
Dairy How to Make an Adjustable Rope Halter and Tie Useful Knots The Rope Halter
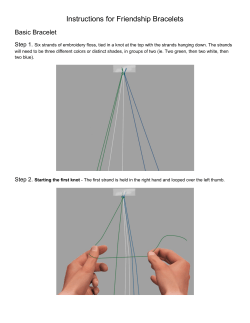
Dairy
REPRINTED 2004
PUBLICATION 404-280
How to Make an Adjustable Rope Halter and Tie Useful Knots
Dennis A. Hartman*
The Rope Halter
Rope halters are needed on all dairy farms. They are practical, serviceable, and inexpensive. By following the
instructions and illustrations, you can make a rope halter easily.
Youʼll need about 13 feet of a three-strand rope to make an adjustable halter for a cow or heifer. Use 3/8-inch
rope for calves and small heifers and 7/16-inch or 1/2-inch rope for large heifers and cows.
2. Untwist rope about 6 inches.
The Nosepiece Loop
1. The nosepiece loop should look like this.
3. Unfold the untwisted end over the first finger of
your left hand about 4 inches past the untwisted
part. This should give you a loop slightly
larger than the diameter of the rope. Have both
the untwisted and long rope facing to your right
as shown in the picture.
* Retired Extension Dairy Scientist, 4-H, Virginia Tech
VIRGINIA POLYTECHNIC INSTITUTE
AND STATE UNIVERSITY
Virginia Cooperative Extension programs and employment are open to all, regardless of race, color, religion, sex, age, veteran status,
national origin, disability, or political affiliation. An equal opportunity/affirmative action employer. Issued in furtherance of Cooperative
Extension work, Virginia Polytechnic Institute and State University, Virginia State University, and the U.S. Department
of Agriculture cooperating. Judith H. Jones, Interim Director, Virginia Cooperative Extension, Virginia Tech, Blacksburg;
Lorenza W. Lyons, Administrator, 1890 Extension Program, Virginia State, Petersburg.
VT/643/0304/1M/242330/404280
VIRGINIA STATE UNIVERSITY
4. Raise the strand on top of the long rope by twisting
clockwise with your right hand.
With your left thumb, press the center strand of
untwisted rope under the raised strand away from
yourself.
6. Turn loop over and raise the remaining unused
strand on the long rope. It is the one on the
bottom. Use your left thumb to press the
untwisted strand under it from the bottom side
and away from yourself.
5. Raise the strand to the left of where untwisted
strand came out. Use your left thumb to press
the top untwisted strand under it and away from
yourself.
7. Pull all three untwisted pieces tight. (If you have
done it correctly, the three untwisted pieces come
out on equal sides of the rope. Two untwisted pieces
should never pass under the same strand.) Braid the
remainder of the untwisted rope into the twisted rope
by going over one strand and under the next. Pull
each untwisted strand tight after putting it under a
strand. Cut off the short ends so the braid is smooth.
2
The Halter Loop
1. Measure rope 16 inches from end of loop. Raise
two strands at this point and pass nosepiece loop
under them away from yourself. Push it through
far enough to make a loop about twice the size of
the rope.
3. After pulling the loop tight it should
look like this.
2. Raise two strands on top of short rope close to
loop. Pass long rope under the two strands away
from yourself.
4. Pass long rope through nosepiece loop
and through second loop to form the
halter.
3
The Crown Knot
1. The finished crown knot at the end of
the long rope should look like this.
3. Fold the center strand over toward you
and hold the loop with your left thumb.
2. Unravel the strands of the end of the
long rope for about 6 inches, ending
with the center strand on the side away
from you.
4. With your right hand, fold the left
strand over the center strand and hold
with your left thumb.
4
5. With your right hand, pull the right
strand down and hold it under the
loose end of the left strand. Then pass
the end of the right strand through the
eye of the first strand.
7. Continue braiding the strands by going
over the next strand and under the
strand next to that. Continue splicing
until all of the ends are used up. Cut
off the short ends.
6. Pull all strands tight at one time to form
the crown knot.
8. A completed halter.
5
The Slip Knot
3. Slip the knot against the rail and pass the short end
through the loop as a safety measure.
The slip knot is an important knot when tying up
cattle. It can be tied quickly, makes a secure tie, but can
be untied quickly if the animal gets in trouble.
1. Pass the rope over the rail and hold both the short
and long end in your left hand. Form a loop with
the short end, then pass it over the long end.
4. To untie quickly, take the short end out of the loop
and pull.
2. Pass the loop in your right hand through the bottom
side of the loop that you will make automatically.
Pull the knot tight.
6
The Square Knot
3. Then twist the short ends together— the rope in
your right hand should go over the other end.
Dairy farmers also have an occasional need to tie
two ropes together so that they will hold. A square knot
can be tied quickly, will hold, and can be untied fairly
easily.
4. If you have tied it correctly, it will look like this
before you tighten it up. Note that the ropes lie
parallel on each end of the knot.
1. Cross the ropes with the left one lying on top.
5. If your knot turns out like this, you have tied a
granny knot. The ropes do not lie parallel on each
end of the knot. It will not hold.
2. Twist the rope on top to the right.
7
3. Pass the short end up through the loop from the
bottom side,
The Bowline
When handling livestock you will occasionally have
need for a loop that will not slip. The bowline is a
perfect choice, and, if practiced a few times, it is not
difficult to tie.
4. around the long rope from the bottom, and
1. The finished bowline.
5. back through the loop. Pull it tight.
2. Form a loop about 10 inches from the end of the
rope. The short end must lie on top of the long
rope.
8


© Copyright 2026