
IPn3G + NMS Quick Start v1.01
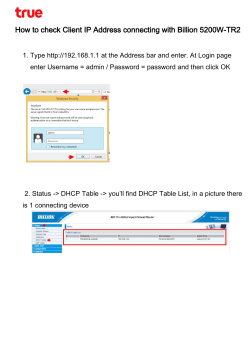
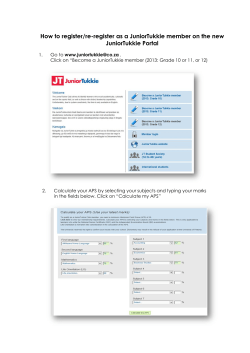
NMS - Quick Start
1
4
Configure the IPn3G to report to NMS as described below.
NMS Server/IP: Enter the address of where
the NMS is hosted. The default is
nms.microhardcorp.com, unless hosted
privately.
Register a domain (profile) at the Microhard NMS website at nms.microhardcorp.com.
Click on Register, located in the top right corner of the page.
Domain: Enter the Domain information as it
was entered in the registration step.
Carrier Location: Enable/Disable location
estimation via carrier connection. When
enabled there is some data consumption to
retrieve the information from internet.
Report Status: Enable/Disable UDP reporting
to the NMS system.
Interval(s): Enter how often the unit will report
data to NMS. Set according to your data plan.
2
Interfaces: Choose which data to report. The
more selected, the bigger the UDP packets.
Fill in the registration information as described below.
Domain Name: Logical management zone for
cellular devices to report to, separate from
other users. Each device needs to be
directed to this domain.
5
Domain Password: Required for each device
for security and to ensure each device
reports to the correct zone.
6
Email Address: The email address used here
will be the login username. Upon registration
a confirmation email will be sent. Once
confirmed, you will be the administrator of
the domain and able to create sub-domains,
users, etc.
3
The Web Service is used to remotely control the device, such as scheduled reboots,
firmware upgrade, etc. Once enabled, the unit will periodically check to see if there
are any tasks for it to perform.
When NMS receives the first report from the IPn3G, it will send an Email to the Domain
Administrator to authorize the device to join the domain. If it is desired to have devices
join the domain without requiring authorization, this can be changed in NMS, under
Settings > Domain Management, and then right clicking on the desired domain name,
and selecting Edit Domain
Log into the IPn3G as shown in the IPn3G Quick Start and navigate to the
Tools > NMS Settings menu.
Microhard Systems Inc.
150 Country Hills Landing N.W. Calgary, AB T3K 5P3
Rev 1.0
Web: www.microhardcorp.com
Email: [email protected]
Phone: (403) 248 - 0028 Fax: (403) 248 - 2762
IPn3G - Quick Start
1
IPn3G - Quick Start
Install SIM Card - Ensure contacts are facing up, and the notch is towards
the modem as shown. The card will “click” into place when installed correctly.
To download the most up to date user manuals, visit the
Microhard Website @
www.microhardcorp.com/support
mic
roh
ard
SY
ST
EM
S IN
Login using your existing account, or for specific access
to the Cellular products use the following general login:
C.
USB
DIA
SIM
GN
OST
IC
RS
CA
RD
SI
ST
AT
RF
US
SG
NL
CO
2
Install/Attach Antennas
NF
IG
3
Attach/Apply power (7-30 VDC)
To connect to the IPn3G for web browser configuration use the
following default IP Addresses:
RS485/422
DAT
A
TxB
TxA
RxB
RxA
GND
Vin+
ET
4
Email: [email protected]
Password: mhscell
HER
NET
Ethernet/RJ45: 192.168.0.1
USB/NDIS: 192.168.111.1
GND(-)
Vin(+)
The default login as follows:
Connect to the USB (requires drivers) or Ethernet port for configuration. To access the
WebUI, open a web browser and enter the IP address in the address bar, for
USB use 192.168.111.1, for Ethernet use 192.168.0.1.
Username: admin
Password: admin
Microhard Systems Inc.
5
Under the Carrier tab, configure the APN, Username, Password, etc, as required
by your Cellular Carrier
Rev 1.0
6
150 Country Hills Landing N.W.
Calgary, AB T3K 5P3
Login using the default login, username: admin password admin
Web: www.microhardcorp.com
Email: [email protected]
Phone: (403) 248 - 0028
Fax: (403) 248 - 2762


© Copyright 2026