
INTRODUCTION TO SCREEN PRINTING Screens - Exposure - Production - Cleaning
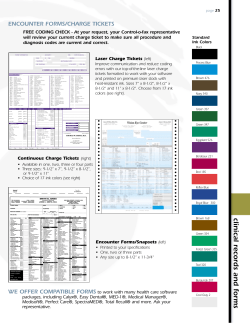
INTRODUCTION TO SCREEN PRINTING
Screens - Exposure - Production - Cleaning
Written by: Douglas Grigar - Illustrated by: Mike Kelly and Douglas Grigar
Copyright 2003-2005 Vastex Inc.
Screen printing? Whatever happened to silk?
The evolution of screen printing began thousands of years
ago when printers around the world began using cut
stencils made from natural materials and paper for
printing. The Japanese and the Chinese developed wooden
frames to support the stencil which was glued onto a
woven fabric mesh. This mesh, originally made from human
hair, eventually was woven from silk, hence the name "silk
screen printing". The resulting mass production of inkdecoration on paper, clothing, books, and many other
surfaces became an important part of Asian culture.
In the late 1800s, artists and printers in France and
Germany advanced the process, and it was given an
English patent in 1907. In the late 1930s, artists coined
the term "serigraphy" (derived from the Latin word seri
[silk] and the Greek word graphein [to write]) to describe
this medium distinguishing it from commercial screen
printing. Today, screen printing uses manmade threads of
steel, nylon, and polyester - no silk at all.
1. OK professor, how does it work?
Screen printing starts with just that: a screen - mesh
fabric stretched tightly across a rigid frame. What is
mesh? Mesh is any fabric manufactured to have
thousands of wide spaces between the
threads. This spacing allows ink to
squeeze through.
2. How does a screen make a print?
In modern screen printing, a stencil is made to
hold back excess ink with a light-reacting
product called emulsion. The mesh is covered
with emulsion and dried. Then a clear film with
dark art is placed on the screen and a light is cast
on it (exposure). The areas under the dark art stay soft, and the other areas "harden."
The soft parts are washed out, leaving open holes in the mesh, enabling the ink
to squeeze through the mesh and print.
3. How does the ink squeeze through the
mesh past the stencil? Enter the squeegee
a flexible plastic blade in a handle. The
squeegee puts pressure on the ink and sends
it past the fabric threads. It leaves a
thin layer of ink on the product
and "shears off" the excess.
That's all there is to it! To print
multiple colors, a separate screen is
needed for each color. For multi-colored
products, such as T-shirts, multi-armed
printers are used to hold the colors to assure
an exact line-up.
For in depth articles on mesh, frames,
and emulsion, see... WWW.VASTEX.COM
© Vastex (www.vastex.com) 1-800-482-7839 - Page 2
1. Since we're talking about printing T-shirts, let us introduce you to our T-shirt printing equipment.
First, our V-2000 HD multi-color T-shirt press. Simply put, this monster-like machine will hold multiple garments and print
more than one color, while perfectly holding colors "in line." (Remember: Each color needs its own screen!) The V-2000 HD
is available as a one-color "table top" model or with capabilities for up to a 10-shirt, 10-color-arm press. All presses are
expandable (to grow as your shop grows), and will hold our high-speed professional numbering systems, cap printers, and
sleeve-printing boards.
3. Drying the ink. Third, is our expandable
2. Printing more than one color or dark
shirts? Second is our E-Flash for "flashing"
(drying) the colors while printing on the press.
Used for multi-color jobs where you don't want to
smear ink, or dark colors where you need to
print ink under other
colors (an underlay).
Econo Red conveyor dryer. In this machine, the
high-output infrared and digital electronic
heating controls assure that
settings are consistent. Our
infrared panels use just the
right wavelength to provide
an efficient cure. (Plastisol
must cure with the entire
layer of ink at 310º-320º.)
5. Fast press "set up" time.
Fifth, our expanded VRS (Vastex
Registration System) is available with
an easy to use steel platen jig that
will reduce screen mistakes and
reduce screen "set up" by over HALF
the normal time!
4. Exposing the emulsion.
Fourth, our automatic timed
Exposit ultraviolet screen
exposing unit. This machine
uses a professional deep-draw
rubber blanket and heavy duty
vacuum, and has the VRS
stops installed (see page 5). A
dual hinged lid can also be used
for side or solar exposure.
©Vastex (www.vastex.com) 1-800-482-7839
Page 3
1. How it all works. Start at the point when
So, all that neat stuff shows up
on the truck. Now what? Even
though this is easier than
programming a DVD player.
READ THE DIRECTIONS!
When unpacking, be careful not
to break anything with a crowbar or
a hammer. Have your electric
service, sinks or booths for water
washout, and drying cabinets ready.
Call us if you are unsure about what
you need (1-800-482-7839). We
can provide on-site training, host
regular classes and have detailed
supply information available.
the press, exposure unit, flash, and dryer are in
place and assembled. Gather
the screen frames
together and begin
screen preparation.
Note: A higher
quality screen (such
as a retensionable
frame) produces
the best
results.*
*For an in-depth article on frames, suggested supplies,
and other technical information, see www.VASTEX.com.
2. Clean (degrease) the screens. Even though
Coating needs
to be in a
"safe light"
(yellow lights)
area.
they're new, the screens will still need a
thorough cleaning. Lather up using a
degreaser and a soft, clean brush. Rinse with
clean water.
3. Place your screens into the drying
cabinet to dry.
5. Coat the screens with emulsion.
Tip the coating trough, when the
emulsion flows to the mesh, apply
pressure, and draw the coater slowly up
the screen. Coat both sides of the
screen (shirt then squeegee side).
6. Back into the drying cabinet.
The screen goes into the cabinet shirt
side down. The drying cabinet will keep
dirt and dust from accumulating on
the drying screen.
© Vastex (www.vastex.com) 1-800-482-7839 - Page 4
4. Fill a
coating "trough" with the liquid
emulsion. You are now ready to put
the emulsion on the screens. This step
is called "coating."
2. Exposit - where it all comes together... The one way pins, carrier
sheets, and VRS-stops all work together here. Place the art on the
pins;
line the screen to the stops;
expose; then go to the
wash booth.
1. Tape art to the film carrier sheets.
Use the VRS pin board to make sure the art is
lined up. The VRS system prevents you from
having to repeat the same alignment procedure
in each step. The key is that the two pins work
only one way no mistakes!
3. After exposure, develop or "wash out" in
the spray booth. Using a fan spray, keep the
spray nozzle about one yard from the screen face.
The soft emulsion left by the dark art areas will
spray out. The dark (opaque) portion of the
positive will prevent the
emulsion from linking.
4. Use the special vacuum head on a shop vac to
remove excess water and any loose emulsion.
Dry the screens in the drying cabinet or in the sun. The
image is now in the screen, and contamination will no
longer be a problem.
5. When the screens are totally dry.
Tape the inside edges and corners
and check for pinholes. After all
screens are taped and any
pinholes blocked (on the shirt
side, NOT the ink side!), it's
time to print.
6. Adjust the angle. Each head
on the V-2000 has vertical off
contact, pitch, and "on See our
the - fly" pitch
flash VRS on
control.
7. Lock the VRS jig on a
platen . You will see
that the three stops
match the stops on
the Exposit.
Position the
pallet so the
screen is well
into the rear clamp.
VASTEX.com.
8. Place the screen onto
the jig. Level the print head,
push the screen against
the stops, and
tighten the
clamp knobs.
9. Fine adjustments. Our
direct linear, zero backlash,
micro-registration will make
moving the image into
perfect registration a snap.
the
VRS
cuts
"set-up"
time by
HALF
or more!
Page 5 - © Vastex (www.vastex.com)
1-800-482-7839
INTRODUCTION TO SCREEN PRINTING
Screens - Exposure - Production - Cleaning
Written by: Douglas Grigar - Illustrated by: Mike Kelly and Douglas Grigar
Copyright 2003-2005 Vastex Inc.
1. Pull off the tape. After scraping
off as much ink as you can with a
scoop or card, pull off the tape. The
tape prevents the ink from leaking,
but removing it can be very messy!
2. Wash the ink off the screen in
the wash sink. Use an ink
degradant, spray, then scrub and
rinse off all ink in the wash sink.
(Another option would be to rent
chemicals and a recirculator from an
outside source.)
3.
4.
5.
3. Reclaim the screens. Squirt on an emulsion remover, scrub with your brush, and allow it to set for a few
minutes. The remover will start to break up the emulsion. Don't let it dry! (If it is allowed to dry, it will never come
off.) 4. Rinse off the remover. Rinse off as much of the loose emulsion and remover from the screen as
possible to prevent the chemicals from falling back on you. 5. Blast off the emulsion. Use
the pressure sprayer set on "fan spray" to blast off the remaining old emulsion. Overlap the
spray on each pass to remove every last speck of old emulsion
Well, that's the end of our
illustrated introduction. We told you
6. Now, degrease again. Once again,
lather up, rinse, and dry the screens.
Now you're all ready for the next job.
Page 7
it wouldn't be as bad as you first thought.
Keep in mind, there are lots of smaller details to
each step. Be sure to check out our website
www.VASTEX.com for articles, more info, links, and
tips. Additionally, there will be more information
available as we add detailed chapters to this
illustrated manual. Questions? We'd love to help.
Call 1-800-482-7839 or e-mail us at
[email protected] You'll soon discover the rewards
(and profits!) in the craft and science of screen
printing.
©Vastex (www.vastex.com) 1-800-482-7839
Screen Supplies
What is needed to start printing production.
2 ea. 195 Dyed T thread plain weave mesh
4 ea. 230 Dyed T thread plain weave mesh
Each item listed is a representation of the needed
supply item, the product listed is available from
Vastex. In almost all cases there are alternative
products and brands available from your regional
screen printing supplier. In some cases there are
even items that can be purchased or made from
supplies available from your local hardware, home
improvement, or department store.
Note: For detailed art, process, or small dots add:
Please download the Vastex “Introduction to Screen
printing” comic and follow along with the comic as a
guide to where the supplies fit in the entire process.
The comic is available for free from www.vastex.com
in the How To Print section. Please refer to the articles
about frames, emulsion, mesh, and tips for more
information (free downloads from www.vastex.com.)
Each item will be labeled with a word tag to help judge
how important it is before a purchase is made.
The tags are:
(Must have) - without this item a shop will not be able
to proceed to the next step and complete a print.
(Should have) - this item is so useful and saves so
much time that it is almost a must have.
4 ea. 305 Dyed T thread plain weave (16 screens)
Note: The best choice for textile printing is the
retensionable frame, but because the choices are so
large with this product (and special tools are needed)
please call or e-mail for additional information.
800-482-7839 or [email protected]
2. Degreasing chemical (Must have) - used to
remove the contamination from the mesh [comic p. 4].
1 ea. Gallon screen mesh degreaser concentrate
3. Emulsion (Must have) - a photo reactive
chemical used to make the stencil [comic p. 4].
1 ea. Gallon of photopolymer or dual cure emulsion
4. Two edged scoop coater (Must have) -
used to apply liquid emulsion to the mesh [comic p. 4].
1 ea. Double edged 15” - 16" scoop coater
(Need) - this item is useful and saves enough money,
supplies or time that it is worth every penny, but the
process can proceed without it’s use.
(Nice to have) - this item is useful and saves money or
time, it is also worth every penny, but many printers do
not use it.
1. Screens (Must have) - used to hold the stencil
for printing [comic p. 2].
5. Drying cabinet (Must have) - used to dry the
screens. [comic p. 4,5]
Note: A drying cabinet can be purchased from Vastex
or built from local supplies. Please see the article on
drying screens on www.vastex.com for ideas.
6. Wash booth (Must have) - for developing,
removing, washing, and degreasing [comic p. 5,7].
Note: A wash booth can be purchased from Vastex or
constructed from local supplies.
Twelve static aluminum frames 20” x 24” outside
diameter frame size with the following mesh:
7. Pressure washer (Must have) - for reclaiming
2 ea. 110 Dyed T thread plain weave mesh
4 ea. 156 Dyed T thread plain weave mesh
Note: A suitable 1000 psi. pressure washer with fan
spray head can be purchased from a local store.
and developing screens [comic p. 5,7].
Supplies p. 1
8. Vacuum head (Nice to have) - for removing
water and scum from exposed screen [comic p. 5].
1 ea. Screen vacuum head attachment for a shop vac.
from the mesh or changing colors while printing.
1 ea. Gallon on press wash (photopolymer safe)
9. Tape (Must have) - used for trapping ink in the
16. Platen adhesive (Must have) - used to tack
down garment to the platens.
screens, taping the squeegee blade, and the famous
“tape trick” (needs clear tape) [comic p. 5,7].
1 ea. Gallon platen adhesive (water based)
Note: Two inch plastic clear and tan tape with rubber
adhesive can be found in any office supply store.
(Scotch 370 or 375 are good choices)
17. Spot cleaning gun (Must have) - for
removing cured ink spots [comic p. 6].
1 ea. 110v. spot remover gun
10. Platen protection tape (Nice to have) - for
covering platens making clean up faster.
1 ea. Pallet Protection tape 18” x 100 yard roll
18. Spot cleaning fluid (Must have) - used in
spot guns [comic p. 6].
1 ea. Gallon spot fluid
11. Squeegees (Must have) - for pushing ink onto
the shirts [comic p. 2, 6].
Note: Each press will need at least one squeegee for
each color print arm. Shorter squeegees will be
needed for small logos
4,6 or 8 ea.14” Wooden handle squeegee (70 duro.)
4,6 or 8 ea. 7” Wooden handle squeegee (70 duro.)
19. Screen scrub brush (Must have) - for use
while cleaning and degreasing [comic p. 7].
2 ea. Fan bristle brushes with handles
2 ea. Bristle brushes
12. Goop Scoops (Need) - for moving ink.
Note: Brushes can be found at any hardware or home
improvement store.
4,6 or 8 ea. One for each print head
Note: This item can be replaced with metal or plastic
paint scrapers. Sharp edges must be rounded.
13. Plastic transfer cards (Nice to have) - For
moving ink in the screen.
4,6 or 8 ea. One for each print head
Note: This item can be replaced with old credit, phone,
or membership cards.
14. Screen block out (should have)
1 ea. Quart screen emulsion blockout
15. On press wash (Must have) - for cleaning ink
20. Plastisol Inks (Must have) - a PVC ink that
does not air dry [comic p. 6].
1 ea. Gallon Plastisol Black
1 ea. Gallon Plastisol White (High Opacity for cotton)
1 ea. Gallon Plastisol White (HO/Low Bleed for 50/50)
1 ea. Gallon Plastisol Red
1 ea. Gallon Plastisol Yellow
1 ea. Gallon Plastisol Royal Blue
1 ea. Gallon Plastisol Navy Blue
1 ea. Gallon Plastisol Green
Supplies p. 2
1 ea. Gallon Plastisol Grey
1 ea. Gallon soft hand - detack
1 ea. Gallon curable reducer
Note: Ink colors are suggestions, any colors available
can be chosen as replacements.
21. Plastisol ink degrader (Must have) - used
to remove ink residue [comic p. 7].
1 ea. Gallon ink (plastisol) degrading Ink wash
22. Emulsion reclaimer (Must have) - Used to
remove used emulsion from the mesh [comic p. 7].
100 ea. Test Squares in black
Note: A local thrift resale store will have old t-shirts for
purchase that can replace this item.
29. Computer and scanner (Must have) used to scan and modify art for final design.
Note: Computers and scanners are available from
many local stores. Your minimum requirements will be
dictated by your software choices. Please call or e-mail
Vastex for suggestions.
30. Graphic Software (Must have) - used to
produce art and separations for printing.
1 ea. Gallon of emulsion remover in a concentrate
form.
23. Haze and stain remover (should have) used to remove stains (haze) from mesh [comic p. 7].
1 ea. Gallon of two part haze remover and activator.
1 ea. Software package Adobe Illustrator
1 ea. Software package Adobe Streamline
1 ea. Software package Adobe Photoshop
Note: Graphic programs are available at your local
computer store or from internet mail order sources.
24. Squeeze spray bottles (should have) used to apply chemicals to screens [comic p. 7].
5 ea. hand held squeeze spray bottles.
Note: Spray bottles help you cover more area and use
less chemicals, they are available in local stores.
25. Heat temperature reader (Must have) used to gauge dryer temperatures
1 ea. Wire return thermal probe -or1 ea. Reflective temperature gun with laser pointer
31. Printer (Must have) - used to make positives to
burn art onto the emulsion [comic p. 5].
1 ea. Ink jet printer with RIP package
Note: The ink jet printers must have a software rip
package to print separations.
26. Ink cure testing chemical kit (Should
have) - used to test plastisol cure.
1 ea. Vastex cure testing kit
Note: This kit can be assembled from local supplies.
32. Art tools (need) - used when needed.
27. Exposure calculator (Must have) - used to
find the correct exposure time
Metal Artist t-square and yard stick, and ruler, Craft
knife and blades, ultra fine tip permanent markers.
1 ea. Multi-step neutral sectioned exposure calculator
Note: Art tools are available from local stores.
28. Printing test squares (Nice to have) - used
Hosted on www.vastex.com
to print a display, check for mistakes or reference.
100 ea. Test Squares in white
Supplies p. 3


© Copyright 2026