
Fitting Shoes to the young Dancer by Craig Coussins of www.Hullachanpro.com
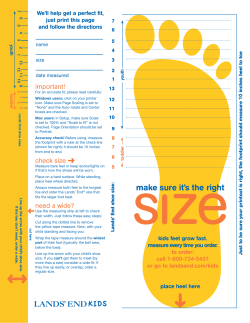
Fitting Shoes to the young Dancer
by Craig Coussins of www.Hullachanpro.com
YOU ONLY HAVE ONE PAIR OF FEET SO WHY RISK DAMAGING THEM?
Although the foot is such a wonderful piece of natural mechanization we are sometimes apt to forget that
it can easily be damaged through incorrect shoe fitting. This can include normal day shoes as well as
ballet and other dance shoes.
If we look at three distinct types of dancing , Highland, Irish and Ballet Pointe, all require different
physical abilities and use opposing tendons and muscles .
The Highland Dancer works on the ball of the foot resulting in a wider width across this area. They can
also develop a shorter Achilles Tendon . Great stress is put on to the heads of the metatarsals and the
impact can be measured at around three to four times the dancers weight hitting at that point of impact.
The Irish Dancer uses the higher area of the foot including rising up. The action is a more forward
travelling movement with impact on the ball of the foot as mentioned in the Highland Dancer. Less
pressure is put on the heel.
The Ballet Dancer on Pointe needs muscle extension and strength in the ankle with less emphasis on the
metatarsal heads. The weight of the body is supported with the sides of the shoe and not the great toe as
some budding ballerinas mothers seem to believe. Not having support on the sides of the shoes can
damage the young foot or deform it.
The muscle group under the sole is important to allow correct relevè or rising up onto the ball of the foot
or base of toes and stress from impact is normally associated.
I want to discuss the problems the Irish dancer is open to. The general observations cover soft shoes and
hard shoes and it is useful to read the results of my day to day work.
The most common problem is the bunion and the deviated big toe joint.
Bunions. Remember that these are confused with the deviated toe joints, either the outer or inner toe, and
inflammation resulting from abrasion or pressure.
The solution is to see first of all if the young dancer is rolling in. The great toe will be compensating by
twisting to the outside of the foot bringing the great toe joint into play. The area on the surface of the joint
will be sore and probably inflamed. This could be inflammation of the Bursa, the small pocket of fluid
around the joint but mainly it is the painful callosity on the foot overlaying a projecting bone.
The rest of the condition is known as 'halux valgus' or deviated toe joint.
The dancer usually needs the toes to be straightened and separated or strapped into the normal line. This
can be done if the shape of the foot is spotted at an early stage as young dancers can start this rolling in at
age two or three. The teacher can help by checking the foot and making the necessary corrective exercises
or send the child to an experienced fitter for further help and advice.
It is a good idea to phone the fitter prior to the child's visit if you are particularly concerned about
something.
The dancer sometimes tries to get a larger or wider shoe to allow no pressure and this will result in no
support at the sides of the shoe making the foot slip down with the great toe following its line and forcing
the joint even further out of alignment exacerbating the original condition.
The fact is that a narrower shoe can greatly help the dancer as long as the foot has been strapped into its
original line. However depending on how far the condition has developed this may not be possible. I
would always work the dancers foot by hand to see how much movement was available and start remedial
discussions from there.
The simple fact remains that despite the research made over the last ten years by specialists, some
teachers still make young dancers wear the brand of shoe that they as dancers wore when it is quite clear
that the foot shapes are so varied and different it is nonsense to assume every foot will fit into the same
brand or style of shoe. Especially now that, I, Craig Coussins, have designed so many new styles,
innovations and types of dance shoe to meet the ever growing demands of the art.
If this were the case with the running shoe industry they would be on a losing streak and I am sure that the
outdoor shoe manufacturers would never recommend one style of shoe and one shape for every child's
foot and that's without taking into consideration the feelings of both child and parent.
To recap the problem we face as teacher, maker and fitter. There are three main shapes of arch, low,
medium and high. Three basic shapes of toe perimeter shape, longer big or great toe, longer second toe
and even first and second or even third toes. This means either a pointed or a square shape foot.
The dancer with the low arch may be unable to achieve a satisfactory arch and could have trouble
standing on toe or high and even on the ball of the foot. The dancer with the high arch invariably has
weak ankles and without proper tuition is unable to support themselves properly as they are simply not
pulling up. Using a stiff outer sole will not help.
Exercise to build up strength in the arch will help and wearing the Hullachan will allow better control. If
you have no arch wearing the Hullachan will not give you one but if you have any kind of arch shape, the
Hullachan will show what you have unlike other brands.
The dancer with the high arch will usually have weak ankles and that will cause her to twist or not get full
strength while on half or full toe. This is a problem while learning until the teacher has taught her how to
build up her strength and help her to develop the thigh muscles instead of just calf and ankles.
As there is no support in the soft toe shoe it is important that good muscle co-ordination is being
developed through exercise and centre floor dance technique.
Many children today have larger feet than the last generation but not so much fatter feet rather longer
slimmer feet. Different areas of the country have predominately different shapes of foot to the other.
To conclude, the way to avoid bunions is to fit the shoe closely to the foot and make sure that the width is
supporting the sides of the foot.
We have a number of fitting techniques to adapt each shoe to each shape of foot and these alterations are
done at the time of fitting. Teachers will make sure that they check the condition of the young foot and
mention any problems quickly to the parent. An experienced fitter will always point out any problems [or
possible problems] to the parent or dancer and this information should be passed on to the teacher for
further help. It really is vital that the fitter, the dancer and the teacher should work together like a three
legged stool, if one is not working with the other then something will fall and that is usually the dancer.
Another problem is the Ingrown toenail.
Starting at any age this condition can result from the first condition mentioned, shoes that are fitted too
tight or too short including soft toe ballet, Pointe shoes, Highland or Irish Shoes. Shoes that are too big
when fitted to the child at a young age when the parent wants room for growth and the little foot tries to
grip onto the sole of the shoe leading to another condition such as hammer toes as well as ingrown
toenails. Another cause is simply tights or socks that are pulled up too tightly and make the toes bend
down. Usually because big sisters hose have been handed down and are still too big.
The solution to avoid the condition is clearly stated in the above paragraph but the solution to the
condition is to cut the toe nails across the width and not to cut into the sides of the nail or shape the nail
into a curve.
Avoiding narrow shoes may be a solution but do not arbitrarily state this as the child may actually benefit
from a narrow fitting depending on the where the problem toe is. The great toe is normally the problem
one and the condition can be on either side of that toe. You sometimes find the toe is twisted or tight
against the next toe and pressure is forcing the skin over the nail. A Podiatrist or chiropodist will give you
help in curing the effect but try and avoid the case. In between the toes soft helloes or corns can develop
on the dancers foot. Extremely painful this condition can be caused by incorrect shoes as opposed to
badly fitting shoes. Warm moist conditions created by Irish or Highland shoes with plastic linings, plastic
or P.V.C. insoles etc]. Hullachan do not use plastic materials to line their shoes.
These corns must be professionally looked at and the shoes that create the conditions that lead to butyric
acid formation through excess perspiration must be avoided. After all you have 125,000 sweat glands in
your foot and it is important that the foot breathes properly. We stopped selling plastic or P.V.C. lined
shoes years ago because of the damage they can cause and all our Hullachan products are made with
natural materials. The special pad actually breathes and allows air to duct.
Hard Corns, common among dancers that had their shoes fitted incorrectly usually form on the knuckles
of the second third and fourth toes. We can talk about this effect and the causes for a long time but the
salient causes go back to two major situations we discussed in the other articles on my website
www.hullachan.com.
The first is when you ask a dancer to point their toes, unless you actually check them they invariably point
their big toe and curl their other toes. As a fitter I see this with the young Highland and, sometimes, Irish
Dancer. When the foot is young the cartilage has not hardened and the young foot can stay in this shape.
The problem of course is that the foot is not being stretched and the development of the arch will never be
easy but the knuckles of the foot are raised to the top of the shoe and through abrasion and pressure a
callosity will grow on the head of the joint and a corn could form.
The point about the shoe being too big for the young foot and a hammer toe condition developing can also
apply to this problem.
The other cause is when a shoe is too big or too wide and the dancer slides down into the crown of the
shoe and finishes up being supported not by the sides of the shoe but by her bent toe joints in the tip of the
shoe. More common than you would believe this is caused by the shop that sells only a few assorted sizes
of shoe and tries to sell what they, the shop, have rather than what the dancer should have.
Unfortunately there are a few bad fitters still around and you, as teachers, parents and dancers must
determine the professionalism of the shop you are recommending your students to. We all know that the
job of teaching doesn't finish when the pupil leaves the class and as the young dancer looks to you for
advice in dance they also rely on you to advise them as to the correct shoe and the correct fitter. Achilles
Tendonitis can be caused by a number of problems and most of these are easily solved.
The first is where the drawstring has been pulled too tight and is digging into the back of the ankle
creating pressure on the sheath of the tendon and causing inflammation. One of the results of this is the so
called heel bump and the problem of that is the dancer can never get a shoe to fit comfortably either for
dance or for street wear.
Another cause is faulty technique in landing and taking off when performing a jetè or jump.
In both cases this may be the result of the shoe being too big and the drawstring being pulled too tight to
compensate. This also goes back to the dancer who has developed the width of the met heads through
Highland or because of a bunion or deviated toe joint.
In all these cases the heel will not widen to match the width at the front of the foot. This causes the heel of
the shoe to be too loose. In this case we can in some cases alter the heel shape to make the shoe a little
firmer.
copyright © Craig Coussins-www.hullachanpro.com. Below is instructions on how to lace your
Hullachan pro Irish Dance Ghillies:
1. Lace normally up to the last set of eyelets or loops.
2. Cross over the laces.
3. Lace the end of the lace through the SECOND set of eyelets from the inside.
4. Take through the back loop.
5. Pull the heel up onto the foot with the laces.
6. Lace through the FIRST set of eyelets now.
7. Pull the excess lace from the front of the foot through the eyelets.
8. Tie in front and either cut off or tuck in.
Always pull the heel up tightly when your laces are thru' the back loop
and then pull the sides up when the side eyelets are laced.
THIS WILL STOP THE SHOE DIGGING INTO YOUR ACHILLES AND REDUCE
DAMAGE OVER THE ARCH OF THE FOOT.
Always pull the heel up tightly when your laces are thru' the back loop and then pull the
sides up when the side eyelets are laced.
The next page instructs on how to lace many other kinds of Irish Dance ghillies including
Pacelli Brand. This information can be found on the Diochra.com website where you will
find some great information on Irish music and dance.
Lacing Your Ghillies (most other brands including Paceilli)
Step One. Lace your lace through the toepiece of your ghillies, leaving equal amounts on both
sides.
Step Two. Lace one side of your lace through the side tabs, rotating from side to side. Slip the
lace through the back loop. If your shoe has side loops, slip it through the side loop.
Step Three. Repeat with the other side of the lace. When you put your shoe on, the crossed laces
that are settled in the heel in this graphic should be in front.
After this, bring the two strings forward and cross them in front of your ankle. From this step you
have two options:
a) Wrap them around your ankle until you can tie a tidy bow which should then be tucked into
the laces, or
b) Wrap them around the arch of your foot snugly (but not tightly), and tie a box at the top of
your foot. Tuck the bows into your shoes tidily. This second way is most preferred by dancers,
but make sure you do not (can I repeat that? do NOT) tie them too tightly around your arch. It
can hurt you - breaking blood vessels and the like. Very nasty business, that. Please use common
sense; take care of your feet and don't worry so much about vanity.
The following pages are instructions on how to break-in and take care of your dancing shoes.
Breaking in Your Shoes
Ghillies
You can bend ghillies at the middle and rubberband them toe-to-heel with the sole touching to give it an
arch.
You can also use mink oil to soften them up, but use it sparingly - it may make your softshoes too floppy.
However, I and many other dancers usually just wear them to break them in, as they're quite soft to begin
with.
Reel Shoes
Some boys' shoes are tough, and some are as flexible as jazz shoes. If you get the tough leather soles,
however, I recommend rubbing mink oil on the sole (at the arch and around the edges) and the upper to
make your shoes more flexible. This way, you won't have to fight the shoe to make a nice point.
Hardshoes
Again, I'm going to have to recommend mink oil. Yes, you can boil your shoes, soak them in water, take a
shower in them. But why do that then your shoes can soften up in five minutes with mink oil?
Rub the oil (which can be found at shoe stores and actually is more of a gel) along the seams of the sole,
the front where the sole meets the tip, the arch and any other place you think you need it. You can also
rub it on the upper as that helps keep it supple.
Do this with a towel down as the oil is quite greasy. It may turn your soles a bit of a different color - it
made my Fay's light gray soles a bit darker with a hint of blue. Wait five minutes and wipe off the excess
oil. These directions should also be on the mink oil itself; always read what's on the container before
applying it to your shoe.
All Shoes
The next best step is to do the obvious - wear them! The only way that the shoes will form to your feet is
if they know how your feet are shaped.
Taking Care of Your Dancing Shoes
Keeping your shoes in good working order is important for many reasons. They should look clean and
well-kept to show that you care about your appearance and the image you present to others. They are an
investment and should last. Also, shoes in working order can help prevent injuries. Taking care of your
shoes should be a priority.
I keep quite a few things in my shoe bag to keep my shoes looking good.
Shoe shining kits can be found in a variety of places, namely shoe stores, some competitions and through
various vendors. Mine includes quite a few things, as I also needed to shine my shoes for JROTC in high
school.
In my case is black polish to cover scratches, neutral polish to add shine, sponges for applying polish, soft
cloths and pieces of an old tshirt for buffing. A small bottle of water will help to add shine, which I will
explain how to do later. Saddle soap gets the grime off; a black permanant marker covers spots. A shoe
brush also helps in the buffing process.
There are also shoe shining sponges for a quick shine. These can be found in the shoe shining section of a
shoe store, or a store such as Walgreens, where I've found most of my items.
You can also keep leather patching kits in your case.
If you have an old pair of shoes that you don't want to get rid of, use those for practices and if the weather
or ground isn't as clean as you'd like or will scrape up your shoes, outdoor performances. Save your nice
new shoes for a feis or indoor performance.
Store your shoes carefully in your bag with the laces undone. Do not stuff them in your bag (which we're
all guilty of) and leave them to crumple and get out of shape. After all of that work breaking them in, do
you really want to have them deform? Keep the laces undone so that they will not pull the shoe out of
form, too.
Shining Your Shoes
Here's a step-by-step guide to shining your shoes similar to the way I learned in JROTC.
•
Needs:
- Black shoe polish
- Neutral shoe polish
- An applicator (old tee shirt or sponge) for the black
- An applicator (old tee shirt or old nylons) for the neutral
- Towel to lay underneath it all
- Water
1. Set your towel down in a spot where making a bit of a mess won't matter.
2. Make sure your shoes are clean. Either wash them off with a wet rag and dry them, or if they're
especially dirty, use saddle soap. Don't decide to use saddle soap for fun, though - it takes a lot of
elbow grease to really clean!
3. Make sure your shoes are dry.
4. Rub black polish on your shoes with a rag or sponge applicator, being careful not to get any on
the non-black sections of your shoes. Let dry.
5. Make sure the shoes are dry. (It's important!) Buff the shoes to make them shiny. They won't be
very shiny until you do step five, but don't shirk on your elbow grease. Really rub!
6. Take a rag or old nylons (nylons are more recommended) and dip it lightly in water. Get the
neutral polish and rub the rag in there. Apply it to your shoes. Let dry completely.
7. Once completely dry (again, it's important!), buff your shoes to a nice shiny finish. Use a clean
part of the nylons, and then a rag.
International Shoe Size Conversion Charts
Girls
System
Sizes
Europe
26
Japan
14.5 15
15.5 16
16.5 17
U.K.
8
8.5
9
10
9.5
10
10.5 11
U.S. &
Canada
26.5 27
27.5 28
9.5
28.5 29
30
30.5 31
31.5 32.2 33
17.5 18
18.5 19
19.5 20
10.5 11
11.5 12
11.5 12
12.5 13
12.5 13
13.5 1
1.5
33.5 34
20.5 21
35
21.5 22
13.5 1
1.5
2
2.5
2
3
3.5
4
2.5
Boys
System
Sizes
Europe
29
29.7
30.5
31
31.5
33
33.5
34
34.7
35
35.5
36
37
37.5
Japan
16.5
17
17.5
18
18.5
19
19.5
20
20.5
21
21.5
22
22.5
23
U.K.
11
11.5
12
12.5
13
13.5
1
1.5
2
2.5
3
3.5
4
4.5
11.5
12
12.5
13
13.5
1
1.5
2
2.5
3
3.5
4
4.5
5
U.S. &
Canada
Women
System
Sizes
System
Europe
Sizes
35
35½ 36
37
37½ 38
4.5
Mexico
38½ 39
40
41
42
43
44
45
46½ 48½
5
6
6.5
7
7.5
9
10
11
12.5
30
31
5.5
Japan
21
21.5 22
22.5 23
23.5 24
24.5 25
25.5
26
27
28
29
U.K.
2½
3
3½
4
4½
5
5½
6
6½
7
7½
8
9½
10½ 11½ 13
Australia
3½
4
4½
5
5½
6
6½
7
7½
8
8½
9
10½ 11½ 12½ 14
U.S. &
Canada
5
5½
6
6½
7
7½
8
8½
9
9½
10
10.5 12
Inches
9
9 1/8 9¼
9 3/8 9½
9 5/8 9¾
9 7/8 10
13
10 1/8 10¼ 10½ 10¾ 11
Centimeters 22.8 23.1 23.5 23.8 24.1 24.5 24.8 25.1 25.4 25.7
14
15.5
11¼ 11½
26
26.7 27.3 27.9 28.6 29.2
Men
System
Europe
Sizes
35
35½ 36
37
37½ 38
4.5
Mexico
38½ 39
40
41
42
43
44
45
46½ 48½
5
6
6.5
7
7.5
9
10
11
5.5
12.5
Japan
21.5 22
22.5 23
23.5 24
24.5 25
25.5 26
26.5 27.5 28.5 29.5 30.5 31.5
U.K.
3
4
5
6
7
8
3½
4½
5½
6½
7½
8½
10
11
12
13½
System
Sizes
3
3½
4
4½
5
5½
6
6½
7
7½
8
8½
10
U.S. &
Canada
3½
4
4½
5
5½
6
6½
7
7½
8
8½
9
10½ 11½ 12½ 14
Inches
9
9 1/8 9¼
Australia
9 3/8 9½
9 5/8 9¾
9 7/8 10
11
10 1/8 10¼ 10½ 10¾ 11
Centimeters 22.8 23.1 23.5 23.8 24.1 24.5 24.8 25.1 25.4 25.7
26
12
13½
11¼ 11½
26.7 27.3 27.9 28.6 29.2
A Few Good Notes
“Due to wide variations among shoe measurement systems, relying solely on these tables is not
sufficient to guarantee everyone's happiness. I suggest sellers measure the inside of the shoe
from toe to heel and list the measurement in inches and centimeters. Buyers should measure their
foot from toe to heel. Buyers should request that sellers list the actual inside toe-to-heel
measurement, if it is not provided.”
Quoted from I18nGuy’s Conversion Charts
Sources
•
I18nGuy’s International Shoe Size Conversion Charts


© Copyright 2026