
BASE PREP & WAXING GUIDE FOR ALPINE, FREERIDE AND SNOWBOARD
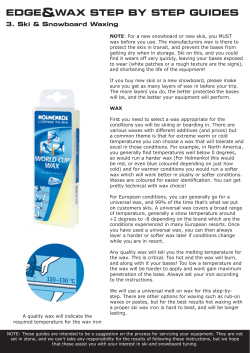
BASE PREP & WAXING GUIDE FOR ALPINE, FREERIDE AND SNOWBOARD 37.5 0.00000 37.5 0.00000 ALPINE SKI AND SNOWBOARD PREPARATION THREE IMPORTANT AREAS WHEN PREPPING EDGES PERFORMANCE USER LEVEL This is the level for alpine skiers and snowboarders who use their equipment often and want to get the most out of their equipment. The focus is on achieving “the optimal feel”. BASE EDGE: STEEL EDGE AND BASE TREATMENT WITH SWIX PRODUCTS In a few simple steps, you can prep your skis or snowboard to gain higher performance from your equipment. These simple steps can help you improve the glide and turning properties of your equipment significantly, and should also give you greater confidence that your equipment will optimise your skiing experience. The greatest benefits come when skiing on hard surfaces. Sidewall Ski/Snowboard Steel edge Base material 1.0° 0.5° Generally 0.5 to 1 degree bevel 1. Base edge: • Make sure that the base edge is level with the base surface. Scraping the base surface is more difficult if the edges are too high, and this may also cause problems steering (erradic “hooking” effect). By beveling the base edge 1 degree, the edges will not grab immediately when you are skiing, but you will gain control progressively, which will allow you to turn your skis or snowboard more easily. • Place the ski or snowboard in the horizontal position in the vise (base up). New skis and snowboards New skis and snowboards that have not been pretreated at the shop should be given a base treatment before use. A base treatment ensures the best possible starting point for the original surface coating and improves glide properties. The edges should also be sharpened in order to ensure the best possible carving properties on snow and ice. Sharpened steel edges provide you with better control and feel when turning, and is like putting new tires on your car – the equipment will be more responsive and tuned to your body, and you will gain more confidence in your skiing abilities. Base-edge filing T149-20 Alpine Ski Vise SIDE EDGE: When prepping skis and snowboards, a vise will help you work more easily and efficiently. We recommend T149-50 for alpine skis and SB31XF for snowboard. For alpine skis retract the ski brakes with the T165 Brake Retainer. ADVICE: When treating the surface and steel edges, always start by prepping the edges first, which will ensure that you avoid getting wax on the filing tools. When the ski or snowboard is new, start the preparation by establishing the edge geometry (edge bevels). The key to obtaining optimal carving properties on snow and ice is to ensure that the edges are as smooth and even as possible. Ski/Snowboard Steel edge Base material Generally 87 to 88 degree bevel SIDEWALL: SB31XF Snowboard Vise T165 Ski Brake Retainer Cover photo: Vegard Breie • For coarse filing of the base edge, use TA3009. Put the file in position for filing the base edge. If you mark the edges with a marker before you start, you can see the effect the file is having. Bevel the base edge 1 degree (see illustration). Using overlapping movements, file by moving the file holder from the tip to the tail. TA3009 R392 Ski Straps TA101N 2. Side edge (and sidewall): • Place the ski or snowboard in the ski vise in a vertical position and with the base facing away from you (see illustration). • In order to obtain optimal carving properties on snow and ice, bevel the side edge 3 degrees, which will produce a sharper angle between the base edge and side edge (see illustration). • Before coarse filing the side edge, we recommend that you remove some of the sidewall offset (see illustration); this will allow you to avoid filing the sidewall with the file and to focus your efforts on filing the steel edge. Use the special tool Swix TA101N. You will have to repeat this procedure periodically when the side edge is filed down to the point where the sidewall and side edge are even. Make sure to not remove too much at a time. Removing sidewall offset 1 SIDE EDGE FILING: • Now you can start coarse filing the side edge. Fasten the file in the holder in the appropriate position for working on the side edge. File from the tip to the tail, using a pattern of overlapping strokes. Generally 2 to 3 degrees resulting in a total edge angle of 87 to 88 degrees. TA3009 Removing cuts in edges with a diamond stone TAA200 Removing burred steel from filing with a diamond stone TAA200 Maintenance of edges with a diamond stone TAA200 2 6. Removing nicks and cuts in edges: • In order to achieve satisfactory carving properties on snow and ice, the edges must be smooth and without any nicks or cuts. Damage to the steel edges are most often caused from hitting rocks. When this happens, the edges of the damaged spot become hardened. When you start filing, you will notice that the file will skid and you will have problems repairing the damage. In order to eliminate the hardened top layer, use diamond stone TAA200, which must be dipped in water. • Use the stone on the base edge and side edge at the damaged site. Then pass over the spot with a file on both sides of the edge. The file should be filing better now. Finish off with the diamond stone in order to even out and polish the edge. Generally 2 to 3 degrees resulting in a total edge angle of 87 to 88 degrees 3. Removing burred steel from filing: • When coarse filing the edge, burrs can develop on the edge. Unless such burrs are smoothed off, the edge will become rounded and duller more quickly. 37.5 0.00000 37.5 0.00000 CONVENIENT CASES • Use the diamond stone TAA200. Work with the stone back and forth along the entire side edge and base edge (see illustration). The edges should now be sharp and polished without any irregularities. 4. Maintaining sharpness of edges: • As with knives, it is not necessary to use a file every time you need to sharpen the steel edges. A diamond stone, TAA200 can be used instead (see illustration). Using such a tool will save time and the result is usually excellent. If you still feel that the edges are not sharp enough, then apply the file in the same manner as described in the base treatment of the edges. 5. Rounding/dulling of edges in front and back: • Some prefer to dull or detune the edges in the front and back sections of the skis or snowboard. If you feel that the tip cuts out to the inside at the start of a turn too quickly, then you can round the edge on both sides of the tip. Use the diamond stone TAA200 and dull the edge in the “shovel” area from the point of snow contact and forward. Do the same procedure at the tail section of the ski or board, approx. 2 inches. If you want to take advantage of the entire turning curve on the skis/ snowboard or want to optimise use of the front section, then there is no need to dull the tip and tail sections. Depending on skill level, technique and application, some prefer this alternative. Edge Kit for alpine/freeride/snowboard (T0065) Contains what is needed to maintain Side Edge and Base Edge on a high level. Ideal for national racers: Young racers (or their parents); old racers (masters). Contains: TA287 Side edge file guide 87°, TA005 Base edge file guide 0.5°, T0106XB File Second Cut, TAA200 Diamond stone, TA022 Clamp, T0165 Ski break holder. Additional space for I0084-150 Glide wax cleaner or I62 Base cleaner. Base and Glide Wax Kit (T0067) Contains tools and waxes to have a fast base. Ideal for national racers: Young racers (or their parents); old racers (masters). For alpine, freeride, snowboard and cross country. Contains: T0823D Scraper, T0162B Bronze Brush, T0160B Finish Blue Nylon Brush, T87 Scraper for sidewalls, T0266N Fibertex, violet, 1 sheet, I0062 Base cleaner, T0151 Fiberlene 60g: CH6, CH7, CH8, CH10 180g: LF6, LF8 3 CLEANING AND SATURATION WAXING I62 37.5 0.00000 37.5 0.00000 TWO WAYS TO WAX ALPINE SKIS AND SNOWBOARDS! 1. Cleaning the surface: • You need to clean the surface of the ski or snow board if it comes straight from a store or after having sharpened the edges. Spray the base with I62 Base Cleaner and wipe dry with Fiberlene T151 after 15 seconds. “Poor glide when skiing is like bicycling with a flat tire”. By selecting a wax matching the day’s temperature and snow conditions, you will ensure that you have a better ski experience – you will glide faster across flat sections and turn much easier as well. 2. Saturation waxing: • Use a soft, warm temperature wax such as Swix CH8 with waxing iron T74. Softer waxes are used for base treatment because these waxes penetrate deeper. Drip the wax in a zigzag pattern and then spread it evenly across the surface with the waxing iron. 1. THE “EXPRESS METHOD” OF WAXING T151 CH8 T74 • Move the iron from the tip to the tail with even passes. Do not stop in the middle of a pass. Complete 3 passes across the entire surface. Be careful to use the recommended temperature on the iron as specified on the wax package. Let the ski or snowboard cool to room temperature, approx.10 minutes. • Repeat the procedure 3 times without scraping off the wax. Make sure that the waxing iron has enough wax to glide smoothly across the surface. T824 T162B T160 • Scrape off the excess wax while it is still hot with a plexi scraper T824, which will clean the surface even more. Do not press the scraper hard against the surface. If the scraper is dull, then it can be sharpened with plexi sharpener T409. • Brush the surface with a bronze brush T162 from the tip to the tail (see illustration). Brush approx. 10 passes with an overlapping movement. Finish off with the blue nylon brush T160. Swix liquid wax is fluorinated and based on formulas featured in the most award-winning glide-wax system in history - “Swix Cera Nova”. F6L F7L F8L FOLLOW THESE EASY STEPS: • Select the wax that matches the day’s air temperature (in the shadow). • Shake the bottle and then press it against the base. Distribute evenly. • Let the wax dry for about 2 minutes and then polish with Fiberlene T151 (just like you would polish your shoes). Remember: The general rule is that liquid wax does not last as long as when using a waxing iron. 4 5 0.00000 37.5 37.5 0.00000 2. THE “PROFESSIONAL METHOD” OF WAXING For this approach, we recommend the Cera Nova system (CH or LF waxes). 1 1 Select the wax that matches the day’s air temperature in the shadow. 2 Set the temperature of the waxing iron in accordance with the instructions on the packaging of the selected wax. 2 135°C (275°F) 3 Drip the wax in a zigzag pattern on the surface (see illustration). The temperature on the waxing iron is ideal when the wax drips relatively quickly, but does not run. The wax must not become so hot that it emits smoke. 3 4 Move the iron from the tip to the tail with an even and steady pass. Do not stop while making the passes. Complete 3 passes across the entire surface. Let the ski or snowboard cool down to room temperature for approx. 10 minutes. 4 5 Scrape off excess wax with a plexi scraper T824 (see illustration). Use light pressure when you do this. Start from the front and scrape in an overlapping pattern from tip to tail. T74 5 6 Brush the surface with a bronze brush T162 (or T159) from the tip to the tail (see illustration). Brush approx. 10 passes with an overlapping movement and moderate pressure. End by brushing with a blue nylon brush T160. T824 6 T162B T159 T160 6P RV12 2 9E www. s wi x s c h o o l . co m 7 8 37.5 0.00000


© Copyright 2026