
Bathroom Remodel Project Guide Appendices Design Ideas Project Stages
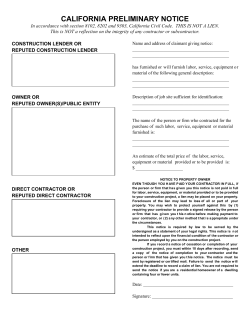
Bathroom Remodel Project Guide
Project Stages
2..... Initial Steps
3.....Find the Right Contractor
4..... Construction to Completion
Understanding Cost
6..... Range of Cost
7..... Cost vs. Value
8..... Financing Your Project
Design Ideas
9......Style Guide
10....Materials Guide
17....Going Green
19.... User Advice
Appendices
20....A 23....D
21....B 24....E
22....C 25....F
PROJECT STAGES: Initial Steps
Scope & Layout
Are you looking to increase bathroom space, or just maximize
current space? Does everything need to go, or will some items
stay on? Can you add a window or skylight? Imagine your ideal,
blow-away bathroom and how it will look.
• Start with style. Are you looking for an exact style or a
general feel for how your bathroom will look? Go to our
style guide on page (9) to get an idea of what you want
or what would best fit with your overall home style.
• If your project is fairly extensive, look into hiring a
bathroom designer. This professional can help bring
your ideas to life, and will likely impress you with
some ideas of their own.
• Determine your level of “Green”. You don’t have to be
a tree-hugger to want to save money on energy bills
or to make your remodeling choices safe for your family.
The All Important Budget
You need a budget. Whether you are obtaining financing or if you
have a rich uncle, budgets keep you, your designer, and your
contractor on the right path. If you are changing the layout of your
bathroom, you will hike up the price significantly. Don’t forget that
labor will make up the majority of the remodeling cost, so using
materials that are less expensive will shave the cost, even if the
labor remains the same.
Your Timeline
Finally, when do you want work to start, and when do you want
your bathroom remodel to be completed? The below chart is the
timeline for a typical bathroom remodel. If you need yours faster
than below, or you have a very extensive remodel but need the
same delivery time, you might need to make some sacrifices,
such as allowing contractors to start early in the morning, work
late at night, or on weekends.
Research What’s Out There
Take your raw ideas and give them some shape, color, and
texture by seeing what’s out there.
• Spend time with our materials guide page (10) to see
what options are available.
• Get some home magazines and cut out everything
that appeals to you.
• Take a spin through some home stores, show rooms,
and Home Shows.
• Be sure to check out our user advice page (19)
for tips and advice from Contractors, Bathroom Designers,
and Homeowners who have done this before.
• Whatever you find that you like, put it in a “design
ideas” folder for your contractor.
Estimated Timeline for Bathroom Remodel
1-2 weeks
Idea Gathering
Design Stage
1-2 weeks
Hire the
Right Pro
2-3 weeks
Prepare for
Constructions
2-3 weeks
Construction
2-5 weeks
• If you need some inspiration, go to the design galleries
under design ideas in your project guide.
TOTAL FROM START TO FINISH: APPROX 12 WEEKS
Unleash Your Inner Accountant
Now that you have everything you want, let’s start to narrow the field
to what you can afford, or what you are willing to pay for.
0
2
4
6
8
10
12
weeks
Finishes & Fixtures
The cost difference between marble and laminate counters can be
significant, much the same as a jetted tub and a one-person shower.
So think about all of the details where you don’t mind a standard
option, and the places where you are firm on what you want. If you
prepare a range of options for each item in your bathroom remodel,
you will give yourself some wiggle room on any budget.
Your Home Improvement Connection
2
PROJECT STAGES: Find the Right Contractor
Choosing a Pro — The Interview
Once you have your list of matching pros, you should make
sure you are consistent when interviewing them. Use our
Contractor Comparison Worksheet (Appendix A) complete with
everything you need to make sure you are comparing apples-toapples, which includes:
• Important questions to ask you Pro
• Questions for references
• Checklist for interviewing Pros consistently
Tips for Evaluating Bids and Avoiding “LowBall” Offers:
• There is a world of difference between a “free”
two-paragraph estimate and one that is five pages
long with all aspects of the project spelled out. Get
the details on paper!
• This is a great time to see if you can work
harmoniously with your contractor – is he willing to
spend the time to educate you on the process and all
the options?
• What did the contractor’s references say about cost
overruns? Factor this in.
• Have you covered everything? Look at your cutouts,
sketches, and fixture lists – are they all on the bid?
• Don’t rely on “Allowances” – if the bid allows $4,000
for cabinets, ask your Pro to show you what $4,000
cabinets look like. This will prevent unpleasant
surprises down the road.
• Price is not everything! Do you like and trust this Pro?
Is there something fishy about him? Trust your
instincts and only hire someone who feels right for you.
Choosing a Pro — Hiring
You’ve done your homework and have settled on the right Pro for
you. Despite appearances, there’s still some work to do to make
sure you get off on the right foot. Use our 10 Steps for Hiring
Service Professionals guide (Appendix B) to make sure you have
your i’s dotted and your t’s crossed.
Choosing a Pro — Contracts
Now you need to make sure that your expectations coincide with
your Pros, and this is where the contract comes in. Check out our
Contracts with Contractors: The Big Issues article (Appendix C)
for explanations of the various sections of a typical remodeling
contract. For a quick take on what you should be thinking about,
see our Contract Checklist below.
A Good Contract:
£ Should be written on company letterhead
£ Should contain the company’s name, address, phone numbers, and license number
£ Includes a detailed description of the work that is
going to be performed
£ Provides dollar amounts associated with each task
included in the project
£ Includes an anticipated/estimated start and finish date
£ Provides a payment schedule
£ Includes a termination clause
£ Protects the homeowner from mechanics liens once
you have paid the contractor in full
£ Clearly states whether permits will be pulled, and
who will be responsible for pulling them
£ Details the process for change orders
ServiceMagic’s 10-Point Screening
ServiceMagic is your source for finding prescreened and top-rated service professionals. It’s our goal to
provide you with up to four professionals that have been 10-point screened, which means that we have done
the following to ensure that you find the right pro for your project:
1 Verify Trade License
6 Bankruptcy Search
2 Verify Insurance
7 Legal Search for Civil Judgments
3 Verification of State Business Filings
8 Liens Search
4 Criminal Records Search
9 Identity Verification (SSN)
5 Sex Offender Search
10 Identity Verification (Reverse Phone Lookup)
Your Home Improvement Connection
3
PROJECT STAGES: Construction to Completion
During Construction
Prepare for Construction: Ground Rules
Progress Meetings
Map out the path the contractors will take from your door
to the bathroom and protect the floor with carpet scraps,
old towels, or plastic.
Once you’ve scheduled the work and nailed down the ground
rules, now you need to put on your project manager’s hat. One
way to keep things on track and stay in the loop is to have progress meetings with your project supervisor or contractor.
A progress meeting is a time to review questions, make decisions, and talk about changes to the scope of the remodel. You
can have these meetings as frequently as every day or once a
week for longer projects. Make sure your contractor is on board
and knows that you want to have a forum for voicing concerns
or making changes.
Schedule of Payments
There are no hard and fast rules as to how a contractor collects his or her fees. Some don’t collect until the work is completed, while others ask for 50 percent upfront. The average is
three payments: • The first payment is commonly due when the bulk of the
materials are delivered
• The second payment is due when the job is half
complete
• Another 20 percent when the job is essentially
complete.
Paying your Pro is tricky - you don’t want to pay and then have
them absent for extended periods, but you also don’t want to
withhold and have the same result. See our Arranging Payment
For Home Improvement Work article (Appendix D) for more
on how to manage this process so you and your contractor are
both as happy as clams.
It’s hard to have someone in the most private room in your
house – especially if you only have one bathroom. Some things
to consider when trying to make things as smooth as possible:
•
• Decide when you want work to begin and end each day
and if they can work weekends. Realize that being
temporarily inconvenienced by workers arriving early and
staying late will likely complete the project quickly.
•
If you have pets, decide what you will do with them to stay
out of the contractor’s way.
• Decide if you want everything cleaned up at the end of
each day. Remember that for longer projects, cleaning
each day can extend the completion date.
• Think about where the contractor will park his vehicle and,
if needed, where the dumpster will be placed.
•
If walls are being opened or worked on, have a plan for
minimizing dust and debris – taping some plastic over the
door can help keep the dust contained.
• Remove anything you can from the bathroom – including
soaps, trash cans, and other accessories. Designate a
place outside where your Pros can wash off tools.
• Designate where they will draw their electrical power from.
• Decide if your contractor can use your bathroom and
telephone.
• Offer water or a beverage to workers when possible.
• Bribery isn’t a bad idea – donuts and coffee can earn you
points that you can cash in during the project.
Your Home Improvement Connection
4
PROJECT STAGES: Construction to Completion (Continued)
Change Orders
A change order is a written modification of the scope of work that
you defined on your contract or blueprints. There are two kinds of
change orders: those you initiate and those that are a result of unforeseen building conditions. While the latter type of change order
can be frustrating, it is an inevitable part of home improvement,
and having a well-defined change order policy in your contract
can smooth this process.
A standard change order should include the following:
1. Job name, address, and phone number
2. Owner’s name
3. A complete description of new work to be performed
4. Total price for materials and labor to complete
the change
5. Revised date of completion due to the change order
6. Signatures of the company representative
7. Signatures of the homeowners
Punch List
A punch list is a checklist of all items related to the project that are
incomplete. It’s a good idea to update and bring this list to your
progress meetings to make sure you and your contractor are on the
same page. Now that you can see the light at the end of the tunnel,
this document serves as a “What’s Left” list. Once the contractor has
addressed all of the Punch List items to your mutual satisfaction, you
should advance any balance owed and call it a day!
Sample Punch List: (See Appendix F)
Sample Change Order: (See Appendix E)
Final Inspection & Substantial Completion
When the project is close to complete, you and your Pro should
schedule a Final Inspection in order to check off everything on
the contract, any change orders, and your Punch List. It’s not
uncommon that there will be minor outstanding items at this
point, and these should be kept on the Punch List and tied to a
final payment. If you and your Contractor are in agreement, this
is the time to advance the last major payment and make plans for
finishing your Punch List.
Your Home Improvement Connection
5
UNDERSTANDING COSTS: Range of Cost
If you’re just looking for a ballpark estimate to help create your
budget, we have some numbers to get you started. Below is
a nationwide average cost for bathroom remodels, based on
feedback from ServiceMagic homeowners.
Average Bathroom Remodel Cost
The Dreaded Hidden Costs
A remodeling contractor can’t see behind
your walls when estimating, so below are a
few hidden things that can drive costs up:
• Dry-rot/Termite damage
• Decaying pipes
• Availability of materials
• Poor insulation
• Trolls and /or viper pits in the walls
What Our Service Pros Have to Say
We surveyed more than 900 Bathroom Remodeling Pros in our network about remodeling a 5x7 bathroom. The updates ranged
from low-end to high-end materials. See graphs for the details.
Low End Remodel
Mid-Range Remodel
High End Remodel
Flooring:
Sink:
Shower/Bath:
Plumbing Fixtures:
Toilet: $506
$247
$1,134
$386
$248
$743
$340
$1,562
$538
$342
$1,213
$550
$2,694
$988
$530
Cabinets:
$383
$569
$1,087
Countertops:
N/A
$421
$925
Lighting Fixtures: $192
$303
$541
Total:
$3,096
$4,818
$8,528
above bathroom remodel estimates are an average of responses provided by ServiceMagic contractors all over the country. The
* The
total figure represents an all inclusive cost for that type of remodel, and as such is not the sum of the broken out categories.
Your Home Improvement Connection
6
UNDERSTANDING COSTS: Cost vs. Value
Many homeowners get too focused on cost instead of focusing on
value. Sure, your bathroom remodel is going to cost a few thousand
dollars, but it is also going to add value back to your home. Our
friends at Hanley Wood produce a Cost vs Value Report1 every year
that shows how much resale value you can expect from certain
projects in certain cities. According to their 2007 Report, the average
bathroom remodel costs $15,789, but that same bathroom increased
the resale value by $12,366. In this situation, you actually only pay
$3,400 for your newly remodeled bathroom. Below is their detailed
breakdown of how they measure an Upscale Bathroom Remodel.
Hanley Wood’s Cost vs. Value Average
Upscale Bathroom Remodel
• Expand an existing 5 x 7 foot bathroom to 9 x 9 ft
within existing house footprint
• Add another window, relocate & replace tub with
custom 4 x 6 dual shower with top-of-line fittings and full body-wash shower wall, tile, and glass block
surround
• Relocated toilet to partitioned area and replace it with
one-piece color unit / add bidet
• Add stone countertops in custom vanity cabinet with
twin designer undermount sinks; nickel-finish faucets
Where to Focus
We asked our network of contractors where the best place
was to invest in a bathroom remodel. Here is the wisdom they
had to share:
LUXURY SHOWER OR TUB #1
FLOORING OR WALL TILE #2
STORAGE SOLUTIONS #3
• Add linen/towel storage closet
• Ceramic tile floor, papered walls, hardwood trim
COUNTERTOPS #4
• Add general and spot lighting and a humidistat
controlled exhaust fan (electrical wiring to code)
LIGHTING #5
Average Job Cost - USA:
Resale Value: Cost Recouped on Sale:
$37,097
$24,455
68.6%
Mid-Range Bathroom Remodel
VANITY #6
The above items are not sure fire winners, but they are good
guides to get the money at closing.
Source: Recent poll of more than 650 ServiceMagic
* home
professionals.
• Update an existing 5 x 7 ft bathroom
• Replace all fixtures to include 30 x 60 inch porcelain
on steel tub with 4 x 4 ceramic tile surround
• New single lever temperature and pressure balanced
shower control
• Standard white toilet, solid-surface vanity counter with
integral double sink
• Recessed medicine cabinet with light, ceramic tile
floor, vinyl wallpaper
Average Job Cost - USA:
Resale Value: Cost Recouped on Sale:
$12,588
$9,770
77.6%
1. Visit www.remodeling.hw.net/costvsvalue/index.html to learn more.
Your Home Improvement Connection
7
PROJECT STAGES: Financing Your Project
Money Matters: How to Finance Your Bathroom Remodel
There are several avenues that you can walk down to finance your remodel against your home’s equity,
and there are also routes to borrow against your earning potential. No matter what your situation, there is
likely a financing option to fit your pistol.
• Home Equity Line of Credit (HELOC)
This is a very popular method for financing remodels. HELOCs act like a credit card, so you are only
financing what you spend instead of a set loan amount. Be careful with these because they typically
have variable interest rates.
• Home Equity Loan
Similar to HELOCs, except that these loans are for a one-time set amount, the payments and interest rate
are fixed, and the closing costs are higher. The good thing about these is neither your interest rate nor
payments will increase.
• Homeowner Loan
Similar to the above methods except that you are borrowing against your income rather than the
equity in your home. Your home will still be the collateral, but this is great for those new to
homeownership with healthy incomes.
• Value Added Loans
If you are making a substantial improvement, you can sometimes borrow against what your home is
going to be worth after the project, rather than its current value.
Your Home Improvement Connection
8
DESIGN IDEAS: Style Guide
Traditional
With a solid foundation of furniture-styled cabinets and vanities,
the Traditional style is typically accented with ornate plumbing
lines and fixtures and complemented by warm, yet subtle, colors
and ornate molding.
Contemporary
This style is marked by clean, sharp lines, minimalism, and an
overall Eastern influence. A Contemporary bathroom will usually
incorporate unique materials and sleek methods, such as concrete, brushed steel, and vessel sinks.
Country
This style pulls from the old school and uses nature to construct
the feeling of yesteryear. From rough hewn wood flooring and
stand-alone clawfooted tubs to wainscoting, floral designs, and
earthy colors, Country is simple and down-to-earth.
Transitional
The Transitional style occupies the space between Traditional and
Contemporary by softening the sometimes industrial Contemporary feel with rounded corners and warm colors while retaining the
sophistication of Contemporary design.
World
Tips from Bathroom
Designers for developing
your style:
• Look at the style and feel of
other rooms in your home.
• Buy magazines and tear
out what you like. Write down what you DON’T want.
• The style of the bathroom
should fit the style and era the home was built/decorated.
• Picture yourself sitting in
that spot– what colors and
objects do you imagine?
• Keep it simple and tasteful,
and don’t cut corners with detailing.
• Don’t go too far out of your
comfort range.
World style draws from Mediterranean and Asian influences and
really defies definition. The components of this style are pulled
from many eras and locations to create the feel of another world,
one you visited on vacation or imagine far away places to be.
Other Styles
Transitional tops the list of “Other” styles homeowners are requesting. This style is a mixture of traditional and contemporary, leaning towards a more modern look. Other styles that are frequently
requested include Ultra Modern, Spa, Asian/Zen influenced, Arts &
Crafts, Art Deco, and Shaker.
Your Home Improvement Connection
9
DESIGN IDEAS: Materials Guide
Cabinets & Storage
These are the keys to efficient bathroom space, but they don’t have to bore you to tears,
nor leave you standing in the soup line. From custom to stock, you have options.
95% of bathroom cabinets will fall into the below categories. We have rank ordered them
from the most expensive to least, as well as noted their individual durability.
• Custom
Custom cabinetry is built to your exact specifications,
out of the material of your choice, and is made by a
skilled craftsman. For these reasons, it is the most
expensive of the cabinetry options.
• Semi-Custom
These sit between custom and stock. You can’t
choose a style, cabinet design, material, or size that
isn’t in a supplier’s catalog, but since suppliers typically
offer an enormous selection in each area, the customer
still gets a “custom” designed set of cabinets that has
that one-of-a-kind feel.
• Vanities
• Stock
Most vanities come with a detached sink, a mirror, and
small shelving units or a modest countertop, allowing
movement and square footage while providing
storage space.
These cabinets are pre-manufactured in the factory in
set designs, materials, and sizes, and then sold by big
box home improvement stores and other suppliers.
• Medicine
Bathroom medicine cabinets can make any space
appear larger. Instead of using awkward cabinetry,
shelving systems, or linen closets in other parts of the
house, a medicine cabinet is like having a tiny pantry
right above your sink.
Your Home Improvement Connection
Low
High
Low
High
• Wide price range
Cost
• Unique designs
Durability
• Very versatile
Low
High
• Inexpensive
• Fewer options
• Quick delivery
Low
High
Low
• Great space saver
Cost
• Small in size
Durability
• Very durable
High
• High-end
• Unique
• Hand-crafted
• Great value
• Many options
• Durable
Cost
Durability
Cost
Durability
Cost
Durability
10
DESIGN IDEAS: Materials Guide (Continued)
Counters
From granite and marble to laminate and solid surface, there are just as many options
for the bathroom as the kitchen.
Most countertops fall into the below categories. All of them are durable, though some
more than others. The difference lies in the cost and style.
• Stone
Many prefer granite and marble stone slabs as an
elegant countertop finish. Stone is sometimes
sectioned down into smaller pieces for tile counters.
Stone is nearly indestructible, easy to manage, and
popular among homeowners.
• Concrete
This material is new to the scene. It is molded into the
exact shape to fit your needs, and it can be stained
if you don’t like the gray look. Concrete is very heavy
and sometimes needs additional fortification to support
the weight.
• Solid Surface
Solid Surface is the industry name for high-grade
plastic counters that can be molded into different
shapes and connect to sinks seamlessly. This is a
high-end product that requires little maintenance and
repairs easily for any problems.
• Laminate
This type is made of plastic and comes in a near
infinite amount of colors and patterns. A great option
for the budget conscious, and easy to fix if it gets
damaged.
Your Home Improvement Connection
• Most expensive
• Very popular
• Will last forever
• Fairly expensive
• Hottest trend
• Very versatile
• Great value
• Many colors
• Repairs easily
• Low cost
• Infinite options
• Fairly durable
Low
High
Low
High
Low
High
Low
High
Cost
Durability
Cost
Durability
Cost
Durability
Cost
Durability
11
DESIGN IDEAS: Materials Guide (Continued)
Flooring
Flooring needs to stand up to water while keeping consistent with your style. Tile, laminate, and hardwood are the best options, but we won’t talk you out of carpet.
Flooring types number very few, but there are endless options with these specific types.
Most homes have several types of flooring, and it’s best to know their pros and cons.
• Hardwood
This type of flooring needs no introduction. These days
hardwood comes in a wider variety of wood species,
plank sizes, and stains to match nearly every
homeowners demand. Hardwood is a very elegant,
sturdy flooring option.
• Tile
Tile is a pretty straightforward choice for bathrooms
and entries because tile stands up well to water and
dirt. With scores of different sizes, materials, patterns,
and colors, tile is a choice for many areas. Be careful,
though, tile usually remains cool and might not be the
best choice in colder climates. Nobody likes cold feet!
• Laminate
Laminate is the newcomer and offers the elegance of
hardwood without the scratches and dents. Laminate
is cheaper, easier to install, and stands up very well
to water.
• Carpet
While carpet is a stock flooring choice, it is not many
people’s first choice for bathrooms. It can trap water
and if the plumbing backs up, it can be very difficult
to clean.
• Elegant
• Durable
• Infinite colors
• Beautiful colors
• Water resistant
• Cool surface
• Great value
• Many options
• Very durable
• Many colors
• Low cost
• Reduces noise
Low
High
Low
High
Low
High
Low
High
Cost
Durability
Cost
Durability
Cost
Durability
Cost
Durability
Your Home Improvement Connection
12
DESIGN IDEAS: Materials Guide (Continued)
Tile
No bathroom is complete without tile, but which to choose from? From unique
styles of Saltillo and Spanish to the elegance of Travertine, there is the perfect tile
for your bathroom.
Tile is a very durable material, but all materials are not created equal. Some are
hard, some stain easily, and some only work as flooring. Here we have gathered
the most popular ones.
• Travertine
Best described as a cross between marble and
limestone, travertine has been popluar for
thousands of years, and was used to build the Roman
Coliseum. Travertine ranges in color from an ivory
shade to beige to reddish brown, and is a very
classy tile.
• Stone
From granite to marble, slate, and sandstone, stone
tiles cover a lot of ground. Great for durability and
appearance, stone can be pricey but worth it. You
can buff it smooth for wall tile and leave it rough for
flooring, whatever you wish.
• Ceramic
They come in an almost endless variety of styles,
they are easy to maintain, they are cost-effective
compared to other tiles on the market, and they’re
just plain good looking. Whatever your tile need,
there’s a ceramic to match.
• Saltillo
Saltillo is the most common of the Mexican and
Spanish tiles. It is made from raw clay traditionally
pressed by hand, and has an earthy, rough, almost
terra cotta look to it. Great for creating a
Southwestern feel.
Your Home Improvement Connection
• High end
• Elegant
• Uncommon
• Expensive
• Very durable
• Popular
• Infinite colors
• Best value
• Great designs
• Very popular
• Good value
• Warm colors
Low
High
Low
High
Low
High
Low
High
Cost
Durability
Cost
Durability
Cost
Durability
Cost
Durability
13
DESIGN IDEAS: Materials Guide (Continued)
Sinks & Faucets
The amount of options for fixtures is paralyzing. With vessel and pedestal sinks to waterfall faucets, you have some thinking to do.
We could go on forever about sinks and faucets because there are a near infinite amount
of designs, materials, and brands. Here are the most popular types of bathroom fixtures.
• Console Table Sinks
• Medium cost
• Country design
• Creat openness
These look like a sink has been set in a table and
the legs are usually prominent and showy. These
can make small bathrooms appear bigger because
they provide an open, airy feel.
• Easy access
• Good value
• Great for storage
• Vanity Sinks
These sinks are installed right inside of a cabinet
and are perfect if you are in need of storage space.
• Vessel Sinks
• High end
• Elegant designs
• Very popular
Vessel sinks sit on top of a cabinet and look like a
basin. These are relatively new and widely popular
becasue of their unique look. Great for guest rooms,
but difficult for shaving and tooth brushing.
• Good value
• Space saver
• Unique designs
• Pedestal Sinks
Just as the name implies, these sinks act as basins
that are sitting on top of a pedestal. These sinks
offer openness to the room with a unique design.
• Solid value
• Space saver
• Typically small
• Wall-Mount Sinks
A great space saver, wall mount sinks afford your
bathroom a sink while using minimal space. The
drawback is that these sinks are not typically very big.
It wouldn’t be a sink without a faucet. There are too
many types, materials, functions to mention, but
here are a few of the more common faucet types to
consider.
Your Home Improvement Connection
• Single Hole Faucets
• Centerset
• Widespread
• Waterfall
• Minispread
• Basin
Low
High
Low
High
Low
High
Low
High
Low
High
Cost
Durability
Cost
Durability
Cost
Durability
Cost
Durability
Cost
Durability
• Roman Tub
• Wall Mount
• Vessel
• Shelf-Back
• Electronic
14
DESIGN IDEAS: Materials Guide (Continued)
Tubs & Showers
Bathtubs can be the centerpiece of you bathroom, while the shower is usually hidden in
the corner. Deep tubs for soothing baths or a two person shower? Decisions, Decisions.
These days, tubs and showers are less about getting clean and more about relaxation. So
no matter what soothes you as you wash, we have the options here to help you decide.
• Stand Alone Tub
Typically, these are “clawfooted” tubs that are not
connected to the wall. These give the feeling of
older times, before showers, and are deeper than
typical tubs for good, long stress-relieving soaks.
• Jetted Tub
Who doesn’t like the soothing feel of a Jacuzzi?
Here you get a bathtub and massaging pulse of jets
all in one.
• Two Person Shower
For larger bathrooms, for romantics, for effciency,
these are great additions. You never have to wait in
line for a shower, Typically installed with showerheads
on both ends, but can be side-by-side if you prefer.
• Fiberglass Shell
This is for a stand-up, one-person shower. The shell
creates the entire shower in one, inexpensive piece.
Great for 3/4 baths and smaller guest bathrooms.
Your Home Improvement Connection
Low
High
Low
High
• Great for couples
Cost
• Good resale value
Durability
• Unique trend
Low
High
• Great value
• Low cost
• Small space
Low
High
• Old world style
• Deep tubs
• Very sturdy
• High end
• Stress reliever
• Typically large
Cost
Durability
Cost
Durability
Cost
Durability
15
DESIGN IDEAS: Materials Guide (Continued)
Trends & Other Cool Stuff
Don’t forget the extras! From heated towel racks and steam showers to wall panel
shower heads and dual flush toilets, here are the gizmos that make bathrooms sizzle.
Some bathroom features defy category, and we have gathered those things in this
section so that you don’t miss out on some of the coolest pieces to find their way into
the bathroom.
• Radiant Flooring
This is more a style of heating than flooring. Heating
cables are installed below the flooring as a heating
format. This is great in bathrooms with tile flooring,
because you can heat the flooring and never get
cold feet on your floor in the morning.
• Heated Towel Racks
Just like what they sound like, heated towel racks
ensure that you have a toasty warm towel to dry off
with after a shower. A definite bathroom luxury.
• Dual Flush Toilets
These toilets have two buttons on the top where you
can use one button for number one, and another for
number two. They look just like regular toilets, they
save water, and are a great Green addition.
• Bathroom Fans
By building code, a bathroom must have either a
fan or a window to reduce and impede mold growth.
Though, sometimes having a bathroom fan is good to
rid the bathroom of smells just as much as moisture.
• Steam Shower
Steam showers are a transistional stall with regular
heads and fixtures. And though you can take a
regular bath within the enclosure, you also have
the ability to turn this space into a steamy sauna.
This is a very healthy, two-for-one addition to your
bathroom.
Your Home Improvement Connection
• No more cold feet
• Efficient heating
• Runs on dimmers
• Toasty towels
• Great luxury
• Fairly expensive
• Green alternative
• Smart creation
• Money saver
• Reduces mold
• Clears odor
• Keeps room fresh
• Very healthy
• Soothing
• High cost
Low
High
Low
High
Low
High
Low
High
Low
High
Cost
Durability
Cost
Durability
Cost
Durability
Cost
Durability
Cost
Durability
16
DESIGN IDEAS: Going Green
The Cost of Going Green
Placing a price tag on the cost of going green with your bathroom
remodel is easier said than done. After all, the level of green each homeowner is willing to commit to is different, as are the individual specifications of each project. What we can tell you is this:
• Green remodeling does not necessarily mean higher initial costs.
• Green remodeling is guaranteed to translate into large energy
savings over the life of your remodel.
• Determining the value of green remodeling isn’t always best
served by focusing on the bottom line.
This last one is maybe the most important. It’s what green remodeling expert David Johnston refers to as “avoiding the payback trap.”
Going green isn’t just about reducing your monthly utility costs. It’s
about creating healthier living environments for you and your family, utilizing long lasting and low maintenance materials so that you’ll
lose less time in the future to maintenance chores and repairs, and
emphasizing environmental responsibility, so you can rest easy knowing that you’re doing everything you can to pass a better world onto
your children and grandchildren. As you can see, assigning value in
the world of green remodeling goes beyond assessing a final cost in
dollars and cents.
How to Maximize Energy Savings in Your Green
Bathroom Remodel
Reducing energy consumption, and in turn utility bills, is one of the most
popular reasons homeowners choose to go green. In the bathroom, that
means reducing water usage and increasing energy efficiency across the
board. Here’s Johnston’s list of things you can do to ensure maximum
efficiency, and in turn, lower the operating costs of your bathroom.
• Install low flow faucets and showerheads. They can reduce
water usage at these fixtures by up to 60%.
• Install low flush, high efficiency toilets. Older toilets use
between 3.5 and 7 gallons per flush. New models do the job just
as well with 1.6 gallons of water or less.
• Use compact fluorescent light bulbs. Homes lit with
incandescent bulbs can attribute up to 25% of their electric bills
to home lighting. Compact fluorescent light bulbs use 75% less
energy, and last 10 times as long.
• Install low-e, multiple paned windows, with vinyl or wood
frames. Installing energy efficient windows throughout your
home can reduce total energy costs by 30 to 50 percent, and they
provide valuable natural light, ventilation, and passive solar heat.
• Install a skylight or solar tube(s) to increase natural lighting.
• Install radiant heating. It’s more efficient, and healthier, than
forced air.
• Insulate plumbing, and remove it from outside walls. It
reduces heat loss as water travels from your hot water heater to
the faucet, and saves on water heating costs.
Your Home Improvement Connection
• Install an “On-demand” hot water circulation pump. These
pumps send hot water to your faucet in seconds, and reducing
the demands placed on your hot water heater.
• Consider replacing your old hot water heater with a newer,
more efficient model. High-efficiency fossil fuel water heaters,
tankless water heaters, and heat pump water heaters, are all
sound energy savings solutions. Or upgrade your present
heater with an insulation jacket, heat traps, and a water heater timer.
• Insulate as much as possible. If you’re gutting your bathroom
anyway, the more insulation you install in the walls, the better.
Be sure to seal up other sources of air leaks as well, such as
the small, hidden gaps where plumbing enters your bathroom.
Green Bathroom Remodeling Tips for a
Healthier Home
Urea formaldehyde, chloride gasses, volatile organic compounds,
and toxic mold might sound like the beginning of a toxicology report,
but all are actually chemicals and byproducts commonly associated
with building materials used in the bathroom. Their presence has
been linked to everything from rising levels of childhood asthma to
much more serious maladies like cancer, repressed immune systems,
and nervous system damage. Green remodeling strives to reduce or
eliminate the presence of these harmful elements, increasing your
home’s indoor air quality, and in turn, the health of everyone that lives
under your roof. Here is David Johnston’s list of things to look for, and
to look out for, in pursuit of the healthiest bathroom possible.
• Investigate your local water supply and install filters on sink
faucets and showerheads. Your water will be healthier, taste
better, and be safer for bathing, especially for those with chemical
sensitivities. Investigate local water quality first, however, since
different filters meet different needs.
• Use formaldehyde free insulation, including recycled
content fiberglass, cellulose, or rockwool insulation.
Traditional insulation materials contain high levels of formaldehyde
that can off-gas into your bathroom. That’s bad news, considering
the fact that formaldehyde is a documented carcinogen.
• Design with ventilation in mind. The high moisture levels in a
bathroom make for the perfect breeding ground for mold and
mildew, as well as rot and other moisture damage. Opening
windows during warmer months, and installing a bathroom
exhaust fan for the rest of the year, helps to keep moisture
levels down.
• Only use water resistant wall and floor coverings. Avoid
wallpaper and carpet, both of which can harbor moisture, foster
mold growth, and offgas other indoor air contaminants.
• Select low-VOC paints, adhesives, and sealers. Most
traditional paints, adhesives, and sealers emit volatile organic
compounds (VOCs) for years after being applied. Low-or noVOC paints, adhesives, grouts, and sealers help achieve higher
indoor air quality levels.
17
17
DESIGN IDEAS: Going Green (Continued)
GREEN BATHROOM CHECKLIST
• Avoid MDF (medium density fiberboard) and particle board
whenever possible. Both are common materials used in
countertop and cabinet construction, and both off gas urea
formaldehyde, a known carcinogen. If you do use MDF or
particleboard, seal it with several coats of a low-or no-VOC paint
or sealer.
• Avoid vinyl flooring. Vinyl flooring puts off chloride gas,
another known carcinogen.
• Replace lead plumbing in older homes.
Environmental Responsibility in the Bathroom
Any discussion of green remodeling would be incomplete without
talking about environmental responsibility. After all, at its heart, green
remodeling is about living more harmoniously with our environment.
Our present way of doing things, including how we build and remodel
our homes, is detrimental to the environment. That being said, here’s
David Johnston’s advice on how to shift your thinking green from an
environmental standpoint, and reasons why it’s a good idea to do so.
• Use recycled building materials. Old lumber, trim, and door
and window casings can all be re-used if removed carefully.
And if you’re willing to be flexible when it comes to design,
perfectly good sinks, cabinet hardware, and ceramic and stone
tile, for example, can all be purchased from retailers who
specialize in reclaiming and recycling old building materials.
• Use materials manufactured with recycled content. Be
it cellulose insulation made from recycled paper and cardboard,
or recycled content glass and ceramic bathroom tile, building
materials made from recycled content help to reduce waste,
require less energy to manufacture, and are equal to, or of
higher quality, than most products made from virgin materials.
• Recycle construction and jobsite waste. Old porcelain toilets
and other ceramics can be ground up and used to make
concrete, steel tubs can me melted down for the metal, and
that ‘70s era sink that you think is hideous might be exactly
what a homeowner across town has been looking for all along.
• Increasing Efficiency Isn’t Just Good for Your Pocketbook.
Whether it’s reducing the amount of fossil fuels needed to heat
and light your bathroom, or eliminating wasteful use of a valueable
natural resource like water, any steps you take to cut your
home utility costs are beneficial for the environment as well.
Solar Energy
£ Install double-paned windows
£ Install low-e (low-emissivity) windows
£ Incorporate natural light
Plumbing
£ Insulate pipes
£ Remove plumbing from outside walls
£ Install on-demand hot water circulation pump
£ Install low-flush toilets
£ Consider greywater flushing
£ Install high-performance showerheads
£ Install low-flow faucets
£ Investigate your water supply
£ Incorporate natural light
£ Install chlorine filters on showerheads
£ Install activated carbon filters
£ Install water distillers
£ Install a reverse osmosis system
Electrical
£ Install compact fluorescent light (CFL) bulbs
£ Install halogen lighting
£ Install lighting controls
£ Install sealed or airtight IC recessed lighting
Heating, Ventilation, and Air Conditioning (HVAC)
£ Use duct mastic instead of duct tape
£ Install ductwork windows for natural ventilation
£ Install a bathroom exhaust fan
£ Install a heat recovery ventilator (HRC)
Insulation
£ Use formaldehyde-free, recycled-content fiberglass insulation
£ Use cellulose insulation
£ Caulk, seal, and weatherstrip
£ Increase insulation thickness
Interior Materials/Finishes
£ Use formaldehyde-free materials
£ Seal all exposed particleboard or MDF
£ Use rapidly renewable flooring materials
£ Use recycled-content tile
£ Replace vinyl flooring with natural linoleum
£ Use low-or-no-VOC and formaldehyde-free paint
£ Use solvent-free adhesives
Structural Framing
£ Use advanced Framing Techniques (AFT)
Green Checklist provided by “Green Remodeling: Changing
* the
World One Room at a Time” by David Johnston
Your Home Improvement Connection
18
18
USER ADVICE
Below are just a few pieces of advice from homeowners, contractors, and designers on how to deal with a
bathroom remodel. For more user advice comments, go to the user advice tab on your project guide.
Homeowner Bathroom Advice
If a contractor states he can do the job in a specific number of days, that does NOT mean continuous days. You must
build in time to apply for permits and obtain them, days lost waiting for the inspections, and getting on and off the contractor’s calendar while you are waiting for permits and inspections. Also, you may need to build in time for your purchases to
be delivered; some items can be received within three days of ordering; some require several weeks.
- Susan K. Parsippany, NJ
Have a good idea about what you want done. Do some research to get a handle on the costs. Get more than two quotes
and interview all of the contractors. Before any work is done, clearly explain your budget with your contractor; set your
ground rules (Debris removal, cleaning--what does clean mean? who does it?) Draw up an agreement to cover all of your
ground rules & have both sides sign it along with a witness.
- Michael s. Hummelstown, PA
Contractor Bathroom Advice
Remember that when remodeling your bathroom, items like lighting fixtures, faucets, or accessories (i.e. towel rings, toilet
paper holders, towel bars, etc.) can be changed inexpensively down the road. Put more money in your budget to get the
tub/shower, toilet, vanity, and floor you want now! You can always put less expensive faucets in now and upgrade down
the road for less. I always encourage my homeowners to pick neutral colors for the floor, vanity, countertop, and shower
(if tile). These items are the most expensive and you can change the entire look of a bathroom with new paint, faucets &
fixtures, bathroom accessories, and lighting. This helps to save money down the road and still allow you to change the
“look” of your bathroom without killing your wallet!
- Scott Shamburger Orange Beach, AL
Think about what your needs are; your preferences; and how the design will fit into the overall decor of your home. A bathroom is the second most expensive room in your house and, obviously, one of the most used and viewed. For a point of reference: A vehicle typically costs between $16K to $40K. A owner usually keeps this car 3-5 years. Your bathroom is going to
out-last your car by 15-20 years. Therefore, the initial investments are extremely worthwhile and should be well thought-out.
- Daniel Lapointe Kennebunk, ME
Designer Bathroom Advice
Visit showrooms and bathroom fixtures and accessories suppliers to draw inspiration when you get the idea that a bathroom needs to be renovated. Look closely at the function and the price point of the products to gain a rough idea for a
total budget needed.
- Eric Lam New York, NY
Get measurements of the room before you shop for fixtures. Know your size limits for vanities, linen cabinets, and shower
stalls. Walk through your daily activity in the bathroom; you may find the perfect vanity that will look great but maybe too
large for the size of your room. Sacrificing floor space for design is never a good plan.
- Judy Harty Battle Lake, MN
Your Home Improvement Connection
19
Appendix A
Contractor Comparison Worksheet
Use this Contractor Comparison form for a side-by-side comparison of every professional you are interviewing for your
bathroom project.
Company #1:
Contact Name:
Phone Number:
Notes:
Company #2:
Contact Name:
Phone Number:
Notes:
Company #3:
Contact Name:
Phone Number:
Notes:
Company #4:
Contact Name:
Phone Number:
Notes:
Use this checklist as a way to properly interview Home Pros about their business and methods. Include references
here as well.
Questions you should always ask your contractor:
• Are you licensed for this particular work? Can I have a copy of the license for my records?
• Will you provide me with a copy of your Insurance Statement?
• References: Name and Number
Optional Questions to ask your Contractor
• How long have you been a bathroom contractor?
• Were you formally trained or how did you acquire your experience?
• Do you belong to any professional organizations?
• Do you give written warranties?
• Will this project require a permit?
• Can you estimate how long this will take?
• How many other projects do you have right now?
• Will you provide options for different materials?
Questions for references
• Were you happy with the project?
• Was the job completed on time?
• Were there any unexpected expenses?
• Would you recommend this bathroom contractor?
• Do you have any advice for me if I decide to use this contractor?
c
Your Home Improvement Connection
Copyright 1999-2008, ServiceMagic, Inc. All Rights Reserved
20
Appendix B
10 Steps for Hiring Service Professionals
1. Confirm the sales person works for the company.
• Verify that the individual with whom you are speaking is an authorized agent of the company that was referred by ServiceMagic.
2. Ask for a copy of the company's license.
•
It is important that you verify the license is still in good standing. Also keep in mind that certain states or provinces do not require
licensing if the job is under a certain dollar amount. Remember that you can find a list of your state's licensing requirements on
the ServiceMagic website.
We recommend before working with a service professional, that you verify information presented is still current
and/or acceptable to you. While ServiceMagic may be notified of changes in member service professional insurance coverage which are then confirmed with insurance agents or companies, we cannot guarantee that insurance
information is still valid at time of presentation. We recommend that you obtain a copy of the service professional's insurance certificate where applicable.
3. Ask for proof of insurance.
• Ask the company to provide a copy of their insurance certificate. We recommend that you verify with the insurance agency or
carrier that the policy is still in good standing.
• General Liability insurance typically covers a contractor for accidents that occur while the contractor is working. However, there
are exclusions to coverage, and you should confirm the actual scope of the contractors coverage directly with the contractor.
4. Finalize the contract before starting on a project.
A good contract...
Should be written on company letterhead
Should contain the company's name, address, phone numbers, and license number (if applicable)
Should contain the consumer's name, address (where work is to be performed), and phone numbers
Is dated when it is written
Includes a detailed description of the work that is going to be performed
Provides dollar amounts associated with each task included in the project
Includes an anticipated/estimated start and finish date
Provides a payment schedule
Includes a termination clause
Contains a clause that protects the homeowner from any potential mechanics liens once you have paid the contractor in full
Clearly states whether permits will be pulled, and who will be responsible for pulling them.
•
•
•
•
•
•
•
•
•
•
•
5. Make payments to the company that was referred.
• Do not pay an individual.
6. Avoid paying with cash.
• Check and credit cards are preferable, and be sure to get a receipt for all payments.
7. Withhold final payment until you are satisfied with the project.
• Don't pay in full until the project is completely finished and you have completed your final inspection.
• If sub-contractors were used, be sure to get signed releases from all subcontractors clearly indicating that they have been paid
in full by the general contractor.
For
• larger projects, don't make the final payment until you have passed the final building inspection.
8. Don't advance money for materials.
• If absolutely necessary, make sure the materials are delivered to your house with a receipt showing that they have been paid in full.
9. Check multiple references.
• In addition to reading the company's ServiceMagic Ratings & Reviews, consider checking additional references for the service
professional.
10. Document all changes to the contract.
• Make sure all changes to the original contact, no matter how small, are documented and signed off by both parties.
c
Your Home Improvement Connection
Copyright 1999-2008, ServiceMagic, Inc. All Rights Reserved
21
Appendix C
Contracts with Contractors: The Big Issues
A contract is a legally binding document that details the expectations and responsibilities of all parties involved in a home improvement project. It clarifies the goals of both homeowner and contractor, and it protects each party’s rights regarding the project.
The Big Stuff
This article addresses the broad strokes of developing a contract between you and your contractor. The finer points are addressed in another
article, but keep in mind that this is simply a guide - contracts vary significantly from project to project.
Contact Information
It seems obvious, but make sure that you include in the contract the contractor’s name, physical address, phone number, insurance company
and account and license numbers. If there is a dispute, you need to know where the company is located (you can’t serve a subpoena if you
don’t have a physical address - a post office box number won’t do!), the company owner, the name of the insurance and bonding carriers and
the way by which you can reach all involved parties.
Scope of Work
Require a complete description of the work to be done. This includes the overall scope of the work as well as individual aspects of the project:
electrical, plumbing, finish carpentry, masonry, etc. The type and quality of all materials should be spelled out. Make allowances for fixtures,
floor coverings, etc. that are sufficient to provide the level of quality you require.
In addition, indicate all large equipment that will remain on site for extended periods, such as scaffolding or cement mixers. If you have architectural plans, include them in this section as well.
If you decide to change the scope of the work during the job by either adding or subtracting items, you should make sure there is a written
change order, with project cost and timing changes signed off on by both the contactor and homeowner.
Project Schedule
Define the project’s start date, and secure from your contractor the approximate length of time it will take to complete. Ask what potential conflicts might arise due to other projects with which your contractor is concurrently involved. You will find that most contractors are reluctant to sign
a contract that includes late penalty clauses, but it still may be an item that you care to pursue. Finally, specify the time that workers will arrive
and depart each day, and mention the days, if any, that they are not to work.
Schedule of Payments
There are no hard and fast rules as to how a contractor collects his or her fees. Some don’t collect until the work is completed, while others ask
for 50% up front. The average is three payments; the first when the bulk of materials are delivered or when a foundation is poured; a second
payment when the job is half complete; and 20% when the job is essentially complete.
Certainly you don’t want to pay and then have them absent for extended periods, but you also don’t want withhold and have the same result. Remember that this is a symbiotic relationship. It is understandable to want to be paid and likewise understandable to want your work done well and quickly.
Try to be as accommodating as your budget will allow. Your contractor has probably dealt with a variety of different payment structures; perhaps what
you have in mind is just fine with him. If you don’t have one in mind, there are two customary ways of paying for a large job listed below:
A) Cost plus flat fee: usually there will be draws set up with the homeowner. The contractor uses the draw to pay actual vs. estimated costs,
and submits all receipts and accounting on a regular basis. Flat fees average 13% to 20% and are usually paid, along with the draws, as the job
progresses. This method allows great flexibility to make changes as the job proceeds, but it is more difficult to estimate the final cost.
B) Bid basis: Your contractor estimates the job, and provides a contract with all materials and fees included. You and your contractor agree on a
payment schedule, referencing stages of completion in the work.
In both cases above, it is your responsibility to be certain that each stage is completed before cutting a check. If you’re not familiar enough with electrical or plumbing work, for example, to know if the proper stage has been completed to make the payment, ask a knowledgeable outside source.
Note: If financing is necessary, be certain that a clause is added stating that the contract is void unless and until financing is obtained.
Building Plans & Permits
Be sure the contractor states in writing that he/she will submit any building plans needed to the city code compliance department, obtain all
necessary permits and arrange for all inspections required.
*If the work does not pass inspection, the contractor must bear the cost of corrections.
Licensing & Insurance
Do your homework on your contractor’s licensing and insurance. Contractor licensing requirements vary by state. Research these regulations
prior to beginning your project, and require that your contractor provide proof of current licensing if relevant.
Mandate in your contract that the contractor provide proof of all required insurance. This should include, but may not be limited to, general liability and worker’s compensation for his or her employees.
c
Your Home Improvement Connection
Copyright 1999-2008, ServiceMagic, Inc. All Rights Reserved
22
Appendix D
Arranging Payment for Home Improvement Work
Homeowners always have questions in regards to how much to pay a contractor when home improvement work first begins. What is an appropriate down payment? Should money be paid during construction, but before the work is complete? And when is the final payment due?
In paying for home improvement projects, every consumer has heard stories about contractors receiving cash payments and not coming back.
This article will address the homeowner “payment dilemma” posed above. To respond to questions about how and when to safely make payments to contractors, we first need to distinguish between projects of different sizes and complexity. For the purpose of simplicity, we will address the way to approach the payment for home improvement projects into the following 3 areas:
• Small Maintenance or Repair Projects
• Custom Projects
• Larger Renovation Projects
Small Maintenance or Repair Projects
A plumbing or electrical repair is an example of a small maintenance or repair project. Fixing a door, window, or mending a fence are additional
examples. These types of projects usually take less than a day to complete, and are billed as either an hourly charge, or fixed fee to the homeowner. With small projects such as these, payments are usually made upon successful completion of the project. Upon successful completion
of the work, the contractor is paid in full. With small jobs like these, down payments are not necessary because the contractor has the ability to
“finance” the work and pay for the materials until payment is received. As projects start to grow in scope and complexity, however, most contractors don’t have the flexibility to provide this kind of project financing.
Custom Projects
Custom projects provide a homeowner with specialized work where products and services are tailored for unique applications. Custom kitchens
and baths, countertops, built-in cabinetry and shelving, and even custom painting projects fall under this category. With this kind of custom
work, materials are being purchased that are created specifically for these projects. With this kind of work, some kind of down payment is usually required to order the custom materials. For example, a custom kitchen or bath cabinet order requires a 30% to 50% down payment to get
the cabinets built. The cabinet manufacturer knows that if the homeowner were to change his mind after making the order, that the manufacturer could be “stuck” with this custom cabinetry that was created for their specific application. Due to this custom application, the manufacturer
protects their investment of time and materials by asking for up to half of the payment to produce the cabinets, and may require the remaining
half upon delivery of the cabinetry to the jobsite.
With custom work such as this, the homeowner and contractor create a payment plan, or draw schedule that provides the contractor with the
money they need to order these custom materials. It’s not up to the contractor to finance large material purchases such as this. This is the
consumer’s responsibility.
With custom work such as this, the homeowner and contractor need to work out a payment plan that provides the contractor with the required
deposits to order materials, and additional payments are made as the custom installations are completed. Payments should not exceed the
work that has been completed. Work with your contractor to arrive at a payment plan that pays for all custom materials upon order, but pays the
balance of the contract upon completion of the custom work.
Large Renovation Projects
Any large project should contain a detailed draw schedule. The homeowner pays these draws or “progress payments” when certain parts or
phases of the project are completed. A draw schedule for a $100,000 second-story addition might look like this:
Payments to be made as follows:
1st DRAW 10% DEPOSIT 2nd DRAW Second Floor Deck Installed 3rd DRAW Windows Installed 4th DRAW Close-In and Inspection 5th DRAW Drywall Taped 6th DRAW Prime Paint 7th DRAW Plumbing Fixtures Set 8th DRAW Hardwood Finished 9th DRAW Final Inspection 10th DRAW Punch List Complete and Final Release of all liens TOTAL: $10,000 10%
$15,000 15%
$15,000 15%
$10,000 10%
$10,000 10%
$10,000 10%
$10,000 10%
$10,000 10%
$5,000 5%
$5,000 5%
$100,000 100%
On large renovation projects, make sure you and the contractor are clear about when the final payment is due. Define in writing when the last
draw is due. In many large projects, there is always some outstanding work to be completed, as you may still be waiting for a custom faucet or
light fixture. It’s not fair to withhold the entire final draw if some part or material is on back-order, and the contractor can’t control delivery and
completion. In cases such as this, agree with the contractor to withhold the cost of the labor and materials for the outstanding work, but if the
rest of the project is complete, pay the balance of the final draw. This type of cooperation and agreement allows you and your contractor to work
together to complete your project to the satisfaction of everyone involved.
c
Your Home Improvement Connection
Copyright 1999-2008, ServiceMagic, Inc. All Rights Reserved
23
Appendix E
Sample Change Order Form
Get matched to 10-point screened pros at www.servicemagic.com
Job Name:__________________________________________________________
Contractor Name:_____________________________________________________
Change Order #:_______________________________________________________
Date:_______________________
Owners:
______________________________________
_______________________________________
______________________________________
Owners hereby authorize the following changes in the plans and specifications of the above described
construction project, and/or order the additional materials, supplies, services, labor and other items listed
below and /or requires to complete this Change Order to all other terms and conditions in the contract with
_______________________________
Change Order Amount $:________________________________
Payment for this Change Order is due upon completion of the change order work. All provisions of contracts
between the above parties pertaining to the above job are applicable to this agreement. This change order may
extend the time required to complete this project. Please see paragraph “Extra Time” in your contract.
Owner (your business name here):________________________________________
Accepted this _____________day of________________
By:___________________________________________
By:__________________________________________
Page:__________________of___________________
Disclaimer
This form is provided for informational purposes only, and does not constitute legal advice. You should have a
licensed attorney review any legal documents to ensure that they are adequate for your needs and are valid and in
conformity with any applicable federal, state and local laws and regulations.
c
Your Home Improvement Connection
Copyright 1999-2008, ServiceMagic, Inc. All Rights Reserved
24
Appendix F
Sample Punch List Form
Get matched to 10-point screened pros at www.servicemagic.com
A punch list is a record of all items withing a project that a contractor must correct or complete to the
satisfaction of the homeowner before the job is considered finalized.
Prior to the project closeout and final payments, homeowner and contractor or architect should jointly
conduct a project walk-through to observe all items that need correcting or completing.
All parties understand that when the homeowner agrees that the punch list details itemized below have
been completed to his or her satisfaction, the project is entirely complete and all outstanding payments
are due to the contractor and /or architects.
Punch list items
Date
Approved
Completed list items submitted by:_______________________________________
All punch list items are complete:________________________________________
c
Your Home Improvement Connection
Copyright 1999-2008, ServiceMagic, Inc. All Rights Reserved
25


© Copyright 2026