
Adobe Photoshop Lightroom CC (2015 release
Adobe Photoshop Lightroom CC 2015 release Lightroom 6 Kilian Schönberger CLASSROOM IN A BOOK® The official training workbook from Adobe John Evans & Katrin Straub Adobe Photoshop Lightroom CC 2015 release Lightroom 6 Kilian Schönberger CLASSROOM IN A BOOK® The official training workbook from Adobe John Evans & Katrin Straub Adobe Photoshop Lightroom CC (2015 release) / Lightroom 6 Classroom in a Book © 2015 Adobe Systems Incorporated and its licensors. All rights reserved. If this guide is distributed with software that includes an end user agreement, this guide, as well as the software described in it, is furnished under license and may be used or copied only in accordance with the terms of such license. Except as permitted by any such license, no part of this guide may be reproduced, stored in a retrieval system, or transmitted, in any form or by any means, electronic, mechanical, recording, or otherwise, without the prior written permission of Adobe Systems Incorporated. Please note that the content in this guide is protected under copyright law even if it is not distributed with software that includes an end user license agreement. The content of this guide is furnished for informational use only, is subject to change without notice, and should not be construed as a commitment by Adobe Systems Incorporated. Adobe Systems Incorporated assumes no responsibility or liability for any errors or inaccuracies that may appear in the informational content contained in this guide. Please remember that existing artwork or images that you may want to include in your project may be protected under copyright law. The unauthorized incorporation of such material into your new work could be a violation of the rights of the copyright owner. Please be sure to obtain any permission required from the copyright owner. Any references to company names in sample files are for demonstration purposes only and are not intended to refer to any actual organization. Adobe, the Adobe logo, Acrobat, Adobe Reader, Classroom in a Book, Flash, Illustrator, InDesign, Kuler, Lightroom, Photoshop, and Revel are either registered trademarks or trademarks of Adobe Systems Incorporated in the United States and/or other countries. Apple, Mac, Macintosh, iPhone, iPad, App Store (iOS) and QuickTime are trademarks of Apple, registered in the U.S. and other countries. Microsoft, Windows, Windows NT, and Windows Media Player are trademarks of Microsoft Corporation registered in the U.S. and/or other countries. Android, Google, and Google Play are registered trademarks of Google Inc., used with permission. All other trademarks are the property of their respective owners. Adobe Systems Incorporated, 345 Park Avenue, San Jose, California 95110-2704, USA Notice to U.S. Government End Users. The Software and Documentation are “Commercial Items,” as that term is defined at 48 C.F.R. §2.101, consisting of “Commercial Computer Software” and “Commercial Computer Software Documentation,” as such terms are used in 48 C.F.R. §12.212 or 48 C.F.R. §227.7202, as applicable. Consistent with 48 C.F.R. §12.212 or 48 C.F.R. §§227.7202-1 through 227.7202-4, as applicable, the Commercial Computer Software and Commercial Computer Software Documentation are being licensed to U.S. Government end users (a) only as Commercial Items and (b) with only those rights as are granted to all other end users pursuant to the terms and conditions herein. Unpublished-rights reserved under the copyright laws of the United States. Adobe Systems Incorporated, 345 Park Avenue, San Jose, CA 95110-2704, USA. For U.S. Government End Users, Adobe agrees to comply with all applicable equal opportunity laws including, if appropriate, the provisions of Executive Order 11246, as amended, Section 402 of the Vietnam Era Veterans Readjustment Assistance Act of 1974 (38 USC 4212), and Section 503 of the Rehabilitation Act of 1973, as amended, and the regulations at 41 CFR Parts 60-1 through 60-60, 60-250, and 60-741. The affirmative action clause and regulations contained in the preceding sentence shall be incorporated by reference. Adobe Press books are published by Peachpit, a division of Pearson Education located in San Francisco, California. For the latest on Adobe Press books, go to www.adobepress.com. To report errors, please send a note to [email protected]. For information on getting permission for reprints and excerpts, contact [email protected]. Printed and bound in the United States of America ISBN-13: 978-0-13-392482-4 ISBN-10:0-13-392482-3 9 8 7 6 5 4 3 2 1 CONTENTS GETTING STARTED1 About Classroom in a Book . . . . . . . . . . . . . . . . . . . . . . . . . . . . . 1 What’s new in this edition . . . . . . . . . . . . . . . . . . . . . . . . . . . . . . 2 Prerequisites. . . . . . . . . . . . . . . . . . . . . . . . . . . . . . . . . . . . . . . . . . . 2 Accessing the Classroom in a Book files . . . . . . . . . . . . . . . . . 3 Understanding Lightroom catalog files. . . . . . . . . . . . . . . . . 4 Creating a catalog file for working with this book. . . . . . . 4 Getting ready to go mobile. . . . . . . . . . . . . . . . . . . . . . . . . . . . . 6 Getting help . . . . . . . . . . . . . . . . . . . . . . . . . . . . . . . . . . . . . . . . . . . 7 Additional resources. . . . . . . . . . . . . . . . . . . . . . . . . . . . . . . . . . . 8 1 A QUICK TOUR OF PHOTOSHOP LIGHTROOM10 Understanding how Lightroom works. . . . . . . . . . . . . . . . . 12 About catalog files . . . . . . . . . . . . . . . . . . . . . . . . . . . . . . . . . . . 12 Managing the photos in your catalog . . . . . . . . . . . . . . . . . 12 Managing files and folders. . . . . . . . . . . . . . . . . . . . . . . . . . . . 13 Non-destructive editing. . . . . . . . . . . . . . . . . . . . . . . . . . . . . . 13 Editing photos in another application. . . . . . . . . . . . . . . . . 13 The Lightroom workspace . . . . . . . . . . . . . . . . . . . . . . . . . . . . 14 Customizing the workspace . . . . . . . . . . . . . . . . . . . . . . . . . . 17 The Lightroom modules . . . . . . . . . . . . . . . . . . . . . . . . . . . . . . 18 The Lightroom workflow. . . . . . . . . . . . . . . . . . . . . . . . . . . . . . 18 Importing photos . . . . . . . . . . . . . . . . . . . . . . . . . . . . . . . . . . . . 19 Reviewing and organizing. . . . . . . . . . . . . . . . . . . . . . . . . . . . 20 iv CONTENTS About keywords. . . . . . . . . . . . . . . . . . . . . . . . . . . . . . . . . . . . . . 21 Working in slideshow mode . . . . . . . . . . . . . . . . . . . . . . . . . . 22 Creating a collection . . . . . . . . . . . . . . . . . . . . . . . . . . . . . . . . . 24 Rearranging and deleting images in a collection . . . . . . 25 Comparing photos side by side. . . . . . . . . . . . . . . . . . . . . . . 27 Developing and editing . . . . . . . . . . . . . . . . . . . . . . . . . . . . . . 30 Using Quick Develop in the Library module . . . . . . . . . . . 30 Working in the Develop module . . . . . . . . . . . . . . . . . . . . . . 32 Straightening and cropping an image. . . . . . . . . . . . . . . . . 34 Adjusting lighting and tonal balance. . . . . . . . . . . . . . . . . . 35 Creating effects with the Radial Filter tool. . . . . . . . . . . . . 37 Sharing your work by e-mail. . . . . . . . . . . . . . . . . . . . . . . . . . 41 Review. . . . . . . . . . . . . . . . . . . . . . . . . . . . . . . . . . . . . . . . . . . . . . . 43 2 BRINGING YOUR PHOTOS INTO LIGHTROOM 44 The import process. . . . . . . . . . . . . . . . . . . . . . . . . . . . . . . . . . . 46 Importing photos from a digital camera. . . . . . . . . . . . . . . 47 Organizing your copied photos in folders . . . . . . . . . . . . . 51 About file formats. . . . . . . . . . . . . . . . . . . . . . . . . . . . . . . . . . . . 53 Creating import presets . . . . . . . . . . . . . . . . . . . . . . . . . . . . . . 54 Backup strategies . . . . . . . . . . . . . . . . . . . . . . . . . . . . . . . . . . . . 55 Renaming files as they are imported . . . . . . . . . . . . . . . . . . 55 Importing images from a hard disk. . . . . . . . . . . . . . . . . . . . 57 Applying metadata. . . . . . . . . . . . . . . . . . . . . . . . . . . . . . . . . . . 60 Importing via drag and drop. . . . . . . . . . . . . . . . . . . . . . . . . . 62 Evaluating photos before importing . . . . . . . . . . . . . . . . . . 63 Importing and viewing video. . . . . . . . . . . . . . . . . . . . . . . . . 65 Importing to a specific folder . . . . . . . . . . . . . . . . . . . . . . . . . 65 ADOBE PHOTOSHOP LIGHTROOM CC (2015 RELEASE) / LIGHTROOM 6 CLASSROOM IN A BOOK v Importing from other catalogs. . . . . . . . . . . . . . . . . . . . . . . . 66 Importing photos from other applications . . . . . . . . . . . . 69 Importing from a watched folder . . . . . . . . . . . . . . . . . . . . . 70 Specifying initial previews when importing . . . . . . . . . . . 71 Tethered shooting. . . . . . . . . . . . . . . . . . . . . . . . . . . . . . . . . . . . 72 Working with the main display area. . . . . . . . . . . . . . . . . . . 75 Setting Grid and Loupe view options. . . . . . . . . . . . . . . . . . 76 Review. . . . . . . . . . . . . . . . . . . . . . . . . . . . . . . . . . . . . . . . . . . . . . . 79 3 EXPLORING THE LIGHTROOM WORKSPACE 80 Importing images into the library. . . . . . . . . . . . . . . . . . . . . 82 Viewing and managing your images . . . . . . . . . . . . . . . . . . 84 Resizing panels. . . . . . . . . . . . . . . . . . . . . . . . . . . . . . . . . . . . . . . 85 Showing and hiding panels or panel groups. . . . . . . . . . . 86 Expanding and collapsing panels . . . . . . . . . . . . . . . . . . . . . 88 Hiding and showing panels. . . . . . . . . . . . . . . . . . . . . . . . . . . 90 Toggling screen modes. . . . . . . . . . . . . . . . . . . . . . . . . . . . . . . 91 Switching views. . . . . . . . . . . . . . . . . . . . . . . . . . . . . . . . . . . . . . 92 Working in Loupe view . . . . . . . . . . . . . . . . . . . . . . . . . . . . . . . 93 Using the Loupe view overlays. . . . . . . . . . . . . . . . . . . . . . . . 95 Comparing photos . . . . . . . . . . . . . . . . . . . . . . . . . . . . . . . . . . . 97 Using Survey view to narrow a selection . . . . . . . . . . . . . . 99 Flagging and deleting images . . . . . . . . . . . . . . . . . . . . . . . 100 Grouping images in the Quick Collection . . . . . . . . . . . . 102 Moving images into or out of the Quick Collection . . . 102 Converting and clearing the Quick Collection . . . . . . . . 103 Designating a target collection . . . . . . . . . . . . . . . . . . . . . . 104 Working with the Filmstrip. . . . . . . . . . . . . . . . . . . . . . . . . . . 105 Hiding the Filmstrip and adjusting its size. . . . . . . . . . . . 105 Using filters in the Filmstrip. . . . . . . . . . . . . . . . . . . . . . . . . . 106 vi CONTENTS Changing the sorting order of the thumbnails. . . . . . . . 107 Using a secondary display . . . . . . . . . . . . . . . . . . . . . . . . . . . 109 Review. . . . . . . . . . . . . . . . . . . . . . . . . . . . . . . . . . . . . . . . . . . . . . 113 PHOTOGRAPHY SHOWCASE: JOHN BATDORFF 4 MANAGING YOUR PHOTO LIBRARY 114 118 Organizing folders. . . . . . . . . . . . . . . . . . . . . . . . . . . . . . . . . . .122 Synchronizing folders . . . . . . . . . . . . . . . . . . . . . . . . . . . . . . . 124 Using collections to organize images. . . . . . . . . . . . . . . . .125 The Quick Collection. . . . . . . . . . . . . . . . . . . . . . . . . . . . . . . . 126 Smart collections. . . . . . . . . . . . . . . . . . . . . . . . . . . . . . . . . . . . 127 Getting started with Lightroom mobile . . . . . . . . . . . . . . 128 Stacking images . . . . . . . . . . . . . . . . . . . . . . . . . . . . . . . . . . . . 131 Applying keyword tags. . . . . . . . . . . . . . . . . . . . . . . . . . . . . . 132 Searching by keywords. . . . . . . . . . . . . . . . . . . . . . . . . . . . . . 135 Using flags and ratings . . . . . . . . . . . . . . . . . . . . . . . . . . . . . . 137 Working with color labels. . . . . . . . . . . . . . . . . . . . . . . . . . . . 140 Adding metadata. . . . . . . . . . . . . . . . . . . . . . . . . . . . . . . . . . . . 141 Storage of metadata. . . . . . . . . . . . . . . . . . . . . . . . . . . . . . . . . 142 Tagging faces in the People view. . . . . . . . . . . . . . . . . . . . . 143 Working in the Map module. . . . . . . . . . . . . . . . . . . . . . . . . 146 Using the Painter tool . . . . . . . . . . . . . . . . . . . . . . . . . . . . . . . 152 Finding and filtering files . . . . . . . . . . . . . . . . . . . . . . . . . . . . 153 Reconnecting missing files and folders. . . . . . . . . . . . . . . 156 Review. . . . . . . . . . . . . . . . . . . . . . . . . . . . . . . . . . . . . . . . . . . . . . 159 PHOTOGRAPHY SHOWCASE: COLBY BROWN 160 ADOBE PHOTOSHOP LIGHTROOM CC (2015 RELEASE) / LIGHTROOM 6 CLASSROOM IN A BOOK vii 5 DEVELOPING BASICS 164 Quick developing in the Library module . . . . . . . . . . . . . 168 Quick and easy video editing . . . . . . . . . . . . . . . . . . . . . . . . 170 Previews in a nutshell . . . . . . . . . . . . . . . . . . . . . . . . . . . . . . . 172 Understanding process versions . . . . . . . . . . . . . . . . . . . . . 173 About white balance . . . . . . . . . . . . . . . . . . . . . . . . . . . . . . . . 175 The Develop module . . . . . . . . . . . . . . . . . . . . . . . . . . . . . . . . 177 Cropping and rotating images. . . . . . . . . . . . . . . . . . . . . . . 178 Removing unwanted objects . . . . . . . . . . . . . . . . . . . . . . . . 181 Retouching spots . . . . . . . . . . . . . . . . . . . . . . . . . . . . . . . . . . . 184 Fixing flash effects in pets’ eyes . . . . . . . . . . . . . . . . . . . . . . 187 Editing photos in Lightroom mobile . . . . . . . . . . . . . . . . . 188 Review. . . . . . . . . . . . . . . . . . . . . . . . . . . . . . . . . . . . . . . . . . . . . . 191 PHOTOGRAPHY SHOWCASE: CHRIS ORWIG 6 ADVANCED EDITING 192 196 Correcting color balance and tonal range . . . . . . . . . . . . 199 Undoing, redoing, and remembering changes . . . . . . . 201 Getting more from the Before & After view. . . . . . . . . . . 201 Working with the Tone controls. . . . . . . . . . . . . . . . . . . . . . 202 Beyond the Basic panel. . . . . . . . . . . . . . . . . . . . . . . . . . . . . . 205 Adjusting contrast using the tone curve. . . . . . . . . . . . . . 205 Making local corrections. . . . . . . . . . . . . . . . . . . . . . . . . . . . . 209 Using the Graduated Filter tool . . . . . . . . . . . . . . . . . . . . . . 209 Using the Adjustment Brush tool. . . . . . . . . . . . . . . . . . . . . 211 Making discrete color adjustments. . . . . . . . . . . . . . . . . . . 212 Adjusting colors selectively. . . . . . . . . . . . . . . . . . . . . . . . . . 213 Converting an image to black and white . . . . . . . . . . . . . 215 Split toning . . . . . . . . . . . . . . . . . . . . . . . . . . . . . . . . . . . . . . . . . 216 viii CONTENTS Synchronizing settings . . . . . . . . . . . . . . . . . . . . . . . . . . . . . . 217 Removing camera-generated image artifacts. . . . . . . . . 218 Correcting perspective effects automatically . . . . . . . . . 220 Sharpening detail and reducing noise. . . . . . . . . . . . . . . . 221 Adding effects. . . . . . . . . . . . . . . . . . . . . . . . . . . . . . . . . . . . . . . 222 Creating your own developing presets. . . . . . . . . . . . . . . 223 Working with virtual copies. . . . . . . . . . . . . . . . . . . . . . . . . . 224 Combining photos as a panorama . . . . . . . . . . . . . . . . . . . 226 Merging photos into an HDR image. . . . . . . . . . . . . . . . . . 227 Review. . . . . . . . . . . . . . . . . . . . . . . . . . . . . . . . . . . . . . . . . . . . . . 229 PHOTOGRAPHY SHOWCASE: CARSTEN SCHAEL 7 CREATING A PHOTO BOOK 230 234 Assembling photos for a book . . . . . . . . . . . . . . . . . . . . . . . 238 Working in the Book module . . . . . . . . . . . . . . . . . . . . . . . . 238 Setting up a photo book. . . . . . . . . . . . . . . . . . . . . . . . . . . . . 239 Changing page layouts. . . . . . . . . . . . . . . . . . . . . . . . . . . . . . 240 Adding page numbers to a photo book . . . . . . . . . . . . . . 242 Placing photos in a book layout. . . . . . . . . . . . . . . . . . . . . . 242 Changing the images in a photo book . . . . . . . . . . . . . . . 243 Working with photo cells. . . . . . . . . . . . . . . . . . . . . . . . . . . . 244 Setting a page background. . . . . . . . . . . . . . . . . . . . . . . . . . 246 Adding text to a photo book. . . . . . . . . . . . . . . . . . . . . . . . . 247 Saving and re-using custom book page layouts . . . . . . 252 Creating a saved book. . . . . . . . . . . . . . . . . . . . . . . . . . . . . . . 252 Exporting a photo book . . . . . . . . . . . . . . . . . . . . . . . . . . . . . 253 Review. . . . . . . . . . . . . . . . . . . . . . . . . . . . . . . . . . . . . . . . . . . . . . 255 PHOTOGRAPHY SHOWCASE: MICHAEL CLARK 256 ADOBE PHOTOSHOP LIGHTROOM CC (2015 RELEASE) / LIGHTROOM 6 CLASSROOM IN A BOOK ix 8 CREATING A SLIDESHOW 260 Assembling photos for a slideshow . . . . . . . . . . . . . . . . . . 264 Working in the Slideshow module . . . . . . . . . . . . . . . . . . . 265 Choosing a slideshow template. . . . . . . . . . . . . . . . . . . . . . 266 Customizing your slideshow template . . . . . . . . . . . . . . . 267 Adjusting the slide layout. . . . . . . . . . . . . . . . . . . . . . . . . . . . 267 Setting up the slide background. . . . . . . . . . . . . . . . . . . . . 268 Adjusting stroke borders and shadows. . . . . . . . . . . . . . . 269 Adding a text overlay. . . . . . . . . . . . . . . . . . . . . . . . . . . . . . . . 270 Creating a Saved Slideshow. . . . . . . . . . . . . . . . . . . . . . . . . . 273 Refining the content of a slideshow. . . . . . . . . . . . . . . . . . 274 Adding sound and motion to your slideshow. . . . . . . . . 275 Saving a customized slideshow template. . . . . . . . . . . . . 276 Exporting a slideshow. . . . . . . . . . . . . . . . . . . . . . . . . . . . . . . 279 Playing an impromptu slideshow . . . . . . . . . . . . . . . . . . . . 280 Review. . . . . . . . . . . . . . . . . . . . . . . . . . . . . . . . . . . . . . . . . . . . . . 281 PHOTOGRAPHY SHOWCASE: NICOLE YOUNG 9 PRINTING IMAGES 282 286 About the Lightroom Print module. . . . . . . . . . . . . . . . . . 290 Selecting a print template . . . . . . . . . . . . . . . . . . . . . . . . . . . 294 Specifying the printer and paper size . . . . . . . . . . . . . . . . 294 Customizing print templates. . . . . . . . . . . . . . . . . . . . . . . . . 295 Rearranging the photos in a print layout . . . . . . . . . . . . . 298 Creating stroke and photo borders. . . . . . . . . . . . . . . . . . . 299 Using the Rotate To Fit option . . . . . . . . . . . . . . . . . . . . . . . 300 Customizing your identity plate. . . . . . . . . . . . . . . . . . . . . . 301 Printing captions and metadata information . . . . . . . . . 302 Saving your customized print template . . . . . . . . . . . . . . 304 x CONTENTS Creating a Custom Package print layout. . . . . . . . . . . . . . 305 Changing the page background color. . . . . . . . . . . . . . . . 307 Soft proofing photos before printing. . . . . . . . . . . . . . . . . 308 Configuring the output settings . . . . . . . . . . . . . . . . . . . . . 310 Using color management. . . . . . . . . . . . . . . . . . . . . . . . . . . . 311 Tweaking printed color manually . . . . . . . . . . . . . . . . . . . . 313 Saving print settings as an output collection . . . . . . . . . 314 Printing your job . . . . . . . . . . . . . . . . . . . . . . . . . . . . . . . . . . . . 315 Review. . . . . . . . . . . . . . . . . . . . . . . . . . . . . . . . . . . . . . . . . . . . . . 316 PHOTOGRAPHY SHOWCASE: SETH RESNICK 318 10 PUBLISHING YOUR PHOTOS322 Publishing photos from the Library . . . . . . . . . . . . . . . . . . 326 Publishing photos to Flickr . . . . . . . . . . . . . . . . . . . . . . . . . . 327 Publishing photo comments. . . . . . . . . . . . . . . . . . . . . . . . . 328 Republishing a photo . . . . . . . . . . . . . . . . . . . . . . . . . . . . . . . 329 Sharing images to Facebook. . . . . . . . . . . . . . . . . . . . . . . . . 332 Sharing work in progress on Behance. . . . . . . . . . . . . . . . 334 Publishing photos to your hard disk. . . . . . . . . . . . . . . . . . 334 Sharing from Lightroom mobile . . . . . . . . . . . . . . . . . . . . . 336 The Lightroom Web module . . . . . . . . . . . . . . . . . . . . . . . . . 339 Assembling photos for an online gallery . . . . . . . . . . . . . 340 Choosing a template in the Web module. . . . . . . . . . . . . 342 Customizing your web gallery . . . . . . . . . . . . . . . . . . . . . . . 346 Working with identity plates . . . . . . . . . . . . . . . . . . . . . . . . 347 Working with Site Info text . . . . . . . . . . . . . . . . . . . . . . . . . . 348 Changing colors. . . . . . . . . . . . . . . . . . . . . . . . . . . . . . . . . . . . . 349 Adding information about your photos . . . . . . . . . . . . . . 351 Specifying output settings. . . . . . . . . . . . . . . . . . . . . . . . . . . 352 ADOBE PHOTOSHOP LIGHTROOM CC (2015 RELEASE) / LIGHTROOM 6 CLASSROOM IN A BOOK xi Watermarking images. . . . . . . . . . . . . . . . . . . . . . . . . . . . . . . 352 Previewing the gallery. . . . . . . . . . . . . . . . . . . . . . . . . . . . . . . 355 Saving your custom template. . . . . . . . . . . . . . . . . . . . . . . . 357 Creating a Saved Web Gallery. . . . . . . . . . . . . . . . . . . . . . . . 357 Exporting your gallery. . . . . . . . . . . . . . . . . . . . . . . . . . . . . . . 358 Uploading your gallery to a web server . . . . . . . . . . . . . . 359 Review. . . . . . . . . . . . . . . . . . . . . . . . . . . . . . . . . . . . . . . . . . . . . . 361 11 MAKING BACKUPS AND EXPORTING PHOTOS 362 Preventing data loss. . . . . . . . . . . . . . . . . . . . . . . . . . . . . . . . . 366 Backing up the catalog file. . . . . . . . . . . . . . . . . . . . . . . . . . . 366 Exporting metadata. . . . . . . . . . . . . . . . . . . . . . . . . . . . . . . . . 368 Backing up the library. . . . . . . . . . . . . . . . . . . . . . . . . . . . . . . 370 Doing incremental backups . . . . . . . . . . . . . . . . . . . . . . . . . 372 Exporting photos . . . . . . . . . . . . . . . . . . . . . . . . . . . . . . . . . . . 373 Exporting JPEG files for on-screen viewing . . . . . . . . . . . 373 Using export plug-ins . . . . . . . . . . . . . . . . . . . . . . . . . . . . . . . 375 Exporting as PSD or TIFF for further editing . . . . . . . . . . 376 Exporting as Original or DNG for archiving . . . . . . . . . . . 378 Using export presets . . . . . . . . . . . . . . . . . . . . . . . . . . . . . . . . 379 Setting up post-processing actions . . . . . . . . . . . . . . . . . . 381 Creating user presets. . . . . . . . . . . . . . . . . . . . . . . . . . . . . . . . 382 Review. . . . . . . . . . . . . . . . . . . . . . . . . . . . . . . . . . . . . . . . . . . . . . 383 INDEX xii CONTENTS 385 GETTING STARTED Adobe® Photoshop® Lightroom® delivers a complete workflow solution for the digital photographer—from importing, reviewing, organizing, and enhancing images to publishing photos, producing client presentations, creating photo books and web galleries, and outputting high-quality prints. The user interface is highly intuitive and easy to learn, yet Lightroom has all the power and versatility you’d expect from an Adobe application, using stateof-the-art technologies to manage large volumes of digital photographs and to perform sophisticated image processing tasks. Whether you’re a home user, a professional photographer, a hobbyist, or a business user, Lightroom enables you to stay in control of your growing photo library and to easily produce good-looking pictures and polished presentations for both web and print. About Classroom in a Book Adobe Photoshop Lightroom CC (2015 release) / Lightroom 6 Classroom in a Book is part of the official training series for Adobe graphics and publishing software developed with the support of Adobe product experts. Each lesson in this book consists of a series of self-paced projects that give you hands-on experience using Adobe Photoshop Lightroom CC / Lightroom 6. If you’re new to Lightroom, you’ll learn the fundamental concepts and skills that will help you master the application; if you’ve used earlier versions of Lightroom, you’ll find that this Classroom in a Book® teaches advanced tips and techniques, and covers the many innovative features that Adobe Systems has introduced in the latest version. ADOBE PHOTOSHOP LIGHTROOM CC (2015 RELEASE) / LIGHTROOM 6 CLASSROOM IN A BOOK 1 What’s new in this edition This edition covers many new features in Adobe Photoshop Lightroom CC / Lightroom 6, such as panoramic and HDR (High Dynamic Range) merging, face tagging, and pan and zoom effects to add motion to your Lightroom slideshows. You’ll also discover enhancements to many of your favorite tools, including automatic straightening, a new Pet Eye mode for the Red Eye Correction tool, a freehand brush for adding to and subtracting from gradient and radial filters, and many exciting new, up-to-date template designs for your web galleries. You’ll learn new techniques for removing unwanted objects with the enhanced Spot Removal tool, how to attach multiple sound files to a slideshow and synch the timing to the music, and how you can take advantage of Lightroom mobile to edit, share, and collaborate on your photos, wherever you go. This edition also includes inspirational showcases of seven guest photographers. Prerequisites Before starting on the lessons in this book, make sure that you and your computer are ready by following the tips and instructions on the next few pages. Requirements on your computer You’ll need about 500 MB of free space on your hard disk for the downloaded lesson files (see Accessing the Classroom in a Book files on the facing page) and the work files that you’ll create as you work through the exercises. Required skills The lessons in this book assume that you have a working knowledge of your computer and its operating system. Make sure that you know how to use the mouse and the standard menus and commands, and also how to open, save, and close files. Can you scroll (vertically and horizontally) within a window to see content that may not be visible in the displayed area? Do you know how to use context menus, which open when you right-click (Windows) / Control-click (Mac OS) items? If you need to review these basic and generic computer skills, see the documentation included with your Microsoft® Windows® or Apple® Mac® OS X software. 2 GETTING STARTED Installing Adobe Photoshop Lightroom Before you begin the lessons in Adobe Photoshop Lightroom CC / Lightroom 6 Classroom in a Book, make sure that your system is set up correctly and that you’ve installed the required software and hardware. You must purchase the Adobe Photoshop Lightroom CC / Lightroom 6 software separately. For system requirements and detailed instructions for downloading, installing, and setting up, see the topics listed on the System Requirements and Release Notes links under Get Support at https://helpx.adobe.com/lightroom.html. Accessing the Classroom in a Book files In order to work through the exercises in this book, you’ll need to download the sample image files and other resources from your Account page at peachpit.com. You can either download the entire Lessons folder before you begin, or download the files for individual lessons as you need them. Your Account page is also where you’ll find any updates to the lessons or work files. Check on the Lesson & Update Files tab for the most current content. Downloading the Lesson files 1 Go to www.peachpit.com/redeem, and enter the code found at the back of this book. If you don’t yet have a Peachpit.com account, follow the prompts to create one. 2 Click the Lesson & Update Files tab on your Account page to see a list of downloadable files. Click the links to download either the entire Lessons folder or the work folders for individual lessons to your computer; then, unzip the downloaded files. 3 Create a new folder named LRCIB inside the username/My Documents (Windows) or username/Documents (Mac OS) folder on your computer. 4 If you downloaded the entire Lessons folder, drag the downloaded folder into the LRCIB folder on your hard disk. If you downloaded the work folder for an individual lesson, first create a Lessons folder inside the LRCIB folder; then, drag the downloaded folder to your LRCIB/Lessons folder. The lesson images you’ve downloaded won’t appear in Lightroom until you’ve imported them into the library catalog file. In the following pages, you’ll set up a dedicated catalog for working with this book; then, you’ll import the first set of lesson files into your work catalog in the section “Importing photos,” after the introductory overview in Lesson 1. Until then, your work library will remain empty. Note: The down- loadable sample images are practice files, provided for your personal use in these lessons. You are not authorized to use these files commercially, or to publish or distribute them in any form without written permission from Adobe Systems, Inc. and the individual photographers who took the pictures, or other copyright holders. ADOBE PHOTOSHOP LIGHTROOM CC (2015 RELEASE) / LIGHTROOM 6 CLASSROOM IN A BOOK 3 Understanding Lightroom catalog files The catalog file stores information about all the photos in your library. It includes the location of the master files, any metadata you’ve added in the process of organizing your images, and a record of every adjustment or edit you’ve made. Most users will keep all their photos in a single catalog, which can easily manage thousands of files. Some might want to create separate catalogs for different purposes, such as home photos and business photos. Although you can create multiple catalogs, you can only have one catalog open in Lightroom at a time. For the purposes of working with this book, you’ll create a new catalog to manage the image files that you’ll use in the lessons. This will allow you to leave the default catalog untouched while working through the lessons, and to keep your lesson files together in one easy-to-remember location. Creating a catalog file for working with this book When you first launch Lightroom, a catalog file named Lightroom Catalog.lrcat is automatically created on your hard disk. This default catalog file is created inside the folder username/My Documents/My Pictures/Lightroom (on Windows) or username/Pictures/Lightroom (on Mac OS). You’ll create your new work catalog file inside your LRCIB folder, right beside the Lessons folder containing your downloaded work files. 1 Launch Lightroom. �Note: In this book, the forward arrow character (>) is used to denote submenus and commands found in the menu bar at the top of the workspace or in context menus; for example, Menu > Submenu > Command. 4 GETTING STARTED 2 From the Lightroom menu bar, choose File > New Catalog. 3 In the Create Folder With New Catalog dialog box, navigate to the LRCIB folder you created on your hard disk. 4Type LRCIB Catalog in the File Name text box on Windows, or the Save As text box on Mac OS; then, click Save (Windows) or Create (Mac OS). 5 If you see a notification about backing up the current catalog before loading your new catalog, choose your preferred option to dismiss the message. In order to be sure that you’re always aware of which catalog you’re working with as you progress through the exercises in this book, you will now set the preferences so that you’ll be prompted to specify the LRCIB catalog each time you launch Lightroom. It is recommended that you keep this preference set as long as you’re working through the lessons in this book. 6 Choose Edit > Preferences (Windows) / Lightroom > Preferences (Mac OS). 7 In the Preferences dialog box, click the General tab. From the Default Catalog menu, choose Prompt Me When Starting Lightroom. 8 Click OK (Windows) / the Close button ( dialog box. Note: In the remainder of this book, instructions that differ for Macintosh users and those working on Windows systems are given in a compact format as follows; the forward slash character ( / ) is used to separate equivalent terms and commands for Windows / Mac OS, in the order shown here. ) (Mac OS) to close the Preferences Next time you start Lightroom the Select Catalog dialog box will appear, giving you the opportunity to make sure that your LRCIB Catalog is selected before Lightroom launches. E Tip: Even if you’ve set Lightroom to load the most recent catalog by default, you can open the Select Catalog dialog box by holding down the Clrl+Alt / Control+Option keys immediately after you launch Lightroom. ADOBE PHOTOSHOP LIGHTROOM CC (2015 RELEASE) / LIGHTROOM 6 CLASSROOM IN A BOOK 5 Getting ready to go mobile Adobe Photoshop Lightroom CC / Lightroom 6 is fully integrated with Lightroom mobile, a cloud-based subscription service that enables you to sync photo collections between your desktop computer and a companion app on your mobile device, so you can review, organize, share, and even edit your photos anywhere, anytime. Whether you’re working in Lightroom on your desktop or on your handheld device, any modifications made to a synced collection or the photos it contains will be updated on the other device. Lightroom mobile syncs high resolution Smart Previews to your mobile device, rather than your original photos. At a small fraction of the original file size, these Smart Previews won’t take long to sync, or use up all your storage space, which means that you can even work with raw images while you’re away from your desktop computer. Edits you make on the mobile device are synced back to the full-size originals in your Lightroom catalog as needed. Photos captured on your handheld device and added to a synced Collection are downloaded to your desktop at their full file size. You can share your photos from Lightroom mobile via Lightroom web. 1 The first step is to download and install Lightroom on your mobile device. You can download the app free from iTunes or the Apple App Store (for iPad and iPhone), or from Google play (for Android), on a 30 day trial basis; then, choose a subscription plan later. 2 Once you’ve installed Lightroom on your handheld device, see the section “Taking your collections on the road” in Lesson 4, “Managing Your Photo Library” for details on getting started with Lightroom mobile. Editing photos in Lightroom mobile is covered in Lesson 5, “Developing Basics.” Sharing collections from Lightroom mobile via Lightroom web is explained in Lesson 10, “Publishing Your Photos.” When your 30-day free trial ends, subscription to Lightroom mobile is free with either a full Creative Cloud subscription, or the Photography Bundle. For subscription details, go to https://creative.adobe.com/plans. 6 GETTING STARTED Getting help Help is available from several sources, each one useful to you in different circumstances: Module-specific tips The first time you enter any of the Lightroom modules, you’ll see module-specific tips that will help you get started by identifying the components of the Lightroom workspace and stepping you through the workflow. You can dismiss the tips if you wish, by clicking the Close button (x) in the upper right corner of the floating tips window. Click the Turn Off Tips checkbox at the lower left to disable the tips for all of the Lightroom modules. You can call up the module tips at any time by choosing Help > [Module name] Tips. In the Help menu you can also access a list of keyboard shortcuts applicable to the current module. Navigating Help in the application The complete user documentation for Adobe Photoshop Lightroom is available from the Help menu. 1 Choose Help > Lightroom Help, or press the F1 key on your keyboard. Lightroom takes you to the online Help landing page. To search for a particular topic in the online Help, use the search bar in the left pane. Enter a search term and press Enter/Return. Note: You need to be connected to the Internet to view Help in Lightroom. 2 For quick access to Help documentation specific to the module in which you are working, press Ctrl+Alt+/ on Windows, or Command+Option+/ on Mac OS. 3 Press Ctrl+/ on Windows, or Command+/ on Mac OS to see a list of keyboard shortcuts for the current module. ADOBE PHOTOSHOP LIGHTROOM CC (2015 RELEASE) / LIGHTROOM 6 CLASSROOM IN A BOOK 7 Accessing Help and Support on the web You can access Lightroom Help, tutorials, support, and other useful resources on the web, even if Lightroom is not currently running. • If Lightroom is currently running, choose Help > Lightroom Online. • If Lightroom is not currently running, point your default web browser to https://helpx.adobe.com/lightroom.html where you can find and browse Lightroom content on adobe.com. Downloading the Lightroom Help PDF Help is also available as a PDF document, optimized for printing, which is helpful for those times when you’re not connected to the internet. You can download the Help PDF at: https://helpx.adobe.com/pdf/lightroom_reference.pdf. Additional resources Adobe Photoshop Lightroom CC / Lightroom 6 Classroom in a Book is not intended to replace the documentation that comes with the application, or to be a comprehensive reference for every feature. Only the commands and options used in the lessons are explained in this book. For comprehensive information about program features and tutorials, please refer to these resources: Adobe Photoshop Lightroom CC / Lightroom 6 Help and Support You can search and browse Help and Support content from Adobe at https://helpx.adobe.com/lightroom/topics.html. Adobe Forums Tap into peer-to-peer discussions, advice, and questions and answers on Adobe products at https://forums.adobe.com/welcome Adobe Creative Cloud Learn For inspiration, key techniques, cross-product workflows, and updates on new features, go to https://helpx.adobe.com/lightroom/tutorials.html Resources for educators You’ll find three free curriculums that use an integrated approach to teaching Adobe software, as well as associated study guides that can be used to prepare for the Adobe Certified Associate exams at www.adobe.com/education/certification-programs.edu.html 8 GETTING STARTED Adobe Photoshop Lightroom CC / Lightroom 6 product home page www.adobe.com/products/photoshop-lightroom.html Adobe Inspire http://inspire.adobe.com offers articles on design and design issues, a gallery showcasing the work of top-notch designers, tutorials, and more. ADOBE PHOTOSHOP LIGHTROOM CC (2015 RELEASE) / LIGHTROOM 6 CLASSROOM IN A BOOK 9 4 MANAGING YOUR PHOTO LIBRARY Lesson overview As your photo library grows larger, it will become increasingly important to organize your files so that they can be easily found. Lightroom offers options for organizing your images before you even click the Import button—and even more once they’re in your catalog. Manage your folders and files without leaving the Library module; then apply keywords, flags, ratings, and labels, and group your photos in convenient collections, regardless of where they’re stored. This lesson will familiarize you with the tools and techniques you’ll use to organize, manage, and search your photo library: • Creating a folder structure • Moving files and synchronizing folders • Understanding Collections • Working with keywords, flags, ratings, and labels • Tagging faces in the People view • Organizing images by location in the Map module • Editing Metadata and using the Painter tool • Finding and filtering files You’ll probably need between one and two hours to complete this lesson. If you haven’t already done so, download the Lesson 4 work files from the Lesson & Update Files tab on your Account page at www.peachpit.com. 118 Lightroom delivers powerful, versatile tools to help you organize your image library. Use people tags, keywords, flags, labels, ratings, and even GPS location data to sort your images, and group them into virtual collections by any association you choose. Make fast, sophisticated searches, based on practically limitless combinations of criteria, that will put the photos you want at your fingertips, right when you need them. 119 Getting started Note: This lesson assumes that you already have a basic working familiarity with the Lightroom workspace. If you find that you need more background information, refer to Lightroom Help, or review the previous lessons. Before you start on this lesson, make sure you’ve set up the LRCIB folder for your lesson files and created the LRCIB Catalog file to manage them, as described in the sections “Downloading the Lesson files” and “Creating a catalog file for working with this book” in the Getting Started chapter at the start of this book. If you haven’t already done so, download the Lesson 4 folder and the Lesson 4 GPS folder from your Account page at www.peachpit.com to the LRCIB/Lessons folder, as detailed in the section “Accessing the Classroom in a Book files” in the chapter “Getting Started.” 1 Start Lightroom. 2 In the Adobe Photoshop Lightroom - Select Catalog dialog box, make sure the file LRCIB Catalog.lrcat is selected under Select A Recent Catalog To Open, and then click Open. E Tip: The first time you enter any of the Lightroom modules, you’ll see module tips that will help you get started by identifying the components of the Lightroom workspace and stepping you through the workflow. Dismiss the tips by clicking the Close button. To reactivate the tips for any module, choose [Module name] Tips from the Help menu. 120 3 Lightroom will open in the screen mode and workspace module that were active when you last quit. If necessary, switch to the Library module by clicking Library in the Module Picker at the top of the workspace. Importing images into the library The first step is to import the images for this lesson into the Lightroom library. 1 In the Library module, click the Import button below the left panel group. LESSON 4 Managing Your Photo Library 2 If the Import dialog box appears in compact mode, click the Show More Options button at the lower left of the dialog box to see all the options in the expanded Import dialog box. 3 Under Source at the left of the expanded Import dialog box, navigate to and select the LRCIB > Lessons > Lesson 4 folder. Ensure that all twelve images in the Lesson 4 folder are checked for import. 4 In the import options picker above the thumbnail previews, select Add so that the imported photos will be added to your catalog without being moved or copied. Under File Handling at the right of the Import dialog box, choose Minimal from the Build Previews menu and ensure that the Don’t Import Suspected Duplicates option is activated. Under Apply During Import, choose None from both the Develop Settings menu and the Metadata menu, and type Lesson 4, Europe in the Keywords text box. Make sure that your import is set up as shown in the illustration below, and then click Import. The twelve images are imported from the Lesson 4 folder and now appear in both the Grid view of the Library module and in the Filmstrip across the bottom of the Lightroom workspace. ADOBE PHOTOSHOP LIGHTROOM CC (2015 RELEASE) / LIGHTROOM 6 CLASSROOM IN A BOOK 121 Organizing folders Each time you import an image, Lightroom creates a new catalog entry to record the file’s address and lists the folder in which it is stored—and the volume that contains that folder—in the Folders panel in the left panel group. In the Folders panel, you can organize your photo library at the most basic level by rearranging files and folders on your hard disk without ever leaving the Lightroom workspace; you can create or delete folders at the click of a button and move files and folders by simply dragging them. When you use the Folders panel to move a photo between folders, Lightroom will delete the image file from its original location and update the library catalog with the file’s new address. Lightroom maintains a single catalog entry for each photo you import, so a master image cannot be duplicated in separate folders or added to the catalog twice. Creating subfolders In this exercise you’ll use the Folders panel to begin organizing the photos in the Lesson 4 folder into categories by separating them into subfolders. You’ll use two methods of creating a subfolder. 1 Click the Lesson 4 folder in the Folders panel; then, Ctrl-click / Command-click to select the four images of the Eiffel Tower in the Grid view. 2 In the Folders panel header, click the Create New Folder button ( ) and choose Add Subfolder from the menu. Make sure the Show Photos In Subfolders option is activated. 3 In the Create Folder dialog box, type Architecture as the name for the new subfolder, activate the option Include Selected Photos, and then click Create. 122 LESSON 4 Managing Your Photo Library 4 In the Folders panel, expand the Lesson 4 folder to see the Architecture folder nested inside. The image count for the new subfolder shows that it contains the four images that you selected in step 1. 5 With the Lesson 4 folder still selected in the Folders panel, select the remaining eight images. 6 Right-click / Control-click the Lesson 4 folder and choose Create Folder inside “Lesson 4” from the context menu. Type Vacation as the folder name, activate the Include Selected Photos option, and then click Create. Click the Vacation subfolder to see the eight images you selected in step 5. Making changes to a folder’s content When you rearrange files and folders in the Folders panel the changes are also made on your hard disk. Inversely, the Folders panel needs to be updated to reflect any changes you make to the location, name, or contents of a folder from outside the Lightroom workspace. In this exercise you’ll experience this first hand by deleting an image in Windows Explorer / the Finder. 1 Click the Lesson 4 folder in the Folders panel. Right-click / Ctrl-click any of the photos of the Eiffel Tower in the Grid view or the Filmstrip, and then choose Show In Explorer /Show In Finder from the context menu. E Tip: To rename a folder in the Folders panel, right-click / Control-click its name and choose Rename from the context menu. Be aware that when you rename a folder in the Folders panel, the change affects the folder on the hard disk. ADOBE PHOTOSHOP LIGHTROOM CC (2015 RELEASE) / LIGHTROOM 6 CLASSROOM IN A BOOK 123 2 The Explorer / Finder window opens. Note the Architecture and Vacation subfolders inside the Lesson 4 folder. Right-click / Ctrl-click the image file DSC_3899.jpg inside the Lesson 4 folder and choose Delete / Move To Trash from the context menu. 3 Switch back to Lightroom. In the Grid view, note that the thumbnail of the image that you deleted in the Explorer / Finder window now has an alert badge in the upper right corner of its grid cell. This indicates that there is still an entry for the image in the library catalog but the link to the original file is broken. When the image is selected, the missing photo alert also appears below the Histogram. 4 Click the missing photo badge. A dialog box opens offering you the option to locate the missing file and reestablish its link to the catalog. Click Cancel. As you deleted the file intentionally you should now remove it from the library catalog. You can remove a missing photo from your catalog by selecting its thumbnail in the Grid view or the Filmstrip and pressing Alt+Backspace / Option+Delete or by choosing Photo > Remove Photo From Catalog. Don’t remove the photo from the catalog yet—if you’ve done so already, choose Edit > Undo Remove Photo From Catalog. In the next exercise you’ll learn a different technique for updating the catalog by synchronizing folders. Synchronizing folders When you synchronize the folders in the Lightroom catalog with the folders on your hard disk you have the option to remove catalog entries for files that have been deleted, import photos that have been added to your folders, or scan for files with updated metadata. You can specify which folders and subfolders will be synchronized and which new images you want added to your library. 124 LESSON 4 Managing Your Photo Library 1 Make sure that the Lesson 4 folder is still selected in the Folders panel. 2 Choose Library > Synchronize Folder. 3 In the Synchronize Folder “Lesson 4” dialog box, the import options are unavailable, indicating that there have been no new photos added to the Lesson 4 folder. Activate the option Remove Missing Photos From Catalog (1), disable Scan For Metadata Updates, and then click Synchronize. E Tip: The Import New Photos option in the Synchronize Folders dialog box automatically imports any files that have been added to a folder without yet having been added to your image library. Optionally, activate Show Import Dialog Before Importing to choose which of those files you wish to import. Activate the Scan For Metadata Updates option to check for files with metadata modified in another application. The missing image is removed from your catalog and its thumbnail is no longer displayed in the Grid view; all the remaining links between your library catalog and the Lesson 4 folder on your hard disk have been restored. Using collections to organize images Although an organized system of folders provides a good foundation for your photo library, grouping images into collections is a far more efficient and flexible way to classify your images—and offers many more options when you need to find them. A collection is like a virtual folder: a grouping of photos from your library based on your own associations rather than on the actual location of the files. A c ollection may contain images drawn from any number of separate folders on your hard disk. Inversely, a single master image can be included in any number of collections; the same photo might appear in a collection of images with architectural content, a compilation of shots with an Autumn theme, a collection you’ve assembled for a client presentation, and another created for a vacation slideshow. Grouping images as collections in your library doesn’t affect the files and folders on your hard disk, and removing a photo from a collection won’t remove it from the library catalog. There are three basic types of collection: Collections, Smart Collections and the Quick Collection. Any collection can also be part of an Output Collection—a collection that is created automatically when you save a print layout or a creative project such as a photo book or web gallery, linking a set of images to a particular project template, together with all of your customized settings. Any collection can also become a Publish collection, which automatically keeps track of images that you’ve shared via an online service, or a Mobile Collection that is synched to your mobile device via Lightroom mobile. Note: Once you’ve grouped a selection of photos as a collection you can rearrange them in the Grid view or the Filmstrip, changing the order in which they will appear in a p resentation or a print layout. Your customized sorting order will be saved with the collection. E Tip: You’ll learn more about Publish collections in Lesson 10, “Publishing Your Photos.” Mobile collections are discussed a little later in this lesson. ADOBE PHOTOSHOP LIGHTROOM CC (2015 RELEASE) / LIGHTROOM 6 CLASSROOM IN A BOOK 125 The Quick Collection Note: If the Thumb- nail Badges option is activated in the Library View Options, a photo that is included in a collection of any kind displays the collection badge ( ) in the lower right of its thumbnail. Click the badge to see a menu listing the collections in which the image is included. Select a collection from the list to designate that collection as the image source folder. The Quick Collection is a temporary holding collection; a convenient place to assemble a group of images while you gather photos from different folders. You can access the Quick Collection from the Catalog panel so that you can easily return to work with the same selection of images at any time. Your images will stay in the Quick Collection until you are ready to convert your selection to a permanent collection that will then be listed in the Collections panel. You can create as many collections and smart collections as you wish, but there is only one Quick Collection; if there is already a selection of images in the Quick Collection, you’ll need to convert it to a standard collection, and then clear the Quick Collection before you can use it to assemble a new grouping. To create a new collection for images that are currently in the Quick Collection, right-click / Control-click the Quick Collection folder in the Catalog panel and choose Save Quick Collection from the context menu. If the Quick Collection Markers option is enabled in the View Options for the Grid view, a circular marker appears in the top right corner of a thumbnail in the Grid view or the Filmstrip when you move your pointer over the image cell. You can add the image to the Quick Collection by clicking this marker. Once the photo is added to the Quick Collection the marker becomes a solid grey circle. Click the solid marker to remove the image from the Quick Collection. You can select multiple images and perform the same operations for the whole group by clicking the Quick Collection marker on any of the selected thumbnails. You can also add a selected image or group of images to the Quick Collection by pressing the B key or choosing Photo > Add To Quick Collection, or remove a selected image or group of images from the Quick Collection by pressing the B key again or choosing Photo > Remove From Quick Collection. Collections You can create as many permanent collections as you wish. Use a collection to collate the images you need for a particular project or to group photos by subject or any other association. When you create a collection of images for a slideshow or a web page, all the work you do on your presentation will be saved with the collection in the catalog file. In fact, the catalog entry for a single collection can incorporate your settings from the Develop module, a slide layout and playback options from the Slideshow module, designs you set up in the Book and Web modules, and a page layout modified 126 LESSON 4 Managing Your Photo Library in the Print module. Output collections for print jobs will also include your color management and printer settings. To create a collection, choose Library > New Collection. Alternatively, click the New Collection button ( ) in the header of the Collections panel and choose Create Collection from the menu. Enter a name for the collection and click Create. Your new collection will be listed in the Collections panel; you can then simply drag photos onto the listing in the Collections panel to add them to the collection. Smart collections A smart collection searches the metadata attached to your photos and gathers together all those images in your library that meet a specified set of criteria. Any newly imported photo that matches the criteria you’ve set up for a smart collection will be added to that collection automatically. Note: Remember that a single photo can be included in any number of collections, although the master image file is located in only one folder in your library. For this reason, grouping your images in collections is a far more versatile organizational method than sorting them into categorized folders. You can create a Smart Collection by choosing Library > New Smart Collection, and then specify the search criteria for your smart collection by choosing options from the menus in the Create Smart Collection dialog box. You can add more search criteria by clicking the + button to the right of any of the rules. Hold down the Alt / Option key and click the Plus button (+) to refine a rule. In the illustration below a second rule has been added to search for images containing “Europe” in any searchable text, and then a refined rule has been added to search for images which were either captured or edited this year. ADOBE PHOTOSHOP LIGHTROOM CC (2015 RELEASE) / LIGHTROOM 6 CLASSROOM IN A BOOK 127 Taking your collections on the road Lightroom mobile enables you to sync photo collections between your desktop computer and your mobile device so that you can access, edit, organize, and share your photos anywhere, anytime. Whether you’re working in Lightroom on your desktop or on your iPad, iPhone, or Android device, any modifications made to a synced collection or the photos it contains will be automatically updated on the other device. Setting up to go mobile Lightroom mobile will let you sync from only one catalog, so you can start by creating a personal catalog rather than syncing the LRCIB Catalog. 1 If you already have a personal catalog, load it now; if you have not already established a personal catalog, do so now (File > New Catalog). There are no lesson images provided for this section; you’ll need to import a selection of your own photos. Lightroom mobile syncs selected collections from your desktop catalog, rather than individual images or folders, so you’ll also need to create at least one collection to work with. 2 Import the photos you’d like to sync with Lightroom mobile. Make a selection in the Grid view; then, click the plus sign (+) at the right of the Collections panel header and choose Create Collection. In the Create Collection dialog box, make sure the option Include Selected Photos is checked and click Create. Select another group of photos and repeat the process to create a second collection. 3 Install Lightroom on your mobile device. You can download the app free from iTunes or the Apple App Store (iPad and iPhone), or from Google play (Android), on a 30 day trial basis; then, choose a subscription plan later. Getting started with Lightroom mobile 1 Click Get Started With Lightroom Mobile at the upper left of the workspace and choose Sign In. In the Lightroom Mobile dialog box, type your Adobe ID (email address) and password, and then click Sign In. The Lightroom identity plate changes to display your name; click your name in the identity plate to check that Lightroom mobile has been activated on your desktop. 128 LESSON 4 Managing Your Photo Library 2 In the Collections panel, click the empty checkbox at the left of the name of one of your new collections to sync it to Lightroom mobile. If the Share Your Synced Collections tip appears, dismiss it for now. 3 In the Collections panel, the empty checkbox is replaced by a two-way arrow icon to indicate that the collection is synced. Repeat the process for your other collection(s). You can also sync an existing collection by right-clicking / Control-clicking the collection name and choosing Sync With Lightroom Mobile from the context menu. When you create a new collection with Lightroom mobile activated, you’ll find a Sync With Lightroom Mobile option in the Create Collection dialog box. E Tip: You can disable syncing for a mobile collection by clicking the two-way arrow sync icon next to the name of the collection in the Collections panel or by right-clicking / Controlclicking the collection and un-checking Sync With Lightroom Mobile in the context menu. 4 Expand the Catalog panel, if necessary; a new All Synced Photographs entry in the Catalog panel shows an image count for your synced photos. In the Grid view, the thumbnails of synced photos show a two-way arrow badge in the upper right corner of the image cell. Viewing synced collections on your mobile device 1 On your iPad, tap the Lightroom app icon; then, click Get Started Now and sign in to Lightroom mobile with your Adobe ID. The first screen you’ll see is the Collections view, which lists the collections you’ve synced from your desktop, as well as those you create in Lightroom mobile. You can create a new collection by tapping the plussign icon (+) at the upper right or set options for a collection by tapping the three dots (…) in the lower right corner of its cover image. Collection options include adding photos to the collection from the device’s camera roll, enabling the collection for Auto Import so that new photos captured with the device will be added automatically, and enabling the collection for off-line editing by downloading smart previews from Lightroom mobile’s cloud storage. ADOBE PHOTOSHOP LIGHTROOM CC (2015 RELEASE) / LIGHTROOM 6 CLASSROOM IN A BOOK 129 2 In the Collection view, tap a collection to open it in the Grid view. E Tip: In the Grid view, tapping with two fingers cycles through metadata related to the photos in the collection. Tapping and holding an individual image brings up a context menu, where you can change the collection’s cover photo, amongst other options. Tapping the downwards-facing triangle in the center of the area above the thumbnail grid brings up a menu with filtering and sorting options. 3 Tap a photo in the Grid view to see it enlarged in the single-image Loupe view. 4 Tap the photo and swipe upwards to mark it as a pick; then, swipe downwards to unflag it or mark it as a reject. Tap the star icon at the lower left to switch to rating mode; swipe upwards to set the rating. Tap with two fingers to cycle through views with and without metadata information and a histogram. In Loupe view, you can copy or move a photo, crop it, flag it as a pick or a reject, apply rating stars, share by mail or messages, and more. Note: You’ll learn about editing your photos in Lightroom mobile in Lesson 5, Developing Basics, and how to share collections from Lightroom on your mobile device via Lightroom Web in Lesson 10, Publishing Your Photos. 130 5 On your desktop computer, choose File > Open Recent > LRCIB Catalog.lrcat. LESSON 4 Managing Your Photo Library Stacking images Another effective way of organizing images within a folder or collection is by creating stacks. Stacks are ideal for reducing clutter in the Grid view—and the number of thumbnails you need to scroll through in the Filmstrip—by grouping similar or related photos so that only the top image in each stack is displayed. You can stack a selection of images of the same subject, a series of photos shot to test different camera settings, or action shots taken using burst mode or auto-bracketing. A stack can be identified in the Grid view and the Filmstrip by an icon representing a stack of photos, together with an image count, in the upper left corner of the thumbnail. You can expand or collapse the stack by clicking the stack icon; rearrange the order of the photos within the stack or specify which image appears at the top either by choosing commands from the Photo > Stacking menu or by using keyboard shortcuts. When you’re working with a folder containing hundreds of photos from the same shoot, you can have Lightroom stack the images automatically based on capture time; you can specify the time interval between stacks so that your shots are grouped in a way that reflects the flow of the shoot. To create a stack, select two or more images in the Grid view or the Filmstrip, and then choose Photo > Stacking > Group Into Stack. To learn more about Stacks, please refer to Lightroom Help. ADOBE PHOTOSHOP LIGHTROOM CC (2015 RELEASE) / LIGHTROOM 6 CLASSROOM IN A BOOK 131 Applying keyword tags Perhaps the most direct way to mark your photos so that they’re easier to find later is by tagging them with keywords—text metadata attached to the image files to categorize them by subject or association. For example, the image in the illustration at the right could be tagged with the keywords Vacation and Croatia, and could therefore be located by searching for either or both of those tags. If the Thumbnail Badges option is activated in the Library View Options dialog box, photos with keyword tags are identified by a keywords badge ( ) in the lower right corner of the thumbnail. You can apply keywords to your photos individually or tag an entire series of images with shared metadata in one operation, thereby linking them by association and making them easier to access amongst all the photos that make up your library. Keywords added to images in Lightroom can be read by Adobe applications such as Bridge, Photoshop, and Photoshop Elements, and by other applications that support XMP metadata. Viewing keyword tags Because you applied keyword tags to the images for this lesson during the import process, the thumbnails in the Grid view and the Filmstrip are all marked with the keywords badge. Let’s review the keywords you already attached to these photos. 1 Make sure that you are still in the Grid view, and then select the Lesson 4 folder in the Folders panel. E Tip: Clicking the keyword badge of an image in Grid view will automatically expand the Keywording panel. 2 Show the right panel group, if necessary; then, expand the Keywording panel. Expand the Keyword Tags pane at the top of the panel. By selecting each thumbnail in the Grid view in turn you can confirm that all the images in the Lesson 4 folder share the keywords “Lesson 4” and “Europe.” 3 Select any one of the photos in the Lesson 4 folder. In the Keyword Tags pane at the top of the Keywording pane, select the text “Lesson 4” and press the Backspace key on your keyboard to delete it. 4 Click anywhere in the Grid view, and then choose Edit > Select All or press Ctrl+A / Command+A to select all the Lesson 4 photos. In the Keyword Tags pane, the keyword “Lesson 4” is now marked with an asterisk to indicate that this tag is not shared by every image in the selection. 5 Expand the Keyword List panel. 132 LESSON 4 Managing Your Photo Library In the Keyword List, a check mark in front of the keyword “Europe” indicates that this tag is shared by every image in the selection, while the tag “Lesson 4” is marked with a dash—indicating that it attached to some, but not all, of the selected images. The image count to the right of the Lesson 4 tag shows that it is shared by only ten of the eleven images. 6 With all eleven images still selected, click the dash mark in front of the Lesson 4 tag to reinstate the deleted tag; a check mark replaces the dash and the image count for the Lesson 4 keyword increases to 11. E Tip: You can apply an existing keyword tag to selected images by clicking the tag in the Keyword Suggestions pane in the Keywording panel. To remove a tag from a selected photo or photos, either delete the word from the Keyword Tags pane in the Keywording panel, or click the checkbox to disable that keyword in the Keyword List panel. Adding keyword tags You already added keywords to your images during the process of importing them into your Lightroom library. Once the images have been added to your Lightroom library, you can add more keywords by using the Keywording panel. 1 In the Folders panel, select the Vacation subfolder inside the Lesson 4 folder, and then choose Edit > Select All or press Ctrl+A / Command+A. 2 In the Keywording panel, click the grey text “Click Here To Add Keywords” below the Keyword Tags pane and type Croatia, Adriatic. Make sure to separate the words with a comma as shown in the illustration at the right, below. Always use a comma to separate keywords; words separated by a space or a period (e.g. “Croatia Adriatic” or “Croatia. Adriatic”) will be treated as a single keyword. 3 Press Enter / Return. The new keywords are listed in alphabetical order in the Keywording panel and in the Keyword List. 4 In the Folders panel, select the Lesson 4 folder, and then choose Edit > Invert Selection to select all the images other than the eight in the Vacation folder. 5 In the Keywording panel, click in the text box below the Keyword Tags pane and type France. Press Enter / Return. 6 Choose Edit > Select None or press Ctrl+D / Command+D on your keyboard. ADOBE PHOTOSHOP LIGHTROOM CC (2015 RELEASE) / LIGHTROOM 6 CLASSROOM IN A BOOK 133 Working with keyword sets and nesting keywords E Tip: Keyword sets are a convenient way to have the keywords you need at hand as you work on different collections in your library. A single keyword tag may be included in any number of keyword sets. If you don’t see the Lightroom presets in the Keyword Set menu, open the Lightroom Preferences and click the Presets tab. In the Lightroom Defaults options, click Restore Keyword Set Presets. You can use the Keyword Set pane of the Keywording panel to work with keyword sets; groups of keyword tags compiled for a particular purpose. You could create a set of keywords for a specific project, another set for a special occasion, and one for your friends and family. Lightroom provides three basic keyword set presets. You can use these sets as they are or as starting points for creating sets of your own. 1 Expand the Keyword Set pane in the Keywording panel, if necessary, and then choose Wedding Photography from the Keyword Set menu. You can see that the keywords in the set would indeed be helpful in organizing the shots from a big event. Look at the categories covered by the other Lightroom keyword sets. You can use these as templates for your own keyword sets by editing them to suit your needs and saving your changes as a new preset. Grouping your keywords in Keyword Sets is one way to keep your keywords organized; another handy technique is to nest related tags in a keywords hierarchy. 2 Ctrl-click / Command-click to select the keywords “France” and “Croatia” in the Keyword List panel; then, drag the selected tags onto the keyword “Europe.” The Europe expands automatically to show the France and Croatia tags nested inside. 3 In the keyword list, drag the Adratic tag from the top of the keyword list onto the keyword “Croatia.” The Croatia tag expands to show the nested Adriatic tag. 4 Right-click / Control-click the keyword “France” and choose Create Keyword Tag Inside “France” from the context menu. 5 In the Keyword Name text box, type Paris. Make sure the first three Keyword Tag Options are activated as shown in the illustration below; then, click Create. Include On Export Includes the keyword tag when your photos are exported. Export Containing Keywords Includes the parent tag when your photos are exported. Export Synonyms Includes any synonyms associated with the keyword tag when your photos are exported. 6 Expand the France tag; then, right-click / Control-click the keyword “Paris” and choose Create Keyword Tag Inside “Paris” from the menu. Type Eiffel Tower; then, click Create. Expand the Paris tag to show all the tags in the hierarchy. 134 LESSON 4 Managing Your Photo Library 7 In the Folders panel, select the Architecture subfolder inside the Lesson 4 folder, and then choose Edit > Select All or press Ctrl+A / Command+A. Drag the Paris and Eiffel Tower tags from the Keyword List panel onto any of the three selected images in the Grid view. In the Keyword List, check marks in front of the new Paris and Eiffel Tower tags, and the image count to the right of each entry, indicate that both keyword tags have been applied to all three selected photos. 8 In the Folders panel, select the Lesson 3 folder, and then choose Edit > Select All or press Ctrl+A / Command+A. Move the pointer over the Croatia tag in the Keyword List, and then click the empty check box at the left. Press Ctrl+D / Command+D or choose Edit > Select None; then, select the four photos of the girl in the hat. Drag the keyword “Adriatic” onto any of the selected images. 9 In the Folders panel, select the Lesson 2 folder; then, select the photos 02_01.jpg through 02_12jpg. Drag the Europe tag onto any of the twelve selected photos. Searching by keywords Once you’ve taken the time to organize your images by adding keywords and other metadata such as ratings, flags, and labels, it will be easy to set up sophisticated and detailed filters to find exactly the photo you’re looking for. For now, we’ll look at some techniques for finding the photos in your library by searching (or filtering) for keywords alone. 1 In the left panel group, collapse the Navigator, Collections, and Publish Services panels if necessary, so that you can clearly see the contents of the Catalog and Folders Panels. In the Folders panel, select the Lesson 4 folder, and then choose Edit > Select None or press Ctrl+D / Command+D. 2 Use the Thumbnails slider in the Toolbar to reduce the size of the thumbnails to the minimum, so that you’ll be able to see as many images as possible in the Grid view. If the Filter Bar is not already visible above the Grid view, choose View > Show Filter Bar, or press the Backslash key (\). E Tip: If you find that you cannot open two panels in one of the side panel groups at the same time, right-click / Control-click the header of any panel in the group and disable the Solo Mode option in the context menu. ADOBE PHOTOSHOP LIGHTROOM CC (2015 RELEASE) / LIGHTROOM 6 CLASSROOM IN A BOOK 135 3 In the right panel group, collapse the Histogram, Quick Develop, and Keywording panels, if necessary, so that you can clearly see the whole of the expanded Keyword List panel. 4 In the Keyword List panel, move your pointer over the entry for the keyword “Europe,” and then click the white arrow that appears to the right of the image count. In the left panel group, All Photographs is now selected in the Catalog panel, indicating that your entire catalog has been searched for photos with the Europe tag. E Tip: To transfer lists of keywords between computers or share them with colleagues who are also working in Lightroom, use the Export Keywords and Import Keywords commands, which you’ll find in the Metadata menu. The Metadata filter has been activated in the Filter bar at the top of the work area, and the Grid view now displays only those images in your library that are tagged with the keyword “Europe.” 5 In the Keyword column at the left of the Metadata filter pane, expand the Europe entry; then, click the nested Croatia tag. The images in the Grid view are filtered so that only the 31 photos with the Croatia tag are still visible. Now you’ll use a different technique to narrow the search further. 136 LESSON 4 Managing Your Photo Library 6 Click Text in the Filter Picker in the Filter bar at the top of the work area. 7 In the Text filter bar, choose Any Searchable Field from the first menu and Contains from the second menu, noting the options available in each menu; then type Adriatic in the text box at the right and press Enter. E Tip: You can use the lock button at the right end of the Filter bar to keep your current filter settings active when you choose a different image source from the Catalog, Folders, or Collections panels. Only the twelve photos from the Dalmatian coast are still visible in the Grid view. Of course, the true power of the Library filters only comes into play when you set up more complex filters based on a combination of criteria—but this exercise should have given you at least a glimpse of the possibilities. 8 In the center of the filter bar, click None in the filter picker to deactivate the combined Text and Metadata filter. In the Folders panel, select the Lesson 4 folder, and then choose Edit > Select None or press Ctrl+D / Command+D. Using flags and ratings The Attribute filters in the Filter bar allow you to search and sort your images according to attributes such as flags and ratings. When you choose Attribute from the Library Filter options in the Filter bar, the Filter bar expands to display controls for sorting your images by flag status, star rating, color label, copy status, or any combination of these attributes. Flagging images Assigning flags to sort the good images from the rejects can be a good way to begin organizing a group of photos. An image can be flagged as a pick ( ), a reject ( ), or left unflagged ( ). 1 Choose Attribute from the picker in the Filter bar. The Filter bar expands to show the Attribute filter controls. ADOBE PHOTOSHOP LIGHTROOM CC (2015 RELEASE) / LIGHTROOM 6 CLASSROOM IN A BOOK 137 E Tip: In the Grid and Loupe views, you’ll find tools for adding ratings, flags, and color labels in the Toolbar. In the Compare and Survey views you can change these attributes using the controls beneath the images. You can also flag, rate, or color label a selected image by using the Set Flag, Set Rating, or Set Color Label commands in the Photo menu. 2 If the Toolbar is not already visible below the Grid view, press the T key. Click the triangle at the right side of the Toolbar and activate the Flagging tool in the menu to show the Flag As Pick and Set As Rejected buttons in the Toolbar. 3 In the Folders panel, select the Vacation subfolder inside the Lesson 4 folder. 4 In the Grid view, select a favorite from this group of photos captured on the Dalmatian Coast in Croatia. If the Flags option is activated in the Library View Options dialog box, a grey (un-filled) flag icon in the upper left corner of the image cell indicates that this photo is not flagged. If necessary, hold the pointer over the image cell to see the flag, or disable the option Show Clickable Items On Mouse Over Only in the Library View Options dialog box. 5 To change the flag status to Flagged, you can either click the flag badge in the image cell or the Flag As Pick button ( ) in the Toolbar. Note that the photo is now marked with a white flag icon in the upper left corner of the image cell. 6 Click the white flag button in the Attribute Filter bar. The Grid view displays only the image that you just flagged. The view is now filtered to display only flagged images from the Vacation folder. 138 LESSON 4 Managing Your Photo Library Lightroom offers a variety of ways to flag a photo. To flag a photo as a pick, choose Photo > Set Flag > Flagged or press the P key on your keyboard. Click the flag icon at the top left corner of the image cell to toggle between Unflagged and Pick status. To flag an image as a reject, choose Photo > Set Flag > Rejected, press the X key, or Alt-click / Option-click the flag icon in the corner of the image cell. To remove a flag from an image, choose Photo > Set Flag > Unflagged or press the U key. To set any flag status for an image, right-click / Control-click the flag icon in the corner of the image cell and choose Flagged, Unflagged, or Rejected from the flagging menu. 7 Click the grey flag button (the flag in the center) in the Attribute Filter bar. The Grid view now displays any photos flagged as Picks and all unflagged photos, so once again we see all of the images in the Architecture folder. E Tip: You can use the Library > Refine Photos command to sort your photos quickly on the basis of their flagging status. Choose Library > Refine Photos, and then click Refine in the Refine Photos dialog box; any unflagged photos are flagged as rejects and the picks are reset to unflagged status. 8 In the Filter bar, click None to disable the Attribute filters. Assigning ratings A quick and easy way to sort your images as you review and evaluate them is to assign each photo a rating on a scale from one to five stars. 1 In the Grid view, select another of the photos in the Vacation folder. 2 Press the 3 key on your keyboard. The message “Set Rating to 3” appears briefly and the photo is now marked with three stars in the lower left of its image cell. E Tip: If you don’t see the star rating in the image cell, choose View > View Options and make sure Rating And Label is activated in the image cell display options. 3 If necessary, click the triangle at the right of the Toolbar and make sure that the Rating controls are activated in the menu. The stars in the Toolbar reflect the rating you just applied to the selected image. 4 In the Folders panel, select the Architecture folder, and then use the same technique to assign a rating of three or more stars to one of the Eiffel Tower images. Click in the Folders panel to reset the Vacation folder as the image source. It’s easy to change the rating for a selected image; simply press another key between 1 and 5 to apply a new rating or press the 0 key to remove the rating altogether. Alternatively, you can click the stars in the Toolbar to change the rating, or click the highest star in the current rating to remove it. E Tip: You can also assign ratings in the Metadata panel, by choosing from the Photo > Set Rating menu, or by choosing from the Set Rating submenu in the context menu when you rightclick / Control-click a photo’s thumbnail. ADOBE PHOTOSHOP LIGHTROOM CC (2015 RELEASE) / LIGHTROOM 6 CLASSROOM IN A BOOK 139 Working with color labels Color labeling can be a very versatile tool for organizing your workflow. Unlike flags and ratings, color labels have no predefined meanings; you can attach your own meaning to each color and customize separate label sets for specific tasks. While setting up a print job you might assign the red label to images you wish to proof, a blue label to those that need retouching, or a green label to mark images as approved. For another project, you might use the different colors to indicate levels of urgency. Applying color labels You can use the colored buttons in the Toolbar to assign color labels to your images. If you don’t see the color label buttons, click the triangle at the right of the Toolbar and choose Color Label from the menu. You can also click the color label icon displayed in a photo’s image cell (a small grey r ectangle, for an unlabeled image) and choose from the menu. Alternatively, choose Photo > Set Color Label and choose from the menu; you’ll notice that four of the five color labels have keyboard shortcuts. To see—and set—color labels in the Grid view image cells, choose View > View Options or right-click / Control-click any of the thumbnails and choose View Options from the context menu to open the Library View Options dialog box. On the Grid View tab in the Library View Options dialog box, activate Show Grid Extras. In the Compact Cell Extras options, you can choose Label or Rating And Label from either the Bottom Label or Top Label menus. In the Expanded Cell Extras options, activate the Include Color Label checkbox. Editing color labels and using color label sets You can rename the color labels to suit your own purposes and create separate label sets tailored to different parts of your workflow. The Lightroom default options in the Photo > Set Color Label menu are Red, Yellow, Green, Blue, Purple, and None. You can change the color label set by choosing Metadata > Color Label Set, and then choosing either the Bridge or Lightroom default sets, or the Review Status set. The Review Status label set gives you an idea of how you might assign your own label names to help you keep organized. The options in the Review Status set are To Delete, Color Correction Needed, Good To Use, Retouching Needed, To Print, and None. You can use this label set as it is or as a starting point for creating your own sets. To open the Edit Color Label Set dialog box, choose Metadata > Color Label Set > Edit. You can enter your own name for each color, and then choose Save Current Settings As New Preset from the Presets menu. Searching by color label In the Filter bar, click Attribute to see the Attribute filter controls. You can limit your search to a single color label by clicking just one button, or activate more than one button at once. To disable an active color label button, simply click it again. You can use the color label search buttons together with other Attribute filters, or to refine a Text or Metadata search. The Attribute filters, including the color label filters, are also available in the bar above the thumbnails in the Filmstrip. 140 LESSON 4 Managing Your Photo Library Adding metadata You can leverage the metadata information attached to the image files to help you organize and manage your photo library. Much of the metadata, such as capture date, exposure time, focal length and other camera settings, is generated by your camera, but you can also add your own metadata to make it easier to search and sort your catalog. In fact, you did just that when you applied keywords, ratings, and color labels to your images. In addition, Lightroom supports the information standards evolved by the International Press Telecommunications Council (IPTC), which includes entries for descriptions, keywords, categories, credits, and origins. You can use the Metadata panel in the right panel group to inspect or edit the metadata attached to a selected image. 1 In the Grid view, select another photo from the Vacation folder. 2 Expand the Metadata panel. If necessary, hide the Filmstrip or collapse the other panels in the right panel group so that you can see as much of the Metadata panel as possible. Choose Default from the Metadata Set menu in the header of the Metadata panel. Even the default metadata set exposes a great deal of information about the image. Although most of this metadata was generated by the camera, some of it can be very useful in sorting your photos; you could filter images by capture date, search for shots taken with a particular lens, or easily separate photos taken on different cameras. However, the default set displays only a subset of an image’s metadata. 3 Choose EXIF And IPTC from the Metadata Set menu in header of the Metadata panel. Scroll down in the Metadata panel to get an idea of the kinds of information that can be applied to an image. 4 For the purposes of this exercise, you can choose Quick Describe from the Metadata Set menu. ADOBE PHOTOSHOP LIGHTROOM CC (2015 RELEASE) / LIGHTROOM 6 CLASSROOM IN A BOOK 141 In the Quick Describe metadata set, the Metadata panel shows the File-name, Copy Name (for a virtual copy), Folder, Rating, and some EXIF and IPTC metadata. You can use the Metadata panel to add a title and caption to a photo, attach a copyright notice, provide details about the photographer and the location where the photo was shot, and also change the star rating. 5 Click in the Metadata panel to assign the image a rating of three or more stars, and type Dalmatian Coast 8 in the Title text box. 6 Control-click / Command-click any of the other seven vacation photos to add it to the selection. In the Metadata panel you can see that the folder name, dimensions and the camera model are shared by both files; items not shared by both images now show the entry <mixed>. Changes made to any of the items in the metadata panel, even those with mixed values, will affect both of the selected images. This is a convenient way to edit items such as copyright details for a whole batch of selected images at the same time. Storage of metadata File information is stored using the Extensible Metadata Platform (XMP) standard. XMP is built on XML. In the case of camera raw files that have a proprietary file format, XMP isn’t written into the original files. To avoid file corruption, XMP metadata is stored in a separate file called a sidecar file. For all other file formats supported by Lightroom (JPEG, TIFF, PSD, and DNG), XMP metadata is written into the files in the location specified for that data. XMP facilitates the exchange of metadata between Adobe applications and across publishing workflows. For example, you can save metadata from one file as a template, and then import the metadata into other files. Metadata that is stored in other formats, such as EXIF, IPTC (IIM), and TIFF, is synchronized and described with XMP so that it can be more easily viewed and managed. To find out more about Metadata, please refer to Lightroom Help. —From Lightroom Help 142 LESSON 4 Managing Your Photo Library Tagging faces in the People view Undoubtedly, your growing photo library will include many photos of your family, friends, and colleagues. Adobe Photoshop Lightroom CC / Lightroom 6 makes it quick and easy to tag the people in your photos with the new face tagging feature, taking much of the work out of sorting and organizing a large portion of your catalog, and making it even easier to retrieve the photos you’re looking for. Face recognition automatically finds the people in your photos and makes it simple for you to tag them; the more faces you tag, the more Lightroom learns to recognize the people you’ve named, automatically tagging their faces whenever they appear in new photos. There are no lesson images provided for this exercise, so the first thing you need to do is to import some of your own photos. 1 Use either the Import button, or the drag and drop method you learned in Lesson 2, to import a good selection of photos featuring the faces of people you know. Make sure you have a mix of single-person images and groups of various sizes, with plenty of overlap—and at least a few strangers’ faces. By default, face recognition is disabled; the next step is have Lightroom analyze your photos and build an index of those images that include faces. 2 In the Catalog panel, change the image source from Previous Import to All Photographs, so that Lightroom will index the entire catalog. Press Control+D / Command+D or choose Edit > Select None. 3 Show the toolbar, if necessary (T), and click the People button. 4 Lightroom displays a message screen welcoming you to the People view. Click Start Finding Faces In Entire Catalog. A progress bar appears at the upper left of the workspace and the Activity Center menu opens, with a tip showing you where you can turn face recognition off and on. Wait for the indexing process to complete before moving on. ADOBE PHOTOSHOP LIGHTROOM CC (2015 RELEASE) / LIGHTROOM 6 CLASSROOM IN A BOOK 143 The work area is now in People view mode. Lightroom stacks similar faces for tagging, with an image count for each stack; the default sorting order is alphabetical but, as none of the faces are yet tagged, they are arranged by stack size. At this point, all the faces are listed in the Unnamed People category. 5 Click the stack badge on a people stack to expand it. Multiple-select all of the photos in the stack that belong together; then, click the question mark below a selected thumbnail, type the person’s name and press Enter / Return. Lightroom moves the selected photos into the Named People category, and the image counts in both category headers are updated. E Tip: You can also add photos to the Named People groups by simply dragging them directly from the Unnamed People pane. 6 Repeat the process for two or three more unnamed stacks. Already, Lightroom is learning from your input, suggesting more photos that may belong with those you’ve named. Move the pointer over a suggested name to confirm or dismiss the suggestion. 7 Continue until you’ve named at least five or six people, and tagged several photos for each; then double-click one of the faces in the Named People stack to enter the Single Person view, where the upper division is now labeled as the Confirmed category, showing all the photos tagged with the selected name. Below, the Similar category displays only the suggested matches for this face. 144 LESSON 4 Managing Your Photo Library 8 Add as many photos as you can to the group in the Single Person view; then, when you’re done, click “< People” at the left of the Confirmed header to return to the People view. 9 Repeat the process for all your named people, alternating between the People and Single Person views until the only untagged photos that remain are people you don’t know, or image fragments incorrectly identified as faces. Remove these from the Unnamed People list by moving the pointer over each and clicking the X icon that appears at the left of the label. 10Click the Grid view button in the toolbar; then double-click a photo with multiple people to see it enlarged in the Loupe view. Click the Draw Face Region button ( ) in the toolbar to see the People tags attached to the image. When you find a face that has not been identified by face recognition, you can use the Draw Face Region tool to drag a box around it, and then enter a name. E Tip: You can quickly isolate your People tags in the Keyword List panel by expanding the filter options at the top of the list of keywords and clicking People. 11Inspect the Keyword List panel to see your new People tags listed with your other keywords. You can use the Keyword List panel or the Text and Metadata filters to search for People tags, just as you’d do for any other keyword. ADOBE PHOTOSHOP LIGHTROOM CC (2015 RELEASE) / LIGHTROOM 6 CLASSROOM IN A BOOK 145 Organizing photos by location Note: You need to be online to make use of the Map module. In the Map module, Lightroom enables you to leverage geotagging technology so that you can see exactly where your photos were captured on a Google map, and search and filter the images in your library by location. Photos that were captured with a camera or phone that records GPS coordinates will appear on the map automatically. You can easily add location metadata to images captured without GPS information by dragging them directly onto the map from the Filmstrip, or by having Lightroom match their capture times to a tracklog exported from a mobile device. 1 In the Library module, click the Import button below the left panel group. E Tip: If the reverse geocoding feature has not yet been enabled for your catalog, you’ll see a dialog box asking you to authorize Lightroom to exchange GPS location information with Google Maps. Click Enable, then click away from the pop-up notification to dismiss it. 2 Under Source at the left of the Import dialog box, navigate to the LRCIB > Lessons > Lesson 4 GPS folder. Make sure that both images in the folder are checked for import. Set the import options above the thumbnail previews to Add, type Lesson 4, GPS in the Keywords text box, and then click Import. 3 In the Grid view or the Filmstrip, select the image DSC_0449.jpg—a sculpture commemorating Emily, Washington, and John Roebling, the designers and builders of the Brooklyn Bridge. 4 Click Map in the module picker. Working in the Map module Lightroom has automatically plotted the photo’s location by reading the GPS metadata embedded in the image file. The mapped location is marked by a colored pin. E Tip: If you don’t see the Map Info overlay and the Map Key, which explains the different color-coded location pins, choose Show Map Info and Show Map Key from the View Menu. Note: What you see on screen may differ from this illustration, depending on the map style and zoom depth set when you last used the Map module. 146 LESSON 4 Managing Your Photo Library The Navigator panel at the left shows a thumbnail overview map, with a white-bordered rectangle indicating the area currently visible in the main map view. The Toolbar below the map view offers a Map Style menu, a Zoom slider, and buttons for locking marker pins and accessing imported GPS tracklogs. You can add location details and other information in the Metadata panel at the right. 1 Dismiss the Map Key by clicking the Close button (x) in the upper right corner of the overlay, or by disabling the Show Map Key option in the View menu. 2 Experiment with changing the magnification of the map by dragging the Zoom slider in the Toolbar, or by clicking the Zoom In (+) and Zoom Out (-) buttons at either end of the slider. Hold down the Alt / Option key and drag a rectangle in the map to zoom into that area. Drag the map to reposition it in the view, or move the focus by dragging the white-bordered rectangle in the Navigator. Note: The maximum zoom depth available depends on your choice of map style. 3 In the Map Style menu at the left of the Toolbar, select each of the six styles in turn, then set the map to the look you prefer. Map styles, clockwise from upper left: Hybrid, Road Map, Satellite, Dark, Light, Terrain. The Location Filter bar above the map lets you highlight just those photos captured at locations currently visible on the map or filter for tagged or untagged shots. 4 Click each of the four options in the Location Filter bar in turn, noting the effect of the filters on which images are displayed in the Filmstrip. In the Filmstrip and the Library module’s Grid view, images that have been tagged with a GPS location are marked with a location marker badge ( ). E Tip: Click the loca- tion marker badge on a thumbnail in the Filmstrip or in the Library module’s Grid view to zoom in to the image’s map location. ADOBE PHOTOSHOP LIGHTROOM CC (2015 RELEASE) / LIGHTROOM 6 CLASSROOM IN A BOOK 147 Geotagging images captured without GPS data E Tip: To see whether a selected photo has GPS metadata, choose the Location preset in the Metadata panel; then, look for coordinates in the GPS field. Even if your camera does not record GPS data, the Map module makes it easy to tag your photos by location. 1 In the header of the Filmstrip, click the white arrow to the right of the name of the currently selected image and choose Folder - Lesson 4 from the Recent Sources list in the menu. Select the three photos of the Eiffel Tower. 2 In the Filter bar, type Eiffel Tower; then, press Enter / Return. The map is redrawn and the new location is marked with a Search Result marker. 3 Clear the Search Result marker by clicking the X button at the right of the text search box in the Location Filter bar. 4 Right-click / Control-click the found location on the map and choose Add GPS Coordinates To Selected Photos. E Tip: If geocoding has been disabled for your catalog, you may see a dialog box asking you to authorize Lightroom to exchange GPS information with Google Maps. Click Enable. You can also disable or activate this feature at any time on the Metadata tab of the Catalog Settings dialog box; choose Catalog Settings from the Edit / Lightroom menu. 5 Choose Edit > Select None. Move the pointer over the marker pin on the map to see a preview of the photos captured at that location. Click the marker pin to select the photos captured at that location. Click the white arrows at the sides of the preview thumbnail to see the other images at this location, and then click away from the preview to close it. 6 In the header of the Filmstrip, click the arrow to the right of the image source information and choose Previous Import from the source menu. Select the image NY_Marathon.jpg in readiness for the next exercise. 148 LESSON 4 Managing Your Photo Library Adding locations using GPS tracklogs Although your camera may not record GPS data, many mobile devices such as phones can export a tracklog that records your location over a given period of time. You can import this information, and then have Lightroom tag your photos automatically by matching their capture times to the locations recorded in the tracklog. 1 Click the GPS Tracklogs button ( ) in the Toolbar and choose Load Tracklog, or choose Map > Tracklog > Load Tracklog. In the Import Track File dialog box, navigate to your LRCIB > Lessons > Lesson 4 GPS folder; then, select the file NY_Marathon.gpx and click Open / Choose. Click the small white arrow at the right of the Track date information and choose All Tracks from the menu. E Tip: Lightroom can work with tracklogs exported in GPX format. If your device doesn’t export in GPX format, you can use GPS Babel to convert its output. The map is updated to a view of New York, with the recorded GPS track shown as either a blue or yellow line on the map, depending on your choice of map style. This tracklog was generated by a sports watch that was set to a different time zone than the camera used to capture our lesson photo, so you may need to offset the times recorded. The offset will depend on the time zone setting on your computer. 2 Click the GPS Tracklogs button ( ) in the Toolbar and choose Set Time Zone Offset, or choose the same command from the Map > Tracklog menu. Use the slider in the Offset Time Zone dialog box, or type a number in the adjacent text box, to shift the starting time for the tracklog to 11:27 AM; then, click OK. ADOBE PHOTOSHOP LIGHTROOM CC (2015 RELEASE) / LIGHTROOM 6 CLASSROOM IN A BOOK 149 3 Set the map to a style other than Satellite. Select the image NY_Marathon.jpg in the Filmstrip, and then choose Map > Tracklog > Auto-Tag Photos. Lightroom matches the capture time of the selected image to the corresponding location on the marathon route recorded by the tracklog. 4 Move the pointer over the new marker pin on the map—or double-click the marker—to see a preview of the tagged image. 5 Zoom into the map close enough to read the street names around the new marker pin. As you can see, the photo was taken near the corner of 4th Avenue and Dean Street. Click Library in the module picker at the top of the workspace and double-click the New York marathon thumbnail in the Grid view to enter Loupe view. Zoom into the upper right corner of the image; the street sign confirms that the photo has been correctly placed. 6 Click Map in the module picker to return to the Map module. Saving map locations In the Saved Locations panel, you can save a list of your favorite places, making it easy to locate and organize a selection of related images. You could create a saved map location to encompass a cluster of places that you visited during a particular vacation, or to mark a single location that you used for a photo shoot for a client. 1 Zoom out in the map view until you can see all of the GPS track. 150 LESSON 4 Managing Your Photo Library 2 Expand the Saved Locations panel, if necessary; then, click the Create New Preset button ( ) at the right of the header. 3 In the New Location dialog box, type New York Marathon as the location name. Under Options, set the Radius value to 9.5 miles; then, click Create. Your new listing appears in the Saved Locations panel; the image count shows that there are two tagged images that fall within the specified radius. On the map, the saved location has a center pin that can be repositioned, and a second pin on the border for increasing or decreasing the radius of the target area. E Tip: Marking a saved location as Private in the New Location and Edit Location dialog boxes ensures that the GPS information will always be removed when photos from that location are exported or shared, without deleting the location from the images in your catalog. This is useful for protecting your privacy at locations such as your home address. For photos that are not in a saved location, you can choose to omit GPS metadata when you set up an export. For more detail, see Lesson 11. Selecting or deselecting a location in the Saved Locations panel shows and hides the circular location overlay, and makes the location active for editing. To add photos to a saved location, you can either drag them directly from the Filmstrip onto the location’s entry in the Saved Locations panel, or select the images in the Filmstrip and click the check box to the left of the location name. Click the white arrow button that appears to the right of the location name when you move your pointer over the location in the Saved Locations panel to move to that saved location on the map. To edit a location, right-click / Control-click its entry in the Saved Locations panel and choose Location Options from the menu. Once your photos are tagged with locations, you can search your library using the filter picker and search box in the Location Filter bar above the map, the Saved Locations panel, and the Library Metadata filters set to GPS Data or GPS Location. 4 Click Library in the module picker to return to the Library module. ADOBE PHOTOSHOP LIGHTROOM CC (2015 RELEASE) / LIGHTROOM 6 CLASSROOM IN A BOOK 151 Using the Painter tool Of all the tools Lightroom provides to help you organize your growing image library, the Painter tool ( ) is the most flexible. By simply dragging across your images in the Grid view with the Painter tool you can “spray on” keywords, metadata, labels, ratings, and flags—and even apply developing settings, rotate your photos, or add them to the Quick Collection. When you pick the Painter tool up from its well in the Toolbar, the Paint menu appears beside the empty tool well. From the Paint menu you can choose which settings or attributes you wish to apply to your images. Once you’ve made your choice the appropriate controls appear to the right of the Paint menu. E Tip: In Lightroom CC / Lightroom 6, the Keywords mode for the Painter tool has been enhanced; you can now apply entire keyword sets, or any selection from your favorite set, with a single spray! With the Painter tool in Keywords mode, press Shift to activate the eyedropper and access the Keyword Set picker. In this exercise you’ll use the Painter tool to mark images with a color label. 1 Click the Vacation folder in the Folders panel. If necessary, press G to switch to the Grid view; then, make sure that none of the images are currently selected. If you don’t see the Painter tool in the Toolbar, click the triangle at the right side of the Toolbar and choose Painter from the tools menu. 2 Click the Painter tool to pick it up from its well in the Toolbar and choose Label from the Paint menu beside it; then, click the red color label button. 3 The Painter tool is now “loaded.” Move the pointer over any of the thumbnails in the Grid view and a red spray can icon appears. 4 Click the thumbnail in the Grid view and the Painter tool applies the red label. Whether you see the color as a tint in the image cell depends on your Library View Options settings, and whether the image is currently selected (our example is not). If you don’t see the red color label marker (circled in the illustration at the right), choose View > Grid View Style > Show Extras. 152 LESSON 4 Managing Your Photo Library 5 Move the pointer back over the same thumbnail, and then hold down the Alt / Option key and; the cursor changes from the Painter tool spray can to an eraser. Click the thumbnail with the eraser cursor and the red color label is removed. 6 Release the Alt / Option key and click the image once more—but this time drag the spray can across several photos to apply the red color tag to multiple images with one stroke. Hold down the Alt / Option key again, and then remove the label from all but one of the photos. 7 Click Done at the right side of the Toolbar, or click the Painter tool’s empty well, to drop the Painter tool and return the Toolbar to its normal state. Finding and filtering files Now that you’re familiar with the different techniques for categorizing and marking your photos, it’s time to see some results. Next you’ll look at how easy it is to search and sort your images once they’ve been prepared in this way. You can now filter your images by rating or label or search for specific keywords, GPS locations and other metadata. There are numerous ways to find the images you need, but one of the most convenient is to use the Filter bar across the top of the Grid view. Using the Filter bar to find photos 1 If you don’t see the Filter bar above the Grid view, press the backslash key (\) or choose View > Show Filter Bar. In the Folders panel, select the Lesson 4 folder. If you don’t see all eleven photos, choose Library > Show Photos In Subfolders. The Filter bar picker contains three filter types: Text, Attribute, and Metadata; choose any of these and the Filter bar will expand to display the settings and controls you’ll use to set up a filtered search. You can either use the different filters separately or combine them for a more sophisticated search. Use the Text filter to search any text attached to your images, including filenames, keywords, captions, and the EXIF and IPTC metadata. The Attribute filter searches your photos by flag status, star rating, color label, or copy status. The Metadata filter enables you to set up to eight columns of criteria to refine your search; choose from the menu at the right end of a column header to add or remove a column. ADOBE PHOTOSHOP LIGHTROOM CC (2015 RELEASE) / LIGHTROOM 6 CLASSROOM IN A BOOK 153 2 If the Text or Metadata filters are active, click None to disable them. Click Attribute to activate the Attribute filters. If any of the flag filters is still active from the previous exercise, click the highlighted flag to disable it, or choose Library > Filter By Flag > Reset This Filter. 3 In the Rating controls, click the third star to search for any image with a rating of three stars or higher. The grid view displays only the three images to which you’ve applied a star rating. 4 There are many options for refining your search. Click Text in the header of the Filter bar to add an additional filter. In the Text filter bar, open the first menu to see the search target options. You can narrow the search to Filename, Copy Name, Title, Caption, Keywords, or searchable IPTC and EXIF metadata, but for this exercise you can choose Any Searchable Field as the search target. Click the second menu and choose Contains All. 5 In the search text box, type France. Your narrowed search returns only one image in the Grid view. E Tip: In the search text box, add an exclamation mark (!) before any word to exclude it from the results. Add a plus sign (+) before any word to apply the “Starting With” rule only to that word. Add a plus sign (+) after a word to apply the “Ending With” rule only to that word. 154 6 In the Rating controls, click the third star to disable the current Rating filter or choose Library > Filter By Rating > Reset This Filter. Click Attribute in the header of the Filter bar to close the Attribute filter controls. 7 In the Text filter bar, clear the search term “France” by clicking the x icon at the right of the text box, and then type Europe. The Grid view now displays all eleven of the photos in the Lesson 4 folder. 8 In the Text filter bar, type a space after the word Europe, and then type !Croatia (note the exclamation mark). The search is narrowed to find those images in the Lesson 4 folder with searchable text that contains the word Europe, but does not contain the word Croatia. The Grid view now displays three photos. Leave the Text filter set as it is for the next exercise. LESSON 4 Managing Your Photo Library Using the Metadata filter 1 Click Metadata in the header of the Filter bar to open the Metadata filter pane. Choose Default Columns from the menu at the far right of the Filter bar header. 2 Click Date in the header of the first column to see the wide range of search criteria from which you can choose for each of up to eight columns. Choose Aspect Ratio from the menu as the criteria for the first column, and then choose Landscape from the Aspect Ratio options in the column. The selection in the Grid view is narrowed to the single image with a horizontal format. 3 Click Text in the header of the Filter bar to disable the Text filter. This search returns nine photos from the Lesson 4 folder. In the Aspect Ratio column, click Portrait to find the two remaining lesson images. 4 Click to close the lock icon at the right of the Filter bar header to lock the current filter so that it remains active when you change the image source for the search. 5 Click the All Photographs listing in the Catalog panel. The Grid view now displays every portrait format image in your catalog. As you can see, there are endless possibilities for combining filters to find just the image you’re looking for. 6 Click None in the Filter bar to disable all filters. Click the Lesson 4 folder in the Folders panel. Using the filters in the Filmstrip The Attribute filter controls are also available in the header of the Filmstrip. As in the Filter bar the Filter Presets menu lists filter presets and offers the option to save your filter settings as a custom preset, which will then be added to the menu. The Default Columns preset opens the four default columns of the Metadata search options: Date, Camera, Lens, and Label. Choose Filters Off to turn off all filters and collapse the Filter bar. Select the Flagged preset to display photos with a Pick flag. Use the Location Columns preset to filter photos by their Country, State/Province, City, and Location metadata. The Rated filter preset displays any photos that match the current star rating criteria. Choose Unrated to see all the photos without a star rating or Used and Unused to see which pictures have been included in projects. E Tip: If you don’t see any filter presets in the presets menu, open Lightroom Preferences and click Restore Library Filter Presets under Lightroom Defaults on the Presets tab. ADOBE PHOTOSHOP LIGHTROOM CC (2015 RELEASE) / LIGHTROOM 6 CLASSROOM IN A BOOK 155 1 Choose Flagged from the Filter Presets menu at the top right of the Filmstrip. The Attribute filter bar opens above the Grid view. The Grid view and the Filmstrip show only one photo that you flagged as a pick in a previous exercise. 2 Click the white flag icon in the header of the Filmstrip to disable the current filter, and then click the red color label button. If you don’t see the color label buttons in the header of the Filmstrip, click the word Filter to the left of the flag buttons. The Attribute filter settings change in the Filter bar above the Grid view and both the Grid view and the filmstrip display only the image that you labeled with the Painter tool. E Tip: To save time and effort setting up searches, save your filter settings as a new preset. Specify criteria for any combination of Text, Attribute, and Metadata filters. Then choose Save Current Settings As New Preset from the Custom Filter menu in the Filter bar or the Filmstrip. 3 To disable all filters and display all the images in the Lesson 4 folder, choose Filters Off from the Filter Presets menu or click the switch at the far right of the Filmstrip’s header. Reconnecting missing files and folders Remember that when you import a photo into your library, Lightroom adds the image file’s name and address to the library catalog file, and displays an entry for the folder in which the photo is stored in the Folders panel. If you rename or move a photo—or a folder—while you’re outside the Lightroom workspace the link to the catalog will be broken and Lightroom may no longer be able to locate the image file. Lightroom will alert you to the problem by marking the thumbnail of the missing photo—or the entry for the missing folder in the Folders panel—with a question mark icon. 156 LESSON 4 Managing Your Photo Library 1 In the Grid view, select one of the photos from the Croatia’s Adriatic coast; then right-click / Control-click the image and choose Show In Explorer / Show In Finder from the context menu. 2 In the Explorer / Finder window, change the name of the selected file to Adriatic.jpg. Change the name of the Architecture folder inside the Lesson 4 folder to Tower. 3 Back in the Grid view in Lightroom, you’ll notice the missing file alert icon in the upper right corner of the selected image cell (and also just below the Histogram). Click the icon; then click Locate in the dialog box. 4 In the Locate file dialog box, select the renamed file and then click Select. When you have merely moved, rather than renamed files, you can activate the Find Nearby Missing Photos option in the Locate file dialog box and Lightroom will find any other missing photos in the same folder automatically. 5 Click Confirm to verify that Adriatic.jpg is the correct file despite the changed name. You have now reestablished the link to your renamed file; the missing file icon no longer appears in its image cell. ADOBE PHOTOSHOP LIGHTROOM CC (2015 RELEASE) / LIGHTROOM 6 CLASSROOM IN A BOOK 157 6 In the Folders panel, the Architecture folder is now dimmed and marked with a question mark icon. Right-click / Control-click the missing folder; you could choose Find Missing Folder from the context menu, and then locate the renamed folder as you did for the missing file, but we’ll take this opportunity to look at a different method instead. 7 Choose Library > Find All Missing Photos. A new temporary collection named Missing Photographs is created in the Catalog panel. The new collection is automatically selected and the three photos from the Architecture folder appear in the Grid view. Select each image in turn; the missing photo icon appears on each image cell. 8 Click the missing photo icon on any of the images in the Grid view and follow the same steps you used previously. Navigate to the renamed folder, and then locate the selected file. This time, activate the Find Nearby Missing Photos option in the Locate file dialog box and Lightroom will find the other missing photos in the folder automatically. Click Select. 9 The renamed folder is now listed in the Folders panel. Although the missing Architecture folder is still listed in the Folders panel, it now shows an image count of 0. Right-click / Control-click the empty folder and choose Remove from the menu. 10Right-click / Control-click the Missing Photographs folder in the Catalog panel and choose Remove This Temporary Collection from the context menu. This concludes the lesson on organizing your image library. You’ve learned about structuring your folders, sorting and grouping images into collections, and a variety of methods for tagging and marking your photos to make them easier to find by applying a range of search filters. However, it’s worth discussing a final step that is invaluable in managing your growing library of photos: perform regular catalog backups. The library catalog contains not only your entire image database but also all the preview images and metadata, together with records of your collections and all your settings from the Develop, Slideshow, Web and Print modules. It is as important to make backups of your catalog as it is to keep copies of your image files. You’ll learn more about backing-up your library in Lesson 11, “Making Backups and Exporting Photos.” Before you move on to the next lesson, take a moment to refresh some of what you’ve learned by reading through the review on the next page. 158 LESSON 4 Managing Your Photo Library Review questions 1 What is a Smart Collection? 2 Why would you create a Stack? 3 What are keyword tags? 4 What are the three modes in the Filter bar? 5 How can you search for images by location? Review answers 1 A Smart collection can be configured to search the library for images that meet specified criteria. Smart collections stay up-to-date by automatically adding any newly imported photos that meet the criteria you’ve specified. 2 Stacks can be used to group similar photos and thereby reduce the number of thumbnails displayed at one time in the Grid view and the Filmstrip. Only the top image in a stack appears in the thumbnail display but the stack can be expanded and contracted by clicking the thumbnail. 3 Keyword tags are text added to the metadata of an image to describe its content or classify it in one way or another. Shared keywords link images by subject, date, or some other association. Keywords help to locate, identify, and sort photos in the catalog. Like other metadata, keyword tags are stored either in the photo file or (in the case of proprietary camera raw files) in XMP sidecar files. Keywords applied in Lightroom can be read by Adobe applications such as Bridge, Photoshop, or Photoshop Elements, and by other applications that support XMP metadata. 4 The Filter bar offers three filter groups: Text, Attribute, and Metadata filters. Using combinations of these filters you can search the image library for metadata text, filter searches by flag, copy status, rating, or label, and specify a broad range of customizable metadata search criteria. 5 Once your photos are tagged with locations, you can search your library from the Map module by using the Location Filter bar above the map and the Saved Locations panel. In the Library you can use the Metadata filters, set to GPS Data or GPS Location. ADOBE PHOTOSHOP LIGHTROOM CC (2015 RELEASE) / LIGHTROOM 6 CLASSROOM IN A BOOK 159 PHOTOGRAPHY SHOWCASE COLBY BROWN “I hope that my images resonate with others, giving me the opportunity to share the world I love and hopefully helping others to learn to appreciate the beauty found all around us.” As a photographer I believe that the artistic process of an image doesn’t stop once the shutter has been released, but continues into the digital darkroom. By blending various exposures together and increasing the dynamic range of details that I can preserve in a given scene, I am able to more accurately recreate and showcase moments frozen in time as I witnessed them, rather than limit myself based on current camera technology. One of the most prolific aspects of the digital revolution of photography is the sheer fact that more people today, have the ability to digitally express themselves than ever before. Billions of people, all across this planet, are capturing the world around them and sharing those experiences with others. This is helping to push the boundaries of what we think is artistically possible as individuals begin to test the limits of their own creativity and passion. As human beings I feel that we are all looking for inspiration as we move through life. We all want to be inspired to be more then we are, see more of the world, and experience more with the limited time that we have. I hope that my images resonate with others, giving me the opportunity to share the world I love and hopefully help others to learn to appreciate the beauty found all around us. www.colbybrownphotography.com 160 P E T R A BY N I G H T 161 MIRRORED REFLECTIONS FOCUSED YO S E M I T E FA L L S A M I D S T T H E S TO R M 162 PHOTOGRAPHY SHOWCASE Colby Brown T H E S U B WAY LO S T I N N O C E N C E ADOBE PHOTOSHOP LIGHTROOM CC (2015 RELEASE) / LIGHTROOM 6 CLASSROOM IN A BOOK 163 This page intentionally left blank INDEX Auto mode Upright tool, 221 Auto Tone adjustment, 200 Auto Tone button, 168 SYMBOLS 8 bit output, 377 16 bit color space, 377 16 bit output, 311, 377 B A Add To Quick Collection command, 102 Adjustment Brush tool, 211 Adobe Bridge, 132, 369 Adobe Photoshop Lightroom Installing, 3 Adobe Photoshop Lightroom Classroom in a Book accessing lesson files, 3 AdobeRGB (1998) color space, 377 Aperture importing from, 69 aspect ratio, 179 Aspect slider Transform controls, 221 As Shot setting, 168 Attribute filter, 138, 153 Autofill in a photo book, 239 auto-layout presets, 240 Auto Hide option, 88 Auto Hide & Show option, 87 Auto Import Settings dialog box, 70, 74 Auto Layout panel, 239 Auto Mask option, 211 Backdrop panel, 268 background setting page backgrounds in a photo book, 246 backing up the catalog file, 366 backing up the library, 370 Back Up Catalog dialog box, 367 backup copies during import, 55 backup frequency, 367 backups backup strategies, 55 incremental, 372 barrel distortion, 219 baseline, 249 Basic panel, 32, 35, 178 Before & After view, 177 designating Before image, 201 Behance, sharing to, 334 black-body radiation, 176 Blurb publishing books to, 238 blurring, 222 Book module working in, 238 Book Settings panel, 239 brush spots show / hide overlays, 182 Build Smart Previews command, 172 burning images to CD/DVD, 380 By Date option, 52 C calibrating computer screen, 377 camera raw file format, 53 candlelight, 176 Caption And Rating slideshow template, 266 Caption option, 351 captions in a photo book, 251 card reader, 48 Cast Shadow option, 269 catalog creating, 4–7 catalog files, 12 cell padding, 244 Cell panel, 244 Cells panel, 291 Choose Burner dialog box, 380 chromatic aberrations, 218 chrominance noise, 222 circle spots Spot Removal tool, 184 clarity, 36, 169 ADOBE PHOTOSHOP LIGHTROOM CC (2015 RELEASE) / LIGHTROOM 6 CLASSROOM IN A BOOK 385 Classroom in a Book about, 1 Clear Book button, 239 Clear Layout button, 239 cloning mode Spot Removal tool, 185 collapsing panels, 88–90 collections, 24, 125–128 rearranging images, 25 Collections panel, 25–26, 88, 102, 126–127, 238, 264, 340 color adjustments, 212, 213 color cast, 175 color fringes, 218 color gamut, 176, 377 color labels, 23, 140–141 color management, 377 by Lightroom, 312 by printer, 311 using, 311 Color Palette panel, 349 ColorSync, 312 color temperature, 176 Color Wash option, 269 color wheel, 212 combining photos HDR, 227 panorama, 226 Compare view, 27–29, 28, 92, 97–99, 112–113 comparing photos, 27–31, 97–99 compatibility problems avoiding when naming files, 360 Constrain Crop option Upright tool, 221 Contact Sheet layouts, 291, 316 contrast adjusting, 205 Contrast slider, 203 386 INDEX cool colors, 176 crop overlay rectangle, 180 Crop Overlay tool, 34–36, 178–180 cropping images, 34, 178, 201 Crop To Fill slideshow template, 266 Custom Name option, 55 Custom Package layouts, 291 creating, 305 D data loss preventing, 366 daylight, 176 Default Columns option, 155 Defringe eyedropper, 218 deghosting, 228 Deselect Photo icon, 29, 99 Detail panel, 221 developing presets creating, 223 Develop module, 32–38, 177– 178, 310 develop presets, 16, 30, 168, 169, 177 Digital Negative (DNG) file format, 53 Don’t Enlarge option, 374 Draft Mode Printing option, 293, 310 E editing in another application, 188 in Lightroom mobile, 188 off-line images, 172 using external editor, 13 e-mail attaching images, 41 Email Account Manager, 42 EXIF Metadata slideshow template, 266 expanding panels, 88–90 Export As Catalog dialog box, 370 Export Containing Keywords option, 134 Export dialog box, 374, 381 exporting photo books, 253 exporting images as catalog, 370 exporting images as JPEG, 373 exporting images as original or DNG, 378 exporting images as PSD or TIFF, 376 Export PDF button, 279 export presets, 379 Export Synonyms option, 134 Export With Previous menu command, 377 Exposure slider, 203 external editing preferences, 13, 188 external editor preferences, 13 F Facebook, sharing to, 332 faces tagging, 143 file formats about, 53 Filename Template Editor dialog box, 56 Filmstrip, 15 changing height of, 86, 106 changing order in, 107 showing and hiding, 17–18, 87–88 using filters in, 106, 155 working with, 105 Filter bar, 21, 23, 75, 138, 140, 153–155, 225 filtering images, 153 Filter Presets menu, 155 Filters Off option, 155 finding images, 153 Find Nearby Missing Photos option, 157, 158 fish-eye distortion, 219 Flag As Pick button, 138 Flagged option, 155 flags, 22, 100, 137, 139 Flickr creating an account, 326 publishing photos to, 327 Folders panel, 61, 122–125 Frame button, 65, 171 FTP server, 360 Full mode Upright tool, 221 full-screen preview, 91 G galleries exporting, 358 previewing in web browser, 355 saving customized template, 357 uploading, 359 Gallery Editor, 339 gallery layout options, 347 geotagging, 146 getting help Module-Specific Tips, 7 GPS, 146 GPS tracklog, 149 GPS Tracklogs button, 149 gradient mask, 210 Graduated Filter tool, 209 Graphical Identity Plate option, 347 grayscale, 215 grid and guides overlays, 96 Grid view, 75, 92, 170 Guides panel, 241, 291, 295 H Help navigating, 7 hiding panels, 90 highlights, 207 Highlights slider, 203 Histogram panel, 89 History panel, 32, 177, 178, 201–202 HSL / Color / Grayscale panel, 212 hue, 212 I ICM Color Management, 312 identity plates creating and modifying, 347 graphical option, 347 in print module, 301 in slideshows, 266, 270 in web gallery, 346 styled text option, 347 Ignore Camera-Generated Folder Names When Naming Folders option, 48 Image Info panel, 351 image quality settings, 352 Image Settings panel, 291, 293, 299 Import button, 57 Import From Catalog menu command, 67 importing video, 65 importing images, 19 by drag and drop, 62 from digital camera, 47 from hard disk, 57 from other catalogs, 66 from watched folder, 70 to a specific folder, 65 Importing photos from other applications, 69 Import New Photos option, 125 import options Add, 57 Copy, 50 Copy As DNG, 58 Move, 58 Import Photos menu command, 57 import presets, 54 Impromptu Slideshow menu command, 22, 280 incremental backups, 372 initial previews, 71 Into One Folder option, 52 Invert Mask command, 37 iPhoto importing from, 69 J Joint Photographic Experts Group (JPEG) file format, 53 JPEG file format, 53 K kerning, 249 Keywording panel, 68, 132–134 keyword sets, 134 ADOBE PHOTOSHOP LIGHTROOM CC (2015 RELEASE) / LIGHTROOM 6 CLASSROOM IN A BOOK 387 Keyword Suggestions pane, 133 keyword tags about, 21 adding, 133 applying, 132 applying during import, 61 backing up, 366 creating, 134 exporting, 134–135 importing, 136 nesting, 134 removing, 133 searching by, 135 using, 56 viewing, 132 L Layout panel, 291 leading, 249 Lens Corrections panel, 218 lens vignetting, 219 lessons files downloading, 3 Level corrections Upright tool, 220 Library View Options dialog box, 76 lighting adjusting, 35 Lightroom Defaults options, 134 Lightroom mobile editing in, 188 getting ready to use, 6 getting started, 128 sharing from, 336 Lightroom Publishing Manager, 326, 332, 334 Lightroom Web, 336 local contrast, 169 local corrections, 37 388 INDEX location organizing images by, 146 Location Columns option, 155 location marker, 147 lock icon, 98 Loupe view, 75, 92, 177, 178, 204 using during import, 63 Loupe view overlays, 95 luminance, 212 luminance noise, 222 M Map module, 146 Map Style menu, 147 Masking slider, 221 Maximize Compatibility option, 53 merging photos to HDR, 227 to panorama, 226 metadata applying, 60, 141–144 exporting, 368 Metadata File Needs To Be Updated icon, 368 Metadata filter, 153–154 Metadata Set menu, 141 Metadata Was Changed Externally icon, 369 mid-range contrast, 206 missing files reestablishing links to, 13, 156 module picker, 19, 46, 82, 87, 166, 236, 288, 324, 364 modules, 14, 18–22 moving files between folders, 122 Multi-Page View button, 239 music adding to slideshow, 275 N Navigator panel, 177 neutral gray, 212 New Catalog menu command, 4 New Collection button, 127 new features, 2 New Metadata Preset dialog box, 60 noise reduction, 199, 222 non-destructive editing, 12, 14 O off-line editing, 172 On/Off switch icon, 210, 215 Options panel, 269 organizing images, 51 by location, 146 output collections, 314 output settings, 310 Output Settings panel, 352 overcast sky, 176 Overlays panel, 270 P padding in photo book cells, 244 Padding Amount slider, 244 Page Bleed guide, 241 page captions in a photo book, 247 page layouts in a photo book, 252 page numbers adding to a photo book, 242 Page panel, 241, 291, 307 Painter tool, 152–154 Pan And Zoom option for slideshows, 276 panel groups, 16 resizing, 17, 85 showing and hiding, 86 panels expanding and collapsing, 88 in Lightroom workspace, 14 resizing, 85 showing and hiding, 90 solo mode, 90 panorama, 226 PDF export for photo books, 253 People view, 143 perceptual rendering, 313 perspective correction, 220 Pet Eye tool, 187 Photo book, 234 adding captions, 251 adding page numbers, 242 adding text to a book layout, 247 assembling photos for a book, 238 auto-layout, 239 changing images, 243 changing page layouts, 240 copying a saved book, 253 custom page layouts, 252 exporting a saved book, 253 fine-tuning text in a book, 249 preferences, 239 saving a book design, 252 setting a page background, 246 setting up, 239 working views Multi-Page view, 239 Single Page view, 244 Spread view, 245 working with photo cells, 244 working with text cells, 248 photo captions in a photo book, 247 Photo cells working with cells in a book layout, 244 Photoshop, 13, 53, 132, 188, 378 Photoshop Camera Raw plug-in, 369 Photoshop Elements, 13, 132 importing from, 69 Photoshop (PSD) file format, 53 pick flag, 22, 100–101, 101, 106, 137–138, 155 Picture Package layouts, 291 Playback Screen pane, 276 post-processing actions, 381 prerequisites, 2 preset text, 251 Preview In Browser button, 355 previews, 172 smart previews, 172 Print button, 315 Print Editor view, 292 printer profiles, 312 printer resolution, 310 Print Job panel, 291, 293, 310 Print One button, 315 print resolution, 310 Print Sharpening options, 310 print templates, 292 customizing, 295 saving, 304 print to JPEG file, 310 process versions about, 173 updating, 173 progress bar, 14 ProPhoto RGB color profile, 377 publish collections, 24, 326 Publishing Manager dialog box, 326, 332 publishing photo comments, 328 Publish Services panel, 326 Put In Subfolder option, 52 Q Quick Collection, 24, 102– 105, 126 Quick Describe metadata set, 142 Quick Develop panel, 30–31, 168 R Radial Filter tool, 37, 38, 204 Brush mode, 40 Rated option, 155 Rating And Label option, 139 rating images, 139 Raw images, 48, 175, 221 Reanalyze command Upright tool, 221 reconnecting missing files, 156 Red Eye Correction tool, 187 Pet Eye mode, 187 redoing changes, 201 reducing noise, 221 Refine Photos menu command, 139 reject flag, 22–23, 100–101, 101–102, 137–138 relative rendering, 313 removing photos from catalog, 124 renaming files, 55 renaming folder names, 123 rendering perceptual, 313 relative, 313 Rendering Intent options, 312 ADOBE PHOTOSHOP LIGHTROOM CC (2015 RELEASE) / LIGHTROOM 6 CLASSROOM IN A BOOK 389 required skills, 2 resetting controls, 169 resetting filters, 154 Restore Keyword Set Presets option, 134 restoring library from backup, 370 retouching, 184 reviewing and organizing, 20 RGB values, 176, 212 rotating images, 178 Rulers, Grid & Guides panel, 291 S sample area, 185 saturated colors, 212 saturation, 212 Saved Locations panel, 151 Scan For Metadata Updates option, 125 screen modes, 91 secondary display, 109 Select Catalog dialog box, 5 Select New Source command, 185 shade, 213 Shadows slider, 203 sharing by e-mail, 41 sharing photos from Lightroom mobile, 336 sharpening images, 199, 217 Show Briefly When Photo Changes option, 78 Show Filter Bar menu command, 135 Show Image Info Tooltips option, 76 390 INDEX Show Import Dialog When A Memory Card Is Detected option, 48 showing panels, 90 Show Message When Loading Or Rendering Photos option, 78 Show Module Picker command, 19, 46, 82, 87, 166, 236, 288, 324, 364 Simple slideshow templates, 266 Single Page View button, 244 Site Info panel, 348 Slide Editor view, 265 slideshow adding music, 275 Slideshow module, 265 slideshows, exporting , 279 slideshow templates about, 266 customizing, 267 selecting, 266 smart collections, 24, 127 Smart Previews, 172 Smart Preview status indicator, 172 snapshots, 177 creating, 201 Snapshots panel, 177, 178 soft proofing, 308 Solo mode, 90 sound playing when process is complete, 375 split toning, 216 Split Toning panel, 216 Spot Removal tool, 181, 183 Spread View button, 245 sRGB color profile, 374 star rating, 22 Start Number text field, 56 Store Password In Preset option, 359 straightening images, 34, 178 Straighten tool, 34, 179 stroke borders, 269 Styled Text Identity Plate option, 347 subfolders, creating, 122 Survey view, 92, 99–102, 112 Synced Collection viewing on mobile device, 129 synchronizing folders, 124 synchronizing settings, 217 T tagged image (TIFF) file format, 53 tagging faces in the People view, 143 target area, 185 target collection, 104 Target tool button, 207, 214, 215 temperature, 175 Temperature slider, 168, 176 Template Browser panel, 266, 278–279, 290, 292, 304– 305, 357 tethered shooting, 72 text in a photo book, 247, 248 Text Adjustment Tool, 249 text cells working with cells in a photo book, 248 Text cells, 247 Text filter, 153 text overlays, 270 text preset creating for a photo book, 251 text style presets, 248 Text Template Editor, 272 textural definition, 169 Thumbnail Badges option, 126, 132 TIFF file format, 53 Time Zone Offset, 149 tint, 175, 213 Tint Grid Cells With Label Colors option, 76 Tint slider, 168, 176 Title option, 351 Toggle Zoom View command, 94 tokens, 56 tonal balance adjusting, 35, 199 tonal ranges, 206 tone, 213 Tone Control pane, 169 working with, 202 Tone Curve panel, 178, 199, 205 Tone Curve Target mode, 208 Toolbar, 15 customizing, 76, 92 showing and hiding, 75, 91 top panel, 14 tracking, 249 Transform controls, 219 Treat JPEG Files Next To Raw Files As Separate Photos option, 48 Trim Video button, 65, 170 type fine-tuning, 249 baseline, 249 kerning, 249 leading, 249 tracking, 249 Type panel, 248 U undoing changes, 201 Unrated option, 155 Unsaved Metadata option, 368 Upload button, 360 Upload Settings panel, 359 Upright tool, 220 upsampling images, 374 Use Defaults button, 78 V Vertical corrections Upright tool, 220 vibrance, 36, 169 video capturing frames from, 171 editing, 170 importing and viewing, 65 playback control bar, 65 setting the poster frame, 171 trimming, 65, 170 video files, 53 view modes, 92 view options, 76 vignettes customizing, 37 virtual copies, 26, 224–226, 369 Visualize Spots view Spot Removal tool, 186 about, 175–176 White Balance Selector tool, 176 white point, 175 Widescreen slideshow template, 266 work area, 14, 75 workflow, 18 Work In Progress, Behance, 334 workspace customizing, 17 overview, 14 X XMP metadata, 132, 142 XMP sidecar file, 369 Z zoom levels, 93 Zoom To Fill option, 293 W warm colors, 176 watched folder, 70 watermarking, 352 Watermark Editor dialog box, 352, 361 web galleries customizing, 346 white balance, 168 ADOBE PHOTOSHOP LIGHTROOM CC (2015 RELEASE) / LIGHTROOM 6 CLASSROOM IN A BOOK 391 Production Notes The Adobe Photoshop Lightroom CC (2015 release) / Lightroom 6 Classroom in a Book was created electronically using Adobe InDesign. Art was produced using Adobe InDesign, Adobe Illustrator, and Adobe Photoshop. References to company names in the lessons are for demonstration purposes only and are not intended to refer to any actual organization or person. Team credits The following individuals contributed to the development of this edition of the Adobe Photoshop Lightroom CC (2015 release) / Lightroom 6 Classroom in a Book : Project coordinators, technical writers: John Evans & Katrin Straub Production: Manneken Pis Productions (www.manneken.be) Copyediting & Proofreading: John Evans, Katrin Straub Keystroker: Megan Ahearn Designer: Katrin Straub Special thanks to Victor Gavenda, Eric Geoffroy, Connie Jeung-Mills, Tracey Croom, and Christine Yarrow. Typefaces used Adobe Clean, Adobe Myriad Pro, and Adobe Warnock Pro are used throughout the lessons. For more information about OpenType and Adobe fonts, visit http://www.adobe.com/products/type/ opentype.html. Photo Credits Photographic images and illustrations supplied by John Batdorff, Colby Brown, Torsten Buck, Michael Clark, John Evans, Chris Orwig, Seth Resnick, Carsten Schael, Katrin Straub, Nicole Young, and Adobe Systems Incorporated. Photos are for use only with the lessons in the book. 392 PRODUCTION NOTES Contributors John Evans has worked in computer graphics and design for more than 25 years, initially as a graphic designer, and then since 1993 as a multimedia author, software interface designer, and technical writer. His multimedia and digital illustration work associated with Japanese type attracted an award from Apple Computer Australia. His other projects range from music education software for children to interface design for innovative Japanese font design software. As a technical writer his work includes software design specifications, user manuals, and more recently several editions of Adobe Photoshop Elements Classroom in a Book and Adobe Photoshop Lightroom Classroom in a Book. Katrin Straub is an artist, a graphic designer, and author. Her award-winning print, painting, and multimedia work has been exhibited worldwide. With more than 20 years’ experience in design, Katrin has worked as Design Director for companies such as Landor Associates and Fontworks in the United States, Hong Kong, and Japan. Her work includes packaging, promotional campaigns, multimedia, website design, and internationally recognized corporate and retail identities. She holds degrees from the FH Augsburg, ISIA Urbino, and The New School University in New York. Katrin has authored many books, among them Adobe Creative Suite Idea Kit, Adobe Soundbooth and several versions of Adobe Photoshop Elements Classroom in a Book, Adobe Premiere Elements Classroom in a Book, and Adobe Photoshop Lightroom Classroom in a Book. ADOBE PHOTOSHOP LIGHTROOM CC (2015 RELEASE) / LIGHTROOM 6 CLASSROOM IN A BOOK 393


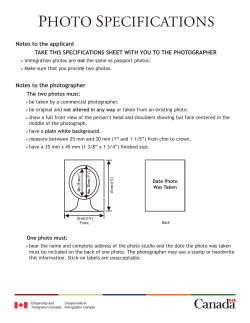

© Copyright 2026