How to attach photos in SystmOne
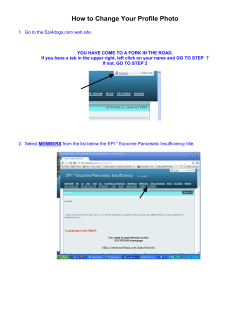
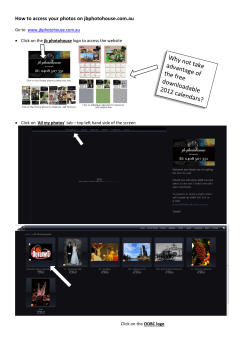
How to attach photos in SystmOne Improvements to smart phone cameras mean that it is possible to get pretty good pictures on your phone. If you don’t have a good camera try this. There are information governance risks associated with taking and storing photos you should consider. If you have not done so set up your nhs.net account on your phone. You should only need your username and password to do this. You may also have to set a security code on your phone if you have not already done so. On the NHSnet web pages there is help with doing this. From the web mail log in (www.nhs.net), choose the tools icon in top panel, then guidance (bottom left side menu), training (left side menu), then mobile devices, applications and email programmes (middle option left side menu). The IT helpdesk can help you with this if needs be. When emailing, for information governance reasons you should only do this from an nhs.net account to an nhs.net account, ie to yourself. You should ensure that your photos are not automatically backed up to the cloud as you will then be storing photos that you do not have permission to store, and if your itunes photos synchronise with other users you will be breaching confidentiality by inadvertently sharing the photos. Delete the photo from your phone after you have emailed it to yourself. Send the original actual size of the photo because this will ensure the maximum detail can be saved and if needed sent to the dermatologists. When you receive photos in Outlook on your PC you should copy the photo to a folder on a secure local network drive before importing them into SystmOne. Do not save files to the C drive of your local machine as this machine is not likely to be backed up and if stolen could represent a greater information governance risk than other networked drives. Once the photo is attached to SystmOne it can be deleted from your network drive This is important as they are relatively large files and you should not need to keep them anyway once in SystmOne. To upload a photo into SystmOne right click on Record Attachments in the Clinical tab as shown below. Select the drive that you are importing from. Once you’ve done this once it usually remembers where that is and goes straight to that folder. (Note you can do this directly from a camera card connected to the PC and the flash card in the camera will be visible as a drive once connected). Click on the folder icon to find your photos stored in your network drive Select your camera drive if that is connected to your PC or your folder in the shared drive if not. Select the photo you want Click ok and it will upload Large files take a little while to upload but you can carry on working while they do It usually only takes a few minutes so don’t shut down until it’s done. To open the file afterwards look in the record attachments list, right click your photo and select View in windows. You can do this within the consultation link too. The photo of the mole you took should then open and look something like this: Shaun O’Connell October 2014
© Copyright 2026

