
Managing Apple Devices: Deploying and Maintaining
Managing Apple Devices SECOND EDITION DEPLOYING AND MAINTAINING iOS 8 AND OS X YOSEMITE DEVICES AREK DREYER | KEVIN M. WHITE Managing Apple Devices Second Edition Arek Dreyer and Kevin M. White Peachpit Press Managing Apple Devices, Second Edition Arek Dreyer and Kevin M. White Copyright © 2015 by Peachpit Press Peachpit Press www.peachpit.com To report errors, please send a note to [email protected] Peachpit Press is a division of Pearson Education. Executive Editor: Lisa McClain Production Editor: Maureen Forys, Happenstance Type-O-Rama Technical Editor: Craig Cohen Copy Editor: Kim Wimpsett Proofreader: Scout Festa Compositor: Cody Gates, Happenstance Type-O-Rama Indexer: Jack Lewis Cover Design and Production: Mimi Heft Notice of Rights All rights reserved. No part of this book may be reproduced or transmitted in any form by any means, electronic, mechanical, photocopying, recording, or otherwise, without the prior written permission of the publisher. For information on getting permission for reprints and excerpts, contact [email protected]. Notice of Liability The information in this book is distributed on an “As Is” basis, without warranty. While every precaution has been taken in the preparation of the book, neither the authors nor Peachpit shall have any liability to any person or entity with respect to any loss or damage caused or alleged to be caused directly or indirectly by the instructions contained in this book or by the computer software and hardware products described in it. Trademarks Many of the designations used by manufacturers and sellers to distinguish their products are claimed as trademarks. Where those designations appear in this book, and Peachpit was aware of a trademark claim, the designations appear as requested by the owner of the trademark. All other product names and services identified throughout this book are used in editorial fashion only and for the benefit of such companies with no intention of infringement of the trademark. No such use, or the use of any trade name, is intended to convey endorsement or other affiliation with this book. ISBN-13: 978-0-13-403196-5 ISBN–10: 0-13-403196-2 987654321 Thanks to Heather Jagman for her love, support, and encouragement. —Arek Dreyer I could not have made this journey without the support of my family and loving wife, Michelle. This book is dedicated to my greatest works; Logan, Sawyer, and Emily. —Kevin M. White Acknowledgments Thanks to you, dear reader, for staying on top of what’s new, while keeping your users’ needs as the root of what you do. Thank you to Tim Cook and everyone at Apple for always innovating. Thanks to Craig Cohen for insightful technical editing. Thanks to Schoun Regan for spending the time to offer guidance. Thank you to the amazingly capable Lisa McClain for gently making sure these materials made it into your hands, and to Kim Wimpsett, Scout Festa, and Maureen Forys and her team at Happenstance Type-O-Rama for working their editorial and production magic. Thank you to the following people. Without your help, guidance, suggestions, and feedback, this guide would be much less than what it is. David Colville Jussi-Pekka Mantere John DeTroye Keith Mitnick Josh Durham Derick Okihara Charles Edge Timo Perfitt Patrick Gallagher John Poynor Ben Greisler Tim Reid Shruti Gupta Dan Semaya Matt Jenns Sal Soghoian Andrew Johnson David Starr Adam Karneboge Brock Walters Ben Levy Josh Wisenbaker Fred Licht Douglas Worley Dave Lopata Eric Zelenka Tip Lovingood Contents About This Guide. . . . . . . . . . . . . . . . . . . . . . . . . . . . 1 Lesson 1 Prerequisites. . . . . . . . . . . . . . . . . . . . . . . . . . . . . . . . . . . . . . . . . . . Learning Methodology. . . . . . . . . . . . . . . . . . . . . . . . . . . . . . . . . . Lesson Structure . . . . . . . . . . . . . . . . . . . . . . . . . . . . . . . . . . . . . . . Exercise Setup . . . . . . . . . . . . . . . . . . . . . . . . . . . . . . . . . . . . . . . . . Lesson 2 Reference 2.1 1 2 3 4 Apple Management Concepts. . . . . . . . . . . . . . . . . . 9 Understanding Apple’s Goals. . . . . . . . . . . . . . . . . . . . . . . . . . . . 10 Exercise 2.4 Device Management and Supervision. . . . . . . . . . . . . . . . . . . . Apple ID Considerations. . . . . . . . . . . . . . . . . . . . . . . . . . . . . . . iCloud in Managed Environments. . . . . . . . . . . . . . . . . . . . . . . Apple Deployment Programs . . . . . . . . . . . . . . . . . . . . . . . . . . . Deployment Scenarios. . . . . . . . . . . . . . . . . . . . . . . . . . . . . . . . . Configure Your Client Mac. . . . . . . . . . . . . . . . . . . . . . . . . . . . . Create Apple IDs. . . . . . . . . . . . . . . . . . . . . . . . . . . . . . . . . . . . . . Verify Administrator Apple ID Access. . . . . . . . . . . . . . . . . . . Configure Your iOS Device. . . . . . . . . . . . . . . . . . . . . . . . . . . . . Lesson 3 Infrastructure Considerations . . . . . . . . . . . . . . . . 59 Reference 2.2 Reference 2.3 Reference 2.4 Reference 2.5 Reference 2.6 Exercise 2.1 Exercise 2.2 Exercise 2.3 11 16 22 29 32 34 45 51 53 Exercise 3.1 Network Considerations. . . . . . . . . . . . . . . . . . . . . . . . . . . . . . . Security Considerations. . . . . . . . . . . . . . . . . . . . . . . . . . . . . . . . Physical Logistics. . . . . . . . . . . . . . . . . . . . . . . . . . . . . . . . . . . . . . Support Options . . . . . . . . . . . . . . . . . . . . . . . . . . . . . . . . . . . . . . Verify Network Service Availability. . . . . . . . . . . . . . . . . . . . . . Lesson 4 OS X Server for Yosemite . . . . . . . . . . . . . . . . . . . . 89 Reference 3.1 Reference 3.2 Reference 3.3 Reference 3.4 Reference 4.1 Reference 4.2 Reference 4.3 59 65 73 78 81 OS X Server Benefits. . . . . . . . . . . . . . . . . . . . . . . . . . . . . . . . . . . 89 OS X Server Setup. . . . . . . . . . . . . . . . . . . . . . . . . . . . . . . . . . . . . 91 TLS/SSL Certificates. . . . . . . . . . . . . . . . . . . . . . . . . . . . . . . . . . . 96 v vi Contents Exercise 4.4 Prepare Your Mac for OS X Server for Yosemite. . . . . . . . . . Install OS X Server for Yosemite. . . . . . . . . . . . . . . . . . . . . . . . Configure OS X Server for Yosemite. . . . . . . . . . . . . . . . . . . . Configure Server on Your Client Computer (Optional). . . . Lesson 5 Caching Service. . . . . . . . . . . . . . . . . . . . . . . . . . . . 135 Exercise 4.1 Exercise 4.2 Exercise 4.3 105 119 122 131 Exercise 5.1 Caching Service Architecture . . . . . . . . . . . . . . . . . . . . . . . . . . Caching Service Setup . . . . . . . . . . . . . . . . . . . . . . . . . . . . . . . . Caching Service Troubleshooting. . . . . . . . . . . . . . . . . . . . . . . Turn On and Verify the Caching Service . . . . . . . . . . . . . . . . Lesson 6 Configuration and Profiles. . . . . . . . . . . . . . . . . . 151 Reference 5.1 Reference 5.2 Reference 5.3 135 139 142 145 Exercise 6.4 Understanding Profiles. . . . . . . . . . . . . . . . . . . . . . . . . . . . . . . . Profile Manager Setup . . . . . . . . . . . . . . . . . . . . . . . . . . . . . . . . Creating Profiles via Profile Manager . . . . . . . . . . . . . . . . . . . Manually Installing Profiles. . . . . . . . . . . . . . . . . . . . . . . . . . . . Turn On Profile Manager. . . . . . . . . . . . . . . . . . . . . . . . . . . . . . Create, Download, and Install Profiles for Users and Groups. . . . . . . . . . . . . . . . . . . . . . . . . . . . . . . . . . . . . . . . . . Inspect the Effects of Signing . . . . . . . . . . . . . . . . . . . . . . . . . . Clean Up Profiles. . . . . . . . . . . . . . . . . . . . . . . . . . . . . . . . . . . . Lesson 7 Mobile Device Management. . . . . . . . . . . . . . . . . 191 Reference 6.1 Reference 6.2 Reference 6.3 Reference 6.4 Exercise 6.1 Exercise 6.2 Exercise 6.3 151 156 160 166 169 170 181 189 Exercise 7.4 Mobile Device Management Architecture. . . . . . . . . . . . . . . . 191 Profile Manager Device Management. . . . . . . . . . . . . . . . . . . 195 User-Initiated Enrollment . . . . . . . . . . . . . . . . . . . . . . . . . . . . . 198 Profile Manager Inventory and Organization. . . . . . . . . . . . . 205 Profile Manager Administrative Tasks. . . . . . . . . . . . . . . . . . . 213 Automatically Pushing Profiles. . . . . . . . . . . . . . . . . . . . . . . . . 216 Enable Device Management . . . . . . . . . . . . . . . . . . . . . . . . . . . 221 Enroll Over the Air. . . . . . . . . . . . . . . . . . . . . . . . . . . . . . . . . . . 223 Deploy Management Settings. . . . . . . . . . . . . . . . . . . . . . . . . . 230 Unenroll Over the Air . . . . . . . . . . . . . . . . . . . . . . . . . . . . . . . . 236 Lesson 8 Apple Configurator: Planning and Setup. . . . . . 241 Reference 7.1 Reference 7.2 Reference 7.3 Reference 7.4 Reference 7.5 Reference 7.6 Exercise 7.1 Exercise 7.2 Exercise 7.3 Reference 8.1 Reference 8.2 Exercise 8.1 Apple Configurator Planning . . . . . . . . . . . . . . . . . . . . . . . . . . 242 Apple Configurator Installation and Setup. . . . . . . . . . . . . . . 246 Get Apple Configurator. . . . . . . . . . . . . . . . . . . . . . . . . . . . . . . 250 Contents vii Lesson 9 pple Configurator: Unsupervised A iOS Devices. . . . . . . . . . . . . . . . . . . . . . . . . . . . . . . 255 Exercise 9.1 Prepare iOS Devices. . . . . . . . . . . . . . . . . . . . . . . . . . . . . . . . . . Install and Edit Profiles . . . . . . . . . . . . . . . . . . . . . . . . . . . . . . . Customize Setup Assistant. . . . . . . . . . . . . . . . . . . . . . . . . . . . . Apple Configurator: Prepare an Unsupervised iOS Device. . . Lesson 10 Apple Configurator: Supervised iOS Devices. . . 287 Reference 9.1 Reference 9.2 Reference 9.3 Reference 10.1 Prepare Supervised iOS Devices. . . . . . . . . . . . . . . . . . . . . . . . Install Profiles and Enroll Devices. . . . . . . . . Reference 10.3 Back Up and Restore iOS Content. . . . . . . . . . . . . . . . . . . . . . Reference 10.4 Manage Supervised iOS Devices. . . . . . . . . . . . . . . . . . . . . . . . Exercise 10.1 Apple Configurator: Prepare a Supervised iOS Device. . . . . Exercise 10.2 Apple Configurator: Back Up and Restore a Supervised iOS Device. . . . . . . . . . . . . . . . . . . . . . . . . . . . . . . . Reference 10.2 Automatically Lesson 11 Apps via Apple Configurator. . . . . . . . . . . . . . . . . . . . . Apps Deployed via Apple Configurator. . . . . . . . . . . Reference 11.3 Single App Mode. . . . . . . . . . . . . . . . . . . . . . . . . . . . . . . . . . . . . Exercise 11.1 Apple Configurator: Prepare to Distribute a Free App. . . . . Exercise 11.2 Deploy Apps to Supervised Devices with Configurator. . . . Reference 11.2 Update 315 327 334 337 340 344 Out-of-the-Box Management via DEP. . . . . . . . 349 Reference 12.1 Device Enrollment Program Introduction . . . . . . . . . . . . . . . Reference 12.2 Integrate DEP with Profile Manager . . . . . . . . . . . . . . . . . . . . Reference 12.3 Configure DEP Assignments in Profile Manager. . . . . . . . . . Exercise 12.1 Enroll with Apple Deployment Programs. . . . . . . . . . . . . . . . Exercise 12.2 Configure Profile Manager for DEP. . . . . . . . . . . . . . . . . . . . . Exercise 12.3 Assign Devices to an MDM Service. . . . . . . . . . . . . . . . . . . . . Exercise 12.4 Create and Manage Device Enrollments. . . . . . . . . . . . . . . . . Lesson 13 288 290 293 297 300 Apple Configurator: App Management. . . . . . . . 327 Reference 11.1 Install Lesson 12 255 259 262 267 350 355 364 372 381 387 390 Activation Lock Management. . . . . . . . . . . . . . . . 397 Reference 13.1 Activation Lock Introduction. . . . . . . . . . . . . . . . . . . . . . . . . . 397 Reference 13.2 Manage Activation Lock. . . . . . . . . . . . . . . . . . . . . . . . . . . . . . 400 Exercise 13.1 Control Activation Lock on a Managed Device. . . . . . . . . . . 404 Lesson 14 VPP-Managed Apps and Books. . . . . . . . . . . . . . 417 Reference 14.1 Volume Purchase Program Essentials . . . . . . . . . . . . . . . . . . . 417 viii Contents Reference 14.2 VPP Service Enrollment and Administration. . . . . . . . . . . . . 422 VPP with Profile Manager . . . . . . . . . . . . . . . . . . . . 425 Reference 14.4 Purchasing VPP Apps and Books. . . . . . . . . . . . . . . . . . . . . . . 428 Reference 14.5 VPP Managed Distribution Assignments. . . . . . . . . . . . . . . . 433 Reference 14.6 VPP Managed Distribution User Enrollment. . . . . . . . . . . . . 438 Reference 14.7 Installing VPP-Assigned Apps and Books. . . . . . . . . . . . . . . . 443 Exercise 14.1 Configure Profile Manager for VPP. . . . . . . . . . . . . . . . . . . . . 447 Exercise 14.2 Purchase and Assign Licensed Apps and Books. . . . . . . . . . . 453 Exercise 14.3 Invite Participants for VPP Managed Distribution . . . . . . . . 461 Exercise 14.4 Install VPP Apps Manually. . . . . . . . . . . . . . . . . . . . . . . . . . . . 468 Exercise 14.5 Remove VPP Managed Distribution Services and Unassign Apps. . . . . . . . . . . . . . . . . . . . . . . . . . . . . . . . . . . . . . . 474 Reference 14.3 Integrate Lesson 15 In-House Apps and Books. . . . . . . . . . . . . . . . . . . 479 Reference 15.1 Deploy Exercise 15.2 In-House Apps and Books. . . . . . . . . . . . . . . . . . . . . . In-House Apps and Books via Profile Manager . . . Deploy In-House Apps via Profile Manager (Optional). . . . Deploy In-House Books via Profile Manager. . . . . . . . . . . . . Lesson 16 User Data and Services . . . . . . . . . . . . . . . . . . . . . 507 Reference 15.2 Manage Exercise 15.1 Reference 16.1 User Content Considerations . . . . . . . . . . . . . . . . . . . . . . . . . . X Server Wiki . . . . . . . . . . . . . . . . . . . . . . . . . . . . . . . . . . . . Reference 16.3 OS X Server WebDAV . . . . . . . . . . . . . . . . . . . . . . . . . . . . . . . . Exercise 16.1 Use the OS X Server Wiki. . . . . . . . . . . . . . . . . . . . . . . . . . . . . Exercise 16.2 Use an OS X Server WebDAV Share . . . . . . . . . . . . . . . . . . . . Reference 16.2 OS Lesson 17 508 518 521 527 533 Managing Access . . . . . . . . . . . . . . . . . . . . . . . . . . 547 Reference 17.1 Managed Open In. . . . . . . . . . . . . . . . . . . . . . . . . . . . . . . . . . . . Reference 17.2 Limit Access to Content and Services. . . . . . . . . . . . . . . . . . . Exercise 17.1 Manage Open In. . . . . . . . . . . . . . . . . . . . . . . . . . . . . . . . . . . . . Exercise 17.2 Restrict Access to Services via Profile . . . . . . . . . . . . . . . . . . . Lesson 18 479 485 490 502 547 549 552 576 Develop a Management Plan. . . . . . . . . . . . . . . . . 589 Reference 18.1 Define Requirements . . . . . . . . . . . . . . . . . . . . . . . . . . . . . . . . . 589 Reference 18.2 Consider Third-Party Solutions. . . . . . . . . . . . . . . . . . . . . . . . 592 Exercise 18.1 Develop a Management Plan. . . . . . . . . . . . . . . . . . . . . . . . . . . 594 Index. . . . . . . . . . . . . . . . . . . . . . . . . . . . . . . . . . . . 600 Lesson 4 OS X Server for Yosemite OS X Server for Yosemite (also informally known as Yosemite Server) helps your users collaborate, communicate, share information, and access the resources they need to get their work done. While OS X Server indeed provides a variety of services, the aim of this guide is to focus on the services that facilitate the management of Apple devices. This lesson begins with a brief introduction of OS X Server before moving into the requirements and initial setup of OS X Server. This lesson also covers selecting and configuring Secure Sockets Layer (SSL) certificates required for Apple device management. Goals ▶▶ ▶▶ Perform the initial installation and configuration of OS X Server Consider TLS/SSL certificate requirements and best practices Reference 4.1 OS X Server Benefits Other solutions are capable of providing management for Apple devices, but at only $19.99 (US), none of them is as inexpensive as OS X Server. Also, despite the price, because Apple develops OS X Server, it’s often the first management solution that supports the latest Apple management features and operating systems. Further, even if you intend to use a third-party Mobile Device Management (MDM) solution, other services in OS X Server are still clearly the best solution. For example, the Caching service has no alternative if you want to reduce the Internet bandwidth required for installing and updating Apple-sourced software. Also, other services in OS X Server are simply the best implementation available. The NetInstall service that provides network system disk access for OS X 89 90 OS X Server for Yosemite computers is available from other servers, but the implementation in OS X Server is considered the best choice. Services Covered in This Guide Again, this guide focuses on the OS X services that are most responsible for helping administrators manage their Apple deployments: ▶▶ Caching service—As introduced previously, the Caching service greatly reduces Internet bandwidth used for the installation of Apple-sourced software and media. Lesson 5, “Caching Service,” focuses on the architecture, setup, and troubleshooting of this service. ▶ OS X Server for Yosemite still supports the legacy Software Update service. However, this older service is limited to providing updates only for OS X system software and Apple software installed from outside the Mac App Store. Due to this service’s limited use in contemporary Apple deployments, it’s not covered in this guide. NOTE ▶▶ ▶▶ ▶▶ ▶▶ Profile Manager—This is the name given to the MDM service provided by OS X Server. The vast majority of material in this guide deals directly with or is designed around MDM management workflows. Both Lesson 6, “Configuration and Profiles,” and Lesson 7, “Mobile Device Management,” cover Profile Manager specifically. In addition, nearly all lessons that follow these two deal with topics related to MDM services. NetInstall—This service makes OS X systems available for startup via a network connection. NetInstall is often used as a platform for installing or re-imaging Mac computers en masse. Coverage of this service is beyond the scope of this guide, but you can find out more from Apple Pro Training Series: OS X Server Essentials 10.10, also from Peachpit Press. WebDAV—This is the only local file-sharing service provided by OS X Server that supports both iOS and OS X devices. This is covered as part of Lesson 16, “User Data and Services.” Wiki—The OS X Server Wiki service not only provides a browser-based interface for collaborative document creation but also serves as an alternative for local file sharing. This service is also covered as part of Lesson 16, “User Data and Services.” MORE INFO ▶ For more detailed coverage of OS X Server setup and services outside the scope of this guide, check out Apple Pro Training Series: OS X Server Essentials 10.10, also from Peachpit Press. Reference 4.2 OS X Server Setup 91 Reference 4.2 OS X Server Setup This section outlines the system requirements for OS X Server and presents suggestions for scoping server hardware. Recommendations for network configuration of an OS X Server are also covered. MORE INFO ▶ Detailed step-by-step instructions for installing and configuring OS X Server are presented in the exercises later in this lesson. Verifying Server Hardware Requirements OS X Server is an app that runs on a Mac running Yosemite; if your Mac can run Yosemite, it can run OS X Server. Before you install OS X Server, confirm that your system meets at least the minimum hardware requirements. You can find this information on the label attached to the box of every Mac sold, or you can find it with the About This Mac and System Information applications. You can install the OS X Server application on any Mac computer running OS X Yosemite, with at least 2 GB of RAM and 10 GB of available disk space. To run Yosemite, your Mac must be one of the following models or later: ▶▶ iMac (mid-2007 or later) ▶▶ MacBook (13-inch Aluminum, late 2008; 13-inch, early 2009 or later) ▶▶ MacBook Pro (13-inch, mid-2009 or later; 15-inch or 17-inch, mid/late 2007 or later) ▶▶ MacBook Air (late 2008 or later) 92 OS X Server for Yosemite ▶▶ Mac mini (early 2009 or later) ▶▶ Mac Pro (early 2008 or later) ▶▶ Xserve (early 2009) Some features of OS X Server require an Apple ID, and some features require a compatible Internet service provider. Server Hardware Considerations For the purposes of the exercises in this guide or any other deployment testing, you can run OS X Server on just about any contemporary Mac. In practice, however, consider the size of your Apple deployment and select hardware appropriate for your production needs: ▶▶ ▶▶ Memory—In general, more system memory results in better system performance, but exactly how much memory is ideal for your situation is impossible for this guide to prescribe. You can, however, get a good idea of system memory usage for an existing server from the Memory Usage and Memory Pressure statistics found in the Stats pane of the Server app. Obviously, if you observe extremely high memory usage, upgrading the Mac computer’s system memory is a good idea. Storage—Be sure you have enough disk space to hold the data for the services you plan to offer. If the services you plan to offer are disk intensive—for example, the Wiki service with a high volume of user content—consider using a faster physical disk or even an external disk system. An external disk is especially useful for the Caching Reference 4.2 OS X Server Setup 93 service since it can potentially fill an entire disk, and the more items that are cached, the more effective the service. ▶▶ ▶▶ ▶▶ Backup—You cannot re-create a lost MDM database because of the security architecture of the MDM service. Thus, if the data store for Profile Manager is lost, you will lose the ability to manage your Apple devices. The devices will retain existing management settings but will accept new management only when enrolled into a new MDM service. In short, you really need to back up your management server. OS X Server is fully supported by the Time Machine backup built in to OS X. Network interfaces—Be sure to consider the speed of the network interface when making a server hardware decision. Most Mac computers support Gigabit Ethernet. All Mac computers capable of running OS X Yosemite that include built-in Ethernet interfaces support Gigabit Ethernet. If your Mac is equipped with Thunderbolt interfaces, you can use Apple Thunderbolt to Gigabit Ethernet adapters to add additional Ethernet interfaces. All services, except for Caching and NetInstall, can operate from the Mac system’s Wi-Fi interface. But for performance reasons, it’s not recommended that you provide services via a Wi-Fi interface. Availability—To help ensure that OS X Server stays up and running, you can turn on the Energy Saver system preference setting “Start up automatically after a power failure” (not available on all Mac systems). It’s also recommended that you use an uninterruptible power supply (UPS) for your server, including any external volumes, to keep your server up and running in the case of a brief power outage. Server Network Considerations Again, for the purposes of completing exercises in this guide or for general testing, you can configure your server using whatever Internet Protocol (IP) address was set via Dynamic Host Control Protocol (DHCP) and even use the computer’s local Bonjour name. However, some services may be negatively affected if the server’s IP address or host name is changed. If you absolutely must change the name of your server, do so only via the server Overview settings in the Server app. On a computer running OS X Server, you should never change the name via Sharing preferences. For example, your MDM service must be resolvable on all managed devices to a single Domain Name System (DNS) host name. Managed devices communicate with the MDM service only via the single host name used during enrollment. In other words, if you want 94 OS X Server for Yosemite to change the DNS host name clients use to resolve the MDM service, you will have to reenroll all your devices with the new host name. Given that changes to a server configuration can dramatically affect device management, it’s obviously best to select network settings that will remain appropriate throughout the duration of your deployment. Consider the following factors when configuring network access for your management server: ▶▶ ▶▶ ▶▶ ▶▶ ▶▶ IP address—Configuring a static IP address for your production OS X Server is highly recommended. The primary reason for this is to prevent accidental changes that would prevent the DNS host name of the server to become unreachable. Subnets—With the exception of two specific issues, most OS X Server services aren’t affected by subnet settings. First, if you don’t use a DNS host name and instead rely on the Bonjour local host name (often defined as something like computername.local), only devices on the local subnet will recognize your server’s local host name. Obviously, this issue can be resolved by configuring a “real” DNS host name. Second, the NetInstall discovery service broadcast doesn’t travel beyond the local subnet by default. Resolving this issue is detailed in Apple Support article PH15509, “Set up NetInstall service across subnets.” Computer name—The server’s computer name affects access to the server only from the local subnet. The computer name is often used to define the Bonjour local host name, which again is resolvable only on the server’s local subnet. For any server that needs to be reachable beyond the local subnet (that is, most servers), the computer name doesn’t really matter. DNS host name—A server’s DNS host name is how most clients will resolve access to almost all the services hosted on your server. You must coordinate with your DNS network administrator to make sure the server’s DNS host name is properly configured. Remember that OS X Server requires both a forward and reverse DNS host name record for proper setup. Network ports—The variety of services offered by your server use a range of both User Datagram Protocol (UDP) and Transmission Control Protocol (TCP) network ports. A properly configured firewall should allow traffic only for the necessary network ports. Thus, newly configured services often require changes to established network firewalls. You will likely have to work with the network firewall administrator to open additional ports for managing Apple devices. Throughout this guide, when a specific service’s architecture is detailed, the required network ports will be included with the documentation. Reference 4.2 OS X Server Setup 95 ▶ Apple maintains a list of all the well-known network ports used by Apple products in Apple Support article HT202944, “TCP and UDP ports used by Apple software products.” MORE INFO ▶▶ Simple Mail Transfer Protocol (SMTP) relay—A variety of services in OS X Server will send email messages as part of their function. If your organization relies on an SMTP relay service for sending email messages, then you need to configure OS X Server to take advantage of this service. ▶ For information about configuring OS X Server to use an SMTP relay, see Apple Support article HT202962, “OS X Server: Sending email invitations, notifications and alerts when an SMTP relay is required.” MORE INFO External Access and Reachability Testing Managed devices can receive management changes only if they can access your MDM service. Thus, if you require that devices are able to receive management changes when they are outside your network or on the Internet, your network infrastructure will have to be properly configured to allow connections from outside your network to reach your server. If your server is on an internal network that uses private IP addresses, as is the most common case, your network routing will need to be configured so that it forwards traffic from a public Internet IP address to your server. If this is the case, only the required specific TCP ports will likely be forwarded to your server. Obviously coordinating with a network administrator will be required to properly configure network routing and firewall rules. Another consideration if your server is to be accessed from the Internet is that the DNS host name must be resolvable to any host on the Internet. As covered previously, in most of these cases, your server will be accessible via an external public IP address that forwards to an internal private IP address. This type of IP forwarding also requires a DNS configuration—commonly known as split DNS—where a single host name resolves to the proper IP address both externally and internally. In other words, even though your server uses a single DNS host name, devices in your network will resolve this host name to a private IP address; devices outside your network will resolve the same host name to a public IP address. Again, coordinating with a network administrator is required to properly set up this type of DNS configuration. Properly testing external service reachability can be tricky because it requires that you have access to a test external network. Fortunately, OS X Server for Yosemite introduces 96 OS X Server for Yosemite a new feature, reachability testing, that will help you determine whether your server is accessible to Internet clients. This testing service is turned on by default, and you can find the results in the server Overview tab in the Server app. You can further verify reachability for specific services by clicking the Details button to the right of the reachability information. The reachability service works by instructing automated servers at Apple to try to contact your server. In the reachability detailed view, you can see what external IP address, public host name, and specific services are available. This information will be valuable for any network administrator who is trying to help you facilitate external access for your server. Reference 4.3 TLS/SSL Certificates Transport Layer Security (TLS) and its predecessor, SSL, are protocols for the secure transmission of data between hosts. More specifically, TLS/SSL technology is used to Reference 4.3 TLS/SSL Certificates 97 prove your server’s identity to client devices and to encrypt communication between your server and client devices. This encryption isn’t just recommended to secure OS X Server services; it’s required for any MDM service including Profile Manager. This section starts with the basics of TLS/SSL certificates and then provides recommendations for certificate best practices in regard to managing Apple devices. Understanding Certificates To enable TLS/SSL communications, you must configure your server with a TLS/SSL certificate (also referred to as simply a certificate). A certificate is a file that identifies the certificate holder. A certificate specifies the permitted use of the certificate and has an expiration date. This is why certificates must be renewed on a regular basis (most often annually). Importantly, a TLS/SSL certificate also includes a public key infrastructure (PKI) public key. This public key is mathematically tied to a private key that is securely stored on the server. Data encrypted with one key can be decrypted only by using the other key. Thus, if you can decrypt data with one key, it proves that the data was encrypted with the other key. To initiate secure TLS/SSL connections, client devices download the certificate (containing the public key) from your server. If a client can successfully verify the identity of the server from the certificate, it will use the public key to begin secure communications with the server. This raises the question, how exactly does a client device verify, or trust, a certificate? The answer is that a certificate is verified by its digital signature. A certificate is either selfsigned or signed by a certification authority (also known as a certificate authority or, more simply, a CA). A self-signed certificate, as the name implies, doesn’t require the involvement of other CAs; thus, OS X Server will automatically create a self-signed certificate during the setup process. You can use a self-signed certificate for most TLS/SSL services, but self-signed certificates created by OS X Server (and most other servers) are not trusted by Apple devices for MDM services. In other words, if you need to manage Apple devices, you will need to configure a certificate that has been signed by a verifiable CA. Certificates used by servers are most often signed by an intermediate CA, which is a CA whose certificate is signed by another CA. The PKI infrastructure allows for a hierarchical chain of certificates, commonly known as a chain of trust. For example, the following figure shows the chain of trust for 98 OS X Server for Yosemite https://www.apple.com, which can be revealed in Safari by clicking the lock to the left of a web address: The certificate for www.apple.com is signed by an intermediate CA with the name of Symantec Class 3 EV SSL CA – G3, and that intermediate CA is signed by a CA with the name of VeriSign Class 3 Public Primary Certification Authority – G5. You can follow a chain of certificates, starting with a signed certificate, following it up to the intermediate CA, and ending at the top of the chain. The certificate chain ends with a CA that signs its own certificate, which is called a root CA. This raises the question, how does a device know whether it can trust a CA? The answer is that trust has to start somewhere. iOS and OS X include a collection of root and intermediate CAs that Apple has determined are worthy of trust out of the box. By extension, your Apple devices also trust any certificate or intermediate CA whose certificate chain ends with one of these CAs. Although you can’t directly inspect the list of root certificates included on iOS devices, you can on an OS X computer from the Keychain Access application. Open Keychain Access (in the Utilities folder). In the upper-left Keychains column, select System Roots. Note that in the following figure the bottom of the window states that there are more than 200 trusted CAs or intermediate CAs by default in Yosemite: Reference 4.3 TLS/SSL Certificates 99 MORE INFO ▶ The Apple PKI website (https://www.apple.com/certificateauthority/) contains more information about the root certificates included with Apple devices. You can also find a complete list of trusted root certificates for iOS in Apple Support article HT204132, “iOS 8: List of available trusted root certificates,” and for OS X in article HT202858, “OS X Yosemite: List of available trusted root certificates.” Certificate Signed by an Open Directory CA Again, any MDM service must use a TLS/SSL certificate signed by a trusted CA. This limits you to one of two choices if using Profile Manager as your MDM service: a certificate signed by a widely trusted CA (as covered in the next section) or a certificate signed by your own local Open Directory CA. Fortunately, OS X Server makes this latter choice an easy option by automatically creating an Open Directory CA and signing your server’s TLS/SSL certificate during the creation of an Open Directory master. ▶ Creating an Open Directory master is required to enable device management for Profile Manager. In other words, you’re probably going to end up with an Open Directory CA even if you don’t use it to sign the server’s certificate. NOTE ▶ Make sure your server’s host name is properly configured prior to the creation of an Open Directory master. The Open Directory CA will only automatically sign the certificate with a name that matches the host name of the server. NOTE 100 OS X Server for Yosemite When creating an Open Directory master from the Server app, Setup Assistant will guide you through several screens. One of the setup screens allows you to enter organizational information. This information will be used to create an Open Directory CA that will then be used to sign an intermediate CA, which is then used to sign your server’s TLS/SSL certificate. This process will also create a code signing certificate that will come in handy for verifying profiles, as covered in Lesson 6, “Configuration and Profiles.” ▶ Detailed step-by-step instructions for creating an Open Directory master are presented in the exercises later in this lesson. MORE INFO Assuming you completed the Open Directory master creation before acquiring other certificates, the Server app will automatically configure all supported services to use the certificate signed by the Open Directory CA. You can verify this by simply navigating to your server’s default secure website, https://hostname, where “hostname” is the name of your server. Even if the Websites service on your server isn’t turned on, you will still see a default web services page and can inspect the certificate used to protect the site. Reference 4.3 TLS/SSL Certificates 101 You’ll note that even though a chain of trust has been created, you still have the fundamental problem that Apple devices, by default, do not trust your server’s Open Directory CA. In a managed environment, this problem can be easily resolved by using a trust profile, also covered in Lesson 6, “Configuration and Profiles.” In fact, deploying a trust profile is required for the enrollment of most MDM services, including Profile Manager. Thus, if you or your staff is going to be directly responsible for managing the enrollment of Apple devices, using a certificate signed by the Open Directory CA is a perfectly acceptable solution for most deployments. Issues with an Untrusted Certificate In some environments, using a certificate signed by an Open Directory CA is not the recommended solution. For example, your organization may require that all TLS/SSL services use certificates that meet a certain specification or are provided by a specific vendor. Alternately, if your environment relies upon users self-enrolling their own devices, you don’t want the first user experience of your management solution to be a warning message. The following warning message appears on an unmanaged iOS device when 102 OS X Server for Yosemite connecting for the first time to an MDM service using a certificate signed by an untrusted Open Directory CA: Not only does this type of warning message make your management solution look sketchy, it means that you (and your users) can’t trust any connection made to your management server. In other words, when connecting from an unmanaged device, you will have no way of identifying a legitimate connection to your server from an illegitimate server acting as your server or a server that is attempting a man-in-the-middle attack. Further, you don’t want to establish that it’s OK for your users to click Continue when presented with this warning. Quite to the contrary, you should be instructing them that accepting connections to unverified servers is extremely dangerous. Certificate Signed by a Widely Trusted CA If you determine that your server needs a certificate signed by a widely trusted CA, the Certificates pane of the Server app provides two main methods for configuration: getting a trusted certificate by generating a certificate signing request (CSR) or importing an existing certificate identity. ▶ At this point, when configuring an OS X Server for managing Apple devices, you only need to acquire a standard TLS/SSL certificate, the kind that is commonly used to protect websites. Although a code signing certificate can be used with an MDM service, it is not required to set up and use the service. NOTE Reference 4.3 TLS/SSL Certificates 103 Get a Trusted Certificate The default behavior for the Add (+) button at the bottom of the Certificates pane in the Server app is to open an assistant that will step you through the process of getting a trusted certificate. Alternately, if the Certificates pane is set to show all certificates (via the Action menu), then the Add (+) button reveals a pop-up menu. The Get a Trusted Certificate assistant will create a new certificate identity consisting of an unsigned certificate and a private/public key pair. After you enter contact information for the certificate, the system will present a CSR. You will need to copy and paste (or save to a text file) the CSR content. The act of providing a CSR to a CA vendor is the most common method for acquiring a certificate signed by a widely trusted CA. At this point, you will need to identify a CA vendor. Your organization may already work with a CA vendor, so that will likely be your first choice. Otherwise, the only recommendation is choosing a CA vendor that works with Apple devices. When selecting a CA vendor, an obvious quick test is that an Apple device can establish a secure connection to the vendor’s website. 104 OS X Server for Yosemite After acquiring a TLS/SSL certificate subscription from a CA vendor, you will need to give the vendor your server’s CSR. Most CA vendors will accept the CSR content via a simple paste into a website. After the CA vendor has validated and signed your certificate, they will return it to you as a download. The download will often include the CA vendor’s intermediate and root certificates. Double-click the pending certificate in the Server app and drag all certificates provided by the CA vendor into the appropriate area. Import a Certificate Identity Again, if the Certificates pane is set to show all certificates (via the Action menu), then the Add (+) button reveals a pop-up menu. From this menu, you can select the option to import a certificate identity. This option assumes you already have a valid certificate identity consisting of a signed certificate and a private/public key pair. This is often the case if your organization uses a centralized certificate repository or if your organization has a wildcard certificate that can be used for multiple services. The term wildcard refers to the fact that the certificate can be used with any host name inside a specific domain. If this is the case, someone else has already done all the hard work for you and will provide you with the appropriate certificates and private/public key pair. Transporting a private key in the clear is dangerous, so the key is often stored in an encrypted document. Further, to make certificate identities easier to transport, this encrypted document will also contain all the appropriate certificates. The most common file types are .pfx and .p12, both of which share a similar encrypted format. The person providing you with the certificate identity will also have to provide you with the encryption key used to protect the document containing the private key. Once you Exercise 4.1 Prepare Your Mac for OS X Server for Yosemite 105 have all the certificate identity documents, simply drag them to the certificate import window in the Server app and then provide the encryption key. Exercise 4.1 Prepare Your Mac for OS X Server for Yosemite ▶ Prerequisites ▶▶ ▶▶ You’ll need a Mac that is qualified to run OS X Server, that has OS X Yosemite on its startup volume, and that does not yet have OS X Server installed and configured on its startup volume. Even though best practice calls for a PTR DNS record (reverse DNS record) to exist for the IPv4 address of your server computer, the exercises in this guide are written for use in a test network with Bonjour .local names, so there should be no PTR record for the primary IPv4 address of your server. In this exercise, you will configure your server computer in preparation for installing OS X Server on it. You’ll use one of two options to configure a local administrator account, depending on whether you are performing these exercises independently or are in an instructor-led environment with a Mac computer that has already been set up. 106 OS X Server for Yosemite In both situations, you’ll use System Preferences to configure Network and Sharing preferences. You will also download the student materials that you’ll use throughout this class. Finally, you will apply any necessary system software updates. Challenge Set up your server computer with a unique computer name. Download the student materials. Considerations The exercises in this guide are written so that the individual reader and the student in the instructor-led environment have a similar experience. In a production environment, it is best practice to use your server’s fully qualified domain name. However, to make the exercises possible for those who cannot provide appropriate DNS records to computers and devices on their test network, the exercises in this guide use your server’s Bonjour .local name instead of a fully qualified domain name. Solution Use Your Client Computer to Confirm Lack of PTR Records Before you configure your server Mac, use your client Mac to confirm that your DNS service does not provide a PTR record defining a host name for the primary IPv4 address your server will use. 1 On your client Mac, press Command–Space bar (or click the Spotlight icon in the upper-right corner of the screen) to reveal the Spotlight Search field. 2 In the Spotlight Search field, enter Network Utility. 3 Confirm that Network Utility is listed in the Top Hit section of the search results, and then press Return to open it. 4 Click the Lookup tab. Exercise 4.1 Prepare Your Mac for OS X Server for Yosemite 107 5 In the “Enter an internet address to lookup” field, enter 10.0.0.n1 (where n is your stu- dent number; for example, student1 uses 10.0.0.11, student 6 uses 10.0.0.61, and student 15 uses 10.0.0.151). 6 Click Lookup. 7 If the result field contains the text “The operation couldn’t be completed,” there is no PTR record for your server’s primary IPv4 address. You can continue with the next section, “Configure OS X on Your Server Computer.” 8 If the result field contains a DNS name such as “servern.pretendco.com” (where n is your student number), the DNS server that you are using provides PTR records for your server’s primary IPv4 address, and you need to take additional actions before continuing with this exercise. For best results when you perform the exercises on your test network, the DNS service for your server computer, your client computer, and your iOS device should not provide a PTR record for your server’s primary IPv4 address. If the DNS service 108 OS X Server for Yosemite does provide a PTR record for your server’s primary IPv4 address, here are two options you might try before continuing with the exercises in this guide: ▶▶ Configure your internal DNS server to not offer a PTR record for your server’s primary IPv4 address. ▶▶ Configure your test network’s DHCP service to use an external DNS service that does not offer a PTR record for your server’s primary IPv4 addresses. ▶▶ After you make one of the suggested changes, perform the previous step 5 again. If you cannot perform either of the previous options, perform the following to configure your server to use a .local Bonjour name even though there is a PTR record available for its primary IPv4 address: ▶▶ After you install OS X Server, select your server in the Server app sidebar, click the Overview tab, click Edit next to the Host Name field, click Next to start the Change Host Name assistant, and select Local Network in the Accessing Your Server pane. Click Next, enter servern.local in the Host Name field, and then click Finish. For experienced administrators, if you must use your server’s fully qualified domain name instead of its Bonjour .local name, replace every instance of a Bonjour .local name with your server’s fully qualified domain name throughout all of the exercises in this guide. Configure OS X on Your Server Computer Starting with a fresh installation of OS X is most convenient. If your Mac is at the Welcome pane when you turn it on, you can use the Option 1 section that follows. If you need to use an existing OS X system, skip to Option 2 so your Mac will be configured as expected for the rest of the exercises. Option 1: Configure OS X on Your Server Computer with Setup Assistant This option is necessary if your server computer has not already been set up, which is the situation in an instructor-led environment. If you are using a Mac with existing accounts, perform the steps in “Option 2: Configure an Existing OS X System for Your Server Computer” instead. Ensure that you have OS X Yosemite installed on your server computer. If it isn’t already installed, install it now using the App Store, the Recovery HD, or a method specified by your instructor, and then continue when you reach the Welcome pane. Exercise 4.1 Prepare Your Mac for OS X Server for Yosemite 109 In this section, you’ll step through the OS X Setup Assistant for the initial system configuration of your server computer. 1 Ensure that your computer is connected to a valid network connection, unless you plan to use Wi-Fi as your primary network connection. 2 If necessary, turn on the Mac that will run OS X Server. 3 At the Welcome screen, select the appropriate region, and click Continue. 4 Select the appropriate keyboard layout, and click Continue. Setup Assistant evaluates your network environment and tries to determine whether you are connected to the Internet. This can take a few moments. 5 If you plan to use Ethernet for your primary network connection and are not asked about your Internet connection, your computer’s network settings have already been configured via DHCP, and you may skip to step 8. If you plan to use Wi-Fi for your primary network connection and are at the Select Your Wi-Fi Network screen, select an appropriate Wi-Fi network, provide the Wi-Fi network’s password if necessary, click Continue, and skip to step 8. 6 If you are at the How Do You Connect screen, select Local network (Ethernet), and click Continue. 7 If you are at the Your Internet Connection screen, leave the settings at their defaults, and click Continue. ▶ If no DHCP service is available or your network is not connected to the Internet, you will see the warning message “Your Mac isn’t connected to the internet.” In this case, click Try Again, configure your router to provide DHCP service, and make sure your network is connected to the Internet. Then click Continue in the Your Internet Connection pane. For advanced users on a network without DHCP, you can set your TCP/IP connection type to Manually, configure settings appropriate for your network, and then click Continue in the Your Internet Connection pane. NOTE 8 When asked about transferring information to this Mac, select “Don’t transfer any information now,” and click Continue. 110 OS X Server for Yosemite 9 At the Sign in with Your Apple ID screen, select “Don’t sign in,” click Continue, and then click Skip to confirm that you want to skip signing in with an Apple ID. Note that if you do provide Apple ID credentials, some figures in upcoming exercises may look slightly different, and there may be extra steps. In an instructor-led environment, entering an Apple ID at this time is not recommended. 10 At the Terms and Conditions screen, when you have finished reading, click Agree. 11 In the OS X Software License Agreement confirmation dialog, click Agree. Create your local administrator account. ▶ Make sure you create this account as specified here. If you do not, future exercises may not work as written. Highlighted text is used throughout this guide to indicate text you should enter exactly as shown. NOTE 1 In the Create Your Computer Account pane, enter the following information: ▶▶ Full Name: Local Admin ▶▶ Account Name: ladmin ▶▶ Password: ladminpw ▶▶ (verify field): ladminpw ▶▶ Hint: Leave blank. ▶▶ Deselect the checkbox “Set time zone based on current location.” If you are performing the exercises independently and if your server is accessible from the Internet, you can select a more secure password for the Local Admin account. Be sure to remember the password you have chosen because you will need to reenter it periodically as you use this computer. If you are performing the exercises independently, you may provide a password hint if you want. If you entered your Apple ID, you can select or deselect the checkbox “Allow my Apple ID to reset this user’s password”; it does not have a major effect on the exercises. NOTE ▶ In a production environment, always use a strong password. 2 Click Continue to create the local administrator account. Exercise 4.1 Prepare Your Mac for OS X Server for Yosemite 111 3 At the Select Time Zone screen, click your time zone in the map or choose the nearest location in the Closest City pop-up menu, and then click Continue. 4 At the Diagnostics & Usage screen, leave selected “Send diagnostics & usage data to Apple” and “Share crash data with app developers,” and then click Continue. Please skip the Option 2 section, and continue at the section “Set the Computer Name and Turn On Remote Management.” Option 2: Configure an Existing OS X System for Your Server Computer This option is designed only for those who are performing the exercises independently and who have a computer that is already set up with an existing administrator account. ▶ You may not use a Mac whose startup volume has already had OS X Server installed. NOTE If your computer has not been set up (that is, if the initial administrator account has not been created), perform the steps in “Option 1: Configure OS X on Your Server Computer with Setup Assistant” instead. Create a new administrator account in System Preferences. 1 If necessary, log in with your existing administrator account. 2 Open System Preferences. 3 In System Preferences, open Users & Groups. 4 In the lower-left corner, click the lock icon. 5 In the dialog that appears, enter the password for your existing administrator account, and then click Unlock. 6 Click the Add (+) button under the user list. 7 In the dialog that appears, use the following settings: 112 OS X Server for Yosemite ▶ Make sure you create this account as specified here. If you do not, future exercises may not work as written. If you already have an account named Local Admin or ladmin, you will have to use a different name here and then remember to use your substitute name throughout the rest of the exercises. Highlighted text is used throughout this guide to indicate text you should enter exactly as shown. NOTE ▶▶ New Account: Choose Administrator. ▶▶ Full Name: Local Admin ▶▶ Account Name: ladmin 8 Select “Use separate password.” 9 If your server is not accessible from the Internet, enter ladminpw in the Password and Verify fields. If you are performing the exercises independently, you can select a more secure password for the Local Admin account. Be sure to remember the password you have chosen because you will need to reenter it periodically as you use this computer. You may provide a password hint if you want. If you entered your Apple ID, you can select or deselect the checkbox “Allow my Apple ID to reset this user’s password”; it does not have a major effect on the exercises. NOTE ▶ In a production environment, always use a strong password. 10 Click Create User. 11 At the bottom of the user list, click Login Options. 12 If an account is selected for Automatic Login, use the pop-up menu to switch it to Off. 13 Quit System Preferences, and log out. 14 At the login screen, select the Local Admin account, and enter its password (ladminpw, or whatever you specified earlier). 15 Press Return to log in. This is the end of Option 2; everyone should continue with the next section. Exercise 4.1 Prepare Your Mac for OS X Server for Yosemite 113 Set the Computer Name You will specify a computer name associated with your student number. If you are performing the exercises independently, you can choose to skip this section. 1 Open System Preferences. 2 Open Sharing. 3 Set Computer Name to servern, replacing n with your student number. For example, if your student number is 17, the computer name should be server17 (all lowercase and no spaces). 4 Press Return. Notice that the name listed under the Computer Name field, which is the local host name, updates to match your new computer name. Turn On Remote Management Enable Remote Management, which will allow the instructor to observe your computer, control your keyboard and mouse, gather information, copy items to your computer, and otherwise help you if necessary. ▶ Even though you know administrator credentials for other students’ computers and have the technical ability to remotely control their computers, please do not use that ability to interfere with their classroom experience. NOTE 1 Click somewhere over the phrase “Remote Management,” but don’t select the check- box yet. 2 For “Allow Access for,” select “Only these users.” 3 Click the Add (+) button, select Local Admin, and click Select. 114 OS X Server for Yosemite 4 In the dialog that appears, hold down the Option key while selecting the Observe checkbox, which selects all the checkboxes. 5 Click OK. 6 Select the checkbox Remote Management. 7 Confirm that the Sharing pane displays the text “Remote Management: On” and dis- plays a green status indicator next to the text. 8 Click Show All (looks like a grid) to return to the main System Preferences pane. Configure Network Interfaces It is best practice to configure your network settings before you initially install and configure OS X Server. To keep the setup as simple as possible for all situations, for this course your Apple devices will access your server’s services via Bonjour, rather than via DNS names. ▶ The exercises are written for only one network interface to be active, but using multiple network interfaces will not significantly impact your ability to complete the exercises. NOTE 1 In System Preferences, click Network. 2 In the instructor-led environment, configure your Mac computer’s built-in Ether- net port (or its Thunderbolt to Ethernet adapter port) to be the only active network service. NOTE ▶ You may leave your Wi-Fi network interface turned on, but not joined to any network, to use AirDrop. If you are performing the exercises independently, you may leave additional interfaces active, but be aware that this may cause differences between the way the exercises describe the windows and what you actually see. In the list of network interfaces, select each network interface that you will not use in the exercise (which should be all interfaces except one Ethernet port), click the Action (gear icon) pop-up menu, and choose Make Service Inactive. Exercise 4.1 Prepare Your Mac for OS X Server for Yosemite 115 3 If you will use multiple network interfaces, click the Action (gear icon) pop-up menu, choose Set Service Order, drag the services to an appropriate order so that your primary interface is at the top of the list, and click OK. 4 Select the active Ethernet interface. 5 Click Advanced. 6 Click the TCP/IP tab. 7 In the Configure IPv4 pop-up menu, choose Manually. 8 In the instructor-led environment, enter the following information to manually con- figure the Ethernet interface (IPv4) for the classroom environment: ▶▶ IP Address: 10.0.0.n1 (where n is your student number; for example, student1 uses 10.0.0.11, student 6 uses 10.0.0.61, and student 15 uses 10.0.0.151) ▶▶ Subnet Mask: 255.255.255.0 ▶▶ Router: 10.0.0.1 If you are performing the exercises independently and choose to use different network settings, see the “Exercise Setup” section in Lesson 1. 9 Click the DNS tab. 10 Even though you just switched Configure IPv4 from DHCP to Manually, you did not yet apply the change, so values assigned by DHCP are listed, but once you click Apply, those values will not remain unless you deliberately add them. 11 In the DNS Servers field, click Add (+). 12 In the instructor-led environment, enter 10.0.0.1. 116 OS X Server for Yosemite If you are performing the exercises independently, enter the value or values appropriate for your environment. 13 If there are any other values in the DNS Servers field, select another value, and then click Delete (–) to delete the value; do this until 10.0.0.1 (or your desired values if you are performing the exercises independently) is the only value in the DNS Servers field. 14 Click OK to save the change and return to the list of network interfaces. 15 Review the settings, and then click Apply to accept the network configuration. 16 Click Show All (looks like a grid) to return to the main System Preferences pane. Update Software To take advantage of possible fixes and improvements, be sure that you’re running the most recent version of OS X. If a local Caching service is available, your Mac will automatically use it. 1 While still in System Preferences, open App Store preferences. 2 Select the checkbox “Install app updates.” 3 Select the checkbox “Install OS X updates.” 4 If the button at the bottom of the window is Check Now, click Check Now. If the button at the bottom of the window is Show Updates, click Show Updates. Exercise 4.1 Prepare Your Mac for OS X Server for Yosemite 117 5 If you are in an instructor-led environment, ask your instructor what updates are appropriate to install; otherwise, if there are any updates, click Update All. If there are no updates available, press Command-Q to quit the App Store, quit System Preferences, skip the rest of this section, and continue with the section “Download the Student Materials.” 6 If the “Some updates need to finish downloading before they are installed” dialog appears, click Download & Restart. If the Restarting Your Computer notification appears, click Restart; after your Mac restarts, you will be automatically logged back in. 7 Quit the App Store. 8 Quit System Preferences. Download the Student Materials Some files are necessary for the completion of some of the exercises. You have already downloaded them to your server computer, but you should also have them available on your client computer. If you are in an instructor-led environment, you can use the Option 1 section that follows. Otherwise, skip to Option 2. Option 1: Download the Student Materials in the Instructor-Led Environment If you are performing the exercises independently, skip to “Option 2: Download the Student Materials for the Independent Reader.” If you are in an instructor-led environment, you will connect to the classroom server and download the student materials used for the course. To copy the files, you’ll drag the folder to your Documents folder. 1 In the Finder, choose File > New Finder Window (or press Command-N). 2 In the Finder window sidebar, click Mainserver. If Mainserver does not appear in the Finder sidebar, in the Shared list, click All, and then double-click the Mainserver icon in the Finder window. Because Mainserver allows guest access, your client computer logs in automatically as Guest and displays the available share points. 3 Open the Public folder. 118 OS X Server for Yosemite 4 Drag the StudentMaterials folder to the Documents folder in the sidebar. 5 Once the copy is complete, disconnect from Mainserver by clicking Eject next to the Mainserver listing. Skip the Option 2 section that follows, and resume with the section “Install the Server App.” Option 2: Download the Student Materials for the Independent Reader If you are in the instructor-led environment, skip this section. If you are performing the exercises independently, copy the student materials from your client or download the materials from Peachpit’s site, and place them in your Documents folder. If both of your Mac systems have AirDrop enabled, you can use AirDrop to copy the StudentMaterials folder from your client to your server computer. Click AirDrop in a Finder window on each Mac. On your client computer, open a new Finder window, open your Documents folder, drag the StudentMaterials folder to the picture for your server computer in the AirDrop window, and then click Send. On your server computer, click Save. When the transfer has completed, open the Downloads folder, and drag StudentMaterials to your Documents folder in the Finder window sidebar. Finally, close the AirDrop window on your client computer and on your server computer. Another option is to use a removable disk. If you have a USB, FireWire, or Thunderbolt disk, you can connect it to your client, copy the StudentMaterials folder from your local administrator’s Documents folder to the volume, eject the volume, connect the volume to your server computer, and drag the StudentMaterials folder to your Documents folder in the Finder window sidebar. Alternatively, you can download the files from Peachpit again using the following steps: ▶ You registered this guide for the lesson files in Exercise 2.1. If you have not already done so, see Exercise 2.1, “Option 2: Download the Student Materials for the Independent Reader,” for details. NOTE 1 Using Safari, open www.peachpit.com, and click the Account link or Account Sign In link at the top right of the home page to access your Peachpit account. 2 Click the Lesson & Update Files tab. Exercise 4.2 Install OS X Server for Yosemite 119 3 Click the lesson file links to download the appropriate files to your computer, which places the materials in your Downloads folder. 4 In the Finder, choose File > New Finder Window (or press Command-N). 5 Choose Go > Downloads. 6 Double-click the StudentMaterials.zip file to decompress the file. 7 Drag the StudentMaterials folder from your Downloads folder to your Documents folder in the sidebar. 8 Drag the StudentMaterials.zip file from your Downloads folder to the Trash in the Dock. In this exercise, you used System Preferences and the Finder to configure OS X on your server computer in preparation for installing OS X Server. Exercise 4.2 Install OS X Server for Yosemite ▶ Prerequisite ▶▶ Exercise 4.1, “Prepare Your Mac for OS X Server for Yosemite” Challenge Now that you have OS X configured on your server computer, install OS X Server on your server computer and configure it so you can administer it remotely. Considerations Your server computer isn’t a server until you run and configure the Server app. If you are a member of the Mac Developer Program or iOS Developer Program (available at https://developer.apple.com), you may obtain a free redemption code for OS X Server. 120 OS X Server for Yosemite Solution Install Server In a production environment, it’s recommended to download the latest version of OS X Server from the App Store. If you’ve already purchased OS X Server, you must use the same Apple ID used for the original purchase to avoid being charged again. If you are in an instructor-led environment, use the Option 1 section that follows. Otherwise, you should skip to Option 2. Option 1: In the Instructor-Led Environment, Copy Server In the instructor-led environment, the classroom server has the Server app available in the StudentMaterials folder; move the Server app to the Applications folder on your server computer with the following steps: 1 In the Finder on your server computer, open a new Finder window, click Documents in the sidebar, open the StudentMaterials folder you downloaded, and then open the Lesson4 folder. 2 Drag the Server app into the Applications folder in the sidebar. Please skip the Option 2 section, and continue at the “Open Server” section that follows. Option 2: For the Independent Reader, Download or Purchase Server in the App Store If you are performing the exercises independently, use the administrator Apple ID you created in Exercise 2.2, “Create Apple IDs,” to purchase or redeem a code for OS X Server from the App Store. This automatically places the Server app in your Applications folder. If you have already purchased the Server app and have it available on a removable volume, drag the Server app from your removable volume into your Applications folder. Open Server Once you have the Server app installed in the Applications folder, open the Server app. 1 In your Dock, click Launchpad. 2 You may need to swipe to the next page in Launchpad to see the Server app (hold down the Command key and press the Right Arrow key, or if you have a trackpad, swipe to the left with two fingers to get to the next page in Launchpad). Exercise 4.2 Install OS X Server for Yosemite 121 3 Click Server to open the Server app. 4 Keep the Server app in the Dock. Click and hold Server in the Dock, and then choose Options > Keep in Dock from the menu that appears. 5 In the “To set up OS X Server on this Mac, click Continue” pane, click Continue. 6 Read and agree to the terms of the software license agreement. 7 Ensure that “Use Apple services to determine this server’s Internet reachability” is selected, and click Agree. 8 Provide local administrator credentials (User Name: Local Admin, Administrator Pass- word: ladminpw), and click Allow. 9 Wait while OS X Server for Yosemite configures itself. After its initial installation, the Server app displays the Overview tab in the Server pane. NOTE ▶ The public IPv4 address in the following figure is obscured intentionally. You have successfully installed OS X Server. Congratulations! 122 OS X Server for Yosemite Configure Your Server to Allow Remote Administration Configure your server so that you can administer it with the Server app on your client computer. 1 In the Server app, click the Settings tab. 2 Select the checkbox “Allow remote administration using Server.” It’s recommended that you administer your server with only one instance of the Server app at a time; if you have the Server app open while logged in on your server, quit the Server app before opening the Server app on your client computer. In this exercise, you used the Server app to configure your server with OS X Server, and you enabled remote administration using the Server app. Exercise 4.3 Configure OS X Server for Yosemite ▶ Prerequisites ▶▶ ▶▶ Exercise 4.2, “Install OS X Server for Yosemite” You need the text files from the student materials, which you obtained as part of Exercise 2.1. Challenge Configure Apple Push Notification Service certificates. Configure and start services you will use for the rest of the course: ▶▶ Open Directory, including importing or creating users and groups ▶▶ Mail ▶▶ Calendar ▶▶ Contacts ▶▶ Wiki Exercise 4.3 Configure OS X Server for Yosemite 123 Considerations In the Server app’s list of services, Open Directory is hidden by default in a section of advanced services. The downloadable student materials contain user import files with eight users and a group import file with two groups. Solution Enable Push Notifications 1 If necessary, open the Server app, authenticate to your server, select your server in the Server app sidebar, and then click the Settings tab. 2 If the “Enable Apple push notifications” checkbox is not already selected, select it now. 3 Enter your administrator Apple ID credentials. 4 Click Get Certificate. 5 After the Server app successfully creates and processes the Apple Push Notification Service certificates and displays their shared expiration date, click Done. 124 OS X Server for Yosemite Configure Your Server as an Open Directory Master In a production environment you would definitely confirm or verify DNS records before configuring your server as an Open Directory master. However, because this environment uses Bonjour names, you can skip the usual DNS verification step. 1 If the Server app does not display the list of advanced services, hover the pointer above “Advanced” in the sidebar, and then click Show. 2 Click Open Directory. 3 Click On to turn on the Open Directory service. 4 Select “Create a new Open Directory domain,” and click Next. 5 Configure a password; you can leave the “Remember this password in my keychain” option selected. If your server is not accessible from the Internet, in the Directory Administrator pane, enter diradminpw in the Password and Verify fields, and click Next. Of course, in a production environment, you should use a secure password. 6 In the Organization Information pane, enter appropriate information. If the following fields do not already contain the information shown, enter it, and click Next: ▶▶ Organization Name: MDM Project n (where n is your student number) ▶▶ Admin Email Address: [email protected] (where n is your student number) 7 View the Confirm Settings pane, and click Set Up. The Server app displays its progress in the lower-left corner of the Confirm Settings pane. When the configuration is complete, the Server app displays the Servers section of the Open Directory pane, with your server listed as the master. It also displays any additional IPv4 addresses your Mac has in addition to your server’s primary IPv4 address (such as Wi-Fi). Exercise 4.3 Configure OS X Server for Yosemite 125 Inspect the SSL Configuration One of the benefits of configuring your server to be an Open Directory master is that it automatically creates a code signing certificate for Profile Manager to use. Use the following steps to inspect your server’s Secure Sockets Layer configuration: 1 In the Server app sidebar, select Certificates. Note that all the services are set to use the same certificate: servern.local certificate (where n is your student number), which is signed by your server’s OD intermediate CA. By default, the Server app does not display all certificates. Use the Action pop-up menu to display all certificates, and then inspect the two certificates. 1 Click the Action (gear icon) pop-up menu, and choose Show All Certificates. 2 Double-click the servern.local certificate (where n is your student number). 3 Inspect the details of the certificate. 4 Scroll to the end of the certificate information, and note that Purpose is Server Authentication. Note the Renew button for the certificate. When the renewal date approaches, the Server app automatically generates an expiration alert for the certificate, and the alert offers a Renew button. You don’t have to wait for the alert; you can use this button to renew the certificate at any time. 5 Click OK to return to the list of certificates. 6 Double-click the Code Signing certificate. 126 OS X Server for Yosemite 7 Scroll to the end of the certificate information, and note that Purpose is Code Signing. 8 Click OK to return to the list of certificates. 9 Click the Action (gear icon) pop-up menu, and choose Show All Certificates to dese- lect that item. Import Users into Your Server’s Shared Directory Node To expedite the exercise, in the StudentMaterials folder is a text file with user accounts. This import file defines these users with a “net” password. Of course, in a production environment, each user should have a unique password or passphrase that is secret and secure. Import the accounts into your server’s shared directory node. 1 In the Server app, choose Manage > Import Accounts from File. 2 In the sidebar, click Documents. Open StudentMaterials, and then open the Lesson4 folder. 3 Select the users.txt file. 4 Click the Type pop-up menu, and choose Local Network Accounts. 5 If directory administrator credentials are not automatically provided thanks to the keychain item, provide directory administrator credentials in the Admin Name and Password fields. 6 Click Import. 7 At the “Importing these accounts may take a long time. Are you sure you want to con- tinue?” dialog, click Import. Exercise 4.3 Configure OS X Server for Yosemite 127 8 After the import has completed, select Users in the Server app sidebar, and confirm that there are eight new local network users. NOTE ▶ If any of the users are listed as Not Allowed, after the import has completed, choose View > Refresh. You now have added eight local network user accounts. Import Groups into Your Server’s Shared Directory Node To expedite the exercise, you have two import files, one that defines some of the imported users as members of the Marketing group and another that defines users as members of the Engineering group. 1 In the Server app, choose Manage > Import Accounts from File. 2 Click the Type pop-up menu, and choose Local Network Accounts. 3 If necessary, provide directory administrator credentials in the Admin Name and Password fields. 4 Double-click the groups.txt file to start importing the file. 5 At the “Importing these accounts may take a long time. Are you sure you want to con- tinue?” dialog, click Import. 6 After the import has completed, select Groups in the Server app sidebar. 7 Double-click the Engineering group. 8 Confirm that there are four members of the Engineering group. 9 Click Cancel to return to the list of groups. 10 Double-click the Marketing group. 11 Confirm that there are four members of the Marketing group. 12 Click Cancel to return to the list of groups. You now have two new local network groups populated with the local network users you previously imported. 128 OS X Server for Yosemite Configure and Start the Mail Service Once you’ve configured the Mail service, you can use it in other parts of this guide for configuration profile examples and to mail VPP notification invitations. This is not a production server, so to expedite the setup, you will disable virus and junk mail filtering. 1 In the Server app sidebar, select Mail. 2 Click Edit Filtering Settings. 3 Deselect the “Enable virus filtering” checkbox. 4 Deselect the “Enable junk mail filtering” checkbox. 5 Click OK to close the Mail Filtering pane. 6 Under the Domains field, click the Add (+) button. 7 In the Domain field, enter servern.local (where n is your student number). 8 Click the Add (+) button. 9 Press Command-B to display the accounts browser window. 10 Select an account in the accounts browser, and then press Command-A to select all users and groups. 11 Drag the accounts to the field that lists the Members and Email columns. 12 Press Command-B to hide the accounts browser window. 13 Click Create. Exercise 4.3 Configure OS X Server for Yosemite 129 14 Click On to start the Mail service. 15 Wait for the mail service to become available (green status indicator in the Status field). Verify the Mail Service 1 Open Mail on either your server Mac or your client Mac. 2 In the “Choose a mail account to add” pane, select Add Other Mail Account, and click Continue. 3 In the Add a Mail Account pane, confirm that the import file includes an email address for your server, for example: ▶▶ Full Name: Barbara Green ▶▶ Email Address: [email protected] (where n is your student number) ▶▶ Password: net 4 Click Create. 5 After the pane displays the message “Account must be manually configured,” click Next. 6 In the Incoming Server Info pane, on the IMAP tab, in the Mail Server field, enter servern.local (where n is your student number). The User Name and Password fields should already be populated. 7 Click Next. 8 If you see the Verify Certificate window, click Show Certificate, select the “Always trust” checkbox, and click Connect. 130 OS X Server for Yosemite 9 If necessary, enter the local administrator credentials, and then click Update Settings. 10 In the Outgoing Mail Server Info pane, use the following information to fill in any empty fields: ▶▶ Mail Server: servern.local (where n is your student number) ▶▶ User Name: barbara ▶▶ Password: net 11 Click Create. Send and Receive a Test Message 1 Choose File > New Message. 2 In the To field, enter [email protected] (where n is your student number). 3 Enter some text in the Subject field. 4 Enter some text in the main body field. 5 Click the Send button in the upper-left corner of the message. 6 Confirm that the message is delivered. If necessary, choose Window > Message Viewer. 7 Quit Mail. Turn On the Calendar Service To have another service available for the Settings for Everyone configuration profile, you can turn on the Calendar service. 1 In the Server app sidebar, select Calendar. 2 Click On to start the service. You can leave all the settings at their defaults. Exercise 4.4 Configure Server on Your Client Computer (Optional) 131 Turn On the Contacts Service Using the Contacts service allows you to quickly look up information, such as email addresses, for the users hosted by your server. 1 In the Server app sidebar, select Contacts. 2 Select the checkbox “Allow users to search the directory using the Contacts application.” 3 Click On to start the service. You can leave all the other settings at their defaults. Turn On the Wiki Service By default, the Wiki service allows iOS users to edit files on the wiki using iWork. 1 In the Server app sidebar, select Wiki. 2 Click On to start the service. You can leave all the other settings at their defaults. In this exercise, you turned on push notifications on your server computer, configured the server as an Open Directory master, imported or created users and groups, and turned on a few key services. Exercise 4.4 Configure Server on Your Client Computer (Optional) ▶ Prerequisites ▶▶ ▶▶ Exercise 4.3, “Configure OS X Server for Yosemite” You need the text files from the student materials, which you obtained as part of Exercise 2.1. 132 OS X Server for Yosemite Challenge Install the Server app on your client computer, and prepare it to remotely administer your server computer. Considerations Your server does not allow remote administration by default. If you attempt to remotely administer your server, you will get a message that your client computer does not trust the identity of the SSL certificate used by the server. Solution Install the Server App On your server computer, you ran the Server app to configure your server computer as a server. However, on your client computer, you can run the Server app to remotely administer your server. Option 1: In the Instructor-Led Environment, Copy the Server App In the instructor-led environment, the classroom server has the Server app available in the StudentMaterials folder; move the Server app to the Applications folder on your server computer with the following steps: 1 In the Finder on your server computer, open a new Finder window, click Documents in the sidebar, open the StudentMaterials folder you downloaded, and then open the Lesson4 folder. 2 Drag the Server app into the Applications folder in the Finder window sidebar. Option 2: For the Independent Reader, Download or Purchase OS X Server in the App Store If you are performing the exercises independently, you should have already purchased OS X Server by the time you completed Exercise 4.1; if this is the case, open the App Store from the Dock or from the Apple menu, sign in with the Apple ID you used to purchase OS X Server, and download OS X Server, which automatically places the Server app in your Applications folder. If you have already purchased the Server app and have it available on a removable volume, drag the Server app from your removable volume into your Applications folder. Exercise 4.4 Configure Server on Your Client Computer (Optional) 133 Use the Server App to Administer Your Server Using your client computer, open the Server app, connect to your server, and accept its SSL certificate. 1 On your client computer, open the Server app. NOTE ▶ Do not click Continue; otherwise, you will configure your client Mac to be a server. 2 Click and hold Server in the Dock, and then choose Options > Keep in Dock from the menu that appears. 3 Click Other Mac. 4 In the Choose a Mac window, select your server, and click Continue. 5 Provide the administrator credentials (Administrator Name: ladmin, Administrator Password: ladminpw). 6 Select the “Remember this password in my keychain” checkbox so the credentials you provide will be saved in your keychain (a secure store of passwords) and so you will not need to provide credentials again. 7 Click Connect. Because your server is using a self-signed SSL certificate that has not been signed by a certificate authority your client computer is configured to trust, you’ll see a warning message that you are connecting to a server whose identity certificate is not verified. ▶ In a production environment, you might want to address this situation as soon as possible by using Keychain Access on your server computer to configure your server to use a valid SSL certificate for the com.apple.servermgrd identity, which is used to communicate with a remote instance of the Server app. This is outside the scope of this guide. NOTE 8 Click Show Certificate. 9 Select the checkbox to always trust com.apple.servermgrd when connecting to your server. 134 OS X Server for Yosemite 10 Click Continue. 11 You must provide your login credentials to modify your keychain. Enter your password (ladminpw), and click Update Settings. After you click Update Settings, the Server app connects to your server. 12 Quit Server. In this optional exercise, you configured your client computer to remotely configure your server with the Server app. Index Numbers 802.1X authentication, 69 A About this guide. see Introduction to this guide Access, configuring OS X Server for, 93–96 Access Bonus Content link, student materials, 43 Access management, 547, 549–551 Account configuration, MDM, 201 Account management, VPP, 425 Acquisitions of in-house books, 482–483 of in-house iOS apps, 480–481 of in-house OS X apps, 481–482 Acronis Access acquisition of, 559–561 introduction to, 553 as managed app, 575–576 opening PDF documents via, 566 Action (gear icon) pop-up menu, 115 Activation Lock administration and, 397–398 allowing, 215, 401–402, 411 behavior of, 399–400 bypass codes in, 403, 413–415 clearing, 215 clearing tasks in, 403–404 clearing via Profile Manager, 402–403 enrolling with MDMs, 407–409, 412–413 exercise, controlling on managed devices, 404–416 Find My Device and, 27, 72, 398– 399, 409–412 introduction to, 397–400 management of, 397, 400–404 removing placeholders in, 416 setting up devices without, 410–411 Setup Assistant and, 407–409, 412–413 supervision of devices in, 406–407, 412 as theft-deterrent measure, 27 unsupervising iOS devices in, 416 wipe tasks in, 409–410 wiping iOS devices, 414 Active Directory, 62, 161 ActiveSync, 63, 71 Activity Monitor, and Caching service, 143 Ad hoc file sharing services, 509 Add Devices dialog, 208–209 Add Placeholder, 211 Administrator account configuring existing OS X system for client, 38–39 configuring existing OS X system for server, 111–112 creating new, 39–40 in DEP, 379–381 local. see Local administrator account in VPP, 448–450 Administrator Apple ID configuring OS X Server, 123 creating/verifying, 46–48 downloading free app from App Store, 148 installing Apple Configurator, 251 installing OS X Server, 120 user data/services, 535, 538 verifying access, 51–53 verifying network service availability, 81, 84, 86 Administrators advanced, 8 Apple deployment scenarios and, 32–34 Apple goals for IT, 10–11 Apple ID for Students program and, 31–32 distributing profiles, 13 downloading profiles, 166 enrolling/unenrolling OS X computers, 198 institutional Apple IDs for, 22 Profile Manager tasks, 213–216 VPP, 31, 424–425 Adobe Creative Suite, 594 Photoshop, 593 Adobe Acrobat introduction to, 552 for PDF documents, 558–559, 566–567 unavailable in Open In, 572 as unmanaged app, 573–574 ADP (Apple Deployment Program) Apple ID for Students program, 31–32 defined, 2 DEP administrator accounts in, activating, 379–380 DEP administrator accounts in, adding, 378–379 DEP administrator accounts in, verifying, 380–381 Device Enrollment Program, 29–30 enrolling in DEP and, 377 exercise, enrolling devices with, 372–381 MDM server configurations from DEP in, 382–387 overview of, 29 program agent accounts in, creating, 372–375 program agent accounts in, verifying, 375–377 requiring Apple ID two-step verification, 20 Volume Purchase Program and, 31, 378 AFP (Apple Filing Protocol), 63, 508, 509 AirDrop Apple Support article, 509 downloading student materials with, 118 securing data in transit with, 70 Wi-Fi network interface and, 114 Airplane mode, verifying network service availability, 88 AirPlay Apple TV supporting peer-to-peer, 62 requesting/stopping mirroring in, 215 for user data/services, 509 AirPort Extreme, 60 All Devices group, Supervised Devices list, 298 Allow/Clear Activation Lock task, Profile Manager, 215 Amsys plc Services Test item, 86–88 Anchor certificates, device enrollment in iOS, 265 APNs (Apple Push Notification service) confirming connectivity with telnet, 81–83 device management with, 196–197 function of, 65 for iMessage and FaceTime, 70–71 initiating device task through, 213 MDM architecture for, 192–194 Index 601 sending VPP invitations to enrolled devices via, 427 sending wipe commands, 72 turning on Activation Lock, 410 App Analytics, iOS Setup Assistant, 264 App management Apple Configurator and Apple IDs, 328–330 download App Store items, 330–332 exercise, deploy apps to supervised devices, 344–348 exercise, prepare to distribute free app, 340–344 free vs. paid iOS App Store items, 330 install apps via Apple Configurator, 327–328 install iOS App Store items, 332–334 single app mode via Configurator, 337–338 single app mode via Profile Manager, 339–340 unsupervised vs. supervised iOS devices, 289–290 update apps deployed via Apple Configurator, 334–335 updating apps via Software Update, 335–336 App Store acquiring Keynote from, 535, 538 apps to read PDF documents from, 557–558 configuring OS X Server software updates, 116–117 creating client testing Apple ID, 49–51 creating/verifying administrator Apple ID, 45–48 deleting/downloading free app from, 149–150 downloading free app from, 147 downloading free/paid items with iTunes, 330–331 downloading items from, 330–332 downloading OS X Server for Yosemite from, 120 free apps vs. paid items from, 330 install Push Diagnostics from, 83–85 installing apps from, 332–334 logging out of, 48 provisioning profiles deploying iOS apps outside of, 152 purchasing/installing Apple Configurator, 250–253 purchasing/licensing content with VPP, 31 restricting access to, 576–578 shared Apple IDs and, 21 testing Caching service from, 142 Apple deployment programs by, generally, 422–424 Developer Program by, 480–481 Time Machine by, 516–518 Apple AirPort Extreme, 6 Apple Configurator acquiring in-house apps/books via, 483 Activation Lock and, generally, 404–406 adding iOS app to, 333 app management with. see App management Apple IDs and, 328–330 backup, 243–244 deploying apps to supervised devices with, 344–348 enabling Find My iPad in, 407–409 enrolling with MDM and, 407–409 erasing/resetting iOS device to be supervised, 245 exercise, purchasing and installing, 250–253 inspecting profiles installed by, 305–309 installation, 247 logistical considerations, 242–243 not installing paid apps without VPP redemption codes, 334 overview of, 241–242 preferences, 248–250 prepare and supervise with, 242 prepare devices limitations, 245–246 preparing to distribute free app, 343–344 restoration workflows in, 516 supervising iOS devices in. see Supervised iOS devices system deployment and, 598 unsupervising iOS devices with. see Unsupervised iOS devices update iOS apps via, 334–335 views, 247–248 wiping iOS devices and, 414 Apple Deployment Program. see ADP (Apple Deployment Program) Apple Developer site, 18 Apple Device Enrollment Program. see DEP (Device Enrollment Program) Apple Filing Protocol (AFP), 63, 508, 509 Apple help documentation, 4 Apple ID for Students program Apple Deployment Programs, 31–32 Apple Family Sharing participation of, 29 shared Apple IDs using, 21 Apple ID management site, 20 Apple IDs Apple deployment scenarios and, 33–34 Apple ID for Students and, 32 configuring OS X on server computer, 110 creating, 17–18 creating administrator, 45–48 creating client testing, 48–51 enabling Apple integrated services, 16 Find My Device/Activation Lock and, 26–27 iCloud services using, 23 institutional, 22 managing, 18–19 overview of, 16–17 per-device iCloud upgrade limitation, 24 requirements for this guide, 5–6 requirements for verification, 6 Setup Assistant and, 556–557 shared, 21 skipping in iOS Setup Assistant, 263 two-step verification, 19–21 in VPP, 470 Apple IDs, Apple Configurator adding iOS app, 333–334 installing iOS apps, 247, 331 overview of, 328–330 preparing supervised iOS device, 305 preparing to distribute free app, 341–342, 344 updating iOS apps via Software Update, 336 Apple management concepts Apple Deployment Programs, 29–32 Apple ID considerations, 16–22 deployment scenarios, 32–34 device management and supervision, 11–16 exercise, configuring client Mac, 34–45 exercise, configuring iOS device for testing, 53–57 exercise, creating Apple IDs, 45–51 exercise, verify administrator Apple ID access, 51–53 iCloud in managed environments, 22–29 overview of, 9 understanding Apple design, 10–11 Apple Pay, 264 Apple Push Notifications. see APNs (Apple Push Notification service) Apple Remote Desktop (ARD), 484 Apple Self-Servicing Account Program, 80 Apple Stores, 18, 418–419 Apple Support articles 602 Index Apple Configurator backup and restore, 244 Bonjour, 61 Caching service content types, 136 configuring Safari behavior to open to, 234–236 defined, 4 encrypted backup disks, 244 iCloud storage pricing, 25 inability to use APNs, 194 list of iOS backup content, 296 requiring Apple ID, 18 services authenticated with Apple ID, 16 two-step verification process, 21 Apple TV, and peer-to-peer AirPlay, 62 AppleCare support options, 79–80 AppleScript, 482 Apply button, Apple Configurator, 258, 338 Apps APNs used in managed, 193 iOS backup/restore and, 294–296 MDM architecture for managed, 193 Profile Manager device inventory, 206–207 user enrollment with managed, 201 Apps folder, on supervised iOS device, 320 Architecture Caching service, 135–139 iCloud security, 25–26 iOS security, 294 MDM, 191–195 MDM security, 93 ARD (Apple Remote Desktop), 484 Assign view, Apple Configurator, 248 Assignments of books/apps in Profile Manager, 504–505 of books/apps in VPP, 434–436, 443–447, 459–461 of DEP-enrolled iOS devices in Profile Manager, 390–396 of devices in DEP, configuration of, 364–371 of devices in DEP, generally, 360–361 of devices in DEP, placeholders for, 364–365 of devices to MDM services, 387–389 of in-house books in Profile Manager, 504 Authentication Apple ID two-step verification, 19–21, 305 email, 62 iOS backup/restore limitations, 294 in WebDAV, 526 Wi-Fi, 61, 69 Authorization, 21, 328–330 Automatic app installation, 15 Automatic discovery, 137 Automatic downloads/updates, in VPP, 445–447 Automatic enrollment, 234 Automatic installation of assignments, in VPP, 445 Automatic installation of profiles, 290–293 Automatic naming of iOS devices, 256 Automatic Push, 163, 218, 280–282 Automatic refresh, Apple Configurator, 249 Automatic removal, General profile settings, 164 Automation tools, 482 Automator, 482 Availability. see Network service availability B Backup Apple Configurator, 243–244 Apple Configurator, of iOS device, 321–322 in disposal workflow, 78 iCloud content and, 24–25 on iOS devices, 514–515 on OS X computers, 516–518 OS X Server hardware for, 93 of production iOS device to iCloud, 54–55 restore iOS device from, 322–323 Backup/restore, supervised iOS device creating iOS backups for restore, 296–297 different families of iOS devices not compatible for, 295 examples of, 295–296 exercise, 314–325 limitations of, 294–295 overview of, 293–294 Bandwidth Caching service, saving on, 62, 89–90, 135, 331 estimating network requirements, 60 items installed via VPP assignment consuming, 422 Beta testing, unreleased versions of iOS, 257 Birth date, creating Apple ID, 17 Bonjour configuring isolated network for this guide, 8 configuring OS X Server network access, 93–94 Mail and, 554 OS X Server Wiki and, 527 profile-based restrictions and, 576 PTR records and, 108 subnet planning and, 61 Books, managed encouraging users to keep enrolled with, 201 how APNs are used in, 193 MDM architecture for, 193 Profile Manager device inventory, 206–207 Breakers, power circuit safety, 73 Bretford storage cabinets, 66 Brownouts, overloaded power circuits, 73 BTU/h (British thermal units per hour), 76 Business organizations, VPP and, 424–425 BYOD (“Bring your own device”), 590 Bypass codes, Activation Lock, 403, 413–415 C CA (certificate authority), 265 Caching service architecture, 135–139 automatic discovery and, 137 Ethernet cable for, 6 exercise, turning on and verifying, 145–150 external storage disk for, 92–93 hosting Apple software locally, 62 on Mac systems lacking Ethernet, 5 for multiple Configurator Mac systems, 259, 331 as OS X Server benefit, 89 on private network, 137–138 reducing Internet bandwidth, 89–90 requirements, 136 setup, 138–141 troubleshooting, 142–145 Calendars collaboration services, 508 configuring OS X Server for Yosemite, 130 default configuration profile, 158–159 Family Sharing, 28 Internet sharing, 510 iTunes syncing, 513 network integration with, 63 OS X Server Wiki and, 519 turning on service, 130 using Exchange ActiveSync, 71 Camera Roll, 320 Captive portal redirect, to enrollment website, 200 Cart devices, 590 Case sensitivity, URL field, 172 Certificate authority (CA), 265 Certificates Apple Configurator, 253, 292, 307 Index 603 in code signing, 154 for device enrollment in iOS, 265 for enrollment profiles, 152 for OS X Server for Yosemite configuration, 123 for OS X Server WebDAV, 522, 538 for OS X Server Wiki, 518–519 for Profile Manager configuration, 157 SSL configuration, 125–126 trust profiles containing digital, 152 for unsupervised iOS devices, 269–270 using Server app to administer server, 133–134 Children Apple Family Sharing participation of, 28–29 Apple ID for Students program, 31–32 Apple ID setup for, 17 shared Apple ID issues, 21 Client device requirements for this guide, 5 for testing, 3 Client Mac computer associating with client testing Apple ID, 470 Caching service automatic discovery for, 137 comparing unsigned/signed profiles on, 183 configuring new Safari behavior, 236 confirming configuration profile on, 173–175 confirming connectivity to APNs, 81–83 confirming effects of management are removed, 239 confirming lack of PTR records, 106–108 creating accounts, 580–581 creating standard local account, 580–583 creating testing Apple ID, 48–51 downloading student materials, 117–119 enrolling, 226–228, 581–582 logging in, 581 OS X Server for Yosemite on, 131–134 profile-based restrictions on, 582–583 removing manually downloaded profiles, 189 unenrolling iOS device from, 237–239 unsigned configuration profile on, 181–182 in VPP, 470 Client Mac computer, configuring creating local administrator account, 38–40 downloading student materials, 42–45 establishing student number, 35 OS X using Setup Assistant, 35–37 overview of, 34–35 setting computer name, 40–41 turning on remote management, 41 updating software, 42 Cloud services, network integration of, 63–64 Code signing overview of, 154 signed vs. unsigned profiles, 181–188 turning on, 159–160 Code Signing certificate, 125–126 Collaboration services, 508, 509 Command-N (New Finder window), 42, 44–45 Commands, MDM security, 193 Computer Name OS X Server for Mac, 113 OS X Server network access, 94 setting, 40 Configuration profiles automatic enrollment of, 233–234 automatic push for, 280–282 Calendar and Contacts, 63 client settings, 64 code signing validating, 159–160 content management, 162 default, 158 deploying Managed Open In via, 71 disabling Apple services, 71 downloading/confirming on iOS device, 175–177 downloading/confirming on Mac, 173–175 downloading/installing updated, 179–180 email settings, 62 Exchange settings, 63 exporting, 262 General profile settings, 164–165 for group, 177–178 iOS backup/restore limitations, 294 for iOS devices, not OS X computer, 153 manually apply to iOS device, 282–284 MDM architecture for, 193 overview of, 152 passcode for, 235 removing, 177, 180–181, 240 setting up client via, 64 signed vs. unsigned, 181–188 standard keys for, 154 updating, 179–180 for user, 171–173 user group, 232–233 Configuration screen, 304 Connectivity confirming APNs, using telnet, 81–83 OS X on client computer, 37 OS X on server computer, 109 Contacts configuring OS X Server for Yosemite, 131 default configuration profile, 158 iTunes syncing, 513 network integration of, 63 using Exchange ActiveSync, 71 Contains listing, automatically pushed profiles, 219 Content Apple customer goals for accessing, 10 Caching service configuration, 140 iCloud backup, 24–25 iOS backup, 296 managing configuration profile, 162 modifying profile, 154 monitoring Caching service, 141 Control Center, 88 Cooling infrastructure, physical logistics, 75–76 Could not open profile, defined, 155 Create Your Computer Account screen, 38 Creative Suite, 594 Credit, in VPP, 429–430 Cryptographic hashes, signed profiles, 154 CSV (comma-separated values), importing device list from, 212–213 Customer needs, as Apple focus, 10 Customized iOS versions, Apple Configurator, 257 Customizing Setup Assistant. see iOS Setup Assistant, customizing D Data in disposal workflow, 78 iOS backup/restore of most, 296 securing at rest, 68–69 securing in transit, 69–71 Debug.log, Caching service, 144–145 Default configuration profile, 158–159 Delivery method, General Profile settings, 164–165 DEP (Device Enrollment Program) activating administrator account, 379–380 adding administrator account, 378–379 ADP, enrolling in, 372–381 Apple IDs and, 328 604 Index assigning devices to MDM services, 387–389 defined, 2 device enrollment in, 390–396 device enrollment in MDM service, 195, 259 enrollment in service, 353–354 exercise, assigning devices to MDM services, 387–389 exercise, device enrollments, 390–396 exercise, enrolling devices with ADP, 372–381 exercise, Profile Manager configuration for, 381–387 introduction to, 349–355 managing administrators in, 354–355 overview of, 29–30, 350–351 Profile Manager and, generally, 355–364 Profile Manager, configuration of, 381–387 Profile Manager, configuring assignments in, 364–371 Profile Manager supporting, 156 requirements for, 351–353 restoration workflows in, 516 supervising iOS device with, 15, 242 system deployment and, 598 VPP and, 422–424 Deployment Apple scenarios for, 32–34 of equipment to user or location, 77 of in-house apps, 490–501 of in-house apps/books, generally, 479–485 of in-house apps/books, to iOS devices, 483–484 of in-house apps/books, to OS X computers, 484–485 of in-house books, 502–506 of management settings, 230–236 Deployment Programs, Apple, 422–424 Description field, General profile settings, 164, 172 Design goals, Apple, 10–11 Device Enrollment Program. see DEP (Device Enrollment Program) Device list associating devices with users, 207–209 importing, 212–213 inspecting devices in, 206 search filter for, 208 Device management enabling, 195–198, 221–223 inspecting automatically pushed profiles, 218–221 and supervision, 11–16 user-initiated enrollment for. see User-initiated enrollment, MDM Device Management Profile, 225 Device placeholders, Profile Manager adding individual placeholder, 211–212 importing device list, 212–213 inspecting/removing after unenrollment, 239–240 overview of, 210–211 removing to wipe iOS device, 416 for unenrolled devices, 205, 313 Device profiles, deploying user profiles vs., 160 Device queries, 193 Devices Apple ID two-step verification using trusted, 20 associating with users, 207–209, 217 associating/disassociating with user, 209 Caching service requirements for, 136 customizing individual, 217 deployment scenarios for, 32–34 groups of, for DEP placeholder records, 385–387 security infrastructure for. see Security infrastructure user-initiated enrollment of. see Userinitiated enrollment, MDM DHCP (Dynamic Host Configuration Protocol) configuring isolated network with, 7 configuring OS X on client, 37 configuring OS X on server, 93, 109 PTR record and, 108 Diagnostics & Usage screen, 38, 111 Digital certificates, 152 Direct payments, in VPP, 428–429 Directory Services, 62 Disallowing access, 550–551 Disk space Caching service, 136 OS X Server storage, 92–93 Disks, downloading student materials, 118 Disposal and recycling, obsolete devices, 77–78 DNS (Domain Name Service) Caching service requirements, 136 configuring OS X Server external access, 95 configuring OS X Server network interfaces, 115–116 confirming lack of PTR records using, 107–108 host name, 94 Documentation, Apple help, 4 Documents confirming restore of, 323 creating on supervised iOS device, 319 profile, 153–154 Domain names, configuring isolated network, 8 Domains, Apple IDs using Apple, 17, 23 Download button, Profile Manager, 166 Download server tokens, in Profile Manager, 384 Download student materials, configuring client Mac, 42–45 Dropbox, 511 Dynamic Host Configuration Protocol. see DHCP (Dynamic Host Configuration Protocol) E Ease of use, Apple customer goals for, 10 Editing existing iOS stored backups, 297 filtering settings in Mail, 128 profiles in Apple Configurator, 261–262 Education organizations, VPP and, 424 Electric monitor, pass-through, 73–74 Electrical infrastructure, 73–74 Email address(es) adding to administrator Apple ID, 52–53 associating Apple ID with multiple, 19 iCloud mail service security and, 25 network considerations, 62 requirements for this guide, 5–6 sending links to enrollment website, 199 setting up administrator Apple ID, 45–47 setting up client testing Apple ID, 49–50 setting up institutional Apple IDs, 22 setting up new Apple ID, 17 Encryption email, 62 of iCloud data in transit, 25 iOS backup/restore limitations, 294 securing data at rest, 68–69 securing data in transit, 69 of Time Machine backup drives, 244 Energy Saver, OS X Server, 93 Enrollment client Mac, for in-house apps/books, 496–497 in DEP, 353–354, 377, 390–396 iOS device, and configuration profiles, 234 iOS device, and MDM, 291–293 iOS device, for in-house apps/books, 502–503 iOS device, in MDM using Setup tab, 271–273 iOS device, restoration workflow, 515 Index 605 iOS device, via Setup Assistant, 264–265 in Open In, 558–559 in Profile Manager, 490–491, 502–503 supervised iOS device, confirming, 323–324 supervised iOS device, deploying apps to, 345 in VPP, 378, 422–424, 441–442 Enrollment, MDM Allow Activation Lock after, 405, 410–411 Configurator, automatic install of profiles for, 265 Configurator, inability to modify profiles with, 261 configuring devices for, 14 customizing iOS Setup Assistant for, 262 defined, 194 DEP enforcing supervision and, 30 DEP facilitating user-based, 350 deployment scenarios, 33–34 device management vs. device, 15 overview of, 194 with profiles. see Configuration profiles profiles needed for, 291–293 streamlined, 195 user-initiated. see User-initiated enrollment, MDM Enrollment, over-the-air, 223–230 Enrollment profiles, MDM in Apple Configurator, importing, 316–317 in Apple Configurator, installing, 291–292 in Apple Configurator, profile installation order, 292 automatically pushed, 218–221 enrolling via My Devices portal, 202–203 function of, 152 installing on OS X computer, 202 not associating devices with users, 207 overview of, 195 removal of, 201, 259, 290 supervised iOS device backup/restore and, 315–316 Enterprise apps for iOS devices, 492–495 for OS X computers, 497–501 EPUB files, 483 Erase all content/settings, unsupervised iOS device, 268 Ethernet as Caching service server requirement, 136, 146 configuring OS X on client, 36–37 configuring OS X on server computer, 109, 114–115 estimating network requirements, 60 OS X Server not requiring use of, 5 subnet planning and, 61 Everyone group group-based profiles and, 161 preparing unsupervised iOS device, 274–275 Exchange ActiveSync, network integration of, 63 Exercise sections, of this guide configuring isolated network, 7–8 correct order of, 8 lesson structure, 3 mandatory requirements, 5–7 performing on isolated network, 4 setup, 4 Expiration alert, SSL certificates, 125 Exporting Open Directory CA, 269–270 profiles created in Apple Configurator, 262, 293 server public keys, in Profile Manager, 383 Extensible Markup Language (XML), profile documents, 153 F FaceTime, 24, 70–71 Family Sharing. see iCloud Family Sharing Features, MDM, 193 File Manager free version of, 580 introduction to, 553 as managed app, 575–576 reading PDF documents with, 560–561, 566 File services, network integration of, 63 File systems, acquiring in-house apps/ books via, 484 File Transfer Protocol (FTP), 63, 509 Filename extension, profile documents, 12 FileVault, 551 FileVault 2, 68–69, 72 Filtering, and network service availability, 64 Find My Device service accessing, 26 Activation Lock and, 27, 72, 398–399, 409–412 Apple Configurator limitations, 246 Find My iPad (or iPhone or Mac). see Find My Device service Finder, downloading student materials, 117 Firewalls, in network service availability, 64 Firmware folder, for iOS software, 273–274 Folder layout, saving in iOS backup, 295 FQDNs (fully qualified domain names) introduction to, 462 Mail and, 554 OS X Server Wiki and, 527 profile-based restrictions and, 576 Free apps deploying to supervised devices with Configurator, 344–348 downloading from App Store, 148 paid apps vs., 330–332 preparing to distribute, 340–344 via VPP, 454–455 Free books, via VPP, 456–457 FTP (File Transfer Protocol), 63, 509 G Gatekeeper, 481, 490 Gateway, for isolated network, 7 General settings, Profile Manager, 163–164, 177, 218 Geohopper, 585, 587 Gigabit Ethernet, OS X Server hardware, 93 Goals, Apple design, 10–11 GPS capabilities, Find My Device, 26–27 Graph, monitoring Caching service content, 141 Group(s) apps assigned to, 459–460 books assigned to, 460–461 configuration profile for user, 177– 178, 232–233 configuration profile update to, 179 default settings via, 217 DEP placeholder records for, 385–387 enterprise apps assigned to, 493–494, 498–499 importing into shared directory of server, 127 Profile Manager device, 209–210 profiles based on, 161–162 removal of, 474–475 removing in VPP, 474–475 user/device preferences for, 217 wiki page for, 231–232 Guest-accessible “enrollment-only” Wi-Fi, 200 H Hardware, OS X Server, 91–93 Help Desk Support, AppleCare, 79 Help documentation, OS X Server, 140 Home screen, 295, 321 Host name alias redirect, to enrollment website, 200 606 Index HTML (Hypertext Markup Language), 520 HTTPS (HTTP Secure), 71, 521 HVAC (heating, ventilation, and air conditioning), cooling infrastructure, 76 I iBooks acquiring in-house books via, 482–483 confirming in-house books in, 504–506 Managed Open In and, 566–567 preinstallation of, 553 unavailable in Open In, 572 as unmanaged app, 573–575 iBooks Author, 483 iBooks Store, in VPP, 31 iCloud Activation Lock. see Activation Lock backing up production iOS device, 54–55 backups in, 514–515 content and backup, 24–25 creating new Apple ID for, 18 Drive, 511–513 Family Sharing, 28–29 Find My Device. see Find My Device service network services integration, 63–64 overview of, 22–23 restoration workflows in, 515–516 security, 25–26 setting up new Apple ID without email, 17 setup, 23–24 iCloud Drive, user content on, 511–513 iCloud Family Sharing Apple ID setup for, 17 enrollment in VPP Managed Distribution and, 444 overview of, 28–29 Icons, identifying profile documents, 12 iMac, 75, 91 Image Capture, 321, 323 iMessage configuring Apple ID for, 24 securing data in transit, 70–71 sending links to enrollment website, 199 Import Placeholders, 212–213 Importing device list, 212–213 groups into server’s shared directory node, 127 server tokens in Profile Manager, 384–385 trust profile for supervised iOS device, 302 users into server’s shared directory node, 126–127 Individual personal device, for Apple deployment, 33 Infrastructure considerations exercise, verify network service availability, 81–88 management plan development, 591, 593 networks, 59–65 overview of, 59 physical logistics, 73–78 security, 65–72 support options, 78–80 In-house apps/books books, acquisition of, 482–483 books, in Profile Manager, 503–505 confirming in iBooks, 504–506 deploying to iOS devices, 483–484 deploying to OS X computers, 484–485 deployment of, generally, 479–485 enrolling client Macs for, 496–497 enrolling iOS devices for, 491–492, 502–503 exercise, deploying apps via Profile Manager, 490–501 exercise, deploying books via Profile Manager, 502–506 inspecting availability of, 471–476 introduction to, 479 iOS apps, acquisition of, 480–481 iOS enterprise apps and, 492–495, 501 managing for iOS devices, 486–489 managing via Profile Manager, 485–490 OS X apps, acquisition of, 481–482 OS X enterprise apps and, 497–500 pushing apps to OS X computers, 489–490 Remote Management Profile for, 494, 496 Initial configuration, installation workflow, 77 Installation of Apple Configurator, 247, 250–253 of app/OS X updates, 42 free app, 346 of iOS App Store items, 332–334 manual profile, 166–169 OS X Server on client computer, 36, 132–134 OS X Server on server computer, 119–122 OS X Server setup for, 91–96, 105–119 of profiles, code signing during, 154–155 of profiles on iOS device, 12 of profiles on supervised device, 289 of profiles on unsupervised device, 259–261, 289 of Push Diagnostics, 83–85 of Services Test, 86–88 using NetInstall for multiple Mac computers, 2 workflows, 76–77 Installation of apps, Apple Configurator App Store items, 332–334 Apple IDs and, 328–330 downloading App Store items, 330–332 free vs. paid iOS App Store items, 330 of iOS App Store items, 332–334 overview of, 327–328 restoring from backup, 322–323 Institutional Apple IDs, 22, 28–29 Institutional devices institutional personal device, 33 institutional shared device, 34 in management plan development, 590 Internet access availability of Apple, 65 configuring OS X Server, 95, 109 network infrastructure considerations, 60 network service availability with, 64 requirements for this guide, 6 Internet sharing/storage options, 510–511 Introduction to this guide exercise order, 8 exercise setup, 5 learning methodology, 2–3 lesson structure, 3–4 mandatory requirements, 5–7 network infrastructure, 7–8 overview of, 1 prerequisites, 1–2 using Apple Deployment Programs, 2 Inventory, verifying in disposal workflow, 78 Invitations to VPP, accepting, 441, 562–563 iOS, prerequisites for using this guide, 1 iOS Developer Enterprise Program, 480 iOS Developer Program, 119 iOS devices Apple Configurator on, 392–393 automatically pushed profiles on, 218–220 backup solutions for, 514–515 configuration profiles for, 153, 175–177 configuration profiles, removing from, 177, 180 configuration profiles, unsigned, 182 DEP-enrolled, 387–390 enrollment by user, 198 Index 607 enrollment with /mydevices site, 224–226 exercise, configuring your, 53–57 finding. see Find My Device service iCloud for, 23–25 management via profiles, 11–12 manual profile installation on, 167–169 MDM servers, unassigning from, 393–394 passcode clearance on, 215 passcode confirmation on, 235–236 preparing with Apple Configurator. see Apple Configurator remotely managing with MDM, 13–14 removing manually downloaded profiles, 189 requirements for this guide, 5 restoration workflows for, 515–516 securing data at rest, 68–69 sharing/storage options for, 508–510 supervised. see Supervised iOS devices testing deployment using Wi-Fi, 6 unenrollment by user, 198 unenrollment from management, 237–239 unsigned vs. signed profiles on, 184 unsupervised. see Unsupervised iOS devices verifying network service availability, 86–88 VPP and, 463–464, 476–478 WebDAV access on, 523–525 wiping, 214, 394 iOS Direct Service Program, 80 iOS enterprise apps, 492–495 iOS iTunes, 513–514 iOS Setup Assistant, customizing configuring device enrollment via, 264–265 manually apply configuration profile on iOS device, 282–284 overview of, 262 preparing unsupervised iOS device, 268–269, 276–278 skipping screens, 263–264 verifying, 265–267 IP address, OS X Server network access, 94 iPads, 74, 468 iPhones, 74, 468, 592 iPods, 74, 468 IPSW files, customizing iOS versions, 257 IPv4 addresses Caching service, 137–139 configuring isolated network, 7 configuring OS X Server network interfaces, 115 IPv6 addresses, Caching service, 137–139 ISBN number, downloading student materials, 43 IT administration, Apple goals for, 10–11 Item management, 592 iTunes acquiring in-house apps/books via, 483 Apple Configurator, adding iOS app from, 333 Apple Configurator, conflict with, 258 Apple Configurator installation using, 247 backups in, 514–515 downloading free app with, 340–342 iOS backups in, 294 restoration workflows in, 515–516 syncing content on, 513–514 testing Caching service from, 142 updating iOS apps via Software Update, 336 updating locally cached iOS apps, 334 VPP accounts for, 465–467 iTunes Store, 328–331 K Keychain Access inspecting Apple Configurator certificate, 253 listing root certificates, 98 preparing unsupervised iOS device, 270–271 Keynote creating presentations in, 539–541 downloading presentations in, 541–545 installing on additional devices, 543 for iOS devices, 534–535, 538 for VPP Managed Distribution, 535–538 in WebDAV, 523, 534 Keys, XML profile format, 153–154 Kiosk devices, 590 L Launchpad, OS X Server installation, 120–121 LDAP (Lightweight Directory Access Protocol), 62 Learning methodology, about this guide, 2–3 Lesson structure, about this guide, 3–4 Library, 485–486 Licenses configuring OS X on client computer, 37 configuring OS X on server computer, 110 managed, for shared Apple IDs, 21 in VPP. see VPP (Volume Purchase Program) Local administrator account configuring OS X on server computer, 110–111 creating, 38–40 preparing Mac for OS X Server, 113–114 turning on remote management, 41 Local Path, 584, 586 Local Recovery HD system, OS X computers, 214 Locally attached drives, 508, 509 Location Services preparing supervised iOS device, 304 setting up iOS device, 56 skipping in iOS Setup Assistant, 263 Lock Screen, Apple Configurator automatically set for supervised devices, 295 configuring customized, 252–253 customizing on supervised iOS device, 321 preferences, 249–250 Lock to App pop-up menu, 337, 339 Lock(s) Activation Lock. see Activation Lock Apple IDs vs. iOS device, 16 device, from My Devices portal, 216 device limitations in Apple Configurator, 245–246 displayed at bottom of Groups pane, 231 iOS devices to single app, 337–338, 347 Lock Screen, Apple Configurator, 249–253, 295, 321 pair locking, Apple Configurator, 289 pair locking, DEP-assigned devices, 368 pair locking, iOS content/services restrictions, 549–550 passcode, 168, 215, 235 physical security using door, 66 as Profile Manager task, 214–215 remotely with ActiveSync, 71 remotely with MDM, 71–72, 192 web address, revealing chain of trust, 98 Login configuring OS X system for server, 112 on Mac client computer, 581 modifying keychain with credentials for, 134 new administrator account, 40 SSO authentication at, 70 in VPP, 450–451 608 Index Logistics Apple Configurator, 242–243 in management plan development, 591 Logs inspecting in Push Diagnostics, 85 troubleshooting Caching service, 143–145 verifying Caching service via, 147, 149–150 M Mac App Store Apple ID authorization for, 328 purchasing/licensing content with VPP, 31 testing Caching service from, 142 Mac computer client. see Client Mac computer as server computer. see Server computer Mac Developer Program, 119, 481 Mac mini, 74–75, 92 Mac notebooks, 74 Mac Pro, 75, 92 MacBook, 91 Mail collaboration services for, 508–509 configuring OS X Server for Yosemite and, 128–129 default configuration profile for, 158–159 Internet sharing and, 510 from managed apps, 575–576 Open In and, 554–555 opening PDF documents from, 565–568, 570–573 from unmanaged apps, 573–575 using Exchange ActiveSync, 71 in VPP, 464–465 Mainserver icon, 42–43 Maintenance, management plan development, 592 Managed apps, 575–576 Managed configuration profiles, MDM, 193 Managed devices, Activation Lock and, 404–416 Managed license distribution, VPP content, 31 Managed Open In apps/accounts in, generally, 548 configuration of, 549 enrolling iOS devices in, 558–559 exercise, using, 552–553 introduction to, 547 invitations to VPP in, 562–563 Mail, docs from managed apps via, 575–576 Mail, docs from unmanaged apps via, 573–575 Mail, opening PDF documents from, 565–568, 570–573 Mail for Workgroup in, 554–555 mailing PDF documents in, 564, 570 PDF documents and, 557–562 pushing VPP apps in, 563–564 restricting, 564 securing data in transit, 71 settings in, 568–570 starting with fresh iOS devices, 556 using Setup Assistant without Apple IDs, 556–557 VPP apps that read PDF documents and, 559–562 Management of Apple IDs, 18–19 availability of Apple services for, 64–65 remote. see MDM (Mobile Device Management) unsupervised vs. supervised iOS devices and, 290 Management plan development administrative flexibility in, 594 advanced deployment in, 594 Apple IDs in, 597 defining requirements in, 589–592 education focus in, 594, 596–597 exercise for, 594–599 infrastructure in, 591, 593, 595–596 introduction to, 589 inventory requirements in, 593–594 item management in, 592, 598–599 logistics in, 591, 595 methodology for, 590 network infrastructure in, 596 ongoing maintenance in, 592, 599 physical logistics in, 595 platform agnostic solutions in, 593 scalability in, 593 self-service options in, 594 service/support options in, 599 software updates in, 599 system deployment in, 591, 598 third-party solutions in, 592–594 training/professional development in, 596–597 usage management in, 591 usage policies in, 597–598 Mandatory requirements, about this guide, 5–7 Manual installation, VPP-assigned books/apps, 443–445 Manual profile installation configuration profile on iOS device, 282–284 overview of, 167–169 removing profiles from, 189 workflow, 160–161 MDM (Mobile Device Management) Activation Lock and, 387–399, 407–409, 412–413 Apple Configurator preferences for, 249 architecture, 191–195 automatically pushing profiles, 13, 164–165, 216–221 availability of, 64–65 backup, 93 deploying apps remotely via, 327 device supervision and, 15 enrollment, iOS device, 265–266, 271–273 enrollment, types of profiles for, 291–292 enrollment, user-initiated. see Userinitiated enrollment, MDM enrollment profiles. see Enrollment profiles, MDM exercise, assigning devices to, 387–389 exercise, deploying management settings, 230–236 exercise, enabling device management, 221–223 exercise, enrolling over the air, 223–230 exercise, unenrolling over the air, 236–240 in-house iOS apps/books via, 484 in-house OS X apps/books via, 485 lock, 71–72 Managed Open In and, 548 overview of, 13–14 preventing manual installation of additional profiles, 168 Profile Manager and, 156, 195–198, 213–216 profile payloads and, 165 redirecting devices in DEP to, 29–30 scalability, 593 servers, 382 system deployment and, 591, 598 third-party solutions, 14 unsupervised vs. supervised iOS devices and, 290 VPP integrating with, 426–427 wipe, 72 Memory, OS X Server, 92 Messages collaboration services, 508–509 default configuration profile, 158–159 Internet sharing, 510 Methodology, management plan development, 590 Microsoft Exchange ActiveSync, 63, 71 Index 609 Microsoft Office for OS X, 594 Migration Assistant, 78 Mobile Device Management. see MDM (Mobile Device Management) Monitoring, Caching service, 141 More Details button, automatically pushed profiles, 219 “More info” resources, lesson structure, 4 My Devices portal administrative tasks, 216 default configuration profile only in, 158 downloading profiles via, 167 group-based profiles in, 161–162 as Profile Manager component, 156 turning on, 157 unenrolling client Mac from management, 238–239 unenrolling iOS device from management, 205, 237–238 user enrollment via, 201–204 website for user-initiated enrollment, 199 N Naming conventions computer, 40 iOS device settings, 256 OS X Server network access, 93–94 NAT (network address translation), and Caching service, 137–138 NetInstall services, 2, 89–90, 94 Network address translation (NAT), and Caching service, 137–138 Network infrastructure availability. see Network service availability considerations, 59–61 service availability, 64–65 service integration, 62–64 Network service availability Caching service configuration, 140 OS X Server hardware for, 93 overview of, 64–65 verifying, 81–88 Network Utility, Lookup tab, 106–107 Networks about this guide, 6–8 access to, 69, 201 configuring interfaces, 114–117 data in transit security, 69–71 file sharing, 508, 509 interfaces, 93 isolated, 6, 7–8 OS X Server considerations, 93–95 New Finder window (Command-N), 42, 44–45 Notes creating documents on supervised iOS device, 319 iTunes syncing, 513 lesson structure for, 3 Numbers in WebDAV, 523 O Ongoing maintenance, 592 Online resources Apple Deployment Programs, 29 Apple ID, 17 Apple IT initiatives, 11 Apple support articles, 4 iOS Developer Program, 119 list of services authenticated with Apple ID, 16 Mac Developer Program, 6 modifying Apple IDs, 18 plus-addressing, 6 working with OS X, 1 working with OS X Server, 2 Open Directory CA, 270 Open Directory master configuring OS X Server for Yosemite, 124 creating code signing certificates, 154 downloading trust profiles, 167 enabling device management, 196, 197 Open In accepting invitations to VPP in, 562–563 configuring Mail for Workgroup in, 554–555 enrolling iOS devices in, 558–559 installing apps to read PDF documents, 557–558 inviting participants to VPP in, 562 mailing docs from managed apps via Mail, 575–576 mailing docs from unmanaged apps via Mail, 573–575 mailing PDF documents in, 564, 570 managing, generally, 552–553 opening PDF documents from Mail, 565–568, 570–573 pushing VPP apps in, 563–564 restricting, 564 settings in, 568–570 starting with fresh iOS devices, 556 using Setup Assistant without Apple IDs, 556–557 VPP apps that read PDF documents for, 559–562 Open LDAP, for directories, 62 Organization information, 163, 288–289 OS Support, AppleCare, 79–80 OS X computers accessing WebDAV on, 525–526 accidental damage of, 79 Apple Configurator backup on, 244 Apple Configurator installation/ update on, 328 automatically pushed profiles in, 220–221 backup solutions, 516–518 configuration profiles not designed for, 153, 262 DEP enforcement limitations, 371 DEP service during Setup Assistant, 350–351, 367–368 downloading free app from App Store, 148 enrolling via My Devices portal, 202–204 enrolling/unenrolling into MDM service, 198 enrollment profile in, 220 erasing data securely from, 78 Ethernet/Wi-Fi used on most, 6 initial configuration plan for, 77 iOS apps created/tested on, 480–482 limiting contents/services on, 551 list of root certificates on, 98 no device supervision on, 14 prerequisites for using this guide, 1 profile documents, identifying on, 153 Profile Manager tasks on, 214–216 profiles, downloading on, 166 profiles, management via, 12–13 profiles, manually installing on, 167–169 pushing in-house apps to, 489–490 remote lock command and, 72 requirements for this guide, 6 running Apple Configurator for iOS devices, 242–243 securing data at rest, 68 securing data in transit, 69–70 software updates on, 136 storage options, 509–511 VPP on, 441, 446–447 workflows for deploying in-house items to, 484–485 OS X devices AirDrop for, 70 App Store apps for, 418–419 Apple IDs for, 16–22 backing up, 517 backup solutions for, 516–518 DEP for. see DEP (Device Enrollment Program) deploying in-house apps to, 485–486 filtering solution for, 64 iCloud for, 23–27, 512–513 limiting contents/services on, 551 management and supervision of, 11–15 Microsoft Office for, 594 physical security for, 66 610 Index profile-based restrictions in, 587–588 profiles, downloading on, 167 profiles, manually installing on, 167–169 sharing/storage options for, 509, 511 VPP-assigned apps on, 445 WebDav supporting, 90 OS X enterprise apps adding, 497–498 confirming removal of, 501 pushing, generally, 489 pushing to groups, 498–499 removal of, 501 running on client Macs, 499–500 OS X Server integrating with Active Directory, 161 prerequisites for using this guide, 2 requirements for this guide, 6 starting with uninstalled, 3 OS X Server for Yosemite benefits, 89–90 configuring on client via Setup Assistant, 36–37 exercise, configuring, 122–131 exercise, configuring client computer, 131–134 exercise, configuring server computer, 105–119 exercise, installing, 119–122 iCloud Drive in, 512–513 overview of, 89 requirements for this guide, 5 services, 90 setup, 91–96 TLS/SSL certificates. see TLS/SSL certificates OS X Server WebDAV accessing on iOS devices, 523–525 accessing on OS X computers, 525–526 enabling access to files via, 522–523 installing server trust profiles, 538–539 introduction to, 508–509 Keynote, creating presentations with, 539–541 Keynote, downloading presentations, 541–545 Keynote, getting/installing for iOS, 534–538 Keynote, installing on additional devices, 543 OS X Server Wiki and, 518–519 overview of, 521–526 shares in, 533–545 for user content, 521–526 OS X Server Wiki accessing files from iOS devices, 532 creating new pages on iOS devices, 527–529 editing pages on client Macs, 529–530 overview of, 518–521 sharing content, 520–521 storing content, 519–520 turning on, 518–519 uploading files to client Macs, 531–532 uploading photos from iOS devices, 532 for user content, 518–521 using, 527–533 viewing photos from client Macs in, 532–533 OTA (over-the-air) administrative flexibility of, 191 confirming device enrollment on server, 228–230 deploying iOS apps for individual users via, 328 encouraging user enrollment, 198–200 enrolling client Mac using /mydevices site, 226–228 enrolling iOS device using /mydevices site, 224–226 MDM vs., 13 unenrolling, 236–240 P Pages in WebDAV, 523 Pages in wikis, defined, 520 Paid apps, 330–332, 455–456 Pair lock, 289 Pairing, 15, 245 Passcode, iOS devices backup/restore limitations, 294 clearing, 215 configuration profiles, adding to, 235 configuration profiles, downloading/ confirming, 175–177 confirming new, 235–236 managed iOS devices, 71 profiles, adding, 234 profiles, manual installation and, 168 setting up, 57 skipping in Setup Assistant, 263–264 unlocking devices with, 214 Pass-through electric monitor, 73–74 Passwords administrator account, 39–40, 112 administrator Apple ID, 45–46 Apple ID, 17–21 configuring server as Open Directory master, 124 securing data at rest, 68 using Server app to administer server, 133–134 Payload settings, profiles, 164–165, 168–169, 200–201 Payments, in VPP, 451 PDF documents in iBooks app, 482–483 installing apps to read, 557–558 mailing, 564, 570 opening, 565–568, 570–573 VPP apps to read, 561–562 Peachpit, downloading student materials, 43, 118–119 Peripheral equipment, power requirements, 75 Personal devices, 590 Personal identification number (PIN), 68, 71 Photos, on supervised iOS device, 320 Photos app, 592 Photoshop, 593 Physical logistics cooling infrastructure, 75–76 disposal and recycling, 77–78 estimating power needs, 74–75 handling, 76–77 overview of, 73 power infrastructure, 73–74 Physical security infrastructure, 65–67 PIN (personal identification number), 68, 71 PKI (public key infrastructure), 69–70 Placeholders. see Device placeholders, Profile Manager Platform agnostic solutions, 593 Plus-addressing, multiple Apple IDs with, 6 Ports, 94, 95 Power circuits, overloading, 73 Power infrastructure, 73–76 Preferences, Apple Configurator, 248– 249, 251–252, 303 Prepare button, Apple Configurator, 257–259, 303–304 Prepare view, Apple Configurator adding iOS app in, 333 configuring device enrollment in Setup Assistant, 265 installing profiles on supervised devices, 292–293 name settings, 256 overview of, 255–256 Prepare button, 257–259 preparing to distribute free app, 343–344 supervised iOS devices, 288 update iOS, 257 Prerequisites, using this guide, 1–2 Print services, network integration of, 63–64 Privacy, user, 10, 27 Private networks, Caching service on, 137–139 Profile documents, 153–154 Index 611 Profile Manager Activation Lock, and, 397–400 Activation Lock management via, 400–404, 411 administrative flexibility in, 594 administrative tasks in, 213–216 automatically pushing profiles, 216–221 for client Macs, access, 580–583 for client Macs, configuring restrictions, 582–583 components of, 156 creating profile, 171–173 default configuration profile settings in, 158–159 for DEP, adding servers in, 356–359 for DEP, assigning devices in, 360–361 for DEP, assignment placeholders in, 364–365 for DEP, configuring assignments to, 364–371 for DEP, enforcement limitations in, 371 for DEP, generally, 355–356 for DEP, managing individual devices in, 363–364 for DEP, managing multiple devices in, 361–363 for DEP, managing servers in, 359–360 for DEP, placeholder records, 385–387 for DEP, verifying functionality in, 368–370 for DEP assignments, device groups from, 365–366 for DEP assignments, enrollment settings, 366–368 downloading server tokens in, 384 enabling device management for, 196–198, 221–223 enrollment process role of, 194–195 exercise, configuring for DEP, 381–387 exporting server public keys in, 383 General profile settings, 163–164 groups in, 577–579 in-house apps to OS X computers in, 489–490 in-house apps/books for IOS devices in, 486–489 in-house apps/books in, generally, 485–490 in-house books, adding, 503 in-house books, assigning, 504 in-house books, confirming removal of, 505–506 in-house books in iBooks, confirming, 504–505 in-house books, unassigning, 505 importing server tokens in, 384–385 inventory and organization, 206–210 iOS device enrollment, confirming, 311, 323–324 iOS devices, accessing in, 578–579 iOS devices, enrolling for books/apps, 491–492 iOS devices, enrolling for in-house apps/books, 502–503 iOS devices, in single app mode, 339–340 iOS devices, removing from, 284–285 iOS devices, restricting access on, 550 Library, 485–486 Mail configurations in, 554–555 managed accounts in, 548 manual profile installation workflows, 160–161 MDM servers and, 382–384 Open In settings, 568–570 OS X apps, assigning to users, 585 OS X computers, accessing in, 584–588 OS X restrictions, 551, 587–588 overview of, 156 profile payloads, 164–165 Push VPP Apps in, 563 refreshing, 561 scalability in, 593 service configuration, 157 signing configuration profiles, 182–183 turning on, 169–170 turning on profile code signing, 159–160 unenrolled devices leaving placeholder in, 205 user-based and group-based profiles, 161–162 for VPP, configuring for, 447–453 for VPP, generally, 425–428, 433 for VPP apps to iOS devices, pushing, 578–580 for VPP books/apps, confirming listing of, 458 for VPP books/apps, purchasing, 433–437 for VPP invitations, confirming, 467 for VPP Managed Distribution, configuring, 451–453 for VPP Managed Distribution purchases, making, 434–436 for VPP Managed Distribution purchases, revoking, 436–437 for VPP OS X apps, pushing, 586–587 web app, 156 workgroup in, 554–555, 577–579 Profile-based access restrictions on access to App Store on iOS devices, 576–578 client Macs, configuring restrictions for, 582–583 client Macs, creating accounts for, 580–581 client Macs, enrolling, 581–582 client Macs, logging in on, 581 introduction to, 547, 576–578 iOS devices, pushing VPP apps to, 578–579 iOS devices, removing, 579 OS X apps, attempting to install, 585–586 OS X apps, for VPP Managed Distribution, 584–585 OS X apps, installing, 587–588 OS X devices, removing, 579 VPP OS X apps, attempting to install, 586 VPP OS X apps, attempting to push, 586–587 VPP OS X apps, pushing, 587 Profiles adding passcodes to, 234 Apple Configurator, editing, 261–262 Apple Configurator, installation order of, 292 Apple Configurator, not restored in backup, 295 Apple Configurator, preferences to preserve, 303 automatic installation for supervised iOS devices, 290–293 automatically pushed, 216–221 code signing, 154–155 controlling iCloud access on iOS devices, 25 creating with Profile Manager, 160–165 device management via, 11–12 exercise, cleaning up, 189–190 exercise, creating/downloading/ installing for users/groups, 170–181 exercise, signed vs. unsigned, 181–188 exercise, turning on Profile Manager, 169–170 inspecting existing iOS device, 305–310 installing on unsupervised device, 259–261 iOS device refresh and, 311–312 manually installing, 166–169 overview of, 151 Profile Manager setup, 156–160 types of, 152 Profiles & Device Management, 266, 305–310 612 Index Profiles list, 261–262, 292–293 Program agent accounts, in ADP, 372–375 Program agents, in VPP, 423–424 Progress updates, Apple Configurator, 258 Protection Plan, AppleCare, 79 Protective cases, for physical security of devices, 67 Protocols, email, 62 Provisioning profiles, 152 PTR records, preparing Mac for OS X Server, 106–108 Public addresses, Caching service and, 137–139 Public key infrastructure (PKI), 69–70 Public keys, 383–384 Push Diagnostics, 83–85 Push notifications, 123 Push OS X Enterprise Apps task, Profile Manager, 216 Push VPP Apps/Books task, Profile Manager, 215 Pushing VPP apps, 548, 563–564 R Random code, Apple ID two-step verification, 20 Reachability testing, OS X Server, 95–96 Receive delivery, installation workflow, 76 Record asset information, installation workflow, 77 Recovery Key, Apple ID two-step verification, 20 Recovery solutions, 71–72 Recycling, obsolete devices, 77–78 Redemption codes, VPP Configurator not installing paid apps without, 334 distributing VPP content, 31 free apps vs. paid items from App Store, 330 overview of, 420–421 redeeming, 332 Redirect user device, to enrollment website, 199–200 Reference sections, in lesson structure, 3 Refreshing supervised devices, 299, 311–312 Registration accessing student materials, 43 Caching service, 147 Remote administration, configuring OS X Server, 122 Remote lock, MDM security command for, 193 Remote management device enrollment in iOS Setup Assistant, 266–267 Find My Device, 26–27 MDM for, 13–14 preparing Mac for OS X Server, 113 turning on, 41 unenrolling device from, 204–205 Remote Management profile email account settings in, 558–559 for in-house apps/books, 488, 494, 496 for supervised iOS device, 309–310, 312, 313 Rename task, Profile Manager, 215 Renew button, SSL certificates, 125 Renewal, APNs yearly, 196 Replacement accessories/devices, 80 Requirements Caching service, 136 to complete lessons in this guide, 5–7 DEP, 351–353 device management, 196–197 management plan development, 589–592 Resetting iOS devices exercise, 55–57 VPP and, 476–478 Restoration workflows, iOS devices, 515–516 Restore iOS backups for, 296–297, 322–323 settings/documents, 323 skipping screen in iOS Setup Assistant for, 263 of supervised iOS devices. see Backup/restore, supervised iOS device Restrictions automatically pushed profiles, 219 clearing, 215 Open In access, 564 user-based and group-based profiles, 162 Revoking apps/books, in VPP, 436–437 RFC standard, plus-addressing, 6 Routing, 6, 95 Rules, Apple Configurator profile installation order, 292 S Safari, 234–236 Scalability, management plan development, 593 SCEP (Simple Certificate Enrollment Protocol), 203 Screens, skipping iOS Setup Assistant, 263–264 Secret information, iOS backup/restore limitations, 294 Secure Sockets Layer (SSL) certificates, 518–519, 522, 538 Security Apple ID two-step verification for, 19–21 Apple Push Notification service, 193 Find My Device and Activation Lock for, 26–27 General profile settings, 164 iCloud, 25–26 infrastructure considerations, 65 MDM architecture for, 193 Security infrastructure overview of, 65 physical security, 65–67 recovery solutions, 71–72 securing data at rest, 68–69 securing data in transit, 69–71 Security Q & A circumventing with social hacking, 19 creating administrator Apple ID, 45 creating Apple ID, 17 creating client testing Apple ID, 50 managing Apple IDs, 18 two-step verification disabling, 20 Select Applications dialog, 343 Self-service, as support option, 80 Send PDF Document app, 564, 570 Sequential device numbering, automating iOS device naming, 256 Serial number, device placeholders, 211–212 Server app administering server with, 133–134 configuring Caching service, 140–142 configuring OS X Server. see OS X Server for Yosemite configuring Profile Manager for DEP, 383–384 creating ADP program agent account, 373–374 device enrollment in iOS Setup Assistant, 266 device management in Profile Manager, 196 enabling remote administration, 122 turning on Profile Manager, 169–170 Server computer assigning devices to MDM services, 387 Caching service requirements, 136 configuring Profile Manager for DEP, 382 configuring supervised iOS device, 318 confirming device enrollment on, 228–230 creating ADP program agent account on, 373–374 creating wiki page on, 231–232 distributing free app, 340 exporting Open Directory CA on, 269–271 Index 613 initial setup with DHCP, 7 installing OS X Server on, 119–122 pushing VPP app to iOS device on, 578–579 restricting access for client Mac, 582–583 restricting access to App Store on, 577 supervised iOS devices, 406 Time Machine service on, 517 Server computer, preparing OS X Server for Yosemite confirming lack of PTR records, 106–108 downloading student materials, 117–119 existing OS X system on server, 111–112 network interfaces, 114–116 overview of, 105–106 remote management, 113–114 setting computer name, 113 updating software, 116–117 using Setup Assistant, 108–111 Server Message Block (SMB), 63, 508–509 Servername, 519 Services authenticating with Apple ID, 16 iCloud security architecture for, 25–26 network availability of, 64–65 network integration of, 62–64 OS X Server, 90 securing data in transit, 70–71 verifying availability of. see Network service availability Services Test, 86–88 Settings app, 167, 295, 336 Setup, Caching service, 138–141 Setup, OS X Server, 91–96 Setup Assistant Activation Lock and, 407–409, 412–413 configuring OS X on client computer, 35–37 configuring OS X Server on server computer, 108–111 free iCloud services of, 23 iCloud backups in, 515 iCloud Drive in, 512 in iOS devices, 390–396 Open In and, 556–557 restoration workflows in, 516 sign-in with Apple ID, 16 for supervised iOS device, 304–305 supervised vs. unsupervised iOS devices, 290 for unsupervised iOS devices. see iOS Setup Assistant, customizing VPP and, 477–478 Setup Profile, 266, 278–280 Setup tab, Prepare view backup/restore of supervised iOS devices, 318 customizing iOS Setup Assistant, 263–264 deploying apps to supervised devices, 345 enrolling iOS device in MDM, 264– 265, 271–273 for supervised iOS devices, 302–303 Share button, Profiles list, 293 Shared Apple IDs, 19–22, 27 Shared devices, institutional, 34 Shared directory, 126–127 Sharing of devices, in management plans, 590 in OS X Server WebDAV, 533–545 traditional options for, 508–509 via Internet, 510–511 Signed profiles code signing. see Code signing comparing unsigned vs., 181–188 overview of, 154 turning on, 159–160 Simple Certificate Enrollment Protocol (SCEP), 203 Simple Mail Transfer Protocol (SMTP), 95, 438 Single app mode, iOS devices locking device to, 15 third-party solutions for, 340 turning off, 338 using, 347 via Apple Configurator, 337–338 via Profile Manager, 339–340 Single sign-on (SSO), 70 Single-use devices, 590 Siri securing data in transit, 71 setting up iOS device, 57 skipping in iOS Setup Assistant, 264 Size, Caching service, 141 SMB (Server Message Block), 63, 508–509 S/MIME encryption, iCloud, 25 SMTP (Simple Mail Transfer Protocol), 95, 438 Software iOS, placing in firmware folder, 273–274 updating OS X, 42–45 Software Update service restricting updates using legacy, 136 troubleshooting Caching service, 142 updating iOS apps, 335–336 Split DNS, 95 Spotlight search field, 81–83, 106, 147 SSIDs, Wi-Fi, 60–61 SSL (Secure Sockets Layer) certificates configuring OS X Server for Yosemite, 125–126 installing server’s trust profile, 538 OS X Server WebDAV access, 522 OS X Server Wiki service, 518–519 securing data in transit, 69–70 Server app administering, 133–134 SSL Detective, 578–579 SSO (single sign-on), 70 Storage cabinets, for smaller devices, 66 iCloud content and backup, 24–25 iCloud pricing for, 25 on Internet, 510–511 OS X Server hardware for, 92–93 traditional options for, 508–509 Streamlined enrollment, into MDM service, 195 Strings, XML format for profiles, 153 Student materials, requirements for this guide, 6 Student number computer name associated with, 40, 113 establishing, 35 Student-owned devices, 590 Students Apple Family Sharing participation of, 29 Apple ID setup for, 17 shared Apple IDs and, 21 Subnet mask, configuring isolated network, 7 Subnets network infrastructure considerations, 61 OS X Server network access via, 94 requirements for this guide, 6 Subscription, iCloud storage, 24–25 Supervise view, Apple Configurator adding iOS app in, 333 defined, 248 locking iOS devices to single app, 337–338 managing supervised devices, 298 Supervised Devices list, 298, 337–338 Supervised iOS devices Activation Lock for, 27, 406–407, 412 Apple Configurator, backup for, 243–244 Apple Configurator, deploying apps to, 344–348 Apple Configurator, function of, 242 Apple Configurator, restoration of, 516 automatically installing profiles/ enrolling devices, 290–293 backup/restore content, 293–297 clearing restrictions on, 215 614 Index exercise, backup and restore of, 314–325 exercise, preparing, 300–314 installing profiles on, 292–293 managing, 297–300 overview of, 14–16 prepare settings, 288 refreshing, 412 renaming, 215 turning on in DEP, 30 unsupervised vs., 288–290 Supervision switch, 301, 345 Support options, 78–80 Sync stations, multiple Apple Configurator, 243 Syncing iTunes content, 513–514 System deployment, management plan development, 591 System imaging, 293–294 System preferences configuring network interfaces, 114–116 configuring OS X Server software updates, 116–117 creating new administrator account, 39–40, 111–112 inspecting installed profiles in OS X, 12 setting Computer Name, 113 updating OS X software, 42 T TapMedia, Ltd., 560 Tasks, Profile Manager administrative, 193, 213–216 TCP (Transmission Control Protocol), 64–65, 94–95 telnet, confirming connectivity to APNs, 81–83 Template iOS Device, 296–297 Terms and conditions, iOS device setup, 56 Testing Caching service, 142 external service reachability, 95–96 iOS backup/restore, 295–297 message sent in OS X Server, 130 OS X Server reachability testing, 96 Services Test for network availability, 86–88 Text files, profile documents as, 153 Text message, sending links to enrollment website, 199 TextEdit, 153 “Think different” design philosophy, 9 Third-party solutions code signing certification, 154 locking mechanism to secure devices, 66 management plan development, 592–594 Mobile Device Management, 14 physically protective coverings, 67 profiles, 160–161 recovery solutions, 72 replacement parts, 80 robust Wi-Fi network, 60 sending links to enrollment website, 199 single app mode for iOS devices, 340 Time Machine, 244 Time zone, 38, 111 “Tip” resources, lesson structure, 3 TLS (Transport Layer Security), 69–70 TLS/SSL certificates overview of, 96–97 Profile Manager device management, 197 Profile Manager service configuration, 157 signed by Open Directory CA, 99–101 signed by widely trusted CA, 102–105 understanding, 97–99 untrusted certificate issues, 101–102 user enrollment via My Devices portal, 202 Touch ID, 264 Traditional sharing/storage options, 508–509 Transmission Control Protocol (TCP), 64–65, 94–95, 438 Transport Layer Security (TLS), 69–70 Troubleshooting, Caching service, 142–145 Trust, between managed device and MSM, 194, 203 Trust profile downloading via My Devices portal, 167 importing into Apple Configurator, 316–317 inspecting, 307 installation order for, 292 for MDM enrollment via Apple Configurator, 291 overview of, 152 for supervised iOS device, 302 for unsupervised iOS device, 270 Trusted apps, 489 Trusted devices, 6, 20 Twocanoes Software, Inc., 584–585 Two-step verification, Apple ID, 19–22 U UDP (User Datagram Protocol), 94 Unassigning apps, in VPP, 475–476 Unassigning in-house books, 505 Unbox equipment, installation workflow, 77 Unenrollment of iOS devices, 324–325 over-the-air, 236–240 preparing supervised iOS device, 312–313 user-initiated, 204–205 Unique identifiers, device placeholders, 211–212 Unmanaged apps, 573–575 Unresponsive devices, Apple Configurator, 246 Unsigned profiles, 154, 181–188 Unsupervised Apple Configurator device, 516 Unsupervised iOS devices creating backup in Apple Configurator, 297 customizing Setup Assistant, 262–267 editing profiles, 261–262 exercise, preparing, 267–285 installing profiles, 259–261 name settings, 256 overview of, 255–256 Prepare button, 257–259 vs. supervised iOS devices, 288–289 unsupervising iOS device, 313–314, 325, 348, 416 update iOS, 257 Unverified profile, 155 Update, software Caching service, 136 configuring OS X on client computer, 42 configuring OS X Server network interfaces, 116–117 Update Info task, Profile Manager, 215 Update iOS for unsupervised vs. supervised iOS devices, 289 via Apple Configurator, 334–335 via Software Update, 335–336 Updates configuration profile, 179–180 of iOS devices to latest version, 257 Profile Manager device information, 207 refreshing supervised devices, 298 URLs device enrollment in iOS Setup Assistant, 265 modifying in profile, 188 in VPP, 438 Usage bar graph, cached content, 146, 147–148 Usage management, 591 USB (universal serial bus) adapters, 508 Apple Configurator and iOS devices, 242 Index 615 Apple Configurator high-power hubs/carts, 243 installing apps via Apple Configurator, 327 installing profiles on unsupervised device, 259–261 iOS backups for restore, 296 managing changes to supervised devices, 290 sync and charge cables, 549 unsupervising iOS device, 314 updating new settings on supervised devices, 298 USB Connected group, Supervised Devices list, 298 User content, data/services, 508–518 User Datagram Protocol (UDP), 94 User data/services iCloud Drive, 511–513 Internet sharing/storage options, 510–511 introduction to, 507 iOS backup solutions, 514–515 iOS iTunes syncing, 513–514 iOS restoration workflows, 515–516 OS X backup solutions, 516–518 OS X Server WebDAV, 521–526, 533–545 OS X Server Wiki, 518–521, 527–533 traditional sharing/storage options, 508–509 user content considerations, 508–518 User self-enrolled devices, 515 User-initiated enrollment, MDM defined, 195 enrollment website for, 198 keeping devices managed, 200–201 My Devices portal for, 201–204 overview of, 198 redirect to enrollment website for, 199–200 unenrollment, 204–205 Users Apple focus on needs of, 10 associating with devices, 207–209, 217 creating user-based profile, 171–173 creating user-based/group-based profiles, 161–162 customizing settings for individual, 217 iCloud for personal use and, 26 importing into server’s shared directory node, 126–127 linking to enrollment website, 199 management for Apple device, 30 manual profile installation, 160–161 Profile Manager device groups, 209–210 removing Apple Configurator enrollment profiles, 259 V Verification administrator Apple ID, 47–48, 51–53 Caching service, 145–150 client testing Apple ID, 50–51 of DEP administrator accounts, 380–381 enrolling using My Devices portal, 203–204 of enrollment in VPP, 441–442 of identity on iCloud, 54 of Mail service for OS X Server, 129–130 of manually installed profiles, 169 network service availability, 81–88 of new Apple ID, 342 OS X Server hardware requirements, 91–92 of program agent accounts in ADP, 375–377 requirements for Apple ID, 6 setting up Apple ID two-step, 19–21 of Setup Assistant customizations, 265–267 Verified profiles, 155 Viewing books on devices, via VPP, 469–470 Views Apple Configurator, 247–248 of automatically pushed profiles, 219 Virtual private network (VPN), 69, 158–159 VPN (virtual private network), 69, 158–159 VPN On Demand, 69 VPP (Volume Purchase Program) accepting invitations to, 441 accepting invitations via Open In, 562–563 account management in, 425 acquiring copy of paid apps in iTunes, 332 acquiring Keynote via, 535–538 administration of, 424–425 administrator accounts in, 448–451 as Apple Deployment Program, 31 Apple deployment scenarios using, 33–34 Apple IDs and, 328 Apple stores and, 418–419 apps to read PDF documents from, 559–562 assigning books/apps in, 434–436, 459–461 associating client Macs with Apple IDs in, 470 availability of app licenses in, 476 availability of books/apps in, 471–473 business organizations and, 424–425 configuring Apple Configurator preferences, 249 credit in, 429–430 defined, 2 direct payments in, 428–429 education organizations and, 424 enrollment in, 422–424 essentials of, 417–422 exercise, configuring Profile Manager for, 447–453 exercise, installing apps/books manually, 468–473 exercise, invitations to Managed Distribution, 461–467 exercise, purchasing books/apps in, 453–461 exercise, removing Managed Distribution, 474–478 inspecting books in, 476 installing apps on devices, 468–469 installing books/apps assigned by, 443–447 inviting participants via Open In, 562 licensing and, 418–420 Managed Open In and, 548 managing books/apps, 215, 417 MDM and, 426–427 payment information in, 428–430, 451 Profile Manager and, 425–428 Profile Manager configuration for, 447–453 Profile Manager, listing books/apps in, 458 Profile Manager, purchase of books/ apps via, 433 Profile Manager supporting, 156 profile-based restrictions on OS X apps in, 584–588 program agents enrolling in, 423–424 purchase of books/apps in, 430–433, 454–457 pushing apps in, 563–564, 578–579 redemption codes in, 420–421 re-deploying paid app in, 330 resetting iOS devices for, 476–478 revoking apps/books in, 436–437 Setup Assistant and, 477–478 unassigning apps in, 475–476 for unsupervised vs. supervised iOS devices, 290 verifying enrollment in, 441–442 viewing books on devices, 469–470 VPP Managed Distribution accepting invitations to, 441, 562–563 allowing access to iTunes in, 465–467 assigning apps to groups, 459–460 assigning books to groups, 460–461 assignments in, generally, 433–437 616 Index automatic downloads/updates in, 445–447 automatically installing new assignments in, 445 configuring Mail for users of, 464–465 configuring with Profile Manager, 451–453 confirming invitations, 467 enabling, 458–459 installing books/apps in, 443–447, 468–473 introduction to, 421–422 inviting participants, 461–467, 562 OS X apps for, 579, 584–587 purchases in Profile Manager, 434–436 reading PDF documents with, 561 removal of, 443, 474–478 removing groups from, 474–475 revoking purchases in Profile Manager, 436–437 setting up iOS devices for, 463–464 user enrollment in, 438–443 W Wallpaper, customizing on iOS device, 321 Waste services, disposal workflow for, 77–78 Web downloads, in-house apps/books, 483–485 WebDAV, 63, 90 Well-known ports, 95 Wi-Fi authenticating data in transit, 69 captive portal redirect to enrollment website, 200 configuring device enrollment, 265 configuring OS X on client, 36–37 configuring OS X on server, 109, 114 configuring supervised iOS device, 304, 319 network infrastructure considerations, 60–61 required for testing iOS devices, 6 setting up iOS device, 56 subnet planning and, 61 Wi-Fi profile deploying apps to supervised devices, 345 inspecting, 307–309 installation order for, 292 for MDM enrollment, 291 Wiki service configuring OS X Server for Yosemite, 131 creating wiki page for group, 231–232 OS X Server, 90 in WebDAV, 522–526 Wikinames, 520 Wiping devices Activation Lock and, 409–410, 414 in disposal workflow, 78 from Find My Device, 72 MDM security command for, 193 from My Devices portal, 216 as Profile Manager task, 214 removing iOS device from Profile Manager, 285 Workflows deployment scenarios, 32–34 logistics of disposal, 78 logistics of installation, 76–77 manual profile installation, 160–161 Workgroup Open In and, 554–555 in Profile Manager, 577–579 settings for, 568–570 WPA2 Enterprise, 69 WPA2 Personal, 69 X Xcode apps, 480–481 XML (Extensible Markup Language), profile documents, 153 Xserve, 92


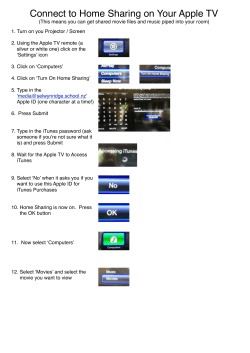


© Copyright 2026