
Two-Drawer Bookcase © 2013 August Home Publishing Co.
Two-Drawer
Bookcase
© 2013 August Home Publishing Co.
Feature
Project
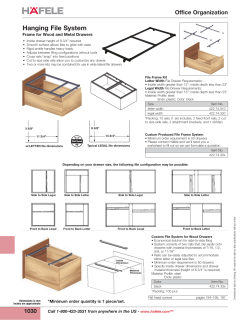
Two-Drawer Bookcase
This Craftsman-style bookcase seems pretty straightforward, but the
shelves hold an interesting woodworking challenge: sliding half dovetails.
W
hen I got my first look at the shop drawings for this project, I liked the design. And
I took it to be a relatively simple, medium-size
bookcase with a couple drawers at the bottom.
But when figuring out exactly how to build
it, I realized that this simple-looking project
included some pretty interesting woodworking techniques.
SOLID WOOD SHELVES . Take the shelves, for
instance. These solid wood panels are over
11" wide, so they need to be able to expand
and contract freely. This means you can’t simply cut a dado in the sides and then glue the
shelves in place. The wood movement will
eventually cause the joint to fail. And screwing
into the end grain on the shelves isn’t a very
strong solution either.
SLIDING HALF DOVETAILS. Instead, this bookcase
uses the mechanical strength of dovetails to
hold the shelves between the sides. The ends
of the four fixed shelves have a half dovetail
profile that slides into half dovetail grooves
on the inside of the side assemblies. (A separate article on creating this dovetail joint is
included, see page 9.)
Of course, the sliding half dovetail was only
half the solution. They allowed the shelves to
expand and contract freely, but you also don’t
want this wood movement to create any visible
gaps or shoulders.
BACK RAILS. So to prevent this, the fixed shelves
are tacked with a finish nail in front (to keep
them flush). Then the back edge of each shelf
fits into a groove on the back rail — with
enough extra room inside the groove to allow
for the wood movement. (Actually, the rails in
back are added after the shelves are in place to
make the assembly easier.)
These back rails (and plywood backs) do more
than just hide the grooves, though. Like the half
dovetails, they also strengthen the bookcase and
help it to resist racking.
What you end up with is a strong, simplelooking bookcase. And a project that will challenge your woodworking skills.
1
WoodsmithPlans.com
WS12006
©2013 August Home Publishing Co. All Rights Reserved.
Construction
Details
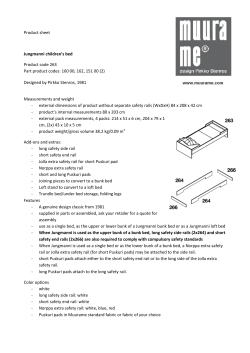
OVERALL DIMENSIONS:
60”H x 32”W x 12”D
Materials & Supplies
A Legs (4)
1 x 3 - 59!/4
B Upr. Side Rails (2) #/4 x 2!/2 - 7!/2
C Mid. Side Rails (2) #/4 x 3!/2 - 7!/2
D Lwr. Side Rails (2) #/4 x 8#/4 - 7!/2
E Slats (8)
!/2 x 1#/4 - 21%/8
F Fixed Shelves (4)
#/4 x 11#/8 - 30#/4
G Adj. Shelves (2)
#/4 x 11!/4 - 30
H Drawer Dividers (2) #/4 x 3 - 7
I Drawer Guide (1) #/4 x 3!/2 - 6%/8
J Upr. Back Rail (1) #/4 x 4!/2 - 31!/2
K Lwr. Back Rails (3) #/4 x 3!/2 - 31!/2
L Upr. Back Panel (1) !/4 ply. - 31!/2 x 21
MMid. Back Panel (1) !/4 ply. - 31!/2 x 20#/4
N Lwr. Back Panel (1) !/4 ply. - 31!/2 x 4
O Drawer Fronts (2) #/4 x 6!/8 - 14!/2
P Drawer Backs (2) !/2 x 6!/8 - 14!/2
Q Drawer Sides (4)
!/2 x 6!/8 - 10!/8
R Drawer Bottoms (2) !/4 ply. - 10 x 14
S Drawer Stops (2) !/2 x !/2 - 14!/2
T Drawer Catches (2) !/2 x !/2 - 1
CUTTING DIAGRAM
(16) #6 x !/2" Fh Woodscrews
(2) #8 x 1” Fh Woodscrews
• (1) !/4"-dia. Cherry Dowel 24” long
• (4) Nylon Glide Strips • (2) Drawer Pulls
•• (8) !/4" Shelf Pins
• (8) 6d Finish Nails
•
•
2
WoodsmithPlans.com
WS12006
©2013 August Home Publishing Co. All Rights Reserved.
Side Assemblies
a.
The two side assemblies
don’t look out of the ordinary. But there’s one thing
to point out right away. The
rails aren’t centered on the
thickness of the legs, as
you might expect. That’s
because the sliding dovetails require that the inside
faces of the legs and rails be
flush, as in detail ‘b.’
LEGS. I started by cutting
the legs to finished size
from 1"-thick stock, see
drawing in margin (3" x
591/4"). Then I laid out the
mortises for the rails.
The trick here is to lay
out the 1/4"-wide mortises
so the rails will end up flush
with the inside face of the
legs. (The tenons will be
centered on the rails.) This
means the legs aren’t identical; you should end up with
two mirrored pairs.
Another thing to note is
that there are two short
mortises for the bottom
rail, instead of a single tall
(long) one, see margin. I
did this to prevent the side
walls around the mortise
from becoming too fragile.
SIDE RAILS. When the mortises on the legs are complete, the upper, middle
and lower side rails that connect the
legs can be cut to size from 3/4"-thick
stock, see detail ‘a.’ (I glued up each
lower side rail from two pieces.)
Next, tenons can be cut on the ends
of all the rails to fit the mortises in
1
3
a.
WoodsmithPlans.com
WS12006
b.
the legs. These tenons should be centered on the thickness of the rails, but
the important thing is that the inside
faces of the rails are flush with the
legs after they’re assembled.
As for twin tenons on the ends of
the lower rail, they don’t start off
2
any different than the other tenons.
Simply cut a single wide tenon first.
Then lay out the inside shoulders
and remove the waste between the
tenons with the rail standing on
end (Figure 1). To avoid creating a
“stepped” shoulder, I didn’t try to cut
a.
©2013 August Home Publishing Co. All Rights Reserved.
right to the shoulders. Instead, I carefully pared down to the shoulder with
a sharp chisel (Figure 1a, page 3).
Finally to hold the slats, I cut a 1/4"
groove 5/16"-deep along the inside
edges of each rail, as in detail ‘a’ and
Figure 2 on page 3. Later I added small
filler strips to these grooves to create
mortises for the slats (Figure 3).
Now the legs and rails can be dry
assembled to check the fit — and to
measure for the length of the slats
that span between the rails. The goal
is to end up with the slats all the same
length. But this means the middle rail
has to be centered perfectly. If yours
aren’t, don’t worry. There’s a quick
way to solve this problem, see Shop
Notes on page 11.
SLATS. At this point, the eight slats
can be cut to size from 1/2"-thick stock
(Figure 3). Just remember when cutting them to length to add 1/2" to the
distance between the rails for the 1/4"long stub tenons on the ends. (My
slats were 13/4" x 215/8".)
Next, I cut the 1/4"-long tenons on
the slats, as in Figure 3a. These allow
the slats to fit into the grooves on the
rails. Then to complete the “mortises”
in the rails that hold these tenons,
I glued 1/4" x 5/16" filler blocks into
the grooves (Figures 3 and 3b). The
outside blocks are 7/8" long; the center one is 11/4" long. And to position
the blocks accurately, I cut spacers
the same width as the tenon (11/2") to
temporarily fit in the grooves. When
the glue dries, sand the edges smooth
to make sure the blocks are flush.
COMPLETE LEGS. The sides are about
ready to be assembled. But first,
there are a couple things to do to the
legs. To hold the adjustable shelves
3
a.
b.
added later, I drilled two sets of holes
for the 1/4" shelf pins (Figure 4 and
drawing on page 3). These holes are
drilled on the inside face of each leg.
Next, I cut a 1/2"-radius on all four
corners of each leg. I laid out each
radius, then roughed them out with
a band saw and sanded them smooth.
ASSEMBLY . Now the legs, rails and
slats are ready to be assembled. First
I clamped the slats between the rails,
as in Figure 4. (I didn’t bother to
glue the slats since they’re trapped
between the rails.) Then the legs can
be fit over the tenons on the rails.
However, before you apply glue
to the rail tenons, first dry assemble
4
the side assemblies to make sure
they will end up perfectly flat. This
is important because of the sliding
half dovetail joinery that will hold
the shelves and side assemblies
together. The flatter the sides (and
shelves) are, the easier they will go
together later.
ADD PEGS. After the side assemblies
were glued together, I used 1/4" dowels to peg the tenons on the rails, as
you can see in Figure 5. To do this,
I drilled 1/4"-dia. holes on the outside
face of each leg, using a hand drill.
Then I glued a short peg in each hole
and trimmed it flush with a chisel,
see Figure 5a.
5
a.
{ Trace around a
quarter to quickly
lay out the corners
of the legs.
4
WoodsmithPlans.com
WS12006
©2013 August Home Publishing Co. All Rights Reserved.
a.
Shelves
To connect the side assemblies with the shelves, I
used sliding half dovetails.
And now that the sides are
assembled, it’s time to tackle
the grooves that will capture
the dovetails on the shelves.
DOVETAIL GROOVES. The procedure isn’t hard to understand. I clamped a shop-made
router guide to each side
assembly and I routed each
half dovetail in two passes:
First routing the square top
shoulder (Figure 6a). Then
the dovetail on the bottom
shoulder (Figure 6b).
But to get all the grooves
parallel and square to the
edges requires some careful work. I labeled the guide
carefully so it was always oriented the same. And I always
kept the router oriented the
same too. And finally, to help
keep the grooves the same
width, I used a spacer when
adjusting the guide to rout
the dovetail, see page 9.
CUT RABBET . After all the
dovetail grooves have been
routed, I cut a rabbet on the
inside edge to hold the back
rails and panels which are added
later, see detail ‘c’ and Figure 7.
(This also cleans up any chipout that
occurred when routing the grooves.)
SHELVES. With the side assemblies
complete, I glued up all the panels for both the four fixed and two
6
a.
b.
c.
adjustable shelves. (It’s a good idea
to glue up a couple panels extra long.
This way, you can use the cutoffs as
test pieces when routing the half
dovetails on the ends.)
HALF DOVETAILS. When the fixed shelves
are cut to finished size (113/8" x 303/4"),
you can rout the half dovetails on the
b.
ends (Figure 8, next page). Test the
setup using one of the cutoffs from
the panels. And check it in all of the
grooves on the side assemblies —
they may not all be exactly the same.
The goal here is not a tight fit.
You’ll never get the shelves into the
grooves. Instead, I sized the tails so
7
9
5
WoodsmithPlans.com
WS12006
©2013 August Home Publishing Co. All Rights Reserved.
they could be pushed into the
grooves by hand at least half way.
Then later when assembling the
shelves, I used clamps to push them
the rest of the way.
FULL DOVETAILS. After the half dovetails have been routed, the next step
is to rout a full dovetail dado centered
on the bottom two shelves. These are
for a divider assembly that will separate the two drawers (Figure 11).
To rout the dado, I used the same
router guide used earlier. But this
time, rout the first pass with a 1/4"
straight bit to remove most of the
waste, as in Figure 9a. Then without
moving the guide, use the dovetail bit
to rout the second pass (Figure 9b).
ASSEMBLY . Now the case can be
assembled. I slid the shelves into
one of the side assemblies and pulled
them flush with the front edge using
clamps. Then I slid the other side
assembly onto the shelves. And I
didn’t use glue. Instead, each shelf
is held with a finish nail, as in Figure
10a. (Set the nails and fill the holes.)
DRAWER DIVIDERS & GUIDE . Next, I
added the drawer divider that slides
into the dovetail dado routed earlier
(Figure 11). Because small narrow
pieces are easier to fit in the dado
than a single wide panel, I made the
assembly out of three parts: two narrow vertical dividers and a guide that
connects them.
I cut the 3"-wide dividers so their
lengths matched the distance between the two dadoes (7"). Then I routed the dovetails on the ends. This is
similar to those on the shelves except
here the dovetails are routed on both
faces. And since the pieces are only
3"-wide, they can fit a little tighter.
11
6
8
a.
9
9
10
10
b.
a.
The dividers will be connected with
a guide, so I cut a 3"-wide mortise on
the inside edge of each(Figure 11a).
The guide is a 31/2"-wide piece
with tenons that fit the mortises in
the dividers. But note that the final
assembly should stop at least 7/8"
short of the back edge of the sides
12
a.
WoodsmithPlans.com
a.
WS12006
so there’s room for the back rails, as
shown in Figure 12a.
To add the drawer divider assembly, I first glued the front divider to
the guide and glued the divider into
the dadoes, see Figure 12. Then I
glued the back divider onto the guide.
(But don’t glue it into the dadoes.)
a.
©2013 August Home Publishing Co. All Rights Reserved.
Back Rails & Panels
{ To match the
roundover on the
legs, the back rails
require a little
extra shaping.
7
a.
The sliding half dovetails hold the
shelves and sides together, but they
don’t prevent the case from racking.
So to do this, I added a “solid” back.
This includes four back rails and 1/4"
plywood panels, see drawing at right.
BACK RAILS. I didn’t need to add four
back rails to the bookcase. But they
do more than support the back panels and stiffen the case. They also
have grooves that fit over the fixed
shelves (detail ‘a’). And there’s plenty of room inside for the shelves to
expand and contract, see detail ‘a.’
I started by cutting the 41/2"-wide
upper back rail and the three 31/2"wide lower back rails to finished
length (311/2"), see drawing.
Now there are three things to do to
each rail, see detail ‘b’ at right:
First, cut a 1/4"-deep groove along
the inside face to fit over the shelves.
The grooves on the lower rails are
centered. The one on the upper rail
is located 1" from the bottom edge.
Second, cut a rabbet on the ends of
each rail to create a 1/2" x 3/4" tongue.
These tongues will fit into the rabbets
on the back of the sides.
And finally, to hold the back panels, you can cut rabbets on the back
inside edges of the rails — the bottom edge of the upper rail, the top
edge of the rail on the bottom, and
both edges of the rails in the middle.
Now the lower rails can be
attached to the back of the bookcase,
see drawing. All you have to do is set
the groove in front over the shelf and
then screw the rail in place.
UPPER RAIL. Because the upper rail
connects to the rounded top corner
of the leg, there’s some shaping to
do before the rail can be attached
to the case, as you can see in the
photo in the left margin.
To create the rounded shoulder on
top, I set the rail in place and marked
the top edge of the leg (Figure 13).
Then I cut the notch with a hand saw.
Next, I rounded over these square
shoulders, see Figure 14. I used a
band saw to rough out the 3/4"-radius
before sanding them smooth. Then
I screwed the rail to the case.
The rail still isn’t done, though. The
square edge of the tongue needs to be
rounded over to match the radius on
the leg (Figure 15). But this time, I
used a rasp to do the rough shaping.
BACK PANELS. Finally, the back panels can be cut to fit the rabbets in
the rails and sides, see drawing. The
upper, middle and lower panels are
all the same width, but their lengths
(heights) will be different.
To attach the backs to the case,
I simply glued them. Then I lightly
softened all the edges of the bookcase with 220-grit sandpaper.
13
14
15
WoodsmithPlans.com
WS12006
b.
©2013 August Home Publishing Co. All Rights Reserved.
Drawers
All that’s left now is to build the two
small drawers that fit the openings
at the bottom of the case, see photo
above right. I joined my drawers with
1/2" dovetails, routing them with a
dovetail jig. But if you don’t have a
dovetail jig, you can use a locking rabbet to join the pieces, see lower photo
at right and Shop Notes on page 11.
To make the drawers, I started by
measuring the openings in the case.
(Mine were 61/4" x 145/8".) Then the
3/4"-thick drawer fronts and 1/2"-thick
backs can be cut to finished size, as
shown in Figure 16. I sized them
to allow for a 1/16" gap around each
edge (61/8" x 141/2"), see Figure 16b.
Note: If you build the drawer with
locked rabbets, the dimensions of
some of the pieces will be slightly
different, see page 11.
Next, I cut the four drawer sides to
size from 1/2"-thick stock. The length
of these pieces depends on the depth
of the case. I wanted the drawers to
stop short of the back rails, so I cut
my sides 101/8"-long, see Figure 16.
(The drawer ended up 103/4" deep,
which left a 1/2" gap at the back.)
With the pieces cut to size, the
dovetails can be routed. And to hold
the 1/4"-thick plywood bottom panels, I cut a 1/4"-deep groove near the
bottom edge of the drawer pieces.
(Locate the groove so it’s centered on
the bottom tail on the sides.)
After cutting the drawer bottoms
to size, the two drawers can be glued
together, and pulls can be mounted to
the fronts of the drawers, see Figure
16a. (I used a Craftsman-style ring
pull with a diamond-shaped plate. For
sources, see page 12.)
Though the drawers are built,
there are still a few details to work
out. First, to help the drawers ride
smoothly and prevent them from
wearing grooves in the shelf the drawer rides on, I added two nylon guide
strips to the bottom of the case, see
16
Figures 17
and 17b. (These
were 1/16"-thick.)
Next, I added a simple
drawer stop to the very back of
each case opening so the drawers
stop flush with the front (Figures 17
and 17a). And finally, I cut a 1/2" x 1/2"
notch in the back of each drawer and
added small turn button catches near
the front of the case. These catches
prevent the drawers from being
pulled all the way out.
{ You don’t need a dovetail jig to build
the drawers. A locking rabbet joint
will also work, see page 11.
a.
11
17
8
a.
WoodsmithPlans.com
WS12006
b.
©2013 August Home Publishing Co. All Rights Reserved.
Woodworking
Technique
Sliding
Half Dovetails
A
s we were designing the twodrawer bookcase, our first
instinct was to simply glue the
shelves into some grooves in the
case sides. But since these solid
wood shelves are going to expand
and contract with changes in humidity, chances are the end grain glue
joints would have failed.
What we decided on was a groove
— with a slight modification. We
added a dovetail profile to its bottom
shoulder. This created a sliding half
dovetail that provides a mechanical
“lock” between the shelves and the
bookcase sides, see the photo above.
And because the half dovetail holds
the shelf securely, you don’t even
need to use any glue.
The nice thing about this joint is
that you get the strength of a dovetail, but you don’t have the difficulty
of fitting a full sliding dovetail (one
SHOP TIP
Before routing the
grooves, carpettape or clamp a
scrap piece to the
front edge of each
side assembly to
prevent chipout.
9
with the profile on both the top and
bottom). And to make it as easy as
possible to fit the half dovetails, we
came up with a way to make the size
of the grooves more consistent by
using an easy-to-build guide and a
guide spacer (box on the next page).
Creating sliding half dovetails is a
two-step process. First, the grooves
are routed on the insides of the side
assemblies. Then the tails are created on the ends of the shelves.
Half DOVETAIL GROOVES
To create sliding half dovetails, the
first step is to rout the grooves in the
case sides that the tails will slide into.
Making these grooves also requires
a couple steps. First, a groove (or
dado) is routed with a 1/2" straight bit.
Then a second pass is made along the
bottom shoulder of this groove, this
time using a 1/2" dovetail bit.
1
2
3
4
WoodsmithPlans.com
WS12006
Before routing however, there are
a few things to do. First, on the inside
face of one of the side assemblies, lay
out the top shoulder of each groove,
see Fig. 1. Next, to prevent chipout
on the front edge, carpet tape a scrap
piece to it, see drawing in margin at
left. (On the bookcase, the chipout
on the back edge was cleaned up by
a rabbet that was cut later.)
STRAIGHT BIT . Now you can mount
a straight bit in the router and set
it to cut a 3/8"-deep groove, see Fig.
2a. Shop Tip: I routed a couple test
grooves on a scrap piece. This came
in handy when setting the depth of
the dovetail bit later.
At this point, the router guide can
be clamped to the side so its slot
is flush with the layout line. (Use a
square to make sure the guide isn’t
angled, and double check that you’re
routing on the correct side of the line.)
a.
a.
©2013 August Home Publishing Co. All Rights Reserved.
When routing this groove, I made
two passes. (3/8" is a bit much to try
to remove in a single pass.) So on
the first pass, I carpet-taped a pair
of 1/4" spacers under the base of the
router to “raise” the bit, see Figs. 2
and 2a. Then I removed the spacers
for the second pass. (Since the bit
may not be perfectly centered on
the router base, it’s important to
keep the router oriented the same
with each pass.)
After the grooves are routed on
one side assembly, transfer their position to the other side to make sure
the grooves will align perfectly (see
Fig. 3). Now you can rout the grooves
on the second side assembly just like
you did the first, as in Figure 2.
DOVETAIL BIT. At this point, I shaped
the bottom shoulder of each groove
by making a single pass with a 1/2"
dovetail bit, see Fig. 4. But first you
have to shift the router guide so the
groove ends up 5/8"-wide, as shown
in Figure 4a. (I used a spacer to do
this, see below.)
5
a.
HALF TAILS
With the grooves routed on the side
assemblies, the next step is to rout
the matching half tails on the ends
of the shelves. The same 1/2" dovetail
bit is used, but this time, I used the
router table with a tall fence to support the workpieces (see Fig. 5).
To set up this cut, I first set the
height of the bit to match the depth of
the grooves (3/8"), see Fig. 5a. Then I
adjusted the router fence to sneak up
on the final size of the dovetail.
The trick, of course, is getting the
right fit. You don’t want the shelf too
loose. But if it’s too tight, you’ll never
slide the shelves all the way into the
side assemblies. On the bookcase,
I set the fence so each shelf would
easily slide halfway into the groove.
Then I finished the job with some
clamps, see margin drawing at right.
Shop Note: To test the setup, I
used a cutoff from one of the shelf
panels. And it’s a good idea to check
the test piece in all the grooves to
make sure there are no surprises.
When the test piece fits, the dovetail profile can be routed on both ends
of the shelves, see Fig. 5. Then you
can begin to assemble the shelves
and case sides, refer to page 5.
{ The dovetails are
sized to easily slide
in half way. Then
clamps push the
pieces the rest of
the way.
ROUTER GUIDE & SPACER
The key to routing the dovetail
grooves is this simple guide.
It’s made up of two hardwood
strips that sandwich the router
base and a piece of 1/4" hardboard the base rides on, see
drawing at right.
GUIDE . What’s important is
that the space between the
guide strips equals the base of
the router, see detail ‘a.’ Also,
you want the outside edges of
the strips parallel with their
inside edges. (This way, you
can use a square to check the
position of the guide.)
When the strips have been
glued to the hardboard base,
I drilled a couple 1"-dia. holes
near the ends to provide clearance for the router bits. Then
I routed a 1/2" slot between the
clearance holes. Note: Mark
your router and guide carefully so that both are always
oriented the same.
10
GUIDE SPACER. When it came
time to move the guide for routing the half dovetail on the bottom of the groove, I decided to
use a simple spacer, see drawing. This keeps the grooves as
consistent as possible.
The spacer should fit tight
in the 1/2" slot in the guide.
And there’s a 1/8" rabbet cut
on one edge so both the guide
and spacer can be shifted 1/8"
towards the bottom edge of the
side. (See the drawings below
for how to use the spacer.)
Create Spacer. To offset the
guide consistently, make a
spacer to fit in the guide. Then
cut a 1⁄8" rabbet on one edge.
WoodsmithPlans.com
WS12006
a.
Move Guide. With the spacer
in place, move the guide and
spacer as far as you can toward
the bottom of the side.
Rout Dovetail. Now the
dovetail bit will automatically
rout along the bottom edge,
creating a 5⁄8"-wide groove.
©2013 August Home Publishing Co. All Rights Reserved.
Locking Rabbets
{ In a locking rabbet
joint, a dado on
the drawer side fits
over a tongue on
the drawer front.
If you don’t have a dovetail jig, you can make
the drawers for the
bookcase with locking
rabbet joints instead.
There’s not much to
a locking rabbet joint. A
dado in the side of the drawer fits over a tongue cut on the
end of the drawer front, locking the two pieces together,
as you can see in the photo at
left. To make the joint, all you
need is a table saw.
Shop Note: The dimensions of the
drawer sides and back are slightly
different than the dovetailed drawer,
see drawing.
To make the joint, the first step is
to cut a 1/4"-wide slot on the ends of
the drawer front, as shown in Figure
1. This slot is centered on the thickness of the workpiece.
1
2
The depth (height) of the slot
should match the thickness of the
stock that you’re using for the
drawer sides.
The next step is to trim away part
of the drawer front along the back to
create a “tongue,” see Fig. 2.
Now all you have to do is cut a
dado on the drawer side to fit over
3
the tongue on the front of the drawer,
see Figs. 3 and 4.
To attach the back of the drawer,
just flip the drawer side around and
cut a second dado on the other end.
Then cut a rabbet on each end of
the drawer back to create tongues
that fit in the dadoes on the drawer
sides, drawing above.
4
Adjusting a Rail
When I was making the sides of the
bookcase, I wanted to position the
middle side rail directly in between
the upper and lower side rails. This
way the slats could all be cut to the
same length.
But when I dry assembled the legs
and rails, I discovered that on one
of the sides, the distances between
the middle rail and the upper rail
were slightly (1/16") longer than the
distance between the middle rail and
the lower rail.
In order to keep all the slats the
same length, I “raised” the middle
side rail so it was positioned an equal
distance between the upper and
lower side rails.
To do this, all you have to do is
pare away a small amount of material from the shoulders of the tenons until the middle rail is centered
11
between the upper and lower rails,
see drawing below and detail ‘a.’
To move the middle rail up, trim
the top shoulders. To move it down,
trim the bottom shoulders, see
drawing at right.
Shop Note: When trimming the
tenons, keep in mind that you only
WoodsmithPlans.com
need to trim off half the
amount of error. (In my case,
I shaved off about 1/32".)
If the fit of the mortise is
a little loose, don’t worry.
When the sides are assembled, the slats will help center the middle rail.
a.
WS12006
©2013 August Home Publishing Co. All Rights Reserved.
MAIL
ORDER
SOURCES
Woodsmith Store
800-444-7527
Horton Brasses, Inc.
800-754-9127
horton-brasses.com
Project Sources
As far as hardware goes for the twodrawer bookcase, besides screws,
you’ll need drawer pulls (MS-4),
which came from Horton Brasses.
You’ll also need shelf pins (30437),
and nylon glide strips (29859). I purchased these from Rockler.
Rockler
800-279-4441
rockler.com
12
WoodsmithPlans.com
WS12006
©2013 August Home Publishing Co. All Rights Reserved.


© Copyright 2026