
Experiment 3 Limiting Reactants
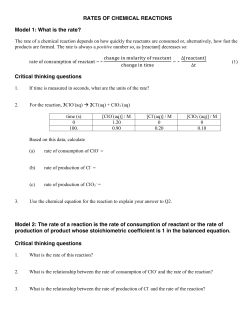
3-1
Experiment 3
Limiting Reactants
Introduction: Most chemical reactions require two or more reactants. Typically, one of the
reactants is used up before the other, at which time the reaction stops. The chemical that is
used up is called the limiting reactant while the other reactant is present in excess. If both
reactants are present in exactly the right amount to react completely, without either in excess,
the amounts of reactants are said to be in a stoichiometric ratio to each other. The
stoichiometric ratio is the mole ratio of the reactants, or reactants to products, as determined
by the coefficients in the balanced chemical equation. Since the limiting reactant will
determine the amount of product that can be produced during a reaction, it is important to be
able to calculate which reactant is the limiting reactant. There are several ways to do this, but
each starts with a balanced chemical equation so that the stoichiometry of the reaction is
known.
For example, the balanced equation for the synthesis of aluminum chloride shows that two
moles of aluminum react with three moles of chlorine gas to produce two moles of the
aluminum chloride product:
2Al(s) + 3Cl2(g) → 2AlCl3(s)
If the reaction is carried out with 50.00 g of aluminum and 150.00 g of chlorine, the reaction
will be observed to stop when the chlorine runs out, even though there is a greater mass of
chlorine. Thus, chlorine is the limiting reactant. To see why this is so, the mass of each
reactant must first be converted to moles using the formula masses. This is done by the first
conversion factor in the example below. The second conversion factor multiplies the moles
of each reactant by the stoichiometric ratio relating moles of product to moles of reactant.
Finally, the third conversion factor changes moles of product into grams of product formed
from the given amounts of each reactant.
This method of determining limiting reactants allows each reactant to be related to the same
product to determine which will result in the least amount of the product formed. The
reactant that does this is the limiting reactant.
⎛ 1 mol Al ⎞ ⎛ 2 mol AlCl3 ⎞ ⎛ 133.34 g AlCl3 ⎞
⎟⎟ = 247.1 g AlCl3
⎟⎟ × ⎜
50.00 g Al × ⎜⎜
⎟ × ⎜⎜
⎝ 26.9815 g Al ⎠ ⎝ 2 mol Al ⎠ ⎝ 1 mol AlCl3 ⎠
⎛ 1 mol Cl 2 ⎞ ⎛ 2 mol AlCl3 ⎞ ⎛ 133.34 g AlCl3 ⎞
⎟⎟ = 188.1 g AlCl3
⎟⎟ × ⎜⎜
⎟⎟ × ⎜⎜
150.00 g Cl 2 × ⎜⎜
70.906
g
Cl
3
mol
Cl
1
mol
AlCl
2⎠ ⎝
2 ⎠ ⎝
3
⎝
⎠
As illustrated above, 150.00 g of Cl2 produces only 188.1 g of AlCl3, as compared to 247.1 g
of AlCl3 from 50.00 g of Al. Therefore, Cl2 is the limiting reactant. Note that this result
would also be obtained by comparison of the moles of AlCl3 produced.
UCCS Chem 103 Laboratory Manual
Experiment 3
3-2
It is particularly beneficial to determine the limiting reactant this way if the theoretical yield
is also desired. The theoretical yield is the amount of product that will be obtained if all the
limiting reactant is converted to product. The theoretical yield must therefore be calculated
based upon the limiting reactant, as no additional product can be formed once it has been
used up. The limiting reactant is related to the product using the stoichiometry of the
balanced equation. In the example above, since Cl2 is the limiting reactant and it could form
188.1 g of AlCl3 product, that will be the theoretical yield for the reaction.
Of course, in practice this yield is rarely attained. There are many potential losses of the
product during its collection after a reaction and non-product forming side reactions usually
occur as well. The actual experimentally measured yield of the product is expressed as a
percentage of the theoretical yield and is called the actual percent yield or just percent yield.
⎛ Actual Yield ⎞
% Yield = ⎜
⎟ × 100
⎝ Theoretical Yield ⎠
If, for the example above, reacting 50.00 g of Al with 150.00 g of Cl2 resulted in an actual
yield of AlCl3 of just 135.5 grams, the percent yield would be 72.04%.
⎛ 135.5 g ⎞
⎟⎟ ×100 = 72.04%
% Yield = ⎜⎜
⎝ 188.1 g ⎠
Both the theoretical yield and the actual yield must be in the same units so that the % yield is
a unitless quantity. However, these yield units need not be only grams; the amount can also
be expressed in moles, volume, or concentration of product (See the following section).
Molarity: The amount of solute present in a given volume of solution is called
concentration. There are several units for concentration but the most often used is molarity in
which the amount of solute is given in moles and the volume in liters of solution. A one
molar solution is defined as a solution having a concentration of 1 mole of solute per liter of
solution and is abbreviated 1 M.
Molarity ( M ) =
mol solute
L solution
When solutions have a concentration given in molarity, the moles of solute in any sample of
the solution is directly related to the volume of that solution. For example, if 20.2 mL of a
1.045 M reactant solution is used for a reaction, the moles of that reactant can be calculated
from the definition of molarity.
⎛ 1.045 mol ⎞ ⎛ 1.045 mol ⎞
1.045 M = ⎜
⎟=⎜
⎟
L
⎝
⎠ ⎝ 1000 mL ⎠
so that
⎛ 20.2 mL ⎞ ⎛ 1.045 mol ⎞
⎜⎜
⎟⎟ × ⎜
⎟ = 0.0211 mol
1000
mL
⎝
⎠
⎝
⎠
Therefore 20.2 mL of the solution contains 0.0211 mol of the solute.
UCCS Chem 103 Laboratory Manual
Experiment 3
3-3
Reaction to Produce the Gas, H2:
The objective of this experiment is to discover how varying the relative amounts of reactants
affects the amount of product produced in a chemical reaction, and thus confirm the concept
of limiting reactants. You will use varying masses of magnesium metal while holding the
hydrochloric acid concentration and volume constant and observing the pressure of
hydrogen gas produced during each run. Under the conditions of the experiment, the
pressure of H2(g) is directly related to the amount in moles of H2(g) produced by the reaction.
The balanced equation for the reaction is:
Mg(s) + 2HCl(aq) → MgCl2(aq) + H2(g)
To save time and achieve more results for use in the analysis, this experiment will be a class
data-pooling project. You will run trials on two lengths of magnesium ribbon (each done in
duplicate), and then you will combine your data and results with fellow classmates who will
run trials on different amounts of magnesium. Your instructor will construct the table shown
below on the chalkboard. Two lengths of Mg ribbon will be assigned to each team starting
with team 1 and working down the list. After teams have determined the average of the
mass of the Mg samples and the average of the pressure of H2 produced for each of
their two lengths, they will enter the values in the table. Since the volume of HCl is the
same for all runs at 3.0 mL, it is not necessary to enter that value.
Team #
1
2
3
4
5
6
7
8
9
10
11
length (cm) mass (mg) P(H2) (torr)
1.0
2.0
3.0
1.3
2.3
3.3
1.7
2.7
3.7
1.5
2.5
length (cm) mass (mg) P(H2) (torr)
4.0
5.0
6.0
4.3
5.3
6.3
4.7
5.7
6.7
4.5
5.5
Students must transfer the data entered by all teams in the above table into a similar table in
their lab notebooks before getting their instructor’s initials in their lab notebooks.
You will need to know that when collecting a gas over an aqueous solution, in this case H2
over aqueous HCl, the collected gas contains H2O vapor. The gas in the flask at the end of
the reaction will also contain the air initially in the Erlenmeyer flask. The total gas pressure
measured by the Vernier probe will thus be the sum of the three component gases in the
flask. Therefore the pressure of the hydrogen gas must be calculated using the asterisked
equation shown under the data table. The greater the pressure of H2 gas calculated for
reactions carried out in the same way, the greater the amount of H2 produced.
UCCS Chem 103 Laboratory Manual
Experiment 3
3-4
You should keep this question in mind while performing the experiment: If, in a series of
experiments, you use increasing amounts of magnesium metal while holding the amount of
HCl constant, will the limiting reactant for the reaction change and, if so, how will this
change affect the pressure of H2 gas produced in the series of experiments?
Reaction to Produce the Solid, Ca(OH)2:
In a separate reaction of calcium chloride and potassium hydroxide (performed in Part B of
this experiment), you will calculate the limiting reagent, theoretical yield, and percent yield
after collection of the calcium hydroxide product. The balanced reaction is shown below.
CaCl2(aq) + 2KOH(aq) → Ca(OH)2(s) + 2KCl(aq)
After separating the Ca(OH)2(s) formed from the reaction mixture, you will be able to
determine the mass of Ca(OH)2(s) and compare it to the theoretical yield to find the percent
yield for the reaction.
Pre-Laboratory Notebook: Provide a title, purpose, both balanced chemical reactions, a
brief summary of the procedure, and table of reagents and products such as the following:
Table of Chemicals Used:
Compound
Magnesium, Mg
Hydrochloric acid, HCl
Magnesium chloride, MgCl2
Hydrogen, H2
Calcium chloride, CaCl2
Potassium hydroxide, KOH
Calcium hydroxide, Ca(OH)2
Potassium chloride, KCl
Formula Mass, (g/mol)
Hazards
Also, before coming to lab, create a data table in your notebook similar to the one below:
Run
Amount of Mg (mg)
Amount of HCl (mL)
Highest Pressure, Ptotal (torr)
Initial Pressure, Pinit (torr)
Temperature (˚C)
PH2O (torr) from table below
PH 2 (torr)*
1
2
3
4
* PH 2 = Ptotal − Pinit − PH 2O
UCCS Chem 103 Laboratory Manual
Experiment 3
3-5
Vapor Pressure of Water at Various Temperatures
Temperature (˚C) Water vapor pressure (torr)
20.0
17.5
21.0
18.7
22.0
19.8
23.0
21.1
24.0
22.4
25.0
23.8
26.0
25.2
Equipment:
Vernier LabPro
Vernier gas pressure sensor
TI -84 calculator
2, 100 mL beakers
Steel wool
Stir rod
125 mL Erlenmeyer flask
Magnesium ribbon
1.0 M HCl
100 mL beaker (for HCl solution)
Liquid funnel and filter paper
Ring stand and ring
In Lab Experimental Procedure:
Note: Work in pairs.
Part A: How Much Is Too Much?1
1.
Set up the LabPro system in DATAMATE according to the first two sections of
instructions in the Vernier tutorial. Connect the gas pressure sensor into channel 1 of
the LabPro. The main screen of DATAMATE should show a pressure in the lab of ~600620 torr. Your instructor will write the lab temperature and the actual lab pressure as
measured by a barometer on the chalkboard. The unit shown on the calculator is
MMHG (mm of mercury), which is identical to torr. If the pressure reading is not ~600620 torr (MMHG), check with your Instructor.
2.
If the pressure units are other then MMHG, select 1:SETUP from the main screen. Press
ENTER to select CH 1. Then select 2: Gas Pressure (MMHG). Select 1: OK twice to return
to the main screen.
3.
Using steel wool, polish a length of Mg ribbon which is about equal to the sum of the
four lengths assigned to you. From this polished strip, cut your four assigned samples
of magnesium ribbon (two each of the two assigned lengths). Then cut each sample into
~1 cm long strips and weigh them in tared weigh boats. Record the exact mass (in mg
units) of each sample in the data table you created in your lab notebook. (1 cm is about
equal to 9 mg, so a 5cm sample should weigh ~45 mg). You can keep the Mg strips in
the weigh boats until ready to proceed with the reactions, but keep track of which
weigh boat contains which sample!
4.
Using a clean 125 mL Erlenmeyer flask, set up the apparatus as shown in Figure 1
below with the first sample of Mg in the flask, but do not add HCl into the syringe at
this point. Ensure that all connections are tightly secured, but do not over tighten
screw on connectors. The connection from the stopcock to the stopper feed through
UCCS Chem 103 Laboratory Manual
Experiment 3
3-6
must not be disconnected. Downward pressure should be applied to ensure that the
stopcock is securely attached to the feed through and that the feed throughs are securely
in place in the stopper. When the stopper is firmly in place, it should not be more than
halfway below the lip of the flask
Figure 1. Apparatus for reacting Mg and HCl to form H2 (g).
5.
With the completely depressed syringe screwed onto the stopcock, retract the plunger
to the 20 mL mark to remove air from the flask and then close the stopcock. The
pressure should be reduced to about 520 torr.
6.
Unscrew the stopcock and depress the plunger completely. Screw the stopcock back on
to the syringe. Then OPEN the stopcock and withdraw another 20 ml air from the
flask, and then CLOSE the stopcock. This should lower the pressure to ~450 torr.
Repeat this process until the pressure in the flask is about 350 torr. With the stopcock
remaining closed, check that the pressure is not increasing more than about 3 torr in 3
minutes, indicating reasonably secure seals.
7.
Unscrew the syringe and draw up 3.0 mL of HCl solution from the beaker into the 20
mL syringe. Note: It is good practice to add more than 3 mL initially. If there are
significant air bubbles in the syringe, point the syringe upwards to get the air at the tip
of the syringe and carefully discharge a small amount of the air and acid into a paper
towel. Then point the syringe downward and depress the plunger, releasing excess HCl
back into its beaker, until the volume in the syringe is 3.0 mL. Read the volume at the
front edge of the inside black ring on the piston of the syringe as shown in Figure 1.
Connect the syringe onto the two-way valve on the white stopper with a twisting
motion to tighten it in place.
UCCS Chem 103 Laboratory Manual
Experiment 3
3-7
8.
Set up the data collection mode. Each run should last just over eight minutes, with a
data sample taken every five seconds. Select SETUP from the main screen. To select
MODE, press
or
until the cursor is to the left of MODE and press ENTER .
Select TIME GRAPH from the SELECT MODE menu. Select CHANGE TIME SETTINGS.
Type “5”, for the time between samples in seconds, and press ENTER . Type “100”, for
the number of samples, and press ENTER . Select OK twice to return to the main screen.
9.
Before adding the HCl to the flask, select START from the main screen on the
calculator to begin data collection. After 20 seconds, open the stopcock, press the
plunger smoothly to add all of the 3.0 mL of HCl solution to the flask, and close the
stopcock immediately.
10.
Check that the stopper remains in place while swirling the apparatus to ensure mixing
of the reactants. Wait for the beep from the Vernier system to signify the end of data
collection. In a few seconds following the end of data collection, the screen will display
the list of channels. With the cursor arrow at CH 1 – Pressure, press ENTER and a plot of
pressure vs. time will appear. Use the cursor arrow buttons to scan through the plot and
record the pressure (y value) at the start of the plot (before addition of HCl); this is Pinit.
Then locate and record the maximum pressure following reaction; this is Ptotal. Enter
these values into your data table in your lab notebook.
11.
Unscrew the syringe from the stopper and open the stopcock to return the flask to
atmospheric pressure. Press ENTER to clear the Lab Pro and press 1-Main screen. Then
repeat the process for the next sample of Mg strips starting at step 4.
12.
In your lab notebook, directly under your data table, show the calculations for the
pressures of H2 for each run. Average the masses of the two equal strips of magnesium
used and the two calculated pressures of the H2. Record these averages (to the nearest
mg of Mg and torr of H2) below your data table and on the chalkboard for both
assigned masses of magnesium. The pool of class data should be recorded in a table in
your notebook that resembles the table on the chalkboard.
13.
Once you have obtained data from the entire class, plot the pressure of the hydrogen
gas (y-axis) vs. the mass of Mg (x-axis) on Microsoft Excel. You may discard points on
the graph that differ significantly from the trend observed for the plot. Add appropriate
titles and units to your Excel plot, and then print a copy for submission with your lab
report. This graph will be used for data analysis in the results and discussion session.
Part B: Percent Yield of Ca(OH)2
1. Measure out 0.490–0.510 g of each reactant, CaCl2·2H2O and KOH, in weigh boats. Note
that while CaCl2 is the reactant in the equation for formation of Ca(OH)2, it is the
hydrate, CaCl2·2H2O, which is the source of the CaCl2. It has a formula mass of 147.02
g/mol, and clearly there is one mole of CaCl2 for each mole of CaCl2·2H2O used.
Therefore when finding the number of moles of CaCl2 for the purpose of determining the
limiting reactant, you must use the mass and formula mass of CaCl2·2H2O.
2. Record the exact mass of the reactants used in your laboratory notebook. Transfer all of
the solid in each weigh boat to separate 100 mL beakers, using de-ionized water. Add
UCCS Chem 103 Laboratory Manual
Experiment 3
3-8
additional de-ionized water to the 30 mL mark on the beaker. Swirl each beaker until the
solid reactants have dissolved completely.
3. Pour the two aqueous solutions together and mix well with a stir rod. A white precipitate
will form almost immediately, but allow the solution to sit for a few minutes to ensure a
complete reaction.
4. Measure and record the mass of a piece of filter paper. Collect the Ca(OH)2 precipitate
onto the paper by performing a gravity filtration.
5. Remove the filter paper from the funnel and place it in a labeled weigh boat to dry. After
at least one day, you can weigh the dried filter paper plus product during any ongoing
laboratory period prior to your next scheduled lab period.
Results and Discussion:
Part A: How Much Is Too Much?1
1. Is the limiting reagent the same throughout the sequence of experiments with different
masses of Mg? Explain your answer based on the Excel plot of P(H2) vs. mass Mg.
2. Initially, what happens to the pressure of hydrogen gas collected as the mass of
magnesium metal is increased? Would you expect this trend continue indefinitely?
Explain your answer based on the Excel plot of P(H2) vs. mass Mg.
3. Which starting reactant is limiting when the mass of magnesium metal is 50 mg? Which
starting reactant is limiting when the mass of magnesium metal is 20 mg? Explain your
answer based on the Excel plot of P(H2) vs. mass Mg.
4. When using 3.0 mL of 1.0 M HCl to react with magnesium metal, at what mass of
magnesium (in mg) are the two reactants in a stoichiometric ratio to each other? Show
your calculation to determine this mass of Mg. What happens to the class plot at this
particular mass of magnesium?
5. Would it be possible to run a chemical reaction with no single limiting reagent? Why or
why not?
UCCS Chem 103 Laboratory Manual
Experiment 3
3-9
Lab Report Outline for Limiting Reactants
Graded Sections
Percent of grade
Pre Lab
In Lab
10
Data table for runs 1-4
Calculations of P(H2), torr
Calculations of averages of masses and P(H2), torr
10
5
5
Post Lab
A. Mg + HCl reaction:
Results and Discussion questions 1-5
Microsoft Excel graph
25
10
B. CaCl2 + KOH reaction: (First restate your key data)
DATA: Mass KOH:_________g, Mass CaCl2·2H2O:__________g,
Mass dry filter:________g; Mass dry filter plus Ca(OH)2:________g;
1. Calculation of moles of CaCl2 (recall CaCl2·2H2O was used) and KOH
2. Determination of limiting reagent and grams Ca(OH)2 in theoretical yield
3. Calculation of actual yield of Ca(OH)2 in grams.
4. Calculation of actual % yield.
5
10
10
5
5
1. “Experiment #3 How Much is Too Much?” Ram Lamba, Shiva Sharma, and Baird W. Lloyd, in
“Constructing Chemical Concepts through a Study of Metals and Metal Ions,” J. Chem. Ed. 74
(1997), 1095-1099.
UCCS Chem 103 Laboratory Manual
Experiment 3
3-10
UCCS Chem 103 Laboratory Manual
Experiment 3


© Copyright 2026