
Smoking The Beginner's Guide to Smoking Food
Smoking
The Beginner's Guide to Smoking Food
Assembled and Compiled by Deejay 2006
Contents
In The Beginning, There Was SMOKE ...................................................................................................... 3
Smokers ................................................................................................................................................................. 3
Fire ........................................................................................................................................................................ 4
Wood & Smoking .................................................................................................................................................. 4
Cookin’ Execution ................................................................................................................................................. 5
Smoking Meat Basics .......................................................................................................................................... 6
Hot Smoking:............................................................................................................................................... 7
Cold Smoking:............................................................................................................................................. 8
How To Water Smoke Food........................................................................................................................ 9
The Four C’s Of Food Hygiene. ................................................................................................................. 9
Cooking:..................................................................................................................................................... 11
The recommended internal temperatures of meat and fish are: ........................................................... 12
Other indications that food is cooked include: .......................................................................................... 12
Chilling: ...................................................................................................................................................... 12
Ice Point Method:.............................................................................................................................................. 16
Why....................................................................................................................................................................... 18
How. ...................................................................................................................................................................... 19
Here’s what the substances commonly found in meat cures do:........................................................ 20
InstaCure, Modern Cure, Prague Powder #1. ..............................................................................................20
Prague Powder #2: ............................................................................................................................................ 21
Morton Meat Curing Products: ....................................................................................................................... 21
Safety Considerations. ............................................................................................................................. 21
Critical Preservation Points (FDA/USDA). ..................................................................................................22
Temperature and times needed to kill Trichinella in pork: ......................................................................23
Temperature and times needed to kill parasites in fish: .........................................................................23
Brisket by Danny Gaulden ....................................................................................................................... 23
Picking a Brisket ................................................................................................................................................23
Recipes....................................................................................................................................................... 30
Sloooooow Smoked Standing Rib Roast ........................................................................................................30
Apple Smoked Pork Loin ................................................................................................................................... 31
Smoking Turkey..................................................................................................................................................32
Smoking Time for a 5 Pound Pork Butt and Best Rub for Beginner .......................................................33
Rib Rub Recipes You Can Use ................................................................................................................ 33
Memphis Style Rib Rub.....................................................................................................................................34
Porkers Rib Rub..................................................................................................................................................34
Don't Wipe Your Eyes Rub ..............................................................................................................................34
Best Rib Rub .......................................................................................................................................................34
Smoked Turkey ......................................................................................................................................... 35
Smoke Cooking....................................................................................................................................................36
The Basics of Smoking a Brisket ............................................................................................................ 36
Secrets to Smoking Brisket............................................................................................................................37
What to do ..........................................................................................................................................................38
How to Smoke a Whole Chicken ............................................................................................................. 38
Deejay’s Poultry Injection Fluid............................................................................................................... 40
3-2-1 Method For Smoked Ribs .............................................................................................................. 40
Home Curing Bacon for a Mild Flavor..................................................................................................... 41
Scrap Iron Chef's Bacon .......................................................................................................................... 43
2
In The Beginning, There Was SMOKE
Smokers
Your smoker is the most important element to low and slow cooking. You can use a regular
charcoal grill, cook indirect and get great results (indirect cooking is placing the grub away
from the heat source, therefore getting its heat indirectly from the enclosed grill). But a
good smoker is the best way to go to regulate the internal temperature accurately. Notice
I say good smoker. You can buy a cheep model that has a "word" thermometer, like ‘low’ or
‘ideal’ and not actual temperature readings. Stay away from models without vents too, as
they do not have the means to regulate airflow and cooking temperature.
A good smoker has vents on the bottom and top and a thermometer to let you
know what temperature you are cooking at. For example, I like to smoke fish at
180ºF, pork around 210ºF, beef around 225ºF and jerky’s anywhere from 120ºF
to 150ºF. So good temperature regulation is essential for the meal you will be
cooking. Typical vertical backyard smokers are about 20 inches in diameter and
about 3 feet tall. They consist of a water pan above the fire, 2 levels of
grating to place your food, a removable lid and a side door where you may add
charcoals or water to your pan. The water pan acts as an insulator and
flavorizer, keeping the direct flames from licking and overheating your food,
Weber 2820
while adding moisture from the evaporation process to the cooking chamber.
Weber builds an excellent dual-layer cooker/smoker available at Amazon (among other
places) that has all these features except a thermometer.
But a drill, a bit and a trip to Home Depot for a grill thermometer will fix that
rascal. Another popular brand is Brinkmann available at Cooking.com and
Amazon. Typically, Brinkmann's do not have vents for temperature control, but
because of their pricing we include them here for the beginner. They sell
several variations including electric and charcoal smokers with dual-layer 19"
and dual-layer 28" for someone looking to get started within a reasonable price
range. Shop around and you will find many others out there that fit the bill.
Brinkmann
28" Green
Another smoking alternative is a grill/smoker. This type of smoker does not
use a water pan to isolate the fire, but uses distance and a firewall. New Branfels Smoker
Company makes an offset fire box smoker that works really well. As a matter-of-fact,
these smokers are a baby versions of tow behind smokers that most professional cooking
teams use. These smokers have a fire box on one end and a vent on the other. Vents and
dampers control internal temperatures pretty accurately and most models are sold with a
good temperature gauge. Smaller models start at about $130 and go up with cooking
surface size.
3
Smokers are powered electrically or by charcoals- most people swear by charcoal, I myself
think a woodburner is the way to go. Smokers can also range from a single roast size to
semi-rig size (and those are often custom built) but for the sake of this beginners guide,
we’re going to stick with charcoal and assume you’re using a single roast smoker.
Fire
Charcoal, the old favorite, is always a stable and readily available heat
source. Invest in a starter chimney to get your first bunch of briquettes
going without using lighting fluids. Practically all serious smokers use a
starter chimney nowadays. You stuff the bottom of the starter with newspaper and heap
charcoal atop the paper. [Editor's note: Here's a tip from Alton Brown- spray a tiny bit of
vegetable oil on the newspaper before you place it at the bottom of the chimney, it will
help you on your way.] Light the paper and viola, you will have ashed briquettes in about 20
minutes. Let all the briquettes get covered with an ash layer before you spread them out
and take the next step of adding flavoring woods, which we will talk about in a second.
If you are in a hurry and need a ready fire in 30 minutes or less, add your own charcoal
lighting fluid; here’s how. Make a pyramid of the briquettes you want to initially fire up,
the steeper the pyramid the better. Start squirtin’ the fluid in circles around and around
from bottom to top of the mountain. Continue this until a trip from the bottom to the top
is not needed because the top is still wet. NOW WAIT AT LEAST 2 MINUTES BEFORE
YOU LIGHT THE PILE OF CHARCOAL IF YOU VALUE YOUR EYEBROWS!! Keep your face
away, toss a match on the pile and it will ignite slowly. All briquettes will ash over in about
20 minutes and you will be ready for the next step.
briquettes don’t last forever. Your initial fire will last a good two hours minimum depending
on your initial load. Have enough charcoal on hand to maintain your fire by adding at least a
dozen briquettes on an hourly basis.
Wood & Smoking
Where there is fire there is smoke? Not necessarily...
You can cook directly over wood but this is a little more involved that just tossing a match
into a fireplace. The type and condition of your wood will effect, and may even ruin a meal.
4
In future lessons we will explore using a hardwood burning fire to make sure you are well
prepared for a tasty meal.
However, you will need to add wood chips or chunks to your fire to generate flavorful
smoke. Use chunks (golf to baseball size) for 2 hour or more sessions because they will last
longer, are more economical and generate less ash. Use chips for sessions less than 2 hours
because they are more intense for a short smoking.
Your wood needs to be soaked prior to use… at least 30 minutes for chips and one hour for
chunks. You immerse the chips or chunks in water so they don’t burst into flames and burn
away instantly without adding smoke. Adding water to wood is what makes the moist,
flavorful, lip-smacking smoke that will flavor your food and have the neighbors sniffing
around your house. Can you use liquids other than water? Sure. I have used beer, apple
juice, red wine and others to add to the smoke flavor with very good results. Don’t use too
sweet of a mixture because the sugars may team up, concentrate and burn creating a nasty
odor.
So what kind of wood do you use? Hickory and mesquite are most common and available.
Hickory is smooth and is good for a long smoking like a turkey or pork roast and mesquite
has a twang that is good for the short run. But be careful- mesquite coals burn hotter
than regular charcoal. I have used Cowboy brand mesquite and Mikes Authentic Mesquite
Charcoal. I've had had good results with both and they are available on the web.
Cookin’ Execution
You’ve picked your wood, your briquettes are hot and ashed; now what?
Begin by spreading that charcoal pyramid out in your smoker. Now you may toss your
soaked chips or chunks on the hot briquettes, depending on your recipe and amount of
smoke you want. If you like just minimal smoke flavor or are cooking a food that soaks up
the smoke easily, you will want to wait until a little later. If you are using a vertical
smoker, lay in your water pan to insulate your foodstuff from direct heat. Pour in the
water and whatever you want to mix with it. If you are using a grill with your charcoal to
the side, place the drip pan under the area your food will go.
Spray the cooking grates with a non-stick spray. This will assure
that your food will not stick and make cleaning you grates for your
next smoking session a breeze. Place the first grill (if you are using
it) atop the water pan in the smoker and load it with the food that
will happily accept the drippings from the foods that you will place
5
on the top grill (for example, you want the pork to drip on the fish and not the fish to drip
on the pork). Next, place the top grill in your smoker and fill it up, but always make sure
not to crowd the food on the grating. This will allow the sweet smoke to get all around
each and every piece and color it with a delicate amber hue.
Cover the smoker, insert your thermometer into the cooking chamber and be patient.
Uncovering and peaking will increase cooking times and release some flavoring- so sit back
and watch the smoker from your hammock with a cold one for a while.
What happens next is completely up to your recipe… it takes over from here. When to foil
wrap, or not, internal temperature readings and resting times should always be contained in
a good smoking recipe. Closing a cooking session will vary, so consult your recipes (or at
least mine!).
With the next addition to this article, we will follow up with more advanced techniques and
recipes to keep you backyard smokin’. Got questions? Feel free to post them in our forum,
or stop by my site tropicalbbq.com and contact me at any of the email links available.
Smoking Meat Basics
Smoking meat is something I fell in love with many years ago and have worked very
diligently at perfecting this fine art. For those of you who are not sure about the
difference between smoking meat, barbecue, grilling, cooking out, etc., I am going
to give you a few basics here to get you started on your way.
Smoking meat is cooking food very slowly, usually at temperatures of 225 degrees
or less over wood coals with thin blue smoke doing all of the flavoring.
We smoke meat much different these days and for different reasons as well.
In olden times when men first started cooking over fire they did it because it was
a great source of heat and although it must have tasted great, the taste was only a
bonus.
Nowadays we have natural gas, electricity, propane, etc. as readily available fuels
and we choose to smoke meat with wood coals solely because it tastes so good.
I am not a purist by any means.. I do not endeavor to do it just like they did it
hundreds of years ago. I happen to like the taste of smoke on my meat and for
6
that reason I will spend hours on end and even all night at times tending a fire for
a relatively small hunk of meat.
Grilling which we will no doubt cover later on another page is simply cooking meat or
vegetables at a very hot temperature usually in excess of 500 degrees.
Barbecue is used fairly synonymous with smoking meat but true barbecue is usally
done at hotter temperatures than 225 degrees.
Every smoker is different and requires different methods for producing wood
flavored meat.
The most common type of smoker is the ECB or El Cheapo Brinkmann so dubbed
because you can pick them up for less than 50 dollars and they work rather well
with very few modifications.
The horizontal smokers with side firebox is also fairly common and does a great
job of smoking meat. The Charbroil Silver Smoker would be an example of this type
of smoker.
For those interested only in the flavor and have no desire to work hard at
maintaining the right temperature or staying up all night, there are numerous
propane and electric models which also have the ability to produce wonderful
smoked meats.
In other pages I will be discussing the particulars of smoking ribs, brisket, chicken,
turkey and even fish to help you learn to smoke meat.
I do want to mention briefly that there is a difference between hot smoking and
cold smoking. Hot smoking is what I mainly deal with and is at temperature of 190
to 225 degrees as I have already mentioned.
Cold smoking is something I do not plan to get into much but just for your
knowledge, it is smoking at temperatures at or less than 100 degrees.
Hot Smoking:
7
In essence the food is cooked and smoked at the same time with food
typically being heated to an internal temperature of 145F (63C) or more,
high enough to kill bacteria.
o
Hot smoking is a lot more tolerant of variations in temperature than cold smoking.
o
This is the predominant method of smoking in the United States.
Cold Smoking:
The food is smoked but NOT cooked, typically at temperatures of around 60F (15C) with a range
of 50-85F (10–29C). However, some sources quote the ideal temperature as being 75-80F. (2426C). True cold smoking temperature must not exceed 85F. (29C).
There is not really a lower cut off temperature for cold smoking and it is
possible to cold smoke at significantly lower temperatures than the literature
suggests. However, it does take longer to cold smoke satisfactorily at lower
temperatures.
o
Cold smoking temperatures are not high enough to kill bacteria and correct
food handling is essential if this method of smoking is utilized.
o
If a cooked product is required, food must be (separately) cooked
adequately in addition to cold smoking. Cold smoking is more common in Europe.
o
Some cold smoked products are eaten raw (e.g Salmon) whilst others are
cooked. (e.g. kippers – cold smoked herring)
o
In some parts of the world temperature and humidity may make cold smoking
impossible.
o
The curing and smoking processes involved during cold smoking may inhibit
bacterial growth.
o
One major benefit is that less expensive cuts of meat can be used which still
become tender and tasty as they slow cook.
o
It has been shown experimentally that slow cooking is a safe means of
cooking with no more inherent risk than other means of cooking provided basic
food hygiene standards are maintained.
o
8
How To Water Smoke Food
Just stick a pan of water between the food and the fire. Place the chips in the water. Or
leave them in the fire. I told you smoking was simple.
With water smoking 3 things can happen...
1. It ticks along nicely.
2. It runs out of water, the temperature goes up and it becomes a hot smoker. Or
3. the fire dies down, the water stops simmering and the cooking stops.
(Incidentally, with water smokers that's why quite often you have a crude heat gauge. The
steam dictates the constant temperature, just above 100°C). A chicken can take 6 hours
this way but ohh she's moist!
Now because cooking this way usually takes longer than one bowl of charcoal lasts, you
need to refuel mid flight so to speak. Now if you've just read my rattlings about the
unpleasant taste from charcoal smoke (link) you could well have assumed that I have lost
the plot. But I haven't! Just get the charcoal going out of the smoker. And before you
think 'he's definitely lost the plot' let me explain. I use a chimney starter.
About an hour into the cooking I fill up and light this beer-mug-contraption. Lighting the
charcoal at the base with either newspaper or a lighter block. The 'funnel effect' really
guarantees that ALL the charcoal will be alight and ready to use in 20 minutes. I then tip
it out onto the concrete and, using a small metal shovel, spoon it gently into the fire bowel.
The advantage of doing it this way is that we don't want to put cold charcoal on a hot fire
and then wait for the unit to come back up to temperature or disturb the ash into coating
the food. For the same reason I'll also top up the water pan with hot water from a kettle.
That too saves cooling down the unit and postponing the cooking.
Water smoking tends to take 2 to 3 times longer than hot smoking, but the wait is well
worth it!
Hot smoking can be done in a water smoker by leaving out the water bowl. I personally
leave the water tray in and leave out the water, and put the wood chips in the bowl rather
than on the flames. Obviously water smoking in a hot smoker can put the fire out unless
you introduce a roasting tin or some such for the water!!
The Four C’s Of Food Hygiene.
First things first……. it is vitally important to buy or otherwise acquire good quality
meat, poultry and fish from a reputable source.
1.
Poor quality produce coming in to a particular food process will equate to
poor quality produce out and may increase the risk of food poisoning.
9
2.
No amount of smoking or curing can make a poor quality product into a good
quality one!!
3.
Ask yourself……… are you confident the food has been handled correctly
before you acquired it!?
4.
There are four simple headings to remember for good food hygiene, the
best reference in my opinion refers to them as the 4C’s………
•
CLEANLINESS
•
COOKING
•
CHILLING
•
CROSS-CONTAMINATION.
Cleanliness:
The spread of harmful bugs can be preventing by observing good personal
hygiene and keeping work surfaces, utensils etc clean:
The recommended time to wash hands is at least 20 seconds in hot soapy
water. Wash both before preparing food and at appropriate stages during
the process.
Cover cuts and abrasions, if one becomes infected then stay out of any food
preparation area.
Do not handle food if you are ill with a stomach problem, such as diarrhea
and/or vomiting.
Keep dishcloths clean, wash regularly….. weekly is recommended.
Use smooth non porous cutting boards made of hard wood or plastic and
discard if they become cracked. Wash thoroughly after use using a scrub
brush and hot soapy water. (Remember, water must be hot enough to kill the
10
bacteria, at least 140F/60C)
Always wash utensils thoroughly after use, do not mix those used for raw
and cooked food.
Food processors or meat grinders must be taken apart and cleaned
thoroughly after use, if items are not dishwasher safe then wash manually in
hot water.
Use either a commercial kitchen cleaner or 1 teaspoon bleach to 1 quart of
soapy water to disinfect work surfaces, sink drains etc.
Cooking:
Cook food to the proper internal temperature, this
varies for different cuts and types of meat.
To ensure meat and poultry are smoked safely; two types
of thermometer should be used. One is required to
monitor air temperature in the smoker whilst the other
is required to determine the internal temperature of the meat, fish or
poultry. Some thermometers (e.g. Maverick ET-73) has 2 probes and
performs this dual role.
Check the accuracy of thermometers.
Typical air temperature of the smoker will be 225F/100C or more when hot
smoking.
Cooking times depend on several factors; examples include type of meat and
size and baseline temperature of meat at start of cooking. It can take just a
couple of hours to 14 hours or more to satisfactorily cook the contents of
your smoker.
11
The recommended internal temperatures of meat and fish are:
1.
Poultry breast:............170F(77C)
2.
Whole poultry and thighs:..180F (82C)
3.
Ground chicken:............165F (71C)
4.
Beef, veal and lamb:.......145 (63C) to 170F (77C)
5.
Pork and ground beef:......160F (71C)
6.
Seafood:...................145F (63C)
7.
Ground fish:...............155F (68C)
8.
Stuffed fish:..............165F (74C)
Other indications that food is cooked include:
•
Shrimp shells turning red.
•
Fish flesh becomes opaque.
•
Clams and mussel shells open then boil for an additional 3 -5 mins.
When reheating food, make sure it is piping hot throughout, do not reheat
more than once. Reheated food should be brought to a temperature of at
least 165F. (74C)
Chilling:
A high proportion of food poisoning events occur because the
food has been left at ambient room temperature for too long. If
cooked food is to be stored satisfactorily it must be chilled as
soon as possible.
When cooling cooked meat cool to less than 7C (45F) within 1.5 to 2 hours.
If ambient temperature is above 90F (30C) reduce this time to 1 hour.
Set the refrigerator temperature to no more than 40F (5C) ….. CHECK!
Set the freezer to no more than 0 F (minus 18C) …… CHECK!
•
12
Freeze ground meat, poultry, fish and shellfish if not eaten within two days
when stored in a fridge.
Freeze other beef, veal, lamb or pork within three to five days when stored
in a fridge.
Use leftovers within three to four days.
Check actual temperatures of fridges and freezers are accurate
occasionally using an independent means of measurement.
Do not overcrowd fridge or freezer.
Wrap food carefully.
Check for mold or other signs of spoilage.
Putting food into smaller portions will aid cooling and freezing. Consider
investing in a vacuum sealer for long term storage of food.
Do not thaw frozen food at room temperature, it must be moved to the
fridge to thaw or defrosted submerged in cold water (change every 30
minutes) or under cold running water.
If defrosting food in a microwave, cook food immediately as a degree of
cooking usually occurs when this method of defrosting is used.
Do not place partially defrosted food in the Bradley Smoker; it must be fully
defrosted before being placed in the smoker.
Marinate meat and poultry in a refrigerator, NOT at room temperature.
Cross Contamination:
This is generally the transfer of bacteria from one food (usually raw) to
other foods. (often cooked)
It may be direct when one food comes into contact with another or indirect
contact from hands, utensils or work surfaces.
To prevent cross contamination:
1.
Wash hands regularly.
13
2.
Keep raw and cooked food totally separate.
3.
Ensure juices do not leak and spoil other food, store raw meat on the
bottom shelf of the refrigerator. Consider using sealed containers for raw
meat products.
4.
Use a different chopping board for raw and cooked food.
5.
Clean knives and other utensils thoroughly.
6.
If re-using marinade previously used for raw meat or poultry it MUST
be boiled first for at least 3 minutes to destroy bacteria. Ideally reserve a
separate portion for use during smoking or as a sauce. The acid in marinade
does not kill bacteria; it merely slows or stops bacterial growth.
COMMENT: Food hygiene is not rocket science!! Following a few basic
rules….. remember the 4C’s…….. becomes second nature and many people will
already be implementing food safety measures almost without realizing.
Having confidence in good food hygiene techniques will give people the
confidence to experiment with different foods, processes and ideas.
Why not try cold smoking as an alternative to hot smoking? Perhaps some
people are reticent about using pork or fish but providing a few simple rules
are followed there is no reason to be worried.
And remember, whilst food poisoning is common, serious consequences
associated with food poisoning are fortunately very rare. This is NOT a
reason to be cavalier in you approach to food hygiene but rather a reminder
to get things in perspective.
"Bacteria as potential tools in bio-terrorism, with emphasis on bacterial toxins".
(British Journal of Biomedical Science, volume 62, number 1, 2005, p40 – 46) Food
Poisoning and Food Hygiene, Hobbs and Roberts, Sixth Edition.
Medical Microbiology, Mims et al.
Principles and Practice of Infectious Diseases, Mandell, Bennett and Dolin. Fourth
Edition.
Cold Smoking and Salt Curing Meat, Fish and Game. A.D.Livingston.
Home Smoking and Curing. Keith Erlandson.
14
Bradleii nsxbillism
Bradleii bsolomonus
Checking a thermometer.
Calibration is a process whereby an instrument can be adjusted by checking
it against a known standard. If the value of this known standard is not
obtained then it indicates that instrument under question should be
recalibrated. Some thermometers cannot be recalibrated.
In relation to thermometers there are two methods of checking they are
giving accurate readings:
Boiling Point Method:
1.
Bring clean tap water to the boil in a deep pan.
2.
Put the thermometer stem or probe into the boiling water so
the sensing area is completely submerged. Take good care not to scald
yourself.
3.
Do not let the probe touch the pan bottom or sides.
4.
Wait 30 seconds or until the indicator stops moving.
5.
The thermometer should read 212F, (100C) or the appropriate
boiling point for your elevation. (see below)
If it does not fall within an acceptable range (+/- 5F/2C) the thermometer
should be recalibrated according to the manufacturer’s instructions, if
15
indeed it can be recalibrated. Not all thermometers can be.
If the thermometer is under warranty it should be returned to the
manufacturer.
If the thermometer is inaccurate, is not under warranty and/or cannot be
adjusted it should be discarded. Any false reading at the boiling point of
water may not be linear; i.e. it could be more (or less) inaccurate at
different temperatures.
The boiling point of water is about 1F (0.5C) lower for every 550 feet (168m) above
sea level.
Ice Point Method:
1.
Fill a large container with crushed ice, add clean tap water until full.
2.
Put the thermometer stem of probe into the ice water so the sensing
area is completely submerged.
3.
Do not let the stem of probe touch the sides of the container.
4.
Wait 30 seconds or until the thermometer indicator stops moving.
5.
The thermometer should read 32F (0C).
If it does not fall within an acceptable range (+/- 5F/2C) the thermometer
should be recalibrated according to the manufacturer’s instructions, if
indeed it can be recalibrated. Not all thermometers can be.
If the thermometer is under warranty it should be returned to the
manufacturer.
If the thermometer is inaccurate, is not under warranty and/or cannot be
adjusted it should be discarded. Any false reading at the freezing point of
water may not be linear; i.e. it could be more (or less) inaccurate at
different temperature.
The boiling point method is more likely to be applicable to thermometers.
However it is recommended the temperature of fridges and freezers is
checked perhaps every 6 months to a year and the ice point method is more
applicable to this process. Cheap thermometers (under $20/£10) suitable
for this are available at many outlets.
16
CURING and BRINING, From JJC
This section is designed to provide basic information about curing and brining
meat (for simplicity, we will use “meat” to mean all animal flesh, including birds and
fish). It will cover the basic definitions of curing and brining, why and how to cure,
and the general principles underlying the different types of curing: dry and wet.
Because it has become so popular recently, we will also cover “flavor brining”, a
process designed primarily to enhance the flavor of meat, rather than preserve it.
Finally, a list of FDA and USDA “critical preservation point” safety data is
provided for informational purposes. Specific recipes for curing are provided in a
different section, but the basic principles and ingredients are given here. The
information was derived from several well-established sources, and links to these
are listed at the end of this section. This is not intended to be a scientific
dissection of the mechanisms of curing meat; for those interested in this aspect,
please consult the aforementioned sources. At the end of the day, it is up to the
individual to make sure he/she is practicing safe smokin’!
Definitions.
The process of adding some combination of salt (sodium chloride), nitrite
or nitrate, and sugar to meat to prevent spoiling and enhance the flavor
and color is called curing. Fully cured meat is defined as meat that can be
left at room temperature for several months or more without spoiling or
harboring disease-causing microbes. There are 2 basic ways to cure meat. In
dry curing, the powdered or crystalline chemicals are rubbed directly onto
the surface of the meat, or mixed into the meat. The second method is
brine, wet, or pickle curing, the meat is treated with a solution of the curing
chemicals dissolved in water. If the meat is immersed completely in the
solution, it is called immersion brining, or more commonly just brining. If the
solution is injected into the meat, it is called injection brining. The term
brine is a very general one that means simply a solution of salt dissolved in
water, regardless of the concentration; one or more other ingredients may
or may not be added. Pickling refers specifically to a brine that has sugar
added to it. More recently, the concept of flavor brining has gained
popularity. This is not a true method of curing meat; rather, the main
17
purpose is to add flavor and moisture to the meat. The fact that salt
dissolved in water is used to help the process makes it a brine, but the salt
concentration is not high enough to fully cure the meat. Flavor brining does
help slow down bacterial action somewhat, however, so there is a partial
curing benefit from this method.
Why.
Meat spoilage is caused by bacteria, some of which are harmful to humans.
Disease-causing organisms are capable of growing at temperatures of 40140F (5-60C), the “danger zone”, and can spoil meat within a few hours. In
the millennia before refrigeration became widely available, the process of
curing was used to preserve meat. It involves adding one or more of the
following to the meat: common salt (sodium chloride), sodium nitrite, sugars,
ascorbates (such as Vitamin C), and seasonings. While all of these substances
have been found to play a role in curing meat, the key agents are salt and
sodium nitrite. The curing process shuts down the growth of harmful
bacteria, and has an additional helpful feature, too. Depending on the
concentration of salt used, it can help to moisten and tenderize the meat.
Salt by itself is capable of fully curing meat only at very high
concentrations, concentrations that most people would find too salty on most
meats. About 200 years ago, saltpeter (potassium or sodium nitrate) was
found to enhance the color of cured meat while preventing the growth of
harmful bacteria at much lower concentrations than salt. Subsequently, it
was shown that nitrates are converted to nitrites by harmless bacteria
commonly present in the mouth and digestive tract, and that nitrite was the
active ingredient in the curing process. This has led to numerous cure
recipes that combine both salt and nitrites/nitrates. It also led to safety
questions about the use of nitrates that we will cover later in this section.
The bottom line, however, is that commercial cure preparations that use
nitrites and nitrates are safe and effective to use, provided that the
directions for use are carefully followed.
Interestingly, smoking food with wood also contributes several significant
antibacterial compounds as well as chemicals that help prevent fat oxidation
and the consequent development of rancid flavors. We smokers get a double
benefit: wonderful flavors, and increased shelf-life of the finished product.
18
How.
As mentioned above, it’s possible to dry or wet cure meat. They key is the
concentration of salt and/or sodium nitrite. Although a few relatively
uncommon harmful bacteria require a salt concentration of 20% to kill, most
disease-causing microbes are inhibited at lower concentrations. For example,
Listeria growth is blocked at 12% salt, Clostridium botulinum (the bacterium
that causes the deadly food-borne-illness botulism) is inhibited at 10%, and
Salmonella growth stops at 3% salt. For this reason, the most commonly
found brine cures call for a salt concentration of about 15% (for an
explanation of salt concentrations, see Technical Points, below). The most
common and basic brining cure calls for 2 cups table salt + 2 cups sugar per
gallon of water. As explained later, this is a 15% salt solution, and the sugar
helps counteract the salty flavor and contributes to the antibacterial action
of the brine.
The mechanisms of action used by salt and nitrite to prevent bacterial
growth are well understood. In contrast, the physical and chemical
mechanisms involved in moisturizing and tenderizing meat are not fully
understood--in fact, there is considerable disagreement about it in the
scientific community. However, everyone agrees that when the salt
concentration inside the cells of muscle tissue is high enough, it causes some
of the muscle tissue proteins to denature (cook) and this tenderizes the
meat. Simultaneously, the amount of overall water content in the tissue is
increased. A brined turkey or pork shoulder, for example, will generally
increase in weight by 20% after brining; when the meat is cooked, about 10%
of this moisture is lost, but the net water gain is still about 10%. Dry cured
meats don’t increase in weight, but the real benefit of increasing salt
concentration in the muscle tissue is that water is retained more tightly and
thus requires a higher temperature to release it. Cooking “low and slow”
allows dry cured meats to retain more of their moisture during cooking.
compared to an uncured meat cooked exactly the same way. Finally, adding
spices and herbs allows the flavor-enhancing molecules from these
ingredients.
19
Here’s what the substances commonly found in meat cures do:
Salt (sodium chloride):inhibits bacterial growth; moisturizes and tenderizes;
adds flavors.
Nitrite: inhibits bacterial growth; adds pink/red color to meat; adds flavor.
Nitrate: “slow-release” form of nitrite; is converted to nitrite by bacteria in
mouth and digestive tract.
Sugar: reduces harshness of salt; Indirectly acts to inhibit harmful
bacteria.
Ascorbic acid(Vitamin C), vinegar, erythorbic acid, glucono-d-lactone: these
are all cure accelerators (accelerate color formation by nitrites); they may
have antibacterial activity.ti
Seasoning/herbs:provide flavoring; certain compounds in herbs/spices are
anti-bacterial, but probably not important at concentrations usually used.
One final note:
Injection brining is not recommended as a stand-alone method of curing.
It is fine for flavor brining, IF the meat will not be in the danger zone for
more than 4 hours, OR the meat will be cooked to at least 160F. When
combined with immersion brining, injection brining can be an especially quick
and effective method of curing meat. Injection brining can also be used with
dry curing. When this method is used it is usually done on large cuts of meat.
It reduces the chance of spoilage, and helps the outside and center of the
cut cure at the same time.
InstaCure, Modern Cure, Prague Powder #1.
These cure mixtures combine sodium nitrite with salt. Use 1 oz. for every
25 lbs. of meat (that’s 1 teaspoon for every 5 lbs, of meat). These products
are recommended for meats that require relatively short cures (several days
or less) and will be cooked.
20
Prague Powder #2:
This is a combination of sodium nitrite and sodium nitrate. 1.6 ounces of
this cure mix should be combined with 1 lb. of salt to produce the final cure
mixture. The nitrate acts like a slow-release form of nitrite, so this mixture
is recommended for meats that require very long cure times (weeks to
months) and that do not require cooking, smoking, or refrigeration.
Morton Meat Curing Products:
These products include TenderQuick, Sugar Cure, and Smoke Flavored
Cure. All of them contain salt and nitrites as well as other ingredients.
Follow the manufacturer’s instructions carefully.
Safety Considerations.
A big flap arose about 25 years ago concerning smoking and BBQing. The concern
was that nitrites or nitrates used to preserve meat might be converted to
cancer-causing nitrosamines during the smoking and grilling process. Many
scientific studies were conducted, and these were carefully analyzed by the
National Academy of Science in the early 1980’s. They concluded that there
was little if any cancer risk from nitrosamines arising from low temperature
(less than 300F) smoking of food. Only at temps in excess of 600F is the
formation of nitrosamines worrisome, and even then unusually large
quantities of such meat would need to be ingested to increase the risk of
cancer. However, the report left open the question of whether high levels of
nitrate in meat could be converted to nitrosamines by naturally-occurring
bacteria in the gut. Because of this potential health issue and the tendency
of the meat industry to use relatively large quantities of nitrates to enhance
meat color rather than for curing, the FDA banned the commercial use of
nitrates in cooked meats in 1999, and limited the amount of nitrite that can
be present in commercial meat like bacon or ham. However, the use of
nitrates is still permitted commercially in small amounts in dry cured meats
that are not cooked prior to sale. Individual purchase and use of nitrates is
still allowed (see preceding paragraph).
21
Technical Points.
Brining solutions often provide concentrations of salt in terms of either
percentage (for example, 15% salt) or volume (for example, _ cup per quart).
When salt concentration is given as a percentage, it is the weight/volume
percentage. Thus, a 15% salt solution means 150 grams salt for every liter
(1000 ml) of water. In non-metric terms, since a quart is 95% of a liter, and
since 1 oz. equals 28.5 grams, we can see that 5 oz. of salt in 1 quart of
water is very close to a 15% solution. Not all salt preparations weigh the
same per unit volume. For example, table salt (regardless of producer)
weighs very close to 10 oz. (285 grams) per cup of volume. Because of its
somewhat coarser grain, Morton Kosher salt weighs about 8 (225 grams) oz.
per cup. Diamond Crystal Salt only weighs 5.5 oz. (155 grams) per cup. Since
there is almost a two-fold difference in the weight of the same volume of
salt depending on how it is made, It is really problematic to determine the
amount to use in a recipe unless the weight of salt is given (for example, “use
150 grams of salt per quart”) or the preparation and volume are given (“use _
cup Morton Kosher Salt per quart”). The 15% salt concentration
1/2 cup table salt,
5/8 cup Morton Kosher Salt,
1 cup Diamond Crystal Salt,
150 grams salt per quart is important since this is the salt concentration
needed to cure meat).
Remember:
1
1
1
1
1
cup table salt (all brands) = 10 oz. = 285 grams
cup Morton Kosher Salt = 8 oz. = 225 grams
cup Diamond Crystal Salt = 5.5 oz. = 155 grams
oz. = 28.5 grams
oz. per quart = 3% salt solution
Critical Preservation Points (FDA/USDA).
The FDA and USDA have published the following data which may be useful
when determining how to preserve, cure, and smoke cook meat:
22
Salt concentrations needed to kill:
Salmonella: 3%C.
Botulinum: 10%
Listeria: 12%
Staphylococcus: 20% (this is a very common disease-causing bacteria,
but not on food)
Temperature and times needed to kill Trichinella in pork:
Heat to 147F for 1 min, 136F for 3 min, or 132F for 15 min
Freeze at 5F for 40 days, -10F for 20 days, or -20F for 12 days
Note: wild game must be heated to 170F to kill Trichinella and other harmful
microbes.
Temperature and times needed to kill parasites in fish:
Freeze at -10F for 7 days.
Temperature and times needed to kill E. coli in sausage:
Heat145F for 4 minutes.
Brisket by Danny Gaulden
Picking a Brisket
The first thing one needs to know is how to pick out a good brisket. For home smoking, one
in the 8 to 10 pound range works well, and doesn't take as long to barbecue as an 11 to 12
ponder. Look for a brisket that has about 1/4 to 1/3" of fat across the top. This is
generally called the "fat cap" by most barbecue folks.
Don't buy a pre-trimmed piece, for it will not cook as tender, and will be dry. With the
brisket lying down and the fat side up, try to pick one that is thick all the way across the
flat. This can be hard to do sometimes, for most are thick on one side, and taper down to
23
become fairly thin on the other side. Try to find one that has a more rounded point, rather
than a pointed point. Briskets with rounded points tend to be more meaty in this area.
Briskets come in two grades, "choice or select". Choice grading costs just a few cents per
pound more than select, and generally has more marbling. Either will do well, but choice is
usually a little better. Preparation: After you have chosen your brisket, generously apply a
good rub on it, wrap it in clear wrap, and let it sit in the refrigerator overnight. This will
allow the seasoning to work its way into the meat a bit. If you don't have a fancy rub, just
use salt, pepper, and garlic powder. Go heavier on the salt than the pepper and garlic
powder. The next day, as you are building your fire, bring meat out of the refrigerator and
let it sit at room temperature for about 30 minutes. You can leave the meat in the
refrigerator until time to put it on the pit, if you like. No harm will be done. After your
fire has settled down to around 240-250°, put the brisket in the pit, fat side up and leave
it like that the entire time if you're using a pit like my Big Bertha with a Ferris wheel
rotiserrie rack system.
Now, if you're using an off-set firebox type pit, like a New Braunfels Black Diamond or a
Klose, put the brisket on the rack fat side up and then turn it over and mop it every two
hours so the bottom side doesn't get too much heat and dry out. While it's with the fat
side up, the fat renders and penetrates in, over and around the cooking meat. When
brisket becomes fork tender in the flat, take it off the pit, let it cool for about 30
minutes. Then slice and serve.
Always check brisket for doneness in the FLAT, not the point. The point will generally
become tender before the flat, and can deceive you, if your pit is cooking even. Continue to
cook until the flat is tender. OK, a lot of folks on the BBQ Mailing List asked me what the
internal temperature is when I take the brisket out of the pit after they're done. So I
measured a bunch of them with a meat thermometer and almost all of them were around
188°to 195 degrees. How Long Does it Take? How many hours does one smoke a brisket?
This argument will go on 'till the end of time, and is hard to answer, for there are so many
variables. Two people that think they smoked their briskets exactly the same will most
likely come out with two totally different finishing times. I like to smoke mine for about 1
to 1-1/4 hours per pound. That would put me at about 10 to 12-1/2 hours for a 10 lb.
brisket - no longer. I stay around 225-250 degrees as constantly as possible. Sure, one will
have some temperature ups and downs, but aim for this range as much as possible. I don't
go off and forget about the fire and I don't open my pit every 10 minutes to "take a peek".
I choose a good piece of meat. All these things make a difference in how long the process
will actually take. Another thing to take into consideration is the quality of the meat. All
briskets are tough, but some are tougher than others. This will have an effect on the
overall smoking time also. I have made a few boo-boos in my many years of smoking
24
briskets, but not many. Ninety nine times out of a hundred, they are tender, juicy, smoky,
and a piece of meat I am proud to serve to friends and customers. How do I know When
It's time to pull the meat? After 30 years in the business, I take tough cuts of meat
(brisket, butts, etc.) off by the fork tender method, not time or temperature. BBQing is
an art, not a science as baking. I think some folks have the idea that Q'ing is like
baking...follow the recipe to exact measurements, time, and temperature, and all will turn
out fine. That just won't happen in Q'ing. It is an art. I know that "great" baking requires
a talent and art to produce the best, even with the measurements, but Q'ing demands
more. It is one of the hardest art forms to learn.
As you go down the road to achieving the best BBQ you can, it doesn't hurt to have a little
science behind you. The science does help a lot, to a point, and I feel it is necessary, for it
helps you understand what"s going on. If you can understand it, you can always do better.
But only a lot of cooking practice and improving your skills and techniques will get you
there. Many a time I have told folks that BBQing sounds easy...all you have to do is make
the right fire and know when to take off the meat. Only a fellow Q'er that has tried this a
few times knows how difficult this can be. It's the easiest thing to explain, and the
hardest thing to do, that I have ever experienced in my life.
Under normal smoking conditions, with the heat being equal on the point and the flat, the
point will become tender before the flat. The reason is simple...the point has more
marbling, or fat in it, vs. the flat. This makes it cook faster and be more tender. I have
heard some say that the point took longer to cook than the flat. Something's not right
there, for under equal heat, the point will become tender first. No need to panic, just let
it cook all together until the flat is tender. How can you tell when a brisket is done?
When you cook as many as I do everyday, you learn fast not to judge when a brisket is
done by its size. If you play that game, you're gonna mess up a bunch of meat. You treat
each one as a totally separate little critter, and never judge it by it's size. Have had 14
pounders come off the pit sooner than 10 pounders. Number one, you don't want "falling
apart" brisket...maybe from the oven, but not for real pit BBQ. Tender, yes. You should be
able to slice the meat. When holding a slice in you hand, with a slight tug, it should pull
apart. That's real pit brisket.
It should have a wonderful, flavorful crust that is very tasty and robust in flavor, not dry,
and a real thrill to eat sliced with and mixed into the sliced meat, or mixed into chopped
beef. Some cooks like to finish off a brisket by wrapping it in foil and continuing to cook
for a few hours. Finishing off one's brisket in FOIL will not achieve this degree of finesse,
but I have seen many a pit where I have felt that it was necessary to do that to produce a
decent product.
25
IF your pit cooks dry (keeps a low humidity level), cook your brisket to around 160-165
degrees internally without foil, then double wrap it tightly with foil. Make sure your
brisket doesn't punch through the foil for this will defeat the purpose. Cook till the
internal temperature reaches 200-205 degrees internally. Remove from pit and let rest at
least 1 to 2 hours in the foil before unwrapping it. You can throw it back on the pit for a
few minutes to crisp up the bark before slicing and serving. You must keep your
temperature up, and average these above stated cooking temperatures to have the above
directions work for you. If you're cooking at lower temperatures, the flat will read at a
lower temperature when done. How to check for a perfectly done brisket is not easy. Here
are some hints: The above temperature readings in the flat; fork tender; or placing a
broiler fork straight into the flat and lifting straight up. If the meat lifts up with the
fork, it's not done...if it doesn't, good chance it's there. Cooking Temperature Some BBQ
cooks like to hold the temperature of a brisket at 170 degrees until done. This "holding at
170 degrees internally" for hours on end is bull to me. I have never found that productive,
nor produced a good brisket following that procedure. The fat will hardly render, and lots
of not good things will happen to the meat. You would have to have a very low and hard to
manage fire to keep the meat at such a temp.
The theory behind all that is that the meat will start to lose it's moisture above that
temp. Fine and dandy. That's all science book theory. As we all know, sometimes that
works, and sometimes it doesn't. In the real world, I find that a bunch of crap. Meat held
at that temp takes many more hours to "become tender", and a slower dryness occurs, vs.
cooking at a slightly higher temp. for less time, and less dryness. It's that simple. Don't
get carried away with the "I can cook as hot as I want" syndrome. Only up to about 250 to
260 degrees maximum for the internal Pit Temp. will work for a really good brisket. I have
found that once one gets over about 250 or so with a wood fired pit, you stand a much
greater chance of creosote and soot. Reason being: the higher the heat, the bigger the
fire. The bigger the fire, the more chance for a hard to control fire.
A hard to control fire produces bad stuff. Brisket Yield: A correctly cooked brisket will
lose 40% of its weight in the cooking process, and the average person will trim off about
20% in fat, after cooked, if cooking a packer. With my briskets, I never expect to have
over 4 lbs. out of a 10 lb. average brisket. Sometimes we get a little more, sometimes, a
little less. Serving If you're not ready to eat it as soon as it done, double wrap in foil, and
set it in a non-drafty place or a small ice chest (no ice) until you are ready to serve it.
Don't leave it for too many hours, or you can risk food poisoning. As long as the internal
temperature of the meat stays between 140 to 160, it is safe. Before serving brisket,
divide it into three pieces. Here's how you do it. Make sure you have a SHARP knife. Now,
with lean side of brisket up, cut off the point (deckle end).
The reason you want to do this with the lean side up is that it is much easier to see where
the point and flat join. Now turn the brisket over with the fat side down and cut off the
26
skirt, flap, whatever you want to call it. The reason for this is that the grain runs in a
different direction than the flat and should be separated from it. With the skirt removed,
trim the fat off of it, top and bottom and where it is connected to the flat.
Don't be surprised if there is a lot of fat--another reason to separate these pieces. Now
turn the skirt so that you are cutting against the grain, and make the slices at about a 30
to 45 degree angle. Cut slices off of the point also, going against the grain, and do the
same to the flat. Mix the different cuts together, and serve. Storing Leftovers After
cooked: freeze in whole form...fat and all. Thaw out the morning of the day you want to
serve them. Trim off all fat except for about 1/8 inch or less, and re-heat in pit with
medium smoke and indirect heat. This will keep the briskets from drying out while heating,
and allow smoke penetration to rekindle original flavor.
What Are Burnt Ends? The burnt ends of a brisket come about two ways. As stated above,
they can be made on purpose by returning the point to the smoker for a few more hours
and they can result from the thinner parts of the brisket's flat getting overcooked during
the smoking process. The burnt ends are usually rather dry and very smoky tasting. These
can be served thinly sliced with lots of barbecue sauce or chopped up and used in dishes
like chili, stews and soups. I recently did a long, extensive test on the "newer, leaner"
briskets it seems we are getting sometimes.
Even the choice cuts I have been getting have very little fat cap. The results will be a
little shocking, but beneficial to all. The brisket I will report on was 11 lbs., nice form, 1/16
to 1/8" fat cap the first 4" of the flat (hate that), and not a lot more the rest of the way.
Went out and bought a few new oven thermometers, checked them for accuracy (they
were correct) to make sure my pit temperature gauge was accurate. It was off about 15
degrees. The oven thermometers were a K-Mart brand named "Bakers Secret", and I
really like them. About $5.99 each. They're big, easy to read, and good. Checked my meat
thermometers with ice water and they were right on the money (32 degrees). Started the
test. I stuck one of the meat thermometers into the flat of the chosen test brisket, right
out of the walk-in. It was on 38 degrees. By the time I got the fire going, loaded the meat
on the pit, (a pretty fair load of 17 briskets, 15 slabs of ribs, 2 butts, several cuts of
boneless, skinless turkey, some sausage and ham), 15 to 20 minutes had passed. The pit
temperature was at about 70 degrees. Locked the doors down and started the test.
This is a very interesting test that I don't think has ever been run for the BBQ mailing
list, nor myself. It is interesting to see how the temperature rises, drops, and rises again
in Q'ing. This rise and drop in temperature is not a mistake on my reporting. It actually
happened. It also happened on the other brisket I tested. You will also notice that once
the temperature got into the "evaporation zone" (160 to 180 degrees), the rise slowed
down considerably. Not sure why, unless it was due to some chemistry taking place during
the evaporation process, or the fact that the closer the meat gets to the inside pit
27
temperature, the slower it goes. The window gets smaller, just like a cars acceleration.
The closer you get to its top speed, the longer it takes to get there vs. the off the line 0
to 60 burst. However, you will notice that the temperature started to rise again after
about 3 or 4 hours in the 160 degree or so zone.
The pit that this meat was cooked on cost a lot of money, is very accurate, easy to control,
and maintains a natural high humidity level. Your home pit may not cook the same,
therefore you must make you own adjustments. Here's the report: Pit temperature at
closing of doors: 70 degrees (due to time of loading with doors open for several minutes.)
Brisket internal temperature at loading time---40 degrees.
I start the burn on my pit slowly. Lots of smoke and low heat for a couple of hours. Then I
start to kick it up a bit. One can get their pit up to a higher cooking temperature sooner, if
they desire. You may notice that the temperature in the pit rose a bit as the time went on.
This was not due to me making a larger fire. As a matter of fact, I kept making a smaller
fire, to a point.
If I had maintained the burn much lower, I would have had to start a new fire every time I
added a new log, considering the fact that this pit demands a greener wood to cook
correctly and is extremely efficient. One must also consider that a smaller burn would be
needed as time goes by, due to the fact that the meat is at a much hotter temperature
than when the pit was first fired with all of the product at 40°.Plus all the ribs, turkey,
etc. were off the pit by this time. Less meat on a pit to soak up the heat, less heat needed.
This may not apply to someone cooking just a couple of briskets, ribs, butts, etc. on a home
rig. So what have we learned from all of this? First of all, one needs to know the structure
of the meat he is dealing with in order to get an approximate, on how to figure out the
time and temperature game. You're working with two different meat cuts here...one fat,
one lean, and you need to know how to successfully Q each of them. It's kind of like
playing checkers. The meat throws a move on you, and you adjust. You've got to learn how
to beat it. To prove to myself that I wasn't going crazy, for I have long thought that a
brisket should reach an internal of 190 to 197 degrees internal temperature in the flat to
be done, I tested the few (about 5 out of the bunch cooked today) briskets that had a
good fat cap. They came off the pit anywhere from 190 to 195 degrees, in the flat. This
was the kind of brisket I was getting a year or so ago, but not so much now.
So we need to know how to deal with what we are given. A totally different feel with the
fork is in play here. They feel tender, but not the same as a brisket with a good fat cap.
Are they good? You're darn right, but not, in my opinion, as tender and moist as the
heavier fat capped ones. When doing a temperature test, you must know where to put the
thermometer, or it ain't gonna work. It will make the difference between a great brisket
and one that only your dog would eat.
28
The thermometer MUST go into the flat, not the point, or anywhere in between. Have the
flat facing towards you, and in the thicker part of it, place your thermometer. Make sure
the thermometer goes in about 2 1/2 to 3 inches. Don't place it in the thinner part of the
flat, nor within two inches of the outside of it.
To give you an example of temperature variation, the fatter, point of the brisket can read
5 to 10 degrees hotter than the flat. Maybe more. This is more common than uncommon.
This could really screw up your day if you don't know where to put the thermometer.
Think. Will the point overcook because it is at a higher temperature. No. The fat and
marbling around it keep it nice and moist. Don't worry about it. Worry about the flat. For
the record, this 11 lb. test brisket came off the pit at 6.7 lbs. A 39.1% shrinkage. Cooking
time: about 61 minutes per pound.
If the fat cap had been thicker, it would have had a tad more shrinkage, but not a lot.
Why? Because a fatter brisket will get done faster than a leaner one. However, the fatter
one will have more trim-off and less yield. It's definitely a trade off. Fortunately, when
you can go to the market and "pick through" the bunch, you may be able to get the cut of
meat you are looking for. But for professional pitmasters, and large caterers, that isn't
possible. We have to buy meat by the case. Some of you may feel that the cooking
temperatures I achieved towards the latter part of the cooking process were a tad too
high. Not so. I make the kind of burn I feel I need to cook with. Quite frankly, I judge the
cooking process more with the kind of fire I have, than with the temperature.
There's good fire and then there's bad fire. It was a small fire, and the meat was cooking
just like it should be - not too hot nor boiling the fat.Just a good steady cooking process
going on. Too hot a fire will boil the fat, and you can hear and see it when you open your pit
doors. At that point, you need to back off. This brisket took 11 hours and 20 minutes to
finish. To me, that's slow. Especially for a cut of meat that's not much more than 3 or 4"
thick to start with. There's no doubt that there is a "bragging thing" about how long ones
cooks their Q. Especially brisket, butt, etc. Don't get caught up in this.
Too slow can be bad...very bad. Don't get carried away with too high a temp., but don't
cook so slow that you don't even render the fat, and are in reality making jerky. I ran
another test with one thermometer about one inch into the brisket, and the other about
three" in. Note the fact that this brisket had a bette.r, but still not great, fat cap, and
weighed less than the other test brisket. Due to the "just a little better" fat cap is why it
came off at a higher temperature, and cooked less time per pound. I am sure of it.
29
Recipes
So not to leave you salivating and waiting, let’s look at two recipes that can get you started
with just a squirt of instruction.
Sloooooow Smoked Standing Rib Roast
"Not cheap...but out of this world."
Cooking Time: 4-5 Hours (Rare)
Use vertical smoker or indirect method on charcoal grill. Smoke at 210º-220º
Shopping List:
2 Bone Standing Beef Rib Roast (minimum)
3 Bottles English Ale
2-3 cloves of Fresh Garlic
Dried Onion
White and Black Pepper
Salt
Day Before: Leaving the fat on the meat, score the fat in 2 directions to make a
crosshatch pattern. Don’t cut into the meat, just the fat. Rub the meat and fat with a
mixture of: 2-3 cloves of smashed and finely chopped fresh garlic, coarse ground black
pepper, ground white pepper and a breeze of salt. All this stuff you can get from the spice
aisle at the supermarket (that’s the place where you often go to get beer… they have
other aisles besides "Beverages"). Wrap tightly in plastic wrap and heave into the fridge.
Cooking A.M.: Remove the cow from fridge an hour or two before cooking and prepare fire
(see above). It won’t spoil in an hour or two and cooks better this way. Distribute the
briquettes when ashed and empty a few beer bottles into the water pan with a 1/2 gallon
of hot water.
Place meat on top center, sprinkle with dried onion flakes, cover and smoke. Add moist
chunks of favorite wood (see above) after 2 hours. Do not over choke with smoke as beef
picks up smokiness easily.
Rib should cook about 40 min. per pound- use an internal meat thermometer when you think
it is getting close to being done. Insert the thermometer way early to protect your
investment! Remove the roast 5ºF shy of your temperature goal because it will continue to
cook once removed. Use 145ºF for rare, and 160ºF for medium. We won’t even talk about
well done. And USE the thermometer damnit! You don’t want to bugger up a piece of dead
30
animal that you spent as much for as a half-barrel for. Let the roast stand AT LEAST 30
minutes prior to cutting to allow the juices you scared into the middle come back out. (Go
ahead, get some of that fat; you’ll hug yourself).
Just prior to serving, run a sharp, thin knife around the bone at the bottom to separate
the bone and cut off the fat where the roast comes to a point. Slice as you like, the
thinner the better and serve on a warm platter in the roasts own juices with roasted
potatoes, your favorite dead plants and of course, more ale.
Apple Smoked Pork Loin
"a succulent meal...plus"
Approx. Cooking Time: 6 hours
Shopping List:
2-4 lb. Center Cut Boneless Pork Loin
1/2 gal. Apple Juice or Liquid Concentrate
apple sauce
allspice seasoning
ground garlic
pepper
10 lbs. good charcoal
Night Before: Dust the whole loin with a mixture of allspice, poultry seasoning, pepper and
a touch of coarse ground garlic. Coat the loin good with unspiced apple sauce and place in a
zip lock type bag on a plate in the fridge. Remove 1-2 hrs. prior to smoking.
Cooking Time: After the standard fire startup drill and your briquettes have ashed, add
gallon of juice and a gallon or so of water to the smoker water pan and float in 2 sliced
apples (core and all). If you are cooking in a regular grill, place the charcoal on the sides
and a drip pan on the grate underneath the roast. Forget the water and use 2 cups of apple
juice and one sliced apple.
Remove the loin from the baggie, leaving on as much of the spiced apple sauce mixture as
you can, but don’t knock yourself out. Place loin on the rack, fat side up and smoke at
225°F. Wait one hour before adding apple wood chunks or your favorite wood chunks--that
have been wet for at least 30 minutes--to the hot charcoal. Use 2 single handful’s of wet
chips or chunks every 2 hours. Add a dozen more charcoal briquettes every hour or so
after 2-3 hours to maintain a good fire.
31
One hour before removing the pigster from the smoker or, when the internal temperature
is around 130 °F, wrap the roast in heavy duty aluminum foil as to catch all the remaining
juices that will fall and place back on the smoker or grill. Stick a meat thermometer
through the foil, on top, and remove from the cooker around 160°F. Let the smoked swine
rest for 30 minutes in the foil before slicing.
Pour the juices onto the bottom of your serving plate, thinly slice the roast and lay in the
juices. Serve with veggies and potatoes or place on insanely fresh sandwich buns with your
favorite barbecue sauce and baked beans on the side. SON!
Smoking Turkey
Welcome to the group... smoking turkey is awesome and if you learn a few basics and
master them you will be really popular around thanksgiving;-)
Check out the site at www.smoking-meat.com for the best details but basically you want
to brine the bird for 10-12 hours in a solution of 2 gallons of water, 2 cups of sugar, 2 cups
of kosher salt and any other liquid flavorings you would like to add. This does some really
neat things to the bird including flavoring the bird all the way through and allows the bird
to handle more dry heat for a longer period of time without drying out.
After the brining process you will build a 225 degree fire with some good smoking wood or
lump charcoal and wood chunks for flavor and smoke the turkey for 6 to 8 hours until you
can shake hands with the turkey's leg (it will be very loose and feel like you could almost
pull it off).. the temp should be around 170 degrees in the thickest part of the thigh.
During the smoking process I recommend an occasional mopping with butter or apple juice
or another mixture of your own making... this will increase the flavor of the bird and keep
the exterior meat and skin moist and tasty.
For wood I recommend hickory, mesquite, or plum although any hardwood or fruitwood will
work well. Mesquite is a very strong flavored wood and needs to be used a little more
sparingly than the others... but it is my favorite wood for almost everything.
For a wood burning smoker I recommend using oak as your base and then adding mesquite,
hickory or some fruitwood in with it. You will soon find out which woods you like best and in
what combinations as you experiment with it.
32
Smoke often and keep a log of what you do for future reference.. it will be a valuable
source of information later.
Feel free to keep asking questions here as you run into things you are not sure about and
someone here will get you an answer.
Once again... welcome!
Jeff Phillips
Jeff has one of the best websites on the internet on smoking food and he runs one of the
best forums:
http://www.smoking-meat.com/
He also has an online e-course on smoking:
http://www.smoking-meat.com/smoking-basics-ecourse.html
Smoking Time for a 5 Pound Pork Butt and Best Rub for Beginner
Q: i am looking to smoke a pork shoulder picnic roast for the first time. It will be smoked
in a smoker with an offset firebox. It weighs about 5 lbs and i was wondering how much
smoke time do you think it should have and what would be the best rub for a beginner.
A: A 5 pound pork shoulder(picnic) will require 7.5 hours of total cook time.. that is 1.5
hours per pound. If you have a thermometer then you will need to smoke the meat until it
reaches 140 oF internally and after that it just needs heat to take it on to 180 oF for
slicing or 200-205 oF for pulling.
If you do not have a thermometer then I would apply smoke for the first 3.5 to 4 hours
then just apply heat for the remaining time.
Try to maintain 225-230oF during the entire process.
Rib Rub Recipes You Can Use
33
Memphis Style Rib Rub
4 teaspoons paprika
2 teaspoons onion powder
1 teaspoons cayenne
2 teaspoons salt
2 teaspoons fresh ground black pepper
Mix ingredients together. Store in an airtight container. Spread evenly on prepared ribs
that have been patted dry and let sit until the rub appears moist.
Porkers Rib Rub
2 cups paprika
1/4 cup coarse ground black pepper
1/4 cup onion salt
1/4 cup chili powder
3/4 cup lemon pepper
1/4 cup white pepper
1/4 cup granulated garlic
3/4 cup brown sugar
Mix all ingredients and store in an air tight container.
Don't Wipe Your Eyes Rub
1/2 cup paprika
1/4 cup sugar
3 tablespoons chili powder
2 tablespoons onion powder
1/4 cup black pepper
3 tablespoons salt
2 tablespoons garlic powder
1 tablespoon cayenne
Mix thoroughly and store in a cool, dry place.
Best Rib Rub
1/3 cup paprika
2 tablespoons onion powder
2 tablespoons ground basil
1 tablespoon black pepper
3 tablespoons dry mustard
2 tablespoons garlic powder
2 tablespoons red pepper
Combine all ingredients. Store in an airtight container. When applying to ribs, coat heavily
and massage into the meat. If you want to make a sweet rub add 1/4 tablepoon of brown
sugar.
34
Smoked Turkey
A delicious change of taste coupled with an appetizing nut brown smoked color makes this
meat highly desirable as a festive treat or a special meal any time of year. There are two
types of smoked turkey, a cured or pumped smoked bird and a smoke-cooked bird with no
added ingredients. To just smoke-cook a turkey or other poultry simply follow the steps
below for smoke-cooking the cured turkey.
Select a plump bird since they give the most satisfactory results. Check the inside of the
bird and remove any bits or pieces of windpipe, lungs or other viscera which have not been
removed. Remove the neck and giblets from the bird for cooking separately. The giblets
are usually stuffed in the crop cavity in the front of the bird. Be sure to remove these.
You are now ready to smoke-cook the turkey if the bird is not going to be pump cured.
Pump Curing
Pump cure the turkey with a brine consisting of the following:
•
•
•
•
•
(4 1/2 gal.) 4 1/2 gallons water (cool)
(12 cups) 6 lbs. salt
(6 cups) 3 lbs. sugar
(6 Tbs.) 3 oz. sodium nitrate (saltpeter) or
(1 tsp.) 0.15 oz. sodium nitrite (optional)
(Please read about Nitrates and Nitrites)
Stitch pump the brine into the thickest portions of the thighs and breast. This can be
done using a large syringe with a No. 12 needle. Be sure to inject the bird uniformly in all
of the muscles and joints. Inject a large bird with brine to about 10 percent of its weight.
Then immerse the bird in the remaining cool curing solution for about 48 hours. The
temperature of the brine and the cooler should be kept at 40ºF or slightly below. Weight
the bird down to keep it covered with brine.
For smaller birds, roasters and fryer size chickens, the birds can be immersed directly
into the brine without pumping and held for four to five days. This will give equal results.
This is not recommended for large turkeys without stitch pumping because of the longer
time required for curing.
35
Smoke Cooking
Remove the cured bird from the brine and wash in fresh water to remove the surface salt.
Allow the surface to air dry and place the bird in the smoker. Start the smoker at about
140ºF. Keep a high humidity (60 percent) and a dense smoke for the first four hours. This
will prevent the meat from drying out and give a lustrous pecan-nut brown color. After
four hours raise the temperature in the smoker 10ºF every 20 minutes to 190ºF and hold
at this temperature until the internal temperature of the bird reaches 165ºF (175ºF for
the smoke-cooked bird). Measure this temperature by probing the inside of the thigh with
a meat thermometer. The total time required is 10 to 12 hours. This time may be
shortened by smoking the bird for four to six hours (depending upon the color desired)
and then placing it in a 300º to 350ºF oven and cooking until the internal temperature is
165ºF for the cured turkey, or 175ºF for the regular smoked-cooked bird. Be sure to
cover with foil to prevent the skin from cracking and drying during cooking.
The finished smoked pump cured turkey should have a rich pecan-nut-brown surface with a
light pink color in the breast meat. The thighs should have the color of well cured ham. A
salt content of about four percent is expected.
Poultry which has been only smoked-cooked is highly perishable and should be handled as
fresh cooked poultry. This product is bland in flavor and is less desirable than a cured
smoked turkey. Cured smoked turkey or poultry is a perishable product and should be
refrigerated. The cured turkey may be freezer stored ready-to-roast or ready-to-eat for
as long as 10 months with negligible change in color or flavor.
The Basics of Smoking a Brisket
You should use Lump Charcoal which is cleaner and burns hotter than briquettes.
Start your fire as usual and when you have a good bed of coals add some smoking wood
chunks of hickory, mesquite or just about any hardwood or fruitwood to the coals. Just as
soon as it starts to smoke add the meat to the smoker.
Maintain 225 oF in the smoker using the air intake on the smoker to control the
temperature.. more air makes the fire burn hotter, less air it burns cooler.
The brisket will require about 1.5 hours per pound cook time so an 8 pound brisket will take
12 hours or better to complete.
Note: You can also use wood chips by wrapping a handful in a large sheet of aluminum foil
and then poking 4 or 5 holes in the top. Lay the foil package right on top of the coals.
36
You need to continue to replenish the chunks/chips until the meat reaches an internal
temperature of 140 oF at which point the meat stops taking on smoke.
After that point you just continue to maintain 225 degrees until the brisket reaches 180
F for slicing or about 200 oF for pulling.
o
Secrets to Smoking Brisket
Brisket is extremely tough but is one of the tastiest pieces of meat you can have after a
long slow process in the smoker.
When you are buying a brisket get the most tender brisket in the supermarket. That will
place you way ahead of the game with very little effort. Simply look for a brisket that is
under 10 pounds if possible and find the one that has the most flex. Balance the brisket on
the side of your hand and see how much it bends.
Once you get the perfect brisket home you will notice the fat cap. I like to have at least a
quarter inch fat cap so I do a little trimming on the thicker parts but nothing major. The
fat will render (Melt) during the smoking process and will do a great job of keeping the
brisket moist during the long hours in the dry smoky environment.
(1) The first thing I do as far as actual prepping of the brisket is to make a series of cuts
through the fat cap and down to the meat. First I do cuts along the width of the brisket
every inch or so then I do the same cuts along the length of the brisket and then
diagonally until it looks like a crosshatch pattern.
This allow the smoke, the rub, the marinade and whatever else you use to get down to
where it can affect the meat in a positive manner without removing the much needed fat
cap.
(2) I will then make incisions into the center of the brisket using a sharp knife so that I
can insert garlic cloves into the meat. I make "spots" for about 5 or 6 cloves normally.
(3) A very special marinade that I like to use consists of:
2 medium onions
1 teaspoon of cayenne pepper
6 garlic cloves
4 tablespoons of course black pepper.
(Feel free to add other spices if you like).
Put all of the above ingredients into the blender and make a paste or puree which you will
then rub all over the brisket making sure it gets down into the cuts you made earlier. Place
the well-coated brisket in a dutch oven or large zip-loc bag and place in the fridge for 12
to 24 hours prior to smoking. You will NOT rinse this marinade off before smoking.
37
(4) After the brisket is in the smoker for an hour or two I use a butter mop every 45
minutes which is basically:
1 cup of water
1 stick of butter
2 tablespoons of Cajun seasoning.
This would do well with any other spices you happen to like as well.
These are things I have discovered over the years to make a good brisket a lot better.
Feel free to experiment with these methods and if you have a better way of doing things
then I would like to hear about it.
What to do
Make a marinade. I will marinate the brisket with this stuff every 1.5 hours once the
brisket smoke has been going on for around two hours.
I fire up the smoker as soon as I am done with the marinade and give the smoker time to
equalize the temperature to eliminate cold spots before the meat goes in.
Place the brisket in the smoker long brisket smoke.
For the next two hours or so I regulate the temperature keeping it around 220 oF
I mop the top of the brisket with my butter marinade, flip it over and do the other side as
well.
The Smoking Plateau many marinades and flips later the brisket has reached 151 oF
degrees and reached a plateau. Anyone who has smoked meat has no doubt experienced
this strange phenomenon. The meat reaches a certain temperature and gets stuck at that
temperature for sometimes hours on end.
Once temperature has finally started to rise again and very slowly over the next several
hours it makes its' way up to 165 oF then 170 oF then 175 oF.
I normally remove the brisket once it reaches 185 oF degrees unless I am going to pull it, in
which case I will let it get as high as 200 oF degrees.
How to Smoke a Whole Chicken
These are actual questions I have received from web visitors via email and my answers
back to them:
Q: please help me with smoking a whole chicken. I`ve tried things but can`t get a great
spicy taste throughout and family says it`s plain tasting.
38
A: Have you tried brining?
Brining is a process in which you soak the chicken (or any meat) in a salt, sugar and water
solution for a specified amount of time. You can also add spices and flavorings to the
solution and believe it or not the flavors will get drawn deep into the meat creating a very
wonderful taste.
I have a page that talks about brining in detail and on there is a recipe in which I brine a
turkey in water, salt, sugar, flavorings, and Zattarains Crab boil.
This creates a spiciness and really rich flavor throughout the meat that I think you should
try.
You will need to amend the time in the recipe a little bit.. for a turkey it requires about 6
hours however a whole chicken of around 4 pounds would only require about 4-5 hours.
Another alternative you should try is injecting the chicken with a spicy marinade of
butter, water and cajun seasoning.. here is the recipe that I use and you can amend this
however you like just be sure and taste it before you use it.. if it taste good to you then it
will taste good in the chicken.
Mop Water/Injection Fluid
1 cup water
1 stick real butter (the salted kind)
2 TBS Tony Chacheres Cajun Seasoning
1 tsp Black Pepper
You will need an injector which you can pick up at Wal-mart or even in the supermarket.. if
you cannot find one by itself go to the aisle with the barbecue sauce and marinades and
sometimes the marinades made for injecting will have an injector attached to the bottle.
You may even see some spicy marinade that looks good.. the main thing is that you get the
marinade down into the meat. Inject the chicken in about 20 different spots on the top
and bottom and sides of the meat. Be sure and get the wings, legs and thighs a little.
Leave the skin on the chicken and dust on some lemon pepper, cajun seasoning and course
black pepper in equal amounts just before smoking.
Smoke the chicken for around 4 hours at 225-250 or until it reaches 168 in the thickest
part of the thigh or breast.. I like to use mesquite chunks/chips however, you can also get
39
great results from oak, hickory, apple, plum, cherry, apricot or a mix of your favorite fruit
or hard wood.
The chicken will be a deep golden brown when it is done.. let it rest for 20 minutes or so
before carving to allow the juices to redistribute throughout the meat.
If you have any further questions let me know.
Deejay’s Poultry Injection Fluid
1 stick of margarine, butter or Butter Buds
3/4 teaspoon Garlic Power
3/4 teaspoon Onion Powder
3/4 teaspoon Cajun Spice
1/4 teaspoon white pepper
1/4 teaspoon salt (omit if poultry has been brined)
Save a bit to use as a rub or just sprinkle spices the over the bird before cooking.
3-2-1 Method For Smoked Ribs
I wish I had a dollar for every smoked rib recipe.. there are many, many recipes but not
all of them are worth their proverbial salt.. fortunately, I have learned of one recently
that I really like and you will too.
It is called the 3-2-1 method and I must warn you that this smoked rib recipe bends the
rules of most purist smokers.. it uses (gasp!) aluminum foil during a portion of the process.
For those of you who are after really smoky and tender ribs and do not have a problem
with using foil then please read on..
The 3-2-1 smoked rib recipe is a good way to smoke ribs and tends to turn out perfect ribs
every time whether you are using the meatier spares or the baby backs.
Here is the scoop..
The 3 stands for the 3 hours that you initially smoke the ribs with nothing but your
favorite rub on them and your favorite hardwood such as hickory, mesquite, apple, pecan,
etc.
40
After the 3 hours you remove the ribs and quickly double wrap them in heavy duty foil..
just before you seal them off splash on some apple juice for good measure and close the
foil leaving some room around the ribs for the steam to be able to flow around the meat
and do it's magic.
The ribs cook in the smoker wrapped for 2 hours undisturbed.
After 2 hours remove the ribs from the smoker, unwrap and place back into the smoker
for the final 1 hour. You can add a glaze or sauce at this point if you wish.
Those who use this smoke rib recipe say the meat will literally fall off the bone and be
extremely juicy, tender and flavorful.
I am assuming you know how to remove the fell from the ribs and know to smoke the ribs
at around 220 oF . If not then please read the smoking ribs page to get more detail on the
individual processes of smoking ribs.
Special thanks to Jefferson Davis, a member of the Smoking Meat forum who introduced
this wonderful smoked rib recipe to the forum.
Home Curing Bacon for a Mild Flavor
Maurice A. Alexander
Department of Animal Science
William C. Stringer
Department of Food Science and Nutrition
Most people eat bacon because they like it, not for its nutritional value. Country-cured
bacon is usually more salty and less desirable than commercially prepared bacon. This guide
will outline procedures for curing bacon to get a milk flavor.
When production of bacon depends upon natural conditions for refrigeration, pork bellies
should be placed in cure during December through February. The risk of spoilage is
greater during the warmer seasons of fall and spring.
Product
To successfully home cure bacon, begin with fresh bellies that have been chilled to about
42 degrees F within 24 to 30 hours after slaughter. If the fresh bellies are purchased
from a commercial source, they have been properly chilled. If the source is farm
slaughter, take care to chill them rapidly. Do not stack warm bellies during the chilling
process. Trim the bellies to desired shape and apply cure within 48 hours after slaughter.
41
Bellies prepared from skinned carcasses may be cured successfully in the same manner as
those from scalded carcasses.
Curing ingredients
Salt is the primary ingredient. Sugar is added to offset some of the salt's harshness. A
combination of 3 pounds salt and 1-1/2 pounds sugar, either white or brown, is a basic
mixture. There are several commercially prepared cures comprised of this basic mixture.
Some have added spices and flavoring to give a characteristic flavor, aroma or appearance.
A cure mixture that performs well under home curing conditions consists of 7 pounds meat
curing salt, 4 pounds sugar (white or brown) and 3 ounces of nitrate (saltpeter -- optional).
This cure produces a milk-flavored bacon.
Applying cure
If commercially prepared cure is used, apply according to the manufacturer's instructions.
If you prepare your cure according to the suggested recipe, apply the cure at rate of 1/2
ounce per pound fresh belly. If you cannot weigh the ingredients and bellies, you can put
the cure on by sprinkling the skin side and by rubbing the sides and inside well with the
cure. Hold the belly on edge and tap gently on table to remove excess cure. The amount
applied will equal about 1/2 ounce per pound.
Curing time
Stack the bellies crisscross no more than four layers deep on a table that is tilted to allow
the moisture to drain away. Plywood on a set of sawhorses works well. Place the bellies in a
well-ventilated, odor-free room and allow to cure 7 days. If the bellies freeze before 7
days, allow them to defrost and add one day to cure for each day they were frozen. After
curing, the product should be smoked.
Preparation for smoking
Wash the bacon in warm water, hang in the smokehouse with door open and allow to dry.
This may take two or three days. The meat will not take smoke until the surface is dry. If
the meat is smoked when still damp, the smoke will be smudgy and the meat will not taste
as good. When the bacon is dry, apply the smoke and allow about 36 to 48 hours to
complete the smoking. Add sawdust or wood as needed during the smoking.
Smokehouse
A smokehouse may be constructed using three pieces of tempered masonite, stove pipe, a
30-gallon drum and frame lumber.
The outside dimensions are about 2 feet wide, 4 feet deep and 8 feet tall. This will smoke
the bacons and jowls from five hogs.
Smoke from burning sawdust in the drum is vented into a lower corner of the smokehouse,
then vented out the opposite corner near the top of a flue.
42
The drum should lay on a metal base with about 2 feet of 3- or 4-inch vent pipe to the
smokehouse. Air vents should be made in the drum on the side opposite the vent pipe and
about one-fourth the distance up from the bottom. Cut a hole in the top to allow filling
with sawdust.
Start the smoke generator by putting crumpled paper in the lower vents, piling sawdust on
the paper and lighting the paper. Leave enough room for air to get in as the sawdust burns.
The sawdust should smolder and give off smoke. If it flames, dampen the sawdust with
water.
Bacon hangers
Bacon hangers can be made of non-resinous wood material about 2-inches wide, 1/2-inch
thick, and 12-inches long. Space four or five No. 6 galvanized nails along the board, make a
hanger from No. 9 galvanized wire and fasten to the middle of the board.
Source of wood for smoke
Use only hardwood sawdust or chips for smoking. Resinous evergreen wood will impart an
undesirable flavor.
Sawdust from a stave bolt mill or sawmill where no resinous lumber is cut will be fine.
Since most home smokehouses are designed to give a cold smoke, drying and smoking will
take longer than at a commercial facility.
Handling the finished product
Bacon cured and smoked in this fashion is perishable and needs to be frozen or stored in a
refrigerator until eaten. Remove the rind if it is not removed during slaughter, slice, wrap
in freezer paper and freeze. The sliced bacon will retain its quality 2 to 3 months in
freezer storage. If more bacon was cured than the family will eat in two to three months,
wrap and freeze in chunks. Bacon will keep its fresh flavor longer during freezer storage if
it is not sliced.
Scrap Iron Chef's Bacon
Recipe courtesy Alton Brown
1 cup sugar
1 cup salt
8 ounces molasses
1/2 gallon (2 quarts) water
1/2 gallon (2 quarts) apple cider
43
2 tablespoons course ground black pepper
1 (5 pound) piece raw pork belly from the loin-end
In a large non-reactive pot, bring half the water, 1 cup of sugar, salt, and 8 ounces
molasses to a boil. Stir to dissolve the sugar. Pour into a large container with the remaining
water, and the apple cider. Place in the refrigerator and cool to 40 degrees F.
Press the black pepper into the pork belly. Once the brine has cooled place the
peppered pork belly into the mixture until completely submerged. Refrigerate for three
days.
After three days have passed, remove the pork from the brine and pat dry with
paper towels. Lay on a rack over a sheet pan and place in front of a fan for 1 hour to form
a pellicle. Lay the pork in the protein box of a cold smoker and smoke for 4 to 6 hours.
Chill the meat in the freezer for 1 hour to stiffen for easy slicing into strips of bacon.
Slice what you need and keep the remainder in a freezer safe bag in the
refrigerator or freezer. Place the strips of bacon onto a sheet pan fitted with a rack and
place into a cold oven. Turn the oven to 400 degrees F and cook for about 12 to 15 minutes,
depending on how crispy you like your bacon. Remove from rack and drain on paper towels.
Enjoy.
Yield: approximately 4 pounds of bacon
Prep Time: 10 minutes
Inactive Prep Time: 3 days
Cook Time: 6 hours
Difficulty: Expert
To: Deejay
From: Chef Paul
44
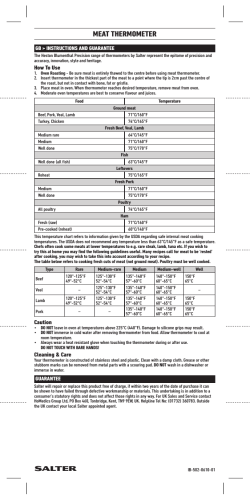
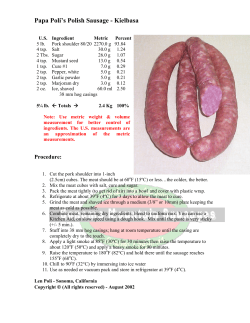


© Copyright 2026