
User`s Guide - Documentation Center
Viz Ticker
User’s Guide
2.6
Copyright © 2015 Vizrt. All rights reserved.
No part of this software, documentation or publication may be reproduced, transcribed, stored in a
retrieval system, translated into any language, computer language, or transmitted in any form or by
any means, electronically, mechanically, magnetically, optically, chemically, photocopied, manually,
or otherwise, without prior written permission from Vizrt.
Vizrt specifically retains title to all Vizrt software. This software is supplied under a license
agreement and may only be installed, used or copied in accordance to that agreement.
Disclaimer
Vizrt provides this publication “as is” without warranty of any kind, either expressed or implied.
This publication may contain technical inaccuracies or typographical errors. While every precaution
has been taken in the preparation of this document to ensure that it contains accurate and up-todate information, the publisher and author assume no responsibility for errors or omissions. Nor
is any liability assumed for damages resulting from the use of the information contained in this
document.
Vizrt’s policy is one of continual development, so the content of this document is periodically
subject to be modified without notice. These changes will be incorporated in new editions of the
publication. Vizrt may make improvements and/or changes in the product(s) and/or the program(s)
described in this publication at any time.
Vizrt may have patents or pending patent applications covering subject matters in this document.
The furnishing of this document does not give you any license to these patents.
Technical Support
For technical support and the latest news of upgrades, documentation, and related products, visit
the Vizrt web site at www.vizrt.com.
Last Updated
26.03.2015
Table of Contents
1 Introduction...................................................................................................9
1.1 About this publication........................................................................... 9
1.1.1 Document Structure....................................................................9
1.1.2 Related Documents.................................................................... 9
1.1.3 Conventions............................................................................ 10
1.2 Customer Feedback and Suggestions..................................................... 10
1.3 Customer Support Request...................................................................10
1.3.1 Before Submitting a Support Request........................................... 11
1.3.2 Submitting a Support Request.................................................... 11
2 About Viz Ticker........................................................................................... 13
2.1 System Applications............................................................................13
2.1.1 Viz Ticker Client....................................................................... 13
2.1.2 Ticker Wizard...........................................................................13
2.1.3 Ticker Feed............................................................................. 14
2.1.4 Ticker Service.......................................................................... 14
2.2 Ticker Creation Workflow..................................................................... 14
2.3 Ticker Plug-ins................................................................................... 14
2.4 Design Conventions............................................................................ 15
2.5 System Log Files................................................................................ 15
3 Installing Viz Ticker Client and Ticker Wizard......................................................17
3.1 Important Before Installation................................................................ 17
3.2 Requirements.................................................................................... 17
3.3 Program Starting Sequence.................................................................. 18
3.4 Installing Ticker Wizard........................................................................18
3.4.1 Ticker Wizard Startup Parameters................................................ 21
3.5 Installing Viz Ticker Client.................................................................... 22
3.5.1 Viz Ticker Client Startup Parameters.............................................25
3.6 System Log Files................................................................................ 27
4 Ticker Wizard...............................................................................................29
4.1 Getting Started.................................................................................. 29
4.2 Main Window..................................................................................... 30
4.3 Main Menu........................................................................................ 30
4.4 Main Panel........................................................................................ 31
4.4.1 Viz Engine Connection Frame......................................................31
4.4.2 Wizards Frame......................................................................... 34
4.4.3 Scene Scan Log Frame.............................................................. 34
4.5 Ticker Carousels Panel.........................................................................35
4.5.1 Existing Carousels List...............................................................36
4.5.2 Carousel Details Frame..............................................................36
4.6 Output Channels Panel........................................................................ 40
4.6.1 Existing Output Channels List..................................................... 40
4.6.2 Output Channel Details Frame.................................................... 41
4.7 GPI Panel.......................................................................................... 42
4.7.1 Existing GPI Handlers List.......................................................... 42
4.7.2 GPI Settings Frame................................................................... 43
4.7.3 GPI List.................................................................................. 45
4.8 Settings Panel....................................................................................46
4.8.1 Show in Main Control Frame....................................................... 46
4.8.2 Enable/Disable Features Frame....................................................47
4.9 Buttons Panel.................................................................................... 48
4.9.1 Button Groups and Buttons List...................................................49
4.9.2 Button Group/Button Details Frame.............................................. 50
4.10 Wizards...........................................................................................51
4.10.1 Scrolling Carousel Wizard......................................................... 52
4.10.2 Flipping Carousel Wizard.......................................................... 57
4.10.3 Reimport Templates Wizard.......................................................58
4.10.4 Output Channel Wizard............................................................ 59
5 Viz Ticker Client........................................................................................... 61
5.1 Getting Started.................................................................................. 61
5.1.1 Logging In...............................................................................61
5.2 Main Menu........................................................................................ 62
5.3 Configuration Panel.............................................................................63
5.4 Control Panel..................................................................................... 64
5.4.1 Actions Frame..........................................................................65
5.4.2 Handler Settings Frame............................................................. 66
5.4.3 Data Frame............................................................................. 67
5.5 Carousel Specific Panel........................................................................68
5.5.1 Pool Frame.............................................................................. 69
5.5.2 Carousel Frame........................................................................ 72
5.5.3 Buttons Frame......................................................................... 76
5.5.4 Elements Editor........................................................................76
5.5.5 Groups and Sections................................................................. 82
6 Importing Ticker Example Scenes.................................................................... 85
7 Creating a Scrolling Carousel.......................................................................... 87
7.1 Scrolling Carousels............................................................................. 87
7.2 Creating a Scrolling Carousel Scene in Viz Artist....................................... 87
7.2.1 Getting Started........................................................................ 88
7.2.2 Adding a Background................................................................ 88
7.2.3 Stopping, Starting, and Clearing the Carousel................................ 93
7.2.4 Adding a Template....................................................................95
7.2.5 Saving the Scene................................................................... 100
7.3 Setting Up a Scrolling Carousel in Viz Ticker...........................................100
7.3.1 Setting Up the System.............................................................101
7.3.2 Setting Up a Scrolling Carousel in Ticker Wizard............................ 101
7.3.3 Using a Scrolling Carousel in Viz Ticker Client............................... 102
7.3.4 Optional Scrolling Carousel Setup in Viz Ticker..............................103
8 Creating a Flipping Carousel......................................................................... 107
8.1 Flipping Carousels............................................................................ 107
8.2 Creating a Flipping Carousel Background Scene in Viz Artist...................... 107
8.3 Creating a Flipping Carousel Template Scene in Viz Artist..........................113
8.4 Setting Up a Flipping Carousel in Viz Ticker........................................... 116
8.4.1 Setting Up the System.............................................................116
8.4.2 Setting Up a Flipping Carousel in Ticker Wizard.............................116
8.4.3 Using a Flipping Carousel in Viz Ticker Client................................117
9 Ticker Feed................................................................................................119
9.1 Getting Started................................................................................ 119
9.2 System Configuration........................................................................ 125
9.2.1 Media Sequencer Hostname..................................................... 125
9.2.2 Source.................................................................................. 125
9.2.3 Basic HTTP authentication........................................................ 126
9.2.4 Transformation....................................................................... 126
9.2.5 Log Level.............................................................................. 128
9.3 XML Data Structure...........................................................................128
9.3.1 XML Example......................................................................... 128
9.3.2 XML DTD.............................................................................. 128
9.4 Ticker Feed Troubleshooting................................................................135
9.5 External components License..............................................................135
10 Ticker Service.......................................................................................... 137
10.1 Ticker Service Options..................................................................... 138
11 Presentation Files......................................................................................139
12 Field Linking and Feed Browsing.................................................................. 141
12.1 Overview.......................................................................................141
12.2 Workflow....................................................................................... 142
12.3 Field Linking.................................................................................. 142
12.4 Feed Browsing................................................................................144
12.4.1 Feed Browsing in Viz Ticker Client............................................ 144
12.4.2 Field Linking with edit restrictions............................................ 146
12.4.3 Searching and Filtering.......................................................... 146
12.5 Shared Memory Support...................................................................146
12.5.1 Configure Field-Linking and SHM support................................... 147
12.5.2 Real-time data updates.......................................................... 147
12.5.3 Technical Specification........................................................... 148
12.6 Technical reference for Field Linking................................................... 148
12.6.1 Feed linking formats.............................................................. 148
12.6.2 XML Namespaces..................................................................149
12.6.3 Elements in atom feed...........................................................149
12.6.4 Elements in atom entry..........................................................150
12.6.5 Fields that can be Linked........................................................151
12.6.6 Fields that cannot be Linked................................................... 152
13 REST interface and services........................................................................153
13.1 Overview.......................................................................................153
13.2 Listing Pool and Rundown Messages................................................... 154
13.3 Listing and Triggering Actions............................................................154
13.4 The curl and tidy utilities................................................................. 155
14 Keyboard Shortcuts................................................................................... 157
15 Troubleshooting........................................................................................ 159
15.1 Not Possible to Scan Scene in Ticker Wizard......................................... 159
15.2 Scrolling Carousel Messages Not On-Air...............................................160
15.3 The System Seems to Freeze when Creating a Message..........................160
15.4 Unable to Connect to Viz Engine........................................................161
15.5 Error exception when Control Text uses identical Field Names.................. 161
Viz Ticker User’s Guide
1 Introduction
This is the user’s guide for Viz Ticker, an advanced ticker system that makes it possible
to build creative and compelling graphic tickers with total flexibility.
1.1
About this publication
This publication is up to date with the latest features available in Viz Ticker version 2.6.
1.1.1
Document Structure
This publication is divided into two major parts:
• The regular manual that provides reference information, and
• A tutorial section that provide detailed information and procedures for creating
Scrolling and Flipping Tickers.
The first two chapters of this document give an introduction to Viz Ticker. It is
suggested you read these two chapters in full to get an overview of the system, the
workflow and the various applications and components before installling or operating
Viz Ticker.
Installing Viz Ticker Client and Ticker Wizard describes how to install Viz Ticker Client
and Ticker Wizard.
Ticker Wizard describes the user interface and how to work with Ticker Wizard, while
Viz Ticker Client describes Viz Ticker Client.
To get new users started there are some example Artist scenes provided with the
installers. These scenes can be studied and used as a starting point for own designs.
Importing Ticker Example Scenes shows how to import ticker example scenes.
Scrolling Carousels and Flipping Carousels give step-by-step instructions on the whole
ticker creation process. From the creation of scenes in Viz Artist, through configuration
in Ticker Wizard, and to playout in Viz Ticker Client.
Ticker Feed describes the Ticker Feed application, used for connecting external feeds
like internet resources to Tickers. Ticker Service explains Ticker Service; a service
process that needs to run if you have scrolling tickers.
Presentation Files explains how to create presentation files in Viz Template Wizard.
Field Linking and Feed Browsing describes the new field linking functionality, introduced
in Viz Ticker 2.5, which makes it possible to browse and insert field values from
external sources.
REST interface and services show how external applications or services can interface
Viz Ticker using the REST API.
Keyboard Shortcuts lists the available system keyboard shortcuts, the Troubleshooting
chapter answers some frequently asked questions.
1.1.2
Related Documents
For complementary information, see the following documents:
Copyright © 2015 Vizrt
Page 9
Viz Ticker User’s Guide
• The Viz Artist User’s Guide contains information about how to create scenes and
details about ticker specific plug-ins and scene design.
• The Viz Template Wizard User’s Guide contains information on how to operate the
application that creates presentation files.
• The Viz Social TV User’s Guide describes how to capture data from web feeds that
uses output formatting that is not supported by Viz Ticker, and how to moderate and
push this content to the ticker system.
1.1.3
Conventions
The following typographic conventions are used in this document:
• Italic is used for external references, such as related documents, books, or internet
pages. Italic is also used to emphasize words.
• The color blue is used for internal references to sections or document elements
(such as tables or figures) in the current document.
• Bold refers to GUI components.
1.
1.2
Numbered paragraphs are action procedures.
Customer Feedback and Suggestions
We encourage suggestions and feedback about our products and documentation.
To give feedback and, or suggestions, please identify your local Vizrt customer support
team at www.vizrt.com.
1.
Click on Contact (top of page).
2.
The Vizrt office which is nearest to your location will be shown, or select from the
list of Vizrt offices.
3.
Click on the Contact button for the office you want.
4.
Complete the required details in the window that opens.
Note: If this message is for Customer Support, and there is a Support Contract in
place, then click on the ‘For support requests, please visit our support portal link
in the message window.
A Vizrt representative will contact you as soon as possible.
1.3
Customer Support Request
Support Requests are supported by Vizrt if Customers have a valid Service Agreement
in operation. Customers who do not have a Service Agreement and would like to set up
a Service Agreement should contact their regional sales representative (see Customer
Feedback and Suggestions).
When submitting a Support Request relevant and correct information should be given
to Vizrt Support, to make sure that Vizrt Support can give the quickest and best
solution to your Support Request.
This section contains information on the following topics:
Page 10
Copyright © 2015 Vizrt
Viz Ticker User’s Guide
• Before Submitting a Support Request
• Submitting a Support Request
1.3.1
Before Submitting a Support Request
Before a Support Request is submitted make sure that you:
Read:
• The relevant User Guide or Guides (see Related Documents).
• The release notes.
and Check:
• That the system is configured correctly.
• That you have the specified hardware, tested and recommended versions
Always refer to your Vizrt Service Level Agreement document.
1.3.2
Submitting a Support Request
When completing a Support Request, add as much information as possible.
This section contains information on the following topics:
• Content of a Support Request
• To submit a Support Request
Content of a Support Request
The report should contain information about these topics:
• Problem description: Include a good description of what the problem is and how
to reproduce it. Remember to use simple English.
• Screen shots and illustrations: Use to simplify the message.
• System log files: Send the .
• System dump files: Send the system dump files from the crash (e.g. Viz Artist
program folder <Viz install directory>).
Note: Check: If the operating system is Windows 7 and up, dump files can be
stored at: <userdir>\AppData\Local\VirtualStore\<Viz install directory> (check
user rights).
• System Config file: Send the system config file (e.g. Viz Artist program folder <Viz
install directory>).
Note: If the operating system is Windows 7 and up, the config file can be
stored at: <userdir>\AppData\Local\VirtualStore\<install_directory> (check
user rights).
• Software configuration: Add exact versions of software (-build) used.
• Hardware configuration: Add exact versions of hardware used.
• System setup: Describe differences in the installation, if any, from the
recommended setup.
Copyright © 2015 Vizrt
Page 11
Viz Ticker User’s Guide
• System Network: Add a description of how the network, bandwidth, routers, and
switches are configured.
Always refer to your Vizrt Service Level Agreement document.
To submit a Support Request
1.
On the www.vizrt.com page, click on Support.
2.
Click on Report a case.
3.
Click on LOG IN to login to the Customer and Partner portal.
4.
At the top of the Case Management page, click on Report a Case.
5.
In the online form complete the required minimum information (shown by a red
asterisk) and click SAVE.
6.
In the saved Support Case that opens, complete the various text boxes and upload
any required documents, files, etc. (see Content of a Support Request).
To track the status of open support tickets, login to the Customer and Partner portal.
Add information or communicate about the cases directly with the support team.
Page 12
Copyright © 2015 Vizrt
Viz Ticker User’s Guide
2 About Viz Ticker
Viz Ticker is an advanced ticker system that makes it possible to build creative and
compelling graphic tickers with total flexibility. The system supports multiple clients
for content insertion and control. Input can be manually entered, or automatically
generated from various feeds; for example news feeds, databases, or the Internet.
With Viz Ticker, multiple graphical elements with various speed can be displayed
simultaneously. The elements can include animated text, images, and so on. The realtime aspect of Viz Ticker takes the elements directly, with no delay, from content
editing to air.
Viz Ticker has features that are not usually included in ticker products. One feature is
that ticker elements can trigger events when entering a scrolling ticker. An event may
for example be the start of an animation, or the display of pre-defined text or graphic
objects positioned anywhere on the screen. Stock price movements can generate up
or down markers, voting results can render 3D charts, and so on. Another feature is
that the system has multi-render support and can be set up to feed several multiple
output channels from one message carousel. Multiple clients can control a shared ticker
message pool, as well as performing on-air control.
This chapter contains information on the following topics:
• System Applications
• Ticker Creation Workflow
• Ticker Plug-ins
• Design Conventions
• System Log Files
2.1
System Applications
Various applications make up the Viz Ticker system:
• Viz Ticker Client - For operating and provide data to defined tickers.
• Ticker Wizard - For importing scenes created in Artist and create tickers.
• Ticker Feed - A service for connecting external feeds to a ticker system.
• Ticker Service - A service component to support scrolling tickers.
2.1.1
Viz Ticker Client
Viz Ticker Client is Vizrt’s Ticker client application. In this system, messages are
created, added to a carousel, and sent to air. The typical user of Viz Ticker Client is a
journalist or operator.
2.1.2
Ticker Wizard
Ticker Wizard is Vizrt’s Ticker configuration application. In this system, carousels are
selected and equipped with templates. Adjustments of the GUI settings in Viz Ticker
Client can also be defined from this system. The typical user of Ticker Wizard is a
graphical artist.
Copyright © 2015 Vizrt
Page 13
Viz Ticker User’s Guide
2.1.3
Ticker Feed
Ticker Feed makes it possible to populate a scrolling or flipping carousel with data
elements from a file that is being updated from an external source. It is optional to
include this component in the Viz Ticker setup.
2.1.4
Ticker Service
Ticker Service is a component responsible for communicating ticker messages to the
Viz Engine renderer. This component is necessary in order to run a scrolling carousel in
Viz Ticker.
2.2
Ticker Creation Workflow
The ticker creation workflow typically starts with the design of a scene in Viz Artist.
The ticker can have almost any given design, except for a few Design Conventions that
must be followed to make the ticker work properly.
The next step in the ticker creation workflow is to scan the scene in Ticker Wizard.
The scanning process verifies the scene structure. After the scanning, the logic for the
ticker can be built. This is done by performing a few quick configuration steps in Ticker
Wizard.
The final step in the ticker creation workflow is to launch Viz Ticker Client. In this client
application, messages can be created and added to the carousel. When the desired
messages have been added, the ticker is ready to go on-air.
2.3
Ticker Plug-ins
In order for a ticker carousel to work properly, the Viz Artist scene that the carousel is
based upon must be designed according to specific conventions. There are also various
Viz Artist plug-ins that must be available in order for a ticker carousel to work properly:
• Scroller: The Scroller plug-in is a geometry plug-in, mostly used for creating
scrolling tickers, which generates a dynamic line of scrolling elements. Information
about the Scroller plug-in can be found in the Viz Artist User’s Guide’s Geometry
Plugins/Ticker section.
• Scroller Action: The Scroller Action plug-in makes it possible to design scrolling
tickers that trigger actions when scroller elements are played out. Information about
the Scroller Action plug-in can be found in the Viz Artist User’s Guide’s Container
Plugins/Ticker section.
• Toggle: The Toggle plug-in is used to toggle between objects in flipping carousel
scenes. Information about the Toggle plug-in can be found in the Viz Artist User’s
Guide’s Container Plugins/Container section.
There are also numerous Control plug-ins that must be available in order to modify the
ticker elements.
Note: The plugins mentioned in this section are required for Viz Ticker to operate
correctly. These plugins are shipped with the Viz Artist installer/distribution, not
with Viz Ticker.
See Also
Page 14
Copyright © 2015 Vizrt
Viz Ticker User’s Guide
• Viz Artist User’s Guide
2.4
Design Conventions
In order for a ticker carousel to work properly, the Viz Artist scene that the carousel is
based upon must be designed according to specific design conventions.
Some design conventions apply for both scrolling and flipping carousels, such as the
requirement to use control plug-ins and in/out-states in scenes. Other conventions
are limited to affect only scrolling carousel scenes, containing the Scroller plug-in, or
flipping carousel scenes, containing the Toggle plug-in.
Information about all these design conventions can be found in the Viz Artist User’s
Guide’s Geometry Plugins/Ticker section. Tutorial examples on how to apply the design
conventions can be found in this manual, see the Creating a Scrolling Carousel and
Creating a Flipping Carousel chapters.
See Also
• Viz Artist User’s Guide
2.5
System Log Files
• Log-files for Viz Ticker Client, Ticker Feed and Ticker Wizard are stored at
%AppData%\Vizrt in the directories “Viz Ticker Client”, “Ticker Feed” and “Ticker
Wizard”.
• Log-files for the service component Ticker Service are stored at %ProgramData
%\Vizrt in the directory “Ticker Service”.
Note: %AppData% and %ProgramData% are Windows environment variables.
Windows Explorer will resolve them into a folder path depending on operation
system, system drive, current user and so on. For example, on Windows 7,
%ProgramData%\Vizrt would resolve to C:\ProgramData\vizrt if Windows is
installed on the C: drive.
Copyright © 2015 Vizrt
Page 15
Viz Ticker User’s Guide
Page 16
Copyright © 2015 Vizrt
Viz Ticker User’s Guide
3 Installing Viz Ticker Client and Ticker Wizard
Viz Ticker comes with several installers that helps to setup the system.
This chapter contains information on the following topics:
• Important Before Installation
• Requirements
• Program Starting Sequence
• Installing Ticker Wizard
• Installing Viz Ticker Client
• System Log Files
Note: The application Ticker Feed are optional and Ticker Service are only
required for scrolling ticker system. Installation instructions for these two
applications/services are in chapters Ticker Feed and Ticker Service.
3.1
Important Before Installation
• If Ticker Wizard or Viz Ticker Client, or both, are already installed on the machine,
you must first remove the old program versions before installing the new ones, see
Installing Ticker Wizard and Installing Viz Ticker Client.
• In addition to Ticker Wizard and Viz Ticker Client, the applications in the section
Requirements must be installed in order for the ticker system to work properly.
3.2
Requirements
The following applications or services must be installed with the version indicated.
Program or Service
Required version
Media Sequencer
Version 2.0 or higher.
Viz Artist/Viz Engine
Version 3.7.1 or higher.
Viz Graphics Hub
Version 2.3.1 or higher.
Viz Graphic Hub REST
Version 1.1.0 or higher.
Microsoft .NET Framework
Version 4.5.2 or higher.
For the .Net framework visit www.microsoft.com and search for .Net. Currently the .Net
Framework 4.5.2 off-line installer can be found at http://www.microsoft.com/en-us/
download/confirmation.aspx?id=42642
Operating system support
Viz Ticker Client 2.6 is a 32-bit application. It can run on both 32-bit and 64-bit versions
of Windows. It has been tested with the software mentioned above on Windows 7,
Windows 8 and Windows Server 2012.
Copyright © 2015 Vizrt
Page 17
Viz Ticker User’s Guide
Operating systems that have reached their end-of-life cycle and are no longer officially
supported by their manufacturers, are not supported for use with Viz Ticker.
Viz Ticker Client 2.6 supports UAC (User Access Control) and does not require
administrator privileges to run, but will in most cases require admin rights to install.
IMPORTANT! Please review the Release Notes for Ticker for any updates to the
recommended version of Ticker and supporting applications or services.
3.3
Program Starting Sequence
After installation, the applications must be started in a specific sequence:
1.
The Media Sequencer must be started before Ticker Wizard and Viz Ticker Client.
Note: A restart/shutdown of the Media Sequencer requires a restart/shutdown of
Ticker Wizard and Viz Ticker Client.
2.
Viz Engine must be started (and put on-air) before Ticker Wizard.
3.
Ticker Service must be running before Ticker System is enabled in Viz Ticker
Client.
Note: Ticker Wizard and Viz Ticker Client can run while starting Ticker Service .
3.4
Installing Ticker Wizard
This section contains information on the following topics:
• To install Ticker Wizard
• To uninstall Ticker Wizard
• Ticker Wizard Startup Parameters
To install Ticker Wizard
Note: If Ticker Wizard is already installed on the machine, first remove the old
program version before installing the new one, see To uninstall Ticker Wizard.
Page 18
1.
Run TickerWizard-<Product Version>.msi.
2.
In the Welcome menu, click the Next button.
Copyright © 2015 Vizrt
Viz Ticker User’s Guide
Welcome menu
3.
In the Custom Setup Panel that appears, make sure that the Location of the
installation folder is specified correctly.
Custom Setup Panel
4.
Optional: To see a list of drives with available disk space, click the Disk Usage
button.
5.
Click the Next button.
6.
In the Ready to Install Panel that appears, click the Install button.
Copyright © 2015 Vizrt
Page 19
Viz Ticker User’s Guide
Ready to Install Panel
7.
In the Completing the Setup Panel that appears, click the Finish button.
Completing the Setup Panel
Ticker Wizard is now installed on the machine at the defined location.
To uninstall Ticker Wizard
1.
Select Start > Control Panel > Programs > Uninstall a program.
The Uninstall or Change a Program Window then opens.
Page 20
Copyright © 2015 Vizrt
Viz Ticker User’s Guide
Uninstall or Change a Program Window
2.
From the list of available programs, select Vizrt Ticker Wizard.
3.
Click the Uninstall button.
4.
If prompted, verify that the uninstallation process should proceed by clicking the
Yes button.
Ticker Wizard is no longer available on the machine.
Note: The software settings are not deleted with the software.
3.4.1
Ticker Wizard Startup Parameters
After installing Ticker Wizard, the Media Sequencer startup parameter can be modified
in the Ticker Wizard Properties .
Copyright © 2015 Vizrt
Page 21
Viz Ticker User’s Guide
Ticker Wizard Properties
To modify the parameter, make sure that the Shortcut tab is selected, and modify the
Target text box.
If Ticker Wizard should connect to a Media Sequencer on a specific machine, type the
machine name as the first parameter after the program path.
Example: “%ProgramFiles%\Vizrt\Ticker Wizard\TickerWizard.exe" localhost
In the example above, Ticker Wizard connects to the Media Sequencer on the localhost
machine.
3.5
Installing Viz Ticker Client
This section contains information on the following topics:
• To install Viz Ticker Client
• To uninstall Viz Ticker Client
• Viz Ticker Client Startup Parameters
To install Viz Ticker Client
Note: If Viz Ticker Client is already installed on the machine, first remove the old
program version before installing the new one, see To uninstall Viz Ticker Client.
Page 22
1.
Run VizTickerClient-<Product Version>.msi.
2.
In the Welcome Panel, click the Next button.
Copyright © 2015 Vizrt
Viz Ticker User’s Guide
Welcome Panel
3.
In the Custom Setup Panel that appears, make sure that the Location of the
installation folder is specified correctly.
Custom Setup Panel
4.
Optional: To see a list of drives with available disk space, click the Disk Usage
button.
5.
Click the Next button.
6.
In the Ready to Install Panel that appears, click the Install button.
Copyright © 2015 Vizrt
Page 23
Viz Ticker User’s Guide
Ready to Install Panel
7.
In the Completing the Setup Panel that appears, click the Finish button.
Completing the Setup Panel
Viz Ticker Client is now installed on the machine at the defined location.
To uninstall Viz Ticker Client
1.
Select Start > Control Panel > Programs > Uninstall a program.
The Uninstall or Change a Program Window then opens.
Page 24
Copyright © 2015 Vizrt
Viz Ticker User’s Guide
Uninstall or Change a Program Window
2.
From the list of available programs, select Vizrt Viz Ticker Client.
3.
Click the Uninstall button.
4.
If prompted, verify that the uninstallation process should proceed by clicking the
Yes button.
Viz Ticker Client is no longer available on the machine.
Note: The software settings are not deleted with the software.
3.5.1
Viz Ticker Client Startup Parameters
After installing Viz Ticker Client, various startup parameters can be modified in the Viz
Ticker Client Properties .
Copyright © 2015 Vizrt
Page 25
Viz Ticker User’s Guide
Viz Ticker Client Properties
To modify the parameters, make sure that the Shortcut tab is selected, and modify the
Target text box.
Viz Ticker Client Startup Parameters
Page 26
Setting
Values
Description
-msehost
hostname
Hostname of the Media
Sequencer for the Viz Ticker
system.
-vizdata
hostname
The Viz Engine host to use for
the object pool browser.
-accessgroup
groupname
Defines the group this
client belongs to. Carousels
can be given restricted
access so that only clients
belonging to one or more
specific groups can access
it. For more information, see
VizBoldAccess Groups Frame .
-config
on|off
Defines whether or not the
Configuration Panel should
be visible in Viz Ticker Client.
Usually this is set to off on
journalist machines, and on
on operator machines.
Copyright © 2015 Vizrt
Viz Ticker User’s Guide
Setting
Values
Description
-control
on|off
Defines whether or not the
Control Panel should be
visible in Viz Ticker Client.
Usually this is set to off on
journalist machines, and on
on operator machines.
-commandqueueport
number
Socket port for external
access to client commands.
Example: ”%ProgramFiles%\Vizrt\Viz Ticker Client\VizTickerClient.exe" -msehost
localhost -vizdata localhost -accessgroup none -config off -control on
3.6
System Log Files
• Log-files for Viz Ticker Client, Ticker Feed and Ticker Wizard are stored at
%AppData%\Vizrt in the directories “Viz Ticker Client”, “Ticker Feed” and “Ticker
Wizard”. Assuming your user running the programs are called “VizUser” then you
normally find config and logfiles in:
C:\Users\VizUser\AppData\Roaming\Vizrt
• Log-files for the service component Ticker Service are stored at %ProgramData
%\Vizrt in the directory “Ticker Service”, nomrally this would be C:\ProgramData
\vizrt\Ticker Service
Copyright © 2015 Vizrt
Page 27
Viz Ticker User’s Guide
Page 28
Copyright © 2015 Vizrt
Viz Ticker User’s Guide
4 Ticker Wizard
Ticker Wizard is Vizrt’s ticker configuration application.
IMPORTANT! Before making changes to the Ticker system configuration in Ticker
Wizard, the Ticker Client should be closed, if open. Ticker Wizard and Ticker Client
should not be used at the same time.
This chapter contains information on the following topics:
• Getting Started
• Main Window
• Main Menu
• Main Panel
• Ticker Carousels Panel
• Output Channels Panel
• GPI Panel
• Settings Panel
• Buttons Panel
• Wizards
4.1
Getting Started
Note: If the Ticker System is currently on, it is highly recommended not to start
Ticker Wizard, as the playout is likely to be disrupted.
To start Ticker Wizard
• Start Ticker Wizard from Start > All Programs > Vizrt > Viz Ticker > Ticker Wizard.
Copyright © 2015 Vizrt
Page 29
Viz Ticker User’s Guide
4.2
Main Window
At system startup, the Main Window appears on the screen.
4.3
Main Menu
At the top of the Main Window is the Main Menu .
Main Menu
The Main Menu contains various tabs that open respective panels.
• Main: Opens the Main Panel .
• Ticker Carousels: Opens the Ticker Carousels Panel .
• Output Channels: Opens the Output Channels Panel .
• GPI: Opens the GPI Panel .
• Settings: Opens the Settings Panel .
• Buttons: Opens the Buttons Panel .
Page 30
Copyright © 2015 Vizrt
Viz Ticker User’s Guide
4.4
Main Panel
The The opens when clicking the VizBoldMain Page tab in the Main Menu opens when
clicking the Main Page tab in the Main Menu
From the Main Panel it is possible to connect the system to a render engine, scan ticker
scenes, and so on.
The Main Panel contains three frames:
• Viz Engine Connection Frame
• Wizards Frame
• Scene Scan Log Frame
4.4.1
Viz Engine Connection Frame
At the top of the Main Panel is the At the top of the Main Panel is the , which contains
various host and scene settings. , which contains various host and scene settings.
• Host: Defines the name of the Viz Engine host Ticker Wizard connects to.
For more information, see To connect Ticker Wizard to a Viz Engine host .
• Connect: Connects Ticker Wizard to the defined Viz Engine host.
For more information, see To connect Ticker Wizard to a Viz Engine host .
• Scene: Defines the name of the currently scanned scene.
• Select Scene: Opens the Choose Scene to Scan Window .
For more information, see To scan a scene .
Copyright © 2015 Vizrt
Page 31
Viz Ticker User’s Guide
• Rescan: Rescans the currently scanned scene and informs Ticker Wizard of changes
that have occurred in the scene design since the last scanning.
This section contains information on the following topics:
• To connect Ticker Wizard to a Viz Engine host
• To check the status of the Viz Engine connection
• To scan a scene
• To rescan a scene
To connect Ticker Wizard to a Viz Engine host
Note: Most Ticker Wizard options are not available until the system is successfully
connected to a Viz Engine host.
1.
Make sure that Viz Engine is running in on air mode.
2.
Type the desired hostname in the Host text box.
Tip: The hostname can be either a text string or an IP address.
3.
Click the Connect button.
To check the status of the Viz Engine connection
• Check the Viz Engine connection status in the upper right corner of the Main
Window .
The status can be one of the following:
Page 32
1.
Connected: Indicates that the ticker system is successfully connected to a
running Viz Engine in on air mode.
2.
Lost Connection: Indicates that Viz Engine has been shut down correctly, and
that the ticker system is no longer connected to the Viz Engine.
3.
Not Connected: Indicates that no attempt has been made to connect the ticker
system to a Viz Engine.
4.
Not On Air: Indicates that the connected Viz Engine is not in on air mode.
5.
Timeout: Indicates that the ticker system is no longer connected to the specified
Viz Engine. The connection has been broken for some unknown reason, without
the Viz Engine being able to communicate the exact problem.
Copyright © 2015 Vizrt
Viz Ticker User’s Guide
6.
Unable To Connect: Indicates that the specified Viz Engine is not running.
7.
Unknown Host: <hostname>: Indicates that the specified Viz Engine host
cannot be found on the network.
To scan a scene
1.
In the Main Panel, make sure that Ticker Wizard is connected to a running Viz
Engine host.
For more information, see To connect Ticker Wizard to a Viz Engine host and To check
the status of the Viz Engine connection .
2.
Make sure that any existing carousels or output channels are deleted.
For more information, see Not Possible to Scan Scene in Ticker Wizard
3.
Click the Select Scene button.
Choose Scene to Scan Window
4.
In the Choose Scene to Scan Window that opens, double-click the thumbnail of the
desired scene.
Tip: In the Choose Scene to Scan Window, scenes can be sorted by name or date,
and presented in regular or reversed order.
Scene Text Box
When a scene has been successfully scanned, the scene name and path will be
presented in the Scene Text Box in the Main Panel .
Copyright © 2015 Vizrt
Page 33
Viz Ticker User’s Guide
To rescan a scene
1.
Make sure that a scene has been scanned
For more information, see To scan a scene .
2.
In the Main Panel, click the Rescan button.
A rescan informs Ticker Wizard of changes that have occurred in the scene design since
the last scanning.
4.4.2
Wizards Frame
In the center of the Main Panel is the Wizards Frame .
Wizards Frame
The Wizards Frame contains two buttons that open wizards for creating scrolling and
flipping carousels.
• Create Scrolling Carousel: Opens the Scrolling Carousel Wizard .
• Create Flipping Carousel: Opens the Flipping Carousel Wizard .
Note: The buttons become available once respective carousel scenes have been
successfully scanned.
4.4.3
Scene Scan Log Frame
At the bottom of the Main Panel is the Scene Scan Log Frame .
Page 34
Copyright © 2015 Vizrt
Viz Ticker User’s Guide
Scene Scan Log Frame
The Scene Scan Log Frame shows an overview of the directors, carousels, and
templates Ticker Wizard identifies when scanning the currently selected scene.
4.5
Ticker Carousels Panel
The Ticker Carousels Panel opens when clicking the Ticker Carousels tab in the Main
Menu .
Ticker Carousels Panel
Copyright © 2015 Vizrt
Page 35
Viz Ticker User’s Guide
This section contains information on the following topics:
• Existing Carousels List
• Carousel Details Frame
4.5.1
Existing Carousels List
On the left side of the Ticker Carousels Panel is the Existing Carousels List .
Existing Carousels List
The Existing Carousels List contains the names of all available carousels. Carousels
become available once they have been created in one of the Wizards .
To view the details for a specific carousel in the Carousel Details Frame , double-click an
item in the list.
4.5.2
Carousel Details Frame
In the center of the Ticker Carousels Panel is the Carousel Details Frame .
Carousel Details Frame
Page 36
Copyright © 2015 Vizrt
Viz Ticker User’s Guide
The Carousel Details Frame shows various information about the carousel that is
currently selected in the Existing Carousels List . The settings in this frame affect how
the carousel behaves in Viz Ticker Client.
• Layer: Reflects the name of the director that holds the stop points in the Viz Artist
scene.
• State: This label is only available for scrolling carousels. The state label reflects the
name of the active in state.
• Carousel Caption: Defines the carousel specific tab name in Viz Ticker Client. The
caption is originally defined when setting up the carousel in one of the carousel
wizards, see Carousel Panel .
For more information, see To change the caption of a carousel .
• Default Template: Defines the template that is used as default when clicking the
New Message button in the Carousel Specific Panel in Viz Ticker Client. For more
information, see To change the default template for a carousel .
• Enable TTL on: Defines an output channel that displays the two Time To Live
frames in Viz Ticker Client’s Elements Editor and makes the TTL column available in
the Carousel Frame .
For more information, see Settings Frame and Carousel List .
Note: It is only possible to enable TTL on one output channel at a time. In order
to enable an output channel, the channel must first be activated in the Output
Channels Frame.
• Enable Set as Next: If enabled, makes the Set as Next feature available in Viz
Ticker Client when right-clicking a message in the Carousel List .
• Spell Check: If enabled makes the Spell Check check box selected by default
when creating a new message in Viz Ticker Client. This feature implies that the
message text will be spell checked.
For more information, see To spell check a message .
• Resume Action: Defines what should happen to the carousel when resuming from
a break.
• Continue: If enabled, the system should continue where it left off when
resuming.
• Restart: If enabled, the system should restart with the first message in the
carousel when resuming from the break.
• Add Messages as: Refers to the message status when messages are added to the
Carousel List in Viz Ticker Client.
• Active: Messages are added as active on all output channels.
• Inactive: Messages are added as inactive on all output channels.
• User Controlled: Adds the Default Output Channel Activation Frame in Viz
Ticker Client, where the default activation status on each available output
channel can be defined. For more information, see To activate messages .
• Add New Messages to: Refers to where messages should be placed after creation
in Viz Ticker Client.
• Pool: Adds new messages to the Pool List .
• Carousel: Adds new messages to the Carousel List .
Copyright © 2015 Vizrt
Page 37
Viz Ticker User’s Guide
Button Groups Available in Carousel Frame
The Button Groups Available in Carousel Frame lists all available button groups.
Button Groups Available in Carousel Frame
The items in this list reflect the items in the Button Groups and Buttons List in the
Buttons Panel .
Button groups that are selected in this list are shown in the Buttons Frame in Viz Ticker
Client’s Carousel Specific Panel .
Access Groups Frame
The Access Groups Frame lists all groups that should have access to this carousel.
Access Groups Frame
Only clients that have defined the right group name in its shortcut properties will have
access to such a restricted carousel.
To set access restrictions to a carousel
1.
In the VizBoldAccess Groups Frame ’s text field, type a descriptive group name, for
example MyAccessGroup, and then press ENTER.
2.
To add another group, click the Add button.
3.
Type the name of the second group in the text field, for example
AnotherAccessGroup.
4.
Change the Viz Ticker Client Startup Parameters , so that the target access group
matches one of the groups defined here.
Example: -accessgroup MyAccessGroup
Output Channels Frame
The Output Channels Frame lists all available output channels.
Output Channels Frame
Page 38
Copyright © 2015 Vizrt
Viz Ticker User’s Guide
Output channels that are selected in this list are available in Viz Ticker Client. For
example, belonging On/Off buttons appear in the Actions Frame , On/Off buttons
can appear in the Buttons Frame (if the belonging button group is selected in the
VizBoldButton Groups Available in Carousel Frame ), and columns are created in the
Carousel Frame .
Templates Frame
At the bottom of the Carousel Details Frame is the Templates Frame .
Templates Frame
The Templates Frame contains a list of all templates that are available for this carousel.
Templates are added when setting up a carousel in one of the carousel Wizards . Each
template is presented with the following information:
• Name: Shows the name of the template.
• Description: Shows the text that is displayed in the Template column in Viz Ticker
Client’s Carousel Frame .
• TTL: Shows the TTL (Time To Live) value. TTL refers to how many times a message
should run before it is taken out of the carousel.
• TTL Action: Shows what should happen to the message when the TTL value is
reached.
• Presentation: Shows the name and path of the presentation file that can be used
to create and manage messages in Viz Ticker Client. To use the default editor, leave
the text field empty.
For more information, see Presentation Files .
• Color: All messages based on this template will be displayed in Viz Ticker Client’s
Carousel List with the selected color.
For a more detailed explanation of these settings, see Scrolling Templates Panel .
Right-clicking a template in the list, opens a menu, which makes it is possible to add
Field Linking and Feed Browsing functionality to the template, so that content can be
fetched from external sources.
The Templates frame also contains two buttons:
• Edit Templates List: Opens the Scrolling Carousel Wizard or Flipping Carousel
Wizard , where it is possible to modify the template settings.
• Reimport Templates: Opens the Reimport Templates Wizard where it is possible to
reimport templates that have changed scene design.
For more information, see To reimport templates .
Copyright © 2015 Vizrt
Page 39
Viz Ticker User’s Guide
To change the caption of a carousel
1.
Double-click a carousel in the Existing Carousels List .
2.
Type a new name in the Carousel Caption text box.
3.
Click the Save button.
For more information, see Carousel Details Frame .
To change the default template for a carousel
1.
Double-click a carousel in the Existing Carousels List .
2.
Select a template from the Default Template drop-down list.
3.
Click the Save button.
For more information, see Carousel Details Frame .
To delete a carousel
4.6
1.
Double-click a carousel in the Existing Carousels List .
2.
Click the Delete button.
Output Channels Panel
The Output Channels Panel opens when clicking the Output Channels tab in the Main
Menu .
Output Channels Panel
Tip: For information about how to create a new output channel, see Output
Channel Wizard and To create an output channel .
This section contains information on the following topics:
• Existing Output Channels List
• Output Channel Details Frame
4.6.1
Existing Output Channels List
On the left side of the Output Channels Panel is the Existing Output Channels List .
Page 40
Copyright © 2015 Vizrt
Viz Ticker User’s Guide
Existing Output Channels List
The Existing Output Channels List contains the names of all available output channels.
Output channels become available once they have been created in the Output Channel
Wizard . To view the details for a specific output channel in the Output Channel Details
Frame , double-click an item in the list.
Note: The Main output channel is automatically generated when setting up a
carousel in one of the carousel Wizards . The Main output channel is by default
based on the Viz Engine localhost.
4.6.2
Output Channel Details Frame
In the center of the Output Channels Panel is the Output Channel Details Frame .
Output Channel Details Frame
The Output Channel Details Frame shows information about the output channel that is
currently selected in the Existing Output Channels List .
• Channel Identifier: Shows the name of the output channel.
• Renderer Hostname: Shows the hostname of the Viz Engine that the ticker
system connects to when using this particular output channel.
• Renderer Port: Shows the port number of the the Viz Engine that the ticker system
connects to when using this particular output channel.
This section contains information on the following topics:
• To change the host of an output channel
• To delete an output channel
To change the host of an output channel
1.
Double-click an output channel in the Existing Output Channels List .
2.
Type the hostname of the new render engine in the Renderer Hostname text
box.
3.
Make sure that the Renderer Port number is correct.
4.
Click the Save button.
Note: It is not possible to modify the channel identifier (name) of an output
channel.
To delete an output channel
Copyright © 2015 Vizrt
Page 41
Viz Ticker User’s Guide
4.7
1.
Double-click an output channel in the Existing Output Channels List .
2.
Click the Delete button.
GPI Panel
The GPI Panel opens when clicking the GPI tab in the Main Menu .
GPI Panel
GPI units register electrical tension (voltage) in one end as high or low, and output
a digital signal (on or off) in the other end. This is used to connect control desks and
similar devices to arbitrary software. Various Vizrt software, including Viz Ticker, can be
controlled by GPI through the Media Sequencer.
This section contains information on the following topics:
• Existing GPI Handlers List
• GPI Settings Frame
• GPI List
4.7.1
Existing GPI Handlers List
On the left side of the GPI Panel is the Existing GPI Handlers List .
Page 42
Copyright © 2015 Vizrt
Viz Ticker User’s Guide
Existing GPI Handlers List
The Existing GPI Handlers List contains the names of all available GPI handlers. To view
the details for a specific GPI handler in the GPI Settings Frame and GPI List , doubleclick an item in the list.
This section contains information on the following topics:
• To create a GPI handler
• To delete a GPI handler
To create a GPI handler
1.
In Ticker Wizard, click the GPI tab in the Main Menu .
2.
Right-click the Existing GPI Handlers List .
3.
In the menu that appears, click Create New GPI Handler.
A new GPI handler will then be created and added to the Existing GPI Handlers List .
To delete a GPI handler
1.
In Ticker Wizard, click the GPI tab in the Main Menu .
2.
Select the handler that should be deleted in the Existing GPI Handlers List .
3.
Right-click the Existing GPI Handlers List .
4.
In the menu that appears, click Delete Selected GPI Handler.
The selected GPI handler will then be deleted and removed from the Existing GPI
Handlers List .
4.7.2
GPI Settings Frame
At the right side of the GPI Panel is the GPI Settings Frame .
GPI Settings Frame
The GPI Settings Frame shows various information about the GPI handler that is
currently selected in the Existing GPI Handlers List .
• Handler Instance: Shows the name of the GPI handler (equal to the name in the
Existing GPI Handlers List ).
• Re-initialize Handler: Re-initializes the GPI handler.
• Description: Shows a description of the GPI handler.
Copyright © 2015 Vizrt
Page 43
Viz Ticker User’s Guide
• Status: Shows the status of the GPI handler.
• Box Type: Defines the type of GPI box that is being configured. The box type can be
set to SRC-8, SRC-8 III, SeaLevel, or SeaLevelMAX.
• Port: Defines the port that the GPI box is connected to. The port can be set to
COM1-COM8, or none.
• Base Entry: This is the node in the Media Sequencer’s data structure where the
systems look for the GPI actions. The base entry is by default set to /sys/gpi.
• Reverse Input Order: If enabled, the signal line that originally triggered GPI action
DL0/DH0 will now trigger GPI action DL7/DH7, the signal line that originally triggered
GPI action DL1/DH1 will now trigger GPI action DL6/DH6, and so on. This option is
only available if the box type is set to SRC-8.
• Use Card: Defines the GPI card that should be used. This option is only available if
the box type is set to SeaLevel.
• IP: Defines the IP address of the Ethernet box. This option is only available if the
box type is set to SeaLevelMAX.
• Unit: Defines the available Ethernet boxes. This option is only available if the box
type is set to SeaLevelMAX.
• Unit: Defines the unit number of the Ethernet box.
• Slave Id: Defines the Slave ID of the Ethernet box.
Advanced GPI Settings
If enabling the Show Advanced check box, the Advanced GPI Settings become
available.
Advanced GPI Settings
• Verbose: If enabled, the Media Sequencer’s GPI handler outputs log information.
This information can be useful for debugging.
• Data Bits: Defines the number of data bits that should be used for each
transmitted and received character. The communicating computer or device must
have the same setting. The number of databits can be set to 4-8.
• Stop Bits: Sets the interval (bps) for when characters should be transmitted. Stop
bits can be set to 1, 1.5, or 2.
• Parity: Changes the type of error checking that is used for the selected port. The
communicating computer or device must have the same setting. The parity can be
set to:
Page 44
Copyright © 2015 Vizrt
Viz Ticker User’s Guide
• Even: A parity bit may be added to make the number of 1s in the data bits even.
This will enable error checking.
• Odd: A parity bit may be added to make the number of 1s in the data bits odd. This
will enable error checking.
• None: No parity bit will be added to the data bits sent from this port. This will
disable error checking.
• Mark: A parity bit set to 0 will be added.
• Space: A parity bit set to 1 will be added.
• Baud Rate: Defines the maximum rate of bits per second (bps) that should
be transmitted through this port. The baud rate can be set to 75-128.000. It is
recommended to use the highest rate that is supported by the computer or device
that is being used.
• Flow Control: Changes how the flow of data is controlled. The flow control can be
set to:
• XonXoff: Standard method of controlling the flow of data between two modems.
This type of flow control is often referred to as software handshaking.
• Hardware: Standard method of controlling the flow of data between a computer
and a serial device. This type of flow control is often referred to as hardware
handshaking.
• None: No control of dataflow.
• Sample Interval (micro-seconds): Defines how often the PCI card should be
checked for updates. The interval is defined in microseconds. This option is only
available if the box type is set to SeaLevel.
• Poll Delay: Defines how often the Ethernet box should be checked for updates. The
interval is defined in microseconds. This option is only available if the box type is set
to SeaLevelMAX.
4.7.3
GPI List
At the bottom of the GPI Panel is the GPI List .
GPI List
The GPI List contains a list of all available GPI handlers and signal lines.
• GPI Handler: Shows the GPI handler that the currently selected GPI line belongs to.
• GPI Line: Shows the name of the GPI line.
• Server Command: Shows a text box in every row, where the action to be
performed on this GPI line can be defined.
Copyright © 2015 Vizrt
Page 45
Viz Ticker User’s Guide
Example: If the server command Program Main is set to be the GPI action of DL0/
DH0, DL0 (low line 0) will set Program to off for the main feed, and DH0 (high line
0) will set Program to on.
• Description: Shows a description of the GPI line action.
4.8
Settings Panel
The Settings Panel opens when clicking the Settings tab in the Main Menu .
Settings Panel
The features in this panel are related to settings in Viz Ticker Client.
Note: Viz Ticker Client must be restarted before the changes in this panel take
effect.
This section contains information on the following topics:
• Show in Main Control Frame
• Enable/Disable Features Frame
4.8.1
Show in Main Control Frame
At the top of the Settings Panel is the Show in Main Control Frame .
Show in Main Control Frame
• Handler Settings: Makes the Handler Settings Frame appear in Viz Ticker Client’s
Control Panel .
• Load/Save Buttons: Makes the Load and Save buttons appear in Viz Ticker
Client’s Data Frame .
• Change User: Makes the Change User button appear in Viz Ticker Client’s Data
Frame .
Page 46
Copyright © 2015 Vizrt
Viz Ticker User’s Guide
Note: If both the Load/Save Buttons and Change User check boxes are
cleared, the Data Frame in Viz Ticker Client’s Control Panel will be unavailable.
4.8.2
Enable/Disable Features Frame
At the bottom of the Settings Panel is the Enable/Disable Features Frame .
Enable/Disable Features Frame
• Live Indicator: Enables the Live Indicator functionality, which makes it possible to
see in Viz Ticker Client’s status bar if the carousel is live on-air or not.
To enable the Live Indicator
1.
In Ticker Wizard, click the Settings tab in the Main Menu .
2.
In the Enable/Disable Features Frame , select the Live Indicator check box.
3.
Click the Save button.
The Live Indicator in Viz Ticker Client should then become available from the status bar
(lower left corner of window).
Live Indicator in Viz Ticker Client
To be able to control (enable/disable) the Live Indicator from Viz Ticker Client, buttons
must be created. To create a button group, perform the following steps:
4.
Click the Buttons tab in the Main Menu to open the Buttons Panel .
5.
Click the New Button Group button to create a new button group.
6.
In the Button Groups and Buttons List , select the new button group.
7.
In the Button Group text box that appears in the Button Group/Button Details
Frame , type a descriptive name, for example Live Indicator.
8.
Click the Save Changes button.
To create a button that makes it possible to enable the Live Indicator from Viz Ticker
Client, perform the following steps:
9.
Click the New Button button to create a new button in the Live Indicator button
group.
10. In the Button Groups and Buttons List , select the new button.
11. In the Button Caption text box that appears in the Button Group/Button Details
Frame , type a descriptive name, for example On.
12. Drag the Live Indicator on action from the System Actions list to the Actions in
Button list.
Note: The Live Indicator on action is only available if the Live Indicator check
box is enabled in the Settings Panel .
Copyright © 2015 Vizrt
Page 47
Viz Ticker User’s Guide
1.
Click the Save Changes button.
To create a button that makes it possible to disable the Live Indicator from Viz Ticker
Client, perform the following steps:
1.
Select the Live Indicator button group in the Button Groups and Buttons List .
2.
Click the New Button button to create a new button in the Live Indicator button
group.
3.
In the Button Groups and Buttons List , select the new button.
4.
In the Button Caption text box that appears in the Button Group/Button Details
Frame , type a descriptive name, for example Off.
5.
Drag the Live Indicator off action from the System Actions list to the Actions in
Button list.
Note: The Live Indicator off action is only available if the Live Indicator check
box is enabled in the Settings Panel .
1.
Click the Save Changes button.
To make sure that the configuration is successful, perform the following steps:
1.
Start Viz Ticker Client.
2.
Click the CONTROL tab in the Main Menu to open the Control Panel .
3.
In the Actions Frame , click the Live Indicator on/off buttons to enable/disable the
feature.
The message in the status bar should change according to the Live Indicator status.
Tip: For information about how to make the Live Indicator buttons available in the
Carousel Specific Panel s in Viz Ticker Client, see VizBoldButton Groups Available
in Carousel Frame .
4.9
Buttons Panel
The Buttons Panel opens when clicking the Buttons tab in the Main Menu .
Page 48
Copyright © 2015 Vizrt
Viz Ticker User’s Guide
Buttons Panel
In the Buttons Panel it is possible to manage button groups. Button groups are
available in the Actions Frame in Viz Ticker Client’s Control Panel . It is also possible to
add button groups to the carousel specific panels, see VizBoldButton Groups Available
in Carousel Frame .
This section contains information on the following topics:
• Button Groups and Buttons List
• Button Group/Button Details Frame
4.9.1
Button Groups and Buttons List
At the left side of the Buttons Panel is the Button Groups and Buttons List .
Button Groups and Buttons List
The Button Groups and Buttons List contains the names of all available button groups
with belonging buttons. For each output channel, there are button groups called Ticker
System and Program. For each carousel, there is also one button group per output
channel.
Copyright © 2015 Vizrt
Page 49
Viz Ticker User’s Guide
To view the details of a button/button group, select an item from the list. Detailed
information will the appear in the Button Group/Button Details Frame .
To move a button/button group up or down in the list, click the arrow buttons positioned
at the right side of the list.
4.9.2
Button Group/Button Details Frame
In the center of the Buttons panel is the Button Group/Button Details Frame .
Button Group/Button Details Frame
If a button group is selected in the Button Groups and Buttons List , the Button Group
text box is the only option that is displayed in this frame. If a button is selected in the
Button Groups and Buttons List , the following four options are available:
• Button Group: Defines the name of the button group. This option can only be
modified if a button group is selected in the Button Groups and Buttons List .
• Button Caption: Defines the caption that appears on the button in Viz Ticker
Client.
• Actions in Button: Lists all actions that have been applied to the selected button.
• System Actions: Lists available actions that can be applied to the selected button.
• Add Selected Action Button: Adds the action that is selected in the System
Actions list to the selected button.
• Remove Action Button: Removes the action that is selected in the Actions in
Button list from the selected button.
This section contains information on the following topics:
• To create a button group
• To create a button
Page 50
Copyright © 2015 Vizrt
Viz Ticker User’s Guide
• To delete a button group
• To delete a button
To create a button group
1.
In Ticker Wizard, click the Buttons tab in the Main Menu .
2.
In the Buttons Panel that appears, click the New Button Group button.
A new button group will then be created at the bottom of the Button Groups and
Buttons List .
3.
In the Button Groups and Buttons List , click the new button group.
4.
In the Button Group/Button Details Frame , type a descriptive name in the Button
Group text box.
5.
Click the Save Changes button.
To create a button
1.
In Ticker Wizard, click the Buttons tab in the Main Menu .
2.
In the Buttons Panel that appears, click the New Button button.
A new button will then be added to the button group that is currently selected in the
Button Groups and Buttons List .
3.
In the Button Groups and Buttons List , click the new button.
4.
In the Button Group/Button Details Frame , type a descriptive name in the Button
Caption text box.
5.
Select one or more actions in the System Actions list.
6.
Click the Add Selected Action button.
7.
Click the Save Changes button.
To delete a button group
1.
In Ticker Wizard, click the Buttons tab in the Main Menu .
2.
In the Buttons Panel that appears, click a button group in the Button Groups and
Buttons List .
3.
Click the Delete Selected button.
Note: All buttons in the selected button group will be deleted too.
To delete a button
4.10
1.
In Ticker Wizard, click the Buttons tab in the Main Menu .
2.
In the Buttons Panel that appears, click a button in the Button Groups and Buttons
List .
3.
Click the Delete Selected button.
Wizards
Various wizards are available in Ticker Wizard.
Copyright © 2015 Vizrt
Page 51
Viz Ticker User’s Guide
This section contains information on the following topics:
• Scrolling Carousel Wizard
• Flipping Carousel Wizard
• Reimport Templates Wizard
• Output Channel Wizard
4.10.1
Scrolling Carousel Wizard
Scrolling carousel scenes are characterized by containing one or more Scroller plug-ins
with belonging directors and stop points. The elements in a scrolling ticker enter the
screen from one side, scroll through the screen, and exit on the other side.
To open the To open the , click the VizBoldCreate Scrolling Carousel button in the Main
Panel. , click the Create Scrolling Carousel button in the Main Panel .
This section contains information on the following topics:
• Carousel Panel
• To add a carousel
• Scrolling Templates Panel
• To add templates to a scrolling carousel
• To select the presentation file for a template
• To select the background color for a template
• Confirm Panel
• To verify the carousel setup information
Carousel Panel
The Carousel Panel opens at wizard startup.
Page 52
Copyright © 2015 Vizrt
Viz Ticker User’s Guide
Carousel Panel
The Carousel Panel contains the following options:
• Carousel Caption: Defines the carousel specific tab name in Viz Ticker Client. By
default, the carousel caption is equal to the carousel name.
For more information, see To change the caption of a carousel .
• Available Carousels: Shows a list of all available carousels. Carousels become
available once a scene has been scanned.
For more information, see To scan a scene .
• Existing Carousels: Shows a list of all carousels that have already been created.
To add a carousel
• In the Carousel Panel , double-click a carousel in the Available Carousels list.
The wizard will then proceed to the Scrolling Templates Panel or Flipping Templates
Panel .
Scrolling Templates Panel
The Scrolling Templates Panel contains a list of all available templates.
Copyright © 2015 Vizrt
Page 53
Viz Ticker User’s Guide
Scrolling Templates Panel
The settings that are defined in this panel affect messages that are created in Viz
Ticker Client. To edit the settings of a specific template, click the various columns. Each
template is presented with the following information:
• Select: Select one or more templates. The templates that are selected here will be
available when creating messages in Viz Ticker Client.
Note: The same template can be available for various carousels.
• Name: Shows the name of the template. The name is used for example when
changing the default template for a carousel, see To change the default template
for a carousel . The template name is defined in the Viz Artist scene settings, and
cannot be changed in Ticker Wizard. The name reflects the template root container
(direct subcontainer of ticker_templates).
• Description: Shows the text that is displayed in the Template column in Viz Ticker
Client’s Carousel Frame . By default, the description is taken from the ControlObject
description field specified during scene design.
Note: Non-ASCII characters must not be used in the description. Also, the system
will reset descriptions of templates that are reimported.
• TTL: Defines the TTL (Time To Live) value. TTL refers to how many times the
message should run before it is taken out of the carousel. By default, the TTL is set
to infinite (column is cleared).
• TTL Action: Defines what should happen to the message when the TTL value is
reached.
• Pool: Moves the message from the Carousel List to the Pool List .
• Remove: Deletes the message.
• Inactive: The message status is set to inactive, and the message remains in the
Carousel List .
Page 54
Copyright © 2015 Vizrt
Viz Ticker User’s Guide
Note: If the Show Time to Live check box has been selected in Ticker Wizard’s
Ticker Carousels Panel , the TTL and TTL Action options can be modified in Viz
Ticker Client’s Settings Frame when creating or modifying a message.
• Presentation: Presentation Files can be used instead of the default editor when
messages are created or edited in Viz Ticker Client.
For more information, see To select the presentation file for a template .
• Color: All messages based on this template will be displayed in Viz Ticker Client’s
Carousel List with the selected color.
For more information, see To select the background color for a template .
To add templates to a scrolling carousel
1.
In the Scrolling Templates Panel , select one or more templates from the
Available Templates list.
2.
Click the Next button.
The wizard will then proceed to the Confirm Panel .
Tip: See also To add templates to a flipping carousel .
To select the presentation file for a template
1.
In the Scrolling Templates Panel , click to enable the Presentation file column.
2.
Click the ... button that appears.
3.
In the Select Presentation File dialog box that opens, browse to locate a
presentation file (.vtw or .vtwc).
Tip: Presentation files are placed at the following location: %ProgramFiles%\Vizrt
\Viz Ticker Client\presentations\<MyPresentationFile>.vtwc.
4.
Click the Open button.
Presentation Files can be used instead of the default editor when messages are created
or edited in Viz Ticker Client. Presentation Files are created in Viz Template Wizard. To
select a presentation file, perform the following steps:
For more information, see To prepare a scrolling carousel for presentation file creation
and To create a presentation file in Viz Template Wizard .
To select the background color for a template
1.
In the Scrolling Templates Panel , click to enable the Color column.
2.
Enter the HTML color hex code in the text field that appears (for example
#00FFFF), or
3.
Click the ... button that appears.
Copyright © 2015 Vizrt
Page 55
Viz Ticker User’s Guide
Color Dialog Box
4.
In the Color Dialog Box that opens, select a color.
5.
Click the OK button.
Tip: The text color in Viz Ticker Client will automatically be adjusted to have a
good contrast to the selected background color.
Confirm Panel
The Confirm Panel contains a summary of the carousel setup information.
Confirm Panel
To verify the carousel setup information
1.
In the Confirm Panel , make sure that the setup information is correct.
2.
Click the Finish button.
This will exit the wizard and create the new carousel.
Page 56
Copyright © 2015 Vizrt
Viz Ticker User’s Guide
4.10.2
Flipping Carousel Wizard
Flipping carousel scenes are characterized by containing one or more Toggle plug-ins
with belonging directors and stop points. The elements in a flipping ticker are flipped in
a static position.
To open the Flipping Carousel Wizard , click the Create Flipping Carousel button in
Ticker Wizard’s Main Panel .
The Flipping Carousel Wizard is similar to the Scrolling Carousel Wizard. The Carousel
Panel and Confirm Panel are identical in the two wizards, while the settings in the
Scrolling Templates Panel and Flipping Templates Panel are slightly different.
Flipping Templates Panel
The Flipping Templates Panel shows the paths and names of all available carousel and
template scenes.
Flipping Templates Panel
The settings that are defined in this panel affect the messages that are created in Viz
Ticker Client. Each template is presented with information such as name, description,
TTL, TTL action, duration, presentation file, and color. For detailed information about
these settings, see Scrolling Templates Panel .
Note: The Duration column is only available for flipping templates. Duration refers
to how many seconds the message should be on-air, before flipping to the next
message in the carousel.
To edit the settings of a specific template, click the various columns in the list.
To add templates to a flipping carousel
1.
In the Flipping Templates Panel , select a folder from the tree.
2.
Double-click a thumbnail.
This will add the selected template to the list at the bottom of the window.
Copyright © 2015 Vizrt
Page 57
Viz Ticker User’s Guide
Tip: The scenes can be sorted by name or date, and presented in forward or
reversed order.
3.
Repeat step 2 until all desired templates are added to the carousel.
Tip: To delete templates from the list, select one or more templates, and then
click the Remove button.
4.
Click the Next button.
The wizard will then proceed to the Confirm Panel .
Tip: See also To add templates to a scrolling carousel .
4.10.3
Reimport Templates Wizard
The Reimport Templates Wizard allows reimporting existing templates that have
changed scene design since the original import. Templates that have changed control
plug-ins, animations, container structure, or other settings must be reimported before
the changes take effect.
Reimport Templates Wizard
To reimport templates
1.
To open the Reimport Templates Wizard , click the Reimport Templates button in
the Ticker Carousels Panel .
2.
In the Reimport Templates Wizard ’s Reimport Templates panel, select one or
more templates that should be reimported in the Candidates for Reimport list.
Tip: Clicking the Select None button will clear all selections in the list, and
clicking the Select All button will select all templates in the list.
Page 58
Copyright © 2015 Vizrt
Viz Ticker User’s Guide
3.
Click the Next button.
The wizard will then proceed to the Confirm panel.
4.
In the Confirm panel, make sure that the reimport information is correct.
5.
Click the Finish button.
This will exit the wizard and reimport the selected templates.
Note: The selected templates will first be deleted from the Media Sequencer, and
then reimported as new templates.
4.10.4
Output Channel Wizard
The Output Channel Wizard allows creating new output channels.
Output Channel Wizard
The Main output channel is created by default when a carousel is set up in one of the
carousel Wizards . Other output channels must be created from this Output Channel
Wizard .
To create an output channel
1.
In the Output Channels Panel , click the New button.
2.
In the Output Channel Wizard that opens, type a descriptive name in the Output
Channel Name text box.
3.
Type the hostname of the render engine in the Renderer Hostname text box.
4.
Type the port number of the the render engine in the Renderer Port text box.
5.
Click the Next button.
6.
In the Confirm Carousel panel that appears, make sure that the output channel
settings are correct, and then click the Finish button.
This will exit the Output Channel Wizard and create a new global output channel.
Copyright © 2015 Vizrt
Page 59
Viz Ticker User’s Guide
Page 60
Copyright © 2015 Vizrt
Viz Ticker User’s Guide
5 Viz Ticker Client
Viz Ticker Client is Vizrt’s ticker client application. This section provides information on
how to operate Viz Ticker Client.
Note: If settings that affect Viz Ticker Client are modified in Ticker Wizard,
Viz Ticker Client must be restarted in order for the changes to take effect. It is
recommended to quit Ticker Client before starting Ticker Wizard.
This chapter contains information on the following topics:
• Getting Started
• Main Menu
• Configuration Panel
• Control Panel
• Carousel Specific Panel
5.1
Getting Started
This section contains information on:
• To start Viz Ticker Client
• Logging In
To start Viz Ticker Client
• Start Viz Ticker Client from Start > All Programs > Vizrt > Viz Ticker > Viz Ticker
Client.
5.1.1
Logging In
At system startup, the Login Window appears.
Login Window
The login is used for example to define the owner of messages, see Settings Frame .
• Username: Defines the name of the current user.
• Auto Login: If enabled, the system automatically logs in with the current user
details.
This section also contains information on the following topics:
Copyright © 2015 Vizrt
Page 61
Viz Ticker User’s Guide
• To log in to Viz Ticker Client
• To enable/disable the auto login
• To change the user
To log in to Viz Ticker Client
1.
Start Viz Ticker Client.
Note: Make sure that the auto login function is disabled, see To enable/disable the
auto login.
2.
Type a username in the text field.
3.
Click the Ok button.
To enable/disable the auto login
1.
In Viz Ticker Client’s Control Panel , click the Change User button.
Note: This button is only available if the Change User check box has been
enabled in Ticker Wizard’s Settings Panel .
2.
In the Login Window that opens, select/clear the Auto Login check box.
3.
Click the OK button.
If the Auto Login check box is enabled, Viz Ticker Client will automatically log in to the
system with the current user details. This setting should typically be used on singleuser computers.
If the Auto Login check box is disabled, the Login Window will appear at system
startup, and a username must be entered before being able to log in. This setting
should typically be used on multi-user computers.
To change the user
1.
In Viz Ticker Client’s Control Panel , click the Change User button.
Note: This button is only available if the Change User check box has been
enabled in Ticker Wizard’s Settings Panel .
2.
In the Login Window that opens, type a username in the text box.
Note: The username can be any name defined by the user.
3.
5.2
Click the OK button.
Main Menu
At system startup, the Main Window appears on the screen.
At the top of the Main Window is the Main Menu .
Page 62
Copyright © 2015 Vizrt
Viz Ticker User’s Guide
Main Menu
The Main Menu contains various tabs, which open respective panels.
• Config: Opens the Configuration Panel .
• Control: Opens the Control Panel .
The Main Menu also contains one or more carousel specific tabs. For each available
carousel, there is one tab and one carousel specific panel.
• <Carousel Specific>: Opens the Carousel Specific Panel .
5.3
Configuration Panel
The Configuration Panel opens when clicking the Config tab in the Main Menu .
Configuration Panel
Note: The Configuration Panel is only available if the Viz Ticker Client Startup
Parameters have been set to -config on.
The Configuration Panel shows a list of all existing keyboard shortcuts. From this panel
it is possible to add user defined keyboard shortcuts. It is also possible to import a
keyboard shortcut file, or to export such a file.
Note: Changing the keyboard shortcuts affects all Viz Ticker systems connected
to the same Media Sequencer.
• Import and Export: These functions are used to import and export shortcut
settings to and from an XML-file for backup and reuse of typical configurations.
Note: The keyboard file has a .kbd file extension.
Copyright © 2015 Vizrt
Page 63
Viz Ticker User’s Guide
• Add Macro: This function is used to write a macro command, and link it to a
shortcut key.
• Add Script: This function is used to write a Visual Basic script, and link it to a
shortcut key.
If a key combination is already in use, you are given the option of overriding the
existing command. This will leave the other command without an assigned shortcut.
• Remove: This function makes it possible to remove macros and scripts that are
custom made. Note that no warning is issued when performing this operation.
IMPORTANT! Avoid using SHIFT as part of a command, as this will disable the
possibility to use the assigned key when writing characters (for example in upper
case).
5.4
Control Panel
The Control Panel opens when clicking the Control tab in Viz Ticker Client’s Main Menu
.
Control Panel
Note: The Control Panel is visible per default, but can be hidden if the Viz Ticker
Client Startup Parameters has been set to -control off.
This section contains information on the following topics:
• Actions Frame
• Handler Settings Frame
• Data Frame
Page 64
Copyright © 2015 Vizrt
Viz Ticker User’s Guide
5.4.1
Actions Frame
At the left side of the Control Panel is the Actions Frame .
Actions Frame
The button groups and buttons in the Actions Frame reflects the list in Ticker Wizard’s
Buttons Panel . The button groups and buttons are created and modified in the Buttons
Panel .
Note: If the Control Panel is hidden, the on and off states of carousels must be
controlled from the Carousel Specific Panel . For information on how to show/hide
the Control Panel , see Viz Ticker Client Startup Parameters . For information on
how to add buttons to the Carousel Specific Panel , see VizBoldButton Groups
Available in Carousel Frame .
For every existing output channel, Ticker System On/Off and Program On/Off buttons
will appear in the Actions Frame .
• Ticker System On: Starts the ticker system, so that commands can be processed
and carousels sent on-air.
Note: The commands are not actually processed and carousels are not actually
sent on-air until Program On is activated.
• Ticker System Off: Takes the ticker system off, making sure that commands can
no longer be processed and carousels sent on-air. When the ticker system is in its
off state, nothing happens if the Program On/Off or the On/Off buttons belonging
to a carousel are selected. When the Ticker System Off button is selected, the
belonging Program Off button is also selected.
The Program On/Off functionality is meant for short breaks, for example commercial
breaks.
• Program On: Sends the carousels that are in its in state on-air. The Program On
button can only be selected if the belonging Ticker System On button is selected.
• Program Off: Takes all carousels off air. The Program Off button pauses the
carousel, so that the next message being played when the carousel resumes, is the
next active message in the carousel. During the break (Program Off) it is possible
to apply new states to the carousels. The changes will not be executed until the
system resumes from the break (Program On).
On/Off buttons belonging to each available carousel on each available output channel
are also available in the Actions Frame . All carousels can then be controlled directly
from the Actions Frame , and more importantly, the carousels can be controlled
externally with GPI.
• <Carousel Specific> On: Takes the specific carousel on-air.
Copyright © 2015 Vizrt
Page 65
Viz Ticker User’s Guide
Note: The carousel will only go on-air if the Ticker System On and Program On
buttons are selected.
• <Carousel Specific> Off: Takes the specific carousel off air.
Tip: Button groups can also be added to the Buttons Frame in the Carousel
Specific Panel . To do this, enable the belonging button group in Ticker Wizard’s
VizBoldButton Groups Available in Carousel Frame .
5.4.2
Handler Settings Frame
In the upper right part of the Control Panel is the Handler Settings Frame .
Handler Settings Frame
Note: The Handler Settings Frame is only available if the Handler Settings
check box is selected in Ticker Wizard’s Settings Panel .
A handler is a component that the ticker system uses to communicate with a certain
Viz Engine. A handler has the ability to disable itself if an error occurs. Separate
handlers are created for each output channel and scrolling carousel.
This section contains information on the following topics:
• Handler List
• VizBoldTo enable a handler
• VizBoldTo disable a handler
• VizBoldTo enable all handlers
• VizBoldTo disable all handlers
Handler List
The Handler List provides information about the handlers.
• Name: Shows the name of the handler.
Example: viz_<output channel>
Page 66
Copyright © 2015 Vizrt
Viz Ticker User’s Guide
• Mode: Shows the mode of the handler. The mode can be either enabled (green) or
disabled (red).
• Status: Shows the status of the handler.
An example of a status error message can be seen in the Troubleshooting section.
To enable a handler
• From the Handler List , click the respective Set Enabled button.
To disable a handler
• From the Handler List , click the respective Set Disabled button.
To enable all handlers
• From the Handler List , click the Enable all button in the Handler Settings Frame .
To disable all handlers
• From the Handler List , click the Disable all button in the Handler Settings Frame .
5.4.3
Data Frame
In the lower right part of the Control Panel is the Data Frame .
Data Frame
Note: The Data Frame is only available if the Load/Save Buttons or Change
User check boxes are selected in Ticker Wizard’s Settings Panel .
• Load: Opens a dialog box where previously saved carousels can be browsed and
loaded.
For more information, see To load previously saved carousels .
• Save: Opens a dialog box where the current carousels can be saved as an XML file.
• Change User: Opens the Login Window .
For more information, see Logging In .
To load previously saved carousels
1.
In Viz Ticker Client’s Data Frame , click the Load button.
Caution: Loading a previously saved carousel will replace all current messages.
2.
In the Open dialog box that opens, browse to find a previously saved XML file.
3.
Click the Open button.
4.
Click one or more Ticker System Off buttons in the Actions Frame .
Copyright © 2015 Vizrt
Page 67
Viz Ticker User’s Guide
Note: There are separate buttons for each available output channel.
5.
Restart Viz Ticker Client.
The messages in the imported carousel will then replace the messages in the current
carousel.
5.5
Carousel Specific Panel
The Carousel Specific Panel opens when clicking the <Carousel Specific> tab in Viz
Ticker Client’s Main Menu .
The tab name is defined in Ticker Wizard, either when setting up the carousel in one of
the carousel Wizards , see Carousel Panel , or when specifying the carousel details in
the Ticker Carousels Panel .
Carousel Specific Panel
One or more carousel specific tabs in the Main Menu open corresponding carousel
specific panels.
This section contains information on the following topics:
• Pool Frame
• Carousel Frame
• Buttons Frame
• Elements Editor
• Groups and Sections
Page 68
Copyright © 2015 Vizrt
Viz Ticker User’s Guide
5.5.1
Pool Frame
In the upper left part of the Carousel Specific Panel is the Pool Frame .
Pool Frame
The Pool Frame contains buttons for creating new messages, groups, and sections, and
also the Pool Search Area and Pool List .
• New Message: Makes it possible to create a new message in the Elements Editor ,
based on the default template.
Tip: The default template is defined in Ticker Wizard’s Ticker Carousels Panel . For
more information, see To change the default template for a carousel .
• New Template Element: Opens the Select Template dialog box, where any
available template can be selected. The message that opens in the Elements Editor
will be based on this template.
Tip: Templates are added in Ticker Wizard when setting up the carousel in one of
the carousel Wizards , see Scrolling Templates Panel or Flipping Templates Panel .
• New Group - Makes it possible to create a new group in the Elements Editor .
Groups help to organize the messages in a carousel. For more information, see To
create a group and Groups.
• New Section: Makes it possible to create a new section in the Elements Editor .
Sections are advanced groups, that help organize the messages in a carousel. For
more information, see To create a section and Sections.
This section of the document also contains information on the following topics:
• Showing/Hiding the Pool Frame
• Pool Search Area
Copyright © 2015 Vizrt
Page 69
Viz Ticker User’s Guide
• To search for Pool items
• Pool List
• Pool List Menu
• Pool List Message Menu
• To change the font of Pool items
Showing/Hiding the Pool Frame
At the right border of the Pool Frame is the thin vertically oblong Show/Hide Pool Frame
Button .
Show/Hide Pool Frame Button
To hide the Pool Frame , click the Show/Hide Pool Frame Button . Once the Pool Frame
is hidden, the Carousel Frame expands, the button moves to the left border of the
window, and the little arrow points to the right.
To show the Pool Frame , click the button again.
Pool Search Area
The Pool Search Area includes the Search box.
Pool Search Area
It is possible to search for all item types in the Pool List; messages, groups, and
sections. For more information, see To search for Pool items.
To search for Pool items
1.
In the Pool Search Area Search box, type one or more letters that correspond with
the item description.
2.
To view the next item in the list that matches the search criteria, press ENTER.
Pool List
The Pool List contains messages that are not yet ready to be sent on-air.
Tip: Inactive messages in the Carousel List basically have the same function.
Page 70
Copyright © 2015 Vizrt
Viz Ticker User’s Guide
Pool List
When new messages are created (saved), they are added either to the Pool List or
Carousel List , depending on which of the Add New Messages option buttons that has
been selected in Ticker Wizard’s Ticker Carousels Panel . If the Pool option button has
been selected, new messages are added to the Pool List , and if the Carousel option
button has been selected, new messages are added to the Carousel List .
Tip: Messages can be dragged from one list to the other.
Pool List Menu
Messages can be presented in the Pool List with various information. Right-clicking the
caption of the Pool List opens the Pool List Menu .
Selecting an option above the command separator in the Pool List Menu makes the
belonging column appear in the list.
• Description: Shows the actual message text.
• Template: Shows the name of the template the message is based on.
The options below the command separator refer to the layout of the list.
• Store as Default: Defines the currently selected columns as default.
• Use Default: Activates the columns in the Pool List based on the default settings.
• Auto Fit Columns: Automatically adjusts the width of the columns.
Pool List Message Menu
Right-clicking a message in the Pool List opens the Pool List Message Menu .
• Cut: Cuts the currently selected messages.
• Copy: Copies the currently selected messages.
• Paste: Pastes the currently cut messages.
• Delete: Deletes the currently selected messages.
• Show Section Headers: Enables headers for the sections in the Pool List.
• Expand All: Expands all groups and sections in the Pool List.
• Collapse All: Collapses all groups and sections in the Pool List.
• Pool Font: Opens the Font Dialog Box, which makes it possible to select a new font
for all messages in the Pool List. For more information, see To change the font of
Pool items .
Tip: See also Keyboard Shortcuts in Viz Ticker Client’s Pool Frame .
To change the font of Pool items
1.
Right-click the Pool List .
2.
In the menu that appears, click Pool Font.
Copyright © 2015 Vizrt
Page 71
Viz Ticker User’s Guide
3.
In the Font Dialog Box that opens, select a font from the Font list.
Font Dialog Box
4.
Select a font style in the Font style list.
5.
Select a font size in the Size list.
6.
Click the OK button.
Note: The font settings only apply to the layout in Viz Ticker Client, not the actual
messages that are sent on-air.
5.5.2
Carousel Frame
In the upper right part of the Carousel Specific Panel is the Carousel Frame .
Carousel Frame
The Carousel Frame contains the Carousel Search Area and Carousel List .
This section contains information on the following topics:
• Carousel Search Area
• To search carousel items
• Carousel List
• Carousel List Menu
• Carousel List Message Menu
• Default Output Channel Activation Frame
Page 72
Copyright © 2015 Vizrt
Viz Ticker User’s Guide
• To activate messages
Carousel Search Area
The Carousel Search Area includes the Search box.
Carousel Search Area
It is possible to search for all item types in the Carousel List; messages, groups, and
sections. For more information, see To search carousel items.
To search carousel items
1.
In theCarousel Search Area Search box, type one or more letters that correspond
with the item description.
2.
To view the next item in the list that match the search criteria, press ENTER.
Carousel List
The Carousel List contains groups, sections, and messages that should be taken on-air.
Carousel List Menu
Messages can be presented in the Carousel List with various information. Right-clicking
the caption of the Carousel List opens the Carousel List Menu .
Carousel List Menu
Selecting an option above the command separator in this list, makes the belonging
column appear in the list.
• Description: Shows the actual message text.
• End: Shows the message end date and time.
Note: The End information is only available if the Date/Time settings have been
defined in the Elements Editor .
• <Output Channel>: One column is available for each output channel. Selecting
the check box in one of these columns activates the message. The current message
in the carousel is emphasized by a red arrow positioned at the left side of the active/
inactive check box. The number of times the message has run in the carousel, is
displayed at the right side of the check box.
• Start: Shows the message start date and time.
Copyright © 2015 Vizrt
Page 73
Viz Ticker User’s Guide
Note: The Start information is only available if the Date/Time settings have been
defined in the Elements Editor .
• Template: Shows the description of the template the message is based on. This
description is defined when setting up a carousel in one of the carousel Wizards in
Ticker Wizard, see Scrolling Templates Panel .
• Duration: Shows how many seconds the message should be on-air, before flipping
to the next message in the carousel.
Note: The Duration column is only available for flipping carousels.
• TTL: Shows how many times the message should run before it is taken out of the
carousel. When the number of runs reaches the Time To Live (TTL)-limit, the TTL
Action will be performed.
Note: The TTL option is only available if the Show Time to Live check box has
been selected in Ticker Wizard’s Ticker Carousels Panel .
The options below the command separator refer to the layout of the list.
• Store as Default: Defines the currently selected columns as default.
• Use Default: Shows the columns in the Carousel List based on the default settings.
• Auto Fit Columns: Automatically adjusts the width of the columns.
Carousel List Message Menu
Right-clicking a message in the Carousel List opens the Carousel List Message Menu .
• Set as Next on: Carousels can have multiple output channels:
• <output channel>: For this particular output channel, changes the playout
order so that the selected message is next to play.
• All Enabled Channels: On all enabled output channels, sets the currently
selected message to the next item in the carousel when resuming from a pause.
Note: The All Enabled Channels option is only available for carousels with multiple
output channels.
• Enable on: Carousels can have multiple output channels:
• All Channels: Activates the currently selected message on all output channels.
• <output channel>: Activates the currently selected message on this particular
output channel.
• Disable on: Carousels can have multiple output channels:
• All Channels: Deactivates the currently selected message on all output
channels.
• <output channel>: Deactivates the currently selected message on this
particular output channel.
• Cut: Cuts the currently selected messages.
• Copy: Copies the currently selected messages.
• Paste: Pastes the currently cut messages.
Page 74
Copyright © 2015 Vizrt
Viz Ticker User’s Guide
• Delete: Moves the currently selected messages to the Pool List .
• Show Section Headers: Enables headers for the sections in the Carousel List.
• Wrap Long Lines: If enabled, the whole message descriptions will be presented,
on multiple lines if necessary.
• Expand All: Expands all groups and sections in the Carousel List.
• Collapse All: Collapses all groups and sections in the Carousel List.
• Carousel Font: Opens the Font Dialog Box, which makes it possible to select a new
font for all messages in the Carousel List.
For more information, see To change the font of all carousel items .
Tip: See also Keyboard Shortcuts in Viz Ticker Client’s Carousel Frame .
To change the font of all carousel items
1.
Right-click the Carousel List .
2.
In the menu that appears, click Carousel Font.
3.
In the Font Dialog Box that opens, select a font from the Font list.
Font Dialog Box
4.
Select a font style in the Font style list.
5.
Select a font size in the Size list.
6.
Click the OK button.
Note: The font settings only apply to the layout in Viz Ticker Client, not the actual
messages that are sent on-air.
Default Output Channel Activation Frame
If selecting the Add Messages as User Controlled check box in Ticker Wizard’s Ticker
Carousels Panel , the Default Output Channel Activation Frame becomes available.
Copyright © 2015 Vizrt
Page 75
Viz Ticker User’s Guide
Default Output Channel Activation Frame
In this frame it is possible to define the default activation settings for each available
output channel.
Example: If enabling the Main check box and leaving the MyOutputChannel
check box clear, messages that are added to the Carousel List will be active on
the Main channel and inactive on MyOutputChannel. Messages get their activation
status when adding them to the Carousel List , either by sending new messages
directly after message creation or dragging existing messages from the Pool List .
To activate messages
To activate all new messages in a carousel by default, perform the following steps:
1.
In Ticker Wizard’s Ticker Carousels Panel , select a carousel from the Existing
Carousels List .
2.
In the Carousel Details Frame that appear, click the Add Messages As Active
check box.
3.
Click the Save button.
To activate existing messages in a carousel, perform the following steps:
1.
Right-click one or more messages in Viz Ticker Client’s Carousel List .
2.
In the Carousel List Message Menu that appears, click Set Active.
Tip: Alternatively, if the <Output Channel> column is shown in the Carousel List ,
activate a message by selecting the check box in front of the message.
5.5.3
Buttons Frame
In the lower right part (center right if Elements Editor is open) of the Carousel Specific
Panel is the Buttons Frame .
Buttons Frame
Buttons are available in this frame according to the button groups that have been
added to the carousel in Ticker Wizard’s Ticker Carousels Panel , see VizBoldButton
Groups Available in Carousel Frame .
Tip: The button groups in Viz Ticker Client’s Control Panel perform the same
actions as the buttons in this frame.
5.5.4
Elements Editor
At the bottom of the Carousel Specific Panel is the Elements Editor .
Page 76
Copyright © 2015 Vizrt
Viz Ticker User’s Guide
Elements Editor
In the Elements Editor , messages, groups, and sections are created and modified.
This section contains information on the following topics:
• To show/hide the Elements Editor
• Data Frame
• Data Frame Menu
• Date and Time Frame
• Settings Frame
To show/hide the Elements Editor
At the top border of the Elements Editor is the thin horizontally oblong Show/Hide
Elements Editor Button .
Show/Hide Elements Editor Button
To hide the Elements Editor , click the Show/Hide Elements Editor Button . Once the
Elements Editor is hidden, the Pool Frame and Carousel Frame expand, the button
moves to the lower border of the window, and the little arrow points upward.
To show the Elements Editor , click the button again.
Data Frame
The Data Frame becomes available when selecting the Data tab in the Elements Editor
.
Data Frame
The appearance of the Data Frame changes according to the item that is being created,
whether it is a message, group, or section.
If the template is configured to fetch content from external sources, one or more Feed
Browsing Icons will be available in this frame. For more information, see Field Linking
and Feed Browsing.
Data Frame Menu
Message elements can be presented in the Data Frame with various information. Rightclicking the caption of the Data Frame opens the Data Frame Menu .
Copyright © 2015 Vizrt
Page 77
Viz Ticker User’s Guide
Note: This menu is only available for message elements.
• Editor Font: Opens the Font Dialog Box, which makes it possible to select a new
font for the content in the Data Frame. For more information, see To change the font
in the data frame .
To change the font in the data frame
1.
Right-click the Data Frame .
2.
In the menu that appears, click Editor Font.
3.
In the Font Dialog Box that opens, select a font from the Font list.
Font Dialog Box
4.
Select a Font style from the list list.
5.
Select a font Size from the list.
6.
Click the OK button.
Note: The font settings only apply to the layout in Viz Ticker Client, not the actual
messages that are sent on-air.
To create a text based message
1.
Click the New Message button in Viz Ticker Client’s Pool Frame .
This will open a new message in the Elements Editor based on the default template.
Tip: Alternatively, click the New Template Element button in the Pool Frame . In
the Select Template dialog box that opens, select a template from the list, and
then click the OK button.
Page 78
2.
In the Elements Editor , make sure that the template is text based (scene contains
the ControlText plug-in).
3.
In the text box, type a message text.
Copyright © 2015 Vizrt
Viz Ticker User’s Guide
4.
Repeat step 3 for all elements in the message.
Tip: For additional message settings, see To make items active at a certain time
and To spell check a message . See also To change the default template for a
carousel , To change the font of Pool items , To change the font of all carousel
items, and To activate messages .
5.
Click the Save button.
Note: If the element is not text based, but for example material, object, or image
based, various other datapools will be displayed instead of the text box. Instead of
typing text in the text box, select an item from the datapool.
To create a group
1.
Click the New Group button in Viz Ticker Client’s Pool Frame .
This will open a new group in the Elements Editor .
2.
In the Elements Editor , type a descriptive name in the Group Description text
box.
3.
From the Group Background Color drop-down list, select a color.
The group will be displayed in the Pool List or Carousel List with the selected color.
4.
Click the Save button.
See Also
• Groups
To create a section
1.
Click the New Section button in Viz Ticker Client’s Pool Frame .
This will open a new section in the Elements Editor .
2.
In the Elements Editor , type a descriptive name in the Section Description text
box.
3.
From the Section Background Color drop-down list, select a color.
The section will be displayed in the Pool List or Carousel List with the selected
color.
Copyright © 2015 Vizrt
Page 79
Viz Ticker User’s Guide
4.
Click the Save button.
See Also
• Sections
Date and Time Frame
The Date/Time Frame becomes available when selecting the Date/Time tab in the
Elements Editor .
Date/Time Frame
The time format is automatically adjusted according to the system settings on
the machine. The format is either 12 hour (01:00:00-12:59:59 AM/PM) or 24 hour
(00:00:00-23:59:59). AM/PM dropdown lists become available next to the Start/End
boxes on machines with 12 hour time format.
To make items active at a certain time
1.
In the Date and Time Frame , type a start time and date (hh:mm:ss and mm.dd
format) in the Start text boxes.
2.
Type an end time and date in the End text boxes.
3.
Select one or more Days (of the week) check boxes.
The message, group, or section will be active only on the selected times.
Note: If a message should be valid only on one certain date, time information
must be added, 23h 59m 59s if necessary, otherwise the information will be read
as all year around, and the information is discarded.
Settings Frame
At the right side of the Elements Editor is the Settings Frame .
Page 80
Copyright © 2015 Vizrt
Viz Ticker User’s Guide
Settings Frame
In the Settings Frame , various settings for the item can be altered.
Message Owner Frame
• Created By: Displays the username of the original message creator, and also the
time of creation.
• Changed By: If a message has been modified, the name of the user and the time
of the last change will be displayed.
Tip: The user name is defined when Logging In .
Time To Live For Message Frame
• Time To Live For Message: The Time To Live (TTL) value refers to how many
times the message should run before it is taken out of the carousel.
• Forever: Sets the TTL value to infinite, so that the message runs forever.
• Set: Defines the number of times the message should run before it is taken out
of the carousel.
When Time To Live Is Finished Frame
• When Time To Live is Finished: This option refers to what should happen to the
message when the TTL value is reached.
• Move to Message Pool: Moves the message from the Carousel List to the Pool
List .
• Remove: Deletes the message.
Copyright © 2015 Vizrt
Page 81
Viz Ticker User’s Guide
• Set Inactive: The message status is set to inactive, and the message remains in
the Carousel List .
Note: The two Time To Live frames are only available if the Show Time to Live
check box has been selected in Ticker Wizard’s Ticker Carousels Panel .
Spell Check Option
• Spell Check: If enabled, the text in the text text box (left side of the Elements
Editor when Data tab is selected) will be spell checked.
For more information, see To spell check a message .
Tip: The TTL and spell check default settings for the carousel can be defined in
Ticker Wizard’s Carousel Details Frame .
To spell check a message
1.
Double-click an existing message in either the Pool List or Carousel List , or create
a new message, see To create a text based message .
2.
In the Elements Editor , select the Spell Check check box.
3.
Click the Save button.
Note: The spell check function is based on the Microsoft Office dictionary, and
uses the default language in Microsoft Word.
5.5.5
Groups and Sections
Messages can be added at the root level of the Pool List or Carousel List , or they can
be added as items in Groups or Sections.
Groups
One or more groups can be added to the Pool List or Carousel List . A group can contain
one or more elements. Group settings apply for all items within the group.
Example: Enabling a group on a certain output channel, will also enable all
messages in this group on this output channel.
For more information, see To create a group.
Sections
One or more sections can be added to the Pool List or Carousel List . A section can
be viewed as a group with advanced features. A section can contain one or more
elements. Section settings apply for all items within the section.
Page 82
Copyright © 2015 Vizrt
Viz Ticker User’s Guide
Example: Enabling a section on a certain output channel, will also enable all
messages in this section on this output channel.
Section Headers Shown in Carusel List
A section contains two subsections:
• Section Heads: Contains one or more heading element, which are played out first
of all the elements. This heading element is typically a notification, that for example
informs that the following elements are news, weather, or sports messages. After a
break, the section heads elements will again be played out first, before continuing
with the element that was next before going to the break. The section heads
elements are typically static, so it is possible to hide the section headers to prevent
users from accidentally updating these elements, see Hidden Section Headers .
Hidden Section Headers
Tip: The section headers can be shown/hidden from the Pool List Message Menu
or Carousel List Message Menu .
• Section Elements: Contains one or more elements for the ticker.
Note: If a section contains one or more section heads elements, but no section
elements, the elements in this section will not be shown at all, as it does not make
sense to show a header with no content.
For more information, see To create a section.
Copyright © 2015 Vizrt
Page 83
Viz Ticker User’s Guide
Page 84
Copyright © 2015 Vizrt
Viz Ticker User’s Guide
6 Importing Ticker Example Scenes
The sections Creating a Scrolling Carousel and Creating a Flipping Carousel describe
how to create ticker carousel scenes in Viz Artist 3, and also how to set up these scenes
using Ticker Wizard, and playing them out in Viz Ticker Client.
In order to create these carousel scenes, it is assumed that users have knowledge of
how to perform basic operations in Viz Artist, such as creating scenes, adding items,
creating animations, and so on. If being unexperienced, either refer to the Viz Artist
User’s Guide while creating the scenes, or alternatively import example scenes from
existing archives.
This chapter contains information on the following topic:
• To import Viz Artist 3 example scenes
To import Viz Artist 3 example scenes
1.
Start Viz Artist 3.
2.
From the Main menu, click Import.
3.
In the Import panel that appears, browse to view the location of the Ticker Wizard
files:
%ProgramFiles%\Vizrt\Ticker Wizard\examples
4.
Make sure that Archives to Import is selected from the drop-down list at the top of
the Import panel.
Copyright © 2015 Vizrt
Page 85
Viz Ticker User’s Guide
The Import panel should then show all available archives that can be imported from
the selected folder.
5.
Select the Viz3_Examples.via archive.
This archive is bundled together with Ticker Wizard, and becomes available after
installing the software.
6.
Click the Import Archive button.
The archive should then be imported and available from the list of scenes in Viz Artist.
The archive contains various scenes; one flipping carousel example, and one scrolling
carousel example.
To view the scenes, perform the following steps:
7.
From the Main menu, click Server.
8.
Make sure that Server - Scenes is selected from the drop-down list at the top of
the server area.
9.
In the list of scenes, browse to view the project Vizrt\Tutorials\Ticker.
10. Double-click one of the thumbnails of the scenes.
Page 86
Copyright © 2015 Vizrt
Viz Ticker User’s Guide
7 Creating a Scrolling Carousel
This section describes how to create a scrolling carousel scene in Viz Artist, and how to
set up this scene in Ticker Wizard and Viz Ticker Client.
This chapter contains information on the following topics:
• Scrolling Carousels
• Creating a Scrolling Carousel Scene in Viz Artist
• Setting Up a Scrolling Carousel in Viz Ticker
7.1
Scrolling Carousels
What characterizes a scrolling carousel is that objects, most often text messages, enter
the screen from one side, scroll through the screen, and then exit on the other side.
A scrolling carousel scene contains both the design for the background and the
templates that are used to create content for the ticker.
Scrolling carousel scenes must contain one or more Scroller plug-ins with belonging
directors and stop points.
See Also
• Ticker Plug-ins
• Design Conventions
7.2
Creating a Scrolling Carousel Scene in Viz Artist
When the tasks in this section have been carried through, this scrolling carousel
scene will include a background, a scroller with a text message template, and state
transitions for animating the carousel in and out.
Tip: If you do not want to perform these steps, scrolling carousel example scenes
can be imported by following the instructions in To import Viz Artist 3 example
scenes . If importing the example scenes, skip the steps in this subsection, and
jump directly to Setting Up a Scrolling Carousel in Viz Ticker . Note that the design
in the example scenes are slightly different from the scene created here, so the
name of the scenes, carousels, templates, and so on may vary.
This section contains information on the following topics:
• Getting Started
• Adding a Background
• Stopping, Starting, and Clearing the Carousel
• Adding a Template
• Saving the Scene
Copyright © 2015 Vizrt
Page 87
Viz Ticker User’s Guide
7.2.1
Getting Started
Tip: It is recommended to save scenes in Viz Artist regularly.
To get started, perform the following steps:
• Start Viz Artist 3.
To create a new scene
• Create a new scene named tutorial-scrolling.
• Open the new scene.
To add a group
• From the Scene Tree’sdisplay area, click the Groups button.
• Rename the group container to LayerContainer.
Tip: Always give containers descriptive names.
• In the Transformation Editor, Position the new group to Y= -170 (note the minus
sign).
7.2.2
Adding a Background
To add a backplate for the scrolling ticker, perform the following steps.
To add a rectangle
• From the Main menu, click Built Ins.
• From the drop-down list, click Geom Plugins.
Page 88
Copyright © 2015 Vizrt
Viz Ticker User’s Guide
• Open the Default folder.
• Drag a Rectangle to the scene tree, and place it as a subcontainer of the
LayerContainer.
The rectangle will function as the background for the scrolling ticker. The background
can be any object, for example a circle, cube, sphere, and so on.
• Rename the rectangle container to Background.
• Open the Background container’s Transformation Editor and set the Position to
Y= -10 (note the minus sign).
• Set the Scaling type to S (single scaling, so that each axis can be scaled by itself).
• Set the Scaling to X= 8, Y= 0.5, and Z= 1.
To add color
• Open the Rectangle Editor and enable Use Vertexcolors.
• Add the following colors:
• UpperLeft: RGB= 232
• LowerLeft: RGB= 163
• UpperRight: RGB= 255 (default value)
Copyright © 2015 Vizrt
Page 89
Viz Ticker User’s Guide
• LowerRight: RGB= 255 (default value)
The background will then have the following appearance:
To add the Scroller plug-in
• From the Main menu, click Built Ins.
• From the drop-down list, click Geom Plugins.
• Open the Ticker folder.
• Drag the Scroller plug-in to the scene tree, and place it as a subcontainer of the
LayerContainer.
Tip: The Scroller plug-in is a Viz Artist geometry that generates a dynamic line of
scrolling elements, where each element is an instance of a template.
Note: The scroller container name must be different from the Element source in
the Scroller Editor.
• Open the Scroller container’s Transformation Editor and set the Position to Z=
1.
Page 90
Copyright © 2015 Vizrt
Viz Ticker User’s Guide
This will position the scroller slightly in front of the background to make sure that the
scroller content becomes visible on screen.
• Open the Scroller Editor, and set the following:
• Element source: Headlines
The Element source must be identical to the in state stop point of the layer director
(not created yet).
• Show advanced: On (enabled)
• Layer: Tutorial
The Layer name must be identical to the name of the layer director (not created
yet).
• Scroll region width: 770
For output format 16:9, a scroll region width of 770 puts the scroller bounds outside
the screen area. This will maintain the illusion of a constantly running scroller. For
output format 4:3, the scroll region width should be at least 600.
• Padding: 50 (adds space between messages)
• Active: On (enabled - activates the scroller)
To add a director
• From the Main menu, click Stage.
• In the Stage Editor that appears, click the Add Director button.
• Rename the director to Tutorial.
The name of the director is identical to the Layer name in the Scroller Editor.
To add a stop point
The director must have at least two stop points, one for the in state (shown on screen)
and one for the out state (hidden from screen). Viz Ticker Client creates control buttons
based on these stop points. The ON button, based on the in state stop point, takes the
carousel on air. The OFF button, based on the out state stop point, takes the carousel
off air.
Copyright © 2015 Vizrt
Page 91
Viz Ticker User’s Guide
To equip the director with two stop points, perform the following steps:
• Make sure that the Tutorial director is selected, and the Timeline is set to 0.
• Click the Add Stop button.
• Select the stop point that appears in the Stage Editor.
• In the appearing Stop Point editor enter the letter O (capitalized) to the Name
field.
• O is a standard design convention for the out state.
To add another stop point
• Select the Tutorial director, and set the Timeline to 50.
• Click the Add Stop button again, and name the new stop point Headlines.
• As the O stop point is automatically the out state of the scene, this new stop
point is the in state.
Note: The in state stop point name is identical to the Element source in the
Scroller editor seen above.
To add an animation
To create a simple in/out animation, perform the following steps:
• Select the LayerContainer in the Scene tree.
• Make sure the Timeline is at position 50.
Page 92
Copyright © 2015 Vizrt
Viz Ticker User’s Guide
• Click the Set key frame button in the Animation bar.
• Open the LayerContainer’s Transformation Editor and set the Position to Y=
-240 (note the minus sign).
• Set the Timeline to 0, and click the Set key frame button again.
In the Stage Editor, a new animation has appeared, and the animation can be
played.
• Click the Start and Continue buttons to reset the scene to its out state, and to run
the scene to its in state.
If the previous tasks have been carried through correctly, a horizontally oblong
rectangle object will slide upwards into the screen’s lower area.
At this point, the scene tree should have the following appearance:
7.2.3
Stopping, Starting, and Clearing the Carousel
When taking a scrolling carousel off air, for example at a commercial break, the
messages in the carousel should stop scrolling.
To add an action
• Open the Stage Editor.
• Select the Tutorial director.
• Click the Add Action button.
• This will add a new action to the director tree.
• Name the new action start_stop_clear.
To add a keyframe
Copyright © 2015 Vizrt
Page 93
Viz Ticker User’s Guide
• Select the new action in the director tree.
• Set the timeline to 1, and click the Add a key frame button in the Stage Editor.
A new keyframe will then be created close to the time of the scroller’s out state. The
action that is performed on this keyframe will not be visible on air as it is only one field
away from the out state. This keyframe will make sure that the carousel is stopped
when it is taken off air, so that the next message in the carousel after the break will be
the correct one. If the carousel is not stopped, the carousel will continue to run during
the break, and then the first message after the break will be a random one, according
to how long the break has lasted.
• In the Keyframe Editor that appears at the right side of the screen, Name the new
keyframe stop.
• Make sure the Time is set to 1.
• In the big text field, type:
THIS_SCENE*TREE*$Scroller*GEOM*ACTIVE SET 0;
This command will disable the Active option in the Scroller Editor and stop the
scroller.
• Click the Reverse button.
This option will disable the Active option in the Scroller Editor only when the timer
slides leftward.
To add another keyframe
• Set the timeline to 2.
• Select the start_stop_clear action in the director tree.
• Click the Add a key frame button.
Page 94
Copyright © 2015 Vizrt
Viz Ticker User’s Guide
Another keyframe will then be created close to the time of the scroller out state. This
keyframe will make sure that the carousel is started when it is taken on air.
• In the Keyframe Editor that appears, type a descriptive name in the Name text
box, for example start_clear.
• In the big text field, add:
THIS_SCENE*TREE*$Scroller*GEOM*ACTIVE SET 1;
This command will enable the Active option in the Scroller Editor and start the
scroller.
• In the big text field, also add:
THIS_SCENE*TREE*$Scroller*GEOM*clear INVOKE
This command will invoke the Clear option in the Scroller Editor, and clear all current
messages in the scroller.
• Click the Normal button.
This option will enable the Active option in the Scroller editor only when the timer
slides rightward.
The background is now finished.
7.2.4
Adding a Template
The tasks in this paragraph create a template for messages that should be put on the
scroller.
To add a group
Copyright © 2015 Vizrt
Page 95
Viz Ticker User’s Guide
• Add a new Group to the scene tree root, and make sure to place it at the top of the
scene tree.
• Rename the new group to ticker_templates.
Note: All template containers must be subcontainers of this template root
container. It is important to position the ticker_templates container at the top of
the scene tree, above the LayerContainer, as the Scroller plug-in caches design.
When the scroller needs to cache new design, it searches through the scene tree
from the top and downward, and selects the first match it finds. By making sure
that all the templates are located above the cache, it is assured that the copied
design is originally from a template, and not from a design that is already in the
cache.
To add another group
• Add a new Group to the scene tree and place it as a subcontainer of the
ticker_templates container.
• Rename the new group to Message.
To add the ControlObject plug-in
• From the Main menu, click Built Ins.
• From the drop-down list, click Container Plugins.
• Open the Control folder.
• Drag the ControlObject plug-in to the Message container.
Any template that should be edited in Viz Ticker must be equipped with a ControlObject
function on the template root container. As the scroller in this scene example will
roll text messages across the screen, the template must be equipped with a control
function, or else the text would be identical each time a new instance of the template
was put on the scroller.
• Open the Message container’s Transformation Editor and set the Position to Y=
-170 (note the minus sign), Z= 1.
Page 96
Copyright © 2015 Vizrt
Viz Ticker User’s Guide
When this scene is played in Viz Engine, the template is positioned on the scroller
independently of the template’s actual position. The template position is only set
here to provide an indication of what the finished scene is going to look like. As
the template’s origo is positioned at the right end of the scroller’s x-axis, it is only
necessary to set the Z and Y coordinates identically to the scroller coordinates to see
how it will appear.
The scene tree should now have the following appearance:
To add a font
• From the Main menu, click Server.
• Click the F (font) tab.
• Drag a font to the scene tree, for example Arial-Bold, and place it as a subcontainer
of Message.
• Rename the new font container to Text.
• Open the Text container’s Transformation Editor and set the Scaling to X,Y,Z=
0.33.
To add a material
• Make sure that Server is still selected in the Main menu.
Copyright © 2015 Vizrt
Page 97
Viz Ticker User’s Guide
• Click the M (material) tab.
• Add a material, for example orange R= 255, G= 102, B= 0, to the Text container.
To add the ControlText plug-in
• From the Main menu, click Built Ins.
• From the drop-down list, click Container Plugins.
• Open the Control folder.
• Drag the ControlText plug-in to the Text container.
Note: A font template container must hold the ControlText function.
• In the ControlText Editor, make sure that the Expose kerning option is disabled.
• Disable Use formatted text.
• Type Hello there! in the Input value text box.
To re-position the text
Page 98
Copyright © 2015 Vizrt
Viz Ticker User’s Guide
The text message is not placed correctly on the scroller. Re-position it by performing
the following steps:
• Open the Message container’s Transformation Editor and set the Axis Center to
Y= C.
• Position the template to Y= -170.
• Set the Axis Center to X= L.
As this template enters the scroller from the right and exits on the left side, it is now
accurately left centered.
Note: Leftward scrolling should be left centered (X=L button), rightward scrolling
should be right centered (X=R button), upward scrolling should be top centered
(Y=T button), and downward scrolling should be bottom centered (Y=B button).
Copyright © 2015 Vizrt
Page 99
Viz Ticker User’s Guide
The window should now have the following appearance:
To hide the template
• Click the eye symbol on the ticker_templates container.
The symbol should then reflect a closed eye, which represents a hidden template. If the
template had not been hidden, it would appear on the screen in its default shape (with
the “Hello there!” text) during playout.
7.2.5
Saving the Scene
The scrolling carousel scene is now finished.
• Set the scene Timeline to 0.
• Click the Save button.
7.3
Setting Up a Scrolling Carousel in Viz Ticker
This section provides information on how to set up a scrolling carousel in Ticker Wizard
and Viz Ticker Client. The carousel example is based on the Viz Artist scene tutorialscrolling, created by following the steps in Creating a Scrolling Carousel Scene in Viz
Artist .
Page 100
Copyright © 2015 Vizrt
Viz Ticker User’s Guide
This section contains information on the following topics:
• Setting Up the System
• Setting Up a Scrolling Carousel in Ticker Wizard
• Using a Scrolling Carousel in Viz Ticker Client
• Optional Scrolling Carousel Setup in Viz Ticker
7.3.1
Setting Up the System
To make sure that all the systems that are necessary to set up a scrolling carousel is
running correctly, perform the following steps:
• Start Viz Artist.
• Make sure that the data root in Viz Artist contains the tutorial-scrolling scene.
• Set Viz Artist On Air.
• Make sure that the Media Sequencer is running.
• Start Ticker Wizard, and delete any existing carousels or output channels.
• Make sure that Ticker Service is running.
7.3.2
Setting Up a Scrolling Carousel in Ticker Wizard
Various operations must be performed in Ticker Wizard.
To connect to a Viz Engine host
• Type the hostname of the Viz Engine output machine in the Host box.
• Click the Connect button.
• Make sure that the Viz Engine status indicator in the upper right corner is green.
A green indicator means that Ticker Wizard is successfully connected to the specified
Viz Engine.
Tip: For more information, see To connect Ticker Wizard to a Viz Engine host and
To check the status of the Viz Engine connection .
To select the scrolling carousel scene
• Click the Select Scene button.
• In the Choose Scene to Scan window that opens, double-click the scene tutorialscrolling.
Tip: For more information, see To scan a scene .
Copyright © 2015 Vizrt
Page 101
Viz Ticker User’s Guide
To set up a scrolling carousel in the Wizard
• Click the Create Scrolling Carousel button.
• In the Scrolling Carousel Wizard that opens, double-click the Tutorial/Headlines
carousel from the Available Carousels list.
• In the Add Scrolling Templates list, select the Message template, and click the
Next button.
• Click the Finish button to confirm the new carousel.
The scrolling carousel setup in Ticker Wizard is now complete.
7.3.3
Using a Scrolling Carousel in Viz Ticker Client
The scrolling carousel setup continues in Viz Ticker Client.
To get started in Viz Ticker Client
• Start Viz Ticker Client.
• From the Main Menu , make sure that the HEADLINES tab is selected.
To create a new scrolling carousel message
• Click either the New Message or New Template Element button.
Note: A new message is based on the default template. The default template is
defined in the Ticker Carousels Panel in Ticker Wizard. As this carousel has only
one template attached, a new message is based on the same template, whether
the New Message or New Template Element button is selected. If the carousel
had several templates attached, messages could be based on different templates.
After clicking either of the buttons,
• In the Elements Editor that appears in the lower area of the window, type Scrolling
Carousel Test in the text box.
• Click the Save button.
• Make sure the message is added to the Carousel List .
Note: Messages are automatically added to the Pool List or Carousel List
depending on the settings in the Carousel Details Frame in Ticker Wizard.
Page 102
Copyright © 2015 Vizrt
Viz Ticker User’s Guide
To activate the system
• From the Main Menu , click the CONTROL tab.
This will open the Control Panel .
Note: The Control Panel is only visible if the To uninstall Viz Ticker Client have
been set to -control on.
• Click the Ticker System Main On button.
• Click the Program Main On button.
To take the carousel on air
• Select the HEADLINES tab to switch back to the Carousel Specific Panel .
• In the Buttons Frame, click the On button.
Tip: Alternatively click the HEADLINES On button in the Control Panel .
If the previous steps have been carried through correctly, a scrolling ticker carousel
should now be displayed in the lower area of the rendering window.
Note: The messages will only be displayed on the renderer if Ticker Service is
running.
7.3.4
Optional Scrolling Carousel Setup in Viz Ticker
To add new messages directly to the Carousel List (instead of the default Pool List ),
and with inactive status (instead of the default active), perform the following steps:
• Start Ticker Wizard.
• From the Main Menu , click Ticker Carousels.
Copyright © 2015 Vizrt
Page 103
Viz Ticker User’s Guide
• In the Ticker Carousels Panel that appears, double-click the Headlines carousel in
the Existing Carousels List .
• In the Carousel Details Frame that appears, click the Add Messages as Inactive
option button.
• Click the Add New Messages to Carousel option button.
• Click the Save button.
To see the actual changes in Viz Ticker Client, perform the following steps:
• Restart Viz Ticker Client.
• Make sure that the HEADLINES tab is selected from the Main menu.
• Click the New Message button.
• Click the Save button.
Messages are now added directly to the Carousel List , and must be manually activated
before being sent on air.
Additional Setup
• Create a new output channel and add it to the current carousel in Ticker Wizard.
Notice that corresponding on and off buttons appear in the Control Panel in Viz
Ticker Client.
Note: Viz Ticker Client must be restarted in order for the changes to take effect.
Page 104
Copyright © 2015 Vizrt
Viz Ticker User’s Guide
• Double-click a message in the Carousel List in Viz Ticker Client. The message then
opens in the Elements Editor . Notice the Created By settings, and then edit the text
message. Open the message again, and notice the Changed By settings that have
appeared.
• Create multiple new messages and try the following:
• Set various message texts
• Set various TTL values
Note: It is not recommended to use TTL values for multi-output systems, as the
behavior will be unpredictable and may not work properly. Also, the Time To Live
settings are only available if the Show Time to Live check box has been selected
in Ticker Wizard’s Ticker Carousels Panel .
• Set different active/inactive status
• Move messages between the Pool List and Carousel List
• Search for messages
Copyright © 2015 Vizrt
Page 105
Viz Ticker User’s Guide
Page 106
Copyright © 2015 Vizrt
Viz Ticker User’s Guide
8 Creating a Flipping Carousel
This section describes how to create flipping carousel background and template scenes
in Viz Artist, and how to set up these scenes in Ticker Wizard and Viz Ticker Client.
This chapter contains information on the following topics:
• Flipping Carousels
• Creating a Flipping Carousel Background Scene in Viz Artist
• Creating a Flipping Carousel Template Scene in Viz Artist
• Setting Up a Flipping Carousel in Viz Ticker
• Using a Flipping Carousel in Viz Ticker Client
8.1
Flipping Carousels
Flipping carousel scenes are characterized by containing one or more Toggle plug-ins
with belonging directors and stop points.
The elements in a flipping ticker are flipped in a static position.
A flipping carousel is made up from multiple scenes; one that contains the design for
the background, and another one that contains the templates that are used to create
content for the ticker.
See Also
• Ticker Plug-ins
• Design Conventions
8.2
Creating a Flipping Carousel Background Scene in Viz Artist
When finished with the tasks in this section, the flipping carousel background scene will
include an animated cube object and state transitions for animating the background
in and out of the scene. The Toggle plug-in makes it possible to add text message
template elements to the scene.
Tip: If you do not want to perform these steps, flipping carousel example scenes
can be imported by following the instructions in To import Viz Artist 3 example
scenes . If importing the example scenes, skip the steps in this subsection and
section Creating a Flipping Carousel Template Scene in Viz Artist , and jump
directly to Setting Up a Flipping Carousel in Viz Ticker . Note that the design in the
example scenes are slightly different from the scenes created here, so the name
of the scenes, carousels, templates, and so on may vary.
To get started
• Start Viz Artist 3.
Copyright © 2015 Vizrt
Page 107
Viz Ticker User’s Guide
To create a new scene
• Create a new scene named tutorial-flipping-back.
• Open the new scene.
To add a cube
• Drag a Cube to the scene tree.
• Rename it to background.
• Open the background container’s Transformation Editor and set the Position to
X,Y= 180.
• Open the Cube Editor, and set the Size X to160, Size Y to 30, and Size Z to 9.
• Set the Bevel to 2.
Page 108
Copyright © 2015 Vizrt
Viz Ticker User’s Guide
To add a material
• Add a material, for example grey R= 235, G= 237, B= 255, to the background
container.
At this point, the output of the scene should have the following appearance:
To add a director
• From the Main menu, click Stage.
• In the Stage Editor that appears, click the Add Director button.
• Rename the director to Tutorial.
To add a stop point
• Make sure that the Tutorial director is selected, and the Timeline is set to 0.
• Click the Add Stop button.
Copyright © 2015 Vizrt
Page 109
Viz Ticker User’s Guide
• Select the stop point that appears in the Stage Editor.
• In the appearing Stop Point editor enter the letter O (capitalized) to the Name
field.
• O is a standard design convention for the out state.
To add another stop point
• Select the Tutorial director, and set the Timeline to 50.
• Click the Add Stop button again, and name the new stop point Headlines.
As the O stop point is automatically the out state of the scene, this new stop point is
the in state.
To add a keyframe
To create a simple in/out animation, perform the following steps:
• Select the background in the Scene tree.
• Make sure the Timeline is at position 50.
• Click the Set key frame button in the Animation bar.
• Open the background container’s Transformation Editor and set the Rotation to
X= 180.
• Set the Position to Y= 240.
To add another keyframe
• Set the Timeline to 0.
• Click the Set key frame button again.
In the Stage Editor, a new animation has now appeared.
• In the Director tree, make sure that the new background animation is placed inside
the Tutorial director.
Page 110
Copyright © 2015 Vizrt
Viz Ticker User’s Guide
The Director tree should now look like this:
The animation can now be played.
• Click the Start and Continue buttons to reset the scene to its out state, and to run
the scene to its in state.
If the previous steps have been carried through correctly, a horizontally oblong cube
object should rotate downwards into the screen’s upper right corner.
At this point, the scene tree still only contains one node:
To add a group
• Add a Group to the scene tree, and place it as a subcontainer of background.
• Rename the new group to Tutorial.
• Open the Tutorial container’s Transformation Editor and set the Position to X=
-75 (note the minus sign), Z= 17.
To add the Toggle plug-in
• From the Main menu, click Built Ins.
• From the drop-down list, click Container Plugins.
• Open the Container folder.
• Drag the Toggle plug-in onto the Tutorial container.
Four child containers are automatically added to the Tutorial container.
Copyright © 2015 Vizrt
Page 111
Viz Ticker User’s Guide
The scene tree should now look like this:
Note: The container holding the Toggle plug-in must have the same name as the
director holding the stop points.
• In the Toggle Editor, click the Default Keyframes button.
This adds additional keyframes in the Stage Editor.
The Stage Editor should now have the following appearance:
To save the scene
The flipping carousel background scene is now finished.
• Make sure that the Timeline is set to 0.
• Click the Save button.
Page 112
Copyright © 2015 Vizrt
Viz Ticker User’s Guide
8.3
Creating a Flipping Carousel Template Scene in Viz Artist
This section describes how to create a flipping carousel template scene in Viz Artist.
Tip: A copy of the flipping carousel template scene has already been created and
can be imported by following the steps in To import Viz Artist 3 example scenes . If
importing the example scenes, skip the steps in this section and section Creating
a Flipping Carousel Background Scene in Viz Artist , and jump directly to Setting
Up a Flipping Carousel in Viz Ticker .
When finished with the steps in this section, this template scene will be used by the
flipping carousel background scene. The Toggle plug-in in the background scene makes
it possible to add text message templates to the carousel.
To get started
• Create a new scene named tutorial-flipping-template.
• Open the new scene.
To add a group
• Add a new Group to the scene tree.
• Rename it to object.
Note: All flipping carousel template scenes must have a root container named
object.
To add the ControlObject plug-in
• Drag the ControlObject plug-in to the object container.
Placing the control plug-in on the root container optimizes the process, as the whole
template scene tree is copied when a new template is added, and the root container is
the first one to be scanned.
Copyright © 2015 Vizrt
Page 113
Viz Ticker User’s Guide
• In the ControlObject Editor, enable Transition Logic.
• Set the Layer identifier to Tutorial.
The layer identifier refers to the layer director in the flipping carousel background
scene.
• Set the State identifier to Headlines.
,The state identifier refers to the in state stop point.
• Set the Background scene to tutorial-flipping-back.
• Set the Description to simple text message.
The description is used when selecting templates in Ticker Wizard and Viz Ticker
Client.
To add a font
• Drag a font to the scene tree, for example Arial-Bold, and place it as a subcontainer
of object in the scene tree.
• Rename the new container to text.
• Open the text container’s Transformation Editor and set the Scaling to X,Y,Z=
0.2.
With this size, the text will fit the background.
To add a material
• Add a material, for example orange R= 255, G= 102, B= 0, to the text container.
If no color is added, the font inherits the color of the container holding the Toggle
plug-in in the background scene.
To add the ControlText plug-in
Page 114
Copyright © 2015 Vizrt
Viz Ticker User’s Guide
• Drag the ControlText plug-in to the text container.
• In the ControlText Editor, make sure that the Expose kerning option is disabled.
• Disable Use formatted text.
• Type Hi there! in the Input value text box.
The scene tree should now have the following appearance:
To fine-tune the position of the template
• Open the object container’s Transformation Editor and set the Axis Center to Y=
C.
When changing the axis center, the position changes too.
• Reset the Position to Y= 0.
These changes put the center of the template scene in the center of the Toggle plug-in
placeholder container.
The output of the template scene should now have the following appearance:
To save the scene
Copyright © 2015 Vizrt
Page 115
Viz Ticker User’s Guide
The template scene is now finished.
• Click the Save button.
8.4
Setting Up a Flipping Carousel in Viz Ticker
This section of the document provides information on how to set up a flipping carousel
in Ticker Wizard and Viz Ticker Client.
The flipping carousel is based on the scenes tutorial-flipping-back created in Creating a
Flipping Carousel Background Scene in Viz Artist and tutorial-flipping-template created
in Creating a Flipping Carousel Template Scene in Viz Artist .
This section contains information on the following topics:
• Setting Up the System
• Setting Up a Flipping Carousel in Ticker Wizard
• Using a Flipping Carousel in Viz Ticker Client
8.4.1
Setting Up the System
To make sure that all the systems that are necessary to set up a flipping carousel are
running correctly, perform the following steps:
• Start Viz Artist.
• Make sure that the data root in Viz Artist contains the tutorial-flipping-back and
tutorial-flipping-template scenes.
• Set Viz Artist On Air.
• Make sure that the Media Sequencer is running.
8.4.2
Setting Up a Flipping Carousel in Ticker Wizard
Various operations must be performed in Ticker Wizard.
To get started
• Start Ticker Wizard, and delete any existing carousels or output channels.
To connect to a Viz Engine host
• Click the Main Page tab, and type the hostname of the Viz Engine output machine
in the Host box.
• Click the Connect button.
Make sure that the Viz Engine status indicator in the upper right corner reflects a
successful connection.
To select the flipping carousel scene
Page 116
Copyright © 2015 Vizrt
Viz Ticker User’s Guide
• Click the Select Scene button.
• In the Choose Scene to Scan window that opens, double-click the scene tutorialflipping-back.
To set up a flipping carousel in the Wizard
• Click the Create Flipping Carousel button.
• In the Flipping Carousel Wizard that opens, double-click the Tutorial carousel from
the Available Carousels list.
• Double-click the tutorial-flipping-template scene.
• Click the Next button.
• Click the Finish button to confirm the new carousel.
The flipping carousel setup in Ticker Wizard is now complete.
8.4.3
Using a Flipping Carousel in Viz Ticker Client
The flipping carousel setup continues in Viz Ticker Client.
To get started in Viz Ticker Client
• Start Viz Ticker Client.
• From the Main Menu , make sure that the TUTORIAL tab is selected.
To create a new flipping carousel message
• Click the New Message button.
• In the Elements Editor that appears in the lower area of the window, type Test 1 in
the text box.
• Click the Save button.
• Click the New Message button again.
• In the text box, type Test 2.
• Click the Save button.
Copyright © 2015 Vizrt
Page 117
Viz Ticker User’s Guide
• Make sure that both messages are added to the Carousel List .
To activate the system
• From the Main Menu , click the CONTROL tab.
This will open the Control Panel .
• Click the Ticker System Main On button.
• Click the Program Main On button.
• To take the carousel on air
• Select the TUTORIAL tab to switch back to the Carousel Specific Panel .
• In the Buttons Frame, click the On button.
Tip: Alternatively click the TUTORIAL On button in the Control Panel .
If the previous steps have been carried through correctly, a flipping carousel should
now be displayed in the upper right area of the rendering window.
Page 118
Copyright © 2015 Vizrt
Viz Ticker User’s Guide
9 Ticker Feed
Ticker Feed is a Viz Ticker add-on program that makes it possible to populate a scrolling
or flipping carousel with data elements from an external source. The program can
access the file through a URL, which is checked for updates at a defined interval.
Ticker Feed communicates with the Viz Ticker system through the Media Sequencer,
which is the server process for a Ticker system.
This chapter contains information on the following topics:
• Getting Started
• System Configuration
• XML Data Structure
• Ticker Feed Troubleshooting
9.1
Getting Started
To install Ticker Feed
Note: If Ticker Feed is already installed on the machine, you must first remove the
old program version before installing the new one, see To uninstall Ticker Feed.
1.
Run TickerFeed-<Product Version>.msi.
2.
In the Custom Setup Panel that appears, make sure that the Location of the
installation folder is specified correctly.
Custom Setup Panel
3.
Optional: To see a list of drives with available disk space, click the Disk Usage
button.
4.
Click the Next button.
5.
In the Ready to Install Panel that appears, click the Install button.
Copyright © 2015 Vizrt
Page 119
Viz Ticker User’s Guide
Ready to Install Panel
6.
In the Completing the Setup Panel that appears, click the Finish button.
Completing the Setup Panel
Ticker Feed is now installed on the machine at the defined location.
To uninstall Ticker Feed
1.
Select Start > Control Panel > Programs > Uninstall a program.
The Uninstall or Change a Program Window then opens.
Page 120
Copyright © 2015 Vizrt
Viz Ticker User’s Guide
Uninstall or Change a Program Window
2.
From the list of available programs, select Vizrt Ticker Feed.
3.
Click the Uninstall button.
4.
If prompted, verify that the uninstallation process should proceed by clicking the
Yes button.
Ticker Feed is no longer available on the machine.
Note: The software settings are not deleted with the software.
To set up a single source Ticker Feed
1.
Click Start > All Programs > Vizrt > Viz Ticker > Ticker Feed > Open Settings
Folder.
This will open the folder where the default.ini file is located.
Copyright © 2015 Vizrt
Page 121
Viz Ticker User’s Guide
default.ini
The default.ini file must be created under
%APPDATA%\Vizrt\Ticker Feed\Settings\
The file can be manually copied from the Ticker Feed installation folder, where it is
called default.ini.example, and then renamed to default.ini. Alternatively start Ticker
Feed once, and the system will automatically perform the copying/renaming operation.
2.
Open the default.ini file.
3.
Define the Media Sequencer Hostname.
Example: mseq-hostname=localhost
4.
Define the Source XML-file that should feed data elements to the Ticker system.
Example: source=ftp://user:[email protected]/newsfeed.xml
5.
Define the Transformation.
Example: transformation=feedcomp:rss20,xsl:filters
\rss20_to_TickerFeedExample.xsl
To set up a multi source Ticker Feed
Note: In order to set up a multi source Ticker Feed configuration, it is necessary
to launch one Ticker Feed instance for each source. Each source must also have a
separate INI-file.
1.
Click Start > All Programs > Vizrt > Viz Ticker > Ticker Feed > Open Settings
Folder.
This will open the folder where the default.ini file is located.
Page 122
Copyright © 2015 Vizrt
Viz Ticker User’s Guide
default.ini
The default.ini file must be created under
%APPDATA%\Vizrt\Ticker Feed\Settings\
The file can be manually copied from the Ticker Feed installation folder, where it is
called default.ini.example, and then renamed to default.ini. Alternatively start Ticker
Feed once, and the system will automatically perform the copying/renaming operation.
2.
Save the default.ini file with a new descriptive name, for example internal.ini
and place it in the same folder.
3.
Create a shortcut of the TickerFeed.exe file found at %ProgramFiles%\Vizrt
\Ticker Feed.
4.
In the Ticker Feed Properties text box, type --inifile=internal.ini (if the
example file name above has been used).
Copyright © 2015 Vizrt
Page 123
Viz Ticker User’s Guide
Ticker Feed Properties
5.
Define the Media Sequencer Hostname.
Example: mseq-hostname=localhost
6.
Define the Source XML-file that should feed data elements to the Ticker system.
Example: source=ftp://user:[email protected]/newsfeed.xml
7.
Define the Transformation.
Example: transformation=feedcomp:rss20,xsl:filters
\rss20_to_TickerFeedExample.xsl
For all additional sources, repeat the steps in this procedure so that one Ticker Feed
instance with a separate INI-file can be launched for each source. Make sure to name
the INI-file and instance parameter differently for each source.
To start Ticker Feed
Note: The correct INI-file settings must be entered before the program is started.
For more information, see To set up a single source Ticker Feed .
• Click Start > All Programs > Vizrt > Ticker Feed > Ticker Feed.
When launched, the program will start to monitor a URL and send data to the Media
Sequencer.
Page 124
Copyright © 2015 Vizrt
Viz Ticker User’s Guide
9.2
System Configuration
The Ticker Feed configuration file is named default.ini. The following settings can be
defined in the INI-file:
• Media Sequencer Hostname
• Source
• Transformation
• Log Level
9.2.1
Media Sequencer Hostname
Ticker Feed communicates with the Viz Ticker system through the Media Sequencer,
which is the server process for the system. The Media Sequencer can be targeted
either by hostname or IP address.
Example: mseq-hostname=localhost
9.2.2
Source
Ticker Feed makes it possible to populate a ticker carousel with data elements from
an external source. The program access the file through a URL, which is checked for
updates at a defined interval. Valid source URL schemes are file, HTTP, and FTP. For
more information about source XML-files, see XML Data Structure.
Example: File on disk: source=file:///C|/feed/data.xml
Example: Web Resource (HTTP): source=http://www.newspaper.com/news/
viz_feed.xml
Example: FTP Server: source=ftp://user:[email protected]/
newsfeed.xml
Important notes about file on disk
Special rules apply to the URL reference for files on disk:
Note: The path must be absolute, not relative.
Example: Instead of C:\file.xml, type C|/file.xml.
Also, when using a disk file as source, it is advisable to write to a temporary file, and
then copy content to the file that is being monitored. This reduces the chance of
reading corrupt/incomplete files.
Copyright © 2015 Vizrt
Page 125
Viz Ticker User’s Guide
9.2.3
Basic HTTP authentication
For basic HTTP-authentication from feeds that have user/password restrictions you can
optionally instruct the URI to be constructed as (example):
http://[username]:[password]@hostname/data.xml
Some, but not all, browsers accept this basic authentication. Be aware that the
username and password are exposed in clear-text in the configuration file. This is a
security issue if access to the server is exposed.
The uid / password must be set in the configuration file. Example:
# HTTP basic authentication username and password.
# Warning: Using HTTP basic authentication is potentially insecure since
your username and password are
# - exposed in clear text in this settings file (not an issue if access
to the file is restricted).
# - potentially exposed on an insecure connection (not an issue if the
network itself is trusted or if using a secure connection).
#url-username=
#url-password=
9.2.4
Transformation
If the source data provides acceptable output in XML format, it is not necessary to
define the transformation settings. If the source data must be converted to acceptable
XML format, specify one or more transformations of the form:
<type-1>:<transformation-1>,<type-2>:<transformation-2>,...
Currently recognized transformation types are:
• xsl: Specify an XSL-file as transformation. If the feed source outputs XML, but of
a different format, write an XSL transformation to be applied to the feed data, for
example:
transformation=xsl:c:\feedtools\yourxml_to_tickerxml.xsl
• prog: Specify an external executable as transformation. The feed data will be piped
through the program via standard input/output. If for example the feed source
outputs data as lines of text, write a VB script to translate this to XML and specify
like this:
transformation=prog:cscript //NoLogo c:\feedtools
\yourdata_to_tickerxml.vbs
Tip: For more information, see the example script in textfile_to_xml.vbs. The file
can be found at %ProgramFiles%\Vizrt\Ticker Feed\filters.
• feedcomp: Apply a built-in transformation to the feed data. Currently available
transformations are:
• rss20: Transforms any RSS XML to the RSS 2.0 format. To read any RSS feed and
insert it into the ticker, write for example:
Page 126
Copyright © 2015 Vizrt
Viz Ticker User’s Guide
transformation=feedcomp:rss20,xsl:filters\rss20_to_TickerFeedExample.xsl
Tip: For more information, see the example script in
rss20_to_TickerFeedExample.xsl. The file can be found at %ProgramFiles%\Vizrt
\Ticker Feed\filters.
If the feed is not trusted, it is possible to apply a censoring filter before inserting the
messages to the ticker, for example:
transformation=feedcomp:rss20,prog:c:\feedtools
\rss_censor.exe,xsl:rss20_to_TickerFeedExample.xsl
• compatibility: Transforms input XML in formats of previous versions to the current
format.
transformation=xsl:filters
\elementlists_to_tickerfeed.xsl,feedcomp:compatibility
Using External Programs to Transform Feed Data
The value specified under the transformation key is a transformation pipeline, meaning
that it enumerates a sequence of transformation steps that data obtained from the
data source will pass through before being applied to the ticker system.
One of the transformation steps that can be configured is a transformation of type
prog, which specifies an external executable that the data will be piped through.
This means that the data will be piped into the standard-in stream of the executable
process, and data will be read back out from the program through the standard-out
stream of the executable process.
This places the following requirements on executables that can be used for
transforming data:
• The executable must read all data provided to it on standard-in fully. The executable
cannot choose to not read some of the data provided, since doing so will cause a
Pipe Broken error to be generated when the application exits without having read all
available data, and this will prevent the transformation pipeline from working.
• The executable must write all outgoing data to standard-out before ending the
process.
• The executable must end the process with exit code 0 to indicate that the
transformation was successful. Any other exit code will be interpreted as an error,
and the entire output will be discarded.
If the Transformation Error below appears in the console or log file, the system has
most likely tried to use an external executable that did not read all the data it was
given on standard-in before it exited. To fix this problem, modify the external program
so that it runs in a loop, reading all available data from standard-in input stream until
it reaches the end-of-file (EOF) marker in the input stream. Only then let the program
exit.
Transformation Error
Copyright © 2015 Vizrt
Page 127
Viz Ticker User’s Guide
9.2.5
Log Level
It is possible to define various logging levels for Ticker Feed. The log level can be set to:
• debug: Logs all necessary information, useful for debugging purposes as it
maximizes the logging detail.
• info: Logs information necessary for normal use. This log level is selected by
default.
• error: Logs only critical errors.
Example: log_level=debug
9.3
XML Data Structure
Note: <tickerfeed version="2.4"> is still used in this version of Ticker Feed. This
means that Ticker Feed sources that worked in Ticker Feed 2.4 or later versions
will also work in this version.
This section of the document contains information on the following topics:
• XML Example
• XML DTD
9.3.1
XML Example
This section contains an example of the standard XML format for feeding data into a
ticker carousel. It corresponds to the Document Type Definition specified in XML DTD .
IMPORTANT! If the input source has an XML format that vary from the Ticker
Feed XML data structure, it is necessary to create an XSL transformation file
to convert it to this format. If the input source is not in XML format, create a
program/script that converts the input to XML.
Ticker Feed understands the following data structure:
9.3.2
XML DTD
The XML format that is used for feeding data into a ticker carousel can also be
described as an XML Document Type Definition (DTD):
<!ELEMENT tickerfeed (playlist*)>
<!ATTLIST tickerfeed version CDATA #FIXED "2.4">
Page 128
Copyright © 2015 Vizrt
Viz Ticker User’s Guide
<!ELEMENT playlist (defaults?,(element|group|section)*)>
<!ATTLIST playlist type (flipping_carousel|scrolling_carousel) #REQUIRED
name CDATA #REQUIRED
target (carousel|pool) #REQUIRED>
<!ELEMENT defaults (field|duration|outputchannels|timematch|ttl|
template|gui-color|attributes)*>
<!ELEMENT element (field|duration|outputchannels|timematch|ttl|
template|gui-color|attributes)*>
<!ELEMENT group (description,(outputchannels|
timematch|gui-color)*,elements?)>
<!ATTLIST group use_existing CDATA #IMPLIED>
<!ELEMENT description (#PCDATA)>
<!ELEMENT elements (group|section|element)*>
<!ELEMENT section (description,(outputchannels|
timematch|gui-color)*,head?,body?)>
<!ATTLIST section use_existing CDATA #IMPLIED>
<!ELEMENT head (element|group|section)*>
<!ELEMENT body (element|group|section)*>
<!ELEMENT field (#PCDATA)>
<!ATTLIST field name CDATA #REQUIRED>
<!ELEMENT duration (#PCDATA)>
<!ELEMENT
<!ELEMENT
<!ELEMENT
<!ELEMENT
<!ELEMENT
<!ELEMENT
<!ATTLIST
<!ELEMENT
<!ELEMENT
<!ELEMENT
<!ELEMENT
<!ATTLIST
outputchannels (active*)>
active (#PCDATA)>
timematch (begin,end)>
begin (#PCDATA)>
end (#PCDATA)>
ttl (#PCDATA)>
ttl action CDATA #REQUIRED>
template (#PCDATA)>
gui-color (#PCDATA)>
attributes (attribute*)>
attribute (#PCDATA)>
attribute name CDATA #REQUIRED>
XML DTD Explanation
<!ELEMENT tickerfeed (playlist*)>
<!ATTLIST tickerfeed version CDATA #FIXED "2.4">
<tickerfeed> is the root container for the entire feed.
• <tickerfeed> can contain any number of <playlist> nodes.
<!ELEMENT playlist (defaults?,(element|group|section)*)>
<!ATTLIST playlist type (flipping_carousel|scrolling_carousel) #REQUIRED
name CDATA #REQUIRED
target (carousel|pool) #REQUIRED>
<playlist> is a collection of elements, groups, and sections.
• Attribute type is either “flipping_carousel” or “scrolling_carousel”.
• Attribute name must correspond to the ticker name, as listed in Ticker Wizard. The
name does not necessarily equal the tab name in Viz Ticker Client.
• Attribute target is either "carousel" or "pool", and specifies where the elements
should be inserted.
Copyright © 2015 Vizrt
Page 129
Viz Ticker User’s Guide
• Can contain zero or one <defaults>.
• Can contain any number of <element>, <group>, and <section> nodes.
<!ELEMENT element (field|duration|outputchannels|timematch|ttl|
template|gui-color|attributes)*>
<element> refers to an actual ticker message. This container has no attributes.
• Can contain any number of <field> nodes.
• Can contain zero or one <duration> node.
• Can contain zero or one <outputchannels> node.
• Can contain zero or one <timematch> node.
• Can contain zero or one <ttl> node.
• Can contain zero or one <template> node. If a <template> node is not present, it
must be defined in a <defaults> node.
• Can contain zero or one <gui-color> node.
• Can contain zero or one <attributes> node.
<!ELEMENT defaults (field|duration|outputchannels|timematch|ttl|
template|gui-color|attributes)*>
A <defaults> node is similar to an <element> node, but contains default values that
will be set on all <element>, <section>, and <group> nodes in the same <playlist>
node, unless they explicitly set the values otherwise.
<!ELEMENT group (description,(outputchannels|
timematch|gui-color)*,elements?)>
<!ATTLIST group use_existing CDATA #IMPLIED>
Corresponds to a group in the Viz Ticker Client rundown.
• The optional attribute "use_existing" can be set to "yes". If set otherwise, or
missing, it will be treated as "no". When set to "yes", Ticker Feed will not create a
new group, but instead locate and use an existing group with the same description
as this, and use that instead. If no such group exists, an error will be reported and
no messages will be added.
• Can contain zero or one <outputchannels> node.
• Can contain zero or one <timematch> node.
• Can contain zero or one <gui-color> node.
• Must contain one <description> node.
• Can contain zero or one <elements> nodes.
<!ELEMENT description (#PCDATA)>
The group’s description. Visible in the rundown, and the same as can otherwise be
manually set in Viz Ticker Client for non-feeded groups.
<!ELEMENT elements (group|section|element)*>
Constitutes the list of messages under a group.
• Can contain any number of <element>, <group>, and <section> nodes.
<!ELEMENT section (description,(outputchannels|
Page 130
Copyright © 2015 Vizrt
Viz Ticker User’s Guide
timematch|gui-color)*,head?,body?)>
<!ATTLIST section use_existing CDATA #IMPLIED>
Corresponds to a <section> in the Viz Ticker Client rundown.
• The optional attribute "use_existing" can be set to "yes". If set otherwise, or
missing, it will be treated as "no". When set to "yes", Ticker Feed will not create a
new group, but instead locate and use an existing group with the same description
as this, and use that instead. If no such group exists, an error will be reported and
no messages will be added.
• Can contain zero or one <outputchannels> node.
• Can contain zero or one <timematch> node.
• Can contain zero or one <gui-color> node.
• Must contain one <description> node.
• Can contain zero or one <head> nodes.
• Can contain zero or one <body> nodes.
<!ELEMENT head (element|group|section)*>
<head> constitutes the list of header messages under a section.
• Can contain any number of <element>, <group>, and <section> nodes.
<!ELEMENT body (element|group|section)*>
<body> constitutes the list of messages under a section.
• Can contain any number of <element>, <group>, and <section> nodes.
<!ELEMENT field (#PCDATA)>
<!ATTLIST field name CDATA #REQUIRED>
Refers to the data field, as designed in the scene template, and also visible as a line in
the standard Viz Ticker Client editor.
• Attribute "name" must be the same as the attribute name defined in the template.
• Contains the field value as a text string.
<!ELEMENT duration (#PCDATA)>
Defines the duration of a flipping message.
• Contains duration as a text string. Must be in plain numerical format, with "." as the
decimal separator if applicable.
<!ELEMENT outputchannels (active*)>
Defines which output channels an element/group/section should be enabled for. If
<outputchannels> is not specified at all, the element/group/section will be enabled
for all available channels. If specified, the element/group/section will only be enabled
for the specified channels.
• Can contain any number of <active> nodes.
<!ELEMENT active (#PCDATA)>
Copyright © 2015 Vizrt
Page 131
Viz Ticker User’s Guide
<active> means an element should be enabled for this channel. The channels check
box will be selected in the rundown.
• Contains the output channel name as a text string.
<!ELEMENT timematch (begin,end)>
<timematch> means an element/group/section should only be considered enabled
during a specified time.
• Must contain one <begin> node.
• Must contain one <end> node.
<!ELEMENT begin (#PCDATA)>
Contains begin timecode as text string. If the element should be valid only at a
specific time interval, this attribute describes the start time. It can contain either a
crontab timecode or a 24-hour hh:mm:ss string, for example 14:30:00. The crontab
timecode is almost in standard Unix crontab format, except the “/” operator is not
supported and it has an extra seconds field. For example 00 00 22 01 12 *, means that
the message will begin at 22:00 on December 1 playing all days of the week.
<!ELEMENT end (#PCDATA)>
Contains end timecode as text string. The format is equal to the begin node.
<!ELEMENT ttl (#PCDATA)>
If present, means the element should have <ttl> enabled.
Note: TTL must also have been enabled for the carousel in Ticker Wizard.
<!ATTLIST ttl action CDATA #REQUIRED>
• Attribute “action” defines the the ttl action. Can be either "remove", "pool", or
"inactive".
• Contains ttl value as text string. Must be a whole number (integer).
<!ELEMENT template (#PCDATA)>
The name of the ticker template to use. See the carousel list in Ticker Wizard for a list
of valid template names.
<!ELEMENT gui-color (#PCDATA)>
HTML-style color format. Defines if an element should appear in Viz Ticker Client with a
specific row background color, for example #00FF00 (green).
<!ELEMENT attributes (attribute*)>
If non-standard attributes must be specified for special integration purposes, they can
be defined in the <attributes> node.
• Contains any number of <attribute> nodes.
<!ELEMENT attribute (#PCDATA)>
<!ATTLIST attribute name CDATA #REQUIRED>
Page 132
Copyright © 2015 Vizrt
Viz Ticker User’s Guide
Specifies an element attribute, for example <attribute name="this">that</
attribute>.
• Node attribute "name" is the name of the element attribute to define.
• Contains element attribute value as a text string.
Note: Although it is possible, it is not recommended to use the Time To Live
(TTL) attributes when feeding a ticker carousel from Ticker Feed. When feeding a
carousel with elements that include the TTL actions remove or pool, the changes
made by these actions, are overwritten by Ticker Feed during the next update
that occurs after a feed XML change or Ticker Feed restart. Manually setting an
element as inactive or moving it to the pool in Viz Ticker Client will likewise be
overwritten during the next update.
The Carousel Overview illustrates the connection between the elements in Viz Ticker
Client, the data in the XML file, and the plug-in setup in Viz Artist.
Copyright © 2015 Vizrt
Page 133
Viz Ticker User’s Guide
Carousel Overview
Note: Control Material acts a bit different than other control plug-ins. While
other plug-ins use field identifier for setting the value, Control Material uses
fieldid.material:
<field name=”2.material”>MATERIAL*ABC</field>
Note: When using Ticker Feed to feed data from a file on disk to a Control Image
plug-in, make sure to use forward slashes and not backslashes when defining the
path, or the file will not be found. Define the path like this:
Page 134
Copyright © 2015 Vizrt
Viz Ticker User’s Guide
<field name="6">d:/data/tmp/thumb125.jpg</field>.
Note: Fields containing a “.” (dot) in the middle of the text will not be part
of the auto generated description. This has been done to prevent fields like
25.kerning or 35.rotation, which generally is not very descriptive, to pollute the
auto description.
9.4
Ticker Feed Troubleshooting
This section describes the most common problem areas that arise when working with
Ticker Feed.
• Q - Is the XML data visible from Viz Ticker Client when it is coming in? For example,
can they open the client and look at the XML fed data?
• A - Yes, the XML data is visible like all other elements. It is recommended to make
the feed set a specific GUI color on the messages from the feed source, so that they
are distinguished from the rest of the (manually created) messages.
• Q - Is it possible to change data coming from the XML in Viz Ticker Client? Will it be
overwritten if reloaded from the XML?
• A - The messages can be opened, viewed, and also modified in Viz Ticker Client, but
there is no point changing the data manually as the messages will be overwritten on
the next Ticker Feed update.
• Q - Can data be directed to the pool in Viz Ticker Client instead of going straight onair?
• A - Yes, but be aware that if elements are directed to the pool from Ticker Feed, and
then manually moved to the carousel, a new instance of each element will be recreated in the pool on the next Ticker Feed update.
9.5
External components License
Ticker Feed uses components from the opensource Universal Feed Parser library, for
code see https://code.google.com/p/feedparser/
This Python library is Copyright:
Copyright (c) 2010-2013 Kurt McKee <[email protected]>
Copyright (c) 2002-2008 Mark Pilgrim
All rights reserved.
Redistribution and use in source and binary forms, with or without
modification, are permitted provided that the following conditions are
met:
* Redistributions of source code must retain the above copyright notice,
this list of conditions and the following disclaimer.
* Redistributions in binary form must reproduce the above copyright
notice, this list of conditions and the following disclaimer in the
documentation and/or other materials provided with the distribution.
THIS SOFTWARE IS PROVIDED BY THE COPYRIGHT HOLDERS AND CONTRIBUTORS
“AS IS” AND ANY EXPRESS OR IMPLIED WARRANTIES, INCLUDING, BUT NOT
LIMITED TO, THE IMPLIED WARRANTIES OF MERCHANTABILITY AND FITNESS FOR
A PARTICULAR PURPOSE ARE DISCLAIMED. IN NO EVENT SHALL THE COPYRIGHT
OWNER OR CONTRIBUTORS BELIABLE FOR ANY DIRECT, INDIRECT, INCIDENTAL,
SPECIAL, EXEMPLARY, OR CONSEQUENTIAL DAMAGES (INCLUDING, BUT NOT LIMITED
Copyright © 2015 Vizrt
Page 135
Viz Ticker User’s Guide
TO, PROCUREMENT OF SUBSTITUTE GOODS OR SERVICES; LOSS OF USE, DATA, OR
PROFITS; OR BUSINESSINTERRUPTION) HOWEVER CAUSED AND ON ANY THEORY OF
LIABILITY, WHETHER IN CONTRACT, STRICT LIABILITY, OR TORT (INCLUDING
NEGLIGENCE OR OTHERWISE) ARISING IN ANY WAY OUT OF THE USE OF THIS
SOFTWARE, EVEN IF ADVISED OF THE POSSIBILITY OF SUCH DAMAGE.
Universal Feed Parser documentation (everything in the docs/ directory)
is released under the following license:
Copyright 2004-2008 Mark Pilgrim. All rights reserved.
Redistribution and use in source (Sphinx ReST) and "compiled" forms
(HTML, PDF, PostScript, RTF and so forth) with or without modification,
are permitted provided that the following conditions are met:
* Redistributions of source code (Sphinx ReST) must retain the above
copyright notice, this list of conditions and the following disclaimer.
* Redistributions in compiled form (converted to HTML, PDF, PostScript,
RTF and other formats) must reproduce the above copyright notice, this
list of conditions and the following disclaimer in the documentation
and/or other materials provided with the distribution.
THIS DOCUMENTATION IS PROVIDED BY THE COPYRIGHT HOLDERS AND CONTRIBUTORS
AS IS AND ANY EXPRESS OR IMPLIED WARRANTIES, INCLUDING, BUT NOT
LIMITED TO, THE IMPLIED WARRANTIES OF MERCHANTABILITY AND FITNESS FOR
A PARTICULAR PURPOSE ARE DISCLAIMED. IN NO EVENT SHALL THE COPYRIGHT
OWNER OR CONTRIBUTORS BE LIABLE FOR ANY DIRECT, INDIRECT, INCIDENTAL,
SPECIAL, EXEMPLARY, OR CONSEQUENTIAL DAMAGES (INCLUDING, BUT NOT LIMITED
TO, PROCUREMENT OF SUBSTITUTE GOODS OR SERVICES; LOSS OF USE, DATA, OR
PROFITS; OR BUSINESS INTERRUPTION) HOWEVER CAUSED AND ON ANY THEORY OF
LIABILITY, WHETHER IN CONTRACT, STRICT LIABILITY, OR TORT (INCLUDING
NEGLIGENCE OR OTHERWISE) ARISING IN ANY WAY OUT OF THE USE OF THIS
DOCUMENTATION, EVEN IF ADVISED OF THE POSSIBILITY OF SUCH DAMAGE.
Page 136
Copyright © 2015 Vizrt
Viz Ticker User’s Guide
10 Ticker Service
Ticker Service is a component responsible for storing and controlling the sequence of
ticker messages in Viz Ticker. This component is necessary in order to run a scrolling
carousel in Viz Ticker.
The service is installed as an executable in the Viz Artist/Engine installation folder. The
program name is TickerService.exe.
IMPORTANT! Viz Ticker must be installed and running on the Viz Engine used for
output for scrolling carousels to operate properly.
Note: The Ticker Service file is installed as: %ProgramFiles%\Vizrt
\Viz3\TickerService.exe on a server with a 32-bit operating system,
for 64-bit Windows the path will likely be %ProgramFiles(x86)%\Vizrt
\Viz3\TickerService.exe
This chapter contains information on the following topics:
• To start Ticker Service as a service
• To start Ticker Service as console application
• Ticker Service Options
To install Viz Ticker Service
Note: If Ticker Service is already installed on the machine, you must first remove
the old program version before installing the new one.
1.
Run TickerService-<Product Version>.msi.
2.
In the Custom Setup Panel that appears, make sure that the Location of the
installation folder is specified correctly.
3.
Optional: To see a list of drives with available disk space, click the Disk Usage
button.
4.
Click the Next button.
In the Ready To Install panel that appears, click the Install button.
To start Ticker Service as a service
1.
Make sure that the Windows service is installed by running:
%ProgramFiles%\Vizrt\Viz3\TickerService.exe --Service
2.
Then start the service from the command line:
%ProgramFiles%\Vizrt\Viz3>net start VizTicker
The VizTicker service is starting.
The VizTicker service was started successfully.
Copyright © 2015 Vizrt
Page 137
Viz Ticker User’s Guide
Tip: It is also possible to start Ticker Service as a service by using the Microsoft
Management Console.
To start Ticker Service as console application
In order to actually see the actions of this service, it is possible to launch Ticker Service
as a console application.
• Click Start > All Programs > Vizrt > Viz Ticker > Ticker Service.
Tip: It is also possible to start Ticker Service as a console application by using the
command line.
10.1
Ticker Service Options
By running TickerService.exe with --help as an argument, all Ticker Service Options
will be listed.
Ticker Service Options
Page 138
Options
Behavior
--help
Shows the Ticker Service help message that lists all
these options
--log-level arg (=50)
Defines the log level to use, a value in 0-100
--port arg (=6301)
Defines the port to bind the socket interface to
--ignore-inactive-uhgroups
Ignore inactive UpdateHub groups, groups that have a
field called active with value 0 will be ignored
--RegServer
Register Ticker Service to run as a server in a console
--UnregServer
Remove the Ticker Service from the registry, only
valid when Ticker Service is registered as a server
--Service
Register Ticker Service to run as a service
--elevated
Used internally by Ticker Service on Windows Vista
to indicate whether Ticker Service has elevated
privileges or not. This parameter should not be set by
the user.
Copyright © 2015 Vizrt
Viz Ticker User’s Guide
11 Presentation Files
When creating messages in Viz Ticker Client it is possible to use presentation files
instead of the default message editor.
Presentation (.vtw) files are created in Viz Template Wizard. From Ticker Wizard, it is
possible to add a presentation file to each template when setting up the carousel in
one of the Wizards . The presentation file replaces the Data Frame and Date and Time
Frame in the Elements Editor .
Presentation files must be placed at the following location:
%ProgramFiles%\Vizrt\Viz Ticker Client\presentations
\<MyPresentationFile>.vtwc.
This chapter contains information on the following topics:
• To prepare a scrolling carousel for presentation file creation
• To create a presentation file in Viz Template Wizard
• Troubleshooting
To prepare a scrolling carousel for presentation file creation
A .vtw template must be based on a scene containing only the template. For flipping
carousels, this is not a problem as the background and template scenes are created
separately. For scrolling carousels, the background and templates are designed within
the same scene. This makes it necessary to create new scenes holding only the
container structure of each template. If creating a presentation file for a scrolling
carousel, perform the following steps:
1.
Start Viz Artist.
2.
Open the scrolling carousel scene.
3.
Create a copy of the scene, and call it MyTemplate.
4.
In the new scene, remove all containers except the ones belonging to the
template (or the first template if the scene contains more than one template).
Note: Remove the ticker_templates root container, all other root containers (with
subcontainers), and also any subcontainers of ticker_templates that does not
belong to the first template.
5.
Repeat steps 2-4 for all templates if the scene contains more than one template.
To create a presentation file in Viz Template Wizard
1.
Start Viz Template Wizard.
Note: Viz Template Wizard becomes available when installing the Viz Content Pilot
package.
2.
From the Main menu, click File.
3.
From the menu that appears, click Wizard.
Copyright © 2015 Vizrt
Page 139
Viz Ticker User’s Guide
4.
From the Wizard window that opens, navigate to the template scene.
Note: A .vtw template must be based on a scene containing only the template.
For a scrolling carousel, a separate template scene must be created, see To
prepare a scrolling carousel for presentation file creation .
5.
Double-click the template scene.
6.
Click the Next button.
7.
Select the elements that should be included in the .vtw template.
8.
Click the Finish button.
9.
Back in the Main window, rename and drag the elements so that they suit the
desired layout.
10. Re-size the template so that it fits the content.
If the template is too big to fit the Elements Editor in Viz Ticker Client, scroll bars
will appear.
11. From the Main menu, click File.
12. From the menu that appears, click Save to file.
13. In the Save Templates window that opens, give the template a descriptive name,
for example MyPresentationFile.
14. Click the Save button.
For detailed instructions on how to operate Viz Template Wizard, see the Viz Template
Wizard User’s Guide.
For instructions on how to add the .vtw file to a template, see To select the
presentation file for a template .
Troubleshooting
When creating a presentation file in Viz Template Wizard that contains the image field
type, the field property isImageMediaSearch must be disabled. Otherwise this will
cause an error in Viz Ticker Client when trying to perform a media search.
Page 140
Copyright © 2015 Vizrt
Viz Ticker User’s Guide
12 Field Linking and Feed Browsing
Viz Ticker supports browsing tab-field values from external sources. Instead of editing
tab-field values manually, values from an external feed can be selected.
This section contains information on the following topics:
• Overview
• Workflow
• Field Linking
• Feed Browsing
• Shared Memory Support
• Technical reference for Field Linking
12.1
Overview
Field Linking assists the user in filling in data by selecting items from a feed rather than
editing the value(s) manually. The feed-source can for instance be a network URI or a
local XML-file. Each Ticker message then uses the feed browser in Viz Ticker Client to
edit the tab-field value. The specified feed URI in Viz Ticker overwrites any existing feed
URI from the control object.
When defining and configuring the field linking in Ticker Wizard you can select to make
the item values returned from a feed read-only. By default the values returned from
a feed-linked item fetched with Ticker Client feed browser can be edited. For more
information see Field Linking with edit restrictions.
Note: Viz Ticker supports Atom 1.0 formatted feeds. See the Technical reference
for Field Linking chapter for more information.
A field in general has several properties. Each property relates to a control plug-in in
the scene. Properties are grouped under a tab-field by a naming convention. To be
able to set the values of multiple tabfield properties from the same feed entry, the
properties must be grouped together under the tabfield. This is done by giving them
the same prefix followed by the period character.
For example, the following tabfield names will generate two groups of tabfields
(candidate1 and candidate2):
candidate1.name
candidate1.image
candidate2.name
candidate2.image
A further example to illustrate tab-field grouping:
The ControlText plug-ins specifying the field identifiers “1.name”, "1.score" and
"1.image" will form a tab-field "1" with the properties "name", "score" and "image".
Selecting a feed item for the tab-field "1" should apply the parts of the selected item to
the properties "name", "score" and "image" at once.
The feed linking is usable across all tab-field types.
Copyright © 2015 Vizrt
Page 141
Viz Ticker User’s Guide
Note: Make sure to define matching object types; a thumbnail link for control
image tab-fields, and so on.
12.2
Workflow
Field linking in Viz Ticker is a two-step procedure:
• Field Linking: Linking the fields in a template to various parts of data that comes
from entries in a feed. This is a setup step that is performed in Ticker Wizard, and is
usually done once for a template.
For more information, see Field Linking and To configure field linking in Ticker
Wizard.
• Feed Browsing: After field linking for a template has been successfully set up,
a property editor for selecting an entry from a feed will be available in Viz Ticker
Client’s Elements Editor. This feed browser lets you select an item in a feed that
contains the values that should be applied to the field values.
For more information, see Feed Browsing and To browse feed data in Viz Ticker
Client.
12.3
Field Linking
Field linking can be configured in Ticker Wizard.
To configure field linking in Ticker Wizard
Page 142
1.
Scan and set up a carousel in one of the Wizards.
2.
Open the carousel in the Ticker Carousels Panel.
3.
Right-click a template from the Templates Frame.
4.
In the popup that appears, click Field Linking
Copyright © 2015 Vizrt
Viz Ticker User’s Guide
5.
In the window that opens, click the Field Link button next to the field that you
want to update
6.
In the window that opens, specify the feed URI in the Feed text box.
Note: The feed source can also be located on the file-system. Assuming a file
is located at C:\feeds\feed.xml then it can be referenced by file:///C:/feeds/
feed.xml. Notice it has to be a well-formed URI.
7.
Specify which part of the selected feed item should be used as value for this field;
content, thumbnail, title, and so on. If the field is grouped the user can select
multiple "parts"/properties to be linked.
Note: Make sure to define matching object types; a thumbnail link for control
image tab-fields, and so on.
8.
Optional: Enable the Use structured content check box to automatically map
tabfield values from the VDF payload content in the selected Atom entry. In order
to use structured content, the feed source must serve out data in the VDF (Viz
Data Format) defined format.
9.
Optional: Enable the Limited choice scope check box to restrict the field-linking
choices. Enabling this option means that the user browsing the feed can not
change the values of items returned from the feed. Effectively this option makes
browsing the feed a read-only operation. For more information see Feed Browsing
in Viz Ticker Client and Field Linking with edit restrictions.
Note: Linking to an ATOM feed is the property of a template in Viz Ticker and
is therefore shared by all messages using that template.
10. Click the Save button.
A green icon in the Field Linker window reflects a configured Field Linking connection.
Copyright © 2015 Vizrt
Page 143
Viz Ticker User’s Guide
Note: The green icon only indicates that there has been set up a field linking
configuration for this particular field. It does not verify that the URL is correct,
available, and so on. By holding the pointer over the icon, the configured URL is
shown as a tool tip.
If the template contains more than one field that should be linked, select additional
Field Link buttons, and repeat steps 6-9.
To continue the workflow, and actually use this feed linking setup as the source for
carousel creation in Viz Ticker, follow the steps in To browse feed data in Viz Ticker
Client.
12.4
Feed Browsing
Feed browsing is the process of fetching carousel content from a working Field Linking
instance.
This section contains information on the following topics:
• Feed Browsing in Viz Ticker Client
• Field Linking with edit restrictions
• VizBoldSearching and Filtering
12.4.1
Feed Browsing in Viz Ticker Client
After setting up a working Field Linking instance in Ticker Wizard, the feed can be used
to generate output for ticker carousels In Viz Ticker Client.
To browse feed data in Viz Ticker Client
1.
Make sure that a valid field linking feed has been configured, see To configure field
linking in Ticker Wizard.
2.
In Viz Ticker Client, create a message or open the message that should be edited.
Feed Browsing Icon
Instead of the regular look of the editor, the Elements Editor will contain a Feed
Browsing Icon if a feed has been configured to one of the fields in the template.
3.
Page 144
Click the Feed Browsing Icon.
Copyright © 2015 Vizrt
Viz Ticker User’s Guide
Feed Browsing Property Editor
While browsing the feed you can right-click on the property editor to bring up the
context menu that will enable various options for displaying and sorting the feed.
Context menu for
Options
Grid View
List View
4.
In the Feed Browsing Property Editor that opens, double-click the feed item that
will serve as content for the field. Use the control icons on the right hand side
to choose style (tabular etc.) for the feed data. You can drill down results shown
using the Feed-Browsing search-field to filter the results.
The content being fetched, depends on which field has been designed to be linked whether it is a title, thumbnail and so on.
5.
Back in the Elements Editor, click the Save button.
The message now contains content from the configured feed.
While browsing a feed the icons below will be displayed in the feed-browser window.
The two icons on the left are switches and will change depending on current selection
as explained in the table below:
Icon
Action when clicked
Display the feed as listview (tabular format).
Hide details view.
Show details
Copyright © 2015 Vizrt
Page 145
Viz Ticker User’s Guide
Icon
Action when clicked
Show as grid.
Reset the field value to the value from the feed.
Select current item and save value.
12.4.2
Field Linking with edit restrictions
As explained in the previous section Feed Browsing in Viz Ticker Client the user by
default can edit the values of items returned from a feed. This changes the payload
and the changed item value will be used in tickers. Usually this is appropriate because
it provides flexibility. However, if the user doing the feed-browsing should be restricted
from changing values received from the feed this can be achieved by setting the fieldlinking option “Limited choice scope” when setting up and configuring the field-linking.
If this option is active for the feed, items received from the feed can not be changed,
effectively reducing the feed to read-only.
12.4.3
Searching and Filtering
If the feed supports OpenSearch, then the search box will be enabled and all searches
will be done on the server. If not, then the search box will be a local text filter box.
See Also
• VizBoldOpenSearch link
12.5
Shared Memory Support
Viz Ticker supports the Viz Engine Shared Memory (SHM) functionality. Combining
Field Linking with the Viz Engine ApplySharedMemory plug-in provides an easy way
to update data instantly. A typical scenario would be updating stock-prices where the
actual stock-values are fetched from external data sources and the ticker displaying the
stock values are updated in near real-time.
The combination of Field-Linking and SHM allows the user of Viz Ticker Client to simply
select an item using Field Linking, which behind the scenes extracts information from
the feed item, including the “locator” element (the key used to set the data in the
ApplySharedMemory plug-in). Real-time data can be sent to the ApplySharedMemory
plug-in using any application that supports it, for instance Viz DataHub. It could also be
any custom application sending data via UDP, TCP or by sending commands directly to
the Viz Engine.
IMPORTANT! This functionality requires Viz Engine 3.7 (REV 43635) or above.
See Also
• Viz Artist Manual
• Apply Shared memory plug-in
• Viz Artist Shared Memory
• Viz Engine
Page 146
Copyright © 2015 Vizrt
Viz Ticker User’s Guide
12.5.1
Configure Field-Linking and SHM support
The Viz Engine used must be configured for Shared Memory Support and the port
used for communication must be agreed upon. In Viz Artist go to Configuration >
Communication > Shared Memory-tab. In the example below we use TCP on port 11000
for communication.
Design and configure the scene to be used as a ticker for SHM. A typical scene-tree are
shown below:
Make sure the ApplySharedMemory plugin is configured:
You can now use Ticker Wizard and Field-Linking with Shared Memory support using the
SHM key/value-combination you have chosen.
12.5.2
Real-time data updates
Use any custom application to send updates to the port you have configured for SHM
use. The message must include the SHM key and the value. The key should be in "/
YOUR_SHARED_MEMORY_BASE_KEY/PERHAPS_WITH_PATH/value" format.
The Viz Engine is shipped with an example implementation (using C#) showing you
how to send data to the engine. The source is typically installed in the directory
C:\Program Files\vizrt\Viz3\Tools\SendToSMM. Using this requires compiler and
programming experience, so obviously end-users should have other tools prepared for
sending data to SHM-enabled tickers.
Copyright © 2015 Vizrt
Page 147
Viz Ticker User’s Guide
12.5.3
Technical Specification
After setting up SHM use in the Viz Artist scene and Field-Linking in Ticker Wizard the
vdf (Viz Data Model) will look like this example:
<model xmlns="http://www.vizrt.com/types">
<schema>
<fielddef name="locator">
<choice scope="suggest">
<collection src="source.xml" />
</choice>
<fielddef name="key" label="Shared memory base key"
mediatype="application/vnd.vizrt.smmkey">
<fromatom select="locator" />
<value></value>
</fielddef>
(...)
</schema>
</model>
The locator element can then be extracted from atom elements like this:
<entry>
<id>MSFT</id>
<published>2012-04-08T16:42:58+07:00</published>
<updated>2012-09-25T10:34:29Z</updated>
<title type="text">Microsoft</title>
<locator type='application/vnd.vizrt.smmkey' xmlns='http://
www.vizrt.com/atom-ext'>/stocks/random/MSFT</locator>
</entry>
Note: Notice that namespace of the <locator /> element is the vizrt atom-ext and
the type is application/vnd.vizrt.smmkey.
12.6
Technical reference for Field Linking
This section contains information on the following topics:
• Feed linking formats
• XML Namespaces
• Elements in atom feed
• Elements in atom entry
• Fields that can be Linked
• Fields that cannot be Linked
12.6.1
Feed linking formats
Viz Ticker supports Atom 1.0 formatted feeds.
The feed browser supports two types of feeds:
• Flat feeds
• Hierarchical feeds (folder structure)
Page 148
Copyright © 2015 Vizrt
Viz Ticker User’s Guide
Linking to Social Media sources
Some of the most popular web feeds, such as Twitter and Facebook, output content in
non-supported formats or they use propriatary APIs. In order to get these and other
Social feeds working together with Viz Ticker, the ticker system must be combined with
Vizrt’s Social TV solution. The Social TV solution then captures content from the social
feeds and pushes moderated content to Viz Ticker wrapped in a open standard-based
network container format (example: Atom/XML) that can be combined with Ticker.
See Also
• Social TV User’s Guide
12.6.2
XML Namespaces
The following XML Namespace Prefixes are used when referring to XML elements:
XML Namespace Prefixes
Prefix
URL
atom
http://www.w3.org/2005/Atom
viz
http://www.vizrt.com/types
vaext
http://www.vizrt.com/atom-ext
media
http://search.yahoo.com/mrss/
thr
http://purl.org/syndication/thread/1.0
opensearch
http://a9.com/-/spec/opensearch/1.1/
Example: The notation <atom:entry> is to be interpreted as referring to the
same element as <entry xmlns=”http://www.w3.org/2005/Atom”>.
The keywords "MUST", "MUST NOT", "REQUIRED", "SHALL", "SHALL NOT", "SHOULD",
"SHOULD NOT", "RECOMMENDED", "MAY", and "OPTIONAL" in this document are to be
interpreted as described in RFC 2119.
12.6.3
Elements in atom feed
Elements that should be present in the <atom:feed> for the full user experience:
OpenSearch link
<atom:link rel="search" type="application/opensearchdescription+xml"
href="http://example.com/opensearchdescription.xml"/>
• Optional, needed for support for server side searching.
• The opensearchdescription XML file must contain a template node that returns
search results as an atom feed:
<opensearch:Url type="application/atom+xml" template="http://..." />
Copyright © 2015 Vizrt
Page 149
Viz Ticker User’s Guide
• See http://www.opensearch.org/Specifications/OpenSearch/1.1 for more details.
Up link
<atom:link rel="up" type="application/atom+xml;type=feed"
href="http://..." />
• Optional, needed for nested collections.
• The up link should link to the parent folder feed for hierarchical feeds.
• The up link must have a type string equal to "application/atom+xml;type=feed".
12.6.4
Elements in atom entry
Elements that should be present in the <atom:entry> for the full user experience:
Self link
<atom:link rel="self" type="application/atom+xml;type=entry"
href="http://..." />
• The self link must link to the URL that will return the <atom:entry> XML.
• The self link must have a type value equal to "application/atom
+xml;type=entry".
• Needed for refresh/update of values from the item to work.
• Needed in combination with the up link for remembering and showing the
selected feed entry in a hierarchy of feeds (folder structure). Not needed for
remembering selection in flat feeds since then the atom:id will be used.
Up link
<atom:link rel="up" type="application/atom+xml;type=feed"
href="http://..." />
• The up link must have a HREF value that is the URL of the feed the entry is in.
• The up link must have a type value equal to "application/atom
+xml;type=feed".
• Needed in combination with the self link for remembering and showing the
selected feed entry in a folder structure.
Down link
<atom:link rel="down" type="application/atom+xml;type=feed"
href="http://..." />
• Needed if this <atom:entry> is to be considered a subfolder instead of a normal
<atom:entry>.
• The down link must have a type value equal to "application/atom
+xml;type=feed".
• The down link must have a HREF value that is the URL of the feed (folder) the
entry represents.
• Link may contain thr:count attribute (RFC4685) indicating how many children
there are. If the value of thr:count is “0” (zero) then the folder will not be
loaded since it is empty. This is an optimization.
Page 150
Copyright © 2015 Vizrt
Viz Ticker User’s Guide
Thumbnail link
<media:thumbnail url="http://..."/>
• Needed for thumbnail icons to display on the entries in the feed browser.
• The URL value must reference a JPEG or PNG image resource.
• If many thumbnails are defined, the first one will be selected as the default. This
is according to "Media RSS" Specification Version 1.5.0.
Other links
<link rel="..." href="http://..." type="..."/>
• Needed in order to select the URL to external resources. This can be images, video,
text, and so on.
• Limitation 1: The Atom 1.0 specs allow multiple links with the same relation, but
when linking a tabfield to a link in Viz Ticker, only the first link will be selected.
• Limitation 2: Viz Ticker can only use the href URL as the value. It cannot
download the resource at the URL and use its contents as the value. The Viz
Engine control plug-in for the property has to be able to understand the URL and
download the resource.
12.6.5
Fields that can be Linked
• <atom:author>
The personal details of the author of the selected <atom:entry>, which might be
an individual person or an organization. The data is provided in child elements as
follows:
• <atom:name>: The name of the author. The value of the <atom:name> element
inside the first <atom:author> element that applies for the entry is recorded
as the field value. This child element is required if you are specifying the
<atom:author> element.
• <atom:uri>: A URL associated with the author, such as a blog site or a company
web site. The value of the <atom:uri> element inside the first <atom:author>
element that applies for the entry is recorded as the field value. This child
element is optional.
• <atom:email>: The e-mail address of the author. The value of the <atom:email>
element inside the first <atom:author> element that applies for the entry is
recorded as the field value. This child element is optional.
• <atom:content>
• Both inline and URL content is supported.
• There is no type match, so it is up to the Viz Ticker operator to figure out what
content can be used.
• For URL content the resource is downloaded first and then applied as the value. If
you just want the URL you should use <atom:link>.
• <atom:entry>
The whole entry XML.
• <atom:link>
This element defines a reference from an entry to a Web resource; in other words
this is the value of the href attribute.
• <vaext:locator>
Copyright © 2015 Vizrt
Page 151
Viz Ticker User’s Guide
The text of the Vizrt Atom Extension <vaext:locator> element which has a
vaext:type attribute equal to the "mediatype" attribute of <viz:fielddef>
element in the model.
• <atom:published>
This element is a Date construct indicating the initial creation or first availability of
the entry. The value of the <atom:published> element in the entry is recorded as
the field value.
• <atom:summary>
This element is a Text construct that conveys a short summary, abstract, or excerpt
of an entry. The content of the <atom:summary> element in the entry is recorded as
the field value.
• <atom:thumbnail>
• The value of the "url" attribute of the first thumbnail element in the entry is
recorded as the field value.
• <atom:title>
This element is a Text construct that conveys a human-readable title for an entry or
feed; the title of the selected <atom:entry>.
• <atom:updated>
This element is a Date construct indicating the most recent instant in time when the
selected <atom:entry> was modified. The value of the <atom:updated> element in
the entry is recorded as the field value.
12.6.6
Fields that cannot be Linked
• <atom:category>
• <atom:id>
• <atom:rights>
• Any other elements
Page 152
Copyright © 2015 Vizrt
Viz Ticker User’s Guide
13 REST interface and services
For most users simply using the client applications Ticker Wizard (for setting up ticker
systems) and Ticker Client (for controlling ticker services and creating messages)
should be used.
For users requiring API access to Viz Ticker functions the REST interface to Media
Sequencer using standard http-calls can be used. Using this feature requires some
programming and network experience and it’s also helpful with some knowledge of
XML.
Note: Currently not all Viz Ticker functions can be controlled by the REST API.
This section contains information on the following topics:
• Overview
• Listing Pool and Rundown Messages
• Listing and Triggering Actions
• The curl and tidy utilities
13.1
Overview
In order to access Ticker functions use standard REST http calls to the Media Sequencer
used by the Ticker system. The full Media Sequencer API documentation can be
accessed by browsing:
http://YourMediaSequencerHostName:8580/doc
Note: 8580 is the default TCP port used by Media Sequencer.
It is advisable to read the Media Sequencer API documentation carefully in order to use
the REST-API effectively.
Most programming and scripting languages have built in support for http-calls which
makes it easy to interface Ticker via the REST API. It is beyond the scope of this
document to explain REST (Representational State Transfer) in detail. There are many
good internet resource for this. A good starting point for reading about REST would be
http://en.wikipedia.org/wiki/Representational_state_transfer.
In the following examples we use the free “curl” utility to send REST-calls and “tidy” to
do a basic XML-formatting, see The curl and tidy utilities. Other tools can of course be
used. For example Telerik’s Fiddler2 (http://www.telerik.com/fiddler) is quite popular.
The basic workflow:
1.
Send the REST API-command you require to port 8580 on the Media Sequencer
running the Ticker system.
2.
You will receive the response from the Media Sequencer as XML in UTF-8.
Example REST API call:
Copyright © 2015 Vizrt
Page 153
Viz Ticker User’s Guide
Send the REST verb GET with curl to the Media Sequencer running on localhost port
8580 to get a list of actions from the command-line:
curl -X GET http://localhost:8580/actions
Receive a slightly more readable output (format the XML with tidy):
curl -X GET http://localhost:8580/actions/ | tidy -xml -i -w 0
13.2
Listing Pool and Rundown Messages
The generic API-call format for Ticker’s Pool is:
GET http://[host]:[port]/element_collection/storage/shows/[carousel-id]
The following shows how to interact with a carousel named news with Media Sequencer
running on localhost and port 8580:
List the Ticker carousels:
curl -X GET http://localhost:8580/directory/shows/
Get elements from Ticker Pool:
curl -X GET http://localhost:8580/element_collection/storage/shows/news
Get elements from Ticker Rundown:
curl -X GET http://localhost:8580/element_collection/storage/shows/news/
playlists/carousel/
Get templates under a carousel:
curl -X GET http://localhost:8580/template_collection/storage/shows/news/
13.3
Listing and Triggering Actions
The generic API-call format to list all Ticker actions is:
GET http://[host]:[port]/actions
Example:
curl -X GET http://localhost:8580/actions
Receive formatted XML:
curl -X GET http://127.0.0.1:8580/actions/ | tidy -xml -i -w 0
Controlling the Ticker actions with REST calls
Assuming you have a Ticker on program with a Ticker carousel named NEWS you can
switch the system on with:
curl -X POST http://localhost:8580/actions/Main%20ticker%20system%20on
curl -X POST http://localhost:8580/actions/Main%20program%20on
Page 154
Copyright © 2015 Vizrt
Viz Ticker User’s Guide
curl -X POST http://localhost:8580/actions/Main%20NEWS%20in
And you can turn the ticker off with:
curl -X POST http://localhost:8580/actions/Main%20NEWS%20out
curl -X POST http://localhost:8580/actions/Main%20program%20off
curl -X POST http://localhost:8580/actions/Main%20ticker%20system%20off
An alternative to curl is to use a browser to parse the received XML for actions as
illustrated in the screenshot below using Firefox:
13.4
The curl and tidy utilities
Curl utility, see: http://curl.haxx.se/download.html
Tidy utility, see: http://tidy.sourceforge.net/#binaries
None of these free utilities are made by, supported or endorsed by Vizrt. Alternatives
exist.
Copyright © 2015 Vizrt
Page 155
Viz Ticker User’s Guide
Page 156
Copyright © 2015 Vizrt
Viz Ticker User’s Guide
14 Keyboard Shortcuts
The following keyboard shortcuts can be used to operate Viz Ticker.
Keyboard Shortcuts in Ticker Wizard and Viz Ticker Client
Function
Key + Mouse Combination
Selects the next tab in the Main Menu
CTRL+TAB
Keyboard Shortcuts in Viz Ticker Client’s Pool Frame
Function
Key + Mouse Combination
Activate the Find text box in the Pool Search CTRL+F
Area
Copy currently selected messages
CTRL+C
Cut currently selected messages
CTRL+X
Delete currently selected messages
DEL
Opens a new message in Elements Editor
based on the default template
CTRL+N
Opens the Select Template dialog box,
where any available message template can
be selected
CTRL+T
Paste messages
CTRL+V
Select all messages
CTRL+A
Keyboard Shortcuts in Viz Ticker Client’s Carousel Frame
Function
Key + Mouse Combination
Activate the Find text box in the Carousel
Search Area
CTRL+F
Activates currently selected messages
INS
Deactivates currently selected messages
CTRL+INS
Delete currently selected messages
DEL
Copy currently selected messages
CTRL+C
Cut currently selected messages
CTRL+X
Paste messages
CTRL+V
Copyright © 2015 Vizrt
Page 157
Viz Ticker User’s Guide
Function
Key + Mouse Combination
Select all messages
CTRL+A
Keyboard Shortcuts in Viz Ticker Client’s Elements Editor
Page 158
Function
Key + Mouse Combination
Saves the current element
CTRL+S
Copyright © 2015 Vizrt
Viz Ticker User’s Guide
15 Troubleshooting
This chapter of the document describes some common problems that arise when
working with Viz Ticker:
• Not Possible to Scan Scene in Ticker Wizard
• Scrolling Carousel Messages Not On-Air
• The System Seems to Freeze when Creating a Message
• Unable to Connect to Viz Engine
• Error exception when Control Text uses identical Field Names
15.1
Not Possible to Scan Scene in Ticker Wizard
Scanning Error Message
Problem
I want to scan a new scene in Ticker Wizard, but the system prevents me from
doing this and the error message above appears: “It is not possible to change the
background scene of an existing ticker system. To use another background scene, you
must start over and delete the current system.”
Solution
In order to scan a new scene, any existing setup must be deleted. To do so, perform the
following steps:
1.
Delete any existing carousels, see To delete a carousel.
2.
Delete any existing output channels, see To delete an output channel.
3.
Try to scan the scene again, see To scan a scene.
The scene should now be successfully scanned.
See Also
• Ticker Wizard
Copyright © 2015 Vizrt
Page 159
Viz Ticker User’s Guide
15.2
Scrolling Carousel Messages Not On-Air
Ticker Service Error Message
Problem
I want to take scrolling carousel messages on-air, but the messages do not appear as
expected.
Solution
This problem can be caused by various errors.
First, make sure that the Ticker Service is running. You can check if this Viz Ticker
component is running, from the Handler Settings Frame in Viz Ticker Client. If the error
message above appears, “error: Connection to ticker service failed”, Ticker Service is
not running. The service can be launched from Start > All Programs > Vizrt > Viz Ticker
> Ticker Service.
If you are sure Ticker Service is running successfully, continue the problem solving
process by making sure that the scene is designed according to the scrolling carousel
Design Conventions.
See Also
• Ticker Service
15.3
The System Seems to Freeze when Creating a Message
Spell Checking Error Message
Problem
I want to create a message in Viz Ticker Client, while the spell check feature is
activated, but the system seems to “freeze” when I try to do this.
Page 160
Copyright © 2015 Vizrt
Viz Ticker User’s Guide
Solution
An error message similar to the above may appear in the background when trying to
create a message while the spell check feature is activated: “Cannot find the proofing
tools for <your default language>. Check your Office Language Preferences to see if
the required proofing tools are installed.” This dialog box must be closed in order for
the system to work.
The spell check function is based on the Microsoft Office dictionary, and uses the
default language in Microsoft Word. In order for the Viz Ticker spell check function to
work, Microsoft Word must be installed on the machine, and the proofing tools must be
updated accordingly.
See Also
• Viz Ticker Client
15.4
Unable to Connect to Viz Engine
Viz Engine Connection Error
Problem
For some reason, the ticker system is not successfully connected to the specified Viz
Engine.
Solution
The Viz Engine may have been shut down, taken off air, or similar. For details about the
Viz Engine connection status, see To check the status of the Viz Engine connection.
See Also
• Ticker Wizard
15.5
Error exception when Control Text uses identical Field Names
Problem
When creating a scrolling carousel where identical field-names are used in a Control
Plugin, the import could cause an exception. A typical error-message would be: “Unable
to perform operation. EOleException: an item with the same key has already been
added.”
Solution
Copyright © 2015 Vizrt
Page 161
Viz Ticker User’s Guide
Make sure that Field Identifiers used in Control Plugins for a template is unique.
Page 162
Copyright © 2015 Vizrt


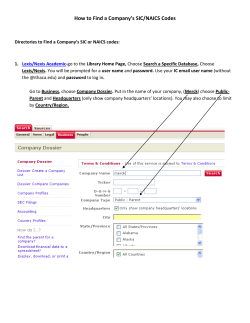
© Copyright 2026