
WindowTint.com Flat Glass Installation Instructions What you will need . . .
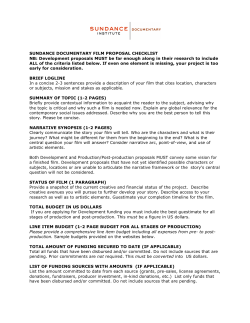
WindowTint.com
Flat Glass Installation Instructions
What you will need . . .
• Cutting Knife (A) or other utility knife for cutting and trimming film during
C
installation.
D
• Single-Edge Razor Blade (B) used during cleaning to remove small
pieces of tape and/or stickers.
• Scrubbing Pad (F) used in place of blades for safer cleaning of glass.
• Rubber Squeegee (C) for cleaning glass surface and to squeegee
mounting solution out from beneath film.
B
• Hard Card (D) to use as a trim guide for cutting film edges during
A
installation. Can be wrapped with paper towels to use as a hand
squeegee for cleaning and preparing glass.
F
• 16-oz Spray Bottle (E) for mixing and applying mounting solution.
Recommended Tools
• Lint-Free Paper Towels (not included in tool kit) for cleaning glass surface
and absorption of excess mounting solution.
• Mild dishwashing soap (not included in tool kit) for mixture with water for mounting solution.
Prepare Mounting Solution
1. Mix 4 drops dish soap into 16 ounces of water.
Tip: If the water in your area is hard, you may want to use
distilled water.
Note: The use of dish soap serves two purposes. It acts as a
lubricant when positioning film during installation and it prevents the film from sticking to itself.
2. Pour solution into a spray bottle for ease of use during
installation.
Note: The mounting solution will be used for several purposes during film installation: cleaning and preparation of glass;
wetting adhesive for ease of positioning, cleaning of film surface during and after installation.
Glass Preparation
1. Glass must be perfectly clean. Remove any tape, stickers,
paint or stain using a single-edge razor blade. Tip: Wetting
the glass with the mounting solution will reduce the chance of
scratching the surface during the scraping process. Use a
fresh blade for each job or be sure to check blade for imperfections which may cause scratching.
2. Once glass has been cleaned of debris, use the razor
blade to go over glass one more time to remove any leftover
residue.
3. Spray glass once more and squeegee it dry using the
Rubber Squeegee (B), then wipe edges dry with lint-free
paper towels.
Film Preparation and Installation
1. Measure height and width of glass surface, keeping in mind
the roll width of the pattern you’re working with. It may be necessary to splice together two or more pieces of film in order to
cover your surface.
E
2. Carefully remove required film from kit. If using roll film,
use a knife and trim guide to cut. Tip: We allow approximately 1” extra material on each side of the film when cutting.
3. Remove protective liner from back side of film. Begin in
one corner and peel away to expose adhesive. Tip: If you
have difficulty doing this, take two pieces of clear adhesive
tape, apply to one corner of each side of film and peel apart.
4. Thoroughly saturate the adhesive by spraying with mounting
solution. This process will allow for easy positioning of film onto
your surface. If any area of adhesive is left dry, it will “grab”
onto the surface and cause difficulty when positioning. Avoid
this by misting the surface of the glass with mounting solution.
5. Carefully place film onto surface (adhesive side to glass
surface) and position as desired.
6. Once you are satisfied with the film position, you will begin
to squeegee out the excess solution. For this first squeegee
process, begin by spraying the film surface with mounting
solution. Using moderate pressure, take the rubber squeegee
and work from the center out to the edges of the film.
7. Using the trim guide and knife, trim excess film from edges
of surface. Tip: It is best to cut in one continuous movement,
using the trim guide to keep film firmly in place.
8. Spray film surface again with mounting solution. You will
now begin the second squeegee process using the rubber
squeegee. All remaining solution must be pushed out from
behind the film. You will need to apply more pressure during
this step. Tip: For this squeegee process, you may use a rubber squeegee and we recommend you catch excess solution
from edges with a paper towel. This will prevent the solution
from seeping back under the film. Another option is to wrap
your trim guide hard card with a paper towel and use it as a
squeegee. PLEASE NOTE: Should you feel your tool begin
to drag on the surface, lightly mist it with mounting solution.
9. If any bubbles are not removed after step 8, it may be
necessary to squeegee again. Always lubricate the top
side of the film with the mounting solution before applying
the squeegee.


© Copyright 2026