ABC
docz
Explore
Log in
Create new account
Download
Report
home and garden
home furnishings
A Dia Key gra
"Lutterloh... we have a problem!"
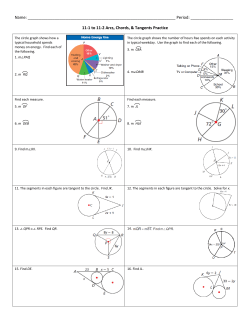
Name: __________________________________________________________________ Period: ___________________
Create Your Own Season! ® XOX Paper Mache Valentine Letters
Before application, clean desired surface to remove grease or dust.
A -T H P
¼” or ½” elastic, 32-36” of double-
Brite-Line BLACK TEMPORARY REMOVABLE TAPE
PERONEAL TENDONITIS APPLICATION OVERVIEW BODY POSITION AVERAGE DAYS WEAR
Learn Pattern-Making in minutes! www dressmaking.co.nz
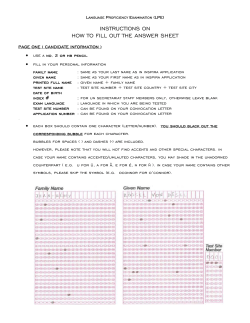
INSTRUCTIONS ON HOW TO FILL OUT THE ANSWER SHEET
HOW TO UNDER TILE WATERPROOF DIY GUIDES:
Title: How to roll out PCB Editor using SITE and HOME
© Copyright 2026
About abcdocz
DMCA / GDPR
Report