
How to retouch photos
Adobe Photoshop CS6
Project 1 guide
How to retouch photos
Other than correcting color, one of the most common tasks you will perform in Adobe Photoshop is retouching
photos to correct imperfections, edit out undesired parts of the photo, and correct problems that result from the phototaking process. This guide covers several ways to retouch photos using the Retouching tools (Figure 1), including
use of the Spot Healing Brush tool, the Red Eye tool, the Patch tool, and the Content-Aware Move tool. Use these
tools individually, or in combination to fine-tune your photo retouching tasks.
Figure 1 Retouching tools
Using the History panel
Because retouching can require trial and error, you should know how to use the History panel to undo steps.
Like most computer users, you’re probably aware of the Undo command available in many applications. This
command lets you undo the effects of whatever command you’ve just applied.
Photoshop takes the Undo command several steps further with the History panel. The History panel keeps track of the
last 20 commands you’ve applied to an image, allowing you to revert to any one of these. When you execute a
command, such as transforming an image or adding text, these are added to the History panel. The commands appear
in the list in the order in which you performed them. Each command is listed with the name of the tool or command
you used to change the image.
You can also take a “snapshot” of a particular set of commands, allowing you to revert to this snapshot later.
Note: Although the History panel is great, it does consume memory (RAM), as do layers. So, if you’re working with
a complex, multilayered image, you may want to reduce the number of History commands saved. You can do so by
choosing Edit > Preferences > Performance (Windows) or Photoshop > Preferences > Performance (Mac OS).
To use the History panel:
1. Open an image in Photoshop.
History
button
2. Click the History button in the right-side panel set (or
choose Window > History) to open the History panel
(Figure 2).
3. Execute several commands—such as selecting a part of
the image, applying a filter, and adding a layer.
The point is to add some commands to the History panel.
Figure 2 History panel
© 2012 Adobe Systems Incorporated
How to retouch photos
1
Project 1 guide
Adobe Photoshop CS6
4. Click one of the earlier commands, such as Move
(Figure 3).
Observe that the image reverts to its appearance at the
time this command was executed. Any commands
executed afterward are temporarily discarded and appear
dimmed. In Figure 3, for example, the Eraser, Paint
Bucket and New Layer are dimmed and the effects no
longer appear in the image.
At this point, the later commands are still available in the
panel (if you select either). However, if you execute
another command, the dimmed commands will be
permanently discarded.
5. To delete a command, select it and then click the Delete
icon (Figure 3).
The image permanently reverts to the command prior to
the deleted command.
Delete icon
Figure 3 Earlier command selected
Taking a snapshot
You can use the Snapshot feature to capture the image as it appears at any point in the list of History commands. Once
you’re satisfied with an image, it’s a good idea to take a snapshot.
To take a snapshot:
1. Click the History command you want to capture.
2. Click the Snapshot icon (Figure 4).
3. Scroll to the top of the History panel as necessary to view
the snapshot (Figure 3).
4. To revert to the snapshot, click it as you would any other
History command.
Snapshots
You can compare different snapshots by clicking on
them.
Take a
Snapshot
icon
Figure 4 Snapshots in the History panel
Using the Spot Healing Brush tool
The Spot Healing Brush tool quickly removes blemishes and other imperfections in your photos. The Spot Healing
Brush works similarly to the Healing Brush: it paints with sampled pixels from an image or pattern and matches the
texture, lighting, transparency, and shading of the sampled pixels to the pixels being healed. Unlike the Healing
Brush, the Spot Healing Brush doesn’t require you to specify a sample spot. The Spot Healing Brush automatically
samples from around the retouched area.
Note: If you need to retouch a large area or need to better define the source sampling area, you can use the Healing
Brush instead of the Spot Healing Brush.
2
How to retouch photos
© 2012 Adobe Systems Incorporated
Adobe Photoshop CS6
Project 1 guide
To use the Spot Healing Brush tool:
1. Click the Spot Healing Brush tool in the Tools panel.
The pointer changes to a brush. Usually the brush appears
as a circle.
2. You can change the size or shape of the brush in the
Options bar (Figure 5).
The brush should be large enough to cover the entire
spot, with some room around the edges.
3. Confirm that the Content-Aware option is selected.
Content-Aware seamlessly fills the selection with similar
image content from nearby. For the best results, create a
selection that extends slightly into the area you want to
replicate.
Figure 5 Brush options
4. Position the Spot Healing Brush tool over the area you
want to correct (Figure 6).
5. Click to apply the correction (Figure 7).
Spot Healing Brush tool
Figure 6 Spot Healing brush positioned over a
blemish
Figure 7 Spot Healing brush applied
Using the Red Eye tool
When you take photos with a flash, red eye can often result. You can quickly correct red eye in flash photos of people
or animals with the Red Eye tool.
© 2012 Adobe Systems Incorporated
How to retouch photos
3
Project 1 guide
Adobe Photoshop CS6
To use the Red Eye tool:
1. Click the Red Eye tool in the Tools panel (Figure 8).
2. Position the Red Eye tool over the pupil you want to
correct.
3. If you are not satisfied with the result, undo the
correction, set one or more of the following options in the
options bar (Figure 9), and click the red eye again.
Pupil Size increases or decreases the area affected by the
Red Eye tool.
Darken Amount sets the darkness of the correction.
4. Click to apply the correction (Figure 10).
Figure 8 Red Eye tool
Figure 9 Red Eye tool options
Figure 10 Red Eye tool applied
Using the Patch tool
The Patch tool lets you repair a selected area with pixels from another area or a pattern. The Patch tool matches the
texture, lighting, and shading of the sampled pixels to the source pixels, making an imperfection disappear into the
surrounding image. You can also use the Patch tool to clone isolated areas of an image.
Note: When repairing with pixels from the image, select a small area to produce the best result.
To use the Patch tool:
1. Identify the object you want to remove from an image.
For example, you can remove the lightpost from the
tourist landmark photo shown in Figure 11.
Figure 11 Initial image to be patched
4
How to retouch photos
© 2012 Adobe Systems Incorporated
Adobe Photoshop CS6
Project 1 guide
2. Select the Patch tool.
3. Drag in the image to select the area you want to repair,
and confirm that the Source option is selected in the
options bar (Figure 12).
Figure 12 Patch tool options
Note: You can also make a selection prior to selecting the
Patch tool.
4. To adjust the selection, do one of the following:
•
Shift-drag in the image to add to the existing
selection.
•
Alt-drag (Windows) or Option-drag (Mac OS) in the
image to subtract from the existing selection.
•
Alt+Shift-drag (Windows) or Option+Shift-drag
(Mac OS) in the image to select an area intersected
by the existing selection.
5. Position the pointer inside the selection, and drag the
selection border to the area from which you want to
sample (Figure 13). When you release the mouse button,
the originally selected area is patched with the sampled
pixels (Figure 14).
Figure 13 Drag the selection to the sample area
Figure 14 The patched image
Using the Content-Aware Move tool
The Content-Aware Move tool functions in a similar way to the Patch tool, with the exception that dragging a
selection relocates a selected part of an image to a new location. The Content-Aware Move tool automatically
samples from around the selection area are to blend together the moved content with the background pixels.
© 2012 Adobe Systems Incorporated
How to retouch photos
5
Project 1 guide
Adobe Photoshop CS6
To use the Content-Aware Move tool:
1. Identify the object you want to move in an image.
For example, continuing work on the tourist landmark
photo shown in Figure 11, it might be preferable to move
the right-most building away from the looming office
building on the left.
2. Drag in the image to select the area you want to move. Be
sure to leave enough of a margin that edge-region pixels
can be suitably blended with background pixels.
Note: You can also make a selection prior to selecting the
Patch tool.
3. To adjust the selection, do one of the following:
•
Shift-drag in the image to add to the existing
selection.
•
Alt-drag (Windows) or Option-drag (Mac OS) in the
image to subtract from the existing selection.
•
Alt+Shift-drag (Windows) or Option+Shift-drag
(Mac OS) in the image to select an area intersected
by the existing selection.
Figure 15 Dragging the image content to be moved
4. Position the pointer inside the selection, and drag the
selection border to the area from which you want to move
the selection (Figure 15). When you release the mouse
button, the originally selected area is moved (Figure 16).
Figure 16 The final retouched image
6
How to retouch photos
© 2012 Adobe Systems Incorporated
Adobe Photoshop CS6
Project 2 guide
How to add text to images
In Adobe Photoshop CS6, you can add text directly to an image. As with shapes, you add text in its own layer, which
is named after the first few words of your text. Once you add text, you can modify it by using the Character and
Paragraph panels, by transforming the text box, and by applying layer styles to the text's layer.
Tool Preset picker
Set the font family
Change text orientation
Set the text Create
color
warped text
Set the font size
Set the font style
Set the antialiasing option
Set the text
alignment
Toggle the
Character and
Paragraph panels
Figure 1 Text options bar
Adding text to an image
1. Start Photoshop and open an image.
2. Select the Type tool (Figure 2).
3. In the Text options bar, set a font family, font style, size,
alignment, and color for the text (Figure 1).
Note: When you're working with a font on-screen, you
may observe that it seems smaller or larger than its point
size. This is because the on-screen appearance of fonts
depends on the document size and magnification. To see
the font sized as it will appear when printed, choose View
> Print Size.
Type tool
Figure 2 Tools panel
4. Select an anti-aliasing option from the Anti-aliasing popup menu.
5. Drag on the image to draw a text box (Figure 3). When
you are satisfied with the size of the box, release the
mouse.
Figure 3 Drawing a text box
6. Click in the text box you've created and type to add text
(Figure 4).
Figure 4 Adding text to a text box
© 2012 Adobe Systems Incorporated
How to add text to images
1
Project 2 guide
Adobe Photoshop CS6
Modifying text by using the Character and Paragraph panels
You can change textual characteristics through the Character and Paragraph panels. These options are similar to those
found in many word-processing and layout applications.
Modifying text by using the Character panel
To set an option in the Character panel, you first open the panel and select the text you want to change. For each
option in the panel, choose a value from the pop-up menu (Figure 5) or type a value. When you type a value directly,
press Enter (Windows) or Return (Mac OS) to apply it.
Panel menu
Font size
Leading
Kerning
Tracking
Vertical scale
Horizontal scale
Font color
All caps
Small caps
Anti-aliasing
Figure 5 Character panel
The options in the Character panel include the following:
•
Font size: Depends on document size. You set this in points.
•
Leading: Space between lines. You set leading in points.
•
Tracking: Space between characters. You set tracking in points. You can also fine-tune the space between
any two characters by selecting them and adjusting kerning. Usually you only need to adjust kerning for
large font sizes—at least 16 points.
•
Horizontal scale: Height of the letters. You set this as a percentage.
•
Vertical scale: Width of the letters. You set this as a percentage.
Anti-aliasing
Anti-aliasing produces smooth-edged type by partially filling the edge pixels so the edges of the type blend into the
background. For print jobs, you will generally want to apply anti-aliasing to your text, especially for larger text. For
smaller text or for web images, you may want to leave anti-aliasing turned off.
•
None: Applies no anti-aliasing.
•
Sharp: Type appears at its sharpest. (This option is set by default.)
•
Crisp: Type appears somewhat sharp.
•
Strong: Type appears heavier.
•
Smooth: Type appears smoother.
Note: When you use anti-aliasing, type may be rendered inconsistently at small sizes and low resolutions (such as the
resolution used for web graphics). To reduce this inconsistency, deselect the Fractional Widths option in the Character
panel menu.
2
How to add text to images
© 2012 Adobe Systems Incorporated
Adobe Photoshop CS6
Project 2 guide
To modify text by using the Character panel:
1. Choose Window > Character.
The Character panel appears (Figure 5).
2. Apply changes to the text
In the example (Figure 6), the following changes have
been applied:
•
Font style set to Bold
•
Font size set to 43 pt.
•
Small Caps is selected
•
Anti-aliasing set to Crisp
Figure 6 Text formatted in Character panel
Modifying text by using the Paragraph panel
You can make further changes to the text in the Paragraph panel. Most importantly, you can change the text's
alignment—whether the text lines up with the right, left, or center of the text box. You can also justify the text.
Justification means spacing the text so it meets both margins.
To modify text by using the Paragraph panel:
1. Choose Window > Paragraph.
The Paragraph panel appears (Figure 7).
2. Apply changes to the text.
In the example (Figure 8), the text has been centeraligned inside the text box.
Figure 7 Paragraph panel
Figure 8 Text formatted in Paragraph panel
© 2012 Adobe Systems Incorporated
How to add text to images
3
Project 2 guide
Adobe Photoshop CS6
Transforming a text box
As with most objects in Photoshop, you can transform text boxes. After you apply transformations, the text remains
editable.
To transform a text box:
1. Choose Windows > Layers and confirm the text layer is
selected (Figure 9).
2. Choose Edit > Free Transform.
3. Drag a transform control to change the shape of the text
box.
4. Move the pointer over a corner of the text box until the
pointer changes into a rotation tool (Figure 10).
5. Drag the rotation tool to rotate the text box.
6. Choose the Type tool in the Tools panel.
A message appears asking if you want to apply the
transformation.
Figure 9 Layers panel
7. Select Yes (Windows) or Apply (Mac OS).
8. Click in the text box.
Observe that the text remains editable even while rotated.
If you resize the text box vertically, the font size changes
accordingly.
Rotation pointer
Figure 10 Text rotated
Warping text
You can also curve, or warp, text by using the Create Warped Text option.
To warp text:
1. Select the Type tool.
2. Select the text you wish to warp.
3. Click the Create Warped Text icon in the Text options
bar.
The Warp Text dialog box appears (Figure 11).
4. Select a style, such as Wave.
5. Choose Horizontal or Vertical to determine a direction for
the warp.
6. Select a degree of bend for the warp.
4
How to add text to images
Figure 11 Warp Text dialog box
© 2012 Adobe Systems Incorporated
Adobe Photoshop CS6
Project 2 guide
7. Change the Horizontal Distortion and Vertical Distortion.
These settings let you create asymmetrical warps in either
a horizontal or vertical direction. You can experiment
with these settings later, but for now, keep the warp
straightforward.
8. Click OK to apply the warp (Figure 12).
Figure 12 Text with Wave warp applied
Modifying text by using layer styles
Because text is added to its own layer, you can also change the appearance of text by using layer styles. You can add
a drop shadow to the text, make the text appear embossed or beveled, or outline each letter with a stroke.
To modify text by using layer styles:
1. If the Layers panel is not already visible, choose
Window > Layers.
2. Double-click the text layer to open the Layer Style dialog
box (Figure 13).
Layer styles appear in a column on the left. To apply a
style, check its box. You can also reveal options for
modifying a style by clicking its name.
3. Apply one or more layer styles to the text.
Outer Glow, Bevel, Contour, and Stroke have been
applied to the text in the example (Figure 14).
Check a box Click a style's name to
to apply style modify options for it
Figure 13 Layer Style dialog box
Figure 14 Layer effects applied to text
© 2012 Adobe Systems Incorporated
How to add text to images
5
Project 2 guide
Adobe Photoshop CS6
Reusing text formats with type styles
You can achieve a consistent look and feel with saved type styles, which let you apply formatting to selected
characters, lines, or paragraphs of text with a single click.
A character style is a collection of character-formatting attributes that you can apply to a selected range of text. A
paragraph style includes both character- and paragraph-formatting attributes and can be applied to a selected
paragraph or range of paragraphs.
To use type styles:
1. Create a paragraph of text in your image.
2. Choose Window > Paragraph Styles.
The Paragraph Styles panel opens (Figure 15).
3. To create a new paragraph style, click the Create New
Style button.
4. Double-click the new style in the Paragraph Style panel.
The Paragraph Style Options dialog box opens
(Figure 16).
Redefine
Clear
Delete Style
Modification button
button
button
Create New
Style button
5. Type a new Style Name, if desired.
6. Define the text and paragraph options you want in the
Paragraph Style Options dialog box and then click OK.
Figure 15 Paragraph Styles panel
7. Select the text paragraph again.
8. Create a second paragraph style in the same way.
9. To apply a paragraph style, select a character, line, or
paragraph of text and click a style name in the
Paragraph Styles panel (Figure 17).
Note: You can update any of the paragraph styles you
create by double-clicking the style name and editing the
options you want in the Paragraph Style Options dialog
box. A plus sign next to a style name in the Paragraph
Styles panel indicates that a style has been overriden, or
modified in the document. To clear overrides and return
text to the appearance defined by the style, click the Clear
Modification button. To redefine the style and maintain
the current text appearance, click the Redefine button.
Figure 16 Paragraph Style Options dialog box
Figure 17 Paragraph Styles panel
6
How to add text to images
© 2012 Adobe Systems Incorporated
Adobe Photoshop CS6
Project 2 guide
How to understand color management
In working with images, you'll likely move color images from device to device. For example, you might scan an
image, view the image on your monitor at home, print the image on an inkjet printer to preview it, and then have it
printed professionally by a print vendor.
At each stage in this process, you can end up with color variations. The reason is this: These devices all have a limited
color gamut. Color gamut refers to the range of colors a device displays. After all, no device can reproduce the full
range of colors the human eye can see.
For example, monitors use RGB color. This color is created through a mix of red, green, and blue light. Because it
depends on light, RGB tends to be better at bright colors—like those in a neon sign—and less adept with dull
colors—blacks and some pastels. CMYK, in contrast, is used by four-color printers, and is a mix of cyan, magenta,
yellow, and black. Because it depends on light being reflected off a page, CMYK tends to be better at pastels and pure
black.
Colors might vary for one of the following reasons:
•
Differences in image sources—whether the image is from a camera or scanned in.
•
The way software applications define color.
•
Your choice of print media. For example, newsprint paper reproduces a smaller gamut than magazinequality paper.
•
Natural variations between devices—monitors differ based on manufacturer and monitor age.
Each device operates within a specific color space that can produce a certain range, or gamut, of colors. Because of
these varying color spaces, colors can shift in appearance as you transfer documents between different devices. For
example, a shade of blue with the values R 25, G 200, B 225 might appear slightly different when you scan an image
with this color than when you view it on a monitor or print it.
Monitor profiles describe how the monitor is currently reproducing color. You should create this profile first, because
you need to view colors accurately on your monitor to make design decisions. If what you see on your monitor does
not represent the actual colors in your document, you will not be able to maintain color consistency. For more
information on creating monitor profiles, see Monitor Profiles in Photoshop Help.
Input device profiles describe what colors an input device is capable of capturing or scanning. If your digital camera
offers a choice of profiles, Adobe recommends selecting Adobe RGB. Otherwise, use sRGB (this is the default for
most cameras).
Output device profiles describe the color space of output devices such as a desktop printer or a printing press. If
you're printing to your desktop printer, you can set this through the Print dialog box. When you print, the color
management system uses output device profiles to properly map the colors in a document to the colors within the
gamut of an output device's color space. Ideally, the output profile should also consider specific printing conditions,
such as the type of paper and ink. For example, glossy paper can display a different range of colors than matte paper.
Most newer inkjet printers include profiles to handle a range of such conditions, and you can often use these profiles
to best effect.
Managing color when you open files
You can solve the problem of working with different color spaces by using a color management system, such as the
one included with Adobe Photoshop CS6. This color management system handles a lot of these choices
automatically, but it's useful to understand color management so you can address problems as they crop up.
Photoshop provides options for you to manage the way color profiles are interpreted when you open files. You set
these options through the Color Settings dialog box, available through the Edit menu.
© 2012 Adobe Systems Incorporated
How to understand color management
1
Project 2 guide
Adobe Photoshop CS6
The settings you choose in the Color Settings dialog box determine the way colors are applied for both RGB and
CMYK. When you choose RGB or CMYK in the Image > Mode menu, the colors displayed in these modes are
determined by the Color Settings dialog box.
Pretested sets of options in the Color Settings dialog box
Although you can customize the options in the Color Settings dialog box, Adobe provides pretested sets of options
you can use. These are available in the Settings menu at the top of the Color Settings dialog box.These settings have
been tested by Adobe to work with most monitors (for screen output) and printers (for print output) in North America.
Here are three sets of settings you will find useful:
•
North America General Purpose 2 works well if you are exporting to both web and print formats. For
example, this setting group uses the sRGB IEC61966-2 setting for the RGB working space. This working
space reflects the settings on most computer monitors, low-end printers, and scanners.
•
North America Prepress 2 works well if you are exporting to a printing press. For example, this setting
group uses the Adobe RGB (1998) setting for the RGB working space. This working space reflects an RGB
range that corresponds more closely to CMYK (which is what printing presses use).
•
North America Web/Internet works well if you are exporting to the Internet only. All images are converted
to the sRGB IEC61966-2 working space.
How Photoshop handles color spaces in opened files
When you open a file, Photoshop compares the colors in the file's color space with the colors defined in the Color
Settings dialog box. By selecting the Ask When Opening option, you can have Photoshop ask you how to proceed
when it encounters a different color space. If this option is not selected, Photoshop automatically converts these
colors to the working space settings in the Color Settings dialog box. For example, if the image you're opening has
been created by using an sRGB IEC61966-2 B color space, and the Color Settings dialog box has Adobe RGB (1998)
working space for RGB, Photoshop converts the sRGB colors to Adobe RGB.
To use the Color Settings dialog box:
1. Start Photoshop.
2. Choose Edit > Color Settings.
The Color Settings dialog box appears (Figure 1).
In the Settings menu, you can choose from a series of
preset settings. For most print purposes, you can use
North America General Purpose 2.
3. Move the pointer over the menus in the Color Settings
dialog box to view more information on these options.
Information appears in the Description box at the bottom
of the dialog box.
4. Change the Settings to North America Prepress 2 and
observe the results.
Remember, North American Prepress 2 is best for
exporting to a printing press, so Photoshop changes RGB
to Adobe RGB (1998). With North American Prepress 2,
Ask When Opening is selected to preserve the integrity
of colors as you import them.
2
How to understand color management
Description box
Color Settings menus
Figure 1 Color Settings dialog box
© 2012 Adobe Systems Incorporated
Adobe Photoshop CS6
Project 2 guide
Using soft proofing
You can use soft proofing to proof on-screen. Soft proofing refers to changing on-screen colors to mimic the colors at
printing.
To use soft proofing:
1. Start Photoshop and open an image. If possible, open an
image with a wide color range, so as to best observe the
effects of soft proofing.
First, you're going to soft proof the image as it would
appear with CMYK printing.
2. Choose View > Proof Setup > Working CMYK. As you
do, look carefully at the image's colors. You should
notice a slight shift.
Note: The amount of color shift depends on the current
settings in the Color Settings dialog box, the image's
colors, and other factors.
Figure 2 Customize Proof Condition dialog box
Now you're going to soft proof an inkjet printer.
3. Choose View > Proof Setup > Custom.
The Customize Proof Condition dialog box appears
(Figure 2).
4. Confirm the Preview option is selected.
This lets you view changes on-screen as you make them.
5. Select Fujifilm ETERNA 250D Printing Density (By
Adobe) from the Device To Simulate menu.
Photoshop soft proofs the image as it would appear when
printed with Fujifilm ETERNA 250D film.
Observe the results in the image.
6. Click Cancel to close the Customize Proof Condition
dialog box without keeping changes.
Managing colors when printing
You can also set options for color management when you print to your printer. In the Color Management area of the
Print dialog box, you can configure whether colors are managed by Photoshop or your printer and specify preferences
for how colors are handled.
Most new inkjet photo printers come with fairly accurate profiles built into the driver. You may end up with the best
results—and save time—by letting the printer select the profile.
© 2012 Adobe Systems Incorporated
How to understand color management
3
Project 2 guide
Adobe Photoshop CS6
To view the Color Management area of the Print dialog box:
1. Open an image in Photoshop.
2. Choose File > Print. (You do not need to have
a printer currently connected to your printer
for this exercise.)
The Print dialog box appears (Figure 3).
The Color Management will be visible on the right side of the dialog box.
3. Move the pointer over the menus in the sections labeled
Color Handling, Printer Profile, and Rendering Intent.
Information on the option selected in each menu appears in the Description section of the dialog box. For
example, in the section Color Handling, you should see Printer Manages Colors selected in the menu. This option
asks your printer to determine how colors are printed.
4. When you've reviewed these options, click Cancel to
close the Print dialog box.
Figure 3 Print Settings dialog box
Rendering intent
Rendering intent refers to the way colors are converted from one system to another. When you print, you're
converting from one colorspace (Photoshop) to another (your printer). Rendering intents set the rules that determine
how colors are adjusted. The product of a rendering intent depends on the colors in your image and the current
settings in the Color Settings dialog box. Some profiles produce identical results for different rendering intents.
4
How to understand color management
© 2012 Adobe Systems Incorporated
Adobe Photoshop CS6
Project 2 guide
Photoshop sets a default rendering intent according to the profile you've selected in the Color Settings dialog box. For
example, if you chose a color setting for North America or Europe, the default rendering intent is Relative
Colorimetric. Generally, it's a good idea to go with these defaults, especially if you're still learning about color
management.
© 2012 Adobe Systems Incorporated
How to understand color management
5
Adobe Photoshop CS6
Project 2 guide
How to use drawing tools
In addition to its photo-editing features, Adobe Photoshop CS6 has a full suite of drawing tools. This guide teaches
you how to draw shapes in Photoshop. If you've used other drawing tools, such as Adobe Illustrator CS6, you will see
that Photoshop's approach to drawing is slightly different. Everything in Photoshop is based on the idea of film
exposure, of letting light show through rather than placing things onto a canvas.
Photoshop uses both bitmapped and vector images. Bitmapped images are made up of individual pixels and do not
scale well; vector images are constructed from mathematical formulas and scale very well.
Types of shapes
This guide addresses adding shapes as shape layers, which gives you the most flexibility in determining how your
shapes appear. However, adding shapes as separate layers adds to your image's file size and may eventually affect
Photoshop's speed. Shape layers are added as vector masks—that is, they are vector shapes through which only part
of the background shows.
If you're creating very simple shapes that do not need to be scaled, you can create bitmaps by using the Fill Pixels
option. This option creates shapes that are rasterized or created from individual pixels. Because Fill Pixels shapes
don't require additional layers, they can improve performance.
You set shape options in the Shape options bar (Figure 1).
Tool Picker
presets
Pick tool Shape fill
Shape stroke
Path operations
Shape width
mode
width
color
Shape height
Stroke color Shape stroke
No
color
Gradient
Solid
color
Pattern
Shape number of sides
(or points if a star)
Figure 1 Shape options bar
Drawing shape layers
Shape layers are essentially vector masks that hide a background. They consist of two parts: a mask and a background
color.
Shape layers offer the most flexibility in determining a shape's appearance, position, and visibility. Because the shape
masks are vector shapes, you can transform these shapes without loss of clarity.
To draw a shape in a shape layer:
1. Start Photoshop and create a new file or open an image.
2. Click one of the shape tools in the Tools panel, such as
the Polygon tool.
By default, the Tools panel shows the Rectangle tool. To
access other shapes, click the Rectangle tool and hold
down the mouse button (Figure 2).
Figure 2 Tools panel
© 2012 Adobe Systems Incorporated
How to use drawing tools
1
Project 2 guide
Adobe Photoshop CS6
3. In the options bar, make sure Shape is selected in the Pick
Tool Mode menu and New Layer is selected in the Path
Operations menu (Figure 1).
4. From the Shape Fill Color menu (Figure 1), select color,
gradient or pattern options for the color. Set stroke color
from the Stroke Color menu.
In the example (Figure 3), the polygon is set to Star, fill
is yellow, stroke is blue, and leaving the Indent Sides By
setting at its default of 50%. You can use the Polygon
Options menu to select the option for the star shape and
the amount by which the sides should be indented
(Figure 4).
Figure 3 Shape appearance as you draw it
5. Draw the shape by dragging the pointer across the
canvas.
When the mouse is released, the shape and stroke fills
with their selected colors (Figure 5).
6. If the Layers panel is not already visible, choose Window
> Layers.
Observe that the shape is on a separate layer with the
default name of Shape 1 (Figure 6).
Figure 4 Polygon Options menu in the options bar
Figure 5 Shape filled with color
Figure 6 Shape layer in Layers panel
2
How to use drawing tools
© 2012 Adobe Systems Incorporated
Adobe Photoshop CS6
Project 2 guide
Adjusting a shape's path
A path is the edge of a vector shape. By changing the path, you change the appearance of the vector mask and thus
the appearance of the shape. One way to change the shape's path is by moving one of its anchor points. Anchor points
appear at the shape's corners.
To adjust a shape's path:
1. Click the Path Selection tool, hold down the mouse
button, and select the Direct Selection tool (Figure 7).
2. Click the edge of the shape to select its path.
Anchor points—small hollow squares—appear at the
corners of the shape .
Figure 7 Tools panel
3. Move the pointer over an anchor point.
4. Click to select the anchor point.
Observe that the anchor point changes from a hollow
square to a solid square when you select it (Figure 8).
5. Drag to change the shape.
In example (Figure 9), the shape of the star has been
considerably altered by dragging several of the anchor
points to new locations.
Selected anchor
point
Figure 8 Moving a point with the Direct Selection
tool
Figure 9 Result of moving several anchor points
Adding to and subtracting from shape areas
You can add to or subtract from a shape layer to show more or less of the background. You set add and subtract
options in the Shape options bar by using the Path Operations menu (Figure 10).
Path operations
Figure 10 Path Operations menu in the options bar
© 2012 Adobe Systems Incorporated
How to use drawing tools
3
Project 2 guide
Adobe Photoshop CS6
Path options for shapes include:
•
New Layer Create a new shape layer.
•
Combine Shapes Add to the existing shape.
•
Subtract Front Shape Subtract from the existing front shape. You will only observe the effect of subtracting
if you draw over an existing shape.
•
Intersect Shape Areas Show only those areas where the last two shapes drawn intersect.
•
Exclude Overlapping Shapes Show all parts of a shape except where the last two drawn shapes intersect.
To add to a shape layer:
1. Click the shape thumbnail in the Layers panel to select
the shape.
2. Select a shape tool, such as the Ellipse tool.
3. Click the Combine Shapes command from the Path
Operations menu in the Shape options bar.
4. Draw a shape that adds to the image (Figure 11).
Observe that the new shape appears in the shape layer
(Figure 12).
Figure 11 Adding to a shape layer
Figure 12 Layers panel
To subtract from a shape layer:
1. Click the mask thumbnail in the Layers panel to select
the shape.
2. Select a shape tool, such as the Rounded Rectangle tool.
3. Click the Subtract Front Shape command from the Path
Operations menu in the Shape options bar.
4. Draw a shape that overlaps the image (Figure 13).
5. Observe that the shape has been modified in the shape
layer.
Figure 13 Subtracting from a shape layer
4
How to use drawing tools
© 2012 Adobe Systems Incorporated
Adobe Photoshop CS6
Project 2 guide
Controlling shape appearance with layer styles
Because shapes are on a layer, you can change their appearance by using layer styles. You can add a drop shadow to
the shape, make the shape appear embossed or beveled, or more.
To modify a shape by using layer styles:
1. If it is not already visible, choose Window > Layers to
open the Layers panel.
2. Double-click the shape's layer to open the Layer Style
dialog box (Figure 14).
A common element to add to a shape is to apply a drop
shadow.
3. In the Layer Style dialog box, select the Drop Shadow
option to apply a shadow. Make sure the Preview option
is selected so you can observe the effects of applying the
drop shadow.
4. Now, adjust the options for the shadow by clicking the
phrase "Drop Shadow" itself. You can set Blend Mode,
Opacity, Angle, Distance, Spread, Size, and other options
for the drop shadow. Try adjusting the various options
until you are happy with the effects.
Figure 14 Layer Style dialog box
5. Click OK to apply the drop shadow.
6. Apply one or more additional layer styles to the shape.
Observe the effects that appear beneath the shape in the
Layers panel (Figure 15).
The example (Figure 16) shows the shape with an Outer
Bevel and Texture style, to give the shape a slightly
raised bumpy appearance, the Drop Shadow style, to
make the shape appear slightly above the page, and a
Pattern Overlay set to 30%.
Note: You can apply layer styles to rasterized shapes as
well. However, the advantage of creating shapes on shape
layers is that you can resize them without loss of
resolution.
Figure 15 Effects applied to a shape layer
Figure 16 Bevel with Texture, Drop Shadow, and
Pattern Overlay applied
© 2012 Adobe Systems Incorporated
How to use drawing tools
5
Adobe Photoshop CS6
Project 2 guide
How to use painting tools
Previous guides describe how to use Adobe Photoshop CS6 to modify an existing image. In this guide, you create
new content by using Photoshop's painting tools.
The Brush tool and the Pencil tool work like traditional drawing tools by applying color with brush strokes.The
Gradient tool, Fill command, and Paint Bucket tool apply color to large areas. Tools such as the Eraser tool, Blur tool,
and Smudge tool modify the existing colors in the image. Some drawing tools provide a more natural and realistic
exerience by eroding as you work. Save favorite blunted tips as presets that you can reuse over and over.
Photoshop gives you a remarkably wide set of options for brush tools that provide good starting points for creating
realistic painting effects. You can select from a number of brush tips and then modify these further by using keyboard
shortcuts or from within the Brush and Brush Presets panels (Figure 1). To see a selection of brush presets, try
selecting different Brush tools from the Tools panel. Observe the changes in the Brush options and presets. You can
even create your own brush settings and save these for later use.
Figure 1 Brush panel and Brush Presets panel
This guide is a basic introduction to painting. After learning the basics, you should experiment with the other painting
tools to find the settings that work for you.
This guide covers four tools:
•
Brush tool Paint the current foreground color on an image and create soft strokes of color.
•
Pencil tool Paint the current foreground color on an image and create hard-edged lines.
•
Mixer Brush tool Simulate realistic painting techniques such as mixing colors on the canvas, combining
colors on a brush, and varying paint wetness across a stroke
•
Pattern Stamp tool Paint with the pattern selected in the Pattern picker.
© 2012 Adobe Systems Incorporated
How to use painting tools
1
Project 2 guide
Adobe Photoshop CS6
Setting brush options
With each brush, you set one or more of the following options in the options bar (Figure 2). A preset brush is a saved
brush tip with defined characteristics, such as size, shape, and hardness.
Tool Preset picker
Toggle Brush panel
Brush Preset picker
Mode
Airbrush mode
Opacity
Flow
Figure 2 Brush options bar
•
Tool Preset picker Save settings for the current tool, such as Airbrush Soft Round 50% Flow. As you change
settings for the Brush tools, you can save your settings for later use.
•
Brush Preset picker Select from a series of preset brushes. There is a wide range of these preset brushes, and
you can also create your own.
•
Mode Describe how painted colors will blend with the underlying image. See the Photoshop Help topic "List
of blending modes" for more detail.
•
Opacity Set the transparency for painted lines, from 0% (invisible) to 100% (opaque). As you paint over an
area, the color's transparency remains the same until you release the mouse button, no matter how many
times you move the pointer over the area. When you release the mouse button and then paint over the same
area, you apply additional color at the same opacity.
Brush only options
•
Flow Set the rate at which color is applied as you paint. For example, if you set the opacity to 100% and the
flow to 33%, the color moves 33% toward 100% opacity each time you move over an area.
•
Airbrush mode Simulate painting with an airbrush. Paint builds up as you hold down the mouse button.
Brush hardness, opacity, and flow options control how fast and how much paint is applied. Click the button
to toggle this option on or off.
Pencil only option
•
Auto erase Paint the background color over areas that contain the foreground color.
Mixer Brush only options
2
•
Current Brush Load swatch From the pop-up panel, click Load Brush to fill the brush with the reservoir
color, or Clean Brush to remove paint from the brush. To automatically perform these tasks after each stroke,
click the Load or Clean buttons.
•
Preset pop-up menu Apply popular combinations of Wet, Load, and Mix settings.
•
Wet Control how much paint the brush picks up from the canvas. Higher settings produce longer paint
streaks.
•
Load Specify the amount of paint loaded in the reservoir. At low load rates, paint strokes dry out more
quickly.
•
Mix Control the ratio of canvas paint to reservoir paint. At 100%, all paint is picked up from the canvas; at
0%, all paint comes from the reservoir. (The Wet setting, however, continues to determine how paints mix on
the canvas.)
•
Sample All Layers Pick up canvas color from all visible layers.
How to use painting tools
© 2012 Adobe Systems Incorporated
Adobe Photoshop CS6
Project 2 guide
Note: The options bar presents only a subset of brush options. Many other options—brush tips, settings, and more—
are available through the Brushes panel. See Photoshop Help for more information on these options.
Painting with the Brush tool
Use the Brush tool to create soft strokes of color.
To paint with the Brush:
1. Open a new document in Photoshop.
2. From the painting tools, select the Brush tool (Figure 3).
3. Choose a color for the brush by using one of the
following methods:
•
To open the Adobe Color Picker, click the
Foreground Color selection box in the Tools panel.
Select a color and click OK.
•
To open the heads-up-display (HUD) color picker in
Windows, hold down Shift+Alt while you Rightclick. Then drag to select a color hue and shade, and
release (Figure 4).
•
To open the heads-up-display (HUD) color picker in
Mac OS, hold down Control+Option+Command
while you click and hold. Then drag to select a color
hue and shade, and release (Figure 4).
Figure 3 Painting tools
4. Choose a relatively large brush, such as 50 px, from the
Brush Preset picker.
Note: You can also set the diameter and hardness
manually in the Brush Preset picker. Hardness determines
the softness of the line's edges.
Figure 4 HUD color picker
5. In the options bar, leave Mode set to Normal.
6. Set Opacity to 100%.
7. Set Flow to 20%.
When you set Flow to 20%, the darkness of the line
moves 20% closer to full opacity each time you overlap
lines.
8. Draw freehand by dragging in the image. Without lifting
the pointer, drag back over the line you just painted
(Figure 5).
Where the lines overlap, the paint becomes darker
because you set Flow to 20%. In that area, the tracedover line has an opacity of 40%
Overlap area is at 40% opacity
Figure 5 Drawing with Brush, Opacity 100%,
Flow 20%
Note: To draw a straight line, click a starting point in the
image. Shift-click an ending point for the line.
9. To draw a new line, release the mouse button and click on
the image again.
© 2012 Adobe Systems Incorporated
How to use painting tools
3
Project 2 guide
Adobe Photoshop CS6
Painting with the Pencil tool
Use the Pencil Tool to create hard-edged lines.
To paint with the Pencil:
1. Create a new Photoshop document.
2. From the painting tools, select the Pencil tool (Figure 3).
3. Choose a color for the Pencil tool by using one of the
following methods:
•
To open the Adobe Color Picker, click the
Foreground Color selection box in the Tools panel.
Select a color and click OK.
•
To open the heads-up-display (HUD) color picker in
Windows, hold down Shift+Alt while you Rightclick. Then drag to select a color hue and shade, and
release (Figure 4).
•
To open the heads-up-display (HUD) color picker in
Mac OS, hold down Control+Option+Command
while you click and hold. Then drag to select a color
hue and shade, and release (Figure 4).
Figure 6 Brush options in the Brush Preset picker
4. From the Brush Preset picker, manually adjust the
Diameter (brush size) to create a small-sized brush,
perhaps 20 px (Figure 6).
Note: You can also select a preset size and shape in the
Brush Preset picker. Hardness determines the softness of
the line's edges.
Figure 7 Overlap lines with opacity set to 50%
5. In the options bar, leave Mode set to Normal.
6. Make sure Opacity is set to 100%.
7. Draw by using one of the following methods:
•
To draw a straight line, click a starting point in the
image. Shift-click an ending point for the line.
•
To draw freehand, drag in the image.
8. Change Opacity to 50% in the options bar and draw
another line that overlaps the first line (Figure 7).
Observe that the line is half as dark as the first line and
that the first line shows through wherever you overlapped
it.
Painting with the Mixer Brush tool
Use the Mixer Brush to create realistic painting techniques such as mixing colors on the canvas, combining colors on
a brush, and varying paint wetness across a stroke.
The Mixer Brush has two paint wells, a reservoir and a pickup. The reservoir stores the final color deposited onto the
canvas and has more paint capacity. The pickup well receives paint only from the canvas; its contents are
continuously mixed with canvas colors.
4
How to use painting tools
© 2012 Adobe Systems Incorporated
Adobe Photoshop CS6
Project 2 guide
To paint with the Mixer Brush:
1. Open Photoshop and create a new document.
2. From the painting tools, select the Mixer Brush tool
(Figure 3).
3. To load paint into the reservoir, Alt-click (Windows) or
Option-click (Mac OS) the canvas. Or, choose a
foreground color.
Note: When you load paint from the canvas, the brush tip
reflects any color variation in the sampled area. If you
prefer brush tips of uniform color, select Load Solid
Colors Only from the Brush Load menu in the options
bar.
Figure 8 Mixer Brush Combinations menu in the
options bar
4. From the Brush Preset picker, manually adjust the
Diameter to create a medium-sized brush, perhaps 25 px.
Note: You can also select a preset size and shape in the
Brush Preset picker.
5. In the options bar, set Mixer Brush Combinations options
using the preset pop-up menu to apply popular
combinations of Wet, Load, and Mix settings (Figure 8).
Figure 9 Shift-click to paint a straight line
6. Do one or more of the following:
•
To draw a straight line, click a starting point in the
image, and then Shift-click an ending point
(Figure 9).
•
When using the Brush tool as an airbrush, hold down
the mouse button without dragging to build up color
(Figure 10).
•
Figure 10 Using the Mixer Brush as an airbrush
Drag in the image to paint. Notice how the paint
dries out towards the end of the stroke. Select
another foreground color from the toolbox and drag
over the painted area. Observe how the paint blends
canvas colors and varies paint wetness (Figure 11).
Figure 11 Dragging the Mixer Brush tool with
multiple colors
© 2012 Adobe Systems Incorporated
How to use painting tools
5
Project 2 guide
Adobe Photoshop CS6
Using specialty brush tips
A large number of brush tips are included with Photoshop and are available across all of the painting tools. These
range from artistic brushes—wet or calligraphic brushes—to specialty brushes such as starbursts or snowflakes. In
the Brush panel, you can select preset brushes from the Brush Presets panel, but you can also modify existing brushes
and design new custom brushes. The Brush panel contains the brush tip options that determine how paint is applied to
an image. For example, advanced options include Brush Pose which allow you to change the Tilt, Rotation, and
Pressure of your paint brush for a broader range of realistic painting effects (Figure 12).
Normal
stroke
Tilt X at
70%
Tilt Y at
-30%
Rotation
at 99%
Pressure
at 50%
Figure 12 25px, Flat Fan Bristle strokes and Brush Pose settings
The brush stroke preview at the bottom of the panel shows how paint strokes look with the current brush options.
You can choose from two types of brush shape options from the Brush panel: Standard tip and bristle tip.
Standard brush tip options
For standard brush tips, you can set the following options in the Brush panel:
6
•
Diameter (Size) Control the size of the brush. Enter a value in pixels or drag the slider.
•
Use Sample Size Reset the brush to its original diameter. This option is available only if the brush tip shape
was created by sampling pixels in an image.
•
Flip X Change the direction of a brush tip on its x axis.
•
Flip Y Change the direction of a brush tip on its y axis.
•
Angle Specify the angle by which an elliptical or sampled brush’s long axis is rotated from horizontal. Type
a value in degrees, or drag the horizontal axis in the preview box.
•
Roundness Specify the ratio between the brush’s short and long axes. Enter a percentage value, or drag the
points in the preview box. A value of 100% indicates a circular brush, a value of 0% indicates a linear brush,
and intermediate values indicate elliptical brushes.
How to use painting tools
© 2012 Adobe Systems Incorporated
Adobe Photoshop CS6
Project 2 guide
•
Hardness Control the size of the brush’s hard center. Type a number, or use the slider to enter a value that is
a percentage of the brush diameter. You can’t change the hardness of sampled brushes.
•
Spacing Control the distance between the brush marks in a stroke. To change the spacing, type a number, or
use the slider to enter a value that is a percentage of the brush diameter. When this option is deselected, the
speed of the cursor determines the spacing
Bristle tip options
Bristle tips let you specify precise bristle characteristics, creating highly realistic, natural-looking strokes. Set the
following bristle tip shape options in the Brush panel:
•
Shape Determine the overall arrangement of bristles.
•
Bristles Control overall bristle density.
•
Length Higher settings simulate the extended, trailing strokes of long bristles; lower settings produce more
abrupt strokes.
•
Thickness Control the width of individual bristles.
•
Stiffness Higher settings provide more precise control; lower settings produce more fluid strokes.
•
Angle Determine the brush angle with painting with a mouse.
•
Spacing Control the distance between the brush marks in a stroke. To change the spacing, type a number, or
use the slider to enter a value that is a percentage of the brush diameter. When this option is deselected, the
speed of the cursor determines the spacing.
To use brush tips:
1. Choose Window > Brush.
Brush
panel
menu
The Brush panel opens (Figure 13).
2. In the Brush panel, select a brush tip shape.
3. Select Brush Tip Shape on the left side of the Brush
panel, and set options.
In the example (Figure 13), the #25 Flat Fan bristle brush
is used.
Note: Some brushes present a thumbnail profile of the
brush tip shape in the document window to help you
select the appropriate brush (Figure 14).
Lock
icon
Brush stroke preview
Figure 13 Brush panel
© 2012 Adobe Systems Incorporated
How to use painting tools
7
Project 2 guide
Adobe Photoshop CS6
4. Drag in the image to paint with the specialty brush
(Figure 15).
5. To lock brush tip shape attributes (retaining them if you
select another brush preset), click the unlock icon . To
unlock the tip, click the lock icon .
6. To save the brush for use later, choose New Brush Preset
from the Brush panel menu.
Note: To save your new brush permanently or distribute
it to other users, you must save the brush as part of a set
of brushes. Choose Save Brushes from the Brush Presets
panel menu, and then save to a new set or overwrite an
existing set. If you reset or replace the brushes in the
Brush Presets panel without saving it in a set, you could
lose your new brush.
Figure 14 Thumbnail profile of a bristle brush tip
Figure 15 Painting with a specialty brush tip
Using the Pattern Stamp tool
A pattern is an image that is repeated, or tiled, when you use it to fill a layer or selection. You can select a pattern
from the pattern libraries or create your own patterns.
To use the Pattern Stamp tool:
1. Click the Clone Stamp tool, and hold down the mouse
button, and select the Pattern Stamp tool (Figure 16).
Observe that the options bar is slightly different than it is
for the Brush tool.
2. In the options bar, open the Pattern picker (Figure 17).
Figure 16 Tools panel
Initially, the selection of patterns in the Pattern picker
may be limited. You can choose to load additional
patterns or to replace the current patterns.
Selected pattern
Figure 17 Pattern picker
8
How to use painting tools
© 2012 Adobe Systems Incorporated
Adobe Photoshop CS6
Project 2 guide
3. Open the panel menu to see the available pattern libraries
(Figure 18).
4. Select the library file you want to use.
5. Click OK to replace the current list, or click Append to
add the library to the current list.
6. Select a pattern from the Pattern picker.
7. Select the Aligned option in the options bar to keep the
pattern aligned with your original starting point.
Panel menu
Otherwise, the pattern starts anew each time you release
the mouse button.
8. Leave the Impressionist option deselected.
With this option on, the pattern appears in blocks of
color.
9. Drag on the image to draw with the Pattern Stamp tool
(Figure 19).
Figure 18 Panel menu in the Pattern picker
Figure 19 Painting with the Pattern Stamp tool
© 2012 Adobe Systems Incorporated
How to use painting tools
9
Project 2 guide
Adobe Photoshop CS6
Using erodible brush tips
Soft drawing tools such as charcoal, pastel, or Conté are often used in art for expressive drawings and making rough
sketches. As these drawing tools are used, the tips wear down and can be sharpened to create different drawing
effects. Photoshop makes the experience of true-to-life, erodible drawing tools available with certain brush tips
(Figure 20). You can draw with an erodible brush tip, sharpen it, and save your favorite blunted tips as presets.
Erodible brush
shape menu
Sharpen Tip
button
Figure 20 50px, Square Charcoal brush tip, and Brush panel with Erodible Shape menu
To use erodible brush tips:
1. From the painting tools, select the Brush tool
(Figure 21).
2. Choose Window > Brush.
The Brush panel opens.
3. In the Brush panel, select the Brush Presets tab.
4. Scroll down to locate one of the erodible drawing brush
tips such as the Square Charcoal, Rounded Watercolor,
Crayon, Pastel, or Pencil brush presets.
Figure 21 Painting tools
In the example (Figure 20), the Square Charcoal brush is
used, with the size set to 50 pixels.
5. In the Brush panel, select the Brush tab.
Confirm that the selected brush preset includes the
erodible Shape menu options (Figure 20).
10
How to use painting tools
© 2012 Adobe Systems Incorporated
Adobe Photoshop CS6
Project 2 guide
6. Select the Brush Pose option in the Brush panel and
adjust the tilt, rotation or pressure of the brush tip.
Experiment with the default settings for Tilt X, Tilt Y,
Rotation, and Pressure.
Observe the change in the brush profile thumbnail as you
make your adjusments (Figure 22).
7. Drag in the image to draw with the erodible brush tip.
Observe the changes in the stroke thickness and how the
brush profile thumbnail changes as the tip wears down
(Figure 23).
8. (Optional) To restore the brush tip to its original state,
click Brush Tip Shape on the left side of the Brush panel,
and then click the Sharpen Tip button on the right side of
the panel.
Figure 22 Thumbnail profile of a square charcoal
brush tip
Note: To save your new brush permanently, you must
save the brush as part of a set of brushes. Choose Save
Brushes from the Brush Presets panel menu, and then
save to a new set or overwrite an existing set. If you reset
or replace the brushes in the Brush Presets panel without
saving it in a set, you could lose your new brush.
Figure 23 Drawing with the square charcoal
erodible brush tip
© 2012 Adobe Systems Incorporated
How to use painting tools
11
Adobe Photoshop CS6
Project 3 guide
How to use filters
Adobe Photoshop CS6 filters provide a range of options for changing your image’s appearance. You can use filters to
clean up or retouch your images, apply special art effects that give your image the appearance of a sketch or pastel
painting, and apply distortions and lighting effects. These filters can create added interest or help you achieve design
goals. As with many Photoshop features, though, you should take care not to overuse filters, as too many filters can
make an image overly manipulated or unprofessional.
Each filter has a range of settings. The Filter Gallery provides a preview of many of the special effects filters
(Figure 1). You can apply multiple filters, turn on the effect of a filter or turn it off, reset options for a filter, and
change the order in which filters are applied. When you are satisfied with the preview, you can then apply it to your
image.
New effect layer
Delete effect layer
Figure 1 Image in Filter Gallery with Grain and Diffuse Glow filters preview
Filters are applied to the active, visible layer or a selection. Not all filters in the Filter menu are available in the Filter
Gallery. Experiment with different settings to achieve your design goals.
Filters have the following limitations:
•
Some filters work only on RGB images.
•
All filters work with 8-bit images. If you are using 16-bit or 32-bit images, please see Photoshop Help for
information on which filters work with each.
•
When applying filters to shape layers, Photoshop first rasterizes the shape. Rasterizing means converting the
shape from vector to bitmap format.
© 2012 Adobe Systems Incorporated
How to use filters
1
Project 3 guide
Adobe Photoshop CS6
Creating a custom shape
In the following steps, you create a shape and then apply filters to it to give it an artistic appearance.
To create a custom shape:
1. Start Photoshop and create a new document.
2. Click and hold the Rectangle tool in the Tools panel, and
then select the Custom Shape tool (Figure 2).
3. In the options bar, make sure Shape is selected as the tool
mode (Figure 3).
4. Select a shape from the Custom Shape picker in the
options bar, such as Blob 1 (Figure 4).
Figure 2 Custom Shape tool
5. Drag the pointer across the image to draw the custom
shape, just as you would if you were drawing a rectangle.
To make the shape uniform in size, hold down the Shift
key while dragging.
Figure 3 Custom Shape tool mode in the options
bar
Figure 4 Custom Shape picker in the options bar
Applying a filter
You can apply a filter to the active layer.
To apply a filter:
1. Select the layer that contains the custom shape
(Figure 5).
By default, it will be labeled “Shape 1.”
2. Choose Filter > Filter Gallery.
Photoshop warns you it needs to rasterize the image
before proceeding. This means the image will no longer
be a vector mask.
Figure 5 Layers panel
2
How to use filters
© 2012 Adobe Systems Incorporated
Adobe Photoshop CS6
Project 3 guide
3. Click OK.
The Filter Gallery appears (Figure 6).
4. Click the Sketch filter in the center column to display
thumbnails of available filter effects.
5. Click the Halftone Pattern thumbnail.
Halftone Pattern is just one of many filters with which
you can achieve an artistic effect. The effect of the
Halftone Pattern is similar to that of certain Pop Art
techniques.
Settings for the selected pattern appear in the right
column.
Figure 6 Filter Gallery
6. Set Size to 10, Contrast to 35, and Pattern Type to Dot.
7. Click OK.
The filter is applied to the custom shape (Figure 7).
Figure 7 Halftone Pattern filter applied
Applying another filter
You can apply multiple filters to one image.
In these steps, you’re applying filters to a custom shape. You can apply filters to almost any image, such as
photographs or other artwork.
To apply another filter:
1. Click the layer with the custom shape.
2. Choose Filter > Pixelate > Crystalize.
As with the Halftone Pattern filter, a dialog box lets you
preview and change settings for the Crystalize filter
(Figure 8).
Figure 8 The Crystalize dialog box
© 2012 Adobe Systems Incorporated
How to use filters
3
Project 3 guide
Adobe Photoshop CS6
3. Set Cell Size slider to 50.
4. Click OK.
The Crystalize filter is applied to the shape (Figure 9).
Observe how the Crystalize filter modifies the effects of
the Halftone Pattern filter. You can create a wide range of
effects by combining filters.
Figure 9 Crystalize filter applied
Using the Liquify filter
The Liquify filter is another interesting filter you can apply to images. It causes the image to appear melted, along the
lines of a Salvador Dali painting.
Using the Liquify filter, you can push, pull, rotate, reflect, pucker, or bloat any area of an image.
To apply the Liquify filter:
1. Open an image in Photoshop.
2. Select the layer to which you wish to apply the Liquify
filter.
3. Choose Filter > Liquify.
The Liquify dialog box appears (Figure 10).
4. In the right column, set a brush size to use.
The brush size needs to be big enough to modify your
image.
5. On the left, choose the Forward Warp tool.
Forward warp tool
Set brush size
Figure 10 Liquify dialog box
4
How to use filters
© 2012 Adobe Systems Incorporated
Adobe Photoshop CS6
Project 3 guide
6. Drag the pointer through a part of the image (Figure 11).
Note: The Reconstruct tool, positioned beneath the
Forward Warp tool, will undo the effects of a liquify tool.
To revert, choose the Reconstruct tool and then drag
through the image.
Experiment with other liquify tools, such as the Pucker
and Bloat tools.
7. When you are satisfied, click OK to apply your changes
to the image.
Brush pointer
Figure 11 Forward warp tool applied
Using the Blur Gallery
The Blur filters soften a selection or an entire image, and are useful for retouching. They smooth transitions by
averaging the pixels next to the hard edges of defined lines and shaded areas in an image.
Advanced blur effects can be accomplished by using the Blur Gallery. Three blur effects make up the Blur Gallery:
•
Field Blur Click to place one or more focal point pins, and apply uniform or graduated blur between the
points. Use this filter on images for maximum customization for focal points settings and blur levels.
•
Iris Blur Applies blur to create an elliptical region of focus based on your settings. The Iris Blur filter works
best in images with a central element around which to focus attention.
•
Tilt-Shift Blur Soften select areas with this filter which lets you create a band of focus with a shallow depth
of field to simulate a minature scene. The Tilt-Shift Blur filter works best in images with elevated viewpoint,
and well-defined foreground, midground, and background focal planes (Figure 12).
Figure 12 Image with Tilt-Shift Blur preview
© 2012 Adobe Systems Incorporated
How to use filters
5
Project 3 guide
Adobe Photoshop CS6
To use the Blur Gallery:
1. Open an image in Photoshop.
2. Select the layer to which you wish to apply a Blur
Gallery filter.
3. Choose Filter > Blur > Tilt-Shift.
The Blur Tools and Blur Effects panels open with the
Tilt-Shift options available (Figure 13). The Blur Gallery
options bar and on-image controls and are also available.
4. Use the on-image tools to customize the Tilt-Shift Blur
filter settings:
•
Click to add a focal point pin.
•
Click-drag between the solid lines to reposition the
focal plane.
•
Click-drag a solid or dashed line to to change the
percieved focal plane tilt and graduated blur areas.
•
Click-drag a handle on the solid line, or between the
solid and the dashed lines to rotate the focal plane.
•
Click-rotate a dial that is around the focal pin to set
blur level (Figure 14).
Turn filter
on or off
5. Compare the original image with the blur filter image by
selecting and deselecting the Preview option in the Blur
Gallery options bar.You can also clear focus points by
clicking the Remove All Pins button.
6. You can preview other filters by clicking on the names in
the Blur Tools panel. Experiment with the Field Blur and
Iris Blur options and on-image controls to understand
how they function.
Figure 13 Blur Tools and Blur Effects panels
Note: More than one Blur Gallery filter can be applied at
one time. Click the check box beside the Blur Tool filter
name to turn a filter on or off.
You can also experiment with the settings in the Blur
Effects panel. Bokeh refers to the aethetic quality of a
blur, or more specifically, how out-of-focus points of
light are rendered.
7. When you are satisfied with the image, click OK to apply
the Blue Gallery settings.
Figure 14 Setting the blur level
6
How to use filters
© 2012 Adobe Systems Incorporated
Adobe Photoshop CS6
Project 4 guide
How to create layer comps
Designers often create multiple compositions or “comps” of a design layout to show clients. You can create comps
out of your image’s layers by using the Layer Comps panel. Using this panel, you can create, manage, and view
multiple versions of a layout in a single Adobe Photoshop CS6 file.
A layer comp is a snapshot of current layer visibility, position, and appearance. Layer comps capture the document as
it currently appears.
•
Layer visibility refers to whether a layer is showing or hidden.
•
Layer position refers to the layer’s position in the Layer panel, above or below other layers. In your
documents, content in upper layers appears over content in lower layers.
•
Layer appearance refers to whether a layer style is applied to the layer. It also refers to the layer’s blending
mode. For more information on layer styles and blending modes, see Photoshop Help.
When you create a layer comp, you can choose to capture one, two, or all three of these attributes.
Layer comps are best employed with images that have many layers. You will find it much easier to create layer comps
if you are in the habit of giving layers meaningful names, such as “image_main” or “border” or “blue background.”
When you give layers names, you can more easily identify them later.
To create a layer comp:
1. Open a file with multiple layers in Photoshop.
2. Choose Window > Layer Comps to display the Layer
Comps panel (Figure 1).
3. Click the Create New Layer Comp button at the bottom
of the Layer Comps panel.
This creates a new comp that shows layers as they
currently appear.
The New Layer Comp dialog box appears (Figure 2).
Create New Layer Comp
Figure 1 Layer Comps panel
Figure 2 New Layer Comp dialog box
© 2012 Adobe Systems Incorporated
How to create layer comps
1
Project 4 guide
Adobe Photoshop CS6
4. Type a name for the comp and add descriptive comments.
5. Select Visibility, Position, and Appearance (Layer Style).
Selecting all three options ensures that the layer comp
will appear exactly as you want it to appear.
6. Click OK.
The current state of the layers has been saved as a layer
comp. This means that the image’s current appearance
has been saved as a layer comp (Figure 3).
7. Using the Layers panel, make changes to the image: hide
some layers, show others, or add more images. Your goal
is to make the image appear significantly different than it
appears now so you can save a different layer comp
(Figure 4).
Figure 3 Original layout layer comp
Note: To show or hide a layer, click the Eye icon to the
left of it.
Next you’re going to create a new layer comp by saving
the changes you just made in the Layers panel.
Eye icon
Figure 4 Layers panel with layers selected for
purple background highlighted
2
How to create layer comps
© 2012 Adobe Systems Incorporated
Adobe Photoshop CS6
Project 4 guide
8. Repeat steps 3–6 to save your changes as another layer
comp. In Figure 5, the new layer comp is called “Purple
background version.”
9. In the Layer Comps panel, click the left column next to
the layer comp you first created (Figure 6).
When you do so, the Apply Layer Comp icon appears
next to the layer comp, indicating it is selected.
The image changes to the first layer comp (Figure 6).
You can now easily toggle between Layer Comps to
compare changes.
Observe that layer visibility has now changed in the
Layers panel.
Figure 5 Purple background version layer comp
Apply Layer Comp icon
Figure 6 Selecting a layer comp
Updating layer comps
After you’ve created them, you can also update layer comps.
To update a layer comp:
1. Select a layer comp in the Layer Comps panel.
2. Open the Layers panel and make changes to layer
visibility or position.
Once you make changes to the Layers panel, the Apply
Layer Comp icon disappears from the selected layer
(Figure 7). The layer comp has not yet been updated, and
the document’s current layer visibility is different from
that saved in the layer comp.
3. Click the Update Layer Comp button to save your
changes.
Update Layer Comp button
Figure 7 Layer Comps panel
© 2012 Adobe Systems Incorporated
How to create layer comps
3
Project 4 guide
Adobe Photoshop CS6
Exporting layer comps
You need to export your layer comps in a form your clients can view. Photoshop generates a different PDF document
for each layer comp.
To export multiple layer comps as PDF documents:
1. Choose File > Scripts > Layer Comps To Files.
The Layer Comps To Files dialog box appears
(Figure 8).
2. Click Browse to set a location on your system for the
output file.
The Choose Folder (Windows) or Choose A Folder (Mac
OS) dialog box appears.
3. Click OK (Windows) or Open (Mac OS) to set the
destination.
4. In the Layer Comps To Files dialog box, enter a name for
File Name Prefix.
5. Deselect Selected Layer Comps Only.
This ensures that all of the layer comps in the Layer
Comps panel will be included in the PDF.
6. From the File Type drop down menu, select PDF.
Figure 8 Layer Comps To Files dialog box
7. Click Run.
Photoshop creates individual PDF files according to your
specifications in the location you indicated. A success
message appears when the file creation is complete.
8. In your system, open the folder containing the PDFs.
9. Double-click a PDF file to open it (Figure 9).
Figure 9 PDFs output to selected folder
4
How to create layer comps
© 2012 Adobe Systems Incorporated
Adobe Photoshop CS6
Project 6 guide
How to blend, feather, and smooth
Quite often, you need to select part of an image to modify it. When you select uniform geometric areas—squares,
circles, ovals, rectangles—you don’t need to worry too much about getting the selection exactly right. Unfortunately,
most of the selections you’ll make in Adobe Photoshop CS6 are likely to be irregular shapes, such as people, trees, or
flags. In the example (Figure 1), the selection of the ship has plenty of irregular edges, most notably in the sails.
Figure 1 Irregular selection
Photoshop’s smoothing, feathering, and blending features help you manage such irregular selections.
•
Smoothing: Reduce the jagged edges that often result from making selections with one of the lasso tools.
•
Feathering: Soften a selection’s edges by making a boundary area between the selection and the pixels
behind it. Feathering is especially useful when you copy a selection to a new background. A selection’s
jaggedness may be emphasized because of contrast between the selection and its new background.
Feathering helps reduce this jaggedness.
•
Blending: The way colors appear when overlaid—when one layer overlays another, for example. You can
fine-tune the way a selection appears by adjusting how the selection blends with its background. Photoshop
provides a wide range of blending options.
© 2012 Adobe Systems Incorporated
How to blend, feather, and smooth
1
Project 6 guide
Adobe Photoshop CS6
Smoothing and feathering with the Refine Edge command
You can use the Refine Edge command to change your selection and preview these changes over a dark or light
background. This makes it easier to edit your selection before you copy and paste it elsewhere.
To smooth and feather an image:
1. Start Photoshop CS6 and open an image.
2. Double-click the Background layer.
The New Layer dialog box opens (Figure 2).
3. Rename the layer or accept the default name, Layer 0.
4. Click OK to close the New Layer dialog box.
5. Select the Lasso tool in the Tools panel (Figure 3).
Figure 2 New Layer dialog box
Note: Some users find the Polygonal Lasso tool easer to
use because you can make a series of short segments
instead of one continuous line. To access the Polygonal
Lasso tool, click the Lasso tool and hold down the mouse
button.
6. Using the Lasso tool, select part of the image.
Preferably, select some irregular shapes like the sails in
the example (Figure 1).
Figure 3 Lasso tool
7. Complete the selection by closing the selection loop, and
release the mouse.
For more information on making selections, see
Photoshop Help.
8. Choose Select > Refine Edge.
The Refine Edge dialog box appears (Figure 4).
The selection appears on a white background by default.
You can choose a different background option in the
View Mode area. White or black will be most useful in
adjusting smoothing and feathering.
Figure 4 Refine Edge dialog box
9. Under Smooth, drag the slider to the right.
Any jagged edges become smoother.
10. When you are satisfied with the selection’s appearance,
release the mouse button.
11. Under Feather, drag the slider to the right.
The outline of the selection becomes blurred. This is the
effect of the feathering.
It is best to limit feathering to 3–5 pixels. Increasing the
feathering beyond 5 pixels can produce interesting
effects, but unless these effects are part of your design
goals, you will not want to apply them.
2
How to blend, feather, and smooth
© 2012 Adobe Systems Incorporated
Adobe Photoshop CS6
Project 6 guide
12. Click the Decontaminate Colors option.
Decontaminate Colors replaces color fringes with the
color of the subject. Because this option changes pixel
color, it requires output to a new layer or document,
preventing unexpected changes to the current layer. You
can accept the default Output To: New Layer With Layer
Mask option.
13. When you are satisfied with the selection’s
appearance (Figure 5), click OK to close the Refine
Edge dialog box.
14. Open the Layers panel.
Figure 5 Smoothing and feathering applied
Notice that now the selection is on a new layer with layer
mask
15. Click the Create A New Layer button to add a new layer
(Figure 6).
16. In the Layers panel, drag the new layer below the layer
mask.
17. Select the Paint Bucket tool in the Tools panel
(Figure 7).
18. Click The Set Foreground Color selection box in the
Tools panel.
The Color Picker opens (Figure 8).
19. Select a color for the background layer behind the layer
mask.
Turn visibility on
Create A New Layer button
Figure 6 Layers panel
Paint Bucket Tool
20. Click OK.
Make sure the Paint Bucket tool is still selected.
Set Foreground Color
Figure 7 Tools panel
Figure 8 Color Picker
© 2012 Adobe Systems Incorporated
How to blend, feather, and smooth
3
Project 6 guide
Adobe Photoshop CS6
21. Click in the new layer to add a new background color.
Observe that the background layer now displays a
thumbnail of a solid color (Figure 9).
Set Opacity
22. (Optional) To change the opacity of the solid color layer,
enter a value between 0% and 100% in the Set Opacity
text area (Figure 9). For example, Figure 10 has the
opacity set to 70% and the visibility of Layer 0 is turned
on.
The selection now appears on a new transparent, colored
background (Figure 10).
Figure 9 Layers panel with solid color layer
Figure 10 Selection on layered background
Layer blending options
Blending options let you determine how colors in the upper layer—known as the blend color—and the lower layer—
known as the base color—blend with one another.
Photoshop offers a wide range of blending modes. A few are defined here. For more information on blending modes,
see the topic “List of Blending Modes” in Photoshop Help. Blends only apply where the two layers overlap.
•
Lighten: Photoshop looks at the colors in each layer and selects the lighter of the base or blend color as the
result color. Pixels darker than the blend color are replaced, and pixels lighter than the blend color do not
change.
•
Darken: Photoshop looks at the colors in each layer and selects the darker of the base or blend color as the
result color. Pixels lighter than the blend color are replaced, and pixels darker than the blend color do not
change.
•
Color Dodge: Photoshop compares the colors in each layer and brightens the base color to reflect the blend
color by decreasing the contrast.
•
Hue: Photoshop creates a new color with the luminance and saturation of the base color and the hue of the
blend color.
Because you can preview these changes, the best way to decide which mode works for you is to experiment with
different blends.
4
How to blend, feather, and smooth
© 2012 Adobe Systems Incorporated
Adobe Photoshop CS6
Project 6 guide
To apply blending options to a layer:
1. Open an image with at least two layers.
2. Click the top layer to select it.
3. Choose Layer > Layer Style > Blending Options.
The Layer Style dialog box appears (Figure 11).
4. Make sure the Preview option is selected, so you can
observe your changes as you make them.
5. Select Lighten from the Blend Mode pop-up menu.
Observe the results (Figure 12).
6. Select Darken from the Blend Mode pop-up menu.
Observe the results (Figure 12).
7. Select Color Dodge from the Blend Mode pop-up menu.
Observe the results (Figure 12).
Blend Mode pop-up menu
Figure 11 Layer Style dialog box
8. Select Hue from the Blend Mode pop-up menu.
Observe the results (Figure 12).
Figure 12 Blending modes: Lighten upper-left,
Darken upper-right, Color Dodge lower-left, Hue
lower-right
© 2012 Adobe Systems Incorporated
How to blend, feather, and smooth
5
Adobe Photoshop CS6
Project 6 guide
How to use advanced color techniques
In Adobe Photoshop CS6, you can adjust an image’s colors in a variety of ways. Using the techniques described in
this guide, you can take the raw material of your image and transform it into an image with different or flattened
colors, improved warmth, or various types of grayscale. You will need practice to get these techniques right, and you
will have to try them to see how they can help you meet design goals.
This guide discusses the following techniques:
•
Changing the hue and saturation of an image
•
Applying photo filters to an image
•
Inverting the colors in an image
•
Using the Channel Mixer
•
Brightening selective colors in an image
•
Using the Replace Color function
•
Posterizing an image
•
Localized color corrections
You will implement most of these changes in adjustment layers. The first section of this guide describes adjustment
layers.
Using adjustment layers
As you apply color changes to an image, you will usually want to preserve your original image. One way is to save a
copy of your original image (this is always a good idea). Photoshop also lets you make changes in special layers
called adjustment layers.
An adjustment layer applies changes to your image without changing the image’s pixels permanently. For example,
instead of changing hue and saturation in your original image, you can create a Hue & Saturation adjustment layer.
The adjustments are stored in the adjustment layer.
These changes apply to all layers below the adjustment layer. Using the Layers panel, you can discard your changes
and restore the original image at any time.
You access adjustment layers through the Layer > New Adjustment Layer menu. To make most of the color
modifications discussed in this guide, you can also use the individual adjustment features in the Adjustments and
Properties panels (Figure 1). These panels provide quick access to every tool you need to adjust the color and tone of
images without losing any of the original image data.
Properties panel button
Figure 1 Properties panel and Adjustments panel
© 2012 Adobe Systems Incorporated
How to use advanced color techniques
1
Project 6 guide
Adobe Photoshop CS6
Changing hue and saturation
Hue identifies easily named colors such as red, orange, and pink and simply refers to the color’s specific place on the
color wheel. Saturation describes relative intensity or dullness of a color from the inside to the outside of the wheel
(Figure 2).
Figure 2 Color wheel
For hue, values reflect the number of degrees of rotation around the wheel from the pixel’s original color. A positive
value indicates clockwise rotation; a negative value, counterclockwise rotation. Values can range from 180 to +180.
In other words, when you change hue positively, blues become more purple, yellows become more green, and so on.
As you decrease hue, the opposite happens.
Saturation changes as you move out from the center of the wheel. That is, yellows become more yellow, and oranges
become more orange. Values can range from 100 to +100.
To change hue and saturation in an adjustment layer:
1. Start Photoshop and open an image.
2. Choose Layer > New Adjustment Layer > Hue/
Saturation.
The New Layer dialog box appears. By default, the layer
is named “Hue/Saturation 1.”
Note: You can change this name if you wish, but this
layer will change hue and saturation, so this name is
meaningful and therefore useful.
3. Click OK.
The New Layer dialog box closes.
The Properties panel appears, with Hue/Saturation
options (Figure 3).
Figure 3 Properties panel, Hue/Saturation options
2
How to use advanced color techniques
© 2012 Adobe Systems Incorporated
Adobe Photoshop CS6
Project 6 guide
4. Move the Hue slider about halfway to the right.
The colors of your image shift dramatically (Figure 4),
with greens becoming more blue and oranges becoming
more green (Figure 5).
Figure 4 Image original
Figure 5 Hue increased
Using the Invert command
The Invert command reverses the colors in an image. When you invert an image, the brightness value of each pixel in
the channels is converted to its opposite value on the color wheel. For example, shades of blue convert to shades of
orange, and shades of purple convert to shades of green.
To use the Invert command in an adjustment layer:
1. Choose Layer > New Adjustment Layer > Invert.
The New Layer dialog box appears.
2. Click OK.
Your image is inverted (Figure 6).
Figure 6 Invert command applied
© 2012 Adobe Systems Incorporated
How to use advanced color techniques
3
Project 6 guide
Adobe Photoshop CS6
Using selective colors
With the Selective Color command, you can change the intensity of selected color groups—such as blues, reds, or
magentas—along the CMYK scale.
To use the Selective Color options:
1. Choose Layer > New Adjustment Layer > Selective
Color.
The New Layer dialog box appears.
2. Click OK.
The Properties panel appears, with Selective Color
options (Figure 7).
3. Choose a color family from the Colors pop-up menu,
such as Magentas.
4. Drag the cyan, magenta, yellow, and black sliders and
observe the effect each has on the image.
Note: The effect on your image may be subtle, depending
on your image’s colors.
For example, if you increase cyan with Magentas
selected, the image’s reds become more purplish or
bluish. If you select Blacks, the image’s reds take on
more shadows.
Figure 7 Properties panel, Selective Color options
5. When you are satisfied with the image’s appearance,
minimize the panel.
Posterizing an image
The Posterize command lets you specify the number of colors in each channel (either RGB or CMYK) in an image
and then maps pixels to the closest matching level. The different colors—or values—in each channel are known as
tonal levels.
The Posterize command immediately reduces the total number of colors in the image. For example, if you choose two
tonal levels in an RGB image, Photoshop limits the total number of colors to six: two each for red, green, and blue.
When you enter 255 in the Posterize dialog box, the result is a “normal–looking” image because you get 255 colors in
each channel, the same as for RGB images.
This command is useful for creating special effects such as large, flat areas in a photograph.
To apply the Posterize image command in an adjustment layer:
1. Open an image in Photoshop.
2. Choose Layer > New Adjustment Layer > Posterize.
The New Layer dialog box appears.
3. Click OK.
The Properties panel appears, with Posterize options
(Figure 8).
Figure 8 Properties panel, Posterize options
4
How to use advanced color techniques
© 2012 Adobe Systems Incorporated
Adobe Photoshop CS6
Project 6 guide
4. In the Levels text box, enter a number between 4 and 8,
or use the slider to select the Posterize level.
The image’s colors flatten (Figure 9).
You can preview your changes in the image window.
The effects of the Posterize command are most dramatic
with a low number.
Figure 9 Posterize command applied
Using photo filters
The photo filters in Photoshop mimic the effects of a camera’s lens filters, as though you applied a very thin layer of
colored cellophane over your image. You can give a black-and-white photo an antiqued look by using a sepia filter, or
you can make your image’s colors seem warmer or cooler by using orange or blue filters.
To use a photo filter in an adjustment layer:
1. Open an image in Photoshop.
2. Choose Layer > New Adjustment Layer > Photo Filter.
The New Layer dialog box appears.
3. Click OK.
The Properties panel appears, with Photo Filter options
(Figure 10).
4. Choose a filter from the pop-up menu.
In the example (Figure 10), one of three warming filters
is selected.
Each filter applies a color to the image. You can also
choose a custom color by selecting the Color option and
clicking the color box.
Figure 10 Properties panel, Photo Filter options
The Density slider changes how much color is applied to
the image. For example, with the warming filter in Figure
10, the warm (orange) color tint intensifies when you
increase Density.
The warming filter is applied. The light parts of the
image appear slightly more orange, giving the photo a
warmer look (Figure 11).
Figure 11 Photo-warming filter applied
© 2012 Adobe Systems Incorporated
How to use advanced color techniques
5
Project 6 guide
Adobe Photoshop CS6
Using the Channel Mixer
You can use the Channel Mixer command to increase or decrease the color values in the red, green, or blue channels.
Each channel contains a set of colors; the three channels combine to create the millions of colors in an image.
In practice, this filter is often used to modify black-and-white images. You can also choose from a set of Channel
Mixer presets. With these presets, you can create black-and-white photos with a variety of shading. Because the
channels have distinct color ranges, they appear dramatically different when converted to black-and-white.
To use the Channel Mixer:
1. Open an image in Photoshop.
2. Choose Layer > New Adjustment Layer > Channel
Mixer.
The New Layer dialog box appears.
3. Click OK.
The Properties panel appears, with Channel Mixer
options (Figure 12).
4. From the Preset menu, choose Black & White With Blue
Filter.
Observe the results (Figure 13).
Figure 12 Properties panel, Channel Mixer options
Figure 13 Black & White With Blue Filter applied
6
How to use advanced color techniques
© 2012 Adobe Systems Incorporated
Adobe Photoshop CS6
Project 6 guide
5. From the Preset menu, choose Black & White With
Green Filter.
Observe the results (Figure 14).
Although both photos are black-and-white, the two
images have depths of gray in different areas. For
example, in the Black & White With Blue Filter, the halo
in the figure on the left—appears much darker than in the
Black & White With Green Filter.
Figure 14 Black & White With Green Filter
applied
Using the Replace Color function
You can use the Replace Color function to change the hue and saturation of a limited set of colors in your picture. For
example, you can change a purple sweater to red or a green flag to blue.
To change hue and saturation:
1. Open an image in Photoshop.
2. Choose Image > Adjustments > Replace Color.
The Replace Color dialog box appears (Figure 15).
3. Move the pointer over the image and click an area with a
specific color.
In the preview area in the center of the Replace Color
dialog box, all of the areas of your image with the
selected color turn white.
The Fuzziness slider adjusts the degree to which colors
close to the chosen color are also selected.
4. Move the Fuzziness slider until you have selected the
amount of the color you want to select.
In the example (Figure 15), the Fuzziness slider has been
moved to the right until all of the orange areas in the
image are selected.
Color chosen here
Parts of image with chosen color
turn white here
Figure 15 Replace Color dialog box
© 2012 Adobe Systems Incorporated
How to use advanced color techniques
7
Project 6 guide
Adobe Photoshop CS6
5. You can also adjust the saturation and lightness of the
selected color.
In the example (Figure 16), all of the orange areas in the
image have been bumped up to maximum Saturation, and
the Lightness reduced by half to create a deeper, darker
shade of orange.
6. When you finish selecting the area you want, move the
Hue slider to adjust the Result color (shown in the lower
right corner).
In the example (Figure 17), the previously orange areas
in the image have changed to magenta.
7. Click OK to close the Replace Color dialog box.
Figure 16 Hue of selected color changed
Figure 17 Selected color changed
Localized color corrections
Sometimes all you need to do to achieve a desired effect is make a minor color adjustment to a small, localized area
of your image. Use selection tools to define a precise area to adjust localized color.
To make localized color changes using a selection tool:
1. Click the Magic Wand tool in the Tools panel.
The pointer looks like a magic wand.
2. Click the Add To Selection option in the options bar and set Tolerance to 20 (Figure 18).
Add to selection
Figure 18 Magic Wand options bar
8
How to use advanced color techniques
© 2012 Adobe Systems Incorporated
Adobe Photoshop CS6
Project 6 guide
3. Move the Magic Wand over a small area of your image
and click an area with a specific color.
In this case, the green halo and the belt are selected with
the Magic Wand (Figure 19).
You may need to use the Magnify tool to view the areas
to be selected.
4. Choose Layer > New Adjustment Layer > Color Balance.
Click OK in the New Layer dialog box.
The Properties panel appears, with Color Balance options
(Figure 20).
5. Select the Shadows, Midtones, or Highlights you want to
adjust.
6. Adjust the color balance sliders to achieve the localized
color correction you want.
Notice in the example how the selected areas of the
image appear more saturated and brighter than in the
original (Figure 21).
Figure 19 Selected areas
Figure 20 Properties panel., Color Balance options
Figure 21 Selected areas of enhanced localized
color
© 2012 Adobe Systems Incorporated
How to use advanced color techniques
9
Project 6 guide
Adobe Photoshop CS6
To make color changes using a lasso tool and the HUD color picker:
You may want to make color changes to an area in an image with more variation than the Magic Wand tool will
accommodate. In that case, try using a lasso tool.
1. Select the Magnetic Lasso tool (Figure 22).
The pointer looks like a triangular lasso with a magnet.
2. Click in the image to set the first fastening point.
Fastening points anchor the selection border in place.
3. To draw a freehand segment, either release or keep the
mouse button depressed, and then move the pointer along
the edge you want to trace.
Figure 22 Lasso tools
The most recent segment of the selection border remains
active. As you move the pointer, the active segment snaps
to the strongest edge in the image, based on the detection
width set in the options bar. Periodically, the Magnetic
Lasso tool adds fastening points to the selection border to
anchor previous segments.
4. If the border doesn’t snap to the desired edge, click once
to add a fastening point manually. Continue to trace the
edge, and add fastening points as needed (Figure 23).
5. Close the selection border:
•
To close the border with a freehand Magnetic
segment, double-click, or press Enter (Windows) or
Return (Mac OS).
•
To close the border with a straight segment, hold
down Alt (Windows) or Option (Mac OS), and
double-click.
•
To close the border, drag back over the starting point
and click.
Figure 23 Tracing an edge
In this case, the whole figure is selected.
6. Choose Layer > New > Layer Via Copy.
The selection is placed on its own layer with the
unselected areas knocked out (Figure 24).
Figure 24 Selection on a new layer
7. From the Tools panel, select the Paint Bucket tool.
The pointer changes to a paint bucket icon.
8. Hold down Shift+Alt while you Right-click (Windows)
or hold down Control+Option+Command while you
click and hold (Mac OS).
The heads-up-display (HUD) color picker appears
(Figure 25). You can release the keys after the HUD
appears.
Figure 25 Using the HUD color picker
10
How to use advanced color techniques
© 2012 Adobe Systems Incorporated
Adobe Photoshop CS6
Project 6 guide
9. Then drag to select a color hue and shade, and release the
mouse button.
Note: To quickly select a color from the canvas to apply
to a shape, Alt-click (Windows) or Option-click (Mac
OS) and drag the eyedropper.
10. Click in the background area of your image to fill in a
background color (Figure 26).
Figure 26 Using the Paint Bucket tool
© 2012 Adobe Systems Incorporated
How to use advanced color techniques
11
Adobe Photoshop CS6
Project 6 guide
How to use the Vanishing Point filter
In many of the images you work with, you’ll need to make edits that involve perspective—the way an object appears
in relation to the viewer and the horizon. The Vanishing Point filter in Adobe Photoshop CS6 makes it easier to edit
images that have perspective planes—rectangular surfaces that seem to get smaller as they approach the horizon.
When you look up a hallway, for example, the walls appear to taper toward the horizon. In the illustration (Figure 1),
the train track rails seem to get closer together towards the horizon.
Figure 1 Image with perspective plane
When you use the Vanishing Point filter, you specify the planes in an image, and then apply edits such as painting,
cloning, copying or pasting, and transforming.
Your edits honor the perspective of the plane you’re working in—that is, if they are oriented correctly.
To use the Vanishing Point filter:
1. Start Photoshop and open an image that contains a
perspective plane.
2. Open the Layers panel.
3. Click the Create A New Layer button to add a new layer
(Figure 2).
When using the Vanishing Point filter, it is best to make
your changes in a separate layer so you do not alter your
original image.
4. Make sure the new layer in the Layers panel is selected
(Figure 2).
Create A New Layer button
Figure 2 Layers panel
© 2012 Adobe Systems Incorporated
How to use the Vanishing Point filter
1
Project 6 guide
Adobe Photoshop CS6
5. Choose Filter > Vanishing Point.
The Vanishing Point dialog box appears (Figure 3).
6. Your first step is to select a perspective plane to modify.
Make sure the Create Plane tool is selected (Figure 4).
7. Click the four points of a perspective plane.
In the example (Figure 5), four points on the train track
rails are selected. When you click the fourth point in the
plane, a grid forms between the four points (Figure 6).
Figure 3 Vanishing Point dialog box
Create Plane tool
Figure 4 Create Plane tool
Figure 5 Creating a plane
2
How to use the Vanishing Point filter
© 2012 Adobe Systems Incorporated
Adobe Photoshop CS6
Project 6 guide
8. Select the Brush tool in the Vanishing Point dialog box
(not in the Tools panel).
So you can see better, you can magnify the image by
using the Zoom tool.
The brush tip (normally a circle) becomes an oval that
continually re-aligns with the image plane as you move
the brush around (Figure 7).
9. Drag the pointer to paint in the image.
Following the lines of the plane is easier than it would be
without the Vanishing Point filter.
10. Select the Stamp tool in the Vanishing Point dialog box.
11. Hold down the Alt key (Windows) or Option key (Mac
OS) and click within the perspective plane to select an
area for cloning (Figure 8).
Zoom tool
12. Drag in the image to clone the area.
Figure 6 Perspective plane grid created
Brush tool
Grid
Observe that the shape of the clone area aligns with the
plane.
13. When you have completed your changes, click OK to
close the Vanishing Filter dialog box and apply the
changes to the image.
Because you began by adding a new layer, all changes
appear in the new layer.
Figure 7 Painting with the Vanishing Point brush
Source area for cloning
Cloned area
Figure 8 Cloning with Vanishing Point
© 2012 Adobe Systems Incorporated
How to use the Vanishing Point filter
3


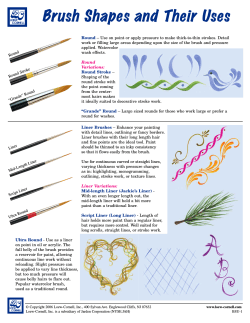


© Copyright 2026