
Page 1 ©2011
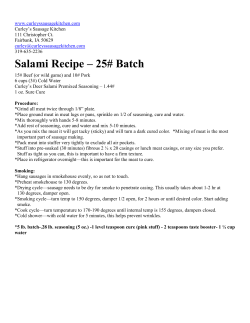
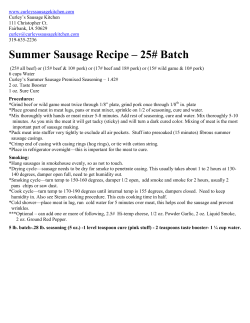
©2011 Page 1 of 17 Field Care of Your Game Meat What You Do Affects What You Taste If you have any experience in hunting you know that making the big kill is really just the beginning. After you have your prize, you then have to take care of the meat in the field. What you do at this point will affect what you taste later. Field dressing game properly is the most important aspect of a successful hunting venture. Deer and many other animals make wonderful meals if the game is well processed out in the field. The flavor of the eventual meat greatly depends on the care and timeliness of the field dressing. Many animals are wasted or not as tasteful because hunters do not follow good meat handling rules. Every time you hunt, expect to make a kill and travel with the tools you will need to complete deer processing. Those tools include: • knife • cooler • ziploc bags • disposable gloves • cutting board • marker There are several guidelines you should follow in the field in order to take care of the game meat in a timely manner. These guidelines will allow you to gain access to tasty meals later at home. Guideline 1 Always work on deer processing immediately after the kill. Never let it sit for a long celebration. (But high fives and war whoops are in order.) Guideline 2 If your knife is not sharpened, don't even bother to start deer processing. You will damage the meat and waste a lot of time - use a Havalon, and you don’t need to worry about losing your edge. Page 2 of 17 Guideline 3 Remember to keep the animal carcass cool and dry at all times. Warm tissue allows meat to spoil very quickly. Temperatures of 40 degrees or below are best. Guideline 4 Cut off all of the things you will not be eating such as fat, meat that has been shotdamaged, and contaminated stomach or intestinal tissues. Guideline 5 As you continue processing the animal, cut the meat into pieces that will fit into ziploc bags. Seal the bags tightly for placing into the freezer. You can always go back later and remove the sinew before cooking. Guideline 6 If this is your first time butchering a kill in the field, it’s best to have help so the deer processing can go quickly enough. Plan ahead. Every hunter may have a slightly different method when it comes to deer processing, but there are efficient methods that can help newcomers understand the process. The following methods are tried and true for deer processing: 1. Remove skin and hang deer by head or front legs from a tree. Skin the deer from neck down to keep the hair from getting into the meat. Pull the skin down and cut off the lower legs. 2. Wash the body while removing any dirt, blood, hair, and damaged tissue. 3. Take the loins from the back bone. This meat creates the best steaks. We’ll address aging the meat later. 4. Take the meat from the front and rear quarters and put it into the cooler. 5. Remove the front and shoulder neck meat for ground meals or stew. 6. Remove the hind quarter meat for roasts or stews. 7. Package all meats and label them accordingly. Make sure they fit securely into the freezer. The amount of time the deer processing will take greatly depends on you and your level of experience. It should take an hour or two to remove the skin, wash the carcass, and quarter the deer. It can also take an hour to remove the bones from the various quarters. It also takes at least 2 and up to 6 hours to cut the pieces out, package the meat, wrap it, and then store it. Experienced hunters can complete the process with their eyes closed. It may take beginners longer, but if you follow these methods and guidelines, the meat you will enjoy later will taste great. Page 3 of 17 Tools For Processing Deer Yourself Once you’ve killed the deer of your dreams, you then have to work on field dressing the animal. After that is behind you, you will have to think about deer processing. Many hunters take their deer to processing companies that can make certain cuts of meat for them. It is also possible, however, to do the deer processing on your own. If you want to complete the cycle from hunting to processing, there are many different tools you will need. What you need will depend greatly on the types of meat you wish to form. Some of the things you may want to consider, depending on how many deer you plan to process and what types of meat you intend to enjoy are the following items: grinder band saw tenderizer dehydrator coolers refrigerators The Basic Necessities The basic deer processing necessities are much more simple. Every hunter will need a clean place to work and sharp knives sitting right alongside knife sharpeners. The work space should be cleaned with a water and bleach solution before any meat touches it. It is also a good idea to re-clean the space often while the deer processing is taking place. Some hunters like to use their favorite knife and take frequent breaks to sharpen the device. Others will keep several similar knives on hand so they do not have to stop deer processing to sharpen the knives as frequently. Sharp knives are definitely the most valued asset when it comes to deer processing. We’re learning that our Havalon Baracuta with XT127 fillet blades and XT115 hunter’s blades are really good for trimming meat down from large to smaller sizes and for removing unwanted fats and connective tissue. Page 4 of 17 Meat Grinder Meat grinders come in many different versions including hand crank products or products with electric motors. If you will be grinding a lot of meat, electric meat grinders are worth the cost. The grinder should come with a few cutting disks to aid with coarse or medium grinds. Coarse works best for jerky while medium is good for anything. Cubers You can purchase tenderizer and cuber attachments for most meat grinders, but the hand crank cubers are something to consider. All you have to do is drop the steak into the cuber, rotate the crank, and watch the cubed steak drop out. You can even pass the venison through twice to cut the meat in two directions. Dehydrator Generally, grinders and cubers will get the average hunter through the deer processing event. However, if you plan to make a lot of jerky, you will also want to add a dehydrator to your list. Whenever you dehydrate, you will want to make sure you are careful that the drying process does not run too hot. You can end up with jerky that is not dry enough and jerky that is too dry. When it comes to venison meat, you do not want to waste anything. Prevent Spoiling Meat The best thing you can do for the deer processing portion of hunting is make sure that the meat does not spoil. This is true whether you plan to take the deer to a professional or do it yourself at home. Take the right actions while you are still in the field. That means right after you kill the deer, you need to gut in a reasonably short period of time. Once you get the meat ready to move, keep it cool, clean, and dry. Page 5 of 17 Venison meat, like any meat, can spoil quickly if it is not kept in the right conditions. It is a good idea to have all of your tools ready and sanitized before you begin deer processing so you can ensure that the meat can be prepared before it begins to spoil. How To Butcher A Deer Yourself Many deer hunters don’t enjoy the butchering process and prefer to have someone else do it. We think it’s just a factor of getting used to it by experience. It’s a little intimidating for those of us that didn’t grow up in a family where butchering was commonplace. But you don’t have to be an expert in order to butcher a deer safely. Anyone who enjoys hunting should also learn the basics in butchering. Even if you do not do the complete processing on your own, it is a good idea to understand it so you can prepare the meat properly. Keep in mind that no matter how you butcher a deer, you need to keep the meat in a cool, dry environment. If it is warm and sunny outside, you will want to take the deer home as quickly as possible so the meat does not get too hot and begin to spoil. You may have heard about the meat aging process, but even that process needs to take place at a temperature just a few degrees above freezing. Hot weather can ruin everything fast. If it is hot, throw an ice bag into the cavity after gutting. It is helpful to hang the meat before beginning the butchering process. When you hang the deer, make sure it is in a controlled environment that’s cool and dry. Butchering Basics In order to butcher a deer and secure meat that is safe to eat, make sure the venison is transported to a cool, clean, dry location quickly. Have we said this enough yet? You will need to have several things on hand anytime you hunt in order to do this when you make a kill. -10-15' rope -Sharp skinning knife (nothing’s sharper than our Havalon) -Knife sharpener (if you’re very old school) -Cutting board -Hacksaw -Paper towels -Plastic bags -Rubber gloves Page 6 of 17 Field Dressing The first step in the process begins immediately after the kill. How you field dress the deer will help determine how you butcher a deer later. First, you will want to lay the deer on its side and tie the rope to one hind leg. Place the other portion of the rope around a tree so the leg of the deer is extended, exposing the belly of the animal for easy access. If it allows easier access, you can also tie the front leg up as well. Next, cut the skin between the groin and the belly. Make sure you do not cut through the muscles at this point. Once the first cut is made, continue to cut the skin from the inside and take the reproductive organs away from the body. You need to remove the urinary and other reproductive tubes between the legs carefully so you do not contaminate the meat. Then, remove the rest of the skin from the body. As you continue to remove skin, be careful you do not puncture the urinary tubes or bowel section of the deer. It is even a good idea to tie off the bowel and urinary tube with a piece of cord. This can help prevent contamination, but you will still need to be careful where you cut. Then, use your knife to make a small cut in the hide near the belly region. Pull the hide apart by hand in order to expose the belly wall and its muscles. You can then cut through the muscle without penetrating the intestines. Once the belly muscles have been cut from the joints, open the chest cavity and cut the gristle away between the breast bone and ribs. Quartering Your Deer After the game has been killed and you field dress the animal, deer processing can be done in one of two ways. You can take the deer to a commercial processor, or you can do it yourself. Plenty of hunters simply take their kill to a commercial processor. It is convenient and these companies are able to make special items from the meat such as jerky, deer sticks, and sausage. Other hunters like to do the deer processing themselves. Some gather with other hunters and process more than one deer at a time. Others simply enjoy finishing what they started and completing the project on their own. No matter what form of deer processing you choose to use, make sure you follow the basic rules. You will need to: -Keep the carcass clean, cool, and dry at all times. -Bone out the meat. Page 7 of 17 -Avoid cutting through the brain or the spinal column with any of the processing equipment. -Store the meat until test results are available if the deer needs to be tested for CWD. If the deer has the disease, dispose of the meat. If you choose to carry out deer processing at home, you will need to know the methods well in order to save as much meat as possible. Cleaning Your work space does not need to be fancy, just clean, cool, dry and sanitized. Your knives need to be cleaned frequently during the process. Clean them in hot, soapy water and rinse regularly between cuts and make sure the work area is regularly cleaned. It’s a good idea to keep bleach water solutions on hand to keep everything sanitized. Deer processing can be narrowed down to three main steps: skinning, boning, and wrapping. Skinning Hang the deer by its head and try not to cut through the hide while you remove the hair. Keep the contaminated areas away from the meat. Cut the lower legs off and be sure to keep the carcass cool, clean, and dry at all times. Boning Take the hind quarters, loins, neck meat, and inner tenderloins off of the carcass while it is still hanging and put them into a cooler. You can then go back and remove the gristle and fat from each piece one at a time. Wrapping In order to preserve every piece of meat, double wrap the meat in freezer paper and get rid of any air pockets. Label the packages with the type of cut and the date. Page 8 of 17 Deer processing can take a significant amount of time, especially for someone who is new to the game. If you can keep things clean and orderly, your meat should taste great and be safe to eat. Processing Deer: How To Age Your Deer Meat Aging Is The Key To Great Tasting Venison Venison actually contains many of the same enzymes as beef such as lactic acid. Venison, however, has a different taste and it is much lower in fat. You can get an even better flavor from your deer by aging the meat in the proper manner. Aging deer is a simple process, but it needs to be done with care to save the meat for consumption. After the deer dies, it enters the rigor mortis stage. This stage usually lasts about a day. During that stage, the muscles contract and the meat is tougher to butcher and hard to cook and eat. You don’t want to freeze the meat during this stage. You can either hang the skinned deer in a very cool spot, or quarter the deer and store the meat in a very cool environment. In order to allow the meat to age without decay, keep the meat at a temperature ranging from 32-35 degrees. Make sure the meat never gets any warmer than 40 degrees because at that temperature, bacteria can begin to grow and the meat will rot. Aging deer can take place over a period of 3 to 10 days or more. There is no specific time. The general rule of thumb is that the younger the deer, the less aging it needs. If you have a mature buck, you may want the meat to age for 7-10 days in order for it to become tender. Younger deer usually only take 3-5 days. You will have to work in a trial and error type of way. The aging deer process will depend on many different factors including the environment, the type of deer and many other things. Whatever you do, make sure you have proper storage facilities with proper temperatures. Anything outside the right temperature range will allow meat the chance to spoil. After the aging process is complete, you want to freeze the venison to use later at your disposal. It is a good idea to freezer wrap each piece of meat in moisture free wrappings. You may want to use vacuum packaging to ensure that you get all of the air bubbles out. This will keep the meat fresh for longer in the freezer. If any moisture gets Page 9 of 17 into the meat, it will have a much more "gamey" taste and it can become tough. Venison can usually be stored in freezers at 0 degrees for anywhere from 6 to 12 months. Make sure you label each package with the date so you can keep track of it's age. If you are an avid hunter, you may also want to label the package in a manner so you can tell from which deer the meat comes. Try it out and enjoy that tender venison! Killer Ways To Cook Venison Yes, You Can Learn To Make Melt-In-Your Mouth Venison Once you’ve claimed the big game, aged and processed the deer, and placed all of the meat into the freezer, you then have to figure out ways to cook venison so you and your family can enjoy the meat you provided. There are quite a few ways to cook venison. Some of the methods involve using dry heat, grilling, roasting, braising, and even stewing. Here are some guidelines to help you make sure the venison is tender and tasty. Broiling If you want to broil some venison, you will be most pleased if you use chops, steaks, or loins. These pieces of meat have all the fat trimmed from them and they work well when they are broiled. Since the pieces are lean, you may need to add a little salt pork or bacon fat before you place seasoning on the meat. Then, preheat your broiler and let the temperature rise before you place the meat on the rack. Make sure the rack is far enough away from the heat source so the meat does not burn or get tough. Broiled meat is usually done before you think it is so check it often. Page 10 of 17 Grilling The best cuts for grilling are the rump and loin, but there are others that can turn out well. You want to marinate your meat before grilling, or you can simply apply cooking oil to each side. This helps ensure the texture of the meat is not tough after it is cooked. Be careful if you add salt before grilling because that can make the game meat dry out. Once the meat’s on the grill, cook it to your desired level and enjoy the great aromas. Pan-frying Chops, steaks, and loins work well when pan-fried. These types of meat have no natural fat, so you will likely want to add a little oil to keep the meat savory and moist. When the pan heats up, season the game as you like, or you can marinate it for a few hours before you throw it in the pan. I’ll dash a lot of tenderizer on the leanest cuts and fork it in to help prevent tough chewing. Once the pan is ready, set the meat in and watch for the blood in the cut to appear on the top. Once you see this reaction, flip the meat over and repeat the process until it’s done. Roasting Oven roasting is good for the rib roast or loin portion of the deer. Before you begin cooking the meat, make sure it’s free from excess fat and then season it with any herbs or spices you might enjoy. Do not add too much salt, however, because this can dry the meat out during the cooking process. Save salt for after it is cooked. That’s a good rule for any meat. If it’s a bone in roast, put the bone on the bottom of the pan. Let the meat sit in the oven at 300 degrees for 20 minutes for each pound of meat in the cut. Use a meat thermometer to make sure the center of the meat is ready before you remove it from the oven. There are many other ways to cook venison including braising, stewing, grounding and plenty more. Experiment with small cuts of meat to find your favorite and then you can go back and cook more in the ways you most enjoyed. Venison can be switched out for red meat in any of your best recipes, with one big warning sign, “Caution – Tough Chewing Ahead.” Venison is a naturally lean meat. That can lead to putting a hockey puck on everyone’s plate if you don’t manage it right. Page 11 of 17 Six Tips For Serving Great Tasting “Killer” Venison 1. Never overcook venison or other lean meats. They will dry out and become tough. Venison is not usually good past the medium well range. If you choose to roast the venison, try covering the pan with foil for the last 15 minutes. The juices will spread out evenly and the meat will cook with less drying. 2. Slow methods of cooking, such as roasting, are generally the best way to keep the venison moist. 3. Do not add salt to the meat before you cook it. Salt can remove juice and dry venison. Salt is for the table or at least for right before serving. 4. Make sure all the connective tissues are removed before you cook venison. These tissues leave an undesirable taste that can ruin the overall affect. Our Havalon Baracuta with fillet blades is great for trimming venison! I guarantee you’ll love it, and if you don’t, we’ll give you your money back. 5. Marinating venison is highly recommended. The acids in a marinade (like wine, vinegar or citrus juice) help tenderize the meat and add flavor. Oil in the marinade helps keep the meat moist. 6. Venison burgers taste great on the grill, but they may need extra moisture since the meat is very low in natural fat. You may want to wrap a piece of bacon around the patties or place an egg in the mixture to bind it together as it cooks. I often lay a strip or two of bacon over meat roasts too. With bacon, how can you go wrong? Five Tips for Delicious Venison Roasts Large cuts of venison roast can be quite delicious if you follow the above tips and keep these guidelines in mind. 1. Prime cuts are best for venison roasts. Look for the top round, the rump roasts, or the sirloin tips for dry heat roasting. These cuts are already tender and it does not take long for any slow cooker to make them into a great meal. 2. If you want to use a high temperature method, choose a roast with 2-5" of thickness. Or, you can pick a thinner piece and roll it up. The roast can reach a medium wellness in the oven at 400 degrees in 10-20 minutes. Roasts cooked to well done may shrink or dry out. 3. Check the meat with a thermometer to read the level of preparedness as it roasts. The USDA recommends an internal temperature of 160 degrees Farenheit for venison roasts. When the roast is five degrees below the temperature you want, take it out of the oven. The internal temperature will rise 5 degrees ten minutes later. Page 12 of 17 4. Low temperature roasting is good on tender cuts, or even less valuable cuts like the bottom round. It is a good idea to put bacon in with the meat so that it will become more moist and tender as it cooks. On low heat, the roast can be cooked to medium or well without becoming tough. 5. Moist heat cooking is a good way to tenderize a venison roast. You can choose tough cuts like the shoulder roast and brown the roast in hot oil along with various flavorings. The meat will become tender on the stovetop or in an oven set to around 350 degrees. Great Recipe for Venison Steak Anyone who loves hunting deer knows how delicious this low calorie meat is when prepared correctly. You want to be careful not to overcook the meat because it can dry out quickly if left too long in any warm temperature. If you want to start simple, enjoy a good venison round steak. The meat will tenderize as it slowly cooks within the oven. First, lay the pieces of steaks in a large pan and cover them with water and a dash of salt. Be sure that you do not add too much salt because it can quickly dry the meat out during the cooking process. Let the concoction soak for an hour. Soaking the meat in this solution will draw some of the blood from it and help improve flavor. Once the venison has soaked, drain the water and rinse the meat with clean water. Pat the steaks dry and set them to the side. You will next get the steaks ready by putting a slight amount of pepper on each side. Then coat each piece with flour. Brown the steaks in hot oil placed in a skillet. Do not cook the steaks completely through at this time. You will want to just lightly brown the steaks on both sides. The rest will finish cooking when you place it in the oven. After the steaks have been browned in the skillet put them in a large pan lined with foil. Add enough water to cover the bottom of the pan and then cover the pan with foil. Cook the steaks at 325 for an hour, give or take ten minutes. Make sure you check the steaks often and add more water if it evaporates. Experiment with other additives like wine, tomato sauce, onions and mushrooms. All of these add moisture and flavor to the meat. Page 13 of 17 Teriyaki Deer Steak Prepare the steaks in advance by placing them in a shallow dish with vinegar, honey, oil, garlic, soy sauce, red pepper flakes, and ginger. Marinate the steaks in the dish in the refrigerator for at least 30 minutes, preferably an hour. Make sure you flip the steaks over at the halfway point so all the meat gets exposure to the marinade. Next, preheat your grill or broiler to cook the steaks. Throw the marinade out and as you place the steaks on the grill or in the broiler, make sure they are not too close to the heat source. If you are concerned about the meat getting too dry, make a reserve bowl of marinade and baste the steaks from time to time. How To Make Deer Jerky If you are an avid hunter, you are probably known for taking various cuts of venison to family gatherings and neighborhood parties. If you really want to be the talk of the town, learn how to make deer jerky. Deer jerky is easy to transport, easy to store, and most importantly, delicious! There are two main types of jerky: sliced or pressed. Sliced jerky is made from a lean cut of meat that is free from gristle. You can use beef, elk, or really any other red meat in place of the venison. Sliced jerky generally comes from the hind quarter of the deer, or the area known as the round. If you plan on making jerky with the meat, you would use the same region of the deer where you get steaks. The difference is, instead of cutting the meat against the grain, as you would for steak, you will cut the meat with the grain. Pressed jerky is made from ground meats that are pressed together and formed. You will also want to choose very lean portions of the meat for this type of jerky. You will then mix dry seasonings in with the meat, much like you would if you were making sausage. This is the more popular form of deer jerky because hunters can get more variety in flavors due to the various seasonings. After the meat has been cut and prepared, you will need to dry it out in order to make the deer jerky. There are three main options when it comes to drying the meat. 1. Oven Method Preheat your oven to a low temperature like 150 and take the meat out of the fridge. Put the meat on clean oven racks or a metal screen. Make sure the slices are spaced apart, not touching. Any overlapped areas will not dry properly. Put the racks with the meat into the oven, but leave the oven door open so the steam can escape. Leave the meat for 6 hours or more until you have reached the level of dryness you desire. Oven temperatures can vary so check in on the jerky every few hours. Make sure you are home during the entire process. Page 14 of 17 2. Dehydrator Method Check the dehydrator to see if it needs to be pre-heated. If it does, set it to the highest temperature. Get the meat out of the fridge and put it on the dehydrator racks. Make sure the slices are not touching so they will dry properly. Once the dehydrator is heated up, put the racks of meat in and turn it to its highest setting, usually between 145-155 degrees. Set the timer for 8 hours, but remember, drying times can vary. It is a good idea to check it every hour or two and stay home while the drying process completes itself. 3. Smoker Method Heat the smoker to 180 degrees and remove the meat from the fridge. Put the meat on smoker racks and make sure the slices do not touch one another. Put the racks of meat on top of the smoker and dry the meat at 180 degrees for around 3 hours. Do not add any smoke or you will see liquid pool on the jerky. Adding the smoke is the very last step. Soak your wood chips in water before you add smoke so the chips will smoulder instead of burning. Once the deer jerky is dry, it should feel a bit tacky, then add water to the wood chips to enhance the smoky flavor. Wicked Venison Stew First, prepare the venison for cooking. Rinse the meat under warm water. Any of the boneless cuts of meat will work well for the stew. If you are using steaks, you can cut them into cubes and put them into a large pot. Next, peel and quarter onions. Generally 3-5 medium sized onions will be enough for the stew. It might seem like a lot of onions, but they will cook down into the stew and add to the overall flavor. Add three peeled and chopped carrots. You will then add one cup of soy sauce, one cup of oil, and a small can of tomato paste. You do not even have to mix the ingredients together because they will blend on their own as they cook. Let the concoction cook on medium so there’s some bubbling going on for 45 minutes. The juices will blend and the meat will get a chance to heat up. Then, empty a package of frozen green beans on top of the mixture. You do not have to stir them in at this point. Simply let them steam on top of the stew. You will cook the entire mixture on low for at least an hour. It will not hurt it to sit longer. Often, overcooking venison brings about bad results with tough meat, but the stew juices make the meat more tender. Add salt and pepper to taste. After the onions cook down and the meat seems tender, stir the entire mixture to make sure the beans and other ingredients are evenly distributed. You can serve this stew with mashed potatoes, bread, wine, or whatever else you choose. Page 15 of 17 Easy Venison Chili If you enjoy chili, you can take out the beef and add venison for a new flavor. There are plenty of varieties and options when it comes to learning how to cook venison. Chili is just one of the great ways you can use the meat you have captured in the wild. If you want to keep things simple, the easy venison chili recipe will not take you very much time. You will need 1 package of chili mix, 1 cup of minced green pepper, 2 pounds of ground venison, 2 cups of water, 1 cup of minced green onion, and 1 can of tomato sauce. Saute the green pepper and onion in a small amount of oil. Then, add the venison until is browned through. Next, the chili mix, water, and tomato sauce get thrown into the mix. Cook the chili on the stove on low heat for an hour and when it's done, you can serve it on buns or in bowls. Texas Venison Chili They say everything is bigger in Texas and the same can be said for the taste of Chili that is named after the large state. To learn how to cook venison Texas style, you will need the following ingredients: 2 pounds of venison, 1 cup of chopped onions, 2 minced garlic cloves, 1/4 cup of vegetable oil, 3 tablespoons of chili powder, 3 1/2 cups of tomatoes, 1 green pepper, cut into strips, 2 tablespoons of sugar, 1 cup of water, 1/2 teaspoon of salt, 1 cup of tomato sauce, and 2 cups of kidney beans. Once the ingredients are nearby, brown the venison in vegetable oil, but take care not to overcook the meat. Then, add the garlic, onions, and green peppers as you stir and cook the mixture for 5 minutes. Next, throw in the sugar, tomato sauce, salt, water, chili powder, and tomatoes. Let the mixture simmer for an hour to an hour and a half. Right before you are ready to serve the chili, add the kidney beans to complete the recipe. Count Your Blessings Are you hungry yet? When we eat the meat gained by our own sweat and skill as a hunter, it seems like our sense of thanks for the blessings of life and the land runs a little deeper in our spirits. How about you, do you know that feeling? Enjoy the hunt. About the Authors Pat Carrothers is president and chief executive officer of Havel’s Inc. and Havalon Knives. Paul Schwartz is division sales manager of Havalon Knives. Page 16 of 17 FREE SHIPPING OFFER! USE COUPON CODE BUCK1211 Receive Free Ground Shipping to any location in the lower 48 states when you use Coupon Code BUCK1211 online or over the phone. You must use this code at the time of order. **Outside the lower 48, use code ALTSHIP for $7 off your order. Order Today: Offer Expires May 31, 2014. Shop Havalon Now Or Call Today 1-888-836-3204. Page 17 of 17


© Copyright 2026