
Turkey hunting and why it’s How to construct and utilize
The Pathfinder School & Blind Horse Knives present An Age Old Ritual Turkey hunting and why it’s worth it to work for your dinner. Slinging Rocks How to construct and utilize this powerful ancient weapon. Fire-Steel Start a fire with nothing but a knife and a spark. $6.99 USD Intro to Knife Throwing Joe Flowers teaches us to throw like a pro. issue 14 — May/June 2013 Self Reliance Illustrated 1 Contents Self Reliance Illustrated LLC. 130 B Warren Lane Wintersville, OH 43953 740-434-0232 http://www.selfrelianceillustrated.com [email protected] Publishers: Dave Canterbury James Canterbury Dan Coppins L.T. Wright Editor-in-Chief: Michael Henninger Associate Ed. / Production Manager Lennon Dinda Executive Editor Erin Wright Marshall Advertising: [email protected] Subscriptions: [email protected] Follow us on Facebook and Twitter! Copyright © 2013 Self Reliance Illustrated (ISSN 2161-2870), Copyright © 2012, is published bi-monthly by Self Reliance Illustrated LLC, 130 B Warren Lane Wintersville, OH 43953. Telephone 740434-0232, Email info@selfrelianceillustrated. com. Periodicals postage paid at Steubenville, Ohio and at additional mailing offices. Single issue price $6.99. Subscription prices for the US: $35.00 per year; Electronic Subscriptions: $18.00 per year; International: $60.00 per year. POSTMASTER: send address changes to Self Reliance Illustrated, Attn: Subscriptions, 130 B Warren Lane Wintersville, OH 43953. Give new and old address including zip code. Please allow four weeks to become effective. Editorial by Dave Canterbury.........................................................................................4 What’s in my Pack? What’s In My Pack?: The Haversack Edition by Tim Stetzer.............................7 Ask Payge Ask Payge by Payge McMahon............................................................................. 11 Water The Ghillie Kettle by Brian Andrews................................................................... 12 Fire Fire-Steel: Spark-Based Fire Starting by Brian Griffin .................................... 18 Shelter Central U.S. Woodland Shelter by Joshua Dick................................................ 25 Tools Introduction to Knife Throwing by Joe Flowers................................................. 28 The Boker Plus Apparo by Tim Stetzer................................................................ 33 Slinging Rocks by Jonathan Hanscom................................................................. 38 Knots The Oat Spike Sinnet Survival Bracelet by Scott Wickham Jr........................ 42 Food Starting Your Garden with Egg Cartons by Stephanie Bondra...................... 48 Domesticating Wild Berries by Eric McCracken............................................... 50 Navigation How to Talk to Airplanes by Victor Lasher........................................................ 54 First Aid Obstacle Racing by Gert Grohmann................................................................... 57 DIY Nesting Cup Handle Mod by Dave ‘Mitch’ Mitchell....................................... 63 More Than Just a Bike by Michael Henninger.................................................. 66 The $20 Blowgun by Zebulon Allison................................................................ 69 Inspirational Creek Walk by Barry Bright.................................................................................. 72 Hunting An Age Old Ritual by Jason Herbert................................................................... 81 Congratulations! Now What? by Jason Herbert............................................... 85 Pathfinder Youth Organization Bridging the Gap by Tony Daniel........................................................................ 89 The Grind What’s Happening at BHK by Dan Coppins.................................................... 92 Book Review by Tim Wansack........................................................................................ 97 Advertiser Index............................................................................................................. 98 Cover: Starting a fire with a Fire-Steel can be a quick and reliable way to start a fire, even with damp tinder material. (pg. 18) Please Recycle issue 14 — May/June 2013 Self Reliance Illustrated 3 From the Editors: Immersion Training Immersion training is not a new concept but rather one that seems forgotten on many levels; we need to be ready to delve into new skills and subject matters often so that we increase our self-reliance tool box to its fullest extent. Many times trying new things and owning new skills is not an easy task. One of the best ways I know of to do this is by immersion training. This type of training takes a lot of discipline and you must almost put on blinders for a time to anything else to concentrate on a single skill set, almost living and breathing that skill until it can be accomplished with ease. If you are undertaking a skill that has a lot of variables or many minor skills need mastered within that major skill then it can be even more of a challenge. To give a couple examples of this type of training I will first use my very good friend Steve “Critr” Davis. As I write this he is probably sitting in his man cave finger weaving a new sash, beading some leg ties, or hand sewing a shirt. He is currently trying to learn all he can about 18th century woodsman skills and equipment. In order to do this he has dedicated much time and effort over the last months in replicating everything he can make by hand from Moccasins, to clothing as well as waterproof Haversacks and other accoutrements so as to enter the woods as if he were in the 1760’s. He does not carry a ferro rod instead relying on the lock of his 18th Century Smoothbore or flint and steel for ignition. Shelter is affected by a canvas tarp hand sewn and waterproofed in traditional fashion. This type of living history training or immersing one-self into that era of time will enable you to own the skills that the long hunters and frontiersman took for granted every day. I myself have engulfed my free time learning to Blacksmith in the old ways with coal or wood, these skills it seems to me would be imperative in a long term self-reliance situation. In days before machines and plastics the Blacksmith was the go to guy for any tool that needed fabricating or repaired from an axe to a lowly nail. To make your own tools and then test them in a wilderness setting is the true test of your ability. Mastering this major skill requires a lot of minor skill sets that must be repeatedly practiced in order to own. It requires almost daily attention and practice for a while like learning to drive or any other life-long skill. In short, do not be afraid to try new things in your daily search to become more self-reliant but at the same time realize that immersion type training will aid you greatly in owning those skills for life. Remember to pass the knowledge you have to someone else and help them become self-reliant as well. Dave Canterbury 4 Self Reliance Illustrated issue 14 — May/June 2013 Mission Statement Self Reliance Illustrated, a collaboration between two grassroots companies (Blind Horse Knives LLC and The Pathfinder School LLC), will present a new and innovative approach to self-reliance, survival, and preparedness. Within these pages you will find detailed information on subjects that relate directly to your ability to survive. The collaboration of The Pathfinder School LLC and Blind Horse Knives LLC is one that is heavily focused on the development of the best tool options for any wilderness situation, as well as the dissemination of information and cross-cultural learning that will truly help us to maintain and pass on the tribal knowledge. What the Pathfinder System symbolizes is learning from everyone around you and valuing everyone’s opinion. To that end you will see many articles by people you may have never seen or heard of that will pass on ideas that we believe are worth learning, so that all have the ability to teach and learn from one another. We will be posting feedback in each issue from our subscribers, both good and bad, so that we may constantly improve on this magazine. In the end, this is not our magazine but your magazine and we want it to be worth your valuable time, energy and money. Within this magazine, like any other, you will see advertisements from companies selling their wares. However, it is our decision that not just any company will be allowed to advertise with us just because they want to pay for advertising. All advertisers will have to be approved by our board before placing ads, and their goods will have to be something we consider worthwhile for purchase by our valued subscribers. Lastly, we will not down grade any individual, business, or company within these pages. You will only see reviews for equipment that we trust and that you can trust your survivability to. It is our opinion that all publications are learning tools and that we should support those entities wishing to provide quality information on subjects of interest. It is our goal and mission to become the best source of learning and teaching possible, understanding that other publications dealing with the same subject matter are out there and are worthy of your attention as well. Thank you, Dave Canterbury James Canterbury Dan Coppins L.T. Wright. The articles in Self Reliance Illustrated are for educational purposes only. The views and opinions expressed are of the author only and in no way should be construed as the opinions of Self Reliance Illustrated LLC, The Pathfinder School LLC, Blind Horse Knives LLC, or any of their officers or employees. The articles may describe activities and techniques which may be dangerous to you or to others. Self Reliance Illustrated LLC, The Pathfinder School LLC, Blind Horse Knives LLC, their officers, and their employees do not endorse the views in these articles nor do we recommend trying these techniques at home. 1 year/6 bi-monthly issues Name US Subscription $35 Electronic Subscription $18 Address Combo Subscription $52 •Paper and electronic City/State/Zip Starter Pack $45 •Subscription + current issue Email Address Phone Credit Card Number Exp. Date CVV Billing Zip issue 14 — May/June 2013 Self Reliance Illustrated 5 Pack one up and start customizing today! http://www.muleteamcanvascompany.com 6 Self Reliance Illustrated issue 14 — May/June 2013 What’s in My Pack: The Haversack Edition By Tim Stetzer The author uses a surplus AK-47 drum magazine pouch for his day kit for hiking and woods bumming. It’s compact and made of sturdy canvas. T his issue’s What’s in My Pack is really more of a “What’s in My Haversack” article. And, truth be told, it’s not really a haversack either, but it is a pouch designed to be slung over the shoulder so that definition is close enough for now. The pouch I’m highlighting here is my go to bag for day hikes, geocaching trips, and other occasions when I don’t need or want to carry a full pack. Often if I do have a pack, this pouch gets tucked inside as well since it has all my emergency items as well as commonly used items for when I am in the woods. The pouch itself is actually a magazine pouch designed for a 75 round AK-47 drum. This particular one is Chinese surplus and made of heavy olive drab canvas and comes with a sturdy adjustable canvas strap. Items inside the pouch are held in place by two interior flaps that you can secure via a wooden toggle button as Tim Stetzer was born and raised in Western Pennsylvania, and has been an avid camper since the age of 12. Tim was in the Boy Scouts and has served in both the US Army and Air Force Reserves and is now a Police Detective. He enjoys shooting, knife collecting, hiking, and craft beer. Tim has been writing professionally since 2006 and helped found the online outdoor magazine, Woodsmonkey.com in 2008. Tim is currently Executive Editor of Woodsmonkey.com issue 14 — May/June 2013 Self Reliance Illustrated 7 An Altoids size tin fits in the outside pocket of the pouch. The author keeps frequently used items there for quick access. Inside the main flap is a second set of flaps secured by a wooden toggle button. This dual flap system helps ensure that the pack’s contents stay in place when in the field. 8 Self Reliance Illustrated issue 14 — May/June 2013 well as a main full flap that also closes with a wooden toggle button. A side pocket is present on this particular model pouch which fits an Altoids type tin with some room to spare. I’ve found that this pouch gives me plenty of room for what I want to carry but is still very handy to grab, and compact to carry. In the side pocket I do in fact keep a small tin with items that I may want to use more frequently. Some of these things duplicate items I have in my survival kit inside the pouch itself, but rather than use the emergency items in the kit I prefer to have duplicates for everyday use. The tin contains a Spyderco Ladybug with bright orange FRN handles and a VG-10 blade. I pretty much always have a belt knife with me in the woods but I like having a small, sharp detail folder available as well for fine tasks. Next are two methods to start fire, a classic small sized Bic lighter for convenience and a LMF Mini fire-steel for longer term use. There is also a compact Sun compass for rough navigation and finally there is a small Sharpie in case I need to write or mark anything. I have some room in the tin for tinder too and probably should add some Tinder Quick tabs or the like. There is also enough room in that side pocket that I could add a small container, like a 35mm film canister, with tinder underneath the tin as well. Moving in to the main compartment you’ll find a 50 foot hank of para-cord in a sealed plastic bag, a small first aid kit, a larger pressure dressing (Swedish military surplus in this case), two Quik Clot sponges, a space blanket, a regular notepad and a small Rite in the Rain notebook, a set of nifty emergency sunglasses from Survival Resources, a coil of orange bank line cord, a lifeboat whistle, a copy of the OUTsmart Survival Guide (a very handy and compact survival manual), and a small roll of duct tape. The first aid kit is a basic model available from grocery and drug stores which I’ve beefed up with extra band aids, Tick tweezers, butterfly bandages and Quik Clot nosebleed gauze. It’s more of a snivel kit but coupled with the pres- sure dressing and Quik Clot Sponges it gives me a fair bit of first aid capability in a very small package. The Witz box seen in the pictures contains my mini personal survival kit (PSK). As mentioned, some of the items inside here duplicate others in the pouch but I don’t plan on cracking into this kit except in an emergency. The other items in the pouch I will use as needed and replace as necessary. I like keeping this kit self-contained because even if I don’t want to take the whole pouch with me I can always snag this kit and stuff it in my pocket and at least have it on me if I have nothing else. Plus, the Witz box is waterproof so its contents will stay dry even if the other items in the pouch get wet. Let’s take a look at what all I have crammed in the kit. Mini Personal Survival Kit Contents (Broken down by category): A top down view of the interior of the pouch loaded, minus the para-cord hank that sits on top. There’s still a bit more room available if anything needs to be added to the kit. First Aid: - 4 Antibiotic Coated Band Aids - 2 Butterfly Band Aids - 6 Alcohol Wipes - 1 2x2” Gauze pad Fire: - Mini Bic Lighter - BSA Fire-steel - Credit Card Fresnel Lens Signaling - AMK Signal Mirror - Photon II Microlight - ACR Whistle Water: - 2 Gerber zip lock Milk Bags - 4 Micropur Tabs The contents of the main compartment of the pouch. They include gear for first aid, signaling, survival, and day to day use. Utility: - Coil Nylon Cord - Coil Wire - 2 Large Safety Pins - 4 Small Safety Pins - 1 Folding Razor Blade - I Folded Square of Aluminum Foil - 1 20mm Button Compass - 1 Copy of EQS Survival Pamphlet issue 14 — May/June 2013 Self Reliance Illustrated 9 - 1 P-38 Can Opener - Victorinox Fishing Kit - 1 Handcuff Key (I’m a cop, just seemed logical to me) - 1 Victorinox 4 Head Mini Driver So, is this kit and pouch set-up the be all, end all of survival kits or day hiking kits? I’m sure it’s not. It works for me and covers most of the survival basics but everyone is going to have their own preferences and priorities when they built their bug out bags and survival kits. The one thing it does lack is water, other than the small water bags and Micropur tabs in the PSK, and I usually carry this along with a canteen or water bottle because of that. Other than that, this particular kit has worked well for me for a good number of years now. The biggest factor for me is that it’s very handy to grab and go, even for a short trip into the woods. It’s also small enough to put in a bigger pack if I am taking one. And it’s modular so I can add to it as needed, replenish commonly used items easily, and separate components for specific use if I need to. 10 Self Reliance Illustrated issue 14 — May/June 2013 LEFT: The core of the pouch is the author’s Mini PSK. The PSK is housed in a waterproof Witz box and can be pulled from the kit and carried separately if need be. RIGHT: Despite its small size the Witz based PSK contains items for first aid, signaling, fire, water, and general utility use. Shelter is the main thing lacking but with the included cordage a field expedient shelter could still be fabricated in a pinch. Q: What are the 3’s? A: ‘The Rules of 3’ are a great base line to remember for survival. All things are variable, but in general, you can survive… • 3 seconds without HOPE • 3 minutes without AIR • 3 hours without SHELTER • 3 days without WATER • 3 weeks without FOOD Q: Forget Gatorade,what is a natural way to replenish electrolytes? A: Coconut water is all the rage now. It has more potassium than commercial sports drinks and provides enough natural sodium. It is a great source for replenishing electrolytes. However, coconut water is a bit pricey and if you are like me, you won’t like the taste of it. This then brings us to plan B. Combine WATER, SODIUM, and CITRUS. You can also add a little honey and/or a favorite tea to the concoction for a little caffeine ‘pick me up.’ Q: What is ‘Dead Reckoning?” A: You are guessing your current position based on your last position and/or a fixed landmark, speed, time, and direction. If you are sailing, it does not factor in wind speed or ocean current. Q: You have been around the world. Where is your favorite place to hike and camp? A: Glacier National Park, Montana. Do you have a question for Payge? Send it to [email protected]— Payge McMahon is an adventure athlete, world traveler and journalist. She is the ‘country girl-next-door’ from Pennsylvania with five older brothers and only a few generations removed from being Amish! Like her FB fan page: www.facebook.com/ paygemcmahon and follow her adventures at: www.turnthepayge.com issue 14 — May/June 2013 Self Reliance Illustrated 11 The Ghillie Kettle By Brian Andrews The set is now very well used. It contains (from left to right) gripper handles, skillet and pot, base and kettle, cooking grid, carrying bag, base stand and pot support. I am lucky enough to have in my possession a Hard Anodized Ghillie Kettle Adventurer Kit. Being excited to write about this and the fact that it is a commercially available product has me dreading the prospect of doing a straight up “product review.” I no longer read many magazines because most have been turned into product review after product review which immediately makes me suspect the validity of the content. Instead then, I would like to use and write about this product and explore the possibilities of whether or not it is capable of enhancing your time in the outdoors, or if it is just something that will further complicate your life. To do that, I will have to go through the features of the kettle, how it works, how well it works, and then discuss the traditional and perhaps non-traditional ways it can be used in the outdoors. This style of kettle is nothing new to me. I was made aware of a product called the Kelley Kettle years ago. Being a camping cookware junkie, it of course caught my eye. At the time, people that had them reported excellent results with them, but to be honest there were a couple of turn offs for me that had always kept me from buying one. When I saw that the Ghillie Kettle had made some changes, it appeared that they were targeting the exact things that I did not like on the Kelley Kettle. Brian Andrews claims that he doesn’t have any professional qualifications to be a woods bum but he is a professional photographer, knife maker, a lover of the outdoors, and he enjoys doing things with hand tools- the old fashioned way. 12 Self Reliance Illustrated issue 14 — May/June 2013 First is the whistle. Every tea kettle has a whistle, (very light for their strength), abrasion resistant (I wash right? But, there is more to it than that. The whistle is my anodized pots with sand), almost non-stick, easy clean also a safety feature too. On the Kelley Kettle, the stopper up, lighter than stainless, cheaper than titanium, and you for the hole is a cork. The directions for the Kelley Kettle would think the dark coating would increase heat absorpclaim that the cork is for plugging the hole and transporttion, but I have never tried to gather data to prove that. ing cold water only. When you actually go to boil water, The Adventurer kit consists of the 1.5 Liter kettle itself, you are supposed to leave the cork out. Those that did not kettle base, base stand (for extra stability on uneven listen and put the cork in place while boiling could be met ground), pot support, and the cook kit, which includes with a cork getting shot out, and even hot water spewa small pot (sauce pan), frying pan, two piece grill, and a ing out of the kettle. Besides being a warning device, the gripper handle. It also came with a bag that holds all of whistle is also a safety feature by not allowing enough pressure to build up to allow hot water to spew out of the hole. Plus, by covering the hole on the kettle, I imagine it has to speed up the boiling time, since you are not letting all that water vapor freely escape. One final turn off for me with the Kelley is the cork itself. Maybe it is just me, but I find it cheesy. I can be pretty hard on the outdoor gear that I use, and the idea of a cork brought forth images of it getting burned, stepped on, crunched, chunks taken out of it, or some other thing that would leave me without the cork being able to do its intended job. Okay, enough about the Kelley Kettle. Let’s take a look at what this Ghillie Kettle is all about. One thing I really like is that the Ghillie Kettle is being offered in hard anodized aluminum. I know there are people that freak about cooking on bare aluminum. I am Not having access to bark or other fine tinder on this particular use, I made some myself. A couple of not one of those people because I feathersticks made to the point where they were cut off of the main stick, and small branches easily am more afraid of the stuff that goes started this fire. Maybe a minute or two of preparation at most for this particular boil. in our food, than what I cook it in. From my understanding, the anodizing process is supposed to seal the aluminum, and minimize these contents. I have to admit, it is probably on the large if not eliminate those concerns. I am not a chemist, so side for what I would like for my own personal use. Both please don’t take my word for it. If that is a concern for in volume and dimensions. I think the 1 Liter version you, do your research. It should also be noted that there would be one that would suit my particular uses the best. are different types of anodizing processes and they are not That is all personal opinion though and instead, I will give all the same. These kettles are hard anodized, which is the you the data on the one I have. best method, in my opinion. Again, another topic to do The 1.5 Liter kettle alone is 12 inches tall. While some research on if you are interested. What I do like are sitting on the base it is 14.5 inches tall. With the base all the tangible benefits of anodized aluminum that I have inverted and stored in the kettle the height is 13.25 inches. personally experienced over the past few years cooking Kettle and base alone, it will weigh you down a total of with anodized aluminum. 33.76 oz. Add the pot stand, pot, skillet and gripper han Some, but not all of the benefits that I have nodle, it will bring your grand total up to 43.92 oz. I can see ticed from anodized aluminum include: strength, weight taking the kettle only and sometimes leave the additional issue 14 — May/June 2013 Self Reliance Illustrated 13 cookware behind. This may seem like a little or a lot to you, depending on your style, but you also have to remember that you no longer need a stove, fuel, fuel bottle and all the accessories associated with those. The principle behind how the kettle works is not exactly rocket science, yet at the same time it is pretty genius. We have all played with hobo stoves, and starting small fires just for the purpose of boiling water in a cup or a small billy pot. Usually hobo stoves are made to supply some upward draught, and at the same time contain all your fuel for a more efficient and less smoky burn. At the heart, this system works in the same way, but quite better. You create your small twig fire in the base using natural materials. Starting small fires in a container definitely helps with your fire starting skills. That is about where the similarities between a hobo stove and the Ghillie Kettle end. When you place the kettle on the stand you create a chimney effect because of the lower air inlet, and the exhaust at the top of the kettle. Much like starting a fire in a wood stove, the chimney effect creates a draught that increases the strength of the flames. The next secret behind why the Ghillie Kettle works so well is associated with the surface area. When you put a 4 inch billy can over flames, the surface area being heated is more or less that 4 inch bottom surface. The Ghillie Kettle is basically a water jacket, and since the flame goes from the bottom, all the way out the top, the surface area of the kettle in contact with flame is greatly increased. I am not going to hurt my brain and do the calculations, but by looking at it, I can convince myself that the surface area is considerably more. I have talked about how it works, but let’s move on to how to use it. You start by putting your natural materials to start your fire in the base. Just like creating a fire anywhere else, you should make sure to have some fine tinder (that will give you some good initial flame), some small kindling (such as small diameter dried twigs) and some larger twigs that can be used for fuel as the fire While burning, adding fuel through the top is my preferred method. It seems easier than poking around the bottom and when viewed from above it is easy to see how well the fire is burning. 14 Self Reliance Illustrated issue 14 — May/June 2013 optimal fuel, this is the point where the blaze inside will be able to handle those types of non-optimal fuels. Initially, I did some time trials. I soon came to realize that I was boiling water very fast and with so little prep time that there really wasn’t a point in timing it. It worked well, and it worked fast. As one final note about usage, something cool that is worth noting is that unlike a traditional billy can over the fire, this setup is pretty clean. The majority of the soot from a wood fire stays in the center or inside the base, rather than on the outside of a pot. Like anything, there are some tips that make using this kettle easier. The first has to do with lighting it. The first The cut away diagram of the kettle shows how the water is held in the kettle and how the fire in the time I used this I made the mental base can use the open space in the kettle to increase surface area and create draught for a strong and mistake of thinking it would have efficient burn. magical powers, and be able to start poor fuels with a single match! Once reality kicked in, I got very good and very fast at making gets established. On all accounts, it is probably best to fires with this kettle, but it took having proper tinder. start with more than you think is necessary until you get a Whether I had it ready to go, like birch bark, a touch of feel for how much will be needed. A couple of things that pitch wood, very small dry branches or having to actually really make the fire starting easy are the very small dead make some fine shavings with my knife, the important part branches you generally find low on coniferous trees, and if you happen to have any birch bark you can peel into strips. With those things, starting the fire is about as fast and easy as starting a gas stove. Without those materials, you may have to take the extra time to cut up some sticks, make some shavings or carve a couple feather sticks. Fill the kettle with water, and put the whistle in place. The whistle lets you know when your water is boiling and keeps you from continually looking at the water through the pour spout. Also, just like my tea kettle I use on my stove top, you can kind of hear the whistle getting ready to blow, so you know in advance that you are close to done, and get ready to pull the water off the stove, or in this case, the kettle off the fire. At this point, you can go ahead and light your fire, either with the kettle in place or off to the side. I have had luck doing it either way, and really have not decided which way is my favorite. They both work, just differently. If you decide to light it with the kettle on it, you just have to make sure that you can do all your lighting in and around the air inlet hole. Once the fire takes off and establishes itself, you can see how its strength is increased by the chimney effect. If you are in While in use, it is pretty low profile. Depending on the fuel used fire can shoot really wet conditions, or are having a hard time finding out the center or not. issue 14 — May/June 2013 Self Reliance Illustrated 15 was having some good tinder. The next tip is a BIG one. It is one that I even knew about, and still did it wrong on the first time! It involves removing the kettle from the base when the water is done. That cool water jacket of a kettle is directing heat (and maybe even flames) out the hole in the top. The water is ready and you want to remove the kettle. You grab the handle with one hand which swings your hand right over what? The heat source! Obviously, that is not the way to do it. The correct way is to grab the bail with two hands, which will allow you to hold it at 90 degrees to the kettle. Now you can safely lift the kettle off the base and sit it down on the ground. With no source of heat in the center of the kettle, you can now grab the handle with one hand. Because the kettle is hot, the chain is a convenient way to control the tip of the kettle to pour your water. Once you learn this one little trick, this becomes one of the safest ways I have seen to handle boiling water in the woods. A piece of kit like this is certainly very cool to people who like to try various cookware. Still, I suspect this kit may be a little large to throw in your backpack for a night or two. Also thinking that this is a “water boiler” and limiting its use to hot drinks would have you miss out on a lot of cooking opportunities. With those things in mind, let’s take a look at the niche areas where I think a product like this really shines. camping and fire usually go well together too. I would not be surprised to see a Cliff Jacobson endorsement on this product before long! Dehydrated Meals: There are many on the market these days. With just boiling water and these meals you can use a kettle like this for so much more than hot drinks. My preference is to dehydrate my own stuff and make my own meals. This opens up the possibilities of freezer bag cooking even further. For some interesting ideas, visit www.trailcooking.com. Survival: We all know that boiling water is an effective method of water purification. It seems rare to have one of these in your pack during a “survival” situation, but it is worth considering. Car Kit: I know a lot of people who keep a stove and fuel in the trunk of their vehicle for emergency situations. How about dump the stove and fuel? Canoeing: Canoeing allows a little more freedom in the size and weight department than backpacking. Canoe 16 Self Reliance Illustrated If you were to just grab the handle and lift off the base, your hand would be directly over the heat source. The correct way to remove the kettle from the fire is to lift it with the handle perpendicular to the kettle. Lift it off the base and set it down next to it. Now you can use the handle in one hand, and use the whistle chain in your other hand to control the pour without needing gloves or to handle anything hot. issue 14 — May/June 2013 Bushcraft: This will likely not make sense to some, but if I grab my canvas pack, a tarp, pot and a knife and hit the woods, the “feel” of the trip changes if I decide to pack a stove and fuel “just in case.” Even though the destination, plans, etc do not change the idea of the trip in my head changes. With this kettle, you can get up in the morning, brew some water for coffee and oatmeal, do it fast, do it with fire, and go on about fishing or whatever you had planned for the day. If you did the same even with a small fire you would likely spend more time tending the fire, putting it out, or making the fires safe enough to leave the campsite. This kettle can help bridge the gap between quick and traditional in a lot of ways. At the time of this writing these kettles are manufactured in the UK and imported into the US through Ghillie Kettle USA (www.ghilliekettleusa.com). The only other source I know that you can get one from is Ben’s Backwoods (www.bensbackwoods.com). Both are local companies, owned by excellent people. issue 14 — May/June 2013 Self Reliance Illustrated 17 Fire-Steel: Spark-Based Fire Starting in the Modern Age Text & Photos by Brian Griffin U sing sparks to ignite tinder material has come a long way in the last thirty years or so. Since the introduction of ferrocerium the term spark-based fire starting no longer applies strictly to the more challenging methods of using flint-and-steel or stone-on-stone. Ferrocerium produces a shower of sparks that could never be matched by either of those methods. Ferrocerium is an alloy made up of: iron, aluminum, magnesium, and cerium, which is pyrophoric in nature. Simply scraping the ferro rod with a hard sharp edge produces a shower of sparks of molten, burning metal. These sparks burn extremely hot and can be used to ignite a variety of materials. Brian Griffin has been a woodsman since his earliest memories of childhood. He’s always sought out a closer connection to the earth and developed a passion for studying wilderness skills at an early age. Now in his mid 40’s he’s logged thousands of hours wandering through and living in the forests of the Southeast United States conducting various studies and experiments. Having a deep fondness for knives and a good understanding of their use as tools he has designed several that are in production today. His work has been published in multiple books and magazines, which is always nice, but today he really enjoys passing along the knowledge he’s gained to those of the younger generation of woods wanderers in person and getting to see the excitement as they master new skills. 18 Self Reliance Illustrated issue 14 — May/June 2013 A Brief History My first encounter with ferrocerium was back in the 80s when I found my first magnesium fire starter. Which, as most of us know, is just a bar of magnesium with a ferrocerium rod embedded into one edge. The intended use is to whittle a pile of shavings from the magnesium side and then ignite those shavings by using the knife to strike the sparking insert or ferro rod. The magnesium serves as a first-stage tinder to ignite heavier materials. The tool coupled with any sharpened piece of steel gives the user the ability to start a fire even if it is immediately upon emerging from the ocean. I soon learned that the ferro rod wasn’t limited to igniting only magnesium shavings, but would ignite various other materials such as cotton wool, dry grasses, and seed tufts. As time went by more manufacturers started producing them for survival and recreational applications, and today there is a plethora of ferrocerium fire starters made by a number of companies. Two Types of Rods It can be a little confusing at first, but while all ferrocerium is mischmetal and all mischmetal is ferrocerium, ferrocerium rods are generally separated into two types. There are the more traditional rods which are somewhat hard and brittle that are commonly referred to as ferro rods, and these will throw sparks from even the slightest friction from a striker. With this type of rod pressure is the key element with more pressure applied resulting in larger and hotter sparks. The advantages of these rods are an ability to work with just a short section of the end of the rod rather than having to strike down the entire length of it, and that the harder rod doesn’t wear away as quickly. However the disadvantage as seen by many is the somewhat cooler sparks compared to the other type. The second type of rod came along later and the name “mischmetal” was chosen to differentiate these rods from the older style. These ferro rods are rather soft, and though they throw very hot sparks, they will not throw sparks very well with slow strikes. Speed and long strokes are the key factors when striking this type of rod. So What Does It Do? Ferro rods are great emergency fire starters that, in my opinion, no survival kit should be lacking, and which the avid outdoorsman can greatly benefit from. These tools are not limited by factors which can greatly affect other fire starting methods. They are not temperature sensitive, they work at One of the methods I use with the harder type rods is to hold the edge of a knife firmly against the tip of the rod by applying diagonal downward pressure with the thumb squeezing the blade and rod together. Then using the thumb as an anchor point I quickly rotate the knife counterclockwise pushing the edge toward the tinder, in this case petroleum soaked cotton. This “pops” a nice hot spark right into the tinder without risk of sending the tinder flying. Petroleum jelly soaked cotton makes a great tinder material because it stores for long periods of time, takes a spark from a ferro rod easily, and a small amount will burn long and hot enough to ignite even wet wood as can be seen by the amount of steam in the photos. issue 14 — May/June 2013 Self Reliance Illustrated 19 In a survival situation every minute and calorie count. Holding the striker still and quickly pulling the rod backward will throw a nice shower of sparks into your tinder pile without the risk of slipping and scattering the fire lay, and causing you to start over again. any altitude, they do not require refueling, and they will work immediately after being soaked in water. They can be used to start fires with a wide variety of tinder materials and in essence they give the user the capability to start fire under virtually any circumstances. Ok, So How Do I Use It? Scraping the ferro rod with a hard, sharp, object (such as the edge of a knife) produces a shower of sparks of molten, burning alloy. Directing this shower of sparks into the tinder correctly will ignite it, however proper preparation is the key to all successful fire starting. It is a little more complicated than making a pile of twigs and throwing sparks at them, but it’s still not very difficult with practice and an understanding that techniques vary depending on type of rod and tinder materials used. To fully explain use and techniques I should first discuss fire lay. The lays for use with a ferro rod and lays for use with flame-based ignition can greatly differ. One simple fire lay for flame-based ignition is to simply place mostly dried leaves in a pile, add kindling and fuel, and ignite the leaves using a match or a lighter. Depending on types of leaves and moisture content this may or may not work with a ferro rod and may take several sparkings to achieve success. If using the edge of a knife as a striker this much repeated striking, and subsequent heat buildup, can do a good bit of damage to the knife’s edge. When using a ferro rod one needs to have a good first stage tinder that will easily catch the sparks, burn hot, and ignite the materials above. In this case, course, dry leaves would be a good second stage tinder material. To ensure successful fire starting with a ferro rod, start with a tinder material that will take a spark with relative ease. For chemical tinder materials Wet Fire® and Tinder Quick® are good pre-packaged options that are available at any good sporting goods store or outfitters. A good one can also be easily made at home by soaking cotton balls with petroleum jelly. Petroleum soaked cotton balls are an accelerant that works as well in wet conditions as any commercial tinder in my opinion, and stored in a sealed container it has an exceptionally long shelf life. Also One technique to use with feather sticks is to pin the material in place with the ferro rod and strike down the rod. This is a good technique to use when working with small amounts of organic tinder that don’t work well with the insert-hold-and-pull method. 20 Self Reliance Illustrated issue 14 — May/June 2013 there are a lot of options for organic tinder materials on dry days. There are seed pods from various plants such as; horse nettle, thistle, and milkweed. Cedar bark and palm tree fibers also work very well, as do very dry grasses, mosses, very fine, dry leaves, and bamboo shavings. Even very fine wood shavings work nicely if you’re good with a knife. There are some natural accelerants to be found in some parts of the world. There is pitch wood to be found in the pine forests of the S.E. United States, and in the wet side of the Pacific North West. The PNW is also home to Balsam Fir forests and these trees produce an extremely flammable resin. Both of these materials will take a spark with proper preparation, they will burn very hot, and in all but the hardest of rains. Techniques Are Important I have a preferred technique that I use with the harder type rods, rods such as the Light My Fire Swedish Fire Steel® and a tinder like petroleum jelly soaked cotton, birch bark, or dry wood shavings. It is to apply a good bit of downward pressure on the side of the rod near the tip with the edge of the striker – usually a knife – using my thumb to squeeze the knife against the rod. I then hold the tip of the rod close to the tinder, and using my thumb as a stop and a hinge point, I rotate the striker counter clockwise (I’m right handed, it would be clockwise for a left-handed person) causing the striker to scrape hard against the rod and pop off a large spark and toss it right into the tinder. This is a good technique to use with these types of rods. It throws very hot sparks and minimizes the amount of rod scraped, and has little risk of scattering the tinder. However, it only works with the harder type rods. Another technique I use in times of high moisture, One of the great advantages of the softer mischmetal rods is the ability to whittle shavings of it to use as a first stage tinder to ignite moist or damp materials. Nut shells, sea shells, and cupped leaves can all make decent collection vessels. A small container of ferrocerium shavings, roughly the size of a marble, will produce a very intense flame. It will only burn for about four or five seconds but it burns extremely hot, and can be a great way to dry damp tinder material. issue 14 — May/June 2013 Self Reliance Illustrated 21 or when working with stubborn fluffy types of tinder material, is to push the rod into the tender pile, hold firm pressure against the rod with the striker, and quickly pull the rod back sending showers of sparks into the tinder. I repeat this as necessary until the heat from the sparks has dried the tinder enough to ignite. Mischmetal rods are softer and require a different striking technique. In my experiences they work best using long, fast strikes done with even pressure along the entire length of the rod. These sparks have a tendency to be more energetic, and can be tricky to get used to, but they do burn very hot. These rods tend to wear down more quickly than harder rods, however the higher quality misch rods definitely offer some distinct advantages in a survival situation. The first advantage is that due to the softer material larger sparks are produced from strikes. Which in turn tend to burn a bit longer and quite a bit hotter, thus taking less time to ignite even stubborn or slightly damp material. The second advantage is that when there is no good source of first-stage tinder handy, shavings can actually be whittled from these rods much like those from a magnesium fire starter, and this serves well as a first stage tinder to ignite heavier leaves and coarse or damp materials. This is a technique that requires slow movement of the knife blade and some patience. I also strongly recommend two collection vessels for the shavings. Whittle a few shavings into one vessel and then dump them into the other and this way you can collect a decent amount of shavings and only lose a few if you slip with the knife and ignite them. It is a real pain to have a good pile of shavings going only to slip and have to start all over again. As with use of a ferro rod in general, I would suggest practicing 22 Self Reliance Illustrated Today there are many styles of ferrocerium fire starters – as many types as there are ways to carry them – in order to more easily suit individual needs. Most good sporting goods stores and outfitters have a decent selection to choose from, and some great deals on high quality systems can be found online. Ferrocerium has come a long way since the simple magnesium fire starter. Today we have products like the ESEE Advanced Fire Kit weather/environment-sealed fire starting system, which has a large ferro rod, tinder storage space, and a 20mm button compass built in. issue 14 — May/June 2013 Some knives are designed with features specific to striking a ferro rod, different designers locate the dedicated striker in various places, usually the spine or the handle. Of the two I prefer to have the striker located in the handle. In case of an injured hand, fire steels can even be operated one-handed if you use your head, as well as other parts of your body. A knife can be positioned over the tinder by use of a prop stick, and held in place with a foot. Then it’s just a simple matter of placing the rod against the edge and pulling quickly to throw hot, molten sparks into the tinder pile. If one has some skill with a knife, making feather sticks or fine, dry wood shavings is easy to do. Paper thin dry shavings make a great tinder material that will transfer a burning spark to flames much easier than thick leaves. For day hikers and minimalists a nanoStriker XL key chain fire starter can be a great option. It has rod, handle, and striker all in a highly portable weather sealed system. They weigh very little, can ignite portable stoves, alcohol stoves, as well as various natural tinder materials. this technique at least once before depending on using it in the field just to get a better understanding of it. or flammable liquids. In this case I like to keep my distance and throw the sparks into the fuel because there is always the chance of the fumes creating a flash fire ball and burning a hand or arm. No adventure or survival situation can be enhanced by an injury. The most common technique I use with the mischmetal rods is the insert, hold, and pull method I mentioned earlier. However another technique I use is to pin the tinder in place with the rod itself and strike down the rod. This is a good technique to use with tinders like feather sticks or small amounts of organic tinder material which do not work well with the “insert and pull” method. It allows you to hold them in place to keep them from being scattered while you shower them with hot, molten sparks until ignition. Both of these methods minimize the chances of scattering the tinder pile as can happen by holding the rod still and rapidly pushing the striker forward. Survival situations are stressful enough without the added setbacks of failures and repeated processes. There are indeed some times when it is a good idea to hold the rod still and move the striker forward. For instance when using a ferro rod to ignite portable stoves In summary, with a little practice fire steels or ferrocerium rods are fantastic tools for the avid outdoorsman to have with them and great additions to any emergency survival kit. With a little practice and by applying the best technique to the material you have on hand, ferro rods can be used to start fire almost anywhere and under almost any conditions. issue 14 — May/June 2013 Self Reliance Illustrated 23 24 Self Reliance Illustrated issue 14 — May/June 2013 Central U.S. Woodland Shelter By Joshua Dick W hen beginning construction of your shelter there are a few things you must take into account. The location, the location, and yes the location! When choosing the location of your shelter you will need to assess all of your surroundings for all resources needed for sustainability and long term use. The first resource you will need to take into consideration is the amount of available building supplies on hand for the design you decide to Beginning with a simple lean-to. use to construct your shelter. There should be plenty of strong pieces of wood of adequate length to use for the frame work of the shelter you choose to build. There should be enough material on hand for natural cordage to fasten your shelter together. Also, there should be enough material for the covering of the outside of the framework as well as material for insulating yourself from the elements such as cold, rain, snow, and sun. The second resource you should consider is the amount of supplies available for building a fire to warm your shelter. The fire will also be used to boil water and prepare Peak of door opening where three Y sections meet. food for consumption. It will also Once you have found a location that will provide provide comfort and security during you with all of these valuable resources you should look for the dark nights. an area that is not in any immediate danger of destruction The third resource you should consider is the from falling limbs, flood waters, or trespassers. amount of food and water available for proper calorie It is time to start the building of your shelter. replacement to feed your life force. While considering this resource you should look for plenty of wild edibles as well There are many different designs one may use for shelter but there are only three key elements your shelter should as animal signs to support your body’s need for nutrition. have. The first element is a sturdy frame that will withstand The fourth and final resource would be the availany strong winds or flying debris. The second element is ability of supplies to create tools for hunting, gathering, and camp supplies such as containers for boiling water and a layered covering to deflect rain and snow and provide shade. The third and final element is a proper layer of cooking food. Joshua Dick grew up in a small town in central Illinois. He began to show interest in the outdoors and survival at an early age. He is an avid outdoorsman, paddler, hunter, and student of the art of survival. He dedicates everything he does to his son Alexander and his family. issue 14 — May/June 2013 Self Reliance Illustrated 25 insulation to protect you from extreme temperatures. When starting the construction of your shelter you will need to start at the bottom and work your way up. By this I mean you will need to set out a floor plan that consists of a comfortable space to move around in without fear of disrupting your frame or causing a sense of discomfort. Your shelter should be large enough to accommodate yourself and anyone else in your party but not so large that it would be hard to warm with a small fire. Again I must stress that there are many different ways to build a shelter and as long as they possess these key elements they will suffice. From here forward I will explain the means for erecting a shelter that I find to accommodate all of these elements and provide shelter for one + one, meaning large enough for yourself and one other. Front roof section and doorway. Front view of roof section and doorway. 26 Self Reliance Illustrated issue 14 — May/June 2013 The style of this shelter is one of a lean-to type but also provides cover on the open side as well. You will begin by finding two trees approximately ten feet apart preferably with a Y in the trunks of equal heights around shoulder height. If you are unable to find two trees of this description you may use two trees without Y’s or a mixture there of but in the case that you do not have trees with Y’s you will need cordage to secure your ridge pole. Next you will want to find a piece of wood for your ridge pole around five inches in diameter which is long enough to span the distance between the two trees and strong enough to withstand the weight of the framework and covering. Usually, I will test this by placing it between the two trees at said height and hanging from it and jostling about. After placing your ridge pole you will need to find enough pieces of sturdy wood seven to eight feet in length to use for the lean-to side of your shelter. These pieces should be two to three inches in diameter. You will want to place these every eight to twelve inches to provide a sturdy framework for your covering. These poles will need to be as straight as possible. When beginning to place these poles you will place one end on the ground and lean them onto the ridge pole so that at most a foot is sticking over the ridge so as to provide a lashing point for the roof framework on the opposite side from the lean-to. After finishing the lean-to section you will notice two triangle shaped spaces at each end which are not covered with framing. You will need to find four or five pieces of wood to cover this area that you will be able to place at a slight angle also that is not as acute as the lean-to side. These poles will all meet where the ridge pole and trees come together and come to the ground at different intervals and stop at the point where the lean-to roof meets the ground. It will be a sort of fanning framework. Now we will begin the frame for the doorway, roof, and walls of the opposite side of you structure. The finished Central Woodland Brush Shelter. First you will need to find three sturdy pieces with Y’s in them to form the ridge line perpendicular to the one you have already in place and the uprights to support the outside end. One will need to be around two feet in length and the others will need to be long enough to reach from the ground to this ridge line and be on enough of an angle to provide enough room to create a comfortable doorway. You will need to place the shortest of the three with the Y end facing away from the lean-to ridge pole at its center and meeting with the other two pieces Y section. You will need to lash these Y ends together. Be sure that the Y ends are at a slightly lower elevation than the ridge pole so you will have an appropriate incline for water disbursement. Next you will need two poles of proper length to reach from the newly added Y’s to the ridge pole of your lean-to. These will provide support for the pitched roof. From here you will need to add framing for the pitched roof and lash the ends to the pieces you left extended above the ridge line. These may over hang the areas where the future wall will be but it is not necessary. After this you can begin to cover the pitched section of roof with pieces of bark layering them in a way so the bottom pieces are covered by the top to resist any eminent rain. After the roof section is framed and covered you will need to cover the remaining walls with framing in the same way you did the other side except letting them terminate in line with the door opening and trees. Now that your roof and framework are complete it is time to cover your walls. For this you will need to weave small branches, vines, or roots between the framing to tie everything together and create a base for your insulation. The best way to tell if you have woven enough through your framework is to take a widely open hand and place it flat on the side and you should not be able to extend your hand through. Last of all, is the insulation in and out. For this I like to place sections of bark over the sides so as there is little to no light coming in and then cover the structure completely with leaves at least a foot thick over its entirety. After covering the outside you will want to cover the floor with leaves as well where you will be sleeping to keep yourself insulated from the ground. That is what I consider to be an adequate source of shelter for any time of year in central Illinois. But again as I said before there are many different designs of shelters some simpler and some more involved but this will do me just fine! So get out there and play in the dirt because it is better to know and not need than to need and not know. issue 14 — May/June 2013 Self Reliance Illustrated 27 Introduction to Knife Throwing By Joe Flowers The knife is thrown from the blade at this close of a distance, resulting in ½ spin. I n the impalement arts, a human is usually the target, and the object is to land the pointed projectile, in some cases a knife, or in some cases an arrow, around the person. Now, I’ve never thrown around a human target before, but my aim (no pun intended) was to draw you into the subject of knife throwing. Through this article, you will be introduced to the wonderful pleasantries of an afternoon of recreational knife throwing. The key word being recreational, for all the mall ninjas who want to learn a way of knife throwing in a combat situation, look elsewhere. A little green book, called Knife Throwing: A Practical Guide by Harry McEvoy, is the sole reason I started flinging blades. The mastermind behind the Joe Flowers is a well-respected writer and contributes to many outdoor related magazines including Tactical Knives, Backpacker Magazine, and Self Reliance Illustrated. He designs for many knife companies, including Condor Tool and Knife and TOPS Knives. Joe holds a degree in Zoology with a minor in Entomology. He has an affinity for reptiles, amphibians, spiders, and all things creepy crawly. This pursuit leads him around the world on expeditions while searching for new blade use knowledge and interesting critters. Joe just got back from a month long expedition in the Amazon region of Brazil and hopes to go back soon. In his spare time, he travels around the US teaching (and taking) survival classes. He also teaches Martial Arts, outdoor skills, and fitness classes locally. 28 Self Reliance Illustrated issue 14 — May/June 2013 From approximately 12 feet, the blade is thrown by the handle for a complete rotation to stick into the target. “modern” style of throwing, Harry McEvoy, made a manual that is second to none in the realm of the blade slinger. In it, he covers all sorts of throwing and aspects from hunting, to even “the impalement arts.” If this article interests you, after reading it, the next step is to get Mr. McEvoy’s book. You will be glad you did. A grip for the handle style throw. I like to point sometimes as it helps the blade slide out of the hand and helps accuracy, but this is just my preference. A hand hold for the blade throw. Notice how I have my thumb on the spine. This is just my preference, I feel it makes the spin more predictable. Knife Choice Probably the first important rule of knife throwing is use a THROWING knife. When people complain that their knife broke when they threw it, most knife companies ignore them. If you want to break a knife (notice how I didn’t say test), throw it. If the knife is supposed to cut well, it will break eventually. I’m no physics major, issue 14 — May/June 2013 Self Reliance Illustrated 29 Here the author is getting ready to throw the blade straight blade style, without rotation. but I do know the torque associated with a knife throw is substantial. Even makers who dub their knives “unbreakable” get angry when someone breaks them because they were throwing the cutting tool. Outdoor blades have a heat treat to cut, not throw, as most throwing knives have a hardness of 50 or below on the Rockwell scale. Throwing a knife that wasn’t mean to be thrown is outright dangerous, not to mention a waste. So what did we learn? If a normal knife breaks from being thrown, that is the fault of the user, not the knife. You might as well play croquet with a golf club, or hike with rock climbing shoes on. There are many reputable knife throwing companies out there. Cold Steel, SOG, Boker, and Condor Tool and Knife make great ones, at rather inexpensive prices. You won’t want to invest too much money in these ballistic blades, as they will be beaten up, abused, and nicked. 30 Self Reliance Illustrated issue 14 — May/June 2013 Targets Targets vary from plywood boards to all out throwing ranges. Try to stay away from pallets, in my experience; nothing likes to stick into the wood that they offer. The best targets are pieces of wood on the transverse plane. What that basically means you have a log, saw it in half, and throw at the sawed off flat part. A regular knife thrower would have a set of these “rounds” in their back yard set up in a safe spot. A safe location with a good backdrop is key, bounces can happen often and if it is near the family vehicle, windows can be damaged. The backdrop is important as well, as the knives will need to be located if they bounce or miss. Keep the area behind the knife target well-trimmed and raked so your time can be spent throwing, not searching for blades. If tomahawks are going to be thrown, you may want to have a dedicated wood target just for those as they are heavier and tend to wear out quicker. Don’t throw at live trees either, as it can easily damage a growing tree, not to mention introduce an opening for insects and fungus. Good options for throwers. Top to bottom: Condor Wing Throwing knife, Condor Dismissal (designed by the author), Cold steel pro flight thrower (discontinued), and Cold steel Pro flight thrower (copy of Harry McEvoy’s bowie-axe) Joe Darrah had this water jet cut; this batman symbol is really fun to throw. The author’s favorite set, 5 Jeff Koch throwers with great grind lines and perfect ground bevels. The book that started it all. Throw! Throwing accurately depends on distance and repetition. So you can pick your distance for throwing, and your style of throwing too. If you are going to throw rotational style, think in half and whole rotations. What distance does it take to throw a knife to get it to rotate half way and stick? Normally, it is around 6 to 7 feet, assuming your knife is around 12 inches long. At this distance, you’ll want to throw by the blade. Visualizing how the knife travels to end up point first in the round, will help with your throwing. At around 11 or 12 feet, you’ll want to throw by the handle, as it will make about 1 full rotation. A little bit further, and the knife will have to do one and a half rotations, so throw it by the blade again. Pay attention to how the knife lands on the round. That will tell you if you need to go back, or forward. Sometimes only a minor change in distance is all that is needed. The American Knife Throwing Alliance (AKTA) has a great system, of 7 feet, 10 feet, 13 feet, and 16 feet which require a ½ spin, 1 spin, 1 ½ spin and 2 spins respectively. For half spins, you’ll probably want to throw from the tip. For a full spin, throw from the handle. The International Knife Throwers Hall of Fame (IKTHOF) uses the metric system and recommends a half spin, throwing from the blade, at 2 meters. At 3 meters, use the handle for a complete spin of the blade. At 4 meters, use the blade for one-and-a-half spins, and so on. I like these as a guide, as it helps keep throwing consistent when moving in between targets. Pay attention to how the knife lands too, as you can read a knife, adjusting if it lands with the handle pointing towards the sky, or towards the ground. issue 14 — May/June 2013 Self Reliance Illustrated 31 machetes, make sure you are OK with busting the handle if it has a polymer style grip, same goes for wood handled axes. Kukris are fun to throw, so are carpet knives, bee hive tools, screwdrivers, giant nails, and old sharpened dental tools. Straight Blade Throw For the straight blade style throw, or the no spin throw, you’ll be keeping the arm straighter, and throwing it with less elbow, overhand. The thumb locks the knife into place, but it must slide out of the hand cleanly to travel well. The throw can come from the side, bottom, or top, but the hand should be straight so that the blade Tips slides out. There is a variation where the wrist flicks, but I am not good at it, I keep my wrist straight when thrown. Don’t spend too much on your throwing set. I Get close to the target, and work your way gradually back once watched a guy at a throwing tournament beat all until you get comfortable sticking these other professional throwit from farther away. You’ll noers, with a set of $20 throwers. tice the farther back you get; the All those other competitors had more you will have to lop it. The special made custom sets, and No Spin throw works well with a designed their own, costing well myriad of items, from screwdrivers over $100. Get good at throwing to tent stakes, and as you get the first, and then invest in the set you movement correct, you’ll soon find like. Choose heavier, longer knives yourself throwing pointy objects if possible. They will be able to be into the ground when you are more predictable in flight. Try bored. As with anything involving different ways of holding the hanhand and motor skills, keeping dle and blade. Some people hold everything consistent is important. it loose; others like to put their The hand hold for the straight blade throw. The more you are consistent, the thumb along it. A follow through easier it is going to be to pick apart after launching the blade helps. problems like accuracy and the Don’t be afraid if the blade bends stick. after a bunch of throws. They will do this if they are tempered right, rather than just break, just bend Other Stuff to Throw them back in a vise. Be consistent. If you got the blade to stick, mark When it comes to tomathat spot, and remember what you hawks, large bowies, and machetes, did. Try to do it again! the thing again is to guess rotation. The bigger it is, the longer it takes The key to having fun is finding The straight blade style throws well with everyto rotate in the air. In my mind, your spot and being consistent. day objects too. it makes them a little easier to With a good amount of practice, throw, especially in the case of a anyone can be good at throwing, tomahawk. A tomahawk doesn’t and will probably find it quite adneed to be straight on to stick, as dicting. There are a myriad of knife opposed to the point of a blade. throwing websites and groups out This is especially true with the there, so do some research, but double edge tomahawks. There above all else, throw a lot! are specific throws that work too, with the head pointing at you, thrown underhand, that also give some variation to the throw with the hawk. If you are going to throw Tomahawks can mess up a target. Here, a dedicated tomahawk target is attached to a dead tree. 32 Self Reliance Illustrated issue 14 — May/June 2013 The Boker Plus Apparo: Bringing Hollow Handled Knives into the Twenty First Century By Tim Stetzer I f you think you know hollow handle knives, think again. The whole hollow handle genre got a bad rap back in the 80’s with a myriad of cheap versions that couldn’t stand up to hard, or even routine, use. It’s time to take another look at the concept though and the new Boker Plus Apparo is just the model to change your mind on the concept. Good hollow handles have always been available; they just weren’t generally what you saw out of the major production companies. There are a number of custom makers and small businesses that have been doing it right all along though and Martin Knives out of Texas is one of them. If you don’t think you can afford a custom just yet though there’s good news, because Martin has teamed up with Boker to do a production version of one of their rugged hollow handle knives called the Apparo. Apparo means “prepared” in Latin and it’s a fitting name for a survival knife; especially one with a hollow handle that allows you to carry other survival gear right inside the knife. The thing that sets the Apparo apart from other hollow handles knives is the unique manner in which the blade is screwed into the handle. It’s a proprietary system designed by Newt Martin but it’s one that they shared with Boker for the production knives. In testing it’s held up extremely well and while they were able to The Apparo is a large, hefty blade. Measuring in at over a foot long it’s plenty big to tackle most outdoor chores. It uses a 7 inch, drop point blade with a saber grind. At 12 7/8 inches overall and weighing in at just less than 19 ounces the Apparo is a solid survival tool for when times get tough. Tim Stetzer was born and raised in Western Pennsylvania, and has been an avid camper since the age of 12. Tim was in the Boy Scouts and has served in both the US Army and Air Force Reserves and is now a Police Detective. He enjoys shooting, knife collecting, hiking, and craft beer. Tim has been writing professionally since 2006 and helped found the online outdoor magazine, Woodsmonkey.com in 2008. Tim is currently Executive Editor of Woodsmonkey.com issue 14 — May/June 2013 Self Reliance Illustrated 33 A 3 inch section of the spine features a crosscut saw useful for notching branches. A heavy double quillioned guard keeps your hand off of the Apparo’s blade during hard use. The Martin Knives logo adorns the Apparo’s blade showing that it’s a collaborative piece between Boker and designer Newt Martin. The Apparo comes with a cord wrapped handle. 34 Self Reliance Illustrated issue 14 — May/June 2013 bend and even break the blade in vice testing the one spot where it never broke was at the juncture of the handle and tang. That’s pretty impressive for a hollow handle. Keep in mind almost anything can be broken if you try hard enough and destructive testing, in the proper setting, can be very informative. You aren’t likely to break your Apparo in normal use though, as I found out during my testing. More on that in a bit. The Apparo is a big, bad survival tool. It’s 12 7/8 inches overall and carries a 7 inch drop point blade with an unsharpened back swedge. Steel is 440C with a saber grind that’s a meaty 6mm thick. Three inches of the spine are cross cut saw, positioned just above a lightening fuller in the blade. A heavy double quillon guard keeps your hand off of the blade and it’s pre-drilled to allow for lashing if need be. The handle itself is a tubular design; 4 inches in length with a screw on pommel that gives you an extra half inch of length. The handle is crosshatched for texture and cord wrapped as it comes from the factory. The hollow handle cavity is about 3 inches deep and 15/16th of an inch in diameter. That’s enough room for a batch of lifeboat matches, a pile of Tinder-Quick tabs and a ferro rod, or a small fishing kit. A set of good threads and a sturdy O-ring on the butt cap keeps things water tight and safe until you need them. The Apparo comes fitted with a simple and sturdy black leather sheath. I like it. It’s made of thick leather with a full welt and has a loop big enough that it’ll ride on just about any belt including a military web pistol belt. There’s a tie down spot for a leg thong as well if that’s your thing. I know we live in a MOLLE world these days but there’s still nothing wrong with the old standbys. A simple leather strap goes over the guard when the knife is sheathed and snaps The 7 inch, 6mm thick, 440c stainless steel blade of the Apparo has an unsharpened top swedge and a lightening fuller. A threaded end cap with O-ring seal keeps contents of the Apparo’s handle dry and secure. A threaded end cap with O-ring seal keeps contents of the Apparo’s handle dry and secure. into place. The sheath is reversible and will work with either a right or left handed carry. MSRP is listed at $189 but street prices can be found more in the $130 range. Not bad for a knife with this much machining and a sturdy leather sheath. When it came time to field test the Apparo, frankly, I beat the snot out of it. I figured folks are going to question the strength of a hollow handle knife so I wanted to make sure it held up before I signed off on it. I did a good bit of chopping with the Apparo to see both how well it actually chopped and how well it held up. I was visiting my folks’ house and found a downed locust tree in the woods behind the house. Locust is tough stuff. There’s a reason that it’s used for fence posts. When it dries it dries dense and hard. I hacked off some wrist thick branches from the tree and then batoned those down into kindling sized pieces. I found that the Apparo chops well. There’s a lot of mass in that thick blade and at 7 inches in length there’s a good bit of room to chop with. I did find my one gripe about the Apparo while doing my chopping though and that’s the cord wrapped handle. The thin cord used to wrap the handle seemed a little slick to me and it moved around while I chopped. I ended up taking it off part way through the testing and found that I much preferred the checkered metal handle unwrapped. I felt it gave me a much more secure grip when I was swinging the knife. The wrap was fine during regular cutting chores, and it’s a nice way to carry some extra cordage, but I felt it hindered your grip while chopping. After I took it off I wrapped it around the sheath so that I still had the cordage available if need be. Once I stripped the cord off, I made it through the chopping with no issues at all. The blade felt solid in the hand and bit deep. I didn’t issue 14 — May/June 2013 Self Reliance Illustrated 35 exhibit any sort of loosening of the blade and honestly didn’t see any difference between the Apparo and many full tangs knives I’ve used before. Batoning that wood down to fire starting size was my next step and an area where I wondered again how the hollow handle would hold up. As mentioned, Locust is tough stuff. I used a Locust baton to split the slightly larger Locust logs. The 7 inch blade gave me plenty of length to work with even on the 3 to 4 inch thick log rounds I was working with. Now, the spine of the blade has a pretty aggressive saw and I’ve heard a lot of folks grumble about how a sawback tears up a baton. Well, that’s true. But guess what? Batons are free! My Locust one was chewed up by the time I was done but still held The saw of the Apparo is rather thick but it worked well for notching branches. The thick, heavy blade bit deeply into this dried locust branch. up pretty well. It became firewood too when I was finished though so it didn’t really matter. Had I broken it on the sawbacked blade I’d have just cut another one. Point being, yes the sawback will chew up your baton but I really never saw that as mattering too much. Speaking of the saw, I did use the saw a bit too. Honestly, I’m not a huge fan of sawbacked knives. Not because they chew up my baton, but because I never found them to work all that well. Given the choice between a saw and a non-saw version I’d take the non-saw version just The Apparo’s handle underneath the cord wrap is checkered to provide a positive grip even without the about every time. With that said, the wrapping in place. The author preferred the steel grip to the cord wrap when it came to heavy chopping. Apparo saw is pretty aggressive and it does work. I found that it cut relativea great compromise. You benefit from all of the design ly well considering the short 3 inch length of teeth and it and engineering of Newt Martin at Martin Knives and made nice, clean notches. And that’s what I would probagain the affordability of a production version from Boker bly use it for, making notches for lashing, making tools etc. Knives in their Plus line. That’s a win-win and you end I could actually hack through limbs faster than I could saw up with a rugged, practical survival tool in the process. through them. Still, it didn’t hurt any other function of the Resources: www.boker.de/us , www.martinknives.com knife and the notching can come in handy at times so I can certainly live with it on the Apparo. If you’ve always wanted a hollow handled survival knife but couldn’t bring yourself to buy one of those cheap ones we all saw as kids, and haven’t saved up the cash for a full blown custom job, then the Boker Plus Apparo is 36 Self Reliance Illustrated issue 14 — May/June 2013 Gray Wolf Knives Quality handmade knives at affordable prices www.graywolfknives.com Hunting • Fishing • Camping • Shooting All Your Outdoor Survival Needs (615) 722-7057 www.allprooutfitters.com issue 14 — May/June 2013 Self Reliance Illustrated 37 Slinging Rocks By Jonathan Hanscom Close up of a sling’s various parts. M ost know the fabled story of David and Goliath as related in the Bible, 1 Samuel 17, where a young shepherd, David, slew the Philistine giant Goliath. He used nothing more than a simple sling and a stone, a powerful, common man weapon that anyone can construct and use. I designed my first sling 3 years ago, intrigued by their simplicity and power. Imagine being able to pick a stone up off the ground and cast it 200 yards away, at speeds exceeding well over 110 miles per hour. With just a sling and some practice, these feats are quite achievable. Dating back to the Neolithic era, slings are one of the earliest projectile weapons seemingly developed independently worldwide. As people began to throw rocks as weapons, the sling developed in order to extend the length of the thrower’s arm. This added length leads to a greater mechanical advantage while throwing, that is, increasing the speed of the released projectile, as well as the distance that it travels. A cheap and simple weapon, the sling has been used in both hunting and warfare for centuries by civilizations such as the Romans, Assyrians, Sumerians, and Egyptians among others. A basic sling is composed of four core components: the pouch, the cords, the finger loop, and the knot, bead, or tassel at the end of the release cord. The pouch holds the projectile, the cords increase the length of your arm, the finger loop prevents the whole sling from being thrown upon release, and the knot, bead, or tassel provides a consistent and secure grip. As long as a sling has these four components, it is possible to craft one from many materials, in an infinite number of shapes and sizes. Because slings can be crafted from so many materials, it is easy to produce one in a survival situation from materials commonly found in many people’s survival kits. One example is a simple sling, woven from a single 20 foot piece of para-cord. This is a durable and stable design that will last a long time. Another example is a sling made with a single 5 foot piece of para-cord and a duct tape pouch. Although it is not as durable as the woven para-cord sling, it can be made in about 5 minutes. Improvised slings can provide reliable weapons in a survival situation, but it is mandatory to practice before encountering such a situation or the sling is virtually useless. As slings developed worldwide, various styles of slinging appeared as well. These styles include Greek, Apache, Balearic, sidearm, underarm, helicopter, and figure-8 among others. Regardless of the style of slinging, the basic grip on the sling is the same. With the loop secured around the index or middle finger, pinch the retention knot between the index finger and thumb. The sling should be hanging straight down at one’s side with the release cords untwisted and parallel. Firmly seat the projectile in the pouch, making sure to distribute its weight evenly on both sides of the pouch to prevent a potential misfire. After getting comfortable with the grip, it is time to find some ammo and do some slinging. The great thing about slings is that they can use just about anything that fits in the pouch as ammunition! Possibilities include rocks, golf balls, tennis balls, black walnuts, and many others. An ideal ammo weight A New York native, Jonathan Hanscom has had a passion for the outdoors since a very young age, developed through hours spent in the woods on his own. A selftaught practitioner of outdoor skills, he has developed a love of various primitive weapons. Currently a junior in high school, Jonathan is an Eagle Scout and a black belt in Shotokan karate. He focuses on honing his martial arts skills along with his primitive weapons knowledge. 38 Self Reliance Illustrated issue 14 — May/June 2013 for hunting small game is around four ounces, which provides ample energy to kill and retain much of this energy upon impact. In order to generate maximum power, it is crucial to understand the mechanics of the throw. A slinger generates power the same way that a golfer builds power for a swing, or a fighter builds power for a punch. All three of these activities generate power from your hips. When slinging, the throw starts at ground level, travels through your legs and into your hips. Your hips then make a powerful rotation, transferring power into your arm through the sling and into the projectile. All this happens in one smooth motion and becomes natural through practice. If done correctly, the throw will generate immense power. The most commonly thought of and Three of the author’s slings, showing variations in design and complexity. misconceived slinging style is what slingers call the helicopter style. Many think that the slinger’s power when using this style comes from whipping the it is more accurate. A basic throwing style, the sidearm is sling around one’s head as quickly as possible before regreat for learning the mechanics of slinging and lends itself leasing the projectile directly at the target. Nothing could to beginners. be farther from the truth, and this amateur technique will The sidearm throw starts similarly to a helicopter result in incredibly weak and inconsistent shots. throw, standing perpendicular to your target. Keeping When performed correctly, the helicopter style your eyes focused on the target, the sling is whirled once can quickly become a slinger’s favorite. To begin the overhead and the arm extends, letting go of the release throw, stand perpendicular to your target with the sling cord as your hand points towards the target. Unlike the hanging down at your side. Make two to five slow, delibhelicopter style where the release path is almost parallel to erate, overhead rotations with the sling, which help to get the ground, the sidearm throw release path is at a forty-five a feel for the projectile. Finally, speed up the last rotation degree angle with the ground. This angle lends itself to and turn towards the target with your hips, sweeping your hitting targets at ground level, making the sidearm throw arm around and letting go of the release cord when your one of the best suited for hunting small game. The sidearm hand points towards the target. With practice, this throw- throw also does not involve the multiple rotations of other ing style feels quite natural and looks very traditional. throwing styles that present a problem while hunting, The sidearm style is another favorite of many slingers and since they can “flag” game. is closely related to the helicopter style. Although it does No matter what style of throwing is first attemptnot generate quite as much force as a helicopter throw, the ed, accuracy will most likely be abysmal. The sling is one of sidearm throw is much quicker to perform and some say, the most difficult ranged weapons to master; with only a A simple sling woven from twenty feet of para-cord. The pouch of an improvised sling made from a single 5-foot piece of para-cord and duct tape. Author demonstrating one correct way to hold a sling. issue 14 — May/June 2013 Self Reliance Illustrated 39 Various sling ammunition. From left to right: Tennis ball, river stone, golf ball, buggy apple, black walnut. Author demonstrates a sidearm throw. Notice how the throw uses the entire body to generate power. few in the world being able to hit what they want 100% of the time. Just like with a rifle or a bow, one only becomes accurate with a sling after years of repetitive practice. Practice at half-power when slinging at targets, so that it is easier to judge the release. After thousands of shots, correct timing will become natural, and accuracy will slowly develop along with power. When practicing, always remember that even though a sling is simple, it can be just as deadly as a bow or 40 Self Reliance Illustrated issue 14 — May/June 2013 gun. Never aim at anything you do not intend to hit, and use soft ammo when first getting started. The same common sense rules apply to a sling as any other weapon, so take precautions when using them around other people. If you are interested in starting to sling, search the internet for slings and see what comes up. There is a large amount of additional information available and people eager to help you get started. Be safe and have fun with this ancient and powerful weapon. issue 14 — May/June 2013 Self Reliance Illustrated 41 The Oat Spike Sinnet Survival Bracelet By Scott Wickham Jr. T he oat spike sinnet survival bracelet is a different twist on the regular survival bracelet. This one will hold a bit more cord than a standard cobra weave bracelet and look much cooler doing it! 1. You’ll need two, 6 foot sections of para-cord. I’d use two different colors for the first one just to see how things weave. 2. Make a bight in the color you want to be the loop (brown), and then bring the other cord (orange) around it like a scarf. 3. Take the working end of the right side brown and pass it through where the two colors touch. 4. Pull the slack through. Scott Wickham Jr. is an apprentice knifemaker at Blind Horse Knives. In addition to knifemaking he has been writing for ten years now and has had a love for the outdoors since a young age. Scott is also the co-founder of the Fort Pitt Land Rover Group and when he is not making knives or writing can be found in his Land Rover. 42 Self Reliance Illustrated issue 14 — May/June 2013 5. Do the same with the left side working end of the brown and pull the slack through. 6. Bring those two brown ends around the front, over the orange. 7. Bring the left orange working end around the front. 8. Now the right orange working end across all of it. 9. Again, pass the right side working end through where the two colors touch. 10. Same on the left. issue 14 — May/June 2013 Self Reliance Illustrated 43 11. And pull snug. 12. Continue this weave until you have about 12-14 weaves. 13. Now size it up and leave about an inch or so gap for the last knot. 14. We now need to tie off the four strands of the weave. This is the same exact way you finish off the bottom of a knife lanyard (square sinnet weave.) Cross over lower left to lower right. 15. Continue crossing the working ends over each other until you get what I have pictured. 16. Now bring the working ends up through the middle of the square you just made. Bring them up one at a time and rotate the whole bracelet clock wise each time to bring up the next one. 44 Self Reliance Illustrated issue 14 — May/June 2013 17. Here is the last one coming up through. Notice I’m holding the other three in my left hand so they don’t get confused with anything else. 18. Here is a shot from the bottom showing all four strands up through the center. 19. And snugged up. 20. Take your knife and cut off two of the strands and singe them with a lighter. Then with the two strands left, tie a simple overhand knot, but not super tight. You might have to retie this knot in another spot; this will determine how tight the bracelet is when finished. 21. I used the long ends to pull through the first loop we made and bump the overhand knot through there to see how the fit is. 22. Knot is too far away, bracelet will be too loose so I’ll have to tie it closer to the finish knot. issue 14 — May/June 2013 Self Reliance Illustrated 45 23. I have checked the knot again, shortened the distance so it fits well and tightened the overhand knot. I’m now going to cut off the tag ends and singe them with a lighter. 24. Finished and ready to try it on. 25. Perfect fit for me, just a touch loose. 26. The weaved side. That’s it; you’ve just made the Oat Spike Sinnet survival Bracelet! Happy knotting, Scooter. 46 Self Reliance Illustrated issue 14 — May/June 2013 issue 14 — May/June 2013 Self Reliance Illustrated 47 Starting Your Garden with Egg Cartons By Stefanie Bondra T here are many signs of spring but the one that is most familiar to me is starting the garden. By late January mailboxes are full of seed catalogs with their colorful offerings. While it is still too early to go out and start your actual outside garden, it is the perfect time to start planning and planting your seeds for the spring transplant. While I love going to the farmers market for produce, it really does say “selfreliance” to have your own garden. This method is very basic, easy to do, and a perfect way to get your kids involved in gardening. So get your empty egg carton and get cracking. Depending on your final frost date determined in part by your “zone” (http://planthardiness.ars. usda.gov/PHZMWeb/) and your Egg Carton (with lid removed), garden trowel, dirt, and seeds. local weather patterns you can begin Using my zone (6-7) which has a final frost date your garden indoors with egg cartons ranging from March 30 to April 30, I back up a few weeks to give plants a great start for the season. Now I’m not a and start my plants inside. You can find more information master gardener or even a really great gardener, but I get on your zone and final frost date at the above web address by really well year after year with my egg carton starters. or by contacting your local cooperative extension (http:// There is a ton of information in books, magazines, and www.csrees.usda.gov/Extension/). Your local extension, websites dedicated to making and cultivating the perfect which is a non formal education program that helps peogarden. But I think to someone starting out, a more simple use research based knowledge, can also help you with plistic approach is the way to go. I don’t mean toss your most of your gardening questions and problems, should tomato seeds on some fresh tilled dirt and spit on them. you have any. Additionally they will, for a fee, test your (Which incidentally is exactly the method my mother soil to ensure it has all the proper nutrients for the growing used for her perfect tomatoes year after year.) I just think that using inexpensive cardboard egg cartons is a great way season. I like to start my indoor season with the plants that take the longest to mature (tomatoes and peppers to of starting out. An added benefit is that the cardboard cartons are biodegradable so putting them into the garden name two) and the closer I get to actual outdoor gardening after the plants are established is a way to recycle and reuse time, I follow with herbs, beans, and finish with lettuce. the cartons. For over ten years, Stefanie Bondra has hosted and entertained her friends and peers in the field with culinary style in the outdoors. Growing up in south New Jersey, she eschewed the malls in favor of the gun range with her Marine Corps father while cultivating a Neo-Renaissance knowledge base which includes metallurgy, networking/programming, medical first response, and culinary skills. After getting married and moving to Pennsylvania, she shifted her outdoor haunts from the pine tree marshes to coniferous hills and ridges. She and her husband share a get-away cabin in the center of the state, and make frequent excursions camping with the Society for Creative Anachronisms, where Stefanie is known not only for her field culinary abilities (which have been used as currency on occasion), but her archery skills, and uncanny ability to know when her husband requires medical attention. They are joined on these adventures by their daughters, Skye and Fiona. 48 Self Reliance Illustrated issue 14 — May/June 2013 Dirt and seeds ready to be watered and covered. Carton covered with plastic wrap, ready to grow! The steps for starting seeds in egg cartons are simple and I am sure someone, somewhere is cringing over my method. This is what works for me; much of gardening is trial, error, and preference. So do what you like, leave out what you don’t, and cringe if you must. Materials: -Clean cardboard egg carton(s) dozen or 1 ½ dozen -Seeds -Dirt (Potting soil or compost soil. I use the soil from the previous year’s garden or just some soil from the surrounding area, minus the sticks, grass, and rocks. Cringe at your leisure.) -A sunny ledge or counter (you can put the plants outside on a sunny day, but bring them in at night!) -Optional plastic wrap and tray to catch spilled water and/ or dirt 1- Tear off lid from the egg carton and set aside. This will be your “What did I plant here?” guide as well as a tray for water/dirt if you don’t want to use a plastic tray.) 2- Fill spaces where the eggs formerly resided with dirt. 3- Poke a hole in the dirt with finger-depth is dependent on the seed. See the back of your packet for planting depth guide. 4- Place seed in hole and cover with dirt. 5- Water-don’t over water but soak the dirt thoroughly. You may need or want to do this in small amounts a few times until the dirt is moist enough. 5a- Cover with plastic wrap-this will speed up germination by keeping the seeds warm and moist. 6- Place in sunny spot. 7- Water daily, but don’t over water. 8- Wait until the seeds poke up through the dirt to remove the plastic wrap (if using) and wait to transplant until the seedlings have at least their first set of leaves. Side view with lid underneath acting as a drip tray. I prefer to wait a week or two longer to plant the seedlings in the garden depending on what the weather is doing. When the time comes though, I wet the whole carton with a hose (gently please) so the cardboard is really soft and easily torn or cut. At this point I cut or tear the individual seed containers apart and either cut the bottom of the carton off so the roots can spread out or gently try to take them out of the egg container itself. Honestly, I usually wind up crushing the new seedling so I make sure the egg carton is completely soaked and put it in the hole I’ve previously put in the garden. Sometimes I will keep a dish of water near me when I do this and set the egg cup in the dish for a minute to ensure it will break down quicker. After you have your seeds in the garden, it’s only a matter of time before you will see the fruits of your labor. You will see them sooner because you started your plants indoors and you will have done it inexpensively. That is always a bonus. I’ve seen plant seeds at my local dollar store, four for a dollar and while I’ve not grown anything from them; at that price, it’s definitely worth a try. Compared to the two dollar price tag at nurseries and other plant stores for some small plants it certainly seems economical. If it doesn’t work out, you can always pick up a well established plant from one of the many stores that will have them at prime planting time. Remember though, that they started theirs when the snow still covered the ground and not many were thinking of a bountiful tomato harvest. Who knows, they might have even used egg cartons! issue 14 — May/June 2013 Self Reliance Illustrated 49 Domesticating Wild Berries By Eric McCracken Typical daily harvest of our raspberries in summer. I am fortunate to own a home that is adjacent to many miles of hiking trails. This allows me at the end of a stressful day to cross the street and spend time in the woods. It also allows me to get in some early morning hikes over the weekends. Slightly off some of the major trails I discovered a considerable amount of wild edibles that includes various types of berries. I particularly enjoyed a period of 2 weeks in the summer when the raspberries were ready to harvest. I filled up my canteen cup and brought them home to the family to enjoy. This prompted me to develop a plan to transplant one of these plants to my yard, which initially ended in failure. I added a garden trowel, pruners, and a small pot to my gear and traveled to the location of one of the larger clusters of raspberry bushes. After reviewing some of the younger plants I selected one of the healthier looking stalks. I clipped it down to about a one foot length and transplanted it into the pot. There is a spot on the edge of my yard which I had already designated for this plant. My intent for moving this plant was twofold. The first of which was to produce food and the second was to provide a natural thorny border to an open section in my backyard. Unfortunately the placement of this plant was one of the biggest mistakes I made. It struggled through the summer and never established. Eventually an animal pulled it out of the ground one night and consumed the roots of the Eric McCracken is employed as a Business Analyst for a logistics company. He enjoys spending his free time doing outdoor activities with his wife and 2 children and teaching preparedness and wilderness skills to various scouting organizations. He is a current Pathfinder student who has completed Phase 1 and is a graduate of the first Pathfinder Advanced Northeast class and is certified in Wilderness First Aid. 50 Self Reliance Illustrated issue 14 — May/June 2013 plant. The following day I made a trip out to where I collected the plant from to see where I went wrong. It turned out I did not observe two major environmental features in which the raspberry bushes were flourishing in. The first of these is sunlight. The location was southern facing on the edge of the woods and got sunlight for more than 70 percent of the day. The soil was the second. It was damp and was covered by natural compost that consisted of leaves of the local plants. After searching my property I found a location that appeared to be ideal which was only about 20 feet from where I made my first attempt. Since it was so late in the season I was going to wait until the spring before I attempted it again. All of the steps were reproStrawberry plants discovered in early spring under some white pines. duced but this time I planted in the new location. The soil was very similar to the location from which I removed the plant from. It contained a thin layer of top soil which was on top of a sand /soil mixture. This time I added a few handfuls of rotting leaves after my first watering. The plant was watered regularly and quickly established itself and required little maintenance into its second year. By the third year it produced its first group of berries and also a group of additional stalks. It is now in year 5 and it currently covers about a 10 foot by 8 foot area and a considerable amount of berries for a 2 week period in the summer. The natural compost holds in a considerable amount of moisture so the plants typically Transplanted strawberry plant. won’t need to be watered in periods of drought. The only yearly service generation of raspberries. that these plants require is pruning of the older or dying My next attempt with wild berries yielded more stalks and cutting back some younger plants so it does not instant results. I discovered some wild strawberry plants expand further than I have intended. I have identified a in a less than favorable situation. It was early spring and younger plant that I intend to relocate to a new spot in they were attempting to grow in a densely wooded area the spring. Since I have a better idea of the time commitwhich was covered in many years of leaf debris. In the ment involved and the space required for a mature group next few weeks when some of the larger trees started of plants I have identified an ideal location for my next producing leaves it was likely these plants would be issue 14 — May/June 2013 Self Reliance Illustrated 51 One of the strawberry plants near the end of the summer with runners. cut off from any sunlight. I transplanted two of the plants, moved them to a small pot and moved them to a location near an existing strawberry bed. The area is in my garden, receives full sunlight, and is watered daily through a system of rain barrels. The smaller planter shared the same soil mix as my raised bed. This mix contained one third commercially purchased garden soil, one third peat (Sphagnum) moss, and one third of my homemade compost. These plants instantly started showing results. They started producing berries within a few months. Later on the plants started expanding by producing runners. This has allowed me to direct these runners into pots to produce some additional plants for future plantings. My plan is to integrate these plants into my front garden. This area contains mostly flowering plants and various non-flowering ground covering. This will allow this area to produce some food and not just be a visually pleasing area. The biggest challenge I have found is protecting these plants from predators. In the case of berries these 52 Self Reliance Illustrated issue 14 — May/June 2013 predators are birds and rodents. This is in contrast to my other plants in my garden area which mostly attract insects. This was discovered when I started finding a series of berries with holes in them. My first thought was that this was caused by insects until I spotted the culprit. It was a Grey Catbird and was quickly damaging a considerable amount of the ripe strawberries. My first attempt to remove this threat was using a plastic owl. This only worked for about 48 hours before I found the birds were actually perching on the owl before going into the garden. It forced me to install bird netting on my raspberries and strawberries. This is typically available at most of the larger hardware stores in the garden section. I had to build a frame to support the netting over my strawberries as they were not strong enough to support the netting. The raspberry bush was able to support the netting which was a relief because I would not have to build a structure to cover the entire area. It was very effective to prevent birds from feeding on the berries but was not particular in what it can catch. I discovered this one evening when I found a Black Racer Snake tangled up in the netting. My initial attempt to untangle the snake caused it to only get itself twisted up further. My only choice was to pick up the snake and cut off all of the netting. I decided to release the snake because it was likely assisting by consuming some smaller rodents that were also threating my gardens. The second predator proved itself as a greater adversary. The common eastern chipmunk easily found itself around the bird netting and I started finding consumed strawberries on the edges of the garden. My immediate instinct was to take care of these issues with a pellet gun. Pressure from my family caused me to look for a less lethal method for removal of this threat. I purchased a Havahart live animal trap and quickly found the only thing the chipmunks loved more than strawberries is peanut butter. Within 48 hours I had captured my first chipmunk which I relocated to a location 4 miles from my home. A few days later I captured a second chipmunk which was also relocated. After the baited trap was empty for two weeks and I was not finding any more eaten berries I realized that my plants were finally protected. Locally we also have Grey Foxes which I have also found consuming my raspberries but I have installed three foot high garden fencing to prevent their access. One thing that my family was not prepared for was the overwhelming amount of berries our raspberry plants produce in a single day. This was not the case with the strawberry plant which typically yields four to five berries daily. We froze a considerable amount of the berries but we are considering better options in the future. We decided to purchase a pressure canner and we intend to make jams and jellies out of them next year. This summer I plan on attempting to relocate the final wild berry I have discovered in the area. I have discovered a cluster of blueberry plants that have worked themselves into a rock wall that is near the opening to one of my favorite hiking trails. This time I have done adequate research and hopefully they will turn into another future successful addition to my garden. First of two Chipmunks captured and relocated to protect berries. Racer snake that was tangled in bird netting. Cutting snake free to assist in my efforts to keep chipmunks out of gardens. issue 14 — May/June 2013 Self Reliance Illustrated 53 How to Talk to Airplanes: Surface to Air Visual Signals Explained By Victor Lasher “Man, that was a great shot,” you think to yourself as you track the monster buck you shot at an hour earlier. “I can’t believe he made it out this far, like that. Man, it’s going to be dark soon… Ahh, he’s got to be just up here.” You finish hiking up a hill for a look around, when it finally hits you… “Crap, I’m lost…” You didn’t want to admit it, in fact you kind of never will admit it. When you tell this story, you’ll remind everyone that you really didn’t need help, it was just easier for everyone, then walking out alone. Your mind was only focused on the antlers you shot at earlier, now, you’re in unfamiliar woods, it’s getting late, and you don’t know where you are. The good news is that you knew this could happen; you’re prepared with your well stocked survival kit, and even a couple cans of beanie-weenies! You told someone where you were going to be, and that you would be home late that night. The problem is, it’s just starting to get dark, and a storm looks to be heading in. Guess who’s spending an unplanned night out in the woods? It can happen just that easy. Tonight, the person you left your plan with will probably call to report you missing, however the storms and time of night will probably prevent a full search until daylight hours. First thing in the morning, you’ll be the subject of a full on search and rescue operation. This will most likely include some sort of airborne search in addition to ground SAR teams. Typically, federal airborne search and rescue operations over land fall under the United States Air Force, and 85% of these missions are accomplished by the men and women of the Civil Air Patrol or CAP. The Civil Air Patrol is the United States Air Force Auxiliary, and there is probably a volunteer squadron near you. So, now that you know who is going to come looking for you, wouldn’t it be a good idea to know how to speak their Diagram 1: Learning a few key visual symbols could very well be the difference between life and death when seconds count. Victor Lasher is a lifelong camper, and hiker, raised in the swamps of coastal North Carolina. A career law enforcement officer, and volunteer firefighter, Victor is also a Dave Canterbury Survival Adventure Network scenario survivor, who believes that we should never stop learning. 54 Self Reliance Illustrated issue 14 — May/June 2013 many hundreds or thousands of feet away? The symbol “I” is understood to mean “Require doctor serious injuries.” You can even specify the type of injury, for example, a broken leg is conveyed through the symbol “4”. What if you want to let the CAP pilot know that all is well, “LL” would be the proper signal to use. Some other very useful visual signals include “->” which indicates which direction you are proceeding, “Y” means yes or affirmative, and conversely, “N” means no or negative. Another option for communicating with CAP pilots after you have been spotted is to use visual body signals. Lying on the ground in a supine position, face up, with your arms extended over your head in the shape of an “I” is taken to mean that you need urgent medical assistance; typically this is only used when life is at stake. Standing straight up, holding one arm up in the air, with the other down by your side means that all is ok; however, standing straight up, holding both arms vertically in the air means that you need to be picked up. Did you know that you can also relay “yes” and “no” to a pilot using visual body signals? With a large contrasting cloth in your hand waived vertically (up and down) in front of you, that means “yes” to a pilot, and a large contrasting cloth in your hand waived low horizontally (side to side, left to right) means “no.” Pilots can also communicate with you on the ground using the movements of the airplane. You’ve probably seen or heard that a pilot rolling or tipping the wings of the plane up and down means that they see you on the ground, but did you know that actually means the message was received and understood? The opposite of this is if the pilot flies the plane in a tight circle, this means “message received but NOT understood.” The pilot can also signal “yes or affirmative” to a person Diagram 2: Why is this important to learn? Because, when using visual body signals, the difference between on the ground by pitching the “I’m OK” and “pick me up” is only one arm. language if they find you? We all know that during a search, anything unusual will be investigated, and smoke will almost always be investigated. What about symbols or signals that you put on the ground to be seen from the air? What does a giant 30 foot by 30 foot “X” mean to a CAP pilot? What about “XX”? You might be surprised to learn they mean two very different things. For instance, take the single “X”, this is taken to mean “Require medical assistance” or formerly “Unable to proceed.” On the other hand “XX” is taken to mean “We are not able to continue, returning to base.” Now, during a search, either of those signals will probably get attention, but what if you needed immediate medical attention for a serious injury? How do you get that point across as soon as possible to a person in a plane issue 14 — May/June 2013 Self Reliance Illustrated 55 Diagram 3: For yes and no responses from a pilot, try to think of the cockpit of the plane as your head, shaking your head up and down means yes, and side to side means no. nose of the plane (the cockpit area) up and down, think of a person nodding their head yes. The pilot can signal “no or negative” by yawing the nose of the plane side to side, think of a person shaking their head no. We all know that knowledge weighs absolutely nothing, but the lack of it when required can be the heaviest of all burdens, so why not take a second to study the diagrams provided in this article. If you’re not one for studying, or just like redundancy, shrink down a copy of the charts and put them in your survival kit. I have a shrunk down, laminated version that weighs next to nothing in my survival kit. To make things even easier for you, I’ve posted all three surface to air, and air to ground signal charts, which you can save, or print on the Self Reliance Illustrated internet forums under the “Communications and Technology” subsection, which can be found at: http://selfrelianceillustrated.com/ forum/ Get out there and practice the skills you need to survive, well before you need them! Please remember that if you practice making emergency signals, do not actually direct them at passing aircraft unless it is a true emergency, and remember to take down any and all practice signs or signals when you are finished. No one wants to search for someone who does not need it. Remember, practice makes habit; perfect practice makes perfect! 56 Self Reliance Illustrated issue 14 — May/June 2013 Obstacle Racing: How it can Make You Better and Safer in the Woods By Gert Grohmann Photos by Brian McGuinnis Team Climbing Rhinos nice and clean before the Tough Mudder from left to right Angie Lawrence, Nikki McGuinnis, Kelly Moriarty, and Gert Grohmann. I need a goal. Working out for that endorphin high just doesn’t do it for me. Over the years, I have participated in 5 K fun runs, sprint triathlons, ½ iron man triathlons (that was a LONG time ago) and competitively lifted weights. But to be honest, at 48 years of age and 200 pounds, my knees don’t appreciate a lot of running anymore and my job and family responsibilities get in the way of training unless I have a goal. Besides, I get bored easily and I don’t have a lot of interest in competing against the 20 something young bucks. I compete primarily against myself these days. Besides, rolling out of bed at 4:30 am is not my favorite thing to do after a night of on-call duty for my fire department. I need a goal to get motivated. Around 2 years ago, I started hearing about a new type of event, the obstacle race. It involved running (not my favorite), climbing (now we are talking) and getting muddy (sounds like fun.) The first event that I ever participated in was called Gert Grohmann has been involved with the Midwest Native Skills Institute http://www.survivalschool.com for 7 years and serves as the Scoutmaster for the Mequon/Thiensville Boy Scout Troop 852. He also maintains a YouTube Channel under the user name Wildernessways. He is a firefighter/EMT, father, and husband. He camps, rock climbs, hunts, sails, and backpacks all over Wisconsin whenever he can find time away. This year in July, he will also realize one of his dreams and will compete in the Chicago to Mackinaw sailboat race, the longest fresh water sailing race in the world, aboard the 40 foot sailboat, Mosquito. issue 14 — May/June 2013 Self Reliance Illustrated 57 Kelly gets over the Berlin Wall with a little help from her friends. Nikki running the Mud Mile. 58 Self Reliance Illustrated issue 14 — May/June 2013 the Warrior Dash. I really did not have time to train for it that summer two years ago, but I was in reasonable physical shape and not ridiculously overweight, so I signed up. When I showed up on race day, I was really shocked at the size of the event, as well as the variety of people that were participating. Some were hard core athletes. Some were middle age people who just wanted to see what they could do. Some were moms and dads on the other side of middle age that looked like they had not run in 20 years, if ever. Some were, well different. During the first ten minutes of the race, I passed (or was passed by) a Viking, a Roman warrior, a gorilla in a tutu, and Waldo (I actually found Waldo.) The Warrior Dash and the Dirty Girl (a female only event similar to the Warrior Dash) are examples of a new breed of fitness events, and I think they are really well suited to what I call practical fitness. Yes, you do some running, but you also climb and crawl. An obstacle racing event is more a test of your mental toughness than it is a test of your physical conditioning although you do need to bring both to the table. It is a great way to motivate you to get back in shape and to do things you never would have thought you could do. It is also a great gateway to the other events such as the tough mudder, which I did this last fall, if you really want to take it to the next level. The Tough Mudder is an obstacle race on a whole different level, whereas the Warrior Dash and the Dirty Girl are 3 mile runs with some obstacles, the tough mudder is a 1012 mile run with 26 obstacles. Many of which are taken from the British SAS basic training obstacle course. However, once I finished my first two Warrior Dashes, I knew that I was ready to commit to my first Tough Mudder challenge. I knew I could do Kelly is still all smiles while crawling through the Boa Constrictor. it, I had a team. Our team name? The Climbing Rhinos. This was very appropriate if anyone has ever seen me run. We could not have been a more diverse crew. Our team consisted of me; Kelly Moriarty, an EMT and ER nurse; Nikki McGuinnis, a shift lead at Walgreens; and Angie Lawrence. I knew that participating in the Mudder would take training, so 6 months before the race I started running 2 times per week and lifting weights 2 times per week. My runs started out painfully at around 2 miles each workout. I increased the distance each week, and over the course of several months, I was running up to 6 miles once a week and 3 miles once a week. But the Tough Mudder is not just a running event, there is a lot of climbing and crawling, so upper body strength was also important. I began working out with free weights twice a week for about 45 minutes each time. My workout was focused on my general strength, which included upper body one day and lower body, the next day. I always used free weights since they require more work to stabilize the weights and you get stronger over a broader range of motion. Free weights were also less expensive, since if you watch the classified ads, you can pick up a set of weights and a bench for less than $300. One of the reasons that I really enjoy obstacle racing is that many of the obstacles directly relate to fitness that you may need to survive in the woods, including climbing over obstacles, crawling through tunnels and in general learning to work with team members to get past obstacles. You will face your fears on at least one of the obstacles and perhaps more than one. Fear of heights, fear of confined spaces, and fear of getting dirty. It breaks down many barriers and shows you that you CAN do things that you never would have attempted otherwise. These descriptions of a couple of the obstacles you can expect to face are directly off of the Tough Mudder website: www.toughmudder.com Berlin Walls This obstacle relies on teamwork. Scale three 12 foot wooden walls with the help of your teammates, strategically placed for when you are at your weakest during the event. While some Mudders have worked up the strength to ascend the walls alone, most need a boost from a fellow Mudder. issue 14 — May/June 2013 Self Reliance Illustrated 59 Running the gauntlet on Shock Therapy. Arctic Enema This obstacle is all about mental grit. Many athletes use ice baths for recovery, but you’ll have a difficult time relaxing your muscles in this frigid dumpster. First you must bravely jump into Big Mudder’s floating iceberg abyss. Once submerged, find the mental and physical strength to swim through the ice, under a wooden plank, and pull yourself out on the other end before you become hypothermic. Mud Mile Slosh through up to a mile of waist-deep sludge as you try not to lose your shoes in the mud. Balance and coordination are required if you want to make it through this obstacle without face-planting, but what’s the fun in that? Real Mudders eat mud for breakfast. On some courses, Mudders will encounter obstructions throughout 60 Self Reliance Illustrated issue 14 — May/June 2013 Mud Mile that require them to fully submerge in the mud to slosh onward. Boa Constrictor If you don’t like small spaces, this obstacle will be a challenge for you. Crawl through a series of pipes that force you on a downhill into some freezing mud, then a slippery uphill to the other side. Your legs will be useless in the narrow confines of the Boa, so use your arms to pull yourself through this obstacle. There really is light at the end of the tunnel. Electroshock Therapy Sprint through a field of live wires — some carrying as much as 10,000 volts of electric shock. Watch out for hay bales and deep mud or you will face-plant There was no quit as I headed up Everest. into some electrifying mud. Some Mudders try to stealthily wind their way through the wires without getting shocked, while others barrel forward to get through as quickly as possible. Either way, you are guaranteed to get zapped with as much as 10,000 volts of electricity and it does NOT tickle. This is typically the last obstacle Mudders must overcome before they cross the finish line. Walk the Plank Test your fear of heights and cold all in one with the 15 foot high jump into freezing water. Everest Snowboarders and skate boarders have the halfpipe. Mudders have a real obstacle: Everest. A quarter-pipe that you’ll have to sprint up and enlist the help of other Mudders to hurl you over this beastly summit. Everest is coated in mud and grease, a combination which will likely send you right back from where you came. Call upon other Mudders to catch you as you run up the quarter-pipe or work together to form a human chain so that you can scale someone’s shoulders to finally summit Everest. The tough mudder pledge is recited at the beginning of every event, by every participant and I feel it captures the spirit of the event. “As a Tough Mudder, I Pledge That…. I understand that the tough mudder is not a race, but a challenge. I put teamwork and camaraderie before my course time. I do not whine, kids whine. I help my fellow mudders complete the course. I overcome all fears.” This sums up what I think is so special and relevant about obstacle racing and the Tough Mudder race issue 14 — May/June 2013 Self Reliance Illustrated 61 Team climbing Rhino after the race, muddy and tired, but still having fun. (So is the photo bomber in back) in particular. Yes, it is a physical challenge, but it is more of a mental challenge. Most people will not be able to finish the course without help from their teammates. On race day, you have several hundred team mates. During that race, I saw numerous examples of people helping total strangers and encouraging them to do something that they could never have done alone. If you are like me and you need an event in your future to help get you motivated to eat better and exercise on a regular basis, one of these events, either the Warrior Dash, the Dirty Girl, or if you really want to challenge yourself, Tough Mudder will do nicely. Everyone on Team Climbing Rhinos finished the race, tired, sore, muddy, and cold, but still smiling. Even the photo-bomber behind us was smiling. Resources: www.toughmudder.com 62 Self Reliance Illustrated issue 14 — May/June 2013 Nesting Cup Handle Mod By Dave ‘Mitch’ Mitchell T he popular nesting cup used with our 32 oz or 38 oz stainless steel bottles is a great piece of kit. The stock butterfly handles however could use an improvement. The issue with the handles is the grip orientation. Plainly speaking the handles are not held parallel to the cup like a mug, rather they are perpendicular like a frying pan, which causes some awkward angles at times during use. What You Need! -Metal cutting tool -Pliers -Metal hanger -Paper -Writing tool Finished Mod. Butterfly handles extended. Frying pan handle. Preferred mug handle. Cup outline. Handle designed. Stock handles removed. Mitch instructs self-reliance and bushcraft in New England. Follow him on his YouTube channel NativeSurvival and Website Nativesurvival.com issue 14 — May/June 2013 Self Reliance Illustrated 63 What’s needed. First 2 bends. Last bend. Preferred mug handle. Getting Started! You want to make this as easy as possible, so begin by tracing your cup on your paper. Now that you have the square shaped outline, add the handle holding bracket as well. Next up is drawing the handle shape you want, I went with a shape reminiscent of the USGI or Crusader cup designs. We’re on our way now, what you now have before 64 Self Reliance Illustrated issue 14 — May/June 2013 you is a physical representation of your cup and your new handle. This allows you to lay your wire on the shape you’ve drawn and it’s going to fit because it’s to scale, making the job much easier and quicker! Prep your wire by cutting the hook off the top and then cutting the hanger in half, you should be left with clean wire stock with only a few bends to contend with. Last task is removing the butterfly handles before the fabrication begins! Both handles on cup. Handle bent. Fabricating the Handle! Use the pliers to bend the wire using your template as a guide, remember this is an exact replica of your cup and handle drawn out so do your best to follow the turns. If it’s not perfect that’s ok you can tweak it later! Once you have one handle finished at this stage, grab the other half of your hanger and make a copy of your finished handle. Handle Bending! The idea here is to bend your handles so they match the curve of your cup. This allows them to be out of the way when in your pack. Both handles smooth. Full-length video of Mitch Instructing His Nesting Cup: http://bit.ly/HandleMod Mitch is a dedicated student of sustainable woodland living. His Native American roots in New England are his guide to better understanding the multi-faceted relationship between man and nature. Owner of NativeSurvival.com: http://www.nativesurvival.com/ Check out Mitch’s Instructional Vids on NativeSurvival’s YouTube channel: http://bit.ly/NativeSurvivalYouTube Join the Discussion on NativeSurvival’s Facebook: http://bit.ly/NativeSurvivalFacebook Done Deal! We’ve fabricated new handles for our cup, modifying the original design to better suit our needs. Using templates whenever possible will make your job much easier to execute. Thinking outside the box with your gear gives it more personal value and customizes it to you, giving more enjoyment when you use it, especially because it performs how you modified it to. Creating your own gear or modifying existing gear especially with common items easily obtained is what self-reliance is all about! Perfect! issue 14 — May/June 2013 Self Reliance Illustrated 65 More Than Just a Bike By Michael Henninger What if I told you that your bug out plans and your outdoor kit should include a bicycle? Now that your eyes are done rolling, let me explain why. A bicycle is a simple machine that is found all over the world and can be repaired with simple hand tools and a few specialist tools. They are wonderfully efficient; you can travel 3 times the distance on a bike as compared to walking on the same calorie output. You can get involved in cycling for very little cash. They can travel in almost every environment with ease and can carry weight with simple modifications. Trek 520 Hopefully now I have your attention and can explain further how they will fit into your bug out plan. If there is a scheduled evacuation of your location, we all know from the past news reports what will happen. There will be gridlock and slow moving traffic. A bicycle will fit between cars or easily down the shoulder. A better bet is to refer to the Rails to Trails network. They have taken old railroad beds and turned them into a nationwide network of multi-use trails that are closed to motor vehicles. It is possible to ride a bicycle from Pittsburgh, PA to Wash- ington, D.C. while spending less than 50 miles on roads. While all the cars are stuck idling in a forced evacuation, you are peacefully pedaling away from the threat with all your necessary preps, with you burning very few resources, and with a little training you should be able to travel at least 12 miles per hour. Woods time also can be enhanced by using a bicycle. Backpacking and bicycle based camping share many of the same kit. The major changes come in the clothing department and that is a question of personal preference. Having been classically trained in the art of mountaineering, Mike’s skill set is varied but useful. He has raced mountain bikes 24 hours and competed in international rowing events all in an effort to bring the most complete information to you, the reader. He has tried to convince anyone that listens that his dogs are the smartest people he knows. He is also a world-ranked thumb wrestler. 66 Self Reliance Illustrated issue 14 — May/June 2013 Now on to what to look for when you consider a bicycle. The SUV option is a mountain bike. It is a slower setup for pavement but will work well in most every situation. The mountain bike comes in two major varieties. You want to consider a 29 inch wheel mountain bike. These large wheels allow the bike to travel a greater Trek Ion CX distance per pedal stroke and provide a greater footprint creating better traction. You should consider a bike that is in the $500.00 price range or greater. Spending less is possible but the quality of the bike you get will cost you money in the long run as it is not set up for what you will be using the bike for and the parts kit will limit the amount of field repair you are able to accomplish. Another option is a Cyclo-cross bike. This is a drop handle bar bike (road bike or the old 10 speed) that can be ridden off road. This is a great choice if you have a lot of dirt roads or an extensive rail-trail network in your area. It will be more efficient (faster) than the Mountain Bike as it is lighter, geared better, and as a result it generally has a higher starting price point. The drop handle bars allow the rider to move their hands around on the bars which will increase rider comfort and allow you to spend more time in the saddle. Finally the last bike I Trek Marlin would recommend would be a traditional Touring bike. These are just as they sound. A bike that you can pack up with gear and head out on an adventure. They should come equipped with a rear rack for panniers and the easiest to maintain drivetrain and shifting systems. Any of the bikes I have suggested are based on my experience and I would encourage anyone who is interested in bicycles as an option to visit a local bike shop (LBS) and have a discussion with a trained sales person. There are way too many niche bikes and options to cover in the pages of SRI, let alone this article. Now you are reading this and you are thinking, I have a bike out in the shed. That’s great! But it may not be the right choice or the right fit for you. A good bike will be sized just like shoes. The bike should fit the rider and if you are not sure about the fit head over to your LBS and schedule a fit. There are a number of adjustments they can make or change to improve the fit assuming the bike is the right size for you. A 5’5” person will have different leg and torso lengths than a 6’0” person. Once you get the bike sorted and you get it fit to you, you need to get two more accomplishments under your belt before you are ready to go. First is to take a bicycle repair class. Most LBS’s will offer classes. You can also check with your local technical and community colleges. issue 14 — May/June 2013 Self Reliance Illustrated 67 Trek Superfly The second thing to do is to turn the pedals. Get on the bike and ride! Look at the distance you will be traveling either for touring, camping or bugging out. You need to train at least half the distance that you plan to ride. Also consider using the bike as an alternative mode of transportation. You can commute or just use it on the weekends for errands around the neighborhood. Anything two miles or less from your home, take your bike! Now you are ready to consider the mods to the bike both for comfort and for gear. Avoid making changes until you have some miles on the bike. You won’t know if that saddle fits well until you get some seat time. Bigger isn’t always better when it comes to saddles! Changes to bars and other cockpit features can be accomplished during your fitting and the LBS will often do it for little to no charge. 68 Self Reliance Illustrated issue 14 — May/June 2013 To get gear on the bike, you can take two routes, on the bike or behind it. On the bike is the cheaper route but requires more skill with how you pack the bike and how the weight will affect the bike’s performance. Behind the bike is a good option as you can quickly detach the trailer and have a bike. You can also carry more weight behind the bike and if the bike falls you don’t have as much weight to right. Width can be a concern with a trailer. Whichever option you try be sure to add the bike to your skill set and gear options. You will not be sorry! Then add a bike rack to your car and increase the distance you can travel after you run out of gas or better yet, use the bike to rescue yourself after your car breaks down. To sum it up; find a good bike shop, have an honest conversation with them about your goals and your budget, and you will have a good quality bike that will serve you for years. The $20 Blowgun By Zebulon Allison T he blowgun is an ancient weapon used to hurl a dart (usually bamboo) through a pipe at a velocity great enough to kill small game. Most people would imagine that you would have to dip the darts into a poison or rub it on a brightly colored frog’s back, which is not realistic in the modern world. Blowguns are a great weapon or just a fun way to spend your free time. The prices are unimaginable some going upwards of $50. So the common man today might think that it is just not in their budget. After a little studying I have found a way to make a blowgun just as powerful as any other one on the market for under $20. First you will need a few things: a 4 foot piece of half inch electrical conduit (this cost me about .80 cents), next you will need wire nuts, aka wire connectors. Try to get some that are half inch diameter so that they will fit into your blowgun, these are about $2. Now you will need some glue, not Elmer’s school glue, try something like contact cement, which will cost about $3. Finally you will need some bamboo skewers and some metal coat hangers (optional). Now you have all of your supplies. You will need a few tools to work with: hammer and nail or a drill with a small drill bit, a few paper towels, and a hacksaw. The first thing you will need to do is make sure your wire nuts fit inside the pipe. If they do not fit, saw them off as shown in Photo 2. Now you will need to punch a hole Zeb Allison is 13 years old and lives in middle Tennessee. He is currently planning a 72 hour survival mission, using only basic materials. He would one day like to be more self-sufficient and have a more off the grid lifestyle. Photo 1 - The required materials from the left: coat hanger, bamboo skewers, glue, wire nuts, and PVC pipe. photo 2 - Marking the wire nut to fit the pipe. Photo 3 - Using a hammer and nail to punch a hole in top of the wire nut. issue 14 — May/June 2013 Self Reliance Illustrated 69 in the top of your wire nut. Use the small nail and hammer, peck the nail completely through the top as shown in Photo 3. You could also use a drill and drill bit to punch the hole. Now you will need to test fit the skewer just make sure it fits, but not too loosely. If it fits kind of tight you are ready for glue. Put glue all over the blunt end of the skewer and stick it in the hole in top of the wire nut. Leave it to dry for as long as the instructions say. The same steps are followed to make the wire darts using the coat hanger. If you want to make darts without waiting for the glue to dry you could make darts using paper as fletchings in place of the wire nuts. If you choose to do this you will need a small roll of tape, scissors, and bamboo skewers or wire coat hangers. First take a small piece of paper (I use post it notes) and roll it into a cone. Now take a small piece of tape and secure the cone. You will want the small end of the cone to be fairly small, at least smaller than your bamboo skewers. Now stick the skewer in from the open end of the cone until there is only about a half inch left inside. Now tape up the entire cone and place it in the bore of your blowgun. With the scissors cut off any excess cone so that it fits perfectly into your blowgun. These darts are not as powerful as the others discussed previously in the article. If you have small children please watch them carefully as the blowgun is a dangerous weapon. This does not mean that they should be left out entirely you can make stun darts that will not hurt anything if they miss the target. These are the fastest and easiest darts to make. You will need a bag of pipe cleaners preferably green or yellow so that they will be easy to find. Take the pipe cleaner and roll it around a bamboo skewer or any other small nail or 70 Self Reliance Illustrated photo 4 - The finished dart left to dry. Photo 5 - Rolling the paper into a cone. Photo 6 - Cutting the dart to fit the cone. Notice the black electrical tape holding the cone together. issue 14 — May/June 2013 stick. Now test fit it in your blowgun, you will want a snug fit. These darts are about as safe as they get. Alright so now you have your blowgun made and your darts ready don’t head out into the woods hunting just yet. You will need practice and lots of it there are no sights on a blowgun so you will have to learn instinctive shooting. This is done by keeping both eyes open and looking at your target. You will see the barrel of your blowgun split in half making two barrels (this is just an illusion so don’t worry) put your target in the middle of the two barrels this will keep you lined up left and right. As for height this only comes with practice. The average target is 20 feet away so make sure you have a good target as the darts will sink deep into cardboard. You might also want to consider a quiver for your darts. These are made easily using a paper towel roll or a toilet paper roll. If you want something more durable use 4 inch PVC pipe for the bottom, use an end cap that should be sold with the pipe, you will only need about 6 inches of it. A hardware store might even give you this for free. So now you have your very own blowgun for under $20 a common man’s price for sure. As always, get out there, practice, and enjoy being in the woods. Photo 7 - Lime green pipe cleaner, which will be used later to make a dart. Photo 8 - The pipe cleaner being rolled around a bamboo skewer. Photo 9 - This is the penetration of a bamboo dart through cardboard. issue 14 — May/June 2013 Self Reliance Illustrated 71 Creek Walk By Barry Bright My surplus CamelBak combat pack with “OR” dry bag tied on, clear Stearns Outdoor bag for my camera gear and tripod. O ften one of our favorite childhood memories is playing in the creek, or wading or maybe going down to the ol’ swimmin’ hole. There’s a grown up way to enjoy those simple pleasures, called the creek walk. The creek walk is a cooler alternative to hiking in the summer heat. It is really the same as wade fishing, only without the fishing and the emphasis on covering ground. It is a way to get some exercise and outdoor experience, test your waterproof gear and get away from civilization for a while. In my case, I was doing some photography. Now there’s only the stone walls for the spillway left and below that the local swimmin’ hole which was full of kids the first time I attempted to walk all the way to the river. An older man who was hanging out at the swimmin’ hole with the younger folk told me he didn’t think the local land owners would mind my exploring their creek. It’s said in certain historical accounts that the Indians or some other pre-historical occupants of this land had a stone fortress in the area, though the physical evidence for this is long gone or deeply buried. I’ve noticed in my studies of such that they often preferred sites like this for their religious centers or simply for ease of defense or ready access to water from which they not only drank but drew several sources of protein, including fish and mussels. The waters of Big Pitman Creek wind between Barry Bright is a patriot, photographer, reporter, former Marine infantryman, veteran of Operations Desert Shield/Storm, grew up on a small farm and has hunted, hiked, biked, fished, swam, kayaked, explored and photographed in the outdoors off and on all his life. 72 Self Reliance Illustrated issue 14 — May/June 2013 steep hillsides, bluffs, and flat bottom land fields of soybeans and corn. Though the trough of the stream is deep enough that the fields are not easily seen and one can keep the ‘wilderness experience’ going most of the time, imagining what it must have been like for the long hunters who first wandered into Kentucky in search of their fortunes in animal skins. The first time I attempted to reach the river I started too late in the day. I expected there to be more gravel bars to walk on which would be faster but since so much time is spent in the water it’s hard to make time. In places the bars are hard packed, in others one’s feet can sink several inches with every step, adding another dynamic to the workout. The water varies in depth from ankle to neck deep and maybe an ‘over your head’ spot here and there with most of the distance being through shin to knee deep water. Ladies, after doing this twice I can claim to maybe have found the ultimate butt and leg workout as different muscles are used to push the legs through the water. There’s probably a stream like this one near you. Part of the reason I wanted to do this story was a video I saw Dave Canterbury do for his YouTube page where he was showing a waterproof bag for use with his Arc’teryx U.S. Marine backpack. He mentioned the waterproof bag could be emptied of clothing and used as a flotation device for a stream crossing. What I’ve found is they float just fine with whatever you happen to have crammed into them. Packs can be the same. A few years back I swam, or rather kicked across the Kentucky River, about 60 yards at that spot, with an old Alice pack, an M-1 Carbine with a plastic stock while dressed in cammies and old style Jungle boots just to see what it would be like. Everything in my pack was either in a plastic food storage bag or in a garbage bag and everything got wet. I wasn’t surprised about the stuff in the garbage bag but I did expect the plastic food storage bags to be more immersion resistant, especially since I was in the water for maybe 15 minutes. I don’t think I knew what a ‘dry bag’ was back Getting ready to wade through waist deep or higher water. I usually let the dry bag with my Camelbak inside it float along behind, tethered with para-cord to my belt. issue 14 — May/June 2013 Self Reliance Illustrated 73 No kind of department store baggies that I’ve found are immersible, at least not for any great length of time, thus the necessity of dry bags. then. I’ve since used them for kayaking and I keep a medium sized Outdoor Research bag in my 3 day pack at all times in case ‘interesting times,’ as the ancient Chinese curse goes, present themselves. It was with that OR bag and a CamelBak pack and one of my kayaking bags that I began my trek down Big Pitman Creek. Before I left I tested the OR bag for floatation and it worked fine. Its material is actually stronger than it looks and would probably be harder to tear than I realized. I’ve depended on a larger version of my Stearns Outdoors clear bag to hold my camera gear and protect it while kayaking with a few dunks to prove its efficiency. The smaller clear one held my camera and extra lens. A topo map is sometimes a good thing to have and I wanted to know how far I’d be from a road or home if I had to leave the creek for some reason. I downloaded one from a website for free that now charges for the same detailed map. I didn’t take my compass because in Kentucky there are generally two directions, up and down. That’s usually enough to know for short trips. Go up or down 74 Self Reliance Illustrated issue 14 — May/June 2013 long enough, usually far less than a half day and you’ll run into a road or a stream that’s recognizable. While walking in ankle to knee deep water I wore my surplus woodland camo CamelBak and kept my camera gear in the clear dry bag which has a too short strap on it. I’ll be shopping at the surplus store for a longer one. I did slip once and dunk the lower portion of the pack in waist deep water. No real harm done. My camera and both lens stayed in the clear Stearns bag at all times unless I was actually using them. When the water got deeper I put the pack in the OR dry bag, compressed the air out of it and rolled it up to seal. It floats fine that way and is easier to push through the water if it’s deep enough to require kicking across a hole of water. See the pictures of me and my dog crossing one of the deeper holes. Since I basically float like a cork, I’d probably just let the dry bags trail behind me, secured with a line or cord, in my case para-cord, and swim across any large body of water. A note, if you can’t float, you can’t swim. End of Hmmm, looks like good fire starting material, often found in branches along creeks. Noticing how high it is, sometimes 20-30 feet above the stream bed, can tell you not to be here during spring flooding. discussion. At the same point in the Kentucky River I swam across with my pack I shared a swim with a friend of mine several years back. He told me he could ‘swim’ before we started. As we neared the other side of the river a small fishing boat was coming down stream. This seemed to cause my friend to panic, don’t know why. Maybe he was just tired of fighting his way across the water. He almost drowned within 10 feet of shore, in about four feet of water shallow enough to stand in, because he couldn’t relax and float. After I watched him rise and sink a few times, it all seemed to happen in slow motion, I determined he wasn’t going to recover and the men in the boat were still too far away to help him, I swam over and gave him my hand, which is not what I wore these Salomons on my first creek walk. They’re very comfortable except for the sand that builds up over time. Probably had to stop 3-4 times and empty them. issue 14 — May/June 2013 Self Reliance Illustrated 75 “OR” dry bag compressed and sealed with Camelbak combat pack inside. Works fine as a floatation device and keeps your stuff dry, just be sure to leave enough space to fold it correctly. I was taught in life guard class but I took the chance and this calmed him down. All he needed was a feeling of solidity I suppose. Then we kicked to the nearby shore. The fishermen in the boat gave him a ride back across the river. So if you can’t float, you can’t swim and it would behoove you to rectify your inability for we live on a planet that is mostly water covered. If your kids can’t float and thus can’t swim it’s your responsibility as a parent to make sure they nail that survival skill down pronto. If you can’t teach them find someone who can, and I don’t mean Uncle Jim Bob who’ll throw them in and tell them ‘swim or drown.’ Mostly what they’ll learn from that is the ‘fight or drown’ technique which leads to the situation I described above. Attempting to kick with deflated dry bag and Camelbak pack inside. Still a slow process. Mick’s afraid I’m going somewhere without him. 76 Self Reliance Illustrated issue 14 — May/June 2013 Trying to kick across a deeper hole. It’s harder than it looks, especially with the bag full of air as it is here. If the dry bag is not fully inflated it’s easier to push through the water, but still a slow process. That’s why I recommend learning to float, and then swim so you can drag your gear along behind you and have your ‘floatation’ devices as backup. To clarify: When you’re crossing a body of water and you run out of ‘fight’ if you can’t relax and float so you can rest, you will drown and die. It’s inexcusable that in a nation with as many bodies of water, streams and pools as we have that kids aren’t taught to swim correctly. I’ll climb down off the soap box now. My dog, Mick the Mountain Fiest went along for both trips. He probably did more swimming on the first trip than he’d ever done in his life. Before we were through I noticed a considerable improvement in his technique, being the basic dog paddle. On the second trip we made it to the river and the banks being too high and steep he had no choice but to be out in the chest deep water with me and after a few minutes he grew tired as I noted above will happen so he climbed up on my shoulders. So my job became dog transporter. Too bad I couldn’t get a picture of it. And his toenails need trimming. For footwear I used a pair of Salomon water shoes with mesh sides on the first trip. I own a pair of Keens without mesh and noted on a kayak trip that they allow small pebbles and sticks to get under your feet. The Salomons keep the pebbles and sticks out but still allow a lot of sand to filter in. I had to stop several times to empty the sand out of them. I even wore running socks for half the trip thinking they’d help keep the sand out, instead I got sand inside and outside the socks. So much for that experiment. On the second trip I wore my OTB Jungle boots which I wrote about in an earlier article for this magazine, July-August 2011. The boots worked out much better, they protected my ankles, and very little sand filtered in. I didn’t feel the need to empty them out at all, and I was wading for about 6 hours. For food or snacks I used MRE leftovers, tuna in a sealed foil pack available in any grocery store and basic breakfast bar type stuff. I ate the tuna with MRE crackers which must be leftover hard tack from the war for southern independence. But it works well enough when you’re issue 14 — May/June 2013 Self Reliance Illustrated 77 All my ‘possibles’ gear for a summer weather half day mini-adventure. From left clockwise spiral: Salomon water mesh shoes, sunglasses case, spare para-cord, 2 lighters, waterproof matches, GI compressed trioxane tab, lens paper, poison ivy toxin removal cloth, GI trauma kit, GI Camelbak with bladder, Stearns Outdoor dry bag, headlight in GI Ziploc style bag, GI sunglasses, swim goggles, dog leash, old GI bandage, spare grocery bags, bug juice, handy wipes and toilet paper, MRE leftovers and grocery store ‘pogey bait’, and thin industrial gloves. I left my GI poncho in the truck since I figured I’d be wet anyway. hungry enough. My clothing consisted of a cotton t-shirt, which is fine in hot weather, swimming trunks on the first walk and on the second a pair of nylon or polyester ‘water shorts’ of some sort I lucked into at the thrift store, polyester underwear from Wal-Mart and a Spec-Ops military style belt with a GunMate holster for my Glock 19 that also holds a magazine and rides under the belt, keeping it more secure. I use a BLACKHAWK lanyard for the handgun attached to my belt in case it falls out in the water. I also carried a Kershaw clip knife in my pocket 78 Self Reliance Illustrated issue 14 — May/June 2013 with a cord lanyard tied to my belt so it doesn’t get lost. That’s 50 bucks I don’t have to lose either. My experience in Uncle Sugar’s camping club taught me that if it ain’t attached it’ll get away. The gun and knife both represent the common sense that says I’m neither Davy Crockett nor Rambo which means I can’t whip just any bear nor two legged predator that might present themselves. As the old saying goes it’s better to be judged by twelve than carried by six. The way things are going in this country that may soon transform into another old saying: “Shoot, shovel and shut up.” issue 14 — May/June 2013 Self Reliance Illustrated 79 Heat treating No order TOO BIG or too small. [email protected] • (814) 333-1782 • www.petersheattreat.com 80 Self Reliance Illustrated issue 14 — May/June 2013 for the hobbyist or professional. An Age Old Ritual By Jason Herbert The author with a mature tom from a hunt that lasted less than 15 minutes! T he thundering gobbles echoed off the hillside and rattled the bushes that were concealing my figure. My gun was raised, my heart was pounding, and I was praying the wise old bird would try to sneak past me. Moments later, with a soft click of the gun’s safety and a single “BOOM!” from my shotgun, it was all over. I had just taken part in one of North America’s oldest rituals. I had killed a wild turkey. Not only is turkey hunting a wonderful way to harvest organic, free range meat; it is absolutely addictive! Turkey hunting is interactive, with calling, decoying, running, and crawling; it’s how hunting is supposed to be. Humans were not meant to eat at a drive through. We are built to work for our dinner, and turkey hunting can be a lot of rewarding work. I’ve successfully hunted turkeys for several years, have made just about every mistake possible, and also learned a lot along the way. To successfully hunt turkeys we must first understand how the turkey mating system works. Unlike most game animals; the hens, or females pursue the toms, or males. A tom will gobble, declaring his dominance and availability, and if a hen is interested, she’ll come running to him. That being said, the primitive urges of breeding season do overcome toms each spring, and killing one is Jason Herbert is a happily married father of four, freelance outdoor writer, and middle school geography teacher. Being blessed with such a large, active family has forced Jason and his wife to become very resourceful. Wanting their children to eat healthy, organic foods, the Herbert’s raise harvest, catch, and kill as much as they can, and buy only what they have to. They try to live the way nature intended, as self-reliant as possible, and enjoy spending time with family and friends outdoors. issue 14 — May/June 2013 Self Reliance Illustrated 81 Killing this bird in the last 15 minutes of the season, the author beamed with pride. certainly possible, although not easy. In most states toms are the only legal bird in the spring. Some states allow fall turkey hunting as well, and usually both sexes are fair game then. The first piece of the turkey hunting puzzle is to find some birds. Start by talking to the farmers; they will know where the birds are. If talking with farmers isn’t an option, drive around with a set of binoculars. I like to glass fields scouting for turkeys in the early morning hours. Usually they can be spotted in fields from sunrise until mid-morning. Once a flock or two of turkeys has been located, strap on the boots and hit the woods. The best place to start looking for turkey sign is a roost area. Turkeys are a prey species, and in order to feel safe enough to sleep at night they need to roost high in trees. They will roost anywhere, but prefer sturdy mature trees off the edge of a ridge or near water. The higher they can get the safer they feel, and if for instance a tree is near a ridge, the turkey can easily fly off the top of the ridge into a tree and be rather high off the ground with little effort. They also like roosting near water which adds a layer of security because turkey 82 Self Reliance Illustrated issue 14 — May/June 2013 predators come at them from land. If no water or ridgelines are present, look for roosts to be near field edges, in fencerows, or tall pines. Roosts can be confirmed by piles of turkey droppings on the ground, feathers scattered, or the old fashioned way; by listening. When I gain access to a new turkey hunting farm, I’ll drive out one morning before the season starts and simply listen. Toms will gobble louder and more frequently while on the roost than anywhere else. Early morning reconnaissance is a great way to gather an inventory of legal birds, locate the roosting area, and get excited for the hunt! Turkey’s needs are the same as every other species; food, water, and shelter. Once the birds fly down off the roost- generally right around sunrise- they usually gather up and wander off to eat. Although turkeys aren’t picky eaters, they do have preferences. Through scouting and observation find out what the local birds like. In my area of Michigan they love old acorns, alfalfa, picked grain fields, grasses and other browse, and picking worms and bugs from freshly plowed crop fields. Turkeys are opportunistic and once they leave the roost, anything is fair game. Usually they start eating by scratching through leaves and dead grass for bugs along the way to their destination. Scratch marks are a great indicator for which direction they travel because they push leaves behind them with their legs. The scratches make almost an arrow shape, pointing to the direction of travel. Our fine feathered friends have no concept of time but for themost part, the birds should breed, eat, and mingle for the first few hours after sunrise. I’ve learned over the years to hunt turkeys in stages. After I have done all of my homework, I’ll sneak in near a roosting area early and quiet, before the first song bird lets out a chirp. If the birds are chirping, the turkeys are awake and scanning their area for danger. I like to hide somewhere between the roost and feeding areas, and don’t make a sound. This is the time to be patient and not call a lot, but rather depend on woodsmanship and let nature take its course. Hen turkeys get jealous of other females and I’ve noticed that calling too early will tend to make the hens turn and walk away, with the toms in tow. Once the hens have grown tired of the tom’s attention, they will wander off to go sit on their nests. This usually happens mid to late morning. At that point, the toms are living the bachelor lifestyle again and on the prowl. This is the best time to kill a turkey because the toms tend to be pretty desperate. At this point, the toms will look for an open, high, sunny, safe area to strut. Take a moment to observe and appreciate one of the Gear such as a vest, decoy, and an assortment of calls will come in handy when turkey hunting. coolest shows Mother Nature has to offer. They’ll get puffed out, and walk single hen decoy. Place her about 20-30 yards out, facing back and forth for hours on end if necessary. Following the the hunter. It is important to face the decoy toward you laws of natural selection, the toms are trying to prove their because any interested tom will not rest until he makes eye dominance and superior genes by “strutting their stuff.” contact with her, allowing for plenty of movement while From about 10am until 1pm where legal (check his back is turned. game laws) I patiently sit in a strut zone. This is where From early afternoon until evening there isn’t a lot decoys can be used and calling helps. There are several of rhyme or reason to turkey behavior. They could be eattypes of decoys sold but for starters, I recommend using a ing, drinking, cruising around, dusting, resting, etc. Many issue 14 — May/June 2013 Self Reliance Illustrated 83 states do not allow afternoon turkey hunting, but if yours does, you can do one of two things. Wander around the farm calling blindly hoping to find a lonely tom or drive to a new farm and hit the strut zones. As a last ditch effort, when all other ideas have failed, head back to the roosting area in hopes of finding a tom on his way back to bed. There are plenty of turkey hunting gizmos and gadgets on the market today, each pretty convincing in their pleas to be a necessity. The one true necessity is some sort of weapon, whether it is a gun or bow. When gun hunting turkeys, I prefer to use a 12 gauge shotgun, with a specific “turkey” load in it. I use the tightest possible choke I can find and plan to kill a bird within 40 yards. With a gun, it’s important to aim at the turkey’s head and neck. Beginning hunters should learn to center their bead right where the red waddles of the neck meet the bird’s feathers, that way, if their gun patterns right and they are off a bit, they may at least tumble him allowing for a follow up shot. While hunting turkeys is no easy task, bowhunting turkeys is next to impossible. If the challenge of taking a fat spring gobbler the way the Native Americans did appeals to you, I recommend building a ground blind. A store bought pop-up style blind works great for bowhunters because they are so light and portable, perfect for a travelling turkey hunter. Another option is to make a brush blind out of dead limbs and twigs. Be sure to leave plenty of room for movement without making any noise. Speaking of movement, don’t try to get away with much when a turkey is close, their eyes and ears are simply amazing, and they are not very forgiving of a restless or unprepared hunter. Be sure to have a few calls. My personal preference is a diaphragm style mouth call, which allows for use of both hands and no obvious movement. Other types of calls are traditional wing bone calls, pot and peg style friction calls, and box calls. Each call serves its own purpose and has its own qualities and downfalls. For starters, it’s important to learn three simple calls. The “cluck” (a soft popping sound) is a social call, just letting other birds know you are there. The “yelp” (a louder yelping sound) is more of a lonely hen call, declaring she may be interested. And “cutting” (an all-out frenzy of clucks and yelps) is an excited call, exclaiming that she is very interested. Each is done in a series, with a cadence and tone that is all your own. Get online to hear samples and observe while in the woods to hear the real experts. Get a few calls well ahead of season and practice as often as possible. In my home, my sons and I are only allowed to use our calls outside or in the truck; apparently the hens in our home do not find them amusing. 84 Self Reliance Illustrated issue 14 — May/June 2013 Decoys are also a hot seller each spring. Although I always carry a decoy with me, I have killed many more birds without even pulling it out of my vest. As I mentioned earlier, it’s good to start with a hen decoy. If you want more, possibly add another hen, a “Jake” which is an immature tom, or a full sized tom. Once again, each has its own purpose and can come in handy at times. Probably the most important thing other than a gun that a turkey hunter could own is a good turkey hunting vest and camouflage clothing. Turkeys can see really well so it is important to be properly camouflaged. I occasionally leave a call at home but never leave home without my vest. They can hold everything a hunter might need like calls, decoys, flashlights, knives, water, first aid kit, bug spray, compass, and lunch. People write books on turkey hunting so it is hard to cover everything in an article. Remember some basic rules. Get camouflaged, sit still, be patient and hunt where the birds will be. A few technical tips I have learned are that turkeys will hit the fields when it rains, stay low in the wind, and don’t bother to fly down at all in really poor weather. There is such thing as “beginner’s luck” in turkey hunting, but normally the old birds teach a rookie hunter a thing or two before one of them finally makes a mistake. Appreciate the time outdoors and rejoice in the fact that you are able to take part in a time honored tradition. Congratulations! Now what? By Jason Herbert Removing the beard is easy to do with a sharp knife. C ongratulations! You killed a turkey. It may have been your first or fiftieth, but it’s still a thrill. It is a hunter’s responsibility to harvest as much as possible from the bird. What happens next is really as important as the hunt itself. Some may butcher the turkey Thanksgiving style and leave it whole for roasting. I find that way to be a bit tough to chew, and prefer to bone out all the meat for various edible projects. I take pride in using as much of the turkey as I can. Here are my tips. Step #1- Take the “trophy” parts. I hate to men- tion the word trophy, but there isn’t a better one to fit. I proudly display the tail fan, spurs, and beard on my basement wall of every bird I kill. I start by capeing the tail fan off the bird. I’ll get a sharp knife and cut from behind, below their tail, near the exit end of their digestive tract. I’ll cut from there a meaty chunk of tail off, and then carefully skin them up their back in one continuous piece. By skinning up the back, I am allowing for beautiful iridescent feathers to still be attached for the fan mount. I then grab the beard, and cut it off, being generous with my cut here as well. Then, I’ll get a hacksaw and lop off both of the Jason Herbert is a happily married father of four, freelance outdoor writer, and middle school geography teacher. Being blessed with such a large, active family has forced Jason and his wife to become very resourceful. Wanting their children to eat healthy, organic foods, the Herbert’s raise harvest, catch, and kill as much as they can, and buy only what they have to. They try to live the way nature intended, as self-reliant as possible, and enjoy spending time with family and friends outdoors. issue 14 — May/June 2013 Self Reliance Illustrated 85 A hacksaw comes in handy when butchering a turkey. legs. The entire legs or just the spurs can be preserved to display later. Some people also display the wings. Those can easily be removed with a hacksaw too. I tend to cut the wings, but dry them on the wall. Arrow makers like turkey wing feathers. For now, mine just look cool hanging in the garage. Everything I cut off to preserve I saturate in Borax. It will dry the fleshy parts out and also deter bugs. I prefer to remove the breasts, legs and thighs. Some people like to pluck the birds for roasting and frying. Others prefer to skin them completely for grilling. Step #2a- Plucking a bird is only necessary when the skin is a desired part of the final product. To properly pluck a turkey, scald it in boiling water at a temperature of about 140 degrees Fahrenheit. Then, little by little, remove all of its feathers. It may be necessary to pour more scalding water over reluctant feathers to persuade them to let loose. Be careful not to accidentally cook the bird’s skin in the water by leaving it in too long or using too hot 86 Self Reliance Illustrated issue 14 — May/June 2013 of water. Also, pull small amounts of feathers gently, as to not tear the precious skin. Skin is an important part of any fine roasted or deep fried turkey, so if you’re going to go through the trouble of plucking it, be sure to take your time. If you do not want to roast or fry the bird whole, read on. I pluck away all of the feathers from the chest. When done, the bird’s chest will almost appear to be like a pyramid, with their sternum being the peak. From this point there are two options. Step #2b- Skinning the bird whole can be done simply by peeling the skin and cutting it loose, little by little. It will take a while, but is possible. Skinning a bird would be a good thing to do if the desired outcome is a whole turkey for grilling. If a whole grilling turkey isn’t quite what you are looking for, then read on. Step #2c- I take a fillet knife and fillet off as much Using a hacksaw is a great way to start removing the tail fan. breast meat as possible. Turkey breasts are enormous, and each can easily feed a large family. Once the breasts are safely off, I’ll whittle away at any leftovers and toss them all in a bowl of cold saltwater for later. The cold water cools the meat, the salt helps draw out the blood. Step #3- Removing the legs and thighs is sort of tricky. I basically unwrap them by handily pushing the legs backward out of their skin. Once the skin is off the legs, I’ll use the fillet knife to peel it back away from the thighs. The whole leg and thigh will pop right out of socket, and with a few precise cuts, the entire thigh is detached. I place these in cold saltwater as well. Step #4- Dealing with the carcass is really up to the individual. I know some people who skin it out completely, and use the feathers to craft projects and fly tying. Some people will boil the carcass for soup stock. I’ve heard the marrow is good, but have never tried it. I simply place it out back as a treat for the local coons and coyotes. Step #5- Preserving the meat can be done in several ways as well. I don’t keep turkey meat long before cooking so usually I just throw it in a Ziploc bag. I know others who save it for Thanksgiving and vacuum seal it. Wild turkey is a bit tougher than its factory farmed distant cousins so it’s important to prepare it properly. Personally we’ve experimented with all sorts of recipes and have found two that everyone agrees on. After the season is done when my oldest two boys and I have all harvested birds, we thinly slice the breasts and make delicious jerky. I prefer to smoke the legs and thighs to cook in such dishes as jambalaya, red beans and rice, soups, stews, etc. Once again, get online and look at what others are doing, this is just what my family likes. issue 14 — May/June 2013 Self Reliance Illustrated 87 Step #6- Proudly displaying a turkey fan for me is a reminder of a memorable hunt. I’m not a trophy hunter, but love to look at the walls and remember the good times. After scraping away any extra flesh, I’ll spread the fan out on cardboard and tack it down with several small trim nails to dry. I have the beard and legs curing in Borax during that time as well. In the meantime I’ll cut and finish some pieces of wood for the display board. Then, once everything is dry, I’ll screw, tack and glue it all on the board. Last step, finding a place for it on the wall! After plucking away the feathers start to fillet the breast away from the ribcage. 88 Self Reliance Illustrated issue 14 — May/June 2013 Bridging the Gap By Tony Daniel POW! POW! This is what I heard as I headed up the lake to check my beaver sets. I thought to myself, someone must be up on the left arm of the lake duck hunting. I wondered if he got anything. It was just past 7 A.M. on a cold January morning. The outside temperature was 28 degrees and there was a thin layer of ice around the water’s edge. I finished checking my sets and headed back to the landing. When I got back to the boathouse a yellow lab was running back and forth along the bank and I thought to myself he sure didn’t hunt very long this morning. I noticed the duck hunter getting his gear together and asked if he had got any ducks. He said “I didn’t have any luck.” I told him I thought most people hunted until around lunch time. He said “I usually do too, but I fell out of the boat in the water and went completely under trying to reach a decoy and I am afraid I am going to get hypothermic.” I didn’t offer a lot of advice because his truck was running and I knew he would be OK. As I think about that day and many other similar instances, I realized that many adults that enjoy the outdoors year round are not prepared to deal with what could happen. Another instance where I realized that there is a gap in the teaching of hunters, trappers and fisherman was when I was visiting family in North Carolina. We had enjoyed a great day, cooked a Brunswick stew, and shared many stories with my cousins of hunting Tony and some of his miniature human students. Isabella, Nicole, Kierra, and Marissa taking time for a photo before taking a break to enjoy some “Pathfinder Triangles.” Tony and his wife Becky have been married for 11 years and live in Chesterfield Va. Tony is an associate instructor at the Pathfinder School and secretary for NPYO. Tony also enjoys teaching and sharing with the youth at Pathfinder classes and at the Gathering. In November of 2010 he graduated from the SC Advanced training and in October of 2011 graduated from the FL Advanced training. issue 14 — May/June 2013 Self Reliance Illustrated 89 and fishing trips. I said my goodbyes and headed up the path for the trip back to Virginia. An hour or so earlier two of my cousins, one in his early twenties and his brother that was fourteen years old had left my Aunt’s house to build a fire to roast marshmallows. As I passed by them I noticed they didn’t have anything close to a fire going. I pulled over and asked what the problem was and they told me they couldn’t get a fire started. They had a huge pile of scrap wood, plenty of broom straw and a box of wooden kitchen matches. I took my kit out, got a mini inferno, fluffed it up, and hit it with my Ferro rod. We had a fire shortly! Then I asked “What would y’all have done if you HAD to have a fire?” They shrugged and said “Guess we would be cold.” These two young men are avid deer hunters, coon hunters, and fishermen. They had been taught about guns, bullets, fishing poles, lures, and big trucks. But no one had taught them how to build a fire, regulate their core temperature, or what to carry when enjoying the outdoors. In both of these situations the “Triangle of Survivability” was missing one or more parts. The duck hunter had the Knowledge of hypothermia and knew he was in trouble but was lacking the Skills and Resources to improve his situation. Having sure fire on his person and at least a Mylar blanket would have made a big difference if he had to spend the night on the lake. The young men trying to build the fire had the Knowledge of what they needed and Resources to make it happen but were lacking the Skills to improve their situation. A quick lesson on building a fire lay and what a fire needs to be sustainable would have helped the young 90 Self Reliance Illustrated issue 14 — May/June 2013 men reach their goal. This is where I think the NPYO will play an important role in filling the void in young people when they are found to be in these and many other situations. As we take young people out to enjoy the outdoors and teach these skills we will be helping to ensure they will be well armed to safely enjoy the outdoors in every season. Stressing the importance of having your kit with you at all times and learning how hard it is to recreate a part of your kit should he or she lose it. These important outdoor skills will also carry over to everyday life as well. I can remember a young lady on the night navigation course at the school. When she was told her dad would be in another group and she would be with other children she became very upset. After a good bit of convincing she reluctantly went out. Not only did she complete the course but did very well. Months later when I saw them again her father told me that the night navigation experience had changed the young lady in a big way. She had more confidence in herself and was doing things on her own she would have never done before like auditioning for a part in her church’s play. Seemingly little things can have a big impact on a child. We have many new Pathfinder Youth Organization chapters starting up this spring which should be very productive. I encourage all of you to support our young people. There are many ways you can help out from volunteering your time, participating in fundraisers, monetary donations, or letting a chapter use your land for outings. Teaching our young people is everyone’s responsibility. Resources: www.pathfinderyouth.org OZARK MOUNTAIN PREPAREDNESS, LLC Instructional courses in fur-trapping,bushcraft, primitive skills, and disaster preparedness. (870) 350-6995 ozarkmountainpreparedness.com 60 SELF RELIANCE Illustrated Issue Number 11, November/December 2012 issue 14 — May/June 2013 Self Reliance Illustrated 91 What’s Happening at Blind Horse Knives? By Dan Coppins John sharpening. Rex flattening steel. The spring and summer months are some of the busiest times for us here at Blind Horse Knives. We are gearing up for another great year, packed with shows and other events. The girls at BHK Outdoors are stocking the shelves and getting ready for the show season as well. We have added some new items to the outdoors website including Dan Coppins is Co-Owner of Blind Horse Knives and has been hunting for over forty years. Dan has dashing good looks and is not afraid to tell you about them. Dan is also one of the Co-Founders of Self Reliance Illustrated. 92 Self Reliance Illustrated issue 14 — May/June 2013 Mike working on PLSK 1’s. A tray of knives being finished up. our newest item, the pocket knives. We now offer them in two different colors, brown jigged bone and green jigged bone, by the time you read this we hope to have a new model out. We continue to thrive at outdoor shows as well as gun and knife shows with our line of emergency blankets, Ruger, and jetboil to name a few. Our outdoor line is always expanding and we will not stop until we are selling customized jeeps! We are now running monthly specials where you can get great deals on some really great products. BHK Outdoors has a new display for shows and we are very excited for everyone to come see us. We have a full list of our upcoming shows (Including the BLADE show in Atlanta) on our website. Please feel free check it out. Blind Horse Knives has been asked to provide some items for the NRA banquet as well as the Ducks Unlimited banquet that are hosted here in Cambridge, Ohio. The guys have been working on the knives for both events and the leather department has been busy making the tooled sheaths for the NRA knives as well as key chains and wallets. In the knife world we are happy to announce we have a new knife maker, Dave McQuain. Yes, the name is familiar; he is the brother of the shop production manager John McQuain. Knife making runs in the family. He is a great addition to our family here at BHK and we couldn’t be more excited to add another family member. issue 14 — May/June 2013 Self Reliance Illustrated 93 The knife makers are hard at work keeping up with orders and getting some one of a kind knives ready for the upcoming shows. If we are at a show in your area you’ll want to come and check us out. These one of a kind knives don’t usually last long. We want to personally thank every one of you for your support along the way, without you we know we couldn’t have made it this far and our dreams for the future would seem a lot farther away. Until next time, take care. Dave flattening PLSK 1’s. One of BHK Outdoors product walls. Do you have what it takes to survive? Knowledge SKilL seT t n e m p I u q e ipment. u q e e th h it w u o We can help y OUTDOORS 94 Self Reliance Illustrated Outdoor Adventure Gear issue 14 — May/June 2013 www.BHKOutdoors.com issue 14 — May/June 2013 Self Reliance Illustrated 95 40lb pull at 24” draw; the killing power of a long bow and fits in your backpack! Available exclusively at ThePathfinderSchoolLLC.com 96 Self Reliance Illustrated issue 14 — May/June 2013 Indian Creek Chronicles: A Winter Alone in the Wilderness by Pete Fromm T his is the recounting of a winter spent in the Selway-Bitteroot Wilderness which is in Montana and Idaho. These are areas which get real winters. I once checked on work in this area and was told that I could see snow on the Fourth of July parade. I never forgot that comment and it gave me some perspective when I read this book. The writer was a student at the University of Missoula in Montana. His roommate was a hunter and had books on the fur trapping mountain men. Pete became caught up in the mountain man era and imagined himself in similar situations (as many of us do.) Fromm learned of an employment opportunity to babysit 2.5 million salmon eggs on the Selway River-Indian Creek area as an employee of Idaho Fish and Game Department. The salary was $200.00 per month. He had second thoughts but went anyway. He was to live alone in a fourteen foot by sixteen foot tent for seven months and maintain the salmon channel. October to June began to sound like a very long time. Fromm’s roommate taught him to skin an animal, so he added that to his list of skills. Before he left for the job his roommate and another friend got him a puppy so that he wouldn’t be totally alone. Of course the friendship grew over time. Fromm had to purchase his own food and clothing to complete the project. When the rangers took him to the site and began to set up the tent it came to light that Fromm had no working knowledge of knots, chain saw operation, and a limited ability to drive a vehicle with a Book Review by Tim Wansack standard transmission. The kicker was when the ranger told him he would need at least seven cords of wood, and Fromm had to ask what a cord of wood is. Fromm took a rifle but had no hunting licenses. He was told that a very serious game warden would be upset. Pete said it was for plinking and that he would not hunt (he did.) Occasionally a group of elk hunters would set up camp so that he did see other humans. Fromm learned his way around the area and kept the water flowing at the salmon channel. With only the dog for company there were periods of introspection. The area in which he operated was vast and he ended up walking a lot of it. His roommate and a buddy came to see him leading to a snowmobile episode. Fromm went into town for a short trip or two. He did get mail from time to time and got word that his father and brother were coming to see him. For various reasons they did not show up. Of course Fromm had no idea what had happened to cause them to miss the visit. Fromm had access to a Forest Service cabin and went there from time to time, often on snowshoes. Indian Creek became special. In spring when the road was open people began to show up. Indian Creek was no longer what it seemed to him. He contacted Idaho Fish and Game to see if they could get someone to finish his tour. They were able to do that and Fromm ended his tour of duty with the salmon eggs. I admit to having thoughts similar to Fromm’s. Thanks to him I won’t do something rash. Tim Wansack is a retired West Virginia deputy sheriff and member of NOVASAR, a search-and-rescue team. The desire to be a good SAR member prompted an interest in the outdoors. Tim cannot remember a time when he was not interested in knives and quality gear. He retired to a teaching position for criminal justice and tries to convey an interest in the outdoors to prepare students for fugitive searches, lost children, etc. issue 14 — May/June 2013 Self Reliance Illustrated 97 Advertising All of us here at Self Reliance Illustrated would like to thank the following advertisers for helping to make each issue a reality. RENEWABLE ENERGY GENERATORS PORTABLE SOLAR GENERATORS WITH BATTERY STORAGE PREPPING / SELF RELIANCE OFF-GRID LIGHTING & REFRIGERATION RUGGED & RELIABLE PLUG & PLAY SIMPLICITY! NO NOISE/ NO FUEL/NO FUMES 484.593.4262 | Altern-Energy.com Small business /Independent ownership 98 Self Reliance Illustrated issue 14 — May/June 2013 180 Tack............................................................................................41 AA Forge Custom Knives...............................................................41 All Pro Outfitters.............................................................................37 Alternate Energy, Inc......................................................................98 BHK Outdoors.................................................................................94 BHK Outdoors Radio.....................................................................79 Blind Horse Knives.........................................................................24 Cross Knives.....................................................................................80 Dark Threads......................................................................................6 Doom and Bloom, LLC..................................................................37 DPx Gear..........................................................................................96 Duluth Pack......................................................................................95 Fiddleback Forge.............................................................................98 Frontier Christian University.........................................................41 Ghillie Kettle USA...........................................................................80 Going Gear.......................................................................Back Cover Gray Wolf Knives.............................................................................37 Habilis Bushtools.............................................................................17 KME Sharpeners..............................................................................24 Mini Inferno (Pathfinder School).................................................91 Mule Team Canvas Company..........................................................6 My Patriot Supply............................................................................95 The Outdoor Podcast......................................................................41 Ozark Mountain Preparedness......................................................91 The Pathfinder School, LLC������������������������������ Inside Back Cover Patriot Preppers.................................................................................5 Peters Heat Treating Inc.................................................................80 The Pocket Hunter (Pathfinder School)��������������������������������������96 Solutions From Science..................................................................47 SRI Compilations..............................................................................6 Survival Gear....................................................................................37 Survival Pax......................................................................................79 Survival Quarterly Magazine.........................................................41 Tops Knives��������������������������������������������������������Inside Front Cover Trek Light Gear................................................................................10 Warbonnet Outdoors......................................................................11 Waterwise.........................................................................................40 Z&R Sporting Goods......................................................................80 For advertising information, rates, sizing and etc. Please visit our website at: www.selfrelianceillustrated.com or contact us via email at: info@selfrelianceillustrated. com or [email protected] 6 SELF RELIANCE Illustrated Issue Number 11, November/December 2012 issue 14 — May/June 2013 Self Reliance Illustrated 99


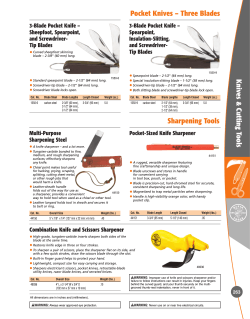


© Copyright 2026