
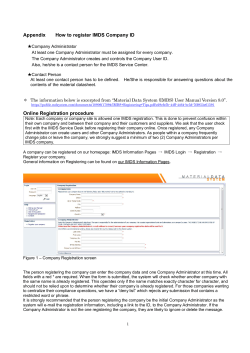
・How to Enter IMDS Data Release 8.0 2014
・How to Enter IMDS Data
Release 8.0
Fuji Heavy Industries Ltd. March, 2014
1
Work Flow
①Login ・・・・・・・・・・・・・・・・・・・・・・・・・・・・・・・・・・・・・・・・・3
・Company ID registration is needed to obtain user ID and
password in advance.
*Company ID registration⇒ “ http://www.mdsystem.com ” → “ IMDS login”
→ “Register your company ”
②Data Sheet Creation・・・・・・・・・・・・・・・・・・・・・・・・・・・・6
(1)Material creation, Basic substance addition・・・・・・・・・・・・・・・ 8
(2)Tree assembly・・・・・・・・・・・・・・・・・・・・・・・・・・・・・・・・・・・・・・・・・・26
(3)Addition of material (1) to component part・・・・・・・・・・・・・・・・31
(4)Selection of “Recyclate”, “Application” ,“Parts Marking”・・36
③Data Sheet Sending・・・・・・・・・・・・・・・・・・・・・・・41
・Supplier Data entry
・Recipient data entry
・Data sheet Sending
④Data Sheet Confirmation・・・・・・・・・・・・・・・・・・・・・・・49
2
①Login
3
IMDS Login Selection
https://public.mdsystem.com/web/imds-public-pages
4
Login
・Enter User ID and Password, Select Language → Login
1
2
If you forget your User ID,
①Click “User ID forgotten”.
②Enter registered e-mail
address.
③”ID” is sent to your e-mail
address.
If you forget your Password,
①Click “Request new password”.
②Enter “User ID” and registered email address.
③“Password” is sent to your e-mail
address.
*Initial password needs to be changed.
5
②Data Sheet Creation
6
Entry Data Composition (Complete Tree)
■ECU ASSY
■:Component
■Bolt
Deliv
Data Creation Procedures
゜。 :Material
ered
゜。S40C
▲ :Basic
parts
▲Iron
substance (1)Material creation, Basic substance
▲Misc.
addition
゜。MFZn5-TC
(S40C,MFZn5-TC,A5182,PP)
▲Zinc
▲Chromium(III)oxide
▲Misc.
(2)Tree assembly
■Cover Sub-Assy
ECU ASSY is created in data sheet and
■Cover
component parts are added.
゜。A5182
(Bolt,Cover Sub-Assy, Cover,
▲Aluminium
Bracket)
▲Tin
▲Lead
(3)Addition of material (1) to component part
▲Misc.
■Bracket
゜。PP
▲PP
▲Carbon
▲Misc.
(4)Selection of ” Recyclate”,
“Application”, “Parts marking”
7
②Data Sheet Creation
(1)Material creation, Basic substance addition
8
Material S40C Creation
Material S40C Creation
・MDS →New → Module →Material
1
2
3
4
Data Sheet:Use when data to be sent to other company is created.
Module:Use when data is modularized for your company and data is
created for registration.
9
Material Classification Selection
Material S40C
Creation
・Select material classification → Apply
1
Select proper
Classification.
After selection, click Apply.
2
10
Material Creation Screen
Material S40C Creation
・Enter Necessary Item ①
1
・Trade name
⇒Arbitrary
Enter symbol and
code specified by
material definition
standard.
⇒MUST
・Internal Mat.-No.
(Metal material is subject
to this entry.)
Check not required.
⇒Arbitrary
Continue to page 12.
11
Material Creation Screen
Material S40C Creation
・Enter Necessary Item ②
・Std.Mat.-No.
2
Continue
from page 11.
(Metal material is subject
to this entry.)
⇒Arbitrary
・Symbol
(Resin, rubber materials are
subject to this entry.)
⇒MUST
・Norms / Standards
⇒Arbitrary
・Supplier
・Remark:Enter general
name for the material.
⇒Arbitrary
12
Material S40C
Norm / Inhouse Norm Selection
Creation
・Norms / Standards Entry:
→Select ”public norms” → Select ”Norm” → Enter ”Norm Code” →Add
・Inhouse Norms Entry:
→ Select ”FHI” →Select FHI Standard → Enter FHI Standard Code → Add
2
Select Public
Norms.
Norms / Standards
3
Select Norm.
5
4
Add.
Enter Norm Code.
1
Select
7
Inhouse Norms
Select FHI.
6
8
8
Select FHI standard.
10
9
Add.
Enter Norm Code.
13
Basic substance Addition
Material S40C Creation
・ Click “Add a Substance reference”
Add a Substance
reference
If this bar is hidden, change the
magnification of the screen.
14
Basic substance Search
Material S40C Creation
・Enter search condition →Search
2
Search Criteria
1
(Enter Basic substance name and
CAS No. as search conditions.)
15
Basic substance Selection
Material S40C Creation
・Select Intended Basic substance →Apply
1
2
16
Basic substance Amounts and Weight Entry
Material
S40C
Creation
・Confirm Selected Basic substance Addition→Enter Amounts and Weight
1
Basic
substance is
added.
Amounts and Weight
(Select Fix, from-to or
Rest).
⇒MUST
2
17
Misc. (Others) Addition
Material S40C
Creation
・Click S40C →Add a Substance reference
Add a Substance reference
2
Click.
1
18
Misc. (Others) Addition
Material S40C
Creation
・Click S40C →Add a Substance reference
・Enter search condition →Search
3
4
Search
・Select Intended Basic substance →Apply
5
6
Apply
19
Use Misc. within 10% Range
Material S40C Creation
・Enter Amounts and Weight
If there are several substances,
total Portion shall be 100% in the entry.
1
Misc.10% Rule:
・Recommendation 001 limits the use of wild card (Misc. Others) up to
10%. For Basic substance, enter “material prohibited in GADSL,
material to be reported” and “main substance”. Enter other Basic
substances until Misc. reaches up to 10%.
・If confidential substance is used, Misc. shall be up to 10% including
wild card.
20
Use Misc. within 10% Range
Material S40C Creation
・Save →Release Internal
1
6
If version is integral
number, Internal Release
is completed.
2
3
4
5
When error/warning doesn’t appear
21
Error/Warning for Internal Release
Material S40C Creation
When Error/Warning Appears
Note: Once Internal Release is implemented,
the data is completed and cannot be changed.
If something is missing in
the entry, error/warning
message appears.
1
Cancel
2
3
Double click “Check results” item to
move to error/warning area. Change the
area as instructed by message.
*Internal Release is possible even with
warning appearance.
22
Material MFZn5-TC Complete Screen
Material MFZn5-TC Creation
Create Material as S40C
For plating,
enter plating
symbol.
⇒MUST
Ref.:Hexavalent chromium free plating symbol
①Corrosion prevention plating (Hexavalent chromium free)
Plating
Chroma SUBARU Std.
te type TS 430-1-35Δ5
JIS standard
JIS D 0201
Clear
MFZn○-TC
Ep-Fe/Zn○-C or B
Black
MFZn○-TK
Ep-Fe/Zn○-K
Zinc/Iron
Black
MFZnFe○-TK
Ep-ZnFe/Zn○-K
Zin/Nickel
Clear
MFZnNi○-TC
Ep-Fe/ZnNi○-C or B
Tin/Zinc
Clear
MFSnZn○-TC
Ep-Fe/SnZn○-C or B
Zinc
○:Plating thickness (μm)
②Rust Preventive film (Hexavalent chromium free)
Paint
color
Std. paint
SUBARU Std.
TS 430-9-9Δ2
Type 1 Silber gray
2C2B
ZnNC-1
Type 2 Black
4C4B
ZnNC-2
JIS standard
JIS B 1046
flZnnc
23
Material A5182(Aluminum Sheet)Complete Screen
Create Material as S40C
Material
A5182
Creation
Code specified
in standard
⇒MUST
24
Material PP Complete Screen
Material PP Creation
Create Material as S40C
Resin symbol
(Abbreviation)
⇒MUST
Ref.:Symbol designation
・If 5.1.a, 5.1.b, 5.2, 5.3 is selected in Classification,
select symbol from drop-down menu.
25
②Data Sheet Creation
(2)Tree assembly
26
ECU ASSY Creation
Tree Assembly
・New →Datasheet →Component
1
2
4
3
If delivery unit data
is created, select
“Data Sheet”.
Data Sheet:Use when data to be sent to other company is created.
Module:Use when data is modularized for your company and data is
created for registration.
27
ECU ASSY Creation Screen
Tree Assembly
・Enter Necessary Item →Add a Component node
Add a Material reference
Add a SemiComponent node
1
Add a Component
node
2
・Description and Part/Item No.
shall be those specified on
drawings.
・For Measured weight per item,
either measurements or
drawing values are acceptable.
28
Bolt Addition
Tree Assembly
・Confirm Component Addition →Enter Necessary Item
Component
is added.
・Description and Part/Item No. shall be those specified on drawings. If
not specified, supplier’s parts name and parts numbers are acceptable.
・For Measured weight per item, either measurements or drawing values
are acceptable.
29
Component Addition
Tree Assembly
(Cover Sub Assy , Cover , Bracket)
・ Component Addition Confirmation →Enter Necessary Item →Save
To add “Cover Sub Assy”,
first click ECU ASSY and
then click component
(node) addition.
1
5
2
Component
(node) is added.
4
To add
“Cover”,”Bracket”,
first click “Cover
Sub Assy” and
then click
component (node)
3
addition.
*To add component, first
click the intended component.
30
②Data Sheet Creation
(3)Addition of material (1) to component part
31
Material S40C Addition
Material S40C Addition
・Click Bolt →Add a Material reference
Add a Material reference
To add S40C, first
click Bolt and then
click material
addition.
2
1
32
Material S40C Addition
Created Material(S40C)Search
・ Enter search condition →Search
1
Enter search condition
2
・Select Intended Material →Apply
Search
3
4
Apply
33
Material S40C Addition Completion
Material
S40C
Addition
・Confirm S40C Addition →Enter Weight
S40C is
added.
2
1
Enter bolt base
material (iron)
Weight.
34
Material Addition(MFZn5-TC, A5182, PP)
Material
Addition
・Add Material →Enter Weight →Save
Add a Material reference
To add MFZn5-TC,
first click Bolt and
then click Add a
Material reference.
1
To add A5182 , first
click Cover and then
click Add a Material
reference.
2
4
6
3
To add PP , first
click Bracket and
then click Add a
Material reference.
5
35
②Data Sheet Creation
(4)Selection of ” Recyclate”,
“Application”, “Parts Marking”
36
Recyclate Entry
Recyclate Selection
・Recyclate →Enter Necessary Item
1
If 1.x、2.x、3.x、4.x、5.x
is selected in material classification,
Recyclate is indicated.
Select either “Yes” or “No”. ⇒MUST
Recyclate
available
Recyclate
available
2
Recyclate
available
3
Recyclate
available
Enter if
you select
“Yes”.
⇒MUST
Note: “No” appears initially. Make sure that your entry is correct.
37
Application Selection
Application Selection
・Double Click Application
Double click.
・If lead, hexavalent chromium, cadmium, mercury,
nickel, PAHs are contained in Basic substance,
application is displayed.
38
アプリケーションの選択
Application
Selection
Application Selection
・Select Intended Application (Content Purpose)
*This item varies depending on material classification and
the content ratio of intended Basic substance.
1
Select intended
application.
⇒MUST
2
Note: Application appears by default initially. Make sure that
your entry is correct.
39
Presence of Parts Marking
Parts Marking Selection
・Click Intended Component →Select Parts Marking (Yes/No) →Save
3
If you select 5.x(resin, elastomer) in
material classification, select Parts
Marking (Yes/No). ⇒MUST
Material classification 5.1.b
Options are displayed in
the component directly
above the intended
material.
1
2
40
③Data Sheet Sending
41
Supplier Data Entry
・Supplier Data → Select Contact Person
1
Select.
2
If intended person doesn’t appear in
the dropdown menu, add the name
as follows:
“Administration”→”Contact
Person”→”Create”→(Necessary item
entry)→”Save”
*” Administration” may be operated
only by Company Administrator.
*When contact person is changed, inform FHI.
42
Recipient data
・Recipient data →Add Recipient
2
1
Add recipient
・Enter Company ID →Search →Click FHI →Apply
3
・FHI IMDS Company ID: 17189
Search
4
・Search is also available when you
enter “Fuji Heavy Industries”.
5
6
Apply
43
Company Data
・Enter Necessary Item
Supplier code (4-digit)
specified by FHI
Purchasing Dept.
⇒MUST
Parts name indicated on drawing
(Entered parts name is reflected
to composition info.)
⇒MUST
Parts/Item No.
indicated on drawing
⇒MUST
Latest ECS No.
⇒MUST
Do not enter hyphen
and space.
Blank for NA
44
Recipient data Entry Completion
・Save → Send
1
2
Release Internal
Release Internal is available before sending the data. You may use
when needed.
【When do you need Release Internal ?】
When you want to use the created data sheet for component part for
other parts, you need Release Internal. Note that Release Internal data
becomes complete data and you cannot directly change it when
designation rejects it (You need to make a copy.)
45
Error/Warning for sending
When Error/Warning Appears If something is missing in the 1
entry, error/warning message
appears.
2
Display error/warning area
and correct them.
*Sending is possible even with
warning appearance.
Note
Once transmit, the data cannot be completely cancelled(*). Make sure that you
entered correct Recipient before sending.
*When you delete it, the status becomes just “cbs: Cancelation by sender”. Data sender and receiver
can browse the data contents.
46
Error/Warning
for sending
送信時のエラー・警告確認
When Error/Warning Doesn’t Appear
・Send →OK
Send.
47
Sending Completion
When the status is “not yet browsed”,
sending is completed.
48
④Data Sheet Confirmation
49
Sending Data Confirmation
Out Box →(Enter sending Data Search Condition) and Search
Out Box →MDS
1
2
Search condition entry
3
Right click →View
4
To cancel data sent(*), right click→”Delete”
*When you delete it, the status becomes just “cbs: Cancelation by sender”. Data sender and receiver
can browse the data contents.
*Approved data cannot be cancelled.
50
For general questions about IMDS, contact IMDS Service
Center.
IMDS Website
http://www.mdsystem.com/
Data Entry Manual (Created by HP Co.)
https://www.mdsystem.com/imdsnt →Online user manual
IMDS Service Center
U.S.A
8:00-5:00 p.m. (CST) (except Sat. & Sun.)
(+1)972 403 3607
[email protected]
Japan
9:00 a.m.-5:00 p.m. (GMT+9)
(except Sat. Sun. & Holidays)
(+81) 3 - 4530 - 9270
[email protected]
51


© Copyright 2026