
Pokémon Ranger: Guardian Signs eGuide - Strategy Guide
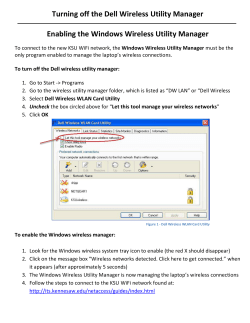
HOME
Oblivia Region Maps
The World of
Pokémon Ranger
Mission Clear Guide
Quest Clear Guide
Browser
Completion Guide
Many Times, Anytime
Capture Machine Guide
Wireless Multiplayer
Mission Guide
Pokémon Browser
Downl
oadeGui
de
How to Use this eGuide
This eGuide has a custom navigation system to allow you to easily find content within the eGuide and move between sections as you choose.
Enter keywords to find a
specific word or phrase.
The main menu puts all of the eGuide
sections for Pokémon Ranger Guardian:
Signs at your fingertips. You can select
the Menu button from any eGuide page
to return to the main menu at any time.
Of course, you can also use the “page
forward” and “return to beginning”
icons to navigate through the eGuide.
For any other questions about your
eGuide, check out the help button.
Protected by copyright. Unauthorized or unlawful copying or downloading expressly prohibited.
HOME
Oblivia Region Maps
The World of
Pokémon Ranger
Mission Clear Guide
Browser
Completion Guide
Quest Clear Guide
Many Times, Anytime
Capture Machine Guide
Wireless Multiplayer
Mission Guide
Pokémon Browser
Downl
oadeGui
de
MAP Renbow Island
Rasp Cavern/Coral Sea/Wireless Tower
Pokémon Appearing in the Field (Rasp Cavern)
Poké Assist
Dark
Recharge
Psychic
Rock
Normal
Rock
Poison
Bug
Recharge
Dark
Fighting
Rock
Poison
Poison
Poison
Pokémon
Absol
Ampharos
Chimecho
Cranidos
Dunsparce
Geodude
Koffing
Ledian
Pachirisu
Poochyena
Primeape
Rampardos
Skuntank
Stunky
Zubat
Field Move
Cut
Recharge
Teleport
Crush
Crush
Crush
Tackle
Crush
Recharge
Crush
Crush
Crush
Tackle
Tackle
Cut
r after
C an ente iplayer
Mult
W ir eless is cleared
1
Mis sion
01
D
Details
P. 191
P. 145
P. 187
P. 151
P. 152
P. 151
P. 151
P. 159
P. 147
P. 150
P. 174
P. 152
P. 152
P. 152
P. 150
Rasp Cavern
D
D
MIS SION
ring
Enter du 3
1
Mis sion
03
D
Rasp Cavern
Rasp Cavern
F
C
MISSION 1
Pinchers 2
Cranidos
D
02
MIS SION
ring
Enter du 9
Mis sion
Save Machine
C
D
Rasp Cavern
04
E
Rasp Cavern
E
D
(P. 7)
E
01
Coral Sea
E
02
A
A
Coral Sea
Crumbling Wall
B
E
03
Coral Sea
Pokémon
Poké Assist
Carvanha
Chinchou
Clamperl
Corsola
Horsea
Kingdra
Luvdisc
Mantyke
Sharpedo
Water
Recharge
Water
Water
Water
Water
Water
Water
Water
05
Wireless
Tower 5F
N
MIS S IO ars
app e
Horsea sion 2
is
after M
B
Field Move
Crush
Recharge
Cut
Crush
Tackle
Crush
Cut
Cut
Crush
F
I
BO S S
in
appears
o
Raik u
3
Mis sion
F
07
04
C
F
Recharge Machine
x2
03
ATTACKED!
MISSION 2
POST-ENDING
Kingdra appears
post-ending
Sharpedo
×2
MIS SION
Starap to
ra
after Mis ppears
sion 8
Pokémon
Barricade
MISSION 3
Pinchers 5
Aron ×2
Lairon
01
A
Wireless
Tower 1F
Holey Rock
Mt. Latolato
(P. 7)
t and
is targe
C lear th appears
Shuck le
Pokémon Appearing in the Field (Wireless Tower)
QUE S T
C
F
Pinchers 3
Skuntank
Aipom
Gligar
Save Machine
C
Beldum
×2
ap p ear
in Ques
t
20
MISSION 3
A
D
04
B
F
06
Wireless Tower 3F
Gate
02
Barricade
E
F
MIS SION
L u xio ap
pears in
Mis sion
7
P O S T-EN
D
C himech ING
o ap
pos t- en pears
ding
Huge Block
Wireless Tower 4F
MISSION 3
Pinchers 4
Pichu
F
Save Machine
E
F
Wireless
Tower 2F
Wireless
Tower Roof
Wireless Tower 6F
D
09
P O S T-EN
DING
Jolteon
app
pos t- en ears
ding
Details
P. 155
P. 153
P. 154
P. 154
P. 154
P. 155
P. 153
P. 153
P. 155
Horsea
Clamperl
C
8
(P. 7)
D
Rasp Cavern
MISSION 2
F
E
Teakwood Forest
ATTACKED!
Save Machine
Coral Sea
t
is targe
C lear th dude
and G e o
appears
D
MIS SION
Rampard
o s ap
in Mis si pears
on 7
Pokémon Appearing in the Field (Coral Sea)
F
G
G
06
Rasp Cavern
B B
Lapras Beach
07
D
Chunky Rock
(P. 7)
H
H
Rasp Cavern
A A
Teakwood Forest
08
Rasp Cavern
D
I
Round Rock
05
B
Aipom
Aron
Beldum
Chimecho
Elekid
Gligar
Hitmonchan
Jolteon
Lairon
Luxio
Magnemite
Porygon2
Shinx
Shuckle
Staraptor
Voltorb
Poké Assist
Rock
Steel
Steel
Psychic
Electric
Ground
Fighting
Electric
Steel
Electric
Recharge
Normal
Electric
Rock
Flying
Normal
Protected by copyright. Unauthorized or unlawful copying or downloading expressly prohibited.
Field Move
Crush
Tackle
Crush
Teleport
Electrify
Cut
Crush
Electrify
Tackle
Electrify
Recharge
Crush
Electrify
Crush
Fly
Electrify
Details
P. 158
P. 163
P. 180
P. 187
P. 162
P. 161
P. 160
P. 156
P. 163
P. 164
P. 161
P. 163
P. 164
P. 161
P. 181
P. 162
HOME
Oblivia Region Maps
The World of
Pokémon Ranger
Mission Clear Guide
Browser
Completion Guide
Quest Clear Guide
Many Times, Anytime
Capture Machine Guide
Wireless Multiplayer
Mission Guide
Pokémon Browser
Downl
oadeGui
de
MAP Mitonga Island
••••••
••••••
Tilt Village/Mitonga Road/Noir Forest/Dangerous Cliff
If you are riding Entei, you can smash rocks wherever
this mark appears.
t
is targe
C lear th eco
and P in
appears
Cap tur e Dusclops
×6
and Dusknoir app
ear s
If you are riding Raikou, you can jump over chasms and
rivers wherever this mark appears.
05*
G
Fallen Log
07
02
E
D D
Moving Grass
QUE S T
appears
Happiny t 23
in Ques
Moving Grass
01
G
Recharge Machine
Roar an
d S en
×3 app tr e t
ear
03
F
Mitonga Road
G
Save Machine
A A
C
B B
Daybreak Ruins
04
(P. 10)
Mitonga Road
G
F
C
MIS SION
Starap to
ra
after Mis ppears
sion 8
Renbow Island
(P. 7)
MISSION 5
Pinchers 1
Quilava
Ambipom
The Union
Pokémon Appearing in the Field
Eastern Sea
(P. 19)
G
08
Tilt Village
G
G
09
H
H
Pokémon
Poké Assist
Budew
Combee
Cyndaquil
Dusclops
Dusknoir
Happiny
Jumpluff
Kabutops
Kricketune
Magby
Magnemite
Grass
Flying
Fire
Ghost
Ghost
Normal
Grass
Rock
Bug
Fire
Recharge
Field Move
Cut
Cut
Burn
Psy Power
Psy Power
Crush
Cut
Cut
Cut
Burn
Recharge
Details
P. 167
P. 175
P. 169
P. 168
P. 168
P. 181
P. 148
P. 188
P. 148
P. 174
P. 161
G
Dangerous Cliff
Pokémon
Poké Assist
Mankey
Mothim
Pichu
Pineco
Probopass
Sandshrew
Sentret
Staraptor
Sunflora
Togepi
Treecko
Fighting
Bug
Recharge
Normal
Rock
Ground
Normal
Flying
Grass
Normal
Grass
Field Move
Crush
Cut
Electrify
Tackle
Tackle
Crush
Tackle
Fly
Cut
Tackle
Cut
Details
P. 173
P. 169
P. 144
P. 175
P. 191
P. 173
P. 145
P. 181
P. 145
P. 169
P. 167
10
Dangerous Cliff
I
G
t
is targe
C lear th flora
and S un
appears
Fallen Log
Mitonga Road
Tilt Village
E
Mitonga Road
Fallen Log
(P. 10)
G
Yellow Flower
Roar an
d Toge
appears pi
t and
is targe
C lear th appears
Bude w
G
Yellow Flower
(P. 10)
Noir Forest
Old Mansion
Mitonga Road
P O S T-EN
DING
P robopa
ss ap
pos t- en pears
ding
Daybreak Ruins
(P. 10)
G
06
Forest Tree
Old Mansion
* The Dusknoir on map G 05 will appear when all the
Dusclops in Noir Forest have been captured.
G
I
J
11
Dangerous Cliff
G
12
Dangerous Cliff
J
K
K
L
G
13
Dangerous Cliff
G
L
14
Dangerous Cliff
DING
P O S T-EN
rs
ps appea
to
u
b
a
K
ding
pos t- en
G
15
Dangerous Cliff
QUE S T
P ichu a
ppears
Ques t 4 in
9
Submarine
(P. 11)
Save Machine
M M
N N
9
Protected by copyright. Unauthorized or unlawful copying or downloading expressly prohibited.
HOME
Oblivia Region Maps
The World of
Pokémon Ranger
Mission Clear Guide
Quest Clear Guide
Browser
Completion Guide
Many Times, Anytime
Capture Machine Guide
Wireless Multiplayer
Mission Guide
Pokémon Browser
Downl
oadeGui
de
Poké Assists
The powers of Pokémon can enable successful captures
Poké Assists are an important part of a successful Pokémon-capturing strategy. Utilizing the strength
of your Friend Pokémon can turn the tables on a difficult capture, but if your Pokémon gets hit by an
attack, it'll be released.
Poké Assists Make Pokémon Captures Easier
A Poké Assist can be a good or bad matchup for the Pokémon you're trying to capture. Red and
blue arrows can help you pick the Pokémon with the best matchup. Pokémon that have helped
you will be able to do another Poké Assist after a certain time period has passed.
Match up Friend Pokémon
Effective against agitated Pokémon
When the targeted Pokémon is agitated, your Capture Styler becomes much less effective. Use
Poké Assists to calm your target down.
Good matchup
Red when agitated
Pokémon with Status Effects Are Easier to Capture
Some Poké Assists can inflict status effects, which
makes capturing the Pokémon much easier.
Status Effect Types and Results
About Pichu's Ukulele
Ukulele Pichu will also help you with captures by using
random, but it tends to appear when the targeted Pokémon
Slowed
its special power, Pichu's Ukulele. Pichu's appearance is
is agitated or when you don't have many Friend Pokémon.
Tired
Until the Tired icon disappears, the Friendship
Gauge will not decrease.
Level up Pichu's Ukulele
Paused
Until the Paused icon disappears, the
Pokémon will be unable to attack.
Stopped
Until the Stopped icon disappears, the
Pokémon will be unable to move or attack.
Icon
Level
Description
Pichu will fire musical notes in the direction of the closest
Start
targeted Pokémon for a fixed period of time.
Attack
Status Effect Group
0.8 times
Styler Power
—
Normal
1
Pichu will fire musical notes in all directions that will 0.3 times
travel a little farther.
Styler Power
—
Normal
2
Pichu will shoot electricity in all directions.
0.2 times
Styler Power
—
Electric
3
Lightning will strike across the screen, and any 2 times Styler
Power
Pokémon hit by the bolts will be Stopped.
Stopped
Electric
Poké Assists
Description
Until the Slowed icon disappears, the Pokémon
will move slowly.
Status Effect
The World of Pokémon Ranger
Bad matchup
Target Clear
Use Pokémon Field Moves to overcome obstacles
A Target Clear is when you use your Pokémon's Field Moves to remove obstacles in your path.
Pokémon have different kinds of Field Moves, so be sure to capture a variety of Pokémon for Target
Clears. There are some targets that require two or more Pokémon to work together.
Pokémon Powers Will Help You on Your Journey
To do a Target Clear, first you need to determine the kind and strength of the Field Move that you need. Then, see if there are
any Pokémon on your team that have that move. If there aren't, you'll have to search the area and capture one; often, the
Pokémon you need are nearby.
33
Protected by copyright. Unauthorized or unlawful copying or downloading expressly prohibited.
HOME
Oblivia Region Maps
The World of
Pokémon Ranger
Mission Clear Guide
Quest Clear Guide
Browser
Completion Guide
Many Times, Anytime
Capture Machine Guide
Wireless Multiplayer
Mission Guide
Pokémon Browser
Downl
oadeGui
de
Check All Your Pokémon's Field Moves on the Upper Screen
When you want to know which Field Moves you have on hand, just glance at the top screen. There, below each
Pokémon's image, is an icon depicting the type and strength of its Field Move.
Field Moves are
displayed here
Field Moves Can Reveal Hidden Pokémon
Field Moves are primarily used for clearing obstacles, but they can also be used to uncover concealed
Pokémon. Some wild Pokémon will camouflage themselves among environmental features such as
Floating Leaves or Solid Snow. Use Field Moves to uncover these Pokémon.
Example
Use the right Field Move
on this Yellow Flower to
The World of Pokémon Ranger
find a Sunflora.
Ranger Signs
Draw Signs to Summon Pokémon
Ranger Signs
During your adventure, you will form bonds with certain Pokémon that want to help you.
These Pokémon can be summoned by drawing their Ranger Signs.
Raikou
Entei
Suicune
Latios
Latias
Sky Fortress
Ho-Oh
Moltres
Zapdos
Articuno
Lugia
Found in-game.
Use to ride Raikou.
Found in-game.
Use to ride Entei.
Found in-game.
Use to ride
Suicune.
Used for boy
Ranger to ride
Latios.
Used for girl
Ranger to ride
Latias.
Opens a door in the
Sky Fortress. *4
Found in-game. *1
Found in-game. *1
Found in-game. *1
Found in-game. *1
Found in-game. *2
Graveler
Jumpluff
Hitmontop
Bidoof
Garchomp
Metagross
Celebi
Mankey
Vulpix
Buneary
Croagunk
Received after
Quest 37 (P. 96).
Re c ei v e d
after Quest 45
(P. 98).
Received after
Quest 31 (P. 95).
Received after
Quest 24 (P. 93).
Hidden Sign. Must
be recorded to
summon. *3
Hidden Sign. Must
be recorded to
summon. *3
Received during
Wireless Multiplayer
Missions.
Received after
Quest 15 (P. 91).
Received after
Quest 19 (P. 92).
Received after
Quest 26 (P. 93).
Hidden Sign. Must
be recorded to
summon. *3
*1Post-ending, you can summon Ho-Oh at the Rainbow Dais, Moltres
at Faldera Volcano, Zapdos at Mt. Layuda, and Articuno at Mt. Sorbet for a
rematch.
*2 After receiving Lugia's Sign, you can ride The Union from Tilt Village to use
the Sign for a rematch.
*3If you touch the "?" button in the Sign List, you can record hidden Signs by
drawing them, but only if that Pokémon is recorded in your Browser.
*4The Sky Fortress Sign cannot be recorded in the Sign List.
Power Charge and Draw a Sign
Once Nema has upgraded your Capture Styler so it can do
the Pokémon you summon will be powered up (P. 36). This
Power Charges, you can also draw Charged Signs. When
is an important technique.
you successfully draw a Sign while your Styler is charged,
34
Protected by copyright. Unauthorized or unlawful copying or downloading expressly prohibited.
HOME
Oblivia Region Maps
The World of
Pokémon Ranger
Mission Clear Guide
Quest Clear Guide
Browser
Completion Guide
Many Times, Anytime
Capture Machine Guide
Wireless Multiplayer
Mission Guide
Pokémon Browser
Downl
oadeGui
de
Getting Around with Pokémon
Work with Pokémon to Go Anywhere in the Oblivia Region
In Pokémon Ranger: Guardian Signs, you can travel all over the Oblivia region riding on
the backs of different Pokémon. You can call on these Pokémon for help when the road
becomes impassable—or when you just want to get somewhere fast!
Pokémon Can Help You Get Anywhere
Entei
Summon with a Sign.
Use to jump over
chasms and rivers.
When you can summon
Suicune
Summon with a Sign.
U s e t o s ma s h la r g e
r ock s block ing your
path.
From Mission 3 (P. 44)
When you can summon
From Mission 5 (P. 51)
Latias
Latios
Once you capture it, it
will carry you through
the sky. You can travel
instantly to anywhere
you've visited before.
When you can capture
Girl Rangers can
summon it with a Sign
to fly through the sky.
Touch the screen to fl y
faster.
Boy Rangers can
summon it with a Sign
to fly through the sky.
Touch the screen to fl y
faster.
From Mission 8 (P. 60)
When you can summon
From Mission 8 (P. 60)
When you can summon
From Mission 11 (P. 69)
When you can summon
From Mission 11 (P. 69)
Getting Around with Pokémon
Staraptor
Summon with a Sign. Use
to run on rivers. Suicune
can also step over wild
Pokémon to avoid their
attacks.
The World of Pokémon Ranger
Raikou
Smoochum/Chingling/Chimecho, and others
Some Pokémon have the Field Move Teleport. Using this move will allow
you to instantly return to the entrance of a building or cave.
Habitat
Mt. Sorbet P. 17
Oblivia Ruins P. 18
Mt. Layuda P. 20
35
Protected by copyright. Unauthorized or unlawful copying or downloading expressly prohibited.
HOME
Oblivia Region Maps
The World of
Pokémon Ranger
Mission Clear Guide
Quest Clear Guide
Browser
Completion Guide
Many Times, Anytime Wireless Multiplayer
Capture Machine Guide
Mission Guide
Pokémon Browser
Downl
oadeGui
de
Mission 1
M Iout
Sof S
IO
Drive the Pinchers
the Woods!
Recommended Route
Location
MAP
❶ Renbow Island
N
1
STEP
Capture Pokémon
in Teakwood Forest
3
Cocona Village - Teakwood Forest - Rasp Cavern
❷ Dolce Island
,
From Booker's house, head north
( ) and west (,) to Teakwood
Forest. Continue heading west
(,) while capturing Pokémon. A
Wooden Fence blocks your way.
Since you don't have a Pokémon
that can clear that target, head
north ( ) to go around it.
Re c o m m e n d e d Ro u te
Mission Start! Chase those Pinchers!
STEP 3
Capture Pokémon in Teakwood Forest
STEP 4
Hoothoot helps you clear the Small Log
STEP 5
Capture the Pinchers' Pokémon
STEP 6
Weezing helps you clear the Round Rock
STEP 7
Drop down the ledge and meet Arley
STEP 8
There's a Pokémon carving on that huge slate
STEP 9
Pinchers steal the Emblem from the Monument
Cut
STEP
Hoothoot helps you
clear the Small Log
4
Tackle
Heading nor th ( ) f r om the
western side of Teakwood Forest,
you f ind a Small Log blocking
your path. Capture the nearby
Hoothoot, and have it do a Target
C lear o n th e lo g s o y o u c an
continue north ( ).
,
STEP 2
,
Those mysterious enemies are the Pokémon Pinchers!
Available
Quests
,
Mission Clear Guide
STEP 1
Necessary
Field Moves
STEP 10 Capture the Pinchers' Cranidos
STEP 11 Discover Raikou while pursuing the Pinchers
STEP
Crush
STEP 14 Pichu ran off after its ukulele broke—go find it!
STEP 15 Talk to Booker and accept the Quest
STEP 16 Go to Dolce Island to find the ukulele material
BOSS Capture Celebi in front of the Stone of Time
Quest 1 P. 87
*Available Quests will
be listed in an order
that allows them to be
cleared smoothly and
easily.
E a s t (/) o f th e m ain R a s p
Cavern entrance, you'll find a rock
blocking your path. Head north
( ) to that entrance instead.
The Pincher s standing by the
entrance will attack with a Buizel
and a Croagunk. Take this chance
to stop their attack and capture those Pokémon.
,
Mission 1: Drive the Pinchers out of the Woods!
STEP 13 Cranidos helps you break the Rock
Capture the
Pinchers' Pokémon
5
STEP 12 Chased off the Pinchers! Mission Clear!
STEP 17 To bygone days with Celebi
Quest 2 P. 87
STEP 18 Ukulele Pichu becomes your Partner Pokémon
STEP 19 Head out toward Rand's house
1
Quest 4 P. 87
Those mysterious
enemies are the
Pokémon Pinchers!
The boat that set off from Dolce
Island arrives at Cocona Village
on Renbow Island. Cocona Village
is in chaos with the attack of
mysterious enemies on UFO-like
vehicles. Booker explains that
these enemies are the Pokémon Pinchers, a group that kidnaps Pokémon.
STEP
2
Mission Start!
Chase those
Pinchers!
Ralph, a village boy, reports that
he saw the Pinchers head into
Teakwood Fores t. He says he
saw Arley, a woodcutter from
the village, give chase, and he's
wor r ied about him due to his
age. Booker asks you to head to
Teakwood Forest and investigate. Mission Start!
Weezing helps you
clear the Round
Rock
STEP
6
Once you're in Rasp Cavern, head
north ( ) into the cave. Capture
the Weezing at the dead end, and
use it to perform a Target Clear
on the Round Rock blocking your
path.
,
STEP
Quest 3 P. 87
STEP
7
Drop down the
ledge and meet
Arley
You can dr op down the ledge
just past the Round Rock, but
remember, it's a one-way route.
After you drop down, you'll meet
the woodcutter Arley. According
to Arley, the Pincher s were
examining the nearby Monument.
40
Protected by copyright. Unauthorized or unlawful copying or downloading expressly prohibited.
HOME
Oblivia Region Maps
The World of
Pokémon Ranger
Mission Clear Guide
Quest Clear Guide
Browser
Completion Guide
Many Times, Anytime Wireless Multiplayer
Capture Machine Guide
Mission Guide
Pokémon Browser
Downl
oadeGui
de
STEP
8
There's a Pokémon
carving on that
huge slate
Near Arley is a huge slate with
an image of a Dr apion car ved
into it. There's a Pokémon in the
room behind this slate, and you
can enter if you play the Wireless
Multiplayer Missions. Check the
sidebar (P. 140) for more details.
STEP
9
Pinchers steal the
Emblem from the
Monument
Capture the
Pinchers' Cranidos
The Pinchers say they've
achieved their goal and begin
to leave. As they start to fly off,
Raikou appear s! Raikou roar s
in anger and chases af ter the
Pinchers running away on their
UFO-like Z.Z. Flyers.
STEP
12
Chased off the
Pinchers! Mission
Clear!
Pichu ran off after
its ukulele broke—
go find it!
When you get back to Cocona
V illage, Edward is there. He's
a doctor traveling the islands
of the Oblivia region. Af ter
intr oduc tions, a near by man
m en tio n s th a t h e s a w P ic h u
c ar r ying a br oken ukulele to
Booker's house. Follow it.
STEP
15
Talk to Booker and
accept the Quest
When you enter Booker's house,
y o u' l l s e e a "..." m a r k a b o v e
Booker's head. This is a signal
tha t he has a Q ue s t f or you.
Speak with Booker, and you can
accept Quest 1 (P. 87). From this
point on, you can take on Quests
whenever you're free to roam.
STEP
16
Go to Dolce Island
to find the ukulele
material
Head to Dolce Island with Nick to
collect material to fi x the broken
ukulele. Head to the large stump
on Dolce Island, and six Sunkern
will appear. Capture them, collect
the ukulele material from the
s tump, and r etur n to Cocona
Village.
BOSS
Group
Arley begins to explain the story
of Raikou and the Monument that
the Pinchers broke. The Pinchers
have successfully been driven
o f f, b u t P i c h u's u k u l e l e w a s
broken in the struggle. Mission
Clear! You r eceive 50 Ranger
Points.
Grass
Mission 1: Drive the Pinchers out of the Woods!
11
Discover Raikou
while pursuing the
Pinchers
Cranidos helps you
break the Rock
Head south ( ) and then west
(,) to the dead end and capture
the Cranidos. Then exit the cavern
and clear the Rock to the west
(, ) before continuing through
Teakwood Forest. Take Arley back
to Cocona Village.
14
The Pinchers attack with a
Cr anidos. Cr anidos has a farreaching attack, so you should
lift the stylus from the screen
and wait for the attack to finish. If
you caught a Hoppip in Teakwood
Forest, it would come in handy for
an effective Poké Assist here.
STEP
13
Mission Clear Guide
10
STEP
STEP
Continue east (/) and you'll see
the Pinchers hit the Monument
with a suspicious beam. It looks
like they'r e tr ying to r emove
t h e E m b l e m c a r v e d i n to t h e
Monument. Pichu bravely stands
up to the Pinchers, and its ukulele
is broken in the struggle.
STEP
Walkthrough
Drive the Pinchers out of the Woods!
,
Mission 1
Capture Celebi
in front of the
Stone of Time
Leave Booker's house and head
to the plaza in the west (, ) of
Cocona Village, and Celebi will
appear. This is the f ir st Boss
Pokémon. Boss Friendship
G aug e s app ear a t the top o f
the screen. Celebi moves very
quickly, so you'll have to chase it and loop it.
41
Protected by copyright. Unauthorized or unlawful copying or downloading expressly prohibited.
HOME
Oblivia Region Maps
The World of
Pokémon Ranger
Mission Clear Guide
Quest Clear Guide
Browser
Completion Guide
Many Times, Anytime Wireless Multiplayer
Capture Machine Guide
Mission Guide
Pokémon Browser
Downl
oadeGui
de
Mission 1
STEP
17
Walkthrough
Drive the Pinchers out of the Woods!
STEP
To bygone days
with Celebi
19
Successfully capture Celebi, and
it will take you back to the past. A
young boy from that time, Ravio,
appear s to be Celebi's friend.
After you listen to Ravio's tale
about the temples and Steelhead,
Celebi brings you back to your
own time.
STEP
18
Head out toward
Rand's house
Booker w ill tell you abou t an
Oblivia Area Ranger named Rand
whose daughter is good wi th
machinery. You can probably ask
her to repair your Styler. From
Cocona Village, head east ( /)
to Lapras Beach, and set out for
Rand's house.
Ukulele Pichu
becomes your
Partner Pokémon
Mission Clear Guide
Enter Booker's house, and see
th a t th e u k u l e l e r e p ai r s a r e
f inished. Pichu is very happy!
Leave the house, and Ukulele
Pichu will follow. From now on,
Ukulele Pichu will be your Partner
Pokémon and will use its ukulele
to help you with your captures!
MISSION
Mission 2
2
Mission 2: Salvage the Sunken UFO!
Salvage the Sunken UFO!
Recommended Route
Location
MAP
STEP
1
Renbow Island Lapras Beach - Coral Sea - Curl Bay - Rand's House
Re c o m m e n d e d Ro u te
STEP 1
Listen to the girl's request—Mission Start!
STEP 2
Capture Lapras for approval
STEP 3
Go diving after the sunken UFO
STEP 4
Corsola helps you break the Crumbling Wall
STEP 5
Capture the attacking Clamperl and Horsea
STEP 6
Chase after the Kingdra that knocked down the UFO
STEP 7
Capture Chinchou to brighten your surroundings
STEP 8
Capture the two attacking Sharpedo
STEP 9
Recover the UFO—Mission Clear!
Necessary
Field Moves
Available
Quests
Listen to the girl's
request—Mission
Start!
Continue to Lapras Beach east
( /) of Cocona Village, and find
two girls arguing. It seems the
girl with the glasses wants to go
out to sea with Lapras. One girl
notices that you are a Pokémon
Ranger and asks you to recover
the UFO that sank into the sea.
Crush
STEP
2
Quest 6 P. 88
STEP 10 Continue with Nema to Rand's house
STEP 11 Confront the Pinchers that were chased by Raikou
STEP 12 Capture two Buizel and a Shellos
Crush
STEP 13 A fire at Rand's house!
Soak
Capture Lapras
for approval
Nixie says that even if you are
a R a n g e r, i f L a p r a s d o e s n' t
approve of you, it won't let you
ride. Capture Lapras to gain its
approval. Loop it while it's not
attacking to raise its Friendship
Gauge. Once you've captured it, it
will let you ride out to sea on its back.
STEP
3
Go diving after the
sunken UFO
STEP 14 Totodile tries to quench the fire
STEP 15 Three Pokémon help you put out the fire
STEP 16 Follow Nema into Rand's house
Soak
×3
Af ter listening to Nixie, touch
" Ye s" to v i s i t t h e C o r a l S e a .
Voice Nav. tells you it detects
a metal objec t, so dive down.
Land Pokémon, including Ukulele
Pichu, cannot accompany you
underwater.
42
Protected by copyright. Unauthorized or unlawful copying or downloading expressly prohibited.
HOME
Oblivia Region Maps
The World of
Pokémon Ranger
Mission Clear Guide
Quest Clear Guide
Browser
Completion Guide
Many Times, Anytime Wireless Multiplayer
Capture Machine Guide
Mission Guide
Pokémon Browser
Downl
oadeGui
de
STEP
4
Corsola helps
you break the
Crumbling Wall
STEP
9
Under w a ter, ther e ar e s ome
areas you can't go because of
the strong current. Capture the
nearby Corsola, and use its Field
Move on the Crumbling Wall to
continue farther underwater past
the rocks blocking the current.
STEP
5
Capture the
attacking Clamperl
and Horsea
6
Chase after the Kingdra
that knocked down the
UFO
After you capture the Sharpedo,
r e tur n to L apr as Beach f or a
Mission Clear! You'll receive 50
Ranger Points. The girl waiting
for you introduces her self as
Nema. She is the daughter of Area
Ranger Rand.
STEP
10
Yo u tell N em a th a t y o u' d
like to meet Rand, and she
accompanies you on the way to
Rand's house. Head east ( / )
from Lapras Beach to Curl Bay.
STEP
11
You catch up to K ingdr a, and
the UFO drops to the bottom of
the sea. As you continue down
even farther, your surroundings
become pitch-black . C aptur e
a nearby Chinchou to light up
the area. A yellow light is a
Chinchou—a red light is either the UFO or a Sharpedo.
8
Before you continue north ( ) to
Rand's house, capture two Buizel
and a Shellos in Curl Bay. You'll
need their assistance later. To find
Shellos, use a Munchlax or Aipom
to Target Clear the Small Rock.
STEP
13
Capture the
two attacking
Sharpedo
A fire at Rand's
house!
Continue nor th ( ) to Rand's
house, and you'll see a fire has
broken out on the east end of the
house. Hurry up and put it out! To
put out the fire, you'll need the
Field Move "Soak 1." Buizel and
Shellos both have "Soak 2," which
is more powerful than you need, so hold on to them for now.
/
STEP
Capture two Buizel
and a Shellos
/
7
12
Capture Chinchou
to brighten your
surroundings
Confront the
Pinchers that were
chased by Raikou
Head nor th ( ) through Curl
Bay, and the Pinchers that Raikou
chased earlier will appear. The
Pinchers will attack with Piplup
and Eevee. When the two get near
each other, that's your chance to
loop them together. Once you've
captured them, the Pinchers run away.
STEP
STEP
Continue with
Nema to Rand's
house
Mission 2: Salvage the Sunken UFO!
Kingdra disappears toward the seafloor with
the UFO. Touch "Yes" to continue downward,
and turn your Nintendo DS vertical to chase
after it. Dodge the bubbles and twisters
K ingdr a sends out, and double-tap the
screen to dive after Kingdra.
Recover the UFO —
Mission Clear!
Mission Clear Guide
As you approach the UFO stuck
on the ledge, the nearby Clamperl
and Hor s ea ar e s tar tled and
attack. When the two stop
attacking and gather in the
center of the screen, draw loops
to capture them. Once they're
captured, an angry Kingdra appears and knocks the UFO farther down into
the sea.
STEP
Walkthrough
Salvage the Sunken UFO!
/
Mission 2
Dodge the charging Sharpedo and
continue your descent, finally
finding the UFO (it's really a Z.Z.
Flyer). You recover it and begin
to return to the water's surface
when two Sharpedo attack. Wait
until they stop their attacks, and
capture them one at a time.
43
Protected by copyright. Unauthorized or unlawful copying or downloading expressly prohibited.
HOME
Oblivia Region Maps
The World of
Pokémon Ranger
Mission Clear Guide
Quest Clear Guide
Browser
Completion Guide
Many Times, Anytime Wireless Multiplayer
Capture Machine Guide
Mission Guide
Pokémon Browser
Downl
oadeGui
de
Quest
1
Pichu's Broken Ukulele
Prerequisite
After Pichu's ukulele is broken in
Mission 1, "Drive the Pinchers out of the
Woods!"
Ranger Points Received
10
Location Renbow
Island(Cocona Village)
Client Booker
Quest
2
Recharge Pachirisu
Prerequisite
Head to Dolce Island to pick up the materials to repair
Pichu's ukulele
Capture Celebi in Mission 1,
"Drive the Pinchers out of the Woods!"
Ranger Points Received
10
Location Renbow Island
(Cocona Village)
Client Little Girl
Pachirisu needs a friend to cheer it up
Booker is quite upset because the Pinchers broke Pichu's ukulele. Listen to
Booker's request and go to Dolce Island (P. 6) with Nick to gather the materials
/
necessary to repair the ukulele. Head south ( ) from Booker's house and
speak with the fisherman. He'll take you to Dolce Island. When you arrive at
the stump where Booker hid the ukulele material, six Sunkern leap out at once.
Capture them, collect the material, and return to Booker's house.
A little girl in Cocona Village is feeling downhearted because her Pachirisu just
doesn't have any energy after being frightened by the Pinchers, who tried
to capture it. The little girl thinks that if her Pachirisu could just see another
Pachirisu that is full of energy, her Pachirisu would feel better. Capture a
Pachirisu and bring it to the little girl. You can find one east (/) of Booker's
house on Lapras Beach (P. 7).
Start Here
Start Here
Yo u ca n f i n d a w i ld
Pachirisu on Lapras Beach.
,
Quest
3
A New Path in Teakwood Forest
Prerequisite
Capture Celebi in Mission 1,
"Drive the Pinchers out of the Woods!"
Ranger Points Received
10
Quest
4
The Elderly Couple's Argument
Location Renbow Island
(Cocona Village)
Client Old Man
Zubat helps you clear a Wooden Fence
An old man in Cocona Village is troubled by a Wooden Fence blocking his way in
Teakwood Forest (P. 7). He tried to remove the Wooden Fence himself but hurt
his back in the process. Remove the fence for him. Zubat, located in Rasp Cavern
/
(P. 8), can help. Capture Zubat and head south ( ) in Teakwood Forest. Once the
Wooden Fence is gone, you'll be able to take a shortcut through Teakwood Forest
on your way back to Rasp Cavern.
Start Here
Prerequisite
Capture Celebi in Mission 1,
"Drive the Pinchers out of the Woods!"
Ranger Points Received
10
Location Renbow Island
(Cocona Village)
Client Man
Solve the secret of the moving rock and reconcile the
elderly couple's fight
The elderly couple living in Cocona Village are having an argument after a
mysterious experience in Rasp Cavern. Bring Geodude, the cause of the elderly
couple's fight, back to the village. Geodude is in Rasp Cavern (P. 8), mimicking
a Chunky Rock. Capture a Marill on Dolce Island (P. 6) to perform a Target Clear.
Escort Geodude back to Cocona Village, speak with the man who gave you the
Quest, and the elderly couple will reconcile.
Start Here
The old man is near the
Stone of Time in Cocona
Village. Upon listening
to his request, hurry to
Teakwood Forest.
Zubat is just inside Rasp Cavern.
Quest 1–Quest 4
To reach the stump that
hides the ukulele material,
go west (,) from the boat
and then south ( ) along
the path.
Quest Clear Guide
The girl is in front of the
northeastern house in
Cocona Village. Look for the
Pachirisu.
This first Quest must be
accepted to continue the
story. Speak with Booker,
and the Quest begins.
Once you've cleared the target, return
to the old man.
This man is concerned
over the elderly couple's
argument and is waiting to
the southwest of the dais in
Cocona Village.
Marill is on the Eastern Beach on Dolce
Island.
Enter Rasp Cavern through the eastern
entrance.
Protected by copyright. Unauthorized or unlawful copying or downloading expressly prohibited.
87
HOME
Oblivia Region Maps
The World of
Pokémon Ranger
Mission Clear Guide
Quest Clear Guide
Browser
Completion Guide
Many Times, Anytime Wireless Multiplayer
Capture Machine Guide
Mission Guide
Pokémon Browser
Downl
oadeGui
de
Post-ending
Quest
5
The Precious Red Berry
Ranger Points Received
25
Quest
6
The Big One That Got Away
Location Renbow Island
Prerequisite
Clear Mission 15, "Calm the Sky's Rage!"
(Cocona Village)
Prerequisite
Client Booker
10
Location Renbow Island
(Lapras Beach)
Client Man
Shake the Forest Tree to find a red berry
Dive into the Coral Sea and look for the missing lure
Booker asks you to bring him a special red berry. You can obtain one by
performing a Target Clear on the right Forest Tree. There are three of these trees
in the Oblivia region, but only the one on Mitonga Road (P. 9) will give you a red
berry. A Kricketot or a Probopass can perform the Target Clear you need. Head
The man on Lapras Beach has lost his sparkly, shiny lure and is troubled. When
he was fishing in the Coral Sea, some large unknown thing cut his line. Go look
for the Pokémon that swam off with the lure. To go to the Coral Sea (P. 8), speak
with the nearby Nixie, and Lapras will take you there. Find the Luvdisc with the
lure in its mouth and capture it, and you'll receive the lure back. Then speak
with the man for a Quest Clear!
/
east (/) from Tilt Village, and then east (/) and north ( ) along Mitonga
Road to get to the right tree.
Start Here
Quest Clear Guide
Quest
Start Here
Visit Booker in his house in
Cocona Village and listen to
his request.
H ea d ea s t ( / ) f r o m
Cocona Village, and find the
gentleman under the tree
on Lapras Beach who lost
his lure.
Continue east along Mitonga Road to find
the Forest Tree at the end of the path.
Dive into the Coral Sea, head
down and to the right to the
dead end, and you'll find the
Luvdisc that took the lure.
The Son's Lunch
Prerequisite
After adding Sign Mode during Mission 3,
"Liberate the Wireless Tower!" and clearing
Quest 4, "The Elderly Couple's Apartment"
Ranger Points Received
10
Quest
8
My Lunch
Ranger Points Received
Location Renbow Island
10
Location Renbow Island
(Cocona Village)
Prerequisite
Clear Quest 7, "The Son's Lunch"
Client Old Woman
(Wireless Tower)
Client Man
Take the forgotten lunch to the Wireless Tower
Return the lunch stolen by the Pidgey
The old woman in Cocona Village tells you that her son left for work without his
lunch. Take the lunch to the young man at the Wireless Tower (P. 8) where he
works. The Wireless Tower is a ways from Cocona Village, so consider riding
Upon taking the lunch to the Wireless Tower and clearing Quest 7, something
happens. A Pidgey comes flying through, snaps up the lunch, and flies away.
Go get the hungry man's lunch back from the Pidgey! The Pidgey that flew off
with the lunch is on Wireless Tower 5F (P. 8). Capture it, and you'll get the lunch
back. Then go speak with the young man, and it's Quest Clear!
/
Raikou there to speed up the trip. Head west (,) from Rand's house, north ( )
on Latolato Trail, and continue along the road to the Wireless Tower. Once you've
handed over the lunch to the man, it's Quest Clear!
Start Here
Start Here
The old woman is in a house
on the south side of the dais
in Cocona Village. It's the
same house you visited in
Quest 4.
Upon clearing Quest 7
in front of the hut at the
Wireless Tower, Quest 8
starts.
The young man who left
without his lunch is in front
of the hut at the Wireless
Tower.
The Pidgey that flew off with
the lunch can be found at
the dead end to the south
( ) of the floor with the
strong winds.
,
Quest 5–Quest 8
You'll find Kricketot as soon as you enter
Teakwood Forest.
7
88
After recovering the Z.Z. Flyer in
Mission 2, "Salvage the Sunken UFO!"
Ranger Points Received
Protected by copyright. Unauthorized or unlawful copying or downloading expressly prohibited.
HOME
Oblivia Region Maps
The World of
Pokémon Ranger
Mission Clear Guide
Quest Clear Guide
Browser
Completion Guide
Many Times, Anytime Wireless Multiplayer
Capture Machine Guide
Mission Guide
Pokémon Browser
Downl
oadeGui
de
Try Capturing Pokémon with
the Many Times, Anytime
Capture Machine
Try to complete an S-Rank capture on 24 strong Pokémon
Just as its name implies, the Many Times, Anytime Capture Machine is a machine for
people like you who love to capture Pokémon! You can capture strong Pokémon that you
encountered in-game again. Use the capture skills that you've been improving through
your adventure, and aim for an S-Rank capture!
Start in Nema's Laboratory in Rand's House
After you clear Quest 51, "Power for Nema" (P. 100), you'll be
able to use the Many Times, Anytime Capture Machine. To use
the machine, enter Rand's house, head east (/), and speak
with Nema in her laboratory.
Many Times, Anytime Capture Machine Guide
Unlimited Attempts to Polish Your Capture Technique!
You'll meet lots of Pokémon that are much stronger than they would be during normal game play with the Many Times,
Anytime Capture Machine. The more you try to capture these Pokémon, the better your capture technique will become!
After battles, you will still receive experience points and your Capture Styler will level up, so you'll get the full benefit.
¡Features of the Many Times, Anytime Capture Machine
1 You get another chance to capture Pokémon you meet only once in the game.
4 Friend Pokémon with you can use Poké Assists.
2 Whether you succeed or fail at capturing, Nema will recharge your Styler.
5 The Pokémon you capture will not accompany you.
3 Even if your Styler gets broken, it's not game over.
6 Speak with Nema to return to Nema's laboratory.
Use Poké Assists Effectively for a Smooth Capture
You can bring your Friend Pokémon from the main game with you when you use the Many Times, Anytime Capture Machine. Use your Poké Assists effectively, based on
Pokémon with you. It's not just about effect area, but also about the group of the Poké Assist and whether it causes status effects.
¡Recommended Poké Assists for the Many Times, Anytime Capture Machine
Recommendation
1
Recommendation
2
Poké Assists that spread out
When a Pokémon uses an
attack that reaches in all
directions so you can't get
close, it's handy to have a
far-reaching Poké Assist so
you can hit it from a safe
distance.
Fast Pokémon are hard
to hit with a Poké Assist.
Poké Assists that hit a
large area will make it
easier.
Ex. Gabite's blue fireballs
Ex. Aggron's iron sphere shot
Recommendation
Recommendation
3
106
Far-reaching Poké Assists
Poké Assists that have
lasting effects
4
Poké Assists that cause
status effects
Some Pokémon are really
fast, or they teleport, or
they move off-screen. A
Poké Assist with a lasting
effect would be helpful
against them.
If you use Poké Assists
that cause status
effects, you can restrict
your foe's attacks or
movement.
Ex. Toxicroak's poison puddles
Ex. Walrein's blizzard
Protected by copyright. Unauthorized or unlawful copying or downloading expressly prohibited.
HOME
Oblivia Region Maps
The World of
Pokémon Ranger
Mission Clear Guide
Quest Clear Guide
Browser
Completion Guide
Many Times, Anytime Wireless Multiplayer
Capture Machine Guide
Mission Guide
Pokémon Browser
Downl
oadeGui
de
Team Up with Your Friends
for a Cooperative Adventure
Wireless Multiplayer Missions Bring a Different Fun Experience
The Wireless Multiplayer Missions use the Nintendo DS's wireless communications to allow
several players to work through an adventure together. You can play these Missions by yourself,
but they're designed and recommended to be enjoyed by two to four players.
Start from the Stone of Time in Cocona Village
Wireless Multiplayer Mission Guide
To start a Wireless Multiplayer Mission, you must first
clear Mission 4, "Investigate the Old Mansion!" To play,
head to the west plaza in Cocona Village on Renbow
Island, and touch the Stone of Time. Then select the
Leader and members.
Unison Capture
1
This is a capture technique for two players. When
the first player draws a Capture Line, a marker
is displayed at the line's origin point. Touch this
marker, and enclose the Pokémon.
Make the Boss Warp Zone Appear, and Defeat the Boss
The goal of the Wireless Multiplayer Missions is to capture the boss Pokémon. Satisfy all the requirements of the
individual Mission, and the Warp Zone to the boss will appear, allowing you to capture the boss. Also, there are
special capture techniques for two to four players of the Wireless Multiplayer Missions to master.
Gather Two to Four Players for a Cooperative Adventure
Gather Your Strength, and Clear All 23 Missions
There are 23 Wireless Multiplayer Missions, connected as indicated in the chart below. For example, upon clearing Mission 6, "A
Pokémon Forest in the Way," you can challenge any of the Fire Temple's first three Missions. Arceus awaits you as the boss of the final
¡Wireless Multiplayer Missions 23 Mission Chart
Mission
1
Mission
2
Mission
3
Mission
4
Mission
5
Mission
6
Mission
7
A Scorching Shower of Flames
Mission
8
Mission
10
Mission
11
Mission
Time, Time, Time!
12
Mission
14
Mission
15
Mission
Are You for Riolu?
16
Mission
18
Mission
19
A Fork in the Dark Road
Mission
20
Mission
22
Mission
110
¡Capture techniques specific to the Wireless
Multiplayer Missions
23
Team Capture
2
This technique is for three or more players. To
enclose the Pokémon, each player charges their
Line and connects it to another player's charge
point and line to enclose the Pokémon.
Drapion in the Forest Temple
Where Are You, Sunkern?
Torchic and Treasure Chests
A Hoard of Treasure Chests
Pidgeotto and the Switch Path
Forest Temple
A Pokémon Forest in the Way
Which Switch Is for Mime Jr.?
Mission
9
Mission
13
Pikachu Pursuit!
Mission
17
Glowing Roads in the Darkness
At Last, Arceus and the Light
Mission
21
Rank
S
A
B
C
Requirement
Clear with 5+ min left
Clear with 3+ min left
Clear with 1.5+ min left
Clear with less than 1:30 left
If You See "Game Over"
A Shock Everywhere You Turn
Thunder Temple
Panic at the Perplexing Temple
Danger! Surrounded by Pokémon!
Round and Round! Find the Floor!
Ice Temple
Rush Ahead! Don't Look Back!
About Wireless Multiplayer Mission
Clear Ranks
¡Clear Rank
Fire Temple
Graveler's Terrible Rocks
Save the Frightened Vulpix
Shaken by Aggron's Footsteps!
When time runs out, or someone's Capture
Styler breaks, it's game over for that Mission.
But you can always play again!
Ground-shaking Dragon Pokémon
Dark Temple
Light Temple
Protected by copyright. Unauthorized or unlawful copying or downloading expressly prohibited.
The Clear Rank awarded
at the end of the Mission
depends on how much
time is left. Aim for S Rank
as you play.
HOME
The World of
Pokémon Ranger
Oblivia Region Maps
Mission Clear Guide
Browser
Completion Guide
Quest Clear Guide
Many Times, Anytime Wireless Multiplayer
Capture Machine Guide
Mission Guide
Pokémon Browser
Downl
oadeGui
de
Mission 15
Find the Correct Switch to Make
Riolu Appear
Are You for
Riolu?
Thunder Temple
BOSS
Lucario
In Mission 15, you must capture two Riolu to make the Warp Zone to the
boss appear. There are many switches that will make Pokémon other
than Riolu appear. If you step on one of these switches, the Pokémon that
appears will attack by throwing either electricity or psychic spheres at
you.
Pattern
❶❷
01
Pattern
❶❷
Pattern
❶❷
Pattern
Pattern
❸
Pattern
❸❹
❸
Pattern
A
02
G r o u p
Pattern
❹
❹
Fighting
Capture Technique
Pattern
❶❷
40
Pattern
❸
B
Pattern
❹
30
Pattern
Pattern
❸
Start
Pattern
Pattern
❶❷
❹
Pattern
Pattern
❸
Pattern
Pattern
❶❷
❹
Pattern
Pattern
❶❷
❶❷
Pattern
Pattern
❸❹
❸❹
Friendship Gauge
12,600
Agitated Gauge
1,500
A P
22
❸
Effective Poké Assists
Pattern
03
❹
C
Pattern
Flying
E
D
❶
Pattern
❸
❸
Pattern
Time Limit
Pattern
❹
29+
Attack Method
Pattern
❹
B
6 min, 30 sec
30
Pattern
Pattern
❶
Requirement to Open Boss Warp Zone
Capture two Riolu by stepping on the right
switches.
Pattern
❷
❷
Pattern
Pattern
❸
❸
Pattern
Pattern
F
❹
Clear Rewards
G
❹
H
10
Rush attack
6
Aura ball
5
Punch
8
Because Lucario moves very quickly, use a
Unison Capture, where your Capture Line is
less likely to be cut if touched by a Pokémon.
Pelipper and Girafarig have useful Poké Assists
that can make Lucario Slowed. Also, Lucario
will become agitated twice, so keep using
those Poké Assists when it stops attacking.
❶
60
Pattern
Damage
Punch (Big)
Mission 15: Are You for Riolu?
❷
Pattern
Recommended Level
Attacks
Pattern
❷
Mission Level
Psychic
❶
Pattern
Mission Data
R e c e i v e d
Wireless Multiplayer Mission Guide
❶❷
A
*In Pattern 3, there is an extra Treasure Chest with an Energy
Clear AP
Recovery 20 in it at the point where you advance to map 05.
Rank S
320
Rank A
Rank B
220
160
Rank C
120
Slate
*In Pattern 4, the Treasure Chest on the left is moved to the right.
04
05
*1
X2
06
*1
*1
60
Goal
Rank S
Lucario (10%)
Grotle (90%)
−−−−−−
Rank A
Riolu
Rank B
−−−−−−
Rank C
−−−−−−
X3
X2
D
C
E
*1 In Patterns 2 and 3, the map flow is different. From the
left, they become maps 05, 06, and 04. Pattern 4 is
also different: from the left, the maps are 04, 06, 05.
07
08
*2
09
*2
G
F
*2
H
Pattern
❶❸❹
Pattern
X2
X2
Goal
❷
60
*2 In Patterns 2 and 3, the map fl ow is different. From
the left, they become maps 09, 08, and 07.
Protected by copyright. Unauthorized or unlawful copying or downloading expressly prohibited.
127
HOME
Oblivia Region Maps
The World of
Pokémon Ranger
Mission Clear Guide
Quest Clear Guide
Browser
Completion Guide
Many Times, Anytime Wireless Multiplayer
Capture Machine Guide
Mission Guide
Pokémon Browser
Downl
oadeGui
de
Pidgey
R-001
Capture Technique
Friendship
Gauge
40
Group
Agitated
Friendship Gauge
Flying
Field Move
Cut
Poké Assist
Tornado (Forward)
—
Exp. Points
(Level 1)
8
Effective
Poké Assists
Max. Hits
Attacks
6
Electric
Ice
Attack Method
Creates a tornado
Rock
Damage
1
Recovery Time
1.5 sec
Sends one small tornado forward. The tornado will
spin in place for a short time.
Pidgey attacks by creating a single tornado. You
have a chance right after an attack to capture
Pidgey. There's some time before the next attack,
so calm down and draw loops.
Primary Location
Story Pokémon
Sky
P. 23–24
Sky
P. 23–24
Pidgeotto
R-002
Capture Technique
Friendship
Gauge
2,240
Group
Agitated
Friendship Gauge
Flying
Field Move
Cut
Poké Assist
Tornado (Forward)
Pokémon Browser
Pokémon Browser
Pre-Ending
Post-Ending
—
Exp. Points
(Level 2)
1,091
Effective
Poké Assists
Max. Hits
Attacks
4
Electric
Ice
Attack Method
Scatters tornadoes
Causes a tornado
Rock
Damage
1
1
Recovery Time
5 sec
Primary Location
Pre-Ending
Sky
P. 23–24
Post-Ending
Sky
P. 23–24
R-003
Pidgeotto attacks by scattering three tornadoes
in front of itself, or creating a single tornado that
remains on the screen. Once it stops attacking,
you have a great chance to capture it, but it moves
very quickly, so be careful that your Capture
Line doesn't get cut. Keep looping, and don't feel
rushed.
Story Pokémon
S c a t ter s t w o small tor nadoe s f or w ar d. T he
tornadoes will spin in place for a short time.
Pidgeot
Capture Technique
Friendship
Gauge
2,700
Group
Agitated
Friendship Gauge
Flying
Field Move
Cut
Poké Assist
Tornado (Forward)
—
Exp. Points
(Level 5)
1,000
Effective
Poké Assists
Max. Hits
10
Attacks
Electric
Ice
Attack Method
Scatters tornadoes
Scatters tornadoes (Big)
Rock
Damage
5
3
Recovery Time
10 sec
S c a t t e r s s i x la r g e t o r na d o e s f o r w a r d . T h e
tornadoes will spin in place for a short time.
Primary Location
Pre-Ending
Sky
P. 23–24
Post-Ending
Sky
P. 23–24
Pidgeot attacks by scattering three tornadoes in
front of itself. One large tornado will remain on the
screen. When Pidgeot's not attacking, it moves
very quickly, so it's easy to get your Capture Line
cut. Watch its movement patterns, and loop with
caution.
143
Protected by copyright. Unauthorized or unlawful copying or downloading expressly prohibited.
HOME
The World of
Pokémon Ranger
Oblivia Region Maps
Mission Clear Guide
Quest Clear Guide
Browser
Completion Guide
Many Times, Anytime Wireless Multiplayer
Capture Machine Guide
Mission Guide
Pokémon Browser
Downl
oadeGui
de
R-004
Pichu
R-006
Raichu
Capture Technique
Capture Technique
Friendship
Gauge
Friendship
Gauge
100
Group
Electric
Field Move
Electrify
Poké Assist
Recharge
Agitated
Friendship Gauge
60
Exp. Points
(Level 1)
1,904
Group
Electric
Field Move
Recharge
Poké Assist
Recharge
Agitated
Friendship Gauge
—
Exp. Points
(Level 4)
10
Effective
Poké Assists
Max. Hits
Attacks
3
800
Ground
Attack Method
Throws lightning
Effective
Poké Assists
Damage
1
Max. Hits
Recovery Time
Recovery Time
9 sec
Pre-Ending
Wireless Tower*
F
02
P. 8
Post-Ending
Cocona Village
C
01
P. 7
Attack Method
Electrical discharge
Summons thunder
Thunder spheres
Damage
4
2
2
18 sec
It perform a Capture Styler Energy Recharge Level
1, three times.
Primary Location
Attacks
5
Ground
It will perform a Capture Styler Energy Recharge
Level 4, fi ve times.
Pichu attacks by shooting lightning from its body
in three directions twice. Then it will move around
for a while. That will be your chance to capture
it. Circle it until its Friendship Gauge is full and
complete the capture.
Primary Location
Pre-Ending
Sophian Road
M
03
P. 15
Post-Ending
Sophian Road
M
03
P. 15
Raichu uses three attacks, one that discharges
electricity from its body, one that calls down three
blue thunderbolts from the sky at once, and a third
that throws spheres of thunder that hang around
on the ground for a while. When the attack stops,
that's your chance to increase its Friendship
Gauge bit by bit.
*Appears during a battle with the Pinchers.
Pokémon Browser
R-004
Ukulele Pichu
R-007
Mareep
Capture Technique
Capture Technique
Friendship
Gauge
Friendship
Gauge
Agitated
Friendship Gauge
Agitated
Friendship Gauge
120
Group
—
Field Move
—
Poké Assist
—
—
Exp. Points
60
Group
Electric
Field Move
Recharge
Poké Assist
Recharge
—
Exp. Points
(Level 1)
12
10
Effective
Poké Assists
Attacks
Becomes your
Par tner Pokémon
Effective
Poké Assists
Attack Method
Electrical discharge
Damage
1
Max. Hits
Attacks
3
Ground
Attack Method
Scatters lightning
Damage
1
Recovery Time
9 sec
Story Pokémon
It will perform a Capture Styler Energy Recharge
Level 1, three times.
Primary Location
Pre-Ending
Dolce Island*
Post-Ending
—
B
02
P. 6
Ukulele Pichu attacks with an electrical discharge
f r o m i t s b o d y . T h e e x ten t o f th e el e c tr ic al
discharge is small, but be cautious and do not try
to loop it. As soon as its attack has stopped, start
looping. Fill the Friendship Gauge to complete the
capture.
Primary Location
Pre-Ending
Dolce Island
B
02
P. 6
Post-Ending
Hinder Cape
C
12
P. 7
Mareep attacks by scattering lightning in three
directions twice. After attacking, it moves around
for a while. Since it moves slowly, take the chance
after it stops attacking, and loop it quickly to raise
its Friendship Gauge.
*Appears during an event.
R-005
Pikachu
R-008
Flaaffy
Capture Technique
Capture Technique
Friendship
Gauge
Friendship
Gauge
Agitated
Friendship Gauge
Agitated
Friendship Gauge
1,056
Group
Electric
Field Move
Recharge
Poké Assist
Recharge
—
Exp. Points
(Level 3)
200
Group
Electric
Field Move
Recharge
Poké Assist
Recharge
—
Exp. Points
(Level 2)
750
Effective
Poké Assists
Max. Hits
5
Recovery Time
Attacks
22
Ground
Attack Method
Electrical discharge
Thunder spheres
Thunder spheres
Effective
Poké Assists
Damage
3
2
2
Max. Hits
3
Faldera Volcano
L
Post-Ending
Faldera Volcano
L
01
01
P. 13
P. 13
Damage
3
12 sec
It will perform a Capture Styler Energy Recharge
Level 3, fi ve times.
Pre-Ending
Attack Method
Electrical discharge
Recovery Time
15 sec
Primary Location
Attacks
Ground
It will perform a Capture Styler Energy Recharge
Level 2, three times.
Pikachu has two types of attacks, one in which
it discharges electricity from its body, another
in which it throws spheres of thunder that hang
around on the ground for a while. Carefully loop
Pikachu, being careful not to run into the spheres
on the ground.
Primary Location
Pre-Ending
Latolato Trail
C
09
P. 7
Post-Ending
Latolato Trail
C
09
P. 7
Flaaffy attacks with an electrical discharge. The
electricity does not reach very far, but it's still
better not to loop during an attack. As soon as the
attack is done, loop as quickly as you can to fill the
Friendship Gauge and capture Flaaffy.
144
Protected by copyright. Unauthorized or unlawful copying or downloading expressly prohibited.
HOME
The World of
Pokémon Ranger
Oblivia Region Maps
Mission Clear Guide
Quest Clear Guide
Browser
Completion Guide
Many Times, Anytime Wireless Multiplayer
Capture Machine Guide
Mission Guide
Pokémon Browser
Downl
oadeGui
de
6
N-011
Max.
Hits
Lv.1
2 Sandslash
3
8
8
Recovery
Time
Recovery
Time
Recovery
Time
9 sec
8 sec
6.5 sec
Power
Power
Power
108
336
48
Recovery Time 5
Power 120
Max.
Hits
Lv.2
4
5
Group
Poké Assist
10
Recovery Time 20
Power 1,075
11
8
Recovery
Time
8.5 sec
7.5 sec
Power
Power
72
300
Power 320
Field Move
Cut
Max.
Hits
Lv.4
8
AP to Level 3
Assist 500
AP to Level 4
Assist 1,500 Recovery Time 120
Recovery
Time
Ground
Sand Spheres
Max.
Hits
Lv.5
8
AP to Level 2
Assist 250
Max.
Hits
Lv.3
12
AP to Level 5
Assist 5,000 Recovery Time 525
When
appearing
as an
enemy
Group
Ground
Friendship Gauge
420(M2)/12,500(M23)
Agitated Gauge
50(M2)/900(M23)
AP Received
3(M2)/24(M23)
Power 2,750
1 Wireless Multiplayer Mission Number
The number assigned to Pokémon appearing in the Wireless Multiplayer
Missions. (These numbers are different from the Pokédex and Ranger numbers.)
2 Pokémon Name
3 Pokémon Image
4 Group
The group that the Pokémon belongs to, such as Grass, Water, or Fire. There are
17 groups in all.
5 Poké Assist
What kind of power the Pokémon can use when helping you capture other
Pokémon. Indicates Poké Assist name, group, and level.
6 Poké Assist Level
Indicates Poké Assist Level, from 1 to 5. Temple Partners appearing in the
Wireless Multiplayer Missions can be leveled up according to their collected AP.
7 Max. Hits
Displays the maximum number of times a Poké Assist attack could possibly
hit an enemy. *
8 Recovery Time
Pokémon Browser
Wireless Multiplayer
Mission/Temple
Partner
How long after using a Poké Assist before you can use the Poké Assist again.
9 Power
The amount that the Friendship Gauge is raised when the Poké Assist hits an
enemy once.
10 Assist Points (AP) Needed for the Next Level
How much the Pokémon's Assist Level, Recovery Time, and Power increases
according to the collected Assist Points (AP). Indicates how many AP are
required for the next level.
7
8
9
Pokémon Browser
1
Wireless Multiplayer Mission/Temple Partner Page Guide
How to Read the Browser Data
11 Field Move
What kind of move the Pokémon can use on targets. Pokémon from the
Wireless Multiplayer Missions that are brought to the main story are all set to
Field Move Level 1.
12 When Appearing as an Enemy
Indicates the Pokémon's Group, Friendship Gauge, Agitated Friendship
Gauge, and how many AP are received when the Pokémon is captured. Some
Pokémon will appear in multiple Missions. In that case, Mission numbers are
indicated.
* Max. Hits can vary, based on the location of the Pokémon when the Poké Assist
is started, the enemy Pokémon's group, and how it moves.
195
Protected by copyright. Unauthorized or unlawful copying or downloading expressly prohibited.
HOME
Oblivia Region Maps
The World of
Pokémon Ranger
Mission Clear Guide
Quest Clear Guide
Browser
Completion Guide
Many Times, Anytime Wireless Multiplayer
Capture Machine Guide
Mission Guide
Pokémon Browser
Downl
oadeGui
de
N-001
Max.
Hits
Lv.1
Piplup
Max.
Hits
Lv.3
1
1
Recovery
Time
Recovery
Time
Recovery
Time
6 sec
5 sec
3.5 sec
Power
Power
40
66
Power
AP to Level 2
Assist 30
Recovery Time 20
20
Power
Group
Poké Assist
20
Max.
Hits
Lv.2
AP to Level 4
Assist 600
Recovery Time 375
Power
Max.
Hits
Lv.4
1
Recovery
Time
Recovery
Time
5.5 sec
4.5 sec
Power
AP to Level 3
Assist 80
Recovery Time 105
N-002
28
Power
Pokémon Browser—Wireless Multiplayer Mission/Temple Partner
Prinplup
AP to Level 2
Assist 30
Recovery Time 5
Power
Poké Assist
AP to Level 3
Recovery Time 20
80
Assist
Piplup•Prinplup•Empoleon•Bulbasaur
N-003
Empoleon
AP to Level 2
250 Recovery Time 5
Assist
Power
Poké Assist
Water
Whirlpool
52
Power
Max.
Hits
Lv.3
AP to Level 3
500 Recovery Time 20
9 sec
8 sec
6.5 sec
Power
Power
Power
20
42
88
80
AP to Level 4
Assist 600
Recovery Time 120
Power
N-004
Max.
Hits
Lv.4
1
Recovery
Time
Recovery
Time
8.5 sec
7.5 sec
Power
Power
240
AP to Level 5
3,000 Recovery Time 525
Assist
Bulbasaur
Group
Poké Assist
Grass
Scatters Seeds
AP to Level 3
Assist 130
Recovery Time 115
Power
2,150
Max.
Hits
Lv.3
Max.
Hits
Lv.5
20
Recovery
Time
Recovery
Time
Recovery
Time
9 sec
8 sec
6.5 sec
Power
Power
Power
72
108
168
120
AP to Level 4
1,500 Recovery Time 120
Assist
Power
1,075
Lv.4
20
Recovery
Time
Recovery
Time
8.5 sec
7.5 sec
320
Power
AP to Level 5
5,000 Recovery Time 525
Assist
Field Move
Cut
Max.
Hits
15
150
Power
Friendship Gauge
9,860
Agitated Gauge
1,188
AP Received
13
2,750
Max.
Hits
Lv.3
Water
Group
When
appearing
as an
enemy
Max.
Hits
Lv.5
1
1
1
Recovery
Time
Recovery
Time
Recovery
Time
6.5 sec
5.5 sec
4 sec
Power
Power
40
66
20
Max.
Hits
Lv.2
*Does not appear as an enemy.
20
20
Power
Cut
64
Power
Power
AP to Level 2
Assist 30
Recovery Time 25
Field Move
10
Max.
Hits
Lv.1
800
1
90
Power
Max.
Hits
Lv.5
1
Power
Assist
1,200
Recovery
Time
Max.
Hits
Lv.2
Group
Power
AP to Level 5
Assist 3,000 Recovery Time 700
Recovery
Time
Max.
Hits
Lv.1
*Does not appear as an enemy.
Recovery
Time
30
Power
Soak
1
Water
Scatters Bubbles (Forward)
Field Move
1
Max.
Hits
Lv.2
Group
100
Max.
Hits
Lv.1
400
1
Water
ScattersBubbles (Forward)
Max.
Hits
Lv.5
1
AP to Level 4
Assist 1,050 Recovery Time 390
Power
400
1
1
Recovery
Time
Recovery
Time
6 sec
5 sec
Power
Power
28
52
100
AP to Level 5
Assist 3,130 Recovery Time 725
Field Move
Cut
Max.
Hits
Lv.4
Power
Grass
Group
When
appearing
as an
enemy
1,200
196
Protected by copyright. Unauthorized or unlawful copying or downloading expressly prohibited.
Friendship Gauge
180
Agitated Gauge
—
AP Received
1


© Copyright 2026