
How to Schedule An Equilibration Appointment Raj Upadya, DMD
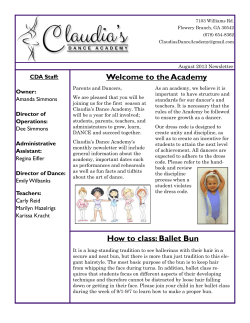
Dawson Academy Whitepaper
How to Schedule An Equilibration
Appointment
Raj Upadya, DMD
Let’s assume that if you’re reading this you’ve performed your complete exam, gathered
your records, done your lab work, and have now formulated your treatment plan.
You’ve had your consultation, and the patient accepted your recommendation. Now for
the next step: Equilibration.
I usually perform
my equilibrations
over a period of three
visits, approximately
two weeks between
each session.
There are many times that equilibration is either the first
step, or the only step in an individual patient’s plan,
while at other times it is performed in conjunction with:
orthodontics, restorations or provisionalization. We will
review the separate equilibration visit here, but it can be
applied to all visits that involve balancing the occlusion. I
usually perform my equilibrations over a period of 3 visits,
approximately 2 weeks between each session.
Dr. Rajeev Upadya practices
Cosmetic, Restorative and Implant
dentistry in Florham Park, NJ,
and remains active in the dental
community as an Associate Faculty
Member and Mentor for the
Dawson Academy as well as a board
member of several publications. His
commitment to staying current on
the new advancements in dentistry
and his dedication to the profession
have inspired him to found several
local dental study clubs focused on
furthering knowledge as well as giving
back to the community.
VISIT 1: First of all, don’t be intimated, this is a process that you have done a hundred
times before on a single tooth basis – you are now going to be doing the more complete
or thorough version. For your first few equilibrations, I suggest that you block out 90120 minutes in your schedule. In all likelihood, you will not need all of this time, but it will make you feel less rushed
and pressured if you have it. After you’ve got a few under your belt, you’ll realize that 60-90 minutes is usually far more
than adequate, and occasionally 30-45 minutes is enough.
Since this is one of the most important and valuable procedures you can perform for your patient, try to make sure you
don’t have to get up too many times during the visit. Just like during an
intensive restorative procedure, perform your hygiene check before you
start, so you should have almost 2 hours until your next hygiene check.
This way you will be prepared with good isolation techniques, at least
two sets of Miller articulating forceps, and a roll of Accufilm 2 or similar
small (8-12 micron) thickness red/black paper. Two of the forceps are
loaded with the articulating paper, while the other two are loaded with
dry 2x2 gauze. We use a good cheek retractor (Optragate by Ivoclar) to
Two of the forceps are loaded with the articulating paper,
get all the soft tissues out of the way.
while the other two are loaded with dry 2x2 gauze.
I usually do not promise the patient anything except that their bite will feel
much different, and will be much healthier when we are finished. Here are my first steps:
• Begin by leaning the patient back
• Use cotton rolls (or the Cranham Deprogrammer) to deprogram for a couple of minutes
• Use bimanual guidance to seat the condyles and load test
• Find and relieve our first interferences (marked in black)
© 2014 The Dawson Academy. All rights reserved.
This material may not be reproduced, displayed, modified or distributed without the express prior written permission of
the copyright holder. For permission, contact [email protected].
Dawson Academy Whitepaper
Just like in our trial equilibration on the models, we slowly, but surely, hone our contacts without removing them, and
sharpen our cusps until we have equal intensity contacts around the mouth. Then we flip the forceps to red, have the
patient go into all excursions and protrusive, flip back to black, and “chop-chop,” removing all red marks until they
are beautifully super-imposed on the black. Sitting the patient up, we check and adjust for long centric and fremitus as
needed. CR is now co-incident with MI. The vast majority of the time the patient will sit up and say “WOW, this is so
different… I never realized that my bite could or should feel this way!”
After having performed a couple, you, your staff, and your patients will actually HEAR the difference… a solid thud
as they close together, like a heavy car door closing. Once my assistant hears that sound, she knows that we are pretty
much done for the visit. After making sure there are no sharp edges, we give a fluoride rinse or varnish, and re-appoint
the patient for a 30-minute follow-up in 2 weeks.
VISIT 2: The 2nd visit is often performed in the side column, and will usually take about 10-20 mins. To be on the safe
side, we block 30 minutes just in case it is needed. This is to account for any rebound of previously mobile/loose teeth,
etc. The patient will often very easily go to CR on their own, and will sometimes be able to point out exactly what needs
to be relieved.
VISIT 3: Most of the time there is little to no adjustments at this visit. Maybe a spot adjustment or two. We use this visit
to discuss and reinforce the value of the treatment that we have performed, and kindly ask the patient for a testimonial
if they were pleased with the outcome.
Common questions and Helpful Hints:
•
How much should we charge for this service? We charge roughly the fee of a single crown. After you have
performed a few, the total time spent on all 3 visits will be 120 minutes or less, so it can actually be quite
profitable providing occlusal therapy. Many patients don’t even feel the need for the 3rd visit.
•
How do I gain confidence to do the procedure? Your trial equilibration on your mounted models should
provide you with some initial confidence. Equilibrating occlusal splints on live patients is another way to
boost your confidence while helping your patients.
•
How do I equilibrate with provisionals or restorations? It is actually even easier to perform equilibrations when in the presence of any
restorative component – the actual total time of the equilibration can be
30 mins or less. I still see the patient for follow-ups to touch up
the occlusion.
•
What burs should I use? I absolutely love the Dawson equilibration kit
from Brasseler. I have at least 3 in each op.
Conclusion
In my office, my entire staff knows that I am happiest while I am performing
occlusal therapy. It is a service that dramatically improves the overall health of our
patients, but is also extremely profitable. I honestly don’t know if there is any better
procedure in all of dentistry!! Now get out there and EQUILIBRATE!!!
© 2014 The Dawson Academy. All rights reserved.
This material may not be reproduced, displayed, modified or distributed without the express prior written permission of
the copyright holder. For permission, contact [email protected].
Dawson Academy Whitepaper
Equilibration in real time (black = first interferences in CR, red = excursions + protrusions, the
goal is matching points of contact on both the red and black marks)
The goal: lines in front, dots in back.
© 2014 The Dawson Academy. All rights reserved.
This material may not be reproduced, displayed, modified or distributed without the express prior written permission of
the copyright holder. For permission, contact [email protected].


© Copyright 2026