
HOW TO BUILD A KNOCKABOUT 595
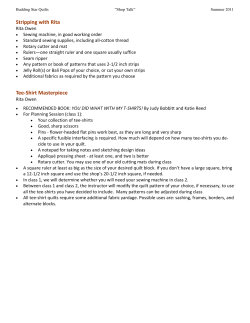
HOW TO BUILD A KNOCKABOUT
595
HOW TO BUILD A KNOCKABOUT
BY CLAY EMERY
Illustrated with Diagrams
HE first thing to be done
in building a knockabout is to "lay down"
the bottom plan of the
boat, full size, from
which the molds are to
be made. To do this, take as many
pieces of white pine, spruce, or any lightcolored soft wood, cut in three-foot
lengths, as are required to measure two
feet in width, and fasten them together
edge to edge by means of battens, as in
Fig. 1. (Page 597.)
Plane the side away from the battens
to make a fairly smooth surface, and on
the smooth side make a copy of the body
plan, using the dimensions given in the
offset table. As soon as this has been
done, you are ready to make your molds.
These can be made of white pine or
spruce, about three-quarter inch thick, as
follows: Take a strip of pine one-eighth
SHOWING HOW THE MEASUREMENTS SHOULD BE MADE FOR LAYING THE KEEL
596
THE OUTING MAGAZINE
inch thick by three-quarter inch wide
and bend it to the section on the body
plan, to which you are going to make the
mold, holding it in position by means of
one inch wire brads driven one on each
side of the strip, so that the head of the
nail does not project above the upper
edge of the strip, as in Fig. 2.
On top of this strip, after it has been
bent to the line of the section, lay a piece
of board, and with a scratcher made
from a piece of one-eighth inch wire
scratch around the strip on the under
side of the board, as shown in Fig. 3.
Now saw the board to the line made by
the scratcher and mark out and saw a
mate to it. When this is done, fasten
the two pieces together in this wise, Fig.
4.
Proceed in the same way for each section until all the molds have been made,
numbering from 1 to 7. Having your
molds made you are now ready for the
keel. The first thing to be done is to
get the length and the correct spacing of
the molds. To do this, you must make
THE DIMENSIONS FOR SAILS AND SHROUDS OF AN EIGHTEEN-FOOT KNOCKABOUT
WITH A FIVE-FOOT BEAM
a full-sized drawing of the keel line, as
shown in the sheer plan. Take a chalk
line and with it snap a straight line on
the floor; on this, set off your stations
for molds and mark the position of the
fore end of the keel. Now take a batten
that will bend readily to the shape of the
keel outline and bend it around to the
set table under heading, "Keel half
breadths." Through these points draw
a line and shape the keel to it. Between
the marks for the centerboard slot make
a mortise one-half inch wide and the full
length between the marks. The keel is
now ready to receive stem and stern
board and to be set up to receive the
line representing the bottom of the keel,
letting the batten come on the upper side
of the line and holding it in place with
a few small nails.
With a pencil, make a mark on the
batten at the forward end of
the keel and at each mold station, and also at each frame
station and the forward and
after ends of the centerboard
slot. When this has been done, take up
the batten and lay it on the piece of oak
you have chosen for the keel, which must
be seventeen feet seven inches long by
eight inches wide and three-quarter inch
molds. We now have to make the stocks
upon which to set up the keel. Take
some rough pine or spruce boards and
shape them to the curve of the bottom of
the keel, fasten them together and set
them up on blocks and brace
them firmly in the manner
shown in Fig. 5.
Now take the keel and spring
it down into the curve of the
stocks, fastening down by means of
screws, so that it may be released easily
when required. Now set up the molds
on the keel and stay them with strips
to hold them firmly in position. We
thick. Transfer the marks on the batten
to the keel piece, making a mark square
across the piece for each frame and mold.
Now, with the chalk line, snap a line
through the center of the keel from end
to end.
Then at each of the mold stations
measure from the center line each way
the keel half breadths, as given in the off-
are now ready to run ribbons, which
are made by sawing from the edge of
clear, straight-grained pine boards, threequarter inch thick, strips about fiveeighth inch in width. These ribbons
will be screwed to the molds and stem
and stern board in the positions shown
in Fig. 6.
The ribbons being all in place, you are
[597]
598
THE OUTING MAGAZINE
ready to bend your frames. To do this
a mold must be made in the following
manner, over which to shape them: Take
two pieces of spruce or pine board and
shape them in the same way as the molds
were made, but with a somewhat smaller
curve, as in Fig. 7, the dotted line representing the curve of the midship mold.
Now fasten these pieces about eighteen
inches apart, connecting them with strips
about one inch by one and one-half inch,
as in Fig. 8.
The frames must be sawed from clear,
straight-grained oak, and should be threequarter inch by three-quarter inch by
four feet long, and if they are partially seasoned they will bend and hold
the shape better than if green. To
prepare them for bending, place them
in a wash boiler of boiling water
and boil them until soft enough to
bend over your form without breaking.
Take them from the boiler one, or if you
find you can bend them
easily enough, two at a
time, and passing one end
between the form and the
bar shown at the end,
wedge them tightly and,
pressing the other end
down, wrap them around the form, tying the end down with a piece of cord
to a bar passed through the end of the
form as shown. The bent frames must
be left on the form until thoroughly dry
before being released, otherwise they will
straighten out, and will not be easily
fitted to the inside of the ribbons.
You will now begin to fit the frames
to the keel and ribbons, trying
them in one at a time and cutting
from the lower end until they fit
the top of the keel and touch each
ribbon when they can be nailed to
the keel and a small nail driven
through each ribbon to hold the
frame in place, the heads of the
nails in the ribbon being left out
enough to allow them to be drawn
out readily when you want to take
the ribbon off. The heels of the frames
forward and aft of the centerboard
slot must be butted together at the
center line of the keel and a floor timber
fitted on the forward side, making a lapping piece to tie the frames together, be-
[599]
DESIGNS FOR KEEL, SHOWING IT IN CROSS AND LONGITUDINAL SECTIONS
600
THE OUTING MAGAZINE
ing fastened to the keel and each frame.
The floor timbers should be about two
feet long and the same size as the frames.
In the way of the centerboard slot the
heels of the frames must be cut one inch
away from the edge of the mortise to allow room to seat the centerboard trunk.
Having your frames bent before they
are fastened to the keel and ribbons, you
will make your centerboard trunk and
fasten it in place, as it will be easier to
fit now than it will after the frames are
in place. Take two pieces of white pine
board without knots or shakes and shape
them, as shown on the construction
drawing. Now get out two pieces of
pine one-half inch thick by one and onehalf inch wide, shaped as shown in the
construction plan, to go between the sides
of the trunk at the ends, allowing them
to project one inch below the lower end
of the side pieces, and fasten with copper
nails through both sides and end piece,
riveting the nails on copper burrs. When
this trunk has been fastened together
thoroughly it must be fitted accurately
to the top of the keel, allowing the projecting ends of the end pieces to pass
through the slot in the keel. Fasten
both sides of the trunk from the bottom
of the keel with two-inch No. 12 brass
screws; countersink the holes in the keel
just enough to let the screw heads finish
flush with the bottom of the keel.
Putting on the Planks
As soon as the frames and floors are
all fitted and fastened, a strip of wood
about three-quarter inch by one inch
must be fastened across the boat from
one side to the other at the head of every
third frame to keep the frames from
spreading when the molds are removed,
which is the next thing to be done. The
molds having been taken out, you can
now commence planking, beginning at
the keel and working toward the top,
the sheer strake being the last to go on.
For your planking you want white pine
or cedar one-half inch thick and eighteen to twenty feet long, as clear of
knots as it is possible to get. Cedar is
better than pine, as it is lighter in weight
and easier to work to the shape required,
but pine will make a very good boat.
To get the shape of each plank take a
piece of pine or cedar three inches to
four inches wide and about one-eighth
inch thick, called a spiling board, and
lay it along the frames where your plank
is to be fitted, tacking it fast to the
frames or holding it in position with
small clamps, being careful not to spring
it edgewise. Now take a rule and measure at every frame the distance between
the edge of the spiling board and the keel
(for the first strake) or the edge of the
last strake fastened on, and mark with
chalk on the spiling board the measurement taken. Then take the spiling board
from the frames and lay it on the board
you have chosen for your piece, measuring from the edge of spiling board the
dimension called for at each frame station.
After the Planks
When the measurements have all been
laid off, tack a batten to the marks and
mark with a pencil along the batten. As
soon as this plank has been cut to shape
lay upside down on another board and
mark off a duplicate of it for the other
side of the boat. Now clamp your plank
to its place and fasten to stem and stern
with brass screws and to frame with
copper nails one inch long, the nails to
pass right through the frames and be
riveted on burrs on the inside of the
planking.
After the planking, the next in order
are the clamps put in the position called
for in the construction plan and fastened
through frames and planking with copper nails riveted on burrs. As soon as
the clamps are in place and fastened, put
in the deck beams, as shown in deck
framing plan, the beams to be fastened
through the clamps and triangular pieces
put in where shown to stiffen up the
framework.
Now comes the deck of one-half inch
pine or cedar any width that is convenient, fastened to the deck beams with
brass screws about one inch No. 10, the
edges of screws to be turned in flush with
top of the deck. Paint the deck with a
good coat of white or lead color paint,
and cover with six ounces cotton duck
drawn over the edge of the deck all
DESIGNS AND DIMENSIONS FOR TILLER, MAST AND BOOMS
around and fastened with copper tacks.
The edge of the canvas around the outside of the boat should be covered with
a half-round molding, as shown in midship section.
The boat can now be taken off the
stocks, turned upside down on blocks or
trestles and the outside planed off and
the seams caulked with cotton forced in
with a caulking iron and mallet, after
which she is to be smoothed up and
painted. Then a triangle piece of dead
wood to be fitted with the after end just
at the rudder hole. This piece to be
fastened to the keel with screws about
two and one-half inches long, No. 16,
turned in from inside of keel. The rudder and centerboard to be made as shown
[601]
602
THE OUTING MAGAZINE
on detail sheet. The expense of sails
is so small, and as the set and fit is such
an important factor toward the success
of the boat, we recommend that they and
the blocks be purchased from a regular
sailmaker.
By cutting out the plans from this
issue and forwarding them with your
order to a sailmaker he will be able to
make you a proper set of sails from them.
Spars of spruce according to the dimensions given.


© Copyright 2026