
How to Make Beer Home Sign Up!
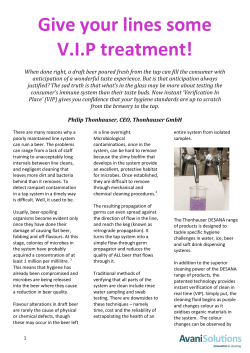
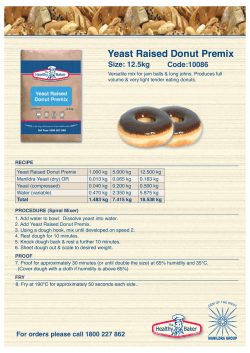
Home Sign Up! Explore Community Submit
All
Art
Craft
Food
Games
Green
Home
Kids
Life
Music
Offbeat
Outdoors
Pets
Ride
Science
Sports
Tech
How to Make Beer
by imarunner2 on May 4, 2006
Table of Contents
intro: How to Make Beer . . . . . . . . . . . . . . . . . . . . . . . . . . . . . . . . . . . . . . . . . . . . . . . . . . . . . . . . . . . . . . . . . . . . . . . . . . . . . . . . . . . . . . . . . . . . . . . . . . . . . . . .
2
step 1: Equipment . . . . . . . . . . . . . . . . . . . . . . . . . . . . . . . . . . . . . . . . . . . . . . . . . . . . . . . . . . . . . . . . . . . . . . . . . . . . . . . . . . . . . . . . . . . . . . . . . . . . . . . . . . . .
2
step 2: Ingredients . . . . . . . . . . . . . . . . . . . . . . . . . . . . . . . . . . . . . . . . . . . . . . . . . . . . . . . . . . . . . . . . . . . . . . . . . . . . . . . . . . . . . . . . . . . . . . . . . . . . . . . . . . . .
3
step 3: Crushing the Grain . . . . . . . . . . . . . . . . . . . . . . . . . . . . . . . . . . . . . . . . . . . . . . . . . . . . . . . . . . . . . . . . . . . . . . . . . . . . . . . . . . . . . . . . . . . . . . . . . . . . . .
3
step 4: Steeping . . . . . . . . . . . . . . . . . . . . . . . . . . . . . . . . . . . . . . . . . . . . . . . . . . . . . . . . . . . . . . . . . . . . . . . . . . . . . . . . . . . . . . . . . . . . . . . . . . . . . . . . . . . . . .
4
step 5: The Boil . . . . . . . . . . . . . . . . . . . . . . . . . . . . . . . . . . . . . . . . . . . . . . . . . . . . . . . . . . . . . . . . . . . . . . . . . . . . . . . . . . . . . . . . . . . . . . . . . . . . . . . . . . . . . .
4
step 6: Air Lock . . . . . . . . . . . . . . . . . . . . . . . . . . . . . . . . . . . . . . . . . . . . . . . . . . . . . . . . . . . . . . . . . . . . . . . . . . . . . . . . . . . . . . . . . . . . . . . . . . . . . . . . . . . . . .
5
step 7: Cooling the Wort . . . . . . . . . . . . . . . . . . . . . . . . . . . . . . . . . . . . . . . . . . . . . . . . . . . . . . . . . . . . . . . . . . . . . . . . . . . . . . . . . . . . . . . . . . . . . . . . . . . . . . . .
5
step 8: . . . . . . . . . . . . . . . . . . . . . . . . . . . . . . . . . . . . . . . . . . . . . . . . . . . . . . . . . . . . . . . . . . . . . . . . . . . . . . . . . . . . . . . . . . . . . . . . . . . . . . . . . . . . . . . . . . . . .
5
step 9: Pitching the Yeast . . . . . . . . . . . . . . . . . . . . . . . . . . . . . . . . . . . . . . . . . . . . . . . . . . . . . . . . . . . . . . . . . . . . . . . . . . . . . . . . . . . . . . . . . . . . . . . . . . . . . .
6
step 10: Fermentation . . . . . . . . . . . . . . . . . . . . . . . . . . . . . . . . . . . . . . . . . . . . . . . . . . . . . . . . . . . . . . . . . . . . . . . . . . . . . . . . . . . . . . . . . . . . . . . . . . . . . . . . .
7
step 11: Priming . . . . . . . . . . . . . . . . . . . . . . . . . . . . . . . . . . . . . . . . . . . . . . . . . . . . . . . . . . . . . . . . . . . . . . . . . . . . . . . . . . . . . . . . . . . . . . . . . . . . . . . . . . . . . .
8
step 12: Bottling . . . . . . . . . . . . . . . . . . . . . . . . . . . . . . . . . . . . . . . . . . . . . . . . . . . . . . . . . . . . . . . . . . . . . . . . . . . . . . . . . . . . . . . . . . . . . . . . . . . . . . . . . . . . . .
9
step 13: Aging . . . . . . . . . . . . . . . . . . . . . . . . . . . . . . . . . . . . . . . . . . . . . . . . . . . . . . . . . . . . . . . . . . . . . . . . . . . . . . . . . . . . . . . . . . . . . . . . . . . . . . . . . . . . . . . 10
step 14: Drink it! . . . . . . . . . . . . . . . . . . . . . . . . . . . . . . . . . . . . . . . . . . . . . . . . . . . . . . . . . . . . . . . . . . . . . . . . . . . . . . . . . . . . . . . . . . . . . . . . . . . . . . . . . . . . . . 10
step 15: Reference . . . . . . . . . . . . . . . . . . . . . . . . . . . . . . . . . . . . . . . . . . . . . . . . . . . . . . . . . . . . . . . . . . . . . . . . . . . . . . . . . . . . . . . . . . . . . . . . . . . . . . . . . . . 11
Related Instructables . . . . . . . . . . . . . . . . . . . . . . . . . . . . . . . . . . . . . . . . . . . . . . . . . . . . . . . . . . . . . . . . . . . . . . . . . . . . . . . . . . . . . . . . . . . . . . . . . . . . . . . . . . . 11
Advertisements . . . . . . . . . . . . . . . . . . . . . . . . . . . . . . . . . . . . . . . . . . . . . . . . . . . . . . . . . . . . . . . . . . . . . . . . . . . . . . . . . . . . . . . . . . . . . . . . . . . . . . . . . . . . . . . 12
Comments . . . . . . . . . . . . . . . . . . . . . . . . . . . . . . . . . . . . . . . . . . . . . . . . . . . . . . . . . . . . . . . . . . . . . . . . . . . . . . . . . . . . . . . . . . . . . . . . . . . . . . . . . . . . . . . . . . . 12
http://www.instructables.com/id/Make-Beer/
intro: How to Make Beer
So, you've considered brewing your own beer but you're not yet willing to drop the cash for the entry level kit just yet. With a few simple pieces of equipment and
ingredients here's how you can brew your own mini batch. In just a couple of weeks you can taste for yourself if homebrewing is a hobby you want to take to the next
level.
Don't get me wrong, I think the entry level brew kits are a good value. They include some special equipment not used here that will make things easier. But, will you enjoy
the beer or find the brewing process rewarding? I think so. This project will allow you to find out for yourself.
Image Notes
1. Here's a picture of the finished product.mmmmmmmm... quite tasty!
step 1: Equipment
Brew pot - any large kitchen pot that will hold a couple of gallons of water with room to spare to avoid boiling over.
Kitchen strainer - to strain grains and hops before going to the fermenter
Kitchen thermometer
Large funnel
Rolling pin - for crushing the grain
3 gallon container of bottled water - this will provide you with the water to make your beer and serve as your fermentation container
Bottling container - An empty container of at least 3 gallons...could be another empty water bottle or a clean, scratch-free, food grade plastic bucket.
3 feet of 3/8" clear poly-vinyl tubing - for siphoning and fermentation air lock
Bottles - there are a lot of options here and I'll cover some of them in the bottling step later
http://www.instructables.com/id/Make-Beer/
Image Notes
1. Plain light dried malt extract (DME)
2. Air lock
3. Pellet hops (not pictured ;-) )
4. Brewing yeast
5. Crushed crystal malt
step 2: Ingredients
Most recipes for the homebrewer are written to make 5 gallon batches. I've simply cut the ingredient list by half for the 2.5 gallon batch here. You'll need to find a local
homebrew supply shop or one of many such shops on the web from which to purchase the ingredients. (See resource list in Step 15)
Simple Ale
3 lbs light dried malt extract
8 oz crushed crystal malt
1 oz Northern Brewer pellet hops
1 pkg brewers yeast
3/8 cup sugar for bottling
step 3: Crushing the Grain
Use a large heavy freezer bag and pour in roughly 8 ounces of the crystal malt a little at a time. Use a rolling pin to crush the grain. You don't want to make flour here just
a very course texture of broken grains. Later on, when you decide to get more serious, you may wish to purchase a malt mill designed specifically for this purpose.
http://www.instructables.com/id/Make-Beer/
step 4: Steeping
This is the brewing term for the process of extracting the goodness from specialty grains, crystal malt in this recipe. First pour 1/2 gallon of water from your 3 gallon water
bottle and place a mark at the 2 1/2 gallon water level. Now pour up to 2 1/2 gallons of the remaining water into your brew pot leaving at least 3 inches to the top of the
pot. Add your crushed grains. Turn on the heat to medium high and bring the temperature up to 150 to 155 degrees. Turn off the heat and cover the brew pot to let the
magic take place inside for 30 minutes. Use a strainer to remove as much of the spent grain as possible without worrying too much about a few remaining grains.
Image Notes
1. Floating thermometer
2. Crushed Crystal Malt
step 5: The Boil
Now bring the contents of the brew pot to a boil. Then, remove from heat and stir in the malt extract. Return to heat and again bring to a boil. Be careful here! This is the
point where you are at most risk of boiling over. A boil over is something you definitely want to avoid as you'll have quite a sticky mess to clean up if it happens. Once you
have a controlled boil add about 2/3 oz of the hop pellets to the boil and maintain the boil for 60 minutes to get the most from the bittering potential of your hops.
Submerse your kitchen strainer in the boil for the last 15 minutes to sanitize it for later use. At the end of 60 minutes turn off the heat and add the remainder of the hop
pellets. Cover and let the newly added hops steep for 10 minutes. Hops added at this point will contribute some hop flavor and aroma to your finished beer.
http://www.instructables.com/id/Make-Beer/
Image Notes
1. Hop pellets added at start of boil
step 6: Air Lock
This step can be done earlier but I chose to do it during the boil. In any case you'll want to keep one eye on the boil at all times. Did I warn you about boiling over?
I used a commercial air lock but you could fashion an air lock from a piece of clear vinyl tubing, one end fitted to the cap and the other end in a cup of water. The
commercial air locks are only $1 or so and are included in the starter kits. I drilled a 3/8" hole in the water bottle cap. The air lock fits snugly in the hole. The idea is to let
carbon dioxide produced during fermentation escape while keeping air outside from getting in.
step 7: Cooling the Wort
Congratulations! At this point you have wort (pronounced wert). Wort is simply unfermented beer. Quicker is better when it comes to cooling. One method for cooling is to
create a cold water bath in the sink to partially submerse the brew pot in. Adding ice to the bath will help accelerate the cooling process. Gently swirl the brew pot in the
cold bath water. Once the sides of the brew pot become cool to the touch you're ready for the next step but first a word on sanitation.
Sanitation is very important in brewing. Anything that comes in contact with your cooled wort must be sanitized else you run the risk of undesireable critters living and
multiplying in the wort only to contribute nasty unintended flavors in your beer. You've sanitized your strainer in the boil, right? Your fermentation bottle is sanitary
because you just opened it and capped it after using water from it, right? Your funnel and anything else to come in contact with the wort can be sanitized by soaking in a
solution of 1 tablespoon of bleach per gallon of water for 30 minutes.
step 8:
Gently pour your cooled wort through your sanitized strainer and funnel into the empty fermentation bottle. You'll want the total volume in the fermenter to be 2 1/2
gallons. If your brew pot was big enough to allow you to boil a full 2 1/2 gallons you'll have to compensate for evaporation that took place during the boil. If you need to
add water to reach the 2 1/2 gallon mark made in Step 4 do it now. Tap water is fine. You can use water from the 1/2 gallon you poured off in Step 4 if you saved it to a
sanitized container. Bring the total volume up to the mark we made earlier on the bottle.
http://www.instructables.com/id/Make-Beer/
step 9: Pitching the Yeast
Pitching yeast is the brewing term for adding yeast to the unfermented wort. If the wort, now in your fermenter, is approximately room temperature you can pitch the
yeast. If the sides of the fermenter are warm to the touch then let the wort cool to room temperature before pitching the yeast. Note: A package of brewers yeast typically
contains an amount for a 5 gallon batch so pour approximately half a package into the fermenter. A little more than half is fine and it's probably better to be a little over
than a little under.
http://www.instructables.com/id/Make-Beer/
step 10: Fermentation
Over the next 7 to 10 days the yeast will do its work of converting sugars in the wort to alcohol and carbon dioxide. Place the fermenter in a cool, dark place. Total
darkness isn't necessary but direct sunlight is a definite no-no. The fermentation process is fun to watch but don't be concerned if nothing appears to be happening for 12
to 24 hours. After that time you should begin to see foaming and bubbles escaping from your air lock. After 7 to 10 days the fermentable sugars should be converted by
the yeast and you're ready for the next step.
http://www.instructables.com/id/Make-Beer/
Image Notes
1. 24 hours later... you can observe the yeast in action.
step 11: Priming
Congratulations, you now have beer! But, you're not done. If you drink it now it's going to be flat. Priming is the process of adding a measured amount of additional
fermentable sugars just before bottling. Live yeast still in your beer will convert the additional sugars to carbon dioxide while in the bottle. The carbon dioxide has no way
to escape the bottle resulting in carbonated beer.
Boil 3/8 cup (1/4 cup plus 2 tablespoons) of sugar (preferably corn sugar but table sugar will do) in 1 cup of water for 5 minutes. Cover and let it cool some then pour into
a sanitized container large enough to hold your beer (another large empty water bottle, empty plastic bucket, etc). Now siphon your beer from the fermenter into the
bottling container being careful not to disturb too much sediment at the bottom of the fermenter (you did remember to sanitize that siphon hose, didn't you?). Your beer is
now primed and ready for bottling.
http://www.instructables.com/id/Make-Beer/
step 12: Bottling
As a homebrewer you're ultimately going to want brown beer bottles and caps or a kegging system to contain your finished product. There are many alternative options
for the first time brewer. You can buy empty bottles and caps. You can reuse bottles and buy caps (not the twist-off cap bottles). If you're going to use regular pry-off cap
bottles you're going to need a capper (included in starter kits) to press fit the caps on the bottles. You can reuse champagne bottles. You can reuse empty growlers from
your local brew pub. You could use empty soda bottles and caps. In any case it's important to use something that will withstand pressure in the bottle resulting from
carbonation. Again, sanitation is important. So, clean and sanitize the bottles prior to filling them. Soaking in a diluted bleach solution for 30 minutes and rinsing with clean
tap water will do the trick.
http://www.instructables.com/id/Make-Beer/
Image Notes
1. Grolsch-type bottle
2. New, unused crown caps
3. 12 oz soda bottle
4. Commercial bottle capper
step 13: Aging
Bottle-conditioned beers must be aged in the bottle at least 7 days to allow the fermentation that takes place in the bottle to carbonate the beer. Place your bottled beer in
a cool dark place for 7-10 days and try to avoid the temptation to open a bottle early. Don't put the bottled beer in the fridge yet or the yeast will not be able to do its job
on the priming sugars. The beer will also begin to clear during this time as suspended yeast settles to the bottom of the bottle.
Image Notes
1. Freshly bottled beer will be cloudy. Over the next few days you'll notice it begin
to clear as suspended yeast begins to settle at the bottom.
Image Notes
1. About 36 hours later you can see the beer beginning to clear and the yeast
settling to the bottom.
step 14: Drink it!
Place a few bottles in the fridge to chill. Open a bottle and slowly pour into a glass leaving just a bit in the bottom of the bottle.
This one turned out well. It tastes very good but I did notice a slight chill haze after refridgeration. I'll admit, I'm still pretty new to this so I'll have to do some research to
find out what causes chill haze. Nevertheless, it's still a tasty brew!
http://www.instructables.com/id/Make-Beer/
Image Notes
1. Here's a picture of the finished product.mmmmmmmm... quite tasty!
step 15: Reference
Brewing supplies:
Northern Brewer - http://northernbrewer.com/
Recommended reading:
The Complete Joy of Homebrewing by Charlie Papazian - http://www.amazon.com/gp/product/0060531053/sr=8-1/qid=1146779286/ref=pd_bbs_1/104-13648164552766?%5Fencoding=UTF8
I recently discovered the Basic Brewing web site. Lot's of good information here including audio and video podcasts... http://www.basicbrewing.com/
Thanks to Luke for the brewing photography and the starter kit that got me interested in brewing to begin with!
Related Instructables
Ginger Beer Alcoholic
Version by
ChrisVincent
How to make
nettle beer by
lemonie
How to Brew
Beer by
moaner70
http://www.instructables.com/id/Make-Beer/
Understanding:
Drinking
Alcohol by )(angman
How to make
wine by
BrainiacVince
British Stinging Nettle
Beer by
brucedenney
Home Brew
Hard Cider from
Scratch by
actsofsubterfuge
Plum Wine by
lemonie
Advertisements
Comments
50 comments Add Comment
luvit says:
view all 234 comments
Jul 18, 2009. 5:31 PM REPLY
give a man beer, he'll fish for a day. teach him to brew beer and he'll fish for a lifetime.
volquete says:
Jul 14, 2009. 7:46 PM REPLY
are there any ingredients you can put in to sort of customize the taste of your beer?
guitarman63mm says:
Jul 17, 2009. 11:52 AM REPLY
...that would be determined by spices and hops, etc.
volquete says:
Jul 18, 2009. 10:51 AM REPLY
right sry
iamnotyou says:
Sep 17, 2006. 1:14 PM REPLY
can you use screw off beer bottles? Like something you would see on a 40? thanks in advance!
roboguy says:
Jul 17, 2009. 1:04 PM REPLY
You will read in many books that you should not use screw off beer bottles, but I have used them many times and have never had a problem. Perfect
seals every time.
ghostfart says:
Jul 17, 2009. 10:51 AM REPLY
If your in the Uk Wilkinsons sell everything you will need for brewing, at a pretty good price.
JakeHog says:
Mar 30, 2009. 7:16 PM REPLY
How mch yeast is a package? Ive been looking around and there are different measures of yeast in different packages.
cygyfish says:
May 27, 2009. 11:11 AM REPLY
Check your recipe. It should list how much yeast to use.
deacons323 says:
Jul 31, 2007. 1:26 PM REPLY
Hi all,
how can I make the beer a lighter color? More like a Lauger?
rosemore says:
Apr 9, 2009. 7:16 PM REPLY
There are many light ale kits available on line I use Midwest supplies. You can also use lager yeast at 70 degrees it is called steam-style beer and it has
a bit of the lager characteristics but mostly ale.
Jarlaxle says:
Nov 15, 2007. 12:53 PM REPLY
One more thing. Lagers ferment at a lower temp. Just something to keep in mind. Depending the yeast, ales yeast ferments at 65-75 (even 80 for some).
lagers ferment between 45-65.
I don't know about you but my house stays at 70-72. 45 is cold and I don't have an extra fridge to keep the fermenter at 50 for a lager.
Cracticus says:
Apr 14, 2008. 10:17 AM REPLY
To keep your fermenting beer at the required temperature, try putting it in a container full of water. A good-sized plastic storage box will do. Put that
into an insulated box to keep its temperature under control. Keep its temperature monitored; put ice in the water if it is too warm, or warm water in it if
it gets too cold. Syphon some of the water out when it gets too full. Your beer will benefit from being kept at an even temperature throughout
fermentation.
http://www.instructables.com/id/Make-Beer/
Jarlaxle says:
Nov 15, 2007. 11:54 AM REPLY
Malt Extract controls the color of the beer as rated by the Standard Reference Method (SRM). The SRM scale goes from light yellow (2), think Bud Light
to Black (70) which is more of a Guinness color.
Use a Lager Pilsener malt or Pale ale malt for a lighter yellowish color.
dacotti says:
Jan 19, 2009. 9:14 AM REPLY
nice 'ible imarunner. I was going to photo my next batch as a simple way of making beer, but you beat me to it. The only things I do that are a little less labor
intensive is I use 3lb of amber malt extract and 3lb of corn sugar in a 6 gal. batch, which I ferment in a big campers water jug with a tube and bottle for an air
lock. At bottling time, I buy two cases of wallmart water bottles, and dump the water, fill with beer, add one lemon drop to carbonate, and screw the cap back
on in one operation. No bottle washing. With the water bottles, it costs me about $14US to put up 6 gal. of beer, an I have all of about $10 invested in
equipment. I saw that some guys picked on you about your equipment too. My brother is all about the fancy equipment too. Me? I'm about enjoying the beer
and saving money!
Cheers! Scot
jangelj says:
Apr 7, 2009. 8:32 AM REPLY
When you say "lemon drop" do you mean the candy, lemon drop, or one drop of lemon juice? I'm guessing the candy, but want to make sure. Also, you
don't use any hops in this recipe at all? It seems very simple.
/Thanks,
Instructabilis Deus says:
Apr 7, 2009. 9:50 PM REPLY
Heh. Good question. I use the hard candy lemon drops. I saw some honey-lemon drops at the beer store for $$, and thought it looked like an easy
way to charge bottles. But, I knew I could get them 2 for a dollar at the convenience store. As for the hops, I don't use any. I kind of miss them now,
but when I first started making this stuff, I wasn't so into hops, so I just left them out. Now I drink Mirror Pond when I have no home brew, which
actually includes some beer with the hops. Go figure.
SuperFlyGT says:
Mar 21, 2009. 12:26 PM REPLY
Does anyone know where I can buy the poly-vinyl tubing or food grade plastic bucket? Do local hardware stores or chains like Home Depot / Lowe's carry
these?
Thanks.
germanater says:
Mar 27, 2009. 1:56 PM REPLY
ya usually a home depot or lowes, pretty much any major hardware/food stores, just make sure they are cleaned
germanater says:
Mar 26, 2009. 3:26 PM REPLY
could you put your finished product in a used (but cleaned) keg?
fizban7 says:
Apr 29, 2009. 9:24 PM REPLY
yes- sort of.
If you use a used soda keg, it will be easier to hook up. but you still need C02 to carbonate it.
A keg you get for parties is already carbonated. So you still need a way to provide carbonation, and they usually use a special hookup so that normal
people cant use them. But it can be done, do not worry. I have a soda keg, and all the hookups, but everything but the fridge to put it in.
germanater says:
Mar 26, 2009. 5:24 PM REPLY
Is the finished product a lager or an ale?
curiousthemonkey says:
Mar 5, 2009. 3:52 PM REPLY
is there any way to not have that layer of misery (suspended yeast) at the bottom of the bottle?
imarunner2 says:
Mar 6, 2009. 5:25 PM REPLY
If you age long enough...a couple of weeks or more, most yeast will settle pretty firmly at the bottom. Just pour carefully and you shouldn't get too much
yeast in your glass. Bottle conditioned beers will always have some yeast settle to the bottom. There are methods of carbonating filtered beer before
bottling but that goes well beyond the intent of this instructable.
el kabong says:
To quote the zen master of homebrewing: "Relax, don't worry, have a homebrew!" -Charlie Papazian
http://www.instructables.com/id/Make-Beer/
May 17, 2006. 2:08 AM REPLY
imarunner2 says:
Jun 16, 2006. 3:26 PM REPLY
el kabong,
Thanks for all your comments. It's only now that I've gone back and looked at each step that I've seen them.
sprucedriveman says:
Feb 25, 2009. 8:37 AM REPLY
what would an approx cost for a brew like be
Grizz72 says:
Feb 24, 2009. 12:04 PM REPLY
Has anyone ever ran there beer threw a wine filter during the bottling process just wondering what would happen, if you would loose taste or would you lose
your prime or what the out come would be. please reply as this is my first batch of beer and I am almost ready to bottle.
Thanks Grizz72
inkywhat says:
Feb 21, 2009. 1:43 PM REPLY
Excellent. Just made my first batch yesterday. I substituted 8 oz of pilsner cracked wheat as opposed to the crystal malt, also added some irish moss for the
clarity. I also had about 3/4 up of the malt left over (because I had to buy more than the required amount) anyway I combined that with the leftover mash and
some whole wheat flour, egg, yeast and made a very tasty bread.
Matt D655 says:
Jul 17, 2008. 7:34 AM REPLY
Why do ya use a Water cooler?
Visit leeners.com and get proper brewing supplies.
harigast says:
Feb 4, 2009. 7:57 PM REPLY
i think the point of this instructable is to make beer without the proper supplies. although if anyone has ever gotten a kit this i really all it is anyway. they
just make it look prettier.
warz0n3 says:
Jan 8, 2009. 7:03 AM REPLY
as for the chill haze. Adding some irish moss in the last 15 minutes of the boiling should help fix that
stonerhhi says:
Jan 20, 2009. 11:25 AM REPLY
Help, My husband made beer on Sat. 1/17/09 and there is no bubbling from the air lock. We added bread yeast because he used brewers yeast that was
2 years past exp. date. We added same amount of bread yeast right after the bad yeast. Is there any way to save this batch? Thanks
J stone
Spartan 117 says:
Jan 29, 2009. 8:49 PM REPLY
Is there any other signs of fermentation, yeast cake, condensation or a krausen?
inho never trust the airlock
Aaron
imarunner2 says:
Jan 20, 2009. 3:22 PM REPLY
Hmmm. Hard to say for sure. I'd say wait it out at this point and see what happens. As long as the temperature is agreeable to the yeast you may
begin to see some activity soon. I'm guessing bread yeast would be happier at the warmer end of the beer fermentation temperature range...but I'm
not sure. I don't really have any experience using bread yeast in beer but I've heard it can make decent beer. If your sanitation was really good then
the yeast may still be able to outrun the possibility of contamination from the undesirable critters. Hopefully, you'll see the yeast become active within
the next day or two. If not, I'd lean toward starting over with fresh yeast.
Good luck!
captainbringdown says:
Jun 6, 2008. 11:34 AM REPLY
can bottles explode at all during priming?
eranox says:
Jan 19, 2009. 6:18 AM REPLY
YES! God, yes. This is one of the most dangerous (and messy) aspects of brewing. Fortunately, it is also one of the easiest to control. Keeping an eye
on just two things will ensure this never happens to you:
First, make certain that your beer has fermented completely before you bottle it. The bubbles going through your airlock should have trickled down to a
tiny trickle, or disappeared completely. Alternatively, you can get fancy and use a brewing doohickey called a hygrometer, which will tell you all kinds of
things, including the specific gravity, sugar content, and alcohol content of your beer. It's a bit tricky and best learned about in a brewing book. Just don't
bottle until the bubbles stop (or almost stop) and you'll be fine. If you are in doubt, letting the beer sit for a day or two after fermentation is complete won't
hurt anything, assuming you sealed everything up properly.
http://www.instructables.com/id/Make-Beer/
Second, don't ever use more priming sugar than the recipe recommends. The golden ratio is 2/3 to 3/4 of a cup for a 5-gallon batch. Anything in this
range is fine, but pay attention to the recipe to get carbonation appropriate for the style you're brewing. Brew stores also offer sugar tablets, designed to
be put one in each bottle, to eliminate any guesswork. These are advantageous because you can bottle directly from your fermentation vessel, with a
minimum of fuss. Just drop the tablet in, fill the bottle with wort, and cap it.
sharadha.kalyanam says:
Sep 20, 2008. 11:50 AM REPLY
Can you use the Baker's Dry Yeast instead of the Brewer's yeast? It is slightly difficult to procure Dry yeast out here. Any other alternatives?
eranox says:
Jan 19, 2009. 6:06 AM REPLY
I've used baker's yeast and had surprisingly positive results. Compared to the dry packets of "brewer's yeast," the only discernible difference is that
baker's yeast dies off at a lower concentration of alcohol--which should not affect beer brewing at all. Different yeast strains can leave different flavors in
your beer, and markedly different aromas. If this is a concern, you're more likely to get away with baker's yeast when brewing a dark beer such as a
stout, over a lighter pilsener or such where the yeast's characteristics will be much more noticeable.
imarunner2 says:
Sep 21, 2008. 6:06 AM REPLY
Can bakers yeast can be used? Yes, bakers yeast will ferment your wort to make beer.
Will it make good beer? No. Well, maybe. I've heard mixed reviews but have never tried it myself.
bell017 says:
Sep 24, 2008. 12:50 PM REPLY
What is the approximate cost for this beer, relative to a comparable commercial beer? Let's say a commercial beer that costs about $1 per bottle?
eranox says:
Jan 19, 2009. 6:01 AM REPLY
imarunner2 said it right--You can make much better beer than the $1/bottle stuff for quite a bit less. If you reuse bottles and don't go crazy with fancy
specialty yeasts and all varieties of hops and what-have-you, you can keep the cost per bottle at about 50 cents.
However, I like the fancy stuff, and buying all those hops, yeast, and other things will put the beer right back up at about $1 per bottle. But: my goal is to
make the best beer possible, rather than saving money. This 'ible has kept brewing equipment pretty minimal, but even so, you'll need to brew a few
batches after your initial investment to realize any type of savings.
imarunner2 says:
Sep 24, 2008. 2:49 PM REPLY
I personally rarely drink any commercial beer that costs $1 per bottle. You can make beer for less than $1 per bottle that is much better than the
commercial offerings. That being said, if you like the pale lagers that the commercial brewers offer at that price, you'll have a difficult time making a beer
that tastes like theirs. Light lagers, in my opinion, are one of the more difficult styles for the home brewer to make well.
bell017 says:
Sep 25, 2008. 5:08 AM REPLY
Thank you - that just makes me want to brew my own beer even more now. And, unfortunately, I do drink the cheap beer frequently. Not that I don't
*try* more expensive beers, but it's going to be a while, with student loans and all, before I can drink them regularly. :)
imarunner2 says:
Sep 25, 2008. 3:51 PM REPLY
I've been in your position so I completely understand. I only wish I knew how to brew then. Yes, you can make beer that rivals beer selling for
more than $7 a six pack for less than $1 per bottle. Good luck!
mev says:
Dec 22, 2008. 7:15 PM REPLY
If you have a turkey fryer, you may want to use the burner and boil outside. It's a little less convenient than brewing in a kitchen, but if you boil over, the mess
is outside, not in your kitchen. A boilover is a real sticky mess!
eranox says:
Jan 19, 2009. 5:47 AM REPLY
100% agreed! If you're married and experience a boil-over in your kitchen, expect to hear about it in recurring arguments for many years to come.
abnbrewers says:
Jan 4, 2009. 3:30 PM REPLY
If you're looking for some help getting started, check for a homebrew club in your area. Our club has been around for 20 years and has members with over
20 years experience plus many beginners: http://abnormalbrewers.org/.
bill14224 says:
Dec 25, 2008. 8:27 PM REPLY
I used 2-liter soda bottles with their original caps, washed and sanitized, with 5 teaspoons of table sugar added to each one for priming and ran into no
problems. It's easier than the process described here. I also used a plastic fermenting keg from a home brewing kit that has a spigot at the bottom and a
large screw-on lid with 2 notches under the lid to let gas escape, eliminating the need for a breather and siphon hose. (easier) With a spigot it's easier to
keep the yeast at the bottom of the keg from getting into your bottles, clouding the beer. (again, easier) Unless you want to impress people, buying bottles,
caps, and a capper is an expensive waste of time. 2-liter bottles with the caps screwed on nice and tight get the job done, and to me the whole idea here is
to make good beer, easy and cheap!
http://www.instructables.com/id/Make-Beer/
stoked34 says:
I didn't strain my wort when I poured it into the fermenter, will my hoppy wort make any difference in the fermentation process?
view all 234 comments
http://www.instructables.com/id/Make-Beer/
Jul 9, 2008. 4:24 PM REPLY


© Copyright 2026