
How to Register on TalentFlow New TalentFlow Users
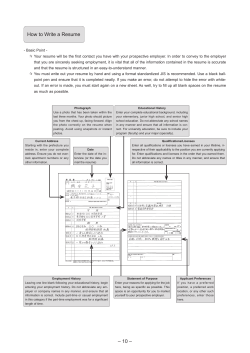
How to Register on
TalentFlow
Instructions for New TalentFlow Users on how
to register an account on TalentFlow
Table of Contents
How to Register on TalentFlow ....................................................................................... 3
Accessing City of Markham External Job Opportunities............................................... 3
How To Register ............................................................................................................. 4
Registering From the Employment Homepage ............................................................ 4
Getting to Know You .................................................................................................... 4
Completing Your Personal Profile ................................................................................... 5
Step 1: Contact Information, Education and Experience ............................................ 5
Step 2: Salary, Employment Type and Job Type Status ............................................ 5
Step 3: Adding a Resume .......................................................................................... 5
Step 4: Core Skills and Job Positions Inventory ......................................................... 6
Modifying or Adding a New Resume .............................................................................. 7
Modifying an Existing Resume .................................................................................... 7
Adding a New Resume ............................................................................................... 8
Modifying or Deleting Your TalentFlow Account ........................................................... 10
Deleting Your TalentFlow Account ............................................................................ 10
Changing Your TalentFlow Password ....................................................................... 10
Editing Your Security Question ................................................................................. 10
For Technical Difficulties .............................................................................................. 11
2
How to Register on TalentFlow
The following are instructions on how to register an account on TalentFlow in order to
apply for City of Markham job opportunities. Please note you can register, view and
apply to all job opportunities anywhere from any computer with internet access.
Before you can apply to any job opportunities, you have to register and create a Profile
on the TalentFlow system.
Creating a profile may take you a while to complete, be patient as you will only
have to do this once. After that you will be able to apply for City of Markham jobs
using the login address and password you create during the registration process.
Accessing City of Markham External Job Opportunities
Go to the City’s employment website address:
http://www.markham.ca/wps/portal/Markham/MunicipalGovernment/EmploymentVolunteer
The City of Markham employment page will display.
Click on one of the following links under Employment Opportunities: City of Markham
job postings, Summer student job postings, Firefighter job postings or Markham
Public Library job postings.
The relevant Job Seeker site will be displayed.
3
How To Register
Before you are able to apply to available job opportunities, you must have a Candidate
Profile registered on TalentFlow.
Registering From the Employment Homepage…
To register from the Employment Homepage, click on the Click here to Register link.
This will take you to the "Register now!" screen where you can start creating your
profile.
Complete all mandatory fields indicated with red text and marked with an asterisk.
Please ensure an accurate email address is entered.
NOTE: Record your User Name and Password. You will be able to review your
online application. To assist us in maintaining a secure database, DO NOT share your
User Name and Password with anyone.
Getting to Know You
In this step you will be asked to complete some "Getting to Know You" questions.
These are mandatory questions and must be completed to proceed further with the
online registration.
When complete, click the Submit Registration button at the bottom of the screen.
This will take you to your Personal Profile which you will need to complete. Reminder you only have to do this once.
4
Completing Your Personal Profile
Step 1: Contact Information, Education and Experience
There are 4 steps in creating your Personal Profile. In Step 1, complete all mandatory
fields indicated in red text marked with an asterisk.
Enter your contact information, education and experience.
Once completed, click the Save and Continue button at the bottom of the page.
Step 2: Job Location, Job Type, Employment Eligibility and Availability
You are now at Step 2 of the Personal Profile. Complete all mandatory fields in red
text marked with an asterisk.
Please select only the Location field: Canada-Ontario-Markham.
Enter your minimum and/or desired salary/rate.
Select the Job Type Status and Employment Type (select all that apply).
Select your employment eligibility status and enter your availability.
Once completed, click the Save and Continue button at the bottom of the page.
Step 3: Adding a Resume
You are now at Step 3 of the Personal Profile. You are required to enter a title for your
profile. Your profile title can be anything you like, i.e. Accounting Assistant 1, the Job
ID, etc. This is for your personal reference only. You will also need to select a Job
Stream for your profile. Click on the drop down menu and select a job family that most
represents what you are applying for.
There are 2 different ways you can attach your resume to your profile:
1. You upload your resume from file (as a Word document 97-2003, a PDF or a
Rich Text document) using the File Manager button.
2. You can type/copy and paste your resume in the Resume text box.
If you do not want to input or upload a resume at the time of registration, input "no
resume" in the resume text box. When applying to a job you must input or upload a
resume.
5
1. Uploading a Resume
To upload your resume from your data files using the File Manager, click the Add New
button to browse the files in your directory.
Click the Browse button and select the file you want to upload. Click the Upload
button.
To view the file/resume that has been uploaded, click on the Title that you entered for
your profile.
Click the Return & Attach button. Your file/resume will appear in the Resume text box.
Use your toolbar to edit, format, etc.
Once your resume editing is complete, click the Save and Continue button and your
resume will be displayed.
You can either further edit your resume by clicking the Edit Resume button, or to
continue completing your profile click Continue.
WARNING: If you click on the Delete Profile button, you will delete the personal profile
that was just created. You will have to re-enter all your information again.
2. Type or Copy/Paste Resume
You can type your resume into the text box provided. Use the tools at the top of the text
box to format your resume (i.e., bold, add bullets etc.). You can also cut and paste from
a MS Word document.
Click on the Save and Continue button, then click on the Continue button.
This will take you to Step 4 of the Registration process.
Step 4: Core Skills and Job Positions Inventory
You are now at Step 4, the last step! This is a Core Skills and Job Positions inventory.
Select at least one Core Skill from the drop down menu and at least one Job Position.
Enter the number of years of experience you have using that skill and the number of
years you have worked in the position selected, respectively. If you have additional
skills you would like to add, click on the Add More Skills button. When complete, click
the Save and Continue button at the bottom.
To remove a Core Skill or Job Position selection, go to the Remove column and place a
checkmark in the field you wish to remove. Click the Remove Selected button and the
field will be removed.
Once you have successfully completed your Profile, you will receive an onscreen
"Thank You!" message. You will also receive a confirmation email to your registered
email address.
6
Modifying or Adding a New Resume
Prior to applying to a job posting, you may want to change your existing resume, delete
or even add a new one. Note: you can store up to three resumes on your profile. This is
done through the Job Seeker Desktop and is called modifying your Profile.
Modifying an Existing Resume:
To modify your existing resume, click on the Edit link in the profile section of your Job
Seeker Desktop.
This will take you to the Edit Professional Profile screen.
Here you can modify your resume in the Resume text box, or re-upload an updated
version of your resume from a file (i.e. Word document or PDF) using the File Manager
button.
To re-upload your updated resume from your data files using the File Manager, click
the Update button to browse the files in your directory.
Click the Browse button and select the file you want to re-upload. Click the Re-Upload
button.
To view the file/resume that has been re-uploaded, click on the Title that you entered for
your profile.
Exit/Close your resume and you will return to the online application form. If this is the
correct document, click the Return & Attach button.
Your file/resume will appear in the Resume text box. Use the toolbar to edit, format, etc.
Once your resume editing is complete, click the Save and Continue button and your
resume will be displayed.
WARNING: If you click on the Delete Profile button, you will delete the personal profile
that was just created. You will have to re-enter all your information again.
If you uploaded your resume from a file you can click the Update button to make further
edits.
If you typed in your resume in the Resume Text box you can either further edit your
resume by clicking the Edit Resume button, or continue to complete your profile click
Continue.
The next screen to display is the Core Skills and Job Positions inventory. You can
make changes here or click the Save and Continue button at the bottom of the screen.
7
To Remove a Core Skill or Job Position selection, go to the Remove column and place
a checkmark in the field you wish to remove. Click the Remove Selected button and
the field will be removed.
You will be returned back to your Job Seeker Desktop with a confirmation message that
you have been successful in editing your profile.
Click on the link Log out to exit the online application form.
Adding a New Resume:
To add a new Resume to your Profile, click on the Add Additional Profile link.
This will display your Personal Profile. You are required to enter a title for your profile.
Your profile title can be anything you like, i.e. Accounting Assistant 1, the Job ID, etc.
This is for your personal reference only. You will also need to select a Job Stream for
your profile. Click on the drop down menu and select a job family that most represents
what you are applying for.
You can type in your resume in the Resume text box, or upload your resume from a file
(i.e. Word document, PDF) using the File Manager button.
To upload your resume from your data files using the File Manager, click the Add New
button to browse the files in your directory.
Click the Browse button and select the file you want to upload. Click the Upload
button.
To view the file/resume that has been uploaded, click on the Title that you entered for
your profile.
Exit/Close your resume and you will return to the online registration form. If this is the
correct document, click the Return & Attach button.
Your file/resume will appear in the Resume text box. Use the toolbar to edit, format, etc.
Once your resume editing is complete, click the Save and Continue button and your
resume will be displayed.
Your previewed resume will be displayed.
You can either further edit your resume by clicking the Edit Resume button, or to
continue completing your profile click Continue.
8
You are now at Step 4 of the Personal Profile. This is a Core Skills and Job Positions
inventory. Select at least one Core Skill from the drop down menu and at least one Job
Position. Enter the number of years using that skill and the number of years in the
position selected, respectively. If you have additional Skills you would like to add, click
on the Add More Skills button.
To Remove a Core Skill or Job Position selection, go to the Remove column and place
a checkmark in the field you wish to remove. Click the Remove Selected button and
the field will be removed.
You will be returned back to your Job Seeker Desktop with a confirmation message that
you have been successful in editing your profile.
Click on the link Log out to exit the online application form.
9
Modifying or Deleting Your TalentFlow Account
Deleting Your TalentFlow Account
Log into TalentFlow using the username and password you created when you
registered.
Click on "Edit" link next to the "Edit Username and Password".
Click on "Delete Account".
Your account, including your stored resume(s) and cover letter(s) will be deleted.
Note: If you wish to apply to job online you will have to go through the registration
process again.
Changing Your TalentFlow Password
Click on "Edit" link next to the "Edit Username and Password" field.
Enter your old password.
Enter your "New" password and "Confirm" password.
Click on "Update".
Editing Your Security Question
Click on "Edit" Link next to the "Edit Security Question" field.
To change your Security Question, click on the drop down menu next to the "Select the
Security Question" field and select a security question.
Input the answer to this Security Question in the text field next to "Security Answer".
Click on "Update".
To change your response to the existing "Security Question", input the new answer to
this Security Question in the text field next to "Security Answer".
Click on "Update".
10
For Technical Difficulties…
If you experience any technical difficulties during the registration process, you can call
TalentFlow Support (provided by Zylog Systems Canada Ltd.) at 1-877-223-1833 or
email [email protected] from 8:30 a.m. until 8:00 p.m., EST, Monday – Friday.
11


© Copyright 2026