
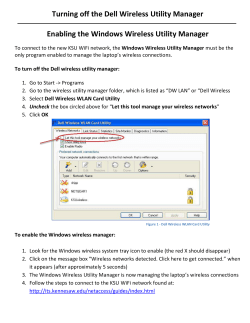
T Setting Up a Wireless Connection, or How to Check
Culp_ch10.qxd
4/11/05
11:02 AM
Page 217
CHAPTER 10
Setting Up a Wireless
Connection, or How to Check
Your Email in a Coffee Shop
he proliferation of wireless networks means that access to the Internet is easier
than ever. From many coffee shops, for example, you can open up a laptop or PDA
and check your email. You can do so merely by configuring your laptop’s wireless
connection, which is what this chapter is all about.
T
One of the areas where XP’s latest Service Pack has had the most noticeable impact is
with the configuration and management of wireless connections. So in many ways, this
chapter is not only about wireless technologies, but also more generally about Service
Pack 2.
Wireless means different things to different people, so we’ll start with an overview of
today’s wireless choices, as well as a quick glance at what’s down the proverbial Road
Ahead. Then, I’ll show you how to quickly set up and secure a wireless connection, and
what options need to be configured to ensure the most trouble-free wireless connection
possible.
The chapter concludes with a brief section on infrared connectivity, which can be very
convenient, but which today, with the ubiquity of wireless, is less and less prevalent.
Keep in the back of your mind that this chapter is also an extension of the topics
introduced in the previous chapter. Wired or no, we’re still talking about computer
networking.
Setting Up a Wireless Connection, or How to Check Your Email in a Coffee Shop
217
Culp_ch10.qxd
4/11/05
11:02 AM
Page 218
Types of Wireless Access
Wireless access comes in a variety of shapes and sizes. Options range from global voice
and data networks—the kind usually associated with big telecommunications providers
such as Sprint and T-Mobile—to infrared connections, which is essentially the same technology you use in TV remote controls. However, the most common wireless access today
comes in the form of IEEE 802.11 technologies. This kind of wireless access uses radio
frequency technology and is meant for short-range connections (no more than about 300
feet or so without signal amplifiers) between wireless clients using 802.11 network cards
and a wireless access point (WAP). Wireless access points are then connected to hardwired methods of Internet access like cable modems, or to existing private LANs, such as
might exist in any office building.
This common configuration of wireless connectivity is also known as a wireless LAN, or
WLAN. The placement of WLAN components is depicted in Figure 10-1.
Wall
Cable Modem/
DSL
Wireless
Clients
Wireless Access
Point
FIGURE 10-1
Common wireless LAN infrastructure.
Because of their widespread availability (chain coffee shops and bookstores notwithstanding), this chapter focuses on 802.11 network connections. This standard for wireless
LANs was first approved by the Institute of Electrical and Electronics Engineers (IEEE) in
1997. The protocol known as 802.11b is currently the most common standard, transferring data at a maximum rate of 11 Mbps. However, you’d be hard pressed to find an
802.11b device on store shelves today. The prevailing standard now is 802.11g, which
allows for data transfer at 54 Mbps using the 2.4 GHz frequency band. (In my experience,
the 802.11g wireless cards also seem to have a greater range and more reliable connectivity than 802.11b devices.) It’s only a matter of time before 802.11g overtakes 802.11b in
terms of implementation; it’s possible that the day will have come by the time you pick
up this book.
218
Setting Up a Wireless Connection > Types of Wireless Access
Culp_ch10.qxd
4/11/05
11:02 AM
Page 219
What’s the Frequency?
Wireless LANs send data packets through the air using the radio waves—the same
electromagnetic waves that carry music, cell phone conversations, garage door
opening instructions, and even microwave heat. The reason you don’t hear conservative talk radio every time you’re making popcorn is because all these different
radio devices transmit on different frequencies.
FM radio, for example, uses the 88 to 108 Mhz frequency bands, which is why you’ll
never tune to 109.3 or 87.1 to hear campus rock. It’s also why the FM radios and
wireless LANs don’t interfere with each other: they transmit using different frequency
bands. The same can’t always be said of some cordless phones. If you put a phone
base station—which might also use the 2.4 GHz frequency band—too close to a
wireless access point, you’re likely to experience the occasional connectivity loss.
Figure 10-2 helps you see how devices might sometimes compete for the same
frequency.
2.4 GHz
100 MHz
Radio
Frequency
Band
1 GHz
VHF
UHF
FM Radio
TV
10 GHz
SHF
Cordless Phones
Wireless LAN
Satellite
Radio
Microwave
Oven
Many Wireless Devices Crowd
Around the 2.4 GHz Frequency Band
FIGURE 10-2
Lots of devices use the 2.4 GHz frequency.
Setting Up a Wireless Connection > Types of Wireless Access
219
Culp_ch10.qxd
4/11/05
11:02 AM
Page 220
What’s Down the Road
So getting rid of the cables within your home is a cool thing indeed. (I take a certain
nerd’s pride for each cable I’m able to tie up and store away. Doesn’t add any functionality, mind you, it’s just, you know, cool.)
But wait. The New, New thing, as author Michael Lewis would describe it, is a standard
called 802.16, which aims to do away with the cables coming into your home. For now,
plans are that 802.16, or WiMAX, will begin hitting the U.S. market sometime in 2005 (in
some places, this is already a reality), and it might just replace the cable modem you now
use. This new standard serves as a sort of long-range Wi-Fi connection, delivering wireless connectivity at up to 30 miles from an antenna, with speeds of up to 75 Mbps. (Cable
modems pipe data to your 802.11b device at just about 5 Mbps at the top end.) Within
three years, expect to see cheap 802.16 laptop cards that will make wireless broadband
Internet access as easy as placing a mobile phone call today. Remember life without
mobile phones? Me neither.
And get this: while WiMAX technology will first be used for broadband Internet access, it
could eventually deliver digital TV as well. Cable without the cable.
But the focus here is on wireless LANs, using the 802.11b or g technologies available
today. Before you access a wireless LAN, you’ll need to make sure your laptop (or desktop) has a wireless network adapter. Without this component, of course, WLAN networking is impossible. Options abound, though.
The Next 802.11 Standard: 802.11n
By the time you’ve cracked the spine of this book, the latest 802.11 standard could
be 802.11n. At the time of this writing, manufacturers are releasing 802.11 pre-n
devices because the IEEE hasn’t formally adapted it as a standard yet. The 802.11n
standard promises wireless LAN speeds of over 100 mbs and boosts coverage areas
of wireless LANs by over 800% when compared to 802.11g products.
220
Setting Up a Wireless Connection > What’s Down the Road
Culp_ch10.qxd
4/11/05
11:02 AM
Page 221
Wireless Network Adapters
A wireless network adapter, or wireless network card, works the same way any cabled network adapter does. It breaks up raw data into small packets of information, and then
sends these packets one at a time to their destination. On the receiving end, the network
adapter does the reverse: it takes ones and zeros from the network and assembles them as
they were originally sent, eventually passing them on to the computer’s CPU. While a traditional network card turns the ones and zeros that make up data packets into electrical
pulses and places these on a wire made of copper, a wireless card turns ones and zeros
into radio signals and sends them out into the air.
Most of this lesson assumes that you already have a wireless network card installed. The
steps to install such a card are really no different than installing every other piece of hardware: you plug the card adapter into the appropriate port, and then install the drivers.
(Caveat: Some manufacturers instruct you to do just the reverse, so the drivers will be
available when XP detects the new hardware.) But because it’s such an essential part of
the puzzle, let’s identify the different types of wireless network adapters out there:
• PCI adapters (including PCI Express). These fit into an open PCI (Peripheral
Components Interconnect) or PCI-x slot on the system’s motherboard, and an
antenna sticks up from the back of the computer. These require you to open your
computer case for installation, and cannot be used on laptops.
• USB adapters. These combine the antenna and card in one piece, and are then
attached (sometimes via USB cable) to an available USB port. Some advantages of
USB cards include their portability and the ability to position the antenna.
• PCMCIA cards. Probably the most common choice for laptops without built-in
wireless cards. These credit card-sized devices are hot-swappable and very portable.
Unlike some USB devices, there are no cables necessary. They can drain battery
power, however, so it’s recommended than you not use them unless a wireless network is present.
• Integrated Adapters. On newer laptops and desktop motherboards, the wireless
network card is integrated, just like the video and sound cards. You don’t have to
install anything at all. Intel’s Centrino, for example, refers to a laptop motherboard
chipset that 1) includes a wireless card, and 2) reduces battery consumption.
Setting Up a Wireless Connection > Wireless Network Adapters
221
Culp_ch10.qxd
4/11/05
11:02 AM
Page 222
A Word about Bluetooth
People often confuse Bluetooth and IEEE 802.11, and with good reason. Both are wireless technologies, and both let computing devices communicate with one another
The difference is that while IEEE 802.11 is strictly a networking technology—wireless
cards and access points simply replace their cabled equivalents—Bluetooth is a
“cable replacement” technology. For example, Bluetooth might let a wireless mouse
and keyboard communicate with a Bluetooth adapter attached to a computer, or it
might let the computer send a print job to a Bluetooth-enabled printer. There’s no
802.11 technology that does the same. 802.11 exists only to send Ethernet packets—
the kind used on virtually every wired LAN—through the air.
And a Word about Wi-Fi
And one more thing. 802.11 is not the same as Wi-Fi, although it’s not uncommon
to hear the words used interchangeably. Wi-Fi refers to a specific kind of 802.11
device that has been deemed “Wi-Fi Certified” by the Wi-Fi Alliance. A device earns
this right by virtue of its proven interoperability with other Wi-Fi devices from different manufacturers. In other words, you can access a “Wi-Fi Certified” access point
from your “Wi-Fi Certified” network card even if they are made by different manufacturers.
Does it matter? Only if you’re concerned with security. In my experience, and as
reported by many others, devices that aren’t Wi-Fi certified work just fine, even
when used on networks where all other devices are. The only real requirement is
that all devices use the same radio frequency.
More about the security consideration later on in the chapter.
222
Setting Up a Wireless Connection > Wireless Network Adapters
Culp_ch10.qxd
4/11/05
11:02 AM
Page 223
Connect to an Existing Wireless Network
Once the proper hardware is in place, connecting to an existing WAP, or infrastructure
network, is a breeze. All you have to do is follow these steps:
1. Access the properties of the wireless network card. You could do so in one of the
following ways:
• Right-click the My Network Places icon on the desktop and choose
Properties. Then right-click the wireless device and choose Properties.
• Right-click the networking icon in the System Tray (lower-right side of the
Taskbar) and choose Open Network Connections. Right-click the wireless
device and choose Properties.
• Open the Control Panel, then open the Network Connections applet. Rightclick the wireless device and choose Properties.
2. Choose the Wireless Networks tab, as shown in Figure 10-3. To connect to an
Available wireless network, click the View Wireless Networks button.
FIGURE 10-3
Choosing an available network.
You will only see the next dialog box if you’re running XP Service Pack 2. (Refer back to
Chapter 1 for instructions and an overview of Service Pack 2.) It’s called the Wireless
Network Connection dialog box, and it presents a list of available wireless networks. This
list doesn’t necessarily mean you can connect to the wireless network; it just means that
Setting Up a Wireless Connection > Connect to an Existing Wireless Network
223
Culp_ch10.qxd
4/11/05
11:02 AM
Page 224
the network card has detected a network and will try and connect if you wish. To connect
to one of the networks on the list (sometimes there’s only one), simply choose the network first with a mouse-click (it will have a shaded background), and then click the
Connect button.
You should then see the dialog box in Figure 10-4 as the network card tries to obtain an
IP address from the wireless access point.
FIGURE 10-4
224
The wireless card is trying to connect.
Setting Up a Wireless Connection > Connect to an Existing Wireless Network
Culp_ch10.qxd
4/11/05
11:02 AM
Page 225
Additional Wireless Connection Considerations
The preceding chunk is dependent on a single setting: allowing Windows to manage your
wireless connections. Fortunately, XP makes this the default configuration, but you can
verify at any time or change the setting by right-clicking the wireless adapter in the
Network Connections dialog box, choosing Properties, and then clicking the Wireless
Networks tab (Figure 10-3 already showed this dialog box).
Furthermore, you can accomplish the preceding a bit more simply by right-clicking on
the wireless networking icon in the System Tray and choosing View Available Wireless
Networks. You see the dialog box shown in Figure 10-5.
FIGURE 10-5
Making a quick connection to a wireless LAN.
And, you also know that there’s an advanced setting that lets your card make these connections without much fuss. To access this setting, click on the Advanced button toward
the bottom of the Wireless Networks tab.
You see the dialog box shown in Figure 10-6, where your card will try and connect to any
available network, looking first for wireless access points before connecting to computerto-computer networks.
Setting Up a Wireless Connection > Additional Wireless Connection Considerations
225
Culp_ch10.qxd
4/11/05
FIGURE 10-6
11:02 AM
Page 226
Your card attempts connection with any available network.
This dialog box also lets you alter this behavior, but if you want to connect in a coffee
shop, make sure either the first or second option is selected. Generally, ad hoc networks
will let you access someone else’s computer, but they won’t provide access to the Net.
What Icon in the System Tray?
Oh yeah. I should probably mention that you might not have a networking icon in
the System Tray, although if you’ve left XP’s defaults alone, you will. To enable or
disable the icon from showing in the System Tray, access the Properties page of
your wireless adapter.
Next, go to the General tab, and make sure the check box called “Show icon in notification area when connected” is selected, as shown in Figure 10-7.
FIGURE 10-7
226
Enabling display of the System Tray icon.
Setting Up a Wireless Connection > Additional Wireless Connection Considerations
Culp_ch10.qxd
4/11/05
11:02 AM
Page 227
Connect Automatically
For any given wireless network, you can tell XP to connect automatically whenever the
network is in range. Actually, you don’t really have to; this also is default behavior. But in
the event that your system is not connecting automatically to a network you think it
should, you should check the network’s Properties to ensure Automatic connection is
enabled.
To do so, follow these steps:
1. Right-click the networking icon in the System Tray and choose View Available
Wireless Networks.
2. From the Wireless Connection dialog box, look in the list of Related Tasks and
choose the Change Advanced Settings link.
3. Select the desired network in the list of Preferred networks, and click Properties.
4. Now click on the Connection tab. Connecting automatically is done with a simple
check box, as shown in Figure 10-8.
FIGURE 10-8
Windows connects automatically to networks within range.
Setting Up a Wireless Connection > Connect Automatically
227
Culp_ch10.qxd
4/11/05
11:02 AM
Page 228
Connect to a Secure Network
As you’ve seen, you can command XP to connect to unsecured networks with ease. But
sometimes a detected network will be secure, which means it has been protected with a
security key, which is basically a password for the network. In this case, you’ll have to provide this authentication credential (if indeed you know it) to access the wireless network.
For example, you might see this when connecting to a network at a hotel. (They want to
limit Internet access to paying guests.)
To enter a security key needed for network connection, follow these steps:
1. Right-click the System Tray icon, choose View Available Wireless Networks, and
then click the Change Advanced Settings link.
2. From the Wireless Network Connection dialog box, choose the network you’re configuring and choose Properties.
3. Click the Association tab. As shown in Figure 10-9, you will make sure the connection’s Network Authentication is set to Shared (it should be) and that the check box
called “The Key is provided for me automatically” is cleared (if you need to provide
a key, it should be cleared as well).
4. Enter and retype the Network key provided in the appropriate spaces. Again, this
key will be given by the person granting you access.
FIGURE 10-9
228
Entering a network key for authentication.
Setting Up a Wireless Connection > Connect to a Secure Network
Culp_ch10.qxd
4/11/05
11:02 AM
Page 229
Connect to an “Unseen” Network
Sometimes, administrators configure their wireless access point not to broadcast its
network name, also known as its Secure Set Identifier (SSID). If you don’t see a wireless
network available under the Available networks section, it may be because some securityconscious administrator has disabled this feature so that not just anyone with a network
card will know about the wireless network.
If you know a wireless network exists, yet you can’t see it listed in the Available networks,
click the Add button under the Preferred network section. Then, in the Wireless Network
Properties, as shown in Figure 10-10, manually specify the SSID. Since the network is
being hidden, chances are that you’ll have to provide wireless network key settings as well.
FIGURE 10-10
Adding a Preferred network to the list.
When you click OK, Windows XP will automatically connect to any wireless networks
listed in the Preferred Networks section.
Before you do, however, just know that any information you transmit in such an environment is sent unencrypted into the very java-scented air about you, and is therefore subject to eavesdropping by someone with a) a wireless network card, b) software to capture
the packets sent by your network card, and c) a lot of spare time on their hands.
And while you shouldn’t worry too much about what data might be captured in a coffee
shop, the same can’t be said for most corporate environments. For this reason, many
wireless administrators have to know how to restrict access to authorized users only, and
also how to encrypt any and all data transmitted. We’ll touch on these security topics a
bit more in a later section of this chapter.
Setting Up a Wireless Connection > Connect to an “Unseen” Network
229
Culp_ch10.qxd
4/11/05
11:02 AM
Page 230
Disable the Existing Network Connection
If you have an existing network adapter that’s used for wireless access, you might want to
disable this connection when it’s not in use. You might never need to enable it again. For
example, most laptops, like the one I’m using to pen this chapter, have an integrated
10/100 Ethernet port. But since I got the PCMCIA wireless card for network access, I
never use the Ethernet port anymore. A lot of desktop motherboards today also have
10/100 Ethernet ports on-board.
If I left the laptop configured the way it was, with the wired connection enabled, I would
get notifications every time the computer booted up that the wired connection’s cable
was unplugged. This can get aggravating over time.
However, disabling the wired connection takes only a couple of steps:
1. Open the Network Connections applet in the Control Panel. (Remember that you
can right-click on My Network Places and choose Properties.)
2. Right-click the wired connection, and from the context menu, choose Disable.
The connection will now be grayed out, and its status will show up as Disabled, as shown
in Figure 10-11. Now, you won’t be reminded anymore about that the network cable is
unplugged. Of course it’s unplugged—you’ve gone wireless, man!
FIGURE 10-11
230
Disabling the unused wired connection.
Setting Up a Wireless Connection > Disable the Existing Network Connection
Culp_ch10.qxd
4/11/05
11:02 AM
Page 231
Secure the Wireless Connection with 802.1x
Authentication
Because the nature of wireless networking is such that packets are just sent out into the
air, it is very easy to have those packets intercepted. What’s disturbing about this for some
is that user names and passwords, as well as other sensitive information, are just as likely
to be intercepted.
One of the technologies to combat this is 802.1x authentication. 802.1x authentication
can help ensure that wireless communication between client and access point is encrypted, and it also prevents unauthorized users from accessing the network.
Encrypted data—a.k.a. cipher text—has been rearranged into a secret code, and it can
only be decoded by the holder of the decryption key. Encryption keys and encrypted
messages have been around for several thousand years, ranging from simple letter substitution schemes, such as those employed by “secret decoder rings,” to the German’s
Enigma machine in WWII, which was cracked once the Allies figured out the key, to
incredibly complex mathematical functions that are used to encrypt a single file and then
are discarded. That way, even if someone were to spend the hours or days or years necessary to crack the key for one message, it wouldn’t do them any good on the next message.
At any rate, here’s how you set up encryption on the wireless client:
1. From the Wireless Networks tab, choose the network for which you want to enable
or disable IEEE 802.1x authentication, and then click Properties.
2. On the Association tab, select WEP from the Data Encryption drop-down box.
WEP is an abbreviation for Wired Equivalent Privacy, and it provides a level of data
encryption by itself. You could stop here if you want, and the date sent to and from
the wireless access point would be encrypted. 802.1x authentication is more secure,
however. To enable it, keep going.
3. Click the Authentication tab. On the Authentication tab, select “Enable IEEE 802.1x
authentication” for this network check box, as shown in Figure 10-12. You have two
choices here:
• Protected Extensible Authentication Protocol (PEAP). PEAP is a wireless security
protocol developed jointly by Microsoft, RSA Security, and Cisco. It transmits
authentication data and passwords over wireless networks.
• Smart Card or other Certificate. These use either physical cards that store user credentials or digital IDs that do roughly the same.
Setting Up a Wireless Connection > Secure the Wireless Connection with 802.1x Authentication
231
Culp_ch10.qxd
4/11/05
11:02 AM
Page 232
Note that if you select either of these 802.1x authentication methods, you will have additional configuration to do, such as specifying the type of certificate used. You can do this
configuration by choosing Properties.
To disable IEEE 802.1x authentication for this connection, clear the “Network access control using IEEE 802.1X” check box.
FIGURE 10-12
Using a smart card for 802.1x authentication.
When connecting to a wireless network, the client does so using the highest level of
security that the network is capable of. Therefore, enabling 802.1x authentication for
one connection still allows connections to other, non-secure networks where this authentication is not in place. In other words, leaving 802.1x authentication enabled for one
network will not adversely affect your ability to use the computer in a wide variety of
wireless networks.
That said, a full discussion of the wireless encryption protocols is beyond the scope of
this book.
232
Setting Up a Wireless Connection > Secure the Wireless Connection with 802.1x Authentication
Culp_ch10.qxd
4/11/05
11:02 AM
Page 233
Secure the Wireless Access Point
Another major consideration when designing a wireless security scheme is the point of
access to the wired network. Without securing the access point, most of your plans for
securing clients are done in vain.
Unfortunately, the procedure for securing this access point will differ depending on
which brand of WAP is in use. What follows then are just some very general considerations to look for, using examples from a wireless router that’s used to share out your
author’s broadband Internet connection.
Every wireless device will have some way of managing its default settings. In the case of
my wireless router, this is done with an HTML interface. To access the device settings, I
connect to the Website running on the internal interface’s IP address. I type
http://192.168.2.1 into my Web browser, and get a login page that looks like what you
see in Figure 10-13.
FIGURE 10-13
Accessing the management interface of the wireless access point (WAP).
Setting Up a Wireless Connection > Secure the Wireless Access Point
233
Culp_ch10.qxd
4/11/05
11:02 AM
Page 234
How Do I Know My IP Address Is Private?
The 192.168.2.1 IP address is within a range of reserved private IP addresses. Lots
of machines that have Internet access can have the IP address of 192.168.2.1, but
none of them can be directly attached to the Internet. Another device, such as a
router, acts as a go-between. In the case of my router, that go-between is the interface connected to the cable modem, and thus my ISP. Confusing? It can be. For further information on private IP addresses, please refer to Chapter 9, “Playing Nicely
with Others.”
Enter a username and password. Here’s one security configuration that can easily be forgotten about. A good many of the wireless routers out there today have not had the
default administrator user names and passwords changed, which means you can hack
into them by using passwords like admin, password, or just by leaving the space blank. I
suggest that changing this password be the first order of business when configuring WAP
security.
Next, look to set the device’s security settings by changing the SSID and the network key
settings. There’s usually a button somewhere that lets you turn off broadcasting of the
SSID. There’s another that will prevent the device from accepting “ANY” as the SSID.
As mentioned, these are a couple of quick and easy security measures that will prevent
the casual user from connecting to the network. Other tabs will let you configure encryption settings for the access point. Refer to your router’s documentation for further
information.
Is It Certified?
If security is a big concern for your wireless access point, make sure to look for the
Wi-Fi Certified logo on the outside of the box. A device that is Wi-Fi Certified will be
able to take advantage of the latest wireless security technologies. Wi-Fi is a consortium of over 200 member companies from around the world. It was formed in 1999
to certify interoperability of wireless Local Area Network products based on the IEEE
802.11 specification.
234
Setting Up a Wireless Connection > Secure the Wireless Access Point
Culp_ch10.qxd
4/11/05
11:02 AM
Page 235
Infrared Communication
You can get data from place to place using radio frequencies, as you have seen throughout
this chapter. But you can also get data from one device to another using infrared technology as well. That’s right, the same technology that runs the most important tool in your
life: the remote control.
The big drawback to using an infrared connection is that the communication requires
line of sight to work. That is, the infrared devices actually have to be pointed at each
other, just as you have to point a remote at the TV to get it to work—you can’t exactly
point it at your spouse and expect much to happen.
Nevertheless, setting up an infrared connection isn’t too much of a hassle. Here’s what
you’ll need to do:
1. Right-click the networking icon in the System Tray and choose Open Network
Connections.
2. Choose the “Create a new connection” task to launch the New Connection Wizard.
Click Next to get things started.
3. Choose to “Set up an advanced connection,” and then in the Advanced Connection
Options dialog box, click “Connect directly to another computer.” Click Next.
4. The connection will either serve as Host or Guest, depending on if the system is
used to access information on another computer, or if it’s storing the data that
needs to be accessed. Make your selection and then click Next.
5. The next dialog boxes depend on whether you selected Host or Guest.
• If you selected Host, choose the Infrared Port (not all computers have one
built-in).
• If you selected Guest, enter a name for the connection, and then select
Infrared Port.
6. Click Next, and again you are presented with two sets of options, depending on
your configuration path:
• If you’re setting up the computer as a host, choose which users can connect
with the Users Permissions dialog box, shown in Figure 10-14.
• If you’re setting up as a guest, select “Anyone’s use” or “My use only” in the
Connection Availability (if you’re the only user, you won’t see this).
7. Now click Next and then Finish to complete the setup.
Setting Up a Wireless Connection > Infrared Communication
235
Culp_ch10.qxd
4/11/05
FIGURE 10-14
11:02 AM
Page 236
Configuring an infrared connection.
Now you’re ready to use the connections, which again require that the connecting device
be brought within line of sight of the infrared port.
Most Personal Digital Assistant devices (PDAs) have a built-in infrared port (most today
come with an integrated wireless network card, rendering the infrared port pretty much
superfluous). They can also be found on some printers and even wrist watches. You’ll find
infrared most useful when transferring something like contact info or a reminder
between devices: just point the laptop (or PDA) at your watch, and bang! You’re now
wearing an email address.
236
Setting Up a Wireless Connection > Infrared Communication
Culp_ch10.qxd
4/11/05
11:02 AM
Page 237
Wrap Up
The previous two chapters are really part of a single discussion. Chapter 9 dealt with setting up and connecting to a network; this chapter looked at issues specific to configuring
a wireless connection. Thus, almost everything discussed in Chapter 9 applies here, too.
The first part of the chapter presented an overview of how to simply connect to a wireless
network from almost anywhere a WLAN is available. Notice, too, that many of these steps
have changed dramatically in Windows XP since the release of Service Pack 2. Many of
these changes, however, have been designed with ease of connection in mind. As long as
most of the defaults mentioned are left alone, I don’t anticipate that you’ll have any difficulty connecting to a wireless network while sipping your latte.
Wireless networks are not very secure by default, in no small part because of their very
nature—you don’t have to have physical access to a port to have access to the network. To
counteract this, we also looked at how to configure security over wireless connections
where data encryption is either required or preferred.
Finally, we looked at the steps necessary to set up an infrared connection. This is still
technically a network connection, although very limited in its scope. We identified some
instances where an infrared connection might be needed to get data from point A to
point B.
In the following chapter, I’ll show you some ways to put your network to work. We’ll look
at how to make resources available over your network, and further, how to lock down
those resources so that data you make available is not changed by anyone other than
those users you specify.
Setting Up a Wireless Connection > Wrap Up
237
Culp_ch10.qxd
4/11/05
11:02 AM
Page 238
![[WCR-300S] How to Change the Wireless Network Name(SSID)](http://cdn1.abcdocz.com/store/data/000232989_1-c13ffbaf9a88e423608ef46454e68925-250x500.png)


© Copyright 2026