
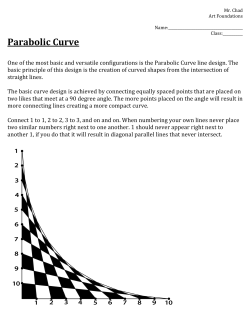
What is CAD?
What is CAD?
CAD if often defined in a variety of ways and includes a large range of
activities. Very broadly it can be said to be the integration of computer
science (or software) techniques in engineering design. At one end when we
talk of modeling, It encompasses the following:
Use of computers (hardware & software) for designing products
Numerical method, optimizations etc.
2D/3D drafting
3D modeling for visualization
Modeling curves, surfaces, solids, mechanism, assemblies, etc.
The models thus developed are first visualized on display monitors using a
variety of techniques including wire frame display, shaded image display,
hidden surface removed display and so on. Once the designer is satisfied,
these models are then used for various types of analysis / applications. thus,
at the other end it includes a number of analysis activities. These could be:
Stress (or deflection) analysis, i.e. numerical methods meant for
estimating the behavior of an artifact with respect to these
parameters. It includes tools like the Finite Element Method (FEM).
Simulation of actual use
Optimization
Other applications like
o CAD/CAM integration
o Process planning
These are activities which normally use models developed using one or more
of the techniques mentioned above. These activities are often included in
other umbrellas like CAM or CAE. A term often used is Cad to include this
broad set of activities. They all use CAD models and often the kind of
application they have to be used in a determines the kind of a model to be
developed. Hence, in this course, It cover them under the umbrella of CAD.
In this course we will strive to give an overview of modeling techniques
followed by some applications, specifically CAM.
Thus there are three aspects to CAD.
Modeling
Display/ Visualization
Applications
1
MODELING
Modeling typically includes a set of activities like
Defining objects
Defining relation between objects
Defining properties of objects
Defining the orientations of the objects in suitable co-ordinate systems
Modification of existing definition (editing)
The figure below explains what a typical CAD model would need to define, what kind of
entities need to be defined and what relationships exist between them.
At the highest level we have the volume which is defined by (or "delimited by") a set of
surfaces. These surfaces can be planar or curved / warped. A planar surface can be
bounded by a set of curves. A curved surface can be seen as a net of curves. These curves
are typically a succession of curve segments which define the complete the curve. The curve
segment is defined using a set of end points / control points which govern the nature of the
curve. Thus a relationship is defined between entities at each level.
2
Once such a relationship is defined, a geometric model of the artifact is available. In any
design there might be many such artifacts. One then has to define properties of each of
these artifacts and define a relationship between them. The properties and the relationships
needed are dependant on the application the model is to be used for subsequently. But one
common application that all models have to go through is visualization of the model (s).
DISPLAY / VISUALIZATION
Displaying the model requires the following:
Mapping objects onto screen coordinates: Models are typically made in a model
coordinate system. this could be the world coordinate system, or a coordinate
system local to the object. these coordinate systems are typically three dimensional
in nature. To display the object on a 2D screen, the object coordinates need to be
mapped on to the 2D coordinate system of the screen. This requires two steps:
o Viewing transformations: The coordinates of the object are transformed in a
manner as if one is looking at the object through the screen. This coordinate
system is referred to as the viewing coordinate system.
o Projections: The object in the viewing coordinate system is then projected
onto the two dimensional plane of the screen.
Surface display or shading / rendering: In displaying the objects on the screen one
often likes to get a shaded display of the object and get a good feel of the three
dimensional shape of the object. This requires special techniques to render the
surface based on its shape, lighting conditions and its texture.
Hidden line removal when multiple surfaces are displayed: In order to get a proper
feel of the three dimensional shape of an object, one often desires that the lines /
surfaces which are not visible should not be displayed. this is referred to as hidden
line / surface removal.
Once a model is visualized on the screen and approved by the conceptual designer, it has to
go through a number of analysis. Some of the kinds of usage this model might have to go
through are the following:
Estimating stresses / strains / deflections in the objects under various static loading
conditions
Estimating the same under dynamic loading conditions
Visualizing how a set of objects connected together would move when subject to
external loading. This leads to a whole set of activities under simulation. These
activities would vary depend upon the application the object is to be subject to.
Optimizing the objects for
Developing 2D engineering drawings of the object
Developing a process plan of the object
Manufacturing the object using NC / CNC machines and generating the programs for
these machines so as to manufacture these objects.
Having given the overview of the kind of activities that can come under the umbrella of CAD
the uses these CAD models can be put to, I know highlight what aspects of these would be
covered in this course. Needless to say, all these activities would be well beyond the scope
3
of one single course. Therefore this course, which is targeted to give an overview of CAD
and its applications, would include the following:
1.
2.
3.
4.
5.
An overview of the hardware systems used in CAD
2D and 3D transformations used to shift between coordinate systems
Projection transformation used to get the object in screen coordinate systems
Modeling of curves and surfaces
Modeling of solids
Cathode-Ray Tubes
Fig. Below illustrates the basic operation of a CRT. A beam of electrons (cathode rays),
emitted by an electron gun, passes through focusing and deflection systems that direct the
beam towards specified position on the phosphor-coated screen. The phosphor then emits
a small spot of light at each position contacted by the electron beam. Because the light
emitted by the phosphor fades very rapidly, some method is needed for maintaining the
screen picture. One way to keep the phosphor glowing is to redraw the picture repeatedly
by quickly directing the electron beam back over the same points. This type of display is
called
a
refresh
CRT.
The primary components of an electron gun in a CRT are the heated metal cathode and a
control grid (fig. Below). Heat is supplied to the cathode by directing a current through a
coil of wire, called the filament, inside the cylindrical cathode structure. This causes
electrons to be “boiled off” the hot cathode surface. In the vacuum inside the CRT
envelope, negatively charged electrons are then accelerated toward the phosphor coating
by a high positive voltage. The accelerating voltage can be generated with a positively
charged metal coating on the inside of the CRT envelope near the phosphor screen, or an
accelerating anode can be used, a in fig below . Sometimes the electron gun is built to
contain the accelerating anode and focusing system within the same unit.
Spots of light are produced on the screen by the transfer of the CRT beam energy to the
phosphor. When the electrons in the beam collide with the phosphor coating, they are
stopped and there are stopped and their kinetic energy is absorbed by the phosphor. Part
of the beam energy s converted by friction into heat energy, and the remainder causes
electron in the phosphor atoms to move up to higher quantum-energy levels. After a short
time, the “excited” phosphor electrons begin dropping back to their stable ground state,
giving up their extra energy as small quantum’s of light energy. What we see on the
screen is the combined effect of all the electrons light emissions: a glowing spot that
quickly fades after all the excited phosphor electrons have returned to their ground
energy level. The frequency ( or color ) of the light emitted by the phosphor is
proportional to the energy difference between the excited quantum state and the ground
state.
4
Different kinds of phosphor are available for use in a CRT. Besides color, a major
difference between phosphors is their persistence: how long they continue to emit light (
that is, have excited electrons returning to the ground state ) after the CRT beam is
removed. Persistence is defined as the time it take the emitted light from the screen to
decay to one-tenth of its original intensity. Lower-persistence phosphors require higher
refresh rates to maintain a picture on the screen without flicker. A phosphor with low
persistence is useful for animation ; a high-persistence phosphor is useful for displaying
highly complex, static pictures. Although some phosphor have a persistence greater than
1 second, graphics monitor are usually constructed with a persistence in the range from
10 to 60 microseconds.
Raster-Scan Displays
In a raster- scan system, the electron beam is swept across the screen, one row at a time
from top to bottom. As the electron beam moves across each row, the beam intensity is
turned on and off to create a pattern of illuminated spots. Picture definition is stored in
memory area called the refresh buffer or frame buffer. This memory area holds the set
of intensity values for all the screen points. Stored intensity values are then retrieved
from the refresh buffer and “painted” on the screen one row (scan line) at a time (fig.
Below). Each screen point is referred to as a pixel or pel (shortened forms of picture
element).
Refreshing on raster-scan displays is carried out at the rate of 60 to 80 frames per second,
although some systems are designed for higher refresh rates. Sometimes, refresh rates are
described in units of cycles per second, or Hertz (Hz), where a cycle corresponds to one
frame. At the end of each scan line, the electron beam returns to the left side of the screen
to begin displaying the next scan line. The return to the left of the screen, after refreshing
each scan line, is called the horizontal retrace of the electron beam. And at the end of
each frame (displayed in 1/80th to 1/60th of a second), the electron beam returns
(vertical retrace)to the top left corner of the screen to begin the next frame.
On some raster-scan systems (and in TV sets), each frame is displayed in two passes
using an interlaced refresh procedure. In the first pass, the beam sweeps across every
other scan line from top to bottom. Then after the vertical retrace, the beam sweeps out
the remaining scan lines (fig. Below). Interlacing of the scan lines in this way allows us
to see the entire screen displayed in one-half the time it would have taken to sweep across
all the lines at once from top to bottom.
5
Random-Scan Displays
Random scan monitors draw a picture one line at a time and for this reason are also
referred to as vector displays (or stroke-writing or calligraphic displays).The
component lines of a picture can be drawn and refreshed by a random-scan system in any
specified
order.
Refresh rate on a random-scan system depends on the number of lines to be displayed
Picture definition is now stored as a set of line-drawing commands in an area of memory
referred to as the refresh display file. Sometimes the refresh display file is called the
display list, display program, or simply the refresh buffer. To display a specified
picture, the system cycles through the set of commands in the display file, drawing each
component line in turn. After all line- drawing commands have been processed, the
system cycles back to the first line command in the list. Random-scan displays are
designed to draw al the component lines of a picture 30 to 60times each second.
6
Color CRT Monitors
The beam penetration method for displaying color pictures has been used with random-scan
monitors. Two layers of phosphor, usually red and green, are coated on to the inside of the CRT
screen, and the displayed color depends on how far the electron beam penetrates into the
phosphor
layers.
Shadow-mask methods are commonly used in raster-scan systems (including color TV) because
they produce a much wider range of color than the beam penetration method. A shadow-mask
CRT has three phosphor color dots at each pixel position. One phosphor dot emits a red light,
another emits a green light, and the third emits a blue light. This type of CRT has three electron
guns, one for each color dot, and a shadow- mask grid just behind the phosphor –coated screen.
Fig. Below illustrates the delta-delta shadow-mask method, commonly used in color CRT
systems. The three electron beam are deflected and focused as a group onto the shadow mask,
which contains a series of holes aligned with the phosphor-dot patterns. When the three beams
pass through a hole in the shadow mask, they activate a dot triangle, which appears as a small
color spot the screen the phosphor dots in the triangles are arranged so that each electron beam
can activate only its corresponding color dot when it passes through the shadow mask.
7
Flat-Panel Displays
The term flat–panel displays refers to a class of video devices that have reduced volume,
weight, and power requirements compared to a CRT. A significant feature of flat-panel
displayed is that they are thinner than CRTs, and we can hang them on walls or wear
them
on
our
wrists.
We can separate flat-panel displays into two categories: emissive displays and nonemissive displays. The emissive displays (or emitters) are devices that displays and light
- emitting diodes are examples of emissive displays. Non-emissive displays( or nonemitters) use optical effects to convert sunlight or light from some other source into
graphics patterns. The most important example of a non-emissive flat-panel display is a
liquidcrystal
device.
Plasma panels, also called gas discharge displays, are constructed by filling the region
between two glass plates with a mixture of gases that usually include neon. A series of
vertical conducting ribbons is placed on one glass panel, and a set of horizontal ribbons is
built into the other glass panel (fig. Below). Firing voltages applied to a pair of horizontal
and vertical conductors cause the gas at the intersection of the of two conductors to break
down into a glowing plasma of electrons and ions. Picture definition is stored in a refresh
buffer, and the firing voltages are applied to refresh the pixel positions (at the
intersections
of
the
conductors)
60
times
per
second.
Another type of emissive device is the light-emitting diode (LED). A matrix of diodes is
arranged to form the pixel positions in the display, and picture definition is stored in
refresh buffer. As in scan- line refreshing of a CRT, information is read from the refresh
buffer and converted to voltage levels that are applied to the diodes to produce the light
patterns
in
the
display.
Liquid- crystal displays (LCDs) are commonly used in systems, such as calculators (fig.
Below) and portable, laptop computers (fig. Below). These non-emissive devices produce
a picture by passing polarized light from the surrounding or from an internal light source
through a liquid- crystal material that can be aligned to either block or transmit the light.
The term liquid crystal refers to the fact that these compounds have a crystalline
arrangement of molecules, yet they flow like a liquid -. Flat-panel displays commonly use
pneumatic (threadlike) liquid-crystal compounds that tend to keep the long axes of the
rod-shaped molecules aligned. A flat-panel display can then be constructed with a
8
pneumatic liquid crystal, as demonstrated in fig. below. Two glass plates, each containing
a light polarizer at right angles to the other palate, sandwich the liquid-crystal material.
Rows of horizontal transparent conductors are built into one glass plate, and columns of
vertical conductors are put into the other plate. The intersection of two conductors defines
a pixel position. Normally, the molecules are aligned as shown in the “on state “of fig.
Below. Polarized light passing through the material is twisted so that it will pass through
the opposite polarizer. The light is reflected back to the viewer. To turn off the pixel, we
apply voltage to the two intersecting conductors to align the molecules so that the light is
not twisted. This type of flat-panel device is referred to as a passive matrix LCD. Picture
definition are stored in a refresh buffer, and the screen is refreshed at the rate of 60
frames per second, as in the emissive devices. Back lighting is also commonly applied
using solid-state electronic devices, so that the system is not completely dependent on
outside light sources. Colors can be displayed by using different materials or dyes and by
placing a triad of color pixels at each screen location. Another method for constructing
LCDs is to place a transistor at each pixel location, using thin-film transistor technology.
The transistors are used to control the voltage at pixel locations and to prevent charge
from gradually leaking out of the liquid-crystal cells. These devices are called activematrix displays.
9
INPUT DEVICES
Various devices are available for data input on graphics workstations. Most systems have
a keyboard and one or more additional devices specially designed for interactive input.
These include a mouse, trackball, spaceball, joystick, digitizers, dials, and button boxes.
Some other input devices used in particular applications are data gloves, touch panels,
image
scanners,
and
voice
systems.
Keyboards
An alphanumeric keyboard on a graphics system is used primarily as device for entering
text strings. The keyboard is an efficient device for inputting such no graphic data as
picture labels associated with a graphics display. Keyboards can also be provided with
features to facilitate entry of screen coordinates, menu selections, or graphics functions.
Mouse
A mouse is small hand-held box used to position the screen cursor. Wheels or rollers on
the bottom of the mouse can be used to record the amount and direction of movement.
Another method for detecting mouse motion is with an optical sensor,. For these systems,
the mouse is moved over a special mouse pad that has a grid of horizontal and vertical
lines. The optical sensor detects movement across the lines in the grid.
Since a mouse can be picked up and put down at another position without change in
cursor movement, it is used for making relative changes in the position of the screen
cursor. One, two, or three buttons are usually included on the top of the mouse for
signaling the execution of some operation, such as recording cursor position or invoking
a
function.
Joysticks
A joystick consists of a small, vertical lever (called the stick) mounted on a base that is
used to steer the screen cursor around. Most joysticks select screen positions with actual
stick movement; others respond to pressure on the stick. Figure below shows a movable
joystick. Some joysticks are mounted on a keyboard; others function as stand-alone units.
10
Digitizers
A common device for drawing, painting, or interactively selecting coordinate positions
on an object is a digitizer. These devices can be used to input coordinate values in either
a two-dimensional or a three-dimensional space. Typically, a digitizer is used to scan
over a drawing or object and to input a set of discrete coordinate positions, which can be
joined with straight-line segments to approximate the curve or surface shapes.
11
One type of digitizer is the graphics tablet (also referred to as a data tablet), which is
used to input two-dimensional coordinates by activating a hand cursor or stylus at
selected positions on a flat surface. A hand cursor contains cross hairs for sighting
positions, while a stylus is a pencil-shaped device that is pointed at positions on the
tablet. Figures below show examples of desktop and floor-model tablets, using hand
cursors that are available with 2, 4, or 16 buttons. Examples of stylus input with a tablet
are shown in Figs. Below. The artist’s digitizing system in Fig. below uses
electromagnetic resonance to detect the three-dimensional position of the stylus. This
allows an artist to produce different brush strokes with different pressures on the tablet
surface. Tablet size varies from 12 by 12 inches for desktop models to 44 by 60 inches or
larger for floor models. Graphics tablets provide a highly accurate method for selecting
coordinate positions, with an accuracy that varies from about 0.2 mm on desktop models
to
about
0.05
mm
or
less
on
larger
models.
Many graphics tablets are constructed with a rectangular grid of wires embedded in the
tablet surface. Electromagnetic pulses are generated in sequence along the wires, and an
electric signal is induced in a wire coil in an activated stylus or hand cursor to record a
tablet position. Depending on the technology, either signal strength, coded pulses, or
phase shifts can be used to determine the position on the tablet.
12
HARD-COPY DEVICES
We can obtain hard-copy output for our images in several formats. Eg: Dot matrix printer, laser
printer & inkjet printer are commonly used.
Drafting layouts and other drawings are typically generated with ink-jet or pen plotters. A pen
plotter has one or more pens mounted on a carriage, or crossbar, that spans a sheet of paper. Pens
with varying colors and widths are used to produce a variety of shadings and line styles. Wet-ink,
ball-point, and felt-tip pens are all possible choices for use with a pen plotter. Plotter paper can
lie flat or be rolled onto a drum or belt. Crossbars can be either moveable or stationary, while the
pen moves back and forth along the bar. Either clamps, a vacuum, or an electrostatic charge hold
the paper in position. An example of a table-top flatbed pen plotter is given in Figure below, and
a larger, rollfeed pen plotter is shown in Fig.below
13
2-D Composite Transformation
INTRODUCTION
With the matrix representations of the transformations, we can set up a matrix for any
sequence of transformations as a composite transformation matrix by calculating the matrix
product of the individual transformations.
If two successive transformations
transformed location
T1 and T2 are applied to a coordinate position P, the final
P' is calculated as:
Where
TRANSLATION
In translation, an object is displayed a given distance and direction from its original position.
If the displacement is given by the vector
be found by applying the transformation
the new object point
P'(x',y')
can
Tv to P(x,y)
where
and
14
15
ROTATION
A generalized rotation about an arbitrary point
(a,b) can be obtained by performing the
The composite matrix for this sequence is obtained as:
where,
16
SCALING
The animation illustrates a transformation sequence to produce scaling with respect to a
selected fixed position (a,b) using a scaling function that can only scale relative to the
coordinate origin.
1. Translate object so that the fixed point coincides with the coordinate origin.
2. Scale the object with respect to the coordinate origin.
3. Use the inverse translation of step 1 to return the object to its original position.
The composite matrix for this sequence is obtained as:
where,
ADVANTAGES OF HOMOGENEOUS COORDINATES
Representing all transformations as matrix multiplications
Two Dimensional coordinates are represented using three-element column vectors, and
Transformation operation is represented by 3 x 3 matrices.
17
which can be written in abbreviated form as
Capturing composite transformations conveniently
On the basis of the matrix product of the individual transformations we can set up a matrix
for any sequence of transformation known as composite transformation matrix. For rowmatrix representation we form composite transformations by multiplying matrices in order
from left to right whereas in column-matrix representation we form composite
transformations by multiplying matrices in order from right to left.
Non linear transformations (3D-perspective transformations)
Representing points at infinity.
Homogeneous coordinates can be used to display a point at infinity. For example
In the above example the point at infinity is presented in the form of homogeneous
coordinates. This is often needed when we want to represent a point at infinity in a certain
direction. For instance, for finding the vanishing point in perspective projections we can
transform the point at infinity in the given direction.
18
3-D Geometric & Modeling Transformation
TRANSLATION
In three-dimensional homogeneous coordinate representation, when a point P is translated
to
P' with coordinated (x,y,z) and (x',y',z') can be represented in matrix form as:
Where,
ROTATION
Unlike 2D, rotation in 3D is carried out around any line. The most simple rotations could be
around coordinate axis. As in 2D positive rotations produce counter-clockwise rotations.
Rotation in term of general equation is expressed as
Where,
R = Rotation Matrix
Rotation matrix when an object is rotated about X axis can be expressed as:
19
Rotation matrix when an object is rotated about Y axis can be expressed as:
Rotation matrix when an object is rotated about Z axis can be expressed as:
SCALING
Scaling an object in three-dimensional is similar to scaling an object in two-dimensional.
Similar to 2D scaling an object tends to change its size and repositions the object relative to
the coordinate origin. If the transformation parameter are unequal it leads to deformation of
the object by changing its dimensions. The perform uniform scaling the scaling factors
should be kept equal
i.e.
Where,
20
NOTE: A special case of scaling can be represented as reflection.
if the value of
Sx, Sy or Sz be replaced by -1 it will return the reflection of the object against
the standard plane whose normal would be either x axis, y axis or z axis respectively.
REFLECTION
In 3D-reflection the reflection takes place about a plane whereas 2D reflection it used take
place about an axis. The matrix in case of pure reflections, along basic planes, viz. X-Y
plane, Y-Z plane and Z-X plane are given below:
Transformation matrix for a reflection through
X-Y plane is:
Transformation matrix for a reflection through
Y-Z plane is:
Transformation matrix for a reflection through
Z-X plane is:
21
3-D Composite Transformation
GENERAL 3-D ROTATION
Rotation in three dimension is more complex than the rotation in two dimensions. Three
dimensional rotations require the prescription of an angle of rotation and an axis of rotation.
The canonical rotations are defined when one of the positive x,y,z coordinate axis is chosen
as the axis of rotation. then the construction of rotation transformation proceeds just like
that of a rotation in two dimensions about the origin.
GENERAL 3-D REFLECTION
Some orientations of a three dimensional object cannot be obtained using pure rotations;
they require reflections. In three dimensions, reflection occur through a plane. By analogy
with the previous discussion of of two dimensional reflection three dimensional reflection
through a plane is equivalent to rotation about an axis in three dimensional space out in to
four dimensional space and back into three dimensional space. For pure reflection the
determinant of the reflection matrix is identically -1
22
Steps to be performed
1. Translate origin to A1
2. Align vector with axis (say, z)
1. Rotate to bring vector in yz plane
23
2. Rotate to bring vector along z-axis
3. Reflect the line P1P2 through the standard y-z plane.
4. Reverse steps 2
5. Reverse step 1
Objective of the animation
Our objective is to reflect line P1P2 by through the plane defined by the equation
ax+by+cz+d=0.
3-D Projections
ORTHOGRAPHIC PROJECTION
The simplest of the Parallel projections is the orthographic projection, commonly used for
engineering drawings. They accurately show the correct or true size and shape of single
plane face of an object. orthographic projections are projections onto one of the coordinate
planes x=0, y=0, z=0.The matrix for projection onto the z plane is
Notice that the third column (the
transformation is to set the
z column) is all zeros. Consequently, the effect of the
z coordinate of a position vector to zero.
Similarly, the matrices for projection on to
x=0 and y=0 planes are
24
and
AXONOMETRIC PROJECTION
A single orthographic projection fails to illustrate the general three-dimensional shape of an
object. Axonometric projections overcome this limitation. An axonometric projection is
constructed by manipulating the object using rotations and translations, such that at least
three adjacent faces are shown. The result is then projected from the center of projection at
infinity on to one of the coordinate plane unless a face is parallel to the plane of projection,
an axonometric projection does not show its true shape. However, the relative lengths of
originally parallel lines remain constant, i.e., parallel lines are equally foreshortened.
Foreshortening factor-it is the ratio of the projected length of a line to its true length
Types of axonometric projections 1.Trimetric
2.Dimetric
3.Isometric
Trimetric projection is the least restrictive and isometric projection is the most restrictive
Trimetric Projection - A trimetric projection is formed by arbitrary rotations in arbitrary
order, about any or all of the coordinate axes, followed by parallel projection on to the z=0
plane. The wide variety of trimetric projections precludes giving a general equation for these
ratios
For any specific trimetric projection, the foreshortening ratios are obtained by applying
transformation matrix to the unit vector along the principal axis specifically,
25
where [U] is the matrix of unit vectors along the untransformed x, y and z axes
respectively, and [T] is the concatenated trimetric projection matrix. The foreshortening
factors along the projected principal axes are then
OBLIQUE PROJECTION
oblique projections illustrate the general 3 dimensional shape of the object. However only
faces of the object parallel to the plane of projection are shown at there true size and
shape, that is angles and lengths are preserved for these faces only. In fact ,the oblique
projection of these faces is equivalent to an orthographic front view.
TYPES OF OBLIQUE PROJECTIONS1.Cavalier
2.Cabinet
Cavalier Projection-A cavalier projection is obtained when the angle between oblique
projectors and the plane of projection is 45 degree. In a cavalier projection the
foreshortening factors for all three principal direction are equal. The resulting figure appears
too thick. A cabinet projection is used to correct this deficiency.
Cabinet projection- An oblique projection for which the foreshortening factor for edges
perpendicular to the plane of projection is one half is called a cabinet projection.
26
STANDARD PERSPECTIVE PROJECTION
A perspective transformation is the transformation from one three space in to another three
space. In contrast to the parallel transformation , in perspective transformations parallel
lines converge, object size is reduced with increasing distance from the center of projection,
and non uniform foreshortening of lines in the object as a function of orientation and the
distance of the object from the center of projection occurs. All of these effects laid the depth
perception of the human visual system., but the shape of the object is not preserved.
Perspective drawings are characterized by perspective foreshortening and vanishing points
.Perspective foreshortening is the illusion that object and lengths appear smaller as there
distance from the center of projection increases. The illusion that certain sets of parallel
lines appear to meet at a point is another feature of perspective drawings. These points are
called vanishing points .Principal vanishing points are formed by the apparent intersection of
lines parallel to one of the three x,y or z axis. The number of principal vanishing points is
determined by the number of principal axes interested by the view plane
Perspective Anomalies
1.Perspective foreshortening- The farther an object is from the center of projection ,the
smaller it appears
2.vanishing Points- Projections of lines that are not parallel to the view plane (i.e. lines
that are not perpendicular to the view plane normal) appear to meet at some point on the
view plane. This point is called the vanishing point. A vanishing point corresponds to every
set of parallel lines. Vanishing points corresponding to the three principle directions are
referred to as "Principle Vanishing Points (PVPs)". We can thus have at most three PVPs. If
one or more of these are at infinity (that is parallel lines in that direction continue to appear
parallel on the projection plane), we get 1 or 2 PVP perspective projection.
Transformation Matrix for Standard Perspective Projection
27
View plane at
or
Similarly,
28
Curves
INTRODUCTION
A curve segment is a point bounded collection of points whose coordinates are given by
continuous, one-parameter, single-valued mathematical functions of the form.
x = x(u)
y = y(u)
z = z(u)
The parametric value of u is constrained to the interval u Є [0,1]. The curve is bounded
between two points at u=0 and the other at u=1.
Any point on the curve can be treated as a component of vector
vector to the point
same point.
p(u). This p(u) is the
u
x(u), y(u), z(u) and p (u) is the tangent vector to the curve at the
here
vector components are:
and the tangent vector is:
A simple example of parametric equation of a curve would be a set of linear parametric
equations above is gives a straight line starting at Point p(0) = [a b c] and ending at point
p(1) = [(a + l) (b + m) (c + n)] where a, b, c and l, m, n are constants. The direction
cosines of the line would be proportional to
l, m, n.
29
GEOMETRIC CONTINUITY CONDITIONS
An alternate method for joining two successive curve sections is to specify conditions for
geometric continuity. In This case, we only require parametric derivatives of the two sections to
be proportional to each other at their common boundary instead of equal to each other.
Zero- order geometric continuity, described as G0 continuity, is the same as zero- order
parametric continuity. That is, the two curves sections must have the same coordinate position at
the boundary point. First order geometric continuity, or G1 continuity, means that the
parametric first derivatives are proportional at the intersection on two successive sections. If we
denote the parametric position on the curve as P(u), the direction of the tangent vector P'(u), but
not necessarily its magnitude, will be the same for two successive curve sections at their joining
point under G1 continuity. Second-order geometric continuity, or G2 continuity, means that
both the first and second parametric derivatives of the two curve sections are proportional at their
boundary. Under G2 continuity, curvatures of two curve sections will match at the joining
position.
A curve generated with geometric continuity conditions is similar to one generated with
parametric continuity, but with slight differences in curve shape. Figure below provides a
comparison of geometric and parametric continuity. With geometric continuity, the curve is
pulled
toward
the
section
with
the
greater
tangent
vector.
Figure 1: Curves with G1 continuity
Figure 1: Curves with C1 continuity
30
Spline Specifications
There are three equivalent methods for specifying a particular spline representation: (1) We van
state the set of boundary conditions that are imposed on the spline; or (2) we can state the matrix
that characterizes the spline; or (3) we can state the set of blending functions (or basis
functions) that determine how specified geometric constraints on the curve are calculate
positions
along
the
curve
path.
To illustrate these three equivalent specifications, suppose we have the following parametric
cubic polynomial representation for the x coordinate along the path of a cubic spline section:
Boundary conditions for this curve might be set, for example, on the endpoint coordinates
x(0)and x(1) and on the parametric first derivatives at the endpoints x'(0) and x'(1). These four
boundary conditions are sufficient to determine the values of the four coefficients ax,bx,cx and dx.
From the boundary conditions, we can obtain the matrix that characterizes this spline curve by
first
rewriting
Eq.
above
as
the
matrix
product.
Where U is the row matrix of powers of parameter u, and C is the coefficient column matrix. If
x(0), x(1), x'(0) and x'(1) are known using the equation above we can right the boundary
conditions in matrix form and solve for the coefficient matrix C as
31
Where
is a four-element column matrix containing the geometric constraint values
(boundary conditions) on the spline
and C is the 4-by-4 matrix of the polynomial coefficients given by
and M is the matrix of the coefficients in the equation.
the equation x=UC can now be rewritten as follows:
or as
Finally, we can expand equation above to obtain a polynomial representation for coordinate x in
terms
of
the
geometric
constraint
parameters
where gk are the constraint parameters, such as the control-point coordinates and slope of the
curve at the control points, and BFk(u) are the polynomial blending functions. These blending
functions can be written in a matrix form as
where Mblend is the set of coefficients of these blending functions. The curve equation can then be
expressed as
where B is the matrix of the input points.
In the following sections, we discuss some commonly used splines and their matrix and
blending-function specifications.
32
ALGEBRAIC AND GEOMETRIC FORMS
The Algebraic form of a parametric cubic (pc) curve segment is given by the following three
polynomials
A set of 12 constant coefficients are called algebraic coefficients. Each unique set of
algebraic coefficient determines a unique pc curve. If two similar curves occupy different
positions in space then their algebraic coefficients are different.
The same set of polynomial equation can be written in a compact for as given below:
.......................................................(1.1)
here p(u) is the position vector of any point on the curve, and a0, a1, a2, a3 are the vector
equivalents of the scalar algebraic coefficients. Again the restriction on the parametric
variable u is expressed as u Є [0,1].
The geometric form of a pc curve is more convenient way of controlling the shape of a curve
in typical modeling situations. For a space curve there are several conditions to choose
from: end points coordinates, tangents, curvature, torsion, plus any number of conditions
dependent on higher order derivatives.
Therefore by using the equation 1.1 we get:
Where
p(0) and p(1) are simply calculated by substituting u with 0 and
p (0) and pu(1) are calculated by differentiating p(u) with respect to u.
1 respectively and
u
By solving this set of four equations, we can define the algebraic coefficients in terms of the
boundary conditions.
33
On substituting their value in equation 1.1 we get
From the above equation we obtain:
Thus equation 1.2 can be written as:
On dropping the function notation the final equation would look like:
This is the geometric form, and are called geometric coefficients. The F terms are
blending functions.
This can be written in the "Standard Geometric Form" as
This form is also the same as the Hermite Splines.
CUBIC SPLINE INTERPOLATION METHODS
This class of spline is most often used to set up paths for object motions or to provide a
representation for an existing object or drawing, but interpolation splines are also used
sometimes to design object shapes. Cubic polynomials offer a reasonable compromise between
flexibility and speed of computation. Compared to higher – order polynomials, cubic splines
require less calculations and memory and they are more stable. Compared to lower-order
polynomials, cubic splines are more flexible for modeling arbitrary curve shapes.
Given a set of control points, cubic interpolation splines are obtained by fitting the input points
with a piecewise cubic polynomial curve that passes through every control point. Suppose we
have
n+1
control
points
specified
with
coordinates
A cubic interpolation fit of these points is illustrated in figure below. We can describe the
parametric cubic polynomial that is to be fitted between each pair of control points with the
following
set
of
equations:
34
For each of these three equations, we need to determine the values of the four coefficients a, b, c,
and d in the polynomial representation for each of the n curve sections between the n+1 control
points. We do this by setting enough boundary conditions at the “joints” between curves sections
so that we can obtain numerical values for all the coefficients. In the following sections, we
discuss common methods for setting the boundary conditions for cubic interpolation splines.
Surfaces
QUADRIC SURFACES
A frequently used class of objects is the quadric surfaces, which are described with second degree equations (quadratics). They include spheres, ellipsoids, tori, paraboloids, and
hyperboloids. Quadric surfaces, particularly spheres and ellipsoids, are common elements of
graphics scenes, and they are often available in graphics packages as primitives from which more
complex
objects
can
be
constructed.
Sphere
In Cartesian coordinates, a spherical surface with radius r centered on the coordinate origin is
defined
as
the
set
of
points
(x,
y,
z)
that
satisfy the
equation
35
We can also describe the spherical surface in parametric form, using latitude and longitude
angles
Figure
below:
The parametric representation in Equ. Below provide a symmetric range for the angular
parameters
and
alternatively, we could write the parametric equations using standard
spherical coordinates, where angle
is specified as the colatitudes fig. below. Then
is
defined over the range
, and is often taken in the range
. We could also
set up the representation using parameters u and v defined over the range from 0 to 1 by
substituting
and
.
Ellipsoid
An ellipsoidal surface can be described as an extension of a spherical surface where the radii in
three mutually perpendicular directions can have different values fig. below. The Cartesian
representation for points over the surface of an ellipsoid centered on the origin is
And a parametric representation for the ellipsoid in terms of the latitude angle
longitude
angle
in
fig.
and the
below
36
Torus
A torus is a doughnut-shaped object, as shown in fig. below. It can be generated by rotating a
circle or other conic about a specified axis. The Cartesian representation for points over the
surface
of
a
torus
can
be
written
in
the
form.
Where r is any given offset value. Parametric representations for a torus are similar to those for
an ellipse, except that angle
we can describe the
extends over 3600.using latitude and longitude angles
torus surface as the set of points that
and ,
satisfy
B-Spline Surfaces
Formulation of a B-spline surface is similar to that for B-splines. We can obtain a vector point
function over a B-spline surface using the Cartesian product of B-spline blending functions in the
form
where vector values for pk1,k2 specify positions of (n1 + 1) by (n2 + 1) control points.
B-Spline surfaces exhibit the same properties as those of their component B-spline curves. A
surface can be constructed from selected values for parameters d1 and d2 (which determine the
polynomial degrees to be used*-+) and from the specified knot vectors in the two directions.
37


© Copyright 2026