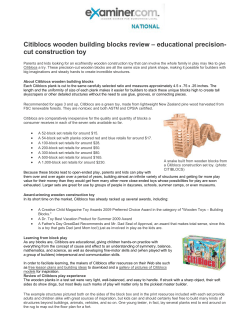
BASIC WOODEN LETTERS calling all alphabets!
You can make our
BASIC
WOODEN
LETTERS
the stars of some pretty
fabulous home décor.
Look inside for our favorite project ideas.
calling all alphabets!
{ C R E AT I V E
I N S P I R AT I O N S
free F R O M H O B B Y L O B B Y }
®
IT’S SHOWTIME We recreated the oh-wow factor of
vintage-style marquee letters by hot gluing strips of lightweight matte
board (Art Department) to the edges of our big
wooden letters. Then we painted,
drilled the appropriate holes,
popped in some globe lights
(Wedding Department), and let
the show begin! Tip: We aged
our letters with metallic paint
and silver leaf.
JUST
B-CAUSE
Bling-up an itty-bitty
“B” to create this
cute monogram
keychain. Punch the
hole first. Then add
the paint and the
gemstones. You’ll
find the hardware
and the little
fleur-de-lis charm
in the Jewelry
Department.
2
BEDTIME
STORY
White on white means a very
good night, according to this
sweet personalized sign. The
base is a painted burlap canvas
(Art Department). We painted
the curly-q wooden letters to
match, and then we glued them
into place. A length of burlap
ribbon serves as the hanger,
and we were done.
INITIALLY YOURS
In this case, the “P” stands for pearls. We hot glued hundreds of pearly
beads (in a variety of sizes) to an oversized wooden letter to create
this lovely monogram art. You can do this look with beads of any
color—just be sure to paint the letter to match before you begin.
IT’S A SIGN
If you’re playing with a
neutral color scheme, try
leaving our wooden letters
as they come. The unfinished
wood can look naturally
mellow against burlap
(upper right corner).
3
THE COWBOY WAY
Here’s a fancy way to say “howdy”: Drape a big
ol’ wooden letter with bandanas. We glued quilt
batting to the wood, and then we wrapped the
fabric tightly, gluing it at the back to secure. And for
the finishing touch? A handful of gold and gemstone
grommets for a touch of bling. Yee-haw!
GREEN PIECE
We traced these letters onto a moss mat (Floral
Department) to get our nod-to-nature display
off the ground. Then we cut out our tracings and
glued them to the wood with tacky craft glue.
When all the letters were covered and dry, we
glued each one to a wood-stained dowel rod.
4
MAKE A NAME
That bouncing bundle of cuteness needs a place
to call her own. And she’ll know it’s hers by
the name on the quirky wooden banner.
The wooden triangles are sold à la carte—
grab as many or as few as you need.
Just paint them, top them with wooden letters,
and string them together with ribbon.
5
LEARN YOUR
LETTERS
This sculptural take on a classic nursery
alphabet chart couldn’t be easier.
We chose some letters—we went
with a mix of sizes and styles—and
painted them to match the room.
Then we dotted them with an
assortment of whimsical papercrafting
embellishments. Tip: Our wooden
letters vary in size from 1 1/4” to 18”.
WORTH A RUFFLE
Chic done simple? Oh, yes! Embellish these wooden letters with
everything from lacy ruffle trim to paper butterflies to fabric rosettes.
MATTER OF
FACT
A nursery’s not complete
until you post your little
one’s stats. For this look, we
painted petite wooden letters
to match the décor. Then
we glued them to painted
foam board. We tucked the
board into a frame—and
an adorable just-the-facts
plaque was born! Tip: The
frame comes in white, but
we gave it a paint job.
©2014 Hobby Lobby® - Photography by Sanford Mauldin
www.hobbylobby.com •
• Crafts - 745901
DO NOT ALLOW CHILDREN TO COMPLETE PROJECTS ALONE. ADULT SUPERVISION REQUIRED.
© Copyright 2026


