
REMODEL Lindsay, OK WALMART STORES, INC. STORE PLANNING
PROJECT MANUAL
REMODEL
Lindsay, OK
Store Number: 0893
24-November-2010
For
WALMART STORES, INC.
STORE PLANNING
Sam Walton Development Complex
2001 S.E. 10th Street
Bentonville, Arkansas 72716-0550
ARCHITECT / ENGINEER
Cyntergy AEC, LLC
12th Floor
320 South Boston Avenue
Tulsa, Oklahoma 74103
918 877 600
UniSpec II - Store Planning
111910
SECTION 00010 - TABLE OF CONTENTS
INTRODUCTORY INFORMATION
00001
00007
00010
Project Title Page
Seals Page
Table of Contents
BIDDING REQUIREMENTS
Bidding Requirements (including Invitation to Bids, Instructions to Bidders, and Bid Forms) are issued by the Owner
(Walmart) under separate cover and are not included in the Project Manual.
CONTRACTING REQUIREMENTS
Contracting Requirements (including Agreement, Bond, and Certificate Forms) are issued by the Owner (Walmart) under
separate cover and are not included in the Project Manual.
DIVISION 1 - GENERAL REQUIREMENTS
01100
Summary
01131
Alterations Project Procedures
01230
Alternates
01255
Request for Information
01310
Construction Management and Coordination
01312
Progress Meetings
01320
Construction Progress Documentation
01330
Submittal Procedures
01432
Electrical Installer Qualifications
01458
Testing Laboratory Services
01500
Temporary Facilities and Controls
01600
Product Requirements
01640
Owner Furnished Products
01700
Execution Requirements
01731
Cutting and Patching
01740
Cleaning
01742
Construction/Demolition Waste Management and Disposal
01770
Contract Closeout
DIVISION 2 - SITE CONSTRUCTION
02023
Selective Site Demolition (Non-Civil)
02320
Excavating, Backfilling and Compacting (Non-Civil)
02821
Chain Link Fences and Gates
02890
Traffic Signs and Signals
DIVISION 3 - CONCRETE
03300
Cast-in-Place Concrete
DIVISION 4 - MASONRY
NOT APPLICABLE
DIVISION 5 - METALS
05500
Metal Fabrications
DIVISION 6 - WOOD AND PLASTICS
06065
Plastic Materials
00010-1
0893 Lindsay, OK
11/23/10
06100
06165
06200
06400
06424
06615
06620
Rough Carpentry
Fiberboard Panels
Finish Carpentry
Architectural Woodwork
Protective Surfacing
Non-Fiberglass Reinforced Panels
Solid Surfacing
DIVISION 7 - THERMAL AND MOISTURE PROTECTION
07210
Building Insulation
07900
Joint Sealers
DIVISION 8 - DOORS AND WINDOWS
08110
Steel Doors and Frames
08311
Access Doors and Frames
08383
Traffic Doors
08411
Aluminum Framed Storefronts
08462
Automatic Sliding Entrance Doors
08710
Door Hardware
08800
Glazing
DIVISION 9 - FINISHES
09250
Gypsum Board
09310
Ceramic Tile
09511
Acoustical Panel Ceilings
09650
Resilient Flooring
09655
Resilient Base and Accessories
09680
Carpet
09900
Paints and Coatings
DIVISION 10 - SPECIALTIES
10170
Plastic Toilet Compartments
10260
Wall and Corner Guards
10440
Signage
10810
Toilet Accessories
DIVISION 11 - EQUIPMENT
NOT APPLICABLE
DIVISION 12 - FURNISHINGS
NOT APPLICABLE
DIVISION 13 - SPECIAL CONSTRUCTION
13121
Fabric Structures
13122
Metal Building Systems
13810
Energy Management Systems (EMS)
13900
Fire Suppression
DIVISION 14 - CONVEYING SYSTEMS
NOT APPLICABLE
DIVISION 15 - MECHANICAL
15050
Basic Mechanical Materials and Methods
15100
Building Services Piping
15410
Plumbing Fixtures
15800
Air Distribution
00010-2
0893 Lindsay, OK
11/23/10
DIVISION 16 - ELECTRICAL
16050
Basic Electrical Materials and Methods
16100
Wiring Methods
16500
Lighting
END OF TABLE OF CONTENTS
00010-3
0893 Lindsay, OK
11/23/10
UniSpec II - Store Planning
032709
SECTION 01100 - SUMMARY
PART 1 - GENERAL
1.1
SUMMARY
A.
1.2
Section Includes:
1.
Definitions.
2.
Work covered by Contract Documents.
3.
Work by Walmart or Separate Contractors.
4.
Contractor use of site and premises.
5.
Coordination with occupants.
6.
Partial occupancy.
DEFINITIONS
A.
Furnish: Purchase and deliver to project site, ready for installation.
B.
Install: Unpack, assemble, set in final position, fasten in place, make final connections, clean, adjust, and leave
ready for use.
C.
Provide: Furnish and install.
D.
Receive: Accepting a delivery. (Entity responsible for accepting a delivery.)
E.
Final Connections: Complete plumbing, mechanical, and electrical connections as required and recommended by
manufacturer for optimum operation of equipment.
1.3
WORK COVERED BY CONTRACT DOCUMENTS
A.
Work of this Contract comprises the general construction required for a Walmart Division 01 Face Lift.
B.
The Division 01 Store Face Lift Work may include, but is not limited to repainting exterior walls, replacing
interior finishes for Walmart Stores, Inc.
1.4
WORK BY WALMART OR SEPARATE CONTRACTORS
A.
Walmart has its own forces who will perform certain Work on the project, items noted 'NIC' (Not In Contract)
which will commence as indicated on the Construction Schedule.
1.
Walmart may award separate contracts for work at the Site, which will be executed concurrent with work
of this Contract. Consult and cooperate with Separate Contractors to the full extent provided for in the
Conditions of the Contract.
B.
During setup of equipment by the Owner or separate contractors, make crane service available to hoist equipment
directly from trucks to final position. Coordinate schedule with Walmart's Construction Manager.
1.5
CONTRACTOR USE OF SITE AND PREMISES
A.
Limit use of site to allow for:
1.
Walmart occupancy.
2.
Work by separate contractors and by Walmart.
3.
Use of site and premises by the public.
01100-1
0893 Lindsay, OK
11/23/10
B.
Confine operations at site to areas permitted by Law, Ordinances, Permits and to Limits of Contract as shown on
Contract Documents. Verify with Walmart Construction Manager acceptable locations where operations may
occur so as not to disturb Owner operations or customer traffic.
C.
Do not unreasonably encumber site with materials or equipment.
D.
Do not load structure with weight that will endanger structure. DO NOT STORE ROOFING MATERIALS ON
THE EXISTING ROOF.
E.
Assume full responsibility for protection and safekeeping of all products stored on premises whether purchased by
Contractor or Owner. Move stored products, which interfere with operations of Owner or customer traffic.
F.
Carefully coordinate sequence of construction activity and operations with Walmart Construction Manager.
G.
Maintain the following conditions at all times during the construction period until possession by Walmart.
1.
Maintain building weathertight and secure.
2.
Maintain building security and fire alarm systems in operation. (In the event both systems should fail, the
Fire Alarm System shall have priority over the Security System.)
a.
Contract with local alarm company to maintain service, and repair existing systems as required due
to work relating to this Contract.
b.
Alarm Company:
1)
Visit site and be familiar with existing conditions.
2)
Respond to service calls within 24 hours.
c.
Provide on-site guard services in the event the existing system is disabled for 8 hours or more.
d.
Coordinate security alarm with Section 01500 - Temporary Facilities and Controls.
e.
Contact Walmart Alarm Central Control at (479) 273-4600 for additional information and
coordination relating to work associated with existing alarm systems.
3.
Maintain access and egress from the building.
1.6
COORDINATION WITH OCCUPANTS
A.
1.7
Owner will occupy premises during entire period of construction for the conduct of Owner's normal, daily
operations. Cooperate with Walmart Construction Manager in construction operations to minimize delays,
inconvenience, or conflict to Owner's daily business operations and customer traffic. The Contractor shall obtain
permission from the Owner for interruptions of utility services to the building. Accidental interruptions shall be
restored immediately.
1.
Any Contractor work operations that may disrupt or interfere with Walmart or building operation or
function shall be reviewed and approved by Walmart Construction Manager.
2.
Submit written request for approval to Walmart Construction Manager 14 calendar days in advance of date
Contractor work operations are required to begin.
PARTIAL OCCUPANCY
A.
Walmart will occupy any completed or partially completed portions of the Work.
B.
Cooperate with Walmart to minimize conflict, and schedule the Work to facilitate Walmart's operations.
C.
Prior to Walmart occupancy in areas of new work, the following provisions shall be in place:
1.
Illuminated exit signs are operational.
2.
Exit doors, including required panic hardware, are operational.
3.
Lighted, enclosed walkways and other temporary safety measures are in place if required by authorities
having jurisdiction.
4.
Fire sprinkler system is operational.
5.
Doors required for Walmart's security purposes are operational.
D.
After Walmart occupancy:
1.
Keep exit routes and exit doors free from obstructions.
01100-2
0893 Lindsay, OK
11/23/10
2.
3.
4.
Maintain exit signs and fire sprinkler system in operational condition.
Provide security for Walmart's products, equipment, and operations.
Do not permit smoking in the building.
PART 2 - PRODUCTS (Not Used)
PART 3 - EXECUTION (Not Used)
END OF SECTION
01100-3
0893 Lindsay, OK
11/23/10
UniSpec II - Store Planning
011108
SECTION 01131 - ALTERATIONS PROJECT PROCEDURES
PART 1 - GENERAL
1.1
DESCRIPTION
A.
1.2
Summary: The procedures and administrative requirements of this Section apply to all of the following Sections
of the Specification, which are involved in alterations to the existing building.
RELATED REQUIREMENTS
A.
Section 01500 - Temporary Facilities and Controls
B.
Section 01731 - Cutting and Patching
C.
Section 02023 - Selective Site Demolition
1.3
SCHEDULING, ACCESS AND SECURITY
A.
Work Sequence:
1.
The existing premises will be occupied during the construction process. Coordinate sequence of work with
Walmart Construction Manager and Store Manager on site in order that Walmart's operations may
continue.
2.
The Walmart Construction Manager will require a job start meeting prior to any Work activity.
3.
The Construction Schedule is limited to a time frame established by Walmart. Contact Walmart
Construction Manager immediately if, at any time, construction schedule is not being met or if delays are
foreseen.
4.
The Contractor shall develop a schedule of Work, which will be reviewed and approved by the Walmart
Construction Manager, describing the starting and completion dates of the different phases of this Project.
Walmart reserves the right to revise this schedule to best meet the needs for the Store’s operations.
Revisions to the Construction Schedule shall be made by the Contractor at no additional cost to Walmart.
As the construction progresses, the Contractor shall give an update of the construction schedule to the Store
Manager and Walmart Construction Manager on a weekly basis.
B.
Security is specified in Section 01500.
C.
Maintenance of Access and Operations:
1.
During period of construction, Walmart will continue to perform normal activities in existing building.
Maintain proper and safe Customer and Associates access to operational areas at all times.
2.
Schedule demolition and remodeling operations with Walmart Construction Manager and/or Store Manager
in such a manner as to allow Walmart operations to continue with approved interruptions.
3.
During period of construction, do not obstruct in any manner existing exitways unless additional exitways
are provided. Prior to removal of existing exitways (stairs, corridors, doors) as part of new Work, provide
and maintain new exitways so as to maintain same number of exitways. Maintain existing fire doors in a
operable condition. Obtain approval from Authorities Having Jurisdiction (AHJ) for all temporary
modifications to the existing system.
D.
Maintenance of Existing Services
1.
Maintain environmental control in existing building, especially temperature, humidity and dust control.
2.
Provide temporary power, services and connections as required to maintain existing mechanical and
electrical services in building.
3.
Notify Walmart Store Manager and Construction Manager a minimum of three (3) days prior to each
required interruption of mechanical or electrical services in building. Such interruptions shall be only at
such times and for lengths of time as approved by the Walmart Construction Manager and/or Store
01131-1
0893 Lindsay, OK
11/23/10
Manager. In no event shall interruption occur without prior approval of the Walmart Construction Manager
and/or Store Manager.
E.
Building Access/Construction Personnel Control.
1.
Access to construction areas within building shall be as directed by Walmart Construction Manager.
2.
Restrict construction traffic to areas specifically designated by Walmart Construction Manager.
3.
All Contractors and any Walmart Subcontractors or Separate Contractors shall supply their employees with
identification badges. All workers on the Project must wear company-specific identification badges or
work shirts with company logo and name identification at all times while working on the Project or will be
required to leave the premises. All company-specific badges shall be approved and acceptable to Walmart.
PART 2 - PRODUCTS (Not Used)
PART 3 - EXECUTION (Not Used)
END OF SECTION
01131-2
0893 Lindsay, OK
11/23/10
UniSpec II - Store Planning
032610
SECTION 01230 - ALTERNATES
PART 1 - GENERAL
1.1
SUMMARY
A.
Section Includes:
1.
Alternate submission requirements description of work included in Alternates.
B.
Related Sections:
1.
Special Conditions: Acceptance of Alternates in award of a Contract.
1.2
DEFINITIONS
A.
1.3
Alternate: An amount proposed by bidders and stated and defined on the Bid Form for certain work that may be
added to or deducted from the base bid amount if Walmart decides to accept a corresponding change either in the
amount of construction to be completed or in the products, materials, equipment, systems, or installation methods
described in the Contract Documents.
1.
Alternates will be a part of the Work only if enumerated in the Agreement.
2.
The cost or credit for each alternate is the net addition to or deduction from the Contract Sum to incorporate
alternate into the Work. No other adjustments are made to the Contract Sum.
PROCEDURES
A.
Notification: Immediately following award of the Contract, notify each party involved, in writing, of the status of
each alternate. Indicate if alternates have been accepted, rejected, or deferred for later consideration. Include a
complete description of negotiated modifications to alternates.
B.
Execute accepted alternates under the same conditions as other work of the Contract.
1.4
SUBMISSION REQUIREMENTS
A.
1.5
Alternates quoted on Bid Forms will be reviewed and accepted or rejected at the Owner's option. Accepted alternates will be identified in the Owner-Contractor Agreement.
SCHEDULE OF ALTERNATES AND DESCRIPTION OF WORK INCLUDED IN ALTERNATES.
A.
Schedule of Alternates, when applicable, and descriptions thereof are shown on the Bid Form.
PART 2 - PRODUCTS (Not Used)
PART 3 - EXECUTION (Not Used)
END OF SECTION
01230-1
0893 Lindsay, OK
11/23/10
UniSpec II - Store Planning
092410
SECTION 01255 - REQUEST FOR INFORMATION
PART 1 - GENERAL
1.1
SUMMARY
A.
1.2
Section Includes:
1.
Requests for Information (RFI) procedures.
DEFINITION
A.
Requests for Information: A formal online process used during the construction phase to facilitate communication
between the Contractor, the Walmart Construction Manager, and the Professional of Record with regard to
requests for additional information and clarification of the intent of the Contract Documents (Drawings and
Specifications).
B.
Professional of Record: The Architect of Record (AOR).
C.
Architect of Record (AOR): The prime consultant in charge of overall design and coordination of the project. The
AOR will be the administrator for all construction RFIs classified as "BLDG".
1.3
REQUEST FOR INFORMATION SUBMITTAL
A.
Submit requests for information for conditions requiring clarification of the Contract Documents on Walmart
Construction RFI website as designated by Walmart. (www.bldgportal.com, enter username and password, select
Construction RFI). Professional of Record will not respond to requests for information unless this format is
utilized and all appropriate information is provided. Faxed or e-mailed RFIs will not be reviewed.
B.
Do not use Request for Information process during bidding phase. For questions during bidding phase, refer to
Invitation to Bid issued by Walmart Contract Administrator.
C.
Submit in accordance with procedure as follows: (See Process Flow Chart at the end of this Section)
1.
Subcontractors, manufacturers, and suppliers shall submit request for additional information and
clarification to Contractor.
2.
Contractor shall contact Walmart Construction Manager with requests for additional information or
clarification. Walmart Construction Manager will not accept requests for information or clarification
submitted directly from subcontractors, manufacturers, or suppliers.
3.
Walmart Construction Manager will provide response to Contractor or will direct Contractor to submit a
formal Request for Information.
a.
Submit a formal RFI only if authorized by the Walmart Construction Manager. Submittal to
Construction RFI website signifies authorization has been given.
b.
Generate Requests for Information by one source per project.
c.
Submit one request for information per website entry.
4.
Professional of Record will review formal requests from Contractor and provide response within 2 working
days.
5.
Professional of Record's response shall not be considered as a Change Order or Change Directive, nor does
it authorize changes in the Contract Sum or Contract Time.
D.
Scheduling, Costing, and Owner Provided Equipment Coordination: Direct to the Owner's Construction Manager.
1.4
PENALTY FOR FAILURE TO FOLLOW PROCEDURE
A.
A $250 administrative cost will be assessed to the Contractor for each Request for Information submitted which
does not follow the procedure specified above.
01255-1
0893 Lindsay, OK
11/23/10
1.5
REIMBURSEMENT FOR ARCHITECTURAL AND ENGINEERING FEES
A.
The Contractor shall be charged administrative costs and professional fees incurred by Walmart for additional
Architectural and Engineering services associated with the correction of completed Work which is not in
accordance with the Contract Documents. See Article 10 of the General Conditions of the Contract for
Construction for provisions relating to correction of Work.
PART 2 - PRODUCTS (Not Used)
PART 3 - EXECUTION (Not Used)
END OF SECTION
01255-2
0893 Lindsay, OK
11/23/10
REQUEST FOR INFORMATION
PROCESS FLOW CHART
WALMART
STORES, SUPERCENTER, SAM’S CLUB,
NEIGHBORHOOD MARKET
Subcontractor , manufacturer, supplier, or other
party submits request for
information to Contractor
Walmart Construction
Manager provides response
to Contractor
Contractor contacts
Walmart Construction
Manager (CM) with request for information. CM
will provide response or
authorize Formal RFI.
Walmart Construction
Manager authorizes Contractor to submit formal
Request for Information to
Walmart
Construction RFI website
Contractor submits Request for Information to
Professional of Record on
Walmart
Construction RFI Website
Professional of Record
notifies appropriate consultant for response on
Construction RFI Website
Consultant answers RFI on
Construction RFI Website
Contractor issues response
to subcontractor, manufacturer, supplier, or other
party.
Professional of Record
issues response to Contractor on Construction RFI
Website
01255-3
0893 Lindsay, OK
11/23/10
UniSpec II - Store Planning
012910
SECTION 01310 - CONSTRUCTION MANAGEMENT AND COORDINATION
PART 1 - GENERAL
1.1
SUMMARY
A.
1.2
Section Includes:
1.
Project Management and Coordination:
a.
Definitions
b.
Construction Manager
c.
Project Coordination
DEFINITIONS
A.
Remodel General Contractor: Responsible contractor, who constructs, coordinates, and supervises the
construction of the total Remodel. Also referred to as the General Contractor.
B.
Separate Contractor: A contractor (either subcontractor, specialty contractor or vendor) hired separately by
Walmart and outside of General Contractor’s Construction Contract.
C.
Walmart Construction Manager: The Walmart (Owner’s) representative in all matters relating to the Work of the
Project. The person responsible for all approvals with the Remodel General Contractor. This person also
coordinates with the Separate Contractors.
1.3
WALMART CONSTRUCTION MANAGER
D.
Walmart will assign this project to a staff Walmart Construction Manager. The Walmart Construction Manager is
the Owner's representative in all matters relating to the Work except that the Walmart Mechanical Services
Construction Manager is also considered the Owner’s representative in all matters relating to the Energy
Management System, HVAC equipment and refrigeration equipment.
E.
Cooperate with the Walmart Construction Manager in all matters relating to the Work on this project.
F.
During construction, coordinate use of site and facilities through the Walmart Construction Manager.
G.
Comply with Walmart Construction Manager's procedures for project communications, reports and records, and
coordination with drawings, and comply with recommendations and resolution of ambiguities and conflicts.
H.
Comply with instructions of the Walmart Construction Manager for use of temporary utilities and construction
facilities.
I.
Coordinate use of site during Walmart fixture setup work under instructions of the Walmart Construction
Manager.
1.4
COORDINATION BETWEEN DIFFERENT CONSTRUCTION CONTRACTS
J.
1.5
Each Project will include a Store Face Lift.
PROJECT COORDINATION
K.
Coordinate scheduling, submittals, and work of the various Sections of specifications to ensure efficient and
orderly sequence of installation of interdependent construction elements, with provisions for accommodating items
installed at a later date and under separate contracts.
01310-1
0893 Lindsay, OK
11/23/10
L.
Obtain necessary drawings, manufacturer's product data, and other necessary data to provide a complete and
proper installation.
1.
Check field dimensions prior to installing equipment and furnishings. Verify necessary clearances and
means of access from equipment storage to final position.
2.
Make shop drawings and manufacturer's rough-in requirements available to trades involved.
M.
Verify that utility requirements of operating equipment are compatible with building utilities. Coordinate work of
various specification Sections for installation and final connection of equipment.
1.
Verify that mechanical, plumbing, and electrical rough-ins have been properly located.
N.
Coordinate space requirements and installation of mechanical and electrical Work which are indicated
diagrammatically on Drawings. Follow routing shown for pipes, ducts, and conduits as closely as practicable.
Make runs parallel with lines of building. Utilize spaces efficiently to maximize accessibility for other
installations, for maintenance, and for repairs.
O.
In finished areas, conceal pipes, ducts, and wiring in the construction. Coordinate locations of fixtures and outlets
with finish elements.
P.
Coordinate completion and clean up of work of separate Sections in preparation for Substantial Completion and
for portions of Work designated for Owners partial occupancy after possession.
Q.
After Owner occupancy of premises, coordinate access to site for correction of defective work and work not in
accordance with Contract Documents, to minimize disruption of Owner's activities.
PART 2 - PRODUCTS (Not Used)
PART 3 - EXECUTION (Not Used)
END OF SECTION
01310-2
0893 Lindsay, OK
11/23/10
UniSpec II - Store Planning
090105
SECTION 01312 - PROGRESS MEETINGS
PART 1 - GENERAL
1.1
PRE-CONSTRUCTION MEETING
A.
A pre-construction meeting will be held at the project site prior to beginning work at a time designated by the
Owner.
B.
The Walmart Construction Manager, Contractor’s Project Manager, Contractor’s Superintendent, and major
subcontractors shall be present.
C.
The following shall serve as a minimum agenda:
1.
Construction schedule.
2.
Critical work sequencing.
3.
Designation of responsible personnel.
4.
Processing of field decisions and changes to the Work.
5.
Walk-through inspection and field determination of scope of work and verification of Construction Documents.
1.2
PROGRESS MEETINGS
A.
Scheduled progress meetings at the job site are required.
B.
The Walmart Construction Manager, Contractor’s Superintendent and major subcontractors (as appropriate to the
agenda) shall be present.
C.
The purpose of these progress meetings is to review the schedule of the Project for the next 2 weeks. The
following shall serve as a minimum agenda:
1.
Field observations, problems and conflicts.
2.
Problems that may impede construction schedule.
3.
Review of delivery schedules.
4.
Coordination of schedules of different trades and delivery of Owner-furnished products and materials. Coordination with Walmart Additional Subcontractors and their scope of work.
5.
Walk-through inspection and determination of additional scope of work and repairs to the Project.
PART 2 - PRODUCTS (Not Used)
PART 3 - EXECUTION (Not Used)
END OF SECTION
01312-1
0893 Lindsay, OK
11/23/10
UniSpec II - Store Planning
032610
SECTION 01320 - CONSTRUCTION PROGRESS DOCUMENTATION
PART 1 - GENERAL
1.1
SUMMARY
A.
1.2
Section Includes:
1.
Progress Schedules and Reports
CONSTRUCTION PROGRESS CHART
A.
Progress of the Project will be monitored using bar charts. Requirements herein provide for planning and execution of the Work and are to assist the Walmart Construction Manager in evaluating progress of the Work economically and chronologically.
B.
The Contractor shall be familiar, in detail, with the milestones listed in the Invitation to Bid. By submitting his
bid, the Contractor acknowledges that the Construction milestones are feasible, reasonable, and are a workable
schedule for the Work.
C.
Delivery times for Walmart Furnished Items are specified in Section 01640. Coordinate delivery of these items
with progress of the Work.
D.
Prior to construction, the Contractor may request reasonable changes to the Construction Progress Bar Chart, provided delivery dates specified in Section 01640 and the contract completion date are not changed. The Walmart
Construction Manager will review requested changes. Upon approval by Walmart, Bar Chart shall become the
"Approved Construction Progress Chart" by which the Contractor shall plan, organize, direct, coordinate, and execute the Work, and the basis of evaluating progress of the Work.
E.
If, in the opinion of the Walmart Construction Manager, any of the dates specified in Section 01640 are not completed by the Contractor on or before the stated time period and after 48 hours written notice to the Contractor,
Walmart may proceed to carry out the work in accordance with Article 13 of the General Conditions.
F.
The Contractor shall perform work directed by the Walmart Construction Manager to meet the Walmart contract
completion date and shall maintain the original management and supervision team to continue their office and job
site duties on a full-time basis through final completion and/or any other time the Contractor has any work being
performed on the project regardless of the date or condition of project completion.
1.3
CONSTRUCTION SCHEDULE
A.
1.4
Using the milestones listed in the Invitation for Bids; the Contractor shall develop a detailed Construction Schedule with activity time duration in calendar days further describing his method for performing the Work. This
schedule shall be similar in appearance to the example Construction Progress Bar Chart with enough detail to
clearly represent workflow and areas to be completed. The Contractor shall review the Contractor's schedule with
the Walmart Construction Manager within 3 weeks from award of Contract, or at the Pre-Construction Meeting,
whichever is first. Failure of the Contractor to have a construction schedule approved by the Walmart Construction Manager will be considered cause to withhold progress payments.
1.
The milestones listed in the Invitation for Bids shall not to be construed as an indication by the Owner as to
means, methods, or techniques of construction to be employed by the Contractor.
2.
Critical path activities shall be indicated on the Contractor's detailed construction schedule.
SCHEDULE UPDATES
A.
The Contractor shall provide to the Walmart Construction Manager regular updated reports on the Construction
Schedule as determined by the Walmart Construction Manager. The Contractor shall maintain a current weekly
updated detailed construction schedule in the site construction field office.
01320-1
0893 Lindsay, OK
11/23/10
1.
B.
1.5
Construction Schedule Updating: Progress information to be included in schedule updates includes actual
start and finish dates, percentage complete, remaining duration or projected finish dates for all activities in
progress during reporting period. Schedule updates may also include approved added activity descriptions.
Updates to the schedule shall not change any milestone dates or the contract completion date.
Periodically, at times to be determined by Walmart, the Walmart Construction Manager will visit the job site for a
meeting with the Contractor's Project Manager and Superintendent. This meeting is to review progress to date,
and to project upcoming work.
RECOVERY PLAN
A.
Should the updated approved Construction Schedule show the Contractor to be behind schedule, the Contractor
shall immediately devise a plan for recovery of lost time within one week and submit it to the Walmart Construction Manager for approval. Once approved by the Walmart Construction Manager, the Contractor shall immediately put the recovery plan into action.
B.
During the period covered by the recovery plan, the Contractor's progress will continue to be monitored against the
Approved Construction Progress Chart. If the Contractor does not recover from delay as detailed in the recovery
plan, Walmart may exercise the option to carry out the work as specified above.
C.
The Contractor shall bear all costs and expenses related to recovery from the Contractor's delays, including costs,
expenses, and lost sales incurred by Walmart.
PART 2 - PRODUCTS (Not Used)
PART 3 - EXECUTION (Not Used)
END OF SECTION
01320-2
0893 Lindsay, OK
11/23/10
UniSpec II - Store Planning
092509
SECTION 01330 - SUBMITTAL PROCEDURES
PART 1 - GENERAL
1.1
SUMMARY
A.
Section Includes:
1.
Submittal procedures prior to and during construction.
B.
Related Sections:
1.
Section 01600 - Product Requirements: Requirements for product selection and product options.
2.
Section 01640 - Owner Furnished Products. General procedures related to Owner furnished products.
3.
Section 01770 - Contract Closeout: Closeout submittals.
1.2
PROCESS AND RESPONSIBILITIES
A.
Contractor Responsibilities:
1.
Comply with submittal requirements defined within individual Sections. Submittals procedures described
herein shall apply unless otherwise stated in individual Sections.
2.
Package each submittal appropriately for transmittal and handling.
3.
Identify Project, Contractor, subcontractor or supplier, pertinent Drawing sheet and detail numbers, and
Specification Section number, as applicable.
4.
Assemble, coordinate, and review submittals of subcontractors, suppliers, and manufacturers.
5.
Review submittal for verification of products required, field dimensions, adjacent construction, and
coordination of information.
6.
Apply Contractor's Submittal Review stamp, signed or initialed and dated, certifying compliance with
Contract Documents.
7.
Forward executed copy of Submittal Review Form to supplier within 5 days after receipt of submittal with
copies to Architect and Walmart's Construction Manager.
8.
Schedule submittals to expedite the Work. Coordinate submission of related items into single submittal.
9.
Submit submittals items required within an individual Specification Section into a single submittal.
10.
Identify variations from Contract Documents and limitations of product and system which may be
detrimental to successful performance of the completed Work.
11.
Provide space on submittal for Contractor, Architect, and Architect's Consultant review stamps.
12.
Allow 10 working days for review.
13.
Revise and resubmit submittals when required. Identify changes made since previous submittal.
14.
Notify Vendor or Subcontractor of approval by Authority Having Jurisdiction of Deferred Submittal
package.
15.
Distribute copies of reviewed submittals to concerned parties and to Record Documents file. Instruct
parties to promptly report inability to comply with provisions.
B.
Supplier Responsibilities - Walmart (Owner) Furnished Products:
1.
Subcontractors, vendors, and suppliers (including suppliers of Walmart (Owner) furnished products) shall
forward copies of submittals to the Contractor.
2.
Prepare submittals in accordance with requirements in individual Specification Sections and Contractor
responsibilities specified herein.
C.
Architect Responsibilities: Review submittals and take appropriate action as follows.
1.
Shop Drawings and Product Data: Architect will mark submittals to indicate appropriate action.
2.
Return Architect reviewed Submittals to Contractor by mail carrier service providing delivery tracking.
3.
Submittals for Information: Architect will not return submittals sent for information only.
D.
Unrequested Submittals: Submittals transmitted to Architect or Architect's Consultants that are not indicated or
requested will not be reviewed. Architect will dispose of unrequested submittal items.
01330-1
0893 Lindsay, OK
11/23/10
1.3
TRANSMITTAL
E.
Transmit each submittal using a transmittal form. Submit to Architect.
1.
Transmit submittals to be reviewed by Architect to:
Submittal Manager
Cyntergy AEC, LLC
12th Floor
320 S. Boston Avenue
Tulsa, Oklahoma 74103
F.
1.4
In addition to recipients stated above, transmit submittals to those parties as may be required in the individual
specification section.
DEFERRED SUBMITTALS
G.
Definition: Deferred Submittal are submittals required by the AHJ for code compliance but which, rather than
being submitted at the time of permit application, have been allowed by the AHJ to be deferred until after Contract
award to enable the successful Contractor, Subcontractor, or Supplier to submit the applicable submittals.
H.
Submit the deferred submittals to the extent indicated on the Deferred Submittal Table located on the Drawing
Cover Sheet.
I.
Process:
1.
Immediately after award of the Contract, the Contractor shall contact the AHJ to coordinate and determine
the AHJ requirements for deferred submittals. Information obtained shall include such requirements as
number of copies; extent of detail of information to be submitted; review, if required, by Professional of
Record (Architect or Engineer); and other necessary process and procedural requirements.
2.
The Contractor, or other entity, responsible for the submittal shall submit, track, and report submittal status
to the Walmart Construction Manager through final approval and issue of permit.
3.
Communicate with vendors, suppliers, and Subcontractors the AHJ requirements for deferred submittals.
Receive, review, and stamp submittals in accordance with submittal requirements herein.
4.
Transmit deferred submittals directly to AHJ unless otherwise requested by AHJ to obtain prior review and
approval by Professional of Record.
5.
Upon approval by AHJ, obtain permits and pay permit fees and other fees required by the AHJ.
6.
Attach approved deferred submittals to the approved "Permit Set" documents at the project site.
7.
Do not install deferred submittals until corresponding submittal documents have been approved by the
AHJ.
1.5
SUBMITTAL REQUIREMENTS
J.
Shop Drawings
1.
Submit Drawings with graphic information at accurate scale. Show dimensions and note which dimensions
are based on field measurement. Identify materials and products in Work shown. Indicate compliance with
specified standards and special coordination requirements. Do not use reproductions of Contract Drawings
as Shop Drawings.
2.
Include on each Shop Drawing the drawing title, number, original issue date, and revision numbers and
dates, in addition to other required identifying information.
3.
Identify details by reference to sheet, detail, schedule, or room names shown on the Contract Drawings.
4.
Identify numerical values in English units.
5.
Size: Not less than 8-1/2 by 11 inches nor more than 30 by 42 inches.
a.
For Shop Drawings submitted on sheets larger than 8-1/2 x 11 inches, submit reproducible
transparency and blueline or blackline reproduction.
b.
For Shop Drawings submitted on sheets 8-1/2 x 11 inches, conform to requirements for Product
Data and submit as a bound volume for submittal required.
6.
Number of Copies Required: Submit one reproducible transparency and one blueline or blackline
reproduction. Submit additional copies to AHJ for approval if required. Comply with requirements of AHJ
01330-2
0893 Lindsay, OK
11/23/10
with regard to signing and sealing of submittals by Registered Professional licensed in the State in which
project is located.
a.
One copy will be returned to the Contractor.
b.
Bar Joists and Joist Girders, and Steel Roof Deck: Owner's Supplier will submit Shop Drawings
and bills of materials directly to Structural Engineer of Record via email.
K.
Product Data
1.
Manufacturer's standard schematic drawings and diagrams:
a.
Clearly mark to identify pertinent products.
b.
Show performance characteristics and capacities.
c.
Show dimensions and clearances required.
d.
Show wiring or piping diagrams and controls.
e.
Modify drawings and diagrams to delete information not applicable to this work.
f.
Supplement standard drawings and diagrams to provide complete information applicable to this
work.
2.
Mark each copy to identify applicable products, models, options, and other data. Supplement Product Data
with material prepared for the Work to satisfy submittal requirements for which Product Data does not
exist. Note that the material is developed specifically for this Contract.
3.
Submit Product Data for each Section as a complete, bound volume. Include table of contents listing page
and catalog item numbers for Product Data.
4.
Indicate, by prominent contrasting color notation on each product being submitted, the Specifications
Section and paragraph numbers to which it pertains.
5.
Where printed Product Data includes information on several products, some of which are not required,
mark copies to indicate information applicable to Work and clearly cross out other information not
applicable to Work. Include the following information:
a.
Manufacturer's printed recommendations or instructions.
b.
Compliance with referenced standards.
c.
Application of testing agency labels and seals.
d.
Notation of dimensions verified by field measurement.
e.
Notation of coordination requirements.
6.
Product Data For Information: Written information not requiring action by Walmart Construction Manager
or Architect; for verification of compliance with requirement. Submittal not complying with requirements
will be rejected.
7.
Number of Copies Required: Four.
L.
Engineering Calculations
1.
Submit calculations signed and sealed by a Registered Professional Engineer licensed in the State where
project is located. Comply with requirements of Authority Having Jurisdiction with regard to signing and
sealing of submittals.
M.
Certifications
1.
Certify manufacturer or installer's qualifications, compliance with tests or specified criteria, or other factors
as required in individual Specification Sections.
2.
Submit supporting reference data, affidavits, and certifications as required.
PART 2 - PRODUCTS (Not Used)
PART 3 - EXECUTION (Not Used)
END OF SECTION
01330-3
0893 Lindsay, OK
11/23/10
UniSpec II - Store Planning
043010
SECTION 01432 – ELECTRICAL INSTALLER QUALIFICATIONS
PART 1 GENERAL
1.1
SUMMARY
A.
Section Includes:
1.
Qualification requirements for work performed on electrical conductors and equipment.
B.
Related Requirements:
1.
General Conditions: Inspections, testing, and approvals required by public authorities.
1.2
DEFINITIONS
A.
1.3
Electrical Worker: For the purposes of the requirements of this Section, electrical workers are defined as those
workers who perform work on the Project on electrical conductors or electrical equipment of 50 volts or greater.
SUBMITTALS
A.
Certification: Submit Certification of Compliance stating that electrical workers will meet qualifications stated
herein.
B.
Statement: Submit statement of anticipated non-compliance, if applicable, and proposed alternative procedure as
specified below.
1.4
CONTRACTOR RESPONSIBILITIES
A.
Electrical workers on the Project shall be either
1.
A licensed electrician; or
2.
An apprentice working under an approved governmental or trade organization apprenticeship program
whose work is being directly overseen by a licensed electrician.
B.
If state or local requirements or industry standards require more stringent qualifications of electrical workers than
the minimum requirements stated above, the electrical workers shall possess such qualifications required by such
state or local requirements or industry standards in lieu of the minimum requirements stated in this Section.
C.
If Contractor, subcontractor, or any sub-subcontractor fails to meet the above qualifications on the Project, then
Owner may, without limitation, at Owner's sole discretion:
1.
Prevent Contractor from participating in bids with regard to additional Owner projects for a minimum of 90
days for the first violation of the above-stated requirement; and
2.
Permanently suspend Contractor from bidding on future Owner projects for violation of the above stated
requirements two or more times.
D.
If Contractor believes, based upon its experience and judgment, that compliance with requirements of this Section
cannot reasonably be achieved, Contractor shall provide Owner with written notification stating why Contractor
believes compliance cannot be achieved and stating how Contractor proposes to proceed with electrical work on
the Project.
PART 2 PRODUCTS (Not Used.)
PART 3 EXECUTION (Not Used.)
END OF SECTION
01432-1
0893 Lindsay, OK
11/23/10
UniSpec II - Store Planning
111910
SECTION 01458 - TESTING LABORATORY SERVICES
PART 1 GENERAL
1.1
SUMMARY
A.
Section Includes:
1.
Administrative and procedural requirements for Owner provided testing and inspection services.
B.
Related Requirements:
1.
General Conditions: Inspections, testing, and approvals required by public authorities.
2.
Section 01640 - Owner Furnished Products: General procedures related to Owner furnished work and Work
of other Contractors.
3.
Section 01770 - Contract Closeout: Project Record Documents.
4.
Section 13900 – Fire Suppression – Fire Sprinkler Site Observation and Acceptance Test (FPAT)
C.
General requirements for testing and inspection to be performed by the Contractor is specified in Section 01452.
1.2
REFERENCES
A.
The publications listed below form a part of this specification to the extent referenced. The publications are
referred to within the text by the basic designation only.
B.
American Association of State Highway and Transportation Officials (AASHTO)
1.
AASHTO R18 - Establishing and Implementing a Quality System for Construction Materials Testing
Laboratories.
C.
ASTM International (ASTM):
1.
ASTM C 1077 - Laboratories Testing Concrete and Concrete Aggregates for Use in Construction and
Criteria for Laboratory Evaluation.
2.
ASTM C 1093 - Accreditation of Testing Agencies for Unit Masonry.
3.
ASTM D 3740 - Minimum Requirements for Agencies Engaged in Testing and/or Inspection of Soil and
Rock as Used in Engineering Design and Construction.
4.
ASTM D 3666 - Minimum Requirements for Agencies Testing and Inspecting Road and Paving Materials.
5.
ASTM D 7186 - Quality Assurance Observation of Roof Construction and Repair.
6.
ASTM E 329 - Agencies Engaged in the Testing and/or Inspection Of Materials Used in Construction.
7.
ASTM E 543 - Agencies Performing Nondestructive Testing.
8.
ASTM E 699 - Criteria for Evaluation of Agencies Involved in Testing, Quality Assurance, and Evaluating
Building Components in Accordance with Test Methods Promulgated by ASTM Committee E-6.
1.3
DEFINITIONS
A.
Testing: Evaluation of systems, primarily requiring physical manipulation and analysis of materials, in accordance
with approved standards.
B.
Inspection: Evaluation of systems primarily requiring observation and engineering judgment.
C.
Quality Assurance: Activities, actions, and procedures performed before and during execution of the Work to
guard against defects and deficiencies and substantiate that proposed construction will substantially comply with
construction documents.
D.
Quality Control: Tests, inspections, procedures, and related actions during and after execution of the Work to
evaluate that actual products incorporated into the Work and completed construction substantially comply with
construction documents.
01458-1
0893 Lindsay, OK
11/23/10
E.
Quality assurance and quality control may be performed by either the Contractor or the Construction Testing
Laboratory employed by the Owner.
F.
Construction Testing Laboratory (CTL): The independent testing and inspection agency employed by the Owner.
G.
Architect of Record (AOR): The prime consultant in charge of overall design and coordination of the building.
H.
Engineer of Record (EOR): The Registered Engineer in responsible charge of engineering design for the project.
I.
Structural Engineer of Record (SER): The Registered Engineer in responsible charge of the structural design for
the project.
J.
Civil Engineering Consultant (CEC): The Registered Engineer in responsible charge of the civil design for the
project.
K.
Architect - Engineer (A/E): A collective term to include the AOR, CEC, SER, and the Mechanical, Electrical, and
Fire Protection EOR.
L.
Special Inspector (SI): The Special Inspector under the direct supervision of a registered civil/structural engineer
(unless otherwise specified) regularly engaged in inspection, and experienced with the type of work requiring
related testing and inspection. The categories of special inspector are:
1.
Technical I (TI): A Technician who is an employee of a qualified and approved testing laboratory. Lab
work shall be performed in a qualified testing laboratory.
2.
Technical II (TII): A Technician with a minimum of 2 years experience, or a graduate engineer, and is an
employee of a qualified and approved testing laboratory.
3.
Technical III (TIII): An engineer regularly engaged in related work with a minimum of 4 years of
experience, licensed in the State in which the project is located, and is an employee of a qualified and
approved testing laboratory. This licensed engineer shall review and approve all final field reports.
4.
Structural I (StI): A graduate civil/structural engineer, or other trained and experienced personnel
acceptable to the SER, with experience in the testing and inspection of related structural systems.
5.
Structural II (StII): A civil/structural engineer regularly engaged in related work with a minimum of 4 years
of experience, licensed in the State in which the project is located. The licensed engineer shall review and
approve all inspection reports.
6.
Independent Roofing Inspector (IRI): A technician employed or subcontracted by the CTL for the purpose
of field observation of roofing installation. The IRI shall be certified as a Registered Roofing Observer
(RRO) by the Institute of Roofing, Waterproofing, and Building Envelope Professionals (RCI) (Formerly
Roof Consultants Institute).
7.
Roofing Technician: A technician employed by the CTL with training and experience in roofing
construction or inspection. The Roofing Technician shall be under the direct supervision of the IRI and
shall provide continuous inspection during roofing work.
8.
Unique special inspector requirements, for specific materials and system, are noted in related technical
specification sections.
M.
Building Official: The Officer or his duly authorized representative charged with the administration and
enforcement of the local building code.
N.
Continuous Inspection: The full-time observation of work requiring special inspection by an approved special
inspector who is present in the area where the work is being performed.
O.
Periodic Inspection: The part-time or intermittent observation of work requiring special inspection by an approved
special inspector who is present in the area where the work has been or is being performed and at the completion of
the work.
P.
Deviation: Any item or component of work that does not substantially conform to the requirements of the
construction plans and/or specifications and which has not been corrected by the end of business on the day it is
identified. A life-safety deviation is any construction deviation that poses a serious hazard to any person.
01458-2
0893 Lindsay, OK
11/23/10
1.4
CONSTRUCTION TESTING LABORATORY (CTL) QUALITY REQUIREMENTS
A.
CTL shall comply with requirements of ASTM C 1077, ASTM C 1093, ASTM D 3740, ASTM D 3666, ASTM E
329, ASTM E 543, ASTM E 699, and AASHTO R18.
B.
CTL shall be authorized to operate in state in which Project is located.
C.
CTL Testing Equipment shall be calibrated at reasonable intervals with devices of an accuracy traceable to either
National Institute of Standards and Technology (NIST) standards or accepted values of natural physical constants.
D.
CTL shall have and maintain a written Quality Manual (QM) for its laboratory conforming to the Appendix
requirements ASTM E 329 or AASHTO R18. The QM shall be available for review by the Walmart Construction
Manager upon request. The QM shall be organized similar to Quality Manual Requirements of AASHTO R18 and
include the following:
1.
Organization and Organizational Policies.
2.
Staff.
3.
Equipment.
4.
Test Data Control and Reports.
5.
Diognostic and Corrective Action.
6.
Internal Quality System Review.
7.
Subcontracting.
8.
Statement certifying compliance with ASTM standards specified above.
1.5
OWNER RESPONSIBILITIES
A.
1.6
Employment and payment for services of an Construction Testing Laboratory (CTL) and/or Special Inspector (SI)
to perform specified testing and inspecting will be by the Owner under separate contract except for specified
testing required to be selected and paid for by the Contractor as may be required by individual specification
sections.
CONSTRUCTION TESTING LABORATORY AND SPECIAL INSPECTOR RESPONSIBILITIES
A.
Responsibilities include inspections, tests, and related actions including reports performed by testing or inspection
service. They do not include Contract enforcement activities performed by the Walmart Construction Manager or
authorities having jurisdiction.
1.
Provide the AOR a copy of the contractual provisions defining the CTL’s and SI’s scope of services.
B.
The CTL/SI representative shall attend a pre-construction meeting prior to actual start of the Project. Except for the
roofing inspection, the CTL/SI representative shall be the Registered Professional Engineer assigned to the project.
C.
Maintain a copy of Contract Drawings and Specifications with all Addenda and Change Orders. Use the Contract
Documents supplemented by the approved shop drawings and applicable material and workmanship provisions of
the Code for testing and inspection of the work.
D.
Provide qualified personnel at site to comply with schedule and submit reports for each test and inspection as
defined in Part 3 of this Section. Testing and inspection, except roofing inspection, shall be under supervision of
the Registered Professional Engineer (P.E.) in the state where Project is located.
E.
Perform specified inspection, sampling, and testing of work, materials, and equipment in accordance with specified
standards.
F.
Ascertain compliance of materials and mixes with requirements of Contract Documents.
G.
Perform testing and inspections in a timely manner to avoid delay of work. Schedule and coordinate testing and
inspections with Contractor and appropriate sub-contractors and installers.
01458-3
0893 Lindsay, OK
11/23/10
H.
If observed deviations from the Contract Drawings, Specifications, or building code will be probable cause of
subsequent rejection of work or material, notify Contractor, the Walmart Construction Manager, CEC, and AOR,
sufficiently in advance for determination to continue operations or take corrective measures before continuing. If
uncorrected after a reasonable period of time, bring the situation to the attention of the SER, the Building Official,
and to the AOR.
I.
Track resolutions and remedial repairs to deviations and subsequent conformance to the Contract Documents on
the Observation Log.
J.
Report any observed life safety issue immediately to Contractor and Walmart Construction Manager. After
notification is given to the Contractor and the Walmart Construction Manager, the CTL/SI shall also log the life
safety issue on Walmart’s Observation Log.
K.
Perform retesting due to non-conformance with the Contract Documents. Costs will be deducted from the Sum due
the Contractor.
L.
Provide a final conformance letter to Walmart, the SER and the AOR. An example is attached at the end of this
section.
M.
Testing and inspection by the Building Official do not preclude the normal field involvement and site observations
by AOR or SER, nor shall it relieve the Contractor of any responsibility to complete the work in accordance with
the approved drawings and specifications.
N.
Construction Testing Laboratory And Special Inspector Limits On Authority: The CTL or SI may not:
1.
Release, revoke, alter, or enlarge on requirements of Contract Documents.
2.
Approve or accept any portion of the Work.
3.
Assume any duties of Contractor.
4.
Stop the Work.
O.
Testing and inspecting services performed by the CTL (Construction Testing Laboratory) are required to verify
compliance with requirements specified or indicated.
1.
CTL services do not relieve Contractor of responsibility for compliance with the Contract Document
requirements nor limit Contractor's other quality-assurance and -control procedures that facilitate
compliance with the Contract Document requirements.
2.
Specific quality-assurance and -control requirements for individual construction activities shall be as
specified in the Sections that specify those activities.
3.
Requirements for Contractor to provide quality-assurance and -control services required by AOR,
Owner, Construction Manager, or authorities having jurisdiction do not limit responsibilities of the CTL.
1.7
CONTRACTOR RESPONSIBILITIES
A.
Cooperate with CTL/SI personnel, and provide access to the Work and to manufacturer's facilities.
B.
Provide incidental labor and facilities to provide access to Work to be tested, to obtain and handle samples at the
site or at source of products to be tested, to facilitate tests and inspections, and to provide storage and curing of test
samples. Provide lift equipment as required for inspection personnel of the Owner or the Owner’s representatives.
C.
Provide CTL 24 hour notice prior to expected time for operations requiring inspecting and testing services.
D.
Notify in writing the Walmart Construction Manager three working days prior to expected time for operations
requiring inspecting and testing services.
E.
Provide the CTL/SI with access to the internet for the purpose of logging deviations onto the Walmart Observation
Log on the Walmart Building Portal website.
01458-4
0893 Lindsay, OK
11/23/10
1.8
CONSTRUCTION TESTING LABORATORY REPORTS
A.
The CTL shall submit reports and other items as required in this paragraph.
B.
CTL Information: Testing laboratory name, address, and telephone number, and names of full time Registered
Engineer and responsible officer.
C.
Roof Observation Program.
D.
Test and Inspection Reports:
1.
Submit test and inspection reports showing the following information:
a.
Date issued.
b.
Project title and number.
c.
Store number.
d.
Firm name and address.
e.
Name and signature of tester or inspector.
f.
Name and seal of registered engineer in responsible charge (as applicable).
g.
Date and time of sampling.
h.
Date of test or inspection.
i.
Identification of product and specification section.
j.
Location in project, including elevations, grid location and detail.
k.
Type of test or inspections.
l.
Results of tests or inspections and interpretation of same.
m.
Observations regarding compliance with Contract Documents or deviations therefrom.
E.
Submit required reports and other items to the following:
1.
AOR: (Construction Administration Leader).
a.
One copy (Site work T&I).
b.
Three copies (Bldg T&I and Roof Observation Program, if specified). AOR shall transmit one copy
of Bldg T&I to SER.
2.
CEC: One copy. (Site work T&I only)
3.
Contractor: Three copies.
4.
Building Official: Quantities as required.
F.
Submit a separate final signed report stating the work requiring inspection is, to the best of the inspector's
knowledge, in conformance with the Contract Documents.
G.
Reports shall be made on 8-1/2 by 11 white paper, suitable for photocopying and binding in booklet form. Sheets
shall have the CTL letterhead (including phone number and address). Larger sheets shall be folded and bound into
the booklet.
H.
Submit Test and Inspection Reports within three working days of T&I occurrence.
I.
Tests and inspections indicating non-conformance (deviations) to the Contract Documents shall be brought to the
attention of the Contractor, CEC, and AOR upon discovery in the form of hard copy reports and entered into the
Walmart Observation Log within 24 hours.
J.
Deviations from the Contract Documents, as defined above, shall be logged onto the Walmart Observation Log by
the CTL/SI representative on site. (www.bldgportal.com, enter username and password, select Observation Log).
Follow instructions on the Observation Log website for entry of information.
K.
The Walmart Construction Manager in conjunction with the CTL and/or SI will determine when to involve the
AOR or EOR for remedial action.
PART 2 PRODUCTS
Not Used.
01458-5
0893 Lindsay, OK
11/23/10
PART 3 EXECUTION
3.1
PRODUCTION TESTING
A.
General Requirements:
1.
Testing shall be conducted as specified in the individual specification sections.
2.
Tests and inspections shall, as a minimum, be performed by Technical I (TI) inspector if not otherwise
specified in the individual section.
3.
If inspection of fabricators work is required, the Owner's representative may require testing and inspection
of the work at the plant before shipment.
4.
Testing and inspection shall be performed in accordance with the industry standard used as the reference for
the specific material or procedure unless other criteria are specified. In the absence of a referenced standard,
tests shall be accomplished in accordance with generally accepted industry standards.
5.
Work shall be checked as it progresses, but failure to detect any defective work or materials shall in no way
prevent later rejection if defective work or materials are discovered, nor shall it obligate Owner to accept
such work.
B.
Applicable Sections: Testing by the Owner’s Construction Testing Laboratory is summarized in the following CTL
Testing and Inspection Program Summary Schedule. Refer to the applicable individual sections for specific details.
The Schedule provides summary information only and does not preclude or supersede requirements contained in
the individual sections.
01458-6
0893 Lindsay, OK
11/23/10
CTL Testing and Inspection Program
Summary Schedule
Section & Title
02320 - Excavating,
Backfilling, and
Compacting
03300 - Cast-In-Place
Concrete
Description of Test or Observation
Type of
Inspector
Report
Frequency
Tests: Classification of Materials,
Laboratory Testing, Field Density Tests
Obversation: Subgrades/excavation
bases, bearing capacity, presence of
groundwater.
Testing: Lab Test, Field Tests
Inspection: Forms, Slabs, Reinforcement,
Conc. mix, placement, curing, embedded
items
TI, TII, or TIII
as specified
Per test/observation
TI, TII, or StI
as specified
Daily
END OF SECTION
01458-7
0893 Lindsay, OK
11/23/10
Mr. Construction Manager
Walmart Construction
Sam M. Walton Development Complex
2001 S. E. 10th Street
Bentonville, Arkansas 72716
Re: Supercenter (Store #xxx) – City, State
Dear Construction Manager:
The purpose of this letter is to state to Walmart, the Architect of Record and the Engineer of Record that, to the best of our
knowledge, the construction on the above referenced project has been completed in substantial conformance with the
approved Contract Documents and with the provisions of the applicable building code. In the capacity of owner’s testing and
inspecting agency, periodic reports as well as a final report have been issued. Those reports state that all of the on-site
inspection and testing has been performed. Work requiring inspection was, to the best of the inspector’s knowledge, in
conformance with the approved plans, specifications, and applicable workmanship provisions of the code.
To our knowledge no outstanding items exist except as otherwise may be entered and shown on the Walmart Observation
Log.
Sincerely,
Testing and Inspection Agency
Include a seal, signature and date of signature
cc: ARCHITECT OF RECORD
ENGINEER OF RECORD
01458-8
0893 Lindsay, OK
11/23/10
UniSpec II - Store Planning
102910
SECTION 01500 -TEMPORARY FACILITIES AND CONTROLS
PART 1 - GENERAL
1.1
SUMMARY
A.
1.2
Section Includes:
1.
Temporary Utilities: Electricity, lighting, heat, ventilation, telephone service, water, and sanitary facilities.
2.
Temporary Controls: Barriers, enclosures and fencing, signage protection of the Work, and water control.
3.
Construction Facilities: All-weather access roads, parking, progress cleaning, temporary buildings, and
staging areas.
ENVIRONMENTAL REQUIREMENTS
A.
Protect properties and water resources from contaminant damage until construction activities are complete.
B.
Do not use methods that would cause flooding, ponding, or other damage to Owner’s property or property of others.
1.3
STORMWATER RUNOFF CONTROL
A.
Control pollutants originating on site from demolition and construction activities.
B.
Ensure adequacy of Best Management Practice measures for controlling site pollutant discharge.
C.
Best Management Practices (BMPs): Refer to Drawings for details of structural controls that may be used as BMP
measures for controlling site pollutant discharge related to construction activities for this project. Site conditions
or Contractor practices could make it necessary to install more structural controls than specified. Continually assess the need for additional controls and implement or adjust existing controls until the construction activities for
this project are complete.
1.
Review site conditions and identify discharge points and all potential areas of impact.
2.
Designate area(s) for equipment cleaning, maintenance, and repair. Coordinate location with Walmart
Construction Manager. The Contractor and subcontractors shall utilize such designated areas. Cleaning,
maintenance, and repair areas shall be protected by temporary perimeter berms, shall not occur within 150
feet of any waterway, water body or wetland, and shall be located as far as practical from storm sewer inlets.
3.
Chemicals, paints, solvents, fertilizers, and other toxic materials must be stored in waterproof containers.
Except during application, the containers must be kept in trucks or within storage facilities as specified
herein. Runoff containing such material must be collected, removed from the site, treated, and disposed of
at an approved solid waste and chemical disposal facility.
4.
Use of detergents for exterior washing is prohibited.
5.
Use products, site pollutant discharge control devices or materials for BMPs as specified and as applicable
to related construction activities.
D.
All BMPs must be installed and functioning, and shall be free of accumulated sediment and debris before construction begins. Maintain in place and functional throughout the duration of construction activities. No measure
shall be implemented which causes flooding or ponding or in any other way causes damage to Owner’s property or
property belonging to others.
E.
Review the site conditions as needed to identify potential areas of impact and discharge points.
F.
Place BMPs as may be dictated by site conditions in order to maintain the intent of the specifications and pertinent
Federal, State and local regulations and permits.
01500-1
0893 Lindsay, OK
11/23/10
G.
Water used for construction which discharges from the site must originate from a public water supply or private
well approved by the State Health Department. Water used for construction that does not originate from an approved public supply must not discharge from the site without being treated in accordance with applicable local
ground water dewatering permits/regulations.
H.
Control substances that have the potential for polluting surface and/or groundwater by whatever means necessary
in order to ensure that they do not discharge from the site.
1.
Do not allow the discharge of wash wastewater to flow from cleaning processes to a storm water drain or
catch basin, street, roadway, sidewalk, gutter, landscape area or any type of storm water structure.
2.
Do not discharge solid materials, including building materials, from the site with storm water.
a.
Collect cementitious material and paint waste from equipment cleaning in aboveground portable
washout containers such as Vinyl-Con by RTC Environmental Products, (530) 589-2007, or equal
as approved by the Walmart Construction Manager and Authorities Having Jurisdiction.
b.
Comply with the requirements of Section 01742 for collection and disposal of waste solids.
3.
Recover and dispose of wash wastewater offsite at a licensed facility.
1.4
TEMPORARY ELECTRICITY
A.
Connect to existing power service. Owner will pay cost of electricity used. Power consumption shall not disrupt
Owner's need for continuous service. Exercise measures to conserve energy.
B.
Provide adequate distribution equipment, wiring, and outlets to provide single-phase branch circuits for power and
lighting. Provide temporary feeders to limit voltage loss to 5% overall from local utility power lines to provide
electric requirements for project during construction.
1.5
TEMPORARY LIGHTING
A.
Provide and maintain lighting for construction operations. Provide minimum of 20 footcandles illumination for
work areas.
B.
Permanent building lighting may be utilized during construction.
1.6
TEMPORARY HEAT
A.
Provide and pay for heat devices and heat as required to maintain specified conditions for construction operations.
B.
Prior to operation of permanent equipment for temporary heating purposes, verify that installation is approved for
operation, equipment is lubricated and filters are in place. Provide and pay for operation, maintenance, and regular
replacement of filters and worn or consumed parts.
C.
Maintain minimum ambient temperature of 50 degrees F in areas where construction is in progress, unless
indicated otherwise in specifications.
1.7
TEMPORARY VENTILATION
A.
1.8
Ventilate enclosed areas to assist cure of materials, to dissipate humidity, and to prevent accumulation of dust,
fumes, vapors, or gases.
TELEPHONE SERVICE
A.
1.9
Provide, maintain and pay for telephone service to field office.
TEMPORARY WATER SERVICE
A.
Connect to existing water source. Owner will pay cost of water used. Exercise measures to conserve water.
01500-2
0893 Lindsay, OK
11/23/10
1.10
TEMPORARY SANITARY FACILITIES
A.
Provide and maintain required chemical toilet facilities.
B.
Locate as directed by Walmart Construction Manager. Maintain facilities clean and serviced as necessary and in
compliance with local health code requirements.
C.
Existing facilities shall not be used.
D.
Existing facilities shall not be used by construction personnel.
1.11
BARRIERS AND CONSTRUCTION TRAFFIC SAFETY
A.
Protect non-owned vehicular traffic, stored materials, site and structures from damage.
B.
Provide barriers to prevent unauthorized entry to construction areas to allow for Owner's use of site, and to protect
existing facilities and adjacent properties from damage from construction operations.
C.
Provide barricades and covered walkways required by governing authorities for public rights-of-way, to allow for
Owner's use of site, and for public access to existing building.
1.
Erect barricades using 1/2" plywood on 2x4 framing. Supports shall be as required to uphold barricade.
Verify requirements with Walmart Construction Manager.
2.
Construct 8'-0" high unless otherwise directed by owner.
3.
Shopping carts shall not be used as barricades.
D.
When operating any motorized construction equipment in areas where customers or Walmart Associates are present, provide a spotter (or signal person) whose sole job responsibility shall be to ensure safe operation, including
directing traffic and keeeping area of traffic clear of people.
1.12
WATER CONTROL
A.
Grade site to drain. Maintain excavations free of water. Provide, operate, and maintain pumping equipment.
B.
Protect site from puddling or running water. Provide water barriers as required to protect site from soil erosion.
C.
The Contractor shall at all times protect all activities of his construction, excavations, fill areas, embankments,
trenches structures or building from damage from rainwater, spring water, ground water, backing up of drains,
sewers and all other water encountered during his operations. He shall provide all pumps, equipment and
enclosures necessary to provide adequate protection.
D.
Verify discharges from dewatering activities are allowed non-storm water discharges under applicable Federal,
State and local regulations. Obtain a dewatering permit according to state and local regulations if discharges from
dewatering activities are not allowed. Discharges from dewatering operations must be directed through an appropriate pollution prevention/treatment measure prior to being discharged from the site. Under no circumstances
will discharges from dewatering operations be discharged directly into streams, rivers, lakes or other areas beyond
the project limits.
1.13
EXTERIOR ENCLOSURES
A.
Provide temporary weather-tight closure of exterior openings to provide acceptable working conditions and
protection for Products, to allow for temporary heating and maintenance of required ambient temperatures
identified in individual specification Sections, and to prevent entry of unauthorized persons.
B.
Provide access doors with self-closing hardware and locks.
01500-3
0893 Lindsay, OK
11/23/10
1.14
INTERIOR ENCLOSURES
A.
As shown on Drawings, provide temporary partitions as required to separate work areas from Owner occupied areas, to prevent penetration of dust and moisture into Owner occupied areas, and to prevent damage to existing materials and equipment.
B.
Framing and plywood sheet materials with closed joints and sealed edges at intersections with existing surfaces.
C.
Temporary Dust Partitions: Installation and removal of temporary dust partitions shall be scheduled with a
minimum of 3 days prior notification to Walmart Construction Manager and/or Store Manager. Maintain
temporary dust partitions to seal openings to Walmart -occupied areas. These shall be scheduled, installed, and
removed as required and directed by Walmart Construction Manager and may not be indicated on the Drawings.
Install partitions prior to demolition of existing walls and maintain in dust tight condition until the completion of
the new construction. It is the Contractor's responsibility to prohibit dust and debris from entering the Sales area
or any Walmart-occupied areas and to obtain approval from AHJ for materials/construction configuration and
phasing of temporary enclosures.
1.
Dust Drapes:
a.
Covering: 6 mil. clear poly sheeting (if allowed by the Authority Having Jurisdiction); otherwise
use Griffolyn type 55 ASFR, anti-static, fire retardant sheeting. Overlap sheeting at joints a
minimum 2’-0" and continuously tape joints. Attach sheeting from ceiling to finish floor for
dustproof condition. If attachment to ceiling is impossible, light framing shall be installed with
sheeting attached all around to prohibit dust penetration.
2.
Type A Partitions:
a.
Framing: Light gauge metal framing or framing material approved by Authorities Having
Jurisdiction (AHJ). Provide continuous 2x4 top and bottom plates and continuous bridging and
bracing. Continue top plate to bottom side of roof deck.
1)
Walls up to 14’-0” may use 3-5/8” - 22 gauge metal studs at 24” o.c. or 2x4’s at 16” o.c.
2)
Walls higher than 14’-0” may use 6” - 20 gauge metal studs at 24” o.c. or 2x6’s at 16” o.c.
b.
Covering: Install continuous 6 mil clear poly sheets (if allowed by the Authority Having
Jurisdiction); otherwise use Griffolyn type 55 ASFR, anti-static, fire retardant sheeting. Install from
finish floor to roof deck. Tape all joints. Install 1/2" C-D plywood over 6 mil poly. Install 4’x8’
sheets horizontally from finish floor to bottom of roof deck. Insure that blocking is provided behind
each joint. Provide sealant at bottom of plywood at finish floor and continuous sealant against plate
on other side.
3.
Type B Partitions:
a.
Framing: (same as Type A above).
b.
Covering: Install continuous 6 mil clear poly sheets (if allowed by the Authority Having
Jurisdiction); otherwise use Griffolyn type 55 ASFR, anti-static, fire retardant sheeting. Install from
finish floor to roof deck. Tape all joints. Install 1/2" C-D plywood over 6 mil poly. Install 4’x8’
sheets horizontally to bottom of finish ceiling. Extend 6 mil poly to bottom of roof deck. Insure that
blocking is provided behind each joint. Provide sealant at bottom of plywood at finish floor and
continuous sealant against plate on other side.
4.
Type D Partitions:
a.
Framing: (same as Type A above).
b.
Covering: At interior face of partition, install continuous 6 mil clear poly sheets (if allowed by the
Authority Having Jurisdiction); otherwise use Griffolyn type 55 ASFR, anti-static, fire retardant
sheeting. Install from finish floor to roof deck. Tape all joints. Install 1/2" C-D plywood over 6 mil
poly. Install 4’x8’ sheets horizontally to bottom of roof deck. Insure that blocking is provided
behind each joint. At exterior face of partition, install 30 gauge, 24” wide corrugated metal panels
as shown on the Drawings. Fill wall cavities with R-13 batt insulation. Provide sealant at bottom of
plywood at finish floor and continuous sealant against plate on other side.
5.
Doors:
a.
Single acting doors, opening out, with sturdy closer, closing against gasketed stops on frame to
reduce passage of dust.
6.
Sealing:
01500-4
0893 Lindsay, OK
11/23/10
a.
7.
1.15
Seal perimeter of partitions and doors to prevent passage of dust. At Type A and B partitions, tape
fastener depressions, joints between panels and joints between panels and floors, ceiling and
columns with 2 in. wide pressure sensitive tape.
Mats:
a.
Provide mats at doors to reduce tracking of dust. Replace or clean daily.
FIELD OFFICES AND SHEDS
A.
Contractor's Office:
1.
Size as required for Contractor's use and to provide space for project meetings.
2.
Adequate electrical power, lighting, heating, and cooling to maintain human comfort.
3.
Office space with desk and chair, layout table, plan rack, and facilities for storage of Project Record
Documents.
4.
Furnishings in meeting area:
a.
Conference table and chairs for at least eight persons.
b.
Racks and files for Project Record Documents in, or adjacent to, the meeting area.
c.
Other furnishings: Contractor's option.
5.
Contractor's office and sheds not to be used as living accommodations.
B.
Storage Sheds: Structurally sound, weathertight, on proper foundations, with floors raised above ground.
C.
Locate office and sheds minimum 30 feet from structures.
1.16
CONSTRUCTION AIDS
A.
Provide construction aids required to facilitate execution of Work, including stairs, ladders, ramps, staging,
platforms, railings, cranes, scaffolds, hoists, chutes, runways, and other required facilities and equipment.
B.
Such apparatus, equipment and construction shall meet requirements of applicable OSHA (Federal), State and
Local Safety and Labor Laws.
C.
Store employees shall not be allowed access to scaffolds, ladders, and hoists.
D.
Coordinate crane service required for erection of structural steel, installation of HVAC Rooftop Units, and other
crane services as required to accommodate Walmart's needs.
1.17
PROTECTION OF EXISTING WORK
A.
The existing building shall be protected from moisture, dust and debris. Install dust partitions or drapes as shown
or as required to keep dust and moisture from the building premises.
B.
Damage to existing property (including merchandise), which occurs during the process of construction shall be
repaired or replaced at no additional cost to the Owner. Contractor shall pay costs for damaged incurred.
C.
Provide suitable temporary watertight coverings over openings as required to protect interior work from inclement
weather and related/adjacent construction areas.
D.
Maintain benchmarks, monuments and other reference point. If disturbed or destroyed, replace as directed.
E.
Protect existing adjacent streets, sidewalks, curbs, buildings and property, including trees, lawns and plants.
1.18
PROTECTION OF INSTALLED WORK
A.
Protect installed Work; provide special protection where specified in individual specification Sections.
B.
Provide temporary and removable protection for installed Products. Control activity in immediate work area to
minimize damage.
01500-5
0893 Lindsay, OK
11/23/10
C.
Provide protective coverings at walls, projections, jambs, sills, and soffits of openings.
D.
Protect finished floors, stairs, and other surfaces from traffic, dirt, wear, damage, or movement of heavy objects,
by protecting with durable sheet materials.
E.
Minimize traffic and storage on roofed surfaces. If traffic or storage is necessary, obtain recommendations for
protection from roofing material manufacturer.
F.
Do not operate cranes or other heavy equipment on concrete floor slabs if damage could result from such
operations.
G.
Prohibit traffic from landscaped areas.
1.19
SECURITY
A.
Maintain the integrity of the existing building security and security systems at all times. Provide security and
facilities to protect Work and Owner's operations from unauthorized entry, vandalism, and theft.
B.
Obtain permission and coordinate with Owner's security program through Walmart Construction Manager at least
12 hours prior to the modification of any existing security system.
C.
Provide continuous security at openings cut into existing exterior walls and roofs.
1.20
ACCESS ROADS AND PARKING
A.
Construct and maintain temporary all weather roads accessing public thoroughfares to serve building pad and construction staging area.
B.
Extend and relocate as Work progress requires. Provide detours necessary for unimpeded traffic flow.
C.
Provide and maintain access to fire hydrants, free of obstructions.
D.
Provide temporary parking areas to accommodate construction personnel.
E.
When site space is not adequate, provide additional off- site parking.
F.
Provide 100' x 100' all weather material staging area exclusive of building pad.
1.21
A.
1.22
A.
NOISE CONTROL
Demolition and other Work that disturbs surrounding Walmart Store areas shall only be allowed in the following
categories and time restrictions:
1.
Low Level Noise: Assembling trades such as electricians, ceiling installers, painters, tapers, etc.. Excludes
all hammering and impact drilling. Low-level noise operations are allowed during Walmart Store
operational hours.
2.
Moderate Level Noise: Trades include gypsum board installers, stud partition installers, duct installers, etc.
Includes occasional and intermittent hammering, screw drilling, etc.. Excludes impact drilling and concrete
sawing. Moderate level noise operations may be allowed during Walmart Store operational hours upon
approval of Walmart Construction Manager or Store Manager.
3.
High Level Noise: Constant loud and high pitched noise produced by impact drilling, concrete sawcutting,
hammering of ductwork, and all demolition work. High-level noise operations shall be restricted to
Walmart Store non-operational hours.
PROGRESS CLEANING
Maintain areas free of waste materials, debris, and rubbish. Maintain site in a clean and orderly condition.
01500-6
0893 Lindsay, OK
11/23/10
B.
Remove debris and rubbish from pipe chases, plenums, attics, crawl spaces, and other closed or remote spaces,
prior to enclosing the space.
C.
Broom and vacuum clean interior areas prior to start of surface finishing, and continue cleaning to eliminate dust.
D.
Remove waste materials, debris, and rubbish from site weekly and dispose off-site.
1.23
A.
1.24
SIGNAGE
Temporary Construction Signage: Provide temporary signage for identification as required due to obscurity
caused by construction. Provide signage for traffic control and safety information. Provide temporary pavement
striping for traffic control and pedestrian safety. Provide temporary handicap parking spaces if existing spaces are
at a non-accessible location to the building entrance.
INFORMATION/SAFETY BOARD
A.
Provide 4'x8'x3/4" C/D exterior glue plywood to be attached on the existing exterior wall at a location designated
by the Walmart Construction Manager.
B.
Information/Safety Board shall be used to communicate safety, state & federal, hiring, OSHA and EPA
requirements, bulletins and other information required for the construction of this Project.
C.
The board shall contain but not be limited to the following:
1.
OSHA Safety Requirements
2.
Federal and State Hiring Regulations
3.
Pertinent State, Local, and Federal Employment Regulations
4.
Building Permits
5.
Emergency telephone numbers
6.
Job Site Safety Meeting notifications
7.
EPA Permits or Notification regarding Asbestos or other Toxic or Hazardous Materials
8.
Other information required to comply with applicable OSHA, EPA and Federal safety laws
D.
Protect posted information with either plastic sleeves stapled to the board or 6 mil clear plastic sheathing over
entire board providing access for posting of additional information.
1.25
A.
1.26
POSTED CONSTRUCTION SCHEDULE
Post construction schedule and Phasing Plans (Floor Tile, Paint) in back office area for clear viewing by all trades
and workmen. Provide names/telephone numbers of Walmart Construction Manager, General Contractor Project
Manager, Superintendent and Phase I Supervisor. Maintain most recent and updated version of schedule.
STORAGE OF CONSTRUCTION MATERIALS AND EQUIPMENT
A.
Locate storage areas to minimize exposure to weather. The Contractor shall inspect areas used for storing
materials for evidence of, or the potential for, pollutants entering the storm drainage system or discharging from
the site. If necessary, the materials must be covered, or original covers must be repaired or supplemented.
Construct protective berms, if needed, in order to contain runoff from material storage areas. Comply with all
state and local regulations pertaining to material storage areas.
B.
The Work area may be used to store materials and equipment as approved by the Walmart Construction Manager.
Provide storage trailers as required for storage of other materials. The Contractor shall not use Walmart trailers or
storage warehouses for materials/equipment storage.
1.
Storage of chemicals, paints, solvents, fertilizers, and other toxic materials within building is prohibited.
Remove such materials daily from store.
2.
Locate storage trailers containing chemicals, paints, solvents, fertilizers, and other toxic materials a minimum of 30 feet from existing structures and adjacent property lines. Coordinate with Walmart Construction Manager if site constraints will not allow placing storage trailers at specified distance.
01500-7
0893 Lindsay, OK
11/23/10
3.
4.
Construction equipment and vehicles shall be maintained to insure equipment and vehicles are without
fluid leaks. Remove construction equipment and vehicles with fluid leaks from store site.
Temporary on-site fuel tanks for construction equipment shall meet all State and Federal regulations.
Tanks shall have approved spill containment with the capacity required by NFPA 30 and all other applicable regulations. Generate a Spill Prevention, Control and Countermeasure (SPCC) Plan if above ground oil
storage capacity at the construction site exceeds 1,320 gallons or as specified by the State in accordance
with Oil Pollution Prevention regulation 40 CFR 112.
C.
Hazardous Material Management and Spill Reporting Plan:
1.
Properly handle any hazardous or potentially hazardous material brought onto construction site to reduce
potential for stormwater pollution.
2.
Store and handle flammable and combustible liquids in accordance with 29 CFR 1926.152. Use only approved containers and portable tanks for storage and handling of flammable and combustible liquids.
3.
Maintain on-site all Material Safety Data Sheets (MSDS) for any and all applicable materials.
4.
Maintain a spill control and containment kit on-site. Contents may typically include:
a.
Absorbent material such as kitty litter or sawdust.
b.
Acid neutralizing agent.
c.
Brooms, dust pans, mops, rags.
d.
Personal Protective Equipment (PPE): gloves, goggles, etc.
e.
Plastic and metal trash containers.
5.
Immediately contain and remove any spilled materials in the manner specified by local, State and Federal
regulations and by product manufacturer.
6.
Notify Walmart Construction Manager immediately in the event of a spill.
7.
Report spills to appropriate agencies in accordance with local or State agency regulations as soon as possible.
D.
The Work area may be used to store materials and equipment as approved by the Walmart Construction Manager.
Provide storage trailers as required for storage of other materials. The Contractor shall not use Walmart trailers or
storage warehouses for materials/equipment storage.
E.
Storage of flammable/volatile liquid and paint materials within building is prohibited.
materials, volatile liquids and paint daily from store.
F.
The Contractor may not store materials on site except for what is in use for the current work.
G.
Cover and protect material in transit.
H.
Stored materials shall be available for inspection by Owner at all times.
I.
Walmart is NOT responsible for the loss of any construction materials or the Contractors' loss of equipment or
tools.
1.27
A.
Remove flammable
TEMPORARY FIRE PROTECTION
Contractors and sub-contractors and their agents and employees shall comply with local fire protection codes and
OSHA Regulations.
1.
Provide a minimum of one U.L. listed 2A:20BC dry chemical fire extinguisher, or one standard U.L. listed
2-1/2 ga. Water (E-10) and one U.L. listed 10BC carbon dioxide fire extinguisher mounted together, in
each of the following areas:
a.
Each 3000 sq. ft. of work area or fraction thereof with minimum of two extinguishers.
2.
Contractor's superintendent, or other assistant superintendents, shall be appointed as project fire warden for
entire construction period.
3.
Train workmen in proper use of each type fire extinguisher.
4.
Post telephone number of fire department, specific information on location of on-site fire fighting
equipment and procedure to be followed in event of fire.
5.
Maintain free access at all times to fire extinguisher equipment, street fire hydrants, and outside
connections for standpipe hose systems.
01500-8
0893 Lindsay, OK
11/23/10
B.
1.28
A.
1.29
Maintain exit facilities and access thereto free of material and other obstructions. If any exits are rendered
inoperative during remodeling, provide the same number of temporary exits and maintain a sufficient number of
required exits and exit width as required by the adopted building code and AHJ.
NON-SMOKING POLICY
Smoking will not be allowed within the building or customer/associate traffic areas at any time.
REMOVAL OF UTILITIES, FACILITIES, AND CONTROLS
A.
Remove temporary above grade or buried utilities, equipment, facilities, materials, prior to Final Walk-Thru
inspection.
B.
Clean and repair damage caused by installation or use of temporary work.
C.
Restore existing facilities used during construction to original condition. Restore permanent facilities used during
construction to specified condition.
D.
At completion of construction, remove fencing, guardrails, barricades, temporary signage and temporary
coverings.
PART 2 - PRODUCTS (Not Used)
PART 3 - EXECUTION (Not Used)
END OF SECTION
01500-9
0893 Lindsay, OK
11/23/10
UniSpec II - Store Planning
062609
SECTION 01600 - PRODUCT REQUIREMENTS
PART 1 - GENERAL
1.1
SUMMARY
A.
Section Includes:
1.
Basic Product Requirements.
2.
Product Options.
3.
Product Substitution Requirements.
4.
Direct Purchase Products.
5.
Product Delivery Requirements.
6.
Product Storage and Handling Requirements.
B.
Related Sections:
1.
Section 01640 - Owner Furnished Products:
products.
1.2
Requirements related to Owner and Walmart furnished
DEFINITIONS
A.
1.3
Products: Defined as new material, machinery, components, equipment, fixtures, and systems forming the Work.
Does not include machinery and equipment used for preparation, fabrication, conveying and erection of the Work.
Products may also include existing materials or components required for reuse.
BASIC PRODUCT REQUIREMENTS
A.
For products or workmanship specified by association, trade, or other consensus standards, comply with
requirements of the standard, except when more rigid requirements are specified or are required by applicable
codes.
B.
Conform to reference standard by date of issue current on date of Contract Documents.
C.
Obtain copies of standards when required by Contract Documents.
D.
Should specified reference standards conflict with Contract Documents, request clarification from Architect before
proceeding.
E.
The contractual relationship, duties, and responsibilities of the parties to the Contract shall not be altered from the
Contract Documents by mention or inference otherwise in any reference document.
1.4
PRODUCT OPTIONS
A.
Products Specified by Naming a Single Manufacturer and/or Model Number: Provide specified product only.
B.
Products Specified by Naming Two or More Manufacturers: Provide specified products of manufacturers and
models named only, meeting specifications and specified requirements.
C.
Products Specified by Reference Standards or by Description Only: Provide any product meeting specified
reference standard or description.
1.5
PRODUCT SUBSTITUTION REQUIREMENTS
A.
No substitutions permitted. Provide specified products only.
01600-1
0893 Lindsay, OK
11/23/10
1.6
DIRECT PURCHASE PRODUCTS
A.
1.7
Direct purchase products shall be purchased directly by the General Contractor from the Manufacturer or the PreNegotiated Supplier as specified in the individual Specifications Sections. Direct purchased products shall not be
purchased by any subcontractor regardless of the discipline or subcontract involved in the installation.
PRODUCT DELIVERY REQUIREMENTS
A.
Transport and handle products in accordance with manufacturer's instructions. Deliver materials and equipment at
such stages of work in order to expedite the Work and minimize storage requirements.
B.
Schedule delivery for Walmart and Owner furnished and installed equipment such that upon delivery of equipment
to the site, sufficient equipment provisions are in place ready for installation and hook-up.
C.
Promptly inspect shipments to assure that products comply with requirements, quantities are correct, and products
are undamaged.
D.
Provide equipment and personnel to handle products by methods to prevent soiling, disfigurement, and damage.
Do not use damaged materials and equipment.
1.8
PRODUCT STORAGE AND HANDLING REQUIREMENTS
A.
Provide safe storage of products.
B.
Store and protect products in accordance with manufacturer's instructions, with seals and labels intact and legible.
Store sensitive products in weather-tight, climate controlled enclosures.
C.
For exterior storage of fabricated products, place on sloped supports, above ground.
D.
Provide off-site storage and protection when site does not permit on-site storage or protection.
E.
Cover products subject to deterioration with impervious sheet covering.
condensation.
F.
Store loose granular materials on solid flat surfaces in a well-drained area. Prevent mixing with foreign matter.
G.
Provide equipment and personnel to store products by methods to prevent soiling, disfigurement, or damage.
H.
Arrange storage of products to permit access for inspection. Periodically inspect to assure products are undamaged
and are maintained under specified conditions.
Provide ventilation to prevent
PART 2 - PRODUCTS
2.1
MATERIALS
A.
Provide interchangeable components of the same manufacturer, for components being replaced.
B.
Do not use materials and equipment removed from existing premises, except as specifically permitted by the
Contract Documents.
PART 3 - EXECUTION (Not Used)
END OF SECTION
01600-2
0893 Lindsay, OK
11/23/10
UniSpec II - Store Planning
111910
SECTION 01640 - OWNER FURNISHED PRODUCTS
PART 1 GENERAL
1.1
SUMMARY
A. Section Includes:
1. Walmart Furnished Products.
B. Related Sections:
1. Section 01600 - Product Requirements: General product requirements related to all products.
1.2
DEFINITIONS
A. Owner: Defined in Construction Agreement. Owner may also be referred to as Walmart.
1.3
RESPONSIBILITIES FOR WALMART FURNISHED PRODUCTS
A. Product Delivery: Product supplier will deliver products to jobsite for Contractor to receive on delivery date
established by Contractor. Supplier will contact Contractor after Award of Contract to establish a product delivery
and installation date, quantities of materials, and a coordination procedure. In the event Supplier contact cannot be
made, contact Walmart Store Planning at (479) 277-2633 or (479) 204-0173.
B. Walmart Responsibilities:
1. Responsibilities by Walmart shall correspond to the party furnishing the product as specified hereinafter.
2. Arrange for delivery of supplier furnished shop drawings, product data, samples, and installation instructions to
Contractor.
3. Arrange and pay for product delivery to site, in accordance with agreed upon construction management plan in
Section 01320.
C. Contractor Responsibilities:
1. Review supplier furnished shop drawings, product data, and samples under provisions of Section 01330. Submit
to supplier with notification to Architect and Walmart's Construction Department of any discrepancies or
problems anticipated in the use the products.
2. Receive and unload products at the Site when specified.
3. Verify quantity of products furnished with shop drawings, Final Field Use Drawings, or Bills of Lading as
applicable.
4. Promptly inspect products upon receipt for shortages, damaged, or defective items; report to Walmart's
Construction Department. Upon notification, Walmart will arrange for delivery of replacement products.
5. Handle products at site, including uncrating, storage, and protection unless otherwise specified.
6. Install products when specified.
7. Provide for installation and hook-up at time of delivery of Walmart installed equipment.
8. Protect installed products from damage.
9. Replace items damaged by Contractor.
10. Remove trash, debris, and rubbish.
11. Manufacturing Defects: Report suspected product manufacturing defects to Walmart Construction Manager
and Product Supplier. Upon notification, Walmart will arrange for repair of product manufacturing defects.
1.4
CONTRACTOR INSTALLATION OF WALMART FURNISHED PRODUCTS
A. Install in accordance with manufacturer's instructions.
B. Unpack and set in place, plumb, level, and secure.
C. Connect to mechanical, plumbing, and electrical systems as required.
01640-1
0893 Lindsay, OK
11/23/10
D. Remove packaging and clean products.
E. Test and adjust as required.
PART 2 PRODUCTS (Not Used)
PART 3 EXECUTION
3.1
PRODUCTS FURNISHED BY OTHERS
A. Equipment may be furnished by Walmart for installation by either the Contractor or by others as specified in the
Products Furnished by Others Schedule included hereinafter.
B. The Products Furnished by Others Schedule includes a listing of Owner furnished products as required in the listed
specifications sections or drawings. Refer to the applicable drawings or individual sections for specific details
regarding Owner furnished products therein. The Schedule provides summary information only and does not
preclude or supersede requirements contained in the individual sections. Contact Walmart Contracts Administration
for resolution of discrepancy between Schedule and Drawings or individual Sections.
C. Coordinate installation of Walmart installed products and equipment. Work in harmony with all subcontractors,
suppliers and manufacturers. Unless otherwise specified, Contractor shall coordinate delivery date of Walmart
furnished equipment. If significant order lead times are required for a specific product, lead time shall be as
specified for that product.
3.2
CONTACTS
A. Contact information for vendors of Walmart Furnished Equipment will be made available to the Contractor at the
Pre-Construction Conference or upon request by the Contractor to the Construction Manager. A limited list of
contacts are as follows:
1. 18” x 12” Cart Corral Signs: “Return Flatbeds & Carts Here” (Part No. 9022):
a. Walmart Sign Shop, Fax: (479) 204-0005, Attn: Vinyl Room, E-mail [email protected], (479)
204-7065, (479) 204-7063.
PRODUCTS FURNISHED BY OTHERS SCHEDULE
Specification
Section
Architectural
Drawings
Architectural
Drawings
Drawings
Drawings
Architectural
Drawings
Architectural
Drawings
08383
08411
Description
Cart Corrals with Signs
Furnished
By
Walmart
Received
By
Contractor
Installed
By
Contractor
Cart Rails (Tubing)
Walmart
Contractor
Contractor
Interior Stainless Steel Pipe
Bollards
Interior Galvanized Steel Pipe
Bollards (Except Contractorprovided core drilled bollards)
Wall Standards
Walmart
Contractor
Contractor
Walmart
Contractor
Contractor
Walmart
Contractor
Contractor
Walmart
Contractor
Contractor
Walmart
Contractor
Contractor
Walmart
Separate
Contractor
Separate
Contractor
Courtesy Desk
(Stand-alone type)
Traffic Doors
Aluminum Storefront Doors (except
doors at Vision Center and
Recycling Center which are
provided by General Contractor)
Order
Date*
Delivery Date*
Contractor to
schedule
Contractor to
schedule
Contractor to
Schedule
Contractor to
coordinate with
specified
supplier in first
week of
construction
Contractor to
Schedule
01640-2
0893 Lindsay, OK
11/23/10
Specification
Section
08462
Description
Aluminum Automatic Sliding Doors
Furnished
By
Walmart
Walmart
Received
By
Separate
Contractor
Contractor
Installed
By
Separate
Contractor
Contractor
09650
Resilient Floor Tile and Adhesive
Floor Treatment Materials
Walmart
Contractor
Contractor
09680
Carpet C-1 (Pharmacy)
Walmart
Contractor
Contractor
09900
Paints (Limited Quantities)
Walmart
Contractor
Contractor
Drawings
Signage
Walmart
Contractor
Separate
Contractor
10810
Soap Dispensers
Walmart
Contractor
Contractor
13810
Energy Monitoring and Control
Systems
Contractor
Contractor
16452
Track Busway System
Walmart,
unless
noted
otherwise
Walmart
Contractor
Contractor
Order
Date*
Delivery Date*
Contractor to
Schedule
Contractor to
Schedule
Contractor to
Schedule
Contractor to
Schedule
Contractor to
schedule
Contractor to
Schedule
w/Sign Dept.
Contractor to
Schedule
Contractor to
Schedule
Contractor to
schedule
delivery
* Dates are based on number of weeks prior to possession (unless noted otherwise).
END OF SCHEDULE
END OF SECTION
01640-3
0893 Lindsay, OK
11/23/10
UniSpec II - Store Planning
043010
SECTION 01700 - EXECUTION REQUIREMENTS
PART 1 - GENERAL
1.1
SUMMARY
A.
1.2
Section Includes:
1.
General Construction Requirements
2.
Verification of Existing Conditions
3.
Work Within and Adjacent to Existing Building Area.
GENERAL CONSTRUCTION REQUIREMENTS
A.
General Requirements
1.
All Work shall be done in a safe and workmanlike manner and in strict accordance with the local and/or
State (if applicable) Building Codes, National Electric Code, ADA-ADAAGS and other Adopted
Accessibility Standards, OSHA, and all applicable codes, regulations, ordinances and Authorities Having
Jurisdiction (AHJ).
2.
Only electric equipment and equipment powered by propane or compressed air shall be operated inside the
building.
a.
Gasoline or diesel powered generators for electric equipment, if required, shall be operated outside
the building and away from air intakes.
b.
Gasoline or diesel powered compressors for air powered tools shall be operated outside the building
and away from air intakes.
c.
Cords for electric equipment shall be sized adequately for voltage, current load, and length, whether
to generator or existing power supply (reference section 01500).
d.
Route equipment cords and hoses in compliance with applicable OSHA requirements.
3.
Propane powered equipment shall have catalytic converters on mufflers and shall be maintained and operated to ensure compliance with local, state, and federal indoor air quality regulations.
a.
Provide storage and handling of propane fuel in compliance with local, state, and federal regulations.
1)
No propane shall remain inside building except during operation of propane equipment.
2)
Propane powered equipment shall be re-fueled outside the building.
4.
Each Subcontractor is responsible for having a thorough knowledge of all drawings and specifications in
their related field. The failure to acquaint himself with this knowledge does not relieve him of any
responsibility for performing his work properly. No additional compensation shall be allowed because of
conditions that occur due to failure to familiarize workers with this knowledge.
5.
The existing building shall be protected from moisture, dust and debris. Install dust partitions or drapes as
required and/or as directed by Walmart Construction Manager to keep dust and moisture from the operating
areas of the store.
6.
Any damage to Walmart’s property, which occurs during the process of construction shall be
repaired/replaced at no additional cost to Walmart; this includes all merchandise. Contractor shall pay the
cost for all damaged merchandise.
7.
The Contractor shall maintain the integrity of the existing building security at all times. This includes
keeping the building secure from persons, environmental elements or hazards. The Contractor shall be
responsible to maintain the integrity of all existing security systems. The Contractor shall obtain
permission from the Store Manager prior to the modification of any existing security system for the
opening (demolition) of any exterior wall.
8.
The Contractor shall keep the work area clean and free of debris and remove all trash and debris from the
construction area daily. No flammable materials or liquids may be stored in the existing building or in any
new addition.
9.
Remove any existing items, services, finishes or surfaces as required for the installation of new
construction. Provide furring for conduits and piping, shown or not, and finish out furring to match
adjacent existing finishes.
01700-1
0893 Lindsay, OK
11/23/10
10.
11.
12.
13.
14.
B.
Repair, re-route, and extend all services, piping, conduit of existing items and equipment as required during
the construction process for the complete installation and operations of new equipment. This includes all
items shown or not shown on the Drawings. Reset existing equipment or related items as required for
proper operation.
Where existing finishes are to remain, clean, repair, patch and repaint as necessary to blend in with adjacent
work. Coordinate with Walmart Construction Manager.
The Contractor shall be responsible for the timely ordering of materials to prohibit delays of the
construction schedule of this Project. It is the responsibility of the Contractor to coordinate delivery of
materials in a timely manner.
It is imperative that the roof framing, decking and roofing system be completed immediately upon the
demolition of the exterior wall to eliminate potential water damage or moisture infiltration. The Contractor
shall keep the building watertight at all times.
The General Contractor shall respond to all requirements of the Structural Engineer/Architect for
verifications, responses, and submissions.
Site Verification Requirements
1.
The Architect has made a scope visit with measurements and photographs of existing conditions and the
Drawings indicate existing conditions verified in the field. It, however, remains the responsibility of the
Contractor to verify all existing conditions prior to the submission of his bid and to the commencement of
any Work. No additional compensation will be paid due to the Contractor’s failure to acquaint himself
with existing site conditions which include, but are not limited to, grades, extent of paving, or utilities.
2.
Any discrepancy with the existing site conditions and/or the Drawings shall be brought to the attention of
the Architect for clarification and instruction. These Construction Documents have been designed and
drawn assuming existing building conditions match the Original Drawings. The General Contractor,
immediately upon arrival at the site, shall verify all existing structural column dimensions, structural
bearing heights, existing dimensions, top of masonry elevations, roofing conditions (including parapets,
scuppers and roof drains), and joist bearing elevations prior to the fabrication of any structural items. If
discrepancies are found between what is shown on the Drawings and existing field conditions, contact the
Walmart Construction Manager and the Architect immediately to determine what action should be taken to
match existing conditions. The beginning of structural steel fabrication by the General Contractor, steel
fabricator, or joist manufacturer means acceptance of the existing conditions.
3.
All utility locations shown are approximate. The Contractor shall field verify the exact location of all
existing utilities (whether shown or not) prior to the submission of his bid or the commencement of
construction. The Contractor shall notify the Walmart Construction Manager of the discovery of existing
utilities not shown or noted on Drawings.
4.
The Contractor shall verify and maintain (repair if damaged) existing irrigation systems affected by the
construction of this Addition.
5.
The Contractor shall field locate and verify all property lines, easements, setbacks and restrictions. A
registered surveyor shall establish all property lines and setbacks prior to the commencement of
construction and clearly flag property lines and setbacks. It remains the responsibility of the General
Contractor to determine exact location of all said boundaries.
6.
The Contractor shall verify exact locations and depths of underground utility services prior to any
excavation.
7.
The Contractor shall verify all grades and proposed final grades. If ramps, stoops, stairs, sidewalks,
flatwork or paving are installed, verify final grades surrounding the new construction and adjust stair risers,
ramp lengths, limits of paving, etc., to accommodate the required ramp slope, riser heights or paving areas.
All ramps and stairs shall meet ADA-ADAAGS (or Adopted Handicap Accessibility Requirements). If
there is a conflict in field conditions, notify Walmart Construction Manager and the Architect prior to the
construction or ordering of materials.
8.
The Contractor shall verify the existing finish floor elevation at all new openings of the existing building
prior to establishing the finish floor elevation. To verify floor elevation, the Contractor shall remove a
small portion of the block wall at the proposed opening between the existing store and the addition.
9.
The Contractor shall verify existing footing depths and match at new Addition to insure proper block
coursing. Any discrepancy shall be reported to the Walmart Construction Manager prior to construction.
10.
The Contractor shall core the roof insulation to determine its thickness after Contract award. It is the
Contractor's responsibility to match existing roof insulation thickness on the Addition unless directed
otherwise to install 3” insulation in separated and isolated roof conditions. Refer to Roofing Specification
Section.
01700-2
0893 Lindsay, OK
11/23/10
11.
C.
Report any discrepancies found in the field immediately to Walmart and the Architect prior to making any
structural modifications or ordering of any materials.
Demolition Requirements
1.
Refer to Section 02023 for general demolition requirements.
2.
The Contractor may not remove the block wall in a proposed opening prior to the roofing system over the
new addition being made watertight. Coordinate with the Walmart Construction Manager and the Store
Manager to schedule for demolition for this new opening.
3.
The Contractor shall remove any building signage that interferes with the Building Addition. Walmart will
reinstall signage or add new signage at completion of Addition.
PART 2 - PRODUCTS (Not Used)
PART 3 - EXECUTION (Not Used)
END OF SECTION
01700-3
0893 Lindsay, OK
11/23/10
UniSpec II - Store Planning
011108
SECTION 01731 - CUTTING AND PATCHING
PART 1 - GENERAL
1.1
SUMMARY
A.
Section Includes:
1.
Requirements and limitations for cutting and patching Work.
2.
Products for patching and extending Work.
3.
Transitions and adjustments.
4.
Repair of damaged surfaces, finishes and cleaning.
B.
Related Sections:
1.
Section 01500 - Temporary Facilities and Controls: Temporary dust partitions.
2.
Section 02023 - Selective Site Demolition: Procedures for removing existing materials and equipment.
1.2
PERFORMANCE REQUIREMENTS
A.
Cutting and patching includes cutting into existing construction to provide for installation or performance of other
work and subsequent fitting and patching required to restore surfaces to their original condition.
B.
Cut into or partially remove portions of the existing building as required for new construction. Include such work
as:
1.
Cutting, moving or removal of items shown to be cut, moved or removed.
2.
Cutting, moving or removal of items not shown to be cut, moved, or removed, but which must be cut,
moved, or removed to allow for new construction. Work or items which are to remain in the finished work
shall be patched or reinstalled after cutting, moving, or removal, and joints and finishes shall match
adjacent or similar work.
3.
Removal of existing surface finishes as needed to install new work and finishes.
4.
Removal of abandoned items and removal of items serving no useful purpose; such as abandoned piping
and electrical conduits to nearest J-boxes.
5.
Repair or removal of dangerous or unsanitary conditions resulting from alterations work.
C.
Structural Work:
1.
Do not cut and patch structural work in manner resulting in reduction of load-carrying capacity or load and
deflection ratio.
2.
Submit proposal for cutting and patching of structural work and obtain Walmart Construction Manager's
approval prior to the structural alterations.
D.
Operational Limitations:
1.
Do not cut and patch in manner resulting in decreased performance, shortened useful life, or increased
maintenance.
2.
Submit proposals for cutting and patching operational elements and safety components and obtain Walmart
Construction Manager's acceptance prior to the work.
E.
Quality Limitations: Do not cut and patch work exposed to view (exterior and interior) in manner resulting in
noticeable reduction of aesthetic qualities and similar qualities, as determined by the Walmart Construction
Manager.
F.
Limitation on Acceptance: Walmart Construction Manager's acceptance to proceed with cutting and patching
shall not waive right to later require removal or replacement of work found to be cut and patched in unsatisfactory
manner as determined by Walmart Construction Manager.
01731-1
0893 Lindsay, OK
11/23/10
G.
Obtain all required inspections and approvals from authorities having jurisdiction for Temporary Certificate of
Occupancy for Offices and Stockroom at least seven calendar days prior to Walmart scheduled move into new
Office and Stockroom areas.
PART 2 - PRODUCTS
2.1
MATERIALS
A.
Use materials for cutting and patching that are identical to existing materials. If identical materials are not
available or cannot be used, use materials that match existing adjacent surfaces to fullest extent possible with
regard to visual effect. Use materials for cutting and patching that will result in equal or better performance
characteristics.
PART 3 - EXECUTION
3.1
EXAMINATION
A.
3.2
Examine surfaces to be cut and patched and conditions under which work is to be performed before cutting. Take
corrective action before proceeding with work if unsafe or otherwise unsatisfactory conditions are encountered.
PREPARATION
A.
Temporary Support: Provide temporary support of work to be cut to prevent failure.
B.
Protection:
1.
Protect other work during cutting and patching to prevent damage.
2.
Provide protection from adverse weather conditions for that part of project that may be exposed during
cutting and patching operations.
3.
Avoid interference with use of adjoining areas or interruption of free passage to adjoining areas.
4.
Take precautions not to cut existing pipe, conduit, or duct serving building but scheduled to be relocated
until provisions have been made to bypass them.
3.3
ALTERATIONS, CUTTING AND PROTECTION
A.
Extent
1.
Cutting and removal work shall be performed so as not to cut or remove more than is necessary and so as
not to damage adjacent work.
2.
Conduct work in such a manner as to minimize noise and to minimize accumulation and spread of dirt and
dust.
3.
Perform cutting for ductwork and other rectangular openings with carborundum saw with approved dust
arrestor.
4.
Drill holes for conduit and piping using core drills.
B.
Responsibility and Assignment to Trades
1.
The General Contractor shall assign the work of moving, removal, cutting, patching and repair to trades
under his supervision so as to cause the least damage to each type of work encountered, and so as to return
the building as much as possible to the appearance of new work.
2.
Patching of finish materials shall be assigned to mechanics skilled in the work of the finish trade involved.
C.
Protection
1.
Protect remaining finishes, equipment, and adjacent work from damage caused by cutting, moving, removal
and patching operations. Protect surfaces, which will remain a part of the finished work.
2.
Protect existing facilities and features, within designated construction limits and along corridor access route
to construction area.
3.
Cover existing wall and floor finishes (if it remains) in work areas, in adjacent areas and along corridor
access route to prevent damage from product delivery and construction operations.
01731-2
0893 Lindsay, OK
11/23/10
4.
5.
6.
D.
3.4
During demolition, cutting and construction, provide positive dust control by wetting dust debris and by
completely sealing openings to Walmart occupied and customer traffic areas with temporary partitions, so
as to prevent spread of dust and dirt to adjacent areas.
After materials, equipment and machinery are installed, properly protect Work until final acceptance.
Any damage to the existing building resulting from construction operations shall be repaired by the
Contractor without cost to the Walmart.
Debris:
1.
Remove debris promptly from Building each day as a minimum. Removed material, except that listed or
marked by the Walmart Construction Manager for retention, becomes the responsibility of the General
Contractor. Load removed material directly on trucks for removal from site. Do not allow debris to enter
sewers.
2.
Do not allow stacked or piled material to endanger structure or the operation of the Store.
3.
Walmart shopping carts shall not be used to haul debris.
4.
Walmart-provided trash containers or dumpsters are not for use of the General Contractor. The Contractor
shall supply trash containers or dumpsters for construction debris.
PATCHING, EXTENDING AND MATCHING
A.
Skill
1.
Patch and extend existing work using skilled mechanics capable of matching the existing quality of
workmanship. The quality of patched or extended work shall not be less than that specified in the Sections
of the Specifications, which follow these general requirements.
B.
Patching
1.
In areas where any portion of an existing finished surface is damaged, soiled, stained, or otherwise made or
found to be imperfect, patch or replace the imperfect portion of the surface with matching material.
2.
Provide adequate support or substrate for patching of finishes.
3.
If the imperfect surface was a painted or coated one, repaint or recoat the patched portion in such a way that
uniform color and texture over the entire surface results.
4.
If the surrounding surface cannot be matched, repaint or recoat the entire surface to nearest corner or
transition point.
5.
At locations in existing areas where partitions are removed, patch the floors, walls and ceilings with finish
materials to match new finishes.
6.
C.
Quality
1.
In the Sections of the Specifications, which follow these General Requirements, no concerted attempt has
been made to describe each of the various existing products that must be used to patch, match, extend or
replace existing work. Obtain all such products in time to complete the Work on schedule. Such products
shall be provided in quality, which is in no way inferior to the existing products.
2.
Where a product or type of construction occurs in the existing building, and it is not specified as a part of
the new work, provide such products or types of construction as needed to patch, extend or match the
existing work.
3.
These Specifications will generally not describe existing products or standards of execution, nor will they
enumerate products, which are not a part of the new construction. The existing product is its own
specification.
4.
The presence of any product or type of construction in the old work shall cause its patching, extending, or
matching to be performed as necessary to make the work complete and consistent, to identical standards of
quality.
D.
Transitions
1.
Where new work abuts or finishes flush with existing work, make the transition as smooth and
workmanlike as possible. Patched work shall match existing adjacent work in texture and appearance so as
to match new construction standards.
2.
Where masonry or other finished surface is cut in such a way that a smooth transition with new work is not
possible, terminate the existing surface in a neat fashion along a straight line at a natural line of division.
01731-3
0893 Lindsay, OK
11/23/10
3.
4.
E.
Where two or more spaces are indicated to become one space, rework ceilings so that horizontal planes,
without breaks, steps or bulkheads result.
In cases of extreme change of ceiling or floor, obtain instructions from Walmart Construction Manager as
to method of making transition.
Matching
1.
Restore existing work that is damaged during construction to a condition equal to its condition at the time
of the start of the Work.
END OF SECTION
01731-4
0893 Lindsay, OK
11/23/10
UniSpec II- Store Planning
082710
SECTION 01740 - CLEANING
PART 1 - GENERAL
1.1
SUMMARY
A.
Section Includes:
1.
Cleaning and maintenance of site premises.
B.
Related Sections:
1.
Section 01742 - Construction/Demolition Waste Management And Disposal: Disposal and removal of nonhazardous construction and demolition waste
1.2
GENERAL
A.
Maintain premises free from accumulations of waste, debris and rubbish caused by construction operations.
B.
At completion of Work, remove waste materials, rubbish, tools, equipment, machinery and surplus materials; and
clean all sight-exposed surfaces. Leave project clean and ready for occupancy.
1.3
REQUIREMENTS OF REGULATORY AGENCIES
A.
Codes and Standards:
1.
Comply with applicable Federal, State and Local codes and regulations relative to environmental safety
regulations.
B.
Hazards Controls:
1.
Store volatile waste in covered metal containers and remove from premises daily. Prevent accumulation of
wastes which create hazardous conditions.
C.
Pollution Control:
1.
Burning or burying of rubbish and waste materials on the project site is prohibited.
2.
Disposal of volatile fluid wastes (such as mineral spirits, oil or paint thinner) in storm or sanitary sewer systems or into streams or waterways is prohibited.
3.
Disposal of any toxic chemicals in storm or sanitary sewer systems is prohibited. Comply with EPA requirements regarding disposal.
PART 2 - PRODUCTS
2.1
CLEANING MATERIALS
A.
Use only cleaning materials recommended by manufacturer of surface to be cleaned.
B.
Use cleaning materials only on surfaces recommended by cleaning material manufacturer.
C.
Cleaning materials shall be clearly labeled and safely stored when not in use. Maintain control of cleaning
materials while in use. Do not leave unattended. No flammable materials or liquids may be stored in the existing
building or in the new addition.
PART 3 - EXECUTION
3.1
CLEANING REQUIREMENTS
A.
Oversee cleaning and ensure that building and grounds are maintained free from accumulations of waste materials
and rubbish.
01740-1
0893 Lindsay, OK
11/23/10
B.
In exterior work, sprinkle dusty debris with fine water mist to control accumulation of dust. Avoid puddling.
C.
Vacuum clean interior building areas when ready to receive finish painting and continue vacuum cleaning on an
as-needed basis until building is ready for acceptance or occupancy.
D.
Schedule cleaning operations so that dust and other contaminants resulting from cleaning process will not fall on
wet, newly-painted surfaces.
E.
Clean exterior premises daily. Do not let debris enter customer areas.
3.2
ACOUSTICAL PANEL CEILING AND EXPOSED OVERHEAD STRUCTURE CLEANING
A.
Clean existing exposed surfaces of acoustical panel ceilings in all areas including non-customer areas such as
break rooms, offices, Pharmacy, etc. Clean existing exposed overhead structure within the sales floor area.
Surfaces to be cleaned include the following:
1.
Acoustical tile ceilings to remain in place including trim, edge moldings, suspension system members, diffusers, speakers, and camera mounts.
2.
Exposed overhead structure to remain in place including, but not limited to, structural steel, steel joists,
metal deck, and bracing members, and suspended items including, but not limited to, drop boxes, ductwork,
and light fixtures.
B.
Qualifications: Cleaning shall be done by a reputable firm regularly engaged in cleaning of acoustical tile ceilings
and overhead structure and shall have been in business for a continuous period of not less than 2 years. Firm shall
be experienced in work of the nature and scale similar to this project
C.
Products and Procedure
1.
Cleaning Products: Accomplish cleaning using solutions and products specifically formulated and recommended for cleaning the surfaces involved. Products shall be non-toxic and non-caustic to metal or acoustic
surfaces. Products shall be enzyme based or of such ingredients to effectively clean, whiten, and dissolve
nicotine tar, cooking oils and grease, soiling, soot, smoke, mildew, and dirt films. Products containing
bleach will not be allowed. Products shall be by a manufacturer regularly engaged in the production of
such products.
2.
Procedures: Cleaning procedure shall be as follows:
a.
Acoustical tile ceilings to remain in place (including trim, edge moldings, suspension system
members, diffusers, speakers, and camera mounts):
1)
Cover entirely with drop cloths, all merchandise, furniture, equipment, and floors in areas to
be cleaned.
2)
Dust or vacuum tiles and tile suspension system to remove loose dirt and dust.
3)
Apply cleaning solutions by spray or mist at a rate recommended by product instructions depending on type and porosity of surface to be cleaned.
4)
Allow sufficient time as recommended by product instructions for solutions to react.
5)
Remove solutions with sponges and wipe dry.
6)
Follow written instructions of product manufacturer where such instructions vary from, or
are in addition to, the foregoing procedures.
b.
Exposed overhead structure to remain in place (including, but not limited to, structural steel, steel
joists, metal deck, and bracing members) and suspended items (including, but not limited to, drop
boxes, ductwork and light fixtures):
1)
Cover entirely with drop cloths, all merchandise, furniture, equipment, and floors in areas to
be cleaned.
2)
Dust or vacuum to remove loose dirt and dust.
D.
Coordination and Scheduling: Perform cleaning during periods when store is closed or during low traffic periods,
typically between 10:00 PM and 6:00 AM. Coordinate cleaning schedule with store manager. Submit to the store
manager, a mutually agreed upon cleaning schedule at least 7 days prior to commencement of cleaning operations.
E.
Cleaning shall be completed within 45 days of possession of area cleaned. Schedule with Walmart Construction
Manager.
01740-2
0893 Lindsay, OK
11/23/10
F.
3.3
Dispose of ceiling tile which cannot be cleaned and must be replaced as specified in section 02023.]
TRASH REMOVAL
A.
On a daily basis, clean work areas and access, and dispose of waste materials, rubbish and debris.
B.
Disposal of non-hazardous demolished materials shall be by Owner's Waste Management Vendor as specified in
Section 01742 and in accordance with agreement between Waste Management Vendor and Contractor.
C.
Deposit waste materials, rubbish, and debris in waste containers as provided by the Waste Management Vendor as
specified in Section 01742. Perform segregation of waste materials into the various classification and segregated
materials as established and agreed to between Waste Vendor and Contractor.
D.
Do not allow waste materials, rubbish and debris to accumulate and become an unsightly or hazardous condition.
E.
Notify the Owner’s Waste Management Vendor when containers are ready for pickup and disposal.
F.
Keep streets and access to site free of rubbish and debris.
3.4
FINAL CLEANING:
A.
Execute final cleaning prior to final inspection as follows.
1.
Clean Project site, yard, and grounds, in areas disturbed by construction activities, including landscape development areas, of rubbish, waste material, litter, and other foreign substances.
2.
Sweep paved areas broom clean. Remove petrochemical spills, stains, and other foreign deposits.
3.
Rake grounds that are neither planted nor paved to a smooth, even-textured surface.
4.
Remove tools, construction equipment, machinery, and surplus material from Project site.
5.
Clean exposed exterior and interior hard-surfaced finishes to a dirt-free condition, free of stains, films, and
similar foreign substances. Avoid disturbing natural weathering of exterior surfaces. Restore reflective
surfaces to their original condition.
6.
Remove debris and surface dust from limited access spaces, including roofs, plenums, shafts, trenches,
equipment vaults, manholes, attics, and similar spaces.
7.
Clean debris from roofs, gutters, downspouts, and drainage systems.
8.
Vacuum carpet and similar soft surfaces, removing debris and excess nap; shampoo if visible soil or stains
remain.
9.
Vacuum clean all interior floor surfaces.
10.
Clean transparent materials, including mirrors and glass in doors and windows. Remove glazing compounds and other noticeable, vision-obscuring materials. Replace chipped or broken glass and other damaged transparent materials. Polish mirrors and glass, taking care not to scratch surfaces.
11.
Remove labels that are not permanent.
12.
Touch up and otherwise repair and restore marred, exposed finishes and surfaces. Replace finishes and surfaces that cannot be satisfactorily repaired or restored or that already show evidence of repair or restoration.
13.
Wipe surfaces of mechanical and electrical equipment and similar equipment. Remove excess lubrication,
paint, and mortar droppings, and other foreign substances.
14.
Clean plumbing fixtures to a sanitary condition, free of stains, including stains resulting from water exposure.
15.
Replace disposable air filters and clean permanent air filters of equipment operated during construction.
Clean exposed surfaces of diffusers, registers, and grills.
16.
Clean ducts, blowers, and coils if units were operated without filters during construction.
17.
Leave Project clean and ready for occupancy.
B.
Cleaning of Restrooms Prior to Possession:
1.
Immediately prior to possession, thoroughly clean restrooms, including walls, floors, plumbing fixtures,
toilet partitions, and accessories, as directed herein or in the individual specifications sections.
2.
Clean entire wall and floor surfaces using cleaning solutions approved by the substrate manufacturer and
wipe dry to prevent surface film or residue.
01740-3
0893 Lindsay, OK
11/23/10
3.
4.
5.
Clean water closets and lavatories with scrubbing cleansers approved by fixture manufacturer to remove
stains and deposits.
Clean and polish stainless steel accessories and toilet partitions to a spotless luster using soap, ammonia, or
mild detergent and water as recommended by the accessory or partition manufacturer. Alternatively, use a
commercial stainless steel cleaner and polish as directed.
Clean mirror surfaces using glass cleaner.
C.
Employ skilled workmen for final cleaning.
D.
Prior to final completion or Owner possession, conduct an inspection of sight-exposed interior and exterior
surfaces and all work areas with the Walmart Construction Manager to verify that entire Work is clean.
END OF SECTION
01740-4
0893 Lindsay, OK
11/23/10
UniSpec II – Store Planning
022610
SECTION 01742 – CONSTRUCTION/DEMOLITION WASTE MANAGEMENT AND DISPOSAL
PART 1 - GENERAL
1.1
SUMMARY
A.
This Section includes administrative and procedural requirements for nonhazardous demolition and construction
waste removal and disposal by an Owner pre-selected waste management vendor.
B.
Related Sections:
1.
Section 01740 - Cleaning: Site and premises cleanup during and at completion of construction.
2.
Section 02023 – Selective Site Demolition.
1.2
DEFINITIONS
A.
Construction Waste: Building and site improvement materials and other solid waste materials resulting from
construction, remodeling, renovation, or repair operations. Construction waste includes shipping and packaging
and discarded temporary construction materials.
B.
Demolition Waste: Building and site improvement materials resulting from demolition or selective demolition
operations.
C.
Disposal: Removal off-site of demolition and construction waste and subsequent sale, recycling, reuse, or deposit
in landfill or incinerator acceptable to authorities having jurisdiction.
D.
Recycle: Recovery of demolition or construction waste for subsequent processing in preparation for reuse.
1.3
SELECTION AND PAYMENT
A.
1.4
Employment and payment for services of a Construction and Demolition Waste Management Vendor (Vendor) for
the collection and disposal of designated construction and demolition waste will be by Walmart.
1.
Walmart Vendor: Oakleaf Waste Management, LLC (678) 507-3181. Contact: Mary Widener.
RESPONSIBILITIES
A.
Walmart Responsibility:
1.
Obtain the services of a pre-negotiated Vendor for the collection and disposal of designated construction
and demolition waste.
B.
Basic Vendor Responsibility:
1.
Communicate to the job site contact what service and recycling is arranged.
2.
Provide handling, containers, storage, signage, transportation, and other items as required to implement
waste management during the entire duration of the Contract.
3.
Identify what container is for which recyclable or for trash.
4.
The Vendor will provide the waste container(s) to be used by the Contractor and and shall coordinate the
exact location(s) of the waste container(s) with the General Contractor. Waste containers will be classified
and segregated to accept materials sorted with respect to type of waste or type of material.
C.
Basic Contractor Responsibility
1.
Within one week after Contract award, contact the Vendor to coordinate scope of Work to ensure proper
waste containers are delivered to job site, and for collection and disposal arrangements.
2.
Supply name and contact information to Vendor for a designated Contractor contact person on the job site.
3.
Commit to required waste separation for recyclables and insure all are disposed in the proper container as
agreed to between Vendor and Contractor.
4.
Contact Vendor to order services during construction.
01742-1
0893 Lindsay, OK
11/23/10
5.
6.
7.
Provide and designate and label specific areas on Project site for waste containers and for separating waste
materials.
Perform segregation of waste materials into the various classification and segregated materials as established and agreed to between Vendor and Contractor. Deposit wasted materials into the containers.
Notify the Vendor when containers are ready for pickup and disposal.
D.
Recycling may consist of, but not necessarily include nor be limited to, any and all non-hazardous demolition and
construction waste and debris to be disposed of and not to be reused, or considered of value to the Contractor and
retained in the Contractor’s possession.
1.
Removed acoustical ceiling tile (ACT) shall be recycled as specified in Section 02023, if applicable.
2.
Removed vinyl composition tile (VCT) shall be recycled as specified in Section 02223, if applicable.
E.
Salvage/Recycle Goals: Owner's goal is to salvage and recycle as much nonhazardous demolition and
construction waste as possible.
1.5
QUALITY ASSURANCE
A.
Waste Management Conference: Conduct meeting between Vendor and Contractor at Project site to review
methods and procedures related to waste management including, but not limited to, the following:
1.
Review and discuss waste management including responsibilities of Vendor and the Contractor.
2.
Review and finalize procedures for materials separation and verify availability of containers and bins needed to avoid delays.
3.
Review procedures for periodic waste collection and transportation to recycling and disposal facilities.
4.
Review waste management requirements as may be necessary for each trade or subcontractor at the work
site.
PART 2 - PRODUCTS (Not Used)
PART 3 - EXECUTION
3.1
PLAN IMPLEMENTATION
A.
3.2
Train workers, subcontractors, and suppliers on proper waste management procedures, as appropriate for the Work
occurring at Project site. Notify workers and subcontractors of waste management plan to be carried out.
DISPOSAL OF WASTE NOT COLLECTED BY VENDOR
A.
Except for items or materials to be removed by the Vendor or to be recycled as specified above, remove waste
materials from Project site and legally dispose of them in a landfill or incinerator acceptable to authorities having
jurisdiction.
B.
Dispose of fluorescent lamps in compliance with all applicable local, state, and Federal guidelines.
C.
Except as otherwise specified, do not allow waste materials that are to be disposed of accumulate on-site.
D.
Remove and transport debris in a manner that will prevent spillage on adjacent surfaces and areas.
E.
Burning: Do not burn waste materials.
END OF SECTION
01742-2
0893 Lindsay, OK
11/23/10
UniSpec II - Store Planning
111910
SECTION 01770 - CONTRACT CLOSEOUT
PART 1 - GENERAL
1.1
SUMMARY
A.
Section Includes
1.
Closeout Procedures
2.
Final Closeout Submittals
3.
Closeout Document Book.
4.
Record Letters of Conformance
5.
Letters of Certification
6.
Project Record Documents
7.
Operations and Maintenance Data
8.
Warranties and Bonds
B.
Related Sections:
1.
Section 01740 – Cleaning: Requirements for final cleaning.
1.2
CLOSEOUT PROCEDURES
A.
Comply with closeout submittal requirements defined within individual Sections. Submittals procedures described
herein shall apply unless otherwise described in individual Sections.
B.
When Contractor considers Work to be Substantially Complete, submit written certification to Walmart's
Construction Manager as follows.
1.
Contract Documents have been reviewed.
2.
Work has been inspected.
3.
Work is complete in accordance with Contract Documents.
4.
Work is ready for inspection.
1.3
FINAL CLOSEOUT SUBMITTALS
A.
1.4
Before final application for payment will be approved, final closeout submittals shall be received and approved by
Walmart. If Contractor fails to provide a fully completed Closeout Document Book within 90 days after
Substantial Completion of the Work, then Contractor agrees to pay Owner the sum of $250.00 per day, as
liquidated damages and not as a penalty, until the fully completed Closeout Document Book is received by
Walmart Contract Administration.
CLOSEOUT DOCUMENT BOOK
A.
Bind closeout documents in a "Closeout Document Book" consisting of a black, three-ring binder. Include only
one set of Documents. Documents included in Closeout Document Book shall consist only of the items in the
following numbered list, separated and identified with a corresponding numbered tab for each numbered item
listed. Note that all closeout documents are not necessarily included in the Closeout Document Book. Each
document shall be an original document (not a copy) unless otherwise permitted in the listing below. If any item is
not applicable, include a “Not Applicable” sheet after the numbered tab. The Contract Document Book shall not be
compiled based only on the brief description of each item in the following list. It is compulsory that the individual
sections and references be examined to comprehend the full description of the specific item to be included. Include
the following:
1.
Contractor's Statement of Warranty. (Reference Article 9 of General Conditions) (Ref form included at end
of this section.)
2.
Copy of Certificate of Occupancy.
3.
List of Subcontractors: Final list of Subcontractors used complete with telephone numbers, addresses, and
01770-1
0893 Lindsay, OK
11/23/10
4.
5.
6.
7.
8.
9.
10.
11.
12.
1.
1.5
after hours telephone numbers. (Reference Article 12 of General Conditions)
Signed and notarized lien waivers from Contractor and all Subcontractors on the Walmart form (Affidavit
of Total Release and Certification of all Bills Paid) (Ref form included at end of this Section.) The form
shall have no modifications or changes made thereon.
Copies of Performance and Payment Bond. (Ref Article 20 of General Conditions).
Consent of Surety to Final Payment: From Bonding Co. (Ref Article 7 of General Conditions)
Substantial Completion Punch List: Building, HVAC/refrigeration punch lists showing items completed
and approved by Walmart. (Ref Article 4 of General Conditions)
Maintenance Data Sheet. (Ref. form at the end of this Section).
Verification of transmittal to Store Manager of all Project Record Documents specified hereinafter and
Operations and Maintenance Manuals. This shall be in the form of a Letter of Transmittal with a statement
signed by the Store Manager verifying that the O&M manuals have been placed in the Electrical
Distribution Center (EDC) by the Contractor and the placement witnessed by the Store Manager.
Warranties. Warranties shall be documents issued and signed by the manufacturer unless otherwise
specified. Tab each warranty listed below separately in the Closeout Document Book.
a.
Traffic Doors (Section 08383)
b.
Automatic Sliding Entrance Doors: (Section 08462)
c.
Heating, Ventilating, and Air Conditioning Equipment: HVAC Components (Section 15700)
Letters of Certification: Include separate letter for each certification required within the sections listed
below.
a.
Rough Carpentry. (Section 06100).
b.
Sheet Metal Flashing. (Section 07620)
c.
Glazing. (Section 08800)
d.
Building Services Piping: (Section 15100)
1)
Certification of testing/inspection contractor.
Record Letters of Conformance: Include separate letter for each item listed below.
a.
Fire Suppression (Including Fire Pump and Water Storage Tank if specified) (Section 13900)
Inspection Reports.
RECORD LETTERS OF CONFORMANCE
A.
1.6
Submit Record Letters of Conformance as a Closeout Submittal. By submitting Record Letter of Conformance, the
Contractor declares that the product identified by manufacturer's name and model number is the product specified
and is suitable for the intended use as defined within the Contract Documents and has been provided and placed in
operational condition in accordance with the manufacturer's published instructions and the Contract Documents.
1.
Submit completed Record Letter of Conformance for each product selected as indicated within each
Section.
2.
Fill-in required information on form and sign in ink by person authorized to sign on behalf of the
Contractor.
3.
No modifications shall be made to the form.
4.
Record Letters of Conformance, when required, are located at the end of the respective Section.
LETTERS OF CERTIFICATIONS
A.
Certify manufacturer's or installer's qualifications, conformance with tests or specified criteria, or other factors as
required in individual specification sections.
B.
Submit supporting reference data, affidavits, and certifications as required.
C.
Number of Copies Required: Two.
1.7
PROJECT RECORD DOCUMENTS:
A.
Maintain on site, one set of the following record documents. Record actual revisions to the Work.
1.
Contract Drawings.
2.
Specifications.
01770-2
0893 Lindsay, OK
11/23/10
3.
4.
5.
Addenda.
Change Orders and other Modifications to the Contract.
Reviewed shop drawings, product data, and samples.
B.
Maintain Record Documents separate from documents used for construction.
C.
As-built Record Documents and Shop Drawings: Record as-builts shall be maintained and submitted for the
primary purpose of recording the locations for concealed interior and exterior underground utilities as specified in
the individual specifications. Legibly record actual measured horizontal and vertical locations of interior and
exterior underground utilities and appurtenances, referenced to permanent surface improvements.
D.
Record required as-built information concurrent with construction progress. Do not permanently conceal work
until required information has been recorded.
E.
At Project completion, the Contractor shall place the Record Documents (including Building Record Drawings,
Specifications, Addenda, and Change Orders) enclosed in a plastic pipe tube (fixed cap at one end and a threadedcap on the other end) for storage in the Electrical Room unless otherwise specified to be located in another location
in the individual Sections. Placement shall be in the presence of and witnessed by the Store Manager.
1.8
OPERATION AND MAINTENANCE DATA
A.
1.9
Operation and Maintenance data shall include a suitably bound set of descriptive literature, maintenance and
operation data, and parts lists for each item of equipment provided under this Contract that will require
maintenance or special operation procedures, including drawings, instructions, or manuals supplied with equipment
furnished by others and installed under this Contract. Submittal of O&M data shall be in the form of placement by
the Contractor of the bound set of O&M data in the Electrical Distribution Center (EDC) within the building. Do
not include O&M data in the Closeout Document Book or submit to Walmart Contract Administration. Placement
of documents shall be witnessed by the Store Manager and shall be at least 14 days prior to final inspection.
WARRANTIES AND BONDS
A.
Prior to Final Application for Payment, submit required warranties and bonds in Closeout Document Book.
1.
Assemble documents from Subcontractors, suppliers, and manufacturers.
2.
For equipment put into use with Owner's acceptance during construction, submit within ten days after first
operation, listing date of acceptance as start of warranty period.
3.
For items of Work delayed materially beyond Date of Substantial Completion, provide updated submittal
within ten days after acceptance, listing date of acceptance as start of warranty period.
PART 2 PRODUCTS (Not Used)
PART 3 EXECUTION (Not Used)
END OF SECTION
01770-3
0893 Lindsay, OK
11/23/10
WALMART STORES, INC.
MAINTENANCE DATA SHEET
Complete all Sections Prior To Final Payment
Location:
Store/Club No.:
Size:
Possession Date:
TYPE OF BUILDING CONSTRUCTION
Walls:
Roof (circle one):
SBS
BUR
EPDM
Roofing Mfg.
Metal
Other (explain)
Warranty Information. (years)
STORE/CLUB TYPE (Check Those That Apply)
Free Standing
New Store
Take-over Store
Strip Center
Relocation
Stockroom Add'n.
Mall
Remodel
Expansion
Back
L. Side
Company Name
Location
Business Phone
Front
R. Side
Emerg. Phone
Developer:
Gen. Contractor:
Subcontractors:
Electrical:
Plumbing:
Fire Protection:
Roofing:
Ht/Vent/Cool.:
Paving:
Painting:
Storefront:
Earthwork:
Site Utility:
Striping:
Fencing:
Concrete Ext.:
Concrete Int.:
01770-4
0893 Lindsay, OK
11/23/10
MAINTENANCE DATA SHEET (CONT)
Company Name
Location
Business Phone
Emerg. Phone
Masonry:
Struct. Steel:
Overhead Doors:
Auto. Doors:
Flooring:
Landscaping:
Irrigation:
HEATING AND AIR CONDITIONING EQUIPMENT
GAS FIRED [ ]
ELECTRIC HEAT [ ]
Quantity
Manufacturer
Model No.
Heat/Cool (BTU's)
Cool Only (BTU's)
MISCELLANEOUS INFORMATION
Quantity
Manufacturer
Catalog/ Model No.
Volts/Watts
Parking Lot Lighting:
Lighting Poles:
Light Fixtures:
Ballasts:
Lamps:
Ceiling Light Fixtures:
High Bay:
Ballasts:
Lamps:
Pendant Mount:
Ballasts:
Lamps:
Fluorescent Mount:
Ballasts:
Lamps:
01770-5
0893 Lindsay, OK
11/23/10
MAINTENANCE DATA SHEET (CONT)
PRODUCTS
Manufacturer
Model/Serial #
Color/Style (If Applicable)
Door Closers:
Panic Hardware:
Auto. Doors:
Ceiling Panels:
Floor Tile:
Rubber:
VCT:
PVC:
Ceramic:
R.R. Partition:
Fire Pump:
Jockey Pump:
Exit Lights:
Emergency Lights:
Note: Include all information requested, including Owner Provided Parts.
DNA: Does Not Apply
END OF MAINTENANCE DATA SHEET
01770-6
0893 Lindsay, OK
11/23/10
AFFIDAVIT OF TOTAL RELEASE AND CERTIFICATION OF ALL BILLS PAID
THE UNDERSIGNED hereby certifies that he (or she) has examined and is authorized and empowered to execute
this Affidavit as the owner, partner, or officer as the case may be, of the contractor named below ("the Contractor") employed
in connection with the construction project ("the Project") mentioned below.
In consideration for the full and final payment to the Contractor for all services in connection with the Project, the
Contractor hereby releases and waives all liens and claims to liens which the Contractor may have on or affecting the Project
or Project property as a result of the Contractor's contract(s) for the Project or for performing labor and/or furnishing
materials that are in any way connected with any construction of any building(s) or improvement(s) for the Project whether on
the Project property or elsewhere. The Contractor further certifies and warrants that all subcontractors of labor and/or
materials supplied to, for, through or at the direct or indirect request of the Contractor and/or subcontractor have been paid.
1.
(Print or type the firm or individual name of the Contractor)
2.
(Print or type the Contractor's address)
3.
Print or type the name of the person signing for the Contractor)
4.
(Print or type the position of the person signing for the Contractor)
5.
Description of the Project (use an additional page, if necessary):
6.
Date that the project was totally completed:
.
The undersigned certifies that the foregoing information is true and correct and acknowledges that the owner of the
Project has placed a material reliance on such information in directing final payment to the Contractor.
EXECUTED this
day of
, 20
.
(To be signed by the person shown in Item 3 above)
Subscribed and sworn before me this
day of
, 20
.
Notary Public:
My Commission Expires:
END OF AFFIDAVIT
01770-7
0893 Lindsay, OK
11/23/10
[CONTRACTOR’S LETTERHEAD]
CONTRACTOR’S STATEMENT OF WARRANTY
DATE:
PROJECT:
LOCATION:
OWNER: Walmart Stores, Inc.
702 SW 8th Street
Bentonville, AR 72712
CONTRACT: Construction Agreement Between Owner and Contractor, dated______________20____.
General Contractor hereby: (1) warrants that the Work for Project complies with Article 9 of the General Conditions; (2)
acknowledges that its warranty obligations under such Article 9 extends one year beyond the actual date of Substantial
Completion of the Project; and (3) affirms, and acknowledges the enforceability of, all other warranties made by Contractor in
the Contract.
Terms used but not defined herein shall have the meanings given to them in the above referenced Contract.
The undersigned Contractor hereby makes the certifications set forth herein to Walmart as of the _______day of
_____________________, 20______.
Witness:
Contractor: _______________________
_______________________________________
By: _____________________________
Print Name: _____________________________Name: __________________________
Title: ___________________________
STATE OF______________________________
COUNTY OF ___________________________
On this the ______________ day of _______________________________________, 20_______
before me, a Notary Public, within and for the State and County aforesaid, personally appeared, to me well know (or proved
to me on the basis of satisfactory evidence), who stated upon oath that (s)he had executed the foregoing instrument for the
consideration set forth therein.
____________________________________________
Notary Public
My commission expires: ________________________
01770-8
0893 Lindsay, OK
11/23/10
UniSpec II- Store Planning
111910
SECTION 02023 - SELECTIVE SITE DEMOLITION
PART 1 GENERAL
1.1
SUMMARY
A.
Section Includes:
1.
Procedures for demolition and removal of existing building elements.
2.
Protection of existing construction.
3.
Salvaged material and items.
4.
Schedule of building demolition.
5.
Disposal of demolished materials (non-hazardous and hazardous).
B.
Related Sections:
1.
Section 01100 - Summary: Restrictions for Work within and adjacent to existing building areas.
2.
Section 01500 - Temporary Facilities and Controls: Temporary protection and barriers. Removal and
disposal of demolished materials.
3.
Section 01700 - Execution Requirements.
4.
Section 01731 - Cutting and Patching: Requirements and limitations for cutting and patching Work.
5.
Section 01742 - Construction/Demolition Waste Management And Disposal: Removal and disposal of nonhazardous demolition waste and debris.
1.2
SYSTEM DESCRIPTION
A.
Selective Demolition Requirements:
1.
Perform demolition in construction sequence phases as required by the scope of Work and as agreed upon
with the Walmart Construction Manager.
2.
Work necessary and required to facilitate the new construction indicated.
3.
Demolish so that construction, new and existing, can be performed and completed in accordance with
construction documents.
4.
Visit the project site and become familiar with the existing conditions and project requirements.
5.
Clarify the scope of the Work under this Section including salvage material. The Owner will be responsible
for removing materials and equipment which the Owner wishes to salvage prior to the beginning of this
Work.
6.
Retain existing fire protection sprinkler system in place and active.
7.
Contractor is responsible for damage to existing structure and replacement or repair of damage.
8.
Repair, replace, or rebuild existing construction as required or as directed which has been removed, altered,
or disrupted to allow for new construction. Correct existing construction to match adjacent construction,
new or existing as specified in Section 01731.
B.
Regulatory Requirements:
1.
Conform to applicable code for demolition of structures, safety of adjacent structures, runoff control, and
disposal.
2.
Comply with applicable local and state dust control regulations.
3.
Obtain required permits from authorities having jurisdiction and submit to Walmart.
4.
Notify affected utility companies before starting work and comply with their requirements. Submit
Certificates for severance of utility services and submit confirmation documentation of all utility company
contacts to Walmart.
5.
Do not close or obstruct roadways, sidewalks, or hydrants without permits from authorities having
jurisdiction and Walmart Construction Manager.
6.
Conform to applicable regulatory procedures when discovering hazardous or contaminated materials.
7.
Test soils around buried tanks for contamination (where buried tanks occur).
02023-1
0893 Lindsay, OK
11/23/10
1.3
PROJECT CONDITIONS
A.
Owner will continuously occupy areas of building immediately adjacent to areas of selective demolition. Work
within and adjacent to existing building areas will be restricted to areas and hours specified in Section 01700.
B.
Conditions of Structure:
1.
Owner assumes no responsibility for actual condition of items or structures to be demolished.
2.
Conditions existing at time of inspection for bidding purposes will be maintained by Owner insofar as
practical.
3.
Variations within structure may occur by Owner's removal and salvage operations prior to start of selective
demolition work.
C.
Traffic: Conduct selective demolition and debris removal in manner to ensure minimum interference with roads,
streets, walks, and other adjacent occupied or used facilities. Provide traffic controls as specified in Section
01500.
1.4
QUALITY ASSURANCE
A.
Qualifications: Engage only personnel who can demonstrate not less that five (5) years successful experience in
Work of similar character.
B.
Performance Criteria:
1.
Requirements of Structural Work: Do not cut structural work in a manner resulting in a reduction of loadcarrying capacity of load/deflection ratio.
2.
Operational and Safety Limitations: Do not cut operational elements and safety-related components in a
manner resulting in a reduction of capacities to perform in a manner intended or resulting in a decreased
operational life, increased maintenance, or decreased safety.
3.
Visual Requirements: Do not cut work which is exposed on the exterior or exposed in occupied spaces of
the building in a manner resulting in a reduction of visual qualities or resulting in substantial evidence of the
demolition work judged by the Architect to be cut and patched in a visually unsatisfactory manner.
4.
Loading: Do not superimpose loads at any point upon existing structure beyond design capacity including
loads attributable to materials, construction equipment, demolition operations, and shoring and bracing.
5.
Vibration: Do not use means, methods, techniques, or procedures which would induce vibration into any
element of the structure.
6.
Fire: Do not use means, methods, techniques, or procedures which would produce any fire hazard.
7.
Water: Do not use means, methods, techniques, or procedures which would produce water run-off, and
water pollution. Refer to Section 01500 for related requirements.
8.
Air Pollution: Do not use means, methods, techniques or procedures which would produce uncontrolled
dust, fumes, or other damaging air pollution.
1.5
UTILITY SERVICES
A.
Maintain existing utilities. Keep in service and protect against damage during demolition operations.
B.
Do not interrupt existing utilities serving occupied or used facilities except when authorized in writing by
authorities having jurisdiction and approval by Walmart Construction Manager.
C.
Provide temporary services during interruptions to existing utilities as acceptable to governing authorities.
D.
Locate, identify, stub off, and disconnect utility services not to remain.
E.
Provide by-pass connections as necessary to maintain continuity of service to occupied areas of building.
F.
Provide advance notice to Walmart if shut-down of service is necessary during change-over.
02023-2
0893 Lindsay, OK
11/23/10
1.6
PROJECT SITE
A.
Indicated "Existing Construction" was obtained from existing drawings. Verify existing conditions and notify the
Walmart Construction Manager of discrepancies before proceeding with the Work.
B.
Perform removal, cutting, drilling, etc., of existing work with extreme care, and use small tools in order not to
jeopardize the structural integrity of the building.
C.
Occupancy: Contractor will have limited use of the facility during construction as specified in Section 01700.
D.
Condition of Structure: The Owner assumes no responsibility for the actual condition of portions of the structure
to be demolished.
E.
Protection: Ensure that the safe passage of persons around the area of demolition is provided. Conduct operations
to prevent damage to adjacent buildings, structures, and other facilities, and injury to persons.
1.7
SEQUENCING AND SCHEDULING
A.
Comply with Walmart approved schedule for sequence of operations for selective demolition work.
B.
Include coordination for shut-off, capping, and continuation of utility services as required, together with details for
dust and noise control.
C.
Provide detailed sequence of demolition and removal work to ensure uninterrupted progress of Owner's on-site
operations.
D.
Conduct selective demolition work in manner to minimize disruption of Owner's normal operations.
E.
Provide Walmart advance notice of demolition activities impacting Walmart's normal operations as specified in
Section 01700.
PART 2 PRODUCTS
2.1
MATERIALS
A.
Designated materials and equipment for re-installation: Carefully remove, store, and protect.
B.
Contractor's Salvage:
1.
Contractor shall verify with and obtain approval from Walmart Construction Manager for all Contractor
salvage items prior to their removal from site.
2.
Transport salvaged items from site as items are removed.
3.
Storage or sale of removed items on site not permitted.
C.
Replace materials scheduled for reuse which are damaged to the extent that they cannot be reused. Replace with
equal quality material at no additional cost to the Owner as specified in Section 01700.
D.
Coordinate with the Owner on disposition of salvage items not scheduled for reuse, demolished materials, and
equipment. Deliver salvaged materials, not reused, as directed, by or to the Owner.
PART 3 EXECUTION
3.1
EXAMINATION
A.
Examine surfaces and adjacent areas of Work under this Section. Do not proceed with Work until unsatisfactory
conditions have been corrected.
02023-3
0893 Lindsay, OK
11/23/10
B.
3.2
Starting Work constitutes acceptance of existing conditions.
PREPARATION
A.
Ensure safe passage of persons around area of demolition.
B.
Erect temporary covered passageways as specified in Section 01500.
C.
Protect existing finish work to remain in place.
D.
Protect floors with suitable coverage.
E.
Construct temporary insulated solid dustproof partitions where noise or extensive dirt or dust operations are
performed. Equip partitions with dustproof doors and security locks if required as specified in Section 01500.
F.
Provide temporary weather protection between demolition and removal of existing construction on exterior
surfaces and installation of new construction to ensure no water leakage or damage occurs to structure or interior
areas of existing building as specified in Section 01500.
G.
Cease operations and notify Walmart Construction Manager immediately if safety of structure appears to be
endangered.
H.
Take precautions to support structure until determination is made for continuing operations.
I.
Cover and protect furniture, equipment, and fixtures to remain from soiling or damage when demolition work is
performed in rooms or areas from which such items have not been removed.
3.3
DEMOLITION
A.
Demolition work within existing building shall be scheduled with the Walmart Construction Manager for approved
times of day.
1.
Submit written request for approval to the Walmart Construction Manager 14 calendar days in advance of
the date Contractor demolition work is required to begin in the existing building.
B.
The Owner will remove or, under separate contract, have materials and equipment which the Owner requires
removed, prior to commencement of Work under this Section. Coordinate scheduling of removal of Owner
materials and equipment with Walmart Construction Manager and Store Manager.
C.
Demolition:
1.
Perform demolition work in systematic manner.
2.
Do not use powder-driven impact tools.
3.
Locate demolition equipment throughout structure and promptly remove debris to avoid imposing excessive
loads on supporting walls, floor, or framing.
4.
Patch with seams which are durable and as invisible as possible. Comply with specified tolerances for the
work.
5.
Demolition shall be carried out in a safe manner and in strict accordance with OSHA regulations.
6.
The Contractor shall field verify the extent of demolition. The Work includes, but is not limited to, the
demolition and removal as shown on Drawing or as required for the installation of the new Work for a
complete job.
7.
When utilities are removed, cap and seal a minimum of 8" below finish floor or a minimum of 6" above
finish ceiling.
D.
Environmental Controls:
1.
Use water sprinkling, temporary enclosures, and other suitable methods to limit dust and dirt rising and
scattering in air to lowest practical level.
2.
Comply with governing regulations pertaining to environmental protection.
02023-4
0893 Lindsay, OK
11/23/10
3.
E.
3.4
Do not use water when it may create hazardous or objectionable conditions, such as ice, flooding, or
pollution.
If unanticipated mechanical, electrical, or structural elements conflicting with intended function or design are
encountered, submit written report of nature and extent of conflict to Architect and Walmart Construction
Manager. Rearrange demolition schedule to continue job progress without delay.
DISPOSAL OF DEMOLISHED MATERIALS
A.
Disposal of non-hazardous demolished materials shall be by Owner’s Waste Management Vendor as specified in
Section 01742 and in accordance with agreement between Waste Management Vendor and Contractor.
B.
Deposit waste materials, rubbish, and debris in waste containers as provided by the Waste Management Vendor
as specified in Section 01742. Perform segregation of waste materials into the various classification and segregated
materials as established and agreed to between Waste Vendor and Contractor.
C.
Do not allow waste materials, rubbish, and debris to accumulate and become an unsightly or hazardous condition.
D.
Notify the Owner’s Waste Management Vendor when containers are ready for pickup and disposal.
E.
If hazardous materials are encountered during demolition operations, comply with applicable regulations, laws, and
ordinances concerning removal, handling, and protection against exposure or environmental pollution. Notify
Walmart Construction Manager, in writing, of hazardous materials encountered.
F.
All acoustical ceiling tile (ACT) panels removed for disposal shall be recycled as directed by the Walmart
Construction Manager.
1.
Store removed ACT as directed. Coordinate location of stored material with Walmart Contruction Manager
and Store Manager.
2.
Ensure ACT to be recycled contains no foreign material.
3.5
POLLUTION CONTROLS
A.
Use temporary enclosures and other suitable methods to limit the amount of dust and dirt rising and scattering in
the air to the lowest practical level.
B.
Comply with governing authorities pertaining to environmental protection.
C.
Clean adjacent portion of the structure and improvement of dust, dirt and debris caused by demolition operations,
as directed by the Walmart Construction Manager and governing authorities. Return adjacent areas to conditions
existing prior to the start of the work.
D.
Burning of trash, debris, or removed materials not permitted on site.
3.6
SCHEDULE OF SELECTIVE DEMOLITION
A.
Remove and dispose of existing building items and adjacent sitework items as required for Work and as indicated
on Drawings.
B.
Electrical Service:
1.
Remove abandoned electrical fixtures, conduit, boxes, and wiring as indicated.
2.
Remove electrical circuits including conduct as indicated.
END OF SECTION
02023-5
0893 Lindsay, OK
11/23/10
UniSpec II - Store Planning
013007
SECTION 02320 - EXCAVATING, BACKFILLING, AND COMPACTING
PART 1 - GENERAL
1.1
SUMMARY
A.
Section Includes:
1.
Trenching and backfilling for utilities.
B.
Related Sections
1.
Section 03300 – Cast-in-Place Concrete: Subbase requirements for granular subbase below building slabs.
1.2
REFERENCES
A.
The publications listed below form a part of this specification to the extent referenced. Publications are referenced
within the text by the basic designation only.
B.
ASTM International (ASTM)
1.
ASTM D 422 - Standard Test Method For Particle Size Analysis of Soil
2.
ASTM D 698 - Laboratory Compaction Characteristics of Soil Using Standard Effort (12,400 ft-lbf/ft3 (600
kN.m/m3))
3.
ASTM D 1557 - Laboratory Compaction Characteristics of Soil Using Modified Effort (56,000 ft-lbf/ft3
(2,700 Kn.m/m3))
4.
ASTM D 2321 - Standard Practice for Underground Installation of Thermoplastic Pipe for Sewers and
Other Gravity-Flow Applications.
5.
ASTM D 2922 - Density of Soil and Soil-Aggregate In Place by Nuclear Methods (Shallow Depth)
6.
ASTM D 4318 - Liquid Limit, Plastic Limit, and Plasticity Index of Soils
C.
American Association of State Highway and Transportation Officials (AASHTO)
1.
AASHTO T 88 - Particle Size Analysis of Soils
D.
National Fire Protection Association (NFPA)
1.
NFPA 70 - National Electrical Code
E.
American Water Works Association (AWWA)
1.
AWWA C200 - Standard For Steel Water Pipe - 6 In. (150 Mm) And Larger
2.
AWWA C206 - Field Welding Of Steel Water Pipe
1.3
QUALITY ASSURANCE
A.
An Independent Testing Laboratory (ITL), selected and paid for by the Owner, will be retained to perform
construction testing on site.
1.
The ITL shall prepare test reports that indicate test location, elevation data, and test results. Owner and
Contractor shall be provided with copies of reports within 96 hours of time that test was performed. In
event that test performed fails to meet Specifications, the independent testing laboratory shall notify Owner
and Contractor immediately.
2.
Costs related to retesting due to failures shall be paid for by the Contractor at no additional expense to
Owner. Contractor shall provide free access to site for testing activities.
3.
Quality assurance testing will be conducted in accordance with Paragraph “Field Testing” in Part 3
hereinafter.
B.
Satisfactory Materials: ASTM D 2487 soil classification groups GW, GP, GM, SW, SP, SM, ML, CL, CH, MH,
SC, GC, or a combination of these group symbols.
1.
Fill material shall further conform to the plasticity index and liquid limits (PI and LL) specified hereinafter.
02320-1
0893 Lindsay, OK
11/23/10
2.
3.
4.
Satisfactory materials shall be free of rock or gravel larger than allowed for fill or backfill material as
specified hereinafter or as shown on the drawings.
Satisfactory materials shall contain no debris, waste, frozen materials, vegetation, and other deleterious
matter.
Unless specifically stated otherwise in "Foundation Subsurface Preparation" on the Drawings, the following
table stipulates maximum allowable values for plasticity index (PI) and liquid limit (LL) of satisfactory
materials to be used as fill in specified areas:
Location
PI
LL
Building area (below upper four feet)
Building area (upper four feet)
20
12
50
40
(References to depth are to finished floor elevation)
C.
1.4
Unsatisfactory Materials: Materials which do not comply with the requirements for satisfactory materials are
unsatisfactoy.
1.
Unsatisfactory materials also include man-made fills; trash; refuse; backfills from previous construction;
and material classified as satisfactory materials which contains root and other organic matter or frozen
material. The ITL shall be notified of any contaminated materials.
2.
Unsatisfactory materials also include satisfactory materials not maintained within 2 percent of optimum
moisture content at time of compaction.
SUBMITTALS
A.
Submit 30-pound sample of each type of off-site fill material that is to be used at the site in airtight containers to
the independent testing laboratory or submit gradation and certification of aggregate material that is to be used at
the site to the independent testing laboratory for review.
B.
Submit certification that all material obtained from off-site sources complies with specification requirements.
C.
Submit name of each material supplier and specific type and source of each material. Change in source throughout
project requires approval of Owner.
D.
Submit Dewatering Plans upon request by Owner.
E.
Shop drawings or details pertaining to excavating and filling are not required unless otherwise shown on the
Drawings or if contrary procedures to Construction Documents are proposed.
F.
Shop drawings or details pertaining to site utilities are not required unless required by regulatory authorities or
unless uses of materials, methods, equipment, or procedures that are contrary to The Drawings or Specifications
are proposed. Do not perform work until Owner has accepted required shop drawings.
PART 2 - PRODUCTS
2.1
SOIL AND ROCK MATERIALS
A.
Fill and Backfill. Satisfactory materials excavated from the site.
B.
Imported Fill Material: Satisfactory material provided from offsite borrow areas when sufficient satisfactory
materials are not available from required excavations.
C.
Trench Backfill: ASTM D 2321 unless otherwise specified or shown on the drawings.
D.
Building Subbase Material: Subbase for building and appurtenances slabs on ground is specified in Section 03300
as applicable.
02320-2
0893 Lindsay, OK
11/23/10
E.
Bedding: Aggregate Type as indicated on the plans or naturally or artificially graded mixture of natural or crushed
gravel, crushed stone, and natural or crushed sand; ASTM D 2940; except with 100 percent passing a 1-inch sieve
and not more than 8 percent passing a No.200 sieve.
F.
Drainage Fill: Washed, narrowly graded mixture of crushed stone, or crushed or uncrushed gravel; ASTM D 448;
coarse-aggregate grading Size 57; with 100 percent passing a 1-1/2- inch sieve and 0 to 5 percent passing a No.8
sieve.
G.
Filter Material: Narrowly graded mixture of natural or crushed gravel, or crushed stone and natural sand;
ASTM D 448; coarse-aggregate grading Size 67; with 100 percent passing a 1-inch sieve and 0 to 5 percent
passing a No.4 sieve.
2.2
EQUIPMENT
A.
2.3
Transport off-site materials to project using well-maintained and operating vehicles. Once on site, transporting
vehicles shall stay on designated haul roads and shall at no time endanger improvements by rutting, overloading, or
pumping.
SOURCE QUALITY CONTROL
A.
Laboratory testing of materials proposed for use in the project shall be by the Walmart Independent Testing
Laboratory at no cost to Contractor. The Contractor shall provide samples of material obtained off-site.
B.
Following tests shall be performed on each type of on-site or imported soil material used as compacted fill:
1.
Moisture and Density Relationship: ASTM D 698 or ASTM D 1557.
2.
Mechanical Analysis: AASHTO T 88 or ASTM D422.
3.
Plasticity Index: ASTM D 4318
PART 3 - EXECUTION
3.1
PREPARATION
A.
Identify required lines, levels, contours, datum, elevations, and grades necessary for construction as shown on the
drawings.
B.
Locate and identify existing utilities that are to remain and protect from damage.
C.
Maintain in operating condition existing utilities, previously installed utilities, and drainage systems encountered in
utility installation. Repair surface or subsurface improvements shown on The Drawings.
D.
Verify location, size, elevation, and other pertinent data required making connections to existing utilities and
drainage systems as indicated on The Drawings.
3.2
GENERAL EXCAVATION
A.
Classification of Excavation: The Contractor shall assure himself by site investigation or other necessary means
that he is familiar with the type, quantity, quality, and character of excavation work to be performed. Excavation
shall be considered unclassified excavation, except as indicated in the Contract Documents.
B.
Shore, brace, and drain excavations as necessary to maintain excavation as safe, secure, and free of water at all
times.
C.
Place satisfactory excavated material into project fill areas.
D.
Unsatisfactory excavated material shall be disposed of in manner and location that is acceptable to Owner and local
governing agencies.
02320-3
0893 Lindsay, OK
11/23/10
E.
3.3
Perform excavation using capable, well-maintained equipment and methods acceptable to Owner and local
governing agencies.
TRENCHING EXCAVATION FOR UTILITIES
A.
Sawcut existing concrete slab and hand dig trench at proper width and depth for laying pipe, conduit, or cable. Cut
trench banks vertical, if possible, and remove stones from bottom of trench as necessary to avoid point-bearing.
Over-excavate wet or unstable soil, if encountered, from trench bottom as necessary to provide suitable base for
continuous and uniform bedding. Replace over-excavation with satisfactory material and dispose of unsatisfactory
material.
B.
Trench excavation sidewalls shall be sloped, shored, sheeted, braced, or otherwise supported by means of sufficient
strength to protect workmen in accordance with applicable rules and regulations established for construction by the
Department of Labor, Occupational Safety and Health Administration (OSHA), and by local ordinances. Lateral
travel distance to exit ladder or steps shall not be greater than 25 feet in trenches 4 feet or deeper.
C.
Perform trench excavation as indicated on the Drawings for specified depths. During excavation, stockpile
materials suitable for backfilling in orderly manner far enough from bank of trench to avoid overloading, slides, or
cave-ins.
D.
Remove excavated materials not required or not satisfactory as backfill or embankments and waste off-site or at
on-site locations approved by the Owner and in accordance with governing regulations.
E.
Accurately grade trench bottom to provide uniform bearing and support for each section of pipe on bedding
material at every point along entire length except where necessary to excavate for bell holes, proper sealing of pipe
joints, or other required connections. Dig bell holes and depressions for joints after trench bottom has been
graded. Dig no deeper, longer, or wider than needed to make joint connection properly.
F.
Trench width below top of pipe shall not be less than 12 inches nor more than 18 inches wider than outside surface
of pipe or conduit that is to be installed to designated elevations and grades. Other trench width for pipe, conduit,
or cable shall be least practical width that will allow for proper compaction of trench backfill.
G.
Trench depth requirements measured from finished slab shall meet the following requirements or applicable codes
and ordinances, whichever is more stringent:
3.4
PIPE BEDDING
A.
3.5
Excavate trenches for pipe or conduit to 4 inches below bottom of pipe and to the width as specified herein. Place
4 inches of bedding material, compact in bottom of trench, and shape to conform to lower portion of pipe barrel.
TRENCH BACKFILLING
A.
Materials used for trench backfill shall comply with requirements as specified herein.
B.
Backfill and compact in accordance with fill and compaction requirements in accordance with ASTM D 2321
unless otherwise shown on the drawings.
C.
Do not backfill trenches until required tests are performed and utility systems comply with and are accepted by
applicable governing authorities.
D.
Backfill trenches as shown on the Drawings.
E.
Do not backfill over porous, wet, frozen, or spongy subgrade surfaces.
02320-4
0893 Lindsay, OK
11/23/10
3.6
COMPACTION
A.
Compact as follows:
Percent of Maximum Laboratory Density
ASTM D698
ASTM D1557
Location
Utility Trench Backfill
98
95
B.
Maintain moisture content of not less than 1 percent below and not more than 3 percent above optimum moisture
content of fill materials to attain required compaction density.
C.
Exercise proper caution when compacting immediately over top of pipes or conduits. Water jetting or flooding is
not permitted as method of compaction.
D.
Corrective Measures for Non-Complying Compaction: Remove and recompact deficient areas until proper
compaction is obtained. Areas continually failing shall be stabilized at no additional cost to Owner. Notify the
Architect of Record and the Walmart Construction Manager should soil stabilization be required.
3.7
MAINTENANCE OF SUBGRADE
A.
Verify finished subgrades to ensure proper elevation and conditions for construction above subgrade.
B.
Remove areas of finished subgrade found to have insufficient compaction density to depth necessary and replace in
manner that will comply with compaction requirements by use of material with CBR or LBR equal to or better than
that specified on the drawings. Surface of subgrade after compaction shall be firm, uniform, smooth, stable, and
true to grade and cross-section.
3.8
BORROW AND SPOIL SITES
A.
3.9
Comply with NPDES and local erosion control permitting requirements for any and all on-site and off-site,
disturbed spoil and borrow areas. Upon completion of spoil or borrow operations, clean up spoil or borrow areas
in a neat and reasonable manner to the satisfaction of Owner or off-site property owner, if applicable.
QUALITY ASSURANCE TESTING AND INSPECTION
A.
Responsibilities: Unless otherwise specified, quality control tests and inspection specified below will be conducted
by the Owner’s Independent Testing Laboratory (ITL) at no cost to the Contractor in accordance with Section
01458. The Contractor shall perform additional testing or inspection as considered necessary by the Contractor for
assurance of quality control.
B.
Field testing, frequency, and methods may vary as determined by and between the Owner and the ITL.
C.
Work shall be preformed by a Special Inspector – Technical I unless specified otherwise. Report of testing and
inspection results shall be made upon the completion of testing.
D.
Classification of Materials: Perform test for classification of materials used and encountered during construction in
accordance with ASTM D2488 and ASTM D2487.
E.
Laboratory Testing Of Materials: Perform laboratory testing of materials (Proctor, Sieve Analysis, Atterberg
Limits, Consolidation Test, etc.) as specified.
F.
Field Density Tests.
1.
Utility Trench Backfill: Intervals not exceeding 30-feet of trench for first and every other 8-inch lift of
compacted trench backfill.
2.
Test Method: In-place nuclear density, ASTM D 2922 (Method B-Direct Transmission).
02320-5
0893 Lindsay, OK
11/23/10
G.
Corrective Measures For Non-Complying Compaction: Remove and recompact deficient areas until proper
compaction is obtained at no additional expense to Owner. Adjust moisture content as necessary to conform to the
requirements of this section.
H.
Observation and Inspection:
1.
Observe all subgrades/excavation bases below slabs and verify design bearing capacity is achieved as
required. Work shall be performed by a Special Inspector – Technical II.
2.
Observe and document presence of groundwater within excavations.
END OF SECTION
02320-6
0893 Lindsay, OK
11/23/10
UniSpec II - Store Planning
012910
SECTION 02821 - CHAIN LINK FENCES AND GATES (BUILDING RELATED)
PART 1 - GENERAL
1.1
SUMMARY
A.
Section Includes:
1.
Building related chain link fence.
2.
Columns for Garden Center aluminum trusses at shade cloth canopy.
B.
Related Sections:
1.
Section 13121 - Fabric Structures: Aluminum trusses and shade cloth at Garden Center.
1.2
REFERENCES
A.
The publications listed below form a part of this specification to the extent referenced. Publications are referenced
within the text by the basic designation only.
B.
ASTM International (ASTM):
1.
ASTM A 392 - Specification for Zinc-Coated Steel Chain-Link Fence Fabric.
C.
Chain Link Fence Manufacturers Institute (CLFMI): Product Manual.
1.3
SYSTEM DESCRIPTION
A.
1.4
Design Requirements: Fencing system and installation engineered to withstand windload as indicated on Drawing
assuming 50 percent coverage with hanging plastic banners and signage.
QUALITY ASSURANCE
A.
Chain link fabric, posts, and components, and installation shall conform with the requirements of the CLFMI
Product Manual unless otherwise shown or specified.
B.
Manufacturer Qualifications: Company specializing in manufacturing the products specified in this Section with
minimum 3 years documented experience.
PART 2 - PRODUCTS
2.1
MATERIALS
A.
Steel Posts: Type I or II or roll formed "C" Section steel conforming to CLFMI and as specified hereinafter.
B.
Fabric: No. 9 gage galvanized steel wire in 2 inch mesh; ASTM A 392, height as shown.
1.
Where mini-mesh is shown, provide 1 inch mesh.
2.
Fabric height less than 72 inches: Top and bottom selvages knuckled.
3.
Fabric height 72 inches and greater: Top selvage twisted, bottom selvage knuckled.
2.2
COMPONENTS
A.
End, Corner, and Pull Posts: Minimum sizes and weights as follows unless otherwise shown.
1.
Up to 13 Foot Fabric Height: Type I or II in accordance with CLFMI Product Manual.
2.
13 foot and over Fabric Height:
a.
Type I Posts: Round; 4.0 inch outside diameter pipe, 9.10 lbs/lin ft.
b.
Type II Posts: 4.0 inch outside diameter pipe, 6.56 lbs/lin ft.
02821-1
0893 Lindsay, OK
11/23/10
B.
Line (Intermediate) Posts: Minimum sizes and weights as follows unless otherwise shown.
1.
Up to 8 Foot Fabric Height: Type I, II, or "C" Section in accordance with CLFMI Product Manual.
2.
Over 8 Foot Fabric Height:
a.
Type I Posts:
1)
Round: 2.875 inch outside diameter pipe, 5.79 lbs/lin ft.
2)
Square: 2.5 inch x 2.5 inch outside dimension, 5.10 lbs/lin ft.
b.
Type II Posts: 2.875 inch outside diameter pipe, 4.64 lbs/lin ft.
C.
Gate Posts: Type I or II in accordance with CLFMI Product Manual unless otherwise shown.
D.
Top, Bottom, and Intermediate Rails: Manufacturer's longest lengths.
1.
Type I or II in accordance with CLFMI Product Manual.
2.
Couplings: Expansion type, approximately 6 inches long.
3.
Attaching Devices: Means of attaching top rail securely to each gate, corner, pull, and end post.
4.
Do not install bottom rail at truck well fence which shall receive tension wire instead.
2.3
ACCESSORIES
A.
Sleeves: Galvanized steel pipe with inside diameter not less than 1/2 inch greater than outside diameter of fence
posts. Provide steel plate closure welded to bottom of sleeves of width and length not less than 1 inch greater than
outside diameter of sleeve.
1.
Up to 6 Foot Fabric Height: Provide sleeve not less than 12 inches long.
2.
Over 6 Foot Fabric Height (Not for Partitions Tight to Roof Deck): Provide sleeve not less than 24 inches
long.
3.
Fabric Installed Tight to Roof Deck (Posts Braced to Roof Structure): Provide sleeve not less than 12
inches long.
B.
Tension Wire: 7 gage steel, metallic-coated coil spring wire, located at bottom of fence fabric.
C.
Wire Ties: 11 gage galvanized steel.
D.
Post Brace Assembly: Manufacturer's standard adjustable brace at end and gate posts and at both sides of corner
and pull posts, with horizontal brace located at mid-height of fabric. Use same materials as top rail for brace, and
truss to line posts with 0.375 inch diameter rod and adjustable tightener.
E.
Post Tops: Galvanized steel, weather tight closure cap for tubular posts, one cap for each post. Furnish cap with
openings to permit passage of top rail as required.
F.
Stretcher Bars: Galvanized steel, one piece lengths equal to full height of fabric; with minimum cross section of
3/16 x 3/4 inch. Provide one stretcher bar for each gate and end post, and two for each corner and pull post.
G.
Stretcher Bar Bands: Manufacturer's standard.
H.
Gate Cross-Bracing: 3/8 inch diameter galvanized steel adjustable length truss rods.
I.
Gate Hardware:
1.
Swinging Gate Hardware:
a.
Hinges:
1)
Size and material to suit gate size; offset to permit 180 degree gate opening. Provide 1-1/2
pair of hinges for each leaf over 6 feet nominal height.
2)
TLE Service Area Gate: Hinges shall be Tru-close self closing round post gate hinges by
D&D Technologies USA, Costa Mesa, CA (800) 716-0888.
b.
Latch:
1)
Exterior: Forked type or plunger-bar type to permit operation from both sides of gate, with
padlock eye.
02821-2
0893 Lindsay, OK
11/23/10
2)
2.
3.
2.4
Interior: Forked type to permit operation from both sides of gate, with padlock link. At
Electrical Room and Sprinkler Room, omit padlock link and substitute standard pin bracket
for attachment of forked latch (gates are not to be padlocked).
3)
TLE Service Area Gate: Butterfly gate latch No. 17307 by Master-Halco or No 5552 by
Merchant Metals.
Double Gate Hardware: In addition to the above, provide gate stops for double gates, consisting of
mushroom type flush plate with anchors set in concrete to engage center drop rod or plunger bar.
Configure for use of one padlock to lock both gate leaves.
Overhead Track Sliding Gate Hardware: Manufacturer's standard heavy duty overhead track sliding gates
including the following:
a.
Track/rail and guide assembly. Top rail with two truck assemblies. Reinforce full length of track/rail
with welded 2-1/2 x 2 x 1/4 min. angle iron.
b.
Gate hangers, rollers, latches, brackets, bracing, and stops.
c.
Bumper/Guide posts. Provide 3-inch x 3’ high bumper/guide post at each gate post. Sleeve set into
slab.
GATE FABRICATION
A.
Fabricate gate frames of min. 1.90 inch outside diameter galvanized steel pipe. Provide horizontal and vertical
members to ensure proper gate operation and for attachment of fabric, hardware, and accessories. Space frame
members maximum 8 feet apart.
B.
Assemble gate frames rigidly by welding or with special fittings and rivets. Use same fabric as specified for fence.
Install fabric with stretcher bars at vertical edges. Bars may also be used at top and bottom edges. Attach
stretchers to frame at not more than 15 inches on center. Install diagonal cross-bracing on gates as required to
ensure frame rigidity without sag or twist.
C.
Attach hardware to provide security against removal or breakage.
D.
Attach fabric on sliding gates to maintain bottom clearance as specified below in Installation.
2.5
FINISH
A.
Fabric and Framing: Zinc coated in accordance with CLFMI Product Manual.
PART 3 - EXECUTION
3.1
INSTALLATION
A.
Install chain link fence in accordance with CLFMI Product Manual unless otherwise specified herein.
B.
Space line posts 10 feet on center maximum, except as otherwise indicated.
1.
Space line posts at 8 feet on center maximum if plastic slats are indicated to be installed in fence fabric.
2.
Space interior line posts 8' feet on center maximum.
C.
Set posts as close to building walls as practical. Gaps greater than 1 inch between wall and posts shall be closed
with a metal closure panel attached full height to post with Tek screws as shown. Hem edges and corners of sheet
metal to eliminate sharp or rough edges.
D.
Methods for Setting Posts:
1.
Grade-Set Posts:
a.
Drill or hand excavate to a depth approximately 3 inches lower than post bottom. Set post bottom
not less than 36 inches below finish grade.
b.
Excavate each post hole to 12 inch diameter, or not less than four times diameter of post.
c.
Hold post in position while placing, consolidating, and finishing concrete.
d.
Post shall be set plumb within ¼ inch in 10 feet.
02821-3
0893 Lindsay, OK
11/23/10
2.
Sleeve-Set Posts In Slabs: Anchor posts in concrete by means of pipe sleeves preset into concrete to depth
not less than 24 inches below finish slab, and anchored into concrete. Insert posts into sleeves and fill
annular space between post and sleeve solid with grout. Mix and place grout in accordance with
manufacturer's published instructions.
E.
Intermediate Rails: Provide center and bottom rails where indicated. Install in one piece between posts and flush
with post on fabric side, using offset fittings where necessary. Place intermediate rails a maximum of 6 feet on
center.
F.
Brace Assemblies: Install braces so posts are plumb with rod in tension.
G.
Tension Wire: Install tension wires through post cap loops before stretching fabric and tie to each post cap with
not less than 6 gage galvanized wire. Fasten fabric to tension wire using 11 gage galvanized steel hog rings spaced
24 inches on center.
H.
Fabric: Space between bottom of fabric and finish grade shall be not greater than 2 inches. Space between bottom
of fabric and finish grade shall not be greater the 1/2-inch on sliding gates. Pull fabric taut and tie to posts, rails,
and tension wires. Install fabric on security side of fence, and anchor to framework so fabric remains in tension
after pulling force is released.
I.
Stretcher Bars: To secure end, corner, pull, and gate posts, thread through or clamp to fabric 4 inches on center
and secure to posts with metal bands spaced 15 inches on center.
J.
Tie Wires:
1.
Use U-shaped wire conforming to diameter of pipe to which attached, clasping pipe and fabric firmly with
ends twisted two full turns. Bend wire ends to minimize hazards to persons or clothing.
2.
Tie fabric to line posts with wire ties spaced 12 inches on center. Tie fabric to rails and braces with wire
ties spaced 24 inches on center. Manufacturer's standard procedure will be accepted if of equal strength
and durability.
K.
Fasteners: Install nuts for tension bands and hardware bolts on side of fence opposite fabric side. Peen ends of
bolts or score threads to prevent removal of nuts.
L.
Gates: Install gates plumb, level, and secure for full opening without interference. Install ground-set items in
concrete for anchorage. Adjust hardware for smooth operation.
3.2
ERECTION TOLERANCES
A.
Maximum Variation from Plumb: 1/4 inch.
B.
Maximum Offset from True Position: 1 inch.
END OF SECTION
02821-4
0893 Lindsay, OK
11/23/10
UniSpec II - Store Planning
012508
SECTION 02890 - TRAFFIC SIGNS AND SIGNALS
PART 1 - GENERAL
1.1
SUMMARY
A.
1.2
Section Includes
1.
Traffic control signs.
REFERENCES
A.
American Standard for Testing Materials (ASTM)
1.
ASTM C94 - Ready Mix Concrete
B.
US Department of Transportation, Federal Highway Administration
1.
Manual on Uniform Traffic Control Devices (MUTCD).
PART 2 - PRODUCTS
2.1
SIGNS: Conform to the following and MUTCD classification is shown in parentheses:
A.
"STOP" Signs: 30-inches x 30-inches, Octagon, white legend and border on red background (R1-1)
B.
"YIELD" Signs: 36-inches x 36-inches x 36-inches, Triangle, red legend and border band with white interior (R12)
C.
"SPEED LIMIT 15MPH" Signs: 24-inches x 30-inches, black legend and border on white background (R2-1)
D.
"NO RIGHT TURN” (or “NO LEFT TURN") Signs: 24-inches x 24-inches, black legend and border, red circle
and bar, and white background (R3-1 and R3-2)
E.
"RIGHT TURN ONLY” (or “LEFT TURN ONLY") Signs: 30-inches x 36-inches, black legend and border on
white background (R3-5)
F.
"DO NOT ENTER" Signs: 30-inches x 30-inches, white legend, bar, and background and red circle (R5-1)
G.
"NO TRUCKS" Signs: 24-inches x 24-inches, black truck symbol, red circle and bar, on white background (R5-2)
H.
"ACCESSIBLE PARKING SYMBOL" Signs: 12-inches x 18-inches, green legend and border, white symbol on
blue box, and white background (R7-8)
I.
"PED XING" Signs: 30-inches x 30-inches, black legend and border on yellow background (W11-2)
J.
"NO PARKING - FIRE LANE" Signs: 30-inches x 36-inches, red legend and border on white background.
K.
"NO PARKING - LOADING ZONE" Signs: 12-inches x 18-inches, black legend and border on white background.
L.
Miscellaneous Signs: See Construction Drawings
2.2
POSTS
A.
"U" channel galvanized steel posts with galvanized sign-mounting hardware for each sign. Posts shall have a
weight of 2-pounds per lineal foot.
02890-1
0893 Lindsay, OK
11/23/2010
2.3
CONCRETE
A.
Mix concrete and deliver in accordance with ASTM C94.
B.
Design mix to produce normal weight concrete consisting of Portland cement, aggregate, water-reducing admixture, air-entraining admixture, and water to produce following:
1.
Compressive Strength: 3,500 psi, minimum at 28 days, unless otherwise indicated on Construction Drawings.
2.
Slump Range: 1 to 3-inches at time of placement
3.
Air Entrainment: 5 to 8 percent
PART 3 - EXECUTION
3.1
PREPARATION
A.
Contractor shall field verify underground utilities prior to sign installation. Primary utilities of concern of shallow
depths include, but are not limited to, lawn sprinkler systems, electric, telephone, fiber optic, cable and gas.
B.
Cost related to repair of damaged surface and subsurface facilities shall be paid for by the Contractor at no additional expense to the Owner.
3.2
INSTALLATION
A.
Install posts in 6” diameter steel bollards in 18 inch diameter x 24 inch deep concrete foundations. Set posts vertical and plumb with bottom of sign at minimum 7'-0" above finish grade unless otherwise indicated on the Construction Drawings. Mount signs in accordance with manufacturer's instructions.
END OF SECTION
02890-2
0893 Lindsay, OK
11/23/2010
UniSpec II - Store Planning
032610
SECTION 03300 - CAST-IN-PLACE CONCRETE
PART 1 - GENERAL
1.1
SUMMARY
A.
Section Includes:
1.
Cast-in-place concrete, including sidewalks adjacent to building, light pole foundations and equipment
pads.
2.
Aggregate base material for building floor slab.
3.
Formwork, shoring, bracing, and anchorage.
4.
Reinforcement and accessories.
5.
Curing and finishing.
6.
Grout, for setting and anchoring items in masonry and concrete.
B.
Related Sections:
1.
Section 01458 - Testing Laboratory Services: Procedures for inspection, testing, and documentation by
Owner furnished testing laboratory.
2.
Section 05500 - Metal Fabrications: Other metal components cast into concrete.
3.
Section 07900 - Joint Sealers: Joint sealant for interior and exterior concrete joints.
1.2
REFERENCES
A.
B.
The publications listed below form a part of this specification to the extent referenced. Publications are referenced
within the text by the basic designation only.
American Association of State Highway and Transportation Officials (AASHTO):
1.
Standard Specification For Transportation Materials And Methods Of Sampling and Testing:
a.
AASHTO M147 – Materials for Aggregate and Soil-Aggregate Subbase, Base, and Surface Courses
C.
American Concrete Institute (ACI):
1.
ACI 117 - Tolerances for Concrete Construction and Materials.
2.
ACI 301 -Structural Concrete for Buildings.
3.
ACI 302 - Guide for Concrete Floor and Slab Construction.
4.
ACI 303 - Standard Specifications for Cast-In-Place Architectural Concrete.
5.
ACI 304 - Guide for Measuring, Mixing, Transporting, and Placing Concrete.
6.
ACI 304.2R - Placing Concrete by Pumping Methods.
7.
ACI 305R - Hot Weather Concreting.
8.
ACI 306R - Cold Weather Concreting.
9.
ACI 306.1 - Standard Specification for Cold Weather Concreting.
10. ACI 308 - Standard Practice for Curing Concrete.
11. ACI 315 - Details and Detailing of Concrete Reinforcement.
12. ACI 318 - Building Code Requirements for Reinforced Concrete and Commentary.
13. ACI 347 - Concrete Formwork
14. ACI SP66 - Detailing Manual
D.
ASTM International (ASTM):
1.
ASTM A36 – Carbon Structural Steel.
2.
ASTM A82 - Steel Wire, Plain, for Concrete Reinforcement.
3.
ASTM A185 - Steel Welded Wire Fabric, Plain, for Concrete Reinforcement.
4.
ASTM A615 - Deformed and Plain Billet-Steel Bars for Concrete Reinforcement.
5.
ASTM C31 - Making and Curing Concrete Test Specimens in the Field.
6.
ASTM C33 - Concrete Aggregates.
7.
ASTM C39 - Compressive Strength of Cylindrical Concrete Specimens
03300-1
0893 Lindsay, OK
11/23/10
8.
9.
10.
11.
12.
13.
14.
15.
16.
17.
18.
19.
20.
21.
22.
23.
24.
25.
26.
27.
28.
29.
30.
31.
ASTM C42 - Drilled Cores and Sawed Beams of Concrete.
ASTM C94 - Ready-Mixed Concrete.
ASTM C138 - Unit Weight, Yield and Air Content (Gravimetric of Concrete).
ASTM C143 - Slump of Hydraulic Cement Concrete.
ASTM C150 - Portland Cement.
ASTM C171 - Sheet Materials for Curing Concrete.
ASTM C172 – Sampling Freshly Mixed Concrete.
ASTM C173 - Air Content of Freshly Mixed Concrete by the Volumetric Method.
ASTM C231 - Air Content of Freshly Mixed Concrete by the Pressure Method.
ASTM C260 - Air-Entraining Admixtures for Concrete.
ASTM C309 - Liquid Membrane-Forming Compounds for Curing Concrete.
ASTM C494 - Chemical Admixtures for Concrete.
ASTM C618 - Fly Ash and Raw or Calcined Natural Pozzolan for use as a Mineral Admixture in Portland
Cement Concrete.
ASTM C881 - Epoxy-Resin-Base Bonding Systems for Concrete.
ASTM C979 - Pigments for Integrally Colored Concrete.
ASTM C1107 - Packaged Dry, Hydraulic-Cement Grout (Non-Shrink).
ASTM C1218 - Water-Soluble Chloride in Mortar and Concrete.
ASTM C1315 - Liquid Membrane Forming Compounds Having Special Properties for Curing and Sealing
Concrete.
ASTM D226 - Asphalt - Saturated Organic Felt used in Roofing and Waterproofing.
ASTM D698 - Moisture-Density Relations of Soils and Soil-Aggregate Mixtures Using 5.5 lb (2.49 Kg)
Hammerand 12-in (305 mm) Drop.
ASTM D1241 - Materials For Soil-Aggregate Subbase, Base, And Surface Courses.
ASTM D2240 - Rubber Property - Durometer Hardness.
ASTM E 1745 - Plastic Water Vapor Retarders Used in Contact with Soil or Granular Fill Under Concrete
Slabs.
ASTM E1155 - Determining Floor Flatness and Levelness Using the F-Number System (Inch-Pound Units)
E.
American Welding Society (AWS): AWS D1.4 - Structural Welding Code Reinforcing Steel.
F.
Concrete Reinforcing Steel Institute (CRSI):
1.
CRSI - Manual of Standard Practice.
2.
CRSI 63 - Recommended Practice for Placing Reinforcing Bars.
3.
CRSI 65 - Recommended Practice for Placing Bar Supports, Specifications and Nomenclature.
G.
Department of Commerce (National Institute of Standards and Technology) – Product Standard (DOC):
1.
DOC PS 1 - Construction and Industrial Plywood.
1.3
SUBMITTALS
A.
Section 01330 - Submittal Procedures: Procedures for Submittals
B.
Upon request, submit evidence and documentation that the specified epoxy joint filler products have been used in
the project
C.
Submit Contractor's Qualification Statement of Conformance included at the end of this section.
D.
Product Data: Submit product data for all concrete materials, admixtures, and curing compounds prior to
beginning production to verify compatibility of materials with coloring agents for color stained concrete.
E.
Shop Drawings:
1.
Reinforcement:
a.
Submit concrete notes that concern proper placing of reinforcing and submit with shop drawings for
field use. Do not use reproductions of Contract Drawings as shop drawings.
b.
Submit reinforcement placement drawings with bar lists. Include elevations of walls and grade
03300-2
0893 Lindsay, OK
11/23/10
beams and plans of footings and slabs. Include sections, details, and schedules. Comply with Part B,
Chapter 3 of ACI 315 for preparation of shop drawings. Include number, grade, size, length, mark,
location, splice lengths, and bending diagrams for all reinforcing steel and related products.
F.
Samples: Materials as requested by the Engineer, including names, sources, and descriptions.
G.
Mix Design: Fill out and submit attached Concrete Mix Design Submittal Form. Submit three copies of each
proposed mix design in accordance with ACI 301, Sections 3.9 "Proportioning on the basis of previous field
experience or trial mixture", or 3.10 "Proportioning based on empirical data". Submit separate mix design for
concrete to be placed by pumping in addition to the mix design for concrete to be placed directly from the truck
chute. Submit mix design by e-mail to the Architect of Record and the Walmart Construction Testing Laboratory.
Include applicable information shown on the Mix Design Submittal Form and the following:
1.
Proportions of cementitious materials, fine and coarse aggregate, and water.
2.
Water-cementitious material ratio, 28-day compressive design strength, slump, and air content.
3.
Type of cement, fly ash, slag and aggregate.
4.
Aggregate gradation.
5.
Type and dosage of admixtures.
6.
Special requirements for pumping.
7.
Range of ambient temperature and humidity for which design is valid.
8.
Special characteristics of mix which require precautions in mixing, placing, or finishing techniques to
achieve finished product specified.
9.
Materials and methods for curing concrete.
H.
Submit Product Data, Shop Drawings, and Quality Assurance Submittals within 5 working days of Contract date.
I.
Testing and Inspection Reports: Submit reports in accordance with Section 01458.
J.
Closeout Submittals: Submit Letter of Certification under provisions of Document 01770.
1.4
QUALITY ASSURANCE
A.
Penetrating Hardener/Densifier Installer Qualifications:
1.
Minimum of 15 concrete finish applications within last 3 years similar in type and size to Work of this
Contract.
2.
Assign experienced mechanics from previous applications including lead mechanic.
3.
Provide letter of certification from the penetrating hardener/densifier manufacturer stating that installer is a
certified applicator of the specified concrete finish material and is familiar with proper procedures and
installation requirements required by manufacturer.
B.
Codes and Standards: Comply with provisions of following codes, specifications, and standards, except where
more stringent requirements are shown or specified:
1.
ACI 301 - Specifications for Structural Concrete for Buildings.
2.
ACI 318 - Building Code Requirements for Reinforced Concrete.
3.
CRSI - Manual of Standard Practice.
C.
Pumped Concrete:
1.
Perform mix design, proportioning and placement in accordance with ACI 304.2R.
2.
Submit documented evidence of experience in placing concrete by pumping on not less than three projects
of similar size and complexity. List available pump size, standby pump size, piping, and other equipment.
3.
Submit documented evidence of concrete supplier's ability to dedicate sufficient mixing and delivery
equipment to supply the concrete continuously for the volumes to be placed by pumping.
D.
Chemical Admixtures: Use of admixtures is subject to Walmart approval.
1.
Notify Walmart Construction Manager at Pre-Bid Conference if admixtures will be used in concrete.
2.
Notify Walmart Construction Manager prior to installation for which admixtures will be used in concrete.
03300-3
0893 Lindsay, OK
11/23/10
E.
Delivery, Storage And Handling:
1.
Deliver materials in unopened containers with labels identifying contents.
2.
Store powdered materials in dry area and in manner to prevent damage. Protect liquid materials from
freezing.
3.
Keep containers closed and upright to prevent leakage.
4.
Dispense penetrating hardener/densifier finish material from factory numbered and sealed drums. Maintain
record of drum numbers.
F.
Pre-Slab Installation Conference: At least 35 days prior to the start of the concrete slab construction, the
Contractor shall conduct a meeting to review the proposed mix designs and to discuss the required methods and
procedures to achieve the required concrete construction.
1.
The Contractor shall send a pre-slab conference agenda to all attendees 20 days prior to the scheduled date
of the conference. The Contractor shall require responsible representatives of each party involved with the
concrete slab work to attend the conference. The conference shall convene only when all parties are
present. Attendees shall include, but not be limited to the following:
a.
Contractor's superintendent.
b.
Laboratory responsible for the concrete design mix.
c.
Laboratory responsible for field quality control.
d.
Construction Manager.
e.
Concrete subcontractor.
f.
Penetrating hardener/densifier installer and polished floor surface installer (if applicable).
g.
Ready-mix concrete producer.
h.
Admixture manufacturer(s).
i.
Concrete pumping equipment manufacturer (if applicable).
j.
Concrete pumping subcontractor (if applicable).
2.
Minutes of the meeting shall be recorded, typed, printed, and distributed to all parties concerned by the
Contractor within 5 days of the meeting. One copy of the minutes shall also be transmitted to the Owner's
representative for information purposes:
3.
The minutes shall include a statement by the Contractor indicating that the proposed mix design will
produce the specified concrete quality.
G.
Exposed Sales Area Concrete Slab:
1.
Check each batch ticket for mix component materials to confirm that weights are within tolerance for mix
design.
2.
Perform slump test and temperature for each truck load.
3.
Do not alter out-of-spec loads at job site. Loads that do not meet specifications for mix design will be
rejected.
1.5
ENVIRONMENTAL REQUIREMENTS
A.
Cold Weather Concreting: Perform work in accordance with ACI 306R and 306.1 during cold weather concreting
operations.
1.
Comply with the following for minimum temperature of concrete delivered to job site:
a.
Air Temperature 30-45 degrees F: Concrete temperature 60 degrees F minimum.
b.
Air Temperature 0-30 degrees F: Concrete temperature 65 degrees F minimum.
c.
Air Temperature below 0 degrees F: Concrete temperature 70 degrees F minimum.
d.
Maximum concrete temperature: Not to exceed the minimum required temperature by more than 10
degrees F.
2.
Combine water heated to above 100 degrees F with aggregates before cement is added. Do not add cement
to water or aggregates having temperature greater than 100 degrees F.
3.
When temperatures of 40 degrees F or lower occur during the placing and curing of concrete, maintain
temperature of concrete at not less than 50 degrees F for at least 7 days for conventional concrete or at least
3 days for high early strength concrete.
a.
Make arrangements before placement to maintain required temperature without damage from
excessive heat.
b.
Do not use combustion heaters during first 48 hours without precautions to prevent exposure of
03300-4
0893 Lindsay, OK
11/23/10
4.
5.
6.
B.
1.6
concrete to exhaust gases containing carbon dioxide and carbon monoxide.
Protect concrete work from physical damage or reduced strength which could be caused by frost, freezing
actions, or low temperatures, in compliance with the requirements of ACI 306R and 306.1 and as herein
specified.
When the air temperature has fallen to or is expected to fall below 40 degrees F, provide adequate means to
maintain the temperature of the plastic concrete as placed, at 50 degrees F minimum, for at least 7 days for
conventional concrete or at least 3 days for high early strength concrete. Provide temporary housings or
coverings including tarpaulins or plastic film. Keep protection in place and intact at least 24 hours after
artificial heat is discontinued. Avoid rapid dry-out of concrete due to overheating, and avoid thermal shock
due to sudden cooling or heating.
Do not use frozen materials containing ice or snow. Do not place concrete on frozen subgrade or on
subgrade containing frozen materials. Ascertain that forms, reinforcing steel, and adjacent concrete
surfaces are entirely free of frost, snow, and ice and temperature of these materials is above 32 degrees F
before placing concrete.
Hot Weather Concreting: Perform work in accordance with ACI 305R.
1.
When hot weather conditions exist that would seriously impair the quality and strength of concrete, place
concrete in compliance with ACI 305R and as herein specified.
2.
Temperature of concrete at time of placing: Not to exceed 90 degrees F. Maintain an accurate reading
thermometer at the job site to check temperature of concrete. Reject concrete before placing if temperature
of concrete exceeds 90 degrees F.
3.
Execute special precautions to protect fresh concrete before and during finishing when the rate of
evaporation of surface moisture from concrete exceeds 0.1 pounds per square foot per hour. Determine rate
of evaporation in accordance with ACI 305R. Provide special precautions as required:
a.
Cool ingredients before mixing to reduce concrete temperature at time of placement. Mixing water
may be chilled, or chopped ice may be used to control the concrete temperature provided the water
equivalent of the ice is calculated to the total amount of mixing water.
b.
Dampen subgrade and forms.
c.
Cover reinforcing steel with water-soaked burlap so the steel temperature will not exceed the ambient
air temperature immediately before embedment in concrete.
4.
When high temperature and/or placing conditions dictate, the concrete supplier may request use of waterreducing retarding admixture (Type D) in lieu of water-reducing admixture (Type A), subject to approval
from the Walmart Construction Manager.
PROJECT CONDITIONS
A.
1.7
Protect concrete slabs from staining prior to application of penetrating hardener/densifier concrete finish.
1.
Diaper hydraulic powered equipment.
2.
Place drop cloths under parked vehicles.
3.
Do not store structural steel or metal fabrications on slab.
4.
Do not allow pipe cutting machine on slab.
SITE VERIFICATION AND ADA-ADAAGS COMPLIANCE
A.
The Contractor shall be responsible for verification of all final concrete elevations for new flatwork, sidewalks,
ramps, stoops and stairs. All new ramps, stoops and stairs shall be ADA accessible unless specifically noted
otherwise. Any discrepancies shall be reported to the Walmart Construction Manager and the Consulting
Architect prior to construction. Failure to do so does not relieve the Contractor from the responsibility to correct
any non-complying construction.
B.
Verify final grades around new ramps and stairs and adjust stair width, risers/treads and ramp lengths to
accommodate required slope or riser heights. The following are max./min. guidelines:
1.
Bale ramps: Slope 10% (1:10) (not required to be handicap accessible).
2.
Bale ramp width: 8’-0” wide typical (unless otherwise noted).
03300-5
0893 Lindsay, OK
11/23/10
3.
4.
5.
6.
7.
8.
9.
10.
11.
12.
1.8
ADA ramps: Slope 8% (1:12).
ADA ramp width: 4’-0” minimum (Refer to Drawings).
ADA accessible sidewalks/flatwork or path of travel in one direction: Max. slope 5% (1:20).
Cross slope to direction of travel: 2% max. (1:50).
Stair riser: 7” max. height.
Stair tread: 11” min. length.
Stair width (single door): 4’-6” minimum.
Stair width (double door): 8’-8” minimum.
Stoops/landings: 6’-0” x 4’-0” single door typical (unless otherwise noted - Refer to Drawings).
Stoops/landings: 9’-0” x 4’-0” double door typical (unless otherwise noted - Refer to Drawings).
WARRANTY
A.
Penetrating Hardener/Densifier Finish: Provide 20 year manufacturer's material warranty commencing at date of
building Substantial Completion. Manufacturer shall warrant to the Owner that treated surface will remain
waterproof, dustproof, hardened and abrasion resistant for the duration of the warranty period.
PART 2 - PRODUCTS
2.1
MANUFACTURERS
A.
Subject to compliance with project requirements, provide products as manufactured by the following to the extent
as specified hereinafter for the specific product:
1.
American Colloid Company, (800) 527-9948.
2.
Ardex Engineered Cements, (412) 264-4240.
3.
BASF Admixtures Inc., Cleveland, OH (Formerly Master Builders) (800) 628-9990.
4.
BASF Building Systems, Shakopee, MN (Formerly Degussa Building Products) (800) 433-9517.
5.
Bomanite Corporation, (800) 854-2094.
6.
Chemtec Int’l, (513) 474-2090.
7.
Conspec Marketing & Manufacturing, (800) 348-7351.
8.
Curecrete Chemical Company Incorporated, (800) 998-5664.
9.
Degussa Building Products: See BASF Building Systems.DRC Inc., Carrollton, KY (502) 732-1001.
10. DRC Inc., Carrollton, KY (502) 732-1001.
11. E-Poxy Industries, Inc., (800) 833-3400.
12. Euclid Chemical Co., (800) 321-7628.
13. EZform, Inc., (866) 913-8363.
14. H & C distributed by Sherwin-Williams.
15. Increte Systems Inc., (800) 752-4626.
16. L. M. Schofield Co., (800) 800-9900.
17. L & M Construction Chemicals Inc., (800) 362-3331
18. Master Builders, Inc.: See BASF Admixtures, Inc.
19. MBT: See BASF Building Systems.
20. Metzger/McGuire, (800) 223-6680.
21. Patterned Concrete Industries, Inc., (800) 252-4619.
22. Permagile Industries, Inc.; (800) 645-7546.
23. PNA Construction Technologies, (800) 542-0214.
24. Reef Industries, (800) 231-6074.
25. Sika Corp., (800) 933-7452.
26. Solomon Colors; (800) 624-0261.
27. Sonneborn Building Products: See BASF Building Products.
28. Stego Industries LLC, (877) 464-7834.
29. Synko-Flex Products (Division of Henry Company); (800) 231-4551.
30. Thoro System Products: See BASF Building Products.
31. Unitex, (816) 231-7700 or (800)821-5846.
32. W.R. Grace and Co., (713) 223-8353.
33. Vexcon Chemicals, Inc., (888) 839-2661.
03300-6
0893 Lindsay, OK
11/23/10
B.
2.2
Substitutions not permitted unless otherwise specified.
AGGREGATE BASE MATERIALS
A.
Any local state DOT approved road base material with 100% passing No. 1½-inch sieve, 15% to 55% passing the
No. 4 sieve and 5% to 12% passing the No. 200 sieve.
B.
Aggregate base material shall be crusher run stone conforming to ASTM D 1241, Grade C or D unless otherwise
indicated in the “Foundation Subsurface Preparation” on the Drawings.
2.3
FORMWORK
A.
Design, engineer, and construct forms, shores, bracing, and other temporary supports to support loads imposed
during construction in accordance with ACI 347. Design under the direct supervision of a licensed Professional
Engineer experienced in design of this Work.
1.
Plywood: DOC PS 1, sound, undamaged sheets with straight edges.
2.
Lumber: Construction grade.
3.
Steel: Minimum 16 gage sheet, well matched, tight fitting, stiffened to support weight of concrete without
deflection detrimental to tolerances and appearance of finished surfaces.
4.
Carton Forms: Moisture resistant treated paper faces, biodegradable, structurally sufficient to support
weight of wet concrete until initial set.
B.
Form Release Agent:
1.
100% biodegradable, non-toxic, 100% natural organic chemical release agent. Will not cause surface
imperfections, non-staining, and compatible with field applied paints, toppings, curing compounds, and
other coatings. Provide one of the following:
a.
Form-EZE Natural by Euclid.
b.
Enviroform by Conspec.
c.
Certi-Vex V Form Release by Vexcon.
d.
Farm Fresh by Unitex.
2.
Use same brand form release agent for all forms.
C.
Accessories:
1.
Form Ties: Removable or snap-off metal, of fixed or adjustable length as applicable, with cone ends.
2.
Waterstops: Provide one of the following.
a.
Volclay RX-10, by American Colloid.
b.
Synko-Fle, by Synko-Flex.
D.
Prefabricated Access Pit Form: Pit form at Refrigeration Pit shall be Prefabricated Fiberglass Access Pit and
Anchoring Assembly, Model POL, as manufactured by Craigg Manufacturing, Ephrata, IL, (717) 733-1412
2.4
REINFORCEMENT
A.
2.5
Reinforcing Steel: ASTM A615; 60 ksi yield grade billet-steel deformed bars, uncoated finish.
REINFORCEMENT ACCESSORY MATERIALS
A.
Tie Wire: Minimum 16 gage annealed type.
B.
Reinforcing Support Devices:
1.
Manufacturer support devices of metal (wire bar), concrete, or recycled plastic devices conforming to CRSI
Manual of Standard Practice
2.
Precast concrete bar supports shall have minimum compressive strength of 3500 psi.
3.
Plastic accessories shall have a minimum of 50% recycled content.
4.
Do not use wood, clay brick, and other devices that can expand due to moisture gain.
5.
For concrete surfaces exposed to view where legs of wire bar supports contact forms, use CRSI Class 1
03300-7
0893 Lindsay, OK
11/23/10
6.
7.
8.
C.
D.
2.6
plastic-protected steel wire or CRSI Class 2 stainless -steel bar supports.
When precast concrete bar supports are used over aggregate base, or over waterproof membranes and vapor
retarders, properly embed tie wires to prevent penetration of substrate.
Properly size foot of bar supports or similar devices to prevent settlement on base material or prevent
puncture of vapor retarder.
When supporting multiple layers of reinforcement, provide the proper size and spacing of bar supports or
similar devices to prevent deformation of plastic and to retain rebar within position tolerances.
Slab on Grade Plate Dowels (For Interior Slabs Only):
1.
Plate dowel shall consist smooth steel plate bars, ASTM A36 steel. Plate dowels shall be one of the
following:
a.
Diamond Dowel System, by PNA Construction Technologies, size 1/4” x 4.5” dowels.
b.
EZdowel (including EZform Board) by EZform, Inc., size 6-1/4” x 3-1/2” x 1/4” dowels
c.
Speed Plate System by Greenstreak, size 1/4” x 4” x 6” dowels.
2.
Install plate dowels at construction joints in accordance with manufacturer’s recommendations.
Joint Dowel Bars (For Exterior Slabs): ASTM A 615, Grade 40 or ASTM A36 plain-steel bars, size as shown on
the drawings. Cut bars true to length with ends square and free of burrs.
CONCRETE MATERIALS
A.
Cement: ASTM C150 - Type I, II, or III. If reactive aggregates are present in the area, use low alkali cement
containing less than 0.6 percent alkalis.
B.
Aggregate
1.
Fine and Coarse Aggregate: Use gradation for fine and coarse aggregate per ASTM C33, but not larger
than 1-1/2 inches.
2.
Fine, Intermediate and Coarse Aggregate: Combined aggregate gradation for slabs and other designated
concrete shall be 8% - 18% for large top size aggregates (1½ in.) or 8% - 22% for smaller top size
aggregates (1 in. or ¾ in.) retained on each sieve below the top size and above the No. 100. For pumped
concrete use maximum aggregate size of 1/3 the inside diameter of the hose or pipe.
C.
Fly Ash: ASTM C618, Class C or F. Submit chemical and physical properties. Use only one type and source
throughout project.
D.
Slag: ASTM C989, Grade 100 or 120. Use only one type and source throughout project.
E.
Water: Clean potable water, not detrimental to concrete.
2.7
CHEMICAL ADMIXTURES
A.
Chemical Admixtures: Provide admixture products as specified below. Within each product listing, provide one of
the products specified. When specifically allowed within each product listing, equivalent admixture products by
other manufacturers meeting the specified ASTM standards may be used upon submittal of product data and
approval by the engineer.
B.
Air Entrainment: ASTM C260.
1.
Air-Mix or AEA-92, by Euclid.
2.
MB-VR MB-AE 90, or Micro-Air, by BASF Admixtures (Master Builders).
3.
Sika AER, by Sika.
4.
Daravair or Darex Series, by W.R. Grace.
5.
Equivalent approved products.
C.
Water Reducing Admixture: ASTM C494, Type A.
1.
Eucon Series, by Euclid.
2.
Pozzolith or PolyHeed Series by BASF Admixtures (Master Builders).
03300-8
0893 Lindsay, OK
11/23/10
3.
4.
5.
WRDA, Daracem, or Mira Series, by W.R. Grace.
Plastiment, Plastocrete, or Sikament Series, by Sika Corp.
Equivalent approved products.
D.
Accelerating Admixture: ASTM C494, Type C or E.
1.
Accelguard 80, by Euclid Chemical Corp.
2.
Daraset Series, Gilco, Lubricon, Polarset, or DCI by W.R. Grace.
3.
Pozzolith or Pozzutec Series, by BASF Admixtures (Master Builders).
4.
Plastocrete 161 FL, Plastocrete 161 HE, Sikaset NC, or Sikaset HE by Sika Corp.
5.
Equivalent approved products.
E.
Water Reducing and Retarding Admixture: ASTM C494, Type B or D.
1.
Eucon Retarder 75, by Euclid.
2.
Pozzolith Series or Delvo by by BASF Admixtures (Master Builders).
3.
Daratard 17 by W.R. Grace.
4.
Plastiment or Plastocrete Series by Sika Corp.
5.
Equivalent approved products.
F.
High-Range, Water Reducing Admixture (Super plasticizer): ASTM C494, Type F or Type G.
1.
Eucon 37 or Eucon 1037, by Euclid.
2.
Rheobuild 1000, by BASF Admixtures (Master Builders).
3.
Sikament 300, by Sika.
4.
Daracem Series, by W.R. Grace.
5.
Equivalent approved products.
2.8
RELATED MATERIALS
A.
Non-shrink Grout: Pre-mixed non-shrinking, high strength grout, ASTM C1107, Type A, B, or C; compressive
strength of 5000 psi in 28 days.
1.
NS Grout, by Euclid.
2.
Construction Grout, by BASF Admixtures (Master Builders).
3.
Sonogrout, by BASF Building Systems (Sonneborn).
4.
Certi-Vex Grout #1000, by Vexcon.
5.
Enduro 50, by Conspec.
B.
Joint Fillers and Sealants: Specified in Section 07900.
C.
Epoxy Bonding Agent: ASTMC881
1.
Euco #452 or Corr-Bond, by Euclid.
2.
EVA-POX Epoxy Paste No. 22, by E-Poxy Industries.
3.
Concresive Liquid (LPL), by BASF Admixtures (Master Builders).
4.
Uniweld, by Permagile Industries.
5.
Sikadur 32, Hi-Mod LPL by Sika.
D.
Bond Breaker: ASTM D226, No. 15, unperforated asphalt saturated felt.
E.
Leveling Compound:
1.
Ardex V-900, by Ardex. Contact: Jesse David.
2.
Flo-Top or Super Flo-Top, by Euclid.
3.
SikaTop Overlay System, by Sika.
4.
Thoro Underlayment Self-Leveling including Thoro Primer #800, by BASF Building Systems (Thoro).
5.
Certi-Vex SLU TC including EnvioBond A Primer, by Vexcon.
6.
Conflow including Primeflow, by Conspec.
7.
MASTERTOP 110 UNDERLAYMENT, by BASF Admixtures (Master Builders).
F.
Pre- Hardener/Densifier Floor Cleaner: WM Pre-Densifier Floor Cleaner, by one of the following:
03300-9
0893 Lindsay, OK
11/23/10
1.
2.
3.
4.
5.
Euclid Chemical Co.
Curecrete Distribution Inc.
L&M Construction Chemicals, Inc.
Dayton/Superior.
Vexcon Chemicals, Inc.
G.
Penetrating Hardener/Densifier: Provide one of the following:
1.
Ashford Formula by Curecrete. Contact: Kathy Moore, Director of Corporate Accounts.
2.
StarSeal PS by Vexcon. Contact: Darryl Manuel, President.
3.
Euco Diamond Hard by Euclid Chemical Company, Contact: Bill Phelan, V.P. of Marketing and Technical
Services.
4.
Intraseal by Conspec.
5.
Seal Hard by L&M. Contact: Frank Bianchi, Regional Sales Manager.
6.
CHEMTEC ONE by Chemtec.
H.
Vapor Retarder: ASTM E1745, Class A, sheet membrane material, not less than 10 mils thick. Color: Mfg.
standard.
1.
Griffolyn 10 mil Green, by Reef Industries (713) 507-4200.
2.
Moistop Ultra 10, by Fortifiber, (800)-773-4777.
3.
Perminator 10 mil, by W.R. Meadows, (847) 214-2100.
4.
Vapor Block 10 mil, by Raven Industries, (800) 635-3456.
5.
Tape and Adhesive: Tape and adhesives for sealing laps, punctures, tears and penetrations shall be pressuresensitive, waterproof adhesive tape, 2 inches minimum width and compatible with retarder.
I.
Concrete Sealer: Solvent based concrete sealer having a minimum 25% solids similar to High Solids Clear Seal
manufactured by Increte Systems Inc.
2.9
CONCRETE CURING MATERIALS
A.
Water: Clean, clear, and potable, not detrimental to concrete finish.
B.
Sheet Materials: Natural fiber / plastic sheet, ASTM C171. White natural fiber matting securely attached to plastic
sheet backing.
1.
UltraCure, by McTech Group.
2.
AquaCure, by DRC.
a.
Exclusive Distributor: Greenstreak Group, Inc., St. Louis, MO (800) 325-9504.
C.
Liquid Membrane Curing and Sealing Compound: ASTM C 1315, Type I, Class A or B, 25% minimum solids
content, clear non-yellowing with no styrene-butadiene.
1.
Water Based, VOC less than 350 g/l:
a.
Super Aqua Cure, by Euclid Chemical Corp.
b.
Kure 1315 by BASF Building Systems (Degussa).
2.
Solvent Based
a.
Super Rez-Seal, by Euclid Chemical Corp.
b.
Kure-N-Seal 30 by BASF Building Systems (Degussa).
D.
Dissipating Curing Compound: ASTM C 309 Type 1, Class A or B, solvent or water base, VOC less than 350 g/l.
1.
Cetri Vex EnvioCure 100 by Vexcon. (Solvent base)
2.
Day Chem REZ Cure (J-11-W) or Safe Cure & Seal (J19) by Dayton Superior. (Water Base)
3.
Kurez DR VOX, by Euclid. (Water Base)
2.10
CONCRETE MIX
A.
Portland Cement: Only one brand of cement shall be used on the project. Mix and deliver concrete in accordance
with ASTM C94. Prepare design mixes for each type and strength of concrete by the laboratory trial batch or the
field experience method as specified in ACI 301. After mix design approval, do not change mix proportions of
03300-10
0893 Lindsay, OK
11/23/10
Portland cement, fly ash, or slag.
B.
Provide concrete with the following characteristics:
1.
28 Day Compressive Strength:
a.
3000 psi for all concrete unless otherwise shown or specified.
b.
3500 psi for exterior concrete and vestibule concrete.
c.
5000 psi for compactor pad concrete
2.
Air Content:
a.
For Concrete Exposed to Weather: 4 percent, plus or minus 1.5 percent.
b.
For Concrete Not Exposed to Weather: Not to exceed 5 percent. Interior steel troweled floors shall
have a maximum air content of 3%. Do not add air-entraining agents.
3.
Slump for Conventionally Placed Concrete: Not to exceed 4 inches or not to exceed 5 inches with a Type A
water reducing admixture.
4.
Slump for Pumped Concrete: Not to exceed 7 inches at the point of discharge from the pipe or hose after
pumping. HRWR admixture (super plasticizer) required.
5.
Maximum Water-Cementitious Material Ratio (Cementitious material includes fly ash or slag):
a.
Exterior Concrete: 0.50 by wt.
b.
Interior Concrete: 0.58 by wt.
c.
Interior steel troweled exposed floor: 0.53 by wt.
6.
Temperature For Exposed Sales Area Floor Slab: Concrete placement temperatures shall be within the
range of 10 to 20 degrees of aggregate base.
7.
Concrete to be Placed by Pumping Methods
a.
The minimum quantity of constituent materials passing the No. 50 sieve (fine aggregate and
cementitious materials) shall be 600 pounds per cubic yard.
b.
The particle size distribution of the combined fine and coarse aggregate shall be uniform from the
largest to the smallest particles.
C.
Admixtures:
1.
Use water-reducing admixture or high-range water-reducing admixture (Superplasticizer) in concrete as
required for placement and workability. Unless otherwise permitted herein, chemical admixtures shall be
dispensed at the batch plant.
2.
Use accelerating admixture in concrete slabs placed at ambient temperatures below 50 F.
3.
Use high-range water-reducing admixture (HRWR) in pumped concrete. Use air-entraining admixture in
exterior concrete exposed to weather. Add air-entraining admixture at manufacturer's prescribed rate to
result in concrete at point of placement having total air content specified above.
4.
Use admixtures for water reduction and set control (accelerators and retarders) in strict compliance with
manufacturer's directions.
5.
Verify with the admixture manufacturer the following:
a.
The compatibility of the individual admixtures when combined in the concrete mix.
b.
The compatibility of the individual admixtures with the concrete materials.
c.
The compatibility of the individual admixtures with the coloring admixture.
D.
Supplementary Cementitous Materials (SCM):
1.
Concrete mix shall contain SCM at the amounts specified unless other amounts are approved by the
Structural Engineering Consultant. Either fly ash or ground granulated blast furnace slag (GGBFS) may be
used for the SCM but shall not be used together to form a ternary mix. Use of fly ash or GGBFS in the
concrete mix is mandatory.
2.
Fly Ash: Substitute fly ash for Portland cement at 15% minimum up to 20% maximum of the total
cementitious content for interior floor slabs and at 20% of the total cementitious content for all other
concrete.
a.
If used to mitigate potential aggregate reactivity, only Type F fly ash may be used and shall have the
following maximum properties: 1.5% available alkali and 8.0% CaO. When a maximum of 30%
replacement is used, up to 10.0% CaO is permitted.
3.
Ground Granulated Blast Furnace Slag (GGBFS): Substitute GGBFS for Portland cement at 25% minimum
up to 30% maximum of the total cementitious content. If required to mitigate potential sulfate exposure or
aggregate reactivity, up to 50% GGBFS substitution of Portland cement may be used.
03300-11
0893 Lindsay, OK
11/23/10
4.
5.
Maintain air-entrainment at specified levels.
In cold weather, provide adequate concrete strength gain so concrete will not be damaged from traffic and
loads of use.
PART 3 - EXECUTION
3.1
EXAMINATION
A.
3.2
Verify anchors, seats, plates, reinforcement, and other items to be cast into concrete are accurately placed, held
securely, and will not cause hardship in placing concrete.
PREPARATION
A.
Prepare previously placed concrete by cleaning with steel brush and applying bonding agent. Apply bonding agent
in accordance with manufacturer's instructions. Do not apply bonding agent at slab-on-grade construction joints.
B.
The base elevation shall conform to an elevation of +0" / -3/4". Prior to placing concrete, the soil support system
shall be proof rolled by a loaded tandem axle dump, a loaded truck mixer, roller, or equivalent. Corrective action
shall be taken if rutting or pumping is evident at any time during the preparation of the soil support system.
C.
Membrane roof construction shall be 100 percent complete prior to placement of interior floor slab.
1.
Roofing system shall be complete including flashing.
2.
Roof curbs shall be covered.
3.
Roof storm water drainage system shall be complete.
D.
Prefabricated Access Pit Form: Install in accordance with manufacturer’s instructions.
3.3
AGGREGATE BASE PLACEMENT
A.
3.4
Unless otherwise shown in the “Foundation Subsurface Preparation” on the Drawings, place aggregate base to a
minimum 4 inch depth below slabs associated with buildings and appurtenances.
1.
Compact to 100 percent of maximum density in accordance with ASTM D698.
VAPOR RETARDER INSTALLATION
A.
Following leveling and tamping of prepared base for slabs, place vapor retarder sheeting with longest dimension
parallel with direction of placement.
B.
Lap joints 6 inches minimum and seal with appropriate tape. Do not disturb or damage vapor retarder while
placing granular fill. If damage occurs, repair before concrete placement.
3.5
PLACING REINFORCEMENT
A.
Perform concrete reinforcement work in accordance with CRSI Manual of Standard Practice, Documents 63 and
65. Detailing practices and fabrication shall conform to ACI SP66.
1.
Accurately place and secure saddle ties at every other intersection with 16 gage black annealed wire; hold
rigidly in place with metal chairs or spacers during placing of concrete.
2.
Hold bars in beams and slabs to exact location during concrete placement. Use spacers, chairs, or other
necessary supports with the following tolerances:
a.
Bars in Slabs and Beams:
1) Members 8 Inches Deep or Less: ± 1/4 inch.
2) Members 8 Inches to 2'-0" Deep: ± 1/2 inch.
3) Members more than 2'-0" Deep: ± 1 inch.
b.
Lengthwise of Member: ± 2 inches.
c.
Concrete Cover to Formed Surfaces: ± 1/4 inch.
d.
Minimum Spacing Between Bars: ± 1/4 inch.
03300-12
0893 Lindsay, OK
11/23/10
B.
Welded Reinforcement (AWS D1.4): Do not weld reinforcement in the shop or field.
C.
Exterior Slab on Grade and Pavement Dowels:
1.
Install round smooth dowels within plus or minus (+/-) 1/4” alignment in vertical and horizontal planes.
2.
Secure dowels perpendicular to joint and parallel to finished concrete surface.
3.
Lightly grease dowels to prevent bond to concrete.
D.
Interior Slab on Grade Plate Dowels:
1.
Install plate dowels at construction joints in accordance with manufacturer’s recommendations.
2.
Secure dowels and their sleeves perpendicular to joint and parallel to finished concrete surface.
3.
Use prefabricated dowel supports at ends of dowels to maintain alignment.
4.
Dowel alignment shall be within specified tolerances.
5.
Do not grease plate dowels
6.
Install plate dowels within plus or minus (+/-) 1/8” in dowel alignment in vertical and horizontal planes.
7.
Install plate dowels horizontally on the bulkhead at the greater depth of either mid-slab or 2-1/4 inch from
slab surface to center line of the plate.
3.6
PLACING CONCRETE
A.
Notify Testing Laboratory minimum 48 hours prior to commencement of concreting operations.
B.
Place concrete in accordance with ACI 301; including hot and cold weather placement procedures.
C.
Inspect reinforcement, inserts, and embedded parts before beginning concrete placement to ensure accurate size
and location.
D.
Ensure reinforcement, inserts, embedded parts and formed joints are not disturbed during concrete placement.
E.
Place concrete in uniform layers, horizontal, 12 to 18 inches thick, exercising care to avoid vertical joints or
inclined planes. Place concrete continuously between predetermined construction joints shown on structural
drawings. Piling up of concrete in forms to cause separation or loss of ingredients is not permitted.
F.
Maximum placement area for individual pours for interior slabs shall be the greatest width between construction
joints shown by the length between exterior walls.
G.
Place exposed concrete surfaces free of stains, including petroleum stains. Means of adequately removing
petroleum stains are not available; therefore, prevention of stains is most critical.
1.
No pipe cutting machinery allowed within building line on concrete surface.
2.
No stock piling of steel allowed within building line on concrete surface.
3.
No vehicle parking within building line on concrete surface without meeting the following requirements:
a.
Provide non-absorbent "drop cloths" below vehicle that will not stain surface.
b.
Cover hydraulic powered equipment to prevent staining of concrete surface.
H.
Do not deposit concrete which has partially set or hardened. Do not deposit initial lubricating mortar when
pumping concrete. Remove hardened or partially hardened concrete which has accumulated on forms or
reinforcement. Do not place concrete on previously deposited concrete which has hardened sufficiently to cause
formation of seams or planes of weakness within respective member or section except as specified.
I.
Deposit concrete as nearly in final position as practical to avoid rehandling. Exercise care to prevent splashing
forms or reinforcing with concrete. Do not permit concrete to drop freely a distance greater than 3 feet. Where
longer drops are necessary, use chute, tremie, or other conveyance to help avoid separation.
J.
Do not deposit concrete into excavation where water is standing. If place of deposit cannot be successfully
pumped dry, place through tremie with outlet end near bottom of place of deposit.
K.
Do not deposit concrete when plasticity, measured by slump test, is outside specified limits. The addition of water
03300-13
0893 Lindsay, OK
11/23/10
to increase slump will not be permitted.
L.
Exposed Sales Area Concrete Floor Slab: Verify that the aggregate base is uniform in moisture content and is fine
graded to a tolerance of plus or minus 1/2 inch. Eliminate high or low spots, pot holes, or other variations which
may affect finishing of concrete placed for floor slab due to uneven base material.
M.
Consolidate and screed concrete slabs-on-grade by use of laser screed to allow construction joint pattern as
indicated on Structural Drawings and specified. Consolidate slab concrete in slabs by vibrating bridge screeds or
laser screeds. Other vibratory screeding methods are acceptable only in areas where laser screed is not accessible.
1.
Check laser screed level head a minimum of 3 times during each pour. Use feeler gauge to measure
deviations. If deviations are present, replace head with a new straight one.
N.
Vibration: As soon as concrete is deposited, thoroughly agitate with mechanical vibrators and suitable hand tools
to work mixture into corners of forms and around reinforcing and embedded items. Use mechanical vibrators with
minimum frequency of 9000 revolutions/minute. Do not over vibrate or use vibrators to transport concrete within
forms. Insert and withdraw vibrators at approximately 18 inches apart. At each insertion, vibrate generally 5-15
seconds, sufficient to consolidate concrete but not long enough to cause segregation. Keep spare vibrator on job
site during concrete placement operations. Do not insert vibrator into lower courses that have begun to set.
O.
Excessive honeycomb or embedded debris in concrete is not acceptable. Notify Walmart Construction Manager
upon discovery.
P.
Pumping: Maintain controls for proportioning, mixing, adjustment of mix and placement in accordance with ACI
301 and ACI 304.2R
1.
Refer to Section 01330 for submittal requirements.
3.7
FORM REMOVAL
A.
Do not remove forms until concrete has attained sufficient strength. Clamps or tie rods may be loosened 24 hours
after concrete is placed. Ties, except for sufficient number to hold forms in place, may be removed at that time.
B.
Minimum Curing Period Prior to Form Removal:
1.
Air Temperature: Above 60 degrees F: 3 days.
2.
Air Temperature: 50 degrees F to 60 degrees F: 5 days.
3.
Air Temperature: 40 degrees F to 50 degrees F: 7 days.
4.
Air Temperature: Less than 40 degrees F: When temperature below 40 degrees F prevails, leave forms
until concrete reaches 75% of 28-day design strength.
C.
Observance of minimum curing periods listed above does not relieve Contractor of responsibility for safety of
structure during construction.
D.
Remove wood forms from under floors, ramps, steps, and similar places (through temporary openings if necessary)
so no material will be left to rot or to be infested by termites.
E.
Exterior Slab Construction and Expansion Joints: Remove greased dowels prior to form removal. Immediately reinsert dowels as forms are removed.
3.8
FINISHING
A.
Schedule of Finishes:
1.
Interior Floor Slabs unless otherwise specified: Machine trowel or hand trowel.
2.
Unexposed Exterior Formed Surfaces: Rough form finish.
3.
Exposed Exterior Formed Surfaces: Rubbed/stoned.
4.
Sidewalks: Light broom.
5.
Ramps and Steps: Heavy broom.
6.
Slabs Receiving Ceramic or Quarry Tile Flooring: Light broom.
03300-14
0893 Lindsay, OK
11/23/10
7.
Exterior Garden Center Slab: Light broom.
B.
Sealing: Apply concrete sealer to interior concrete curbs in cart storage area.
C.
Initial Finishing:
1.
Initial surface straightening shall be performed with a laser screed.
2.
Re-straighten surface irregularities with a 10 ft highway screed in two directions as close to perpendicular
as possible before water appears on concrete surface.
3.
Do no further working of surface until time for floating; do not work surface while water is present.
4.
"Dry Sprinkle" method finishing is not acceptable and will be cause for rejection
D.
Floating:
1.
Begin float operations when bleed water sheen has disappeared and concrete has stiffened sufficiently to
allow walking on surface without leaving heel prints more than 1/4 inch deep. Check and level the surface
lane to an initial tolerance not exceeding ¼ inch in ten feet when tested with a ten foot straight edge.
Immediately after leveling, refloat surface to a uniform smooth granular surface. Use magnesium or
aluminum power float unless otherwise specified.
2.
Avoid premature finishing that brings excessive fines to surface causing finished slab to have soft surface
which will dust.
E.
Troweling:
1.
Delay troweling as long as possible to prevent working excess fines and water to surface. Do not begin
until surface moisture film and shine remaining after floating have disappeared. Trowel in alternate pass
directions.
2.
Power trowel using riding trowel where possible. Use hand trowel in inaccessible areas.
3.
Do not over-trowel floors scheduled to receive curing/sealing or penetrating hardener/densifier compound
unless specified otherwise. Slab shall be capable of accepting subsequent floor treatment. Coordinate with
floor treatment manufacturer's application instructions for proper finish and for procedures when finish is
too dense for proper floor treatment application.
4.
Do not re-wet surface to trowel.
F.
Final hand finish passes shall be done in the same direction. Finish all surfaces within a reasonable time period to
provide uniformity of appearance.Broomed Finish:
1.
Provide a floated finish, then finish with broom.
a.
Heavy Boom Finish: Steel wire or stiff, course, fiber broom.
b.
Light Broom Finish: Soft-bristled fiber broom.
2.
Allow surface to harden sufficiently to retain scoring or ridges.
3.
Broom transverse to traffic or at right angles to slope of slab.
G.
Floor Finish Tolerance
1.
Provide FF35/FL30 tolerance for troweled floors in accordance with ACI 117.
2.
Replace slab if measured values are below minimum or give credit to Owner.
H.
Pitch to drains: Form 18 inch radius around floor drains and pitch concrete surface to drains at rate of 1/4 inch per
foot nominal, unless noted otherwise in Drawings.
3.9
JOINTING
A.
Building Slab Joints:
1.
Saw-Cut Control Joints:
a.
Primary Method: Soff-Cut System, by Soff-Cut International, Corona, CA (800) 776-3328.
Finisher shall have documented successful experience in the use of this method prior to this project.
Install cuts within 2 hours after final finish at each saw cut location. Use 1/4 inch thick blade, cutting
3/4 inch into slab.
b.
Optional Method (Where Soff-Cut System Equipment is Not Available): Properly time cutting with
set of concrete. Wet saw-cut control joints within 12 hours after finishing. Start cutting as soon as
03300-15
0893 Lindsay, OK
11/23/10
concrete has hardened sufficiently to prevent aggregates being dislodged by saw. Complete cutting
before shrinkage stresses become sufficient to produce cracking. Use 1/4 inch thick blade, cutting
1-1/4 inch into slab.
B.
3.10
Sidewalk Joints:
1.
Tooled Joints: Provide at 12 feet on center maximum intervals each way, unless indicated at smaller
intervals on Drawings.
a.
Form tooled joints in fresh concrete by grooving top of slab minimum 1/4 slab thickness with jointer
and finishing edges.
b.
Do not use sawed joints.
2.
Expansion Joints: Provide at 30 feet on center maximum intervals unless indicated at smaller intervals on
Drawings. Provide at joints abutting concrete curbs, buildings, and other appurtenances.
a.
Recess top of filler 1/4 inch below finished surface of sidewalk. Provide joint fillers in one piece
lengths for full width being placed.
3.
Align curb, gutter, and sidewalk joints.
JOINT FILLING AND SEALING
A.
3.11
Joint filling and sealing is specified in Section 07900.
CURING
A.
General:
1.
Cure concrete in accordance with ACI 301, ACI 308R and ACI 308.1, except as noted.
2.
Start curing as soon as concrete surface will not be damaged by curing operations.
3.
Continuously cure concrete for at least 7 consecutive days.
4.
During curing period, do not allow any part of the concrete to become dry.
5.
If using forms for curing, keep forms in contact with concrete wet during curing period unless type of form
is impervious to water, such as metal or fiberglass.
6.
If forms are removed before curing period is complete, continue curing immediately with other approved
methods
B.
Moisture Cure:
1.
Begin moisture cure immediately after concrete placement and initial setup.
2.
Thoroughly saturate the non-woven fabric side of concrete curing cover prior to placement on slab.
3.
Wet exposed surfaces of concrete after completing finishing and then apply sheet with edges lapped 6
inches minimum and sealed & secured in such manner as to prevent moisture from escaping from concrete
from laps or edges.
4.
Install sheet in accordance with manufacture’s recommendations. After laying, squeegee sheet with roller
squeegee to insure uniform contact between curing cover and slab.
5.
Place concrete curing cover with non-woven fabric side in intimate contact with concrete surface.
6.
Place curing cover over entire concrete surface.
7.
Maintain cure and keep surface saturated for a minimum of 7 days.
8.
Ensure all edges and overlaps are secured against displacement during curing period.
9.
Maintain reasonable constant temperature in freshly placed concrete for the duration of the curing period.
C.
Removal Of Concrete Curing Cover At Sales Area Floor Slab.
1.
After minimum 7 day cure, remove sheet in sections. Dispose of used sheet material. Do not reuse sheet
material.
2.
A maximum of 35,000 square feet of concrete curing cover may be removed at any one time.
3.
Using a powered floor scrubber with a citrus-based detergent, scrub floor to remove any soluble salts that
may have accumulated at the floor surface.
4.
Double scrub floor with automatic scrubber capable of minimum of 80 to 120 pounds of head pressure,
equipped with nylo-grit or strato-grit brushes or black stripping pads to remove any residues from curing.
Rinse area thoroughly with clean fresh water. Remove water and allow to dry. If whitening occurs during
drying, repeat scrubbing process before floor dries until no whitening occurs during drying.
03300-16
0893 Lindsay, OK
11/23/10
5.
6.
D.
3.12
Scrubbing shall be performed by the certified penetrating hardener/densifier applicator.
All areas of the floor shall remain wet during floor scrubbing process. Expose only the amount of floor
surface that can be cleaned before any drying occurs without exceeding the maximum allowable exposed
area.
Curing Schedule:
1.
Interior slabs:
a.
Curing methods shall be as indicated for the specific areas on the Slab Plan on the Structural
Drawings. Where curing compound is indicated, use only dissipating curing compound.
b.
When interior surfaces to be moisture cured will be subject to freezing temperatures during curing
period, use dissipating curing compound in lieu of moisture cure.
2.
Exterior: Unless otherwise shown, unformed surfaces shall receive a moisture cure or curing compound as
appropriate.
3.
Use solvent based curing compounds when curing compound is applied below 40 F.
PENETRATING HARDENER/DENSIFIER FINISH
A.
Apply penetrating hardener/densifier finish to all interior floors expect floors scheduled to receive other final floor
finish material.
B.
Examination and Preparation:
1.
Examine surfaces receiving penetrating hardener/densifier concrete finish. Verify that surfaces conform to
product manufacturer's requirements for substrate conditions.
2.
Prior to application, scrub floor with WM Pre-Densifier Floor Cleaner to remove latent salts . Verify floor
is free of curing membrane, bond-breaker, and construction laitance. Do not proceed until unsatisfactory
conditions have been corrected.
3.
Beginning of application indicates acceptance of existing conditions.
C.
Application:
1.
Schedule to begin 2 days after 7 day curing period. Application shall be performed by certified applicator
in accordance with manufacturer's published instructions
2.
Employ methods to ensure concrete surface is not damaged during application, including discoloration.
3.
Vacuum and clean saw cut joints and surrounding area so that no dust remains to react with concrete finish
material.
4.
If dissipating curing compound has been applied, remove compound prior to application of penetrating
hardener/densifier. Remove compound by cleaning and scrubbing in accordance with manufacturer’s
instructions.
5.
Apply penetrating hardener/densifier finish in accordance with manufacturers published instructions.
6.
Apply finish material with low pressure sprayer with enough coverage to keep concrete surface wet for 30
to 45 minute period (approximately 200 square feet per gallon).
7.
When treated surface gels and becomes slippery under foot, lightly sprinkle surface with water and agitate
with broom to redistribute special concrete finish material evenly across surface.
8.
After surface again becomes slippery, using garden hose with garden-type spray nozzle, flush entire surface
with water removing excess material, alkali, or impurities. Squeegee or wet-vac surface dry to remove
excess material to avoid whitening of concrete during curing. Whitening of concrete by over -application of
hardener/densifier may be cause for rejection.
D.
Disposal:
1.
Upon completion of hardener/densifier treatment, dispose of excess hardener/densifier material as required
by local agency having jurisdiction.
2.
Certified applicator shall remove hardener/densifier product containers from job site immediately upon
completion of hardener/densifier treatment.
03300-17
0893 Lindsay, OK
11/23/10
3.13
DEFECTIVE CONCRETE
A.
Concrete that does not satisfy the performance requirements of this specification, including but not limited to,
tolerance, strength, durability and finish shall be removed and replaced at no extra cost to the Owner if repair
cannot be accomplished to the satisfaction of Walmart Construction Manager.
B.
Where cracking occurs wider than paper thickness, remove and replace entire section of concrete slab to nearest
control joints each way.
C.
Patching;
1.
Notify Walmart Construction Management immediately upon discovery and before patching any imperfect
areas.
2.
Repair and patch imperfect areas immediately after discovery with cement mortar consisting of the same
cementitious material proportions as the base concrete. Imperfect areas not acceptable to Walmart
Construction Management will be considered defective.
3.
Cut out honeycomb, rock pockets, voids over ¼ inch in any dimension, surface imperfections and holes left
by tie rods and bolts down to solid concrete, but in no case, to a depth of not less than one inch. Make
edges of cut perpendicular to the concrete surface. Thoroughly clean, dampen with water and brush-coat
the area to be patched with specified bonding agent. Place patching mortar after bonding compound has
dried.
3.14
QUALITY CONTROL TESTING AND INSPECTION (BY OWNER)
A.
Unless otherwise specified field quality control tests and inspection specified below will be conducted by the
Owner’s Construction Testing Laboratory (CTL) at no cost to the Contractor in accordance with Section 01458.
The Contractor shall perform additional testing or inspection as considered necessary by the Contractor for
assurance of quality control.
B.
Qualifications: Unless otherwise specified, work shall be preformed by a Special Inspector – Technical II or
Special Inspector – Structural I. In addition to the Inspector and CTL qualifications specified in Section 01458,
the following qualifications shall apply for all Cast-in-Place Concrete inspection.
a.
Technical I: ACI Certified Grade I inspector.
b.
Technical II: ACI Certified Grade II inspector.
c.
CTL Testing Laboratory: C.C.R.L. certification at the National Bureau of Standards.
d.
Lead technician shall have at least five years experience in projects of this size and complexity.
e.
Other technicians shall have at least two years experience.
C.
Review the Contractor's proposed materials and mix design for conformance with specifications.
D.
Perform testing in accordance with ACI 301 and testing standards listed herein.
E.
Conduct strength tests:
1.
Secure composite samples in accordance with ASTM C 172. Sample at regularly spaced intervals from
middle portion of the batch. Sampling time shall not exceed 15 minutes.
2.
Mold and cure specimens in accordance with ASTM C 31.
a.
A minimum of four concrete test cylinders shall be taken for every 3 cubic yards or less of each class
of concrete placed each day and not less than once for each 250 square feet of surface area or less for
slabs.
b.
During the initial 24 hours (plus or minus 8 hours) after molding, the temperature immediately
adjacent to the specimens shall be maintained in the range of 60 to 80 degrees F. Control loss of
moisture from the specimens by shielding from the direct rays of the sun and from radiant heating
devices.
c.
Specimens transported prior to 48 hours after molding shall not be demolded, but shall continue
initial curing at 60 to 80 degrees F until time for transporting.
d.
Specimens transported after 48 hours age shall be demolded in 24 hours (plus or minus 8 hours).
Curing shall then be continued but in saturated limewater at 73.4 degrees (plus or minus 3 degrees F)
03300-18
0893 Lindsay, OK
11/23/10
3.
until the time of transporting.
Test cylinders in accordance with ASTM C 39.
a.
Date test cylinders and number consecutively. Give each cylinder of each set an identifying letter
(i.e. A, B, C, D). Prepare a sketch of the building plan for each test set identifying location of placed
concrete.
b.
Test one cylinder (A) at 7 days for information. If the compressive strength of the concrete sample is
equal to or above the 28 day specified strength, test another cylinder (B) at 7 days. The average of
the breaks shall constitute the compressive strength of the concrete sample.
c.
Test two cylinders (B and C) at 28 days and the average of the breaks shall constitute the
compressive strength of the concrete sample.
d.
Retain fourth cylinder (D) for further testing if needed, but do not retain cylinder more than 60 days.
F.
Conduct slump test for each cylinder set taken in accordance with ASTM C 143. Make additional slump tests for
every other load from a stationary mixer or truck to test consistency. Sampling shall be in accordance with ASTM
C 172.
G.
Conduct air content test for each cylinder set for concrete exposed to freeze-thaw in accordance with ASTM C
231, ASTM C 173, or ASTM C 138. Indicate test method on report. Make test at same time as slump test.
1.
When Type F fly ash is used and concrete is exposed to weather, perform air content test for first and
second truck for each class of concrete placed each day. If either test fails, perform air test on every truck
until two consecutive air tests comply with the requirements of the project specifications.
H.
Unit Weight: ASTM C 138.
I.
Conduct temperature test for each cylinder set taken in accordance with ASTM C 1064. Test hourly when air
temperature is 40 F and below or 80 F and above. Determine temperature of concrete sample and ambient air for
each strength test.
J.
Additional Tests: In-Place tests in accordance with ASTM C 42 shall be conducted as directed by the Walmart
Construction Manager when specified concrete strengths and other characteristics have not been attained in the
structures.
K.
In addition to required information noted previously in this Section, record the following information on concrete
compression reports:
1.
Test cylinder number and letter.
2.
Specific foundations or structures covered by this test.
3.
Proportions of concrete mix or mix identification.
4.
Maximum size coarse aggregate.
5.
Specified compressive strength.
6.
Tested compressive strength.
7.
Slump, air-content (when applicable) and concrete temperature.
8.
Concrete plastic unit weight.
9.
Concrete Temperature.
10. Elapsed time from batching at plant to discharge from delivery truck at project.
11. Date and time concrete was placed.
12. Ambient temperature, wind speed, and relative humidity during concrete placement.
13. Name of technician securing samples.
14. Curing conditions for concrete strength test specimens (field and laboratory).
15. Date strength specimens transported to laboratory.
16. Age of strength specimens when tested.
17. Type of fracture during test.
L.
At the start of each day's mixing, report any significant deviations from approved mix design including
temperature, moisture and condition of aggregate.
M.
Note trends of decreasing quality in concrete due to changing seasons, conditions of curing, or other causes and
03300-19
0893 Lindsay, OK
11/23/10
bring to attention of the Walmart Construction Manager with recommendations for corrective action before
material falls below requirements of specifications for environmental tolerances. Report and log comments on
Non-Conformance Correction Log.
N.
Certify each delivery ticket of concrete. Report type of concrete delivered, amount of water added and time at
which cement and aggregate were loaded into truck, and time at which concrete was discharged from truck.
O.
Evaluation and Acceptance:
1.
Strength level of concrete will be considered satisfactory if the average of all sets of three consecutive
strength tests equal or exceed specified strength and no individual strength test (average of two cylinders)
results are below specified compressive strength by more than 500 psi.
2.
Complete concrete work will not be accepted unless requirements of ACI 301, Section 1.7 have been met,
including dimensional tolerances, appearance, and strength of structure.
3.
Non-Compliance Test Reports: All test reports indicating non-compliance should be faxed immediately to all
parties on the test report distribution list. Copies shall be on different colored paper.
4.
Where average strength of cylinders, as shown by tests, falls below minimum ultimate compressive strength
specified, Walmart reserves the right to require Contractor to provide improved curing conditions of
temperature and moisture to secure required strength. If average strength of laboratory control cylinders
should fall so low as to cause portions of structure to be in question by Walmart, follow core procedure set
forth in ASTM C42. If results of core test indicate, in opinion of Walmart, that strength of structure is
inadequate, provide without additional cost to Walmart, replacement, load testing, or strengthening as may
be ordered by Walmart. If core tests are so ordered and results of such tests disclose that strength of
structure is as required, cost of test will be paid by Walmart.
P.
Inspection:
1.
Concrete Form Work: Verify formwork dimensions will result in member size and configuration shown.
Structural adequacy of formwork is the sole responsibility of the Contractor.
2.
Concrete Reinforcement: Inspect reinforcement excluding slabs on grade, footings without transverse
reinforcement, and topping slabs.
a.
Verify reinforcing bar grade.
b.
Verify reinforcing bars are free of dirt, excessive rust, and damage.
c.
Verify reinforcing bars are adequately tied, chaired, and supported to prevent displacement during
concrete placement.
d.
Verify proper clear distances between bars and to surfaces of concrete.
e.
Verify reinforcing bar size and placement.
f.
Verify bar laps for proper length and stagger.
3.
Slab-on-Grade Structural Inspection: Inspect slabs-on-grade for compliance with Drawings and
Specifications. Report on the following:
a.
Preparation of subgrade.
b.
Slab thickness.
c.
Size, spacing, placement (cover), and lap of reinforcement.
d.
Size, spacing, and placement of joint dowels.
e.
Placement and finishing of concrete.
f.
Time of saw cuts after placement of concrete.
4.
Concrete Foundations Structural Inspections: Inspect foundations for compliance with Drawings and
Specifications. Report on the following:
a.
Concrete footing size and depth.
b.
Footing bar size, spacing, and placement (cover).
c.
Placement and vibration of concrete.
d.
Dowel bar size, orientation, embedment, and spacing.
5.
Concrete Mix:
a.
Verify mixer truck trip ticket conforms to approved mix design.
b.
Verify that total water added to mix on site does not exceed that allowed by concrete mix design.
c.
Verify that concrete quality is indicative of adequate mixing time, consistency, and relevant time
limits.
d.
Work shall be preformed by a Special Inspector – Technical I. Report of results shall be made daily.
03300-20
0893 Lindsay, OK
11/23/10
6.
7.
8.
3.15
Preparation and Placement: Inspect preparation and placement of concrete, excluding slabs on grade, strip
footings without transverse reinforcement, and topping slabs.
a.
Verify acceptable general condition of concrete base prior to placement.
b.
Verify that concrete conveyance and depositing avoids segregation and contamination.
c.
Verify that concrete is properly consolidated.
d.
Verify reinforcement remains at proper location.
e.
Inspections shall be continuous.
Protecton and Curing: Observe protection and curing methods for all concrete, excluding slabs on grade,
strip footings without transverse reinforcement, and topping slabs.
a.
Verify specified curing procedures are followed.
b.
Verify that specified hot and cold weather procedures are followed.
Embedded Items:
a.
Verify specified size, type, spacing, configuration, embedment length, and quantity of anchor bolts
and embedded items.
b.
Verify proper concrete placement and means have been taken to achieve consolidation around bolts
and embedded items.
PROTECTION
A.
Protect finished work.
B.
Immediately after placement, protect concrete from premature drying, excessively hot or cold temperatures, and
damage.
C.
Patch or replace damaged portions of concrete.
3.16
CLEANING
A.
Remove forms, equipment, protective coverings, and rubbish resulting from concreting operations. Leave finished
concrete surfaces in clean conditions. After sweeping with ordinary broom and removing mortar, concrete
droppings, loose dirt and mud, wash concrete floors and platforms with soapy water and rinse with clean water.
Provide adequate measures during scrubbing, mopping, and rinsing to keep excessive or detrimental amounts of
water off resilient tile floors. Repair damage to resilient tile floors due to concrete cleaning operations.
END OF SECTION
03300-21
0893 Lindsay, OK
11/23/10
WALMART STORES
CONCRETE MIX DESIGN SUBMITTAL FORM
(Section 03300 – Cast-in-Place Concrete)
Date ____________________________
SUBMITTED MIX DESIGN
STORE INFORMATION
Interior Building Slabs
03300-SLN
Natural Concrete (gray)
STORE #
ADDRESS
Color Textured Stamped Concrete
03300-SLS
CITY, ST
GENERAL CONTRACTOR
COMPANY
* Same basic proportions for all interior slab concrete
JOBSITE PHONE
A. CONCRETE INFORMATION
Supplier Mix Design #
Design Strength (f’c)
psi
LEAVE
BLANK FOR
ENGINEER’S
STAMP
Water / Cementitious Ratio
Total Air Content
%
Mix Developed From
Trial Mix Test Data (attach test data)
Field Experience
Density
Wet
pcf
Dry
pcf
Slump
“
( ± 1” ) WITHOUT WR Admixture
“
( ± 1” ) WITH WR Admixture
B. ADMIXTURE INFORMATION
ASTM Designation
Product
(Manufacturer/Brand)
Dosage (ounces)
oz / cy
oz / cwt
Water Reducing
Accelerating
Retarding
03300-22
0893 Lindsay, OK
11/23/10
C.
MIX DESIGN
Mix Proportions (per cubic yard)
Identification
Weight
Density
(Type, size, source, etc.)
(pounds)
(SSD)
Volume
(cubic feet)
% Aggregate
Absorption
Cement
Fly Ash
Slag (GGBFS)
Coarse Aggregate #1
#2
#3
Fine Aggregate #1
#2
Water
Air Content
TOTALS
Coarse & Fine Aggregate Gradation Information
Sieve
Size
1-1/2"
1"
3/4"
1/2"
3/8"
#4
#8
# 16
# 30
# 50
# 100
# 200
% of Vol
Coarse
Agg. # 1
% Passing Each Sieve
(All Sieve Sizes must be entered)
Coarse
Coarse
Fine
Agg. # 2
Agg. # 3
Agg. # 1
Combined % Retained
Fine
Agg. # 2
Combined
% Passing
Cumulative
Individual
Aggregate Ratios
Coarseness Factor =
Workability Factor =
Adj-Workability Factor =
Allowable Adj-WF=
Combined % cumulative retained 3/8” sieve
=
Combined % cumulative retained #8 sieve
Combined % passing #8 sieve
=
WF + [(Cementitious Material - 564) ÷ 37.6]
=
Adj-WF = [(11.25 - .15 CF) + 35.5] ± 2.5
=
Low
High
03300-23
0893 Lindsay, OK
11/23/10
D.
ATTACHMENTS: Include the following with this Mix Design Report.
Portland Cement mill test reports
Fly ash mill test reports
Ground Granulatd Blast Furnace Slag mill test reports
Designation, type, quality, and source (natural or manufactured) of coarse and fine aggregate materials
Separate aggregate gradation reports including all required sieve sizes
•
All gradation sieve report tests dated within 60 days of this report
•
Report for each coarse and fine aggregate material in mix
Statement if possible reactivity of aggregate, based on tests or past service
Statement if possible aggregate pop-outs or their disruptions, based on tests or past service
Product data for the following admixtures:
•
Chloride ion data and related calculations
•
Water reducing, set retarding, set accelerating, etc.
Concrete compressive strength data used for standard deviation calculations
Measured water-soluble chloride ion content. (percent by weight of cement)
E.
CONCRETE SUPPLIER INFORMATION
Company Name
Tel. #
(
)
Cell #
(
)
(
)
Address
City, ST Zip
Technical Contact
e-mail
Sales Contact
Cell #
PRIMARY PLANT
SECONDARY PLANT
Plant Location:
Miles from Site:
Travel Time to Site:
NRMCA Certified:
YES
NO
YES
NO
State DOT Certified:
YES
NO
YES
NO
Batch Mixing Type:
DRY
CENTRAL MIX
DRY
CENTRAL MIX
03300-24
0893 Lindsay, OK
11/23/10
CONTRACTOR'S QUALIFICATION STATEMENT OF CONFORMANCE
SECTION 03300
CAST-IN-PLACE CONCRETE
Project Location:_______________________________________________Date:
Project Number:____________________________Store Number:
By signing below as approved, the Contractor hereby confirms that the qualifications of the concrete finishing
subcontractor conforms to the qualifications as follows:
The concrete floor finishing subcontractor foreman and two additional members of the finishing crew are certified under the
Concrete Flatwork Finisher Training and Certification Program as granted by the American Concrete Institute. (Attach
Certificates)
The concrete floor finisher subcontractor has experience in finishing interior floors of similar size and scope in at least 5
previous projects. Projects name and location are identified as follows
1. ___________________________________________________________________
2. ___________________________________________________________________
3. ___________________________________________________________________
4. ___________________________________________________________________
5. ___________________________________________________________________
Submit one copy to the Walmart Construction Manager.
Concrete Finishing Contractor Company Name and Address:
__________________________________________
__________________________________________
__________________________________________
Signature of Responsible Officer: _________________________
Typed Name and Title of Officer: _________________________
Telephone Number: ( ______ ) ___________________________
General Contractor Company Name and Address:
_______________________________________
_______________________________________
______________________________________
Signed by:
Date:_________________
03300-25
0893 Lindsay, OK
11/23/10
UniSpec II - Store Planning
092410
SECTION 05500 - METAL FABRICATIONS
PART 1 - GENERAL
1.1
SUMMARY
A.
Section Includes:
1.
Shop fabricated ferrous metal items, galvanized and prime painted.
2.
Walmart furnished fabricated metal items.
B.
Products Installed But Not Furnished Under This Section:
1.
Under provisions of Section 01640, Walmart's metal fabrication suppliers will furnish the following
fabricated metal items for installation by Contractor.
a.
Interior Stainless Steel Bollards – Floor Mounted/Bolted.
b.
Interior Galvanized Steel Bollards – Floor Mounted/Bolted.
C.
Related Sections:
1.
Section 01458 - Testing Laboratory Services: Testing and inspection.
2.
Section 01640 - Owner Furnished Products: General procedures related to Walmart furnished products.
1.2
REFERENCES
A.
The publications listed below form a part of this specification to the extent referenced. Publications are referenced
within the text by the basic designation only.
B.
ASTM International (ASTM):
1.
ASTM A 36 - Carbon Structural Steel.
2.
ASTM A 53 - Pipe, Steel, Black and Hot-Dipped, Zinc-Coated Welded and Seamless.
3.
ASTM A 123 - Standard Specification for Zinc (Hot-Dip Galvanized) Coatings on Iron and Steel Products
4.
ASTM A 153 - Standard Specification for Zinc Coating (Hot-Dip) on Iron and Steel Hardware
5.
ASTM A 307 - Carbon Steel Bolts and Studs, 60,000 psi Tensile Strength.
6.
ASTM A 325 - Structural Bolts, Heat Treated, 120/105 ksi Minimum Tensile Strength.
7.
ASTM A 500 - Cold-formed Welded and Seamless Carbon Steel Structural Tubing in Rounds and Shapes.
8.
ASTM A 591 - Steel Sheet, Electrolytic Zinc-Coated, for Light Coating Mass Applications.
9.
ASTM A 653 - Steel Sheet, Zinc-Coated (Galvanized) or Zinc-Iron Alloy-Coated (Galvannealed) by the
Hot-Dip Process.
10.
ASTM A 992 – Standard Specification for Structural Steel Shapes
11.
ASTM A 1008 - Steel, Sheet, Cold-Rolled, Carbon, Structural, High-Strength Low-Alloy, High-Strength
Low-Alloy with Improved Formability, Solution Hardened, Baked Hardenable.
12.
ASTM A 1011 - Steel, Sheet and Strip, Hot-Rolled, Carbon, Structural, High-Strength Low-Alloy and
High-Strength Low-Alloy with Improved Formability.
C.
American Welding Society (AWS):
1.
AWS D1.1 - Structural Welding Code.
2.
AWS D1.3 - Structural Welding Code - Sheet Steel.
D.
Steel Structures Painting Council (SSPC):
1.
SSPC-Paint 20 Type II - Zinc Rich Primers - Organic.
2.
SSPC-Paint 25 - Red Iron Oxide, Zinc Oxide, Raw Linseed Oil, and Alkyd Primer.
3.
SSPC-SP3 - Power Tool Cleaning
4.
SSPC-PA1 - Shop, Field, and Maintenance Painting of Steel.
1.3
SUBMITTALS
A.
Shop Drawings: Submit directly to Architect for Contractor furnished items only.
05500-1
0893 Lindsay, OK
11/23/10
1.
2.
3.
4.
Indicate profiles, sizes, connection attachments, reinforcing, anchorage, size and type of fasteners, and
accessories.
Include erection drawings, elevations, and details where applicable.
Indicate welded connections using standard AWS welding symbols. Indicate net weld lengths.
Prepare shop drawings under the supervision of a licensed structural Professional Engineer.
B.
Submit Shop Drawings within 10 working days of Contract date.
C.
Section 01330 - Submittal Procedures: Procedures for submittals.
1.4
QUALITY ASSURANCE
A.
1.5
Qualifications for Welding Work: Qualify welding operators in accordance with Standard Qualification
Procedures as required by AWS D1.1.
DELIVERY, STORAGE AND HANDLING
A.
1.6
Section 01600 - Product Requirements: Transport, handle, store, and protect products.
DELIVERY, STORAGE AND HANDLING (WALMART FURNISHED, CONTRACTOR INSTALLED
ITEMS)
A.
Product Delivery: Walmart's metal fabrication supplier will deliver products to jobsite for Contractor to receive on
delivery date established by Contractor. To establish product delivery date and obtain Manufacturer's Installation
Drawings contact:
1.
Wylie Welding, Gravette, AR (479) 787-9929.
B.
Product Packaging: Products will be packaged in manufacturer's standard packaging on shipping pallets.
Installation Drawings will be included with products.
C.
Acceptance at Site: Receive products as specified in Section 01640.
1.
Verify quantity of products furnished with Bill of Material provided with Walmart furnished products.
2.
Report discrepancies in product quantity delivered, or damage to products delivered to the Walmart
Construction Manager immediately.
3.
Upon notification by Contractor, Walmart will arrange for delivery of replacement products.
4.
Note description of product quantity discrepancies and/or product damage on Bill of Lading.
PART 2 - PRODUCTS
2.1
MATERIALS
A.
Steel Wide Flanges: ASTM A 992.
B.
Steel Plates and Shapes other than wide flanges: ASTM A 36.
C.
Bolts, Nuts, and Washers: ASTM A 325 and ASTM A 307.
D.
Cold Rolled Steel Sheet: ASTM A 1008.
E.
Hot Rolled Steel Sheet: ASTM A 1011.
F.
Galvanized Steel Sheets:
1.
Structural: ASTM A 653 Structural Quality, G90.
2.
Galvanized Sheet Steel: ASTM A 591, Class C.
G.
Stainless-Steel Sheet, Strip, and Plate: ASTM A 240 or ASTM A 666, Type 304.
05500-2
0893 Lindsay, OK
11/23/10
H.
Steel Tubing: ASTM A 500, Grade B.
I.
Steel Piping: ASTM A 53.
J.
Welding Materials: AWS D1.1 and AWS D1.3 type required for materials being welded.
K.
Primers:
1.
Shop application and field touch-up: SSPC 25.
2.
Touch-up Primer for Galvanized Surfaces: SSPC 20.
3.
Color: To match primer used on steel roof deck and joists.
L.
Concrete Inserts: Cast steel or malleable bolts, washers, and shims; galvanized.
M.
Adhesive Anchors: Stud-type anchors consisting of threaded steel rod, nut, and washer or deformed reinforcing
bar, and anchor adhesive as noted on Drawings.
a.
Substitutions not permitted.
2.2
FABRICATION
A.
Verify dimensions on site prior to shop fabrication.
B.
Fabricate items with joints tightly fitted and secured.
C.
Fit and shop assemble in largest practical sections, for delivery to site.
D.
Grind exposed welds flush and smooth with adjacent finished surface. Ease exposed edges to small uniform
radius.
E.
Form exposed connections with hairline joints, flush and smooth, using concealed fasteners where possible. Use
exposed fasteners of type indicated or, if not indicated, Phillips flat-head (countersunk) screws or bolts. Locate
joints where least conspicuous.
F.
Supply components required for anchorage of metal fabrications. Fabricate anchorage and related components of
same material and finish as metal fabrication, except where specifically noted otherwise.
2.3
FINISHES
A.
Finish metal fabrications after assembly. Comply with NAAMM's "Metal Finishes Manual for Architectural and
Metal Products" for recommendations for applying and designating finishes. Shop prime ferrous-metal items not
indicated to be galvanized.
B.
Prime Painting:
1.
Prime paint in shop as scheduled.
2.
Prepare uncoated ferrous-metal surfaces to comply with SSPC-SP 3, "Power Tool Cleaning."
3.
Apply shop primer to comply with SSPC-PA 1, "Paint Application Specification No. 1," for shop painting.
4.
Do not prime surfaces in direct contact bond with concrete or where field welding is required.
5.
Prime paint items scheduled with one coat. Touch up with same primer.
C.
Galvanizing: Hot-dip galvanize items indicated to be galvanized to comply with ASTM A 123 or ASTM A 153 as
applicable. Galvanize to minimum 2.0 oz/sq ft zinc coating, exterior items, and those items indicated on Drawings
and specified herein, to be galvanized.
D.
Finish Painting: Finish paint after installation as shown on the drawings or specified herein in accordance with
Section 09900.
05500-3
0893 Lindsay, OK
11/23/10
PART 3 - EXECUTION
3.1
PREPARATION
A.
Obtain Walmart Construction Manager approval prior to site cutting or making adjustments not scheduled.
B.
Clean and strip site primed steel items to bare metal where site welding is scheduled.
C.
Make provision for erection loads with temporary bracing. Keep work in alignment.
D.
Use grout specified in Section 03300 for setting metal fabrications.
3.2
INSTALLATION
A.
Install items plumb and level, accurately fitted, free from distortion or defects.
B.
Perform field welding in accordance with AWS D1.1 or D1.3, as applicable. After installation, grind sightexposed field welds smooth, touch-up welds, scratched, or damaged surfaces with primer.
3.3
FIELD QUALITY CONTROL
A.
3.4
Testing and Inspection: See Section 01458.
SCHEDULE
A.
Provide items as scheduled herein and as indicated on Drawings.
B.
Include related items and systems necessary to complete the Work including anchorages and attachments
necessary for installation
C.
Loose Bearing Plates and Lintels: Fabricate to sizes and configuration indicated on Drawings; prime paint finish
except for items requiring field welding.
D.
Miscellaneous Framing and Supports: Furnish steel framing and supports. Fabricate welded construction in as
large units as possible. Drill and tap for hardware and other items. Include anchors required for building into
work of other Sections.
1.
Interior: Prime paint finish, gray.
2.
Exterior: Galvanized.
E.
Rough Hardware: Custom fabricated bolts, plates, anchors, hanger, dowels, and other miscellaneous steel and iron
shapes required for framing, supporting, and anchoring other construction. Galvanized unless otherwise indicated
on Drawings.
F.
Miscellaneous Steel Trim: Profiles and sizes as indicated on Drawings; continuous welded joints and smooth
exposed edges. Use concealed field splices where possible. Provide cutouts, fittings, and anchorages; coordinate
assembly and installation into work of other Sections.
1.
Interior: Prime paint finish.
2.
Exterior: Galvanized.
G.
Interior Steel Pipe Bollards (Core Drilled): ASTM A 53, Type E (electric-resistance welded) or Type S (seamless),
Grade B, Schedule 40.
1.
Size: Height and nominal diameter as shown on the drawings.
2.
Fill bollard as indicated on Drawings.
3.
Finish: Field primed and painted in accordance with Section 09900.
4.
Install as shown on the drawings.
H.
Interior Stainless Steel Bollards – Floor Mounted/Bolted (Walmart Furnished, Contractor Installed): 302 stainless
05500-4
0893 Lindsay, OK
11/23/10
steel with dome top, brushed finish.
1.
Manufacturer/ Walmart Suppliers:
a.
Marco, Ft. Worth, TX (817) 244-8300.
b.
McCue Corporation, Salem, MA (800) 800-8503
c.
Star-Guard, Dallas, TX (972) 284-1250, John Krawietz.
2.
Size: Height and nominal diameter as shown on Drawings.
3.
Location: Where shown on Drawings
4.
Install in accordance with manufacturer’s instructions, using manufacturer supplied hardware.
I.
Interior Galvanized Steel Bollards – Floor Mounted/Bolted (Walmart Furnished, Contractor Installed): 10 gage
CRS tubing with rounded cap and floor mounted support.
1.
Manufacturer/ Walmart Supplier: Marco, Ft. Worth TX, (817) 244-8300.
2.
Size: Height and nominal diameter as shown on the drawings.
3.
Fasteners: 5/8” x 5” Titan-HD anchor bolts and socket head set screw.
4.
Finish: Hot dip galvanized.
5.
Install as shown on the drawings.
END OF SECTION
05500-5
0893 Lindsay, OK
11/23/10
UniSpec II - Store Planning
103009
SECTION 06065 - PLASTIC MATERIALS
PART 1 - GENERAL
1.1
SUMMARY
A.
Section Includes:
1.
Plastic Sleeve: Thermoplastic polyethylene pipe sleeves for steel pipe bollards.
PART 2 - PRODUCTS
2.1
PLASTIC SLEEVES
A.
Polyethylene thermoplastic (HDPE) molded sleeves, bollard sleeve, 52" high (field verify height) to fit 4” or 6" diameter pipe bollards as shown. Color as shown on the Drawings.
1.
Ideal Shield, Detroit, MI (313) 842-7290;e-mail: [email protected].
PART 3 - EXECUTION
3.1
INSTALLATION
A.
Plastic Sleeves:
1.
Install (2) beads of clear 100% silicone sealant by starting beads at opposite sides of top of bollard and spiraling downward, making one complete revolution of bollard with each bead.
2.
Slide sleeve over bollard seating sleeve in sealant.
3.
Allow sealant to cure and verify sleeve holds fast to bollard.
4.
Repeat installation if sleeve can be removed easily from bollard.
5.
Do not install sleeves with manufacturer’s double sided foam tape.
END OF SECTION
06065-1
0893 Lindsay, OK
11/23/10
UniSpec II - Store Planning
082710
SECTION 06100 - ROUGH CARPENTRY
PART 1 - GENERAL
1.1
SUMMARY
A.
1.2
Section Includes:
1.
Preservative and fire resistive treatment.
2.
Concealed blocking behind wall mounted items.
3.
Non-structural panel products including the following:
a.
Backing for electrical and telephone equipment.
REFERENCES
A.
The publications listed below form a part of this specification to the extent referenced. Publications are referenced
within the text by the basic designation only.
B.
American Lumber Standards Committee (ALSC):
1.
Softwood Lumber Standards.
C.
American Plywood Association (APA):
1.
Grades and Standards.
D.
ASTM International (ASTM):
1.
ASTM A 123/A - Zinc (Hot-Dip Galvanized) Coatings on Iron and Steel Products.
2.
ASTM A 153 - Zinc Coating (Hot-Dip) on Iron and Steel Hardware.
3.
ASTM A 307 - Specification for Carbon Steel Bolts and Studs, 60,000 psi Tensile Strength.
4.
ASTM A 653 - Steel Sheet, Zinc-Coated (Galvanized) or Zinc-Iron Alloy-Coated (Galvannealed)
by the Hot-Dip Process.
5.
ASTM E 84 - Test Method for Surface Burning Characteristics of Building Materials.
6.
ASTM B 117 - Standard Practice for Operating Salt Spray (Fog) Apparatus.
E.
American Society of Mechanical Engineers (ASME):
1.
ASME B18.6.1 - Wood Screws (Inch Series)
F.
American Wood Protection Association (AWPA):
1.
AWPA M4 - Care of Preservative Treated Wood Products.
2.
AWPA U1 – User Specification for Treated Wood.
G.
Department of Commerce (National Institute of Standards and Technology) - Product Standard (DOC):
1.
DOC PS 1 - Construction and Industrial Plywood.
2.
DOC PS 2 - Performance Standard for Wood Based Structural Use Panels.
3.
DOC PS 20 - American Softwood Lumber Standard.
H.
Southern Pine Inspection Bureau (SPIB):
1.
Grading Rules.
I.
Western Wood Products Association (WWPA):
1.
Western Lumber Grading Rules.
J.
Underwriters' Laboratories (UL):
1.
UL FR-S Classification - Fire Retardant Treated Wood with Flame Spread Ratings of 25 or less in
accordance with ASTM E84.
2.
UL 723 - Test for Surface Burning Characteristics of Building Materials.
06100-1
0893 Lindsay, OK
11/23/10
1.3
SUBMITTALS
A.
Comply with the requirements of Section 01330
B.
Closeout Submittals: Submit Certifications in compliance with the requirements of Section 01770.
1.4
QUALITY ASSURANCE
A.
Lumber Grading Agency: Lumber to be grade stamped by an agency certified by the Board of Review of the
American Lumber Standards Committee (ALSC).
B.
Plywood Grading Agency: Certified by APA.
C.
Regulatory Requirements:
flame/smoke ratings.
D.
Certifications:
1.
Preservatives Treatment: For type specified, include certification by treating plant stating
chemicals and process used, net amount of preservative retained and conformance with AWPA
U1.
a.
For water-borne preservatives, include statement that moisture content of treated materials was reduced to a maximum of 15-19% for treated materials prior to shipment to project site.
2.
Fire Retardant Treatment: For type specified, include certification by treating plant stating
chemicals and process used, net amount of retardant retained and conformance with AWPA U1.
a.
For water-borne preservatives, include statement that moisture content of treated materials was reduced to a maximum of 15-19% for treated materials prior to shipment to project site.
1.5
Conform to applicable codes for fire retardant treatment of wood surfaces for
DELIVERY, STORAGE AND HANDLING
A.
Transport, handle, store, and protect products in compliance with the requirements of Section 01600.
B.
Provide proper facilities for handling and storage of materials to prevent damage to edges, ends and surfaces.
C.
Keep materials dry. Stack materials off ground a minimum of 12 inches or if on concrete slab-on-grade a
minimum of 1-1/2 inches, fully protected from weather. Provide for air circulation around stacks and under
coverings.
PART 2 - PRODUCTS
2.1
MATERIALS AND PRODUCTS
A.
Lumber: DOC PS 20; S4S. Maximum of 19 percent moisture content, surfaced dry, No. 2 any species graded
under WWPA grading rules or No. 3 Grade Southern Pine graded under SPIB grading rules.
B.
Plywood Backing Panels: DOC PS 1, Exposure 1, Grade C Plugged veneer, fire retardant treated, thickness
indicated but not less than 1/2 inch nominal thickness.
C.
Nonstructural Panel: DOC PS 1 or PS 2, fire retardant treated plywood.
1.
Type 1 (Interior): Grade C-D Plugged veneer, Exposure I, locations and thickness indicated on the
Drawings.
2.
Type 2 (Exterior): Grade B-B veneer, Exterior, locations and thickness as indicated on the Drawings.
2.2
FASTENERS
A.
Where rough carpentry is exposed to weather, in ground contact, pressure-preservative treated, or in area of high
relative humidity: Comply with the treated lumber manufacturer’s recommendations for fasteners and metal
components in contact with treated lumber.
06100-2
0893 Lindsay, OK
11/23/10
1.
2.
Fasteners: ASTM A 153, class D for hot dip galvanized fasteners or type 304 or type 316 stainless steel.
Other components: ASTM A 653, G-185, with minimum of 1.85 ounces of zinc coating per square foot
coverage or type 304 or type 316 stainless steel.
B.
At no time shall any galvanized metal, stainless steel, or other dissimilar metals be in contact with one another.
C.
Nails, Brads and Staples:
1.
ASTM F 1667 Galvanized for exterior locations and high humidity areas, and for treated wood
2.
ASTM A123 plain finish for other interior locations.
3.
Size and type to suit application, unless otherwise noted.
D.
Bolts, Nuts, Washers, and Lag Screws: ASTM A307, Medium carbon steel; size and type to suit application;
galvanized for exterior locations, high humidity areas, and treated wood; plain finish for other interior locations, of
size and type to suit application, unless otherwise noted.
E.
Wood Screws: ASME B18.6.1
F.
Powder or Pneumatically Activated Fasteners: For anchorage of non-structural items to steel.
G.
Fasteners for Wood and Plywood to Light Gage Metal Framing and Metal Deck (up to 10 gage, 0.1345 inch):
Self-drilling flat head wood-to-metal screws.
1.
Manufacturers:
a.
Hilti, Tulsa, OK (800) 879-6000.
b.
ITW Buildex, Itasca, IL (800) 323-0720.
2.
Wood and Plywood Up to 3/4 Inch Thick:
a.
Hilti: S-WD 8-18 x 1-15/16 PFH #3 Black Phosphated.
b.
ITW: Traxx 10-16 #3 point.
c.
Pre-drill wood if wood thickness is greater than 1/2 inch or use heavier fastener specified below.
3.
Wood less than or equal to 1-1/8 inch thickness to 18 Gage (0.0478 inch) and 20 Gage (0.0359 inch) Metal:
a.
Hilti: S-WD 10-24 x 1-1/2 PWH #3 wafer head screw.
b.
ITW: Traxx 10-16 #3 point.
c.
Pre-drill wood if wood thickness is greater than 1/2 inch.
4.
Wood less than or equal to 1-3/4 inch thickness to 16 Gage (0.598 inch) and Heavier Metal (less than or
equal to 0.232 inches):
a.
Hilti: S-WW 12-24 x 2-1/2 PFH #4 Wings.
b.
ITW: Traxx 12-24 #4 Point with Wings.
5.
Wood less than or equal to 2-inch thickness to 16 Gage (0.598 inch) and heavier metal (less than or equal
to 1/4 inch):
a.
Hilti: S-WW 1/4-20 x 2-3/4 PFH #4 Wings.
H.
For wall and roof sheathing panels, provide screws with organic-polymer or other corrosion-protective coating
having a salt-spray resistance of more than 800 hours according to ASTM B 117 with wafer heads or reamer wings
as specified above, length as shown or as recommended by screw manufacturer for material being fastened.
I.
Alternate Manufacturers: Subject to compliance with project requirements, fasteners by alternate manufacturers of
equal types to those specified may be provided, except where substitutions are specifically prohibited.
2.3
WOOD TREATMENT
A.
Preservative Pressure Treated Lumber Treatment:
1.
Products and Manufacturers: Provide any of the following:
a.
Wolman CCA, by Arch Wood Protection, Smyrna, GA, (770) 801-6600.
b.
CCA Pressure Treatment by Hoover Treated Wood Products Inc., Thomson, GA, (800) .832-9663.
c.
SupaTimber, by Viance, Charlotte, NC, (800) 421-8661.
2.
Treat lumber in accordance with AWPA U1; Use Category UC2 for interior construction not in contact
with the ground; Use Category UC3b for exterior construction not in contact with the ground; and Use
Category UC4a for items in contact with the ground.
06100-3
0893 Lindsay, OK
11/23/10
3.
4.
5.
Preservative Chemicals shall be acceptable to Authorities Having Jurisdiction and contain no arsenic or
chromium where prohibited.
Kiln dry lumber after treatment to 15-19 percent moisture content. Do not use warped material or materials
that do not comply with requirements for untreated material. Material to be painted or stained shall have
knots and pitch streaks sealed as with untreated wood.
Mark lumber with treatment quality mark of an inspection agency approved by the ALSC Board of Review
and acceptable to Authorities Having Jurisdiction.
B.
Field-Applied Lumber Preservative:
1.
Provide the following:
a.
Inorganic boron.
b.
Copper napthenate.
C.
Fire Retardant Treatment:
1.
Products and Manufacturers: Provide any of the following:
a.
Dricon FRX (exterior) and Dricon FRT (interior), by Arch Wood Protection, Smyrna, GA,
770.801.6600.
b.
Exterior X (exterior) and Pyro-Guard (interior) by Hoover Treated Wood Products, Inc.; Thomson,
GA; phone: 800.832.9663.
c.
D-Blaze (interior) by Viance, Charlotte, NC; phone: 800.421.8661.
2.
Identify fire retardant treated wood with appropriate classification marking of testing and inspecting agency
acceptable to Authorities Having Jurisdiction.
3.
For exposed items indicated to receive a stained or natural finish, use chemical formulations that do not
bleed through, contain colorants, or otherwise adversely affect finishes.
4.
Kiln dry lumber after treatment, to an average moisture content of 19 percent or less.
5.
Kiln dry plywood after treatment, to an average moisture content of 15 percent or less.
6.
Chemicals used to treat material shall be free of halogens, sulfates, ammonium phosphate and
formaldehyde.
7.
Treatment material shall provide protection against termites and fungal decay and shall be registered for
use as a wood preservative by the U. S. Environmental Protection Agency.
D.
Wood Requiring Treatment:
1.
Lumber, Preservative Treated:
a.
Nailers, blocking, stripping, and similar items in conjunction with roofing, flashing, and other construction.
2.
Lumber, Fire Retardant Treated:
a.
Interior partition framing, furring, blocking, nailers, and miscellaneous exposed wood at roofing
system and wood exposed within the roof/ceiling assembly.
3.
Interior Plywood, Fire Retardant Treated:
a.
Plywood used as finish material, walls, ceilings, wainscots and bases.
b.
Plywood backing for electrical and telephone equipment.
c.
Plywood concealed within gypsum board and metal stud partitions.
d.
Non-structural plywood wall sheathing at concealed spaces.
e.
Exposed to sight plywood surfaces.
4.
Exterior Plywood, Fire Retardant Treated:
a.
Plywood used as sheathing, substrate, or parapet cap assembly.
PART 3 - EXECUTION
3.1
EXAMINATION
A.
Examine areas to receive rough carpentry work and verify following:
1.
That installation of building components to receive rough carpentry work is complete.
2.
That surfaces are satisfactory to receive work.
3.
That spacing, direction and details of supports are correct to accommodate installation of blocking,
backing, stripping, furring and nailing strips.
06100-4
0893 Lindsay, OK
11/23/10
3.2
SITE TREATMENT OF WOOD MATERIALS
A.
3.3
Wood Treatment at Site: Comply with AWPA M4 for applying field treatment to cut surfaces of preservative
treated lumber.
1.
Use inorganic boron for items continuously protected from liquid water.
2.
Use copper naphthenate for items not continuously protected from liquid water.
INSTALLATION
A.
Set rough carpentry to required levels and lines, with members plumb, true to line, cut, and fitted. Fit rough
carpentry to other construction; scribe and cope as needed for accurate fit. Locate furring, nailers, blocking,
grounds, and similar supports to comply with requirements for attaching other construction.
1.
Construct members of continuous pieces of longest possible lengths.
2.
Do not splice structural members between supports, unless otherwise indicated.
B.
Provide blocking and framing indicated and necessary to support facing materials, fixtures, specialty items, and
trim.
1.
Provide metal clips for fastening gypsum board or lath at corners and intersections where framing or
blocking does not provide a surface for fastening edges of panels. Space clips not more than 16 inches o.c.
C.
Secure members in place with specified fastener. Select fasteners of size that will not fully penetrate members
where opposite side will be exposed to view or will receive finish materials. Make tight connections between
members. Install fasteners without splitting wood. Do not countersink nail heads unless otherwise indicated.
D.
Wood Ground, Sleeper, Blocking, and Nailer: Install where indicated and where required for screeding or
attaching other work. Form to shapes indicated and cut as required for true line and level of attached work.
Coordinate locations with other work involved.
1.
Attach items to substrates to support applied loading. Recess bolts and nuts flush with surfaces, unless
otherwise indicated.
2.
Recess heads of fasteners below surface of wood members.
E.
Wood Furring: Install level and plumb with closure strips at edges and openings. Shim with wood as required for
tolerance of finish work.
F.
Fasteners: Install fasteners with manufacturer’s recommended power tool for each type of fastener.
3.4
PROTECTION
A.
Protect rough carpentry from weather throughout construction period.
END OF SECTION
06100-5
0893 Lindsay, OK
11/23/10
UniSpec II - Store Planning
052909
SECTION 06165 - FIBERBOARD PANELS
PART 1 - GENERAL
1.1
SUMMARY
A.
1.2
Section Includes:
1.
Tack (bulletin) boards.
REFERENCES
A.
The publications listed below form a part of this specification to the extent referenced. Publications are referenced
within the text by the basic designation only.
B.
American Society for Testing and Materials (ASTM):
1.
ASTM C209 - Test Methods for Cellulosic Fiber Insulating Board.
2.
ASTM C954 - Steel Drill Screws for the Application of Gypsum Board or Metal Plaster Bases to Steel
Studs From 0.033 inches to 0.112 inches in Thickness.
3.
ASTM C 1002 - Steel Self-Piercing Tapping Screws For The Application Of Gypsum Panel Products Or
Metal Plaster Bases To Wood Studs Or Steel Studs.
4.
ASTM D1037 - Test Methods of Evaluating Properties of Wood-Base Fiber and Particle Panel Materials.
5.
ASTM E84 - Test Method for Surface Burning Characteristics of Building Materials.
1.3
DELIVERY, STORAGE AND HANDLING
A.
1.4
Section 01600 - Material and Equipment: Transport, handle, store, and protect products.
PROJECT CONDITIONS
A.
Maintain environmental conditions (temperature, humidity, and ventilation) within limits recommended by manufacturer. Do not install products under conditions outside manufacturer's limits.
B.
Acclimatize panels to existing moisture conditions and for not less than 24 hours before installation. Comply with
manufacturer's recommendations.
PART 2 - PRODUCTS
2.1
MANUFACTURERS
A.
2.2
Fiberboard: Subject to compliance with requirements specified herein, provide fiberboard by the following.
1.
Homasote Company, P.O. Box 7240, West Trenton, NJ 08628-0240, (609) 883-3300.
2.
Subsitutions: Not permitted.
MATERIALS
A.
Homasote 440 Sound Barrier: Molded, recycled post-consumer paper, cellulose fiber structural panel.
1.
Thickness: 1/2 inch.
2.
Density: 26-28 pcf tested in accordance with ASTM C209.
3.
Tensile Strength when tested in accordance with ASTM C209:
a.
Parallel: 450-7000 psi.
b.
Transverse: 750-1,000 psi.
4.
Hardness (Janka Ball): 230 lbs tested in accordance with ASTM D1037.
5.
Water Absorption by Volume: When tested in accordance with ASTM D 1037:
a.
2 hour immersion: 5 percent maximum.
b.
24 hour immersion: 15 percent maximum.
06165-1
0893 Lindsay, OK
11/23/10
6.
7.
8.
2.3
Expansion: 50 to 90 percent relative humidity, 0.25 percent in accordance with ASTM C209.
Thermal Resistance: When tested in accordance with ASTM C209 per ASTM C518:
a.
R-value: 1.2
Flame Spread: 76 to 200 tested in accordance with ASTM E84, Class III or C.
ACCESSORIES
A.
Panel Fasteners: ASTM C 954 and C 1002, Type S-12 bugle head, corrosion-resistant self-drilling self-tapping
steel screws; length as required to penetrate framing members 3/4" minimum.
B.
Panel Adhesive: Latex-based paneling adhesive approved by fiberboard panel manufacturer.
C.
Field Applied Paint Finish: Water-based acrylic enamel, semi-gloss, as specified in Section 09900 for wood substrates.
1.
Color: White, or as directed by the Walmart Construction Manager.
PART 3 - EXECUTION
3.1
PREPARATION
A.
Prepare substrate in accordance with fiberboard panel manufacturer's recommendations.
B.
Beginning of installation is acceptance of substrate.
3.2
INSTALLATION
A.
Install where noted on the Drawings in accordance with manufacturer's instructions.
B.
Install only clean, dry, undamaged panels.
C.
Field Finishing: Refer to Section 09900.
END OF SECTION
06165-2
0893 Lindsay, OK
11/23/10
UniSpec II - Store Planning
052909
SECTION 06200 - FINISH CARPENTRY
PART 1 - GENERAL
1.1
SUMMARY
A.
Section Includes:
1.
Interior standing and running trim.
2.
Shelving.
B.
Related Sections:
1.
Section 06400 - Architectural Woodwork: Plastic laminate casework and wainscoting.
2.
Section 09900 - Paints and Coatings: Opaque and transparent finishes.
1.2
REFERENCES
A.
The publications listed below form a part of this specification to the extent referenced. Publications are referenced
within the text by the basic designation only.
B.
American Woodworking Institute (AWI):
1.
AWI - Quality Standards.
C.
American Plywood Association (APA):
1.
APA - Grades & Specifications.
1.3
DELIVERY, STORAGE AND HANDLING
A.
Section 01600 - Material and Equipment: Transport, handle, store, and protect products.
PART 2 - PRODUCTS
2.1
WOOD MATERIALS
A.
Interior Standing and Running Trim : AWI Custom Grade; plain sawn, Grade II lumber.
1.
Painted Finish: Closed-grain hardwood, any species
2.
Clear Sealed Hardwood: One of the following hardwood species. Use one species throughout
a.
Ash.
b.
Birch.
c.
Oak.
B.
Shelving - Clear Sealer Finish: Fir or birch plywood with veneer core and sanded edges.
1.
APA 5-ply A/C, 3/4 inch thickness at Stockroom shelving.
2.
APA 5-ply A/B at other locations.
C.
Panel Product for Finish Material on Walls, Ceilings, Wainscots, and Bases: See Section 06100.
2.2
HARDWARE
A.
2.3
Fasteners: Size and type to suit application; galvanized for exterior and high humidity locations; plain finish at
other locations.
FABRICATION
A.
Fabricate to AWI Standards.
1.
Standing and Running Trim: Custom Grade.
06200-1
0893 Lindsay, OK
11/23/10
2.
Wood Shelving with Clear Sealer: Economy Grade.
PART 3 - EXECUTION
3.1
INSTALLATION
A.
Install woodwork plumb, level, and straight without distortion; use concealed shims. Scribe and cut woodwork to
fit adjoining work. Anchor woodwork items to nailers or blocking or directly to substrate using concealed
fasteners.
B.
Standing and Running Trim: Install with minimum joints, using maximum lumber lengths possible. Cope at
returns; miter at corner.
C.
Wood Shelving: Assemble units and install as indicated on Drawings.
D.
Site Finishing: Refer to Section 09900.
END OF SECTION
06200-2
0893 Lindsay, OK
11/23/10
UniSpec II - Store Planning
111910
SECTION 06400 - ARCHITECTURAL WOODWORK
PART 1 - GENERAL
1.1
SUMMARY
A.
1.2
Section Includes:
1.
Plastic Laminate Casework.
REFERENCES
A.
The publications listed below form a part of this specification to the extent referenced. Publications are referenced
within the text by the basic designation only.
B.
American National Standards (ANSI):
1.
ANSI A208.1 - Particleboard
2.
ANSI A208.2 - Medium Density Fiberboard For Interior Use
C.
Architectural Woodworking Institute (AWI)
1.
AWI – Architectural Woodwork Quality Standards Illustrated.
2.
AWI Architectural Woodwork Standards replaces the AWI Architectural Woodwork Quality Standards Illustrated and the Woodwork Institute’s (WI) Manual of Millwork upon availability first quarter of 2009.
D.
Engineered Wood Association (APA): APA - Grades & Specifications.
E.
National Electrical Manufacturer's Association (NEMA)
1.
NEMA LD3 - High-Pressure Decorative Laminates
1.3
DELIVERY, STORAGE AND HANDLING
A.
Inspect materials delivered and reject those not qualifying with requirements, those damaged in transit, or those
that appear otherwise unsatisfactory.
B.
Schedule delivery of items to installation areas that are in proper condition to receive them. Place items neatly and
systematically to avoid damage, store in clean, dry, enclosed, and secure storage area.
PART 2 - PRODUCTS
2.1
LAMINATE MATERIALS
A.
Manufacturers: Provide products as manufactured by the following as specified in the Color/Pattern Schedule below:
1.
Formica Corporation; Indianapolis, IN; Contact: Megan Shaughnessy; (513) 786-3039.
2.
Nevamar Decorative Surfaces; Hampton, SC (800) 638-4380.
3.
Pionite Decorative Surfaces; Auburn, ME; (800) 746-6483.
4.
Wilsonart; Temple, TX; Contact: Richard Wylie, (972) 523-1027.
B.
High pressure laminate (PL); NEMA LD3; color, pattern, and finish as indicated in this Section.
1.
Exposed Horizontal Surfaces: GP-50.
2.
Exposed Vertical Surfaces: GP-50.
3.
Postformed Surfaces: PF-42.
4.
Thickness: Nominal 0.050 inch thick.
06400-1
0893 Lindsay, OK
11/23/10
2.2
ACCESSORIES
A.
Adhesives: Low VOC adhesive, as recommended by laminate manufacturer and suitable for shop or field application.
1.
Toxicity / IEQ:
a.
Comply with applicable regulations regarding toxic and hazardous materials.
b.
Comply with Green Seal Standard GS-36 for commercial aerosol adhesives.
c.
Comply with California’s South Coast Air Quality Management District (SCAQMD) Rule No. 1168
in areas where exposure to freeze/thaw conditions and direct exposure to moisture will not occur. In
areas where freeze/thaw conditions exist or direct exposure to moisture can occur, then comply with
California’s Bay Area AQMD Regulation 8, Rule 51 for containers larger than 16 oz. and with California Air Resource Board (CARB) for containers 16 oz or less.
2.
Acceptable Products: Provide the following or equivalent as recommended by laminate manufacturer.
a.
Wilsonart 3000 Adhesive Series.
b.
Conbond C5800 Liquid or Cylinder.
c.
Bond Rite WC 75.
d.
Titebond
B.
Fasteners: Unless otherwise recommended by the manufacturer, use size and type to suit application; galvanized or
stainless for exterior and high humidity locations; plain finish at other locations.
C.
Metal Edge Trim;
1.
Manufacturer: Macklanburg-Duncan, Oklahoma City, OK (800) 654-0007.
2.
Description: Extruded aluminum shapes, smooth surface, anodized finish. Size and type to suit application.
3.
Alternate Manufacturers: As approved by the Walmart Construction Manager.
2.3
COLOR/PATTERN SCHEDULE
A.
Provide one color where two or more are specified. Provide laminate specified below as applicable and as
shown/scheduled on the Drawings. All PL designations are for HPL unless otherwise indicated. Colors shown in
parentheses are generic color names.
1.
PL-4 (Maple):
a.
No. WM791 Hardrock Maple, by Pionite.
b.
No. 10776HW-60 Kensington Maple, by Wilsonart
2.
PL-28 (Aloe): No. 7962K-18 Aloe, by Wilsonart.
B.
Substitutions: Not permitted.
2.4
PLASTIC LAMINATE CASEWORK
A.
Fabricate to AWI Standards.
1.
Plastic Laminate Casework: Custom Grade, reveal overlay construction.
a.
Exposed Surfaces: High pressure laminate, nominal 0.050 inch thick.
b.
Semi-Exposed Surfaces: High pressure laminate, nominal 0.028 inch thick.
c.
Concealed Surfaces: Mill option.
B.
Panel Product Substrate for Laminate Clad Casework: Medium Density Fiberboard (MDF), ANSI A208.2, Grade
MD or 45 lb density particleboard ANSI A208.1, Grade M-2.
C.
Cabinet Hardware:
1.
Base Cabinets:
a.
Drawer Slides
b.
Drawer Lock
c.
Shelf Standards
d.
Shelf Supports
2.
Doors:
a.
Wire Pull
Knape & Vogt (KV)
KV
KV
KV
1300
986 NP
255ZC
239
Ives
36 B26D
06400-2
0893 Lindsay, OK
11/23/10
b.
c.
d.
D.
2.5
Door Lock
Hinges
Magnetic Catches
KV
Rockford Process
Ives
986 NP
IH 860
325 (A 92)
Fasteners: Unless otherwise recommended by the manufacturer, use size and type to suit application; galvanized or
stainless for exterior and high humidity locations; plain finish at other locations.
LAMINATE WAINSCOT PANELS
A.
Provide wainscot from high pressure laminate (HPL) materials specified above as shown on the Drawings.
B.
Corner Guards: Aluminum corner guards specified in Section 10260.
PART 3 - EXECUTION
3.1
GENERAL
A.
3.2
Install items specified herein where and as shown on the Drawings.
PLASTIC LAMINATE CASEWORK
A.
Install woodwork plumb, level, and straight without distortion; use concealed shims. Scribe and cut woodwork to
fit adjoining work. Anchor woodwork items to nailers or blocking or directly to substrate using concealed fasteners.
B.
Casework: Provide well fitting and smooth operating doors and drawers.
1.
Install woodgrain laminate with grain oriented vertically.
C.
Countertops: Anchor plastic laminate countertops securely to base units.
3.3
LAMINATE WAINSCOT
A.
Securely attach wainscot panels to substrate at locations shown on the Drawings.
B.
Provide extruded aluminum trim at exposed vertical and horizontal edges of high pressure laminate (HPL).
C.
Install woodgrain laminate with grain oriented vertically.
END OF SECTION
06400-3
0893 Lindsay, OK
11/23/10
UniSpec II – Store Planning
022610
SECTION 06424 - PROTECTIVE SURFACING
PART 1 - GENERAL
1.1
SUMMARY
A.
Section Includes: Interior rigid sheet protective wall covering.
B.
Related Requirements:
1.
Section 09250 - Gypsum Board: Substrate for protective surfacing.
1.2
REFERENCES
A.
The publications listed below form a part of this specification to the extent referenced. Publications are referenced
within the text by the basic designation only.
B.
ASTM International (ASTM):
1.
ASTM E 84 - Test Method for Surface Burning Characteristics of Building Materials.
2.
ASTM D1308 - Standard Test Method for Effect of Household Chemicals on Clear and Pigmented Organic
Finishes.
3.
ASTM F476 - Standard Test Methods for Security of Swinging Door Assemblies.
1.3
QUALITY ASSURANCE
A.
Manufacturer’s Qualifications: Not less than 5 years experience in the production of specified product.
B.
Installer qualifications: Not less than 3years experience in installation of similar product/system, as required for
this project.
C.
Fire Performance Requirements:
1.
Surface Burning Characteristics: Conform to the following in accordance with ASTM E 84.
a.
Flame Spread: Less than 25 or less.
b.
Smoke Density: 450 or less.
D.
Impact Strength Requirements:
1.
Tested in accordance with and meets or exceeds the applicable provisions of ASTM F 476.
E.
Chemical and Stain Resistance Requirements:
1.
Tested in accordance with and meets or exceeds ASTM D 1308.
1.4
DELIVERY, STORAGE AND HANDLING
A.
1.5
Store in clean, dry, enclosed, and secure storage area. Store flat and in accordance with manufacturer’s published
requirements.
PROJECT CONDITIONS
A.
Store material in an environment of 65-75ºF for at least 24 hours prior to beginning the installation.
B.
Installation areas shall be enclosed and weatherproofed before installation commences.
06424-1
0893 Lindsay, OK
11/23/10
PART 2 - PRODUCTS
2.1
MANUFACTURER
A.
2.2
Grand Entrance, Frederick, MD.Contact: Walmart National Account (888) 424-6287, [email protected]
MATERIAL
A.
Product: Protective surfacing wall covering panel shall be EcoShield by Grand Entrance.
1.
Part No.WMWC40ES410S601.
B.
Description:
1.
PVC-free polyester blend compound, high impact, rigid sheet.
2.
Thickness: .040”.
3.
Sheet Size: 48” by 96”.
4.
Texture: Suede.
5.
Color:
a.
PS-1: Walmart Blue.
2.3
ACCESSORIES
A.
Adhesive: Spray Lock Wall Panel Adhesive, as manufactured by Interlock Industries, Inc., Dalton, GA, (706) 517
8989.
B.
Corner Trim: High impact Ecoshield extrusions by Grand Entrance. Color, Walmart Blue to match wall covering
panel.
1.
Inside Corner: Manufacturer’s standard, Grand Entrance Part No. WMWC40IS601.
2.
Outside Corner: SSM-20 Suede Texture. Grand Entrance Part No. WMSSM20ESS601.
C.
Caulk: Color-matched and furnished by manufacturer. Grand Entrance Part No. WMCAULK601.
PART 3 - EXECUTION
3.1
EXAMINATION
A.
3.2
Examine surfaces and adjacent areas where protective wall covering will be installed and verify that substrates are
flat, clean, dry, solid, and free from coatings and defects detrimental to installation. Verify that surfaces conform
to product manufacturer's requirements for substrate conditions.
PREPARATION
A.
Prepare substrate for protective wall covering installation in accordance with manufacturer's published instructions
and recommendations.
B.
View manufacturer’s installation video prior to start of installation.
3.3
INSTALLATION
A.
Install protective wall covering and accessories, including trim, in accordance with manufacturer's published instructions and video. Use manufacturer’s recommended adhesive, as specified above. Follow the manufacturer’s
installation video except as otherwise instructed by the manufacturer.
B.
Relative humidity shall not exceed 80% at time of installation.
C.
Apply using adhesive specified.
06424-2
0893 Lindsay, OK
11/23/10
D.
Apply caulk at butt joints as required to fill gaps.
E.
Maintain temperature between 65-75ºF for at least 48 hours after the installation.
3.4
CLEANING
A.
Immediately upon completion of installation, clean protective surfacing and accessories in accordance with manufacturer's recommended cleaning method.
B.
Remove surplus materials, rubbish and debris resulting from installation as work progresses and upon completion
of work.
3.5
PROTECTION
A.
Protect installed protective surfacing from subsequent construction activities. Use materials that may be easily removed without leaving residue or permanent stains.
END OF SECTION
06424-3
0893 Lindsay, OK
11/23/10
UniSpec II - Store Planning
092410
SECTION 06615 – NON-FIBERGLASS REINFORCED PLASTIC PANELS
PART 1 - GENERAL
1.1
SUMMARY
A.
Section Includes: Non-fiberglass reinforced plastic (NRP) coated panels and accessories.
B.
Related Requirements:
1.
Section 01600 – Product Requirements: Direct Purchase Products.
1.2
REFERENCES
A.
The publications listed below form a part of this specification to the extent referenced. Publications are referenced
within the text by the basic designation only.
B.
ASTM International (ASTM):
1.
ASTM D570 - Standard Test Method For Water Absorption Of Plastics
2.
ASTM D648 - Standard Test Method For Deflection Temperature Of Plastics Under Flexural Load In The
Edgewise Position
3.
ASTM D695 - Standard Test Method For Compressive Properties Of Rigid Plastics
4.
ASTM D732 - Standard Test Method For Shear Strength Of Plastics By Punch Tool
5.
ASTM D2240 - Standard Test Method For Rubber Property - Durometer Hardness
6.
ASTM D5420 - Standard Test Method for Impact Resistance of Flat, Rigid Plastic Specimen by Means of a
Striker Impacted by a Falling Weight (Gardner Impact)
7.
ASTM E 84 - Test Method for Surface Burning Characteristics of Building Materials.
1.3
DELIVERY, STORAGE AND HANDLING
A.
Transport, handle, store, and protect products in compliance with the requirements of Section 01600.
B.
Store in clean, dry, enclosed, and secure storage area. Store flat and in accordance with manufacturer’s published
requirements.
C.
Protect non-fiberglass reinforced plastic products and accessories, especially adhesive, from freezing temperatures,
excessive heat, temperature fluctuations, humidity and moisture penetration.
1.4
PROJECT CONDITIONS
A.
Environmental Requirements: Maintain uniform temperature and humidity within ranges recommended by panel
manufacturer for at least 24 hours prior to installation, during installation, and after installation.
B.
Maintain panel and adhesive material in an environment of a minimum of 68 F and within humidity range recommended by panel manufacturer for at least 24 hours prior to beginning the installation.
PART 2 - PRODUCTS
2.1
PRODUCT PROCUREMENT REQUIREMENTS
A.
Purchase Non-fiberglass Reinforced Plastic panels and accessories specified herein direct from Owner’s
pre-negotiated supplier as follows:
1.
Haines, Jones & Cadbury. Contact: Customer Service (800) 459-7099, [email protected].
B.
Reference paragraph Direct Purchase Products in Section 01600.
06615-1
0893 Lindsay, OK
11/23/10
2.2
MANUFACTURER
A.
2.3
Manufacturer of NRP products and accessories specified herein shall be by the following unless otherwise specified:
1.
Parkland Plastics, Inc., Middlebury, Indiana (800) 835-4110.
PANELS
A.
Description: Plas-Tex NRP by Parkland Plastics. Waterproof, mineral reinforced, sanitary wall covering sheets
fabricated from recycled polyethylene and polypropylene resins mixed with calcium carbonate and extruded to
form a chemically inert sheet. Sheets with fiberglass reinforcement are not acceptable.
1.
Recycled Content: 90 percent minimum.
2.
Recyclable Content: 100 percent.
3.
Panel Thickness: 3/32 inch thick.
B.
Physical Characteristics: Meet the following minimum characteristics:
1.
Resistant to fungi and bacteria growth, cleaning agents, acids, and other chemicals.
2.
No yellowing or color change with corrosive environments.
3.
Fire Rating (ASTM E84: Class C).
a.
Flame spread: 105 maximum.
b.
Smoke development: 435 maximum.
4.
Water Absorption (ASTM D570): 0.055 percent maximum.
5.
Shear Strength (ASTM D732): 970 psi minimum.
6.
Hardness (ASTM D2240): 51 Shore D minimum.
7.
Compressive Strength (ASTM D695): 5293 psi minimum.
8.
Impact Resistance (ASTM D5420):
a.
22.6 inch pounds minimum at 73 degrees F.
b.
5.9 inch pounds minimum at minus 4 degrees F.
9.
Heat Deflection Temperature (ASTM D648): 124 F.
10.
United States Department of Agriculture (USDA): Approved for incidental food contact.
C.
Finish: Matte.
D.
Color:
1.
NRP2 (Almond): Almond by Parkland.
2.4
ACCESSORIES
A.
Adhesive: Pressure sensitive, low VOC adhesive. One of the following as determined by the pre-negotiated supplier:
1.
X7029 Parkland Panel Adhesive by Parkland.
2.
Spray-Lock by Interlock Industries, Inc. Chattanooga, TN, Contact: Walmart Coordinator (706) 517-8989.
B.
Anchors: Smooth-head mechanical anchors consisting of one piece or two piece nylon rivets as recommended by
manufacturer. Anchors shall be furnished and shipped with delivered panels by the panel manufacturer.
C.
Moldings: Extruded polyvinyl chloride (PVC) channel type moldings with flanges to fit beneath wall sheets.
Shapes for panel division, inside and outside corners, and edge caps. Color: Match NRP panel color.
D.
Sealant: Silicone type as specified in Section 07900 and approved by NRP manufacturer for this application.
2.5
SUBSTITUTIONS
A.
Reference Section 01600.
06615-2
0893 Lindsay, OK
11/23/10
PART 3 - EXECUTION
3.1
EXAMINATION
A.
3.2
Examine surfaces and adjacent areas where products will be installed and verify that substrates to receive panels
are flat, clean, dry, solid, and free from coatings and defects detrimental to installation. Verify that surfaces conform to product manufacturer's requirements for substrate conditions.
PREPARATION
A.
3.3
Prepare substrate for product installation in accordance with manufacturer's published instructions.
INSTALLATION
A.
Install NRP panels in accordance with manufacturer's instructions. Follow the Plas-Tex installation online video
for installation instructions except as may be otherwise instructed by the adhesive manufacturer.
http://www.parklandplastics.com/install-nrp-polywall.shtml
B.
Assure HVAC is in operation and a minimum temperature of 68 F and a maximum relative humidity of 80% is
maintained at time of installation and 48 hours subsequent to installation in accordance with manufacturer’s installation instructions.
C.
Install sheets vertically with adhesive and anchors as shown.
D.
Cut sheets by scoring and snapping, with sheet metal shears, or by sawing with fine toothed blade.
E.
Position sheet against wall. Allow recommended gap at top, bottom, and sides of sheets. Secure sheet by applying
pressure with roller over entire surface. Ensure adhesive contact is even and complete.
F.
Penetrations and openings: Drill round openings. For rectangular cutouts, first drill hole at each corner to relieve
stress. Provide minimum 1/8 inch space around pipes, electrical fittings, obstructions and other items penetrating
panels.
G.
Install panels with edges vertical and plumb. Use maximum length pieces to provide minimum number of end
joints.
1.
Align panel to panel vertical joints at inside and outside corner conditions.
H.
Adhesive: Apply in accordance with manufactures application instructions for substrates listed below:
1.
CMU: Parkland Adhesive. Follow on-line video installation instructions referenced above.
2.
Gypsum Board, Plywood And Glass-Mat Faced Gypsum Backing Board: Spray-Lock Adhesive. Follow
on-line video instructions as follows: http://www.spraylock.com/world/walmart_installers.html
I.
Anchors: Apply as shown and in accordance with panel manufacturer’s instructions.
J.
Moldings: Install accessory panel trim pieces concurrently with installation of panels. Miter cut accessory panel
trim at corners to provide smooth transition.
1.
Provide moldings for wall covering joints, perimeter edges, and corners. Neatly cut molding to required
lengths. Ensure moldings are straight and correctly aligned.
2.
Allow space in molding channels as recommended by manufacturer for wall covering expansion.
K.
Apply continuous bead of sealant in all molding channels.
1.
Seal corner seams, base and ceiling junctures, and junctures between panels and wall with sealant.
2.
Provide sealant around all openings, corners, and joints.
L.
Immediately remove excess adhesive and sealant from wall covering and moldings.
M.
Adhesive and sealant should not be visible in completed system.
06615-3
0893 Lindsay, OK
11/23/10
3.4
PROTECTION
A.
Protect installed panels from subsequent construction activities.
END OF SECTION
06615-4
0893 Lindsay, OK
11/23/10
UniSpec II - Store Planning
082710
SECTION 06620 – SOLID SURFACING
PART 1 - GENERAL
1.1
SUMMARY
A.
1.2
Section Includes:
1.
Solid surfacing material.
REFERENCES
A.
The publications listed below form a part of this specification to the extent referenced. Publications are referenced
within the text by the basic designation only.
B.
ASTM International (ASTM):
1.
ASTM E-84 - Test Method for Surface Burning Characteristics of Building Materials.
1.
ASTM C 97 - Absorption and Bulk Specific Gravity of Dimensional Stone.
2.
ASTM C 482 - Standard Test Method for Bond Strength of Ceramic Tile to Portland Cement.
3.
ASTM C 484 - Standard Test Method for Thermal Shock Resistance of Glazed Ceramic Tile.
4.
ASTM C 648 - Standard Test Method for Breaking Strength of Ceramic Tile.
C.
National Sanitation Foundation / American National Standards Institute (NSF/ANSI):
1.
NSF/ANSI 51 – Food Equipment Materials.
1.3
DELIVERY, STORAGE, AND HANDLING
A.
Deliver, store, protect, and handle products in accordance with provisions of Section 01600.
B.
Store surfacing materials to prevent breakage and marring of surfaces in accordance with manufacturer’s printed
instructions.
C.
Provide protective coverings to prevent physical damage or staining following installation for duration of project.
PART 2 - PRODUCTS
2.1
MANUFACTURER
A.
Provide solid surfacing material by the following manufacturer
1.
The Swan Corporation, St. Louis, MO (314) 231-8148
B.
Substitutions: Comply with the requirements of Section 01600.
2.2
REGULATORY REQUIREMENTS
A.
Comply with the requirements of ASTM E 84:
1.
Class: A.
B.
United States Department of Agriculture (USDA): Approved for incidental food contact.
C.
Complying with the requirements of NSF/ANSI 51.
2.3
SOLID SURFACING MATERIAL
A.
Product Description: Homogenous compression molded solid surfacing material composed of acrylic resins or
polyester/acrylic resin blend, fire-retardant filler materials, fiber reinforcement, and coloring agents meeting the
06620-1
0893 Lindsay, OK
11/23/10
following requirements:
1.
Nominal sheet thickness: 0.40 inch
2.
Approximate weight: 2 pounds per square foot.
B.
Models as follows as shown on Drawings:
1.
IT27145 (.40), 27 X 145, .40" thickness, by Swan.
2.
IT3698 (.40), 36 X 98, .40" thickness, by Swan.
C.
Colors shall be as follows as applicable as shown on Drawings:
1.
SST1 – Tahiti Desert
2.4
COUNTERTOP SUBSTRATE
A.
2.5
Substrate for solid surfacing countertop at locations indicated on Drawings: Medium density fiberboard (MDF),
ANSI A208.2, Grade MD made with binder containing no urea formaldehyde resin or 45lb density particle board
ANSI A208.1, Grade M-2. Provide one of the following products.
1.
Flakeboard MDF, by Flakeboard Company.
2.
440 Sound Barrier, by Homasote
3.
NCFR (fire rated), by Homasote.
4.
Purekor MDF Board Plus, by Panel Source International.
5.
Medite II, by Sierra Pine.
6.
Medite FR (fire rated), by Sierra Pine.
7.
Skyblend, by Roseburg Forest Products.
8.
Provide the following product at locations with sinks or adjacent to wet areas.
a.
Medex (moisture resistant), by Sierra Pine.
ACCESSORIES
A.
2.6
Supply materials for installation of products as specified in manufacturer’s printed installation instructions including color matched silicon sealant and adhesives where applicable.
FABRICATION
A.
Fabricate components in shop to the greatest extent practical to sizes and shapes indicated.
B.
Form joints between components using manufacturer’s recommended joint adhesive. Joints shall be flush, tight
fitting, level, without voids, and inconspicuous in appearance.
C.
Provide holes and cutouts for plumbing and bath accessories as indicated on Drawings.
D.
Rout and finish component edges to a smooth, uniform finish.
E.
Surfaces shall have a uniform finish
PART 3 - EXECUTION
3.1
EXAMINATION
A.
3.2
Examine surfaces and adjacent areas where products will be installed and verify that surfaces conform to product
manufacturer's requirements for substrate conditions.
PREPARATION
A.
Preparation: Precondition surfacing materials and surfaces to receive surfacing materials in accordance with manufacturer’s printed instructions.
06620-2
0893 Lindsay, OK
11/23/10
3.3
INSTALLATION
A.
Installation shall be by factory trained specialists.
B.
Use blades, saws, drill bits and other tools as required by solid-surfacing manufacturer for making
field cutouts and modifications.
C.
Install components plumb and level in accordance with manufacturer’s printed installation instructions.
D.
Fabricate seams and fixture mounting in accordance with factory fabrication manual.
E.
Form field joints using manufacturer’s recommended adhesive, with joints inconspicuous in finished work.
F.
Provide backsplashes and end splashes as indicated on Drawings. Adhere to countertop using manufacturers
standard color matched silicone sealant.
G.
At backsplashes provide a smooth continuous cove of sealant free of voids and neat in appearance at bottom, top
and vertical corners.
H.
Remove adhesives, sealants and other stains upon completion of installation per manufactures written instructions.
END OF SECTION
06620-3
0893 Lindsay, OK
11/23/10
UniSpec II - Store Planning
092509
SECTION 07210 - BUILDING INSULATION
PART 1 - GENERAL
1.1
SUMMARY
A.
1.2
Section Includes:
1.
Sound Attenuation Insulation (Sound Batts).
REFERENCES
A.
The publications listed below form a part of this specification to the extent referenced. Publications are referenced
within the text by the basic designation only.
B.
ASTM International (ASTM):
1.
ASTM E 84 - Test Method for Surface Burning Characteristics of Building Materials.
2.
ASTM C 665 - Specification for Mineral-Fiber Blanket Thermal Insulation for Light Frame Construction
and Manufactured Housing.
3.
ASTM E 136 - Behavior of Materials in a Vertical Tube Furnace at 750º C.
1.3
DEFINITIONS
A.
Concealed Insulation: Insulation concealed within framing system, both faces protected by finish material.
B.
Exposed Insulation: Insulation exposed within framing system, one or both faces unprotected.
1.4
QUALITY ASSURANCE
A.
Fire Test Response Characteristics: Provide insulation and related materials with the fire-test-response characteristics indicated, as determined by testing identical products per ASTM E 84 for surface-burning characteristics and
other methods specified. Identify materials with appropriate markings of applicable testing and inspecting agency.
PART 2 - PRODUCTS
2.1
MANUFACTURERS
A.
2.2
Provide products from one of the following manufacturers as specified in the Materials paragraph below:
1.
Atlas Energy Products, Atlanta, GA (800) 933-1476.
2.
Celotex Corporation, Tampa, FL (813) 873-1700.
3.
CertainTeed Corporation, Valley Forge, PA (800) 523-7844.
4.
Dow Chemical Company, Midland, MI (800) 232-2436.
5.
Firestone Building Products Company, Carmel, IN (800) 428-4442.
6.
Guardian Fiberglass Incorporated, Albion, MI (800) 748-0035.
7.
Johns Manville Insulations, Denver, CO (800) 654-3103.
8.
NRG Division/Johns Manville, Portland, ME (800) 343-1285.
9.
Owens-Corning, Toledo, OH (800) 438-7465.
10.
Pactiv Building Products, Toledo, OH (800) 438-7465.
MATERIALS
A.
Batt Insulation: ASTM C 665 mineral fiber blanket insulation.
1.
Sound Attenuation Insulation (Sound Batts): Unfaced glass fiber insulation as specified above.
2.
Provide batt insulation by one of the following manufacturers:
a.
CertainTeed Corporation.
b.
Guardian Fiberglass, Inc.
07210-1
0893 Lindsay, OK
11/23/10
c.
d.
B.
2.3
Johns Manville.
Owens Corning.
Substitutions: Not permitted.
ACCESSORIES
A.
Tape: Polyethylene or polyester self-adhering type; two inches wide.
PART 3 - EXECUTION
3.1
PREPARATION
A.
3.2
Batt Insulation:
1.
Verify adjacent materials are dry and ready to receive installation.
2.
Verify mechanical and electrical services within walls have been installed and tested.
INSTALLATION - BATT INSULATION
A.
Install batt insulation in accordance with manufacturer's instructions, without gaps or voids.
B.
Trim insulation neatly to fit spaces. Use batts free of damage. Fit insulation tight in spaces and tight to exterior
side of mechanical and electrical services within the plane of insulation.
C.
Install insulation with factory applied membrane facing warm side of building spaces. Lap ends and side flanges
of membrane. Attach insulation in place to framing; tape seal butt ends and lapped side flanges. Tape seal tears or
cuts in membrane.
3.3
SCHEDULES
A.
Provide insulation types as scheduled below and as indicated on Drawings.
CONDITION
Sound Attenuation
TYPE OF INSULATION
Unfaced Batt Insulation
THICKNESS
3-1/2 inches or 6 inches as Shown.
END OF SECTION
07210-2
0893 Lindsay, OK
11/23/10
UniSpec II - Store Planning
092410
SECTION 07900 - JOINT SEALERS
PART 1 - GENERAL
1.1
SUMMARY
A.
Section Includes:
1.
Joint sealants for interior and exterior joints in vertical surfaces and horizontal nontraffic surfaces.
2.
Joint sealants and fillers in interior concrete floor slab-on-grade joints.
3.
Joint sealant and fillers in exterior concrete sidewalks and pavement adjacent to building.
B.
Related Sections:
1.
Section 09900 - Paints and Coatings: Protection of wall joints from painting prior to sealing.
1.2
REFERENCES
A.
The publications listed below form a part of this specification to the extent referenced. Publications are referenced
within the text by the basic designation only.
B.
ASTM International (ASTM):
1.
ASTM C920 - Specification for Elastomeric Joint Sealants.
2.
ASTM C1330 - Cylindrical Sealant Backing for Use with Cold Liquid Applied Sealants.
3.
ASTM D 1056 - Flexible Cellular Materials-Sponge or Expanded Rubber.
4.
ASTM E84 - Test Method for Surface Burning Characteristics of Building Materials
1.3
SUBMITTALS
A.
Installer Qualification Certification: Provide certification letters for the installers of the following:
1.
Polyurea Joint Filler.
B.
Letter shall be from the product manufacturer stating that the installer is qualified and certified by the manufacturer to install the material to be used, citing the specific project and location.
C.
Provide minimum of 15 projects, with locations, performed within the last 3 years, similar in type and size to this
project.
D.
Product Data: Brand name, chemical composition, installation directions and certificates of compliance with required standards for the following products:
1.
Elastomeric joint materials (sealant and back-up material).
2.
Preformed expansion (isolation) joint filler (PMEJ)
3.
Polyurea joint filler.
4.
Submit 30 days prior to first concrete placement.
1.4
QUALITY ASSURANCE
A.
1.5
Interior sealants in food preparation areas shall meet the compositional requirements for use in USDA regulated
facilities, as required by FDA according to 21 CFR 177.2600, and local authorities having jurisdiction.
ENVIRONMENTAL REQUIREMENTS
A.
Do not install solvent curing sealants in enclosed building spaces.
B.
Maintain temperature and humidity recommended by sealant manufacturer during and after installation.
07900-1
0893 Lindsay, OK
11/23/10
PART 2 - PRODUCTS
2.1
ELASTOMERIC SEALANTS (BUILDING)
A.
General: Comply with ASTM C 920 and other requirements indicated for each liquid-applied chemically curing
sealant specified, including those referencing ASTM C 920 classifications for type, grade, class, and uses related
to exposure and joint substrates.
B.
Sealants identified as (Non-USDA) shall not be used in food preparation areas.
C.
Manufacturers:
1.
BASF Building Systems (Formerly Sonneborn Building Products), (952) 496-6000, Craig Agney.
2.
CSS Polymers, Inc. (770) 645-0101.
3.
Convenience Products, (800) 325-6180.
4.
Dow Corning Corporation. www.dowcorning.com
5.
Euclid Chemical Co., (877) 438-3826.
6.
GE Silicones & GE Sealants and Adhesives (Momentive Performance Materials). (877) 943-7325
www.gesilicones.com
7.
Metzger/McGuire, (800) 223-6680.
8.
Pecora Corporation. (215) 796-1401, Keith Waters. www.pecora.com
9.
Tremco Sealant/Weatherproofing Division. (800) 841-3778. Jack Sykes. www.tremcosealants.com
10.
VersaFlex Inc. (913) 321-1416
11.
W. R. Meadows, Inc., (847) 214-2100.
D.
Polyurethane Sealants (USDA Certified, unless otherwise noted):
1.
Polyurethane Sealant #1 (P1): ASTM C920, Type S, Grade NS, Class 25, single component.
a.
Vulkem 116, Dymonic, or Dymonic FC by Tremco.
b.
Dynatrol I-XL, by Pecora.
c.
Sonolatic NP-1, by BASF.
2.
Polyurethane Sealant #2 (P2): ASTM C920, Type S, Grade P, Class 25, single component.
a.
Vulkem 45 (Non-USDA), by Tremco.
b.
Urexpan NR-201, by Pecora.
c.
Sonolastic SL-1, by Sonneborn.
3.
Polyurethane Sealant #3 (P3): ASTM C920, Type M, Grade NS, Class 50, multi-component.
a.
Dymeric 240FC, by Tremco.
b.
Sonolastic NP-2 by BASF.
c.
Dynatrol II (Non-USDA) by Pecora.
E.
Silicone Sealants (USDA Certified, unless otherwise noted):
1.
Silicone Sealant #1 (S1): ASTM C920, Type S, Grade NS, Class 25.
a.
Spectrem 1, Spectrem 2, or Spectrem 3, by Tremco.
b.
791 Silicone Perimeter Sealant (Non-USDA), by Dow
c.
864 or 890 by Pecora.
d.
Sonolastic 150 by BASF.
e.
SilPruf (Non-USDA), by GE.
2.
Silicone Sealant #2 (S2): ASTM C920, Type S, Grade NS, Class 25, mildew resistant.
a.
Tremsil 200, by Tremco.
b.
898 by Pecora.
c.
786 Silicone Sealant (Non-USDA), by Dow.
d.
Sanitary SCS 1700 (Non-USDA), by GE.
F.
Sealant Color:
1.
In interior and exterior exposed areas, match color of adjacent paint color finish or other adjacent finish
color.
2.
In joints where plumbing fixtures meet adjacent floor and wall finishes, match color of plumbing fixture.
3.
Use clear, colorless sealant where applied to stainless steel surfaces.
07900-2
0893 Lindsay, OK
11/23/10
2.2
EXPANDING FOAM SEALANTS
A.
2.3
Polyurethane Expanding Foam Sealants:
1.
Polyurethane Expanding Foam Sealant #1 (EF1): Closed-cell foam and non-flammable propellant; urea
formaldehyde-free, CFC-free; UL Class 1 Foam with flame spread of 20 and smoke developed of 25 as
tested in accordance with ASTM E84.
a.
Touch'n Seal Quick Cure, by Convenience Products.
b.
Space Invader by GE Sealants & Adhesives, (877) 943-7325.
JOINT FILLER (BUILDING)
A.
Preformed Control Joint Filler:
1.
Regular Joint: 2-5/8 inches by 1-1/2 inches; rubber.
a. Rapid Control Joint DA2001 by Dur-O-Wal (Dayton Superior), Dayton, OH (888) 977-9600.
2.
Tee Joint: 2-5/8 inches by 1 inch; rubber.
a. Rapid Control Joint D/A 2025 by Dur-O-Wal.
B.
Expansion Joint Filler (Compression Seal):
1.
Backerseal (Grayflex) expanding precompressed foam by Emseal Joint Systems, Ltd., Westborough, MA
(800) 526-8365.
2.
Willseal 600 polyurethyene foam joint sealing tape by Willseal USA, Pelham, NH (800) 438-0684.
2.4
JOINT-SEALANT BACKING (BUILDING)
A.
Sealant Backing (Backer Rod): Provide sealant backings of material and type that are nonstaining; are compatible
with joint substrates, sealants, primers, and other joint fillers; and are approved for applications indicated by
sealant manufacturer based on field experience and laboratory testing.
1.
Cylindrical Sealant Backings: ASTM C 1330, types as approved by joint-sealant manufacturer for joint
application indicated, and of size and density to control sealant depth and otherwise contribute to producing
optimum sealant performance:
2.
Elastomeric Tubing Sealant Backings: Neoprene, butyl, EPDM, or silicone tubing complying with
ASTM D 1056,
B.
Bond-Breaker Tape: Polyethylene tape or other plastic tape recommended by sealant manufacturer for preventing
sealant from adhering to rigid, inflexible joint-filler materials or joint surfaces at back of joint where such adhesion
would result in sealant failure. Provide self-adhesive tape where applicable.
2.5
INTERIOR SLAB ON GRADE JOINT SEALANT MATERIALS
A.
Preformed Expansion (Isolation) Joint Filler (PMEJ) Strips: Flexible closed-cell synthetic foam expansion joint
strips, non-extruding, for full depth of concrete.
1.
Ceramar Flexibe Foam Expansion Joint, by W.R. Meadows.
2.
Deck-O-Foam Expansion Joint Filler, by W.R. Meadows
3.
Expansion Joint Filler, by BASF Building Systems (Degussa) (Formerly Sonneborn Sonolastic).
B.
Elastomeric Joint Materials:
1.
Sealant:
a.
Polyurethane Sealant: No. 2 (P2) as specified above.
b.
Color: Match color of adjacent exposed surface of concrete slab..
c.
Sealant shall be compatible with construction material placed against it.
2.
Joint Back-Up Material:
a.
Polyethylene Foam, 100% closed cell.
b.
Material shall be compatible with construction material to be placed against it such as tile adhesive.
C.
Polyurea Joint Filler (PY1): Rapid setting, two-component polyurea polymer liquid of 100% solids content, Shore
Hardness 85 to 92, compatible with construction material placed against it. (USDA Certified, unless otherwise
noted.)
07900-3
0893 Lindsay, OK
11/23/10
1.
2.
3.
4.
5.
2.6
Spall-Pro RS 88 (Non-USDA), by Metzger/McGuire.
Euco Qwik Joint 200 (Non-USDA), by Euclid Chemical.
VersaFlex SL/85, by VersaFlex.
Quick Joint 85, by CSS Polymers.
Match color of adjacent exposed surface of concrete.
EXTERIOR PAVEMENT JOINT MATERIALS
A.
Joint Back-up Material: Polyethylene foam, 100% closed cell
B.
Sealant:
1.
Dow 888, by Dow Corning.
2.
301 NS by Pecora.
3.
Spectrum 800 or 900 by Tremco.
C.
Soft Preformed Joint Filler: Flexible closed-cell non-extruding synthetic foam expansion joint strips.
1.
Ceramar Flexibe Foam Expansion Joint, by W.R. Meadows.
2.
Deck-O-Foam Expansion Joint Filler, by W.R. Meadows
3.
Expansion Joint Filler, by BASF Building Systems (Degussa) (Formerly Sonneborn Sonolastic).
2.7
ACCESSORIES
A.
Primer: Non-staining type, recommended by sealant manufacturer to suit application.
B.
Joint Cleaner: Non-corrosive and non-staining type, recommended by sealant manufacturer; compatible with joint
forming materials.
PART 3 - EXECUTION
3.1
EXAMINATION
A.
Verify that surfaces and joint openings are ready to receive work and field measurements are as indicated on
Drawings.
B.
Beginning of installation means installer accepts existing substrates.
3.2
PREPARATION
A.
Clean and prime joints in accordance with manufacturer's instructions.
B.
Remove loose materials and foreign matter which might impair adhesion of sealant.
C.
Verify that joint backing and release tapes are compatible with sealant.
D.
Protect elements surrounding work of this Section from damage or disfiguration.
3.3
INSTALLATION
A.
Install sealant in accordance with manufacturer's instructions.
B.
Measure joint dimensions and size materials to achieve required width/depth ratios.
C.
Install joint backing to achieve neck dimension no greater than 1/3 the joint width.
D.
Install bond breaker where joint backing is not used.
E.
Apply sealant within recommended temperature ranges. Consult manufacturer when sealant cannot be applied
07900-4
0893 Lindsay, OK
11/23/10
within recommended temperature ranges.
F.
Install sealant free of air pockets, foreign embedded matter, ridges, and sags.
G.
Tool joints concave.
3.4
INTERIOR SLAB ON GRADE JOINT SEALING AND FILLING
A.
General:
1.
Seal/fill contraction, isolation and construction joints in floor slabs and pavements, unless otherwise
indicated on Drawings or specified herein.
2.
Unless noted otherwise, use polyurea joint filler in floor slab contraction and construction joints and use
elastomeric joint sealant in isolation joints.
3.
Use pavement sealant in pavement’s contraction, construction, and isolation joints.
4.
Do not seal joints with materials specified herein when below relatively impervious floor finish material,
such as PVC flooring, sheet rubber, wood, epoxy topping; refer to floor finish specification for joint sealing
requirements.
5.
Do not place polyurea joint filler under resilient flooring. Coordinate placement of polyurea joint filler with
joint filler placement specified under resilient flooring as specified in Section 09650.
B.
Cleaning:
1.
Immediately prior to sealing/filling, clean joints to full depth of sealant/filler in accordance with
manufacturer’s recommendation.
2.
Remove dirt, debris, saw laitance, and other foreign material from joint. Clean inner joint walls
mechanically using dustless dry-cut saw, or similar tool, to the full depth of saw cuts and 2 inch minimum
depth in construction joints.
3.
Remove form release agent, curing compound, or other components.
C.
General Installation:
1.
Commence placing floor joint sealant / filler no sooner than 30 days after first placement of concrete.
2.
If joint is wet or damp, allow joint to dry for 72 hours prior to filling.
3.
Delay floor joint sealing / filling operations until facility’s environmental systems have been placed in
operation for 14 days.
4.
Mix and install sealant and filler in accordance with manufacturer’s recommendations. Use primer if
recommended for specific application.
5.
Choke off shrinkage crack if necessary at bottom of contraction joint or void below construction joints by
the following methods.
a.
Saw Cut Contraction Joints:
1)
Place 1/8 inch to 1/4 inch (maximum) layer of dry-bagged silica sand. Do not use compressible backer rod.
b.
Construction Joints Through Slab: Fill by one of the following methods:
1)
Fill joint with dry-bagged silica sand to within 2 inches of slab surface.
2)
Insert compressible backer rod to a minimum depth of 2 inches below slab surface.
6.
Do not allow sealant / filler to extend over joint edges in finished condition.
D.
Elastomeric Joint Sealant Installation:
1.
Use joint back-up material.
2.
Tool surface to provide smooth, attractive appearance and geometry recommended by sealant
manufacturer.
E.
Joint Filler Installation
1.
Installation shall be by installer who is approved in writing by the manufacturer’s corporate office for this
project.
2.
Do not use joint back-up material (i.e. backer rod, sand, etc.) except below bottom of saw cut in
construction joints. Provide a minimum joint filler depth of 2 inches.
3.
Install test sample of the polyurea joint filler to determine if filler will leave a stain, shadow, or film on slab
surface.
07900-5
0893 Lindsay, OK
11/23/10
4.
5.
6.
7.
8.
9.
10.
F.
3.5
If test sample reveals stain, shadow, or film, use joint filler stain preventing film at joints to receive
polyurea joint filler.
Fill joint using single pass method. Fill joint full depth from bottom to top, leave slight crown at slab
surface.
Add extra filler prior to filler set if needed to prevent depressed areas. If concave filler is already set,
abrade with wire wheel or similar tool to minimum depth of 1/4” below surface prior to refilling.
Razor off crowned filler flush with floor surface after filler has sufficiently set.
Remove stain preventing film (if used). Film shall be removed by joint filler installer immediately after
shaving joint filler.
One week prior to Grand Opening, refill joints if:
a.
Joint filler sidewall separation or splitting exceeds 1/32 in.
b.
Joint filler surface profile is concave, crowned, or chattered or if voids occur.
Follow manufacturer’s requirements for joint preparation for proper adhesion.
Isolation Joints: Form isolation joints of preformed joint-filler strips (PMEJ) where indicated.
1.
Extend joint fillers full width and depth of joint.
2.
Terminate joint filler or otherwise provide joint sealant cavity of not less than 1/2 inch or more than 1 inch
below finished surface if joint sealant is indicated.
3.
Place top of joint filler flush with finished concrete surface if joint sealant is not indicated.
4.
Furnish joint fillers in one-piece lengths. Where more than one length is required, lace or clip joint-filler
sections together.
5.
Protect top edge of joint filler during concrete placement with metal, plastic, or other temporary preformed
cap. Remove protective cap after concrete has been placed on both sides of joint.
EXTERIOR SIDEWALK AND PAVEMENT JOINT SEALING AND FILLING
A.
Fill and seal sidewalk and pavement joints in areas of pavement adjacent to the building. Joint filling and sealing
of sidewalks and pavement not adjacent to building is specified in Division 2.
B.
Joint Fillers: Extend joint fillers full-width and depth of joint, and not less than 1/2-inch or more than 1-inch below finished surface where joint sealer is indicated. Furnish joint fillers in 1-piece lengths for full width being
placed, wherever possible. Where more than 1 length is required, lace or clip joint filler sections together.
C.
Joint Sealants: Joints shall be sealed as shown and scheduled and shall be installed in accordance with manufacturer's recommendations.
3.6
SCHEDULE
A.
Provide sealants in accordance with the following schedule. Joint sealing required by the drawings or required for
a complete and proper installation but not listed in the following schedule shall be sealed as necessary regardless
of whether shown or scheduled. Such joints not shown or scheduled shall be sealed with sealants consistent with
specified materials or as recommended by the manufacturer for the specific application.
EXTERIOR JOINTS
MATERIAL
SITE
TO
MATERIAL
Concrete Sidewalk Control Joint
Concrete Sidewalk
JOINT
WIDTH
1/4"
Concrete Sidewalk Expansion Joint
Concrete or CMU
1/2"
Concrete Paving Control Joint
Concrete Paving
1/4"
SEALANT TYPE
Sidewalks adjacent to
building: See Materials Par. Otherwise:
See Division 2.
See above
Pavement adjacent to
building: See Materials Par. Otherwise:
See Division 2.
07900-6
0893 Lindsay, OK
11/23/10
EXTERIOR JOINTS
MATERIAL
BUILDING
WALL
TO
Concrete Paving Expansion Joint
Concrete
JOINT
WIDTH
1/2"
Concrete Stair Expansion Joint
Concrete or CMU
1/2"
P1 or P3
Concrete Curb Expansion Joint
Concrete or CMU
1/2"
See Division 2
CMU Wall Control Joint, 3/8"
CMU Wall Expansion Joint, 1"
CMU Wall
CMU Wall
3/8"
1"
P1 or P3
P1 or P3
EIFS Wall
CMU or Cast Concrete
shapes
CMU or EIFS
1/2"
P1 or P3
1/2"
P1 or P3
EIFS Cornice/Trim
MATERIAL
SEALANT TYPE
See above
WALL
FLASHING
Metal Flashing
Metal Flashing
Metal Flashing
CMU, EIFS, Aluminum
Storefront Frame
1/4"
S1
P1 or P3
SOFFITS
Gypsum Soffit Control Joint
Gypsum Soffit Perimeter Expansion
Joint
Gypsum Soffit
EIFS or CMU
3/8"
3/8"
P1 or P3
P1 or P3
Metal Soffit Panel Trim
EIFS or CMU
Aluminum Storefront Frame
CMU, EIFS, Aluminum
Storefront Frame
Cast Concrete Shapes or
Concrete Slab
Concrete Slab
1/4"
P1 or P3
1/4"
P1 or P3
Translucent Insulated Panels
Translucent Insulated
Panels, EIFS, Metal Flashing
1/4"
S1
Hollow Metal Door Frame
1/4"
P1 or P3
Hollow Metal Door Threshold
Steel Corner Angle Frame
CMU Wall, Tube Steel
Frame
Concrete Slab
CMU Wall
1/4"
P1 or P3
P1 or P3
Steel Pipe and/or Conduit Through
Ganged Steel Conduit Through
PVC and/or Copper Pipe Through
CMU, EIFS, Concrete
CMU, EIFS, Concrete
CMU, EIFS, Concrete
1/2"
1/2"
1/2"
P1 or P3
P3
P1 or P3
Roofing Membrane
Roofing Membrane
Roofing Membrane
Roofing Membrane
Roofing Membrane
Waterproof Wall Membrane
Metal Facia
Molded Pipe Flashing
Waterproof Membrane
Waterproof Membrane
Metal Facia, Plates, Bolts
Steel Conduit
1/2"
P1 or P3
P1 or P3
Metal Cap Flashing Joint
Metal Cap Flashing Expansion Joint
Metal Cap Flashing
Metal Cap Flashing
1/8"
1"
S1
S1
WALL PENETRATIONS
Aluminum Storefont Sill
Aluminum Storefront Door Threshold
ROOF
MEMBRANE
AREA
P1 or P3
P1 or P3
See Roofing Section
See Roofing Section
See Roofing Section
See Roofing Section
07900-7
0893 Lindsay, OK
11/23/10
EXTERIOR JOINTS
MATERIAL
ROOF
METAL/
FIBERGLASS
PANELS
TO
MATERIAL
JOINT
WIDTH
SEALANT TYPE
Metal Cap Flashing
Gasketed Fasteners
S1
Skylight Flashing Joints
Vent Flashing Joints
Smoke Vent Flashing Joints
RTU Flashing Joints
Skylight Flashing
Vent Flashing
Smoke Vent Flashing
RTU Flashing
S1
S1
S1
S1
Waterproof Membrane Termination
Bar
Steel Gutter
Steel Downspout
CMU Wall
Steel Gutter or Downspout
Steel Downspout
S1
S1
Roof Panel
Roof Panel
Roof Panel
Flue Penetration Flashing
Gutter
End Closure
P1 or P3
P1 or P3
P1 or P3
1/4"
S1
INTERIOR JOINTS
MATERIAL
FLOOR
WALLS
TO
MATERIAL
JOINT
WIDTH
SEALANT TYPE
1/4"
3/4"
See
Dwgs
See Materials Par.
Same
Same
Concrete Floor
Contraction and Construction Joint
Expansion Joint
Isolation Joint
Concrete Floor
Concrete Curb In Grocery
Concrete Floor
Ceramic Tile Expansion Joints
Quarry Tile Expansion Joints
Floor Joints Beneath Floor Finish
Materials (VCT or PVC Flooring)
Ceramic Tile
Quarry Tile
Transition Strip (Korlyte)
Mop Sink
Sanitary Cove Base (SCB)
Wood Base
Concrete Slab
Floor
Floor
Concrete Floor
PY1
P1 or P3
See Section 09655
P1 or P3
Structural Steel Column
VCT/PVC
P1
CMU Wall Control Joint, 3/8"
CMU Wall Expansion Joint, 1"
Rated Gypsum Board Wall Control
Joint
Gypsum Board
CMU Wall
CMU Wall
Rated Gypsum Board Wall
3/8"
1"
P1
P1
CMU Walls
3/8"
Ceramic Tile
Wood or Galvanized Steel
Base Trim
Stainless Steel
Ceramic Tile
P1 (Use edge trim,
ref. Section 09250)
P1 or P3
Ceramic Tile
Ceramic Tile
Same
Ref Mfr.
Ref Mfr.
P1 or P3
P1 or P3
See Section 09650
S1 or S2
P1 or P3
07900-8
0893 Lindsay, OK
11/23/10
INTERIOR JOINTS
MATERIAL
TO
Stainless Steel Corner Guards
Stainless Steel Corner Guards
Plastic Base
Plastic Base
Plastic Base
Sanitary Cove Base (SCB)
Wood Base
MATERIAL
JOINT
WIDTH
Ceramic Tile
Wall
Grocery Equipment Wall
Ceramic Tile or Gypsum
Board Wall
Concrete or Quarry Tile
Floor
Wall
Plywood Wainscot
S1 or S2
S1 or S2
P1 or P3
P1 or P3
P1 or P3
See Section 09655
P1
Joints shown on the drawings to be
sealed with Expanding Foam Sealant
WALL
PENETRATIONS
Aluminum Storefront Frame
SEALANT TYPE
EF1
Alum Storefront Frame,
CMU, or Gypsum Board
Gypsum Board Wall or Cast
Concrete Shapes
1/4"
P1
1/4"
P1
Hollow Metal Door Frame
CMU or Gypsum Board
1/4"
P1
Steel Corner Angle Frame
CMU Wall
1/4"
P1
Steel Pipe or Conduit Through
Steel Pipe or Conduit Through
CMU Wall
Gypsum Board
1/2"
1/4"
P1
P1
PVC or Copper Pipe Through
CMU or Gypsum Board
1/2"
P1
Steel, PVC, or Copper Pipe Through
Rated CMU or Gypsum
Board Wall
Rated CMU or Gypsum
Board Wall
See Section 07840
Aluminum Storefront Sill
Steel Conduit Through
See Section 07840
TOILET
Sink
Ceramic Tile Wall
S2
FIXTURES
Floor Mount Toilet
Wall Mount Toilet or Urinal
Ceramic Tile Floor
Ceramic Tile Wall
S2
S2
GROCERY
EQUIP
Pre-manufactured Freezer
Pre-manufactured Freezer
Pre-manufactured Freezer
Refrigerated Case Trim
Refrigerated Case Trim
Stainless Steel Equipment
P1 or P3
P1 or P3
P1 or P3
S1 or S2
S1 or S2
S1 or S2
Stainless Steel Equipment
Concrete Curb
Plastic Transition Strip
Concrete Floor
Refrigerated Case
Concrete Floor
Fiberglass Reinforced Plastic (FRP) Wall Panels
Ceramic Tile
Electric Water Coolers
Ceramic Tile
P1 or P3
EWC
S1 or S2
07900-9
0893 Lindsay, OK
11/23/10
INTERIOR JOINTS
MATERIAL
COUNTER
TO
Plastic Laminate Counter Tops
MATERIAL
Gypsum Board or Plastic
Laminate Walls
JOINT
WIDTH
SEALANT TYPE
S2
END OF SECTION
07900-10
0893 Lindsay, OK
11/23/10
UniSpec II - Store Planning
111910
SECTION 08110 - STEEL DOORS AND FRAMES
PART 1 - GENERAL
1.1
SUMMARY
A.
Section Includes:
1.
Steel doors, panels, and frames.
2.
Glazed light frames.
B.
Related Sections:
1.
Section 08710 - Door Hardware: Door hardware coordination.
2.
Section 09250 - Gypsum Board: Door frame attachment to metal wall framing.
3.
Section 09900 - Paints and Coatings: Field painting of doors and frames.
1.2
REFERENCES
A.
The publications listed below form a part of this specification to the extent referenced. Publications are referenced
within the text by the basic designation only.
B.
American National Standards Institute (ANSI):
1.
ANSI A117.1 - Specifications for Making Buildings and Facilities Accessible to and Usable by Physically
Handicapped People.
2.
ANSI A250.8 (Formerly SDI-100) - Recommended Specifications for Standard Steel Doors and Frames.
3.
ANSI A250.11 (Formerly SDI-105) - Recommended Erection Instructions for Steel Frames.
C.
ASTM International (ASTM):
1.
ASTM C578 - Standard Specification for Rigid, Cellular Polystyrene Thermal Insulation
2.
ASTM A653 - Specification for Steel Sheet, Zinc-Coated (Galvanized) or Zinc-Iron Alloy-Coated
(Galvannealed) by the Hot-Dip Process.
D.
National Fire Protection Association (NFPA):
1.
NFPA 80 - Fire Doors and Windows.
2.
NFPA 252 - Fire Tests for Door Assemblies.
E.
Underwriters Laboratories (UL):
1.
UL 10B - Fire Tests of Door Assemblies.
F.
Regulatory Requirements:
1.
Installed Fire Rated Door Assemblies: Conform to NFPA 80, NFPA 252, and UL 10B for fire rated class,
as indicated on Drawings.
2.
When replacing existing fire-rated doors, verify and match rating required for opening assembly. Ensure
compliance with the Building Code for fire-rated assembly for each specific opening.
1.3
DELIVERY, STORAGE AND PROTECTION
A.
1.4
Protect doors and frames with resilient packaging. Break seal on-site to permit ventilation.
PROJECT CONDITIONS
A.
Field Measurements: Verify that field measurements are as indicated on shop drawings.
B.
Coordination: Coordinate the work with door opening construction, door frame and door hardware installation.
08110-1
0893 Lindsay, OK
11/23/10
PART 2 - PRODUCTS
2.1
MANUFACTURERS
A.
Doors and Frames: Subject to compliance with requirements specified herein, provide flush doors and frames by
one of the following:
1.
Amweld Building Products Division.
2.
Ceco Door Division.
3.
Curries.
4.
Fenestra Corporation.
5.
Kewanee Corporation.
6.
Mesker.
7.
Steelcraft Manufacturing Co.
8.
Windsor Republic Doors.
B.
Pharmacy Door with Coiling Shutter Cutout: Model WM 3070 as manufactured by Steward Steel Door Div.,
Sikeston, MO. (573) 472-2121 or equivalent as manufactured by any of the above named manufacturers.
2.2
DOORS
A.
Interior Doors: ANSI 250.8, Level 1 and Physical Performance Level C (Standard-Duty), 1-3/4 inches thick,
Model 1 (Full Flush) 0.032 min. thickness (20 gage), cold-rolled steel, optional core construction as specified
below.
B.
Exterior Doors: ANSI 250.11, Level 2 and Physical Performance Level B (Heavy Duty), 1-3/4 inches thick,
Model 1 (Full Flush) 0.042 inch min. thickness (18 gage), ASTM A 653, Commercial Steel (CS), Type B, with an
A60 zinc-iron-alloy (galvannealed) coating cold-rolled steel, polyurethane or polystyrene foam insulated core
construction
1.
Fabricate head flush with top edge to exclude water.
C.
Core Construction:
1.
Polyurethane core foamed in place or laminated, R=10; 1/2 inch maximum voids in any direction. Strength
of bond between core and steel face sheet shall exceed strength of core so delamination will not occur
during operating conditions.
2.
Rigid core or polystyrene foam board, R=7. Strength of bond between core and steel face sheet shall
exceed strength of core so that delamination will not occur under operating conditions.
3.
Honeycomb Core: Kraft fiber honeycomb with nominal 1 inch cell size and crush strength of 45 psi.
4.
If laminated insulation is used, apply adhesive full coverage to door face.
D.
Pharmacy Door with Coiling Shutter Cutout: SDI-100; Grade III, Extra Heavy Duty 1-3/4 inches thick, Model 1,
Full Flush Design, 16 gage.
1.
Fabricate with integral shelf and opening for coiling shutter and with additional reinforcement as shown on
the drawings. Shutters are specified in Section 08337.
2.3
FRAMES
A.
Interior Drywall Frames: 0.053 min. thickness (16 gage), cold-rolled steel, mitered welded units.
1.
Jamb depth: Sized to fit wall thickness.
B.
Interior Drywall Frames (Retrofit Openings ONLY): 16 gage, cold-rolled steel, mitered knock down.
1.
Jamb depth: Sized to fit wall thickness.
C.
Interior Masonry Frames: (16 gage), cold-rolled steel, mitered and welded units.
1.
Jamb depth: Sized to fit wall thickness.
D.
Exterior Frames: (16 gage steel), A60 galvannealed coating (ASTM A 653), mitered and welded units.
1.
Jamb depth: 5-3/4", unless otherwise indicated on Drawings.
08110-2
0893 Lindsay, OK
11/23/10
2.4
ACCESSORIES
A.
Rubber Silencers: Resilient rubber. Specified in Section 08710.
B.
Glazing Stops: Rolled steel channel shape, butted corners; prepared for countersink style screws.
C.
Plaster Guards: Provide 26 gage steel plaster guards or mortar boxes, welded to frame, at back of hardware
cutouts in masonry openings.
D.
Mullions For Double Doors: Removable type, specified in Section 08710.
E.
Astragals for Double Doors: Steel, specifically for double doors. For rated pairs of doors, provide astragal to
meet UL rating requirement. If doors are provided that maintain rating without an astragal, submit door
manufacturer’s literature indicating UL rating. If U-shaped astragal is used that does not require a coordinator,
omit double door coordinator from applicable hardware set in Section 08710.
F.
Board Insulation Blocking: ASTM C578, Type IV (density 1.6 pcf minimum), 1 inch thick. Provide one of the
following:
1.
Greenguard CM by Pactiv Building Products, Smyrna, GA (800) 241-4402.
2.
Styrofoam Square, by Dow Chemical Co., Midland, MI (800) 232-2436.
3.
Foamular 250, by Owens Corning, Toledo, OH (800) 438-7465.
G.
Door Shelf (Pharmacy Door): Manufacturer's standard full shelf, 16 gage cold-rolled steel, with 2 support
brackets each side, width as shown on the drawings. Provide beveled head sheet metal fasteners for attachment of
shelf support brackets to door.
2.5
PROTECTIVE COATINGS
A.
Bituminous Coating: Fibered asphalt emulsion, field applied.
B.
Primer: Exposed surfaces shall be cleaned, treated with Bonderite chemical and given one baked-on shop coat of
gray synthetic primer.
2.6
FABRICATION
A.
Fabricate doors and frames in accordance with ANSI A250.8.
B.
Transom Bars for Glazed Lights: Fixed type, of same profiles as jamb and head.
C.
Fabricate doors with hardware reinforcement welded in place.
D.
Fabricate frames with hardware reinforcement plates welded in place. Provide mortar guard boxes.
E.
Fabricate frames to suit masonry wall coursing with 4 inch head member.
F.
Silencers: Prepare frames for silencers.
1.
Single Doors: Provide 3 single rubber silencers on strike side.
2.
Double Doors with Mullions: Provide 3 single rubber silencers on each door, on strike side.
3.
Double Doors without Mullions: Provide 2 single silencers on frame head.
4.
Do not install silencers until frames have received their final finish coat.
G.
Fire Rated Doors: Attach fire rated label to each door and each frame unit. Do not paint over labels.
H.
Undercut non-fire rated doors as indicated on drawings.
I.
Where multiple openings are indicated, fabricate double wide frames of material gage as scheduled. Joint frames
at swing jamb using minimum 16 gage insert spline connection full length. After assembly, fill joint with epoxy
08110-3
0893 Lindsay, OK
11/23/10
filler, allow to harden and finish smooth and flush.
1.
Fabricate impost base anchor, providing for minimum of two (2) anchors per impost. Base shall fit impost
inside profile with "force fit."
2.7
SIGNAGE
A.
All exit doors shall have a mounted sign stating:
“THIS DOOR TO REMAIN UNLOCKED DURING BUSINESS HOURS.”
B.
The letters on the sign shall be a minimum of 1" high and on contrasting background (white on black or black on
white).
PART 3 - EXECUTION
3.1
EXAMINATION
A.
3.2
Verify substrate conditions, opening sizes and tolerances are acceptable for proper installation.
INSTALLATION
A.
Install frames in accordance with ANSI A250.8.
B.
Install doors in accordance with ANSI A250.11.
C.
Coordinate with adjacent wall construction for anchor placement.
D.
Coordinate installation of glass and glazing.
E.
Coordinate installation of doors with installation of hardware specified in Section 08710.
1.
Provide board insulation blocking at exterior hollow metal frames. Glue blocking in frame jambs (strike
side and hinge side) at height indicated on Drawings.
3.3
ADJUSTING AND CLEANING
A.
Test for smooth operation through full range of swing; make necessary adjustments.
B.
Coordinate adjustment of doors with installation of hardware. Adjust doors and hardware for smooth and balanced
door movement.
END OF SECTION
08110-4
0893 Lindsay, OK
11/23/10
UniSpec II - Store Planning
082809
SECTION 08311 - ACCESS DOORS AND FRAMES
PART 1 - GENERAL
1.1
SUMMARY
A.
Section Includes:
1.
Access doors and frames for walls and ceilings.
B.
Related Sections:
1.
Section 09250 - Gypsum Board: Openings in gypsum board ceilings.
2.
Section 09900 - Paints and Coatings: Field paint finish.
1.2
REFERENCES
A.
The publications listed below form a part of this specification to the extent referenced. Publications are referenced
within the text by the basic designation only.
B.
ASTM International (ASTM):
1.
ASTM A 653 - Steel Sheet, Zinc-Coated (Galvanized) or Zinc-Iron Alloy-Coated (Galvannealed) by the
Hot-Dip Process.
2.
ASTM A 879 - Steel Sheet, Zinc Coated by the Electrolytic Process for Applications Requiring
Designation of the Coating Mass on Each Surface.
3.
ASTM A 1008 - Steel, Sheet, Cold-Rolled, Carbon, Structural, High-Strength Low-Alloy, High-Strength
Low-Alloy with Improved Formability, Solution Hardened, and Bake Hardenable.
4.
ASTM E 119 - Standard Test Methods for Fire Tests of Building Construction and Materials.
C.
National Fire Protection Association (NFPA):
1.
NFPA 80 - Fire Doors and Windows.
2.
NFPA 252 - Fire Tests for Door Assemblies.
D.
Underwriters Laboratories (UL):
1.
UL 10B - Fire Tests of Door Assemblies.
2.
UL 263 - Fire Tests Of Building Construction And Materials.
PART 2 - PRODUCTS
2.1
MANUFACTURERS
A.
2.2
Provide access doors by one of the following manufacturers:
1.
Milcor, Inc (Commercial Products Group) Bensenville, IL; Contact Don Fessendon (630) 595-7320.
2.
Acudor Products, Inc., Fairfield, NJ. (800) 722-0501.
3.
Nystrom Building Products, Minneapolis, MN. (800) 547-2635 or (612) 781-7850.
STEEL MATERIALS
A.
Steel Sheet: Uncoated or electrolytic zinc-coated, ASTM A 879 with cold-rolled steel sheet substrate complying
with ASTM A 1008, Commercial Steel (CS), exposed.
B.
Metallic-Coated Steel Sheet: ASTM A 653, Commercial Steel (CS) with A60 zinc-iron-alloy (galvannealed)
coating or G60 mill-phosphatized zinc coating.
C.
Drywall Beads: 0.0299-inch zinc-coated steel sheet to receive joint compound.
D.
Manufacturer's standard finish factory primed finish.
08311-1
0893 Lindsay, OK
11/23/10
2.3
ACCESS DOORS AND FRAMES FOR WALLS AND CEILINGS
A.
Flush Access Doors and Frames:
1.
Fabricated from steel sheet
2.
Exposed Trim Type:
a.
Model NT by Nystrom.
b.
Model M 3202 by Milcor.
c.
Model UF 5000 by Acudor.
3.
Trimless Frame:
a.
Model MW by Nystrom.
b.
Model DW 3203 by Milcor.
c.
Model DW 5040 by Acudor.
4.
Locations: Wall and ceiling.
5.
Door: Minimum 0.060-inch- thick sheet metal.
6.
Frame: Minimum 0.060-inch- thick sheet metal with 1-1/4-inch- wide, surface-mounted trim.
7.
Hinges: Spring-loaded, concealed-pin type or continuous piano.
8.
Latch: Cam latch with interior release. Provide latch for all units unless specified to have locks.
9.
Lock: Cylinder with 2 keys. Provide lockable cylinders as follows:
a.
Exterior locations.
10.
Units larger than 24 inches on the hinge side shall have two locks or latches.
B.
Substitutions: Not Permitted.
2.4
FINISH
A.
Base Metal Protection: Factory prime coat units with electrostatic baked on electrostatic powder. For ceiling
units, prime exposed edges with coat of white rust-inhibitive paint.
PART 3 - EXECUTION
3.1
INSPECTION
A.
Verify rough openings for door and frame are correctly sized and located.
B.
Beginning of installation means acceptance of existing conditions.
3.2
INSTALLATION
A.
Install units in accordance with manufacturer's instructions.
B.
Install units plumb, square and flush with adjacent ceiling or wall surface. Secure rigidly in place.
C.
Position to provide convenient access to concealed work requiring access.
D.
Provide weather tight installation at exterior locations
3.3
ACCESS DOOR SCHEDULE
A.
Provide access door and frame suitable for the application.
B.
Install trimless access door and frame in interior gypsum board walls and ceilings and other locations suitable and
adaptable for trimless installation
C.
Install exposed trim access door and frame where at exterior locations and where impractical to install trimless installation.
08311-2
0893 Lindsay, OK
11/23/10
D.
Install access doors in ceilings and walls in locations as shown on the Drawings, at valves, controls, and manual
dampers requiring access, and as required by code and governing authorities.
E.
For access doors adjacent to secure areas (Cash/Counting Room), coordinate location with Walmart Construction
Manager.
END OF SECTION
08311-3
0893 Lindsay, OK
11/23/10
UniSpec II - Store Planning
092410
SECTION 08383 - TRAFFIC DOORS
PART 1 - GENERAL
1.1
SUMMARY
A.
Section Includes:
1.
Owner furnished full-height traffic doors for installation by Contractor.
B.
Related Requirements:
1.
Section 01640 – Owner Furnished Products. Provisions for products supplied by the Owner.
2.
Section 05500 - Metal Fabrications: Prepared opening with steel channel jambs and head.
1.2
DELIVERY, STORAGE AND HANDLING
A.
Transport, handle, store, and protect products in compliance with the requirements of Section 01600 and manufacturer’s recommendations.
B.
Product Delivery: Walmart Supplier will make delivery of products to Site ready for installation. Contact Supplier
to establish a product delivery and installation date and establish a coordination procedure.
C.
Product Compliance Inspection: Inspect delivered products for compliance with product descriptions in Part 2
herein. Report discrepancies to the Architect.
D.
Product Packaging: Doors will be shipped in manufacturer's standard packaging with identification markings on
each component or package.
E.
Acceptance at Site: Receive products as specified in Section 01640.
1.
Verify quantity of products furnished with Bills of Lading provided with products.
2.
Note description of product quality discrepancies and/or product damage on Bill of Lading.
3.
Report discrepancies in product quantity delivered, or damage to products delivered to Walmart
immediately.
4.
Upon notification, Walmart will arrange for delivery of replacement products.
F.
Manufacturing Defects: Report suspected product manufacturing defects to Walmart Construction Manager and
Owner's Supplier. Upon notification, Walmart will arrange for repair of manufacturing defects.
G.
Store doors and accessories in unopened packages in protected dry area to prevent damage from environmental
and construction operations.
1.3
WARRANTY
A.
Door Panel: Ten years on panel against manufacturer’s defects.
B.
Hardware: Lifetime warranty.
PART 2 - PRODUCTS
2.1
OWNER FURNISHED PRODUCTS
A.
Owner’s traffic door Supplier (specified below under Manufacturers) will furnish traffic doors specified as follows
under provisions of Section 01640 for installation by Contractor.
B.
Descriptions and related provisions of products by Owner’s Supplier as specified herein are included as requirements for Supplier of products to be furnished by Owner and are included as information only to Contractor.
08383-1
0893 Lindsay, OK
11/23/10
2.2
MANUFACTURERS
1.
Mueller Door Corporation, Wauconda, IL: Suzanne Miller, (800) 981-2040.
B.
2.3
The Contractor shall furnish all flexible door clear openings to the specified supplier within the first week of construction.
FULL HEIGHT TRAFFIC DOORS
A.
Description: High impact plastic traffic door, gasketed or non-gasketed as shown on the drawings.
B.
Door Panel: U.S.D.A. compliant, solid high density polyethylene panels or non-CFC urethane-filled polyethylene
plastic sandwich panels with textured surfaces each face. Minimum thickness as follows
1.
8 ft Wide x 9 ft High Openings: 3/4" thick panel.
2.
All Other Openings: 1/2" thick panel
C.
Gaskets (Seals): Provide integrated nylon brush or rubber perimeter seal package. Provide solid gasket seals at
food preparation areas as shown on the drawings. Color: Black
D.
Hardware: Enclosed stainless steel positive-close double acting hinges interconnected by full length powder coated
aluminum spline. Color: Black.
E.
Vision Panel: Integrated, non-gasketed 1/4" thick polycarbonate. Size: 200 square inch per leaf. Locate bottom of
panel to be not more than 43 inches above finished floor.
F.
Jamb Guards: Space saving low profile integrated steel jamb guards. Color: Matt stainless steel.
G.
Impact Bumper: Two-foot high impact absorbing tear drop shaped bumper each side of door.
H.
Door Color: Kahki or Black as shown on Drawings.
2.4
SUBSTITUTIONS
A.
Comply with the requirements of Section 01600.
PART 3 - EXECUTION
3.1
EXAMINATION
A.
Verify that openings are ready to receive work and opening dimensions and clearances are as indicated on Drawings.
B.
Beginning of installation means acceptance of existing conditions.
3.2
INSTALLATION (BY CONTRACTOR)
A.
Install door unit assembly to manufacturer's installation instructions and manufacturer's location and installation
drawings.
B.
Frame Mounted Traffic Doors: Use anchorage devices to fasten traffic door assembly to door frame construction
without distortion or imposed stresses.
C.
Fit and align door assembly level and plumb.
D.
Adjust door assembly to provide smooth operation from closed to full open position.
08383-2
0893 Lindsay, OK
11/23/10
3.3
CLEANING
A.
Remove protective material from pre-finished surfaces.
B.
Remove labels and visible markings.
C.
Wash down surfaces with a solution of mild detergent in warm water, applied with soft, clean wiping cloths. Wipe
surfaces clean.
END OF SECTION
08383-3
0893 Lindsay, OK
11/23/10
UniSpec II - Store Planning
062510
SECTION 08411 - ALUMINUM FRAMED STOREFRONTS
PART 1 - GENERAL
1.1
SUMMARY
A.
Section Includes:
1.
Aluminum storefront frames, and glazed lights.
B.
Related Sections:
1.
Section 01640 - Owner Furnished Products: General procedures related to Owner furnished products.
2.
Section 08462 - Automatic Sliding Entrance Doors: Coordination between components.
3.
Section 08800 - Glazing: Glass products.
1.2
REFERENCES
A.
The publications listed below form a part of this specification to the extent referenced. Publications are referenced
within the text by the basic designation only.
B.
Architectural Aluminum Manufacturers Association (AAMA):
1.
AAMA 611 – Voluntary Specifications for Anodized Architectural Aluminum.
C.
ASTM International (ASTM):
1.
ASTM A 123 - Zinc (Hot-Dip Galvanized) Coatings On Iron And Steel Products
2.
ASTM E 283 - Standard Test Method For Determining Rate Of Air Leakage Through Exterior Windows,
Curtain Walls, And Doors Under Specified Pressure Differences Across The Specimen
3.
ASTM E331 - Water Penetration Of Exterior Windows, Skylights, Doors, And Curtain Walls By Uniform
Static Air Pressure Difference
D.
Americans with Disabilities Act of 1990: Accessibility Guidelines for Buildings and Facilities.
E.
American National Standards Institute (ANSI):
1.
ANSI A117.1 - Specifications for Making Buildings and Facilities Accessible to and Usable by Physically
Handicapped People.
1.3
SYSTEMS DESCRIPTION
A.
Storefront System Performance Requirements:
1.
Air Infiltration: ASTM E 283. Air infiltration rate shall not exceed 0.06 cfm/ft2 at a static air pressure
differential of 6.24 psf.
2.
Water Penetration Under Static Pressure: Systems do not evidence water penetration through fixed glazing
and framing areas when tested according to ASTM E 331 at a minimum static-air-pressure difference of 20
percent of positive wind-load design pressure, but not less than 6.24 lbs/sq. ft.
3.
Structural Performance: Maximum deflection of L/175 of span under a windload pressure calculation by
the manufacturer based on the design wind loads shown on the Structural Drawings but not less than 20
psf.
PART 2 - PRODUCTS
2.1
MANUFACTURERS
A.
Subject to compliance with requirements, products by one of the following manufacturers may be provided.
Kawneer product designations are used within this Section to identify aluminum framed storefront types and
associated products unless noted otherwise.
08411-1
0893 Lindsay, OK
11/23/10
1.
2.
B.
2.2
Kawneer Company, Inc., National Accounts Contacts as follows:
a.
Central Area: Greenwood, IN, (877) 505-3757.
b.
Eastern Area: Bloomsburg, PA, (877) 505-3756.
c.
Southern Area: Springdale AR, (877) 505-3783.
d.
Western Area: Visalia, CA, (877) 505-3785.
Alternate Manufacturers: Subject to compliance with project requirements, unless otherwise specified,
aluminum framed storefronts and accessories equivalent to the Kawneer products specified by one of the
following alternate manufacturers may be provided:
a.
EFCO Corporation; Monett, MO; (800) 221-4169.
b.
Southwest Aluminum Systems, Inc.; Chandler, AZ; (602) 961-2000.
c.
Tubelite, Inc.; Reed City, MI; (800) 866-2227.
d.
U.S. Aluminum Corporation; Waxahachie, TX; (800) 627-6440.
e.
Vistawall Architectural Products; Terrell, TX; (800) 869-4567.
Substitutions: Not permitted.
FRAMING
A.
Interior Framing System: TRIFAB VG 450, by Kawneer. 1-3/4 x 4-1/2 inch nominal dimension, extruded
aluminum flush glazed framing system.
B.
Interior Framing System: TRIFAB VG 451T, by Kawneer. 2 x 4-1/2 inch nominal dimension, thermally broken
extruded aluminum flush glazed framing system
1.
Thermal Barrier: Thermal break with a 1/4" separation consisting of a two part chemically curing, high
density polyurethane which is mechanically and adhesively joined to aluminum storefront sections.
C.
Exterior Framing System: TRIFAB VG 450, by Kawneer. 1-3/4 x 4-1/2 inch nominal dimension, extruded
aluminum flush glazed framing system.
D.
Receptor Channel: Model No. 451VG570 and 451VG572, by Kawneer or equivalent for system specified.
1.
Finish: Match storefront system.
E.
Member Wall Thickness: Each framing member shall provide structural strength to meet specified performance
requirements.
2.3
FABRICATION
A.
Fabricate components with minimum clearances and shim spacing around perimeter of assembly, yet enabling
installation and dynamic movement of perimeter seal.
B.
Rigidly fit and secure joints and corners. Make joints and connections flush, hairline, and weatherproof.
C.
Develop drainage holes with moisture pattern to exterior.
D.
Prepare components to receive anchor devices. Fabricate anchorage items. Arrange fasteners, attachments, and
jointing to ensure concealment from view.
E.
Reinforce framing members for imposed loads.
F.
Accessories:
1.
Break Metal Closures: Minimum 0.040 inch thick aluminum x length required. Finish to match adjacent
related work.
2.
Provide clean sharp edges, uniform in appearance and consistent in shape. Secure in place with concealed
fasteners where possible. Exposed fasteners shall match enclosure fabrication.
3.
Sill Flashing: Fabricate to configuration indicated and required of minimum 0.040 inch aluminum having
exposed edges hemmed. Finish to match adjacent related work.
08411-2
0893 Lindsay, OK
11/23/10
2.4
FINISHES
A.
Exposed Aluminum Surfaces: Architectural Class II anodic coating conforming to AAMA 611, AA-M12 C22
A31, #17 Clear, unless otherwise indicated on Drawings.
B.
Provide clear finish for all new storefront systems unless partial replacement or repair; then, verify and match
existing storefront system color. Maintain same color range. Do not mix light and dark shades.
C.
Concealed Steel Items: Galvanized in accordance with ASTM A386 to 2.0 oz/sq ft.
D.
Apply two coats of bituminous paint to concealed aluminum and steel surfaces in contact with cementitious or
dissimilar materials.
PART 3 - EXECUTION
3.1
EXAMINATION
A.
Verify wall openings are ready to receive work of this Section. Verify dimensions, tolerances, and method of
attachment with other work.
B.
Beginning of installation means acceptance of existing conditions.
3.2
PREPARATION
A.
3.3
General Contractor shall provide rough openings including rough masonry openings and modifications to existing
aluminum storefront components and glazing as shown on the drawings or as required for complete installation of
work specified herein.
INSTALLATION
A.
Install storefront system components in accordance with manufacturer's instructions.
B.
Use anchorage devices to securely attach frame assembly to structure.
C.
Align assembly plumb and level, free of warp or twist. Maintain assembly dimensional tolerances, aligning with
adjacent work.
D.
Break Metals:
1.
Set sill flashing in full bed of sealant. Provide riveted end laps of not less than 3 inches.
E.
Pack fibrous insulation in shim spaces at perimeter of assembly to maintain continuity of thermal barrier.
F.
Install perimeter sealant and backing materials in accordance with Section 07900.
G.
Install glass in accordance with Section 08800, to glazing method required to achieve performance criteria.
3.4
TOLERANCES
A.
Variation from Plane: 0.03 inches per foot maximum or 0.25 inches per 30 feet, whichever is less.
B.
Misalignment of Two Adjoining Members Abutting in Plane: 0.015 inches.
3.5
FIELD QUALITY CONTROL
A.
Inspect storefront system installation and attachment to building structure.
08411-3
0893 Lindsay, OK
11/23/10
3.6
CLEANING
A.
Wash down exposed surfaces using a solution of mild detergent in warm water, applied with soft, clean wiping
cloths. Take care to remove dirt from corners. Wipe surfaces clean.
B.
Remove excess sealant by moderate use of mineral spirits or other solvent acceptable to sealant manufacturer.
END OF SECTION
08411-4
0893 Lindsay, OK
11/23/10
UniSpec II - Store Planning
111910
SECTION 08462 - AUTOMATIC SLIDING ENTRANCE DOORS
PART 1 - GENERAL
1.1
SUMMARY
A.
Section Includes:
1.
Owner furnished and installed electric operated automatic sliding entrance doors with transom assemblies,
including frames, glazing, and hardware.
2.
Control System: Motion detection and hold open safety system.
3.
Video camera system.
B.
Related Requirements:
1.
Section 01640 – Owner Furnished Products: General procedures related to Owner furnished products.
2.
Section 07900 - Joint Sealers.
3.
Section 08800 - Glazing: Storefront system glass.
4.
Section 16100 - Wiring Methods: Power to automatic doors.
1.2
1.3
REFERENCES
A.
The publications listed below form a part of this specification to the extent referenced. Publications are referenced
within the text by these basic designations only.
B.
American Association of Automatic Door Manufacturers (AAADM)
1.
AAADM Inspector Certification Program.
C.
American National Standards Institute (ANSI):
1.
ANSI A117.1 - Guidelines For Accessible And Usable Buildings And Facilities.
2.
ANSI (BHMA) A156.10 - Power Operated Pedestrian Doors.
3.
ANSI Z97.1 - Safety Glazing Material Used in Buildings.
D.
ASTM International (ASTM):
1.
ASTM C 1048 - Heat Treated Flat Glass - Kind HS, Kind FT Coated and Uncoated Glass.
E.
Consumer Products Safety Standards for Architectural Glazing: CPSC 16 CFR, Part 1201.
F.
Americans with Disabilities Act of 1990: Accessibility Guidelines for Buildings and Facilities.
ADMINISTRATIVE REQUIREMENTS
A. Pre-Installation Conference:
1.
Convene Pre-installation Conference at Site one week prior to commencing Work of this Section. Require
attendance of parties directly affecting Work of this Section, including, but not limited to, Walmart
Construction Manager, Contractor Project Field Superintendent, Aluminum Storefront job foreman,
Automatic Entrance Door Manufacturer's Technical Representative, electrical subcontractor field
supervisory personnel, and any subcontractor, supplier, or installer directly affecting, or affected by Work
of this Section.
2.
Contact Walmart Construction Manager two weeks prior to Pre-installation Conference to confirm
schedule.
3.
Review foreseeable methods and procedures related to automatic entrance door Work, including the
following:
a.
Tour, inspect, and discuss condition of door assembly openings, connections to
building structure, electrical requirements, and other preparatory work performed by
other trades.
08462-1
0893 Lindsay, OK
11/23/10
b.
4.
1.4
Review automatic entrance door system requirements including drawings,
specifications and other contract documents.
c.
Review required submittals, both completed and yet to be completed.
d.
Review and finalize construction schedule related to automatic entrance door Work
and verify availability of materials, installer's personnel, equipment and facilities
needed to make progress and avoid delays.
e.
Review required inspections, operational testing, and certifying procedures.
f.
Review weather and forecasted weather conditions, and procedures for coping with
unfavorable conditions.
g.
Review preparation and installation procedures and coordinating and scheduling required with
related work.
Record discussions of conference and decisions and agreements (or disagreements) reached, and furnish
copy of record to each party attending.
QUALITY ASSURANCE
A.
1.5
Installer Qualifications:
1.
Automatic and barrier free door equipment shall be installed by the manufacturer’s factory trained installers
or shall be installers as recommended and approved by the automatic door operator manufacturer.
2.
Installers shall be certified and recognized by and in accordance with the AAADM Inspector Certification
Program.
DELIVERY, STORAGE AND HANDLING
A.
Product Delivery: Automatic Entrance Door Supplier will deliver products to Site and install products. Automatic
Entrance Door Supplier will contact Contractor after Award of Contract to establish a product delivery and
installation date and establish a coordination procedure.
B.
Product Packaging: Automatic Entrance Doors will be delivered in manufacturer's standard packaging with
identification markings on each component or package.
C.
Acceptance at Site: Inspect products with Automatic Entrance Door Supplier upon delivery of products to Site.
1.
Verify quantity of products furnished.
2.
Report discrepancies in product quantity delivered, or damage to products delivered to Automatic Entrance
Door Supplier and Walmart immediately. Upon notification, Walmart will arrange for delivery of
replacement products.
D.
Manufacturing Defects: Report suspected manufacturing defects to Walmart Construction Manager and Automatic
Entrance Door Supplier. Upon notification, Walmart will arrange for repair of manufacturing defects.
E.
Section 01600 - Product Requirements: Transport, handle, store, and protect products.
1.6
WARRANTY
A.
Provide manufacturer's three year warranty. Include coverage of complete system for failure to meet specified
requirements. Include cost of material and labor for repairs and adjustments.
PART 2 - PRODUCTS
2.1
OWNER FURNISHED PRODUCTS
A.
Under provisions of Section 01640, Owner's automatic entrance door Supplier will furnish and install automatic
entrance doors as described within this Section.
B.
Unless otherwise specified, provisions specified herein of products provided by Owner are included as
requirements for Supplier of products to be furnished by Owner and are included as information only to
08462-2
0893 Lindsay, OK
11/23/10
Contractor.
2.2
MANUFACTURER
A.
2.3
Stanley Access Technologies, Farmington, CT
1.
Contact: Kevin Bernier, National Accounts Project Manager, (860) 409-6500.
PERFORMANCE REQUIREMENTS FOR AUTOMATIC SLIDING ENTRANCE DOORS
A.
Design system to operate, hold open, and close doors under wind and suction loads calculated by the
manufacturer based on the design wind loads shown on the Structural Drawings but not less than a
windload pressure of 20 PSF.
B.
Provide for dimensional distortion of components during operation.
C.
Provide for opening and closing operation of door panels in the event of power failure.
D.
Operating Temperature Range: -20 F to 130 F ambient.
E.
Eliminate system performance interference by ambient light and radio frequencies.
F.
Provide sliding doors and side panels with break-away capability where scheduled or shown.
2.4
REGULATORY REQUIREMENTS FOR AUTOMATIC SLIDING ENTRANCE DOORS
A.
Conform to applicable code for automatic release of control drive unit to permit manual opening of
doors.
B.
State or Local requirements (where applicable).
C.
Comply with ANSI A156.10 and ANSI A117.1.
D.
ADA (Americans with Disabilities Act - 1990) requirements for entrance door access, entrance doors
and hardware.
E.
Products Requiring Electrical Connection: Listed and classified by Underwriters Laboratories, Inc.,
as suitable for the purpose specified and indicated.
2.5
AUTOMATIC SLIDING ENTRANCE DOORS
A.
Jamb-Mounted Exterior Doors: Dura-Glide Series 3000 with Stan-Vision by Stanley. Overhead concealed slide
door system with sidelights and transom where indicated, full breakout of doors and sidelights unless otherwise
scheduled to be non-breakaway, and doorway monitoring device to control door opening, closing, and hold open
functions, single or pair as indicated.
1.
Door and Transom Sizes: As shown on Drawings.
B.
Surface-Mounted Exterior Doors: Dura-Glide Series 2000 with Stan-Vision by Stanley. Overhead concealed slide
door system, breakaway on sliding leaf only, and doorway monitoring device to control door opening, closing, and
hold open functions. Provide package with 'P' panels.
1.
Door Sizes: As shown on Drawings.
C.
Interior Doors: Dura-Glide Series 3000 with Stan-Vision by Stanley. Overhead concealed slide door system with
sidelights and transom (interior) where indicated, full breakout of doors and sidelights unless otherwise scheduled
to be non-breakaway, and doorway monitoring device to control door opening, closing, and hold open functions,
single or pair as indicated.
1.
Door and Transom Sizes: As shown on Drawings.
08462-3
0893 Lindsay, OK
11/23/10
2.6
OPERATING SYSTEM COMPONENTS
A.
Visual Sensing System (Motion Detector): Stan-Vision Series as manufactured by Stanley.
1.
The system consists of the following major components:
a.
Two CCD (Closed Circuit Digital) visual sensors with mounting templates, one visual sensor
controller, a four-channel encoder, two RG-59 cables for connecting the visual sensors to the visual
sensor controller.
2.
The system shall connect with the Stanley interface board, motor encoder assembly, and the Stanley DuraGlide microprocessor control box.
3.
Provide one unit center mounted above doorway on each side of header.
4.
Provide a 4-11/16" square by 2-1/4" deep “J-Box” at the center above the automatic doors for the camera
coax cable. Provide (2) 1-1/4" flex cables to the door jamb pre-drilled holes. Provide 1-1/4" conduit to the
“J-Box” up above ceiling level or to roof structure area as required for connections by Walmart Loss
Prevention.
B.
Jamb / Stile Mounted Frontal View Camera System:
1.
CMOS video camera system by Stanley. The system consists of the following major components:
a.
Jamb mounted CMOS color camera with mounting hardware
b.
Camera I/O interface module for power connection and video output connection located within the
header assembly.
2.
Camera system shall be mounted within the jamb tube that supports the door assembly.
3.
Provide one camera at approach side of each sliding door.
4.
Provide one camera each side of Garden Center sliding door.
2.7
DOORS, HARDWARE, AND ACCESSORIES
A.
Doors: Narrow stile aluminum doors.
1.
Top Rail: Manufacturer’s standard.
2.
Bottom Rail: 10 inches high.
3.
Horizontal Muntins: Provide two muntins, locate at 24 inches and 42 inches above finish floor. Align with
bumper guards and push bars on aluminum storefront system entrance door as indicated on Drawings.
4.
Stiles: 2-1/4 inches.
5.
Glass:
a.
Interior Doors and Transom Glazing: Clear tempered glass; ASTM C1048, Kind FT (Fully
Tempered), Condition A (Uncoated), Type I (Transparent Glass, Flat), Class 1 (Clear), Quality q3
(Glazing Select). Conform to ANSI Z97.1 and CPSC 16 CFR Part 1201.
1)
Thickness: 1/4 inch.
2)
Identification: Permanently identify by manufacturer. Etch or ceramic fire identification on
glass visible when unit is glazed.
b.
Exterior Doors : Tinted tempered glass; ASTM C 1048, Kind FT (Fully Tempered), Condition A
(Uncoated), Type I (Transparent Glass, Flat), Class 2 (Tinted Heat Absorbing and Light Reducing),
Quality q3 (Glazing Select). Conform to ANSI Z97.1 and CPSC 16CFR Part 1201.
1)
Thickness: 1/4 inch.
2)
Color: Gray tint or bronze tint (verify and match existing).
3)
Identification: Permanently identify by manufacturer. Etch or ceramic fire identification on
glass visible when unit is glazed.
c.
Exterior Transoms: Clear tempered glass; ASTM C1048, Kind FT (Fully Tempered), Condition A
(Uncoated), Type I (Transparent Glass, Flat), Class 1 (Clear), Quality q3 (Glazing Select). Conform
to ANSI Z97.1 and CPSC 16 CFR Part 1201.
1)
Thickness: 1/4 inch.
2)
Identification: Permanently identify by manufacturer. Etch or ceramic fire identification on
glass visible when unit is glazed.
B.
Finish:
1.
Exposed Aluminum Surfaces: Architectural Class II anodic coating, AA-M12 C22 A31, #17 Clear, unless
otherwise indicated on Drawings.
08462-4
0893 Lindsay, OK
11/23/10
2.
3.
C.
Provide clear finish for all new storefront systems unless partial replacement or repair; then, verify and
match existing storefront system color. Maintain same color range. Do not mix light and dark shades.
Apply two coats of bituminous paint to concealed aluminum and steel surfaces in contact with cementitious
or dissimilar materials.
Door Hardware and Accessories:
1.
Pivots: Allows sliding panel and sidelights to break away to full open position to provide immediate egress
at any point in door movement.
2.
Panic break-away shall be code approved, acceptable to authorities having jurisdiction.
3.
Top Door Arm: Door holders for all break-away door panels.
4.
Quick disconnect wiring harness.
5.
Power Switch: 5 position "On/Off/Hold Open" switch; full automatic, reduced automatic, and exit only.
6.
Adjustable door sweeps (exterior doors only).
7.
Finger Protection: Provide finger protection between sidelight and sliding door when door is in open
position.
8.
Lock:
a.
Cylinder: Slide doors shall include two point lock securing lead edges of door styles together and to
hanger assembly.
b.
Electric Solenoid Locking System (Exterior Doors): Provide automatic locking mechanism to
secure doors in closed position when the door is closed to outside entry (ENTER/NO). Provide failsafe control. Provide door unit with exterior access by key control switch mounted at outside jamb to
dis-engage electric solenoid locking system and open door.
9.
"Watchdog" monitoring of microprocessor.
10.
Keyed Cylinder (Outside): Specified in Section 08710. (Furnished by Contractor)
11.
Perimeter pile weatherstripping.
12.
Thresholds:
a.
Provide aluminum threshold of profile shown for doors when scheduled in Section 08710.
b.
Provide edge profile suitable for installation adjacent to entrance tile where applicable.
c.
Length: Opening width plus 2 inches minimum.
13.
Glass Guards (Crash Bars): Nominal 1/2 inch by 2 inch aluminum bar with 1 inch projection from
mounting surface. Mount on doors where and as shown on the drawings.
PART 3 - EXECUTION
3.1
EXAMINATION
A.
Examine existing conditions with Automatic Entrance Door Supplier prior to start of door installation.
B.
Examine surfaces and adjacent areas in which Work is performed. Report conditions that may adversely affect
satisfactory execution of Work to Walmart Construction Manager. Do not proceed with Work until unsatisfactory
conditions have been corrected.
3.2
PREPARATION BY CONTRACTOR
A.
Provide door openings to size indicated on Drawings.
B.
Provide door head level and parallel with floor at door opening. Size and configuration shall be as indicated on
the Drawings.
C.
Provide door jambs parallel and plumb.
D.
Provide power to location at door required by door manufacturer ready for power connection.
3.3
INSTALLATION BY OWNER
A.
Automatic entrance doors and operating system will be installed by Automatic Entrance Door supplier personnel.
08462-5
0893 Lindsay, OK
11/23/10
B.
Installation will be in accordance with manufacturer's published instructions.
C.
Anchorage devices will be used to securely fasten assembly to adjacent construction without distortion or stress.
D.
Hardware will be installed in accordance with ANSI A117.1 requirements and local adopted disabled access
requirements for hardware.
E.
Joint sealing between door frames and walls will be by Automatic Entrance Door supplier in accordance with
Section 07900.
F.
Doors shall be rendered non-breakaway when scheduled on the drawings.
3.4
INSTALLATION BY CONTRACTOR
A.
Make final power connections to automatic entrance doors as specified in Section 16100.
B.
Furnish and install keyed cylinder and thumbturn if and where specified in Section 08710.
C.
Interface with Other Work:
1.
Coordinate locations of power connections and requirements.
2.
Coordinate locations of building management alarm connections and requirements.
3.
Coordinate requirements for door openings required for automatic entrance door installation.
3.5
FIELD QUALITY CONTROL
A.
Site Tests: Upon completion of installation, test operation of automatic entrance doors and operating system.
Make all necessary adjustments as required and retest.
B.
Inspection:
1.
Inspect automatic entrance doors and operating system installation in accordance with AAADM
requirements. Submit completed AAADM inspection form as specified.
2.
Correct deficiencies in Work which inspection indicates are not in compliance with Contract Documents.
END OF SECTION
08462-6
0893 Lindsay, OK
11/23/10
UniSpec II - Store Planning
092410
SECTION 08710 - DOOR HARDWARE
PART 1 - GENERAL
1.1
SUMMARY
A.
Section Includes:
1.
Hardware for doors.
2.
Thresholds.
3.
Weatherstripping, seals and door gaskets.
B.
Related Sections:
1.
Section 08462 - Automatic Sliding Entrance Doors: Hardware coordination.
2.
Section 16100 - Wiring Methods: Electrified hardware coordination.
1.2
REFERENCES
A.
The publications listed below form a part of this specification to the extent referenced. Publications are referenced
within the text by the basic designation only.
B.
American National Standards Institute (ANSI):
1.
ANSI A117.1 - Specifications for Making Buildings and Facilities Accessible to and Usable by Physically
Handicapped People.
C.
National Fire Protection Institute (NFPA):
1.
NFPA 80 - Fire Doors and Windows.
2.
NFPA 101 - Code for Safety to Life from Fire in Buildings and Structures.
3.
NFPA 252 - Fire Tests of Door Assemblies.
D.
Underwriters Laboratories (UL):
1.
UL 10B - Fire Tests of Door Assemblies.
2.
UL 305 - Panic Hardware.
1.3
QUALITY ASSURANCE
A.
Perform work in accordance with the following requirements:
1.
ANSI A117.1
2.
NFPA 101.
3.
NFPA 80.
4.
NFPA 252.
5.
UL 10B.
6.
UL 305.
B.
Regulatory Requirements:
1.
Conform to applicable code for requirements applicable to fire rated doors and frames.
2.
Products Requiring Electrical Connection: Listed and classified by Underwriters' Laboratories, Inc., and
acceptable to the authority having jurisdiction as suitable for the purpose specified and indicated.
3.
Conform to applicable local, State or Federal disabled access requirements for the installation and operation
of door hardware.
08710-1
0893 Lindsay, OK
11/23/10
PART 2 - PRODUCTS
2.1
MANUFACTURERS
A.
Provide hardware as Scheduled in the Hardware Schedule in Part 3 of this Section.
B.
Suppliers: Provide hardware by one of the following suppliers:
1.
D.H. Pace Inc
Springfield, MO
Mark Lyons
(417) 831-5585
2.
Girtman & Associates
Nashville, TN
Bruce Wilkerson
(615) 350-6000 Ext 24
3.
Royal Architectural Products, Ltd
Amarillo, TX
Fred Barksdale, ACH
(806) 373-1759
C.
Product Designations: Hardware may be any of the products listed within the tables below for each specific type.
Substitutions will not be permitted.
D.
ID
A
Ar
CR
Hardware Manufacturer Designations:
Manufacturer
Telephone
ID
Manufacturer
Telephone
(213) 699-0511
(800) 233-0478
(800) 438-1951
No
P
Po
Norton (Yale Security Group)
Pemko Mfg. Co.
Positive Lock
(800) 438-1951
(805) 642-2600
(800) 342-7670
De
Dor
Dyn
Adams Rite.
Arrow (ASSA ABLOY)
Corbin Russwin (Yale Security
Group)
Detex Corporation
Dorma Architectural Hardware
DynaLock Corp
(800) 729-3839
(800) 523-8483
(877) 396-2562
GJ
H
I
Glynn-Johnson
Hager Companies
H. B. Ives (IR Security & Safety)
(800) 525-0336
(800) 325-9995
(877) 613-8766
L
LCN
Lawrence Brothers, Inc.
LCN Closers (IR Security &
Safety)
Locknetics (IR Security & Safety)
(815) 625-0360
(800) 526-2400
Re
Ri
Ru
Ro
Sa
Sc
Sel
Si
S
T
Reese Enterprises, Inc.
Rixson (Yale Security Group)
Rutherford Controls
Rockwood
Sargent (ASSA ABLOY)
Schlage (IR Security & Safety)
Select Hinge
Simplex (Kaba Ilco)
Stanley
Trimco (Trimco/BBW)
(800) 328-0953
(800) 438-1951
(800) 265-6630
(814) 926-2026
(203) 562-2151
(800) 847-1864
(800) 423-1174
(919) 725-1331
(800) 622-4393
(213) 262-4191
(866) 322-1237
VD
(800) 999-0408
(717) 346-7551
(800) 826-5792
W
Y
Von Duprin (IR Security &
Safety)
Wooster Products Inc.
Yale (Yale Security Group)
Ln
Mc
Mo
McKinney (ASSA ABLOY)
Monarch Exit Devices & Door
Hardware (IR Security & Safety)
National Guard Products, Inc.
Na
2.2
(800) 321-4936
(800) 438-1951
(800) 647-7874
HINGES
A.
Material:
1.
Provide full mortise-type hinges with stainless steel pins, except steel pins with steel hinges; non-removable
pin (NRP) for exterior and public interior exposure, non-rising pin, flat button with matching plugs, 4-1/2 x
4-1/2 unless otherwise shown.
2.
Ball-bearing Type: Swaged, inner leaf beveled, square corners.
08710-2
0893 Lindsay, OK
11/23/10
3.
B.
Full-surface Reinforcing Pivot:
a.
For 4-1/2" butts with standard 1/4" backset.
b.
Install per manufacturer's written instructions using attachments furnished with pivot.
Hinges by types:
Type
Description
Finish
H-1
626
652
652
652
652
F179
F179
FBB179
FBB179
H-6
Butts: Medium weight door, average frequency, bronze
(NRP)
Butts: Medium weight door, low frequency, steel
Butts: Medium weight door, low frequency, steel (NRP)
Butts: Medium weight door, average frequency, steel
Butts: Medium weight door, average frequency, steel
(NRP)
Hinge: Continuous geared hinge
MANUFACTURER/MODEL
Stanley
Hager
McKinney
FBB191
BB1191
TB2314
CL
SL21 SD x SDTF x FDH by Select Hinge
(Sel)
H-7
H-8
H-9
Not Used
Hinge: Surface mounted 3 x 3
Pivot: Full-Surface Reinforcing (Helper Hinge)
US2H
808BP
H-2
H-3
H-4
H-5
2.3
1279
1279
BB1279
BB1279
1808
253 (right or
left handed
as
applicable)
T2714
T2714
TB2714
TB2714
705
LOCKS, LATCHES, AND BOLTS
A.
Materials:
1.
Cylindrical Locks: ANSI A156.2, Series 4000 Grade 1, equipped with 6-pin tumbler; "keyed alike" to
match keying system of existing locks to remain. Provide 2-3/4 inch backset. Provide two keys for each
lock.
2.
Mortise Locks: ANSI A156.13, Grade 1, equipped with 6-pin tumbler; "keyed alike" to match keying
system of existing locks to remain. Provide 2-3/4 inch backset. Provide two keys for each lock.
3.
Latch Sets: Provide push-button releases by turning lever, closing door, or turning emergency release key
through hole in outside knob.
4.
Strikes: ANSI Strikes, 1-1/4 x 4-7/8 inches, with curved lip. Wrought box strikes, with extended lip for
latch bolts, except open strike plates may be used in wood frames. Provide dustproof strikes for foot bolts.
5.
Tactile Warning: Provide locks with tactile warning for handicapped codes when required by local
jurisdiction having authority.
B.
Locks by types:
Type
Description
Finish
MANUFACTURER/MODEL
Corbin Russwin
Sargent
L-1
L-2
L-3
L-4
L-5
Mortise Cylinder
Mortise Cylinder
Rim Cylinder
Thumbturn
Storeroom Lock (F86)
626
626
626
626
626
100-118-A03
1000-114-A02
3000-200
1300-118-A03
CL3357-NZD-217L13
41
42
34
124-41
10G04 LL
L-6
Office Lock (F82)
626
CL3351-NZD-217L13
10G05 LL
L-7
Passage Latch (F75)
626
CL3310-NZD- 217L13
10U15 LL
Schlage
(Provide Classic “C”
keyway)
20-001
20-001-1-1/4"
20-022
ND80PD-Rhodes- 25
ND50PD-Rhodes-10025
ND10S - Rhodes- 10025
Yale
2153
2153
1109
S2053S
5405LNAU-497
5407LNAU-497
5401LNAU-497
08710-3
0893 Lindsay, OK
11/23/10
Type
Description
Finish
MANUFACTURER/MODEL
Corbin Russwin
Sargent
Schlage
(Provide Classic “C”
keyway)
ND40S - Rhodes- 10 025
B661P
Yale
L-8
Privacy Lock (F76)
626
CL3320-NZD- 217L13
10U65 LL
L-9
L-10
L-11
Dead Bolt Lock
Access Control Lock
Entrance Lock
(F81/82)
Storeroom Lock with
deadbolt
Institutional Lock
(F87)
Institutional Lock
(F91)
Entrance Lock with
deadbolt
Dead Bolt Lock with
thumbturn (Classroom
Function)
626
626
626
DL2111
Simplex L1011
CL3351-NZD - 217L13
486
10G05 LL
ND53PD– Rhodes 10–
25
L9480-06L
5407LN–
AU–497
CL3332-NZD - 217L13
10G17 LL
5430LNAU-497
626
ND82PD-Rhodes 10025
ND66PD-Rhodes 10-025
626
L9453-06L
L-12
L-13
L-14
L-15
L-16
2.4
E-2
E-3
E-4
E-5
E-6
626
626
DL2017
487
B663P
3562B
EXIT DEVICES
A.
Alarm Exit: Contact manufacturer for Contractor-furnished alarm exit device.
1.
Positive Lock - Contact: Kimbra White, (800) 342-7670.
B.
Materials:
1.
Provide exposed metal to match hardware.
2.
Size and mount units indicated or, if not indicated, to comply with manufacturer's recommendations for
exposure condition. Reinforce substrate as recommended.
C.
Exit Devices by types:
Type
E-1
626
5402LN AU-497
3532B
Description
Finish
Exit Device: Rim, exit only, UL
listed.
Exit Device: Rim, exit only, with
alarm. Provide exterior access
model or time delay when
scheduled.
Exit Device: Surface vertical rod
(top rod only), lever trim, blank
escutcheon, UL listed.
Exit Device: Concealed vertical
rod, lever trim, blank escutcheon,
UL listed for oversized doors.
Exit Device: Rim, lever trim,
blank escutcheon, UL listed.
626
Alarm Exit. Rim, weatherproof,
exit only, with alarm.
600
600
626
626
626
MANUFACTURER/MODEL
Adams
Corbin
Yale
Rite
Russwin
ED5200A 7100-F
Monarch
Von Duprin
F18R BA
99EO-F
Positive Lock THPA-30
Positive Lock THPA (O/A)-30 - Outside Access
Positive Lock THPA-30 (TDL) -Time Delay
Positive Lock THPA (O/A)-30 (TDL) - Outside Access, Time Delay
3100T x
F-18-V LE- 9927L-F-BE3083-91
LS/LK
LBR
Dane
F-18-C LE- 9948L-F-BE
LS/LK
Dane
3700 x
ED5200A 7100-F x
F-18-R LE- 99L-F-BE
3083-97
x N710
AU528F
LS/LK
Dane
Positive Lock THPA (WE)-30
08710-4
0893 Lindsay, OK
11/23/10
Type
Description
Finish
MANUFACTURER/MODEL
Adams
Corbin
Yale
Rite
Russwin
ED5200 x 7100 x
T1357
532
Monarch
Von Duprin
18-R P
Apollo
99NL x
697NL
CX9975L x
992L
(06 Lever)
E-7
Exit Device: Rim, pull trim.
626
E-8
Exit Device: Rim delay exit
device, pull trim, with alarm.
Power Transfer #EPT-10
Power Supply #PS 873-2
Exit Device: Rim, pull trim, with
alarm.
626
626
626
Detex V40 EB W AL RWE
600
Positive Lock THPA (WE)-70
600
Positive Lock THPA- 40
Positive Lock THPA- 40 (TDL) -Time Delay
Positive Lock THPA-70
E-16
Exit Device: Rim, exit only
Exit Device: Rim, weatherproof,
exit only, with alarm.
Exit Device: Rim, weatherproof,
exit only, with alarm.
Exit Device: Rim, exit only, with
alarm.
Exit Device: Rim, exit only, with
alarm.
Exit Device: Rim, lever trim, with
alarm.
Power Transfer #EPT-10
Mini-Power Booster #PS-873-BB
Exit Device: Rim, lever trim
E-17
Exit Device: Rim, pull trim
626
E-18
Exit Device: Rim, lever trim, UL
Listed
626
E-9
E-10
E-11
E-12
E-13
E-14
E-15
D.
2.5
626
600
99NL x
697NL +
99ALK
99EO
626
CX99L X 0
Second
Release
626
99L-992LNL
33NLOPx3308NL
99L-F-992LNL
ED4200x
T1457
7200x
512F
17 R DT
Substitutions: Not permitted.
PULLS AND PUSHES
A.
Materials: ANSI A156.6 for 0.050 inch thickness.
B.
Push and Pulls by types:
Type
Description
Finish
P-1
P-2
P-3
Push
Pull
Pull. 8" CTC x 3/4" dia
630
630
626
2.6
MANUFACTURER/MODEL
Ives
Trimco
8200
1001-2
8314-5
1012-2
8103-8
1194-2
Rockwood
70B
137x70B
107
CLOSERS
A.
Materials & Features:
1.
ANSI A156.4, grade 1.
2.
ADA/ANSI A117.1
3.
UL listed.
4.
Non-handed, non-sized; adjustable 1-6.
5.
180 degree door opening.
6.
Heavy-duty parallel arm.
08710-5
0893 Lindsay, OK
11/23/10
7.
8.
9.
10.
11.
12.
B.
Standard cover.
Multiple backcheck location valve.
Extreme temperature fluid.
Sex nuts and bolts (SNBs).
Provide exposed metal to match hardware.
Size and mount units indicated or, if not indicated, to comply with manufacturer's recommendations for
exposure condition. Reinforce substrate as recommended.
Closers by types:
Type
Description
Finish
C-1
Closer
Painted
2.7
MANUFACTURER/MODEL
Corbin Russwin
LCN
DC6210M54
4041RW PA
TBWMS
Norton
P8501 SNB
Yale
3501 SNB
Dorma
8616 AF86P
FC SNB1
DOOR PROTECTION PLATES
A.
Materials: J100 Protection Plates conforming to ANSI 156.6, stainless steel, 0.050" (1.2 mm) minimum thickness.
Mount centered, flush with bottom of door. Screws: Phillips head sheet metal screws plated to match plate.
B.
Protection Plates by types:
Type
Description
Size
Finish
MANUFACTURER/MODEL
Ives
Trimco
Rockwood
630
630
630
8400
8400
8400
K0050
KA050-2
KA050-2
J102
J101
J101
630
630
8400
J102
K1050F
630
K0050-1
KA050-2 Fire
Rated
KA050-2
Fire Rated
K-1
K-2
K-3
K-4
Not Used
Kick Plate (J102)
Armor Plate (J101)
Armor Plate (J101)
K-5
K-6
Kick Plate (J102)
Armor Plate (UL Rated)
10" x (DW-2")
34" x (DW-2")
41” x (DW-2”)
Notch for lockset
18" x (DW-2")
34" x (DW-2")
K-7
Armor Plate (UL Rated)
36" x (DW-2")
2.8
K1050F
STOPS, HOLDERS AND BUMPERS
A.
Materials:
1.
Door stop mounting: Methods to suit substrates encountered (plastic anchor, drywall anchor, expansion
shield).
2.
Provide gray rubber exposed resilient parts.
3.
Do not furnish aluminum floor stops.
4.
For most doors, the preferred door stop is Wall Stop type S-1 and is specified as such in the hardware
schedule. However, if circumstances prevent a wall stop installation (door too far from perpendicular wall,
door swing into adjacent glass, etc.) then substitute a type S-3 or S-4 floor stop as indicated for use
intended.
5.
Adjust height of floor stops to suit undercut of adjacent door.
B.
Stops, Holders and Bumpers by types:
Type
Description
Finish
S-1
S-2
S-3
Wall Stop
Stop & Holder
Stop. For doors without
630
626
626
MANUFACTURER/MODEL
Ives
Trimco
407
W1276CS
445
1207
436
1211ES
Rockwood
409
477
441
08710-6
0893 Lindsay, OK
11/23/10
Type
Description
S-4
thresholds
Stop. For doors with
threshold or undercut doors
S-5
S-6
Overhead Stop - 3-0 doors
Overhead Stop - 2-6 doors
S-7
Stop & Holder. Kickdown
type. Alum or satin chrome
2.9
Finish
MANUFACTURER/MODEL
Ives
Trimco
Rockwood
626
438
1212 3/4ES
442
626
626
Rixson
9-336
9-236
Glynn-Johnson
904S
902S
Sargent
594S
592S
Ives
452
Trimco
1221-4FF
Rockwood
460
ELECTROMAGNETIC DOOR HOLDERS
A.
Materials & Features:
1.
ANSI A156.15, Grade 1.
2.
UL listed.
3.
Magnet protected against transients and surges up to 600 volts.
4.
24V DC
5.
Holding force 35 lbs., nominal.
6.
Low residual magnetism for easy release of door.
7.
Electrical values +10% -15%.
8.
Provide exposed metal to match hardware.
9.
Size and mount units indicated or, if not indicated, to comply with manufacturer's recommendations for
exposure condition. Reinforce substrate as recommended.
B.
Electromagnetic Door Holders by types:
Type
Description
Finish
DH-1
Door Holder
As Scheduled
2.10
A.
MANUFACTURER/MODEL
LCN
Rixon
SEM 7850 689
FM-998 SA
THRESHOLDS
Thresholds by types:
Type
Description
T-1
T-2
T-3
T-4
Threshold: 5” Heavy-duty abrasive cast aluminum (Alumogrit).
Threshold: 6” x 1/4” Aluminum saddle type, fluted.
Not Used
Threshold: 2" x 1/8" Stainless steel plate, smooth surface, beveled 1
side only. Transition threshold between concrete slab and vinyl tile.
Set threshold in full bed of silicone sealant, butted to adjacent vinyl
tile. Anchor into concrete slab with Hilti Kwik-Con II, #14-134 TFH
fasteners spaced at 6-inch centers using Matched Tolerance drill bit for
dense concrete.
Threshold: 5” x 1/2” Aluminum half saddle type, fluted.
Threshold: 5” x 1/2” Aluminum saddle type, fluted.
Not Used
Threshold: 4” x 1/4” Aluminum half saddle/offset type, fluted.
T-5
T-6
T-7
T-8
Dorma
EM-F24120 652
MANUFACTURER/MODEL
National
Pemko Reese
Wooster
Guard
114
513
271A
S405A
BAR6SS
-210bevel
325
425
255A
171A
S245A
S205A
414
274A
S439A
08710-7
0893 Lindsay, OK
11/23/10
2.11
A.
WEATHERSTRIPPING
Weatherstripping by types:
Type
Description
W-1
W-2
W-3
Jamb & Head Weatherstripping, aluminum, vinyl insert
Door Shoe. Weatherstripping, aluminum, slotted, vinyl insert.
Door Bottom Sweep, surface mounted sweep, anodized
aluminum, neoprene seal.
Meeting Stile Gaskets, aluminum, silicone insert seal.
Jamb Door Gaskets, adhesive application, silicone seal.
Door Shoe Weatherstripping, for hollow metal doors with
inverted bottom channel, recessed thermo-plastic insert,
slotted/adjustable.
Door Shoe Weatherstripping, for hollow metal doors with
inverted bottom channel, recessed vinyl insert, slotted/adjustable
Jamb & Head Weatherstripping, aluminum, silicone insert
W-4
W-5
W-6
W-7
W-8
2.12
MANUFACTURER/MODEL
National Guard
Pemko
155
303AV
35A
217AV
201NA
315CN
Reese
807A
DB596F
323A
160S
5050
35EN
807A
797B
596AF
303AS
S88D
222PK
222AV
155S
303AS
678
MISCELLANEOUS HARDWARE
A.
Silencers: Provide in metal door frames, unless not permitted for fire rating, or unless bumper-type
weatherstripping is provided; three for each single door frame, two for double-door frame.
B.
Miscellaneous Hardware by types:
Type
Description
Size
Finish
MANUFACTURER/MODEL
Stanley
Ives
Lawrence
SP917
WS1920 930
CD4060
144
40
700
M-1
M-2
M-3
M-4
Hasp & Staple
Surface Bolt
Surface Bolt
Viewer
4-1/2”
4”
3”
602
626
626
M-5
M-6
Flush Bolt (UL)
Automatic Flush Bolt
12”
M-7
Electric Strike
M-8
Silencers
Ives
SR64
Trimco
1229-A
Rockwood
608
M-9
Drip Cap
National Guard
16AD
Pemko
346CxFW
Reese
R201A
M-10
Door Coordinator
Ives
469
Trimco
3093
Ives
458
559
626
626
Trimco
3917
Rockwood
629
Rockwood
555
FA712 by Folger Adam
F4114-08 32D 24VAC by Rutherford Controls (Fire Rated)
S6514-08 32D 24VAC by Rutherford Controls (Non Fire
Rated)Transformer: 40VA, 120VAC to 24VAC with provisions for
mounting in a standard 1/2" knockout. No. 599, by Edwards.
Push Button: Single button with one normally open contact and one
normally closed contact. No. KR3BH13, by Square D.
Arrow
Detex
08710-8
0893 Lindsay, OK
11/23/10
M-11
M-12
M-13
Door Alarm with rim
or mortise cylinder
Door Alarm with rim
cylinder
626
Electromagnetic Lock
626
Arrow
130 Series AL
630
Detex
EA-500
Alarm: EA-2500F
Transformer: PP5152-3
ML1548 by Detex.
3000-TD-DYN-LED by DynaLock.
390-ADD-MBSL1 by Locknetics.
8310 SES US28 by Rutherford.
Power Supply/Transformer: 120VAC to 24VAC with provisions
for mounting in a standard 1/2" knockout.
80-800 or 90-800 by Detex.
5500 by DynaLock.
505 by Locknetics.
PS 10.-175 UL by Rutherford.
Push Button: Single button with LED indicator.
PB2100 by Detex.
6110-LED by DynaLock.
603-RD-L2 by Locknetics.
908 32RD by Rutherford.
Blank Lens (2 push buttons required).
Motion Sensor (mount above door on service side)
MN01 by Detex.
ScanII-B by Locknetics.
915 by Rutherford.
Set motion sensor opening time to 20 seconds.
Ives
Rockwood
M-14
M-15
Not Used
Lock Guard
M-16
Removable Mullion
M-18
M-19
M-20
M-21
Push Button
Electric Strike
Power Supply
Keypad
2.13
US32D
321
Von Duprin
4954
Schlage
660PB
626
Securitron
UNL-24
BPS-24-1
DK-26PSS
FABRICATION
A.
Finish and Base Material Designations: Number indicates BHMA Code or nearest traditional U.S. commercial
finish.
B.
Where base material and quality of finish are not otherwise indicated, provide at least commercially recognized
quality.
PART 3 - EXECUTION
3.1
EXAMINATION
A.
Verify that doors and frames are ready to receive Work and dimensions are as instructed by the manufacturer.
08710-9
0893 Lindsay, OK
11/23/10
B.
3.2
Verify that electric power is available to power operated devices and of the correct characteristics.
INSTALLATION
A.
Hardware Mounting Heights: Door and Hardware Institute Recommended Locations for Builders Hardware for
Standard Steel Doors and Frames, except as otherwise indicated.
1.
Conform to requirements of applicable local, State or Federal disabled access requirements for the
installation and operation of door hardware.
B.
Install each hardware item to comply with manufacturer's instructions and recommendations.
C.
Thru-bolt closers on doors.
D.
Vestibule Thresholds: Set and bolt into grout.
3.3
ADJUSTING
A.
3.4
Hardware Adjustment: Return to project one month after Owner's occupancy, and adjust hardware for proper
operation and function. Instruct Walmart personnel in proper maintenance and adjustment.
HARDWARE SCHEDULE
A.
Product Designations: Products specified in the following Hardware Schedule are for reference only. Alternate
products for each hardware type shown may be any of the products as specified in the tables in Part 2 above.
B.
The Hardware Schedule below represents the full set of hardware for each door listed. Refer to the Door Schedule
and Schedule Notes on Sheet A8 for actual hardware components required for each door in this project.
SET 100A
Door 100A - Sales : (Plastic, Pair)
1 ea.
(T-4) Threshold
NG
BAR6SS-2-10bevel
2" x DW x 1/8"
Hardware furnished by door manufacturer per Section 08383.
SET 101A
Doors 101A – Vestibule: (Aluminum/Glass, Bi-Parting Automatic w/ Breakaway)
1 ea.
1 ea.
1 ea.
(L-1) Keyed Cylinder
Locking Device
Threshold
Sc
-
20-001
626
See Section 08462.
See Section 08462.
All other hardware furnished by door manufacturer as specified in Section 08462.
08710-10
0893 Lindsay, OK
11/23/10
SET 101B
Doors 101B – Vestibule: (Aluminum/Glass, Bi-Parting Automatic w/ Breakaway)
1 ea.
1 ea.
1 ea.
(L-1) Keyed Cylinder
Locking Device
Threshold
Sc
-
20-001
626
See Section 08462.
See Section 08462.
All other hardware furnished by door manufacturer as specified in Section 08462.
SET 101C
Doors 101C – Vestibule: (Aluminum/Glass, Bi-Parting Automatic w/ Breakaway)
1 ea.
1 ea.
1 ea.
(L-1) Keyed Cylinder
Locking Device
Threshold
Sc
-
20-001
626
See Section 08462.
See Section 08462.
All other hardware furnished by door manufacturer as specified in Section 08462.
SET 101D
Doors 101D - Vestibule-GM: (Aluminum/Glass, Bi-Parting Automatic w/ Breakaway)
1 ea.
1 ea.
1 ea.
(L-1) Keyed Cylinder
Locking Device
Threshold
Sc
-
20-001
626
See Section 08462.
See Section 08462.
All other hardware furnished by door manufacturer as specified in Section 08462.
SET 101E
Doors 101E - Vestibule: (Aluminum/Glass, Single-Slide Automatic w/ Breakaway)
1 ea.
1 ea.
(L-1) Keyed Cylinder
Locking Device
Sc
-
20-001
626
See Section 08462.
All other hardware furnished by door manufacturer as specified in Section 08462.
SET 101F
Doors 101F - Vestibule: (Aluminum/Glass, Single-Slide Automatic w/ Breakaway)
1 ea.
1 ea.
(L-1) Keyed Cylinder
Locking Device
Sc
-
20-001
626
See Section 08462.
All other hardware furnished by door manufacturer as specified in Section 08462.
08710-11
0893 Lindsay, OK
11/23/10
SET 164A
Door 164A - Alcove : (Plastic, Pair)
1 ea.
(T-4) Threshold
NG
BAR6SS-2-10bevel
2" x DW x 1/8"
Hardware furnished by door manufacturer per Section 08383.
SET 165A
Door 165A – Customer Men: (HM, Single)
1 ea.
1 ea.
1 ea.
1 ea.
2 ea.
1 ea.
3 ea.
(H-6)
(P-1)
(P-2)
(C-1)
(K-3)
(S-2)
(M-8)
Continuous Geared Hinge
Push
Pull
Closer
Armor Plate
Stop and Holder
Silencers
Sel
I
I
CR
I
I
I
SL21 SD x SDTF x FDH
8200
8314-5
DC6210-M54
8400
34" x (DW-2")
445
SR64
CL
630
630
689
630
SET 166A
Door 166A – Customer Women: (HM, Single)
1 ea.
1 ea.
1 ea.
1 ea.
2 ea.
1 ea.
3 ea.
(H-6)
(P-1)
(P-2)
(C-1)
(K-3)
(S-2)
(M-8)
Continuous Geared Hinge
Push
Pull
Closer
Armor Plate
Stop and Holder
Silencers
Sel
I
I
CR
I
I
I
SL21 SD x SDTF x FDH
8200
8314-5
DC6210-M54
8400
34" x (DW-2")
445
SR64
CL
630
630
689
630
SET 500A
Doors 500A - Garden Center: (Aluminum/Glass, Single-Slide Automatic w/ Breakaway)
1 ea.
1 ea.
1 ea.
(L-1) Keyed Cylinder
Locking Device
Threshold
Sc
-
20-001
626
See Section 08462.
See Section 08462.
SET 500B
Door 500B - Garden Center: (Chain Link, Rolling Gate)
Hardware furnished by fence manufacturer as specified in Section 02821.
END OF SECTION
08710-12
0893 Lindsay, OK
11/23/10
UniSpec II - Store Planning
082710a
SECTION 08800 - GLAZING
PART 1 GENERAL
1.1
SUMMARY
A.
Section Includes:
1.
Glass and glazing for interior and exterior applications.
B.
Related Sections:
1.
Section 08411 - Aluminum Framed Storefronts: Aluminum storefront framing system.
2.
Section 08462 - Automatic Sliding Entrance Doors: Glazed doors.
3.
Section 08710 - Door Hardware: Hardware coordination.
1.2
REFERENCES
A.
The publications listed below form a part of this specification to the extent referenced. Publications are referenced
within the test by these basic designations only.
B.
American National Standards Institute (ANSI):
1.
ANSI Z97.1 - Safety Performance Specifications and Methods of Test for Safety Glazing Material Used in
Buildings.
C.
ASTM International (ASTM):
1.
ASTM C920 - Specification for Elastomeric Joint Sealants.
2.
ASTM C1036 - Flat Glass.
3.
ASTM C1048 - Heat-Treated Flat Glass - Kind HS, Kind FT Coated and Uncoated Glass.
4.
ASTM D2000 - Classification System for Rubber Products in Automotive Applications.
5.
ASTM E2074 - Standard Test Method for Fire Tests of Door Assemblies, Including Positive Pressure
Testing of Side-Hinged and Pivoted Swinging Door Assemblies.
D.
Flat Glass Marketing Association (FGMA):
1.
FGMA - Glazing Manual and Glazing Sealing Systems Manual.
E.
National Fire Protection Agency (NFPA):
1.
NFPA 252: Standard Methods of Fire Tests of Door Assemblies.
2.
NFPA 257: Standard on Fire Test for Window and Glass Block Assemblies.
F.
Consumer Product Safety Standards for Architectural Glazing.
1.
CPSC 16 CFR, Part 1201.
G.
Underwriters Laboratories, Inc. (UL):
1.
UL 10B - Fire Tests of Door Assemblies.
1.3
SUBMITTALS
A.
Contract Closeout Submittals: Submit the following under provisions of Section 01770.
B.
Letters of Certification: Submit certification from fire-protection-rated glazed light manufacturer that permanent
label identification is applied on each glazed light.
1.4
QUALITY ASSURANCE
A.
Conform to FGMA Glazing Manual for glazing installation methods.
08800-1
0893 Lindsay, OK
11/23/10
B.
Provide permanent labeling for safety glass indicating conformance with specified standards.
C.
Fire-Protection-Rated Glazing Labeling: Permanently mark fire-protection-rated glazing with a UL label of
certification or label of certification of a testing agency acceptable to Authorities Having Jurisdiction. Label shall
indicate manufacturer's name, test standard, whether glazing is for use in fire doors or other openings, whether or
not glazing passes hose-stream test, whether or not glazing has a temperature rise rating of 450 degrees and the
fire-resistance rating in minutes.
PART 2 PRODUCTS
2.1
GLASS MATERIALS
A.
Tempered Glass: ASTM C 1048, Kind FT (Fully Tempered), Condition A (Uncoated), Type I (Transparent Glass,
Flat), Quality q3 (Glazing Select).
1.
Conform to ANSI Z97.1 and CPSC 16CFR Part 1201.
2.
Tempered glazing panels as specified in the Glass Schedule below (including doors, sidelights, storefronts,
and transoms) shall comply with the CPSC 16CFR Part 1201 criteria for Category I or II as follows:
a.
Glazing Panels 9 sq. ft. or less:. Category I.
b.
Glazing Panels more than 9 sq. ft.: Category II.
c.
Thickness:
1)
1/4 inch unless otherwise shown or specified.
3.
Clear: Class 1 (Clear).
4.
Tinted: Class 2 (Tinted Heat Absorbing and Light Reducing).
a.
Color: Gray tint or bronze tint (match existing).
B.
Identification:
1.
Each unit of tempered glass shall be permanently identified by the manufacturer. The identification shall be
etched or ceramic fired on the glass and be visible when the unit is glazed.
2.2
GLAZING COMPOUNDS
A.
Polysulphide Sealant: Two component, chemical curing, non-sagging type; cured Shore A hardness of 15-25.
B.
Silicone Sealant: Single component, chemical curing; capable of water immersion without loss of properties; nonbleeding, non-staining; cured Shore A hardness of 15-25.
1.
Color: Clear.
C.
Acrylic terpolymer compounded especially for glazing; non-hardening, non-staining, and non-bleeding.
2.3
GLAZING ACCESSORIES
A.
Setting Blocks: Resilient blocks of 70 to 90 Shore A durometer hardness; compatible with glazing sealant.
B.
Spacers: Resilient blocks of 40 to 50 Shore A durometer hardness; self adhesive on one side; compatible with
glazing sealant.
C.
Filler Rods: Closed cell or jacketed foam rods of polyethylene, butyl, neoprene, polyurethane, or vinyl; compatible
with glazing sealant.
D.
Joint Cleaners, Primers, and Sealers: As recommended by glazing sealant manufacturer.
E.
Gaskets: ASTM D2000, SBC 415 to 3BC 620; extruded or molded neoprene or EPDM, black.
08800-2
0893 Lindsay, OK
11/23/10
PART 3 EXECUTION (REFER TO RELATED SECTIONS FOR OWNER PROVIDED WORK IN THIS SECTION)
3.1
EXAMINATION
A.
Verify surfaces of glazing channels or recesses are clean, free of obstructions, and ready for work of this Section.
B.
Beginning of installation means acceptance of substrate.
3.2
PREPARATION
A.
Clean contact surfaces; prime or seal where recommended by sealant manufacturer for intended application.
B.
Inspect glass edges immediately prior to setting; discard those with edge damage that will contribute to glazing
failure.
3.3
GLAZING
A.
Locate setting blocks at quarter points of sill; set in sealant if heel or toe bead is required.
B.
Install spacers inside and out except where preshimmed tape or glazing gaskets are to be used.
C.
Set each piece in a series to other pieces in pattern draw, bow, or other visually perceptible characteristics.
D.
Provide glazing sealants and gaskets as required for particular glazing application. Coordinate with other Sections
for material compatibility.
E.
Gaskets:
1.
Provide adequate anchorage, particularly for driven-in wedge gaskets.
2.
Miter and weld ends of channel gaskets at corners to provide continuous gaskets.
3.
Seal face gaskets at corners with sealant to close opening and prevent withdrawal of gaskets from corners.
F.
Do not leave voids in glazing channels except as specifically indicated or recommended by glass manufacturer.
Force sealant into channel to eliminate voids. Tool exposed surfaces to slight wash away from joint. Trim and
clean promptly.
G.
Do not allow sealant to close weeps of aluminum framing.
H.
Provide filler rod where sealants are used in the following locations:
1.
Head and jamb channels.
2.
Colored glass over 75 united inches in size.
3.
Clear glass over 125 united inches in size.
3.4
ADJUSTING AND CLEANING
A.
3.5
Immediately prior to Walmart acceptance of Project, replace broken or otherwise damaged glass. Wash and polish
glass inside and out.
GLASS SCHEDULE
A.
Provide type of glass specified for the applications scheduled as follows:
APPLICATION/LOCATION
TYPE OF GLASS
Interior storefront including storefront doors
Clear tempered glass.
Storefront transom (Garden Center Entry)
Fully etched and sealed tempered glass.
08800-3
0893 Lindsay, OK
11/23/10
Exterior storefront including storefront doors
Tinted tempered glass.
Exterior Automatic Sliding Doors and Transoms
Specified in Section 08462
END OF SECTION
08800-4
0893 Lindsay, OK
11/23/10
UniSpec II - Store Planning
111910
SECTION 09250 - GYPSUM BOARD
PART 1 - GENERAL
1.1
SUMMARY
A.
Section Includes:
1.
Interior nonload-bearing steel stud partition framing 20 (30 mil) gage and lighter (designed for 5 pounds per
square foot uniform load perpendicular to partition).
2.
Gypsum board.
3.
Backer materials: Backer panels for wall tile and plastic wall panels.
B.
Related Sections:
1.
Section 06100 - Rough Carpentry: Wood furring strips, plywood, blocking, and fasteners attached to
partition framing.
2.
Section 09900 - Paints and Coatings: Paint finish applied to gypsum board.
1.2
REFERENCES
A.
The publications listed below form a part of this specification to the extent referenced. Publications are referenced
within the test by these basic designations only.
B.
ASTM International (ASTM):
1.
ASTM A 653 - Steel Sheet, Zinc-Coated (Galvanized) or Zinc-Iron Alloy-Coated (Galvannealed) by the
Hot-Dip Process
2.
ASTM C 475 - Joint Compound and Joint Tape for Finishing Gypsum Board.
3.
ASTM C 557 - Adhesives for Fastening Gypsum Wallboard to Wood Framing.
4.
ASTM C 645 - Nonstructural Steel Framing Members.
5.
ASTM C 754 - Installation of Steel Framing Members to Receive Screw-Attached Gypsum Panel Products.
6.
ASTM C 840 - Application And Finishing Of Gypsum Board.
7.
ASTM C 954 - Steel Drill Screws for the Application of Gypsum Board or Metal Plaster Bases to Steel
Studs From 0.033 inches to 0.112 inches in Thickness.
8.
ASTM C 1002 - Steel Self-Piercing Tapping Screws For The Application Of Gypsum Panel Products Or
Metal Plaster Bases To Wood Studs Or Steel Studs.
9.
ASTM C 1178 - Coated Glass Mat Water-Resistant Gypsum Backing Panel.
10. ASTM C 1396 - Gypsum Board
11. ASTM C 1658 - Glass Mat Gypsum Panels.
12. ASTM D 3273 - Standard Test Method for Resistance to Growth of Mold on the Surfaces of Interior
Coatings in an Environmental Chamber.
13. ASTM D 3274 - Standard Test Method for Evaluating Degree of Surface Disfigurement of Paint Films by
Microbial (Fungal or Algal) Growth or Soil and Dirt Accumulation.
C.
Gypsum Association (GA):
1.
GA-214 - Levels of Gypsum Board Finish.
2.
GA-216 - Application and Finishing of Gypsum Board.
3.
GA-234 - Control Joints For Fire-Resistance Rated Systems.
4.
GA-600 - Fire Resistance and Sound Control Design Manual.
D.
Steel Stud Manufacturer's Association (SSMA)
1.
Member listing
1.3
SUBMITTALS
A.
Product Data: Provide product data for framing members.
09250-1
0893 Lindsay, OK
11/23/10
1.4
QUALITY ASSURANCE
A.
1.5
Installer Qualifications: Company specializing in the installation of light gage metal framing components and
gypsum wallboard with minimum 5 years documented experience.
DELIVERY, STORAGE, AND HANDLING
A.
Section 01600 - Product Requirements: Transport, handle, store, and protect products.
B.
Protect metal framing from corrosion, deformation, and other damage during delivery, storage, and handling.
C.
Store and protect metal framing with weatherproof covering, and ventilate to avoid condensation.
D.
Deliver materials in original packages, containers, or bundles bearing brand name and identification of
manufacturer or supplier.
E.
Stack gypsum board flat to prevent sagging.
1.6
PROJECT CONDITIONS OR SITE CONDITIONS
A.
Environmental Requirements:
1.
Establish and maintain environmental conditions for applying and finishing gypsum board in conformance
with GA-216.
PART 2 - PRODUCTS
2.1
FRAMING MATERIALS
A.
Manufacturer: Subject to compliance with requirements, provide products of one of the following:
1.
Dietrich Metal Framing.
2.
The Steel Network.
3.
Other manufacturers listed as a member of SSMA.
B.
Recycled Content of Steel Products: Provide steel framing products with an average recycled content of steel
products such that the postconsumer recycled content plus 1/2 of preconsumer recycled content is not less than 25
percent.
C.
Interior Nonload-Bearing Partition Framing: ASTM C 645; galvanized sheet steel, channel shaped, punched for
utility access, depth and gages as indicated below unless otherwise indicated on Drawings.
1.
Partition having an unbraced length of 12 feet or Less: Minimum 25 gage (18 mil).
2.
Partition having an unbraced length greater than 12 Feet: Minimum 20 gage (30 mil).
3.
Partition (bulkheads) suspended from overhead having an unbraced length of 10 Feet or Less: Minimum 25
gage (18 mil).
4.
Partition height 8 feet and less: Minimum 25 gage (18 mil).
5.
Partition height 8 - 16 feet: Minimum 22 gage (27 mil).
6.
Partition height 16 feet and higher: Minimum 20 gage (30 mil).
D.
Option: Modified framing members of equivalent thickness for 20 and 25 gage metal such as UltraSTEEL by
Dietrich may be used in lieu of traditional framing members.
E.
Partition Floor Tracks and Runners: ASTM C 645; galvanized sheet steel, channel shaped, same depth and gage
as studs, tight fit; solid web.
F.
Capture (Deflection) Track: Deep leg track at roof deck or structure to provide vertical travel as indicated.
1.
Contractor's Option: Manufacturer’s standard double or single deflection track as follows:
a.
VertiClip or VertiTrack by The Steel Network, Raleigh, NC (888) 474-4876. If this option is used,
09250-2
0893 Lindsay, OK
11/23/10
b.
c.
track may be 20 gage (30 mil) for all stud sizes.
FastTop Clip by Dietrich Metal Framing, Pittsburg, PA (412) 281-2805.
SLP-TRK by Brady Innovations as distributed by Dietrich Metal Framing.
G.
Furring and Bracing: ASTM C 645; galvanized sheet steel.
1.
Studs: ST25 - 2-1/2 inch deep, 25 gage (18 mil).
2.
Studs: ST25 - 3-5/8 inch deep, 25 gage (18 mil).
3.
Resilient Furring Channels: 1/2 inch deep x 2-1/2 inch wide, 25 gage (18 mil)
4.
Hat-Shaped Channels: 7/8 inch deep x 1-1/2 inch wide, 25 gage (18 mil).
5.
Cold-Rolled Channels: 3/4 x 1/2 inch and 1-1/2 x 17/32 inch, 16 gage (54 mil).
6.
Z Furring Channel: 1-1/2 inch deep, 25 gage (18 mil).
7.
Clip Angles: 2 inches x 2 inches x 16 gage (54 mil) x 1/4 inch less than stud width.
8.
Contractor’s Option: In lieu of cold rolled channels and clip angles for horizontal wall bridging, Contractor
may provide one of the following:
a.
Bridge Bar by the Steel Network.
b.
TradeReady Spazzer 9200 Bridging and Bracing Bar by Dietrich Metal Framing
H.
Partition Framing Fasteners: Corrosion-resistant self-drilling self-tapping steel screws.
1.
22 (27 mil) Gage Framing: ASTM C 1002; 3/8 inch Type S pan head.
2.
20 (30 mil) Gage and Heavier Framing: ASTM C 954; 5/8 inch Type S-12 low-profile head.
I.
Bracing to Framing Attachment Angle Fasteners: #12 diameter pan head corrosion-resistant self-drilling screws.
J.
Partition Floor Track Anchorage Device: Low velocity powder-actuated drive pins; minimum 0.138 inch shank
diameter x 1-1/2 inch shank length with 7/8 inch diameter washer.
1.
Hilti PAT System using X-ZF 37 P8S36 Pins, by Hilti, Tulsa, OK (800) 879-8000.
2.
Ramset System using 1500SD Pins, by ITW Ramset, Wood Dale, IL (630) 350-0370.
K.
Wall Furring to Concrete or Masonry Wall Fasteners: Hex head sleeve anchors; minimum 1/4 inch diameter x
minimum 1-1/8 inch embedment.
1.
Slv Anch HX 5/16 x 2-1/2, by Hilti, Tulsa, OK (800) 879-8000.
2.
Dynabolt HN-1413, by ITW Redhead, Wood Dale, IL (708) 350-1558.
L.
Furring Channel to Masonry or Concrete Surface Fasteners: Low velocity powder-actuated drive pins of size to
suit application.
M.
Flat Straps and Plates: ASTM A 653; galvanized sheet steel, gage, shape, and configuration as indicated on
Drawings.
1.
Contractor's Option: In lieu of 2-inch continuous metal strap at capture tracks, Contractor may provide one
of the following:
a. Bridge Bar by The Steel Network.
b. TradeReady Spazzer 9200 Bridging and Bracing Bar by Dietrich Metal Framing
2.2
GYPSUM BOARD MATERIALS
A.
Manufacturer: United States Gypsum Company, Chicago, IL (800) 874-4968.
1.
United States Gypsum (USG) gypsum wallboard designations are used within this Section to identify
gypsum wallboard and accessory types, unless noted otherwise.
2.
Alternate Manufacturers: Subject to compliance with project requirements, unless otherwise specified,
gypsum board and accessories equivalent to the USG products specified, by one of the following alternate
manufacturers may be provided:
a. CertainTeed Corp, Tampa, FL (866) 427-2872.
b. Georgia-Pacific, Atlanta, GA (800) 284-5347.
c. National Gypsum Company, Gold Bond Building Products, Charlotte, NC (800) 628-4662.
d. Temple-Inland, Diboll, TX. (972) 235-4448.
e. The Steel Network, Raleigh, NC (888) 474-4876 (Accessories only)
09250-3
0893 Lindsay, OK
11/23/10
f.
Dietrich Metal Framing, Pittsburg, PA (412) 281-2805 (Accessories only).
B.
Standard Gypsum Board: Sheetrock, ASTM C 1396; 1/2 inch and 5/8 inch thick, maximum permissible length;
ends square cut, tapered edges.
C.
Water Resistant Gypsum Board: ASTM C 1396 or C 1658, 1/2 inch thick, maximum permissible lengths; ends
square cut, tapered edges. Mold resistance of water resistant gypsum board shall score a rating of not less than 10
when tested in accordance with ASTM D 3273.
1.
Sheetrock Brand Mold Tough by USG.
2.
Gold Bond Brand XP Gypsum Board by National Gypsum.
3.
DensArmor Plus by Georgia-Pacific.
4.
ComfortGuard Mold Resistant by Temple Inland.
D.
Fire Resistant Gypsum Board: ASTM C 1396, Type X; 5/8 inch thick, maximum permissible lengths; ends
square cut, tapered edges; core material as required to comply with Underwriters Laboratories (UL) assemblies
indicated on Drawings.
1.
Sheetrock Firecode Core by USG.
E.
Water and Fire Resistant Gypsum Board: ASTM C 1396, Type X; 5/8 inch thick, maximum permissible lengths;
ends square cut, tapered edges, core material as required to comply with Underwriters Laboratories (UL)
assemblies indicated on Drawings. Mold resistance of water and fire resistant gypsum board shall score a rating of
not less than 10 when tested in accordance with ASTM D 3273.
1.
Sheetrock Mold Tough Firecode “C” Core, by USG.
2.
Gold Bond Brand XP Fire-Shield C Gypsum Board, by National Gypsum.
3.
ComfortGuard Type C by Temple Inland.
F.
Impact Resistant Gypsum Board: ASTM C 1396, thickness shown, manufactured to produce greater resistance to
surface indentation and through-penetration than standard gypsum panels.
1.
Sheetrock Brand Abuse-Resistant Gypsum Wallboard by US Gypsum.
2.
Hi-Abuse Brand Wallboard by National Gypsum.
3.
ProRoc Brand Abuse Resistant Gypsum Board by CertainTeed.
4.
DensArmor Plus Impact Resistant by Georgia-Pacific.
5.
ComfortGuard Abuse Resistant Gypsum Board by Temple Inland.
G.
Impact and Water Resistant Gypsum Board: ASTM C 1396, thickness shown, manufactured to produce greater
resistance to surface indentation and through-penetration than standard gypsum panels and providing water
resistant gypsum core with paperless facing and mold resistance with a rating of not less than 10 when tested in
accordance with ASTM D 3273.
1.
DensArmor Plus Impact Resistant by Georgia Pacific.
H.
Gypsum Board Fasteners:
1.
Metal Framing: ASTM C 954 and C 1002, Type S-12 bugle head, corrosion-resistant self-drilling selftapping steel screws.
a. One Layer 1/2 Inch: 1 inch.
b. One Layer 5/8 Inch: 1-1/8 inch.
c. Two Layers: 5/8 Inch: 1-7/8 inch.
2.
Wood Furring: ASTM C 1002, 1-1/4 inch, Type W bugle head, corrosion-resistant self-drilling steel
screws.
I.
Gypsum Board Accessories:
1.
Corner Beads: No. 104 Dur-A-Bead galvanized steel corner bead.
2.
Edge Trim: Galvanized steel casing.
a.
No. 200-B, L shape for tight abutment at edges.
b.
No. 200-A, J shape at other locations.
3.
Control Joint Accessory Piece:
a.
No. 093 roll-formed zinc.
09250-4
0893 Lindsay, OK
11/23/10
4.
5.
2.3
Vertical Movement Joint Trim:
a.
No DRMZ-625-200 aluminum Z shape trim by Fry Reglet.
Adhesive:
a.
Commercial Adhesive complying with ASTM C 557.
JOINT TREATMENT MATERIALS
A.
General: Comply with ASTM C 475.
B.
Joint Tape:
1.
Interior Gypsum Wallboard: Paper tape.
2.
Backer Panels:
a.
Glass-Mat Backer Material: 10/10 grid glass mesh tape.
C.
Joint Compound
1.
Interior Gypsum Wallboard:
a.
Sheetrock Ready-Mixed Lightweight All-Purpose Joint Compound with Dust Control, by USG.
b.
Substitutions not permitted.
2.
Backer Panels:
a.
Glass-Mat Backer Materials: Use setting-type taping compound as recommended by backer panel
manufacturer and that is rated 10 when tested in accordance with ASTM D 3273 and evaluated in
accordance with ASTM D 3274.
2.4
BACKER MATERIALS
A.
Provide cementitious backing materials as follows where indicated to receive cement board, cement backer board,
or cementitious backer board.
1.
Fiber Cement Backing Board: Hardibacker by James Hardie Building Products, Mission Viejo, CA (888)
542-7343.
2.
Thickness as indicated.
a.
Hardibacker 250, 1/4".
b.
Hardibacker 500, 1/2".
c.
Other as noted on Drawings.
B.
Glass-Mat Backer Materials: Provide glass-mat moisture resistant gypsum core backer materials complying with
ASTM C 1178 as follows:
1.
Product: DensShield Tile Backer by Georgia Pacific.
2.
Glass-Mat Backer Material shall score a rating of 10 when tested according to ASTM D 3273.
3.
Thickness: As indicated.
4.
Substitutions not permitted.
PART 3 - EXECUTION
3.1
EXAMINATION
A.
Examine existing conditions and adjacent areas where products will be installed and verify that conditions conform
to product manufacturer's requirements. Verify that building framing components are ready to receive Work.
Verify that rough-in utilities are in-place and located where required. Do not proceed until unsatisfactory
conditions have been corrected.
B.
Examine panels to assure they are dry and free of moisture and mold damage as evidenced by discoloration,
sagging, irregular shape, fuzzy or splotchy surface contamination, and discoloration.
C.
Beginning of erection and installation indicates acceptance of existing conditions.
09250-5
0893 Lindsay, OK
11/23/10
3.2
INSTALLATION: STEEL FRAMING, GENERAL
A.
Installation Standards: Comply with ASTM C 754, and ASTM C 840 requirements that apply to framing
installation and with further details and instruction by gypsum board manufacturer's written construction
guidelines.
B.
Install supplementary framing, blocking, and bracing at terminations in gypsum board assemblies to support
fixtures, equipment services, heavy trim, grab bars, toilet accessories, furnishings, or similar construction.
Comply, if none available, with United States Gypsum's "Gypsum Construction Handbook."
3.3
INSTALLATION - PARTITION FRAMING
A.
Install studs and fasteners in accordance with manufacturer's published instructions, ASTM C 754, GA-216, and
GA-600.
B.
Metal Stud Spacing: Unless otherwise noted, provide interior framing at maximum 24 inches on center. Provide
spacing of 16 inches on center maximum for walls to receive ceramic tile.
C.
Align stud web openings horizontally.
D.
Splice studs with minimum 8 inch nested lap, fasten each stud flange with minimum two screws.
E.
Construct corners using minimum three studs.
F.
Double stud at wall openings, door and window jambs, maximum 2 inches from each side of openings.
G.
Place studs as indicated on Drawings, minimum 2 inches from abutting walls.
H.
Install framing between studs for attachment of mechanical and electrical items.
I.
Install intermediate studs above and below openings to match wall stud spacing.
J.
Refer to Drawings for indication of partitions extending to finished ceiling only and for partitions extending
through ceiling to building structure above.
K.
Maintain clearance under structural members to avoid deflection transfer to studs.
1.
Where indicated, construct partition to accommodate vertical deflection.
2.
Install optional products specified in Part 2 above in accordance with manufacturer's printed instruction.
a.
Install clip with step bushing in center of slotted hole.
b.
Use a minimum of two fasteners per clip leg to connect clip to structure and partition framing.
c.
Attach clip to each stud by screwing through the center of each step bushing.
L.
Fasten studs adjacent to door and window frames, partition intersections, and corners to top and bottom runner
flanges in double-stud fashion with metal lock fastener tools.
1.
Securely fasten studs to jamb and head anchor clips of door and borrowed-light frames.
2.
Place horizontally a cut-to-length section of runner with web-flange bend at each end, fasten with minimum
one screw per flange.
3.
Position a cut-to-length stud (extending to top runner) at vertical panel joints over door frame header.
M.
Lateral Bracing for Metal Studs:
1.
In metal stud partitions and bulkheads where length of metal studs is over 8 feet, install lateral bracing using
one of the following methods:
a.
Install 1-1/2 inch cold-rolled channel through stud web holes and screw attach in place with clip
angles. Lap channels by nesting one inside the other to a depth of at least 8 inches and wire tie
together.
b.
Install optional products specified in Part 2 above in accordance with the manufacturers printed
09250-6
0893 Lindsay, OK
11/23/10
instructions.
Install field-cut runner for solid bridging at each end of wall, adjacent to wall openings, and 10 feet
on center maximum. Install 1-1/2 inch wide, 20 (30 mil) gage strap bracing on both sides of stud.
Fasten strap bracing to each solid bridging runner section with four screws.
Gypsum Board Partitions: Space lateral bracing at the following intervals:
a.
Provide bracing at ceiling line or at mid-span of studs at areas without ceilings.
Wire Mesh Partitions: Space lateral bracing at the following intervals:
a.
Stud Length Greater Than 8 Feet and Up To 10 Feet: Provide bracing at midpoint.
b.
Stud Length Greater Than 10 Feet and Up To 15 Feet: Provide bracing at third points.
c.
Stud Length Greater Than 15 Feet and Up To 20 Feet: Provide bracing at quarter points.
c.
2.
3.
N.
Install braced framing of steel stud framing as indicated on Drawings. Use only screw attachments.
O.
Blocking: Screw attach wood blocking between studs. Install blocking for support of plumbing fixtures, toilet
partitions, wall cabinets, toilet accessories and hardware.
P.
Framing Fastening: Fasten framing in accordance with manufacturer's published instructions and schedule below,
unless indicated otherwise on Drawings.
CONNECTION
FASTENER
Floor Track to Concrete ....................................................................
Partition Stud to Floor Track ............................................................
Stud Brace Web to Stud Web ...........................................................
Plates and Straps to Studs .................................................................
Stud Web to Stud Web ......................................................................
Stud Brace Web to Attachment Angle ..............................................
Lateral Bracing to Partition Stud Using clip Angles .........................
1 - Pin at 32 inches on center.
1 - Screw each side at each flange.
2 - Screws.
2 - Screws.
2 - Screws.
2 - Screws.
2 - Screws to stud and 2 - Screws to cold
rolled channel.
Runner to Header .............................................................................. 1 - Screw at 16 inches on center, maximum 6
inches from each end.
3.4
INSTALLATION: SUSPENDED CEILING
A.
Unless otherwise shown, install suspended ceilings in accordance with the following requirements.
B.
Suspend ceiling hangers from building structure as follows:
1.
Install 1 1/2" cold rolled channels 4'-0" oc with 8 ga hanger wire spaced a max of 4'-0" oc along carrying
channels. Attach 7/8” screw furring channels spaced 16" oc perpendicular to the 1 1/2" channel with
double strand of saddle tied # 16 ga galvanized tie wire or 1 1/2" furring channel clips. Apply 1/2" gypsum
board with its long dimension at right angles to the furring channels. Attach gypsum board with 1" self
drilling drywall screws 12" oc in the field of the board 8" or 12" oc at butt joints, located not more than 1/2"
from edges.
2.
Install hangers plumb and free from contact with insulation or other objects within ceiling plenum that are
not part of supporting structural or ceiling suspension system. Splay hangers only where required to miss
obstructions and offset resulting horizontal forces by bracing, countersplaying, or other equally effective
means.
3.
Where width of ducts and other construction within ceiling plenum produces hanger spacing that interferes
with the location of hangers required to support standard suspension system members, install supplemental
suspension members and hangers in form of trapezes or equivalent devices. Size supplemental suspension
members and hangers to support ceiling loads within performance limits established by referenced
standards.
4.
Secure wire hangers by looping and wire-tying, either directly to structures or to inserts, eyescrews, or other
devices and fasteners that are secure and appropriate for substrate, and in a manner that will not cause them
to deteriorate or otherwise fail.
5.
Do not attach hangers to steel deck tabs.
09250-7
0893 Lindsay, OK
11/23/10
6.
7.
C.
3.5
Do not attach hangers to steel roof deck. Attach hangers to structural members.
Do not connect or suspend steel framing from ducts, pipes, or conduit.
Installation Tolerances: Install steel framing components for suspended ceilings so members for panel attachment
are level to within 1/8 inch in 12 feet measured lengthwise on each member and transversely between parallel
members.
INSTALLATION - FURRING
A.
Furring Channels:
1.
Attach vertically spaced at maximum 16 inches on center, to masonry and concrete surfaces with hammer
set or powder driven fasteners staggered 24 inches on center on opposite flanges.
2.
Nest channels 8 inches at splices and anchor with 2 fasteners in each wing.
B.
Wall Furring:
1.
Secure top and bottom runners to structure.
2.
Space metal studs at maximum 16 inches on center.
3.
Furring for Fire Rating: Install metal furring as required for fire resistance ratings indicated on Drawings,
and to GA-600 requirements.
3.6
INSTALLATION - GYPSUM BOARD
A.
Install gypsum board in accordance with manufacturer's published instructions, ASTM C 840, GA-216, and GA600.
1.
Use water resistant gypsum board at wet areas including walls and ceiling in toilet rooms, janitor closets,
and food prep areas as applicable and where shown.
2.
Use fire resistant gypsum board at locations of fire-resistive rated assemblies indicated on Drawings.
3.
Use water and fire resistant gypsum board at locations of fire-resistive rated assemblies where water
resistant gypsum board is specified.
4.
Use standard gypsum board at locations not indicated to be fire resistant or water resistant type.
B.
Where applicable, install ceiling panels before the installation of wall panels.
C.
Erect single layer gypsum board in most economical direction in accordance with ASTM C 840, with attachment
to firm bearing surfaces over framing members. Do not align panel joints with edges of openings.
D.
Double Layer Applications: Secure second layer to first with screws; apply second layer with screws, staggering
joints with those of first layer. Use adhesive only to hold second layer until screwed in place. Use fire rated
gypsum backing board for fire rated partitions.
E.
Treat cut edges, holes, fastener heads, and joints, including those at angle intersections, in water resistant gypsum
board with specified joint compound. Treat prior to installation.
F.
Place gypsum panels over supporting framing members with panel ends aligning and parallel with framing
members. Leave bottom edge spacing above floor in accordance with GA-216. Install access panels to all control
dampers.
G.
Install fasteners spaced and located in accordance with GA-216 or ASTM C840.
3.7
BACKER MATERIALS
A.
Install backer materials where indicated to receive glass-mat backer material.
manufacturer's instructions.
Install in accordance with
09250-8
0893 Lindsay, OK
11/23/10
3.8
JOINT TREATMENT
A.
Install joint treatment in accordance with GA-216.
B.
Install corner bead, trim, and casing in accordance with GA-216.
C.
Install control joints full height of partition with 1/2 inch gap between board edges and between studs. Control
joints shall be installed in accordance with the gypsum manufacturer’s recommended guidelines for control joints
or the Gypsum Association GA-234 for control joint in fire rated systems. Apply sealant at base of joint and
control joint accessory piece at face. Install control joints at the following locations:
1.
Where a wall or partition runs in an uninterrupted straight plane exceeding 30 linear feet.
2.
At pairs of doors, install vertical control joint at each jamb. At single doors, install control joint at latch
side of jamb.
3.9
FINISH
A.
Apply gypsum board finish in accordance with manufacturer's published instructions and GA-214 Finish Levels.
B.
Provide gypsum board finish levels at locations as follows:
1.
Level 0 (GA-214): No taping, finishing, or accessories necessary.
a.
Exposed surfaces above 12 ft high in Cart Storage Area.
2.
Level 1 (GA-214): Joints and interior angles have tape embedment set in joint compound. Surface free of
excess joint compound. Tool Marks and ridges are acceptable.
a.
Areas above ceilings where required by drawings.
b.
Concealed areas.
c.
Areas where Customers do not have access.
d.
Stockroom Area and Stockroom Area Corridors.
e.
Areas not indicated to receive Level 3 Finish.
3.
Level 3 (GA-214): Joints and interior angles have tape embedded in joint compound and one additional
coat of joint compound applied over all joints and interior angles and two separate coats of joint compound
are applied over joints, angles, fastener heads, and accessories. Surface smooth and free of tool marks and
ridges.
a.
Sales Areas.
b.
Tenant Spaces.
c.
Public Restrooms.
d.
Customer Service Areas.
e.
Grocery Sales Area.
f.
Employee Toilet Rooms.
g.
Breakroom, Training, UPC/Merch, and Offices.
h.
Pharmacy.
3.10
A.
3.11
CONSTRUCTION
Interface with Other Work:
1.
Coordinate erection of studs with hollow metal door and window frames, sliding window, and overhead
coiling door frames.
2.
Coordinate installation of anchors, supports, and blocking for mechanical, electrical, and building accessory
items installed within framing.
FIELD QUALITY CONTROL
A.
Inspect metal framing erection, placement, spacing, fasteners, and connections to building.
B.
Inspect gypsum board installation, fastener type, spacing, and finish level.
C.
Inspect installation of firestopping penetrations of fire-restive rated partitions and at voids between top of partition
09250-9
0893 Lindsay, OK
11/23/10
and building structure.
D.
Correct deficiencies in Work which inspection indicates are not in compliance with Contract Documents.
END OF SECTION
09250-10
0893 Lindsay, OK
11/23/10
UniSpec II - Store Planning
092410
SECTION 09310 - CERAMIC TILE
PART 1 GENERAL
1.1
SUMMARY
A.
Section Includes:
1.
Ceramic floor tile.
2.
Ceramic tile base.
3.
Ceramic wall tile.
B.
Related Sections:
1.
Section 07900 - Joint Sealers: Sealant at tile penetrations and control/construction joints.
C.
Products Supplied by Walmart Supplier and Installed by the Contractor Under This Section: Under Provisions of
Section 01640, Walmart's supplier will furnish the following to be installed by the Contractor:
1.
Ceramic Tile CT-2 including setting materials, additives, leveling compound, transition strip, and
accessories as required for the installation of CT-2 tile.
2.
Walmart supplied products shall be as specified in the MATERIALS paragraph below.
3.
Products will be supplied to the job site as a bundle complete and ready for installation.
4.
Walmart Supplier: Haines, Jones & Cadbury, Inc, (800) 459-7099.
1.2
REFERENCES
A.
The publications listed below form a part of this specification to the extent referenced. Publications are referenced
within the text by the basic designation only.
B.
American National Standards Institute (ANSI):
1.
ANSI A108/A118/A136.1 – Specifications for the Installation of Ceramic Tile
a.
A108 – Installation Standards
1)
.02 – General Requirements: Materials, Environmental, and Workmanship
2)
.5 – Installation of Ceramic Tile with Dry-Set Portland Cement Mortar or Latex-Portland
Cement Mortar
3)
.15 – Alternate Method: Installation of Paper-Faced Glass Mosaic Tile
b.
ANSI A118 – Material Specifications
1)
.1 – American National Standard Specifications for Dry-Set Portland Cement Mortar
2)
.4 – American National Standard Specifications for Latex-Portland Cement Mortar
2.
ANSI A137.1 - Recommended Standard Specifications for Ceramic Tile.
C.
Tile Council of America, Inc. (TCA):
1.
TCA Handbook for Ceramic Tile Installation.
1.3
QUALITY ASSURANCE
A.
1.4
Conform to ANSI A137.1.
DELIVERY, STORAGE, AND HANDLING
A.
Section 01600 - Product Requirements: Transport, Handle, Store, and Protect Products.
B.
Deliver and store packaged materials in original containers with seals unbroken and labels intact until time of use.
C.
Prevent damage or contamination to materials by water, freezing, foreign matter, and other causes.
09310-1
0893 Lindsay, OK
11/23/10
1.5
SITE CONDITIONS
A.
Do not install adhesives in a closed, unventilated environment.
B.
Maintain 50 degrees F during installation of mortar materials.
1.6
MAINTENANCE
A.
Extra Materials: Provide one unopened box of wall and floor tile with label indicating store number and date.
Submit to Walmart Construction Manager at Date of Substantial Completion.
PART 2 PRODUCTS
2.1
PRODUCT PROCUREMENT
A.
2.2
Products specified herein, except Walmart furnished materials, shall be direct purchased by the General Contractor
from a pre-negotiated supplier. Reference Section 01600 for additional information regarding Direct Purchase
Products. Pre-negotiated supplier shall be as follows:
1.
Haines, Jones & Cadbury, Inc, Contact: Customer Service, (800) 459-7099, (479) 756-8998 fax,
[email protected].
MANUFACTURERS
A.
Ceramic Tile: Provide products by the following manufacturers as specified:
1.
American Olean Tile Company, Dallas, TX.
2.
Crossville Ceramics, Crossville, TN.
3.
Dal-Tile Corporation, Dallas, TX.
4.
Mannington Mills, Inc., Salem, NJ.
5.
StonePeak Ceramics, Chicago, IL
B.
Floor Leveling Compound: Provide products by any of the following:
1.
Laticrete International, Bethany, CT.
2.
Mapei Corporation, Deerfield Beach, FL.
C.
Mortar and Grout: Provide products by any of the following manufacturers in colors equivalent to those specified:
1.
Laticrete International, Bethany, CT.
2.3
MATERIALS
A.
Floor and wall tile: Provide tile and grout specified herein as applicable as shown on the drawings. Provide sizes
specified or as shown on the drawings. Provide only products specified. Provide product of one of the
manufacturers where more than one is specified. Provide matching inside and outside corners, and trim. Provide
matching 2 inch cove base unless specified otherwise.
1.
CT-2 (Red): (Walmart furnished, Contractor installed)
a.
DP1224 River Red, by StonePeak.
B.
Mortar:
1.
Dry Set Portland Cement Mortar: ANSI A118.1.
2.
Latex-Portland Cement Mortar: ANSI A118.4
C.
SpectraLOCK Grout by Laticrete.
1.
G-2 (Dark Gray): Platinum #42. (Walmart furnished, Contractor installed)
D.
Grout Cleaning Additive: Laticrete SpectraLOCK Pro Cleaning Additive.
E.
Floor Leveling Compounds: Cementitious, quick-setting, trowelable or self-leveling floor topping over concrete
09310-2
0893 Lindsay, OK
11/23/10
substrate specifically formulated for placement as a leveling underlayment for floor covering. Provide one of the
following:
1.
Laticrete 86 Latilevel Self-Leveling Underlayment by Laticrete.
a.
Admix and Primer for Underlayment by Laticrete.
2.
Ultraplan M20, by Mapei.
a.
Primer: Ultraprime L, by Mapei.
F.
12 x 24 Tile Setting Materials: Use the following specifically for setting and sealing the 12 x 24 wall and floor tile
and associated trim.
1.
Mortar: 255 MultiMax Multipurpose Thin-set Mortar (floors and walls) by Laticrete.
2.
Floor Leveling Compounds and Primer: As specified above.
3.
Calking: Latasil Tile and Stone Silicone Sealant for use at cove base.
G.
Sealant: See Section 07900.
H.
Stainless Steel Top and Corner Trim – C: Rondec-E 3/8 x 1-1/4, stainless steel, by Schluter.
I.
Stainless Steel Vertical Inside Corner Trim: EHK U11, stainless steel, by Schluter.
J.
Tile Edge Transition – D: Schluter Schiene E110, stainless steel, by Schluter.
K.
Substitutions: Not permitted.
2.4
MORTAR MIX AND GROUT
A.
Mix mortars and grouts to comply with requirements of referenced standards and manufacturers for proportioning
of materials, water or additive content; type of mixing equipment, selection of mixer speeds, mixing containers,
and mixing time to produce mortars and grouts of uniform quality with optimum performance characteristics for
application indicated.
PART 3 EXECUTION
3.1
EXAMINATION
A.
Examine surfaces and adjacent areas where products will be installed and verify that surfaces conform to product
manufacturer's requirements for substrate conditions. Do not proceed until unsatisfactory conditions have been
corrected.
B.
Beginning of installation indicates acceptance of substrate conditions.
3.2
PREPARATION
A.
Protect surrounding work from damage or disfiguration.
B.
Interior Concrete Slab:
1.
Vacuum clean existing substrate and damp clean.
2.
Seal substrate surface cracks with filler.
3.
Level existing substrate surfaces in accordance with TCA installation requirements and remove peaks or
valleys using floor leveling compound specified. Prime, clean and prepare concrete surface as required by
manufacturer and apply leveling compound in accordance with manufacturer's instructions.
C.
Prepare substrate surfaces which do not need joint repair with sealers or conditioners as recommended by adhesive
manufacturer.
09310-3
0893 Lindsay, OK
11/23/10
3.3
INSTALLATION TRAINING
A.
Pre-Construction Training Meeting: Prior to tile installation, a training meeting shall be conducted by the
Contractor with mandatory attendance by the General Contractor, tile installation contractor, Walmart Construction
Testing Laboratory, and the Walmart Construction Manager. The meeting program shall include a viewing of the
Laticrete Manufacturer’s Tile Installation Instruction Video. The video will be provided to the Contractor by the
Walmart pre-negotiated supplier with the Walmart furnished products.
B.
Attendance Verification: An attendance roster shall be prepared by the Contractor showing attendees and a
statement attesting each attendee has completed the training. Roster shall be verified and signed by the
Construction Manager.
3.4
INSTALLATION
A.
ANSI Tile Installation Standards: Comply with parts of ANSI A108 Series "Specifications for Installation of
Ceramic Tile" that apply to types of setting and grouting materials shown and specified.
B.
TCA Installation Guidelines: TCA's "Handbook for Ceramic Tile Installation." Comply with applicable TCA
installation methods.
C.
Transition Strip: Install transition strip at transitions between ceramic tile and concrete or VCT. Install during tile
placement in accordance with edge strip manufacturer’s instructions.
D.
Lay tile to pattern indicated. Do not interrupt tile pattern through openings.
1.
Lay tile to grid pattern shown at vestibule. Customers must have access to at least half the vestibule
entrance at all times.
E.
Cut and fit tile tight to penetrations. Form corners and bases neatly. Align floor and base joints.
F.
Place tile joints uniform in width, subject to variance in tolerance allowed in tile size. Make joints watertight,
without voids, cracks, excess mortar, or excess grout.
G.
Sound tile after setting. Replace hollow sounding units.
H.
Expansion Joints: Provide tile expansion joints at control/construction joints in concrete slab. Keep joints free of
mortar or grout.
1.
Installation Method: TCA EJ171.
I.
Allow tile to set for a minimum of 48 hours prior to grouting.
J.
Grout tile joints.
1.
Grout space shall be 1/16-inch for all tile joints except as follows:
a.
Entry: 1/8 inch.
K.
Apply sealant to junction of tile and dissimilar materials, at tile penetrations, and at tile expansion joints.
3.5
FIELD QUALITY CONTROL
A.
Inspect ceramic tile installation, joints, grout line alignment, and attachment to substrate.
B.
Correct deficiencies in Work which inspection indicates are not in compliance with Contract Documents.
3.6
CLEANING
A.
Remove excess mortar and grout from floor, base, and wall surfaces without damage.
09310-4
0893 Lindsay, OK
11/23/10
B.
On completion of placement and grouting, clean all ceramic tile surfaces so they are free of foreign matter.
1.
Initially clean and remove grout residue from tile as soon as possible according to tile and grout
manufacturer's written instructions. Use cleaners recommended by tile and grout manufacturers and only
after determining that cleaners are safe to use by testing on samples of tile and other surfaces to be cleaned.
Protect metal surfaces and plumbing fixtures from effects of cleaning. Flush surfaces with clean water
before and after cleaning.
2.
Begin final cleaning approximately 1 hour after initial cleaning of the grout. Mix cleaning additive to 2
gallons of clean, cool water. Use a white scrub pad to lightly scrub apart any of the leftover residue
remaining on the surface of the tile. Drag a clean, damp sponge diagonally over the scrubbed surfaces to
remove any froth and residue. Rinse sponge often and change water every 50 square feet of surface. Allow
cleaned areas to dry and inspect entire surface of tile. Repeat if haze remains.
3.
If haze remains 24 hours after installation, clean surfaces using straight white vinegar or bleaching type
cleanser by methods described in preceding paragraph.
C.
Perform final cleaning of tile with cleaning materials recommended by tile manufacturer one day prior to Date of
Substantial Completion.
3.7
PROTECTION
A.
Protect installed tile work with kraft paper or other heavy covering during construction period to prevent staining,
damage, and wear. If recommended by tile manufacturer, apply coat of neutral protective cleaner to completed tile
walls and floors.
B.
Prohibit traffic from floor finish for 72 hours after installation.
END OF SECTION
09310-5
0893 Lindsay, OK
11/23/10
UniSpec II - Store Planning
082710a
SECTION 09511 - ACOUSTICAL PANEL CEILINGS
PART 1 - GENERAL
1.1
SUMMARY
A.
Section Includes:
1.
Suspended metal grid ceiling system.
2.
Acoustical panels.
3.
Perimeter trim.
4.
Column trim.
B.
Related Sections:
1.
Section 13900 - Fire Suppression: Sprinkler heads in ceiling system.
1.2
REFERENCES
A.
The publications listed below form a part of this specification to the extent referenced. Publications are reference
within the text by these basic designations only.
B.
ASTM International (ASTM):
1.
ASTM C 635 - Specification for Metal Suspension Systems for Acoustical Tile and Lay-in Panel Ceilings.
2.
ASTM C 636 - Practice for Installation of Metal Ceiling Suspension Systems for Acoustical Tile and Lay-in
Panels.
3.
ASTM E 84 - Test Method for Surface Burning Characteristics of Building Materials.
4.
ASTM E 1264 - Acoustical Ceiling Products.
C.
American Society of Civil Engineers (ASCE):
1.
ASCE 7 - Minimum Design Loads for Buildings and Other Structures
1.3
SYSTEM DESCRIPTION
A.
1.4
Design Requirements:
1.
Rigidly secure acoustical ceiling system including integral mechanical and electrical components with
maximum deflection of 1/360.
DELIVERY, STORAGE AND HANDLING
A.
Section 01600 - Product Requirements: Transport, handle, store, and protect products.
B.
Deliver acoustical units in manufacturer's original unopened containers with brand name and type clearly marked.
C.
Store under cover in dry, watertight conditions.
D.
Prior to installation, store acoustical units for 24 hours minimum at same temperature and relative humidity as
space where Work will be installed.
1.5
PROJECT CONDITIONS
A.
Environmental Requirements: Maintain uniform temperature range of 60-85 degrees F, and humidity of no more
than 70 percent relative humidity prior to, during, and after installation.
09511-1
0893 Lindsay, OK
11/23/10
PART 2 - PRODUCTS
2.1
MANUFACTURERS
A.
2.2
Provide products by the following manufacturers as specified:
1.
Armstrong World Industries Incorporated, Lancaster, PA (800) 448-1405.
2.
CertainTeed Ceilings, Valley Forge, PA (800) 233-8990.
3.
Chicago Metallic Corporation, Chicago, IL (800) 323-7164.
4.
Gold Bond Building Products, National Gypsum Company, Charlotte, NC (704) 365-7300.
5.
USG Interiors, Chicago, IL (800) 950-3839.
REGULATORY REQUIREMENTS
A.
Surface Burning Characteristics in Accordance with ASTM E 84 for Class A finish:
1.
Flame Spread: Less than 25.
2.
Smoke Density: Less than 50.
B.
Seismic Performance: Acoustical ceiling shall withstand the effects of earthquake motions determined according to
ASCE 7.
C.
Food Serving and Preparation Areas where Scheduled:
1.
United States Department of Agriculture (USDA): Approved for incidental food contact.
2.3
SUSPENSION SYSTEM
A.
Provide suspension system specified herein for the corresponding ACT system as applicable as shown on the
drawings. Provide suspension system compatible with acoustical panels selected.
B.
Grid: ASTM C635, heavy duty, steel exposed T; nominal 1 inch width; stab-in connections.
C.
Accessories: Stabilizer bars, clips, and splices.
D.
Grid Finish: White.
E.
Support System: Hot or cold rolled steel channels; galvanized hanger wire, minimum 12 gage.
F.
Edge Moldings: Metal channel with exposed flange to match suspension system. Minimum 2 inch wide horizontal
leg.
G.
Hold-Down Clips:
H.
Compression Struts: Telescoping compression strut designed to attach to main tees at each splayed wire location,
preventing upward movement of ceiling grid system. Provide either of the following:
1.
Donn Compression Post, by USG.
2.
Field fabricated compression struts as detailed on drawings.
I.
ACT-1; Non Fire-Rated Suspension System: Provide one of the following:
1.
Prelude 15/16 inch, XL #7300 Exposed Tee System, by Armstrong.
2.
Classic Stab System, 15/16 inch, #C12-12-15, by CertainTeed.
3.
1200 System, by Chicago Metallic.
4.
Donn DX System, by USG.
J.
Substitutions: Not Permitted.
09511-2
0893 Lindsay, OK
11/23/10
2.4
ACOUSTICAL LAY-IN PANELS:
A.
Provide acoustical panels specified herein for the corresponding ACT system as applicable as shown on the
drawings.
B.
ACT-1: Non Fire-Rated Panels, square edge, nonperforated, abuse-resistant vinyl film facing, size as shown.
Provide one of the following:
1.
Vinyl Faced Fiberglass Ceiling Panels, Random Fissured; Item #2911 by Armstrong.
2.
Premier Hi-Lite ClimaPlus Kapok Panels, unperforated, Item #7057G, by USG.
3.
Versatone Unperforated Vintage Item #1530-VIN-1, by CertainTeed.
4.
Coral Soft Touch Series, Item #7010-01F, by Chicago Metallic.
C.
Substitutions: Comply with the requirements of Section 01600.
2.5
ACCESSORIES
A.
Flexible curved angle trim for Sales Area Columns.
PART 3 - EXECUTION
3.1
PREPARATION/DEMOLITION
A.
Examine surfaces and adjacent areas where products will be installed and verify that surfaces conform to product
manufacturer's requirements for substrate conditions. Do not proceed until unsatisfactory conditions have been
corrected.
B.
Coordinate extension of existing grid ceiling system if existing system is to remain.
C.
Clean or paint existing grid as shown on Drawings prior to removal of “old” panels. Refer to Section 09900.
D.
Remove existing ceiling panels as shown on Drawings. Store removed panels for recycling as specified in Section
02023.
1.
If ceiling batt insulation is present, remove, retain and re-install batts above new ceiling panels.
E.
In new ceiling grid installation, verify that layout of hangers will not interfere with other Work.
F.
Beginning of installation indicates acceptance of existing conditions.
3.2
INSTALLATION – GENERAL
A.
Interface with Other Work:
1.
Do not install acoustical ceilings until building is enclosed, heating is provided, dust generating activities
have terminated, and overhead work is completed, tested, and approved.
2.
Schedule installation of acoustic units after interior wet work is completed.
3.
Install after major above ceiling work is complete.
4.
Coordinate location of hangers with other Work.
B.
Site Tolerances:
1.
Variation from Flat and Level Surface: 1/8 inch in 12 feet.
3.3
INSTALLATION - SUSPENSION SYSTEM
A.
Install System in accordance with ASTM C636, ASCE 7 and manufacturer's published instructions.
B.
Rigidly secure acoustical ceiling system including integral mechanical and electrical components with maximum
deflection of 1/360.
09511-3
0893 Lindsay, OK
11/23/10
C.
If metal deck is not supplied with hanger tabs, coordinate installation of hanger clips during steel deck erection.
Provide additional hangers and inserts as required.
D.
Hang system independent of walls, columns, ducts, pipes and conduit. Where carrying members are spliced, avoid
visible displacement of face plane of adjacent members. Where ducts or other equipment prevent regular spacing
of hangers, reinforce nearest affected hangers and related carrying channels to span extra distance.
E.
Locate system on room axis according to Reflected Ceiling Plan, where indicated on Drawings, or locate system to
a balanced grid design with edge units no less than 50 percent of acoustical panel size where Reflected Ceiling
Plan not shown on Drawings. Match direction of existing ceiling grid unless directed otherwise by the Drawings.
F.
Do not support components on main runners or cross runners if weight causes total dead load to exceed deflection
capability. Do not eccentrically load system, or produce rotation of runners.
G.
Install edge molding at intersection of ceiling and vertical surfaces using longest practical lengths. Miter corners.
Provide edge moldings at junctions with other interruptions. Secure at 16 inches on center.
H.
Install compression struts and secure system with tie wires.
1.
Unless otherwise indicated on Drawings, provide four 12 gage wires secured to main runner within 2 inches
of cross runner intersection and splayed 90 degrees from each other at angle not exceeding 45 degrees from
plane of ceiling.
2.
Fasten strut to main runner, extend to and fasten to structural member supporting roof.
3.
Compression strut and splayed hanger wires shall be provided as follows:
a.
One assembly per each light fixture.
b.
Locate at maximum of 12 feet on center in both directions with first point within 6 feet from each
partition.
3.4
INSTALLATION - ACOUSTICAL PANELS
A.
3.5
Fit acoustic units in place free from damaged edges or other defects. Install acoustic units level, in uniform plane,
and free from twist, warp, and dents.
FIELD QUALITY CONTROL
A.
Inspect acoustical panel placement, ceiling grid suspension system installation and connection to structure.
B.
Correct deficiencies in Work which inspection indicates are not in compliance with contract requirements.
3.6
CLEANING
A.
Clean exposed surfaces of acoustical ceilings including trim, edge moldings, and suspension system members
END OF SECTION
09511-4
0893 Lindsay, OK
11/23/10
UniSpec II - Store Planning
102910
SECTION 09650 - RESILIENT FLOORING
PART 1 - GENERAL
1.1
SUMMARY
A.
Section Includes:
1.
Walmart furnished vinyl composition tile, and adhesive.
2.
Walmart furnished PVC plank flooring and adhesive.
3.
Contractor furnished resilient flooring accessories.
4.
Preparation of Contraction/Construction Joints under floor finishes.
5.
Contractor installation of resilient flooring and accessories.
6.
Floor Treatment: Application of stripper and finish to resilient floor tile.
B.
Under provisions of Section 01640, Walmart will furnish the following for installation by the Contractor:
1.
Resilient flooring.
2.
Primer and adhesive.
3.
Floor Treatment Materials.
a.
Contractor shall furnish all labor and equipment for installation of Walmart furnished Floor
Treatment Materials. Use of Walmart owned equipment is not allowed.
C.
Related Sections:
1.
Section 01640 - Owner Furnished Products: General procedures related to Walmart furnished products.
2.
Section 09655 - Resilient Base and Accessories: Resilient flooring base.
1.2
REFERENCES
A.
The publications listed below form a part of this specification to the extent referenced. Publications are referenced
within the text by these basic designations only.
B.
ASTM International (ASTM):
1.
ASTM E 648 - Test Method for Critical Radiant Flux of Floor-Covering Systems Using a Radiant Heat
Energy Source.
2.
ASTM E 662 - Test Method for Specific Optical Density of Smoke Generated by Solid Materials.
3.
ASTM F 710 – Preparing Concrete Floors to Receive Resilient Flooring.
4.
ASTM F 1700 - Solid Vinyl Floor Tile.
5.
ASTM F 1066 - Vinyl Composition Floor Tile.
6.
ASTM F 1869 – Measuring Moisture Vapor Emission Rate of Concrete Subfloor Using Anhydrous
Calcium Chloride.
1.3
QUALITY ASSURANCE
A.
Regulatory Requirements:
1.
Critical Radiant Flux in Accordance with ASTM E 648: More than 0.45 Watts per square centimeter.
2.
Specific Optical Smoke Density in Accordance with ASTM E 662: Less than 450.
B.
Floor Treatment Applicator Qualifications:
1.
Company Requirements: Company specializing in performing work as specified herein with minimum 3
years documented experience.
09650-1
0893 Lindsay, OK
12/08/10
Revision No. Two
1.4
DELIVERY, STORAGE, AND HANDLING
A.
Product Delivery: Walmart will deliver products to jobsite for Contractor to receive on delivery date established
by Walmart.
B.
Walmart Floor Finish Plan: Issued to Contractor by Walmart prior to possession date.
C.
Product Packaging: Resilient flooring and accessories will be packaged in manufacturer's standard cartons.
D.
Acceptance at Site: Receive Walmart furnished products as specified in Section 01640.
1.
Verify quantity of products furnished with Bill of Material provided with Walmart furnished products.
2.
Store resilient tile indoors and protect from excessive cold, heat, temperature fluctuations, humidity and
moisture penetration. Store tile on original pallets with no multiple stacking of pallets. Check material for
consistency of run item and shade numbers. Store resilient tile adhesive in same manner as tile and protect
from freezing.
3.
Report discrepancies in product quantity delivered or damage to products delivered to Walmart Store
Planning Division within 24 hours.
4.
Upon notification by Contractor, Walmart will arrange for delivery of replacement products.
5.
Note description of product quantity discrepancies and/or product damage on Bill of Lading.
E.
Storage:
1.
Store materials in a secure area to prevent loss due to theft or damage. Store flooring and adhesive
materials in controlled climate conditions when recommended by manufacturer label instruction. Do not
allow adhesive to freeze. Store adhesives in environment between 60 and 80 degrees.
F.
Transport, handle, store, and protect products in compliance with the requirements of Section 01600 and
manufacturer's recommendations.
1.5
SITE CONDITIONS
A.
1.6
Environmental Requirements:
1.
Store flooring materials for three days prior to installation in area of installation to achieve temperature
stability.
2.
Maintain ambient temperature required by adhesive manufacturer (no less than 72 degrees F for 48 hours)
three days prior to, during, and 24 hours after installation of materials.
SCHEDULING
A.
Schedule resilient flooring installation to prevent damage to resilient flooring and to prevent movement of
construction materials over area of resilient flooring.
B.
Work shall begin no earlier than 15 minutes before approved “start time” and shall finish within one hour after
approved completion time. Approved time is determined by the Walmart Construction Manager.
C.
All work shall be done in association with approved interruption of the Store’s normal operations.
PART 2 - PRODUCTS
2.1
MATERIALS
A.
Walmart will furnish resilient flooring specified herein as applicable as shown on the drawings.
B.
Owner’s Supplier:
1.
PVC Plank Flooring: Schwarz Supply Source, Morton Grove, IL
a.
Contact: Nancy Quach (847) 967-4085 or Megan O’Malley (847) 583-3536.
09650-2
0893 Lindsay, OK
12/08/10
Revision No. Two
2.
Vinyl Composition Tile (VCT) Flooring: One of the following as determined by Walmart.
a.
Armstrong: Contact Jeff Gobbell (281) 593-5405.
b.
Tarkett: Contact Allison Harris, Linron Company (713) 802.9137.
C.
Vinyl Composition Tile (VCT): ASTM F 1066, Class 1, solid-color tile or Class 2, through-pattern tile, nonasbestos formulated, 0.125 inch thick, 12 by 12 inches square, Standard EXCELON Imperial Texture or Safety
Zone slip resistant by Armstrong or Azrock by Tarkett. Pattern and color numbers listed below will be furnished
as applicable as shown on the drawings.
1.
VCT-9 (White): Cortina No. V-789, Windrift.
2.
VCT Adhesive: Tarkett 100 Solvent-Free Clear Thin Spread Adhesive, by Tarkett, or SpraySmart, by
Tarkett, as determined by Walmart.
D.
PVC Plank Flooring: Plank Flooring, 7” x 48” x 1/8” strips, virgin PVC composition, by Matworks.
1.
PVC-1 (Woodgrain): Woodgrain by Matworks.
2.
PVC Adhesive: Pressure sensitive, low VOC, Spray-Lock by Interlock Industries, Inc. Chattanooga,TN,
Contact: Walmart Coordinator (706) 517-8989.
E.
Primers: Types as suitable for specific material and substrates encountered.
F.
Floor Treatment Materials:
1.
Stripper: Pro Strip Extra Heavy Duty Stripper, by SC Johnson Wax Professional.
2.
Finish: Signature High Performance UHS Finish, by SC Johnson Wax Professional.
G.
Substitutions: Not permitted.
2.2
CONTRACTOR FURNISHED ACCESSORIES
A.
VCT Flooring to Concrete Transition Strip: 2” x 1/8” extruded aluminum transition strip, beveled one edge at 10
degrees, predrilled for fasteners at no more than 12” o.c
1.
Transition Strip – one of the following:
a.
No. 8132, by National Guard Products, Inc.
b.
2" CTC Reducer by Ceramic Tool Co.
2.
Fasteners: Hilti Qwik-Con II, #14-134 TFH (1/4” x 1-3/4 Torq Flathead).
B.
Subfloor Filler (Cementitious Based Underlayment): Provide one of the following:
1.
Ardex SD-F Feather Finish, by Ardex Engineered Cements; Contact: Jesse David, (888) 512-7339.
2.
Levelayer l, by Dayton Superior.
3.
No. 547 UniPro Universal Underlayment by W.W. Henry. Contact: Dave Fabyonic (724) 203-5035.
C.
Contraction/Construction Joint Filler: Epolith P or G, two-part, 100% solids, flexible epoxy joint filler, by BASF
Building Systems, (800) 433-9517
PART 3 EXECUTION
3.1
EXAMINATION
A.
Examine surfaces and adjacent areas where products will be installed and verify that surfaces conform to the
following requirements for substrate conditions. Do not proceed until unsatisfactory conditions have been
corrected.
1.
Verify concrete floors are free of excessive moisture, hydrostatic pressure, alkalinity, scale, and dusting.
2.
Verify concrete floors are plane to tolerances specified in Division 3 specifications.
3.
Verify concrete floors are free from oil, grease, dust, construction debris, loose or scaly paints or coatings,
incompatible curing or sealing compounds, and other substances that may impair adhesion of adhesive and
finish materials.
4.
Verify temperature of conditioned space has been maintained at 60 - 80 degrees F for period of 7 days
09650-3
0893 Lindsay, OK
12/08/10
Revision No. Two
prior to installation. Maintain specified temperature range for duration of construction.
B.
On remodel installations evaluate existing materials for suitability as a substrate.
C.
Beginning of installation indicates acceptance of substrate conditions.
3.2
PREPARATION
A.
The Contractor must have the Final Floor Finish Plan and the schedule of moving the gondolas and verify with
Walmart Construction Manager, Store Manager, and Store Planning Field Project Manager. Contact Store
Manager and Department Manager 48 prior to any work affecting their area.
B.
Remove existing floor tiles as required. All demolished tile shall be recycled as specified in Section 02223.
C.
Concrete Substrates: Unless otherwise specified herein, prepare substrate according to ASTM F 710.
D.
Prepare substrate according to manufacturer’s written recommendations and as outlined below to ensure adhesion
of resilient products.
E.
Remove by sanding, grinding, or similar means ridges, bumps, protrusions, and other irregularities. Properly
prepare expansion joints and fill contraction/construction joints with joint sealant or subfloor filler specified in
Part 2 of this section as required. Do not seal joints using polyurea or epoxy joint filler specified for concrete
slabs in Division 3. Fill cracks, holes, and depressions with cementitious based underlayment, which upon cure is
sanded smooth, to achieve a level, flat, hard surface.
F.
Smooth concrete surface by light sanding or grinding. Finished concrete surface shall be smooth with no more
than 1/8 inch variation from plane within any 10 feet.
G.
Remove paint, oils, waxes, sealers and curing compounds not compatible with adhesive to be used. Do not use
organic solvents or liquid adhesive removers.
H.
Bond Test: Determine suitability of concrete substrate for receiving resilient flooring with regard to moisture
content and curing compounds. Conduct bond test by adhering 3 feet by 3 feet panels of specified floor covering
with specified adhesive. Test will be considered passed if after several days panels are well bonded, difficult to
remove, and display no signs of moisture or adhesive degradation.
I.
Moisture Content and pH Tests: Moisture content tests and pH tests will be conducted by Owner’s Construction
Testing Laboratory (CTL) at no cost to the Contractor. Moisture tests will be made to ensure that moisture
content in concrete substrate does not exceed manufacturer’s recommendations. Tests shall be taken in sufficient
number and locations as required to obtain results representative of various areas to be covered by resilient
flooring.
J.
Prohibit traffic until filler is cured. Thereafter, unnecessary traffic in work areas shall be kept to a minimum.
K.
Vacuum clean substrate.
3.3
INSTALLATION
A.
Install resilient flooring in accordance with manufacturer's published instructions at locations indicated on
Walmart Floor Finish Plan.
B.
Open number of floor material cartons to provide quantity required to cover each area; mix pieces within single
shade lot to ensure shade variations do not occur within any one area. When working with more than one lot, plan
lot placement and location to minimize possible shade differences.
09650-4
0893 Lindsay, OK
12/08/10
Revision No. Two
C.
Apply adhesive in accordance with manufacturer’s directions. Follow adhesives open time by spreading only
enough adhesive to permit installation of floor materials before initial set. Do not spread adhesive for overnight
dry.
D.
VCT Flooring Installation:
1.
Lay flooring from center marks established parallel to building walls.
2.
Allow minimum 1/2 full size tile width at room or area perimeter.
3.
Adjust tile layout as required to avoid use of units less than 1/2 tile.
4.
Install tile to square grid pattern with all joints aligned.
a.
Install smooth surface tile in alternating grain, basket weave pattern unless indicated otherwise on
Drawings.
b.
Install slip resistant tile with all tiles in same grain direction. Grain direction shall be oriented sideto-side, parallel with front wall of building
5.
Install threshold transitions at locations indicated on Final Floor Finish Plan.
E.
PVC Plank Flooring Installation:
1.
Install PVC flooring strips from side-to-side, not front-to-back, of store.
2.
Install PVC plank strips with random end-joint offset over entire area. Cut planks in random sizes for
starter pieces and alternate the size of the starter piece to avoid a repeating joint pattern. The shortest
starter piece shall be not less than 12”.
3.
Overall PVC flooring layout shall produce a complete random appearance of joint spacing with end joints
staggered a minimum of 6” apart.
4.
Install PVC border as shown on the drawings.
F.
Wipe down adhesive bleed through during installation.
G.
Rolling: Set flooring into place, thoroughly cross roll with a 100-150 pound three-sectional roller before adhesive
set time expires to attain full adhesion.
H.
Terminate flooring at centerline of door openings where adjacent floor finish is dissimilar. Where flooring
continues through door opening, continue established pattern with no interruption.
I.
Install transition strips at unprotected or exposed edges where flooring terminates.
1.
Set metal transition strips butted to adjacent flooring. Anchor into concrete slab with specified fasteners.
Drill concrete with Matched Tolerance Drill Bit for Dense Concrete by Hilti.
J.
Scribe flooring to walls, columns, cabinets, floor outlets, and other appurtenances to produce tight joints.
K.
Continue flooring under movable type partitions without interrupting floor pattern.
3.4
FIELD QUALITY CONTROL
A.
Inspect resilient flooring installation, pattern, layout, and attachment to substrate.
B.
Correct deficiencies in Work which inspection indicates are not in compliance with Contract Documents.
3.5
CLEANING
A.
Remove excess adhesive from floor, base, and wall surfaces without damage.
B.
Broom clean resilient flooring after application.
3.6
FLOOR TREATMENT
A.
Provide floor treatment for new resilient flooring.
09650-5
0893 Lindsay, OK
12/08/10
Revision No. Two
B.
Examine surfaces and adjacent areas where products will be applied and verify that surfaces conform to product
manufacturer's requirements for substrate conditions. Do not proceed until satisfactory conditions have been
corrected.
C.
Stripping VCT
1.
Mix one part stripper to four parts water.
2.
Apply solution liberally to a manageable area of the floor and let solution set for 10 minutes prior to
scrubbing. Do not allow the stripper to dry. Re-wet as necessary.
3.
Scrub VCT floor using an auto scrubber with maximum pad pressure or a slow speed buffer equipped with
black pads or stripping brushes. Make at least three passes over each tile to remove mill finish.
4.
Thoroughly rinse the floor to remove any residue of cleaning or stripper solution.
5.
Let floor dry completely prior to application of floor finish.
D.
Cleaning PVC
1.
Clean PVC flooring with a commercial flooring cleaner using mop or scrubber with white pads.
2.
Apply stripper only as necessary to remove adhesive bleed-thru.
a.
Apply diluted stripper solution liberally to a manageable area of the floor and let solution set for 10
minutes prior to scrubbing. Do not allow the stripper to dry. Re-wet as necessary.
3.
Pick up cleaning or stripper solution from floor using the auto scrubber with clear water and red pads.
4.
Thoroughly rinse the floor to remove any residue of cleaning or stripper solution.
5.
Let floor dry completely prior to application of floor finish.
E.
Finishing
1.
Apply floor finish in accordance with manufacturer's instructions.
2.
VCT Tile: Apply four coats of floor finish to floor. Burnish floor after 24 hours after final application and
again maximum 72 hours prior to construction completion.
3.
Slip Resistant VCT Tile: Apply two coats of floor finish to floor.
4.
Allow a minimum of 45 minutes drying time between coats.
5.
HVAC shall be in operation during drying and curing of floor finish.
END OF SECTION
09650-6
0893 Lindsay, OK
12/08/10
Revision No. Two
UniSpec II - Store Planning
062510
SECTION 09655 - RESILIENT BASE AND ACCESSORIES
PART 1 - GENERAL
1.1
SUMMARY
A.
Section Includes:
1.
Plastic base (B).
2.
Duratuff Base (DB).
B.
Related Requirements:
1.
Section 07900 – Joint Sealers: Sealant between bases and floor or wall surfaces.
1.2
REFERENCES
A.
The publications listed below form a part of this specification to the extent referenced. Publications are referenced
within the text by the basic designation only.
B.
ASTM International (ASTM):
1.
ASTM E84 - Surface Burning Characteristics Of Building Materials.
1.3
QUALITY ASSURANCE
A.
Regulatory Requirements: Conform to applicable code for flame/fuel/smoke rating requirements in accordance
with ASTM E84.
PART 2 - PRODUCTS
2.1
MATERIALS
A.
Plastic Base: Style B, Plas-tex by Parkland Plastics with NRP emboss on backside by Parkland Plastics Incorporated, Middlebury, IN (574) 825-4336 or (800) 835-4110.
1.
Size: As shown on the drawings.
2.
Colors:
a.
B-6 - Black: 6-inch base, Model No. PTX2131P.
b.
B-9 - Black: 4-inch base, Model No. PTX2137P.
c.
B-10 - Black Plastic Base Outside Corner: 3” x 6” corner angle, Model No. PTX6143P.
3.
Fasteners: Black flathead countersunk screws, length sufficient to penetrate substrate and metal stud wall
framing.
B.
Duratuff Plastic Base: Plas-Tex by Parkland Plastics, including ends, corners and accessories, by Parkland Plastics, Inc., Middlebury, IN, (574) 825-4336 or (800) 835-4110. Distributed by Plunkett Distributing, Fort Smith,
AR; Contact Hollie Pierce, (800) 833-4393.
1.
DB5 - Par-5-Blk-Base, 3/8" x 5" x 144".
2.
DB10 - Par-Blk-Base, 3/8" x 10" x 144".
3.
Color: Black.
4.
Fasteners: Black flathead countersunk screws, length sufficient to penetrate substrate and metal stud wall
framing.
PART 3 - EXECUTION
3.1
INSTALLATION
A.
Plastic Base (including Duratuff Plastic Base):
1.
Fit joints tight and vertical. Maintain minimum measurement of 18 inches between joints
09655-1
0893 Lindsay, OK
11/23/10
2.
3.
4.
5.
3.2
Install base on solid backing. Bond tight to wall and floor surfaces.
Scribe to fit door frames and other interruptions.
Miter and adhesively bond plastic base joints together.
Pre-drill plastic base and trim for attachment screws. Unless otherwise shown, attach plastic base at 24
inches on center into metal stud wall framing.
CLEANING
A.
Remove excess adhesive from floor, base, and wall surfaces without damage.
END OF SECTION
09655-2
0893 Lindsay, OK
11/23/10
UniSpec II - Store Planning
053008
SECTION 09680 - CARPET
PART 1 - GENERAL
1.1
SUMMARY
A.
Section Includes:
1.
Owner furnished, Contractor installed carpet tiles for the following areas:
a.
Pharmacy.
B.
Related Sections:
1.
Section 01640 - Owner Furnished Products: General procedures related to products furnished by others.
1.2
REFERENCES
A.
1.3
Carpet and Rug Institute (CRI)
1.
CRI 104 - Standard for Installation of Commercial Carpet.
QUALITY ASSURANCE
A.
1.4
Installer Qualifications: A qualified installer who is certified by the Floor Covering Installation Board or who can
demonstrate compliance with its certification program requirements.
DELIVERY, STORAGE AND HANDLING
A.
Product Delivery: Carpet will be delivered to jobsite for Contractor to receive on delivery date established by
Contractor. To establish product delivery date and quantity of carpet required, contact the following three weeks
prior to desired delivery:
1.
Walmart Store Planning Division, Suzann Johnson, (479) 273-4088.
B.
Product Packaging: Carpet will be shipped in cartons. Manufacturer's published installation instructions will be
included in package.
C.
Acceptance at Site: Receive products as specified in Section 01640. Verify quantity of products furnished with
Bill of Material provided with products. Report discrepancies in product quantity delivered or damage to products
delivered to contact specified above. Upon notification by Contractor, arrangement will be made for delivery of
replacement products. Note description of product quantity discrepancies and/or product damage on Bill of Lading.
D.
Comply with CRI 104, Section 5, "Storage and Handling."
E.
Section 01600 - Product Requirements: Transport, Handle, Store, and Protect products.
F.
Protect packaged adhesive from temperature cycling and cold temperatures. Keep adhesives away from any ignition source.
G.
Do not store roll goods on end.
1.5
SITE CONDITIONS
A.
Environmental Requirements:
1.
Maintain areas to receive carpet at constant minimum temperature of 45 to 50 degrees F for minimum three
days prior to and during installation.
a.
Comply with carpet manufacturer's surface moisture requirements.
09680-1
0893 Lindsay, OK
11/23/10
2.
3.
b.
Provide negative alkalinity at substrate.
Provide continuous ventilation during and after installation.
Do not install carpet until wet work in spaces is complete and dry, and ambient temperature and humidity
conditions are maintained at the levels indicated for Project when occupied for its intended use.
B.
Provide lighting levels of 80 foot candles measured mid-height at substrate surface.
C.
General: Comply with CRI 104, Section 6.1, "Site Conditions; Temperature and Humidity."
D.
Do not install adhesive applied carpet over concrete slabs until slabs have cured and are sufficiently dry to bond
with adhesive and concrete slabs have pH range recommended by manufacturer.
1.6
SCHEDULING
A.
Schedule installation to prevent damage to carpet by subsequent construction activities.
PART 2 - PRODUCTS
2.1
CARPET
A.
Carpet will be provided as applicable as shown on the drawings.
B.
C-1 (Pharmacy): Cushion Back Carpet Tile: Geometry by Interface, or match existing carpet which is to remain.
CushonBac Plus Tile, tufted tip sheared pattern loop, 100% Solutia yarn. Furnished by Walmart, installed by Contractor.
1.
Tile Size: 50 cm x 50 cm. (19.69 in. square).
2.
Pattern: Geometry, or match existing which is to remain.
3.
Color: Optical, or match existing which is to remain.
2.2
ACCESSORIES (OWNER FURNISHED)
A.
Adhesive: Franklin 780 Premium Multipurpose Flooring Adhesive by Franklin International.
1.
Water resistant type, VOC less than 50 g/l.
B.
Primer: Type recommended by adhesive and carpet manufacturer; compatible with substrate.
C.
Transition Strip: Rubber transition strip at exposed edge of carpet tile as detailed on Drawings.
PART 3 - EXECUTION
3.1
EXAMINATION
A.
Examine surfaces and adjacent areas where products will be installed and verify that surfaces conform to product
manufacturer's requirements for substrate conditions. Do not proceed until unsatisfactory conditions have been
corrected.
1.
Substrate Surface: Clean, true, and free of irregularities.
B.
Beginning of installation indicates acceptance of substrate conditions.
3.2
PREPARATION
A.
Prepare substrate for product installation in accordance with manufacturer's published instructions.
B.
Vacuum clean surfaces free of loose particles.
09680-2
0893 Lindsay, OK
11/23/10
3.3
INSTALLATION
A.
Install in accordance with manufacturer’s instructions.
B.
Comply with CRI 104, Section as applicable for the application method used.
C.
Maintain uniformity of carpet direction and lay of pile (except, alternate direction at Pharmacy). At doorways,
center seams under door in closed position. Bind or seal cut edges as recommended by carpet manufacturer.
D.
Install pattern parallel to walls and borders.
E.
Install geometric pattern in non-directional layout as recommended by the manufacturer.
3.4
FIELD QUALITY CONTROL
A.
Inspect installation, pattern matching, and attachment to substrate.
B.
Correct deficiencies in Work which inspection indicates are not in compliance with Contract Documents.
3.5
CLEANING AND PROTECTION
A.
Perform the following operations immediately after installing carpet:
1.
Remove excess adhesive, seam sealer, and other surface blemishes using cleaner recommended by carpet
manufacturer.
2.
Remove yarns that protrude from carpet surface.
3.
Vacuum carpet using commercial machine with face-beater element.
B.
Protect installed carpet to comply with CRI 104, Section 15, "Protection of Indoor Installations."
C.
Protect carpet against damage from construction operations and placement of equipment and fixtures during the
remainder of construction period. Use protection methods indicated or recommended in writing by carpet manufacturer.
END OF SECTION
09680-3
0893 Lindsay, OK
11/23/10
UniSpec II - Store Planning
092410
SECTION 09900 - PAINTS AND COATINGS
PART 1 - GENERAL
1.1
SUMMARY
A.
Section Includes:
1.
Field applied paints and finishes for interior and exterior surfaces. (Partial Walmart Furnished/Partial Contractor furnished, Contractor Installed)
B.
Related Sections:
1.
Section 01640- Owner Furnished Products.
1.2
REFERENCES
A.
The publications listed below form a part of this specification to the extent referenced. Publications are referenced
within the text by the basic designation only.
B.
ASTM International (ASTM):
1.
ASTM E 2129 - Standard Practice for Data Collection for Sustainability Assessment of Building Products.
1.3
QUALITY ASSURANCE
A.
Regulatory Requirements:
1.
VOC Content: Provide paint and coating materials that conform to Federal, State, and Local restrictions for
Volatile Organic Compounds (VOC) content.
2.
Toxicity/EQ: Comply with federal, state, and local toxicity and environmental quality regulations and with
federal requirements on content of lead, mercury, and heavy metals. Do not use solvents in paint products
that contribute to air pollution.
B.
Exterior Finish Pre-Installation Conference:
1.
Convene a pre-installation teleconference, at least one week prior to commencing Work of this Section.
2.
Contact Walmart Construction Manager two weeks prior to pre-installation conference to confirm schedule.
3.
Attendance:
a.
Walmart Construction Manager.
b.
Contractor.
c.
Coating Subcontractor.
d.
Coating Manufacturer's Technical Representative. This individual must be the same person that
performed the Initial Site Visit. Technical Representative shall reference the Sherwin Williams/WM Initial Site Visit Worksheet for site specific information.
1)
Contact Name: Tim Lederer
2)
Supplier Store Number: 7356
3)
Store Address: 1124 S. 4th St., Chickasha, OK 73018
4)
Store Phone number: 405-224-6543
4.
Agenda:
a.
Sherwin Williams/WM Initial Site Visit Worksheet.
b.
Recommended exterior paint/coating and primer (if required).
c.
Preparation of existing substrate to receive recommended finish.
d.
Sequence and method of application of coating system.
e.
Warranty provisions.
5.
Record, type, and print minutes of the meeting. Distribute minutes to all parties concerned within 5 days of
the meeting. Transmit one copy of the minutes to the Owner's representative for information purposes.
C.
Waste Management:
09900-1
0893 Lindsay, OK
11/23/10
1.
2.
1.4
Paint Containers: Obtain paint in containers of the largest size practical for each color, sheen, and type.
Make arrangements to clean and recycle containers that cannot be returned to manufacturer.
Return reusable drums and totes to manufacturer.
DELIVERY, STORAGE AND HANDLING
A.
Section 01600 - Product Requirements: Transport, handle, store, and protect products.
B.
Product Order and Delivery: The Contractor shall prepare and order all coating materials and accessories for Contractor furnished products and arrange delivery of Walmart furnished products and submit together to Walmart
Supplier specified hereinbefore. Walmart Supplier will deliver products to site on delivery date established by
Contractor. To arrange product order and delivery, contact Supplier.
C.
Acceptance at Site: Receive products as specified in Section 01640.
1.
Verify quantity of products furnished with Bill of Material provided with Walmart furnished products.
2.
Report discrepancies in product quantity delivered or damage to Supplier.
3.
Upon notification by Contractor, Supplier will arrange for delivery of replacement products.
4.
Note description of product quantity discrepancies and/or product damage on Bill of Materials.
D.
Paint orders shall identify the store number, location, and address of project.
E.
Delivery of paint materials shall be in sealed original labeled containers, bearing manufacturer's name, type of
paint, brand name, lot number, brand code, coverage, surface preparation, drying time, cleanup requirements, color
designation, and instructions for mixing and/or reducing. Notify Supplier when delivered products to not conform
to these requirements.
1.5
ENVIRONMENTAL REQUIREMENTS
A.
Apply paint finishes only when moisture content of surfaces is within manufacturer's acceptable ranges for type of
finish being applied.
B.
Minimum surface temperatures or ambient air temperature shall be as follows for the specified coatings unless otherwise specifically stated by the manufacturer for the specific coating:
1.
Alkyd and interior and exterior latex finishes: 50 degrees F.
2.
Varnish and transparent finishes: 65 degrees F.
3.
All coatings: 5 degrees F above dew point.
C.
Provide continuous ventilation and heating facilities to maintain temperatures above the manufacturer’s stated
minimum surface and air temperature for 24 hours prior to, during, and 48 hours after application of finishes.
D.
Do not apply paint in areas where dust is being generated.
E.
Expose waste paint to air and allow paint to dry.
F.
Remove bulk from container and dispose in accordance with MSDS data and local environmental regulations for
paint products. Clean containers and recycle.
G.
Provide lighting level in areas being painted of 80 foot candles measured mid-height at substrate surface.
PART 2 - PRODUCTS
2.1
OWNER FURNISHED PRODUCTS
A.
Products Supplied by Walmart Supplier and Installed by Contactor: Under provisions of Section 01640,
Walmart’s supplier will furnish a limited portion of the specified products in the quantities as specified hereinafter
on the Walmart furnished Quantity Schedule for installation by the Contractor.
1.
Walmart supplied products will conform to the specifications included in this section.
09900-2
0893 Lindsay, OK
11/23/10
2.
Walmart Supplier: Sherwin Williams Company. Contact: Tim Lederer, 580-585-7784.
B.
Products Provided (Furnished and Installed) by the Contractor: The Contractor shall provide all products specified
herein which are not scheduled to be Walmart furnished.
C.
Quantity Furnished: Walmart will furnish coatings in the quantities shown on the Walmart Furnished Quantity
Schedule at the end of this Section. The quantity furnished by Walmart is not to be considered fully sufficient for
the total project. Supplemental required quantities to those of Walmart furnished coatings including additional
quantities of Walmart furnished coatings, coatings not furnished by Walmart, and other materials and accessories
as determined by the Contractor necessary for the complete project, shall be furnished by the Contractor at Contractor expense. Supplemental coating quantities shall be obtained from the Walmart Supplier. Walmart furnished
coatings are not differentiated by color. The Contractor shall identify on the order, the appropriate colors as required.
2.2
MATERIALS
A.
Paint: Walmart and Contractor provided coating materials shall be the product of Sherwin Williams Co. as specified in the Painting Schedule hereinafter. Substitutions will not be permitted.
B.
Accessory Materials (Contractor Provided): Accessory materials not specifically indicated herein but required to
achieve the finishes specified, shall be provided by the Contractor and shall be of highest quality and as recommended by the manufacturer.
1.
Paint Thinners: Type recommended by paint or coating manufacturer for paint or coating system, VOC
compliant, first line commercial quality. Do not use solvents for thinning paint materials.
2.
Patching Materials: Low VOC Latex filler.
PART 3 - EXECUTION
3.1
EXAMINATION
A.
Examine surfaces and adjacent areas where products will be applied and verify that surfaces conform to product
manufacturer's requirements for substrate conditions. Do not proceed until unsatisfactory conditions have been corrected.
B.
Beginning of application indicates acceptance of substrate conditions.
3.2
PREPARATION
A.
Apply paint only on surfaces free of dirt, rust, scale, grease, moisture, scuffed surfaces, and conditions otherwise
detrimental to formation of a durable paint film.
B.
Coordinate moving of merchandise and fixtures with the Walmart Field Project Manager prior to painting in Sales
areas.
C.
Perform preparation and cleaning procedures in accordance with paint manufacturer's published instructions for
each particular substrate condition.
1.
Provide barrier coats over incompatible primers or remove and reprime as required.
2.
Remove hardware, hardware accessories, machined surfaces, plates, lighting fixtures, and similar items in
place and not to be painted or provide surface applied protection prior to surface preparation and painting
operations. Reinstall all removed items after completion of paint work.
3.
Clean surfaces to be painted before applying paint or surface treatment. Remove oil and grease prior to mechanical cleaning.
D.
Ferrous Metals: Clean ferrous surfaces that are not galvanized or shop-coated, of oil, grease, dirt, loose mill scale,
and other foreign substances by solvent or mechanical cleaning.
1.
Touch-up shop-applied prime coats where damaged or bare. Clean and touch-up with same type shop primer.
09900-3
0893 Lindsay, OK
11/23/10
E.
Galvanized Surfaces: Clean free of oil and surface contaminants with non-petroleum based solvent. Apply coat of
etching primer if required by paint manufacturer.
F.
Cementitious Materials: Prepare cementitious surfaces to be painted by removing efflorescence, chalk, dust, dirt,
grease, oils, and by roughening as required to remove glaze.
1.
Determine alkalinity and moisture content of surfaces to be painted by performing appropriate tests.
a.
Alkalinity shall be a maximum ph of 13 and a minimum of 6.
b.
If surface alkalinity is outside range specified above, correct condition before application of paint.
c.
Do not paint over surfaces where moisture content exceeds that permitted in manufacturer's printed
instructions.
2.
Clean and etch floor surfaces scheduled to be painted with a commercial solution of muriatic acid, or other
etching cleaner. Flush floor with clean water to neutralize acid and allow to dry before painting. Mask floor
surfaces not to be cleaned and etched.
a.
Sealer Removal: Prior to etching, remove curing compound and sealers with strong solvents such as
xylene, MEK, toluene or commercial paint strippers or by sandblasting or other similar mechanical
action.
G.
Wood: Clean wood surfaces to be painted of dirt, oil, and other foreign substances with scrapers, mineral spirits,
and sandpaper, as required. Sandpaper smooth those finished surfaces exposed to view, and dust off. Scrape and
clean small, dry, seasoned knots and apply a thin coat of white shellac or other recommended knot sealer, before
application of priming coat. After priming, fill holes and imperfections in finish surfaces with putty or plastic
wood filler. Sandpaper smooth when dried.
1.
Prime, stain, or seal wood required to be job-painted immediately upon delivery to job. Prime edges, ends
faces, undersides, and backsides of such wood, including cabinets and counters.
2.
Seal tops, bottoms, and cut-outs with a heavy coat of varnish or equivalent sealer immediately upon delivery to job.
H.
Gypsum Board: Fill minor defects with filler compound. Spot prime defects after repair.
1.
If shown on Drawings to receive textured finish, prepare gypsum board surfaces with textured coating
specified in Section 09250.
2.
Exterior Gypsum Board Sheathing: Exterior gypsum board sheathing to receive a paint finish shall be prepared for painting with joint treatment and skim coating as specified in Section 09250.
I.
Previously Painted Surfaces: Prepare previously painted surfaces in accordance with manufacturer’s recommendations. Remove loose paint by scrape or wire brush as necessary. Smooth edges of existing sound paint film to prevent telegraphing of ridges through new paint film. Clean surfaces thoroughly and roughen existing paint surfaces
by lightly sanding. Clean and remove mildew using trisodium phosphate. Touch up bare surfaces with prime coat
scheduled. Painted surfaces with existing sound prime or finish coats do not require additional prime coating. Finish coats shall be applied in number and DFT specified.
J.
Existing Composite Overhead Sectional Doors: Prepare surface as recommended by manufacturer. Surface shall be
clean and dull before painting. Thoroughly wash with an abrasive cleanser or wash and dull by sanding.
3.3
APPLICATION
A.
Apply coating systems specified in the Painting Schedule hereinafter for the corresponding surface. Shop primed
surfaces will not require field applied 1st coat (primer) specified in the Painting Schedule.
B.
Apply paint products in accordance with manufacturer's published instructions using application procedures approved for the particular application and substrate.
C.
Apply each coat to the Dry Film Thickness (DFT) specified which represents the minimum Dry Film Thickness in
mils per coat. Apply each coat to uniform coverage.
D.
Apply each coat slightly darker than preceding coat unless otherwise approved by Walmart Construction Manager.
Lightly sand surfaces between coats to achieve specified finish.
09900-4
0893 Lindsay, OK
11/23/10
E.
Allow drying time between coats as recommended by the manufacturer.
F.
Apply additional coats when undercoats, stains, or other conditions show through final coat until paint film is of
uniform finish, color, and appearance. Surfaces, including edges, corners, crevices, welds, and exposed fasteners
shall receive minimum dry film thickness equivalent to that of flat surfaces.
G.
Prime Coats: Before application of finish coats, apply a prime coat of material as scheduled or as recommended
by manufacturer to material scheduled to be painted or finished that has not been shop primed. Recoat primed and
sealed surfaces where evidence of suction spots or unsealed areas in first coat appears, to assure a finish coat with
no burn through or other defects due to insufficient sealing.
H.
Pigmented (Opaque) Finishes: Completely cover to provide an opaque, smooth surface of uniform finish, color,
appearance and coverage. Cloudiness, spotting, laps, brush marks, runs, sags or other surface imperfections will
not be acceptable.
3.4
MECHANICAL AND ELECTRICAL EQUIPMENT
A.
Replace identification markings on mechanical or electrical equipment when painted over or spattered.
B.
Where exposed piping, conduit, and electrical equipment are to be painted, paint color and texture shall match adjacent surfaces.
C.
Paint both sides and edges of plywood backboards for electrical equipment prior to installation.
D.
Prepaint Gas piping prior to installation. Touch up paint after installation. Colors shall be as follows:
1.
Exterior Piping on Roof (Yellow): P5, OSHA Standard "Safety Yellow."
2.
Interior Piping in Receiving and Stockroom Areas (Yellow): P5, OSHA Standard "Safety Yellow."
3.
Piping in all Other Areas: Color to match adjacent surfaces.
3.5
FIELD QUALITY CONTROL
A.
Inspect painting and coating application for scheduled material, color, sheen, specified thickness (DFT), and coverage.
B.
Remove, refinish or repaint work rejected by Walmart Construction Manager.
3.6
CLEANING
A.
As work proceeds and upon completion, promptly remove paint where spilled, splashed, or spattered.
B.
During progress of work keep premises free from unnecessary accumulation of tools, equipment, surplus materials,
and debris.
C.
Collect waste, cloths, and material which may constitute a fire hazard, place in closed metal containers, and remove daily from site.
D.
Upon completion of work, leave premises neat and clean.
3.7
PROTECTION
A.
3.8
A.
Mark
Protect other surfaces from paint and damage. Repair damage as a result of inadequate or unsuitable protection.
PAINT COLOR SCHEDULE
Provide following colors as applicable as shown or scheduled on the drawings.
Color Number/Name by Sherwin Williams unless otherwise noted.
09900-5
0893 Lindsay, OK
11/23/10
Mark
P1
P2
P3
P4
P5
P6
P7
P8
P9
P10
P11
P12
P13
P14
P15
P16
P17
P18
P19
P20
P21
P22
P23
P24
P25
P26
P27
P28
P29
P30
P31
P32
P33
P34
P35
P36
P37
P38
P39
P40
P41
P42
P43
P44
P45
P46
Color Number/Name by Sherwin Williams unless otherwise noted.
SW # 1234 "Evening Shadow"
SW # 7664 "Steely Gray"
SW # 1504 “Nobility Blue”, OR
SW # 6510 “Loyal Blue”
SW # 1602 “Theater Red”
OSHA Standard "Safety Yellow"
SW # 6811 "Honorable Blue"
Pittsburgh Paints #2537 "Blossom
White"
SW # 7005 “Pure White”
SW # 7042 “Shoji White”. Apply over
textured coating specified in Section
09250
SW # 6061 “Tan Bark”
SW # 6115 “Totally Tan”
SW # 6112 “Biscuit”
SW # 6454 “Shamrock"
SW # 6677 “Goldenrod”
SW #7669 “Summit Gray”
SW # 7074 “Software”
SW # 7689 “Row House Tan”
SW # 7068 “Grizzle Gray”
SW # 6094 "Sensational Sand"
SW # 7036 “Accessible Beige”
Sherwin Williams “Safety Red”. Shop
coated doors and storefronts shall be
coated with color P21 specified in the
respective Division 8 sections.
Pantone Color System PMS 286C.
SW #7005 “Pure White."
SW # 2819 “Downing Slate”
SW # 0045 “Antiquarian Brown”
SW # 6080 “Utterly Beige”
SW # 6103 "Tea Chest"
SW # 6124 "Cardboard"
SW # 6420 Queen Anne’s Lace"
SW # 2018 "Pink Beige"
SW # 2016 "Canberra".
SW # 6387 "Compatible Cream"
SW # 6385 "Dover White"
SW # 6519” Hinting Blue.
SW # 7071 “Gray Screen”
SW # 6989 "Domino"
SW # 0046 "White Hyacinth"
SW #6102 "Portabello"
SW #6122 "Camelback"
SW # 6665 “Gardenia”
SW # 6100 “Practical Beige”
SW # 6372 “Inviting Ivory”
SW # 6667 “Afterglow”
SW # 6666 “Enjoyable Yellow”
SW # 0044 “Hubbard Squash”
SW # 7006 “Extra White”
Mark
P47
P48
P49
P50
P51
P52
P53
P54
P55
P56
P57
P58
P59
P60
P61
P62
P63
P64
P65
P66
P67
P68
P69
P70
P71
P72
P73
P74
P75
P76
P77
P78
P79
P80
P81
P82
P83
P84
P85
P86
P87
P88
P89
P90
P91
P92
P93
P94
P95
P96
P97
Color Number/Name by Sherwin Williams unless otherwise noted.
SW # 0051 “Classic Ivory”
SW # 7722 “Travertine"
SW #7019 “Gauntlet Grey”
SW #6382 “Ceremonial Gold”
SW # 6662 “Summer Day”
SW # 6334 “Flower Pot”
SW # 6810 “Lupine”
SW # 6432 “Garden Spot”
SW # 6285 “Grape Harvest”
SW # 6500 “Open Seas”
SW # 2848 “Roycroft Pewter”
Not Used
SW # 0077 “Classic French Gray”
SW # 6053 “Reddened Earth”
SW # 6079 “Diverse Beige”
SW # 6172 “Hardware”.
SW # 2340 “Buff”
SW # 6332 “Coral Island”
SW # 6378 “Crisp Linen”
SW # 6085 “Simplify Beige”
SW # 6114 “Bagel”
SW # 6113 “Interactive Cream”
SW # 6340 “Baked Clay”.
SW # 2838 “Polished Mahogany”
SW # 7051 “Analytical Gray”.
SW # 6658 “Welcome White”.
SW # 6214 “Underseas”
SW # 6659 “Captivating Cream”
SW # 2804 “Renwick Rose Beige”
SW #076 Medium Walmart Blue
SW # 6087 “Trusty Tan”
SW # 2445 “Creamy White”
SW # 6359 “Sociable”
SW # 6060 “Moroccan Brown”
SW # 6258 “Tricorn Black”
SW # 7679 "Golden Gate"
SW # 6082 "Cobble Brown"
Not Used
SW # 7519 "Mexican Sand"
SW # 7687 "August Moon"
SW # 2807 "Rookwood Medium
Brown"
SW # 2823 "Rookwood Clay"
SW # 6062 "Rugged Brown "
SW # 7502 "Dry Dock"
SW # 7513 "Sanderling"
SW # 7536 "Bittersweet Stem"
SW # 7538 "Tamarind"
SW # 7694(EXT) "Exterior Dromedary
Camel"
SW # 7702 "Spiced Cider"
SW # 7705 "Wheat Penny "
SW # 7710 "Brandy Wine"
09900-6
0893 Lindsay, OK
11/23/10
Mark
P98
P99
P100
P101
P102
P103
P104
P105
P106
P107
P114
P115
3.9
Color Number/Name by Sherwin Williams unless otherwise noted.
SW # 7718 "Oak Creek"
SW # 7722 "Travertine"
SW #6521 “Notable Hue”
SW #6904 “Gusto Gold”
SW #7518 “Beach House”
SW #6095 “Toasty”
SW #6676 “Butterfield”
SW #6526 “Icelandic”
SW #6675 “Afternoon”
SW#7698 “Straw Harvest”
SW #7720 “Deer Valley”
SW #6076 “Turkish Coffee”
Mark
P150
P151
P152
P153
P154
P155
P156
P157
P158
P159
P160
P161
Color Number/Name by Sherwin Williams unless otherwise noted.
SW #6354 “Armagnac”
SW #6674 “Jonquil”
Pantone 368C (WNM Brand Green)
PMS 285 (Walmart Blue)
PMS 364 (Focal Green)
SW #6661 “Papaya”
SW #7717 “Ligonier Tan”
SW #7732 “Lemongrass”
SW #7725 “Yearling”
SW #6081 “Down Home”
SW #7720 “Deer Valley”
SW #7503 “Sticks and Stones”
PAINT SHEEN SCHEDULE
A.
Gloss:
1.
2.
3.
4.
5.
6.
7.
8.
Exterior metal surfaces.
Exterior hollow metal doors and frames (inside and outside surfaces).
Roof hatch (inside and outside surfaces).
Interior & exterior pipe bollards shown to be painted.
Interior & exterior metal railings.
Metal stair stringers and handrails.
Metal fixed ladders and cages.
Exterior composite overhead sectional door surface if shown to be painted.
B.
Semi-gloss:
1.
Interior hollow metal doors and frames.
2.
Interior hollow metal window frames.
3.
Wood trim or simulated wood trim scheduled to be painted.
4.
Coiling metal counter doors, except aluminum coiling counter shutters at Pharmacy.
5.
Toilet gypsum board ceilings.
C.
Eggshell:
1.
All surfaces to be painted where a sheen is not otherwise specified.
3.10
A.
ITEMS TO BE PAINTED SCHEDULE
Paint surfaces as shown or scheduled on the drawings including, but not limited to, the following items.
1.
Exterior: Paint existing exterior surfaces and new exterior surfaces as shown and noted on the Drawings,
including, but not limited to:
a.
Hollow metal doors and frames.
b.
Metal opening frames and trim.
c.
Metal flashing and downspout (surfaces exposed from ground level).
d.
Metal gutters (surfaces exposed to view from ground level).
e.
Metal fascias (vertical face).
f.
Top of metal parapet cap where exposed to view from ground level.
g.
Parapet walls, roof side (where roofing does not occur).
h.
Pipe bollards where shown to be painted.
i.
Metal railings.
j.
Roof hatch.
k.
Shop primed metal canopies and canopy supporting steel structure.
l.
Overhead doors if shown.
m.
Paving graphics and markings.
09900-7
0893 Lindsay, OK
11/23/10
2.
B.
3.11
A.
Surface
n.
Exposed piping and conduit, hangers and supports.
Interior: Paint existing and new interior surfaces as indicated on the Drawings including, but not limited to:
a.
Hollow metal doors and frames.
b.
Hollow metal window frames.
c.
Overhead coiling doors.
d.
Metal opening frames and trim.
e.
Gypsum wallboard.
f.
Pipe Bollards shown to be painted.
g.
Metal railings.
h.
Exposed plywood.
i.
Plywood wainscot, if shown to be painted.
j.
Exposed mechanical ductwork, hangers and supports (if exposed structure is scheduled to be painted).
k.
Exposed piping and conduit, hangers and supports (if exposed structure is scheduled to be painted).
l.
Exposed structure columns.
m.
Wall accent stripes, signage, and graphics.
n.
Floor striping, graphics, and markings as shown or noted.
o.
Metal stair stringers and handrails.
p.
Exposed wood trim.
Do not paint the following Items:
1.
Aluminum, brass, bronze, stainless steel, and chrome plated steel.
2.
Pre-finished items, such as toilet compartments, acoustical ceiling materials, mechanical, and electrical
equipment or factory finished metal panels and trim, unless otherwise shown or specified.
3.
UL, FM, and other code-required labels.
4.
Equipment identification, performance rating, and name plates.
5.
Finish hardware.
6.
Fire Suppression sprinklers.
PAINTING SCHEDULE
Apply paint to the substrate surface scheduled as applicable as specified or as shown on the drawings in accordance with the following:
Shee
n
1st Coat
EXTERIOR PAINTING SCHEDULE
Gloss Pro Industrial ProCryl Universal
Ferrous
Primer B66-310
Metal
Gloss All States except CA: Epolon II
Ferrous
Rust Inhibitive Epoxy Primer
Metal
B67W400, B67A400, B67A400
(Existing
roof
State of CA: Macropoxy 646mounted
100, B58W620, B58V620
equip framing to remain)
Bond-Plex Waterbased Acrylic
Low
PrefinSheen B71-200 Series
ished
Metal Panels and
Trim
(If shown
to be repainted)
Galvanized Semi- Pro Industrial ProCryl Universal
DFT
(mils)
VO
C
(g/l)
DFT
(mils)
VO
C
(g/l)
3.0
100
2 Coats: Pro Industrial Zero VOC
Enamel, B66-600 Series
2 Coats: WB Acrolon 100 Water
Based Urethane B65-720, B65V720
4.0
0
5.0
300
2-4
<100
5-10
<100
4.0
48
1 Coat: Bond-Plex Waterbased
Acrylic B71-200 Series
4.0
48
3.0
100
2 Coats: Pro Industrial Zero VOC
4.0
0
2nd and 3rd Coats
09900-8
0893 Lindsay, OK
11/23/10
Surface
Shee
n
1st Coat
Primer B66-310
gloss
Trim
Semi- Pro Industrial ProCryl Universal
NonferPrimer B66-310
gloss
rous and
Galvanized
Metal, including
existing
ornamental
metal fencing (if
shown to be
repainted)
Setfast Acrylic Waterborne TrafEggConcrete
fic Marking Paint, TM 226/227
shell
Pavement
INTERIOR PAINTING SCHEDULE
DFT
(mils)
VO
C
(g/l)
2nd and 3rd Coats
DFT
(mils)
VO
C
(g/l)
Enamel, B66-600 Series
3.0
100
2 Coats: Pro Industrial Zero VOC
Enamel, B66-600 Series
4.0
0
8.5
100
1 Coat: Setfast Acrylic Waterborne
Traffic Marking Paint, TM 226/227
8.5
100
VO
C
(g/l)
100
Surface
Sheen
1st Coat
DFT
(mils)
Ferrous
Metal
(Except as
otherwise
scheduled)
Gloss
Pro Industrial ProCryl Universal
2
Ferrous
Metal
(Except as
otherwise
specified)
Ferrous
Metal
(Columns
and Hollow
Metal Door
Frames as
shown on
Drawings
to receive
epoxy)
Galvanized
Metal
(Exposed
Ductwork)
Gypsum
Board
Semigloss
ProCryl Universal Primer B66310
2
Semigloss
All States except CA: Epolon II
4.0
300
State of CA: Macropoxy 646100, B58W620, B58V620
5.010.0
100
Semigloss
Pro Industrial ProCryl Universal
Primer B66-310
2
Gloss
Pro Green 200 Latex Primer,
B28W600
1.5
2nd and 3rd Coats
VOC
(g/l)
1.5
143
1.6
49
1.6
47
1 coat: WB Acrolon 100 Water
Based Urethane B65-720,
B65V720
2-4
<100
100
2 coats: Pro Green 200 Interior Latex
Semi-Gloss Enamel, B31-600 Series
1.6
47
43
All States except CA:
2 Coats: Pro Mar 200 Interior Latex
1.5
143
1.6
49
1.6
47
1.7
41
Primer B66-310
All States except CA:
2 Coats: Pro Mar 200 Interior Latex
DFT
(mils)
Gloss Enamel, B21W200
100
State of CA:
2 Coats: Solo Gloss Low VOC
Enamel, B21WJ Series
2 coats: Pro Green 200 Interior Latex
Semi-Gloss Enamel, B31-600 Series
Rust Inhibitive Epoxy Primer
B67W400, B67A400, B67A400
Gloss Enamel, B21W200
Gypsum
Board
Semigloss
Pro Green 200 Latex Primer,
B28W600
1.5
Gypsum
Board
Eggshell
Pro Green 200 Latex Primer,
B28W600
1.5
43
43
State of CA:
2 Coats: Solo Gloss Low VOC
Enamel, B21WJ Series
2 Coats: Pro Green 200 Interior Latex Semi-Gloss Enamel, B31-600
Series
2 Coats: Pro Green 200 Interior Latex Eggshell Enamel, B20-600 Series
09900-9
0893 Lindsay, OK
11/23/10
Surface
Wood
Wood
(Transparent sealer)
Concrete
Floors
3.12
Shee
n
1st Coat
Semigloss
Pro Green 200 Latex Primer,
B28W600
1.5
VO
C
(g/l)
43
Wood Classics Varnish Sanding
Sealer, B26V43
1.2
522
Floor & Porch Enamel, A32-100
1.4
50
Eggshell
DFT
(mils)
2 Coats: Pro Green 200 Interior Latex Semi-Gloss Enamel, B31-600
Series
1.6
VO
C
(g/l)
47
2 Coats: Floor & Porch Enamel,
1.4
50
DFT
(mils)
2nd and 3rd Coats
A32-100
WALMART FURNISHED COATINGS QUANTITY SCHEDULE
Sherwin Williams Coating Product Number
EXTERIOR
A6-100 Series
Sherwin Williams Coating Product Number
INTERIOR
B20-600
B31-600
Product Description
Gallons Furnished by
Walmart
A-100 Exterior Latex Finish
30
Product Description
Gallons Furnished by
Walmart
Pro Green 200 Interior Latex Eggshell Enamel,
Pro Green 200 Interior Latex Semi-Gloss Enamel
30
10
END OF SECTION
09900-10
0893 Lindsay, OK
11/23/10
UniSpec II - Store Planning
042707
SECTION 10170 - PLASTIC TOILET COMPARTMENTS
PART 1 - GENERAL
1.1
SUMMARY
A.
Work Includes:
1.
Plastic toilet compartments and screens, floor mounted, head rail braced.
B.
Related Sections:
1.
Section 06100 - Rough Carpentry: Framing and plates within walls.
1.2
ENVIRONMENTAL REQUIREMENTS
A.
1.3
Resource Management:
1.
Recycled Content: Solid plastic compartments and screens manufactured with recycled plastic will be
permitted.
REFERENCES
A.
American National Standards Institute (ANSI): ANSI A117.1 - Specification for Making Buildings and Facilities
Accessible To and Usable by Physically Handicapped People.
B.
Americans with Disabilities Act (ADA), ADA-ADAAGS - 1990 Accessibility Guidelines for Buildings and Facilities.
C.
State and local disabled accessibility requirements and guidelines.
PART 2 - PRODUCTS
2.1
MANUFACTURERS
A.
Subject to compliance with project requirements, provide solid plastic (polyethylene (HDPE) or phenolic) toilet
compartments and screens, as manufactured by one of the following:
1.
Comtec/Capitol Industries: Ed Smichowski, (800) 445-5148. Ext. 313
a.
Capitol:
1)
HDPE: Poly-Pro Plus (P3)
2)
Phenolic: Pro-Nolic
b.
Comtec:
1)
HDPE: Standard Series.
2.
Santana Products, Inc. (800) 368-5002.
a.
HDPE: Santana HDPE
3.
Rockville Partitions, Inc. Contact: Phil Bonnema, (256) 657-6755.
a.
HDPE: Polyrock HDPE
b.
Phenolic: Rockville Solid Phenolic
4.
Partition Systems, Inc., Contact: Tim Ivey, (803) 765-9980.
a.
Phenolic: Columbia HD 8000 Series
5.
Accurate Partitions Corp., Contact Jim Povejsil, (800) 400-6804, Ext. 135.
a.
HDPE: SP
b.
Phenolic: PH
6.
Metpar Corp., Westbury, NY (516) 333-2600.
a.
HDPE: Poly SPR
b.
Phenolic: Solid Phenolic
B.
Furnish compartment and screens all of the same type and the product of one manufacturer.
10170-1
0893 Lindsay, OK
11/23/10
C.
2.2
Substitutions: Not permitted.
PRODUCT PROCUREMENT
A.
2.3
Products specified herein shall be direct purchased by the General Contractor from a pre-negotiated supplier. Reference Section 01600 for additional information regarding Direct Purchase Products. Pre-negotiated supplier shall
be as follows:
1.
Haines, Jones & Cadbury, Inc, Contact: Customer Service, (800) 459-7099, fax (479) 756-8998, Email: [email protected].
MATERIALS
A.
Plastic Compartments and Screens: Provide any of the following:
1.
Solid Plastic, Polymer Resin: High-density polyethylene (HDPE) with homogenous color and material
throughout. Provide unit with eased edges and with minimum 1 inch thick doors, pilasters, and panels with
seamless construction.
2.
Solid-Plastic, Phenolic Core: Solid phenolic core with melamine facing on both sides, fused to substrate
without visible glue line or seam. Provide units with eased edges and with minimum 3/4-inch thick doors
and pilasters and minimum 1/2-inch thick panels and screens.
B.
Urinal Screens: Wall hung type, 24" x 42" to match toilet compartments.
C.
Pilaster Shoes: 4 inches high, one-piece stainless steel or solid plastic floor shoe.
D.
Headrail: Extruded brite anodized type 6463T5 aluminum channel; anti-grip design.
E.
Attachments:
1.
Screws, and Bolts: Stainless steel; tamper proof type.
2.
Wall Mounting Brackets: Continuous, full height, double ear extruded brite anodized type 6463T5
aluminum.
3.
Side Panel to Pilaster Bracket: Continuous, full height, U-channel extruded brite anodized type 6463T5
aluminum.
F.
Hardware: Wrap-around, surface mounted, or integral pivot hinges, gravity type, adjustable for door close positioning; nylon bearings; clear anodized aluminum slide-type door latch; door strike and keeper with rubber bumper; cast alloy chrome plated coat hook and bumper.
G.
Heat-Sink Strip: Manufacturer's standard continuous, extruded-aluminum strip in manufacturer's standard finish
for solid plastic polymer resin products.
2.4
FABRICATION
A.
Solid Plastic: 1/4 inch radius beveled edges.
B.
Hardware: Pre-drilled by manufacturer; provide for protection of dissimilar metals.
2.5
FINISHES
A.
Provide any of the colors as follows. Only one manufacture and type of solid plastic shall be used throughout.
Colors listed shall be equivalent color for both types of solid plastic.
B.
Compartments and Screens:
1.
Onyx 308 or 3308 by Capitol.
2.
Glacier Gray D400 (Designer Series) by Comtec.
3.
Onyx 733 by Santana.
4.
Folkstone Gray 9400 by Accurate. (HDPE)
5.
Folkstone Celeste 692 by Accurate. (Phenolic)
10170-2
0893 Lindsay, OK
11/23/10
6.
7.
8.
Meteor Nebula by Rockville (HDPE).
Gray Glace by Rockville (Phenolic).
Metpar: Match any of above colors
PART 3 - EXECUTION
3.1
PREPARATION
A.
Take site dimensions. Verify correct spacing of plumbing fixtures.
B.
Verify correct location of built-in framing, anchorage, and bracing.
3.2
INSTALLATION
A.
Layout and install all items in accordance with federal, state, and, local disabled (handicap) accessibility
requirements.
B.
Install partitions secure, rigid, plumb, level, and square in accordance with manufacturer's instructions.
1.
Provide for adjustment due to minor floor variations.
2.
Install adjacent components for consistency of line and plane.
C.
Maintain 1/2 inch space between wall and panels, and between wall and pilasters. Attach continuous panel brackets securely to walls using anchor devices.
D.
Attach panels and pilasters to bracket with through sleeve, tamperproof bolts, and nuts. Locate head rail joints at
pilaster centerlines.
E.
Anchor urinal screen panels to walls with continuous bracket in accordance with manufacturer's instructions to suit
supporting wall construction.
F.
Conceal floor fastenings with pilaster shoes.
G.
Equip each door with hinges, one slide-type door latch, and one coat hook and bumper. Align hardware to uniform clearance at vertical edges of doors, not exceeding 1/4 inch.
3.3
ADJUSTING
A.
In Swinging Doors: Adjust hinges to locate doors in partial open position when unlatched.
B.
Out Swinging Doors: Adjust hinges to gently return doors to closed position.
END OF SECTION
10170-3
0893 Lindsay, OK
11/23/10
UniSpec II - Store Planning
052810
SECTION 10260 - WALL AND CORNER GUARDS
PART 1 - GENERAL
1.1
SUMMARY
A.
1.2
Section Includes:
1.
Surface applied corner guards.
2.
Wall guards.
DELIVERY, STORAGE AND HANDLING
A.
Section 01600 - Product Requirements: Transport, handle, store, and protect Products.
PART 2 - PRODUCTS
2.1
MANUFACTURER
A.
2.2
Unless specified otherwise, provide guards by one of the following manufacturers as specified:
1.
American Floor Products Co., Inc., (800) 342-0424.
2.
InPro Corporation, Muskego, WI (262) 679-9010.
3.
IPC Door and Wall Protection Systems, (800) 222-5556.
4.
McCue Corporation, Salem, MA, Attn: Rich Whelan, (800) 800-8503 or (978) 741-8500 x268.
5.
Parkland Plastics Incorporated, Middlebury, IN (574) 825-4336.
6.
Pawling Corporation (800) 431-3456, Contact: Jennifer Killmer.
7.
Schluter Systems, Plattsburgh, NY (800) 472-4588.
CORNER GUARDS
A.
Plastic:
1.
Clear Plastic:
a.
Space (CG-2145) Corner Guard, clear, 1/8-inch thick, 2-1/2 x 2-1/2 inches x 48 inches, by American Floor.
b.
Clear Polycarbonate Corner Guards (CGT-18), 2-1/2 inches x 2-1/2 inches x 48 inches, by Pawling.
2.
Rigid Plastic
a.
Rigid Plastic Corner Guard, 1/2-inch thick, 3 x 3 inches x 32 inches, color black, by Parkland Plastics.
b.
Fasteners: Black flathead countersunk screws, length sufficient to penetrate substrate.
B.
Vinyl:
1.
2.
3.
4.
C.
Electra (CG-2144) Corner Guard, 3/4 x 3/4 inches x 48 inches, by American Floor.
Surface Mounted Corner Guard (CG-34), 3/4 x 3/4 inches x 48 inches, by Pawling.
Color: Black
Contact Adhesive: One of the following:
a.
Starstuk HM by North Star Chemicals, Cartersville, GA. (770) 386-6961.
b.
3M Fastbond Adhesive, by 3M, St. Paul, MN (800) 362-3550.
c.
Other similar contact adhesive that is suitable for use with high pressure laminates.
Aluminum:
1.
Polaris (CG-2139) 90° Corner Guard, 18 gage, 2 x 2 inches x 48 inches, unless otherwise shown, by American Floor.
2.
Aluminum Corner Guard, 0.08 inch thick, 2 x 2 inches x 48 inches, unless otherwise shown, by Pawling.
a.
CG-401, for 90° corners.
b.
CG-404, for 135° corners.
3.
Factory pre-drilled for installation with countersunk screws.
10260-1
0893 Lindsay, OK
11/23/10
2.3
WALL GUARDS
A.
Plastic Wall Guards - also noted on drawings as 'WG' or 'bumper rail' - (Except Pharmacy): PVC bumper on PVC
mounting base, 2" high x 12 ft long x 1-3/4" projection, color black. Provide the following:
1.
CartGuard E (CGT-175) bumper with base (CGB-175), including corners and end caps as required, by
McCue Corporation.
B.
Pharmacy Wall Guards: Vinyl bumper on continuous aluminum retainer, 3” high x 12 ft long section x 1” projection, lightly pebbled or matte finish. Provide one of the following:
1.
WG-3 Wall Guard, by Pawling.
a.
Gray: No 210 Silver Gray.
2.
500 Wall Guard by IPC.
a.
Gray: No. 0105 Silver.
C.
Accessories: End caps, outside corners, brackets, and fasteners, as recommended by wall guard manufacturer.
PART 3 - EXECUTION
3.1
EXAMINATION
A.
3.2
Examine substrates and wall areas, with installer present, for compliance with requirements for installation tolerances and other conditions affecting performance of Work.
1.
Examine walls to which wall guards will be attached for blocking, grounds, and other solid backing installed in the locations required for secure attachment of support fasteners.
2.
Proceed with installation only after unsatisfactory conditions have been corrected.
PREPARATION
A.
3.3
Before installation, clean substrate to remove dust, debris, and loose particles.
INSTALLATION
A.
Install in accordance with manufacturer's instructions, square and plumb, secured rigidly in position.
B.
Position corner guard spaced above finished floor to allow for installation of wall base type specified or shown on
Drawings. Coordinate installation of wall finishes with corner guard installation.
C.
Attach vinyl corner guard using contact adhesive only.
D.
Attach aluminum corner guards using stainless steel screws.
3.4
SCHEDULE
A.
Corner Guards:
1.
Locate aluminum corner guards in sales areas accessible by public at locations as shown on the drawings,
unless otherwise indicated or specified to receive other type of corner guards.
2.
Locate rigid plastic corner guards at millwork at locations shown on the drawings. Attach corner guards
with countersunk screw fasteners at 6 inches on center. Fill countersunk holes with plugs matching rigid
plastic material.
B.
Wall Guards: Locate wall guards where shown on the drawings.
END OF SECTION
10260-2
0893 Lindsay, OK
11/23/10
UniSpec II - Store Planning
052810
SECTION 10440 - SIGNAGE
PART 1 - GENERAL
1.1
WORK INCLUDED
A.
Exterior Fire Lane and Handicap Accessible Signs.
B.
Exterior Fire Lane Stripes.
C.
Temporary Construction and Temporary Operational Signs.
D.
Exit Door Signage.
E.
Exterior Building signs (furnished and installed by Walmart Sign Department).
1.2
REFERENCES
A.
ADA - American with Disabilities Act, Title 3, ADA-ADAAGs Accessibility Guidelines.
B.
State Specific Requirements for Handicap Accessibility:
1.
Texas.
2.
Florida.
3.
North Carolina.
4.
Louisiana.
5.
California.
1.3
PRODUCT DELIVERY AND STORAGE
A.
Walmart will deliver signage in boxes or cartons, adequately padded and protected against scratching and other
damage. Label packages with listing of sign labels and locations.
B.
Store materials out of weather and protect from damage.
PART 2 - PRODUCTS
2.1
TEMPORARY CONSTRUCTION SIGNS
A.
Traffic Direction Signs.
1.
Minimum 6” high lettering on contrasting background. Size and location to suit job site situation and
conditions.
B.
Temporary Operational Signs.
1.
Stenciled letters in 12” high letters (black color) on white background.
C.
Refer to Section 01500 for Temporary Construction Signs.
2.2
EXTERIOR BUILDING SIGNS
A.
2.3
Furnished and installed by Walmart Sign Department.
EXTERIOR FIRE LANE STRIPE
A.
Stenciled letters “FIRE LANE” in 6" high letters (white color) on continuous red paint stripe. Space at 20'-0" o.c. or as
directed by Local/State Fire Marshal.
10440-1
0893 Lindsay, OK
11/23/10
2.4
FIRE LANE SIGN
A.
2.5
Provide pre-manufactured signage approved by Local/State Fire Marshal attached to metal posts.
ACCESSORIES
A.
2.6
Nuts, bolts, washers and adhesive necessary to install signage.
EXIT DOOR SIGNAGE
A.
Signage: When required by local authority having jurisdiction, post doors with durable, permanent signs, 1 inch high
block letters of contrasting background, located on header framing, reading:
1. “THESE DOORS MUST REMAIN UNLOCKED DURING BUSINESS HOURS.”
2. “IN EMERGENCY, PUSH TO OPEN”.
PART 3 - EXECUTION
3.1
INSTALLATION
A.
Coordinate installation of Temporary Construction Signs with the Walmart Construction Manager. Install Temporary
Construction Signs at locations directed by Walmart Construction Manager. Attach these signs based upon function
and location. Install as soon as possible after commencement of Project construction.
B.
The Contractor shall demolish or remove existing signage that interferes with the new construction, unless otherwise
noted on Drawings. Do not leave partial signs, words or phrases at any time.
C.
Removed signage that is intended to be relocated by Walmart shall be stored and protected by the General Contractor
until installation. The Contractor shall patch or replace surfaces damaged by removed signage. This includes all
electrical conduits and boxes.
D.
Verify exact locations of new or relocated signage with Walmart Construction Manager. Contractor will be responsible
for repair or replacement of substrate materials damaged by improper locations of signs.
E.
Install signs and letters plumb, level, and in line and in accordance with manufacturer’s recommendations.
F.
Painted Fire Lane striping shall be installed by striping painting Contractor experienced in this Work. All work shall
meet Local and State Fire Marshal approval.
G.
Verify and install exterior Fire Lane signs where required and approved by Local/State Fire Marshal.
H.
Install exit door signage as required by local code and Authorities Having Jurisdiction on door head of aluminum
storefront doors or centered at 5'-0" A.F.F. on solid panel hollow metal doors.
I.
All signage required for compliance shall be installed in accordance with ADA-ADAAGS and State specific handicap
accessibility requirements.
3.2
CLEANING
A.
Clean and polish signs and related brackets and supports. Comply with manufacturer's recommendations.
B.
Clean any paint spillage to satisfaction of Walmart Construction Manager. Refer to Section 01740.
END OF SECTION
10440-2
0893 Lindsay, OK
11/23/10
UniSpec II - Store Planning
111910
SECTION 10810 - TOILET ACCESSORIES
PART 1 - GENERAL
1.1
SUMMARY
A.
Section Includes: Toilet accessories and attachment hardware.
B.
Work Installed, But Not Furnished Under This Section: Under provisions of Section 01640, Walmart will furnish
toilet accessories for installation by Contractor as follows:
1.
Soap Dispensers.
C.
Related Sections:
1.
Section 01600 - Product Requirements: General procedures related to products.
2.
Section 01640 - Owner Furnished Products: General procedures related to Owner furnished products.
3.
Section 06100 - Rough Carpentry: Blocking for attachment of accessories.
1.2
REFERENCES
A.
The publications below form a part of this specification to the extent referenced. Publications are referenced within the text by the basic designation only.
B.
American National Standards Institute (ANSI):
1.
ANSI A117.1 – Accessible and Usable Buildings and Facilities.
PART 2 - PRODUCTS
2.1
PRODUCT PROCUREMENT
A.
All Contractor provided accessory items specified herein shall be purchased by the General Contractor direct from
a pre-negotiated supplier. Reference section 01600 for additional information regarding Direct Purchase Products.
Pre-negotiated supplier shall be as follows:
B.
Haines, Jones & Cadbury, Inc; Contact: Customer Service; (800) 459-7099, Fax (479) 756-8998, Email: [email protected].
2.2
MANUFACTURERS
A.
Provide products from the following manufacturers as specified in the Schedule of Accessories hereinafter:
1.
American Specialties Co., Inc.; Deer Park, NY.
2.
Bobrick Washroom Equipment, Inc.; Jackson, TN.
3.
Bradley Corporation, Menomonee, WI.
4.
Brocar Products Inc., Cincinnati, OH
5.
Excel Dryer Corporation, East Longmeadow, MA.
6.
Ginger, Ft. Mill, SC.
7.
Koala Bear Kare Corporation (A Division of Bobrick). Englewood, CO.
8.
Meek Manufacturing Company, Fort Smith, AR.
9.
World Dryer Corporation.
B.
Substitutions: Not permitted.
2.3
MATERIALS
A.
Stainless Steel: AISI Type 302/304.
10810-1
0893 Lindsay, OK
11/23/10
B.
Mounting Devices: Hot-dip galvanized after fabrication or of same material as accessory unit.
C.
Adhesive: Epoxy type contact cement.
D.
Finishes:
1.
Chrome/Nickel Plating: Polished finish.
2.
Stainless Steel: No. 4 satin finish, unless specified otherwise.
3.
Shop Primed Ferrous Metals: Pre-treat and clean, spray apply one coat primer and bake.
2.4
FABRICATION
A.
Weld and grind smooth joints of fabricated components.
B.
Form exposed surfaces from one sheet of stock, free of joints. Form surfaces flat without distortion. Maintain flat
surfaces without scratches or dents.
C.
Provide steel anchor plates and anchor components for installation on building finishes. Hot-dip galvanize ferrous
metal anchors and fastening devices.
D.
Back paint components where contact is made with building finishes to prevent electrolysis.
E.
Shop assemble components and package complete with anchors and fittings.
PART 3 - EXECUTION
3.1
PREPARATION
A.
Deliver inserts and rough-in frames to jobsite at appropriate time for building-in. Use templates and rough-in
measurements as required.
B.
Ensure that blocking is appropriately installed and ready to receive accessories.
C.
Rough Wall Openings: Provide rough wall opening (RWO) in compliance with ADA Accessibility Guidelines, as
detailed on architectural drawings, and as described in the Schedule of Accessories.
3.2
INSTALLATION
A.
Install fixtures, accessories, and items in accordance with manufacturer's instructions and as shown on Drawings.
Install accessories within toilet rooms and install soap dispensers in other areas in addition to toilet rooms where
shown on the drawings. Use tamper-proof fasteners.
B.
Install true, plumb, and level, securely and rigidly anchored to wall framing.
C.
Install sealant around metal frames of mirrors and all toilet accessories abutting FRP wall panels.
3.3
SCHEDULE OF ACCESSORIES
A.
Soap Dispensers: Furnished by Walmart for installation by Contractor.
B.
Sanitary Napkin Dispenser:
1.
Model No. 0468-Recessed by American Specialties, Inc.
a.
Finish: Stainless Steel.
b.
Rough Wall Opening: 16"W x 26"H x 6-1/4"D
2.
Model No. 4017 by Bradley Corporation
a.
Finish: Stainless Steel.
b.
Rough Wall Opening: 12"W x 26"H x 6-1/2"D
10810-2
0893 Lindsay, OK
11/23/10
C.
Sanitary Napkin Disposal:
1.
Model No. 0473-1A by American Specialties, Inc.
a.
Finish: Stainless Steel.
2.
Model No. 4722-15 by Bradley.
a.
Finish: Stainless Steel.
D.
Paper Towel Dispensers: Recessed Pull Core Paper Towel Cabinet and Waste Receptacle
1.
Model 04693MCPTD, by American Specialties, Inc.
a.
Rough Wall Opening: 15-3/4"W x 54-1/2"H x 10-1/4"D or 4-1/4"D depending on wall depth. Top
of rough wall opening 3/4" below top of unit.
b.
Provide collar as required for depth of wall stud.
2.
Model No. 236-WM as manufactured by Bradley.
a.
Rough Wall Opening: 15-3/4"W x 54-1/2"H x 7-1/2"D.
b.
Provide collar as required for depth of wall studs.
E.
Paper Towel Dispensers - Surface Mounted: Walmart furnished and installed.
F.
Toilet Paper Dispenser:
1.
Model No. 5425, by Bradley Corporation.
2.
Model No. 0040 by American Specialties.
A.
Electric Hand Dryers: Stainless steel, surface mounted, automatic (no-touch) model. One of the following:
1.
Model MO6ACS-UL Speedflow by Saniflow.
2.
Model 2902-287400 Aerix by Bradley.
B.
Diaper Changing Table and Accessories:
1.
Changing Table: Provide one of the following
a.
Brocar Products Inc: Stainless Steel Baby Changing Station Recessed Mount; Model 100-SSCMCB.
b.
Koala Bear Care: Stainless Steel Baby Changing Station Recessed Mount KB110-NLRF.
2.
Accessories: Provide accessories by one of the following manufacturers:
a.
Manufacturer: Koala Bear Kare
1)
Diaper Dispenser: Koala Model KB143-SS-Recessed with KB144-99 collar.
a)
Rough Wall Opening: 12 1/2”W x 42 1/4 ”H x 5 1/2 ”D.
2)
Sanitary Liner Dispenser: Koala Model KB134-SSLD-Recessed.
a)
Rough Wall Opening: 7 7/8”W x 16 1/2 ”H x 4 1/4 ”D.
b.
Manufacturer: Brocar Products Inc.
1)
Diaper Dispenser: Brocar Model 105-SS-SM-Recessed with 025-SS recessing flange.
a)
Rough Wall Opening: 12-3/4"W x 42-1/4"H x 5-1/4"D.
c.
Manufacturer: Bradley Corp.
1)
Sanitary Liner Dispenser: Bradley Model 2441-Recessed.
a)
Rough Wall Opening: 11-3/8"W x 15-11/16" H x 4"D.
d.
Manufacturer: Bradley Corp.
1)
Diaper Disposal: Bradley Model No. 356-35, Recessed, Stainless Steel, with push flap door.
a)
Rough Wall Opening: 12-1/2"W x 26-1/2"H x 4"D.
C.
Toilet Seat Cover Dispensers: Surface mounted (one per each water closet), 22 gage 18-8 type 304 stainless steel,
satin finish.
1.
Model No. 0477SM, by American Specialties.
2.
Model No. B221, by Bobrick.
3.
Model No. 583, by Bradley.
D.
Small Framed Mirrors: No. 1 quality 1/4 inch float glass electrolytically copper plated, tempered glass. Mitered
stainless steel frame; concealed theft resistant wall hanger. Mirror size shall be 24 x 36 unless otherwise shown.
1.
Model No. M1516, by Meek.
2.
Model No. 781-024362, by Bradley.
10810-3
0893 Lindsay, OK
11/23/10
E.
Child Safety Seat: Surface Mounted.
1.
Model No. 103-BQS, by Brocar.
F.
Coat Rack: Surface Mounted.
1.
Model 2810D, by Ginger (Double Coat Rack)
2.
Model 2810T, by Ginger (Triple Coat Rack)
3.
Model 2810Q, by Ginger (Quad Coat Rack)
G.
Restroom Needs Cleaning Switch Sign: Approximately 2" x 4" sign.
H.
Grab Bars: 18 gage stainless steel; 1-1/4 inch diameter, (1-1/2 inch diameter where required by Local Code) textured grip surface; concealed mounting consisting of welded-on mounting flange with snap-on cover flange or escutcheon. Location, quantity, and length shall be as shown.
1.
Model No. 3700 P, by American Specialties.
2.
Model No. B5506.99, by Bobrick.
3.
Model No. 832-2, by Bradley.
I.
Cleaning
1.
Protection and Cleaning of Toilet Accessories and Attachment Hardware Prior to Possession.
2.
Immediately prior to possession, clean stainless steel accessories and attachment hardware thoroughly using soap, ammonia, or mild detergent and water. Apply with sponge or soft cloth, rinse with clear water
and wipe dry. Always rub in the direction of polish lines. Rinse thoroughly with fresh water after every
cleaning operation. Clean and polish to a spotless luster. Wipe dry to avoid water marks.
3.
Clean and polish stainless steel accessories and mirror surfaces to a spotless luster.
END OF SECTION
10810-4
0893 Lindsay, OK
11/23/10
UniSpec II - Store Planning
082710
SECTION 13121 - FABRIC STRUCTURES
PART 1 - GENERAL
1.1
SUMMARY
A.
Section Includes:
1.
Garden Center aluminum trusses and accessories.
2.
Shade cloth.
B.
Related Sections:
1.
Section 02821 - Chain Link Fences and Gates: Shade cloth canopy truss support columns.
1.2
DELIVERY, STORAGE, AND HANDLING
A.
Installation Drawings and Instructions: Delivered with furnished products.
B.
Product Packaging: Products will be packaged in manufacturer's standard cartons.
1.
Trusses: Four trusses per bundle. Trusses weigh approximately 3 pounds 8 ounces per lineal foot.
2.
Truss Hardware: Boxes approximately 24 inches x 8 inches x 20 inches.
3.
Shade Cloth: Boxes approximately 30 inches x 20 inches x 25 inches.
C.
Section 01600 - Product Requirements: Transport, Handle, Store, and Protect Products.
D.
Protect roll materials from damage by storing on end.
PART 2 - PRODUCTS
2.1
MANUFACTURERS
A.
Subject to compliance with project requirements, provide products specified herein by one of the following manufacturers:
1.
Hendee Enterprises Incorporated, Houston, TX (800) 231-7275. Contact: Crystal Genovese at [email protected]
2.
HH Technologies, Inc., Bremen, AL (800) 219-0117 Extension 1122. Contact: Randy Remington.
[email protected]
3.
Substitutions: Not permitted.
B.
Aluminum Trusses:
1.
Height of Trusses:
a.
Provide 12 inch high trusses at all-new-garden center.
b.
Provide trusses of height to match existing where new garden center area is a continuation of the existing garden center or for replacement of existing damaged trusses as noted on the drawings..
2.
Lengths: Furnished in standard lengths in two foot increments.
3.
Hardware: Mounting brackets, cross bracing, angle brackets, bolts, and washers.
4.
Provide special trusses as determined by truss vendor for special garden center configurations for support
of trusses at interface of new and existing trusses.
5.
Color: Clear Aluminum.
C.
Shade Cloth: Vinyl impregnated woven polyester yarn, heat set for stability.
1.
Color: Spiced Sand.
2.
Shade Cloth Shade Factor: 45%.
13121-1
0893 Lindsay, OK
11/23/10
PART 3 - EXECUTION
3.1
EXAMINATION
A.
Examine conditions and adjacent areas where products and materials will be installed and verify that conditions
conform to product manufacturer's requirements for in conditions. Do not proceed until unsatisfactory conditions
have been corrected.
B.
Beginning of installation indicates acceptance of substrate conditions.
3.2
INSTALLATION - ALUMINUM TRUSSES
A.
Coordinate location and installation of steel post columns provided in Section 02821.
B.
Install aluminum trusses in accordance with suppliers published instructions.
C.
Attach mounting brackets to Garden Center truss support columns or to CMU wall as shown on Drawings.
D.
Attach one end of truss to mounting bracket. Hold opposite end of truss to other mounting bracket to determine
required truss length. Cut truss to required length. Repeat for each truss requiring field cutting.
E.
Fit trusses into mounting brackets and attach.
F.
Install truss "X" bracing between trusses.
G.
Install shade cloth attachment tubing between truss mounting brackets.
3.3
INSTALLATION - SHADE CLOTH
A.
Install shade cloth panels to aluminum truss system in accordance with suppliers published instructions.
B.
Install each shade cloth panel individually to truss system by rope lacing in a zigzag pattern on all four sides of
panel.
C.
Provide spacing between shade cloth panel and truss system components as shown on drawings.
D.
Install rope lacing through grommets in shade cloth panel and around truss top chords and attachment tubing between trusses.
3.4
CONSTRUCTION
A.
3.5
Interface with Other Work: Coordinate installation of light fixtures to aluminum trusses at locations indicated on
Drawings.
FIELD QUALITY CONTROL
A.
Inspect installation of all components and attachments.
B.
Correct deficiencies in Work which inspection indicates are not in compliance with Contract Documents.
END OF SECTION
13121-2
0893 Lindsay, OK
11/23/10
UniSpec II - Store Planning
010106
SECTION 13122 - METAL BUILDING SYSTEMS
PART 1 - GENERAL
1.01
SUMMARY
A.
Section Includes:
1.
Structural steel framing.
2.
Wall and roof panels.
3.
Metal flashing, trim gutters and downspouts.
4.
Framing around wall and roof openings.
5.
Reinforcement of existing structure for new mechanical equipment.
6.
Match existing system in panel design and color.
B.
Related Sections:
1.
Section 09900 - Painting.
1.02
REFERENCES
A.
AISC - Specification for the Design, Fabrication and Erection of Structural Steel for Buildings.
B.
AISC - Code of Standard Practice for Steel; Buildings and Bridges.
C.
AISI - Specification for the Design of Cold-Formed Steel Structural Members.
D.
American Society for Testing and Materials (ASTM) as referenced.
E.
Metal Building Manufacturer's Association (MBMA) - Recommended Design Practices Manual.
F.
Underwriter's Laboratory (UL).
1.03
SYSTEM DESCRIPTION
A.
The design of the structural system shall be a clear span rigid frame.
1.
Primary Framing: Rigid frame of rafter beams and columns, end wall columns and wind bracing.
2.
Secondary Framing: Purlins, steel joists, girts, eave struts, flange bracing, sill supports, clips and other
items detailed.
B.
Wall and Roof System: Preformed metal panels with sub-girt framing/anchorage assembly, liner sheets and
accessory components.
C.
Coordination necessary to design, fabricate and erect the steel frame, standing seam metal roofing system and
guttering and downspout system as an integrated, functional building system.
D.
Match the framing of the existing framing system when adding on to an existing building.
1.04
SPECIAL BID INFORMATION
A.
Metal building manufacturers shall submit with their Bid to the General Contractor, the foundation design loads
for components of the metal building frame supported by the foundation and items related to the foundation
design and construction. Design loads must be complete with required loading combinations. Include a layout
plan of metal building components with identifying marks coordinated with design load summary, an anchor bolt
plan with placement details and other items which require coordination with the foundation design or details.
B.
This information, when submitted to Owner shall be complete, final and ready to be used for design of
13122-1
0893 Lindsay, OK
11/23/10
foundations. If the metal building manufacturer modifies this information after award of the Contract (except due
to revisions to the plans caused by Owner), expenses for redesign or redrawing of other portions of the Project,
field modifications to the construction, and time spent in review of such modifications, shall be borne solely at the
expense of the metal building manufacturer.
1.05
DESIGN REQUIREMENTS
A.
Design members to withstand dead loads, live loads, snow loads, wind loads, seismic loads and other loads in
accordance with the local building code and the Metal Building Manufacturer's Association Design Manual. Use
the most stringent requirements when requirements differ. Design live loads and special loads are indicated on
the Drawings. It is the responsibility of the metal building manufacturer to contact local building officials to
verify codes and loading requirements.
B.
Design metal building elements so that only shear and axial forces are transferred to foundation.
C.
Limit lateral deflections of the building frames to the eave height divided by 200. Limit lateral deflection of roof
diaphragms to eave heights divided by 200.
D.
Limit deflections of components used as backup to finish materials as follows:
1.
Metal Wall and Roof: Span/180.
E.
Metal walls and roofing shall meet UL Class 90 wind uplift resistance.
F.
Provide drainage to exterior for water entering and condensation occurring with cladding system.
G.
Thermal Performance:
1.
Walls: U = .08.
2.
Roof: U = .09.
H.
Assembly shall permit movement of components without buckling, failure of joint seals, undue stress on
fasteners, and other detrimental effects.
I.
Size and fabricate wall and roof systems free of distortion and defects detrimental to appearance and performance.
J.
Maximum Roof Slope: ¼" per foot. (Match existing slope.)
K.
Provide special framing required for coordination with trades and materials provided by others. If openings are
required in the existing building roof, provide additional structural support integrating existing joists, beam or
purlins and reinforce to support required loads indicated on Drawings.
L.
Design gutters and downspouts for appropriate local intensity per hour in a 5 minute period. Contact local
building code official for information.
M.
Provide level surface insulated curb for roof top units. Coordinate with metal roof panel profile used.
1.06
SUBMITTALS
A.
Manufacturer's Literature: Materials description and erection instructions.
B.
Shop Drawings:
1.
Indicate profiles, sizes, spacing and locations of structural members, connections, attachments, openings,
fasteners, cambers and loads.
2.
Indicate welded connections using standard AWS welding symbols. Indicate net weld lengths.
3.
Indicate framing anchor bolt settings, sizes and locations from datum.
4.
Indicate wall and roof system dimensions, panel layout, general construction details, downspout locations,
anchorages and method of anchorage and method of installation.
5.
Submit other fabrication or erection drawings required for proper completion of Project.
13122-2
0893 Lindsay, OK
11/23/10
6.
7.
Indicate loads, including uplift, to be applied to foundation.
Shop drawings shall bear the seal and signature of a Professional Structural Engineer registered in the State
in which the Project is located.
C.
Certifications:
1.
Submit with the Bid, the manufacturer's certification that building structure proposed will
meet or exceed design load criteria and structural design will be in conformance with code and the
Specifications.
2.
Submit proof of qualifications of welders, erection crews and full time field engineer.
D.
Warranty: Executed copies of guarantees and warranties described in this Section.
1.07
QUALITY ASSURANCE
A.
1.08
Qualifications:
1.
Erection and installation of all work included in this Section shall be performed by metal building
manufacturer's personnel or by subcontractors authorized or approved in writing by the metal building
manufacturer. Manufacturer shall have a qualified field engineer on site full time during erection and setting
of anchor bolts to assure that construction conforms to erection drawings, Specifications and applicable
standards.
2.
Welders and welding operators involved in fabrication and erection shall have been certified within the 12
months before performing work according to applicable AWS Standards.
DELIVERY, STORAGE AND HANDLING
A.
1.09
Deliver materials to the Project site clearly marked for identification and store above ground protected from
damage. Damaged materials, when so ascertained, shall be immediately removed from the Project site.
WARRANTY
A.
Submit with the Bid a specimen copy of guarantees and warranties which are required as part of this Contract as
follows:
1.
Durability of roof panels against rupture, structural failure and perforation shall be guaranteed for 20 years
by the metal building manufacturer.
2.
Weather tightness of roof system shall be guaranteed for 10 years by the metal
building manufacturer.
3.
Wall panels shall be guaranteed against chalking for 5 years and against fading, checking blistering, peeling,
chipping, flaking and loose adhesion for 10 years by the metal building manufacturer.
PART 2 - PRODUCTS
2.01
MANUFACTURERS
A.
American/Metallic-Braden Building Company.
B.
Atlantic Building Systems, Incorporated.
C.
Butler Manufacturing Company.
D.
Ceco Building Division, Ceco Corporation/Ceco Industries Company.
E.
Star Manufacturing Company, H.H. Robertson Company.
F.
Varco-Pruden
13122-3
0893 Lindsay, OK
11/23/10
2.02
STRUCTURAL BUILDING COMPONENTS (MATCH EXISTING BUILDING)
A.
2.03
Structural Steel Members for Shapes, Plates and Bars:
1.
Comply with ASTM A6-87d and applicable ASTM standards of steel used. Minimum yield strength of steel
allowed is 36 ksi.
2.
Structural Tubing: ASTM A500-84, Grade B.
3.
Structural Steel Pipe: ASTM A501-88.
4.
Plate or Bar Stock: 42,000 psi minimum yield strength; ASTM A529-88, A570-85 or A572-88b.
5.
Galvanized Steel Sheet: ASTM A446-87 with G90 coating, or A525-87, G90.
6.
Bolts, Nuts and Washers: ASTM A325-88a.
7.
Wind Bracing Rods: 1/2" diameter minimum threaded steel; ASTM A36-86b or A572-88b, Grade D.
8.
Welding materials: AWS D1.1; type required for materials being welded.
9.
Primer: FS TT-P-636.
10. Columns between merchandise racks are limited to 1'-0" depth between racks.
11. Joists shall be used as secondary roof support system.
ROOFING SYSTEM (MATCH EXISTING BUILDING)
A.
Standing Seam Roofing: Roofing panels shall be 24 gauge (minimum), Galvalume or aluminized Type 2 steel in
longest lengths possible, one of the following:
1.
Standing Seam Roof System (American/Metallic-Braden).
2.
AR-6000 Roof System (Atlantic).
3.
MR-24 Roof System (Butler).
4.
Cecoloc Roof System (Ceco).
5.
Star Shield Standing Seam Roof System (Star).
6.
VPSSR Roof System (Varco-Pruden).
B.
Standing seams shall have factory applied non-hardening sealant and shall be continuously locked or crimped
together by an electrically operated mechanical device during erection.
2.04
WALL SYSTEM (MATCH EXISTING BUILDING)
A.
2.05
Wall Panels: 26 gauge galvanized steel, continuous panels with factory primed finish.
1.
Long Span Panel; (American/Metallic-Braden).
2.
API Wall Panels; (Atlantic).
3.
Butler II; (Butler).
4.
CBD Siding Panel; (Ceco).
5.
Star Mark Wall Panels; (Star).
6.
VP Panel Rib; (Varco-Pruden).
ACCESSORIES
A.
Fasteners: Manufacturer's standard system.
1.
Metal backed neoprene washers under fastener heads bearing on weather side
of panels.
2.
Weather Side: Aluminum or stainless steel fasteners.
3.
Interior: Galvanized or cadmium plated fasteners.
4.
Color: Match color of material fastened.
B.
Closure Strips: Closed cell expanded cellular rubber, self-extinguishing, butt or pre-molded to match
configuration or roofing.
C.
Sealing Tape: 100 percent solids, pressure sensitive gray polyisobutylene compound with release paper backing,
not less than ½" wide by 1/8" thick, non-sag, non-toxic, non-staining and permanently elastic.
D.
Joint Sealant: One part elastomeric, polyurethane, polysulfide or silicone rubber.
13122-4
0893 Lindsay, OK
11/23/10
E.
Trim and Other Accessories: Manufacturer's standard.
F.
Grout: Non-shrinking as required to obtain uniform bearing and to maintain level base elevations.
2.06
INSULATION
A.
Roof Insulation: Aged R=9.09 (minimum) at 72 degrees F.
1.
Lower: One fiberglass blanket or batt for installation by roll runner type system. Batt or blanket shall have
a 0.6 pcf density and a 4 mil white vinyl face on lower side. Each batt or blanket shall have extra length
continuous vapor tight edge tabs, if required, so as not to compress upper insulation later. Insulation and
facing shall (as a composite material) carry a UL fire hazard rating indicating flame spread of 25 or less.
2.
Upper: One fiberglass blanket or batt install over lower blanket or batt perpendicular to
purlins or joists. Upper batts or blankets shall have a 0.6 pcf density and shall be unfaced. Provide thermal
spacer blocks continuous on top of purlins or joists.
B.
Wall Insulation: Non-combustible 4" fiberglass blanket or batt faced with 4 mil white vinyl barrier. Insulation
shall have a density of 0.6 pcf with 2" wide continuous vapor tight edge tabs. Insulation and facing (as a
composite material) shall carry a UL fire hazard rating indicating a flame spread of 25 or less.
2.07
GUTTERS AND DOWNSPOUTS (MATCH DESIGN & PROFILE OF EXISTING BUILDING)
A.
Material: Gutters and downspouts shall be 26 gauge (minimum) galvanized steel.
B.
Gutters:
1.
Form in sections not less than 8'-0" in length, complete with end pieces, outlet tubes and special pieces that
may be required. Join section with riveted and soldered or sealed joints.
2.
Provide expansion type slip joint at center of runs. Furnish gutter supports sized as required above and
spaced at 2'-0" on center maximum.
C.
Downspouts:
1.
Color and finish shall be same as gutters.
2.
Form in sections approximately 10'-0" complete with elbows and offsets. Joint sections with minimum 1½"
telescoping joints. Provide fasteners for top, bottom and 5'-0" on center intermediately between, designed to
securely hold downspouts not less than 1 (one) inch away from walls.
D.
Shop Finish for Fascia, Gutters and Related Trim: Baked on thermo-setting synthetic enamel system in one or
more coats to achieve a minimum dry film thickness of one mil.
E.
Precast Concrete Splash Blocks (WHERE SHOWN ON DRAWINGS): 3,500 psi air-entrained concrete,
approximately 24" long with chamfered corners and drainage slots on underside.
2.08
ROOF OPENINGS
A.
Flue and Plumbing Vent Openings: Provide standard roof jack for flue and plumbing vent penetrations through
roof.
B.
Mechanical Openings: For mechanical openings larger than 12" in diameter or 12" square, provide roof curb as
required by equipment and compatible with profile of roofing system panels and seams. Assume joist or purlin at
standard spacing may occur below roof openings larger than purlin or joist spacing.
2.09
WALL OPENINGS
A.
Doors: Frame openings for personnel doors, supply fans, supply louvers and exhaust louvers in accordance with
manufacturer's standards. Provide one additional girt above each door.
B.
Provide framing for each wall opening shown on Drawings. Where approved by Owner, location of wall
13122-5
0893 Lindsay, OK
11/23/10
openings may be varied slightly to accommodate standard girt configurations at framed openings. Verify location,
size and number of wall openings from final metal building shop and erection drawings approved by the
Architect.
C.
2.10
Provide openings and required framing as shown on Drawings. Assume openings between wall girts where girt
spacing allows. Design opening framing for loads shown with all fans assumed to be supported by wall framing.
GENERAL FABRICATION
A.
Shop fabricate to indicated sizes and sections, complete with base plates, bearing plates and other plates as
required for erection welded in place with holes required for anchoring and connections.
B.
Fabricate material completely and knock down for shipping. Crate or bundle as necessary for shipping
preparation. Make parts of building accurately, true to dimensions, so that in erection the parts will easily fit
together.
C.
Form, punch, cut, weld and shop prime structural steel members.
D.
Weld in accordance with standard practices of the American Welding Society, using certified welders.
E.
Provide holes and clips required for primary and secondary connections; supply from plant of manufacturer along
with members which they connect.
F.
Provide sizes of prefabricated components and necessary field connections required for erection to permit easy
assembly and disassembly. Fabricate components in such a manner that, once assembled, they may be
disassembled, repackaged and reassembled with minimum amount of labor and maximum salvageability.
G.
Clearly and legibly mark each piece and part of assembly to correspond with previously prepared erection
drawings, diagrams and instruction manual. Use removable tags or washable marker so identification may be
easily removed.
2.11
STRUCTURAL FABRICATION
A.
Fabricate structural framing in accordance with AISC Specifications.
B.
Comply with AWS D1.1 for all welding.
C.
Shop fabricate material to sizes and shapes indicated in the shop drawings. Clearly mark all pieces to match shop
drawings. Use removable tags or markers for all exposed materials.
2.12
FINISHES
A.
Paint Systems:
1.
Shop Primer for Ferrous Metal: Fast-curing, lead-free, abrasion-resistant, rust-inhibitive primer selected by
the manufacturer for compatibility with substrates with types of alkyd finish paint systems indicated and for
capability to provide a sound foundation for field-applied topcoats despite prolonged exposure. Comply
with FS TT-P-86, Types I, II or III.
a.
Color: Light gray.
2.
Shop Primer for Galvanized Metal Surfaces: Zinc dust-zinc oxide primer selected by the manufacturer for
compatibility with substrate. Comply with FS TT-P-641.
3.
Wall Panel Finish: Manufacturer's standard shop-applied primer finish for application to
galvanized wall panels, related trim and accessory elements. Field paint panels to
match existing building.
4.
Roof Panel Finish: Manufacturer's standard shop-applied baked enamel finish to
match existing panel color.
B.
Application:
13122-6
0893 Lindsay, OK
11/23/10
1.
2.
Clean surfaces to be primed of loose mill scale, rust, dirt, oil, grease and other matter precluding paint bond.
Follow procedures of SSPC-SP3 for power tool cleaning, SSPC-SP7 for brush-off blast cleaning and SSPCSP1 for solvent cleaning.
a.
Prime structural steel primary and secondary framing members with the manufacturer's standard rustinhibitive primer.
b.
Prime galvanized members, after phosphoric acid pretreatment, with manufacturer's
standard zinc dust-zinc oxide primer.
For roofing apply finish coat on exterior facings and manufacturer's standard wash coat on reverse face.
a.
Clean galvanized steel with an alkaline compound, then treat with a zinc phosphate
conversion coating, and seal with a chromic acid rinse.
b.
Apply baked-on thermo-setting modified acrylic enamel to pretreated steel sheets, in one or more
coats as standard with the manufacturer to achieve a minimum dry film thickness of 1.5 mils.
PART 3 - EXECUTION
3.01
SURVEY
A.
3.02
Employ Professional Engineer registered in State in which Project is located, experienced in survey work, to
establish permanent bench marks as shown and as necessary for accurate erection of structural steel. Check
elevations of concrete and masonry bearing surfaces and locations of anchor bolts and similar devices, before
erection work proceeds, and report discrepancies to Owner. Do not proceed with erection until corrections have
been made, or until compensating adjustments to structural steel work have been agreed upon with Sam's Club.
FRAMING ERECTION
A.
Erect framing in accordance with AISC Code of Standard Practice.
B.
Erect structural framing true to line, level, and plumb, rigid and secure. Level base plates to true even plane with
full bearing to supporting structures, set with anchor bolts.
C.
Provide for erection and wind loads. Provide temporary bracing to maintain structure plumb and in alignment
until completion of erection and installation of permanent bracing. Locate braced bays as indicated.
D.
Set column base plates with non-shrink grout to full plate bearing as shown in the shop drawings. Grout to obtain
uniform bearing and to maintain level base line elevation. Moist cure grout for not less than 7 days after
placement.
E.
Field modification of parts shall be in accordance with best standard procedures and shall be the responsibility of
the building erector. No field modifications shall be made on the joists, truss purlins, or beam trusses unless
specified on the erection drawings. All field modifications shall be approved in advance by the Architect.
F.
After erection, prime welds, abrasions, and surfaces not shop primed. Use a primer consistent with shop coat.
3.03
ROOFING SYSTEM INSTALLATION
A.
Apply panels and associated items for neat and weathertight enclosure. Avoid "panel creep" and application not
true to line. Protect factory finishes from damage.
B.
Provide weather seal under ridge cap; flash and seal roof panels at eave and rake with rubber, neoprene or other
closures to exclude weather.
C.
Provide sealant tape at lapped joints of ribbed roof sheets, and between roof sheeting and protruding equipment,
vents, and accessories.
D.
Apply sealant tape continuous to clean, dry surface of weather side of fastenings on end laps and elsewhere to
make weather proof to driving rains.
13122-7
0893 Lindsay, OK
11/23/10
E.
Fasten roof panels to purlins/joists with concealed zee clips adequately spaced to develop uplift requirements.
The roof system shall carry a UL wind uplift Class 90 rating.
F.
Installed system shall be free of rattles, noise due to thermal movement and wind whistles.
3.04
INSULATION INSTALLATION
A.
Roof Insulation:
1.
Install lower batt or blanket parallel to and between purlins or joists. Allow edge tabs only to lap over the
purlins. The roll runner type system shall include three 3/8" wide galvanized bands parallel to each purlin
spacing. Support bands by 12 gauge galvanized wire installed perpendicular to purlins or joists at 10'-0" on
center maximum and attached to purlins or joists according to manufacturer's recommendations.
2.
Install upper batt or blanket over the lower, perpendicular to purlins or joists.
B.
Wall Insulation: Apply insulation over girts and inside wall panels with vapor barrier facing toward interior of
building. Seal joints tightly in accordance with metal building manufacturer's recommendations.
3.05
MISCELLANEOUS INSTALLATION
A.
Install shapes of proper design and size to reinforce openings and to carry loads and vibrations imposed, including
equipment furnished under mechanical and electrical work. Securely attach to building frame.
B.
Install roof curbs in accordance with the manufacturer's recommendations for positive anchorage to building and
weathertight mounting.
C.
Install gutters, downspouts and other sheet metal accessories in accordance with manufacturer's recommendations
for positive anchorage to building and weathertight mounting.
D.
Install roof jacks and curbs and flash to make weathertight.
E.
Where indicated or required install closure strips, flashing and other items required to make building weathertight.
3.06
ROOF OPENINGS
A.
Flash and seal to the roof panel, openings of 12" or smaller, providing complete structural support and Weather
tightness.
B.
Coordinate roof curbs and structural framing to support rooftop mechanical equipment loads and to maintain them
in level position. Provide support for new HVAC equipment in existing Building Roof System. Equipment
locations are shown on Drawings. Reinforce and brace curbs with joints properly formed and edges beaded to be
watertight under normal positive pressure conditions.
END OF SECTION
13122-8
0893 Lindsay, OK
11/23/10
UniSpec II – Store Planning
032709a
SECTION 13810 - ENERGY MANAGEMENT SYSTEM (EMS)
PART 1 - GENERAL
1.1
SUMMARY
A.
Equipment Furnished by Owner For Installation By Contractor: Owner’s EMS equipment supplier will furnish
EMS equipment as indicated on Drawings and defined in Section 01640 - Owner Furnished Products for installation by the EMS Installer. The EMS Installer shall be the General Contractor’s installation subcontractor and shall
receive and install Energy Management System equipment scheduled or shown on the Drawings and described in
this Section.
B.
Section Includes:
1.
Installation of Owner furnished EMS equipment.
2.
Making of EMS terminations and installation of cables and conduit as applicable.
3.
Proper identification of systems to include labeling Owner furnished EMS equipment.
4.
Coordination with Structured Cabling for installation of Ethernet cable.
5.
Coordination of Communication with Walmart Support Services for final download of system parameters.
6.
Performance of on-site EMS test.
7.
Coordination with EMS Supplier for final checkout of Energy Management System.
8.
Coordination with Walmart Mechanical Services Department Construction Manager for Start-Up Week
(Supercenters and Sam’s only)
9.
Warranty of Energy Management System and Components.
C.
Related Sections:
1.
Section 06100 - Rough Carpentry: Installation of 3/4-inch plywood backboard as shown on drawings.
D.
Contractor Responsibilities:
1.
Conduit, bushings, wire ties, fasteners, bolts, panduit labels, hangers, wire connectors, etc.
2.
Install all Energy Management equipment scheduled or shown on drawings and described in this Section.
3.
Coordinate release of Owner furnished equipment with Walmart Mechanical Services Department.
4.
Make all terminations to Owner furnished equipment.
1.2
DEFINITION OF TERMS
A.
Work: Complete Installation of equipment and devices in accordance with applicable specifications and as described in the Drawings, Application Sheets, Manufacturer’s legend sheets and instructions, Request for Bids, and
Purchase Orders.
B.
The Owner's authorized representative is defined as the Walmart Mechanical Services Department Construction
Manager.
C.
Energy Management contractor shall mean the General Contractor’s, Walmart approved, Subcontractor that is responsible for performing the Energy Management work as specified on the construction documents. Energy
Management Contractor shall be responsible for compliance with applicable codes, ordinances, and work permits.
1.3
DRAWINGS AND SPECIFICATIONS
A.
The Drawings and Specifications are complimentary. What is required by one shall be as binding as if required by
both. Should the Drawings and Specifications be contradictory or should there be any apparent errors, discrepancies, or omissions, or should there be any doubt as to the meaning of either, the Contractor shall refer to the RFI
Process.
B.
Neither the Contractor nor the Owner shall be responsible for oral instructions.
13810-1
0893 Lindsay, OK
11/23/10
C.
1.4
EXAMINATION OF THE PREMISES
A.
The Contractor’s bid shall take into consideration all conditions which may affect the work under this contract.
B.
Take field measurements and verify field conditions; compare such field measurements and conditions and other
information known to the Contractor with the Drawings and Specifications before commencing activities. Errors,
inconsistencies or omissions discovered shall be reported through the RFI Process.
1.5
SUPERVISION AND CONSTRUCTION PROCEDURES
A.
Contractor shall agree to undertake all Work contained within the Contract and complete the Work according to
the approved construction schedule.
B.
The Owner's schedule is critical. The Contractor shall be responsible for meeting the schedule. Complete the following items prior to schedule Substantial Completion Date.
1.
EMS Equipment installed and working.
2.
Communication between all devices and controllers.
3.
Sensors tested (refrigeration only).
4.
Confirm Ethernet communicating.
5.
Ensure the system is free of alarms or the alarms can be justified and documented.
C.
Furnish necessary supervision to coordinate activities of all trades to insure complete installation. Report problems or anticipated problems which may impede progress of the project to the Mechanical Services Construction
manager.
D.
Check new equipment against Walmart Specifications and report discrepancies to Walmart Mechanical Services
Department Construction Manager.
1.6
1.7
Addenda, corrections, or letters issued during time of bidding shall take precedence over drawings and specifications.
WARRANTY
A.
Provide warranty and service on equipment and materials installed. Warranty shall include failures during installation and for 90 days beyond store Grand Opening date. Warranty shall include labor and parts for equipment
covered under the specifications. Owner will require EMS Supplier to furnish replacement parts for failures of
OEM Parts during installation period and for one year beyond store Grand Opening date. Contractor shall be responsible for obtaining replacement parts from EMS Supplier. Owner will not pay additional cost associated with
repair or replacement of materials and parts during the warranty period. Additional cost attributed to equipment
failures shall be handled directly with the EMS Supplier.
1.
In the event the Contractor fails to respond to emergency calls or fails to perform required maintenance or
repairs during a warranty period, the Owner will have the right to have the repair or maintenance performed
by another contractor. In this case, the Contractor agrees to pay Owner the involved amount of the services
performed plus 15 percent. Maximum response time to emergency calls as follows:
a.
Building Automation System - 24 hours
b.
Refrigeration Control System - 8 hours
2.
If the Contractor subcontracts the warranty work, the 90-day warranty responsibility remains with the
primary Contractor. The Contractor shall resolve all payments between the two parties. The Owner will not
be involved in resolving payment issues. If the Energy Management Contractor fails to respond to warranty
calls, Walmart will remove that contractor from the New Store Bid List until such a time when all disputes
or claims are settled.
B.
Complete Energy Management Punch List: Send completed punch list to Walmart Stores Inc., 2001 SE 10th
Street, Bentonville, AR 72712-0550, Attention: Mechanical Services Department Construction Manager, for verification of completion and copy General Contractor.
MANUFACTURER’S WARRANTIES AND INSTRUCTIONS
13810-2
0893 Lindsay, OK
11/23/10
A.
1.8
Nothing shall be done by the Contractor which will void any manufacturer’s warranty.
LAWS AND ORDINANCES
A.
Comply with laws, ordinances, rules, and regulations bearing on the Work. If the Contractor observes that Drawings or Specifications, or both are at variance therewith, the Contractor shall promptly notify the Owner in writing. If the Contractor, without written notice to the Owner, performs work, which is not in conformance with such
laws, ordinances, rules and regulations, Contractor shall bear all cost arising from correction thereof.
B.
Compliance with laws, rules, and regulations shall not be used as means of justifying installations or applications
of parts assemblies, or methods inferior to those specified.
C.
Comply with OSHA regulations. A copy of all appropriate M.S.D.S. sheets shall be on the job at all times.
1.9
INSPECTION OF WORK
A.
The Owner shall have access to the Work at all times for purpose of inspection.
B.
If specifications, Instructions, Inspection Coordinators, or laws, ordinances, rules, regulations or any public authority require a portion of the work to be tested, approved or inspected, Contractor shall give the Owner timely
notice of its readiness for inspection.
1.10
CHANGES IN THE WORK
A.
1.11
Do not make changes, perform additional work, or pay for additional work unless authorized in writing by the
Owner.
DEDUCTIONS FOR WORK NOT CORRECTED
A.
1.12
If the Owner deems it expedient to correct work not conforming to the Contract or defective work, an equitable
deduction from the contract price will be made.
CORRECTION OF WORK BEFORE FINAL PAYMENT
A.
If the Owner rejects a portion of the work due to failure to conform to the Contract, the Owner will promptly notify the Contractor of such failure.
B.
Upon receipt of such notice, replace or remedy (whichever the Owner requires) the rejected work to conform to
the Contract.
C.
Contractor shall bear all expenses incident to correction of non-conforming work including cost of transportation,
removal of non-conforming work, correction of the work, and repairs to work of other contractors necessitated by
remedial work.
1.13
PROTECTION
A.
Protect all Work from damage until final acceptance by the Owner. Damaged or defective work shall be replaced
at Contractor’s expense.
B.
Contractor shall be responsible for damage caused by Contractor’s own forces or by Contractor’s subcontractor’s
forces.
C.
Replace damaged work at no expense to the Owner.
1.14
USE OF PREMISES
A.
Confine apparatus, storing of materials and operations of workers to limits indicated by the Owner. Do not unrea13810-3
0893 Lindsay, OK
11/23/10
sonably encumber premises with materials.
B.
Promptly remove material interfering with work of other contractors, if directed by the Owner.
C.
Enforce the Owner's policies regarding signs, advertisements, and smoking.
1.15
TAXES
A.
1.16
Contractor shall include in his bid, costs of state or local sales or use taxes and federal taxes, charges, or duties of
any nature applicable to the work incorporated under this Contract.
SPECIAL DAYS
A.
1.17
Keep one qualified technician available to handle emergencies connected with Energy Management work from
the time job begins until the end of the 90 day warranty. The Owner reserves the right to have the Contractor replace the technician if the Owner feels the present technician is failing to respond or is unqualified.
UNLOADING EQUIPMENT
A.
Contractor will be held liable for back charges from trucking company due to Contractor failure to meet the Owner’s equipment delivery schedule.
B.
Equipment shall remain boxed until ready for installation.
C.
Notify Owner of equipment received from carrier in damaged conditions and shortages. Obtain verification of
damage from carrier’s truck driver.
1.18
DRAWINGS
A.
Provide in the main EDC, framed or laminated as-built drawings for Building Automation System communication loop.
B.
Provide near the refrigerated case input controller backboard, framed or laminated drawings of the layout of refrigeration sensors.
1.19
REQUEST FOR INFORMATION SUBMITTAL
A.
All Request for Information (RFIs) regarding EMS shall follow the attached copy of the Request for Information
Process Flow Chart.
B.
Refer to Specification Section 01255 for RFI Information Submittal Process.
PART 2 - PRODUCTS
2.1
ENERGY MANAGEMENT SYSTEM
A.
2.2
Unless otherwise specified to be furnished by EMS Installer, Owner’s EMS supplier will furnish energy monitoring and control system components indicated on Drawings.
MATERIALS (BY EMS INSTALLER)
A.
Conduit: Provide properly sized conduit for energy management system cable sets as indicated on Drawings and
for the following conditions:
1.
Required by local electrical codes.
2.
Cables are installed in a plenum space used for return air.
3.
Cables are installed outside building.
4.
Cables are installed less than 15 feet AFF in stockrooms.
13810-4
0893 Lindsay, OK
11/23/10
5.
6.
7.
8.
9.
10.
11.
Cables are subject to physical damage.
Cables pass through any firewall.
Cables are installed underground.
Cables are installed in concealed area.
Cables are installed in finished area.
Cables are installed in finished wall.
Cables are installed under refrigerated cases.
B.
Run conduit from zone sensor directly to junction box and use flex conduit into the roof top unit.
C.
Run conduit along bar joist for communication loop and clamp securely.
D.
Provide panduit in electrical rooms and refrigerated case input/output controller mounting area where necessary.
E.
Bushings:
1.
Provide properly bushed opening for raceways ending as open conduit.
2.
Cables shall pass through a bushing into the roof top unit.
F.
Nipples: EMS Installer will provide properly sized conduit nipples for energy management system cable sets as
indicated on Drawings and for the following conditions:
1.
Required by local codes.
2.
Cables pass through wall.
3.
Cables pass through floor.
G.
Boxes: EMS Installer will provide properly sized boxes for open conduit systems.
H.
For replacement of damaged parts, only controls manufactured by the EMS Supplier will be accepted. For pricing
and ordering information, contact EMS Supplier.
I.
Current Transducers for retrofits and new construction: Only revenue-grade current transducers will be accepted.
For pricing and ordering information contact EMS Supplier.
2.3
FABRICATIONS (BY EMS INSTALLER)
A.
The following describes items and/or functions necessary for field installation:
1.
Wire stripping and heat shrink and routing wires
2.
Junction boxes to mount wall temp sensors
3.
Override panel
4.
Installation of conduit
5.
CO2 sensors
6.
Light dimming
7.
Communication cable between controllers
8.
Mounting of EMS parts
9.
Dual-temperature switches
PART 3 - EXECUTION
3.1
RESPONSIBILITY
A.
3.2
All Part 3 Execution requirements specified below shall be the responsibility of the EMS Installer.
INSTALLATION
A.
Install EMS components provided in this section in accordance with EMS Supplier installation instructions and
make all 24 VAC control terminations required.
B.
Address EMS equipment and controllers and mark on equipment label.
13810-5
0893 Lindsay, OK
11/23/10
C.
In portions of installation where conduit is not necessary, tie wrap cables every 36 inches or a minimum distance
of the bar joist spacing. Cables shall be supported by the building structure.
D.
Provide wire ties for EMS cable. Colors shall be black UV resistant for RTU and sensor mast assembly, white for
inside store in open ceilings, and any color in EDC houses and in EMS equipment.
E.
Install Energy Management Sensors where shown on drawing or to Owner's specifications to EMS Supplier installation and hardware mounting procedures.
F.
Verify proper Application Specific Controllers are installed in equipment in accordance with EMS Supplier installation and hardware mounting procedures.
G.
Generic Input/Output Controller (IOC):
1.
Ground IOC with #12 green awg wire.
2.
IOC legend shall be typed
3.
IOC lock down screws shall be tightened
H.
Global Network Controller (GNC):
1.
Provide a solidly grounded green insulated conductor, minimum size of #12 AWG, from GNC to system
ground buss at main distribution board.
2.
Mount GNC display 60 to 72 inches from finished floor, at eye level for the average height person.
3.
Provide required clearances for GNC Ethernet connection.
4.
GNC lock down screw shall be tightened.
I.
Cable:
1.
Provide communication cable between all network devices.
2.
Do not splice EMS cables for EMS components inside or 5 feet or less outside the building.
3.
Splices shall be soldered, heat shrinked, and concealed in a junction box.
4.
Cables from rack house to condensers shall be in conduit or sealtite.
5.
Cables shall be sealed in roof top unit. (Duct seal, caulk, or other type of sealant.)
6.
Cable shall have heat shrink at terminating ends. (No tape allowed.)
7.
No drooping or excessive sagging cables.
8.
No cable shall run though a raw metal edge hole. Use bushings and chase nipples as needed.
9.
Fire rated and sheetrock walls that have EMS cables passing through them shall have an EMT pipe sleeve
with bushings on the ends. Fire caulk will be provided by others.
J.
Outdoor Assembly:
1.
Mount outdoor assembly to 1-1/4 inch rigid conduit through roof (provided by others).
2.
Install sensor assembly 5 feet above roof and a minimum of ten feet from edge of roof or from HVAC
equipment.
K.
Conduit:
1.
Installation, EMT:
a.
The number of conductors permitted in single tubing shall not exceed the percentage fill listed in
NEC
b.
There shall be no more than the equivalent of four-quarter bends (360 degrees total) between pull
points.
c.
Bends in the tubing shall be made so that the tubing will not be damaged and the internal diameter
of the tubing will not be effectively reduced.
d.
All cut ends of tubing shall be reamed to remove rough edges.
e.
Boxes and fittings shall comply with NEC.
f.
Tubing shall be supported at least every 10 feet and with in 3 feet of junction boxes or devices
2.
Installation, Armored Cable:
a.
Type AC cable shall be secured by approved staples, hangers, and straps, as not to damage the cable, at intervals not more than 4 1/2 feet and within 12 inches of junction box or other device
b.
Fittings shall be used at all ends of armored cables and meet NEC specifications.
c.
Bends shall be made so as not to damage cable.
13810-6
0893 Lindsay, OK
11/23/10
L.
3.3
Light Dimming:
1.
All light dimming fixtures are to be tied together by conduit, flex, or box 14 gage wire or larger.
2.
Home run to dimming control shall be 14 gage or larger in conduit or flex.
3.
MC cable is permitted for connecting light fixtures together for low voltage control purposes.
4.
Separation between lighting power supply wiring and lighting control wiring shall comply with NEC.
IDENTIFICATION
A.
Provide electronic, permanent labels for location of each refrigeration sensor identifying circuit.
B.
Label refrigeration sensors at location in cases with electronic, permanent labels.
C.
Provide electronic, permanent labels with 3/4 inch nominal size numbers corresponding to associated rooftop unit
for zone temperature sensors.
D.
Label each wire a minimum of one inch from end, identifying cable.
E.
Label breakers for Energy Management System with orange stickers: “DO NOT TURN OFF!”
3.4
CLEAN UP
A.
Promptly remove all rubbish or debris resulting from the Work.
B.
During the course of the Work, the area in which the Contractor is working shall be kept in an orderly, reasonably
clean condition. Keep gang boxes, spools of wire, and boxes off of sales floor. Tools, supplies, etc. shall remain
only as long as they are in use. Abide by site cleanliness policies of General Contractor for general construction.
C.
Thoroughly clean Work furnished and installed under this Contract, ready for Owner's use.
3.5
START-UP (SUPERCENTERS & SAM'S)
A.
Energy Management equipment start-up and documentation of operation shall be in accordance with Walmart
Specifications. Final payment will not be made until start-up reports are received and checkout paperwork is
turned over to Walmart Energy Management.
B.
Provide adequate number of qualified personnel for start-up period. If the Walmart Mechanical Services Department Construction Manager determines that the schedule cannot be met, provide additional startup personnel for
completion in that time frame.
C.
Fill out the attached checkout paperwork and send to Walmart Energy Management Department.
1.
Pre-checkout forms: Walmart Support Installation Form, HVAC Information, Cutler Hammer Module
Configurations and Pre-Checkout Verification Form.
2.
Checkout forms: Refrigerated Case Sensor Input Verification, Pulse Meter Letter, Phase Loss Information,
Operating Information and Manager’s Orientation.
D.
Start-up shall include but not limited to the following:
1.
Verify all modules are communicating.
2.
Verify all terminations are correct.
3.
Verify all sensor locations.
4.
Verify, icebath, and calibrate to +/- one degree Fahrenheit if needed on all refrigeration sensors.
5.
Replace any modules or sensors that are defective.
3.6
CHECKOUT
A.
Coordinate with Walmart Support for final checkout. The Energy Management Contractor shall not receive final
approval until final checkout is complete and deficiencies have been corrected. System documentation will not be
complete until Energy Management Contractor has been received final checkout verification number from
13810-7
0893 Lindsay, OK
11/23/10
Walmart Support.
B.
Checkout shall include, but is not limited to, the following:
1.
Complete Pre-checkout.
2.
Complete on-line checkout.
3.
Network status.
4.
Phase loss monitors.
5.
Override verification.
6.
Sensor verification.
7.
Address verification.
8.
Alarm log verification.
9.
Transducer verification
10.
AHU sensor verification.
11.
Light dimming: Dim lights from 100% down to minimum and back up to 100% to demonstrate proper
operation.
12.
ALS & hi/lo output verification.
13.
RTU sensor verification.
14.
CO2 sensor verification.
15.
RTU damper/actuator verification.
13810-8
0893 Lindsay, OK
11/23/10
HVAC/REFRIGERATION/EMS
REQUEST FOR INFORMATION
PROCESS FLOW CHART
WALMART
STORES, SUPERCENTER, SAM’S CLUB,
NEIGHBORHOOD MARKET
Subcontractor , manufacturer,
supplier, or other party submits request for information
to Contractor
Walmart Mechanical Services Construction Manager provides response to
Contractor
Contractor contacts
Walmart Mechanical Services Construction Manager
(MSCM) with request for
information. MSCM will
provide response or authorize Formal RFI.
Walmart Mechanical Services Construction Manager authorizes Contractor
to submit formal Request
for Information to
Walmart
Construction RFI website
Contractor submits Request for Information to
Professional of Record on
Walmart
Construction RFI Website
Professional of Record
notifies appropriate consultant for response on
Construction RFI Website
Consultant answers RFI on
Construction RFI Website
Contractor issues response
to subcontractor, manufacturer, supplier, or other
party.
Professional of Record
issues response to Contractor on Construction RFI
Website
13810-9
0893 Lindsay, OK
11/23/10
WALMART SUPPORT INSTALLATION FORM
Store #
Date :
Address :
City :
State :
EMS phone #
Store phone #
Poss date :
Zip :
G.O. Date :
GNC Serial #
Ethernet adapter serial #
MAC address :
New :
Switch:
Remodel :
Port #
Expansion :
Changeout :
EMS Contractor :
Contractor 24 hr #
Installer :
Time zone :
Lighting control by:
Daylight savings time :
Cutler Hammer S.O.B.
Contactors:
Square-D Powerlink:
Cutler Hammer:
Number Of Phase Loss Monitors:
If store has light dimming ballast, is the negative (gray) control wire from dimming ballast grounded?
List any programming changes below
13810-10
0893 Lindsay, OK
11/23/10
WALMART SUPPORT INSTALLATION FORM (continued)
EMS Phone #
Type Of Lighting:
Main Store #
Fluorescent:
Light Dimming Fluorescent:
Yes
Halide:
No
High / Low:
Yes
No
What Panel And Circuit Breaker Feeds 120vac To GNC Transformer?
Panel:
Circuit Breaker:
What Panel And Circuit Breaker Feeds 120vac To IOC Transformer?
IOC Designation:
Panel:
Circuit Breaker:
What Panel And Circuit Breaker Feeds 120vac To IOC Transformer?
IOC Designation:
Panel:
Circuit Breaker:
What Panel And Circuit Breaker Feeds 120vac To IOC Transformer?
IOC Designation:
Panel:
Circuit Breaker:
What Panel And Circuit Breaker Feeds 120vac To IOC Transformer?
IOC Designation:
Panel:
Circuit Breaker:
What Panel And Circuit Breaker Feeds 120vac To IOC Transformer?
IOC Designation:
Panel:
Circuit Breaker:
If Store Has Contactors, What Panel And Circuit Feeds 120vac To Contactor?
Panel:
Circuit Breaker:
If Store Has Cutler Hammer S.O.B.S, What Panels & Circuit Breakers Feed 120vac To S.O.B.S?
Panel:
Panel:
Panel:
Panel:
Circuit Breaker:
Circuit Breaker:
Circuit Breaker:
Circuit Breaker:
Are All EMS Circuit Breakers Marked With Orange EMS Stickers?
Yes
If No Explain:
13810-11
0893 Lindsay, OK
11/23/10
WALMART SUPPORT INSTALLATION FORM (continued)
SUBMIT THIS PAGE FOR FINAL DRAFT
Checkout Number:
Date:
EMS Contractor:
Contractor 24 hr #
Installer :
Refrigeration start-up: Signature of Walmart Mechanical Services Department Construction Manager:
Date:
Attach completed punch list
Make 4 sets of all information and distribute to the following :
1. General Contractor after final checkout (developer projects only)
2. EMS supplier after all signatures are obtained
3. Walmart HVAC technician (leave in package near GNC)
4. Installer’s work file
Comments:
Explanations:
13810-12
0893 Lindsay, OK
11/23/10
PRE-CHECKOUT VERIFICATION FORM
HOA switches in AUTO position for IOCs
Phase Loss Monitors wired and working properly
Sensors reading properly
No Communications Losses or Alarms exist
No Meter failed alarms
Overrides wired and working properly
Exterior lights override in off position
Verify exterior lights are working properly
Verify inside ALS is working properly by covering it and reading GNC display
Verify each CO2 sensor has its own power supply and is working properly
Verify CO2 dampers are working properly
Verify light dimming is working properly
Verify IOC outputs are working properly
Verify phone line is in, number is correct, and functioning
Each of the above lines shall be checked off with the technician’s initials.
Without this Verification Form, on-line checkout will not begin.
Signed:
EMS Company:
Store #:
Location:
13810-13
0893 Lindsay, OK
11/23/10
HVAC INFORMATION
Rtu
#
Cool
Stage
Heat
Stage
Gas/
Elec
Dmpr
M/Ec
Nos Load
Y/N Title
Mfg
Model #
13810-14
0893 Lindsay, OK
11/23/10
HVAC INFORMATION
Rtu
#
Cool
Stage
Heat
Stage
Gas/
Elec
Dmpr
M/Ec
Nos
Y/N
Load
Title
Mfg
Model #
13810-15
0893 Lindsay, OK
11/23/10
CUTLER HAMMER MODULE CONFIGURATIONS
Panel:
Panel Location:
2P1
CRK
1
Module Address:
Number Of Circuits:
LOAD
SOB
CRK
LOAD
SOB
2
3
4
5
6
7
8
9
10
11
12
13
14
15
16
17
18
19
20
21
22
23
24
25
26
27
28
29
30
31
32
33
34
35
36
37
38
39
40
41
42
1. Indicate 2 pole breakers by checking “2p” box.
13810-16
0893 Lindsay, OK
11/23/10
2P1
CUTLER HAMMER MODULE CONFIGURATIONS
Panel:
Panel Location:
2P1
CRK
43
Module Address:
Number Of Circuits:
LOAD
SOB
CRK
44
45
46
47
48
49
50
51
52
53
54
55
56
57
58
59
60
61
62
63
64
65
66
67
68
69
70
71
72
73
74
75
76
77
78
79
80
81
82
83
84
LOAD
SOB
1. Indicate 2 pole breakers by checking “2p” box.
13810-17
0893 Lindsay, OK
11/23/10
2P1
REFRIGERATED CASE SENSOR INPUT VERIFICATION1
Store #
Location:
Walmart Acceptance:
Date:
Tested By:
Company:
Module ID:
Module ID:
Module ID:
S/N:
S/N:
S/N:
Location:
Input # Sensor Input Readings
Sensor
Pre-Cal
Post-Cal Startup
ID
1)
Location:
Input #
Sensor Input Readings
Sensor
Pre-Cal
Post-Cal Startup
ID
1)
Location:
Input #
Sensor Input Readings
Sensor
Pre-Cal
Post-Cal Startup
ID
1)
2)
2)
2)
3)
3)
3)
4)
4)
4)
5)
5)
5)
6)
6)
6)
7)
7)
7)
8)
8)
8)
9) Cir #
Notes:
DT Switch Y / N
9) Cir #
Notes:
DT Switch Y / N
9) Cir #
Notes:
DT Switch Y / N
Module ID:
Module ID:
Module ID:
S/N:
S/N:
S/N:
Location:
Input # Sensor Input Readings
Sensor
Pre-Cal
Post-Cal Startup
ID
1)
Location:
Input #
Sensor Input Readings
Sensor
Pre-Cal
Post-Cal Startup
ID
1)
Location:
Input #
Sensor Input Readings
Sensor
Pre-Cal
Post-Cal Startup
ID
1)
2)
2)
2)
3)
3)
3)
4)
4)
4)
5)
5)
5)
6)
6)
6)
7)
7)
7)
8)
8)
8)
9) Cir #
Notes:
DT Switch Y / N
9) Cir #
Notes:
DT Switch Y / N
9) Cir #
Notes:
DT Switch Y / N
1. Immerse sensor in ice bath. Allow ample time for reading to stabilize. Record reading in Pre-Cal column.
If sensor requires adjustment, follow calibration procedures. Record adjusted ready in Post-Cal column.
Startup column is for EMS Supplier factory representative spot-check at refrigeration equipment startup.
13810-18
0893 Lindsay, OK
11/23/10
PULSE METER LETTER
Cutler-Hammer IQ 200 Electrical Distribution System Meter
System Frequency
Wiring Configuration
Current Transformer Ratio
Potential Transformer Ratio
Demand Window
KYZ Output Setting
Energy per Pulse Rate
Example:
System Frequency
Wiring Configuration
Current Transformer Ratio
Potential Transformer Ratio
Demand Window
KYZ Output Setting
Energy per Pulse Rate
60 Hz
4 wire
1200/5
N/A
5 min
KWh
1
13810-19
0893 Lindsay, OK
11/23/10
PHASE LOSS INFORMATION
How many phase loss monitors exist in store? _____________
Phase loss sensor cable wired between the common and the normally closed contacts?
Yes________ if no, explain____________________________________________________
Input to global network controller (GNC) is connected to phase loss input terminals?
Yes________ if no, explain____________________________________________________
480 volts to phase loss monitor(s)? Yes ________
What panel and circuit feed 480vac to phase loss monitor(s)?
Panel: ____________________________ Circuit Breaker: _________________________
Panel: ____________________________ Circuit Breaker: _________________________
Panel: ____________________________ Circuit Breaker: _________________________
Panel: ____________________________ Circuit Breaker: ________________________
Panel: ____________________________ Circuit Breaker: _________________________
VOLTAGES
PLS #1
PLS #2
PLS #3
PLS #4
PLS #5
A To C
B To C
A To B
A To Ground
B To Ground
C To Ground
Phase Loss Sensor
Under-Voltage: _________________________ Vac
Over-Voltage: _________________________ Vac
Delay: _________________________ Seconds
Lighting information: Include copy of appropriate electrical drawing(s) indicating type of lighting control
used, loads and their power circuits. (Use the one line drawing for the contactors, IFP(s), LCU(s) or Cutler Hammer-1000(s) from electrical drawings in plans.)
13810-20
0893 Lindsay, OK
11/23/10
OPERATING INFORMATION
Communications established with Walmart support: How many phase loss.
Yes________ if no, explain____________________________________________________
Each EMS cable is labeled and run without splice. (Include rooftop map from EM1 drawings showing
any changes – use red ink on original.)
Yes________ if no, explain____________________________________________________
System cables meet material specifications.
Yes________ if no, explain____________________________________________________
Outdoor sensor assembly mounted per plas and facing north.
Yes________ if no, explain____________________________________________________
All system wiring is neatly tie-wrapped and not exposed to the elements.
Yes________ if no, explain____________________________________________________
Global network controller (GNC) batter jumper installed in proper position.
Yes________ if no, explain____________________________________________________
Ethernet communication has been established.
Yes________ if no, explain____________________________________________________
Activation of HOA switch to each position (off, on, auto) cause all loads to turn off or on according to
the white label attached to the transition board of the input/output controller (IOC).
Yes________ if no, explain_____________________________________________________
Demonstrate battery backup works by lifting global network controller (GNC) from its power supply
then replacing it.
Yes________ if no, explain____________________________________________________
Demand pulse generator (DPG – demand meter) is functioning and global network controller (GNC)
reads correct kw usage as calculated using formula on the pulse meter.
Yes________ if no, explain____________________________________________________
END OF SECTION
13810-21
0893 Lindsay, OK
11/23/10
UniSpec II - Store Planning
103009
SECTION 13900 - FIRE SUPPRESSION
PART 1 - GENERAL
1.1
SUMMARY
A.
Section Includes:
1. Automatic sprinkler systems.
2. Fire protection sprinkler piping work with feed and cross main piping, branch line piping, test valves, test
connections, and sprinklers.
3. Flow indicators, valves, gauges, alarms, drain piping, and supervisory switches.
4. System design, installation and certification.
B.
Related Sections:
1. Section 09900 - Paints and Coatings.
1.2
REFERENCES
A.
ASTM International (ASTM):
1. ASTM A 47 - Ferritic Malleable Iron Castings
2. ASTM A 53 - Pipe, Steel, Black And Hot-Dipped, Zinc-Coated, Welded And Seamless
3. ASTM A 135 - Electric-Resistance-Welded Steel Pipe
4. ASTM A 234 - Piping Fittings Of Wrought Carbon Steel and Alloy Steel For Moderate And High
Temperature Service
5. ASTM A 536 - Ductile Iron Castings
6. ASTM A 795 - Black And Hot-Dipped Zinc-Coated (Galvanized) Welded And Seamless Steel Pipe For Fire
Protection Use
7. ASTM A 865 - Threaded Couplings, Steel, Black Or Zinc-Coated (Galvanized) Welded Or Seamless, For Use
In Steel Pipe joints
B.
American Society of Mechanical Engineers (ASME):
1. ASME B 16.1 - Cast Iron Pipe Flanges And Flanged Fittings
2. ASME B 16.3 - Malleable Iron Threaded Fittings
3. ASME B 16.4 - Gray Iron Threaded Fittings
4. ASME B 16.5 - Pipe Flanges And Flanged Fittings Nps 1/2 Through Nps 24 Metric/ Inch Standard
5. ASME B 16.9 - Factory-Made Wrought Buttwelding Fittings
6. ASME B 16.11 - Forged Fittings, Socket-Welding And Threaded
C.
Factory Mutual System (FM):
1. Approval Guide, Latest edition.
D.
National Fire Protection Association (NFPA):
1. NFPA 13, 1999Edition - Installation of Sprinkler Systems.
2. NFPA 24, 2002 Edition - Standard for the Installation of Private Fire Service Mains and their Appurtenances.
3. NFPA 25, 2008 Edition – Standard for the Inspection, Testing, and Maintenance of Water-Based Fire
Protection Systems.
E.
Underwriters Laboratory (UL):
1. UL Fire Protection Directory – Latest Edition.
1.3
SUBMITTALS
A.
Authorities Having Jurisdiction (AHJ)
1. Drawings and calculations have been submitted to the AHJ for code compliance at the time of the permit
13900-1
0893 Lindsay, OK
11/23/10
application.
B.
Submit the following:
1. Product data
2. Shop drawings
3. Additional data as may be required by NFPA 13 and Walmart’s Fire Protection Consultant.
C.
Submittal Procedure:
1. Reference Section 01330 for general submittal procedures. Conform to provisions of Section 01330 unless
otherwise specified herein.
2. Within 21 days after award of prime contract, send submittals to Walmart’s Fire Protection Consultant as
specified Section 01330. Allow 15 day turn-around on submittals sent to Walmart’s Fire Protection
Consultant.
a.
If the Contractor fails to submit a complete Fire Suppression submittal package within 21 days after
award of contract, the Contractor shall pay the Owner $250.00 per day as liquidated damages and
not as a penalty, until the fully completed Fire Suppression submittal package is received by
Walmart’s Fire Protection Consultant.
b.
Send a copy of the Letter of Transmittal sent with the submittals to the Architect indicating date of
and content of transmittal.
3. Within 21 days after Award of Contract by Walmart to Contractor, submit two copies of complete submittals
to Authorities Having Jurisdiction if required by Walmart’s Fire Protection Consultant. Coordinate submittal
with Walmart’s Fire Protection Consultant. Submit additional copies if required
4. Submittals shall be complete, accurate, and in full compliance with contract requirements for proper and
timely approval.
5. Contractor shall respond to shop drawing review comments within 7 days of receipt.
6. Maintain two copies of approved documents on site.
D.
Submittal Rejection:
1. Walmart’s Fire Protection Consultant will reject submittals which do not comply with Contract Documents. If
submittal is rejected by Walmart’s Fire Protection Consultant for any reason, Walmart Stores, Inc., will backcharge the Contractor $200.00 via Change Order, to cover the processing costs of each subsequent review
until submittal is approved. Submittal rejections include, but are not limited to, the following reasons:
a.
Design Issues: Incorrect densities, design areas, equipment sprinkler spacing, hose station missing,
incomplete system design, etc. No changes in design area, number of sprinklers operating, pipe
sizes, number of branch lines, number of mains or deviation of water supply from that shown on the
Contract Documents shall be approved by Walmart’s Fire Protection Consultant. This is not
intended to limit the Contractor from making minor modifications to system design for coordination
purposes.
b.
Incorrect Water Test: Failure to use Walmart water test found on project fire protection
Construction Documents. No other water test data is permitted for system design submittals to
Walmart’s Fire Protection Consultant.
c.
Incorrect Material: Do not propose pipe, sprinklers or backflow preventers not indicated in Contract
Documents. Products not specified in contract documents are cause for rejection.
d.
Incorrect Valves: Do not propose OS&Y valves when wall PIV's are indicated in the Contract
Documents.
2. Rejected submittals shall be revised and resubmitted until approved. Extension of time will not be allowed for
rejected submittals.
a.
The Fire Suppression subcontractor shall revise and resubmit rejected submittals within 7 days of
receipt of rejected submittals.
b.
The Contractor shall verify that the Fire Suppression subcontractor has addressed all required
revisions in the resubmittal.
E.
Contract Closeout Submittals: Submit the following under provisions of Section 01770.
1. Maintenance Data: Include components of system, servicing requirements, inspection data, and owners
manuals.
2. Training Requirements: Provide operational training to Walmart. Include system control operation, Fire
13900-2
0893 Lindsay, OK
11/23/10
3.
4.
5.
6.
7.
Pump (if provided) manual and abort functions, trouble procedures, auxiliary functions and emergency
procedures.
Contractors Material Test Certificates: Provide Copies of completed Underground, Overhead, and Fire Pump
(if applicable) Contractor’s Material Test Certificates.
As-Built shop drawings indicating installed location of components, including all piping, sprinklers, hangers,
valving, inspector's test stations, auxiliary drains, and hose stations (if required).
Contractor's Record Letter of Conformance for Fire Suppression: Upon satisfactory Fire Sprinkler Site
Observation and Acceptance Test (FPAT), Walmart’s Fire Protection Consultant will issue to the contractor a
Contractor's Record Letter of Conformance for Fire Suppression. The Contractor shall complete the Record
Letter of Conformance, obtaining all signatures (Consultant, Sub Contractor, and Contractor) and submit
original for payment per Contract Documents. One Record Letter of Conformance shall be completed and
submitted for all Fire Sprinkler Systems, Fire Pump Systems and Water Storage Tanks associated with the
project.
At Project completion, present to the Store Manager the As built Drawings enclosed in a plastic pipe tube
(fixed cap at one end and a threaded-cap on the other end) for storage in the Riser Room.
In addition to the copies of Documents delivered to the Store Manager, distribute additional copies of
documents as indicated below:
a.
Contractor shall deliver copies of the As-Built shop drawings and Contractor's Record Letter of
Conformance for Fire Suppression and Contractor’s Material Test Certificates (Underground,
Overhead, and Fire Pump) in both hard copy and electronic form (*.pdf or *.plt) to Walmart’s Fire
Protection Consultant.
b.
Contractor shall deliver copies of the Contractor's Record Letter of Conformance for Fire
Suppression and Contractor’s Material Test Certificates (Underground, Overhead, and Fire Pump) in
both hard copy and electronic form (*.pdf or *.plt) to
AIE
Sue Warmann
Alternatives in Engineering
1314 Hwy DD
Defiance, MO 63341
(636) 398-5288
1.4
SYSTEM DESCRIPTION
A.
System shall provide coverage for all existing and new building and expansion areas including, but not limited to,
areas scheduled in this Section. Contract Documents have been prepared in accordance with NFPA 13 (working
plans) except for fabrication information. The Contract Documents are prepared to a level consistent with that
level required by the Authorities Having Jurisdiction to gain plan check approval. No changes in design area,
number of sprinklers operating, pipe sizes, number of branch lines, number of mains or deviation of water supply
from that shown on the drawings shall be approved by Fire Protection Consultant. This is not intended to limit the
Contractor from making minor modifications to system design for coordination purposes. The Contractor shall
review the Contract Documents for completeness and to ensure that the Construction Documents meet all
Authorities Having Jurisdiction requirements. Discrepancies with NFPA or Authorities Having Jurisdiction
requirements shall be brought to the attention of the Fire Protection Consultant prior to bid. The Contractor shall
complete the fire protection Contract Documents to provide all final required detail such as fabrication details,
final pipe cuts, hanger cuts, and other miscellaneous details not required by the Authority Having Jurisdiction for
approval. Contractor is responsible to coordinate design with all trades and disciplines.
1. Fire Protection Consultant has submitted Contract Documents to Authorities Having Jurisdiction for review
and approval. Contractor shall provide all other documents, qualifications, submittals and coordination
necessary to obtain approval by Authorities Having Jurisdiction. All changes made to the Contract
Documents by the Contractor shall be submitted to the Fire Protection Consultant for approval prior to
fabrication or installation. Refer to Section 01330 for submittal requirements.
B.
Base system design on water flow test data shown on the Drawings.
C.
Limit each system to 52,000 square feet.
13900-3
0893 Lindsay, OK
11/23/10
1.5
QUALITY ASSURANCE
A.
Guarantee system for a period of one year after completion of work and acceptance by Owner.
B.
Qualifications (Installer): Company specializing in performing work of this Section with minimum three years
experience and a minimum of a NICET Certified Engineering Technician (Level III) Fire Sprinkler Designer on
staff responsible for project.
C.
Company shall have a sprinkler contractor license issued by the Authorities Having Jurisdiction.
D.
Regulatory Requirements: Provide certificate of compliance from Authorities Having Jurisdiction indicating
approval of field acceptance tests.
1.6
EXTRA MATERIALS
A.
Provide extra sprinklers under the provisions of NFPA 13. Provide suitable wrenches for each sprinkler type.
Provide sprinklers as needed to meet the requirements listed below. Provide a minimum of 2 spare sprinklers for
new sprinklers being added that do not match existing:
1. 12 Sales Floor Type
2. 4 Dry Pendent
3. 2 each of other type present for a total of 24.
B.
If needed, provide sprinkler and sprinkler wrench cabinet per NFPA 13, adjacent to sprinkler risers.
C.
Provide hydraulic calculation placard attached to each riser on systems that are modified or added.
1.7
DELIVERY, STORAGE, AND HANDLING
A.
Deliver, store, and protect products to site under provisions of Section 01600.
B.
Store products in shipping containers and maintain in place until installation. Provide temporary inlet and outlet
caps. Maintain caps in place until installation.
PART 2 - PRODUCTS
2.1
MATERIALS
A.
2.2
Provide UL Listed or FM Approved materials complying with NFPA 13, unless noted otherwise in Contract
Documents.
FIRE PROTECTION PIPING - ABOVE GROUND
A.
Pipe: Steel pipe, conforming to the applicable requirements of NFPA 13, and ASTM A 53, ASTM A 135, or
ASTM A 795, as applicable.
1. Wet Pipe Systems, Utilizing Threaded Pipe:
a.
Schedule 40 black steel pipe.
b.
Threadable lightwall sprinkler pipe. One of the following:
1)
Dyna-Thread by Allied Tube and Conduit, Harvey, IL, (800) 882-5543.
2)
Eddy Thread 40 by Bull Moose Tube Company, Chesterfield, MO, (800) 325-4467.
3)
Mega-Thread by Wheatland Tube Company, Collingswood, NJ, (800) 257-8182.
4)
EZ-Thread by Youngstown Tube, Youngstown, OH (866) 843-8823.
5)
Substitutions: Not permitted.
c.
Pipe shall have a corrosion resistance ratio of 1.0 or greater after threading.
d.
Pipe located outdoors and piping in non-conditioned spaces shall be externally galvanized.
2. Wet Pipe Systems, Utilizing Roll Grooved Pipe.
a.
Schedule 10 black steel pipe.
13900-4
0893 Lindsay, OK
11/23/10
b.
3.
Lightwall sprinkler pipe. One of the following:
1)
Dyna-Flow by Allied Tube and Conduit, Harvey, IL, (800) 882-5543.
2)
Eddy-Flow by Bull Moose Tube Company, Chesterfield, MO, (800) 325-4467.
3)
Fire-Flo by Youngstown Tube, Youngstown, OH (866) 843-8823.
4)
EZ-Flow, by Northwest Pipe Company, Portland, OR, (800) 824-9824.
5)
Substitutions: Not permitted.
c.
Pipe shall have a corrosion resistance ratio of 1.0 or greater.
d.
Pipe located outdoors and piping in non-conditioned spaces shall be externally galvanized.
Dry Pipe Systems: Same as wet pipe systems except pipe shall be galvanized, zinc coated internally and
externally.
B.
Fittings: Provide one of the following:
1. Cast-Iron Threaded Flanges: ASME B16.1.
2. Cast-Iron Threaded Fittings: ASME B16.4.
3. Malleable-Iron Threaded Fittings: ASME B16.3.
4. Steel, Threaded Couplings: ASTM A 865.
5. Steel Welding Fittings: ASTM A 234, ASME B16.9, or ASME B16.11.
6. Steel Flanges and Flanged Fittings: ASME B16.5.
7. Steel, Grooved-End Fittings: UL-listed and FM-approved, ASTM A 47, malleable iron or ASTM A 536,
ductile iron; with dimensions matching steel pipe and ends factory grooved according to AWWA C606. Roll
groove only, cut groove unacceptable.
8. Steel Fittings and Cast Iron fittings shall not be used for dry pipe systems.
9. Fitting type shall match pipe. Galvanized fittings shall be used for dry pipe systems.
10. Crimp-type couplings shall not be used.
C.
Flexible Piping Systems: At Contractor’s option, UL listed and FM approved flexible piping connections to
sprinklers may be used for both suspended and sheetrock ceilings when suitable for their intended use.
1. Description: Connections shall include a fully welded (non-mechanical fittings), braided, leak-tested sprinkler
drop with a minimum internal corrugated hose diameter of 1 inch, lengths of 2 ft to 6 ft., and a one-piece
multi-port ceiling bracket with removable attachment hub and self-securing integrated snap-on clip-ends for
attachment to ceiling grid without the need for a screw fastener.
2. Acceptable Manufacturer: Flex Head series 2000 by Flexhead Industries of Holliston, MA (800) 829-6975
or (508) 893-9596, Fax (508) 893-6020.
3. No Substitutions Permitted.
2.3
BACKFLOW PREVENTER ASSEMBLIES (IF NEEDED)
A.
2.4
Subject to compliance with design and Authority Having Jurisdiction requirements, provide Backflow Preventer
Assembly as follows:
1. 2 Inch Connections and Smaller: If Authorities Having Jurisdiction requires double check, double detector
check, or reduced pressure type devices use ASSE or USC Cross Connection approved device.
2. 2-1/2 Inch Through 10 Inch Connections:
SPRINKLERS
A.
Subject to compliance with requirements, provide UL Listed or FM Approved automatic sprinklers. Provide
sprinklers with nominal 5.6, 8.0, 11.2, or 16.8 K-factor. Sidewall sprinklers are not acceptable, unless noted
otherwise. Provide the following sprinkler types:
1. Areas With Exposed Structure Above: Upright or pendent sprinkler, bronze.
2. Areas With Gypsum Board Ceilings: Pendent sprinkler, white, with two-piece white escutcheon plate.
3. Areas With Lay-in Ceilings: Pendent sprinkler, white, with two-piece semi-recessed white escutcheon plate.
B.
Standard Sprinklers: Glass bulb sprinklers are acceptable. Sprinklers with o-rings not permitted.
C.
Dry Pendent Sprinklers shall be Concealed type Globe Model GL5681, Tyco Model TY3555, or Victaulic V3618.
1. Substitutions: Not permitted.
13900-5
0893 Lindsay, OK
11/23/10
D.
2.5
Dry Horizontal Sidewall Sprinklers shall be Tyco Model TY3355, TY5339, or Reliable R5734.
1. Tyco Model TY5339 for extended coverage ordinary hazard (ECOH) installations.
2. Substitutions: Not permitted.
ACCESSORIES
A.
Wire Cage Sprinkler Guards:
1. Provide guards on pendent sprinklers located within 7'-6" of finished floor, except for semi-recessed and
concealed sprinklers.
2. Provide guards on sprinklers located beneath overhead doors.
B.
Substitutions: Not permitted.
2.6
FIRE PUMP
A.
Fire Pump not permitted.
PART 3 - EXECUTION
3.1
GENERAL INSTALLATION REQUIREMENTS
A.
Install system and equipment in accordance with NFPA 13 and manufacturer's instructions.
B.
Replace with an identical K-Factor, temperature rating, and response-type any sprinkler that has signs of leakage,
paint applied other than by the sprinkler manufacturer, corrosion, damage, or loading; or is installed in the
improper orientation.
3.2
INSTALLATION - ABOVE GROUND PIPING
A.
Provide piping in accordance with NFPA 13.
B.
Locate top beam clamp or thru bolt connection near joist panel points per pipe support detail.
C.
Provide piping to conserve building space. Do not interfere with use of building space and other work.
D.
Group piping whenever practical at common elevations.
E.
Prepare pipe, fittings, supports, and accessories for finish painting. Where pipe support members are welded to
structural building framing, scrape, brush clean, and apply one coat of zinc rich primer to welding. Protect
sprinkler to ensure sprinklers do not receive field paint. Remove protective covering after painting. Replace
sprinklers having paint other than factory finish with new sprinklers. Cleaning and reuse of painted sprinklers is
prohibited.
F.
Examine other work indicated on the Drawings and conditions at job site. Coordinate routing of work with other
construction trades to avoid interference with other installations. Do not cut building structural members, beams,
joists, etc. for routing of sprinkler piping.
G.
Seal pipe penetrations through fire rated walls or floors to achieve fire resistance equivalent to fire separation
required. Provide wall plates at all penetrations. Provide zinc coated (galvanized) all-thread rod for hanging dry
system piping.
H.
Provide valves with stems upright or horizontal.
I.
Route piping and locate sprinklers as required to avoid building structure, equipment, plumbing piping, heating and
air conditioning piping, ductwork, lighting fixtures, electrical conduits and bus ducts, and similar work. Locate
center of sprinkler a minimum of 6 inches off ceiling grid.
13900-6
0893 Lindsay, OK
11/23/10
1.
2.
3.3
Final location of lighting and exposed ductwork shall have priority over pipe routing and final sprinkler
locations.
Sprinkler piping in sales area without a ceiling and stockroom shall be located above bottom of joists.
Minimum height of sprinkler piping in areas with ceilings shall be 1’-0” above ceiling.
FIELD QUALITY CONTROL
A.
General: Contractor shall schedule, coordinate and conduct all tests required by Authorities Having Jurisdiction
and Walmart’s Fire Protection Consultant. Contractor shall modify, replace or retest as required by Authorities
Having Jurisdiction and / or Walmart’s Fire Protection Consultant.
B.
Flush, test, and inspect sprinkler system according to NFPA 13 "Systems Acceptance" Chapter. Test the systems,
including the underground water mains, and the aboveground piping and components to assure that equipment and
components function as intended. Pressure test the systems in accordance with NFPA 13 and NFPA 24. The
Contractor shall have available copies of as-built drawings.
1. Above Ground Fire Protection Piping:
a.
Test per NFPA 13.
b.
Inspect welds and verify welder's qualifications per Authorities Having Jurisdiction.
c.
Perform Hydrostatic tests per NFPA 13.
2. Backflow Prevention Assembly Forward Flow Test.
3. Operation of control valves and flowing of inspector's test connections to verify operation of alarm devices
including alarm switches. After operation of control valves has been completed, assure that control valves are
in the open position.
4. Main Drain flow test.
C.
Fire Sprinkler System Construction Follow Up: Walmart’s Fire Protection Consultant (as specified in Section
01330) will conduct a Pre Construction Conference Call and Fire Sprinkler Site Observation and Acceptance Test
(FPAT). The purpose of the Pre Construction Conference call is to review status of project, notify contractor of
status of approvals, and review project expectations. The purpose of the Fire Sprinkler System Site Observation is
to determine if the new or remodeled fire sprinkler systems are in general conformance with Contract Documents
and shop drawings. The Contractor shall coordinate with Walmart’s Fire Protection Consultant for the time and
date of the test. Scheduling for the FPAT shall begin 21 days prior to Construction End Date with FPAT being
conducted one to one week prior to Construction End Date. FPAT shall occur prior to Construction End Date. A
representative sample checklist is available upon request.
This construction follow up will be required on all projects in which more than a total of 2,500 square feet of the
sprinkler systems (i.e. more than 25 new or relocated sprinklers are present in one store at one time) are affected.
1.
2.
Pre Construction Conference Call: The Contractor shall contact Walmart’s Fire Protection Consultant within
2 days after Contract Award to schedule the Pre Construction Conference Call with the Contractor, Fire
Sprinkler Contractor, and Fire Pump Vendor (if applicable). The conference call will be held within 7 days
after Award. FPAT will be preliminarily scheduled at time of Pre Construction conference call.
FPAT: Walmart’s Fire Protection Consultant will meet the Contractor, and Sprinkler Contractor. Contractor
shall invite Alarm Central representatives to the test, but their presence is not required. At scheduled time,
Contractor/Sprinkler Contractor shall be ready to initiate Acceptance tests as outlined herein. Prior to
initiating tests, the following information shall be reviewed and copies provided to Walmart’s Fire Protection
Consultant:
a.
Contractors Materials and Test Certificate for Above Ground Piping (By System). As a minimum,
the form shall contain information indicated in sample form shown in NFPA 13 (i.e. Figure 16.1 of
2002 edition). Certificate shall be complete and verify all information except Dry pipe test section
and hydrostatic test section. Dry pipe section may be completed during Acceptance Test.
Hydrostatic test may be completed in the future and a copy forwarded to Walmart’s Fire Protection
Consultant at a later date.
b.
Sprinkler Zone Map.
c.
Approved Shop Drawings.
d.
Fire Pump Factory Test Curve (if applicable).
13900-7
0893 Lindsay, OK
11/23/10
3.
4.
5.
After these documents have been reviewed, Acceptance Test shall be initiated by Contractor/Sprinkler
Contractor in the order determined by Walmart’s Fire Protection Consultant. Each of these tests shall be
interfaced with the fire alarm system. Contractor shall arrange for system to be put in test and arrange to be
able to silence local alarms during Acceptance Test. Contractor shall coordinate with Alarm Central. The
Contractor shall provide all personnel, material, equipment, lifts, air and water pumps, hand tools, and
apparatus necessary to complete the above required testing. The Contractor shall notify the store management
that the above tests are scheduled.
The following tests shall be conducted by the Contractor / Sprinkler Contractor and witnessed by Walmart’s
Fire Protection Consultant. Generally this is the order the tests shall be conducted, but the Walmart’s Fire
Protection Consultant may require tests be conducted in any order deemed appropriate. Determination of
order will be made while on site.
a.
Fire Pump Systems (if applicable): Sprinkler Contractor shall conduct a full NFPA 20 acceptance
test, including (but not limited to) flow (churn, 100%, and 150%), manual and automatic starts, etc.
Sprinkler Contractor shall provide all equipment and personnel necessary to conduct test. Verify
flushing and pre-start preparation prior to test. Typically, this is the first test in the Acceptance Test.
b.
Water Storage Tank (if applicable): Sprinkler Contractor shall drop water level, overflow tank, and
operate tank heaters. Typically, this is the second test in the Acceptance Test.
c.
Dry pipe Systems: Sprinkler Contractor shall operate dry system to verify High, and Low air
pressure settings as well as water delivery time. This test typically follows the Fire Pump/Tank test
depending on site conditions.
d.
Inspector’s Test: Sprinkler Contractor shall operate each Inspector’s Test to verify flow switch
operates within 90 seconds (preferred time is 45 seconds, minimum time is 30 seconds). This test
typically follows the Dry pipe system Acceptance Test.
e.
System Control Valves: Sprinkler Contractor shall operate each system control valve to verify
functionality. This test typically follows the Inspector’s Test Acceptance Test.
f.
Antifreeze Systems (if applicable): Sprinkler Contractor shall test antifreeze mixture to verify
proper solution ratio. This test typically follows the System Control Valve Acceptance Test.
g.
Hydrostatic Test: Sprinkler Contractor shall hydrostatically test all systems simultaneously.
Typically this will be the last test initiated, and depending on schedule may not be fully witnessed by
Walmart’s Fire Protection Consultant. Contractor/Sprinkler Contractor shall certify and provide
signed off copies of test certificates proving successful completion of Hydrostatic tests prior to full
acceptance.
In addition to conducting the Fire Protections Systems Acceptance Test, a Fire Sprinkler System Site
Observation of the installed systems will also be conducted. Walmart’s Fire Protection Consultant will
conduct and document a site observation of the fire sprinkler systems (and fire pump / tank as applicable). At
the conclusion of this Observation, an exit interview will be conducted with the Contractor to review and
identify issues that need correction prior to acceptance of the system.
D.
Replace sprinkler system components that do not pass test procedures and retest to demonstrate compliance.
Repeat procedure until satisfactory results are obtained. The installation shall not be considered accepted until
identified discrepancies have been corrected and test documentation is properly completed and received. If FPAT
is required to be repeated or rescheduled due to unsatisfactory results rescheduling could take up to four weeks,
and may result in Contractor being back charged for Walmart’s Fire Protection Consultant additional time and
expenses.
E.
Prior to interior store finishing, test existing and new above ground pressure piping for leakage in presence of
Authority Having Jurisdiction and Owner's representative. Maintain test pressure at the high end for two hours.
Test pressure: 200 psi or 50 psi over normal operating pressure, whichever is greater. Conduct test in accordance
with NFPA 13, Hydrostatic Tests. Submit documentation per Contract Closeout Submittals of this section and
01770.
END OF SECTION
13900-8
0893 Lindsay, OK
11/23/10
CONTRACTOR'S RECORD LETTER OF CONFORMANCE
SECTION 13900, 13920, 13220 - FIRE SUPPRESSION
Project Location:
Date:
(City)
State
Store Number
Project Number
Statement of Conformance:
This Record Letter of Conformance is provided as a Record Document in accordance with Section 01770 – Contract
Closeout. The undersigned hereby declares that the fire sprinkler system(s) including fire pump(s) and water storage tanks
(hereafter referred to as the “Systems”) is installed and is in general conformance with the Contract Documents, submitted
shop drawings and submitted product data. The “Systems” have been provided and placed in operational condition in
accordance with the manufacturer's published instructions and the Contract Documents.To be accepted, all signatures must be
original ink signatures (copies are not allowed).
FIRE SPRINKLER SUBCONTRACTOR:
Phone Number: (
)
(Subcontractor Signature)
(Subcontractor name and address)
CONTRACTOR:
Contractor Company Name
___________
Signature
_
Title of Signatory
Recommendation of Acceptance (This Section to be completed by Walmart’s Fire Protection Consultant):
FPAT Required for this project:
Yes
No
If no is checked above, FPAT has not been conducted. In those cases where a FPAT is not conducted, this Recommendation
of Acceptance from Walmart’s Fire Protection Consultant is only based on a review and approval of the documents provided
by the Contractor .
This Recommendation of Acceptance is provided as a Record Document in accordance with Section 01770 – Contract
Closeout. We recommend Walmart accept the installation of the “Systems” (as referenced above). The “Systems”
Installation/Design are found to be in general conformance with the Contract Documents, and Approved Shop Drawings.
This recommendation is based on Shop Drawing review and Fire Sprinkler Site Observation and Acceptance Test (FPAT)
conducted on ___________________(Report Date), and follow up verification of identified issues conducted on
___________________ (Trip Date, Report Date).
While this review is an integral part of this project, it does not relieve the Contractor of their responsibility to comply with the
applicable provisions of the Contract Documents along with the mandated codes and standards. These examinations shall not
be construed as a check of every item nor does it prevent authorities from hereafter requiring corrections of errors in plans or
installation.
WALMART’S FIRE PROTECTION CONSULTANT:
Phone Number: (
)
Signature and contact Name of Walmart’s Fire Protection Consultant
(Walmart’s Fire Protection Consultant name and address)
13900-9
0893 Lindsay, OK
11/23/10
CONTRACTOR’S MATERIAL AND TEST CERTIFICATE FOR UNDERGROUND PIPING
Store Number:
Date:
City, ST:
Pipe Type and Class:
Underground
Pipes
And
Joints
Test Description
Flushing Test
Hydrostatic Test
Type Joint :
Pipe conforms to NFPA 13/24:
Fittings conform to NFPA 13/ 24:
If no explain :
□ Yes
□ Yes
□ No
□ No
Joints anchored clamped, strapped, or blocked in accordance with NFPA 13/24: □ Yes
If no, explain:
□ No
Flushing: Flow the required rate until water is clear and indicated by no collection of foreign material
in burlap bags at outlets such as hydrants and blow-offs. Flush at flows not less than 390 gpm for 4 in.
pipe, 880 gpm for 6 in. pipe, 1560 gpm for 8 in. pipe, 2440 gpm for 10 in. pipe, and 3520 gpm for 12
in. pipe. When supply can not produce stipulated flow rates, obtain maximum available.
Hydrostatic: All piping and attached appurtenances subjected to system working pressure shall be
hydrostatically tested at 200 psi or 50 psi in excess of the system working pressure, whichever is
greater, and shall maintain that pressure ± 5 psi for 2 hours.
Hydrostatic Testing Allowance: Where additional water is added to the system to maintain the test
pressures required by 10.10.2.2.1, the amount of water shall be measured and shall not exceed the
limits of the equation in the Leakage Test section.
New underground piping and lead in flushed according to NFPA 13/24:
□ Yes
□ No
If no, explain :
How flushing flow was obtained:
Public water
□
Tank or reservoir
□
Fire pump
□
All new underground piping hydrostatically
tested at ________ psi for _______ hours.
If no, explain:
L =
Leakage Test
Hydrants
Hydrant butt
Open pipe
Through what type opening:
□
□
Joints Covered:
SD P
148 , 000
L=
□ Yes
□ No
(________ ft ) × (_________ in ) × (_______ )
148,000
psi
L= testing allowance, gal per hr
S= length of pipe, ft
D= nominal diameter of pipe, in.
P= Avg test pressure during hydrostatic test, psi
L= Allowable leakage: ________gal ______hrs
Leakage measured:
________gal ______hrs
Leakage actual< leakage allowed?
□ Yes
□ No
Number installed:
Manufacturer & Model:
All operate satisfactorily:
□ Yes
□ No
Water control valves left wide open:
□ Yes
□ No
If no, explain:
Hose threads of fire department connections and hydrants compatible with AHJ: □ Yes
□ No
Contractor Firm & Contact Name:
Signatures
Signature:
Title:
AHJ Witness:
Representing:
Signature:
Title:
Date:
Date:
13900-10
0893 Lindsay, OK
11/23/10
UniSpec II - Store Planning
052209
SECTION 15050 - BASIC MECHANICAL MATERIALS AND METHODS
PART 1 - GENERAL
1.1
SUMMARY
A.
Section Includes:
1.
Hangers and Supports: Pipe supports.
B.
Related Section:
1.
Section 13900 - Fire Suppression: Fire Protection Sprinkler system piping.
2.
Section 15100 - Building Services Piping: Domestic water, reverse osmosis, sanitary drain and vent, interior storm water, and condensate piping. Piping Insulation. Pipe freeze protection.
1.2
REFERENCES
A.
The publications listed below form a part of this specification to the extent referenced. Publications are referenced
within the text by the basic designation only.
B.
British Standards Institution (BS):
1.
BS302 - Specifications for stranded steel wire ropes.
C.
Cast Iron Soil Pipe Institute (CISPI):
1.
Cast Iron Soil Pipe and Fittings Handbook.
1.3
QUALITY ASSURANCE
A.
Comply with rules and regulations of public utilities and municipal department affected by connection of services.
B.
Laws, codes, and ordinances shall take precedence except where work called for by Drawings and Specifications
exceeds code requirements in quality or quantity.
1.4
CONSTRUCTION DOCUMENTS
A.
1.5
Drawings and Specifications show pipe and duct sizes, general routing and location, and describe various systems.
These documents describe equipment, including size, general location, usage, support, and auxiliary requirements.
Contract Documents do not, however, detail certain job requirements. Drawings are intended to cover layout and
design of the Work and are not to be scaled for exact measurements. Where specific detail and dimension for mechanical Work are not shown on Drawings, take measurements and make layouts as required for proper installation of mechanical Work in coordination with other Work on project.
DELIVERY, STORAGE AND HANDLING
A.
Follow manufacturer's published directions in the delivery, storage, protection, installation, piping, and wiring, and
start-up of equipment and materials.
PART 2 - PRODUCTS
2.1
HANGERS AND SUPPORTS
A.
Pipe Hanger Schedule: Pipe hangers shall be as specified in Schedule I at the end of this Section.
B.
Multiple or Trapeze Hangers: Steel channels with angles or unistrut spacers and hanger rods.
C.
Wall Support for Pipe Sizes to 3 Inches: Cast iron hook.
15050-1
0893 Lindsay, OK
11/23/10
D.
Wall Support for Pipe Sizes 4 Inches and Over: Welded steel bracket and wrought steel clamp, adjustable steel
yoke and cast iron roll for hot pipe sizes 6 inches and over.
E.
Vertical Support: Steel riser clamp.
F.
Provide copper plated hangers and supports for uninsulated copper piping. Provide plastic inserts for uninsulated
copper piping penetrating metals studs.
2.2
WIRE ROPE HANGER SYSTEMS (CONTRACTOR'S OPTION)
A.
General: At the option of the Contractor, wire rope hanger system for piping support may be used in lieu of conventional hangers specified above.
B.
Manufacturer: Gripple Limited, Sheffield, United Kingdom. U. S. Distributor: Gripple, Inc., Batavia, IL. (630)
208-0111.
C.
Product: Hang Fast Wire Rope Hanging System by Gripple Inc.
1.
Substitutions: Not permitted.
D.
Wire Rope:
1.
Galvanized steel wire rope, manufactured to BS302.
2.
Standard lengths of 5, 10, 15 and 30 feet with a preformed loop at one end.
E.
Locking Mechanism:
1.
Zinc housing with Type 302 S26 stainless steel springs along with oil impregnated steel locking wedges.
PART 3 - EXECUTION
3.1
HANGERS AND SUPPORTS
A.
Support pipes throughout building, both horizontally and vertically. Attach to structure overhead by methods approved at job site. Do not use fasteners which penetrate the roof deck.
1.
For Projects in Seismic Zones 2, 3 or 4, provide sway bracing to comply with code seismic requirements.
B.
In areas without ceilings, secure insulation shields to insulation with pressure sensitive tape at each end of shield.
C.
Piping Support Spacing: Support horizontal piping above slab as shown in Schedules II and III at the end of this
Section.
D.
Install hangers to provide minimum 1/2 inch clear space between finished covering and adjacent work.
E.
Place a hanger within one foot of each horizontal elbow.
F.
Wire Rope Hanger Systems (Gripple Hang-Fast) (Option).
1.
Comply with manufacturer's load ratings and recommended installation procedures.
2.
For insulated pipe, provide pipe saddles to protect the entire circumference of the pipe insulation.
3.
Support piping in accordance with Schedule IV at the end of this Section.
3.2
OPERATION PRIOR TO ACCEPTANCE
A.
Contractor may operate any equipment provided that the operation is supervised and the Contractor retains full responsibility for properly maintaining equipment and the full manufacturers warranty remains unaffected from the
time of Owner possession.
15050-2
0893 Lindsay, OK
11/23/10
3.3
SCHEDULES: Schedules below apply to all piping hung inside the building unless otherwise specified.
SCHEDULE I - PIPE HANGER SCHEDULE
Pipe Service Pipe Size
Hanger Type B-Line No.
Globe No.
Grinnell No.
PHD
2" & smaller
Split Ring
B-3173 with
B-3224
721
108 with 114
500 with 114
2-1/2" &
larger
Clevis
B-3100
404/407
260
450
2" & smaller
Ring
B-3170-CT
301
CT 99
152
2-1/2" &
larger
Clevis
B-3104-CT
407
CT 65
442
Cast Iron
Soil Pipe
All
Clevis
B-3102
404
260
420
Insulated
Steel or PVC
2" & smaller
Clevis
B-3100 with
shield
404 with
shield
260 with
shield
550 with
shield
2" & smaller
Clevis
B-3104 with
shield
411 with
shield
CT 65 with
shield
442 with
shield
2 1/2" &
larger
Clevis
B-3100 with
shield
408 with
shield
260 with
shield
442 with
shield
Uninsulated
Steel or PVC
or CPVC
Uninsulated
Copper
Insulated
Copper
SCHEDULE II - PIPING SUPPORT SCHEDULE
Maximum Spacing In Feet
Copper
Steel
6’ max up to
1-1/4” I.D.
12' max
10’ max all
other
Cast Iron
PVC
5’ max, except may be 10’ max
where 10’ lengths are installed.
Min one hanger at each joint.
CPVC
3’ max up to
1” I.D.
4' max
4’ max all
other
SCHEDULE III - PIPING SUPPORT SCHEDULE
(GAS PIPE)
Maximum Spacing In Feet
Pipe I.D.
Steel
1/2"
3/4" or larger
6'
8'
15050-3
0893 Lindsay, OK
11/23/10
SCHEDULE IV - WIRE ROPE HANGER SYSTEM SCHEDULE
Pipe I.D.
Single hanger
at 10 ft. spacing
Single hanger
at 6 ft. spacing
Single hanger
up to 4 ft. spacing
No. 2
No. 3
No. 3
No. 4
No. 4
Up to 2"
No. 2
No. 2
Up to 3"
No. 3
No. 2
Up to 4"
No. 3
No. 3
Up to 5"
No. 4
No. 3
Up to 6"
No. 4
No. 4
NOTES:
1. Maintain maximum spacing as shown above.
2. Wire diameters are based on the following sizes:
Size 2= 5/64"
Size 3 = 1/8"
Size 4= 3/16"
3. Hanger sizes are based on vertical hanging only. Refer to manufacturer's data for load limits of hangers at angles other than vertical.
4. Schedule is based on schedule 40 steel pipes filled with water.
END OF SECTION
15050-4
0893 Lindsay, OK
11/23/10
UniSpec II - Store Planning
102910
SECTION 15100 - BUILDING SERVICES PIPING
PART 1 - GENERAL
1.1
SUMMARY
A.
Section Includes:
1.
Under-building slab and aboveground domestic water pipes, tubes, fittings, and specialties inside the
building.
2.
Sanitary waste and vent piping.
3.
Drains, cleanouts, hose bibbs, and hydrants.
4.
Water piping and drain piping specialties.
5.
Pipe freeze protection.
6.
Piping Insulation.
7.
Connection of miscellaneous equipment furnished under other Sections.
8.
Testing.
B.
Related Sections.
1. Section 06100 - Rough Carpentry: Preservative pressure treatment for wood blocking pipe supports.
5. Section 15050 - Basic Mechanical Materials and Methods: Piping hangers and supports.
6. Section 16100 - Wiring Methods.
1.2
REFERENCES
A.
The publications listed below form a part of this specification to the extent referenced. The publications are
referred to within the text by the basic designation only.
B.
American Society of Mechanical Engineers (ASME):
1.
ASME A13.1 - Scheme for the Identification of Piping Systems.
2.
ASME A112.14.3 - Grease Interceptors.
C.
American National Standards Institute (ANSI):
1.
ANSI B16.3 - Malleable Iron Threaded Fittings.
2.
ANSI B16.22 - Wrought Copper & Copper Alloy Solder-Joint Pressure.
D.
American Society of Heating, Refrigerating and Air Conditioning Engineers (ASHRAE)
1.
ASHRAE 90.1 - Energy Efficient Design Of New Buildings Except New Low-Rise Residential Buildings.
E.
ASTM International (ASTM):
1.
ASTM A53 - Pipe, Steel, Black And Hot-Dipped, Zinc-Coated, Welded And Seamless.
2.
ASTM A74 – Hub and Spigot Cast Iron Soil Pipe and Fittings.
3.
ASTM A536 – Ductile Iron Castings.
4.
ASTM A861 -High-Silicon Iron Pipe and Fittings.
5.
ASTM A888 – Hubless Cast Iron Soil Pipe and Fittings.
6.
ASTM B88 - Seamless Copper Water Tube.
7.
ASTM B135 - Seamless Brass Tube.
8.
ASTM B584 - Copper Alloy Sand Castings For General Applications.
9.
ASTM C564 – Rubber Gaskets for Cast Iron Soil Pipe and Fittings.
10.
ASTM C921 – Determining The Properties Of Jacketing Materials For Thermal Insulation.
11.
ASTM C1277 – Shielded Couplings Joining Hubless Cast Iron Soil Pipe and Fittings.
12.
ASTM C1540 – Heavy Duty Shielded Couplings Joining Hubless Cast Iron Soil Pipe and Fittings.
13.
ASTM D1785 - Poly vinyl Chloride (PVC) Plastic Pipe, Schedules 40, 80, and 120.
14.
ASTM D2000 - Standard Classification System For Rubber Products In Automotive Applications.
15.
ASTM D2467- Polyvinyl Chloride (PVC) Plastic Pipe Fittings, Schedule 80.
15100-1
0893 Lindsay, OK
11/23/10
16.
17.
18.
19.
20.
21.
22.
23.
24.
25.
26.
27.
28.
29.
F.
1.3
ASTM D2564 - Solvent Cements for Polyvinyl Chloride (PVC) Plastic Pipe and Fittings.
ASTM D2609 - Plastic Insert Fittings for Polyethylene (PE) Plastic Pipe.
ASTM D2665 - Poly(Vinyl Chloride) (PVC) Plastic Drain, Waste, and Vent Pipe and Fittings
ASTM D2846 - Chlorinated Poly (Vinyl Chloride) (CPVC) Plastic Hot And Cold Water Distribution.
ASTM D2855 - Making Solvent-Cemented Joints with Polyvinyl Chloride (PVC) Pipe and Fittings.
ASTM D3311 - Drain, Waste, and Vent (DWV) Plastic Fittings Patterns
ASTM E84 - Surface Burning Characteristics of Building Materials.
ASTM E96 – Water Vapor Transmission Materials.
ASTM F439 - Chlorinated Poly (Vinyl Chloride) (CPVC) Plastic Pipe Fittings, Schedule 80.
ASTM F441 - Chlorinated Poly (Vinyl Chloride) (CPVC) Plastic Pipe, Schedules 40 And 80.
ASTM F493 - Solvent Cements For CPVC Pipe And Fittings.
ASTM F656 - Primers For Use In Solvents Cement Joints Of Poly (Vinyl Chloride) (PVC) Plastic Pipe And
Fittings.
ASTM F876 - Crosslinked Polyethylene (PEX) Tubing.
ASTM F2014 - Non-Reinforced Extruded Tee Connections for Piping Applications.
American Water Works Association (AWWA)
1.
AWWA C651 - Disinfecting Water Mains.
SUBMITTALS
A.
Product Data: Submit product data and installation details for grease interceptor to Authority Having Jurisdiction
for approval. Include rated capacities, operating characteristics, and accessories.
B.
Closeout Submittals: Submit the following as described in the testing and inspection requirements in Part 3 below
as a part of closeout submittals in accordance with Section 01770.
1.
Certification of video inspection contractor qualifications.
2.
Video inspection report.
3.
Disinfection report.
PART 2 - PRODUCTS
2.1
DOMESTIC WATER PIPING
A.
Water Piping Above Grade:
1.
Type "L" hard drawn, seamless copper water tube, ASTM B88.
2.
Jointing: Join with wrought copper pressure fittings, ANSI B16.22. Make joints using "lead free" solder
and a non-corrosive, paste-type flux. Core solder is not permitted. Solder shall be solid string or wire type.
Where soldered copper piping is connected to threaded brass piping, use cast brass adaptor.
3.
At Contractor’s option, in lieu of a soldered copper piping system as specified above, any of the following
copper pipe assembly systems may be used.
a.
CTS Copper Grooved Piping System by Victaulic Company of America: Copper tubing systems
from 2” through 8” shall be installed using mechanical pipe couplings of a bolted type, with
pressure-responsive gaskets and grooved end copper or bronze fittings. The CTS System shall
include the following components:
1.
Copper Tube: Type "L" hard drawn, seamless copper water tube, ASTM B88.
2.
Mechanical Couplings: Style 606 rigid couplings 2 inch – 8 inch for copper consisting of a
ductile iron cast housing, a synthetic rubber gasket of a pressure-responsive design, with
plated nuts and bolts to secure unit together.
3.
Coupling Housings: Ductile iron conforming to ASTM A536, Grade 65-45-12, with a copper
color alkyd enamel paint coating.
4.
Gaskets: Molded of Grade “E” EPDM synthetic rubber, conforming to ASTM D2000,
designation 2CA615A25B24F17Z, and recommended for potable water service within the
specified temperature range of –30 to +230 degrees F. Gaskets shall conform to the copper
tube size (CTS) outside diameter and coupling housing inside diameter.
5.
Flange Adapters: Style 641 adapters 2”-6”, ductile iron ASTM A536, Grade 65-45-12,
15100-2
0893 Lindsay, OK
11/23/10
4.
engaging directly into roll grooved copper tube and fittings and bolting directly to ANSI
Class 125 cast iron and Class 150 steel flanged components; installer shall provide standard
flange bolts.
6.
Fittings: Full flow copper fittings with grooves designed to accept Victaulic grooved end
couplings. Fittings shall be copper per ASTM B75 alloy C12200; or bronze sand castings
per ASTM B584 copper alloy CDA 844 (81-3-7-9) per ANSI B16.18. Use Style 47
dielectric waterways when connecting dissimilar metals in liquid systems.
7.
Valves: Series 608 Butterfly valves, 2-1/2” - 6”, 300 psi, with grooved ends, cast bronze
body to CDA-836 (85-5-5-5), rubber encapsulated ductile iron disc, ASTM A536, Grade 6545-12. Bubble tight, dead-end or bi-directional service as required.
b.
ProPress copper pipe fitting system by Viega.
c.
Mechanically formed tee fitting system by T-Drill Industries in accordance with ASTM F 2014.
1.
Joints shall be installed (brazed) in compliance with code and the manufacturer's instructions.
2.
Soft solder joints shall not be used.
Assembly and Quality Assurance
a.
Contractor shall be a certified installer of any of the optional copper piping assembly systems used.
b.
The piping system manufacturer shall certify that the piping system is installed in accordance with its
recommendations.
B.
Water Piping Below Grade (Under Slab):
1.
1-1/2 Inches and Smaller:
a.
Crosslinked PE (PEX) tubing, ASTM F876 without joints beneath the slab.
b.
Type ‘K’ soft coper without joints beneath slab.
2.
2 Inches and Larger: Type K hard drawn with brazed fittings.
C.
Chrome-Plated Seamless Brass Tube: ASTM B135.
D.
Insulation:
1.
Manufacturers: Subject to compliance with requirements, provide insulation as manufactured by one of the
following:
a.
CertainTeed.
b.
Imcoa (Nomaco K-Flex).
c.
Knauf.
d.
Owens-Corning.
e.
Johns Manville.
f.
Armacell.
2.
Provide one of the following types of insulation throughout the project:
a.
Rigid Glass Fiber: Type ASJ/SSL, maximum k factor at 75 degrees F of 0.23 Btu-in/hr.f.sq ft, 3
lb/cu.ft density. Vapor barrier jacket shall be white kraft paper with glass fiber yarn, bonded to
aluminized film conforming to ASTM C921, with a maximum moisture vapor transmission rate of
0.02 perm-inch in accordance with ASTM E96. Insulate fittings with PVC covers with glass fiber
inserts.
b.
Polymer Foam Insulation: Arctictherm by Imcoa or equal. Maximum k factor at 75 degrees F of
0.25 Btu-in/hr.f.sq ft, 1.5 lbs/cu. ft. density, maximum flame spread and smoke development of 25
and 50, respectively per ASTM E84. Insulate fittings with pre-formed foam covers.
c.
Elastomeric Flexible Closed Cell Insulation: AP Armaflex W (white) by Armacell or equal.
Maximum k factor at 75 degrees F of 0.28 Btu-in/hr.f.sq ft, maximum flame spread and smoke
development of 25 and 50, respectively. Insulate fittings per manufacturer's recommendations.
3.
Insulation Color: White.
4.
Insulation Thickness: Provide minimum insulation thickness for water piping in compliance with ASHRAE
90.1 and the following:
a.
Hot Water:
1.
Branch runouts up to 2” in diameter and less than 12 feet in length: 1/2” insulation.
2.
Pipes 2” in diameter and less: 1” insulation.
3.
Pipes 2-1/2” to 4”: 1-1/2” insulation.
b.
Cold Water: 1/2" insulation.
15100-3
0893 Lindsay, OK
11/23/10
2.2
SANITARY WASTE AND VENT PIPING
A.
Soil, Waste, and Vent Piping: Provide any of the following as applicable:
1.
Cast Iron: Cast iron soil pipe and fittings, coated inside and outside, ASTM A74 or ASTM A888. Provide
weight of pipe as required by code for location and duty.
2.
Ductile-Iron Pipe: AWWA C151 or AWWA C115 ductile-iron pipe, with AWWA C104 cement-mortar
lining.
3.
PVC Pipe: May be used for sanitary drainage pipes (drain, waste, and vent) where permitted by Authority
Having Jurisdiction.
a.
Solid-Wall PVC Pipe: ASTM D2665, drain, waste, and vent. Cellular (foam) core PVC not
permitted.
b.
PVC Socket Fittings, ASTM D2665, made to ASTM D3311, drain, waste, and vent patterns.
4.
Copper Drainage Tubing (Above grade only): Copper drainage tubing conforming to ASTM B306.
5.
ABS Pipe; Not permitted.
B.
Joints:
1.
Cast Iron Pipe: Push-on compression gasketed type joint for hub and spigot, ASTM C564. No-hub
mechanical joints with center stops, ASTM 1277 or ASTM C1540.
2.
PVC Pipe: Solvent-welded joints.
3.
Copper Drainage Tubing: Join with wrought copper pressure fittings, ANSI B16.22. Make joints using
"lead free" solder and a non-corrosive paste type flux. Core solder shall not be used. Solder shall be solid
string or wire type.
C.
Traps:
1.
Provide deep seal P-traps for floor drains, including drains furnished as integral parts of floor-type mop
basins, and similar fixtures.
2.3
DRAINS, CLEANOUTS, HOSE BIBBS, AND HYDRANTS
A.
2.4
Subject to compliance with Project requirements, provide drains, cleanouts, hose bibbs, and hydrants of
manufacturers, types, and model numbers as scheduled on the Drawings.
WATER PIPING SPECIALTIES
A.
2.5
Subject to compliance with Project requirements, provide piping specialties of manufacturers, types, and model
numbers as indicated on the Plumbing Schedules on the Drawings. Water piping specialties shall include such
items as hose bibbs, hydrants, valves, backflow preventers, vacuum breakers, mixing valves, pressure reducing
(regulating) valves, expansion tanks, water hammer arresters, trap primers, and accessories therefor.
DRAINAGE PIPING SPECIALTIES
A.
2.6
Subject to compliance with Project requirements, provide piping specialties of manufacturers, types, and model
numbers as indicated on the Plumbing Schedules on the Drawings. Drainage piping specialties shall include floor
drains, deck drains, cleanouts, and accessories therefor.
SPECIALITY PLUMBING FIXTURES
A.
2.7
Subject to compliance with Project requirements, provide specialty plumbing fixtures of manufacturers, types, and
model numbers as scheduled on the Drawings.
PIPE FREEZE PROTECTION
A.
Pipe freeze protection system shall include the following:
1.
Parallel circuit heating cable.
2.
Transformers.
3.
Outdoor ambient thermostat.
15100-4
0893 Lindsay, OK
11/23/10
4.
5.
6.
B.
Junction boxes.
Branch circuit wiring and conduit as specified in Section 16100.
Other items as necessary to complete system.
Components:
1.
Heating Cable: Parallel circuit, jacketed cable, self-limiting, 120 volt. Provide XL-Trace as manufactured
by Raychem or equal by Chemelex.
a.
Provide minimum 5 watts per lineal foot (or more) as required for specified piping and insulation per
manufacturer's published instructions.
b.
Provide termination fittings for direct connection to junction boxes.
2.
Junction Boxes: NEMA 5 watertight..
3.
Outdoor Ambient Thermostat: Provide thermostat with adjustable contacts. Set contacts to close at 40
degrees F on decreasing temperature.
PART 3 - EXECUTION
3.1
PIPING INSTALLATION
A.
Install piping neatly and parallel with, or perpendicular to, lines of the structure. Install pipe hangers as specified
in Section 15050 to maintain accurately aligned piping systems, adequately supported both laterally and vertically.
B.
Provide Schedule 40 steel pipe sleeve, minimum of one size larger than the protected pipe, for underground piping
routed beneath structural footings. Extend sleeve 24 inches in both directions beyond the footing.
C.
Where practical, connect two or more vents together and extend as one vent through roof. Make vent connections
to stacks by appropriate use of 45 degree wyes, long sweep quarter bends, sixth, eighth, or sixteenth bends, except
that sanitary tees may be used on the vertical stacks.
D.
Extend vent piping 12 inches above roof line or more if required by Authority Having Jurisdiction. Coordinate
installation with roofing.
E.
Conceal piping in chases, interior walls, furred spaces, and above ceiling.
F.
Identify nonpotable water systems by color markings or metal tags in accordance with ASME A13.1.
G.
Make piping connections to fixtures and equipment with chrome-plated seamless brass tube with cleanout plug and
escutcheon.
H.
For items to be installed on split face CMU, grind surface of CMU to a smooth finish for tight installation. Seal
with silicone sealant in accordance with Section 07900.
3.2
PIPING INSULATION - INSTALLATION
A.
3.3
Domestic Hot and Cold Water Lines: Insulate lines above slab. Do not insulate Reverse Osmosis piping.
WATER PIPING SPECIALTIES INSTALLATION
A.
Install backflow preventers in each water supply to mechanical equipment and systems and to other equipment
where shown and water systems that may be sources of contamination. Comply with authorities having
jurisdiction.
1.
Locate backflow preventers in same room as connected equipment or system.
2.
Install drain for backflow preventers with atmospheric-vent drain connection with air-gap fitting, fixed airgap fitting, or equivalent positive pipe separation of at least two pipe diameters in drain piping and pipe to
floor drain. Locate air-gap device attached to or under backflow preventer. Simple air breaks are not
acceptable for this application.
3.
Do not install bypass piping around backflow preventers.
15100-5
0893 Lindsay, OK
11/23/10
B.
Install water regulators with inlet and outlet shutoff valves. Install pressure gages on inlet and outlet.
C.
Install balancing valves in locations where they can easily be adjusted.
D.
Install temperature-actuated water mixing valves with check stops or shutoff valves on inlets and with shutoff valve
on outlet.
1.
Install thermometers and water regulators if specified.
2.
Install cabinet-type units recessed in or surface mounted on wall as specified.
E.
Install Y-pattern strainers for water on supply side of each control valves and pressure-reducing valves.
F.
Install water hammer arresters in water piping according to PDI-WH 201.
G.
Install supply-type, trap-seal primer valves with outlet piping pitched down toward drain trap a minimum of
1 percent, and connect to floor-drain body, trap, or inlet fitting. Adjust valve for proper flow.
H.
Drawings indicate general arrangement of piping and specialties.
I.
Equipment Nameplates and Signs: Install engraved plastic-laminate equipment nameplate or sign on or near each
of the following:
1.
Intermediate atmospheric-vent backflow preventers.
2.
Reduced-pressure-principle backflow preventers.
3.
Double-check backflow-prevention assemblies.
4.
Water pressure-reducing valves.
5.
Primary, thermostatic, water mixing valves.
6.
Supply-type, trap-seal primer valves.
J.
Distinguish among multiple units, inform operator of operational requirements, indicate safety and emergency
precautions, and warn of hazards and improper operations, in addition to identifying unit.
3.4
DRAIN PIPING SPECIALTIES INSTALLATION
A.
Install backwater valves in building drain piping. For interior installation, provide cleanout deck plate flush with
floor and centered over backwater valve cover, and of adequate size to remove valve cover for servicing.
B.
For floor cleanouts for piping below floors, install cleanout deck plates with top flush with finished floor.
C.
For cleanouts located in concealed piping, install cleanout wall access covers, of types indicated, with frame and
cover flush with finished wall.
D.
Install floor drains at low points of surface areas to be drained. Set grates of drains flush with finished floor, unless
otherwise indicated.
1.
Position floor drains for easy access and maintenance. Set floor drains below elevation of surrounding
finished floor to allow floor drainage.
2.
Install floor-drain flashing collar or flange so no leakage occurs between drain and adjoining flooring.
Maintain integrity of waterproof membranes where penetrated.
3.
Install individual traps for floor drains connected to sanitary building drain, unless otherwise indicated.
E.
Install deep-seal traps on floor drains and other waste outlets, if indicated.
F.
Install floor-drain, trap-seal primer fittings on inlet to floor drains that require trap-seal primer connection.
1.
Exception: Fitting may be omitted if trap has trap-seal primer connection.
2.
Size: Same as floor drain inlet.
G.
Install air-gap fittings on draining-type backflow preventers and on indirect-waste piping discharge into sanitary
drainage system.
15100-6
0893 Lindsay, OK
11/23/10
H.
Install traps on plumbing specialty drain outlets. Omit traps on indirect wastes unless trap is indicated.
I.
Install escutcheons at wall, floor, and ceiling penetrations in exposed finished locations and within cabinets and
millwork. Use deep-pattern escutcheons if required to conceal protruding pipe fittings.
3.5
PIPE FREEZE PROTECTION
A.
Install heating cable at locations shown on drawings for pipe freeze protection.
B.
Cut heating cable to length required for pipe lengths and watt per foot requirements. Secure to pipe and install in
accordance with manufacturer's published instructions.
3.6
PIPE TESTS
A.
Test underground piping prior to backfilling and before installing equipment and before insulation is applied, using
specified methods and conditions. Subject piping to test for not less than 24 hours. Make necessary replacements
or repairs and repeat tests until entire system, including equipment, is accepted as satisfactory.
B.
Install equipment, operate systems, clean out scale, dirt, oil, waste, and foreign matter, and correct additional leaks.
C.
Test plumbing drainage systems under 10 foot static head for a period of not less than 24 hours. Test water
systems under 150 psig hydrostatic pressure.
D.
Sterilize domestic water system to meet Authority Having Jurisdiction requirements. Flush system thoroughly of
dirt and foreign matter, then fill with water treated with 50 ppm of chlorine. During filling process, open valves
and faucets several times to assure treatment of entire system. Post warning signs at outlets. Leave treated water in
system for 24 hours after which time system may be flushed; if residual chlorine is not less than 10 ppm, repeat
flushing. After sterilization, receive approval by Authority Having Jurisdiction on samples of water in system.
3.7
CLEANING AND DISINFECTION
A.
Clean and disinfect potable domestic water piping as follows:
1.
Purge new piping and parts of existing piping that have been altered, extended, or repaired before using.
2.
Use purging and disinfecting procedures prescribed by authorities having jurisdiction. If methods are not
prescribed, use procedures described in AWWA C651 or follow procedures described as follows:
a.
Flush piping system with clean, potable water until dirty water does not appear at outlets.
b.
Fill and isolate system according to either of the following:
1.
Fill system or part thereof with water/chlorine solution with at least 50 ppm of chlorine.
Isolate with valves and allow to stand for 24 hours.
2.
Fill system or part thereof with water/chlorine solution with at least 200 ppm of chlorine.
Isolate and allow to stand for three hours.
c.
After the standing time, flush system with clean, potable water until no chlorine is in water coming
from system.
B.
Submit water samples in sterile bottles to authorities having jurisdiction.
examination shows contamination.
C.
Reports: Prepare disinfection reports signed by the authority having jurisdiction and submit to the Architect upon
completion of the project.
3.8
Repeat procedures if biological
UNDERGROUND PIPING VIDEO INSPECTION (AT THE DISCRETION OF THE WALMART
CONSTRUCTION MANAGER)
A.
General: Perform video inspection of new underground sewer piping both outside the building through the mains
and inside the building and through the single takeoff to each fixture.
15100-7
0893 Lindsay, OK
11/23/10
B.
When there are problems with existing sewer piping, perform video inspection of existing sewer piping and
coordinate repair of deficiencies with Walmart Construction Manager. An equitable adjustment will be made in
the contract price for additional work directed and performed.
C.
Contractor Qualifications: Inspection shall be conducted by a Contractor who has at least 2 years experience in the
specific work involved.
D.
Certification: Provide statement of certification of the following:
1.
Verification of video inspection contractor qualifications.
2.
Statement of completion that the work is in accordance with the specified requirements.
3.
Name and signature of the General Contractor.
4.
Names and signatures of the video inspection subcontractor.
E.
Video Taping Requirements:
1.
Video camera designed for express purpose of sewer line inspection.
2.
Camera and apparatus capable of extending to all points of piping required within 2 inch to 8 inch diameter
pipe.
3.
Video taping with recording on-screen distance counter.
4.
Taping shall include expert narrative of situations encountered which may be associated with improper
installation or operation of the sewer. Audio commentary shall include time and date, location description
in an on-to-from format, size of sewer, direction of flow, and video tape identification number.
5.
Taping shall produce clear, sharp, images in VHS or CD-ROM format.
6.
Tape shall identify date, time, and precise location of taping operations. Tape shall reveal evidence of
surrounding area around each entry point.
F.
Procedure:
1.
Inspect sewer pipes with video camera no earlier than 30 days after floor slab has been poured. Sections of
sewer determined to be deficient shall be uncovered and repaired or replaced to satisfaction of Owner.
Retest repaired section.
2.
Adequately flush and clean sewer piping prior to video inspection
3.
Provide additional video inspection at contractor's expense if there are clogging problems within the first
year warranty and if requested by owner.
G.
Report :
1.
Provide summary report of pipes inspected and defects noted. Report shall be in MS Word format. The log
shall show the exact measure location of faults such as, but not limited to:
a.
Open joints
b.
Broken, cracked or collapsed pipe
c.
Accumulation of debris or obstructions
d.
Evidence of infiltration
e.
Water depth variation and sags
f.
Protrusions
2.
The reference location shall include the distance away from the reference point of entry such as manhole or
cleanout and the position of the fault as to the bottom, top or side of the pipe. Significant faults are to
warrant audio commentary on the video tape duplicating report information. Stop the camera briefly at
these locations.
3.
Furnish one copy of the final report with one copy of video tapes to the Walmart Construction Manager
within one week after completion of the inspection.
4.
Video tapes shall be numbered and cross indexed to the report. Report shall be bound.
5.
Provide plan of piping network covered with notations and identification of corresponding tape.
3.9
ADJUSTING
A.
Set field-adjustable pressure set points of water pressure-reducing valves.
B.
Set field-adjustable flow of balancing valves.
15100-8
0893 Lindsay, OK
11/23/10
C.
3.10
Set field-adjustable temperature set points of temperature-actuated water mixing valves.
PROTECTION
A.
Protect drains during remainder of construction period to avoid clogging with dirt or debris and to prevent damage
from traffic or construction work.
B.
Place plugs in ends of uncompleted piping at end of each day or when work stops.
END OF SECTION
15100-9
0893 Lindsay, OK
11/23/10
UniSpec II - Store Planning
103009
SECTION 15410 - PLUMBING FIXTURES
PART 1 - GENERAL
1.1
SUMMARY
A.
Section Includes:
1.
Plumbing fixtures.
2.
Plumbing fixture trim.
B.
Related Sections:
1.
Section 01600 - Product Requirements: Requirements for Pre-Negotiated Suppliers.
2.
Section 01770 - Contract Closeout: Operation and maintenance data requirements.
3.
Section 07900 - Joint Sealers: Sealant for fixtures at wall and floors.
1.2
REFERENCES
A.
The publications listed below form a part of this specification to the extent referenced. Publications are referenced
within the text by the basic designation only.
B.
American Society of Mechanical Engineers (ASME):
1.
ASME /ANSI A112.18.1 - Plumbing Fixture Fittings.
1.3
SUBMITTALS
A.
Section 01770 - Contract Closeout: Procedures for Closeout Submittals.
B.
Closeout Submittals:
1.
Operation and Maintenance Data: Include manufacturer's descriptive literature, operating instructions,
maintenance and repair data, and parts listing for plumbing fixtures.
1.4
QUALITY ASSURANCE
A.
1.5
Regulatory Requirements:
1.
Products Requiring Electrical Connection: Listed and classified by Underwriter's Laboratories, Incorporated, and acceptable to the Authority Having Jurisdiction as suitable for the purpose specified and indicated.
2.
Disabled Access: Conform to applicable local, State or Federal disabled access requirements for the installation, mounting heights, and operation of plumbing fixture.
DELIVERY, STORAGE, AND HANDLING
A.
Section 01600 – Product Requirements: Transport, handle, store, and protect products.
B.
Accept fixtures on site in factory packaging. Inspect for damage.
C.
Protect installed fixtures from damage by securing areas and by factory packaging in place to protect fixtures and
prevent use.
15410-1
0893 Lindsay, OK
11/23/10
PART 2 - PRODUCTS
2.1
PLUMBING FIXTURES (CUSTOMER RESTROOMS)
A.
2.2
All plumbing fixtures and trim, including hose bibb, as applicable to public and single toilets as shown on the Mechanical Drawings and Plumbing Fixture Schedules shall be purchased by the GC direct from a pre-negotiated
supplier as follows:
1.
Pre-Negotiated Supplier Contact: Customer Service; Haines, Jones & Cadbury, phone (800) 459-7099, fax
(479) 756-8998, E-mail [email protected].
PLUMBING FIXTURES (NON-CUSTOMER RESTROOMS)
A.
2.3
All plumbing fixtures and trim, including hose bibb, as applicable to toilets as shown on the Mechanical Drawings
and Plumbing Fixture Schedules shall be purchased by the GC direct from a pre-negotiated supplier as follows:
1.
Pre-Negotiated Supplier Contact: Customer Service; Haines, Jones & Cadbury, phone (800) 459-7099, fax
(479) 756-8998, E-mail [email protected].
MANUFACTURERS
A.
2.4
Subject to compliance with Project requirements, provide plumbing fixtures of manufacturers indicated on Drawings.
FIXTURES
A.
Fixture types and model numbers shall be as scheduled on the drawings.
B.
Substitutions: Not permitted.
2.5
FIXTURE TRIM
A.
Provide each fixture complete with required trim. Exposed piping and trim shall be polished chrome-plated brass.
Provide each fixture with chrome angle stop valves.
B.
Provide flow-limiting device which limits flow to not more than 2.2 gpm for each sink except service and 3compartment sinks. Provide devices integral with fixture trim, wherever possible, and products of same manufacturer as fixture trim.
C.
Lavatory faucets for public use or within public restrooms shall be of the electronic self-closing type and shall
have a maximum flow rate of 0.5 GPM in accordance with ASME/ANSI A112.18.1. Provide devices integral with
fixture trim, wherever possible, and products of same manufacturer as fixture trim.
D.
Flush Valves: Subject to compliance and compatible with plumbing fixtures as scheduled on the drawings. Provide flush valves that do not exceed code requirements for maximum gallons per flush.
E.
Interior Escutcheons: Polished chrome-plated, wall flange with set screw.
F.
Exterior Escutcheons: 304 Stainless Steel, wall flange.
G.
Provide trim as required to permit scheduled lavatory to be installed for handicap use.
H.
Provide bolt caps with retainer clips on water closets.
15410-2
0893 Lindsay, OK
11/23/10
PART 3 - EXECUTION
3.1
EXAMINATION
A.
3.2
Examine surfaces and adjacent areas where products will be installed. Verify that conditions conform to product
manufacturer's requirements and installation conditions. Do not proceed until unsatisfactory conditions have been
corrected.
1.
Verify that walls and floor finishes are prepared and ready for installation of fixtures.
2.
Verify that plumbing piping for fixture is in the correct location and of the correct type.
PREPARATION
A.
3.3
Rough-in fixture piping connections in accordance with minimum sizes indicated on Drawings for particular fixtures.
INSTALLATION
A.
Install fixtures and trim in accordance with manufacturer's published instructions. Make final connections.
B.
Support each fixture in rigid manner which permits no perceptible movement of fixture by manually applied forces. Seal space between fixtures and floor or walls with silicone sealant.
C.
Install each fixture with trap which is easily removable for servicing and cleaning.
D.
Install components level and plumb. Install toilet seats on water closets.
E.
Install and secure fixtures in place with carriers and bolts.
F.
Solidly attach water closets to floor or wall as required.
G.
Seal fixtures to wall and floor surfaces with sealant as specified in Section 07900, color to match fixture.
3.4
FIELD QUALITY CONTROL
A.
3.5
Inspect plumbing fixture and trim installation, attachment to building, operation, and connections. Ensure that fixtures are installed and operate in conformance with disabled access requirements.
1.
Prior to final acceptance, inspect faucets, flush valves, stop valves, and similar devices, to determine that
they operate properly and discharge proper quantities of water. Correct any deficiencies as directed by
Owner's representative.
ADJUSTING AND CLEANING
A.
Operate and adjust stops or valves for intended water flow rate to fixtures without splashing, noise or overflow.
1.
Replace malfunctioning units.
2.
Replace washers and seals of leaking and dripping faucets and stops.
B.
Clean fixtures, trim, and accessories of foreign materials, including labels, before final acceptance.
END OF SECTION
15410-3
0893 Lindsay, OK
11/23/10
UniSpec II - Store Planning
122608
SECTION 15800 - AIR DISTRIBUTION
PART 1 - GENERAL
1.1
SUMMARY
A.
Section Includes:
1.
Ductwork, dampers, inlets and outlets for HVAC systems.
B.
Related Sections:
1.
Section 08311 - Access Doors and Frames.
2.
Section 01455 - Mechanical Equipment Testing, Adjusting, and Balancing: Testing and balance of HVAC
systems.
1.2
REFERENCES
A.
The publications listed below form a part of this specification to the extent referenced. Publications are referenced
within the text by the basic designation only.
B.
The publications listed below form a part of this specification to the extent referenced. Publications are referenced
within the text by the basic designation only.
C.
Air Movement and Control Association (AMCA):
1.
AMCA 500 – Test Methods for Louvers, Dampers And Shutters
D.
ASTM International (ASTM):
1.
ASTM A653 - Steel Sheet, Zinc-Coated (Galvanized), or Zinc-Iron Alloy-Coated (Galvannealed) by the
Hot Dip Process.
2.
ASTM C553 - Mineral Fiber Blanket Thermal Insulation for Commercial and Industrial Applications
3.
ASTM C1071 - Thermal and Acoustical Insulation (Mineral Fiber, Dust Lining Material.
4.
ASTM C1136 - Flexible, Low Permeance Vapor Retarders for Thermal Insulation
5.
ASTM E84 - Surface Burning Characteristics of Building Materials.
6.
ASTM E119 - Fire Tests of Building Construction and Materials.
E.
National Fire Protection Association (NFPA):
1.
NFPA 90A - Installation of Air Conditioning and Ventilating Systems.
2.
NFPA 96 - Ventilation Control And Fire Protection Of Commercial Cooking Operations
F.
Sheet Metal Air Conditioning Contractors National Association (SMACNA):
1.
SMACNA 1035 - HVAC Duct Construction Standards - Metal & Flexible
G.
British Standards Institution (BSI):
1.
BS 302 - Stranded Steel Wire Ropes.
1.3
QUALITY ASSURANCE
A.
1.4
Comply with NFPA 90A unless otherwise indicated.
SCHEDULING
A.
Schedule testing and balancing in accordance Section 01455 after completion of system start-up requirements.
15800-1
0893 Lindsay, OK
11/23/10
1.5
WARRANTY
A.
Warrant new and modified ductwork for period of one year from date of final acceptance of job, against noise and
vibration under full range of operating conditions.
PART 2 PRODUCTS
2.1
SHEET METAL DUCTWORK
A.
Sheet Metal Ductwork: Continuous hot-dip mill galvanized, minimum coating of G90, lock-forming quality steel
sheets, in accordance with ASTM A653.
B.
Gages: Sheet metal gage as specified in SMACNA 1035 but not less than the following.
1.
Rectangular Duct: 26 gage for all sizes.
2.
Round Duct: Prime grade steel sheets, by United Sheet Metal Co. Inc. or equivalent.
a.
14 inch diameter and smaller: 26 gage.
b.
15 inch diameter and larger: 24 gage.
C.
Round ductwork shall be spiral seam where exposed and not insulated on sales floor area and spiral or longitudinal
seam in all other areas.
D.
Ductwork connections for round duct may be made using SpiralMate self-sealing duct connection system by
Ductmate Industries (800) 245-3188.
2.2
DUCTWORK INSULATION
A.
Manufacturers:
1.
CertainTeed.
2.
Knauf.
3.
Schuller (Manville).
4.
Owens/Corning.
B.
Substitutions: Not permitted.
C.
Duct Liner: ASTM C1071.
1.
Material fibers shall be bonded with thermosetting resin, with smooth air stream surface.
2.
Maximum flame spread rating of 25, ASTM E84
3.
Maximum smoke developed rating of 50, ASTM E84
4.
Density: 2 lb. per cu.ft. with following minimum R-values at 75 degrees F.
a.
1/2 inch thick liner: R=3.3.
b.
1 inch thick liner: R=3.7.
c.
1 1/2 inch thick liner: R=5.6.
d.
2 inch thick liner: R=7.4
D.
Duct Wrap: ASTM C553.
1.
Material Facing: Type II FSK or vinyl, ASTM C1136
2.
Maximum flame spread rating: 25, ASTM E84.
3.
Maximum smoke developed rating: 50, ASTM E84.
4.
Density: 1 lb. per cu.ft. with following minimum R-values at 75 degrees F.
a.
2 inch thick duct wrap: R=7.4 (minimum out-of-package value), R=6.0 (minimum installed value).
2.3
SELF-SEALING SPIRAL DUCTWORK SYSTEM (CONTRACTOR OPTION)
A.
General:
1.
At the option of the Contractor, self-sealing ductwork system may be used in lieu of round built-up system.
2.
Meet or exceed SMACNA's Leakage Class 3 requirements with no additional sealants.
15800-2
0893 Lindsay, OK
11/23/10
B.
Manufacturer:
1.
Lindab Inc., Stamford, CT (800) 797-7476.
C.
Round Spiral Sheet Metal Ductwork System:
1.
SPIROsafe as manufactured by Lindab, Inc.
2.
Duct: Galvanized, minimum coating designation of G90, lock-forming quality steel sheets, in accordance
with ASTM A653.
3.
Substitutions: Not permitted.
D.
Fittings:
1.
SPIROsafe as manufactured by Lindab, Inc.
2.
End gaskets EPDM rubber, factory installed, U-profile, double lipped.
E.
Control Dampers: SPIROsafe DSU as manufactured by Lindab, Inc.
F.
Supply Grilles: SPIROcomfort RGS-3 as manufactured by Lindab, Inc.
2.4
VOLUME CONTROL DAMPERS
A.
Manual Dampers: Provide manual volume-control dampers where indicated and of the type and model number as
scheduled on the drawings. Frame and blades shall be galvanized steel. Provide ceiling doors where required in
accordance with Section 08311.
1.
Manufacturers: Provide dampers by one of the following:
a.
A.E.S. Inc, East Tallassee, AL, Contact: Chad Burt (800) 786-0402.
b.
Sisneros Brothers Mfg, Contact: Joshua Gallegos (800) 499-0106.
c.
Ruskin Company, Kansas City, MO, (816) 761-7476.
2.
Round Dampers: Dampers shall have end bearings and center locking control handle with position
indicator. Control handle shall be Durodyne KL-7R or Ventlok 639. Provide 2-inch extension to protect
insulation.
3.
Rectangular Dampers: Dampers shall have single blade or multiple inter-locked opposed blades with shaft
bearings, 3/8 inch square control shaft and center locking control handle. Control handle shall be Durodyne
KL7 or Ventlok 639.
B.
Field fabricated dampers shall not be used.
C.
Substitutions: Not permitted unless otherwise specified.
2.5
AIR INLETS AND OUTLETS
A.
2.6
Grilles, registers, ceiling outlets, and ceiling inlets shall be as indicated on Drawings. Wall mounted and hard
ceiling mounted air inlets and outlets shall be provided with heavy-duty sponge or soft felt gaskets.
DROP BOX DIFFUSERS (OWNER FURNISHED - CONTRACTOR INSTALLED)
A.
Manufacturer: Walmart supplier for drop box diffusers will be as follows
1.
AES Industries, Tallassee, AL, Contact: Chad Burt (800) 786-0402.
B.
General Description: Drop boxes will be constructed of 18 gage galvannealed/galvanized (paintable) steel sheet
conforming to ASTM A 653, min. A60 coating designation, with integral 18 gage minimum air diverters. Drop
boxes shall be fully welded. Mechanical fastened seams shall not be used. Diffusers shall be fully adjustable
double deflection drum louvers. Base louver in 6-way box shall be double deflection with opposed blade dampers.
Provide air tight gaskets at louver connections to drop box. Drop boxes shall be insulated with 1” x 1.5 lb density
duct liner glued with 100% coverage of adhesive and pin spotted to all interior surfaces per SMACNA. Provide 14
gage mounting brackets, 2”x 2”x 1/4” pre-punched angles, 3/8” all thread rod, beam clamps, and additional nuts
and washers.
15800-3
0893 Lindsay, OK
11/23/10
C.
Accessory Package: Manufacturer shall provide mounting accessory package for each drop box consisting of the
following:
1.
2" x 2" x 1/4" pre-punched angles (or Unistrut).
2.
3/8" all thread rod (pre-cut).
3.
Beam clamps.
4.
All bolts, nuts and washers.
D.
6-Way Drop Box Performance Criteria:
6-Way Diffuser - Louver Schedule
Unit
Size
Box
Type
Total CFM
Drum Louver Size
Base Louver Size
Minimum Throw (ft)
5 Ton
6-way
2000
6 x 12
None
33
10 Ton
6-way
4000
6 x 18
None
47
20 Ton
6-way
6000 -7000
10 x 25
6 x 18
61
25 Ton
6-way
8000 - 10000
12 x 30
6 x 18
74
Base louver in 6-way box shall be double deflection with opposed blade dampers. Provide air tight gaskets at
louver connections to drop box.
E.
Finish: Prime and finish coat in the shop. Paint exposed screws and fasteners to match drop box. Finish coating
shall be color to match Sherwin-Williams #SW6385 “Dover White” .
1.
Alkyd Primer: One coat PPG Multigrip Epoxy Ester Dry Fog #6-157.
2.
Alkyd Finish: One coat PPG Speedhide Super-Tech Dry Fog Coating, Eggshell # 6-151.
F.
Identification: Paint RTU number in black 6” letters on the bottom of each drop box.
2.7
DUCT SEALERS
A.
Manufacturer: Provide duct sealers of one of the following:
1.
Kingco 11376 or 10526.
2.
Ductmate PROseal.
3.
United McGill Duct-Sealer.
4.
Trans-Continental Equipment Co. - Multipurpose Duct Sealant.
5.
Hardcast #601 Iron-Grip.
6.
Hardcast Aluma-Grip Tape.
B.
Substitutions: Not permitted.
2.8
WIRE ROPE HANGER SYSTEMS (CONTRACTOR OPTION).
A.
General: At the option of the Contractor, wire rope hanger system for ductwork may be used in lieu of
conventional hangers.
B.
Manufacturer: Gripple Limited, Sheffield, United Kingdom. U. S. Distributor: One of the following:
1.
Ductmate Industries, E. Monongahela, PA, (800) 245-3188
2.
Gripple, Inc., Batavia, IL. (630) 208- 0111.
C.
Product: Gripple Hang-Fast Wire Rope Hanging System
1.
Substitutions: Not permitted.
D.
Wire Rope
1.
Galvanized steel wire rope conforming to BSI BS 302.
2.
Standard lengths of 5, 10, 15 and 30 feet with a preformed loop at one end.
15800-4
0893 Lindsay, OK
11/23/10
E.
Locking Mechanism:
1.
Zinc housing with Type 302 S26 stainless steel springs along with oil impregnated steel locking wedges.
PART 3 EXECUTION
3.1
FABRICATION
A.
Fabrication requirements apply to new and modified ductwork.
B.
Fabricate, erect, and install ductwork for heating, ventilating, and air conditioning systems per SMACNA 1035 and
the requirements of the Authority Having Jurisdiction.
C.
Make joints air tight on supply, return, and exhaust ducts. Seal transverse and longitudinal joints with duct sealer
unless otherwise noted. Seal exhaust ducts with exterior seal as required to assure positive seal.
3.2
DUCT INSULATION
A.
Insulate ducts in accordance with SMACNA 1035. Do not insulate exhaust ductwork unless otherwise shown or
specified.
B.
Rectangular Duct:
1.
Supply duct and air plenums: 1-1/2 inch liner.
2.
Return duct and air boots: 1-1/2 inch liner.
C.
Round Duct: Insulate the following with 2-inch wrap. Overlap facing and staple securely.
1.
Supply and return duct in receiving areas.
2.
Supply and return duct above finished ceilings.
3.3
AIR INLETS AND OUTLETS
A.
Locations of outlets indicated on Drawings are approximate. Coordinate with other trades to make symmetrical
patterns. Determine locations by established pattern of lighting fixtures, or architectural reflected ceiling plan.
B.
Install fire radiation dampers and other devices at air inlets and outlets where required by codes and regulations of
governing authorities. Dampers shall be UL labeled, constructed and installed in accordance with NFPA 90A and
UL instructions.
3.4
DROP BOX DIFFUSERS
A.
Install drop boxes in accordance with the manufacturer’s installation instructions and as detailed on the drawings.
B.
Provide duct transitions and return air plenums as required to complete the installation of drop boxes. Insulate duct
transitions with 1” x 1.5 lb density duct liner glued and spot welded to interior surfaces.
C.
Labeling: Contractor shall label drop box diffusers by painting the appropriate RTU number in black 6” letters on
the bottom of each drop box.
3.5
DUCT SUPPORTS
A.
Duct support requirements apply to new and modified ductwork.
B.
Support horizontal and vertical sheet metal duct work in accordance with Schedule I or II at the end of this section.
C.
Wire Rope Hanger System (Gripple Hang-Fast) (Contractor Option).
1.
Comply with SMACNA 1035, Duct Construction Standards (DCS) with the following exceptions.
a.
Use is not restricted to the SMACNA DCS diametrical limits for single wires.
15800-5
0893 Lindsay, OK
11/23/10
2.
b.
Wire rope system shall not be used for hanging risers nor for two-tier trapeze hanging method.
Provide stress distribution saddles as required when a single wire rope is passed continuously under round
and rectangular duct as required to retain duct shape
D.
Do not use fasteners which penetrate roof deck.
E.
Provide sway bracing to comply with seismic requirements per local codes and Authority Having Jurisdiction.
F.
Install approved fire dampers in air ducts or air inlets and outlets where required by codes and regulations of
governing authorities. Install access doors in ducts at all fire dampers.
3.6
PROTECTION
A.
3.7
Protect work, equipment and material to prevent obstruction, damage or breakage. Close pipe openings with caps
or plugs during installation. Cover and protect equipment against dirt, water, chemical or mechanical injury. At
the completion of work, thoroughly clean all equipment and deliver the entire system in an unblemished condition
TESTING
A.
Prepare systems for test and balance as specified in Section 01455.
B.
In coordination with Section 01455, make changes in pulleys, belts, ductwork, and dampers as required for correct
balance as recommended by air balance and testing agency.
3.8
SCHEDULES
SCHEDULE I – DUCT SUPPORT SCHEDULE
Minimum Hanger Size
RECTANGULAR DUCTWORK
Maximum Half
Pair at 10 ft Spacing
of
Duct Perimeter*
Strap
Rod
P/2 = 30"
1" x 22
10 ga
ga
P/2 = 72"
1" x 18
ga
* Perimeter = Sum of Sides
3/8”
Pair at 8 ft spacing
Pair at 5 ft spacing
Strap
1" x 22
ga
Rod
10 ga
Strap
1" x 22 ga
1" x 20
ga
1/4"
1" x 22 ga
Pair at 4 ft
spacing
Rod
12
g
a
1/4"
Strap
1" x 22
ga
1" x 22
ga
ROUND DUCTWORK
Diameter
Maximum Spacing
Rod
Strap
24" and less
10'
1/4"
1" x 22 ga
25"-36"
10'
3/8"
1" x 20 ga
Rod
12
g
a
1/4"
SCHEDULE II - WIRE ROPE HANGER SYSTEM SCHEDULE - OPTION
Minimum Hanger Size
RECTANGULAR DUCTWORK
Maximum Half
Single Loop at 10 ft
Single Loop at 8 ft
Single Loop at 5 ft
Single Loop at 4 ft
of Duct Perimeter*
Spacing
Spacing
Spacing
Spacing
P/2 = 12"
P/2 = 20"
No. 2
No. 3
No. 2
No. 3
No. 2
No. 2
No. 2
No. 2
15800-6
0893 Lindsay, OK
11/23/10
P/2 = 28"
P/2 = 52"
P/2 = 68"
No. 3
No. 4
No. 4
No. 3
No. 4
No. 4
No. 2
No. 3
No. 3
No. 2
No. 3
No. 3
Maximum Half of
Duct Perimeter*
Pair at 10 ft
Spacing
Pair at 8 ft
Spacing
Pair at 5 ft
Spacing
Pair at 4 ft
Spacing
P/2 = 12"
P/2 = 20"
P/2 = 28"
P/2 = 52"
P/2 = 68"
P/2 = 108"
No. 2
No. 2
No. 3
No. 3
No. 3
No. 4
No. 2
No. 2
No. 2
No. 3
No. 3
No. 4
No. 2
No. 2
No. 2
No. 2
No. 3
No. 3
No. 2
No. 2
No. 2
No. 3
No. 3
ROUND DUCTWORK
Maximum Diameter
10 ft Spacing
8 ft Spacing
5 ft Spacing
8"
10"
12"
20"
24"
No. 2
No. 3
No. 3
No. 4
No. 4
No. 2
No. 2
No. 2
No. 3
No. 3
No.
No.
No.
No.
No.
Maximum Diameter
Pair at 10 ft Spacing
Pair at 8 ft Spacing
Pair at 5 ft Spacing
2
2
2
2
2
26"
No. 3
No. 2
No. 2
36"
No. 3
No. 3
No. 2
NOTES:
1. Wire diameters are based on the following sizes:
Size No. 2= 5/64"
Size No. 3 = 1/8"
Size No. 4= 3/16"
2. Schedule is based on 16 gage maximum ductwork.
3. Hanger sizes are based on vertical hanging only. Refer to manufacturer's data for load limits of hangers at angles other
than vertical.
END OF SECTION
15800-7
0893 Lindsay, OK
11/23/10
UniSpec II - Store Planning
082106
SECTION 16050 - BASIC ELECTRICAL MATERIALS AND METHODS
PART 1 - GENERAL
1.1
SUMMARY
A.
Section Includes:
1.
Electrical Identification
2.
Hangers and Supports
3.
Conduit Sleeves
4.
Grounding and Bonding
B.
Related Sections
1.
Section 09900 - Paints and Coatings: Field painting of hangers and supports.
2.
Section 13810 – Energy Management System (EMS)
3.
Section 16100 – Wiring Methods
PART 2 - PRODUCTS
2.1
ELECTRICAL IDENTIFICATION (Non EDC Items)
A.
2.2
Nameplates: Provide laminated plastic nameplates with 3/4 inch minimum contrasting-color engraved letters.
HANGERS AND SUPPORTS
A.
Manufacturers:
1.
Unistrut Metal Framing, Unistrut Corporation, Wayne, MI, (800) 521-7730 or contact Steve Goldstein 800243-1054 ext 111.
2.
ERICO, Solon, OH, (440) 349-2630.
3.
Minerallac Fastening Systems, Hampshire, IL, (877) 285-2200.
B.
Conduit and Equipment Supports: Hangers shall be Series P3000 or P3300 channels by Unistrut depending on
load and span involved. Use Pipe Hangers by Minerallac , or Caddy Clips by ERICO only where impractical to
install Unistrut Hangers.
C.
Attach hangers and supports to structure overhead by methods approved at job site. Do not use fasteners which
penetrate the roof deck.
2.3
CONDUIT SLEEVES
A.
2.4
Sleeves: Galvanized, black steel or schedule 40 PVC pipe.
GROUNDING AND BONDING
A.
Insulated Grounding Bushing: Steel with feed-thru lugs.
B.
Insulated Equipment Ground Wire: Copper.
PART 3 - EXECUTION
3.1
INSTALLATION
A.
Install specified materials in accordance with manufacturer's recommendations and as indicated on Drawings.
B.
Cutting and Patching: Where cutting is required through walls, floors, or ceilings, make openings no larger than
required and repair affected surfaces to match adjacent surfaces.
16050-1
0893 Lindsay, OK
11/23/10
C.
Nameplates: Bolt or pop-rivet nameplates to equipment. Clearly identify equipment or equipment served, such as
"BALER", "COMPACTOR," etc. Install nameplates for each safety switch, contactor, time switch, pushbutton and
other similar equipment.
D.
Electrical Equipment Supports: Support electrical equipment with hangers and supports specified above or in
another approved manner where details are not indicated.
E.
Sleeves: Install where conduits pass through concrete floors. Caulk sleeves through outside walls above grade
with sealant as specified in Section 07900.
F.
Fastening and Anchoring: Fasten conduit straps, disconnect switches, panelboards, and other equipment secured to
walls and slabs with cadmium plated screws or bolts and lead cinch anchors or expansion bolts and install in holes
drilled with proper size masonry drill. Properly size anchors in accordance with manufacturer's recommendations
for load to be supported.
G.
Torque all conductor connection terminations including those in EDC to manufacturer's recommended values.
Inspect panelboards for physical damage, proper alignment, anchorage, and grounding. Check proper installation
and tightness of connections for circuit breakers, fusible switches, and fuses.
3.2
GROUNDING
A.
General: Ground all metallic conduits, supports, cabinets, equipment, system neutrals, metal building structures,
and other items required to be grounded in accordance with the NEC and other applicable codes and as indicated
on drawings.
B.
Equipment Grounding:
1.
Make conduits electrically continuous using proper fittings, connections, grounding bushings, etc.
2.
Install insulating grounding bushings on all conduit connections 1 1/4 inch and larger and where indicated
on Drawings.
3.
Install an insulated equipment ground wire as shown on drawings.
C.
Metal Underground Cold Water Pipe: Connect to electrical system if available and permitted by local codes.
Install jumpers around water meters, valves, or other devices which might cause an interruption of continuity
during service.
D.
Concrete Encased Electrodes: Where indicated on the Drawings, furnish and install electrodes, jumpers, and
approved fittings in accordance with Grounding Electrode Detail .
E.
Ground Rods: If ground rods are required, install two 5/8 inch minimum diameter Copperweld rods driven
vertically not less than 12 feet apart and each with 8 feet of length in contact with the soil.
3.3
TESTING
A.
Upon completion of installation, perform continuity tests on power and equipment branch circuit conductors.
Inspect wire and cable for physical damage. Verify proper phasing connections.
B.
Measure ground resistance from system neutral connection at service entrance to convenient ground point on
building water pipe using suitable ground testing equipment.
C.
Test receptacles with circuit tester to ensure proper polarity, grounding, and continuity of circuits.
D.
Load test GFCI receptacles.
END OF SECTION
16050-2
0893 Lindsay, OK
11/23/10
UniSpec II - Store Planning
032610
SECTION 16100 - WIRING METHODS
PART 1 GENERAL
1.1
SUMMARY
A.
Section Includes:
1.
Wire and Cable.
2.
Conduit
3.
Outlet boxes and Conduit Fittings.
4.
Wiring Devices.
5.
Wire Connectors.
B.
Products Provided Under Separate Contract: Under provisions of Section 01640, Owner will furnish and install
fire and security alarm system
1.
Contractor shall provide rough-in as specified herein.
1.2
REFERENCES
A.
National Fire Protection Association (NFPA):
1.
NFPA 70 - National Electrical Code (NEC).
2.
NFPA 72 – National Fire Alarm Code
B.
American Society for Testing Material (ASTM)
1.
ASTM D698 - Laboratory Compaction Characteristics of Soil Using Standard Effort (12,400 ft-lbf/ft
2.
ASTM D1557 - Laboratory Compaction Characteristics of Soil Using Modified Effort (56,000 ft-bf/ft3)
C.
Underwriters Laboratories (UL)
1.
UL 1569 - Metal Clad Cables
PART 2 PRODUCTS
2.1
WIRE AND CABLE
A.
Electrical Components and Devices: Listed and labeled as defined in NFPA 70, Article 100, by a nationally
recognized testing agency and marked for use.
B.
Wire and cable shall bear UL label and shall conform to standards established for such materials by nationally
recognized agencies.
C.
Provide code gage, soft annealed copper wire, not less than 98 percent conductivity and of 600 volt class.
D.
Aluminum Alloy Conductors: Shall not be used in new circuits.
E.
Conductors:
1.
Insulation type shall be one of the following:
a. THHN
b. THWN
c. XHHW
d. XHHW-2
2.
Type:
a. #10 and smaller – stranded or solid.
b. #8 and larger - stranded
16100-1
0893 Lindsay, OK
11/23/10
F.
Interlocked Armor Metal Clad (MC) Cable: Contractor's option as allowed by authorities having jurisdiction. MC
cable shall have the following characteristics:
1.
Standard MC.
2.
Minimum size conductor, #12 AWG copper, including green insulated equipment ground, sized in
accordance with the NEC.
3.
Overall moisture resistant tape.
4.
Galvanized steel or aluminum interlocked cladding.
5.
Manufactured in accordance with UL 1569.
G.
Wire smaller than #12 AWG not permitted unless otherwise noted. #14 AWG, type MTW or TFF permitted for
signal and pilot control circuits unless otherwise noted.
H.
Color code:
SYSTEM
VOLTAGE
NEUTRAL
COLOR
PHASE
GROUND
ISOLATED
GROUND
208/120V
white
A-black
B-red
C-blue
green
green W/ yellow tracer
480/277V
lt. gray or white with
colored stripe other
than yellow
A-brown
B-orange
C-yellow
green
green W/ yellow tracer
I.
Color code #8 AWG and smaller phase and neutral conductors by continuous outer covering. Conductors #6
AWG and larger may be color coded by tape. Tape shall have minimum of two complete wraps around conductor
at 6 inches from terminations, splices, and junction points.
J.
Identify circuit numbers with synthetic cloth or plastic labels at splice and junction points.
2.2
CONDUIT
A.
Conduit types shall be as follows and shall bear UL or ETL label:
1.
Galvanized Rigid Metal Conduit (GRC): Hot-dip galvanized.
2.
Intermediate Metal Conduit (IMC): Hot-dip galvanized.
3.
Electrical Metallic Tubing (EMT): Hot-dip galvanized.
4.
Schedule 40 heavy-wall PVC for all underground conduit runs.
5.
Flexible Metal Conduit: Zinc-coated steel or Aluminum.
6.
Liquid Tight Flexible Steel Conduit with PVC jacket.
7.
MC Cable: Steel or Aluminum Cladding.
B.
Conduit Sizes: Size conduit in accordance with NEC unless noted otherwise on Drawings, but not less than the
following:
1.
Alarm and Data Systems: 3/4 inch.
2.
Flexible Metal Conduit: For connection of recessed light fixtures in suspended ceilings, 3/8 inch. For
connection of other equipment subject to vibration: 1/2 inch.
3.
Underground Conduit in Parking Lot: 1 inch.
4.
Other Uses: 1/2 inch.
2.3
OUTLET BOXES AND CONDUIT FITTINGS
A.
Outlet boxes and conduit fittings shall bear UL or ETL label.
B.
Boxes: Comply with NEC in regard to maximum allowable number of conductors.
16100-2
0893 Lindsay, OK
11/23/10
1.
2.
3.
C.
2.4
Interior Boxes: Hot-dip galvanized, 4 inches minimum octagon or square, unless otherwise noted. Provide
single or multiple gang outlet boxes as required for flush installation in drywall construction. Provide
masonry boxes for outlets installed flush in concrete unit masonry. Provide single surface-mounted outlet
boxes for utility type boxes.
Outlet Boxes: Suitable for supporting lighting fixtures if intended for that purpose.
Ceiling Fan Boxes: Rated and listed for mounting ceiling fans.
Conduit Fittings:
1.
Indoor EMT Fittings: Diecast or steel set screw type.
2.
Outdoor EMT Fittings: Steel Compression type.
3.
Outdoor GRC, IMC, or EMT Box Connectors: Weather-tight hubs.
4.
Threadless GRC or IMC Fittings: Not permitted.
5.
Indoor GRC or IMC connectors.
6.
PVC Fittings: Solvent weld type for PVC conduit.
7.
Locknuts and bushings
WIRING DEVICES
A.
Branch Circuit Switches: Specification grade rated 20A 120/277V AC as follows:
1.
Single Pole:
a. Hubbell HBL1221I.
b. Pass and Seymour PS20AC1-I.
c. Cooper 2221V.
d. Leviton 1221-2I.
e. Bryant 4901I.
2.
Double Pole:
a. Hubbell HBL1222I.
b. Pass and Seymour PS20AC2-I.
c. Cooper 2222V.
d. Leviton 1222-2I.
e. Bryant 4902I
3.
Three Way:
a. Hubbell HBL1223I.
b. Pass and Seymour PS20AC3-I
c. Cooper 2223V.
d. Leviton 1223-2I.
e. Bryant 4903I.
4.
Four Way:
a. Hubbell HBL1224I.
b. Pass and Seymour PS20AC4-I.
c. Cooper 1224-I2224V.
d. Leviton 1224-2I.
e. Bryant 4904I
5.
Dimmers:
a. Lutron NT-600-S-NFB-IV-120.
6.
Single Pole Occupancy Sensor:
a. Hubbell WS277I.
b. Sensor Switch WSD-I.
7.
Double Pole Occupancy Sensor:
a. Hubbell WS1277W2.
b. Sensor Switch WSD-2P-I.
8.
Three Way Dimmer:
a. Leviton IP710-DLW-I
b. Lithonia ISD-BC-120/277-IV
c. Hunt PS-010-3W-IV-227V
B.
Receptacles - Straight Blade Nylon Grounding - Type Outlet Devices: Specification grade as follows:
16100-3
0893 Lindsay, OK
11/23/10
1.
2.
3.
4.
5.
6.
7.
8.
9.
10.
Clock Receptacle 15A 125V (5-15R):
a. Hubbell HBL5235.
b. Pass and Seymour S3733-SS.
c. Cooper 93632.
d. Leviton 5261-CH.
e. Bryant 2828GS.
Single Receptacle 15A 125V (5-15R):
a. Hubbell HBL5261I.
b. Pass and Seymour 5261-I.
c. Cooper 5261V.
d. Leviton 5261-I.
e. Bryant 5261I.
Duplex Receptacle 15A 125V (5-15R):
a. Hubbell HBL5262I.
b. Pass and Seymour 5262-I.
c. Cooper 5262V.
d. Leviton 5262-I.
e. Bryant BRY5262I.
Duplex Receptacle 15A 125V Isolated Ground (5-15R):
a. Hubbell IG5262.
b. Pass and Seymour IG6200.
c. Cooper IG5262RN.
d. Leviton 5262-IG.
e. Bryant BRY5262IG.
GFCI Duplex Receptacle 15A 125V (5-15R):
a. Hubbell GF5252I.
b. Pass and Seymour 1594-I.
c. Cooper GF15V.
d. Leviton .6599-I
e. Bryant .GF52IA
Single Receptacle 20A 125V (5-20R):
a. Hubbell HBL5361I.
b. Pass and Seymour 5361-I.
c. Cooper 5361V.
d. Leviton 5361-I.
e. Bryant 5361I.
Duplex Receptacle 20A 125V (5-20R):
a. Hubbell HBL5362I.
b. Pass and Seymour 5362-I.
c. Cooper 5362V.
d. Leviton 5362-I.
e. Bryant BRY5362I.
Duplex Receptacle 20A 125V Isolated Ground (5-20R):
a. Hubbell IG5362.
b. Pass and Seymour IG6300.
c. Cooper IG5362RN.
d. Leviton 5362-IG.
e. Bryant BRY5362IG.
GFCI Duplex Receptacle 20A 125V (5-20R):
a. Hubbell GF5352I.
b. Pass and Seymour 2094-I.
c. Cooper GF20V.
d. Leviton .6899-I
e. Bryant .GF53IA
Single Receptacle 15A 250V 2 pole 3 Wire Grounded (6-15R):
a. Hubbell HBL5661I.
b. Pass and Seymour 5671-I.
c. Cooper 5661V.
16100-4
0893 Lindsay, OK
11/23/10
11.
12.
13.
14.
15.
16.
17.
18.
19.
20.
d. Leviton 5661-I.
e. Bryant 5661I.
Single Receptacle 20A 250V 2 pole 3 Wire Grounded (6-20R):
a. Hubbell HBL5461I.
b. Pass and Seymour 5871-I.
c. Cooper 5461V.
d. Leviton 5461-I.
e. Bryant 5461I.
Single Receptacle 30A 250V 2 pole 3 Wire Grounded (6-30R):
a. Hubbell HBL9330.
b. Pass and Seymour 3801.
c. Cooper 5700N.
d. Leviton 5372.
e. Bryant 9630FR.
Single Receptacle 50A 250V 2 pole 3 Wire Grounded (6-50R):
a. Hubbell HBL9367.
b. Pass and Seymour 3804.
c. Cooper 5709N.
d. Leviton 5374.
e. Bryant 9650FR.
Single Receptacle 20A 125/250V 3 pole 4 Wire Grounded (14-20R):
a. Hubbell HBL8410.
b. Pass and Seymour 3820.
c. Cooper 5759.
d. Leviton NOT AVAILABLE.
e. Bryant NOT AVAILABLE.
Single Receptacle 30A 125/250V 3 pole 4 Wire Grounded (14-30R):
a. Hubbell HBL9430A.
b. Pass and Seymour 3864.
c. Cooper 5744N.
d. Leviton 278.
e. Bryant 9430FR.
Single Receptacle 50A 125/250V 3 pole 4 Wire Grounded (14-50R):
a. Hubbell HBL9450A.
b. Pass and Seymour 3894.
c. Cooper 5754N.
d. Leviton 279.
e. Bryant 9450FR.
Single Receptacle 20A 3 Phase 250V 3 pole 4 Wire Grounded (15-20R):
a. Hubbell HBL8420.
b. Pass and Seymour NOT AVAILABLE.
c. Cooper NOT AVAILABLE.
d. Leviton NOT AVAILABLE.
e. Bryant NOT AVAILABLE.
Single Receptacle 30A 3 Phase 250V 3 pole 4 Wire Grounded (15-30R):
a. Hubbell HBL8430A.
b. Pass and Seymour 5740.
c. Cooper 8430N.
d. Leviton 8430.
e. Bryant 8430FR.
Single Receptacle 50A 3 Phase 250V 3 pole 4 Wire Grounded (15-50R):
a. Hubbell HBL8450A.
b. Pass and Seymour 5750.
c. Cooper 8450N.
d. Leviton 8450.
e. Bryant 8450FR.
Single Receptacle 60A 3 Phase 250V 3 pole 4 Wire Grounded (15-60R):
a. Hubbell HBL8460A.
16100-5
0893 Lindsay, OK
11/23/10
b.
c.
d.
e.
C.
Pass and Seymour 5760.
Cooper 8460N.
Leviton 8460.
Bryant 8460FR.
Receptacles - Locking Nylon Grounding - Type Outlet Devices: Specification grade as follows:
1.
Single Locking Receptacle 15A 125V (L5-15R):
a. Hubbell HBL4710.
b. Pass and Seymour 4710.
c. Cooper CWL515R.
d. Leviton 4710.
e. Bryant 4710.
2.
Single Locking Receptacle 15A 125V Isolated Ground (L5-15R):
a. Hubbell IG4710.
b. Pass and Seymour IG4710.
c. Cooper IGL515R.
d. Leviton 4710-IG.
e. Bryant 4710IG.
3.
Duplex Locking Receptacle 15A 125V (L5-15R):
a. Hubbell HBL4700.
b. Pass and Seymour 4700.
c. Cooper 4700.
d. Leviton 4700.
e. Bryant 4700DR.
4.
Duplex Locking Receptacle 15A 125V Isolated Ground (L5-15R):
a. Hubbell IG4700A.
b. Pass and Seymour IG4700.
c. Cooper IG4700.
d. Leviton 4700-IG.
e. Bryant 4700DRIG.
5.
Single Locking Receptacle 20A 125V (L5-20R):
a. Hubbell HBL2310.
b. Pass and Seymour L520-R.
c. Cooper CWL520R.
d. Leviton 2310.
e. Bryant 70520FR.
6.
Single Locking Receptacle 20A 125V Isolated Ground (L5-20R):
a. Hubbell IG2310.
b. Pass and Seymour IGL520-R.
c. Cooper IGL520R.
d. Leviton 2310-IG.
e. Bryant 70520IG.
7.
Single Locking Receptacle 30A 125V (L5-30R):
a. Hubbell HBL2610.
b. Pass and Seymour L530-R.
c. Cooper CWL530R.
d. Leviton 2610.
e. Bryant 70530FR.
8.
Single Locking Receptacle 20A 250V 2 Pole 3 Wire Grounded (L6-20R):
a. Hubbell HBL2320.
b. Pass and Seymour L620-R.
c. Cooper CWL620R.
d. Leviton 2320.
e. Bryant 70620FR.
9.
Single Locking Receptacle 30A 250V 2 Pole 3 Wire Grounded (L6-30R):
a. Hubbell HBL2620.
b. Pass and Seymour L630-R.
c. Cooper CWL630R.
16100-6
0893 Lindsay, OK
11/23/10
10.
11.
12.
13.
14.
D.
d. Leviton 2620.
e. Bryant 70630FR.
Single Locking Receptacle 20A 125/250V 3 pole 4 Wire Grounded (L14-20R).
a. Hubbell HBL2410.
b. Pass & Seymour L1420-R.
c. Cooper CWL1420R.
d. Leviton 2410.
e. Bryant 71420FR.
Single Locking Receptacle 30A 125/250V 3 pole 4 Wire Grounded (L14-30R).
a. Hubbell HBL2710.
b. Pass & Seymour L1430-R.
c. Cooper CWL1430R.
d. Leviton 2710.
e. Bryant 71430FR.
Single Locking Receptacle 30A 3 Phase 250V 3 pole 4 Wire Grounded (L15-30R).
a. Hubbell HBL2720.
b. Pass & Seymour L1530-R.
c. Cooper CWL1530R.
d. Leviton 2720.
e. Bryant 71530FR.
Single Locking Receptacle 50A 250V 2 pole 3 Wire Grounded (Non-Nema):
a. Hubbell HBL3771.
b. Pass and Seymour 3771.
c. Cooper 3771.
d. Leviton 3771.
e. Bryant 3771.
Single Locking Receptacle 50A 125/250V 3 pole 4 Wire Grounded (Non-Nema):
a. Hubbell CS6369.
b. Pass and Seymour CS6369.
c. Cooper CS6369.
d. Leviton CS63-69.
e. Bryant CS6369N.
Connectors - Cord mounted Locking Nylon Grounding - Type to match Plugs as follows:
1.
Locking Connector 15A 125V (L5-15R):
a. Hubbell HBL4729C.
b. Pass and Seymour L515-C.
c. Cooper 4731N.
d. Leviton 4729-C.
e. Bryant 4732NC.
2.
Locking Connector 20A 125V (L5-20R):
a. Hubbell HBL2313.
b. Pass and Seymour L520-C.
c. Cooper CWL520C.
d. Leviton 2313.
e. Bryant 70520NC.
3.
Locking Connector 15A 250V 2 Pole 3 Wire Grounded (L6-15R):
a. Hubbell HBL4579C.
b. Pass and Seymour L615-C.
c. Cooper 6566N.
d. Leviton 4579-C.
e. Bryant 70615NC.
4.
Locking Connector 20A 3 Phase 250V 3 Pole 4 Wire Grounded (L15-20R):
a. Hubbell HBL2423.
b. Pass and Seymour L1520-C.
c. Cooper CWL1520C.
d. Leviton 2423.
e. Bryant 71520NC.
16100-7
0893 Lindsay, OK
11/23/10
E.
Connectors - Cord mounted Corrosion Resistant Locking Nylon Grounding - Type to match Plugs as follows:
1.
Corrosion Resistant Locking Connector 20A 125V (L5-20R):
a. Hubbell HBL23CM13.
b. Pass and Seymour CRL520-C.
c. Cooper CRL520C.
d. Leviton 23CM-13.
e. Bryant 70520NCCR.
2.
Corrosion Resistant Locking Connector 20A 125/250V 3 Pole 4 Wire Grounded (L14-20R):
a. Hubbell HBL24CM13.
b. Pass and Seymour CRL1420-C.
c. Cooper CRL1420C.
d. Leviton NOT AVAILABLE.
e. Bryant NOT AVAILABLE.
3.
Corrosion Resistant Locking Connector 20A 3 Phase 250V 3 Pole 4 Wire Grounded (L15-20R):
a. Hubbell HBL24CM23.
b. Pass and Seymour NOT AVAILABLE.
c. Cooper CRL1520C.
d. Leviton NOT AVAILABLE.
e. Bryant NOT AVAILABLE.
4.
Corrosion Resistant Locking Connector 30A 3 Phase 120/208V 4 Pole 5 Wire Grounded (L21-30R):
a. Hubbell HBL28CM13.
b. Pass and Seymour NOT AVAILABLE.
c. Cooper NOT AVAILABLE.
d. Leviton NOT AVAILABLE.
e. Bryant NOT AVAILABLE.
F.
Plugs - Cord mounted Nylon Grounding - Type to match Outlet Devices as follows:
1.
Plug 20A 125V 2 Pole 3 Wire Grounded (5-20P):
a. Hubbell HBL5366CA.
b. Pass and Seymour 5366-X.
c. Cooper 5366AN.
d. Leviton 5366-CA.
e. Bryant 5395.
2.
Plug 20A 250V 2 Pole 3 Wire Grounded (6-20P):
a. Hubbell HBL5466CA.
b. Pass and Seymour 5466-X.
c. Cooper 5466AN.
d. Leviton 5466-C.
e. Bryant 5475N.
3.
Plug 20A 3 Phase 250V 3 Pole 4 Wire Grounded (15-20P):
a. Hubbell HBL8421C.
b. Pass and Seymour NOT AVAILABLE.
c. Cooper NOT AVAILABLE.
d. Leviton NOT AVAILABLE.
e. Bryant NOT AVAILABLE.
4.
Plug 30A 3 Phase 250V 3 Pole 4 Wire Grounded (15-30P):
a. Hubbell HBL8432C.
b. Pass and Seymour 5741-AN.
c. Cooper 8432AN.
d. Leviton 8432-P.
e. Bryant 8432ANPB.
5.
Plug 50A 3 Phase 250V 3 Pole 4 Wire Grounded (15-50P):
a. Hubbell HBL8452C.
b. Pass and Seymour 5751-AN.
c. Cooper 8452AN.
d. Leviton 8452-P.
e. Bryant 8452ANPB.
6.
Plug 60A 3 Phase 250V 3 Pole 4 Wire Grounded (15-60P):
16100-8
0893 Lindsay, OK
11/23/10
a.
b.
c.
d.
e.
G.
Hubbell HBL8462C.
Pass and Seymour 5761-AN.
Cooper 8462AN.
Leviton 8462-P.
Bryant 8462ANPB.
Plugs - Cord mounted Locking Nylon Grounding - Type to match Outlet Devices as follows:
1.
Locking Plug 15A 125V 2 Pole 3 Wire Grounded (L5-15P):
a. Hubbell HBL4720C.
b. Pass and Seymour L515-P.
c. Cooper 4721N.
d. Leviton 4720-C.
e. Bryant 4721NP.
2.
Locking Plug 20A 125V 2 Pole 3 Wire Grounded (L5-20P):
a. Hubbell HBL2311.
b. Pass and Seymour L520-P.
c. Cooper CWL520P.
d. Leviton 2311.
e. Bryant 70520NP.
3.
Locking Plug 15A 250V 2 Pole 3 Wire Grounded (L6-15P):
a. Hubbell HBL4570C.
b. Pass and Seymour L615-P.
c. Cooper 6565N.
d. Leviton 4570-C.
e. Bryant 70615NP.
4.
Locking Plug 20A 250V 2 Pole 3 Wire Grounded (L6-20P):
a. Hubbell HBL2321.
b. Pass and Seymour L620-P.
c. Cooper CWL620P.
d. Leviton 2321.
e. Bryant 70620NP.
5.
Locking Plug 30A 250V 2 Pole 3 Wire Grounded (L6-30P):
a. Hubbell HBL2621.
b. Pass and Seymour L630-P.
c. Cooper CWL630P.
d. Leviton 2621.
e. Bryant 70630NP.
6.
Locking Plug 20A 3 Phase 250V 3 Pole 4 Wire Grounded (L15-20P):
a. Hubbell HBL2421.
b. Pass and Seymour L1520-P.
c. Cooper CWL1520P.
d. Leviton 2421.
e. Bryant 71520NP.
7.
Locking Plug 30A 3 Phase 250V 3 Pole 4 Wire Grounded (L15-30P):
a. Hubbell HBL2721.
b. Pass and Seymour L1530-P.
c. Cooper CWL1530P.
d. Leviton 2721.
e. Bryant 71530-NP.
8.
Locking Plug 50A 250V 2 Pole 3 Wire Grounded (Non-Nema):
a. Hubbell HBL3763C.
b. Pass and Seymour 3763-M.
c. Cooper 3763N.
d. Leviton 3763-C.
e. Bryant 3763N.
9.
Locking Plug 50A 125/250V 3 Pole 4 Wire Grounded (Non-Nema):
a. Hubbell CS6365C.
b. Pass and Seymour CS6365.
16100-9
0893 Lindsay, OK
11/23/10
c.
d.
e.
Cooper CS6365N.
Leviton CS63-65C.
Bryant CS6365N.
H.
Plugs - Cord mounted Corrosion Resistant Locking Nylon Grounding - Type to match Outlet Devices as follows:
1.
Corrosion Resistant Locking Plug 20A 125V 2 Pole 3 Wire Grounded (L5-20P):
a. Hubbell HBL23CM11.
b. Pass and Seymour CRL520-P.
c. Cooper CRL520P.
d. Leviton 23CM-11.
e. Bryant 70520NPCR.
2.
Corrosion Resistant Locking Plug 20A 125/250V 3 Pole 4 Wire Grounded (L14-20P):
a. Hubbell HBL24CM11.
b. Pass and Seymour CRL1420-P.
c. Cooper CRL1420P.
d. Leviton NOT AVAILABLE.
e. Bryant NOT AVAILABLE.
3.
Corrosion Resistant Locking Plug 20A 3 Phase 250V 3 Pole 4 Wire Grounded (L15-20P):
a. Hubbell HBL24CM21.
b. Pass and Seymour NOT AVAILABLE.
c. Cooper CRL1520P.
d. Leviton NOT AVAILABLE.
e. Bryant NOT AVAILABLE.
4.
Corrosion Resistant Locking Plug 30A 3 Phase 120/208V 4 Pole 5 Wire Grounded (L21-30P):
a. Hubbell HBL28CM11.
b. Pass and Seymour NOT AVAILABLE.
c. Cooper NOT AVAILABLE.
d. Leviton NOT AVAILABLE.
e. Bryant NOT AVAILABLE.
I.
Pin & Sleeve - Insulated Water Tight - Type Outlet Devices: Specification grade as follows:
1.
Water Tight Receptacle 30A 250V 2 Pole 3 Wire Grounded (Non-Nema):
a. Hubbell HBL330R6W.
b. Pass and Seymour PS330R6W.
c. Cooper CW330R6W.
d. Leviton 330R6W.
e. Bryant 330R6W.
2.
Water Tight Receptacle 60A 250V 2 Pole 3 Wire Grounded (Non-Nema):
a. Hubbell HBL360R6W.
b. Pass and Seymour PS360R6W.
c. Cooper CW360R6W.
d. Leviton 360R6W.
e. Bryant 360R6W.
J.
Boots: Weatherproof Boots for Locking Plug and Connector Bodies - Type to match Devices as follows:
1.
Corrosion Resistant Locking Plug and Connector 20A 125V (L5-20):
a. Hubbell HBL60CM31 & HBL60CM32.
b. Pass and Seymour CRL2030-RBC & CRL2030-RBP.
c. Cooper BM1 & BM2.
d. Leviton 6031-Y & 6032-Y.
e. Bryant 72002BP & 72002BC.
2.
Corrosion Resistant Locking Plug and Connector 20A 125/250V 3 Pole 4 Wire Grounded (L14-20):
a. Hubbell HBL60CM35 & HBL60CM36.
b. Pass and Seymour CRL2030-RBC & CRL2030-RBP.
c. Cooper BL1 & BL2.
d. Leviton NOT AVAILABLE.
e. Bryant NOT AVAILABLE.
16100-10
0893 Lindsay, OK
11/23/10
3.
4.
Corrosion Resistant Locking Plug and Connector 20A 3 Phase 250V 3 Pole 4 Wire Grounded (L15-20):
a. Hubbell HBL60CM35 & HBL60CM36.
b. Pass and Seymour CRL2030-RBC & CRL2030-RBP.
c. Cooper BL1 & BL2.
d. Leviton NOT AVAILABLE.
e. Bryant NOT AVAILABLE.
Corrosion Resistant Locking Plug and Connector 30A 3 Phase 120/208V 4 Pole 5 Wire Grounded (L2130):
a. Hubbell HBL60CM35 & HBL60CM36.
b. Pass and Seymour CRL2030-RBC & CRL2030-RBP.
c. Cooper BL1 & BL2.
d. Leviton NOT AVAILABLE.
e. Bryant NOT AVAILABLE.
K.
Cover Plates:
1.
Nylon cover plates for flush mounted devices.
2.
Galvanized steel plates where devices are installed on exposed fittings or boxes.
3.
Single Gang GFCI Receptable Weatherproof, While-In-Use, Lockable Vertical Metallic Cover Plate:
a. Red Dot CKMGV
b. Hubbell WP26M
c. Intermatic WP1010MC
4.
Single Gang GFCI Receptacle Weatherproof, While-In-Use, Lockable Horizontal Metallic Cover Plate:
a. Red Dot CKMG
b. Hubbell WP26MH
c. Intermatic WP1010HMC
5.
Single Gang Deep Box Twistlock Receptacle Weatherproof, While-In-Use, Lockable Vertical Metallic
Cover Plate:
a. Red Dot CKLSVL
b. Hubbell WP7D
6.
Double Gang Two GFCI Receptacles Weatherproof, While-In-Use, Lockable Vertical Metallic Cover
Plate:
a. Red Dot 2CKG
b. Intermatic WP1030MC
7.
Double Gang GFCI Feed-Thru With Simplex Receptacle Weatherproof, While-In-Use, Lockable Vertical
Metallic Cover Plate:
a. Red Dot 2CKSG
b. Intermatic WP1030MC
8.
302 stainless steel cover plates for recessed outlet boxes in masonry walls.
9.
Blank cover plate on all boxes without device.
L.
Colors:
1.
Unless otherwise noted, wiring devices and cover plates shall be ivory nylon.
2.
Blank Cover Plates: On boxes without devices or fixtures, provide same type and color as those installed
on devices in the same room or area.
3.
Isolated ground receptacles: Orange nylon cover plates with circuit number engraved in plate.
2.5
SURFACE RACEWAY (G3000)
A.
Manufacturer
1.
The surface raceway system specified herein for branch circuit wiring shall be the 3000 Series Steel
Prewired Raceway as manufactured by The Wiremold Company.
B.
Materials
1.
The raceway and all system components must be UL Listed. The raceway base and cover sections shall be
manufactured of galvanized steel, finished in grey and be suitable for field repainting to match
surroundings.
16100-11
0893 Lindsay, OK
11/23/10
a.
b.
2.6
Fittings: Multi-outlet system consisting of factory assembled components with a full complement of
fittings including, but not limited to, elbows (90 degree, internal and external) slide couplings for
joining raceway sections, blank end caps for closing open ends of the raceway, and flat tees. No field
cutting of raceways will be permitted.
Devices: Wiring devices and other connectors shall be factory installed, electrically wired, and covers
labeled as identified on the Drawings. Each receptacle shall be identified noting the panel number and
circuit number from which it is fed. Receptacles rated higher than NEMA 5-20R shall also be
provided with voltage, phase and amperage identified in the same manner. Raceway sections shall be
provided with 12 inch pigtails at feed locations for ease of installation. Grounding shall be maintained
by means of factory installed NEC sized grounding conductors and utilize insulation displacement
connectors as required.
WIRE CONNECTORS
A.
Splices:
1.
#8 AWG and Smaller: Ideal Wingnut, 3M Scotchlok, or equal connectors of proper size. 3M No. 567 inline self-stripping connectors will be permitted only at ballast lead connections in fluorescent light rows.
2.
#6 AWG and Larger: Solderless lugs and connectors.
PART 3 EXECUTION
3.1
INSTALLATION - GENERAL
A.
Install specified materials in accordance with manufacturer's recommendations.
B.
Where switches operating at 277 volts are on same circuit and are ganged, provide permanently installed steel
barriers between switches. Where switches operating at 277 volts are on separate circuits and are ganged, provide
separate boxes and separate coverplates for each circuit.
C.
Access to Equipment: Coordinate access doors to allow for easy access of equipment for repair and maintenance.
D.
Aluminum Alloy Conductors: Shall not be used in new circuits.
3.2
WIRE
A.
3.3
Tie wrap groups of conductors in switchboards and panel boards.
CONDUIT
A.
Installation:
1.
Install conduit concealed, except in unfinished areas and where indicated on Drawings.
2.
Support conduit by means of specified hangers.
3.
Clean PVC conduit per manufacturer's recommendations before application of solvent cement.
4.
Coordinate flashings where conduit penetrates roof membrane.
5.
Paint metallic conduit under concrete slab or where installed in contact with earth. Apply two 6 mil coats
of PVC or Asphalt paint continuously along entire length of conduit prior to installation below grade. Do
not run conduit in concrete slab.
6.
Install flexible metal conduit or liquid tight flexible metal conduit for final connections to dry-type
transformers, baler, air compressors, HVAC equipment, motors and other vibrating equipment.
7.
Coordinate installation of conduit in masonry work.
8.
Do not install conduit under slab unless indicated on Drawings. Conduit installed below slab shall be
galvanized rigid metal (GRC), intermediate metal conduit (IMC), or Schedule 40 PVC. Provide exterior
coated GRC bends and elbows for all under ground conduit.
9.
Route above grade conduit parallel or perpendicular to building lines.
10.
Maintain minimum of 6 inches clearance at flues and heat sources.
11.
Install GRC conduit penetrating above grade outdoors or penetrating concrete slabs, Including elbow.
12.
Install GRC elbow on all conduit runs that have 45º bends or greater.
16100-12
0893 Lindsay, OK
11/23/10
13.
B.
3.4
Install double locknut and bushings when terminating GRC or IMC conduit, except where conduit
terminates in threaded hub.
Location:
1.
Galvanized Rigid Metal Conduit (GRC): Permitted for general exposed or concealed work above or below
grade.
2.
Intermediate Metal Conduit (IMC): Permitted for general exposed or concealed work above or below
grade.
3.
Electrical Metallic Tubing (EMT): Permitted for general exposed or concealed work above grade.
4.
PVC Rigid Nonmetallic Conduit (PVC) Unless Noted Otherwise on Drawings: Permitted for below-grade
use when permitted by local governing codes.
5.
Flexible Metal Conduit: Permitted in attic spaces and exposed in lengths of 6 feet or less for connections to
equipment in dry areas. Not permitted for general exposed or concealed work. For connection of recessed
light fixtures in suspended ceilings and connection of other equipment subject to vibration.
6.
Liquid tight Flexible Metal Conduit: Permitted exposed in lengths of 6 feet or less for connections to food
service equipment, refrigeration equipment and other vibrating equipment in damp locations where rigid
connections are not suitable.
7.
MC Cable: Permitted only where concealed inside partitions and above finished ceilings. Cable exposed
on walls or in open bar joist areas will not be permitted. Cut cable with manufacturer's recommended
armor stripping tool. Provide manufacturers approved connectors.
WIRING DEVICES
A.
Replace outlets or devices improperly located or installed. Set outlets and devices plumb or horizontal and extend
to, but not project above, finished surface.
B.
Unless otherwise noted, receptacles, switches, and other wiring devices shall not be mounted back-to-back.
3.5
SURFACE RACEWAY (G3000)
A.
INSPECTION
1.
Examine conditions under which raceways, boxes, distribution systems, accessories, and fittings are to be
installed and substrate that will support raceways. Notify the Architect/Engineer in writing of conditions
detrimental to proper completion of the work. Do not proceed with work until unsatisfactory conditions
have been corrected.
B.
INSTALLATION
1.
Strictly comply with manufacturer's installation instructions and recommendations. Coordinate installation
with adjacent work to ensure proper clearances and to prevent electrical hazards.
3.6
WIRE CONNECTIONS
A.
Make final connection of motors, starters, disconnects, and other items furnished under other Sections.
END OF SECTION
16100-13
0893 Lindsay, OK
11/23/10
UniSpec II - Store Planning
102910
SECTION 16500 - LIGHTING
PART 1 - GENERAL
1.1
SUMMARY
A.
Section Includes:
1.
Lighting fixtures.
B.
Products Under This Section:
1.
Contractor shall provide light fixtures, lamps and Protect-A-Lamp covers, as indicated on Drawings.
1.2
QUALITY ASSURANCE
A.
1.3
Fixtures and their electrical components will bear a UL Label.
DELIVERY, STORAGE, AND HANDLING
A.
Storage and Protection: Provide proper facilities for handling and storage of materials to prevent damage to edges,
ends and surfaces. Keep materials dry, fully protected from weather.
B.
Contact selected distributor three weeks prior to desired delivery date to arrange for delivery of lighting fixtures.
PART 2 - PRODUCTS
2.1
LIGHT FIXTURES
A.
Approved Lighting Vendors:
1.
Malmstrom White Co., Little Rock, AR. (800) 662-3877.
2.
Hunzicker Brothers, (800) 324-1026
3.
Haines, Jones & Cadbury, Inc., (800) 459-7099.
PART 3 - EXECUTION
3.1
INSTALLATION
A.
Install lighting fixtures, lamps, lighting panels, and connections in accordance with manufacturer's recommendations and as indicated on Drawings.
B.
Coordinate exact mounting location of light fixtures with building structure and other trades prior to installation.
Continuous rows shall be installed straight and true.
C.
Recessed fixtures installed in lay-in ceiling grid systems shall have four to six feet of flexible conduit from outlet
boxes supported from building structural system to fixtures. Fixtures shall be attached to ceiling grid.
D.
Maintain all light fixtures and lamps during construction, and coordinate replacement of any defective lamps with
Owner’s lighting vendor prior to Certification of Substantial Completion. Notify Owner’s lighting vendor immediately of any damaged fixtures or lamps delivered to the jobsite and make arrangements to have them replaced.
E.
Verify ceiling and wall details. Install fixtures complete with proper mounting arrangements for ceiling or wall
construction encountered.
F.
Where indicated on Drawings, install Protect-A-Lamp covers and caps.
G.
Lighting fixtures and lamps shall be clean and free of building paint over-spray one week prior to possession.
16500-1
0893 Lindsay, OK
11/23/10
H.
Provide all additional hardware required to complete installation such as nuts, bolts, threaded rods and Unistrut
channels.
END OF SECTION
16500-2
0893 Lindsay, OK
11/23/10
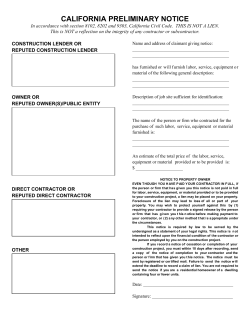
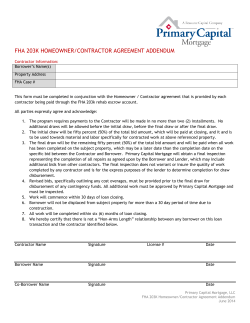

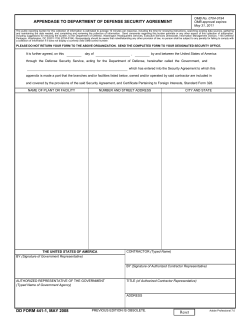
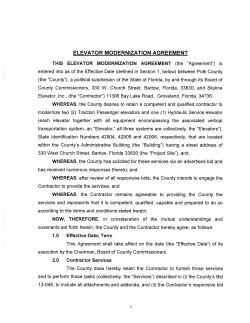


© Copyright 2026