
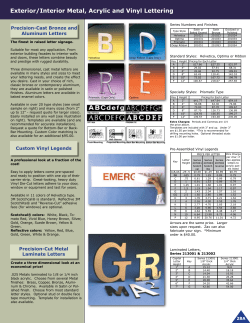
Architectural Letters
Architectural Letters
Left: “A” embellished with colored
pencil and marker
art + language arts
Below: “D” embellished with
acrylic gel medium and acrylic
colors.
One of the definitions of the word
“architecture” is “the art and action of
building or constructing.” In this lesson plan,
students design and construct a 3dimensional letter using one of their initials.
The surface can be decorated with
descriptive words and images that are
personally meaningful and unique to the
student’s identity.
Instead of wet, messy adhesive, this
process uses paper packing tape to
create papier mâché. This tape is
inexpensive, easy, and tidy to use,
and the finished letters are hard and
durable.
Adapt to older grade levels by
having students design a logo or
their own font, or have them work in
teams to create words.
Grade Levels 3-12
Note: instructions and materials are
based on a class size of 25 students.
Adjust as needed.
Process
1. Design the shape of a letter on
drawing paper using a pencil. The
letter should be a minimum of 21/2” thick in all areas, but may be
up to 14” x 22” in overall size. Cut
the letter out and use it as a
pattern to trace onto both
chipboard pieces, then cut out.
2. Take one chipboard letter, rightside-up and glue paper cups onto
it, staggering them up and down
so the cups fit together, see (A).
The more cups used, the stronger
the letter will be. Allow glue
to dry until tacky (or longer),
then glue the top letter in
place, being careful to align it
with the bottom letter. Allow
to dry completely.
3. Dampen a sponge and place it
onto a plate. Cut paper tape
into a variety of lengths.
Dampen the adhesive on the
tape and press an end on the
Materials
All-Purpose Chipboard,
single thick, 22" x 28"
(13115-2222); need one
sheet per student, cut in
half to 14" x 22" pieces
Paper cups, 5-oz bath
size
Fiskars® Student Scissors
(57016-1065); need one
per student
Blick® White Sulphite
Drawing Paper, 60-lb
(10209-1009); need one
sheet per student
Household sponge
Gummed Kraft Paper
Tape, 2" x 600-ft roll
(24118-1002); share 4 rolls
across classroom
(A)
Select Materials for
Decoration, including:
Blickrylic™ Gesso, quart
(00711-1017)
Faber-Castell® Red-Line
Colored Pencils,
(20553-1036)
Blick® Broadline
Water-Based Markers
(21224-0089)
Roylco® Paint Scrapers
(04986-1004)
Colour Shaper™ Kid’s Set
(04935-0601)
Sargent® Metallic Acrylic
Colors, assorted colors
(00730-)
Blickrylic™ Student
Acrylics, assorted colors
(00711-)
Blickrylic™ Gel Medium,
quart (00711-1007)
1.
Process, continued
top side. Smooth gently around
and adhere it to the back side.
Continue until all surfaces are
completely covered with at least
two layers of paper tape. Apply the
tape as smoothly as possible,
avoiding excessive overlapping. The
letter will look like (B).
4. As an option, apply two coats of
acrylic gesso to make the surface
white and help seal any edges.
Allow the gesso to dry between
coats.
5. Embellish the surface of the letter
with descriptive words, images and
symbols that are meaningful to the
student’s personal identity. Some
options for surface decoration include:
Drawing: Coating the packing tape with
acrylic gesso will create a smooth, white
surface for drawing with colored pencils or
markers; see example on page 1.
Collage: Collect photos, magazine cutouts, colorful paper, tissue and more. Apply
them decoupage-style to the surface of the
letter. Gesso is not needed as a primer for
this technique.
Painting: Priming the surface with gesso
first will make colors brighter and easier to
apply. Use acrylic or premium-grade
tempera colors to create designs.
Metallic/Gel Architectural Letter: Working
on one side of the letter at a time, use a
plastic knife or craft stick to spread gel
medium to about 1/16" thickness across the
surface. Use paint scrapers, modeling tools
and other items to create words, textures
and designs in the gel. Gel will appear
white when wet but will be clear when dry.
After all sides of the letter are textured and
dry, paint them with black acrylic paint and
allow them to dry. Sponge metallic color
over the black paint.
Options
1. Older students can design their own fonts
or logos, or work in teams to form words
with their architectural letters.
2. Instead of paper packing tape, use Activa®
Rigid-Wrap Plaster Cloth (333507-1004) to
cover the letter form, see (C). When dry,
letters will be very hard and may be
painted and embellished with any of the
ideas listed above.
(B)
(C)
Copyright © 2009 Dick Blick Art Materials. All rights reserved. JD
National Standards
Content Standard #1 — Understanding and applying media,
techniques and processes
K-4
Students use different media, techniques and
processes to communicate ideas, experiences and stories
5-8
Students intentionally take advantage of the qualities
and characteristics of art media, techniques and processes to
enhance communication of their experiences and ideas
9-12
Students conceive and create works of visual art that
demonstrate an understanding of how the communication of
their ideas relates to the media, techniques and processes
they use
Content Standard #2 — Using knowledge of structures and
functions
K-4
Students use visual structures and functions of art to
communicate ideas
5-8
Students employ organizational structures and
analyze what makes them effective or not effective in the
communication of ideas
9-12
Students create artworks that use organizational
principles and functions to solve specific visual arts problems
Content Standard #3 — Choosing and evaluating a range of
subject matter, symbols and ideas
K-4
Students select and use subject matter, symbols and
ideas to communicate meaning
5-8
Students use subjects, themes and symbols that
demonstrate knowledge of contexts, values and aesthetics
that communicate intended meaning in artworks
9-12
Students apply subjects, symbols and ideas in their
artworks and use the skills gained to solve problems in daily
life
2.


© Copyright 2026