
Soft SampleCell Guide Version 3.0 for Macintosh
Soft SampleCell
Guide
Version 3.0 for Macintosh
Digidesign Inc.
3401-A Hillview Avenue
Palo Alto, CA 94304 USA
tel: 650·842·7900
fax: 650·842·7999
Technical Support (USA)
650·842·6699
650·856·4275
Product Information (USA)
650·842·6602
800·333·2137
Fax on Demand (USA)
1·888·USE·DIGI (873·3444)
International Offices
Visit the Digidesign Web site
for contact information.
World Wide Web
www.digidesign.com
Digidesign FTP Site
ftp.digidesign.com
Copyright
This guide is copyrighted ©2001 by Digidesign, a division of
Avid Technology, Inc. (hereafter “Digidesign”), with all rights
reserved. Under copyright laws, this manual may not be
duplicated in whole or in part without the written consent of
Digidesign.
DIGIDESIGN, AVID and PRO TOOLS are trademarks or
registered trademarks of Digidesign and/or Avid Technology,
Inc. All other trademarks are the property of their respective
owners.
All features and specifications subject to change without
notice.
PN 932708602-00 REV A 05/01$
contents
Chapter 1. Getting Started With Soft SampleCell . . . . . . . . . . . . . . . . . . . . . . . . . . . . . . . 1
System Requirements . . . . . . . . . . . . . . . . . . . . . . . . . . . . . . . . . . . . . . . . . . . . . . . . . . . . . 1
Conventions Used in This Guide . . . . . . . . . . . . . . . . . . . . . . . . . . . . . . . . . . . . . . . . . . . . . . 2
Installing Soft SampleCell . . . . . . . . . . . . . . . . . . . . . . . . . . . . . . . . . . . . . . . . . . . . . . . . . . 3
Authorizing Soft SampleCell . . . . . . . . . . . . . . . . . . . . . . . . . . . . . . . . . . . . . . . . . . . . . . . . . 3
Deauthorizing Soft SampleCell . . . . . . . . . . . . . . . . . . . . . . . . . . . . . . . . . . . . . . . . . . . . . . . 4
Configuring OMS . . . . . . . . . . . . . . . . . . . . . . . . . . . . . . . . . . . . . . . . . . . . . . . . . . . . . . . . . 4
Configuring Soft SampleCell . . . . . . . . . . . . . . . . . . . . . . . . . . . . . . . . . . . . . . . . . . . . . . . . . 5
Testing Playback . . . . . . . . . . . . . . . . . . . . . . . . . . . . . . . . . . . . . . . . . . . . . . . . . . . . . . . . . 7
Enabling Background MIDI Playback and Input Devices . . . . . . . . . . . . . . . . . . . . . . . . . . . . . 8
Chapter 2. Using Banks and Instruments . . . . . . . . . . . . . . . . . . . . . . . . . . . . . . . . . . . . . . 9
SampleCell File Types . . . . . . . . . . . . . . . . . . . . . . . . . . . . . . . . . . . . . . . . . . . . . . . . . . . . . 9
CD-ROM File Structure . . . . . . . . . . . . . . . . . . . . . . . . . . . . . . . . . . . . . . . . . . . . . . . . . . . . 10
Opening a Bank . . . . . . . . . . . . . . . . . . . . . . . . . . . . . . . . . . . . . . . . . . . . . . . . . . . . . . . . 10
Working with Banks . . . . . . . . . . . . . . . . . . . . . . . . . . . . . . . . . . . . . . . . . . . . . . . . . . . . . 12
Multiple Banks . . . . . . . . . . . . . . . . . . . . . . . . . . . . . . . . . . . . . . . . . . . . . . . . . . . . . . . . . 14
Alternate Data Entry Methods. . . . . . . . . . . . . . . . . . . . . . . . . . . . . . . . . . . . . . . . . . . . . . . 15
Setting MIDI Channel . . . . . . . . . . . . . . . . . . . . . . . . . . . . . . . . . . . . . . . . . . . . . . . . . . . . . 16
Assigning Audio Outputs . . . . . . . . . . . . . . . . . . . . . . . . . . . . . . . . . . . . . . . . . . . . . . . . . . 17
Instrument Panning . . . . . . . . . . . . . . . . . . . . . . . . . . . . . . . . . . . . . . . . . . . . . . . . . . . . . . 17
Instrument Tuning . . . . . . . . . . . . . . . . . . . . . . . . . . . . . . . . . . . . . . . . . . . . . . . . . . . . . . . 19
Saving a Bank. . . . . . . . . . . . . . . . . . . . . . . . . . . . . . . . . . . . . . . . . . . . . . . . . . . . . . . . . . 21
Saving an Instrument . . . . . . . . . . . . . . . . . . . . . . . . . . . . . . . . . . . . . . . . . . . . . . . . . . . . 22
Contents iii
Chapter 3. Creating and Modifying Instruments . . . . . . . . . . . . . . . . . . . . . . . . . . . . . . . 23
Instrument Basics . . . . . . . . . . . . . . . . . . . . . . . . . . . . . . . . . . . . . . . . . . . . . . . . . . . . . . 23
Creating New Instruments . . . . . . . . . . . . . . . . . . . . . . . . . . . . . . . . . . . . . . . . . . . . . . . . . 24
Sample Maps . . . . . . . . . . . . . . . . . . . . . . . . . . . . . . . . . . . . . . . . . . . . . . . . . . . . . . . . . . 25
Adding/Importing Samples . . . . . . . . . . . . . . . . . . . . . . . . . . . . . . . . . . . . . . . . . . . . . . . . 27
Key Group Editing . . . . . . . . . . . . . . . . . . . . . . . . . . . . . . . . . . . . . . . . . . . . . . . . . . . . . . . 28
Editing Sample-Specific Parameters . . . . . . . . . . . . . . . . . . . . . . . . . . . . . . . . . . . . . . . . . . 31
Loop Window . . . . . . . . . . . . . . . . . . . . . . . . . . . . . . . . . . . . . . . . . . . . . . . . . . . . . . . . . . 32
Sample Parameters Window . . . . . . . . . . . . . . . . . . . . . . . . . . . . . . . . . . . . . . . . . . . . . . . 33
Misc Parameters Window . . . . . . . . . . . . . . . . . . . . . . . . . . . . . . . . . . . . . . . . . . . . . . . . . 35
Envelopes . . . . . . . . . . . . . . . . . . . . . . . . . . . . . . . . . . . . . . . . . . . . . . . . . . . . . . . . . . . . 40
Matrix Modulation . . . . . . . . . . . . . . . . . . . . . . . . . . . . . . . . . . . . . . . . . . . . . . . . . . . . . . 43
Modulators . . . . . . . . . . . . . . . . . . . . . . . . . . . . . . . . . . . . . . . . . . . . . . . . . . . . . . . . . . . 45
Trackers . . . . . . . . . . . . . . . . . . . . . . . . . . . . . . . . . . . . . . . . . . . . . . . . . . . . . . . . . . . . . 47
Chapter 4. Sample Editing and Looping. . . . . . . . . . . . . . . . . . . . . . . . . . . . . . . . . . . . . . . 49
Loop Types . . . . . . . . . . . . . . . . . . . . . . . . . . . . . . . . . . . . . . . . . . . . . . . . . . . . . . . . . . . 49
The Loop Window . . . . . . . . . . . . . . . . . . . . . . . . . . . . . . . . . . . . . . . . . . . . . . . . . . . . . . . 50
Creating Loops . . . . . . . . . . . . . . . . . . . . . . . . . . . . . . . . . . . . . . . . . . . . . . . . . . . . . . . . . 55
Trimming Audio . . . . . . . . . . . . . . . . . . . . . . . . . . . . . . . . . . . . . . . . . . . . . . . . . . . . . . . . 59
Selecting Loop Window Colors . . . . . . . . . . . . . . . . . . . . . . . . . . . . . . . . . . . . . . . . . . . . . . 59
Selecting a Different Sample Editor . . . . . . . . . . . . . . . . . . . . . . . . . . . . . . . . . . . . . . . . . . 59
Chapter 5. Advanced Techniques . . . . . . . . . . . . . . . . . . . . . . . . . . . . . . . . . . . . . . . . . . . . 61
Templates . . . . . . . . . . . . . . . . . . . . . . . . . . . . . . . . . . . . . . . . . . . . . . . . . . . . . . . . . . . . 61
Using Trackers . . . . . . . . . . . . . . . . . . . . . . . . . . . . . . . . . . . . . . . . . . . . . . . . . . . . . . . . . 63
Filters . . . . . . . . . . . . . . . . . . . . . . . . . . . . . . . . . . . . . . . . . . . . . . . . . . . . . . . . . . . . . . . 67
Ensemble Instrument Performance Ideas . . . . . . . . . . . . . . . . . . . . . . . . . . . . . . . . . . . . . . 68
Other Effects and Tricks . . . . . . . . . . . . . . . . . . . . . . . . . . . . . . . . . . . . . . . . . . . . . . . . . . 70
iv Soft SampleCell Guide
Chapter 6. Soft SampleCell Menus . . . . . . . . . . . . . . . . . . . . . . . . . . . . . . . . . . . . . . . . . . . 73
File Menu . . . . . . . . . . . . . . . . . . . . . . . . . . . . . . . . . . . . . . . . . . . . . . . . . . . . . . . . . . . . . 73
Edit Menu . . . . . . . . . . . . . . . . . . . . . . . . . . . . . . . . . . . . . . . . . . . . . . . . . . . . . . . . . . . . . 74
Instrument Menu . . . . . . . . . . . . . . . . . . . . . . . . . . . . . . . . . . . . . . . . . . . . . . . . . . . . . . . 75
SampleCell Menu . . . . . . . . . . . . . . . . . . . . . . . . . . . . . . . . . . . . . . . . . . . . . . . . . . . . . . . 78
Preferences . . . . . . . . . . . . . . . . . . . . . . . . . . . . . . . . . . . . . . . . . . . . . . . . . . . . . . . . . . . 80
Windows Menu . . . . . . . . . . . . . . . . . . . . . . . . . . . . . . . . . . . . . . . . . . . . . . . . . . . . . . . . . 82
Appendix A. Using Soft SampleCell with Pro Tools . . . . . . . . . . . . . . . . . . . . . . . . . . . . . 83
Configuring Pro Tools for MIDI . . . . . . . . . . . . . . . . . . . . . . . . . . . . . . . . . . . . . . . . . . . . . . 84
Using DirectConnect . . . . . . . . . . . . . . . . . . . . . . . . . . . . . . . . . . . . . . . . . . . . . . . . . . . . . 85
Appendix B. Recording Samples . . . . . . . . . . . . . . . . . . . . . . . . . . . . . . . . . . . . . . . . . . . . . 89
Sampling with Pro Tools . . . . . . . . . . . . . . . . . . . . . . . . . . . . . . . . . . . . . . . . . . . . . . . . . . 89
Using Sound Libraries . . . . . . . . . . . . . . . . . . . . . . . . . . . . . . . . . . . . . . . . . . . . . . . . . . . . 89
Appendix C. MIDI Controller Numbers . . . . . . . . . . . . . . . . . . . . . . . . . . . . . . . . . . . . . . . . 91
Index . . . . . . . . . . . . . . . . . . . . . . . . . . . . . . . . . . . . . . . . . . . . . . . . . . . . . . . . . . . . . . . . . . . . . 95
Contents v
vi Soft SampleCell Guide
chapter 1
Getting Started With Soft SampleCell
Thank you for purchasing Soft SampleCell.
Soft SampleCell adds powerful sample editing
and playback capabilities to your computer.
You can use sounds from CD-ROM sample libraries or import your own digitally-recorded
sounds and edit them to meet your needs. You
can then control sample playback from any
MIDI device or MIDI software.
When used with Pro Tools, Soft SampleCell becomes a fully-integrated, dedicated sampler
within the Pro Tools 24-bit recording, editing
and mixing environment.
Soft SampleCell features include:
• Up to 64 voices
• Sample RAM limited only by computer RAM
(up to 1 gigabyte)
• 16- and 24-bit mono and stereo audio playback
• 44.1 and 48 kHz audio playback
System Requirements
To use Soft SampleCell you’ll need:
◆ A Digidesign-qualified Power Macintosh computer with:
• At least 32 MB RAM; 128 MB RAM recommended
• Additional RAM is highly recommended if
you plan to use other audio or MIDI applications concurrently with Soft SampleCell;
virtual memory is not supported
◆
Apple System software version 9.0.4 or later
◆ OMS (Open Music System) software version
2.3.8 or later (included with Soft SampleCell)
◆ A 17-inch or larger color monitor; black and
white monitors are not supported
◆ A Digidesign-qualified floppy drive, along
with the appropriate driver software (included
on the Soft SampleCell Installer CD-ROM); required to authorize Soft SampleCell
• 4-pole, 24 dB per octave, resonant lowpass filter
• 3 envelopes, 2 LFOs and 1 filter per voice
• Unique modulation matrix
• Integrated loop editor
• Tracking generator
• Total setup recall when used with DirectConnect
Chapter 1: Getting Started With Soft SampleCell
1
MIDI Requirements
You must install and configure OMS (Open Music System) software version 2.3.8 or later to use
Soft SampleCell with MIDI devices. See “Configuring OMS” on page 4.
Both USB and serial MIDI interfaces work effectively with Soft SampleCell. Serial MIDI interfaces offer the best possible MIDI timing.
Serial MIDI interfaces require either a Mac serial port or a qualified modem-to-serial port
adapter (thereby not using a PCI slot). Refer to
Digidesign's Web site for supported adapters.
◆
Additional Equipment
Depending on your needs, the following items
may also be required:
• An audio monitoring system such as a mixer,
power amplifier, and speakers
• MIDI controller keyboard (or other MIDI controller device) and MIDI cables to trigger playback of Soft SampleCell using MIDI
• MIDI sequencing software compatible with
OMS
If you are using Soft SampleCell with Mark
of the Unicorn’s Digital Performer or other
software that is compatible with FreeMIDI™, you must set Free MIDI to OMS
compatibility mode. For details, refer to the
FreeMIDI documentation.
Compatibility Information
For the latest compatibility information, visit
Digidesign's Web site:
www.digidesign.com/compato/
2
Soft SampleCell Guide
Conventions Used in This
Guide
Digidesign guides use the following conventions to indicate menu choices and key commands:
Convention
Action
File > Save
Session
Choose Save Session from the
File menu
Control+N
While pressing the Control key,
press the N key
Option-click
While pressing the Option key,
click the mouse button
The following symbols are used to highlight important information:
User Tips are helpful hints for getting the
most from your system.
Important Notices include information that
could affect your data or the performance of
your system.
Cross References point to related sections in
Digidesign guides.
Installing Soft SampleCell
Authorizing Soft SampleCell
To install Soft SampleCell, use the Installer
CD-ROM. There are two install options:
When you launch Soft SampleCell Editor for the
first time after installing, you will be prompted
to authorize Soft SampleCell.
Soft SampleCell Select this option to install
Soft SampleCell.
◆
Digi System Files. Select this option only if you
need to update an older, pre-Pro Tools 5.1 version DAE and other Digidesign System files.
To install Soft SampleCell:
1 Insert the Installer CD-ROM in your CD-ROM
drive and double-click the Installer.
The Authorizer diskette authorizes a single system to use Soft SampleCell. This diskette also allows you to reclaim the authorization if necessary.
Do not lose the Authorizer diskette. You
will not be able to complete an installation
without it. Keep the disk in a safe place.
To authorize Soft SampleCell:
2 Select the desired install option.
3 Click Install.
4 When installation is complete, click Quit.
Register and Receive a Backup
Authorizer Diskette
When you send in the Registration Card,
Digidesign will mail you an additional authorization disk for Soft SampleCell. If you are an international customer, refer to the list of international distributors included with your
registration package.
1 Launch the Soft SampleCell Editor application.
2 Insert the Authorizer diskette when
prompted.
3 When authorization is complete, click Done.
You can use the Authorizer diskette as a
backup authorization key when you have
used all available authorizations. Launch
Soft SampleCell Editor and insert the diskette when prompted for authorization.
Chapter 1: Getting Started With Soft SampleCell
3
Deauthorizing
Soft SampleCell
If you want to authorize a different hard drive to
use Soft SampleCell, you must reclaim the original Soft SampleCell authorization key since authorization is limited to a single drive.
Similarly, if you plan to low-level reformat a
hard drive containing an authorization key, you
must first reclaim the authorization or it may be
lost.
■ If not yet installed, install the OMS software
included with your Soft SampleCell package.
■ If OMS is already installed and configured,
you’ll need to update your current Studio Setup
to recognize Soft SampleCell.
To update your current OMS Studio Setup:
1 Connect your MIDI interface, keyboard controllers, and other MIDI devices. Refer to their
documentation if necessary.
To deauthorize Soft SampleCell:
2 Turn on the MIDI devices and start your computer.
1 Insert the Authorizer diskette into the diskette
drive.
3 Launch the OMS Setup application.
2 Double-click the DeAuthorizer application.
3 Click Setup. From the Authorization pop-up
menu, select Remove, then select the appropriate hard drive. (The drive with the authorization
key is indicated by a “key” icon.)
4 Choose Studio > MIDI Cards and Interfaces.
OMS searches for and locates your MIDI devices
and the Soft SampleCell driver and displays
them in your Studio Setup document.
5 Double-click the Soft SampleCell icon to con-
4 Click Remove.
figure its MIDI Device Info dialog.
5 When deauthorization is complete, click
Done, then Quit to return to the Finder.
Check that it is set it to receive on all channels
(1–16), unless you only want it to receive MIDI
on certain channels, then click OK.
Configuring OMS
To use Soft SampleCell with OMS-compatible
MIDI applications, or to use the MIDI services in
the Soft SampleCell Editor, you’ll need to install
and configure the Open Music System (OMS).
OMS keeps track of how your MIDI studio is
connected and configured and stores this information in Studio Setup documents, which are
edited in the OMS Setup application. OMS also
routes MIDI between Soft SampleCell, OMScompatible sequencers, and MIDI interfaces.
4
Before you begin:
Soft SampleCell Guide
6 Choose File > Save and Make Current, then
Quit.
To create a new OMS Studio Setup:
1 Connect your MIDI interface, keyboard controllers, and other MIDI devices. Refer to their
documentation if necessary.
2 Turn on the MIDI devices and start your computer.
3 Launch the OMS Setup application.
4 Choose File > New Studio Setup.
OMS searches for and locates your MIDI devices
and the Soft SampleCell driver and displays
them in your Studio Setup document.
5 Double-click the Soft SampleCell icon to con-
figure its MIDI Device Info dialog.
Check that it is set it to receive on all channels
(1–16), unless you only want it to receive MIDI
on certain channels, then click OK.
Configuring
Soft SampleCell
Before you can use Soft SampleCell, you must
configure several parameters such as voice polyphony, sample memory and sound output using the Soft SampleCell Setup dialog.
Following are descriptions of these parameters
and instructions for configuring them.
6 Choose File > Save and Make Current, then
Quit.
In Soft SampleCell:
1 Launch Soft SampleCell Editor.
2 Choose SampleCell > OMS Input Devices.
3 Select the MIDI controller and other devices
that you will use to play Soft SampleCell.
4 To improve MIDI performance, disable any
devices that you will not use for MIDI control of
Soft SampleCell.
Soft SampleCell Setup dialog
Using Free MIDI
Sound Output
If you are using Soft SampleCell with software
that is compatible with Mark of the Unicorn’s
FreeMIDI™, you must set Free MIDI to OMS
compatibility mode. For details on configuration, refer to the FreeMIDI documentation.
There are three sound output options:
DirectConnect Choose this option if you have
Digidesign audio hardware and want to use
Soft SampleCell within Pro Tools or another
DAE-compatible digital audio application such
as Logic Audio or Digital Performer. In this case,
you will use your Digidesign audio interface for
audio connections. DirectConnect allows up to
32 independent Soft SampleCell outputs to be
routed within DAE-compatible applications.
Chapter 1: Getting Started With Soft SampleCell
5
Direct I/O Choose this option if you have
Digidesign audio hardware but wish to run
Soft SampleCell as a stand-alone application.
You will still use your Digidesign audio interface
for audio connections. Direct I/O allows up to
16 analog or digital outputs for Soft SampleCell
using Digidesign hardware.
Sound Manager Choose this option if you do not
have Digidesign audio hardware. In this case,
you will use the sound output jack of your Macintosh for audio connections. The Macintosh
Sound Manager allows a maximum of 2
Soft SampleCell outputs.
Soft SampleCell defaults to Sound Manager
output when first installed. Use the
Soft SampleCell Setup dialog to change to a
different sound output option if desired.
Sample Memory
The amount of RAM available for sample playback is limited only by the amount of RAM in
your computer. You can set a memory allocation limit using the Sample Memory pop-up.
Avoid setting this limit too high or other applications (including Mac OS) may not have
enough memory to function properly.
Setting Sample Memory to “All” allocates
all memory in your computer to sample
playback, leaving none for other applications. This may result in system performance problems. It is recommended that
you leave a least 10% of total system RAM
free for other applications.
To check available RAM:
Audio Latency
1 Open Soft SampleCell Editor and all other audio applications you’ll be using simultaneously.
Because Soft SampleCell uses the processor in
your computer for audio tasks, a small amount
of audio delay, or latency, will occur depending
on the sound output option you choose. The
lower the latency setting the higher the load on
your CPU.
2 Go to the Finder and choose About This Computer from the Apple menu. The amount of
available RAM is shown as “Largest Unused
Block.” For reliable system performance, set
Soft SampleCell’s Sample Memory allocation
limit well below this amount.
You can set the latency to Low or High. Selecting Low latency reduces the amount of audio
delay, but may also reduce Soft SampleCell
voice polyphony. Selecting High latency increases the amount of audio delay, but allows
maximum Soft SampleCell voice polyphony.
When DirectConnect is chosen as the
sound output option, you cannot manually
set audio latency. DirectConnect manages
audio latency automatically. See the
Pro Tools Reference Guide for more information.
6
Soft SampleCell Guide
Checking available RAM
Voice Polyphony
Soft Sample provides a maximum of 64 voices of
sample playback. However, maximum polyphony depends on the of speed of your computer.
Slower CPUs may provides fewer than 64 voices.
For optimum system performance, allocate only
as many voices as you need.
To configure Soft SampleCell:
Testing Playback
You can use the Soundcheck demo Bank included
with Soft SampleCell to do a quick check of your
audio and MIDI connections.
If you have chosen DirectConnect as your
sound output option, set it to Direct I/O or
Sound Manager for this test. After the test,
you can reset it to DirectConnect.
1 Launch Soft SampleCell Editor.
To test your audio and MIDI connections:
2 Choose SampleCell > Soft SampleCell Setup.
3 Choose the appropriate Sound Output option.
If you choose Direct I/O, click Hardware Setup
and configure output options for your particular
Digidesign card and interface, then click Done.
If you choose Direct I/O or Sound Manager, select either High or Low latency depending on
your performance needs.
4 Using the Sample Memory pop-up, set the desired memory allocation limit for sample playback.
5 Using the Number of Voices pop-up, set the
desired number of voices.
6 Click OK.
1 In the Soft SampleCell Editor application,
choose File > Open.
2 Select the Soundcheck demo Bank and click
Open.
3 Double-click the Basic Left Instrument to open
the Sample Map window.
4 In the Sample Map window, click on the keyboard to hear sample playback.
5 Play your MIDI keyboard controller and confirm MIDI communication.
6 Make sure the right and left channels of your
audio outputs are correctly connected by clicking the Solo button and playing the Basic Left
Instrument. Repeat for the Basic Right Instrument.
Allocating more voices than your CPU can
power may result in pops and clicks during
playback. Choose SampleCell > Soft SampleCell Setup and if Soft SampleCell is using more than 50% of the CPU, use the
Soft SampleCell Setup dialog to reduce voice
polyphony.
Chapter 1: Getting Started With Soft SampleCell
7
Enabling Background MIDI
Playback and Input Devices
Soft SampleCell Editor routes MIDI (via OMS)
from your keyboard controller to any Instruments assigned to the channel sent by your keyboard.
If you are using Soft SampleCell as a stand-alone
application, you will need to enable your MIDI
controller and other MIDI input devices so that
you can use them with Soft SampleCell.
To enable MIDI input devices:
You can also trigger Soft SampleCell Instruments from a MIDI keyboard when
Soft SampleCell Editor is not the current application by enabling background MIDI operation in
OMS MIDI Setup. This option also allows an
OMS-compatible sequencer to continue MIDI
playback when it is no longer the current application—thereby allowing you to audition
changes in Soft SampleCell Editor while the sequencer continues playing.
1 In the Soft SampleCell Editor application,
choose SampleCell > OMS Input Devices.
Keep in mind that when Run MIDI in Background is enabled, and both the Soft SampleCell
Editor and your sequencer are echoing MIDI
thru to the same Instrument, double-notes will
occur.
Enabling OMS input devices
To avoid this problem, make sure the Pass MIDI
Thru in Background option is deselected in the
Soft SampleCell Preferences dialog if you have
enabled MIDI in Background in OMS MIDI
Setup.
To enable background MIDI:
1 In Soft SampleCell Editor, choose SampleCell
> Preferences.
2 Choose SampleCell > MIDI Setup.
3 In the OMS MIDI Setup dialog, select Run
MIDI in Background.
4 Click OK.
8
Enabling OMS Input Devices
Soft SampleCell Guide
2 Select the devices that you want to use and
click OK.
chapter 2
Using Banks and Instruments
This chapter covers the fundamentals of using
Banks and Instruments in Soft SampleCell Editor.
For information on creating Instruments and
Banks from scratch, using your own samples, refer to Chapter 3, “Creating and Modifying Instruments.”
Instruments
An Instrument consists of one or more samples
that are assigned to different ranges of keys and
velocities.
SampleCell File Types
Instrument (top) and sample files
Samples
Many modulation options such as envelopes
and LFOs can be employed at the Instrument
level.
A sample is the raw waveform data of a sampled
sound.
Banks
Sample file
Instruments are combined into performance
groups called Banks.
SampleCell has no direct provision for recording
digital waveforms, or samples. A great number
of samples are available from third party sound
developers.
Samples can also be recorded with
Pro Tools. See Appendix B, “Recording
Samples.”
Bank (top), Instrument and sample files
Samples cannot be directly played with
Soft SampleCell—they must be loaded into an
Instrument.
Chapter 2: Using Banks and Instruments
9
Banks are where various Instruments are assigned to outputs, panned, and attenuated.
Each Instrument in a Bank can be assigned to respond to a different MIDI channel and range of
notes for use as a multi-timbral sound module
with a sequencer (or other device capable of
transmitting multiple MIDI channels).
A Samples folder typically contains only raw
samples, organized according to their Instruments.
Instruments cannot be opened into multiple
Banks, open at the same time, but can be copied
and pasted.
Banks are good for organizing all the Instruments needed by a song or MIDI sequence into
a single document, or for putting all the elements of a submix (different stems or music/effects instruments) together on one screen view.
To avoid stuck notes, stop your sequencer
when opening Bank or Instrument files, or
while opening the Edit Loops window.
File hierarchy
When you work with your own samples, it is a
good idea to create folders for Banks, Instruments, and Samples in the same manner, to
keep everything organized.
Opening a Bank
CD-ROM File Structure
The file structure on many third-party sample library CD-ROMs reflects the hierarchy outlined
in the previous section. Samples, Instruments,
and Banks are all kept in folders that bear those
respective titles.
To open an existing Bank, follow the instructions.
To load an existing Bank:
1 Choose File > Open.
A Banks folder typically contains Bank files,
each of which generally contains one or more
Instruments.
An Instruments folder typically contains Instrument files, each of which is linked to its associated samples.
These nested folders make it easier to keep track
of the Instruments stored on the CD-ROM by
category, such as Guitars, Synths, or Woodwinds.
10
Soft SampleCell Guide
Opening a Bank
2 Select the Bank and click Open.
Finding Files
All selected instruments will be loaded. To skip
specific instruments, deselect them.
If Soft SampleCell cannot locate an Instrument
or sample needed to load a Bank or Instrument,
the Find File dialog appears.
To locate missing files:
■ Choose the search destination in the pop-up
menus at the bottom of this dialog and click
New Search.
Select Instrument dialog
If you are using Soft SampleCell in addition
to a Digidesign SampleCell II card, you can
use the SampleCell pop-up menu in the dialog to choose where you want the Instrument loaded.
3 Click OK.
Insufficient RAM
If there is not enough RAM available to load all
samples for one or more Instruments in a Bank,
Instruments will be loaded without sample data.
You can check for unloaded samples by opening
the Sample Map window for a specific Instrument. (See “Sample Maps” on page 25.) Unloaded samples are indicated by italics.
Find File dialog
If the “Preview Using Sound Manager” preference is selected in the SampleCell Preferences dialog, you can audition samples in the Find File
dialog by selecting a sample file’s name and
clicking Play. Click the button a second time to
stop playback.
Sample Loading Priority
Once a Bank of Instruments is open, you can
control the order in which their samples are
loaded in the future by rearranging the Instrument order of the Banks. Instruments (and their
samples) are loaded in left-to-right priority
when in full height view and in top-to-bottom
priority when in small height view. (See “Bank
Views” on page 12.)
Chapter 2: Using Banks and Instruments
11
Working with Banks
When a Bank opens, the Bank window appears.
you will use this window to set Instrument levels, panning, outputs and other parameters.
To change Bank view:
■ Choose Windows > Switch Bank Size or press
Command+B.
By default, Soft SampleCell displays Banks in
large Bank view. To conserve screen space, you
can change this default to small Bank view.
Bank Views
SampleCell offers two Bank views, large Bank
view and small Bank view. Large Bank view displays a full height channel strip for all Instruments in the Bank. Small Bank view displays all
Instruments in a compact, row-style view.
To set the default Bank View to Small Bank View:
1 Choose SampleCell > Preferences.
2 Select Default to Small Bank View and click
OK.
Creating a New Bank
You can create your own Banks to group frequently-used Instruments or together.
When working with Instruments and samples
from multiple sources (multiple CD-ROMs, for
example) you may want to organize the files
from each volume into their own Bank. This can
greatly simplify things when you save a Bank
that contains Instruments and/or samples from
multiple CD-ROMs.
To create a new Bank:
1 Choose File > New.
Large Bank view
Select Document Type dialog
Small Bank view
12
Soft SampleCell Guide
2 Select Bank, and click OK.
You can now add existing Instruments to the
Bank or create your own new Instruments from
scratch. (See Chapter 3, “Creating and Modifying Instruments.”)
Choose File > Save Bank As. This lets you batchsave samples and Instruments to new locations,
such as when saving from CD-ROM to hard disk.
Samples can also be selected and loaded using
this dialog box. The selected sample will be
loaded into a new, single-sample Instrument in
the current Bank, or into a new Bank if there are
no open Banks
If any of the samples used by an Instrument are
already in memory, they will not be reloaded.
Loading Instruments into a Bank
You can add Instruments to a new, empty Bank
or add additional Instruments to an existing
Bank, RAM permitting.
To load Instruments into an open Bank:
1 Choose File > Open.
2 Select an Instrument and click Open.
Instrument as it appears in a Bank
3 Repeat for any additional Instruments.
You can also open instruments by dragging
and dropping their icon on the
Soft SampleCell Editor in the Finder.
To avoid stuck notes, avoid opening Banks,
Instruments, or SampleCell Editor’s Loop
window during sequencer playback.
Opening an Instrument
Chapter 2: Using Banks and Instruments
13
Multiple Banks
Multiple Banks can be open and active at the
same time. For example, different Banks could
contain Instruments for different songs or sets.
Or, one Bank might contain a rock drum set,
while another contains a jazz set. You will probably find that this modular approach makes
configuring Banks and Instruments easier across
a variety of songs and sources.
Unless you have copied the samples to your
hard drive, avoid putting files from more than
one CD-ROM into the same Bank or you may
have to repeatedly swap discs to load all of the
files.
Using More Than One Copy of an
Instrument in a Bank
A common production technique entails using
two identical Instruments slightly detuned from
each another to fatten their sound. To implement this type of effect, you’ll need to create
two identical Instruments in a Bank.
However, since Soft SampleCell will not allow
you to load the same Instrument into a Bank
twice, you’ll need to copy and paste the instrument to duplicate it.
To duplicate an Instrument in a Bank:
1 Select the Instrument to be copied by clicking
its Name.
2 Choose Edit > Copy Instrument.
3 Choose Edit > Paste.
14
Soft SampleCell Guide
Controlling Samples Used in Multiple Instruments
When you copy and paste to duplicate an Instrument, some Sample Parameters such as Panning can be edited independently for each Instrument.
Other Sample Parameters, including Sample
Start Coarse/Medium and Loop Detune are global adjustments and will affect all Instruments
that use that sample. This is because copied Instruments reference the same samples. This allows Soft SampleCell to conserve RAM.
Deleting Instruments From a Bank
Instruments can be removed from Banks.
To delete an Instrument from a Bank:
1 Select the Instrument by clicking its Name in
the Bank window.
2 Choose Edit > Clear Instrument or press the
Delete key.
Alternate Data Entry Methods
Most Soft SampleCell Instrument and Bank parameters are controlled by on-screen sliders and
buttons. You can also use your MIDI keyboard
controller or computer keyboard to enter parameter values.
2 Play the desired note on your MIDI keyboard
controller.
Using a Computer Keyboard
You can also use your computer keyboard for
quick entry of parameter values.
To adjust a value with a computer keyboard:
Using MIDI Continuous Controllers
You can adjust an on-screen control using a
MIDI continuous controller such as a mod
wheel, joy stick, or MIDI data slider.
To adjust a control using a MIDI controller:
1 Control-click the control you want to adjust.
A MIDI icon appears.
1 Control-click the parameter’s text box. A MIDI
icon appears.
2 Press the up arrow, right arrow, or plus (+) key
on your computer to increase the value.
3 Press the down arrow, left arrow, or minus (-)
key on your computer to decrease the value
4 To exit keyboard-entry mode, click anywhere
on screen.
Mapping a Pan control to an external MIDI controller
2 Move the MIDI continuous controller. The parameter value is adjusted accordingly.
To unmap the MIDI controller:
■
Click anywhere on screen.
To reset an on-screen control to its default value:
■
Option-click the control.
Using MIDI Note Numbers
Some parameters use MIDI Note Numbers for
their values. For these parameters, you can enter
a value by playing the corresponding note on
your MIDI controller.
To enter a MIDI note number using a MIDI device:
1 Control-click the parameter’s text box. A
small MIDI icon appears.
Chapter 2: Using Banks and Instruments
15
Setting MIDI Channel
The MIDI channel of existing Instruments can
be set with the MIDI channel pop-up menu on
the Instrument strip.
To change the lowest MIDI note an Instrument will
respond to:
1 Click the small keyboard icon to the right of
Lo. A pop-up keyboard will appear.
To set an Instrument’s MIDI channel:
1 Click the number above the MIDI Chan indicator. A pop-up menu will appear.
Setting the Lo MIDI Note
Setting the MIDI Channel (Small Bank View shown)
2 Drag until the desired channel number is
highlighted.
When creating new Instruments,
Soft SampleCell can assign a unique MIDI
channel automatically to each new Instrument. For details, see “Instruments Preferences” on page 81.
Setting MIDI Zones
When an Instrument is first loaded into a Bank,
it responds to the entire range of MIDI notes.
This response range can be changed for each Instrument. For example, to create a split keyboard you might want a bass sound to respond
only to notes below C2 and an organ to respond
to notes C2 and above. The Hi/Lo Note pop-up
keyboards provide quick ways to define split
points by setting the lo and hi note range for the
Instrument.
16
Soft SampleCell Guide
2 Drag along the keyboard until the desired
note is highlighted. The Instrument will no
longer respond to notes below the one you have
selected.
To change the highest MIDI note an Instrument
will respond to:
1 Click the small keyboard icon to the right of
Hi. A pop-up keyboard will appear.
2 Drag along the keyboard until the desired
note is highlighted. The Instrument will no
longer respond to notes above the one you have
selected.
You can also Control-click the Hi/Lo value and
enter a new value by playing a note on your
MIDI keyboard.
MIDI Channel and MIDI Zones can be
saved as Instrument defaults. For information on the Set Instrument Default command, refer to Chapter 6, “Soft SampleCell
Menus.”.
Assigning Audio Outputs
Only one output pair can be selected for any Instrument at one time.
It’s no coincidence that the Instrument control
panels bear a strong resemblance to a mixing
console. The functions are almost identical,
with each Instrument acting much like a channel on a traditional console.
If you are using Soft SampleCell with Pro Tools
and DirectConnect, changing these analog output assignment controls also changes signal
routing.
Each Instrument can be routed to any one of the
Soft SampleCell audio output pairs. The number
of outputs depends on the sound output option
chosen on the Soft SampleCell Setup dialog. See
“Sound Output” on page 5.
Just as you might have piano, bass, and drums
receiving on separate MIDI channels, their respective audio outputs could be routed to three
different stereo outputs. These could, in turn, be
routed to three separate stereo pairs on a mixing
console for submixing.
Similarly, each output pair in a film or video
post session might be dedicated to a different
stem (such as music and effects, Foley, atmospherics).
To assign an Instrument to an audio output pair:
Click the Output button associated with the
desired output pair. The Instrument’s audio will
appear only on the corresponding outputs.
■
Audio Output can be saved as an Instrument default. For information on the Set Instrument Default command, see “Set Instrument Defaults” on page 77.
Instrument Panning
Panning determines the balance of the Instrument within the selected stereo output pair. For
example, if Output 1-2 is selected, panning all
the way to the left sends a Mono Instrument
only to Output 1; panning all the way to the
right would send the Instrument to Output 2
only.
Stereo Instruments output odd numbered channels to hard left, even numbered channels hard
right.
The Instrument Pan slider shifts the center of
the Instrument’s stereo image. Negative values
weight the sound toward the left output, positive values weight the sound toward the right
output.
To change the panning of individual samples
within the Instrument’s stereo image, see “Key
Group Panning” on page 34.
Key group panning mainly works as an offset for an Instrument’s main Pan control.
You cannot use it to pan one sample hard
left and another one hard right in the same
instrument.
Setting the Output Channels
Chapter 2: Using Banks and Instruments
17
To pan an Instrument within the selected output
pair:
To solo an Instrument:
■
Drag the Pan control in the desired direction.
The number inside the slider indicates the exact
amount of panning.
Click the Instrument’s Solo button.
■
To return to normal operation, click Solo again.
Option-click to unsolo all Instruments.
Instrument Volume
An Instrument’s master volume is attenuated
with its Volume Fader.
To change the volume of an Instrument:
Instrument Pan control
For information about modulating panning
with LFOs or other modulation sources, see
“Matrix Modulation” on page 43.
■ Drag the Instrument’s Volume Fader to the desired level. A numeric readout is provided for exact measurement.
Instrument Panning can be saved as an Instrument default. For information on the Set
Instrument Default command, see “Set Instrument Defaults” on page 77.
Muting and Soloing an Instrument
Like a mixing console, muting silences the associated Instrument, while soloing ensures that
only the selected Instruments are heard.
More than one Instrument can be muted or soloed at the same time. Soloing an Instrument
mutes all other Instruments in all open Banks.
Solo and Mute buttons
To mute an Instrument:
■
Click the Instrument’s Mute button.
To return to normal operation, click Mute again.
Option-click to unmute all Instruments.
18
Soft SampleCell Guide
Instrument’s Volume Fader
Control-click the Volume Fader to temporarily map
a MIDI controller (mod wheel, etc.) to Instrument
volume.
Instrument Volume can be saved as an Instrument default. For information on the Set
Instrument Default command, refer to
Chapter 6, “Soft SampleCell Menus.”.
Comments for Instruments and
Banks
Instrument Tuning
SampleCell lets you enter comments about Instruments and Banks. Comments are displayed
in the Open File dialog when you select a particular Bank or Instrument.
SampleCell has no global Bank tuning controls.
Instead, each Instrument has its own individual
tuning parameters. These controls are found in
the Misc window of each Instrument.
To enter or edit comments for a Bank:
To access the tuning controls for an Instrument:
1 With a Bank file open and no Instruments se-
lected, choose File > Get Bank Info.
2 Enter or edit comments as desired.
1 Select the Instrument in the Bank window.
2 Choose Windows > Misc Parameters or click
the Misc button in the Bank toolbar.
3 When you close the window, your comments
will be stored in the current Bank file.
Misc button
To enter or edit comments for an Instrument:
4 Select an Instrument within a Bank and
choose File > Get Instrument Info or click the
Info button.
info button
5 Enter or edit comments as desired.
6 When you close the window, your comments
will be stored in the current Bank file.
Misc Window
To transpose the Instrument’s octave:
Comments associated with Instruments are also
entered in this window. These comments remain associated with these Instruments when
they are used in other Banks as well.
■ Drag the Pitch Octave slider to the appropriate position. The range can be adjusted up three
octaves and down four octaves from the original
pitch.
To transpose an Instrument in half-steps:
■ Drag the Pitch Semitone slider to the appropriate position. The range can be adjusted ±12
semitones from the original pitch.
Chapter 2: Using Banks and Instruments
19
Fine-tuning is extremely valuable when a chorused or detuned effect is desired between two
identical copies of an Instrument.
If you use extreme transposition, you may
begin to hear adjacent samples in the Sample Map. For better control over the pitch
range for a single sample, create a new instrument for the sample and use the Hi/Low
key controls to specify the desired pitch
range within which the sample can be
played.
To fine-tune or detune an Instrument:
Drag the Detune slider to the appropriate position. The range can be adjusted ±1/4 tone from
the original pitch.
■
Each sample can be individually tuned
from within the Sample Parameters window. See “Sample Parameters Window” on
page 33 for details.
Equal Detune
The Detune controls respond differently in different ranges of an Instrument, depending on
the Equal Detune setting in the Misc window.
Equal Detune Off When Equal Detune is off,
Soft SampleCell playback is based on equal-tempered (exponential) tuning and the Detune
slider changes the tuning of all notes by the selected number of cents (a cent = 1/100th of a
semitone). In other words, a minus 5 cents detuning will have the same perceived effect
throughout the entire range of an Instrument.
A1 will sound “as flat” as A6, or D7. This is because the offset in cents is logarithmic.
Equal Detune On When Equal Detune is on, the
frequency is detuned by a constant Hz value
across the whole scale. If you have two samples,
and one is very slightly detuned from the other
20
Soft SampleCell Guide
in Equal Detune mode, the two samples will
“beat” against each other at the same rate across
the entire range of the keyboard.The amount of
pitch shift varies with frequency:
◆ If a sample is played at its MIDI Root Note, the
Detune slider has a range of plus or minus one
semitone (half step).
◆ If a sample is played one octave below its
MIDI Root Note, the Detune slider has a detune
range of plus or minus one whole step (two
semitones).
◆ If a sample is played one octave above its
MIDI Root Note, the Detune slider has a detune
range of plus or minus a quarter tone.
Experiment with the Equal Detune option on
non-western Instruments or early Instruments.
Or, use it when trying to match loops to other
beats. It could provide the subtle change in
speed (playback speed/pitch) you need to lock
down a groove.
Saving a Bank
Once you have configured a Bank with Instruments and their basic settings, you’ll want to
save the Bank so that it can be retrieved for future use.
You can save all Instruments and samples associated with a Bank by using the Save Bank As
command.
Soft SampleCell doesn’t automatically distinguish between samples, Instruments and
Banks, making it possible to overwrite a
sample if you accidentally save an identically named Instrument to the same location. For safety’s sake, create separate folders for Banks, Instruments, and samples.
To save the current Bank with its original name
and destination:
■
Choose File > Save Bank.
If the Save Bank command doesn’t appear
in the File menu, it is because an Instrument is currently selected on screen in the
Bank window. Deselect the Instrument by
clicking an empty area in the Bank window
before saving a Bank.
Saving a Bank and Instruments
4 Select “Save all referenced samples to a new lo-
cation” if you want to save new copies of the
samples associated with each Instrument.
To save all changed Instruments and Banks:
■
Choose File > Save All Changed.
Closing a Bank
To close an open Bank:
■ Click the Bank window’s Close Box or choose
File > Close.
For more information on closing
Soft SampleCell Banks, see “Automatically
delete unused samples” on page 80.
To save a Bank with a new name or destination:
1 Choose File > Save Bank As.
2 Enter a name and choose the destination for
the Bank.
3 Select “Save all instruments to a new location”
if you want to save new copies of the Instruments associated with the Bank.
Chapter 2: Using Banks and Instruments
21
Saving an Instrument
Most parameters discussed in this chapter are
saved as part of a Bank, as well as with the Instrument. If you change the Instrument Comment or any parameter associated with an Instrument, however, the Instrument must be
saved in order to preserve those changes.
While you will be automatically prompted to
save these Instrument changes if you close a
Bank, you can also save an Instrument manually.
To save an Instrument with its original name and
destination:
■
Choose File > Save Instrument.
If the Save Instrument command doesn’t
appear in the File menu, it is because the Instrument is not currently selected on screen
in the Bank window. Select the Instrument
by clicking it before saving.
To save an Instrument with a new name or
destination:
1 Choose File > Save Instrument As.
2 Enter a name and choose the destination for
the Instrument.
3 Select “Save all referenced sample to a new location” if you want to save new copies of the
samples associated with the Instrument.
To save all changed Instruments and Banks:
■
22
Choose File > Save All Changed.
Soft SampleCell Guide
chapter 3
Creating and Modifying Instruments
This chapter explains the Instrument editing
features of Soft SampleCell.
Soft SampleCell controls for Instrument Volume, Pan, Audio Output, MIDI Channel and
Range are associated with Banks. Banks group
these controls together with performance parameters. For more information on Banks, see
Chapter 2, “Using Banks and Instruments.”
Sample Map Window
The Sample Map window has controls for mapping samples to various ranges of MIDI notes
and velocities.
Misc Parameters window
Instrument Basics
An Instrument is a group of samples mapped to
specific keys so that it can be played using a
MIDI controller or sequencer. Instruments can
be loaded from CD-ROM and edited, or new Instruments can be created and configured with
custom samples, key maps, and modulation settings.
Each Instrument has its own customizable parameters that are accessible by clicking the following buttons on the Edit toolbar:
The Misc Parameters window has controls for tuning, priority, overlap, velocity response, pitch
wheel, and filter amount. In addition, there are
checkboxes for Instrument Crossfade, Monophonic, Key Track, Equal Detune and Disable
MIDI Volume/Pan.
Envelope Window
The Envelope window provides 3 four-point envelopes with additional controls for Key Track, Envelope Amount and Gate Time.
Chapter 3: Creating and Modifying Instruments
23
Matrix Modulation Window
The Matrix Modulation window is a modulationmapping tool that lets you create a mapping between a large number of modulation control
sources to destination parameters.
Modulators Window
The Modulators window provides 2 LFOs with
variable speed, amplitude, shape and trigger
mode. In addition, a Ramp Generator and 2
variable MIDI Controllers are provided.
Trackers Window
Creating New Instruments
There are two basic instrument types: singlesample Instruments and multi-sample Instruments. Instruments can be either mono or stereo.
Single-Sample Instruments
Single-sample Instruments have a single Key
Group, a single Velocity Zone, and no modulation paths (sound effects and loops are often
single-sample Instruments). Because of this, Envelope, Matrix, Modulators or Trackers are not
available for single-sample Instruments.
Multi-Sample Instruments
Multi-sample Instruments can have multiple
Key Groups, multiple Velocity Zones, and many
modulation paths. Multi-sample Instruments
can also be edited using any of the Instrument
editing windows. Soft SampleCell can open a
maximum of 60 mono or 30 stereo instruments.
Mono or Stereo Instruments
The Trackers provide a nine-break point graph
for plotting custom response curves for any parameter.
Instruments can be mono or stereo. The
mono/stereo characteristic of the samples you
plan to use in the Instrument will determine
how you should define the new Instrument itself. Soft SampleCell can open a maximum of 60
mono or 30 stereo instruments.
When mono samples are loaded into stereo
Instruments, the mono sample will use up 2
voices.
24
Soft SampleCell Guide
To create a new Instrument:
1 With a Bank already open, choose File > New
or click the Create New Instrument button in
the Edit toolbar.
To automatically create one or more new
Instruments:
■ In the Finder, drag any number of samples
onto Soft SampleCell Editor.
Sample Maps
Create New button
2 Select the type of Instrument you want to cre-
ate, then click OK.
At its most fundamental level, an Instrument
consists of samples that are mapped to various
ranges of MIDI notes (Key Groups) and velocities (Velocity Zones). This mapping can be
viewed, edited, and altered in the Sample Map
window.
To open the Sample Map window:
■ Click the Instrument’s Sample Map icon in
the Bank window, or double-click an Instrument
name.
Create New Instrument dialog
Auto-Creating Instruments
Sample Map icon
If you drag sample files onto the Soft SampleCell
Editor in the Finder, Soft SampleCell will automatically create new Instruments from them.
Key Mapping Basics
When the “Make One Instrument when Multiple Sound Files are Dragged Onto the Editor”
option is selected in the Preferences dialog
Soft SampleCell will create a single Instrument
from all dragged samples.
When this option is deselected, a separate Instrument will be created for each sample.
You cannot auto-create Velocity Zones. Velocity zones must be added individually.
Key mapping is the arrangement of multiple
samples across the playable range of a multisample Instrument.
Multiple samples are usually necessary to realistically reproduce the timbre and range of many
musical instruments. By recording multiple
samples that capture different frequency and
dynamic ranges, and mapping them to Key
Groups and Velocity Zones, it is possible to emulate the original source very realistically.
Chapter 3: Creating and Modifying Instruments
25
Sample Parameters
Instrument Select
Pop-up
New Key Group
Loop Window
Reload Sample
MIDI Selects Zone Checkbox
Change Sample
New
Velocity
Zone
Velocity Zone
Boundary
Velocity Zone
Velocity
Scale
Set Root Note
Order Key
Groups by
Root Note
Spread Key Groups
Key Group
MIDI Root Note
Keyboard
Key Group Boundary
Figure 1. Sample Map window
Key Groups
Samples are mapped along the horizontal axis to
various note ranges called Key Groups. The
number of Key Groups can be anywhere from a
single Key Group spanning the entire keyboard,
up to 60 different Key Groups (memory permitting).
Velocity Zones
Each Key Group contains Velocity Zones. Most
acoustic instruments and sounds in nature have
different timbres depending on their volume.
For this reason, velocity mapping is also em26
Soft SampleCell Guide
ployed (in addition to pitch mapping) so that
different samples that have been recorded at
varying intensities can be assigned to corresponding velocity ranges.
Soft SampleCell can have up to 6 samples/Velocity Zones per Key Group. The sample in the
Velocity Zone that matches the incoming MIDI
Velocity will be triggered.
The Sample Map window shown in Figure 1 illustrates an Instrument with 3 Velocity Zones
and 5 Key Groups.
Therefore, this Instrument is actually comprised
of 15 samples. The sample names bear a suffix
such as soft, med, or loud to indicate their intended Velocity Zone.
Velocity Zones can also be used to switch between completely different sounds. A classic example of this would be a bass guitar with a fingered bass in the lower Velocity Zone, and a slap
sample in the upper Zone. Notes played louder
would trigger the pop samples, while softer
MIDI velocities trigger regular finger plucked
bass.
3 Select a sample to import. You can select entire sound files or regions within sound files
New Key Group dialog
4 Click Play to audition the sample.
Adding/Importing Samples
Once you have created a new single- or multisample Instrument, you’re ready to add samples. You can add samples individually or in
groups.
To add a single new sample:
1 Choose Windows > Sample Map or click the
Sample Map icon.
2 Choose Instruments > New Key Group, or
click the New Key Group button in the Sample
Map window:
5 Click Open to load the selected sample. The
new Key Group is placed at C8.
6 Repeat to load additional samples.
When additional samples are added, the Key
Group to the immediate left is shrunk to accommodate the new samples. Any single-note Key
Groups are shuffled to the left by one note.
To add multiple samples:
1 Choose Instruments > Add Multiple Key
Groups.
New Key Group button
Add Multiple Key Groups dialog (Macintosh)
Chapter 3: Creating and Modifying Instruments
27
2 Select samples in the Select Files to Add list
and click Add.
• Click Add All to add the entire contents of the
current folder.
• To remove a sample from the Files Added list,
select it and click Remove.
3 Click Done when finished.
All new Key Groups will be evenly spread across
the range of the Instrument in the Sample Map
window.
When you move a Key Group, all the Velocity
Zones in that group are moved together, and the
Key Group will retain its width (the key range)
after being moved.
Selecting Samples in the Sample
Map
Before a Key Group or Velocity Zone’s Sample
Parameters can be edited, the appropriate sample must be selected in the Sample Map window.
To select a sample manually:
To add a sample to a new Velocity Zone:
1 In the Sample Map window, select a sample in
the Key Group to which you want to add a new
Velocity Zone.
2 Choose Instruments > New Velocity Zone or
click the New Velocity Zone button:
■ Click the desired Key Group/Velocity Zone in
the Sample Map window.
– or –
■ Click on the on-screen keyboard to select a
Key Group, then click the Velocity Scale to select
a zone within that Key Group.
To select a sample using the computer keyboard:
New Velocity Zone button
3 Select the sample and click Open.
The new sample is placed in the highest velocity
range for the selected Key Group.
4 Drag the sample to the desired Velocity Zone
in the selected Key Group. If necessary, adjust
the Velocity Zone boundaries to set the range of
velocities that will trigger the sample.
Key Group Editing
Once samples are loaded into an Instrument’s
Sample Map, their location and Key Group
width can be edited in several ways. In addition,
several Key Group parameters such as Zone Start
(where in the sample playback will begin) can be
edited from the Sample Parameters window.
28
Soft SampleCell Guide
◆ With any zone already selected, press the
Right arrow (or the Tab key) to select Key Groups
to the right. Press the Left arrow (or Shift-Tab) to
select Key Groups to the left. Press the Up/Down
arrows to select a higher/lower Velocity Zone,
respectively.
To select a sample using a MIDI controller:
◆ Select the MIDI Selects Zone option, located
near the upper-right corner of the Sample Map
window.
With this option selected, playing a note on
your MIDI controller selects the sample at the
appropriate MIDI note range and velocity. The
ability to select Key Groups/Zones via MIDI remains in effect while editing in the Sample Parameters window.
Moving, Editing, Replacing and
Deleting Samples
There are many ways to rearrange the samples
that make up an Instrument’s Sample Map.
Resizing Key Groups
You can resize Key Groups manually or automatically.
To change the range of a Key Group:
You can reorder Key Groups by dragging them
to new locations, and you can adjust their key
range by dragging their boundaries. In addition,
you can use several special function buttons to
reorder Key Groups.
To drag a Key Group to a new location:
Drag the bottom-most sample in the Key
Group to a new location. All the Velocity Zones
in that Key Group will be moved and will retain
their ranges.
■
The Reorder Key Groups By Root Note command remaps Key Groups according to root
note, lowest to highest. If you have just loaded
multiple samples, this provides a quick way to
arrange them by root note in the Sample Map.
■ Drag the boundary line of the Key Group to
the desired position. The adjacent Key Group
will shrink or expand to accommodate the resizing operation.
You can resize selected Key Groups so that they
are spread evenly across the keyboard. The
widths of all Key Groups to the right of the currently selected Key Group (or all if none is selected) will become uniform.
Spread Key Groups button
Figure 2 shows an Instrument’s Sample Map before using the Spread Key Groups command.
Reorder Key Groups By Root Note button
If there is more than one Velocity Zone in the
Key Group, they will move with their Key
Group. In other words, all zones will be
remapped according to the root note of the lowest Velocity Zone in their Key Group. (See “Setting the MIDI Root Note” on page 31 for details.)
To sort Key Group location by root note:
Figure 2. Sample Map before using Spread Key Groups
Click the Reorder Key Groups By Root Note
button, or choose Instruments > Reorder Key
Groups By Root Note.
After clicking the Spread Key Groups button the
Instrument’s Sample Map becomes uniform, as
shown in Figure 3.
■
All Key Groups in the Instrument will be reordered according to their MIDI Root Note.
Chapter 3: Creating and Modifying Instruments
29
Replacing and Deleting Samples
You can replace or delete Samples within the
Sample Map window. This makes it possible to
create pre-mapped Instrument templates to
quickly build Instruments.
To delete a Key Group or Velocity Zone:
1 Select the sample to be deleted.
2 Choose Edit > Clear or press the Delete key.
Figure 3. Sample Map after using Spread Key Groups
This removes the Key Group or Velocity Zone
from the Sample Map.
To spread all Key Groups evenly across the range
of the Instrument:
You can quickly replace one sample with another using the Change Sample button.
Click the Spread Key Groups button in the
Sample Map window. All Key Groups to the
right of and including the selected Key Group
will be spread evenly across the keyboard.
■
To replace a sample:
1 Select the sample to be changed by clicking
the appropriate Key Group or Velocity Zone.
2 Click the Change Sample button or choose In-
Resizing Velocity Zones
struments > Change Sample.
Each Key Group in the Sample Map can contain
up to 6 Velocity Zones. You can rearrange the
samples in these zones by dragging or by adjusting their Velocity Zone boundaries.
Change Sample button
To move a sample to a new Velocity Zone within
the same Key Group:
Drag the sample to the desired Velocity Zone
within the Key Group.
■
To adjust the range of a Velocity Zone:
Drag the boundary line of the Velocity Zone
to the desired position.
■
You can edit all range of all Velocity Zones
simultaneously by Option- dragging the
boundary of any Velocity Zone. All zones
will then have the same boundary setting.
30
Soft SampleCell Guide
3 Select a new sample to replace the original.
4 Click Open to load the selected sample.
The new sample appears in the Sample Map
window in the same Key Group and Velocity
Zone as the one it replaced.
To unload a selected sample:
1 Select the sample to be deleted.
2 Choose Instruments > Unload Sample.
The selected sample is unloaded from RAM, and
the Instrument will retain the sample’s Key
Group and Velocity Zone boundaries. Unloaded
samples appear in italics in the Sample Map.
To reload a sample that has been unloaded:
1 Select the sample’s Key Group/Velocity Zone.
Click the Reload Sample button, or choose Instruments > Load Sample.
Load Sample button
Samples normally remain in memory after you
close a Bank or delete an Instrument. You can
set Soft SampleCell to automatically unload all
samples when closing Banks or deleting Instruments.
In general, the MIDI Root Note should match
the original pitch of the sample. However, you
can alter sounds by setting the root note to a different pitch. For example, if you load a C3 trumpet sample and set the root note to C4, the
trumpet will sound an octave lower, transforming it into an acceptable substitute for a tuba.
Soft SampleCell can play a sample up to three
octaves higher than the original pitch.
You can open the Sample Parameters window
for a Key Group and set individual Root Notes
manually, or drag the Root Note marker to an
appropriate location along the Sample Map’s
on-screen keyboard.
To automatically unload samples when closing
Banks or deleting instruments:
To assign a sample’s MIDI Root Note:
1 Choose SampleCell > Preferences.
1 In the Sample map, click the sample whose
MIDI Root Note you want to set.
2 Select Automatically Delete Unused Samples.
A black square appears above the keyboard, indicating the current Root Note of the sample.
Editing Sample-Specific
Parameters
2 Drag the square to the desired Root Note.
Using the tools in the Sample Map and other
windows, you can modify a variety of samplespecific parameters, including MIDI Root Note,
sample loop, sample start offset, and more.
Setting the MIDI Root Note
When a sample is assigned to the Sample Map,
the original sample must be assigned to a note,
referred to as the MIDI Root Note. When played,
the sample is then transposed up or down in relation to its MIDI Root Note.
MIDI Root Note set to C4
Assigning the MIDI Root Note
Chapter 3: Creating and Modifying Instruments
31
To set the root note for all Key Groups in an
Instrument:
Loop Window
1 Click the Set Root Note button, or choose Instruments > Set Root Notes.
Many samples contain playback loops that allow them to be sustained as long as a note is
held. In the Sample Loop window you can create and edit loops for a specific sample.
Set Root Note button
To open the Loop window:
2 Choose one of the following:
1 Select a sample in the Sample Map window.
2 Click the Loop button.
Loop button
MIDI Root Note dialog
Lowest: places the root note at the lowest note
in the Key Group.
◆
Middle: places the root note in the middle of
a Key Group.
◆
Highest: places the root note at the upper
note in the Key Group.
◆
Use Audio File: places root note according to
one of the following.
◆
• If the sample is an AIFF file, it uses the root
note stored with the file.
• If the sample is an Sound Designer II (SDII)
file, it defaults to C4 (Middle C).
3 Click OK to change the Root Note.
32
Soft SampleCell Guide
Loop window
Here you can adjust loop start points, loop type,
and other loop parameters. Looping is covered
in depth in Chapter 4, “Sample Editing and
Looping” along with other sample editing techniques.
Sample Parameters Window
• Right arrow (or Tab key) selects the lowest
zone in the next highest Key Group.
The Sample Parameters window provides controls for sample amplitude, sample playback direction, start point offset, and loop tuning.
• Down arrow (or Page Down key) selects the
next lowest Velocity Zone in the current Key
Group.
To open the Sample Parameters window:
• Left arrow (or Shift-Tab) selects the lowest
zone in the next lowest Key Group.
1 Select a sample in the Sample Map window.
2 Click the Sample Parameters button, or double-click the desired sample in the Sample Map.
Sample Parameters button
• Home key selects the lowest, left Velocity
Zone.
You can also select samples in their Key Groups
and zones via MIDI if the MIDI Selects Zone option is selected.
Setting the Sample Start
You can change the point at which playback begins within a sample’s waveform. This is useful
for fine-tuning the attack of a sample to change
its character or remove unwanted characteristics
such as pick noise from a guitar sample.
Sample Start can be adjusted using 3 different
sliders: Coarse, Medium and Fine. The Fine
slider adjusts the sample start point in the smallest increments.
To adjust a sample’s start point:
Sample Parameters window
Using the Sample Select Arrows
You can select different samples for editing
within an Instrument by using the Sample Select Arrows (or the arrow keys of your computer
keyboard), as follows:
1 In the Sample Map window, select the desired
sample and click the Sample Parameters button
(or double-click the sample).
Sample Parameters button
2 Adjust the Fine slider.
Sample Select Arrows
• Up arrow (or Page Up key) selects the next
highest Velocity Zone in the current Key
Group.
Each increment represents 256 samples for a total possible offset of 32,512 samples.The current
sample offset is displayed in the Zone Parameter’s Start Offset.
Chapter 3: Creating and Modifying Instruments
33
Key Group Panning
Each Key Group within the Sample Map can be
panned individually. You can use this feature to
create effects such as a stereo piano, where the
lower samples are panned more to the left and
higher ones panned more to the right.
An Instrument’s overall stereo image is controlled by its Pan slider in the Bank window.
To change the panning of a Key Group:
To change the playback direction of a sample:
◆ In the Sample Map window, select the desired
sample and select Forward or Backward.
Sample Amplitude
An individual sample’s volume can be attenuated using the Amplitude slider. If you are using
an Instrument with samples recorded at different volume levels, you can use this control to
even out the levels between the samples.
In the Sample Map window, select the desired
sample and drag the Key Group Pan slider
(while playing the sample from a MIDI controller if desired).
◆ In the Sample Map window, select the desired
sample and adjust the Amplitude slider.
The sample’s entire Key Group will now be
panned within the Instrument’s stereo image.
Each increment represents 0.5 dB for a total
range of 50 dB.
■
You can simulate a stereo effect without editing the Key Group panning for every sample. Use the Matrix window to map MIDI
Note Numbers to control Instrument Panning. See “Matrix Modulation” on page 43
for details.
To attenuate the volume of a sample:
Sample Tuning
Samples and their loops can be individually
tuned. In some cases, the overall tuning of a
sample may need to be adjusted to make its
pitch compatible with other samples in an Instrument.
MIDI Root Note
When played, a sample is transposed up or
down in relation to its MIDI Root Note. The default MIDI Root Note for samples is C4. See “Setting the MIDI Root Note” on page 31 for more
information.
Sample Playback Direction
A sample can be played forward (beginning to
end) or backward (end to beginning). Backward
sample playback is useful for creating special effects such as reverse snare drums. When the
sample playback direction is set to backward,
any loops in the sample are ignored.
34
Soft SampleCell Guide
To tune a sample:
1 In the Sample Map window, select the desired
sample and adjust the Sample slider (in the Sample Fine Tuning section) to raise or lower the
pitch of sample.
You can adjust the slider while playing the sample using a MIDI controller.
The slider range is ± 1/4 tone. If a sample in
memory is used by more than one Instrument,
Key Group, or Velocity Zone, changing tuning
in this manner will affect all Instruments with
that sample.
Sample Loop Tuning
In certain cases, the looped portion of a sample
may need to be tuned to match the pitch of the
attack portion of a sample.
If a sample has a single loop, it functions as both
a sustain and a release loop. If the sample has
two loops, the first is the sustain loop and the
second is the release loop.
To turn an existing loop on or off:
1 In the Sample Map window, select the desired
sample, then do one of the following:
• If the sample has a single loop, select Sus/Rel
Loop to turn on the loop. Deselect Sus/Rel
Loop to turn off the loop.
• If the sample has two loops, select Sus Loop
Enable to turn on the sustain loop; deselect
Sus Loop Enable to turn it off. Select Rel Loop
to turn on the release loop; deselect Rel Loop
to turn it off.
Loop enables
Loop Tuning and Loop Switching
Loop tuning controls
To tune a sample loop:
In the Sample Map window, select the desired
sample, then do one of the following:
◆
• If the sample has a single loop, adjust the
Sus/Rel Loop slider to tune the pitch of the
looped portion of the sample.
• If the sample has two loops, use the Sus Loop
slider to adjust pitch of the sustain loop. Use
the Sus/Rel Loop slider to adjust the pitch of
the release loop.
The slider range is ± 1/4 tone. You can adjust the
slider while playing the sample using a MIDI
controller.
Turning Off a Sample Loop
For spoken word, sound bite and other speech
samples, experimenting with the two loops can
lead to very interesting results. Use the Matrix
Modulation and Envelope windows to control
the balance between the first loop and second
loop, then trigger and control the timing with
one key on your MIDI controller.
Misc Parameters Window
The Misc Parameters window has controls for
pitch, filter frequency, crossfade, key track, pitch
tracking, intonation, MIDI filtering, voice overlap and priority, and velocity sensitivity.
These parameters apply to Instruments as a
whole. Adjusting the Filter Frequency, for example, adjusts it for all samples within the Instrument.
Sustain and release loops can be turned on or off
individually.
Chapter 3: Creating and Modifying Instruments
35
To open the Misc Parameters window:
To disable key tracking in an Instrument:
Select Windows > Misc, or click the Misc Parameters button.
1 In an open Bank, select the desired Instrument.
■
2 In the Misc Parameters window, deselect Key
Track.
Misc Parameters button
The name of the currently selected Instrument
appears in the Instrument pop-up. Use this popup to choose any Instrument in the currently active Bank and edit its parameters.
SampleCell can be configured so that Key Track
defaults to being disabled when new Instruments are created. This is useful when creating
Instruments comprised of non-pitched sounds
such as drums or sound effects.
To disable key tracking as a default:
1 Choose SampleCell > Preferences.
2 Select the option “Default New Instruments to
Key Track Off” and close the Preferences window.
For more information on Soft SampleCell Preferences, see “Preferences” on page 80.
Misc Parameters window
MIDI Velocity Response
Disabling Key Tracking
MIDI velocity controls how the volume of an Instrument responds when you play harder or
softer on a MIDI controller. The Velocity slider
in the Misc Parameters window lets you adjust
the MIDI Velocity response of each Instrument
individually.
There are times when it is desirable for samples
to always be played back at their original
pitches, regardless of which MIDI note is being
played. Sound effects and drum kits are two
common examples.
By default, key tracking is enabled. Playing MIDI
notes will change the pitch of the samples in the
Instrument accordingly.
With key tracking is disabled, playing MIDI
notes will not change the pitch of the samples.
They will play at their original pitch, as assigned
by their MIDI Root Note.
The MIDI Velocity control can be set to a positive or a negative value. With positive values, Instrument volume increases with as MIDI Velocity, increases. With negative values, Instrument
volume decreases as MIDI Velocity increases.
With MIDI Velocity set to 0, there is no response
to MIDI velocity.
Using Negative MIDI Velocities
Negative velocity settings are useful when crossfading between two Instruments according to
how hard you play your MIDI controller.
36
Soft SampleCell Guide
Imagine that you have two Instruments, Strings
and Brass, assigned to the same MIDI channel.
You want only Strings to play when you play
softly. You want only Brass to play when you
play hard. And you want both Instruments to
play when you play at medium velocities.
You can accomplished this by setting the MIDI
Velocity of the Strings to a negative value and
the MIDI Velocity of the Brass to a positive
value.
To perform velocity-controlled crossfading
between two Instruments:
1 In the Bank window, assign two Instruments
to the same MIDI channel.
2 Select the Instrument you want to respond to
soft velocities, and click the Misc Parameters
button.
3 In the Misc Parameters window, select Ins Vel
Crossfade.
4 Play your MIDI controller.
To change an Instrument’s MIDI velocity response:
1 In an open Bank, select the desired Instru-
ment.
2 In the Misc Parameters window, set the Velocity slider to the desired level.
If all Instruments in a Bank do not respond
to changes in MIDI velocity when you play
your MIDI controller, check the velocity
curve settings on the controller. Setting an
appropriate velocity curve on the controller
ensures that Instruments respond properly
to MIDI Velocity.
Instrument Velocity Crossfade
The Misc Parameters window provides another
means of performing velocity-controlled crossfading between two Instruments: the Instrument Velocity Crossfade option. With this option enabled, an Instrument will only respond
significantly to low MIDI velocities.
By assigning two Instruments to the same MIDI
channel and enabling the Instrument Velocity
Crossfade option on only one of them, velocitycontrolled crossfading between the two can be
achieved.
Playing softly should trigger the first Instrument. Playing hard should trigger the second Instrument.
Instrument Crossfading uses two voices for
every note played. Playing four notes with a
crossfaded Instrument pair, for example,
will use eight voices.
Voice Priority, Overlap, and
Polyphony
By default, Instruments are polyphonic. However, you can set Instruments to respond monophonically if desired. When monophonic playback is selected, an Instrument will respond to
the note most recently played.
To select monophonic playback:
1 In an open Bank, select the desired Instrument.
2 In the Misc Parameters window, select Monophonic.
Chapter 3: Creating and Modifying Instruments
37
Voice Priority
If you play many Instruments simultaneously, it
is possible to run out of voices. When you attempt to play more voices than are available,
Soft SampleCell will “steal” voices from some
Instruments and allocate them to other Instruments as needed.
You can prioritize Instruments so that their
voices are more likely or less likely to be stolen
when necessary. Typically, lead Instruments
should be given high priority while background
or pad-type Instruments are given low priority.
To adjust an Instrument’s voice allocation priority:
1 In an open Bank, select the desired Instrument.
2 In the Misc Parameters window, set the Sound
Priority slider to the desired value.
Voice Overlap
Soft SampleCell provides a Voice Overlap feature that improves the realism of Instruments
whose samples are typically retriggered in rapid
succession.
When Voice Overlap is selected, a sample that is
retriggered before it completely dies out will
continue to sound, while successive samples
overlap it as they are triggered. This prevents
sounds such as ride or crash cymbal from being
artificially choked off when played repeatedly.
A setting of 0 specifies no overlap—each new
note chokes, or mutes previous notes. A value of
99 allows samples to sound for the full duration
of their release envelope.
To specify how retriggered notes overlap:
1 In an open Bank, select the desired Instrument.
38
Soft SampleCell Guide
1 In the Misc Parameters window, adjust the
Overlap Amount slider.
Try adjusting the Overlap Amount while repeatedly playing the same note on your MIDI controller.
Excessive use of the Overlap feature may
steal voices from other Instruments.
Filter
Soft SampleCell features a resonant low-pass filter. This type of filter is used to remove or emphasize certain frequencies or harmonics in a
sampled waveform.
You can use the Filter to change the harmonic
content and character of instruments in the
same way that you would with the filters of an
analog synthesizer. Wah-wah effects and synthesizer-like filter sweeps are only two of the
many effects you can create.
The Filter Frequency control specifies the cutoff
frequency—the frequency below which harmonics in a sampled waveform are removed. The
higher the cutoff frequency, the brighter the
sound. The lower the cutoff frequency, the
duller the sound.
The Filter Resonance control determines how
much frequencies near the cutoff are emphasized, and how much those that are farther away
are suppressed. High resonance settings add a
nasal, ringing quality to sounds.
The Filter can operate in either 1-pole,
6 dB/octave mode or 4-pole, 24 dB/octave
mode. The 4-pole filter is better suited to creating synthesizer-type resonant filtering effects.
Filter Resonance controls are not available
when the Filter is set to 1-pole mode.
5 Set Filter Resonance to its midway point.
6 Open the Matrix Modulation window by
clicking the Matrix Modulation button or
choosing Windows > Matrix Modulation.
7 Set the Amount slider for the Envelope 1-toFilter Frequency modulation path to 30.
8 Open the Envelope window by clicking the
Envelope button or choosing Windows > Envelopes.
Filter controls
To adjust the filter:
1 In the Bank window, select the desired Instru-
ment.
2 Click the Misc Parameters button to open the
Misc Parameters window.
3 Adjust the Filter Frequency and Filter Resonance controls for the effect you want.
Controlling the Filter with an Envelope
The Filter is generally used in conjunction with
the Envelope Generator. This allows an envelope to control how the filter responds each
time you play a note. Soft SampleCell provides 3
separate Envelopes. Of these, Envelope 1 is assigned to Filter Frequency by default.
For information on using the Envelope Generator, see “Envelopes” on page 40.
9 Repeatedly play a note on your MIDI controller while adjusting the Attack, Decay, Sustain,
Sustain Decay and Release controls of
Envelope 1.
10 Experiment with various Envelope, Envelope
Amount, Filter Frequency, and Resonance settings to achieve the effect you want.
Resampling Quality
If an Instrument has a small number of Instrument samples that are mapped over a relatively
wide range, you may hear audio artifacts in the
samples as they are played 7 semitones or more
above their MIDI Root Note.
The Resampling Quality pop-up menu allows
you to minimizes these artifacts by selecting
Soft SampleCell’s pitch interpolation and resampling quality. Choices are:
ment.
No Resampling turns off resampling and will result in audio artifacts as samples are played
above their MIDI Root Note. This can be used to
produce interesting effects.
2 Open the Misc Parameters window by clicking
the Misc Parameters button or choosing Windows > Misc Parameters.
Standard Selects standard resampling quality.
Audio artifacts may occur if samples are played 7
semitones or more above their MIDI Root Note.
To control the filter with an envelope:
1 In the Bank window, select the desired Instru-
3 From the Filter Poles pop-up, choose 4 pole.
4 Set Filter Frequency to its midway point.
Chapter 3: Creating and Modifying Instruments
39
High Selects the highest quality resampling. This
will minimize audio artifacts but requires more
CPU processing power. This will reduce the total
number of Soft SampleCell voices available.
Resampling Quality pop-up menu
Decay Controls how long it takes for the Envelope to fall from its peak level to the Sustain
level.
Sustain Controls the level at which the Envelop
remains after its Decay phase. higher Sustain
values produce long it takes for the Envelope to
reach its maximum level when a note is first
played. Higher Attack values produce softer,
slower attacks.
To select the resampling quality:
1 In the Bank window, select the desired Instru-
ment.
2 Open the Misc Parameters window by clicking
the Misc Parameters button or choosing Windows > Misc Parameters.
3 From the Resampling Quality pop-up, choose
the type of resampling that you want to use.
Envelopes
Envelope generators give shape to the volume,
filter cutoff, and other parameters of a Instrument each time a note is played.
Sustain Decay Adds a secondary sustain level to
which the envelope falls during the Sustain
phase.
Release Controls the rate at which the volume
decreases after a note is released. The higher the
Release value, the longer it takes for volume to
fall from the Sustain level to zero.
Envelope Amount Controls how much the Envelope affects Instrument volume, filter frequency, or any other parameter to which it is
routed. The higher the Envelope Amount, the
greater the envelope’s effect.
Gate Time Controls how long the envelope is
held open, even if a note is released.
Soft SampleCell provides 3 separate Envelopes
with controls for attack, decay, sustain, release,
and other parameters.
Adding Gate Time to an envelope is useful
with single-shot, drum-type instruments
since it helps preserve ambience at the end
of samples that might otherwise be lost if a
note is instantly released after being struck.
decay
sustain
release
Attack Controls how long it takes for the Envelope to reach its maximum level when a note is
first played. Higher Attack values produce softer,
slower attacks.
2
env
1&
env
sustain level
Envelope controls
amplitude
3
attack
gate on
Envelope stages
40
Soft SampleCell Guide
gate off
Using Envelopes
Envelopes are primarily used to control the volume and harmonic content of a sound. For this
reason, Envelope 3 is permanently assigned to
amplitude and Envelope 1 is assigned to Filter
Frequency by default.
Using the Modulation Matrix you can use any of
the 3 Envelopes control parameters such as
pitch, panning, LFO speed, and so on.
For information on using the Modulation Matrix to route Envelopes and other modulation
sources, see “Matrix Modulation” on page 43.
To open the Envelope window:
1 In the Bank window, click the Envelope button or choose Windows > Envelope.
Envelope controls in line--segment format
Envelope button
Envelope Display Format
Envelope controls can be displayed as line segments or sliders. Use the SampleCell Preferences
dialog to choose the display format you prefer.
To select how Envelope parameters are displayed:
1 Select SampleCell > Preferences.
2 To display Envelope controls as line segments,
select Display Line Segment Envelopes.
– or –
3 To display Envelope controls as sliders, deselect Display Line Segment Envelopes.
Envelope controls in slider format
4 Close and reopen the Envelope window for
changes to take effect.
5 To edit Envelope parameters, drag the slider or
line segment breakpoint.
Chapter 3: Creating and Modifying Instruments
41
Envelope Parameter Values
Envelope and other parameter values can be displayed in milliseconds, decibels and other
meaningful units or in Soft SampleCell units.
Use the SampleCell Preferences dialog to choose
the format you prefer.
To select how parameter values are displayed:
1 Choose SampleCell > Preferences and select
Display Controls in Real Units to use milliseconds, decibels and other real-world units.
– or –
2 Deselect Display Controls in Real Units to use
Soft SampleCell units.
3 Close and reopen the Envelope window for
changes to take effect.
Envelope Key Tracking
Envelopes can track the keyboard so that envelope times are progressively shortened as MIDI
notes get higher, and lengthened as they get
lower. This is useful for simulating acoustic instruments such as brass, where higher-register
instruments such as trumpets have much faster
attacks then low-register instruments such as tubas.
To enable envelope key tracking:
In the Envelope window, select Keyboard
Track.
■
42
Soft SampleCell Guide
Matrix Modulation
Matrix modulation lets you route a variety of
modulation sources to a variety of modulation
destinations. Typical modulation routings include:
• Controlling filter cutoff frequency with the
mod wheel of a MIDI controller
• Controlling Instrument volume with an LFO
for tremolo effects.
• Controlling filter cutoff frequency with an
LFO for auto-wah wah effects
• Controlling sample pitch with the Random
Generator for sample & hold effects.
Modulation destinations
All new Instruments have five pre-defined modulation paths:
• Velocity to Sample Select (MIDI velocity triggers samples in the appropriate Velocity
Zones)
• LFO 1 to Pitch (vibrato)
• Modulation Wheel to LFO 1 Amplitude (mod
wheel controls vibrato amount)
• Sustain Pedal to Envelope 3 Release (standard
sustain pedal operation)
Matrix Modulation window
• Envelope 1 to Filter Frequency
These default modulation routings can be removed if desired by setting the Source and Destination pop-ups to none (the blank space at the
bottom of the menu).
Matrix Modulation routings can be saved as
new Instrument defaults by choosing Instruments > Set Instrument Defaults.
Modulation sources
Chapter 3: Creating and Modifying Instruments
43
Modulation Parameters
Key Shortcuts
There are a total of 20 user-definable modulation paths. Each path consists of a Source, Destination, Gate enable, and Modulation Amount
parameter.
There are several key shortcuts for setting Modulation Matrix parameters.
Source Selects the modulation source.
To set an amplitude value to maximum (+99):
■ Option-Shift-click the amplitude value (not
the slider).
Destination Selects the modulation destination.
Amount Controls the modulation intensity.
Higher values apply greater modulation. Negative values invert the modulation effect. To set
this parameter, click the pop-up slider next to its
text box.
Gated When selected, modulation is only applied while a MIDI note is held. When the note
is released, modulation stops.
To set an amplitude value to minimum (-99):
■
Option-Control-click the amplitude value.
To reset an amplitude value to 0:
■
Option-click the amplitude value.
To clear a Source or Destination:
■ Option-click the Source or Destination popup.
To use Matrix Modulation:
1 In the Bank window, select the desired Instru-
ment.
2 Open the Matrix Modulation window by
clicking the Misc Parameters button or choosing
Windows > Matrix Modulation.
Modulation Sources with Their
Own Amount Controls
Some modulation sources such as Envelopes,
LFOs, and MIDI controllers have their own Amplitude control. This takes precedence over the
Amount control in the Modulation Matrix and
determines the overall amount of modulation
available.
Matrix Modulation button
3 From the Source pop-up, choose a modulation
source.
4 From the Destination pop-up, choose a modulation destination.
5 Set the Amount slider to the desired modulation amount.
To intensify modulation beyond its normal
range, create a second (or even third) modulation path with the identical source and
destination.
44
Soft SampleCell Guide
If the Amplitude control of one of these modulation sources is set to 0, no modulation can be
applied. Make sure that any modulation sources
you use have their own Amplitude control set to
an appropriate amount before using them for
Matrix Modulation.
Modulating Panning of Stereo
Instruments
On stereo Instruments, if you want to create a
stereo panning effect by routing an LFO to Panning, you must create two modulation paths
with the same LFO-to-Panning routing for
Soft SampleCell to pan both channels. For
monophonic Instruments, you need only create
a single LFO-to-Panning modulation path.
Modulator button
Modulators
The Modulators window contains parameters
for 5 different modulators: LFO 1, LFO 2, Ramp
Generator, MIDI Controller A and MIDI
Controller B. These can be used as both modulation sources and destinations in the Matrix
Modulation window.
To open the Modulators window:
1 In the Bank window, select the desired Instru-
ment.
2 Click the Misc Parameters button or choose
Windows > Modulators.
Modulators window
LFO 1 & 2
LFO 1 and LFO 2 each produce periodic waveforms with the following parameters:
Waveform Selects Sine, Triangle, Upward Sawtooth, Downward Sawtooth, Square, Random,
or Noise waveforms. Sine and Triangle waves are
typically used to modulate pitch for vibrato effects. Square waves are typically used to modulate pitch or amplitude for trills or tremolo effects.
Trigger Mode Selects how and when the waveform is generated:
• Free Run generates the waveform freely, without LFO phase synchronization or retriggering. As a result, can be virtually anywhere
within its own cycle when modulation is engaged. This adds a somewhat random element
to the LFO modulation.
• Sync synchronizes the phase of all LFO waveforms in all Soft SampleCell voices to simulate
uniform modulation by a single LFO.
Chapter 3: Creating and Modifying Instruments
45
• Trig restarts the LFO waveform each time a
MIDI note is played. This is useful for trills
and other effects that require modulation
consistency among all notes.
• Sync & Trig combines the Trig and Sync attributes.
Speed Sets the frequency of the LFO. Higher
speeds produce more rapid modulation.
Amplitude Determines the overall amount of
modulation available when used in the Modulation Matrix. Larger Amplitudes allow more intense modulation.
MIDI Controller A & B
Soft SampleCell allows you to select two MIDI
Controllers (from a total list of 120) as modulation sources. This enables you to use, for example, a Breath Controller (MIDI Controller #2) to
modulate Volume or a foot pedal (MIDI Controller #4) to modulate LFO Amplitude.
For a list of MIDI Controller numbers, see
Appendix C, “MIDI Controller Numbers.”
To assign MIDI Controller A or B:
■ Click the MIDI Controller pop-up and choose
the desired MIDI Controller number.
To set an LFO’s waveform:
1 Choose a waveform from the Waveform popup menu.
Selecting a MIDI Controller number
LFO waveforms
Ramp Generator
The Ramp Generator produces a stepped or
ramped control signal. The signal starts at its
normal level then rises at a defined speed to another level. Positive modulation Amplitude values cause the ramp to slope upward. Negative
modulation Amplitude values cause it to slope
downward.
The Ramp Time slider controls the rate at the
ramp signal ascends or descends.
Routing the Ramp Generator to Pitch, for example, will produce a sliding pitch effect. Setting a
modulation Amplitude value of +50 causes the
pitch to slide up an octave. Setting a value of -50
causes the pitch to slide down an octave.
46
Soft SampleCell Guide
You can directly assign a MIDI Controller
by Control-clicking the MIDI Controller text
box, then moving the desired controller (a
mod wheel for example) on your MIDI keyboard controller.
Trackers
The Tracking Generator allows you to modify a
modulation signal according to an editable
curve of nine breakpoints.
A pop-up menu above each Tracking Generator
selects the modulation source affected by the
Tracker. When that Tracking Generator is then
used in the Modulation Matrix, its normal behavior will be modified by the curve you have
created.
To open the Trackers window:
1 In the Bank window, select the desired Instru-
ment.
2 Click the Trackers button or choose Windows
> Trackers.
Trackers button
Modulation targets for the Tracking Generator
Some applications for the Tracking Generator
include:
• Modifying pitch wheel response with an exponential tracking curve that produces a
much wider bend at end of the bend range.
• Modifying mod wheel response with an exponential tracking curve that produces much
more intense modulation at end of the mod
wheel range.
Trackers window
By default the Tracking Generator’s modulation
curve is linear. Moving a breakpoint will vary
the modulation signal according to the shape of
the curve.
• Modifying MIDI note number response to
produce microtonal scales.
Exponential curve
For additional examples, refer to “Using
Trackers” on page 63.
Chapter 3: Creating and Modifying Instruments
47
To use the Tracking Generator:
1 In the Bank window, select the desired Instru-
ment.
2 Click the Trackers button or choose
Windows > Trackers.
3 From the pop-up menu, choose the modulation source you want to modify.
4 Drag breakpoints on the Tracker to create the
tracking curve you want.
To reset a breakpoint to its default position,
Option-click it.
5 Open the Matrix Modulation window and
route the modulation source to the desired destination.
6 Drag the Amount slider to the desired level.
Negative values will invert the modulation’s effect.
48
Soft SampleCell Guide
chapter 4
Sample Editing and Looping
Soft SampleCell Editor includes its own Loop
window for adding, editing, and deleting loop
points in samples. It provides all the tools necessary to turn samples into quality loops.
The Loop window also provides audio trim capabilities, which let you trim unwanted pre- and
post-loop audio.
Use the Loop window to:
◆
Create up to 2 loops in any sound file
◆
Trim audio (deletes all unselected audio)
Perform crossfades, forward/backward loops,
and more
◆
◆
Save files directly from the Loop window
Open audio files from disk or from within
Soft SampleCell Instruments
◆
View loop data info, audition and edit/move
loops while continuously monitoring and triggering the sample from external MIDI controllers
◆
Loop Types
Soft SampleCell supports a maximum of two
loops within an audio file.
Single-Loop Samples
If an audio file has a single loop, Soft SampleCell
will play the sample up to the loop’s beginning
and then continue to play the looped portion of
the sample while the note is held. When the
note is released, Soft SampleCell will continue
to play the loop while the sound fades according
to its current envelope.
If a sound file contains a single loop, it is referred to as a Sustain/Release loop since it is used
in both the sustained portion and the released
portion of a note.
Two-Loop Samples
If an audio file has two loops, Soft SampleCell
plays the first loop (the sustain loop) as long as a
note is held. When the note is released, it plays
the second loop (the release loop) as the note
fades out.
There are 2 requirements for loops:
• The two loops must not overlap (loop 1 must
end before loop 2 starts)
• Each loop’s length must be at least one complete waveform cycle in length, or 5 sampleframes of the sample
Chapter 4: Sample Editing and Looping
49
The Loop Window
Loop window lets you work non-destructively
on a sample until you are ready to resave it with
your modifications.
You can open a sample that is currently in use in
an Instrument, or load an audio file from disk.
To avoid stuck notes, always stop sequencer
playback before opening the Loop window.
To open a sample currently in use in an
Instrument:
1 In the Bank window, select the desired Instru-
ment and click the Sample Map button.
2 In the Sample Map window, select the sample
that you want to edit and click the Loop button
or choose Instruments > Edit (sample name).
Loop menu and Loop Tools
Save Audio File Saves the edited sample. If it is
used in the current Instrument, the sample is
updated within the Instrument as well.
Save Audio File As Saves the edited sample under a new name or location. This command also
automatically creates a new Instrument containing the sample as its only Key Group.
Save As Audio File Copy Saves a copy of the edited sample to disk without updating or creating
an Instrument.
Save Audio Selection As Saves the currently selected audio segment as a new file on disk.
Loop button
To open a sample on disk (not in a Instrument):
1 Choose Instruments > Edit Loops.
Loop Window Tools
This window provides tools for defining, editing, and auditioning loops, and selecting and
trimming audio.
Loop Menu
This is a pop-up menu for saving an audio file after you have modified it.
Revert Audio File Reverts the current sample to
its original, previously saved state.
Speaker Button
The Speaker button plays the current sample
(using the Macintosh Sound Manager) through
the computer's sound output, at the currently
set volume level.
To bypass Sound Manager and play a sample using Soft SampleCell’s audio setup,
click the Send to Instrument button and trigger the sample by playing notes on your
MIDI controller.
Speaker button
50
Soft SampleCell Guide
Speaker (Play Sample)
Send to Instrument
Swap Loops
Selector
Trim Selection
Zoom View Arrows
Loop menu
Loop Start
Marker
Loop End Marker
Delete Loop Marker
Loop Start Marker
Waveform
Display (stereo)
Loop End Marker
Scroll to
Loop Point
Zero Crossing
Select Loop
Type/Direction
Loop Display
Loop Info fields
Selection Info fields
Scroll
Play Loop Only
Select Loop Select Channel
Audition in Stereo
Crossfade Loop Loop End
Loop Start
Auto Locate Loop Point
Loop window
Send to Instrument Button
Swap Loops Button
Clicking this button sends the contents of the
Loop window to Soft SampleCell for playback. If
the sample is not currently in use in an Instrument, a new single-sample Instrument is automatically created for the sample. If the sample is
currently in use in an Instrument, the Instrument is updated to use the edited sample. You
can play the sample by triggering it from your
MIDI controller.
If a sample contains a single loop (Loop 1), clicking this button changes it to Loop 2. This transforms it from a Sustain/Release loop to a Releaseonly loop. You can then create a new Sustain
Loop prior to it.
This is convenient when you’ve located a good
Sustain/Release loop point then decide you’d
like to use it as a Release-only loop instead (allowing you to find and create a new sustain loop
location).
Send to Instrument button
Swap Loops button
Chapter 4: Sample Editing and Looping
51
Trim Tool
Selector
The Trim Tool deletes audio before and after a
selection, leaving only the selection itself. Select
audio with the Selector tool then click the Trim
Tool to perform the trim operation.
Use the Selector to move Loop Markers or select
audio in the Loop window. To select audio, drag
the Selector in the waveform. To move a Loop
Marker, drag the Marker.
Do not trim too much audio near loop
points or you may not be able to create a
crossfade loop. Crossfade loops use audio
bordering loop points.
Selector
Loop Start and End Markers
Trim Tool button
Zoom Arrows
These arrows zoom in on audio waveform in the
Loop window. Up/Down arrows increase/decrease the height of the waveform, while
Right/Left arrows zoom in/out along the time
line. Option-click a Zoom arrow to zoom in or
out to maximum resolution.
You can also use the Arrow keys on your
computer keyboard to zoom in or out.
Drag a Loop Start or Loop End Marker onto a
waveform to define loop start or end points. The
first markers dragged onto a waveform are automatically defined as Loop 1 markers (Sustain/Release). Drag a second pair to define
Loop 2 (Release only).
See “Creating Loops” on page 55 for more information on adding Loop Markers.
Loop Start and End Markers
Delete Loop Marker
Select this tool and click on a Loop Marker to delete it.
Zoom Arrows
Delete Loop Marker
52
Soft SampleCell Guide
Loop Display
This window shows a close-up of the looped
portion of a sample. The left pane is shows the
loop end. The right pane shows the loop start.
loop end
For example, if you are adjusting the Loop End,
clicking the right Auto-Locate Loop arrow will
move the Loop End to the next wave cycle that
matches the slope and amplitude of the Loop
Start.
loop start
Auto Locate Loop Start/End
Clicking the left Auto-Locate Loop arrow would
move the same marker earlier in the audio file to
find a matching location.
Loop Display Tools
Scroll Arrows
Clicking on these arrows moves a Loop Marker
earlier (left arrow) or later (right arrow) in the
sound file. The Scroll Arrows are best suited to
making incremental adjustments in loop points.
For larger adjustments, drag one of the Loop
Markers in the upper waveform display.
Command-click the Scroll Arrows to scroll
more slowly.
Bear in mind that though these tools will match
one marker’s location to the other’s slope and
amplitude, this in itself does not guarantee a
perfect loop. You will most likely need to use
your ears and the Crossfade Loop tool to finetune most loops.
Loop Zoom Arrows
These arrows adjust the zoom level. Up/Down
arrows increase/decrease the height of waveforms. Right/Left arrows increase/decrease horizontal zoom.
Scroll Arrows
Loop Zoom Arrows
Auto-Locate Loop Point
Stereo Checkbox
Clicking on the Auto-Locate Loop Point arrow
automatically locates a suitable loop point in a
sample based the value and the slope of the corresponding Loop Marker.
This checkbox lets you audition individual
channels of a stereo loop. When selected, both
channels of a stereo sample are auditioned.
When deselected, the channel selected using
the Channel Select button is auditioned.
Chapter 4: Sample Editing and Looping
53
Crossfade Loop Button
Speaker Button
Clicking this button opens the Crossfade Loop
dialog box where you can select the type and
length of a crossfade. You can choose a Linear or
Equal Power crossfade and a Forward or Backward loop.
The Speaker button plays the selected loop
through the computer's sound outputs using
the Macintosh Sound Manager. If the Send to
Instrument button is selected, you can listen to
the loop as you change it by retriggering it on
your MIDI controller.
See “Creating Crossfades” on page 57 for
details.
Speaker button
Loop Info
Crossfade Loop button
Loop Select Button
Clicking this button selects which loop (if there
are two in the sample) is displayed for editing in
the Loop Display.
The Loop Info Area provides editable text fields
for loop and audio selection start and end
points. Clicking the Eyeglass icon scrolls the display to the selected loop point. A pop-up menu
selects loop type.
To set loop or selection points numerically:
1 Click the text field.
2 Type a numerical value and press Return.
Loop Select button
Channel Select Button
Clicking this button will display either the left
or right channel loop of a stereo sample.
Channel Select button
54
Soft SampleCell Guide
Loop Info
Creating Loops
In this section, you’ll learn to create loops. The
first step is to open the sample in the Loop window.
Use the waveform display to look for a repeating
pattern in the waveform if possible. Then drag
Loop Markers to approximate start and end
points for the loop.
Repeating pattern
To open a sample currently in use in an
Instrument:
1 In the Bank window, select the desired Instru-
ment and click the Sample Map button.
2 In the Sample Map window, select the sample
that you want to edit and click the Loop button
or choose Instruments > Edit (sample name).
Good loop location
To create a loop:
1 Click the Loop Start Marker then click at the
desired point in the waveform display.
Loop button
To open a sample on disk (not in a Instrument):
1 Choose Instruments > Edit Loops.
Loop Start and End Markers
Locating Good Loop Points
To create a good instrument loop you have to locate an area in a waveform where the audio material at the loop start and loop end points is as
closely matched as possible in timbre, volume,
and waveshape.
This helps prevent bumps, clicks, and other obvious audio artifacts from occurring at the splice
point—the point where the loop start and end
meet. The best potential loop points generally
occur in an area of the waveform that is fairly
stable and repetitive.
2 Next, click the Loop End Marker, then click at
the desired point in the waveform display.
3 Click the Speaker button in the Loop display
to hear the loop. Loops are always auditioned
through the Macintosh Sound Manager.
See “Auditioning Loops” on page 56 for
other ways to audition the loop or the entire
sample.
Chapter 4: Sample Editing and Looping
55
Fine Tuning a Loop
Auditioning Loops
At this point, it is doubtful that the loop is perfect. Use the Loop Display to view and fine tune
the splice point.
You can audition a loop in various ways. The
Speaker button in the Loop display auditions
only the loop itself. You can audition the rest of
the sample through the Macintosh Sound Manager or through a Soft SampleCell Instrument
and your current Soft SampleCell audio setup.
To fine tune a loop:
1 Click the scroll arrows to move the Loop Start
or End. Markers. Command-click to scroll more
slowly.
2 Match the waveform’s upward and downward
slopes at the zero crossing—the point where the
cross hairs meet in the Loop Display.
well-matched splice at zero crossing
Using Sound Manager
To play a sample in the Loop window:
■ Click the Speaker button. The sample plays
from its beginning through the looped audio,
which is repeated.
To play the entire sample, ignoring loops and
selections:
■
Option-click the Speaker button.
To play only the loop:
■ Click the Speaker button in the Loop Display
area.
Good splice
To play selected audio only:
poorly-matched
splice point
1 With the Selector, make a selection in the
waveform.
2 Click the Speaker button.
You can also press the Spacebar to start
playback.
Using Soft SampleCell
Bad splice
3 If you can’t find a good splice point, try click-
ing one of the Auto-Locate Loop Point buttons.
Click on the waveform in the right or left
pane of the Loop display and the corresponding Loop Marker will move to that location .
56
Soft SampleCell Guide
To audition a sample through Soft SampleCell
audio setup, you will use the Send to Instrument
button. This also allows you to trigger the sample using a MIDI controller.
Clicking the Send to Instrument button sends
the contents of the Loop window to Soft SampleCell for playback. If the sample is not currently in use in an Instrument, a new single-
sample Instrument is automatically created for
the sample. If the sample is currently in use in
an Instrument, the Instrument is updated to use
the edited sample.
Send to Instrument button
To play a sample through a Soft SampleCell
Instrument:
1 Click the Send to Instrument button. The but-
ton stays selected until you click it again.
2 Play your MIDI controller.
With the Send to Instrument button selected, each time you edit a sample in the
Loop window, the sample is updated in the
Instrument in which it resides. Changes are
temporary, however, until you resave the
sample or the Instrument.
Creating Crossfades
To create a good loop, it is often necessary to
crossfade across the transition between loop
start and end points to smooth over audio artifacts.
Before creating a crossfade loop it is important
that you locate a good loop point and try to
match the splice point as well as possible first.
Even a crossfade can’t fix a really bad splice.
To ensure that loop transitions play smoothly,
crossfades are centered over the loop start and
end points. For this reason it is essential that
there is ample audio material in the sample before and after the loop points. This will be used
as part of the crossfade.
Crossfade Loop dialog
Crossfade Parameters
Crossfade Type Offers either a linear or an equal
power crossfade. A Linear crossfade uses a flat
(linear) crossfade curve and is better for most applications. An Equal Power crossfade uses a nonlinear fade curve. This type of crossfade is useful
if the center of your crossfade seems to drop in
volume.
Crossfade Length Determines how much waveform on either side of the loop points will be included in the crossfade. For this reason, the
Crossfade Length must be shorter than the total
length of the loop; shorter than the length of
waveform between the very beginning of the
sound file and loop start; and shorter than the
length of waveform between the loop end and
the end of the sound file.
To create a crossfade loop:
1 With the sample open in the Loop window
and loop points set, click the Crossfade button.
Crossfade button
2 Select the crossfade type and length that you
want and click OK.
Chapter 4: Sample Editing and Looping
57
Adding a Second Loop
Swapping Loops
Soft SampleCell can recognize two separate
loops in an audio file. When only one loop exists that loop will be played during both the sustain and release portions of the sound file.
If, after defining a single Sustain/Release loop
you decide that you want to use it as a Release
loop instead, you can do so by using the Swap
Loops button. You will need to create a new Sustain loop for the file later.
When a second loop is added to a file it becomes
a Release loop, while the first loop becomes a
Sustain loop.
To create a Release loop:
1 Click the Loop Start Marker then click at the
desired point in the waveform display.
Swap Loops button
To swap loops:
1 Using the Loop Markers, define Loop 1 in the
sample.
Loop Start and End Markers
2 Next, click the Loop End Marker, then click at
2 Click the Loop Switch button. The Loop 1
Markers change to Loop 2 Markers and the loop
becomes a Release loop.
the desired point in the waveform display.
3 Using the Loop Markers, define a new Sustain
Loop (Loop 1).
3 Click the Loop select button to select Loop 2
for viewing, auditioning, and editing in the
Loop display.
Deleting Loops
To delete one or more Loop Markers, use the Delete Loop Marker tool.
Loop Select button
4 Click the Speaker button in the Loop display
to hear the loop.
Delete Loop Marker
To delete a loop:
1 Click the Eraser icon. The cursor changes to an
Eraser.
2 Click the Loop Start and Loop End markers
you want to delete.
58
Soft SampleCell Guide
Trimming Audio
2 Click one of the three color options and
choose the desired color.
You can quickly trim audio before and after a selection in a waveform with the Trim button.
3 Repeat for the other channel or background
options.
To trim unwanted data from a sound file:
1 Select the area of the sound file that you want
to keep.
2 Click the Trim button.
Trim button
All data but the selected area is removed. This
can be undone by choosing Edit > Undo.
3 Choose Save Selection As from the Loop menu
to save the trimmed sample.
Be sure to give the trimmed sample a new name
so it doesn’t overwrite the original audio file.
You should also close the original sample, without saving changes to it, to leave it unchanged.
Selecting a Different Sample
Editor
If you’d rather use a different application for
sample editing, Soft SampleCell allows you to
do so. Use the Select Sample Editor command to
select a compatible audio editing application.
To choose a different sample editor:
1 Choose Instrument > Select Sample Editor.
2 Locate the application and click Open.
3 Soft SampleCell will remember the application you choose and open it whenever you use
the Launch Sample Editor command.
To launch the selected sample editor:
1 In the Sample map window, select the sample
you want to edit.
Selecting Loop Window
Colors
You can customize the colors used to display
each audio channel and the background in the
Loop window.
2 Choose Instrument > Launch Sample Editor.
The sample is opened by the sample editor you
selected.
To choose custom colors for the Loop window:
1 Choose SampleCell > Preferences.
Selecting custom colors for the Loop window
Chapter 4: Sample Editing and Looping
59
60
Soft SampleCell Guide
chapter 5
Advanced Techniques
This chapter suggests some techniques for adding variety and realism to Instruments and samples. Use these examples as the starting point for
your own experimentation.
Templates
The basic function of an Instrument template is
to store Key Group mapping and Instrument parameter settings. A template can be used as a
starting point for new Instruments.
Soft SampleCell templates contain Sample Map,
Matrix Modulation, Envelope, Tracker and
other Instrument parameters.
Automatically Load Samples
When the Automatically Load Samples option
(in the Preferences window) is selected,
Soft SampleCell will load all samples required by
the Banks and Instruments currently being
opened. When this option is deselected, the Instrument opens with blank samples and the
Sample Map displays sample names in italics.
Templates can be loaded with placeholder samples containing little or no audio information.
This makes the template load quickly, and you
can then replace the samples with real sound
files.
Templates are convenient for setting up complex Instruments. For example, drum kit Instruments typically have a large number of individual samples, many Key Groups/Velocity Zones,
and many individual parameter settings.
Once you set up a drum kit Instrument with the
desired MIDI mapping, velocity, envelopes, filtering, panning, and so on, you can use the Save
Instrument As command to save a new copy of
that Instrument and use it as a template.
If you want to reuse an Instrument template
many times, you can save it as a Stationery Pad
using the Get Info command in the Finder.
Individual key Groups or Velocity Zones can be
selected and their samples replaced, or the original sample can be loaded by selecting its zone
and choosing the Load Sample command.
Saving an Instrument as a Stationery Pad
Chapter 5: Advanced Techniques
61
To create an Instrument template:
1 Open or create an Instrument and configure
its Instrument parameters as desired.
2 Configure the Sample Map window and edit
the Misc, Envelope, Matrix Modulation, Modulators, Trackers and Sample Parameters windows
as appropriate.
3 Choose File > Save Instrument As and save the
file, giving it a new name that identifies it as a
template.
4 Open the template in one of the following
ways:
To open the template quickly without loading
any samples, open the Preference window and
deselect the Automatically Load Samples option.
◆
– or –
To open the template and load all of its samples, make sure the Automatically Load Samples
option is selected in the Preferences window,
then open the template file.
◆
5 Choose Save Instrument As to save the new
Instrument under a new name, or choose Save
Instrument to save a new version of the template.
6 When the template file opens, replace or load
samples as necessary.
Using Blank Samples
Instrument templates can use blank samples to
conserve disk space and speed initial loading of
the template. A blank sample is a very short audio file. Once the Instrument is open you can
begin loading samples into the Sample Map to
replace the blank ones.
62
Soft SampleCell Guide
Instrument Defaults and
Templates
Many Soft SampleCell parameters can be saved
as Instrument defaults. It is important to understand how these defaults differ from the Instrument templates discussed earlier.
Instrument Defaults Are applied to all new Instruments. Any single- or multi-sample, mono
or stereo Instrument will be configured according to the current Instrument Defaults.
Instrument Default settings are created whenever you choose Instrument > Set Instrument
Defaults. This stores the current Instrument and
Bank parameters (but not Key Group sample
maps).
When a new Instrument is then created, the previously set Bank and Instrument default settings
are applied. Instrument-specific parameters (Envelope, Matrix Modulation, Modulators, Trackers, and Misc Parameters) will be configured according to the Instrument file opened.
If you are using both a SampleCell II card
and Soft SampleCell, choosing Set Instrument Defaults only sets the default values
for the SampleCell device the selected instrument is assigned to. If there is a set of
defaults you want for both the SampleCell
card and Soft SampleCell, choose Set Instrument Defaults once for each.
Instrument Templates Provide a way for you to
save different sets of Instrument Defaults with
the added advantage of storing Key Group sample maps (since sample maps are not stored with
Instrument Defaults).
Using Trackers
Tracking Generators have many uses, including
designing custom response curves, increasing
the resolution of Matrix Modulation settings,
adding an element of pitch randomization, and
enhancing the effect of vibrato and other performance parameters.
The following example illustrates how to use the
Tracking Generator to subtly modulate a controlling modulator—in this case, velocity—to
achieve enhanced resolution from a Matrix
Modulation routing.
Try using an Instruments such as a Drum kit.
Use the Tracking Generator to animate drum
sounds while leaving the pitch of cymbals unaffected.
Custom Response Curves
To use the Tracking Generator:
Custom response curves are used to increase or
decrease one parameter based on the input of
another parameter. The Trackers enable you to
draw a custom response curve, making it easy to
increase the resolution of virtually any Matrix
Modulation routing to achieve enhanced vibrato, and other effects.
Following are examples of how to use custom response curves in many different situations.
Increasing the Resolution of Matrix
Modulation
The Tracking Generators can be used to increase
the resolution of Matrix Modulation. This is useful when a Matrix amplitude value of 2 isn’t
enough, but 3 is too much, for example.
This dilemma can arise when mapping velocity
to pitch to simulate natural variations in drums
and other percussion instruments. In such cases,
too high a modulation setting can make the
samples change pitch too much (tom toms start
to sound like timpani, for example), while too
low a setting might yield too subtle results.
1 Open the Trackers window and choose the desired Instrument from the Instrument pop-up.
2 Choose Velocity from the Tracker 1 pop-up.
3 Edit the tracking curve so that it deviates
slightly from its default linear shape. Try raising
or lowering breakpoints slightly from center. Experiment with different settings to achieve the
desired result.
4 In the Bank window, select the desired Instru-
ment.
5 Open the Matrix Modulation window and create a modulation routing with Tracking Generator 1 as the Source and Pitch as the Destination.
6 Set the modulation Amplitude to 5 and play
the Instrument.
If further adjustment is necessary, increase or
decrease the Matrix Modulation amplitude of
the Tracker to Pitch routing, or return to the
Tracking Generator and edit the response curve.
Experiment with these two parameters until
your Instrument has just the right amount of response.
In addition, you might not want a kick drum or
cowbell to fluctuate in pitch as much as other
components in the kit.
Chapter 5: Advanced Techniques
63
Pitch Randomization
To randomize pitch in subtle increments:
The Tracking Generator can be used to add pitch
variation and randomization in Instruments to
increase their realism and animation. This is
particularly useful for emulating instruments
such as dulcimers, koras, and non-western
stringed instruments.
1 Open the Trackers window and choose the desired Instrument from the Instrument pop-up.
Non-Semitone Pitch Variation
The following example demonstrates non-semitone pitch variation using the Tracking Generator.
To randomize pitch in non-semitone increments:
1 In the Bank window, select the desired Instru-
ment
2 Open the Misc Parameters window and deselect Key Track.
3 Open the Trackers window and select MIDI
2 Choose Random Generator from the Tracker 1
pop-up.
3 Edit the tracking curve so that it deviates from
its default linear shape. Areas where you raise
the curve will apply more of the Random Generator.
This curve will be the basis of the randomization
of the Instrument, visually representing the
ranges in which the Instrument’s tuning will be
sharp or flat.
4 Open the Matrix Modulation window and create a modulation routing with Tracking Generator 1 as the Source and Pitch as the Destination.
5 Set the modulation Amplitude to 10 and play
the Instrument.
Note # from the pop-up. Set the Tracker to its default linear curve if it’s not already. Option-click
on the breakpoints to reset it them if necessary.
This will take the Instrument slightly out of
tune while maintaining a sense of pitch center.
4 Open the Matrix Modulation window and cre-
For greater pitch variation in the response of the
Instrument:
ate a modulation routing with Tracking Generator from the Source pop-up and Pitch from the
Destination pop-up.
5 Set the amplitude to 99.
1 Return to the Matrix Modulation window and
create a modulation routing with Random Generator as the Source and Pitch as the Destination
2 Set the modulation Amplitude to 12.
This should produce non-semitone tone increments. Experiment with the Matrix Modulation
amplitude and the Tracker curve until the desired intonation is achieved.
Subtle Detuning with Pitch Randomization
The following example demonstrates subtle
pitch variation using the Tracking Generator.
64
Soft SampleCell Guide
3 Repeatedly play a note on your MIDI controller., listening to the pitch variation produced by
the Random Generator.
The Random Generator is generally a subtle
modulation source. It can add a very natural destabilization to the tonality of the Instrument.
Dynamic Vibrato
The Tracking Generator can also be used for dynamic vibrato. Soft SampleCell provides a type
of default vibrato by mapping LFO 1 to Pitch.
Using the Tracking Generator, you can apply a
response curve that varies the width of the vibrato varies depending on the relative pitch of
the note.
For this example, consider how vibrato sounds
on violins and other bowed stringed instruments. Vibrato is commonly wider in upper registers than it is in lower registers. The reason for
this becomes clear if you look at the neck of a
guitar, where frets are closer together higher up
the neck. The higher the frequency, the less distance there is between pitches.
The same vibrato technique may vary the pitch
± a quarter step when applied to the lowest note,
but significantly more (a half or more) an octave
higher on the same string.
You can use the Tracking Generator to set up a
curve that, when mapped to the vibrato-generating LFO 1 Amplitude, can increase the width
of the vibrato in the upper registers to more
closely match this effect. While it is very simple
to achieve this by simply mapping MIDI Note #
to LFO 1 Amplitude in the Matrix Modulation
window, the resolution of the Matrix Modulation Amplitude may be insufficient to achieve
the desired result
The Trackers can provide a more subtle degree of
vibrato variation, especially when an Instrument’s range is limited.
To add dynamic vibrato:
1 Open the Trackers window and choose the desired Instrument from the Instrument pop-up.
3 Edit the tracking curve by raising the upper
breakpoints slightly and lowering the bottom
breakpoints slightly.
4 In the Bank window, select the desired Instru-
ment.
5 Open the Matrix Modulation window and create a modulation routing with Tracking Generator 1 as the Source and LFO 1 as the Destination.
6 Create a second modulation routing with
LFO 1 as the Source and Pitch as the Destination. (If this routing already exists, skip this
step.)
7 Set the modulation Amplitude to 15 and play
the Instrument.
8 Adjust the modulation Amplitude until the
desired effect is achieved.
Delayed Vibrato
Delayed vibrato is another expressive effect.
Many singers and instrumentalists don’t apply
vibrato immediately. Rather, a long note will be
held steady for a variable amount of time, then
gradually colored by increasing amounts of vibrato.
In Soft SampleCell, this can be accomplished by
mapping your MIDI controller’s mod wheel to
LFO amplitude, or by using the Ramp Generator
to delay vibrato by a constant amount, or by using an Envelope to delay vibrato by a variable
amount.
Mod Wheel Using the mod wheel to control LFO
amplitude is the easiest way to achieve delayed
vibrato. This method is ideal when you have a
hand free, but is of no use if both hands are busy
and you don’t have a foot pedal controller.
2 Choose MIDI Note # from the Tracker 1 popup.
Chapter 5: Advanced Techniques
65
Ramp Generator Using the Ramp Generator is
another simple way to set up a delayed vibrato
effect. The only drawback to this technique is
that the speed of the Ramp Generator itself cannot be modulated by any other parameter (such
as a Mod Wheel, MIDI Note #, Pressure, and so
on).
Envelope Using an Envelope to control the delay
time of Vibrato offers greater flexibility, and it
only takes a few steps to achieve.
3 Edit the tracking curve. To have vibrato appear quicker in the higher registers, raise the upper breakpoints slightly. To have vibrato appear
slower on lower register notes, lower the bottom
breakpoints slightly.
4 Open the Envelopes window and set a slow
Attack for Envelope 2.
5 Open the Matrix Modulation window and create a modulation routing with Tracking Generator 1 as the Source and Envelope 2 Attack as the
Destination.
To use the Ramp Generator to delay vibrato:
1 In the Bank window, select the desired Instru-
ment
2 Open the Modulators window and set the
Ramp Time fairly high. (You can readjust it
later.)
3 Open the Matrix Modulation window and create a modulation routing with Ramp Generator
as the Source and LFO 1 as the Destination.
7 Create a second modulation routing with Envelope 1 Attack as the Source and LFO 1 as the
Destination.
8 Set the modulation Amplitude to 30.
9 Play notes in the lower, middle and upper reg-
4 Set the modulation Amplitude to 30.
isters of your MIDI controller, and listen to the
rate at which vibrato begins to appear.
5 If necessary, adjust the Ramp Time control in
the Modulators window or the modulation Amplitude in the Modulation Matrix window until
the desired effect is achieved.
If necessary, return to the Tracking Generator
and Matrix Modulation windows to adjust the
vibrato delay until the desired effect is achieved.
Dynamic Vibrato Delay
Though the preceding example yields useful results, the rate of the delay remains the same regardless of the pitch. To produce a less linear application of vibrato, you can utilize a Tracking
Generator to add a response curve to the rate of
delay.
To use a Tracking Generator to delay vibrato:
1 In the Bank window, select the desired Instru-
ment.
2 Open the Trackers window and choose MIDI
Note # from the Tracker 1 pop-up.
66
6 Set the modulation Amplitude to -11. This
makes higher notes reduce the Envelope Attack
time.
Soft SampleCell Guide
Filters
An Instrument’s filter can be used for many creative effects. Two possible uses are to brighten
drum and percussion Instruments and to reduce
noise on samples with slow attacks.
Using the Filter to Dynamically
Control Percussion Brightness
The only limitation of this technique is that no
drummer’s dynamics are as consistent as the
0-127 unit resolution of MIDI velocity. For situations where you want variation that exceeds
the simple Velocity-to-Filter example, you can
add the Random Generator into the mix to further modulate the filter in subtle, or not-so-subtle, ways.
To use the Random Generator to enhance filtering:
A simple but effective way to brighten drum and
percussion sequences is to use Soft SampleCell
filters.
1 Set up the Velocity to Filter Matrix path as de-
To use the filter to enhance percussion:
2 Open the Matrix Modulation window and create an additional modulation routing with Random Generator as the Source and Filter
Frequency as the Destination.
1 In the Bank window, select the desired Instru-
ment.
2 Open the Misc Parameters window by clicking
the Misc Parameters button or choosing Windows > Misc Parameters.
3 From the Filter Poles pop-up, choose 1 pole.
4 Open the Matrix Modulation window and cre-
ate a modulation routing with Velocity as the
Source and Filter Frequency as the Destination.
5 Set the modulation Amplitude to ±30. Don’t
set the Amplitude much higher or the filter may
close completely on quiet notes.
This modulation routing mimics the way real
drums can sometimes sound brighter when hit
harder, and duller when hit softer.
scribed in the previous example, using the
1-pole filter.
You now should have two different filter modulation sources: Velocity and the Random Generator.
3 Set the modulation Amplitude of the Random
Generator-to-Filter path relatively high, then
experiment until you find a good balance between controlling the Filter Frequency with Velocity versus the Random Generator.
Keep in mind that the Random Generator is a
subtle modulation source, so you may find that
you need to create multiple routings of Random
Generator to Filter Frequency to achieve more
obvious results.
6 Open the Misc Parameters window and set the
Filter Cutoff somewhere below maximum.
7 Set the Overlap Amount to 75.
This prevents successive notes from cutting off
previous ones as the filter responds to new velocity amounts.
Chapter 5: Advanced Techniques
67
Filtering Out Noise
If you have a noisy sample you may find that
the signal-to-noise ratio in the lower dynamic
range is undesirable. This is usually most apparent during the decay stage of the sample, where
you may notice ambient noise as the sample
fades out.
To reduce the effect of such noise, try routing
Envelope 3 to the Filter Frequency in the Modulation Matrix. Use a moderate modulation Amplitude so that the filter opens as the sound
builds and closes as the sound decays.
This would allow you to match the timing of the
oncoming jet (the filter slowly opening), the jet
overhead (the filter full open), and the receding
jet noise (the filter closing again gradually).
Ensemble Instrument
Performance Ideas
This section provides examples of how to use
Matrix Modulation routings to enhance ensemble instruments such as horn or string sections.
Using a Mod Wheel
Filtering Sound Effects for
Film/Video
You can use your external MIDI controller and
Soft SampleCell’s filters to gain control over the
frequency spectrum of sound effect. This effect
works especially well with sounds that have a lot
of high frequency content.
Here is an example of when this might be useful.
Imagine that were doing sound effects for a
scene in a film in which a jet passes overhead. If
the scene took place in the middle of an open
field, the raw sample from your sound effects library would probably sound realistic.
Increasing Expression with Sample
Select
But what if the scene took place on a city street,
surrounded by skyscrapers? In such a situation,
the sound of the engines would be muted, then
grow in loudness until the jet was directly overhead.
This technique requires an ensemble Instrument with several Velocity Zones per Key
Group—the more the better. The main component of this effect is controlling Sample Select
with a mod wheel control wheel.
When the jet disappeared again, its sound
would once again diminish, then drone away
into the distance.
When the Instrument’s Velocity Zones contain
multiple dynamic variations of the sound, the
result is additional expressiveness throughout
the dynamic range of the Instrument. When the
different Velocity Zones contain different riffs
or stylistic inflections, the mod wheel allows
you to perform parts with much greater nuance!
By creating a Matrix Modulation routing with
your MIDI controller’s mod wheel controlling
Filter Frequency, you can perform filter changes
in real time while watching a reference video.
68
Pitch bend or LFO pitch modulation are great
for synth sounds or even some solo acoustic instruments like guitar or trumpet. However, ensemble acoustic instruments rarely sound authentic when all of them are modulating at the
exact same rate, and as a result the mod wheel
(or pitch wheel too) usually goes unused with
such Instruments. This makes the pitch and/or
mod wheel available for real-time control of
other parameters—ones that you can put to use
in very powerful and expressive ways.
Soft SampleCell Guide
To use a mod wheel to select samples in real time:
1 In the Bank window, select the desired Instru-
ment.
2 Open the Matrix Modulation window and create a modulation routing with Mod Wheel as
the Source and Sample Select as the Destination.
For now, you might want to turn off any other
mod wheel mappings (such as LFO or other
standard mod wheel assignments).
3 Experiment with the mod wheel while playing at different dynamic levels.
The mod wheel can cause the upper Velocity
Zones to be triggered, yet the volume will still be
controlled by Velocity.
You can also use this technique to simulate the
real-time effect of a Hammond organ’s percussion drawbar being pushed in and out. If you
load highly percussive samples into the upper
Velocity Zones, the mod wheel will trigger
sounds with a bright attack, even at low velocities.
Here’s an additional trick:
1 In the Bank window, select the desired Instru-
ment.
2 Open the Matrix Modulation window and create a modulation routing with Mod Wheel as
the Source and Envelope 3 Amplitude as the
Destination.
3 Set the modulation Amplitude to -99.
This effectively makes it a volume control for
performing fade outs.
4 Open the Trackers window and choose Mod
Wheel from the Tracker 1 pop-up.
The combination of these two Matrix Modulation routings all you to use the mod wheel for a
much greater range of dynamic expression.
Enhanced Strings
Bowed stringed instruments do not have uniform attacks at different dynamic levels. When
bowed to produce a loud note, a cello, for example, will respond instantaneously and be immediately audible. When bowed slowly, however,
the attack is slightly delayed due to the slower
draw of the bow over the string.
If you don’t have the luxury of using multi-sampled strings, you can simulate this effect by
mapping Envelope 1 or 2 to the amplitude-controlling Envelope 3.
To improve string ensemble realism:
1 In the Bank window, select the desired Instru-
ment.
2 Open the Envelopes window.
3 Edit Envelope 2 by increasing its Attack time
so that it is greater (slower) than the Envelope 3
Attack.
The greater the difference between these two parameters, the more exaggerated the effect.
4 Open the Matrix Modulation window and create a modulation routing with Velocity as the
Source and Envelope 3 Amplitude as the Destination. Set the modulation Amplitude to 90.
5 Create a second modulation routing with Envelope 2 as the Source and Envelope 3 Attack as
the Destination. Set the modulation Amplitude
to 30.
5 Edit the tracking curve by lowering the middle
breakpoints and creating a crescent shape.
Chapter 5: Advanced Techniques
69
Envelop 2 will respond to softly played notes,
while Envelope 3 will respond to a high velocity
For additional realism, map Envelope 2 to
the Filter with a modulation Amplitude of
99.
Chorusing
Chorusing is useful for thickening Instruments.
You can achieve good chorusing effects with the
following example.
To use chorusing:
1 In the Bank window, copy and paste the Instrument so that you have 2 of the same Instruments in the Bank.
2 In the Bank window, select the copied Instrument.
Other Effects and Tricks
Following are additional techniques for adding
realism to sampled instruments.
Controlling Sample Start with
Velocity
When adding footsteps or similar sound effects
to a project, simply increasing the volume of the
effect as a character approaches is often unsatisfactory. Instead, you can modify the footsteps so
the sound’s attack becomes more pronounced as
they get closer.
This can be achieved by mapping Velocity to
Sample Start Point in the Matrix Modulation
window.
To control Sample Start with Velocity:
3 Open the Misc Parameters window and de-
tune the Instrument slightly with the Detune
slider.
For more chorusing effects, try mapping a
Modulator to the Pitch of the second Instrument. Experiment with different LFO Sync
and Waveform settings.
1 In the Bank window, select the desired Instru-
ment.
2 Open the Sample Map window and double
click the sample to open the Sample Parameters
window.
3 Adjust the Zone Start to the lowest velocity
you will be triggering.
4 Open the Matrix Modulation window and create a modulation routing with Velocity as the
Source and Sample Start Point as the Destination.
5 Set the modulation Amplitude to a negative
value. This will make the sample start earlier
with higher velocities.
70
Soft SampleCell Guide
Enhancing Drums
Sample randomizing allows you to randomly
play different samples with the same MIDI note.
This is especially helpful in making sampled
drums sound less repetitive. To use this technique, you must use an Instrument with at least
2 Velocity Zones in its samples.
To randomize sample selection:
1 In the Bank window, select the desired Instru-
ment.
2 Open the Matrix Modulation window and create 3 identical modulation routings with Random Generator as the Source and Sample Select
as the Destination.
3 Set the modulation Amplitude to 99.
Since the Random Generator selects Left/Right
independently, this example only works with
mono samples. It might, for example, play the
left channel of sample 1 and the right channel
of sample 2.
If you are working with stereo samples, try using
an LFO to modulate Sample Select instead of the
Random Generator.
Chapter 5: Advanced Techniques
71
72
Soft SampleCell Guide
chapter 6
Soft SampleCell Menus
File Menu
Stereo Single-Sample Instrument An Instrument
using one or more stereo samples in a single Key
Group without modulation options.
Open
Opens an existing Bank, Instrument or sample.
Close
Closes the active window.
File menu
Close All
New
Closes all currently open windows.
Creates a new Bank or a new Instrument. The
four Instrument types are:
Save All Changed
Multi-Sample Instrument An Instrument using
one or more mono samples with modulation
options.
Stereo Multi-Sample Instrument An Instrument
using one or more stereo samples with modulation options.
Saves all modifications made to any open Banks
and all of the Instruments they contain.
Save Bank
Saves the current Bank to the drive and directory from which it was loaded.
Single-Sample Instrument An Instrument using
one mono sample in a single Key Group without
modulation options.
Chapter 6: Soft SampleCell Menus
73
Save Bank As
Edit Menu
Saves the current Bank to a specified drive and
directory. This command also allows you to save
Instruments and samples to a new directory.
Revert Bank
Reverts to the last saved version of the current
Bank.
Edit menu
Save Instrument
Undo
Saves the currently selected Instrument to the
drive and directory from which it was loaded.
Undoes the last command or edit (not all commands/edits can be undone).
Save Instrument As
Cut Instrument
Saves the current Instrument to a specified drive
and directory. Also allows you to save all samples associated with the Instrument to a new directory.
Removes the currently selected Instrument from
a Bank and places a copy on the Clipboard. Cannot be Undone.
Revert Instrument
Copy Instrument
Reverts to the previously saved version of the Instrument.
Places a copy of the currently selected item onto
the Clipboard, without removing it from the
Bank. Cannot be Undone.
Get Bank Info
Paste Instrument
Displays comments about the current Bank.
Bank Info comments are displayed in the Open
and Where Is dialogs.
Pastes an Instrument from the Clipboard into
the current Bank. A copy of the Instrument remains on the Clipboard as well. Cannot be Undone.
Quit
Quits Soft SampleCell.
Clear Instrument
Removes the currently selected Instrument from
a Bank without placing a copy on the Clipboard.
Cannot be Undone.
74
Soft SampleCell Guide
Show Clipboard
Add Multiple Key Groups
Shows the current contents of the Clipboard.
Lets you select multiple samples and load them
into an Instrument. This command is useful for
quickly building multi-sample Instruments.
Instrument Menu
Load Sample
Loads a sample into the currently selected Key
Group or Velocity Zone.
Unload Sample
Unloads the currently selected sample from an
Instrument while retaining its Key Group/Velocity Zone mapping and file referencing.
Reload Sample
Instrument menu
Reloads a sample or region that has been unloaded or modified and resaved.
New Velocity Zone
Change Sample
Creates a new Velocity Zone within the currently selected Key Group and loads a selected
sample into that Velocity Zone. You can create a
maximum of 6 Velocity Zones per Key Group. If
a stereo sample is selected for a mono Instrument, you have the choice of selecting channel
1 (left) or 2 (right) as the channel to load.
Loads a new sample into the currently selected
Key Group or Velocity Zone. Any parameters
you have set for this sample (such as Start Point,
Tuning, and so on) will be applied.
New Key Group
Creates a new Key Group for a selected sample
and loads the sample into the Key Group. Each
Instrument can have a maximum of 60 Key
Groups. The new Key Group is placed at the
right end of the Sample Map, with a default
range of one note.
Chapter 6: Soft SampleCell Menus
75
Sample Parameters
Global Parameters
Opens the Sample Parameters window for the
currently selected sample in the Sample Map
window.
The following parameters are global sample parameters. Their effect is heard in all currently
open Instruments that use the selected sample:
The Sample Parameters window can also be
opened by double-clicking a sample in the
Sample Map window.
Sample Start Coarse Adjusts the sample start
point over the entire sample length.
Sample Start Medium Provides fine-tuning adjustments for the Sample Start Coarse setting.
Sus Loop Fine Tune Sets the fine tuning of the
sample’s pitch during the sustain loop. This
slider is only be available if the sample has two
loops.
Sample Parameters
Sus/Rel Loop Fine Tune Tunes the pitch of a
sample’s sustain/release or release loop. This
control is not available if a sample has no loops.
If a sample has one loop only, the Sus/Rel control fine tunes the audio played during both sustain and release loops. If a sample has two loops,
this control tunes the audio played during the
release loop.
The following information is displayed in the
Sample Parameters window:
Sample Fine Tune Sets the overall fine tuning of
the sample’s pitch.
Instrument Shows the name of the
Soft SampleCell Instrument that contains the
currently selected sample file.
Sus Loop Enable Activates the sustain loop
when checked. Click to toggle on/off. This control is only available if a sample has two loops.
File Shows the name of the currently selected
sample file.
Sus/Rel Loop Enable When enabled, activates
the sustain/release or release loop. Click to toggle on/off.
Size Shows the file size of the currently selected
region/file.
Instrument-Specific Parameters
Sample parameters window
Volume Shows the location of the currently selected sample file.
Region Shows the name of the currently selected
region.
Time Shows the length of the file/region (in seconds).
76
Soft SampleCell Guide
The following parameters are Instrument-specific parameters. Their effect is heard only in the
current Instrument:
Key Group Pan Controls panning of the selected
sample within the Instrument’s overall stereo
field. A setting of zero pans the sample in the
center of the stereo field
Sample Amplitude Sets the volume of the selected sample.
Convert Instrument to
Stereo/Mono
Fine (Zone Start) Sets the playback start point of
the sample in smaller increments than the sample start coarse/medium. This parameter only affects the currently selected sample (not copies of
the sample used in other open Instruments).
This control is useful for eliminating unwanted
silence or transients at the beginning of a sample.
Converts the currently selected Instrument to
stereo if it is mono, and vice-versa. The new Instrument will have “mono” or “stereo” appended to its name.
MIDI Root Note Specifies the MIDI note that will
play the sample at its original pitch. To set the
MIDI Root Note, click the pop-up keyboard and
select a note value.
Direction Determines whether the sample will
be played forward or backward. Loops are ignored when Backward is selected.
Launch Sample Editor
Selects and opens a different sample editing application and opens the currently selected sample. After editing, you will need to use the Reload Sample command if you edited the sample
destructively, or use the Change Sample command to load a new version of the sample.
Select Sample Editor
Selects the sample editing application that will
launch when you click the Edit Sample button.
Edit Loops
Selects an audio file to load into the Loop window.
Edit “sample name”
Get Instrument Info
Displays comments about the currently selected
Instrument. Comments are useful for making
comments about an Instrument such as “Pitch
Wheel controls pitch, Mod wheel controls panning,” and so on.
Set Instrument Defaults
Saves the parameters (Modulators, Envelopes,
and so on) for the currently selected Instrument
as defaults for use when creating new Instruments or adding Instruments to a Bank. If you
create a new Instrument, the saved settings are
applied to the entire Instrument. If you open an
Instrument into a Bank, only the saved Bankspecific parameters (Panning, MIDI channel, Instrument Volume) are applied since the Instrument-specific parameters are taken from the Instrument file itself.
Map All Instruments
Remaps all Instruments in the current Bank and
adjusts the Hi/Lo Note range of each Instrument
so that it has a unique note range. For example,
if two Instruments are added to a Bank and both
of their note ranges are from A0 to C8, the Map
All Instruments command will remap the first
(left-most) Instrument’s Lo/Hi note range to A0
to F4, and the second Instrument to F#4 to C8.
Loads the sample currently selected in the Sample Map window into the Loop window.
Chapter 6: Soft SampleCell Menus
77
Set Root Notes
Delete Unused Samples
Sets the MIDI Root Note for a selected sample
automatically, based on the lowest, highest or
middle note of the sample’s Key Group.
Removes any samples from memory that are not
being used by the current Instrument.
If the files is an AIFF file, you can also set
the MIDI root note using the root note definition stored in the file.
Reorder Key Groups By Root Note
Rearranges Key Groups selected in the Sample
Map window (including all Key Groups to the
right of the selected Key Group), sorting them
by root note in ascending order across the Instrument.
Soft SampleCell Setup
Use this dialog to configure Soft SampleCell
voice polyphony, sample memory and sound
output options. See “Configuring
Soft SampleCell” on page 5 for details on using
this command.
Spread Key Groups
Moves and resizes the selected Key Groups (including all Key Groups to the right of the selected Key Group) so that they are of equal
width and range.
Monitor SampleCell window
SampleCell Menu
Soft SampleCell CPU Usage
Displays the percentage of available processing
currently used by Soft SampleCell.
For best performance do not exceed a system load of 50%. To reduce CPU usage, use
the Soft SampleCell Setup dialog to reduce
the number of SampleCell voices.
Test SampleCell
SampleCell menu
Load All Samples
Loads all samples needed for the currently open
Bank and Instruments.
78
Soft SampleCell Guide
If you are using a SampleCell card, this command tests its various RAM and ROM components. Without a SampleCell card, this command is unavailable. For more details about this
feature, see the SampleCell II User’s Guide.
Monitor SampleCell
Displays the amount of RAM currently available
and currently in use by Soft SampleCell.
Monitor SampleCell window
OMS MIDI Setup dialog
Total Memory Shows the total amount of RAM
allocated for Soft SampleCell sample playback.
For more information, refer to the OMS Manual.
Available Memory Displays the amount of memory left for additional samples.
OMS MIDI Input Devices
Largest Unused Block Displays the size of the
largest block of contiguous, unused RAM.
Soft SampleCell cannot load samples larger than
the largest unused block because it must store
samples in a contiguous block of memory.
Opens the OMS MIDI Input dialog, where you
can enable MIDI controllers and other devices
for playing Soft SampleCell. For details on configuring your OMS MIDI setup, see “Configuring OMS” on page 4.
Open OMS Studio Setup
Launches the OMS Setup application and opens
the current Studio Setup document. For details
on configuring your OMS Studio Setup, see
“Configuring OMS” on page 4.
Do not enable any OMS Input Devices here
if you plan to use Soft SampleCell with a sequencer. Doing so will result in doubled
notes as MIDI data is sent twice—directly
from the MIDI device, and also from a
MIDI track in the sequencer.
OMS MIDI Setup
Opens the OMS MIDI Setup dialog, where you
can enable and disable ports for MIDI communication. For details on configuring your OMS
MIDI setup, see “Configuring OMS” on page 4
OMS MIDI input devices
Chapter 6: Soft SampleCell Menus
79
All Notes Off
Pass MIDI Thru to selected instrument’s channel
This command turns off all notes playing on all
Instruments in all Banks. Use it if MIDI notes become stuck.
Allows you to switch back and forth to adjust
Soft SampleCell parameters without having to
set the correct MIDI channel to trigger the selected Instrument. Incoming MIDI data will be
sent to all currently selected Instruments, regardless of MIDI channel assignment. Deselecting this option avoids the possibility of doubletriggering of notes, a situation that can occur
when the sequencer and the Instrument are already set to the same channel.
Preferences
The options in the Preferences window allow
you to customize several Soft SampleCell operating parameters.
If you have several Instruments assigned to the
same MIDI channel, MIDI Thru will play
through all of them, not just the one currently
selected.
Pass MIDI Thru unchanged Allows you to trigger
Soft SampleCell playback from a MIDI sequencer or from a MIDI application on a different computer. With this option selected, notes
are triggered according to the channel sent by
your MIDI controller, regardless of which instrument is selected.
If you are using SampleCell II cards in addition
to Soft SampleCell, MIDI notes will be sent to
Instruments set to the corresponding channel
on all SampleCell devices.
Preferences window
General Preferences
Automatically delete unused samples When a
Bank is closed or an Instrument deleted, this ensures that the associated samples are removed
from memory. This is recommended for efficient memory management.
80
Soft SampleCell Guide
If you want MIDI thruing to occur in the background, also select the Pass MIDI Thru When in
Background option.
Pass MIDI thru when in background Allows external MIDI devices to continue triggering playback of Soft SampleCell, even if Soft SampleCell
Editor is not the current application. Also select
Pass MIDI Thru Unchanged in the SampleCell
Preferences dialog for this to work properly.
Instruments Preferences
Default new Instruments to “Key Track” off Specifies that the pitch of any new Instruments are
not affected by MIDI notes. This feature is useful
when creating a Bank of non-pitched Instruments such as sound effect.
Automatically Remap Instruments This command spreads all existing Instruments in the
current Bank whenever a new Instrument is
added. Instrument range is spread over a 5 octave range and the center note of each Key
Group is assigned to the MIDI Root Note. For example, if you have 5 Instruments open, the leftmost Instrument is mapped from C0 to B2 with
its root note set to F#2. Moving to the right, the
next Instrument is mapped from C3 to B3 with
a root note of F#3, and so on. This is an easy way
to build sound effects or drum kit Banks on the
fly.
Make One Instrument When this option is selected, all sample files are loaded into one new
Instrument when dragged onto the
Soft SampleCell Editor. If they are AIFF files,
their Key Group mapping is taken from the parameters in the AIFF file.
When this option is not selected, a new Instrument is created for each sample file, and Instrument Hi & Lo note mapping will observe the
AIFF parameters (if they exist). If they are not
AIFF files they will be sorted and loaded in alphabetical order by sample name.
Try to Assign Unused MIDI Channel This option
supersedes the Instrument defaults and automatically assigns the first unused MIDI channel
available for each new Instrument.
If no MIDI channels are in use, or none are available, the Instrument will be set to its default
MIDI channel, which can result in duplicate
MIDI channel assignments.
This Preference only looks for unused channels
in the current Bank. If you have more than one
Bank open, it is possible that this Preference will
assign a MIDI channel that is already in use by
another open Bank.
Opening/Loading Preferences
Preview using Sound Manager This option lets
you use the Macintosh Sound Manager to audition samples in file dialogs for Open, New Key
Group and Add Multiple Key Groups. If this option is deselected, audio previewing is through
Soft SampleCell’s audio setup. Preview “Stop” is
not available when monitoring through
Soft SampleCell.
If you are using SampleCell II cards in addition
to Soft SampleCell, previewing will take place
through whichever SampleCell device was most
recently selected.
Verify sample file locations Specifies whether
Soft SampleCell verifies file locations before
loading or during loading. By verifying before
loading, you may find out sooner that
Soft SampleCell Editor is looking for a file on a
CD you don't have anymore. By verifying during loading, you may do less disc swapping if
the Bank uses samples from more than one CDROM.
Automatically open all Instruments in a Bank
This option skips the Select Instrument dialog
that appears when opening Banks. The Select Instrument dialog lets you choose which individual Instruments in a Bank you want to load.
Automatically load samples Loads each associated sample when an Instrument or Bank is
opened. When this option is off Banks and Instruments are opened without the associated
sample files loaded into RAM.
Chapter 6: Soft SampleCell Menus
81
Display Preferences
Sample Map
Display line segment envelopes Displays envelope controls in the Envelope window as line
segments than can be dragged for editing. When
deselected, displays envelope controls as sliders.
Opens the Sample Map window.
Default to Small Bank View Sets the default Bank
view. When selected, newly created or opened
Banks are displayed in small height view. When
deselected, banks are displayed in full-height
view.
Display controls in real units Displays Instrument parameters in real unit values (ms, Hz, and
so on) or Soft SampleCell values (0-127 and
other control ranges).
Misc Parameters
Opens the Misc Parameters window.
Envelopes
Opens the Envelopes window.
Matrix
Opens the Matrix Modulation window.
Modulators
Loop Editing Preferences
Lets you set channel and background colors for
the Loop window. Refer to “Selecting Loop Window Colors” on page 59 for details.
Opens the Modulators window.
Trackers
Opens the Trackers window.
File Searching Preferences
Switch Bank Size
Lets you specify the locations on which to
search for Soft SampleCell Instruments and
samples.
Windows Menu
Switches the Bank Size View for the current
Bank from full-size view to small-size view, and
vice versa.
Current Bank
At the bottom of the Windows menu, all currently open Banks are listed. Selecting a Bank
makes it the active Bank window.
Windows menu
82
Soft SampleCell Guide
appendix a
Using Soft SampleCell with Pro Tools
By using DirectConnect to integrate
Soft SampleCell within a Pro Tools session, you
can take advantage of the many MIDI recording
and editing, digital mixing, and DSP processing
capabilities of Pro Tools.
DirectConnect is a Macintosh-only plug-in that
allows up to 32 separate audio channel outputs
from Soft SampleCell to be independently
routed, recorded, processed, and mixed within
the Pro Tools environment.
Once Soft SampleCell outputs are routed to
Pro Tools, you can:
• Assign them to auxiliary inputs for plug-in
processing
• Automate volume, pan, and plug-in parameters
If you attempt to use more channels than are
available with DirectConnect, you may encounter a DAE error -6042 (PCI bus too busy).
DirectConnect and Track Count on
Pro Tools LE Systems
On Pro Tools LE-based systems, performance is
determined by several factors, including host
CPU speed, available memory, and buffer settings. Digidesign cannot guarantee 32 simultaneous audio channel outputs with DirectConnect on all computer configurations.
For the latest information on recommended
CPUs and system configurations, please check
the Digidesign Web site.
• Bounce to disk
• Take advantage of the audio outputs of your
Digidesign audio interfaces
DirectConnect and Track Count on
Pro Tools TDM Systems
Each channel of audio transmitted through DirectConnect uses the same amount of PCI bus
bandwidth as a single audio track on Pro Tools
TDM systems. For example, if you are playing 48
disk tracks on a Pro Tools MIX System, that will
leave 16 channels of audio (16 mono, or 8 stereo) that can be used with DirectConnect.
Appendix A: Using Soft SampleCell with Pro Tools
83
DirectConnect and DSP Resources
(TDM Systems Only)
3 In the Input Devices dialog, select the MIDI
devices you will use to play Soft SampleCell and
record MIDI.
Similar to some plug-ins, DirectConnect requires a specific type of DSP chip (SRAM) to
function; there are three of these particular DSP
chips on a MIX Core card.
When DirectConnect is in use, it takes up one of
these DSPs and makes it unavailable for any
other plug-ins.
You can use the Show System Usage window (Windows > Show System Usage) to see
how much DSP is available on your system
and how it is currently being used. For details, see the Pro Tools Reference Guide.
Enabling MIDI input devices
To improve MIDI performance, deselect any
unused MIDI devices.
Configuring Pro Tools for MIDI
4 Click OK.
Before you can use Soft SampleCell with
Pro Tools, you must first configure your
Pro Tools MIDI setup.
MIDI Thru
Enabling Input Devices
To play Soft SampleCell or record MIDI tracks
from a MIDI keyboard controller, the controller
must be enabled in the Input Devices dialog.
To enable input devices:
To monitor Soft SampleCell and other MIDI devices while recording, enable MIDI Thru. When
enabled, Pro Tools routes MIDI from your controller to the MIDI device and channel assigned
to the MIDI track currently record-enabled.
To enable MIDI Thru:
■
Select MIDI > MIDI Thru.
1 Turn on the MIDI devices and launch
Pro Tools.
2 Choose MIDI > Input Devices.
MIDI Thru enabled
84
Soft SampleCell Guide
When using MIDI Thru, disable Local Control
on your MIDI keyboard controller. Otherwise,
your keyboard may receive double MIDI notes,
which can lead to stuck notes. If unsure how to
disable Local Control for your instrument, refer
to the manufacturer’s documentation.
3 Select the option for Program Changes. Leave
all other messages deselected.
4 Click OK.
Using DirectConnect
When MIDI Thru is enabled, System Exclusive events are echoed to the MIDI device
assigned to the record-enabled track—but
only if the sysex events are smaller than
256 bytes.
To play Soft SampleCell within Pro Tools, you’ll
use DirectConnect.
To configure DirectConnect:
1 Launch Soft SampleCell Editor.
MIDI Input Filter
You can use the MIDI Input Filter to filter out
certain MIDI messages. The Input Filter can be
set to record “all” messages, “only” the specified
messages, or “all except” the specified messages.
When using the Only option, only the MIDI
messages that are selected will be recorded. Conversely, when using the All Except option, the
selected messages will not be recorded.
For instance, to filter out program changes:
1 Choose MIDI > Input Filter.
2 Select the All Except option.
2 Choose SampleCell > Soft SampleCell Setup
and under Sound Output options, select DirectConnect. Click OK.
3 Open any Soft SampleCell Banks you want to
use in the Pro Tools session.
4 Assign Instruments in the Banks to appropriate MIDI channels.
5 Assign the outputs of Instruments to the desired outputs.
6 Launch Pro Tools and create a new session.
7 Choose File > New Track and specify one Auxiliary Input (stereo) track, then click Create.
8 Choose File > New Track and specify one MIDI
Track, then click Create.
9 In the Mix window, click on the new MIDI
track’s Output Device/Channel Selector and select Soft SampleCell and the desired MIDI channel.
MIDI Input Filter
Appendix A: Using Soft SampleCell with Pro Tools
85
Soft SampleCell Instruments set to the same
MIDI channel in Soft SampleCell Editor will be
triggered by the MIDI track.
12 Select MIDI > MIDI Thru and record-enable
the MIDI track. Play some notes on your MIDI
controller to trigger Soft SampleCell.
You must record-enable a MIDI track to
monitor the assigned instrument.
You can now record and play MIDI performance
data for the Soft SampleCell Instrument as you
would with any MIDI device in Pro Tools.
Selecting Soft SampleCell as a MIDI device
10 In the Mix window, assign the
Soft SampleCell DirectConnect plug-in to the
Auxiliary Input track.
For more information on MIDI recording,
editing, and playback refer to your
Pro Tools reference Guide.
To add additional Soft SampleCell instruments:
1 Create a MIDI track for each Soft SampleCell
Instrument you want to add.
2 Click the MIDI track’s Output Device/Channel Selector, then select Soft SampleCell and the
desired MIDI channel.
Inserting Soft SampleCell on an auxiliary input
11 In the DirectConnect plug-in window, set
the Direct Connect input to the desired
Soft SampleCell output.
The DirectConnect input channel assignment must match the output channel assignment of the desired Instrument in
Soft SampleCell Editor.
Selecting Soft SampleCell in DirectConnect
86
Soft SampleCell Guide
3 Choose File > New Track and create a new
Auxiliary Input (stereo) for each Soft SampleCell
Instrument you want to add.
4 In the Mix window, assign the
Soft SampleCell DirectConnect plug-in to each
new Auxiliary Input track.
5 In the DirectConnect plug-in window, set the
Direct Connect input on each new Auxiliary Input to the desired Soft SampleCell output.
Total Session Recall
Digi001 Users
Once you save and re-open a session that uses
Soft SampleCell with DirectConnect, Pro Tools
will automatically recall all settings, launch
Soft SampleCell Editor, and open the appropriate Banks and Instruments for you. This provides convenient total recall of your Pro Tools
and Soft SampleCell setups.
If you use the MIDI capabilities of Digi001, you
must launch Pro Tools before launching
Soft SampleCell Editor (or any other OMS application), or Pro Tools will not open.
To use session recall, save your session in the order below:
To use total session recall:
In addition, you must quit the other applications before quitting Pro Tools, or MIDI will be
inactive on the Digi001 until all OMS applications have quit.
If you don't use the MIDI capabilities of Digi001,
remove the Digi001 OMS driver from your OMS
folder to avoid the above restrictions.
1 Create the Pro Tools/Soft SampleCell session
according the instructions given in “Using DirectConnect” on page 85.
2 In Soft SampleCell Editor, choose File >
Save All Changed to save the Banks and Instruments. If you want to copy instruments and
samples to new locations, select the appropriate
checkboxes in the Save dialog.
3 In Pro Tools, choose File > Save Session to save
the session.
4 Close the Pro Tools session.
The next time you open the session, Pro Tools
will launch Soft SampleCell Editor and open the
associated Banks and Instruments.
Do not close Soft SampleCell Banks before
saving the Pro Tools session or Pro Tools
will not recall them. In addition, all
Soft SampleCell Banks must have been
saved—Pro Tools will not recall unsaved,
untitled Banks.
Appendix A: Using Soft SampleCell with Pro Tools
87
88
Soft SampleCell Guide
appendix b
Recording Samples
While Soft SampleCell itself cannot directly
sample audio by itself, there are a variety of ways
to accomplish this using Digidesign’s Pro Tools
or other digital audio recording applications.
Using Sound Libraries
Sampling with Pro Tools
There are many sample libraries available for
Soft SampleCell from Digidesign’s Development
Partners. The Soft SampleCell Demo Sounds CDROM included with Soft SampleCell provides a
small overview of what's available.
Digidesign’s Pro Tools system can be used to
record audio samples for use with
Soft SampleCell.
Contact Digidesign or your local dealer for more
information about other sound libraries available for Soft SampleCell.
To create samples using Pro Tools:
Using Sound Libraries for Other
Samplers
1 Use Pro Tools to record the desired sounds to
hard disk. (See the Pro Tools Reference Guide.)
Soft SampleCell can play samples recorded at
16- or 24-bit fidelity and either 44.1 or 48 kHz.
When using Soft SampleCell with DirectConnect, samples are played at the
Pro Tools session’s sample rate. When using Direct I/O, samples are played at the
sample rate selected on the audio interface.
2 Use Pro Tools editing tools to edit the samples
if desired, then save the audio file in SDI, SDII,
AIFF, or.WAV format.
Since most sound libraries for other samplers are
in audio file formats supported by
Soft SampleCell, you can import the samples
and create your own Soft SampleCell Instruments.
You can also utilize any of the many file translation applications available for transferring
sound libraries from one format to another.
Contact Digidesign or your local dealer for information about these and other applications
from Digidesign’s Development Partners.
3 Launch Soft SampleCell and load the samples
into an Instrument. See “Adding/Importing
Samples” on page 27.
Appendix B: Recording Samples
89
90
Soft SampleCell Guide
appendix c
MIDI Controller Numbers
Soft SampleCell allows you to select two MIDI
controller numbers from a total list of 120 as
modulation sources. This enables you to use, for
example, a breath controller (MIDI Controller
#2) to modulate Volume or a foot pedal (MIDI
Controller #4) to modulate LFO Amplitude.
Table 1. MIDI controller numbers
Controller
Number
Controller Type
13
Effect Control 1
14 - 15
Undefined
Table 1. MIDI controller numbers
Controller
Number
16
General Purpose Controller #1
17
General Purpose Controller #2
18
General Purpose Controller #3
19
General Purpose Controller #4
Controller Type
0
Bank Select
1
Modulation Wheel
2
Breath Control
3
Undefined 6
4
Foot Controller
5
Portamento Time
6
Data Entry
7
Channel Volume
8
Balance
9
Undefined
10
Pan
11
Expression Controller
12
Effect Control 1
20 - 31
Undefined
32
Bank Select
33
Modulation Wheel
34
Breath Control
35
Undefined
36
Foot Controller
37
Portamento Time
38
Data Entry
39
Channel Volume
40
Balance
Appendix C: MIDI Controller Numbers
91
Table 1. MIDI controller numbers
Controller
Number
Controller Type
Controller
Number
Controller Type
41
Undefined
75
Sound Cont. 6 (Decay Time)
42
Pan
76
Sound Cont. 7 (Vibrato Rate)
43
Expression Controller
77
Sound Cont. 8 (Vibrato Depth)
44
Effect Control 1
78
Sound Cont. 9 (Vibrato Delay)
45
Effect Control 2
79
Sound Cont. 10
Undefined
80
General Purpose Controller #5
48
General Purpose Controller #1
81
General Purpose Controller #6
49
General Purpose Controller #2
82
General Purpose Controller #7
50
General Purpose Controller #3
83
General Purpose Controller #8
51
General Purpose Controller #4
84
Portamento Control
46 - 47
Undefined
52 - 63
85 - 90
Undefined
64
Damper Pedal on/off (Sustain)
91
Reverb Send Level
65
Portamento on/off
92
Effects 2 Depth (Tremolo Depth)
66
Sustenuto on/off
93
Chorus Send Level
67
Soft pedal on/off
94
Effects 4 Depth (Celeste/Detune
Depth)
68
Legato Footswitch
95
Effects 5 Depth (Phaser Depth)
69
Hold 2
96
Data entry +1
70
Sound Cont. 1 (Sound Variation)
97
Data entry -1
98
Non-Registered Parameter
Number
99
Non-Registered Parameter
Number
71
92
Table 1. MIDI controller numbers
Sound Cont. 2 (Timbre/Harmonic
Intensity)
72
Sound Cont. 3 (Release Time)
73
Sound Cont. 4 (Attack Time)
74
Sound Cont. 5 (Brightness)
Soft SampleCell Guide
100
Registered Parameter Number
Table 1. MIDI controller numbers
Controller
Number
101
102 - 119
Controller Type
Registered Parameter Number
Undefined
Appendix C: MIDI Controller Numbers
93
94
Soft SampleCell Guide
index
Numerics
1-pole filter 38
4-pole filter 38
A
adding samples into instruments 27
adding velocity zones 28
advanced techniques 61
amplitude value 44
assigning audio outputs 17
audio outputs
assigning 17
Authorizer diskette
obtaining a backup 3
using as a key 3
authorizing Soft SampleCell 3
Auto Locate Loop buttons 53
auto-creating Instruments 25
B
Banks 9
closing 21
comments 19
creating 12
deleting instruments from 14
loading 10
loading Instruments into 13
multiple 14
opening 10
saving 21
setting default view 12
views 12
breakpoints 48
closing Banks 21
comments, adding and viewing 19
creating Banks 12
creating Instruments 24
Crossfade Loop button 54
crossfade loops 54
D
DAE error -6042 83
data entry
using a computer keyboard 15
using a MIDI controller 15
using MIDI Note Numbers 15
deauthorizing Soft SampleCell 4
defaults for Instruments 62
Delete Loop Marker button 52
deleting
key groups and velocity zones 30
deleting instruments from Banks 14
Detune control 20
detuning an Instrument 20
Digi001 and Soft SampleCell 87
DirectConnect
and DSP resources 84
DSP resources 84
total setup recall 87
track count 83
using with Soft SampleCell 83
disabling key tracking 36
Display Controls in Real Units option 42
duplicating Instruments 14
dynamic vibrato 65
C
Channel Select button 54
chorusing 70
Index
95
E
Edit Menu 74
Edit menu commands
Clear Instrument 74
Copy Instrument 74
Cut Instrument 74
Paste Instrument 74
Show Clipboard 75
Undo 74
editing key groups 28
editing samples 49
enabling MIDI controllers 5
enabling MIDI input devices 84
ensemble instruments 68
envelope
creating vibrato 66
Envelope Amount control 40
envelope generator 40
controlling filter with 39
display options 41, 42
envelope stages 40
key tracking 42
envelope key tracking 42
Envelope window 23, 41
Equal Detune option 20
Equal Detune Off 20
Equal Detune On 20
F
File menu 73
File menu commands
Close 73
Close All 73
Get Bank Info 74
New 73
Open 73
Quit 74
Revert Bank 74
Revert Instrument 74
Save All Changed 73
Save Bank 73
Save Bank As 74
Save Instrument 74
Save Instrument As 74
Filter 38
1-pole 38
advanced techniques 67
96
Soft SampleCell Guide
controlling brightness 67
controlling with an envelope 39
Filter Frequency control 38
Filter Resonance control 38
filter
4-pole 38
Find File dialog 11
finding files 11
G
Gate Time control 40
H
Hi/Lo Note pop-up menu 16
I
Input Devices command 84
Input Filter command 85
MIDI Input Filter dialog 85
Installer CD-ROM 3
installing Soft SampleCell 3
Instrument files 9
Instrument Menu 75
Instrument menu commands
Add Multiple Key Groups 75
Change Sample 75
Convert Instrument to Stereo/Mono 77
Edit Loops 77
Get Instrument Info 77
Launch Sample Editor 77
Load Sample 75
Map All Instruments 77
New Key Group 75
New Velocity Zone 75
Reload Sample 75
Reorder Key Groups By Root Note 78
Sample Parameters 76
Select Sample Editor 77
Set Instrument Defaults 77
Set Root Notes 78
Spread Key Groups 78
Unload Sample 75
Instrument templates
creating 62
Instruments
adding samples into 27
auto-creating 25
basic concepts 23
changing MIDI velocity response 37
chorusing 70
comments 19
creating 24
creating and modifying 23
defaults 62
deleting from Banks 14
detuning 20
duplicating 14
editing 23
ensemble 68
loading into Banks 13
modulating panning in stereo 45
mono and stereo 24
multi-sample 24
muting and soloing 18
panning 17
saving 22
setting MIDI channel of 16
single-sample 24
templates 62
transposing 19
tuning 19
using copies of 14
velocity crossfade 37
voice priority 38
volume 18
K
key groups
deleting 30
editing 28
key group panning 17, 34
moving to new location 29
resizing 29
sorting location 29
Spread 29
key mapping 25
key tracking 36, 42
L
large Bank view 12
loading Instruments into Banks 13
Local Control 85
Loop button 32
Loop Display 53
Loop menu 50
Loop Select 54
Loop Select button 54
Loop Start and End markers 52
loop tuning 35
Loop tuning controls 35
Loop window 32, 50
Loop Zoom arrows 53
Looping 49
loops
auditioning 56
deleting 58
Info area 54
switching 35
tuning 35
turning on or off 35
Zoom arrows 52
M
mapping a MIDI controller 15
Matrix Modulation
increasing resolution 63
modulation destinations 43
modulation sources 43
parameters 44
Matrix Modulation button 24
Matrix Modulation window 43
MIDI
changing velocity response 37
configuring for Pro Tools 84
enabling input devices 84
improving performance 84
input filter 85
input filter with Pro Tools 85
requirements 2
selecting samples using 28
setting MIDI channel 16
setting MIDI zones 16
specifying note number from a MIDI device 15
MIDI controller
Local Control 85
mapping to a control 15
MIDI Controller number
assigning to modulator 46
modulators 46
using for data entry 15
Index
97
MIDI Controller A & B 46
MIDI menu
Input Devices command 84
Input Filter command 85
MIDI Thru option 84
MIDI Note Numbers 15
data entry 15
MIDI root note 34
setting 31
MIDI Thru option 84
MIDI velocity
adjusting 36
negative 36
Misc Parameters button 23, 36
Misc Parameters window 35
Mod wheel
creating vibrato 65
modulation parameters 44
Modulators
LFO 1 & 2 45
MIDI Controller A & B 46
Ramp Generator 46
Modulators button 24
Modulators window 45
monophonic polyphony 37
multiple Banks 14
Multi-Sample Instrument command 73
multi-sample Instruments 24
muting and soloing Instruments 18
O
OMS Input Devices 5
opening Banks 10
output channels, setting 17
P
panning Instruments 17
panning instruments 18
panning key groups 17, 34
pitch randomization 64
polyphony 37
Preferences
display preferences 82
file searching preferences 82
general preferences 80
Instrument Preferences 81
98
Soft SampleCell Guide
loop editing preferences 82
open/loading preferences 81
Preferences window 80
Pro Tools
configuring MIDI 84
using with Soft SampleCell 83
R
RAM
allocating 6
insufficient 11
Ramp Generator 46
creating vibrato with 66
registering Soft SampleCell 3
Resampling Quality menu 39
resizing velocity zones 30
Revert Audio File command 50
S
sample amplitude 34
sample files 9
sample loading priority 11
sample loops
turning on or off 35
Sample Map window 23, 26
entering 25
parameters 31
Sample Parameters button 33
Sample Parameters window 33
sample playback direction 34
sample select 68
Sample Select arrows 33
sample start point 33
SampleCell Menu 78
SampleCell menu commands
All Notes Off 80
Delete Unused Samples 78
Load All Samples 78
Monitor SampleCell 79
OMS MIDI Input Devices 79
OMS MIDI Setup 79
Open OMS Studio Setup 79
Preferences 80
Soft SampleCell CPU Usage 78
Soft SampleCell Setup 78
Test SampleCell 78
samples
adding into instruments 27
changing 30
deleting 29
loading unloaded samples 31
moving 29
moving to new velocity zone 30
replacing 29
replacing and deleting 30
selecting in Sample Map window 28
selecting manually 28
selecting using keyboard 28
selecting using MIDI controller 28
sizing 29
Save All Changed command 22
Save As Audio File Copy command 50
Save Audio Selection As command 50
saving Banks 21
saving Instruments 22
Scroll arrows 53
Select Instrument dialog 11
Selector tool 52
Send to Instrument button 51
Set Instrument Default command 18
Set Root Note button 32
setting
MIDI channels 16
setting Instrument volume 18
setting MIDI root note 31
setting MIDI zones 16
setting output channels 17
setting the Hi/Lo MIDI Note 16
Single-Sample Instrument command 73
Small Bank View 12
small Bank view 12
Soft SampleCell
authorizing 3
deauthorizing 4
features 1
file types 9
banks 9
instruments 9
samples 9
installing 3
using with DirectConnect 83
using with Pro Tools 83
with Digi001 87
sound output options 7
Speaker button 50, 54
Spread Key Groups button 29
start point of samples 33
Stereo Multi-Sample Instrument command 73
Sustain Decay control 40
Swap Loops button 51
Switch Bank Size 12
System Exclusive data 85
system requirements 1, 2
T
templates, instrument 61
total setup recall 87
Trackers button 24
Tracking Generator 47, 63
advanced techniques 63
and Matrix Maps 63
breakpoints 48
transposing Instruments 19
Trigger Mode 45
Trim tool 52
trimming audio 59
tuning
Instruments 19
sample loops 35
V
velocity crossfade 37
velocity zones 26
adding 28
deleting 30
resizing 30
vibrato
delayed 65
dynamic 65
voice allocation priority 38
voice overlap 37, 38
voice polyphony 37
voice priority 37, 38
voice stealing 38
Index
99
W
Windows Menu 82
Windows menu commands
Current Bank 82
Envelopes 82
Matrix 82
Misc Parameters 82
Modulators 82
Sample Map 82
Switch Bank Size 82
Trackers 82
Z
Zone Start 34
Zoom arrows 52
100
Soft SampleCell Guide
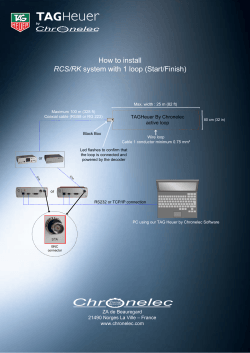


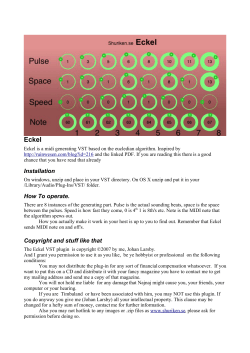


© Copyright 2026