
Micr oso The smart way to learn Microsoft Project 2013
spine = 1.32” —one step at a time! Experience learning made easy—and quickly teach yourself how to manage the complete project life cycle with Project 2013. With Step by Step, you set the pace—building and practicing the skills you need, just when you need them! 1 • Create and fine-tune your project plan • Schedule tasks, set milestones, and assign resources • Use Gantt charts to visualize project schedules • Track progress and troubleshoot variances • Communicate status with custom reports • Learn project-management best practices 2 3 4 1 Follow the easy numbered steps Microsoft Project 2013 The smart way to learn Microsoft Project 2013 Build exactly the skills you need. Learn at the pace you want. 2 Use screenshots to check your work Your Step by Step digital content includes: •All the book’s practice files—ready to download at: http://aka.ms/Project2013sbs/files •Fully searchable ebook. See the instruction page at the back of the book. microsoft.com/mspress ISBN: 978-0-7356-6911-6 U.S.A.$29.99 Canada $31.99 3 Get helpful tips and pointers 4 Build your skills hands-on with ready-made practice files Chatfield Johnson Microsoft Project 2013 [Recommended] Microsoft Office/Microsoft Project Carl Chatfield, PMP, and Timothy Johnson, MCTS Practice files plus ebook Sample Chapters Copyright © 2013 by Carl Chatfield and Tim Johnson All rights reserved. To learn more about this book visit: http://aka.ms/Project2013sbs/details Contents Introduction . . . . . . . . . . . . . . . . . . . . . . . . . . . . . . . . . . . . . . . . . . . . . . . . . . . . . . . . . . . . . . . . . . . . . . . . xi Who this book is for . . . . . . . . . . . . . . . . . . . . . . . . . . . . . . . . . . . . . . . . . . . . . . . . . . . . . . . . . . . . . . xi How this book is organized . . . . . . . . . . . . . . . . . . . . . . . . . . . . . . . . . . . . . . . . . . . . . . . . . . . . . . . . xi Download the practice files . . . . . . . . . . . . . . . . . . . . . . . . . . . . . . . . . . . . . . . . . . . . . . . . . . . . . . . xii Your settings in Project . . . . . . . . . . . . . . . . . . . . . . . . . . . . . . . . . . . . . . . . . . . . . . . . . . . . . . . . . . xiii Your companion ebook . . . . . . . . . . . . . . . . . . . . . . . . . . . . . . . . . . . . . . . . . . . . . . . . . . . . . . . . . . xiv Get support and give feedback . . . . . . . . . . . . . . . . . . . . . . . . . . . . . . . . . . . . . . . . . . . . . . . . . . . xiv Errata . . . . . . . . . . . . . . . . . . . . . . . . . . . . . . . . . . . . . . . . . . . . . . . . . . . . . . . . . . . . . . . . . . xv We want to hear from you . . . . . . . . . . . . . . . . . . . . . . . . . . . . . . . . . . . . . . . . . . . . . . . xv Stay in touch . . . . . . . . . . . . . . . . . . . . . . . . . . . . . . . . . . . . . . . . . . . . . . . . . . . . . . . . . . . xv PART 1 Introduction to Microsoft Project 1 Microsoft Project, project management and you 2 Meet the Project application . . . . . . . . . . . . . . . . . . . . . . . . . . . . . . . . . . . . . . . . . . . . . . . . . . . . . . . 3 Meet the Project family . . . . . . . . . . . . . . . . . . . . . . . . . . . . . . . . . . . . . . . . . . . . . . . . . . . . . . . . . . . 4 New features in Project 2013 . . . . . . . . . . . . . . . . . . . . . . . . . . . . . . . . . . . . . . . . . . . . . . . . . . . . . . 5 What was new in Project 2010 . . . . . . . . . . . . . . . . . . . . . . . . . . . . . . . . . . . . . . . . . . . . . 6 What was new in Project 2007 . . . . . . . . . . . . . . . . . . . . . . . . . . . . . . . . . . . . . . . . . . . . . 8 You as a project manager . . . . . . . . . . . . . . . . . . . . . . . . . . . . . . . . . . . . . . . . . . . . . . . . . . . . . . . . . 9 Let’s get started! . . . . . . . . . . . . . . . . . . . . . . . . . . . . . . . . . . . . . . . . . . . . . . . . . . . . . . . . 10 iii 2 A guided tour of Project 12 The Project interface: Finding your way around . . . . . . . . . . . . . . . . . . . . . . . . . . . . . . . . . . . . . The Backstage view: Managing files and setting options . . . . . . . . . . . . . . . . . . . . . . . . . . . . . The ribbon and tabs: Finding the features you want . . . . . . . . . . . . . . . . . . . . . . . . . . . . . . . . . Views: Working with schedule details the way you want . . . . . . . . . . . . . . . . . . . . . . . . . . . . . . 14 17 21 27 Reports: Seeing project status in new ways . . . . . . . . . . . . . . . . . . . . . . . . . . . . . . . . . . . . . . . . . 33 Key points . . . . . . . . . . . . . . . . . . . . . . . . . . . . . . . . . . . . . . . . . . . . . . . . . . . . . . . . . . . . . . . . . . . . . . 37 PART 2 Simple Scheduling Basics 3 Starting a new plan 40 Starting a new plan, and setting its start date . . . . . . . . . . . . . . . . . . . . . . . . . . . . . . . . . . . . . . . Setting nonworking days in the project calendar . . . . . . . . . . . . . . . . . . . . . . . . . . . . . . . . . . . Entering the plan’s title and other properties . . . . . . . . . . . . . . . . . . . . . . . . . . . . . . . . . . . . . . Key points . . . . . . . . . . . . . . . . . . . . . . . . . . . . . . . . . . . . . . . . . . . . . . . . . . . . . . . . . . . . . . . . . . . . . 4 Building a task list 52 Entering task names . . . . . . . . . . . . . . . . . . . . . . . . . . . . . . . . . . . . . . . . . . . . . . . . . . . . . . . . . . . . . Entering task durations . . . . . . . . . . . . . . . . . . . . . . . . . . . . . . . . . . . . . . . . . . . . . . . . . . . . . . . . . . Entering a milestone task . . . . . . . . . . . . . . . . . . . . . . . . . . . . . . . . . . . . . . . . . . . . . . . . . . . . . . . . Creating summary tasks to outline the plan . . . . . . . . . . . . . . . . . . . . . . . . . . . . . . . . . . . . . . . . . Creating task dependencies with links . . . . . . . . . . . . . . . . . . . . . . . . . . . . . . . . . . . . . . . . . . . . . Switching task scheduling from manual to automatic . . . . . . . . . . . . . . . . . . . . . . . . . . . . . . . . Checking the plan’s duration and finish date . . . . . . . . . . . . . . . . . . . . . . . . . . . . . . . . . . . . . . . Documenting tasks with notes and hyperlinks . . . . . . . . . . . . . . . . . . . . . . . . . . . . . . . . . . . . . . Key points . . . . . . . . . . . . . . . . . . . . . . . . . . . . . . . . . . . . . . . . . . . . . . . . . . . . . . . . . . . . . . . . . . . . . iv Contents 42 45 48 50 54 57 62 63 66 72 76 78 81 5 Setting up resources 82 Entering work resource names . . . . . . . . . . . . . . . . . . . . . . . . . . . . . . . . . . . . . . . . . . . . . . . . . . . . Entering resources’ maximum capacity . . . . . . . . . . . . . . . . . . . . . . . . . . . . . . . . . . . . . . . . . . . . . Entering resource pay rates . . . . . . . . . . . . . . . . . . . . . . . . . . . . . . . . . . . . . . . . . . . . . . . . . . . . . . . Adjusting working time in a resource calendar . . . . . . . . . . . . . . . . . . . . . . . . . . . . . . . . . . . . . . 84 87 89 92 Setting up cost resources . . . . . . . . . . . . . . . . . . . . . . . . . . . . . . . . . . . . . . . . . . . . . . . . . . . . . . . . . 97 Documenting resources with notes . . . . . . . . . . . . . . . . . . . . . . . . . . . . . . . . . . . . . . . . . . . . . . . . 98 Key points . . . . . . . . . . . . . . . . . . . . . . . . . . . . . . . . . . . . . . . . . . . . . . . . . . . . . . . . . . . . . . . . . . . . 101 6 Assigning resources to tasks 102 Assigning work resources to tasks . . . . . . . . . . . . . . . . . . . . . . . . . . . . . . . . . . . . . . . . . . . . . . . . Controlling work when adding or removing resource assignments . . . . . . . . . . . . . . . . . . . . Assigning cost resources to tasks . . . . . . . . . . . . . . . . . . . . . . . . . . . . . . . . . . . . . . . . . . . . . . . . . Checking the plan’s duration, cost, and work . . . . . . . . . . . . . . . . . . . . . . . . . . . . . . . . . . . . . . Key points . . . . . . . . . . . . . . . . . . . . . . . . . . . . . . . . . . . . . . . . . . . . . . . . . . . . . . . . . . . . . . . . . . . . 7 Formatting and sharing your plan 124 Customizing a Gantt Chart view . . . . . . . . . . . . . . . . . . . . . . . . . . . . . . . . . . . . . . . . . . . . . . . . . . Customizing a Timeline view . . . . . . . . . . . . . . . . . . . . . . . . . . . . . . . . . . . . . . . . . . . . . . . . . . . . . Customizing reports . . . . . . . . . . . . . . . . . . . . . . . . . . . . . . . . . . . . . . . . . . . . . . . . . . . . . . . . . . . Copying views and reports . . . . . . . . . . . . . . . . . . . . . . . . . . . . . . . . . . . . . . . . . . . . . . . . . . . . . . Printing views and reports . . . . . . . . . . . . . . . . . . . . . . . . . . . . . . . . . . . . . . . . . . . . . . . . . . . . . . . Key points . . . . . . . . . . . . . . . . . . . . . . . . . . . . . . . . . . . . . . . . . . . . . . . . . . . . . . . . . . . . . . . . . . . . 8 Tracking progress 126 133 136 139 144 149 150 Saving a baseline of your plan . . . . . . . . . . . . . . . . . . . . . . . . . . . . . . . . . . . . . . . . . . . . . . . . . . . Tracking a plan as scheduled through a specific date . . . . . . . . . . . . . . . . . . . . . . . . . . . . . . . Entering a task’s completion percentage . . . . . . . . . . . . . . . . . . . . . . . . . . . . . . . . . . . . . . . . . . Entering actual values for tasks . . . . . . . . . . . . . . . . . . . . . . . . . . . . . . . . . . . . . . . . . . . . . . . . . . Key points . . . . . . . . . . . . . . . . . . . . . . . . . . . . . . . . . . . . . . . . . . . . . . . . . . . . . . . . . . . . . . . . . . . . 104 112 116 118 122 153 156 157 160 165 Contents v PART 3 Advanced Scheduling Techniques 9 Advanced task scheduling 170 See task relationships with Task Path . . . . . . . . . . . . . . . . . . . . . . . . . . . . . . . . . . . . . . . . . . . . . . Adjusting task link relationships . . . . . . . . . . . . . . . . . . . . . . . . . . . . . . . . . . . . . . . . . . . . . . . . . . Setting task constraints . . . . . . . . . . . . . . . . . . . . . . . . . . . . . . . . . . . . . . . . . . . . . . . . . . . . . . . . . Interrupting work on a task . . . . . . . . . . . . . . . . . . . . . . . . . . . . . . . . . . . . . . . . . . . . . . . . . . . . . . Adjusting working time for individual tasks . . . . . . . . . . . . . . . . . . . . . . . . . . . . . . . . . . . . . . . . Control task scheduling with task types . . . . . . . . . . . . . . . . . . . . . . . . . . . . . . . . . . . . . . . . . . . Key points . . . . . . . . . . . . . . . . . . . . . . . . . . . . . . . . . . . . . . . . . . . . . . . . . . . . . . . . . . . . . . . . . . . . 10 Fine-tuning task details 198 Entering deadline dates . . . . . . . . . . . . . . . . . . . . . . . . . . . . . . . . . . . . . . . . . . . . . . . . . . . . . . . . . Entering fixed costs . . . . . . . . . . . . . . . . . . . . . . . . . . . . . . . . . . . . . . . . . . . . . . . . . . . . . . . . . . . . . Setting up a recurring task . . . . . . . . . . . . . . . . . . . . . . . . . . . . . . . . . . . . . . . . . . . . . . . . . . . . . . Viewing the project’s critical path . . . . . . . . . . . . . . . . . . . . . . . . . . . . . . . . . . . . . . . . . . . . . . . . Scheduling summary tasks manually . . . . . . . . . . . . . . . . . . . . . . . . . . . . . . . . . . . . . . . . . . . . . . Key points . . . . . . . . . . . . . . . . . . . . . . . . . . . . . . . . . . . . . . . . . . . . . . . . . . . . . . . . . . . . . . . . . . . . 11 Fine-tuning resource and assignment details 200 202 204 208 211 215 216 Setting up resource availability to apply at different times . . . . . . . . . . . . . . . . . . . . . . . . . . . Entering multiple pay rates for a resource . . . . . . . . . . . . . . . . . . . . . . . . . . . . . . . . . . . . . . . . . Setting up resource pay rates to apply at different times . . . . . . . . . . . . . . . . . . . . . . . . . . . . Setting up material resources . . . . . . . . . . . . . . . . . . . . . . . . . . . . . . . . . . . . . . . . . . . . . . . . . . . . Delaying the start of assignments . . . . . . . . . . . . . . . . . . . . . . . . . . . . . . . . . . . . . . . . . . . . . . . . Applying contours to assignments . . . . . . . . . . . . . . . . . . . . . . . . . . . . . . . . . . . . . . . . . . . . . . . . Applying different pay rates to assignments . . . . . . . . . . . . . . . . . . . . . . . . . . . . . . . . . . . . . . . Assigning material resources to tasks . . . . . . . . . . . . . . . . . . . . . . . . . . . . . . . . . . . . . . . . . . . . . Viewing resource capacity . . . . . . . . . . . . . . . . . . . . . . . . . . . . . . . . . . . . . . . . . . . . . . . . . . . . . . . vi Contents 170 173 179 185 187 191 197 218 221 223 225 226 229 234 236 238 Adjusting assignments in the Team Planner view . . . . . . . . . . . . . . . . . . . . . . . . . . . . . . . . . . . 241 Key points . . . . . . . . . . . . . . . . . . . . . . . . . . . . . . . . . . . . . . . . . . . . . . . . . . . . . . . . . . . . . . . . . . . . 247 12 Fine-tuning the Project plan 248 Examining resource allocations over time . . . . . . . . . . . . . . . . . . . . . . . . . . . . . . . . . . . . . . . . . 250 Resolving resource overallocations manually . . . . . . . . . . . . . . . . . . . . . . . . . . . . . . . . . . . . . . . Leveling overallocated resources . . . . . . . . . . . . . . . . . . . . . . . . . . . . . . . . . . . . . . . . . . . . . . . . . Checking the plan’s cost and finish date . . . . . . . . . . . . . . . . . . . . . . . . . . . . . . . . . . . . . . . . . . . Inactivating tasks . . . . . . . . . . . . . . . . . . . . . . . . . . . . . . . . . . . . . . . . . . . . . . . . . . . . . . . . . . . . . . Key points . . . . . . . . . . . . . . . . . . . . . . . . . . . . . . . . . . . . . . . . . . . . . . . . . . . . . . . . . . . . . . . . . . . . 13 Organizing project details 274 Sorting Project details . . . . . . . . . . . . . . . . . . . . . . . . . . . . . . . . . . . . . . . . . . . . . . . . . . . . . . . . . . Grouping Project details . . . . . . . . . . . . . . . . . . . . . . . . . . . . . . . . . . . . . . . . . . . . . . . . . . . . . . . . Filtering Project details . . . . . . . . . . . . . . . . . . . . . . . . . . . . . . . . . . . . . . . . . . . . . . . . . . . . . . . . . . Creating new tables . . . . . . . . . . . . . . . . . . . . . . . . . . . . . . . . . . . . . . . . . . . . . . . . . . . . . . . . . . . . Creating new views . . . . . . . . . . . . . . . . . . . . . . . . . . . . . . . . . . . . . . . . . . . . . . . . . . . . . . . . . . . . . Key points . . . . . . . . . . . . . . . . . . . . . . . . . . . . . . . . . . . . . . . . . . . . . . . . . . . . . . . . . . . . . . . . . . . . 14 Tracking progress on tasks and assignments Viewing and reporting project status 300 305 312 317 320 322 Identifying tasks that have slipped . . . . . . . . . . . . . . . . . . . . . . . . . . . . . . . . . . . . . . . . . . . . . . . Examining task costs . . . . . . . . . . . . . . . . . . . . . . . . . . . . . . . . . . . . . . . . . . . . . . . . . . . . . . . . . . . . Examining resource costs . . . . . . . . . . . . . . . . . . . . . . . . . . . . . . . . . . . . . . . . . . . . . . . . . . . . . . . . Reporting project cost variance with a stoplight view . . . . . . . . . . . . . . . . . . . . . . . . . . . . . . . Key points . . . . . . . . . . . . . . . . . . . . . . . . . . . . . . . . . . . . . . . . . . . . . . . . . . . . . . . . . . . . . . . . . . . . 276 280 285 290 294 297 298 Updating a baseline . . . . . . . . . . . . . . . . . . . . . . . . . . . . . . . . . . . . . . . . . . . . . . . . . . . . . . . . . . . . Tracking actual and remaining values for tasks and assignments . . . . . . . . . . . . . . . . . . . . . Tracking timephased actual work for tasks and assignments . . . . . . . . . . . . . . . . . . . . . . . . . Rescheduling incomplete work . . . . . . . . . . . . . . . . . . . . . . . . . . . . . . . . . . . . . . . . . . . . . . . . . . . Key points . . . . . . . . . . . . . . . . . . . . . . . . . . . . . . . . . . . . . . . . . . . . . . . . . . . . . . . . . . . . . . . . . . . . 15 255 259 267 271 273 324 330 333 336 341 Contents vii 16 Getting your project back on track 342 Troubleshooting time and schedule problems . . . . . . . . . . . . . . . . . . . . . . . . . . . . . . . . . . . . . . Troubleshooting cost and resource problems . . . . . . . . . . . . . . . . . . . . . . . . . . . . . . . . . . . . . . Troubleshooting scope-of-work problems . . . . . . . . . . . . . . . . . . . . . . . . . . . . . . . . . . . . . . . . . Key points . . . . . . . . . . . . . . . . . . . . . . . . . . . . . . . . . . . . . . . . . . . . . . . . . . . . . . . . . . . . . . . . . . . . . 345 353 357 360 PART 4 In-Depth and Special Subjects 17 Applying advanced formatting and printing 362 Formatting a Gantt chart view . . . . . . . . . . . . . . . . . . . . . . . . . . . . . . . . . . . . . . . . . . . . . . . . . . . Formatting a Timeline view . . . . . . . . . . . . . . . . . . . . . . . . . . . . . . . . . . . . . . . . . . . . . . . . . . . . . . Formatting a Network Diagram view . . . . . . . . . . . . . . . . . . . . . . . . . . . . . . . . . . . . . . . . . . . . . Formatting a Calendar view . . . . . . . . . . . . . . . . . . . . . . . . . . . . . . . . . . . . . . . . . . . . . . . . . . . . . Printing and exporting views . . . . . . . . . . . . . . . . . . . . . . . . . . . . . . . . . . . . . . . . . . . . . . . . . . . . Key points . . . . . . . . . . . . . . . . . . . . . . . . . . . . . . . . . . . . . . . . . . . . . . . . . . . . . . . . . . . . . . . . . . . . . 18 Advanced report formatting 388 Formatting tables in a report . . . . . . . . . . . . . . . . . . . . . . . . . . . . . . . . . . . . . . . . . . . . . . . . . . . . Formatting charts in a report . . . . . . . . . . . . . . . . . . . . . . . . . . . . . . . . . . . . . . . . . . . . . . . . . . . . Creating a custom report . . . . . . . . . . . . . . . . . . . . . . . . . . . . . . . . . . . . . . . . . . . . . . . . . . . . . . . . Key points . . . . . . . . . . . . . . . . . . . . . . . . . . . . . . . . . . . . . . . . . . . . . . . . . . . . . . . . . . . . . . . . . . . . 19 Customizing Project 364 371 373 378 381 387 390 399 406 415 416 Sharing custom elements between plans . . . . . . . . . . . . . . . . . . . . . . . . . . . . . . . . . . . . . . . . . . 418 Recording macros . . . . . . . . . . . . . . . . . . . . . . . . . . . . . . . . . . . . . . . . . . . . . . . . . . . . . . . . . . . . . . 423 Editing macros . . . . . . . . . . . . . . . . . . . . . . . . . . . . . . . . . . . . . . . . . . . . . . . . . . . . . . . . . . . . . . . . . 429 Customizing the ribbon and Quick Access Toolbar . . . . . . . . . . . . . . . . . . . . . . . . . . . . . . . . . . 434 Key points . . . . . . . . . . . . . . . . . . . . . . . . . . . . . . . . . . . . . . . . . . . . . . . . . . . . . . . . . . . . . . . . . . . . . 440 viii Contents 20 Sharing information with other programs 442 Copying Project data to other programs . . . . . . . . . . . . . . . . . . . . . . . . . . . . . . . . . . . . . . . . . . 444 Opening other file formats in Project . . . . . . . . . . . . . . . . . . . . . . . . . . . . . . . . . . . . . . . . . . . . . 449 Saving to other file formats from Project . . . . . . . . . . . . . . . . . . . . . . . . . . . . . . . . . . . . . . . . . . 454 Generating visual reports with Excel and Visio . . . . . . . . . . . . . . . . . . . . . . . . . . . . . . . . . . . . . 460 Key points . . . . . . . . . . . . . . . . . . . . . . . . . . . . . . . . . . . . . . . . . . . . . . . . . . . . . . . . . . . . . . . . . . . . . 465 21 Consolidating projects and resources 466 Creating a resource pool . . . . . . . . . . . . . . . . . . . . . . . . . . . . . . . . . . . . . . . . . . . . . . . . . . . . . . . . Viewing assignment details in a resource pool . . . . . . . . . . . . . . . . . . . . . . . . . . . . . . . . . . . . . Updating assignments in a sharer plan . . . . . . . . . . . . . . . . . . . . . . . . . . . . . . . . . . . . . . . . . . . . Updating a resource’s information in a resource pool . . . . . . . . . . . . . . . . . . . . . . . . . . . . . . . Updating all plans’ working times in a resource pool . . . . . . . . . . . . . . . . . . . . . . . . . . . . . . . . Linking new plans to a resource pool . . . . . . . . . . . . . . . . . . . . . . . . . . . . . . . . . . . . . . . . . . . . . Changing sharer plan assignments and updating a resource pool . . . . . . . . . . . . . . . . . . . . Consolidating plans . . . . . . . . . . . . . . . . . . . . . . . . . . . . . . . . . . . . . . . . . . . . . . . . . . . . . . . . . . . . Creating dependencies between plans . . . . . . . . . . . . . . . . . . . . . . . . . . . . . . . . . . . . . . . . . . . . Key points . . . . . . . . . . . . . . . . . . . . . . . . . . . . . . . . . . . . . . . . . . . . . . . . . . . . . . . . . . . . . . . . . . . . . 468 474 476 478 482 485 489 493 494 502 Appendices A A short course in project management 505 Understanding what defines a project . . . . . . . . . . . . . . . . . . . . . . . . . . . . . . . . . . . . . . . . . . . . The project triangle: Viewing projects in terms of time, cost, and scope . . . . . . . . . . . . . . . Time . . . . . . . . . . . . . . . . . . . . . . . . . . . . . . . . . . . . . . . . . . . . . . . . . . . . . . . . . . . . . . . . . Cost . . . . . . . . . . . . . . . . . . . . . . . . . . . . . . . . . . . . . . . . . . . . . . . . . . . . . . . . . . . . . . . . . . Scope . . . . . . . . . . . . . . . . . . . . . . . . . . . . . . . . . . . . . . . . . . . . . . . . . . . . . . . . . . . . . . . . Time, cost, and scope: Managing project constraints . . . . . . . . . . . . . . . . . . . . . . . . . . . . . . . . Managing your projects with Project . . . . . . . . . . . . . . . . . . . . . . . . . . . . . . . . . . . . . . . . . . . . . 505 506 507 508 508 509 512 Contents ix B Developing your project-management skills 513 Joining a Project learning community . . . . . . . . . . . . . . . . . . . . . . . . . . . . . . . . . . . . . . . . . . . . . 514 Joining a project-management learning community . . . . . . . . . . . . . . . . . . . . . . . . . . . . . . . . 515 Final words . . . . . . . . . . . . . . . . . . . . . . . . . . . . . . . . . . . . . . . . . . . . . . . . . . . . . . . . . . . . . . . . . . . . 516 C Collaborating: Project, SharePoint, and PWA 517 Introduction to sharing your plan with SharePoint . . . . . . . . . . . . . . . . . . . . . . . . . . . . . . . . . . 517 Introduction to team collaboration with Project Web App . . . . . . . . . . . . . . . . . . . . . . . . . . 521 Introduction to Enterprise Project Management . . . . . . . . . . . . . . . . . . . . . . . . . . . . . . . . . . . . 526 D Using this book in a classroom 529 Matching content to instructional needs . . . . . . . . . . . . . . . . . . . . . . . . . . . . . . . . . . . . . . . . . . 529 Teaching project management with Project . . . . . . . . . . . . . . . . . . . . . . . . . . . . . . . . . . . . . . . 531 Glossary . . . . . . . . . . . . . . . . . . . . . . . . . . . . . . . . . . . . . . . . . . . . . . . . . . . . . . . . . . . . . . . . . . . . . . . . . . 533 Index . . . . . . . . . . . . . . . . . . . . . . . . . . . . . . . . . . . . . . . . . . . . . . . . . . . . . . . . . . . . . . . . . . . . . . . . . . . . . 543 About the authors . . . . . . . . . . . . . . . . . . . . . . . . . . . . . . . . . . . . . . . . . . . . . . . . . . . . . . . . . . . . . . . . . 558 How to download your ebook . . . . . . . . . . . . . . . . . . . . . . . . . . . . . . . . . . . . . . . . . . . . . . . . . . . . . . . 559 Survey page . . . . . . . . . . . . . . . . . . . . . . . . . . . . . . . . . . . . . . . . . . . . . . . . . . . . . . . . . . . . . . . . . . . . . . . 560 x Contents Chapter at a glance Define Outline Create a task list, page 54. Create summary tasks to give your plan an outline structure, page 63. Link Schedule Link tasks and create dependencies, page 66. Control if tasks are manually or automatically rescheduled, page 72. 4 Building a task list IN THIS CHAPTER, YOU WILL LEARN HOW TO ▪▪ ▪▪ ▪▪ ▪▪ ▪▪ ▪▪ ▪▪ Enter task names, durations, and start and finish values. Create milestone tasks. Create summary tasks to outline a task list. Link tasks to create task dependencies between them. Convert individual tasks to automatic scheduling, and then change the default to have new tasks automatically scheduled. Check a plan’s overall duration and scheduled finish date. Enter task notes and hyperlinks. Tasks are the most basic building blocks of any project’s plan. Tasks represent the work to be done to accomplish the goals of the plan. Tasks describe work in terms of dependencies, duration, and resource requirements. In Microsoft Project 2013, there are several kinds of tasks. These include summary tasks, subtasks, and milestones (all discussed in this chapter). More broadly, what are called tasks in Project are sometimes more generally called activities or work packages. PRACTICE FILES Before you can complete the exercises in this chapter, you need to copy the book’s practice files to your computer. A complete list of practice files is provided in “Download the practice files” at the beginning of this book. For each exercise that has a practice file, simply browse to where you saved the book’s practice file folder. IMPORTANT If you are running Project Professional with Project Web App/Project Server, take care not to save any of the practice files you work with in this book to Project Web App (PWA). For more information, see Appendix C, “Collaborating: Project, SharePoint, and PWA.” 53 Entering task names As mentioned previously, tasks represent the work to be done to accomplish the goals of the project. For this reason, it’s worth developing good practices about how you name tasks in your plans. Task names should be recognizable and make sense to the people who will perform the tasks and to other stakeholders who will see the task names. Here are some guidelines for creating good task names: ▪▪ Use short verb phrases that describe the work to be done, such as “Edit manuscript.” ▪▪ If tasks will be organized into an outline structure, don’t repeat details from the summary task name in the subtask name unless it adds clarity. ▪▪ If tasks will have resources assigned to them, don’t include resource names in the task names. Keep in mind that you can always edit task names later, so don’t worry about getting exactly the right task names when you’re initially entering them into a plan. Do aim to use concise, descriptive phrases that communicate the required work and make sense to you and others who will perform the work or review the plan. When necessary, you can also add more details in task notes, described later in this chapter. TIP As you enter a task name, you are creating a new task. Every task in Project has one of two scheduling modes that controls how the task is scheduled: manual (the default) or automatically scheduled. You’ll work with automatic scheduling in “Switching task scheduling from manual to automatic” later in this chapter. The scenario: At Lucerne Publishing, you have collected the initial task names for the new book launch. You know you don’t have all the details you’ll eventually need, but you have enough detail now to start with. In this exercise, you enter the names of tasks. SET UP You need the Simple Tasks_Start file in your Chapter04 practice file folder to complete this exercise. Open the Simple Tasks_Start file, and save it as Simple Tasks. 1 2 Click the cell directly below the Task Name column heading. Type Assign launch team members, and then press the Enter key. The task you entered is given an ID number. Each task has a unique ID number, but it does not necessarily represent the order in which tasks occur. Your screen should look similar to the following illustration. 54 Chapter 4 Building a task list The indicators in this column tell you whether a task is manually or automatically scheduled. Because this is a manually scheduled task (as indicated in the Task Mode column), no duration or date values appear, and the task does not yet have a Gantt bar in the chart portion of the Gantt Chart view. Later you will work with automatically scheduled tasks that always have duration, start, and finish dates. Think of a manually scheduled task as an initial placeholder you can create at any time without affecting the rest of the schedule. You might not know more than a task name at this time, and that’s OK. As you discover or decide more details about the task, such as when it should occur, you can add those details to the plan. 3 Enter the following task names, pressing Enter after each task name: Design and order marketing material Distribute advance copies Coordinate magazine feature articles Launch public web portal for book Your screen should look similar to the following illustration: Entering task names 55 4 While reviewing the tasks you entered, you realize that you missed a task. You want to enter this task between tasks 2 and 3. You’ll insert that task next. 4 5 Click the name of task 3, Distribute advance copies. On the Task tab, in the Insert group, click Task. Project inserts a row for a new task and renumbers the subsequent tasks. Project names the new task <New Task>. 6 With <New Task> selected type Public Launch Phase, and then press Enter. The new task is added to your plan. TIP To delete a task, right-click the task name and in the shortcut menu that appears, click Delete Task. Project management focus: Defining the right tasks for the deliverable Every project has an ultimate goal or intent: the reason that the project was started. This is called the project’s deliverable. This deliverable might be a tangible product, such as a new book, or a service or event, such as a product launch party. Defining the right tasks to create the deliverable is an essential skill for a project manager. The task lists you create in Project should describe all the work required, and only the work required, to complete the project successfully. When developing your task lists, you might find it helpful to distinguish product scope from project scope. Product scope describes the quality, features, and functions of the deliverable of the project. In the scenario used in Part 2, “Simple scheduling basics,” for example, the deliverable is a new children’s book, and the product scope might include its number of pages and illustrations. Project scope, on the other hand, describes the work required to deliver such a product or service. In the scenario in this chapter, the project scope includes detailed tasks relating to generating publicity and advance reviews for the book. Scope as a component (along with time and cost) of the project manager’s focus is described more in Appendix A, “A short course in project management.” 56 Chapter 4 Building a task list Entering task durations A task’s duration represents the amount of time you expect it will take to complete the task. Project can work with task durations that range from minutes to months. Depending on the scope of your plan, you’ll probably want to work with task durations on the scale of hours, days, and weeks. Giving your tasks duration values is one of the benefits of using a scheduling tool like Project over a simple checklist or to-do approach to organizing work. Let’s explore task durations with an example. Let’s say a plan has a project calendar with working time defined as 8 A.M. through 5 P.M. with one hour off for lunch breaks Monday through Friday, leaving nonworking time defined as evenings (after 5 P.M.) and weekends. (If you need a refresher on the project calendar, see “Setting nonworking days in the project calendar” in Chapter 3, “Starting a new plan.”) If you estimate that a task will take 16 hours of working time, you could enter its duration as “2d” to schedule work over two eight-hour workdays. You should then expect that starting the task at 8 A.M. on a Friday means that it will not be completed until 5 P.M. on the following Monday. No work would be scheduled over the weekend because Saturday and Sunday have been defined as nonworking time. You can use abbreviations when entering durations. If you enter this abbreviation It appears like this And it means 30m 30 mins 30 minutes 6h 6 hrs 6 hours 4d 4 days 4 days 3w 3 wks 3 weeks 2mo 2 mons 2 months As noted earlier, Project handles task scheduling in two ways. Automatically scheduled tasks always have a duration (one day by default). Manually Scheduled tasks, however, do not initially have any duration. A task’s duration is essential for Project to schedule a task, so it makes sense that a manually scheduled task, which is not scheduled by Project, does not require a duration. You can, however, enter duration values for manually scheduled tasks— you’ll do so in this section. With manually scheduled tasks, you can enter regular duration values using the abbreviations shown in the preceeding table—for example, “3d” for three days. You can also enter text values, such as “Check with Bob.” Such text values are replaced with the default 1-day duration value when you convert a task from manual to automatic scheduling. Entering task durations 57 4 TIP Project will not allow you to enter a text value for an automatically scheduled task’s duration, start, or finish value. Project uses standard values for minutes and hours for durations: 1 minute equals 60 seconds, and 1 hour equals 60 minutes. For the durations of days, weeks, and months, you can use Project’s defaults (for example, 20 days per month) or set your own values. To do this, on the File tab, click Options, and in the Project Options dialog box, click Schedule, as illustrated here: With a setting of 8 hours per day, entering a two-day task duration (2d) is the same as entering 16 hours (16h). With a setting of 40 hours per week, entering a three-week task duration (3w) is the same as entering 120 hours (120h). With a setting of 20 days per month, entering a one-month task duration (1mo) is the same as entering 160 hours (8 hours per day × 20 days per month). The exercises in this chapter use Project’s default values: 8 hours per day, 40 hours per week, and 20 days per month. TIP If needed, you can schedule tasks to occur during nonworking as well as working time. To do this, enter an elapsed duration to a task. You enter elapsed duration by preceding the duration abbreviation with an “e”. For example, type “1ed” to indicate one full 24-hour day, or “1ew” to equal seven 24-hour days, or “1em” to equal thirty 24-hour days. You might use an elapsed duration for a task that goes on around the clock rather than just during normal working hours. For instance, a construction project might have the tasks “Pour foundation concrete” and “Remove foundation forms.” If so, you might also want a task called “Wait for concrete to cure” because you don’t want to remove the forms 58 Chapter 4 Building a task list until the concrete has cured. The task “Wait for concrete to cure” should have an elapsed duration because the concrete will cure over a contiguous range of days, whether they are working or nonworking days. If the concrete takes 48 hours to cure, you can enter the duration for that task as “2ed,” schedule the task to start on Friday at 9 A.M., and expect it to be complete by Sunday at 9 A.M. In most cases, however, you’ll work with nonelapsed durations in Project. The scenario: At Lucerne Publishing, you showed your initial task list to the resources who will perform the work and to other project stakeholders. They gave you their preliminary (although incomplete) feedback on some task durations and dates that you’d like to record in the new book launch plan. In this exercise, you enter various task duration, start, and finish values for the manually scheduled tasks you created. 1 Click the cell below the Duration column heading for task 1, Assign launch team members. The Duration field for task 1 is selected. 2 Type 1d, and then press Enter. TIP You can also click the up and down arrows to enter or change the value in the Duration field. The value 1 day appears in the Duration field. Project draws a Gantt bar for the task, starting at the project start date you previously set in Chapter 3. Until the tasks are linked or a specific start or finish date is set, Project will set all new tasks that have a duration value to start at the project start date. This is true whether the tasks are manually or automatically scheduled. Entering task durations 59 4 3 Enter the following durations or text phrases for the following tasks: Task ID Task name Duration 2 Design and order marketing material Check with Marketing team 3 Public Launch Phase (press Enter to skip this task for now) 4 Distribute advance copies 2d For task 5, Coordinate magazine feature articles, you’ll enter start and finish dates, and Project will calculate the duration. 4 In the Start field (not the Duration field) for task 5, type 1/19/15, and then press the Tab key. TIP You can also select the date you want in the Start field. Click the down arrow button, and in the calendar that appears navigate to the month you want. Then click the date you want. 5 In the Finish field for the same task, type or select 1/27/15, and then press Enter. Project calculates the duration as six days. Note that this is six working days: Monday through Wednesday, and Friday of the first week, and then Monday and Tuesday of the following week. Project also draws the Gantt bar for the task to span these working days plus the nonworking days (the Thursday, January 22 morale event you set up in Chapter 3, plus the weekend) between them, as shown here: The project calendar's nonworking days—in this case, this Thursday as well as Saturdays and Sundays—are formatted in gray. 6 For task 6, Launch public web portal for the book, you don’t know a duration or start or finish date yet, but you can still capture what you do know. 60 Chapter 4 Building a task list 7 In the Start field for task 6, type About two weeks before launch complete, and then press Enter. As with the duration value of a manually scheduled task, you can also enter a text string for a start or finish date, or both. When the task is switched to be automatically scheduled, the text strings will be replaced with specific dates. Project management focus: How do you come up with accurate task durations? You should consider two general rules when estimating task durations: ▪▪ Overall project duration often correlates to task duration; long projects tend to have tasks with longer durations than do tasks in short projects. ▪▪ If you track progress against your plan (described in Chapter 8, “Tracking rogress,” and in Part 3, “Advanced scheduling techniques”), you need to consider p the level of detail you want to apply to your plan’s tasks. If you have a multiyear project, for example, it might not be practical or even possible to track tasks that are measured in minutes or hours. In general, you should measure task durations at the lowest level of detail or control that is important to you, but no lower. For the projects you work on in this book, the durations are supplied for you. For your projects, you will often have to estimate task durations. Good sources of task duration estimates include ▪▪ Historical information from previous, similar projects ▪▪ Estimates from the people who will complete the tasks ▪▪ The expert judgment of people who have managed similar projects ▪▪ The standards of professional or industrial organizations that carry out projects similar to yours One rule of thumb to consider is called the 8/80 rule. This rule suggests that task durations between 8 hours (or one day) and 80 hours (10 working days, or two weeks) are generally sized about right. Tasks shorter than one day might be too granular, and tasks longer than two weeks might be too long to manage properly. There are many legitimate reasons to break this rule, but for most tasks in your projects, it’s worth considering. Entering task durations 61 4 For complex, long-duration projects or projects involving a large number of unknowns, you might be able to make detailed duration estimates only of tasks to be started and completed soon (for example, within two to four weeks). You then might have only very general duration estimates for tasks that will start later (for example, after two to four weeks). You could hold a recurring task-duration estimating session with the team in a regular cadence as time progresses. For complex projects, you probably would combine these and other strategies to estimate task durations. Because inaccurate task duration estimates are a major source of risk in any project, making good estimates is well worth the effort expended. Entering a milestone task In addition to entering tasks to be completed, you might want to account for an important event for your project’s plan, such as the end of a major phase of the project. To do this, you will create a milestone task. Milestones are significant events that are either reached within the plan (such as the completion of a phase of work) or imposed upon the plan (such as a deadline by which to apply for funding). Because the milestone itself doesn’t normally include any work, milestones are represented as tasks with zero duration. The scenario: At Lucerne Publishing, you just learned the date by which the new book launch’s planning activities needs to be completed for the book launch to occur on time. You want this date to have visibility in the plan. In this exercise, you create a milestone task. 1 2 Click the name of task 3, Public Launch Phase. On the Task tab, in the Insert group, click Milestone. Project inserts a row for a new task and renumbers the subsequent tasks. Project names the new task <New Milestone> and gives it a zero-day duration. As with the other new tasks, the milestone is initially scheduled at the project start date of January 5. 62 Chapter 4 Building a task list 3 With <New Milestone> selected, type Planning complete! and then press Enter. The milestone task is added to your plan. On the Gantt chart, the milestone appears as a diamond. TIP You can mark a task of any duration as a milestone. Double-click the task name to display the Task Information dialog box, and then click Advanced and select the Mark Task As Milestone option. Creating summary tasks to outline the plan You’ll find it helpful to organize groups of closely related tasks into an outline using summary tasks. When the summary tasks are sequenced over time, the highest level summary tasks are called phases. When reviewing a project’s plan, seeing tasks organized in an outline structure helps you and your stakeholders think in terms of major work items. For example, it is common to divide book publishing projects into Editorial, Design, and Production phases. With an outline structure applied, you can then expand or collapse the outline to show just the level of detail you want. You create an outline structure by indenting and outdenting tasks. In Project, the tasks indented below a summary task are called subtasks. Summary tasks are automatically scheduled and not manually scheduled by default. The duration of an automatically scheduled summary task is calculated by Project as the span of time from the earliest start date to the latest finish date of its subtasks. If you directly edit the duration of an automatically scheduled summary task, or its start or finish date, it will be switched to a manually scheduled task. When a summary task is manually scheduled, its duration will be calculated based on its subtasks, just like the duration of an automatically scheduled summary task. However, you can edit the duration of a manually scheduled summary task and Project will keep track of both the manual duration that you entered and the calculated duration. Creating summary tasks to outline the plan 63 4 TIP You will work with summary tasks with both manual and automatically calculated durations in Chapter 10, “Fine-tuning task details.” The highest level of a plan’s outline structure is called the project summary task. Project automatically generates the project summary task but does not display it by default. Because the project summary task is at the highest level of the plan’s outline structure, it includes rolled-up details from all subtasks. It also represents the full duration of the plan so it’s a handy way of seeing some essential details, such as the plan’s overall duration. Project management focus: Top-down and bottom-up planning Two common approaches to developing tasks and phases are top-down and bottom-up planning: ▪▪ Top-down planning identifies major phases or components of the project’s plan before filling in all the details required to complete those phases, represented as summary tasks. Complex plans can have several layers of nested summary tasks. This approach works from general to specific. ▪▪ Bottom-up planning identifies as many of the bottom-level detailed tasks as ossible before outlining them into logical groups called phases or summary tasks. p This approach works from specific to general. Creating accurate tasks and phases for most complex plans requires a combination of top-down and bottom-up planning. Typically, a project manager begins with established, broad phases for a plan (top-down planning), and the resources who will execute the plan provide the detailed tasks that fill out each phase (bottom-up planning). The scenario: At Lucerne Publishing, the new book launch plan is put together enough to now organize the plan into two sequential phases. In this exercise, you outline your task list by creating summary tasks: 1 Select the names of tasks 5 through 7. These are the tasks you want to make subtasks of the public launch phase. 64 Chapter 4 Building a task list 2 On the Task tab, in the Schedule group, click Indent Task. Project promotes task 4 to a summary task and switches it to automatic scheduling. Or you can think of it as Project demoting tasks 5 through 7 to subtasks; either way, the plan now includes a summary task and subtasks. Summary task Summary task bar in the Gantt chart Subtasks TIP If you want to demote a summary task back to a subtask, you must change the outline structure of the subtasks below the summary task. Select all subtasks, and then click the Outdent command. Notice the scheduling effect of creating the summary task. Because task 6 had specific start and finish dates already, Project set the start date of the summary task (and its other subtask with a duration) to the same date, January 19. Next you’ll create another summary task in a different way. 3 4 Select the names of tasks 1 through 3. On the Task tab, in the Insert group, click Summary. Project inserts a row for a new task, indents the task directly below it, and renumbers the subsequent tasks. Project names the new task <New Summary Task>. Creating summary tasks to outline the plan 65 4 5 With <New Summary Task> selected, type Planning Phase and press Enter. Now the plan is organized into two phases of work. Creating task dependencies with links When you link tasks, you create scheduling relationships between the tasks. These task relationships are called dependencies, as in “the start of this task is dependent upon the completion of a prior task.” Once you create task dependencies (also called links), Project can automatically adjust the scheduling of linked tasks as changes occur in your plan. Creating dependencies by linking tasks is crucial to getting the full benefit of Project’s scheduling engine. Let’s look at one type of dependency relationship you can create between two tasks. Most plans require tasks to be performed in a specific order. For example, the task of writing a chapter of a book must be completed before the task of editing the chapter can occur. These two tasks have a finish-to-start relationship, which has two aspects: ▪▪ The second task must occur after the first task; this is a sequence. ▪▪ The second task can occur only if the first task is completed; this is a dependency. In Project, the first task (“Write the chapter”) is called the predecessor because it precedes tasks that depend on it. The second task (“Edit the chapter”) is called the successor because it succeeds, or follows, tasks on which it is dependent. Any task can be a predecessor for one or more successor tasks. Likewise, any task can be a successor to one or more predecessor tasks. 66 Chapter 4 Building a task list Although this might sound complicated, two tasks can have one of only four types of task relationships. This task relationship Means Looks like this in the Gantt chart Example Finish-to-start (FS) The finish date of the predecessor task determines the start date of the successor task. This is the default task relationship. A book chapter must be written before it can be edited. Start-to-start (SS) The start date of the predecessor task determines the start date of the successor task. Ordering prepress and ordering paper are closely related, and they should start simultaneously. Finish-to-finish (FF) The finish date of the predecessor task determines the finish date of the successor task. Tasks that require specific equipment must end when the equipment rental period ends. Start-to-finish (SF) The start date of the predecessor task determines the finish date of the successor task. The time when the print run is scheduled to start determines when a binder selection task must end. TIP You can adjust the schedule relationship between predecessor and successor tasks with lead and lag times. For example, you can set a two-day lag between the end of a predecessor task and the start of its successor task. For more information, see Chapter 9, “Advanced task scheduling.” Representing task relationships and handling changes to scheduled start and finish dates are two areas where the use of a scheduling engine such as Project really pays off. For example, you can change task durations or add or remove tasks from a chain of linked tasks, and Project will reschedule tasks accordingly. Task relationships appear in several ways in Project, including the following: ▪▪ In Gantt chart and Network Diagram views, task relationships appear as the lines connecting tasks. Creating task dependencies with links 67 4 ▪▪ In tables, such as the Entry table, task ID numbers of predecessor tasks appear in the Predecessor fields of successor tasks. (You might need to drag the vertical divider bar to the right to see the Predecessor column.) The scenario: At Lucerne Publishing, the new book launch plan is coming together nicely. Tasks have been outlined under summary tasks, and you’re now ready to create task relationships. In this exercise, you link tasks to create task dependencies between them: 1 2 Select the names of tasks 2 and 3. On the Task tab, in the Schedule group, click Link the Selected Tasks. Tasks 2 and 3 are linked with a finish-to-start relationship. The change highlighting indicates values that are affected after you make a change to a project. The link line indicates a task relationship between tasks. Note that task 3 previously had no start or finish date, but by making it a successor of task 2, you gave Project enough information to give task 3 a start date: January 6, the next working day following the end of task 2. Have you noticed the light blue highlighting of some of the Duration, Start, and Finish fields as you linked tasks? Project highlights the values that are affected after each scheduling change you make in a plan. 68 Chapter 4 Building a task list TIP To unlink tasks, select the tasks you want to unlink and then click Unlink Tasks in the Schedule group on the Task tab. Next, you’ll link tasks 3 and 4 using a different technique. 3 4 Select the name of task 4, Planning complete! On the Task tab, in the Properties group, click Information. The Task Information dialog box appears. 5 6 Click the Predecessors tab. 7 8 In the Task Name list, click Design and order marketing material. Click the empty cell below the Task Name column heading, and then click the down arrow that appears. Click OK to close the Task Information dialog box. Tasks 3 and 4 are linked with a finish-to-start relationship. TIP Recall that any task can have multiple predecessor tasks. One way you can specify additional predecessor tasks is to add them on the Predecessors tab of the Task Information dialog box. For finish-to-start relationships (the default link type), the predecessor with the later finish date determines the start date of the successor task. This predecessor task is sometimes called the “driving predecessor” because it determines or drives the start date of its successor task. Project includes a feature that helps you see driving predecessor and successor relationships more easily. The feature is called Task Path and is described in Chapter 9. Next you’ll link all the subtasks under Public Launch Phase in one action. 9 10 Select the names of tasks 6 through 8. On the Task tab, in the Schedule group, click Link the Selected Tasks. Tasks 6 through 8 are linked. Creating task dependencies with links 69 4 TIP Tasks 6 through 8 are adjacent to each other. To select tasks that are not adjacent, select the first task, hold down the Ctrl key, and then select additional tasks. There are several ways of linking tasks, and you’ll use one more to link the two phases of the new book launch plan. 11 In the chart portion of the Gantt Chart view, point the mouse pointer at the summary task bar for task 1, Planning Phase, and then click and drag down and to the right to the Gantt bar for task 5, Public Launch Phase. Note that as you drag the mouse pointer, it changes to a link icon and pop-up window that updates with information as you hover over other task bars. This tooltip can help you link tasks using the mouse. The mouse pointer changes to indicate that you are linking tasks. 12 When the mouse pointer is over the summary task bar for task 5, release the mouse pointer. The summary tasks 1 and 5 are linked with a finish-to-start relationship. 70 Chapter 4 Building a task list So far, you’ve used three different techniques to link tasks. Another simple way to create a task relationship is to enter the predecessor’s task ID in the Predecessors field of the successor task. As you use Project more, you’ll probably find you prefer one of these or another way of linking tasks. TIP When working with summary tasks, you can either link summary tasks directly (as you did previously) or link the latest task in the first phase with the earliest task in the second phase. The scheduling result is the same in either situation. Under no circumstances, however, can you link a summary task to one of its own subtasks. Doing so creates a circular scheduling problem, so Project doesn’t allow it. To conclude this exercise, you’ll enter a specific duration value for task 3. The Lucerne marketing team has reported that its estimate is that task 3 should have a two-week duration. 13 In the duration field for task 3, type 2w, and then press Enter. Notice that the new duration for task 3 caused the Planning Phase summary task’s duration to increase, but it did not affect the scheduling of the task 4 milestone. Why not? Remember that this task is still manually scheduled. You can force Project to adjust the start and finish dates of this task while leaving it as manually scheduled. Creating task dependencies with links 71 4 14 15 Select the name of task 4. On the Task tab, in the Schedule group, click Respect Links. Project reschedules task 4 to start following the completion of its predecessor, task 3. You might have noticed that the start of the Public Launch Phase summary task does not respect its link to its predecessor, the Planning Phase summary task. Clicking the Respect Link button with the Public Launch Phase summary task selected will not cause it to be rescheduled, as it did for task 4. That’s because the start and finish dates of the summary task are driven by the earliest start and latest finish dates of its subtasks, which in this case are still manually scheduled. You’ll address this issue next by switching to automatic scheduling. Switching task scheduling from manual to automatic Project by default sets new tasks to be manually scheduled. In fact, so far in Part 2 of this book you’ve worked only with manually scheduled tasks. In Project, you control the scheduling of tasks in two different ways: ▪▪ Work with manually scheduled tasks to quickly capture some details but without scheduling tasks. Think of a manually scheduled task as an initial placeholder you can create at any time without affecting the rest of the plan. You might not initially know more than a task’s name, and that’s OK. As you discover or decide more details about the task, such as when it should occur, you can add those details to the plan. ▪▪ Work with automatically scheduled tasks to take full advantage of the powerful scheduling engine in Project. 72 Chapter 4 Building a task list With automatic scheduling, Project updates calculated schedule values such as task durations, start dates, and finish dates automatically in response to changes in a plan. Changes to factors such as constraints, task relationships, and calendars can also cause Project to recalculate affected tasks. The scenario: At Lucerne Publishing, the new book launch plan has been reviewed by the resources who will carry out the work and by other project stakeholders. Although you expect the plan to change somewhat as you learn more about the book launch, you now have enough confidence in the plan overall to switch from manual to automatic task scheduling. In this exercise, you convert tasks to automatic scheduling and then change the default scheduling mode to have new tasks automatically scheduled: 1 Select the names of tasks 2 through 4. These tasks are currently set to be manually scheduled, as indicated by the push-pin indicator in the Task Mode column. 2 On the Task tab, in the Tasks group, click Auto Schedule. Project switches these tasks to be automatically scheduled. Project changes the Task Mode icons and formatting of the tasks’ Gantt bars to indicate that they are now automatically scheduled. Next you’ll use a different method to change the scheduling mode for a task. 3 4 Click the Task Mode field of task 6, and then click the arrow that appears. In the list that appears, click Auto Scheduled. Switching task scheduling from manual to automatic 73 4 This time, task 6 was rescheduled to start later. Why did this happen? Recall the dependency between the two summary tasks. The dependency said, in effect, that the Public Launch Phase should start once the Planning Phase was finished. However, because task 6 and the other subtasks of the Public Launch Phase were manually scheduled, Project did not reschedule the subtasks to account for this dependency. As soon as you set task 6 to automatic scheduling, however, Project did just that and adjusted the start date of its summary task as well. The remaining subtasks 7 and 8 are still manually scheduled, so Project did not reschedule them. You’ll switch these tasks next. 5 6 Select the names of tasks 7 and 8. On the Task tab, in the Tasks group, click Auto Schedule. Project reschedules the remaining tasks. This extends the duration of the Public Launch Phase and of the overall project. Notice that Project replaced the start date text value of task 8 with a scheduled date, and supplied a one-day duration. Project did so because it requires a numeric time value for the duration for every automatically scheduled task. The question mark 74 Chapter 4 Building a task list f ollowing the duration value indicates that this is an estimated duration; the question mark has no effect on the scheduling of the task. Right now, this plan is set to treat any new tasks you might enter as manually scheduled. You could leave this setting as is and then switch specific tasks to be automatically scheduled. However, this plan is developed enough now to switch to automatic scheduling and later set some specific tasks to manually scheduled as needed. 7 On the Task tab, in the Tasks group, click Mode and then click Auto Schedule. TIP You can toggle the scheduling mode of the plan currently open in Project by clicking the New Tasks status bar text and then picking the other scheduling mode. 4 You can also change the default scheduling mode Project applies to all new plans. To do this, on the File tab click Options and then click the Schedule tab. In the Scheduling Options For This Project box, click All New Projects, and then in the New Tasks Created box, click Auto Scheduled. Next you’ll see automatic scheduling in action when you add a new task to the plan. 8 In the Task Name field, below task 8, type Launch social media programs for book and then press Enter. Project adds the new task to the plan. By default, it is not linked to any other task, is given a one-day duration, and is scheduled to start at its summary task’s start date. Unlike manually scheduled tasks, automatically scheduled tasks get a duration and start and finish dates when added to the plan. To end this exercise, you’ll link two tasks. 9 10 Select the names of tasks 8 and 9. On the Task tab, in the Schedule group, click Link the Selected Tasks. Switching task scheduling from manual to automatic 75 Project links the two tasks. Notice that the duration of the Public Launch Phase summary task was updated automatically from 9 to 10 days. Checking the plan’s duration and finish date At any time in the planning or execution of a project, you and other project stakeholders very likely will want to know how long the project is expected to take. You don’t directly enter a total project duration or finish date in a plan, and you don’t need to. Project calculates these values based on the task durations, dependencies, project calendar adjustments, and many other factors you have recorded in a plan. An easy way to view the plan’s duration and scheduled start and finish dates is via the Timeline view, the project summary task, and the Project Information dialog box. The scenario: At Lucerne Publishing, your plan for the new book launch is helping the team to get organized for the upcoming work. You are frequently asked to provide the currently scheduled duration and finish date for the book launch. In this exercise, you check the plan’s overall duration and scheduled finish date based on the task durations and relationships you entered. 1 In the Timeline view above the Gantt Chart view, note the plan’s current start and finish dates. 76 Chapter 4 Building a task list NOTE If the Timeline view is not shown, on the View tab, in the Split View group, select the Timeline check box. The Timeline view is a handy way of seeing the big picture of the plan. Here you’re looking just at start and finish dates, but in later chapters, you’ll work with the Timeline view in different ways. Next you’ll get a closer look at the plan’s duration. 2 On the Project tab, in the Properties group, click Project Information. The Project Information dialog box appears. Here again you see the finish date: 2/3/15. You can’t edit the finish date directly because this plan is set to be scheduled from the start date. Project calculates the plan’s finish date based on the span of working days required to complete the tasks, starting at the plan’s start date. Any change to the start date causes Project to recalculate the finish date. Next, let’s look at the duration information in more detail. 3 Click Statistics. You don’t need to understand all of these numbers yet, but the current duration is worth noting. The duration is the number of working days (not elapsed days) between the plan’s start date and finish date. TIP Project determines the overall duration of a plan by calculating the difference between the earliest start date and the latest finish date of the plan’s tasks. The plan’s duration is also affected by other factors, such as task relationships, which are discussed in “Creating task dependencies with links” previously in this chapter. Because Project distinguishes between working and nonworking time, a task’s duration doesn’t necessarily correlate to elapsed time. Checking the plan’s duration and finish date 77 4 4 Click Close to close the Project Statistics dialog box. Next you will display the project summary task in the Gantt Chart view. 5 Click anywhere in the Gantt Chart view. With the focus now on the Gantt Chart view, the contextual label of the Format tab changes to Gantt Chart Tools. 6 On Format tab, in the Show/Hide group, select the Project Summary Task check box. Project displays the project summary task at the top of the Gantt Chart view with an ID of 0. Here you’ll see the same duration and start and finish values displayed in Project Statistics as well as a Gantt bar that’s drawn from the start and finish dates of the overall plan. Documenting tasks with notes and hyperlinks You can record additional information about a task in a note. For example, you might have detailed descriptions of a task but want to keep the task’s name succinct. You can add such details to a task note rather than to the task’s name. That way, the information resides in the plan and can be easily viewed or printed. There are three types of notes: task notes, resource notes, and assignment notes. You can enter and review task notes on the Notes tab in the Task Information dialog box. Notes in Project support a wide range of text formatting options; you can even link to or store graphic images and other types of files in notes. TIP You will work with resource notes in Chapter 5, “Setting up resources.” Sometimes you might want to associate a task in a plan with information stored in a different document or on a webpage. Hyperlinks allow you to connect a specific task to additional information that resides outside of the plan. The scenario: At Lucerne Publishing, you have some details about a few tasks in the new book launch plan that you’d like to record in the plan. This will help you later by keeping such details right in the plan, and it will also be valuable for any other project stakeholders who might work with the plan in the future. 78 Chapter 4 Building a task list In this exercise, you enter task notes and hyperlinks to document important information about some tasks: 1 2 Select the name of task 6, Distribute advance copies. On the Task tab, in the Properties group, click Notes. TIP You can also right-click the task name and click Notes in the shortcut menu that appears. Project displays the Task Information dialog box with the Notes tab visible. 3 In the Notes box, type Get recipient list from publicist. 4 4 Click OK. A note icon appears in the Indicators column. 5 Point to the note icon for task 6. The note appears in a ScreenTip. For notes that are too long to appear in a ScreenTip, you can double-click the note icon to display the full text of the note. You might notice a note icon for task 0, the project summary task. We’ll look at that next. 6 Point to the note icon on task 0. You might recognize this note that appears in the ScreenTip from “Entering the plan’s title and other properties” in Chapter 3. This text was entered in the Comments field of the Properties dialog box. As you can see, text entered in Comments appears as a note on the project summary task. If you add or change a note on the project sum- Documenting tasks with notes and hyperlinks 79 mary task as you did earlier, your change will appear in the Comments field in the Properties dialog box. To conclude this exercise, you will create a hyperlink. 7 Right-click the name of task 8, Launch public Web portal for book, and then click Hyperlink on the shortcut menu. The Insert Hyperlink dialog box appears. 8 9 10 In the Text to display box, type Add to spring catalog here. In the Address box, type http://www.lucernepublishing.com/ Click OK. A hyperlink icon appears in the Indicators column. Pointing to the icon displays the descriptive text you typed earlier. To open the webpage in your browser, either click the hyperlink icon or right-click on the hyperlink icon and in the shortcut menu that appears point to Hyperlink, and then click Open Hyperlink. TIP You can quickly remove notes, hyperlinks or formatting from selected tasks. On the Task tab, in the Editing group, click Clear (looks like an eraser), and then select the command you want. + CLEAN UP Close the Simple Tasks file. 80 Chapter 4 Building a task list Key points ▪▪ Good task names should be short verb phrases that will make sense to those who will review the plan or perform the work. ▪▪ Essential aspects of tasks in a plan include their duration and order of occurrence. ▪▪ In Project, phases of a schedule are represented as summary tasks. ▪▪ Task links, or relationships, cause the start or end of one task to affect the start or end of another task. A common task relationship is a finish-to-start relationship, in which the completion of one task controls the start of another task. ▪▪ Tasks can be manually or automatically scheduled. For manually scheduled tasks, you can record whatever information you might have about a task’s duration, start, and finish values without affecting the overall plan. ▪▪ You can document additional details using task notes and create hyperlinks to the web. Key points 81 4 Advanced task scheduling 9 IN THIS CHAPTER, YOU WILL LEARN HOW TO ▪▪ ▪▪ ▪▪ ▪▪ ▪▪ ▪▪ Visually highlight a task’s predecessors and successors. Adjust task links for more control over how tasks are related. Apply a constraint to a task. Split a task to record an interruption in work. Create a calendar and apply it to a task. Change a task type to control how Project schedules tasks. In Part 3, ”Advanced scheduling techniques,” you’ll complete a full project life cycle (planning, tracking progress, and responding to variance) as you did in Part 2, “Simple scheduling basics.” In Part 3, however, you dive deeper into the Microsoft Project 2013 feature set to handle more complex needs. This chapter and the next one introduce you to a broad feature set that focuses on a deeper level of task management. This chapter focuses on core task scheduling features, including task links, constraints, and task types. PRACTICE FILES Before you can complete the exercises in this chapter, you need to copy the book’s practice files to your computer. A complete list of practice files is provided in “Download the practice files” at the beginning of this book. For each exercise that has a practice file, simply browse to where you saved the book’s practice file folder. IMPORTANT If you are running Project Professional with Project Web App/Project Server, take care not to save any of the practice files you work with in this book to Project Web App (PWA). For more information, see Appendix C, “Collaborating: Project, SharePoint, and PWA.” 169 See task relationships with Task Path When fine-tuning task relationships, you need to keep track of the predecessor tasks that affect the scheduling of their successor tasks. In complex plans, visually identifying predecessor and successor relationships is not always easy. This is especially true when a task has multiple predecessors or successors. Project 2013 introduces a feature called Task Path that applies color formatting to the Gantt bars of the selected task’s predecessor and successor tasks. Task Path can also distinguish a task’s driving predecessor (the predecessor that directly determines, or drives, the start date of the task) from that task’s other predecessors. (Predecessor tasks that can slip without rescheduling their successor tasks are said to have slack, described in detail in Chapter 10, “Fine-tuning task details.”) The Task Path feature can also do the same for driving successor tasks. The scenario: At Lucerne Publishing, at an upcoming team meeting you’d like to demonstrate some of the more complex task dependencies in a new children’s book plan. In this exercise, you use the Task Path feature to see predecessor and successor tasks. SET UP You need the Advanced Tasks_Start file located in your Chapter09 practice file folder to complete this exercise. Open the Advanced Tasks_Start file, and save it as Advanced Tasks. 1 Vertically scroll the task list until task 16, Proofread and index, is near the top. 170 Chapter 9 Advanced task scheduling Now you’ll more easily see the results of your next actions. 2 Click the name of task 29, Send to color house. You’d like to identify this task’s predecessor and successor tasks. 3 On the Format tab, in Bar Styles group, click Task Path and then click Predecessors. Project applies a gold highlight formatting to the Gantt bars of task 29’s predecessor tasks. As you can see in the view, task 29 has a chain of predecessor tasks. Next you’ll take a closer look at the predecessor tasks that directly affect the scheduling of task 29. 4 On the Format tab, in the Bar Styles group, click Task Path and then click Driving Predecessors. Project applies a dark orange highlight formatting to the Gantt bars of this task’s driving predecessor tasks. See task relationships with Task Path 171 9 Some of the predecessor tasks directly drive the scheduling of task 29, and are referred to as driving predecessors (task 24 is one example). Other predecessor tasks have some amount of slack between them and task 29 (task 27 for example). In addition to predecessor highlighting, you can also use Task Path to highlight the selected task’s successor tasks. 5 With task 29 still selected, on the Format tab, in Bar Styles group, click Task Path and then Successors. Project applies a light purple highlight formatting to the Gantt bars of this task’s successor tasks. These are tasks 30 and 31. 172 Chapter 9 Advanced task scheduling Now the predecessor, driving predecessor, and successor task highlighting is turned on for the selected task. Next you’ll see these highlights for another task. 6 Select the name of task 22, Proof and review. Project applies highlight formatting to the Gantt bars of this task’s predecessor, driving predecessor, and successor tasks. To conclude this exercise, you’ll turn off the highlighting and change the zoom level. 7 On the Format tab, in the Bar Styles group, click Task Path and then click Remove Highlighting. 8 On the View tab, in the Zoom group, in the Timescale box, click Days. When you’re working in a complex project, you can turn on Task Path highlighting to help you quickly visually identify predecessor and successor tasks. The different color highlighting for driving predecessor and successor tasks is especially useful when you’re focused on managing the overall duration of a sequence of linked tasks. Adjusting task link relationships You might recall from Chapter 4, “Building a task list,” that there are four types of task dependencies, or relationships: ▪▪ Finish-to-start (FS) The finish date of the predecessor task determines the start date of the successor task. Adjusting task link relationships 173 9 ▪▪ Start-to-start (SS) The start date of the predecessor task determines the start date of the successor task. ▪▪ Finish-to-finish (FF) The finish date of the predecessor task determines the finish date of the successor task. ▪▪ Start-to-finish (SF) The start date of the predecessor task determines the finish date of the successor task. When you link tasks in Project, they are given a finish-to-start relationship by default. This is fine for many tasks, but you will most likely change some task relationships as you finetune a plan. The following are some examples of tasks that require relationships other than finish-to-start: ▪▪ You can start setting pages as soon as you start illustration work on a book project (a start-to-start relationship). This reduces the overall time required to complete the two tasks, because they are completed in parallel. ▪▪ Planning the editorial work for a book can begin before the manuscript is complete, but it cannot be finished until the manuscript is complete. You want the two tasks to finish at the same time (a finish-to-finish relationship). Task relationships should reflect the sequence in which work should be performed. After you have established the correct task relationships, you can fine-tune your schedule by entering overlap (called lead time) or delay (called lag time) between the finish or start dates of predecessor and successor tasks. When two tasks have a finish-to-start relationship ▪▪ Lead time causes the successor task to begin before its predecessor task concludes. ▪▪ Lag time causes the successor task to begin sometime after its predecessor task concludes. The following is an illustration of how lead and lag time affect task relationships. Assume that you initially planned the following three tasks using finish-to-start relationships. 174 Chapter 9 Advanced task scheduling Initially, the tasks are linked with finish-to-start relationships, so the successor task is scheduled to begin when the predecessor task finishes. Before task 2 can begin, you need to allow an extra day for the copyedited manuscript to be shipped to the author. You do not want to add a day to the duration of task 5 because no real work will occur on that day. Instead, you enter a one-day lag between tasks 1 and 2. This lag time delays the start of the successor task by one day. However, task 3 can start as soon as task 2 is halfway completed. To make this happen, enter a 50 percent lead time between tasks 2 and 3. This lead time schedules the successor task to start before the predecessor task finishes. You can enter lead and lag time as units of time, such as two days, or as a percentage of the duration of the predecessor task, such as 50 percent. Lag time is entered in positive units and lead time in negative units (for example, –2d or –50%). You can apply lead or lag time to any type of task relationship: finish-to-start, start-to-start, or any other types. Places in which you can enter lead or lag time include the Task Information dialog box (Task tab), the Predecessors column in the Entry table, the Task Form (View tab, Split View group, Details command), and the Task Dependency dialog box (viewable by double-clicking a link line between Gantt bars). The scenario: At Lucerne Publishing, editorial and design work on a new children’s book is about to begin. At this stage, you have an initial plan with task names, durations, r elationships, and resource assignments. Now you want to fine-tune those task relationships. Adjusting task link relationships 175 9 In this exercise, you enter lead and lag time and change task relationships between predecessor and successor tasks. 1 On the Task tab, in the Tasks group, click Inspect. The Task Inspector pane appears. This pane succinctly reveals the scheduling factors that affect the selected task, such as predecessor task relationships, resource calendars, task calendars, or a combination of factors. You can click any item in the Task Inspector that appears in blue to get more details. For example, you can click the assigned resource’s name under Calendar to see their resource calendar. You do not need to display the Task Inspector to change task details, but it can be a handy tool in some cases. 2 Select the name of task 31, Print and ship. In the Task Inspector pane, you can view the scheduling factors affecting this task. For task 31, you can see that its predecessor is task 30, Generate proofs. You can see in the pane that the two tasks have a finish-to-start relationship with zero lag time. Next, you’ll adjust the lag value on the task relationship to account for the transit time of the proofs to the printer. Because you cannot edit this value directly in the Task Inspector, you’ll display the Task Information dialog box. First, though, you’ll display this task’s Gantt bar so that you can more easily observe the effect of adjusting the lag. 3 On the Task tab, in the Editing group, click Scroll to Task. 176 Chapter 9 Advanced task scheduling Next, you’ll adjust the lag value between this task and its predecessor. 4 On the Task tab, in the Properties group, click Information. The Task Information dialog box appears. It contains details about the currently selected task, 31. 5 6 Click the Predecessors tab. In the Lag field for predecessor task 30, type 3d, and then click OK to close the Task Information dialog box. Task 31 is now scheduled to start three working days after the end of task 30. Predecessor details such as lag time appear in the Task Inspector. 9 Next, you will adjust the lag time between two other tasks. 7 Click the name of task 10, Copyedit incorp. You’d like to overlap this task with its predecessor; the Copyedit incorp task can start before the author review of the copyediting is completed. 8 On the Task tab, in the Editing group, click Scroll to Task. Adjusting task link relationships 177 9 On the Task tab, in the Properties group, click Information, and then click the Predecessors tab. TIP You can use the selected task’s shortcut menu for both commands: Scroll To Task and Information. Right-click the task name and, in the shortcut menu, select the command you want. 10 In the Lag field for predecessor task 9, type –25%, and then click OK. Entering lag time as a negative value results in lead time. Task 10 is now scheduled to start at the 25-percent-remaining point of the duration of task 9. Should the duration of task 9 change, Project will reschedule the start of task 10 so that it maintains a 25 percent lead time. To conclude this exercise, you will change the type of task relationship between two tasks. 11 Double-click the name of task 14, Interior illustration design. TIP Double-clicking a task name is a shortcut way to display the Task Information dialog box. The Predecessors tab should be visible. Note also that the Task Inspector pane in the background updates to display the scheduling details for task 14, the currently selected task. 12 On the Predecessors tab, click in the Type column for predecessor task 13. Select Start-to-Start (SS), and click OK. Project changes the task relationship between tasks 13 and 14 to start-to-start. 178 Chapter 9 Advanced task scheduling Adjusting relationships between tasks and entering lead or lag times where appropriate are excellent techniques to fine-tune task relationships so that you get the results you want. However, Project cannot automatically make such schedule adjustments for you. As a project manager, you must analyze the sequences and relationships of your tasks and use your best judgment when making such adjustments. Setting task constraints Every task that you enter into Project has some type of constraint applied to it. A constraint determines the degree to which that task can be rescheduled. There are three categories of constraints: ▪▪ Flexible constraints Project can change the start and finish dates of a task. The default constraint type in Project is that tasks start as soon as possible. This type of flexible constraint is called As Soon As Possible, or ASAP for short. No constraint date is associated with flexible constraints. Project does not display any special indicator in the Indicators column for flexible constraints. ▪▪ Inflexible constraints A task must begin or end on a certain date. For example, you can specify that a task must end on November 13, 2015. Inflexible constraints are sometimes called hard constraints. When an inflexible constraint has been applied to a task, Project displays a special indicator in the Indicators column. You can point to a constraint indicator, and the constraint details will appear in a ScreenTip. ▪▪ Semi-flexible constraints A task has a start or finish date boundary. However, within that boundary, Project has the scheduling flexibility to change the start and finish dates of a task. For example, let’s say a task must finish no later than June 19, 2015. However, the task could finish before this date. Semi-flexible constraints are Setting task constraints 179 9 sometimes called soft constraints or moderate constraints. When a semi-flexible constraint has been applied to a task, Project displays a special indicator in the Indicators column. In total, there are eight types of task constraints. This constraint category Includes these constraint types And means Flexible As Soon As Possible (ASAP) Project will schedule a task to occur as soon as it can occur. This is the default constraint type applied to all new tasks when scheduling from the project start date. There is no constraint date for an ASAP constraint. As Late As Possible (ALAP) Project will schedule a task to occur as late as it can occur. This is the default constraint type applied to all new tasks when scheduling from the project finish date. There is no constraint date for an ALAP constraint. Start No Earlier Than (SNET) Project will schedule a task to start on or after the constraint date you specify. Use this constraint type to ensure that a task will not be scheduled to start before a specific date. Start No Later Than (SNLT) Project will schedule a task to start on or before the constraint date you specify. Use this constraint type to ensure that a task will not start after a specific date. Finish No Earlier Than (FNET) Project will schedule a task to finish on or after the constraint date you specify. Use this constraint type to ensure that a task will not finish before a specific date. Finish No Later Than (FNLT) Project will schedule a task to finish on or before the constraint date you specify. Use this constraint type to ensure that a task will not finish after a specific date. Must Start On (MSO) Project will schedule a task to start on the constraint date you specify. Use this constraint type to ensure that a task will start on an exact date. Must Finish On (MFO) Project will schedule a task to finish on the constraint date you specify. Use this constraint type to ensure that a task will finish on an exact date. Semi-flexible Inflexible These three constraint categories have very different effects on the scheduling of tasks: ▪▪ Flexible constraints, such as As Soon As Possible (ASAP), allow tasks to be scheduled without any limitations other than their predecessor and successor relationships, and the project’s start date (for ASAP task constraints) or finish date (for As Late As 180 Chapter 9 Advanced task scheduling Possible, or ALAP, task constraints). No fixed start or end dates are imposed by these constraint types. Use these constraint types whenever possible. ASAP In this example, tasks A and B are linked and task B has an ASAP constraint applied. As the duration of task A shrinks or grows, the start date of task B is automatically adjusted accordingly. ▪▪ Semi-flexible constraints, such as Start No Earlier Than or Start No Later Than (SNET or SNLT), limit the rescheduling of a task within the date boundary you specify. Constraint Date SNET Here, tasks A and B are linked and task B has an SNET constraint set to Day 4 applied. If Task A’s duration decreases, the start of Task B is unaffected. However, if Task A’s duration extends, Project adjusts Task B’s start date automatically. ▪▪ Inflexible constraints, such as Must Start On (MSO), prevent the rescheduling of a task. Use these constraint types only when absolutely necessary. MSO In this example, tasks A and B are linked and task B has an MSO constraint set to Day 4 applied. If task A’s duration decreases or increases, the start of task B is unaffected. Setting task constraints 181 9 TIP When working with a manually scheduled task, you cannot change the constraint type or set a constraint date. The reason is that Project does not schedule manually scheduled tasks, so constraints have no effect. For more information about manually scheduled tasks versus automatically scheduled tasks, see Chapter 4. The type of constraint you apply to the tasks in your projects depends on what you need from Project. You should use inflexible constraints only if the start or finish date of a task is fixed by factors beyond the control of the project team. Examples of such tasks include handoffs to clients and the end of a funding period. For tasks without such limitations, you should use flexible constraints. Flexible constraints provide the most discretion in adjusting start and finish dates, and they allow Project to adjust dates if your plan changes. For example, if you used ASAP constraints and the duration of a predecessor task changes from four days to two days, Project adjusts, or pulls in, the start and finish dates of all successor tasks. However, if a successor task had an inflexible constraint applied, Project cannot adjust its start or finish dates. The scenario: At Lucerne Publishing, a task in the new children’s book plan cannot start quite as early as you had expected. Tad Orman, the children’s book author, needs to proofread his book at a certain stage in the design process. This work is accounted for in task 16, Proofread and index. However, Tad has informed you that because of his travel schedule, he will be unable to start his review before July 17—later than currently scheduled. In this exercise, you apply a constraint type and date to a task. 1 2 Select the name of task 16, Proofread and index. On the Task tab, in the Editing group, click Scroll to Task. TIP To select a task quickly, even a task you can’t see in the current view, press Ctrl+G, and in the ID field of the Go To dialog box, enter a task number, and then click OK. 182 Chapter 9 Advanced task scheduling Note the current scheduled start date: 7/15/15. This needs to be adjusted. 3 4 5 On the Task tab, in the Properties group, click Information. 6 In the Constraint Date box, type or select 7/17/15. 7 Click OK. In the Task Information dialog box, click the Advanced tab. In the Constraint Type box, select Start No Earlier Than. Project applies a Start No Earlier Than constraint to the task, and a constraint icon appears in the Indicators column. You can point to the icon to see the constraint details in a ScreenTip. To see a ScreenTip position the mouse pointer on a constraint indicator (or any icon in the Indicators column). Because this constraint affects the scheduling of the task, the Task Inspector pane now includes the constraint details. Setting task constraints 183 9 Task 16 is rescheduled to start on July 17 instead of July 15. All tasks that depend on task 16 are also rescheduled. One way to view this rescheduling is by the light blue change highlighting that Project applies to the Start and Finish dates of the successor tasks of task 16. Because the durations of the 1st Pages review and Design and Production summary tasks were also changed by applying the constraint to task 16, the Duration and Finish fields for those summary tasks are also highlighted. Change highlighting remains visible until you perform another editing action or save the file, and it is an effective visual way to see the broader effects of your specific actions in your schedule. 8 Click the Close button (the “X” button in the upper-right corner) on the Task Inspector pane. Here are a few other things to keep in mind when applying constraints to tasks: ▪▪ Entering a Finish date for a task (for example, in the Finish column) applies a Finish No Earlier Than constraint to the task. ▪▪ Entering a Start date for a task (for example, in the Start column) or dragging a Gantt bar directly on the Gantt chart applies a Start No Earlier Than constraint to the task. ▪▪ In many cases, entering a deadline date is a preferable alternative to entering a semi-flexible or inflexible constraint. You will work with deadline dates in Chapter 10. ▪▪ Unless you specify a time, Project schedules a constraint date’s start or finish time using the Default Start Time or Default End Time value on the Schedule tab of the Project Options dialog box. (To open this dialog box, on the File tab, click Options.) In this project, the default start time is 8 A.M. If you want a constrained task to be scheduled to start at a different time, enter that time along with the start date. For example, if you want to schedule a task to start at 10 A.M. on July 16, enter 7/16/15 10AM in the Start field. ▪▪ To remove a constraint, first select the task or tasks and, on the Task tab, in the roperties group, click Information. In the Task Information dialog box, click the P Advanced tab. In the Constraint Type box, select As Soon As Possible or (if scheduling from the project finish date) As Late As Possible. ▪▪ If you must apply semi-flexible or inflexible constraints to tasks in addition to task relationships, you might create what is called negative slack. For example, assume that you have a successor task that has a finish-to-start relationship with its predecessor task. If you enter a Must Start On constraint on the successor task earlier than the finish date of the predecessor task, this results in negative slack and a scheduling conflict. By default, the constraint date applied to the successor task will override the 184 Chapter 9 Advanced task scheduling relationship. However, if you prefer, you can set Project to honor relationships over constraints. On the File tab, click Options, and in the Project Options dialog box, click the Schedule tab. Clear the Tasks Will Always Honor Their Constraint Dates check box. ▪▪ If you must schedule a project from a finish date rather than a start date, some c onstraint behaviors change. For example, the As Late As Possible constraint type, rather than As Soon As Possible, becomes the default for new tasks. You should pay close attention to constraints when scheduling from a finish date to make sure that they create the effect you intend. Interrupting work on a task When initially planning project tasks, you might know that work on a certain task will be interrupted. Rather than listing a task twice to account for a known interruption in work, you can split the task into two or more segments. The following are some reasons why you might want to split a task: ▪▪ You anticipate an interruption in a task. For example, the facility where a task must be performed will not be accessible midway through the tasks’ completion. ▪▪ A task is unexpectedly interrupted. After a task is underway, a resource might have to stop work on the task because another task has taken priority. After the second task is completed, the resource can resume work on the first task. The scenario: At Lucerne Publishing, you’ve learned that work on a task in the new children’s book plan will be interrupted. You’d like to account for this in the plan by recording the interruption where no work should be scheduled but keep the assigned work values on the task unchanged. In this exercise, you split a task to account for a planned interruption of work on that task. 1 2 Select the name of task 3, Content edit. On the Task tab, in the Editing group, click Scroll to Task. You have learned that work on this task will be interrupted for three days starting Monday, April 13. 3 On the Task tab, in the Schedule group, click Split Task (it looks like a broken Gantt bar). A ScreenTip appears, and the mouse pointer changes. Interrupting work on a task 185 9 4 Move the mouse pointer over the Gantt bar of task 3. This ScreenTip is essential for accurately splitting a task because it contains the date at which you would start the second segment of the task if you dragged the mouse pointer from its current location on the Gantt bar. As you move the mouse pointer along the Gantt bar, you will see the start date in the ScreenTip change. 5 Move (but don’t click) the mouse pointer over the Gantt bar of task 3 until the scheduled start date of Monday, April 13, appears in the ScreenTip. To help you accurately split tasks use this ScreenTip, which will change as you move the Split Task mouse pointer. Split Task mouse pointer 6 Click and drag the mouse pointer to the right until the task start date of Thursday, April 16, appears in the ScreenTip, and then release the mouse button. Project inserts a task split, represented in the Gantt chart as a dotted line, between the two segments of the task. The split, which indicates an interruption of work on a task, appears as a dotted line connecting the segments of the task. 186 Chapter 9 Advanced task scheduling TIP Splitting tasks with the mouse might take a little practice. In step 6, if you didn’t split task 3 so that the second segment starts on April 16, just point to the second segment again. When the mouse pointer changes to a four-headed arrow, drag the segment to the correct start date. Here are a few other things to keep in mind when splitting tasks: ▪▪ You can split a task into multiple segments. ▪▪ You can drag a segment of a split task either left or right to reschedule the split. ▪▪ To rejoin two segments of a split task, drag one segment of the task until it touches the other segment. ▪▪ The time of the task split, represented by the dotted line, is not counted in the duration of the task. No work occurs during the split. ▪▪ If the duration of a split task changes, the last segment of the task is increased or decreased. ▪▪ If a split task is rescheduled (for example, if its start date changes), the entire task is rescheduled, splits and all. The task keeps the same pattern of segments and splits. ▪▪ Resource leveling or manually contouring assignments over time can cause tasks to split. You will contour assignments in Chapter 11, “Fine-tuning resource and assignment details,” and level resources in Chapter 12, “Fine-tuning the project plan.” ▪▪ If you do not want to display splits as a dotted line, you can hide the dotted lines. On the Format tab, in the Format group, click Layout. In the Layout dialog box, clear the Show Bar Splits check box. Adjusting working time for individual tasks There might be times when you want a specific task to occur at times that differ from the working time of the project calendar. Or perhaps you want a task to occur at a time outside of the resource working time, as determined by the resource’s calendar. To accomplish this, you apply a task calendar to such tasks. As with the project calendar, you specify which base calendar to use as a task calendar. The following are some examples of when you might need a task calendar: ▪▪ You are using the Standard base calendar with 8:00 A.M. to 5:00 P.M. normal working hours as your project calendar, and you have a task that must run overnight. Adjusting working time for individual tasks 187 9 ▪▪ You have a task that must occur on a specific weekday. ▪▪ You have a task that must occur over a weekend. Unlike resources, Project does not create task calendars as you create tasks. (If you need a refresher on resource calendars, see Chapter 5, “Setting up resources.”) When you need a task calendar, you assign a base calendar to the task. This base calendar might be one that is provided with Project or a new base calendar that you create for the task. For example, if you assign the 24 Hours base calendar to a task, Project will schedule that task according to a 24-hour workday rather than the working time specified in the project calendar. For tasks that have both a task calendar and resource assignments, Project schedules work during the working times that are common between the task calendar and resource calendar(s). If there is no common working time, Project alerts you when you apply the task calendar or assign a resource to the task. When you apply a task calendar to a task, you can choose to ignore resource calendars for all resources assigned to the task. Doing so causes Project to schedule the resources to work on the task according to the task calendar and not their own resource calendars (for example, to work 24 hours per day). The scenario: At Lucerne Publishing, you need to record that a task in the new children’s book project has a more restrictive working time than the rest of the tasks. The plan includes a task for the handoff of final book proofs to a color-setting services firm, which then prepares the book for commercial printing. However, this firm starts new jobs only on Mondays through Wednesdays. In this exercise, you create a new base calendar and apply it to a task as a task calendar. 1 On the Project tab, in the Properties group, click Change Working Time. The Change Working Time dialog box appears. 2 In the Change Working Time dialog box, click Create New Calendar. The Create New Base Calendar dialog box appears. 3 4 In the Name box, type Monday-Wednesday. Make sure that the Make a copy of option is selected and that Standard is selected in the drop-down list. 188 Chapter 9 Advanced task scheduling 5 Click OK. TIP This plan uses the Standard base calendar as its Project calendar. One benefit of creating a new calendar by copying the Standard base calendar is that all the working-day exceptions from the Standard calendar, such as national holidays you have previously entered, will also appear in the new calendar. Any future changes made to either calendar do not affect the other calendar, however. Note that Monday-Wednesday now appears in the For calendar box. 6 In the Change Working Time dialog box, click the Work Weeks tab. Next, you’ll enter the working-time details for this new calendar. 7 8 Make sure that the Name value [Default] in Row 1 is selected, and then click Details. In the Select day(s) box, select Thursday and Friday. These are the days you want to change to nonworking days for this calendar. 9 Choose Set days to nonworking time. 9 10 Click OK to close the Details dialog box, and then click OK again to close the Change Working Time dialog box. Now that you’ve created the Monday-Wednesday calendar, you’re ready to apply it to a task. 11 Select the name of task 29, Send to color house. Currently, this task is scheduled to start on Thursday, September 3. Adjusting working time for individual tasks 189 12 On the Task tab, in the Properties group, click Information. The Task Information dialog box appears. 13 Click the Advanced tab. As you can see in the Calendar box, the default for all tasks is None. 14 In the Calendar box, select Monday-Wednesday from the list of available base calendars. 15 Click OK to close the dialog box. Project applies the Monday-Wednesday calendar to task 29. The task calendar causes Project to reschedule the task to the next available working day, which is the following Monday. A calendar icon appears in the Indicators column, reminding you that this task has a task calendar applied to it. 16 Point to the calendar icon. A ScreenTip appears, showing the calendar details. Because of the custom calendar you applied to this task, it will not be scheduled on a Thursday or Friday or over the weekend. 190 Chapter 9 Advanced task scheduling Control task scheduling with task types You might recall from Chapter 6, “Assigning resources to tasks,” that Project uses the following formula, called the scheduling formula, to calculate a task’s work value: Duration × Assignment Units = Work Here, assignment units are normally expressed as a percentage. Remember also that a task has work when it has at least one work resource (people or equipment) assigned to it. Each value in the scheduling formula corresponds to a task type. A task type determines which of the three scheduling formula values remains fixed if the other two values change. The default task type is fixed units: If you change a task’s duration, Project will recalculate work. Likewise, if you change a task’s work, Project will recalculate the duration. In either case, the units value is not affected. The two other task types are fixed duration and fixed work. For these task types, Project uses a timephased field called peak units when responding to schedule changes. For a fixed-work task ▪▪ You can change the assignment units value and Project will recalculate the duration. ▪▪ You can change the duration value and Project will recalculate peak units per time period. The assignment units value is not affected. TIP You cannot turn off effort-driven scheduling for a fixed-work task. If you need a refresher on effort-driven scheduling, see “Controlling work when adding or removing resource assignments” in Chapter 6. For a fixed-duration task ▪▪ You can change the assignment units value and Project will recalculate work. ▪▪ You can change the work value and Project will recalculate peak units per time p eriod. The assignment units value is not affected. Project also keeps track of the highest peak units value per assignment. This value is stored in the Peak field, which is explained later in the chapter. Control task scheduling with task types 191 9 TIP You cannot change the task type of a manually scheduled task, and the effect of the task type on the scheduling of a task as described here applies only to automatically scheduled tasks. If you need a refresher on manually scheduled tasks, see Chapter 4, “Building a task list.” To view the task type of the selected task, on the Task tab, in the Properties group, click Information. Then, in the Task Information dialog box, click the Advanced tab. You can also view the task type in the Task Form. (When in the Gantt Chart view, you can display the Task Form by clicking Details on the View tab, in the Split View group.) You can change a task type at any time. Note that characterizing a task type as fixed does not mean that its duration, assignment units, or work values are unchangeable. You can change any value for any task type. Which is the right task type to apply to each of your tasks? It depends on how you want Project to schedule that task. The following table summarizes the effects of changing any value for any task type. You read it like a multiplication table. ...and you change the Duration If the task type is... Assignment Units Work Fixed duration Work Work Peak Fixed units Work Duration Duration Fixed work Peak Duration Duration ...then Project recalculates Assignment units, peak, peak units, and the scheduling formula In previous versions of Project, it was possible that a resource’s initial assignment units value would change, and this led to unexpected results with regard to the scheduling formula. This behavior changed starting with Project 2010. Project now tracks both the assignment units value and a calculated value called peak (or, when viewed in a timescale, peak units). 192 Chapter 9 Advanced task scheduling Project uses the assignment units value when initially scheduling or later rescheduling a task, but it uses peak units when reporting a resource’s maximum peak units value. Here’s one example. If you initially assigned a resource at 100% assignment units to a 1-day, fixed-unit task, Project used that value to initially calculate 8 hours of work. However, if you then recorded 10 hours of actual work on the task, versions of Project prior to 2010 would have recalculated the assignment units to be 120% to keep the scheduling formula accurate. If you then added more work or changed the duration of the task, Project would have scheduled the task using the 120% assignment units value—probably not the result you’d want. Project 2010 and later, however, will record the 120% peak value, and if you subsequently add work or change the duration of the task, Project will use the original assignment units value of 100% rather than the peak value of 120% to reschedule the task. Scenario: At Lucerne Publishing, you tried adjusting work and assignment details of some tasks in the new children’s book plan but didn’t get the results you wanted. After learning how to adjust task types, you decide to give that a try. In this exercise, you change a task type and some scheduling formula values, and you see the resulting effect on the tasks. 1 On the View tab, in the Task Views group, click Task Usage. The Task Usage view appears. 2 3 In the Task Name column, select the name of task 8, Copyedit. On the Task tab, in the Editing group, click Scroll to Task. Project displays the schedule and assignment details for task 8, Copyedit. The Task Usage view groups the assigned resources below each task and shows you, among other things, each task’s duration and work—two of the three variables of the scheduling formula. Control task scheduling with task types 193 9 4 If necessary, drag the vertical divider bar to the right so that the Finish column is visible. Next, you’ll add two columns to the Usage table so that you can see the assignment units (the third variable of the scheduling formula) and the peak values. You don’t need to modify this view every time you want to use it, but for our purposes here, this is a good way to illustrate the effect of changing task types and scheduling formula values. 5 Click the Start column heading, and then, on the Format tab, in the Columns group, click Insert Column. A list of fields appears. 6 7 Click Assignment Units. 8 Click Peak. Click the Start column heading again, and on the Format tab, in the Columns group, click Insert Column. Project inserts the Assignment Units and Peak columns to the left of the Start column. Peak is the resource’s maximum units value at any time throughout the assignment’s duration. You can see that task 8 has a total work value of 240 hours, a resource assignment units value of 200%, and a duration of 15 days. Next, you will change the task’s duration to observe the effects on the other values. After a discussion between the two copyeditors about who will perform the copyedit, you all agree that the task’s duration should increase and the resource’s daily work on the task should decrease correspondingly. 9 In the Duration field for task 8, type or select 20d, and press the Enter key. Project changes the task’s duration to 20 days and increases the work to 320 hours. Note the change highlighting applied to the Work and Duration values. You increased the duration and wanted the total work to remain the same (it didn’t), so you will use the Action button to adjust the results of the new task duration. 194 Chapter 9 Advanced task scheduling 10 Click the Action button for task 8’s Duration field. Review the options on the list that appears. Because task 8’s task type is fixed units (the default task type), the Action’s default selection is to increase work as the duration increases. However, you’d like to keep the work value the same and decrease the resource’s assigned daily work on the task. 11 On the Actions list, click Decrease the hours resources work per day (units) but keep the same amount of work. The assignment units and peak values decreases to 150%, and the total work on the task remains unchanged at 240 hours. On the right side of the usage view, you can see that the work scheduled per day was reduced from 16 to 12 hours per day. Next, you will change a task type and then adjust the work on another task. 12 13 Select the name of task 24, Final review. On the Task tab, in the Editing group, click Scroll to Task. Project displays work values for task 24, Final review in the timephased grid. 14 On the Task tab, in the Properties group, click Information. The Task Information dialog box appears. 15 Click the Advanced tab. The selected task describes the final review of the new book’s page proofs. As you can see in the Task Type box, this task has the default task type of fixed-units. The task is scheduled for four days. Because it’s Lucerne’s policy to allow four working days for such reviews, you’ll make this a fixed-duration task. Control task scheduling with task types 195 9 16 17 In the Task Type box, select Fixed Duration. Click OK to close the Task Information dialog box. Changing the task type does not result in any immediate change to the schedule. Next, you’ll add work to the task and observe the effect. 18 In the Work field for task 24, Final review, type 120h, and then press Enter. Because this is a fixed duration task and you added work, Project adjusted the peak value to 125%; this represents an intentional overallocation. On the right side of the usage view, you can see that the resources assigned to task 24 now have 10 hours of work scheduled per day for most days of their assignments to this task. Their original assignment units values of 100% each remain unaffected, however. As you fine-tune your plans in Project, you might find times when a quick adjustment to Project’s response to a schedule change via the Actions button is sufficient. At other times, you might choose to intentionally change a task type to more consistently control how Project will handle its scheduling. Task types and effort-driven scheduling Many people misunderstand task types and effort-driven scheduling and conclude that these two issues are more closely related than they really are. Both settings can affect your schedule. Whereas the effect of a task type applies whenever you edit a task’s work, duration, or unit values, effort-driven scheduling affects your schedule only when you’re assigning or removing resources from tasks. For more information about effort-driven scheduling, see Chapter 6. + CLEAN UP Close the Advanced Tasks file. 196 Chapter 9 Advanced task scheduling Key points ▪▪ Use the Task Path feature to quickly highlight predecessors and successors of the selected task. ▪▪ By using a combination of task relationships plus lead and lag time, you can more accurately model when work should be done. ▪▪ When entering lead time between a predecessor task and successor task, entering a percentage lead time value offers some flexibility because Project recalculates the lead time value whenever the duration of the predecessor task changes. ▪▪ Think through the effects of semi-flexible and inflexible constraints on your schedules, and use them sparingly. ▪▪ For tasks that must be completed at times other than the project’s normal working time (as specified by the project calendar), you can create a new base calendar and apply it to the task. ▪▪ You can interrupt work on a task by splitting it. 9 Key points 197

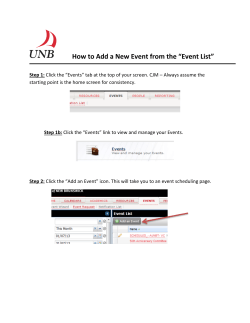


© Copyright 2026