
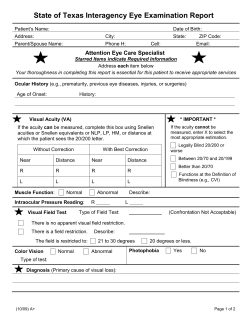
7 chapter A
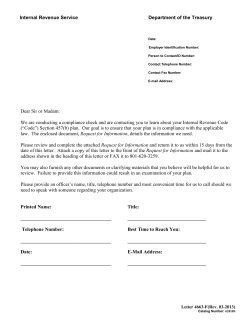
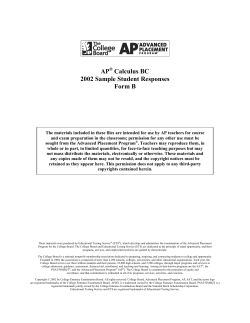
B978-1-4377-1397-8.00007-1, 00007
chapter
7
c0035
Examining the Head and Neck
D. ANNA JARVIS
Learn to see, learn to hear, learn to smell. Know that by practice alone can you
become an expert.
AL
P
P
P
P
B
P
S
P
PR
SA O
M PE
PL R
E TY
C O
O F
N E
TE L
N SE
T V
- N IE
O R
T
FI
N
SIR WILLIAM OSLER
A
major challenge in accurate pediatric physical
diagnosis is completion of a thorough head and neck
examination. If the child cries or resists, your examination
may be incomplete and the findings unreliable. When
you can complete this examination consistently without
upsetting your young patients, you may be confident that
your clinical skills are developing satisfactorily.
Observations of the child’s general appearance and
some specific aspects of the head and neck should begin
as soon as you enter the room. Hands-on examination can
be deferred until the end of the assessment. Many infants
and younger children cry when approached by strangers,
particularly those carrying an otoscope, ophthalmoscope,
or the dreaded tongue depressor. The order in which the
examination is conducted is not critical, so make a conscious decision about the sequence with each child, based
on your observations. Let the child set the pace, with
input from the parents. In some young school-aged children, I find it best to get the throat or ear examination out
of the way first. The child can then relax, cooperate, and
enjoy the rest of our interactions.
Proficiency with an ophthalmoscope, otoscope, and
tongue depressor requires knowledge of relevant anatomy, hand-eye coordination, and lots of practice. Develop
your skills by examining colleagues, family members,
and friends, who will provide instant feedback if your
examination causes pain.
KEY POINT
Do not attempt to examine any child’s head and neck
until you have practiced using an otoscope and an
ophthalmoscope on consenting adults to the point that you
are proficient enough to avoid all pain and discomfort during
routine use.
General Observations
Your initial impression of the child’s appearance is
extremely important. The facial expression and level
of animation indicate alertness, social awareness,
mood, or neurologic dysfunction. The effort required
to breath, the quality of crying (if any), the characteristics of speech (if any), and the presence of a cough
are important clinical clues. Cyanosis, pallor, jaundice, or unusual skin lesions are readily apparent. Your
“gestalt” impression of the child determines the order
of the examination. Continue to observe the child
throughout the history-taking process. How does he or
she interact with parents, respond to your voice, play,
or explore the environment? Visual and auditory function often are better assessed during play than during
a specific hands-on examination. Asymmetry of the
face may only become apparent when the child smiles
broadly or laughs.
Initial observations of facial features are important:
Does the head look proportional to the face? Is the
shape abnormal? Are the left and right sides of the face
symmetrical? Are the eyes too close together or too far
apart? Are the ears normally placed? Is the chin appropriately developed? Does the child look like the parents?
The ability to describe visual observations is an essential
clinical skill that takes practice to master. The range of
“normal” in pediatric physical examination is extremely
broad. Never, ever use offensive, demeaning terms such
as “funny looking kid” to describe dysmorphic children.
Describe the noted differences or asymmetries precisely.
The child may look like a parent because they both
have an autosomal dominant dysmorphic syndrome (see
Chapter 5).
Approach to the Physical Examination
of the Head
AU1
S
EXAMINING THE HEAD
Head Shape
Children’s heads, like those of adults, come in a wide
range of sizes and shapes. The variation is greatest in
younger infants because newborns have pliable heads.
The intense pressures applied during vaginal delivery
mold the head. Most babies enter the world “occiput
first” (occiput anterior), resulting in marked occipital
prominence. Overlapping of some skull bones is common. The head remolds spontaneously within days.
http://www.us.elsevierhealth.com/product.jsp?isbn=9781437713978
P
S
S
P
89
GOLDBLOOM, 978-1-4377-1397-8
0001156510.INDD 89
3/15/2010 8:06:20 PM
B978-1-4377-1397-8.00007-1, 00007
90
P
P
P
AU11
AL
Premature infants have characteristic head shapes
flattened along the temporal aspects, leading to a long,
narrow appearance due to the increased pliability of
their bones.
The newborn skull examination includes careful palpation of the entire skull. Meticulously follow each suture
with a finger. Two common abnormalities resulting from
birth pressures may be present: caput succedaneum and
cephalhematoma. A caput succedaneum is a diffuse area
of edema over the presenting part of the head. It does
not follow any bony landmarks. A cephalhematoma is a
subperiosteal hemorrhage, usually found over the parietal
bones posteriorly. When present bilaterally, it appears as
though the child has two horns. These hematomas heal
partly through ossification, which starts around the edges
where the periosteum lifted away from the skull. Parents
need considerable reassurance because a cephalhematoma
feels, on palpation, like a hole in the bone surrounded
by a hard ridge around the base. Cephalhematomas are
harmless, never cross suture lines, and may take many
months to resolve.
Since implementation of the successful Back to Sleep
campaign to decrease sudden infant death syndrome
(SIDS), it is not uncommon to encounter young infants
with markedly flattened occipital bones. In other infants,
asymmetric flattening develops as they lie with the head
turned to one side or the other, preferentially toward the
main light source, for example, a window. Parents must
be encouraged to spend “tummy time” with their infant
(i.e., supervised prone positioning for short periods
several times a day while the infant is awake). Infants
with lateral skull flattening must be examined carefully
to rule out any tightening of the sternocleidomastoid
muscle or other neck mobility anomaly. By alternating
placement of infants in their cribs, pressure on the soft
infantile skull bones will spontaneously be distributed
more evenly in most cases, which allows for remodeling. In the final analysis, the most powerful factor in
the spontaneous improvement or resolution of postural
cranial distortion is the child’s assumption of the upright
posture.
Brain growth is the prime determinant of head size.
Other important factors include genetic influence, intracranial pressure, and bony abnormalities. Hydrocephalus,
that is, the abnormal accumulation of cerebrospinal
fluid, leads to increased intracranial pressure and rapid
expansion of the infant skull. Craniosynostosis, the premature closure of sutures, limits skull growth. Skull
bones grow relatively independently, usually symmetrically, along the suture lines in a direction perpendicular
to the lines.
Craniosynostosis of the sagittal suture limits the
skull’s width. As a result, compensatory excess growth
occurs along the anteroposterior axis and possibly in
the height of the skull, which produces a scaphocephalic shape, that is, a long, narrow skull (Fig. 7–1, A).
Premature closure of the coronal suture results in a tall,
wide head (Fig. 7–1, B). When a suture closes prematurely, a palpable firm bony ridge sometimes is present
along the suture line. Do not confuse this finding with
normally overlapped sutures that are felt soon after
birth.
FIGURE 7–1 Measurement of head circumference in an infant. F
The tape should encircle the most prominent parts of the forehead
and occiput.
PR
SA O
M PE
PL R
E TY
C O
O F
N E
TE L
N SE
T V
- N IE
O R
T
FI
N
P
7 — Examining the Head and Neck
C A S E H I S T O RY
S P
The parents of a 10-day-old baby boy bring him in for
evaluation because of lumps at the back of his head
and extra soft spots. Joshua was delivered vaginally
at 42 weeks’ gestation. The labor lasted 20 hours,
and delivery was assisted by both vacuum extractor
and outlet forceps. It has been difficult to establish
breastfeeding, and Joshua is described by his first-time
parents as crying excessively. Both grandmothers
are present, and they are concerned that Joshua
experienced brain damage from birth trauma.
The experienced clinician will try to establish the
root causes for the family’s concerns. For example,
the family may be comparing Joshua with another
child who has cerebral palsy or developmental delays.
It also is essential to give the parents the necessary
space and permission to frankly discuss their feelings
about the grandmothers’ concerns, the grandmothers’ acceptance of the parents’ decisions regarding
pregnancy, delivery, and child rearing, and ongoing
expectations for involvement of the grandmothers in
key medical decisions regarding Joshua’s health.
There is a wide range of normal variation in
head size and shape of normal babies at birth.
Cephalhematomas and edema caused by vacuum
extractors frequently are interpreted by brand-new
parents as signs of skull fractures and brain trauma.
The result is excessive anxiety and concern, which
can lead to disturbed infant-parent bonding.
Many of the most common scalp and head shape
anomalies are described in this chapter, with tips
on how to distinguish the results of normal vaginal
delivery pressures from signs of significant injuries.
B P
AU2
P
P
P
Head Measurement
Accurate measurement of head circumference is surprisingly difficult. Measure the largest circumference possible
by wrapping the tape around the most prominent parts of
the forehead and occiput (Fig. 7–2). You should routinely
take three measurements. If these measurements differ,
S
P
http://www.us.elsevierhealth.com/product.jsp?isbn=9781437713978
GOLDBLOOM, 978-1-4377-1397-8
0001156510.INDD 90
3/15/2010 8:06:20 PM
B978-1-4377-1397-8.00007-1, 00007
91
F
P
P
P
PR
SA O
M PE
PL R
E TY
C O
O F
N E
TE L
N SE
T V
- N IE
O R
T
FI
N
AL
7 — Examining the Head and Neck
FIGURE 7–2
bones.
A, Fontanels and bones of the newborn skull, viewed from above. B, Lateral view of newborn skull, showing fontanels and
you need to refine your technique. Even a slight variation
in the position of the measuring tape changes the result
significantly. Many infants and young children actively
dislike head circumference measurement. Because a calm,
cooperative child may become fretful, fearful, and oppositional when you attempt to obtain this measurement,
it is best to leave it until the end of the examination. A
parent’s assistance may be essential. I have found that the
task is easier to accomplish when the infant is fed or cuddled and when the young child distracted with a toy or
play activity.
The head circumference measurement must be plotted
on a standardized head circumference graph. As with
all standardized charts and graphs, no single value represents a “normal” head circumference (see Chapter 3).
Measurements of new immigrants from various ethnic
and racial groups may plot in the lower percentiles.
Remember that, by definition, three percent of the normal population will have head circumferences that are
below the third percentile or above the ninety-seventh
percentile.
Also, head sizes tend to follow familial patterns.
Measure the head circumferences of both parents and be
sure to enquire about grandparents or any family member with an unusual shaped or sized head. Family photographs found on cell phones have made assessment of
familial patterns much easier for the clinician.
A single measurement of head circumference may identify significant microcephaly or macrocephaly. Of greater
value is the pattern of growth over time. Accurate measurement and charting is critical. An increase in measurement from the 25th to the 75th percentile over a month
may lead to early detection of hydrocephalus or to a distressed, angry family if either measurement is inaccurate.
More importantly, computed tomography (CT) studies of
the infant brain have been implicated in decreased cognitive and intellectual outcomes and increased lifetime risks
of cancer. Diagnostic imaging of the young brain should
be ordered only when there is reasonable evidence of a
significant problem.
Fontanels
The fontanels are the gaps between bones in the infant
skull where three skull bones meet (Fig. 7–1, A and B).
Gentle palpation of the fontanels is a routine part of the
newborn examination.
The posterior fontanel usually closes by 6 to 8 weeks
of life. Closure of the anterior fontanel is much more
variable and usually occurs between the ages of 12 to 18
months. In some infants, normal closure does not occur
until age 24 months. Remember, variations in shape, size,
and development are to be expected in children. Be very
cautious about your body language and vocal tone when
asking parents about the shape of their child’s head.
Four other fontanels are routinely present, though
they rarely have an impact on clinical assessment: two
anterolateral (sphenoid) fontanels where the coronal
and squamosal sutures meet, and two posterolateral
(mastoid) fontanels where the squamosal and lambdoid
sutures meet. Occasionally the anterior fontanel seems to
extend between the frontal bones. The metopic fontanel
is actually a widening of the metopic suture. Other extra
fontanels may be palpated. The parietal fontanels, that is,
persistent parietal foramina, are located along the sagittal
suture between the anterior and posterior fontanels. These
symmetrical holes on either side of the sagittal suture once
were mistakenly thought to be evidence of trephining by
ancient Egyptians in well-preserved mummy skulls.
The anterior fontanel may vary in size from that of an
adult fingertip to several centimeters in width and length.
Persistent delays in closure or an unusually large size may
indicate increased intracranial pressure or pathological
delay in bone growth. When the posterior fontanel persists, hypothyroidism must be ruled out.
Increases in intracranial pressure, such as in meningitis,
are reflected by changes in palpable tension at the fontanel
and loss of normal venous pulsations (Fig. 7–3). A normal
fontanel may feel full when the infant lays flat, cries, or
struggles. It is best to assess fontanels when the infant is
calm and held upright. With dehydration, the fontanel
will appear sunken. Practice and palpation of dozens of
S
P
P
P
P
P
http://www.us.elsevierhealth.com/product.jsp?isbn=9781437713978
GOLDBLOOM, 978-1-4377-1397-8
0001156510.INDD 91
3/15/2010 8:06:21 PM
B978-1-4377-1397-8.00007-1, 00007
92
fontanels educate your fingers to detect abnormalities in
size and tension. Each infant is his or her own standard.
Serial assessments with careful descriptions of findings
facilitate early detection of raised intracranial pressure.
S
P
S
P
S
P
S
P
AL
FIGURE 7–3 Palpation of the anterior fontanel. For best results,
the infant should be upright and calm.
Young infants often lose hair over the occiput and other
pressure points. Be aware of possible infant neglect and
insufficient changes of position as causes of this hair loss.
Patchy areas of loss may be associated with fungal infection or twirling or pulling of the hair (trichotillomania).
Again, excess hair loss may indicate child maltreatment.
Be cautious in your approach because many young children twirl the forelock as a self-soothing routine (a behavior frequently associated with thumb or finger sucking).
An idiopathic cause of hair loss is alopecia areata. Focal
loss of hair may be the result of head shaving in the neonatal intensive care unit, cultural and religious practices,
or ectodermal defects. General hair loss may follow severe
febrile illnesses, such as typhoid fever.
Extremely sparse, fine hair is associated with ectodermal dysplasia. Coarse hair is seen in persons with hypothyroidism. In Menkes syndrome, a degenerative neurologic
condition that results in kinky hair, the hair shafts grow
twisted and brittle, breaking off a few centimeters from
the scalp. The abnormal hairs are called “pili torti.”
In persons who are severely malnourished, the hair
becomes fine and brittle, and in persons who are black,
it frequently changes to a reddish color. The same phenomenon is seen in children presenting with untreated
HIV/AIDS. A white forelock may be seen in children
with Waardenburg syndrome. This dominantly inherited condition is usually associated with deafness.
Albinos lack pigment in their hair, skin, and irises, leading to teasing, bullying, and, at times, rejection by the
family.
PR
SA O
M PE
PL R
E TY
C O
O F
N E
TE L
N SE
T V
- N IE
O R
T
FI
N
F
7 — Examining the Head and Neck
Craniotabes
Craniotabes is the ability of the skull to indent under pressure and, like a ping-pong ball, to spring back into shape.
This phenomenon is normal in infants, especially along
the lambdoid sutures. Persistence of craniotabes past the
first few months suggests inadequate bone mineralization, as is seen in persons with rickets.
Auscultation
Listen to the skull over the vertex, temples, and eyeballs.
Soft bruits or flow noises are common in normal children.
During febrile episodes, the noises tend to be louder. The
presence of a harsh, loud bruit suggests an arteriovenous
malformation or transmission of abnormal sounds from
the heart or great vessels. Bruits are frequently a normal
variant, so listen to as many skulls as possible to tune
your ears to the range of normal noises.
Transillumination
See Chapter 4 for a detailed discussion of transillumination.
Hair
Characteristics of normal hair differ widely between ethnic and racial groups. Examination of hair includes distribution, loss, broken strands, texture, color, and variation
from the family norm. The scalp also must be inspected to
detect problems such as seborrheic dermatitis, psoriasis, or
ectodermal dysplasia, which may affect the hair. Normal
newborns may have a full head of soft, silky hair or be completely bald. Excess scalp and facial hair associated with
facial anomalies may indicate a genetic syndrome such as
cri du chat. Infants of diabetic mothers often have excess
scalp and body hair compared with infants of nondiabetic
mothers. Newborn hair tends to fall out by approximately
3 months and is replaced by hair that may differ markedly
in texture, color, and distribution.
P
P
P
KEY POINT
B
Pay attention when a family expresses concern that the child’s
hair is “different.” Hair changes may be the first indication of a
significant systemic or genetic disorder. Albinos are reviled in
some cultures.
P
EXAMINING THE EARS
Hearing
Always ask parents if they have any concerns about
their child’s ability to hear. Parents often suspect a hearing problem months before their child’s health care providers do. Audiologists are now able to measure hearing
in infants from birth. The assessment of children with
anomalies of the head and neck must always include formal hearing testing because the incidence of hearing problems is higher in children with such anomalies. Likewise,
parental concerns about lags in language development
should result in prompt audiologic evaluation. Delayed
expressive language milestones may indicate hearing
dysfunction (see Chapter 6).
S
Shape and Position
Start with a close inspection of the external ears. Are both
present and normally formed, or do they fit the criteria
for low-set ears? (See Chapter 5.) Do not be fooled by
posteriorly rotated ears. If the vertical axis of the pinna is
tilted posteriorly, the ear may appear to be low set. Minor
anomalies of the ears such as skin tags, pits, or fistulas
just anterior to the tragus are common and usually are
S
AU8
S
P
P
http://www.us.elsevierhealth.com/product.jsp?isbn=9781437713978
GOLDBLOOM, 978-1-4377-1397-8
0001156510.INDD 92
3/15/2010 8:06:22 PM
B978-1-4377-1397-8.00007-1, 00007
7 — Examining the Head and Neck
P S
The Otoscope
KEY POINT
P
The otoscope terrifies many young children, particularly if
they have had a previous painful experience with it.
P
The confidence and skill with which you use the otoscope will be reflected in the child’s cooperation. For an
adequate examination, use a halogen light with a good
bulb and fully charged batteries; an AC power source is
even better. The speculum should be the largest that fits
comfortably into the auditory canal. Pediatric wards and
clinics are notorious for having speculums available in
every size but the one needed, so it may be worthwhile to
carry a personal set.
With toddlers and older children, explain that you are
going to use the light to look into their ears, and then
demonstrate that the instrument is no more than a flashlight by shining the light on their hands. Children often
become interested if you shine the light in front of them
and ask them to blow it out; as they blow, deftly turn the
rheostat dial to achieve the desired effect. You also can
demonstrate how the otoscope is used by placing it at
the entrance to your own auditory canal so the child can
see what the procedure involves; then do the same to the
child.
Most young children are anxious about the ear examination. I have found that giving them a choice (“Ok,
buddy, which ear shall we examine first?”) often helps
these apprehensive patients gain a sense of control, and
most children then will be cooperative.
P
P
B
P
S
P
P
PR
SA O
M PE
PL R
E TY
C O
O F
N E
TE L
N SE
T V
- N IE
O R
T
FI
N
B
to remove wax), a second person must immobilize the
baby’s head. Many older infants and young children can
be held by the parent against their shoulder or chest with
one hand while holding the head steady with the other
hand.
Some infants and toddlers are amazingly cooperative
during an ear examination. Never subject any infant or
child to more restraint than is absolutely necessary. Before
beginning the examination, ask the parents the following
questions:
• What approach seems to work best?
• Does this particular child prefer the sitting or lying
position?
• Is the child more comfortable on the parent’s lap facing forward, or cuddled against the parent’s chest
and/or shoulder, facing away from the examiner?
(Fig. 7–4).
Remember that distractions such as stickers and
blowing soap bubbles are effective anxiolytic adjuncts.
AL
of no major significance. Inspect and palpate the mastoid
and postauricular areas. Gently move the pinna and tragus; any tenderness suggests otitis externa.
KEY POINT
If a child complains of pain in one ear, always examine the
other ear first.
Positioning the Child
Examination of an infant’s ears is a two-person procedure. The infant’s head must be immobilized and his or
her hands kept out of the way. Many new parents are
reluctant to restrain their baby. Explain carefully that
appropriate positioning and restraint actually reduces
discomfort and facilitates a shorter, more accurate
examination. A variety of effective positions and techniques may be used. At each encounter, you will need to
choose a combination of techniques to match the child’s
age, variation of mood, level of anxiety, and ability to
cooperate.
It often is easier to examine infants placed supine on a
table with the parent or your assistant holding the arms
at the sides and immobilizing both the arms and the body.
The examiner then uses one hand to hold the infant head
against the table and the other to hold the otoscope. If
the examiner needs both hands to manipulate the external ear for successful completion of the examination (or
93
P
U
U
U
P
KEY POINT
B
Remain calm; use a gentle tone of voice and touch.
Whenever possible, work with the child at his or her eye
level and do not tower over the child. Always congratulate
the child on his or her cooperation and help, even if the child
provided resistance.
P
The otoscope should be held in either the “forehand”
or “backhand” position—that is, with the thumb pointing either toward the light or toward the handle (Fig 7–4,
A–D). The advantage of the latter position is that it allows
the back of your hand to lay against the face and, with
any sudden movement, your hand moves with the child’s
face. In other words, the position of the speculum relative
to the ear does not change when the baby moves, and you
avoid causing pain. Many examiners use the forehand
position with equal comfort, especially if they use their
opposite hand to stabilize the baby’s head.
The otoscope is held with the right hand, using the left
thumb and forefinger to grasp the pinna and gently apply
traction away from the head and slightly posteriorly. This
position straightens the normally curved external auditory canal, enabling you to see better. Depending on your
level of manual dexterity, it also may be helpful to use the
third finger of the left hand to gently push the tragus anteriorly, thereby opening the auditory canal further.
Inspect the external auditory meatus and gently place
the tip of the otoscope there. Your head will be away
from the otoscope as you are not yet looking through it.
Once the otoscope tip is in position at the meatus, move
your head up close to the otoscope and look through it;
gently aim the otoscope to see the ear canal beyond. Your
head should move with the otoscope as it is aimed in different directions.
Once the lumen is clearly visualized, gently advance
the instrument. The external auditory canal is exquisitely
sensitive even in the absence otitis externa or a furuncle.
Observe carefully for the presence of a foreign body or
signs of inflammation. You may be able to work around
P
P
P
P
http://www.us.elsevierhealth.com/product.jsp?isbn=9781437713978
GOLDBLOOM, 978-1-4377-1397-8
0001156510.INDD 93
3/15/2010 8:06:22 PM
B978-1-4377-1397-8.00007-1, 00007
94
F
PR
SA O
M PE
PL R
E TY
C O
O F
N E
TE L
N SE
T V
- N IE
O R
T
FI
N
AL
7 — Examining the Head and Neck
FIGURE 7–4 Otoscopic examination of the infant’s ear. A and B, The otoscope may be held in the “forehand” position with the infant’s
head stabilized against the mother’s face and the infant positioned over the shoulder (A) or facing forward (B). C and D, alternatively, the
otoscope may be held in the “backhand” position. Note that the back of the examiner’s hand rests against the infant’s head to stabilize the
otoscope. The infant may face backward (C) or forward (D), whichever position seems more calming.
small amounts of wax. If your view is obstructed, the
wax will have to be removed. Never rest the instrument’s
weight against the auditory canal or you may cause bleeding in addition to pain. The ability to guide the otoscope
through the canal without touching the walls only comes
with practice.
S
P
P
Tympanic Membrane
Study Figure 7–5 to acquaint yourself with the visual landmarks of the tympanic membrane. Textbook and atlas
photographs do not do justice to the full range of normal
appearance or the changes in color seen with wax, fever,
or crying. It is essential to examine as many ears as possible to appreciate the range of normal.
Because you usually have only a few seconds in which
to inspect the eardrum, you must know what you are
looking for. The most easily recognized landmark is the
long process (handle) of the malleus, which runs from
the anterior superior area to the center of the membrane,
FIGURE 7–5 Visual landmarks of the right tympanic membrane.
ending in the umbo.
The light source is reflected from
http://www.us.elsevierhealth.com/product.jsp?isbn=9781437713978
F
GOLDBLOOM, 978-1-4377-1397-8
0001156510.INDD 94
3/15/2010 8:06:22 PM
B978-1-4377-1397-8.00007-1, 00007
U
U
U
P
B
P
P
S
P
P
FIGURE 7–6 Pneumatic otoscopy. You may hold otoscope and F
bulb in one hand and retract the pinna with the other. Also, rest
the back of your hand against the infant’s head, stabilizing the otoscope. If the head moves suddenly, your hand and the otoscope will
move with it.
PR
SA O
M PE
PL R
E TY
C O
O F
N E
TE L
N SE
T V
- N IE
O R
T
FI
N
P
the umbo as a narrowed cone starting at the center and
expanding in an inferior–anterior direction. The normal
tympanic membrane (TM) is most concave at the umbo.
Changes in middle ear pressure result in alterations to
the concavity of the membrane and the diffusion of
the light cone. The TM is thinner in the anterosuperior
quadrant, the pars flaccida, because of the absence of the
fibrous membrane present in the pars tensa. Early signs
of inflammation may be observed in the pars flaccida.
Pressure changes are best assessed by pneumatic otoscopy. With practice, you can learn much from visual
inspection:
• Are any foreign bodies or white sclerotic scars of
previous perforations present?
• Is there a surgical ventilation tube or grommet protruding through the membrane?
• How prominent are the bony landmarks?
Think of the eardrum as a plastic wrap over the ossicles. If negative pressure develops in the middle ear, which
is frequently associated with Eustachian tube blockage or
chronic effusions, the membrane is sucked inward, wrapping more tightly over the bones, which appear more
prominent. If middle ear pressure increases, as in acute
bacterial otitis media, the TM bulges outward and the
bony landmarks are poorly demarcated or not seen at all.
95
AL
7 — Examining the Head and Neck
KEY POINT
Changes in contour and landmarks of the tympanic
membrane are more important than color changes.
Color changes in the tympanic membrane are notoriously unreliable. Particularly in infants, the vascular
changes seen on the cheeks with fever or crying are also
observed in the TMs. There is a real risk of overdiagnosis
of otitis media. It is essential to focus on the TM shape
and landmarks; if they are normal, the infant does not
have otitis media. Other causes of fever and crying then
must be considered, especially serious bacterial infections
such as pyelonephritis and meningitis.
Pneumatic Otoscopy
Pneumatic otoscopy, which is a relatively simple procedure, can yield important information about middle ear
pressure. It works on a simple principle. Remember the
example of the plastic wrap and the effect of changes
in middle ear pressure? Now imagine that the pressure
changes are imposed from the other side of the membrane (i.e., from the external auditory canal). To perform
this procedure, use an otoscope with a pneumatic bulb
attachment(it is best to carry your own) and a special
speculum with an expanded tip that forms an airtight seal
in the external canal without the application of pressure.
As an alternative, a small piece of rubber tubing placed
over the tip of a standard speculum provides an excellent seal. Look through the otoscope while squeezing and
releasing the rubber bulb (Fig. 7–6).
The normal tympanic membrane moves medially
(away from you) when you apply external pressure by
squeezing and moves laterally (toward you) when you
create negative pressure by releasing the bulb. If middle
ear pressure is already significantly negative and the eardrum is retracted medially, this pneumatic maneuver may
produce only slight lateral motion of the drum when the
bulb is released. If the middle ear pressure is abnormally
positive, you may produce only slight medial movement
when you apply positive pressure. If the pressure changes
are significant, the drum may be immobile. Experience
brings an appreciation of the nuances of these changes. As
with every other aspect of the examination, you must see
many eardrums move before you can recognize slightly
reduced mobility.
Wax
To evaluate an eardrum, you must be able to see it adequately. Wax is a normal constituent of the ear canal
and causes no harm; however, if it obstructs your view,
it must be removed. Carefully explain to the parents
that your only reason for removing the wax is to attain
visual access. The routine use of cotton-tipped swabs and
other devices at home to clean the ears should be strongly
discouraged.
Wax can be removed either by curettage or by use of a
syringe. Children (and parents) dislike both procedures,
so defer wax removal to the end of the examination.
If the wax is truly impacted and the child is not acutely
ill, it is preferable to have the parent instill a few drops of
ear wax softener (plain mineral oil will do) for a few days
to facilitate cleaning. It also is possible to refer the child
to an otolaryngologist to have the wax removed.
S
P
AU3
P
KEY POINT
B
If ear wax softeners are used, caution parents that some
commercial brands may cause an inflammatory response in
the ear canal and surrounding soft tissues.
P
The less traumatic method of wax removal is through
use of a syringe. Because this procedure is messy, it is
necessary to have access to towels, a kidney basin to
catch water as it runs out of the ear, and knowledgeable
P
http://www.us.elsevierhealth.com/product.jsp?isbn=9781437713978
GOLDBLOOM, 978-1-4377-1397-8
0001156510.INDD 95
3/15/2010 8:06:24 PM
B978-1-4377-1397-8.00007-1, 00007
96
P
B
KEY POINT
P
Always perform curettage under direct vision and with the
child totally restrained.
S
S
P
P
P
AL
P
assistants. The child can be gently restrained in either the
lying or sitting position. Older children can be encouraged to participate by holding the kidney basin. Carefully
explain what you plan to do and why. A calm tone of
voice, a gentle touch, running commentary, constant reassurance, and encouragement can make syringing a very
tolerable procedure.
First ensure that the water is lukewarm (i.e., comfortable to touch). In infants, I use a 10- to 20-mL syringe
attached to butterfly tubing (with the needle cut off). In
children, a 20- to 50-mL syringe or an ear syringe can be
used. Flushing out the wax may require multiple squirts
of water. The TM may appear flushed or unusually pink
after irrigation.
Curettage requires skill, appropriate equipment, and
total restraint of the patient. However, curettage is more
effective than the use of a syringe for wax removal.
Remember, only clean out the wax that obscures your
view of the TM. To acquire skill in curettage, you must
learn from an expert and practice under supervision.
Reading a book will not prepare you for the task.
A blunt ear curette and an otoscope with an operating
head are essential equipment. Carefully explain to parents why the procedure is necessary and why the child
must be totally restrained. They need to know that the
lining of the ear canal is sensitive, fragile, and bleeds easily. Warn them that some blood may drain from the ear
after the procedure. Once you see the auditory canal,
carefully advance the curette so the tip is just beyond the
wax and pull gently, drawing the wax out.
FIGURE 7–7 Examination of the mouth, supine position. The F
mother restrains the infant’s arms at the sides.
PR
SA O
M PE
PL R
E TY
C O
O F
N E
TE L
N SE
T V
- N IE
O R
T
FI
N
P
7 — Examining the Head and Neck
EXAMINING THE MOUTH
Position for Examination
The approach to examination of the oral cavity is similar
to that of the examination of the ear. It requires excellent
knowledge of the anatomy of the mouth, skill, appropriate equipment, and proper positioning and restraint.
Most children will cooperate during the examination.
Relatively young children are able to open their mouth
widely on request. However, a significant number of children are absolutely terrified of the tongue depressor and
oral examination. Many of these children have had previous painful experiences during such an examination or
possess an overly sensitive gag reflex.
It is best to approach the examination positively. Show
the child the flashlight or otoscope light without a tongue
depressor in sight. Allowing some children to assist by
placing a hand on the light or even on the tongue depressor gives them a sense of control. Infants are best examined supine with the arms restrained (Fig 7–7). Beyond
early infancy, it is best to examine infants and children
in the sitting position (Fig 7–8). Encourage the child to
open his or her mouth widely and vocalize “aaahhh.”
In many children, the soft palate rises and the tongue
descends spontaneously when the mouth is fully opened,
allowing a clear view, which may include the epiglottis.
FIGURE 7–8 Examination of the mouth, sitting position. The F
mother uses one hand to restrain the infant’s arms and the other to
keep the head steady.
In other children, even with their full cooperation, it will
be necessary to depress the base of the tongue with the
tongue depressor to view the full oral cavity. Any pressure at the base of the tongue results in a brief gagging
response, which causes the soft palate to rise and allows
brief inspection of the posterior pharyngeal wall.
If the child refuses to open his or her mouth, it is still
possible to complete the inspection. You will need willing assistants to ensure appropriate restraint of the child
(with similar positioning as in the ear examination) and
ongoing calming conversation to distract from the examination. Insert the tongue depressor behind the posterior
teeth and quickly slip it medially to depress the base of
the tongue. This procedure will allow a few seconds of
full vision and may result in a gag response and/or vomiting. A typical gurgle precedes an episode of vomiting,
which may be aborted by rapid withdrawal of the tongue
depressor, closure of the mouth, and tilting the chin
upwards. Always reassure the child that he or she was
very good and brave. Future cooperation with any part
of the physical examination depends on your ability to
relate to the child after a painful or resisted examination
has been completed.
P
http://www.us.elsevierhealth.com/product.jsp?isbn=9781437713978
GOLDBLOOM, 978-1-4377-1397-8
0001156510.INDD 96
3/15/2010 8:06:24 PM
B978-1-4377-1397-8.00007-1, 00007
7 — Examining the Head and Neck
P
Many children have exquisitely sensitive gag reflexes. Pay
attention to the child’s facial expression and listen for the
characteristic gurgle of an impending, explosive episode of
vomiting.
S
Breath
Always smell the child’s breath. In young children, ketosis
rapidly develops secondary to starvation or inadequate
caloric intake during febrile illnesses. A characteristic
acetone odor (similar to that of nail polish remover) is
easily recognized. This smell also may indicate diabetic
ketoacidosis. Children with infectious mononucleosis
or diphtheria have characteristic odors to their breath.
Halitosis can be associated with poor dental hygiene,
gingivitis, sinusitis, and constipation.
P
S
P
P
S
P
P
Teeth
Inspection of the gums should include close inspection
of the teeth. The normal age of first tooth eruption is
extremely variable from intrauterine life (natal teeth) until
12 months of age. Most children start teething between
3 to 4 months of age. A marked delay in eruption may
indicate hypothyroidism or a general delay in skeletal
maturation.
Note carefully the shape of the teeth, their alignment,
the condition of the gums around erupted teeth, and signs
of trauma to the lips, tongue, or buccal mucosa adjacent
to the teeth.
Characteristic peg-shaped teeth are seen in persons
with ectodermal dysplasia. Children with mal-aligned
secondary teeth resulting from the presence of persistent primary teeth should be referred promptly for dental
care. Likewise, children with chipped or broken teeth and
significant lip or mucosal trauma due to mal-aligned teeth
deserve prompt dental care. Rarely, extraction of lower
incisors is indicated in persons with oral self-abusive conditions, such as Lesch-Nyhan syndrome.
Do the gums look healthy or inflamed? Do they bleed
on touch with your tongue depressor? Periodontal disease
can have a significant adverse effect on chronic medical
conditions, such as nephrotic syndrome and congenital
heart disease. Gum changes may result from the use of
medications. Candida gingivitis is a common complication of broad-spectrum antibiotic use. Typical gum hypertrophy is seen in children who take the anticonvulsant
drug phenytoin for extended periods. Next note the dental enamel color, formation, and the presence of caries.
There are many congenital/genetic causes for abnormal
enamel. Describe your observations accurately and ask
the parents if they have noted any changes. Initial carious lesions are opaque white spots that may progressively
demineralize, producing typical caries. The complex
interactions of dietary sugars and cariogenic oral organisms (for example, Streptococcus mutans) result in a lowered dental plaque pH which, in turn, facilitates caries
formation.
Oral health in infants has been a major preventive
focus for health care professional associations in recent
years. Poor dental hygiene, caries, and the associated
chronic morbidities constitute one of the leading preventable health care issues in developed countries. All parents
should commence routine dental care by the child’s first
birthday.
S
Lips
Examination of the oral cavity starts with inspection of
the lips. Note the color in relationship to the family’s
genetic background. Blue lips are indicative of central
cyanosis. A bluish (sometimes gray) discoloration in the
circumoral area is commonly seen in young infants as a
peripheral vasomotor phenomenon. A blister or callus
in the center of the upper lip is seen frequently in the
first few weeks of life. These blisters or calluses may be
present at birth and are caused by friction during vigorous sucking. Midline anomalies such as cleft lips are readily apparent. Cracking at the corners of the mouth may be
associated with monilial (Candida) infection. Cold sores
usually are associated with herpes simplex type 1 infection in childhood. Perioral erythema, particularly patches
above or below the lips or at the sides of the mouth, often
are caused by repeated licking of the area, known as “lip
licker’s rash.”
Invert the lips and inspect for the presence of mucoceles, which are seen predominantly in the first two
decades of life. They arise from mechanical trauma to one
of the minor salivary glands.
Gingiva and Buccal Mucosa
Inspection of the gums and the buccal mucosa follows
inspection of the lips. Even in children with tightly clenched
jaws, it is easy to gently retract the lips with a tongue
depressor and inspect the buccal mucosa by retracting the
cheeks laterally while shining a bright light source against
the surface. Note the color of the gums and the presence
of any inflammation (gingivitis); vesicles or ulcers (canker
sores) appear as grayish white papules as they heal. Note
the presence of petechiae or bleeding. Check the gums for
excess sponginess or swelling. In extreme cases of gingivitis, the teeth may actually appear buried.
A white coating on the buccal mucosa in young infants
may be the result of a recent milk feed or oral candidiasis (thrush). This finding is common, and oral candidiasis
usually is a harmless infection in young infants. Gently
scrape the coating with a tongue depressor or a cotton
swab. Milk is easily removed. Candida lesions often
are resistant to removal or leave a sore erythematous/
hemorrhagic base when scraped off.
Tongue
Most toddlers and older children will protrude their
tongue on request. Note the relative size of the tongue
compared with the oral cavity in particular. Does the
tongue protrude from the mouth at rest? This characteristic is seen with congenital hypothyroidism and the
Beckwith-Widemann syndrome. The normal healthy
tongue is wet and glistening. Dehydrated children tend
to have sticky, stringy secretions. Note unusual color
changes. Enlargement and reddening of the papillae
(“strawberry tongue”) is seen with streptococcal infections. The presence of sharply demarcated areas of differing color as a result of cyclic irregular desquamation of
the tongue surface is called a “geographic tongue.”
S
P
P
P
AL
KEY POINT
PR
SA O
M PE
PL R
E TY
C O
O F
N E
TE L
N SE
T V
- N IE
O R
T
FI
N
B
97
P
AU4
P
P
http://www.us.elsevierhealth.com/product.jsp?isbn=9781437713978
GOLDBLOOM, 978-1-4377-1397-8
0001156510.INDD 97
3/15/2010 8:06:25 PM
B978-1-4377-1397-8.00007-1, 00007
98
P
B
KEY POINT
P
If you use a tongue depressor, avoid touching the posterior
third of the tongue whenever possible.
S
Hard and Soft Palate
Inspect the roof of the mouth for the slope of the arch,
midline defects, and the shape of the uvula. When you have
inspected many palates, you will be comfortable deciding
if the arch is high or if any anomaly is present. Cleft palates
are clearly visible if the soft palate is involved. There may,
however, be a submucous cleft of the bone. Therefore, it is
important to palpate the newborn palate with a finger to
detect the presence of a submucous cleft. Look at the soft
palate and uvula. The uvula moves as the child breathes
and vocalizes; note the pattern. Asymmetric movement
may be neurologic in origin or it may result from scarring
from a past tonsillectomy. Petechiae on either the soft or
hard palate may be associated with streptococcal infection. Although notched or bifid uvulas can be normal
variants, it is important to carefully palpate the palate in
such children to rule out a submucous cleft.
P
S
P
AU5
swallowing or breathing. It is normal to observe pits and
white concretions on tonsil surfaces for months following
an infection.
Assess carefully the size, color, and shape of the
tonsils, along with the presence of any exudates, vesicles, lesions, or changes in the adjacent soft tissues (the
soft palate, uvula, tonsillar pillars, and buccal mucosa).
Normally the tonsils and tonsillar fossae are slightly
redder than the buccal mucosa and posterior pharynx.
Once again, unless you have observed many normal
tonsils, you will be unable to decide whether the tonsil
fits within normal variation or whether an inflammatory/infectious process is present. It used to be fashionable to blame tonsils for most childhood complaints.
It is now common knowledge that the vast majority
of tonsils involute spontaneously and tonsillectomy is
rarely indicated.
Tonsils
Following the soft palate laterally, you will observe two
vertical webs of tissue known as the anterior and posterior tonsillar pillars. Between them lie the tonsils. These
lymphoid glands vary tremendously in size. Hardly visible at birth, they tend to grow steadily in early childhood,
reaching maximum size between 6 and 9 years of age.
After that age, they involute and are usually hardly visible
in adulthood. Variation in tonsil size often leads to great
parental and physician distress. Most children whose
tonsils touch on gagging have absolutely no difficulty
P
AL
P
Inspect the lateral margins of the tongue for signs of
trauma, which can be associated with poorly aligned
teeth or dental caries. The underside of the tongue and
the floor of the mouth may be the site of mucoceles or a
ranula (due to injury to the duct of the sublingual or submandibular salivary glands or one of the minor salivary
glands in the floor of the mouth). A ranula is usually a
soft, bluish swelling on one side of the floor of the mouth.
It may enlarge to the point that it herniates through the
mylohyoid muscle to involve the neck.
The tongue is attached to the floor of the mouth anteriorly by a thick fibrous membrane of varied length called
the frenulum. It used to be routine to cut the frenulum in
the delivery room to avoid “tongue-tie.” Over the years
this routine has been discontinued because there is no
evidence that the length of the frenulum either influences
speech development or causes any speech impediment.
The base of the tongue is the site of ectopic lingual
thyroid glands. Gentle pressure on the anterior two thirds
of the tongue may be sufficient to allow full inspection of
the base and posterior pharynx. If your view is obstructed,
gently advance the tongue depressor and press briefly on
the posterior third of the tongue. The gag reflex elicited
will cause the mouth to open widely and the soft palate to
rise, allowing you a clear view of the posterior structures.
Beware of children who vomit readily.
PR
SA O
M PE
PL R
E TY
C O
O F
N E
TE L
N SE
T V
- N IE
O R
T
FI
N
P
7 — Examining the Head and Neck
KEY POINT
B
Asymmetry of the tonsils, especially if one tonsil protrudes
medially enough to displace the uvula, is a sign of a
peritonsillar abscess or, more rarely, a neoplastic process.
P
Posterior Pharyngeal Wall
The posterior boundary of the oral cavity is the posterior
pharyngeal wall. Some children are able to expose the wall
when they open their mouth fully. In others, you will have
to induce a gag reflex to deflect the tongue and soft palate
sufficiently to view the structure. Get accustomed to the
range of normal color variation in posterior pharyngeal
walls. Observe for the presence of edema, lymphoid
hyperplasia, exudates, hemorrhage, or excessive secretions. Carefully describe the conditions observed. Be slow
to jump to a diagnosis until you have wide experience in
observing the area.
S
Epiglottis
Examination of the epiglottis is not a routine part of
the head and neck assessment. In many children, the
epiglottis is clearly visible when they protrude their
tongue. The normal structure sticks up from beyond the
tongue base and looks like a thin, curved pink structure. In the presence of infection, the epiglottis enlarges
dramatically and appears as a red swollen thumb sticking
into the posterior pharyngeal space.
S
P
P
KEY POINT
B
Never attempt to visualize the epiglottis if an infection is
suspected. Such a maneuver may cause immediate airway
obstruction.
P
EXAMINING THE NOSE
The nose is the most prominent part of the face and is
easily examined. Observe it for shape, deformity, or deviation to one side. Ask the child to tilt his or her head upward
so that you can observe the septum and the presence of
nasal discharge. A foul-smelling unilateral discharge indicates that the child may have a foreign body in that nostril
S
P
http://www.us.elsevierhealth.com/product.jsp?isbn=9781437713978
GOLDBLOOM, 978-1-4377-1397-8
0001156510.INDD 98
3/15/2010 8:06:25 PM
A
B978-1-4377-1397-8.00007-1, 00007
7 — Examining the Head and Neck
AU6
S
P
P
B
P
P
S
S
Tenderness over the sinuses is not a reliable sign of sinusitis.
Some people are excessively sensitive to palpation and, in
others, full-blown sinusitis is present without tenderness.
APPROACH TO THE PHYSICAL
EXAMINATION OF THE NECK
Examination of the neck is usually brief. However, in
a febrile or sick child, it may yield the diagnosis. Many
young children are excessively ticklish and resist palpation of the neck. If the child is old enough, first test neck
mobility by asking the child to move his or her head in the
full range of normal movement. For many children, this is
a fun game. To check neck mobility, you can give a child
the following instructions:
• Lateral rotation: “Touch your chin to your shoulder.”
• Lateral flexion: “Touch your ear to your shoulder.”
• Extension: “Bend your head back and look at the
ceiling.”
• Flexion: “Touch your chin to your chest.”
You may need a toy or bright light to distract the child
into participating in the range of motion exercise. For
infants or those who are unable to cooperate, lie the child
flat on his or her back and then gently attempt to flex the
neck by placing a palm under the occiput and lifting. The
presence of neck stiffness (nuchal rigidity) is a cardinal
sign of meningitis in children beyond infancy; it also is
observed in the presence of meningeal irritation (subarachnoid hemorrhage).
Pain on neck movement is not synonymous with meningitis. The presence of inflamed lymph nodes, a sore throat,
or tonsillar abscess also will induce pain on flexion. Ask
the child to indicate where it hurts and visualize the area
carefully for the presence of swollen glands, erythema, or
skin changes before you palpate or move the neck.
S
Remember the anatomic relationship of structures
adjacent to each sinus. Maxillary or ethmoidal sinusitis
may present with periorbital edema or cellulitis. Dental
pain may be associated with maxillary sinusitis. The presence of unilateral persistent nasal discharge may indicate
chronic maxillary sinusitis.
Lymph Nodes
Review the anatomy of head and neck lymph nodes. The
glands are widely distributed and easily accessible. Use
both hands simultaneously, facing the child at his or her
eye level. Move your hands along the occipital ridges, then
to the posterior hairline and postauricular areas, before
moving forward and downward along the posterior and
AL
Salivary Glands
The salivary glands most likely to come to clinical attention are the parotid and submandibular glands. The sublingual and many smaller salivary glands may come to
attention when they are damaged and present as mucoceles or ranulae. The parotid glands are only palpable when
enlarged. Review the anatomy carefully. The gland overlaps the lateral aspect of the mandible and extends onto
the cheek in front of the ear and into the neck. Parotid
gland enlargement is seen as a bulge in front of the ear,
often displacing the tragus. The parotid glands empty
through Stensen’s ducts on the buccal mucosa just opposite the second molars. Observe the site for redness. In
the presence of facial swelling, the parotid gland and duct
should be palpated bimanually with a gloved finger inside
the mouth and the other over the gland externally.
The submandibular gland is the other major salivary
gland. The ducts empty under the tongue just lateral to
the frenulum. It may be difficult to distinguish between
swelling of the submandibular gland and enlargement of
lymph nodes, which override the gland.
or an obstruction due to a polyp or other anomaly. Nasal
discharge colors are not predictive of viral versus bacterial
infections. Develop the habit of observing the alae nasi
during quiet breathing. Flaring of the alae nasi is a subtle
sign of respiratory distress and may indicate the presence
of pneumonia or congestive cardiac failure. A horizontal
crease across the lower part of the nose is frequently seen
in children with allergies who rub the tip of the nose by
pushing it upward with the palm or heel of their hand, the
so-called “allergic salute.”
Next, inspect inside the nose. You will need a nasal
speculum and light or a regular otoscope with a large
nasal speculum. Remember that the anterior septum,
Little’s area, is extremely vascular and sensitive. Any
trauma to this area will induce pain and possibly bleeding, as well as an uncooperative child and upset family.
Insert the speculum slowly, being careful to follow the
floor of the cavity that runs toward the occiput. Gentle
pressure against the lateral wall will expose the nasal turbinates and mucosa. Observe the presence of edema, pallor, inflammation, bleeding, or secretions. Swollen, pale
turbinates that obstruct the nasal airways partly or completely are the hallmarks of nasal allergy. Polyps may be
seen as pale boggy masses that occlude posteriorly. Note if
the nares are patent with allow equal air passage through
both. In newborns, it is essential to determine bilateral
patency. Choanal atresia on both sides may lead to cyanotic episodes and apnea in infants who are all obligate
nasal breathers (see Chapter 4).
PR
SA O
M PE
PL R
E TY
C O
O F
N E
TE L
N SE
T V
- N IE
O R
T
FI
N
P
99
Paranasal Sinuses
The paranasal sinuses are cavities in the facial bones
essential to normal phonation and resonance. The
ethmoidal and maxillary sinuses are present at birth,
though they are very small. The frontal sinuses start to
develop between 4 and 7 years of age. As the sinuses
develop and become fully aerated, they are all potential infection sites. The sphenoidal sinuses are present
at birth but are unusual sites of clinical disease in early
childhood.
Routinely palpate over the paranasal sinuses. Some
children find firm pressure over the maxillary antra painful. Try this on yourself and on friends and relatives.
Practice allows you to gauge the difference between the
child who is sensitive to pressure and those who truly
have tenderness on palpation. Likewise, pressure against
the medial corner of the orbit against the nasal bridge or
over the frontal sinuses may illicit pain.
KEY POINT
P
AU7
P
P
U
U
U
U
P
P
P
http://www.us.elsevierhealth.com/product.jsp?isbn=9781437713978
GOLDBLOOM, 978-1-4377-1397-8
0001156510.INDD 99
3/15/2010 8:06:25 PM
B978-1-4377-1397-8.00007-1, 00007
P
S
P
S
P
FIGURE 7–9 Palpation of lymph nodes in the anterior cervical
chain. Note that the infant is still in the mother’s lap, and the examiner maintains visual contact with the infant.
Classic Neck Anomalies
A few classic findings on neck examination are associated with significant systemic disorders. The first is neck
webbing, that is, excess skin laterally. This condition
typically is seen in girls with Turner Syndrome (XO
anomaly) or in boys with Noonan syndrome. Masses,
pits, or dimples may be present that are remnants from
embryonic development. A midline neck mass that
moves upward when the tongue protrudes is probably
a thyroglossal duct cyst. If the cyst becomes infected,
it shows the usual signs of inflammation and may rupture externally to form a sinus. Cystic masses or openings more lateral on the neck, usually just anterior to
the sternocleidomastoid muscle, may be branchial cleft
remnants.
In newborns, a mass within the body of the sternocleidomastoid is associated with congenital torticollis.
The masses are due to fibromas and lead to functional
shortening of the muscle and limitation of neck movement. The head usually is tilted toward the lesion but
rotated away from it. It is important to diagnose these
masses early and enroll the child in appropriate physiotherapy to ensure normal mobility.
PR
SA O
M PE
PL R
E TY
C O
O F
N E
TE L
N SE
T V
- N IE
O R
T
FI
N
F
7 — Examining the Head and Neck
AL
100
anterior cervical chains (Fig. 7–9). The nodes just below
the angle of the jaw are the ones most frequently inflamed
and swollen, a condition usually associated with minor
viral respiratory infections. Do not forget the submental
area and supraclavicular fossae.
Few normal children are found without any enlarged
nodes. It is routine for enlarged lymph nodes to persist for
months or years after a significant infection. They often
are described as “shotty” and appear as pea-sized or marble-sized masses, readily mobile and nontender. A lymph
node warrants investigation when it is fixed to surrounding structures, increases in size over 1 cm, or is associated
with surrounding erythema, tenderness, or heat.. Like
tonsils (which also consist of lymphoid tissue), nodes tend
to increase in size until the child is 6 to 9 years of age.
Following puberty, nodes tend to atrophy.
Thyroid
See Chapter 15 for a detailed description of how to conduct a thyroid examination.
Trachea
Tracheal position can be assessed with the child in either
the supine or upright position. Palpate as many normal
tracheas in different childhood age groups as possible.
The trachea is a mobile, easily displaced structure. In
infants with short chubby necks, the exact location is difficult to ascertain. Your main purpose is to decide whether
the trachea is shifted to the right or left, which would be
associated with serious intrathoracic abnormalities such
as pneumothorax or atelectasis.
SUMMARY
S
P
P
S
Recurrent themes may be found throughout this chapter (and the rest of the book) that apply to every aspect
of the pediatric examination. You must be aware of the
“range of normal” in the populations you serve. Always
ensure that the family and anyone else observing you is
convinced of your genuine concern for the child’s comfort. A detailed knowledge of normal developmental
milestones and how best to communicate positively with
children will be invaluable in enabling you to master the
physical examination. With practice, you will learn that
even your youngest patients respond positively to a gentle
tone of voice, soothing reassurance, and a firm but gentle
touch.
P
RECOMMENDED READING
American Academy of Pediatrics: Preventive oral health intervention for
pediatricians. Pediatrics 122:1387–1394, 2008.
Canadian Paediatric Society Community Paediatrics Committee:
Safe sleep for babies. (website): http://www.caringforkids.cps.ca/
AU9
pregnancy&babies/safesleepforbaby.htm.
Bluestone C: Pediatric otolaryngology, 4th ed. Philadelphia, Saunders,
2003.
Krol DM, Keels MA: Oral conditions. Pediatr Rev 28(1):15–21, 2007.
Canadian Pediatric Society: Preventing flat heads in babies who sleep
on their back. (website): http://www.caringforkids.cps.ca/pregnancy&
AU10
babies/Flatheads.htm.
http://www.us.elsevierhealth.com/product.jsp?isbn=9781437713978
GOLDBLOOM, 978-1-4377-1397-8
0001156510.INDD 100
3/15/2010 8:06:25 PM


© Copyright 2026