
INSTRUCTION MANUAL Software #14705.x & 14750.x August 2013 Part Number: 144-23910 R4
INSTRUCTION MANUAL Software #14705.x & 14750.x August 2013 Part Number: 144-23910 R4 © Copyright 2013 Magnetek ©2013 MAGNETEK All rights reserved. This notice applies to all copyrighted materials included with this product, including, but not limited to, this manual and software embodied within the product. This manual is intended for the sole use of the persons to whom it was provided, and any unauthorized distribution of the manual or dispersal of its contents is strictly forbidden. This manual may not be reproduced in whole or in part by any means whatsoever without the expressed written permission of Magnetek. Parts of this product may be covered by one or more of the following patents: 121,334,911; 6,653,804; 7,190,146; 111,585,671; 6,956,399; 6,598,859. DANGER, WARNING, CAUTION, and NOTE Statements DANGER, WARNING, CAUTION, and Note statements are used throughout this manual to emphasize important and critical information. You must read these statements to help ensure safety and to prevent product damage. The statements are defined below. DANGER DANGER indicates an imminently hazardous situation which, if not avoided, will result in death or serious injury. This signal word is to be limited to the most extreme situations. WA R N I N G WARNING indicates a potentially hazardous situation which, if not avoided, could result in death or serious injury. CAUTION CAUTION indicates a potentially hazardous situation which, if not avoided, could result in minor or moderate injury. It may also be used to alert against unsafe practices. NOTE: A NOTE statement is used to notify installation, operation, programming, or maintenance information that is important, but not hazard-related. IMPULSE®•G+ & VG+ Series 4 Instruction Manual - August 2013 i Disclaimer of Warranty Magnetek, hereafter referred to as Company, assumes no responsibility for improper programming of a drive by untrained personnel. A drive should only be programmed by a trained technician who has read and understand the contents of this manual. Improper programming of a drive can lead to unexpected, undesirable, or unsafe operation or performance of the drive. This may result in damage to equipment or personal injury. Company shall not be liable for economic loss, property damage, or other consequential damages or physical injury sustained by the purchaser or by any third party as a result of such programming. Company neither assumes nor authorizes any other person to assume for Company any other liability in connection with the sale or use of this product. WA R N I N G Improper programming of a drive can lead to unexpected, undesirable, or unsafe operation or performance of the drive. Service Information For questions regarding service or technical information contact: 1.866.MAG.SERV (1.866.624.7378) World Headquarters Magnetek, Inc. N49 W13650 Campbell Drive Menomonee Falls, WI 53051 1.800.288.8178 Magnetek, Inc. has additional satellite locations for Canada and the United States. For more information, please visit http://www.magnetekmh.com. IMPULSE®•G+ & VG+ Series 4 Instruction Manual - August 2013 ii Contents: DANGER, WARNING, CAUTION, and NOTE Statements . . . . . . . . . . . . . . . . . . . . . . . . . . . . . . . . . . . . . . . . . . . . . . . . i-i Disclaimer of Warranty . . . . . . . . . . . . . . . . . . . . . . . . . . . . . . . . . . . . . . . . . . . . . . . . . . . . . . . . . . . . . . . . . . . . . . . . . . . i-ii Service Information . . . . . . . . . . . . . . . . . . . . . . . . . . . . . . . . . . . . . . . . . . . . . . . . . . . . . . . . . . . . . . . . . . . . . . . . . . . . . . i-ii Chapter 1: Introduction How to Use This Manual . . . . . . . . . . . . . . . . . . . . . . . . . . . . . . . . . . . . . . . . . . . . . . . . . . . . . . . . . . . . . . . . . . . . . . . . . 1-4 Introduction . . . . . . . . . . . . . . . . . . . . . . . . . . . . . . . . . . . . . . . . . . . . . . . . . . . . . . . . . . . . . . . . . . . . . . . . . . . . . . . . . . . 1-5 Assessing the System Requirements . . . . . . . . . . . . . . . . . . . . . . . . . . . . . . . . . . . . . . . . . . . . . . . . . . . . . . . . . . . 1-5 Assessing the Drive Environment . . . . . . . . . . . . . . . . . . . . . . . . . . . . . . . . . . . . . . . . . . . . . . . . . . . . . . . . . . . . . . 1-5 IMPULSE®•G+ & VG+ Series 4 General Specifications. . . . . . . . . . . . . . . . . . . . . . . . . . . . . . . . . . . . . . . . . . . . . . . . . 1-6 AC Reactor Specifications . . . . . . . . . . . . . . . . . . . . . . . . . . . . . . . . . . . . . . . . . . . . . . . . . . . . . . . . . . . . . . . . . . . . 1-8 S4IF Interface Specifications . . . . . . . . . . . . . . . . . . . . . . . . . . . . . . . . . . . . . . . . . . . . . . . . . . . . . . . . . . . . . . . . . 1-12 S4I and S4IO Option Specifications . . . . . . . . . . . . . . . . . . . . . . . . . . . . . . . . . . . . . . . . . . . . . . . . . . . . . . . . . . . 1-12 Chapter 2: Installation IMPULSE®•G+ & VG+ Series 4 System Components And External Devices . . . . . . . . . . . . . . . . . . . . . . . . . . . . . . . . 2-4 Long Time Storage . . . . . . . . . . . . . . . . . . . . . . . . . . . . . . . . . . . . . . . . . . . . . . . . . . . . . . . . . . . . . . . . . . . . . . . . . . . . . 2-5 Installing the Drive . . . . . . . . . . . . . . . . . . . . . . . . . . . . . . . . . . . . . . . . . . . . . . . . . . . . . . . . . . . . . . . . . . . . . . . . . . . . . 2-7 Multiple Drive Installation (Side-by-Side Installation). . . . . . . . . . . . . . . . . . . . . . . . . . . . . . . . . . . . . . . . . . . . . . . . 2-9 Drive Derating Data . . . . . . . . . . . . . . . . . . . . . . . . . . . . . . . . . . . . . . . . . . . . . . . . . . . . . . . . . . . . . . . . . . . . . . . . . . . 2-10 Temperature Derating . . . . . . . . . . . . . . . . . . . . . . . . . . . . . . . . . . . . . . . . . . . . . . . . . . . . . . . . . . . . . . . . . . . . . . 2-10 Dimensions for IP00/Open Chassis Enclosures . . . . . . . . . . . . . . . . . . . . . . . . . . . . . . . . . . . . . . . . . . . . . . . 2-10 Chapter 3: Wiring IMPULSE®•G+ & VG+ Series 4 Wiring Practices. . . . . . . . . . . . . . . . . . . . . . . . . . . . . . . . . . . . . . . . . . . . . . . . . . . . . . 3-3 Suggested Circuit Protection Specifications and Wire Size . . . . . . . . . . . . . . . . . . . . . . . . . . . . . . . . . . . . . . . . . . . . . . 3-6 Power Circuit Wiring Procedures . . . . . . . . . . . . . . . . . . . . . . . . . . . . . . . . . . . . . . . . . . . . . . . . . . . . . . . . . . . . . . . 3-9 Main Circuit Connection Diagram . . . . . . . . . . . . . . . . . . . . . . . . . . . . . . . . . . . . . . . . . . . . . . . . . . . . . . . . . . . . . 3-10 Terminal Block Configuration. . . . . . . . . . . . . . . . . . . . . . . . . . . . . . . . . . . . . . . . . . . . . . . . . . . . . . . . . . . . . . . . . 3-13 Insulation Barrier . . . . . . . . . . . . . . . . . . . . . . . . . . . . . . . . . . . . . . . . . . . . . . . . . . . . . . . . . . . . . . . . . . . . . . 3-15 Grounding . . . . . . . . . . . . . . . . . . . . . . . . . . . . . . . . . . . . . . . . . . . . . . . . . . . . . . . . . . . . . . . . . . . . . . . . . . . . 3-15 Interface Circuit Board . . . . . . . . . . . . . . . . . . . . . . . . . . . . . . . . . . . . . . . . . . . . . . . . . . . . . . . . . . . . . . . . . . . . . . 3-16 S4IF DIP Switches and Jumper (120 VAC, 48 VAC, and 24 VAC) . . . . . . . . . . . . . . . . . . . . . . . . . . . . . . . . 3-16 Dip Switches . . . . . . . . . . . . . . . . . . . . . . . . . . . . . . . . . . . . . . . . . . . . . . . . . . . . . . . . . . . . . . . . . . . . . . . . . . 3-16 Sinking/Sourcing Mode Selection for Safe Disable Inputs . . . . . . . . . . . . . . . . . . . . . . . . . . . . . . . . . . . . . . . 3-17 Control Circuit Terminals . . . . . . . . . . . . . . . . . . . . . . . . . . . . . . . . . . . . . . . . . . . . . . . . . . . . . . . . . . . . . . . . . . . . 3-18 S4IF Control Circuit Terminal Diagram (120 VAC, 48 VAC, 24 VAC) . . . . . . . . . . . . . . . . . . . . . . . . . . . . . . . . . . 3-19 Safe Torque Off . . . . . . . . . . . . . . . . . . . . . . . . . . . . . . . . . . . . . . . . . . . . . . . . . . . . . . . . . . . . . . . . . . . . . . . . . . . 3-20 Wiring the Encoder Circuit . . . . . . . . . . . . . . . . . . . . . . . . . . . . . . . . . . . . . . . . . . . . . . . . . . . . . . . . . . . . . . . . . . . . . . 3-21 Encoder Circuit Wiring Procedures . . . . . . . . . . . . . . . . . . . . . . . . . . . . . . . . . . . . . . . . . . . . . . . . . . . . . . . . . . . . 3-21 Encoder Wiring Diagrams and Information . . . . . . . . . . . . . . . . . . . . . . . . . . . . . . . . . . . . . . . . . . . . . . . . . . . . . . 3-22 Chapter 4: Getting Started Overview . . . . . . . . . . . . . . . . . . . . . . . . . . . . . . . . . . . . . . . . . . . . . . . . . . . . . . . . . . . . . . . . . . . . . . . . . . . . . . . . . . . . . 4-3 Checks Before Powering . . . . . . . . . . . . . . . . . . . . . . . . . . . . . . . . . . . . . . . . . . . . . . . . . . . . . . . . . . . . . . . . . . . . . 4-3 Precautions . . . . . . . . . . . . . . . . . . . . . . . . . . . . . . . . . . . . . . . . . . . . . . . . . . . . . . . . . . . . . . . . . . . . . . . . . . . . . . . 4-3 Using the Keypad . . . . . . . . . . . . . . . . . . . . . . . . . . . . . . . . . . . . . . . . . . . . . . . . . . . . . . . . . . . . . . . . . . . . . . . . . . . . . . 4-4 IMPULSE®•G+ & VG+ Series 4 Instruction Manual - August 2013 Keypad LED and Button Functions . . . . . . . . . . . . . . . . . . . . . . . . . . . . . . . . . . . . . . . . . . . . . . . . . . . . . . . . . . . . . 4-5 Parameters . . . . . . . . . . . . . . . . . . . . . . . . . . . . . . . . . . . . . . . . . . . . . . . . . . . . . . . . . . . . . . . . . . . . . . . . . . . . . . . 4-3 Parameter Modes . . . . . . . . . . . . . . . . . . . . . . . . . . . . . . . . . . . . . . . . . . . . . . . . . . . . . . . . . . . . . . . . . . . . . . . . . . 4-7 IMPULSE®•G+ & VG+ Series 4 Menu Structure . . . . . . . . . . . . . . . . . . . . . . . . . . . . . . . . . . . . . . . . . . . . . . . 4-7 Initialization Set-up . . . . . . . . . . . . . . . . . . . . . . . . . . . . . . . . . . . . . . . . . . . . . . . . . . . . . . . . . . . . . . . . . . . . . . . . . 4-9 Parameter Access Level (A01-01) . . . . . . . . . . . . . . . . . . . . . . . . . . . . . . . . . . . . . . . . . . . . . . . . . . . . . . . . . . 4-9 Control Method Selection (A01-02) . . . . . . . . . . . . . . . . . . . . . . . . . . . . . . . . . . . . . . . . . . . . . . . . . . . . . . . . . 4-9 X-Press Programming™. . . . . . . . . . . . . . . . . . . . . . . . . . . . . . . . . . . . . . . . . . . . . . . . . . . . . . . . . . . . . . . . . 4-10 Motion (A01-03) . . . . . . . . . . . . . . . . . . . . . . . . . . . . . . . . . . . . . . . . . . . . . . . . . . . . . . . . . . . . . . . . . . . . . . . 4-10 Speed Reference (A01-04). . . . . . . . . . . . . . . . . . . . . . . . . . . . . . . . . . . . . . . . . . . . . . . . . . . . . . . . . . . . . . . 4-10 Initialize Parameters (A01-05) . . . . . . . . . . . . . . . . . . . . . . . . . . . . . . . . . . . . . . . . . . . . . . . . . . . . . . . . . . . . 4-14 Password Entry (A01-06) . . . . . . . . . . . . . . . . . . . . . . . . . . . . . . . . . . . . . . . . . . . . . . . . . . . . . . . . . . . . . . . . 4-14 User Parameters (A02-01 through 32) . . . . . . . . . . . . . . . . . . . . . . . . . . . . . . . . . . . . . . . . . . . . . . . . . . . . . . 4-15 Auto-Tuning . . . . . . . . . . . . . . . . . . . . . . . . . . . . . . . . . . . . . . . . . . . . . . . . . . . . . . . . . . . . . . . . . . . . . . . . . . . . . . . . . 4-16 Standard Auto-Tune (T01-01 = 0) Instructions . . . . . . . . . . . . . . . . . . . . . . . . . . . . . . . . . . . . . . . . . . . . . . . . . . . 4-17 Non-Rotational Auto-Tune (T01-01 = 1) Instructions. . . . . . . . . . . . . . . . . . . . . . . . . . . . . . . . . . . . . . . . . . . . . . . 4-18 Terminal Resistance Auto-Tune (T01-01 = 2) Instructions . . . . . . . . . . . . . . . . . . . . . . . . . . . . . . . . . . . . . . . . . . 4-19 Non-Rotational 2 Auto-Tune (T01-01 = 4) Instructions . . . . . . . . . . . . . . . . . . . . . . . . . . . . . . . . . . . . . . . . . . . . . 4-19 Chapter 5: Programming Advanced Features Introduction . . . . . . . . . . . . . . . . . . . . . . . . . . . . . . . . . . . . . . . . . . . . . . . . . . . . . . . . . . . . . . . . . . . . . . . . . . . . . . . . . . . 5-3 Application . . . . . . . . . . . . . . . . . . . . . . . . . . . . . . . . . . . . . . . . . . . . . . . . . . . . . . . . . . . . . . . . . . . . . . . . . . . . . . . . . . . 5-3 Preset Reference . . . . . . . . . . . . . . . . . . . . . . . . . . . . . . . . . . . . . . . . . . . . . . . . . . . . . . . . . . . . . . . . . . . . . . . . . . . 5-3 Reference Limits . . . . . . . . . . . . . . . . . . . . . . . . . . . . . . . . . . . . . . . . . . . . . . . . . . . . . . . . . . . . . . . . . . . . . . . . . . . 5-5 Sequence/Reference Source. . . . . . . . . . . . . . . . . . . . . . . . . . . . . . . . . . . . . . . . . . . . . . . . . . . . . . . . . . . . . . . . . . 5-6 Stop Method . . . . . . . . . . . . . . . . . . . . . . . . . . . . . . . . . . . . . . . . . . . . . . . . . . . . . . . . . . . . . . . . . . . . . . . . . . . 5-7 Decel to Stop (B03-03=0) . . . . . . . . . . . . . . . . . . . . . . . . . . . . . . . . . . . . . . . . . . . . . . . . . . . . . . . . . . . . . . . . . 5-7 Coast to Stop (B03-03=1). . . . . . . . . . . . . . . . . . . . . . . . . . . . . . . . . . . . . . . . . . . . . . . . . . . . . . . . . . . . . . . . . 5-8 Decel w/Timer (B03-03=4) . . . . . . . . . . . . . . . . . . . . . . . . . . . . . . . . . . . . . . . . . . . . . . . . . . . . . . . . . . . . . . . . 5-8 Motor Rotation Change . . . . . . . . . . . . . . . . . . . . . . . . . . . . . . . . . . . . . . . . . . . . . . . . . . . . . . . . . . . . . . . . . . 5-9 Zero-Speed Operation . . . . . . . . . . . . . . . . . . . . . . . . . . . . . . . . . . . . . . . . . . . . . . . . . . . . . . . . . . . . . . . . . . . 5-9 Input Scan Time . . . . . . . . . . . . . . . . . . . . . . . . . . . . . . . . . . . . . . . . . . . . . . . . . . . . . . . . . . . . . . . . . . . . . . . 5-10 LO/RE Run Select . . . . . . . . . . . . . . . . . . . . . . . . . . . . . . . . . . . . . . . . . . . . . . . . . . . . . . . . . . . . . . . . . . . . . 5-10 Acceleration/Deceleration . . . . . . . . . . . . . . . . . . . . . . . . . . . . . . . . . . . . . . . . . . . . . . . . . . . . . . . . . . . . . . . . . . . 5-12 Accel/Decel Time Switching Frequency. . . . . . . . . . . . . . . . . . . . . . . . . . . . . . . . . . . . . . . . . . . . . . . . . . . . . . . . . 5-13 Jump Frequencies . . . . . . . . . . . . . . . . . . . . . . . . . . . . . . . . . . . . . . . . . . . . . . . . . . . . . . . . . . . . . . . . . . . . . . . . . 5-14 Special Functions . . . . . . . . . . . . . . . . . . . . . . . . . . . . . . . . . . . . . . . . . . . . . . . . . . . . . . . . . . . . . . . . . . . . . . . . . . . . . 5-15 Quick Stop™ . . . . . . . . . . . . . . . . . . . . . . . . . . . . . . . . . . . . . . . . . . . . . . . . . . . . . . . . . . . . . . . . . . . . . . . . . . . . . 5-16 Reverse Plug Simulation™ . . . . . . . . . . . . . . . . . . . . . . . . . . . . . . . . . . . . . . . . . . . . . . . . . . . . . . . . . . . . . . . . . . 5-17 Micro-Speed™ . . . . . . . . . . . . . . . . . . . . . . . . . . . . . . . . . . . . . . . . . . . . . . . . . . . . . . . . . . . . . . . . . . . . . . . . . . . . 5-18 End of Travel Limits . . . . . . . . . . . . . . . . . . . . . . . . . . . . . . . . . . . . . . . . . . . . . . . . . . . . . . . . . . . . . . . . . . . . . . . . 5-19 Phantom Stop . . . . . . . . . . . . . . . . . . . . . . . . . . . . . . . . . . . . . . . . . . . . . . . . . . . . . . . . . . . . . . . . . . . . . . . . . . . . 5-20 Load Sharing/Torque Following - 2 or more mechanically coupled motors . . . . . . . . . . . . . . . . . . . . . . . . . . . . . . 5-20 Klixon . . . . . . . . . . . . . . . . . . . . . . . . . . . . . . . . . . . . . . . . . . . . . . . . . . . . . . . . . . . . . . . . . . . . . . . . . . . . . . . . . . . 5-21 Hook Height Measurement . . . . . . . . . . . . . . . . . . . . . . . . . . . . . . . . . . . . . . . . . . . . . . . . . . . . . . . . . . . . . . . . . . 5-22 Electronic Programmable Limit Switches (EPLS) . . . . . . . . . . . . . . . . . . . . . . . . . . . . . . . . . . . . . . . . . . . . . . . . . 5-23 IMPULSE®•G+ & VG+ Series 4 Instruction Manual - August 2013 Lower Limit/Upper Limit Bypass MFDI. . . . . . . . . . . . . . . . . . . . . . . . . . . . . . . . . . . . . . . . . . . . . . . . . . . . . . . . . . 5-25 Load Float 2 . . . . . . . . . . . . . . . . . . . . . . . . . . . . . . . . . . . . . . . . . . . . . . . . . . . . . . . . . . . . . . . . . . . . . . . . . . . . . . 5-27 Load Check II™ . . . . . . . . . . . . . . . . . . . . . . . . . . . . . . . . . . . . . . . . . . . . . . . . . . . . . . . . . . . . . . . . . . . . . . . . . . . 5-28 V/f Operation (A01-02 = 00) . . . . . . . . . . . . . . . . . . . . . . . . . . . . . . . . . . . . . . . . . . . . . . . . . . . . . . . . . . . . . . 5-28 OLV and FLV Operation (A01-02 = 02 and 03) . . . . . . . . . . . . . . . . . . . . . . . . . . . . . . . . . . . . . . . . . . . . . . . 5-28 Load Check II Set Up (C05-01 = 09) . . . . . . . . . . . . . . . . . . . . . . . . . . . . . . . . . . . . . . . . . . . . . . . . . . . . . . . 5-28 Swift-Lift™ & Ultra-Lift™ . . . . . . . . . . . . . . . . . . . . . . . . . . . . . . . . . . . . . . . . . . . . . . . . . . . . . . . . . . . . . . . . . . . . 5-32 Swift-Lift . . . . . . . . . . . . . . . . . . . . . . . . . . . . . . . . . . . . . . . . . . . . . . . . . . . . . . . . . . . . . . . . . . . . . . . . . . . . . 5-32 Ultra-Lift . . . . . . . . . . . . . . . . . . . . . . . . . . . . . . . . . . . . . . . . . . . . . . . . . . . . . . . . . . . . . . . . . . . . . . . . . . . . . 5-32 Adaptive Ultra-Lift . . . . . . . . . . . . . . . . . . . . . . . . . . . . . . . . . . . . . . . . . . . . . . . . . . . . . . . . . . . . . . . . . . . . . . 5-32 Configuring the Swift-Lift & Ultra-Lift Function . . . . . . . . . . . . . . . . . . . . . . . . . . . . . . . . . . . . . . . . . . . . . . . . 5-34 Torque Limit . . . . . . . . . . . . . . . . . . . . . . . . . . . . . . . . . . . . . . . . . . . . . . . . . . . . . . . . . . . . . . . . . . . . . . . . . . . . . . 5-35 Anti-Shock . . . . . . . . . . . . . . . . . . . . . . . . . . . . . . . . . . . . . . . . . . . . . . . . . . . . . . . . . . . . . . . . . . . . . . . . . . . . . . . 5-37 No-Load Brake Hoist (VG+). . . . . . . . . . . . . . . . . . . . . . . . . . . . . . . . . . . . . . . . . . . . . . . . . . . . . . . . . . . . . . . . . . 5-39 Digital Input Option Set-up (DI-A3 and S4IO) . . . . . . . . . . . . . . . . . . . . . . . . . . . . . . . . . . . . . . . . . . . . . . . . . . . . 5-43 Weight Measurement. . . . . . . . . . . . . . . . . . . . . . . . . . . . . . . . . . . . . . . . . . . . . . . . . . . . . . . . . . . . . . . . . . . . . . . 5-44 System Tare and Calibration for Weight Measurement . . . . . . . . . . . . . . . . . . . . . . . . . . . . . . . . . . . . . . . . . 5-45 Setting Up U01-29 to Display Actual Weight . . . . . . . . . . . . . . . . . . . . . . . . . . . . . . . . . . . . . . . . . . . . . . . . . 5-45 Weight Measurement Design Considerations . . . . . . . . . . . . . . . . . . . . . . . . . . . . . . . . . . . . . . . . . . . . . . . . 5-45 Slack Cable Detection . . . . . . . . . . . . . . . . . . . . . . . . . . . . . . . . . . . . . . . . . . . . . . . . . . . . . . . . . . . . . . . . . . . . . . 5-46 Snap Shaft Detection . . . . . . . . . . . . . . . . . . . . . . . . . . . . . . . . . . . . . . . . . . . . . . . . . . . . . . . . . . . . . . . . . . . . . . . 5-48 Brake Delay Timers . . . . . . . . . . . . . . . . . . . . . . . . . . . . . . . . . . . . . . . . . . . . . . . . . . . . . . . . . . . . . . . . . . . . . . . . 5-49 Timer Function . . . . . . . . . . . . . . . . . . . . . . . . . . . . . . . . . . . . . . . . . . . . . . . . . . . . . . . . . . . . . . . . . . . . . . . . . . . . 5-49 Maintenance Timer . . . . . . . . . . . . . . . . . . . . . . . . . . . . . . . . . . . . . . . . . . . . . . . . . . . . . . . . . . . . . . . . . . . . . . . . 5-50 Inching Control. . . . . . . . . . . . . . . . . . . . . . . . . . . . . . . . . . . . . . . . . . . . . . . . . . . . . . . . . . . . . . . . . . . . . . . . . . . . 5-51 Index Function . . . . . . . . . . . . . . . . . . . . . . . . . . . . . . . . . . . . . . . . . . . . . . . . . . . . . . . . . . . . . . . . . . . . . . . . . . . . 5-52 Tuning . . . . . . . . . . . . . . . . . . . . . . . . . . . . . . . . . . . . . . . . . . . . . . . . . . . . . . . . . . . . . . . . . . . . . . . . . . . . . . . . . . . . . . 5-55 DC Injection . . . . . . . . . . . . . . . . . . . . . . . . . . . . . . . . . . . . . . . . . . . . . . . . . . . . . . . . . . . . . . . . . . . . . . . . . . . . . . 5-55 Motor Slip Compensation . . . . . . . . . . . . . . . . . . . . . . . . . . . . . . . . . . . . . . . . . . . . . . . . . . . . . . . . . . . . . . . . . . . 5-56 Torque Compensation . . . . . . . . . . . . . . . . . . . . . . . . . . . . . . . . . . . . . . . . . . . . . . . . . . . . . . . . . . . . . . . . . . . . . . 5-56 Automatic Speed Regulator (ASR) Tuning . . . . . . . . . . . . . . . . . . . . . . . . . . . . . . . . . . . . . . . . . . . . . . . . . . . . . . 5-57 Torque Control . . . . . . . . . . . . . . . . . . . . . . . . . . . . . . . . . . . . . . . . . . . . . . . . . . . . . . . . . . . . . . . . . . . . . . . . . . . . 5-62 Speed/Torque Control Switching . . . . . . . . . . . . . . . . . . . . . . . . . . . . . . . . . . . . . . . . . . . . . . . . . . . . . . . . . . 5-63 S-Curve Acceleration/Deceleration . . . . . . . . . . . . . . . . . . . . . . . . . . . . . . . . . . . . . . . . . . . . . . . . . . . . . . . . . . . . 5-65 Carrier Frequency . . . . . . . . . . . . . . . . . . . . . . . . . . . . . . . . . . . . . . . . . . . . . . . . . . . . . . . . . . . . . . . . . . . . . . . . . 5-66 Hunting Prevention . . . . . . . . . . . . . . . . . . . . . . . . . . . . . . . . . . . . . . . . . . . . . . . . . . . . . . . . . . . . . . . . . . . . . . . . 5-68 Motor Parameters . . . . . . . . . . . . . . . . . . . . . . . . . . . . . . . . . . . . . . . . . . . . . . . . . . . . . . . . . . . . . . . . . . . . . . . . . . . . . 5-69 Voltage/Frequency Pattern . . . . . . . . . . . . . . . . . . . . . . . . . . . . . . . . . . . . . . . . . . . . . . . . . . . . . . . . . . . . . . . . . . 5-69 Motor Set-up . . . . . . . . . . . . . . . . . . . . . . . . . . . . . . . . . . . . . . . . . . . . . . . . . . . . . . . . . . . . . . . . . . . . . . . . . . . . . 5-75 Test Mode Configuration . . . . . . . . . . . . . . . . . . . . . . . . . . . . . . . . . . . . . . . . . . . . . . . . . . . . . . . . . . . . . . . . . . . . 5-76 Option Card Parameters . . . . . . . . . . . . . . . . . . . . . . . . . . . . . . . . . . . . . . . . . . . . . . . . . . . . . . . . . . . . . . . . . . . . . . . . 5-77 Encoder (PG) Option Set-up . . . . . . . . . . . . . . . . . . . . . . . . . . . . . . . . . . . . . . . . . . . . . . . . . . . . . . . . . . . . . . . . . 5-77 Analog Input (AI-A3) Option Set-up . . . . . . . . . . . . . . . . . . . . . . . . . . . . . . . . . . . . . . . . . . . . . . . . . . . . . . . . . . . . 5-80 Analog Output (AO-A3) Option Set-up . . . . . . . . . . . . . . . . . . . . . . . . . . . . . . . . . . . . . . . . . . . . . . . . . . . . . . . . . 5-81 Digital Output (DO-A3) Option Set-up . . . . . . . . . . . . . . . . . . . . . . . . . . . . . . . . . . . . . . . . . . . . . . . . . . . . . . . . . . 5-82 IMPULSE®•G+ & VG+ Series 4 Instruction Manual - August 2013 Profibus-DP Communication Option Card Set-up . . . . . . . . . . . . . . . . . . . . . . . . . . . . . . . . . . . . . . . . . . . . . . . . . 5-84 Ethernet Option Card Set-up (Ethernet IP & Modbus TCP/IP) . . . . . . . . . . . . . . . . . . . . . . . . . . . . . . . . . . . . . . . 5-86 Terminal Parameters. . . . . . . . . . . . . . . . . . . . . . . . . . . . . . . . . . . . . . . . . . . . . . . . . . . . . . . . . . . . . . . . . . . . . . . . . . . 5-88 Digital Inputs . . . . . . . . . . . . . . . . . . . . . . . . . . . . . . . . . . . . . . . . . . . . . . . . . . . . . . . . . . . . . . . . . . . . . . . . . . . . . 5-88 F1 and F2 Keys Function Selection . . . . . . . . . . . . . . . . . . . . . . . . . . . . . . . . . . . . . . . . . . . . . . . . . . . . . . . . . . . . 5-91 Digital Outputs . . . . . . . . . . . . . . . . . . . . . . . . . . . . . . . . . . . . . . . . . . . . . . . . . . . . . . . . . . . . . . . . . . . . . . . . . . . . 5-93 Digital Outputs—Alarm/Fault Annunciate (H02-01–03=40) . . . . . . . . . . . . . . . . . . . . . . . . . . . . . . . . . . . . . . . . . . 5-97 Analog Inputs . . . . . . . . . . . . . . . . . . . . . . . . . . . . . . . . . . . . . . . . . . . . . . . . . . . . . . . . . . . . . . . . . . . . . . . . . . . . 5-100 Analog Outputs . . . . . . . . . . . . . . . . . . . . . . . . . . . . . . . . . . . . . . . . . . . . . . . . . . . . . . . . . . . . . . . . . . . . . . . . . . 5-103 Serial Communication Set-up . . . . . . . . . . . . . . . . . . . . . . . . . . . . . . . . . . . . . . . . . . . . . . . . . . . . . . . . . . . . . . . 5-105 Pulse Train Input/Output . . . . . . . . . . . . . . . . . . . . . . . . . . . . . . . . . . . . . . . . . . . . . . . . . . . . . . . . . . . . . . . . . . . 5-107 Protection Parameters . . . . . . . . . . . . . . . . . . . . . . . . . . . . . . . . . . . . . . . . . . . . . . . . . . . . . . . . . . . . . . . . . . . . . . . . 5-108 Motor Overload . . . . . . . . . . . . . . . . . . . . . . . . . . . . . . . . . . . . . . . . . . . . . . . . . . . . . . . . . . . . . . . . . . . . . . . . . . 5-108 Power Loss Ride Thru . . . . . . . . . . . . . . . . . . . . . . . . . . . . . . . . . . . . . . . . . . . . . . . . . . . . . . . . . . . . . . . . . . . . . 5-109 Stall Prevention . . . . . . . . . . . . . . . . . . . . . . . . . . . . . . . . . . . . . . . . . . . . . . . . . . . . . . . . . . . . . . . . . . . . . . . . . . 5-110 Speed Agree . . . . . . . . . . . . . . . . . . . . . . . . . . . . . . . . . . . . . . . . . . . . . . . . . . . . . . . . . . . . . . . . . . . . . . . . . . . . 5-112 Test Mode . . . . . . . . . . . . . . . . . . . . . . . . . . . . . . . . . . . . . . . . . . . . . . . . . . . . . . . . . . . . . . . . . . . . . . . . . . . . . . 5-114 Torque Detection . . . . . . . . . . . . . . . . . . . . . . . . . . . . . . . . . . . . . . . . . . . . . . . . . . . . . . . . . . . . . . . . . . . . . . . . . 5-115 Hardware Protection . . . . . . . . . . . . . . . . . . . . . . . . . . . . . . . . . . . . . . . . . . . . . . . . . . . . . . . . . . . . . . . . . . . . . . 5-118 Automatic Fault Reset . . . . . . . . . . . . . . . . . . . . . . . . . . . . . . . . . . . . . . . . . . . . . . . . . . . . . . . . . . . . . . . . . . . . . 5-121 Fault Latch Selection . . . . . . . . . . . . . . . . . . . . . . . . . . . . . . . . . . . . . . . . . . . . . . . . . . . . . . . . . . . . . . . . . . . . . . 5-123 Operator Parameters . . . . . . . . . . . . . . . . . . . . . . . . . . . . . . . . . . . . . . . . . . . . . . . . . . . . . . . . . . . . . . . . . . . . . . . . . 5-124 Monitor Selection . . . . . . . . . . . . . . . . . . . . . . . . . . . . . . . . . . . . . . . . . . . . . . . . . . . . . . . . . . . . . . . . . . . . . . . . . 5-124 Keypad Key Selection . . . . . . . . . . . . . . . . . . . . . . . . . . . . . . . . . . . . . . . . . . . . . . . . . . . . . . . . . . . . . . . . . . . . . 5-127 Maintenance History . . . . . . . . . . . . . . . . . . . . . . . . . . . . . . . . . . . . . . . . . . . . . . . . . . . . . . . . . . . . . . . . . . . . . . 5-130 Copy Function . . . . . . . . . . . . . . . . . . . . . . . . . . . . . . . . . . . . . . . . . . . . . . . . . . . . . . . . . . . . . . . . . . . . . . . . . . . 5-131 Monitor Parameters . . . . . . . . . . . . . . . . . . . . . . . . . . . . . . . . . . . . . . . . . . . . . . . . . . . . . . . . . . . . . . . . . . . . . . . . . . 5-134 Chapter 6: Troubleshooting Troubleshooting the Drive . . . . . . . . . . . . . . . . . . . . . . . . . . . . . . . . . . . . . . . . . . . . . . . . . . . . . . . . . . . . . . . . . . . . . . . . 6-3 Maintenance and Inspection . . . . . . . . . . . . . . . . . . . . . . . . . . . . . . . . . . . . . . . . . . . . . . . . . . . . . . . . . . . . . . . . . . 6-3 Troubleshooting Encoder Related Faults . . . . . . . . . . . . . . . . . . . . . . . . . . . . . . . . . . . . . . . . . . . . . . . . . . . . . . . . . . . 6-15 Fault Code: DEV– Speed Deviation Fault . . . . . . . . . . . . . . . . . . . . . . . . . . . . . . . . . . . . . . . . . . . . . . . . . . . . . . . 6-15 Fault Code: PGO-X-S/PGO-X-H–Pulse Generator Signal Fault . . . . . . . . . . . . . . . . . . . . . . . . . . . . . . . . . . . . . . 6-16 Fault Code: BE1–Rollback Fault . . . . . . . . . . . . . . . . . . . . . . . . . . . . . . . . . . . . . . . . . . . . . . . . . . . . . . . . . . . . . . 6-17 Fault Code: BE2–Torque Proving Fault . . . . . . . . . . . . . . . . . . . . . . . . . . . . . . . . . . . . . . . . . . . . . . . . . . . . . . . . . 6-17 Fault Code: BE3–Brake Release Fault . . . . . . . . . . . . . . . . . . . . . . . . . . . . . . . . . . . . . . . . . . . . . . . . . . . . . . . . . 6-18 Alarm Code: BE6–Brake Proving Alarm . . . . . . . . . . . . . . . . . . . . . . . . . . . . . . . . . . . . . . . . . . . . . . . . . . . . . . . . 6-19 Alarm Code: BE8–Brake Slipping Alarm . . . . . . . . . . . . . . . . . . . . . . . . . . . . . . . . . . . . . . . . . . . . . . . . . . . . . . . . 6-19 Fault Code: OC–Over Current Fault . . . . . . . . . . . . . . . . . . . . . . . . . . . . . . . . . . . . . . . . . . . . . . . . . . . . . . . . . . . 6-21 Fault Display and Corrective Actions at Auto-Tuning . . . . . . . . . . . . . . . . . . . . . . . . . . . . . . . . . . . . . . . . . . . . . . . . . . 6-22 Troubleshooting Option Card Related Faults . . . . . . . . . . . . . . . . . . . . . . . . . . . . . . . . . . . . . . . . . . . . . . . . . . . . . . . . 6-24 Drive-Side Error Codes . . . . . . . . . . . . . . . . . . . . . . . . . . . . . . . . . . . . . . . . . . . . . . . . . . . . . . . . . . . . . . . . . . . . . 6-24 Copy Function Related Faults. . . . . . . . . . . . . . . . . . . . . . . . . . . . . . . . . . . . . . . . . . . . . . . . . . . . . . . . . . . . . . . . . . . . 6-27 Tasks, Errors, and Troubleshooting. . . . . . . . . . . . . . . . . . . . . . . . . . . . . . . . . . . . . . . . . . . . . . . . . . . . . . . . . . . . 6-27 Power Section Check . . . . . . . . . . . . . . . . . . . . . . . . . . . . . . . . . . . . . . . . . . . . . . . . . . . . . . . . . . . . . . . . . . . . . . . . . . 6-29 IMPULSE®•G+ & VG+ Series 4 Instruction Manual - August 2013 Power Off Checks . . . . . . . . . . . . . . . . . . . . . . . . . . . . . . . . . . . . . . . . . . . . . . . . . . . . . . . . . . . . . . . . . . . . . . . . . 6-29 S4IF Replacement Procedure. . . . . . . . . . . . . . . . . . . . . . . . . . . . . . . . . . . . . . . . . . . . . . . . . . . . . . . . . . . . . . . . . . . . 6-30 Appendix A: Parameter Listing IMPULSE®•G+ & VG+ Series 4 Parameter Listing . . . . . . . . . . . . . . . . . . . . . . . . . . . . . . . . . . . . . . . . . . . . . . . . . . . A-3 IMPULSE®•G+ & VG+ Series 4 Instruction Manual - August 2013 IMPULSE®•G+ & VG+ Series 4 Instruction Manual - August 2013 Chapter 1 Introduction This page intentionally left blank. IMPULSE®•G+ & VG+ Series 4 Instruction Manual - August 2013 1-2 WA R N I N G Do not touch any circuitry components while the main AC power is on. In addition, wait until the red “CHARGE” LED is out before performing any service on that unit. It may take as long as 5 minutes for the charge on the main DC bus capacitors to drop to a safe level. Do not check signals during operation. Do not connect the main output terminals (U/T1, V/T2, W/T3) to the incoming, three-phase AC source. Before executing a rotational Auto-Tuning, ensure that the motor is disconnected from the drive train and the electric brake is released. If the electric brake cannot be released, you must ensure that the brake is disengaged for the entire tuning process. Read and understand this manual before installing, operating, or servicing this drive. All warnings, cautions, and instructions must be followed. All activity must be performed by qualified personnel. The drive must be installed according to this manual and local codes. Do not connect or disconnect wiring while the power is on. Do not remove covers or touch circuit boards while the power is on. Do not remove or insert the digital operator while power is on. Before servicing, disconnect all power to the equipment. The internal capacitor remains charged even after the power supply is turned off. The charge indicator LED will extinguish when the DC bus voltage is below 50 VDC. To prevent electric shock, wait at least five minutes after all indicators are OFF and measure DC bus voltage to confirm safe level. Do not perform a withstand voltage test on any part of the unit. This equipment uses sensitive devices and may be damaged by high voltage. The drive is suitable for circuits capable of delivering not more than 100,000 RMS symmetrical Amperes. Install adequate branch circuit short circuit protection per applicable codes. Failure to do so may result in equipment damage and/or personal injury. Do not connect unapproved LC or RC interference suppression filters, capacitors, or overvoltage protection devices to the output of the drive. These devices may generate peak currents that exceed drive specifications. IMPULSE®•G+ & VG+ Series 4 Instruction Manual - August 2013 1-3 How to Use This Manual This manual provides technical information on IMPULSE®•G+ and VG+ Series 4 parameter settings, drive functions, troubleshooting, and installation details. Use this manual to expand drive functionality and to take advantage of higher performance features. This manual is available for download on the Magnetek Material Handling document center website at www.magnetekmh.com. The IMPULSE®•G+ and VG+ Series 4 drives share a common power section, and similar parameters. The parameters and performance differ because the VG+ drives includes a PG-X3 encoder feedback card allowing the drive to perform Flux Vector control of the motor. The G+ drives operate in V/f or Open Loop Vector control methods, appropriate for traverse or standard hoist motions. The VG+ drives are typically applied to the non-mechanical load brake hoist motion, and can be applied to traverse motions where torque control or a wide speed control range is required. Many IMPULSE®•G+ and VG+ Series 4 parameter functions are common between the two drive classes. The functions that differ are noted with a “Model” column; this column designates which parameters are available for a given function. Functions may also be control method dependant; these differences are noted in the function and parameter details. Table 1-1 below notes which drives can operate in a particular control method. Table 1-1: Control Methods by Model Drive Model Control Method (A01-02) Speed Control Range Motion (A01-03) G+ V/f (0) 40:1 Traverse (0) Standard Hoist (1) G+ Open Loop Vector (2) 200:1 Traverse (0) Standard Hoist (1) VG+ Flux Vector (3) 1500:1 Traverse (0) NLB Hoist (2) The instructions in the following chapters apply to most IMPULSE®•G+ & VG+ Series 4 crane, hoist, and monorail applications. However, carefully evaluate each specific situation and ensure that the National Electric Code (NEC) codes and local wiring practices are followed. These chapters explain how to install the IMPULSE®•G+ & VG+ Series 4 and, to some extent, the components that it interconnects. It explains how to: assess the drive’s environment, mount the drive, and wire the drive circuits. It is important to develop a “plan of attack” for both the mounting and wiring since each task has an effect on the other one. IMPULSE®•G+ & VG+ Series 4 Wiring Practices is included to provide assistance and reference. NOTE: If the IMPULSE®•G+ & VG+ Series 4 is part of a Magnetek motor control panel, reference the control drawings, disregard this chapter, and turn to Chapter 4. IMPULSE®•G+ & VG+ Series 4 Instruction Manual - August 2013 1-4 Introduction Assessing the System Requirements It is important to know how the drive will be utilized before working on installation and wiring. Please know the requirements for the following components: • Speed control method(s) - i.e. stepped, stepless, infinitely variable • Braking method(s) - coast to stop, decel to stop, No Load Brake (NLB) Hoist • Power source voltage, number of phases, and kVA rating • Power source location • Wire size • Grounding location and method • Control wiring sources - i.e. cab, pendant, radio Assessing the Drive Environment When choosing a location for IMPULSE®•G+ & VG+ Series 4, perform the following steps: 1. Ensure that a three-phase 200 to 240 VAC 50/60 Hz power supply is available for a 230 VACrated drive, a three-phase 380 to 480 VAC 50/60 Hz power supply is available for a 460 VACrated drive, and a 500 to 600 VAC 50/60 Hz power supply is available for a 575 VAC-rated drive. 2. Ensure the encoder is supplied with +5 VDC or 12 VDC. 3. If the RMS encoder current requirement is greater than 200 mA, provide an auxiliary power supply to the encoder. 4. Ensure that the drive-to-motor wiring distance is less than 150 ft. unless appropriate reactors, filters, and/or inverter duty motor is used. 5. Ensure that the drive circuit wiring is protected or isolated from: • Ambient temperatures outside the range of +14°F to +140°F (-10°C to +60°C) at 2 kHz carrier frequency. • Rain or moisture • Corrosive gases or liquids • Direct sunlight • Severe mechanical vibration 6. Ensure that the drive is housed in an appropriate NEMA-rated enclosure. 7. For severe-duty applications (long lifts, for example) or with 75-HP-or-greater motors, ensure that the drive control system (including dynamic braking resistors) is adequately cooled, even though the ambient temperature limit is not exceeded. For more information, contact Magnetek. IMPULSE®•G+ & VG+ Series 4 Instruction Manual - August 2013 1-5 IMPULSE®•G+ & VG+ Series 4 General Specifications Table 1-2: Specification Values and Information - Heavy Duty 230 V 460 V 575 V Model (-G+/ VG+S4) Rated Output Current (A) Output Capacity (kVA) Model (-G+/ VG+S4) Rated Output Current (A) Output Capacity (kVA) Model (-G+/ VG+S4) Rated Output Current (A) Output Capacity (kVA) 2003 3.2 1.2 4001 1.8 1.4 5001 1.7 1.7 2005 5.0 1.9 4003 3.4 2.6 5003 3.5 3.5 2007 6.9 2.6 4004 4.8 3.7 5004 4.1 4.1 2008 8.0 3.0 4005 5.5 4.2 5006 6.3 6.3 2011 11.0 4.2 4007 7.2 5.5 5009 9.8 9.8 2014 14.0 5.3 4009 9.2 7.0 5012 12.5 12.5 2017 17.5 6.7 4014 14.8 11.3 5017 17.0 17.0 2025 25.0 9.5 4018 18.0 13.7 5022 22.0 22.0 2033 33.0 12.6 4024 24.0 18.3 5027 27.0 27.0 2047 47.0 17.9 4031 31.0 24.0 5032 32.0 32.0 2060 60.0 23.0 4039 39.0 30.0 5041 41.0 41.0 2075 75.0 29.0 4045 45.0 34.0 5052 52.0 52.0 2085 85.0 32.0 4060 60.0 48.0 5062 62.0 62.0 2115 115 44.0 4075 75.0 57.0 5077 77.0 77.0 2145 145 55.0 4091 91.0 69.0 5099 99.0 99.0 2180 180 69.0 4112 112 85.0 5130 130 129 2215 215 82.0 4150 150 114 5172 172 171 2283 283 108 4180 180 137 5200 200 199 2346 346 132 4216 216 165 -- -- -- 2415 415 158 4260 260 198 -- -- -- -- -- -- 4304 304 232 -- -- -- -- -- -- 4370 370 282 -- -- -- -- -- -- 4450 450 343 -- -- -- -- -- -- 4605 605 461 -- -- -- -- -- -- 4810 810 617 -- -- -- -- -- -- 41090 1090 831 -- -- -- IMPULSE®•G+ & VG+ Series 4 Instruction Manual - August 2013 1-6 Table 1-3: Specifications for 230 V, 460 V, and 575 V Specification Specification Value and Information for All Models Certification UL, cUL, CSA (CE available upon request) Crane Duty Classification Rated for CMAA Crane Duty Class A - F only (or equivalent) Rated input power supply volts & freq 3-phase 200 to 240 VAC 50/60 Hz for a 230 VAC-rated drive 3-phase 380 to 480 VAC 50/60 Hz for a 460 VAC-rated drive 3-phase 500 to 600 VAC 50/60 Hz for a 575 VAC-rated drive Control Voltage 120 V (+10%/-15%)/60 Hz (±3 Hz) standard 24 VDC, 24 VAC/60 Hz, 48 VAC/60 Hz, 120 VAC/50 Hz optional Allowable input voltage fluctuation +10% or -15% of nominal Allowable input frequency fluctuation ±5% of nominal Control method Fully digital, V/f, open loop vector, or flux vector control; sine-wave, pulsewidth-modulated Maximum output voltage (VAC) 3-phase 200 to 240 VDC (proportional to input voltage) 3-phase 380 to 480 VDC (proportional to input voltage) 3-phase 500 to 600 VDC (proportional to input voltage) Rated frequency (Hz) 150 Hz standard (400 Hz optional, consult factory and equipment manufacturer) Output speed control range FLV: 1500:1; OLV: 200:1; V/f: 40:1 Output frequency accuracy 0.01%—with digital reference command 0.1%—with analog reference command; 10 bits/10 V Frequency reference resolution Digital: 0.01 Hz; analog: 0.03 Hz (at 60 Hz) Output frequency resolution 0.01 Hz Overload capacity 150% of drive rated load for 1 min Remote frequency reference sources 0–10 VDC (20k); 4–20 mA (250); ±10 VDC serial (RS-485) Accel/decel times 0.1 to 6000.0 sec—4 sets; 8 parameters are independently adjustable Braking torque 150% or more with dynamic braking Motor overload protection UL recognized electronic thermal overload relay; field-programmable Overcurrent protection level (OC1) 200% of drive rated current Circuit protection Ground fault and blown-fuse protection Overvoltage protection level 230 VAC class: Stops when DC bus voltage exceeds approx. 410 VDC 460 VAC class: Stops when DC bus voltage exceeds approx. 820 VDC 575 VAC class: Stops when DC bus voltage exceeds approx. 1040 VDC Undervoltage protection level 230 VAC class: Stops when DC bus voltage falls below approx. 190 VDC 460 VAC class: Stops when DC bus voltage falls below approx. 380 VDC 575 VAC class: Stops when DC bus voltage falls below approx. 475 VDC Heatsink overtemperature Thermostat trips at 105°C (221°F) Torque limit selection Separate functions for FORWARD, REVERSE, REGEN; all selectable from 0–300% Stall prevention Separate functions for accel, decel, at-speed, and constant horsepower region * 2kHz carrier frequency ** Maximum rated temperature of 65°C at the drive chassis with factory approved air handling system IMPULSE®•G+ & VG+ Series 4 Instruction Manual - August 2013 1-7 Specification Specification Value and Information for All Models Other protection features VG+: Speed deviation, overspeed, mechanical brake failure, lost output phase, failed-oscillator, PG-disconnect, roll-back detection, micro controller watchdog, internal braking transistor failure, torque output limit, motor overcurrent, inverter overcurrent, input phase loss. G+: Lost output phase, micro-controller watchdog, internal braking resistor failure, motor overcurrent, inverter overcurrent, input phase loss. DC bus voltage indication Charge LED is on until DC bus voltage drops below 50 VDC Location Indoors; requires protection from moisture, corrosive gases, and liquids Ambient operating temperature -10° to 60°C (14° to 140°F)* -10° to 65°C (14° to 149°F)** Storage temperature -20°C to +70°C (-4°F to 158°F) Humidity 95% relative humidity or less and free of condensation Vibration 10 to 20 Hz at 9.8 m/s2 20 to 55 Hz at 5.9 m/s2 (Models 2003 to 2180, 4001 to 4150, and 5001 to 5077) or 20 to 55 Hz at 2.0 m/s2 (Models 2215 to 2415, 4180 to 4605, and 5099 to 5200) Elevation 1000 m or lower, up to 3000 m with derating. Orientation Install the drive vertically to maintain maximum cooling effects. * 2kHz carrier frequency ** Maximum rated temperature of 65°C at the drive chassis with factory approved air handling system AC Reactor Specifications Reactors, both as input (line) and output (load) devices, protect adjustable frequency drives, motors, and other load devices against excessive voltage and current. The following guidelines may help determine input and output reactor requirements: • The following tables are only a guideline. The motor FLA should not exceed the reactor FLA. • Install an input reactor if the power source is greater than 500 kVA. • Install an output reactor if the distance between the drive and the motor exceeds 150 feet. • Install an output reactor if a device, such as a power limit switch, is used to disconnect the motor from the drive. Use a power limit switch early break circuit to fault the drive. • Install one output reactor per drive for a multiple-drive arrangement requiring reactor protection. • For a multiple drive arrangement, an input reactor for each drive is recommended for optimal protection. However, if the drives are within two drive sizes of each other, a single input reactor can be used. The reactor must be rated at amperage equal to or greater than the sum of the amperage for all the drives. • Reactors are most effective when the reactor current rating approaches the drive current rating. IMPULSE®•G+ & VG+ Series 4 Instruction Manual - August 2013 1-8 Table 1-4: 230 V Class Model Number 230 V Part Number Maximum Amps of Reactor 2003-G+/VG+S4 REA230-1 4 2005-G+/VG+S4 REA230-1 4 2007-G+/VG+S4 REA230-2 8 2008-G+/VG+S4 REA230-2 8 2011-G+/VG+S4 REA230-3 12 2014-G+/VG+S4 REA230-3 12 2017-G+/VG+S4 REA230-5 18 2025-G+/VG+S4 REA230-7.5 25 2033-G+/VG+S4 REA230-10 35 2047-G+/VG+S4 REA230-15 45 2060-G+/VG+S4 REA230-20 55 2075-G+/VG+S4 REA230-25 80 2085-G+/VG+S4 REA230-30 80 2115-G+/VG+S4 REA230-40 100 2145-G+/VG+S4 REA230-50 130 2180-G+/VG+S4 REA230-60 160 2215-G+/VG+S4 REA230-75 200 2283-G+/VG+S4 REA230-100 250 2346-G+/VG+S4 REA230-125 320 2415-G+/VG+S4 REA230-150 400 IMPULSE®•G+ & VG+ Series 4 Instruction Manual - August 2013 1-9 Table 1-5: 460 V Class Model Number 460 V Part Number Maximum Amps of Reactor 4001-G+/VG+S4 REA460-1 2 4003-G+/VG+S4 REA460-2 4 4004-G+/VG+S4 REA460-3 6 4005-G+/VG+S4 REA460-5 8 4007-G+/VG+S4 REA460-5 8 4009-G+/VG+S4 REA460-5 8 4014-G+/VG+S4 REA460-7.5 12 4018-G+/VG+S4 REA460-10 18 4024-G+/VG+S4 REA460-15 25 4031-G+/VG+S4 REA460-20 35 4039-G+/VG+S4 REA460-25 35 4045-G+/VG+S4 REA460-30 45 4060-G+/VG+S4 REA460-40 55 4075-G+/VG+S4 REA460-50 80 4091-G+/VG+S4 REA460-60 80 4112-G+/VG+S4 REA460-75 100 4150-G+/VG+S4 REA460-100 130 4180-G+/VG+S4 REA460-150 200 4216-G+/VG+S4 REA460-150 200 4260-G+/VG+S4 REA460-200 250 4304-G+/VG+S4 REA460-250 320 4370-G+/VG+S4 REA460-300 400 4450-G+/VG+S4 REA460-400 500 4605-G+/VG+S4 REA460-500 600 4810-G+/VG+S4 Consult Factory Consult Factory 41090-G+/VG+S4 Consult Factory Consult Factory IMPULSE®•G+ & VG+ Series 4 Instruction Manual - August 2013 1-10 Table 1-6: 575 V Class Model Number 600 V Part Number Maximum Amps of Reactor 5001-G+/VG+S4 REA575-1 2 5003-G+/VG+S4 REA575-2 4 5004-G+/VG+S4 REA575-3 4 5006-G+/VG+S4 REA575-5 8 5009-G+/VG+S4 REA575-10 12 5012-G+/VG+S4 REA575-10 12 5017-G+/VG+S4 REA575-15 18 5022-G+/VG+S4 REA575-20 & 25 25 5027-G+/VG+S4 REA575-30 35 5032-G+/VG+S4 REA575-30 35 5041-G+/VG+S4 REA575-40 45 5052-G+/VG+S4 REA575-50 55 5062-G+/VG+S4 REA575-60 80 5077-G+/VG+S4 REA575-75 80 5099-G+/VG+S4 REA575-100 100 5130-G+/VG+S4 REA575-150 160 5172-G+/VG+S4 REA575-200 200 5200-G+/VG+S4 REA575-200 200 IMPULSE®•G+ & VG+ Series 4 Instruction Manual - August 2013 1-11 S4IF Interface Specifications IMPULSE®•G+ & VG+ Series 4 is designed to interface with 120 VAC/60 Hz user input and output devices through the S4IF interface board. This eliminates the need for an additional interface relay or isolation circuitry. The S4IF comes in 24 VDC, 24 VAC/60 Hz, 48 VAC/60 Hz, and 120 VAC/50 Hz options. The S4IF has eight optically isolated input terminals which can be used to connect the user input device to the drive. The eight terminals are multi-function terminals, and are used for speed control and other controls. The drive has four 250 VAC, 1.0 Amp relays for output devices. It includes three programmable multi-function output terminals, and a fault output terminal. Table 1-7: S4IF Ratings S1-S8 S4IF Model Voltage Frequency S4IF-120A60 120 VAC 60 Hz S4IF-48A60 48 VAC 60 Hz S4IF-24A60 24 VAC 60 Hz S4IF-24D00 24 VDC -- S4IF-120A50 120 VAC 50 Hz S4I and S4IO Option Specifications IMPULSE®•G+ & VG+ Series 4 is compatible with AC digital input (S4I) and AC digital input/output (S4IO) options. The options expand the I/O capability of the drives, without the need for interface relays or isolation circuitry. The S4I has four optically isolated input terminals. The S4IO has four optically isolated input terminals and four dry contact form A relays. Table 1-8: S4I Ratings I1-I4 S4I Model Voltage Frequency S4I-120A60 120 VAC 60 Hz S4I-48A60 48 VAC 60 Hz S4I-24A60 24 VAC 60 Hz Table 1-9: S4IO Ratings S4IO Model I1-I4 O1-O6 Voltage Frequency Voltage Current S4IO-120A60 120 VAC 60 Hz 120 VAC 1.0 A S4IO-48A60 48 VAC 60 Hz 120 VAC 1.0 A S4IO-24A60 24 VAC 60 Hz 120 VAC 1.0 A IMPULSE®•G+ & VG+ Series 4 Instruction Manual - August 2013 1-12 Chapter 2 Installation This page intentionally left blank. IMPULSE®•G+ & VG+ Series 4 Instruction Manual - August 2013 2-2 WA R N I N G •When preparing to mount the IMPULSE®•G+ & VG+ Series 4 drive, lift it by its base. Never lift the drive by the front cover, as doing so may cause drive damage or personal injury. •Mount the drive on nonflammable material. •The IMPULSE®•G+ & VG+ Series 4 drive generates heat. For the most effective cooling possible, mount it vertically. For more details, refer to the “IMPULSE®•G+ & VG+ Series 4 Dimensions/Heat Loss-Open Chassis” in this chapter. •When mounting units in an enclosure, install a fan or other cooling device to keep the enclosure temperature below 65°C (149°F)*. Failure to observe these warnings may result in equipment damage. This chapter explains the following: 1. Choosing a location 2. IMPULSE®•G+ & VG+ Series 4 components and external devices 3. Drive environment 4. Drive installation In addition, this section will cover information on the components that interconnect with IMPULSE®•G+ & VG+ Series 4. Choosing a Location Be sure that the drive is mounted in a location protected against the following conditions: • Extreme cold and heat. Use only within the ambient temperature range: -10°C to +60°C (+14°F to 140°F)* • Direct sunlight (not for use outdoors) • Rain, moisture • High humidity • Oil sprays, splashes • Salt spray • Dust or metallic particles in the air • Corrosive gases (e.g. sulfurized gas or liquids) • Radioactive substances • Combustibles (e.g. thinner, solvents, etc.) • Physical shock, vibration • Magnetic noise (e.g. welding machines, power devices, etc.) * 2 kHz carrier frequency IMPULSE®•G+ & VG+ Series 4 Instruction Manual - August 2013 2-3 IMPULSE®•G+ & VG+ Series 4 System Components And External Devices Standard IMPULSE®•VG+ Series 4 Drive Components • PG-X3 Line Driver Encoder Card Optional Drive Components • DI-A3 Digital DC Input Card • DO-A3 Digital Output Card • AI-A3 Analog Input Card • AO-A3 Analog Output Card • S4I-xxxA60 Control Digital AC Input Card • S4IO-xxxA60 Control Digital AC Input/Output Card • PS-A10L 24 VDC Control Power Unit for 230 V models • PS-A10H 24 VDC Control Power Unit for 460 V and 575 V models • PG-B3 Open Collector Encoder Card • SI-EN3 EtherNet/IP • SI-EM3 Modbus TCP/IP • SI-EP3PROFINET • SI-P3 PROFIBUS-DP As-Required Drive Components • AC reactor - line or load • DC bus choke • External dynamic braking resistor(s) • External dynamic braking unit Required External Devices • Motor • User input device (pendant, joystick, PC, PLC, radio, or infrared control) • External circuit protection devices (fuses or circuit breakers) (See “Suggested Circuit Protection Specifications and Wire Size” in Chapter 3). • R-C surge suppressors on contactor coils IMPULSE®•G+ & VG+ Series 4 Instruction Manual - August 2013 2-4 Long Time Storage Powering up the drives every six months is quite beneficial. Over longer periods of time without power, the drives’ electrolytic DC bus capacitors require reformation, especially if stored in an area of high temperatures. Capacitor reforming is required if drives are stored without power for more than 2 to 3 years. This process can be avoided by powering up the drive bi-annually for 30 to 60 minutes. NOTE: Bus cap reforming alone may not restore full drive functionality after 2 to 3 years of storage without power. Inverter drives contain large bus capacitors that have the potential to be reformed. However, printed circuit boards also contain electrolytic capacitors that may not function after several years without power. Magnetek recommends replacing the PCBs should the drive’s functionality not be restored after bus cap reforming. Contact Magnetek Service for questions. Capacitor Storage and their Reforming Process The electrical characteristics of aluminum electrolytic capacitors are dependent on temperature; the higher the ambient temperature, the faster the deterioration of the electrical characteristics (i.e., leakage current increase, capacitance drop, etc.). If an aluminum electrolytic capacitor is exposed to high temperatures such as direct sunlight, heating elements, etc., the life of the capacitor may be adversely affected. When capacitors are stored under humid conditions for long periods of time, the humidity will cause the lead wires and terminals to oxidize, which impairs their solderability. Therefore, aluminum electrolytic capacitors should be stored at room temperature, in a dry location and out of direct sunlight. In the event that a capacitor has been stored in a high ambient environment for more than 2 or 3 years, a voltage treatment reformation process to electrolytic capacitors may have to be performed. When stored above room temperatures for long periods of time, the anode foil may react with the electrolyte, increasing the leakage current. After storage, the application of even normal voltages to these capacitors may result in higher than normal leakage currents. In most cases the leakage current levels will decrease in a short period of time as the normal chemical reaction within the capacitor occurs. However, in extreme cases, the amount of gas generated may cause the safety vent to open. Capacitors, when used in inverter drives that are stored for long periods of time, should be subjected to a voltage treatment/reforming process as noted below, which will reform the dielectric and return the leakage current to the initial level. Inverter Bus Capacitor Reforming Procedure: 1. Connect the inverter inputs L1, L2, and L3 to a variac. 2. Make sure the variac voltage setting is turned down so that when input power is applied to the variac, the output of the variac will be at or near 0 volts. 3. Apply power to the variac, listening for abnormal sounds and watching for abnormal visual indications in the drive. If the variac has an output current indication, make sure the current is very near zero with zero or a steady output voltage applied. 4. Slowly turn the variac up, increasing the variac’s output voltage to nominal rated input voltage over a time period of 2 to 3 minutes. In other words, ramp the voltage up at a rate of approximately 75 to 100 volts/minute for 230 VAC units, 150 to 200 volts/minute for 460 VAC units, and 225 to 300 volts/minute for 575 VAC. 5. Let the output voltage remain at rated voltage for 30 to 60 minutes while keeping close watch for abnormal signs within the inverter. While increasing the variac’s output voltage, the current will momentarily increase as current is necessary to charge the capacitors. 6. Once 30 to 60 minutes elapse, remove power. IMPULSE®•G+ & VG+ Series 4 Instruction Manual - August 2013 2-5 If any abnormal indications occur during this process, it is recommended that the process be repeated. Otherwise, this completes the capacitor reforming procedure. Figure 2-1: Long Time Storage IMPULSE®•G+ & VG+ Series 4 Instruction Manual - August 2013 2-6 Installing the Drive To install IMPULSE®•G+ & VG+ Series 4: 1. Ensure the drive will be used in a proper environment. Refer to page 1-5. 2. Review “IMPULSE®•G+ & VG+ Series 4 Terminal Block Configuration” on page 3-12. 3. Determine the sizes and connection locations for the drive components and external devices that need to be wired. Locate the ground. 4. Determine the proper drive orientation on the subpanel to maintain proper cooling (see Figure 22). Figure 2-2: Correct Installation Orientation IMPULSE®•G+ & VG+ Series 4 Instruction Manual - August 2013 2-7 5. Ensure that the air can flow freely around the heat sink as shown in Figure 2-3. A – 1.97 in (50 mm) minimum C – 4.73 in (120 mm) minimum B – 1.18 in (30 mm) minimum D – Airflow direction Figure 2-3: Correct Installation Spacing NOTE: • Allowable intake air temperature: 14° to 140°F (-10° to +60°C) at 2 kHz carrier frequency. • If necessary, a heater or air conditioner must be used to maintain the temperature range listed above. 6. Lay out the wire runs. Size the wire according to Tables 3-1, 3-2, and 3-3, and in accordance with NEC Table 610-14(a). • Ensure that the drive control circuit and power circuit wires are perpendicular to each other at any point they cross. • Keep power and control festoon wiring in separate cables. • Separate control drive circuit and power circuit wiring on the terminal block strip. 7. Obtain the appropriate hardware for mounting. 8. Mount the subpanel or surface to which you are mounting the drive (contact Magnetek if advice is needed in regards to mounting drives, especially for larger drives). 9. Fasten the drive and components to the subpanel. 10. Remove the terminal cover. 11. Follow the wiring practices outlined in Chapter 3. IMPULSE®•G+ & VG+ Series 4 Instruction Manual - August 2013 2-8 Multiple Drive Installation (Side-by-Side Installation) Models 2003 to 2075, 4001 to 4039, and 5001 to 5027 can take advantage of Side-by-Side installation. When mounting drives with the minimum clearing of 0.08 inches (2 mm) according to Figure 2-4, set parameter L08-35 to 1 while considering derating. A – 1.97 in (50 mm) minimum B – 1.18 in (30 mm) minimum C – 0.08 in (2 mm) minimum D – 4.73 in (120 mm) minimum Figure 2-4: Space Between Drives (Side-by-Side Mounting) NOTE: Align the tops of the drives when installing drives of different heights in the same enclosure panel. Leave space between the tops and bottoms of stacked drives for easier cooling fan replacement. IMPULSE®•G+ & VG+ Series 4 Instruction Manual - August 2013 2-9 Drive Derating Data Temperature Derating To ensure the maximum performance life, the drive output current must be derated when the drive is installed in areas with high ambient temperature or if drives are mounted side-by-side in a cabinet. In order to ensure reliable drive overload protection, set parameters L08-12 and L08-35 according to the installation conditions. Contact Magnetek for derating curves. IP00/Open-Chassis Enclosure Drive operation between -10°C to +60°C (14°F to 140°F) allows CMAA Class F continuous current without derating. Side-by-Side Mounting Drive operation between -10°C and 30°C (14°F to 86°F) allows CMAA Class F continuous current without derating. Operation between 30°C and 50°C (86°F to 122°F) requires output current derating. Dimensions for IP00/Open Chassis Enclosures IMPULSE®•G+ & VG+ Series 4 Instruction Manual - August 2013 2-10 Figure 2-9 Table 2-1: Enclosure Dimensions - 230 V Drives Drive Model Number Dimensions (in) Total Loss (W)* W H D W1 W2 H1 H2 H4 D1 t1 t2 d Wt. (lbs) 2003 5.51 10.24 5.79 4.80 -- 9.76 -- 0.06 1.50 0.20 -- M5 7.3 59 2005 5.51 10.24 5.79 4.80 -- 9.76 -- 0.06 1.50 0.20 -- M5 7.3 72 2007 5.51 10.24 5.79 4.80 -- 9.76 -- 0.06 1.50 0.20 -- M5 7.5 84 2008 5.51 10.24 5.79 4.80 -- 9.76 -- 0.06 1.50 0.20 -- M5 7.5 95 (-G+/VG+S4) Figure 2011 5.51 10.24 5.79 4.80 -- 9.76 -- 0.06 1.50 0.20 -- M5 7.5 122 2014 5.51 10.24 6.46 4.80 -- 9.76 -- 0.06 2.17 0.20 -- M5 8.2 137 2017 2-5 5.51 10.24 6.46 4.80 -- 9.76 -- 0.06 2.17 0.20 -- M5 8.2 168 2025 5.51 10.24 6.57 4.80 -- 9.76 -- 0.06 2.17 0.20 -- M5 9.3 287 2033 5.51 10.24 6.57 4.80 -- 9.76 -- 0.06 2.17 0.20 -- M5 9.3 319 2047 7.09 11.81 7.36 6.30 -- 11.18 -- 0.06 2.95 0.20 -- M5 13.0 410 2060 8.66 13.78 7.76 7.56 -- 13.19 -- 0.06 3.07 0.20 -- M6 20.1 558 2075 8.66 13.78 7.76 7.56 -- 13.19 -- 0.06 3.07 0.20 -- M6 22.0 681 2085 10.00 15.75 10.16 7.68 0.31 15.16 0.30 -- 3.94 0.09 0.09 M6 50.7 721 2115 10.98 17.72 10.16 8.66 0.31 17.13 0.30 -- 3.94 0.09 0.09 M6 61.7 912 2145 12.95 21.65 11.14 10.24 0.31 21.06 0.30 -- 4.33 0.09 0.09 M6 90.4 1122 2180 12.95 21.65 11.14 10.24 0.31 21.06 0.30 -- 4.33 0.09 0.09 M6 92.6 1354 17.72 27.76 12.99 12.80 0.39 26.77 0.49 -- 5.12 0.13 0.13 M10 167.6 1980 2283 17.72 27.76 12.99 12.80 0.39 26.77 0.49 -- 5.12 0.13 0.13 M10 176.4 2524 2346 19.69 31.50 13.78 14.57 0.39 30.43 0.51 -- 5.12 0.18 0.18 M12 216.1 3347 2415 19.69 31.50 13.78 14.57 0.39 30.43 0.51 -- 5.12 0.18 0.18 M12 218.3 3626 2215 2-6 * Total Loss is specified for continuous operation. IMPULSE®•G+ & VG+ Series 4 Instruction Manual - August 2013 2-11 Table 2-2: Enclosure Dimensions - 460 V Drives Drive Model Number Dimensions (in) W H D W1 W2 W3 H1 H2 H4 D1 t1 t2 d Wt. (lbs) Total Loss (W)* 4001 5.51 10.24 5.79 4.80 -- -- 9.76 -- 0.06 1.50 0.20 -- M5 7.5 61 4003 5.51 10.24 5.79 4.80 -- -- 9.76 -- 0.06 1.50 0.20 -- M5 7.5 70 4004 5.51 10.24 5.79 4.80 -- -- 9.76 -- 0.06 1.50 0.20 -- M5 7.5 87 4005 5.51 10.24 6.46 4.80 -- -- 9.76 -- 0.06 2.17 0.20 -- M5 7.9 101 4007 5.51 10.24 6.46 4.80 -- -- 9.76 -- 0.06 2.17 0.20 -- M5 8.2 108 5.51 10.24 6.46 4.80 -- -- 9.76 -- 0.06 2.17 0.20 -- M5 8.2 130 4014 5.51 10.24 6.57 4.80 -- -- 9.76 -- 0.06 2.17 0.20 -- M5 9.0 221 4018 5.51 10.24 6.57 4.80 -- -- 9.76 -- 0.06 2.17 0.20 -- M5 9.0 247 4024 7.09 11.81 6.57 6.30 -- -- 11.18 -- 0.06 2.17 0.20 -- M5 12.6 323 4031 7.09 11.81 7.36 6.30 -- -- 11.18 -- 0.06 2.95 0.20 -- M5 13.2 403 4039 8.66 13.78 7.76 7.56 -- -- 13.19 -- 0.06 3.07 0.20 -- M6 19.2 509 (-G+/VG+S4) 4009 Figure 2-5 4045 10.00 15.75 10.16 7.68 0.31 -- 15.16 0.30 -- 3.94 0.09 0.09 M6 50.7 518 4060 10.98 17.72 10.16 8.66 0.31 -- 17.13 0.30 -- 3.94 0.09 0.09 M6 59.5 701 4075 12.95 20.08 10.16 10.24 0.31 -- 19.49 0.30 -- 4.13 0.09 0.13 M6 86.0 817 1022 4091 12.95 20.08 10.16 10.24 0.31 -- 19.49 0.30 -- 4.13 0.09 0.13 M6 86.0 4112 12.95 21.65 11.14 10.24 0.31 -- 21.06 0.30 -- 4.33 0.09 0.09 M6 99.2 1325 12.95 21.65 11.14 10.24 0.31 -- 21.06 0.30 -- 4.33 0.09 0.09 M6 101.4 1920 4180 17.72 27.76 12.99 12.80 0.39 -- 26.77 0.49 -- 5.12 0.13 0.13 M10 174.2 2313 4216 19.69 31.50 13.78 14.57 0.39 -- 30.43 0.51 -- 5.12 0.18 0.18 M12 211.6 3075 4260 19.69 31.50 13.78 14.57 0.39 -- 30.43 0.51 -- 5.12 0.18 0.18 M12 224.9 3178 4304 19.69 31.50 13.78 14.57 0.39 -- 30.43 0.51 -- 5.12 0.18 0.18 M12 235.9 4060 5.31 0.18 0.18 M12 275.6 4742 5358 4150 2-6 4370 2-7 19.69 37.40 14.57 14.57 0.31 -- 36.34 0.51 -- 4450 2-8 26.38 44.88 14.57 17.32 0.24 8.66 43.70 0.59 -- 5.91 0.18 0.18 M12 476.2 26.38 44.88 14.57 17.32 0.24 8.66 43.70 0.59 -- 5.91 0.18 0.18 M12 487.2 5875 49.21 54.33 14.57 43.70 0.24 13.00 52.95 0.59 -- 5.91 0.18 0.18 M12 1201.5 9367 49.21 54.33 14.57 43.70 0.24 13.00 52.95 0.59 -- 5.91 0.18 0.18 M12 1223.6 10781 4605 4810 41090 2-9 * Total Loss is specified for continuous operation. IMPULSE®•G+ & VG+ Series 4 Instruction Manual - August 2013 2-12 Table 2-3: Enclosure Dimensions - 575 V Drives Drive Model Number Dimensions (in) Total Loss (W)* W H D W1 W2 H1 H2 H4 D1 t1 t2 d Wt. (lbs) 5001 5.51 10.24 5.79 4.80 -- 9.76 -- 0.06 1.50 0.20 -- M5 7.5 48.7 5003 5.51 10.24 5.79 4.80 -- 9.76 -- 0.06 1.50 0.20 -- M5 7.5 81.9 5004 5.51 10.24 6.46 4.80 -- 9.76 -- 0.06 2.17 0.20 -- M5 8.2 80.0 5006 5.51 10.24 6.46 4.80 -- 9.76 -- 0.06 2.17 0.20 -- M5 8.2 115.1 (-G+/VG+S4) 5009 Figure 5.51 10.24 6.57 4.80 -- 9.76 -- 0.06 2.17 0.20 -- M5 9.0 160.3 5012 2-5 7.09 11.81 7.36 6.30 -- 11.18 -- 0.06 2.95 0.20 -- M5 13.2 212.2 5017 7.09 11.81 7.36 6.30 -- 11.18 -- 0.06 2.95 0.20 -- M5 13.2 284.8 5022 8.66 13.78 7.76 7.56 -- 13.19 -- 0.06 3.07 0.20 -- M6 19.2 381.1 5027 8.66 13.78 7.76 7.56 -- 13.19 -- 0.06 3.07 0.20 -- M6 19.2 465.1 5032 10.98 17.72 10.16 8.66 0.31 17.13 0.30 -- 3.94 0.09 0.09 M6 59.5 533.5 5041 10.98 17.72 10.16 8.66 0.31 17.13 0.30 -- 3.94 0.09 0.09 M6 59.5 688.5 5052 12.95 21.65 11.14 10.24 0.31 21.06 0.30 -- 4.33 0.09 0.09 M6 99.2 1606.5 12.95 21.65 11.14 10.24 0.31 21.06 0.30 -- 4.33 0.09 0.09 M6 99.2 1836.5 12.95 21.65 11.14 10.24 0.31 21.06 0.30 -- 4.33 0.09 0.09 M6 99.2 1619.0 5099 17.72 27.76 12.99 12.80 0.39 26.77 0.49 -- 5.12 0.13 0.13 M10 174.2 1750 5130 17.72 27.76 12.99 12.80 0.39 26.77 0.49 -- 5.12 0.13 0.13 M10 174.2 2146 5172 19.69 31.50 13.78 14.57 0.39 30.43 0.51 -- 5.12 0.18 0.18 M12 235.9 2762 5200 19.69 31.50 13.78 14.57 0.39 30.43 0.51 -- 5.12 0.18 0.18 M12 235.9 3422 5062 5077 2-6 * Total Loss is specified for continuous operation. IMPULSE®•G+ & VG+ Series 4 Instruction Manual - August 2013 2-13 IMPULSE®•G+ & VG+ Series 4 Instruction Manual - August 2013 2-14 Chapter 3 Wiring This page intentionally left blank. IMPULSE®•G+ & VG+ Series 4 Instruction Manual - August 2013 3-2 IMPULSE®•G+ & VG+ Series 4 Wiring Practices WA R N I N G Before you wire the drive, review the following practices to help ensure that your system is wired properly. • Ensure that the encoder wiring is less than 300 feet unless fiber optic cables are used. • Ensure that the encoder wiring is isolated from the power wiring. • Ensure that the encoder wiring shield is grounded only at the drive end. • Connect the incoming three-phase AC source to terminals R/L1, S/L2, T/L3. • Connect the Motor leads to terminals U/T1, V/T2, W/T3. • Install a line reactor between the output of the drive in applications that require a disconnecting means between the drive’s output and motor. Use a “make before break” auxiliary contact with the disconnect means and the hardware base block of the drive. • Use hard contacts between the PLC output and the drive 120/24/48 VAC input card. If using a solid state output from a PLC (TRIAC) to a 120/24/48 VAC input card, use a 5K, 5W resistor between the signal and X2. • If the power source is 500 kVA or greater, or more than 10 times the inverter kVA rating, ensure that there is at least 3% impedance between the power source and the drive input. To accomplish this, a DC reactor can be installed between inverter terminals 1 and 2, or an AC line reactor can be used on the input of the drive. Excessive peak currents could damage the input power supply circuit if there is not enough impedance provided. • Comply with “Suggested Circuit Protection Specifications” on page 3-6. • Use time delay fuses, which are sized at 150% of drive's continuous rated input current, for wiring protection. • Use appropriate R-C or MOV type surge absorbers across the coil of all contactors and relays in the system. Failure to do so could result in noise-related, nuisance fault incidents. • Use external dynamic braking resistors for all applications. • Do not ground the drive with any large-current machines. • Before using any welding or high-current machines near the crane, disconnect all line and ground wiring. • Do not let the wiring leads come in contact with the drive enclosure. • Do not connect power factor correction capacitors to the drive input or output; use a sine wave filter. • When possible, hard-wire the drive and motor. Do not use sliding collector bars (e.g., festoon cable). • If there is a user input device or interface board that is remote, use shielded cable between the drive input terminals and the interface output terminals or user input device(s). • Before turning on the drive, check the output circuit (U/T1, V/T2 and W/T3) for possible short circuits and ground faults. • Increase the wire size by one gauge for every 250 feet (76.2 meters) between the drive and motor; suggested for center driven cranes, trolleys, and bridges (voltage drop is significant at low frequencies). • When using more than one transformer for the drive's power, properly phase each transformer. IMPULSE®•G+ & VG+ Series 4 Instruction Manual - August 2013 3-3 • To reverse the direction of rotation, program B03-04 = 1 (exchange phases), or interchange any two motor leads (changing R/L1, S/L2, or T/L3 will not affect the shaft rotation direction) as well as encoder phasing (F01-02 = 0/1 or swapping A and A wires). • Use shielded cable for all low-level DC speed reference signals (0 to 10 VDC, 4 to 20 mA). Ground the shield only at the drive side. • Please observe National Electrical Code (NEC) guidelines when wiring electrical devices. NOTE: Failure to observe these warnings may result in equipment damage. CAUTION Do NOT connect external dynamic breaking units to drive braking resistor terminal “B2”. Connect positive external dynamic braking unit terminal(s) to drive terminal “+3” and negative external dynamic braking unit terminal(s) to drive terminal “-”. When drive terminal “+3” is unavailable, use terminal “B1”. IMPULSE®•G+ & VG+ Series 4 Instruction Manual - August 2013 3-4 Figure 3-1: IMPULSE®•G+ & VG+ Series 4 Typical Connection Diagram IMPULSE®•G+ & VG+ Series 4 Instruction Manual - August 2013 3-5 Suggested Circuit Protection Specifications and Wire Size In order to comply with most safety standards, some circuit protective devices should be used between the incoming three-phase power supply and the IMPULSE®•G+ & VG+ Series 4. These devices can be thermal, magnetic, or molded-case breakers (MCCB); or “slow-blow” type fuses such as “CCMR” or “J.” CAUTION The following guidelines are only suggested values. Always conform to local electrical codes and wiring practices. Table 3-1: Wire Sizing for 230 V Class Recommended Gauge (AWG) 1, 4 Inverse Time Continuous Time Delay Time Delay Molded/Case Circuit Model # HD Input Input Fuse Input Fuse (-G+/VG+S4) Amps (A) Class Breaker (A)3 Power Circuit Wiring Control Wiring Ground Copper2 2003 2.9 5 CC 15 14 to 10 18 to 16 14 to 10 2005 5.8 10 CC 15 14 to 10 18 to 16 14 to 10 2007 7.0 12 CC 15 14 to 10 18 to 16 14 to 10 2008 7.5 15 CC 15 14 to 10 18 to 16 14 to 10 2011 11.0 20 CC 20 14 to 10 18 to 16 14 to 10 2014 15.6 25 CC 30 14 to 10 18 to 16 14 to 10 2017 18.9 30 CC 35 12 to 10 18 to 16 12 to 10 2025 28.0 40 J 50 10 to 6 18 to 16 10 to 8 2033 37.0 50 J 70 8 to 6 18 to 16 10 to 8 2047 52.0 60 J 90 6 to 4 18 to 16 8 to 6 2060 68.0 80 J 110 4 to 2 18 to 16 6 to 4 2075 80.0 125 J 150 4 to 2 18 to 16 6 to 4 2085 82.0 125 J 150 2 to 1/0 18 to 16 6 to 4 2115 111 175 J 200 2 to 1/0 18 to 16 4 2145 136 200 J 250 1/0 to 2/0 18 to 16 4 to 2 2180 164 250 J 300 1/0 to 2/0 18 to 16 4 to 1/0 2215 200 300 J 350 250 2-2/0 18 to 16 3 to 300 2283 271 400 J 450 350 2-3/0 18 to 16 2 to 300 2346 324 500 J 600 400 2-250 18 to 16 1 to 350 2415 394 600 J 700 400 2-250 18 to 16 1 to 350 1) NFPA 70 National Electric Code 2011. 430.122(a) and Table 610-14(a) 40°C, 60-minute, copper 50°C ambient 2) NFPA 70 National Electric Code 2011. Table 250.122. 3) NFPA 70 National Electric Code 2011. Table 430.52. 4) NFPA 40 National Electric Code 2011. Table 315(b)(2)(a). IMPULSE®•G+ & VG+ Series 4 Instruction Manual - August 2013 3-6 Table 3-2: Wire Sizing for 460 V Class Recommended Gauge (AWG)1, 4 Model # (-G+/VG+S4) Inverse Time Continuous Time Delay Time Delay HD Input Input Fuse Input Fuse Molded/Case Circuit Amps (A) Class Breaker (A)3 Power Circuit Wiring Control Wiring Ground Copper2 4001 1.8 2 CC 15 14 to 10 18 to 16 14 to 12 4003 3.2 6 CC 15 14 to 10 18 to 16 14 to 12 4004 4.4 8 CC 15 14 to 10 18 to 16 14 to 10 4005 6.0 9 CC 15 14 to 10 18 to 16 14 to 10 4007 8.2 15 CC 15 14 to 10 18 to 16 14 to 10 4009 10.4 20 CC 15 14 to 10 18 to 16 14 to 10 4014 15.0 25 CC 30 12 to 6 18 to 16 14 to 10 4018 20 30 CC 40 10 to 6 18 to 16 12 to 10 4024 29 35 J 50 8 to 6 18 to 16 10 to 8 4031 39 45 J 60 8 to 6 18 to 16 10 to 6 4039 44 50 J 70 6 to 4 18 to 16 8 to 6 4045 43 60 J 80 6 to 4 18 to 16 8 to 6 4060 58 80 J 100 4 to 2 18 to 16 6 4075 71 100 J 125 4 to 2 18 to 16 6 to 4 4091 86 125 J 175 2 to 1/0 18 to 16 6 to 4 4112 105 150 J 225 1/0 to 2/0 18 to 16 4 4150 142 200 J 300 3/0 to 4/0 18 to 16 4 to 2 4180 170 250 J 350 250 2-2/0 18 to 16 4 to 300 4216 207 300 J 400 250 2-2/0 18 to 16 2 to 350 4260 248 350 J 500 350 2-3/0 18 to 16 2 to 350 4304 300 400 J 600 350 2-4/0 18 to 16 1 to 350 4370 346 500 J 700 500 2-250 18 to 16 1 to 1/0 4450 410 700 L 900 500 2-300 4-3/0 18 to 16 1/0 to 300 4605 584 800 L 1200 2-400 4-250 4-3/0 18 to 16 2/0 to 300 4810 830 1400 L 1500 4/0 x 4P x 2 18 to 16 3/0 to 300 41090 1031 1600 L 2000 300 x 4P x 2 18 to 16 4/0 to 300 1) NFPA 70 National Electric Code 2011. 430.122(a) and Table 610-14(a) 40°C, 60-minute, copper 50°C ambient 2) NFPA 70 National Electric Code 2011. Table 250.122. 3) NFPA 70 National Electric Code 2011. Table 430.52. 4) NFPA 40 National Electric Code 2011. Table 315(b)(2)(a). IMPULSE®•G+ & VG+ Series 4 Instruction Manual - August 2013 3-7 Table 3-3: Wire Sizing for 575 V Class Recommended Gauge (AWG)1, 4 Inverse Time Continuous Time Delay Time Delay Molded/Case Circuit Model # HD Input Input Fuse Input Fuse (-G+/VG+S4) Amps (A) Class Breaker (A)3 Power Circuit Wiring Control Wiring Ground Copper2 5001 1.9 3 CC 15 14 to 10 18 to 16 14 to 10 5003 3.6 5 CC 15 14 to 10 18 to 16 14 to 10 5004 5.1 7 CC 15 14 to 10 18 to 16 14 to 10 5006 8.3 10 CC 15 14 to 10 18 to 16 12 to 10 5009 12 15 CC 20 14 to 10 18 to 16 12 to 8 5012 16 20 CC 25 10 to 8 18 to 16 12 to 8 5017 23 25 CC 35 10 to 8 18 to 16 10 to 6 5022 31 35 J 45 10 to 6 18 to 16 10 to 6 5027 38 45 J 50 10 to 6 18 to 16 10 to 6 5032 33 50 J 60 10 to 6 18 to 16 6 5041 44 60 J 80 8 to 4 18 to 16 6 5052 54 70 J 100 6 to 4 18 to 16 4 5062 66 90 J 125 4 18 to 16 4 5077 80 100 J 150 4 18 to 16 4 5099 108 125 J 200 2 18 to 16 4 to 300 5130 129 175 J 250 1/0 18 to 16 4 to 300 5172 158 225 J 350 2/0 18 to 16 1 to 350 5200 228 300 J 450 3/0 18 to 16 1 to 350 1) NFPA 70 National Electric Code 2011. 430.122(a) and Table 610-14(a) 40°C, 60-minute, copper 50°C ambient 2) NFPA 70 National Electric Code 2011. Table 250.122. 3) NFPA 70 National Electric Code 2011. Table 430.52. 4) NFPA 40 National Electric Code 2011. Table 315(b)(2)(a). IMPULSE®•G+ & VG+ Series 4 Instruction Manual - August 2013 3-8 Power Circuit Wiring Procedures To wire the power circuit for IMPULSE®•G+ & VG+ Series 4: 1. Run the three-phase power supply wires through an appropriate enclosure hole. 2. Refer to “Suggested Circuit Protection Specifications and Wire Size” on page 3-6, connect the three-phase power supply wires to a circuit protection system. 3. Connect the three-phase power supply wires from the circuit protection Terminals R/L1, S/L2, and T/L3. 4. From Terminals U/T1, V/T2, and W/T3, connect the power output wires to the motor. If a load reactor is used, connect these output wires to the reactor input instead; then connect the reactor output to the motor. NOTE: If a device that can interrupt power is installed between the drive and the motor, install a reactor on the output side of the drive. Table 3-4: Main Circuit Terminal Wiring Terminal Drive Model 230 V Class 2003 to 2075 2085 to 2115 2145 to 2415 460 V Class 4001 to 4039 4045 to 4060 4075 to 41090 575 V Class 5001 to 5027 5032 to 5041 5052 to 5200 Function R/L1 S/L2 Main circuit power supply input NOTE: 6-pulse operation only Connects line power to the drive T/L3 U/T1 V/T2 Drive Output Connects to the motor W/T3 B1 B2 +2 +1 -- +3 Braking Resistor DC link choke connection (+1, +2) (remove the bar between +1 and +2) DC power supply input (+1, -) Not Available Not Available DC power supply input (+1, -) Not available Same as B1 on models: 2003 to 2115 4001 to 4060 5001 to 5041 DC power supply input (+1, -) Braking unit connections (+3, -) For 230 V class: 100 or less For 460 V class: 10 or less For 575 V class: 10 or less Available for connecting a braking resistor or a braking resistor unit option For connecting: • the drive to a DC power supply (terminals +1 and are not UE/CE or UL approved) • dynamic braking options • a DC link choke Grounding terminal IMPULSE®•G+ & VG+ Series 4 Instruction Manual - August 2013 3-9 Main Circuit Connection Diagram Figure 3-2: Connecting Main Circuit Terminals (2003 to 2075) (4001 to 4039) (5001 to 5027) Figure 3-3: Connecting Main Circuit Terminals (2085 and 2115) (4045 and 4060) (5032 and 5041) IMPULSE®•G+ & VG+ Series 4 Instruction Manual - August 2013 3-10 * Connect optional DBU to terminals B1 and – Figure 3-4: Connecting Main Circuit Terminals (2145 to 2180) (4075 to 4112) (5052 to 5077) Figure 3-5: Connecting Main Circuit Terminals (2215 to 2415) (4150 to 4605) (5099 to 5200) IMPULSE®•G+ & VG+ Series 4 Instruction Manual - August 2013 3-11 * Connect optional DBU to terminals +3 and – Figure 3-6: Connecting Main Circuit Terminals 4810 and 41090 * Connect optional DBU to terminals +3 and – IMPULSE®•G+ & VG+ Series 4 Instruction Manual - August 2013 3-12 Terminal Block Configuration Figure 3-7 and Figure 3-8 show the different main circuit terminal arrangements for the drive capacities. Figure 3-7: Main Circuit Terminal Block Configuration IMPULSE®•G+ & VG+ Series 4 Instruction Manual - August 2013 3-13 <1> Terminal block design differs slightly for models 2215 to 2415, 4180 to 4304, and 5099 to 5200. Figure 3-8: Main Circuit Terminal Block Configuration (continued) IMPULSE®•G+ & VG+ Series 4 Instruction Manual - August 2013 3-14 Insulation Barrier Insulation barriers are packaged with drive models 4370 through 41090 to provide added protection between terminals. Magnetek recommends using the provided insulation barriers to ensure proper wiring. Refer to Figure 3-9 for instructions on placement of the insulation barriers. Figure 3-9: Installing Insulation Barriers Grounding 5. Connect terminal G to the common panel ground. Use ground wiring as specified in “Suggested Circuit Protection and Wire Size” on page 3-6, and keep the length as short as possible. • Ground Resistance: • For 230V class: 100 or less • For 460V class: 10 or less • For 575V class: 10 or less • Never run the IMPULSE®•G+ & VG+ Series 4 drive ground wires in common with welding machines, or other high-current electrical equipment. • When more than one drive is used for the same system, ground each directly or daisy-chain to the ground pole. Do not loop the ground wires. Figure 3-10: Grounding IMPULSE®•G+ & VG+ Series 4 Instruction Manual - August 2013 3-15 Interface Circuit Board S4IF DIP Switches and Jumper (120 VAC, 48 VAC, and 24 VAC) Figure 3-11: S4IF DIP Switches and Jumper Location Table 3-5: Terminal and Wire Specifications Terminal Symbol Terminal Screw Clamping Torque Lb-in (N-m) Wire Range AWG (mm2) TB M3 4.2 to 5.3 (0.5 to 0.6) 26 to 16 (Stranded: 0.14 to 1.5) (Solid: 0.14 to 1.5) Dip Switches DIP Switches are described in this section. The functions of the DIP switches are shown in the table below. Table 3-6: DIP Switches Name Function Setting S1 Input method for analog input A2 V: 0 to 10 VDC or -10 to 10 VDC (internal resistance: 20 ) (default) I: 4-20mA (internal resistance: 250 ) S2 RS-485 and RS-422 terminating resistance OFF: No terminating resistance (default) ON: Terminating resistance of 110 S3 Hardware Base Block Configuration See page 3-17 for setting details S4 Analog 3/PTC input select OFF: A3 is used as Analog Input 3 (default) ON: A3 is used with a Positive Temperature Coefficient (PTC) thermistor S5 Output method for analog output FM V: 0 to 10 VDC or -10 VDC to 10 VDC (default) I: 4 to 20 mA IMPULSE®•G+ & VG+ Series 4 Instruction Manual - August 2013 3-16 Sinking/Sourcing Mode Selection for Safe Disable Inputs Use jumper S3 on the Interface Board to select between Sink mode, Source mode, or external power for the Safe Disable inputs H1 and H2 (as shown in Table 3-7). Jumper S3 is also used to disable the Safe Disable inputs H1 and H2, with the jumpers in place the Safe Disable inputs are disabled. Remove H1 and H2 disable jumpers if external Safe Disable functionality is to be used. Refer to Figure 3-11 for locating jumper S3. Table 3-7: Safe Disable Input Sink/Source/External Power Supply Selection Mode Drive Internal Power Supply External 24 VDC Power Supply Sinking Mode Sourcing Mode (Default) IMPULSE®•G+ & VG+ Series 4 Instruction Manual - August 2013 3-17 Control Circuit Terminals The table below outlines the functions of the control circuit terminals. Terms: • Multi-Function Digital Input (MFDI) • Multi-Function Digital Output (MFDO) • Multi-Function Analog Input (MFAI) • Multi-Function Analog Output (MFAO) Table 3-8: Control Circuit Terminals Classification Sequence Input Signal Analog Input Signal Terminal Signal Function Description Signal Level S1 MFDI 1 (Run Forward) S2 MFDI 2 (Run Reverse) S3 MFDI 3 (Speed 2) S4 MFDI 4 (Speed 3) S5 MFDI 5 (Speed 4) S6 MFDI 6 (Speed 5) S7 MFDI 7 (External Fault) S8 MFDI 8 (Microspeed Gain 1) X2 MFDI Common Common for control signal +V Power supply for analog inputs Positive supply for analog inputs +10.5 VDC, 20 mA -V Power supply for analog inputs Negative supply for analog inputs -10.5 VDC, 20 mA A1 MFAI 1 (Master Frequency Reference) -10 to +10 VDC/-100% to 100% 0 to +10 VDC/0 to 100% -10 to +10 V (20kΩ) 0 to +10 V (20kΩ) A2 MFAI 2 (Not Used) Multi-function analog input (H03-09) -10 to +10 V (20kΩ) 0 to +10 V (20kΩ) 4 to 20 mA (250Ω) A3 MFAI 3 (Master Frequency Reference) Auxiliary analog input (H03-05) -10 to +10 V (20kΩ) 0 to +10 V (20kΩ) AC Analog Common Common for analog signal E(G) Multi-function digital inputs (H01-01 to H01-08) *Programmable input Ground for shielded Earth ground lines and option cards IMPULSE®•G+ & VG+ Series 4 Instruction Manual - August 2013 3-18 Photo-coupler isolation 120 VAC 0V 0V – Classification Terminal Form A Relay: 250 VAC, 1 A 30 VDC, 1 A MFDO (X-Press Programming) (H02-02) Programmable Output Form A Relay: 250 VAC, 1 A 30 VDC, 1 A MFDO (X-Press Programming) (H02-03) Programmable Output Form A Relay: 250 VAC, 1 A 30 VDC, 1 A Fault annunciate Terminals MA-MC: N/O Terminals MB-MC: N/C Terminals MA & MC N/O; closed at major faults Terminals MB & MC N/C open at major fault Form C Relay: 250 VAC, 1 A 30 VDC, 1 A FM MFAO 1 (Output frequency) Multi-function analog output (H04-01 to H04-03) -10 to +10V, 2 mA 0 to +10V, 2 mA 4 to 20 mA AC Analog Common Analog signal common 0V AM MFAO 2 (Output current) Multi-function analog output 2 (H04-04 to H04-06) -10 to +10V, 2 mA 0 to +10V, 2 mA RP Multi-Function Pulse Train Input Input Freq.: 0 to 32 kHz Duty Cycle: 30 to 70% Pulse input frequency reference (H06-01) High level: 3.5 to 13.2 VDC Low Level: 0 to 0.8 VDC Input Impedance: 3kΩ MP Pulse train output (Output frequency) Pulse output frequency (H06-06) R+ Receive (+) R- Receive (-) S+ Transmit (+) S- Transmit (-) IG Shield connection H1 Safe Disable input 1 H2 Safe Disable input 2 HC Safe Disable common M2 M3 M5 M6 MA MB MC Pulse I/O Signal RS-485/422 Safe Disable Signal Level (H02-01) Programmable Output M1 Analog Output Signal Description MFDO (Brake Release) M0 Relay Output Signal Signal Function DM+ DM- For 2-wire RS-485, jumper R+ and S+ and jumper R- and SSerial Communication Shield • One or both open: Motor Output Disabled 32 kHz (max) RS-485/422 Line Driver 115.2 kbps (max) 0V 24 VDC, 8 mA Internal Impedance: 3.3kΩ • Both closed: normal operation – • Off time of at least 1ms Safety monitor output Outputs the status of the Safe Disable Safety monitor output function. Closed when both Safe Disable channels are closed. common 48 VDC, 8 mA – S4IF Control Circuit Terminal Diagram (120 VAC, 48 VAC, 24 VAC) Figure 3-12: S4IF Control Circuit Terminal Diagram IMPULSE®•G+ & VG+ Series 4 Instruction Manual - August 2013 3-19 Safe Torque Off Safe Torque Off disables the drive power section for mechanical maintenance, E-STOPs, or redundant safety monitoring controller intervention. Safe Torque Off provides safe removal of motor torque without removal of power to the drive. The IMPULSE®•G+ & VG+ Series 4 provides this functionality as standard in a safety category 3 architecture, and is designed to meet SIL CL2 according to ISO/EN 13849-1 and IEC/EN 62021 respectively, meeting the requirements for IEC/EN 61508. TUV certified drives can be purchased optionally; consult Magnetek Material Handling for details. The Safe Torque Off feature (Figure 3-14) includes safe disable inputs (H1 and H2) and safe monitor outputs (DM+ and DM-). Figure 3-13: Safe Torque Off Block Diagram IMPULSE®•G+ & VG+ Series 4 Instruction Manual - August 2013 3-20 Wiring the Encoder Circuit A shaft-mounted encoder is required to provide speed and shaft position feedback to IMPULSE®•VG+ Series 4. Without an encoder, a flux vector control cannot operate properly. Before you wire the encoder circuit, refer to the specification tables 3-10 and 3-11 on page 3-22 and “Suggested Circuit Protection Specifications and Wire Size” on page 3-6. Encoder Circuit Wiring Procedures Table 3-9: Encoder Specifications Power supply +12 VDC (+5 VDC by CN3 jumper); if current demand is greater than 200 mA (consult factory if inrush currents exceed 200 mA), an auxiliary power supply must equipped - contact Magnetek to purchase Output Type Quadrature (A and B channels; Z is not required) Type of output circuit High-speed, differential line drive (open collector interface is optional). Maximum Input Frequency 300 kHz Mounting method Encoder must be direct-coupled to motor shaft, using a zero-backlash-type coupling. To wire the encoder circuit for IMPULSE®•VG+ Series 4 (assuming the cover and keypad are detached): 1. Direct-couple the encoder to the motor shaft, using a zero-backlash-type coupling. NOTE: Do not connect the encoder to the motor with roller chain or gear drive. If unable to direct-couple the encoder, use a timing belt to drive the encoder. (Contact Magnetek for encoder kits.) Also, do not connect the encoder to the low-speed shaft of a speed reducer. 2. Connect the encoder to the PG-X3 Encoder Interface Card. Refer to Figure 3-14: “PG-X3 Encoder Card Wiring” on page 3-22. NOTE: Use twisted-pair, shielded cable W100W impedance (Magnetek R-20/6, R-22/6, Belden 9730, or Brand Rex T-11651). Strip the encoder wires .25 in. (5.5 mm). Keep the wiring length less than 300 feet (for cable lengths greater than 300 feet, contact Magnetek for information on available fiber optic cable). 3. Ground the shielded cable to Terminal FE of the PG-X3 Encoder Interface Card (ground only one end of the shielded cable). NOTE: For LakeShore encoders, the shield connection is not considered “Ground.” The shield should be grounded. 4. Whenever possible, the encoder cable should be wired in a continuous run between the motor and drive. If it cannot be a direct run, the splice should be in its own junction box and isolated from the power wires. IMPULSE®•G+ & VG+ Series 4 Instruction Manual - August 2013 3-21 Encoder Wiring Diagrams and Information Encoder 1: Install in option port CN5-C Encoder 2: Install in option port CN5-B. Figure 3-14: PG-X3 Encoder Card Wiring Table 3-10: Encoder Wiring (Lakeshore Model: SL56 and SL85; Avtron Models: M56 and M85) Encoder Signal Wire Color PG-X3 Terminal Red IP Black IG A+ Blue A+ A- Gray A- B+ Green B+ B- Yellow B- -- FE +5 to 15 VDC 0V Shield Table 3-11: PG-X3 Line Driver Encoder Interface Card Specifications Power supply to encoder: Dual; +5 VDC or +12 VDC; 200 mA maximum Encoder input signal: RS-422–level, line-driver-type Pulse monitor output signal (repeater): RS-422–level, line-driver-type or open collector Pulse phases accepted: Phases A and B (both + and -) Maximum input frequency: 300 kHz NOTE: See PG-X3 Open Collector Encoder Card manual for wiring and terminal descriptions. IMPULSE®•G+ & VG+ Series 4 Instruction Manual - August 2013 3-22 Chapter 4 Getting Started This page intentionally left blank. IMPULSE®•G+ & VG+ Series 4 Instruction Manual – August 2013 4-2 Overview With its easy-to-use keypad and X-Press Programming, the IMPULSE®•G+ & VG+ Series 4 makes it easy to get up and running right away. In addition to explaining the keypad and X-Press Programming, this chapter explains how to view the scroll settings, get into the programming mode, and program speeds. Checks Before Powering After mounting and interconnections are completed, verify: • Correct connections. • Correct input power supply (no voltage drop or imbalance, source kVA 500, unless a line reactor is used). • No short circuit conditions. • No loose screw terminals (check especially for loose wire clippings). • Proper load conditions. Precautions • Only start the motor if motor shaft rotation is stopped. • Even with small loading, never use a motor whose nameplate amperage exceeds the inverter rated current. DANGER Extreme caution should be used if braking method is set for Decelerate to stop. If deceleration time is too long, equipment could run into the end stop device, causing damage to equipment or injury to personnel. IMPULSE®•G+ & VG+ Series 4 Instruction Manual – August 2013 4-3 Using the Keypad With five 16-character lines available, the keypad display makes it possible to monitor drive operation, change parameter settings, and view fault codes. In addition, the parameter description is included on the top line of the display. The keypad enables you to: • Program the various drive parameters. • Monitor the functions of the drive. • Read alpha-numeric fault-diagnostic indications. • Operate the drive using the keypad (local operation). WA R N I N G Because of the additional potential hazards that are introduced when any drive is operated locally, we advise you to avoid operating it this way. If the drive is operated locally, be aware that the crane or hoist will move when the RUN button is pressed. Contact Magnetek with any questions. IMPULSE®•G+ & VG+ Series 4 Instruction Manual – August 2013 4-4 Keypad LED and Button Functions Some of the keypad buttons, whose functions are described below, are dual-purpose. The dualpurpose keys have one function when used in a view-only mode, and another function when used in a programming mode. 1 The functions assigned to F1 and F2 vary depending on the current displayed menu. The name of each function appears in the lower half of the display window. • 2 3 Returns to the previous display • Moves the cursor one space to the left. • Pressing and holding this button will return to the Frequency Reference Display. • Moves the cursor to the right. • Resets the drive to clear a fault situation. 4 Starts the drive when in LOCAL mode. 5 Scrolls up to display the next item, selects parameter numbers, and increments setting values. 6 Scrolls down to display the previous item, selects parameter numbers, and decrements setting values. 7 Stops drive operation. *1 8 9 • Enters parameter values and settings. • Selects a menu item to move between displays. • Displays the phone number for the Magnetek Service department. • Switches drive control between the operator (LOCAL) and an external source (REMOTE) for the Run command and frequency reference. *2 • Pressing the key three times resets the maintenance timer, U01-52. 10 Lit while the drive is operating the motor. Flashing when the drive has a phantom fault. 11 Lit while the operator is selected to run the drive (LOCAL mode). 12 Off during normal operation (no fault or alarm). Illuminated when the drive detects an alarm or error. Flashes when an alarm occurs, when an oPE is detected, or when a fault or error occurs during Auto-Tuning. *1 The STOP key has highest priority. Pressing the STOP key will always cause the drive to stop the motor, even if a Run command is active at any external Run command source. *2 The LO/RE key can only switch between LOCAL and REMOTE when the drive is stopped. To enable the LO/RE key to switch between LOCAL and REMOTE, set parameter O02-01 to 1. IMPULSE®•G+ & VG+ Series 4 Instruction Manual – August 2013 4-5 Parameters There are hundreds of parameters that determine how the drive functions. These parameters are programmed into the drive’s software as measurable values or options - both of which will be referred to in this manual as settings. While some of these parameters are associated with one setting, others are tied to a number of possible settings. NOTE: The terms “constant” and “parameter” have the same meaning. Before shipping the drive, Magnetek programmed initial settings in the drive’s software so that most, if not all, of the crane system requirements are supported. However, if it is necessary to change the initial settings, Magnetek recommends that only qualified crane system technicians program the drive. This can be accomplished by using the Password and Access Level features. For more information on these security features, see “Initialization Set-Up” on page 4-9. The drive can be programmed to allow personnel with limited crane system knowledge to program only certain parameters, called User Parameters. To select these parameters, see “User Parameters (A02-01 through 32)” on page 4-15. Two other features to be aware of are Initialize Parameters (A01-05) and User Defaults (O02-03). Both of these features are related and revert back to previously saved parameter settings. This is especially helpful when a number of programming changes were made, but the previous settings may still be needed. To program these features, see “Initialize Parameters (A01-05)” on page 4-14 and “User Defaults (O02-03)” on page 5-120. IMPULSE®•G+ & VG+ Series 4 Instruction Manual – August 2013 4-6 Parameter Modes All parameters are organized under four modes: Operation Mode Drive operation is enabled. Drive status LED is lit. Programming Mode Parameter access levels, control method, motion, speed reference, and passwords are selected. Parameters are set/read. Items to be set/read vary depending on the access level setting. Auto-Tuning Mode Automatically calculates and sets motor parameters to optimize drive performance. Modified Constants Mode Only parameters that have been changed from the factory settings are set/read. IMPULSE®•G+ & VG+ Series 4 Menu Structure Initialize* *Refer to parameter list on page 4-8. Figure 4-1: IMPULSE®•G+ & VG+ Menu Structure IMPULSE®•G+ & VG+ Series 4 Instruction Manual – August 2013 4-7 Group Monitor Initialize Application Special Function Tuning Motor Options Terminal Protection Operator Function U01 U02 U03 U04 U06 A01 A02 B01 B02 B03 B05 B08 C01 C01 C02 C03 C03 C03 C03 C03 C04 C05 C06 C07 C07 C08 C08 C09 C10 C11 C11 C12 C12 C13 D01 D02 D03 D04 D05 D08 D09 D10 D11 E01 E02 E03 F01 F02 F04 F05 F06 F07 H01 H02 H03 H04 H05 H06 L01 L02 L03 L04 L05 L06 L08 L09 O01 O02 O03 O04 IMPULSE®•G+ & VG+ Series 4 Instruction Manual – August 2013 4-8 Monitor Fault Trace Fault History Maintenance Control Monitor Initialization Parameters User-Defined Parameters Preset References Reference Limits Sequence/Reference Source Acceleration/Deceleration Jump Frequencies Quick Stop Reverse Plug Simulation Micro-Speed End of Travel Limits Phantom Stop Klixon Electronic Programmable Limit Switches (EPLS) Hook Height Measurement Load Float 2 Load Check II Swift-Lift/Ultra-Lift Torque Limit Anti-Shock No-Load Brake Hoist Brake Answerback Digital Input Option Set-Up Weight Measurement Slack Cable Detection Snap Shaft Detection Delay Timers and Timer Functions Inching Control Indexing Control DC Injection Braking Motor Slip Compensation Torque Compensation Automatic Speed Regulator Tuning Torque Control Dwell Function S-Curve Acceleration/Deceleration Carrier Frequency Hunting Prevention V/f Pattern 1 Motor Set-up Test Mode Encoder (PG-X3) Option Set-up Analog Input (AI-A3) Option Set-up Analog Output (AO-A3) Option Set-up Digital Output (DO-A3 or S4IO) Option Set-up Communication Option Card Set-Up Ethernet Option Card Set-Up Digital Inputs Digital Outputs Analog Inputs Analog Outputs Serial Communication Set-up Pulse Train Input/Output Set-up Motor Overload Power Loss Ride Thru Stall Prevention Reference Detection Test Mode Torque Detection Hardware Protection Automatic Fault Reset Operator Display Operator Key Maintenance Copy Function Initialization Set-up Parameter Access Level (A01-01) This parameter allows the “masking” of parameters according to user level. See the following table: Table 4-1: Parameter Access Level Settings Setting Description 0 Operation Only Access to only parameters A01-01, A01-06, and all U monitor parameters. 1 User Parameters Accesses parameters selected by OEM or installer (A02-01 to A02-32). These User Parameters can be accessed using the Setup Mode of the digital operator. 2 Advanced Level For advanced programming in special applications. All parameters can be viewed and edited. Control Method Selection (A01-02) Select the control method best suited for your application. Table 4-2: Control Method Selection Settings Setting Description Model 0 V/f Control for Induction Motors (V/f) Use this mode for simple speed control and for multiple motor applications with low demands to dynamic response or speed accuracy. This control method is also used when the motor parameters are unknown and Auto-Tuning cannot be performed. The speed control range is 40:1. G+ 2 Open Loop Vector Control (OLV) Use this mode for general, variable-speed applications that require precise speed control, quick torque response, and high torque at low speed without using a speed feedback signal from the motor (a speed control range of 200:1). G+ 3 Flux Vector Control (FLV) Use this mode for general, variable-speed applications that require precise speed control down to zero speed, quick torque response or precise torque control, and a speed feedback signal from the motor. The speed control range is up to 1500:1. VG+ NOTE: An auto-tune should be performed for all Flux Vector and Open Loop Vector applications. Refer to the Auto-Tuning section on page 4-16. IMPULSE®•G+ & VG+ Series 4 Instruction Manual – August 2013 4-9 X-Press Programming™ X-Press ProgrammingTM automatically configures several commonly used parameters and features when Control Method (A01-02), Motion (A01-03), or Speed Reference (A01-04) are programmed. These parameters are also added to the Quick-Set menu for fast parameter modification. Reference tables 4-5, 4-6, and 4-7 for X-PressTM Programming defaults. Motion (A01-03) Set this parameter to match the motion of application. See X-Press Programming (Table 4-5, 4-6, or 4-7 on pages 4-11, 4-12, and 4-13) for details. Table 4-3: Select Motion Settings Setting Description Model 0 Traverse G+/VG+ 1 Standard Hoist - G+ Default 2 Hoist NLB - VG+ Default 4 Braketronic G+ VG+ G+/VG+ Speed Reference (A01-04) This parameter will automatically define the input terminals for the selections listed below. See XPress Programming (Table 4-5, 4-6, or 4-7 on pages 4-11, 4-12, and 4-13) for details. Table 4-4: Speed Reference Settings Setting Description 0 2-SPD Multi-Step — Defines Terminal S3 = 2nd speed. 1 3-SPD Multi-Step — Defines Terminals S3 and S4 as speeds 2 and 3 respectively (default). 2 5-SPD Multi-Step — Defines Terminals S3-S6 as speeds 2–5. 3 2-Step Infinitely Variable — Terminals S1 and S2 use B01-01 and speed hold. Terminal S3 = Accelerate. 4 3-Step Infinitely Variable — Terminals S1 and S2 use B01-01. Terminal S3 = Speed Hold. Terminal S4 = Accelerate. 5 Uni-Polar Analog — Terminals S1 and S2 = A directional input. Terminal A1 = 010V. Terminal A2 = 4-20mA (when using Terminal A2, set H03-02 to 1F and H03-10 to 0). 6 Bi-Polar Analog — Terminals S1 and S2 = Run Command. Terminals A1 and A2 = direction and frequency -10 to +10VDC. 7 Industrial Coms (Other than MFDI H01-01–08) 8 RS485/RDSI Coms Sets all terminals to “not used.” Reference B03-01 and B0302. WA R N I N G When changing A01-03 or A01-04, MFDI, MFDO, and speed reference parameters will be overwritten by X-Press ProgrammingTM (Table 4-5, 4-6, or 4-7 on pages 4-11, 4-12, and 4-13). All parameter settings must be verified for proper operation. IMPULSE®•G+ & VG+ Series 4 Instruction Manual – August 2013 4-10 Parameters Changed by X-Press Programming Table 4-5: Traverse (A01-03= 0) for G+ and VG+S4 Models A01-04 = Parameter Description 0 1 2 3 4 5 6 7 8 2-Speed MultiStep 3-Speed MultiStep 5-Speed MultiStep 2-Step Infinitely Variable 3-Step Infinitely Variable UniPolar Analog Bi-Polar Analog Industrial Coms RS485/ RDSI Coms B01-01 Speed 1 20.00 15.00 6.00 6.00 6.00 0.00 0.00 15.00 0.00 B01-02 Speed 2 60.00 30.00 15.00 0.00 0.00 0.00 0.00 30.00 0.00 B01-03 Speed 3 0.00 60.00 30.00 0.00 0.00 0.00 0.00 60.00 0.00 B01-04 Speed 4 0.00 0.00 45.00 0.00 0.00 0.00 0.00 0.00 0.00 B01-05 Speed 5 0.00 0.00 60.00 0.00 0.00 0.00 0.00 0.00 0.00 B01-06–16 Speed 6–16 0.00 0.00 0.00 0.00 0.00 0.00 0.00 0.00 0.00 B01-17 Jog Ref 6.00 6.00 6.00 6.00 6.00 6.00 6.00 6.00 6.00 B01-18 Ref Priority 0 0 0 0 0 1 1 0 1 B02-03 Ref. Lower Limit 2.0 2.0 2.0 2.0 2.0 2.0 2.0 2.0 2.0 B03-01 Freq. Ref. Select 1 1 1 1 1 1 1 3 1 B03-02 Run Cmd Select 1 1 1 1 1 1 1 3 1 B03-03 Stopping Method 0 0 0 0 0 0 0 0 0 B05-01 Accel Time 1 5.0 5.0 5.0 5.0 5.0 5.0 5.0 5.0 5.0 B05-02 Decel Time 1 5.0 5.0 5.0 5.0 5.0 5.0 5.0 5.0 5.0 C01-01 Quick Stop 0 0 0 0 0 0 0 0 0 C03-07 Action @ LL1/UL2 2 2 2 2 2 2 2 2 2 C08-10 Load Float Time 0 0 0 0 0 0 0 0 0 C13-12 Index Brake Ctrl 0 0 0 0 0 0 0 0 0 D09-01 S-Curve Accel at Start 1.50 1.50 1.50 1.50 1.50 1.50 1.50 1.50 1.50 D09-02 S-Curve Accel at End 1.50 1.50 1.50 1.50 1.50 1.50 1.50 1.50 1.50 D09-03 S-Curve Decel at Start 1.50 1.50 1.50 1.50 1.50 1.50 1.50 1.50 1.50 E01-03 V/f Selection 00 00 00 00 00 00 00 00 00 H01-01 Terminal S1 Select 80 80 80 80 80 80 80 80 80 H01-02 Terminal S2 Select 81 81 81 81 81 81 81 81 81 H01-03 Terminal S3 Select 00 00 00 05 04 0F 0F 0F 0F H01-04 Terminal S4 Select 0F 01 01 0F 05 0F 0F 0F 0F H01-05 Terminal S5 Select 0F 0F 02 0F 0F 0F 0F 0F 0F H01-06 Terminal S6 Select 0F 0F 03 0F 0F 0F 0F 0F 0F H01-07 Terminal S7 Select 0F 0F 0F 0F 0F 0F 0F 0F 0F H01-08 Terminal S8 Select 0F 0F 0F 0F 0F 0F 0F 0F 0F H02-01 Terminal M0/M1 Select 000 000 000 000 000 000 000 000 000 H02-02 Terminal M2/M3 Select 00F 00F 00F 00F 00F 00F 00F 00F 00F H02-03 Terminal M5/M6 Select 00F 00F 00F 00F 00F 00F 00F 00F 00F H03-01 Terminal A1 Signal Level 0 0 0 0 0 0 1 0 0 H03-02 Terminal A1 Select 0 0 0 0 0 0 0 0 0 H03-06 Terminal A3 Select 1F 1F 1F 1F 1F 1F 1F 1F 1F H03-10 Terminal A2 Select 1F 1F 1F 1F 1F 1F 1F 1F 1F IMPULSE®•G+ & VG+ Series 4 Instruction Manual – August 2013 4-11 Table 4-6: Hoist - Standard Hoist (A01-03 = 1) for G+S4 Models A01-04 = Parameter Description 0 1 2 3 4 5 6 7 8 2-Speed MultiStep 3-Speed MultiStep 5-Speed MultiStep 2-Step Infinitely Variable 3-Step Infinitely Variable UniPolar Analog Bi-Polar Analog Industrial Coms RS485/ RDSI Coms 15.00 6.00 6.00 6.00 0.00 0.00 15.00 0.00 B01-01 Speed 1 20.00 B01-02 Speed 2 60.00 30.00 15.00 0.00 0.00 0.00 0.00 30.00 0.00 B01-03 Speed 3 0.00 60.00 30.00 0.00 0.00 0.00 0.00 60.00 0.00 B01-04 Speed 4 0.00 0.00 45.00 0.00 0.00 0.00 0.00 0.00 0.00 B01-05 Speed 5 0.00 0.00 60.00 0.00 0.00 0.00 0.00 0.00 0.00 B01-06–16 Speed 6–16 0.00 0.00 0.00 0.00 0.00 0.00 0.00 0.00 0.00 B01-17 Jog Ref 6.00 6.00 6.00 6.00 6.00 6.00 6.00 6.00 6.00 B01-18 Ref Priority 0 0 0 0 0 1 1 0 1 B02-03 Ref. Lower Limit 2.0 2.0 2.0 2.0 2.0 2.0 2.0 2.0 2.0 B03-01 Freq. Ref. Select 1 1 1 1 1 1 1 3 1 B03-02 Run Cmd Select 1 1 1 1 1 1 1 3 1 B03-03 Stopping Method 1 1 1 1 1 1 1 1 1 B05-01 Accel Time 1 5.0 5.0 5.0 5.0 5.0 5.0 5.0 5.0 5.0 B05-02 Decel Time 1 3.0 3.0 3.0 3.0 3.0 3.0 3.0 3.0 3.0 C01-01 Quick Stop 0 0 0 0 0 0 0 0 0 C03-07 Action @ LL1/UL2 1 1 1 1 1 1 1 1 1 C08-10 Load Float Time 0 0 0 0 0 0 0 0 0 C13-12 Index Brake Ctrl 0 0 0 0 0 0 0 0 0 D09-01 S-Curve Accel at Start 0.50 0.50 0.50 0.50 0.50 0.50 0.50 0.50 0.50 D09-02 S-Curve Accel at End 0.50 0.50 0.50 0.50 0.50 0.50 0.50 0.50 0.50 D09-03 S-Curve Decel at Start 0.50 0.50 0.50 0.50 0.50 0.50 0.50 0.50 0.50 E01-03 V/f Selection 04 04 04 04 04 04 04 04 04 H01-01 Terminal S1 Select 80 80 80 80 80 80 80 80 80 H01-02 Terminal S2 Select 81 81 81 81 81 81 81 81 81 H01-03 Terminal S3 Select 00 00 00 05 04 0F 0F 0F 0F H01-04 Terminal S4 Select 0F 01 01 0F 05 0F 0F 0F 0F H01-05 Terminal S5 Select 0F 0F 02 0F 0F 0F 0F 0F 0F H01-06 Terminal S6 Select 0F 0F 03 0F 0F 0F 0F 0F 0F H01-07 Terminal S7 Select 0F 0F 0F 0F 0F 0F 0F 0F 0F H01-08 Terminal S8 Select 0F 0F 0F 0F 0F 0F 0F 0F 0F H02-01 Terminal M0/M1 Select 000 000 000 000 000 000 000 000 000 H02-02 Terminal M2/M3 Select 00F 00F 00F 00F 00F 00F 00F 00F 00F H02-03 Terminal M5/M6 Select 00F 00F 00F 00F 00F 00F 00F 00F 00F H03-01 Terminal A1 Signal Level 0 0 0 0 0 0 1 0 0 H03-02 Terminal A1 Select 0 0 0 0 0 0 0 0 0 H03-06 Terminal A3 Select 1F 1F 1F 1F 1F 1F 1F 1F 1F H03-10 Terminal A2 Select 1F 1F 1F 1F 1F 1F 1F 1F 1F IMPULSE®•G+ & VG+ Series 4 Instruction Manual – August 2013 4-12 Table 4-7: Hoist NLB (A01-03 = 2) for VG+S4 Models A01-04 = Parameter Description 0 1 2 3 4 5 6 7 8 2-Speed MultiStep 3-Speed MultiStep 5-Speed MultiStep 2-Step Infinitely Variable 3-Step Infinitely Variable UniPolar Analog Bi-Polar Analog Industrial Coms RS485/ RDSI Coms 15.00 6.00 6.00 6.00 0.00 0.00 15.00 0.00 B01-01 Speed 1 20.00 B01-02 Speed 2 60.00 30.00 15.00 0.00 0.00 0.00 0.00 30.00 0.00 B01-03 Speed 3 0.00 60.00 30.00 0.00 0.00 0.00 0.00 60.00 0.00 B01-04 Speed 4 0.00 0.00 45.00 0.00 0.00 0.00 0.00 0.00 0.00 B01-05 Speed 5 0.00 0.00 60.00 0.00 0.00 0.00 0.00 0.00 0.00 B01-06–16 Speed 6–16 0.00 0.00 0.00 0.00 0.00 0.00 0.00 0.00 0.00 B01-17 Jog Ref 6.00 6.00 6.00 6.00 6.00 6.00 6.00 6.00 6.00 B01-18 Ref Priority 0 0 0 0 0 1 1 0 1 B02-03 Ref. Lower Limit 0.0 0.0 0.0 0.0 0.0 0.0 0.0 0.0 0.0 B03-01 Freq. Ref. Select 1 1 1 1 1 1 1 3 1 B03-02 Run Cmd Select 1 1 1 1 1 1 1 3 1 B03-03 Stopping Method 6 6 6 6 6 6 6 6 6 B05-01 Accel Time 1 5.0 5.0 5.0 5.0 5.0 5.0 5.0 5.0 5.0 B05-02 Decel Time 1 3.0 3.0 3.0 3.0 3.0 3.0 3.0 3.0 3.0 C01-01 Quick Stop 1 1 1 1 1 1 1 1 1 C03-07 Action @ LL1/UL2 2 2 2 2 2 2 2 2 2 C08-10 Load Float Time 10 10 10 10 10 10 10 10 10 C13-12 Index Brake Ctrl 2 2 2 2 2 2 2 2 2 D09-01 S-Curve Accel at Start 0.50 0.50 0.50 0.50 0.50 0.50 0.50 0.50 0.50 D09-02 S-Curve Accel at End 0.50 0.50 0.50 0.50 0.50 0.50 0.50 0.50 0.50 D09-03 S-Curve Decel at Start 0.50 0.50 0.50 0.50 0.50 0.50 0.50 0.50 0.50 E01-03 V/f Selection 0F 0F 0F 0F 0F 0F 0F 0F 0F H01-01 Terminal S1 Select 80 80 80 80 80 80 80 80 80 H01-02 Terminal S2 Select 81 81 81 81 81 81 81 81 81 H01-03 Terminal S3 Select 00 00 00 05 04 0F 0F 0F 0F H01-04 Terminal S4 Select 0F 01 01 0F 05 0F 0F 0F 0F H01-05 Terminal S5 Select 0F 0F 02 0F 0F 0F 0F 0F 0F H01-06 Terminal S6 Select 0F 0F 03 0F 0F 0F 0F 0F 0F H01-07 Terminal S7 Select 0F 0F 0F 0F 0F 0F 0F 0F 0F H01-08 Terminal S8 Select 0F 0F 0F 0F 0F 0F 0F 0F 0F H02-01 Terminal M0/M1 Select 000 000 000 000 000 000 000 000 000 H02-02 Terminal M2/M3 Select 000 000 000 000 000 000 000 000 000 H02-03 Terminal M5/M6 Select 078 078 078 078 078 078 078 078 078 H03-01 Terminal A1 Signal Level 0 0 0 0 0 0 1 0 0 H03-02 Terminal A1 Select 0 0 0 0 0 0 0 0 0 H03-06 Terminal A3 Select 1F 1F 1F 1F 1F 1F 1F 1F 1F H03-10 Terminal A2 Select 1F 1F 1F 1F 1F 1F 1F 1F 1F IMPULSE®•G+ & VG+ Series 4 Instruction Manual – August 2013 4-13 Initialize Parameters (A01-05) Use this parameter to reset the inverter to its factory default settings. Table 4-8: Initialize Parameter Settings Setting 0 NOTE: Description No Initialization (factory default) 1110 User Default (defaults) Resets parameters to the values saved by the user as User Settings. User Settings are stored when parameter O02-03 is set to “1: Set defaults”. NOTE: User Initialization resets all parameters to a user-defined set of default values previously saved to the drive. Set parameter O02-03 to 2 to clear the user-defined default values. 5432 Cntrl Int→Term Moves the parameters stored in the control board and copies them to the terminal board. 5550 Control Init (OPE04 Reset) An oPE04 error appears on the digital operator when a interface card with settings saved to its built-in memory is installed in a drive that has edited parameters. Set A01-05 to 5550 to use the parameter settings saved to the terminal block memory. 7770 Swap Setup Prepares all modified and user parameters for IF card removal. 8880 Swap Exe Prepares new IF card with previously modified and user parameters after A01-05 = 7770 has been executed. Performing a 7770 initialization will clear a parameter set stored in the digital operator. Password Entry (A01-06) This parameter enables the user to set a password that inhibits the programming of the parameters. This function is useful when used in conjunction with the access level parameter A01-01. To set the password, enter a password number in parameter A01-07 and press the key. If A01-06 is not the same as A01-07, A01-01 cannot be changed once A01-01 is set to 0 or 1. When A01-06 is the same as A01-07, A01-01 can be changed. To create a password, when A01-06 is displayed, press the to set A01-07. and key simultaneously IMPULSE®•G+ & VG+ Series 4 Instruction Manual – August 2013 4-14 User Parameters (A02-01 through 32) The user can select up to 32 parameters for quick-access programming. By setting the user access level (A01-01) to “User Program”, only the parameters selected in function A2 can be accessed by the user. To assign a parameter as a user parameter, go to the A2 level in the initialize menu. Once the A2 parameters are set and A01-01 is programmed to “User Program”, only the parameters visible in the program menu will be assigned to an A2 parameter. The A2 group is pre-loaded with the settings listed in table 4-9, based on A01-03. Table 4-9: Application Quick Set A01-03 0 1 2 Favorite Traverse Std Hoist NLB Hoist -- B01-01: Speed 1 B01-01: Speed 1 B01-01: Speed 1 A02-01 B01-02: Speed 2 B01-02: Speed 2 B01-02: Speed 2 A02-02 B01-03: Speed 3 B01-03: Speed 3 B01-03: Speed 3 A02-03 B01-04: Speed 4 B01-04: Speed 4 B01-04: Speed 4 A02-04 B01-05: Speed 5 B01-05: Speed 5 B01-05: Speed 5 A02-05 B03-04: Change Rotation B03-04: Change Rotation B03-04: Change Rotation A02-06 B05-01: Accel Time 1 B05-01: Accel Time 1 B05-01: Accel Time 1 A02-07 B05-02: Decel Time 1 B05-02: Decel Time 1 B05-02: Decel Time 1 A02-08 C01-03: Reverse Plug C02-01: MicroSpd Gain 1 C01-01: Quick Stop A02-09 C01-04: Rev-Plg Dec Time C03-01: UL1 Speed C01-02: Quick Stop Time A02-10 C01-05: Rev-Plg Acc Time C03-04: LL1 Speed C02-01: MicroSpd Gain 1 A02-11 C02-01: MicroSpd Gain 1 C06-01: Swift-Lift C03-01: UL1 Speed A02-12 E01-03: V/f Selection C06-02: SwiftLift FWDSpd C03-04: LL1 Speed A02-13 E02-01: Motor Rated FLA C06-03: SwiftLift REVSpd C06-01: Ultra-Lift A02-14 H01-06: Terminal S6 Select C06-04: SL FWD Current/Torque C06-02: UltraLift FWDSpd A02-15 H01-07: Terminal S7 Select C06-05: SL REV Current/Torque C06-03: UltraLift REVSpd A02-16 H01-08: Terminal S8 Select C06-06: SL Enabling Spd C06-04: UL FWD Torque A02-17 H02-03: Terminal M5/M6 Select E01-03: V/F Selection C06-05: UL REV Torque A02-18 H03-02: Terminal A1 Function Select E01-04: Max Frequency C08-03: Min Brk Rel Trq A02-19 H04-02: Terminal FM Gain E02-01: Motor Rated FLA C08-10: Load Float Time A02-20 -- H01-06: Terminal S6 Select C08-11: Brake Set Delay A02-21 -- H01-07: Terminal S7 Select C08-14: Brake Hold Speed A02-22 -- H01-08: Terminal S8 Select F01-01: PG1 Pulses/Rev A02-23 -- H02-03: Terminal M5/M6 Select F01-05: PG1 #Gear Teeth2 A02-24 -- H03-02: Terminal A1 Function Select H01-06: Terminal S6 Select A02-25 -- H04-02: Terminal FM Gain H01-07: Terminal S7 Select A02-26 -- -- H01-08: Terminal S8 Select A02-27 -- -- H02-03: Terminal M5/M6 Select A02-28 -- -- H03-02: Terminal A1 Function Select A02-29 -- -- H04-02: Terminal FM Gain A02-30 -- -- -- A02-31 -- -- -- A02-32 -- -- -- IMPULSE®•G+ & VG+ Series 4 Instruction Manual – August 2013 4-15 Auto-Tuning CAUTION The brake output is not energized during Auto-Tune. The brake must be manually released before tuning and set when Auto-Tuning is complete. Ensure no load is on the hook, and that the hook is near the floor. The IMPULSE®•G+ & VG+ Series 4 can adapt to nearly all motors manufactured worldwide with its automatic tuning function. The inverter asks the user for minimal motor information, and then guides the user through a quick simple tuning process. Ideally, perform a standard Auto-Tune with the motor uncoupled from the load. When the motor cannot be disconnected from the load, perform a static or non-rotating Auto-Tune. NOTE: Contact Magnetek’s service department if an auto-tune can not be performed. Table 4-10: Auto-Tuning Parameter Settings Parameter Code Display Description Tuning Mode Sel Selects Tuning Method Default Setting G+ VG+ V/f OLV FLV 0 x x x 0 Standard Tuning (Rotational Auto-Tuning) T01-01 1 Tune-No Rotate1 (Stationary Auto-Tuning 1)** 2 Term Resistance (Stationary Auto-Tuning for Lineto-Line Resistance) 4 Tune-No Rotate2 (Stationary Auto-Tuning 2) T01-02 Rated Horsepower Sets the motor rated HP as specified on the motor nameplate (note: HP = kW/0.746) Model dependent x x x T01-03 Rated Voltage Sets the motor rated voltage as specified on the motor nameplate Model dependent x x x T01-04 Rated Current Set the motor rated full-load current (FLA) as specified on the motor nameplate Model dependent x x x T01-05 Rated Frequency Set the rated frequency of the motor as specified on the motor nameplate 60.0 Hz x x x T01-06 the number of motor poles as Number of Poles Sets specified on the motor nameplate 4 x x x T01-07 Rated Speed Sets the rated speed of the motor as specified on the motor nameplate 1750 RPM x x x T01-08 PG Pulses/Rev Set the number of pulses per revolution for the PG being used (pulse generator or encoder) 1024 PPR -- -- x * If the value is not known, leave at default. ** See page 4-18 for Non-Rotational Auto-Tune instructions. IMPULSE®•G+ & VG+ Series 4 Instruction Manual – August 2013 4-16 Parameter Code Display Description Default Setting G+ VG+ V/f OLV FLV T01-09* Sets the no-load current for the motor. After setting the motor capacity to T01-02 and the motor rated current to T01-04, this will automatically No-Load Current parameter display the no-load current for a standard 4 pole motor. Enter the no-load current as indicated on the motor test report or motor nameplate. -- -- -- x T01-10* Sets the motor rated slip. After setting the motor capacity to T0102, this parameter will display the motor Motor Rated Slip automatically slip for a 4 pole motor. Enter the motor slip as indicated on the motor test report or motor nameplate. -- -- -- x * If the value is not known, leave at default. ** See page 4-18 for Non-Rotational Auto-Tune instructions. Standard Auto-Tune (T01-01 = 0) Instructions This is a rotational Auto-Tuning method for the IMPULSE®•VG+ Series 4 drive which allows for Auto-Tuning on an unloaded or decoupled the motor. This method requires that the motor be unloaded or decoupled from the load with the brake also disengaged. The instructions below will provide a step-by-step procedure to complete the non-rotational segment of this Auto-Tune function: 1. In preparation for the Auto-Tune, the crane should be unloaded with minimal attachments. This Auto-Tuning method requires free rotation of the unloaded motor, so decoupling the motor from the load may be necessary. 2. Ensure the break is not set during the Auto-Tuning process. 3. Using the keypad, browse to the “Auto-Tuning” menu. 4. Choose “Standard Tuning” (T01-01 = 0) for the Tuning Mode. 5. Enter the nameplate motor characteristics (T01-02 – T01-08) until the “Tuning Ready?” screen is reached. 6. Press the green “RUN” key to start the Auto-Tune. It will take up to a few minutes to complete. During this time, the current will ramp up and down and a high pitched frequency may be audible coming from the motor; this is normal. The motor will then begin a rotational cycle, which will complete in one minute or less. 7. When the Auto-Tune has completed, the keypad display will display an “End Tune Successful” message. Press the “ESC” key twice to exit. NOTE: If the STOP key is depressed during tuning, auto-tuning is interrupted and the motor coasts to a stop. The data changed during tuning returns to its original values. IMPULSE®•G+ & VG+ Series 4 Instruction Manual – August 2013 4-17 Non-Rotational Auto-Tune (T01-01 = 1) Instructions A non-rotational Auto-Tuning method has been implemented into the IMPULSE®•VG+ Series 4 drive which allows for Auto-Tuning without decoupling the motor. This method will require a short movement of the crane subsequent to the non-rotational Auto-Tune process which allows the drive to calibrate the Motor Rated Slip and No-Load Current. The instructions below will provide a step-by-step procedure to complete the non-rotational segment of this Auto-Tune function: 1. In preparation for the Auto-Tune, the crane should be unloaded with minimal hook attachments. For Traverse motion, ensure freedom of travel for Step #6. 2. Using the keypad, browse to the “Auto-Tuning” menu. 3. Choose “Tune-No Rotate1” (T01-01 = 1) for the Tuning Mode. 4. Enter the nameplate motor characteristics (T01-02 ~ T01-09) until the “Tuning Ready?” screen is reached. 5. Press the green “RUN” key to start the Auto-Tune. It will take up to a few minutes to complete. During this time, the current will ramp up and down and a high pitched frequency may be audible coming from the motor; this is normal. When the Auto-Tune has completed, the keypad display will display an “End Tune Successful” message. Press the “ESC” key twice to exit. 6. Run the motor to at least 30% of the Rated Frequency (T01-05). For example, if the Rated Frequency is 60 Hz, the motor must run to at least 18 Hz. In a hoisting motion, the motor must be run in the Up/Raising direction. NOTE: In hoisting motions, remove any loads or spreader bars. 7. When the short run and adjustments have been completed, the motor will stop, and the keypad will display “TMDN Tune Complete”. The Auto-Tune is now complete and the drive is ready for normal operation. IMPULSE®•G+ & VG+ Series 4 Instruction Manual – August 2013 4-18 Terminal Resistance Auto-Tune (T01-01 = 2) Instructions This is a non-rotational Auto-Tuning method for the IMPULSE®•G+ Series 4 drive which allows for Auto-Tuning without decoupling the motor. This method is recommended for motors configured with the V/f control method when the motor horsepower and motor rated current are known. The instructions below will provide a step-by-step procedure to complete the non-rotational segment of this Auto-Tune function: 1. In preparation for the Auto-Tune, the crane should be unloaded with minimal hook attachments. 2. Using the keypad, browse to the “Auto-Tuning” menu. 3. Choose “Term Resistance” (T01-01 = 2) for the Tuning Mode. 4. Enter the nameplate motor characteristics for Motor Horsepower and Motor Rated Current (T0102 and T01-04) until the “Tuning Ready?” screen is reached. 5. Press the green “RUN” key to start the Auto-Tune. It will take up to a few minutes to complete. During this time, the current will ramp up and down and a high pitched frequency may be audible coming from the motor; this is normal. When the Auto-Tune has completed, the keypad display will display an “End Tune Successful” message. Press the “ESC” key twice to exit. Non-Rotational 2 Auto-Tune (T01-01 = 4) Instructions This is a non-rotational Auto-Tuning method for the IMPULSE®•VG+ Series 4 drive which allows for Auto-Tuning without decoupling the motor. This method is recommended when the motor cannot be decoupled, and the Motor Rated Slip is known. If the Motor Rated Slip is not known, then the Non-Rotational 1 (T01-01 = 1) is recommended. The instructions below will provide a step-by-step procedure to complete the non-rotational segment of this Auto-Tune function: 1. In preparation for the Auto-Tune, the crane should be unloaded with minimal hook attachments. 2. Using the keypad, browse to the “Auto-Tuning” menu. 3. Choose “Tune-No Rotate2” (T01-01 = 4) for the Tuning Mode. 4. Enter the nameplate motor characteristics (T01-02 ~ T01-10) until the “Tuning Ready?” screen is reached. 5. Press the green “RUN” key to start the Auto-Tune. It will take up to a few minutes to complete. During this time, the current will ramp up and down and a high pitched frequency may be audible coming from the motor; this is normal. When the Auto-Tune has completed, the keypad display will display an “End Tune Successful” message. Press the “ESC” key twice to exit. IMPULSE®•G+ & VG+ Series 4 Instruction Manual – August 2013 4-19 This page intentionally left blank. IMPULSE®•G+ & VG+ Series 4 Instruction Manual – August 2013 4-20 Chapter 5 Programming Advanced Features This page intentionally left blank. IMPULSE®•G+ & VG+ Series 4 Instruction Manual – August 2013 5-2 Introduction This chapter features parameters that are available only when the Series 4 drive is in Advanced mode. Application • B1 Preset References • B2 Reference Limits • B3 Sequence/Reference Source • B5 Acceleration/Deceleration • B8 Jump Frequencies Preset Reference Table 5-1: Preset Reference Parameter Settings Parameter Code Display Function Range** Initial Value B01-01 Reference 1 Sets the Speed 1 frequency. 0.00–E01-04 Hz 15.00* B01-02 Reference 2 Sets the Speed 2 frequency. 0.00–E01-04 Hz 30.00* B01-03 Reference 3 Sets the Speed 3 frequency. 0.00–E01-04 Hz 60.00* B01-04 Reference 4 Sets the Speed 4 frequency. 0.00–E01-04 Hz 0.00* B01-05 Reference 5 Sets the Speed 5 frequency. 0.00–E01-04 Hz 0.00* B01-06 Reference 6 Sets the Speed 6 frequency. 0.00–E01-04 Hz 0.00* B01-07 Reference 7 Sets the Speed 7 frequency. 0.00–E01-04 Hz 0.00* B01-08 Reference 8 Sets the Speed 8 frequency. 0.00–E01-04 Hz 0.00* B01-09 Reference 9 Sets the Speed 9 frequency. 0.00–E01-04 Hz 0.00* B01-10 Reference 10 Sets the Speed 10 frequency. 0.00–E01-04 Hz 0.00* B01-11 Reference 11 Sets the Speed 11 frequency. 0.00–E01-04 Hz 0.00* B01-12 Reference 12 Sets the Speed 12 frequency. 0.00–E01-04 Hz 0.00* B01-13 Reference 13 Sets the Speed 13 frequency. 0.00–E01-04 Hz 0.00* B01-14 Reference 14 Sets the Speed 14 frequency. 0.00–E01-04 Hz 0.00* B01-15 Reference 15 Sets the Speed 15 frequency. 0.00–E01-04 Hz 0.00* B01-16 Reference 16 Sets the Speed 16 frequency. 0.00–E01-04 Hz 0.00* B01-17 Jog Reference Jog Control and Inching Control frequency reference. 0.00–E01-04 Hz 6.00 B01-18 Ref Priority Determines whether the digital or analog frequency reference is used. NOTE: When using Higher Reference Select, 2-Step Infinitely Variable should NOT be used for a 0–2 Speed Reference setting in parameter A01-04. The two functions are not intended to work in conjunction. 0 Digital Ref Only 1 Analog Ref Only 2 Higher RefSelect 0* * Initial value is determined by X-Press Programming (Table 4-5, 4-6, or 4-7 on pages 4-11, 4-12, and 4-13). ** Consult Magnetek for frequencies above 150 Hz. IMPULSE®•G+ & VG+ Series 4 Instruction Manual – August 2013 5-3 Table 5-2: Multi-Step Speed Processing by Multi-Function Input (B01-01–B01-16) Speed Reference STOP B01-01 Speed Ref 1 B01-02 Speed Ref 2 B01-03 Speed Ref 3 B01-04 Speed Ref 4 B01-05 Speed Ref 5 B01-06 Speed Ref 6 B01-07 Speed Ref 7 B01-08 Speed Ref 8 B01-09 Speed Ref 9 B01-10 Speed Ref 10 B01-11 Speed Ref 11 B01-12 Speed Ref 12 B01-13 Speed Ref 13 B01-14 Speed Ref 14 B01-15 Speed Ref 15 B01-16 Speed Ref 16 Forward/ Reverse Terminal S1 or S2 Multi-Step Speed 2 H01-01–08 = 0 Multi-Step Speed 3 H01-01–08 = 1 Multi-Step Speed 4 H01-01–08 = 2 Multi-Step Speed 5 H01-01–08 = 3 Fwd/Rev Jog Fwd/Rev Inch H01-01–08 = 15, 16, 17, 18 Off – – – – Off On Off Off Off Off Off On On Off Off Off Off On On On Off Off Off On On On On Off Off On On On On On Off On Off On Off Off Off On Off On On Off Off On Off Off On Off Off On Off On On On Off On Off Off On On Off On Off Off Off On Off On On Off Off On Off On On On Off On Off On Off On Off On Off On On Off On Off Off On On Off On On Off IMPULSE®•G+ & VG+ Series 4 Instruction Manual – August 2013 5-4 Reference Limits These parameters limit the frequency range as a percentage of maximum output frequency (E0104). However, if the lower limit is below the DC Inj Start Freq (D01-01), then operation will continue according to B03-05. An alternate upper limit frequency can be used during operation when a Multi-Function Digital Input (MFDI) is set to 59 (Alt F-Ref Up Lmt) and the MFDI is on. Table 5-3: Reference Limit Parameter Settings Parameter Code Display Function Range Initial Value B02-01 Ref Upper Limit Sets as a percentage of the maximum output frequency (E0104), which determines the maximum frequency at which the drive is able to run. 0.0–110.0% 100.0* B02-02 Ref Lower Limit Sets as a percentage of the maximum output frequency (E0104), which determines the minimum master frequency reference only. 0.0–110.0% 0.0 B02-03 Ref1 Lower Limit Sets as a percentage of the maximum output frequency (E0104), which determines the minimum frequency at which the drive is able to run. 0.0–110.0% 2.0* B02-04 Alt Upper Limit Alternate of B02-01 set by MFDI=59. 0.0–110.0% 0.0 * Initial value is determined by X-Press Programming (Table 4-5, 4-6, or 4-7 on pages 4-11, 4-12, and 4-13). Figure 5-1: Setting Frequency Upper and Lower Limits IMPULSE®•G+ & VG+ Series 4 Instruction Manual – August 2013 5-5 Sequence/Reference Source B03-01 and B03-02 determine the source from where the frequency reference and RUN command are generated. Table 5-4: Sequence/Reference Source Parameter Settings Parameter Code Display Function Range Initial Value B03-01 Ref Source 1 Source from where the frequency reference is generated. 0-4 1* 0 Operator Digital Operator 1 Terminals 0-3 1* 2 Serial Com Terminals or Analog Input • S4-IF Interface Card • S4-I AC Digital Input Option • S4-IO Digital Input/Output Option • DI-A3 Digital Input Option (not used for B03-02) Serial communication • 3 Option PCB Industrial Communication Option card (Port CN5-A) • 4 B03-02 Pulse Input RS485/422 Serial Communications (R+, R-, S+, S-) EtherNet/IP • Modbus TCP/IP • PROFINET • PROFIBUS-DP Pulse input via Terminal RP(H0601) Run Source 1 Source from where the RUN command is generated. 0 Operator Digital Operator 1 Terminals 2 Serial Com Terminals • S4-IF Interface Card • S4-I AC Digital Input Option • S4-IO Digital Input/Output Option • DI-A3 Digital Input Option (not used for B03-02) Serial communication • 3 Option PCB RS485/422 Serial Communications (R+, R-, S+, S-) Industrial Communication Option card (Port CN5-A) • EtherNet/IP • Modbus TCP/IP • PROFINET • PROFIBUS-DP * Initial value is determined by X-Press Programming (Table 4-5, 4-6, or 4-7 on pages 4-11, 4-12, and 4-13). IMPULSE®•G+ & VG+ Series 4 Instruction Manual – August 2013 5-6 Stop Method B03-03 selects the stopping method suitable for the particular application. Table 5-5: Stop Method Parameter Settings Parameter Code Display Function Range Initial Value B03-03 Stopping Method Determines stop method. 0, 1, 4, 6 0 Decel to Stop (Fig 5-2) G+/VG+ 1 Coast to Stop (Fig 5-3) G+/VG+ 4 Decel with timer (Traverse mode only) (Fig 5-4) G+/VG+ 6 No Load Brake See No-Load Brake Parameter Group C8. VG+ Model G+: 0* VG+: 6* * Initial value is determined by X-Press Programming (Table 4-5, 4-6, or 4-7 on pages 4-11, 4-12, and 4-13). Decel to Stop (B03-03=0) Upon removal of the FWD or REV run command, the motor decelerates at a rate determined by the time set in deceleration time 1 (B05-02) and DC injection braking is applied after the DC injection start frequency D01-01 has been reached. If the deceleration time is set too short or the load inertia is too large, an overvoltage fault (OV) may occur during deceleration. In this case, increase the deceleration time or install an optional braking transistor and/or braking resistor. Figure 5-2: Decel to Stop IMPULSE®•G+ & VG+ Series 4 Instruction Manual – August 2013 5-7 Coast to Stop (B03-03=1) Upon removal of the FWD or REV run command, the motor starts to coast and the electric brake sets. Run Command Frequency Output Base Block Brake Output Figure 5-3: Coast to Stop Decel w/Timer (B03-03=4) NOTE: This option is only available in traverse motion. Upon run command removal, the motor decelerates to stop. The brake delays for a time interval (C12-02) before it is set. This option reduces brake wear for applications that involve frequent stopping and starting. Figure 5-4: Decel w/Timer IMPULSE®•G+ & VG+ Series 4 Instruction Manual – August 2013 5-8 Motor Rotation Change This parameter allows you to change the motor direction without changing the motor leads. Table 5-6: Motor Rotation Parameter Settings Parameter Code Display Function Range Initial Value B03-04 Change Rotation Reverse motor direction 0, 1 0 NOTE: 0 Standard 1 SwitchPhaseOrder Switch phase order (reverses the direction of the motor To reverse the direction of rotation, program B03-04 = 1 (exchange phases), or interchange any two motor leads (changing R/L1, S/L2, or T/L3 will not affect the shaft rotation direction) as well as encoder phasing (F01-02 = 0/1 or swapping A and A wires). Zero-Speed Operation This parameter sets the speed reference level at which Zero Speed mode operation will activate. Table 5-7: Zero-Speed Operation Parameter Settings Parameter Code Display Function Range Initial Value Model B03-05 Zero-Speed Oper Operation Selection at Zero Speed. 0–3 0 0 RUN at Freq Ref Operate according to the Frequency Reference VG+ 1 STOP Coast when the Frequency Reference is below E01-09 VG+ 2 RUN at Min Freq Output the Frequency set in E0109 VG+ 3 RUN at Zero RPM Operate at zero speed VG+ IMPULSE®•G+ & VG+ Series 4 Instruction Manual – August 2013 5-9 Input Scan Time B03-06 selects the microprocessor scan time for reading sequence input data from the control circuit terminals. Set B03-06 to “0” when a quicker response is needed from the control circuit terminal. Table 5-8: Input Scan Time Parameter Settings Parameter Code B03-06 Display Function Range Initial Value 0, 1 1 Cntl Input Scans Selects the terminal scan time 0 1 Scan 1 ms 1 2 Scans 2 ms LO/RE Run Select If the run reference/speed reference is switched between serial mode and drive terminal mode, B03-07 determines action after the switch. Table 5-9: LO/RE Run Select Parameter Settings Parameter Code Display Function Range Initial Value B03-07 LO/RE RUN Sel Determines action after switching Run/Speed reference source. 0, 1 0 0 Cycle Extrn RUN If the run command is present at the time when the Run/Speed reference source is switched, it requires the run command to be removed and then reapply the run command from the new source to resume the normal operation. 1 Accept Extrn RUN If the run command is present at the time when the Run/Speed reference source is switched, it does not require the run command from the new source to be removed. The normal operation will continue. Allows the Run Method to be 0–2 changed via the Local/Remote key while the drive/motor are running. 0 AllowRun@PowerUp Determines how the drive will start 0, 1 if an external run command is active when the drive is powered up. 0 0 Cycle Ext Run Disregarded. A new Run command must be issued after power up. 1 Accept Ext Run Allowed. Motor will start immediately after power up if a Run command is already enabled. B03-08 B03-10 RUN CMD at PRG 0 Run Disabled@PRG 1 Run Enabled@PRG 2 PRG Only @ Stop IMPULSE®•G+ & VG+ Series 4 Instruction Manual – August 2013 5-10 Parameter Code Display Function Range Initial Value B03-15 Ref Source 2 Source from where the frequency reference is generated. 0–4 0 0 Operator Digital Operator 1 Terminals 0–3 0 2 Serial Com Terminals or Analog Input • S4-IF Interface Card • S4-I AC Digital Input Option • S4-IO Digital Input/Output Option • DI-A3 Digital Input Option (not used for B03-02) Serial communication • 3 Option PCB Industrial Communication Option card (Port CN5-A) • 4 B03-16 Pulse Input RS485/422 Serial Communications (R+, R-, S+, S-) EtherNet/IP • Modbus TCP/IP • PROFINET • PROFIBUS-DP Pulse input via Terminal RP(H0601) Run Source 2 Source from where the RUN command is generated. 0 Operator Digital Operator 1 Terminals 2 Serial Com Terminals • S4-IF Interface Card • S4-I AC Digital Input Option • S4-IO Digital Input/Output Option • DI-A3 Digital Input Option (not used for B03-02) Serial communication • 3 Option PCB RS485/422 Serial Communications (R+, R-, S+, S-) Industrial Communication Option card (Port CN5-A) • EtherNet/IP • Modbus TCP/IP • PROFINET • PROFIBUS-DP IMPULSE®•G+ & VG+ Series 4 Instruction Manual – August 2013 5-11 Acceleration/Deceleration Acceleration time sets the time necessary for the output frequency to accelerate from 0 Hz to maximum output frequency (E01-04). Deceleration time sets the time necessary for the output frequency to decelerate from the maximum output frequency (E01-04) to 0 Hz. Table 5-10: Acceleration/Deceleration Parameter Settings Parameter Code Display Function Range Initial Value B05-01 B05-02 Accel Time 1 Sets acceleration time. 0.0–25.5 sec** 5.0* Decel Time 1 Sets deceleration time. 0.0–25.5 sec** 3.0* B05-03 Accel Time 2 Acceleration time 2 enabled when H01-xx = 1A. 0.0–25.5 sec** 10.0 B05-04 Decel Time 2 Deceleration time 2 enabled when 0.0–25.5 sec** H01-xx = 1A. 10.0 * Initial value is determined by X-Press Programming (Table 4-5, 4-6, or 4-7 on pages 4-11, 4-12, and 4-13). ** Range is extended to 0.0–6000.00 when B05-16 = 1. Figure 5-5: Normal Accel/Decel Time and Multiple Accel/Decel Changeover NOTE: Assume the constant B03-03 is set to “0” (Decel to Stop). IMPULSE®•G+ & VG+ Series 4 Instruction Manual – August 2013 5-12 Accel/Decel Time Switching Frequency Accel/Decel times can be changed automatically without using multi-function inputs. When multifunction digital inputs are set for Accel/Decel selection, this command has priority over automatic change of Accel/Decel. Table 5-11: Accel/Decel Time Switching Frequency Parameter Settings Parameter Code Display Function B05-05 Acc Time N Chg Sets Acceleration time at Acc/Dec 0.0–25.5 sec Switch Frequency (B05-10) 2.0 B05-06 Dec Time N Chg Sets Deceleration time at Acc/Dec 0.0–25.5 sec Switch Frequency (B05-10) 2.0 B05-08 Fast Stop Time Sets deceleration time for complete stop at external fault. See “External Fault Response Selection” on page 5-92. 0.0–25.5 sec 0.5 B05-10 Acc/Dec SW Freq Determines acceleration/ deceleration time settings 0.0–E01-04 0.0 B05-11 SW Freq. Compare Determines when Acceleration Time and Deceleration Time at Speed Switch Hz is enabled; 0, 1 1 0 Lower SW Freq 0: B05-05/B05-06 enabled, U01-02 < B05-10 1 Upper SW Freq 1: B05-05/B05-06 enabled, U01-02 > B05-10 Range Initial Value B05-12 Accel Time 3 Acceleration time 3 enabled when H01-xx = 1B. 0.0–25.5 sec* 3.0 B05-13 Decel Time 3 Deceleration time 3 enabled when 0.0–25.5 sec* H01-xx = 1B. 3.0 B05-14 Accel Time 4 Acceleration time 4 enabled when H01-xx = 1C. 0.0–25.5 sec* 3.0 B05-15 Decel Time 4 Deceleration time 4 enabled when 0.0–25.5 sec* H01-xx = 1C. 3.0 B05-16 Acc/Dec Ext Rang Enables extended range of Acc/ Dec Params: B05-01–B05-04, B05-12–B05-15, C03-02, C03-03, C03-05 and C03-06 0 0 Disabled Range = 0.0–25.5 1 Enabled Range = 0.0–6000.0 0, 1 * Range is extended to 0.0–6000.00 when B05-16 = 1. IMPULSE®•G+ & VG+ Series 4 Instruction Manual – August 2013 5-13 Jump Frequencies This function allows the “jumping” of critical frequencies so that the motor can operate without resonant vibrations caused by some machine systems. This function is also used for deadband control. Setting the value to 0.0 Hz disables this function. Table 5-12: Jump Frequencies Parameter Settings Parameter Code Display Function Range Initial Value B08-01 Jump Freq 1 First of three jump frequencies. 0.0–150.0 Hz 0.0 B08-02 Jump Freq 2 Second of three jump frequencies. 0.0–150.0 Hz 0.0 B08-03 Jump Freq 3 Third of three jump frequencies. 0.0–150.0 Hz 0.0 B08-04 Jump Bandwidth Jump frequency reference bandwidth. 0.0–20.0 Hz 1.0 Figure 5-6: Jump Frequencies IMPULSE®•G+ & VG+ Series 4 Instruction Manual – August 2013 5-14 Special Functions Table 5-13: Special Function Usage Access Level (A01-01) Advanced (2) Motion (A01-02) Function/Control Method (A01-03) Traverse (0) Standard Hoist (1) NLB Hoist (2) V/f (0) OLV (2) FLV (3) V/f (0) OLV (2) FLV (3) C1: Quick Stop C1: Reverse Plug SimulationTM C2: Micro-SpeedTM C3: End of Travel Limits C3: Phantom Stop C3: Klixon C3: EPLS C3: Hook Height Measurement C4: Load Float C5: Load Check IITM C6: Swift-LiftTM/Ultra-LiftTM C7: Torque Limit C7: Anti-Shock C8: No-Load Brake Hoist C8: Brake Answerback C9: Digital Input Option Set-up C10: Weight Measurement C11: Slack Cable Detection C11: Snap Shaft Detection C12: Brake Delay Timers C12: On/Off Delay Timers C12: Maintenance Timer C13: Inching Control C13: Index Control TM : Available for the Motion selected : Not available for the Motion selected IMPULSE®•G+ & VG+ Series 4 Instruction Manual – August 2013 5-15 Quick Stop™ The Quick Stop Function provides an automatic Alternate Deceleration at Stop. NOTE: The Quick Stop Deceleration time differs from the normal deceleration time and is applied only when the RUN command is removed. Table 5-14: Quick Stop Parameter Settings Parameter Code Display Function C01-01* Quick Stop Determines whether Quick Stop is 0, 1 enabled 0 Deceleration time during Quick Stop function. 1.0 C01-02 0 Disabled 1 Enabled Quick Stop Time Range 0.0–25.5 sec * Initial value is determined by X-Press Programming (Table 4-5, 4-6, or 4-7 on pages 4-11, 4-12, and 4-13). Figure 5-7: Quick Stop IMPULSE®•G+ & VG+ Series 4 Instruction Manual – August 2013 5-16 Initial Value Reverse Plug Simulation™ The Reverse Plug Simulation provides an automatic alternate deceleration time/acceleration time at a change direction command. The deceleration time and the acceleration time are set independently of the normal acceleration and deceleration times. NOTE: Reverse Plug Simulation is not available in MLB (standard) Hoist. Table 5-15: Reverse Plug Simulation Parameter Code Display Function C01-03 Reverse Plug Determines whether Reverse Plug 0, 1 Simulation is enabled. 0 0 Disabled 1 Enabled Range Initial Value C01-04 Rev-Plg Dec Time Deceleration time during Reverse Plug Simulation. 0.0–25.5 sec 2.0 C01-05 Rev-Plg Acc Time Acceleration time during Reverse Plug Simulation. 0.0–25.5 sec 0.0 NOTE: A setting of 0.0 in C01-05 will cause B05-01 to be used during acceleration. Figure 5-8: Reverse Plug Simulation IMPULSE®•G+ & VG+ Series 4 Instruction Manual – August 2013 5-17 Micro-Speed™ Micro-Speed provides a reduced speed range operation for precise positioning. Enabled by a MultiFunction Input, it multiplies the normal speed reference by the Micro-Speed Gain. Two Micro-Speed Gains are available: Gain 1 (C02-01) and Gain 2 (C02-02). They can be adjusted and enabled independently. Table 5-16: Micro-Speed Parameter Settings Parameter Code Display Function Range Initial Value C02-01 MicroSpd Gain 1 The multiplier of the Analog or Digital Speed Reference to achieve slow-speed operation. Multi Function Digital Input = E Hoist: 0.01–1.00 1.00 Traverse: 0.01–2.55 C02-02 MicroSpd Gain 2 An alternate multiplier of the Hoist: 0.01–1.00 1.00 Analog or Digital Speed Reference Traverse: 0.01–2.55 to achieve slow-speed operation. Multi Function Digital Input = 10 Figure 5-9: Micro-Speed Control NOTE: If both Micro-Speed 1 and Micro-Speed 2 are enabled, Micro-Speed 1 always takes higher priority over Micro-Speed 2. IMPULSE®•G+ & VG+ Series 4 Instruction Manual – August 2013 5-18 End of Travel Limits This function can automatically slow and stop a crane or hoist when it reaches the end of travel limits. Two types of limit inputs (slowdown and stop) are available in both travel directions. Inputs can be programmed through the S4IF card. Table 5-17: End of Travel Limits Parameter Settings Parameter Code Display Function Range Initial Value C03-01 UL1 Speed Speed when UL1 is detected 0.00–E01-04 Hz 6.00 C03-02 UL1 Decel Time Decel time when UL1 is detected 0.0–25.5 sec** 1.0 C03-03 UL2 Stop Time Decel time to STOP when UL2 is detected 0.0–25.5 sec** 1.0 C03-04 LL1 Speed Speed when LL1 is detected 0.00–E01-04 Hz 6.00 C03-05 LL1 Decel Time Decel time when LL1 is detected 0.0–25.5 sec** 1.0 C03-06 LL2 Stop Time Decel time to STOP when LL2 is detected 0.0–25.5 sec** 1.0 C03-07 Lmt Stop Method Determines the stopping method when UL2 or LL2 is detected 0-2 2* UL3 Stop Method Weight Limit Stop Method and action when H01-xx = 12 or 62 0-5 4 0 Decel / Alarm Decel to Stop with Alarm (no further raise allowed) 1 Coast / Alarm Coast to Stop with Alarm (no further raise allowed) 2 Use B3-03/Alarm Use B03-03 to Stop with Alarm (no further raise allowed) 3 Decel / Fault Decel to Stop with Fault 4 Coast / Fault Coast to Stop with Fault 5 Use B3-03/Fault Use B03-03 to Stop with Fault UL3 Decel Time Sets the deceleration time when H01-xx = 12 or 62 0.0–25.5 sec 1.0 0 Decel to Stop 1 Coast to Stop 2 Use B3-03 Method C03-08 C03-09 * Initial value is determined by X-Press Programming (Table 4-5, 4-6, or 4-7 on pages 4-11, 4-12, and 4-13). ** Range is extended to 0.0–6000.00 when B05-16 = 1. IMPULSE®•G+ & VG+ Series 4 Instruction Manual – August 2013 5-19 Phantom Stop The Phantom Stop allows quick identification of the faulted drive while stopping the other drives with Phantom Stop enabled. The Phantom Stop feature is designed to stop the drive operation using the stopping method selected in C03-10 when a Phantom Fault input (H01-01–H01-08 = 5F or 63) is active. The drive will indicate a Phantom Fault has occurred by blinking the LED on the RUN key in sequence of two short bursts. The drive will resume normal operation when a Phantom Fault is removed. Table 5-18: Phantom Stop Parameter Settings Parameter Code Display Function Range Initial Value C03-10 Phantom Stop Met Stopping Method when MultiFunction Input = 5F and 63 0–2 1 0 Decel to Stop 1 Coast to Stop 2 Use B3-03 Method NOTE: For settings of 0 or 2 deceleration is by B05-08. Load Sharing/Torque Following - 2 or more mechanically coupled motors The Load Share Limit function allows the drive to follow the limit switch frequency references and stopping methods when enabled. Table 5-19: Load Share Limit Parameter Settings Parameter Code Display Function Range Initial Value Model C03-11 Load Share Limit See below for detailed description 0, 1 0 VG+ 0 Disabled 1 Enabled The VG+ Series 4 Software allows one or more IMPULSE®•VG+ Series 4 driven motors to be connected in a Master/Slave fashion such that slave inverter will follow the torque reference of the master inverter. It can be configured in two ways, either as a dedicated Slave or as a Master/Slave that can be switched on or off by multi-function input. When it is in Load Share Mode (Slave), it is essentially nothing more than a torque helper to the master motor. The Master Inverter outputs the commanded amount of torque from a ± 10 VDC analog signal into the Slave inverter, which correlates directly to the direction and quantity of torque the slave inverter should apply to its own motor. This can be particularly useful when two or more motors are driving a common load (i.e. single drum, gear box, etc.) and it is important that they share the load. This will allow one inverter/ motor to handle the speed reference and speed regulation while the others simply “help” the master. This overcomes inherent problems with having more than one inverter/motor trying to regulate speed on a common load. The Load Sharing function can be used when the master is configured for Hoist or Traverse motions (i.e. for a hoist motion, two or more motors coupled to a single gearbox; for a traverse motion, a circular crane, multiple motors driving a single end truck, cable reel, etc). NOTE: The master drive can be of an IMPULSE®•VG+ Series 1, 2, 3, or 4 generation. When using Multi-function input H01-0x = 66—”Load Share” (Torque Following mode), setting C0311 = Enabled will allow the inverter to accept the Limit Switch inputs where H01-0x = 06H–0DH. When C03-11 = Disabled (Factory Default), the Slave inverter will ignore any change in state of the Limit switch inputs. The setting of this parameter is only in effect when the Multi-function input H010x = 66 “Load Share” is ON. It is important to understand that when in a Load Sharing mode, the IMPULSE®•G+ & VG+ Series 4 Instruction Manual – August 2013 5-20 Slave inverter is only supplying torque to “help” the Master inverter. The master inverter typically handles the logic of limit switches or other special functions. If this is not the case, each inverter may try to move or decelerate at a different speed placing extra strain on the drive train and potentially resulting in a speed deviation fault. NOTE: 1. The Limit Switch stopping method is not selectable in Load Sharing mode. If a Stop Limit is input, the output is turned off and the brake output will set immediately. 2. Weight Limit Input (H01-xx = 12 or 62) — Upper Limit 3 is always active regardless of the setting of parameter C03-11. Minimum Programming Requirement for “Load Sharing” Operation 1. The Master and Slave drives must be programmed for the Flux Vector control method, A01-02 = 3. 2. The Slave drive requires H01-xx = 66 — “Load Share”. 3. The Master drive requires a ±10 VDC with H04-01 or H04-04 = 109 — “Torque Reference”. 4. The Master drive analog output gain (H04-02 and H04-05) should be = 50%. 5. The Master drive requires H02-0x = 2A — “During RUN 2”. 6. The Slave drive requires a ±10 VDC with H03-06 or H03-10 = 13 — “Torque Reference”. 7. The Slave drive analog input gain (H03-03, H03-07, or H03-11) should be = 200%. 8. The digital operator must not be in LOCAL mode (O02-01 = 1). 9. The Master drive requires H01-xx = 68 — “Slave Rdy Run”. Klixon The Klixon Multi-Function input is intended for motors that have a Motor Thermal Overload Switch called a Klixon. Klixon is usually embedded in the motor windings and changes state when the motor reaches a certain temperature. When a multi-function input (H01-01–H01-08 = 56 or 57) is active, the drive will use the stopping method programmed in C03-12 and display the KLX Klixon alarm. The drive will resume normal operation when the motor cools down and a new RUN command is applied. Table 5-20: Klixon Action Parameter Settings Parameter Code Display Function Range Initial Value C03-12 Klixon Action When MFDI = 56 (N.O.) or 57 (N.C.) 0, 1 0 0 Use B3-03 Method 1 Allow Lower Only* * Only available in a hoist motion. IMPULSE®•G+ & VG+ Series 4 Instruction Manual – August 2013 5-21 Hook Height Measurement Hook Height Measurement provides a monitor parameter (U01-50) and analog output proportional to the hook’s current position between a home position and a limit position. Hook height programming is used in conjunction with the Electronic Programmable Limit Switch parameters. Reference Figure 5-10 for Hook Height configuration. Table 5-21: Hook Height Parameter Settings Parameter Code Display Function C03-13 Height Measure C03-14 C03-15 NOTE: Initial Value Model Number of motor revolutions from 0–65535 Rev the Hook Height out position (C0315). Displayed at U01-50 and U0151. U01-50 and U01-51 are stored to EEPROM. 250 VG+ Hook Height Home Selects the position of the hook when at Home 0–4 2 VG+ 0 Home = UL2 Upper home position is set to zero when UL2 is closed (H01-xx = 07 or 0B) 1 Home = LL2 Lower home position is set to zero when LL2 is closed (H01-xx = 09 or 0D) 2 Home MFDI Upper Upper home position is set to zero when H01-xx = 67 is closed 3 Home MFDI Lower Lower home position is set when H01-xx = 67 is closed 4 Home = UL3 Upper home position is set to zero when UL3 is closed (H01-xx = 12 or 62) Selects the output voltage and 0, 1 Monitor when the hook is at Home 0 VG+ Hook Height Out 0 At Home = 0% 0% - U01-50 = 0%, MFAO = 0V 1 At Home = 100% 100% - U01-50 = 0%, MFAO = 0V Range When C03-14 = 0, C03-16 must be set to zero, and a physical UL2 limit switch input (H010x = 07 or 0B) is required for UL2 to function. When C03-14 = 1, C03-19 must be set to zero, and a physical LL2 limit switch input (H010x = 09 or 0D) is required for LL2 to function. IMPULSE®•G+ & VG+ Series 4 Instruction Manual – August 2013 5-22 Electronic Programmable Limit Switches (EPLS) Using a stored height measurement (U01-50, U01-51), it is possible to program UL1, UL2, LL1, and LL2 functions for redundancy or use without rotary limit switches. When C03-16, C03-17, C03-18,or C03-19 has a value other than 0, the Electronic Programmable Limit Switch function will be enabled, and will use the logic in the table below. Height Measurement must be correctly set up before using EPLS. Table 5-22: Electronic Programmable Limit Switches Parameter Settings NOTE: Parameter Code Display Range Initial Value Model C03-16 UL2 Revolutions 0–65535 Rev 0 VG+ C03-17 UL1 Revolutions 0–65535 Rev 0 VG+ C03-18 LL1 Revolutions 0–65535 Rev 0 VG+ C03-19 LL2 Revolutions 0–65535 Rev 0 VG+ An OPE26 fault will occur when C03-14 = 0 and C03-16 ≠ 0, or when C03-14 = 1 and C0319 ≠ 0. A setting of 0 disables that specific limit. Table 5-23: Limit Switch Outputs H02-0x or F05-0x = Function 2B - Upper Limit 1 Output ON when keypad displays UL1 2C - Upper Limit 2 Output ON when keypad displays UL2 2D - Lower Limit 1 Output ON when keypad displays LL1 2E - Lower Limit 2 Output ON when keypad displays LL2 30 - Lower Limit Output ON when keypad displays LL1 or LL2 31 - Up/Low Limit Output ON when keypad displays UL1, UL2, LL1, or LL2 NOTE: MFDO 2B–31 works with MFDI 06–0D or EPLS. NOTE: When using EPLS and Hook Height Measurement, Hook Height must be homed by using UL1 or LL1; it cannot be homed by using UL2 or LL2. IMPULSE®•G+ & VG+ Series 4 Instruction Manual – August 2013 5-23 * An OPE20 error will occur if the equation is not satisfied based on the setting of C03-14. Figure 5-10: EPLS Parameter Layout NOTE: C03-14 = 0 or 2 is the default setting. Example: Limit Switch Revolution Settings (C03-13 = 250 Rev) C03-14 Home Option C03-16 UL2 C03-17 UL1 C03-18 LL1 C03-19 LL2 0 0 Rev 55 Rev 220 Rev 240 Rev (U01-51 C03-16) (U01-51 C03-17) (U01-51C03-18) (U01-51 C03-19) 1 240 Rev 220 Rev 55 Rev 0 Rev (U01-51 C03-16) (U01-51 C03-17) (U01-51 C03-18) (U01-51 C03-19) 2, 4 20 Rev 55 Rev 220 Rev 240 Rev (U01-51 C03-16) (U01-51 C03-17) (U01-51C03-18) (U01-51 C03-19) 3 240 Rev 220 Rev 55 Rev 20 Rev (U01-51 C03-16) (U01-51 C03-17) (U01-51 C03-18) (U01-51 C03-19) * Please consult the factory for additional information on Height Measurement and Electronic Programmable Limit Switches IMPULSE®•G+ & VG+ Series 4 Instruction Manual – August 2013 5-24 Lower Limit/Upper Limit Bypass MFDI The “Limit Bypass” allows for the following without the use of jumpers or re-programming of the drive parameters: 1. Ease of testing of the Weighted Upper Limit Switch (UL3) or re-homing the Height Measurement function 2. To allow changing of the wire ropes, i.e. spooling all the rope off of the hoist drum NOTE: The momentary key-switch to operate this function should only be accessible to maintenance personnel, not the crane operator. A functional description and usage procedure should be included in an administrative control program to avoid confusion and potentially have the End of Travel Limit switches left in a bypassed state during normal operation of the crane. Table 5-24: Limit Bypass MFDI Functions Bypassed C09-0x or H01-0x settings will bypass the functions in the left most column when the input is activated 73 Upper Limit 1 N.O. (MFDI = 06) Upper Limit 2 N.O. (MFDI = 07) × × Lower Limit 1 N.O. (MFDI = 08) Lower Limit 2 N.O. (MFDI = 09) × × × Upper Limit 1 N.C. (MFDI = 0A) Upper Limit 2 N.C. (MFDI = 0B) 74 × × × Lower Limit 1 N.C. (MFDI = 0C) × × Lower Limit 2 N.C. (MFDI = 0D) × × UL2 detected by EPLS (C03-16) × × UL1 detected by EPLS (C03-17) × LL1 detected by EPLS (C03-18) × LL2 detected by EPLS (C03-19) × × × = Limit Bypass IMPULSE®•G+ & VG+ Series 4 Instruction Manual – August 2013 5-25 Figure 5-11: Upper Limit (UL1) Figure 5-12: Upper Limit 2 (UL2) Figure 5-13: Lower Limit 1 (LL1) Figure 5-14: Lower Limit 2 (LL2) IMPULSE®•G+ & VG+ Series 4 Instruction Manual – August 2013 5-26 Load Float 2 Load Float 2 can be enabled by an MFDI at Stop to release the brakes without moving up or down for fine positioning. The Load Float function performs all torque proving and brake check functions, and allows motion when the run command is applied. When Load Float (C08-10) is enabled, it maintains the motor shaft at a stationary position with brake open. Load Float Time 2 is enabled by a MFDI (Multi-Function Digital Input) that is programmed as the digital input setting 35 (H01-xx = 35). If load float is being used, this time (C04-01) will be added to the standard load float time (C08-10). Table 5-25: Load Float Time 2 Parameter Settings Parameter Code Display Function C04-01 Load Float Time2 Maximum duration of Load Float 2 0–65535 sec time when MFDI = 35 10 C04-02 Load Float Gain Load Float Gain. 10* Range 0–100 Initial Value * Dependent on kVA ( 30 HP: 10; > 30 HP: 20) IMPULSE®•G+ & VG+ Series 4 Instruction Manual – August 2013 5-27 Load Check II™ The Load Check II function is a load-limiting feature which ensures the programmed load limit of the hoist is not exceeded. It prevents the lifting (and potential stall) of a load that is overweight. When IMPULSE®•G+ & VG+ Series 4 detects an overload condition it prevents any further lifting. The load may then be lowered at the speed that is specified by the Load Check Alarm Speed (C05-08). DANGER Load Check II is designed to limit loads less than or equal to the crane’s rated capacity. Consult the factory and crane manufacturer before calibrating Load Check II with a load heavier than the crane capacity. V/f Operation (A01-02 = 00) When using Load Check II in V/f control method (during lifting) the IMPULSE®•G+ Series 4 will compare the motor current readings (U01-03) to values stored during the Load Check set up process. If they exceed the values for the active Load Check Zone, the IMPULSE®•G+ Series 4 will stop the motor based on the LC Alarm Action (C05-02) and display a Load Check alarm (LC). NOTE: If an application requires Load Check to be bypassed, an MFDI may be programmed to 69 (N.O.) or 6A (N.C.) OLV and FLV Operation (A01-02 = 02 and 03) When using Load Check II in Open Loop Vector or Flux Vector control method (during lifting) the IMPULSE®•G+ & VG+ Series 4 will compare the motor torque readings (U01-09) to values stored during the Load Check set up process. If they exceed the values for the active Load Check Zone, the IMPULSE®•G+ & VG+ Series 4 will stop the motor based on the LC Alarm Action (C05-02) and displays a Load Check alarm (LC). NOTE: If an application requires Load Check to be bypassed, an MFDI may be programmed to 69 (N.O.) or 6A (N.C.) NOTE: Precautions should be taken when using load check where two or more hoists are used to lift a single load. Example: Use a load check MFDO H02-0x = 01E to break the raise (FWD Run) command to the other hoist(s). This will insure that all hoists stop lifting if one hoist is being overloaded. Ensure that C05-02 = 3 to prevent uneven lowering or design lowering logic accordingly. Load Check II Set Up (C05-01 = 09) The Load Check II set up procedure will quickly measure and calculate the current or torque required at each of the Load Check Zones starting with the rated load suspended. These values will automatically be stored in parameters C05-09 through C05-24 during the Load Check II set up process. The following steps are required to perform the Load Check II set up process. 1. Verify that when the Master Switch is at full deflection (the highest speed point if stepped, or 10V if Analog), the Frequency Reference shown in U01-01 is equal to Motor Base Frequency shown in E01-06 (typically 60Hz). For example, with a 3-Step speed reference, if B01-03 is set at 60Hz, then the frequency reference should be 60Hz when the Master Switch is pushed to full IMPULSE®•G+ & VG+ Series 4 Instruction Manual – August 2013 5-28 deflection. If the frequency reference doesn’t reach Motor Base Frequency, set the following (depending on Speed Ref): • Multi-Step: B01-0x is 60Hz • Infinitely Variable: B02-01 = 100% • Analog: H03-03 = 100% and B02-01 = 100% 2. The motor should be properly Auto-tuned. • FLV and OLV operation – Rotational Auto-tune. • V/f operation – Stationary Auto-tune. 3. Check that B02-03 and E01-09 are at their desired values. If you change these values, re-run Load Check II setup. 4. Motor should be at normal operating temperature for the application (operate at or near rated capacity for at least 10 minutes) before performing the Load Check set up process. 5. Suspend the rated load just off of the ground (this allows for accurate measurements during calibration). 6. Set C05-01 equal to 9. 7. Press and hold the Hoist (Up) command button on the pendant or radio for full speed operation (60 Hz). NOTE: The Load Check set up process can be temporarily paused by lowering the load back to the ground, keeping the load suspended, then pressing and holding the Hoist (Up) command button at full speed until the Load Check set up process is complete. 8. When the Load Check set up process finishes its calculations, the drive will decelerate the load to indicate the set up calibration is complete. 9. Press the Lower (Down) command to complete the Load Check set up process and lower the load to the ground. NOTE: If an application requires Load Check to be bypassed, an MFDI may be programmed to 69 (N.O.) or 6A (N.C.) NOTE: Upon completion of the Load Check set-up process, the drive will automatically set C05-01 to 1. NOTE: If an error occurs during the Load Check set up, the load being lifted causes current or torque to exceed 160%. Increase holding time and testing time, and decreases the load weight. Table 5-26: Load Check II Parameter Settings Parameter Code Display Function C05-01 Load Check Determines whether Load Check is 0–9 enabled. NOTE: If Micro-Speed Ref is less than Look Speed 1, Load check can not detect overload. 0 Disabled Disables Load Check II Function 1 Hold & Measure Checks per Holding and Testing Time 3 Immediate Immediately faults when I/T level is exceeded 9 LC Set Up Set up Load Check II Range Initial Value 0 IMPULSE®•G+ & VG+ Series 4 Instruction Manual – August 2013 5-29 Parameter Code C05-02 Display Function Range Initial Value 0–4 4 LC Alarm Action Action at Load Check alarm or fault 0 Alarm Only L.C. blinking, can continue raising 1 Decel to Stop Allows lower only 2 Coast to Stop Allows lower only 3 Fault Stop Fault contacts change state - requires reset 4 Use B3-03 Method Allows Lower only C05-03 Holding Time Sets the time to hold the output frequency 0.00–2.55 sec allowing the output current/torque to stabilize. 0.15 C05-04 Testing Time Sets the time (after the Holding Time) for 0.00–2.55 sec comparing output current/torque to values for a particular LC Zone being tested. 0.25 C05-05 I/T Margin Acc Sets the margin for Load Check detection 0–50% during acceleration. A setting of 00 is the most sensitive. 5 C05-07 I/T Margin Sets the margin for Load Check detection 0–20% at speed agree. A setting of 00 is the most sensitive. 5 C05-08 Alarm Speed Sets the maximum lowering speed after an LC alarm. 6.0 C05-09 I/T Level 01 Current/Torque values detected during LC 0–250% set up for Zone 01 0 C05-10 I/T Level 02 Current/Torque values detected during LC 0–250% set up for Zone 02 0 C05-11 I/T Level 03 Current/Torque values detected during LC 0–250% set up for Zone 03 0 C05-12 I/T Level 04 Current/Torque values detected during LC 0–250% set up for Zone 04 0 C05-13 I/T Level 05 Current/Torque values detected during LC 0–250% set up for Zone 05 0 C05-14 I/T Level 06 Current/Torque values detected during LC 0–250% set up for Zone 06 0 C05-15 I/T Level 07 Current/Torque values detected during LC 0–250% set up for Zone 07 0 C05-16 I/T Level 08 Current/Torque values detected during LC 0–250% set up for Zone 08 0 C05-17 I/T Level 09 Current/Torque values detected during LC 0–250% set up for Zone 09 0 C05-18 I/T Level 10 Current/Torque values detected during LC 0–250% set up for Zone 10 0 C05-19 I/T Level 11 Current/Torque values detected during LC 0–250% set up for Zone 11 0 C05-20 I/T Level 12 Current/Torque values detected during LC 0–250% set up for Zone 12 0 C05-21 I/T Level 13 Current/Torque values detected during LC 0–250% set up for Zone 13 0 C05-22 I/T Level 14 Current/Torque values detected during LC 0–250% set up for Zone 14 0 C05-23 I/T Level 15 Current/Torque values detected during LC 0–250% set up for Zone 15 0 C05-24 I/T Level 16 Current/Torque values detected during LC 0–250% set up for Zone 16 0 IMPULSE®•G+ & VG+ Series 4 Instruction Manual – August 2013 5-30 0.0–30.0 Hz Parameter Code Display Function Range Initial Value C05-25 LC Integral Time C05-26 LC Delay Time Integral time used to smooth transitions 0.00–2.55 sec 0.05 Load Check delay time for transitions 0.00–2.55 sec 0.25 C05-27 Min I->Fwd Tim Minimum delay when switching from REV 0.0–25.5 sec to FWD in LC. Used when the load brake cannot stop the load fast enough. Setting of 0.0 disables delay triggering timer 0.0 C05-28 Dly Trig Freq Minimum frequency that will trigger C0527 timer 30.0 0.0–60.0 Hz IMPULSE®•G+ & VG+ Series 4 Instruction Manual – August 2013 5-31 Swift-Lift™ & Ultra-Lift™ Swift-Lift/Ultra-Lift provides additional productivity by allowing a crane or hoist to quickly move into position. The feature enables the motor to over speed when the load is less than 100% of the rated capacity. Ultra-Lift determines the torque required for the load, calculates the maximum safe speed, and automatically accelerates to this speed. However, the maximum speed cannot exceed the lesser value of the Maximum Forward Speed (C06-02), Maximum Reverse Speed (C06-03), and Maximum Frequency (E01-04). Swift-Lift Swift-Lift can be enabled in the Standard Hoist motion of the G+ Series 4. In the V/f control method, the Swift-Lift function uses motor current to determine the maximum safe speed. When the OLV control method is selected, the Swift-Lift function uses motor torque in place of motor current for its safe speed calculations. Swift-Lift will not be enabled if the current or torque levels exceed C06-04 or C06-05 settings. Both C06-04 and C06-05 are a percentage of E02-01. Ultra-Lift Ultra-Lift can be enabled in the Non-mechanical Load Brake (NLB) Hoist motion of the VG+ Series 4 (FLV only). The Ultra-Lift function measures motor torque at base speed and then accelerates to the maximum safe speed. Ultra-Lift will not be enabled if the torque levels exceed C06-04 or C06-05 settings. Adaptive Ultra-Lift Adaptive Ultra-Lift can only be enabled in the (NLB) Hoist motion of the VG+ Series 4. The Adaptive Ultra-Lift function continuously monitors motor torque when running above base speed to increase or decrease motor speed based on varying load conditions. NOTE: Ultra-Lift is disabled when in traverse applications. Maximum Frequency (E01-04) must be > C06-02 and C06-03. Table 5-27: Swift-Lift/Ultra-Lift Parameter Settings Parameter Code Display C06-01 Swift-Lift (V/f and OLV) Ultra-Lift (FLV) 0 Disabled 1 Enabled Auto 2 Enabled by MFDI Function Range Initial Value Model Determines whether Swift-Lift/ Ultra-Lift is enabled. 0–4 0 G+/VG+ 3 Enabled Adaptive Ultra-Lift Only 4 Adaptive by MFDI Ultra-Lift Only C06-02 SwiftLift FWDSpd (V/f and OLV) UltraLift FWDSpd (FLV) Maximum Swift-Lift Forward Speed 0.1–150.0 Hz 60.0 G+/VG+ C06-03 SwiftLift REVSpd (V/f and OLV) UltraLift REVSpd (FLV) Maximum Swift-Lift Reverse Speed 0.1–150.0 Hz 60.0 G+/VG+ C06-04 SL FWD Current (V/f) SL FWD Torque (OLV) UL FWD Torque (FLV) Output Current/Torque < C06- 0–100% 04 to enable Swift-Lift Forward. Not used with Adaptive UL. 50 G+/VG+ IMPULSE®•G+ & VG+ Series 4 Instruction Manual – August 2013 5-32 Parameter Code Display Function Range Initial Value Model 0–100% 30 G+/VG+ C06-05 SL REV Current (V/f) SL REV Torque (OLV) UL REV Torque (FLV) Output Current/Torque < C0605 to enable Swift-Lift Reverse. Not used with Adaptive UL. C06-06 SL Enabling Spd (V/f and OLV) UL Enabling Spd (FLV) Fout > C06-06 to Enable Swift- 0.1–150.0 Hz Lift. (Threshold Speed) 59.0 G+/VG+ C06-07 SL Delay Time (V/f and OLV) UL Delay Time (FLV) Delay time at Enabling speed to check Output Torque 2.0 G+/VG+ C06-08 SFS Acc Gain Swift-Lift acceleration multiplier 0.1–9.9 for V/f Modes. Settings greater than 1 increase the acceleration time proportionately; settings less than 1 decrease the acceleration time proportionately 1.0 G+ C06-10 Mtr Trq Quickset Set available motor torque over base speed. 0–5 3 VG+ 0 Custom 1 Very Low Torque 2 Low Torque 3 Standard 4 High Torque 5 Very High Torque 0.0–25.5 sec C06-11 Motor Torque 1 Sets the available torque at Speed 1 (above base speed) 1–100% 45 VG+ C06-12 Motor Speed 1 Sets the Speed 1 point 0.0–150.0 Hz 90.0 VG+ C06-13 Motor Torque 2 Sets the available torque at Speed 2 (above base speed) 1–100% 25 VG+ C06-14 Motor Speed 2 Sets the Speed 2 point 0.0–150.0 Hz 120.0 VG+ C06-15 AUL FWD Offset Adaptive UL torque measurement offset in the up direction to allow for deceleration. 0–100% 10 VG+ C06-16 AUL REV Offset Adaptive UL torque measurement offset in the down direction to allow for deceleration 0–100% 20 VG+ NOTE: C06-11 through C06-16 are hidden unless C06-10 is set to “Custom”. Otherwise, C06-11 through C06-14 are automatically modified by C06-10. IMPULSE®•G+ & VG+ Series 4 Instruction Manual – August 2013 5-33 Configuring the Swift-Lift & Ultra-Lift Function For 2, 3, 5-Speed Multi-Step (A01-04 = 0, 1, or 2): 1. Set C06-01= 1–4 to enable the Swift-Lift & Ultra-Lift Function, 1 = Enable Automatic, 2 = Enable by Multi-Function Digital Input (MFDI), 3 = Enable Adaptive (Ultra-Lift Only), 4 = Adaptive by MFDI (Ultra-Lift Only). 2. Set C06-02 and C06-03 to determine Swift-Lift & Ultra-Lift maximum FWD/REV output frequency. 3. Set C06-04 and C06-05 to determine Swift-Lift & Ultra-Lift maximum enable output current. 4. Set the Swift-Lift & Ultra-Lift Enabling Speed (C06-06) one or two hertz below the maximum normal running speed reference. For example: If the maximum normal running speed is at 60 Hz, set C06-06 to 59 Hz or 58 Hz as the Swift-Lift & Ultra-Lift Enabling Speed. 5. Ensure that the Maximum Frequency (E01-04) is increased from 60 Hz. For 2, 3 Step Infinitely Variable (A01-04 = 3 or 4) 1. If the system is using 2-Step or 3-Step Infinitely Variable as the Speed Control Method, the following formula is used to adjust the constant B02-01 (Reference Upper Limit). For Uni-Polar/Bi-Polar Analog (A01-04 = 5 or 6) 1. If the system is using Bi-Polar Analog or Uni-Polar Analog as the Speed Control Method, the following formula is used to adjust the constant H03-03 (Gain Multiplier for Terminal A1 analog input signal). H03-11 (Gain Multiplier for Terminal A2 analog input signal). WA R N I N G Motors and drive machinery must be capable of operating above motor base speed. Consult the motor/gearbox/hoist manufacturer before enabling the Swift-Lift and Ultra-Lift function. Failure to observe this warning may result in damage to equipment and possible injury or IMPULSE®•G+ & VG+ Series 4 Instruction Manual – August 2013 5-34 Torque Limit IMPULSE®•G+ & VG+ Series 4 dynamically controls the torque output of the motor at all times. The Torque Limit Function limits the amount of regen motor torque vector control operation: • Forward Motoring (I) • Forward Regenerating (II) • Reverse Motoring (III) • Reverse Regenerating (IV) Table 5-28: Torque Limit Parameter Settings Parameter Code Display Function Range Initial Value Model C07-01 Trq Limit FWD FORWARD torque limit 0–300% 150 G+/VG+ C07-02 Trq Limit REV REVERSE torque limit 0–300% 150 G+/VG+ C07-03 Trq Lmt FWD Rgn Regenerative torque limit at FORWARD 0–300% 180 G+/VG+ C07-04 Trq Lmt REV Rgn Regenerative torque limit at REVERSE 0–300% 180 G+/VG+ x = Available in the specified drive/control method IMPULSE®•G+ & VG+ Series 4 Instruction Manual – August 2013 5-35 Parameter Code Display Function Range Initial Value Model C07-05 T-Lim FWD Gain Torque Limit gain in FWD direction 0.00–2.55 when MFDI = 14 is ON. Gain is applied to C07-01. If T-Lim by Analog Input is used, gain is applied to post-scaled/biased input. 1.25 G+/VG+ C07-06 T-Lim REV Gain Torque Limit gain in REV direction 0.00–2.55 when MFDI = 14 is ON. Gain is applied to C07-02. If T-Lim by Analog Input is used, gain is applied to post-scaled/biased input. 1.25 G+/VG+ C07-07 T-Lim RGN Gain Torque Limit gain in RGN mode when MFDI = 14 is ON. Gain is applied to C07-03 and C07-04. If T-Lim by Analog Input is used, gain is applied to post-scaled/ biased input. 0.00–2.55 1.25 G+/VG+ C07-08 Trq Lim I Time Sets the integral time constant for the torque limit. (OLV only) 5–10000 ms 200 G+ C07-09 Torque Limit Sel Torque Limit Control Method Selection during Accel/Decel 0, 1 0 G+ 0 P-ctrl @ Acc/ Dec Changes to integral control at constant speed. Use this setting when acceleration to the desired speed should take precedence over the torque limit. 1 I-ctrl @ Acc/ Dec Integral control. Set L7-07 to 1 if the torque limit should take precedence. (OLV only) ASR I time is forced to 0 when the 0, 1 output frequency is greater than the C07-11 speed window. When using this feature, it is suggested that the Overspeed Detect Level (F01-24) be increased to 110% to avoid overspeed faults. 0 G+/VG+ Sets the frequency window (+/-) size for Traverse Torque Limiter (C07-10) when at speed. 2.0 G+/VG+ C07-10 C07-11 Trav Trq Limiter 0 Disabled 1 Enabled Limiter Freq 0.5–10.0 x = Available in the specified drive/control method This traverse torque limiter function (C07-10 and C07-11) is used in multi-drive, closed-loop traverse applications to reduce drive fighting due to speed discrepancies between the two sides of a bridge. This resolves the situation where one side of a bridge will be at full forward torque, while the other side is a full regen torque. When moving below the Limiter Freq, this feature is disabled and the drive behaves as normal. When accelerating past the Limiter Freq, the ASR I time is reduced to zero to limit torque imbalance. Once the motor has accelerated to within the Limiter Freq (i.e. 60 Hz) the regen torque limit also goes to zero. The drive will remain in this state until the speed reference is changed. When the speed reference is raised or lowered, regen torque is re-enabled to accel or decel the bridge as required. Note that a heavy swinging load may pull the bridge faster than the PG Overspeed level. It is therefore highly suggested that a PG Overspeed Sel (F01-23) be set to Alarm Only. IMPULSE®•G+ & VG+ Series 4 Instruction Manual – August 2013 5-36 Anti-Shock Anti-Shock is a Hoist NLB feature on the IMPULSE®•VG+ Series 4 drive in the Flux Vector control method. The torque output of the hoist is continuously monitored, and when it increases above a threshold (C07-15 and C07-16), the hoist automatically decelerates and waits for the torque to stabilize before smoothly re-accelerating (C07-17 and C07-18). Anti-Shock is designed to maximize hoist operational efficiency while minimizing crane structure fatigue. Table 5-29: Anti-Shock Parameter Settings Parameter Code Display Function Range Initial Value C07-12 Anti-Shock Enables or disables the Anti-Shock function. 0–2 0 0 Disabled Anti-Shock is disabled always. 1 Enabled Anti-Shock is enabled always. 2 Enbl, Not In MSpd Disables Anti-Shock if Micro-Speed is enabled. C07-13 Enabling Freq Anti-Shock is disabled until the output frequency is above this setting. 0.0–60.0 Hz 6.0 C07-14 Re-Accel Delay If the operator decelerates the hoist then re-accelerates, Anti-Shock Detection is disabled for this period of time. 0.00–2.55 sec 0.20 C07-15 Torque Delta Torque increase required to initiate the Anti-Shock sequence. 0–180% 10 C07-16 Detection Time Time window to detect the torque delta (C07-15). 0.01–0.50 sec 0.30 C07-17 Smoothing Freq When the torque increase is detected, the 0.0–15.0 Hz drive will decelerate to this frequency. 3.0 C07-18 Smoothing Decel When the torque increase is detected, the 0.00–1.00 sec drive will decelerate to the C07-17 smoothing frequency in this time duration. Adjustable in case OV or OC faults occur. 0.30 C07-19 Steadying Delta Torque delta level indicating a steady state of the load. 5 C07-20 Steadying Time Time window to satisfy the steadying delta 0.00–0.50 sec condition. 0.20 C07-21 Steadying Max Maximum time allowed for the load to stabilize. The B05-01 acceleration time will take over when this timer expires. 0.00–2.55 sec 2.50 C07-22 AlarmDisplayTime When Anti-Shock is triggered, an alarm will display on the keypad screen for the selected duration of time. 0–30 sec 4 C07-23 No Load Torque Any torque values below this level are ignored. This is best described as the torque level while hoisting with an empty hook (no load). 0–100% 20 C07-24 Required Torque In order for Anti-Shock to be triggered, the 0–180% torque increase is required to peak above this percentage. 75 C07-25 Detection Method Anti-Shock detection method. 1 0 Always Detect Anti-Shock can be continuously detected. 1 Once Per Lift After Anti-Shock is detected once during a run, it will become disabled until the hoist is lowered. 0–50% 0, 1 IMPULSE®•G+ & VG+ Series 4 Instruction Manual – August 2013 5-37 Initial Setup and Adjustment Choosing an option to enable/disable Anti-Shock: 1. Setting C07-12 to 0 (Disabled) ensures Anti-Shock does not function. 2. Setting C07-12 to 1 (Enabled) allows Anti-Shock to run always. 3. Setting C07-12 to 2 (Enbl, Not In MSpd) will block Anti-Shock when Micro-Speed is enabled. 4. Setting H01-xx to 7F (Anti-Shock OFF) sets a digital input which, when enabled, will block AntiShock. This allows Anti-Shock to be enabled or disabled by an external input. To make Anti-Shock less sensitive to light loads and more sensitive to heavy loads: 1. Increasing C07-15 (Torque Delta) to a higher percentage increases the torque spike magnitude that is required to trigger Anti-Shock. 2. Increasing C07-16 (Detection Time) to a higher time widens the window of time that a torque spike is looked for. To make Anti-Shock more sensitive to light loads: 1. Decreasing C07-15 (Torque Delta) to a lower percentage lowers the torque increase magnitude that is required to trigger Anti-Shock. 2. Increasing C07-61 (Detection Time) to a higher time widens the window of time that a torque spike is looked for. Troubleshooting Anti-Shock is trigger when the load is already in the air: Cause: This is caused by a torque increase due to acceleration, which falls within the requirements of triggering Anti-Shock. Corrective Action: 1. Increasing C07-14 (Re-Accel Delay) to a higher time may help remedy this occurrence. 2. Increasing C07-15 (Torque Delta) and decreasing C07-16 (Detection Time) will require a higher torque spike to occur in a shorter amount of time. When Anti-Shock is triggered, the drive faults to an OV (Overvoltage) or OC (Overcurrent): Cause: By default, Anti-Shock is configured to decelerate very quickly when a torque increase is detected. The deceleration rate may cause a rapid increase in voltage or current, which may fault the drive. Corrective Action: 1. Increasing C07-18 (Smoothing Decel) will increase the time it takes for the drive to decelerate directly after the torque spike is detected. Spikes in voltage and/or current will be reduced. IMPULSE®•G+ & VG+ Series 4 Instruction Manual – August 2013 5-38 No-Load Brake Hoist (VG+) The No-Load Brake Hoist mode provides a start and stop sequence designed specifically for NoLoad Brake Hoists. This mode is enabled automatically when the Motion is set to NLB Hoist (A01-03 = 2). This will also automatically set the Stopping Method to No-Load Brake (B03-03 = 6). Start The start sequence begins by building up torque in the motor to a predefined level within the C08-01 (Torque Compensation Time) timer. This level is determined by several factors which are defined below. During the C08-02 time, the drive is monitoring current to motor. The current feedback equation must be satisfied within the time set in C08-02 (IFB OK Time). If it is not, a BE2 (NoCurrent) fault will be displayed on the keypad and the drive will stop outputting voltage to the motor. The brake will remain closed. Once the brake has been commanded to release, the drive output remains in Load Float for the amount of time programmed into C08-04. During C08-04, the drive waits for the brake to completely open and watches encoder feedback. If the amount of feedback is less than the setting in C08-05 (Roll Back Count), then the drive proceeds to the BE3 check. If it is not, a BE1 fault is displayed on the keypad and the sequence stops. For the BE3 check, if the brake opened mechanically, then the encoder feedback must be greater than or equal to the value programmed in C08-07 (BE3 Detect Count) within the time set in C08-06 (BE3/Alt Torq Tim). If it is not, then a BE3 fault is displayed. By the time the drive has completed the BE3 check, there should be a significant amount of motor shaft movement and the start sequence is complete. Stop The stop sequence begins when the run command has been removed and the output frequency has decelerated to zero. Once at zero speed, the motor maintains a Load Float position for the duration of C08-10 (Load Float Time). During the Load Float time, run commands in either direction are accepted and will begin accelerating immediately in the commanded direction, thereby skipping the start sequence entirely. The Load Float Timer is reset after each new run command. Once the Load Float Timer expires, the brake output command is removed (thereby closing the brake) and Load Float is maintained for the time set in C08-11 (Brake Set Delay) to allow the brake to fully close. Once the Brake Delay Time has expired, the BE6 check is executed. The BE6 check monitors encoder feedback while the load is being transferred from the motor to the brake and compares it to C08-13 (BE6 Max Count). The encoder feedback must not exceed the number of counts in C08-13 within the C08-12 (BE6 Detect Timer) time. If it does (meaning the load slipped through the brake), a BE6 alarm is displayed on the keypad and the drive will reset its Load Float position and maintain its new position. Run commands will still be accepted with the exception of a reduced speed in the up direction set by C08-18 (BE6 Up Speed Limit) and the NLB stop sequence will begin again once the run command had been removed. Torque Proving Factor 1: On the first run command after power up, or after any major fault which causes the stop sequence to be skipped, the start sequence by default uses the value programmed in C08-16, the Initial Brake Release torque. Factor 2: Once the system has completed a successful start and stop, a new Brake Release Torque value is used. This value is one that has been memorized and stored into memory during the stop sequence. It is equivalent to the amount of torque required for the motor to hold the load on the hook in Load Float with the brake released. Some benefits of stored Load Float torque for the next brake release are: • Faster response to run commands when drive is in Base Block Status. • Upon brake release, shaft rotation begins in the direction of the run command. IMPULSE®•G+ & VG+ Series 4 Instruction Manual – August 2013 5-39 If the stored value is less than the programmed value in C08-03 (Minimum Brake Release torque), C08-03 is used as the next brake release value. If the feature must be disabled, C08-03 will override C08-16 if it is a greater value. NOTE: All brake faults are annunciated by both the keypad and via a programmed digital output. Since the keypad is not visible by the operator, an external warning device must be used to ensure proper safety of personnel and equipment. Annunciating a brake fault can be accomplished by using one, or both, of the following methods: 1) An indicator or strobe light that is continuously “ON”, indicating proper operation. If the light should turn “OFF”, this indicates that the light bulb has either burned out, or there is a drive or brake problem. Either scenario requires immediate corrective action. 2) The use of an indicating light wired to relay output terminals MC-MA, N.O. contact, or an audible warning device that will sound during a brake fault condition. A 120 VAC audible warning device can be wired directly to terminals MCMA, provided that its ratings do not exceed the 1 Amp, 120 VAC, Inductive Spec. If a brake fault is annunciated during a “Start” sequence, it is recommended that the crane be moved to a safe location with the load on the hook. The hoist should only be operated if absolutely necessary. In this type of alarm sequence, either the brake is seized or the drive cannot develop enough torque in the motor in the time allotted. To troubleshoot the hoist, it will be necessary to monitor the keypad on the drive and operate the hoist at the same time. Two people are recommended for this procedure. With one person operating the hoist and the other person monitoring the keypad, run the hoist. The keypad should display one of the following faults: BE1, BE2, BE3, or BE4. For corrective action, refer to “Troubleshooting the Drive” in Chapter 6 of this manual. If a brake fault is annunciated after the hoist has come to a complete stop, and Load Float (C0810) has timed out, it would indicate that the drive has checked the brake and determined that the brake has insufficient torque available to hold the load. DO NOT TURN OFF POWER. This condition indicates that the brake has failed and the drive / motor combination is suspending the load. If, during this condition, the hoist is operated in the “Raise” direction, it will only be allowed to run at a speed equal to or less than the “BE6 Up Speed” setting in parameter C08-18 (C08-18 is 6 Hz by default.) This is an additional indication that the brake has failed to open, or the load is slipping through the brake. It is recommended that the crane be moved to a safe location and the load lowered to the ground. Corrective action should be taken to repair the brake. The keypad will be displaying one of two alarms during this condition: BE5 or BE6. Refer to “Troubleshooting the Drive” in Chapter 6 of this manual. WA R N I N G DO NOT turn off power to the drive during a BE6 or BE8 alarm. This may result in loss of control of the load if the brake has failed in the open position or is unable to hold the load. Table 5-30: No Load Brake Parameter Settings Parameter Code Display Function C08-01 Torque Comp Time Amount of time for the Torque Comp value to reach 300%. Range 0.00–2.55 sec * Initial value is determined by X-Press Programming (Table 4-5, 4-6, or 4-7 on pages 4-11, 4-12, and 4-13). IMPULSE®•G+ & VG+ Series 4 Instruction Manual – August 2013 5-40 Initial Value 1.00 Model VG+ Parameter Code Display C08-02 IFB OK Time C08-03 C08-04 Min Brk Rel Trq Rollback Timer C08-05 Rollback Count C08-06 BE3/Alt Torq Tim C08-07 BE3 Detect Count C08-08 Alt Rev Trq Lim C08-09 Zero Speed Level C08-10 Load Float Time C08-11 Brake Set Delay C08-12 BE6 Detect Time C08-13 BE6 Max Count C08-14 Brake Hold Speed Function Sets the amount of time to look for the current feedback to be OK before posting a BE2 alarm. Setting this parameter to 0.00 will disable torque proving at start & eliminate BE2 detection (consult factory before disabling torque proving). Minimum brake release torque. Sets the amount of time for the brake to release and for brake feedback to be received into the Brake Answer Back Multi-Function Digital Input at start before posting BE1 or BE4 alarm. It is also the time period during which the amount of rollback is checked. Detection counts for excessive rollback. 4 pulses = 1 ppr of F01-01 Time period which C08-07 is measured. Also see C08-08. Detection count for Encoder/ Seized-Brake Alarm (BE3). It is the minimum encoder pulse count, during the time period of C08-06, below which the BE3 alarm is triggered. 4 pulses = 1 ppr of F01-01 For a LOWER command in the NLB Hoist Motion Mode onlyTorque limit for time of C08-06 to prevent driving through a brake that has failed closed with a load on the hook. Determines speed feedback at which Load Float activates. After stop command time period during which the load is held at the zero-position and the electric brake is not set. Sets the amount of time for the brake to set and for brake feedback to be removed from the Brake Answer Back Multi-Function input at stop before posting a BE5 Alarm. Time period during which the electric brake is set and tested for sustaining the load. NOTE: To disable BE6 detection, set C08-12 to 0.0. Total pulse counts must be less than C08-13, during C08-12, otherwise BE6 alarm. 4 pulses = 1 ppr of F01-01 The frequency the drive outputs to push against the brake for brake proving at start as well as the frequency the drive continues to output until Brake Set Delay Timer expires or the Brake Answerback MFDI is removed 5% of F max (factory setting). Range 0.00–2.55 sec Initial Value 1.00 Model VG+ 0–300% 0.00–2.55 sec 10 0.30 VG+ G+/VG+ 0–15000 pulses 800 VG+ 0.00–2.55 sec VG+ 0.30 0–15000 pulses 10 VG+ 0–300% 25 VG+ 0.0–10.0 Hz 1.0 VG+ 0-65535 sec 10* VG+ 0.0–25.5 sec 0.7 G+/VG+ 0.0–25.5 sec 5.0 VG+ 0–15000 pulses 250 VG+ 0.0–25.5% VG+ 0.0 (FLV) * Initial value is determined by X-Press Programming (Table 4-5, 4-6, or 4-7 on pages 4-11, 4-12, and 4-13). IMPULSE®•G+ & VG+ Series 4 Instruction Manual – August 2013 5-41 Parameter Code Display C08-15 Load Float Ext T Range 0–65535 sec Initial Value 10 Model VG+ C08-16 10–300% 100 VG+ C08-18 C08-19 C08-20 C08-22 C08-23 C08-24 C08-25 Function Load Float extension time enabled by MFDI=5D. Init FWD Brk Trq Initial Brake Release Torque. The percentage of forward/up motor torque that must be reached within C08-02 time in order for the brake to release at the start of the run command. (BE2 detection) BE6 Up Speed Lim Maximum up speed limit after BE6 or BE8 alarm is detected. Brk Slip Reset Determines if BE6 alarm is automatically reset. If enabled, drive will always perform BE6 test after Load Float time to determine if brake is operational and the fault can be cleared. If disabled the drive will remain in BE6 alarm state until drive power is cycled. 0 Disabled 1 Enabled BE6 Check Torque Torque output during a BE6 check. Brk Slip Detect Enables continuous monitoring of the brake for NLB Hoists. (BE8 Detection) 0 Disabled 1 Enabled Brk Slip Det Spd Adjusts the sensitivity of Brake Slip Detection. BE8 Brake Test Torq Motor runs in Forward direction at C08-25 speed when MFDI 61 is active. Brake output Multi-function output is not energized, PGO and DEV detection are disabled. Monitor Brake Test Torque at U0186. Brake Test Speed Speed the drive will push against brake during testing. 0.00–150.00 Hz 6.00 G+/VG+ 0, 1 0 VG+ 0.5–20.0% 0, 1 1.0 0 VG+ VG+ 0–10 Hz 1.0 VG+ 0–6553.5 Flb (see ** below) VG+ 0–10 Hz 6 VG+ * Initial value is determined by X-Press Programming (Table 4-5, 4-6, or 4-7 on pages 4-11, 4-12, and 4-13). ** WA R N I N G During a BE5, BE6, or BE8 alarm, power should not be removed from the control. The load should be lowered to the ground and the crane moved to a safe location for service. WA R N I N G If a BE5, BE6, or BE8 condition is detected while the drive is base-blocked due to a FAULT condition, the drive will remain in a base-blocked condition and not control the load with the motor. IMPULSE®•G+ & VG+ Series 4 Instruction Manual – August 2013 5-42 Digital Input Option Set-up (DI-A3 and S4IO) Selects the digital input controls for either the DI-A3, S4I, or S4IO option when installed. Table 5-31: Digital Input Set-up Parameter Settings Parameter Code Display Function C09-01 Digital In Sel Provides additional programmable 0–2, 5 MFDI 0 Disabled No additional MFDI are being used. 1 Enabled S4IO S4IO or S4I card is installed 2 Enabled DI-A3 DI-A3 card is installed 5 Serial Modbus RTU using C09-02–C09-17 Parameter Code Display C09-02* C09-03* Range Terminal Designation Initial Value 0 Range Initial Value I1 00–FF 0F I2 00–FF 0F I3 I3 00–FF 0F I4 I4 00–FF 0F 4 -- -- 00–FF 0F DIO Terminal 6 5 -- -- 00–FF 0F DIO Terminal 7 6 -- -- 00–FF 0F DIO Terminal 8 7 -- -- 00–FF 0F DI-A3 S4I S4IO DIO Terminal 1 0 I1 DIO Terminal 2 1 I2 C09-04* DIO Terminal 3 2 C09-05* DIO Terminal 4 3 C09-06* DIO Terminal 5 C09-07* C09-08* C09-09* C09-10* DIO Terminal 9 8 -- -- 00–FF 0F C09-11* DIO Terminal 10 9 -- -- 00–FF 0F C09-12* DIO Terminal 11 A -- -- 00–FF 0F C09-13* DIO Terminal 12 B -- -- 00–FF 0F C09-14* DIO Terminal 13 C -- -- 00–FF 0F C09-15* DIO Terminal 14 D -- -- 00–FF 0F C09-16* DIO Terminal 15 E -- -- 00–FF 0F C09-17* DIO Terminal 16 F -- -- 00–FF 0F * See Table 5-67 for MFDI selections IMPULSE®•G+ & VG+ Series 4 Instruction Manual – August 2013 5-43 Weight Measurement The IMPULSE®•G+ & VG+ Series 4 includes a Weight Calculation function that can be used in hoisting applications. The weight measurement calculation is based on motor torque at a constant speed. The drive must pause the acceleration, wait for the torque to stabilize, and then perform the weight calculation based on the system tare values. The function takes a reading one time per lift (Raise Run command) when C10-01 = 1 (Automatic), or it can be configured to take a reading at any speed with a Multi-Function Input when C10-02 = 1 (Manual). The calculated weight can be displayed on the keypad of the hoist drive. NOTE: Weight Calculations will be more consistent when a weight measurement is calculated at the same speed every time. Example: C10-01 = 1, weight measurement is always calculated at C10-05 speed. It is important to note that after the load has been rigged, it should be suspended and the brakes should be set on the hoist. When the next raise command is given, the hoist is now ready to calculate the weight of the load. The function only works in the Raising motion (Fwd Run). If extreme accuracy is required, a load cell should be used. The Weight Measurement function of the hoist drive has an accuracy within 5% with VG+ drives and 10% with G+ drives of the hoist’s rated capacity. Table 5-32: Weight Measurement Parameter Settings Parameter Code C10-01 Display Load Weight C10-04* 0 Disabled 1 Auto - I/T 2 Auto-Analog LW Start 0 At C10-05 1 By MFDI=5C LW Display Hold 0 Hold Display 1 Hold Disp 3 Sec LW Conversion C10-05 Test Freq C10-06* C10-07 Unit Displayed 0 Tons 1 Pounds 2 Kilograms 3 Metric Tons 4 Percent Load Holding Time C10-09 Full Load Torque C10-10 No Load Torque C10-02 C10-03 Function Selects method for Load Weight measurements. Measurement is reset at Brake Closed. Enabled (VG+ Only) Enabled Analog LW Measurement Start Range 0–2 Initial Value 0 Model G+/VG+ 0, 1 0 G+/VG+ 0, 1 0 G+/VG+ 0 G+/VG+ 6 G+/VG+ 4 G+/VG+ 0.0–2.55 sec 1.00 G+/VG+ 0.0–200.0% 100.0 VG+ 0.0–200.0% 20.0 VG+ Hold until next run command Multiplier of torque output 0–39999 calculation for display. Data is n0000, so multiplier is 10000; “n” is decimal point. Example: 24000 = 40.00 Frequency at which the Weight 0–E01-04 Hz Measurement will occur. Selects the units of measurement 0–4 being displayed. Time for holding output frequency to measure weight. Percentage of Torque output that is considered full load. Percentage of Torque output that is considered no load. * Used for keypad display; consult factory for assistance. IMPULSE®•G+ & VG+ Series 4 Instruction Manual – August 2013 5-44 System Tare and Calibration for Weight Measurement 1. Attach all of the under-hook attachments that are required during normal lifting (chains, slings, spreader beam, etc.). Remove the load from the bottom block. If there is a spreader beam or other lifting device that is constantly attached to the bottom block, it may be left in place. If the lifting device changes, it should be removed for this procedure and the known weight of the lifting device used for each lift should be manually subtracted from weight that is calculated by the hoist drive. 2. Run the unloaded hoist in the raise direction at the speed that the weight will be calculated at. The hoist will automatically pause at the speed programmed in parameter C10-05 (6 Hz is the default) while calculating the weight on the hook. This is the speed the hoist should be run at. An easy method would be to set the first speed point equal to C10-05 or, if using an analog speed reference, then program B02-02 (minimum speed) so that it is equal to C10-05. 3. Record the torque reading being displayed by the monitor parameter U01-09 (Torque Reference). Repeat this step several times and record the average “No Load Torque” in parameter C10-10 (No Load Torque). 4. Rig the FULL load that the hoist and weight measurement system will be expected to calculate. If the rigging used for the full load is different than that used in steps 2 and 3, it will need to be added to the known weight being lifted to obtain an accurate total weight at a later time. 5. Run the loaded hoist in the raise direction at the same speed as step 2. 6. Record the torque reading being displayed by the monitor parameter U01-09 (Torque Reference). Repeat this step several times and record the average “Full Load Torque” in parameter C10-09 (Full Load Torque). 7. The monitor parameter U01-29 should now be displaying a value when lifting a full load. This value is a raw number that could later be converted into a meaningful weight to be displayed on the keypad. For this procedure, it is not imperative that the number is converted to tons or pounds. Most importantly, it should read a value of zero or very close to zero when lifting no load and should be relatively consistent when lifting the same weight repeatedly. Setting Up U01-29 to Display Actual Weight 1. Enter the weight of the FULL load into C10-04, not including chains, slings or spreader beams. Enter this number into the right-most four digits of C10-04. 2. Set the desired number of decimal places in the left most digit. For example, if the FULL load is 40 tons, enter 24000 into C10-04. This will be displayed in U01-29 as the weight with two decimal places, or 40.00 tons. If the FULL load is 1000 pounds, enter 01000 into C10-04. This will be displayed in U01-29 as the weight with no decimal places, or 1000 lb. Weight Measurement Design Considerations 1. The drive’s weight measurement monitor, U01-29, will display a fixed value after the measurement occurs. That value will continue to be displayed until the next weight measurement is taken at the next run. 2. When displaying the drive’s weight measurement feedback on an auxiliary display, such as a radio or PLC interface, the most accurate feedback can be obtained from the drive with the use of the drive’s RS-485 Memobus interface, similar to the architecture implemented with Magnetek’s RDSI systems. An analog interface can also be implemented, but it is important to understand the analog input and output resolution’s effect on feedback accuracy before implementation. IMPULSE®•G+ & VG+ Series 4 Instruction Manual – August 2013 5-45 Slack Cable Detection IMPULSE®•VG+ Series 4 offers Slack Cable Detection for hoist applications. The Slack Cable condition is detected when the torque output is drastically reduced and has dipped below a set-point (C11-03) level. When Slack Cable condition occurs, the output action is defined by the C11-02 which has 6 selections. The Slack Cable Detection is not executed, unless both of the following conditions are true: • The output frequency is between C11-04 and C11-06. • The Slack Cable Detection delay time is between C11-05 and C11-07. Setup Procedure: • Set the Slack Cable Detection torque level (C11-03), by lowering the hoist without load at a constant speed that the hoist would normally run during the operation. Monitor and record the torque reference (U01-09). Repeat the above operation several times to ensure an accurate reading. • Then Set C11-03 = [(U01-09)-2]. • Enable Slack Cable Detection by setting the C11-01 to 1. • Select output action when Slack Cable is detected by defining C11-02. Table 5-33: Slack Cable Detection Parameter Code Display Function C11-01 Slack Cable C11-02 C11-03 Initial Value Model (For Hoist Application) Determines 0, 1 whether Slack Cable Detection is enabled. 0 VG+ Action at SLC Multi-function output that occurs at 0–5 Slack Cable Detection. For all Selections, RAISE command is permitted (MFDO = 28). 2 VG+ 0 No Action Alarm Only 1 No Act/C3-04 Next LOWER command is at Lower Limit 1 speed (C03-04). 2 Decel/C3-04 Decelerate to Lower Limit 1 Speed C03-04 by C03-05. Continued LOWER commands allowed, but at C03-04 as max speed. 3 Decel/No Opr Decelerate to Lower Limit 1 Speed C03-04 by C03-05. Continued LOWER commands are not allowed. 4 Dec Stop/C3-04 Decel (by C03-05) to Lower Limit 1 Speed C03-04. Continued LOWER commands allowed, but only at C03-04 speed. 5 Dec Stop/No Opr Decel (by C03-06) to stop. Continued LOWER commands are not allowed. 30 VG+ 0 Disabled 1 Enabled SLC Detect Torq Percentage of Output Torque below which the enabled Slack Cable Detection is activated-as long as the Frequency output is between C11-04 and C11-06, and the delay time is between C11-05 and C11-07. IMPULSE®•G+ & VG+ Series 4 Instruction Manual – August 2013 5-46 Range 0–100% Parameter Code Display Function Range Initial Value Model C11-04 SLC Detect Spd 1 The Frequency Output that is required for the enabled Slack Cable Detection to be activated. It corresponds to Slack Cable Detection Delay Time 1 (C11-05). 0–E01-04 Hz 2 VG+ C11-05 SLC Delay Time 1 The delay time before the enabled 0.00–2.55 sec. 0.50 Slack Cable Detection can be activated. It corresponds to Slack Cable Detection Speed 1 (C11-04). Prevents false outputs. VG+ C11-06 SLC Detect Spd 2 The Frequency Output below which the enabled Slack Cable Detection can be activated. It corresponds to Slack Cable Detection Delay Time 2 (C11-07). VG+ C11-07 SLC Delay Time 2 The delay time before the enabled 0.00–2.55 sec. 0.10 Slack Cable Detection can be activated. It corresponds to Slack Cable Detection Speed 2 (C11-06). Prevents false outputs. 0–E01-04 Hz 60 VG+ IMPULSE®•G+ & VG+ Series 4 Instruction Manual – August 2013 5-47 Snap Shaft Detection This feature is designed to detect a broken or loose coupling by monitoring for a speed deviation between rotating shafts on a drive train. Ideally, mount one encoder on the motor, which drives the gearbox and one encoder on the last rotating part of the drive train, usually near the drum if used for a hoist motion. It is required that a second brake be mounted on the drum shaft. The encoders are wired into two separate PG-X3 encoder input cards, with channel 1 (CN5-C) being the high speed shaft input and channel 2 (CN5-B) being the low speed shaft input. The drive will use channel 1 as the flux vector feedback. The software monitors and compares the speed of both encoders. A gear ratio is entered into parameters C11-12 and C11-13. In an example, if the gearbox ratio is 46.34 : 1, then you would program C11-12 to 4634 and C11-13 to 100. If the difference in speed is greater than the value in C11-10 for a period longer than the setting of C11-11, a “Snap Shaft” is displayed on the keypad display and the drive will perform the action at snap (C11-09). Set Up Parameter U01-30 should be monitored during operation to obtain the exact speed difference in Hz between the two shafts. The low speed shaft speed is normalized internally by multiplying the speed of the gear ratio. The value of C11-12 should be adjusted at start up such that U01-30 approaches 0.0. Table 5-34: Snap Shaft Parameter Settings Parameter Code Display Function Range Initial Value Model C11-08 Snap Shaft Determines whether snap shaft detection is enabled. 0, 1 0 VG+ Action taken at detection. 0, 1 A setting of 0 will set the brake and display a fault. With a setting of 1, the drive will continue to run. 0 VG+ 1.0 VG+ C11-09 0 Disabled 1 Enabled Action at Snap 0 Brake/Fault Out 1 Alarm Only C11-10 Delta Speed Difference in speeds of the two shafts normalized by the gear ratio. C11-11 Delay Time Gear backlash time in milliseconds 0–2000 ms 250 VG+ C11-12 Gear Ratio Num Gear ratio numerator 1–65535 10000 VG+ C11-13 Gear Ratio Den Gear ratio denominator 1–65535 10000 VG+ IMPULSE®•G+ & VG+ Series 4 Instruction Manual – August 2013 5-48 0.0–E01-04 Hz Brake Delay Timers This function is used in trolley or bridge applications. It can reduce the mechanical brake wear when the operator tries to position a load. This function is available only in traverse mode and the constant B03-03 must be set to 4 (Decel With Timer). Table 5-35: Delay Timers Parameter Settings Parameter Code Display Function Range Initial Value C12-01 Brake Jog Delay Brake set delay time at Jog Control input. 0.0–100.0 sec 0.0 sec C12-02 Brake Run Delay Brake set delay time at RUN input. 0.0–100.0 sec 0.0 sec Figure 5-15: Brake Delay Timers NOTE: The Jog control input is a multi-function input. It is enabled by programming H01-01–08 = 15 or 16. Timer Function • The timer function is enabled when the timer function MFDI (H01-0x = 43) and the timer function MFDO (H02-0x = 12) are set respectively. • The input and output serve as general purpose I/O. Chattering of sensors, switches, contactors, etc., can be prevented by setting a delay time. • When the timer function input ON time is longer than the value set for C12-03 (Timer function ON-Delay Time), the timer function output turns ON. • When the timer function input OFF time is longer than the value set for C12-04 (Timer function OFF-Delay Time), the timer function output turns OFF. Table 5-36: Timer Function Parameter Settings Parameter Code Display Function Range Initial Value C12-03* Delay-ON timer Timer function output On-delay time (dead zone) for timer function input is set at a unit of seconds. 0.0–3000.0 sec 0.0 C12-04* Delay-OFF timer Timer function output Off-delay time (dead zone) for timer function input is set at a unit of seconds. 0.0–3000.0 sec 0.0 * This function is enabled when timer function is set to MFDI/MFDO; H01-xx=43, H02-xx=12. IMPULSE®•G+ & VG+ Series 4 Instruction Manual – August 2013 5-49 Maintenance Timer The “Maintenance Timer” is a maintenance feature that will alert an operator, for example, when the bearings need to be greased. It consists of a Multi-Function Output (H02-0x–08 = 37) that becomes active when the total running time has exceeded the amount of time (in hours) programmed in parameter C12-05 and the frequency reference will be multiplied by a programmable gain (C12-06) to slow the motion down until the bearings have been greased. An alarm will also be posted on the Keypad stating “Maintenance Required”. Once the bearings have been greased, the output and alarm message can be reset by two different methods. One method is through a Multi-Function Input programmed for Maintenance Reset (H01-01–08 = 5A) and the second method is by pressing the Mode/Service (Local/Remote) button three consecutive times with no more than 2 seconds between presses. Press enter to reset the timer. A message will then appear on the keypad stating that the timer has been reset. The Multi-Function Output will turn off at this time. When C12-01 = 0, the function is disabled. Table 5-37: Maintenance Timer Parameter Settings Parameter Code Display Function Range Initial Value C12-05 Maintenance Tmr Maintenance Timer Trip Level 0–32767 Hr 0 C12-06 Maintenance Gain Speed Reference Gain 0.00–1.00 0.50 IMPULSE®•G+ & VG+ Series 4 Instruction Manual – August 2013 5-50 Inching Control Inching Control Function can be enabled by programming H01-01–08 = 17, 18, and 19, respectively. The frequency reference used during inching is determined by B01-17 (Jog Reference). CAUTION A directional input is not needed to enable motor torque. Table 5-38: Inching Control Parameter Settings Parameter Code Display Function C13-01 Inch Run Time Inching Control run time. 0.00–2.55 sec 1.00 G+/VG+ C13-02 Repeat Delay Tim Inching Control repeat delay time. 0.00–2.55 sec 1.00 G+/VG+ Range Initial Value Model Figure 5-16: Inching Function and Inching Repeat IMPULSE®•G+ & VG+ Series 4 Instruction Manual – August 2013 5-51 Index Function Indexing allows for precise movement of the motor each time a run command is applied by the operator and the Index function is enabled by a Multi-Function Input (H01-xx = 60). This function can only be used with Traverse (A01-03 = 0) and No Load Brake (A01-03 = 2) motions in Flux Vector (A01-02 = 3) and any Speed Reference setting for A01-04. The total distance (Pulses) the motor will index is determined by the following equation: Total distance(Pulses) = [F01-01(Pulse/Rev) * C13-04(Revs)] + C13-05(Pulses) When the Index function is turned ON, the function can also be programmed to repeat an Index as long as the Run command is enabled and by setting the Index Repeat Delay (C13-06) greater than 0.00 seconds. The Index will repeat again after the Index Repeat Delay (C13-06) time has expired. Once the motor completes the Index, the brake will either set or remain in Load Float depending on the braking sequence described below. When an Index move is complete, a Multi-Function Output (Index Complete H02-xx = 34) can be programmed to turn ON, and will remain ON until one of the following is true: • another directional run input is received, • the repeat delay time has expired and the movement is repeating, or • the Index Function is disabled. When Applied in Traverse (A01-03 = 0) When the Index Function is turned ON in Traverse applications, the Index Brake Control (C13-12) can control the action of the brake. The following describes the brake control for each setting: Open on Index Command (C13-12 = 0) When the Index Function is turned ON, the brake will release and hold the position in Load Float until a run command is applied. The brake will set and normal operation will resume when the Indexing function is disabled. Open on Each Run (C13-12 = 1) When the Index function is turned ON, the brake will release after each run command is applied, then Index the motor. The brake will set after the Index or Index Repeat is complete, or the run command is removed. Latch Open on Run (C13-12 = 2) When the Index function is turned ON, the brake will release when a run command is applied, then the drive will Index the motor and will hold the position in Load Float after the Index function is complete. The drive will remain in Load Float until another run command or the Index function is turned OFF. The brake will set and normal operation will resume when the Index function is turned OFF. NOTE: For best performance, enable Index after brake has released. Not recommended for double A4 applications. IMPULSE®•G+ & VG+ Series 4 Instruction Manual – August 2013 5-52 When Applied in No-Load Brake (NLB) Hoist (A01-03 = 2) When the motion is No-Load Brake Hoist and the Index Brake Control C13-12 = 2, the action of the brake is controlled by the No-Load Brake sequence. The Index function can be enabled at any time during operation and the action of the brake is described below in C13-12. At Stop If the Index function is turned ON while the crane is stopped, the brake will release when a run command is applied. Then the drive will Index the motor and will hold the position in Load Float after the Index function is complete. The drive will remain in Load Float until another Run command is applied or the Index function is turned OFF. When the Index function is turned OFF, the drive will set the brake according to the No-Load Brake stop sequence. During Run If the motor is in motion when the Index function is turned ON, the drive will decelerate to zero and hold the position in Load Float. After a Run command is applied, the drive will Index the load and hold the position in Load Float after the Index is complete. The brake is set according to the No-Load Brake stop sequence when the Index function is turned OFF. NOTE: For best performance, enable Index after brake has released. Not recommended for double A4 applications. NOTE: When either the Index Enable or Run Command is removed, the stop sequence will be initiated. Table 5-39: Index Function Parameter Settings Parameter Code Display Function Range Initial Value Model C13-03 Index Run Ref Index frequency Ref. (MFDI = 60) 0.01–60.00 Hz 0.10 VG+ C13-04 Index Revs Index motor revolutions (F01-01 PPR = 1 Rev.) 0–65535 Rev 0** VG+ C13-05 Index Count Index fractional motor revolution. 4 pulses = 1 ppr of F01-01 0–65535 Pulses 100** VG+ C13-06 Index Rpt Delay Index Repeat Delay Time (Setting of 0.00 disables Index Repeat). 0.00–60.00 sec 0.00 VG+ C13-07 Index Complete Index Complete Width 0–32767 (Quadrupled) for MFDO = 34. Upper Limit range is dependent on the following conditions: 32767 or (C13-04 *4 * PG constant PPR + C13-05 -1), whichever is smaller. 1 pulse = 1 ppr of F01-01 10 VG+ C13-08 Index Zsv Gain Index Zero Servo Gain. 0–100 10 VG+ C13-09 Index ASR P Gain Index ASR P Gain. 0.00–300.00 30.00 VG+ C13-10 Index ASR I Time Index ASR Integral Time. 0.000–10.000 sec 0.200 VG+ C13-11 Acc/Dec Gain Index Accel/Decel Rate Gain. 0.0–5.0 1.0 VG+ ** If both C13-04 and C13-05 = 0, the Index function is disabled. IMPULSE®•G+ & VG+ Series 4 Instruction Manual – August 2013 5-53 Parameter Code Display Function Range Initial Value C13-12 Index Brake Ctrl Configures brake behavior when indexing (traverse only). TRAV: 0–2 NLB: 0, 2 NLB: 2 else: 0 0: Open on Index Brake will open on Index Cmd and remain open until Index Cmd is OFF. Drive is in Load Float between runs. 1: Open on each Run Brake will open on Run cmd and close when run is finished, or after Load Float in NLB. 2: Ltch Open On Run Brake will open on Run cmd and remain open with drive in Load Float until Index is turned off. ** If both C13-04 and C13-05 = 0, the Index function is disabled. IMPULSE®•G+ & VG+ Series 4 Instruction Manual – August 2013 5-54 Model VG+ Tuning • D1 DC Injection Braking • D2 Motor Slip Compensation • D3 Torque Compensation • D4 Automatic Speed Regulator (ASR) Tuning • D5 Torque Control • D8 Dwell Function • D9 S-Curve Acceleration/Deceleration • D10 Carrier Frequency • D11 Hunting Prevention DC Injection With decel to stop enabled (B03-03=0), upon removal of the run command, the IMPULSE®•G+ & VG+ Series 4 drive controls motor deceleration according to the Decel Time setting (B05-02), until output frequency reaches the DC Injection Braking Start Frequency (D01-01 setting). Then the IMPULSE®•G+ & VG+ Series 4 frequency output is turned off and DC injection current is applied to the motor. The effective DC injection time and current should be set to provide adequate stopping without excessive motor heating. The DC injection voltage is determined by the DC injection braking current and motor impedance. Table 5-40: DC Injection Parameter Settings Parameter Code Display Function Range Initial Value D01-01 DCInj Start Freq DC Injection Braking Frequency Start 0.0–10.0 Hz 0.5 D01-02* DCInj Current Sets the DC Injection Braking current as a percentage of the drive rated current. 0–100% 50 D01-03 DCInj Time@Start DC Injection Braking Time 0.00–10.00 sec 0.00 D01-04 DCInj Time@Stop DC Injection Braking Time at Stop 0.00–10.00 sec 0.05 * Not available in the Flux Vector control method (A01-02 = 3). Figure 5-17: DC Braking Sequence IMPULSE®•G+ & VG+ Series 4 Instruction Manual – August 2013 5-55 Motor Slip Compensation As the load becomes larger, the motor speed is reduced and the motor slip increases. The slip compensation function keeps the motor speed constant under varying load conditions. D02-01 sets the slip compensation gain. When the gain is “1.0”, the output frequency is increased by 1% of the E01-06 setting at rated current. A setting of “0.0” results in no slip compensation. Table 5-41: Motor Slip Compensation Parameter Settings Parameter Code Display Function Range Initial Value D02-01 Slip Comp Gain Slip compensation multiplier. 0.0–2.5 V/f: 0.0 G+/VG+ OLV: 1.0 FLV: 1.0 D02-02 Slip Comp Time Adjusts the slip compensation function delay time, 0–10000 ms V/f: 2000 G+ OLV: 200 D02-03 Slip Comp Limit Sets an upper limit for the slip compensation function as a percentage of motor rated slip (E02-02). 0–250% 200 G+ D02-04 Slip Comp Regen Disabled slip compensation during 0–2 regeneration. 0 G+ Automatically reduces motor flux 0, 1 when the output voltage saturates. 0 G+/VG+ Model 0 Disabled 1 Enabled >6 Hz 2 Enabled >2 Hz D02-05 Output V Lim Sel 0 Disabled 1 Enabled D02-13* Output V Limit Start Level Output Voltage Limit Operation Start Level 70.0–90.0% 85.0 VG+ D02-14* Output V Limit Max Level Maximum Output Voltage Limit Level 85.0–100.0% 90.0 VG+ D02-15* Output V Limit Level Output Voltage Limit Level 30.0–100.0% 90.0 VG+ * Available only for 4810 and 41090 models. Torque Compensation The motor torque requirement changes according to load conditions. Full-range automatic torque boost adjusts the voltage of the V/f pattern according to the required torque. The IMPULSE®•G+ & VG+ Series 4 automatically adjusts the voltage during constant-speed operation as well as during acceleration. The required torque is calculated by the inverter. This ensures trip-less operation and power savings. Output voltage Torque compensation gain x Required torque When more torque is needed, increase the torque compensation gain in one-tenth (0.1) increments. Increase the setting when the wiring distance between the inverter and the motor is 100ft. or longer. If the motor generates excessive vibration or oscillates, decrease the torque compensation. IMPULSE®•G+ & VG+ Series 4 Instruction Manual – August 2013 5-56 Increasing torque compensation gain increases motor torque, but an excessive increase may cause the following: • Inverter fault trips due to motor overexcitation, and/or • Motor overheat or excessive vibration. Increase the torque compensation time constant in 10 ms increments when the motor’s output current is unstable. Decrease this value when speed response is slow. Parameter Code Display Function Initial Value D03-01 Torq Comp Gain Model Sets the gain for the automatic 0.00–2.50 torque (voltage) boost function and helps to produce better starting torque. 1.0* G+ D03-02 Torq Comp Time Sets the torque compensation filter 0–60000 ms time. V/f: 200 OLV: 20 G+ D03-03 F TorqCmp@Start Sets torque compensation at forward start as a percentage of motor torque. 0.0–200.0% 0.0 G+** D03-04 R TorqCmp@Start Sets torque compensation at reverse start as a percentage of motor torque. -200.0–0.0% 0.0 G+** D03-05 TorqCmp Delay T Sets the time constant for torque 0–200 ms compensation at forward start and reverse start (C04-03 and C0404). 10 G+** D03-06 Start Torq Time Sets the torque compensation time 0–10000 ms 2. 150 G+** Range *Default setting is determined by parameter A01-02, Control Method Setting. ** Only available in Open Loop Vector control method (A01-02 = 2). Automatic Speed Regulator (ASR) Tuning The ASR controls the motor speed in V/f with PG and FLV control methods and adjusts the output frequency (V/f w/PG) or torque reference (FLV) to minimize the difference between frequency reference and actual motor speed. The figure below illustrates ASR functionality: Figure 5-18: Speed Control Block Diagram for FLV Perform Auto-Tuning and set up all motor data correctly prior to adjusting ASR parameters. Generally when tuning the ASR, optimize the ASR gain before adjusting the integral time settings. Always make adjustments with the load connected to the motor. IMPULSE®•G+ & VG+ Series 4 Instruction Manual – August 2013 5-57 Adjusting the ASR Parameters in FLV The drive is preset to use ASR settings D04-01/02 over the entire speed range in FLV. If required by the application, a second set of ASR parameters (D04-03/04) can be automatically activated depending on the motor speed or by using a digital input. Refer to the description in D04-01/D04-02 and D04-03/D04-04 on page 5-61. Perform the following steps for adjusting ASR parameters: 1. Run the motor at zero speed and increase the ASR gain (D04-01) as much as possible without oscillation. 2. Run the motor at zero speed and decrease the ASR integral time (D04-02) as much as possible without oscillation. 3. Run at the normal operating speed. Check for over/undershoot when changing speed and for any oscillation. 4. If problems occur in step 3, increase the integral time and reduce the gain. Alternatively, use different ASR settings for high and low speed. Set the values from step 1 and 2 to parameters D04-03 and D04-04, then set an ASR switching frequency in parameter D04-07. Run the motor at a speed higher than D04-07 and repeat step 3 while adjusting D04-01 and D04-02. Solving Problems During ASR Setup Use Table 5-42 when making adjustments to ASR. IMPULSE®•G+ & VG+ Series 4 Instruction Manual – August 2013 5-58 Table 5-42: ASR Setup Problems and Corrective Actions Problem Possible Solutions Slow response to speed changes or speed deviation lasts for too long • Increase the ASR gain. • Decrease the integral time. Overshoot or undershoot at the end of acceleration or deceleration • Decrease the ASR gain. • Increase the integral time. Vibration and oscillation occur at constant speed • Decrease the ASR gain. • Increase the integral time. • Increase the ASR delay time (D04-06). • FLV: Use D04-01, D04-02, D04-03, and D04-04 to define optimal ASR settings for high and low speed. Use D04-07 to define a switching frequency. Oscillation at low speed and response is too slow at high speed (or vice versa) -- IMPULSE®•G+ & VG+ Series 4 Instruction Manual – August 2013 5-59 Table 5-43: ASR Tuning Parameter Settings Parameter Code Display Function Range Initial Value Model D04-01 ASR P Gain 1 Sets the proportional gain of the speed control loop (ASR). 0.00–300.00 20.00 VG+ D04-02 ASR I Time 1 Sets the integral time of the speed 0.000–10.000 control loop (ASR). sec 0.500 VG+ D04-03 ASR P Gain 2 Sets the speed control gain 2 of the speed control loop (ASR). 0.00–300.00 20.00 VG+ D04-04 ASR I Time 2 Sets the integral time 2 of the speed control loop (ASR). 0.000–10.000 sec 0.500 VG+ D04-06 ASR Delay Time ASR Output Primary Delay Time. 0.000–0.500 sec 0.004 VG+ D04-07 ASR Gain SW Freq ASR Gain Switching Frequency. 0.0–150.0 Hz 0.0 VG+ D04-08 ASR I Limit ASR Integral Limit. 0–400% 400 VG+ D04-36 NLB Strt ASR I Integral Time at NLB start 0.000–30.000 0.100 VG+ D04-37 NLB Strt ASR Dly ASR Gain Delay at NLB start 0.00–2.55 0.50 VG+ These parameter settings will function differently depending on the control method. NOTE: Mechanical backlash in an application can cause secondary current (I2) reference variations in the motor’s rotor. This condition can prevent the desired adjustment of ASR parameters. The output delay time constant is used to increase the stability of the system allowing a wider setting range of ASR parameters. IMPULSE®•G+ & VG+ Series 4 Instruction Manual – August 2013 5-60 Flux Vector (FLV) Parameters D04-03 and D04-04 define the ASR proportional gain an integral time at zero speed. The settings in D04-01 and D04-02 are used at speeds above the setting in D04-07. D04-07 is set by default to 0.0 so D04-01 and D04-02 are used by default over the entire speed range. However, changing D04-07 creates two levels of ASR control settings, as shown in Figure 5-19 below. Figure 5-19: Low-speed and High-speed Gain Settings The switching frequency (D04-07) can also be controlled with a digital input programmed to “ASR gain switch” (H01-xx = 37). When the terminal is open, the drive uses the ASR gain level set by the pattern in Figure 5-19 above. When the terminal closes, D04-03 is used. The integral time set to D04-02 is used to change linearly between these settings, as shown in Figure 5-20 below. The ASR gain switch command from a multi-function input terminal overrides the switching frequency set to D04-07. Figure 5-20: ASR Proportional Gain Switch IMPULSE®•G+ & VG+ Series 4 Instruction Manual – August 2013 5-61 Torque Control Please consult factory for application assistance regarding torque control. Typically, torque control should not be applied on a hoist. This function is used to avoid excessive changes in torque, which may be caused by abnormal resonance when the torque reference changes rapidly. Table 5-44: Torque Control Parameter Settings Parameter Code Display Function Range Initial Value Model D05-01 Torq Control Sel Determines whether Speed or Torque Control is selected. 0, 1 0 VG+ 0 Speed Control Speed Control enabled with torque limit 1 Torque Control* Torque control enabled with speed limit. 0–1000 ms 0 VG+ 2 VG+ D05-02 Torque Ref Filter Primary delay time for Torque Reference Input. D05-03 Speed Limit Sel Speed Limit Selection (See Figure 1, 2 5-21) 1 Fref Limit Limit set by the frequency reference in B01-01. 2 Speed Limit Sel Limit set by D05-04. D05-04 Speed Lmt Value Speed Limit Value (% of E01-04) -120–120% 105 VG+ D05-05 Speed Lmt Bias Speed Limit Bias (% of E01-04) 0–120% 10 VG+ D05-06 Ref Hold Time Speed/Torque Switching Timer 0–1000 ms 0 VG+ D05-08 Drctn SpdLmt Sel Parameter D05-08 selects how the 0, 1 speed limit bias is applied. 1 VG+ 0 Disabled 1 Enabled * Cannot set D05-01 = 1 for NLB Hoist; use Load Share MFDI (H01-xx = 66) instead. NOTE: Speed/torque control selection can also be made by using a multi-function input select (H01-xx = 34 speed-torque control changeover). IMPULSE®•G+ & VG+ Series 4 Instruction Manual – August 2013 5-62 Speed/Torque Control Switching Speed control or torque control is used in traverse applications and can be selected “on the fly” with the VG+ drive by using the multi-function input speed/torque control selection command (H01-xx = 34). Table 5-45:Speed/Torque Control Switch Parameters Terminal Number Parameter Number Setting Description S1 - S8 H01-01–H01-08 34 Speed/torque control selection A1 B03-01 D05-03 1 1 Frequency reference selection (terminals A1, A2, or A3) Speed limit selection (terminals A1, A2, or A3) A3/A2 H03-06/H03-10 13 Torque reference/torque limit Figure 5-21: Speed/Torque Control Selection Timing Diagram IMPULSE®•G+ & VG+ Series 4 Instruction Manual – August 2013 5-63 1. When the speed/torque control selection contact is OFF, speed control is activated. • Speed reference during speed control depends on the frequency reference selection (B03-01) setting. To use terminal A1, A2, or A3 as the master frequency reference, set B03-01 to “1.” • Torque limit during speed control is the smaller of the absolute value of terminal A2 or A3 torque limit, or the values set in the torque limit parameters (C07-01 to C07-04) is used as the torque limit. • When a stop command is given during speed control, speed control is maintained as the motor decelerates to stop and the smaller of the absolute value of the terminal A2 or A3 torque limit, or the values set in the torque limit parameters (C07-01 to C07-04) is used as the torque limit. 2. When the speed/torque control selection is ON, torque control is activated. • Speed limit during torque control is the master frequency reference at terminal A1, A2, or A3 when speed limit selection (D05-03) is set to “1”, and is the speed limit value (D05-04) when D05-03 = “2”, regardless of the frequency reference selection (B0301) setting. • During torque control, the terminal A2 or A3 analog input value becomes the torque reference. 3. By giving a stop command during torque control, operation changes to speed control automatically, and the motor decelerates to stop. The torque limit during deceleration to stop becomes the values set in the torque limit parameters (C07-01 to C07-04). NOTE: The control method actually changes after the speed/torque control selection command changes and the reference delay timer (D05-06) elapses. The speed reference/speed limit and the torque limit/torque reference are stored in the inverter until the time set to D05-06 elapses. IMPULSE®•G+ & VG+ Series 4 Instruction Manual – August 2013 5-64 S-Curve Acceleration/Deceleration An S-Curve pattern is used to reduce shock and provide smooth transitions during machine acceleration and deceleration. S-Curve characteristic time is the time from the output frequency to the set accel/decel time. See S-Curve Characteristic timing diagrams below and on the following page. Table 5-46: S-Curve Acceleration/Deceleration Parameter Settings Parameter Code Display Function Range Initial Value D09-01 SCrv Acc @ Start Sets the S-Curve at the beginning of the Accel time. 0.00–10.00 sec 0.20* D09-02 SCrv Acc @ End Sets the S-Curve at the end of the 0.00–10.00 sec Accel time. 0.20* D09-03 SCrv Dec @ Start Sets the S-Curve at the beginning of the Decel time. 0.20* D09-04 SCrv Dec @ End Sets the S-Curve at the end of the 0.00–10.00 sec Decel time. 0.00–10.00 sec 0.20 * Initial value is determined by X-Press Programming (Table 4-5, 4-6, or 4-7 on pages 4-11, 4-12, and 4-13). The figure below shows FWD/REV run switching during deceleration to stop. The S-curve function will add time to the acceleration and deceleration. Time to accelerate from the minimum frequency to the maximum frequency (total acceleration) is: Total Acceleration = Time to decelerate from the maximum frequency to the minimum frequency (total deceleration) is: Total Deceleration = CAUTION CAUTION Accel/Decel times will be extended. IMPULSE®•G+ & VG+ Series 4 Instruction Manual – August 2013 5-65 Figure 5-22: S-Curve Characteristic-FWD/REV Operation Carrier Frequency The Carrier Frequency group provides the ability to modify the drive’s output carrier frequency and drive overload level. CAUTION Consult Magnetek for drive derating before modifying the D10 group parameters. Failure to do so may result in equipment damage. Table 5-47: Carrier Frequency Parameter Settings Parameter Code Display Function Range Initial Value Model D10-01 Heavy/NormalDuty Constant Torque/Variable Torque Selection 0, 1 0 G+/VG+ 0 Heavy Duty 1 Normal Duty IMPULSE®•G+ & VG+ Series 4 Instruction Manual – August 2013 5-66 Parameter Code D10-02 Display Function Range Initial Value Model CarrierFreq Sel Carrier Frequency Selection 1–9, A, F 1 G+/VG+ 1 Fc=2.0kHz 2 Fc=5.0kHz 3 Fc=8.0kHz 4 Fc=10.0 Hz 5 Fc=12.5kHz 6 Fc=15.0kHz 7 Swing PWM1* 8 Swing PWM2* 9 Swing PWM3* A Swing PWM4* F User defined Determined by D10-03 through D10-05 D10-03 CarrierFreq Max Determines the carrier frequency upper limit. 1.0–15.0 kHz 2.0 G+/VG+ D10-04 CarrierFreq Min Determines the carrier frequency lower limit (V/f Control only). 1.0–15.0 kHz 2.0 G+ D10-05 CarrierFreq Gain Carrier Frequency Gain (V/f Control only). 0–99 0 G+ * Not available in VG+ (A01-02 = 3) IMPULSE®•G+ & VG+ Series 4 Instruction Manual – August 2013 5-67 Hunting Prevention Occasionally, in an application, resonance between the internal control system and the mechanical system causes instability. This is called hunting, and may cause a crane to vibrate at a lower speed (up to 30 Hz) and/or with a light load. The hunting prevention function monitors the motor flux and uses a special control circuit to “smooth out” any peaks in the output current wave form. Increase the set value of D11-02 when hunting is present while driving a light load. Decrease the set value of D11-02 when the motor vibrates or stalls while driving a heavy load. Table 5-48: Hunting Prevention Parameter Settings Parameter Code Display D11-01 Hunt Prev Select 0 Disabled 1 Enabled Function Range Initial Value Control Method Model Enable/Disable Hunt Prevention function 0, 1 1 V/f G+ D11-02 Hunt Prev Gain Hunting Prevention Gain 0.00–2.50 1.00 V/f G+ D11-03 Hunt Prev Time Hunting Prevention Time Constant 0–500ms 10 V/f G+ D11-05 Rev Hunt Prev Gn Reverse Hunting Prevention Gain 0.00–2.50 0.00 V/f G+ IMPULSE®•G+ & VG+ Series 4 Instruction Manual – August 2013 5-68 Motor Parameters • E1 V/f Pattern 1 • E2 Motor Set-up • E3 Test Mode Voltage/Frequency Pattern WA R N I N G Drive input voltage (not motor voltage) must be set in E01-01 for the protective features of the drive to function properly. Failure to do so may result in equipment damage and/or death or personal injury. Table 5-49:V/f Pattern Parameter Parameter Code Display Function Range Initial Value E01-01 Input Voltage Sets input voltage 230V: 155–255 VAC 460V: 310–510 VAC 575V: 446–733 VAC 230 460 575 Figure 5-23: E01-01 Input Voltage IMPULSE®•G+ & VG+ Series 4 Instruction Manual – August 2013 5-69 • • • • Factory setting is 230 (230V units) or 460 (460V units). When E01-11 = 0, then the value of E01-11 is not used. When E01-12 = 0, then the value of E01-12 is not used. When E01-13 = 0, then the value of E01-13 is not used. An OPE10 error will occur if the following conditions are not met: E01-05 E01.12 E01-13 E01-08 E01-10 E01-04 E01-11 E01-06 E01-07 E01-09 NOTE: When using the Flex Vector control method, the V/f pattern voltage values will be adjusted by the Auto-Tuning function. IMPULSE®•G+ & VG+ Series 4 Instruction Manual – August 2013 5-70 The setting E01-01 sets the maximum and base voltage used by preset V/f patterns (E01-03 = 0 to E), and adjusts the levels of drive protective features (e.g. Overvoltage, braking resistor turn-on, stall prevention, etc). Table 5-50: DC Bus Regulation Overvoltage Trip Braking Transistor Inverter Voltage E01-01 Setting Trip Reset On Off Stall Level 230 155–255 410 V 380V 380V 375V 380V 460 400 820 V 760V 760V 750V 760V 460 <400 740 V 680V 660V 650V 670V 575 ≥500 V 1040 V 990V 990V 970V 960V 575 <500 V 990 V 940V 860V 840V 830V Parameter E01-01 performs the above mentioned function in all three control methods. Table 5-51:V/f Parameters Parameter Code Display Function Range E01-03 V/f Selection Motor V/f selection V/f: 0–9, A–F, FF OLV: F, FF * 0 60 Hz, Level 0 (Default for A01-03 = 0 (Traverse), A01-03 = 4 (Braketronic)) 1 60 Hz, Level 1 2 60 Hz, Level 2 3 60 Hz, Level 3 4 60 Hz, Level 4 5 60 Hz, Level 5 6 60 Hz, Level 6 7 60 Hz, Level 7 8 60 Hz, Level 8 9 72 Hz, Level 0 A 72 Hz, Level 1 40.0–150.0 Hz 60.0 E01-04 B 72 Hz, Level 2 C 90 Hz, Level 0 D 90 Hz, Level 1 E 90 Hz, Level 2 F Custom V/f Initial Value (Default for A01-03 = 1 (Std Hoist)) E01-04 through E01-13 settings define the V/f pattern, (Default for A01-03 = 2 (Hoist NLB)). When A01-03 = 0, 1, 3, or 4 and E01-03 is changed to 0F, the values for E01-04 through E01-13 are the same as E01-03 = 4. See V/f tables for appropriate voltage. FF Custom w/o limit Custom with no lower limits on E01-xx. Max Frequency Maximum Frequency * Initial value determined by X-Press Programming (Table 4-5, 4-6, or 4-7 on pages 4-11, 4-12, and 4-13). IMPULSE®•G+ & VG+ Series 4 Instruction Manual – August 2013 5-71 Parameter Code Display Function Range E01-05 Max Voltage Maximum Voltage 230 V: 0.0–255.0 460 V: 0.0–510.0 575 V: 0.0–733.1 E01-06 Base Frequency Motor Base Frequency (FA) 0.0–150.0 Hz 60.0 E01-07 Mid Frequency A Motor Middle output frequency (FB) 0.0–150.0 Hz Determined by E01-03 E01-08 Mid Voltage A Motor Middle output frequency Voltage (VC) 230 V: 0.0–255.0 460 V: 0.0–510.0 575 V: 0.0–733.1 Determined by E01-03 E01-09 Min Frequency Minimum Frequency (FMIN) 0.0–150.0 Hz Determined by E01-03 E01-10 Min Voltage Motor Minimum output frequency Voltage (VMIN) 230 V: 0.0–255.0 460 V: 0.0–510.0 575 V: 0.0–733.1 Determined by E01-03 E01-11 Mid Frequency B Midpoint Output Frequency B 0.0–150.0 Hz 0.0 E01-12 Mid Voltage B Midpoint Output Voltage B 230 V: 0.0–255.0 460 V: 0.0–510.0 575 V: 0.0–733.1 0.0 E01-13 Base Voltage Motor Base Voltage 230 V: 0.0–255.0 460 V: 0.0–510.0 575 V: 0.0–733.1 0.0 * Initial value determined by X-Press Programming (Table 4-5, 4-6, or 4-7 on pages 4-11, 4-12, and 4-13). IMPULSE®•G+ & VG+ Series 4 Instruction Manual – August 2013 5-72 Initial Value Determined by O02-04 Table 5-52: Voltage/Frequency (V/f) Pattern Options (230 V) E01-03= E01-04 E01-05*3 E01-06 E01-07 E01-08 E01-09 E01-10 E01-11 E01-12 E01-13 0* 60.0 Hz 230.0 V 60.0 Hz 3.0 Hz 15.0 V 1.3 Hz 8.1 V 0.0 Hz 0.0 V 0.0 V 1 60.0 Hz 230.0 V 60.0 Hz 3.0 Hz 16.1 V 1.3 Hz 9.2 V 0.0 Hz 0.0 V 0.0 V 2 60.0 Hz 230.0 V 60.0 Hz 3.0 Hz 17.3 V 1.3 Hz 10.4 V 0.0 Hz 0.0 V 0.0 V 3 60.0 Hz 230.0 V 60.0 Hz 3.0 Hz 18.4 V 1.3 Hz 11.5 V 0.0 Hz 0.0 V 0.0 V 4* 60.0 Hz 230.0 V 60.0 Hz 3.0 Hz 19.6 V 1.3 Hz 12.7 V 0.0 Hz 0.0 V 0.0 V 5 60.0 Hz 230.0 V 60.0 Hz 3.0 Hz 20.7 V 1.3 Hz 13.8 V 0.0 Hz 0.0 V 0.0 V 6 60.0 Hz 230.0 V 60.0 Hz 3.0 Hz 21.9 V 1.3 Hz 15.0 V 0.0 Hz 0.0 V 0.0 V 7 60.0 Hz 230.0 V 60.0 Hz 3.0 Hz 23.0 V 1.3 Hz 16.1 V 0.0 Hz 0.0 V 0.0 V 8 60.0 Hz 230.0 V 60.0 Hz 3.0 Hz 24.2 V 1.3 Hz 17.3 V 0.0 Hz 0.0 V 0.0 V 9 72.0 Hz 230.0 V 60.0 Hz 3.0 Hz 16.1 V 1.3 Hz 9.2 V 0.0 Hz 0.0 V 0.0 V A 72.0 Hz 230.0 V 60.0 Hz 3.0 Hz 17.8 V 1.3 Hz 10.9 V 0.0 Hz 0.0 V 0.0 V B 72.0 Hz 230.0 V 60.0 Hz 3.0 Hz 19.6 V 1.3 Hz 12.7 V 0.0 Hz 0.0 V 0.0 V C 90.0 Hz 230.0 V 60.0 Hz 3.0 Hz 16.1 V 1.3 Hz 9.2 V 0.0 Hz 0.0 V 0.0 V D 90.0 Hz 230.0 V 60.0 Hz 3.0 Hz 17.8 V 1.3 Hz 10.9 V 0.0 Hz 0.0 V 0.0 V E 90.0 Hz 230.0 V 60.0 Hz 3.0 Hz 19.6 V 1.3 Hz 12.7 V 0.0 Hz 0.0 V 0.0 V F 60.0 Hz 230.0 V 60.0 Hz 3.0 Hz 19.6 V 1.3 Hz 12.7 V 0.0 Hz 0.0 V 0.0 V 1 FF FF* 2 60.0 Hz 230.0 V 60.0 Hz 3.0 Hz 19.6 V 1.3 Hz 12.7 V 0.0 Hz 0.0 V 0.0 V 60.0 Hz 230.0 V 60.0 Hz 0.0 Hz 0.0 V 0.0 Hz 0.0 V 0.0 Hz 0.0 V 0.0 V *Default for Traverse Motion/Braketronic *1 Default for Standard Hoist Motion *2 Flux Vector Only - Default for No-Load Brake Hoist Motion *3 Initial value is dependent on drive size, which is determined by O02-04 (kVA Selection) Table 5-53:Voltage/Frequency (V/f) Pattern Options (460 V) E01-03= E01-04 E01-05*3 E01-06 E01-07 E01-08 E01-09 E01-10 E01-11 E01-12 E01-13 0* 60.0 Hz 460.0 V 60.0 Hz 3.0 Hz 29.9 V 1.3 Hz 16.1 V 0.0 Hz 0.0 V 0.0 V 1 60.0 Hz 460.0 V 60.0 Hz 3.0 Hz 32.2 V 1.3 Hz 18.4 V 0.0 Hz 0.0 V 0.0 V 2 60.0 Hz 460.0 V 60.0 Hz 3.0 Hz 34.5 V 1.3 Hz 20.7 V 0.0 Hz 0.0 V 0.0 V 3 60.0 Hz 460.0 V 60.0 Hz 3.0 Hz 36.8 V 1.3 Hz 23.0 V 0.0 Hz 0.0 V 0.0 V 4* 60.0 Hz 460.0 V 60.0 Hz 3.0 Hz 39.1 V 1.3 Hz 25.3 V 0.0 Hz 0.0 V 0.0 V 5 60.0 Hz 460.0 V 60.0 Hz 3.0 Hz 41.4 V 1.3 Hz 27.6 V 0.0 Hz 0.0 V 0.0 V 6 60.0 Hz 460.0 V 60.0 Hz 3.0 Hz 43.7 V 1.3 Hz 29.9 V 0.0 Hz 0.0 V 0.0 V 7 60.0 Hz 460.0 V 60.0 Hz 3.0 Hz 46.0 V 1.3 Hz 32.2 V 0.0 Hz 0.0 V 0.0 V 8 60.0 Hz 460.0 V 60.0 Hz 3.0 Hz 48.3 V 1.3 Hz 34.5 V 0.0 Hz 0.0 V 0.0 V 9 72.0 Hz 460.0 V 60.0 Hz 3.0 Hz 32.2 V 1.3 Hz 18.4 V 0.0 Hz 0.0 V 0.0 V A 72.0 Hz 460.0 V 60.0 Hz 3.0 Hz 35.7 V 1.3 Hz 21.9 V 0.0 Hz 0.0 V 0.0 V B 72.0 Hz 460.0 V 60.0 Hz 3.0 Hz 39.1 V 1.3 Hz 25.3 V 0.0 Hz 0.0 V 0.0 V C 90.0 Hz 460.0 V 60.0 Hz 3.0 Hz 32.2 V 1.3 Hz 18.4 V 0.0 Hz 0.0 V 0.0 V D 90.0 Hz 460.0 V 60.0 Hz 3.0 Hz 35.7 V 1.3 Hz 21.9 V 0.0 Hz 0.0 V 0.0 V E 90.0 Hz 460.0 V 60.0 Hz 3.0 Hz 39.1 V 1.3 Hz 25.3 V 0.0 Hz 0.0 V 0.0 V F 60.0 Hz 460.0 V 60.0 Hz 3.0 Hz 39.1 V 1.3 Hz 25.3 V 0.0 Hz 0.0 V 0.0 V FF 60.0 Hz 460.0 V 60.0 Hz 3.0 Hz 39.1 V 1.3 Hz 25.3 V 0.0 Hz 0.0 V 0.0 V 60.0 Hz 460.0 V 60.0 Hz 0.0 Hz 0.0 V 0.0 Hz 0.0 V 0.0 Hz 0.0 V 0.0 V 1 FF* 2 *Default for Traverse Motion/Braketronic *1 Default for Standard Hoist Motion *2 Flux Vector Only - Default for No-Load Brake Hoist Motion *3 Initial value is dependent on drive size, which is determined by O02-04 (kVA Selection) IMPULSE®•G+ & VG+ Series 4 Instruction Manual – August 2013 5-73 Table 5-54:Voltage/Frequency (V/f) Pattern Options (575 V) E01-03= E01-04 E01-05*3 E01-06 E01-07 E01-08 E01-09 E01-10 E01-11 E01-12 E01-13 0* 60.0 Hz 575.0 V 60.0 Hz 3.0 Hz 37.4 V 1.3 Hz 20.1 V 0.0 Hz 0.0 V 0.0 V 1 60.0 Hz 575.0 V 60.0 Hz 3.0 Hz 40.3 V 1.3 Hz 23.0 V 0.0 Hz 0.0 V 0.0 V 2 60.0 Hz 575.0 V 60.0 Hz 3.0 Hz 43.1 V 1.3 Hz 25.9 V 0.0 Hz 0.0 V 0.0 V 3 60.0 Hz 575.0 V 60.0 Hz 3.0 Hz 46.0 V 1.3 Hz 28.8 V 0.0 Hz 0.0 V 0.0 V 4* 60.0 Hz 575.0 V 60.0 Hz 3.0 Hz 48.9 V 1.3 Hz 31.6 V 0.0 Hz 0.0 V 0.0 V 5 60.0 Hz 575.0 V 60.0 Hz 3.0 Hz 51.8 V 1.3 Hz 34.5 V 0.0 Hz 0.0 V 0.0 V 6 60.0 Hz 575.0 V 60.0 Hz 3.0 Hz 54.6 V 1.3 Hz 37.4 V 0.0 Hz 0.0 V 0.0 V 7 60.0 Hz 575.0 V 60.0 Hz 3.0 Hz 57.5 V 1.3 Hz 40.3 V 0.0 Hz 0.0 V 0.0 V 8 60.0 Hz 575.0 V 60.0 Hz 3.0 Hz 60.4 V 1.3 Hz 43.1 V 0.0 Hz 0.0 V 0.0 V 9 72.0 Hz 575.0 V 60.0 Hz 3.0 Hz 40.3 V 1.3 Hz 23.0 V 0.0 Hz 0.0 V 0.0 V A 72.0 Hz 575.0 V 60.0 Hz 3.0 Hz 44.6 V 1.3 Hz 27.3 V 0.0 Hz 0.0 V 0.0 V B 72.0 Hz 575.0 V 60.0 Hz 3.0 Hz 48.9 V 1.3 Hz 31.6 V 0.0 Hz 0.0 V 0.0 V C 90.0 Hz 575.0 V 60.0 Hz 3.0 Hz 40.3 V 1.3 Hz 23.0 V 0.0 Hz 0.0 V 0.0 V D 90.0 Hz 575.0 V 60.0 Hz 3.0 Hz 44.6 V 1.3 Hz 27.3 V 0.0 Hz 0.0 V 0.0 V E 90.0 Hz 575.0 V 60.0 Hz 3.0 Hz 48.9 V 1.3 Hz 31.6 V 0.0 Hz 0.0 V 0.0 V F 60.0 Hz 575.0 V 60.0 Hz 3.0 Hz 48.9 V 1.3 Hz 31.6 V 0.0 Hz 0.0 V 0.0 V FF 60.0 Hz 575.0 V 60.0 Hz 3.0 Hz 48.9 V 1.3 Hz 31.6 V 0.0 Hz 0.0 V 0.0 V 60.0 Hz 575.0 V 60.0 Hz 0.0 Hz 0.0 V 0.0 Hz 0.0 V 0.0 Hz 0.0 V 0.0 V 1 FF* 2 *Default for Traverse Motion/Braketronic *1 Default for Standard Hoist Motion *2 Flux Vector Only - Default for No-Load Brake Hoist Motion *3 Initial value is dependent on drive size, which is determined by O02-04 (kVA Selection) IMPULSE®•G+ & VG+ Series 4 Instruction Manual – August 2013 5-74 Motor Set-up E2 constants define motor parameters. Normally, the default settings for E2 constants are determined by kVA selection (O02-04). In flux vector control and open loop vector, the E2 constants will be set automatically during auto-tuning. At minimum, the motor rated current should be entered into E02-01. If rotational auto-tuning cannot be performed, E02-02 and E02-05 can be calculated using the motor’s nameplate information or by performing non-rotational auto-tuning. Motor rated slip frequency (E02-02) can be calculated by using the following equation: fs f W h ere… N * P 120 fs: slip freq uency (H z) f: rated frequency (H z) N: rated m otor speed (rpm ) P: num ber of m otor poles Motor terminal resistance E02-05 can be calculated by using the following equation: 25 C Ti 273 2 rt r p * 2 73 Ti W here… r t : m oto r t erm inal resistance r p : Phase-to-P hase resistance at insu lation class tem perature T i : insulation class tem peratu re (°C ) Table 5-55: Motor Set-up Parameter Settings Parameter Code Display Function Range Initial Value E02-01 Motor Rated FLA Motor-rated current * * E02-02** Motor Rated Slip Motor-rated slip frequency 0.00–20.00 Hz * E02-03** No-Load Current Motor no-load current 0–[(E02-01)-1] * E02-04 Number of Poles Number of poles in motor 2–48 4 E02-05** Term Resistance Motor terminal resistance 0.000–65.000 * E02-06** Leak Inductance Leakage Inductance 0.0–40.0% * E02-07** Saturation Comp 1 Core-Saturation Compensation Coefficient 1 0.00–0.50 0.50 E02-08** Saturation Comp 2 Core-Saturation Compensation Coefficient 2 E02-07–0.75 0.75 E02-09** Mechanical Loss Sets the motor mechanical loss as 0.0–10.0% a percentage of motor rated power (HP) for the motor. 0.0 E02-10** Motor Iron Loss Sets the motor iron loss in Watts for the motor. 0–65535 W * E02-11 Rated Horsepower Rated output 0.0–650.0 HP * * Initial value is determined by O02-04 (kVA Selection) and D10-01. ** This value is automatically set during auto tuning. IMPULSE®•G+ & VG+ Series 4 Instruction Manual – August 2013 5-75 Test Mode Configuration Test Mode is a troubleshooting aid that is intended for troubleshooting Flux Vector control method problems in the field. This feature cannot be left on indefinitely, as it will generate a fault after being on for a total accumulated time of ten minutes. At this time, the fault must be reset or the power must be cycled. To enable Test Mode, refer to parameter L05-01. Table 5-56: Test Mode Configuration Parameter Settings Parameter Code Display Function Range Initial Value E03-02 Stopping Method Deceleration Method 0, 1 1 0 Decel to Stop 1 Coast to Stop E03-03 Max Frequency Maximum Frequency 40.0–150.0 Hz 60.0 E03-04 Max Voltage Maximum Voltage 230 V: 0.0–255.0 460 V: 0.0–510.0 575 V: 0.0–733.1 Determined by O02-04 E03-05 Base Frequency Motor Base Frequency (VA) 0.0–150.0 Hz 60.0 E03-06 Mid Frequency A Motor Middle output frequency (FB) 0.0–150.0 Hz Determined by E01-03 E03-07 Mid Voltage A Motor Middle output frequency voltage (VC) 230 V: 0.0–255.0 460 V: 0.0–510.0 575 V: 0.0–733.1 Determined by E01-03 E03-08 Min Frequency Minimum Frequency (FMIN) 0.0–150.0 Hz Determined by E01-03 E03-09 Min Voltage Motor Minimum output frequency voltage (VMIN) 230 V: 0.0–255.0 460 V: 0.0–510.0 575 V: 0.0–733.1 Determined by E01-03 E03-10 Mid Frequency B Midpoint Output Frequency B 0.0–150.0 Hz 0.0 E03-11 Mid Voltage B Midpoint Output Voltage B 230 V: 0.0–255.0 460 V: 0.0–510.0 575 V: 0.0–733.1 0.0 E03-12 Base Voltage Motor Base Voltage 230 V: 0.0–255.0 460 V: 0.0–510.0 575 V: 0.0–733.1 0.0 IMPULSE®•G+ & VG+ Series 4 Instruction Manual – August 2013 5-76 Option Card Parameters • F1 Encoder (PG-X3) Option Set-up • F2 Analog Input (AI-A3) Option Set-up • F4 Analog Output (AO-A3) Option Set-up • F5 Digital Output (DO-A3 or S4IO) Option Set-up • F6 Communication Option Card Set-up • F7 Ethernet Option Card Set-up Encoder (PG) Option Set-up Table 5-57: Encoder (PG) Option Set-Up Parameter Settings Parameter Code Display Function Range Initial Value Model F01-01 PG1 Pulses/Rev Sets encoder Pulses/Rev for Channel 1 0–60000 ppr 1024 VG+ 0, 1 0 VG+ 1 VG+ F01-02 F01-03 PG1 Rotation Sel 0 Fwd = C.C.W. 1 Fwd = C.W. PG1 Output Ratio (B-phase at motor REV. run) (A-phase at motor REV. run) Sets the division ratio for the 1–132 pulse monitor used of the PG option card installed to CH1 (port CN5-C). Example: For a ratio of 1/32 between the PG card pulse input and output, set F01-03 = 032 (where n = 0 and m = 32). If only using the A pulse for onetrack input, the input ratio will be 1:1 regardless of F01-03 setting. F01-04 PG1 #Gear Teeth1 Sets the gear ratio between the 0–1000 motor shaft and the encoder (PG). A gear ratio of 1 will be used if F01-04 or F01-05 are set to 0. A gear ratio of 1 will be used if either of these parameters is set to 0. 0 VG+ F01-05 PG1 #Gear Teeth2 Sets the gear ratio between the 0–1000 motor shaft and the encoder (PG). A gear ratio of 1 will be used if F01-04 or F01-05 are set to 0. A gear ratio of 1 will be used if either of these parameters is set to 0. This function is not available in Flux Loop Vector Control. 0 VG+ IMPULSE®•G+ & VG+ Series 4 Instruction Manual – August 2013 5-77 Parameter Code Display Function Initial Value Model F01-06 PGO-1-H Delay time for PGO-1-H 0–100 ms detection. A setting of zero disables PGO-1-H detection. Channel 1 is associated with slot CN5-C, used for motor encoder feedback. 15 VG+ F01-11 PG2 Pulses/Rev Sets the number of pulses for a 0–60000 ppr PG option card connected to port CN5-B. 1024 VG+ F01-12 PG2 Rotation Sel 0, 1 0 VG+ 0 Fwd= C.C.W. (B-phase at motor REV. run) 1 Fwd = C.W. (A-phase at motor REV. run) Range F01-13 PG2 #Gear Teeth1 Sets the gear ratio between the motor shaft and the encoder (PG). A gear ratio of 1 will be used if F01-13or F01-14 are set to 0. 0–1000 0 VG+ F01-14 PG2 #Gear Teeth2 Sets the gear ratio between the motor shaft and the encoder (PG). A gear ratio of 1 will be used if F01-13 or F01-14 are set to 0. 0–1000 0 VG+ F01-15 PG2 Output Ratio Sets the division ratio for the 1–132 pulse monitor used of the PG option card installed to port CN5B. 1 VG+ F01-16 PGO-2-H Delay time for PGO-2-H 0–100 ms detection. A setting of zero disables PGO-2-H detection. Channel 2 is associated with slot CN5-B. 15 VG+ F01-21 PG Fdbk Loss Sel Stopping method when PGO-1- Traverse: 0–3 H, PGO-2-H, PGO-1-S, or PGO- NLB: 1 2-S faults are detected. 1 VG+ 0 Decelerate to stop using the deceleration time in B05-02. Decel to Stop 1 Coast to Stop 2 Fast Stop 3 Alarm Only Decelerate to stop using the deceleration time in B05-08. F01-22 PGO-1-S Det Time PGO-1-S (CH1) disconnection detection time 0.0–10.0 sec 2.0 VG+ F01-23 PG Overspeed Sel Sets the stopping method when an overspeed (OS) fault occurs. Traverse: 0–3 NLB: 1 1 VG+ 0 Decel to Stop Decelerate to stop using the deceleration time in B05-02. 1 Coast to Stop 2 Fast Stop 3 Alarm Only Decelerate to stop using the deceleration time in B05-08. F01-24 PG Overspd Level Sets the overspeed detection level as a percentage of the maximum output frequency. 0–120% 105 VG+ F01-25 PG Overspd Time Sets the time in seconds for an overspeed situation to trigger a fault (oS). 0.0–2.0 sec 0.0 VG+ IMPULSE®•G+ & VG+ Series 4 Instruction Manual – August 2013 5-78 Parameter Code Display Function Range Initial Value Model F01-26 PG Deviation Sel Stopping method at excessive speed deviation. Traverse: 0–7 NLB: 5 5 VG+ 0 @Spd AgreeDecel Stops by deceleration time 1 B05-02. 1 @Spd AgreeCoast Coast to stop. 2 @SpdAgree-FStop Decelerates by fast-stop B05-08. 3 @Spd Agree-Alm DEV displayed, operation continues. 4 @Run-Decel Stops by deceleration time 1 B05-02. 5 @Run-Coast Coast to stop. 6 @Run-Fast Stop Decelerates by fast-stop B05-08. 7 @Run-Alarm Only DEV displayed, operation continues F01-27 PG Deviate Level Sets the speed deviation detection level as a percentage of the maximum output frequency. 0–50% 10 VG+ F01-28 PG Deviate Time Sets the time in seconds for a speed deviation situation to trigger a fault DEV. 0.0–10.0 sec 0.3 VG+ IMPULSE®•G+ & VG+ Series 4 Instruction Manual – August 2013 5-79 Analog Input (AI-A3) Option Set-up Sets CH1 to CH3 input functions when AI-A3 option is connected. When the 3CH individual input is used, parameter B03-01 is automatically set to “1” (frequency reference from control circuit terminal). The option/inverter reference selection, which is selected by a multi-function digital input (H01-xx= “1F”), is disabled when using the AI-A3 option. Table 5-58: Analog Input Option Parameters Parameter Code Display Function F02-01 AI Function Sel Determines whether the 3-channel 0, 1 input selection is individual or addition. See Table 5-58. 0 0 3ch Individual 1 3ch Addition Initial Value Range F02-02 AI Input Gain Sets the gain for the input signal to -999.9–999.9% the analog card. 100.0 F02-03 AI Input Bias Sets the bias for the input signal to -999.9–999.9% the analog card. 0.0 Table 5-59: Analog Input Option Configuration Setting Function CH1 (V1 to AC) CH2 (V2 to AC) CH3 (V3 to AC) 0 3-channel individual input (factory default) Substitute for terminals V1 & AC Substitute for terminals V2 & AC Substitute for terminals V3 & AC 1 3-channel addition input Sum of CH1 to CH3 input values is used as the frequency reference value IMPULSE®•G+ & VG+ Series 4 Instruction Manual – August 2013 5-80 Analog Output (AO-A3) Option Set-up Selects the analog output monitors for channel 1 and 2 if the AO-A3 optional card is connected. Table 5-60: Analog Output Option Set-Up Parameter Settings Parameter Code Display Function Range Initial Value F04-01 AO Ch1 Select Analog output option Channel 1 selection 1–630 102 F04-02 AO Ch1 Gain Analog output Channel 1 multiplier -999.9–999.9% 100 F04-03 AO Ch2 Select Analog output option Channel 2 selection (Same as F04-01) 103 1–630 F04-04 AO Ch2 Gain Analog output Channel 2 multiplier -999.9–999.9% 50 F04-05 AO Ch1 Bias Channel 1 bias -999.9–999.9% 0.0 F04-06 AO Ch2 Bias Channel 2 bias -999.9–999.9% 0.0 F04-07 AO Opt Level Ch1 Channel 1 output signal 0, 1 0 Channel 2 output signal 0, 1 0 0 0 to 10 V 1 -10 to 10 V F04-08 AO Opt Level Ch2 0 0 to 10 V 1 -10 to 10 V Table 5-61: Parameter Settings for F04-01 and F04-03 Display Display 0 165 PG Output Freq Not Used 101 Frequency Ref 184 NLB State* 102 Output Freq 185 NLB Rel Trq* 103 Output Current 408 Heatsink Temp 105 Motor Speed* 416 Motor OL1 Level 106 Output Voltage 417 Drive OL2 Level 107 DC Bus Voltage 601 Mot SEC Current 108 Output HP 602 Mot EXC Current* 109 Torque Reference* 603 ASR Input* 115 Term A1 Level 604 ASR Output* 116 Term A2 Level 605 Voltage Ref (Vq)* 117 Term A3 Level 606 Voltage Ref (Vd)* 120 SFS Output 607 ACR(q) Output* 121 AI Opt Ch1 Level 608 ACR(d) Output* 122 AI Opt Ch2 Level 611 Iq Reference* 123 AI Opt Ch3 Level 612 Id Reference* 129 Load Weight 618 PG1 CounterValue 130 SS Delta Speed 619 PG2 CounterValue 150 Hook Height* 622 Zero Servo Pulse* 154 Input Pulse Mon 626 FF Cont Output* 163 PG CH1 Freq 627 FF Estimate SPD* 164 PG CH2 Freq -- * Not available in the V/f control method (A01-02 = 0) IMPULSE®•G+ & VG+ Series 4 Instruction Manual – August 2013 5-81 Digital Output (DO-A3) Option Set-up Selects the multi-function digital output settings for channels 1 through 8 of the DO-A3 option card. Table 5-62: Digital Output Set-Up Parameter Settings Terminal Designation Parameter Code Display DO-A3 S4IO Range Initial Value F05-01* DO Ch1 Select M1-M2 O1-O2 0–148 F F05-02* DO Ch2 Select M3-M4 O3-O2 0–148 F F05-03* DO Ch3 Select P1-PC O4-O5 0–148 F F05-04* DO Ch4 Select P2-PC O6-O5 0–148 F F05-05* DO Ch5 Select P3-PC -- 0–148 F F05-06* DO Ch6 Select P4-PC -- 0–148 F F05-07* DO Ch7 Select P5-PC -- 0–148 F F05-08* DO Ch8 Select P6-PC -- 0–148 F F05-09 DO Function Sel 0–2 2 0 8ch Individual 1 Binary Output 2 8ch Selected Selects how the DO-A3 option card will work with the drive. * See Table 5-71 for MFDO selections. IMPULSE®•G+ & VG+ Series 4 Instruction Manual – August 2013 5-82 Selects the multi-function output selections for the DO-A3 option. Table 5-63: DO-A3 Output Mode Selection for IMPULSE®•G+ and VG+ Series 4 Parameter F05-09 setting 0 Output Type Terminals Output Contents 8 –Channel Individual (Fixed Data) TD5 – TD11 TD6 – TD11 TD7 – TD11 TD8 – TD11 TD9 – TD11 TD10 – TD11 TD1 – TD2 TD3 – TD4 OverCurrent (SC, OC, GF) OverVoltage (OV) Drive Overload (OL2, OH, OH1) Fuse Blown (PUF) OverSpeed (OS-1, OS-2) Motor Overload (OL1) Brake Release Limit Switch (UL1, UL2, UL3, LL1 or LL2) Bit 3, 2, 1, 0 Output Bit 3, 2, 1, 0 Output 0000 No Fault 1000 EF (ALL) 0001 SC, OC, GF 1001 CPF (ALL) 0010 OV 1010 oL1 0011 OL2 1011 BE7 0100 OH, OH1 1100 UV (ALL) 0101 OS-1, OS-2 1101 DEV-1, DEV-2 PGO-1-S PGO-1-H 0110 PUF 1110 PGO-2-S PGO-2-H 0111 LF 1111 Not Used Minor Fault (Alarm) Inverter Ready Brake Release Limit Switch (UL1, UL2, UL3, LL1 or LL2) F05-01 (See Table 5-71 for output selections) F05-02 (See Table 5-71 for output selections) F05-03 (See Table 5-71 for output selections) F05-04 (See Table 5-71 for output selections) F05-05 (See Table 5-71 for output selections) F05-06 (See Table 5-71 for output selections) F05-07 (See Table 5-71 for output selections) F05-08 (See Table 5-71 for output selections) TD5 – TD11 (Bit 0) TD6 – TD11 (Bit 1) 1 Binary Coded TD7 – TD11 (Bit 2) TD8 – TD11 (Bit 3) 2 8-Channel Selectable TD9 – TD11 TD10 – TD11 TD1 – TD2 TD3 – TD4 TD5 – TD11 TD6 – TD11 TD7 – TD11 TD8 – TD11 TD9 – TD11 TD10 – TD11 TD1 – TD2 TD3 – TD4 IMPULSE®•G+ & VG+ Series 4 Instruction Manual – August 2013 5-83 Profibus-DP Communication Option Card Set-up Settings for the Profibus-DP communication option card SI-P3. Table 5-64: Communication Option Card Parameter Settings Parameter Code Display Function Range Initial Value F06-01 Comm Bus Flt Sel Stopping method at communication error. 0–4 1 Option External Fault 0, 1 0 Option External Fault 0–4 1 F06-02 F06-03 0 Decel to Stop 1 Coast to Stop 2 Fast Stop 3 Use B3-03 Method 4 Alarm Only EF0 Detection 0 Always Detected 1 Only During Run EF0 Fault Action 0 Decel to Stop 1 Coast to Stop 2 Fast Stop 3 Use B3-03 4 Alarm Only F06-04 BUS Err Det Time Set the maximum time the drive should wait for a communication error to occur (bUS). 0.0–5.0 sec 2.0 F06-06 Torq Ref/Lmt Sel Torque Reference Limit Selection (FLV only) 0, 1 0 Fref PrioritySel Selects how multi-step speed inputs are treated when the NetRef command is set. 0, 1 0 0 Net/Com REF Multi-step reference disabled 1 MultiStep Speed 0, 1 0 0–125 0 F06-07 F06-08 F06-30 0 Disabled 1 Enabled Multi-step reference enabled Com Prm Init Sel Determines whether communication-related parameters (F06-xx and F07-xx) are reset when the drive is initialized using A01-05 0 Init Com Prms Communication-related parameters (F06-xx and F07-xx) are not reset when the drive is initialized using A01-05. 1 No Init Com Prms Reset all communication-related parameters (F06-xx and F07-xx) when the drive is initialized using A01-05. PB Node Address Sets the node address if the Profibus-DP option card is installed IMPULSE®•G+ & VG+ Series 4 Instruction Manual – August 2013 5-84 Parameter Code Display Function Range Initial Value F06-31 PB Clear Select Determines the operation when a “Clear Mode” command is received on the Profibus-DP option Card 0, 1 0 0 Reset to Zero Resets drive operation with a Clear mode command. 1 Hold Prev Value Maintains the previous operation state when Clear mode command is given. Selects the data format used for Profibus-DP communications. 0, 1 0 F06-32 PB Map Select 0 PPO Type 1 Conventional F06-35 CO Node Address Sets the node address if a CANopen option card is installed. 0–126 0 F06-36 CO Baud Rate Sets the baud rate for the CANopen option card 0–8 6 0 Auto Detect 1 10 kbps 2 20 kbps 3 50 kbps 4 125 kbps 5 250 kbps 6 500 kbps 7 800 kbps 8 1 Mbps F06-50 DN MAC Address Sets the MacID address of the DeviceNet option card. 0–64 64 F06-51 DN Baud Rate Sets the baud rate for the DeviceNet option card. 0–4 4 0 125 kbps 1 250 kbps 2 500 kbps 3 Set from Network 4 Automatic F06-52 DN PCA Selection Sets the format of the data received from the DeviceNet master to the drive. 0–255 21 F06-53 DN PPA Selection Sets the format of the data sent from the drive to the DeviceNet master. 0–255 71 F06-54 DN Idle Flt Det Selects whether the drive triggers an EF0 fault when no data is received from the DeviceNet master (such as when the master is idling). 0, 1 0 0 Enabled 1 Disabled No fault detection IMPULSE®•G+ & VG+ Series 4 Instruction Manual – August 2013 5-85 Parameter Code Display Function Range Initial Value F06-55 DN BAUD RATE MEM Displays the baud rate of the DeviceNet network. (Read Only Monitor) 0–2 0 0 125 kbps 1 250 kbps 2 500 kbps F06-56 DN Speed Scale Sets the scaling factor for the speed monitor in DeviceNet. -15–15 0 F06-57 DN Current Scale Sets the scaling factor for the output current monitor in DeviceNet. -15–15 0 F06-58 DN Torque Scale Sets the scaling factor for the torque monitor in DeviceNet. -15–15 0 F06-59 DN Power Scale Sets the scaling factor for the power monitor in DeviceNet. -15–15 0 F06-60 DN Voltage Scale Sets the scaling factor for the voltage monitor in DeviceNet. -15–15 0 F06-61 DN Time Scale Sets the scaling factor for the time monitor in DeviceNet. -15–15 0 F06-62 DN Heart Beat Sets the heartbeat interval for DeviceNet communications. A setting of 0 disables the heartbeat. 0–10 0 F06-63 DN MAC ID MEM Displays the DeviceNet MacID 0–63 assigned to the drive (Read Only Monitor). 0 Ethernet Option Card Set-up (Ethernet IP & Modbus TCP/IP) Settings for communication option cards SI-EN3 and SI-EM3. Table 5-65: Communication Option Card Parameter Settings Parameter Code Display Function Range Initial Value F07-01 IP Address 1 IP Address 1 0–255 192 F07-02 IP Address 2 IP Address 2 0–255 168 F07-03 IP Address 3 IP Address 3 0–255 1 F07-04 IP Address 4 IP Address 4 0–255 20 F07-05 Subnet Mask 1 Subnet Mask 1 0–255 255 F07-06 Subnet Mask 2 Subnet Mask 2 0–255 255 F07-07 Subnet Mask 3 Subnet Mask 3 0–255 255 F07-08 Subnet Mask 4 Subnet Mask 4 0–255 0 F07-09 Gateway IP Add 1 Gateway Address 1 0–255 192 F07-10 Gateway IP Add 2 Gateway Address 2 0–255 168 F07-11 Gateway IP Add 3 Gateway Address 3 0–255 1 F07-12 Gateway IP Add 4 Gateway Address 4 0–255 1 IMPULSE®•G+ & VG+ Series 4 Instruction Manual – August 2013 5-86 Parameter Code Display Function Range Initial Value F07-13 IP Add Mode Sel Sets how the option card IP Address is set at start up 0–2 2 Sets how the communication between host/client will be determined 0–2 1 F07-14 F07-15 0 User Defined 1 BOOTP 2 DHCP Duplex Select 0 Half Duplex 1 Auto Negotiate 2 Full Duplex Baud Rate Sets the communication speed for 10, 100 Mbps the option card. 10 Sets the time-out value for communication loss detection in tenths of a second. A value of 0 disables the connection time-out. Example: an entered value of 100 represents 10.0 seconds. 0 10 10 Mbps 100 100 Mbps F07-16 CommLoss Tout 0–300 deciseconds IMPULSE®•G+ & VG+ Series 4 Instruction Manual – August 2013 5-87 Terminal Parameters • H1 Digital Inputs • H2 Digital Outputs • H3 Analog Inputs • H4 Analog Outputs • H5 Serial Communication Set-up • H6 Pulse Input/Output Digital Inputs The IMPULSE®•G+ & VG+ Series 4 has eight multi-function digital inputs for the set-up of numerous functions. The following table lists the function selections for the multi-function digital inputs (terminals S1 to S8) and indicates the control methods during which each function can be enabled. An OPE03 error will occur if a function is programmed in more than one terminal at the same time. Table 5-66:Digital Inputs Parameter Settings Parameter Code Display Function Range H01-01 Term S1 Select Selects the multi-function inputs. Reference Table 5-67 0–81 80 (FWD) H01-02 Term S2 Select Reference Table 5-67 0–81 81 (REV) H01-03 Term S3 Select Reference Table 5-67 0–81 * H01-04 Term S4 Select Reference Table 5-67 0–81 * H01-05 Term S5 Select Reference Table 5-67 0–81 * H01-06 Term S6 Select Reference Table 5-67 0–81 * H01-07 Term S7 Select Reference Table 5-67 0–81 * 0–81 H01-08 Term S8 Select Reference Table 5-67 H01-14 Alt Ref Override Alternate Frequency Reference 0, 1 Override. When enabled, and an input of H01-xx = 1F is true, will switch between Frequency Reference Source 2 (B03-15) and the terminals (B01-xx). 0 Disabled 1 Enabled Initial Value * 0 * Initial value is determined by X-Press Programming (Table 4-5, 4-6, or 4-7 on pages 4-11, 4-12, and 4-13). Table 5-67: Multi-Function Digital Inputs (MFDI) selectable for H01-0x and C09-0x Display Function 0 Multi-Step Ref 2 Multi-Step Reference 2 1 Multi-Step Ref 3 Multi-Step Reference 3 2 Multi-Step Ref 4 Multi-Step Reference 4 3 Multi-Step Ref 5 Multi-Step Reference 5 4 Speed Hold 2 Speed Hold 2 (2nd Step of Three-Step Infinitely Variable) 5 Accel Command Accel Command (2nd Step of Two-Step Infinitely Variable or 3rd Step of Three-Step Infinitely Variable) 6 Upper Lmt 1 N.O. Upper Limit - Slow Down; Normally Open. UL1 - blinking 7 Upper Lmt 2 N.O. Upper Limit - Stop; Normally Open. UL2 - blinking IMPULSE®•G+ & VG+ Series 4 Instruction Manual – August 2013 5-88 Display Function 8 Lower Lmt 1 N.O. Lower Limit - Slow Down; Normally Open. LL1 - blinking 9 Lower Lmt 2 N.O. Lower Limit - Stop; Normally Open. LL2 - blinking A Upper Lmt 1 N.C. Upper Limit - Slow Down; Normally Closed. UL1 - blinking B Upper Lmt 2 N.C. Upper Limit - Stop; Normally Closed. UL2 - blinking C Lower Lmt 1 N.C. Lower Limit - Slow Down; Normally Closed. LL1 - blinking D Lower Lmt 2 N.C. Lower Limit - Stop; Normally Closed. LL2 - blinking E M-Speed Gain 1 Micro-Speed positioning control multiplier 1. Gain is set by parameter C02-01. (Has Priority over Micro-Speed 2) F Not Used No function - Terminal is disabled. 10 M-Speed Gain 2 Micro-Speed positioning control multiplier 2. Gain is set by parameter C02-02. 11 Load Float 1 Load Float Hold - When input during run, Load Float will remain On and Fref is held at 0 Hz while MFDI is ON. 12 Weight Lmt N.C. Weighted Upper Limit - UL3. Stopping Method determined by C03-08. 13 SwiftLift Enable UltraLift Enable Ultra/Swift Lift Enable (C06-01 = 2). Not Available for Traverse Motion. 14 Alt T-Lim Gain Alternate Torque Limit Gain - C07-05. Use when Load Testing a Hoist. (Internal T-Lim* C07-05) 15 Forward Jog Forward Jog (Uses B01-17 Reference) 16 Reverse Jog Reverse Jog (Uses B01-17 Reference) 17 Forward Inch Forward Inch 18 Reverse Inch Reverse Inch 19 Inch Repeat Inch Repeat 1A Acc/Dec 2 Acceleration/Deceleration Time Changeover 2 using B05-03 and B05-04 1B Acc/Dec 3 Acceleration/Deceleration Time Changeover 3 using B05-12 and B05-13 1C Acc/Dec 4 Acceleration/Deceleration Time Changeover 4 using B05-14 and B05-15 1D Digital Chngover Analog/Digital Reference Changeover; When B01-18 = 1 If Closed = Digital 1F Run/Ref Src 1/2 Run/Ref Source 2 Switch - Closed = Run / Fref Selection from B03-15 / B03-16, else B03-01/B03-02 20 through 2F External Fault (Desired setting is possible.) Input mode: N.O. / N.C., Detection mode: Always / During run. See External Fault Selection (Table 5-75) 30 Program Lockout Closed: Parameters enabled to write; Open: Parameters disabled to write other than freq. reference (U01-01). 31 Local/Remote Sel Local/Remote Changeover. Closed = Local 32 Ext BaseBlk N.O. N.O.: Baseblock by ON. 33 Ext BaseBlk N.C. N.C.: Baseblock by OFF. 34 Spd/Trq Chngover Speed/Torque Control Changeover (ON: Torque Control) 35 Load Float 2 Zero Servo initiated. Manual Load Float Timed by C04-01. (Stop Method must be No Load Brake) 36 Polarity Rev Polarity Reversing command for External Torque Control. Closed = Reverse Polarity 37 ASR Gain Switch ON: Switches to ASR Gain 2 parameters - Forces D04-07. 38 Acc/Dec RampHold Speed Hold 1 - Accel/decel is stopped by ON, and frequency is held. 39 OH2 Alarm Signal External OH2 - Inverter overheat prediction (OH2 is shown by ON.) (Alarm Only) 3A MFAI Enable When closed, the terminals specified in H03-14 are enabled. When open, the drive disregards the input signal to the analog terminals. The terminals that are not set in H03-14 to be enabled by this feature will always be enabled. 3F Fault Reset Resets Drive Faults when ON. IMPULSE®•G+ & VG+ Series 4 Instruction Manual – August 2013 5-89 Display Function 43 Timer Function Function settings by C12-03, C12-04. It is set with timer function output H02-01–H02-03 = 12. 47 Ref Sample Hold Analog frequency reference Sample / Hold. 48 Flt Latch Reset When a function is latched, toggle this input ON and then OFF to clear the fault. 4B Anti-Shock OFF When this input is ON, Anti-Shock will be blocked from functioning. 4C DCInj Activate ON: DC injection braking command, once SFS reaches Zero Speed 53 Comm Test Mode Communication test mode - Loopback test of Modbus RS-422/485 interface. 55 Drive Enable When Programmed, must be ON in order for Inverter Ready - Generates “Can’t Run - Drive Not Ready” Alarm. “RDY” is displayed in upper right hand corner of LCD when drive is ready. 56 Klixon N.O. When Closed, Reset run command, use stopping method B03-03, display KLX - Klixon Alarm on Keypad 57 Klixon N.C. When Open, Reset run command, use stopping method B03-03, display KLX - Klixon Alarm on Keypad 58 Brake Answerback Generates BE0, BE4, BE5, BE7 alarm conditions only when programmed to MFDI. (C08-04, C08-11) 59 Alt F-Ref Up Lmt Use Alternate Upper Limit Frequency Reference B02-04 5A MaintenanceReset Resets Maintenance Timer (C12-05–06, U01-52) 5B BE6/8 Up Spd Lmt Limits Fref to setting in C08-18 (BE6 Up Speed Lmt) 5C Weight Measure Weight Measurement by C10-01 5D Load Float Ext Extends C08-10 Time by adding C08-15 time. 5E M-Spd Gn1 & LF-E Micro-Speed Gain 1 and Load Float Extension Time. (Combination of MFDI “E” and “5D” ON) 5F Phantom Flt N.C. Phantom Fault N.C. - Stops motion based C03-09 but does not change Keypad display. RUN L.E.D. on keypad blinks. 60 Index Enable Enables indexing function (Hidden when B03-03 = 1 Coast to Stop) 61 Brake Test Motor pushes against brake up to programmable torque setting C08-24 at programmable frequency C08-25. Disables PG Faults during this condition. 62 Weight Lmt N.O. Weighted Upper Limit - UL3 - Stopping Method determined by C03-08. 63 Phantom Flt N.O. Stops motion based C03-10 but does not change Keypad display. RUN L.E.D. on Display Blinks. 65 Dwell Enable Enables / Disables Dwell Function. When H01-0x = 65, OFF = Disabled. 66 Load Share Load Share - Enables / Disabled Load Sharing. 67 Hook Height Home Used w/ C03-14 - Height Measurement function. 68 LodShr Slave Rdy Load Share slave drive ready signal. 69 LC Bypass N.O. Disables Load Check and clears any LC Faults. 6A LC Bypass N.C. Disables Load Check and clears any LC Faults. 70 Torque Detection When the input is closed, Overtorque / Undertorque detection is enabled. 73 LL2/UL2 Bypass Bypass Upper/Lower Limit 2 74 LL/UL Bypass Bypass Upper/Lower Limit 80 Run FWD Forward/Up Run Command 81 Run REV Reverse/Down Run Command IMPULSE®•G+ & VG+ Series 4 Instruction Manual – August 2013 5-90 F1 and F2 Keys Function Selection The F1 and F2 keys on the keypad have the ability of being programmed with specific functions to imitate digital inputs. The table below displays the various settings, which are valid for these buttons. • To operate a function assigned to the F1 or F2 key, the respective button must be held down. Releasing the button will stop the function. Be cautious when operating these keys, and remember that the STOP key will override and stop all functions. • To quickly view the functions assigned to both buttons, press the LO/RE key three times. Table 5-68: F1 and F2 Function Selection Parameter Settings Parameter Code Display Function Range Initial Value H01-09 F1 Key Selection Multi-Function Digital Input selection for F1 key 0F–74 0F H01-10 F2 Key Selection Multi-Function Digital Input selection for F2 key 0F–74 0F Table 5-69: F1 and F2 keys function selectable for H01-09 and H01-10 Display Function Instruction Alert/Confirm Message 0F Not Used No function - terminal is disabled -- -- 48 Flt Latch Reset When a fault is latched, toggle this input ON and then OFF to clear the fault. Press F1 or F2 once to Confirm? pre-start Fault Latch Flt Latch Reset Reset. A confirm message will appear, and the same key press will be required once more to reset a latched fault. 53 Comm Test Mode Communication Test Mode - loopback test of Modbus RS-422/485 interface Hold down the F1 or F2 key for 2–3 seconds to initiate the Comm Test. 5A MaintenanceReset Resets Maintenance Timer (C12-05, C12-06, U01-52) Press F1 or F2 once to Confirm? pre-start Maintenance MaintenanceReset Timer Reset. A confirm message will appear, and the same key press will be required once more to reset the Maintenance Timer. 61 Brake Test Motor pushes against Hold down the F1 or F2 brake up to key to initiate the Brake programmable torque Test. setting C08-24 at programmable frequency C08-25. Disabled PG Faults during this condition. 67 Hook Height Home Used with C03-14 Height Measurement function. 69 LC Bypass N.O. Disables Load Check and Hold down the F1 or F2 clears any LC faults. key to initiate the LC Bypass. Running: Comm Test Mode Running: Brake Test Press F1 or F2 once to Confirm? pre-start Hook Height Hook Height Home Home. A confirm message will appear, and the same key press will be required once more to home the Hook Height. Running: LC Bypass N.O. IMPULSE®•G+ & VG+ Series 4 Instruction Manual – August 2013 5-91 Display Function Instruction Alert/Confirm Message 73 LL2/UL2 Bypass Bypass Limit MFDI and EPLS Hold down the F1 or F2 key to initiate the LL2/ UL2 Bypass. Running: LL2/UL2 Bypass 74 LL/UL Bypass Bypass MFDI and EPLS Hold down the F1 or F2 key to initiate the LL/UL Bypass. Running: LL/UL Bypass IMPULSE®•G+ & VG+ Series 4 Instruction Manual – August 2013 5-92 Digital Outputs The IMPULSE®•G+ & VG+ Series 4 has three built-in multi-function digital outputs for indicating various conditions. Drive digital output capabilities can be increased with the installation of an S4IO or DO-A3 option card. The following table lists the function selections for the multi-function digital outputs and indicates the control methods during which each function can be enabled. Table 5-70: Digital Outputs Parameter Settings Parameter Code Display Function Range Initial Value H02-01 Term M0-M1 Sel Digital Output 1 Function (Reference Table 5-71) 0–1FF * H02-02 Term M2-M3 Sel Digital Output 2 Function (Reference Table 5-71) 0–1FF * H02-03 Term M5-M6 Sel Digital Output 3 Function (Reference Table 5-71) 0–1FF * Wh Disp Units Watt Hour Output Unit Selection 0–4 0 H02-06 0 0.1 kWh units 1 1 kWh units 2 10 kWh units 3 100 kWh units 4 1000 kWh units * Initial value is determined by X-Press Programming (Table 4-5, 4-6, or 4-7 on pages 4-11, 4-12, and 4-13). Table 5-71:Multi-Function Digital Outputs (MFDO) selectable for H02-0x and F05-0x Display Function 0 Brake Release* ON/CLOSED: When the drive is outputting either voltage or frequency OFF/OPEN: When the drive is not outputting either voltage or frequency 1 Zero Speed* ON/CLOSED: When Motor Speed < B01-01 or E01-09 2 Fref/Fout Agree1 ON/CLOSED: When the output frequency (U01-02) is within the frequency reference (U01-01) ± L04-02 OFF/OPEN: When the output frequency or motor speed is not within the frequency reference (U01-01) ± L04-02 3 Fref/Set Agree 1 ON/CLOSED: When the output frequency (U01-02) is within L04-01 ± L04-02 OFF/OPEN: When the output frequency (U01-02) is not within L04-01 ± L04-02 4 Freq Detect 1 ON/CLOSED: When the output frequency (U01-02) is L04-01 + L04-02 OFF/OPEN: When the output frequency (U01-02) is > L04-01 + L04-02 5 Freq Detect 2 ON/CLOSED: When the output frequency (U01-02) is L04-01 + L04-02 OFF/OPEN: When the output frequency (U01-02) is < L04-01 - L04-02 6 Inverter Ready* ON/CLOSED: After the drive has performed initialization process and no faults or programming mode is detected 7 DC Bus Undervolt* ON/CLOSED: When the DC Bus voltage falls below the trip level set in L02-05 8 BaseBlock ON/CLOSED: During BaseBlock - No Voltage output OFF/OPEN: When drive is not in a BaseBlock state - Voltage Output 9 Operator Ref ON/CLOSED: When frequency reference is from the operator OFF/OPEN: When frequency reference is not from the operator (i.e. external terminals) * This output does not have an inverse output ** Contact will open when power is disconnected IMPULSE®•G+ & VG+ Series 4 Instruction Manual – August 2013 5-93 Display Function B Trq Det 1 N.O. ON/CLOSED: When the output current/torque exceeds the value set in parameter L0602 for longer than the time set in parameter L06-03. OFF/OPEN: When the output current/torque does not exceed the value set in parameter L06-02 for longer than the time set in parameter L06-03. C Anti-Shock ON ON/CLOSED: When Anti-Shock is enabled and a torque spike is detected. OFF/OPEN: When torque is stable and a spike is not detected. D DB Overheat ON/CLOSED: When the drive displays an “RH” or “RR” fault OFF/OPEN: When the drive is not in an “RH” or “RR” fault condition E Fault ON/CLOSED: When the drive is in a fault condition (excluding CPF00 and CPF01) OFF/OPEN: When the drive is not in a fault condition F Not Used* (No Function) Does not trigger any function in the drive, but does allow for status to be read via option card or MEMOBUS/Modbus communications. 10 Minor Fault ON/CLOSED: When the drive is in a minor fault condition OFF/OPEN: When the drive is not in a minor fault condition 11 Reset Cmd Active ON/CLOSED: When there is a reset command present using the terminals, serial communications, or communication option card OFF/OPEN: When a reset command is not present 12 Timer Output ON/CLOSED: When H01-xx = 43 is active for longer than C12-03 time OFF/OPEN: When H01-xx = 43 is not active 13 Fref/Fout Agree2 ON/CLOSED: When the output frequency (U01-02) is within the frequency reference (U01-01) ±L04-04 OFF/OPEN: When the output frequency (U01-02) is not within the frequency reference (U01-01) ±L04-04 14 Fref/Set Agree 2 ON/CLOSED: When the output frequency (U01-02) is within L04-03 ±L04-04 OFF/OPEN: When the output frequency (U01-02) is not within L04-03 ±L04-04 18 Trq Det 2 N.O. ON/CLOSED: When the output current/torque exceeds the value set in parameter L0605 for longer than the time set in parameter L06-06 OFF/OPEN: When the output current/torque does not exceed the value set in parameter L06-05 for longer than the time set in parameter L06-06 19 During Fast Stop ON/CLOSED: When a Fast-Stop command is detected (H01-xx = 40 or 42 is active) OFF/OPEN: When a Fast-Stop command is not detected (H01-xx = 40 or 42 is not active) 1A Forward Dir ON/CLOSED: During Forward/Up operation OFF/OPEN: When running in Reverse/Down direction or baseblock 1B Reverse Dir ON/CLOSED: During Reverse/Down operation OFF/OPEN: When running in Forward/Up direction or baseblock 1C Swift/Ultra-Lift Mode ON/CLOSED: When the drive is operating in Swift-Lift/Ultra-Lift mode OFF/OPEN: When the drive is not operating in Swift-Lift/Ultra-Lift mode 1D Brk Trans Fault ON/CLOSED: When the drive detects a brake transistor failure OFF/OPEN: Normal operation 1E LC Operating ON/CLOSED: When the drive is testing the current load before posting a LC Fault OFF/OPEN: Normal operation 1F Regenerating ON/CLOSED: When the drive is in a regenerative mode OFF/OPEN: Normal operation 20 Auto-Rst Attempt ON/CLOSED: When Auto-reset is enabled OFF/OPEN: Normal operation 21 Overload (OL1) ON/CLOSED: When the drive exceeds 90% of the motor overload detection level (oL1) OFF/OPEN: Normal operation 22 OH Pre-Alarm ON/CLOSED: When the drive heatsink temperature ≥ L08-02 OFF/OPEN: Normal operation * This output does not have an inverse output ** Contact will open when power is disconnected IMPULSE®•G+ & VG+ Series 4 Instruction Manual – August 2013 5-94 Display Function 23 Torque Limit ON/CLOSED: When the torque (U01-09) is ≥ L07-01–L07-04. OFF/OPEN: Normal operation 24 Speed Limit ON/CLOSED: When: 1. the frequency reference has reached the upper limit set in B02-01 (D02-01). 2. the frequency reference has fallen below B02-02 (D02-02) or B02-03 (D02-03). 3. parameter B03-05 (B01-05) = 1, 2, or 3, and the frequency reference is < E01-09. OFF/OPEN: Normal operation 25 During Load Flt ON/CLOSED: When drive is in Zero Servo mode OFF/OPEN: When drive is not in Zero Servo mode 26 Run Cmd is Input ON/CLOSED: When either a Forward or Reverse command is active on H01-xx OFF/OPEN: When neither a Forward or Reverse command is active on H01-xx 27 Load Check Det ON/CLOSED: When the drive has detected a “Load Check fault” OFF/OPEN: Normal operation 28 Slack Cable Det ON/CLOSED: When the drive has detected a “Slack Cable” OFF/OPEN: Normal operation 29 Upper Limit ON/CLOSED: When a UL1, UL2, or UL3 is detected OFF/OPEN: Normal operation 2A During RUN 2 ON/CLOSED: When a run command is active and the drive is outputting voltage. 2B Upper Limit 1 ON/CLOSED: When UL1 is detected OFF/OPEN: Normal operation 2C Upper Limit 2 ON/CLOSED: When UL2 is detected OFF/OPEN: Normal operation 2D Lower Limit 1 ON/CLOSED: When LL1 is detected OFF/OPEN: Normal operation 2E Lower Limit 2 ON/CLOSED: When LL2 is detected OFF/OPEN: Normal operation 30 Lower Limit* ON/CLOSED: When LL1 or LL2 is detected OFF/OPEN: Normal operation 31 Up/Low Limit* ON/CLOSED: UL1, UL2, UL3, LL1, or LL2 is detected OFF/OPEN: Normal operation 32 Snap Shaft ON/CLOSED: When the drive has detected a “Snap Shaft” OFF/OPEN: Normal operation 34 Index Complete ON/CLOSED: When the Index move is complete OFF/OPEN: Normal operation or Index move is not complete 35 Ready for F-Ref ON/CLOSED: When C08-04 timer has expired or the Brake Answerback is detected H01-xx = 58 is true OFF/OPEN: Normal operation or drive detected a BE1, BE2, BE4 alarm or is stopped. 36 Fan Alrm Det ON/CLOSED: When the drive detects that the internal cooling fan has failed OFF/OPEN: Normal operation 37 Maintenance ON/CLOSED: When the Maintenance Timer (U01-52) ≥ C12-05 OFF/OPEN: Normal operation or the Maintenance Timer (U01-52) < C12-05 38 Spd Lim @ T Cont ON/CLOSED: When Speed Limit has been reached while using Torque Control OFF/OPEN: When the Speed Limit has not been reached when using Torque Control 39 Drive Enable ON/CLOSED: When Drive Enable (H01-xx = 65) is active OFF/OPEN: When Drive Enable (H01-xx =65) is not active 3B Watt-hour Pulse ON/CLOSED: When the Watt-hour time is reached (based on setting of H02-06), the contact will close for 200 ms OFF/OPEN: When the Watt-hour time has not been reached * This output does not have an inverse output ** Contact will open when power is disconnected IMPULSE®•G+ & VG+ Series 4 Instruction Manual – August 2013 5-95 Display Function 3D Fault or Alarm ON/CLOSED: When either a Fault or Alarm condition is detected OFF/OPEN: Normal operation 3E Overspeed ON/CLOSED: When an overspeed condition is detected OFF/OPEN: Normal operation 3F Klixon ON/CLOSED: When a Klixon alarm is detected (H01-xx = 56 or 57 is active) OFF/OPEN: Normal operation 40 through FF Flt Annunciate ON/CLOSED: When specific fault condition are detected (see Fault Annunciation) OFF/OPEN: Normal operation 102 through 1FF** Parameter Settings 2 through FF with inverse output. * This output does not have an inverse output ** Contact will open when power is disconnected IMPULSE®•G+ & VG+ Series 4 Instruction Manual – August 2013 5-96 Digital Outputs—Alarm/Fault Annunciate (H02-01–03=40) Digital Outputs—Fault Annunciate enables you to assign a set of six fault outputs to Relay Output M2/M3 and/or Output M5/M6. In addition, you can select whether each fault output is enabled. NOTE: Output M0/M1 can also be used for Digital Outputs—Fault Annunciate; however, it is normally assigned to a brake output. Before you start to program this feature, you may find it convenient to first photocopy the “Binary-toHexadecimal Conversion Worksheet” in this section. By being able to write in the worksheet’s boxes, you will find it easier to program the feature. Programming Digital Outputs—Fault Annunciate requires that you determine two 4-digit binary numbers and then convert these numbers to two 1-digit hexadecimal numbers. You enter the hexadecimal numbers when you program the drive. To program Digital Outputs—Fault Annunciate (from the Programming Menu): 1. Press the and the buttons to navigate to H02-01. 2. Determine the output terminal to which you want Fault Annunciate assigned; Terminals M0-M1, M2-M3 or M5-M6 and press 3. Press the 4. Press the or button. until the value blinks. button until H02-xx = 040 appears. H02-xx = 40 Flt Annunciate appears. 5. From the worksheet in table 5-72, select one of three fault output sets (each row is a set). Enter the one-zero combination that corresponds to the set (row) that you selected. 6. Determine which fault outputs should be enabled. To enable a fault output, enter 1 in the box above the fault output; otherwise, enter 0. Do this for each fault output in the set. 7. Using the Binary to Hexadecimal Conversion chart (table 5-74), determine the 1-digit hexadecimal number for both 4-digit binary numbers. 8. Press the or and press Enter. and buttons until the appropriate hexadecimal number appears Example: Select a fault annunciate set in which the fault you want to appear is shown. You must select only faults from one set. If you want to have the relay output to change based on only inputs LL1 and UL1, you would choose Set 2. 1. Place a “1” below LL1 and UL1 for Set 2. 2. Use table 5-73 to convert the left binary value “1 0 0 0” to Hex 8. 3. Use table 5-73 to convert the right binary value “1 0 1 0” to Hex A. 4. Enter this value into H02-xx. IMPULSE®•G+ & VG+ Series 4 Instruction Manual – August 2013 5-97 Table 5-72: Fault Annunciate Example First digit from the left Second digit from the left 1 or 0 1 or 0 1 or 0 1 or 0 1 or 0 1 or 0 1 or 0 1 or 0 Set 2 1 0 OT1 OT2 LL1 LL2 UL1 UL2 Binary Number 1 0 0 0 1 0 1 0 First digit from the left = 8 Second digit from the left = A, so H02-xx = 8A Table 5-73:Fault Annunicate Worksheet First digit from the left 1 or 0 Second digit from the left 1 or 0 1 or 0 1 or 0 1 or 0 1 or 0 1 or 0 1 or 0 BE8 BE6 BE5 BE3 BE2 BE1 Set 1 0 1 Binary Number 0 1 First digit from the left Second digit from the left 1 or 0 1 or 0 1 or 0 1 or 0 1 or 0 1 or 0 1 or 0 1 or 0 Set 2 1 0 OT1 OT2 LL1 LL2 UL1 UL2 Binary Number 1 0 First digit from the left Second digit from the left 1 or 0 1 or 0 1 or 0 1 or 0 1 or 0 1 or 0 1 or 0 1 or 0 Set 3 1 1 SLC BE4 BE3 BE2 BE1 BE0 Binary Number 1 1 IMPULSE®•G+ & VG+ Series 4 Instruction Manual – August 2013 5-98 Table 5-74: Binary to Hexadecimal Conversion Binary Number Hexadecimal Number Binary Number Hexadecimal Number 0000 0001 0010 0011 0100 0101 0110 0111 0 1 2 3 4 5 6 7 1000 1001 1010 1011 1100 1101 1110 1111 8 9 A B C D E F External Fault Response Selection It is sometimes desirable to have at least one external fault input to the drive. To properly program a multi-function input (H01-01 to H01-08) for this purpose an external fault response must be selected. The table below shows the possible selections for an external fault response. Table 5-75: External Fault Selection Input Level Selection N.O.(1) N.C.(1) Detection Method Always During Run 24(3) 28 26 2A 25 29 2E 21 2C 22 MFDI Setting Result 20 Alarm Only Coast to Stop Fast Stop(2) Ramp to Stop External Fault Action 2D 23 27 2B 2F (1) N.O. = normally open contact; N.C. = normally closed contact (2) Uses B05-08 timer (3) Factory Default IMPULSE®•G+ & VG+ Series 4 Instruction Manual – August 2013 5-99 Analog Inputs The IMPULSE®•G+ & VG+ Series 4 has three built-in analog inputs for the external input of numerous references and limits. Drive analog input capabilities can be increased with the installation of an AI-A3 option card. Table 5-76: Analog Inputs Parameter Settings Parameter Code Display Function Range Initial Value H03-01 Term A1 Signal Voltage for Terminal A1 analog input signal 0, 1 * 0–31 * 0 0 to 10 V 1 -10 to 10 V H03-02 Terminal A1 Sel Sets the function of terminal A1 (see tables 5-77 and 5-78 for option selections). H03-03 Terminal A1 Gain Sets the level of the input value -999.9–999.9% selected in H03-02 when 10 V is input at terminal A1. 100.0 H03-04 Terminal A1 Bias Sets the level of the input value selected in H03-02 when 0 V is input at terminal A1. -999.9–999.9% 0.0 H03-05 Term A3 Signal Voltage for Terminal A3 analog input signal 0, 1 0 0–31 * 0 0 to 10 V 1 -10 to 10 V H03-06 Terminal A3 Sel Sets the function of terminal A1 (see tables 5-77 and 5-78 for option selections). H03-07 Terminal A3 Gain Gain multiplier for Terminal A3 analog -999.9–999.9% input signal 100.0 H03-08 Terminal A3 Bias Bias multiplier for Terminal A3 analog input signal -999.9–999.9% 0.0 H03-09 Term A2 Signal Terminal A2 Signal Level Selection 0–3 2 0 0 to 10 V 1 -10 to 10 V 2 4 to 20 mA 3 0 to 20 mA NOTE: Use DIP switch S1 to set input terminal A2 for a current or a voltage input signal. H03-10 Terminal A2 Sel Sets the function of terminal A2 (see tables 5-77 and 5-78 for option selections). 0–31 1F H03-11 Terminal A2 Gain Gain multiplier for terminal A2 analog input signal -999.9–999.9% 100.0 H03-12 Terminal A2 Bias Bias multiplier for terminal A2 analog input signal -999.9–999.9% 0.0 H03-13 Filter Avg Time Analog input filter average time 0.00–2.00sec 0.03 * Initial value is determined by X-Press Programming (Table 4-5, 4-6, or 4-7 on pages 4-11, 4-12, and 4-13). IMPULSE®•G+ & VG+ Series 4 Instruction Manual – August 2013 5-100 Parameter Code Display Function Range Initial Value H03-14 A1/A2/A3 Sel Determines which analog input terminals will be enabled when a digital input programmed for “MFAI Enable” (H01-xx = 3A) is activated. 1–7 7 1 A1 Available 2 A2 Available 3 A1/A2 Available 4 A3 Available 5 A1/A3 Available 6 A2/A3 Available 7 All Available H03-15 TerminalA1Offset Adds an offset when the analog signal -500–500 to terminal A1 is 0V 0 H03-16 TerminalA2Offset Adds an offset when the analog signal -500–500 to terminal A2 is 0V 0 H03-17 TerminalA3Offset Adds an offset when the analog signal -500–500 to terminal A3 is 0V 0 * Initial value is determined by X-Press Programming (Table 4-5, 4-6, or 4-7 on pages 4-11, 4-12, and 4-13). Table 5-77: Option Selections for H03-02, H03-06, and H03-10 (Flux Vector) Display Function 0 Analog Freq Ref1 100% = Max output frequency (E01-04) Same value can be set using H03-02 and H03-10. 10V = E01-04 (Maximum output frequency) 1 Frequency Gain The value of the analog frequency reference will be multiplied with the analog frequency reference gain value. 2 Analog Freq Ref2 Max. output frequency 10V = E01-04 (Maximum output frequency) 3 Analog Freq Ref3 Max. output frequency 10V = E01-04 (Maximum output frequency) 5 Acc/Dec T Reduct 10V = 100% 7 OT / UT Det Lvl Motor rated torque (vector control); inverter rated current (V/f control) 9 Ref Lower Limit Max. output frequency 10V = E01-04 (Maximum output frequency) D Freq Ref Bias 2 The input value of an analog input set to this function will be added to the frequency reference. This function can be used with any frequency reference source. E MotorTemperature 10 FWD Torque Limit 11 REV Torque Limit 12 Regen Torque Limit Torque limit during regen. 13 Torque Reference Torque reference when in Torque Control mode. 14 Torque Comp 15 Torque Limit FWD and REV torque limit. 16 Load Cell Used for Weight Measurement and/or Load Check 1F Not Used -- IMPULSE®•G+ & VG+ Series 4 Instruction Manual – August 2013 5-101 Table 5-78: Option Selections for H03-02, H03-06, and H03-10 (V/f) Display Function 0 Analog Freq Ref1 100% = Max output frequency (E01-04) Same value can be set using H03-02 and H03-10. 10V = E01-04 (Maximum output frequency) 1 Frequency Gain The value of the analog frequency bias will be multiplied with the analog frequency reference gain value. 2 Analog Freq Ref2 Max. output frequency 10V = E01-04 (Maximum output frequency) 3 Analog Freq Ref3 Max. output frequency 10V = E01-04 (Maximum output frequency) 4 Voltage Bias Output Voltage Bias. This bias boosts the output voltage of the V/f curve as a percentage of the maximum output voltage (E01-05). Only available in V/f mode. Motor rated voltage (E01-05) 10V = E01-05 (Motor rated Voltage) 5 Acc/Dec T Reduct 10V = 100% 6 DC Inj Braking DC Injection Braking Current 10V = 100% Drive rated current 4 to 20 mA = 0 to 100% Drive rated current 7 OT / UT Det Lvl Motor rated torque (vector control); inverter rated current (V/f control) 8 Stall Prev Level 9 Ref Lower Limit Max. output frequency 10V = E01-04 (Maximum output frequency) D Freq Ref Bias 2 The input value of an analog input set to this function will be added to the frequency reference. This function can be used with any frequency reference source. E MotorTemperature 16 Load Cell Used for Weight Measurement and/or Load Check 1F Not Used -- IMPULSE®•G+ & VG+ Series 4 Instruction Manual – August 2013 5-102 Analog Outputs The IMPULSE®•G+ & VG+ Series 4 has two built-in analog outputs for the external monitoring of drive conditions. Drive analog output capabilities can be increased with the installation of an AO-A3 option. Table 5-79: Analog Outputs Parameter Settings Parameter Code Display Function H04-01 Terminal FM Sel Assigns one of the following 000–630 function analog output parameters to Terminal FM. Reference the U monitor group for output function descriptions. 0 Range Initial Value 102 Not Used 101 Frequency Ref 102 Output Freq 103 Output Current 105 Motor Speed 106 Output Voltage 107 DC Bus Voltage 108 Output HP 109 Torque Reference 115 Term A1 Level 116 Term A2 Level 117 Term A3 Level 120 SFS Output 121 AI Opt Ch1 Level 122 AI Opt Ch2 Level 123 AI Opt Ch3 Level 129 Load Weight 130 SS Delta Speed 150 Hook Height 154 Input Pulse Mon 163 PG CH1 Freq 164 PG CH2 Freq 165 PG Output Freq 408 Heatsink Temp 416 Motor OL1 Level 417 Drive OL2 Level 601 Mot SEC Current 602 Mot EXC Current 603 ASR Input 604 ASR Output 605 Voltage Ref (Vq) 606 Voltage Ref (Vd) 607 ACR(q) Output 608 ACR(d) Output 611 Iq Reference 612 Id Reference IMPULSE®•G+ & VG+ Series 4 Instruction Manual – August 2013 5-103 Parameter Code Display Function Range Initial Value 618 PG1 CounterValue 619 PG2 CounterValue 622 Zero Servo Pulse 625 ASR Out w/o Fil 626 FF Cont Output 627 FF Estimate SPD H04-02 Terminal FM Gain Gain multiplier for Terminal FM analog output signal -999.9–999.9% 100.0 H04-03 Terminal FM Bias Bias multiplier for Terminal FM analog output signal -999.9–999.9% 0.0 H04-04 Terminal AM Sel Assigns one of the above function analog output parameters to Terminal AM 000–630 103 H04-05 Terminal AM Gain Gain multiplier for Terminal AM analog output signal -999.9–999.9% 50.0 H04-06 Terminal AM Bias Bias multiplier for Terminal AM analog output signal -999.9–999.9% 0.0 H04-07 FM Level Select Sets the voltage output level of U Monitor data for Terminal FM (Some monitors may not be assigned) 0–2 0 0–2 0 H04-08 0 0 to 10 V 1 -10 to 10 V 2 4 to 20 mA AM Level Select 0 0 to 10 V 1 -10 to 10 V 2 4 to 20 mA (Terminal FM only) Sets the voltage output level of U Monitor data for Terminal AM (Some monitors may not be assigned) Only available for 24 VDC interface card IMPULSE®•G+ & VG+ Series 4 Instruction Manual – August 2013 5-104 Serial Communication Set-up The IMPULSE®•G+ & VG+ Series 4 uses terminals R+/R-, S+/S- to communicate the MODBUS RTU (RS-485/422) protocol. Cycle power after changing serial format parameters. Table 5-80: Serial Communication Set-up Parameter Settings Parameter Code Display Function Range Initial Value H05-01 Serial Comm Adr Serial communication address 00–FF 1F H05-02 Serial Baud Rate Sets the baud rate 0–8 3 0–2 0 Determines stopping method when a serial fault occurs. 0–3 0 Determines whether Serial Fault Detection is enabled 0, 1 1 0 1200 bps 1 2400 bps 2 4800 bps 3 9600 bps 4 19.2 kbps 5 38.4 kbps 6 57.6 kbps 7 76.8 kbps 8 115.2 kbps Cycle power for the setting to take effect. H05-03 Serial Com Sel 0 No Parity 1 Even Parity 2 Odd Parity Sets the parity type Cycle power for the setting to take effect. H05-04 H05-05 Serial Fault Set 0 Decel to Stop 1 Coast to Stop 2 Fast Stop 3 Alarm Only Serial Flt Dtct 0 Disabled 1 Enabled H05-06 Transmit WaitTIM Send waiting time 5–65 ms 5 H05-07 RTS Control Sel RTS Control enable/disable 0, 1 1 0 Disabled RTS is always on 1 Enabled RTS is ON only when sending H05-09 CE Detect Time Sets the time required to detect a 0.0–10.0 sec communications error. Adjustment may be needed when networking several drives. 2.0 H05-10 CommReg 25h Unit Selects the units for the output voltage monitor value in Modbus Register 0025H. 0 0 0.1V 1 1V 0, 1 IMPULSE®•G+ & VG+ Series 4 Instruction Manual – August 2013 5-105 Parameter Code Display H05-11 Enter CommandSel H05-12 NOTE: Function 0 Enter Required Drive requires an Enter command before accepting any changes to parameter settings. 1 No EnterRequired Parameter changes are activated immediately without the Enter command. Run CommandSel 0 FWD Run &REV Run 1 Run & FWD/REV Range Initial Value 0, 1 1 0, 1 0 After initial communication, if the inverter is not communicated with for 2 seconds, a communication fault will occur (CE Memobus ERR). IMPULSE®•G+ & VG+ Series 4 Instruction Manual – August 2013 5-106 Pulse Train Input/Output Pulse Input and Output provides speed control capabilities via the RP and MP terminals. Table 5-81: Pulse Input/Output Parameter Settings Parameter Code Display Function Range Initial Value H06-01 Pulse Input Sel Selects the function of pulse input terminal RP. 0, 5–7 0 0 Frequency Ref Set B03-01 = 4 (pulse input) to enable this input. 5 Simple PG OLV Control with Simple PG feedback (possible only when using motor 1 in Hoist NLB). 6 PG Feedback PG-X3 pulse feedback into the RP terminal coming from a Slave drive. 7 RP Feedback Pulse feedback into the RP terminal coming from a Slave drive. 1000–32000 Hz 1440 H06-02 Pulse In Scale Number of pulses equal to the maximum output frequency H06-03 Pulse Input Gain Sets the output level when input is 0.0–1000.0% 100% 100.0 H06-04 Pulse Input Bias Sets the output level when input is -100.0–100.0% zero Hz. 0.0 H06-05 Pulse In Filter Sets the input filter time constant 0.00–2.00 sec 0.10 H06-06 Pulse Output Sel Selects the function of pulse output terminal MP. 0–502 102 000 Not Used 101 Frequency Ref 102 Output Freq 105 Motor Speed 120 SFS Output H06-07 Pulse Out Scale Item output by pulse monitor is 0–32000 Hz selected by corresponding U01-xx value. 1440 H06-08 Pulse Min Freq Sets the minimum frequency for the pulse train input to be detected. Enabled when H06-01 = 0. 0.5 H06-09 Pulse Dev Detect When the Pulse Input terminal RP 0.0–25.5% (H06-01) is programmed for PG Feedback (6) or RP Feedback (7), the pulse input from terminal RP is compared to the pulse output of terminal MP. If the difference is greater than the percentage programmed into H06-09, the drive will fault and display “PULSDEV” on the keypad display. 0.1–1000.0 Hz 5.0 IMPULSE®•G+ & VG+ Series 4 Instruction Manual – August 2013 5-107 Protection Parameters • • • • • • • • • L1 Motor Overload L2 Power Loss Ride Thru L3 Stall Prevention L4 Reference Detection L5 Test Mode L6 Torque Detection L8 Hardware Protection L9 Automatic Fault Reset L9 Fault Latch Motor Overload The IMPULSE®•G+ & VG+ Series 4 drive has an electronic overload protection function (OL1) for protecting the motor from overheating. The drive bases the protection on time, output current, and output frequency. The electronic thermal overload function is UL-recognized, so an external thermal overload relay is not required for single motor operation. This parameter selects the motor overload curve used according to the type of motor applied. Setting L01-01 = 1 selects a motor with limited cooling capability below rated (base) speed when running at 100% load. The OL1 function derates the motor any time it is running below base speed. Setting L01-01 = 2 selects a motor capable of cooling itself at any speed when running at 100% load. The OL1 function derates the motor when it is running at 1/10 of its rated speed or less. Setting L01-01 = 3 selects a motor capable of cooling itself at any speed when running at 100% load. This includes zero speed. The OL1 function does not derate the motor at any speed. If the drive is connected to a single motor, the motor overload protection should be enabled (L01-01 = 1, 2, 3) unless another means of preventing motor thermal overload is provided. When the electronic thermal overload function is activated, an OL1 fault occurs, shutting OFF the drive’s output, thus preventing additional overheating of the motor. The motor temperature is continuously calculated as long as the drive is powered up. When operating several motors with one drive, install a thermal relay on each motor and disable the motor overload protection (L01-01 = 0). Table 5-82: Motor Overload Parameter Settings Parameter Code Display Function Range Initial Value L01-01 Mtr OL Charact Sets the type of motor overload protection. 0-3 3 0.1–5.0 min 1.0 L01-02 0 OL1 Disabled 1 VT Motor General purpose motor (standard fan cooled) 2 CT Motor Drive dedicated motor with a speed range of 1:10 3 Vector Motor Speed range of 1:100 MOL Time Const Time for OL1 fault when motor current is 150% of the motor rated current. IMPULSE®•G+ & VG+ Series 4 Instruction Manual – August 2013 5-108 Parameter Code Display Function L01-03 Mtr OH Alarm Sel Operation when the motor 0–3 temperature analog input (H03-02, H03-06, or H03-10 = E) exceeds the OH3 alarm level. (1.17V) L01-04 0 Decel to Stop 1 Coast to Stop 2 Fast Stop (Alarm) Decel by B05-08 3 Alarm Only OH3 Flashes Mtr OH Fault Sel 0 Decel to Stop 1 Coast to Stop 2 Fast Stop Motor temperature analog input filter time constant (H03-02, H0306, or H03-10 = E) L01-13 Mtr OL Mem Sel Determines whether or not to hold 0, 1 the current value of the electrothermal motor protection (L01-01) when the power supply is interrupted. 1 Enabled 1 Decel by B05-08 Mtr Temp Filter Disabled 3 Operation when the motor 0–2 temperature analog input (H03-02, H03-06, or H03-10 = E) exceeds the OH4 fault level. (2.34V) L01-05 0 Initial Value Range 0.00–10.00 sec 0.20 1 Power Loss Ride Thru Table 5-83: Power Loss Ride Thru Parameter Settings Parameter Code Display Function Range Initial Value L02-01 PwrL Selection Enables/disables the Power Loss Ride thru function 0–2 0 0 Disabled Drive trips on (Uv1) fault when power is lost. 1 Enable w/ Timer Recover within the time set in L0202. Uv1 will be detected if power loss is longer than L02-02. 2 Enable if CPU on Recover as long as CPU has power. Uv1 is not detected. L02-02 PwrL Ridethru t Power Loss Ride thru time 0.0–25.5 sec ** L02-03 PwrL Baseblock t Output turn on delay after power resumes 0.1–5.0 sec ** L02-04 PwrL V/F Ramp t Voltage recovery time after speed search is complete 0.0–5.0 sec ** L02-05 PUV Det Level Under voltage fault detection level 230V: 150–210 VDC 460V: 300–420 VDC 575V: 431–604 VDC Determined by E01-01 ** Initial value is dependent on drive size, which is determined by O02-04 (kVA Selection). IMPULSE®•G+ & VG+ Series 4 Instruction Manual – August 2013 5-109 Stall Prevention Table 5-84: Stall Prevention Parameter Settings Parameter Code Display Function Range Initial Value Model L03-01 StallP Accel Sel Sets how the Stall Prevention will function during acceleration. 0–2 1 G+ 0 Disabled 1 General Purpose Acceleration is paused as long as the current is above the L03-02 setting. 2 Intelligent Accelerate in the shortest possible time without exceeding the L03-02 level. L03-02 StallP Accel Lvl Sets the output current level at which the Stall Prevention during acceleration is activated. 0–150% * G+ L03-03 StallPAcc LowLim Sets Stall Prevention lower limit during acceleration when operating in the constant power range. Set as a percentage of drive rated current. 0–100% 50 G+ L03-05 StallP Run Sel Sets the control for the stall prevention during run. 0–2 1 G+ 0 Disabled Drive runs at a set frequency. A heavy load may cause speed loss. 1 Decel Time 1 Uses the deceleration time set to C01-02 while Stall Prevention is performed. 2 Decel Time 2 Uses the deceleration time set to C01-04 while Stall Prevention is performed. L03-06 StallP Run Level Sets the current level to trigger 30–150% Stall Prevention during run. Depending on the setting of parameter L03-23, the level is automatically reduced in the constant power range (speed beyond base speed). Enabled when L03-05 is set to 1 or 2. * G+ L03-11 OV Inhibit Sel Enables or disables the OV 0, 1 suppression function, which allows the drive to change the output frequency as the load changes to prevent an OV fault. 0 G+/VG+ 230 V: 375 V 460 V: 750 V 575 V: 930 V G+/VG+ A01-02 G+/VG+ 0 Disabled 1 Enabled L03-17 DC Bus Reg Level Sets the desired value for the DC bus voltage during overvoltage suppression and Stall Prevention during deceleration. L03-20 DC Bus P Gain Sets the proportional gain for KEB 0.00–5.00 Ride-Thru, Stall Prevention, and overvoltage suppression. * Default and Range changed by D10-01. IMPULSE®•G+ & VG+ Series 4 Instruction Manual – August 2013 5-110 230 V: 150– 400 VDC 460 V: 300– 800 VDC 575 V: 431– 1150 VDC Parameter Code Display Function Range L03-21 Acc/Dec P Gain Sets the proportional gain used to calculate the deceleration rate during KEB Ride-Thru, OV suppression function, and Stall Prevention during deceleration. L03-23 CHP Stall P Sel This function reduces the Stall Prevention during run level in the constant power range. 0 Lvl set in L3-06 Sets the Stall Prevention level that is used throughout the entire frequency range. 1 Autom. Reduction Automatic Stall Prevention level reduction in the constant output range. The lower limit value is 40% of L03-06. L03-24 Mtr Accel Time Initial Value Model 0.10–10.00 sec A01-02 G+/VG+ 0, 1 0 G+ O02-04 or E501 G+/VG+ Sets the time needed to accelerate 0.001–10.000 the uncoupled motor at rated sec torque from stop to the maximum frequency. * Default and Range changed by D10-01. IMPULSE®•G+ & VG+ Series 4 Instruction Manual – August 2013 5-111 Speed Agree The IMPULSE®•G+ & VG+ Series 4 utilizes three different functions for detecting output frequency: Speed Agree 1 • When enabled using MFDO "H02-xx = 2", the contact closes when the output frequency (U0102) is equal to the frequency reference (U01-01) plus or minus the speed agree detection width (L04-02). • U01-02 = (U01-01 ± L04-02) • When enabled using MFDO “H02-xx =3”, the contact closes when the output frequency (U0102) is equal to the speed agree detection level (L04-01) plus or minus the speed agree detection width (L04-02). • U01-02 = (L04-01 ± L04-02) Speed Agree 2 • When enabled using MFDO “H02-xx = 13”, the contact closes when the output frequency (U0102) is equal to the frequency reference (U01-01) plus or minus the speed agree detection width (L04-04). • U01-02 = (U01-01 ± L04-04) • When enabled using MFDO “H02-xx = 14”, the contact closes when output frequency (U01-02) is equal to the speed agree detection level (L04-03) plus or minus the speed agree detection width (L04-04). • U01-02 = (L04-03 ± L04-04) Frequency Detect • When enabled using MFDO “H02-xx = 4”, the contact closes when the output frequency (U0102) is less than or equal to the speed agree level (L04-01) plus the speed agree detection width (L04-02). • U01-02 ≤ (L04-01 + L04-02) • When enabled using MFDO “H02-xx = 5”, the contact closes when the output frequency (U0102) is greater than or equal to the speed agree level (L04-01) minus the speed agree detection width (L04-02). • U01-02 ≥ (L04-01 - L04-02) NOTE: If L04-01 or L04-03 is set below 5 Hz, the DC Injection Start Frequency (D01-01) and Speed Agree Widths (L04-02/L04-04) may need to be adjusted lower in order for the drive to recognize runs properly. IMPULSE®•G+ & VG+ Series 4 Instruction Manual – August 2013 5-112 Table 5-85: Speed Agree Parameters Parameter Code Display Function Range Initial Value L04-01 Spd Agree Level Sets the detection level for the desired speed agree 1 and frequency detection functions. The detection level is effective during both FWD and REV operation. 0.0–150.0 Hz 0.0 L04-02 Spd Agree Width Sets the detection width for speed agree 1 and frequency detection functions. 0.0–20.0 Hz 2.0 L04-03 Spd Agree Lvl+- Sets the detection level for the -150.0–150.0 Hz desired speed agree 2 function. The detection level is effective during either FWD or REV operation, depending on the set detection level (positive value for FWD operation, negative value for REV operation). 0.0 L04-04 Spd Agree Wdth+- Sets the detection width for the speed agree 2 function. 2.0 0.0–20.0 Hz Table 5-86: Reference Detection Parameter Settings Parameter Code Display Function L04-05 Ref Loss Sel The drive can detect a loss of an 0, 1 analog frequency reference from input A1, A2, or A3. Frequency reference loss is detected when the frequency reference drops below 10% of the reference or below 5% of the maximum output frequency within 400 ms. 0 Stop Drive stops when the frequency reference is lost. 1 Run@L406PrevRef Drive runs at a reduced speed when the frequency reference is lost. Range L04-06 Fref at Floss Sets the percentage of the frequency reference that the drive should run with when the frequency reference is lost. L04-07 Freq Detect Sel Determines when frequency 0, 1 detection is active using parameters L04-01 through L04-04. 0 No Detection @BB No detection during baseblock. 1 Always Detected 0.0–100.0% Initial Value 0 80 0 Detection always enabled. IMPULSE®•G+ & VG+ Series 4 Instruction Manual – August 2013 5-113 Test Mode Test Mode is a troubleshooting aid that is intended for troubleshooting Flux Vector Control Method problems in the field. The feature cannot be left on indefinitely as it will generate a fault after being on for a total accumulated time of 10 minutes. At this time, the fault must be reset or power must be cycled. When enabled, the Control Method in A01-02 is temporarily overridden to V/f. All other functions for the new control method are not restricted. Certain programming may need to be done to clear up any OPE conditions that may occur as a result of the change in control method during this mode. It is up to the user to determine if a special function may cause an unsafe condition during testing. Since this feature will be used mainly for No-Load Brake type hoists, many of the inherent safety checks will become disabled. It may be desirable to disable functions such as Ultra-Lift, but desirable to leave Limit Switch functions enabled. The user will need to determine what functions are being used. If unsure, it is best to ensure that the function is disabled (either by programming or MFDI in OFF state) before running the drive/motor in this mode. Table 5-87: Test Mode Parameter Settings Parameter Code Display Function Range Initial Value L05-01 Test Mode Test Mode Enable. Starts a 10 minute timer after which the drive will not function until Test Mode is disabled. If power is cycled, Test Mode will become disabled. When test mode is enabled, Test Mode settings will be used for operation. Refer to the E3 group. 0, 1 0 0 Disabled 1 Enabled IMPULSE®•G+ & VG+ Series 4 Instruction Manual – August 2013 5-114 Torque Detection The overtorque detection circuit activates when the motor load causes the motor current to exceed the overtorque detection level (L06-02). When an overtorque condition is detected, alarm signals can be sent to a multi-function output. To output an overtorque detection signal, select torque detection 1 at either of the multi-function digital outputs (H02-0x = “B” or “18”). Table 5-88: Torque Detection Parameter Settings Parameter Code Display Function Range Initial Value L06-01 Torque Det 1 Sel Activates overtorque/undertorque detection and selects whether detection generates an alarm or a fault 0-8 0 0 Disabled 1 OT@SpdAgree-Alm 2 OT At RUN - Alm 3 OT@SpdAgree-Flt 4 OT At RUN - Flt 5 UT@SpdAgree-Alm 6 UT At RUN - Alm 7 UT@SpdAgree-Flt 8 UT At RUN - Flt Table 5-89:Torque Detection Setting Descriptions Setting Description 0 Torque detection is disabled (factory default). 1 Overtorque detection is enabled whenever at the speed agree level (when inverter is not accelerating or decelerating). Continue running after detection (OT1 alarm). 2 Overtorque detection is enabled always. Continue running after detection (OT1 alarm). 3 Overtorque detection is enabled whenever at the speed agree level. Coast to a stop after detection (OT1 fault). 4 Overtorque detection is enabled always. Coast to a stop after detection (OT1 fault). 5 Undertorque detection is enabled whenever at the speed agree level (when inverter is not accelerating or decelerating). Continue running after detection (UT1 alarm). 6 Undertorque detection is enabled always. Continuing running after detection (UT1 alarm). 7 Undertorque detection is enabled whenever at the speed agree level. Coast to a stop after detection (UT1 fault). 8 Undertorque detection is enabled always. Coast to stop after detection (UT1 fault) NOTE: • • • To detect overtorque/undertorque during acceleration or deceleration, set to “2” or “4” / “6” or “8”. To continue operation after overtorque/undertorque detection, set to “1” or “2” / “5” or “6” During detection, the digital operator displays an “OL3” alarm (blinking). To stop the inverter after an overtorque/undertorque detection fault, set to “3” or “4” / “7” or “8”. During detection, the digital operator displays an “OL3/UL3” fault. IMPULSE®•G+ & VG+ Series 4 Instruction Manual – August 2013 5-115 Table 5-90: Torque Detection Parameter Settings - continued Parameter Code Display Function L06-02 Torq Det 1 Lvl Sets the overtorque detection as a 0–300% percentage of inverter rated current, during V/f control, and motor rated torque during vector control. 150 L06-03 Torq Det 1 Time The overtorque detection delay time 0.0–10.0 sec inserts a delay, between the time motor current (or torque) exceeds the overtorque level (L06-02) and when the overtorque detection function is enabled. The digital operator then displays “OL3”. 0.1 L06-04 Torq Det 2 Sel Activates overtorque/undertorque detection, and selects whether detection generates an alarm or a fault. 0 0 Disabled 1 OT@SpdAgree-Alm 2 OT At RUN - Alm 3 OT@SpdAgree-Flt 4 OT At RUN - Flt 5 UT@SpdAgree-Alm 6 UT At RUN - Alm 7 UT@SpdAgree-Flt 8 UT At RUN - Flt Range 0–8 Initial Value Table 5-91:Torque Detection 2 Select Descriptions Setting Description 0 Overtorque/undertorque detection is disabled (factory default). 1 Overtorque detection is enabled whenever at the speed agree level (when inverter is not accelerating or decelerating). Continue running after detection (OT2 alarm). 2 Overtorque detection is enabled always. Continue running after detection (OT2 alarm). 3 Overtorque detection is enabled whenever at the speed agree level. Coast to a stop after detection (OT2 fault). 4 Overtorque detection is enabled always. Coast to a stop after detection (OT2 fault). 5 Undertorque detection is enabled whenever at the speed agree level (when inverter is not accelerating or decelerating). Continue running after detection (UT2 alarm). 6 Undertorque detection is enabled always. Continuing running after detection (UT2 alarm). 7 Undertorque detection is enabled whenever at the speed agree level. Coast to a stop after detection (UT2 fault). 8 Undertorque detection is enabled always. Coast to stop after detection (UT2 fault) Overtorque detection 2 functions the same as overtorque/undertorque detection 1 (L06-01), except that “OT2/UT2” is displayed on the digital operator instead. This function is used when two types of detection are output to the multi-function output terminals. Table 5-92: Torque Detection Parameter Settings - continued Parameter Code Display Function Range Initial Value L06-05 Torq Det 2 Lvl Torque Detection 2 Level 0–300% 150 L06-06 Torq Det 2 Time Torque Detection 2 Time 0.0–10.0 sec 0.1 IMPULSE®•G+ & VG+ Series 4 Instruction Manual – August 2013 5-116 Parameter Code Display Function Range Initial Value L06-08 Mech Fatigue Sel This function can detect an overtorque or undertorque in a certain speed range as a result of machine fatigue. It is triggered by a specified operation time and uses the oL1 detection settings (L06-01 and L06-03) 0–8 0 0 Disabled 1 Alm Spd>L06-09 2 Alm [Spd]>L06-09 3 Flt Spd>L06-09 4 Flt [Spd]>L06-09 5 Alm Spd<L06-09 6 Alm [Spd]<L06-09 7 Flt Spd<L06-09 8 Flt [Spd]<L06-09 Table 5-93: Mechanical Fatigue Selection Description Setting Description 0 Mechanical Weakening Detection disabled (factory default). 1 Continue running (alarm only). Detected when the speed (signed) is greater than L06-09. 2 Continue running (alarm only). Detected when the speed (not signed) is greater than L06-09. 3 Interrupt drive output (fault). Detected when the speed (signed) is greater than L06-09. 4 Interrupt drive output (fault). Detected when the speed (not signed) is greater than L06-09. 5 Continue running (alarm only). Detected when the speed (signed) is less than L06-09. 6 Continue running (alarm only). Detected when the speed (not signed) is less than L06-09. 7 Interrupt drive output (fault). Detected when the speed (signed) is less than L06-09. 8 Interrupt drive output (fault). Detected when the speed (not signed) is less than L06-09. Table 5-94: Torque Detection Parameter Settings - continued Parameter Code Display Function Range Initial Value L06-09 MechFat Det Spd Sets the speed that triggers Mechanical Weakening Detection. When L06-08 is set for an unsigned value, the absolute value is used if the setting is negative. -110.0–110.0% 110.0 L06-10 MechFat Det Time Sets the time mechanical weakening 0.0–10.0 sec has to be detected before an alarm or fault is triggered. 0.1 L06-11 MechFat Det Hour Sets the operation time (U01-04) required before Mechanical Weakening Detection is active. 0 0–65535 IMPULSE®•G+ & VG+ Series 4 Instruction Manual – August 2013 5-117 Hardware Protection The IMPULSE®•G+ & VG+ Series 4 comes equipped with a number of built-in functions designed to protect the inverter and its components from damage. Table 5-95: Hardware Protection Parameter Settings Parameter Code Display Function L08-02 OH Pre-Alarm Lvl Sets the heatsink temperature level for 50–150°C protection against overheat (OH). NOTE: The inverter measures heatsink temperature by an negative temperature coefficient thermistor. * L08-03 OH Pre-Alarm Sel Selects the stopping method when heatsink overheat is detected. 0–5 3 0 Decel to Stop Decel to stop using B05-02 1 Coast to Stop Immediate stop 2 Fast Stop Decel to stop using B05-08 3 Use B3-03 Method Uses programmed B03-03 Method 4 Alarm Only Operation continues and “OH Heatsink Overtemp” is displayed on keypad 5 Run@L8-19 Rate Continue operation at reduced speed as set in L08-19. Input phase loss detection 0, 1 1 Output phase loss detection 0–2 1 Enables/disables ground fault detection 0, 1 1 Cooling fan operation select 0, 1 0 0–300 sec 60 L08-05 L08-07 Ph Loss In Sel 0 Disabled 1 Enabled Ph Loss Out Sel 0 L08-09 L08-10 Range Initial Value Disabled 1 1PH Loss Det 2 2/3PH Loss Det Ground Fault Sel 0 Disabled 1 Enabled Fan On/Off Sel 0 Dur Run (OffDly) 1 Always On L08-11 Fan Delay Time When L08-10 = 0, fan will operate L08-11 seconds after Run Command is removed L08-12 Ambient Temp Adjusts Overload (OL2) Protection for -10–50°C high ambients 40 L08-13 UV3 Detect Enabled Soft Charge Bypass Circuit Fault 1 0 Disabled 1 Enabled * Initial value is dependent on drive size, which is determined by O02-04 (kVA selection) ** Initial value is dependent on carrier. 2kHz = 0, else 1 IMPULSE®•G+ & VG+ Series 4 Instruction Manual – August 2013 5-118 0, 1 Parameter Code Display Function Range Initial Value L08-15 OL2 Sel @ L-Spd Enables/disables OL when output frequency < 6 Hz 0, 1 0** L08-18 0 Disabled 1 Enabled Soft CLA Sel 0 Disabled 1 Enabled Enables/disables the software current 0, 1 limit function. Limits output frequency when current exceeds 110% of rated. 0 L08-19 Fc Red dur OHAlm Specifies the frequency reference reduction gain at overheat pre-alarm when L08-03 = 4. 0.1–0.9 Hz 0.8 L08-32 MC,FAN Fault Sel MC, FAN configure the operation of power if it detects a warning alarm 0–4 1 Drive Installation Method 0–3 * Temporarily reduces the carrier 0–2 frequency when the drive exceeds a certain level. This temporarily increases the overload capability (OL2 detection) allowing the drive to run through transient load peaks without tripping. * L08-35 0 Decel to Stop 1 Coast to Stop 2 Fast Stop 3 Use B3-03 Method 4 Alarm only Installation Sel 0: IP20/OpenChassis 1: Side-by-Side 2: IP20/Nema Type 1 3: Finless/Fin Ext L08-38 L08-40 Fc Reduct dur OL 0 Disabled 1 Active below 6Hz Enabled below 6 Hz Carrier Frequency is reduced when: < 6Hz when current > 100% of Drive Rated Current, returns to normal carrier frequency or when output current falls below 88% of drive rated current or frequency > 7Hz 2 Active @ any Spd Enabled for the entire speed range < 6Hz when current > 100% of Drive Rated Current > 7Hz when current > 112% of Drive Rated Current FC Reduct Time Sets the time that the drive continues 0.00–2.00 sec running with reduced carrier frequency after the carrier reduction condition is gone. Setting L08-40 to 0.00 disables the carrier frequency reduction time. A01-02 * Initial value is dependent on drive size, which is determined by O02-04 (kVA selection) ** Initial value is dependent on carrier. 2kHz = 0, else 1 IMPULSE®•G+ & VG+ Series 4 Instruction Manual – August 2013 5-119 Parameter Code Display Function L08-41 High Cur Alm Sel Triggers a high current alarm (HCA) 0, 1 when the output current rises exceeds 150% of the drive rated current. 0 DB Tr protection Internal Braking Transistor Protection (DB Tr protection) 1 0 Disable Disable braking transistor protection when not using the internal braking transistor. 1 Enable Enable when connecting a braking resistor or a braking resistor unit to the drive's built-in braking transistor. L08-55 0 Disabled 1 Enabled Range 0, 1 * Initial value is dependent on drive size, which is determined by O02-04 (kVA selection) ** Initial value is dependent on carrier. 2kHz = 0, else 1 Figure 5-24: Ambient Temperature and Installation Method Derating IMPULSE®•G+ & VG+ Series 4 Instruction Manual – August 2013 5-120 Initial Value Automatic Fault Reset When a fault occurs during operation, the IMPULSE®•G+ & VG+ Series 4 can be programmed for an auto reset operation to automatically reset the fault. Table 5-96: Automatic Reset Parameter Settings Parameter Code Display Function Range Initial Value L09-01 Reset Select Activates the fault auto-reset function. 0, 1 1 0 Disabled 1 Enabled L09-02 Reset Attempts Sets the number of reset attempts. 0–10 Reset attempt counter is returned to zero if no faults occur within a ten minute period. 3 L09-03 Reset Time Sets the reset starting time. 0.5–180.0 sec 0.5 L09-04* Reset Flt Sel 1 Reset Fault Select 1. 0–FFFF 0001 L09-05* Reset Flt Sel 2 Reset Fault Select 2. 0–FFFF E000 L09-06 Flt Contact Sel Fault contact operation during reset attempts 0, 1 0 0 Flt Outp Disabld 1 Flt Outp Enabled * To program constant L09-04 and L09-05, refer to the example on the following page and follow steps 1 through 4: 1. Assign 1 to each fault code to enable the auto reset. 2. Assign 0 to each fault code to disable the auto reset. 3. Convert all Digits (1 to 4) from binary to hex. 4. Program L09-04 and L09-05 by entering the hex number obtained from step 3. Figure 5-25: Automatic Fault Reset IMPULSE®•G+ & VG+ Series 4 Instruction Manual – August 2013 5-121 Example: Enable auto-reset for UV1 and CE faults. Table 5-97: Auto-Reset Programming Digit 4 HEX Digit 3 0 Digit 2 0 Digit 1 0 1 Binary 0 0 0 0 0 0 0 0 0 0 0 0 0 0 0 1 L09-04 E F O - - - L F P F U T 1 U T 2 O H 1 S C O V G F O C U V 3 U V 2 U V 1 HEX 0 0 8 0 Binary 0 0 0 0 0 0 0 0 1 0 0 0 0 0 0 0 L09-05 B E 1 B E 2 B E 3 B E 4 O L 1 O L 2 O T 1 O T 2 C E C A L L E F 8 E F 7 E F 6 E F 5 E F 4 E F 3 Table 5-98: Auto-Reset Programming Summary L09-04 Binary HEX L09-05 Binary Hex Digit 4 0000 0 Digit 4 0000 0 Digit 3 0000 0 Digit 3 0000 0 Digit 2 0000 0 Digit 2 1000 8 Digit 1 0001 1 Digit 1 0000 0 Table 5-99: Binary to Hexadecimal Conversion Binary Number Hexadecimal Number 0000 0 0001 1 0010 2 0011 3 0100 4 0101 5 0110 6 0111 7 1000 8 1001 9 1010 A 1011 B 1100 C 1101 D 1110 E 1111 F IMPULSE®•G+ & VG+ Series 4 Instruction Manual – August 2013 5-122 Fault Latch Selection The Fault Latch function allows for specific faults to become “latched” after the automatic fault reset attempts (L09-02) has maxed out. The Reset key on the keypad will be blocked from clearing the fault, and the fault can only be cleared by any of the methods explained below. In the case of a power loss, the fault will remain latched when power is restored. A latched fault can be cleared in three ways: 1. The recommended method is to program an MFDI (H01-xx) to 48 (Flt Latch Reset). The digital input must be toggled (ON and then OFF) in order for the fault to clear. Since this feature is intended for safety, a key switch is the recommended form of hardware. This will prevent the recurring fault from being continuously cleared and ignored unless the key is present and toggled. 2. A second method for clearing the fault is using the Monitor tool within IMPULSE®•Link. 3. The F1 or F2 keypad key can be programmed to 48 (Flt Latch Reset). When a fault is latched, simply pressing the F1 or F2 key twice will reset the fault. NOTE: An MFDI and F1/F2 keys are allowed to be programmed after a fault is latched. Table 5-100: Fault Latch Selection Parameter Settings Parameter Code Display Function Range Initial Value L09-07* Flt Latch Sel 1 Fault Latch Select 1 0000–FFFF 0000 L09-08* Flt Latch Sel 2 Fault Latch Select 2 0000–FFFF 0000 * To program parameters L09-07 and L09-08, refer to the example on the previous page. The same concept for the Automatic Fault Reset also applies here. Table 5-101: Fault Latch Programming Digit 4 HEX Digit 3 0 Digit 2 0 Digit 1 0 0 Binary 0 0 0 0 0 0 0 0 0 0 0 0 0 0 0 0 L09-07 - - - P G O 1 H P G O 2 H U L 3 D E V S N A P B E 8 B E 7 B E 6 B E 5 B E 4 B E 3 B E 2 B E 1 HEX 0 0 0 0 Binary 0 0 0 0 0 0 0 0 0 0 0 0 0 0 0 0 L09-08 - - - - E F 5 E F 6 E F 7 E F 8 O S O V U V 1 L C O L 1 O L 2 O T 1 O T 2 IMPULSE®•G+ & VG+ Series 4 Instruction Manual – August 2013 5-123 Operator Parameters • • • • O1 Monitor Selection O2 Keypad Key Selection O3 Clear History O4 Copy Function Monitor Selection The top level in the operation mode allows the viewing of four monitor variables. They are Fref, Fout, Iout, and User-Selected monitor. This user-selected monitor can be selected from the following table. See the Monitor Parameters table on page 5-133 for available monitors by control method. Table 5-102: Monitor Selection Parameter Settings Parameter Code Display Function Range Initial Value O01-01 User Monitor Sel Selects the content of the last monitor that is shown when scrolling through Drive Mode display. Enter the last three digits of the monitor parameter number to be displayed: U0X-xx. Default: 106 (Monitor: Output Voltage Reference U01-06) 104–813 106 104 Control Method 105 Motor Speed 106 Output Voltage 107 DC Bus Voltage 108 Output HP 109 Torque Reference 110 Input Term Sts 111 Output Term Sts 112 Int Ctl Sts 1 114 CPU 1 SW Number 115 Term A1 Level 116 Term A2 Level 117 Term A3 Level 120 SFS Output 121 AI Opt Ch1 Level 122 AI Opt Ch2 Level 123 AI Opt Ch3 Level 125 DI Opt Status 128 CPU 2 SW Number 134 OPE Error Code 139 Transmit Error 144 ASR Out w/o Fil 150 Hook Height 151 Motor Revolution 152 MaintenanceTimer 153 Index Count IMPULSE®•G+ & VG+ Series 4 Instruction Manual – August 2013 5-124 Parameter Code Display Function Range Initial Value 154 Term RP Inp Freq 160 PG CH1 Count 161 PG CH2 Count 321 RUN Cmd Counter 401 Drv Elapsed Time 403 Fan Elapsed Time 404 Fan Life Mon 405 Cap Life Mon 406 ChgCirc Life Mon 407 IGBT Life Mon 408 Heatsink Temp 410 kWh Lower 4 dig 411 kWh Upper 5 dig 412 CPU Occup Rate 413 Current PeakHold 414 Freq@ I PeakHold 416 Motor OL1 Level 417 Drive OL2 Level 418 Reference Source 419 MEMOBUS Freq Ref 420 Option Freq Ref 421 Run Cmd Source 422 MEMOBUS Ref Reg 423 Option Ref Reg 601 Mot SEC Current 602 Mot EXC Current 603 ASR Input 604 ASR Output 605 Voltage Ref (Vq) 606 Voltage Ref (Vd) 607 ACR(q) Output 608 ACR(d) Output 611 Iq Reference 612 Id Reference 618 PG1 CounterValue 619 PG2 CounterValue 622 Zero Servo Pulse 626 FF Cont Output IMPULSE®•G+ & VG+ Series 4 Instruction Manual – August 2013 5-125 Parameter Code Display Function O01-02 Power-On Monitor Selects the monitor to be 1–5 displayed on the digital operator immediately after the power supply is turned on. 1 Frequency Ref Frequency reference (U01-01) 2 FWD/REV Forward/Reverse 3 Output Freq Output frequency (U01-02) 4 Output Current Output current (U01-03) 5 User Monitor User-selected monitor (set by O01-01) O01-03 O01-04 Display Scaling Sets the units to display the frequency reference and output frequency. Range Initial Value 3 0–3 A01-02 0 0.01 Hz 1 0.01 % (100% = E01-04) 2 RPM Calculated using the number of motor poles setting in E02-04, E404, or E5-04 3 User Units User-selected units (set by O01-10 and O01-11) Display Units Setting units for E01-04, E01-06, and E01-09. 0, 1 A01-02 0–5 3 0 Hertz 1 RPM O01-05 LCD Contrast Adjusts brightness of the keypad display O01-10 UserDisp Scaling Determines the display value that 1–60000 is equal to the maximum output frequency. Default setting is dependent on parameter O01-03, Digital Operator Display Selection. When O01-03 = 0; O01-10=6000; O01-11 = 2 When O01-03 = 1; O01-10=10000; O01-11 = 2 When O01-03 = 2; O01-10=1800 (4 pole motor); O01-11 = 0 When O01-03 = 3; O01-10=10000; O01-11 = 2 This setting defines the displayed values when O01-03 is set to 3. 6000 O01-11 UserDisp Dec Sel Determines the position of the decimal position. 2 0 No Dec (XXXXX) When O01-03 = 0, O01-11 = 2 1 1 Dec (XXXX.X) When O01-03 = 1, O01-11 = 2 2 2 Dec (XXX.XX) When O01-03 = 2, O01-11 = 0 3 3 Dec (XX.XXX) When O01-03 = 3, O01-11 = 2 IMPULSE®•G+ & VG+ Series 4 Instruction Manual – August 2013 5-126 0–3 Keypad Key Selection Table 5-103: Keypad Key Selection Parameter Settings Parameter Code Display Function O02-01 LO/RE Key Pressing the LO/RE Key once 0–1 displays: “Call Magnetek at 1-866624-7378”. Control Method (A01-02) Pressing the LO/RE Key a second time: Motion (A01-03) Speed Reference (A01-04) Pressing the LO/RE Key a third time: F1 and F2 Keys (H01-09 and H01-10) O02-02 O02-03 O02-04 0 Mode/Service 1 Local/Remote Range Initial Value 0 Local/remote key is enabled depressing the LO/RE key switches operation command between the digital operator and the settings of B03-01 and B03-02. Oper STOP Key Selects the action when the digital 0–2 stop key is pressed. 0 Coast to Stop (Immediate stop) 1 Decel to Stop 2 Use B3-03 Method User Default Sel 0 No Change 1 Set Defaults Memorizes up to 150 modified parameters. User defaults can be restored by setting A1-05= “1110”. 2 Clear All Clear user defaults. Inverter Model # Enter the drive model. Setting required only if installing a new control board. *Default determined by drive capacity. Use normal duty current ratings and drive nameplate. 62 2_0004 2003-G+/VG+S4 63 2_0006 2005-G+/VG+S4 64 2_0008 2007-G+/VG+S4 65 2_0010 2008-G+/VG+S4 66 2_0012 2011-G+/VG+S4 67 2_0018 2014-G+/VG+S4 68 2_0021 2017-G+/VG+S4 6A 2_0030 2025-G+/VG+S4 6B 2_0040 2033-G+/VG+S4 6D 2_0056 2047-G+/VG+S4 6E 2_0069 2060-G+/VG+S4 6F 2_0081 2075-G+/VG+S4 70 2_0110 2085-G+/VG+S4 72 2_0138 2115-G+/VG+S4 0 0–2 0 0x00–0xFF * IMPULSE®•G+ & VG+ Series 4 Instruction Manual – August 2013 5-127 Parameter Code Display Function 73 2_0169 2145-G+/VG+S4 74 2_0211 2180-G+/VG+S4 75 2_0250 2215-G+/VG+S4 76 2_0312 2283-G+/VG+S4 77 2_0360 2346-G+/VG+S4 78 2_0415 2415-G+/VG+S4 92 4_0002 4001-G+/VG+S4 93 4_0004 4003-G+/VG+S4 94 4_0005 4004-G+/VG+S4 95 4_0007 4005-G+/VG+S4 96 4_0009 4007-G+/VG+S4 97 4_0011 4009-G+/VG+S4 99 4_0018 4014-G+/VG+S4 9A 4_0023 4018-G+/VG+S4 9C 4_0031 4024-G+/VG+S4 9D 4_0038 4031-G+/VG+S4 9E 4_0044 4039-G+/VG+S4 9F 4_0058 4045-G+/VG+S4 A1 4_0072 4060-G+/VG+S4 A2 4_0088 4075-G+/VG+S4 A3 4_0103 4091-G+/VG+S4 A4 4_0139 4112-G+/VG+S4 A5 4_0165 4150-G+/VG+S4 A6 4_0208 4180-G+/VG+S4 A7 4_0250 4216-G+/VG+S4 A8 4_0296 4260-G+/VG+S4 A9 4_0362 4304-G+/VG+S4 AA 4_0414 4370-G+/VG+S4 AC 4_0515 4450-G+/VG+S4 AE 4_0675 4605-G+/VG+S4 B0 4_0930 4810-G+/VG+S4 B2 4_1090 41090-G+/VG+S4 C3 5_0003 5001-G+/VG+S4 C4 5_0004 5003-G+/VG+S4 C5 5_0006 5004-G+/VG+S4 C7 5_0009 5006-G+/VG+S4 C9 5_0011 5009-G+/VG+S4 CA 5_0017 5012-G+/VG+S4 CC 5_0022 5017-G+/VG+S4 CD 5_0027 5022-G+/VG+S4 CE 5_0032 5027-G+/VG+S4 CF 5_0041 5032-G+/VG+S4 D1 5_0052 5041-G+/VG+S4 D2 5_0062 5052-G+/VG+S4 D3 5_0077 5062-G+/VG+S4 IMPULSE®•G+ & VG+ Series 4 Instruction Manual – August 2013 5-128 Range Initial Value Parameter Code O02-05 O02-06 O02-07 O02-15 O02-19 Display Function D4 5_0099 5077-G+/VG+S4 D5 5_0125 5099-G+/VG+S4 D6 5_0145 5130-G+/VG+S4 D7 5_0192 5172-G+/VG+S4 D9 5_0242 5200-G+/VG+S4 Operator M.O.P. Selects whether the ENTER key is 0, 1 used when the frequency reference is set by the digital operator. The digital operator can simulate a motor operated potentiometer (M.O.P.) by setting this parameter. 0 Disabled ENTER Key Required 1 Enabled ENTER Key Not Required NOTE: This feature cannot be used in conjunction with infinitely variable speed control. Oper Detection If the digital operator is disconnected from the inverter. This parameter selects whether the inverter detects this condition. The operator is only detected when the inverter is being commanded locally. 0 Disabled 1 Enabled FWD/REVSel@PwrUp 0 Forward 1 Reverse Legacy RDSI 0 Disabled 1 Enabled ParameterSet Sel 0 Disabled 1 Enabled Range Initial Value 0 0, 1 1 Determines the direction of the 0, 1 motor at power up when operation is assigned to the digital operator. This parameter requires that drive operation be assigned to the digital operator. 0 Legacy support for Hetronic RDSI. 0, 1 0 Turns off writing to EEPROM during a UV fault. 0 0, 1 IMPULSE®•G+ & VG+ Series 4 Instruction Manual – August 2013 5-129 Maintenance History Table 5-104: Clear History Parameter Settings Parameter Code Display Function Range Initial Value O03-01 Elapsed Time Set Sets the value for the cumulative operation time of the drive in units of 10 hours. Cumulative time can be viewed using monitor Cumulative Operation Time (U04-01). A setting of 30 = 300 hours 0–9999 x 10 hr 0 O03-02 Elapsed Time Run Selects how the cumulative timer will keep track of the total operation time. 0, 1 1 0 Power-On Time Logs power-on time 1 Running Time Logs operation time when the drive output is active (output operation time). O03-03 Fan ON Time Set Sets the value of the Fan 0–9999 x 10 hr Operation Time monitor (U04-03) in units of 10 hours. A setting of 30 = 300 hours 0 O03-05 BusCap Maint Set Sets the value of the Maintenance 0–150% Monitor for the capacitors. See U04-05 to check when the capacitors may need to be replaced. 0 O03-09 IGBT Maint Set Sets the value of the Maintenance 0–150% Monitor for the IGBTs. See U04-07 for IGBT replacement times. 0 O03-11 Fault Data Init Determines if Fault Trace (U02-xx) 0, 1 and Fault History (U03-xx) parameters will be cleared when the drive is initialized. 0 0 No Reset Not cleared 1 Reset Cleared (U02-xx, U03-xx, and U04-01 set to 0, and O03-01 = 0 after U2 and U3 are initialized) O03-12 O03-14 kWh Monitor Init Determines if the monitor data (U04-10 and U04-11) are reset when the drive is initialized. 0 No Reset U04-10 and U04-11 monitor data is not reset when the drive is initialized (A01-03). 1 Reset U04-10 and U04-11 monitor data is reset when the drive is initialized (A01-03). Count Hist Clear Determines which counter will be cleared. After counters are cleared, initial value (O03-14) is set to 0. 0 No Reset Number of Run commands counter is not reset when the drive is initialized (A01-03). 1 Reset Runs Number of Run commands counter is reset (U03-21 and U0322). 2 OL/LC Count Clr Clears OL/LC Counters (U03-23). 3 Both Count Clr Clears Runs and OL/LC Counters. IMPULSE®•G+ & VG+ Series 4 Instruction Manual – August 2013 5-130 0, 1 0 0–3 0 Copy Function Table 5-105: Copy Function Parameter Settings Parameter Code Display Function Range Initial Value O04-01 Copy Function Sel Copy parameters to/from keypad 0–3 0 0, 1 1 O04-02 O04-07 0 COPY SELECT 1 INV OP READ Drive Keypad 2 OP INV WRITE Keypad Drive 3 OP ↔ INV VERIFY Keypad ↔ Drive Read Allowable 0 Disabled 1 Enabled ChrgCircMaintSet Enables/disables copy function Sets the value of the Maintenance 0–150% Monitor for the soft charge bypass relay. See U04-06 to check when the bypass relay may need to be replaced. 0 The digital operator has parameter COPY capabilities via built-in non-volatile memory. The digital operator can READ all of the parameters in the Drive and store them for later, and then WRITE back to the Drive or into a Drive with the same product code and software number. In order to read the parameter values and store them into the digital operator, select O04-02 = 1 (Enabled). If you attempt to READ the data, which overwrites any previously stored data, without first setting O04-02 = “1: Enabled,” you will get the following error: RDER READ DATA ERROR After setting O04-02 = 1 (Enabled), it is possible to store parameter values in the digital operator by setting O04-01 = 1 (INV OP READ). A successful READ of the parameter values will display: END READ COMPLETE IMPULSE®•G+ & VG+ Series 4 Instruction Manual – August 2013 5-131 An error may occur while saving the parameter values to the digital operator’s memory. If an error is displayed, press any key to cancel the error display and return to parameter O04-01. Error displays and their meanings are covered in Chapter 6: Troubleshooting of Copy function Related Faults. To COPY the parameter values into a Drive, set O04-01 = 2 (OP INV WRITE). During the writing of the parameter values into the Drive, the digital operator will display: COPY OP INV COPYING A successful COPY of the parameter values will display: END COPY COMPLETE An error may occur while writing the parameter values to the Drive. If an error is displayed, press any key to cancel the error display and return to parameter O04-01. Error displays and their meanings are covered in Chapter 6: Troubleshooting of Copy Function Related Faults. It is possible to compare the parameter values stored in the digital operator with the parameter values currently in the Drive by using the VERIFY function. This VERIFY function should not be confused with the “-VERIFY-” that is displayed on the digital operator when viewing the “Modified Constants” menu. To VERIFY the parameter values in the Drive as compared with those stored in the digital operator, set O04-01 = 3 (OP INV VERIFY). During the comparing of the parameter values into the drive the digital operator will display: VRFY DATA VERIFYING A successful VERIFY of the parameter values will display: END VERIFY COMPLETE IMPULSE®•G+ & VG+ Series 4 Instruction Manual – August 2013 5-132 If all the parameters stored in the digital operator do not match those programmed in the Drive, the digital operator displays the following: VYE VERIFY ERROR The digital operator will not display which parameters did not match, only that the verification found discrepancies in some parameter values. NOTE: In order to properly use the COPY or VERIFY functions, the following Drive information must be identical between the Drive that the parameters were read from and the Drive that the parameters are written to: Model Number (e.g. 5001-G+S4) Software Number (e.g. 14700 also known as FLASH ID) Control Method (e.g. A01-02) Motion (e.g. A01-03) NOTE: Reference the Copy Function Related Faults section in Chapter 6 for additional copy function troubleshooting. IMPULSE®•G+ & VG+ Series 4 Instruction Manual – August 2013 5-133 Monitor Parameters • • • • • U1 Monitor U2 Fault Trace U3 Fault History U4 Maintenance U6 Control Monitor Table 5-106: Monitor Parameters Parameter Code Display Function Units U01-01 Frequency Ref Frequency Reference Hz U01-02 Output Freq Inverter Output Frequency Hz U01-03 Output Current Inverter Output Current A U01-04 Control Method Displays the value of A01-02 -- U01-05 Motor Speed Motor Speed Hz U01-06 Output Voltage Inverter Output Voltage (Reference) VAC U01-07 DC Bus Voltage DC Bus Voltage (Measured) VDC U01-08 Output HP Inverter Output Power (Calculated) HP U01-09 Torque Reference Torque Reference (Internal) % U01-10 Input Term Sts Input Terminal Status -- U01-11 Output Term Sts Output Terminal Status -- IMPULSE®•G+ & VG+ Series 4 Instruction Manual – August 2013 5-134 Parameter Code Display Function Units U01-12 Int Ctl Sts 1 Operation Status -- U01-14 CPU 1 SW Number Flash ROM software ID number -- U01-15 Term A1 Level External Terminal Input level % U01-16 Term A2 Level External Terminal Input level % U01-17 Term A3 Level External Terminal Input level % U01-20 SFS Output Primary freq. after the SFS Hz U01-21 AI Opt Ch1 Level Displays the input voltage to terminal V1 on analog input card AI-A3. % U01-22 AI Opt Ch2 Level Displays the input voltage to terminal V2 on analog input card AI-A3. % U01-23 AI Opt Ch3 Level Displays the input voltage to terminal V3 on analog input card AI-A3. % U01-25 Opt In Low Displays the reference value input from the DI option card (DI-A3, S4I, or S4IO) lower 8 bits. -- U01-26 Opt In High Displays the reference value input from the DI option card (DI-A3, S4I, or S4IO) upper 8 bits. -- U01-28 CPU 2 SW Number ROM ID -- U01-29 Load Weight Monitors load weight when C10-01 is enabled C10-06 U01-30 SS Delta Speed Snap Shaft Delta Speed between Ch1 and Ch2 after gear ratio Hz U01-34 OPE Error Code Displays the parameter number that caused the OPExx or Err (EEPROM write error) error. -- U01-39 Transmit Error Displays the contents of a MEMOBUS/Modbus error -- U01-44 ASR Out w/o Filter Output monitor from Speed Control loop (Primary Delay filter % input value). 100% is displayed at motor rated secondary current. U01-50 Hook Height Percentage of Hook height is displayed. % U01-51 Motor Revolution Number of revolutions after Home with respect to Home Revs U01-52 MaintenanceTimer Hours since last timer reset Hrs IMPULSE®•G+ & VG+ Series 4 Instruction Manual – August 2013 5-135 Parameter Code Display Function Units U01-53 Index Count Number of motor revolutions the shaft has moved since the beginning of a new Index command in quadrature Revs U01-54 Term RP Inp Freq Displays the frequency to pulse train input terminal RP. Hz U01-60 PG CH1 Count Displays the raw PG Channel 1 pulse count 4 pulses = 1 ppr of F01-01 Pulses U01-61 PG CH2 Count Displays the raw PG Channel 2 pulse count 4 pulses = 1 ppr of F01-01 Pulses U01-63 PG CH1 Freq Displays the current input frequency on PG Channel 1 Hz U01-64 PG CH2 Freq Displays the current input frequency on PG Channel 2 Hz U01-65 PG Output Freq Displays the current output frequency on the PG Output channel Hz U01-66 BE6 Pulse Count Displays the amount of shaft movement during the BE6 detection time 4 pulses = 1 ppr of F01-01 Pulses U01-68 LC Zone Displays the LC Zone the driver is currently running in. If an -LC fault occurs, the value displayed will be which LC zone the LC fault occurred in. U01-69 LC Margin Displays how close the current/torque levels are to the -target value for each of the LC zones. Values less than zero will cause an LC detection or an LC fault to occur. If the LC fault occurs, the value displayed is the amount the level was below the LC zone setting. U01-84 NLB State Displays the current NLB State Machine sequence. Analog Output Level: 0.5V/State U01-85 NLB Rel Trq Torque level for next BE2 check. Is set to 100% after BE2 is % passed, and set to torque output level at end of Load Float. No signal output available U01-86 Brk Test Trq Brake breakaway torque; FLV only; MFDI needs to be programmed with “Brake Test” -- Flb Table 5-107: Fault Trace Parameters* Parameter Code Display Function Units U02-01 Current Fault Display the most current fault detected before being reset. -- U02-02 Last Fault Displays most recent fault after being reset. -- U02-03 Frequency Ref Freq ref when fault was detected. Hz U02-04 Output Freq Output freq when fault was detected. Hz U02-05 Output Current Output current when the fault was detected. A U02-06 Motor Speed Motor Speed when the fault was detected. Hz U02-07 Output Voltage Output voltage when fault was detected. VAC U02-08 DC Bus Voltage DC Bus voltage when fault was detected. VDC U02-09 Output HP Displays the output power at the fault (U02-02). HP U02-10 Torque Reference Torque reference when the fault was detected. % U02-11 Input Term Sts Input terminal status when fault was detected. -- U02-12 Output Term Sts Output terminal status when the fault was detected. -- U02-13 Inverter Status Inverter status before the fault was detected. -- U02-14 Elapsed Time Elapsed time when the fault was detected. Hrs * Available only for 4810 and 41090 models. IMPULSE®•G+ & VG+ Series 4 Instruction Manual – August 2013 5-136 Parameter Code Display Function Units U02-15 SFS Output Displays the speed reference for the soft starter at the previous fault (U02-02). Hz U02-16 Motor Iq Current Displays the q-axis current for the motor at the previous fault % (U02-02). U02-17 Motor Id Current Displays the d-axis current for the motor at the previous fault % (U02-02). U02-20 Actual Fin Temp Displays the temperature of the heatsink when the most recent fault occurred. U02-27* Motor Temp (NTC) Displays the temperature of the motor when the most recent °C fault occurred. U02-28* Fault Axis Display the module where the previous fault occurred at a decimal number. °C -- * Available only for 4810 and 41090 models. Table 5-108: Fault History Parameters Parameter Code Display Function Units U03-01 Last Fault Displays the first most recent fault. -- U03-02 Fault Message 2 Displays the second most recent fault. -- U03-03 Fault Message 3 Displays the third most recent faults. -- U03-04 Fault Message 4 Displays the fourth most recent fault. -- U03-05 Fault Message 5 Displays the fifth most recent fault. -- U03-06 Fault Message 6 Displays the sixth most recent fault. -- U03-07 Fault Message 7 Displays the seventh most recent fault. -- U03-08 Fault Message 8 Displays the eighth most recent fault. -- U03-09 Fault Message 9 Displays the ninth most recent fault. -- U03-10 Fault Message 10 Displays the tenth most recent fault. -- U03-11 Elapsed Time 1 Elapsed time of the first most recent fault. Hrs U03-12 Elapsed Time 2 Elapsed time of the second most recent fault. Hrs U03-13 Elapsed Time 3 Elapsed time of the third most recent fault. Hrs U03-14 Elapsed Time 4 Elapsed time of the fourth most recent fault. Hrs U03-15 Elapsed Time 5 Elapsed time of the fifth most recent fault. Hrs U03-16 Elapsed Time 6 Elapsed time of the sixth most recent fault. Hrs U03-17 Elapsed Time 7 Elapsed time of the seventh most recent fault. Hrs U03-18 Elapsed Time 8 Elapsed time of the eighth most recent fault. Hrs U03-19 Elapsed Time 9 Elapsed time of the ninth most recent fault. Hrs U03-20 Elapsed Time 10 Elapsed time of the tenth most recent fault. Hrs U03-21 RUN Cmd Counter Counts FWD or REV run commands Count U03-22 U3-21 Rollovers Increments when U03-21 passes 9999. U03-21 is set to 0. Counter cleared by O03-14. Count U03-23 OL/LC Count Counts OL1, OL2, LC faults. Counter cleared by O03-14. Count IMPULSE®•G+ & VG+ Series 4 Instruction Manual – August 2013 5-137 Table 5-109: Maintenance Parameters Parameter Code Display Function U4-01 Drv Elapsed Time Displays the cumulative operation time of the drive. The Hrs value for the cumulative operation time counter can be reset in parameter O03-01. Use parameter O03-02 to determine if the operation time should start as soon as the power is switched on or only while the Run command is present. The maximum number displayed is 99999, after which the value is reset to 0. U4-03 Fan Elapsed Time Displays the cumulative operation time of the cooling fan. Hrs The default value for the fan operation time is reset in parameter O03-03. After the count reaches 99999, the value will reset to 0 and start counting again. U4-04 Fan Life Mon Displays main cooling fan usage time in as a percentage of its expected performance life. Parameter O03-03 can be used to reset this monitor. % U4-05 Cap Life Mon Displays main circuit capacitor usage time in as a percentage of their expected performance life. Parameter O03-05 can be used to reset this monitor. % U4-06 ChgCirc Life Mon Displays the soft charge bypass relay maintenance time as a percentage of its estimated performance life. Parameter O04-07 can be used to reset this monitor. % U4-07 IGBT Life Mon Displays IGBT usage time as a percentage of the expected performance life. Parameter O03-09 can be used to reset this monitor. % U04-08 Heatsink Temp Displays the heatsink temperature. °C U04-09 LED Oper Check Lights all segments of the LED to verify that the display is working properly. -- U04-10 kWh Lower 4 dig Monitors the drive output power. The value is shown as a 9 digit number displayed across two monitor parameters, U04-10 and U04-11. kWH U04-11 kWh Upper 5 dig -- MWH U04-12 CPU Occup Rate Displays the amount of space being used in the CPU. % U04-13 Current PeakHold Displays the highest current value that occurred during run. A U04-14 Freq@ I PeakHold Displays the output frequency when the current value shown Hz in U04-13 occurred. U04-16 Motor OL1 Level Shows the value of the motor overload detection accumulator. 100% is equal to the OL1 detection level. Accumulator is reset when drive power is cycled. % U04-17 Drive OL2 Level 100% = OL2 detection level % U04-18 Reference Source Displays the source for the frequency reference as XY-nn. -- U04-19 MEMOBUS Freq Ref Displays the frequency reference provided by MEMOBUS/ Modbus (decimal). % U04-20 Option Freq Ref Displays the frequency reference input by an option card (decimal). % U04-21 Run Cmd Source Displays the source for the Run command as XY-nn. -- U04-22 MEMOBUS Ref Reg Displays the drive control data set by MEMOBUS/Modbus communications register no. 0001H as a four-digit hexadecimal number. -- U04-23 Option Ref Reg Displays drive control data set by an option card as a fourdigit hexadecimal number. -- U04-32* Motor Temp (NTC) Displays the motor temperature (NTC). U04-32 will display “20 °C” when a multi-function analog input is not set for motor thermistor input (H01-xx = 17H). -- * Available only for 4810 and 41090 models. IMPULSE®•G+ & VG+ Series 4 Instruction Manual – August 2013 5-138 Units Parameter Code Display Function Units U04-37* OH Alarm Axis Displays the module where the oH alarm occurred as a binary number. BIN U04-38* FAN Alarm Axis Displays the module where the FAn alarm occurred as a binary number. BIN U04-39* VOF Alarm Axis Displays the module where the voF alarm occurred as a binary number. BIN * Available only for 4810 and 41090 models. Table 5-110: Control Monitor Parameters Parameter Code Display Function Units U06-01 Mot SEC Current Displays the value of the motor secondary current (Iq). Motor rated secondary current is 100%. % U06-02 Mot EXC Current Displays the value calculated for the motor excitation current % (Id). Motor rated secondary current is 100%. U06-03 ASR Input Displays the input value when using ASR control. % U06-04 ASR Output Displays the output value when using ASR control. % U06-05 Voltage Ref (Vq) Output voltage reference (Vq) for the q-axis. VAC VAC U06-06 Voltage Ref (Vd) Output voltage reference (Vd) for the d-axis. U06-07 ACR(q) Output Displays the output value for current control relative to motor % secondary current (q-axis). U06-08 ACR(d) Output Displays the output value for current control relative to motor % secondary current (d-axis). U06-18 PG1 CounterValue Monitors the number of pulses for speed detection. Analog Output Level: 10V/65535 -- U06-19 PG2 CounterValue Monitors the number of pulses for speed detection. Analog Output Level: 10V/65535 -- U06-22 Zero Servo Pulse Displays how far the rotor has moved from its last position in -PG pulses (multiplied by 4). U06-26 FF Cont Output Output monitor for Feed Forward control. % IMPULSE®•G+ & VG+ Series 4 Instruction Manual – August 2013 5-139 This page intentionally left blank. IMPULSE®•G+ & VG+ Series 4 Instruction Manual – August 2013 5-140 Chapter 6 Troubleshooting This page intentionally left blank. IMPULSE®•G+ & VG+ Series 4 Instruction Manual – August 2013 6-2 Troubleshooting the Drive In this troubleshooting section, “Check,” means investigating whether an item is functioning and in an acceptable physical condition, and then taking corrective action (adjusting, fixing, replacing, etc.) as necessary. In the “Corrective Action” column, you may not have to perform all of the steps to correct the problem. Maintenance and Inspection This section describes basic maintenance and inspection procedures for the IMPULSE®•G+ & VG+ Series 4. Table 6-1: Maintenance and Inspection Component Check Corrective Action External terminals, Loose screws or connectors connectors, mounting screws, etc. Securely tighten. Heatsink Build-up of dust and dirt Blow with dry, compressed air (57-86 psi). Printed Circuit Board (PCB) Accumulation of conductive dust or oil Blow with dry, compressed air (57-86 psi). If dust and oil cannot be removed, replace the board. Cooling Fan Abnormal noise and vibration Clean or replace the fan. Power Components Accumulation of dust or dirt Blow with dry, compressed air (57-86 psi). Alarm and Fault classes are described as follows: • Major Fault: Brake is set, operation indicator lights flash, fault is displayed on keypad and fault contact output (terminals MA, MB, & MC) are activated. The reset key must be pressed, a multifunction input set for fault reset or power must be cycled in order to continue operation. • Fault (minor): Brake is set, RUN Led flashes until run command is removed, fault is displayed on keypad, fault contact output (terminals MA, MB, & MC) are not activated. The reset key does not need to be pressed. The drive will attempt to run again at the next run command. • Alarm (Warning): Operation continues, fault is displayed on the keypad, fault contact output (terminals MA, MB and MC) are not activated. Table 6-2: Motor Faults and Corrective Actions Symptom Corrective Action Analog frequency reference is not stable. (drifting) 1. Stabilize the analog source. 2. Increase B02-02. 3. Increase B05-01 or B05-02. No motor rotation. 1. Verify that power is on (Charge LED). 2. Verify that the keypad display is not showing a fault. 3. Verify that the run command is input to the drive (U01-10). 4. Check if motor is stalled due to excessive load. Motor rotation is in the wrong direction. 1. Verify FWD/REV or UP/DN is correct at the interface card. 2. Match wiring to the phase order of the motor leads T1, T2, T3. 3. Change motor rotation (B03-04). 4. Set F01-02 to 0 or 1 (VG+ only). IMPULSE®•G+ & VG+ Series 4 Instruction Manual – August 2013 6-3 Symptom Corrective Action Motor rotates, but at minimum speed only. 1. Check wiring of speed inputs. 2. Verify speed reference setting (A01-04). 3. Verify reference and run source settings are correct (B0301, -02). 4. Verify reference priority setting (B01-18). Motor RPM too high or too low. 1. Compare motor nameplate specifications with E1 parameter. 2. Check maximum frequency setting (E01-04). 3. Check minimum frequency setting (E01-09). Alarm Code Fault/Alarm Description AS1 (flashing) Anti-Shock Indicator. When the 1. No action is required. Anti-Shock function is triggered, this alarm will be displayed on the keypad for the duration of time set via C0722. X BB (flashing) External Base Block Indicator. The 1. Check constants H01-01 through flashing base block signal is the H01-08 for proper programming. result of a multi-function input in the 2. Check terminal status (U01-10). terminal strip. The base block indicates that the drive’s IGBTs have been disabled. The motor will begin coasting when the base block input is received. If a RUN command is still present when the BB signal is removed, the output voltage will be restored to the previous operating level and operation will continue at the previously commanded frequency. X BE0 (flashing) Brake answer back signal is lost 1. Check brake answer back circuit. X during run. While running, the multi2. Check terminal status. (U01-10) function input brake answer back (H01-0x = 58) is lost. X BE1 Torque Proving Fault. The BE1 1. Please reference troubleshooting X fault indicates that the drive has encoder related faults on page 6released the brake, but not started to 14. accelerate the motor when it detects excessive encoder feedback. A BE1 fault will occur if the pulses received during the BE1 detection time (C0804) are greater then the expected number of pulses (C08-05). BE2 Torque Proving Fault. Before the 1. Ensure the motor has been Auto- X brake is released, the drives current/ tuned successfully. torque did not reach Initial Brake Release Torque level (C08-16) within 2. Confirm that the holding brake is closed. the IFB OK timer (C08-02). 3. If a power limit switch is used, ensure that the switch is closed. Anti-Shock Base Block Brake Ans Lost Rollback detect No Current Corrective Action Fault Table 6-3: Drive Faults and Alarms 4. Decrease the value of C08-02 to no less than 0.5 seconds. 5. Decrease the value of C04-02 to no less than 5. 6. Decrease the value of C08-16 to no less than 50. IMPULSE®•G+ & VG+ Series 4 Instruction Manual – August 2013 6-4 BE3 Torque Proving Fault. The BE3 1. Please reference encoder related fault indicates that the drive has faults on page 6-14. released the brake and commanded the drive to run, but it has not detected the expected encoder feedback. A BE3 fault will occur if the pulses received during the BE3 detection time (C08-06) are less than the expected number of pulses (C0807). BE4 (flashing) Brake Answer-Back, Brake not Released. At Start, Brake Answerback is not input within predetermined time (C08-04) after electric brake release command is output–Electric brake not released. Brake Release NG Brake Answer 1 Corrective Action Alarm Fault/Alarm Description Fault Code X X 1. Check brake answer back circuit. 2. Increase the value of C08-04. 3. Check terminal status (U01-10). BE5 (flashing) Brake Answer-Back At Stop. At 1. Check brake answer back Stop, Brake Answer-back signal is circuitries not removed within predetermined 2. Increase the value of C08-11 time (C08-11) after electric brake time. release command is removed– Electric brake not closed. A BE5 will only be a fault if set in the Fault Latch Table (L09-07) and revived after a power cycle. X X BE6 (flashing) Brake Proving Alarm. The BE6 1. Please reference troubleshooting X alarm indicates that the drive has encoder related faults on page 6commanded the brake to set but it 14. has detected more than the expected encoder feedback. A BE6 alarm will occur if the number of pulses received during the BE6 detection time (C08-12) is greater than the expected number of pulses (C08-13). A BE6 will only be a fault if set in the Fault Latch Table (L09-07) and revived after a power cycle. X BE7 Brake Answer-Back Major Fault. 1. Check if brake is closed. At Power Up, Brake Answer-Back is 2. Check brake answer back on - Electric brake not closed. circuitry. X BE8 Brake Slipping Fault. The BE8 1. Check the brake. alarm indicates that the drive has 2. Check C08-23 for proper detected more than the expected programming. encoder feedback. A BE8 alarm will occur if the encoder frequency exceeds C08-23; Load Float will be enabled, and the brake will remain closed. A BE8 will only be a fault if set in the Fault Latch Table (L09-07) and revived after a power cycle. X X boL Braking Transistor Overload 1. The wrong braking resistor is Fault. The braking transistor reached installed. its overload level. 2. Select the correct braking resistor. X X X X Brake Answer 2 Brake Stop Brake Welded Brake Slipping 3. Install an external braking module. BUS Option Com Err Option Card Communication Error. Communication to the option card was lost. 1. Check all connections. IMPULSE®•G+ & VG+ Series 4 Instruction Manual – August 2013 6-5 Alarm Fault/Alarm Description CALL (flashing) Serial Communication 1. Check serial device connections. Transmission Error. Control data is 2. Ensure drive is properly not received correctly after power programmed for serial supply is turned ON for 2 sec. communication. X Cant Run User is trying to give a run command 1. Turn on Drive Enable Multiwhile a FWD or REV is present at Function Input. Power Up. 2. Check H01-01 to H01-08 programming. X SI-F/G Com Call Drive Not Ready Corrective Action Fault Code 3. Change B03-10 to allow run at power up. Can’t SW Can’t Switch - Motor Running. The 1. Allow the motor to come to a stop user is trying to enable or disable the before enabling or disabling the Digital Changeover MFDI (H01-XX = Digital Changeover MFDI. 1D), while the motor is still running. X CE Communication Error. Serial 1. Check serial connections (6 CN). X communications disruption. Fault or 2. Check H05-01 through H05-05 alarm defined by H05-04. for proper programming. X Motor Running Memobus Com Err CPF00 CPF01 Control Circuit Error. There is a self-diagnostic error in the control circuit, or the connector on the operator is damaged. 1. Cycle power to the drive. X 2. If the problem continues, replace the control board or the entire drive. Contact Magnetek for instructions on replacing the control board. 3. Replace the operator if it is damaged. CPF02 A/D Conversion Error. An A/D 1. Cycle power to the drive. conversion error or control circuit error occurred. The control circuit is 2. If the problem continues, replace the control board or the entire damaged. drive. Contact Magnetek for instructions on replacing the control board. X CPF03 Control Board Connection Error. Connection Error: Connection error between the control 1. Turn off the power and check the board and the drive. Can be caused connection between the control by a connection error, or the drive board and the drive. failing to operate properly due to 2. If the problem continues, replace noise interference. the control board or the entire drive. Contact Magnetek for instructions on replacing the control board. Noise Interference: X 1. Check the various options available to minimize the effects of noise. 2. Counteract noise in the control circuit, main circuit, and ground wiring. 3. Use only recommended cables or other shielded line. Ground the shield on the controller side or the drive input power side. 4. Ensure that other equipment such as switches or relays do not cause noise. Use surge suppressors if required. 5. Separate all communication wiring from drive power lines. Install an EMC noise filter to the drive power supply input. IMPULSE®•G+ & VG+ Series 4 Instruction Manual – August 2013 6-6 CPF06 EEPROM Memory Data Error. An Error in the EEPROM Circuit Error in the data saved to EEPROM. 1. Turn off the power and check the Can be caused by an error in the connection between the control EEPROM control circuit, or the power board and the drive. supply being switched off while parameters are being saved to the 2. If the problem continues, replace drive. the control board or the entire drive. Contact Magnetek for instructions on replacing the control board. Parameter Save Interruption EEPROM Error Corrective Action Alarm Fault/Alarm Description Fault Code X 1. Reinitialize the drive (A01-03 = 2220, 3330). CPF07 CPF08 Terminal Board Connection Error. 1. Turn off the power and reconnect the terminal board. There is a fault connection between the terminal board and the control 1. If the problem continues, replace board. the control board or the entire drive. Contact Magnetek for instructions on replacing the control board. X CPF20 or CPF21 Control Circuit Error. Hardware is damaged. X CPF22 Hybrid IC Failure. Hybrid IC failure 1. Cycle power to the drive. on the power board. 2. If the problem continues, replace the control board or the entire drive. Contact Magnetek for instructions on replacing the control board. X CPF23 Control Board Connection Error. 1. Turn off the power and check the Connection error between the control connection between the control board and the drive. The hardware is board and the drive. damaged. 2. If the problem continues, replace the control board or the entire drive. Contact Magnetek for instructions on replacing the control board. X CPF24 Drive Unit Signal Fault. The drive 1. If the problem continues, replace capacity cannot be detected correctly the control board or the entire (drive capacity is checked when the drive. Contact Magnetek for drive is powered up). The hardware instructions on replacing the is damaged. control board. X CPF25 Terminal Board Not Connected. Terminal board is not connected correctly. 1. Reconnect the terminal board to the connector on the drive, then cycle power to the drive. X CPF26– CPF34 Control Circuit Error. 1. Cycle power. X Hybrid IC Failure 1. Cycle power to the drive. 2. If the problem continues, replace the control board or the entire drive. Contact Magnetek for instructions on replacing the control board. 2. Ensure that the terminal board is seated properly. 3. Set A01-05 = 5550. CPF40– CPF45 4. Replace control board and/or terminal board. IMPULSE®•G+ & VG+ Series 4 Instruction Manual – August 2013 6-7 Alarm Fault/Alarm Description Dev Speed Deviation Fault. Occurs 1. Please reference troubleshooting X when the deviation of the speed encoder related faults on page 6reference and speed feedback 14. exceeds the regulation level, F01-27 for the time F01-28. Alarm or fault defined by F01-26. X EF (flashing) Both FORWARD/UP and REVERSE/ 1. Check control input wiring. DOWN commands are input at same 2. Check the sequence of time for 500 msec or longer. operation. X EF0 External fault input from communication option card. Alarm or fault defined by F06-03. EF1 Speed Deviation External Fault Corrective Action Fault Code X X External fault occurs on Terminal S1. 1. Check constant H01-01 for proper programming. Alarm or fault defined by the External Fault Selection table (table 5-75 on 2. Check the conditions for input page 5-99). terminal S1. X X EF2 External fault occurs on Terminal S2. 1. Check constant H01-02 for proper programming. Alarm or fault defined by the External Fault Selection table (table 5-75 on 2. Check the conditions for input page 5-99). terminal S2. X X EF3 External fault occurs on Terminal S3. 1. Check constant H01-03 for proper programming. Alarm or fault defined by the External Fault Selection table (table 5-75 on 2. Check the condition of the input page 5-99). terminal S3. X X EF4 External fault occurs on Terminal S4. 1. Check constant H01-04 for proper programming. Alarm or fault defined by the External Fault Selection table (table 5-75 on 2. Check the condition of the input page 5-99). terminal S4. X X EF5 External fault occurs on Terminal S5. 1. Check constant H01-05 for proper programming. Alarm or fault defined by the External Fault Selection table (table 5-75 on 2. Check the condition of the input page 5-99). terminal S5. X X EF6 External fault occurs on Terminal S6. 1. Check constant H01-06 for proper programming. Alarm or fault defined by the External Fault Selection table (table 5-75 on 2. Check the condition of the input page 5-99). terminal S6. X X EF7 External fault occurs on Terminal S7. 1. Check constant H01-07 for proper programming. Alarm or fault defined by the External Fault Selection table (table 5-75 on 2. Check the condition of the input page 5-99). terminal S7. X X EF8 External fault occurs on Terminal S8. 1. Check constant H01-08 for proper programming. Alarm or fault defined by the External Fault Selection table (table 5-75 on 2. Check the condition of the input page 5-99). terminal S8. X X ERR EEPROM Read/Write Fault. 1. Cycle Power. EEPROM internal data did not match 2. User initialize (A01-05=1110). when initializing the parameter. 3. Replace Control board. FAn Internal Fan Fault. Internal cooling fan has malfunctioned. Alarm or fault defined by L08-32. Optional External Fault External Fault 1 External Fault 2 External Fault 3 External Fault 4 External Fault 5 External Fault 6 External Fault 7 External Fault 8 EEPROM R/W Err 1. Check communication option card connection and signals. 1. Cycle power to the drive. 2. Check for fan operation. 3. Verify the fan elapsed time with U04-03 and verify the fan maintenance timer with U04-04. 4. Replace fan. IMPULSE®•G+ & VG+ Series 4 Instruction Manual – August 2013 6-8 X X X GF During operation, the inverter sums 1. Disconnect motor from drive and the currents of all three motor check it for shorts using a phases. Ideally, the sum should megger. always equal zero. If the sum is 2. greater than 50% of the inverter rated Ensure that R/C Surge Suppressors are used across all output current, a GF occurs. brake contactor coils to prevent disturbance by electrical transients. Ground Fault Corrective Action Alarm Fault/Alarm Description Fault Code X HBB or HBBf (flashing) X External Base Block Indicator. The 1. Check signal status at the input flashing Hardware Base Block signal terminals H1 and H2. is a result of either of the Safe 2. Disable inputs being open. The motor Check the Sink/Source Selection for the digital inputs (see table 3Hardware Base Block will begin coasting when the Hardware Base Block signal is open. 7). 3. If the Safe Disable function is not utilized, verify that H1 and H2 jumpers are installed correctly (see table 3-7). 4. Replace either the control board or the entire drive. KLX Klixon LC Load Check Err LC Done Klixon Circuit Alarm. Input by MFDI 1. Check Motor for Overtemp. H01-0x = 56 or 57. 2. Check Klixon Circuit. Load Check Fault. Load is greater than specified amount. Alarm or fault defined by C05-02. 1. Reduce Load. X X 2. Check Load Check sequence set-up. (C05-xx). Load Check Done Load Check Done Alarm. This 1. None. alarm is displayed after the LC set up process is done. The alarm will clear when the Down command is pressed and complete the LC set up process. LF An open phase occurred at the inverter output. Output Phase Loss X 1. Check for broken wires in output cable. X X 2. Check for open winding in the motor. 3. Check for loose terminals LF2 Output Current Imbalance Output Current Imbalance. One or 1. Check for faulty wiring or poor/ more of the phases in the output loose connections on the output current are lost. side of the drive. X 2. Correct the wiring. 3. Measure the line-to-line resistance for each motor phase. Ensure all values match. 4. Replace the motor. LL1 (flashing) Lower Limit 1 Err LL2 (flashing) Lower Limit 2 Err Lower Limit 1—SLOW DOWN Indicator. Lower Limit 1—SLOW DOWN is input (switch status is changed). 1. May not require corrective action. X 2. Check the Limit Switches position. 3. Check the Limit Switches condition. Lower Limit 2—STOP Indicator. 1. May not require corrective action. Lower Limit 2—STOP is input (switch 2. Check the Limit Switches status is changed). position. X 3. Check the Limit Switches condition. MNT Maintenance Reqd Maintenance Required Alert. 1. Reset timer by H01-0x = 5A or Running time has exceeded C12-05 depress Mode/Service key three times and enter within 2 seconds. X IMPULSE®•G+ & VG+ Series 4 Instruction Manual – August 2013 6-9 Corrective Action OC Over Current Detected. Output current exceeds 200% of inverter rated output current. 1. Check for a phase-to-phase short in the motor or wiring using a megger. Over Current Alarm Fault/Alarm Description Fault Code X 2. Extend the acceleration/ deceleration time. 3. Check torque limit setting. 4. Please reference troubleshooting encoder related faults on page 614. OH (flashing) Heatsnk Over temp OH1 Heatsink MaxTemp OH2 (flashing) Overheat 2 OH3 Motor Overheat 1 Overheat Pre-Alarm. Heatsink is 1. The inverter cooling fan has overheating. The temperature of the stopped. inverters heatsink exceeded the 2. Reduce the ambient setting in L08-02. temperature. X Overheat Fault. There are two situations that result in an overheat fault. The first occurs when the measured heat sink exceeded 105°C. The second is a result of a fault in the internal 24 VDC cooling fan. X Overheat Alarm. Signal is input by external terminal. H01-0x=39 1. Ensure that the heat sink cooling fans are functioning. X 2. Ensure that the heat sink is free from dirt and debris. 3. Ensure that the inverter’s ambient temperature is within specification. X 4. Replace the 24 VDC fan 5. Replace the heat sink thermistor(s) Motor Overheating 1. Thermistor analog input detected motor overheating. See L01-03. Alarm defined by L01-03. 1. Check the motor rated current value, E02-01. 2. Increase cycle time or reduce the load. X OH4 Motor Overheating 2. Thermistor analog input detected motor overheating. See L01-04 OL1 Motor Overload Fault. Inverter 1. Ensure drive is programmed with output exceeded the motor overload proper motor full load Amps level. (E02-01). Alarm or fault defined by L06-08. 2. Reduce the load. X X Inverter Overload Fault. Inverter output exceeded the inverter overload level. X X X X OS X Overspeed Fault. The motor has 1. Check the Automatic Speed exceeded the programmed detection Regulator settings, D4 sub level and time. This is typically group. caused by an overshoot condition 2. Check setting of F01-24, F01-25. due to an over-responsive ASR loop. If the drive is programmed to flux 3. Verify proper encoder PPR vector “torque control” mode, and no setting, F01-01. load is present, an overspeed fault will typically occur. Alarm or fault defined by F01-23. X OT1 Overtorque Detection Level 1. Defined by L06-02. Alarm or fault defined by L06-01. 1. Check for proper programming for L06-xx constant. X X Overtorque Detection Level 2. Defined by L06-05. Alarm or fault defined by L06-04. 1. Check for proper programming for L06-xx constant. X X Motor Overheat 2 Motor Overloaded OL2 INV Overload OPR Oper Disconnect Over Speed Overtorque Det 1 OT2 Overtorque Det 2 1. Reduce the load. 2. Extend the acceleration time. Keypad Disconnected. The keypad 1. Secure the keypad. is removed while the inverter is running, and the run command was 2. Verify O02-06 setting. initiated via the keypad RUN key. IMPULSE®•G+ & VG+ Series 4 Instruction Manual – August 2013 6-10 X OV Overvoltage Fault. The main circuit 1. Extend the deceleration time. direct current voltage exceeded the 2. Check for proper DBU operation. overvoltage level 3. Check the resistor. DC Bus Overvolt Corrective Action Alarm Fault/Alarm Description Fault Code X 4. Check the line voltage. OV (flashing) Overvoltage Fault. Overvoltage occurs during stop. Main circuit DC voltage rises above the detection level while the drive output is off. PF Input Phase Loss Fault. Inverter 1. Check the line voltage and fuses. X input power supply has open phase. 2. Remove power. DC Bus Overvolt Input Phase Loss 1. Check the line voltage. X 3. Re-tighten the input terminal screws. PGO-1-S PGO-1-H Pulse Generator Channel 1 Fault. 1. Check for proper direction of X encoder feedback. PGO-1-S, software detected fault. PGO-1-H, hardware detected fault. 2. Please reference troubleshooting encoder related faults on page 6Alarm or fault defined by F01-21. 14. X PGO-2-S PGO-2-H Pulse Generator Channel 2 Fault. 1. Check for proper direction of X encoder feedback. PGO-2-S, software detected fault. PGO-2-H, hardware detected fault. 2. Please reference troubleshooting encoder related faults on page 6Alarm or fault defined by F01-21. 14. X PG Open Ch1 PG Open Ch2 PULSDEV Pulse Deviation Pulse Deviation. The pulse input into terminal RP compared to the pulse output from terminal MP is greater than the percentage programmed into H06-09. 1. During operation, verify that there X is an incoming pulse signal on the RP terminal, viewable at U0154. 2. Increase the deviation margin percentage in parameter H06-09. RF Braking Resistor Fault. the 1. Verify correct braking resistor. resistance of the braking resistor is too low, or the proper braking resistor has not been installed. X RH Braking Resistor Overheat. Deceleration time is too short and excessive regenerative energy is flowing back into the drive. 1. Verify correct braking resistor. X RR Braking Transistor Fault. Internal Braking transistor failed. 1. Verify that the external braking resistor is connected to the proper terminals. X DynBrk Transistr 2. Confirm that the proper resistor is installed. 3. Check for a short circuit across the braking resistor. SC Short Circuit Short Circuit Fault. The inverter has 1. Disconnect the motor from the detected an output short circuit inverter. condition. 2. Check for a short circuit in the motor or wiring using a megger. SLC Slack Cable Fault. A hoist slack cable condition occurred. 1. May not require corrective action. SNAP Snapped Shaft Fault. A drive train discontinuity has been detected. Alarm or fault defined by C11-09. 1. Check for loose or broken coupling. Slack Cable Detection Snapped Shaft X X 2. Check proper programming of Slack Cable Detection (C11-xx). X X 2. Check for loose encoder(s). 3. Check for broken shaft. IMPULSE®•G+ & VG+ Series 4 Instruction Manual – August 2013 6-11 Corrective Action SVE Load Float Fault. 1. Check to verify shaft is not rotating during load float. Ensure load is not greater than capacity. Load Float Fault Alarm Fault/Alarm Description Fault Code X 2. Check torque limit settings (C07xx). 3. Check encoder signal. TST END Exceeded the 10 minute time limit. Exit Test Mode 1. Ensure the test mode MFDI is OFF. X 2. Reset the fault (Fault Reset MFDI, Keypad, or cycle power) 3. Ensure that test mode is not used for normal operation. UBNC Current Unbalance. Current flow 1. Check wiring. has become unbalanced. 2. Check for damaged transistors. Exclusive to 4810 and 41090 models. 3. Check for short circuits or grounding problems on the connected motor. UL1 Upper Limit 1—SLOW DOWN Indicator. Upper Limit 1—SLOW DOWN switch status is changed. 1. May not require corrective action. Upper Limit 2—STOP Indicator. Upper Limit 2—STOP switch status is changed. 1. May not require corrective action. Upper Limit 3—Weighted Stop. Upper Limit weighted limit switch tripped. 1. May not require corrective action. X Unbalanced Cur Upper Limit 1 Err UL2 Upper Limit 2 Err UL3 Upper Limit 3 Err X X 2. Check the limit switches location. 3. Check the limit switches condition. X 2. Check the limit switches location. 3. Check the limit switches condition. X 2. Check the position of the Limit Switch. 3. Check the condition of the Limit Switch. 4. Check the conditions of/for terminal H01-xx (U01-10) UT1 Undertorque Det 1 UT2 Undertorque Det 2 UV DC Bus Undervolt UV1 DC Bus Undervolt UV2 CTL PS Undervolt Undertorque Detection 1. The 1. Check settings. current is less than L06-02 for more 2. Check motor coupling. than L06-03. Alarm or fault defined by L06-01. X X Undertorque Detection 2. The 1. Check settings. current is less than L06-05 for more 2. Check motor coupling. than L06-06. Alarm or fault defined by L06-04. X X Undervoltage Fault. Undervoltage status occurs for more than 2 sec during STOP. 1. Check the power source wiring. X 2. Replace any bad branch fuses. 3. Check collector system. Undervoltage 1 Fault. Undervoltage 1. Check power supply wiring. status occurs for more than 2 sec 2. Correct the line voltage. during RUN command. 3. Check collector system. X Undervoltage 2 Fault. The inverter 1. Check power supply wiring. detected a loss of the 24V logic 2. Correct the line voltage. power supply voltage. 3. Check collector system. X IMPULSE®•G+ & VG+ Series 4 Instruction Manual – August 2013 6-12 UV3 MC Fault. The pre-charge contactor 1. Check power supply wiring. opened during operation. 2. Correct the line voltage. MC Answerback Corrective Action Alarm Fault/Alarm Description Fault Code X 3. Check collector system. 4. Wait 30-45 seconds before restarting drive after auto shut down. UV4 Gate Drive Board Undervoltage. 1. Cycle power to the drive and see if the fault reoccurs. Voltage drop in the gate drive board circuit. 2. If the problem continues, replace Exclusive to 4810 and 41090 models. either the gate drive board or the entire drive. For instructions on replacing the gate drive board, contact Magnetek or a Magnetek representative. X X voF Output Voltage Detection Fault. 1. Replace the drive. Problem detected with the voltage on the output side of the drive. X X GC Undervolt Table 6-4: Operation Error Table Code Error Name/Description OPE01 kVA Setting Error. Inverter kVA setting 1. Check O02-04 constant for proper range is incorrect. kVA. OPE02 Setting Out of Range. Parameter setting is out of range. kVA Selection Limit Corrective Action 1. With the fault displayed on the keypad, press the ENTER key to reveal the “Out of Range” parameter via the U01-34 monitor. 2. Verify that E02-03 is < E02-01. 3. Verify E01-05 is within range. 4. Compare modified constants with defaults. 5. Cycle Power. OPE03 Multi-Function Input Setting Error. Set values other than “F” are duplicated. 1. Check the settings for H01-01 to H0108, verify that the same input is not used twice. OPE04 Initial Parameter Settings Error. 1. Set A01-05 to 5550 to use the parameter settings saved to the terminal block memory. OPE05 Frequency Reference Source 1. Cycle power. Selection Error. A frequency reference is assigned to an option card that is not 2. Ensure that the option card is seated properly into the option card slot. connected. 3. Replace option card. OPE06 Missing PG Card. A closed loop control method was selected, and the required PG feedback card is not installed. 1. Install the required option card. Multi-Function Analog Input Setting Error. H03-02, H03-06, and/or H03-10 multi-function analog input settings are set to the same value. 1. Check the function selections. Terminal PG Constant Sequence Select PG Opt Missing OPE07 Analog Selection 2. Remove power and reset the option card. 3. Check the A01-02, control method, program setting IMPULSE®•G+ & VG+ Series 4 Instruction Manual – August 2013 6-13 Code Error Name/Description OPE08 Selection Parameter Error. A 1. Undo the last parameter change (if parameter has been changed that is not known) available in the present control method. 2. Scroll through modified constants for obvious setting errors. Ctrl Func Error Corrective Action 3. Perform a user initialize (A0105=1110) CAUTION: All settings will be restored to the factory defaults. OPE10 V/f Parameter Setting Error. 1. Check Parameters E01-04 to E01-11. OPE11 Carrier Frequency Parameter Error. 1. Check Parameters D10-01 to D10-05. OPE16 Weight Measurement. Full load torque 1. Satisfy condition C10-09 > C10-10. is less than no load torque. OPE19 Incompatible Setting of Stopping Method and Control Method. 1. Satisfy B03-03 > 6 and A01-02 < 1. OPE20 Electronic Programmable Limit Switch Setting Error. 1. Check if C03-14 = 0, 2 or 4: C03-19 > C03-18 > C03-17 > C03-16 V/f Ptrn Setting Carr Frq/ON-Delay Weight Measure Stp-Mthd & Ctrl EPLS Setting 1. Check if C03-14 = 1 or 3: C03-19 < C03-18 < C03-17 < C03-16 OPE21 Option Card PG-X3 is missing when C11-08 is Enabled. 1. Install correct option card. OPE22 Incompatible Setting of Motion and Control Method. 1. Satisfy A01-02 < 1 and A01-03 > 2. OPE24 Slack Cable. Incorrect setup. 1. Satisfy condition C11-04 < C11-06 and C11-05 < C11-07. 2nd Chan Missing Ctrl & Motion Slack Cable OPE26 Limit Sw/C3-14 Hook Height Home Setting Error. The 1. if C03-14 is set to 0, then C03-16 Hook Height Home (C03-14) parameter must be set to 0. is configured incorrectly. 2. If C03-14 is set to 1, then C03-19 must be set to 0. IMPULSE®•G+ & VG+ Series 4 Instruction Manual – August 2013 6-14 Troubleshooting Encoder Related Faults The faults in this section may involve the encoder feedback system. During system startup, these faults are often caused by parameters that need to be adjusted. However, after the system has been running for some time without a fault, this usually indicates a problem with the physical system and adjusting the parameters should only be done after the physical system has been inspected. Fault Code: DEV– Speed Deviation Fault Definition A speed deviation fault means that the drive output is not able to follow the commanded speed reference. This is possible if there is not enough torque available to follow the internal speed reference. Therefore, speed deviations will typically occur when the drive is at its programmed torque limit. In addition, if the drive receives erratic, or missing, encoder pulses, speed deviations are also possible. If the initial drive tuning and start-up of the system was successfully completed and the crane has been in operation without any faults, then the occurrence of this fault most likely indicates that something mechanical with the system has changed or drive parameters were changed (i.e., failed encoder, load snag, crane overload, change in acceleration or deceleration times, etc.). Corrective Action 1. Do NOT continue to operate the hoist. NOTE: Continued attempts to operate the hoist with speed deviation faults occurring can result in loss of control of the load under certain circumstances. 2. As a precaution the load float time, parameter C08-10 should be set to zero until the source of the speed deviation fault has been determined and corrected. 3. Verify if the load has snagged or if there is a load on the hook that exceeds capacity. 4. Check the alignment of the encoder pulse wheel with the sensor head, or the encoder shaft coupling (depending on the type of encoder used). If the pulse wheel is misaligned or the shaft coupling is loose the drive will get erratic pulse signals or no signals at all causing a speed deviation fault or PGO (Pulse Generator Open) fault. Repairs to the encoder wheel or shaft coupling should be made immediately before again attempting to operate the hoist. 5. If the encoder appears to have no mechanical problems, the encoder cable should be checked for damage and replaced if a problem is found. 5.1 Each of the encoder wires should be checked for continuity. 5.2 The wires should be checked for shorts between any two wires. 5.3 The wires should be checked for shorts to the shield or ground. 5.4 Visually inspect the cable for damage that may be causing intermittent problems. 6. If the encoder feedback system checks out mechanically and electrically, then the last physical check to make is for something in the mechanical system that might be resisting normal operation. One example may be the brake is not opening fully and is causing enough drag to prevent the system from operating at commanded speed. IMPULSE®•G+ & VG+ Series 4 Instruction Manual – August 2013 6-15 7. If the encoder feedback system checks out and no other mechanical problems can be found, then something must have changed in the control system. 7.1 Check if the acceleration or deceleration times have been changed (B05-01, B05-02, C0102, C01-04, or C01-05). 7.2 Check if a function that provides an alternate acceleration or deceleration rate has been enabled or changed. (Quick Stop, Reverse Plug Simulation, Accel/Decel Time 2) If one of these times is too short, causing torque limited acceleration or deceleration, then the times should be extended. 8. If none of the above steps has identified a valid problem(s), only then should the speed deviation detection levels be adjusted. NOTE: The reaction time necessary to stop a load is limited to the lift of the hoist and the response time of the hoist brakes. It is desirable to have as fast a fault reaction time as possible without causing nuisance trips.) 9. Increase Encoder Excessive Speed Deviation Level to no more than 30 (F01-27). 10. After the corrective action has been taken and the fault no longer occurs then the load float time, C08-10, can be set back to its initial value. Fault Code: PGO-X-S/PGO-X-H–Pulse Generator Signal Fault Definition The pulse generator signal missing fault indicates that the drive has detected a problem with encoder feedback. This fault will typically occur if the drive doesn’t receive any encoder feedback pulses while it is commanded to run or encoder wiring has a discontinuity. NOTE: The “X” in PGO-X-S and PGO-X-H depicts either a “1” if the PG-X3 is seated in connector CN5-C, or a “2” if the PG-X3 is seated in connector CN5-B. Corrective Action 1. Do NOT continue to operate the hoist in the event of a PGO-X-H fault or repeated PGO-X-S faults. NOTE: Continued attempts to operate the hoist with PGO faults occurring can result in loss of control of the load under certain circumstances. 2. As a precaution, the load float time, parameter C08-10, should be set to zero until the source of the PGO Fault has been determined and corrected. Disable PGO hardware detection with F01-06 or F01-08. 3. Check the alignment of the encoder pulse wheel with the sensor head, the encoder shaft coupling (depending on the type of encoder used), or check for a failed encoder sensor head. If one of these conditions exists the drive will get erratic pulse signals or no signal at all causing a speed deviation fault or PGO fault. Repairs to the encoder wheel or shaft coupling should be made immediately before attempting to operate the hoist again. 4. If the encoder appears to have no mechanical problems, the encoder cable should be checked for damage and replaced if a problem is found. 4.1 Each of the encoder wires should be check for continuity. 4.2 The wires should be checked for shorts between any two wires. 4.3 The wires should be checked for shorts to the shield or ground. 4.4 Visually inspect the cable for damage that may be causing intermittent problems. 5. If the encoder feedback system checks out, then check for physical obstruction to motor rotation such as brake failing to open. IMPULSE®•G+ & VG+ Series 4 Instruction Manual – August 2013 6-16 6. After corrective action has been taken and the fault no longer occurs then the load float time, C08-10, can be set back to initial value. Fault Code: BE1–Rollback Fault Definition The BE1 fault indicates that the drive has released the brake, but has not started to accelerate the motor when it detects more than the expected encoder feedback. A BE1 fault will occur if the pulses received during the BE1 detection time (C08-04) are greater than the expected number of pulses (C08-05). This is typically caused by the drive/motor having insufficient torque to suspend the load. Correction Action 1. Check the encoder cable for damage and proper grounding. Replace it if a problem is found. 1.1 Each of the encoder signals should be checked for excessive noise. 1.2 The shielded encoder cable should be properly grounded. 1.3 Visually inspect the cable for damage that may be causing intermittent problems. 2. Check the alignment of the encoder pulse wheel with the sensor head, or the encoder shaft coupling (Depending on the type of encoder used). If the pulse wheel is misaligned or the shaft coupling is loose the drive may get erratic pulse signals possibly causing a BE1 fault. Repairs to the encoder wheel or shaft coupling should be made immediately before again attempting to operate the hoist. 3. If none of the above steps has identified a valid problem(s), only then should the BE1 detection parameters be adjusted. NOTE: It is desirable to have as fast a fault reaction time as possible without causing nuisance trips. 4. Increase C08-05 to no more than 800 pulses. Fault Code: BE2–Torque Proving Fault Definition The BE2 fault indicates that the drive was unable to develop sufficient torque before releasing the brake. A BE2 fault occurs when the torque (U01-09) is less than the Initial Forward Brake Torque (C08-16) during the current feedback timer (C08-02) at start. This typically indicates that the brake is slipping while torque is building up in the motor before releasing the brake. NOTE: This fault typically indicates a failed brake. Power should NOT be removed while this alarm is active and the load should be moved to a safe location and lowered before proceeding with any corrective action. Corrective Action 1. Check the brake for proper operation and adjustment. If the brake does not set, is improperly adjusted or is excessively worn, it may not be able to hold the load. This will allow the encoder pulses received while torque is building up in the motor. 2. Check the encoder cable for damage and proper grounding. Replace it if a problem is found. 2.1 Each of the encoder signals should be checked for excessive noise. 2.2 The shielded encoder cable should be properly grounded. 2.3 Visually inspect the cable for damage that may be causing intermittent problems. 3. Check the alignment of the encoder pulse wheel with the sensor head, or the encoder shaft IMPULSE®•G+ & VG+ Series 4 Instruction Manual – August 2013 6-17 coupling (depending on the type of encoder used). If the pulse wheel is misaligned or the shaft coupling is loose the drive may get erratic pulse signals possibly causing a BE2 fault. Repairs to the encoder wheel or shaft coupling should be made immediately before again attempting to operate the hoist. 4. Perform a Brake Torque test to verify the braking torque compared to the brake specifications before proceeding. 5. If none of the above steps has identified a valid problem(s), the brake may need to be replaced. NOTE: It is desirable to have the Current Feedback Timer set as low as possible without causing nuisance trips. Fault Code: BE3–Brake Release Fault Definition The BE3 fault indicates that the drive has released the brake and commanded the drive to run, but has not detected the expected encoder feedback. A BE3 fault will occur if the pulses received during the BE3 detection time (C08-06) are less than the expected number of pulses (C08-07). NOTE: Depending on the condition of the crane and control system, the load may drift during the BE3 detection time until the brake is again set. If giving a run command, the BE3 fault should be detected before a PGO fault would be detected. Corrective Action 1. Check the brake for proper operation. If the brake does not open the drive will not see the proper number of encoder pulses returned and will post this fault. 2. Check the alignment of the encoder pulse wheel with the sensor head, or the encoder shaft coupling (depending on the type of encoder used). If the pulse wheel is misaligned or the shaft coupling is loose the drive will get erratic pulse signals or no signals at all possibly causing a BE3 fault. Repairs to the encoder wheel or shaft coupling should be made immediately before again attempting to operate the hoist. 3. If the encoder appears to have no mechanical problems, the encoder cable should be checked for damage and replaced if a problem is found. 3.1 Each of the encoder wires should be checked for continuity. 3.2 The wires should be checked for shorts between any two wires. 3.3 The wires should be checked for shorts to the shield or ground. 3.4 Visually inspect the cable for damage that may be causing intermittent problems. 4. If none of the above steps has identified a valid problem(s), only then should the BE3 detection parameters be adjusted. NOTE: It is desirable to have as fast a fault reaction time as possible without causing nuisance trips. 5. Ensure that C08-04 is equal to the brake’s mechanical delay time. 6. Increase the value of C08-06 to no more than 1 second. 7. Decrease the value of C08-07 to no less than 10 pulses. IMPULSE®•G+ & VG+ Series 4 Instruction Manual – August 2013 6-18 Alarm Code: BE6–Brake Proving Alarm Definition The BE6 alarm indicates that the drive has commanded the brake to set but it has detected more encoder pulse feedback than expected. A BE6 alarm will occur if the number of pulses received during the BE6 detection time (C08-12) is greater than the expected number of pulses (C08-13). The drive will initiate Load Float for the duration of the BE6 alarm. NOTE: This fault typically indicates a failed brake. Power should NOT be removed while this alarm is active and the load should be moved to a safe location and lowered before proceeding with any corrective action. NOTE: The BE6-Brake Proving Alarm is re-verified during every brake set, including brake sets that occur after the BE6 alarm is posted. The BE6 alarm will turn off if a successful brake check occurs after an initial BE6 alarm condition is posted based on the setting of C08-19. Corrective Action 1. Check the brake for proper operation and adjustment. If the brake does not set, is improperly adjusted or is excessively worn, it may not be able to hold the load. This will allow the encoder pulses received during the detection time to exceed the set point. 2. Check the encoder cable for damage and proper grounding. Replace it if a problem is found. 2.1 Each of the encoder signals should be checked for excessive noise. 2.2 The shielded encoder cable should be properly grounded. 2.3 Visually inspect the cable for damage that may be causing intermittent problems. 3. Check the alignment of the encoder pulse wheel with the sensor head, or the encoder shaft coupling (Depending on the type of encoder used). If the pulse wheel is misaligned or the shaft coupling is loose the drive may get erratic pulse signals possibly causing a BE6 alarm. Repairs to the encoder wheel or shaft coupling should be made immediately before again attempting to operate the hoist. 4. If none of the above steps has identified a valid problem(s), only then should the BE6 detection parameters be adjusted. NOTE: It is desirable to have as fast a fault reaction time as possible without causing nuisance trips. 5. Ensure that C08-11 is equal to the brake’s mechanical delay time. 6. Increase the value of C08-13. Alarm Code: BE8–Brake Slipping Alarm Definition The BE8 alarm indicates that the drive has detected that the brake slipping after the brake is set. A BE8 alarm will occur if the drive detects that the load is moving greater than the brake Slip Detection Speed (C08-23) when the brake is set. When this occurs, the drive will go into load float while the brake is set. NOTE: This alarm typically indicates a failed brake. Power should NOT be removed while this alarm is active and the load should be moved to a safe location and lowered before proceeding with any corrective action. IMPULSE®•G+ & VG+ Series 4 Instruction Manual – August 2013 6-19 Corrective Action 1. Check the brake for proper operation and adjustment. If the brake does not set, is improperly adjusted or is excessively worn, it may not be able to hold the load. This will allow the encoder pulses received while the brake is set. 2. Check the encoder cable for damage and proper grounding. Replace it if a problem is found. 2.1 Each of the encoder signals should be checked for excessive noise. 2.2 The shielded encoder cable should be properly grounded. 2.3 Visually inspect the cable for damage that may be causing intermittent problems. 3. Check the alignment of the encoder pulse wheel with the sensor head, or the encoder shaft coupling (depending on the type of encoder used). If the pulse wheel is misaligned or the shaft coupling is loose the drive may get erratic pulse signals possibly causing a BE8 fault. Repairs to the encoder wheel or shaft coupling should be made immediately before again attempting to operate the hoist. 4. If none of the above steps has identified a valid problem(s), the brake may need to be replaced. NOTE: It is desirable to have as fast a fault reaction time as possible without causing nuisance trips. IMPULSE®•G+ & VG+ Series 4 Instruction Manual – August 2013 6-20 Fault Code: OC–Over Current Fault Definition An over current fault is caused if the output current exceeds 200% of the inverter rated output current. This fault can be caused by short circuits in the wiring or in the motor, and it can also be caused by parameters that are not adjusted properly. One other cause of this fault could be erratic or no encoder feedback. In the last instance, the drive is trying to command the motor to hold a position, but due to the encoder problem, is unable to find the correct position. This would cause the drive to increase current output to the motor in an attempt to correct the position until an over current fault occurs. Corrective Action 1. Check the motor wiring and the motor itself for a short between phases. 2. Check the alignment of the encoder pulse wheel with the sensor head, or the encoder shaft coupling (depending on the type of encoder used). If the pulse wheel is misaligned or the shaft coupling is loose the drive will get erratic pulse signals or no signals at all possibly causing an OC fault. Repairs to the encoder wheel or shaft coupling should be made immediately before again attempting to operate the hoist. 3. If the encoder appears to have no mechanical problems, the encoder cable should be checked for damage and replaced if a problem is found. 3.1 Each of the encoder wires should be check for continuity. 3.2 The wires should be checked for shorts between any two wires. 3.3 The shield should be check for proper grounding. 3.4 The wires should be checked for shorts to the shield or ground. 3.5 Visually inspect the cable for damage that may be causing intermittent problems. 4. If none of the above steps has identified a valid problem(s), check if any of the torque limit parameters (C07-01 to C07-04) have been changed. If these parameters have been changed to allow a higher torque value, it could cause overcurrent trips. NOTE: Changing these parameters could also induce speed deviation or overload faults. Only a trained technician should modify these parameters. It is desirable to have as fast a fault reaction time as possible without causing nuisance trips. IMPULSE®•G+ & VG+ Series 4 Instruction Manual – August 2013 6-21 Fault Display and Corrective Actions at Auto-Tuning The following are fault displays and corrective actions at auto-tuning. If any of the following faults are found, the digital operator displays that fault contents; the motor coasts to stop if it is under operation. Fault contact output or minor fault contact output does not operate. Table 6-5: Fault Display and Corrective Actions Fault Display Fault or Indicator Name/Description Er-01 Motor Data Fault. Motor data input fault for • Check input data. auto-tuning. Relationship between motor • Check inverter and motor capacity output and motor rated current fault. • Check motor rated current and no-load Relationship between input motor rated current. current and set no-load current fault (at vector control method and line-to-line resistance tuning.) Fault Er-02 Alarm. The minor fault is detected during auto-tuning. Minor Fault Er-03 Corrective Action • Check input data. • Check wirings • Check load. STOP Key Input. The stop key is pressed during auto-tuning. STOP Key Er-04 Resistance Er-05 No-Load Current Er-08 Line to Line Resistance Fault. Auto-tuning is not completed within the expected time. The auto-tuning is outside the parameter setting. No-load Current Fault. Auto-tuning is not completed within the expected time. The auto-tuning is outside the parameter setting. Rated Slip Rated Slip Fault. Auto-tuning is not completed within the expected time. The auto-tuning is outside the parameter setting. Er-09 Acceleration Fault. The motor did not accelerate at the expected time. Accelerate Er-10 Motor Direction Er-11 Motor Speed Er-12 Motor Speed Fault (Rotation type tuning only). The motor speed was over 100% at autotuning (flux vector control without PG only). • Increase B05-01 (acceleration time). • If a motor and a load are connected, separate the motor from the load. Current Detection Fault. Current exceeded the motor rated current. • Release brake. • Check for open motor lead. Leakage Inductance Fault. Auto-tuning did not finish within the set time. • Check the T1 parameters. • Check motor wiring. Leakage Inductance NOTE: • Increase B05-01 (acceleration time). • If C07-01 and C07-02 (torque limit value) are decreased, increase values. • If a motor and a load are connected, separate the motor from the load. Motor Direction Error. The encoder signal • Check and correct wiring to the PG lines are not properly connected to the drive; encoder. the motor direction and PG direction are • Check the motor speed monitor U01-05 opposite; or the load pulled the motor in the while manually turning the motor forward. If opposite direction of the speed reference and the sign displayed is negative, change the the torque exceeded 100%. setting of parameter F01-02. • Uncouple the motor from the load and restart Auto-Tuning. I.det.Circuit Er-13 • Check input data. • Check motor wiring. • If a motor and a load are connected, disconnect the motor from machinery system. * Excessive V/f set value, motor iron core saturation coefficient fault, and rated current set alarm are displayed after the auto tuning is completed. IMPULSE®•G+ & VG+ Series 4 Instruction Manual – August 2013 6-22 Fault Display Fault or Indicator Name/Description Corrective Action End 1* Excess V/f setting (Rotation type tuning only). The torque reference exceeded 100% and no load current exceeded 70%. • Check the T1 parameters. • Disconnect the motor from the load. V/f Oversetting End 2 Saturation Motor Iron Core Saturation Coefficient • Check the T1 parameters. Fault (Rotation type tuning only). Since the • Check motor wiring. motor iron core saturation coefficient could not be auto-tuned within the set time, tentative • Disconnect the motor from the load value is set in the iron core saturation coefficient. End 3 Rated Current Set Alarm. Motor current during tuning was greater than the set value. • Check E02-01. Rated FLA Alm NOTE: * Excessive V/f set value, motor iron core saturation coefficient fault, and rated current set alarm are displayed after the auto tuning is completed. IMPULSE®•G+ & VG+ Series 4 Instruction Manual – August 2013 6-23 Troubleshooting Option Card Related Faults Drive-Side Error Codes Table 6-6 lists the various fault codes related to option cards. Check the following items first when an error code occurs on the drive: • Communication cable connections. • Make sure the option is properly installed to the drive. • Did a momentary power loss interrupt communications? NOTE: The ports are checked in alphanumeric order. Please see Figure 6-1 for port locations. Figure 6-1:Option Card Ports IMPULSE®•G+ & VG+ Series 4 Instruction Manual – August 2013 6-24 Table 6-6: Fault Codes for Option Cards Fault or Indicator Name/Description Error Card Cause Possible Solution oFA00 A1-A3 AO-A3 DI-A3 DO-A3 S4I S4IO Option Card Connection • The option card • Check if the drive Error at Option Port CN5installed into port CN5supports the option A. A is incompatible with card to be installed. the drive. Contact Magnetek for assistance. • A PG option card is connected to option • PG option cards are port CN5-A. supported by option ports CN5-B and CN5C only. Connect the PG option card to the correct option port. oFA01 A1-A3 AO-A3 DI-A3 DO-A3 S4I S4IO Option Fault (CN5-A). Option is not properly connected. • Option at drive port CN5-A was changed during run. • Turn the power off and check the connectors between the drive and the option. oFB01 A1-A3 AO-A3 DI-A3 DO-A3 S4I S4IO Option Fault (CN5-B). Option is not properly connected. • Option at drive port CN5-B was changed during run. • Turn the power off and check the connectors between the drive and the option. oFB02 A1-A3 AO-A3 DI-A3 DO-A3 S4I S4IO Option Fault (CN5-B). Two of the same option cards are connected simultaneously. • AI-A3: Only one of the • AI-A3: AI-A3 option options, AI-A3, DI-A3, connected to CN5-B or SI-xx can be port while another input connected to the drive option was connected at the same time. to CN5-A port. • DI-A3: Only one of the • DI-A3: DI-A3 option options, AI-A3, DI-A3, connected to CN5-B or SI-xx can be port while another input connected to the drive option was connected at the same time. to CN5-A port. • AO-A3/DO-A3: Use • AO-A3/DO-A3: only compatible Duplicate type of options. option card is connected to drive ports CN5-A, CN5-B, and CN5-C. oFC00 A1-A3 AO-A3 DI-A3 DO-A3 S4I S4IO Option connection error at drive port CN5-C. • The option card • Confirm that the drive installed into port CN5supports the option C is incompatible with card to be installed. the drive Contact Magnetek for assistance. • A communication option card has been • Communication option installed in option port cards are only CN5-C supported by option port CN5-A. It is not possible to install more than one communication option. IMPULSE®•G+ & VG+ Series 4 Instruction Manual – August 2013 6-25 Error Card oFC01 A1-A3 AO-A3 DI-A3 DO-A3 S4I S4IO oFC02 Fault or Indicator Name/Description Cause Possible Solution Option connection error at drive port CN5-C. • Option at drive port CN5-C was changed during run. • Turn off the power and check the connectors between the drive and the option. A1-A3 AO-A3 DI-A3 DO-A3 S4I S4IO Option Fault (CN5-C). Two of the same option cards are connected simultaneously. • AI-A3: Only one of the • AI-A3: AI-A3 option options, AI-A3, DI-A3, connected to CN5-B or SI-xx can be port while another input connected to the drive option was connected at the same time. to CN5-A port. • DI-A3: Only one of the • DI-A3: DI-A3 option options, AI-A3, DI-A3, connected to CN5-B or SI-xx can be port while another input connected to the drive option was connected at the same time. to CN5-A port. • AO-A3/DO-A3: Use • AO-A3/DO-A3: only compatible Duplicate type of options. option card is connected to drive ports CN5-A, CN5-B, and CN5-C. oFC03 to oFC11 A1-A3 AO-A3 DI-A3 DO-A3 S4I S4IO Option Card Fault at Option Port CN5-C. • Option card or hardware is damaged. • Cycle power to the drive • If the problem continues, replace the control board or the entire drive. Contact Magnetek for instructions on replacing the control board. oFC12 to oFC17 A1-A3 AO-A3 DI-A3 DO-A3 S4I S4IO Option Card Fault at Option Port CN5-C. • Option card or hardware is damaged. • Cycle power to the drive • If the problem continues, replace the control board or the entire drive. Contact Magnetek for instructions on replacing the control board. oPE05 A1-A3 DI-A3 S4I S4IO Run command/frequency • Frequency reference is • Reconnect the option reference source assigned to an option to the drive. selection error. (B03-01 = 3), but an option is not connected. oPE06 -- Control Method Selection • A control mode has • Connect to a PG option Error been selected that card. requires a PG option • Correct the value set to card to be installed, but A01-02. no PG encoder is installed (A01-02 = 1 or 3). IMPULSE®•G+ & VG+ Series 4 Instruction Manual – August 2013 6-26 Error Card oPE07 A1-A3 Fault or Indicator Name/Description Multi-function Analog Input Selection Error. Cause Possible Solution • At least two analog input terminals are set to the same function. • Analog input terminal and pulse train input are set to the same function. • Adjust H03-02, H03-06, and H03-10 settings so functions no longer conflict. Copy Function Related Faults Tasks, Errors, and Troubleshooting The table below lists the messages and errors that may appear when using the Copy function. When executing the tasks offered by the Copy function, the operator will indicate the task being performed. When an error occurs, a code appears on the operator to indicate the error. Note that errors related to the Copy function do not trigger a multifunction output terminal that has been set up to close when a fault or alarm occurs. To clear an error, simply press any key on the operator and the error display will disappear. Table 6-7 lists the corrective action that can be taken when an error occurs. NOTE: 1. Whenever using the copy function, the drive should be fully stopped. 2. The drive will not accept a Run command while the Copy function is being executed. 3. Parameters can only be saved to a drive when the voltage class, capacity, control method, and software version match. Table 6-7: Copy Function Task and Error Displays Fault Display Fault or Indicator Name/Description Corrective Action CPEr Control Method Mismatch. Control method • Verify the control method for the parameters of the parameters to be loaded onto the drive to be loaded onto the drive and the control and the control method set to the drive do not method on the drive to which those match. parameters will be written. • Set the same control method using parameter A01-02 and retry. CPyE Error Writing Data. Failed writing parameters. Attempt to write parameters again. CSEr iFEr Copy Unit Error. Hardware fault. Replace the operator or the USB Copy Unit. • Check the cable connection. Communication Error. • Use the cable originally packaged with the • A communication error occurred between USB Copy Unit. the drive and the operator or the USB copy unit. • A non-compatible cable is being used to connect the USB Copy Unit and the drive. IMPULSE®•G+ & VG+ Series 4 Instruction Manual – August 2013 6-27 Fault Display Fault or Indicator Name/Description ndAT Model, Voltage Class, Capacity Mismatch. • Make sure model numbers and specifications are the same for both drives. • The drive from which the parameters were copied and the drive to which the • Make sure all connections are correct, and parameters will be written have different copy the parameter settings onto the USB electrical specifications, capacities, are set Copy Unit or the operator. to different control methods, or are different models. • The device being used to write the parameters is blank and does not have any parameters saved on it. rdEr Error Reading Data. Failed while attempting to read parameter settings from the drive. Press and hold the READ key on the USB Copy Unit for at least one second to have the unit read parameters from the drive. vAEr Voltage Class, Capacity Mismatch. The drive from which the parameters were copied and the drive on which the Verify mode is being performed have different electrical specifications or are a different capacity. Make sure electrical specifications and capacities are the same for both drives. vFyE Parameter settings in the drive and those saved to the copy function are not the same. Indicates that parameter settings that have been Read and loaded onto the Copy Unit or Digital Operator are different. To synchronize parameters, either write the parameters saved on the USB Copy Unit or digital operator onto the drive, or Read the parameter settings on the drive onto the USB Copy Unit. IMPULSE®•G+ & VG+ Series 4 Instruction Manual – August 2013 6-28 Corrective Action Power Section Check WA R N I N G Do NOT touch any circuit components while AC main power is on or immediately after the main AC power is disconnected from the unit. You must wait until the red “CHARGE” lamp is extinguished. It may take as long as 10 minutes for the charge on the main DC bus capacitors to drop to a safe level. Failure to adhere to this warning could result in serious injury. Power Off Checks To perform a power section check, remove the drive’s main and control wiring from the terminal strips. Obtain reading as specified in the table on the next, and ensure that the reading falls within the normal reading range. Test equipment - Analog Ohmmeter set R x 1 scale or digital multimeter set to the diode. Device VOM (on RX1 Scale) Positive Lead Negative Lead L1 L2 L3 – – – L1 L2 L3 + + + + + + L1 L2 L3 – – – L1 L2 L3 Bus Capacitors + – Pre-charge Resistor – Across the Resistors T1 T2 T3 – – – T1 T2 T3 + + + B2 B1 B2 – + + + T1 T2 T3 – – – T1 T2 T3 B1 B2 – B2 Input Rectifier Bridge *1 Output Transistors *2 *3 Braking Diode Normal Reading (Analog Meter) Normal Reading (Digital Meter) 7–100 Approximately 0.5 V Infinite OL Displayed Observe gradually increasing resistance Observe gradually increasing voltage to OL 100 or less – 7-100 Approximately 0.5V Infinite OL Displayed 10 Infinite Infinite Infinite 0.5 V OL Displayed OL Displayed 0.5 V 1. “+” could be any one of three (+) terminals which are labeled as 1, 2, and 3. 2. If the bus fuse is blown you must install a jumper across the fuse terminals to get accurate resistance measurements. 3. If the pre-charge resistor is open, you will read infinite W between + and any output terminal unless you install a temporary jumper across the resistor. IMPULSE®•G+ & VG+ Series 4 Instruction Manual – August 2013 6-29 S4IF Replacement Procedure WA R N I N G Do NOT touch any circuit components while AC main power is on or immediately after the main AC power is disconnected from the unit. You must wait until the red “CHARGE” lamp is extinguished. It may take as long as 10 minutes for the charge on the main DC bus capacitors to drop to a safe level. Failure to adhere to this warning could result in serious injury. NOTE: When handling boards always use electrostatic discharge protection. Keep the boards in the ESD bag as long as you can. Do not lay the board on any surfaces without ESD protection. When handling, always hold the board from the edges and do not touch the components. Installation should be performed only by qualified personnel who are familiar with this type of equipment and the hazards involved. Figure 6-2: Location of Retaining Screws 1. Prior to installation, record all modified parameters. 2. Set A01-05 = 7770 (this prepares all modified and user parameters for IF card removal). 3. Disconnect all electrical power to the drive. 4. Remove the drive's front cover. 5. Verify that the “CHARGE” indicator lamp inside the drive is OFF (may take up to 5 minutes). 6. Use a voltmeter to verify the voltage at the incoming power terminals (L1, L2, and L3) has been disconnected. IMPULSE®•G+ & VG+ Series 4 Instruction Manual – August 2013 6-30 7. Follow your local ESD procedures. 8. Loosen the two retaining screws (A) pictured in Figure 6-2. 9. Remove existing interface card by grasping each corner at TB6 and TB5 and slide down until free. 10. Return I/O board to ESD bag 11. Complete all main circuit terminal connections as the installation of the S4IF interface card may block wiring access. NOTE: Wires to the S4IF interface card should be stripped 0.2" ±20% for maximum system safety. Solder dipping or ferrules are also highly recommended. 12. Insert the S4IF interface card by sliding it onto the side guides until it mates tightly into the CN41 connector. 13. Tighten the screws (A) pictured in Figure 6-2. 14. Connect the command signals to the desired inputs of the S4IF interface card. 15. Refer to Table 3-8 for additional information regarding the S1, S2, S3, and S4 settings. 16. Reinstall and secure the drive's front cover. 17. Reconnect power to the drive. 18. Set A01-05 = 8880 (this moves all modified and user parameters to new IF card). 19. Verify modified parameters with those recorded in Step 1. IMPULSE®•G+ & VG+ Series 4 Instruction Manual – August 2013 6-31 This page intentionally left blank. IMPULSE®•G+ & VG+ Series 4 Instruction Manual – August 2013 6-32 appendix A IMPULSE®•G+ & VG+ Series 4 Parameter Listing This page intentionally left blank. IMPULSE®•G+ & VG+ Series 4 Instruction Manual – August 2013 A-2 IMPULSE®•G+ & VG+ Series 4 Parameter Listing Parameter Parameter Name Default Range Units Reference A01-01 Access Level 2 0–2 -- 4-9 A01-02 Control Method 3 0–3 -- 4-9 A01-03 Motion G+: 1 VG+ 2 0–2 -- 4-10 A01-04 Speed Ref * 0–8 -- 4-10 A01-05 Initialize Parameters 0 0–8880 -- 4-14 A01-06 Password 1 0 -- -- 4-14 A02-01 to A02-32 User Parameters -- -- -- 4-15 B01-01 Reference 1 15.00* 0.00–E1-04 Hz 5-3 B01-02 Reference 2 30.00* 0.00–E1-04 Hz 5-3 B01-03 Reference 3 60.00* 0.00–E1-04 Hz 5-3 B01-04 Reference 4 0.00* 0.00–E1-04 Hz 5-3 B01-05 Reference 5 0.00* 0.00–E1-04 Hz 5-3 B01-06 Reference 6 0.00* 0.00–E1-04 Hz 5-3 B01-07 Reference 7 0.00* 0.00–E1-04 Hz 5-3 B01-08 Reference 8 0.00* 0.00–E1-04 Hz 5-3 B01-09 Reference 9 0.00* 0.00–E1-04 Hz 5-3 B01-10 Reference 10 0.00* 0.00–E1-04 Hz 5-3 B01-11 Reference 11 0.00* 0.00–E1-04 Hz 5-3 B01-12 Reference 12 0.00* 0.00–E1-04 Hz 5-3 B01-13 Reference 13 0.00* 0.00–E1-04 Hz 5-3 B01-14 Reference 14 0.00* 0.00–E1-04 Hz 5-3 B01-15 Reference 15 0.00* 0.00–E1-04 Hz 5-3 B01-16 Reference 16 0.00* 0.00–E1-04 Hz 5-3 B01-17 Jog Reference 6.00 0.00–E1-04 Hz 5-3 B01-18 Ref Priority 0* 0–2 -- 5-3 B02-01 Ref Upper Limit 100.0* 0.0–110.0 % 5-5 B02-02 Ref Lower Limit 0.0 0.0–110.0 % 5-5 B02-03 Ref1 Lower Limit 2.0* 0.0–110.0 % 5-5 B02-04 Alt Upper Limit 0.0 0.0–110.0 % 5-5 B03-01 Ref Source 1 1* 0–4 -- 5-6 B03-02 Run Source 1 1* 0–3 -- 5-6 B03-03 Stopping Method G+: 0* VG+: 6* 0, 1, 4, 6 -- 5-7 B03-04 Change Rotation 0 0, 1 -- 5-9 B03-05 Zero-Speed Oper 0 0–3 -- 5-9 * Initial value set by X-Press Programming (Table 4-5, 4-6, or 4-7 on pages 4-11, 4-12, and 4-13). ** Initial value dependant on drive size, which is determined by O02-04 (kVA Selection). *** Value is automatically set during auto tuning. **** 0.0–25.5 seconds is extended to 0.0–6000.0 seconds when B05-16 = 1. ***** Initial value is dependent on carrier. 2kHz = 0. else 1. IMPULSE®•G+ & VG+ Series 4 Instruction Manual – August 2013 A-3 Parameter Parameter Name Default Range Units Reference B03-06 Ctnl Input Scans 1 0, 1 -- 5-10 B03-07 LOC/REM RUN Sel 0 0, 1 -- 5-10 B03-08 RUN CMD at PRG 0 0, 1 -- 5-10 B03-10 Allow Run@Powerup 0 0, 1 -- 5-10 B03-15 Ref Source 2 0 0–4 -- 5-11 B03-16 Run Source 2 0 0–3 -- 5-11 B05-01 Accel Time 1 5.0* 0.0–25.5**** sec 5-12 B05-02 Decel Time 1 3.0* 0.0–25.5**** sec 5-12 B05-03 Accel Time 2 10.0 0.0–25.5**** sec 5-12 B05-04 Decel Time 2 10.0 0.0–25.5**** sec 5-12 B05-05 Accel Time N Chg 2.0 0.0–25.5 sec 5-13 B05-06 Decel Time N Chg 2.0 0.0–25.5 sec 5-13 B05-08 Fast Stop Time 0.5 0.0–25.5 sec 5-13 B05-10 Acc/Dec SW Freq 0.0 0.0–150.0 Hz 5-13 B05-11 SW Freq. Compare 1 0, 1 -- 5-13 B05-12 Accel Time 3 3.0 0.0–25.5**** sec 5-13 B05-13 Decel Time 3 3.0 0.0–25.5**** sec 5-13 B05-14 Accel Time 4 3.0 0.0–25.5**** sec 5-13 B05-15 Decel Time 4 3.0 0.0–25.5**** sec 5-13 B05-16 Acc/Dec Ext Rang 0 0, 1 -- 5-13 B08-01 Jump Freq 1 0.0 0.0–150.0 Hz 5-14 B08-02 Jump Freq 2 0.0 0.0–150.0 Hz 5-14 B08-03 Jump Freq 3 0.0 0.0–150.0 Hz 5-14 B08-04 Jump Bandwidth 1.0 0.0–20.0 Hz 5-14 C01-01 Quick Stop 0* 0, 1 -- 5-16 C01-02 Quick Stop Time 1.0 0.0–25.5 sec 5-16 C01-03 Reverse Plug 0 0, 1 -- 5-17 C01-04 Rev-Plg Dec Time 2.0 0.0–25.5 sec 5-17 C01-05 Rev-Plg Acc Time 0.0 0.0–25.5 sec 5-17 C02-01 MicroSpd Gain 1 1.00 H: 0.01–1.00 -T: 0.01–2.55 5-18 C02-02 MicroSpd Gain 2 1.00 H: 0.01–1.00 -T: 0.01–2.55 5-18 C03-01 UL1 Speed 6.00 0–E1-03 Hz 5-19 C03-02 UL1 Decel Time 1.0 0.0–25.5**** sec 5-19 C03-03 UL2 Stop Time 1.0 0.0–25.5**** sec 5-19 C03-04 LL1 Speed 6.00 0–E1-04 Hz 5-19 C03-05 LL1 Decel Time 1.0 0.0–25.5**** sec 5-19 C03-06 LL2 Stop Time 1.0 0.0–25.5**** sec 5-19 C03-07 Lmt Stop Method 2* 0–2 -- 5-19 * Initial value set by X-Press Programming (Table 4-5, 4-6, or 4-7 on pages 4-11, 4-12, and 4-13). ** Initial value dependant on drive size, which is determined by O02-04 (kVA Selection). *** Value is automatically set during auto tuning. **** 0.0–25.5 seconds is extended to 0.0–6000.0 seconds when B05-16 = 1. ***** Initial value is dependent on carrier. 2kHz = 0. else 1. IMPULSE®•G+ & VG+ Series 4 Instruction Manual – August 2013 A-4 Parameter Parameter Name Default Range Units Reference C03-08 UL3 Stopping Method 4 0–5 -- 5-19 C03-09 UL3 Decel Time 1.0 0.0–25.5 sec 5-19 C03-10 Phantom Stop Met 1 0–2 -- 5-20 C03-11 Load Share Limit 0 0, 1 -- 5-20 C03-12 Klixon Action 0 0, 1 -- 5-21 C03-13 Height Measure 250 0–65535 Rev 5-22 C03-14 Hook Height Home 2 0–4 -- 5-22 C03-15 Hook Height Out 0 0, 1 -- 5-22 C03-16 UL2 Revolutions 0 0–65535 Rev 5-23 C03-17 UL1 Revolutions 0 0–65535 Rev 5-23 C03-18 LL1 Revolutions 0 0–65535 Rev 5-23 C03-19 LL2 Revolutions 0 0–65535 Rev 5-23 C04-01 Load Float Time 2 10 0–65535 sec 5-27 C04-02 Load Float Gain 10** 0–100 -- 5-27 C05-01 Load Check 0 0–9 -- 5-29 C05-02 LC Alarm Action 4 0–4 -- 5-30 C05-03 Holding Time 0.15 0.00–2.55 sec 5-29 C05-04 Testing Time 0.25 0.00–2.55 sec 5-30 C05-05 I/T Margin Acc 5 0–50 % 5-30 C05-07 I/T Margin 5 1–20 % 5-30 C05-08 Alarm Speed 6.0 1.0–30.0 Hz 5-30 C05-09 I/T Level 01 0 1–250 % 5-30 C05-10 I/T Level 02 0 1–250 % 5-30 C05-11 I/T Level 03 0 1–250 % 5-30 C05-12 I/T Level 04 0 1–250 % 5-30 C05-13 I/T Level 05 0 1–250 % 5-30 C05-14 I/T Level 06 0 1–250 % 5-30 C05-15 I/T Level 07 0 1–250 % 5-30 C05-16 I/T Level 08 0 1–250 % 5-30 C05-17 I/T Level 09 0 1–250 % 5-30 C05-18 I/T Level 10 0 1–250 % 5-30 C05-19 I/T Level 11 0 1–250 % 5-30 C05-20 I/T Level 12 0 1–250 % 5-30 C05-21 I/T Level 13 0 1–250 % 5-30 C05-22 I/T Level 14 0 1–250 % 5-30 C05-23 I/T Level 15 0 1–250 % 5-30 C05-24 I/T Level 16 0 1–250 % 5-30 C05-25 LC Integral Time 0.05 0.00–2.55 sec 5-31 C05-26 LC Delay Time 0.25 0.00–2.55 sec 5-31 C05-27 Min I->Fwd Tim 0.0 0.0–25.5 sec 5-31 * Initial value set by X-Press Programming (Table 4-5, 4-6, or 4-7 on pages 4-11, 4-12, and 4-13). ** Initial value dependant on drive size, which is determined by O02-04 (kVA Selection). *** Value is automatically set during auto tuning. **** 0.0–25.5 seconds is extended to 0.0–6000.0 seconds when B05-16 = 1. ***** Initial value is dependent on carrier. 2kHz = 0. else 1. IMPULSE®•G+ & VG+ Series 4 Instruction Manual – August 2013 A-5 Parameter Parameter Name Default Range Units Reference C05-28 Dly Trig Freq 30.0 0.0–60.0 Hz 5-31 C06-01 Swift-Lift (V/f and OLV) Ultra-Lift (FLV) 0 0–4 -- 5-32 C06-02 SwiftLift FWDSpd (V/f and OLV) UltraLift FWDSpd (FLV) 60 0–150 Hz 5-32 C06-03 SwiftLift REVSpd (V/f and OLV) UltraLift REVSpd (FLV) 60 0–150 Hz 5-32 C06-04 SL FWD Current (V/f) SL FWD Torque (OLV) UL FWD Torque (FLV) 50 0–100 % 5-32 C06-05 SL REV Current (V/f) SL REV Torque (OLV) UL REV Torque (FLV) 30 0–100 % 5-33 C06-06 SL Enabling Spd (V/f and OLV) UL Enabling Spd (FLV) 59.0 0–150 Hz 5-33 C06-07 SL Delay Time (V/f and OLV) UL Delay Time (FLV) 2.0 0.0–25.5 sec 5-33 C06-08 SFS Acc Gain 1.0 0.1–9.9 -- 5-33 C06-10 Mtr Trq Quickset 3 0–5 -- 5-33 C06-11 Motor Torque 1 45 1–100 % 5-33 C06-12 Motor Speed 1 90.0 0.0–150.0 Hz 5-33 C06-13 Motor Torque 2 25 1–100 % 5-33 C06-14 Motor Speed 2 120.0 1.0–150.0 Hz 5-33 C06-15 AUL FWD Offset 10 0–100 % 5-33 C06-16 AUL REV Offset 20 0–100 % 5-33 C07-01 Trq Limit FWD 150 0–300 % 5-35 C07-02 Trq Limit REV 150 0–300 % 5-35 C07-03 Trq Lmt FWD Rgn 180 0–300 % 5-35 C07-04 Trq Lmt REV Rgn 180 0–300 % 5-35 C07-05 T-Lim FWD Gain 1.25 0.00–2.55 -- 5-36 C07-06 T-Lim REV Gain 1.25 0.00–2.55 -- 5-36 C07-07 T-Lim RGN Gain 1.25 0.00–2.55 -- 5-36 C07-08 Trq Lim I Time 200 5–10000 ms 5-36 C07-09 Torque Limit Sel 0 0, 1 -- 5-36 C07-10 Trav Trq Limiter 0 0, 1 -- 5-36 C07-11 Limiter Freq 2.0 0.5–10.0 Hz 5-36 C07-12 Anti-Shock 0 0–2 -- 5-37 C07-13 Enabling Freq 6.0 0.0–60.0 Hz 5-37 C07-14 Re-Accel Delay 0.20 0.00–2.55 sec 5-37 C07-15 Torque Delta 10 0–180 % 5-37 C07-16 Detection Time 0.30 0.01–0.50 sec 5-37 C07-17 Smoothing Freq 3.0 0.0–15.0 Hz 5-37 * Initial value set by X-Press Programming (Table 4-5, 4-6, or 4-7 on pages 4-11, 4-12, and 4-13). ** Initial value dependant on drive size, which is determined by O02-04 (kVA Selection). *** Value is automatically set during auto tuning. **** 0.0–25.5 seconds is extended to 0.0–6000.0 seconds when B05-16 = 1. ***** Initial value is dependent on carrier. 2kHz = 0. else 1. IMPULSE®•G+ & VG+ Series 4 Instruction Manual – August 2013 A-6 Parameter Parameter Name Default Range Units Reference C07-18 Smoothing Decel 0.30 0.00–1.00 sec 5-37 C07-19 Steadying Delta 5 0–50 % 5-37 C07-20 Steadying Time 0.20 0.00–0.50 sec 5-37 C07-21 Steadying Max 2.50 0.00–2.55 sec 5-37 C07-22 AlarmDisplayTime 4 0–30 sec 5-37 C07-23 No Load Torque 20 0–100 % 5-37 C07-24 Required Torque 75 0–180 % 5-37 C07-25 Detection Method 1 0, 1 -- 5-37 C08-01 Torque Comp Time 1.00 0.00–2.55 -- 5-40 C08-02 IFB OK Time 1.00 0.00–2.55 sec 5-41 C08-03 Min Brk Rel Trq 10 0–300 % 5-41 C08-04 Rollback Timer 0.30 0.00–2.55 sec 5-41 C08-05 Rollback Count 800 0–15000 pulses 5-41 C08-06 BE3/Alt Torq Tim 0.30 0.00–2.55 sec 5-41 C08-07 BE3 Detect Count 10 0–15000 pulses 5-41 C08-08 Alt Rev Trq Lim 25 0–300 % 5-41 C08-09 Zero Speed Level 1.0 0.0–10.0 Hz 5-41 C08-10 Load Float Time 10* 0–65535 sec 5-41 C08-11 Brake Set Delay 0.7 0.0–25.5 sec 5-41 C08-12 BE6 Detect Time 5.0 0.0–25.5 sec 5-41 C08-13 BE6 Max Count 250 0–15000 pulses 5-41 C08-14 Brake Hold Speed 0.0 (FLV) 0.0–25.5 (FLV) % 5-41 C08-15 Load Float Ext T 10 0–65535 sec 5-42 C08-16 Init FWD Brk Trq 100 10–300 % 5-42 C08-18 BE6 Up Speed Lim 6.0 0.0–150.0 Hz 5-42 C08-19 Brk Slip Reset 0 0, 1 -- 5-42 C08-20 BE6 Check Torque 1.0 0.5–20.0 % 5-42 C08-22 Brk Slip Detect 0 0, 1 -- 5-42 C08-23 Brk Slip Det Spd 1.0 0–10.0 Hz 5-42 C08-24 Brake Test Torq 1.25* (E0211*5252)/ F01-01 0–65535 flb 5-42 C08-25 Brake Test Speed 6 0–10 Hz 5-42 C09-01 Digital In Sel 0 0–2, 5 -- 5-43 C09-02 DIO Terminal 1 0 0–FF -- 5-43 C09-03 DIO Terminal 2 0F 0–FF -- 5-43 C09-04 DIO Terminal 3 0F 0–FF -- 5-43 C09-05 DIOTerminal 4 0F 0–FF -- 5-43 C09-06 DIO Terminal 5 0F 0–FF -- 5-43 C09-07 DIO Terminal 6 0F 0–FF -- 5-43 * Initial value set by X-Press Programming (Table 4-5, 4-6, or 4-7 on pages 4-11, 4-12, and 4-13). ** Initial value dependant on drive size, which is determined by O02-04 (kVA Selection). *** Value is automatically set during auto tuning. **** 0.0–25.5 seconds is extended to 0.0–6000.0 seconds when B05-16 = 1. ***** Initial value is dependent on carrier. 2kHz = 0. else 1. IMPULSE®•G+ & VG+ Series 4 Instruction Manual – August 2013 A-7 Parameter Parameter Name Default Range Units Reference C09-08 DIO Terminal 7 0F 0–FF -- 5-43 C09-09 DIO Terminal 8 0F 0–FF -- 5-43 C09-10 DIO Terminal 9 0F 0–FF -- 5-43 C09-11 DIO Terminal 10 0F 0–FF -- 5-43 C09-12 DIO Terminal 11 0F 0–FF -- 5-43 C09-13 DIO Terminal 12 0F 0–FF -- 5-43 C09-14 DIO Terminal 13 0F 0–FF -- 5-43 C09-15 DIO Terminal 14 0F 0–FF -- 5-43 C09-16 DIO Terminal 15 0F 0–FF -- 5-43 C09-17 DIO Terminal 16 0F 0–FF -- 5-43 C10-01 Load Weight 0 0–2 -- 5-44 C10-02 LW Start 0 0, 1 -- 5-44 C10-03 LW Display Hold 0 0, 1 -- 5-44 C10-04 LW Conversion 0 0–39999 -- 5-44 C10-05 Test Freq 6 0–E01-04 Hz 5-44 C10-06 Unit Displayed 4 0–4 -- 5-44 C10-07 Holding Time 1.00 0.00–2.55 sec 5-44 C10-09 Full Load Torque 100.0 0.0–200.0 % 5-44 C10-10 No Load Torque 20.0 0.0–200.0 % 5-44 C11-01 Slack Cable 0 0, 1 -- 5-46 C11-02 Action at SCL 2 0–5 -- 5-46 C11-03 SLC Detect Torq 30 0–100 % 5-46 C11-04 SLC Detect Spd 1 2 0–E01-04 Hz 5-47 C11-05 SLC Delay Time 1 0.50 0.00–2.55 sec 5-47 C11-06 SLC Detect Spd 2 60 0–E01-04 Hz 5-47 C11-07 SLC Delay Time 2 0.10 0.00–2.55 sec 5-47 C11-08 Snap Shaft 0 0, 1 -- 5-48 C11-09 Action at Snap 0 0, 1 -- 5-48 C11-10 Delta Speed 1.0 0.0–E01-04 Hz 5-48 C11-11 Delay Time 250 0–2000 ms 5-48 C11-12 Gear Ratio Num 10000 1–65535 -- 5-48 C11-13 Gear Ratio Den 10000 1–65535 -- 5-48 C12-01 Brake Jog Delay 0.0 0.0–100.0 sec 5-49 C12-02 Brake Run Delay 0.0 0.0–100.0 sec 5-49 C12-03 Delay-ON Timer 0.0 0.0–3000.0 sec 5-49 C12-04 Delay-OFF Timer 0.0 0.0–3000.0 sec 5-49 C12-05 Maintenance Tmr 0 0–32767 hr 5-50 C12-06 Maintenance Gain 0.50 0.00–1.00 -- 5-50 C13-01 Inch Run Time 1.00 0.00–2.55 sec 5-51 C13-02 Repeat Delay Tim 1.00 0.00–2.55 sec 5-51 * Initial value set by X-Press Programming (Table 4-5, 4-6, or 4-7 on pages 4-11, 4-12, and 4-13). ** Initial value dependant on drive size, which is determined by O02-04 (kVA Selection). *** Value is automatically set during auto tuning. **** 0.0–25.5 seconds is extended to 0.0–6000.0 seconds when B05-16 = 1. ***** Initial value is dependent on carrier. 2kHz = 0. else 1. IMPULSE®•G+ & VG+ Series 4 Instruction Manual – August 2013 A-8 Parameter Parameter Name Default Range Units Reference C13-03 Index Run Ref 0.10 0.01–60.00 Hz 5-53 C13-04 index Revs 0 0–65535 Rev 5-53 C13-05 Index Count 100 0–65535 Pulses 5-53 C13-06 Index Rpt Delay 0.00 0.00–60.00 sec 5-53 C13-07 Index Complete 10 0–32767 -- 5-53 C13-08 Index Zsv Gain 10 0–100 -- 5-53 C13-09 Index ASR P Gain 30.00 0.00–300.00 -- 5-53 C13-10 Index ASR I Time 0.200 0.000– 10.000 sec 5-53 C13-11 Acc/Dec Gain 1.0 0.0–5.0 -- 5-53 C13-12 Index Brake Ctrl TRAV: 0–2 NLB: 0, 2 NLB: 2 else: 0 -- 5-54 D01-01 DCInj Start Freq 0.5 0.0–10.0 Hz 5-55 D01-02 DCInj Current 50 0–100 % 5-55 D01-03 DCInj Time@Start 0.00 0.00–10.00 sec 5-55 D01-04 DCInj Time@Stop 0.05 0.00–10.00 sec 5-55 D02-01 Slip Comp Gain V/f: 0.0 OLV: 1.0 FLV: 1.0 0.0–2.5 -- 5-56 D02-02 Slip Comp Time V/f: 2000 OLV: 200 0–10000 ms 5-56 D02-03 Slip Comp Limit 200 0–250 % 5-56 D02-04 Slip Comp Regen 0 0–2 -- 5-56 D02-05 Output V Lim Sel 0 0, 1 -- 5-56 D02-13 Output V Limit Start Level 85.0 70.0–90.0 % 5-56 D02-14 Output V Limit Max Level 90.0 85.0–100.0 % 5-56 D02-15 Output V Limit Level 90.0 30.0–100.0 % 5-56 D03-01 Torq Comp Gain 1.0 0.00–2.50 -- 5-57 D03-02 Torq Comp Time V/f: 200 OLV: 20 0–60000 ms 5-57 D03-03 F TorqCmp@start 0.0 0.0–200.0 % 5-57 D03-04 R TorqCmp@start 0.0 -200.0–0.0 % 5-57 D03-05 TorqCmp Delay T 10 0–200 ms 5-57 D03-06 Start Torq Time 150 0–10000 ms 5-57 D04-01 ASR P Gain 1 20.00 0.00–300.00 -- 5-60 D04-02 ASR I Time 1 0.100 0.000– 10.000 sec 5-60 D04-03 ASR P Gain 2 20.00 0.00–300.00 -- 5-60 D04-04 ASR I Time 2 0.500 0.000– 10.000 sec 5-60 D04-06 ASR Delay Time 0.004 0.000–0.500 sec 5-60 D04-07 ASR Gain SW Freq 0.0 0.0–150.0 Hz 5-60 D04-08 ASR I Limit 400 0–400 % 5-60 * Initial value set by X-Press Programming (Table 4-5, 4-6, or 4-7 on pages 4-11, 4-12, and 4-13). ** Initial value dependant on drive size, which is determined by O02-04 (kVA Selection). *** Value is automatically set during auto tuning. **** 0.0–25.5 seconds is extended to 0.0–6000.0 seconds when B05-16 = 1. ***** Initial value is dependent on carrier. 2kHz = 0. else 1. IMPULSE®•G+ & VG+ Series 4 Instruction Manual – August 2013 A-9 Parameter Parameter Name Default Range Units Reference D04-36 NLB Strt ASR I 0.100 0.000– 30.000 -- 5-60 D04-37 NLB Strt ASR Dly 0.50 0.00–2.55 -- 5-60 D05-01 Torq Control Sel 0 0, 1 -- 5-62 D05-02 Torque Ref Filter 0 0–1000 ms 5-62 D05-03 Speed Limit Sel 2 1, 2 -- 5-62 D05-04 Speed Lmt Value 105 -120–120 % 5-62 D05-05 Speed Lmt Bias 10 0–120 % 5-62 D05-06 Ref Hold Time 0 0–1000 ms 5-62 D05-08 Drctn SpdLmt Sel 1 0, 1 -- 5-62 D09-01 SCrv Acc @ Start 0.20* 0.00–10.00 sec 5-65 D09-02 SCrv Acc @ End 0.20* 0.00–10.00 sec 5-65 D09-03 SCrv Dec @ Start 0.20* 0.00–10.00 sec 5-65 D09-04 SCrv Dec @ End 0.00 0.00–10.00 sec 5-65 D10-01 Heavy/Normal Duty 0 0, 1 -- 5-66 D10-02 CarrierFreq Sel 1 1–9, A, F -- 5-67 D10-03 CarrierFreq Max 2.0 1.0–15.0 kHz 5-67 D10-04 CarrierFreq Min 2.0 1.0–15.0 kHz 5-67 D10-05 CarrierFreq Gain 00 00–99 -- 5-67 D11-01 Hunt Prev Select 1 0, 1 -- 5-68 D11-02 Hunt Prev Gain 1.00 0.00–2.50 -- 5-68 D11-03 Hunt Prev Time 10 000–500 ms 5-68 D11-05 REV Hunt Pref Gn 0.00 0.00–2.50 -- 5-68 E01-01 Input Voltage 230V: 230 460V: 460 575V: 575 230V: 155– 255 460V: 310– 510 575V: 446– 733 VAC 5-69 E01-03 V/f Selection * V/f: 0–9, A– F, FF OLV: 0F, FF -- 5-71 E01-04 Max Frequency 60.0 40.0–150.0 Hz 5-71 E01-05 Max Voltage Determined by O02-04 0.0–733.1 VAC 5-72 E01-06 Base Frequency 60.0 0.0–150.0 Hz 5-72 E01-07 Mid Frequency A Determined by E1-03 0.0–150.0 Hz 5-72 E01-08 Mid Voltage A Determined by E1-03 0.0–733.1 VAC 5-72 E01-09 Min Frequency Determined by E1-03 0.0–150.0 Hz 5-72 E01-10 Min Voltage Determined by E1-03 0.0–733.1 VAC 5-72 * Initial value set by X-Press Programming (Table 4-5, 4-6, or 4-7 on pages 4-11, 4-12, and 4-13). ** Initial value dependant on drive size, which is determined by O02-04 (kVA Selection). *** Value is automatically set during auto tuning. **** 0.0–25.5 seconds is extended to 0.0–6000.0 seconds when B05-16 = 1. ***** Initial value is dependent on carrier. 2kHz = 0. else 1. IMPULSE®•G+ & VG+ Series 4 Instruction Manual – August 2013 A-10 Parameter Parameter Name Default Range Units Reference E01-11 Mid Frequency B 0.0 0.0–150.0 Hz 5-72 E01-12 Mid Voltage B 0.0 0.0–733.1 VAC 5-72 E01-13 Base Voltage 0.0 0.0–733.1 VAC 5-72 E02-01 Motor Rated FLA ** ** -- 5-75 E02-02 Motor Rated Slip ** 0.00–20.00 Hz 5-75 E02-03*** No-Load Current ** 0–[(E02-01)1] -- 5-75 E02-04 Number of Poles 4 2–48 -- 5-75 E02-05*** Terminal Resistance ** 0.000– 65.000 5-75 E02-06*** Leak Inductance ** 0.0–40.0 % 5-75 E02-07*** Saturation Comp 1 0.50 0.00–0.50 -- 5-75 E02-08*** Saturation Comp 2 0.75 E02-07–0.75 -- 5-75 E02-09*** Mechanical Loss 0.0 0.0–10.0 % 5-75 E02-10*** Motor Iron Loss ** 0–65535 W 5-75 E02-11 Rated Horsepower ** 0.0–650.0 HP 5-75 E03-02 Stopping Method 1 0, 1 -- 5-76 E03-03 Max Frequency 60.0 40.0–150.0 Hz 5-76 E03-04 Max Voltage Determined by O02-04 230V: 0.0– 255.0 460V: 0.0– 510.0 575V: 0.0– 733.1 V 5-76 E03-05 Base Frequency 60.0 0.0–150.0 Hz 5-76 E03-06 Mid Frequency A Determined by E01-03 0.0–150.0 Hz 5-76 E03-07 Mid Voltage A Determined by E01-03 230V: 0.0– 255.0 460V: 0.0– 510.0 575V: 0.0– 733.1 V 5-76 E03-08 Min Frequency Determined by E01-03 0.0–150.0 Hz 5-76 E03-09 Min Voltage Determined by E01-03 230V: 0.0– 255.0 460V: 0.0– 510.0 575V: 0.0– 733.1 V 5-76 E03-10 Mid Frequency B 0.0 0.0–150.0 Hz 5-76 * Initial value set by X-Press Programming (Table 4-5, 4-6, or 4-7 on pages 4-11, 4-12, and 4-13). ** Initial value dependant on drive size, which is determined by O02-04 (kVA Selection). *** Value is automatically set during auto tuning. **** 0.0–25.5 seconds is extended to 0.0–6000.0 seconds when B05-16 = 1. ***** Initial value is dependent on carrier. 2kHz = 0. else 1. IMPULSE®•G+ & VG+ Series 4 Instruction Manual – August 2013 A-11 Parameter Parameter Name Default Range Units Reference E03-11 Mid Voltage B 0.0 230V: 0.0– 255.0 460V: 0.0– 510.0 575V: 0.0– 733.1 V 5-76 E03-12 Base Voltage 0.0 230V: 0.0– 255.0 460V: 0.0– 510.0 575V: 0.0– 733.1 V 5-76 F01-01 PG1 Pulses/Rev 1024 0–60000 PPR 5-77 F01-02 PG1 Rotation Sel 0 0, 1 -- 5-77 F01-03 PG1 Output Ratio 1 001–132 -- 5-77 F01-04 PG1 #Gear Teeth1 0 0–1000 -- 5-77 F01-05 PG1 #Gear Teeth2 0 0–1000 -- 5-77 F01-06 PGO-1-H 15 0–100 ms 5-78 F01-11 PG2 Pulses/Rev 1024 0–60000 ppr 5-78 F01-12 PG2 Rotation Sel 0 0, 1 -- 5-78 F01-13 PG2 #Gear Teeth1 0 0–1000 -- 5-78 F01-14 PG2 #Gear Teeth2 0 0–1000 -- 5-78 F01-15 PG2 Output Ratio 1 1–132 -- 5-78 F01-16 PGO-2-H 15 0–100 ms 5-78 F01-21 PG Fdbk Loss Sel 1 0–3 NLB: 1 -- 5-78 F01-22 PGO-1-S Det Time 2.0 0.0–10.0 sec 5-78 F01-23 PG Overspeed Sel 1 0–3 NLB: 1 -- 5-78 F01-24 PG Overspd Level 105 0–120 % 5-78 F01-25 PG Overspd Time 0.0 0.0–2.0 sec 5-78 F01-26 PG Deviation Sel 5 Traverse: 0–7 NLB: 5 -- 5-79 F01-27 PG Deviate Level 10 0–50 % 5-79 F01-28 PG Deviate Time 0.3 0.0–10.0 sec 5-79 F02-01 AI Function Sel 0 0, 1 -- 5-80 F02-02 AI Input Gain 100.0 -999.9– 999.9 % 5-80 F02-03 AI Input Bias 0.0 -999.9– 999.9 % 5-80 F04-01 AO Ch1 Select 102 1–630 -- 5-81 F04-02 AO Ch1 Gain 100 -999.9– 999.9 % 5-81 F04-03 AO Ch2 Select 103 1–630 -- 5-81 * Initial value set by X-Press Programming (Table 4-5, 4-6, or 4-7 on pages 4-11, 4-12, and 4-13). ** Initial value dependant on drive size, which is determined by O02-04 (kVA Selection). *** Value is automatically set during auto tuning. **** 0.0–25.5 seconds is extended to 0.0–6000.0 seconds when B05-16 = 1. ***** Initial value is dependent on carrier. 2kHz = 0. else 1. IMPULSE®•G+ & VG+ Series 4 Instruction Manual – August 2013 A-12 Parameter Parameter Name Default Range Units Reference F04-04 AO Ch2 Gain 50 -999.9– 999.9 % 5-81 F04-05 AO Ch1 Bias 0.0 -999.9– 999.9 % 5-81 F04-06 AO Ch2 Bias 0.0 -999.9– 999.9 % 5-81 F04-07 AO Opt Level CH1 0 0, 1 -- 5-81 F04-08 AO Opt Level CH2 0 0, 1 -- 5-81 F05-01 DO Ch1 Select F 0–148 -- 5-82 F05-02 DO Ch2 Select F 0–148 -- 5-82 F05-03 DO Ch3 Select F 0–148 -- 5-82 F05-04 DO Ch4 Select F 0–148 -- 5-82 F05-05 DO Ch5 Select F 0–148 -- 5-82 F05-06 DO Ch6 Select F 0–148 -- 5-82 F05-07 DO Ch7 Select F 0–148 -- 5-82 F05-08 DO Ch8 Select F 0–148 -- 5-82 F05-09 DO Function Sel 2 0–2 -- 5-82 F06-01 Comm Bus Flt Sel 1 0–4 -- 5-84 F06-02 EF0 Detection 0 0, 1 -- 5-84 F06-03 EF0 Fault Action 1 0–4 -- 5-84 F06-04 BUS Err Det Time 2.0 0.0–5.0 sec 5-84 F06-06 Torq Ref/Lmt Sel 0 0, 1 -- 5-84 F06-07 Fref PrioritySel 0 0, 1 -- 5-84 F06-08 Com Prm Init Sel 0 0, 1 -- 5-84 F06-30 PB Node Address 0 0–125 -- 5-84 F06-31 PB Clear Select 0 0, 1 -- 5-85 F06-32 PB Map Select 0 0, 1 -- 5-85 F06-35 CO Node Address 0 0–126 -- 5-85 F06-36 CO Baud Rate 6 0–8 -- 5-85 F06-50 DN MAC Address 64 0–64 -- 5-85 F06-51 DN Baud Rate 4 0–4 -- 5-85 F06-52 DN PCA Selection 21 0–225 -- 5-85 F06-53 DN PPA Selection 71 0–225 -- 5-85 F06-54 DN Idle Flt Det 0 0, 1 -- 5-85 F06-55 DN BAUD RATE MEM 0 0–2 -- 5-86 F06-56 DN Speed Scale 0 -15–15 -- 5-86 F06-57 DN Current Scale 0 -15–15 -- 5-86 F06-58 DN Torque Scale 0 -15–15 -- 5-86 F06-59 DN Power Scale 0 -15–15 -- 5-86 F06-60 DN Voltage Scale 0 -15–15 -- 5-86 F06-61 DN Time Scale 0 -15–15 -- 5-86 * Initial value set by X-Press Programming (Table 4-5, 4-6, or 4-7 on pages 4-11, 4-12, and 4-13). ** Initial value dependant on drive size, which is determined by O02-04 (kVA Selection). *** Value is automatically set during auto tuning. **** 0.0–25.5 seconds is extended to 0.0–6000.0 seconds when B05-16 = 1. ***** Initial value is dependent on carrier. 2kHz = 0. else 1. IMPULSE®•G+ & VG+ Series 4 Instruction Manual – August 2013 A-13 Parameter Parameter Name Default Range Units Reference F06-62 DN Heart Beat 0 0–10 -- 5-86 F06-63 DN MAC ID MEM 0 0–63 -- 5-86 F07-01 IP Address 1 192 0–255 -- 5-86 F07-02 IP Address 2 168 0–255 -- 5-86 F07-03 IP Address 3 1 0–255 -- 5-86 F07-04 IP Address 4 20 0–255 -- 5-86 F07-05 Subnet Mask 1 255 0–255 -- 5-86 F07-06 Subnet Mask 2 255 0–255 -- 5-86 F07-07 Subnet Mask 3 255 0–255 -- 5-86 F07-08 Subnet Mask 4 0 0–255 -- 5-86 F07-09 Gateway IP Add 1 192 0–255 -- 5-86 F07-10 Gateway IP Add 2 168 0–255 -- 5-86 F07-11 Gateway IP Add 3 1 0–255 -- 5-86 F07-12 Gateway IP Add 4 1 0–255 -- 5-86 F07-13 IP Add Mode Sel 2 0–2 -- 5-87 F07-14 Duplex Select 1 0–2 -- 5-87 F07-15 Baud Rate 10 10, 100 -- 5-87 F07-16 CommLoss tout 0 0–300 deciseconds 5-87 H01-01 Terminal S1 Sel 80 (FWD) 0–81 -- 5-88 H01-02 Terminal S2 Sel 81 (REV) 0–81 -- 5-88 H01-03 Terminal S3 Sel * 0–81 -- 5-88 H01-04 Terminal S4 Sel * 0–81 -- 5-88 H01-05 Terminal S5 Sel * 0–81 -- 5-88 H01-06 Terminal S6 Sel * 0–81 -- 5-88 H01-07 Terminal S7 Sel * 0–81 -- 5-88 H01-08 Terminal S8 Sel * 0–81 -- 5-88 H01-09 Flt Latch Sel 1 0F 0F–74 -- 5-91 H01-10 Flt Latch Sel 2 0F 0F–74 -- 5-91 H01-14 Alt Ref Override 0 0, 1 -- 5-88 H02-01 Term M0-M1 Sel * 0–1FF -- 5-93 H02-02 Term M2-M3 Sel * 0–1FF -- 5-93 H02-03 Term M5-M6 Sel * 0–1FF -- 5-93 H02-06 Wh Disp Units 0 0–4 -- 5-93 H03-01 Term A1 Signal * 0, 1 -- 5-100 H03-02 Terminal A1 Sel * 0–31 -- 5-100 H03-03 Terminal A1 Gain 100.0 -999.9– 999.9 % 5-100 H03-04 Terminal A1 Bias 0.0 -999.9– 999.9 % 5-100 H03-05 Term A3 Signal 0 0, 1 -- 5-100 * Initial value set by X-Press Programming (Table 4-5, 4-6, or 4-7 on pages 4-11, 4-12, and 4-13). ** Initial value dependant on drive size, which is determined by O02-04 (kVA Selection). *** Value is automatically set during auto tuning. **** 0.0–25.5 seconds is extended to 0.0–6000.0 seconds when B05-16 = 1. ***** Initial value is dependent on carrier. 2kHz = 0. else 1. IMPULSE®•G+ & VG+ Series 4 Instruction Manual – August 2013 A-14 Parameter Parameter Name Default Range Units Reference H03-06 Terminal A3 Sel * 0–31 -- 5-100 H03-07 Terminal A3 Gain 100.0 -999.9– 999.9 % 5-100 H03-08 Terminal A3 Bias 0.0 -999.9– 999.9 % 5-100 H03-09 Term A2 Signal 2 0–3 -- 5-100 H03-10 Terminal A2 Sel 1F 0–31 -- 5-100 H03-11 Terminal A2 Gain 100.0 -999.9– 999.9 % 5-100 H03-12 Terminal A2 Bias 0.0 -999.9– 999.9 % 5-100 H03-13 Filter Avg Time 0.03 0.00–2.00 sec 5-100 H03-14 A1/A2/A3 Sel 7 1–7 -- 5-101 H03-15 TerminalA1Offset 0 -500–500 -- 5-101 H03-16 TerminalA2Offset 0 -500–500 -- 5-101 H03-17 TerminalA3Offset 0 -500–500 -- 5-101 H04-01 Terminal FM Sel 102 000–630 -- 5-103 H04-02 Terminal FM Gain 100.0 -999.9– 999.9 % 5-104 H04-03 Terminal FM Bias 0.0 -999.9– 999.9 % 5-104 H04-04 Terminal AM Sel 103 000–630 -- 5-104 H04-05 Terminal AM Gain 50.0 -999.9– 999.9 % 5-104 H04-06 Terminal AM Bias 0.0 -999.9– 999.9 % 5-104 H04-07 FM Level Select 0 0–2 -- 5-104 H04-08 AM Level Select 0 0–2 -- 5-104 H05-01 Serial Comm Adr 1F 01–FF -- 5-105 H05-02 Serial Baud Rate 3 0–8 -- 5-105 H05-03 Serial Com Sel 0 0–2 -- 5-105 H05-04 Serial Fault Set 0 0–3 -- 5-105 H05-05 Serial Flt Dtct 1 0, 1 -- 5-105 H05-06 Transmit WaitTIM 5 5–65 ms 5-105 H05-07 RTS Control Sel 1 0, 1 -- 5-105 H05-09 CE Detect Time 2.0 0.0–10.0 sec 5-105 H05-10 CommReg 25h Unit 0 0, 1 -- 5-105 H05-11 Enter CommandSel 1 0, 1 -- 5-106 H05-12 Run CommandSel 0 0, 1 -- 5-106 H06-01 Pulse Input Sel 0 0, 5–7 -- 5-107 H06-02 Pulse In Scale 1440 1000–32000 Hz 5-107 H06-03 Pulse Input Gain 100.0 0.0–1000.0 % 5-107 * Initial value set by X-Press Programming (Table 4-5, 4-6, or 4-7 on pages 4-11, 4-12, and 4-13). ** Initial value dependant on drive size, which is determined by O02-04 (kVA Selection). *** Value is automatically set during auto tuning. **** 0.0–25.5 seconds is extended to 0.0–6000.0 seconds when B05-16 = 1. ***** Initial value is dependent on carrier. 2kHz = 0. else 1. IMPULSE®•G+ & VG+ Series 4 Instruction Manual – August 2013 A-15 Parameter Parameter Name Default Range Units Reference H06-04 Pulse Input Bias 0.0 -100.0– 100.0 % 5-107 H06-05 Pulse In Filter 0.10 0.00–2.00 sec 5-107 H06-06 Pulse Output Sel 102 0–502 -- 5-107 H06-07 Pulse Out Scale 1440 0–32000 Hz 5-107 H06-08 Pulse Min Freq 0.5 0.1–1000.0 Hz 5-107 H06-09 Pulse Dev Detect 5.0 0.0–25.5 % 5-107 L01-01 Mtr OL Charact 3 0–3 -- 5-108 L01-02 MOL Time Const 1.0 0.1–5.0 min 5-108 L01-03 Mtr OH Alarm Sel 3 0–3 -- 5-109 L01-04 Mtr OH Fault Sel 1 0–2 -- 5-109 L01-05 Mtr Temp Filter 0.20 0.00–10.00 sec 5-109 L01-13 Mtr OL Mem Sel 1 0, 1 -- 5-109 L02-01 PwrL Selection 0 0–5 -- 5-109 L02-02 PwrL Ridethru t ** 0.0–25.5 sec 5-109 L02-03 PwrL BaseBlock t ** 0.1–5.0 sec 5-109 L02-04 PwrL V/F Ramp t ** 0.0–5.0 sec 5-109 L02-05 PUV Det Level Determined by E1-01 230V: 150– 210 460V: 300– 420 575V: 431– 604 VDC 5-109 L03-01 StallP Accel Sel 1 0–2 -- 5-110 L03-02 StallP Accel Lvl Determined by D10-01 0–150 % 5-110 L03-03 StallPAcc LowLim 50 0–100 % 5-110 L03-05 StallP Run Sel 1 0–2 -- 5-110 L03-06 StallP Run Level Determined by D10-01 30–150 % 5-110 L03-11 OV Inhibit Sel 0 0, 1 -- 5-110 L03-17 DC Bus Reg Level 230 V: 375 460 V: 750 575 V: 930 230 V: 150– 400 460 V: 300– 800 575 V: 431– 1150 VDC 5-110 L03-20 DC Bus P Gain A01-02 0.00–5.00 -- 5-110 L03-21 Acc/Dec P Gain S01-02 0.10–10.00 sec 5-111 L03-23 CHP Stall P Sel 0 0, 1 -- 5-111 L03-24 Mtr Accel Time O02-04 or E5-01 0.10–10.00 sec 5-111 L04-01 Spd Agree Level 0.0 0.0–150.0 Hz 5-113 L04-02 Spd Agree Width 2.0 0.0–20.0 Hz 5-113 * Initial value set by X-Press Programming (Table 4-5, 4-6, or 4-7 on pages 4-11, 4-12, and 4-13). ** Initial value dependant on drive size, which is determined by O02-04 (kVA Selection). *** Value is automatically set during auto tuning. **** 0.0–25.5 seconds is extended to 0.0–6000.0 seconds when B05-16 = 1. ***** Initial value is dependent on carrier. 2kHz = 0. else 1. IMPULSE®•G+ & VG+ Series 4 Instruction Manual – August 2013 A-16 Parameter Parameter Name Default Range Units Reference L04-03 Spd Agree Lvl+- 0.0 -150.0– 150.0 Hz 5-113 L04-04 Spd Agree Wdth+- 2.0 0.0–20.0 Hz 5-113 L04-05 Ref Loss Sel 0 0, 1 -- 5-113 L04-06 Fref at Floss 80.0 0.0–100.0 % 5-113 L04-07 Freq Detect Sel 0 0, 1 -- 5-113 L05-01 Test Mode 0 0, 1 -- 5-114 L06-01 Torque Det 1 Sel 0 0–8 -- 5-115 L06-02 Torq Det 1 Lvl 150 0–300 % 5-116 L06-03 Torq Det 1 Time 0.1 0.0–10.0 sec 5-116 L06-04 Torq Det 2 Sel 0 0–8 -- 5-116 L06-05 Torq Det 2 Lvl 150 0–300 % 5-116 L06-06 Torq Det 2 Time 0.1 0.0–10.0 sec 5-116 L06-08 Mech Fatigue Sel 0 0–8 -- 5-117 L06-09 MechFat Det Spd 110.0 -110.0–110.0 % 5-117 L06-10 MechFat Det Time 0.1 0.0–10.0 sec 5-117 L06-11 MechFat Det Hour 0 0–65535 -- 5-117 L08-02 OH Pre-Alarm Lvl ** 50–150 °C 5-118 L08-03 OH Pre-Alarm Sel 3 0–5 -- 5-118 L08-05 Ph Loss In Sel 1 0, 1 -- 5-118 L08-07 Ph Loss Out Sel 1 0–2 -- 5-118 L08-09 Ground Fault Sel 1 0, 1 -- 5-118 L08-10 Fan On/Off Sel 1 0, 1 -- 5-118 L08-11 Fan Delay Time 60 0–300 sec 5-118 L08-12 Ambient Temp 40 -10–50 °C 5-118 L08-13 UV3 Detect 1 0, 1 -- 5-118 L08-15 OL2 Sel @ L-Spd 0***** 0, 1 -- 5-119 L08-18 Soft CLA Sel 0 0, 1 -- 5-119 L08-19 Fc Red dur OHAlm 0.8 0.1–0.9 Hz 5-119 L08-32 MC,FAN Fault Sel 1 0–4 -- 5-119 L08-35 Installation Sel ** 0–3 -- 5-119 L08-38 Fc Reduct dur OL 2** 0–2 -- 5-119 L08-40 FC Reduct Time A01-02 0.00–2.00 sec 5-119 L08-41 High Cur Alm Sel 0 0, 1 -- 5-120 L08-55 DB Tr protection 1 0, 1 -- 5-120 L09-01 Reset Select 1 0, 1 -- 5-121 L09-02 Reset Attempts 3 0–10 -- 5-121 L09-03 Reset Time 0.5 0.5–180.0 sec 5-121 L09-04 Reset Flt Sel 1 0001 0000–FFFF -- 5-121 L09-05 Reset Flt Sel 2 E000 0000–FFFF -- 5-121 * Initial value set by X-Press Programming (Table 4-5, 4-6, or 4-7 on pages 4-11, 4-12, and 4-13). ** Initial value dependant on drive size, which is determined by O02-04 (kVA Selection). *** Value is automatically set during auto tuning. **** 0.0–25.5 seconds is extended to 0.0–6000.0 seconds when B05-16 = 1. ***** Initial value is dependent on carrier. 2kHz = 0. else 1. IMPULSE®•G+ & VG+ Series 4 Instruction Manual – August 2013 A-17 Parameter Parameter Name Default Range Units Reference L09-06 Flt Contact Sel 0 0, 1 -- 5-121 L09-07 Flt Launch Sel 1 0000 0000–FFFF -- 5-123 L09-08 Flt Launch Sel 2 0000 0000–FFFF -- 5-123 O01-01 User Monitor Sel 106 104–626 -- 5-124 O01-02 Power-On Monitor 3 1–5 -- 5-126 O01-03 Display Scaling A01-02 0–3 -- 5-126 O01-04 Display Units A01-02 0, 1 -- 5-126 O01-05 LCD Contrast 3 0–5 -- 5-126 O01-10 UserDisp Scaling 6000 1–60000 -- 5-126 O01-11 UserDisp Dec Sel 2 0–3 -- 5-126 O02-01 LO/RE Key 0 0, 1 -- 5-127 O02-02 Oper STOP Key 0 0–2 -- 5-127 O02-03 User DefaultSel 0 0–2 -- 5-127 O02-04 Inverter Model # ** 0x00–0xFF -- 5-127 O02-05 Operator M.O.P. 0 0, 1 -- 5-129 O02-06 Oper Detection 1 0, 1 -- 5-129 O02-07 FWD/REVSel@PwrUp 0 0, 1 -- 5-129 O02-15 Legacy RDSI 0 0, 1 -- 5-129 O02-19 ParameterSet Sel 0 0, 1 -- 5-129 O03-01 Elapsed Time Set 0 0–9999 hr 5-130 O03-02 Elapsed Time Run 1 0, 1 -- 5-130 O03-03 Fan ON Time Set 0 0–9999 hr 5-130 O03-05 BusCap Maint Set 0 0–150 % 5-130 O03-09 IGBT Maint Set 0 0–150 % 5-130 O03-11 Fault Data Init 0 0, 1 -- 5-130 O03-12 kWh Monitor Init 0 0, 1 -- 5-130 O03-14 Count Hist Clear 0 0–3 -- 5-130 O04-01 Copy Function Sel 0 0–3 -- 5-131 O04-02 Read Allowable 1 0, 1 -- 5-131 O04-07 ChrgCircMaintSet 0 0–150 % 5-131 T01-01 Tuning Mode Sel 0 0–2 -- 4-16 T01-02 Rated Horsepower ** -- Hp 4-16 T01-03 Rated Voltage ** -- V 4-16 T01-04 Rated Current ** -- A 4-16 T01-05 Rated Frequency 60.0 -- Hz 4-16 T01-06 Number of Poles 4 -- Poles 4-16 T01-07 Rated Speed 1750 -- RPM 4-16 T01-08 PG Pulses/Rev 1024 -- PPR 4-16 T01-09 No-Load Current -- -- -- 4-17 T01-10 Motor Rated Slip -- -- -- 4-17 * Initial value set by X-Press Programming (Table 4-5, 4-6, or 4-7 on pages 4-11, 4-12, and 4-13). ** Initial value dependant on drive size, which is determined by O02-04 (kVA Selection). *** Value is automatically set during auto tuning. **** 0.0–25.5 seconds is extended to 0.0–6000.0 seconds when B05-16 = 1. ***** Initial value is dependent on carrier. 2kHz = 0. else 1. IMPULSE®•G+ & VG+ Series 4 Instruction Manual – August 2013 A-18 Parameter Parameter Name Default Range Units Reference U01-01 Frequency Reference -- -- Hz 5-134 U01-02 Output Frequency -- -- Hz 5-134 U01-03 Output Current -- -- A 5-134 U01-04 Control Method -- -- -- 5-134 U01-05 Motor Speed -- -- Hz 5-134 U01-06 Output Voltage -- -- VAC 5-134 U01-07 DC Bus Voltage -- -- VDC 5-134 U01-08 Output HP -- -- HP 5-134 U01-09 Torque Reference -- -- % 5-134 U01-10 Input Terminal Status -- -- -- 5-134 U01-11 Output Terminal Status -- -- -- 5-134 U01-12 Inverter Control Status 1 -- -- -- 5-135 U01-14 CPU 1 SW Number -- -- -- 5-135 U01-15 Term A1 Level -- -- % 5-135 U01-16 Term A2 Level -- -- % 5-135 U01-17 Term A3 Level -- -- % 5-135 U01-20 SFS Output -- -- Hz 5-135 U01-21 AI Opt Ch1 Level -- -- % 5-135 U01-22 AI Opt Ch2 Level -- -- % 5-135 U01-23 AI Opt Ch3 Level -- -- % 5-135 U01-25 Opt In Low -- -- -- 5-135 U01-26 Opt In High -- -- -- 5-135 U01-28 CPU 2 SW Number -- -- -- 5-135 U01-29 Load Weight -- -- -- 5-135 U01-30 SS Delta Speed -- -- Hz 5-135 U01-34 OPE Error Code -- -- -- 5-135 U01-39 Transmit Error -- -- -- 5-135 U01-44 ASR out w/o Filter -- -- % 5-135 U01-50 Hook Height -- -- % 5-135 U01-51 Motor Revolutions -- -- Revs 5-135 U01-52 Maintenance Timer -- -- hr 5-135 U01-53 Index Counts -- -- Revs 5-136 U01-54 Term RP Inp Freq -- -- Hz 5-136 U01-60 PG CH1 Count -- -- Pulse 5-136 U01-61 PG CH2 Count -- -- Pulse 5-136 U01-63 PG CH1 Freq -- -- Hz 5-136 U01-64 PG CH2 Freq -- -- Hz 5-136 U01-65 PG Output Freq -- -- Hz 5-136 U01-66 BE6 Pulse Count -- -- Pulse 5-136 U01-68 LC Zone -- -- -- 5-136 * Initial value set by X-Press Programming (Table 4-5, 4-6, or 4-7 on pages 4-11, 4-12, and 4-13). ** Initial value dependant on drive size, which is determined by O02-04 (kVA Selection). *** Value is automatically set during auto tuning. **** 0.0–25.5 seconds is extended to 0.0–6000.0 seconds when B05-16 = 1. ***** Initial value is dependent on carrier. 2kHz = 0. else 1. IMPULSE®•G+ & VG+ Series 4 Instruction Manual – August 2013 A-19 Parameter Parameter Name Default Range Units Reference U01-69 LC Margin -- -- % 5-136 U01-84 NLB State -- -- -- 5-136 U01-85 NLB Rel Trq -- -- % 5-136 U01-86 Brk Test Trq -- -- Flb 5-136 U02-01 Current Fault -- -- -- 5-136 U02-02 Last Fault -- -- -- 5-136 U02-03 Frequency Ref -- -- Hz 5-136 U02-04 Output Freq -- -- Hz 5-136 U02-05 Output Current -- -- A 5-136 U02-06 Motor Speed -- -- Hz 5-136 U02-07 Output Voltage -- -- VAC 5-136 U02-08 DC Bus Voltage -- -- VDC 5-136 U02-09 Output HP -- -- HP 5-136 U02-10 Torque Reference -- -- % 5-136 U02-11 Input Terminal Sts -- -- -- 5-136 U02-12 Output Terminal Sts -- -- -- 5-136 U02-13 Inverter Status -- -- -- 5-136 U02-14 Elapsed Time -- -- hr 5-136 U02-15 SFS Output -- -- Hz 5-137 U02-16 Motor Iq Current -- -- % 5-137 U02-17 Motor Id Current -- -- % 5-137 U02-20 Actual Fin Temp -- -- °C 5-137 U02-27 Motor Temp (NTC) -- -- °C 5-137 U02-28 Fault Axis -- -- -- 5-137 U03-01 Last Fault -- -- -- 5-137 U03-02 Fault Message 2 -- -- -- 5-137 U03-03 Fault Message 3 -- -- -- 5-137 U03-04 Fault Message 4 -- -- -- 5-137 U03-05 Fault Message 5 -- -- -- 5-137 U03-06 Fault Message 6 -- -- -- 5-137 U03-07 Fault Message 7 -- -- -- 5-137 U03-08 Fault Message 8 -- -- -- 5-137 U03-09 Fault Message 9 -- -- -- 5-137 U03-10 Fault Message 10 -- -- -- 5-137 U03-11 Elapsed Time 1 -- -- hr 5-137 U03-12 Elapsed Time 2 -- -- hr 5-137 U03-13 Elapsed Time 3 -- -- hr 5-137 U03-14 Elapsed Time 4 -- -- hr 5-137 U03-15 Elapsed Time 5 -- -- hr 5-137 U03-16 Elapsed Time 6 -- -- hr 5-137 * Initial value set by X-Press Programming (Table 4-5, 4-6, or 4-7 on pages 4-11, 4-12, and 4-13). ** Initial value dependant on drive size, which is determined by O02-04 (kVA Selection). *** Value is automatically set during auto tuning. **** 0.0–25.5 seconds is extended to 0.0–6000.0 seconds when B05-16 = 1. ***** Initial value is dependent on carrier. 2kHz = 0. else 1. IMPULSE®•G+ & VG+ Series 4 Instruction Manual – August 2013 A-20 Parameter Parameter Name Default Range Units Reference U03-17 Elapsed Time 7 -- -- hr 5-137 U03-18 Elapsed Time 8 -- -- hr 5-137 U03-19 Elapsed Time 9 -- -- hr 5-137 U03-20 Elapsed Time 10 -- -- hr 5-137 U03-21 RUN Cmd Counter -- -- count 5-137 U03-22 U3-21 Rollovers -- -- count 5-137 U03-23 OL/LC Count -- -- count 5-137 U04-01 Drv Elapsed Time -- -- hr 5-138 U04-03 Fan Elapsed Time -- -- hr 5-138 U04-04 Fan Life Mon -- -- % 5-138 U04-05 Cap Life Mon -- -- % 5-138 U04-06 ChgCirc Life Mon -- -- % 5-138 U04-07 IGBT Life Mon -- -- % 5-138 U04-08 Heatsink Temp -- -- °C 5-138 U04-09 LED Oper Check -- -- -- 5-138 U04-10 kWh Lower 4 dig -- -- kWh 5-138 U04-11 kWh Upper 5 dig -- -- MWh 5-138 U04-12 CPU Occup Rate -- -- % 5-138 U04-13 Current PeakHold -- -- A 5-138 U04-14 Freq@ I PeakHold -- -- Hz 5-138 U04-16 Motor OL1 Level -- -- % 5-138 U04-17 Drive OL2 Level -- -- % 5-138 U04-18 Reference Source -- -- -- 5-138 U04-19 MEMOBUS Freq Ref -- -- % 5-138 U04-20 Option Freq Ref -- -- % 5-138 U04-21 Run Cmd Source -- -- -- 5-138 U04-22 MEMOBUS Ref Reg -- -- -- 5-138 U04-23 Option Ref Reg -- -- -- 5-138 U04-32 Motor Temp (NTC) -- -- -- 5-138 U04-37 OH Alarm Axis -- -- BIN 5-139 U04-38 FAN Alarm Axis -- -- BIN 5-139 U04-39 VOF Alarm Axis -- -- BIN 5-139 U06-01 Mot SEC Current -- -- % 5-139 U06-02 Mot EXC Current -- -- % 5-139 U06-03 ASR Input -- -- % 5-139 U06-04 ASR Output -- -- % 5-139 U06-05 Voltage Ref (Vq) -- -- VAC 5-139 U06-06 Voltage Ref (Vd) -- -- VAC 5-139 U06-07 ACR(q) Output -- -- % 5-139 U06-08 ACR(d) Output -- -- % 5-139 * Initial value set by X-Press Programming (Table 4-5, 4-6, or 4-7 on pages 4-11, 4-12, and 4-13). ** Initial value dependant on drive size, which is determined by O02-04 (kVA Selection). *** Value is automatically set during auto tuning. **** 0.0–25.5 seconds is extended to 0.0–6000.0 seconds when B05-16 = 1. ***** Initial value is dependent on carrier. 2kHz = 0. else 1. IMPULSE®•G+ & VG+ Series 4 Instruction Manual – August 2013 A-21 Parameter Parameter Name Default Range Units Reference U06-18 PG1 CounterValue -- -- -- 5-139 U06-19 PG2 CounterValue -- -- -- 5-139 U06-22 Zero Servo Pulse -- -- -- 5-139 U06-26 FF Cont Output -- -- % 5-139 * Initial value set by X-Press Programming (Table 4-5, 4-6, or 4-7 on pages 4-11, 4-12, and 4-13). ** Initial value dependant on drive size, which is determined by O02-04 (kVA Selection). *** Value is automatically set during auto tuning. **** 0.0–25.5 seconds is extended to 0.0–6000.0 seconds when B05-16 = 1. ***** Initial value is dependent on carrier. 2kHz = 0. else 1. IMPULSE®•G+ & VG+ Series 4 Instruction Manual – August 2013 A-22
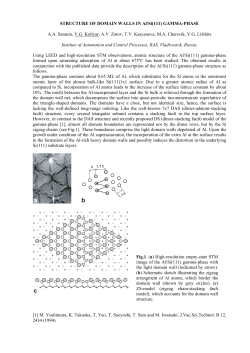


© Copyright 2026