
7. PREPARING AND TRANSMITTING EDGARLINK ONLINE SUBMISSIONS 7.1 Introduction
7. PREPARING AND TRANSMITTING EDGARLINK ONLINE SUBMISSIONS 7.1 Introduction EDGARLink Online allows you to prepare and submit a number of submission types. The main content of these submissions is made up of attached documents one of which is the form itself. Usually the filer creates these documents first and then “builds” the submission using the online interface. EDGARLink Online submissions are typically accessed from the ‘EDGARLink Online Form Submission’ link on the EDGAR Filing Website. However, a Draft Registration Statement which is an EDGARLink Online submission is accessed from the ‘Draft Reg. Statement’ link on the EDGAR Filing Website. The process to create and submit a Draft Registration Statement to EDGAR is identical to an EDGARLink Online submission. When you create your submission using EDGARLink Online, you must enter information into specified fields. Some fields are required, some fields are required when applicable, and some fields are optional. Required fields are indicated by a ‘*’ next to their labels. The EDGAR rules apply to both mandatory/required and optional fields. When you enter information into EDGAR-specified fields in the EDGARLink Online submission, headers are automatically created in XML. Just as EDGAR uses access codes to recognize you as a filer, EDGARLink Online needs information to accurately process the submission you are filing. For example, basic submission information identifies the entity for whom the filing is being made, gives information on fees, and indicates the type of document you are filing. EDGARLink Online verifies that the information required for submission validation has been entered. For example, if the submission requires the time period for which you are filing the report, EDGARLink Online verifies that you have provided a date in the Period field. For more information on field, document, or submission validation; see Section 7.4 Validating Your Submission. You must enter information in all header fields designated as “required” in the submission or EDGARLink Online will prevent you from making the submission. EDGARLink Online helps you prepare, submit, and correct submissions by: ● Formatting your submission information using XML. This formatting is needed to process your submission in EDGAR. To manually create a submission in XML, see Chapter 10, FILER-CONSTRUCTED XML SUBMISSIONS. ● Checking for formatting errors in the document and submission prior to submitting it. ● Assisting you in troubleshooting errors. EDGARLink Online provides a screen text viewer that allows you to identify errors in the submission. Note: If there are errors in your submission document, you need to incorporate your changes, save the document, and reattach it to your submission. You can use the EDGAR Filing Website to submit EDGARLink Online Filings.The EDGAR Gateway will also direct you to the EDGAR Filing Website. Note: Please remember to enter https when entering the URL. You will not be able to access the EDGAR Filing Website without the “s” designation. June 2014 7-1 EDGAR Filer Manual (Volume II) The EDGAR Filing Website provides the following capabilities: ● Accesses EDGAR’s features using the Internet. ● Provides online submission preparation and transmission. ● Provides editing capabilities for your company information. ● Provides submission notification messages. ● Provides requested Return Copy download capabilities. ● Allows filers to update their EDGAR Password. We require that your browser support JavaScript and we recommend that you accept browser “cookies” when accessing this website. The EDGAR Filing Website software contains functions that allow us to remind you if you need to update your software depending upon the last time you visited the EDGAR Filing Website. This information is recorded in your browser cookies. It is your decision as to the best means to access the Internet. EDGAR accepts transmissions from any Internet source, so you can decide which Internet Service Provider (ISP) best suits your needs. Most filers will use the Internet website to submit EDGARLink Online filings. Another option for submitting EDGARLink Online filings is to connect using a Leased Line. This method is commonly used by bulk filers. 7.1.1 Using the EDGAR Filing Website Later in this document there will be step-by-step instructions for accessing the EDGARLink Online submissions form types. To do this you will use the EDGAR Filing Website. Before you get started on this process, read this section to get general information about this website. It will cover the basics about using a browser and accessing the EDGAR Filing Website. Detailed information on the screens is also included. To access the EDGAR Filing Website, either use the EDGAR Gateway or follow the directions listed below to access it directly: 1. Connect to the Internet. 2. Go to the EDGAR Filing Website Login page (https://www.edgarfiling.sec.gov). 3. Click in the CIK field and enter your CIK. Note: You must obtain Filer Login credentials (CIK and Password) to log in to the EDGAR Filing Website. For more information, please refer to Section 3.2 of Volume I of the Filer Manual. 4. Press [Tab] and enter your password. This is your login password, not your CCC, PMAC, or passphrase. Your password is case-sensitive. 5. Click the [Login to EDGAR] button. 6. If your CIK and password are valid and you have a passphrase, the Welcome page appears. The Create Passphrase page appears if your CIK and password are valid and you do not have a passphrase. See Section 3.2.4 of Volume I of the Filer Manual for information on creating a passphrase. EDGAR Filer Manual (Volume II) 7-2 June 2014 We have placed information and menu links on the EDGAR Filing Website Home page, that connect you to websites concerning filing and submission types, help files, SEC Rulemaking, and fee information. Once you log in to EDGAR, an option menu appears on the left-hand side of the browser window. This menu allows you to navigate easily through EDGAR without having to return to a menu page. Figure 7-1: EDGAR Menu illustrates the menu. Figure 7-1: EDGAR Menu Two additional functions will help you use the EDGAR Filing Website. The [Logoff] button ends your EDGAR session. Clicking ‘Home’ brings you to the EDGAR Filing Website Welcome page. From this menu you can move back and forth between pages, find news, or get additional assistance. This menu is broken down into four different sections: ● Information Exchange ● Draft Submissions ● Online Forms ● Support June 2014 7-3 EDGAR Filer Manual (Volume II) 7.1.1.1 Information Exchange In the Information Exchange section there are four links: ● Transmit The ‘Transmit’ link allows you to transmit your filings to EDGAR. This function applies to filer-constructed submissions. ● Retrieve/Edit Data By clicking the ‘Retrieve/Edit Data’ link, you can query company, filing, or module/segment information, retrieve your Return Copies or fee account information, request return of unused funds, or change your password or CCC. ● EDGARLink Online Form Submission By clicking the ‘EDGARLink Online Form Submission’ link, you can select a submission type to open it, and then enter the submission information, attach and validate documents and submit. Once submitted, the filing is processed by EDGAR. ● Fee Rate Table Click the ‘Fee Rate Table’ link to view the latest fee rate information from the SEC. The fee rate information displayed is: o Form Type o Fee Rate o Validity Date o Fee/Interest o Fee Type EDGARLink Online automatically includes the fee rates for calculating submission fees. Details for using EDGARLink Online to calculate the fee rates are covered in Section 7.2.2. 7.1.1.2 Draft Submissions This menu section provides a link that enables you to file Draft Registration Statements. Draft Registration Statements are EDGARLink Online submission form types which can be submitted via the following link: ● Draft Reg.Statement This link allows you to prepare and submit a New Draft Registration Statement (Form DRS), an Amended Draft Registration Statement (Form DRS/A), or a Correspondence Related to Draft Registration Statement (DRSLTR) to EDGAR for processing. Companies that qualify to submit draft registration statements either under the JOBS Act §106 or the Division of Corporation Finance’s Foreign Private Issuer policy must prepare and submit their confidential draft documents here. Filers can disseminate previously accepted draft registration statements that are yet to be disseminated to the public via the ‘Draft Reg. Statement’ link. EDGAR Filer Manual (Volume II) 7-4 June 2014 7.1.1.3 Online Forms This menu section provides links that enable you to file online submissions of the following forms: ● File 13H Allows you to prepare and submit Form 13H variants (13H, 13H-A, 13H-Q, 13H-I, 13H-T, and 13H-R) to EDGAR for processing. ● File Form 13F Allows you to prepare and submit Form 13F variants (13F-HR, 13F-HR/A, 13F-NT, and 13F-NT/A) to EDGAR for processing. ● File Municipal Advisor Forms Allows you to prepare and submit Municipal Advisor Forms (MA, MA-A, MA/A, MA-I, MA-I/A, and MA-W) to EDGAR for processing. 7.1.1.4 Support This menu section provides links to a number of resources that will assist you in the filing process. In addition to general help, you can review topics like frequently asked questions, and rule making. ● General Help If you need help while using EDGAR on the Internet, click ‘General Help’ from the menu to bring up the General Support Menu page that displays a list of help topics. See Figure 7-2: General Help Page. When you click a topic, you are shown information or additional links to specify the type of assistance you need. Figure 7-2: General Help Page ● Frequently Asked Questions ‘Frequently Asked Questions’ (FAQ) opens the EDGAR Frequently Asked Questions page. The FAQ page includes different questions that have been asked most often. Click the hyperlink topic to display the answer in the lower portion of the window. ● SEC Rulemaking The ‘SEC Rulemaking’ link leads you to an area of the SEC’s Public Website that gives you up-to-date rule information. You will get information about rules that have been proposed or adopted, as well as other bulletins and notices. June 2014 7-5 EDGAR Filer Manual (Volume II) ● Fees The ‘Fees’ link in the EDGAR menu opens the EDGAR Filing Fee Information page. This page contains information on filings that require fees, offsetting fees, making fee payments, and bank wire transfers. ● Company Search This link opens the Company Search page and redirects your browser to the EDGAR Company Database. From this website you can perform company searches through the EDGAR database that is updated daily. 7.1.2 Information on Headers Header information for your filing documents is still required in EDGAR, but you should not add them if you use EDGARLink Online. By using EDGARLink Online, your header tags and information are automatically placed in the correct nesting order and in the correct places within your submission. 7.2 Creating an EDGARLink Online Submission This section describes the general process for preparing an EDGARLink Online submission and transmitting it to EDGAR for processing. 7.2.1 Accessing the EDGARLink Online Submission You can access the different EDGARLink Online submissions on the EDGAR Filing Website using the EDGARLink Online Form Submission option from the left navigation menu. Note: Draft Registration Statements which are EDGARLink Online submissions can be accessed from the ‘Draft Reg. Statement’ link displayed under the Draft Submissions section of the EDGAR Filing Website. Companies that qualify to submit draft registration statements either under the JOBS Act §106 or the Division of Corporation Finance’s Foreign Private Issuer policy must use this link to prepare and submit their confidential draft documents. No co-registrants are allowed on Draft Registration Statements. The following sections of this chapter describe the steps for completing one submission form type. You can use these steps whether you are compiling a correspondence, filing a Draft Registration Statement, an annual 10-K, or submitting segments, as the Graphical User Interface for these form types are similar. Submissions consist of sets of fields and information designated for specific submission types. You will need to fill out the appropriate submission before you transmit it. To access an EDGARLink Online submission: 1. Access the EDGAR Filing Website and log in. 2. Click one of the following links on the left navigation menu, based on the form type you want to submit: Draft Reg.Statement The Draft Registration Statements page displays. Proceed to step 3 to access the form type you want to submit. EDGAR Filer Manual (Volume II) 7-6 June 2014 EDGARLink Online Form Submission The EDGARLink Online Type Selection page displays. Proceed to step 4 to access the form type you want to submit. 3. On the Draft Registration Statements page, click either the ‘New Draft Registration Statement’ or the ‘Amended Draft Registration Statement’ link to submit a draft registration statement. Click the ‘Correspondence Related to Draft Registration Statement’ link to submit a correspondence related to the draft registration statement. Note: All correspondence with the staff during the confidential or non-public portion of the filing review process must be submitted using the ‘Correspondence Related to Draft Registration Statement’ link. This ensures that your communication with the staff during the confidential or non-public part of the review remains in the non-public status. Do not send correspondence relating to a draft registration statement as a separate submission (using the CORRESP submission type). Figure 7-3: Draft Registration Statements Selection Page The selected draft registration statement page appears. Proceed to Section 7.3 for details on how to prepare your draft registration statement. Note: If you want to disseminate a draft registration statement, click the ‘Disseminate Draft Registration Statement’ link. Refer to the steps outlined in Section 7.7, Disseminating Draft Registration Statements, for information on how to disseminate a previously submitted DRS or DRS/A submission. June 2014 7-7 EDGAR Filer Manual (Volume II) 4. On the EDGARLink Online Submission Type Selection page, click the submission form type link. Alternatively, scroll through the Submission Types list box and select a submission type, then click the [Go to Form] button. Figure 7-4: EDGARLink Online Submission Type Selection Page The selected submission type appears. 7.2.2 Viewing the Fee Rate EDGARLink Online contains the latest fee rates from the SEC and automatically inputs this information into the Offering & Fees page. When you begin working on your fee bearing submission, EDGARLink Online uses this information to update the amount owed by automatically loading the rate into your submission. When the fee rates change, the latest rate is available in your submission. Check the EDGAR Filing Website for changes in fees. The changes in fee rate are noted on the EDGAR Welcome pages. EDGAR Filer Manual (Volume II) 7-8 June 2014 7.3 Preparing Your EDGARLink Online Submission 7.3.1 Submission This section outlines how to organize the EDGARLink Online submissions. Section 7.3.11, Module and Segment Submissions, provides support for preparing module and segment submission. Section 7.3.14, Bulk Filing provides support for transmission of bulk submissions. 7.3.1.1 Submission Structure To create a submission, EDGARLink Online provides you with a Graphical User Interface (GUI) screen that contains fields where you enter your values. Different forms have different fields that are rendered or do not render depending upon which submission you selected. Each submission is broken down into sections, called blocks; see Figure 7-5: Submission Main Page. The top block contains a field that displays the filer’s submission type. This information automatically appears once you select the submission. This field is read-only which means you cannot edit the information displayed in it. In this block there are tabs that open the different pages you need to create your submission and also other buttons that allow you to SAVE, PRINT, SUBMIT, RESTORE and EXIT your submission. This block also provides you access to EDGARLink Online HELP. The lower block contains fields where you enter submission information. As discussed in Section 7.1.1, Using the EDGAR Filing Website, some of these fields are required, and some are optional. As you enter information in these fields, you are creating your submission. In this chapter we discuss in general terms the process of submission preparation which includes all the different types of documents you can submit: correspondence, cover letters, and exhibits. APPENDIX C contains sample submission types. Figure 7-5: Submission Main Page June 2014 7-9 EDGAR Filer Manual (Volume II) 7.3.1.2 Menu Buttons The EDGARLink Online submissions are easily navigated using the tabs displayed in the upper block of the screen: ● Documents ● Notifications ● Module/Segment ● Series/Classes (appears only on S/C Investment company form types) ● Fee Offsets (appears only on fee bearing form types) ● Offering & Fees (appears only on fee bearing form types) The Documents, Notifications and Module/Segment tabs appear for every online submission. The Series/Classes, Fee Offsets and Offering & Fees tabs appear only if you have selected a series and classes or fee bearing form type. In each EDGARLink Online submission, there are seven working pages: Main, Attached Documents List, Notification Information, Referenced Module/Segment List, Series/Classes (Contracts) Information, Offerings & Fees, and Fee Offset Information. The Documents, Notifications and Module/Segment tabs appear when you open any submission. The Series/Classes tab appears when the form type is chosen as a Series/Classes (Contracts) type and the filer indicates through a choice of Investment Company type that they must report series and classes. The Fee Offsets and Offering & Fees tabs appear only after you have selected a fee bearing form type. The [Help] button activates the help functions. If you need help as you are completing your submission, you can access the help files to assist you in the process. 7.3.1.3 EDGARLink Online Tool Bar The tool bar located in the upper block of the screen helps you perform basic functions like save, restore, print, submit, exit and view EDGARLink Online help. The following list displays the buttons and explains what function the button performs: The [SAVE] button saves the current submission to your local drive. This will enable you to save a partially completed submission on your computer. If you click this button, your submission fields and attached documents are saved into one file. EDGARLink Online will add an .eis extension to the file name. You can retrieve this file using the [RESTORE] button. The [PRINT] button prints all the submission tabs, with and without information entered: ● The visible text contained in the fields will print. ● Submission documents will not be printed. For more information on printing submission documents; see Section 7.3.4.11, Printing Documents. EDGAR Filer Manual (Volume II) 7-10 June 2014 The [SUBMIT] button transmits your submission to EDGAR for processing. When you click the [SUBMIT] button, EDGAR will automatically validate your submission information. If there are errors, EDGAR will provide the list of error messages for this validation. These error messages will be shown in red and display a “red x” icon next to the field names to indicate which fields contain invalid information. You must correct the errors on each page. The [RESTORE] button allows you to retrieve a previously saved submission. When you click the [RESTORE] button it opens the Restore File window that lets you locate your previously saved submission. The [HELP] button opens a window displaying the EDGAR Filer Manual (Volumes I – III) The [EXIT] button exits the current submission and opens the EDGARLink Online Submission Type Selection page. Any data entered will be discarded. 7.3.1.4 Submission Fields When the fields in EDGARLink Online submissions are displayed, you will notice that some of these fields are mandatory (indicated by a “*” next to the fields label), and some are optional. If the mandatory fields are filled out incorrectly, EDGARLink Online will prevent you from transmitting your submission. You must correct the invalid values. Although the fields without a “*” next to their label are optional, we do ask that you provide any relevant information. As you are looking at the online submissions, there are certain fields that appear on all submissions and some fields that are not visible. Some of the fields common to all submissions are the Filer CIK, Filer CCC, Submission Contact, and SROs. To enter information in any field in the submission, click a field and enter the information by using your keyboard. Some fields have a pick list, so you do not need to enter information. You can scroll through the list and click the entry you want to appear in the field. EDGARLink Online checks the entry of each field for format and length. If you enter data incorrectly a “red x” icon is displayed next to the associated field. Some fields do not require input; they read information that has already been entered. For example, on the Attached Documents List page, there is a Document Count field that automatically updates when you attach submission documents. EDGARLink Online counts the number of documents and inserts that number in this field. Some information is provided via radio buttons and check boxes. These types of fields insert a condition. For example, when you attach documents in the Attached Documents List page, you can have EDGAR validate these documents by activating the check boxes next to the documents and clicking the [Doc Validation] button; see Section 7.4.2, Document Validation. Some fields require a date value. For example, the Fee Offset Information page contains an Offset Filing Date field. You can either enter a valid date in this field or use the calendar icon next to the field to select a valid date. June 2014 7-11 EDGAR Filer Manual (Volume II) Before EDGAR can receive, process, and disseminate submissions electronically, filers must include filer information in EDGARLink Online fields. We call the process of adding required information to a prepared submission EDGARizing. EDGARLink Online helps you format the values correctly. For instance, in the case of a pre-effective amendment to a Form S-1, where the correct value for the Submission Type field is “S-1/A” (not “S-1” or anything else), EDGARLink Online recognizes the correct combinations of required information and removes much of the submission preparation burden from you. 7.3.2 EDGARLink Online Submission Preparation Map The online submission pages for electronic filing are outlined in Figure 7-6: Submission Requirements for Electronic Filing. Figure 7-6: Submission Requirements for Electronic Filings Certain elements are common to all submissions. * (5) is used only on submission for investment companies that have series and classes (contracts). ** (6) and (7) are common only to fee bearing submissions only. KEY: (1) EDGAR requires identification of the filer, regardless of the medium chosen for an electronic submission: EDGAR Filer Manual (Volume II) 7-12 June 2014 ● For Internet, you must provide the Filer CIK and CCC. ● For Leased Line transmission, you must contact us for the Leased Line Specification Document For each submission, you must supply submission and filer information (basic information for one entire submission that includes the CIK, CCC, SROs, etc.) This submission information is automatically inserted into the correct EDGAR format from the fields on the Main page. Each submission may require specific information. If required information is missing, EDGARLink Online will not allow you to submit a filing. (2) You may attach multiple submission documents in ASCII, HTML, or PDF format in a single submission in addition to correspondence and cover letters. You can also attach referenced graphics, *.jpg or *.gif, as part of your submission. The maximum size of each HTML document attached within ABS-15G and ABS-15G/A submission must not exceed 25 MB. (3) The documents attached to a submission are mimed by EDGARLink Online before transmission, which increases the size of the documents by approximately one third of its original size. The maximum size of your submission, after the miming of the documents by EDGARLink Online, must not exceed 200 MB. (4) In addition to receiving submission notification messages to your primary company e-mail address, you may send submission notification messages to additional e-mail addresses listed on that page. 7.3.2.1 Tips for Submission Template Data Entry When you begin your submission using EDGARLink Online there are fields where you enter information that is recorded in your submission. Entering information in the fields is as easy as typing on a word processing application: 1. Click in the field using your mouse. 2. Use your keyboard to enter information. You can use your mouse to move from field to field. You can also use the [Tab] key to move your cursor to the next field. Note: In EDGARLink Online it does not matter in which order you enter your fields, or on which page you start, because you can save the partially completed submission and return to it later; however, all required fields must be filled out before you transmit the submission. EDGARLink Online allows you to enter any type of information via a keyboard: numbers, letters, or special characters. EDGARLink Online checks the validity of the value. For example, your CCC is eight characters long and must contain at least one number, one letter, and one special character, @, #, $, or *. If you enter your CCC incorrectly (does not conform to these rules), a “red x” icon is displayed next to the associated field and you cannot complete the processing of your submission until you correct the entry. June 2014 7-13 EDGAR Filer Manual (Volume II) Some fields contain pick lists that display when you click the down arrow on the right hand border. When the list appears, click the option you want to choose for that field. Other fields automatically format your entry. The Period field automatically converts dates to the correct EDGAR mm-dd-yyyy format. Check boxes allow you to tell EDGARLink Online that you want to activate a function. To turn a check box on, click it once. A check appears in the box. If you want to turn the check box off, click it again, and the check disappears. Radio buttons work similarly to check boxes, but a radio button informs EDGAR of a condition. When you use the “Is this a LIVE/TEST Filing” radio button, you are telling EDGAR what type of submission you are filing. The default for this button is “LIVE”. In order to submit a test filing, you need to change the “LIVE” radio button to the “TEST” radio button. To change the filing to a TEST filing, click once on the “TEST” radio button. 7.3.3 The EDGARLink Online Main Page Just as EDGAR uses access codes to recognize you as a filer, EDGAR needs information to accurately process the submission you are filing. For example, basic submission information identifies the entity for which the filing is being made, gives information on fees, and indicates the type of document you are filing. EDGARLink Online verifies that the information required for all submission validation has been entered. For example, if the submission requires the indication of a time period for which you are filing the report, EDGARLink Online verifies that you have provided a date in the Period field. APPENDIX C, EDGAR SUBMISSION TYPES, lists the submission header fields that apply to each form that you file electronically. You must enter information in all header fields designated as “required” in the submission or EDGARLink Online will prevent you from transmitting your submission to EDGAR. Fields are categorized in the following two ways for a particular submission: ● Required -- EDGARLink Online will not allow you to omit a required field. Fields that are required when applicable should be entered when your filing situation requires them. Required fields are indicated by a “*” next to the fields name. ● Optional -- Optional fields and their values provide important information but are not required for EDGAR to accept your submission. We encourage you to use such fields where applicable, but, if you do not, EDGAR will not suspend your submission. EDGARLink Online uses some of the information you have entered to process your submission and to create a “header” for your submission. Headers are automatically created in XML when you enter filer-supplied information (values) into EDGAR-specified fields in the EDGARLink Online submission. Header information is included when your submission is disseminated. 7.3.3.1 Entering Submission Information Once you open a submission, you can begin entering submission information. On the Main page, you are required to fill out the Filer CIK, Filer CCC, and SROs fields: 1. Click in the Filer CIK field and enter your CIK. You do not need to enter the leading zeros (0); EDGARLink Online automatically inserts them before the number you enter. EDGAR Filer Manual (Volume II) 7-14 June 2014 2. Click in the CCC field and enter your CCC. EDGARLink Online will validate the value you entered in the Filer CIK and CCC field to ensure that the combination is valid. Note: EDGARLink Online masks the CCC value entered by the user. 3. If there are any Co-Registrants, add their CIK and CCC. EDGARLink Online will validate each Co-Registrant CIK and CCC pair to ensure it is valid. If there is more than one co-registrant, click the [Add Co-Registrant] button. If there are more co-registrant CIK and CCC fields than you need, use only the number you need. When processing your submission, EDGAR ignores all extra empty fields. You may remove one or more additional Co-Registrants by checking the box to the left of the Co-Registrant CIK field and then clicking the [Delete Co-Registrant] button 4. Select value(s) for the SROs field by clicking the check boxes next to each SROs option. If none, select “none.” Depending upon the submission type you are preparing, you may have completed all the required fields for that submission. Some submissions require other fields. For a list of the submission type samples, see APPENDIX C. If you want to change the submission type in EDGARLink Online, you would be required to exit the current submission using the [EXIT] button. This causes the EDGARLink Online Submission Type Selection page to appear. Any data entered will be discarded. When you change submission types in EDGARLink Online, you are prompted whether or not you want to clear entered information. If you answer “Yes,” all currently entered information and attached documents are discarded. If you answer “No,” all currently entered information and attached documents are preserved. Information entered in fields that do not appear for the new submission type will not be deleted and will be transmitted with your submission and you may receive a warning during processing. If you changed from a fee-bearing submission type to a non fee-bearing submission type, all fee information will be deleted. 7.3.3.2 Field Values and Definitions In this manual, the term “value” refers to the information that you need to supply. When EDGAR encounters a field, it determines if you have supplied the required information. In some cases, no value is required; however, in most cases, values are required. For EDGAR to process values, you must enter them in a specified format. The Period field automatically converts dates to the correct EDGAR mm-dd-yyyy format. EDGAR is programmed to verify if there is a specified number of characters for each value. This specified number of characters is the field length. For example: ● The CIK field has a field length of up to 10 digits, 1234567890. In EDGARLink Online, the Main page field values will not allow you to exceed the specified number of characters. In some cases, as in CIK, EDGARLink Online inserts leading zeros before your input if the value is less than the field length. Table 7-1: Information Fields Available on Main Page contains a list of all the fields available on the Main page for all submission types. You may only see some of these fields depending upon the submission type you are preparing. June 2014 7-15 EDGAR Filer Manual (Volume II) Table 7-1: Information Fields Available on Main Page Field # Field Name Example of Value to be Inserted Definition (Limits of Field) 1 Is this a LIVE or TEST Filing? Radio Button Marks a submission to be treated as a TEST or LIVE filing. Unless the submission is marked as TEST, the filing will be treated by EDGAR as a LIVE filing and, if accepted, be disseminated. Submit live filings in live mode if using EDGARLink Online. We cannot change a test submission into a live submission, nor can we change a live submission into a test submission. 2 Would you like a Return Copy? Check Box Requests Return Copy of the filing as we receive it. Copies of accepted filings are stored on the EDGAR Filing Website for seven (7) business days for you to download. 3 SROs Check Box Identifies one or more stock exchanges or other self-regulatory organizations on which the issuer's securities are listed or traded. The value “NONE” is selected by default. 4 Submission Contact Label Marks the area of the submission contact information. 4a Name A. Jones This field is not required; however we recommend that you enter a value. Identifies a person to contact if there are questions about the submission. This field allows up to 30 characters. 4b Phone 202-555-1111 This field is not required; however we recommend that you enter a value. Phone number of the contact person; you must include an area code. This field allows up to 20 characters. 5 Filer CIK 1234567890 Your SEC-supplied CIK. This field allows up to 10 characters. Note: In those instances where a single filing is being made on behalf of more than one person or entity, you must enter separate filer information for each such entity or fill in the Group Members field, depending upon the filing being made. See Section 7.3.3.1, Entering Submission Information, for more information on co-registrants. EDGAR Filer Manual (Volume II) 7-16 June 2014 Field # Field Name Example of Value to be Inserted Definition (Limits of Field) Note: This field is necessary for all forms except Form 144, in which case it is called the Reporting Owner Information field. 6 Filer CCC X21234@1 Your CCC (8 characters, at least one of which must be a numeral and at least one must be @, #, $, or *). It is case-sensitive. 7 File Number 333-00000-1111 SEC-supplied file number required for Confirming Copy submissions, some amendments, and other specific submission types. The field allows up to 17 characters. The prefix may contain 1-3 digits, the sequence number may contain 1-8 digits, the optional suffix may contain 1-4 characters, and the fields are separated with a hyphen. 8 Duty to File Reports Remains? Yes Select Yes or No to indicate if the registrant’s duty to file reports under section 13(a) or 15(d) remains. 9 Form Type Pick List** Form type for Filer or Co-Registrant used for combining filing form types in a single submission. 10 Is Filer a Registered Investment Company or a Business Development Company? Check Box This must be checked by Investment Companies to display fields specifically for Investment Companies. 11 Filer Investment Company Type Pick List*** Registered Investment Companies and Business Development Companies must indicate their type based on their last effective registration statement (except N-14). (See Rule 313(a) of regulation S-T.) 12 Co-Reg CIK 1234567890 The SEC-supplied CIK for a registrant associated with this submission. 13 Co-Reg CCC x21234@1 The CCC for a registrant associated with this submission. (8 characters, at least one of which must be a numeral and at least one must be @, #, $, or *). It is case-sensitive. June 2014 7-17 EDGAR Filer Manual (Volume II) Field # Field Name Example of Value to be Inserted Definition (Limits of Field) 14 Co-Reg File Number 333-00000-1111 SEC-supplied file number. Required for amendments to 1933 Act registration statements and with specific form types. This field allows up to 17 characters. When adding a new co-registrant to an amendment, you must type “New” in the File Number field of the new co-registrant. 15 Co-Reg Duty File Reports Remains? Yes Select Yes or No to indicate if the co-registrant’s duty to file reports under section 13(a) or 15(d) remains. 16 Form Type S-3/A Used to specify a different form type for a co-registrant filing, or to indicate a combination filing. 17 Reporting Owner Information Label Marks the beginning of reporting owner identification and must be followed by the CIK and CCC. Note: This group replaces the Filer CIK/CCC for Form 144. 17a CIK 1234567890 SEC-supplied reporting owner's CIK. This field allows up to 10 characters. 17b CCC x21234@1 Reporting owner's CCC (8 characters, at least one of which must be a numeral, and at least one must be @, #, $, or *; case-sensitive). 17c Relationship Pick List; DIRECTOR, OFFICER, OWNER,OTHER Identifies relationship of the reporting owner to the subject company. 18 Period 12-31-2000 End date of report or period of filing; preferred order is month, day, and year (i.e., mmddyyyy) and EDGAR will convert your input to this format. Months should be abbreviated using the first three letters only (i.e., Apr or JAN).This field is also used for proxy meeting dates (field up to 20 characters; use hyphen, slash, or space to separate numbers). Unless otherwise specified, future dates for most form types will be flagged as errors. Refer to Appendix E for information regarding which forms will allow you to use future dates in the Period field. This field will allow you to either enter a date or select a date using the calendar icon. or 12 31 2000 or DEC 31 2000 or 31 DEC 2000 or Dec 31 2000 or 12/31/00 EDGAR Filer Manual (Volume II) 7-18 June 2014 Field # Field Name Example of Value to be Inserted Definition (Limits of Field) 18a Start Period Date Picker;01-01-1980 Start date of report or period of filing. Date value should be between 01-01-1980 and 12-31-2050. No future date is allowed. The Start Period cannot have the same value as the End Period. 18b End Period Date Picker;12-31-2050 End date of report or period of filing. Date value should be between 01-01-1980 and 12-31-2050. No future date is allowed. The date entered has to be later than the date entered in Start Period field. 19 Act Radio Button; 33 40 For certain filings by investment companies, the field identifies Act or Acts when the form type may be filed under more than one Act. Valid values when required are 33, 34, 40 or 33 40. If both apply, use the entry with both Acts. or 33 or 40 20 Delaying Amendment Check Box Indicates that submission includes a delaying amendment. 21 References-429 333-00000 Refers to 1933 Act Registration Statements updated pursuant to Rule 429. The value represents the file number of the prior registration statement. If more than one applies, repeat the field for each value. This field allows up to 17 characters. 22 Reference-462B 333-00000 Identifies the 1933 Act file number associated with the prior effective registration statement for the same offering pursuant to Securities Act Rule 462(b). This field allows up to 17 characters. 23 Subject Company Label Marks the area of subject company information fields. 23a CIK 1234567890 Identification of the subject company. This field allows up to 10 characters. 23b IRS Number 22-7777777 Subject company's IRS employer identification code. The IRS number usually appears on the cover page of a Form 10-K (nine characters plus an optional hyphen; EDGARLink Online displays a hyphen with this tag). 23c Name Small Co. Ltd. Name of the subject company. This field allows up to 150 characters. June 2014 7-19 EDGAR Filer Manual (Volume II) Field # Field Name Example of Value to be Inserted Definition (Limits of Field) 23d File Number 005-00000 SEC file number used under subject company for confirming copies and other specific submission types. This field allows up to 17 characters. 24 Is Subject Company a Registered Investment Company or a Business Development Company? Check Box This must be checked when the subject company is an Investment Company to display fields specific to Investment Companies. 25 Investment Company Type Pick List*** Used when subject company is a Registered Investment Company or Business Development Company to indicate their type based on their last effective registration statement (except N-14). (See Rule 313(a) of Regulation S-T.) 26 Items Pick List; 1.02 Identifies each reportable event declared in an 8-K filing. If more than one applies, repeat the field for each event. See listing of item values and event definitions in Appendix E. (field is one item selection for each entry). 5.05 7.01 26a Fiscal Year 12/31 Identifies the new Company fiscal year end date mm/dd format. This field allows up to 5 characters. Item 5.03 Amendments to articles of Incorporation or Bylaws; Change in Fiscal Year requires you to enter the new Fiscal Year end date (mm/dd) in the Fiscal Year field. 05/31 26b Item Submission Type Pick List; 425 Identifies an optional additional Submission Type that the 8-K submission simultaneously satisfies as an additional filing obligation under Rules 425, 14a-12, 14d-2(b), or 13e4(c). Items 1.01, 1.02, 2.01, 5.01, or 8.01 allow an optional field, Item Submission Type, to specify an additional Submission Type that the 8-K submission simultaneously satisfies as an additional filing obligation. DEFA14A DFAN14A SC TO-C 26c Depositor 33 File Number 333-12345 EDGAR Filer Manual (Volume II) SEC-supplied file number. Required when an 8-K is the 1st filing for an asset-backed security issuing entity and an Item 6.01 is specified. This field allows up to 17 characters. 7-20 June 2014 Field # Field Name Example of Value to be Inserted Definition (Limits of Field) 27 Serial Check Box Used when an offering is made from an effective shelf registration statement and the offering relates to interests in a separate legal entity, such as a trust or partnership, that is distinct from the registrant. Used when applicable to submissions of form type 424B1, 424B2, 424B3, 424B4, 424B5, 424B7 or 424B8. This will initiate the generation of a new CIK for the serial company created by this filing. 27a Serial Company Name Small Co Ltd Name of the serial company. If more than one, repeat the field. This field allows up to 150 characters. The name should be in conformed format. See conformance definitions in Appendix C, Automated Name Conformance Rules, in Volume I of the Filer Manual. 28 Is this an electronic copy of an official filing submitted in paper format? Check Box A confirming copy is not an official filing. This tag should be used only when the official filing was previously made on paper. When a confirming copy is sent, the File Number field is visible and mandatory for non-subject company filings. For subject company filings, the File Number field is mandatory and is located under the Subject Company label. If you are using EDGARLink Online, the field automatically appears when you activate the “Confirming Copy” check box. 29 Group Members John Smith Identifies list of group member names or joint filers. Used with Williams Act filings when there is more than one member of a Williams Act group or where there are joint filers. The list should exclude the entity identified in the filer tags (there is only one filer). Each name must appear in a separate field. Jane Doe June 2014 7-21 EDGAR Filer Manual (Volume II) Field # 30 Field Name Effectiveness Date Example of Value to be Inserted 10-15-2000 Definition (Limits of Field) Filer requested effectiveness date that applies to all co-registrants in a co-registrant filing for certain Investment Company filings. Preferred order is month, day, and year, i.e., mmddyyyy and EDGAR will convert your input. This field allows up to 20 characters. Use hyphen, slash, or space to separate numbers. This field will allow you to either enter a date or select a date using the calendar icon. or 10/15/2000 or 10 15 2000 or 15 Oct 2000 or 10/15/00 or OCT 15 2000 31 Depository International Financial Corporation Identifies the bank foreign filers deposited SEC filing fees. This field allows up to 50 characters. 32 Is Filer a Shell Company? Pick List; Yes or No Select Yes or No to indicate if company meets the shell company criteria: a company with no or nominal operations, and with no or nominal assets or assets consisting solely of cash and cash equivalents. 33 Is Filer a Well-Known Seasoned Issuer? Pick List; Yes or No Select Yes or No to indicate if primary registrant meets the well-known seasoned issuer criteria noted in Rule 405 of Regulation C under the Securities Act of 1933 [17 CFR 230.405]. 34 Is Filer a Voluntary Filer? Pick List; Yes or No Select Yes or No to indicate if primary registrant (other than an investment company) is not required to file reports pursuant to Section 13 or 15(d) of the Securities Exchange Act of 1934. 35 Accelerated Filer Status Pick List; Non-Accelerated Filer or Accelerated Filer or Large Accelerated Filer or Not Applicable Indicates whether the primary registrant is a Large Accelerated Filer, Accelerated Filer, Non-Accelerated Filer, or Not Applicable. Indicate Not Applicable where the accelerated filer status is unknown for the filing period. 36 Is Fee Table in Prospectus? Check Box Indicates a prospectus that contains a fee table. 37 Is Filing Pursuant to Rule 163? Check Box Indicates that the communications are made under Rule 163. 38 Is Filing Pursuant to Rule 433? Check Box Indicates that the communications are made under Rule 433. EDGAR Filer Manual (Volume II) 7-22 June 2014 Field # Field Name Example of Value to be Inserted Definition (Limits of Field) 39 Is Filing First Filing of an Issuing Entity? Check Box Indicates that the Free Writing Prospectus is the first filing for an asset-backed security issuing entity. 39a Depositor CIK 1234567890 SEC supplied Depositor's CIK. Required when a Free Writing Prospectus is the 1st filing for an asset-backed security issuing entity. This field allows up to 10 characters. 39b Depositor 33 File Number 333-12345 SEC-supplied file number. Required when a Free Writing Prospectus is the 1st filing for an asset-backed security issuing entity. This field allows up to 17 characters. 40 Smaller Reporting Company (Investment Companies may not select this option) Check Box Indicates that the company is a smaller reporting company with both a public float and revenues of less than $75 million. 41 Rule 13p-1 Check Box Indicates that an SD or SD/A submission is being made under Rule 13p-1. The filer is required to select at least one item under which the submission is being made: Item 1.01 or 1.02. (If both Items apply, select Items 1.01 and 1.02). Fields displayed upon selection of Items: Item 1.01: • Period Item 1.02: • Period Note: If you selected Item 1.02 on an SD or SD/A submission form type, then you must attach an EX-1.02 document type (in ASCII or HTML format) using the Documents tab. 42 Sponsor CIK June 2014 1234567890 The CIK of the Sponsor who organizes and initiates an asset-backed securities transaction by selling or transferring assets to the issuing entity. This field allows up to 10 characters. 7-23 EDGAR Filer Manual (Volume II) Field # 43 Field Name ABS Asset Class Example of Value to be Inserted Pick List Definition (Limits of Field) Asset class of the asset-backed securities. The values are: • Residential mortgages – Prime • Residential mortgages – Non-Prime • Residential mortgages – HELOC • Residential mortgages – Reverse Mortgages • Residential mortgages – Manufactured Housing • Residential mortgages – Other/Combined • Commercial mortgages • Auto loans • Auto leases • Equipment leases • Equipment loans • Student loans • Floorplan financings • Debt Securities • Resecuritization • Credit card • Other 44 ABS Sub Asset Class List Box Identifies the ABS sub asset class for the asset-backed security. 45 Rule 15Ga-1 Radio Button Indicates a submission is being made under Rule 15Ga-1. The filer is required to select under which item the submission is being made:1.01,1.02, or 1.03 Fields displayed upon selection of Items: Item 1.01: • Securitizer has no activity to report for the initial period pursuant to Rule 15Ga-1(c)(1) EDGAR Filer Manual (Volume II) 7-24 June 2014 Field # Field Name Example of Value to be Inserted Definition (Limits of Field) Item 1.02: • Start Period • End Period • Has the Securitizer previously filed an ABS-15G under Item 1.01 for the same Asset Class as this report? • File Number • Securitizer has no activity to report for the quarterly period pursuant to Rule 15Ga-1(c)(2)(i) • Securitizer has no activity to report for the annual period pursuant to Rule 15Ga-1(c)(2)(ii) Item 1.03: • Not Applicable (N/A) 46 Securitizer has no activity to report for the initial period pursuant to Rule 15Ga-1(c)(1) Pick list; Yes or No Select Yes or No to indicate if the Securitizer has any activity to report for the initial period pursuant to Rule 15Ga-1(c)(1). 47 Has the Securitizer previously filed an ABS-15G under Item 1.01 for the same Asset Class as this report? Pick list; Yes or No Select Yes or No to indicate if the Securitizer has previously filed an ABS-15G under Item 1.01 for the same Asset Class as this report. June 2014 7-25 EDGAR Filer Manual (Volume II) Field # 48 Field Name File Number Example of Value to be Inserted 025-00000-1 Definition (Limits of Field) If the answer to ‘Has the Securitizer previously filed an ABS-15G under Item 1.01 for the same Asset Class as this report?’ is ‘Yes’, you are required to enter the SEC supplied file number. This field allows up to 17 characters, and only one file number is allowed for each registrant. The valid prefix for the file number is 025-. If the answer to ‘Has the Securitizer previously filed an ABS-15G under Item 1.01 for the same Asset Class as this report?’ is ‘No’, then the system will generate a new “025-” file number, and assign that number to the filing. 49 Securitizer has no activity to report for the quarterly period pursuant to Rule 15Ga-1(c)(2)(i) Pick list; Yes or No Select Yes or No to indicate if the Securitizer has any activity to report for the quarterly period pursuant to Rule 15Ga-1(c)(2)(i). 50 Securitizer has no activity to report for the annual period pursuant to Rule 15Ga-1(c)(2)(ii) Pick list; Yes or No Select Yes or No to indicate if the Securitizer has any activity to report for the annual period pursuant to Rule 15Ga-1(c)(2)(ii). 51 Rule 15Ga-2 Radio Button Indicates a submission is being made under Rule 15Ga-2. The filer is required to select under which item the submission is being made: 2.01 or 2.02. Fields displayed upon selection of Items: Item 2.01: • File Number of Securitizer • Serial Number Item 2.02: • Issuer Entity CIK/Name • File Number of Securitizer • Serial Number 52 Issuer Entity CIK 1234567890 The issuer’s SEC supplied CIK. This field allows up to 10 characters 53 Issuer Entity Name Small Ltd Name of the issuer. This field allows up to 150 characters. EDGAR Filer Manual (Volume II) 7-26 June 2014 Field # Field Name Example of Value to be Inserted Definition (Limits of Field) 54 File Number of Securitizer 333-12345 The SEC supplied file number of the Securitizer. This field allows up to 17 characters. 55 Serial Number 333-12345 The SEC supplied file number of the issuer. This field allows up to 17 characters. 56 Accession Number 0000000000-12-000191 Refers to the Accession number of the submission type that the filer is amending. This field allows up to 20 characters. *These fields are read-only. You do not need to enter information: EDGARLink Online automatically fills these fields. **The values on the Form Type pick list are: S-1 S-3 S-1/A S-3/A S-1MEF S-3MEF ***The values on the Investment Company Type pick list are: Form N-1A Filer (Mutual Fund) Form N-1 Filer (Open-End Separate Account with No Variable Annuities) Form N-2 Filer (Closed-End Investment Company) Form N-3 Filer (Separate Account Registered as Open-End Management Investment Company) Form N-4 Filer (Variable Annuity UIT Separate Account) Form N-5 Filer (Small Business Investment Company) Form N-6 Filer (Variable Life UIT Separate Account) Form S-1 or S-3 Filer (Face Amount Certificate Company) Form S-6 Filer (UIT, Non-Insurance Product) June 2014 7-27 EDGAR Filer Manual (Volume II) 7.3.3.3 Test and Live Filings If you want to submit a test filing through EDGARLink Online, you have to set the “TEST” radio button on the Main page. EDGAR treats the submission as a test and it will not be disseminated. WARNING: (1) If you want your submission to be live, you must use the “LIVE” radio button: Acceptance processing and public dissemination is an automated process that takes place immediately upon receipt of live filings. Public portions of a live filing are immediately disseminated to the public. (2) If you use the “TEST” radio button, the filing is not an official filing. If you intended to submit a live filing, you must change the radio button to “LIVE” and transmit the submission. 7.3.3.4 Filing on Behalf of More than One Entity When a registration statement is made on behalf of more than one entity, you must include the co-registrant CIK and CCC for each entity in the Main page in the fields provided. Caution: All co-registrant filings must apply to the same Act(s). Only registrants identified in the Filer CIK field as the filer in the original registration can be part of the submission of an amendment. Note: A maximum of 999 co-registrants is acceptable per submission. Co-registrants in excess of this number must be split into multiple submissions. When a submission requires Series and Classes, EDGARLink Online will prevent you from transmitting the submission if the filing does not include at least one valid Series and Class ID: ● For the registrant. ● For each existing co-registrant. When a filing involves a single registration statement under the 1933 Act filed on behalf of more than one registrant (co-registrants), you must add a CIK and CCC field for each registrant on the Main page. If the filing is an amendment to the registration statement, you must include the File Number for each registrant. If you are adding a new co-registrant to an amendment, you must type “New” in the File Number field of the new co-registrant. There are only a few submission form types that can be filed in these combinations. If the submission type is not listed below, then each co-registrant must transmit the submission separately. When the submission type is: Then the Form-Type can only be used to refer to: S-1 S-1 or S-3 S-3 S-3 or S-1 S-1/A S-1/A or S-3/A S-3/A S-3/A or S-1/A S-1MEF S-1MEF or S-3MEF S-3MEF S-3MEF or S-1MEF See Section 7.4, Validating Your Submission, for details of all submission types that can be combined, either with multiple registrants or a single registrant. EDGAR Filer Manual (Volume II) 7-28 June 2014 Another unique situation where multiple registrants need to report on the same submission relates to Williams Act Submissions. In this case the filing is based on a group. Use the Group Members field when a Williams Act filing (SC 13D or SC 13G) is being made on behalf of more than one entity, for example, for members of a group or joint filers. Identify only one filer in the Filer field. List the other members of the group (or the other joint filers) under the Group Members field by name (no CIKs are necessary). See Figure 7-7: Entering Group Members. Figure 7-7: Entering Group Members 7.3.4 The EDGARLink Online Attached Documents List Page The Attached Documents List page will list your documents after you attach them, and is designed similarly to the Main page, in that there are fields, check boxes, and buttons that assist you in entering descriptions about your documents, validating your documents, and navigating from one screen to another. Figure 7-8: Attached Documents List Page June 2014 7-29 EDGAR Filer Manual (Volume II) 7.3.4.1 Attached Documents List Page Fields On the Attached Documents List page, the File Name field is automatically entered when you attach a document; see Section 7.3.4.4, Attaching a Document. The Type field provides you with a list of document types you can attach such as: Cover, Correspondence, Graphic, EU-1, and exhibits. The Description field (which is optional) is used to enter a description for the document up to 255 characters in length. You can attach as many documents as you would like; see Section 7.3.4.5 Attaching Multiple Documents. Clicking the check box next to the File Name field will automatically select all attachments for this submission. Corresponding to each attached document is a check box, which when selected indicates which attachment to process when one of the tab functions is chosen (for eg. Delete Document, View Document, etc). You can validate the attachment for errors by selecting the check box corresponding to the attachment and clicking the [Doc Validation] button; see Section 7.4.2, Document Validation. If errors are found after Doc validation is performed, EDGARLink Online displays the number of errors in the Errors field. Another field on the page is the Document Count field. This field automatically inserts the number of submission documents you attach to the submission. EDGARLink Online automatically calculates this number based on the number of submission documents you attach. For more information on attaching submission documents; see Section 7.3.4.4 Attaching a Document. Table 7-2: Information Fields Available on Documents Page lists all the fields available on the Documents List page. Table 7-2: Information Fields Available on Documents Page Field # Field Name Example of Value to be Inserted Definition (Limits of Field) 57 Document Count ** 1 Number of documents included in the submission. 58 File Name** r10q99.txt The file name of the document you attach. The file name is automatically inserted from the Attach window. 59 Module or Segment Name* Opinion 1 The name of the module or segment currently stored on EDGAR. 60 Master Seg CIK* 1234567890 The CIK of the filer for the master segment, the submission you are attaching the segment to. 61 Type Pick List;10-Q Indicates to EDGAR the type of document being attached. This field assists EDGAR in keeping public and non-public documents separated. 62 Description 2000 Quarterly Report Is not a required field. We do ask that you describe the document, graphic, or exhibit you are attaching. This field allows a maximum of 255 characters. 63 Errors** Link Displays the number of errors in the attached document. Filer can click the link to view the errors. EDGAR Filer Manual (Volume II) 7-30 June 2014 * These fields appear in the Module/Segment submission only. ** These fields are read-only: you do not need to enter information. EDGARLink Online automatically fills these fields. Type 1 and 2 modules and segments must have unique file names and unique module and segment names. Note: When you assemble a submission that includes multiple documents, i.e., correspondence, cover letter, etc., EDGARLink Online updates the File Name fields automatically when you attach additional documents. When you incorporate segments and modules, these values represent the number of documents that will be contained in the submission after final assembly. 7.3.4.2 Document Count Although this field is read-only and EDGARLink Online automatically fills in this field, there are limitations on its value. Please use the following guidelines when adding a document to a filing. A submission may include a maximum of 612 documents in the following combinations: ● At least one (1) primary submission document* ● Up to ten (10) cover letters (document type “COVER”) ● Up to one hundred (100) correspondence documents (document type “CORRESP”) ● Up to five hundred (500) exhibits/graphics files (document type “EX__”)** ● One (1) EU-1 * The primary document must include the primary filing; exhibits must be included in separate exhibit documents appropriately labeled. ** For appropriate labels for exhibits, please see APPENDIX C and/or in accordance with rule or form requirements. 7.3.4.3 Submission Documents In previous sections, we discussed preparing the documents that you are including in your submission. The documents supported include: ASCII, HTML, PDF, XBRL, and *.jpg/*.gif graphics only. In text documents, lines cannot be more than 80 characters wide, unless in a table that is no more than 132 characters wide, and no special characters. When you prepare your documents using EDGARLink Online, you no longer include Header or Document tags. EDGARLink Online automatically takes care of that for you. 7.3.4.4 Attaching a Document Once you have prepared your submission document, correspondence, or cover letter, you can include it in your submission by using EDGARLink Online. This procedure assumes you have a submission open and a submission document prepared: 1. Click the Documents tab. 2. The Attached Documents List page appears, Figure 7-9: Attached Documents List Page. June 2014 7-31 EDGAR Filer Manual (Volume II) 3. Click the [Add Document] button. 4. EDGARLink Online displays the Attachment Selection and Upload window, Figure 7-10: Attachment Selection and Upload Window. To attach multiple documents to a submission you can select multiple files in the browser window before selecting the [Open] button. Figure 7-9: Attached Documents List Page Figure 7-10: Attachment Selection and Upload Window 5. Click the [Browse] button. The Choose file window appears, Figure 7-11: Browse: Choose file Window. Open the location of your documents using the Look in: field EDGAR Filer Manual (Volume II) 7-32 June 2014 Figure 7-11: Browse: Choose file Window Click the down button in the right hand side of the field. Select the folder you want to open by clicking it. The folder structure appears in the window with the subdirectories and files. Double click the subdirectory folders until your submission file appears. 6. Click once on the file you want to attach; it could be a document, graphic, N-SAR or PDF file. 7. Click the [Open] button. The file you selected appears in the Attached Documents List page. 7.3.4.5 Attaching Multiple Documents While creating a submission, there are occasions where you will attach more than one document, for instance a cover letter, correspondence, a revised submission document, and a PDF version of your submission document. In order for EDGAR to divide documents into public and private documents, each of these documents should be listed individually on the Attached Documents List page rather than compiled into one document. To attach multiple documents, follow the same procedures as attaching a single document. This creates additional lines in the document list: ● Press the [Shift] key to select a list of documents. ● Press the [Ctrl] key to select more than one document in a list. June 2014 7-33 EDGAR Filer Manual (Volume II) 7.3.4.6 Organizing Documents EDGARLink Online has added a new feature on the Attached Documents List page. After you attach your documents and the file names appear in the File Name field, you can organize the document names on the Attached Documents List page. EDGARLink Online has two additional buttons on this page: [Move Doc Up] and [Move Doc Down]. To move a document up the list: 1. Select the check box next to the File Name field for the document you want to move. 2. Click the [Move Doc Up] button. To move a document down the list: 1. Select the check box next to the File Name field for the document you want to move. 2. Click the [Move Doc Down] button. Note: This organization function moves the documents only until they are either at the top or bottom of the list. 7.3.4.7 Correcting a Document If errors are found after validation is performed, EDGARLink Online displays the number of errors in the Errors field on the Attached Documents List page. You can click the value in the Errors field of each validated document to view the validation errors, if any. To ensure your changes are reflected in future submissions, you should use the original application (e.g., word processor) to correct the errors, save the document, and re-attach your submission documents. 7.3.4.8 Removing a Document As you are preparing your submission, you may need to detach or delete a document from your submission. The process to remove a document from your submission is as easy as attaching a document: 1. Select the check box next to the File Name field for the document you want to remove. 2. Click the [Delete Document] button. Figure 7-12: Remove Attachments Window EDGAR Filer Manual (Volume II) 7-34 June 2014 EDGARLink Online prompts you to confirm that you want to remove your document. See Figure 7-13: Remove Attachment Confirm Window. If you click [Yes], then EDGAR removes the document from your submission. You can use this process if the file contains errors when you validate your document. Figure 7-13: Remove Attachment Confirm Window 7.3.4.9 Replacing a Document Rather than removing an incorrect document, you can re-attach a corrected version of the document with the same name: 1. Click the [Add Document] button. 2. Click the [Attach] button. 3. Choose the corrected submission document and click the [Open] button. EDGARLink Online warns you that the file(s) is already attached, and asks if you would like to replace the selected file(s). 4. Click the [Yes] button if you want to replace it. EDGARLink Online then replaces the document in your submission. 7.3.4.10 Viewing a Document Once you have attached a document, you may want to view the document’s text: 1. Select the check box next to the File Name field for the document you want to view. 2. Click the [View Document] button. 3. The attached document appears. From here you can review your document by scrolling through it or printing a copy. 4. To return to your submission close the viewer window. 5. If you have multiple documents attached in your submission, you will have to choose which documents you want to view. You can only view one document at a time. June 2014 7-35 EDGAR Filer Manual (Volume II) Figure 7-14: View Document Window 7.3.4.11 Printing Documents Before you transmit your submission, you might want to print your submission document. You can do this using EDGARLink Online: 1. Display your submission document, as described above. 2. Use the browser’s print feature to send your document to your printer. 7.3.5 The EDGARLink Online Notification Information Page EDGARLink Online allows you to notify multiple e-mail addresses of the status of your EDGAR submission. You can add these additional addresses on the Notification Information page. They will receive acceptance/suspense messages for both Live and Test filings. Figure 7-15: Notification Information Page If you need to change your default notification address, you can change it on the EDGAR Filing Website using the “Retrieve/Edit Data” option. Table 7-3 contains the fields available on the Notification page. EDGAR Filer Manual (Volume II) 7-36 June 2014 Table 7-3: Information Fields Available on Notification Information Page Field # Field Name Example of Value to be Inserted Definition (Limits of Field) 64 Internet Notification Address [email protected] Identifies Internet User IDs that are to receive submission acceptance or suspense messages. Cannot be used to request Return Copies. This field must be in standard Internet address format, including exactly one “@” character and all necessary “.” characters; only EDGAR acceptable characters are allowed in the address; each address may be up to eighty (80) characters long. 65 Notify via Filing website Only Check Box For a filer who wants only to download their notifications from the EDGAR Filing Website. This is suggested if you are transmitting a filing after 5:30 p.m. 7.3.5.1 Adding Notification Addresses Place your additional notification e-mail addresses on the Notification Information page: 1. From your open submission, click the Notifications tab. 2. The Notification Information page appears, Figure 7-15: Notification Information Page. 3. Enter the additional Internet e-mail address in the Internet Notification Address field. Click the [Add] button. Note: If there are additional Internet e-mail addresses that you want to enter click the [Add] button. You are allowed to add as many e-mail addresses as you would like. 7.3.5.2 Removing Notification Addresses As you are preparing your submission, you may need to remove or delete an internet notification address from your submission. The process to remove an internet notification address from your submission is as easy as adding a notification address: 1. From your open submission, click the Notifications tab. 2. Select the check box next to the Internet Notification Address field for the notification addresses you want to remove. 3. Click the [Delete] button. EDGARLink Online prompts you to confirm that you want to remove your notification addresses. If you click [Yes], then EDGAR removes the Internet Notification Addresses from your submission. 7.3.6 The EDGARLink Online Module/Segment Page A module or segment is information that is stored on the non-public data storage area of EDGAR. Information about creating module and segment documents is covered in Section 5.3 Preparing or Referencing Module and Segment Documents. Also included in this section is information on June 2014 7-37 EDGAR Filer Manual (Volume II) including references to Type 1 modules and segments in other filing documents. Before using either Type 1 or Type 2 modules/segments in a filing, you must submit them so that they reside on the non-public data storage. The submission of these documents is outlined in Section 7.3.11 Module and Segment Submissions. Information on managing your modules and segments while they are in the private storage area is covered in Section 11.5.2 Retrieve Module/Segment Information. This section will tell you how to add Type 2 module and segment documents as you prepare your submission. When you add these documents, EDGARLink Online automatically inserts the reference in your submission, retrieves the document from the non-public storage area, and places the documents at the end of the submission. To add Type 2 module/segment documents to a submission on the EDGARLink Online Main Page, click the Module/Segment tab. Figure 7-16: Referenced Module/Segment List Page will appear. You can use this screen to add the documents. Fields on the page will be based on whether the document you are adding is a module or segment. If you select the “M” check box, both the CIK and CCC fields are enabled. If you select the “S” check box the entry boxes under the CIK and CCC will disappear. Figure 7-16: Referenced Module/Segment List Page Table 7-4: Information Fields Available on the Referenced Module/Segment List Page contains the fields available on the Referenced Module/Segment List page. It will help you correctly complete the fields on this page by defining the content of each field and giving an example. Table 7-4: Information Fields Available on the Referenced Module/Segment List Page Field # Field Name Example of Value to be Inserted Definition (Limits of Field) 66 M/S Check box Identifies the reference as a (M)odule or (S)egment. 67 Module/Segment Name OPINION 1 Identifies the name of the Type 2 module or segment currently residing on EDGAR that you are including in your submission. 68 CIK 1234567890 Identifies the primary owner of the Type 2 module you reference in your submission. 69 CCC x21234@1 Identifies the CCC of the primary owner of the Type 2 module you reference in your submission. EDGAR Filer Manual (Volume II) 7-38 June 2014 Field # Field Name 70 Type Example of Value to be Inserted Pick List; EX-1 Definition (Limits of Field) Identifies the document type of module or segment you are referencing. 7.3.6.1 Referencing Your Module or Segment Document When you reference Type 1 modules and segments (partial documents) in your submission, you should make reference inside your submission document to a Type 1 module or segment currently residing on the EDGAR system. Type 1 and 2 modules and segments should have unique file names and module and segment names. You reference your Type 2 modules in EDGARLink Online on the Referenced Module/Segment List page. When EDGAR processes your submission, the module (or segment) residing on the system is automatically attached to the bottom of the submission. When you reference Type 2 modules and segments (one complete document), EDGARLink Online automatically inserts the reference in your submission. The following sections describe how to reference Type 2 modules and segments. 7.3.6.2 Including Type 2 Modules in Your Submission These instructions assume that EDGAR has previously accepted your module: 1. Click the Module/Segment tab. The Referenced Module/Segment List page appears. 2. Select the “M” check box. The CIK and CCC fields are enabled. 3. Enter the module name (not the module file name) in the Module/Segment field. 4. Enter the CIK and CCC of the filer whose module you are placing within your submission. EDGARLink Online will validate the CIK and CCC pair to ensure it is correct. 5. Select the document type of your module in the Type field: Click the down button. Scroll until you see the module document type. Click the document type to enter it in to this field. If the referenced module does not exist on EDGAR, your submission will be suspended. 7.3.6.3 Including Type 2 Segments in Your Submission These instructions assume that EDGAR has previously accepted your segment: 1. Click the Module/Segment tab. The Referenced Module/Segment List page appears. 2. Select “S” for the M S field. 3. Enter the segment name (not the segment file name) in the Module/Segment Name field. June 2014 7-39 EDGAR Filer Manual (Volume II) 4. Select the document type of your segment in the Type field: Click the down button. Scroll until you see the segment document type. If your document is a cover letter or correspondence, be sure it is correctly marked. Click the document type to enter it in to this field. IMPORTANT: If your document is a cover letter or correspondence, be sure to give it the correct type. Otherwise it will be disseminated immediately to the public. If the referenced segment does not exist on EDGAR, your submission will be suspended. 7.3.6.4 Errors in Segments EDGAR validates segments at the time you submit them. If a segment contains errors, EDGAR reports those errors to you and/or your filing agent. If a transmitted Type 1 or 2 segment contains only white space (is blank), EDGAR will suspend the entire submission. If an error arises when the EDGAR system attempts to combine segments, or if EDGAR detects an error in the master segment, EDGAR will suspend the filing. The expiration dates of subordinate segments referenced in the master segment are extended six business days from the day of suspension of the master segment. When EDGAR detects an error in a subordinate segment, the segment is not accepted and you must re-submit the corrected subordinate segment. Note: EDGARLink Online will raise an error when it is error-checking a master segment with Type 2 segment references and it cannot find the segment referenced. This error will not occur if all subordinate segments are present on EDGAR when the master segment is filed and the document count accounts for all documents in the assembled filing. 7.3.7 The EDGARLink Online Series/Classes (Contracts) Information Page Refer to Rule 313 of Regulation S-T [17 CFR 232.313] for the substantive rule requirements underlying the functions of this page. The Series/Classes tab will appear on the Main Page based on responses to information on the Main Page. The answers that trigger the display of the Series/Classes tab may include the following: ● When the form type can includes series and class (contract) information, ● When the filer has selected an option from the Filer Investment Company Type pick list on the Main page indicating that they are a Registered Investment Company or a Business Development Company, ● When the Filer Investment Company type selected is an S/C type, listed below: o Form N-1A (Mutual Fund) o Form N-3 (Separate Account registered as Open-End Management Investment Company) EDGAR Filer Manual (Volume II) 7-40 June 2014 o Form N-4 (Variable Annuity UIT Separate Account) o Form N-6 (Variable Life UIT Separate Account) See Figure 7-17, Main Page for Investment Company with Series and Classes (Contracts), for an illustration of a submission that fulfills all of these conditions and shows the Series/Classes tab. Figure 7-17: Main Page for Investment Company with Series and Classes (Contract) The filer may click the Series/Classes tab on the Main Page to access the page shown in Figure 7-18: Series /Classes (Contracts) Information Page. This page is used to add series and class (contract) information to a filing. This page is used for three purposes: ● Indicating existing series and class (contract) identifiers on behalf of which a filing is being made (“Existing” radio button) ● Adding new series and class (contract) names on behalf of which a filing is being made (“Adding New” radio button) ● Provide identifying information on series and classes (contracts) that are parties to a merger (“Merging” radio button) The page is first displayed with the “Adding New” radio button selected. Selecting the “Existing” radio button will change the fields displayed on the form and will be illustrated in figures in this section. The submission form type will determine which of the fields and buttons are available. For example, the N-14 submission form type will display the “Merging” radio button, while the 485APOS form type will display the “Existing” and “Adding New” radio buttons. In addition to the radio buttons being dependant on the form type, the fields available will depend on the June 2014 7-41 EDGAR Filer Manual (Volume II) Investment Company Type. For example, an N-1A filer will be asked for both series and class (contract) information, while the N-6 filer will not enter series information but will be asked instead for class (contract) information. Figure 7-18: Series/Classes (Contracts) Information Page An S/C Fund investment company also has a duty to update and keep current existing series and class (contract) information. See Rule 313(a) (1) and (2) of Regulation S-T. Filers can update information via the Series and Classes (Contracts) Information page accessible on the EDGAR Filing Website. See EDGAR Filer Manual, Volume I, Maintenance of Company Data for more information. Use the Series and Classes (Contracts) Information page for the following: ● Series and class (contract) name changes and adding ticker information after the ticker has been received from the exchange. ● In the case of a merger, the filer must use the page to set the status of series and classes (contracts) to Merge after a merger becomes effective. ● Set the status of series and classes (contracts) to Inactive after all required filings have been made for the series or class (contract). 7.3.7.1 EDGAR Submission Form Types with Investment Company Type and the Series/Classes (Contracts) Information Page For those EDGAR submission types identified in this filer manual, a S/C Fund must include all series and/or class (or contract) identifiers of each series and or class (or contract) on behalf of which a filing is made. See Rule 313(a)(3) of Regulation S-T. EDGARLink Online is programmed to help the filer by asking questions only when appropriate. Questions on the Investment Company Type and/or series and classes (contracts) information will be based on the form type. On registration statements and pre-effective amendments, the Investment Company Type of the primary registrant is determined based on the EDGAR submission form type. Thus on the Main Page for the registrations and pre-effective amendments, the pick-list for Investment Company Type shows the IC type and all other values are grayed-out. Filers may not EDGAR Filer Manual (Volume II) 7-42 June 2014 change the IC type on these form types. The following form types are registrations and pre-effective amendments. N-1,N-1-A N-5, N-5/A N-1A, N-1A/A N-6, N-6/A N-2, N-2/A, N-2MEF S-1, S-1/A N-3, N-3/A S-3, S-3/A N-4, N-4/A S-6, S-6/A Other form types for Investment Companies are filed by the primary registrant but are not registrations and pre-effective amendments. On these EDGAR submission form types, a pick-list is provided for the Investment Company Type of the primary registrant. On most of these form types, Series and classes (contracts) identifiers might also be required in the submission. The exceptions are NSAR-U and NSAR-U/A, where Series and classes will not be included in the filing. 24F-2NT, 24F-2NT/A N-CSR, N-CSR/A, N-CSRS, N-CSRS/A 485APOS, 485BPOS, 485BXT N-PX, N-PX/A, N-PX-FM, N-PX-FM/A 497, 497AD, 497J, 497K N-Q, N-Q/A DEF 14A, DEF 14C NSAR-A, NSAR-A/A, NSAR-AT, NSAR-AT/A, DEFA14A, DEFA14C NSAR-B, NSAR-B/A, NSAR-BT, NSAR-BT/A DEFM14A, DEFM14C NSAR-U, NSAR-U/A DEFR14A, DEFR14C NT-NCSR/A, NT-NSAR, NT-NSAR/A N-14, N-14/A POS AMI N-30B-2 PRE 14A, PRE 14C N-30D, N-30D/A PREM14A, PREM14C PRER14A, PRER14C These EDGAR submission form types are for registrant and non-registrant third party filers making proxy filings with respect to subject investment companies. On these EDGAR submission form types, an Investment Company type pick-list defines the IC type of the subject company. Series and classes (contracts) identifiers might be required, depending on the (subject company) Investment Company Type and the form type. DEFC14A PREC14A DEFC14C PREC14C DEFN14A PREN14A DFAN14A PRRN14A DFRN14A PX14A6G 425 PX14A6N June 2014 7-43 EDGAR Filer Manual (Volume II) 7.3.7.1.1 Series and Class (Contract) Information based on EDGAR Submission Form Type Some of the EDGAR submission form types listed above in Section 7.3.7.1 can be used by filers to identify merged and new series and classes (contracts). New series and classes (contracts) identifiers may be obtained by the filing of most registration statements, pre-effective and post-effective amendments. There are a few exceptions to the general rule however. Form N-4 and N-6 filers get an automatically generated single series. The name of the series is identical to the investment company name when the first class (contract) is defined. The second exception is that the 485BPOS may only be used to obtain identifiers for new classes (contracts), but not for new series. The form types in this group are as follows: N-1A, N-1A/A 485APOS, 485BPOS N-3, N-3/A POS AMI N-4, N-4/A N-6, N-6/A A few submission form types can be used to identify series and classes (contracts) merger data. These form types are as follows: 425 N-14, N-14/A DEFM14A, DEFM14C PREM14A, PREM14C Some submission form types are used by both registered investment companies and other filer types. The submission helps distinguish between the two types of filers by asking whether the filer is a registered investment company or a business development company before the fields for investment companies are displayed. These form types are as follows: DEF 14A, DEF 14C PRE 14A, PRE 14C DEFA14A, DEFA14C PREC14A, PREC14C DEFC14A, DEFC14C PREM14A, PREM14C DEFM14A, DEFM14C PREN14A DEFN14A PRER14A, PRER14C DEFR14A, DEFR14C PRRN14A DFAN14A, DEFR14C PX14A6G, PX14A6N 425 S-1, S-1/A S-3, S-3/A 7.3.7.1.2 Non-Registrant Third Party Filings Registrant and non-registrant third party filers making proxy filings with respect to subject investment companies may file using the EDGAR submission form types as previously mentioned in Section 7.3.7.1. See Rule 313(d) of Regulation S-T. In these cases, the investment company type specified is that of the subject company. The filer will also include series and/or class (contract) identifiers on whose behalf the filing is being made. The series and class EDGAR Filer Manual (Volume II) 7-44 June 2014 (contract) identifiers for the subject company can be found in the SEC-EDGAR Company Database at http://www.edgarcompany.sec.gov. 7.3.7.2 Existing Series and Classes (Contracts) Identifiers Figure 7-19: Including Series and Classes (Contracts) Identifiers shows the fields displayed when the “Existing” radio button is selected. This page would be used by Form N-1A or Form N-3 filers. When the Investment Company Type is for Form N-4 or Form N-6 filers, the series fields are not displayed since these types of companies have only a single series, however information on multiple classes (contracts) can be included. Figure 7-19: Including Series and Classes (Contracts) Identifier Enter the Existing Series ID and Class (Contract) ID associated with the filing. Use the “All?” Series ID box to indicate that you are making the filing on behalf of all your series and classes (contracts) with a status of Active. Use the “All?” Class (Contract) ID box to indicate that you are making the filing on behalf of all the classes of a series with a status of Active. If you are not using either of the “All?” boxes and you are identifying individual classes, clicking the [Add] button for Class (Contract) ID will display a field to add another Class (Contract) ID to the series on whose behalf the filing is being made. Clicking the [Add Another Series/Class] button will display fields to indicate another set of series and classes (contracts) on whose behalf the filing is being made. Clicking the [Delete Series/Class] button will remove the selected set of series and classes (contracts). Caution: If you enter a number of Series IDs and then later select the “All?” button, the entered Series ID fields will be eliminated. The class “All?” button works identically to that of the Series. Be careful before selecting the button if you have entered either series or class (contracts) identifiers. June 2014 7-45 EDGAR Filer Manual (Volume II) 7.3.7.3 Adding New Series and Classes (Contracts) For those form types that allow the filer to add new series and classes (contracts), selecting the “Adding New” radio button displays the fields to enter new series and class (contract). The fields displayed depend on the Investment Company Type of the primary registrant or the subject company and the EDGAR submission form type being used. Figure 7-20: New Series and Classes (Contracts) on Registration Statements, shows the fields displayed on the N-1A and N-3 EDGAR submission form types. When the Investment Company Type is for Form N-4 or Form N-6 filers, the series fields are not displayed since these types of companies have only a single series. Figure 7-20: New Series and Classes (Contracts) on Registration Statements Enter a series name and the name for its first class (contract). Each series must have at least one class (contract). For the first series you may use your company name as the Series Name by clicking the “Use Company Name as Series Name?” check box. The series for a “stand alone fund” without separate series will have the same name as the fund itself. If the series does not have separate classes, the filer should use the series name as the class name. To do this, click the “Use Series Name as Class (Contract) Name?” check box. The class for a series without separate classes will have the same name as the series itself. This is the only case where the class name should use the series name. You may enter additional classes (contracts) for the series by clicking the [Add] button. Multiple series may be added by clicking the [Add Another Series/Class] button. Multiple series may be removed by clicking the [Delete Series/Class] button. EDGAR Filer Manual (Volume II) 7-46 June 2014 You must enter a unique name for each series, i.e., you may not enter duplicate series names for your investment company (although its series might have the same name(s) as the series of other investment companies). For each series, you should enter the name by which that series is most commonly known. For example, if the “Acme Trust” complex has a series named the “Bond Fund” which is known and marketed as “the Acme Bond Fund,” the fund should enter the name “Acme Bond Fund” as the name of the series. For a series, you must enter a unique name for each of its classes (contracts), i.e., you may not enter duplicate class (contract) names for classes (contracts) of the same series. Most class names are letters (e.g., A or B) or names such as “Institutional” or “Retail.” Insurance company separate accounts must enter unique names for their contracts; if they currently have duplicate names, then the separate account information should be added to the contract name. Further identifying information, such as a number indicating the date of the contract’s creation or the Securities Act file number issued to that contract may also be used. N-4 and N-6 filers have one “dummy” series which is automatically created when their first class (contract) is created and has the same name as their company. These funds enter the information for their contracts, and receive their contract identifiers, at the class level. Figure 7-21: New Classes (Contracts) on Pre-effective and Post-effective Amendments shows fields for adding a class to an existing series based on Investment Company Type for Form N-1A or Form N-3 filers. Figure 7-21: New Classes (Contracts) on Pre-effective and Post-effective amendments To add an additional class to an existing series of an investment company of type N-1A or N-3, click the “Existing Series?” check box and enter the existing Series ID and a new class name. June 2014 7-47 EDGAR Filer Manual (Volume II) 7.3.7.4 Mergers When a registered investment company with series and classes (contracts) is involved in a merger, the filer must identify merger information. See Rule 313 (c) of Regulation S-T. The filer may be the primary registrant or could be filing with respect to a subject company. In either case, the filer must supply series and classes (contracts) information about the acquiring fund and the target (and their series and classes or contracts, if any, in existence). Figure 7-22: Parties to a Merger on Series/Classes (Contracts) Information Page shows the fields used to identify the parties to a merger. Figure 7-22: Parties to a Merger on Series/Classes (Contracts) Information Page To enter information for the Acquiring or Target company of a merger, first select its Investment Company Type to display the appropriate fields. Since series and class (contract) specific information may not be available at the time of the filing, the filer is required to supply at a minimum one set of CIKs involved in the merger. To assist the filer, default values based on the primary registrant or subject company and their role in a merger are pre-filled. You may change the pre-filled values. The target company must be the primary registrant or co-registrant on submissions with co-registrants. For investment companies with series and classes (contracts), enter the Series ID and Class (Contract) ID involved in the merger. For the target company, using the “All?” check box in front of the Series ID field indicates that all of the series and classes with a status of Active are included in the merger. If a series is a target of a merger, use the “All?” Class (Contract) ID box to indicate all of the classes of the series with a status of Active are included in the merger. Clicking the [Add Another Series/Class] button for Series ID will display fields to add another target series. EDGAR Filer Manual (Volume II) 7-48 June 2014 Clicking the [Delete Series/Class] button will remove the selected set of target series and classes (contracts). Clicking the [Add] button for Class (Contract) ID will display fields to add another class to the target series. Clicking the [Add Another Acquiring/Target] button will display fields to add another merger specification to the filing. Clicking the [Delete Acquiring/Target] button will remove the selected set of acquiring series and classes (contracts). 7.3.7.5 Field Definitions for Series and Classes (Contracts) Information Page Table 7-5: Series and Classes (Contracts) Information Page Field # Field Name Example of Value to be Inserted Definition (Limits of Field) 71 Existing Radio Button Displays fields to identify Series ID and Class (Contract) ID included in the filing 72 Adding New Radio Button Displays fields to add new series and/or classes (contracts) to the registration and obtain identifiers in the filer notification message 73 Merging Radio Button Displays fields to identify parties to a merger including Series ID and Class (Contract) ID if they exist 74 All? (Series ID) Check Box Indicates that a filing is being made on behalf of all the series with an active status and their classes with an active status 75 Series ID S000000999 Investment Company Series Identifier 10 characters (‘S’ and nine numeric) 76 All? (Class (Contract ID)) Check Box Indicates that a filing is being made for all classes with an active status for the associated series 77 Class (Contract) ID C000000999 Investment Company Class (Contract) Identifier (‘C’ and nine numeric) 78 Add Button Displays input field for another class (contract) identifier 79 Series Name Global Large Cap Investment Company Series Name (150 characters) 80 Use Company Name as Series Name? Check Box Indicates that the Company Name will be used as the Series Name for the first series 81 Class (Contract) Name A, B, C, K Investment Company Class (Contract) Name (150 characters) 82* Use Series Name as Class (Contract) Name? Check Box Indicates that the Series Name will be used as the Class (Contract) Name for the first class (contract) June 2014 7-49 EDGAR Filer Manual (Volume II) Field # Example of Value to be Inserted Field Name Definition (Limits of Field) 83* Add Button Displays input fields for an another class (contract) name 84* Add Another Series/Class Button Displays input fields for an another series and class (contract) name set No info blank cell Delete Series/Class Button Removes input fields for a selected series and class (contract) name set 85* Existing Series? Check Box Displays Series ID field to add a class (contract) to an existing series 86* Investment Company Type Pick-list* Used to select the Investment Company Type for the Acquiring and Target parties to a merger 87* CIK 0123456789 Used to supply the CIK for the Acquiring and Target parties to a merger (10 numeric characters) 88* All? Check Box Indicates that all the series with a active status and their classes with an active status are targets of the merger 89* All? Check Box Indicates that all classes with an active status for the associated series are targets of the merger 90* Add Another Acquiring/Target Button Displays input fields for an another series and class (contract) name set No info blank cell Delete Acquiring/Target Button Removes input fields for a selected acquiring and target series and class name set *The values on the Investment Company Type pick-list are: ● Form N-1A Filer (Mutual Fund) ● Form N-1 Filer (Open-End Separate Account with No Variable Annuities) ● Form N-2 Filer (Closed-End Investment Company) ● Form N-3 Filer (Separate Account Registered as Open-End Management Investment ● Company) ● Form N-4 Filer (Variable Annuity UIT Separate Account) ● Form N-5 Filer (Small Business Investment Company) ● Form N-6 Filer (Variable Life UIT Separate Account) ● Form S-1 or S-3 Filer (Face Amount Certificate Company) ● Form S-6 Filer (UIT, Non-Insurance Product) ● Not an Investment Company EDGAR Filer Manual (Volume II) 7-50 June 2014 7.3.8 The EDGARLink Online Fee Offset Information Page Filers can add fee offset information via the Fee Offset Information Page in EDGARLink Online. You can add multiple fee offsets for each submission. Figure 7-23: Fee Offset Information Page illustrates the page. Table 7-6: Information Fields Available on the Fee Offset Information Page contains the values required in each field. Finally, follow the specific directions that are listed after Table 7-6 to complete the page. Figure 7-23: Fee Offset Information Page Table 7-6: Information Fields Available on the Fee Offset Information Page Field # Field Name Example of Value to be Inserted Definition (Limits of Field) 91 CIK 1234567890 Identifies the filer/registrant who previously paid the offset amount. Required if there is an offset. This field allows up to 10 characters. 92 Form Type Pick List; S-1 Indicates form type in which the offsetting fee amount was paid. Required if there is an offset amount. This field allows up to 10 characters. 93 File Number 333-00000000-001 References the file number for the offset filing. This field allows up to 16 characters. 94 Offset Filing Date 10/15/2000 Indicates filing date of the offsetting payment; preferred order is month, day, year (i.e., mm/dd/yyyy). This field will allow you to either enter a date or select a date using the calendar icon. 95 Amount 4000 Indicates an offsetting payment against your filer’s fee obligation, as provided for in Section 14 of the Exchange Act. (0 - 99,999,999,999,999.99). June 2014 7-51 EDGAR Filer Manual (Volume II) Field # Field Name Example of Value to be Inserted Definition (Limits of Field) 96 Fee Offset Total 4000 Read-only field containing the sum of Amount fields for all offset rows entered for the submission. 97 Add Fee Offset Line Button Displays input fields for an another fee offset payment Delete Fee Offset Line Button Removes input fields for a selected fee offset payment Place the fee offset information on the Fee Offset Information page. 1. From your open submission, click the Fee Offsets tab. 2. The Fee Offset Information page appears, Figure 7-23: Fee Offset Information Page. 3. Enter the Filer/Registrant CIK in the CIK field. 4. Select the form type in the Form Type field. 5. Enter the file number in the File Number field. 6. Enter or select the date of the offset filing in the Offset Filing Date field. 7. Enter the amount of the offsetting in the Amount field. 8. Click or tab out of the Amount field in order to automatically update the Fee Offset Total field with the sum of each Amount field. 9. If there are additional offsets to be applied, click the [Add Fee Offset Line] button. You are allowed to enter as many fee offset rows as you would like. 10. If there are offsets to be removed, select the offset by clicking the check box next to the CIK field and then click the [Delete Fee Offset Line] button. 7.3.9 The EDGARLink Online Offerings & Fees Page The Offerings & Fees page contains the fee-relevant fields for your submission and simulates the facing page of the registration statement for normal registration offerings. Calculations for the estimated filing fees are automatically generated and displayed. EDGARLink Online contains the latest fee rates from the SEC and automatically inputs this information into the Offerings & Fees page; see Section 7.2.2, Viewing the Fee Rate. EDGAR Filer Manual (Volume II) 7-52 June 2014 Figure 7-24: Offerings & Fees Page 7.3.9.1 Entering Offerings & Fees Information 1. If someone other than the Primary CIK is paying the fees, enter that CIK and CCC into the Payor CIK and Payor CCC fields. EDGARLink Online will validate the Payor CIK and Payor CCC pair to ensure it is correct. 2. Select the Payment Method, if applicable. 3. Enter the amount paid for this submission in the Fee Paid field. 4. Select the Security Type from the pull down field. 5. Enter: The number of shares in the Amount Being Registered field. The maximum price per share in the Proposed Maximum Offering Price per Unit field. The Proposed Maximum Aggregate Offering Price will compute and automatically appear. OR 6. Enter the total offering price in the Proposed Maximum Aggregate Offering Price field. June 2014 7-53 EDGAR Filer Manual (Volume II) Table 7-7: Fields Available on Offerings & Fees Page Field # Field Name Example of Value to be Inserted Definition (Limits of Field) 98 Payor CIK 1234567890 CIK of a third-party payor for the fee obligation. This field allows up to 10 characters. 99 Payor CCC X21234@1 CCC of a third-party payor for the fee obligation (8 characters, at least one must be @, #, $, or *; case-sensitive). 100 Payment Method Radio Button; FEDWIRE or LOCKBOX Indicates how the fee is being paid to us. Values accepted are: FEDWIRE and LOCKBOX. This field allows up to 7 characters. Clear Hyperlink Allows you to clear any value selected for Payment Method field. 101 Fee Paid 100.00 Indicates the amount of fee paid with the filing being submitted (0 - 99,999,999,999,999.99). 102 Type of Payment Pick List; Pay In Advance or Pay As You Go Applies to the following automatic shelf registration statements and prospectuses: Automatic Shelf Registration: F-3ASR, S-3ASR, and POSASR Prospectus: 424B1, 424B2, 424B3, 424B4, 424B5, 424B7, and 424B8 Indicates in the offering line whether the filing fees will be paid in advance or on a pay-as-you-go basis. If you choose the 'Pay In Advance' payment type, then a fee is required when filing an automatic shelf registration statement or prospectus. 103 Security Type Pick List; Non-Convertible Debt For offering submissions only. Indicates the type of security being registered, offered, or sold. Values accepted are: Debt, Non-Convertible Debt, Debt Convertible into Equity, Equity, Asset-Backed Securities, Mortgage Backed Securities, Limited Partnership Interests, Unallocated (Universal) Shelf, ADRs/ADSs, Face Amount Securities, Other. 104 Amount Being Registered 250,000 Number of units being registered Proposed Maximum Offering Price per Unit 10.0123 105 EDGAR Filer Manual (Volume II) (0 - 99,999,999,999,999.99). Dollar value per unit (0 -99,999,999,999,999.99). 7-54 June 2014 Field # Field Name Example of Value to be Inserted Definition (Limits of Field) 106 Proposed Maximum Aggregate Offering Price 2,500,000.00 Computed product if both optional values for Proposed Amount Being Registered and Maximum Offering Price per Unit are provided; otherwise, total dollar amount of the security. Even if the value is computed the filer can override (0 - 99,999,999,999,999.99). 107 Total Offering 2,500,000.00 Computed total of Proposed Maximum Aggregate Offering Price for all rows provided (0 - 99,999,999,999,999.99). 108** Fee Basis 30,000,000 For transactional submissions only. Total amount for certain submission types (the amount on the filing fee is based pursuant to Exchange Act Rule 0-11). Refer to Note 1 after this table (0 - 99,999,999,999,999.99). 109* Will this filing be submitted late? Check Box Activates the Enter Number of Days Late, Total Fee, Estimated Interest, and Interest Rate fields. 110* Enter Number of Days Late 240 Number of calendar days by which the submission is overdue; maximum value is 9999. 111* Itemize Check Box Requests itemization of sales entries. 112* Series/Class (Contract) ID S000000002 or C000000001 Investment Company Series Identifier (‘S’ followed by nine numeric characters) or Investment Company Class (Contract) Identifier (‘C’ and nine numeric characters). 113* Sales Proceeds 1,999,999.00 Proceeds of sales of shares. See Note 2 that follows this table. (0 - 99,999,999,999,999.99). 114* Redeemed Value 9,999 Redeemed value of shares. (0 - 99,999,999,999,999.99). 115* Net Value 1,990,000.00 Calculated net value of shares (Sales Proceeds – Redeemed value) (read-only field). 116* Fee 497.50 Calculated fee based upon the net value of shares (read-only field). 117* Fee Rate .000250 or 2.5% Current fee rate for Offering, Transactional, Flat, or Sales Shares Submissions as read from the Fee Rate Table (read-only field). 118* Fee Rate as of 12/21/2000 Effectiveness date of the Fee rate displayed (read-only field). 119* Estimated Interest 2.50 Calculated amount of interest owed due to filing late (read-only field). June 2014 7-55 EDGAR Filer Manual (Volume II) Field # Field Name Example of Value to be Inserted Definition (Limits of Field) 120* Interest Rate .0006 or 6% Current interest rate for late filing as read from the Fee Rate Table (read-only field). 121* Total Fee 625.00 For offerings, sales shares, and transactional submissions: computed product of Total offering times the fee rate (read-only field). 122 Total Offset from Fee Offset Page 1250 Value of the Fee Offset Total from the Fee Offset Information Page (read-only field). 123 Fee due 625.00 Calculated fee due (read-only field). * Sales shares submission field. ** Transactional submission field. Notes: 1. When you prepare submission types PREM14A, PREM14C, PRER14A, PRER14C, SC 13E1, SC 13E1/A, SC 13E3, SC 13E3/A, SC13E4F, SC13E4F/A, SC14D1F, SC14D1F/A, SC TO-I, SC TO-I/A, SC TO-T, and SC TO-T/A, enter the transactional amount (i.e., the amount on which the filing fee is based pursuant to Exchange Act Rule 0-11) in the Fee Basis field. When submitting submission types PREM14A and PREM14C, use the Fee Basis field in the same manner, unless the filing fee is not based upon the amount of the transaction because it is for the sole purpose of changing your address (Exchange Rule Act 0-11(c)(1)(ii) or because the filer is an investment company). In this case, you should not enter an amount in the Fee Basis field. When submitting submission types SC 13E3, SC TO-I, SC TO-T, SC13E4F, or SC14D1F a positive Fee Basis must be provided. For other submission types, the Fee Basis field can be a positive number or zero only. 2. When you submit an amendment under Rule 24F-2 under the Investment Company Act of 1940 to report a change in the total offering amount (submission type 24F-2NT/A), you should report only incremental INCREASES in SALE PROCEEDS or REDEEMED VALUE. These values can only be a positive number or zero. Report negative values as zero. For 24F-2NT, the value for Sale Proceeds is the value reported in Form 24F-2, Item 5(i). 3. When you amend a Securities Act registration statement to report a change in the Offering Amount field, you should report only incremental additions to the offering amount as the value(s) for the Amount Being Registered and Proposed Maximum Offering Price per Unit fields or the Proposed Maximum Aggregate Offering Price field. The calculation of fees in EDGARLink Online occurs whenever the value of a fee-related field changes. The fee related fields are located on the Fee Offset Information page and the Offerings & Fees page. The filer entered fields used in calculating a fee are the Amount field(s) (Fee Offset Information page) and the Amount Being Registered, the Proposed Maximum Offering Price per EDGAR Filer Manual (Volume II) 7-56 June 2014 Unit and the Proposed Maximum Aggregate Offering Price fields, Sale Proceeds and Redeemed Value or Fee Basis (Offerings & Fees page). On the Fee Offset Information page, the read-only Fee Offset Total field contains the sum of the Amount field(s) in each offset row. This value is updated whenever an Amount field value is changed for one or more fee offsets. On the Offerings & Fees page the read-only Total Offering field contains the sum of the Proposed Maximum Aggregate Price field(s) in each Offering row. The Fee Rate and Fee Rate as of Date fields are read-only fields displaying the latest fee information for Offerings. The Total Fee field (read-only) is the product of the Total Offering and Fee Rate fields, the sum of the Shares Information fees or the product of the Fee Basis and Fee Rate fields. The Fee Offset Total field from Fee Offset Information page (read-only) displays the total offset value. The Fee Due field is the calculated fee for this submission. 7.3.9.2 Fee and Offering Information Page for Form 24F-2 Submissions Figure 7-25: Non-Itemized Offerings & Fees Page is only for Form 24F-2 submissions and amendments. This figure also illustrates when the “Itemize” check box is not checked as is appropriate for investment companies that do not have series and classes (contracts) or for investment companies that choose not to compute the fee separately for series and classes (contracts). When the Investment Company Type field on the Main Page has a value selected for filers who do not have series or classes (contracts), the “Itemize” check box cannot be selected. Figure 7-25: Non-Itemized Offerings & Fees Page To add Sale Proceeds and Redeemed Value fields for each series or class (contract), click the “Itemize” check box. To add another set of values, click the [Add Another Line] button. To delete a set of values, click the [Delete Line] button. Figure 7-26: Itemization of Fee Data by June 2014 7-57 EDGAR Filer Manual (Volume II) Series/Class (Contract) shows the “Itemize” check box as selected. When the Filer Investment Company Type is Form N-1A or Form N-3, a Series/Class (Contract) ID field is displayed. If the filer indicates that they are a Form N-4 or Form N-6 filer, a Class (Contract) ID field is displayed. Series IDs or Class (Contract) IDs used in the Itemization section must also be reported on the Series/Classes (Contracts) Information Page. Figure 7-26: Itemization of Fee Data by Series/Class (Contract) Note: Amendments under Rule 24F-2 should be used to report a change in the total offering amount on Submission type 24F-2NT/A. This means that the filer should report only incremental CHANGES in Sale Proceeds or Redeemed Value. Values in the submission can only be positive numbers or zero. If by reporting only the incremental values, the calculation results in an incorrect incremental net value, then the filer should consult with the Division of Investment Management before completing this form. For 24F-2NT, the value for Sale Proceeds is the value reported in Form 24F-2, Item 5(i). For example if a filer reported $2,000,000 in Sales Proceeds on the original 24F-2NT and $100,000 in Redeemed Value, then the Net Value would be $1, 900,000. If actual sale proceeds were $2,300,000, then the filer should enter the difference or $300,000 into the sale proceeds field for the amendment filing. This would result in an additional fee. EDGAR Filer Manual (Volume II) 7-58 June 2014 7.3.9.3 Offerings & Fees Page for Transactional Submissions Figure 7-27: Transactional Submission Offerings & Fees Page is only for transactional submissions. Figure 7-27: Transactional Submission Offerings & Fees Page 7.3.10 Combining Form Types in a Single Submission 7.3.10.1 Multi-Form Type Registration Statements A registration statement can be made for more than one entity. Sometimes these entities are required by rule to file different form types. In a few circumstances it is permitted to fulfill both filing obligations in a single submission on behalf of the multiple registrants, but for the form types listed below only: When the submission type is: Then the Form-Type can only be used to refer to: S-1 S-1 or S-3 S-3 S-3 or S-1 S-1/A S-1/A or S-3/A S-3/A S-3/A or S-1/A S-1MEF S-1MEF or S-3MEF S-3MEF S-3MEF or S-1MEF The submission type is listed in the first column. For each registrant, along with their CCC, you will also be required to specify the form type that can only be the values listed in the second column. EDGARLink Online will only permit the correct combinations of the submission types and form types. An example of an incomplete form type showing the S-1 and S-3 combination is shown in Figure 7-28: Combination Registration Statement. June 2014 7-59 EDGAR Filer Manual (Volume II) Figure 7-28: Combination Registration Statement 7.3.10.2 Combining Selected Williams Act Filings into a Single Submission EDGAR can process the following submission type combinations in a single submission only when the combined filings are paired in any of the specified combinations: SC TO-I and a SC 13D/A or a SC 13E3 or a SC 13E3/A SC TO-I/A and a SC 13D/A or a SC 13E3 or a SC 13E3/A SC TO-T and a SC 13D/A or a SC 13E3 or a SC 13E3/A SC TO-T/A and a SC 13D/A or a SC 13E3 or a SC 13E3/A In this case the filing can be for a group. Identify only one filer in the Filer field. List the other members of the group (or the other joint filers) under the Group Members field by name (no CIKs are necessary). See Figure 7-29: Combination Williams Act Submission. EDGAR Filer Manual (Volume II) 7-60 June 2014 Figure 7-29: Combination Williams Act Submission When you are submitting one of the above combinations, the Submission Type should be SC TO-I, SC TO-I/A, SC TO-T, or SC TO-T/A. The Type field on the Attached Documents List Page must match the Submission Type field. See Figure 7-30: Setting the Correct Document Type. Figure 7-30: Setting the Correct Document Type When you make a combination filing, EDGARLink Online automatically counts the number of documents and places the correct submission type names in your submission. June 2014 7-61 EDGAR Filer Manual (Volume II) 7.3.10.3 Form 8-K Combined Submissions Form 8-K and its variants (8-K/A, 8-K12G3, 8-K12G3/A, 8-K15D5, 8-K15D5/A, 8-K12B, 8-K12B /A) are used to report specific reportable events usually within four days of occurrence. The list of reportable events is specified in Appendix E (Table E-1 Form 8-K Item Numbers for Reportable Events), which also lists an Item Number to be used for each reportable event. Up to nine items may be specified on a single EDGARLink Online Form 8-K submission. A Period field is provided for the applicable report date for all the items specified on a single Form 8-K. Items with a different report Period must be submitted on separate Form 8-K submissions. For certain reportable events (Items), the Form 8-K filing may be used to simultaneously satisfy the filing obligations of Rules 425, 14a-12, 14d-2(b), or 13e-4(c). The EDGARLink Online 8-K submission has a field, Item Submission Type, which appears after certain 8-K Items (1.01, 1.02, 2.01, 5.01, or 8.01) have been selected, to optionally allow the filer to select another submission type to simultaneously satisfy a second filing requirement with the single Form 8-K combined submission. The selectable values for Item Submission Type are: 425, DEFA14A, DFAN14A, SC TO-C. The Item Submission Type allowed with each Item type is shown in Table 7-8. Allowable Set of Item Submission Type Values Based on Items Selected. After the second submission type is selected, if necessary for subject company filings, additional fields will appear on the EDGARLink Online submission to collect more information for the second submission. When the subject company is an Investment Company with series and classes (contracts) and the required submission is a 425, DEFA14A, or DFAN14A, file the submissions separately instead of using the Form 8-K Combined Submissions. When the Form 8-K is submitted to EDGAR, if it contains a value for Item Submission Type, EDGAR will treat it as two submissions. The filer will receive two notification messages, each with its own unique accession number: one for the 8-K and another one for the second submission. If an error is detected in either submission, the filer will receive two notification messages of suspended filings, one for each submission, and neither submission is accepted. Table 7-8: Allowable Set of Item Submission Type Values Based on Items Selected Items 425 DEFA14A DFAN14A SC TO-C 1.01 X X X X 1.02 X X X X 2.01 X No info blank cell No info blank cell No info blank cell 5.01 X No info blank cell No info blank cell X 8.01 X X X X EDGAR Filer Manual (Volume II) 7-62 June 2014 7.3.11 Module and Segment Submissions Once you have created your module or segment document, you are ready to prepare it for submission to EDGAR. Use the Module/Segment submission (Submission Template 5) that is available on the EDGARLink Online Submission Type Selection Page of the EDGAR Filing Website: 1. Log in to EDGAR. 2. Click ‘EDGARLink Online Form Submission’ from the menu. EDGARLink Online Submission Type Selection Page appears. 3. Scroll down the page to Template 5. Click either ‘Module’ or ‘Segment’. 4. Open the submission and enter your filer information in the appropriate fields: Filer CIK Filer CCC Figure 7-31: Module/Segment Page When you are ready to attach your module or segment to the submission: 1. From the Module/Segment Main page, click the Documents tab. The Attached Module or Attached Segment List page appears. 2. Click the [Add Document] button and the Attachment Selection and Upload window appears, Figure 7-10: Attachment Selection and Upload Window. Attach the module(s) or segment(s) one at a time, as described in Section 7.3.4.4, Attaching a Document. 3. Once your module or segment document(s) are attached, enter the module or segment reference name, a description of the document, and select the type of document you are attaching. If you want the module or segment validated, select the corresponding module or segment check box and click the [Doc Validation] button. June 2014 7-63 EDGAR Filer Manual (Volume II) 4. If you are submitting a segment, you will need to enter the Master Segment CIK in the Master Seg CIK field. Both Type 1 and 2 modules and segments are stored on EDGAR as documents and are incorporated in your submission when your submission is processed. Where the modules or segments appear in your submission document depends upon where you reference the module or segment: ● Type 1 module or segment is not a complete document and is referenced within a submission document text. ● Type 2 module or segment is one complete document and is included in your submission. 7.3.11.1 Testing Module and Segment Submissions The EDGAR system validates modules/segments at the time you submit them. If a module/segment contains errors, EDGAR will report those errors to you and/or your filing agent. Module and segment submissions that contain errors will be suspended and will not be placed in the non-public storage area. There are two ways to test your module and segment documents to be sure that all documents will be accepted by EDGAR. One way is to send in a test module/segment submission. If you activate the “TEST” radio button on the Main page (Figure 7-31: Module/Segment Main Page), EDGAR will check the module/segment submission for errors during processing, but will not store it (i.e., test modules/segments are not stored for referencing in subsequent submissions). You will receive via e-mail the results of your submission and, if needed, can make corrections to the module and segment documents before they are submitted as live. A much better way to validate your documents is to use EDGARLink Online to make the check prior to submission. Select the check box for the document you want to validate in the Attach Segment List Page, and click the [Doc Validation] button. The validation results appear on the Attached Document List page in the Errors field for each validated document. See Section 7.4 Validating Your Submission, for complete details. Figure 7-32: Attach Segment List Page EDGAR Filer Manual (Volume II) 7-64 June 2014 7.3.12 Correspondence Submissions and Documents You may submit a correspondence document (CORRESP) on the Attached Documents List page, or as a separate correspondence submission to EDGAR. EDGAR does not immediately disseminate correspondence documents and submissions to the public, but they do become a part of our records. The SEC staff may release all or portions of these documents electronically if they relate to the staff’s review process. See SEC Press Release 2004-89, “SEC Staff to Publicly Release Comment Letters and Responses.” To create a correspondence document, use a word processing application that supports ASCII or HTML. Attach it to the submission using the Attached Documents List page. You may also include a PDF copy in a correspondence document. 7.3.13 N-SAR Documents Open-end and closed-end management investment companies (other than small business investment companies) that are electronically submitting N-SAR documents should use special software that we provide. Use the N-SAR for DOS application to compile your N-SAR documents. Use the N-SAR online submission in EDGARLink Online to submit your N-SAR submission. We supply EDGAR-compatible N-SAR software to filers along with a supplement to the EDGAR Filer Manual, Volume III: N-SAR Supplement. Except for small business investment companies and unit investment trusts, N-SAR filers must use the N-SAR application to create a Form N-SAR document, called answer.fil. Using EDGARLink Online, attach the answer.fil to the N-SAR submission to prepare the Form N-SAR submission. A filer submitting an NSAR-A or NSAR-B for a small business investment company or an NSAR-U for a unit investment trust cannot use the special N-SAR software. These form types must prepare a text document that includes the questions that apply from Form N-SAR and their answers. If you need the Form N-SAR, please contact our Publications department (202) 551-4040. When using EDGARLink Online to submit the N-SAR filing, use the Series/Classes (Contracts) Information Page to identify series and class (contract) identifiers associated with the filing. 7.3.14 Bulk Filing In EDGARLink Online you can attach multiple submissions (more than 1) in a submission called Bulk Filing: 1. Log in to EDGAR Filing Website. 2. Click ‘EDGARLink Online Form Submission’. 3. Scroll down to Submission Template 6, Bulk Submission. 4. Click ‘Bulk’. Bulk Submission main page appears. June 2014 7-65 EDGAR Filer Manual (Volume II) Figure 7-33: Bulk Submission Main Page 5. Click the [Add Submission] button. The Attachment Selection and Upload window appears. 6. Click the [Browse] button. The Choose File window appears. 7. Select the location of the submissions using the Look in: field. 8. Select the submission by clicking on it and clicking the [Open] button. Repeat steps 7-8 for all the submissions you are attaching. The files you attached are listed on the Bulk Filing List page. Enter a description for each of the files listed. ● You can remove a file by clicking the [Delete Submission] button; see Section 7.3.4.8, Removing a Document. ● You can move the submissions up or down in the Bulk Filing List page by selecting the check box next to the File Name field for the submission file you want to move and clicking the [Move Sub Down] or [Move Sub Up] button; see Section 7.3.4.6, Organizing Documents. If you have many bulk filings, you may want to use a unique name so you can reuse the blank Bulk Filing template. Transmit the Bulk Filing using the ‘Transmit Bulk Filing’ link on the EDGAR Filing Website. See Section 7.6.3, Transmitting Bulk Filings. 7.4 Validating Your Submission EDGARLink Online validates your submission in three ways: ● Field Validation ● Document Validation ● Submission Validation After successful validation of your submission, EDGAR should not encounter any errors within the submission itself. However, EDGAR can validate only information outside the submission EDGAR Filer Manual (Volume II) 7-66 June 2014 such as the CIK/CCC combinations, referenced file numbers, or module/segment references after the filing is transmitted. 7.4.1 Field Validation In this manual, the term “value” refers to the information that you need to supply. When EDGAR encounters a field, it determines if you have supplied the required information. In some cases, no value is required; however, in most cases, values are required. For EDGAR to process values, you must enter them in a specified format. For example, when the Submission Contact Phone field is used, the value should contain at least ten digits (e.g., 123-456-7890). EDGARLink Online automatically converts the Period field to the correct EDGAR mm-dd-yyyy format. 7.4.1.1 Limits on Length of Field Values EDGAR is programmed to verify if there are a specified number of characters for each value. This specified number of characters is the field length. For example: The CIK field has a field length of up to ten (10) digits, 1234567890. In EDGARLink Online, the Main page field values will not allow you to exceed the specified number of characters. In some cases, as in CIK, EDGARLink Online inserts leading zeros before your inputs if the value is less than the field length. EDGARLink Online automatically checks the validity of your information when you enter it in each field. For instance, if you enter your CCC and forget to enter a special character, a “red x” icon is displayed next to the field name, and a help message appears describing the type of information that belongs in the field. After you correct the field value, you must click in another field to make the “red icon” disappear. 7.4.2 Document Validation When you have entered values in the required and optional fields on the Main, Attached Documents List, Attached Module or Segment, and Notification Information pages, your submission will be ready to validate. EDGARLink Online checks submission documents via the Attached Documents Information page. Validation ensures that your internal document tags match and that you have entered the correct values for the tags. Your document is also checked for non-ASCII characters and for correct line lengths. Before you transmit your submission, you should validate your documents: 1. Attach your submission document(s) as described above. 2. Select the check box for each document you want to validate. 3. Click the [Doc Validation] button. Figure 7-34: Attached Document Validation shows the document specimen.txt and the [Doc Validation] button. June 2014 7-67 EDGAR Filer Manual (Volume II) Figure 7-34: Attached Document Validation After you click the [Doc Validation] button, EDGARLink Online will pre-process your documents using the EDGAR document rules, allowing you to check your documents before they are processed. If you encounter any errors in your documents, the Errors field on the Attached Documents List page lists the number of errors in your document. To view the errors, click the value under the Errors field. The error View window will appear on your screen. The window is illustrated in Figure 7-35: Document Validation. In this illustration, the document specimen.htm has been chosen and the document validation window outlines the errors in this document. 7.4.2.1 Correcting Submission Documents EDGARLink Online allows you to correct your submission documents before you transmit your submission to EDGAR. When you run the Document Validation, the number of errors is displayed in the Errors field on the Attached Documents List page. To see a detailed list of document errors, click the value under the Errors field for the document that contains errors; the document name appears in the top pane of this window. You can correct your document using the tool that you used to create your document. Note: If you are checking N-SAR documents, such as submission types NSAR-A, NSAR-B, NSAR-AT, NSAR-BT, or an associated amendment, you must return to the N-SAR software to correct any errors. EDGAR Filer Manual (Volume II) 7-68 June 2014 Figure 7-35: Document Validation Window 7.4.3 Submission Validation After you have completed your submission, attached and validated the individual submission documents, and referenced any modules or segments, you are ready to validate your submission in its entirety: 1. From your open submission, click the [Submit] button. June 2014 7-69 EDGAR Filer Manual (Volume II) Figure 7-36: Submission Validation Results Window EDGARLink Online processes your submission using the same rules that EDGAR does. After validating your submission, EDGARLink Online displays submission and document errors under “Submission Errors” in the upper block of the screen. The list of the error messages will be shown in red under “Submission Errors” and can be viewed regardless of the tab you are on. In addition, a “red x” icon will be displayed next to the field names to indicate which fields contain invalid information. You must correct the errors for each field. To see a detailed list of document errors, click the Documents tab. Select the check box for the document listed under File Name and click the [Doc Validation] button. When you run the Document Validation, the number of errors is displayed in the Errors field on the Attached Documents List page. Click the value in the Errors field for the document that contains errors. Figure 7-36: Submission Validation Results Window appears. After correcting those errors, you should retransmit your submission. 7.4.4 Editing Your Submission When you run the validation, the errors you have may be of two kinds: errors in the submission itself or errors in the submission document(s). For a list of errors, see APPENDIX A, MESSAGES REPORTED BY EDGAR. To correct errors in your submission: 1. Correct any errors listed in the upper block of the screen under the submission Errors heading by editing the text in the field. 2. Save your submission and validate it again. If there are errors in your attached document, select the check box for the document listed under File Name and click the [Doc Validation] button. When you run the Document Validation, the number of errors is displayed in the Errors field on the Attached Documents List page. You can EDGAR Filer Manual (Volume II) 7-70 June 2014 correct your document using the tool that you used to create it, see Section 7.4.2.1, Correcting Submission Documents. 7.4.5 Submission Errors Errors in your submission might consist of blank required fields or invalid text within fields. When EDGARLink Online reports your errors, you can open the EDGARLink Online page with the error, and correct the entry. A list of fields and sample entries is listed in APPENDIX C. 7.4.6 Document Errors Errors in your document might consist of improper Table tags. To correct any errors in your document, open your original document (e.g., word processor), correct the errors, save the document in the appropriate format (ASCII or HTML), and re-attach the document in your submission. These processes are detailed in Section 7.3.4.6, Organizing Documents. If you are checking N-SAR documents, such as submission types NSAR-A, NSAR-B, NSAR-AT, NSAR-BT, or an associated amendment, you must return to the N-SAR software to correct any errors. 7.5 Saving Your Submission EDGARLink Online lets you save a partially or fully completed online submission on your computer. The [SAVE] button saves the current submission you have open. If you click the [SAVE] button your submission fields and attached documents are saved into one file. (Refer to Section 2.3.3 for details on how to set up the Firefox browser's save/download preferences.) EDGARLink Online will put an .eis extension by default when you save your submission. You can name your submission with a description name so that you can refer to your copy as needed. EDGARLink Online defaults the file name to the name of the submission. Once saved, you will have the option of retrieving the online submission from the Main page of the same blank submission using the [RESTORE] button. Please note that any tampering with the saved file may result in its corruption and render it unusable. 7.6 Transmissions to EDGAR All the EDGARLink Online submissions discussed in this chapter can be prepared and submitted to EDGAR using two transmission methods: Internet or Leased Line. 7.6.1 Transmitting Single Submissions When your submission has been compiled and validated, you can transmit your submission. This process instructs you how to transmit a LIVE filing: 1. Click the [SUBMIT] button on the open submission. The Confirmation page appears. 2. Click the [Transmit LIVE Submission] button. Once you click this button, EDGAR will transmit your submission. June 2014 7-71 EDGAR Filer Manual (Volume II) Figure 7-37: Transmit Live Submission Page The Transmit Single LIVE Submission page appears with a warning stating that any information contained in the LIVE submission is subject to be disseminated immediately. Note: If you do not want to transmit a LIVE submission, click the [Cancel] button on the Confirmation window. 7.6.1.1 Transmission Status An accession number appears on the Acknowledgment page. This does not mean your submission has been accepted. It means your submission has been transmitted. You can find out the status of your submission one of two ways: ● Through e-mail ● By performing a Submission query on the EDGAR Filing Website. For more information on Submission queries, see Section 11.5, Submission Information. 7.6.2 Transmitting Modules and Segments Transmitting modules and segments to EDGAR uses the same process as transmitting submissions. This procedure assumes that you have created your Type 1 or Type 2 module or segment document and compiled it using the Module/Segment submission. If you need further assistance please contact our Filer Support Staff at (202) 551-8900. 7.6.3 Transmitting Bulk Filings After you have created a Bulk Filing, see Section 7.3.14, Bulk Filing. You can transmit the bulk filing via the EDGAR Filing Website. 1. Click the LIVE or TEST radio button on the Bulk Submission page. 2. Click the [Submit] button. The Confirmation page appears. 3. Click the [Transmit LIVE Submission or Transmit TEST Submission] button. Once you click this button, EDGAR will transmit your submission. EDGAR Filer Manual (Volume II) 7-72 June 2014 The Transmit Bulk LIVE Submission page appears with a warning announcing that any information contained in a live submission is subject to be disseminated immediately. Note: If you do not want to transmit a live submission, click the [Cancel] button on the Confirmation window. 7.6.4 Test Submissions Test submissions allow you to transmit a submission in a test mode. The filing will be processed in a similar manner as live filings EXCEPT: ● It will not be disseminated ● Modules and segments will not be stored ● Some items may not be checked ● Login-CIK filers may access a requested Return Copy ● There are no fees; however, EDGAR warns you if you have insufficient funds in your account You can designate test filings, single or bulk, in the following ways: 7.7 ● Activate the “TEST” radio button on the Main page of your submission before transmitting your submission ● Transmit a bulk filing, as a test filing, by clicking the [TRANSMIT TEST] button. Disseminating Draft Registration Statements The Disseminate Draft Registration Statement page is shown below (Figure 7-38) and it lists the DRS and DRS/A submissions that are available for dissemination for the filer entered CIK. You can use the Accession numbers displayed on this page to help you identify a previously submitted DRS or DRS/A submission. These draft registration statements can be disseminated to the public using the [Disseminate] button. Once a draft registration statement is disseminated, the company information is also made public for the companies who created their access codes to submit draft registrations. Figure 7-38: Disseminate Draft Registration Statement June 2014 7-73 EDGAR Filer Manual (Volume II) Follow the steps given to disseminate a draft registration statement to the public: 1. Click the ‘Draft Reg. Statement’ link on the EDGAR menu. The Draft Registration Statements page displays. 2. Click the ‘Disseminate Draft Registration Statement’ link on the Draft Registration Statements page. The Disseminate Draft Reg. Statement page displays. 3. Enter your CIK in the CIK field. 4. Enter your CCC in the CCC field. 5. Click [Continue]. The Disseminate Draft Registration Statement page displays a list of previously accepted draft registration statements and amendments for the CIK entered by the filer, which are yet to be disseminated. The page also displays the Accession Number, File Number, and the Received Date for each draft registration statement or amendment. 6. Select the check box corresponding to the DRS or DRS/A submission that you want to disseminate and click [Disseminate]. A Warning/Confirmation screen prompts you for confirmation. 7. Click [Disseminate] to disseminate the selected DRS or DRS/A submission. EDGAR disseminates the primary official document (in HTML or ASCII format) along with any Exhibits or graphic files. Note that EU-1 and COVER documents will not be disseminated for DRS or DRS/A submission. 8. If you do not want to disseminate the draft registration statement, click [Cancel] to return to the Disseminate Draft Registration Statement page. 7.8 EDGAR Filing Website Help When you are on the EDGAR Filing Website and are using the Internet, there are links that provide assistance: ● General Help ● SEC Rulemaking ● Fee Information ● Company Search EDGAR Filer Manual (Volume II) 7-74 June 2014 7.8.1 EDGARLink Online Help When you are using EDGARLink Online, there are two types of help available: ● Field-Level Help ● EDGAR Help Both of these assist you in creating a submission. Help text will be available for most fields by placing your mouse over the field labels.You can access EDGAR Help by clicking the [HELP] button in EDGARLink Online. This will display filer manual volumes in a new browser window. 7.9 Common Problems Incorrect security codes Be careful when you enter security codes such as the CCC. It is important that we ensure that others do not file for you. We will suspend filings from any filer using an incorrect code. Incorrect file numbers If you are required to specify a file number with your filing, EDGAR will check that the file number is assigned to you. If it is not, your filing may either be suspended or blocked. In other cases, your reporting file number must be appropriate for the filing you submit. These are all values that you can validate. Incorrect filer data Some of the data you maintain about your company on our system is used in validating your filings. For example, if you are an individual filer, we do not expect you to submit registration statements. Training agents cannot submit live filings, etc. Incorrect Dates EDGAR performs a number of validations on dates. For example, if a filing requires you indicate a period date, then a future date may not be accepted. These types of errors can easily be avoided by validating your filing. Missing information: Filers who do not validate their filings may omit an essential element of information. If essential data elements are missing, the filing will be suspended. Duplicate filing If the form type can only be submitted a single time for the same period, the second filing may be suspended. Incorrect IRS Number If you are required to submit an IRS number with a filing, your filing may be suspended if it does not match the IRS number of record on our database. June 2014 7-75 EDGAR Filer Manual (Volume II)


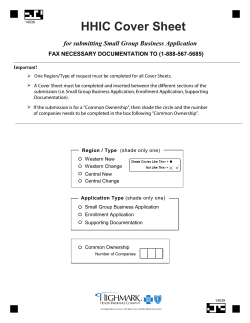


© Copyright 2026