
Ultra Shine Building Maintenance Employee Reference Manual
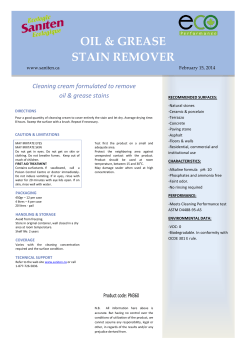
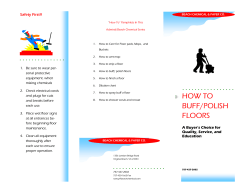
Ultra Shine Building Maintenance Employee Reference Manual 1/23/2014 page 1 Table of Contents MISSION STATEMENT…………………………………………………………………………………………...3 GOALS……………………………………………………………………………………………………………...3 SAFETY RULES AND REGULATIONS…………………………………………………………………………4 CHEMICAL AND CLEANING SOLUTIONS…………………………………………………………………….4 CHEMICAL DILUTION CHART, TABLE OF EQUIVALENTS AND THE pH SCALE……………………5-6 CLEANING EQUIPMENT AND USES…………………………………………………………………………..7 DUSTING, CUSTODIANS CART, MOP BUCKET AND PRESS, WET MOP, DUST MOP, PUSH BROOM AND CORN BROOM, VACUUM CLEANER, FLOOR MACHINES, CARPET EXTRACTORS METHODS AND PROCEDURES………………………………………………………………………………..9 ASSEMBLING EQUIPMENT AND SUPPLIES, DUSTING,DUST MOPPING FLOORS, WET MOPPING FLOORS, TRASH, CARPET VACUUMING RESTROOM CLEANING………………………………………………………………………………………..12 WASHROOM CLEANING CHECKLIST, REFILLING DISPENSERS, CLEANING SINKS AND WASH BASINS, MIRRORS, URINALS AND TOILET BOWLS, BATHROOM WALLS AND PARTITIONS, BATHROOM AND SHOWER FLOORS PROCEDURE FOR CLEANING BLOOD OR BODILY FLUIDS………………………………………...14-15 KITCHEN CLEANING……………………………………………………………………………………………15 RESTAURANT CLEANING, OFFICE CLEANING, SLOT MACHINE CLEANING...……………………..16 WALL CLEANING………………………………………………………………………………………………..17 GLASS CLEANING, RESILIENT FLOOR CLEANING, MASONRY FLOOR CLEANING.....……………18 STAIN REMOVAL………………………………………………………………………………………………..19 FLOOR MACHINES……………………………………………………………………………………………...24 EMPLOYEE SIGNATURE PAGE...…………………………………………………………………………….25 1/23/2014 page 2 UltraShine Building Mantenance MISSION STATEMENT Striving for excellence through safety, training, efficiency, supervision, communication and leadership. GOALS 1. To hire quality personnel committed to performing a professional job. Each member of our company is expected to work with honesty, integrity and transparency, including the ability to be open about any concerns or difficutlies that he or she may be experiencing. We expect our team to be open with each other and their supervisors because we believe that no issue can be fully resolved without it. If a concern or issue may arise, we encourage the discussion with a supervisor, outside of regular scheduled work hours, on a one to one basis and in the presence of another company associate as a witness. 2. To provide quality training/in-service to develop housekeeping knowledge, safety awareness, and task performance skills and techniques in the janitorial program. Each member of the company is expected to work together with the other associates in order to deliver impeccable quality work. Working on a team has been shown to be more productive and pleasant than working alone. In order to fulfill a task on a team, each member must be fully clear on what they are doing and the proper way to do it. This includes safety rules, proper equipment, quality control, and efficiency. While working on a team, the more experienced members are expected to provide leadership and guidance to the more junior associates. 3. To provide quality cleaning products (chemicals), equipment and supplies. 4. To provide a continuous monitoring for quality assurance. Each member of the company is expected to comply with the company’s mission statement and core values. All applicable laws, regulations, company policies and procedures, instructions given by a supervisor, this training manual, and any other training that may be received in the future. 1/23/2014 page 3 Janitorial Procedures Guidelines SAFETY RULES AND REGULATIONS Never leave a slick spot or any foreign material on the floor that may be hazardous to the occupants of the building. Always put out safety precaution signs where a floor may be wet from mopping or leaking water. Chemical and Cleaning Solutions Most chemicals used come in a highly concentrated form and must be diluted before use. Some are in dispensing systems that dilute automatically. Always read the instructions and the material safety data sheets for each product. The following safety rules are for your protection; *Only dilute with water 1. Ensure that Material Safety Data Sheets (MSDS) are accessible and that all maintenance and janitorial personnel as well as administration are aware of their location. Periodically review your MSDS sheets to ensure that they are current and reference chemicals that are currently in use. KNOW THE PROPER FIRST AID PROCEDURES FOR ALL CHEMICALS USED THAT HAVE THE ABILITY TO CAUSE HARM TO BUILDING OCCUPANTS AND WORKERS. 2. Know what you are using. Do not use chemicals from unmarked bottles or containers. 3. Always read the label and follow the instructions. 4. Measure all chemicals. If the directions say to use four (4) ounces in one (1) gallon of water, measure the water and the chemical correctly. A weak solution may not provide the proper cleaning power. A solution that is too strong will not only waste supplies, but will damage the surface on which you use it. It may also have the potential to cause injury to yourself or others. 5. Do not substitute chemicals. Many chemicals are made only for specific jobs. 6. Never mix chemicals. You can easily destroy a chemical’s usefulness or possibly create a poisonous gas or solution by mixing it with other chemicals. 7. Do not get in the habit of smelling chemicals as a means of identification. A deep breath of the fumes from some chemicals can and will injure you. 8. Protect yourself with the appropriate personal protection, i.e., safety glasses, rubber gloves, or protective clothing, if the solution you are using is a strong acid or alkali. 9. Always secure bottle caps and lids before the container leaves your hands. 10. Label all containers with the district approved Hazardous Material Information Sheet (HMIS) label that reflects product name, health and hazard information, and required personal protection equipment. 11. Do not store harsh or liquid chemicals on overhead shelves. 12. Do not store heavy containers on overhead shelves. 13. Use proper ventilation at all times. 14. Store all flammable products in flammable, ventilated cabinets. Note: Do not bring chemicals from home and do not purchase chemicals yourself. Common Safety Oversights 1. Failure to lock or completely close office doors 2. Failure to lock main or rear entrances 1/23/2014 page 4 3. Windows left open or unlocked 4. Power left on to equipment that should be turned off including lights Report Any Unsafe or Potentially Hazardous Conditions to: • Your trainer/supervisor • Take care of it yourself, it could be as easy as closing a file cabinet drawer so no one trips over it, keeping your work area clean, labeling hazards in the workplace etc. Make Sure the Equipment, Tools or Machines you use are: • In good working order • Have machine guards in place • Are certified or maintained on a regular basis • Used properly and safely by yourself and others Wear Personal Protective Equipment (PPE): • Know what type of PPE to wear, for example, you need to know the proper type of glove for the work you do and the materials you work with. • Know the proper way to wear your PPE for maximum protection. • Know how to take care of your PPE and perform regular inspections to check for holes in gloves or protective clothing, tears in respirators, chemical saturation etc. If your job requires you to wear a respirator for protection, you need to be fit tested annually to ensure proper fit and protection. Chemical Dilution Chart Table of Equivalents 1 gallon = 128oz = 8lbs 1 quart = 32oz = 2lbs 1 pint = 16oz = 1lb 1 cup = 8oz = 1.5lbs 1 tablespoon = 0.5oz 1 teaspoon = 1/6oz (0.16oz) 1/23/2014 page 5 The pH Scale The pH scale is a scale to determine the acidity or alkalinity of a given solution. It runs from 0 to 14, a pH of 7 s neutral, a pH of 7 more than 7 is an alkaline, and a pH of less than 7 is an acid. The pH scale measures the strength of a solution, so it will not change significantly when more chemical is added. It measures the strength and not the quality of the solution. A step up on the pH scale represents 10 time the strength and this is important as only a couple steps up the scale will result in a much stronger solution, and if misused, can cause harm to the surface being cleaned or the individual. Bacteria In order for bacteria to live and reproduce they require food, moisture, warmth and darkness. Odors are caused by bacteria that have begun to decompose organic matter. Before an area can be disinfected, it must be cleaned to remove the organic matter that the bacteria are using to live and grow. After this matter is removed, they can then be disinfected and deodorized. 1/23/2014 page 6 CLEANING EQUIPMENT AND USES The need for proper care of equipment cannot be overemphasized. Equipment that has proper care will stay in use much longer. It will be safer for the operator to use and will enable the janitor to do a better job. After each use, make it a practice to clean equipment and store it properly. Inspect power equipment daily. If equipment needs repairs, ensure you communicate the repair required to your supervisor. Ensure that electrical cords and connectors are grounded and in good condition. Any cords that have had the grounding prong removed or broken or where the cord is frayed should be immediately taken out of service. Do not use equipment until it has been fully repaired. Dusting 1. Dusting can be done with a rag or a duster, both can be treated with chemicals or water or left untreated. 2. When cleaning slot machines, dusting should be done first, high surfaces first and work downward. 3. When the cloth gets dirty, refold to a clean side and continue. Be sure to move objects to dust under them. Never move work papers. 4. Telephones should be dry dusted daily, and damp dusted periodically with a germicidal detergent. 5. Dust chairs from the top downward. 6. When completed, brush out the duster with a stiff wire brush. Custodians Carts The custodian’s cart is one of the most useful tools in building housekeeping. It is designed to carry all necessary equipment needed by the custodian. 1. Several cleaning tools or products can be readily available by using the ‘caddy’ with pockets. 2. Keep cart clean, stocked and stored properly. 3. Empty all trash into dumpster each shift. Mop Bucket and Press 1. Clean after use and store properly. 2. Buckets will last longer if emptied, dried, and turned upside down to store. Wet Mops 1. Consist of long strands of twisted cotton yarn secured by a band at the top. 2. The most common size mop head is 24 ounces. Note: 1/23/2014 Wet mops should be rinsed out well each time they are used, wrung as dry as possible, and then after shaking the strands apart, hung with the head up where they will dry. If stored a long in a damp place, wet mops will mildew and render them unfit for use. page 7 Dust Mops 1. 2. 3. 4. 5. 6. Consists of twisted cotton yarn strands secured to a band for attaching to the dust mop handle. Available in a variety of sizes and shapes. Most commonly used sizes are 24”, 48”, and 60” plus ‘wedge’ mops. Can be used with cleaning solutions, or treated with oil for dust control. Can be laundered. Will remove approximately 90% of the soil and debris found on most hard floors, and should be the preliminary step to all other floor care daily to maintain a smooth floor surface and prevent damage. Push Brooms and Corn Brooms 1. Made from various materials depending upon the job they are designed for. 2. Used primarily for sweeping sidewalks, entries, and other non-finished surfaces. 3. Will raise a lot of dust into air, unless used with care. 4. Do not use on finished floors. Vacuum Cleaners The suction of the vacuum cleaner pulls all loose particles into its flow, including those in corners and around furniture, preventing the gradual accumulation in difficult places. On carpeting it draws the embedded dust out of the pile. Grit left in the carpeting, cuts the pile and hastens the deterioration of the carpeting. 1. The industrial vacuum cleaner performs another function which is almost as necessary and quite as effective as picking up dry accumulations. Most industrial vacuum cleaners are or can be adapted for picking up water and are, therefore, highly efficient for removing scrub water from resilient floors. 2. Vacuum cleaners must be emptied each shift (or otherwise as necessary). 3. Filters are to be cleaned regularly to insure maximum air-flow and to extend the life of the motor. 4. Clean machine exterior also, and store properly. Floor Machines Floor machinse are an indispensable for maintaining resilient floors. In some cases they can also be used for spot-cleaning carpets when properly equipped. No Employee shall attempt the use of any of these machines until they have been trained and approved by an area supervisor. 1. Swing Machine – runs a circular motion brush or pad at low speeds in clockwise or counterclockwise directions, used for deep scrubbing and for stripping floors. 2. Auto Scrubber – lays water and floor soap in front of an agitating pad and then squeegees and vacuums up dirty water. These machines can be push, self driving or ride on. 1/23/2014 page 8 3. Burnisher - runs a circular motion pad at high speeds in clockwise or counterclockwise directions, used for buffing floors. Comes in propane and electic models. Care must be taken when using propane models as they are known to activate overhead sprinklers. 4. Oscillating Machine – runs a rapid oscillation of a square driving pad, used for deep scrubbing and stripping floors. 5. Cylindrical Machine – run two round fiber brushes that spin toward each other. Carpet Extractors Carpet Extractors provide the most efficient method of cleaning carpets. Most are designed to inject a solution of plain water and detergents (under pressure) into the carpet. This solution is then agitated by a powered brush and the soiled solution is then extracted by means of a powerful vacuum, removing soils and most of the moisture. The use of fans after a carpet has been cleaned will help speed the drying process and help prevent the growth of mildew. 1. Individuals must be trained to operate these machines. 2. Removes more soil than any other practical system. 3. Leaves carpets damp/dry if equipment is used properly. METHODS AND PROCEDURES Assembling Equipment and Supplies At the beginning of each shift, the janitor should assemble all tools and materials needed to clean thoroughly his/her area of responsibility. Custodian cart with caddy Spray bottles with appropriate solutions to clean glass, counters, sinks, disinfect surfaces, and spot cleaning Colored microfiber cloths, specific colors for specific roles Paper towels Putty knife/razor blade scrapper Dust mop (treated if needed) Wet mop (if needed) Mop bucket and press (if needed) Vacuum cleaner complete Plastic liners (small and large) Counter brush Dust pan Protective glasses and gloves Dusting From the standpoint of health as well as appearance, dusting is one of the most important jobs. Dust can be a carrier of disease germs. Visible dust presents a dirty appearance that needs to be taken care of as soon as possible. Treated “dust cloths” can be used for most dusting. These are usually rolls of factory treated flannel cloth. 1/23/2014 page 9 Some surfaces lend themselves well to ‘damp dusting’ using a clean cloth and plastic sprayer with appropriate solution. Dust all horizontal surfaces such as window ledges, sills, files, counter tops, machines, telephones, desks ect. As a general rule all horizontal surfaces less than 5’ will receive a thorough dusting weekly. Horizontal surfaces greater than 5’ will receive a thorough dusting monthly. Some surfaces may require spot dusting on a daily basis. Note: Lock all windows when you clean the sills. Dust Mopping Floors 1. Pick up large pieces of paper or other debris before starting to clean. 2. Gum and other material that adheres to the floor should be picked up with a putty knife as you proceed with the dust moping. 3. Use treated dust mop and carefully dust mop all resilient floor areas. Clean under all desks, equipment, etc. that are off the floor. 4. Use counter brush and dust pan in the areas that are hard to reach with a dust mop, e.g. under chairs, tables, counters, in the corners and behind equipment. 5. Dust mop debris to one area for pick up with counter brush and dust pan. 6. Dust mop may be lightly shaken or vacuumed to remove dust. Do in appropriate area. 7. Retreat dust mop as necessary by lightly spraying with dust oil and allow setting before using, or hanging up. 8. If area is carpeted, with a strip of resilient flooring, it is permissible to sweep dust onto carpet for pick up when vacuuming. 9. Dust mops should always be stored off the floor as they are likely to stain the floor surface permanently, causing a discoloration. 10. Treated dust mops should not be used on light colored floors, such as: Bare Wood Floor 1/23/2014 Marble page White Terrazzo 10 Wet Mopping Floors 1. 2. 3. 4. Dust mop the floor using the dry mop cleaning procedures above Keep all obstructions out of the way after finishing the dry mop. Position wet floor signs. Always wear protective goggles and gloves when handling cleaning chemicals. 5. Fill mop bucket with floor cleaner solution following directions on the product label. 6. Start with a clean mop. Place mop into cleaning solution. Wring the mop thoroughly; it should only be damp, not dripping. 7. It is important to use the correct wringing technique, never twist the mop. 8. Damp mop an area approximately 10" x 10", using a figure 8 motion. Side to side. Leave the floor as dry as possible. This will speed the drying process and allow the floor open to traffic sooner. 9. To avoid wetting baseboards or furniture make the first stroke parallel to the baseboard and about 20 inches from it. 10. Turn the mop over occasionally and for best results the mop should be turned over two or three times per dip of water. 11. Remove deep scuff marks using a push-pull stroke. Rub scuff marks with the heel of the mop or rub them lightly with a scratch pad under the toe of your shoe. 12. To prevent dirt from being re-deposited, change floor cleaner solution frequently. Avoid streaks; go over the floor with a well wrung out rinse mop. 13. Clean all equipment and return to storage area. Trash Empty all trash receptacles. Do not reach into the receptacles, but carefully dump the contents of the receptacle into the waste collection bag. Damp wipe soiled receptacles. Replace plastic liners only when soiled or otherwise needed. Carpet Vacuuming The vacuum cleaner is the most effective tool to remove soil from many surfaces, especially carpeting. 1. 2. 3. 4. Move furniture in room only as necessary to vacuum all areas of the carpeting. Pick up large pieces of paper and other debris before vacuuming Vacuum all carpeted areas, getting under desks, furniture and equipment that is off the floor. Replace all furniture. 5. Look for and clean up spots or soiled areas on carpeting using plastic sprayer, appropriate cleaner, and clean cloths or paper towels. Remove gum by using gum remover-follow manufacturer’s instructions. 6. Before leaving the room, visually check to make sure all the following duties are completed: Windows are locked. All items are in appropriate place. Room looks clean and is clean 1/23/2014 page 11 Lights are turned off. Door is locked. Restroom Cleaning The job of cleaning and disinfecting your rest rooms is not a difficult one, if the work is done efficiently. Modern fixture design usually makes cleaning them fast and effective if proper procedures are followed. Clean rest rooms are important for a number of reasons: Bacteria control to help eliminate cross infections to safeguard health. Clean rest rooms encourage the public to help keep them that way. Clean rest room fixtures greatly reduce the possibility of offensive odors (and complaints). The most frequent lingering cause of odors in rest rooms is due to uric acid salts. Remove these salts through proper cleaning procedures and the odors are gone! Rest rooms also require adequate ventilation. Washroom Cleaning Checklist 1. Put on the gloves and place wet floor sign outside the washroom. 2. Restock the supplies. 3. Spray Urinals and toilette bowls 4. Clean sinks and wash basins using _________ colored cloths 5. Clean mirrors using glass cleaner and ___________ colored cloths 6. Clean Urinals and toilette bowls using toilette brush and _____________ colored cloths 7. Clean up major spots on the walls and partitions, wipe down door handles toilet paper and paper towel dispensers. 8. Remove the garbage. 9. Sweep and mop the floors. Refilling Dispensers 1. Check all dispensers daily to insure adequate supply. 2. Refill all dispensers as required (including toilet paper dispensers). 3. Interfold the bottom sheet with the remaining top sheet in the dispenser when adding paper towels. 4. Check the working condition of the units. 5. Close and lock dispenser. 6. Spray the surfaces with germicidal/disinfectant solution and wipe dry with paper towel. At the same time check the soap valve to assure proper operating condition. 7. Clean the surface of the dispenser as above. 8. Fill all soap dispensers. Cleaning Sinks and Wash Basins Several methods can be used to clean sinks with equal final results, however, the following is recommended: 1. Use spray bottle with germicidal/disinfectant solution and spray sink (inside and outside), faucets and adjacent wall areas. 1/23/2014 page 12 2. Let sit a minute, and then scrub with paper towel, clean cloth, or brush. (Paper towel preferred.) 3. Use a small amount of fine cleanser if necessary. 4. Rinse as necessary and polish with clean cloth or paper towel. 5. Wipe walls adjacent to sinks to remove grime, spots, etc. as above. 6. Clean pipes underneath sinks daily as part of the procedure. 7. Do not use lime de-scaler on counter tops. Mirrors Mirrors in rest rooms are easy to keep clean by spraying lightly with glass cleaner or germicidal/detergent solution and wiping dry and/or polishing with a clean, lint free cloth or paper towel. Never use an abrasive cleaner or acid or dirty cloth on minor. These may mar or scratch surface. Avoid using excessive water as it may get into the frame backing and damage the silvering. Urinals and Toilet Bowls Wear rubber gloves at all times. This is for your personal protection. To clean inside bowl: 1. Flush toilet and/or urinal. 2. Use disinfectant from dispensing system-follow manufacturer’s instructions. 3. Use cotton swab (poodle tail) and/or toilet brush and swab inside of bowl using solution. 4. Scrub as necessary-be sure to swab solution up and under the flush rim. Scrub thoroughly. 5. Flush toilet or urinal and rinse swab or brush in clean water before proceeding to next fixture To clean seat and outside of fixtures using sprayer: 1. Spray germicidal/disinfectant solution on toilet seat (both sides), and all of the outside surfaces of the fixtures (toilets and urinals). 2. Let stand a minute or so. 3. Wipe dry with paper towels starting with the top of the seat, then underside and finally the balance of the fixture down to the floor. Note: This procedure is the most effective way to sanitize a fixture, because you are always using clean solution with no chance of cross-contamination. Also, plastic spray bottles or one (1) gallon pressure sprayers can be used. Bathroom Walls and Partitions: 1. Spray or damp dust with a germicidal/detergent solution on surfaces such as ledges, partitions, dispensers, wainscoting, shelves, areas around urinals and toilets, and lower walls as necessary. 2. Use either sprayers or bucket with germicidal/detergent solution, paper towels, clean cloths or a brush. 1/23/2014 page 13 3. Wipe dry, if necessary, with paper towels or clean cloth to prevent streaks and spotting. Bathroom and Shower Floors: (Does not include wood floors) The floors are made of a variety of materials. Some judgment is necessary as to the use of strong chemicals and excessive amounts of water. If the floor can be damaged by over-wetting, substitute with light damp mopping. 1. Mix mopping solution per manufacturer’s instructions. 2. Use clean, wet mop and wet down the floor thoroughly with the solution (damp mop if floor would be damaged as above). 3. Let stand a few moments for the chemicals to work. 4. Agitate the solution with your mop as needed. 5. Pick up soiled solution with mop, floor squeegee, and pick-up pan or floor drain, or use wetvac for pick up. Clean all corners and edges. (Scrape if necessary.) 6. Return all receptacles to proper position. Note: Do not rinse floor as we want to take full advantage of the residual benefits of the germicide. Before leaving the rest room, take a quick visual check of the area and see if it smells clean and looks clean! Be proud of doing the job well. Floor Surfaces The flooring surfaces vary considerably in the different buildings, however, the following is recommended: 1. 2. 3. 4. 5. Sweep or dust mop (treated) floor to remove large pieces of paper and other debris. Lightly flood floors with germicide/detergent solution and warm water. Let stand 3 minutes or more for chemical action. Agitate or scrub with wet mop, brush (long handled),or power buffer, if necessary. Pick up soiled solution with mop, squeegee to drain, or wet vacuum up. Note: Rinsing not necessary as the residual benefits of the germicide are desirable. Clean all equipment and store properly. Procedure for Cleaning Up Blood or Bodily Fluids on Hard Surfaces Blood, vomit and feces may contain germs that can cause serious infections. People who clean blood and other bodily fluids should reduce the risk of infection to themselves and others by following these procedures: Procedure for Blood Spills/Vomit/Feces: 1. Wear appropriate personal protective equipment, such as disposable gloves when cleaning up a spill. If the possibility of splashing exists, protective eyewear and a gown should be worn. Eye glasses are not considered to be protective eyewear. 2. Dispose with care, any broken glass or sharps into a puncture-proof container. If available, disposal of sharps into an approved sharps container for biomedical waste is preferred. 3. Clean the spill area with paper towel to remove most of the spill. Disinfectants cannot work properly if the surface has blood or other bodily fluids on it. Cloth towels should not be used unless they are to be thrown out. 1/23/2014 page 14 4. Discard the paper towel soaked with the blood, vomit, feces or fluid in a plastic-lined garbage bin. 5. Care must be taken to avoid splashing or spraying during the clean-up process. 6. Clean the affected area with soap and water then disinfect with a 1:10 bleach solution for 10 minutes or an appropriate disinfectant with proven effectiveness against non-enveloped viruses (eg. Poliovirus, Norovirus, Rotavirus, Feline Calicivirus). Refer to the manufacturer’s label to ensure the disinfectant is left on the contaminated surface for the correct contact time. With bleach, this would mean the surface stays wet for at least 10 minutes. 7. Ventilate the room well when using a bleach solution. Make sure it is not mixed with other cleaning agents. Kitchen Cleaning Kitchen Cleaning The kitchen cleaning is divided between two people, one cleaning the cooking equipment, that part of the job is referred to as the “hot side” and the other cleaning the counters and the floor, this job is referred to the “cold side”. The kitchen wall cleaning and other deep cleaning is divided into sections, a portion done daily. Hot Side Cleaning Clean inside of microwave ovens. Spray stoves, grill and flattop with degreaser and let sit for several minutes. Clean other equipment while waiting from all sides, clean the trays, move the equipment and clean walls behind it, clean heat vents above in a dishwasher or sink Cold Side Cleaning Wipe down the counter tops including sides and underneath. Wipe down all glass with glass cleaner.Polish the elevator, polish fridge doors with stainless steel polish. 1. 2. 3. 4. Kitchen Cleaning Checklist Wash the walls. Sweep the floor, make sure to sweep under all equipment. Remove floor mats, trash cans and other movable equipment to sweep under. Run the auto scrubbing machine with the vacuum turned off twice breaking the floor into sections. Allow at least 10 minutes for the floor cleaner to penetrate the floor and mop with war clear water. Make sure to mop under all equipment. Clean the auto-scrubber, empty the buckets and rinse the inside. Wipe squeegees and clean the brush, remove any stuck fibers, clean the wheels. 1/23/2014 page 15 Restaurant Cleaning 1. 2. 3. 4. 5. 6. 7. 8. 9. Restaurant Cleaning Checklist Open all the curtains on the stage (if there is a stage area). Dust mop the stage, making sure to get into all the corners, behind the equipment and under the cords. Sweep or vacuum the carpet under the drum kit. Spot clean the walls. Dust all the ledges and wipe down couches and chairs. Clean glass doors with Glass Cleaner. Dust mop the dance floor, move the chairs and make sure to get under all the tables and corners. Vacuum the carpeted areas. Clean the bar and remove the trash and wipe down the trash cans. Dust the walls under the counter and wipe all the surfaces, spot clean the equipment. Mop the floor including under equipment. Office Cleaning Office Cleaning Checklist 1. Dust furniture surfaces and damp clean tabletops. Dust all work-level surfaces, and high dusting around vents and lights, low dusting on chair rungs, chair bases and window sills. (low dust below 5 feet) 2. Empty waste receptacles and damp clean. 3. Sanitize phone pads and mouth/earpieces 4. 5. 6. 7. 8. 9. Vacuum traffic patterns on carpeted floors and remove gum and soil spots. Dust mop and wet mop tiled floors. Clean glass in doors and partitions. Vacuum carpeted areas thoroughly. Clean door surfaces, handles, push plates, kick plates High dust vents, lights, pipes, Venetian blinds, and connecting vertical and horizontal wall surfaces. (High dust above 6 feet) Slot Machine Cleaning 1. 2. 3. 4. 5. 6. Slot Machine Cleaning Checklist Dust the tops and the sides of the slot machines. Clean the screens and buttons of the machines with sanitizer Use one damp cloth to apply the sanitizer and a dry cloth to wipe dry as to not leave streaks Do not spray directly on the screens, dampen the cloth instead Clean the stands including between the machines with antibacterial solution. If a change tray is included on the machine, wipe all surfaces corner to corner 1/23/2014 page 16 7. Spot clean the chair bases and foot rests if nessesary. Wall Cleaning 1. 2. 3. 4. 5. 6. 7. 8. 9. Equipment Required All-purpose cleaner properly mixed Sponges or hand size towels Bucket or spray bottle Cloths/towels Step ladder or platform stage 2 "wet floor" signs Rubber gloves Wet mop Mop bucket with wringer Procedure 1. Test wall surface for wash ability before beginning wall-washing operation. Do not wash wall if paint comes off on sponge when using cleaner according to manufacturer’s directions. Report condition to supervisor. 2. Prepare detergent/disinfectant or detergent solution according to manufacturer’s directions, in bucket in slop sink area. 3. Fill second bucket half full with clean water for rinsing the sponges or toweling. 4. Take tools and supplies to area to be cleaned. Remove all movable obstructions from area (or room). 5. Cover immovable obstructions with drop cloth. Place drop cloth on floor up to baseboard at area to be cleaned. 6. Set up "wet floor" signs at both ends of area where wall washing is to be done. 7. Dip sponge used for washing in detergent/disinfectant or detergent solution and squeeze sponge to a wet but not dripping consistency. Do not allow sponge drippings to run down wall surface. 8. Begin wall-washing operation in a corner starting at floor level and working left or right in three (3) foot sections. Work your way up the wall approximately one (1) foot. Deposit sponge in detergent/disinfectant or detergent solution. Immerse second sponge in rinse water of second bucket. Squeeze to wet, but not dripping, consistency and wipe away residual soil. Turn sponge frequently. 9. Rinse sponge frequently to avoid soil streaks on wall. 10. Use even strokes when washing and rinsing. 11. Continue wall washing operation by overlapping section done and work upwards toward ceiling a section at a time. 12. When area has been washed and thoroughly rinsed to eye level height, stop, move over to next section and continue wall-washing operation. Continue one section at a time until entire wall has been washed and thoroughly rinsed to eye level height. 13. Set up platform stage with platform below eye level. Be sure platform stage is far enough away from the wall to allow freedom of movement but near enough to allow easy accessibility to wall area to be washed. 14. Continue wall-washing operation as previously described until entire wall has been completed. Wash all walls in the room in this manner. 15. Detergent/disinfectant or detergent solution, and rinse water (to rinse the sponges), should be changed frequently to avoid re-depositing soil. 16. Use extreme caution when working around window areas from platform. 1/23/2014 page 17 17. When wall-washing operation has been completed, remove drop cloths, and wash floor as described under floor washing procedure. Return equipment to storage area, rinse sponges thoroughly; and wring out dry. Rinse wet mop and buckets thoroughly; hang up wet mop and turn buckets over in slop sink to drain dry. If cloths are wet, allow to air dry before folding for storage. Store the platform stage out of the way of traffic. Glass Cleaning 1. 2. 3. 4. Best Types of Glass Cleaner Commercial glass cleaners and synthetic detergents Ammonia – this softens the water and makes the windows shine Alcohol is good for loosening dirt on the window especially in winter Dish detergent is popular as it is mild and only a small amount is required Note: TSP (trisodium phosphate) is not recommended as it tends to damage aluminum window frames, panels and building exteriors. 1. 2. 3. 4. 5. How to Clean Glass and Windows Prepare cleaning solution Open drapes and raise blinds or shades. Clear each window sill of obstructions. Either remove the screen or prop it up. Clean the window sill inside and out. Dry dust the frame or wash if necessary. Apply the cleaning solution with sponge or brush. Cover the entire window in side to side single motion. If heavily soiled, go over it again. Remove the soiled water with the squeegee, cut in on both sides. There are two basic motions, the figure 8 motion and the top to bottom motion. For the figure 8 motion start with the squeegee in a vertical position at an upper corner and stroke across. When you reach the opposite side make a half turn and return. Continue back and forth in overlapping strokes. Wipe with a sponge or chamois after each stroke. Wipe the excess water from the sill. With the top to bottom method, the entire sill will need to be wiped. Resilient Floor Cleaning Resilient Floors These include such flooring surfaces as asphalt tile, hard vinyl tile, linoleum, and resilient ‘poured’ floors. Never Use: Solvent or paste waxes. Avoid harsh chemicals and cleaners. Some soap and detergent tend to leave a film on asphalt tiles. Oil or solvents such as naphtha, asoline, turpentine or carbon tetrachloride should never be used for cleaning asphalt tile. Never: Strip or wax a floor without having been trained and qualified to do so by a supervisor. Wood Floors After a wood floor has been sealed, a daily sweeping with a long fiber coarse broom is the most effective. Wet cleaning and liquid spills should be avoided to increase safety and the life of the flooring. For heavy cleaning of industrial floors use a coarse wire brush, sweep and dry vacuum. Be sure to reseal with the desired preservative and let sit for recommended period of time (usually at least 24 hours). Mop up the excess sealer and sprinkle with absorbent. Sweep. 1/23/2014 page 18 Never: Strip of scrub new wood floors or floors that are not protected by a sealer or finish. Seal and Varnish Strippers Seal and varnish strippers should be used only after you have been qualified by a supervisor. They should be used when you wish to remove shellac, varnish, lacquer and most paint-like products from protected wood flooring. Masonry Floors Cleaning Masonry floors, such as those made of clay tiles, stone or poured aggregate have much harder surfaces than do synthetic or wood floor coverings. They require special care and cleaning techniques. Clay Tile Floors – use synthetic detergents that are neutral on the pH scale. Clay tile floors should be maintained daily. Use synthetic pads or nylon grit brushes for complete scrubbing. Newly laid grouted tile should dry for at least ten days prior to sealing. You should never use coarse abrasive scrubbers, as they may scratch the tile. Do not use seals or finish on conductive tile, strong alkaline chemicals because they may build up and crystalize, soaps because they will leave a dull film on the surface. Strong chemicals may be used for difficult cleaning, however remove the chemical immediately after use and neutralize followed by several clear water rinses. Efflorescence (salt deposits on the surface of tile caused from unsealed installation) can be prevented by sealing and patching cracks. Terrazzo – The correct care and procedures for terrazzo are determined by the flooring’s age, use and condition. Floors over three months old and have been properly sealed and maintained should be cleaned using a neutral synthetic detergent. Remove spots and stains immediately. Marble with a cement base is porous and requires protection from moisture absorption and wear. Penetrating sealer should be applied as needed. Never use chemicals containing water-soluble inorganic, metallic or crystalizing salts as they will cause dusting, efflorescence and pitting of the surface. Never use coarse or abrasive materials for scrubbing or maintenance, as they will permanently scratch and dull the surface. Never use oily mop treatments or sweeping compounds, because of the porous nature of the terrazzo. Remove spills and moisture from the surface of as soon as possible to prevent absorption and staining. Never use steel wool, since it will darken the surface and slivers of steel may become embedded in the surface and later cause discoloration through rusting. Masonry floors are more sensitive to stains and moisture because of the fillers used. Avoid excess wet cleaning procedures. Stain Removal There are eight major types of stains and eight methods for removing those stains most effectively. Stain #1: Tar or Asphalt, Grease, Oil, Candle Wax, Chewing Gum Asphalt Tile, Vinyl Tile, Rubber Tile or Homogeneous Vinyl Tile Remove excess material with a putty knife. Rub spot with number 0 steel wool dipped in a neutral floor cleaner (full strength). If spot remains, dust with a mild abrasive cleanser and rub again with the steel wool dipped in cleaner. Rinse well. Wax when dry. Never use a solvent cleaner such as naphtha or a solvent wax. 1/23/2014 page 19 Linoleum. Linoleum Tile or sheet Vinyl Flooring Remove excess material with a putty knife. Apply a liquid solvent wax or a paste solvent wax to number 0 steel wool and rub the spotted area. Wipe with a clean cloth before the wax dries completely. Buff when dry. Wood If the stain is caused by tar or asphalt, use naphtha on a fresh spot. If it has hardened, use dry ice. For grease or oil, use a prepared oil absorbent or naphtha-saturated fine sawdust, or scrub with trisodium phosphate, after wetting the spot and sprinkling on the chemical. For candle wax and chewing gum, apply dry ice until it crumbles or flakes or scrapes off. Ice cubes can work as a substitute for dry ice but the results will take more time. Cork Tile or Custom Vinyl-Cork Tile Remove excess with putty knife. Apply a liquid solvent, wax or paste wax to a rag and rub the spotted area. Wipe with a clean cloth before the solvent wax dries. Buff when dry. Terrazzo or Marble For hardened tar, asphalt, candle wax, and gum, apply dry ice until it crumbles or can be scraped off the surface. For grease or oils, use poultice of whiting with equal parts amyl acetate and acetone. Stain Type #2: Rubber Heel Marks, Shoe Polish Asphalt Tile or Vinyl-Asbestos Tile, Rubber Tile or Homogeneous Vinyl Tile Rub the spot with number 0 steel wool dipped in a neutral floor cleaner at full strength. If spot remains, dust with a mild abrasive cleanser and rub again with the wool. Rinse well. Wax when dry. Never use a solvent cleaner or solvent wax such as naphtha. Sheet Linoleum, Linoleum Tile, Sheet Vinyl Flooring Apply liquid solvent wax or a paste wax, to a rag and rub the spot. Wipe with a clean dry cloth before the wax dries completely. Buff when dry. If spot remains, dust with a mild abrasive cleanser and rub again with the wool. Rinse well. Wax when dry. Wood Floor For rubber heel marks, use rubber burn remover or naphtha dipped steel wool or cloth. For shoe polish, use four parts denatured alcohol to one part each of glacial acetic oxalic acids and glycerin. Apply mixture with cloth and rub. Cork Tile or Custom Vinyl Cork Tile Apply liquid solwax or a paste wax to a rag and rub the spotted area. Wipe with clean dry cloth before the wax dries completely. Buff when dry. Terrazzo or Marble For rubber heel marks, apply a strong solution of synthetic detergent with a stiff brush. For shoe polish, use four parts denatured alcohol to one part each of glacial acetic oxalic acids and glycerin. Apply mixture with cloth and rub. Follow with ammonia to neutralize acids. 1/23/2014 page 20 Stain Type #3: Coffee Stains, Alcoholic Beverages, Juice, Ink, Iodine, Mercurochrome, Mustard, Ketchup Asphalt Tile or Vinyl Asbestos Tile If freshly spilled, wipe up immediately and wash area with a rag dipped in a mild solution of neutral floor cleaner. Rinse well. Wax when dry. If stain is dry, rub with a number 0 steel wool dipped in a neutral floor cleaner at full strength. If spot remains, dust with a mild household abrasive cleanser and rub with the number 0 steel wool dipped in a neutral floor cleaner. Stain Type #4: Cigarette Burns, Rust Stain, Mildew, Dye, Grass Stains Asphalt Tile, Vinyl Asbestos Tile, Rubber Tile, Homogeneous Vinyl Tile, Sheet Linoleum, Linoleum Tile or Sheet Vinyl Flooring Rub spot with number 0 steel wool dipped in a neutral floor cleaner at full strength. Rinse well. If stain remains, dust with a mild abrasive cleaner and rub again with the steel wool. Rinse well. Wax when dry. Never sand or abrade dry tile, as asbestos fibers may become airborne, creating a serious health hazard. Wood For cigarette burns, use steel wool or sandpaper. For rust use steel wool, sandpaper, rust remover or one part sodiumcitrate to six parts water and add an equal portion of glycerin and make poultice with whiting. For mildew, use ammonia followed with germicide. For dye, use equal parts denatured alcohol, acetone, and glacial acetic acid. For grass stains, use ammonia or hydrogen peroxide. Cork Tile or Custom Vinyl Cork Tile Rub spot with a number 0 steel wool dipped in a neutral floor cleaner at full strength. Rinse well. Wax when dry. If stain remains, sand with number 00 sandpaper, apply paste wax to the area and buff. Terrazzo or Marble For cigarette burns, rub with abrasive powder on wet cloth. For rust, make a poultice of one part sodium to six parts water and an equal portion of glycerin with water. For mildew, use ammonia followed with germicide. For dye, use equal parts denatured alcohol, acetone and glacial acetic acid. For grass stains use ammonia or hydrogen peroxide. Cork Tile or Custom Vinyl Cork Tile Rub spot with number 0 steel wool dipped in a neutral floor cleaner at full strength. Rinse well. Wax when dry. If stain remains, sand with number 00 sandpaper, apply paste wax to the area and buff. Stain Type #5: Paint, Varnish and Solvents Asphalt Tile, Vinyl Asbestos Tile, Rubber Tile, Homogeneous Vinyl Tile, Cork Tile or Custom Vinyl Cork Tile Mop up freshly spilled paint or varnish immediately. Wash area with a rag dipped in a neutral floor cleaner at full strength. Rinse well. Wax when dry. If spot is dry on cork tile, contact the flooring manufacturer. If paint or varnish spot is dry, remove excess with putty knife and rub spot with a number 0 steel wool dipped in a neutral floor cleaner at full strength. Rinse well. Wax when dry. If spot remains, dust with a mild abrasive cleaner and rub again with number 0 steel wool, rinse well, wax. Never use a solvent cleaner, such as naphtha or a solvent wax. 1/23/2014 page 21 Wood For paint and varnish, use a solvent type paint and varnish remover. For dried solvents, use dry steel wool or hydrogen peroxide. Terrazzo or Marble For paint and varnish flush off with paint remover. For solvents, use ammonia or hydrogen peroxide. Stain Type #6: Shellac Asphalt Tile, Vinyl Asbestos Tile, Rubber Tile, Homogeneous Vinyl Tile, Linoleum, Linoleum Tile or Sheet Vinyl Flooring, Cork Tile or Custom Vinyl Cork Tile or Wood Blot up freshly spilled shellac immediately. Wash area with a rag dipped in a neutral floor cleaner at full strength. Rinse well and wax when dry. If shellac spot is dry rub lightly with a cloth dampened with alcohol. Rinse and wax when dry. Never use a solvent cleaner, such as naphtha or a solvent wax. Terrazzo or Marble Rub spot with denatured alcohol until removed. Stain Type #7: Nail Polish, Nail Polish Remover, Lacquer, Dry Cleaning Fluid Asphalt Tile, Vinyl Asbestos Tile, Rubber Tile, Homogeneous Vinyl Tile, Linoleum, Linoleum Tile or Sheet Vinyl Flooring, Cork Tile or Custom Vinyl Cork Tile Mop up freshly spilled liquids immediately by blotting action. Wash area with a rag dipped in a neutral floor cleaner at full strength. Rinse well and wax when dry. If liquid has dried to a solid, scrape off excess with putty knife and rub spot with a number 0 steel wool dipped in a neutral floor cleaner. Never use a solvent cleaner, such as naphtha or a solvent wax. If spot remains, dust with a mild abrasive cleanser and rub again with the number 0 steel wool. Wood For nail polish use nail polish remover (amyl acetate). For nail polish remover, use dry steel wool or detergent and steel wool or hydrogen peroxide. Terrazzo or Marble For nail polish spill, use nail polish remover or banana oil. To clean up spilled nail polish remover, use synthetic detergent solution and steel wool or hydrogen peroxide. For lacquer spills, use a lacquer thinner. For dry cleaning fluid spills use detergent and steel wool or hydrogen peroxide. Stain Type #8: Acids, Alkali, Lye, Drain Cleaner, Strong Soaps, Cleansers and Detergents Asphalt Tile, Vinyl Asbestos Tile, Rubber Tile, Homogeneous Vinyl Tile, Linoleum, Linoleum Tile or Sheet Vinyl Flooring Blot up freshly spilled materials immediately. Wash area with rag dipped in water. Rinse well and wax when dry. Rub any stained areas with number 0 steel wool dipped in neutral full strength floor cleaner. Rinse well and wax when dry. Never use a solvent cleaner, such as naphtha or a solvent wax. Wood For acids use ammonia or soda solution. If stained, use hydrogen peroxide. If etched, use dry steel wool. For alkali, lye or drain cleaners use a vinegar solution mixed 50-50 with water. For strong soaps, cleaners, and detergents use warm water and steel wool or vinegar solution mixed 50-50 with water. 1/23/2014 page 22 Cork Tile or Custom Vinyl Cork Tile Blot up freshly spilled materials immediately. Wash area with rag dipped in water. Rinse well and wax when dry. If stain is deep contact the floor manufacturer. Terrazzo and Marble For acids, use ammonia, and if stained use hydrogen peroxide. If etched rub with a fine pumice and water. For alkali, lye or drain cleaners use a vinegar solution mixed 50-50 with water. For strong soaps, cleaners, and detergents use warm water and steel wool or vinegar solution mixed 50-50 with water. Floor Machines Procedure: Running an Autoscrubber in a Mall or other public area while members of the public are present An auto scrubber can be run while patrons are present as long as the following the safety procedures are followed: • • • • • • No more than half a hallway blocked off, In the case of a mall with central kiosks, the operator must consider there to be two hallways separated by the kiosks and never block off more than half of one of the hallways, or a quarter of the overall space No more than 15M at a time total length may be cleaned with the auto scrubber. Wet floor signs to be placed visibly at both ends of the length and along the sides every 5 M. It takes 4 wet floor signs if you are working against a wall or 6 wet floor signs working in a middle area. Operator must have a dry mop to mop up any water left over by the auto scrubber before clearing the wet floor signs and moving to another area. • Working Against a Wall Mid hallway Vendor 5 meters 5 meters AREA BEING SCRUBBED 1/23/2014 page 23 5 meters Working In the Middle of a Hallway Mid hallway Vendor 5 meters AREA BEING5 SCRUBBED meters 5 meters 5 meters 5 meters 5 meters How to Use a Floor Machine Effectively and Safely *You must be trained by a supervisor There are three major types of floor machines: rotary, oscillating and cylindrical. The type, model and size you will use will vary depending on where you work, the types of floors to be maintained, and the type of job to be done. Floor machines, pads, brushes and accessories are available for many tasks, such as resilient and hard floor polishing, scrubbing, stripping, sanding, carpet cleaning, spray buffing and specialized floor care. Checklist for Floor Machine Safety 1. Be sure you have a sign off from a supervisor to operate a floor machine 2. Always have the electrical cord over your left shoulder to prevent injury should you loose control of the machine 3. Use both hands to guide the machine near windows or glass panels. Always work carefully and alertly and avoid quick actions 4. Always unplug a floor machine and tilt it back when changing pads or brushes or when the machine is not in use. 5. If you loose control of the floor machine, do not panic, the machine will shut off automatically. 6. If your machine is in need of repairs, report it to your supervisor and tag the machine so it is not used by another custodian 1/23/2014 page 24 How long should it take? Industry production rates Production Cleaning Rates Most cleaning production rates are based on 1,000 square feet, a medium populated office building, and are approximate amounts of time. Other items that can affect your production rates: Hours of building operation Population density Weather conditions Hard floor surfaces versus carpeted surfaces Public access Customer expectations MINUTES/EACH GENERAL CLEANING Empty trash can (28 qt), replace liner (or see ,50 sq. ft. rate – next section) Empty and damp wipe ash tray .14 Damp wipe trash can (inside and outside – .50 28 quart) Sanitize/polish drinking fountain 1.00 Dust/vacuum blinds 4’ by 3’ .45 Clean refrigerator – inside & out 20.00 Clean microwave 5.00 GENERAL CLEANING Empty trash can (28 qt), replace liner Remove trash from building MIN TO CLEAN 1,000 SQ FT DUSTING High dusting – vents, MIN TO CLEAN 1,000 SQ FT 1/23/2014 SQ FT PER HOUR 2 30,000 1 15,000 3.00 page 25 SQ FT PER HOUR 20,000 corners, lights Low dusting – chair legs, base boards Horizontal dusting – spot cleaning using microfiber cloth, desk tops, pictures, computers DETAIL DUSTING Overheads, behind computers, behind doors 5.00 12,000 5.00 12,000 MIN TO CLEAN 1,000 SQ FT SQ FT PER HOUR 4.00 RESTROOM CLEANING Clean toilet – top/bottom Clean sink Clean urinal top/bottom Clean/disinfect shower stall Restroom partitions (wipe down) Clean fixtures, mirrors, counter tops, fill supplies 15,000 MINUES/EACH 2.50 1.00 2.25 7.00 2.00/stall 2.5 per fixture SWEEPING 24” Push broom 26” Push broom 28” Battery walk behind sweeper MIN TO CLEAN 1,000 SQ FT DUST MOPPING 24” Dust mop 36” Dust mop MIN TO CLEAN 1,000 SQ FT DAMP MOPPING 18” Microfiber flat mop 24 oz Mop head w/bucket wringer 32 oz Mop head w/bucket wringer MIN TO CLEAN 1,000 SQ FT CARPET VACUUMING 12” Upright vacuum 16” Upright vacuum MIN TO CLEAN 1,000 SQ FT SQ FT PER HOUR 15.00 10.00 4.00 3,800 5,500 15,000 SQ FT PER HOUR 7.00 5.00 6,000 12,000 SQ FT PER HOUR 4.00 12.00 10,000 5,000 10.00 6,000 SQ FT PER HOUR 26.00 14.00 STAIRWAYS & LANDINGS (5’ wide 2,300 4,280 MIN PER FLOOR stairwell, 28 steps per floor) Dust & spot clean all handrails Vacuum stairs, landings Damp mop with mop/wringer Damp mop w/microfiber flat mop Check stairwell for litter & debris 5.00 2.00 3.00 2.00 1.00 Standard 2’ x 4’ Fixture LIGHT FIXTURES Remove tubes/clean lens and reflectors and replace tubes Vacuum w/backpack with brush attachment on ladder 1/23/2014 page 26 8.00 each 2.00 each CEILING VENTS Vacuum w/backpack with brush attachment .45 each MIN TO CLEAN1,000 SQ FT WASHING (painted walls) Walls painted w/semi-gloss or higher luster finish By hand with rag/bucket 180 18” Microfiber flat mop 90 SQ FT PER HOUR DUST WALLS Using 18” Microfiber flat mop MIN TO CLEAN 1,000 SQ FT SQ FT PER HOUR WASHING (vinyl walls) Using 18” Microfiber flat mop By hand with rag/bucket SPOT CLEAN WALLS Remove handmarks from light switches, doors using Microfiber cloth MIN TO CLEAN1,000 SQ FT 333 667 17 60 150 MIN TO CLEAN 1,000 SQ FT 2.00 3571 SQ FT PER HOUR 1000 5000 SQ FT PER HOUR 30,000 CLEAN ELEVATOR Wipe walls, panels, doors, and door tracks MINUTES/EACH WINDOW WASHING Spray/wipe 4’ by 3’ window one side using microfiber cloth Wash with squeegee/applicator 4’ by 3’ window Spot clean entrance door glass MINUTES/EACH CARPET CARE Apply soil protection using pump sprayer Apply soil protection using electric sprayer Apply soil protection using hydro-force sprayer Apply carpet pre-spray using pump sprayer Apply carpet pre-spray using electric sprayer Apply carpet pre-spray using hydro-force sprayer Dry clean: spread dry cleaning compound Dry clean: agitate dry cleaning compound with 24” brush machine vacuum dry cleaning compound With 16” upright vacuum Dry foam with 24” machine with foam pick-up Rotary shampoo with 17” 175 rpm floor machine Rotary shampoo with 20” 175 1/23/2014 7.00 MIN TO CLEAN 1,000 SQ FT page 27 .30 .23 12 SQ FT PER HOUR 10.00 6,000 5.00 12,000 5.00 12,000 10.00 6,000 5.00 12,000 5.00 12,000 13.00 4,500 25.00 2,400 30.00 22.00 2,000 2,600 60.00 1,000 58.00 1,033 rpm floor machine Bonnet cleaning with 17” floor machine Bonnet cleaning with 20” floor machine Hot water extraction with portable machine Hot water extraction with self contained machine with 16” floor tool MACHINE SCRUBBING 17” 175 rpm scrub/pickup/rinse 20” 175 rpm scrub/pickup/rinse 20” Auto scrubber 40.00 1,500 37.00 1,600 40.00 1,500 35.00 1,714 MIN TO CLEAN 1,000 SQ FT SQ FT PER HOUR 31.00 1,900 25.00 2,100 11.00 5,500 UltraShine Building Maintenance Manual I have received the UltraShine Building Maintenance Manual Printed Name (First, Middle, Last) Employee Signature Date 1/23/2014 Supervisors Signature page 28 1/23/2014 page 29


© Copyright 2026