
ChIP-exo Kit (Do not re-freeze the Magnetic Beads. 104480
ChIP-exo Kit
(Do not re-freeze the Magnetic Beads.
Store them at +4°C upon receiving this kit!)
104480
ChIP-exo Kit
(version A1)
Catalog No. 53043
Active Motif North America
1914 Palomar Oaks Way, Suite 150
Carlsbad, California 92008, USA
Toll free:
877 222 9543
Telephone:
760 431 1263
Fax:
760 431 1351
Active Motif Europe
Avenue Reine Astrid, 92
B-1310 La Hulpe, Belgium
UK Free Phone:
France Free Phone:
Germany Free Phone:
Telephone:
Fax:
0800 169 31 47
0800 90 99 79
0800 181 99 10
+32 (0)2 653 0001
+32 (0)2 653 0050
Active Motif Japan
Azuma Bldg, 7th Floor
2-21 Ageba-Cho, Shinjuku-Ku
Tokyo, 162-0824, Japan
Telephone:
+81 3 5225 3638
Fax:
+81 3 5261 8733
Copyright 2014 Active Motif, Inc.
www.activemotif.com
TABLE OF CONTENTS
Page
Overview . . . . . . . . . . . . . . . . . . . . . . . . . . . . . . . . . . . . . . . . . . . . . . . . . . . . . . . . . . . . . . . . . . . . . . . . . . . 1
Flow Chart of Process . . . . . . . . . . . . . . . . . . . . . . . . . . . . . . . . . . . . . . . . . . . . . . . . . . . . . . . . . . . . . . . . 2
Introduction . . . . . . . . . . . . . . . . . . . . . . . . . . . . . . . . . . . . . . . . . . . . . . . . . . . . . . . . . . . . . . . . . . . . . . . .3
References . . . . . . . . . . . . . . . . . . . . . . . . . . . . . . . . . . . . . . . . . . . . . . . . . . . . . . . . . . . . . . . . . . . . . . . . . .3
Kit Performance and Benefits . . . . . . . . . . . . . . . . . . . . . . . . . . . . . . . . . . . . . . . . . . . . . . . . . . . . . . . . 4
Protocol Overview and Time Table . . . . . . . . . . . . . . . . . . . . . . . . . . . . . . . . . . . . . . . . . . . . . . . . 5
Kit Components and Storage
ChIP-exo Kit . . . . . . . . . . . . . . . . . . . . . . . . . . . . . . . . . . . . . . . . . . . . . . . . . . . . . . . . . . . . . . . . . . . . 6
Additional Materials Required . . . . . . . . . . . . . . . . . . . . . . . . . . . . . . . . . . . . . . . . . . . . . . . . . . . . 7
Protocols – Experimental Set Up
Cell Growth and Recommendations . . . . . . . . . . . . . . . . . . . . . . . . . . . . . . . . . . . . . . . . . . . . . . . 9
Buffer Preparation . . . . . . . . . . . . . . . . . . . . . . . . . . . . . . . . . . . . . . . . . . . . . . . . . . . . . . . . . . . . . 10
Recommendations . . . . . . . . . . . . . . . . . . . . . . . . . . . . . . . . . . . . . . . . . . . . . . . . . . . . . . . . . . . . . . 12
Information in this manual is subject to change without notice and does not constitute a commitment on the part of Active Motif, Inc. It is supplied on an “as is” basis without any warranty of any
kind, either explicit or implied. Information may be changed or updated in this manual at any time.
This documentation may not be copied, transferred, reproduced, disclosed, or duplicated, in
whole or in part, without the prior written consent of Active Motif, Inc. This documentation is
proprietary information and protected by the copyright laws of the United States and international treaties.
The manufacturer of this documentation is Active Motif, Inc.
© 2014 Active Motif, Inc., 1914 Palomar Oaks Way, Suite 150; Carlsbad, CA 92008. All rights reserved.
All trademarks, trade names, service marks or logos referenced herein belong to their respective
companies.
www.activemotif.com
Protocols
Section A.
Section B.
Section C.
Section D.
Section E.
Section F.
Section G.
Section H.
Section I.
Section J.
Section K.
Section L.
Section M.
Section N.
Section O.
Section P.
Section Q.
Section R.
Cell Fixation Starting with Cultured Cells . . . . . . . . . . . . . . . . . . . . . . . . . . . . . . . 13
Chromatin Sonication of Cultured Cells . . . . . . . . . . . . . . . . . . . . . . . . . . . . . . . 14
Cell Fixation Starting with Fresh or Frozen Tissue . . . . . . . . . . . . . . . . . . . . . . . . 17
Chromatin Sonication of Tissue . . . . . . . . . . . . . . . . . . . . . . . . . . . . . . . . . . . . . . 18
Antibody Conjugation to Protein G Beads . . . . . . . . . . . . . . . . . . . . . . . . . . . . . . 21
Chromatin Immunoprecipitation . . . . . . . . . . . . . . . . . . . . . . . . . . . . . . . . . . . . . 22
Perform End Repair . . . . . . . . . . . . . . . . . . . . . . . . . . . . . . . . . . . . . . . . . . . . . . . . . 22
Ligation of P7 Exo-Adapter . . . . . . . . . . . . . . . . . . . . . . . . . . . . . . . . . . . . . . . . . . 23
Nick Repair . . . . . . . . . . . . . . . . . . . . . . . . . . . . . . . . . . . . . . . . . . . . . . . . . . . . . . . . . 24
Lambda Exonuclease Digestion . . . . . . . . . . . . . . . . . . . . . . . . . . . . . . . . . . . . . . . 25
RecJf Exonuclease Digestion . . . . . . . . . . . . . . . . . . . . . . . . . . . . . . . . . . . . . . . . . 25
Reversal of Cross-links and Elution from Beads . . . . . . . . . . . . . . . . . . . . . . . . . 26
DNA Purification . . . . . . . . . . . . . . . . . . . . . . . . . . . . . . . . . . . . . . . . . . . . . . . . . . . . 27
P7 Primer Extension . . . . . . . . . . . . . . . . . . . . . . . . . . . . . . . . . . . . . . . . . . . . . . . . . 28
Ligation of P5 Exo-Adapter . . . . . . . . . . . . . . . . . . . . . . . . . . . . . . . . . . . . . . . . . . 29
PCR Amplification of DNA Library . . . . . . . . . . . . . . . . . . . . . . . . . . . . . . . . . . . . 29
Size Select the Library . . . . . . . . . . . . . . . . . . . . . . . . . . . . . . . . . . . . . . . . . . . . . . . . 31
Recommendations for Data Analysis . . . . . . . . . . . . . . . . . . . . . . . . . . . . . . . . . . 32
Appendix
Section S.
Section T.
Section U.
Section V.
Use of Magnetic Beads and Included Bar Magnet . . . . . . . . . . . . . . . . . . . . . . 34
Walking Primer Design . . . . . . . . . . . . . . . . . . . . . . . . . . . . . . . . . . . . . . . . . . . . . . 37
Troubleshooting Guide . . . . . . . . . . . . . . . . . . . . . . . . . . . . . . . . . . . . . . . . . . . . . . 39
Related Products . . . . . . . . . . . . . . . . . . . . . . . . . . . . . . . . . . . . . . . . . . . . . . . . . . . 41
Technical Services . . . . . . . . . . . . . . . . . . . . . . . . . . . . . . . . . . . . . . . . . . . . . . . . . . . . . . . . . . . . . . . . . . 42
www.activemotif.com
Overview
Transcriptional regulation is a highly complex mechanism that involves changes in epigenetic
modifications, transcription factors and cofactors, and chromatin structure. Because aberrations
in transcription are often associated with disease states, including cancer, gaining further insight
into the mechanisms regulating gene expression is crucial to understanding disease susceptibility,
initiation and progression. Chromatin Immunoprecipitation (ChIP) is a powerful tool for studying
protein/DNA interactions because it enables identification of the localization of proteins bound
to specific DNA loci. However, traditional ChIP-sequencing (ChIP-seq) and ChIP-chip methods provide limited resolution for transcription factors and often produce high background which limits
sequencing coverage and increases noise.
Active Motif’s ChIP-exo* (ChIP-exonuclease) Kit overcomes these limitations by providing a high
resolution method for mapping protein binding sites genome-wide. ChIP-exo utilizes exonucleasemediated digestion of DNA during the immunoprecipitation protocol to eliminate extraneous
DNA and increase binding site resolution to within 20-95 bp reads making it easier to more accurately define sequences representing protein/DNA binding motifs. This makes ChIP-exo ideal for
mapping transcription factor binding sites, performing discovery-based studies, or evaluation of
mutation and SNP effects.
The ChIP-exo Kit contains sufficient reagents to prepare chromatin and perform 12 immunoprecipitation reactions. Reagents are also provided for preparation of sequencing libraries for use on
Illumina sequencing platforms.
product
format
catalog no.
ChIP-exo Kit
12 rxns
53043
*Technology covered under U.S. Patent No. 8367334 b2
www.activemotif.com
1
Flow Chart of Process
Introduction
Chromatin immunoprecipitation technologies (ChIP-seq and ChIP-chip) have provided valuable
information regarding protein-DNA localization, which has increased our understanding of the
functional organization of the genome1. However, these methods have their limitations with
regards to mapping transcription factor binding sites and resolution of positional information.
Transcription factors often bind DNA in a sequence dependent manner as monomers, homodimers or heterodimers, but only a fraction of a given transcription factor will be bound to the
chromatin at any specific time2. Current ChIP methods aim to identify protein binding sites in the
presence of several hundred base pairs of non-specific DNA that result from random chromatin
fragmentation. Given the relatively low abundance of chromatin-associated transcription factors,
and the relatively high level of background noise in the IP reaction, accurate identification of
precise binding sequences, or resolution of positional information about binding complexes are
not possible with these methods.
ChIP-exonuclease (ChIP-exo) is a technology that was developed in the laboratory of B. Franklin
Pugh3-5. This technology modifies the traditional ChIP-seq method by including an exonuclease
digestion step to trim the immunoprecipitated DNA to a precise distance from the cross-linking
site. By removing the excess DNA that is not bound by the protein of interest, background signal is
reduced such that fewer sequencing reads map to non-specific genomic regions enabling the identification of weak peaks which would be indistinguishable from noise in a traditional ChIP-seq. The
high resolution of ChIP-exo facilitates the identification of consensus sequences for transcription
factors that could lead to the discovery of new binding sequences to significantly improve our understanding of the impact that mutations or SNPs have on transcriptional regulation and disease.
Active Motif’s ChIP-exo Kit is a streamlined version of the original methodology that has adapted
the assay for use on Illumina sequencing platforms6. The Kit contains optimized buffers for
chromatin preparation from cell or tissue samples. Chromatin is then captured and enzymatically
treated while bound to Protein G magnetic beads for easy processing. Sequencing adapters are
added and the library is amplified and size selected before it is subjected to high throughput
sequencing. Guidelines are also provided for data analysis of the sequencing reads.
Flow chart of ChIP-exo method.
Cells are fixed with formaldehyde to cross-link protein-DNA binding interactions. Cells are then lysed and chromatin is
fragmented by sonication. An antibody directed against the protein of interest is conjugated to protein G magnetic beads
for immunoprecipitation of the DNA of interest. With the chromatin still bound by the beads, the DNA is end-polished
and P7-exo adapters are ligated onto the blunt ends. The nicked DNA is repaired and then digested by lambda and RecJf
exonulceases to excise DNA in a 5´to 3´direction, trimming up to the site of the cross-linking and selectively eliminating
the P7 adapter at the 5´ end. Following cross-link reversal and elution from the beads, the DNA is made double-stranded
by P7 primer extension and a P5-exo adapter is added to the exonuclease-treated ends. The DNA library is PCR amplified
and size selected before it is subjected to high-throughput sequencing. The sequence of the DNA is mapped back to the
reference genome to determine the binding locations of the protein of interest. The 5´ends of the DNA fragments on the
forward strand indicate the left border of a DNA-protein interaction, while the 5´ ends of DNA fragments on the reverse
strand indicate the right border of a DNA-protein interaction. These borders demarcate the precise site of the protein-DNA
cross-linking, providing high resolution (20-95 base pairs) identification of genomic binding locations.
www.activemotif.com
2
References
1.
2.
3.
4.
5.
6.
Dunham, I. et al. (2012) Nature, 489: 57-74.
Bailey, T. et al. (2013) PLoS Comput Biol, 9(11): e1003326.
Rhee H.S. and Pugh B.F. (2011) Cell, 147(6): 1408-1419.
Rhee H.S. and Pugh B.F. (2012) Nature, 483(7389): 295-301; erratum 487(7405): 128.
Rhee H.S. and Pugh B.F. (2012) Curr Protoc Mol Biol., Chapter 21: Unit 21.24.
Serandour, A.A. et al. (2013) Genome Biology, 14(12): R147.
www.activemotif.com
3
Kit Performance and Benefits
ChIP-Exo Advantages:
• Enables high resolution genome-wide mapping of transcription factor binding locations
• Superior resolution maps protein binding sites within 20-95 bp making it easy to study
mutation or SNP effects
• Low background due to exonuclease-mediated degradation of non-specific DNA
• On-bead enzymatic reactions streamline sample processing
Published
(10x107 cells)
Binding Site = 70 bp
AM
(2x10⁷ cells)
Binding Site = 14 bp
{
{
FoxA1 ChIP-exo from MCF-7 Cells
Protocol Overview and Time Table
Below is an overview of the protocol steps and the required time to completion. Please read the
entire assay protocol and plan your experimental design before starting the assay. Suggestions for
dividing up the assay each day are provided below, but may be modified as needed to accommodate your experimental plan and time line.
Day
Protocol
Required Time
Day 1
Cell or Tissue Fixation and Lysis
1.5 hours
Chromatin Sonication
15 minutes per sample
Assessment of Chromatin Size*
4.5 hours for cell culture
Overnight for tissue
Antibody Conjugation to Protein G Magnetic Beads
4 hours (or overnight) incubation
Immunoprecipitation
Overnight incubation
End Repair
30 minutes
P7 Exo-Adapter Ligation
1 hour
Nick Repair
20 minutes
Lambda Exonuclease Digestion
30 minutes
RecJf Exonuclease Digestion
30 minutes
Reversal of Cross-links
2.5 hours
DNA Purification
2 hours to overnight incubation
P7 Primer Extension
1.5 hours
P5 Exo-Adapter Ligation
1.5 hours
PCR Amplification of the DNA Library
1 hour
Library Size Selection
1.5 hours
Day 2
6.3
Fw
Day 3
10.1
Rv
3.3
Fw
Day 4
5.2
Rv
* The protocol varies between cell culture and tissue samples.
Reported FoxA1
Binding Site (215 bp)
Figure 1: BigWig graphs comparing Active Motif’s ChIP-exo data with published ChIP-exo data for FoxA1.
To generate Active Motif’s ChIP-exo results (AM) for FoxA1, 100 μg of chromatin obtained from 20 million MCF-7 cells was
fragmented and ChIP was performed using the ChIP-exo Kit with antibodies against FoxA1. Results were compared with
published results (Published) for FoxA1 obtained by performing ChIP-exo on fragmented chromatin generated from 100
million MCF-7 cells as described previously by Serandour et al. (Ref 6). Data was aligned to the hg19 human reference genome using Bowtie. The BigWig graphs were generated using the ChIP-exo-specific analysis software: MACE (Model based
Analysis of ChIP-exo). These results demonstrate that Active Motif’s ChIP-exo method achieves comparable resolution of
binding motifs as the published data for FoxA1 using a fraction of the starting cell numbers used to obtain the published
data. Results overlap with reported FoxA1 binding sites.
www.activemotif.com
4
www.activemotif.com
5
Kit Components and Storage
Fixation Buffer
Please store each component at the temperature indicated in the table below. Do not re-freeze
the Protein G Magnetic Beads. Once thawed, Protein G beads should be stored at 4°C.
Reagents
2 x 1.5 ml
4°C
Blocking Buffer AM3
52 ml
4°C
Protein G Magnetic Beads*
600 µl
4°C
AMPure Beads**
3.3 ml
4°C
Quantity
Storage
T4 DNA Ligase (2000 U/µl)
25 µl
-20°C
5X Wash Buffer AM1
50 ml
4°C
DNA Polymerase I Klenow fragment (5 U/µl)
13 µl
-20°C
10X Wash Buffer AM6
15 ml
4°C
T4 Polynucleotide Kinase (10 U/µl)
65 µl
-20°C
Stop Solution
20 ml
RT
T4 DNA Polymerase (3 U/µl)
65 µl
-20°C
Chromatin Prep Buffer
80 ml
RT
Phi29 Polymerase (10 U/µl)
32 µl
-20°C
ChIP Buffer
30 ml
RT
Lambda Exonuclease (5 U/µl)
25 µl
-20°C
Elution Buffer AM4
2 x 2 ml
RT
RecJf Exonuclease (30 U/µl)
13 µl
-20°C
DNA Purification Elution Buffer
5 ml
RT
Q5 High-Fidelity DNA Polymerase (2 U/µl)
13 µl
-20°C
5 M NaCl
400 µl
RT
5X Q5 Reaction Buffer
125 µl
-20°C
TE pH 8.0
2 x 1.5 ml
RT
1X Phi29 Reaction Buffer
1.6 ml
-20°C
Detergent
20 ml
RT
10X T4 DNA Ligase Buffer
65 µl
-20°C
Bar magnet
1 ea
RT
10X Lambda Exonuclease Buffer
125 µl
-20°C
Glue dots
2 ea
RT
10X Reaction Buffer AM3
375 µl
-20°C
dNTPs (5 mM)
400 µl
-20°C
100 mM ATP
25 µl
-20°C
* The Protein G Magnetic Beads are shipped on dry ice and can be stored frozen until their first
use. Once thawed, the Protein G beads should not be re-frozen by the customer. Protein G Magnetic Beads should be stored at 4ºC.
Indexing Primer 2
13 µl
-20°C
** This product contains AMPure XP Reagent manufactured by Beckman Coulter, Inc.
Indexing Primer 4
13 µl
-20°C
P7 exo-adapter
125 µl
-20°C
P5 exo-adapter
13 µl
-20°C
P7 primer
13 µl
-20°C
RNase A (10 µg/µl)
40 µl
-20°C
Proteinase K (10 µg/µl)
180 µl
-20°C
100 mM PMSF
500 µl
-20°C
Protease Inhibitor Cocktail (PIC)
500 µl
-20°C
Precipitation Buffer
1 ml
-20°C
Carrier
30 µl
-20°C
Glycogen
13 µl
-20°C
10X PBS
120 ml
-20°C
www.activemotif.com
6
Additional materials required
• A ChIP-seq validated antibody directed against the protein of interest
• Dounce homogenizer with a small clearance pestle (e.g. Active Motif Catalog Nos. 40401
& 40415) with the tight-fitting “A” pestle). Use of a homogenizer is necessary for shearing
chromatin.
• 37% formaldehyde solution with 10-15% methyl alcohol to prevent polymerization. Do not
use paraformaldehyde.
• Phenol
• Chloroform/isoamyl alcohol (24:1)
• 100% ethanol (absolute)
• 70% ethanol
• DNase-free H2O
www.activemotif.com
7
• Rocking platform for culture plates
Protocols – Experimental Set Up
• Apparatus to rotate tubes end-to-end at 4°C (e.g. a Labquake from Barnstead/Thermolyne
with a tube holder for 1.5 ml microcentrifuge tubes)
PLEASE READ THE ENTIRE PROTOCOL BEFORE STARTING!
• Thermal Mixer (Fisher Scientific 05-450-206) or heat block
• Microcentrifuge (table top centrifuge 4°C) and microcentrifuge tubes
• 250 µl PCR tubes
• Thermal cycler
• 15 and 50 ml conical tubes
• Spectrophotometer for DNA quantitation
• Pipettors and tips (filter tips are recommended)
• Sonicator (e.g. Active Motif’s EpiShear™ Sonicator with a 1/8” probe (Catalog No. 53051) with
the EpiShear™ Cooled Sonication Platform (Catalog No. 53080))
• Agarose gel electrophoresis apparatus
• Razor blades (for tissue preparations)
• Hand-held homogenizer for tissue preparations (e.g. Biospec Products Tissue-Tearor)
• Cell scraper (rubber policeman)
Cell Growth Recommendations
Successful ChIP-exonuclease (ChIP-exo) requires a large sample input, and is also dependent on
the quality of the ChIP antibody and the abundance of the target protein. Lower binding affinity
antibodies / low abundance transcription factors will require more input material than a highly
abundant protein / high affinity ChIP antibody. The minimum recommended number of cells that
should be used for the preparation of chromatin is 15 million cells (approximately one 150 mm
plate), although significant improvements in sequencing coverage are observed if the cell number
is increased to 30 - 45 million cells per sample. In order to efficiently process the exonuclease reaction, each 15 million cell pellet is divided and processed as 3 independent IP reactions. If using 45
million cells, the chromatin will be divided into 9 independent IP reactions. Scaling quantities into
a single tube will reduce the efficiency of the IP and is not recommended.
Calculate the number of cell culture plates needed per sample based on the abundance of your
target protein and/or affinity of the ChIP antibody to achieve the desired level of sequencing coverage. Note that if you wish to analyze the effect of particular compounds or culturing conditions
on transcription factor/DNA interactions, you should prepare chromatin from control (untreated)
cells as a reference sample.
Protein Abundance /
Antibody Affinity
High
abundance
/ affinity
Medium
abundance
/ affinity
Low
abundance
/ affinity
# Cell Culture Plates
1 x 150 mm
2 x 150 mm
3 x 150 mm
Seeding Density
6
5.0 x 10
2 x 5.0 x 10
3 x 5.0 x 106
Total Cells at 70-80%
Confluency*
15.0 x 10⁶
30.0 x 10⁶
45.0 x 10⁶
Growth Medium
Volume
20 ml
2 x 20 ml
3 x 20 ml
Cell Fixative Solution
2 ml
2 x 2 ml
3 x 2 ml
6
Stop Solution
1.1 ml
2 x 1.1 ml
3 x 1.1 ml
PBS Wash Buffer
2 x 10 ml
4 x 10 ml
6 x 10 ml
Chromatin Prep Buffer
5 ml
2 x 5 ml
3 x 5 ml
ChIP Buffer
500 µl
2 x 500 µl
3 x 500 µl
Expected chromatin
yield
50 µg
100 µg
200 µg
Required # IP rxns
3 IP rxns
6 IP rxns
9 IP rxns
* The number of cells on a confluent plate or dish will vary with cell type. For this table, HeLa
cells were used. Please adjust as needed based on your particular cell type.
**Please refer to the descriptions below for complete details on buffer preparations
www.activemotif.com
8
www.activemotif.com
9
Buffer Preparation
Complete Cell Fixation Solution
Buffer should be prepared fresh before each experiment. For every 20 ml of cell growth medium
used, prepare 2.5 ml of Complete Cell Fixation Solution by adding 180 µl Fixation Buffer to 1.57 ml
sterile water in a 15 ml conical tube. Using appropriate precautions (i.e. safety glasses, gloves and
lab coat), add 750 µl 37% formaldehyde to the tube and vortex to mix. Use 1/10 growth medium
volume per plate. Complete cell fixation solution can be added to the growth medium in the presence or absence of serum.
Complete Tissue Fixation Solution
Buffer should be prepared fresh before each experiment. Prepare 10 ml of Tissue Fixation
Solution for each tissue sample to be processed by adding 1 ml 10X PBS to 8.7 ml sterile water in a
15 ml conical tube. Using appropriate precautions (i.e. safety glasses, gloves and lab coat), add
280 µl 37% formaldehyde to the tube and vortex to mix.
Stop Solution
Is provided ready to use. Use 1/20 media volume per cell culture plate or 515 µl per 10 ml Complete
Tissue Fixation Solution.
PBS Wash Buffer
Prepare 25 ml PBS Wash Buffer for every 15 cm plate or tissue sample. To a 50 ml conical tube add
21.25 ml sterile water, 2.5 ml 10X PBS and 1.25 ml Detergent. Mix by inverting. Place PBS Wash Buffer
on ice to chill. PBS Wash Buffer can be prepared in large quantities and stored at 4ºC for 6 months.
100 mM PMSF and Protease Inhibitor Cocktail (PIC)
Thaw PMSF and PIC at room temperature until fully dissolved, which takes about 30 minutes.
Vortex gently and spin down briefly before use, then add to the buffers immediately before use.
Chromatin Prep Buffer
Is supplied ready to use.
ChIP Buffer
Is supplied ready to use.
Blocking Buffer AM3
Is supplied ready to use. The BSA contained in the Blocking Buffer AM3 may form clumps, therefore it is necessary to completely resuspend the buffer by warming to room temperature and
vortexing for 1 minute prior to use.
Preparation of 1X Wash Buffer AM1
Prepare the amount of 1X Wash Buffer AM1 required for the assay as follows: For every IP reaction
prepare 20 ml of 1X Wash Buffer AM1 by diluting 4 ml 5X Wash Buffer AM1 with 16 ml distilled water. Vortex to mix. This includes excess for pipetting errors. Please scale volumes as needed based
on the number of IP reactions per experiment.
Preparation of 1X Wash Buffer AM6
Prepare the amount of 1X Wash Buffer AM6 required for the assay as follows: For every IP reaction
prepare 15 ml of 1X Wash Buffer AM6 by diluting 1.5 ml 10X Wash Buffer AM6 with 13.5 ml distilled
water. Vortex to mix. This includes excess for pipetting errors. Please scale volumes as needed
based on the number of IP reactions per experiment.
Elution Buffer AM4
Is supplied ready to use.
AMPure Beads
Is supplied ready to use. Ensure that the beads are fully resuspended prior to use. Just before
removing an aliquot of beads, vortex for 30 seconds. Repeat each time you remove beads.
Enzymes, Adapters, Primers and Cofactors
This kit contains multiple enzymes, adapters, primers and cofactors needed to perform end repair,
adapter ligation, nick repair, exonuclease digestion, primer extension and PCR amplification. Each
tube contains a small quantity of the necessary reagent. All reagents should be kept on ice when
not in use. Centrifuge each tube prior to opening to ensure that the contents are collected at
the bottom so that material is not lost when removing the caps. Use the recommended tables
provided throughout the manual to determine the volumes needed based on the number of IP
reactions. Do not prepare excess volumes above the suggested amounts.
Protein G Magnetic Beads
Follow the instructions in the manual to conjugate antibody to the beads for use in the IP reactions. For best results, gently shake and invert the tube to resuspend the magnetic beads. The
beads settle quickly, and therefore should be resuspended just before pipetting. We recommend
cutting 2 mm from the end of a pipet tip prior to pipetting to prevent the tip from becoming
clogged. Protein G Magnetic Beads are shipped on dry ice and can be stored frozen until their
first use. Once thawed, beads should not be re-frozen by the customer. Protein G Magnetic
Beads should be stored at 4ºC.
www.activemotif.com
10
www.activemotif.com
11
Recommendations
Protocols
ChIP-seq validated Antibody
We recommend conjugating 10 µg antibody per 50 µl Protein G magnetic beads. If the concentration of the antibody is unknown, use 15 µl antibody per 50 µl Protein G magnetic beads. However,
this will vary according to the affinity of the antibody and the quality of the chromatin; you may
need to use more of a particular antibody. ChIP performed with an antibody that has not been
ChIP-seq validated must include appropriate controls (such as Active Motif’s ChIP-IT Control qPCR
Kits, Catalog Nos. 53026, 53027 and 53028) to validate the chromatin preparation and the ChIP
methodology. To see a list of available ChIP-seq validated antibodies available from Active Motif,
please visit www.activemotif.com/chipabs.
Section A: Cell Fixation Starting with Cultured Cells
Chromatin Shearing Tips
We suggest using a probe sonicator (i.e. Active Motif’s EpiShear Probe Sonicator) which employs
a direct sonication method to prepare chromatin for use in the ChIP-IT Exonuclease Kit. Indirect
sonication systems may require longer sonication times to achieve optimal chromatin shearing. ChIP
experiments usually require chromatin that has been sheared to a size of 200-1200 bp. In general,
shearing efficiency is improved through the use of a small shearing volume and a V-bottom tube
rather than a round-bottom tube. Also, note that shearing is inefficient if the chromatin sample
becomes emulsified with air bubbles. To determine the appropriate shearing level for your sample,
set up a “practice” tube containing only ChIP Buffer. Slowly increase the sonication amplitude
until foaming starts to occur. Reduce the amplitude setting down slightly and mark this as the
highest possible intensity to use without foaming. If a chromatin preparation becomes emulsified
inadvertently, discontinue shearing and centrifuge the sample at maximum speed for 4 minutes at
4ºC in a microcentrifuge to remove trapped air. Finally, to prevent overheating and denaturation of
chromatin, samples should be kept on ice as much as possible during shearing, and shearing should
be performed discontinuously (i.e. sonicate for 20 seconds, then place on ice/water for 30 seconds,
sonicate again for 20 seconds, etc.). If possible, shear while on ice or use Active Motif’s EpiShear™
Cooled Sonication Platform (Catalog No. 53080) to help regulate sample temperature.
Thermal Mixer
The use of a thermal mixer (e.g. Fisher Scientific 05-450-206) is highly recommended to improve
the efficiency of the enzymatic reactions during the ChIP-exo protocol. If a thermal mixer is not
available, use a heat block with intermittent mixing by hand throughout the incubation steps.
Safety Precautions
Formaldehyde and PMSF are highly toxic chemicals. Appropriate safety precautions (i.e. safety
glasses, gloves and lab coat) should be used. Also, formaldehyde is highly toxic by inhalation and
should be used only in a ventilated hood. Finally, chromatin sonication should be performed in a
biosafety hood if the chromatin is extracted from biohazardous or infectious materials.
www.activemotif.com
12
This protocol describes cell fixation and chromatin preparation from one 15 cm plate (approximately 1.5 x 10⁷ cells). We recommend using 20 ml growth medium per 15 cm plate. The minimum
cell number to be used for the preparation of chromatin is 15 million (1.5 x 10⁷) cells. If using multiple plates we recommend processing each plate separately. Do not pool samples together.
1.
Prepare 15 cm plates for each cell line to be tested. Grow the cells to 70-80% confluency.
Stimulate cells as desired to activate the pathway of interest.
2.
Freshly prepare Complete Cell Fixation Solution for each 15 cm plate. The volumes listed
below are enough to process one 15 cm plate.
3.
To fix cells, add 1/10 growth medium volume of freshly prepared Complete Cell Fixative Solution to the existing culture media for the cells (e.g. 20 ml growth medium would get
2 ml Complete Cell Fixation Solution). Shake gently at room temperature for 15 minutes.
4.
Stop the fixation reaction by adding 1/20 media volume of Stop Solution to the existing
culture media for the cells (e.g. 20 ml growth medium would get 1.1 ml Stop Solution). Swirl
to mix and incubate at room temperature for 5 minutes.
5.
Following the incubation, hold the plate at an angle and using a rubber policeman scrape
cells down to collect them at the bottom edge of the plate. Use a pipette to transfer the
cells to a 50 ml conical tube on ice.
6.
Pellet the cells from step 5 by centrifugation for 3 minutes at 1,250 x g at 4°C.
7.
Remove the supernatant and discard. Resuspend the pellet(s) in 10 ml ice-cold PBS Wash Buffer by pipetting up and down. Keep samples ice-cold for the remainder of the procedure.
8.
Centrifuge for 3 minutes at 1,250 x g at 4°C. Remove the supernatant and discard. Wash the
pellet(s) a second time in 10 ml ice-cold PBS Wash Buffer by pipetting up and down. Centrifuge for 3 minutes at 1,250 x g at 4°C. Remove the supernatant and discard. (Cell pellets may
be stored at -80°C at this stage).
9.
Resuspend each pellet(s) in 5 ml Chromatin Prep Buffer supplemented with 5 µl PIC and
5 µl 100 mM PMSF. Pipet up and down to mix.
10. Incubate on ice for 10 minutes.
11.
Transfer the resuspended pellets individually to a chilled dounce homogenizer on ice. Use
the tight fitting pestle (Type A) to homogenize the sample for 30 strokes. Transfer the contents to a new 15 ml conical tube and centrifuge for 3 minutes at 1,250 x g at 4°C.
Monitor Cell Lysis: To ensure cell lysis, take 10 µl of the cell lysate from the dounce and look
at it under a phase contrast microscope using a hemocytometer to verify that the nuclei
have been released. It is often helpful to look at the cells before and after the lysis step as
this makes it easier to identify the nuclei versus whole cells. Intact cells should have a dark
central region (nucleus) surrounded by a halo of less dense cytoplasm. In lysed cells, the
nuclei will appear as dots surrounded by asymmetric debris. If the cells are not lysed, then
www.activemotif.com
13
dounce on ice with an additional 10 strokes, or until the cells are lysed.
12. Remove the supernatant and discard. Resuspend each pellet in 500 µl ChIP Buffer supplemented with 5 µl PIC and 5 µl 100 mM PMSF. Transfer the contents to a new 2 ml microcentrifuge tube.
Input Preparation
5. To each 25 µl chromatin preparation from Step 3 above, add 175 µl TE pH 8.0 and
1 µl RNAse A. Cap the PCR tubes and vortex to mix
6.
Incubate in a thermocycler at 37°C for 30 minutes.
13. Incubate on ice for 10 minutes. Proceed to Step B: Chromatin Sonication of Cultured Cells.
7.
Add 2 µl Proteinase K to each tube and vortex. Incubate tubes in a thermocycler at 55°C for
30 minutes and then increase the temperature to 80°C for 2 hours.
Section B. Chromatin Sonication of Cultured Cells
8.
Transfer each chromatin input to a 1.5 ml microcentrifuge tube. Add 83 µl Precipitation Buffer, 2 µl Carrier and 750 µl absolute ethanol. Vortex to mix and chill at -80°C for 30 minutes
to overnight.
9.
Spin tubes at 4°C in a microcentrifuge at maximum speed for 15 minutes.
The section below describes the fragmentation of chromatin using sonication. Sonication results
may vary depending on cell type and sonication device being used. This protocol has been
validated using Active Motif’s EpiShear™ Probe Sonicator in combination with an EpiShear™ Cooled
Sonication Platform to maintain probe height and temperature consistency between samples.
We do not recommend sonication of samples containing less than 350 µl volume or more than
15 million cells. If using multiple plates, each cell pellet should be sonicated independently using
identical sonication conditions.
The Chromatin Prep Buffer has been optimized for immunoprecipitation performance, however,
due to its unique composition optimization of sonication conditions may be required. To maintain
the high sensitivity of the assay, we recommend using our buffer system and altering the sonication time and/or amplitude of your sonication system to achieve the desired fragmentation (e.g.
some systems may require as much as a three-fold increase in sonication time to improve chromatin shearing). Please pay particular attention to our protocol regarding the processing of input
chromatin for agarose gel analysis prior to the chromatin immunoprecipitation reaction as many
steps may differ from traditional ChIP protocols and failure to follow the outlined procedure may
lead to artifacts in the gel images as shown in Figure 2 on page. 16
1.
Place the 2 ml microcentrifuge tube containing the chromatin into the tube cooler or packed
ice. Open cap and submerge the microtip into the liquid until the microtip is approximately
5 mm from the bottom of the tube. Sonicate according to optimized settings for the cell
type being used (see Recommendations on page 12). A recommended starting range for
cultured cells is: 25% amplitude, pulse for 30 seconds on and 30 seconds off for a total
sonication “on” time of 10 minutes (or 20 minutes elapsed time).
2.
Spin tubes at 4°C in a microcentrifuge at maximum speed for 2 minutes to pellet the cellular
debris.
3.
Transfer 25 µl of each chromatin preparation into a 250 µl PCR tube for analysis of shearing
efficiency and chromatin quantification. This sample will be used to generate the Input DNA.
4.
Aliquot the remainder of each chromatin preparation into 1.5 ml microcentrifuge tubes. We
recommend making 3 aliquots of 150 µl volume from each cell pellet and storing at -80°C.
Note:
The size of the chromatin sonication should be verified before proceeding to the
immunoprecipitation step.
www.activemotif.com
14
10. Carefully remove the supernatant taking care not to disturb the pellet. Wash the pellet with
500 µl 70% ethanol and spin at 4°C in a microcentrifuge at maximum speed for 5 minutes.
11.
Carefully remove the supernatant taking care not to disturb the pellet. Remove residual
ethanol with a pipet tip. Leave the tubes uncapped and air dry for 10-15 minutes.
12. When the pellets are dry, add 25 µl DNA Purification Elution Buffer to each tube. Incubate at
room temperature for 10 minutes. Then vortex to ensure the pellet is completely resuspended. This solution contains your Input DNA.
13. Read the absorbance of each sample on a NanoDrop or other spectrophotometer at
260 nm to determine the DNA concentration of each chromatin preparation. Set aside
500 ng of DNA for analysis as described in Step 14. Store the remaining Input DNA at -20°C.
14. Analyze each chromatin preparation on an agarose gel by following the instructions below.
a.
Prepare 500 mM NaCl by adding 2 µl 5M NaCl to 18 µl sterile water. Vortex to mix.
b.
Transfer 500 ng of Input DNA to a 250 µl PCR tube and add 1 µl 500 mM NaCl. Adjust
the final volume to 10 µl with sterile water if needed.
c.
Heat samples in a thermocycler at 100°C for 20 minutes followed by ramping the temperature down to 50°C.
d.
Remove tubes from the thermocycler and incubate at room temperature for 5 minutes.
e.
Add gel loading buffer to each sample and run on a 1.5% agarose gel. Include 100 bp
and 1 kb DNA ladders to analyze chromatin size. DNA should appear as a smear anywhere between 200-1200 bp.
Note:
Chromatin prepared using the ChIP-IT Exonuclease protocol may look different on an agarose gel compared to chromatin prepared using traditional ChIP
methods. However, this will not affect the sensitivity of the assay or increase
background signal. Please follow the protocol as listed above for preparing Input
DNA. Use of an alternative reverse cross-linking method or omitting the 20
minute incubation at 100°C in NaCl is not recommended as this will cause artifacts that make the DNA appear larger. As long as the chromatin falls within the
recommended 200-1200 bp range, proceed with the ChIP reaction. If fragments
do not fall within this range sonication conditions should be further optimized.
www.activemotif.com
15
15. If chromatin preparations were successful, the aliquots stored at -80°C from Section B, Step 4
can be used to perform the ChIP reactions in Section F.
Figure 2: Validation of chromatin shearing efficiency following reversal of cross-links at 80°C for 2 hours.
Chromatin preparations of MCF-7 cells were fixed and sonicated using the EpiShear™ Probe Sonicator and EpiShear™
Cooled Sonication Platform from Active Motif. Input DNA was prepared in duplicate according to Section B, Steps 5-13 in
the manual. In Sample 1, Step 14 was not performed and 500 ng of input DNA was loaded directly onto a 1.5% agarose gel
without receiving the addition of NaCl and incubation at 100°C. The omission of Step 14 has caused a buffer artifact that
makes the DNA appear larger on a gel. The duplicate sample, Sample 2, was processed according to the manual instructions
and included the addition of NaCl and incubation at 100°C as stated in Step 14. Analysis of 500 ng of this input DNA on a
1.5% agarose gel shows the expected fragmentation between 200-1200 bp. The difference in DNA sizing on the gel between
the two samples illustrates the importance of following the protocol recommendations regarding the processing of input
chromatin for agarose gel analysis prior to chromatin immunoprecipitation. Omission of key steps can lead to inaccurate
analysis of chromatin shearing efficiency. If the protocol steps were followed and the DNA fragments fall outside of the
recommended range, sonication conditions should be further optimized.
Section C: Cell Fixation Starting with Fresh or Frozen Tissue
This protocol describes cell fixation and chromatin preparation from 100-400 mg fresh or frozen
animal tissue. If performing chromatin preparation on multiple tissue samples, we recommend
completing Steps 1-7 for each sample before processing the next sample.
1.
For tissue fixation, transfer 10 ml Complete Tissue Fixation Solution (see Buffer Preparation
on page 7) to a 60 mm petri dish. Place the dish on ice.
2.
Add 100-400 mg fresh or frozen tissue sample to the petri dish and ensure that the sample is
fully immersed. Cut the tissue sample into small pieces (approximately 1 mm cubes) using a
razor blade.
3.
Transfer the sample plus the Complete Tissue Fixation Solution to a 15 ml conical tube and
rotate at room temperature for 15 minutes.
4.
Stop the fixation reaction by adding 515 µl Stop Solution to the conical tube and rotate at
room temperature for 5 minutes.
5.
Place the conical tube on ice and homogenize the contents with a hand-held tissue homogenizer set at 30,000 rpm for 45 seconds.
6.
Pellet the cells from step 5 by centrifugation for 3 minutes at 1,250 x g at 4°C.
7.
Remove the supernatant and discard. Resuspend the pellet in 10 ml ice-cold PBS Wash Buffer
by pipetting up and down. Keep samples ice-cold for the remainder of the procedure.
8.
Centrifuge for 3 minutes at 1,250 x g at 4°C. Remove the supernatant and discard. Wash the
pellet(s) a second time in 10 ml ice-cold PBS Wash Buffer by pipetting up and down. Centrifuge for 3 minutes at 1,250 x g at 4°C. Remove the supernatant and discard. (Cell pellets may
be stored at -80°C at this stage).
9.
Resuspend each pellet in 5 ml Chromatin Prep Buffer supplemented with 5 µl PIC and
5 µl 100 mM PMSF.
10. Incubate on ice for 10 minutes.
11.
Transfer the resuspended pellet(s) individually to a chilled dounce homogenizer on ice. Use
the tight fitting pestle (Type A) to homogenize the sample for 30 strokes. Once finished,
transfer the contents to a new 15 ml conical tube.
Monitor Cell Lysis: To ensure cell lysis, take 10 µl of the cell lysate from the dounce and look
at it under a phase contrast microscope using a hemocytometer to verify that the nuclei
have been released. It is often helpful to look at the cells before and after the lysis step as
this makes it easier to identify the nuclei versus whole cells. Intact cells should have a dark
central region (nucleus) surrounded by a halo of less dense cytoplasm. In lysed cells, the
nuclei will appear as dots surrounded by asymmetric debris. If the cells are not lysed, then
dounce on ice with an additional 10 strokes, or until the cells are lysed.
12. Centrifuge for 3 minutes at 1,250 x g at 4°C.
13. Remove the supernatant and discard. Resuspend each pellet in 500 µl - 1 ml ChIP Buffer
supplemented with PIC and 100 mM PMSF. (For 500 µl add 5 µl PIC and 5 µl PMSF. For 1 ml
www.activemotif.com
16
www.activemotif.com
17
add 10 µl PIC and 10 µl PMSF) Transfer the contents to a new 2 ml microcentrifuge tube.
14. Incubate on ice for 10 minutes. Proceed to Section D: Chromatin Sonication of Tissue.
Section D. Chromatin Sonication of Tissue
The section below describes the fragmentation of chromatin using sonication. Due to the
increased concentration of protein and cellular debris present in animal tissue, we recommend
following this protocol for the preparation of chromatin and input DNA from tissue. Sonication results may vary depending on tissue type and sonication device being used. This protocol has been
validated using Active Motifs EpiShear™ Probe Sonicator in combination with the EpiShear™ Cooled
Sonication Platform to maintain probe height and temperature consistency between samples. We
do not recommend sonication of samples containing less than 350 µl volume. If the total sample
volume is 1 ml, split the sample into two 500 µl aliquots for sonication. Each 500 µl tube should be
sonicated independently using identical sonication conditions
The Chromatin Prep Buffer has been optimized for immunoprecipitation performance, however,
due to its unique composition optimization of sonication conditions may be required. To maintain
the high sensitivity of the assay, we recommend using our buffer system and altering the sonication time and/or amplitude of your sonication system to achieve the desired fragmentation (e.g.
some systems may require as much as a three-fold increase in sonication time to improve chromatin shearing). Please pay particular attention to our protocol regarding the processing of input
chromatin for agarose gel analysis prior to the chromatin immunoprecipitation reaction as many
steps may differ from traditional ChIP protocols and failure to follow the outlined procedure may
lead to artifacts in the gel images as shown in Figure 3 on page 20.
1.
Place the 2 ml microcentrifuge tube containing the chromatin into the tube cooler or packed
ice. Open cap and submerge the microtip into the liquid until the microtip is approximately
5 mm from the bottom of the tube. Sonicate according to optimized settings for the tissue
type being used (see Recommendations on page 12). A recommended starting range for
tissue samples is: 25% amplitude, pulse for 30 seconds on and 30 seconds off for a total
sonication “on” time of 10 minutes (or 20 minutes elapsed time).
Input Preparation
5. To each 25 µl chromatin preparation from Step 3 above, add 175 µl TE pH 8.0 and
2 µl RNAse A. Cap the PCR tubes and vortex to mix.
6.
Incubate in a thermocycler at 37°C for 1 hour.
7.
Add 5 µl Proteinase K to each tube, vortex and incubate in a thermocycler at 37°C for 3 hours.
8.
Add 10 µl 5 M NaCl, vortex and incubate at 65°C for 6-16 hours to reverse cross-links.
9.
Remove tubes from the thermocycler and add 250 µl phenol and 125 µl chloroform:isoamyl
alcohol (24:1). Vortex vigorously and spin tubes in a room temperature microcentrifuge at
maximum speed for 2 minutes.
10. Transfer each upper aqueous layer to a new 1.5 ml microcentrifuge tube and add 250 µl
chloroform:isoamyl alcohol (24:1). Vortex vigorously and spin tubes in a room temperature
microcentrifuge at maximum speed for 2 minutes.
11.
Transfer the upper aqueous layer to a new 1.5 ml microcentrifuge tube. Add 83 µl Precipitation Buffer, 2 µl Carrier and 900 µl absolute ethanol. Vortex to mix and chill at -80°C for 30
minutes to overnight.
12. Spin at 4°C in a microcentrifuge at maximum speed for 15 minutes.
13. Carefully remove the supernatant taking care not to disturb the pellet. Wash the pellet with
500 µl 70% ethanol and spin at 4°C in a microcentrifuge at maximum speed for 5 minutes.
14. Carefully remove the supernatant taking care not to disturb the pellet. Remove residual
ethanol with a pipet tip. Leave the tubes uncapped and air dry for 10-15 minutes.
15. When the pellets are dry, add 25 µl DNA Purification Elution Buffer to each tube. Incubate at
room temperature for 10 minutes. Then vortex to ensure the pellet is completely resuspended. This solution contains your Input DNA.
16. Read the absorbance of each sample on a NanoDrop or other spectrophotometer at
260 nm to determine the DNA concentration of each chromatin preparation. Set aside
500 ng of DNA for analysis as described in Step 17. Store the remaining Input DNA at -20°C.
17. Analyze each chromatin preparation on an agarose gel by following the instructions below.
a.
Prepare 500 mM NaCl by adding 2 µl 5M NaCl to 18 µl sterile water. Vortex to mix.
b.
Transfer 25 µl of each chromatin preparation into a 250 µl PCR tube for analysis of shearing
efficiency and chromatin quantification. This sample will be used to generate the Input DNA.
Transfer 500 ng of Input DNA to a 250 µl PCR tube and add 1 µl 500 mM NaCl. Adjust
the final volume to between 10 µl with sterile water if needed.
c.
Aliquot the remainder of each chromatin preparation into 1.5 ml microcentrifuge tubes. We
recommend making 3 aliquots of 150 µl volume from each sonication and storing at -80°C.
Heat samples in a thermocycler at 100°C for 20 minutes followed by ramping the temperature down to 50°C.
d.
Remove tubes from the thermocycler and incubate at room temperature for 5 minutes.
Note:
e.
Add gel loading buffer to each sample and run on a 1.5% agarose gel. Include 100 bp
and 1 kb DNA ladders to analyze chromatin size. DNA should appear as a smear anywhere between 200-1200 bp.
2.
Spin tubes at 4°C in a microcentrifuge at maximum speed for 2 minutes to pellet the cellular
debris.
3.
4.
The size of the chromatin sonication should be verified before proceeding to the
immunoprecipitation step.
Note:
www.activemotif.com
18
Chromatin prepared using the ChIP-IT Exonuclease protocol may look different on an agarose gel than chromatin prepared using traditional ChIP methods.
www.activemotif.com
19
However, this will not affect the sensitivity of the assay or increase background
signal. Please follow the protocol as listed above for preparing Input DNA. Use of
an alternative reverse cross-linking method or omitting the 20 minute incubation
at 100°C in NaCl is not recommended as this will cause artifacts that make the
DNA appear larger. As long as the chromatin falls within the recommended 2001200 bp range, proceed with the ChIP reaction. If fragments do not fall within
this range sonication conditions should be further optimized.
18. If chromatin preparations were successful, the aliquots stored at -80°C from Section D,
Step 4 can be used to perform the ChIP reactions in Section F.
Figure 3: Validation of chromatin shearing efficiency following reversal of cross-links overnight at 65°C.
Chromatin preparations were fixed and sonicated using the EpiShear™ Probe Sonicator and EpiShear™ Cooled Sonication Platform from Active Motif. Input DNA was prepared in duplicate according to Section D, Steps 5-16 in the manual.
In Sample 1, Step 17 was not performed and 500 ng of input DNA was loaded directly onto a 1.5% agarose gel without
receiving the addition of NaCl and incubation at 100°C. The omission of Step 17 has caused a buffer artifact that makes
the DNA appear larger on a gel. The duplicate sample, Sample 2, was processed according to the manual instructions and
included the addition of NaCl and incubation at 100°C as stated in Step 17. Analysis of 500 ng of this input DNA on a 1.5%
agarose gel shows the expected fragmentation between 200-1200 bp. The difference in DNA sizing on the gel between
the two samples illustrates the importance of following the protocol recommendations regarding the processing of input
chromatin for agarose gel analysis prior to chromatin immunoprecipitation. Omission of key steps can lead to inaccurate
analysis of chromatin shearing efficiency. If the protocol steps were followed and the DNA fragments fall outside of the
recommended range, sonication conditions should be further optimized.
Section E. Antibody Conjugation to Protein G Beads
Successful chromatin immunoprecipitation depends on the quality of the ChIP antibody and
the abundance of the target protein. ChIP antibodies must recognize fixed, native protein that is
bound to DNA and/or complexed with other proteins. Many antibodies that perform well in other
applications do not perform in ChIP. Therefore, we recommend using a ChIP-validated antibody
for conjugation to the Protein G beads. For information regarding the use of the magnetic beads
and the included bar magnet and glue dots, please refer to Appendix Section S.
1.
Determine the number of immunoprecipitation reactions needed using the table below as a
guide. We recommend using the chromatin extracted from 15 million cells in 3 independent
IP reactions. These IP reactions will be pooled at the end of the protocol to produce a single
sample for sequencing. Scaling quantities into a single tube will reduce the efficiency of the
IP and is not recommended. Prepare labeled tubes based on the number of reactions.
15 million
cells
30 million
cells
45 million
cells
Tissue
Small Vol.
Tissue
Large Vol.
# Cell Culture Plates
1 x 150 mm
2 x 150 mm
3 x 150 mm
N/A
N/A
Sonication Volume
1 x 500 µl
2 x 500 µl
3 x 500 µl
1 x 500 µl
2 x 500 µl
# Chromatin Tubes
Section B.4 or D.4
3 x 150 µl
6 x 150 µl
9 x 150 µl
3 x 150 µl
6 x 150 µl
Required # IP rxns
3 IP rxns
6 IP rxns
9 IP rxns
3 IP rxns
6 IP rxns
2.
Resuspend the Protein G magnetic bead vial by end-to-end rotation for 5 minutes at room
temperature. Magnetic beads have a tendency to settle to the bottom of the tube and it is
important to resuspend the contents completely before use. Following resuspension, use a
wrist flick to collect beads out of the cap prior to opening the vial.
3.
Aliquot 50 µl Protein G magnetic beads to each labeled tube prepared in Step 1.
4.
Add 1 ml Blocking Buffer AM3 to each tube. Gently flick to mix. Place beads against the
magnet and allow beads to collect to the side of the tube. Carefully remove and discard the
supernatant without disturbing the beads.
5.
Repeat Step 4 two more times for a total of 3 Blocking Buffer washes.
6.
Resuspend the beads in 250 ml Blocking Buffer AM3.
7.
Add 10 µg antibody (15 µl antibody if the concentration is unknown) per IP tube. Incubate the
reactions for 4 hours to overnight at 4°C with end-to-end rotation.
8.
Centrifuge the tubes at 8,150 x g for 20 seconds to collect the contents to the bottom.
9.
Place the tubes on the magnet to separate. Remove and discard the supernatant. Add 1 ml
ice-cold Blocking Buffer AM3 and gently flick to mix.
10. Place the tubes on the magnet to separate. Remove and discard the supernatant. Add 1 ml
room temperature ChIP Buffer and gently flick to mix.
11.
www.activemotif.com
20
Using the magnet, remove and discard the supernatant. Resuspend the beads in 150 µl ChIP
Buffer supplemented with 5 µl Protease Inhibitor Cocktail.
www.activemotif.com
21
Section F. Chromatin Immunoprecipitation
3.
Chromatin is added to the antibody-conjugated Protein G beads for capture of the protein/DNA
binding interactions of interest.
Place the tubes in a thermal mixer set to shake at 960 rpm with a set temperature of 30°C.
Incubate for 30 minutes.
Note:
The use of a thermal mixer greatly enhances the efficiency of the reaction. If
a thermal mixer is not available, place tubes in a heat block or water bath set
to 30°C. Flick the tubes with your fingers every 5 minutes during the 30 minute
incubation to ensure proper mixing.
1.
Thaw the 3 x 150 µl aliquots of sonicated chromatin per sample (from Section B.4 or Section
D.4) on ice. Spin chromatin at 4°C in a microcentrifuge at maximum speed for 2 minutes.
2.
Add 150 µl of chromatin per tube of antibody-conjugated beads. The total volume of the IP
is 305 µl per tube.
4.
Place the tubes on the magnet to separate. Remove and discard the supernatant. Add 1 ml
Wash Buffer AM1 and pipette up and down to mix.
3.
Incubate on an end-to-end rotator overnight at 4°C.
5.
Repeat Step 4 one more time.
4.
Quick spin the tubes to collect the liquid to the bottom. Using the magnetic stand, remove
and discard the supernatant.
6.
Wash each reaction with 1 ml of Wash Buffer AM6. Pipette up and down three times to mix.
Using the magnetic stand, remove and discard the supernatant.
5.
Wash each reaction with 1 ml Wash Buffer AM1 supplemented with 5 µl PIC. Pipette up and
down three times to mix. Using the magnetic stand, remove and discard the supernatant.
7.
Add 1 ml Wash Buffer AM6 to each tube. Allow reactions to sit in wash buffer while preparing the reaction mix needed for Ligation of Adapters in Section H below.
6.
Repeat this wash five more times.
7.
Wash each reaction with 1 ml of Wash Buffer AM6. Pipette up and down three times to mix.
Using the magnetic stand, remove and discard the supernatant.
Section H: Ligation of P7 Exo-Adapter
8.
Add 1 ml Wash Buffer AM6 to each tube. Allow reactions to sit in wash buffer while preparing the reaction mix needed for End Repair in Section G below.
This protocol is for ligation of P7 exo-adapters to the ends of the immunoprecipitated chromatin.
1.
In a new microcentrifuge tube, set up the Adapter Ligation master mix as follows:
Reagents
Per rxn
3 rxns
6 rxns
9 rxns
12 rxns
dH2O
78 µl
241.8 µl
475.8 µl
713.6 µl
951.6 µl
This section is designed to perform end repair of the immunoprecipitated samples while they are
bound to the Protein G magnetic beads. End repair creates blunt ends for adapter ligation.
10X Reaction Buffer AM3
10 µl
31 µl
61 µl
91.5 µl
122 µl
15 µM P7 exo-adapter
10 µl
31 µl
61 µl
91.5 µl
122 µl
1.
100 mM ATP
1 µl
3.1 µl
6.1 µl
9.2 µl
12.2 µl
Section G: Perform End Repair
In a new microcentrifuge tube, prepare the End Repair master mix.
Reagents
Per rxn
3 rxns
6 rxns
9 rxns
12 rxns
dH2O
76 µl
235.6 µl
463.6 µl
695.2 µl
927.2 µl
10X Reaction Buffer AM3
10 µl
31 µl
61 µl
91.5 µl
122 µl
100 mM ATP
1 µl
3.1 µl
6.1 µl
9.2 µl
12.2 µl
dNTP Mix, X(5) mM each
2 µl
6.2 µl
12.2 µl
18.3 µl
24.4 µl
T4 DNA Polymerase (3 U/µl)
5 µl
15.5 µl
30.5 µl
45.8 µl
61 µl
DNA Polymerase I Klenow (5 U/µl)
1 µl
3.1 µl
6.1 µl
9.2 µl
12.2 µl
5 µl
15.5 µl
30.5 µl
45.8 µl
61 µl
100 µl
310 µl
610 µl
915 µl
1220 µl
T4 Polynucleotide Kinase (10 U/µl)
Total Volume
2.
Once the End Repair reaction mixture is ready, place the IP samples from Section F.8 on a
magnetic stand. Remove and discard the supernatant. Immediately add 100 µl per tube of
the End Repair reaction and pipette up and down to mix.
www.activemotif.com
22
T4 DNA Ligase (2000 U/µl)
Total Volume
1 µl
3.1 µl
6.1 µl
9.2 µl
12.2 µl
100 µl
310 µl
610 µl
915 µl
1220 µl
2.
Once the Adapter reaction mixture is ready, place the IP samples from Section G.7 on a
magnetic stand. Remove and discard the supernatant. Immediately add 100 µl per tube of
the Adapter Ligation mixture and pipette up and down to mix.
3.
Place the tubes in a thermal mixer set to shake at 960 rpm with a set temperature of 25°C.
Incubate for 1 hour.
Note:
4.
The use of a thermal mixer greatly enhances the efficiency of the reaction. If a
thermal mixer is not available, place tubes in a heat block or water bath set to
25°C. Flick the tubes with your fingers every 5 minutes during the 1 hour incubation to ensure proper mixing.
Place the tubes on the magnet to separate. Remove and discard the supernatant. Add 1 ml
Wash Buffer AM1 and pipette up and down to mix.
www.activemotif.com
23
5.
Repeat Step 4 one more time.
Section J: Lambda Exonuclease Digestion
6.
Wash each reaction with 1 ml of Wash Buffer AM6. Pipette up and down three times to mix.
Using the magnetic stand, remove and discard the supernatant.
7.
Add 1 ml Wash Buffer AM6 to each tube. Allow reactions to sit in wash buffer while preparing the reaction mix needed for Nick Repair in Section I below.
This protocol is to perform 5´to 3´exonuclease digestion of the double-stranded DNA. Digestion
occurs along the 5´to 3´strands and trims away DNA that is not protected by binding of the
target protein to the chromatin.
1.
Reagents
Section I: Nick Repair
This protocol is used to fill in overhangs and repair DNA nicks following P7 exo-adapter ligation.
1.
In a new microcentrifuge tube, set up the Nick Repair master mix as follows:
Reagents
Per rxn
3 rxns
6 rxns
9 rxns
12 rxns
1X Phi29 Reaction Buffer
95.5 µl
296 µl
582.5 µl
873.8 µl
1165.1 µl
dNTP Mix, 5 mM each
3 µl
9.3 µl
18.3 µl
27.5 µl
36.6 µl
Phi29 DNA polymerase (10 U/µl)
1.5 µl
4.7 µl
9.2 µl
13.7 µl
18.3 µl
Total Volume
100 µl
310 µl
610 µl
915 µl
1220 µl
2.
Once the Nick Repair mixture is ready, place the IP samples from Section H.7 on a magnetic
stand. Remove and discard the supernatant. Immediately add 100 µl per tube of the Nick
Repair mixture and pipette up and down to mix.
3.
Place the tubes in a thermal mixer set to shake at 960 rpm with a set temperature of 30°C.
Incubate for 20 minutes.
Note:
In a new microcentrifuge tube, set up the Lambda Exonuclease master mix as follows:
The use of a thermal mixer greatly enhances the efficiency of the reaction. If
a thermal mixer is not available, place tubes in a heat block or water bath set
to 30°C. Flick the tubes with your fingers every 5 minutes during the 20 minute
incubation to ensure proper mixing.
Per rxn
3 rxns
6 rxns
9 rxns
12 rxns
dH2O
88 µl
272.8 µl
536.8 µl
805.2 µl
1073.6 µl
10X Lambda Exonuclease Buffer
10 µl
31 µl
61 µl
91.5 µl
122 µl
Lambda exonuclease (5 U/µl)
2 µl
6.2 µl
12.2 µl
18.3 µl
24.4 µl
100 µl
310 µl
610 µl
915 µl
1220 µl
Total Volume
2.
Once the Lambda Exonuclease mixture is ready, place the IP samples from Section I.7 on a
magnetic stand. Remove and discard the supernatant. Immediately add 100 µl per tube of
the Lambda Exonuclease mixture and pipette up and down to mix.
3.
Place the tubes in a thermal mixer set to shake at 960 rpm with a set temperature of 37°C.
Incubate for 30 minutes.
Note:
The use of a thermal mixer greatly enhances the efficiency of the reaction. If
a thermal mixer is not available, place tubes in a heat block or water bath set
to 37°C. Flick the tubes with your fingers every 5 minutes during the 30 minute
incubation to ensure proper mixing.
4.
Place the tubes on the magnet to separate. Remove and discard the supernatant. Add 1 ml
Wash Buffer AM1 and pipette up and down to mix.
5.
Repeat Step 4 one more time.
6.
Wash each reaction with 1 ml of Wash Buffer AM6. Pipette up and down three times to mix.
Using the magnetic stand, remove and discard the supernatant.
7.
Add 1 ml Wash Buffer AM6 to each tube. Allow reactions to sit in wash buffer while preparing the reaction mix needed for the RecJf Exonuclease Reaction in Section K below.
4.
Place the tubes on the magnet to separate. Remove and discard the supernatant. Add 1 ml
Wash Buffer AM1 and pipette up and down to mix.
5.
Repeat Step 4 one more time.
6.
Wash each reaction with 1 ml of Wash Buffer AM6. Pipette up and down three times to mix.
Using the magnetic stand, remove and discard the supernatant.
Section K: RecJf Exonuclease Digestion
7.
Add 1 ml Wash Buffer AM6 to each tube. Allow reactions to sit in wash buffer while preparing the reaction mix needed for the Lambda Exonuclease Digestion reaction in Section J
below.
This protocol is to remove the deoxynucleotide monophosphates from single-stranded DNA following the lambda exonuclease digestion.
1.
In a new microcentrifuge tube, set up the RecJf Exonuclease master mix as follows:
Reagents
www.activemotif.com
24
Per rxn
3 rxns
6 rxns
9 rxns
12 rxns
dH2O
89 µl
275.9 µl
543 µl
814.3 µl
1086 µl
10X Reaction Buffer AM3
10 µl
31 µl
61 µl
91.5 µl
122 µl
www.activemotif.com
25
RecJf exonuclease (30 U/µl)
Total Volume
2.
3.
1 µl
3.1 µl
6.1 µl
9.2 µl
12.2 µl
Section M. DNA Purification
100 µl
310 µl
610 µl
915 µl
1220 µl
This protocol is for the removal of the inactive Proteinase K and purification of the DNA.
Once the RecJf Exonuclease mixture is ready, place the IP samples from Section J.7 on a
magnetic stand. Remove and discard the supernatant. Immediately add 100 µl per tube of
the RecJf Exonuclease mixture and pipette up and down to mix.
Place the tubes in a thermal mixer set to shake at 960 rpm with a set temperature of 37°C.
Incubate for 30 minutes.
Note:
The use of a thermal mixer greatly enhances the efficiency of the reaction. If
a thermal mixer is not available, place tubes in a heat block or water bath set
to 37°C. Flick the tubes with your fingers every 5 minutes during the 30 minute
incubation to ensure proper mixing.
4.
Place the tubes on the magnet to separate. Remove and discard the supernatant. Add 1 ml
Wash Buffer AM1 and pipette up and down to mix.
5.
Repeat Step 4 one more time.
6.
Wash each reaction with 1 ml of Wash Buffer AM6. Pipette up and down three times to mix.
Using the magnetic stand, remove and discard the supernatant.
7.
Add 1 ml Wash Buffer AM6 to each tube. Pipette up and down three times to mix. Using the
magnetic stand, remove and discard the supernatant. Proceed immediately to Section L:
Reversal of Cross-links and Elution from the Beads below.
1.
Remove the tubes from the thermal mixer/heat block and allow to cool to room temperature.
2.
Place tubes on the magnet to separate. Transfer the supernatant into a new microcentrifuge
tube. This contains the eluted ChIP DNA.
3.
Add 250 µl Phenol and 125 µl chloroform/isoamyl alcohol (25:1) to each reaction tube. Vortex
1 minute to mix.
4.
Centrifuge at 14,000 rpm for 5 minutes.
5.
Collect the aqueous (top) phase and transfer to a new microcentrifuge tube. Determine the
volume of the aqueous phase (~200 µl).
6.
Add 5 M NaCl to achieve a final concentration of 0.2 M. (For 200 µl volume you will need to
add 8 µl 5M NaCl.)
7.
Add 1 µl Glycogen to each tube and vortex to mix.
8.
Add 650 µl of 100% ethanol to each reaction. Vortex to mix and place at -80°C to precipitate
for 1 hour to overnight.
9.
Following the incubation, centrifuge the tubes at 14,000 rpm for 20 minutes in a refrigerated
microcentrifuge set to 4°C. There should be a visible pellet of precipitated DNA following
the centrifugation.
Note:
Section L. Reversal of Cross-links and Elution from the Beads
This section is designed to reverse the protein cross-links and elute the ChIP-enriched DNA from
the Protein G magnetic beads.
1.
Add 200 µl Elution Buffer AM4 to each reaction tube.
2.
Add 10 µl Proteinase K to each reaction tube.
3.
Place the tubes in a thermal mixer set to shake at 960 rpm with a set temperature of 55°C.
Incubate for 30 minutes.
Note:
4.
The use of a thermal mixer greatly enhances the efficiency of the reaction. If
a thermal mixer is not available, place tubes in a heat block or water bath set
to 55°C. Flick the tubes with your fingers every 5 minutes during the 30 minute
incubation to ensure proper mixing.
If there is no visible pellet following centrifugation, there is a very high probability that the ChIP-exo reaction has failed. We recommend that you repeat the
experiment from the beginning.
10. Carefully remove and discard the supernatant without disturbing the pellet. Add 500 µl icecold 70% ethanol to each tube. Centrifuge at 14,000 rpm for 10 minutes.
11.
Carefully remove and discard the supernatant without disturbing the pellet. Allow the pellet
to air dry for 30-90 minutes. Drying time depends on how efficiently the liquid was removed
following centrifugation. Make sure the traces of ethanol have evaporated and the pellet
is dry, but do not extend drying time for prolonged periods beyond what is needed as this
makes it more difficult to resuspend the pellet.
12. Resuspend the pellet in 20 µl sterile water. Vortex the sample for 10 seconds to aid in resuspension of the DNA pellet. Quick spin the tubes to collect the liquid. The DNA can be stored
at -20°C at this stage. If the DNA is stored, we recommend heating the samples at 37°C for 10
minutes prior to use to ensure the DNA is fully dissolved.
Following the incubation, increase the temperature of the thermal mixer/heat block to
80°C to heat inactivate the Proteinase K. Incubate samples at 80°C for 2 hours. Mixing is not
required during this step.
www.activemotif.com
26
www.activemotif.com
27
Section N. P7 Primer Extension
Section O. Ligation of P5 Exo-Adapter
In this section, the P7 primer anneals to the P7 exo-adapter sequence that was added in Section H,
and the Phi29 Polymerase extends the DNA sequence to create double-stranded DNA.
In this section the P5 exo-adapters are added to the DNA. These adapters will serve as binding
sites for the indexing primers during PCR amplification.
1.
Transfer 20 µl of each ChIP-exo DNA into a 200 µl PCR tube.
1.
2.
Heat the samples for 5 minutes at 95°C. While the samples are incubating, prepare the Primer
Extension Reaction mixture below.
Reagents
Phi29 Reaction Buffer
3.
In a new microcentrifuge tube set up the P5 Adapter master mix as follows:
Reagents
Per rxn
3 rxns
6 rxns
9 rxns
12 rxns
dH2O
23 µl
71.3 µl
140.3 µl
210.3 µl
280.6 µl
Per rxn
3 rxns
6 rxns
9 rxns
12 rxns
10X T4 DNA Ligase Buffer
5 µl
15.5 µl
30.5 µl
45.8 µl
61 µl
29 µl
89.9 µl
176.9 µl
265.3 µl
353.8 µl
15 µM P5 adapter
1 µl
3.1 µl
6.1 µl
9.2 µl
12.2 µl
1 µl
3.1 µl
6.1 µl
9.2 µl
12.2 µl
30 µl
93 µl
183 µl
274.5 µl
366 µl
5 µM P7 primer
1 µl
3.1 µl
6.1 µl
9.2 µl
12.2 µl
T4 DNA Ligase (2000 U/µl)
Total Volume
30 µl
93 µl
183 µl
274.5 µl
366 µl
Total Volume
Add 30 µl Primer Extension mixture to each tube and pipette up and down to mix.
2.
Add 30 µl of the P5 Adapter Mix to each PCR tube. Pipette up and down to mix.
4. Place tubes in a PCR instrument and program as below. Please note that additional components need to be added to the reactions within 7 minutes of starting the PCR program.
Have these reagents on ice and ready for addition into the tubes in advance of starting the
program. There is an additional 10 minutes built into the program to accommodate the addition of reagents without the need to pause the machine.
3.
Place reactions in a PCR instrument set to 25°C for 1 hour.
4.
Following the incubation, remove the samples and add 90 µl AMPure beads to each tube.
Pipette up and down repeatedly (~10 times) to ensure a homogenous mixture.
5.
Place the tubes on the magnet to separate. Remove and discard the supernatant.
65°C for 5 minutes
30°C for 30 minutes*
65°C for 10 minutes
4°C Hold
* Once the PCR program has completed the first 2 minutes of the 30°C cycle, remove the
samples and add 1 µl Phi29 Polymerase and 2.1 µl dNTPs (5 mM each) to each tube. Mix by pipetting up and down and return the samples back to the PCR instrument. Allow the program
to continue to completion with the 4°C hold.
6.
Without removing the tubes from the magnet, add 200 µl ice-cold 70% ethanol to wash the
beads. Allow beads to sit in the ethanol wash for 30 seconds before removing and discarding
the supernatant.
7.
Repeat Step 6 one more time.
8.
Without removing the tubes from the magnet, allow the beads to air dry for 20 minutes.
9.
Remove the tubes from the magnet and resuspend the beads in 20 µl DNA Purification Elution buffer. Pipette up and down to mix.
10. Place the tubes on the magnetic stand to separate. Transfer the supernatant to a new 200 µl
PCR tube.
5.
Once the PCR is finished, place the samples at room temperature.
6.
Add 90 µl AMPure beads to each reaction. Pipette up and down repeatedly (~10 times) to
ensure a homogenous mixture.
7.
Place the tubes on the magnet to separate. Remove and discard the supernatant.
Section P: PCR Amplification of the DNA Library
8.
Without removing the tubes from the magnet, add 200 µl ice-cold 70% ethanol to wash the
beads. Allow beads to sit in the ethanol wash for 30 seconds before removing and discarding
the supernatant.
9.
Repeat Step 8 one more time.
In this section, the DNA library is PCR amplified. Each Indexing primer included in the kit can be
used to process 6 reactions. If your experiment requires more than 6 reactions you will need to
use both Indexing primers. If needed, the sequencing information generated from the different
primers can be merged together during bioinformatic analysis. If additional Indexing primers are
required to multiplex samples, please visit the Illumina website for TrueSeq Index Primers. The
barcode sequence for the Indexing primers included in the kit are listed below.
10. Without removing the tubes from the magnet, allow the beads to air dry for 20 minutes.
11.
Remove the tubes from the magnet and resuspend the beads in 20 µl DNA Purification Elution buffer. Pipette up and to mix.
12. Place the tubes on the magnetic stand to separate. Transfer supernatant to a new PCR tube.
www.activemotif.com
28
Indexing primer 2 = ACATCG
Indexing primer 4 = TGGTCA
www.activemotif.com
29
1.
In a new microcentrifuge tube, set up the PCR Amplification master mix as follows:
Per rxn
3 rxns
6 rxns
This process selects a size range of DNA templates.
dH2O
14 µl
43.4 µl
85.4 µl
1.
5X Q5 Reaction Buffer
10 µl
31 µl
61 µl
dNTPs, 5 µM each
3 µl
9.3 µl
18.3 µl
Indexing primer 2 or Indexing primer 4**
2 µl
6.2 µl
12.2 µl
2.
Add 5X loading dye to each DNA sample so that the final concentration is 1X.
Q5 High-Fidelity Polymerase
1 µl
3.1 µl
6.1 µl
3.
30 µl
93 µl
183 µl
Run the entire PCR amplified DNA Library from Step P.11 and 500 ng of 100 bp DNA ladder on
a 1.5% agarose gel for size selection of the DNA library. To avoid potential cross contamination of adjacent wells, leave at least one empty lane between DNA ladder and sample wells.
4.
Run the gel at 120V for ~1 hour or until the tracking dye is 2/3 down the length of the gel.
5.
Visualize the DNA using a Dark Reader transilluminator to avoid exposure to UV light. If
using a UV light, work quickly when excising the band to minimize direct exposure to UV.
Prolonged exposure to UV light can damage DNA.
6.
Using a clean razor blade, excise a gel slice in the 180-310 bp range. We recommend to photograph the gel before and after the band is excised.
7.
Use a QIAquick Gel Extraction Kit (QIAGEN Cat. No. 28704) to purify the DNA from the agarose. Make the following protocol modifications to the QIAquick Gel Extraction Kit protocol:
Reagents
Total Volume
** Indexing primers are specific for working with the Illumina sequencing platforms. These
index primers contain a short “barcode” sequence that allows for individual identification of
samples within a mixed population. Two index primers are included in the assay kit that may
be used to combine two samples together within a single sequencing lane.
2.
Add 30 µl of the PCR amplification mix to each DNA sample.
3.
Place tubes in a PCR instrument and program as follows:
Once the PCR is finished, remove the samples from the machine and place at room temperature.
5.
Add 90 µl AMPure beads to each reaction. Pipette up and down repeatedly (~10 times) to
ensure a homogenous mixture.
6.
Place the tubes on the magnet to separate. Remove and discard the supernatant.
7.
Without removing the tubes from the magnet, add 200 µl ice-cold 70% ethanol to wash the
beads. Allow beads to sit in the ethanol wash for 30 seconds before removing and discarding
the supernatant.
8.
Repeat Step 7 one more time.
9.
Without removing the tubes from the magnet, allow the beads to air dry for 20 minutes.
10. At this stage, the three IP reactions that were set up from one 15 million cell pellet will be
recombined into a single tube. Remove the tubes from the magnet and add 30 µl DNA Purification Elution buffer to the first tube of beads. Pipette up and to mix. Once these beads are
fully resuspended, transfer the solution to the second tube of beads. Pipette up and to mix.
Once these beads are fully resuspended, transfer the solution to the third tube of beads.
Pipette up and to mix. This tube should now contain all the beads from the 3 IP reactions in
approximately 30 µl volume.
Place the tubes on the magnetic stand to separate. Transfer the supernatant to a new PCR
tube. This contains the eluted DNA library.
www.activemotif.com
30
Prepare a 1.5% agarose TAE gel with 400 ng/ml ethidium bromide using a large-well comb.
Note:
95°C for 90 seconds
(98°C for 10 seconds, 65°C for 30 seconds, 72°C for 30 seconds) for 14 cycles
72°C for 5 minutes
4°C Hold
4.
11.
Section Q: Size Select the Library
8.
Ethidium bromide is a mutagen. Use appropriate precaution when handling.
a.
QIAquick columns can handle a maximum of 400 mg agarose. If using a larger quantity
of agarose, you will need to split your sample across multiple columns.
b.
Incubate the gel slice in 3 volumes Buffer QG at 37°C for 30 minutes instead of the
suggested 50°C for 10 minutes. Buffer volumes and incubation times are dependent
upon the thickness of the gel and may need to be adjusted based on your sample. If
necessary, add additional Buffer OG and increase the duration of the 37°C incubation.
c.
Add the recommended extra 0.5 ml Buffer QG to the QIAquick column.
d.
During the wash steps, incubate 2-5 minutes in Buffer PE before centrifugation.
e.
Elute the DNA in 20 µl Buffer EB.
The size selected DNA library is now ready for downstream analysis. For sequencing, we
recommend 40 million reads. This generally returns results between 20 - 45 million read
counts. If the numbers fall below this range the samples may need to be resubmitted for
another sequencing run. Alternatively, PCR walking primers can be developed to confirm the
exonuclease digestion of the ChIP DNA prior to sequencing (see Appendix Section T).
www.activemotif.com
31
Section R: Recommendations for Data Analysis
The following information is included to provide guidance for data analysis of sequencing results
and represents one program we have successfully utilized for analysis of ChIP-exo sequencing
reads. Alternative programs are available and may be used for analysis. Please note that data
output from other programs will use different algorithms and result in different border length
values. Therefore, results should not be compared across programs. Active Motif is not responsible
for analysis of the sequencing data or for tracking modifications or changes that are made to the
software program over time. Recommendations are provided as guidelines only. Specific inquiries
regarding analysis programs and files should be directed towards your bioinformatics provider.
1.
When your sequencing files are returned, we suggest running a filter step.
2.
Align the sequences to the human genome.
3.
Covert the .SAM files to .BAM files. (A .BAM file is a .SAM file but stored in binary. Conversion
will save storage space and make it faster to manipulate files.)
4.
Sort your .BAM files
5.
Index your .BAM files
6.
.BAM files can be used in your analysis software. We recommend using a program designed
for analysis of ChIP-exo data called MACE (Model-Based Analysis of ChIP-exo). MACE will
look at the border peaks on either side of the transcription factor/protein binding site and
will give very concise sequence information. More traditional analysis programs, such as
MACS, may also be used. These programs may require additional manipulations to generate
summit length values which represent the range between the two peaks of the forward
and reverse peak strands. This range will be broader than the range defined by MACE and
therefore will have lower resolution of binding site identification. Because of the decrease
in resolution, we suggest using MACE for analysis and have guidelines to run the program
below. For any MACE-specific questions, or to download the software, please visit:
http://dldcc-web.brc.bcm.edu/lilab/MACE/docs/html/
Move to directory containing your .BAM files. The program may take 4 hours or more to run.
The data output will be in the form of .bw (BigWiggle) files and .bed files. These files can
be loaded into the UCSC genome browser to examine binding sites by looking at either the
“elite_border_pairs” or the “Gale-Sharpley Paired Border, GSB border_pairs”. You will also
have SFB and SRB borders, which are single direction binding events (forward or reverse) that
do not have a pair. These may or may not represent true binding sites and should be evaluated further.
www.activemotif.com
32
ChIP-seq
Cells
Reads
Alignments Total Peaks Avg. Binding Site Length
FoxA1 MCF-7
95,314
297 bp
MACS
Cells
Reads
AM
7
2x10
49,044,067
41,028,096
106,397
141 bp
Published
10x107
19,348,662
13,465,289
78,231
88 bp
MACE
Cells
Reads
AM
2x10⁷
49,044,067
41,028,096
3,746
33 bp
Published
10x10
38,793,798
26,985,549
6,187
38 bp
7
Alignments Total Peaks Avg. Binding Site Length
Alignments Total Peaks Avg. Binding Site Length
Figure 4: Example of data analysis from ChIP-exo with transcription factor FoxA1.
Active Motif’s ChIP-exo Kit was used to analyze transcription factor FoxA1 for comparison to published data.
Bioinformatic analysis was performed using both MACS and MACE programs. The data displays comparable results
between the kit and published results. The identified FoxA1 binding sites are significantly smaller for ChIP-exo than
traditional ChIP-seq results. This data shows the reproducibility of the assay for binding site identification.
Published
(10x107 cells)
Binding Site = 70 bp
AM
(2x10⁷ cells)
Binding Site = 14 bp
{
{
FoxA1 ChIP-exo from MCF-7 Cells
6.3
Fw
10.1
Rv
3.3
Fw
5.2
Rv
Reported FoxA1
Binding Site (215 bp)
Figure 5: BigWig graphs comparing Active Motif’s ChIP-exo data with published ChIP-exo data for FoxA1.
To generate Active Motif’s ChIP-exo results (AM) for FoxA1, 100 μg of chromatin obtained from 20 million MCF-7
cells was fragmented and ChIP was performed using the ChIP-exo Kit with antibodies against FoxA1. Results were
compared with published results (Published) for FoxA1 obtained by performing ChIP-exo on fragmented chromatin
generated from 100 million MCF-7 cells as described previously by Serandour et al. (Ref 6). Data was aligned to
the hg19 human reference genome using Bowtie. The BigWig graphs were generated using the ChIP-exo-specific
analysis software: MACE (Model based Analysis of ChIP-exo). These results demonstrate that Active Motif’s ChIP-exo
method achieves comparable resolution of binding motifs as the published data for FoxA1 using a fraction of the
starting cell numbers used to obtain the published data. Results overlap with reported FoxA1 binding sites.
www.activemotif.com
33
Appendix
Section S. Use of Magnetic Beads and Included Bar Magnet
Washing should be performed as follows:
a. Place the tubes in the rack against the magnet and allow the beads to be pinned to the
side of the tube, as shown below.
• The magnet should be stored in the provided tube.
• Be careful when working near metal objects or surfaces. A free magnet will jump great
distances onto nearby metal surfaces with surprising speed. This can break the magnet.
• Use the provided Mini Glue Dots to attach the bar magnet to an empty pipette tip box to
create an effective magnetic stand for use with either PCR strips or microcentrifuge tubes.
• If the magnet becomes attached to a flat metal surface, it should be removed by sliding it
off the edge of the surface. The magnet may break if you attempt to pull one end or pry it
away from the metal.
Caution: The included neodymium bar magnet is extremely powerful and is easily broken
if handled incorrectly.
b.
Remove supernatant with a 200 µl pipetteman or a 200 µl eight-channel pipetteman.
c.
Move the tube strip into a row that is not adjacent to the magnet.
d.
Add wash buffer and pipet up and down to fully re-suspend the beads. Ensure that a
minimal amount of beads cling to the tips when the re-suspension is complete.
e.
Repeat steps a-d until desired washing steps are complete.
Creating a magnetic stand for 8-well PCR strips:
Note:
8-well strip tubes for use with standard 96-well PCR cyclers are recommended
(e.g. Thermo Fisher AB-0451).
1.
Place a strip of PCR tubes in the wells of an empty tip box (200 µl tips) and place the magnet
directly against the tubes. This is the way the magnet will be positioned when the glue dots
are used to affix it to the box.
2.
Remove the covering tape from one side of two glue dots and attach the glue dots on the
bar magnet (the uncovered face of the dot is placed on the magnet) as shown below.
3.
Remove the covering tape from the exposed side of the glue dots. Fix the magnet to the tip
box so that it is against the PCR tubes. The magnetic stand is now ready for use.
Note:
Familiarize yourself with using the magnetic stand before performing with PCR
tubes for the first time. Add 5 µl of magnetic beads to 100 µl ChIP Buffer in one
tube of an 8-well strip of PCR tubes. Use this tube with the assembled bar
magnet stand to become familiar with use of the beads and magnet. It is difficult
to re-suspend the beads if the tubes are directly adjacent to the magnet, so it is
best to move the tubes away from the magnet for resuspension steps.
www.activemotif.com
34
Centrifugation of 8-well PCR strip tubes:
When working with 8-well PCR strip tubes, it may be desirable to centrifuge the tubes to collect
the liquid and beads from the insides of the caps. This is easily accomplished in a centrifuge fitted
with adaptors for spinning microtiter plates. Place a standard 96-well plate in the adaptor to hold
the tubes in place. Be sure to balance the rotor (i.e. place a microtiter plate and tubes of appropriate mass in the rotor’s opposing 96-well plate adaptor). Spin the plates briefly to let the rotor
reach a speed of 1000 x g before allowing the rotor to stop.
Creating a magnetic stand for 1.7 ml microcentrifuge tubes:
1. Remove the covering tape from one side of two glue dots.
2.
Place two 1.7 ml microcentrifuge tubes in the wells of an empty tip box (1000 µl) and place
the magnet directly against the tubes. This is the way the magnet will be positioned when
the glue dots are used to affix it to the box.
www.activemotif.com
35
3.
Attach the glue dots on the bar magnet (the uncovered face of the dot is placed on the
magnet) as shown above.
4.
Remove the covering tape from the exposed side of the glue dot. Fix the magnet to the tip
box so that it is against the tubes. The magnetic stand is now ready for use.
Note:
1.7 ml microcentrifuge tubes are held less securely in this assembled tube stand
than in a typical commercial magnetic stand. This is not a problem if the below
washing protocol is followed. Work with 1 tube at a time, and keep the tubes in
the standard tube rack unless you are holding the tube next to the magnet.
Washing is best performed one tube at a time, as follows:
1.
Place the tube in a standard 1.7 ml microcentrifuge tube rack and open the cap.
2.
Place the opened tube in the assembled magnetic stand. The beads will pellet more rapidly if
the bottom of the tube is held against the magnet, as shown below, and then slowly lowered
into the well. This will pellet the beads up onto the side of the tube.
Section T: Walking Primer Design
Walking primers can be utilized to confirm the success of the ChIP-exo efficiency prior to submitting samples for sequencing. Primers are designed to a known protein binding site based on
ENCODE data sets. A series of primers are created which will cover the binding site and 400 bp
upstream and 400 bp downstream of the binding site. If the ChIP-exo reaction was successful, the
exonuclease digestion should trim away the DNA sequence that was not associated directly with
the protein binding site. As a result, primers designed to DNA sequences far away from the binding
site will not generate a PCR amplicon, while primers in the immediate vicinity of the binding site
should generate a PCR amplicon. This provides a quick, visual assessment of the efficiency of the
exonuclease reaction. Samples that are successful should then be submitted for sequencing.
A. Design of the primers
• Design and analyze your potential primer pairs using the ENCODE information on the UCSC
Genome Browser at http://genome.ucsc.edu/cgi-bin/hgGateway.
• Select the genome and assembly to search.
• Under Regulation, ensure that the Encode Transcription Factor Binding (ENC TF Binding) is
showing. Refresh if necessary. Click the link for the ENC TF BInding and select the track to
display. As a default you can use Uniform TFBS.
• Search for the protein of interest and the cell line that you will be using. Please note that ENCODE does not contain data for all transcription factors, cell lines or combinations thereof.
For simplicity, it is best to remove any unrelated transcription factors and cell lines from the
search. Submit the search.
3.
Allow the beads to pellet completely and remove supernatant with a 1000 µl pipetteman.
You can either leave the tube in the rack or pull it out when you remove the buffer. The
beads will remain on the side of the tube, even when not next to the magnet.
4.
Return the tube to the standard microcentrifuge tube rack, add wash buffer and fully resuspend the beads by pipetting up and down.
5.
After the final wash has been removed, the last traces of wash buffer should be removed
with a 200 µl pipetteman.
• Under Mapping and Sequencing, ensure that Assembly is showing. Go to a known binding
site of interest and zoom in. Select a known binding site sequence which covers ~200 bp. The
goal is to capture the DNA sequence that lies 400 bp upstream and 400 bp downstream of
your desired binding site for primer design.
• Once you have identified your region of interest, right click on the Assembly track and select
“Get DNA for”. Then, input the range of interest and get DNA. Obtain the DNA sequence
that lies ~400 bp upstream and ~400 bp downstream of your desired binding site.
• Within the sequence identified as a binding site for your protein, try and determine the
binding motif using Factorbook (http://www.factorbook.org/mediawiki/index.php/Welcome_to_factorbook). If the motif cannot be determined, use the absolute center of the
binding site sequence.
• Using the identified motif or center of binding sequence, design a collection of primers
that will cover 100 bp, 200 bp, 300 bp and 400 bp in each direction from the center. Primers
designed on the forward strand should have a universal reverse primer imbedded in the
binding site and different forward primers that cover the various DNA lengths upstream
of the binding site. Primers designed on the reverse strand should have a universal forward
primer imbedded in the binding site and different reverse primers that cover the various
DNA lengths downstream of the binding site.
www.activemotif.com
36
www.activemotif.com
37
• Use a program such as Primer3plus (http://www.bioinformatics.nl/cgi-bin/primer3plus/
primer3plus.cgi/) to design the primer collection. Try and maintain a constant annealing
temperature across the primer pairs to enable all reactions to be performed in the same PCR
run.
• Perform PCR using a 1:20 dilution of the isolated DNA. We recommend 1 µl of diluted DNA
per 20 µl PCR reaction according to the manufacturer’s instruction for your PCR master mix.
An example of primer design strategy and PCR results are shown below.
Section U. Troubleshooting Guide
Problem/question
Recommendation
At what points in the
protocol can I stop?
The protocol may be stopped and samples stored at the times and temperatures below:
1. After formaldehyde fixation and centrifugation (intact cell pellet), -80°C.
2. After chromatin shearing, -80°C.
3. After DNA clean up, -20°C.
After sonication shearing
and centrifugation, a
viscous or cloudy layer is
visible in the chromatin.
Depending upon the cell type, lipid or glycogen layers may be seen after centrifugation.
For example, fatty tissues may have a lipid layer. Avoid such layers when you remove the
supernatant. However, if the whole supernatant is cloudy, it should not interfere with the
IP reaction.
Poor yield of sheared
chromatin.
Insufficient cell numbers were used. Repeat chromatin preparation using a larger number
of cells. We recommend using 15-45 million cells per chromatin preparation.
Nuclei not released. It is highly recommended to perform dounce homogenization, even
when using sonication. Use a dounce homogenizer with a small clearance pestle (Active
Motif Catalog Nos. 40401 & 40415). Monitor cell lysis under a microscope. Generally, the
more cells that are lysed, the higher the sheared chromatin yield.
Sonication samples were emulsified. Avoid emulsification by turning up the power of
the sonicator gradually. If a chromatin preparation becomes emulsified inadvertently,
discontinue shearing and centrifuge the sample for 4 minutes at 8,000 rpm in a 4°C
microcentrifuge to remove trapped air.
Example of walking primer design.
PCR primers are designed using a known protein binding sequence as the center of the binding site. Additional
primers are designed at increasing intervals both upstream and downstream of the binding site to determine the
efficiency of the exonuclease digestion.
Use fresh formaldehyde when preparing Complete Cell Fixation Solution and Complete
Tissue Fixation Solution.
Shearing efficiency is not
clear from gel analysis.
Material is stuck in the wells, and smears or streaks are seen from the top to bottom of
the lane. The sheared chromatin needs to have the cross-links reversed, protein removed
(Proteinase K) and RNA removed (RNase), followed by DNA purification.
High molecular weight products. Decrease the size of the fragments by re-sonicating the
sample. If an alternative reverse cross-linking method was used, or the 20 minute incubation at 100°C in NaCl was omitted prior to running the agarose gel for analysis, please
repeat the input chromatin preparation and follow the manual instructions.
Example of ChIP-exo walking primer analysis.
PCR primers were designed around a known CTCF binding site. A universal reverse primer was designed using the
center of the CTCF binding motif and forward primers were designed to detect DNA sequences at 75 bp, 150 bp,
200 bp, 300 bp and 400 bp upstream of the binding site. The image on the left shows the walking primer results
from a successful exonuclease reaction. The primer sets closest to the CTCF binding site amplify readily, while the
distant DNA sequences that were targeted by exonuclease digestion show little to no amplification. The image on
the right shows a no exonuclease control reaction. In this case a PCR product was produced from all primer sets,
indicating that DNA was not digested during ChIP-exo.
www.activemotif.com
38
What if my ChIP antibody
does not have a concentration?
We recommend using 10 µg of antibody if a concentration is known. For serum antibodies, or those without a known concentration use 15 µl antibody per 50 µl Protein G beads.
ChIP efficiency will depend on the antibody amount, the affinity of the antibody and the
abundance of the target protein. Optimization may be required.
Performing the IP with
a larger volume of
chromatin.
This is not recommended. Each IP reaction is designed to work with approximately 5 million cells. For successful sequencing reads, chromatin should be prepared from a minimum
of 15 million cells and divided into three separate IP reactions. The eluted material will be
combined later in the protocol to generate a single sequencing read. Do not perform a
single scaled-up reaction, as the capture efficiency is lower.
High background.
Inefficient exonuclease digestion. Ensure that all components were added in the proper
order to the reactions. We suggest the use of a thermal mixer to increase the efficiency
of each reaction. If a thermal mixer is not available, flick the tubes every 5 minutes during
the incubation to ensure proper mixing of the samples for better efficiency. If possible,
design walking primers to a known binding site to verify exonuclease digestion prior to
sequencing.
When size selecting the sequencing library, excise the band between 180-310 bp. Larger
fragments will increase the background signal.
www.activemotif.com
39
Section V. Related Products
Problem/question
Recommendation
Poor or no enrichment
with target antibody.
Too little chromatin. For very low abundance transcription factors, chromatin should be
extracted from a larger number of cells and additional IP reactions should be set up. For
high abundance proteins we suggest 15 million cells and 3 IP reactions. For low abundance
proteins we suggest 45 million cells and 9 IP reactions. Adjust the cell number and IP reactions based on the protein abundance and desired sequencing coverage.
Antibody is not ChIP validated. The antibody does not efficiently recognize fixed
proteins, either because the epitope is destroyed by fixation or because the epitope is
masked by other proteins in a larger complex. To assist in ChIP validating an antibody, it
is very useful to use a positive control antibody such as Histone H3K4me3 (Catalog No.
39915) and a negative IgG from the same species, and primers that have been proven to
work in the type of PCR being used. Active Motif offers species-specific ChIP-IT Control
qPCR Kits for antibody validation (Catalog Nos. 53026, 53027 & 53028).
Low-affinity antibody. Use a different antibody.
Antibody affinity to protein G is weak. Individual monoclonals have variable binding
affinities to protein G, which are pH dependent; the optimal pH may vary for each Ig, For
those with low to medium affinity, capture efficiency by protein G can be dramatically
improved through use of our Bridging Antibody (Catalog No. 53017). This antibody is a
rabbit anti-mouse pAb that recognizes all subclasses of mouse immunoglobulins. If your
IgG has a weak/medium affinity to protein A or G, the Bridging Antibody will increase
antibody capture by the beads without increasing background.
Problems with PCR. Confirm the amplified sequence for the positive control primer set is
bound by the antibody target. Identify other binding sites.
What analysis program
should I use to look at
my ChIP-exo data after
alignment?
We recommend using a ChIP-exo specific program such as MACE for the highest resolution. Programs such as MACS and Peakzilla have also been successfully tested. Other
analysis programs such as GEM, GeneTrack and CexoR are available but have not been
tested by Active Motif.
Talk to your bioinformatic specialist to determine the best program for your needs.
What is the expected
ChIP-exo peak size?
Peak size results will depend on the algorithm used to analyze the data. When using
MACE the border peak pair length is on average between 20-95 bp. If MACS is used for
analysis the average summit size is between 95-150 bp. The difference in results is a result
of the computational model used to determine the distance between peaks.
ChIP-IT® Kits
Format
ChIP-IT® Express
ChIP-IT® Express Enzymatic
ChIP-IT® Express Shearing Kit
ChIP-IT® Express Enzymatic Shearing Kit
ChIP-IT® High Sensitivity
ChIP-IT® qPCR Analysis Kit
ChIP-IT® ChIP-Seq
ChIP-IT® FFPE
ChIP-IT® FFPE Chromatin Preparation Kit
ChIP-IT® Express HT
Re-ChIP-IT®
RNA ChIP-IT®
Chromatin IP DNA Purification Kit
EpiShear™ Probe Sonicator
EpiShear™ Cooled Sonication Platform, 1.5 ml
ChIP-IT® Protein G Magnetic Beads
Protein G Agarose Columns
Siliconized Tubes, 1.7 ml
ChIP-IT® Control qPCR Kit – Human
ChIP-IT® Control qPCR Kit – Mouse
ChIP-IT® Control qPCR Kit – Rat
ChIP-IT® Control Kit – Human
ChIP-IT® Control Kit – Mouse
ChIP-IT® Control Kit – Rat
Ready-to-ChIP HeLa Chromatin
Ready-to-ChIP Hep G2 Chromatin
Ready-to-ChIP K-562 Chromatin
Ready-to-ChIP NIH/3T3 Chromatin
Bridging Antibody for Mouse IgG
Dounce Homogenizer
Dounce Homogenizer
25 rxns
25 rxns
10 rxns
10 rxns
16 rxns
10 rxns
10 libraries
16 rxns
5 rxns
96 rxns
25 rxns
25 rxns
50 rxns
110 V
1 platform
25 rxns
30 rxns
25 tubes
5 rxns
5 rxns
5 rxns
5 rxns
5 rxns
5 rxns
10 rxns
10 rxns
10 rxns
10 rxns
500 µg
1 ml
15 ml
Catalog No.
53008
53009
53032
53035
53040
53029
53041
53045
53030
53018
53016
53024
58002
53051
53080
53014
53039
53036
53026
53027
53028
53010
53011
53012
53015
53019
53020
53021
53017
40401
40415
ChIP-validated Antibodies
For an up-to-date list of over 125 ChIP-validated antibodies, please visit www.activemotif.com/chipabs.
Whole Genome Amplification
Format
GenoMatrix™ Whole Genome Amplification Kit
1 kit
Co-Immunoprecipitation
Format
Catalog No.
Nuclear Complex Co-IP Kit
Universal Magnetic Co-IP Kit
Modified Histones Array
50 rxns
25 rxns
Format
54001
54002
Catalog No.
MODified™ Histone Peptide Array
1 array
Histone Modification FP Binding Assay
Format
HiLite™ Histone H3 Methyl-Lys9 / Lys27 FP Binding Assay
www.activemotif.com
40
www.activemotif.com
41
1 kit
Catalog No.
58001
13001
Catalog No.
57001
Technical Services
If you need assistance at any time, please call Active Motif Technical Service at one of the
numbers listed below.
Active Motif North America
1914 Palomar Oaks Way, Suite 150
Carlsbad, CA 92008
USA
Toll Free:
877 222 9543
Telephone: 760 431 1263
Fax:
760 431 1351
E-mail:
[email protected]
Active Motif Europe
Avenue Reine Astrid, 92
B-1310 La Hulpe, Belgium
UK Free Phone:
0800 169 31 47
France Free Phone: 0800 90 99 79
Germany Free Phone: 0800 181 99 10
Telephone: +32 (0)2 653 0001
Fax: +32 (0)2 653 0050
E-mail: [email protected]
Active Motif Japan
Azuma Bldg, 7th Floor
2-21 Ageba-Cho, Shinjuku-Ku
Tokyo, 162-0824, Japan
Telephone: +81 3 5225 3638
Fax:
+81 3 5261 8733
E-mail:
[email protected]
Visit Active Motif on the worldwide web at http://www.activemotif.com
At this site:
• Read about who we are, where we are, and what we do
• Review data supporting our products and the latest updates
• Enter your name into our mailing list to receive our catalog, MotifVations newsletter and
notification of our upcoming products
• Share your ideas and results with us
• View our job opportunities
Don’t forget to bookmark our site for easy reference!
www.activemotif.com
42


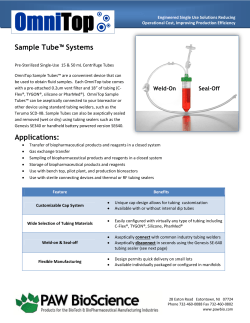


© Copyright 2026