
in-Step for Administrators Manual
Manual
in-Step
®
for
Administrators
Manual
Copyright
This document is protected by copyright. No part of this document may be reproduced
or transmitted in any form or by any means, electronic or mechanical, including translating, photocopying, recording, or information storage and retrieval systems, without the
express written permission of microTOOL GmbH.
© microTOOL GmbH. Berlin 2007-2012. All rights reserved.
in‑Step and microTOOL making IT better are registered trademarks of microTOOL GmbH.
Microsoft and Windows are registered trademarks of the Microsoft Corporation. Oracle is
a registered trademark of the Oracle Corporation.
in-Step uses Apache Lucene .NET for the full text search with Oracle.
Apache Lucene is protected by copyright, © 2006 The Apache Software Foundation
(http://www.apache.org/). Apache Lucene is released under Apache License Version
2.0.
The reproduction of trade names, product names, trademarks, etc., in this handbook
does not entitle their free use, in the sense of trademark acts, even if they are not specially marked as such.
Issued: January 2012
2
in-Step
®
Contents
The Administrator Manual –
Configuring in-Step for Working
on a LAN
Contents
Here’s How to Control Projects on a LAN or the Internet
with in-Step
Page 5
How to install in-Step
Page 5
Installing in-Step with a Control File
Page 5
Standard Installation
Page 10
Setting Up a Program to Run Every Time You Start in-Step
Page 10
How to License in-Step
Page 10
Workstation License with a License Key
Page 10
Workstation License with a Hardlock
Page 11
Floating License
Page 11
Activating in-Step without an Internet Connection
Page 12
Installing a Local Hardlock Page 12
Manually Configuring the License Server
Page 13
Using a Client Access License
Page 16
Automatic Software Update of in-Step (Clients)
Page 17
Setting up the Update Path for the Automatic
Software Update
Page 18
Controlling the Updating Process
Page 18
Automatic Uninstall
Page 20
in‑Step and Oracle
Page 22
System Requirements
Page 22
A Few Notes on Configuring Oracle
Page 22
How to Configure in-Step Server
Distributing Rights for in-Step Server Services
How an in-Step System is Represented in the File System
Use Rights in the File System
Page 23
Page 36
Page 37
Page 37
3
in-Step
®
Contents
The Administrator Manual –
Configuring in-Step for Working
on a LAN
How in-Step and Oracle Work Together
Page 38
Featuring in‑Step Systems under Oracle
Page 38
Upgrading older Systems (Version 3.6 And Earlier)
Page 38
Creating Systems
Page 38
Creating and Restoring Backups
Page 39
Tip for Configuring: Performance Improvement
by Changing the Oracle Start Parameter
Page 42
Tip for Configuring: Increase Maximum Number of
Sessions/Processes
Page 43
Making in-Step available online
Page 44
How to Check an in‑Step System
Page 44
How to Create a Backup
Page 45
Restoring a System
Page 47
Upgrading Systems
Page 47
Converting to a New Version
Page 48
License Configuration with the ASP Frontend
Page 49
More Settings
Page 50
Support
Page 51
4
Administrator Manual
Here’s How to Control Projects on a LAN or the Internet with in-Step
With in‑Step, projects can be controlled just as safely in distributed projects via the Internet as in your company’s
LAN. To work locally or in your LAN, all you need is in‑Step (clients) installed on local workstations. For LAN operation, the clients work on a common system located on a file server. This system may be edited in multi-user mode.
If you would like to configure in‑Step for different locations, you will need in‑Step Server together with as many
in‑Step clients as you’d like. in‑Step Server is a separate product which makes in‑Step systems visible worldwide and
manages them centrally via TCP/IP. The systems made available can be simultaneously edited in multi-user mode
from different locations in the Internet.
How to install in-Step
You can install in‑Step the standard way or by using a control file. Before you begin installing in‑Step, please read the
following sections in order to decide which type of installation is right for you. In addition, you will find a description of what you need to do if you want a program to run automatically every time you start in‑Step.
Installing in-Step with a Control File
Before beginning with in‑Step’s installation, you will want consider the following: you can use a control file to install
in‑Step clients. For example, this file enables you to set the port for the internet connection to the in‑Step Server, or
the path to where to automatically search for newer versions of in‑Step. Using a control file is thus recommended
whenever you install in‑Step clients on to multiple workstations in a LAN. Like this, you don’t have to configure
every in‑Step client at every workstation manually. You also ensure that in‑Step is configured the same way at each
workstation.
Here you can see an example of a control file:
BATCH=1
PATH=file://\\products\microtool\in-Step\
CHECKVERSION=2
PORT=64711
LANGUAGE=B
LICENCE=B
MAINDIR=C:\Program Files\in-Step
A control file always begins with BATCH=1. Under PATH, the path is specified where in‑Step will check for software
updates.
Furthermore, you can use the following variables – default standards are used if they are not set in the control file.
BATCH
This value is used by the in‑Step installation to identify the applicable control file. The value must be 1
BATCH=1
5
Administrator Manual
MAINDIR
This value is used to determine in which directory in‑Step should be installed. <Program Path>\microTOOL\
in-Step is set as the default.
MAINDIR=C:\Program Files\microTOOL\in-Step
SYSTEMSDIR
This value is used to determine in which directory the sample systems should be installed. C:\in-Step Systems
is set as the default.
SYSTEMSDIR=C:\in-Step Systems
PATH
This value is used to determine the path in‑Step should search for new versions. Read more about this in the paragraph „Automatic Software Update of in-Step (Clients)“.
PATH=file://\\products\microtool\in-Step\
CHECKVERSION
This value is used to determine if and how the automatic software update should be set. If the automatic software
update is activated, you have to use the variable PATH.
Possible values:
1 in‑Step searches for new updates at the first start up of the day.
2 in‑Step searches for new updates with each new start
0 in‑Step never searches for updates
CHECKVERSION=1
PORT
This value determines the default port in‑Step uses to communicate with the in‑Step Server. Unless you enter something else, in‑Step will use the port 64711.
PORT=59152
LANGUAGE
This value determines in which language in‑Step should be installed.
Possible values:
A German (default)
B English
LANGUAGE=B
LICENSE
This value requires that you enter the type of licensing. As long as you are generally working with the systems via
the in‑Step Server, you can ignore this value.
Possible values:
A = Desktop license (default)
B = Floating license
LICENSE=A
6
Administrator Manual
GROUP
This value determines the name of the program group where in‑Step is to be stored.
GROUP=in-Step CoreProcess Edition
DISABLEOPLOCK
This value is used to determine whether or not opportunistic locking should be disabled on the client. By default,
opportunistic looking is enabled by Windows. Opportunistic locking increases performance for multi user operations due to the fact that writing accesses are cached locally. During the default installation of in‑Step, opportunistic
locking is disabled. The data will otherwise be cached and rewritten from server to client at any given point. Due
to the fact that this process can’t be controlled by in‑Step, we explicitly recommend that you disable opportunistic
locking on the server used to save your in‑Step systems if you haven’t already disabled it on the client.
You can find more information about this: http://support.microsoft.com/kb/296264/en
Please note that any changes to this setting may decrease the performance of other operations if you’re not working on the in‑Step Server.
If opportunistic locking is disabled and has never before been disabled, you’ll need to restart your system after the
installation.
Possible values:
1 Opportunistic locking is deactivated
0 The current setting for opportunistic locking has not been changed.
DISABLEOPLOCK=0
SILENT_LOGON
This value is used to determine if an automatic login should be used for the most recently opened system when
starting up in‑Step. For this you also have to set the values for LASTSERVER and LASTSYSTEM.
Please note that the user’s Windows account is used here to login. The user must therefore be able to login to
LASTSYSTEM using their Windows account.
If the most recently opened system was opened exclusively, an automatic login is not possible and the login dialog
will pop up. If there’s a login error, the login dialog will always be shown.
Possible values:
0 There is no automatic login
1 There is always an automatic login for the most recently opened or specified system.
SILENT_LOGON=0
Note: If the login dialog should reappear, press Shift while starting up in‑Step.
LASTSERVER
This value is used to enter the IP address or name of the server you installed the in‑Step Server on. If you use this
value, also include LASTSYSTEM.
LASTSERVER=130.94.122.195
LASTSERVER=SERVERNAME
7
Administrator Manual
LASTSYSTEM
This value is used to determine the most recently opened system. If the system is published by the in‑Step Server,
enter the respective name of the system. Otherwise use the isf file path.
LASTSYSTEM=MySystem
LASTSYSTEM=C:\in-Step Systems\MySystem.isf
SHOWPRODUCTACTIVATION
This value is used to determine whether or not an activation dialog should be provided at the first start up of
in‑Step. Deactivation of the dialog is recommended if the client doesn’t have access to the internet or if you are
using a floating or client access license. If the workstation license is being accessed with a license key, the dialog
should not be deactivated. The license is activated by this dialog.
Possible values:
0 The activation dialog will not be opened.
1 The activation dialog will be opened (default).
SHOWPRODUCTACTIVATION=0
INSTALL_PROCESSTEMPLATES
This value is used to determine whether or not the included templates for organizational units and projects should
be installed.
Possible values:
0 The templates will not be installed.
1 The templates will be installed.
INSTALL_PROCESSTEMPLATES=0
INSTALL_TUTORIALS
This value is used to determine whether or not the included sample systems and tutorials should be installed.
Possible values:
0 Sample systems and tutorials will not be installed.
1 Sample systems and tutorials will be installed.
INSTALL_TUTORIALS=0
INSTALL_OFFICETEMPLATES_FIRSTUSE
This value is used to determine whether or not MS Office Integration should be installed at the first start up of
in‑Step.
Possible values:
0 MS Office Integration will not be installed
1 MS Office Integration will always be installed (without asking the user).
Note: If you don’t select this option, in‑Step will automatically ask at the first start up.
INSTALL_OFFICETEMPLATES_FIRSTUSE=0
8
Administrator Manual
EMAIL_AUTH_NAME, EMAIL_AUTH_PASSWORD, EMAIL_OUTSERVER,
EMAIL_SENDER_ADDRESS, EMAIL_SENDER_NAME
This value is used to determine the e-mail settings. If you’re working on the in‑Step Server, you don’t enter the
value on the client. In this case only the server’s settings will be used.
EMAIL_AUTH_NAME=Peter Lichtenstein
EMAIL_AUTH_PASSWORD=abc123
EMAIL_OUTSERVER=mail.eSystem.eu
[email protected]
EMAIL_SENDER_NAME=P. Lichtenstein
CMDIALOGS_SHOWADD, CMDIALOGS_SHOWGET, CMDIALOGS_SHOWCHECKOUT, CMDIALOGS_SHOWCHECKIN, CMDIALOGS_SHOWUNDOCHECKOUT
This value is used to show the dialogs for “Add”, “Check out”, “Get “, “Checkin” or “Undo check out” as default. This is carried out using the value 0.
CMDIALOGS_SHOWADD=0
CMDIALOGS_SHOWGET=0
CMDIALOGS_SHOWCHECKOUT=0
CMDIALOGS_SHOWCHECKIN=0
CMDIALOGS_SHOWUNDOCHECKOUT=0
OFINSIDE_INSTALL
This value is used to determine whether or not you would like to install objectiF inside for requirements modeling in in‑Step. .NET Framework 2.0 is required for the graphical requirements modeling with objectiF inside. If
.NET Framework 2.0 is not installed, the setting 1 will be ignored. If you are using a product version of objectiF, this
value should always be set to 0.
Possible values:
0 objectiF inside will not be installed
1 objectiF inside will be installed (default).
OFINSIDE_INSTALL=0
OFINSIDE_MAINDIR
If you’ve activated the installation of objectiF inside with OFINSIDE_INSTALL, you use this value to determine in
which directory objectiF inside should be installed. You can also do this relative to in‑Step’s installation folder. For
example: OFINSIDE_MAINDIR=%MAINDIR%\objectiF inside.
OFINSIDE_MAINDIR=C:\Programme\objectiF inside
Give the control file the extension.ini and copy it into the same directory as the in‑Step setup file. Then, create a
shortcut to the setup file in the same directory and enter the parameters /S /M together with the name of the control file in the shortcut’s properties in the field Target. For example, INSTEP-COREPROCESSEDITION-SETUP.
exe /S /M=inStep.ini. All you have to do then is double click the shortcut in order to install in‑Step using the
control file.
When updating the software, the control file is automatically transferred to the setup, if the directory with the
setup file contains such a shortcut or an individual control file.
9
Administrator Manual
Standard Installation
Installing in‑Step without using a control file works like this: insert the in‑Step CD-ROM into the CD-ROM drive and
the setup program starts automatically. Simply follow the instructions, which appear on your screen.
To call the setup program directly, select Run in the Windows start menu and enter D:\INSTEP-[EDITION]SETUP or – if you are installing in‑Step Server – D:\INSTEP-SERVER-SETUP, where D: stands for the drive
where the CD-ROM drive is located on your computer. Alternately, you can start the setup program from your Windows explorer by double clicking the file INSTEP-[EDITION]-SETUP.exe or INSTEP-SERVER-SETUP.exe.
`` Please note: both in‑Step Server software and in‑Step client software cannot be installed onto the
same computer at the same time.
Setting Up a Program to Run Every Time You Start in-Step
If you’ve extended in‑Step’s scope of functions to include components of your own, there’s a way of making sure
that all users will always be able to access these components even if in‑Step is newly installed. In this case, you’ll
want to write a batch file which sees to it that these components are registered.
A batch job might look something like this, for example:
@ECHO OFF
regsvr32.exe /s \\Products\microTOOL\in-Step\MyExtension.dll
Give the file the name Autostart.bat and copy this file into the same directory where in‑Step’s setup file is located. The batch file will then be copied into in‑Step’s installation directory whenever the setup file is executed and
automatically run every time the program is started. Like this, you can ensure that any changes you make to your
components will automatically be made available to users.
How to License in-Step
In order to work with in‑Step you will require a valid product license. This license can be provided via a server or
locally. You can determine what type of licensing you wish to use the first time you start in‑Step. If you want to
change the license type later, you can open the product activation dialog again at any time, under the option
Product Activation in the in‑Step Windows program group.
in‑Step can be licensed in three different ways:
Workstation License with a License Key
If you have received a license key with your in‑Step purchase, you can activate it by selecting the option The license
is available locally with a license key, and entering the key. Click Activate to finish the installation and activate
the software.
10
Administrator Manual
The license key is activated over the Internet and is an anonymous process which only takes a few moments. During this process the product license is checked. You only need to carry out this step once when you first start the
tool. If you do not have an Internet connection at your workstation, proceed as described under the heading Activating in-Step without an Internet Connection.
Workstation License with a Hardlock
If you have purchased in‑Step with a hardlock, or are already using one with an earlier version, select The license is
provided by a local hardlock. The hardlock must be installed on the same PC as the software, as described under
the heading Installing a Local Hardlock.
Floating License
Floating licenses are licenses which are not tied to any specific computer. Instead, they are provided via a server
with the help of the microTOOL license server. This gives you the opportunity, for example, to use the licenses flexibly in a project team and use them wherever they are needed at the moment.
If you have purchased one or more floating licenses which are provided via a license server in the network, select
the option The license is provided by a server. Complete the licensing process by clicking OK. Where floating
licenses are concerned, the activation key is entered via the license server software. This must be installed on a
workstation or a server in the network after installing in‑Step. Alternatively, floating licenses can also be provided via
a hardlock.
All information and files relevant to the installation can either be found in the sub-folder
\LicenceServer on the installation CD, or, if you have received the license server over the Internet, in the
downloaded file. Here you will also find a separate ReadMe with detailed information about the installation and
configuration of the license server.
`` Please note: to successfully install the license server under MS Windows NT 4.0 and MS Windows
2000, you must have administrator rights.
You can install the microTOOL license server on a workstation computer or a server with MS Windows 98/
ME/2000/XP/Vista/7 or MS Windows NT 4.0 (or higher).
`` Please note: If the hardlock and license server are installed onto the same workstation where
in‑Step is also installed, the DWORD value LocalHardlock with the value 0 must be created in
the key HKEY_CURRENT_USER\Software\microTOOL GmbH\in-Step\2.0\Licence IV in the
Windows registry database. Additionally at least one active network connection must exist when
you first start in-Step.
You can find more detailed information about the values to be entered on your installation CD, or in the folder \
LicenceServer in the file Readme.doc. Here you can also find out which settings you need to define if you
want to combine several license forms, use a specific license, determine the order of licenses etc.
11
Administrator Manual
Activating in-Step without an Internet Connection
If you want to use a workstation license with a license key but the computer on which you want to activate in‑Step
doesn’t have an Internet connection, you should follow these steps:
- Open the activation dialog by starting in‑Step or via Product Activation from the in‑Step Windows program group. Click Activate. If your computer does not have an Internet connection, a window opens
automatically with your Computer ID.
- Note the computer ID.
- Switch to a workstation with an Internet connection and go to the Website www.microTOOL.de/ProductActivation.
- Enter your license key and your computer ID. After clicking Next you will receive a Windows registry file
which you can download.
- Copy the file onto the workstation where the software is installed and double-click it.
The activation is complete.
Installing a Local Hardlock
Regardless of whether you are using an in-Step workstation or floating license, you must install the hardlock on
your PC or server. With a workstation license, the hardlock must be installed on the same PC as the in-Step software. For a floating license the hardlock must be installed on a server in the LAN. You’ll find the installation file for
the driver software in the directory \Hardlock in your in‑Step program directory. The hardlock is attached to either
a parallel or USB interface.
Only install the hardlock on a PC which is turned off. In other words, turn off your computer now if necessary.
A hardlock for the parallel interface is installed thusly: Plug the end of the hardlock with the 25 point male connector in the socket plug of your PCs parallel interface. If you currently have a printer plugged into this interface, remove the printer plug, install the hardlock and then plug the printer cable into the hardlock. In this case it is recommended the printer is turned on when you are working with in‑Step. This ensures that the hardlock is recognized.
You can plug the USB hardlock into any free USB interface. The hardware recognition then occurs automatically.
in‑Step is now ready for use.
12
Administrator Manual
Manually Configuring the License Server
If you run into problems with the previously existing combination of client and server operating systems in your
company and the possible network protocols when you are running the microTOOL license server, then you will
have to make the necessary settings in the registry settings which in‑Step uses.
`` If you don’t want to edit the Windows registry database “by hand”: you can use the tool LicenseConfig.exe which is located in in‑Step’s installation directory to make all of the relevant settings
through a dialog interface.
When you make changes manually, please note: all of the settings described in the following sections need
to be entered in the Windows registry file under HKEY_CURRENT_USER/Software/microTOOL GmbH/
in‑Step/2.0/License IV. If this section does not yet exist, you will need to create it yourself. The same key
can be entered under HKEY_LOCAL_MACHINE. This is a good idea for whenever you can’t be sure which users will
be working at a certain computer. The license configuration is read out of HKEY_LOCAL_MACHINE by default. If
no license can be activated there, then the search continues under HKEY_CURRENT_USER. The license configuration for the client licenses which are managed in in‑Step Server can then be made under /Software/microTOOL GmbH/in-Step/2.0/Client Access License IV.
The following settings can then be made:
AutomaticRescan=n
This setting determines whether the network should automatically be searched for a server with a license. If the
server that was being used is not available at the moment, it will overwrite the settings once it has found another
server with a valid license. This also occurs if it doesn’t find a server with a valid license. If you deactivate the automatic search, your old settings will be kept. The automatic search should always inactivate under
HKEY_LOCAL_MACHINE.
13
Administrator Manual
The following values are possible for n:
0
1
Deactivate the automatic search; the existing server entries are processed.
Automatic search for a server with a license, which will write over the existing settings, if applicable.
The standard setting is [1].
RemoteHardlock=n
This setting lets you determine whether a hardlock that is available in the network should be used, or if a license
server should be searched for.
0
1
Licensing occurs via local hardlock.
Licensing can only occur via license server. Any previously available hardlocks are ignored.
The standard setting is [1].
LocalHardlock=n
This setting lets you determine whether a locally available hard lock should be used or if a search should be initiated for a license server in the network. If this entry is missing (or if nothing has been entered for the value n),
the client will first look for a hardlock installed on the client computer; if no such hardlock can be found and the
segment [License IV] doesn't have any valid server entries, a network-broadcast is initiated, to look for connection
possibilities to a license server. The following values are valid for n:
0
1
Licensing occurs only via a license server. Any previously available local hardlocks are ignored, if applicable.
Licensing can occur via the local hardlock.
The standard setting is [1].
BroadcastTimeout=n
With BroadcastTimeout you set the time (in seconds) that in‑Step waits for an answer from a License Server
present in the network. This value is preset at 5. You can increase the value if your network has heavy traffic and/
or long response times. Please remember that the waiting time entered here is used for each protocol for the client
computer: if the client supports the TCP and SPX protocols, for example, the value n = 5 yields a waiting time of
10 seconds (5 seconds multiplied by 2 protocols).
After the broadcast has been executed, the server answers received are then entered into the initialization file. The
first entry in this way has a value of n. This stands for the number of possible connections, calculated from the
number of servers that reacted to the broadcast and also the number of protocols supported by these servers.
14
Administrator Manual
ServerCount=n
For each supported protocol for each server found, 3 further entries are made. These entries describe the connection type, and have the following structure:
Server_n_NetProtocol=ProtocolName
Server_n_Name=ServerName
Server_n_Address=Address
where "_n_" refers to the number of the respective server, that is "_1_", "_2_" etc. The possible values for n are:
ProtocolNameNP
SPX II
TCP
ServerName
Windows name of the computer on which the License Server software runs
Address
The structure of the values depends on the protocol used:
NP:
SPX:
TCP:
\\ServerName\pipe\PipeName
In which ServerName is the Windows name of the server, pipe a
constant string, and PipeName the name of the pipe to be used,
which is installed on the server. The default value for PipeName is
"mtLicense" and can be changed as necessary (see chap. 4.2).
nnnnnnnn-xxxxxxxxxxxx,
In which "nnnnnnnn" gives the hexadecimal
network address and "xxxxxxxxxxxx" the
hexadecimal IPX node address.
IP address in V4 format (e.g. "111.111.111.11"), V6, DNS, hosts
Hint: if you use the SPX protocol, you can enter the command line "ipxroute servers" in Windows NT to get the
server addresses available in the network. In other environments, please use the appropriate command line here.
Tip: if you created or changed what you entered for an in‑Step client, you can export the changed part structure of
the registry file (menu command Registry/Export Registry File in the Windows Registry Editor). Afterwards, you
can import this part structure to all of the other clients simply by double clicking or with the command Registry/
Import Registry File.
Please note: the server page Opportunistic Locking in the network must be deactivated in order for in‑Step to run
unimpeded.
For an NT server, this means the value of the following key in the Windows registration file must exist, must contain
the DWORD value EnableOplocks and must be set to 0: HKEY_Local_Machine\System\CurrentControlSet\Services\LanmanServer\Parameters.
15
Administrator Manual
Beginning with version 2.0, in order to use a Unix / Linux computer with Samba as your repository server, you must
have the following entries:
blocking locks = no
oplocks = no
in the Samba configuration file /etc/ smb.conf ([Global] section).
Using a Client Access License
A client access license is a special form of floating license for in‑Step where the clients get their licenses from in‑Step
Server. In order to be able to use a client access license, you first have to install in‑Step Server. If a user has logged
on to a server, they can only use the license he or she provided earlier. Access to licenses which are provided locally
is then not used.
16
Administrator Manual
Automatic Software Update of in-Step (Clients)
in‑Step automatically checks if an updated version of the tool has been made available by microTOOL as a standard.
If you did not install in‑Step using a control file (see above), which contained another path for automatic updates,
in‑Step checks the preset address http://instep.microTOOL.de for newer product versions. An update can, however,
also be placed on a LAN, if you prefer.
There are several possibilities to activate the automatic software update of in‑Step Clients:
Manual Configuration in in-Step
In order to edit the current settings for the software update at the individual in‑Step workstations, just execute the
function Tools/Options located in in‑Step’s main menu.
On the tab in‑Step Software Update, you can set up in‑Step to check for a newer version of the software on your
local network instead of in the Internet. You can enter the path to the directory with the update directly or click the
button [...] to browse for the appropriate folder. In addition, you can set in‑Step to look for an update every time
the program is started, only at the first start of the day or to never check for an update. Then when you start the
tool on one of the clients, in‑Step searches for an update at the location you specified in the LAN as frequently as
you defined.
`` Please note: all of the in‑Step clients need to have the same version in order to work on a common
system. We definitely recommend using a control file when you install the software on to several
clients (see above). Otherwise, you will have to select the same the settings as every workstation
for the automatic update manually. Like this, you avoid any problems which occur from working
with several different versions of in‑Step at the same time.
The user will need to have the rights in the specified directory to Read and Execute in order to check for updates
and install the software.
To recognize that the specified path or internet address are valid for updating the software, the file inStepUpdate.xml must be found in this directory.
17
Administrator Manual
Configuration in the Windows Registry Database
The path or internet address used for updating is stored in the Windows Registry Database under the key HKEY_
LOCAL_MACHINE\SOFTWARE\microTOOL GmbH\in-Step\2.0 in the string „CheckVersionPath“. In
order to change this value the user needs at least the rights of a main user.
The configuration for searching for a current version is user-specific and is therefore stored under the key the
HKEY_CURRENT_USER\Software\microTOOL GmbH\in-Step\2.0 in the string „CheckVersion“.
You can enter both of the values manually according to each user or configure them automatically by using AutoStart.bat. In order to pick the second option the user must have at least the rights of a main user.
Configuration During the Installation
As mentioned in “Installing in‑Step with a Control File”, you can set the values of CheckVersion and CheckVersionPath during the installation with the help of the variables CHECKVERSION and PATH.
Setting up the Update Path for the Automatic Software Update
As described in setting up the software update manually, inStepUpdate.xml must be located in the folder selected for updating the software.
If the automatic software update is activated, in‑Step searches for inStepUpdate.xml in the update folder at
start up. The version number is readout and then compared with that of the already installed version of in‑Step.
If the value in the XML file is higher than the currently installed version, in‑Step will suggest an update.
In order for the automatic software update to be carried out, the new in‑Step installation file must also be located
in the update folder.
`` Important: Don’t rename the installation file. During the installation process, in‑Step will check
to see which editions are already installed on the user’s workstation. After an edition has been
detected, in‑Step will then check in the installation directory to see if there is also an appropriate
installation file for it. If it’s not located, the automatic software update will not proceed.
Controlling the Updating Process
Apart from the standard process described above, you can also use the following options to control the updating
process:
Begin Installation with a Control File
You can store an additional control file in the update folder. This file must end in “ini”. If the update folder contains an ini file, the installation will prefer to use it when starting up. Of course, without an ini file, the regular installation file will be used.
Please note: If there are more than one ini files in the folder, this mechanism will not work.
18
Administrator Manual
Installing Using a Link to the Installation File
You can also create a link to the installation file in the update folder. This link must have the same name as the
installation file.
If in‑Step finds a link with the name of the installation file during the update process, this file will be preferably
used.
As described in the paragraph „Installing in‑Step with a Control File“, a control file will only be considered if you
extend the link using the switch /M. Additionally, you can also begin the installation in silent mode by using the
switch /S.
Installing Using a Link to the Batch File
The link in the update folder is not compelled to refer to the installation file. Alternatively, the link can refer to a
batch file. The only thing to take notice of is the name of the link: In order for in‑Step to recognize it as a valid update file, the link must share the same name as the batch file.
The installation can be started in the batch file with the relevant switches. However, there are also a few other options before the installation begins, for instance setting up a message to be shown before the installation begins.
Updating in‑Step Server can be done with ease. To do this, you will need to open in‑Step Server’s configuration settings.
19
Administrator Manual
Automatic Uninstall
To unistall in silent mode you would carry out the following calls in a batch file:
General:
<in-Step Installation Directory>\Unwise.exe /S <in-Step Installation Directory
>\Install.log
It’s especially important to include the switch /S directly after Unwise.exe and to enter the path of Install.
log afterwards. If not, the setting will not be acknowledged.
The Registry Database query (to the in‑Step installation directory) and the subsequent calls in the batch file could look
something like this:
rem Uninstall - begin
set regkey=HKEY_LOCAL_MACHINE\SOFTWARE\microTOOL GmbH\in-Step\2.0
set keyname=AppPath
::Create temporary directory
if not exist %temp%\isUpdate md %temp%\isUpdate
::Create registration key (required if it doesn’t exist)
> “%temp%\isUpdate\tmp0.reg” ECHO REGEDIT4
>>”%temp%\isUpdate\tmp0.reg” ECHO.
>>”%temp%\isUpdate\tmp0.reg” ECHO [%regkey%]
START /WAIT REGEDIT /S “%temp%\isUpdate\tmp0.reg”
Del %temp%\isUpdate\tmp0.reg
::Get registration key
Start /Wait %windir%\Regedit /E %temp%\isUpdate\tmp1.reg “%regkey%”
Find “%keyname%” < %temp%\isUpdate\tmp1.reg | Find /V “” >”%temp%\isUpdate\
nvcpath.txt”
Del %temp%\isUpdate\tmp1.reg
FOR /F “tokens=* delims==” %%A IN (‘TYPE %temp%\isUpdate\nvcpath.txt’) DO SET
rootkey=%%A
FOR /F “tokens=1* delims==” %%A IN (‘ECHO.%rootkey%’) DO CALL :Parse01 %%A %%B
:Parse01
:: %1 gives the key, %2 gives its value
SET instep=%2
:: Replace double quotes and double backslash\\
SET instep=%instep:”=%
SET instep=%instep:\\=\%
“%instep%\Unwise.exe” /S “%instep%\Install.log”
rem Uninstall – end
20
Administrator Manual
A temporary .reg file is created in order to get the relevant key. The result – also temporary – is stored in a text file
where its content will be evaluated. The directory is stored in the variable “instep”. The files will be deleted and
then the uninstalling process will begin.
Alternatively, the “possible” installation directories can be “tested” in the batch file:
rem Uninstall - begin
‘C:\Program Files\microTOOL\in-Step\Unwise.exe’
microTOOL\in-Step\Install.log’
‘D:\Program Files\microTOOL\in-Step\Unwise.exe’
microTOOL\in-Step\Install.log’
‘C:\Program Files\microTOOL\in-Step\Unwise.exe’
microTOOL\in-Step\Install.log’
‘D:\Program Files\microTOOL\in-Step\Unwise.exe’
microTOOL\in-Step\Install.log’
rem Uninstall - end
/S ‘C:\Program Files\
/S ‘D:\Program Files\
/S ‘C:\Program Files\
/S ‘D:\Program Files\
In both cases the installation process can be subsequently carried out in silent mode. The uninstalling routine is only
visible for users who don’t have installed in‑Step in one of the used directories (2nd option), or if access to the registry database fails. This is because in this case it will not be uninstalled.
21
Administrator Manual
in‑Step and Oracle
If you want to use in‑Step together with Oracle, you have to install in‑Step Server for Oracle. Direct access via
in‑Step Clients to an Oracle database is not possible.
System Requirements
The in‑Step Server can run on the same computer as the one containing the Oracle database. If the in‑Step Server
is installed at a different location, the Oracle Client Software must be installed there. So that the in‑Step Server can
access Oracle, there must be an OracleNet-connection. The supported Oracle-Versions are Oracle 9i, Oracle 10g,
and Oracle 10g Express Edition (XE) and Oracle11g.
The program isOracleConnectionTest.exe in the in‑Step Server installation directory lets you check, whether in‑Step Server can be combined with Oracle. Enter the database ID and an Oracle user with password. If the
connection is successful, you will receive the respective message, if not, you receive an Oracle error message.
A Few Notes on Configuring Oracle
Before you go on to learn in the next section how to publish systems via in‑Step Server for Oracle, here are a few
notes on what you have to pay attention to during configuration of your Oracle installation.
-
-
-
-
-
First it is important to remember the SYS password for the Oracle database. You will need it when creating
a new system via in-Step Server Konfiguration.
It is very important to choose a font (NLS_CHARACTERSET) that supports the usual characters used in Windows and in‑Step forms (with layout). If the chosen font does not support these characters, then they cannot be stored later on in the database and arte displayed as upside-down question marks. We recommend
using the font WE8MSWIN1252. If this font is not installed by default, you have to assign when creating a
user-defined database. There are known problems with WE8ISO8859P15. Do not use this font.
The Oracle Client installed on the in‑Step Server for Oracle computer has to be a 32 bit client. Because
in‑Step Server for Oracle is a 32 bit application.
Also, the NLS_LANG parameter has to be set correctly on the Oracle client computer. That means, under
Windows, a system variable NLS_LANG has to be defined with the value AMERICAN_GERMANY.WE8MSWIN1252 or GERMAN_GERMANY.WE8MSWIN125. TZhis setting can be made on some operating systems via the registry. The entry NLS_LANG can be found under e.g. HKEY_LOCAL_MACHINE\SOFTWARE\
Wow6432Node\ORACLE\KEY_OraClient11g_home1. Experience shows that an entry in the registry is not
enough. The environment variable has to be set as well for that reason.
If the NSL_LANG parameter is not set correctly, it may happen, that special characters and umlauts are
replaced by upside-down question marks.
There should only be one Oracle client installed on the Oracle client computer. If multiple clients are needed anyway, the PATH ewnvironment variable should be adapted, so that only one client path is specified
there. If that is not the case, accessing the OCIWrapper.dll is may not be possible. We also recommend setting the path for accessing the Oracle client up front in the PATH environment variables.
Accessing Oracle can be tested with the program isOracleConnectionTest.exe that is installed
with in‑Step Server for Oracle.
It is located in installation directory of in‑Step Server for Oracle.
22
Administrator Manual
How to Configure in-Step Server
in-Step Server and in-Step Server for Oracle are additional components in the in‑Step editions. They enable you
to plan and execute IT projects via TCP/IP over the Internet/intranet. in-Step Server for Oracle also allows you to
manage project results in an Oracle database. in‑Step Server and in‑Step Server for Oracle come with a service for
sending e-mail notifications. In addition, in‑Step Server for Oracle also comes with two index services for the full
text search based on Apache Lucene .NET.
After installing an in‑Step Server, you will find the heading in‑Step Server Configuration in the microTOOL
in‑Step Server program group. Use it to open a dialog where you can specify the server’s configuration in detail.
The dialog is made up of five tabs.
Service
The Service tab shows the server’s current status: if the button Start is active, the server is not running. If the Stop
button is active, it means the server is currently running. If the server is running and you change its configuration,
you will need to restart the server using the button Restart in order for the changes to take effect.
23
Administrator Manual
Configuration
You will find the port for communication between server and clients on the tab Configuration. By default,
in‑Step uses the port 64711. To change settings, click Edit.
You can change the port, but you will need to do so for all of the clients and other servers as well. If you use a
firewall, you will need to activate the selected port there, as well. By the way, in‑Step uses as proprietary protocol.
Security is always ensured through the use of 128-bit encryption and the user identification (login and password).
The number of simultaneous connections you can have depends on your network resources. You can influence the
time it takes for the server to answer requests from the clients via the number of threads. If it’s taking too long, you
should reduce the number of threads.
You can also set the language of the configuration dialogs. Select the desired language from the dropdown-list.
The selected setting will become active the next time you call up the in‑Step Server Configuration.
To keep a log of every time a user logs on or off, you can create two log files: the start and end times of the connections between clients and server are recorded under in‑Step Service. In addition, the systems, which the clients
logged on to are listed under Server. You can also create a logfile under Notification Service, which protocols errors
and information from mail exchanges.
You can enter the name of the server under Server Name. That will be the name in‑Step uses for generating web
links. This entry is required whenever you specified automated actions that contain a link to objects, which are
provided by the in‑Step Web Client.
24
Administrator Manual
Published Systems
The tab Published Systems displays the names of the systems managed by the server. If you have installed in‑Step
Server for Oracle, you not only can make available those systems managed by the in-Step system (type: isf) file but
also the systems located in the Oracle database (type: Oracle).
Name, number of users and visibility can be edited right away: just double-click the corresponding column.
Before a new system can be accessed over the server, it needs to be registered on the list of available systems. To
do this, click the button New on the toolbar.
First you must choose whether you want to open an existing system or a new one. Then click Next.
Publishing an Existing System...
Once you have installed in‑Step Server for Oracle, you decide whether you want to make available an in-Step system file, meaning a file with the extension *.isf, or one in an Oracle scheme. When using in‑Step Server, only systems located in in-Step system files can be made available.
25
Administrator Manual
… in in-Step System File
In the follow-up dialog, enter name and path of the system or click the button [...], to select an existing system.
Next, you can enter a name for the system to be made available by in‑Step Server. By default, in‑Step suggests a
system name. If you click Next, you can make entries regarding visibility and number of users.
If you select Finish right away, the default entries (Visible = yes and Max. number of Users = unlimited) apply.
Please note. Systems located in in‑Step system files should normally be made available locally, i.e. on the computer
where the server is installed. If an in‑Step system is located somewhere else in the network, the path must be selected and a user must be assigned with access rights to the system. To do this, first open your Windows control panel.
Select the folder Administrative Tools followed by the heading Services. Next, call the properties of the microTOOL
in‑Step Server. On the tab Log On, the option This Account must be selected, a user must be assigned and a
password must be entered. Take on these settings for the e-mail notification service too.
26
Administrator Manual
… in Oracle Scheme
Under Database ID, you first enter the name of the Oracle database, where the new system (= Oracle Scheme)
will be managed.
Under User, enter the name of the in‑Step Server logging onto this database. The user name corresponds to the
name of the system schema in Oracle. Then enter the login Password used for Oracle. No products are stored
in the Oracle database. Under Directory you can specify the storage location for all binary files, not accessible to
outside parties. Should several in‑Step servers access one Oracle database, they always have to enter the same directory.
As a next step, enter the name of the system in‑Step Server provides. By default, in‑Step suggests the system name.
If you click Next, you can make entries regarding visibility and number of users. If you select Finish right away, the
default entries (Visible = yes and Max. number of Users = unlimited) apply.
27
Administrator Manual
Creating and Publishing a System
Once you have installed in‑Step Server for Oracle, you decide whether you want to make available an in-Step system file, meaning a file with the extension *.isf, or one in an Oracle scheme. With in‑Step Server, only systems
located in the in-Step system file can be made available.
… in-Step System File
Enter a name and path for the system in the follow – up dialog or click the button [...] to locate a suitable storage
place.
Is there a suitable system template already? You can define the system template to be used for the system in the
follow-up dialog or you can mark the option Create Empty System.
As a next step, enter the name of the system in‑Step Server provides. By default, in‑Step suggests the system name.
If you click Next, you can make entries regarding visibility and number of users. If you select Finish right away, the
default entries (Visible = yes and Max. number of Users = unlimited) apply.
28
Administrator Manual
... in Oracle Schema
Under Database ID, you should first enter the name of the Oracle database, where the new system (= Oracle
Scheme) should be created.
Log on to this database as Oracle administrator and enter your Password under Oracle. The entered User must
have the right to create a new scheme and tablespaces. With Log On as, you can specify the user group to which
the Oracle user belongs.
As a second step, specify the name of the new schema under which the system should be managed. It corresponds
to the name of the User, entered by in‑Step Server when logging on to the database. Choose a Password for the
logon under Oracle and verify it by re-entering under Confirm Password. If necessary, select a directory for creating tablespaces. If you do not enter a Tablespace Directory, Oracle will use the default one.
No products are stored in the Oracle database. Under Directory, you can specify the storage location for all binary
files, not accessible to outside parties. Should several in‑Step servers access one Oracle database, they always have
to enter the same directory.
29
Administrator Manual
Is there a suitable system template already? You can define the system template to be used for the system in the
follow-up dialog or you can mark the option Create Empty System.
As a next step, enter the name of the system in‑Step Server provides. By default, in‑Step suggests the system name.
If you click Next, you can make entries regarding visibility and number of users. If you select Finish right away, the
default entries (Visible = yes and Max. number of Users = unlimited) apply.
30
Administrator Manual
More Options Featured on the Tab Published Systems
The buttons on the tab Published Systems also offer more functions:
If you have installed in‑Step Server for Oracle and you select an available Oracle system, the button Properties is
activated. It opens a dialog where you can change the directory and/or the password for the in‑Step Server login.
This is necessary, for example, if the directory in the file system was moved or the password was changed in Oracle.
After a warning, the button Remove deletes the selected system from the list of the server’s available systems.
The functions summarized under System offer you the following options:
Show logged-in users opens a window where you can identify which users are working on the current system.
You can update the display by clicking the symbol at the foot of the window.
Import project or organizational unit lets you populate a system with data. Click the button to start the in‑Step
Import Wizard. You will find more information on the import and export of results in the Help section. Just press F1
key.
With Configure e-mail notifications you can determine when a user should be notified about the contents of a
view as default. You can determine which views a user should be informed about in in‑Step, under the user properties of the user concerned. The command opens a dialog where you must authorize yourself as a system administrator with your login and password.
31
Administrator Manual
Enter the time at which when notifications should occur under time. If you check the box Disable notifications,
you may not request that users in the system receive notifications regarding view contents.
The command Reorganize data directory enables you to re-organize the directory in which the products of the
selected system are saved as binary data. Here, the files are distributed across several sub-directories, which can
then be further divided into sub-directories as required. Reorganize data directory opens a login dialog where
you need to login to the selected system as the System administrator. You can then define the directory depth for
re-organizing the data.
If the data directory contains more than 30,000 files, a directory depth of 1 is recommended; for 80,000 files or
more, select the value 2. A directory depth of 3 is only recommended if the data directory contains more than
1,000,000 files. After selecting the appropriate value, check the box Reorganize data directory now and click
OK. Please note, this process may last anywhere between a few minutes and a few hours, depending on the
amount of data to be reorganized and the directory depth selected. It cannot be interrupted.
Under Configure system indexing you can determine whether or not the selected system should be indexed for
the full text search. A dialog will open where you’ll sign in as System Administrator, using your login and password.
Only after being authorized as the system administrator can you enter the settings for indexing the system.
Please note: This function is only available for Oracle systems.
32
Administrator Manual
If the checkbox Activate indexing for this system is selected, a digital Index can be created for versioned texts in
the system, allowing for a quick and easy search for each word or word part and their location in the text(s). Under
Login data for indexing service you’ll specify the user account through which the index service can login to the
system. This user must have access to the System Administrator Rights. If the index service isn’t running on the
same computer as in‑Step Server, select Index service is running on a remote server, and enter the location of
the index/ search service in the appropriate fields. Should you change the location, a new index must then be created. A corresponding message will appear when you close the dialog by clicking OK.
Activate system indexing for the selected system with Rebuild system index. If you click Yes in following message, you won’t be able to stop the indexing process.
`` Warning: If a system is being indexed for the first time, or if a new index must be created because
the index service is now operating on a different server, it could take several hours for the index
to be created. It is therefore recommended to let the indexing process run over night or over the
weekend, especially when dealing with larger systems.
Tips for Fulltext Search and IFilter
in‑Step full text search based on Lucene .NET searches through all texts versioned in the product library. This includes everything from MS Office documents and PDFs to HTML pages and in‑Step forms. In order for a user to be
able to access more than just simple text files, a compatible IFilter must be installed on the same server as the index
service. This ensures that the content of the documents can be collected and analyzed without concern for the
layout or document structure.
Several applications, such as Microsoft Office, already come equipped with compatible IFilters. However, in some
cases you may have to download them from the internet.
33
Administrator Manual
Where can you find compatible IFilters? What are some problems that might occur?
Adobe PDF:
32Bit: included in Adobe Acrobat and Acrobat Reader installation; cannot be individually installed.
64Bit: http://www.adobe.com/support/downloads/detail.jsp?ftpID=4025
Microsoft Office:
Office 2010:
http://www.microsoft.com/downloads/details.aspx?FamilyID=5cd4dcd7-d3e6-4970
75e-aba93459fbee
Office 2007:http://www.microsoft.com/downloads/details.aspx?FamilyId=60C92A37-719C-4077
B5C6-CAC34F4227CC&displaylang=en
Office 2003:
can be installed together with MS Office. You’ll find more specific instructions here:
http://intranomic.com/download/office/Office2003.pdf
Text Files:
The IFilter is included in Windows, but limited to 25MB. If necessary, it can be adapted in the Windows Registry:
http://support.microsoft.com/?scid=kb%3Ben-us%3B318747&x=14&y=16
OpenOffice:
There are a few issues with the IFilters currently available with OpenOffice. Other free IFilters for OpenOffice intended for commercial use are currently not available.
A useful tool to see which IFilters have been installed is the IFilterExplorer:
You can download it here:
http://www.citeknet.com/Products/IFilters/IFilterExplorer/tabid/62/Default.aspx
At the CiteKnet website there are several more IFilters available for download:
http://www.citeknet.com/Downloads/tabid/53/Default.aspx
Now back to the menu System: Perform system upgrade still needs to be described. Published Systems on the
tab are only available if the client’s version number matches the version number of the current in‑Step system and a
valid path has been entered. If No appears in the list Available, it means that either the path entered to the system
is incorrect or the version is no longer valid. This can happen if the in‑Step Server has been upgraded, for example.
Systems, which were managed using an older version of in‑Step Server can easily be updated. Just select these
systems in the dialog and click the Perform system upgrade under System. All of the systems are then updated
automatically.
34
Administrator Manual
E-Mails
Next, there’s the tab E-Mail. Here you can configure the settings for the case when you want an e-mail to be sent
automatically when a transition in a product or activity’s state occurs, as well as notifications from users. You can
read what rights are required for the notification service in the following section. You will need to determine the
SMTP server for outgoing messages under Outgoing Mail Server. If this server requires you log in before you can
send mail, select the check box Server requires authentication and enter your access information under Account Name and Password. Enter the sender data under Name and E-Mail.
Please also keep in mind that a valid e-mail address must be entered under in‑Step in the Properties dialog of the
recipient.
Software Update
That just leaves the tab Software Update: you can enter a path for updating in‑Step Server here. You can check if
a newer version is available by clicking the button Check for New Version.
35
Administrator Manual
Distributing Rights for in-Step Server Services
Services such as the in‑Step Server and the e-mail notification service require certain rights in order to work. By
default the in‑Step Server and the notification service use the local system account. If you would like to launch the
service under a different account name, you are required to issue the following rights. If you let the in‑Step Server
and the notification service run under the system account, no further settings will be required. This account has
universal access to the system.
The following rights must be issued for the non-system account
-
-
-
-
Read permission in the installation directory
By default: C:\Program Files\microTOOL\in-Step
Read permission in the directory for the common data
By default: C:\Program Files\Common Files\microTOOL
Write permission on the systems provided by the in‑Step Server
Read permission on HKEY_LOCAL_MACHINE\SOFTWARE\microTOOL GmbH\in-Step Server\2.0
Without these rights, access to the configuration and the provided systems is not possible. The message:
Error Message Server:“ Method ‘~’ of object ‘~’ failed” will be shown or rather, the list of
provided systems remains empty.
The in‑Step Server service also requires the following rights:
-
-
Read permission on: HKEY_LOCAL_MACHINE\SYSTEM\CurrentControlSet\Services\isService\Parameters
Without these rights, the configuration cannot be read and no logfile is created.
The right to start, activate and connect to isServer.Session
Without the rights listed, the component isServer.Session cannot be instanced and the instance
created cannot be accessed. You can change the security settings with DCOMCNFG.EXE. Administrator
rights are required for this program.
The Notification Service also requires the following right:
-
The right to start, activate and connect to isLogon.Logon
Without the rights listed, the component isLogon.Logon cannot be instanced and the instance created
cannot be accessed. You can change the security settings with DCOMCNFG.EXE. Administrator rights are
required for this program.
36
Administrator Manual
How an in-Step System is Represented in the File System
An in‑Step system is basically composed of a file with the extension isf. As a rule, you will find a
folder with the name Systemname.data in the same directory. This folder contains binary data
which cannot be accessed directly. This folder can only be missing if there are no documents in
the system. When you work with in‑Step, a folder with the name Systemname.temp is created
for saving temporary files. There is usually also another folder, e.g. Systemname.html, in the
same directory where the help texts are located. If you would like to move an in‑Step system to another directory,
you will definitely need to move both the system file and the folder Systemname.data to the same target directory.
When a user takes advantage of the possibility of sending instant messages with in‑Step, the subdirectory ShortMessages is created in the folder Systemname.data.
Use Rights in the File System
If an in‑Step system is accessed by clients from a server in a LAN, we recommend assigning the following use rights:
for the folder where the in‑Step system is located, Read (R) and Execute (X) rights should be given. For the files in
the system, Read (R) and Write (W) access should be granted. Like this, you ensure that no one is able to delete
files from the directory where the system is located.
For the folder Systemname.data, we recommend granting Read (R), Write (W) and Execute (X) rights. This enables
users to create new files in the folder from their workstations. We recommend the rights Read (R) and Delete (D)
for the files in the folder Systemname.data. These use rights allow users to delete older versions of files from there
workstations. If only Read (R) is assigned, the binary data would remain even if older versions of files are deleted.
This would mean that only a system administrator would be able to eliminate unnecessary files via the in‑Step System Check. We will describe this tool’s operation in the next section.
All of the users need to have read and write authorization to the temporary files (Systemname.temp), otherwise the
folder becomes unnecessarily full. All rights to delete should be granted to the directory Systemname.data/ShortMessages. Please note that this subfolder is only created once the first instant message has been sent.
Finally, please note the following: the first time you access a system, in‑Step automatically generates a log file in
the folder Systemname.data. This file always has the name inStep.log. All of the actions performed on the
corresponding system are recorded in this file. In case something goes wrong, you can always trace who did what
when. Errors are indicated by an “E” in the log file, whereas a successful action has an “I”. Before the actions can
be recorded, all of the users need to be granted read and write access to the log file. In other words, Read (R) und
Write (W) need to be set for the file inStep.log in the LAN.
37
Administrator Manual
How in-Step and Oracle Work Together
If you want to use in‑Step together with Oracle, you have to install in‑Step Server for Oracle. Direct access via
in‑Step Clients to an Oracle database is not possible.
Featuring in‑Step Systems under Oracle
An in‑Step-System corresponds to an Oracle Schema. The in‑Step Server logs on as a user under the name of the
schema.
Only in‑Step administrative data is stored in Oracle. The project results, meaning the documents and files which
were created during the course of the project are stored as consolidated files in the file system – similar to the way
it is done with a system featured in the in‑Step system files (*.isf). You can create the directory individually for each
system when configuring in‑Step Server for Oracle.
Upgrading older Systems (Version 3.6 And Earlier)
If you are using an older version of in‑Step, you will have to export an XML export file or conduct an XML backup,
before the existing systems can be run via in‑Step Server for Oracle.
This is what you have to do prior to uninstalling the old in‑Step version:
- With the tool „in‑Step System Backup“ you create a backup of the affected systems. You can find the
application in the program files of in‑Step in the group Tools, where a double click on its symbol will start
the application.
- Before creating the backup with Start, deactivate the option Copy File Directory.
System Backup creates a system export file in the target directory you chose (Systemname001.xml_system).
- The existing file directory (<Systemname>.data) can be used as before! If necessary, copy or move this
directory to the server intended for replacement by Oracle.
After installing in‑Step Server for Oracle you only have to upgrade the system export file so that the data can be
further processed with the current version:
- To do this, start the tool “in‑Step System Upgrade“ in the program files of in‑Step.
- After a successful upgrade, this xml_system file can be used as a system template for creating a system
under Oracle-the same way as was described in the section How to Configure in‑Step Server.
Creating Systems
An in‑Step system schema can be created easily with the tool “in-Step Server Configuration“. The individual options are described in detail in the section How to Configure in‑Step Server.
To create the system schema, use the SQL script located in the installation directory of in‑Step Server in the folder \
OracleScripts. It is called in-Step Oracle Script.sql. This script contains the definitions of all the database objects necessary for an in‑Step system. Additionally, when running this script, two tablespaces are created.
One for files, the other for the indices.
You can also run this script manually with the corresponding Oracle tool. Please note the added commentary notes.
38
Administrator Manual
`` Caution: the original script must not be changed!
Just like in the section How to Configure in‑Step Server, a manually created system must then be published via
the tool “in-Step Server Configuration“.
Creating and Restoring Backups
`` To plan and realize backups, keep in mind that besides the Oracle data files, you must also save
the in‑Step-data directory.
As described above, XML backups can be created with the help of the tool “in‑Step System Backup“. You can
find more detailed information on how to do this in the section How to Create a Backup.
Before you introduce the XML backup, you have to delete the old scheme including the two tablespaces for data
and indices under Oracle. An example of a batch file can be found below. Only then can you make the system you
have saved available under the same name on in‑Step Server for Oracle.
Oracle itself offers two backup options:
-
-
Backup with the Oracle Recovery Manager. For this purpose the XE version provides Backup Database
and Overwrite Database, i.e. similarly configured tasks.
Script-guided backup using the Oracle import/export tool.
We recommend that you always export or import on the Oracle server and not on the client.
Here’s an example for a batch file where you can create a backup with the help of scripts:
echo Exporting Oracle scheme and tablespaces
expdp userid='sys/<Password>@<Database> as sysdba' dumpfile=<Export File>
schemas=<Schema/User>
echo Saving in-Step data directory
xcopy <Data Path> <Backup Path> /Y /E /Q
Export file is only for specifying the file name. The following folder is used as the path for exporting and importing:
<Oracle Installation Directory>\Admin\<Database>\dpdump
The export file will be created there automatically. Files which you would like to import have to be stored there.
39
Administrator Manual
Older versions of Oracle do not support the expdp command. If you are using Oracle 9 or older to create a backup, substitute the expdp command with the following command:
exp userid='sys/<Password>@<Database> as sysdba' file=<Export Path>
owner=<User>
`` Caution: Backups made under Oracle 11.2 using the exp command cannot be restored.
The file for restoring the backup may look somewhat like the following:
echo Deleting in-Step data directory
rmdir /S /Q <Data Path>
echo Getting in-Step data directory
xcopy <Backup Path> <Data Path> /Y /E /Q
echo Deleting Oracle scheme and tablespaces
sqlplus -S "sys/<Password>@<Database> as sysdba" @DeleteOracleUser.sql
echo Creating Oracle scheme and tablespaces
sqlplus -S "sys/<Password>@<Database> as sysdba" @CreateOracleUser.sql
echo Importing database
impdp userid='sys/<Password>@<Database> as sysdba' dumpfile=<Export File>
schemas =<Schema/User>
Older versions of Oracle do not support the impdp command. If you are using Oracle 9 or older to restore a backup, substitute the impdp command with the following command:
imp userid='sys/<Password>@<Database> as sysdba' file=<Export File>
fromuser=<User> touser=<User>
Please keep in mind that the same name has to be entered for fromuser and touser.
40
Administrator Manual
There is an SQL script for either deleting or creating the Oracle system scheme.
DeleteOracleUser.sql:
DROP USER <User> cascade;
drop tablespace <User>_DATA including contents and data files cascade
constraints;
drop tablespace <User>_INDEX including contents and data files cascade
constraints;
CreateOracleUser.sql:
CREATE USER "<User>" PROFILE "DEFAULT" IDENTIFIED BY "<Password>"
TEMPORARY TABLESPACE "TEMP" ACCOUNT UNLOCK;
GRANT UNLIMITED TABLESPACE TO "<User>";
GRANT "CONNECT" TO "<User>";
GRANT "RESOURCE" TO "<User>";
CREATE TABLESPACE "<User>_DATA"
DATAFILE '<Tablespace Path>\<User>_DATA.DBF' SIZE 126 M AUTOEXTEND ON NEXT
20 M MAXSIZE UNLIMITED
LOGGING
ONLINE
PERMANENT
EXTENT MANAGEMENT LOCAL UNIFORM;
CREATE TABLESPACE "<User>_INDEX"
DATAFILE '<Tablespace Path>\<User>_INDEX.DBF' SIZE 426 M AUTOEXTEND ON NEXT
20 M MAXSIZE UNLIMITED
LOGGING
ONLINE
PERMANENT
EXTENT MANAGEMENT LOCAL UNIFORM;
ALTER USER "<User>" DEFAULT TABLESPACE "<User>_DATA";
ALTER USER "<User>" QUOTA UNLIMITED ON "<User>_DATA";
ALTER USER "<User>" QUOTA UNLIMITED ON "<User>_INDEX";
By the way: This script is part of the file in-Step Oracle Tables Script.sql. It is located in the folder
\OracleScripts in the installation directory of your in‑Step Server for Oracle.
41
Administrator Manual
Tip for Configuring: Performance Improvement by Changing the Oracle Start Parameter
Even if your server has more memory, a standard Oracle installation only utilizes max. 1 GB RAM. The performance
for read operations can be improved by changing the Oracle start parameters.
Three parameters are relevant for this purpose:
sga_max_size = maximum size of the so-called System Global Area
db_cache_size = size of the caches for data and index blocks
memory_target = total RAM to be used by database instance
The following table will give you a first impression of how changing these parameters can influence the time it
takes to open views in in‑Step. We measured the time it took to open all of a user’s views.
This is how to change the start parameters in Oracle 11g:
Oracle uses a so-called SPFILE usually during start-up in which, besides the binary Oracle information, the configuration settings for using the Oracle instance resides. In addition, there are also so-called PFILEs in Oracle. Just like
SPFILEs, they contain configuration settings, but no binary Oracle information.
To find out, which file your Oracle instance utilizes, start SQLPlus and send the following query “SYS as SYSDBA“:
select value from v$parameter where name ='spfile';
To change the configuration settings the SPFILE has to be converted to a PFIL. The following command does the
trick. It also has to be executed as a SYSDBA:
create pfile='C:/mypfile.ora' from spfile;
The configuration settings can be adapted using any editor. Afterward, the PFILE has to be converted back to a
SPFILE. The following command does the trick. It also has to be executed as a SYSDBA:
create spfile from pfile='C:/mypfile.ora';
The changes take effect after restarting the Oracle service.
42
Administrator Manual
Tip for Configuring: Increase Maximum Number of Sessions/Processes
If the maximum number of sessions or processes which you have set for Oracle has been reached, then no further
users can log onto the system, because no connection can be made to the Oracle server.
Incease the number of max. sessions and processes in Oracle/Oracle XE in this manner:
Start SQLPlus on the server and log on to the database:
sqlplus sys/passwort@dbname as sysdba
Now you can have the max. number of sessions and processes displayed using the following commands:
show parameter sessions
show parameter processes
Use these commands to change the values:
alter system set processes=100 scope=spfle;
alter system set sessions=120 scope=spfile;
Then you have to restart Oracle for the changes to take effect:
43
Administrator Manual
Making in-Step available online
In order to make in‑Step available online, the computer must first be accessible from the outside. If the web client is
available, this is already disclosed (however only for port 80). You have to open port 64711 (or port 80 for the web
client) in all the firewalls between the in‑Step client and the server, or you have to make sure that in‑Step Server/
in‑Step are allowed to communicate via this port. Here it’s important to make sure that these ports are accessible
from the outside. All queries concerning these ports must be automatically rerouted to the relevant server.
In the in‑Step login dialog enter the name or IP address (followed by a colon and deviant port number if necessary)
under Location.
Example: Under http://in-Step.microTOOL.de/in-Step you’ll find one of our public web clients with a
tutorial you can use to try it out for yourself. You can also reach this system via a desktop client: Enter in-Step.microTOOL.de under Location.
If necessary, you can adjust the port in in‑Step Server Configuration. In this case you must declare the port on
the client. To do this you would either enter the port in addition to in-Step.microTOOL.de (in-Step.microTOOL.
de:64711) under Location, or adjust the value of “Port” in the Windows Registry Database by editing the key
“HKEY_LOCAL_MACHINE\SOFTWARE\microTOOL GmbH\in-Step\2.0”. (This is then applicable for all connections of this client to an in‑Step Server).
How to Check an in‑Step System
in‑Step includes the tool “in‑Step System Check” in its standard delivery package. This tool enables you to quickly
and easily check your system for physical and semantic errors. System Check generates the report file Systemname.txt into the directory of your choice and automatically corrects as many of the semantic errors as possible.
You will find the tool “in‑Step System Check” in the in‑Step or in‑Step Server program group. Double-click its symbol to start it. The following options are available:
The name and path of the system to be checked is displayed under the heading System. To check an Oracle
system, enter the name under which the system was published here. By default, in‑Step suggests the last system
edited. In addition, the last 10 systems you edited are offered in a dropdown list for easy selection. If the system
44
Administrator Manual
you’d like to back up is not offered for selection, click the button [...]. A dialog opens where you can browse for
the system of your choice. In the drop-down list User, you need to select the user name (login) under which you
are registered for the selected system. in‑Step automatically suggests the last user name entered. If you have set a
password in order to protect access to the selected system, please enter it in the field Password. If no password
has been defined, you do not need to enter anything in this field. You can also determine the extent of the system
check: select the check box Run Physical Check (only for isf files), if you want to physically check an isf system.
If you want to check your system for semantic errors which affect several projects, select Run System Specific
Checks. Select the check box Run Project Specific Checks for if the semantic check should be carried out for
individual projects. If you click the blue, underlined phrase All Projects and Organizational Units, you can limit the
check to individual projects or organizational units. A dialog will appear where you can select the elements to be
checked. Specify the name and path of the Report File which the test results will be saved to in the field Report.
in‑Step automatically suggests the current system directory with the name of the selected system. Click the button
[...] to determine another directory which the system will be saved to. Select the option Correct errors, if possible
if you would like semantic errors to be corrected automatically.
After you press Check, the System Check tests the system according to your settings and generates the report file.
Alternately, System Check can be executed command line oriented – for automatic jobs with the Windows Scheduler, for example. The command looks like this:
inStepCheck-system “<System>” -user <Username> -password “<Password>” -reportfile “<Report>” -winlogon
<Logintype> -checksystem <1I0> -checkprojects <1I0> -checkphysical <1I0> -checkonlyopenprojects <1I0> -project
<Project> -project
System and Report must be specified, but all other entries are optional. You can enter every user, listed in the system. The user does not need administrator rights and he/she need not be a member of the project team. If you do
not enter a User Name, the user account Administrator will automatically be used to sign on without a password.
If you do use a password, you must enter a user name beforehand. The password can be entered in plain text.– in
this case, we recommend you create a separate user for each in‑Step system when running a system check – or encrypted with the help of the provided tool isCryptPassword.exe. The encrypted password is generated in the
notepad and can be easily entered into command lines, or used for BATCH Jobs. To sign on in Windows, enter “1“
as the Login Type. In each check, 1 is Yes and 0 is No. The parameter project can be used repeatedly.
How to Create a Backup
in‑Step also includes the tool “in‑Step System Backup” in its standard delivery package. This tool enables you
to quickly and easily make a copy of your in‑Step system for safekeeping. System Backup exports a copy of the
in‑Step system to the directory of your choice in a system export file (Systemname001.xml_system). If applicable, the
export files will be numbered consecutively. You will find the tool “in‑Step System Backup” in in‑Step’s program
group. Double click its symbol to start it.
45
Administrator Manual
The following options are available:
Enter the name and path of the system to be copied under System. To check an Oracle system, enter the name
under which the system was published here. By default, in‑Step suggests the last system edited. In addition, the last
10 systems you edited are offered in a dropdown list for easy selection. If the system you’d like to back up is not
offered for selection, click the button [...]. A dialog opens where you can browse for the system of your choice. In
the drop-down list User, you need to select the user name (login) under which you are registered for the selected
system. in‑Step automatically suggests the last user name entered. If you have set a password in order to protect
access to the selected system, please enter it in the field Password. If no password has been defined, you do not
need to enter anything in this field.
You can decide if you’d like to use your in‑Step or your Windows login under Login. Would you like to make sure
that no one changes any data while you’re backing up a system? Just select the check box Open system exclusively to keep others from accessing the selected system for as long as you have it open.
Specify the path of the directory where the backup will be created in the field Backup Directory. in‑Step automatically suggests the current system directory with the name of the selected system. Click the button [...] to determine
another directory which the backup will be saved to. Select the option Copy Data Directory if you not only want
to back up the system’s repository structure but also the data places under configuration management. System
Backup then creates an additional directory Export_Filename.xml_system_data within the backup directory. When
moving or copying files this directory and its contents must always be kept together with the system export file.
Only then will you be able to reuse the exported data successfully. After pressing Start, the System Backup exports the system according to your settings and generates the system export file.
Alternately, System Backup can be executed command line oriented – for automatic jobs with the Windows
Scheduler, for example.
The call looks like this – for the case where the data directory is also copied: inStepBackup <System> <BackupDirectory> <1> <User> <Password>
Or if you would prefer not to include the data directory, use the following call: inStepBackup <System> <BackupDirectory> <0> <User> <Password>
The password can be entered in plain text, or encrypted with the help of the provided tool isCryptPassword.
exe.
Hint: please keep in mind that standard backup software cannot back up open files. For this reason, you should
always back up a system which contains open files with in‑Step.
46
Administrator Manual
Restoring a System
You restore an *. isf system that is not accessable via an in‑Step server as follows: click the button Other Systems
in in‑Step’s login dialog and Create in the following window. Give the created file a name, and select the option
Use system template in the dialog Create in‑Step System. In the resulting dialog Choose in‑Step System
Template, you can select an export file and initialize the system accordingly.
In order to restore an XML backup of a system, that is accessible via an in‑Step server, you have to create and publish a new system using the “in-Step Server Configuration” tool. Use the exported file as system template. The
individual steps are described in the chapter How to Configure in‑Step Server: Creating and Publishing a
System, in full detail.
Please note: in order to make a system available under the same name via in‑Step Server for Oracle, you have to
delete the former schema including both tablespaces for data and indexes in Oracle, before you restore the XML
backup. An example of a respective batch file can be found in the chapter How in‑Step and Oracle Work Together: Creating and Restoring Backups.
Upgrading Systems
You can update an in‑Step system, created with an older version, with different methods:
- Open it with the new in‑Step version and log on. Upon being asked a security question, the system is upgraded automatically
-Run in‑Step System Upgrade – under Tools – in the in‑Step program group. In the follow-up dialog you
can choose the in‑Step system and upgrade it.
Systems, managed by in‑Step Server can be updated via the user interface. More about this topic can be found in
How to Configure in‑Step Server.
47
Administrator Manual
Converting to a New Version
If you use in‑Step Server or in‑Step Server for Oracle, use the following steps to update your software.
Make sure that no one is working on in‑Step during the course of the conversion process.
Stop the in‑Step Server in in‑Step Server Configuration or Windows Services.
Close all open applications.
First, uninstall the in‑Step web client and the in‑Step web service (in the event that you’ve installed these
extensions).
5.Uninstall in‑Step Server or in‑Step Server for Oracle.
6. Now install the new version of in‑Step Server or in‑Step Server for Oracle. As soon as the new version has
been installed, it is no longer possible to access the server with older versions of in‑Step.
7. Start the new in‑Step Server in in‑Step Server Configuration.
8. Carry out the upgrade process of your systems in in‑Step Server Configuration. Select the intended system
from the list of published systems and select Upgrade from the System menu.
9. Before the actual conversion process, in‑Step Server creates a backup. Whether the system is presented
under Oracle or as an *.isf system file is irrelevant.
10. If you’re using the automatic software update, copy the new inStepUpdate.xml and the new in‑Step
installation file into the update folder.
11. The users can now install the new version or access the automatic software update.
1.
2.
3.
4.
If you do NOT use in‑Step Server or in‑Step Server for Oracle, use the following steps to update your software:
1. If you’re using the automatic software update, copy the new inStepUpdate.xml and the new in‑Step
installation file into the update folder.
2. Regardless of whether you install the software manually or automatically, make sure that in‑Step and all
MS Office applications are closed.
3. Follow the suggested steps for uninstalling in‑Step.
4. Install the new version of in‑Step.
5. Convert the in‑Step systems with the provided upgrade component. Make sure that no user is still logged
in to the system.
Optional – License Server Installation:
If you need to install a new version of the License server, use the following steps:
1. Stop the License server in Windows Services.
2. Uninstall the old License server
3. Install the new version of the License server
48
Administrator Manual
License Configuration with the ASP Frontend
You have the option of conveniently configuring your licenses with the ASP frontend. To do this, open the page
license.asp in your browser. The path to the hosting server for this page could look something like this, for
example:
http:// <Server> \<Path>\License.asp
You can make possible settings for the Automatic Rescan in the section Options. If you select the corresponding
check box, the network is automatically searched for a server with a license. If the server that was being used is not
available at the moment, it will overwrite the settings once it has found another server with a valid license. This also
occurs if it doesn’t find a server with a valid license. If you deactivate the automatic search, your old settings will be
kept.
In the section Add License Server, enter the name of the new server under Server Name. You can type in the
address of the server under Server Address. This could be the server’s IP address or its name once again. You can
choose between the protocols TCP, NP and IPX II in the drop-down list Protocol. Click Add Server and the server
will be added to the list under License Configuration, in the upper section of the page.
Use the headings Up und Down in order to reposition existing servers in the list. If you would like to delete a server from the list, simply click Remove.
`` Please note: the Internet user (iuser) must be authorized with write access to the registry values.
You can change this setting under Windows 2000 with Start/Run/RegEdt32.exe. You can then
grant the iuser full access to Regedit32 in the main menu under Security/Permissions. For
Windows XP, call regedit.exe first. The command Permissions is located in the context menu
of the individual users.
49
Administrator Manual
More Settings
Some of the configuration settings can only be made in the Windows registry database.
Turning Off the Display of the List of Users for the Domains
Would you like to use the Microsoft Windows login for authentication in your projects? When you want to enter or
change user data, it can take a long time until the complete list of all of the domain users is loaded. But you have
the option of turning off the user list for a domain. Simply open the Windows Registry Editor and locate the key:
HKEY_LocalMachine\SOFTWARE\microTOOL GmbH\in-Step\2.0.
Create the DWORD value DontShowDomainUsers. Its value must be set to 1.
The heading Click here to view all domain users will then no longer be offered for editing the user data.
Turning Off the Suggestion Mechanism
When you move your cursor onto New in the context menu of a product or activity, in‑Step determines which products or activities could be created at this location in the hierarchy according to the process model and offers these
to you in a submenu for selection. You can turn off the suggestion mechanism, however. Simply open the Windows Registry Editor and locate the key:
HKEY_Local_Machine\SOFTWARE\microTOOL GmbH\in-Step\2.0.
Create the key Optimization at this location and then the key StdProjectCS.ProductCS under that one.
Under the lower key, you will finally need to specify the string LoadChildTypes and assign the value 1 to it.
In the server mode, you will need to turn off this feature for the server user under HKEY_USERS\.DEFAULT\
Software\microTOOL GmbH\in-Step\2.0.
Check if a Directory Contains Products
in‑Step displays a plus sign in front of each folder by default, regardless of whether or not the folder has been refined further or now. You can configure in‑Step, so the tool first checks whether the folder contains any products,
although this takes more time than the default setting. Simply open the Windows Registry Editor and locate the
key:
HKEY_Current_User\SOFTWARE\microTOOL GmbH\in-Step\2.0.
Create the key Optimization under it and then the key StdReporter.ProductCS under that one. For the
final specification, you will finally need to type in the characters TestChildExistence and assign the value 1 to
them.
Afterwards, plus signs will only appear if the folder really contains products.
For server operation, you will need to specify this option under HKEY_USERS\.DEFAULT\Software\microTOOL GmbH\in-Step\2.0.
50
Administrator Manual
Support
Do you have any questions about configuring in‑Step? Then just contact our technical support at
in‑[email protected]. We are always happy to help.
microTOOL GmbH
Voltastr. 5
13355 Berlin
Germany
Phone +49 (30) 467 086-0
Fax
+49 (30) 464 47 14
[email protected]
www.microTOOL.biz
51


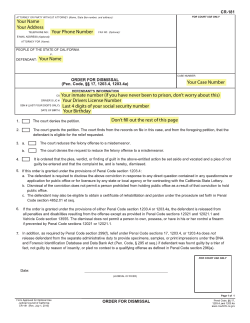
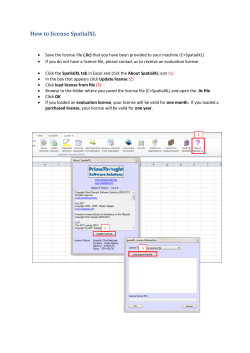


© Copyright 2026