
NORTH – NANSON CLINICAL MANUAL “The Red Book”
NORTH – NANSON CLINICAL MANUAL “The Red Book” 2014 8th Edition Medical Programme Directorate University of Auckland i North – Nanson Clinical Manual 8th Edition Copyright © 2014 Medical Programme Directorate, University of Auckland ISBN 978-0-473-27139-8 PDF ISBN 978-0-473-27140-4 E Book ISBN 978-0-473-27141-1 ii PREFACE to the 8th Edition The North-Nanson clinical manual is an institution in the Auckland medical programme. The first edition was produced in 1968 by the then Professors of Medicine and Surgery, JDK North and EM Nanson. Since then students have diligently carried the pocket-sized „red book‟ to help guide them through the uncertainty of the transition from classroom to clinical environment. Previous editions had input from many clinical academic staff; hence it came to signify the „Auckland‟ way, with students well-advised to follow the approach described in clinical examinations. Some senior medical staff still hold onto their „red book‟; worn down and dog-eared, but as a reminder that all clinicians need to master the basics of clinical medicine. The last substantive revision was in 2001 under the editorship of Professor David Richmond. The current medical curriculum is increasingly integrated, with basic clinical skills learned early, then applied in medical and surgical attachments throughout Years 3 and 4. Based on student and staff feedback, we appreciated the need for a pocket sized clinical manual that did not replace other clinical skills text books available. Attention focussed on making the information accessible to medical students during their first few years of clinical experience. Incorporated into the new edition are a more modern formatting, up-to-date advice, clear and concise wording and new chapters. It has been specifically designed to complement current teaching and guidelines for student involvement in clinical settings. For the first time this will be available electronically. Our gratitude goes to the editorial team of Drs Gihan Ganeshanantham, Maneka Deo and Harsh Bhoopatkar, along with Associate Professors Andy Wearn and Warwick Bagg. They had great pleasure in producing this revised 8th edition. They and we acknowledge the academic giants on whose work it is based, and hope you find it useful and engaging. Phillippa Poole, Head of the Department of Medicine Ian Bissett, Head of the Department of Surgery Auckland, 2013 iii Acknowledgements Editors Assoc. Prof. Warwick Bagg Assoc. Prof. Ian Bissett Dr. Harsh Bhoopatkar Dr. Maneka Deo Dr. Gihan Ganeshanantham Prof. Phillippa Poole Assoc. Prof. Andy Wearn Contributors Mr. Ian Civil, Assoc. Prof. N. Dalbeth, Dr. Claire King, Assoc. Prof. W. Meyer-Rocher, Prof. Fiona McQueen, Dr. Francis Yoon Thanks Ms. Teresa Timo and Medical Programme Directorate Staff iv Contents Preface, i Acknowledgements, ii 1 Introduction to Clinical Practice, 1 1.1 Ethical Guideline for Clinical Students, 1 1.2 Practicalities for Clinical Students, 4 2 Medical Case History Taking, 6 2.1 Introduction, 6 2.2 Taking the History, 6 3 Introduction to the Physical Examination, 15 3.1 Introduction 3.2 Basic Equipment, 16 3.3 General Observation, 16 3.4 Inspection, 17 3.5 Palpation, 17 3.6 Percussion, 17 3.7 Auscultation, 18 3.8 Summary, 18 4 Cardiovascular System Examination, 22 4.1 General Observation, 22 4.2 Peripheries, 22 4.3 The Heart, 26 4.4 Posterior Chest/Trunk, 32 4.5 Lower Legs, 32 5 Respiratory System Examination, 33 5.1 General Observation, 33 5.2 Peripheries, 33 5.3 Inspection, 34 5.4 Palpation, 35 5.5 Percussion, 35 5.6 Auscultation, 35 v 6 Gastrointestinal System Examination, 38 6.1 General Observation, 38 6.2 Peripheries, 38 6.3 The Abdomen, 39 6.4 Other Gastrointestinal Examinations, 42 7 Neurological System Examination, 43 7.1 Mental Status, 43 7.2 Cranial Nerves, 45 7.3 Peripheral Nervous System, 51 7.3.1 Upper Limbs, 55 7.3.2 Lower Limbs, 57 8 Musculoskeletal System Examination, 61 8.1 Introduction, 61 8.2 Examination of the Hand And Wrist, 61 8.3 Examination of the Elbow Joint, 63 8.4 Examination of the Shoulder Joint, 64 8.5 Examination of the Hip Joint, 66 8.6 Examination of the Knee joint, 67 8.7 Examination of the Ankle and Foot, 68 8.8 Examination of the Spine, 69 8.9 The GALS Locomotor Screening Examination, 70 9 Surgical Clinical Examinations, 73 9.1 Examination of Groin Swellings, 73 9.2 Examination of a Lump, 74 9.3 Examination of the Breasts, 74 9.4 Examination of the Neck and Thyroid, 75 9.5 Peripheral Vascular System Examination, 79 Notes vi 1 - INTRODUCTION TO CLINICAL PRACTICE Clinical medicine is much more than an intellectual exercise in problem solving; it is the clinician‟s call of duty to care for the patient. As clinicians we must remember that patients are in a vulnerable position, often being in an unfamiliar environment and having lost a sense of control over their health and physical status. Doctors are therefore in a position of trust and it is essential that this trust be accepted with responsibility. In taking a history from a patient, recognise that the patient has usually presented because of a health-related concern or condition for which they are seeking assistance. Also remember that it is the patient who is telling their story. It is essential that a clinician provides a welcoming and empathic attitude, seeks to clearly define the nature of the problem or issues and brings the encounter to a suitable conclusion. Often this is seeking a cause so that effective management might be offered. This requires the skill of first building rapport, gathering the relevant information, and then using it in a meaningful way. To be effective, a doctor needs to be holistic in their approach. Social problems frequently contribute to physical illness and should be addressed appropriately. Remember also that a good doctor sees themself as their patient‟s medical advisor and advocate; as such they aid the patient to gain the understanding needed to make informed decisions about their own care. The optimal setting for interaction with a patient is a private environment where the patient feels at ease and interruptions are minimised (consulting rooms in hospital or primary care). Unfortunately, in clinical practice these conditions are difficult to achieve. Many consultations instead occur in hospital wards or in the emergency department. We should strive for as private a setting as possible. Interruptions are often unavoidable, but should be minimised to the best of our ability. The time available for history taking may also be limited. Remember too that it is sometimes necessary and often helpful to obtain information from others. As a student, you are a member of the clinical team, albeit one whose main responsibility is to acquire clinical skills, knowledge and reasoning matched with professionalism and integrity. You are entering a process of learning how to receive clinical information, analyse it and communicate it to others: more senior members of the medical team, nurses, other health professionals, patients and their families. This book is designed to help you accomplish this. 1.1 ETHICAL GUIDELINES FOR CLINICAL STUDENTS Although teaching and learning are important features of a health workplace, they must not interfere with the welfare of patients. Most patients are very willing to help but it is important to limit your time at any one sitting so that they do not become fatigued or find the process laborious. In a complex system such as a hospital, systems errors do occur. If you see or hear anything that may put a patient‟s health at risk, please consult immediately with a member of that patient‟s health care team or your university tutor with your concerns. 1 The medical programme staff have formulated the following guidelines for the involvement of patients in clinical teaching. Students must adhere to them at all times. Guidelines 1. General rights of patients Every patient has the right to decide whether he or she wishes to agree to an interview, examination or other specific procedure carried out by a student and to withdraw from the teaching situation at any stage. No patient is obliged to see students. Patients have the right to have a support person present. These rights should be brought to the attention of all patients who have been asked to become involved in clinical teaching. 2. Refusal will not jeopardise Every patient declining such involvement must receive a clear assurance that refusal will not jeopardise his or her medical care in any way. 3. Students to seek consent Students must seek the agreement of patients allocated to them to be interviewed and examined or to be the subject of specific learning procedures, and must explain clearly what is involved. 4. Situations needing special care Special care must be exercised when there may be difficulties for patients in understanding what is proposed, or in making their views known. Patients who may have such difficulties include: Children For children less than 16 years of age consent must be sought from a parent or guardian. Children who can understand what is involved should participate in the decision. Those from a different cultural background to the teacher or student Cultural differences in decision-making should be respected. This process may include involvement of family members. Those not proficient in English Patients must have an adequate prior understanding of what is proposed. The involvement of family members or a recognised interpreter may be necessary before, during or after the teaching as the patient chooses. Those disabled by confusion, altered state of consciousness, mental incompetence, difficulties with understanding speech or hearing problems Agreement should be sought from another person who can speak for the patient, e.g. family member or close friend. 2 5. Involvement not to be unreasonable Physical examination or specific procedures must not be repeated unreasonably on any one patient and must not produce or prolong any distress, pain or discomfort already present. 6. Support for particular procedures The patient‟s right to have a support person present requires particular emphasis during intimate examinations such as breast, rectal and vaginal examinations. For sensitive examinations, students must follow the steps in the MBChB policy guide (www.mbchb.auckland.ac.nz). These include prior permission of a more senior staff member to proceed, and use of a chaperone. 7. Written consent for procedures under anaesthetic Students must confirm that written consent has been obtained before premedication of the patient for any procedure or examination to be performed by them while the patient is under general anaesthesia or sedation. 8. Observing in the operating theatre Students must confirm that the patient has provided verbal consent for procedures to be observed in theatre. 9. Identity of students to be known Patients have the right to know the name and professional status of any person who wishes to interview and/or examine them or carry out any specific treatment or investigation. Students must wear name badges and photographic university identification badges at all times and introduce themselves to their patients as medical students. 10. Students to respect confidentiality Students are responsible for ensuring that personal information acquired about their patients remain strictly confidential. Whilst it is proper to discuss this information with the team of doctors looking after the patient, and with your colleagues/tutor group in the ward, it is a breach of confidentiality to discuss the patient in public places, such as the lift. 11. Social Media Students must ensure they adhere to social media policy (refer to the medical programme guideline) and be extremely careful with regards to confidentiality, doctor-patient boundaries and not posting inappropriate comments. Remember that access to information online is often more widespread and more accessible than thought and medical students will be held to the same professional standards as qualified doctors. 3 1.2 PRACTICALITIES FOR CLINICAL STUDENTS Identification Approved identification must be worn at all times in clinical settings. Standards of Dress You are required to conform to the required standard of dress and local hospital code/GP practice when you are in the clinical environment. A neat appearance conveys respect for patients, families and other visitors in hospital. A business-like standard of dress is expected. Men are expected to wear collared shirts (ties are not generally worn now for infection control reasons). For women, a neat, modest standard of dress is required (if you can see up it, down it or through it, it isn‟t appropriate). Appropriate clothing does not include jeans or track pants. Appropriate footwear does not include sports shoes or beach shoes. Extremes of clothing or appearance generally, must be avoided. Hospital facilities You are able to access and use some staff spaces within the hospital or general practice e.g. toilets, ward station, clinic rooms (where you will find the notes and monitor screen), meeting rooms. Infection Control As part of a health workplace it is vital that you do not contribute to the spread of infection. You must wash and dry your hands at the start and end of a clinical session and then clean your hands with hand gel before and after seeing every patient. If there is organic contamination you must wash and dry your hands again. Get into good habits now! The Hand Hygiene NZ programme utilises the World Health Organisation (WHO) approach in considering five moments of hand hygiene: 1. 2. 3. 4. 5. Before patient contact Before a procedure After a procedure or after fluid exposure risk After patient contact After contact with patient surroundings Patient Handling It is normal to be apprehensive about moving patients, especially if they are frail. Basic rules include „do no harm‟, and „leave the patient as you found them.‟ More specifically, you should not move patients nor expose more of the body than is needed for an adequate examination. You‟ll need to become familiar with the various mechanisms for operating hospital beds. Some patients find it hard to sit up on the bed; help them to swing their legs over the side of the bed. 4 If you move a patient off the bed or chair, you must make sure they do not fall. Check with a health care worker first if you are not sure. If you run into trouble use the patient bell, or call out. Get a patient up slowly - allowing them to sit on the edge of the bed, before standing until they get their balance. Don‟t pull patients up. Stand close at their side and be prepared to support them around their waist (centre of gravity) if unsteady. Some patients have lifting belts – know how to use them. Once you have settled the patient back to their bed or chair, cover them up and check if they need anything, such as the bedside table, drink, food, or personal effects. Don‟t forget to thank them. Reference Texts and Bibliography There are numerous clinical skills texts available and provide much more in depth reviews. The recommended texts are: Talley NJ, O‟Connor S (eds). Clinical Examination: A Systematic Guide To Physical Diagnosis. 7th ed. Sydney: Churchill Livingstone Australia; 2013. ISBN: 9780729541473 Glynn M, Drake W (eds). Hutchison‟s Clinical Methods: An integrated approach to Clinical Practice. 23rd ed. Edinburgh: Saunders Elsevier; 2012. ISBN-10: 0702040916 Douglas G, Nicol F, Robertson C. (eds). Macleod‟s Clinical Examination. 13th ed. Edinburgh: Churchill Livingstone Elsevier; 2013. ISBN-10: 0702047287 5 2 - MEDICAL CASE HISTORY TAKING 2.1 INTRODUCTION The medical interview is the initial step in the problem-solving process that comprises a major part of clinical medicine. The medical interview serves the purposes of: Building rapport with the patient Identifying the specific problems which require action with the patient Gathering the information needed to guide formulation of a list of possible diagnoses or actions for each problem Developing a plan of action with the patient The physical examination of the patient is the second step and is used to gain supplementary information that confirms or changes the list of possible diagnoses. In the Calgary-Cambridge model, with which you are familiar, the physical examination is embedded in the interaction as part of information gathering. Information obtained from the history and physical examination may together enable a differential diagnosis to be made and will help determine what investigations would be most appropriate to make a diagnosis, as well as what management needs to start. Once you have received the initial story from the patient, a comprehensive list of symptoms and signs relating to individual organ systems is often worked through; particularly when the history-taker is inexperienced. This is necessary so that students learn the full range of symptoms and signs that may be present in disease. With experience, the method of clinical reasoning changes and it is possible to formulate working hypotheses while taking the history and examining. These hypotheses are then tested by directing the history and the physical examination appropriately. Once a history is complete a differential diagnosis needs to be formulated. This is a list of possible diagnoses in order of probability. Specific symptoms and/or signs and issues (e.g. reduced mobility due to illness) which don‟t fit into a differential diagnosis should be listed as separate problems (sometimes with their own list of differentials). The differential diagnoses will then lead to the development of a management plan. Even as a student, get into the habit of formulating both a list of differential diagnoses and management plan. The management plan will include further investigations required, actions to be taken and any treatments to commence. 2.2 TAKING THE HISTORY When beginning an interview, introduce yourself clearly (name and status) and let the patient know the purpose of your visit and the expected duration. Confirm their consent for the interview to take place and document this in the notes. Make sure that the patient is correctly identified by name, which is also on their ID bracelet (for patients in hospital). (Wards are dynamic environments and patients are often moved around). Other useful information on the ID bracelet / hospital sticker includes DOB, ethnicity, gender, address, GP, and hospital team. Most people 6 in NZ l have a national health index (NHI) number. This is a unique identifier which enables accurate identification and links to the patient‟s previous records. We suggest you do not look at previous patient records before you take the history, so as to sharpen your own skills in data gathering and synthesis. You may check these later to fill in gaps and get feedback. Be aware the records are not always correct. Over many years a standardised approach to obtaining and documenting a case history has developed. This is presented below. Students often ask whether they should be taking notes during an interview with a patient. It is wise to take brief notes as you go along. If you explain to patients the reason for doing so, most will not find it obtrusive. It is not wise to try to write long detailed notes during an interview; instead try to make notes which will jog your memory when you record the material in more detail later on. Use the communication skills that you have been introduced to in your learning to date. Follow the Calgary-Cambridge framework (Initiating, Gathering Information, Explanation & Planning and Closing). As a junior student, you will focus mostly on the first two and the last. Remember that asking too many questions can impair communication. As a result the patient may feel that they have not been heard and the main problem may emerge late in the interview (or not emerge at all). Another patient centred approach to communication that can be utilised is “ICE” (Ideas, Concerns, Expectations) and can be very helpful in communicating with less forthcoming patients. Use a balance of open-ended and closed questions to facilitate the history taking process and keep it efficient. Keep questions as simple and short as possible. Avoid multiple nested questions. Phrase questions in a positive way rather than negative i.e. „Do you have any.....?‟ rather than “You don‟t have any .....do you?” Allow patients time to qualify their answers if they need to. Remember the principles of good communication: reflection, summary, clarification, rapport, empathy, exploring the patient‟s perspective, picking up cues, appropriate language etc. Sometimes it is necessary to use respectful techniques for managing unduly verbose patients. Interventions such as “Can we focus back now on ... (the main issue), or “Okay, we might talk about that in more detail later on: right now I need to ask you .....” can be helpful. Don‟t be afraid if there are periods of silence – encourage the patient with non-verbal cues or rephrase the question. Communicating with older patients can present new challenges and forms an increasing component of healthcare work. Obtaining and collating histories may involve collateral history and various techniques including the “Seven „S‟s” principles (Table 2.1). Taking the history in these cases may also require a few sittings with the patient – do not be afraid of this, the patient will be very thankful. 7 Table 2.1” Seven S‟s” principle of history taking, Department of Geriatric Medicine, Year 4 Handbook). Experienced clinicians are reasonably sure of the likely diagnosis at the conclusion of the history-taking in the majority of cases. At the end of the case history you should have a clear understanding of the current problem(s) in order to construct a problem list. Hopefully you will also have a reasonable differential diagnosis(es) in mind. This will help guide your physical examination and then onto producing a reasonable management plan. Presenting Complaint Begin the conversation with an open question such as: “Please tell me about what has brought you to hospital?” The purpose of this is to elucidate the patient‟s presenting symptom(s) or problem(s) and be able to write them as a list using the patient‟s own words and avoiding medical terminology e.g. can‟t catch my breath, rather than dyspnoea. Where there is more than one presenting symptom/problem, list these in the order of importance, or if this is not clear, in the order of onset. You may also wish to ask: “Are there any other problems that you wanted to tell me about?” This may trigger the patient‟s memory about other symptoms. Remember that when patients use medical or scientific terms they sometimes mean something different to what you may assume. For example people may use term „palpitation‟ for anxiety or shortness of breath. „Indigestion‟ and „dizziness‟ are other terms with a wide range of meanings for different people. Always ask the patient to describe exactly what they mean by any medical-sounding terms they use. Be aware that the reason for attending a health care setting varies with the context. In outpatients, primary care and medical school assessments, there may be no presenting complaint. In this case the patient may have a chronic problem and be attending for routine review. In these cases, the suggested approach is chronological, starting with when and how the problem started; going on to 8 investigations, treatments and responses, complications, progress and current symptomatology and management issues. The History of the Presenting Complaint The purpose of this part of the history is to gather all of the relevant details of each presenting symptom so that a differential diagnosis can be formulated for each. Focus on each symptom in turn. For each, it is important to find out objectively when it began, how long it has been present, any patterns, where the symptom is located, whether there are any aggravating or relieving factors, whether there are any specific characteristics to the symptom, how severe it is, etc. and whether it is accompanied by any other symptoms (as learnt in Year 2). In the case of episodic („come and go‟) symptoms it is important to have a detailed description of a recent episode. Enquire about the frequency of the episodes, the circumstances under which they occur, the time of the last event, any precipitating or relieving factors, and whether there have been similar symptoms in the past. Relevant questions regarding each symptom should be learnt and a systematic approach should be applied to all symptoms. Pain as a symptom is especially important and needs to be described with regards to the following features which can be remembered by the abbreviation “SOCRATES”. Site of maximum intensity Onset and duration Character of the pain Radiation to other sites, if so where Associated symptoms Timing and frequency of pain Exacerbating and alleviating factors Severity (e.g. anchored rating scale) Some patients may not be able to provide a complete history. For example, people having seizures or blackouts may have no knowledge of events around the time of the episodes. This also applies when a person is has a communication problem such as expressive dysphasia or cognitive impairment. Under such circumstances it is important to take a third party history from family, friends or witnesses. As the process of history-taking proceeds, you will find yourself attempting to understand what each symptom signifies and how they connect. You will begin forming hypotheses as to the cause and origin of the symptoms and how they relate to one another. These hypotheses will be the basis for additional questions which you will use to direct the enquiry to support or refute your hypotheses. You will also be making mental notes about where to concentrate the physical examination and what you may find. 9 Past Medical History Ask about health-related events of the past and active chronic conditions. These may be relevant to the present symptoms or any treatment prescribed. You may begin this enquiry by asking: “Have you had any medical problems before?” Chronic diseases and previous important diagnoses may be missed if the patient does not realise their relevance and you fail to elicit them. Therefore ask specifically about the following examples; admissions to hospital, regular treatment, cancer, diabetes (mellitus), rheumatic fever, tuberculosis (“TB”), asthma, allergy, epilepsy (“fits”), hypertension (“high blood pressure”), heart disease, stroke and chronic kidney disease. Surgical procedures are also often forgotten thus include a question such as „Have you ever had an operation?‟ It is also good practice to note the year and place of previous surgeries. A psychiatric history may be important, as psychiatric disorders or their treatment may contribute to the current presentation. Medication History Clarity about which medications the patient is currently taking is extremely important. Also ask about over-the-counter medicines („OTCs‟) or any “natural” or alternative remedies. List medications using their generic name alongside its formulation (e.g. tablet, liquid, suppository), dose, frequency and route. Reasons for use should be enquired about. This process may also elicit additional diagnoses that will need to be added to the past medical history and explored. Intermittent medicines are often missed. Important ones to ask about in patients with chronic illness are: influenza vaccination, zolendronate infusions (annual) B12 injections (three monthly) vitamin D tablets (monthly) alendronate, methotrexate (weekly) courses of prednisone It is vital to also ask and document whether or not the patient is allergic to any medicines or to other substances such as foods, dressings and materials. It‟s important to know the nature of the „allergic‟ symptoms as they may not constitute true allergy. For example a person who has diarrhoea after a course of antibiotics may believe that this was an allergic reaction whereas it was actually a side-effect. Always check for a Medic-Alert bracelet and the reason for wearing it and whether they carry an „EpiPen‟ (injectable adrenaline). Social History The social history will involve enquiry regarding the patients living arrangements, employment status/usual occupation and leisure activities. It helps build up a 10 general picture in order to tailor a comprehensive, patient – centred management plan. Social or psychological factors may impact on or even cause, physical symptoms. They may impact on the management of a medical problem by affecting the actions that a patient takes. People react differently to illness according to their personality, social circumstances, cultural norms, religious beliefs, past experience and age. Medical problems may have a major impact on a person‟s daily life and psychological wellbeing. The functional impact of a medical condition is vitally important to understand. For example, consider the impact on a young selfemployed builder with a recurrent shoulder dislocation versus the elderly patient who lives alone in an isolated house who has started experiencing seizures. Others conditions have significant impact on the individuals but their needs will differ greatly. Generally, for the elderly, a more in depth functional enquiry is needed to find out about their activities of daily living (washing, dressing, nutrition, socialising, mobility (including driving),) Finding out about other family members and their state of health is often helpful. There are formal measures utilised to form an objective measure of independence e.g. Function Independence Measure (see Department of Geriatric Medicine, Year 4 handbook) that are particularly helpful for the MDT within rehabilitation facilities. For younger patients, occupation and dependents are important. Smoking, alcohol and illicit drug consumption is included in the social history. Ensure you ask about these in a non-judgemental way. Document smoking history in terms of pack-years (1 pack year is 20 cigarettes a day for a year) and standard drinks per week. Ask about attempts to quit, reduce or stop and of the above. You may give a brief intervention if you feel comfortable. Family History Family history can be useful to uncover genetic diseases that run in the family. Include information about whether the patient‟s parents and siblings are still alive and if so, what their state of health is. If not alive, ask about the cause of death and their age at death (remember to be appropriately empathic, particularly if they have lost a family member suddenly and/or recently). The ages and state of health of siblings and children should be recorded. Useful questions here are: “has anyone in your family had an illness similar to your present illness?” or “do any diseases occur commonly in your family?” Diabetes mellitus, breast or colon cancer, and cardiovascular disease may be specifically asked about. Systems Enquiry The patient may have symptoms of disease which have been overlooked in the course of concentrating on the present illness. Therefore it is routine (in some settings) to ask a series of screening questions covering major symptoms associated with disease in organ systems of the body not already covered during the interview. If a detailed history has been taken, the functional enquiry for that/those system(s) 11 should have been incorporated in the history of presenting symptoms, but the other organ systems should be asked about here. Positive findings from other systems should be noted in the problem list. Negative findings are often important too (however, this is something that you will only appreciate and learn with experience and mentoring). Many of the symptoms listed here are experienced by a large proportion of the population as part of normal life (e.g. headache, change in sleeping patterns, brief episodes of localised pain). It is only with experience that you will be able to judge the significance or not of any symptoms reported. The approach to this section of the case history may be by way of a statement such as the following: “I am now going to ask you a series of questions to ensure that we have not missed any important problem affecting your health”. The following are regarded as possible screening topics appropriate to the major organ systems. 1. General Sleeping patterns Weight patterns Appetite General sense of well-being General levels of energy 2. Cardiovascular System Swelling of the feet and ankles Shortness of breath (dyspnoea) at rest or on exertion Shortness of breath lying down (orthopnoea) or causing waking at night relieved by sitting up/extra pillows(paroxysmal nocturnal dyspnoea) Chest pain (may be angina). If present, what provokes it? Pain in the calves or buttocks on brisk walking (may be claudication) Irregular or rapid heartbeat (palpitations) 3. Respiratory System Nasal problems including snoring, nocturnal episodes of apnoea and arousal, and daytime somnolence; earache; sore throat Cough (if present, its features especially duration, periodicity, whether productive of sputum) Sputum (if present, its colour and quantity) Coughing up blood (haemoptysis) Shortness of breath at rest or on exercise Chest pain (is it worse on inspiration and with coughing as in pleuritic chest pain) Noisy breathing (wheeze or stridor) 4. Gastrointenstinal System Appetite Weight loss or gain, and time of change in weight The condition of the teeth (natural or dentures) 12 Difficulty with swallowing (dysphagia) Indigestion (dyspepsia) Abdominal pain, nausea or vomiting Change in bowel frequency or stool Character, frequency and colour of stools (you may have to use a colloquial term to be understood) Rectal bleeding 5. Central Nervous System Memory/Cognition (If there is loss of memory, the patient may not realise it and this will affect the accuracy of any information they give you) Headache Difficulty walking – balance, muscle power or feeling in limbs Vision, hearing and speech Fits or altered consciousness Swallowing (dysphagia) Weakness of muscles Numbness, “pins and needles” pain or tingling 6. Endocrine System Increased thirst (polydipsia)and increased frequency of micturition in the day (polyuria) or at night (nocturia) Neck swelling (goitre) Palpitations Character of bowel motions Weight loss Heat intolerance Menstrual history (date of menarche and menopause if relevant and cycle) History of breast feeding 7. Musculo-skeletal System Pain, swelling or deformity of joints (arthritis). If so, which joints? Backache Morning stiffness in arms, legs or back Muscle pain or tenderness Can you dress yourself without any problem? Can you walk up and down stairs without a problem? Ask about other activities of daily living which pose a problem (eating, washing, toilet, mobility) 8. Urogenital System Involuntary passing of urine with coughing, laughing or movement or other reasons (urinary continence) Urinary urgency or frequency Pain on passing urine (dysuria) Abnormal urinary volumes (polyuria) Nocturia (the need to frequency pass urine overnight) Presence of visible blood in the urine (macroscopic haematuria) Sensation of failure to empty the bladder Change of smell of urine 13 Females: Vaginal discharge, itch, rash or pain Males: Strength of the urinary stream, difficulty starting or stopping the stream. Urethral discharge, itch, rash or pain. 9. The Skin Rashes Itch (pruritus) Lumps - location, size, duration, appearance, rate of accompanying symptoms e.g. itch, pain, erythema (red colour) Ulcers Changes in nails or hair Changes in moles or birthmarks Any past history of having skin lesions removed growth, 10. Haemopoietic System (blood, bone marrow, lymphatics) Spontaneous bruising Abnormal bleeding (e.g. brushing teeth, mild trauma etc.) Lymph gland enlargement (lymphadenopathy) – ask about lumps in neck, armpits or groins 11. Psychiatric Changes in mood (high and low) Changes in sleep Recent stresses Disturbing thoughts including about self-harm Unusual visions or voices (hallucinations) Persistent fixed false ideas (delusions) Panic attacks You will notice that several of the symptoms feature in two or more organ systems reflecting the fact that a single symptom may have a range of causes. It is helpful to commit the above list to memory. When a positive response is obtained to any symptom which has not previously been elucidated, it is wise to review it in more detail. The Summary At the end of the case history you should have a clear understanding of the current problems and be able to construct a problem list. Hopefully you will also have a reasonable differential diagnosis(es) in mind. This will help guide your physical examination and then onto producing a management plan. 14 3 - INTRODUCTION TO THE PHYSICAL EXAMINATION 3.1 INTRODUCTION The function of a physical examination is to confirm or refute your suspicions as to the cause of the problem(s) identified from the history and to determine whether there are abnormalities in structure or physiological function of relevant organ systems. It also serves as a quick screen for other problems. An important point is that the physical examination will not often produce a diagnosis in the absence of differential diagnosis(es) already derived from the case history. Furthermore the detection and interpretation of abnormal physical signs in isolation is a relatively unreliable process. Although physical examination is taught on the basis of the various organ systems separately, in practice patients are examined in a regional or integrated way. Despite this, in your assessments you will often be asked to examine one organ system at a time. Remember the „Gingerbread‟ metaphor in Phase 1 – first you learn individual skills, then individual systems examinations, then you are able to perform a comprehensive examination, finally you begin to develop a focussed examination based on the case history. Your aim should be to be able to examine a patient in a structured, orderly way. Strive to synthesise a thorough method of examination which you can eventually perform without having to stop and think what to do next. This frees you up to think about the problem and the diagnosis. Generally your approach will be an amalgamation of a system approach and a regional approach that you can adapt to the context. Increase efficiency by asking the patient to change their position as few times as possible. Learn the correct technique for each part of the examination and understand its purpose and value; „sloppy‟ technique and lack of comprehension can lead to incorrect findings. It is vitally important that you master the techniques of physical examination and are able to interpret the findings correctly. There is no substitute for practice. Peer examination allows you to hone your skills in a safe and controlled setting, without the risk of harming patients. However, it is important that you also examine and learn from patients as this will be the context in which you will use your skills in practice. Use an additional text such as Talley and O‟Connor‟s Clinical Examination to expand your skills and knowledge. Videos, simulations and recordings (e.g. of heart sounds and murmurs) can be readily found online. These can be valuable in the early phases of learning. Some useful resources were highlighted in your „Clinical Skills‟ materials and your tutors may have other suggestions (but be aware of the credibility of sources, as for any online resource). The traditional order of a complete physical examination begins with a general observation from the end of the bed (or seated), moving to the hands and wrists, arms, face, neck, chest, abdomen and finally the legs. This is because peripheral clues may be found which help in interpretation of other findings. Also the order of conducting a physical examination is usually inspection, palpation, percussion and auscultation („IPPA‟). In certain settings, including OSCEs you may need to perform a 15 system examination alone. This is especially so for neurological and rheumatological examinations. Findings on physical examination need to be seen in context. E.g. peripheral neurological examination: An older woman may have relatively less muscle strength than a young man, yet be in the normal range for her age and gender. Be sensitive to patient‟s feelings with regards to the amount of exposure you require of them during the examination. It is never necessary for a patient to have to lie or stand totally naked. Involve the patient in exposure where possible, explain what and why you need to expose and be careful about the language that you use (“feel” and “touch” may have sexual overtones, “examine” is usefully neutral). Where examination of sensitive areas is involved, there must be a clear reason and students must always have a chaperone present (see year guide book for details). Remember that the ambient room temperature may be too cool for comfort for patients who are undressed. Irrespective of temperature, consider the need for a blanket/sheet to cover areas of the body not being examined and allow the patient to redress as soon as possible. Avoid any discussion of findings during the examination; save these until the patient is redressed and ready to listen. 3.2 BASIC EQUIPMENT Students should purchase their own stethoscope, a plastic or steel ruler 15cm long, and a pocket torch. Other equipment such as a tendon hammer, a 128 cycles per second tuning fork, or ophthalmoscope are found in the wards but are handy to carry if you have them. 3.3 GENERAL OBSERVATION The importance of a brief general observation of the patient before moving on to examine specific organ systems cannot be overstated. Make sure you have adequate light. Be alert to the patient‟s gait, posture, mood/demeanour, nutritional status, state of consciousness, respiratory rate and skin colour. Look for skin signs of systemic disease. Evidence of smoking (tar staining of the fingers), joint deformities, spinal abnormalities, abnormal shape, size or movement of face, hands and feet, are all things that may be obvious to the discerning eye without needing to touch the patient. Some diagnoses may also be possible at this stage before the formal organ-based physical examination has started because of classical patterns, e.g. Parkinson‟s disease, severe thyroid deficiency (myxoedema), severe tricuspid regurgitation. Core Observations/Vital Signs The following are often carried out at this stage: the patient‟s height and weight are measured and body mass index (BMI) calculated. Temperature is checked and recorded (typically tympanic using a digital thermometer). The peripheral pulse is assessed (rate and rhythm), respiratory rate counted, blood pressure measured and oxygen saturation is often recorded. These will be discussed in Chapter 4. 16 3.4 INSPECTION Each of the organ systems has relevant signs to look for as part of the organ-specific examination. Learn a list of which signs are relevant to each organ system, where to look for each, and the possible causes. It is important not to skip this step as it often yields important clues. Particularly of relevance to inspect for in all examinations are general features e.g. jaundice, anaemia, clubbing, cyanosis, oedema, lymphadenopathy (JACCOL). 3.5 PALPATION Remember your hand hygiene. Patients dislike being examined with cold hands. Warm your hand by washing in warm water or using friction. Palpation is the act of gaining tactile information. The actual manoeuvres undertaken will be explained in the sections on examination of the various organ systems that follow. There are, however, certain general principles that are important. Positioning the patient and yourself correctly is an aid to good palpation. Both you and the patient need to be comfortable. Avoid or minimise discomfort to the patient. Before beginning palpation ask the patient whether they have any pain or tenderness at that site and ask them to let you know if anything you do is painful. Take time with palpation. Ensure that you have obtained all the information you can before moving on to other aspects of the physical examination. Characteristics such as size, consistency, smoothness, degree of tenderness, mobility and exact location in relation to other structures are all attributes that one might expect to document after palpation. Sensitive examinations have been mentioned previously but appropriate steps must be taken for your protection. Chaperones should be requested as required and consent obtained in a proper manner. Some examinations by their nature require thought and practice to maintain patient‟s dignity. For example, it is entirely appropriate that students examine the anterior chest during auscultation of the chest of both male and female patients. When examining females, a technique needs to be developed so that dignity is always maintained and the methods used to lay hands on the patient are appropriate. It must be noted that this is quite different from a primary breast examination that requires an entirely different approach. 3.6 PERCUSSION Percussion is a method of using sound and tactile sensation to learn more about the density of tissue. Internal features of the body such as the size of internal organs or 17 cavities, or the presence or absence of fluid can be identified this way. It is used chiefly during the examination of the chest and abdomen. It is essential to learn the correct percussion technique. For right-handed people it is customary to place the middle finger of the left hand against the body surface (the “pleximeter”) parallel to the ribs in the case of the chest, and to strike the middle phalanx sharply with the tip of the middle finger of the right hand (the “plexor”). Use the wrist rather than a forearm action to ensure that at the point of striking, the terminal phalanx of the right middle finger is vertically above the distal end of the middle phalanx of the left middle finger. The finger needs to strike and lift away to allow for vibration to be sustained. A range of percussion notes may be elicited. In general, the presence of air (as in the lung or bowel) increases resonance (often also higher pitched), whereas an underlying solid structure such as an enlarged liver, lung consolidation or a collection of fluid in the chest reduces resonance (a duller note). It is not just the audible note that is important but a combination of what one hears, and what one feels through the finger that is applied to the body surface. As a general rule one percusses from areas of greater to areas of lesser resonance in attempting to delineate the boundary between them. The pleximeter finger is placed parallel to the anticipated boundary. 3.7 AUSCULTATION The stethoscope is used to listen to sounds within a body cavity. You will note that the head of most stethoscopes have two sides to it - a „diaphragm‟ and a „bell‟. The diaphragm consists of a flat piece of material overlying a concave resonant chamber; it transmits mid- and high-pitched sounds better than low pitched. It is most effective when applied with normal pressure to the underlying surface. The bell is open and more deeply concave; it transmits low-pitched sound best (remember “bell - low”) and is most effective when applied with only sufficient force to eliminate extraneous noise. More recently, manufacturers have produced single-headed stethoscopes with „tuneable‟ diaphragms. These have a sprung diaphragm that allows the head to operate as a bell or diaphragm according to applied pressure. Auscultation is an important component of the examination of the heart and lungs. It also has value in abdominal examination and in detecting bruits caused by turbulent blood flow in the arterial system. 3.8 SUMMARY The information gathered during the history and examination are synergistic and allow a more accurate differential diagnosis. The examination component is subjective to a degree and all tests have a level of sensitivity and specificity that can differ greatly. With more experience, the examination helps further guide management and the component of laying hands on the patient cannot be underestimated. 18 Reproduced from Chizner, Michael A., MD - Current Problems in Cardiology - Volume 33, Issue 7, 326-408 © 2008 Mosby. Reproduced with kind permission and licence from Elsevier. 19 History and Examination Summary Format Presenting Complaint(s) A brief statement of the key issue(s) from the patient‟s perspective and timeline, i.e. - History Of Presenting Complaint Opening line describes patient demographics, i.e. A 50-year-old NZ European woman. This is then followed by: - Past Medical History Breathless at rest for two days Chest pain for three hours Details of presenting issue(s) Explore the features of the presenting symptom(s) including important negative findings Ask all questions relevant to this organ system Discuss past medical history that relates to this issue / organ system List all problems with relevant associated procedures. Include surgical and psychiatric history. Ask about conditions monitored by GP e.g. Ischaemic Heart Disease o Coronary artery bypass (CABG) 1989 o Non ST elevation myocardial infarction (NSTEMI) with per cutaneous Intervention (PCI) 2001 Medications List name, dose, route and frequency, i.e. Metoprolol CR 95mg po (=oral) mane (=in the morning). - Include all regular and prn (when required) medications Include all over-the-counter / supplements/ alternative treatments Ask about previously used or discontinued medications and reasons for discontinuation Allergies List what (medication, food, metal etc.) and associated reaction Personal , Social and Occupational History A paragraph to describe their living situation and identify issues that may need to be addressed - Living situation (type and with who) Mobility and functioning Current employment status Support services, e.g. Home Help Smoking / alcohol intake Previous occupation(s) 20 Family History List of significant medical conditions especially those with a genetic component i.e. muscular dystrophy or familial component, i.e. ischaemic heart disease. First (and sometimes second) degree relatives System‟s Enquiry Briefly ask screening questions on other systems to identify any previously unrecognised issues. Don‟t include a long list of negatives. (You will begin to learn the significant negatives and positives relating to presenting symptoms through feedback from your tutors). Examination - Problem List - Differential Diagnosis - Investigations / Results - Vital signs (normal or abnormal) and general observations Core organ systems – CVS, Resp, Gastro, Neuro in all examinations Include other organs systems that relate to presenting complaint e.g. Musculoskeletal, Gynaecolgy Note abnormal findings plus a brief comment on normal systems. A list of all identified problems/issues which can be symptoms, signs, abnormal results or social/functional issues This provides a list to work from when synthesising differential diagnosis and plan E.g. chest pain, bilateral lower chest crackles on examination, elevated serum creatinine, heavy alcohol intake (in units), and frequent falls at home. Use the problem list to create a list of possible causes. These should be synthesised with the most likely first. At Year 3 level this will be limited by knowledge and experience, but get used to thinking about it. List important investigations and results, for example blood tests, chest X-ray, ECG as basic investigations and other more advanced investigations as appropriate. 21 4 - EXAMINATION OF THE CARDIOVASCULAR SYSTEM Introduction Ideal exposure – from waist up, maintaining dignity Position – lying, upper body at 45° Equipment – stethoscope, 15cm ruler 4.1 GENERAL OBSERVATION Begin with observation of the patient‟s general health, making note of any respiratory distress or cachexia. Look for signs of Down syndrome, Marfan‟s syndrome and Turner‟s syndrome which are associated with cardiac abnormalities. 4.2 PERIPHERIES Hands and Wrist Pallor of the palmar creases – this may indicate anaemia (high likelihood if triad of pale skin, pale creases and pale conjunctivae) Finger clubbing – This can be caused by cyanotic heart disease and infective endocarditis, but note that there is a wide range of other causes unrelated to the heart. Splinter haemorrhages – These are linear haemorrhages in the nail beds which can be caused by infective endocarditis, although trauma is a more common cause and vasculitis is another potential cause. Tendon xanthomata – Yellow/orange lipid deposits on the tendons of the hand. They are associated with hyperlipidaemia. Tar-staining from smoking The pulse Assessment of the heart rate normally begins at the radial pulse. Time the pulse for 15-30 seconds and calculate the rate per minute. In the presence of a rapid irregular beat such as atrial fibrillation a “pulse deficit” may be present. This means that the rate at the apex of the heart (apical rate) may be faster than the radial rate because some of the lower amplitude systolic waves may not be palpable at the radial artery. Generally, a heart rate above 100 beats per minute is termed a tachycardia and below 60 beats per minute a bradycardia. However, these figures should be taken in context of the patient and acted upon as such e.g. a resting heart rate of 40 beats per minute could be entirely normal in an elite athlete but very abnormal in a 90 year old frail woman. The rhythm may be regular (normal), irregular or irregularly irregular. An irregularly irregular rhythm is characteristic of atrial fibrillation which can be differentiated from a regularly irregular rhythm. A background of regularity with periodic premature beats is consistent with extra systoles of either atrial or ventricular origin. When extra systoles are frequent it may be difficult to distinguish between this rhythm and atrial fibrillation. 22 The volume of the pulse wave is noted. The radial pulse can be described as normal, weak or high volume/bounding. Palpating the brachial or carotid pulse allows the character to be described. The forceful, hyperdynamic „bounding‟ of a high metabolic output state such as that induced by an overactive thyroid gland can again be felt, the slow rising and falling („plateau‟) pulse of severe aortic valve stenosis, the „collapsing‟ pulse (a rapid rise followed by collapse of the pressure wave) of aortic valve regurgitation and the rapid low volume pulse of shock, toxic states or dehydration. In addition the pulse may vary in strength with phases of respiration (pulsus paradoxus) or vary from beat to beat in a random manner in atrial fibrillation or with every second beat in what is called pulsus alternans. If the radial pulse is not easily palpated the brachial pulse in the antecubital fossa may be easier to evaluate. A useful manoeuvre where aortic valve regurgitation is suspected is to elevate the arm and palpate the brachial pulse: the elevation exaggerates the rapidity of the drop between the peak of systolic and the trough of diastolic arterial pressure. Synchronicity of pulses (timing of pulses at two different sites) e.g. radial-radial (leftright circulation), radio-femoral (upper-lower body) delay is also included in the assessment of the pulse. Blood pressure The blood pressure at the brachial artery should be measured next. It is wise to check the pulses of both arms to ensure that the blood pressure measurement is not going to be affected by proximal arterial obstruction which might artificially reduce the pressure at the brachial arteries. Care must be taken to ensure that the cuff is applied correctly and tightly to the upper arm and that the correct cuff size is used. In order to ensure that the cuff is inflated beyond the peak systolic pressure, inflation should be accompanied by palpation of the radial pulse to ensure that it is obliterated. This will give an approximate value for systolic pressure which may then be checked in subsequent readings with a stethoscope. The cuff should be inflated quickly to beyond systolic pressure and the cuff pressure slowly released. The systolic pressure is recorded at the point the Korotkoff sounds first appear (Korotkoff I). As the cuff pressure is further released the sounds become louder before quite suddenly muffling and then disappearing. The diastolic pressure is recorded as the point of which the sounds disappear (Korotkoff V). Where there is any suggestion of fainting episodes, blackouts or recurring falls, it is wise to take the blood pressure both lying and standing to check for postural hypotension. Jugular venous pressure: Although the level of the jugular venous pressure (JVP) wave is only a rough guide to intravascular volume, it is the best clinical sign available. It is not always an easy sign to elicit. Position the patient so that s/he is lying comfortably at 45° to the horizontal with the neck exposed and head turned slightly away to the left. 23 Figure 4.1 The jugular venous pressure (JVP). (a) Assessment of the JVP. The patient should lie at 45°. The relationships between the sternocleidomastoid muscle, the JVP, the sternal angle and the mid-right atrium are shown. (b, c) The anatomy of the neck showing the relative positions of the main vascular structures, clavicle and sternocleidomastoid muscle Talley, Nicholas J, MB BS (Hons), MMedSc (Clin Epi) (Newc), MD (NSW), PhD (Syd), FRACP, FAFPHM, FRCP (Lond), FRCP (Edin), FACP, FACG, AGAF - clinical examination: A systematic guide to physical diagnosis, 57-85 © 2014 Churchill Livingstone. Reproduced with kind permission and licence from Elsevier. 24 Good lighting is beneficial and looking across the neck from the side can assist with locating the venous pulse wave. The complex pulse wave of the internal jugular vein with its “a”, and “v” peaks produces a localised ripple - like (or “fluttering”) pulse in between the heads of sternocleidomastoid muscle as shown in Figure 4.2. Figure 4.2 The JVP and its relationship to the first (S1) and second (S2) heart sounds. Talley, Nicholas J, MD, PhD, FRACP, FRCP (London), FRCP (Edin), FAFPHM, FACP, FACG, AGAF Examination Medicine, 263-393© 2010 © 2010 Elsevier Australia It is sometimes difficult to tell whether a visible movement in the neck is venous or arterial (carotid artery) in origin. Table 4.1 illustrates some of these differences. Arterial Venous One peak per cycle (described as an outward pulsation) Two peaks per cycle, in sinus rhythm (described as flickering) It is Palpable It is NOT Palpable The dominant movement is OUTWARDS The dominant movement is INWARDS Independent of respiration Varies with respiration Pulse not affected by pressure at the base of the neck Can be occluded with light pressure at the base of the neck Independent of position Varies with the position of the patient Independent of abdominal pressure Rises with abdominal pressure Table 4.1 Differences between arterial and venous pressure wave. 25 If the pulse wave is not detectable at first inspection, a variety of manoeuvres may be attempted to locate it. If the level is thought to be high, the patient can be repositioned at 90º in an attempt to bring the top of the column into view. If it is low, it may only be detected if the patient is lying at <45 degrees. If still uncertain about the level of the venous column, an “abdominojugular reflux” can elicited by applying firm, sustained pressure in the region of the right hypochondrium. This may cause the jugular venous column to rise in the neck making it more easily visible. A Valsalva manoeuvre (forcible exhalation against a closed glottis) has a similar effect. Taking a deep breath in will cause the JVP to rise briefly at the end of inspiration and is an easy manoeuvre to ask the patient to perform. The level of the JVP is taken as the vertical height in centimetres of the top of the jugular venous column above the sternal angle (=“Angle of Louis”) - which is ~5cm above the centre of the right atrium. A 15 cm ruler placed vertically at the Angle of Louis is a useful measuring device. The normal level is up to 4cm above the sternal angle (at 45 degrees you can only record values >0cm. Low, normal JVP can be below the sternal angle). 4.3 THE HEART In examining the heart, information regarding its structure and function may be gained. The usual sequence of inspection, palpation, (percussion), auscultation (IPPA) is followed; however, percussion of the heart is not useful and therefore omitted. Please note the following terms which are used when describing findings relevant to the cardiovascular system and describe the effect of abnormally turbulent blood flow within the heart and great vessels: Thrill - The vibration at the skin surface which can be felt – caused by turbulent flow within the heart or in a peripheral vessel. Murmur - Turbulent blood flow within the heart detected on auscultation. Bruit – turbulent blood flow heard in a peripheral vessel on auscultation. Inspection With female patients, the bra would usually be left in place. If the left breast is in the way for examination, either ask the patient to lift it aside or - with permission – use the back of your left hand to lift it up. Begin with a general inspection of the front of the chest looking for structural defects such as the abnormal depression of the sternum („pectus excavatum‟). This can displace the heart to the left. Scoliosis or kyphosis of the thoracic spine may also displace the heart and will be most obvious on posterior inspection. Also inspect for a visible apex beat (can be normal in young and/or thin) and any scars from cardiothoracic surgery. An impulse may not be visible (or indeed palpable) in obese or heavily muscled people or where there is chronic air-trapping in the lungs e.g. chronic obstructive pulmonary disease (COPD). 26 Palpation The position and character of the apex beat should be confirmed by palpation of the chest wall with the palm of the hand. Then use the index finger for more accurate localisation of the lowest and outermost point at which a distinct impulse is palpable. Make an impression about the quality of the beat, in particular whether it is abnormally forceful („thrusting‟) which might indicate left ventricular hypertrophy, or sustained. The position of the apex beat in relation to the mid-clavicular or anterior axillary lines should be recorded as should the number of the intercostal space in which it is detected. It is normally in the 5th left intercostal space just inside the mid-clavicular line. Cardiac enlargement displaces the apex beat to the left. Palpation of the front of the chest over the cardiac silhouette may reveal abnormalities. A parasternal „lift‟ felt by placing the hand over the lower sternum may indicate right ventricular hypertrophy. The presence of “thrills” indicative of underlying valvular defects or abnormally turbulent blood flow within the heart should be sought. A thrill in the left axilla could indicate mitral valve regurgitation. Thrills in the second left and right intercostal spaces close to the sternum may indicate pulmonary and aortic stenosis respectively. Pulsations at locations other than the apex are always abnormal. Auscultation Cardiac auscultation involves checking the first and second heart sounds and listening between the heart sounds for the presence of additional sounds such as murmurs, clicks, snaps and friction rubs. Listen with the diaphragm of the stethoscope at each area and at the apex with the bell as well – as a typical screening assessment. The four standard areas for auscultation to best hear the sounds arising from the valves of the heart are (Figure 4.3): 1. 2. 3. 4. Fifth left ICS at the midclavicular line (apex/mitral area) Fifth left ICS at the sternal edge (tricuspid area) Second left ICS at the sternal edge (pulmonary area) Second right intercostal space (ICS) at the sternal edge (aortic area) It should be noted that there are exceptions to this. For example, the diastolic murmur of aortic regurgitation may be heard best at the tricuspid area. It is not uncommon for the murmur of aortic stenosis to radiate quite loudly to the carotid arteries and the murmur of mitral regurgitation tends to radiate into the left axilla. 27 Figure 4.3 The areas best for auscultation do not exactly correlate with the anatomical location of the valves Talley, Nicholas J, MD, PhD, FRACP, FRCP (London), FRCP (Edin), FAFPHM, FACP, FACG, AGAF - Clinical Examination, 35-105 © 2010 Elsevier Australia. Reproduced with kind permission and licence from Elsevier. The heart sounds The first heart sound (S1) is created by closure of the mitral and tricuspid valves and marks the beginning of systole. The second sound (S2) represents closure of the aortic and pulmonary valves at the end of systole. Normally, the aortic valve being in a higher pressure system closes fractionally ahead of the pulmonary valve and both components may be heard, especially during a slow inspiration, an effect described as „splitting‟ of the second heart sound. If it is difficult to differentiate the heart sounds from each other, palpate the carotid artery pulse whilst listening to the heart. The first heart sound is heard just prior to the carotid pulsation. A third heart sound (S3) may be present in early diastole, heard most usually at the left sternal edge and the apex. The triple rhythm it generates is sometimes called a „gallop‟ rhythm because it sounds like the hoof-strikes of a galloping horse. In children or young adults, a third heart sound is common and consistent with normal heart function. In older people, this sound is indicative of rapid ventricular filling in the presence of left heart failure. A fourth heart sound, (S4) may be present in late 28 diastole (just before S1) at the left sternal edge. It represents atrial contraction against a raised ventricular pressure and is always abnormal. Normally, the opening of the mitral and tricuspid valves in early diastole is inaudible, but in mitral stenosis the valve may be heard to open soon after S2 with a snapping quality - the so-called “opening snap”. Heart murmurs Murmurs are sounds that are caused by turbulent blood flow through valves or abnormal structures of the heart. They are described in terms of their timing (in the cardiac cycle), site of maximal intensity, quality, duration, radiation and intensity. The intensity is usually graded on a scale of one to six as below. 1. Murmur is only audible on listening carefully for some time. 2. Murmur is faint but immediately audible on placing the stethoscope on the chest. 3. A loud murmur readily audible but with no palpable thrill. 4. A loud murmur with a palpable thrill. 5. A loud murmur with a palpable thrill. The murmur is so loud that it is audible with only the rim of the stethoscope touching the chest. 6. A loud murmur with a palpable thrill. The murmur is audible with the stethoscope not touching the chest but lifted just off it. Systolic Murmurs Murmurs indicative of aortic and pulmonary valve stenosis are heard in systole and have a crescendo/decrescendo character („diamond shaped‟). For those nonmusicians, crescendo means “getting louder” and decrescendo means “getting quieter”. They tend to be loud and somewhat harsh in quality. Aortic stenosis is usually loudest at the „aortic‟ area and is transmitted to the carotid arteries. It may also radiate towards the left sternal edge and the apex of the heart where it may on occasion be confused with the systolic murmur of mitral regurgitation. However, the murmur of aortic stenosis is usually louder at the heart base (2nd intercostal space left and right) and that of mitral regurgitation at the apex. Pulmonary valve stenosis is quite uncommon in adults but a soft systolic “flow murmur” is often heard in the second left intercostal space at the sternal edge. Mitral and tricuspid regurgitation are „pansystolic‟ murmurs, i.e. they extend throughout the whole of the interval between the first and second heart sounds. Mitral regurgitation is heard best at the apex and radiates towards the axilla. It is loudest on expiration. Tricuspid regurgitation is heard best at the left lower sternal edge and is loudest in inspiration. Diastolic Murmurs Murmurs indicative of aortic and pulmonary valve regurgitation are heard in early diastole. They are soft, high pitched and have a decrescendo quality, and are best heard at the lower sternal edge with the patient leaning forward. 29 The murmur of mitral stenosis is often the most difficult murmur to detect clinically. It is a diastolic murmur often characterised by a low-pitched, rumbling „mid-diastolic‟ sound (between S2 and S1) heard best at the apex. This is therefore best heard using the bell of the stethoscope. Manoeuvres There are specific manoeuvres to enhance auscultation of heart murmurs. Right sided murmurs are loudest on inspiration; left sided murmurs loudest on expiration. This may be remembered with the acronym “RILE”. For example, breath holding at the end of expiration enhances aortic murmurs and breath holding at the end of inspiration enhances pulmonary murmurs. Aortic regurgitation can also be enhanced by having the patient sit forward. Mitral stenosis is enhanced when the patient is rolled over on to the left side. 30 Figure 4.4 Diagrammatic representation of various heart murmurs. A2 and P2 are commonly heard together as S2. (From James EC, Corry RJ, Perry JF: Principles of basic surgical practice, Philadelphia, 1987, Hanley & Belfus.) Mangione, Salvatore, MD - Cardiology Secrets, 16-21 © 2014 Copyright © 2014, 2010 by Saunders, an imprint of Elsevier Inc. Reproduced with kind permission and licence from Elsevier. 31 Pericardial rubs Pericardial friction rubs may be heard in the presence of pericarditis. These rubs have a scratchy, sawing, “to-and-fro” quality, are often not limited to systole or diastole and unlike pleural sounds they do not disappear when the patient holds their breath. 4.4 POSTERIOR CHEST / TRUNK After you have performed cardiac auscultation, you may need to assess aspects of the respiratory system. As a minimum, palpate and auscultate the lower posterior chest looking for signs of a sacral oedema, pleural effusion and pulmonary oedema. 4.5 LOWER LEGS Check for lower limb oedema. It is important to note whether leg swelling is bilateral or unilateral as the potential causes differ. If oedema is present determine whether it is pitting or non-pitting oedema, and to what upper level it extends. “Pitting” of the swollen area when sustained thumb or finger pressure is applied indicates the presence of subcutaneous fluid. There are states of non-pitting oedema mainly due to lymphatic obstruction (lymphoedema) but the differences are not diagnostic and are subtle. Pulse examination is detailed in Chapter 9. 32 5 - EXAMINATION OF THE RESPIRATORY SYSTEM Introduction Ideal Exposure – from waist up maintaining patient‟s dignity Position – sitting up in bed or sat in chair Equipment – Stethoscope 5.1 GENERAL OBSERVATION The general observation of a patient allows us to almost instantaneously differentiate the severely ill patient from the less unwell patient. A few signs we should look for are: Respiratory distress signs – A general term used to cover increased effort of breathing. It is indicated by the involvement of the accessory muscles (i.e. strap muscles of the neck), flaring of the nostrils and intercostal in-drawing (especially in children). Such signs indicate increased effort of breathing and have a correlation with severe disease. Respiratory cycle – Observe the rate, pattern and depth. The normal rate of breathing is between 12 and 20 breaths/minute (varies between sources, quoted up to 25). Respiratory rate is a particularly good marker of physiological stress and acute illness. Look at the pattern of breathing – in the normal state, inspiration is longer than expiration. Surgical Scars – Particularly look for midline sternotomy (commonly used for coronary artery bypass grafting) and thoracotomy scars. Sputum – Check tissues or sputum pots if present and note colour, any blood and consistency. 5.2 PERIPHERIES As with most examinations, begin the system examination at the hands and continue in a logical manner as below. Hands and Wrist Nail changes, including finger clubbing – The respiratory causes of clubbing include fibrosing alveolitis, suppurative lung diseases and bronchial carcinoma. Peripheral cyanosis – A bluish discolouration seen best in the nail beds either due to global reduction in haemoglobin oxygen saturation or a local phenomenon e.g. Raynaud‟s. Carbon dioxide retention flap (asterixis) – Indistinguishable from the hepatic flap, this can be seen in patients that are hypercapnic. Beware, this may indicate that hypoxia has become their drive to breathe and so is a warning to take care when administering oxygen therapy. Radial pulse – Routinely measured as part of the respiratory examination (see Cardiovascular examination chapter). 33 Axilla Lymphadenopathy – Palpate the four walls and apex of the axilla to assess the lymph nodes, which can be enlarged in infective or malignant conditions. Face Eyes – Subconjuctival pallor can be identified in anaemic patients. Mouth – It is good to look for both peripheral and central cyanosis when examining the mouth, by looking for the bluish discolouration in the lips and under the tongue, respectively. This is indicative of a high level of deoxyhaemoglobin, estimated at 2.5g/dl to be visible. Upper airways – remember that the upper respiratory tract begins at the nose and mouth and includes the sinuses and the Eustachian tube. You may need to assess these structures Neck Lymphadenopathy – Examine the submandibular, submental, cervical and supraclavicular lymph nodes, balloting them with your fingers to assess size. Trachea – Important to palpate for tracheal deviation in the acutely distressed patient. A deviation may be due to a tension pneumothorax and also can see tracheal tug during increased respiratory effort. A large and obvious pre-tracheal space may alert you to an increased Anteroposterior diameter and overexpansion. 5.3 INSPECTION With female patients, the bra would usually be left in place. When we arrive at examination of the chest we adhere to the IPPA sequence. For ease of the patient and streamlining of the examination, we apply this sequence first to the anterior chest while the patient is resting at 45°, and then the posterior chest. For the latter, sit the patient forward in bed or ask them to sit with their legs over the side of the bed. Some clinicians will reverse the order, examining the posterior before the anterior chest. Observe the shape of the chest. Look for symmetry of the chest and its movements, and for scars that may be pointers to previous lung resection surgery (usually posterior or laterally). Asymmetry may be caused by kyphoscoliosis, or loss of lung volume due to lobar atelectasis (collapse). Asymmetrical movements when the chest is expanding may indicate atelectasis, consolidation, pneumothorax or a pleural effusion. An increased anteroposterior (AP) diameter of the chest suggests chronic hyperinflation of the lungs. Look also for pectus excavatum (a deeply depressed sternum) or pectus carinatum (prominent sternum, “pigeon-like” chest). These two conditions are largely 34 congenital, sometimes acquitred, and can affect proper functioning of the respiratory system (rare in developed world setting). Make sure your hands are clean before proceeding. 5.4 PALPATION The main information derived from palpation of the chest is that of chest expansion. Inspection of the chest may have allowed us to suspect a problem; with palpation we aim to quantify chest expansion. This may be done anteriorly and/or posteriorly. During end-expiration, the finger tips are placed firmly on either side of the lateral chest wall, with the thumbs almost meeting at the midline but off the chest wall. As the patient takes a deep inspiration, the thumbs move apart as the chest expands and should move symmetrically apart in normal chest expansion. The most important observation is that there is movement and that it is symmetrical. 5.5 PERCUSSION Percussion gives us important information about the tissue and spaces lying beneath the surface. Percuss superior to inferior and left to right. You are comparing the note as you move down and across. You need to percuss over the lung fields anteriorly, posteriorly and in the mid axillae. The normal percussion note is resonant in sound and feel, and is symmetrical. The exception to this is the area of cardiac dullness anteriorly. Also note that the diaphragm may be slightly higher on the right, causing an asymmetry of the percussion note here. An abnormal percussion note may be hyper-resonant, dull or stony dull (Table 5.1). By convention, the first percussion point anteriorly is over the clavicle and is percussed directly (without using a finger to strike against – the pleximeter) 5.6 AUSCULTATION Instruct the patient to breathe in and out through an open mouth;this minimises the upper airway sounds and creates good air flow. Auscultate systematically anteriorly and posteriorly, beginning high and moving from side to side. As a minimum, auscultate at each site for the duration of a full respiratory cycle. Include the supraclavicular fossae as listening areas (for the apices). Historically, normal breath sounds are termed „vesicular‟ and are characterised by an expiratory phase that is softer and short in duration than is the inspiratory phase. We tend to simply refer to “normal breath sounds” now. Bronchial breath sounds are louder and harsher than normal breath sounds, and the length of the expiratory phase is equivalent to the inspiratory phase. The sound is similar to that heard when listening directly over the trachea. They are characteristic of consolidation of the alveolar spaces (as in pneumonia) whilst the airways remain patent. This reduces the modifying effect of the alveoli on breath sounds and enhances the transmission of sounds. Similar pathophysiological 35 mechanisms are responsible for increased vocal resonance and whispering pectoriloquy. Also listen for the presence of additional sounds, in particular stridor, wheeze, crackles or rubs. Stridor is a loud inspiratory sound heard without a stethoscope or over the trachea or larynx (and throughout the chest). It is more prominent on exertion and indicates high extra-thoracic obstruction. Wheezes are described as „musical‟, somewhat squeaky, sounds which may vary in duration, timing and pitch. They indicate airway narrowing and are characteristically heard in asthma and chronic obstructive pulmonary disease (COPD). They are usually heard in expiration but may also be present in inspiration. Note that in severe airways obstruction wheezing may be absent. Crackles are discontinuous sounds which vary in pattern, timing, and frequency. They may be heard in a variety of lung disorders. Fine crackles are characteristic of left heart failure although similar sounds can be heard in certain types of pulmonary fibrosis. Medium crackles are more characteristic of bronchiectasis and infection. Rubs are caused by inflamed and roughened pleural surfaces generating friction as they move over each other during respiration. They are creaking, sawing “to-andfro” sounds that stop when the breath is held. Percussion & Auscultation – positioning hint: For posterior assessment it is useful to ask the patient to place their hands on opposite shoulders. For anterior assessment it is useful to ask patients to place hand lightly on their hips. Sign Normal lung Consolidation Pleural Atelectasis effusion Palpation Normal expansion Reduced expansion Reduced expansion Reduced expansion Percussion Normal Reduced (dull) Reduced / absent (stony dull) Reduced Auscultation Vesicular breath sounds Bronchial breath sounds Reduced or (Usually) Reduced breath sounds absent breath sounds Table 5.1 Summary table of respiratory examination findings 36 Other aspects to consider Tactile vocal fremitus and vocal resonance are techniques can be used to further differentiate areas of consolidation and effusion. They are not performed routinely, but can be added to core examination if consolidation or effusion is suspected. In general they have low sensitivity and high specificity [refer to a text book, Chapter 1]. Peak Expiratory Flow Rate (PEFR). This can be a useful bedside/clinic test for patients with known airways obstruction. Patients often know there typical performance when well and this can be compared with the acute test. Make sure you use clean or disposable mouth piece, ideally have the patient standing and use a normogram to interpret the result. In practice, the cardiovascular and respiratory (“cardiorespiratory”) examinations are often indivisible and intertwined and therefore performed together. But for the purposes of clarity in this guide they are separated. 37 6 - EXAMINATION OF THE GASTROINTESTINAL SYSTEM Introduction Ideal exposure – Entire abdomen (xyphi sternum to pubic symphysis); arms and chest should be examinable also Position – Lying supine with head on one pillow, hands to the side Equipment – Stethoscope 6.1 GENERAL OBSERVATION From the end of the bed make an observation of the patient‟s level of consciousness. Hepatic encephalopathy can decrease alertness. Look for abdominal distension which can be caused by masses, ascites, obesity, flatus, faeces or pregnancy. Also look for the presence of: Cachexia – This is the appearance of general physical wasting including loss of muscle bulk. It can be caused by malnutrition, malabsorption, anorexia and malignancy. The Body-Mass Index (BMI) is a useful tool for quantifying nutritional status. Jaundice – Yellow discolouration of the skin and sclerae (often seen earliest at the latter site) caused by hyperbilirubinaemia. This can be due to severe liver disease or common bile duct obstruction by a gall stone or tumour. Pigmentation – Haemochromatosis can cause generalised bronze skin pigmentation. Gynaecomastia - Chronic liver failure may cause breast enlargement in males. Make sure your hands are clean before proceeding. 6.2 PERIPHERIES Hands and wrist Pallor of the palmar creases – This may indicate anaemia (also note general skin colour and conjunctivae). Underlying causes to be considered include malabsorption, blood loss, chronic disease and haemolysis. Palmar erythema – This is abnormal red flushing affecting the thenar and hypothenar eminences. This can occur in association with chronic liver disease but is also found in a range of other conditions including polycythaemia and thyrotoxicosis. Dupuytren‟s contracture – This is a fixed flexion (most often of the ring finger) caused by contraction of the palmar fascia. This can be idiopathic, associated with alcoholism or with manual labour. Clubbing – Gastrointestinal causes of this include liver cirrhosis, inflammatory bowel disease and coeliac disease. Leuconychia – White colouration of the nail bed due to hypoalbuminaemia. Check for hepatic flap (asterixis) by asking the patient to hold their arms outstretched for 15 seconds with fingers separated and wrists in extension. Watch for jerky flapping movements at the wrist and MCP joints. This can occur with liver 38 failure, but other possible causes include hypercapnia and electrolyte abnormalities and is due encephalopathy. Arms, neck and axillae Bruising – May be indicative of clotting abnormalities from liver failure. Excoriations – Scratch marks which indicate itch. There are a range of causes for itch including obstructive liver disease. Spider naevi – These are small red lesions found on the upper trunk and arms consisting of a central arteriole with small vessels radiating outwards. These lesions blanch when pressure is applied to the central red spot. The presence of more than 2-3 spider naevi is associated with liver cirrhosis. Acanthosis nigricans – Velvety brown skin thickening found in the axillae, groin and posterior neck. This can be associated with obesity and insulin resistance, but can also be drug-related or benign in certain racial groups. Lymphadenopathy – Check for axillary, cervical, supraclavicular and inguinal lymphadenopathy which can indicate solid organ malignancy, lymphoma or viral infection e.g. Epstein Barr virus („Glandular Fever‟). A prominent left supraclavicular lymph node may be associated with upper gastrointestinal carcinoma (Virchow‟s node/Troisier‟s sign). Face Examine the eyes for signs of anaemia and jaundice. Also look for: Kayser-Fleischer rings – Brown/green rings at the edges of the cornea. They are caused by copper deposition and are found in Wilson‟s disease. A number of signs can be checked for in the mouth. Assess the state of the dentition. Note any unusual smell (e.g. hepatic and uraemic foetor). Look also for: Gum hypertrophy – This can be caused by gingivitis, vitamin C deficiency (Scurvy) and leukaemia. Macroglossia – Tongue enlargement which can occur in acromegaly and amyloidosis. Glossitis - This is a smooth, sometimes red tongue due to atrophic papillae. This can be caused by nutritional deficiencies. Aphthous Ulcers – there are numerous systemic causes but are associated with inflammatory bowel disease and coeliac disease 6.3 THE ABDOMEN Inspection Check for the normal rise and fall of the abdomen with respiration (it will be held more rigidly when in pain, especially in peritonitis). Look for the presence of scars that may indicate previous surgical procedures. Check for distended superficial veins, e.g. Caput Medusae – prominent veins of the abdominal wall in which blood flows away from the umbilicus. This is an uncommon sign of portal hypertension. Note that for descriptive purposes the abdomen is conventionally described as having nine areas as shown below in Figure 6.1. 39 Figure 5.1 (a) Regions of the abdomen; (b) Quadrants of the abdomen (Courtesy of Glenn McCulloch) Talley, Nicholas J, MB BS (Hons), MMedSc (Clin Epi) (Newc), MD (NSW), PhD (Syd), FRACP, FAFPHM, FRCP (Lond), FRCP (Edin), FACP, FACG, AGAF - clinical examination: A systematic guide to physical diagnosis, 182-218 © 2014 This edition © 2014 Elsevier Australia. Reproduced with kind permission and licence from Elsevier. By adhering to this convention it is possible to report the location of superficial and deep abnormalities in a uniform way. The abdomen may also be described more broadly in terms of four quadrants (Figure 6.1). Palpation Before beginning palpation ask the patient whether there is any pain or abdominal tenderness. This allows you to plan your examination so that you examine the painful area last. It is best if your hands are warm to avoid causing discomfort and subsequent tensing of the abdominal muscles. Begin with superficial palpation in each of the nine areas while watching the patient‟s face for signs of discomfort. Note any tender areas or masses. Tenderness or pain may be accompanied by “guarding” - an involuntary tensing of the abdominal muscles in response to palpation which, in its extreme form becomes generalised rigidity of the abdominal wall. The latter is highly suggestive of peritonitis and is a surgical emergency. A patient may voluntarily guard with lesser pain or through anxiety. Following superficial palpation, deep palpation is conducted in the nine abdominal areas. This component is particularly useful for identifying masses. Any masses palpated should be fully described in terms of: location, size, consistency (hard, firm, 40 soft or fluctuant), surface texture, tenderness, mobility, presence of pulsation and percussion note. An aneurysm of the abdominal aorta may be felt as a pulsatile mass in the epigastrium that is also expansile. Check this by aligning your hands parallel to the aorta on either side of it. Note that a normal abdominal aorta may be palpable in thin people but would not be expansile. The liver should next be assessed. The patient should be instructed to inhale and exhale deeply and regularly. Use the lateral edge of the first finger and hand or the fingertips of all fingers and start parallel to the costal margin, at the level of the umbilicus. With each inspiration, push the hand/fingers gently but deeply into the abdomen where they are held in order to palpate the liver edge as it is pushed down by diaphragmatic action. On expiration, move the hand/fingers 1 to 2 cm closer to the costal margin and repeat cycle with respiration. The liver edge can be palpable just below the costal margin on inspiration in normal people (left lobe, medially) but is difficult. If a liver edge is palpable it is important to determine its surface characteristics, consistency and whether it is tender or nontender, pulsatile or non-pulsatile. The spleen should be assessed next. It normally enlarges inferiorly and diagonally across from left to the right of the abdomen. Using the fingertips of your right hand, begin palpation from the right iliac fossa and move towards the left hypochondrium. Ask the patient to breathe as for liver assessment and again push on inspiration and move on expiration. A characteristic “notch” is often present near the tip of the spleen on its medial edge. If the spleen is not palpable, but enlarged, it may become obvious if the patient is rolled partially over to the right side (left hand supporting the left posterior costal margin). The spleen is not palpable, even with the added manoeuvre, in the normal state. Enlargement of the spleen is usually accompanied by percussion dullness over the left lower rib cage. The kidneys may be palpable when they are enlarged. To assess them, place one hand in the renal angle and flex the fingers while pressing down with the other hand over the opposite surface anteriorly. The kidney may be felt between the two hands. At this point you can provide alternating firm flicks with each hand to set up a fluid wave and increase your chance of identifying a kidney (“balloting”) Percussion Percussion over the abdomen can sometimes illicit pain and is known as percussion tenderness. This is a good indicator of underlying peritonitis. Rebound tenderness has historically been used but percussion tenderness is regarded as a much more acceptable examination to patients as causes far less discomfort. Percussion is also sometimes used to determine the span of the liver in the midclavicular line by determining the upper and lower border. The percussion note changes from resonant to dull as the lower edge of the liver is reached while percussing upwards from the low-mid abdomen to the costal margin. Similarly, when percussing downwards from the right anterior chest wall, the percussion note 41 changes from resonant to dull when the upper border of the liver is reached. normal liver span is 6 to 12cm. The reliability of percussion of the liver is low. The If the abdomen is distended, check for ascites by testing for shifting dullness. With the patient lying supine, percuss the abdomen from the mid-line out to the flanks. If there is flank dullness, note the point (e.g. leave your finger in place) where the dullness begins on the left side. Have the patient roll so that the side you note the dullness is up and after 30-60s percuss again. In the presence of ascites this area will now be resonant due to air and fluid shift. Auscultation Check for the presence of bowel and stomach sounds by listening with the diaphragm of the stethoscope (this can be done anywhere on the abdomen, but is conventionally placed on the left and below the umbilicus). Bowel sounds are absent in the presence of an ileus. “Tinkling” (high pitched and persistent) bowel sounds occur with bowel obstruction. Check for renal bruits by listening on either side above the umbilicus. 6.4 OTHER GASTROINTESTINAL EXAMINATIONS Rectal examination, examination of herniae and external genitalia Rectal examination, hernia examination and genital examination are regarded as part of the gastrointestinal examination. They are complementary to the core examination as indicated by history or examination. In line with the MBChB Sensitive Examination policy, these examinations will only be performed by students after discussion and under supervision. Female pelvic examination may also be indicated and also comes under the policy. The process for performing a rectal examination and a female pelvic examination are given in your Phase 1 clinical skills notes. Herniae may be found at the site of old incisions, involving the umbilicus and in the groin and scrotum. A description of groin swelling examination is included in Chapter 9. 42 7 - EXAMINATION OF THE NERVOUS SYSTEM The key to performing a good neurological exam is a logical sequence and good observation. The primary purpose of a neurological assessment is to accurately locate a lesion causing neurological deficit – identified through correct examination skills and sound application of anatomy knowledge. The full assessment comprises of various components that can be roughly separated into conscious state, cranial nerve and peripheral nervous system examinations. 7.1 MENTAL STATUS State of consciousness This is an important general observation. The patient may be alert, drowsy (falls asleep if undisturbed), stuporose (only arouses with vigorous stimulation), or comatose (does not open eyes even with vigorous stimulation). This is objectively measured using the Glasgow Coma Scale, scored from a minimum of 3 (E1V1M1) to maximum of 15 (E4V5M6). E Eye opening V Best verbal response Spontaneous 4 To verbal stimulation 3 To pain 2 Never 1 Oriented 5 Disoriented 4 Inappropriate words 3 Incomprehensible sounds 2 No vocalisation 1 43 M Best motor response Obeys commands 6 Localises pain (pulls examiner‟s hand away) 5 Flexion/withdrawal from painful stimulus Abnormal flexion to pain (decorticate) Extension to pain (decerebrate) No response to pain 4 3 2 1 Orientation Check the patient is orientated to time, place and person. Patients can be disoriented in any or all of these frames of reference. NB confusion may have a number of causes, e.g. neurological, psychiatric, metabolic or infective disease. Higher function Speech is a particularly important part of higher function that is commonly affected by a variety of neurological conditions. Dysarthria (difficulty articulating words), dysphonia (difficulty phonating words) and dysphasia (inability to process words/language – expressive or receptive) are common abnormalities. Other cognitive functions such as working and long term memory, mental calculations, etc. can be tested as part of mental status. Typically, cognitive function is tested using a „mini mental state‟ test involving a list of questions – there are several variants in common usage. Other preliminary observations General appearance, attitude to the examiner, emotional state or mood, attention span and concentration, thought processes, abnormal thought content and insight are considered further as part of a psychiatric assessment. This is often called the mental state examination, but is different to the purely cognitive mini mental state test. 44 7.2 CRANIAL NERVES Ideal Exposure – face fully visible Position – sitting Equipment – pen torch, cotton wool, „neurotip‟, tendon hammer, 256Hz or 512Hz tuning fork, tongue depressor Supplementary Equipment – ophthalmoscope, red hat pin General observation Some of the most important information during neurological examination is obtained from observation. From a cranial nerve point of view, note the facial appearance, involuntary movements and position of the head and neck. The olfactory nerve (I) Check that the nasal passages are patent and ask the patient to occlude one nostril and sniff through the other. Test each nostril separately with a non-irritant substance (alcohol swabs or coffee granules are often used) to formally test the sense of smell. To informally test, ask the patient whether they have noted a change in their sense of smell. The optic nerve (II) Visual acuity Measure visual acuity of each eye separately with a Snellen chart at a distance of 6m (or 3m for a half size chart). Some clinicians now use a Bailey-Lovie chart instead. This is not a test of refractive error thus ensure the patient is wearing spectacles or contact lenses if they normally do so or ask them to look through a pin hole in a piece of card if their glasses are not available. Acuity is measured by covering each eye and asking the patient to read from the top of the chart down to the lowest possible line – all letters must be correctly identified in each line. The acuity is recorded as the distance from the chart over the number associated with the last complete line read e.g. 6/18 means the patient can read letters at 6m which normally people can read from 18m. Normal acuity is 6/6. If visual acuity is severely reduced and patient is unable to even read the top line, see if the patient 45 can count fingers, detect hand movements, or detect light (on/off pen torch) and record the acuity as such. Colour Vision Test using Ishihara plates. It may pay to check yours first! Pupils Assess the pupils with the patient looking straight ahead at rest; noting size, shape and symmetry of the pupils. Test the pupillary light reflex (Afferent CN II and Efferent CNIII) with a pen torch for the direct response and the consensual response, noting equality and reactivity. Ideally, introduce the light from below (cheek to eye). The swinging light test may also be performed to check for a relative afferent pupillary defect (RAPD). Accommodation Reflex Ask the patient to fix on a distant object and then change quickly to look at a near object, e.g. your finger held close to their nose. The reaction comprises of convergence and meiosis (pupil constriction) in both eyes. Visual Fields This is called a confrontation test and assumes your fields are normal – you are comparing your visual field to theirs. Seat the patient in front of you and sit with your face approximately 30 cm away (you could both be standing instead). Start by asking the patient to cover their right eye whilst you cover your left eye. Explain that they need to continue to look at your nose and ask them to say “yes” when they can see your finger/red hat pin. Bring your finger/pin from each quadrant (upper and lower temporal, upper and lower nasal) towards the centre, i.e. following one side of an „X‟ shape centred on the centre of the field. Swap your hands over when changing from testing temporal fields to nasal fields and do the other side of the „X‟. Identifying central scotoma can be difficult. If using a red hat pin (or other small red object) the patient notices a loss of colour centrally rather than a loss of vision. There are simpler ways of testing visual fields, but this is the best clinical approach. Optic Fundi - Fundoscopy Usually the patient is seated, but you can sit or stand. Ask the patient to remove their glasses and remove your own. Ask the patient to fix on a distant object which is straight ahead and slightly above eye level and keep focussed on it. To examine the patient‟s right eye, use your right eye and hold the ophthalmoscope with your right hand. Change to your left eye and left hand to examine the left eye of the patient. 46 With permission, you may place your free hand lightly on the patient‟s forehead, with your thumb above the eyebrow of the side you are examining to help assist with balance and orientation. With regard to Māori and Pacific peoples, remember that there are cultural sensitivities to touching the head. Always ask permission if you need to touch the head area – it is good practice to do this for all patients. At arm‟s length and holding the ophthalmoscope up to your eye (touching side of nose and orbit), line up the light beam so that you can see the light reflex from the retina (yellow to red). Starting at “+5” adjust the lens selector until the retinal blood vessels seen as part of the red reflex are in focus, changing the lens settings with your index finger to focus the image. Once in rough focus, approach the patient‟s eye keeping the light beam on the retina until you are as close as necessary to get a good view of the retina. Identify the optic disc, in the nasal half of the retina. If the optic disc is not easily visible, follow a blood vessel from thinner to thicker diameter until the disc is seen. Identify any disc changes. Next, examine the retinal blood vessels looking for features of diabetic or hypertensive retinopathy. The fundus, especially the macula, should also be examined. Oculomotor (III), trochlear (IV) and abducens (VI) nerves Sit or stand opposite the patient. Begin by looking at the primary position of the eyes and eyelids. Hold up your finger ~30cm from the patient in the centre of their vision. Ask the patient to keep their head still and then move your finger in an “H” manner to examine full range of movements of each muscle (verticals of the H at the temporal sides of the head). Bear in mind which nerves supply the ocular muscles (“SO4 LR6 The rest 3”). Test the movements slowly and ask about diplopia (“tell me if you see two fingers at any time”. Note the type, if any, of a gaze or muscle palsy or pathological nystagmus (rhythmic oscillation). This is a good time to also test for lid lag (in line with the nose, ask patient to follow your finger in the vertical plane). If the patient reports diplopia but eye movements appear to be full, further tests such as the cover test will be required (see text book). Trigeminal nerve (V) Facial sensation Test facial sensation in all three divisions (ophthalmic, maxillary, mandibular) of the nerve. Testing both light touch (with cotton wool) and pain (pinprick) sensation is the usual standard. Compare each side with patient‟s eyes closed. 47 Muscles of mastication The trigeminal nerve also supplies the muscles of mastication. Look for wasting in the temporal fossae. Palpate the masseter and temporalis muscles while the jaw is clenched. Profound weakness can lead to the jaw deviating towards the side of the weak muscles as the jaw opens. Check for bilateral weakness by ensuring the patient can hold the jaw open against resistance. Corneal reflex This tests a combination of the trigeminal nerve (afferent) and facial nerve (efferent) but is not done routinely to avoid patient discomfort. A very light touch of damp cotton wool on the cornea (not sclera) invokes a bilateral blinking response (this has both a direct and consensual response). Approach the cornea from the side (so they don‟t see it) and avoid touching the eye lid or moving the wool in front of the pupil, both of these errors will induce a blink response due to CN III, giving a false positive result. Jaw jerk Again there is no need to check the jaw jerk routinely. A jaw jerk is commonly absent in health, especially younger people. Ask the patient to let the lower jaw hang open about 2cm in a relaxed position. Place your index finger below the lower lip and gently tap your finger using a tendon hammer in a downward direction. If the jaw jerk is present, there is brisk closure of the jaw. Facial nerve (VII) Facial movements The facial nerve controls the muscles of facial expression; therefore asymmetry of the face upon observation at rest is usually indicative of a lesion. Also, observe movement of the face while smiling and talking spontaneously. Test the strength of the facial muscles and observe the movements while the patient raises their eyebrows, tightly closes the eyes, blows out their cheeks, shows their teeth and purses their lips. Strength is tested by gently trying to oppose the action they are performing and comparing each side of the face. Sensory Taste sensation to the anterior two thirds of the tongue is supplied by the facial nerve. It is not routine to test this but it can help to distinguish between an upper and lower motor neuron lesion. You can ask patients whether they have noticed any changes in sense of taste (although taste overlaps with CN I and the tongue is also supplied by CN IX). 48 Vestibulocochlear nerve (VIII) Hearing A whispering screening test is performed by asking the patient to repeat whispered numbers in one ear whilst masking the other ear by gently moving your finger back and forth in the entrance to the ear canal. Audiometry is a formalised method to measure hearing acuity. If hearing is decreased, determine if the hearing loss is sensorineural (disease of cochlea or cochlea fibres of nerve) or conductive (middle ear disease with loss of air conduction) by using a 256 Hz or 512 Hz tuning fork to perform the following tests. Rinne‟s test determines whether air conduction is better than bone conduction (normal). Place the vibrating tuning fork on the mastoid process until it can no longer be heard and then move it to just in front of the ear canal opening and ask whether it can be heard. If so, this proves air conduction is better and is recorded as a positive test (normal). In sensorineural hearing loss, air conduction is still better than bone conduction. In conductive hearing loss, bone conduction is better than air conduction. Weber‟s test helps supplement Rinne‟s test. The base of the tuning fork is placed on the middle of the patient‟s forehead and the patient is asked where they hear the sound. It is normal to “hear” it in the midline or find it hard to localise. In unilateral sensorineural deafness, it is “heard better” by the normal ear. In unilateral conductive deafness, the tuning fork is “heard better” in the abnormal ear. I.e. the sound localises to one side. Vestibular function Tests of vestibular function are not part of the routine examination of the nervous system, but may be important in the assessment of balance and gait and for comatose patients. Tympanic membrane and external acoustic meatus (otoscopy) This can be performed to examine for tympanic membrane pathology including signs of chronic changes e.g. increased vascularity in chronic inflammation. Glossopharyngeal (IX) and vagus (X) nerves Phonation, palate and swallowing Assess the patient‟s quality of speech and volume. Ask the patient to swallow a sip of water and check for symmetrical co-ordination of the action. Observe the soft 49 palate at rest and during phonation (“Ah”). If there is unilateral weakness, the paralysed side does not move and the midline of the palate is pulled towards the normal side. Gag Reflex and Sensation The reflex involves the sensory afferent glossopharyngeal pathway and motor efferent vagus pathway. It is an unpleasant test which involves tactile stimulation of the pharynx or tonsils with a spatula that results in pharyngeal constriction and palate elevation. Although unpleasant for the patient, it is important to test if you suspect CN involvement at this level. Taste from the posterior two thirds of the tongue is supplied by the glossopharyngeal nerve but is impractical to test. Accessory nerve (XI) Trapezius muscle Look for wasting and compare strength of each side by asking the patient to shrug their shoulders and resisting this by pushing your hands down on their shoulders. Sternocleidomastoid muscle Ask the patient to turn their head to one side and resist you by trying to bring their head gently back to the midline. Palpate the tone of the tense sternocleidomastoid (SCM) muscle. A lesion causes weakness of the SCM on the ipsilateral side i.e. weakness in turning the head away from the lesion side. Hypoglossal nerve (XII) The tongue can demonstrate fasciculations, atrophy and weakness with a hypoglossal nerve lesion. Asking the patient to stick out their tongue can identify these with the tongue deviating towards the weak side, the side of the lesion. Strength of the tongue can be assessed by asking the patient to press the tongue against the wall of their cheek with your finger on the outside of the cheek. Hints and Tips Practice giving the same clear instructions to perfect your examination Careful observation is required to identify deficits Think about what the patient will say for particular visual field defects and document it Ensure you understand the action of each extra ocular muscle 50 7.3 PERIPHERAL NERVOUS SYSTEM Ideal Exposure – from waist up for upper limbs, from waist down lower limbs but ensuring dignity is preserved Position – in bed or chair Equipment –cotton wool, “neurotip”, tendon hammer, 128Hz tuning fork Introduction and General Principles This examination can be separated and structured in numerous ways, depending on the purpose of the examination. The components for upper limb and lower limb nervous system examination are the same: Inspection Tone Power Reflexes Co-ordination Sensation In terms of the order in from distal to proximal or proximal to distal it should be case dependent e.g. assessing for a sensory level following trauma a proximal to distal sensory examination should be used, for detecting a subtle sensory loss in peripheral neuropathy a distal to proximal approach may be better suited. Whichever method is utilised it should be performed systematically. Inspection Inspect the muscles of the upper and lower limbs for wasting, fasiculations or tremor. The patient‟s posture often gives clues to underlying pathology as does observing their gait (watch the patient as they walk in or ask them to walk if feasible). Tone You are looking for increased or reduced tone in muscle groups. This is assessed by passively moving a selection of joints. In upper motor neurone lesions, tone is increased (rigid/spastic) whilst it is normal or reduced (flaccid) in lower motor lesions. Increased tone may be described as rigidity (sustained hypertonia) or spasticity (hypertonia which reduces with continued movement). Rigidity is commonly associated with Parkinson‟s disease, whilst spasticity is commonly associated with upper motor neurone lesions such as „stroke‟. Clonus is associated with increased tone (upper motor lesions) but a few beats can be normal. 51 Power Power is usually graded according to the Medical Research Council (UK) scale, as below (Table 7.1). To resist movements you must use comparable muscle groups i.e. their finger strength compared to yours, great toe strength compared to your thumb. Grade Definition 5 normal power 4 active movement against resistance, but reduced 3 active movement against gravity but not against resistance 2 active movement with gravity eliminated 1 a flicker or trace of contraction 0 no contraction Table 7.1 Medical Research Council (MRC) power grades Reflexes It is important that the patient is relaxed so that the deep tendon reflexes can be elicited. Strike the tendon and watch for a reaction – look for movement around the joint, movement in the muscle and potentially movements that you feel with one of the examining hands. Grade the reflexes elicited according to the following table Grade Definition 0 absent + Present but reduced ++ Normal +++ Increased, possibly normal ++++ Greatly increased Table 7.2 Grading of reflexes 52 The reflex can be reinforced by either asking the patient to clench the jaw or tightly interlock their fingers (fisherman‟s grip) and pulling, just prior to striking with the hammer. This reduces central inhibition of the spinal reflex. Coordination This is commonly incorporated into peripheral nervous system examination and also tests cerebellar function. It is included at this point because it combines motor and sensory function. Sensation (General points) Sensory impairment can be difficult to elicit. Impairment can be local or central and often encompasses one or several spinal levels. Therefore looking for dermatomal patterns is helpful. A sensory level of impairment is particularly important in spinal pathology. The commonly affected modalities of light touch, joint position sense (proprioception), pin prick, vibration, temperature and two point discrimination are tested. It is generally done with the patient‟s eyes closed and sensory stimulus applied at irregular intervals to ensure recording an accurate examination. It is also important to compare each side and ask for subjective differences in sensation. Test each dermatome as shown in Figure below. Light touch Use very light touches with a wisp of cotton wool. Do not stroke the skin with the wool, as this also tests pain reception. Ask the patient to say “yes” when they feel the stimulus and report any differences between each side. Pinprick Use a „neurotip‟ pin only (do not use a needle) - this is a specialised test pin that is double ended, with one sharp (twist off the protecting cap) and one blunt. Irregularly alternate which side is applied and ask the patient to identify “sharp” or “blunt”. Be careful to test sharp sensation in enough dermatomes to prevent missing a sensory deficit. 53 Figure 7.1 Dermatomes for sensory testing. Reproduced and adapted with kind permission from American Spinal Injury Association (ASIA) International Standards for Neurological Classification of Spinal Cord Injury, Key Sensory Points Chart. 54 Joint position Usually tested from the most distal joint. It is important to hold the joint on either side and to start by demonstrating an upward and downward movement with that joint. Then test with the patient‟s eyes closed and ask patient to identify the direction in which the joint moves. When testing, try not to hold the digit over the joint as the pressure will allow false identification of movement as you the joint up or down. Vibration Demonstrate the stimulus by placing the vibrating tuning fork (128Hz) on the patient‟s sternum (set the fork vibrating by striking on your thigh above your knee). Start with the most distal bony point of the limb. Perform the test by applying the vibrating tuning fork to the bony point to be tested with patients eyes closed. Ask the patient to indicate when the vibration is stopped, which you control by clasping your hands over the fork. Alternatively ask whether the fork is vibrating or not, either placing a vibrating or non-vibrating fork on the point. Move proximally if vibration sensation is absent. Temperature Rarely tested in practice but can be done with glass test-tubes filled with warm and cold water. Two-point discrimination Requires a specialised two point discriminator (similar to a set of compasses) so this is also rarely tested except in a specialist clinic. As you close the discriminator, ask the patient when they can no longer differentiate two points and record this distance. 7.3.1 UPPER LIMBS Inspection Inspect primarily for posture, wasting (noting its distribution), fasciculations and abnormal movements (e.g. tremor, chorea, dystonia). Tone Begin at the shoulder and move down to test the elbow and then wrist. Both slow and quicker movements should be performed, usually best done by holding the patients (like a handshake) in yours with your other hand supporting the elbow. “Cog wheel” rigidity is name given to a type that “gives way” suddenly in small increments. This commonly occurs in Parkinson‟s disease and is identified on flexion/extension at the elbow. Another type of increased tone, spasticity, gives a different observation known as “clasp knife” where the limb suddenly gives way 55 after initial resistance to movement (like opening a penknife blade). This can also be identified on flexion/extension of the elbow, whereby resistance suddenly lessens allowing near full extension. Power The following movements are tested and recorded. Abduction/Adduction of the Shoulder Flexion/Extension of the Elbow Supination/Pronation of the Forearm Flexion/Extension of the Wrist Flexion/Extension of the Fingers at the MCP joints Abduction/Adduction of the fingers Abduction/Adduction of the thumb Reflexes Biceps reflex (C5/C6). Sit the patient up (in bed or a chair) with arms resting in the lap and forearms supinated (sometimes helpful to rest arms on a pillow). Put your thumb (or two fingers) on the biceps tendon and strike your fingers/thumb with the tendon hammer. Brachioradialis/Supinator reflex (C5/C6*). Position the patient‟s arm as for the biceps reflex with the forearms midway between prone and supine. Place your index finger on the distal end of the radius and strike your finger with the tendon hammer. * Although this is the same level as biceps, it is tested to distinguish simple from mixed UM and LM lesions Triceps reflex (C7/8). Place the patient‟s forearm across the abdomen with the elbow flexed to about 90 degrees. Strike the triceps tendon. You may cover the tendon with your thumb as you strike it. There is an alternative position with the upper arm supported in abduction at 90 degrees and the forearm hanging at 90 degrees to upper arm. Finger reflex (C8). The finger reflexes are not tested routinely but, in some situations provide useful additional information. Ask the patient to hold their hand palm up. Place the tips of your fingers on the palmer aspect of the patient‟s proximal phalanges (a loose fisherman‟s grip) and tap your fingers gently. The finger reflexes are absent in many normal people but an exaggerated flexion response is abnormal. 56 Coordination Ask the patient to alternately supinate and pronate the hand rapidly – best done by touching the hand to the other hand or another surface. Observe the rhythm and speed of the movements. Difficulty with this rapid alternating movement is also known as dysdiadochokinesis. The finger-nose test can assess movement accuracy, coordination and also identify an intention tremor. Ask the patient to touch the end of their nose with the tip of their index finger and with the same finger, reach out and touch your finger placed at arm‟s length away from them. Move your target finger and repeat several times. Sensation Light touch is tested starting at C3 dermatome and working through to T2 dermatome comparing light touch sensation (see diagram). Pin prick is also tested in the same dermatomal pattern. Vibration sense is usually done on a bony point at the interphalangeal joint first and if normal move on. If abnormal continue to test at progressively proximal joints. Joint position is tested at the distal phalynx of the thumb or a finger. If joint position sensation is impaired in the fingers, test it in the wrist and elbow. 7.3.2 LOWER LIMBS Inspection Once again we need to observe for posture, wasting, fasciculations and tremor. Gait is very useful to incorporate as part of your lower limb inspection. Observing the patient‟s stride length, turning ability, broadness of base and the smoothness of the movements will give important clinical and functional information. Do not let the patient fall, support them if needed. Heel and tip-toe walking can also be incorporated as well as Romberg‟s test. Tone With the patient lying in bed and relaxed, rock each leg by applying lateral movements at the knee. Observe the movement of the foot which should move out of time with the leg movement if normal – it will be in time with increased tone. Also to check for spasticity, lift the knee smoothly and fairly quickly up from the bed and watch the patient‟s heel. Normally, the knee will bend causing the heel to drag along the bed. If there is increased tone the heel will lift off the bed as you lift the 57 knee. Assess clonus in the ankle by taking the weight of the patient‟s lower leg with a hand under the knee, and quickly dorsiflex the ankle, holding the foot in dorsiflexion. Up to three beats of clonus can be accepted as normal. With spasticity, the foot continues to beat in a repeated cycle of flexion and extension. Power Power in lower limb muscle groups needs to be assessed and the following movements are tested and recorded. Flexion/Extension of the Hip Flexion/Extension of the Knee Dorsiflexion (up)/Plantar flexion (down) of the Foot Flexion/Extension of the Great Toe Coordination Rapid alternating movements are tested by asking the patient to tap their foot quickly on your hand held close to the patient‟s sole. The heel-shin test Ask the patient to lift one foot and accurately place the heel on their other knee, then slowly slide the heel down the shin to their ankle with their eyes closed. The foot then needs to be taken off at the ankle and moved away in a circle back to the knee and the motion repeated. Reflexes Knee reflex (L3/L4). There are three options: (1) Slightly flex the right knee and slide your arm under it, laying your hand on the opposite knee. Ask the patient to relax their leg. Strike the patellar tendon. For the left leg, rest your forearm on the right knee and support the left knee with your hand under the joint. (2) Flex the knee to 90 degrees and support the thighs with the patient‟s heels resting on the bed. Strike the patellar tendon. (3) Alternatively have the patient sit with their legs hanging free over the edge of the bed. Strike the patellar tendon. Ankle reflex (S1/2). There are three main ways to elicit this reflex: (1) The most commonly used is with the patient supine, flex and externally rotate the patient‟s hip. Flex the knee and gently hold the patient‟s foot in 90° dorsiflexion. Strike the Achilles tendon directly with the tendon hammer. (2) With the patient lying supine, dorsiflex the foot to 90o hold the ball of the foot with your fingers and strike your fingers with the hammer, feeling for a reflex response. (3) Ask the patient to kneel on the edge of a chair, facing away from you (this requires a greater degree of cooperation and function). Strike the Achilles tendon directly with the tendon hammer. 58 The plantar responses are commonly checked during this examination but this is a superficial reflex, not a tendon reflex. It can be elicited by tactile stimulation of the plantar surface of the foot, moving over the lateral border of the sole and then across the ball of the foot. The stimulus should be performed using a firm, blunt instrument (avoid the end of tendon hammers if they are sharp). The end of a wooden tongue spatula works well. The normal response is flexion of the big toe (flexor plantar response). In an upper motor neuron lesion, the big toe extends up and the other toes may fan out (extensor plantar response or Babinski reflex). Record as extensor (up-going), flexor (down-going) or no response. Sensation Light touch is tested starting at L2 dermatone and working through to S2 dermatome comparing light touch sensation. Perianal sensation, although a sensitive examination, could yield vital information in acute spine pathologies. Pin prick is also tested in the same dermatomal pattern. Vibration sense is usually done at a bony point on the interphalangeal joint first and if normal move on. If abnormal continue to test on bony prominences at progressively proximal joints. Joint position is tested with the great toe, holding the proximal phalanx and moving the distal phalanx. If joint position sensation is impaired in the toes, test it in the ankle or knee. Summary of Findings Upper Motor Neurone Inspection Lower Motor Neurone Muscle atrophy, fasciculations present Tone Increased Decreased Power Decreased Decreased Reflexes Increased, clonus present Reduced or Absent Reflexes Other Babinki sign positive Table 7.3 Summary of neurological examination findings in upper motor and 59 lower motor neurone lesions Hints and Tips False weakness can be identified secondary to pain Isolate joints to accurately assess power (e.g. hand on shin, below knee, when testing ankle reflex) Always compare the two limbs The heel shin test is best explained by passively moving the patients limb through the movement as you talk through it Reflexes are elicited by striking a tendon not muscle 60 8 - EXAMINATION OF THE MUSCULOSKELETAL SYSTEM 8.1 INTRODUCTION Individual joints require specialised tests to give clues towards a clinical diagnosis. The principles of musculoskeletal examination remain the same for each joint and are simply: Look Feel Move Neurovascular assessment is also usually performed to complete joint examination. There are also numerous specialised tests for each joint and adjacent structures, but these are outside the scope of this book. What are presented here are simplified examinations limited to tests relevant at an undergraduate level. Ideal Exposure – joint exposure Position – upper limb sitting, lower limb lying in bed Equipment – nil except for special tests 8.2 EXAMINATION OF THE HAND AND WRIST Look A lot of clinical information can be obtained from the initial inspection of the hands. Psoriatic skin and nail changes, ischaemic changes in vasculitis, characteristic connective tissue disease rashes and finger pulp tophi in chronic gout are all commonly visible. The distribution of joint pathology in the hands can be indicative of/specific to certain diseases, thus should be noted e.g. the osteoarthritis versus rheumatoid arthritis distributions. Other joint deformities can also be characteristic of disease e.g. Boutonniere‟s deformity in rheumatoid arthritis, Heberden‟s nodes in osteoarthritis. Isolated thenar muscle wasting may occur in carpal tunnel syndrome and osteoarthritis of the 1st carpometacarpal joint. Generalised muscle wasting accompanies chronic hand arthritis due to disuse, primary neurologic disease and old age. Feel A “metacarpal squeeze” compressing across all MCP joints is a quick method to screen for joint disease and elicits tenderness. Palpate each DIP and PIP joint individually for pain and swelling. Palpate over the palm for crepitus and nodularity in the flexor tendons with passive finger movement. Dupuytren‟s contracture is a commonly identified pathology of thepalmar fascia, which becomes thickened and contracted, so that the tendons cannot move freely . 61 Move Joints A good start to the hand examination is to test hand function for activities of daily living. This will involve: Pen grip Pinch grip Key grip Hammer grip Check that all fingers can be fully extended. If not, this may be due to tendon rupture, subluxation or fixed joint damage. Check that a tight clenched fist can be made i.e. this tests the interphalangeal joints. The range of motion of the wrist and forearm should be compared to the table below. Flexion Extension Radial Deviation Ulnar Deviation Pronation Supination 70° 70 ° 20° 30° 80° 80° Tendons Finkelstein's test is to test for radial tenosynovitis. This is performed by the patient clenching their thumb in a fist and gently applying pressure to ulnar-deviate the wrist. Occurrence of pain along the radial wrist border occurs in the presence of tenosynovitis of abductor pollicis longus or extensor pollicis brevis (de Quervain‟s tenosynovitis). Flexor digitorum superficialis inserts into the middle phalynx and can be tested by holding the proximal phalynx and asking the patient to flex at the PIP joint. Likewise, flexor digitorum profundas inserts into the distal phalynx and asking the patient to flex at the DIP joint whilst holding the middle phalynx. Neurovascular Vascular Both the radial artery and ulnar arteries should be palpated and collateral circulation checked using Allen’s test. Neurology Motor The median nerve supplies the short muscles of the hand (Lateral two lumbricals, Opponens Pollicis, Abductor Pollicis Brevis, Flexor Pollicis Brevis [LOAF]). Function can be tested in the hand by testing thumb opposition. This is performed by turning the 62 patient‟s hands palm up and asking the patient to raise their thumbs towards the ceiling. Resisting this movement will enable you to assess muscle strength. The radial nerve enables wrist extension so strength should be compared to the examiners. Radial nerve lesions will result in wrist drop. The ulnar nerve supplies the intrinsic muscles of the hand and allows finger abduction and adduction. Check the strength of finger abduction by comparing against yours. Test finger adduction by placing a piece of paper between the patient‟s fingers and ask them to abduct their fingers strongly around it, whilst you try to remove the paper as you hold the other end of the paper in the same manner. Sensation The median nerve supplies the volar aspect of the hand of the radial three and half fingers. The radial nerve supplies a relatively small area and sensory testing is usually limited to the anatomical snuff box on the dorsal aspect of the hand. The ulnar nerve supplies the dorsal and volar aspects of the ulnar one and half fingers. Sensation to all modalities should be tested as with any neurological assessment. Special tests Phalen's tests for median nerve compression involves flexing the wrist for 60 seconds and question the patient about the development of tingling, pins and needles, or numbness in the median nerve distribution. Tinel's test for median nerve compression is performed with the palm facing upwards and the wrist dorsiflexed. Gently tap the flexor aspect of the wrist with your finger. Tingling, or pins and needles radiating in the median nerve distribution suggest compression and patients commonly state it recreates their carpal tunnel syndrome symptoms. 8.3 EXAMINATION OF THE ELBOW JOINT Look Ask the patient to stand in the anatomical position with arms fully extended and look for an abnormal carrying angle. Swelling within the elbow joint appears beneath the lateral epicondyle in the olecranon concavity. The olecranon bursa is located posteriorly and is not in communication with the elbow joint. This may swell in response to friction, sepsis or sterile inflammation. Rheumatoid nodules, gouty tophi or psoriasis may all be visible over the posterior elbow surface. Feel Elbow pain commonly arises from the tendon-bone junctions of the common flexor tendon medially („golfer‟s elbow‟) or the common extensor tendon laterally („tennis elbow‟) as they attach to the humeral epicondyles. Palpate these bony prominences and as well as distally for a few centimetres along the tendon. Pain is often increased by resistance against the working muscle tendon unit. Palpate the olecranon bursa between thumb and index finger to identify small nodules or tophi. Palpate the radial head and the upper outer forearm while passively rotating the 63 forearm to identify crepitus or direct pressure to elicit subluxation („nursemaids elbow‟). Move Record any fixed flexion deformity whilst the patient attempts to fully extend the elbows. Touch the thumb to the anterior shoulder to assess flexion and normal flexion is 150° with 0° of extension. Neurovascular Vascular Palpate the brachial artery as part of the elbow examination Neurology The distal tests of hand function are utilised as well as further sensory testing of the forearm. The forced flexion test and Tinel‟s test at the elbow can also be used to elicit signs of ulnar neuritis. 8.4 EXAMINATION OF THE SHOULDER JOINT The shoulder joint complex includes the glenohumeral joint, rotator cuff, tendons and muscles, the subacromial bursa, acromioclavicular joint, sternoclavicular joint and scapulo-thoracic articulation. Always examine the neck to complete shoulder assessment as pain is frequently referred from the neck to the shoulder. Look Asymmetry between the shoulders can indicate generalised muscle wasting may reflect disuse, neurological or muscle disease. Localised wasting in the supraspinatus fossa groove may occur with rotator cuff disease. The neutral position of the shoulders should also be observed. Swelling of the glenohumeral joint is seldom visible but occasionally subacromial bursal swelling is seen in the anterolateral upper arm. Look for acromioclavicular or sternoclavicular joint enlargement. Feel Feel for tenderness over the greater humeral tuberosity where the rotator cuff tendons attach, over the anterior shoulder joint line, sternoclavicular and acromioclavicular joints. Roll the biceps tendon under the finger over the anterior humeral head with the shoulder externally rotated. Move Function A screening examination utilising Apley‟s three-step scratch test involves asking the patient to scratch an imaginary itch over the opposite scapula by doing the following: 64 1. Reaching over the opposite shoulder 2. Reaching behind the neck 3. Reaching behind the back These movements assess internal and external rotation of the shoulder. Abduction and adduction should also be tested. Shoulder pain is commonly due to disturbance of rotator cuff tendons and/or the closely associated subacromial bursa. This can be tested with: “Belly Press Test” – the patient is asked to place their hand in front of their abdomen and press towards themselves. This is a test of subscapularis. “Lift Off Test” – this is useful for younger patients whereby the patient is asked to place their dorsal aspect of their hand against their lumbar spinal region. Against resistance they are asked to lift off their hand away from their back. This is a test for shoulder impingment and subscapularis. “Empty Can Test” – the patients is asked to place their hands extend their arms fully and turn their thumbs towards the floor (as if emptying beer cans). Against resistance ask the patient to abduct their arms. This is a test for supraspinatus. External rotation - assessed with arms by the sides, elbows flexed and forearms rotated outwards) is typically limited with glenohumeral arthritis or frozen shoulder. Shoulder impingement syndrome and supraspinatus tendonitis tends to produce a painful arc of abduction from approximately 40° to 140°. Passive motions should also be assessed if limited on active movements. Forward Flexion Backward Extension Abduction Adduction Internal Rotation External Rotation 180° 60° 180° 45° 80° 60° Neurovascular Vascular The subclavian artery and brachial artery can be palpated as part of the shoulder examination. Neurology The myotomes of C5 to T1 are generally included in the shoulder examination. The motor function of the long thoracic nerve should be tested by looking for a winged scapula. This can be done by asking the patient to press their palms against a wall and look at the movements of the scapulae from the rear. The sensory component will involve testing sensation in the “regimental patch” area on the deltoid to test function of the axillary nerve, particularly relevant post shoulder dislocation. 65 8.5 EXAMINATION OF THE HIP JOINT Look Assessment of lower limb symptoms begins when the patient walks from the waiting room to the consultation room. Observe the gait for abnormalities suggesting proximal muscle weakness, unilateral pain or uneven leg length. Record whether a walking aid is required. Looking at the hips, begin by examining for scars, asymmetry or skin abnormalities. Examine for buttock wasting and for pelvic tilt by standing behind the patient with a hand on each side of the pelvic brim. The Trendelenberg test for weakness of hip abductors (common but not specific to hip disease) is performed by asking the patient to stand alternately on each leg. Normally, the hip abductors cause the pelvis to tilt up with the side the leg is lifted. If they are weak, the pelvis will not be able to be lifted up and actually tilt down. Thus, a positive test is noted when the pelvis tilts down when standing on the affected side. The position of the leg at rest is also particularly relevant to note. For example, a suspected fractured neck of femur the leg is often shortened and externally rotated. Feel Feel for tenderness over the greater femoral trochanter in the upper lateral thigh. This is the site of muscle attachment and also of a bursa, both of which can give rise to pain. Also feel for warmth of the joint. With the patient supine, measure the patient‟s actual leg lengths (anterior superior iliac spine to medial malleolus), and apparent leg lengths (umbilicus to medical malleolus). Actual leg length discrepancies may reflect hip disease or past surgery. Apparent leg length discrepancies suggest a tilted pelvis due either to spinal disease or an abduction contracture of the hip on the shorter side. Move Check first for any fixed flexion deformity of the hip which may be hidden by a compensatory lumbar lordosis. Unmask this deformity by lying the patient supine, flexing the hip opposite to the side you are testing with your free hand underneath their lumbar spine to see the lordosis has been obliterated (normal). Without a fixed flexion deformity the tested leg will remain straight and extended on the bed. If the hip has any fixed flexion deformity this will become evident as the thigh lifts from the bed and patient is unable to keep their leg straight (Thomas test). Then proceed to examine hip movements with a degree of knee flexion. Roll the patient to a lateral or prone position to test extension if they are mobile enough. 66 Flexion Extension Abduction Adduction External Rotation Internal Rotation 120° 30° 45° 30° 45° 45° 8.6 EXAMINATION OF THE KNEE JOINT Look Observe the standing patient for misalignment of the knee under load (vaLgus deformity is Lateral tibial deviation, varus deformity is medial tibial deviation) from in front and behind. Inspect the popliteal fossa for swelling. Look for quadriceps wasting and confirm by circumferential measurement of each thigh at a defined distance above tibial tuberosity e.g. 10cm above. Inspect the suprapatellar and medial joint regions for joint swelling. Feel Palpate for sites of tenderness may include the medial and lateral patella edges, infra-patella bursa and infra-patella tendon just below the knee cap, tibial tuberosity, and medial and lateral joint line themselves (best felt with the knee in flexion). Examine for patellofemoral pain by compression of the joint over the distal patella. Have the patient apply a quadriceps contraction during this manoeuvre. Ascertain whether the knee is warm. Soft tissue swelling of the knee may reflect synovial thickening and/or effusion. Confirm the presence of free fluid in one of two ways: Bulge test (for small effusions). Compress the suprapatellar pouch with the left hand while “milking” fluid from the medial aspect of the joint; then press or stroke the lateral knee while maintaining suprapatellar pressure. Watch medially for a fluid wave. Patellar tap test (for larger effusions). Maintain compression of the suprapatellar bursa with the left hand while balloting the patella posteriorly against the femur. Feel for the rise and fall of the patella which indicates excess joint fluid and the 'tap' of the patella against the femur. Move Check for complete knee extension (0°) and flexion the knee by drawing the heel towards the buttock (135°) both actively and passively. Palpate the joint line for crepitus during these manoeuvres. Assess medial and lateral collateral ligaments for stability by supporting the knee close to full extension and then applying 67 alternate varus and valgus stress to the tibia to test the lateral and collateral ligaments, respectively. Assessment of the cruciate ligaments begins with observation. With the patient supine, ask them to bend their legs and place their feet on the bed with knee flexed at approximately 90°. Lag of the tibia beneath distal femur suggests weakness or rupture of the posterior cruciate ligament. The anterior cruciate is tested by the anterior draw test. Stabilise the lower leg usually by sitting on the patient‟s foot and grasping the proximal tibia in both hands and try to draw it forward. A draw forward is a positive test and suggests anterior cruciate weakness. Repeat with posterior pressure as the posterior draw test. Neurovascular Vascular Palplate the popliteal artery within the popliteal fossa and distal dorsalis pedis and posterior tibialis pulses. Neurology Test sensation to dermatomes to L2 to S2. 8.7 EXAMINATION OF THE ANKLE AND FOOT Look Inspect the Achilles tendons for swelling of tendon or bursa and then look at the ankle joint itself looking for swelling, deformity or scars. Examine the muscle bulk of the calf inspecting for wasting or contractures and note the neutral position of the heels at rest. Looking at the foot, examine the arches and their change during toes standing as well as hallux valgus and varus. In the supine patient inspect the sole of the foot for callosities or features of irregular loading e.g. ulcers. It is useful to look at the patient‟s shoes as excess wear can help assess gait and abnormal loading. Feel Palpate the Achilles tendon insertion posteriorly on the calcaneus and the plantar fascial insertion medially beneath the calcaneus. Confirm an intact Achilles tendon by gently squeezing the calf with the patient prone or kneeling on a chair and observing plantar flexion of the ankle (Simmond‟s test). The ankle joint itself should be palpated to identify effusions or warmth. Transverse squeeze of the forefoot is a useful screening test for MTP synovitis/bursitis. Palpate the intermetatarsal space for tenderness suggesting bursitis. Feel for metatarsal heads subluxed into the sole. 68 Move Assess flexion/extension at the ankle joint and inversion/eversion at the subtalar joint. The latter is demonstrated by rocking the calcaneus beneath the talus while stabilising the latter anteriorly with the non-examining hand. Assess the mid foot for stiffness and pain by grasping the movement and passively rotate it. Check the range of motion of the toes. 8.8 EXAMINATION OF THE SPINE Look General observations such as posture, general health and how comfortable the patient is are important when looking at the spine. Look for spinal deformities such as scoliosis, kyphosis and check for the normal lumbar lordosis. Look for any surgical scars. Feel With the patient standing slightly forward flexed, gently palpate vertebral bodies and interspinous spaces for tenderness or defect. Palpate bilaterally for soft tissue pain para spinally. Move Cervical spine flexion / extension are assessed by asking the patient to look first at the ceiling then to flex the chin to the chest. Rotation is assessed by asking the patient to look over each shoulder. Lateral flexion is assessed by tipping the ear towards the shoulder. Thoracic spine rotation is assessed by first seating the patient to stabilise the pelvis. Ask the patient to place his hands behind his head and rotate to the right and left. The lumbar spine should have a normal lordotic curve, which is reversed on forward flexion. Lumbar distraction is measured by a modified Schober‟s test. It may be measured by identifying the posterior iliac crests and marking a point 10cm above and 5cm below in the midline. The 15cm gap between these two points should distract at least 5cm in forward flexion (i.e 15 to 20cm) with straight knees. Assess extension by asking the patient to bend back at the waist and lateral flexion by having the patient run the fingers laterally down the side of each leg. Neurology Neurologic examination is an important aspect of spinal examination and should cover full upper and lower limb neurological examination. 69 Sacral nerve root assessment should include perineal sensation and rectal examination for sphincter tone (motor function). Upper motor neurone dysfunction may occur where spinal disease affects the spinal cord. Assess for increased limb tone (including knee or ankle clonus), upper motor neurone distribution weakness, hyperreflexia and extensor plantar responses. Assess for evidence of nerve root entrapment using a few special tests: Straight leg raise whereby straight leg raising is limited by pain (note degree of hip flexion this occurs at). This pain is due to the nerve root becoming entrapped. Femoral stretch test (upper lumbar roots) - with the patient on his side or prone and the knee in a fully flexed position, extend the hip. Pain again occurs as the nerve becomes entrapped. 8.9 THE GALS LOCOMOTOR SCREENING EXAMINATION The GALS (Gait-Arms-Legs-Spine) is a simple and quick screening examination that focuses on specific joints or groups of joints that are sensitive indicators of musculoskeletal problems. It is a combination of inspection, palpation and movements for each section. If any problems are detected in this screening examination, you then need to do a detailed examination of the relevant areas. Three screening questions Do you have any pain or stiffness in your arms, legs, or back? Do you have any trouble getting up and down stairs or steps? Can you dress yourself completely without difficulty? Examination Gait Ask the patient to walk a short distance, turn and then walk back. Observe their gait looking for symmetry, smoothness of movement, normal stride length, pelvic tilt, arm swing, normal heel strike, stance, toe-off, swing through and ability to turn with ease. Note any antalgic, trendelenburg, hemiplegic gait or Parkinsonian gait features. Arms, Legs and Spine Inspection As convention dictates the GALS screen begins with simple observation. done from the front, the side and then behind. This is 70 From behind Inspect for a straight spine (note any scoliosis), normal paraspinal muscle bulk, symmetrical shoulder and gluteal muscle bulk, symmetry of iliac crests, absence of popliteal swellings, absence of foot or hindfoot swellings. From the side Inspect for a normal cervical and lumbar lordosis and normal thoracic kyphosis. Whilst standing beside the patient place your index finger on one of the lumbar vertebral spinous processes and your middle finger on the next one down and ask the patient to bend over and touch their toes, keeping their legs straight. Normally, as the patient bends, the spinous processes will move apart, so your fingers will move apart also. From the front Inspect for a normal and symmetrical shoulder and quadriceps muscle bulk, knee swellings, deformity of mid or hind feet. Arm, Legs, Spine Palpation and Movement Begin at the shoulders over mid supraspinatus and roll the skin over the trapezius to test for signs of hyperalgesia or fibromyalgia. Following this work through the joints and movements systematically, noting asymmetry, restricted movements, crepitus and pain. Rotation of the thoracic and lumbar spine. Gently hold the patient's hips still and ask them to: "Turn your shoulders round as far as you can to the left, then do the same to the right." Lateral flexion of the thoracic and lumbar spine: "Stand up straight and then slide the palm of your right hand down your thigh towards your knee, bending your shoulder down to the side." "Now do the same with your left hand down your left leg." Cervical Spine Lateral Flexion: "Bend your left ear down towards your left shoulder and then your right ear down towards your right shoulder" Cervical spine flexion/extension: "bend your neck forwards to try to touch your chin against your chest" and "bend your neck back to lift your chin." Tempero-mandibular joint movement: "open your jaw and move it from side to side" Steno-clavicular, gleno-humeral and acromio-clavicular joint movement: "put your hands behind your head with your elbows as far back as they can go. Now try to touch the small of your back" Elbow extension "put your hands by your sides with your elbows straight" Wrist and finger deformity or restricted range of motion: "put your hands out in front of you with your palms down and fingers out straight" 71 Supination of the forearm and swellings of the palms: "now turn your hands over" Grip strength: "now make a fist with both hands around my fingers and squeeze tightly" Fine precision: "place the tip of each finger onto the thumb" Metacarpal squeeze for metacarpal phalangeal tenderness. Now lay the patient down. True (ASIS to medial malleolus) and apparent (umbilicus to medial malleolus) leg length for each side Knee movement: "put your heel onto your bottom" Internal rotation of the hip with the knee joint flexed to 90 degrees (moving the foot laterally with the knee flexed causes internal rotation of the hip joint early OA causes pain and limitation of this movement). Inspect the soles of the feet for any calluses, or skin changes. Squeeze the metatarsal joints to test for any tenderness Hints and Tips Always ask a patient if they have pain in a joint before assessing passive range of motion A look-feel-move examination sequence is useful for most peripheral joints For unilateral problems examine the normal side first Comparison of the symptomatic with the contralateral normal limb in unilateral disease is more informative than comparison with a text book movement range. Restriction of active and passive movement may reflect damage to the articular surface, permanent soft tissue contraction, muscle spasm or simply pain. Restriction of just active movement it is more likely to be a muscle or tendon dysfunction 72 9 – SURGICAL CLINICAL EXAMINATIONS 9.1 EXAMINATION OF GROIN SWELLINGS AND TESTES Ideal Exposure – from umbilicus to knees Position – standing and lying Equipment – chaperone, gloves, torch Inspection Hernias are best identified in the standing position so the examination should begin with the patient standing unless there is a clear lump already present. Initially look for any obvious swellings, scars or asymmetry in the groin or scrotum and overlying skin changes. Ask the patient to turn their head away and cough while looking for a bulge. Hernias are a protrusion of a viscus through an abnormal opening in the abdominal wall and are most common in the groin. Palpation With the patient standing you must crouch, sit or kneel to the side of the patient to best examine a groin swelling. The examiner‟s hand should match the patient‟s side being examined. The inguinal ligament is identified running from the anterior superior iliac spine to the pubic tubercle. The hand is placed with the middle finger aligning with the inguinal ligament and the tip palpating the pubic tubercle. The index finger will lie over the site of a direct inguinal hernia, the middle over an indirect hernia and the ring finger over a femoral hernia. The patient is then requested to cough again while feeling for an impulse. Any lump should be palpated gently noting size, tenderness and consistency. It is important to assess if the hernia is reducible. This is best assessed with the patient lying with most patients being able to reduce the hernia themselves. If the patient cannot reduce the hernia gentle pressure by the examiner is appropriate. Irreducible hernias can become obstructed and if tense and tender may be strangulated. Palpation of the Testes Check for the presence of masses or cysts within the scrotum by gently palpating the testes, epididymis, spermatic cord and the overlying scrotal skin and dartos muscle. Tenderness should be noted and the position of any lump in relation to these anatomical structures noted. Check whether it is possible to get above the lump as a large indirect inguinal hernia can reach the scrotum. Trans-illumination of 73 a scrotal mass helps to differentiate between a cystic (epididymal cyst, hydrocele) and solid (tumour) lesion. To complete the examination, palpate for inguinal and para-aortic lymph nodes as testicular lymphatic drainage is to the para-aortic nodes. 9.2 EXAMINATION OF A LUMP Describing a lump well often guides the differential diagnosis. This format should be used to describe any identified mass on examination. The salient descriptive features are: Site – Describe all lumps in relation to planes (eg. the skin, subcutaneous tissue, muscle or bone) and anatomical landmarks Size – measure three dimensional size in cm. Shape Surface and composition – The smoothness or regularity is important to note as well as whether it is solid or fluid filled in composition. Skin – Tethering to the skin should be noted and any overlying skin changes Surrounding structures and relations – Check whether the lump is tethered to surrounding structures (mobility) and palpate the lymph nodes that drain the area. Special tests – Trans-illumination, reducibility, bruits are further differentiating features particular to specific pathologies. Other features – temperature, pulsatility and tenderness 9.3 EXAMINATION OF THE BREASTS Ideal Exposure – from waist up Position – sitting up during inspection, inclined or flat during palpation Equipment – chaperone Supplementary Equipment – pen torch Please refer to previous chapters and University Guidelines with regard to sensitive examinations. Inspection Inspect the breast and axillary regions for any surgical scars indicating previous breast excisions, reconstructive or cosmetic surgery. Assess for asymmetry whilst the patient is seated relaxed with her hands on her thighs. Look carefully for skin changes (puckering, colour changes, etc.), nipple changes (inversion, etc.) or discharge and masses. Inspection should also be done as the patient presses her hand on her hips, contracting the pectoral muscles which may accentuate any skin dimpling, then also with her hands placed behind her head which may make any masses more obvious. 74 Palpation Careful palpation of the breasts with the flat of the fingers in each of the four quadrants and central breast regions should be undertaken. Apply enough pressure to examine superficial then deep tissue of the breast. Move from the outer breast towards the nipple and in a clockwise direction. The texture of the breast tissue, any tenderness and palpable mass noted. Any mass identified should be described as any lump (see below) but fixation to underlying or overlying structures is particularly important. Assessing for fixation to the skin is like other lumps but checking for attachment to the pectoral muscles can be done by asking the patient to tense her muscles with her hands on her hips. Mobility of a breast lump can help differentiate a fibroadenoma which is highly mobile. The axillary tail of Spence needs to be examined and palpated between your thumb and fingers. Discharge should be attempted to be expressed from the nipple as is relevant to numerous underlying breast pathologies. Note characteristics of nipple discharge including the presence of blood staining. Note whether nipple discharge is unilateral or bilateral. The lymph nodes within the supraclavicular fossa and the axilla also need to be palpated to conclude the routine breast examination. Relaxation of musculature and axillary fascia is achieved by supporting the arm in neutral position and will facilitate palpation of deep axillary lymph nodes. A full system examination should be performed if carcinoma is suspected. 9.4 EXAMINATION OF THE NECK AND THYROID Ideal Exposure – neck fully exposed Position – sitting in chair Equipment – Tongue depressor, pen torch, stethoscope, glass of water, piece of A4 paper Supplementary Equipment –tendon hammer The neck is comprised of various structures that can require careful examination. The thyroid gland, salivary glands, carotid and subclavian arteries, jugular veins, lymph glands, trachea and oesophagus are all important structures. 75 Inspection Inspect the patient from the end of the bed as with any patient, paying particular attention to the many signs of thyroid disease (see Table 9.1). A few pertinent features are: Look for the presence of an anterior neck swelling suggesting the presence of a goitre or thyroid nodule/mass. Habitus as well as obvious signs of recent weight loss or gain. Patients attire and whether is suitable for the prevalent weather can be indicative. Hands - ask them to hold them out flat, looking for a resting tremor and clubbing. A tremor can be easier to identify by placing a piece of A4 paper on top of their hands. Feel for moist/sweaty palms and inspect pulse for rate and dysrhythmia. Face and eye examination - look from the side to exophthalmos and from the front for chemosis. Test for a lid lag by placing your finger approximately 30cm in front of their face in line with their nose and raising it upwards and asking them to follow. This is repeated to see if the eyelids tire. Test full range of eye movements to assess for the presence of a divergent squint, diplopia or ophthalmoplegia (seen in severe Graves‟ ophthalmopathy) Muscle weakness and myopathy. Tendon reflexes may be abnormal. Pemberton‟s sign – ask the patient to raise up both arms high. Hold for at least 30 seconds. Inspect for venous congestion and cyanosis consequently occurring. This can illustrate a thoracic inlet obstruction due to a retrosternal goitre. Make note of any dysphonia indicating the possibility of laryngeal nerve dysfunction. Examination of the neck is incomplete without inspection of the oro-pharynx, salivary glands, scalp and skin of the face and neck. Malignant lesions in these regions may present with cervical lymph node metastases. Dentures should be removed to allow complete inspection of the oral cavity. A tongue depressor and good illumination assists with examination. Observe the state of dentition and inspect the oral cavity including tongue, floor of mouth and posterior pharynx . Look closely at the neck from both the side and front looking for goitre, scars and skin changes. Ask the patient to take a sip of water and swallow upon your request as you look for a thyroid swelling move upwards. A thyroglossal cyst can be differentiated by the presence of a midline mass which will elevate when the patient is asked to stick out their tongue. The vessels can usually be identified – examining for abnormal pulsations or distension. 76 Palpation The thyroid gland is palpated by standing behind the patient. Place your hands on each side of the thyroid gland and try to palpate the borders of the gland. A completely normal thyroid gland may not be palpable. The thyroid should also be palpated during swallowing. Describe an enlarged thyroid in the usual manner as any lump and note warmth or tenderness. Note the presence or absence of tracheal deviation. The lymph nodes of the neck are also best examined whilst standing behind the patient. Use the tips of your fingers to palpate in sequence the lymph nodes of the neck – submental, submandibular, pre and post auricular, occipital, cervical and supraclavicular. Check the active range of motion of the neck for flexion/extension, lateral (right and left) flexion and rotation. Palpate the parotid, submandibular and sublingual glands. Examine the facial nerve function. Percussion Percuss the upper part of the manubrium where dullness could signify a retrosternal goitre. Auscultation Checking for a thyroid bruit is regarded as part of the thyroid exam and would signify a hyper vascular thyroid gland and is typically seen with Graves‟ disease. The carotid arteries are also auscultated to identify bruits signifying stenosis. 77 Eyes Hyper-thyroidism Hypo-thyroidism Chemosis Periorbital oedema Stare Lid lag Exophthalmos* Face Cachexic Puffy Eye signs Hoarse voice Anxious Limbs Pulse and BP Sweaty palms Cold puffy fingers Persistent fine tremor Carpal tunnel syndrome Rapid hyper-dynamic pulse Slow pulse rate Possible atrial fibrillation Skin Sweaty Cold, thick Pre-tibial myxoedema* Muscles Proximal limb weakness (myopathy) Delayed relaxation ankle jerks Brisk reflexes Other Enlarged thyroid gland Features Table 9.1 Summary of features of hyper- and hypo thyroidism. * These features are specific to Graves‟ disease 78 9.5 PERIPHERAL VASCULAR SYSTEM EXAMINATION Ideal Exposure – from waist up and from underwear down (including socks off), covered by blanket Position – lying in bed Equipment – Stethoscope Supplementary Equipment – Doppler ultrasound General observation As always, start with a general observation from the end of the bed looking for clues to help make your diagnosis. A few observations you should look for are: Bandages – Look for their presence as well as the type and location. Dressings can be very specific to the underlying pathology. Ulcers – Taking a good general look at the start the examination will help identify ulcers and ensure they are not missed later on closer inspection. Surgical scars – Bypass graft scars, vein harvesting scars or precordium or abdominal scars may be for correction of vascular disease. Peripheries – upper limb Begin the examination at the hands and continue in a logical manner as below. Hands and wrist Finger clubbing - There are numerous cardiovascular causes of clubbing Capillary refill – This is measured by pressing down on the pulp of the thumb/finger for 5 seconds until blanched. Upon release, note the time to return to normal colour and is normally less than 3 seconds with good arterial supply. Peripheral cyanosis – Localised cyanosis secondary to vascular disease can occur or can be due to a central cause. Radial pulse – This pulse is palpated by compressing the radial artery against the distal volar aspect of the radius at the wrist. A slow rising pulse is associated with significant aortic stenosis. Arm Brachial pulse – This is assessed by palpating the brachial artery underneath the head of biceps on the medial side, compressing it against the humerus. Face Eyes – Subconjuctival pallor can be identified in anaemic patients as well as signs of hypercholesterolaemia. Mouth – Check for similar signs to your cardiovascular examination. 79 Neck Carotid pulse – This should be auscultated in the anterior triangle of the neck between the larynx and the anterior border of sternocleidomastoid listening for a bruit. Do not palpate the carotid in peripheral vascular disease (risk of embolus) but palpate the superficial temporal artery anterior to the ear. Precordium and abdomen It is generally accepted to include a brief, modified examination of the heart within the peripheral vascular system examinations. The abdomen needs to be palpated to check for an abdominal aortic aneurysm. Bruits are auscultated for in the renal arteries and iliac arteries (both sides). Renal arteries are auscultated for either side of the midline above the level of the umbilicus, whilst iliac arteries are auscultated below the level of the umbilicus. Peripheries – lower limb including ulcer examination The bulk of the pathology will be identified during examination of the lower limbs. A closer inspection of the lower limbs is required looking for the following particular features. Ulcers – This is defined as a discontinuity of the skin epithelial surface. There aetiology of skin ulcers is varied and differentiating the types requires observation of the following characteristics: Position - Venous ulcers tend to occur in the “gaiter” region, neuropathic ulcers on pressure regions and arterial ulcers are often on the lateral aspect of the distal calf and in the toes and interdigital spaces as well as at pressure areas. Size Shape Walls and depth - Arterial and neuropathic ulcers tend to be punched out and deep whist venous ulcers tend to have more sloping edges and shallow. Everted edges occur in malignant ulcers. Base - Sloughy bases with exudate tend to be venous stasis ulcers, whilst arterial ulcers depending on stage can be even be black and tend not to bleed. Sensation - Neuropathic ulcers are painless and insensate. Surrounding tissues - Venous skin changes can surround venous ulcers, callosities can surround neuropathic ulcers and cellulitis may also be present. Skin changes – Trophic changes where the skin appears very smooth and hairless. Nails Hair distribution – The distribution of hair changes with vascular disease 80 Skin colour - Characteristic skin changes occur with vascular insufficiency, depending on its chronicity and degree. Temperature – Ischaemic limbs become cold and easier to assess by comparing both sides. Pressure areas – Make a point of looking at the pressure areas of the feet; particularly the first MTP joint, the heel and the lateral aspect of the foot. In between the toes – Important to check for often unnoticed lesions. Acutely ischaemic limb – this is a surgical emergency and clinical features are often referred to as the 6 P’s (painful, pallor, pulseless, parasthaesia , paralysis and perishing with cold) Pulses Femoral pulse including radio-femoral delay – The femoral pulse is felt half way between the pubic symphysis and the anterior-superior iliac spine at the mid inguinal point. Popliteal pulse – This is palpated within the popliteal fossa when the knee is very slightly flexed by the examiner. It is important that the patient is relaxed. Two hands are required to lift the pulse of the popliteal artery between the heads of gastrocnemius and feel it against the upper end of the tibia. Dorsalis pedis pulse – The artery is palpated between the first and second rays of the foot. Posterior tibialis pulse – This is located 1cm posterior to the medial malleolus. Further Tests Ankle/Brachial Pressure Index (ABPI) – this is a ratio of the systolic blood pressure measured in the ankle divided by the pressure measured in the arm. This is usually done by using a standard sphygmomanometer cuff to provide occlusion in the arm and just above the ankle and a Doppler ultrasound placed on the brachial artery or posterior tibial/dorsalis pedis artery, respectively, to obtain a reading. 81 NOTES 82 83 Contact Medical Programme Directorate Faculty of Medical and Health Sciences The University of Auckland Private Bag 92019 Auckland New Zealand Phone: +64 9 923 1606 Email: [email protected] Web: www.fmhs.auckland.ac.nz 84
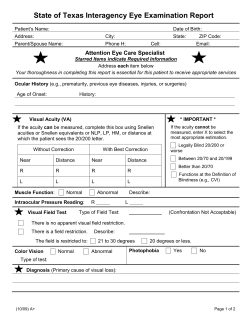


© Copyright 2026