
COPYRIGHT © VIRGINIA DEPARTMENT
COPYRIGHT © 2014 Department of Forensic Science VIRGINIA DEPARTMENT OF SECTION FORENSIC BIOLOGY PROCEDURES MANUAL FORENSIC SCIENCE SECTION VI QUALITY ASSURANCE PROGRAM DNA TYPING OF BIOLOGICAL MATERIALS UNCONTROLLED COPY Forensic Biology Section Procedures Manual, Section VI Issued by Biology Program Manager Issue Date: 22-September-2014 Document 210-D600 Revision 5 Page 1 of 38 Table of Contents TABLE OF CONTENTS 1 Quality Assurance Program 2 Equipment, Reagents and Supplies 3 Quality Control of Critical Reagents and Supplies 4 Validation of PCR-Based Analytical Procedures 5 Internal Controls and Standards – Polymerase Chain Reaction (PCR) Procedures 6 Dedicated PCR Facilities COPYRIGHT © 2014 VIRGINIA DEPARTMENT OF FORENSIC SCIENCE Appendix A Autoclave Quality Control Appendix B Centrifuge Speed Check by Tachometer Appendix C Care and Maintenance of Pipettes Appendix D Thermometer Temperature Calibration Appendix E Thermal Cycler 9700 Temperature Calibration, Temperature Non-Uniformity and System Performance Diagnostic Tests Appendix F Preparing NIST Traceable Samples Appendix G Guide for Review of CE DNA Data UNCONTROLLED COPY Forensic Biology Section Procedures Manual, Section VI Issued by Biology Program Manager Issue Date: 22-September-2014 Document 210-D600 Revision 5 Page 2 of 38 1 Quality Assurance Program 1 1.1 QUALITY ASSURANCE PROGRAM Goals and Objectives 1.1.1 Goals COPYRIGHT © 2014 VIRGINIA DEPARTMENT OF FORENSIC SCIENCE 1.1.1.1 To support criminal justice agencies in the Commonwealth with DNA typing of selected biological materials associated with criminal investigations using polymerase chain reaction (PCR) based testing. 1.1.1.2 To maintain a DNA Data Bank of convicted offenders and arrestees. 1.1.1.3 To ensure the quality, integrity, and accuracy of the DNA typing data through the implementation of a detailed quality control program. 1.1.2 Objectives 1.1.2.1 Establish and monitor quality requirements for reagents, supplies, equipment, and analytical procedures. 1.1.2.2 Ensure that the entire DNA typing procedure is operating within the established performance criteria and that the quality and validity of the analytical data is maintained. 1.1.2.3 Ensure that problems are noted and that the appropriate corrective action is taken and documented in a Memorandum of Record or case file documentation for the affected case file(s) and, if necessary, for the Quality Control records. 1.2 Organization and Management Structure The organization and management of the Virginia Department of Forensic Science is addressed in the Quality Manual, Section 3, Organization and Management. The management structure for the Department is set forth in the Department Organizational Chart. 1.3 Personnel Qualifications and Training The procedure for the qualification and training of personnel is addressed in the Quality Manual, Section 19, Personnel and Training. The policy that addresses attending meetings and seminars is addressed in the Quality Manual, Section 19.8, Continuing Education and Training. UNCONTROLLED COPY Each laboratory will maintain the training record for each assigned person. All analyst(s), the technical leader and casework CODIS administrator(s) must receive 8 hours of continuing education on a yearly basis. The technical leader shall approve the continuing education program which will be documented on the Department’s Report of Training /Conference Attendance Form. Records of attendance shall be maintained by the laboratory. A review of scientific literature will be conducted through the use of a reading list. The technical leader will approve the articles on the list. Documentation of the completion of the required reading shall be maintained by the section supervisor or their designee(s). 1.4 Facilities The Facilities of the Department are addressed in the Quality Manual, Section 20, Facilities, Security and Safety. Forensic Biology Section Procedures Manual, Section VI Issued by Biology Program Manager Issue Date: 22-September-2014 Document 210-D600 Revision 5 Page 3 of 38 1 Quality Assurance Program 1.5 Evidence Control The procedure for the assignment of laboratory numbers to submission of physical evidence, and item [sub-item] numbers to evidence contained in the submission of physical evidence is addressed in the Quality Manual, Section 15, Records and Case Files. COPYRIGHT © 2014 VIRGINIA DEPARTMENT OF FORENSIC SCIENCE The procedure for the handling of physical evidence is addressed in the Quality Manual, Section 14, Evidence Handling. DNA extracts and amplified product are defined as work product. 1.6 Validation The validation of new DNA technologies/methodologies by the Forensic Biology Section is addressed in this manual. In addition, a summary of each validation study is maintained with the data. The summary and data are maintained by the Biology Program Manager as directed by Section 5 of the Quality Manual, Technical Procedures and Manuals. 1.7 Analytical Procedures The analytical procedures used by the Section are set forth in the Section Procedures Manual. Establishment of these procedures is guided by the Quality Manual, Section 4, Quality System Documents, and Section 5, Technical Procedures and Manuals 1.7.1 Estimation of the uncertainty of measurement: no critical measurements are taken during the analytical process in the Section; therefore, no estimation of uncertainty of measurement is necessary. 1.8 Calibration and Maintenance Procedures for the calibration and maintenance of laboratory equipment are set forth in this manual. Establishment of these procedures is guided by the Quality Manual, Section 5, Technical Procedures and Manuals, Section 8, Supplies and Services, and Section 21, Equipment. 1.9 Proficiency Testing The proficiency testing program for the Department is referenced in Section 17.5 of the Quality Manual, Proficiency Testing, as well as Section 10 of the Quality Manual, Nonconformities and Corrective Actions. 1.10 Corrective Action The procedure for corrective action is set forth in the Quality Manual, Section 10, Nonconformities and Corrective Actions. 1.11 Reports UNCONTROLLED COPY The procedure for generating a Certificate of Analysis is addressed in the Quality Manual, Section 16, Reporting Test Results. The procedure for the preparation, storage and disposition of case file records is addressed in the Quality Manual, Section 15, Records and Case Files. The procedure for the expungement of records is addressed in the Quality Manual, Section 15.11, Expungement of Records. 1.12 Review The procedure for the administrative and technical review of case files is addressed in the Quality Manual, Section 17, Monitoring Results. To aid the Section examiner during the review of the documentation found in the case file, the “Guide for Review of CE DNA Data” found in Appendix G is used as a guide and is not intended to supercede or replace the official technical review form addressed in the Quality Manual. Forensic Biology Section Procedures Manual, Section VI Issued by Biology Program Manager Issue Date: 22-September-2014 Document 210-D600 Revision 5 Page 4 of 38 1 Quality Assurance Program The procedure for the monitoring of the testimony of casework examiners is addressed in the Quality Manual, Section 17.4, Testimony Monitoring. The administrative review also includes a review of the chain of custody and the disposition of the evidence. The chain of custody review includes the written chain of custody on the RFLE and the electronic chain information maintained for the item/container. COPYRIGHT © 2014 VIRGINIA DEPARTMENT OF FORENSIC SCIENCE On occasion, there can be initial disparities between the conclusions drawn by qualified examiners in the technical review process. The first step towards achieving a unified scientific conclusion should be a discussion between the examiner and technical reviewer. In this discussion, each party should provide details supporting the basis of their conclusions. If consensus cannot be achieved, the supervisor should be consulted. The Biology Program Manager can be contacted for further technical discussions between the examiner and technical reviewer/supervisor or examiners in other laboratories, if necessary. An inconclusive result should be reported in the rare instance where a scientific consensus cannot be reached. 1.13 Safety The policies and procedures for safety in the laboratory are addressed in the Department Safety Manual. 1.14 Audits The procedure for audits of the Department is addressed in the Quality Manual, Section 12, Audits. A FBI Quality Assurance Audit of the Section is conducted by an external agency at a minimum of every other year. The official record and response to prior audits is maintained by the Department Quality Assurance Coordinator in the Department’s headquarters laboratory. 1.15 Outsourcing Outsourcing is addressed in the Quality Manual, Section 7, Subcontracting of Tests. Technical specifications of the outsourcing agreement are approved by the technical leader prior to the outsourcing agreement being awarded. A technical review of the vendors data is conducted prior uploading sample profiles into SDIS. The following elements are included in the technical review: • • • • DNA types to ensure they are supported by the analytical data Associated controls, ILS and ladder A review of the final report if provided by the vendor Verification of the DNA types, eligibility and correct specimen categories for entry to CODIS UNCONTROLLED COPY On-site visits are conducted prior to the beginning of casework analysis. Annual on-site visits are conducted as required. The on-site visit will be documented and maintained by the laboratory. The on-site visit will assess the following elements: • • • • Evaluate training and credentials of new personnel involved in the project Evaluate any new validation which will be implemented on contract samples Review procedures Inspect facilities Forensic Biology Section Procedures Manual, Section VI Issued by Biology Program Manager Issue Date: 22-September-2014 Document 210-D600 Revision 5 Page 5 of 38 1 Quality Assurance Program 1.16 Document Retention The document retention policy of the Department is addressed in the Quality Manual and is summarized below: • • • • • • • Proficiency tests are maintained for at least 6 years Corrective actions are maintained for at least 6 years Audit records are maintained for at least 6 years Training records are permanent records Continuing education is a permanent record Case files are retained for 50 years Court testimony monitoring is maintained for at least 6 years COPYRIGHT © 2014 VIRGINIA DEPARTMENT OF FORENSIC SCIENCE 1.17 Case File Documentation Technical records that are generated electronically and printed are considered complete after the document is printed and the print session is closed. Changes to these records after this time must be tracked and made in accordance with the Quality Manual. Technical records that are generated electronically and saved for printing upon completion are considered complete when the last analytical procedure documented on that record (e.g., worksheet) has been completed. Changes to these records after this time must be tracked and made in accordance with the Quality Manual. Note: For example – in the Excel workbooks used for DNA analysis, each individual worksheet will be considered complete once the last procedure documented on that worksheet has been completed. Examination documentation that is saved electronically and not printed (e.g., additional injections not used for conclusions, Data Bank data) is considered complete when saved to a disk (or other suitable media) which is then initialed, dated and uniquely identified by the examiner prior to the technical review. Changes to this documentation after it is complete will need to be regenerated electronically and saved to a new disk which is then initialed, dated and uniquely identified by the examiner. The original and subsequent disks are saved as part of the case record. UNCONTROLLED COPY Forensic Biology Section Procedures Manual, Section VI Issued by Biology Program Manager Issue Date: 22-September-2014 Document 210-D600 Revision 5 Page 6 of 38 2 Equipment, Reagents and Supplies 2 EQUIPMENT, REAGENTS AND SUPPLIES The purpose of the procedures in this section is to ensure that the parameters of the testing process are routinely monitored in the manner necessary to maintain the success and reliability of the testing procedures. To ensure that the supervisor in each laboratory is aware of the quality control and quality assurance issues that affect his/her section on a quarterly basis, at minimum, the supervisor and/or the individual assigned the task of overseeing the quality assurance/control, will conduct a documented review of the equipment calibration/maintenance logs (e.g., temperature logs) to ensure that the documentation is completed correctly. In addition, upon the completion of the quality control testing of critical reagents the supervisor or designee will review, initial and date the quality control documentation prior to the critical reagent being used to conduct casework or Data Bank analyses. COPYRIGHT © 2014 VIRGINIA DEPARTMENT OF FORENSIC SCIENCE Controls utilized during each phase of the testing procedure are designed to signal potential problems in the analysis. If acceptable results are obtained on these controls, it is reasonable to assume that the results for other samples analyzed using the same equipment, reagents, and supplies will be accurate and acceptable. If the controls indicate a problem with the analysis, it may be possible to determine the source of the problem and correct for it. Depending on the nature of the problem, re-analysis of the samples may be required. Where the samples are irreplaceable and/or limited in amount (as in most casework), it is highly desirable to minimize the need for repeat analysis due to failure of equipment, materials or reagents. To that end, quality control (QC) procedures should focus as much as possible on preventing problems before they occur rather than on dealing with them after they happen. 2.1 Instruments and Equipment 2.1.1 Inventory The section will maintain an equipment inventory. 2.1.2 Operating Manuals Warranty information and operating manuals will be filed in the laboratory and will be readily available to all operators of instruments and equipment. 2.1.3 Calibration/Maintenance/Repair Records Anytime an instrument or piece of equipment requires calibration, service or maintenance, that fact will be documented on an "Equipment Calibration/Maintenance/Repair Form” found in Document 210-F600 or comparable log form. Additionally, instruments/equipment on routine service contracts will have routine service calls documented. These forms will be maintained in a ring binder or properly labeled file. 2.1.4 Calibration and Maintenance Schedules UNCONTROLLED COPY Routine maintenance and/or calibration will be performed on each instrument/piece of equipment listed, based upon the following schedule. Critical equipment is defined as: NIST traceable thermometer Balance Thermal cycler temperature verification system Thermal cycler QPCR system 3130xl Pipettes Biomek QIAGEN Universal robot Forensic Biology Section Procedures Manual, Section VI Issued by Biology Program Manager Issue Date: 22-September-2014 Document 210-D600 Revision 5 Page 7 of 38 2 Equipment, Reagents and Supplies NOTE: If an instrument/equipment is out of calibration with the manufacturer’s or the Section’s specifications, the instrument/equipment will immediately be taken off line for repair and the maintenance/repair will be documented on the "Equipment Calibration/Maintenance/Repair Form”. If an instrument/equipment is out of calibration and cannot be repaired it will be taken off line and the attempted repair will be documented on the "Equipment Calibration/Maintenance/Repair Form”. Subsequently, the instrument/equipment will be removed from the section’s inventory and will be documented. COPYRIGHT © 2014 VIRGINIA DEPARTMENT OF FORENSIC SCIENCE • ANALYTICAL BALANCES: Annually - Serviced and calibrated by outside vendor. Record the service call on the "Equipment Calibration/Maintenance/Repair Form" found in Document 210-F600 or comparable log form. If the balance is taken off line for repair/maintenance, prior to being put back in service, the annual calibration will be conducted or the calibration check will be conducted as a performance check. Calibration check - Because there are many different analytical balances used throughout the Section the weights used to verify the calibration of the analytical balance should include at least 3 data points covering the range for which the analytical balance is used. PASS/FAIL RANGES FOR EACH DATA POINT (WEIGHT) 0.1 g 1.0 g 10 g 50 g 100 g 400 g 500 g 1.0 kg ± 0.005 g ± 0.01 g ± 0.1 g ± 0.1 g ± 0.5 g ± 1.0 g ± 1.0 g ± 1.0 g If the analytical balance is outside of the acceptable range perform the calibration check a second time prior to making a service call. • AUTOCLAVE: 6 Months - Verify and record operating temperature and pressure using a biological indicator. (Refer to Appendix A for the procedure.) Each Use - Check the temperature and pressure gauges to ensure the autoclave is working properly. Monitor autoclave tape indicator. UNCONTROLLED COPY As Needed - Clean. Have authorized vendor service. If the autoclave is taken off line for repair/maintenance, prior to being put back in service, the biological indicator test will be conducted as a performance check. ● P BIOMEK® NX WORKSTATION: Annually - Have authorized vendor evaluate and perform necessary maintenance and repair. Record the service call on the "Equipment Calibration/Maintenance/Repair Form" found in Document 210F600 or comparable log form. Annually – The syringes and or pipettes on the instrument will be calibrated by an authorized vendor. Record the service call on the "Equipment Calibration/Maintenance/Repair Form" found in Document 210-F600 or comparable log form. Forensic Biology Section Procedures Manual, Section VI Issued by Biology Program Manager Issue Date: 22-September-2014 Document 210-D600 Revision 5 Page 8 of 38 2 Equipment, Reagents and Supplies P Quarterly - Refer to the Procedures Manual Section IX, Biomek® NX Workstation Automation P Workstation Procedures Manual, Appendix C, Calibration of the Biomek® NX Automation Workstation, for the procedure on performing this function. P If the Biomek® NX is taken off line for repair/maintenance, prior to being put back in service, the home all axes and framing the deck functions will be conducted as well as extracting samples and blanks as a performance check. The number of samples and blanks may vary depending on the repair/maintenance performed. Most situations will be covered by extracting 2 samples and 2 blanks and taking these samples all the way through the DNA typing process. If a pipette probe is out of calibration and repaired a sample and a blank should be processed in this affected row. This will dictate if additional samples and blanks are processed. For example, if 4 pipette probes are out of calibration then 4 samples and 4 blanks will be required for the performance check. COPYRIGHT © 2014 VIRGINIA DEPARTMENT OF FORENSIC SCIENCE • CENTRIFUGES: Annually - Using a photoelectric tachometer check and record the speed of the rotor. (Refer to Appendix B for the procedure.) If a centrifuge is only used to pulse spin samples it is not necessary to quality control check the centrifuge rotor speed using a tachometer. Each Use - Wipe out the inside of the centrifuge with 70% ethanol or isopropanol. As Needed - Clean and replace brushes. Have authorized vendor service and calibrate. Document the authorized vendor’s service or the in-house maintenance on the "Equipment Calibration/Maintenance/Repair Form" found in Document 210-F600 or comparable log form. If a centrifuge is taken off line for repair/maintenance, prior to being put back in service, the annual tachometer check will be conducted as a performance check. Not required for centrifuges that are used for pulse spins only. • DNA CONCENTRATOR/EVAPORATOR: Each Use - Wipe out the inside of the DNA concentrator/evaporator with 70% ethanol or isopropanol. As Needed - Clean solvent collection trap. • FREEZERS (- 20°C): Weekly (and prior to putting into service) - Check and record temperatures each Monday. If the temperature checks cannot be performed on Monday, they will be made on the first regularly scheduled work day. If the temperature is greater than -10°C the thermostat will be adjusted to lower the temperature. Afterward the temperature will be monitored to ensure that the temperature does not increase. If the temperature continues to rise above -10°C the freezer will be removed from service until it can be repaired. The maintenance/repair will be documented on the "Equipment Calibration/Maintenance/Repair Form found in Document 210-F600 or comparable log form. • UNCONTROLLED COPY HEAT BLOCKS: Weekly (and prior to putting into service) - Check and record temperature. If the temperature on the thermometer while in the hole of the block designed to hold the thermometer is greater than ± 2.0°C from the specified temperature (e.g., 37°C, 56°C, or 95°C) the thermostat will be adjusted to obtain the correct temperature. The heat block temperature will be re-read and documented. If the correct temperature cannot be achieved the heat block will be removed from service until it can be repaired. The maintenance/repair will be documented on the "Equipment Calibration/Maintenance/Repair Form” found in Document 210-F600 or comparable log form. Forensic Biology Section Procedures Manual, Section VI Issued by Biology Program Manager Issue Date: 22-September-2014 Document 210-D600 Revision 5 Page 9 of 38 2 Equipment, Reagents and Supplies Each Use - Check temperature. • HOODS: o BIOLOGICAL SAFETY CABINETS (EVIDENCE HANDLING AND PCR SETUP) and FUME HOODS COPYRIGHT © 2014 VIRGINIA DEPARTMENT OF FORENSIC SCIENCE Annually - Have authorized vendor evaluate and perform necessary maintenance and repair. Record the service call on the "Equipment Calibration/Maintenance/Repair Form" found in Document 210-F600 or comparable log form. Each Use - Wipe down the inside of the hood with 10% bleach (or a solution that will degrade DNA) followed by cleaning with isopropyl alcohol and/or ethanol before each use. If the hood is equipped with an alarm and the alarm sounds when the hood is in use, and will not reset, the hood will be taken off line until it can be repaired. An authorized vendor will be contacted to repair the hood. The maintenance/repair will be documented. o BENCH TOP AIRCLEAN WORKSTATIONS (EVIDENCE HANDLING, PCR SETUP and EXTRACTION) and DRYING CABINETS (EVIDENCE HANDLING) Annually - Have authorized vendor evaluate and perform necessary maintenance and repair. Record the service call on the "Equipment Calibration/Maintenance/Repair Form" found in Document 210-F600 or comparable log form. As Needed - Change pre-filter and HEPA filter. Each Use - Wipe down inside of the hood with 10% bleach. Do not use isopropanol or ethanol in the workstation. • INCUBATORS (OVENS): If the incubator is used only to dry glassware it is not necessary to verify the temperature as specified below. Weekly - Check and record temperatures. If the temperature is greater than ± 2.0°C from the specified temperature (e.g., 37°C, 56°C, or 95°C) the thermostat will be adjusted to obtain the correct temperature. The incubator temperature will be re-read and documented. If the correct temperature cannot be achieved the incubator will be removed from service until it can be repaired. The maintenance/repair will be documented on the "Equipment Calibration/Maintenance/Repair Form” found in Document 210-F600 or comparable log form. UNCONTROLLED COPY Each Use - Check temperature. • NIST TRACEABLE THERMOMETER: Purchase a new NIST traceable thermometer when the unit needs to be re-calibrated. Maintain documentation of the calibration of the NIST traceable thermometer. Prior to use or yearly check documentation to ensure thermometer is within calibration. • pH METER: Each Day of Use - Check and record the calibration at two set points. As Needed - Check solution in probe and replace. Document the maintenance on the "Equipment Calibration/Maintenance/Repair Form" found in Document 210-F600 or comparable log form. Forensic Biology Section Procedures Manual, Section VI Issued by Biology Program Manager Issue Date: 22-September-2014 Document 210-D600 Revision 5 Page 10 of 38 2 Equipment, Reagents and Supplies If a pH meter is taken off line for repair/maintenance, prior to being put back in service, the each day of use check will be conducted as a performance check. • PHOTOELECTRIC TACHOMETER: Follow manufacturer’s requirements for recalibration – If required have an authorized vendor evaluate and recalibrate or recertify the tachometer. Document the maintenance on the "Equipment Calibration/Maintenance/Repair Form" found in Document 210-F600 or comparable log form. COPYRIGHT © 2014 VIRGINIA DEPARTMENT OF FORENSIC SCIENCE • PIPETTES: Annually - Have an authorized vendor evaluate and perform necessary maintenance and repair. Record this service on the "Equipment Calibration/Maintenance/Repair Form" found in Document 210-F600 or comparable log form and retain the calibration certificate generated by the vendor. This serves to demonstrate that the pipette has passed QC prior to being put back into service. As Needed - Clean inside/outside with isopropyl alcohol and check the seal. (Refer to Appendix C for the procedure.) Once the pipette has been reassembled conduct a quick calibration check using the graduated Rainin Pipette Tips discussed in Appendix C. If a pipette appears to be out of calibration, it will be sent to an authorized vendor for repair. Record this service on the "Equipment Calibration/Maintenance/Repair Form" found in Document 210-F600 or comparable log form and retain the calibration certificate generated by the vendor. As Needed - If a pipette appears to be out of calibration between normally scheduled performance/calibration checks, the pipette will be sent to an authorized vendor for repair. The maintenance/repair will be documented on the "Equipment Calibration/Maintenance/Repair Form” found in Document 210-F600 or comparable log form and retain the calibration certificate generated by the vendor which will serve as the pipette’s performance check. o MULTI-CHANNEL PIPETTES: Annually (if used for precision measurements) - Have an authorized vendor evaluate and perform necessary maintenance and repair. Record this service on the "Equipment Calibration/Maintenance/Repair Form" found in Document 210-F600 or comparable log form and retain the calibration certificate generated by the vendor. If a multi channel pipette appears to be out of calibration between normally scheduled performance/calibration checks, the pipette will be sent to an authorized vendor for repair. The maintenance/repair will be documented on the "Equipment Calibration/Maintenance/Repair Form” found in Document 210-F600 or comparable log form and retain the calibration certificate generated by the vendor which will serve as the pipettes performance check. • UNCONTROLLED COPY QIAGEN UNIVERSAL ROBOT Annually - Have authorized vendor evaluate and perform necessary maintenance and repair. Record the service call on the "Equipment Calibration/Maintenance/Repair Form" found in Document 210F600 or comparable log form. Refer to the Procedures Manual, Qiagen Universal Procedures Manual, Appendix B, Calibration and Maintenance, for the procedure on performing these calibration and maintenance checks. If the Universal Robot is taken off line for repair/maintenance, prior to being put back in service, the monthly calibration and maintenance will be conducted as a performance check. • REFRIGERATORS (4°C): Weekly - Check and record temperatures each Monday. If the temperature checks cannot be performed on Monday, they will be made on the first regularly scheduled work day. The temperature should fall between 1-6°C. If not, the thermostat will be adjusted accordingly to bring the temperature into this Forensic Biology Section Procedures Manual, Section VI Issued by Biology Program Manager Issue Date: 22-September-2014 Document 210-D600 Revision 5 Page 11 of 38 2 Equipment, Reagents and Supplies range. Afterward the temperature will be monitored to ensure that the temperature does not fall outside of this range. If the temperature continues to fall outside of this range the refrigerator will be removed from service until it can be repaired. The maintenance/repair will be documented on the "Equipment Calibration/Maintenance/Repair Form” found in Document 210-F600 or comparable log form. • STRATAGENE® MX3005P™ QPCR SYSTEM: COPYRIGHT © 2014 VIRGINIA DEPARTMENT OF FORENSIC SCIENCE Semi-Annually – Perform the instrument qualification test run following the procedure outlined in the P Procedures Manual Section IX, Biomek® NX Workstation Automation Workstation Procedures Manual, Appendix D, PERFORMING THE STRATAGENE MX3005P™ INSTRUMENT QUALIFICATION TEST. Record the results of the qualification test in the quality control log. Note: The filter/gain settings need to be changed back to the instrument default prior to conducting the test. If the QPCR system is taken off line for repair/maintenance, prior to being put back in service, the instrument qualification test run will be conducted as a performance check. • THERMAL CYCLER VERIFICATION UNIT: Annually - Send the thermal cycler verification unit to an authorized vendor for calibration. Record the calibration/maintenance check on the "Equipment Calibration/Maintenance/Repair Form" found in Document 210-F600 or comparable log form. • THERMAL CYCLER: 9700 Thermal Cycler: Quarterly - Perform and record the results of the temperature calibration, temperature non-uniformity and the system performance diagnostic tests. If any of the tests fail, contact an authorized vendor. The maintenance/repair will be documented on the "Equipment Calibration/Maintenance/Repair Form found in Document 210-F600 or comparable log form. Record the results of the verification test on the appropriate worksheet provided in Document 210-F601. (Refer to Appendix F for the procedure.) If a thermal cycler is taken off line for repair/maintenance, prior to being put back in service, the quarterly calibration tests will be conducted as a performance check. • THERMOMETERS: Annually - Check calibration of each thermometer (excluding thermometers used to verify refrigerator and freezer temperatures) in use against a NIST or NIST traceable thermometer. (Refer to Appendix D for procedure.) If the temperature is greater than ± 1.0°C from the temperature of intended use (e.g., 37°C, 56°C, or 95°C) the thermometer will not be used to monitor temperatures at that range. If the thermometer is greater than ± 1.0°C for more than one temperature range the thermometer will be removed from service and documented. UNCONTROLLED COPY Check the calibration of all new thermometers (excluding thermometers that are to be used to verify refrigerator and freezer temperatures) against a NIST or NIST traceable thermometer prior to putting into service. As Needed - Clean with mild detergent. • TYPE 1 WATER SYSTEM: As Needed - Change filters/cartridges, sanitize, and/or have an authorized vendor clean and check unit. Record the replacement/maintenance check on the "Equipment Calibration/Maintenance/Repair Form" found in Document 210-F600 or comparable log form. Forensic Biology Section Procedures Manual, Section VI Issued by Biology Program Manager Issue Date: 22-September-2014 Document 210-D600 Revision 5 Page 12 of 38 2 Equipment, Reagents and Supplies • WATER BATH: Each Day of Use - Check and record temperature. Ensure the water level is at the correct height. If the temperature is greater than ± 2.0°C from the specified temperature the thermostat will be adjusted to obtain the correct temperature. The water bath temperature will be re-read and documented. If the correct temperature cannot be achieved the water bath will be removed from service until it can be repaired. The maintenance/repair will be documented on the "Equipment Calibration/Maintenance/Repair Form” found in Document 210-F600 or comparable log form. COPYRIGHT © 2014 VIRGINIA DEPARTMENT OF FORENSIC SCIENCE As Needed - Clean and replace water. • 3130xl GENETIC ANALYZER: Annually - Have authorized vendor evaluate and perform necessary maintenance and repair. Record the service call on the "Equipment Calibration/Maintenance/Repair Form" found in Document 210F600 or comparable log form. Refer to the Procedures Manual, Data Bank PowerPlex 16 Procedures Manual, Appendix C for the maintenance of the 3130xl. If a 3130xl is taken off line for repair/maintenance, prior to being put back in service, a performance check will be performed. This check will consist of injecting a minimum of 2 ladders and 2 DNA samples of a known genotype. 2.2 Reagents, Chemicals, and Supplies 2.2.1 Sources of Reagents, Chemicals, and Supplies A listing of all commercial reagents, chemicals, and supplies is found in the Procedures Manual, Section III, Fluorescent Detection PCR-Based STR DNA Protocol PowerPlex® 16 BIO System. 2.2.2 Reagents, Chemicals and Supply Inventory Upon receipt of all reagents, chemicals and supplies, the packing slip will be checked for agreement with the items received. A copy of each packing slip initialed and dated by the receiver will be maintained as a permanent record. If the packing slip does not contain the lot number of the reagent or chemical, the individual inventorying the item will add the lot number to the packing slip. The date of receipt, date opened, date of verification (if appropriate) and initials of the person performing the verification and/or opening the reagent/standard will be marked on all incoming reagent/chemical/supply as well as the expiration date. UNCONTROLLED COPY NOTE: Reagents and supplies which have passed the expiration date will not be used on casework or Data Bank samples. However, these reagents/supplies may be used on non-critical samples (i.e., training samples, research, etc.) and will be appropriately labeled as such. 2.2.3 Material Safety Data Sheets The MSDS received from the manufacturer for each chemical used in the laboratory can be found in the designated MSDS book or online. These data sheets will be kept current and readily available to all laboratory personnel. 2.2.4 Laboratory Prepared Reagents and Solutions 2.2.4.1 All laboratory prepared reagents and solutions will be made with great care and using good laboratory practices. Forensic Biology Section Procedures Manual, Section VI Issued by Biology Program Manager Issue Date: 22-September-2014 Document 210-D600 Revision 5 Page 13 of 38 2 Equipment, Reagents and Supplies 2.2.4.2 A log will be maintained for each laboratory prepared reagent/solution, including dilutions of laboratory concentrates. Each reagent/solution prepared will have the following information recorded in the log book: • • • • • • • • chemicals used commercial sources of chemicals lot numbers of chemicals date prepared initials of individual preparing reagent/solution expiration date other pertinent data, such as pH lot number COPYRIGHT © 2014 VIRGINIA DEPARTMENT OF FORENSIC SCIENCE The lot number assigned to laboratory prepared reagents/solutions will consist of the date prepared (two digit numerical representation of month, day and year) and the initials of the preparer. Example: Lot number 100806TM represents a reagent/solution prepared on October 8, 2006 by Teresa Mathis. 2.2.4.3 Labeling Requirements All laboratory prepared reagents/solutions will be clearly labeled; labels will include reagent/solution identity, date of preparation, expiration date (as specified in the Procedures Manual or labeled “no expiration), the initials of preparer, and, as appropriate, storage requirements. Commercial reagents/chemicals will be labeled with the identity of the reagent and the expiration date. For commercial reagents without a supplied expiration date, a date of 3 years from the date of receipt will be used. 2.2.5 Storage and Disposal All chemicals must be stored, used, and disposed of in a manner conforming to established safety requirements for that chemical. 2.2.6 Critical Reagents and Supplies All critical reagents and supplies must be quality control tested for accurate, reliable performance prior to being used in the Section on casework or Data Bank samples. Refer to Section 3, Quality Control Of Critical Reagents and Supplies. The results of all quality control tests will be maintained in a ring binder or properly labeled file. UNCONTROLLED COPY Forensic Biology Section Procedures Manual, Section VI Issued by Biology Program Manager Issue Date: 22-September-2014 Document 210-D600 Revision 5 Page 14 of 38 3 Quality Control of Critical Reagents and Supplies 3 QUALITY CONTROL OF CRITICAL REAGENTS AND SUPPLIES The following reagents/kits/supplies will be quality control tested as indicated below when a new lot is received into the laboratory. The successful completion of the quality control test is documented by the initials of the analyst reviewing the QC data on the paperwork and the placement of the quality control date on the reagent or packaging. 3.1 COPYRIGHT © 2014 VIRGINIA DEPARTMENT OF FORENSIC SCIENCE PCR-Based System Kits 3.1.1 Upon receipt and before use, each new lot of PCR-based kits will be quality control tested to ensure the integrity of the PCR reagents that are provided with the kit. If the same lot of the PCR-based system kits is received for several shipments, it is not necessary to quality control test the kits again until a new lot is received into the laboratory. 3.1.2 Amplify and type two samples that have been extracted of known DNA type, one negative amplification blank, and one positive amplification control per lot of new kits. Follow the amplification and typing procedures outlined in the Procedures Manual, Section VIII, Capillary Electrophoretic Detection PCRBased STR DNA Protocol: PowerPlex® 16 System. Record the loading position of the samples on the worksheets used for casework analysis. 3.1.3 Once the electropherograms have been sized, provided the expected types are obtained (i.e., known samples and positive amplification control) and the negative amplification blank does not produce results, the new lot of PCR- based kits will be considered to have passed the quality control verification and may be put on-line for routine use. 3.1.4 Once the new lot of PCR-based kits has passed the quality control verification, the kits will be labeled with the quality control date. All worksheets and paperwork associated with the quality control test will be maintained in a ring binder or properly labeled file. NOTE: This quality control test can be done in conjunction with the quality control testing of AmpliTaqTM Gold DNA polymerase. 3.2 AmpliTaqTM Gold DNA Polymerase 3.2.1 Each new lot of AmpliTaqTM Gold DNA polymerase will be quality control tested before used on casework or data bank samples to verify the activity of the enzyme. If the same lot of AmpliTaqTM Gold DNA polymerase is received for several shipments, it is not necessary to quality control test the AmpliTaqTM Gold DNA polymerase again until a new lot is received into the laboratory. 3.2.2 Amplify and type two samples that have been extracted of known DNA type, one negative amplification blank, and one positive amplification control per lot of new AmpliTaqTM Gold DNA polymerase. Follow the amplification and typing procedures outlined in the Procedures Manual, Section VIII, Capillary Electrophoretic Detection PCR-Based STR DNA Protocol: PowerPlex® 16 System. Record the loading position of the samples on the worksheets used for casework analysis. UNCONTROLLED COPY 3.2.3 Once the electropherograms have been sized, providing the expected types are obtained for the known samples and positive control and the amplification blank does not produce results, the new lot of AmpliTaqTM Gold DNA polymerase will be considered to have passed the quality control verification and may be put on-line for routine use. 3.2.4 Once the new lot of AmpliTaqTM Gold DNA polymerase has passed the quality control verification, the AmpliTaqTM Gold DNA polymerase stock box will be labeled with the quality control date. All worksheets and paperwork associated with the quality control test will be maintained in a ring binder or properly labeled file. NOTE: This quality control test can be done in conjunction with the quality control testing of the PCR based kits. Forensic Biology Section Procedures Manual, Section VI Issued by Biology Program Manager Issue Date: 22-September-2014 Document 210-D600 Revision 5 Page 15 of 38 3 Quality Control of Critical Reagents and Supplies 3.3 Plexor HY Kits 3.3.1 When a new lot number of the Plexor HY System kit is received, it must be tested to determine if it conforms to the performance parameters defined by internal testing and the manufacturer’s specifications prior to its use on casework. COPYRIGHT © 2014 VIRGINIA DEPARTMENT OF FORENSIC SCIENCE 3.3.2 A Plexor HY System run will be performed, but it only needs to include two columns of the genomic standard; no additional DNA samples are required. 3.3.3 The slope, Y-intercept, R2 and melt temperatures will all be assessed. Data points may be deselected, as described in the quantitation chapters of Section III and Section IX of the Procedures Manual, if necessary, to improve the standard curve. 3.3.4 The data for the parameters listed above will be compared to the chart below to determine if they conform to within the indicated ranges. 3.3.5 If the data conform, then the quality control test is complete and the stock box or bag will be labeled with the quality control date. If not, the test will be repeated. If the data do not conform after the second attempt, then the manufacturer will be contacted to determine if that lot number should be replaced with a new lot, if additional testing needs to be performed, or if other corrective action needs to be implemented. Slope Y-intercept R2 Melt temperature 3.4 Auto Average -3.81 ± 1.02 24.92 ± 3.39 0.99 ± 0.01 81.23 ± 1.5°C Y Average -3.56 ± 0.76 24.73 ± 2.84 0.99 ± 0.01 82.59 ± 1.5°C Standard Reference Material (SRM) 2391 Kit The Standard Reference Material (SRM) 2391 kit is designed to assure that each step of the procedure for the DNA polymerase chain reaction (PCR) methodology is functioning properly and can be calibrated to the national standard provided by the National Institute of Standards and Technology (NIST). The SRM 2391 kit will be used on each applicable extraction and DNA typing system that is currently being used to analyze casework or Data Bank samples (e.g., stain extraction buffer with Microcons®, DNA IQ™ and Qiagen extractions). 3.4.1 Each laboratory conducting PCR analysis will verify its procedure using the SRM 2391 kit or samples traceable to a SRM kit annually or when substantial method changes/new validation has occurred. 3.4.2 Twelve samples are provided in the SRM 2391 kit (i.e., genomic 1-8, genomic GM09947A and GM09948, and GM09947A and GM09948 cells). Depending on the stage for which the sample is provided, the sample will be carried through the normal STR procedures addressed in the Procedures Manual. Alternately, at least two NIST traceable samples can be processed. Refer to Appendix F for information on how to prepare NIST traceable samples. UNCONTROLLED COPY 3.4.3 Once the electropherograms have been sized, the expected types obtained and the controls typed appropriately, the laboratory’s procedure will be considered to be functioning properly and calibrated to the national standard. 3.4.4 All worksheets and paperwork associated with the quality control test will be maintained in a ring binder for properly labeled files. Forensic Biology Section Procedures Manual, Section VI Issued by Biology Program Manager Issue Date: 22-September-2014 Document 210-D600 Revision 5 Page 16 of 38 4 Validation of PCR – Based Analytical Procedures 4 VALIDATION OF PCR-BASED ANALYTICAL PROCEDURES The validation of new DNA technologies/methodologies utilized by the Section is addressed in this section. In addition, a summary of each validation study is maintained with the data. The summary and data are maintained by the Biology Program Manager as directed by Section 5 of the Quality Manual, Technical Procedures and Manuals. Summaries of applicable validation data are also available at each regional laboratory. 4.1 COPYRIGHT © 2014 VIRGINIA DEPARTMENT OF FORENSIC SCIENCE Developmental Validation During the development of a DNA procedure and prior to the adoption of the procedure by the DNA laboratory, validation studies must have been conducted by the scientific community. These validation studies form the basis for evaluating the validity, accuracy, precision and reproducibility of a particular DNA analytical procedure. The developmental validation and scientific literature should include the following where applicable: • • • • • • • • • • • 4.2 Characterization of the genetic marker Species specificity Sensitivity studies Stability studies Reproducibility Case type samples Population studies Mixture studies Precision and accuracy studies PCR based studies o PCR based studies include differential and preferential amplification, effects of multiplexing, assessment of appropriate controls and product detection studies. Peer reviewed publication of the underlying principles of a technology Internal Validation of Established Procedures Prior to implementing a new DNA procedure, or an existing DNA procedure developed by another laboratory that meets the developmental criteria, the Section will validate the new PCR-based procedure internally to demonstrate the reliability of the procedure. This same prerequisite applies to any existing procedure to which significant modifications have been made. This validation forms the basis for assessing the specificity, reproducibility, and limitations of the particular PCR-based procedure. Prior to implementation the technical leader shall approve the internal validation studies. The internal validation shall include as appropriate the following: 4.2.1 Known and non-probative evidence samples or mock evidence samples 4.2.2 Reproducibility and precision studies UNCONTROLLED COPY 4.2.3 Sensitivity and stochastic studies 4.2.4 Mixture studies 4.2.5 Contamination assessment 4.2.5.1 Regional labs may rely on internal validation conducted at another DFS lab but will need to complete the following validation studies: 4.2.5.1.1 Precision 4.2.5.1.2 Sensitivity 4.2.5.1.3 Contamination assessment Forensic Biology Section Procedures Manual, Section VI Issued by Biology Program Manager Issue Date: 22-September-2014 Document 210-D600 Revision 5 Page 17 of 38 4 Validation of PCR – Based Analytical Procedures 4.2.6 Internal validation shall define quality assurance parameters and interpretation guidelines. 4.2.7 Before the PCR-based procedure is used by a casework examiner he/she will successfully complete a qualifying test. 4.2.8 A performance check shall be required if modifications are made to an instrument/software or if an additional critical instrument is received prior to implementation. COPYRIGHT © 2014 VIRGINIA DEPARTMENT OF FORENSIC SCIENCE 4.2.9 Significant software or instrument changes that may impact interpretation or the analytical process will require validation prior to implementation. 4.2.10 If a significant modification has been made to an analytical procedure, the modified procedure must be compared to the original using similar types of samples. UNCONTROLLED COPY Forensic Biology Section Procedures Manual, Section VI Issued by Biology Program Manager Issue Date: 22-September-2014 Document 210-D600 Revision 5 Page 18 of 38 5 Internal Controls and Standards – Polymerase Chain Reaction (PCR) Procedures 5 INTERNAL CONTROLS AND STANDARDS – POLYMERASE CHAIN REACTION (PCR) PROCEDURES Analysis of evidence samples will be conducted to provide the maximum information with the least consumption of the sample. This requires the use of critical judgment and the use of standards and controls. At each step of the testing procedure standards and controls must be used to evaluate the effectiveness of the testing process and to assure that the procedure is being properly performed. Refer to the Procedures Manual for the interpretation guidelines of the following controls. 5.1 COPYRIGHT © 2014 VIRGINIA DEPARTMENT OF FORENSIC SCIENCE Reagent Blanks The reagent blank is a check for possible contamination of the reagents by human DNA. Testing of the reagent blank is performed by carrying out the DNA extraction in a tube containing no DNA, just reagents. This blank extract is then amplified and analyzed. Reagent blanks should produce no results. The reagent blank is extracted and amplified concurrently, with each extraction set. For any cases in which more than 50% of an evidentiary stain has been consumed, a devoted reagent blank (case reagent blank) will be processed with the respective case samples. The reagent blank is extracted, amplified and typed with the same instrument model, injection conditions and the most sensitive volume conditions as the extraction set. Examples: If 9.6 µl of a sample is amplified, at least 9.6 µl of the reagent blank must be amplified. If some samples from the set are loaded at 2 µl and injected for 10 seconds the reagent blank must be loaded at 2 µl and injected for 10 seconds. If some samples are extracted using 800 ul of DNA IQ Lysis buffer, 800 ul of DNA IQ Lysis extraction buffer must be used for the case reagent blank. 5.2 Random Sample (used during the analysis of convicted offender and arrestee samples) A random sample will be run with each set of convicted offender and arrestee sample extractions to serve as a verification that the samples are successfully being entered into the Combined DNA Index System (CODIS) and the search algorithm is working properly. The random sample is a previously analyzed convicted offender sample for which the identity of the sample is known to the State CODIS Administrator or designee. This sample serves as an internal laboratory control since the DNA profile is not known to the DNA Data Bank analyst and must be verified prior to the sizing data being considered acceptable. If a sample must be re-extracted a new random sample must be extracted along with the sample. 5.3 Procedures for Estimating DNA Recovery UNCONTROLLED COPY A procedure must be used for estimating the quantity of human DNA recovered from the evidence sample. 5.3.1 Plexor™ HY System The Plexor™ HY System is a novel real-time PCR system for the quantitation of total (Autosomal) and human male (Y) DNA within a sample. The Plexor™ technology takes advantage of the specific interaction between two modified nucleotides to achieve quantitative PCR analysis. One of the primers contains a modified nucleotide (iso-dC) linked to a fluorescent label at the 5’ end. The second PCR primer is unlabeled. The reaction mix includes deoxynucleotides and iso-dGTP modified with the quencher dabcyl. Dabcyl-iso-dGTP is incorporated opposite the iso-dC residue in the primer. The incorporation of the dabcyl-iso-dGTP at this position results in quenching of the fluorescent dye on the complementary strand and a reduction in fluorescence, which allows quantitation during amplification. With the Plexor™ technology, the accumulation of product is accompanied by a decrease in fluorescence. Thus the fluorescent signal for high levels of DNA will be quenched in fewer cycles than a low Forensic Biology Section Procedures Manual, Section VI Issued by Biology Program Manager Issue Date: 22-September-2014 Document 210-D600 Revision 5 Page 19 of 38 5 Internal Controls and Standards – Polymerase Chain Reaction (PCR) Procedures concentration of DNA requiring more amplification cycles. Through the use of such instrumentation as the Stratagene MX3005P™ QPCR System the concentration (ng/µL) of isolated DNA can be determined. The standard curve used for the Plexor™ HY System ranges from 0.0016 ng/µL to 25.0 ng/µL. The concentration of the extracted DNA sample is extrapolated by plotting as a log of the standard curve. COPYRIGHT © 2014 VIRGINIA DEPARTMENT OF FORENSIC SCIENCE 5.3.2 Yield Gel The yield gel procedure for assessing the quality and quantity of isolated DNA will not be used for casework samples in place of Plexor® procedures for assessing the quantity of isolated human DNA. However, the yield gel may be used on known reference samples and utilized to evaluate the need for dilutions of casework samples believed to contain a high concentration of DNA. A set of high molecular weight DNA calibration standards is used on the yield gel to permit a quantitative estimate of the amount of DNA recovered (i.e., 5 to 120 ng). This procedure provides an estimate of the quantity of DNA recovered and the degree of DNA degradation. 5.4 Negative Amplification Control The negative amplification control is a check of the PCR amplification reagent for contamination that may have occurred during the set up of the PCR reaction. It is subjected to the most sensitive conditions of the sample set. The negative amplification control is amplified concurrently with the sample set and typed with the same instrument model, injection conditions and the most sensitive volume conditions as the sample set. Example: If some samples are injected for 10 seconds the negative amplification control is injected for 10 seconds. 5.5 Positive Amplification Control(s) The positive control is DNA of a known profile and is used to monitor the reagents used during the PCR reaction and the accuracy of the thermal cycler. 5.6 Procedure for Estimating the Extent of Amplified Product A product gel may be used for estimating the extent of amplified product. The amplified DNA is then compared against a standard molecular weight ladder or internal lane standard. UNCONTROLLED COPY Forensic Biology Section Procedures Manual, Section VI Issued by Biology Program Manager Issue Date: 22-September-2014 Document 210-D600 Revision 5 Page 20 of 38 6 Dedicated PCR Facilities 6 DEDICATED PCR FACILITIES To minimize the potential for carry-over contamination, the laboratory is organized so that the area in which amplified DNA is handled is physically isolated in a separate room from the work areas for DNA extraction and PCR setup. The laboratory has designated work areas for evidence handling, DNA extraction, and PCR setup. (These areas may be in the same room, but must be clearly delineated). Another area is reserved strictly for PCR amplification and typing, of casework samples and other activities that require handling of amplified DNA. All functions performed during the processing and analysis of convicted offender or arrestee samples are conducted in an area totally separate from the analysis of evidence samples COPYRIGHT © 2014 VIRGINIA DEPARTMENT OF FORENSIC SCIENCE NOTE: In order to trace the order in which the samples were processed/handled the sample will be listed on the analytical worksheets in the order in which they were processed/handled. If contamination is identified which is not isolated to a single case and could adversely affect all of the DNA analyses conducted in the section, the supervisor will be notified immediately. Subsequently, the supervisor will notify the Biology Program Manager of the contamination so that assistance can be provided to correct the problem and to ensure that the incident is properly documented. Depending on the level of contamination and severity, if necessary, the Section in the affected laboratory will be shut down until the problem can be corrected. In order to prevent compromising evidence samples, if the Biology Program Manager is not available and therefore the problem cannot be discussed, if the level of contamination is wide spread, the supervisor has the discretion to shut down the section to correct the problem once he/she has notified the laboratory director. 6.1 DNA Extraction Work Area This work area is used for evidence handling and for extraction and isolation of DNA. Microscopy, photography, and any other activities that involve the handling of evidence samples before amplification may also be performed in this work area. Casework samples and Data Bank samples are handled in separate areas. P If DNA extraction is preformed robotically, refer to the Procedures Manual Section IX, Biomek® NX Automation Workstation Procedures Manual. 6.1.1 Equipment and supplies used in the DNA extraction work area may be exposed to relatively high concentrations of human genomic DNA. Therefore the dedicated equipment and supplies for this area should not be used in any other area except the DNA extraction work area. 6.1.2 Special Precautions 6.1.2.1 Perform the DNA extraction and PCR setup of evidence samples at a separate time or space (i.e., a different bench) from the DNA extraction and PCR setup of reference samples. This helps to prevent potential cross-contamination between evidence samples and reference samples. UNCONTROLLED COPY 6.1.2.2 Perform DNA extractions of samples containing high levels of DNA (for example, bloodstains) after samples containing a low level of DNA (single hairs, small bloodstains, etc.), in a “low to high” order of placement to minimize the potential for sample-to-sample contamination. 6.1.2.3 Use disposable gloves at all times. Change gloves frequently to avoid sample-to-sample contamination with DNA and whenever exiting the work area. DO NOT TOUCH any surface which may contain a contaminant, such as the surface of the skin, eyes, safety glasses, clothing, or a non-cleaned bench-top, while wearing disposable gloves or working with evidence. 6.1.2.4 After cutting each sample thoroughly clean scissors and other implements with 10% bleach (or a solution that will degrade DNA) followed by cleaning with isopropyl alcohol and/or ethanol or use a fresh scalpel blade to cut each item. 6.1.2.5 Use a clean cutting surface for each piece of evidence. 6.1.2.6 Use sterile disposable plugged pipette tips and microcentrifuge tubes. Forensic Biology Section Procedures Manual, Section VI Issued by Biology Program Manager Issue Date: 22-September-2014 Document 210-D600 Revision 5 Page 21 of 38 6 Dedicated PCR Facilities 6.1.2.7 Change pipette tips between handling each sample. 6.1.2.8 Store reagents in small quantities to minimize the number of times a given tube of reagent is opened. 6.1.2.9 To avoid splashing centrifuge all liquid to the bottom of the closed tube before the tube is opened. COPYRIGHT © 2014 VIRGINIA DEPARTMENT OF FORENSIC SCIENCE 6.1.2.10 Include reagent blank controls with each set of DNA extractions to check for the presence of contaminating DNA in the reagents. 6.1.2.11 Thoroughly clean all work surfaces with 10% bleach (or a solution that will degrade DNA) followed by cleaning with isopropyl alcohol and/or ethanol before setting up the DNA Extraction Work Area. Use disposable bench paper or a Kaydry to prevent the accumulation of human DNA on permanent work surfaces. After each set of samples discard the bench paper or Kaydry. 6.1.2.12 Limit the quantity of samples handled during a single analysis to a manageable number. This precaution reduces the risk of sample mix-up and the potential for sample-to-sample contamination. 6.1.2.13 Wear a dedicated lab coat for pre-amplification sample handling when working in the DNA Extraction Work Area. 6.2 PCR Setup Work Areas This work area is used for adding sample DNA to the PCR Reaction Mix. P If the PCR setup is preformed robotically, refer to the Procedures Manual Section IX, Biomek® NX Automation Workstation Procedures Manual. 6.2.1 To prevent transfer of exogenous human DNA into the PCR setup area, dedicated equipment and supplies used for PCR setup should not be taken out of the PCR setup work area. Casework samples and Data Bank samples are handled in separate areas. 6.2.2 Special Precautions 6.2.2.1 Use a dedicated 10 μL or 20 μL pipette for adding sample DNA to the PCR Reaction Mix. 6.2.2.2 DNA is always added to the PCR Reaction Mix (i.e., primers, 10X buffer, type 1 water, and DNA polymerase) last. UNCONTROLLED COPY 6.2.2.3 After the addition of each DNA sample, re-cap the tube before proceeding to the next sample. 6.2.2.4 Cap the negative amplification control tube last, after all DNA samples have been added to the other tubes. This control provides a check for contamination occurring during PCR setup. 6.2.2.5 Change gloves frequently, whenever they may have been contaminated with DNA. 6.2.2.6 Avoid touching the inside surface of the tube caps. 6.2.2.7 Change pipette tips after addition of each sample DNA to a PCR Reaction Mix. 6.2.2.8 Store the DNA amplification reagents away from amplified product, which serves as a barrier to possible contamination by exogenous DNA. Forensic Biology Section Procedures Manual, Section VI Issued by Biology Program Manager Issue Date: 22-September-2014 Document 210-D600 Revision 5 Page 22 of 38 6 Dedicated PCR Facilities 6.3 Amplified DNA Work Area This work area is a physically separate area used only for those activities that involve the handling of amplified DNA. This includes real-time QPCR quantitation and capillary electrophoresis of amplified DNA, waste disposal of amplified DNA solutions, and storage of amplified DNA. Casework samples and Data Bank samples are handled in separate areas. COPYRIGHT © 2014 VIRGINIA DEPARTMENT OF FORENSIC SCIENCE 6.3.1 Do not remove amplified DNA or the dedicated equipment and supplies used to handle amplified DNA from the amplified DNA work area. 6.3.2 Special Precautions Carefully handle amplified DNA to avoid dispersing it around the room. Reducing the dispersal of amplified DNA within this work area reduces the potential for transfer of amplified DNA to other work areas. 6.3.2.1 Always remove gloves prior to leaving the Amplified DNA Work Area to avoid the transfer of amplified DNA into other work areas. 6.3.2.2 Change gloves whenever they become contaminated with amplified DNA to reduce unnecessary dispersal of DNA around the work area. 6.3.2.3 To avoid splashing carefully open tubes containing amplified DNA. 6.3.2.4 Store tubes of amplified DNA in a designated refrigerator or freezer in a separate box from the reagents used during the typing step. Store tubes of amplified DNA in a separate freezer from the amplification reagents. 6.3.2.5 Thoroughly clean all work surfaces with 10% bleach (or a solution that will degrade DNA) followed by cleaning with isopropyl alcohol and/or ethanol before setting up the amplified DNA Work Area. Use disposable bench paper or a Kaydry to prevent the accumulation of human DNA on permanent work surfaces. After each set of samples discard the bench paper or Kaydry. 6.3.2.6 When working with post amplification samples wear a lab coat dedicated for use in the amplified DNA work area. UNCONTROLLED COPY Forensic Biology Section Procedures Manual, Section VI Issued by Biology Program Manager Issue Date: 22-September-2014 Document 210-D600 Revision 5 Page 23 of 38 Appendix A – Autoclave Quality Control Appendix A – Autoclave Quality Control Due to the sensitive nature of DNA analysis, especially PCR applications, it is necessary to ensure adequate sterilization of glassware and solutions. Evaluation of the efficiency of sterilization is best accomplished by the utilization of a biological indicator. The spores of the thermophile Bacillus Stearothermophilus ATCC 7953 grow during incubation at 56-60°C, but are inactivated if exposed to temperatures above 125°C. Acid production during the growth of the bacteria will cause a colormetric change in the indicator solution from purple to yellow. It is necessary to use a positive control to show growth of the bacteria during normal incubation without inactivation by sterilization. The Barnstead/Thermolyne Ampules are to be stored at 15° to 30°C prior to use. COPYRIGHT © 2014 VIRGINIA DEPARTMENT OF FORENSIC SCIENCE Precaution: The ampules contain live cultures. Handle with care to prevent breakage. Do not store in refrigerator with other biologicals. Ampules may not be used after expiration date. Use each ampule once and destroy by autoclaving or incineration after testing. Biological Indicators for Steam Sterilization Procedure: 1 2 3 4 Label ampule(s) “Test” and “Control”. Carefully place one unopened purple ampule (Test) into the center of the autoclave. Proceed with sterilization as indicated by the manufacturer for a liquid solution or empty glassware. After the cycle has ended, allow the ampule to cool for 10 to 30 minutes until it is cool enough to handle. To activate the media, place the ampule in an upright position in a plastic crusher. Gently squeeze the crusher to break the glass ampule. 5 Break both the “Test” and “Control” ampules. Place "Test" and "Control" ampules into a 56-60°C incubator or oven. 6 Observe ampules at 24 and 48 hours for color change from purple to yellow. 6.1 The "Control" ampule should change after approximately 24 hours of incubation. If the "Test" ampule changes within the 48 hour maximum, the sterilization cycle fails to meet the proper standard. 6.2 The sterilization cycle passes the test if the "Test" ampule does not turn yellow within the 48 hour incubation period but the "Control" ampule changes color. 7 Repeat test with new ampules if the "Control" does not change color from purple to yellow. 8 Record the results of the test. If the test fails, remove the autoclave from service and contact an authorized vendor to service the autoclave. UNCONTROLLED COPY Forensic Biology Section Procedures Manual, Section VI Issued by Biology Program Manager Issue Date: 22-September-2014 Document 210-D600 Revision 5 Page 24 of 38 Appendix B – Centrifuge Speed Check by Tachometer Appendix B – Centrifuge Speed Check by Tachometer 1 Upon receipt the calibration of each centrifuge will be checked by verifying the speed of the rotor. Once a year thereafter or following adjustments or repairs, the speed of the rotor will be checked. 2 The speed or number of rotations per minute (RPM) will be checked using a photoelectric tachometer. Use a high contrast label to mark a visibly accessible spot on the rotor. Follow the manufacturer’s instructions provided with the tachometer to take the RPM readings. The speed of the centrifuge will be measured with the rotor installed and the cover closed. If the rotor speed is found to vary more than ± 1000 RPMs from the set speed of 10,000 RPMs, an authorized vendor will be called to recalibrate the speed of the centrifuge. COPYRIGHT © 2014 VIRGINIA DEPARTMENT OF FORENSIC SCIENCE UNCONTROLLED COPY Forensic Biology Section Procedures Manual, Section VI Issued by Biology Program Manager Issue Date: 22-September-2014 Document 210-D600 Revision 5 Page 25 of 38 Appendix C – Care and Maintenance of Pipettes Appendix C – Care and Maintenance of Pipettes 1 Cleaning and Checking the Sealing System Remove the tip ejector arm by pulling downward. Unscrew the shaft coupling slowly while holding the body and shaft firmly. The internal piston is spring loaded and will release when disengaged. Remove the white shaft from the piston assembly. 2 COPYRIGHT © 2014 VIRGINIA DEPARTMENT OF FORENSIC SCIENCE a. Shaft: Inspect the tip sealing end of the shaft for scratches, wear marks and splits. b. Piston: Expose the piston surface. If the stainless steel surface is highly polished, the piston is in good condition and is not damaged. If the piston is highly stained or dirty, clean with isopropyl alcohol and a Kimwipe. Allow to air dry before reassembly. If the piston surface is scratched, heavily stained, corroded, or bent, the piston must be replaced. c. Polyethylene Seal: Slide the white polyethylene seal up and down the piston. If the seal has resistance throughout the full length of the piston, it remains in good condition. If the resistance is spotty or non-existent, replace the seal. Seal replacement will not effect the pipette calibration. Routine In-House Verification of the Pipette Calibration Once the pipette has been reassembled after cleaning, conduct a quick calibration check using graduated Rainin Pipette RT tips. Verify the pipetting volumes of the pipette as specified in the Pipette Verification Table below. The pipette tips are guaranteed to be accurate ± 3% at the specified reference lines. Should the pipette be visibly incorrect according to the reference line, the pipette will be sent to the manufacturer for repair. Pipette Verification Table Pipette P-10 P-20 Tip RT-10F 2 μL Tip RT-10F Tip RT-20F 2 μL 10 μL Tip RT-200F 10 μL P-100 50 μL 100 μL P-200 50 μL 100 μL P-1000 Tip RT-200 200 μL 100 μL UNCONTROLLED COPY Forensic Biology Section Procedures Manual, Section VI Issued by Biology Program Manager Issue Date: 22-September-2014 500 μL 1000 μL Document 210-D600 Revision 5 Page 26 of 38 Appendix C – Care and Maintenance of Pipettes RT-10F GP-10F RT-20F GP-20F RT-100F GP-100F RT-200F GP-200F RT-200 COPYRIGHT © 2014 VIRGINIA DEPARTMENT OF FORENSIC SCIENCE 200 ul 10 ul 1000 ul 10 ul 2 ul 100 ul 100 ul 50 ul 50 ul 500 ul 10 ul 10 ul 100 ul UNCONTROLLED COPY Forensic Biology Section Procedures Manual, Section VI Issued by Biology Program Manager Issue Date: 22-September-2014 Document 210-D600 Revision 5 Page 27 of 38 Appendix D – Thermometer Temperature Calibration Appendix D – Thermometer Temperature Calibration Thermometers (excluding thermometers used to verify refrigerator and freezer temperatures) will be verified upon receipt for accuracy at the temperature of intended use. If available, a thermometer certified by the National Institute of Standards and Technology (NIST) should be used for comparison. However, a thermometer that is traceable to a NIST thermometer may also be used. COPYRIGHT © 2014 VIRGINIA DEPARTMENT OF FORENSIC SCIENCE 1 Tag each thermometer with an identifying number. 2 Place all of the thermometers in a vessel containing water at a temperature approximately 4°C below the temperature of intended use. 3 Record the temperature shown on each thermometer. 4 Next warm water to approximately 4°C above the temperature of intended use. 5 Place thermometers into the warmed water and record the temperature of each thermometer. 6 All thermometers should be within ± 1°C of the NIST thermometer or a thermometer traceable to a NIST thermometer. Any thermometer that varies more than ± 1°C in the range of intended use will not be used. NOTE: If a thermometer is not acceptable at a specified temperature range (e.g., 37°C, 56°C, or 95°C) this does not preclude the thermometer from being used at another temperature providing it has passed the quality control test. UNCONTROLLED COPY Forensic Biology Section Procedures Manual, Section VI Issued by Biology Program Manager Issue Date: 22-September-2014 Document 210-D600 Revision 5 Page 28 of 38 Appendix E – Thermal Cycler 9700 Temperature Calibration, Temperature Non-Uniformity and System Performance Diagnostic Tests Appendix E – Thermal Cycler 9700 Temperature Calibration, Temperature Non-Uniformity and System Performance Diagnostic Tests 1 DNA Thermal Cycler 9700 Temperature Calibration Verification Test COPYRIGHT © 2014 VIRGINIA DEPARTMENT OF FORENSIC SCIENCE 1.1 Verifying the Temperature Calibration 1.1.1 If the sample block heated cover is in the forward position, lift the lever, then slide the heated cover back. 1.1.2 Place the 9700 Temperature Verification Frame on the sample block. 1.1.3 Coat well A6 with mineral oil using a cotton swab. 1.1.4 Place the 0.2 mL probe assembly into well A6. Carefully thread the probe wire through the channel in the 9700 temperature verification frame to prevent damage to the probe and lead wires. 1.1.5 Make sure the probe is connected to the digital thermometer and is seated properly. Close the cover carefully by sliding the heated cover forward, and pulling the lever down. 1.1.6 Turn on the digital thermometer and follow the instructions in the Temperature Verification Kit on how to operate the digital thermometer, Model 4500. 1.1.7 Turn on the GeneAmp PCR System 9700. The main menu appears. 1.1.7.1 Select Utilities (F4) 1.1.7.2 Select Diagnostics (F1) 1.1.7.3 Select TmpVer (F3) 1.1.8 The Temperature Verification screen appears, select Temp (F1). This automatically configures the system 9700 for the Calibration Verification Test. The following screen appears: Calibration Verification Block temp = xx.x°C Cover temp = xxx°C Place probe in well A6 Run Cancel UNCONTROLLED COPY F1 F2 F3 F4 F5 1.1.9 Use the digital thermometer to take temperature readings of the sample well connected to the 0.2 mL Probe Assembly. You will take a reading at two different setpoint temperatures. Forensic Biology Section Procedures Manual, Section VI Issued by Biology Program Manager Issue Date: 22-September-2014 Document 210-D600 Revision 5 Page 29 of 38 Appendix E – Thermal Cycler 9700 Temperature Calibration, Temperature Non-Uniformity and System Performance Diagnostic Tests 1.1.10 Select Run (F1) to start the Calibration Verification Test. The following screen appears with the setpoint values displayed. Calibration Verification Block temp = xx.xºC Cover temp = xxxºC COPYRIGHT © 2014 VIRGINIA DEPARTMENT OF FORENSIC SCIENCE Setpoint is 85ºC Cover must be within 10ºC of 85ºC Cancel F1 F2 F3 F4 F5 The cover must be within 1°C of 105°C. It may take several minutes for the system to ramp up. 1.1.11 The Calibration Verification screen counts down the time until the setpoint is reached. When the “Stabilization at setpoint” value decrements to zero, read the digital thermometer. 1.1.12 Using the numeric keys, type the value displayed on the digital thermometer in the “Enter actual block temperature” field displayed on the screen. The digital thermometer displays a four-digit value; round this off to three digits before typing it in the Calibration Verification screen. 1.1.13 Press Enter on the keypad. The system automatically begins the second reading (45°C setpoint). The Calibration Verification screen appears with the setpoint value displayed. Calibration Verification Block temp = xx.xºC Cover temp = xxxºC Setpoint is 45ºC Cover must be within 30ºC of 45ºC Cancel F1 F2 F3 F4 F5 The cover must be within 1°C of 105°C. 1.1.14 Repeat steps 1.1.11 and 1.1.12, then press Enter from the keypad. UNCONTROLLED COPY 1.1.15 The system 9700 evaluates the calibration of the sample block temperature for the setpoint values that were entered and displays the results. A summary screen appears at the conclusion of the test. Calibration Verification Actual temperature at 85ºC Actual temperature at 45ºC xx.xºC xx.xºC Accept F1 Cancel F2 Forensic Biology Section Procedures Manual, Section VI Issued by Biology Program Manager Issue Date: 22-September-2014 F3 F4 F5 Document 210-D600 Revision 5 Page 30 of 38 Appendix E – Thermal Cycler 9700 Temperature Calibration, Temperature Non-Uniformity and System Performance Diagnostic Tests 1.1.16 Record the results on the Calibration Verification Test Data Sheet (Document 210-F601), then select Accept (F1). 1.1.17 If the sample block module is properly calibrated the Calibration Verification screen will display “Calibration is Good” COPYRIGHT © 2014 VIRGINIA DEPARTMENT OF FORENSIC SCIENCE 1.1.18 If the sample block module does not pass the Calibration Verification Test the screen will display “Instrument may require service. Contact Applied Biosystems Technical Support”. 1.1.18.1 If the test fails, repeat the procedure to make sure the digital thermometer was not misread or that errors were not made entering data. 1.1.18.2 If the test fails again, contact Applied Biosystems Technical Support. 1.1.19 End the test by selecting Exit (F5). 2 Temperature Non-Uniformity Test 2.1 Verify the temperature uniformity of the system 9700 with a 0.2 mL sample block module. 2.1.1 If the sample block heated cover is in the forward position, lift the lever, then slide the heated cover back. 2.1.2 Place the 9700 Temperature Verification Frame on the sample block. 2.1.3 Coat wells A1, A12, C4, C9, F4, F9, H1, and H12 with mineral oil using a cotton swab. 2.1.4 Place the 0.2mL probe assembly into well A1. Carefully thread the probe wire through the channel in the 9700 temperature verification frame to prevent damage to the probe and lead wires. 2.1.5 Make sure the probe is connected to the digital thermometer and is seated properly. Close the cover carefully by sliding the heated cover forward, and pulling the lever down. 2.1.6 Turn on the digital thermometer and follow the instructions in the Temperature Verification Kit on how to operate the digital thermometer, Model 4500. 2.1.7 Turn on the GeneAmp PCR System 9700. The main menu appears: 2.1.7.1 Select Utilities (F4) 2.1.7.2 Select Diagnostics (F1) UNCONTROLLED COPY 2.1.7.3 Select TmpVer (F3) 2.1.8 The Temperature Verification screen appears, select TNU (F2). This automatically configures the system 9700 for the Temperature Non-Uniformity Test. The following screen appears: TNU Performance Sample temp = xx.xºC Cover temp = xxxºC Setpoint is 35ºC Cover must be within 1ºC of setpoint Cancel F1 F2 Forensic Biology Section Procedures Manual, Section VI Issued by Biology Program Manager Issue Date: 22-September-2014 F3 F4 F5 Document 210-D600 Revision 5 Page 31 of 38 Appendix E – Thermal Cycler 9700 Temperature Calibration, Temperature Non-Uniformity and System Performance Diagnostic Tests It will take approximately 40 minutes for the cover temperature to reach the setpoint. 2.1.9 When the cover setpoint has been reached the following screen will appear: COPYRIGHT © 2014 VIRGINIA DEPARTMENT OF FORENSIC SCIENCE TNU Performance Sample temp = xx.xºC Cover temp = xxxºC Place Probe in well A1 Press Run Run F1 F2 Cancel F3 F4 F5 2.1.10 Press Run (F1) and the following screen appears with the setpoint value displayed. TNU Performance Sample temp = xx.xºC Cover temp = xxxºC Setpoint is 37ºC Sample must be within 1ºC of setpoint Cancel F1 F2 F3 F4 F5 The sample block must be within 1.0°C of the setpoint and the cover must be within 1°C of 35°C. It may take a few minutes for the system to reach the setpoint temperature. 2.1.11 The TNU Performance screen counts down the time until the setpoint is stabilized. When the “Stabilization at setpoint” value decrements to zero, read the digital thermometer. 2.1.12 Using the numeric keys, type the value displayed on the digital thermometer in the “Enter actual block temperature” field displayed on the screen. The digital thermometer displays a four-digit value; round this off to three digits before typing it in the Calibration Verification screen. 2.1.13 Press enter on the keypad. The TNU Performance screen appears with setpoint value displayed at 94°C. When the sample temp reaches 94°C the setpoint value changes to 37°C and the following screen appears. UNCONTROLLED COPY TNU Performance Sample temp = xx.xºC Cover temp = xxxºC Place probe in well A12 Press Run Run F1 F2 Cancel F3 F4 F5 During the 94°C setpoint test this will be reversed. The first setpoint value displayed is 37°C, when this sample temp setpoint is reached the setpoint value changes to 94°C and the TNU Performance screen appears. Forensic Biology Section Procedures Manual, Section VI Issued by Biology Program Manager Issue Date: 22-September-2014 Document 210-D600 Revision 5 Page 32 of 38 Appendix E – Thermal Cycler 9700 Temperature Calibration, Temperature Non-Uniformity and System Performance Diagnostic Tests 2.1.14 Slide the heated cover back and place the probe in A12. Make sure the probe is seated properly. Close the cover carefully by sliding the heated cover forward, and pulling the lever down. Repeat steps 2.1.10 through 2.1.13. Complete the steps for all 8 wells: A1, A12, C4, C9, F4, F9, H1, and H12. 2.1.15 After reading the last well (H12) press Enter and the 9700 system will begin the second reading (94°C setpoint). The TNU Performance screen appears with the setpoint displayed at 94°C the cover temp will increase and must be within 1°C of 105°C. It may take a few minutes for the system to stabilize at the setpoint temperature. COPYRIGHT © 2014 VIRGINIA DEPARTMENT OF FORENSIC SCIENCE 2.1.16 When the system has stabilized the TNU Performance screen with the “place probe in well A1” prompt appears. Repeat steps 2.1.9 to 2.1.13. 2.1.17 After the last reading for setpoint 94°C is completed, the system 9700 evaluates the uniformity of the sample block temperature for the setpoint values that were entered and displays the results. A summary screen appears at the conclusion of the test. Well A1 A12 C4 C9 Accept 94ºC xx.x xx.x xx.x xx.x F1 37ºC xx.x xx.x xx.x xx.x Well F4 F9 H1 H12 94ºC xx.x xx.x xx.x xx.x More F2 F3 F4 37ºC xx.x xx.x xx.x xx.x Cancel F5 2.1.18 Record the results on the Temperature Non-Uniformity Test Data Sheet (Document 210-F601), then select Accept (F1). 2.1.19 When the system completes the Temperature Non-uniformity test, the TNU Performance screen appears with either “Pass” or “Fail” after each setpoint. 2.1.19.1 If the temperature of the sample block wells is uniform then the test has passed. 2.1.19.2 If the temperature variation of the sample block wells exceeds performance expectations the test has failed. 2.1.19.2.1 If the test fails, repeat the procedure to make sure the digital thermometer was not misread or that errors were not made entering data. UNCONTROLLED COPY 2.1.19.2.2 If the test fails again, contact Applied Biosystems Technical Support. 2.1.20 End the test by selecting Cancel (F5). 2.1.21 If all measurements are completed, remove the probe and the Temperature Verification Frame from the sample block and turn off the digital thermometer. 2.1.22 Clean the wells of the sample block using cotton swabs. 3 System Performance Diagnostics: Rate Test and Cycle Test 3.1 Testing the integrity of the cooling and heating system 3.1.1 Before beginning the tests, an empty 96-well plate with full plate cover or caps must be in the sample block. Forensic Biology Section Procedures Manual, Section VI Issued by Biology Program Manager Issue Date: 22-September-2014 Document 210-D600 Revision 5 Page 33 of 38 Appendix E – Thermal Cycler 9700 Temperature Calibration, Temperature Non-Uniformity and System Performance Diagnostic Tests 3.1.2 Turn on the GeneAmp PCR System 9700. The main menu appears. 3.1.2.1 Select Utilities (F4) 3.1.2.2 Select Diagnostics (F1) COPYRIGHT © 2014 VIRGINIA DEPARTMENT OF FORENSIC SCIENCE 3.1.2.3 Select System (F2) 3.1.3 The System Performance Screen appears System Performance Rate – Cool and Heat Rate Test Cycle – Cycle Performance Test Rate F1 Cycle F2 Exit F3 F4 F5 3.1.4 Select Rate Test (F1) to verify that the Peltier units are operating correctly. The System Performance screen displays the following message: “WARNING!! Install the appropriate empty consumables into the sample block. Refer to System Performance Section of the Block User Manual.” 3.1.5 Select Cont. (F1) after the plate and cover has been installed and the Cool and Heat test screen appears. 3.1.6 The instrument then runs through a series of tests where the sample block ramps to and stabilizes at 35°C, 94°C and 4°C, which is displayed on the screen. At the conclusion of the test, the Cool and Heat screen appears displaying the results and whether the test results passed or failed. Record this information in the Cool and Heat Rate Test area on the worksheet (Document 210-F601). If the test fails contact Applied Biosystems Technical Support. Cool and Heat Rate Test Pass Heating rate: x.xx ºC/s Cooling rate: x.xx ºC/s Print F1 Cancel F2 F3 F4 F5 UNCONTROLLED COPY 3.1.7 The following table lists the passing ranges for the Rate test: 96-well Heating Rate 3.0 to 6.0 °C/second Cooling Rate 3.0 to 6.0 °C/second 3.1.8 Return to the System Performance screen by selecting Cancel (F5) and select Cycle Test (F2) to verify that the PCR cycling function operates properly. The System Performance screen displays the following message: “WARNING!! Install the appropriate empty consumables into the sample block. Refer to System Performance Section of the Block User Manual.” 3.1.9 Select Cont. (F1) after the plate and cover has been installed. Forensic Biology Section Procedures Manual, Section VI Issued by Biology Program Manager Issue Date: 22-September-2014 Document 210-D600 Revision 5 Page 34 of 38 Appendix E – Thermal Cycler 9700 Temperature Calibration, Temperature Non-Uniformity and System Performance Diagnostic Tests 3.1.10 The Cycle Test executes a standard PCR cycle reaction (6 cycles), measures, and reports the average cycle time, and the cycle to cycle variation. At the conclusion of the test, the Cycle Test screen will display the results and whether the test results passed or failed. Record this information in the Cycle Performance area on the worksheet (Document 210-F601). If the test fails contact Applied Biosystems Technical Support. COPYRIGHT © 2014 VIRGINIA DEPARTMENT OF FORENSIC SCIENCE Cycle Performance Pass Average Cycle Time: xxx.x sec Cycle time STD: x.x sec Print F1 Cancel F2 F3 F4 F5 3.1.11 The following table lists the passing ranges for the Cycle Test. Average Cycle Time <= 160 sec Cycle Time STD < 5 sec 3.1.12 Select Cancel (F5) to exit the test. UNCONTROLLED COPY Forensic Biology Section Procedures Manual, Section VI Issued by Biology Program Manager Issue Date: 22-September-2014 Document 210-D600 Revision 5 Page 35 of 38 Appendix F – Preparing NIST Traceable Samples Appendix F – Preparing NIST Traceable Samples 1 Take blood samples from at least 2 people, apply this material to blood stain cards (1 donor on each card) and dry the cards. 2 Demonstrate that the dried samples from each donor are homogenous by taking cuttings from each stain card prepared and process the samples in accordance with the DNA extraction and typing procedures outlined in the Procedures Manual. All normal controls must be processed with samples (e.g., reagent blanks, negative blanks, positive controls, etc.). The same DNA profile should be obtained from the duplicate samples from each card. 3 Once the representative testing has been completed as outlined above take a single cutting from each stain card (e.g., if enough blood was drawn to make 2 stain cards from each donor for a total of 4 stain cards then a single cutting from each card is needed) and extract these samples in parallel with samples from a Standard Reference Material (SRM) 2391B kit. If the correct DNA profiles are obtained from the in-house prepared samples and the SRM kit samples, then the in-house prepared samples are now considered National Institute of Standards and Technology (NIST) traceable. 4 To conduct the annual testing using the in-house prepared NIST traceable samples take a single cutting from each donor (e.g., if enough blood was drawn from an individual to make 2 stain cards a single sample from 1 of the cards is needed). Process the samples in accordance with the DNA extraction and typing procedures outlined in the Procedures Manual. Maintain all documentation in a properly labeled file. 5 The in-house prepared samples are good until the sample is consumed or a discrepancy is detected. New lots of NIST traceable samples have to be prepared as listed in step 1 above (meaning you cannot just bleed the same people and use their sample without going through the representative testing with all the applicable extraction and typing controls). COPYRIGHT © 2014 VIRGINIA DEPARTMENT OF FORENSIC SCIENCE UNCONTROLLED COPY Forensic Biology Section Procedures Manual, Section VI Issued by Biology Program Manager Issue Date: 22-September-2014 Document 210-D600 Revision 5 Page 36 of 38 Appendix G – Guide for Review of CE DNA Data APPENDIX G – Guide for Review of CE DNA Data Extraction worksheet • Samples extracted from low to high (batch or per case) • Knowns extracted separately from evidence • Appropriate reagent blanks used and correct volumes • Extraction method, volume, buffer and analyst specified COPYRIGHT © 2014 VIRGINIA DEPARTMENT OF FORENSIC SCIENCE Biomek worksheet • Samples & controls in proper location • Knowns separated from evidence • “Wells Loaded” box accurately recorded • Operator/Analyst actions initialed and dated • Crosscheck initialed and dated or otherwise marked • Instrument ID recorded if applicable Plexor worksheet • Operator initials present • Proper documentation if STD curves adjusted • Lot # of kit recorded • R2 values for Autosomal/Y curves recorded • IPC value checked for possible inhibition • Samples noted that are not going to be amplified here or on the sample dilution tracking form • Instrument ID recorded if applicable Sample Dilution Tracking worksheet • Operator initials present • Deviations correctly noted Reagent / Amplification worksheet • Lot #s & required expiration dates recorded • Extraction / Quantitation / Amplification dates recorded • TC # & QC, unique positive and negative info recorded date recorded and initialed Manual Amplification form • Reagent blank volumes mimic the most sensitive samples they monitor CE Plate map • Reagent volumes, lot #s & expiration dates recorded • Polymer load date & buffer change date recorded • Sample load volumes & injection times recorded • Plate name, instrument ID, plate loading date, and wells loaded recorded • Controls evaluated and documented in box checked off and dated by examiner & tech reviewer • Reagent blanks loaded and injected proper volume • Minimum one ladder loaded per plate UNCONTROLLED COPY CE Plate map (continued) • Reason for reinjection documented CE Data / Electronic Information • Correct module file & peak threshold values used • Verify ILS for each sample is suitable • Verify ladder(s) allele values are correct • Verify correct types obtained for at least one positive control associated with the amplification run per run associated Forensic Biology Section Procedures Manual, Section VI Issued by Biology Program Manager Issue Date: 22-September-2014 Document 210-D600 Revision 5 Page 37 of 38 Appendix G – Guide for Review of CE DNA Data • • • • At least one passing positive control per amplification Negative control(s)/reagent blanks evaluated, proper action taken if expected values not obtained Evaluate for off-scale data Verify sample allele calls/edits/ST calculations are accurate Egram printouts • Injection time recorded on egrams or in case file documentation • ST, M/m calculations are documented and correct COPYRIGHT © 2014 VIRGINIA DEPARTMENT OF FORENSIC SCIENCE Landscape worksheet (if present) • Verify allele calls against egrams, including M/m designations • INC loci addressed if not addressed elsewhere • Profile suitability for comparison/searching documented, if not documented elsewhere CODIS Specimen Detail report printouts • All appropriate samples entered into CODIS • Appropriate specimen nomenclature used • Appropriate specimen category assigned • Source ID appropriately chosen, if applicable • Correct alleles entered • CODIS review documented, if applicable & not documented elsewhere • Reported NDIS suitability consistent with data entry CODIS search result printouts • Staff index search conducted, if appropriate • Local & state search sheets included, if appropriate • Proper indices searched • Matches properly evaluated & documented • Appropriate alleles used Statistics • Appropriate calculation used • For LR, appropriate assumptions made • For CPI, loci used with all data above stochastic threshold • For single source, profile evaluated for 2p • Theta used as appropriate • ST peaks considered if appropriate • Correct alleles entered • Correct database used • Sample description / identification listed • Reported value listed on printout UNCONTROLLED COPY Forensic Biology Section Procedures Manual, Section VI Issued by Biology Program Manager Issue Date: 22-September-2014 Document 210-D600 Revision 5 Page 38 of 38


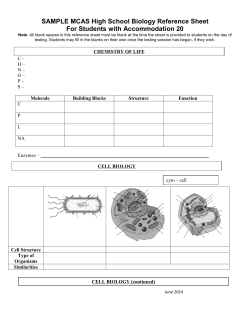


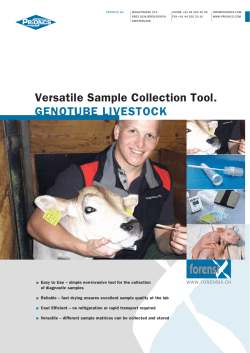
© Copyright 2026