
DeskPRO Agent Manual July 3rd, 2014 • Revision #33
DeskPRO
Agent Manual
DeskPRO Agent Manual
July 3rd, 2014 • Revision #33
DeskPRO
. . . . . . . . . . .Agent
. . . . . . .Manual
. . . . . . . . . . . . . . . . . . . . . . . . . . . . . . . . . . . . . . . . . . . . . . . . . . . . . . . . . . . . . . . . . . . . . . . . . . . . . . . . . . . . . . . . . . . . . . . . .1. . . . . . . . . . . . . . . .
1.. Introducing
. . . . . . . . . . . . . . .DeskPRO
..................................................................................................6
.................
1.1.
. . .Getting
. . . . . . . . started
. . . . . . . . . . . . . . . . . . . . . . . . . . . . . . . . . . . . . . . . . . . . . . . . . . . . . . . . . . . . . . . . . . . . . . . . . . . . . . . . . . . . . . . . . . . . . 7. . . . . . . . . . . . . . . .
Logging
. . . . . . . . .in
. . for
. . . .the
. . . .first
. . . . .time
..........................................................................7
................
Agent
. . . . . . vs
. . .user
. . . . .views
....................................................................................8
................
2.. .The
. . . . .Agent
. . . . . . . Interface
. . . . . . . . . . . . . . . . . . . . . . . . . . . . . . . . . . . . . . . . . . . . . . . . . . . . . . . . . . . . . . . . . . . . . . . . . . . . . . . . . . . . . . . . . . . . . . . . . . . 10
..................
2.1.
. . . App
. . . . . bar
. . . . . . . . . . . . . . . . . . . . . . . . . . . . . . . . . . . . . . . . . . . . . . . . . . . . . . . . . . . . . . . . . . . . . . . . . . . . . . . . . . . . . . . . . . . . . . . 11
.................
2.2.
. . . .Filter
. . . . . .pane
. . . . . . . . . . . . . . . . . . . . . . . . . . . . . . . . . . . . . . . . . . . . . . . . . . . . . . . . . . . . . . . . . . . . . . . . . . . . . . . . . . . . . . . . . . . . .12
.................
2.3.
. . . .List
. . . .pane
. . . . . . . . . . . . . . . . . . . . . . . . . . . . . . . . . . . . . . . . . . . . . . . . . . . . . . . . . . . . . . . . . . . . . . . . . . . . . . . . . . . . . . . . . . . . . . . 14
.................
Viewing
. . . . . . . . properties
. . . . . . . . . . . . . . . . . . . . . . . . . . . . . . . . . . . . . . . . . . . . . . . . . . . . . . . . . . . . . . . . . . . . . . . . . . . . . . . . . . . . . . . . . .14
................
Opening
. . . . . . . . . items
. . . . . . . . . . . . . . . . . . . . . . . . . . . . . . . . . . . . . . . . . . . . . . . . . . . . . . . . . . . . . . . . . . . . . . . . . . . . . . . . . . . . . . . . .15
................
Multiple
. . . . . . . . .selections
. . . . . . . . . . .and
. . . . mass
. . . . . .actions
. . . . . . . . . . . . . . . . . . . . . . . . . . . . . . . . . . . . . . . . . . . . . . . . . . . . . . . . . . . . . . . . . . . 16
.................
Viewing
........a
. . list
. . . .as
. . .a. table
. . . . . . . . . . . . . . . . . . . . . . . . . . . . . . . . . . . . . . . . . . . . . . . . . . . . . . . . . . . . . . . . . . . . . . . . . . . . . . . 16
.................
2.4.
. . . Content
. . . . . . . . . .pane
. . . . . . . . . . . . . . . . . . . . . . . . . . . . . . . . . . . . . . . . . . . . . . . . . . . . . . . . . . . . . . . . . . . . . . . . . . . . . . . . . . . . . . . . . . 18
.................
2.5.
. . . Toolbar
. . . . . . . . . . . . . . . . . . . . . . . . . . . . . . . . . . . . . . . . . . . . . . . . . . . . . . . . . . . . . . . . . . . . . . . . . . . . . . . . . . . . . . . . . . . . . . . . . . . .19
.................
Help
. . . . . . . . . . . . . . . . . . . . . . . . . . . . . . . . . . . . . . . . . . . . . . . . . . . . . . . . . . . . . . . . . . . . . . . . . . . . . . . . . . . . . . . . . . . . . . . . . 19
.................
Log
. . . .Out
. . . . . . . . . . . . . . . . . . . . . . . . . . . . . . . . . . . . . . . . . . . . . . . . . . . . . . . . . . . . . . . . . . . . . . . . . . . . . . . . . . . . . . . . . . . . . 19
.................
The
. . . . Create
. . . . . . . .button
. . . . . . . . . . . . . . . . . . . . . . . . . . . . . . . . . . . . . . . . . . . . . . . . . . . . . . . . . . . . . . . . . . . . . . . . . . . . . . . . . . . . . 19
.................
The
. . . . Recent
. . . . . . . .button
. . . . . . . . . . . . . . . . . . . . . . . . . . . . . . . . . . . . . . . . . . . . . . . . . . . . . . . . . . . . . . . . . . . . . . . . . . . . . . . . . . . . .20
.................
Notifications
. . . . . . . . . . . . . . . . . . . . . . . . . . . . . . . . . . . . . . . . . . . . . . . . . . . . . . . . . . . . . . . . . . . . . . . . . . . . . . . . . . . . . . . . . . . . . . . . .20
.................
Toggling
. . . . . . . . . panes
. . . . . . . . . . . . . . . . . . . . . . . . . . . . . . . . . . . . . . . . . . . . . . . . . . . . . . . . . . . . . . . . . . . . . . . . . . . . . . . . . . . . . . . . 21
.................
Quick
. . . . . . Search
. . . . . . . .bar
. . . . . . . . . . . . . . . . . . . . . . . . . . . . . . . . . . . . . . . . . . . . . . . . . . . . . . . . . . . . . . . . . . . . . . . . . . . . . . . . . . . 21
.................
2.6.
. . . .Customizing
. . . . . . . . . . . . . .the
. . . .agent
. . . . . .interface
. . . . . . . . . . . . . . . . . . . . . . . . . . . . . . . . . . . . . . . . . . . . . . . . . . . . . . . . . . . . . . . . . . . . . . . . . . .23
.................
2.7.
. . . Account
. . . . . . . . . .preferences
. . . . . . . . . . . . . . . . . . . . . . . . . . . . . . . . . . . . . . . . . . . . . . . . . . . . . . . . . . . . . . . . . . . . . . . . . . . . . . . . . . . . . . . . . .24
.................
Account
. . . . . . . . .profile
. . . . . . . . . . . . . . . . . . . . . . . . . . . . . . . . . . . . . . . . . . . . . . . . . . . . . . . . . . . . . . . . . . . . . . . . . . . . . . . . . . . . . . . . 24
.................
Signature
. . . . . . . . . . . . . . . . . . . . . . . . . . . . . . . . . . . . . . . . . . . . . . . . . . . . . . . . . . . . . . . . . . . . . . . . . . . . . . . . . . . . . . . . . . . . . . . . . 25
.................
Notification
. . . . . . . . . . . . .preferences
. . . . . . . . . . . . . . . . . . . . . . . . . . . . . . . . . . . . . . . . . . . . . . . . . . . . . . . . . . . . . . . . . . . . . . . . . . . . . . . . . . . . 26
.................
Macro
. . . . . . .preferences
. . . . . . . . . . . . . . . . . . . . . . . . . . . . . . . . . . . . . . . . . . . . . . . . . . . . . . . . . . . . . . . . . . . . . . . . . . . . . . . . . . . . . . . . . . 27
.................
Filter
. . . . . .preferences
. . . . . . . . . . . . . . . . . . . . . . . . . . . . . . . . . . . . . . . . . . . . . . . . . . . . . . . . . . . . . . . . . . . . . . . . . . . . . . . . . . . . . . . . . . . 28
.................
SLA
. . . . preferences
. . . . . . . . . . . . . . . . . . . . . . . . . . . . . . . . . . . . . . . . . . . . . . . . . . . . . . . . . . . . . . . . . . . . . . . . . . . . . . . . . . . . . . . . . . . . . 28
.................
3.. .Tickets
. . . . . . . . . . . . . . . . . . . . . . . . . . . . . . . . . . . . . . . . . . . . . . . . . . . . . . . . . . . . . . . . . . . . . . . . . . . . . . . . . . . . . . . . . . . . . . . . . . . . . . . . . . . . . . .29
..................
3.1.
. . . Ticket
. . . . . . . properties
. . . . . . . . . . . . . . . . . . . . . . . . . . . . . . . . . . . . . . . . . . . . . . . . . . . . . . . . . . . . . . . . . . . . . . . . . . . . . . . . . . . . . . . . . . . . .30
.................
IDs
. . . .and
. . . . ref
. . . .codes
. . . . . . . . . . . . . . . . . . . . . . . . . . . . . . . . . . . . . . . . . . . . . . . . . . . . . . . . . . . . . . . . . . . . . . . . . . . . . . . . . . . . .30
.................
3.2.
. . . .Ticket
. . . . . . .status
. . . . . . . . . . . . . . . . . . . . . . . . . . . . . . . . . . . . . . . . . . . . . . . . . . . . . . . . . . . . . . . . . . . . . . . . . . . . . . . . . . . . . . . . . . . .32
.................
Core
. . . . . statuses
. . . . . . . . . . . . . . . . . . . . . . . . . . . . . . . . . . . . . . . . . . . . . . . . . . . . . . . . . . . . . . . . . . . . . . . . . . . . . . . . . . . . . . . . . . . . 32
.................
On
. . . hold
. . . . . .status
. . . . . . . . . . . . . . . . . . . . . . . . . . . . . . . . . . . . . . . . . . . . . . . . . . . . . . . . . . . . . . . . . . . . . . . . . . . . . . . . . . . . . . . . 32
.................
Hidden
. . . . . . . .tickets:
. . . . . . . .awaiting
. . . . . . . . . validation,
. . . . . . . . . . . .spam
. . . . . .and
. . . . deleted
. . . . . . . . . . . . . . . . . . . . . . . . . . . . . . . . . . . . . . . . . . . . . . . . . . 33
.................
3.3.
. . . .Ticket
. . . . . . .assignment
. . . . . . . . . . . . . . . . . . . . . . . . . . . . . . . . . . . . . . . . . . . . . . . . . . . . . . . . . . . . . . . . . . . . . . . . . . . . . . . . . . . . . . . . . . . .35
.................
Teams
. . . . . . . . . . . . . . . . . . . . . . . . . . . . . . . . . . . . . . . . . . . . . . . . . . . . . . . . . . . . . . . . . . . . . . . . . . . . . . . . . . . . . . . . . . . . . . . . . 36
.................
DeskPRO Agent Manual
1
DeskPRO
Agent Manual
Following
. . . . . . . . . . tickets
. . . . . . . . . . . . . . . . . . . . . . . . . . . . . . . . . . . . . . . . . . . . . . . . . . . . . . . . . . . . . . . . . . . . . . . . . . . . . . . . . . . . . . . 36
.................
3.4.
. . . Departments
. . . . . . . . . . . . . . . . . . . . . . . . . . . . . . . . . . . . . . . . . . . . . . . . . . . . . . . . . . . . . . . . . . . . . . . . . . . . . . . . . . . . . . . . . . . . . . . . . . . .38
.................
3.5.
. . . Ticket
. . . . . . . .fields
. . . . . . . . . . . . . . . . . . . . . . . . . . . . . . . . . . . . . . . . . . . . . . . . . . . . . . . . . . . . . . . . . . . . . . . . . . . . . . . . . . . . . . . . . . . .39
.................
Categories
. . . . . . . . . . . . . . . . . . . . . . . . . . . . . . . . . . . . . . . . . . . . . . . . . . . . . . . . . . . . . . . . . . . . . . . . . . . . . . . . . . . . . . . . . . . . . . . . . 39
.................
Products
. . . . . . . . . . . . . . . . . . . . . . . . . . . . . . . . . . . . . . . . . . . . . . . . . . . . . . . . . . . . . . . . . . . . . . . . . . . . . . . . . . . . . . . . . . . . . . . . . 39
.................
Workflows
. . . . . . . . . . . . . . . . . . . . . . . . . . . . . . . . . . . . . . . . . . . . . . . . . . . . . . . . . . . . . . . . . . . . . . . . . . . . . . . . . . . . . . . . . . . . . . . . .40
.................
Custom
. . . . . . . . fields
. . . . . . . . . . . . . . . . . . . . . . . . . . . . . . . . . . . . . . . . . . . . . . . . . . . . . . . . . . . . . . . . . . . . . . . . . . . . . . . . . . . . . . . . .40
.................
Field
. . . . . validation
. . . . . . . . . . . . . . . . . . . . . . . . . . . . . . . . . . . . . . . . . . . . . . . . . . . . . . . . . . . . . . . . . . . . . . . . . . . . . . . . . . . . . . . . . . . . .41
................
3.6.
. . . .Ticket
. . . . . . .history
. . . . . . . . . . . . . . . . . . . . . . . . . . . . . . . . . . . . . . . . . . . . . . . . . . . . . . . . . . . . . . . . . . . . . . . . . . . . . . . . . . . . . . . . . . . .43
.................
Ticket
. . . . . . .message
. . . . . . . . .history
. . . . . . . . . . . . . . . . . . . . . . . . . . . . . . . . . . . . . . . . . . . . . . . . . . . . . . . . . . . . . . . . . . . . . . . . . . . . . . . . . 43
.................
Ticket
. . . . . . .log
. . . . . . . . . . . . . . . . . . . . . . . . . . . . . . . . . . . . . . . . . . . . . . . . . . . . . . . . . . . . . . . . . . . . . . . . . . . . . . . . . . . . . . . . . . 44
.................
Ticket
. . . . . . .dates
. . . . . .and
. . . . times
. . . . . . . . . . . . . . . . . . . . . . . . . . . . . . . . . . . . . . . . . . . . . . . . . . . . . . . . . . . . . . . . . . . . . . . . . . . . . . . . 45
.................
Viewing
. . . . . . . . raw
. . . . .message
. . . . . . . . . source
. . . . . . . . . . . . . . . . . . . . . . . . . . . . . . . . . . . . . . . . . . . . . . . . . . . . . . . . . . . . . . . . . . . . . . . . . . . 46
.................
3.7.
. . . Replying
. . . . . . . . . . to
. . . a. .ticket
. . . . . . . . . . . . . . . . . . . . . . . . . . . . . . . . . . . . . . . . . . . . . . . . . . . . . . . . . . . . . . . . . . . . . . . . . . . . . . . . . . . . .47
.................
Using
. . . . . .ticket
. . . . . . CC
. . . . to
. . .copy
. . . . . .in
. . users
. . . . . . . . . . . . . . . . . . . . . . . . . . . . . . . . . . . . . . . . . . . . . . . . . . . . . . . . . . . . . . . . . . . . . . 47
.................
Message
. . . . . . . . .attachments
. . . . . . . . . . . . . . . . . . . . . . . . . . . . . . . . . . . . . . . . . . . . . . . . . . . . . . . . . . . . . . . . . . . . . . . . . . . . . . . . . . . . . . . . 47
.................
Quick
. . . . . . message
. . . . . . . . . .screenshots
. . . . . . . . . . . . with
. . . . . .paste
. . . . . .or
. . drag
. . . . . .and
. . . . drop
. . . . . . . . . . . . . . . . . . . . . . . . . . . . . . . . . . . . . . . . . . . . . 48
.................
Ticket
. . . . . . .message
. . . . . . . . .formatting
. . . . . . . . . . . . . . . . . . . . . . . . . . . . . . . . . . . . . . . . . . . . . . . . . . . . . . . . . . . . . . . . . . . . . . . . . . . . . . . . . 48
.................
Using
. . . . . .links
. . . . . .in
. . messages
. . . . . . . . . . . . . . . . . . . . . . . . . . . . . . . . . . . . . . . . . . . . . . . . . . . . . . . . . . . . . . . . . . . . . . . . . . . . . . . . . . . 49
.................
Automatic
. . . . . . . . . . .translation
. . . . . . . . . . . .plugin
. . . . . . . . . . . . . . . . . . . . . . . . . . . . . . . . . . . . . . . . . . . . . . . . . . . . . . . . . . . . . . . . . . . . . . . . . . .51
................
Ticket
. . . . . . .notes
. . . . . . . . . . . . . . . . . . . . . . . . . . . . . . . . . . . . . . . . . . . . . . . . . . . . . . . . . . . . . . . . . . . . . . . . . . . . . . . . . . . . . . . . . . .51
................
@mentions
. . . . . . . . . . . . . . . . . . . . . . . . . . . . . . . . . . . . . . . . . . . . . . . . . . . . . . . . . . . . . . . . . . . . . . . . . . . . . . . . . . . . . . . . . . . . . . . . . .51
................
Snippets
. . . . . . . . . . . . . . . . . . . . . . . . . . . . . . . . . . . . . . . . . . . . . . . . . . . . . . . . . . . . . . . . . . . . . . . . . . . . . . . . . . . . . . . . . . . . . . . . . 52
.................
Snippet
. . . . . . . . categories
. . . . . . . . . . . and
. . . . .sharing
. . . . . . . . . . . . . . . . . . . . . . . . . . . . . . . . . . . . . . . . . . . . . . . . . . . . . . . . . . . . . . . . . . . . . . . . . 53
.................
Snippet
. . . . . . . . shortcuts
. . . . . . . . . . . . . . . . . . . . . . . . . . . . . . . . . . . . . . . . . . . . . . . . . . . . . . . . . . . . . . . . . . . . . . . . . . . . . . . . . . . . . . . . . 53
.................
Snippet
. . . . . . . . variables
. . . . . . . . . . . . . . . . . . . . . . . . . . . . . . . . . . . . . . . . . . . . . . . . . . . . . . . . . . . . . . . . . . . . . . . . . . . . . . . . . . . . . . . . . 54
.................
3.8.
. . . .Replying
. . . . . . . . . .to
. . tickets
. . . . . . . .by
. . .email
. . . . . . . . . . . . . . . . . . . . . . . . . . . . . . . . . . . . . . . . . . . . . . . . . . . . . . . . . . . . . . . . . . . . . . . . . . . .56
.................
Email
. . . . . . action
. . . . . . . codes
. . . . . . . . . . . . . . . . . . . . . . . . . . . . . . . . . . . . . . . . . . . . . . . . . . . . . . . . . . . . . . . . . . . . . . . . . . . . . . . . . . . . 56
.................
3.9.
. . . .Creating
. . . . . . . . . a. .ticket
. . . . . . . . . . . . . . . . . . . . . . . . . . . . . . . . . . . . . . . . . . . . . . . . . . . . . . . . . . . . . . . . . . . . . . . . . . . . . . . . . . . . . . . .58
.................
Field
. . . . . validation
. . . . . . . . . . . . . . . . . . . . . . . . . . . . . . . . . . . . . . . . . . . . . . . . . . . . . . . . . . . . . . . . . . . . . . . . . . . . . . . . . . . . . . . . . . . . 58
.................
New
. . . . .ticket
. . . . . . message
. . . . . . . . . . . . . . . . . . . . . . . . . . . . . . . . . . . . . . . . . . . . . . . . . . . . . . . . . . . . . . . . . . . . . . . . . . . . . . . . . . . . . . 59
.................
Forwarding
. . . . . . . . . . . . an
. . . email
. . . . . . .to
. . create
. . . . . . .a
. . ticket
. . . . . . . . . . . . . . . . . . . . . . . . . . . . . . . . . . . . . . . . . . . . . . . . . . . . . . . . . . . . . . . .60
.................
Processing
. . . . . . . . . . . email
. . . . . . .cc:
. . .field
. . . . . . . . . . . . . . . . . . . . . . . . . . . . . . . . . . . . . . . . . . . . . . . . . . . . . . . . . . . . . . . . . . . . . . . . . . . .60
.................
3.10.
. . . . .Ticket
. . . . . . .actions
. . . . . . . . . . . . . . . . . . . . . . . . . . . . . . . . . . . . . . . . . . . . . . . . . . . . . . . . . . . . . . . . . . . . . . . . . . . . . . . . . . . . . . . . . . .61
.................
Locking
. . . . . . . . tickets
. . . . . . . . . . . . . . . . . . . . . . . . . . . . . . . . . . . . . . . . . . . . . . . . . . . . . . . . . . . . . . . . . . . . . . . . . . . . . . . . . . . . . . . . . 61
.................
Merging
. . . . . . . . .tickets
. . . . . . . . . . . . . . . . . . . . . . . . . . . . . . . . . . . . . . . . . . . . . . . . . . . . . . . . . . . . . . . . . . . . . . . . . . . . . . . . . . . . . . . . 61
.................
Holding
. . . . . . . . .tickets
. . . . . . . . . . . . . . . . . . . . . . . . . . . . . . . . . . . . . . . . . . . . . . . . . . . . . . . . . . . . . . . . . . . . . . . . . . . . . . . . . . . . . . . . 63
.................
Changing
. . . . . . . . . . a. .ticket's
. . . . . . . .user
. . . . . . . . . . . . . . . . . . . . . . . . . . . . . . . . . . . . . . . . . . . . . . . . . . . . . . . . . . . . . . . . . . . . . . . . . . . . . 63
.................
Splitting
. . . . . . . . .messages
. . . . . . . . . . to
. . .a. .new
. . . . ticket
. . . . . . . . . . . . . . . . . . . . . . . . . . . . . . . . . . . . . . . . . . . . . . . . . . . . . . . . . . . . . . . . . . . . . 63
.................
Creating
. . . . . . . . .a. .linked
. . . . . . .ticket
. . . . . . . . . . . . . . . . . . . . . . . . . . . . . . . . . . . . . . . . . . . . . . . . . . . . . . . . . . . . . . . . . . . . . . . . . . . . . . . 64
.................
Creating
. . . . . . . . .a. .new
. . . . .pending
. . . . . . . . .article
. . . . . . . . . . . . . . . . . . . . . . . . . . . . . . . . . . . . . . . . . . . . . . . . . . . . . . . . . . . . . . . . . . . . . . . . 65
.................
Printing
. . . . . . . . .and
. . . . exporting
. . . . . . . . . . .ticket
. . . . . . information
. . . . . . . . . . . . . . . . . . . . . . . . . . . . . . . . . . . . . . . . . . . . . . . . . . . . . . . . . . . . . . . . . . . 65
.................
3.11.
. . . . Filtering
. . . . . . . . . .and
. . . . sorting
. . . . . . . . tickets
. . . . . . . . . . . . . . . . . . . . . . . . . . . . . . . . . . . . . . . . . . . . . . . . . . . . . . . . . . . . . . . . . . . . . . . . . . . . .66
.................
The
. . . . awaiting
. . . . . . . . . .agent
. . . . . .section
. . . . . . . . . . . . . . . . . . . . . . . . . . . . . . . . . . . . . . . . . . . . . . . . . . . . . . . . . . . . . . . . . . . . . . . . . . . . .66
.................
Ticket
. . . . . . .status
. . . . . . filters
. . . . . . . . . . . . . . . . . . . . . . . . . . . . . . . . . . . . . . . . . . . . . . . . . . . . . . . . . . . . . . . . . . . . . . . . . . . . . . . . . . . .66
.................
Real-time
. . . . . . . . . . updating
. . . . . . . . . . in
. . .the
. . . .list
. . . .pane
. . . . . . . . . . . . . . . . . . . . . . . . . . . . . . . . . . . . . . . . . . . . . . . . . . . . . . . . . . . . . . . . . . 67
.................
Grouping
. . . . . . . . . . tickets
. . . . . . . . . . . . . . . . . . . . . . . . . . . . . . . . . . . . . . . . . . . . . . . . . . . . . . . . . . . . . . . . . . . . . . . . . . . . . . . . . . . . . . . 67
.................
DeskPRO Agent Manual
2
DeskPRO
Agent Manual
Creating
. . . . . . . . .custom
. . . . . . . . ticket
. . . . . . .filters
. . . . . . . . . . . . . . . . . . . . . . . . . . . . . . . . . . . . . . . . . . . . . . . . . . . . . . . . . . . . . . . . . . . . . . . . . 68
.................
Ordering
. . . . . . . . . .tickets
. . . . . . .in
. . .the
. . . .list
. . . pane
. . . . . . . . . . . . . . . . . . . . . . . . . . . . . . . . . . . . . . . . . . . . . . . . . . . . . . . . . . . . . . . . . . . . . . .71
................
Ticket
. . . . . . .mouseover
. . . . . . . . . . . .preview
. . . . . . . . . . . . . . . . . . . . . . . . . . . . . . . . . . . . . . . . . . . . . . . . . . . . . . . . . . . . . . . . . . . . . . . . . . . . . . 72
.................
Field
. . . . . display
. . . . . . . . options
. . . . . . . . . . . . . . . . . . . . . . . . . . . . . . . . . . . . . . . . . . . . . . . . . . . . . . . . . . . . . . . . . . . . . . . . . . . . . . . . . . . . 72
.................
Labeling
. . . . . . . . . tickets
. . . . . . . . . . . . . . . . . . . . . . . . . . . . . . . . . . . . . . . . . . . . . . . . . . . . . . . . . . . . . . . . . . . . . . . . . . . . . . . . . . . . . . . . 74
.................
Flags
. . . . . . . . . . . . . . . . . . . . . . . . . . . . . . . . . . . . . . . . . . . . . . . . . . . . . . . . . . . . . . . . . . . . . . . . . . . . . . . . . . . . . . . . . . . . . . . . . 75
.................
3.12.
. . . . Prioritizing
. . . . . . . . . . . . . tickets
. . . . . . . . . . . . . . . . . . . . . . . . . . . . . . . . . . . . . . . . . . . . . . . . . . . . . . . . . . . . . . . . . . . . . . . . . . . . . . . . . . . . . . 77
.................
SLAs
. . . . . . . . . . . . . . . . . . . . . . . . . . . . . . . . . . . . . . . . . . . . . . . . . . . . . . . . . . . . . . . . . . . . . . . . . . . . . . . . . . . . . . . . . . . . . . . . . .77
................
Filtering
. . . . . . . . .SLAs
. . . . . . . . . . . . . . . . . . . . . . . . . . . . . . . . . . . . . . . . . . . . . . . . . . . . . . . . . . . . . . . . . . . . . . . . . . . . . . . . . . . . . . . . 78
.................
Urgency
. . . . . . . . . . . . . . . . . . . . . . . . . . . . . . . . . . . . . . . . . . . . . . . . . . . . . . . . . . . . . . . . . . . . . . . . . . . . . . . . . . . . . . . . . . . . . . . . . 79
.................
Ticket
. . . . . . .priority
. . . . . . . . field
. . . . . . . . . . . . . . . . . . . . . . . . . . . . . . . . . . . . . . . . . . . . . . . . . . . . . . . . . . . . . . . . . . . . . . . . . . . . . . . . . .80
.................
3.13.
. . . . Macros
. . . . . . . . . . . . . . . . . . . . . . . . . . . . . . . . . . . . . . . . . . . . . . . . . . . . . . . . . . . . . . . . . . . . . . . . . . . . . . . . . . . . . . . . . . . . . . . . . . . 81
.................
Macro
. . . . . . .actions
. . . . . . . . . . . . . . . . . . . . . . . . . . . . . . . . . . . . . . . . . . . . . . . . . . . . . . . . . . . . . . . . . . . . . . . . . . . . . . . . . . . . . . . . . . 83
.................
Macros
. . . . . . . .and
. . . . permissions
. . . . . . . . . . . . . . . . . . . . . . . . . . . . . . . . . . . . . . . . . . . . . . . . . . . . . . . . . . . . . . . . . . . . . . . . . . . . . . . . . . . . . 84
.................
3.14.
. . . . Searching
. . . . . . . . . . . for
. . . . tickets
. . . . . . . . . . . . . . . . . . . . . . . . . . . . . . . . . . . . . . . . . . . . . . . . . . . . . . . . . . . . . . . . . . . . . . . . . . . . . . . . . . . .86
.................
Advanced
. . . . . . . . . . ticket
. . . . . . .search
. . . . . . . . . . . . . . . . . . . . . . . . . . . . . . . . . . . . . . . . . . . . . . . . . . . . . . . . . . . . . . . . . . . . . . . . . . . . . . . . 87
.................
3.15.
. . . . Mass
. . . . . . actions
. . . . . . . . . . . . . . . . . . . . . . . . . . . . . . . . . . . . . . . . . . . . . . . . . . . . . . . . . . . . . . . . . . . . . . . . . . . . . . . . . . . . . . . . . . . . .95
.................
Table
. . . . . .view
. . . . . mass
. . . . . . actions
. . . . . . . . and
. . . . .CSV
. . . . .export
. . . . . . . . . . . . . . . . . . . . . . . . . . . . . . . . . . . . . . . . . . . . . . . . . . . . . . . . . . . . . . 97
.................
3.16.
. . . . .User
. . . . .satisfaction
. . . . . . . . . . . . . . . . . . . . . . . . . . . . . . . . . . . . . . . . . . . . . . . . . . . . . . . . . . . . . . . . . . . . . . . . . . . . . . . . . . . . . . . . . . . . .99
.................
3.17.
. . . . Billing
. . . . . . . . . . . . . . . . . . . . . . . . . . . . . . . . . . . . . . . . . . . . . . . . . . . . . . . . . . . . . . . . . . . . . . . . . . . . . . . . . . . . . . . . . . . . . . . . . 100
...................
4.. .Chat
. . . . . . . . . . . . . . . . . . . . . . . . . . . . . . . . . . . . . . . . . . . . . . . . . . . . . . . . . . . . . . . . . . . . . . . . . . . . . . . . . . . . . . . . . . . . . . . . . . . . . . . . . . . . . . 101
...................
4.1.
. . . Accepting
. . . . . . . . . . . chats
. . . . . . . . . . . . . . . . . . . . . . . . . . . . . . . . . . . . . . . . . . . . . . . . . . . . . . . . . . . . . . . . . . . . . . . . . . . . . . . . . . . . . . . .103
..................
Setting
. . . . . . . chat
. . . . . notification
. . . . . . . . . . . . . volume
. . . . . . . . . . . . . . . . . . . . . . . . . . . . . . . . . . . . . . . . . . . . . . . . . . . . . . . . . . . . . . . . . . . . . . .104
..................
4.2.
. . . Chatting
. . . . . . . . . . with
. . . . . users
. . . . . . . . . . . . . . . . . . . . . . . . . . . . . . . . . . . . . . . . . . . . . . . . . . . . . . . . . . . . . . . . . . . . . . . . . . . . . . . . . . . .105
..................
Chat
. . . . .details
. . . . . . . . . . . . . . . . . . . . . . . . . . . . . . . . . . . . . . . . . . . . . . . . . . . . . . . . . . . . . . . . . . . . . . . . . . . . . . . . . . . . . . . . . . .105
..................
Chat
. . . . .visitor
. . . . . . . information
. . . . . . . . . . . . . . . . . . . . . . . . . . . . . . . . . . . . . . . . . . . . . . . . . . . . . . . . . . . . . . . . . . . . . . . . . . . . . . . . . . . .106
..................
Block
. . . . . .user
. . . . . . . . . . . . . . . . . . . . . . . . . . . . . . . . . . . . . . . . . . . . . . . . . . . . . . . . . . . . . . . . . . . . . . . . . . . . . . . . . . . . . . . . . .106
..................
4.3.
. . . Assigning
. . . . . . . . . . . chats
. . . . . . . . . . . . . . . . . . . . . . . . . . . . . . . . . . . . . . . . . . . . . . . . . . . . . . . . . . . . . . . . . . . . . . . . . . . . . . . . . . . . . . . .107
..................
4.4.
. . . Viewing
. . . . . . . . . .closed
. . . . . . .and
. . . . missed
. . . . . . . . chats
. . . . . . . . . . . . . . . . . . . . . . . . . . . . . . . . . . . . . . . . . . . . . . . . . . . . . . . . . . . . . . . . . . . . . . 110
..................
Open
. . . . . .chats
. . . . . .filter
. . . . . . . . . . . . . . . . . . . . . . . . . . . . . . . . . . . . . . . . . . . . . . . . . . . . . . . . . . . . . . . . . . . . . . . . . . . . . . . . . . . . 110
..................
Ended
. . . . . . .chats
. . . . . .filter
. . . . . . . . . . . . . . . . . . . . . . . . . . . . . . . . . . . . . . . . . . . . . . . . . . . . . . . . . . . . . . . . . . . . . . . . . . . . . . . . . . . 110
..................
4.5.
. . . Custom
. . . . . . . . . chat
. . . . . fields
. . . . . . . . . . . . . . . . . . . . . . . . . . . . . . . . . . . . . . . . . . . . . . . . . . . . . . . . . . . . . . . . . . . . . . . . . . . . . . . . . . . . . 112
..................
5.. .CRM
. . . . . . . . . . . . . . . . . . . . . . . . . . . . . . . . . . . . . . . . . . . . . . . . . . . . . . . . . . . . . . . . . . . . . . . . . . . . . . . . . . . . . . . . . . . . . . . . . . . . . . . . . . . . . . .113
..................
5.1.
. . . Filtering
. . . . . . . . . .and
. . . . sorting
. . . . . . . . users
. . . . . . and
. . . . .organizations
. . . . . . . . . . . . . . . . . . . . . . . . . . . . . . . . . . . . . . . . . . . . . . . . . . . . . . . . . . . . . . . . . . 114
..................
Filtering
. . . . . . . . .users
. . . . . . . . . . . . . . . . . . . . . . . . . . . . . . . . . . . . . . . . . . . . . . . . . . . . . . . . . . . . . . . . . . . . . . . . . . . . . . . . . . . . . . . .114
.................
Filtering
. . . . . . . . .agents
. . . . . . . . . . . . . . . . . . . . . . . . . . . . . . . . . . . . . . . . . . . . . . . . . . . . . . . . . . . . . . . . . . . . . . . . . . . . . . . . . . . . . . . .114
.................
Filtering
. . . . . . . . .people
. . . . . . . .alphabetically
. . . . . . . . . . . . . . . . . . . . . . . . . . . . . . . . . . . . . . . . . . . . . . . . . . . . . . . . . . . . . . . . . . . . . . . . . . . . . . . .114
.................
Ordering
. . . . . . . . . .people
. . . . . . . . . . . . . . . . . . . . . . . . . . . . . . . . . . . . . . . . . . . . . . . . . . . . . . . . . . . . . . . . . . . . . . . . . . . . . . . . . . . . . . .114
.................
Viewing
........a
. . table
. . . . . .of
. . .people
. . . . . . . . . . . . . . . . . . . . . . . . . . . . . . . . . . . . . . . . . . . . . . . . . . . . . . . . . . . . . . . . . . . . . . . . . . . . . .114
.................
5.2.
. . . User
. . . . . .records
. . . . . . . . . . . . . . . . . . . . . . . . . . . . . . . . . . . . . . . . . . . . . . . . . . . . . . . . . . . . . . . . . . . . . . . . . . . . . . . . . . . . . . . . . . . . . 116
..................
Setting
. . . . . . . user
. . . . . organization
. . . . . . . . . . . . . . . . . . . . . . . . . . . . . . . . . . . . . . . . . . . . . . . . . . . . . . . . . . . . . . . . . . . . . . . . . . . . . . . . . . . . 116
..................
Setting
. . . . . . . usergroups
. . . . . . . . . . . . . . . . . . . . . . . . . . . . . . . . . . . . . . . . . . . . . . . . . . . . . . . . . . . . . . . . . . . . . . . . . . . . . . . . . . . . . . . . . 116
..................
User
. . . . .summary
. . . . . . . . . . . . . . . . . . . . . . . . . . . . . . . . . . . . . . . . . . . . . . . . . . . . . . . . . . . . . . . . . . . . . . . . . . . . . . . . . . . . . . . . . . . 116
..................
User
. . . . .contact
. . . . . . . .information
. . . . . . . . . . . . . . . . . . . . . . . . . . . . . . . . . . . . . . . . . . . . . . . . . . . . . . . . . . . . . . . . . . . . . . . . . . . . . . . . . . . 116
..................
Users
. . . . . .with
. . . . .multiple
. . . . . . . . . email
. . . . . . .addresses
. . . . . . . . . . . . . . . . . . . . . . . . . . . . . . . . . . . . . . . . . . . . . . . . . . . . . . . . . . . . . . . . . . . . . .117
.................
Changing
. . . . . . . . . . user
. . . . . email
. . . . . . .address
. . . . . . . . for
. . . .a. .ticket
. . . . . . . . . . . . . . . . . . . . . . . . . . . . . . . . . . . . . . . . . . . . . . . . . . . . . . . . . . . . .117
.................
User
. . . . .properties
. . . . . . . . . . . . . . . . . . . . . . . . . . . . . . . . . . . . . . . . . . . . . . . . . . . . . . . . . . . . . . . . . . . . . . . . . . . . . . . . . . . . . . . . . . . .117
.................
DeskPRO Agent Manual
3
DeskPRO
Agent Manual
User
. . . . .history
. . . . . . . . . . . . . . . . . . . . . . . . . . . . . . . . . . . . . . . . . . . . . . . . . . . . . . . . . . . . . . . . . . . . . . . . . . . . . . . . . . . . . . . . . . . .118
.................
Agent
. . . . . . records
. . . . . . . . . . . . . . . . . . . . . . . . . . . . . . . . . . . . . . . . . . . . . . . . . . . . . . . . . . . . . . . . . . . . . . . . . . . . . . . . . . . . . . . . . . .118
.................
5.3.
. . . Usergroups
. . . . . . . . . . . . . . . . . . . . . . . . . . . . . . . . . . . . . . . . . . . . . . . . . . . . . . . . . . . . . . . . . . . . . . . . . . . . . . . . . . . . . . . . . . . . . . . . . . . 119
..................
Setting
. . . . . . . usergroups
. . . . . . . . . . . . . . . . . . . . . . . . . . . . . . . . . . . . . . . . . . . . . . . . . . . . . . . . . . . . . . . . . . . . . . . . . . . . . . . . . . . . . . . . . 119
..................
Guest
. . . . . .and
. . . . registered
. . . . . . . . . . . .users
. . . . . . . . . . . . . . . . . . . . . . . . . . . . . . . . . . . . . . . . . . . . . . . . . . . . . . . . . . . . . . . . . . . . . . . . . . 119
..................
5.4.
. . . Organizations
. . . . . . . . . . . . . . . . . . . . . . . . . . . . . . . . . . . . . . . . . . . . . . . . . . . . . . . . . . . . . . . . . . . . . . . . . . . . . . . . . . . . . . . . . . . . . . . . . . . 121
..................
Organization
. . . . . . . . . . . . . .details
. . . . . . . . . . . . . . . . . . . . . . . . . . . . . . . . . . . . . . . . . . . . . . . . . . . . . . . . . . . . . . . . . . . . . . . . . . . . . . . . . . 121
..................
Organization
. . . . . . . . . . . . . .members
. . . . . . . . . . . . . . . . . . . . . . . . . . . . . . . . . . . . . . . . . . . . . . . . . . . . . . . . . . . . . . . . . . . . . . . . . . . . . . . . . . 121
..................
Organization
. . . . . . . . . . . . . .properties
. . . . . . . . . . . . . . . . . . . . . . . . . . . . . . . . . . . . . . . . . . . . . . . . . . . . . . . . . . . . . . . . . . . . . . . . . . . . . . . . . . 121
..................
Automatically
. . . . . . . . . . . . . . .associating
. . . . . . . . . . . .users
. . . . . .with
. . . . .organizations
. . . . . . . . . . . . . . .by
. . .email
. . . . . . domain
. . . . . . . . . . . . . . . . . . . . . . . . . . . . . . . . . . 121
..................
Linking
. . . . . . . . organizations
. . . . . . . . . . . . . . .to
. . .usergroups
. . . . . . . . . . . . . . . . . . . . . . . . . . . . . . . . . . . . . . . . . . . . . . . . . . . . . . . . . . . . . . . . . . . . . . 122
..................
Organization
. . . . . . . . . . . . . .managers
. . . . . . . . . . . . . . . . . . . . . . . . . . . . . . . . . . . . . . . . . . . . . . . . . . . . . . . . . . . . . . . . . . . . . . . . . . . . . . . . . . 122
..................
5.5.
. . . New
. . . . . .users
. . . . . . . . . . . . . . . . . . . . . . . . . . . . . . . . . . . . . . . . . . . . . . . . . . . . . . . . . . . . . . . . . . . . . . . . . . . . . . . . . . . . . . . . . . . . .124
..................
Creating
. . . . . . . . .a. .user
. . . . . . . . . . . . . . . . . . . . . . . . . . . . . . . . . . . . . . . . . . . . . . . . . . . . . . . . . . . . . . . . . . . . . . . . . . . . . . . . . . . . . 124
..................
User
. . . . .rules
. . . . . . . . . . . . . . . . . . . . . . . . . . . . . . . . . . . . . . . . . . . . . . . . . . . . . . . . . . . . . . . . . . . . . . . . . . . . . . . . . . . . . . . . . . . 124
..................
5.6.
. . . .User
. . . . .actions
. . . . . . . . . . . . . . . . . . . . . . . . . . . . . . . . . . . . . . . . . . . . . . . . . . . . . . . . . . . . . . . . . . . . . . . . . . . . . . . . . . . . . . . . . . . . .126
..................
Create
. . . . . . .ticket
. . . . . . . . . . . . . . . . . . . . . . . . . . . . . . . . . . . . . . . . . . . . . . . . . . . . . . . . . . . . . . . . . . . . . . . . . . . . . . . . . . . . . . . . . 126
..................
Merging
. . . . . . . . .users
. . . . . . . . . . . . . . . . . . . . . . . . . . . . . . . . . . . . . . . . . . . . . . . . . . . . . . . . . . . . . . . . . . . . . . . . . . . . . . . . . . . . . . . 126
..................
Login
. . . . . . as
. . .user
. . . . . . . . . . . . . . . . . . . . . . . . . . . . . . . . . . . . . . . . . . . . . . . . . . . . . . . . . . . . . . . . . . . . . . . . . . . . . . . . . . . . . . . 126
..................
Disable
. . . . . . . .account
. . . . . . . . . . . . . . . . . . . . . . . . . . . . . . . . . . . . . . . . . . . . . . . . . . . . . . . . . . . . . . . . . . . . . . . . . . . . . . . . . . . . . . . . 126
..................
Reset
. . . . . .password
. . . . . . . . . . . . . . . . . . . . . . . . . . . . . . . . . . . . . . . . . . . . . . . . . . . . . . . . . . . . . . . . . . . . . . . . . . . . . . . . . . . . . . . . . . 127
..................
Deleting
. . . . . . . . .users
. . . . . . . . . . . . . . . . . . . . . . . . . . . . . . . . . . . . . . . . . . . . . . . . . . . . . . . . . . . . . . . . . . . . . . . . . . . . . . . . . . . . . . . 127
..................
5.7.
. . . Searching
. . . . . . . . . . . for
. . . .users
. . . . . .and
. . . . organizations
. . . . . . . . . . . . . . . . . . . . . . . . . . . . . . . . . . . . . . . . . . . . . . . . . . . . . . . . . . . . . . . . . . . . . . . . . .128
..................
Advanced
. . . . . . . . . . search
. . . . . . . .for
. . . users
. . . . . . and
. . . . .organizations
. . . . . . . . . . . . . . . . . . . . . . . . . . . . . . . . . . . . . . . . . . . . . . . . . . . . . . . . . . . . . . . . 128
..................
6.. .Publish
. . . . . . . . . . . . . . . . . . . . . . . . . . . . . . . . . . . . . . . . . . . . . . . . . . . . . . . . . . . . . . . . . . . . . . . . . . . . . . . . . . . . . . . . . . . . . . . . . . . . . . . . . . . . . . 129
...................
6.1.
. . . Organizing
. . . . . . . . . . . . .portal
. . . . . . .content
. . . . . . . . into
. . . . .categories
. . . . . . . . . . . . . . . . . . . . . . . . . . . . . . . . . . . . . . . . . . . . . . . . . . . . . . . . . . . . . . . . . .130
..................
Adding
. . . . . . . .a. new
. . . . . category
. . . . . . . . . . . . . . . . . . . . . . . . . . . . . . . . . . . . . . . . . . . . . . . . . . . . . . . . . . . . . . . . . . . . . . . . . . . . . . . . . .130
..................
Editing,
. . . . . . . . deleting
. . . . . . . . . and
. . . . .reordering
. . . . . . . . . . . .categories
. . . . . . . . . . . . . . . . . . . . . . . . . . . . . . . . . . . . . . . . . . . . . . . . . . . . . . . . . . . . . . 131
..................
Adding
. . . . . . . .items
. . . . . .to
. . .categories
. . . . . . . . . . . . . . . . . . . . . . . . . . . . . . . . . . . . . . . . . . . . . . . . . . . . . . . . . . . . . . . . . . . . . . . . . . . . . . . 131
..................
6.2.
. . . .Creating
. . . . . . . . . a. .Knowledgebase
. . . . . . . . . . . . . . . . .article
. . . . . . . . . . . . . . . . . . . . . . . . . . . . . . . . . . . . . . . . . . . . . . . . . . . . . . . . . . . . . . . . . . . . . .132
..................
Pending
. . . . . . . . .articles
. . . . . . . . . . . . . . . . . . . . . . . . . . . . . . . . . . . . . . . . . . . . . . . . . . . . . . . . . . . . . . . . . . . . . . . . . . . . . . . . . . . . . . . 132
..................
Adding
. . . . . . . .attachments
. . . . . . . . . . . . .and
. . . . .images
. . . . . . . to
. . . a. .Knowledgebase
. . . . . . . . . . . . . . . . .article
. . . . . . . . . . . . . . . . . . . . . . . . . . . . . . . . . . . . . . . . . 133
..................
Knowledgebase
. . . . . . . . . . . . . . . . article
. . . . . . . editing
. . . . . . . . controls
. . . . . . . . . . . . . . . . . . . . . . . . . . . . . . . . . . . . . . . . . . . . . . . . . . . . . . . . . . . . . . . . . 133
..................
6.3.
. . . .News
. . . . . .posts
. . . . . . . . . . . . . . . . . . . . . . . . . . . . . . . . . . . . . . . . . . . . . . . . . . . . . . . . . . . . . . . . . . . . . . . . . . . . . . . . . . . . . . . . . . . .135
..................
6.4.
. . . .Downloads
. . . . . . . . . . . . . . . . . . . . . . . . . . . . . . . . . . . . . . . . . . . . . . . . . . . . . . . . . . . . . . . . . . . . . . . . . . . . . . . . . . . . . . . . . . . . . . . . . .136
..................
6.5.
. . . .Comments
. . . . . . . . . . . .on
. . . portal
. . . . . . .content
. . . . . . . . . . . . . . . . . . . . . . . . . . . . . . . . . . . . . . . . . . . . . . . . . . . . . . . . . . . . . . . . . . . . . . . . . . . . 137
..................
6.6.
. . . .Glossary
. . . . . . . . . . . . . . . . . . . . . . . . . . . . . . . . . . . . . . . . . . . . . . . . . . . . . . . . . . . . . . . . . . . . . . . . . . . . . . . . . . . . . . . . . . . . . . . . . .138
..................
6.7.
. . . Translations
. . . . . . . . . . . . . .for
. . . .Publish
. . . . . . . . content
. . . . . . . . . . . . . . . . . . . . . . . . . . . . . . . . . . . . . . . . . . . . . . . . . . . . . . . . . . . . . . . . . . . . . . . . .139
..................
6.8.
. . . .Helping
. . . . . . . . .users
. . . . . .find
. . . . .portal
. . . . . . content
. . . . . . . . . . . . . . . . . . . . . . . . . . . . . . . . . . . . . . . . . . . . . . . . . . . . . . . . . . . . . . . . . . . . . . . .140
..................
Editing
. . . . . . . .the
. . . .URL
. . . . .slug
. . . . .for
. . . .portal
. . . . . . content
. . . . . . . . . . . . . . . . . . . . . . . . . . . . . . . . . . . . . . . . . . . . . . . . . . . . . . . . . . . . . . . .140
..................
Linking
. . . . . . . . articles
. . . . . . . . to
. . .products
. . . . . . . . . . . . . . . . . . . . . . . . . . . . . . . . . . . . . . . . . . . . . . . . . . . . . . . . . . . . . . . . . . . . . . . . . . . . .140
..................
Viewing
. . . . . . . . revisions
. . . . . . . . . . of
. . . portal
. . . . . . . content
. . . . . . . . . . . . . . . . . . . . . . . . . . . . . . . . . . . . . . . . . . . . . . . . . . . . . . . . . . . . . . . . . . . .140
..................
Setting
. . . . . . . related
. . . . . . . . content
. . . . . . . . . . . . . . . . . . . . . . . . . . . . . . . . . . . . . . . . . . . . . . . . . . . . . . . . . . . . . . . . . . . . . . . . . . . . . . . . .140
..................
Setting
. . . . . . . search
. . . . . . . .terms
. . . . . . . . . . . . . . . . . . . . . . . . . . . . . . . . . . . . . . . . . . . . . . . . . . . . . . . . . . . . . . . . . . . . . . . . . . . . . . . . . .141
.................
Labeling
. . . . . . . . . Publish
. . . . . . . . content
. . . . . . . . . . . . . . . . . . . . . . . . . . . . . . . . . . . . . . . . . . . . . . . . . . . . . . . . . . . . . . . . . . . . . . . . . . . . . . . .141
.................
7.. .Feedback
. . . . . . . . . . . . . . . . . . . . . . . . . . . . . . . . . . . . . . . . . . . . . . . . . . . . . . . . . . . . . . . . . . . . . . . . . . . . . . . . . . . . . . . . . . . . . . . . . . . . . . . . . . . . . . 142
...................
7.1.
. . .Feedback
. . . . . . . . . . types
. . . . . . . . . . . . . . . . . . . . . . . . . . . . . . . . . . . . . . . . . . . . . . . . . . . . . . . . . . . . . . . . . . . . . . . . . . . . . . . . . . . . . . . . .143
..................
DeskPRO Agent Manual
4
DeskPRO
Agent Manual
Feedback
. . . . . . . . . .categories
. . . . . . . . . . . . . . . . . . . . . . . . . . . . . . . . . . . . . . . . . . . . . . . . . . . . . . . . . . . . . . . . . . . . . . . . . . . . . . . . . . . . . . 143
..................
7.2.
. . . Feedback
. . . . . . . . . . .status
. . . . . . . . . . . . . . . . . . . . . . . . . . . . . . . . . . . . . . . . . . . . . . . . . . . . . . . . . . . . . . . . . . . . . . . . . . . . . . . . . . . . . . . .144
..................
7.3.
. . . Filtering
. . . . . . . . . .and
. . . . sorting
. . . . . . . . feedback
. . . . . . . . . . items
. . . . . . . . . . . . . . . . . . . . . . . . . . . . . . . . . . . . . . . . . . . . . . . . . . . . . . . . . . . . . . . . . . . 145
..................
Approving
. . . . . . . . . . . pending
. . . . . . . . . feedback
. . . . . . . . . . items
. . . . . . .and
. . . . comments
. . . . . . . . . . . . . . . . . . . . . . . . . . . . . . . . . . . . . . . . . . . . . . . . . . . . . . . 145
..................
Working
. . . . . . . . . with
. . . . . feedback
. . . . . . . . . . in
. . . the
. . . . list
. . . .pane
. . . . . . . . . . . . . . . . . . . . . . . . . . . . . . . . . . . . . . . . . . . . . . . . . . . . . . . . . . . . . 145
..................
Searching
. . . . . . . . . . for
. . . . feedback
. . . . . . . . . . . . . . . . . . . . . . . . . . . . . . . . . . . . . . . . . . . . . . . . . . . . . . . . . . . . . . . . . . . . . . . . . . . . . . . . . . 146
..................
7.4.
. . . Working
. . . . . . . . . . with
. . . . . feedback
. . . . . . . . . . in
. . . the
. . . .content
. . . . . . . . .pane
. . . . . . . . . . . . . . . . . . . . . . . . . . . . . . . . . . . . . . . . . . . . . . . . . . . . . . . . . . 147
..................
Feedback
. . . . . . . . . .item
. . . . . properties
. . . . . . . . . . . . . . . . . . . . . . . . . . . . . . . . . . . . . . . . . . . . . . . . . . . . . . . . . . . . . . . . . . . . . . . . . . . . . . . . . 147
..................
Editing
. . . . . . . .the
. . . .URL
. . . . .slug
. . . . .for
. . . .a. feedback
. . . . . . . . . . item
. . . . . . . . . . . . . . . . . . . . . . . . . . . . . . . . . . . . . . . . . . . . . . . . . . . . . . . . . . . 147
..................
Editing
. . . . . . . .feedback
. . . . . . . . . .item
. . . . .content
. . . . . . . . . . . . . . . . . . . . . . . . . . . . . . . . . . . . . . . . . . . . . . . . . . . . . . . . . . . . . . . . . . . . . . . . . 147
..................
8.. .Tasks
. . . . . . . . . . . . . . . . . . . . . . . . . . . . . . . . . . . . . . . . . . . . . . . . . . . . . . . . . . . . . . . . . . . . . . . . . . . . . . . . . . . . . . . . . . . . . . . . . . . . . . . . . . . . . . 149
...................
8.1.
. . . Creating
. . . . . . . . . .a. .task
. . . . . . . . . . . . . . . . . . . . . . . . . . . . . . . . . . . . . . . . . . . . . . . . . . . . . . . . . . . . . . . . . . . . . . . . . . . . . . . . . . . . . . .150
..................
Creating
. . . . . . . . .a. .task
. . . . linked
. . . . . . . .to
. . a. .ticket
. . . . . . . . . . . . . . . . . . . . . . . . . . . . . . . . . . . . . . . . . . . . . . . . . . . . . . . . . . . . . . . . . . . . .150
..................
8.2.
. . . .Keeping
. . . . . . . . .track
. . . . . .of
. . tasks
. . . . . . . . . . . . . . . . . . . . . . . . . . . . . . . . . . . . . . . . . . . . . . . . . . . . . . . . . . . . . . . . . . . . . . . . . . . . . . . . . 151
..................
Task
. . . . .notifications
. . . . . . . . . . . . . . . . . . . . . . . . . . . . . . . . . . . . . . . . . . . . . . . . . . . . . . . . . . . . . . . . . . . . . . . . . . . . . . . . . . . . . . . . . . . .151
.................
8.3.
. . . .Working
. . . . . . . . . with
. . . . . .tasks
. . . . . in
. . .the
. . . .list
. . . .pane
. . . . . . . . . . . . . . . . . . . . . . . . . . . . . . . . . . . . . . . . . . . . . . . . . . . . . . . . . . . . . . . . . . .152
..................
8.4.
. . . Commenting
. . . . . . . . . . . . . . . on
. . . tasks
. . . . . . . . . . . . . . . . . . . . . . . . . . . . . . . . . . . . . . . . . . . . . . . . . . . . . . . . . . . . . . . . . . . . . . . . . . . . . . . . .153
..................
9.. .Agent
. . . . . . . IM
. . . . . . . . . . . . . . . . . . . . . . . . . . . . . . . . . . . . . . . . . . . . . . . . . . . . . . . . . . . . . . . . . . . . . . . . . . . . . . . . . . . . . . . . . . . . . . . . . . . . . . . 154
...................
10.
. . .DeskPRO
. . . . . . . . . . . Terminology
. . . . . . . . . . . . . . . . . . . . . . . . . . . . . . . . . . . . . . . . . . . . . . . . . . . . . . . . . . . . . . . . . . . . . . . . . . . . . . . . . . . . . . . . . . . . . . . . . . 155
...................
DeskPRO Agent Manual
5
DeskPRO
Agent Manual
1. Introducing DeskPRO
Welcome to DeskPRO!
This manual is about using DeskPRO as an agent. There are three categories of people who will interact
with DeskPRO:
agents: the staff within your organization who use DeskPRO to provide help
users: the people you are helping
admins: agents who have administrator access to configure your DeskPRO helpdesk
Agents use DeskPRO through the agent interface. Admins have additional access to the admin interface,
and can also use the agent interface. Users may have access to a user portal, which agents can also log into
if it's enabled.
This manual aims to be a comprehensive guide to using DeskPRO as an agent. If you just want a quick
overview of how to get started, try the Quick Start Guide for agents.
If you want to know more about setting up and configuring DeskPRO as an admin, consult the Admin
Manual.
There's more help information available in the DeskPRO Knowledgebase at https://support.deskpro.com/,
including how-to articles and troubleshooting guides.
You can also contact us directly at [email protected].
1. Introducing DeskPRO
6
DeskPRO
Agent Manual
1.1. Getting started
You should have received an email with the subject
"Your new DeskPRO helpdesk agent account"
your login details. If not, contact your admin who will be able to create a new account for you.
with
Your account has permissions (set by your admins) which determine what you are allowed to view or
modify within the helpdesk.
Depending on your permissions, you may not be able to use some DeskPRO functions. The administrators
may also have disabled some helpdesk features altogether. If you find that this manual shows a function
that is not available to you, consult your admins.
Your administrators may have set up DeskPRO so you can sign in using your account from another
service (such as LDAP, Microsoft Active Directory, Joomla, etc.).
If you check the Remember me box, you will stay logged in even if you close your browser. Otherwise,
you will have to log out of DeskPRO from the toolbar.
Logging in for the first time
When you log in for the first time, you will see a pop-up window.
1. Introducing DeskPRO
7
DeskPRO
Agent Manual
Check that your Name is correct. You can edit it if necessary.
Note that, by default, users will see the name you enter here. If you would prefer users to see a
different name when you communicate with them, you can set an override name from your
account preferences in the Toolbar to use instead. Other agents will still see your real name.
Check that the Timezone displayed matches your timezone.
DeskPRO automatically checks the timezone you choose against the one your computer is using. If
they are different, DeskPRO will offer you the option to use your computer's timezone setting.
Daylight Savings Time/Summer Time is handled automatically.
You should choose a picture to represent yourself to users and other agents. Click
an image from your computer in GIF, JPEG or PNG format.
Choose File and select
Click Done, start using DeskPRO to see the agent interface.
Agent vs user views
The DeskPRO agent interface is what you will use as an agent to provide helpdesk support to users.
1. Introducing DeskPRO
8
DeskPRO
Depending on how your organization has set up DeskPRO, your users may have access to a
where they can view their own tickets, and access help information:
Agent Manual
web portal
Users may be able to use the portal to submit tickets and provide feedback.
Your organization may not use the web portal at all, instead taking ticket submissions only through email
or phone calls.
1. Introducing DeskPRO
9
DeskPRO
Agent Manual
2. The Agent Interface
Here is an overview of the agent interface.
The app bar is where you select which DeskPRO app you want to use.
The filter pane lets you select groups of items to be displayed in the list pane, such as tickets, users etc.
The app you're using determines what sort of items you'll see in these panes.
The content pane is where you can view and work with individual items. The tabbed interface lets you
have multiple items from different apps open at the same time.
The toolbar gives you quick access to important functions like creating a new ticket and quick search. It's
also where you can change your account preferences and chat status.
2. The Agent Interface
10
DeskPRO
Agent Manual
2.1. App bar
The app bar is where you select which DeskPRO application you want to use. Each app lets you work on a
different type of helpdesk content.
The apps are:
Tickets - the main application you will be using as an agent to communicate with users about
their tickets.
Chat - this is where you communicate with users who have requested real-time text chat your
portal or website, and view logs of previous chats.
CRM - used to view a unified record of each user and their history with the helpdesk, such as all
previous tickets.
Feedback - view and manage crowdsourced feedback; users submit suggestions about your
products/services via the web portal, and others can vote so you can identify the most popular
ideas.
Publish - create and manage the help content on your web portal; this can include news posts,
downloads and articles
Tasks - keep track of tasks that you or your fellow agents need to carry out.
2. The Agent Interface
11
DeskPRO
Agent Manual
2.2. Filter pane
In each app, the filter pane on the left is used to filter the items you're dealing with: tickets in the tickets
app, people and organization records in the CRM app, and so on.
Selecting a filter lets you select a group of items to work on in the list pane.
Each filter shows only the items which match certain criteria - the number to the right of the filter shows
how many match.
For example, the My Tickets filter shows you tickets that are assigned to you (i.e. you're responsible for
resolving them).
In most apps, you can also view items by labels: text tags entered by agents to help group similar items.
2. The Agent Interface
12
DeskPRO
Agent Manual
For more information about using filters in particular apps, see:
Filtering and sorting tickets
Viewing closed and missed chats
Filtering and sorting users and organizations
Labeling Publish content
2. The Agent Interface
13
DeskPRO
Agent Manual
2.3. List pane
The result of your selection in the filter pane is displayed in the list pane.
For example, if you click on a ticket filter, you will see the list of tickets that match the criteria of the filter
in the list pane. You can think of it as being like a list of search results.
In some apps, you can change the ordering of items in the list with controls at the top of the list pane.
If you have more than 50 items in the list pane, the list is divided into multiple screens. Use the arrow
controls at the bottom to move between screens.
Viewing properties
In the Tickets, CRM and Feedback apps, properties are shown for each item using gray text labels.
2. The Agent Interface
14
DeskPRO
Agent Manual
You can customize the properties which are displayed using the cog control at the top right of the list pane.
You can use this to display the properties that are most relevant to you.
Opening items
You can open items from the list pane into the content pane to view them in more detail.
You open an item by clicking on it - it turns blue to show that it is open, and is displayed in a new tab in
the content pane, in front of the tabs for any other items you have open.
Clicking an item that's already open with its tab at the front of the content pane closes it.
If it is open but not at the front of the content pane, its tab is brought to the front.
2. The Agent Interface
15
DeskPRO
Agent Manual
Multiple selections and mass actions
In the Tickets, Tasks and Publish apps, you can select multiple items from the list pane using the
checkboxes at the left. This enables you to perform mass actions on up to 50 items at once - if you need to
delete a lot of items at the same time, you don't have to open them one by one in the content pane.
Viewing a list as a table
In the Tickets and CRM apps, you can view the items in the list pane in a table by clicking on this button:
2. The Agent Interface
16
DeskPRO
Agent Manual
This is useful to get an overview of a long list of items.
2. The Agent Interface
17
DeskPRO
Agent Manual
2.4. Content pane
The content pane is where you can view the details of a single item and work on it.
Note that, no matter what app you have selected, a mixture of types of items can be open in the content
pane. You can switch between them by clicking on the tabs.
The tab that's currently at the front (i.e. its content is being displayed) is highlighted in blue.
If you have more tabs than can fit in your browser window, you can scroll with the arrows at the edge of
the tab bar.
If the content of a tab changes while it's not at the front, (for example, a new message is added to a chat
conversation), its borders will flash.
You can close a tab using the small X button that appears when you mouse over it:
In some cases, items are opened in a pop-up window. You can use the green arrow control to transfer
them to a tab in the content pane:
2. The Agent Interface
18
DeskPRO
Agent Manual
2.5. Toolbar
The toolbar at the top of the agent interface gives you quick access to common tasks like creating a new
item, and quick search.
At the top left of the toolbar is the account area which shows you which agent you are logged in as, and lets
you access Preferences and Help, or log out.
The Preferences link enables you to set options relating to your account: see Account preferences for
details.
Help
The Help section tells you how to contact us and get the latest Quick Start Guide .
It also offers a guide to keyboard shortcuts you can use within DeskPRO. The most useful shortcuts are for
creating new items:
Log Out
Click here to log out of your DeskPRO account.
You can just close your browser to log out, unless you selected the Remember me option when you logged
in.
The Create button
Use the Create button to create new tickets, person (user) records, organizations (groups of users who work
for the same company or other enterprise), articles for your Knowledgebase, news posts, download files,
feedback items and tasks.
2. The Agent Interface
19
DeskPRO
Agent Manual
Alternatively, you can make sure your cursor is not in a text input box and then use the following shortcut
keys to do the same thing:
t
Open new ticket form
p
Open new person form
o
Open new organization form
k
Open new task form
a
Open new article form
i
Open new feedback form
n
Open new news form
d
Open new download form
Note that if your browser window is less than a certain size, the Create button will be displayed as this icon
to save space:
The Recent button
Use the Recent button to get back to items you have viewed recently. Items are ordered by the time since
you last viewed them, with the most recent at top. You can type to filter matching items.
Note that if your browser window is less than a certain size, the Recent button will be displayed as this icon
to save space:
Notifications
This icon shows a count of your browser notifications, ordered by the most recent. The mail icon
indicates that it's telling you about a ticket; different types of helpdesk content will have different icons.
Click the icon to see expand the notification window:
2. The Agent Interface
20
DeskPRO
Agent Manual
You may be able to customize which events create a browser notification here using your account
preferences or the gear icon at top right of the notification window. (You may not have permission to
change your notification settings, in which case you will see the message "Please contact the administrator
to update your email notifications").
Click Dismiss All Notifications to clear all notifications.
Toggling panes
These controls let you show and hide the different agent interface panes.
This can be useful if you are working on a relatively small screen, or if you just want to focus on a task in
one or two panes.
The left control toggles the filter pane on and off; the three controls on the right let you select different
combinations of the list and contents pane.
Quick Search bar
The Quick Search bar is at the top right of the agent interface. This search looks for matching content
across all the apps. It is designed for relatively simple searches.
You can search for items by:
ID
Ref code (tickets)
Subject (tickets)
Name (users/organizations)
Email address (tickets/users/organizations)
Title (articles/news/downloads/feedback)
Labels
2. The Agent Interface
21
DeskPRO
Agent Manual
You can view a summary of what fields Quick Search works on by clicking on the ? icon at the right of the
Quick Search bar.
If you need a more advanced search, you can search from the filter pane of most apps. The filter pane
search lets you specify required values for multiple properties of a ticket. If you're getting too many
matches from the quick search, the advanced search enables you to be more specific.
See the section on Advanced ticket search for details of using advanced search to find tickets.
2. The Agent Interface
22
DeskPRO
Agent Manual
2.6. Customizing the agent interface
You can change the relative size of the list and content panes. Simply mouseover the top of the divider
between them, click, and drag to resize.
There are also controls in the toolbar which let you show and hide different combinations of the content
panes.
It can be useful to switch to a two- or one-pane view if you have a smaller monitor, or you just want to
focus your attention, For example, if you have to get through a list of tickets, you could open them all as
tabs in the content pane, then turn off the other panes and work through the tickets one by one.
2. The Agent Interface
23
DeskPRO
Agent Manual
2.7. Account preferences
You can edit your account preferences from the Preferences link at the top left of the toolbar.
Account profile
In the account profile, you can manage your account and set the following options:
2. The Agent Interface
24
DeskPRO
Agent Manual
Name - this is displayed to your fellow agents in the agent interface; by default it will be used in
email messages to users and on the web portal (both to identify you when the user logs in to view
their tickets, and on any portal content you create).
Override Name - a name that is displayed to users instead of the name your fellow agents see. If
you enter an override name, it will be used instead of the Name field in all user-facing
communications (both in email and on the portal).
Email - your main email address and any additional email addresses you want to use
Timezone - specify what timezone your helpdesk is in to ensure times are displayed correctly.
Users can have their own timezone settings, so you should set this to the timezone where you
actually work. Daylight Savings/Summer Time is handled automatically.
Language - set your preferred language. You may be able to use the agent interface in this
language if there is a translation available and your admins have installed it.
Picture - depending on your permissions, you may be able to upload a picture to represent you.
This will be displayed both in the agent/admin interface and on the user portal. You can change
your picture by uploading a new one at any time.
Desktop Notifications - with some browsers, you can receive pop-up notifications on your
computer desktop when you . See the section on Notification preferences below for more details.
Change Password - you can change your password here. Password requirements are set by your
admins.
Tickets - you can change the behavior of the agent interface for replying to tickets here. The
options are:
Automatically close ticket tabs when replying/adding a note - this closes the ticket as
soon as you reply to it or write a note to fellow agents.
Show newest messages first affects the order that the messages within an individual
ticket are shown under the reply box: by default, newest message are at the top.
Automatically load the next ticket in the list after replyingmeans that if you reply to a
ticket and Automatically close ticket tabs is enabled, the next ticket in the list pane will
automatically open; enabling this is useful if you often have to work through a list of
tickets in order
Signature
You can create a rich text signature that's automatically displayed at the bottom of your messages when
you reply to a ticket. You should include a sign off and your name so that you don't have to type them
every time you reply to a user.
If you have enabled an override name, remember to use the same name in your signature.
The editing controls for entering a signature work are a simpler version of the ticket message formatting
controls.
2. The Agent Interface
25
DeskPRO
Agent Manual
The
button enables you to insert an image into the body of the signature. You can either Upload an
image file from your desktop, or select Link to provide the web address of an image file. If you use a web
address, make sure it's on a site your enterprise controls.
The
button enables you to insert a clickable web link or email address into your signature. See the
section Using links in messages for details.
Notification preferences
These settings control what notifications you get about tickets. You may not have permission to change
your notifications, in which case you will see a message to contact your admins.
2. The Agent Interface
26
DeskPRO
Agent Manual
There are two kinds of notifications that DeskPRO can send: email notifications (which are simply emails
sent to your DeskPRO account address) and browser notifications.
Browser notifications are shown in the notification tray to the right of the toolbar. The tab icon in your
browser will also display the number of notifications and will flash when you have a new notification.
You'll only see browser notifications if you're logged in to the agent interface.
If you've enabled desktop notifications, when you receive a browser notification you will also get a pop-up
alert on your computer desktop. The exact appearance will vary depending on your operating system.
There are two notifications tabs:
Ticket Notifications - set email and browser notifications about ticket events and @mentions (see
Replying to a ticket details about @mentions). Note that you can set different notification options
for tickets that match certain filters.
Notifications - set what notifications you want to receive about non-ticket events: chats, tasks,
feedback, publish content (new feedback and comments), CRM (new user registration). You can
also opt to receive an email every time your account is logged into or there's a failed login
attempt.
Macro preferences
From here you can create macros to automatically perform sequences of actions. You can either create
personal macros that only you can use, or shared macros that everyone can access. If other agents have to
do the same task that you've written a macro for, consider making it shared, to save them having to come
up with their own version.
Your admins can see everyone's macros, so contact them if you need help making a macro work.
Note that you can't run a macro if you don't have permissions to do all the actions it includes. If you run a
macro and don't have the right permissions, you will receive a pop-up warning. Speak to your admins to
resolve this issue.
2. The Agent Interface
27
DeskPRO
Agent Manual
Filter preferences
This shows your custom filters . You can create filters here or from the filter pane of the
Tickets app.
You can hide custom filters from here if you don't want to see them in the filter pane.
SLA preferences
This option lets you control which SLAs (Service Level Agreements) you see in the Ticket app. If there are
SLAs which are not relevant to you, you can choose not to see when tickets are warning or failing because
of them.
You can hide SLAs just as can with filters. You can also choose whether to show all the tickets that have
had an SLA applied, or just those that are assigned to you/your team.
2. The Agent Interface
28
DeskPRO
Agent Manual
3. Tickets
The Tickets app is used to manage and reply to tickets. Each ticket denotes a user issue that your helpdesk
needs to resolve.
DeskPRO tracks what is happening to a ticket using its status. The ticket's status reflects who needs to reply
to it next.
There are several features designed to help you decide which tickets to answer first. You can track service
level agreements, and assign tickets urgency and priority levels.
You can work more efficiently with tickets using macros to apply a series of actions to a ticket, and mass
actions to work on several tickets at once.
Tickets can be changed by automatic processes ( triggers and escalations) set up by your admins. For
example, the helpdesk could automatically assign tickets based on their properties.
3. Tickets
29
DeskPRO
Agent Manual
3.1. Ticket properties
When you open an individual ticket in the content pane, you can see the information DeskPRO stores
about it.
The fields you see will vary:
some built-in fields are optional
your admins can add custom fields
if there is no value entered for a field on an individual ticket, the field is not displayed even if
your helpdesk uses it
the required fields can be different for tickets in different departments.
Click the
helpdesk.
at the top right of the Properties tab to see all available fields, including custom fields for your
IDs and ref codes
Every ticket has a unique ID number. These are assigned in the order tickets are created.
3. Tickets
30
DeskPRO
Agent Manual
You may notice that other items in DeskPRO have their own ID numbers. For example, users and
knowledgebase articles have IDs. ID numbers for different items are separate - for example, you can have
a ticket with ID 17 and a user with ID 17.
Your admins may have set your helpdesk so that users see a unique ref code instead of the ID. The ref
code is usually a string of numbers and letters (e.g. WHPL-4979-OBBV ). Your admins may have
customized the format. Click on a ticket's ID to toggle to displaying the ref code instead.
The ref code format can be customized to include information about the date and time that the ticket was
created, e.g. 2014-07-WHPL-4979 .
Another advantage of ref codes is that they make it harder for your users and competitors to work out
how many (or how few) tickets you have.
Put your mouse cursor over an ID or ref code and a yellow clipboard icon appears. Click the icon.
The ID or ref is now copied to your clipboard, for easy pasting.
You can find a ticket quickly by putting its ID or ref code into the Quick Search bar; this is the best way to
call up a ticket if a user is calling you about it on the phone (or a fellow agent is yelling about it across the
room).
Note that emails DeskPRO sends about tickets will include either an ID or ref code for the relevant ticket.
3. Tickets
31
DeskPRO
Agent Manual
3.2. Ticket status
DeskPRO tracks the status of a ticket, which tells you whether it's an agent or the user that needs to act
next - or if there's no need to act at all, e.g. it was resolved, or it was created from a spam email.
A single ticket might be assigned back and forth between several agents, and go through several different
statuses, before it is resolved or deleted. You can view the details of a ticket's history when you open it in
the content pane.
Core statuses
The most important statuses for a ticket are:
awaiting agent - this means the helpdesk needs to act on the ticket; typically, the user is expecting
a reply.
awaiting user - this means the helpdesk is awaiting a reply from the user before any more
progress can be made in resolving the issue.
resolved - the issue is resolved to everyone's satisfaction, and communication has ended.
As an example, consider a user who reports an issue by email, creating a ticket with
awaiting agent status.
An agent replies, perhaps requesting more information, and setting the ticket to awaiting user status.
The user's next message would set the status back to awaiting agent again.
As you will see later, when you write your reply to a ticket, you can decide what status to give it.
If you are telling the user that you're assigning the ticket to a different agent, or reassuring them that
you're working on the problem and will get back to them, you may decide to reply and leave the ticket
status as awaiting agent.
The goal for most tickets will be to get them to resolved status.
Resolved tickets can be re-opened by agents (and possibly by users; this depends on
permissions).
usergroup
Other possible statuses are:
on hold
awaiting validation
spam
deleted
On hold status
3. Tickets
32
DeskPRO
Agent Manual
On hold status is a way to record that an agent needs to act on the ticket, but that you're waiting for
something else to happen first. This often involves waiting for a third party.
For example, a user has raised a new ticket and you need to check something with one of your suppliers
before you reply. You have emailed the supplier and you are waiting to hear back.
Leaving this ticket marked as awaiting agent isn't quite right, since that would make it seem like there's
something you need to do to it now, whereas in fact you just have to wait for the supplier. The solution is
to put it on hold.
You can think of on hold as a sub-status of awaiting agent.
If you have tickets on hold, there will be a checkbox in the top part of the filter pane of the Tickets app check it to view the tickets on hold, uncheck it to view awaiting agent tickets as usual.
See the section on Holding tickets for more detail.
Hidden tickets: awaiting validation, spam and deleted
There are three ticket statuses that are used for tickets that should be hidden from agents. These are
awaiting validation
spam
deleted
These hidden statuses will not generate notifications and will not show up in searches from the filter pane.
Depending on how your helpdesk is set up, new users may need to be validated before their tickets are
shown in the main parts of the agent interface. You can still see tickets from unvalidated users in the
Awaiting Validation filter of the Tickets app.
See the section on new users for more details.
There are two independent methods of validation that may be required:
1
2
3. Tickets
Email validation - new users are emailed a link which they have to click on to prove
they have provided a valid address. This may be set to happen when they first
register, or when they submit a ticket.
Agent validation - new users have to be manually approved by an agent.
33
DeskPRO
Agent Manual
You may get tickets created as a result of spam emails or web robots posting junk messages into the forms
on the web portal. You can set the status of these tickets as spam.
DeskPRO does not have its own automatic spam filter, but your admins may use another spam
filter system combined with DeskPRO features to mark suspected spam automatically.
Tickets set as spam can be seen in the Spam filter in the filter pane.
Tickets can also be deleted. They are then shown in the Recycle Bin in the filter pane. You might want to
delete a ticket that is abusive or irrelevant (e.g. the user has sent it to the wrong company). You don't need
to bother deleting valid tickets after resolving them, because DeskPRO can handle very large numbers of
tickets using its archiving feature.
You can set a single ticket as spam or delete it using the Remove button.
You can use mass actions to spam or delete tickets in bulk.
Tickets in the Spam filter or the Recycle Bin will be purged - deleted permanently - after a certain amount
of time. The time until purging is set by your admins. It can be different for deleted and spam tickets.
You can always undelete or unspam a ticket before it is purged.
Before you undelete a ticket, you need to correct any errors, such as missing fields - otherwise the
undelete button won't work.
3. Tickets
34
DeskPRO
Agent Manual
3.3. Ticket assignment
Assignment is about keeping track of who is responsible for each ticket.
You can assign tickets agent or a team, or both. This screenshot shows the assignment controls on an
individual ticket:
You can set up different notification settings for tickets that are assigned to you ("My Tickets"):
With the settings in this example, you would get notified about every new ticket, but you would only get
notified when a ticket was assigned to you. If you checked more of the assignment boxes, you could get
notifications when tickets are assigned to your team or to other agents' assignments.
If a ticket is assigned to Agent A, that doesn't stop Agent B acting on it: Agent B can still reply to the ticket,
assign it to another agent, etc.
Assignment overrides department permissions: assigning a ticket to an agent guarantees they can view
and change it, even if they would not have permissions on the department it's in. See the section on
Departments for more details.
On most helpdesks, newly created tickets will usually be unassigned. Unassigned means not assigned to an
agent or a team.
You'll notice that when you reply to a ticket from within the agent interface, the default is to assign it to
yourself.
3. Tickets
35
DeskPRO
Agent Manual
Note that if another agent is replying to a ticket, you can see a live preview of what they're typing. This
makes it easy to see when someone else is answering a ticket, even if they're not assigned to it.
Teams
Instead of assigning a ticket to an individual agent, you can assign it to a team: a group of agents. You
would typically put agents who work closely together and tend to answer similar tickets into the same
team: for example, you might have a support team and a sales team.
An agent can be a member of more than one team. Agents can choose to get notifications when a ticket is
assigned to one of their teams.
Teams are useful because they let you bring a ticket to the attention of several agents. For example,
suppose you find a ticket that is a request for a product demonstration; you know that someone from the
sales team arranges those, but you don't know who exactly. You can assign it to the sales team, and they
can then reassign it to an individual agent.
Note that a ticket can be assigned both to an individual agent and to a team. If a ticket is assigned to you
individually, and you assign it to a team, it will still show up in your "My Tickets" filter, unless you clear the
assignment to yourself.
You have the same permissions to modify a ticket that's assigned to your team as you would if it was
assigned to you directly.
Following tickets
Following is a way to keep track of a ticket without it being assigned to you.
3. Tickets
36
DeskPRO
Agent Manual
You can add yourself as a follower if you want to keep an eye on a ticket. If you follow a ticket:
you can get notifications about it (depending on your account preferences).
it shows up in the "Tickets I Follow" filter whenever it has awaiting agent status.
you will be able to see it even if it is set to a department you don't have permission to view.
Agents can also add each other as followers. For example, suppose you are training an agent who's not
ready to answer tickets; you don't want to assign them tickets, but you could add them as a follower to a
ticket that you want them to watch.
The permissions you have as a follower of a ticket are separate from the permissions you have if it's
assigned to you/your team. For example, your helpdesk may be set up so that you can modify tickets
you're assigned, but not tickets you are following.
Your helpdesk may also be configured to add you as a follower if a user cc:s you in on a ticket email.
3. Tickets
37
DeskPRO
Agent Manual
3.4. Departments
Departments can be used to control the tickets that agents in different parts of your company can see and
modify.
A ticket can only be added to one department.
Agent accounts can be set so they do not have permission to view tickets in certain departments.
For example, your helpdesk could have a Research department and a Customer Service department. You
might not be able to see Research tickets; another agent might not be able to see Customer Service tickets,
and a third agent might be able to see tickets in both.
The advantage of this is that you only have to sort through the tickets that are relevant to your particular
role.
However, assignment and following always overrule departments.
If you're not normally allowed to see Research department tickets, but one is assigned to you or your
team, you can then see it. And if a ticket you are following is then set as a Research ticket, you will still be
able to see it.
You may be allowed to assign a ticket to a department that you don't have permission to view. It depends
on your permissions, which are set by your admins.
In the example above, if you found a useful customer suggestion among the Customer Service tickets, your
account might let you assign it to the Research department. If you tried to access the ticket afterwards, you
would see a No Permission error message.
A final point to bear in mind is that your helpdesk can be customized so that different departments have
different forms for creating a ticket. This customization can be done separately for users and for agents.
You may find that the fields which are visible or mandatory when you're creating a ticket vary between
departments, and between users and agents.
3. Tickets
38
DeskPRO
Agent Manual
3.5. Ticket fields
Aside from core information like subject, status and user, DeskPRO stores more fields giving you extra
information about a ticket.
You can view them in the ticket Properties tab.
You can edit them by clicking the
icon at the top right. Note that if there is no value set for a particular
field, the field is not shown until you do this.
Your admins have a wide variety of configuration options. Some built-in ticket fields are optional, and
may not be set up on your helpdesk. The fields you see may vary by the department of the ticket you're
creating.
The optional Language field records what language the ticket is in.
Categories
The Category field may not be enabled. If your helpdesk uses it, the values you can choose from are set by
your admins.
This field is used to divide tickets into categories that are useful to your company.
If it's enabled, users can choose a category when submitting a ticket from the web portal.
Here are some examples of how different helpdesks could use categories:
Software/Hardware
Question/Complaint/Praise
Consumer/Professional/Reseller
Windows/Mac/Linux
Products
The Product field may not be enabled. It is used to track different products your company makes or
supports.
If your helpdesk uses it, the values will usually be products you help people with.
If it's enabled, users can select a product when submitting a ticket from the web portal. You can also select
a product for knowledgebase articles.
3. Tickets
39
DeskPRO
Agent Manual
Workflows
Workflow is an optional field used for tracking the progress of a ticket through your helpdesk, according
to your company's procedures.
Since it describes your internal processes, the workflow field is never visible to users.
Workflow is set in the ticket Properties tab.
Click the
icon at the top right to edit properties.
If your helpdesk uses workflow, the available workflow stages are defined by your admins. You may be
required to set the workflow yourself, or it could change automatically.
Here's an example of how workflow could be used:
1
every new ticket has the workflow field set to "Triage", to show that a first-line agent
needs to assess which team needs to deal with it and how serious it is
2
once it is assigned to a team, the workflow field is set to "Support"
3
once the agent thinks they have dealt with the ticket, the workflow field is set to
"Follow Up" and a manager reviews their work before marking the ticket resolved.
Custom fields
Your admins can also add custom fields to track extra information about tickets.
These custom fields will have a name chosen by your admins. Custom fields can either be visible to users
(for example on the web portal), or for agents only.
3. Tickets
40
DeskPRO
Agent Manual
If you see a ticket field at the bottom of the Properties section that isn't mentioned in this manual, it's a
custom field.
The kind of input a custom field can take varies:
Text - a simple one-line text box.
Textarea - a multi-line text box that can be used for longer entries like descriptions or notes.
Choice - a set of predefined options presented as a drop-down select menu, radio buttons or
checkboxes.
Toggle (on/off) - a single checkbox that you can check or uncheck.
Date - lets you select a date using a calendar widget.
Display - this is a field you can't edit, that is used for displaying information to the user.
Hidden - this stores information from the user's browser; the user won't see it on the portal, but
the information stored can be viewed and edited by agents
Custom fields aren't matched from the Quick Search bar, but you can find them from the advanced ticket
search.
Field validation
3. Tickets
41
DeskPRO
Agent Manual
When you're creating or editing a ticket, you may find that selecting or entering a value for some fields is
compulsory. This is determined by validation options set by your admins. In this example, the Priority
field is compulsory:
Your admins can set it up so that some fields are compulsory for agents, but not users. If you open a ticket
with some compulsory fields missing, you will see this:
Before you continue to work with a ticket that is missing required fields, you must correct the problem.
3. Tickets
42
DeskPRO
Agent Manual
3.6. Ticket history
At the bottom of a ticket as you view it in the content pane is the ticket history. There are three tabs which
provide different information:
the history of messages connected with this ticket - emails to and from the user, and internal
agent notes
a full log of all the actions that have been applied to the ticket by agents, users, or automatic
processes
details of dates and times associated with the ticket - when it was created, how long the user has
been waiting, etc.
Ticket message history
The ticket message history shows all messages to and from the user about this ticket. It also shows agent
notes in gray: these are used for internal communication between agents.
By default, the message history is shown in reverse chronological order with the newest message at the
top. You can change this to chronological order, with the newest message at the bottom, by changing the
setting in your account preferences.
You can access any attachments the user has sent from the ticket message history.
You can use the gear icon on the right-hand side of individual messages to carry out actions on individual
messages. You may not have permissions to use all of these.
The possible message actions are:
3. Tickets
43
DeskPRO
Agent Manual
View message in a new window enables you to view the raw message, email headers and HTML
source code - see Viewing raw message source for details.
Quote:
This action inserts the message content into the reply box, formatted as a quote, email-style.
Forward message:
This lets you forward the message as an email, for when you want to discuss it as part of a normal
email conversation, rather than via DeskPRO.
Delete message deletes the individual message (as opposed to the ticket). Note that this action
cannot be undone; deleted messages do not go to the Recycle Bin.
Set as agent note converts the message to a note visible only to agents.
Split message removes the message from the thread and makes it into a new ticket. See the
section on Splitting messages to a new ticket for more details.
Create Linked Ticket uses the message as the initial message in a linked ticket, linked to the
original ticket. See the section Create a linked ticket for more details.
Edit lets you edit the message content, if you have the correct permissions.
Download Debug File is used to diagnose technical problems. Your admins or a DeskPRO
employee may ask you to send them this file.
Ticket log
3. Tickets
44
DeskPRO
Agent Manual
Click on the Full Log tab to see a record of everything that has happened related to the ticket: which SLAs
were applied, automatic actions by your helpdesk, which emails have been sent, changes to properties, etc.
If a ticket has changed in a way you don't understand, checking the log will usually explain what made the
change.
You can click on the controls at the top to show only Messages (from both agents and users), Attachments
(from both agents and users) or Assignments (when the ticket's user, assigned agent or team was changed).
This is useful to find the relevant content if the ticket has a long history; for example, this is what it looks
like when you filter the log to show only attachments.
Ticket dates and times
Click on the Dates & Times tab to see details of significant events in the ticket lifecycle, and user waiting
times.
3. Tickets
45
DeskPRO
Agent Manual
Viewing raw message source
Sometimes it is useful to view the raw message source for a ticket message. Sometimes the user's email
client or browser may have inserted formatting that DeskPRO can't interpret; if a message isn't displaying
properly or contains strange characters, doing this might help you decipher it.
You may also want to view the email headers on a message to diagnose delivery problems.
Click on the gear icon in the top-right corner of the message to bring up the context menu, then click
View message in a new window.
In the window that opens, click on the Raw Message tab or the Source Code tab.
If a message contains malicious code, viewing the Raw Message (Unsanitized) tab may allow it to run. It's
best to consult with your admins before using this view.
3. Tickets
46
DeskPRO
Agent Manual
3.7. Replying to a ticket
When you're viewing an individual ticket in the agent interface, you can send a message to the user from
the reply area.
By default, when you press the Send Reply as... button, your message is emailed to the user's primary
address.
Use the pull-down menu at the right of the Send Reply as... button to select what the status of the ticket
should be after you send the message:
Send Reply as Awaiting User (default) - if you need to hear back from the user before progressing
Send Reply as Awaiting Agent - if an agent needs to act further on this ticket
Send Reply as Resolved - if the user's issue is resolved and no more communication is needed
You can uncheck the Email User checkbox if you don't want this message to be sent to the user - for
example, if the message is a summary of a phone conversation you had with the user.
Note that you can also reply directly to a ticket email notification from your email software. See the
section on Replying to a ticket by email for more details.
Messages should be used for recording communication with the user - if you want to leave internal
messages for other agents, use notes instead.
Using ticket CC to copy in users
Adding a user to the ticket CC field means they will be copied in on ticket email messages, even though
they are not the main user associated with the ticket.
You must enter the exact email address for the person.
CCs enable multiple users to track the progress of the ticket.
Any user who is cc'd into the original email which created the ticket will be added as a CC user (up to a
limit of 10 cc: addresses). Agents cannot be CC'd to a ticket; instead they can be added as ticket followers.
If an agent is cc'd into the original email, by default, they will be added as a follower (although your
admins may have disabled this feature).
Note that the CC users will only be copied in on outgoing emails from DeskPRO; the main user associated
with the ticket must use "Reply All" from their email software for the CCed users to see their messages.
Another way to allow multiple users to track the progress of a ticket is using organization managers. An
organization manager can see all the tickets from their organization, even if they are not the main user or
CC'd.
Message attachments
You can attach a file to your message, for example a screenshot, updated software drivers, or an electronic
manual.
Your admins may set limits on the type and size of files you are allowed to attach. Remember that the
user's email system may reject large files (the limit varies, but is typically 5MB-50MB), or files that look
like they might be harmful, like .exe files.
3. Tickets
47
DeskPRO
Agent Manual
Click the
button to select a file from your computer.
You can also drag and drop a file onto the bar where the Attach button is.
You can use drag and drop to attach multiple files to a message at the same time.
Quick message screenshots with paste or drag and drop
You can quickly add screenshots or other images to the body of your message by pasting them from your
clipboard.
If you have software on your computer that can save a screenshot directly to the clipboard with a
keyboard shortcut, then you only need to press Ctrl-V (Mac: Cmd-V) in the reply box to upload the image.
Taking and adding a screenshot to your ticket reply can be done in two key presses.
Pasting screenshots only works correctly on recent versions of Firefox and Chrome browsers.
For Windows users, we recommend the free software Greenshot for taking screenshots.
You can also drag and drop an image file into the reply box.
Ticket message formatting
You can apply rich text formatting to your message using the controls above the text area. If you've used
standard word-processing software before, you should find them familiar.
The text style buttons are:
B for bold
I for italics
U for underlined text
A for colored text (select the color after you click on it)
You can use these buttons in two ways:
3. Tickets
48
DeskPRO
Agent Manual
1
2
Toggle: without any text selected, click a button to apply the relevant style to
everything you type from that point on. Click it again to stop.
Paint: select some text, then click a button to apply the relevant style to the selection.
Click it again with the same selection to remove that style.
You can toggle bold with the keyboard shortcut
Ctrl-B
and italics with
Ctrl-I .
To the right of the text styling controls are buttons which apply formatting to your current paragraph, or
all paragraphs under the selection area:
bullet list
numbered list
shift paragraph left
shift paragraph right
The
button enables you to insert an image into the body of the message. You can either upload an
image file from your desktop, or provide the web address of an image file.
The
button enables you to insert a clickable web link or email address into your message.
Using links in messages
To insert a clickable link to a website or file server:
3. Tickets
49
DeskPRO
Agent Manual
1
2
Optionally, highlight some text you want to turn into a link.
Click the
icon, then click Insert link.
3
The default URL link type is used for inserting a web link.
4
Enter the full address in the URL field e.g.
http://www.yourcompany.com/troubleshooting .
5
Enter the text for the link in the Text field e.g. "our troubleshooting guide" - if you
highlighted some existing text, it will appear here.
6
Check the Open link in a new tab box if you want the link to open in a new tab when
the user clicks it. (This will usually happen anyway, depending on how they read their
email).
The result is the link " our troubleshooting guide " which goes to
http://www.yourcompany.com/troubleshooting .
To insert a clickable email address that will open a new email in the user's email client:
3. Tickets
50
DeskPRO
Agent Manual
1
2
Optionally, highlight some text you want to turn into an email link.
Click the
and click Insert link.
3
Select the Email link type.
4
Enter the email address in the Email field e.g.
5
Enter the text for the link in the Text field e.g. "email our sales team".
To remove a link, highlight it, press the
[email protected]
button and click Unlink.
Automatic translation plugin
If your admins have installed the Microsoft Translator plugin, you will see a control to translate the
message content between languages.
Note that this is automatic translation, and quality of results can vary. Be cautious when sending
automatically translated replies in a language you don't understand.
Ticket notes
Notes are messages intended for viewing only by other agents. They show up in the message history as
usual, and agents will be notified of them according to their preferences, but they are not sent to the user.
Click the Note tab to enter a note.
You can convert a normal ticket message to a note, or vice versa, by using the gear icon to the right
of the note or message.
@mentions
You can quickly alert another agent that you've written a note you want them to see using
@mentions.
Type @ and then start typing the agent's name - you'll see a list of matching suggestions.
3. Tickets
51
DeskPRO
Agent Manual
Click on the agent you want to notify.
Enter the rest of your note. When you click Add Note, the agent you mentioned will be notified that you
mentioned them.
How you are notified when somebody @mentions you depends on your Notes with @mentions
preferences setting: you can choose either:
Always receive an email and an agent IM message
Receive an agent IM message if online, and an email if you're not logged in to DeskPRO
Note that the @mention IM notifications use the agent IM system; you will receive them even if you are
logged out of user chat in the toolbar.
Snippets
Snippets are a way to avoid typing the same thing into messages over and over again.
You can use a snippet to automatically insert a piece of rich text, including images.
To set up a snippet:
3. Tickets
52
DeskPRO
Agent Manual
Click the Snippets button. You may be prompted to create a category - if so, enter "Personal" and leave the
"Category can be used by" option set as "Just me".
From the resulting Ticket Snippets window, click Add Snippet.
In the Edit Snippet window, enter a title for the snippet. This is to describe what the snippet does; it will
not change the title of a ticket.
Enter and format the snippet content. For example, perhaps you want to be able to quickly enter your
standard greeting.
Click Save in the Edit Snippet window.
Now in the Ticket Snippets window, click the title of your new snippet and it will be inserted into your
message at the cursor.
You can edit the content that a snippet will insert by clicking the gear icon next to its title.
Note that you don't need to use a snippet to add a personal signature to your messages - use the
Signature setting in Preferences.
Ticket
Snippet categories and sharing
You can organize your snippets into categories. Create a new category with the
pane of the Ticket Snippets window.
+ button in the Categories
If you choose to create a Shared category, any snippets in that category will be available to all agents.
This is useful for standardizing your communication. For example, if you want agents to use a standard
greeting, you can save it as a shared snippet. Then all agents can insert the exact same greeting.
Another use for snippets is to provide standardized "canned answers" to common problems.
Snippet shortcuts
There's a quicker way to insert a snippet, using a shortcut code that you type into a message.
3. Tickets
53
DeskPRO
Agent Manual
For example, you can set it up so that your standard greeting is inserted whenever you type
Shortcut codes always begin and end with % .
%hello% .
Open the Ticket Snippets window and edit a snippet with the gear icon.
You can enter a shortcut code for the snippet at the lower left (you don't need to type in the
symbols).
%
Snippet variables
What if the content you want to enter with a snippet varies from ticket to ticket? For example, what if you
want your standard greeting snippet to mention the user by name?
You can automatically insert information into your message using variables.
For example, to make a snippet which addresses the user by name, you can add the following to the
snippet content:
Hello {{ ticket.person.display_name }}
When you paste the snippet into a message, the variable is replaced by the user's actual name.
The easiest way to insert variables is to select them from the list at the lower right of the
window, then click Insert Variable.
Ticket Snippets
The following variables are available.
Snippet variable
Value inserted
{{ ticket.product.title }}
current product of ticket
{{ ticket.category.title }}
current category of ticket
{{ ticket.workflow.title }}
current workflow stage of ticket
{{ ticket.priority.title }}
current priority of ticket
{{ ticket.id }}
ticket ID number
{{ ticket.ref }}
ticket ref code
{{ ticket.fieldX }}
display a custom ticket field; replace X with field ID *
3. Tickets
54
DeskPRO
Agent Manual
{{ ticket.date_created }}
time and date ticket was created e.g. 2014-03-14 11:38:17
{{ ticket.agent.display_name }}
the name of currently assigned agent (or override name if set)
{{ ticket.person.display_name }}
user's name
{{ ticket.person.fieldX }}
display a custom user field; replace X with field ID *
* you can find out the ID for custom fields by using the
3. Tickets
insert variable function or asking your admins
55
DeskPRO
Agent Manual
3.8. Replying to tickets by email
When you receive an email notification about a message from a user, you can reply to it in your email
client, rather than in the agent interface. DeskPRO will process your message as a reply to the user.
You must make sure to type your reply above the
=== REPLY ABOVE ===
line.
Note that if you receive an email as a follower of a ticket, any reply you make by email will be sent to the
user, not to the assigned agent - even if you are replying to a message the agent sent. If you want to send a
message via email to the agent, you can use an email action code to send your reply as a note. Simply put
#note at the top of your response. The content of your email will be added as a note on the ticket, and
the assigned agent will be notified about if they have enabled the relevant preference.
Email action codes
DeskPRO allows agents to perform actions via the use of special action codes. Action codes must be
placed at the top of the email message and all follow the format:
#codename option
where codename is the name of a code, and option is an optional parameter used to perform an action.
For example, if you reply to a user by email and put
be set as resolved.
#status resolved
at the top, the relevant ticket will
You can enter as many codes in one email as you want so long as they are at the very top of the email.
DeskPRO strips out codes when it sends email, so they are not seen by the user.
Code
Description
Example
Sets the ticket status.
Available options:
#status
option
agent
user
#status resolved
resolved
hold
#awaitingagent
Shortcut for #status agent
#awaiting-agent
#awaitinguser
Shortcut for #status user
#awaiting-user
#resolved
Shortcut for #status resolved
#resolved
#hold
Shortcut for #status hold
#hold
#unhold
Removes hold status on a ticket and sets status to
awaiting agent
#unhold
#note or
#is-note
Sets the current reply to be an agent note rather
than a ticket reply
#is-note
Assigns the ticket to agent specified.
#assign
option or
#agent option
Option can be:
Agent email address
#assign
[email protected]
#assign john doe
Full agent name (e.g., "john doe")
3. Tickets
56
DeskPRO
Agent Manual
#team option
or
#assignteam option
Assigns the ticket to the team specified
#team support
#user option
Used only if an agent is sending a new ticket to the
helpdesk, this sets the ticket user by email address
#user
[email protected]
#label option
or
#labels
option
Adds labels to the ticket. Provide labels as a
comma-separated list
#label bug, important
#dep option
or
#department
option
Sets the department
#dep support
#cat option
or
#category
option
Sets the ticket category
#cat consumer
#prod option
or
#product
option
Sets the product
#prod gyrocopter
#pri option
or
#priority
option
Sets the priority
#pri urgent
#field value
Sets any custom field.
#field is the name of the custom field with spaces
removed or turned into dashes, and value is the
value to set.
#license-id 12345
#discount yes
Prevents a message from being added to the ticket.
#noreply
Use this when you want to use other action codes
but don't want to add an actual reply to the ticket.
#noreply
When DeskPRO is searching for values based on a string title or name (for example, a category name or
an agent name), all comparisons are case-insensitive and ignore white space and punctuation. Here are a
few examples:
"Booker Dean-DeWitt" is matched as
"License ID" is matched as
bookerdeandewitt
licenseid
"Product Name (Full)" is matched as
productnamefull
Your option values are treated the same way. So
#assign Booker dean dewitt or
#assign booker dean de-WITT would both match the name "Booker Dean-DeWitt".
3. Tickets
57
DeskPRO
Agent Manual
3.9. Creating a ticket
A ticket can be created in the following ways:
1
A user submits a ticket through the web portal.
2
A user sends an email to a support address that is linked to DeskPRO.
3
An agent creates a ticket on behalf of a user, either
by using the agent interface or
by forwarding a user email message to the support address.
A ticket is always associated with a user. You can change a ticket's user, but it's not possible to have a ticket
without a user at all. (As a result, deleting a user will also delete all their tickets).
In most helpdesks, users will normally create their own tickets by sending an email or using the Contact Us
form on your web portal.
However, you may need to create a ticket on behalf of a user - for example, if they are telling you about
the issue over the phone or in person.
You can create a new ticket from the Create button in the toolbar at the top of the agent interface.
The new ticket must be associated with a user, so you must either choose a user or create one.
Begin typing either a name or an email address in the Choose a person to create this ticket fortext area.
DeskPRO will show you matching records as you type.
Alternatively, click Create a new person to make a new user record. You will need to provide the user's
email address and name.
Field validation
3. Tickets
58
DeskPRO
Agent Manual
Depending on your helpdesk configuration, it may be compulsory to select or enter values for some of the
ticket fields.
For example, if your helpdesk has departments, you have to specify one:
When you have selected the fields, you can assign the ticket to an agent or team.
Note that when an agent creates a ticket, the fields which are compulsory may differ from when a
user creates a ticket.
The requirements for fields can also be different between departments.
New ticket message
When you create a ticket, you must write a message, which would usually include a description of the
problem.
Your options when sending the message are as follows:
set the status of the new ticket as:
awaiting user (default)
awaiting agent or
resolved
select whether or not to email the message to the user with the Email User checkbox
select whether or not to open the new ticket in a tab in the content pane straight away with the
Open Tab checkbox.
For example, suppose your job is to take down the content of a phone call and pass it to the right part of
your company. You could write a summary of the issue for the other agents, uncheck Email User, assign it
to the appropriate agent/team, and then choose Send Reply as Awaiting Agent.
On the other hand, your job might be to research the issue and then send help information to the user by
email. In that case, you might write a message addressed to the user, summarizing the problem and
suggesting a fix. It would make sense to leave Email User selected, assign the ticket to yourself, and Send
Reply as Awaiting User.
If you were able to resolve the user's issue on the phone, you would probably want to
Resolved.
Send Reply as
See Replying to a ticket for more details about ticket messages.
3. Tickets
59
DeskPRO
Agent Manual
Forwarding an email to create a ticket
There's another way you can create a ticket on behalf of a user: you can forward a user email to an email
address configured to automatically create tickets. This feature is convenient if a user has emailed a
support request to the wrong place.
DeskPRO will make a ticket from the user's original message and associate it with that user, even though it
came from your address. The text of the forwarded email appears as the first message on the ticket. If you
write something above the forwarded text, that appears as a message from you.
The ticket is created as unassigned, but you will be added to the ticket as a follower. If the original message
had addresses in the email cc: field, they will be added to the CC field for the new ticket.
You can use Email action codes when creating a ticket in this way.
'Unable to verify the email address' error
Some email programs forward messages in a way that stops DeskPRO detecting the original email address
of the user.
DeskPRO tries to work out the original user from the text headers of the email you send. For example, if
the headers are:
-----Original Message----From: Victoria Johnson [mailto:[email protected]]
Sent: 05 November 2013 14:38
To: [email protected]
Subject: Support Request
DeskPRO can detect
original user.
Some clients send a
[email protected]
From:
in the From: line and determine that she is the
header that is missing the email address when a message is forwarded, e.g.
From: Victoria Johnson
This commonly happens in enterprises that use Outlook and Active Directory.
If you run into this problem, you should forward the original email to DeskPRO as an attachment. This will
give DeskPRO the information it needs to work out the original user.
'Unable to parse the original message' error
This means that your client forwarded a message that DeskPRO did not understand. If you are using less
common email software, DeskPRO may not be able to interpret the headers.
If you receive this error, please forward an example email to
can fix the issue in future update.
[email protected]
so our developers
Processing email cc: field
When a ticket is created from an incoming email, DeskPRO will process any email addresses that are cc'd
in to the email.
By default, any agents who are cc'd in to the original email will be added to the ticket as followers. Your
admins may have disabled this.
Any non-agent email addresses cc'd in to the email will be CC'd to the ticket.
3. Tickets
60
DeskPRO
Agent Manual
3.10. Ticket actions
Aside from the core reply and assignment functions, there are various other actions you can apply to
tickets.
All the actions below are available from the buttons above the reply area.
Locking tickets
Confusion about who is working on a ticket is usually prevented by:
1
2
agent assignment
the live draft messages you see if another agent is replying to a ticket.
Sometimes you may want to make clear to other agents that you're working on a ticket and prevent them
from editing it - for example, if you are researching the issue.
Locking the ticket achieves that.
The Lock button is above the reply area when you view a ticket in the content pane.
You can unlock the ticket from the Lock button or at the top of this tab.
The lock will automatically be removed after a period of time set by your admins (one hour is the default).
This is to stop tickets being left locked for too long.
DeskPRO can also be set to automatically lock a ticket while an agent is viewing it.
Merging tickets
Sometimes you will end up with two tickets about the same issue - for example, two different users in the
same organization report the same thing, or a user emails about the same issue from two different email
addresses.
3. Tickets
61
DeskPRO
Agent Manual
You can quickly merge two tickets together, combining their details to make one ticket.
When tickets merge, some properties will be overwritten. For example, a ticket can only have one subject,
so the merged ticket can keep the subject from only one of the original tickets.
You can pick which ticket will overwrite the other ticket's properties.
If a value for a property is only set in one ticket, then it is kept in the merged ticket, regardless of which
ticket you pick. For example, if one ticket is assigned to an agent team A, and the other ticket isn't assigned
to any team, the new ticket will always be assigned to agent team A.
If the tickets have different users, the other user will be added as a
CC to the new ticket.
The labels from both tickets will be applied to the new ticket.
The Merge button is above the reply area when you view a ticket in the content pane.
1
Open one of the tickets in the content pane.
2
Click the Merge button.
3
You are shown a list of the user's tickets and open tickets. If you want to merge with a
different ticket, click Search, then enter a ticket ID. It may take a second or two to
show the matching ticket.
4
Select the ticket you wish to merge with.
5
The Merge Ticket window opens. Click Switch to pick which ticket's properties to
keep where there's a conflict. The values shown in red will be overwritten.
Click Merge these two tickets to complete the process. You cannot undo a ticket merge.
3. Tickets
62
DeskPRO
Agent Manual
Holding tickets
Putting a ticket on hold is useful if the user is awaiting a reply, but you are waiting for a third party to do
something before you can respond. For example, you need to hear back from one of your company's
suppliers before you can send the user a solution to their problem.
You can put a ticket on hold using the Actions pulldown menu.
Only tickets that are awaiting agent can be put on hold. You can think of on hold as a sub-status that
applies to awaiting agent tickets.
If there are tickets on hold, you will see how many there are in the Awaiting Agent area of the filter pane;
the checkbox toggles between not showing held tickets and only showing held tickets.
Tickets on hold will be displayed in the rest of the interface as normal, whether or not the box is checked.
You can't search for tickets that are on hold from the advanced ticket search. You can find them using the
quick search bar.
A good way to make sure you don't forget about a ticket you put on hold is to create a
ticket.
task linked to that
Changing a ticket's user
You can change the user associated with the ticket from the Actions pull-down menu, creating a new user
record if necessary.
For example, if user A creates a ticket, but then tells you that user B will be handling it from now on,
change the user. That way user B will receive emails about the ticket, will be able to track it from your web
portal, etc.
Splitting messages to a new ticket
If there are messages about two different issues mixed up in a single ticket, you can use
New Ticket from the Actions pull-down menu.
Split Messages To
Enter a title for the new ticket, and select the messages you want to move with the checkboxes.
3. Tickets
63
DeskPRO
Agent Manual
The user for the new ticket will be the same.
You can also split off an individual message from the ticket history into a new ticket. Click the gear icon at
the top right of the message, and select Split Message.
Creating a linked ticket
Sometimes you might want to have separate tickets for the same issue. For example, suppose a user raises
a ticket and you need to discuss it with an outside contractor. You don't want to change the ticket user, and
you don't want to add the contractor as an agent.
The solution is to create a linked ticket, using Create Linked Ticket the Actions pull-down menu.
The new linked ticket acts like an independent ticket, but you can see that it's linked to the original ticket
when you open it in the content pane.
3. Tickets
64
DeskPRO
Agent Manual
This works only one way: you can't see the newer ticket from the original ticket.
Creating a new pending article
If you realize that the issue in a particular ticket should be addressed in a knowledgebase article, you can
use Create a new pending article from the Actions pull-down menu.
Enter a note describing the article that needs to be written, then click Add.
This creates a pending article in the Publish app.
The pending article is linked to the ticket, making it easy to refer to the ticket while writing the article.
Printing and exporting ticket information
You can select Print from the Actions pull-down menu to display the ticket in a layout suitable for
printing from your web browser.
You can select Download PDF from the Actions pull-down menu to get a PDF version of the ticket details
and message history.
3. Tickets
65
DeskPRO
Agent Manual
3.11. Filtering and sorting tickets
The Tickets app has a variety of filters. Some of them are shown in the image below; for example, My
Tickets is a filter.
Filters give you an overview of how busy the helpdesk is at a glance, because each filter displays the
number of tickets it matches. In this example, there is one ticket in My Tickets, none in Tickets I Follow,
three in My Teams' Tickets, and so on.
To select a filter, click on it. The tickets matching it are displayed in the list pane.
The awaiting agent section
At the top of the filter pane is the Awaiting Agent section. As you'd expect, this section only shows the
tickets with awaiting agent status; in other words, the tickets agents need to act on because the user is
waiting for help!
The filters in this section are:
My Tickets - tickets assigned to you and awaiting agent
Tickets I Follow - tickets you follow that are awaiting agent
My Teams' Tickets - tickets assigned to a team you belong to that are awaiting agent
Unassigned Tickets - unassigned tickets that are awaiting agent
All Tickets - all tickets that are awaiting agent
Ticket status filters
At the bottom of the filter pane you can see filters for the other statuses.
3. Tickets
66
DeskPRO
Agent Manual
The Awaiting Agent filter will show you the same tickets as the All Tickets filter in the Awaiting Agent
section.
The other filters available are:
Awaiting User
Resolved
Awaiting Validation
Spam (tickets marked as spam)
Recycle Bin (deleted tickets)
Tickets marked as spam or deleted will be permanently deleted after a period of time set by your admins by default, spam tickets are kept for 2 weeks, and deleted tickets for 1 month.
Real-time updating in the list pane
When you click a filter, it shows you all matching tickets in the list pane. It's a lot like running a search except that a filter doesn't just show you the tickets that matched at one point in time.
The list of matching tickets automatically updates itself. If you watch the All Tickets filter for a busy
helpdesk for a while, you'll see tickets appear and disappear.
Tickets will appear in All Tickets as they are set to awaiting agent, whether because they have just been
created or because the user has just replied.
A ticket might disappear because an agent replied and set the status back to awaiting user, or because it
was marked as spam or deleted, or because it was put on hold.
You can disable real-time updates by clicking the
icon at the upper right of the list pane.
Grouping tickets
You can customize the filters in the Awaiting Agent section by grouping tickets to create a subfilter.
1
3. Tickets
Click the arrow to the left of a filter.
2
Click on Select Field to Group Tickets
3
Select the field you are interested in from the pull-down menu.
67
DeskPRO
Agent Manual
For example, you might choose to group All Tickets according to the user's organization.
To change the grouping, just click the arrow again.
A second level of grouping is available in the list pane, using the grouped by control.
DeskPRO creates groups based on the range of values for the property you've selected.
You can click the groups at the top of the list pane to filter the results further.
Creating custom ticket filters
If grouping is not sufficient to show you the tickets that matter to you, you can also define your own
custom filter.
A custom filter is specific to your account; other agents can't see your custom filters.
To make a custom filter:
3. Tickets
68
DeskPRO
Agent Manual
1
Click the Filters section
icon to make a new custom filter.
2
The Filters section of your account Preferences opens.
3
Click Create Filter.
4
Under Title, enter a name for the filter that describes what it shows.
5
Click Add criteria to select a ticket property that you want to show in this filter.
Possible criteria are:
3. Tickets
69
DeskPRO
Agent Manual
Originated interface (how tickets were created - email, web portal, website or through the agent
interface)
Ticket Gateway Address
Ticket Gateway Account i.e. the email account through which the ticket was created
Subject
Department
Assigned Agent
Assigned Team
Followers (which agents are following the ticket)
Labels
Status
Ticket is on hold
Organization
Product
Category
Urgency
Priority
Workflow
SLA (filter tickets to which a certain SLA applies)
SLA Status (filter tickets which are meeting or failing an SLA)
User Waiting Time (filter tickets that are currently awaiting agent by how long they have had that
status)
User Total Waiting Time (filter by how long in total the ticket has spent awaiting agent over its
lifetime)
Date Created
Date Closed (when the ticket was archived - this only applies if your helpdesk has a very large
number of tickets and older ones have to be archived)
Date of Last Agent Reply
Date of Last User Reply
Custom ticket fields your admins may have set up
You can filter tickets by the properties of the ticket's user:
3. Tickets
70
DeskPRO
Agent Manual
Name (of user)
Email Address (of user)
Email Domain (the part of the user's email address after the @ symbol - useful for finding users
from the same company)
Person ID (ID number, the user equivalent of ticket ID)
Date of profile creation
Labels (on the user)
Contact Phone
Contact Address
Contact Instant Messaging
Custom user fields your admins may have set up
You can also filter by the properties of the user's organization:
Date Created
Email Domains (which email domains are recorded in DeskPRO for the organization: e.g. email
from anyone @dreadco.zy is from a user belonging to the DreadCo organization)
Labels
Contact Phone
Contact Address
Contact Instant Messaging
Custom organization fields
You can click Add Criteria again to add to the filter - the filter will only show tickets which meet
criteria you set.
all the
Close the account preferences window with the X at the top right. Your custom filters are displayed in the
filter pane.
Ordering tickets in the list pane
Once you have selected a list of tickets using a filter, you may want to view them in a certain order - for
example, oldest tickets first, or tickets with the highest urgency first.
You can order the tickets in the list pane using the Ordered by pull-down menu.
3. Tickets
71
DeskPRO
Agent Manual
ASC and DESC mean ascending and descending. For example, Waiting Time ASC means that the
tickets will be shown in ascending order of user waiting time: the waiting time gets higher as you go up the
list, with the highest waiting time at the top.
You can order by:
Urgency (available for Awaiting Agent and custom filters only)
Date Opened (when the ticket was created)
Date of Last Agent Reply
Date of Last User Reply
Date of Last Reply
Priority (if your helpdesk uses this field)
Waiting Time (for tickets with awaiting agent status; this does nothing on tickets with another
status)
All Waiting Time (total time spent with awaiting agent status over the ticket's lifetime)
Note that DeskPRO saves your chosen order separately for each filter.
Ticket mouseover preview
You can see a preview of the most recent message in a ticket by mousing over it.
Field display options
Some fields are shown in gray boxes on each ticket in the list pane.
3. Tickets
72
DeskPRO
You can customize which fields are displayed by clicking the
Agent Manual
icon at the top right of the list pane.
Use the checkboxes to add and remove fields, then click Apply.
3. Tickets
73
DeskPRO
Agent Manual
The fields you choose to display are saved separately for each filter.
Labeling tickets
You can apply labels to tickets (and other items). A label is a short piece of text you can attach to items to
help find them quickly, and group similar items.
Labels are shared between agents. Other agents can see labels you add, and you can see and benefit from
other agents' labels.
You can enter a label using the content pane from the Properties section of an individual ticket.
You can either select an existing label from the pull-down menu, or type a new one and press Enter.
Click the x on the left of a label to remove it.
You can also apply labels as a mass action.
There are many possible uses for labels, depending on the needs of your helpdesk. You might label tickets
to track software platforms, or product versions, or different types of problem.
Labeling has two benefits:
1
Searches from the Quick Search bar match labels.
Suppose you had a ticket that was about engine problems but didn't mention the
word "engine" in the Subject field. A quick search for "engine" wouldn't find it, but you
could label it "engine" to make it easier to find.
2
3. Tickets
You can use labels to filter tickets using the Labels tab in the bottom section of the
filter pane.
74
DeskPRO
Agent Manual
Click on each label to see tickets.
The Cloud view shows labels in bigger text the more tickets they have. You can also select a List view by
clicking on the List tab.
Flags
Flags are a personal way to organize tickets. Unlike labels, other agents can't see your flags.
You can apply flags using the content pane from the Properties section of an individual ticket.
You can use flags to filter tickets from the Flagged tab in the bottom section of the filter pane.
By default, flags are named after their colors.
3. Tickets
75
DeskPRO
Agent Manual
You can double-click on the flag names in the filter pane to change them to something more descriptive.
Flags are also displayed at the right hand side of the list pane.
3. Tickets
76
DeskPRO
Agent Manual
3.12. Prioritizing tickets
There are several different ways in DeskPRO to track which tickets are most important.
SLAs
SLAs (Service Level Agreements) are targets set up by your admins for how soon you should reply to or
resolve a ticket. They may reflect your company's own service standards, or contractual obligations your
company has to your users.
A simple example is an SLA which states you will send the first reply to each ticket within 4 hours.
The way SLAs track waiting time can be more complex: for example, you can have an SLA that states a
user shouldn't spend more than 12 hours total waiting time during your helpdesk working hours before
their ticket is resolved.
An SLA may apply to all tickets, or only to certain categories of tickets. For example, if some organizations
pay you for premium support, your helpdesk could have an SLA that applied only to tickets from those
organizations. Some SLAs can be assigned by agents manually.
An SLA also has a warning time which specifies when you will be warned that the ticket is close to failing.
You can see SLAs in the Tickets app filter pane.
In this example, 7 tickets are currently passing the "First Response" SLA (figure in green), 2 are on warning
(in amber), and 1 has failed (in red).
Click on the name of an SLA to see all the tickets to which it applies, ordered by descending SLA severity
(that is, failing tickets at the top).
Tickets that are failing an SLA are red at the left-hand edge whenever they're displayed in the list pane.
Tickets on warning are amber at the edge.
3. Tickets
77
DeskPRO
Agent Manual
To see the details of your helpdesk's SLA conditions, click the
icon in the SLA section.
You can view the SLAs which apply to an individual ticket in the SLAs tab in the content pane.
This is also where you can select agent-assigned SLAs to apply to the ticket.
Filtering SLAs
Click the
icon at the top right of the SLAs section to open the SLAs section of your account
Preferences.
From here you can use the Filter SLA results pull-down menu to change what the SLAs area of the filter
pane shows.
You can choose to:
Show all matching tickets
Show only tickets assigned to me
Show only tickets assigned to my team
For example, if you select Show only tickets assigned to me, then close Preferences, you see SLA
information only for tickets assigned to you.
3. Tickets
78
DeskPRO
Agent Manual
You can also use the Hide checkboxes to hide SLAs that are not relevant to you.
If a ticket is created by an agent, SLAs which specify the time until first response will not apply.
Urgency
Tickets are assigned an urgency score from 1 to 10. This is a graded measure of how soon the ticket needs
attention.
Urgency can be set manually by agents.
Your admins can also automatically change urgency based on automatic triggers when some event
happens - for example, when a certain user creates a ticket by email, it could be assigned a higher urgency
than usual - and escalations based on how much time has passed - for example, tickets that are close to
failing an SLA could be made more urgent.
Here's an example of tickets sorted by descending urgency in the list pane.
The urgency scores are displayed on the right. Low urgency scores are colored yellow, shading through
orange to red as the score gets higher.
3. Tickets
79
DeskPRO
Agent Manual
Note the difference between SLA condition and urgency score. A ticket can fail an SLA or be on
SLA warning, but still have a low urgency.
Ticket priority field
Priority is an optional ticket field. It has priority levels that have an order, from lowest to highest.
The number of different priority levels and their names is decided by your admins.
Here are some examples of priority levels that different helpdesks might use, in increasing priority order:
Low/Medium/High
Routine/Urgent
Deviation/Anomaly/Incident/Accident/Meltdown
While urgency and SLAs are internal to your helpdesk and can't be see by users, DeskPRO can be
configured to enable users to set priority when they submit tickets from the web portal.
3. Tickets
80
DeskPRO
Agent Manual
3.13. Macros
Macros let you apply a pre-defined sequence of actions to a ticket quickly and easily.
If your workflow involves doing the same steps over and over again, setting up a macro can save you time.
For example, suppose your procedure when you find a complicated problem is:
assign it to the 2nd level support team
label it "complicated"
add your manager as a follower
Here's how you would set that up as a macro:
1
3. Tickets
Open the Preferences area (in the toolbar at the top left of the interface) and select
the Macros tab.
2
Click Create Macro.
3
The New Macro window opens.
4
Under Who can use this macro?? select whether the macro is available to just you, or
to every agent.
5
Click Add Action, then select an action from the pull-down menu. In this example,
first you need to Set Agent Team.
6
You then select which team to assign.
81
DeskPRO
Agent Manual
7
Now use Add Action again with Add Labels to have the macro label the ticket
"complicated", and use it a third time with Add agent followers to have it add your
boss as a follower.
8
When the macro is complete, click Save.
When you apply that macro to a ticket, the three actions you've stored will be done (in order).
You can apply a macro from the content pane using the Macros button.
You will be asked to confirm the list of actions.
You can also choose to apply a macro when replying to a ticket, instead of setting a status.
Use the Reply as... pull-down and select the macro.
3. Tickets
82
DeskPRO
Agent Manual
The actions the macro will apply are confirmed at the top of the reply box.
Of course, you can have the macro change the status for you if required.
You can also apply a macro to multiple tickets at the same time by selecting them from the list pane and
using a mass action.
Macro actions
These are the actions you can add to a macro:
3. Tickets
83
DeskPRO
Agent Manual
Set agent
Add agent followers
CC users
Set agent team
Set status
Ticket hold status
Delete ticket
Set department
Set language
Set category
Set product
Set priority
Set workflow
Add labels
Remove labels
Add organization managers to ticket
Set flag
Increase/decrease urgency - add or subtract the defined amount from urgency score (can't go
below 1 or above 10)
Set urgency - sets the urgency score to the value you enter; you can choose 'Only set when
urgency is lower' (e.g. if the urgency is 8 and a 'Set urgency to 7' action runs, the urgency would
remain 8) or 'Always set this urgency' (would set the urgency to 7 in that example)
Set subject
Add ticket reply - adds text to the ticket's reply box. You can choose to 'Append' text (after
anything you're already entered), 'Prepend' text (before anything you've entered) or replace
existing text.
Add reply from snippet
Set custom field
Set custom user field
Close ticket tab
Macros and permissions
Different agent accounts have different permission levels which affect what they're allowed to do with
tickets.
If your account lacks the permissions to do any of the actions in a macro, the macro can't run.
3. Tickets
84
DeskPRO
3. Tickets
Agent Manual
85
DeskPRO
Agent Manual
3.14. Searching for tickets
The Quick Search bar shows tickets where your search terms match any of the following:
ID
Ref code
Subject
Labels
Click the gray plus icon next to a user's name to view their tickets.
If you're looking for a ticket you've worked on recently, you can also filter results from the Recent field.
3. Tickets
86
DeskPRO
Agent Manual
Advanced ticket search
DeskPRO can handle millions of tickets, so the quick search will not always be specific enough. You can
construct a much more detailed custom search from the list pane.
Click the Search tab in the list pane to access advanced ticket search.
The advanced ticket search lets you search across many more properties of the ticket than the quick
search: for example, you can search through all message text, not just the ticket subject.
You can narrow down your search using:
Status
Agent (and/or team)
Fields (department, product, category, priority, workflow, custom fields you have set up etc.)
Subject
Message (the text, who wrote it, and when)
User (name, email, usergroup)
Organization
Dates & Times
By default, your search is limited to tickets which are assigned to you and have a status of
agent or awaiting user.
either awaiting
Let's say you want to narrow down the search further by specifying a category.
3. Tickets
87
DeskPRO
Agent Manual
1
Click the Fields gear icon
2
A gray panel opens showing fields search options. Click to select a category.
3
Your selection is shown as a gray box.
4
Click outside the gray panel to close it.
5
Click Search to see your results.
Only tickets which match every property you have searched on will show up in your search results.
3. Tickets
88
DeskPRO
Agent Manual
In the example search shown below, the ticket status must be awaiting agent and the department field
must match "Support Dept" and the organization of the user must be DreadCo and the user total waiting
time must be more than 6 days. (From this view, you can see which properties have been used in the
search, but not what values you are searching for).
You can click the
Note that the
options.
3. Tickets
icons to view and edit the search terms for a particular ticket property.
icon at the lower left of the gray search options pane lets you access extra search
89
DeskPRO
Agent Manual
To clear Status and Agent options, just click the white box and then uncheck them.
Don't forget to clear the defaults for status and agent if they're not what you want.
To clear options denoted by gray boxes, click the x at the left.
To clear text entry options, delete the entered text.
If you want to completely clear your search and go back to the default setting, click Reset under the Search
button.
Status
Only the tickets with the checked status types will show up in your search results.
You can search for any combination of:
Awaiting agent
Awaiting user
Resolved
Awaiting validation
Spam
Deleted
3. Tickets
90
DeskPRO
Agent Manual
You cannot search for tickets with "on hold" status using advanced search.
Agent
You can search for tickets assigned to any agent or team.
If you select Unassigned and Me, your search will match tickets which are either unassigned or assigned
to you.
If you select Sales Team, your search will match tickets which are assigned to that team, but not tickets
which are assigned to an individual agent who belongs to that team.
Fields
The fields search allows you to match by department, product, category, priority or workflow (your
helpdesk may not have all of these set up).
Note that you can also choose None to match tickets which have no value entered for a field.
You can choose to apply either is or is not to the field.
This will match tickets where the product is not Gyrocopter (including tickets with no product).
This will match all tickets which have a category, but not tickets where no category was set.
The extra options accessible from the
3. Tickets
are:
91
DeskPRO
Agent Manual
Ticket ID
Ticket ref code
Urgency
SLA
SLA status
Custom fields
Labels
You can filter the available search options.
Message text
You can enter text into the Subject and Message boxes. You can press Enter to update your search straight
away.
Use the
to construct more advanced searches.
You can choose to search for tickets which either contain or do not contain the text.
You can choose to match/exclude by:
All words - every word you type must be present
Any words - any word you type can be present
Phrase - the words you type must be present in that order
The message search also has options to match messages:
By anyone
By an agent
By a user
and to match messages
Written any time
Written before
Written after
Written between
where the relevant time is selected from a calendar.
3. Tickets
92
DeskPRO
Agent Manual
Click Relative time on the calendar to specify a number of minutes, hours, days, weeks, months or years
ago.
For the text search options, the
searches together.
icon does not let you select extra properties, but instead lets you chain
User
You can search on the details of the user associated with the ticket:
Name
Email
Usergroup
and from the
icon:
Custom fields
Person ID
Date of profile creation
Labels
Contact Phone
Contact Address
Contact Instant Messaging
Organization
You can search on the organization associated with the ticket.
From the
icon:
Date created (date the organization was added to your helpdesk)
Email Domains
Labels
Name
Contact Phone
Contact Address
Contact Instant Messaging
3. Tickets
93
DeskPRO
Agent Manual
Dates & times
You can search by:
User Waiting Time (time the user has been waiting since the last agent action)
User Total Waiting Time (how long the user has spent waiting over the life of the ticket)
Date Created
Date Resolved
Date Closed (that is date the ticket was archived - this only applies to very large helpdesks which
have to archive old tickets)
Date of Last Agent Reply
Date of Last User Reply
3. Tickets
94
DeskPRO
Agent Manual
3.15. Mass actions
You may find that you need to apply the same action to a number of tickets at once.
Instead of clicking through each ticket one by one, you can carry out
mass actions.
You can use mass actions from the list pane, by selecting tickets from the list using the checkboxes on the
left.
The total number of tickets you have selected is displayed at the upper left of the list pane. You can click
the checkbox at the upper left to select all the tickets on the page.
When you select a ticket, the Apply actions to selections window appears.
3. Tickets
95
DeskPRO
Agent Manual
You can:
set all tickets to a certain status
assign them to an agent or team
change their department
set a built-in field
set them to a certain language
write a reply to all of them
More actions, including setting custom fields and adding labels, are available from Add action under
Other Properties.
The full list of actions is:
3. Tickets
96
DeskPRO
Agent Manual
Set agent
Add agent followers
CC users
Set agent team
Set status
Ticket hold status (add or remove from hold)
Delete ticket
Set department
Set language
Set product
Add/remove labels
Add organization managers to the ticket
Set flag
Increase/decrease urgency (by an amount you specify)
Set urgency (you can choose Only set when urgency is lower; e.g. if you selected this option and
applied 'set urgency 7' to a ticket with urgency 8, the urgency would remain 8)
Set subject
Set custom ticket or user fields
Close the ticket tab
You must have the correct permissions to apply the actions. Note that your permissions may limit you
from replying using a mass action, even if you would have permission to reply to the tickets individually.
If you are writing a mass reply, you could customize the message to each user by using
snippets.
For maximum productivity, you can apply a macro as a mass action.
Table view mass actions and CSV export
You can also carry out mass actions using the table view, which is accessible from the upper right of the list
pane.
Select the tickets you want to act on using the checkboxes at the left, then press the
button at the bottom left of the table view window.
3. Tickets
Perform Actions
97
DeskPRO
Agent Manual
The table view also offers an export to CSV button at the bottom right. Click this to download details of all
the tickets in the table as a file in CSV (Comma Separated Values) format. CSV is compatible with most
spreadsheet programs (such as Excel) and databases.
Note that the CSV export always includes all properties for all the tickets in the table; the table view
options or checkboxes you have selected do not affect it.
3. Tickets
98
DeskPRO
Agent Manual
3.16. User satisfaction
Users can rate your interactions with them (ticket replies and chats) from the web portal, using a simple
satisfaction survey (if your admins have enabled it).
You may be able to see satisfaction ratings and comments that users have left on your tickets.
3. Tickets
99
DeskPRO
Agent Manual
3.17. Billing
If you need to bill users based on the support you provide, your admins may have enabled
billing.
This is not to be confused with the Billing interface you may be able to see at the lower left, where you pay
for the service.
If billing is enabled, you will see a Billing tab when you have a ticket open in the content pane.
There are two ways to bill, by specifying an amount of money or by recording your time.
To add a specified charge:
1
Make sure the Amount button is selected.
2
Enter the amount in your currency.
3
Enter a comment in the Comment field (optional).
The billing currency is set by your admins.
To bill by time:
1
Make sure the Time button is selected.
2
Click the Start button at right.
3
The timer starts counting. This can be used to time how long it takes you to do work
related to the ticket e.g. a chargeable support call.
4
Click Pause to stop the timer (e.g. if you stop work), and Start to restart it.
5
When you are ready to bill for the amount of elapsed time, enter a comment
(optional) and click Add Charge.
You can only add time by running the timer. There is no way to enter an amount of time, or edit
the elapsed time.
Use the Billing tab in an organization's record to see all the items billed to that organization.
3. Tickets
100
DeskPRO
Agent Manual
4. Chat
The Chat app enables you to communicate with users via real-time text chat. Depending on your helpdesk
configuration, users may be able to initiate a chat from the web portal or your website, or from both.
The chat button in the status bar gives you an overview of the state of the chat system. It shows the
number of agents who are logged in to chat, and the number of users who are browsing your pages on
your site or portal where chat is available.
Click the button to see details of the agents who are logged in to chat, and the users who are browsing your
portal or website.
If you are not available to chat, you can log out of the chat system while remaining signed in to DeskPRO.
Click the Sign out of chat button to do so.
Note that there is a separate instant messaging system for use between agents. Logging out of user chat
does not log you out of agent IM. See the section on Agent IM for details.
If you are logged in to chat, the button is green.
If you are not logged in, but other agents are, the button turns brown.
If no agents are logged in, the button turns red.
If no agents are logged in, users who try to chat are offered the option to email the helpdesk instead.
You can get a more detailed view of current and past chats from the Chat app filter pane:
4. Chat
101
DeskPRO
4. Chat
Agent Manual
102
DeskPRO
Agent Manual
4.1. Accepting chats
When a user initiates a chat and you're logged in to chat, you will see a NEW CHAT pop-up window at the
top left of the user interface. You will also hear an audio notification if you have them enabled.
You can choose to Dismiss the chat and leave it for other agents, or you can Accept to begin chatting.
You can also accept a chat by going to the Open Chats section of the filter pane, find the chat you want
and click it in the list pane to open it. Note that this will accept even if you are not logged in to chat.
While waiting for an agent to accept the chat, the user sees a Finding an agent message.
4. Chat
103
DeskPRO
Agent Manual
Depending on your DeskPRO configuration, user login may not be required before using chat. This
means that somebody starting a chat could enter the email address of a registered user, without
needing to log in and prove that the address is theirs.
When this happens, you will see the following warning:
You should avoid discussing sensitive data in case the user is an impostor, at least until you can
verify that they are really the user by other means.
Setting chat notification volume
To change the level of chat sound notifications, expand the toolbar chat button and then click
notification volume.
Chat
To mute chat sounds altogether, simply move the slider all the way to the bottom.
4. Chat
104
DeskPRO
Agent Manual
4.2. Chatting with users
Chatting works much like popular chat clients such as Google Talk, Facebook Chat, AIM etc. You see each
message the user types in a blue speech bubble.
Use the reply box at the bottom of the window to send your response. You can use the
or just press Enter/Return on your keyboard.
button
Your replies are shown in gray bubbles.
When a user has read your message, it is marked with a green icon:
You can mouse over the icon to see when they read your message.
You can see what pages the user is viewing on your web portal or website in lines with a gray background.
This gives you context for the problem they're describing, and can help you check which site they're on,
that they are in the right place while following troubleshooting instructions etc.
You can format your reply in a similar manner to a ticket message. See the ticket message formatting
section for more details. You can attach files to chat messages just as you can with a ticket reply, except
that drag and drop only works with images. Users can also send you files.
Between the formatting bar and the Send button are two buttons specific to Chat.
The
button creates a ticket linked to the current chat. This is useful if you can't resolve the user's
issue during the chat and need to track it in the ticket system.
Note that if the user did not enter a valid email address when you started the chat, you must enter one
when you create a linked ticket.
The
button ends the chat.
Chat details
4. Chat
105
DeskPRO
Agent Manual
At the top of the tab you can see:
the chat's ID number
the department selected by the user, which you can change
the label field - you can label a chat as with a ticket or user
Chat visitor information
During the chat you can switch to the Visitor Information tab to get details about the user:
IP Address
User Agent (this describes what web browser they're using)
Session Start Time (the time they arrived at your web portal or site in their current browsing
session)
Session Landing Page (the first page they arrived at this session)
Initial Visit Time & Initial Landing Page (the time and page they arrived at when they first
visited your portal/site, as recorded by browser cookies)
Block user
If a chat user is abusive, trying to waste your time, or should be excluded from chat for some other reason,
you can switch to the Block User tab and block them for the next 24 hours.
Enter a brief description of why you chose to block the user, then click
Block User.
You can optionally select Block IP address. This prevents all chat attempts from that user's last IP address.
Note that if the user was chatting from a shared network (such as a business, university or wi-fi hotspot),
blocking their IP may prevent all users on that network from chatting. Also, users accessing the internet
from home or mobile broadband tend not to have fixed IP addresses.
4. Chat
106
DeskPRO
Agent Manual
4.3. Assigning chats
Chats are assigned to agents, just like tickets. A chat is automatically assigned to you when you accept it.
You can see the assigned agent for a chat in the Assignments section at the upper right.
You may decide that another agent would be in a better position to deal with a chat that's assigned to you.
To assign a chat to another agent:
4. Chat
107
DeskPRO
Agent Manual
1
Click the
at the top right of the Assignments section.
2
The Assignments window opens. In the Assign to pane, select an agent.
You can click on Filter at the top right of the pane and type to filter the list of agents.
3
Click Apply.
The chat opens in the content pane of the newly assigned agent's interface. You can
also make the chat Unassigned.
Note that if you make a chat unassigned, other agents are not notified, so you
should be careful not to leave the user waiting.
You can also invite other agents to join a chat using the Invite Others pane. This is useful if you want to
stay in control of the chat, but you want to get another agent's input.
4. Chat
108
DeskPRO
Agent Manual
1
Click the
icon at the top right of the Assignments section.
4. Chat
2
The Assignments window opens. In the Invite Others pane, select the agent to invite.
3
Click Apply. Again, the chat opens in the invited agent's interface. If you close the tab
of a chat that's assigned to you, you see the Leave Chat? warning pop-up - you can
choose to either unassign yourself from the chat, or end it.
109
DeskPRO
Agent Manual
4.4. Viewing closed and missed chats
You can view chats from the Chat app filter pane.
There are sections for open (active) chats, ended chats, and filtering chats by label.
Open chats filter
The Open Chats section shows current active chats:
New Chats - chats that have not yet been assigned.
My Open Chats - open chats assigned to you.
All Open Chats - all chats, sub-filtered by agent.
Note that even if you signed out of chat, you can click on open chats to accept them.
Ended chats filter
The Ended Chat section shows:
My Chats - ended chats that were assigned to you
Assigned Chats - ended chats that were assigned to an agent
Missed Chats - chats where the user left before an agent was assigned
When you view ended chats in the content pane, there is a Create ticket button in the Person section of
the chat record. This creates a ticket linked to the chat.
4. Chat
110
DeskPRO
Agent Manual
You can use this to quickly open a ticket linked to a missed chat and maintain communication with the
user.
4. Chat
111
DeskPRO
Agent Manual
4.5. Custom chat fields
Your admins can set up custom chat fields to record extra information about chats. These work like
custom ticket fields.
The user can enter values for custom fields (that aren't agents-only) when they initiate the chat.
In this example, Nature of query is a custom field.
If your helpdesk has any custom chat fields, chats you view in the content pane have a Fields tab. Select it
to view the custom fields.
Click the
4. Chat
at upper right to edit the custom fields.
112
DeskPRO
Agent Manual
5. CRM
The CRM ( Customer Relationship Management) app enables you to view and manage your helpdesk users.
DeskPRO can also record details of user organizations: this is typically the company the user works for.
You can also control the actions each user is allowed to do on your helpdesk by adding them to
usergroups. Belonging to a usergroup grants the user a set of permissions.
The usergroups available are defined by your admins, based on the needs of your enterprise. For example,
you might want to limit access to the chat system to paying users only. Your admins would implement this
by setting up a "paying users" usergroup, and disabling chat for users who do not belong to it.
You can store extra information about users, such as contact details or notes. You can also use the CRM
app to view details of your agents and teams.
5. CRM
113
DeskPRO
Agent Manual
5.1. Filtering and sorting users and organizations
You can use the filter pane on the left of the CRM app to filter users and organizations.
Filtering users
The People section at the top of the filter pane lets you filter by
shown in the list pane.
usergroup. The result of your selection is
The number of users in each usergroup is displayed on the right of the filter pane.
You can also filter users with labels.
Click on a label to open the users matching that label in the list pane.
The Cloud view shows labels in bigger text the more tickets they have. You can also select a List view by
clicking on the List tab.
Filtering agents
You can filter agents by team at the bottom of the filter pane.
Click on a team to see its agents in the list pane.
Filtering people alphabetically
When the list pane is showing a list of people, you can further filter it alphabetically, as in an address book,
using the alphabet strip to the left of the list pane.
Click a letter to show people who have a surname beginning with that letter, and who match the filter
selected in the filter pane.
In this example, the G has been selected, so only users with surnames beginning with G are being shown.
To clear your letter selection, click the dot at the top of the strip.
Ordering people
When you're viewing a list of people (agents or users) in the list pane, you can change how they're ordered
with the Ordered by pull-down.
You can choose to order them by:
Name (first name, alphabetically)
Date created (oldest account at top)
Last login time (most recent at top)
Organization (users with no organization at the top, then alphabetically)
Number of tickets (users with most tickets at the top)
Viewing a table of people
You can view the contents of a list of people as a table using the
icon at the upper right of the list pane.
You can choose how the list is ordered and which fields to display using the controls at the top right.
5. CRM
114
DeskPRO
5. CRM
Agent Manual
115
DeskPRO
Agent Manual
5.2. User records
Click a user in the list pane to open their details in the content pane.
Users have a unique ID number, just like tickets do.
In most parts of the agent interface, you can access a user record by clicking on the user's name.
If you do this from the content pane, the user record is displayed as a pop-up window to the left. To open
it in the content pane, click the green arrow at the top left of the record.
Setting user organization
Click the
icon at the top right of the Organization section to select the user's organization.
You can type into the text field at the top of the list to filter the list.
You can also Create a new organization.
See the Organizations section for more details.
Setting usergroups
Click the
at the top right of the Usergroups section to set usergroup memberships.
Select the checkboxes for the usergroups the user should be in.
Click Save when you are done.
See the Usergroups section for more details.
User summary
The Summary field is a text field that you can use to record general information about the user, any
special requirements they have, and so on.
Simply click on it and enter or edit text, then click Save.
User contact information
The Contact Information section shows the contact details available for the user.
If you mouse over the user's email address, a yellow clipboard icon appears. Click on the icon to copy the
address to your clipboard.
Mouse over the user's mailing address to see a map.
Click the
icon at the upper right to edit the user's contact information.
User contact information can include:
5. CRM
116
DeskPRO
Agent Manual
Email address (every user must have at least one email address)
Phone number
Website
IM (instant messaging) account name
Twitter username (no need to include the
@
symbol)
Linkedin account (enter the full profile web address e.g.
http://www.linkedin.com/in/sueuser7/5/43 )
Facebook profile (enter the full profile web address e.g.
http://www.facebook.com/sue.advuse )
Address (mailing address)
Users with multiple email addresses
You can enter more than one email address for a user.
However, DeskPRO will only send ticket notifications to the primary email address.
When the user has more than one email address, the primary one is marked with a yellow tag:
In this example,
[email protected]
is the primary address.
To set the primary address, mouse over another email address until a green
make primary tag appears:
Click the green tag to make that address the primary one.
If the same person sends emails from two different addresses, DeskPRO might set up two separate
user accounts for that person. You can fix this by merging users .
Changing user email address for a ticket
If the user has more than one email address, you can change the address where they receive notifications
for a particular ticket.
You can do this from a ticket in the content pane: use the pull-down control on the right of the user box.
This control is only present if the user has more than one email address.
User properties
The Properties section records information about user timezone and language.
This is also where you can view and edit any custom user fields your admins have set up.
The Local Time for the user is displayed here, based on their timezone.
If no language is shown, the user is receiving content in the default user language of your helpdesk.
To change properties, click the
icon at the top right of the Properties area.
Click Save when you have finished editing the fields, or Cancel if you don't want to save your changes.
Note that custom fields with no value set for the user will not be displayed until you click the gear (in this
example, Limbs is such a field).
5. CRM
117
DeskPRO
Agent Manual
Set the user's local timezone with the Timezone control. This affects times shown on email notifications
etc.
If multiple languages are enabled on your helpdesk, you can set the user's preferred language with the
Language control. This will change the language of their email notifications and the text they see when
they're logged in to the web portal. (If you don't see the language you want, your admins may need to
install a language pack).
User history
Below the user Properties section, you can see the user's tickets, chats and billing history.
You can add notes at the bottom left of the user record.
This is separate from the ticket notes system, and does not support @mentions.
Unlike the summary, you can enter more than one note about the user.
Click on the Activity Stream tab to see a more detailed activity history.
Click on the Detail tab to see technical details about the account and the user's login activity.
The Auto-responder? option is used to avoid email loops. If the user's email account sends an automatic
response, such as a vacation message, DeskPRO may reply with its own automatic response, triggering a
further response from the user account, and so on.
If this starts happening, click on the blue User is not an auto-responder text and select the option to
disable DeskPRO's auto-replies.
Agent records
At the bottom of the CRM filter pane is a section for your agents.
You can filter agents by team. You can view individual records for agents, just as you can for users. You
can see an agent's activity stream and view and edit a summary, additional contact information and notes,
just like you can with a user.
This can be a useful way to keep track of the other agents on your helpdesk, especially if you have agents
who work at different physical locations.
5. CRM
118
DeskPRO
Agent Manual
5.3. Usergroups
You may want some users to have a different level of access to the helpdesk than others.
For example, your company may want to restrict chat access to users who pay for a premium support
package, or accept feedback only from experienced users of your products.
DeskPRO supports this by giving each user permission levels: these determine what areas of the web
portal the user can see, and what helpdesk functions they can use.
You control a user's permissions by assigning them to usergroups. Each usergroup grants the user a set of
permissions.
Your admins decide what usergroups your helpdesk has and what permissions they grant.
Here are some example usergroups a helpdesk might have:
Registered - all users who are registered with the helpdesk
Power Users - advanced users who know your product well
Trial Users - users who are evaluating your product with a free trial
VIPs - users who pay extra for priority support
Some example permissions:
Power Users can submit comments without agent approval in the web portal
Trial Users can access chat with the sales department
VIPs can access chat with the support department
Note that each user can belong to multiple usergroups, and is granted the combined permissions of them
all.
In the example above, if User A is a member of Power Users and VIPs, they can submit comments without
agent approval and access chat with the support department.
Setting usergroups
Open a user in the content pane and look at the Usergroups section (lower right) to see their usergroups.
Click the
icon to see all usergroups.
Use the checkboxes to select the user's usergroups. Click Save to keep your choices, or Cancel to close the
section without saving your changes.
You can also see usergroups in the filter pane of the CRM app.
Note that usergroups with no members will not be shown in the filter pane.
Guest and registered users
By default, even guest users - those who haven't been registered in the system, for example by signing up
for an account through the web portal - have some permissions. For example, most helpdesks allow
anyone browsing the web portal to view news items and Knowledgebase articles without logging in.
Guest permissions are set by admins using a usergroup called Everyone .
5. CRM
119
DeskPRO
Agent Manual
Most DeskPRO helpdesks have a Registered usergroup which grants permissions to all registered users
(the requirements to be registered vary depending on the helpdesk setup, from simply emailing a ticket
address to registering and being approved by an agent).
5. CRM
120
DeskPRO
Agent Manual
5.4. Organizations
Organizations are used to record the company (or other enterprise) to which each user belongs.
In most cases, that will be the user's employer, but it might be the charity they volunteer for, or the
reseller they bought your product from, if that is what is relevant to your helpdesk.
Each user can only belong to a single organization.
To view all the organizations set up in your helpdesk, select the Organizations filter.
Organization details
Open an organization in the content pane to view its details.
You can edit the organization's name by double-clicking it.
The summary field and labels work as for a user.
Organization members
The Members section shows you all the users who belong to the organization. Click a user's name to view
their details in a pop-up window.
You can record the position (job role) of each user in an organization.
If a user doesn't have a position yet, click on the
No position set
text to add one:
You can click on a user's position to edit it.
Use the small flags on the right to set which users are organization managers who can see all tickets from
their organization. See the Organization managers section for more details.
The Tickets and Chats tabs let you view all the tickets or chats associated with any member of the
organization.
To remove a user from an organization, click on the red icon at right. This does not delete the user.
Organization properties
The Properties section is where you view and edit any custom organization fields your admins have set
up.
For example, you could have a Profit status field to track if the organization is for profit or non-profit.
Click the
at the top right of the Properties section to edit the fields.
Click Save when you have finished editing the fields, or Cancel to leave them as they were.
Note that custom fields with no value set for the organization will not be displayed until you click the gear
icon.
The Properties section also displays the date when the organization was created.
Automatically associating users with organizations by email domain
The Email domain associations section allows you to automatically associate users with the organization,
based on their email address.
5. CRM
121
DeskPRO
Agent Manual
For example, suppose you want to have all new users with an
added to the "Ace Tomato" organization.
Click the
@acetomato.zy
address automatically
at the top right of the section.
The Email Domain Associations pop-up window opens.
Enter the domain e.g.
acetomato.zy .
Click Add to associate it with the organization.
You can now add another domain. For example, you may want to associate the
domains for an international organization.
.com
and
.co.uk
When you are finished adding domains, close the window with the X at top right.
Note that email domain associations only apply to users who register after you have set up the association.
However, if there are existing users whose addresses match the domain, DeskPRO will prompt you to
associate them with the organization.
In this example, clicking Associate 10 users would associate all existing users who do not belong to an
organization with example.com.
Linking organizations to usergroups
You can add all the members of an organization to a usergroup using the Usergroups section at the lower
right of the organization record.
Click the
to set which usergroups are linked with the organization.
Linking an organization to a usergroup in this way is convenient when the permissions users should have
changes an organization-wide basis.
For example, suppose the VIPs usergroup is for users who are entitled to VIP-level support, and the Ace
Tomato Company decides to pay for VIP support for all its employees. You could find all users who belong
to the "Ace Tomato" organization and change their usergroup, but it's better to link the usergroup to the
organization:
1
2
it's quicker
any future Ace Tomato users will automatically join the VIPs usergroup
If you try to remove a user from a usergroup that is linked to their organization, it won't work.
Note that DeskPRO remembers the difference between users who were added to a usergroup individually,
and users who were added through a link to their organization. For example:
1
To start with, User A is the only member of VIPs from the DreadCo organization.
2
DreadCo is then linked to the VIPs usergroup. Every DreadCo user is now a member
of VIPs.
3
The link between DreadCo and VIPs is removed.
User A would not be removed from VIPs.
Organization managers
The organization managers feature allows specific users to oversee all the tickets for their organization.
5. CRM
122
DeskPRO
Agent Manual
Normally, a user can only see tickets that they've created or interacted with.
However, an organization manager can see any ticket associated with their organization, and can even
automatically be added as a participant to any new tickets.
You can see and edit manager status on the user's record in the organization section, as well as from the
organization's record.
An organization manager can view all of their organization's tickets via the web portal.
A manager can choose to automatically join any tickets for their organization when they're created. They
can set this option on the Edit your profile page.
5. CRM
123
DeskPRO
Agent Manual
5.5. New users
Your helpdesk may be configured so that a user account is created automatically when the user submits a
ticket via email or the web (an open helpdesk).
However, users may be required to register before submitting content.
Your admins may enable validation of new users when they register.
There are two separate forms of validation:
1
2
Email validation: users required to prove that their email address is valid by clicking
on a link in an email
Agent validation: new users need to be manually approved by an agent.
If there are users who need to be validated, you will see them in a
app filter pane.
Pending section at the top of the CRM
The user's tickets will be held in the Awaiting Validation filter in the Tickets app until the user is
validated.
To approve a user who needs agent validation, simply find them in the list pane or content pane and click
the Approve button.
Creating a user
You can also create a user account from scratch with the Create button.
Select the New Person option.
The New Person window opens.
You must enter an email address for the user in the Email field.
Name and Organization are optional.
If your helpdesk uses custom user fields, they may be required or optional.
Users may also be able to log in with their Facebook, Twitter or Google accounts.
User rules
DeskPRO can automatically associate users with organizations based on their email address.
For example, your helpdesk could add all users with a
organization.
5. CRM
@dreadco.zy
address to the DreadCo
124
DeskPRO
Agent Manual
See the section on email domain associations for how you can set this up.
Your admins can also set up rules which automatically add new users to usergroups.
These user rules only apply to new users created after the rule was set up.
You can use linking an organization to a usergroup to associate all of an organization's new and
existing users with a usergroup.
5. CRM
125
DeskPRO
Agent Manual
5.6. User actions
When you open a user record in the content pane, you can carry out the following actions.
Create ticket
This opens a pop-up window where you can create a ticket assigned to the user.
Merging users
If you have duplicate user records for the same person, you can combine them into one record using the
merge action.
When users merge, some properties will be overwritten. For example, a user can only have one
organization, so the merged user can keep the organization from only one of the originals.
You can pick which user will overwrite the other user's properties.
The labels from both users will be applied to the new user.
1
2
Click Merge.
Any users whose records are currently open are offered as targets for the merge. Click
the user you want. If the user you want is not shown, click Find Person. The Merge
People window opens.
Type part of the user's name or email address to filter user records, then click the user
you want.
3
Click Switch to pick which user's properties to keep where there's a conflict. The
values shown in red will be overwritten.
4
Click Merge these two profiles to complete the process.
Login as user
Click the Login As User button to access the user's web portal account.
This can be useful when troubleshooting; you can see exactly what the user does when they view their
tickets and chats on the web portal.
Disable account
Use the Disable Account option from the More pull-down menu to temporarily disable the user's
account.
When the account is disabled the user's profile image is marked with an X.
The user will not be able to log in or create tickets.
They will still show up in searches and filters. You can still set them as the user for existing tickets.
Select Enable Account from the More pull-down to restore the account to normal.
5. CRM
126
DeskPRO
Agent Manual
Reset password
Use the Reset password option from the More pull-down menu to change the user's password.
The password you enter will replace the user's old password. The new password will be emailed to the
user, so it is important that you have the right email address for them.
Deleting users
Use the Delete User option from the More pull-down menu to permanently delete the user's account.
Deleting a user will also delete all their tickets.
The Delete User & Ban Email option does the same thing, but also prevents the user registering again with
the same email address.
5. CRM
127
DeskPRO
Agent Manual
5.7. Searching for users and organizations
You can search for users and organizations from the Quick Search bar at the top right of the agent
interface.
Quick search will match what you enter to the name, ID number or label of a user or organization. It will
show you users whose email addresses match your search, and organizations where any user's email
address matches.
Advanced search for users and organizations
You can access advanced search for users or organizations from the filter pane when the
selected.
CRM app is
Use the Type field to select if you want to search for People (users) or Organizations.
For users, you can search by:
Name
Email Address
Organization Name
Phone
IP Address
Usergroup
Label
Fields - enables you to search by custom user fields if your helpdesk has any
For organizations, you can search by:
Name
Email Domain
Label
Fields - search by custom organization fields if your helpdesk has any
Note that if you enter values for more than one of these properties, the results will include only
users/organizations which match all your requirements.
5. CRM
128
DeskPRO
Agent Manual
6. Publish
The Publish app is used to manage the content on your web portal.
There are four different types of content you can manage through Publish:
Knowledgebase articles - rich-text articles that can include images or attachments; they typically
address a common user problem or explain how to do something
News posts - designed for announcements about your company, new products or product
updates, etc.
Downloads - files you want to make available to your users; for example, manuals, brochures or
software drivers
Glossary words - definitions of terms you use in articles to help users understand them
Feedback also appears on the web portal, but is managed in the Feedback app, rather than in Publish.
Portal content items (articles, news posts or downloads) can have the following
statuses:
Published - item is visible to users on the web portal
Unpublished - item not visible to users
Draft - item not visible to users, appears in the Pending section of the agent interface
Archived - status only available once an article has been published; removes item from visibility
on web portal; use this for outdated content
You can see an overview of your portal content using the filter pane.
Content is organised into categories. In this example, you can see that posts in the News section are
divided into categories called New products, Sales and General.
At the top of the filter pane is the Pending section which shows:
pending articles that need to be written
any content (articles, news posts, downloads) saved with Draft status
You can expand and collapse the different sections to show only the items that are relevant to you.
Click the icon to collapse a section.
Click the icon to expand a collapsed section again.
6. Publish
129
DeskPRO
Agent Manual
6.1. Organizing portal content into categories
You can help your users find what they're looking for by organizing your articles, posts and files using
categories.
Items in the same category are displayed together on the web portal. In this example,
Choosing a Product, Vehicles, General and Getting Started are all categories.
Advanced Usage,
You can limit access to each category by usergroup - for example, you could set it so that only users in the
Experienced usergroup could see articles in the Advanced Usage category.
You can create one category inside another, giving you a nested category structure. This is useful to
subdivide large categories.
In this example, the Vehicles category has four sub-categories inside it.
Nested categories are also used to help users navigate the portal.
You can have as many layers of nested categories as you want.
In the filter pane, there are two numbers next to a category: the first shows the number of items in the top
level of the category, and the second the total number inside it, including in subcategories.
In the example above, there is one article in the Vehicles category, and ten more articles in subcategories
below Vehicles.
The category structures for Knowledgebase, News and Downloads are all separate.
Adding a new category
You can create new categories from the filter pane of the Publish app. Use the Add new category link at
the bottom of the relevant section.
1
2
Click the Add new category link.
The Add Category window opens.
Enter a Title for the category to identify it to agents and users
If you want the category to be nested, select the Parent Category that it
should be inside
Use the Permissions checkboxes to select which usergroups can see the
category.
3
Click Save.
If the Everyone usergroup is selected, anyone can see articles in the category without logging in.
When Everyone is selected, it overrides all the options below - deselecting other usergroups has no
effect, because all users have permission to view the category through their membership of
Everyone .
If the Registered usergroup is selected, all users who are registered on the helpdesk and logged in
can see the category. Again, when Registered is selected, deselecting the usergroups below has no
effect.
6. Publish
130
DeskPRO
Agent Manual
Editing, deleting and reordering categories
To edit an existing category, click on it in the filter pane.
The items in the category are displayed in the list pane. Click on the name of the category at the top.
You can use the Delete Category button to remove the category altogether. You must remove all items
from the category (either deleting them or putting them in different categories); otherwise deleting will
not work.
In the Edit Category section, you can edit the category title or change which usergroups have permissions
to view the category.
You can use the Reorder Category section to change the display order of categories. This lets you change
the order of all the categories.
For example, suppose you decide it would make more sense to have the "Getting Started" category appear
before "Advanced Usage".
1
2
Click on the category, and drag it with the mouse button held down.
Drag the category to where you want it to go.
A horizontal blue line means you are going to put it between categories
A blue box means that you are going to put it inside another category.
3
Let go of the mouse button when the category is where you want it.
You can expand nested categories by clicking on the triangle icons. They also expand automatically when
you drag something over them.
Adding items to categories
When you open a Knowledgebase article, News post or Downloads file in the content pane, you can
change its category using these controls:
Note that a Knowledgebase article can belong to more than one category, but News posts and Downloads
files can't. See the Editing article categories section for details.
6. Publish
131
DeskPRO
Agent Manual
6.2. Creating a Knowledgebase article
To create an article from scratch:
1
Select the New Article option from the Create button in the toolbar.
2
The New Article window opens.
3
Select a Category that the article will appear in. You can add extra categories later.
4
Choose the Status the article should have when you save it.
Published - article visible to users on the web portal, appears in the
Knowledgebase section of the filter pane
Unpublished - article not visible to users, still appears in the Knowledgebase
section of the filter pane
Draft - article not visible to users, appears in the Pending section (under My
Drafts for articles you create)
5
Enter a Title, and then write the article in the rich text editor. The editing controls are
an expanded version of the controls found in the Tickets message editor. See the
section Knowledgebase article editing controls for more details.
6
Click Properties to add a label to the article.
7
Click Attachments to attach a file to the article.
8
Click Create Article to save the article with your chosen status.
Saving a new article as **draft** is useful if you don't want to publish it straight away; for example, if you haven't fini
Pending articles
Pending articles are a way to keep track of which articles need to be written.
Select the Pending Articles filter (at the top of the Pending section) to view all pending articles.
In this view, you can use the Add button at the top left of the list pane to create a new pending article.
Enter a brief description of the article and click Add.
Often an article that needs to be written will be about an issue that has come up in a ticket (or maybe a
series of tickets). So a better way to make a pending article is to find a related ticket and use the Create a
new pending article action available from the ticket Actions menu.
A pending article created this way is linked to the ticket.
6. Publish
132
DeskPRO
Agent Manual
When you click Create Article, the new article takes the title of the original ticket, and the first message
from the ticket is inserted into the article, formatted as a question.
Of course, you can edit the content from the ticket as you write the article.
If you want to refer to more details of the original ticket, click the link to it at the top of the new article
window to open it in the content pane. The Create Article window opens in a pop-out to the left of the
content pane, so you can see both the article and the ticket at the same time.
Adding attachments and images to a Knowledgebase article
Note that when editing an article, you can't use drag and drop to add attachments or images as you can
with a ticket message.
You can attach a file to the article using the Attachments section at the bottom.
1
2
Click Choose Files and select the attachment(s) you want. You can upload multiple
files at once by holding down Ctrl/Cmd.
Click Upload.
You can insert an image into the text of an article, use the
button.
Do not use to attach non-image files. It may look like it has created a link, but the link won't work
for users.
You can use the button to embed an image from the internet into your article.
Be wary about embedding images from servers your company doesn't control. The content of the
image displayed in your article could change without warning.
Knowledgebase article editing controls
Icons
Function
make text bold, italic or underlined
make text left-aligned (default), centred or right-aligned
set the text color, set a background color (giving a highlighter effect)
apply styles
select custom font settings
make bulletpoint lists or ordered lists
indent paragraphs or decrease indent
add or remove links; add an anchor; insert an image; hotlink or edit images
6. Publish
133
DeskPRO
Icons
Agent Manual
Function
add a horizontal rule; add a table
table editing options
toggle table guidelines; view raw HTML; remove formatting; toggle full screen editor
6. Publish
134
DeskPRO
Agent Manual
6.3. News posts
News posts are intended for communicating information which is time-sensitive, like a new product
announcement or details of a holiday sale.
In contrast, Knowledgebase articles are for content which will be useful for a long period of time, like a
product troubleshooting guide. If the information in an article is likely to be stale within a week or two, it
may be better as a news post.
News posts are shown on the web portal in reverse chronological order, like blog posts.
They have sharing buttons to encourage your users to promote them on social media.
You can make a news post using the Create button in the toolbar.
News posts contain rich text content. The process of editing and publishing them is the same as for
creating Knowledgebase articles.
Remember that your news post is only visible once you save it as Published.
News posts can only belong to one category (but news categories can still be nested).
6. Publish
135
DeskPRO
Agent Manual
6.4. Downloads
A download is a file you want to make available to your users. It might be a PDF manual or brochure, a
software application or driver.
Each download consists of a single file, plus a rich-text description which you can create and edit as you
would a Knowledgebase article.
You can make a new download using the Create button in the toolbar.
To select the file, you can either:
click Choose Files and upload a file from your computer
click the Hotlink an existing file link and enter a URL (web address) for the file
you must enter the full URL e.g.
http://www.example.com/files/manual.pdf
you can optionally specify the file size to display
Once you've selected a file, you can use the File Name field to change the filename. You can use this to
pick a name that is more meaningful to users. For example, you might have saved your download file as
Gyr Manual-updated _FINAL_ davehasapproved.pdf , but a better user-facing filename would be
ACME_Gyrocopter_Manual-v2.pdf .
Click Create Download to save your download. It will only be available to users if you save it as
6. Publish
Published.
136
DeskPRO
Agent Manual
6.5. Comments on portal content
Users with the right permissions can add comments on portal content.
You can select user comments from the Comments section of the filter pane.
Comments may need to be approved before they can become visible.
Select comments in the filter pane to view them in the list pane.
You can approve, delete and edit comments from this view. You can also create a linked
user's issue needs addressing.
ticket in case the
You can also view comments on an item when it is open in the list pane, using the Comments tab.
6. Publish
137
DeskPRO
Agent Manual
6.6. Glossary
The glossary is used to provide definitions of terms you use in Knowledgebase articles.
If you have a glossary entry for a term, then it is show underlined on the web portal the first time it
appears in an article. Users can mouse over to see the full definition.
This is useful to explain acronyms or technical terms which might confuse users.
The glossary is displayed at the bottom of the filter pane.
To create a new definition:
1
Click Add new glossary word.
2
Enter the term you wish to define in the top field, then press Tab.
3
Enter the definition and click Add.
A term can consist of more than one word.
If you want several variations of a term to share the same definition, you can enter
multiple versions
Click an existing term to edit it.
6. Publish
138
DeskPRO
Agent Manual
6.7. Translations for Publish content
If your helpdesk has multiple languages enabled, Knowledgebase articles have a Translations tab for
managing alternate language versions.
Click on a language and edit the translation with the usual rich text editor.
The Set contents from article loads the untranslated text into the editor as a guide.
6. Publish
139
DeskPRO
Agent Manual
6.8. Helping users find portal content
Editing the URL slug for portal content
An item's URL Slug is the text that appears at the end of the web address for the item on the web portal.
You can see the URL Slug for an item in its Properties tab. By default, this is based on the title of the item.
For example, if you had an article with the title "Diagnosing Shim Failure":
its URL slug will be
diagnosing-shim-failure
its address on the portal will be something like
https://acmeinc.deskpro.com/articles/12-diagnosing-shim-failure
Putting more descriptive text in the web address can help users find your help content through web search
engines.
Click Edit Slug to change the URL text to something more descriptive.
Click Okay to save your change.
Any links to the old address will be redirected to the new address, so don't worry that editing the
slug will break any links, or stop users' bookmarks working.
Linking articles to products
On the Properties tab of an article, you can select related products. This improves navigation on the web
portal.
Viewing revisions of portal content
Click the Revisions tab to see a list of previous versions of an item.
To see a comparison of exactly what changed between two versions:
1
Select the two versions to compare with the checkboxes on the right.
2
Click Compare Selected.
3
The Comparing Revisions pop-up window opens, showing the differences.
Setting related content
You can use the Related Content tab of an item to cross-reference it to other portal content.
6. Publish
140
DeskPRO
Agent Manual
1
2
3
Find related items in the list pane, then click the Related Content tab.
icons appear next to the list items.
Click the
to link the two items.
Each of the linked items is shown under "Related articles" when viewed from the other item's portal page.
Setting search terms
You can use the Search tab of an item to make sure the item is always included in search results for terms
you choose.
Enter search terms related to the item.
When a user searches for any of the terms you enter using the portal search function, the item will always
be listed in their top results.
Labeling Publish content
As with other helpdesk content, labels you add to Publish items are used for matching in the agent Quick
Search bar and displayed as a word cloud in the agent interface filter pane.
In addition, the labels you add to some types of content are displayed to users on the web portal.
If a user clicks on a label, they can browse similarly labelled items, and choose to filter them by type.
Labels are also used to return search results from the portal. If an item doesn't mention a relevant term in
its main body, you can add that term as a label and the article will be returned in the search results. Unlike
search terms, labels are not weighted any more heavily.
6. Publish
141
DeskPRO
Agent Manual
7. Feedback
The Feedback app lets you view and manage user suggestions from the web portal. This enables you to
gather ideas to improve your products or services.
As well as submitting items of feedback, users can vote and comment on them (depending on their
permissions). This allows 'crowdsourcing' where users can identify the most popular ideas and discuss
their pros and cons.
Agents can also vote and comment on feedback.
7. Feedback
142
DeskPRO
Agent Manual
7.1. Feedback types
Feedback submitted is organized by type. The possible types are set by your admins, but some examples
would be:
Suggestion
Product idea
Bug report
Feature request
Your admins can configure the helpdesk so that some types of feedback can only be submitted by
particular usergroups. For example, you might take Feature request feedback only from members of the
Advanced users usergroup, or Bug reports only from Registered users.
Feedback categories
Your helpdesk may also require users to select a category for their feedback. The categories available are
chosen by your admins, based on what categories your helpdesk finds useful.
Examples of some possible sets of feedback categories:
Delivery/Set-up/Usage/Maintenance
Desktop/Mobile
Software/Hardware/Packaging/Manuals/Accessories
7. Feedback
143
DeskPRO
Agent Manual
7.2. Feedback status
Feedback items have a status which tracks what your enterprise is doing with that item. Users can see the
status on the web portal.
A feedback item starts out with new status. On the web portal, this is displayed as "Gathering Feedback".
Agents can then change the status to reflect what is happening with each feedback item.
The available statuses are chosen by your admins. You can have as many different statuses as you like, but
they are divided into two main kinds:
Active statuses - indicate that the feedback has been looked at by an agent, and your enterprise is
going to do something further with it - for example, it is going to be studied further, or it is
actively being implemented
Closed statuses - indicate that your enterprise is not going to do anything further with the
feedback - for example, it has been acted on or rejected
Examples of possible Active statuses:
Under review
Planning
Started
Testing
Examples of possible Closed statuses:
Completed
Duplicate
Declined
Setting an item to a Closed status means it is archived on the web portal: still visible to users, but no
further comments or votes will be accepted.
There are also hidden statuses, just as with tickets - items that have been deleted or marked as spam or
are waiting for the user to validate their email address. Hidden items are not shown on the web portal.
7. Feedback
144
DeskPRO
Agent Manual
7.3. Filtering and sorting feedback items
You can see an overview of feedback items in the filter pane.
The Pending section shows feedback and comments that need agent approval before becoming visible on
the web portal.
Which items need approval depends on your DeskPRO configuration: every item may need
approval, or only items from unregistered users, or all items that don't come from users in a
trusted usergroup.
The Status section shows all feedback items which don't need approval, filtered by status.
Use the Type or Labels tabs to filter by the relevant properties.
Approving pending feedback items and comments
Use the Feedback to Validate filter to approve pending feedback items.
To approve feedback items individually:
1
Click on the feedback item. It opens in the content pane.
2
Use the Disapprove/Approve buttons in the upper left.
3
Click Approve to move the feedback to new status.
Or click Disapprove to delete the feedback. You can enter a brief explanation which
will be emailed to the user who created it.
To approve feedback items with mass actions:
1
2
Select the items you want to delete using the check boxes to the left.
Click the Perform Actions button and select Approve or Delete.
If you choose to Delete items with a mass action, you can enter a single explanation to send to all the
users.
Use the Comments to Review filter to approve pending comments.
Approving comments works like approving feedback, except that:
you can't enter an explanation when deleting a comment
you can Edit comments from the list pane; to edit a feedback item you need to open it in the
content pane
you can click the Create Ticket button to make a ticket based on the comment
Working with feedback in the list pane
7. Feedback
145
DeskPRO
Agent Manual
Click on a filter to view all its feedback items in the list pane.
The number of votes for each item is displayed in a yellow circle.
You can use the Ordered by control at the top of the list pane to sort feedback by:
Votes - total user votes
Popularity - popularity score (takes into account both the total number of votes received and
how long it took to get those votes)
Date Created - newest at top
You can group by feedback type in the list pane:
Note that if you have a type filter selected in the filter pane, you can group by status instead.
To carry out mass actions on feedback, select items with the checkboxes on the left, then click Perform
Actions.
Mass actions available for feedback items are:
Set status
Set type
Delete
Mark as spam
Searching for feedback
You can find feedback items by ID, title or labels using the Quick Search bar.
Advanced search is available from the Feedback app filter pane.
Search only works for feedback items, not comments.
7. Feedback
146
DeskPRO
Agent Manual
7.4. Working with feedback in the content pane
Click on a feedback item in the list pane to open it in the content pane.
From this view of a feedback item, you can view and edit it in detail.
You can change the status of the item using the pull-down menu at the upper left. If your helpdesk has a
lot of different statuses, you can type in the search box at the top to filter them.
You can also click on the Type box to change the item's type (if your helpdesk uses types).
The Properties section enables you to apply a range of actions to the feedback item.
Next to the item's Votes, you can vote for it yourself by clicking the +1 button. If you change your mind,
you can withdraw your vote by clicking +1 again.
Feedback item properties
Click Edit Properties to change the item's category.
You can also Delete, Mark as Spam and Merge the item.
Merging feedback items works like merging tickets
Click Copy permalink to see a permanent web address for this item that will not change even if you
the URL slug.
edit
Click View in user interface to see the item on the web portal, as users would see it. Note that this shows
you how the item will look on the web portal even if it is not currently being displayed to users because it
is awaiting validation. In that case, you will see a reminder.
Editing the URL slug for a feedback item
The item's URL slug is the text that appears at the end of the web address for the item on the web portal.
By default, this is based on the user-submitted title of the item.
For example, if the feedback item's title is "Leaky Valve":
its URL slug will be
leaky-valve
its address on the portal will be something like
https://acmeinc.deskpro.com/feedback/view/17-leaky-valve
Putting more descriptive text in the address address can help users find your content through web search.
Click Edit Slug to change the URL text to something more descriptive.
Click Okay to save your change.
Any links to the old address will be redirected to the new address, so don't worry that editing the
slug will break any links, or stop users' bookmarks working.
Editing feedback item content
The Description tab at the bottom of a feedback item shows you the description submitted by the user.
7. Feedback
147
DeskPRO
Agent Manual
Click the Edit button on the right to edit the description. This might be necessary to fix a formatting
problem, or to remove sensitive information like passwords.
The Comments tab shows the comments on a feedback item.
You can use the comment box here to add your own comment, which will be displayed to users on the
portal.
Click the
icon to the upper right of an existing comment for options to:
Edit the comment
Delete the comment
Create a ticket based on the comment
Comments awaiting agent approval will have a Validate link at the top right. Click it for options to
Validate or Delete the comment.
Click the Revisions tab to see a list of previous versions of the feedback item.
To see a comparison of exactly what changed between two versions:
1
7. Feedback
Select the two versions to compare with the checkboxes on the right.
2
Click Compare Selected.
3
The Comparing Revisions pop-up window opens, showing the differences.
148
DeskPRO
Agent Manual
8. Tasks
The Tasks app is a way to keep track of pieces of work agents need to do beyond dealing with tickets. For
example, you could use a task to remind yourself to proof-read a product manual next Monday, or to
DeskPRO keeps a list of your outstanding tasks, and can send you a notification the day a task is due.
You can delegate tasks to other agents, and see when they have been completed.
Tasks can be private or public. Public tasks are visible to all agents. Private tasks you create are visible only
to you and any agents you assign them to.
Tasks can be assigned to teams instead of single agents.
8. Tasks
149
DeskPRO
Agent Manual
8.1. Creating a task
To create a new task:
1
2
Click the Create button in the toolbar, then New Task.
The New Task window opens.
Enter a description of the task.
3
To set a due date (optional), click on No due date and select a date from the calendar.
If a due date is set, you can also choose to specify a time on that date.
4
By default, the task is Public.
You can make the task Private using the pull-down menu.
5
By default, the task is assigned to you. If you wish to delegate it, click
agent or team from the pull-down menu.
6
If you need to create more than one task, click Add another task and repeat the above
steps.
7
When you are finished, click Save.
Me and pick an
Creating a task linked to a ticket
You can create a task linked to a ticket, making the context for the task more obvious.
There are two ways to create a linked task. You can either:
If a ticket is open in the content pane when you create a new task, the new task will be linked to it
by default. If you don't want the task to be linked to the ticket, click the icon to remove the link.
or
Click on the Tasks tab of a ticket that is open in the content pane, and enter a task from there.
8. Tasks
150
DeskPRO
Agent Manual
8.2. Keeping track of tasks
The Tasks app filter pane shows you an overview of outstanding tasks.
You can filter tasks based on assignment and due date.
My Tasks shows tasks assigned to you.
My Teams' Tasks shows tasks assigned to any team to which you belong.
Tasks I Delegated shows any task you have delegated to another agent or team.
All Tasks shows every outstanding task that you are allowed to see:
all public tasks
any private tasks you have created or that have been delegated to you
Under each of these filters are sub filters based on due date, showing which tasks are overdue, which are
due today and which are due in future.
If there is no due date set for a task, then it is always shown in the Due Today filter.
Click on any of these filters to see matching tasks in the list pane.
Task notifications
By default, you are notified when a task is assigned to you or your team, when a task you delegated is
completed, and when a task that's assigned to you is due that day. You can configure your task
notifications in the Notifications area of your account preferences.
8. Tasks
151
DeskPRO
Agent Manual
8.3. Working with tasks in the list pane
Unlike most DeskPRO items, you can't open a task in the content pane.
Everything you need to do with tasks can be done in the list pane.
At the top of the list pane, you can choose to sort by
agent or Creator.
Date (most overdue at top, shown here), Assigned
You can re-assign (delegate) a task by clicking the assigned agent or team, and selecting a new one from
the pull-down menu.
To mark a task completed, just use the checkbox to the left.
8. Tasks
152
DeskPRO
Agent Manual
8.4. Commenting on tasks
You can click on the Add Comment control to comment on a task.
8. Tasks
153
DeskPRO
Agent Manual
9. Agent IM
Separate from the user chat system, DeskPRO also provides IM between agents.
Even if you are logged out of user chat, you will be available on the agent IM system. There's no way to
sign out of agent IM, short of logging out of the agent interface completely.
You can see icons representing your fellow agents who are online in a bar on the lower left of the agent
interface:
Click the bar to expand the agent IM interface. This opens a chat window in the list pane.
You can initiate a one-to-one IM session with an individual agent by clicking their name. You can select
the Show Offline checkbox to see agents who aren't currently logged in to DeskPRO.
Click the Teams tab to send an IM to a team, and the Everyone tab to send an IM to everyone.
If you send IMs to agents who aren't currently online, they will see them next time they log in to DeskPRO.
The agent IM system is used to send notifications about @mentions. When someone @mentions you in a
ticket note, you can either respond to them via IM or by replying with another note with an @mention.
The advantage of using notes to discuss a ticket is that they are kept as part of the ticket message history,
so it's easier for other agents to find your discussion and see it in context.
You can view all old agent IM conversations (even if you weren't involved) using the
the bottom right of the agent IM interface.
9. Agent IM
Chat History link at
154
DeskPRO
Agent Manual
10. DeskPRO Terminology
Admin: staff member within your company who has administrator access to configure and customize
your helpdesk
Agent: staff member within your company who uses DeskPRO to provide help
Article: in the context of DeskPRO, an article refers to a piece of
knowledgebase content
Assignment: a ticket can be assigned to an agent or a team to track who is dealing with that ticket
CC: a user who is CCed on a ticket will receive notifications about its progress. The equivalent for agents is
following
Chat: real-time instant messaging between agents and users; may be available to users from the web portal
or integrated into a website
CRM: the app used for managing users and assigning them to organizations and usergroups; short for
Customer Relationship Management
Downloads: useful files you provide to users through your web portal; e.g., software drivers or product
manuals; maintained in the Publish app
Feedback: suggestions from users submitted through your web portal; e.g. a feature request or new
product idea
Following: an agent added as a follower of a ticket can get notifications and see it in the
filter; useful for keeping track of a ticket without being assigned to it
Tickets I Follow
Glossary: part of the Publish app used to maintain definitions of terms which are automatically displayed
in knowledgebase articles
Knowledgebase: part of the web portal which contains rich-text help articles
News: part of the web portal which displays news posts chronologically; useful for product
announcements
Organizations: used to track the company or other enterprise a user belongs to; you can assign users to
organizations using the CRM app, or DeskPRO can automatically assign organizations based on user email
addresses;
Permissions: settings which control what an agent or user can do with DeskPRO; your agent permissions
are set by your admins and might, for example, prevent you deleting tickets; a user's permissions depend
on their usergroup
Publish: the app used to maintain content for the web portal: knowledgebase articles, news posts,
downloads and glossary entries
SLAs: short for Service Level Agreements; goals for dealing with tickets that your helpdesk aims to meet, e.g.
that you must reply to a new ticket within 4 hours; shown in the Tickets app.
Snippets: short pieces of text which you can quickly insert into messages to users; useful to save time
entering standard greetings, phrases, canned answers etc.
Status: a ticket's status is used to track who needs to act on a ticket next: awaiting agent means the
helpdesk must do something related to that ticket; awaiting user means the helpdesk is waiting for the
user to reply; resolved means the issue that ticket represents has been resolved
Tasks: an app used to track “to-do” items for agents
Teams: agents are grouped into teams to enable group ticket assignment
Ticket: represents a user question, problem or complaint; can be created automatically from incoming
user email, or by a user from the web portal, or by an agent on a user's behalf
Ticket email account or just email account: an email account that is linked to DeskPRO so that incoming
emails are turned into tickets e.g. [email protected]
User: one of the people the helpdesk is trying to help
Usergroup: users belong to usergroups which determine what they are allowed to do and see when
interacting with DeskPRO; created by admins, assigned with the CRM app
10. DeskPRO Terminology
155
DeskPRO
Agent Manual
Web portal: the user-facing web interface of DeskPRO - can be integrated into your own website; help
information on the portal is maintained using the Publish app
10. DeskPRO Terminology
156

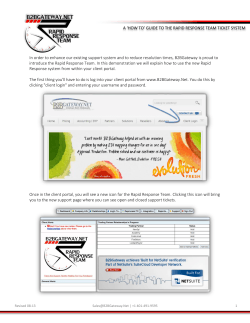


© Copyright 2026