
2014 Year End Solutions User Guide
NewportWave, Inc.
2014 Year End
Solutions User Guide
A Complete Guide To Using the YES Software
Version 2014
6/15/2014
INTRODUCTION ............................................................................................................. 6
How your information is organized ........................................................................
How the program works .........................................................................................
Quick start .............................................................................................................
Data Entry ..............................................................................................................
Importing ...............................................................................................................
Printing forms ........................................................................................................
Electronic filing ......................................................................................................
6
7
8
8
8
9
9
MENUS AND LISTS ..................................................................................................... 10
Important Buttons ............................................................................................... 11
Lists ..................................................................................................................... 11
PAYER SETUP ............................................................................................................. 13
Field Notes ........................................................................................................... 13
State tax ids ......................................................................................................... 14
RECIPIENT DATA ENTRY ........................................................................................... 15
Screen styles ........................................................................................................
Keyboard vs. mouse .............................................................................................
What the buttons do.............................................................................................
Checking for errors ..............................................................................................
(Re)Print a form immediately ..............................................................................
Void recipients .....................................................................................................
Batch Numbers .....................................................................................................
Setup....................................................................................................................
Getting Help .........................................................................................................
15
17
17
17
19
19
19
20
21
1099 CORRECTIONS ................................................................................................... 22
IRS Point of view .................................................................................................
Data entry ............................................................................................................
Automatic batch number ......................................................................................
Click CORRECT and make changes ........................................................................
22
22
22
23
IMPORTING .................................................................................................................. 24
Overview ..............................................................................................................
Starting an import ................................................................................................
Creating a new map .............................................................................................
Starting the import...............................................................................................
Checking import results .......................................................................................
CSV import ...........................................................................................................
dBASE import .......................................................................................................
Flat file import .....................................................................................................
Print image import ...............................................................................................
IRS / SSA files .....................................................................................................
Last year’s data ....................................................................................................
System specific imports .......................................................................................
Using other people’s maps ...................................................................................
Sending a map to someone else ...........................................................................
2
24
24
26
30
31
31
32
32
34
35
36
38
38
39
QUICKBOOKS 2006+ IMPORT.................................................................................... 41
Strategy ...............................................................................................................
Fix City Names .....................................................................................................
Assign Payroll Items to W2 Boxes ........................................................................
Final Step .............................................................................................................
41
44
46
48
QUICKBOOKS 1099 IMPORT ...................................................................................... 50
Creating the Generic printer ................................................................................. 50
Print the 1099s to the new printer ....................................................................... 51
Import the print image file ................................................................................... 51
CONSOLIDATION ........................................................................................................ 52
Consolidation Out .................................................................................................
Consolidation In ...................................................................................................
Transaction update ..............................................................................................
File combine .........................................................................................................
Rollup on tax id ....................................................................................................
52
53
54
55
55
FORM SETUP ............................................................................................................... 56
Usage ...................................................................................................................
Printer ..................................................................................................................
Contents...............................................................................................................
Margins ................................................................................................................
Advanced .............................................................................................................
Items ...................................................................................................................
Test print .............................................................................................................
Blank form ...........................................................................................................
57
57
57
58
58
59
60
60
PRINTER SETUP.......................................................................................................... 61
PRINTING FORMS ....................................................................................................... 63
Supplies ............................................................................................................... 63
Printing options ................................................................................................... 64
Individual PDF Files ............................................................................................. 65
ELECTRONIC FILING .................................................................................................. 67
IRS registration....................................................................................................
SSA Registration ..................................................................................................
Creating an electronic file ....................................................................................
W2 file options .....................................................................................................
1099 file options ..................................................................................................
67
67
67
68
70
SECURITY .................................................................................................................... 72
Overview ..............................................................................................................
Enable security.....................................................................................................
Adding Operators .................................................................................................
Payer/Form Level Control ....................................................................................
Encryption ............................................................................................................
72
72
73
74
76
SSN – TIN VERIFICATION ........................................................................................... 78
Creating the File ................................................................................................... 78
3
Getting Registered ............................................................................................... 79
Uploading your file(s) .......................................................................................... 79
Processing the Results File................................................................................... 80
CP2100 – PAPER LISTING .......................................................................................... 82
4
5
Introduction
Let’s face it. Very few people actually enjoy doing W2s and 1099s. But just because the task is not
always enjoyable doesn’t mean it has to be inefficient. That’s where this software comes in. It makes
the W2 & 1099 process as quick, efficient, and reliable as possible. This software:
•
Collects your information via the keyboard or importing
•
Checks your information for errors and omissions
•
Provides tools for you to manage, control, and secure your information
•
Prints reports from your information
•
Prints the actual forms in a variety of styles
•
Creates files for the IRS and SSA
The most disliked activity in the process is data entry. This program makes data entry as easy as
possible by providing easy to read data entry screens that look like the real forms. You are notified
about possible errors and omissions as data is entered. For W2s, on-screen calculations supply ready
made entries for calculated fields. Totals can be displayed at any time for balancing.
Importing provides a timesaving alternative to keyboard entry. You can import a variety of file
formats from programs such as QuickBooks and Excel. The built-in mapping procedure allows you to
import a file of any field sequence. Imports from multiple systems can be combined after importing.
The screen based error checking activity checks all entries and displays any errors or omissions right
on the screen so that you can make corrections. Any error conditions are also printed on reports.
Tools are provided to help you manage your database, including a built in backup and restore facility.
A query / update tool provides an easy method to make bulk changes to the database. Rollup tools
consolidate multiple forms for a tax id into one return. And there are more …
The report engine provides several sorting and grouping options. Reports can be previewed on screen
before printing.
Forms printing is where the program really shines. Forms can be laser generated or fill-in preprinted
forms. Recipient copies can be printed in a variety of styles. Forms can also be printed to PDF files
for archiving or use in web applications.
The last activity in the process is the easiest – creating files for the IRS and SSA. At the click of the
mouse, the program gathers up all of your information and formats it exactly to IRS/SSA
specifications, ready to upload – Federal, states, and localities.
This program is fast, efficient, easy to use, and includes everything you need for your W2 & 1099
project.
How your information is organized
There are two important categories of information: payers and recipients. The payers are the
companies, clients, and organizations for whom you prepare the W2s and 1099s. Payer information is
entered only one time by completing one data entry screen for each payer. The payer information is
used when needed on forms, reports, and in IRS/SSA files. Some types of imports will also create
payers.
The bulk of your database will be filled with recipient information. These are the individuals who
actually receive the forms. When entered via the keyboard, one screen is completed for each
recipient (more on that later). When imported, each record in the import file creates one recipient in
the database. Once entered or imported, the recipient information can be viewed, changed, and
printed as needed.
6
The program also stores information about you and your company. It is entered when you first access
the program, and is used primarily when creating IRS/SSA files.
In addition to these three basic categories of information the program also keeps records about forms,
printers, tax-ids, preferences, and more. But these files are all maintained automatically by the
program and do not require your attention.
How the program works
This program, like most programs, is organized around a main menu and a series of sub-menus. The
main menu is the “home base” for the program. All activities in the program are accessed from the
main menu or a sub-menu. To add a payer, for example, you would click the PAYERS button on the
main menu, which takes you to the payer data entry screen. After adding your payer and clicking the
EXIT button, you would be returned to the main menu.
When performing an activity, you will be working within a payer / form. For example, when you select
recipient data entry by clicking the RECIPIENTS button on the main menu, the program will ask you to
choose a payer and a form. Data entry works on one payer / form at a time. Other activities can
operate on multiple payers and forms at a time. Printing forms is one example – you can print forms
for many payers and form types in a single operation. When you select FORMS from the PRINT MENU
the program will present the payer and forms lists, from which you can make single or multiple
selections. The program will always tell you when multiple selections are allowed.
In addition to the menus, the program includes a variety of data entry screens. These screens use
standard windows controls (radio buttons, click buttons, lists, edit boxes, etc.) and should be easily
understood. Help is available on any screen by pressing the F1 key.
7
Quick start
1.
2.
3.
4.
5.
6.
7.
Start the program
Enter the information about your company
Select PAYERS from the Main Menu
a. Click ADD, complete one screen for each payer you want to process
Select RECIPIENTS from the Main Menu
a. Choose payer and form to work in
b. Click ADD, complete one screen for each recipient
Print forms – recipient copy
a. Go Main Menu -> PRINT -> FORMS
Create IRS/SSA files
a. Choose ELECTRONIC FILING from the main menu
b. Click on CREATE NEW IRS/SSA FILE
c. Choose W2 or 1099
d. Select payers and forms to be included
e. When file is complete, click on ELECTRONIC FILING FILE NAME, make a note of the
file name.
f. Click on SSA WEB SITE or IRS WEB SITE to upload your file
Create archive
a. Print file copy
b. Print file copy to PDF for CD archive
Data Entry
Keyboard data entry is the first of two ways to get all of your recipient data into the program (the
other is importing). The strategy is simple. You first select a payer and a form type to work in. You
then complete one screen for each recipient. Each form type has its own data entry screen with fields
appropriate to that form. Some forms (like the W2 and 1099MISC) also have screens that look like
the real form.
In addition to adding new recipients, the data entry screens allow you to:
•
Change the data for a recipient
•
Browse through the recipient screens forwards and backwards in several sort orders
•
Display totals for the file or a batch
•
Void / Unvoid a recipient
•
Immediately print a recipient form (great for individual reprints)
•
Display IRS instructions for that form
•
Check your file of recipients for errors and omissions
Data entry is where you spend most time in the program. For this reason it has been designed to be
as efficient as possible.
Importing
Importing recipient information from other systems and programs is a speedy alternative to manual
data entry.
The program accepts data in a variety of file formats:
•
CSV (Comma Separated Values) used with Excel, sometimes call ASCII Files
•
QuickBooks
•
dBASE
•
Print image
8
•
•
•
IRS/SSA electronic files
Flat files
A variety of program / System specific formats
If you have a file but are not sure of its format, email it to us. We will advise you as to the format and
how to import it.
Printing forms
You have to make a decision before printing forms, possibly two. First, you must decide whether to
use preprinted forms provided by a forms vendor, or whether to let the program generate the forms
using a laser printer. Some prefer the preprinted forms for a more professional appearance. Laser
generated forms, however, are not far behind and look just like a purchased form. They are totally
acceptable to the IRS and SSA. Laser generated forms are easier to manage since all you need is
plain white paper.
Using laser generated forms allows you to choose from a variety of forms styles for the recipient
copies. The W2, 1099MISC and 1099R all have several form styles available. The basic idea is to get
all of the copies of a form that a recipient needs on one sheet of paper. There are “stacked” forms
styles where the forms are arranged from top to bottom on the paged. There are also “tiled” form
styles, with a form appearing in each corner of the page. In all cases, the recipient instructions can be
printed in one of the form spaces.
For the W2 (and W3) form you can print the SSA copy (Copy A) on plain paper as well. The format
printed by the program is approved each year by the SSA. 1099 Copy A forms, however, must still be
printed on the traditional “red forms”. THE IRS DOES NOT ACCEPT BLACK/WHITE COPY A FORMS.
Because of the effort needed to order, inventory, print and mail the Copy A forms, most users of the
program choose to file electronically with the IRS/SSA. Doing so avoids the Copy A forms altogether.
Electronic filing
Electronic filing is one of the most important of the program activities, but it is also one of the easiest.
Many people are intimidated by the prospect of electronic filing, but in reality it is very easy to do.
The basic strategy is this: (1) You tell the program to make a file, then (2) you log onto the IRS or
SSA web site, register, then upload your file. It’s as simple as that. You make one file for all of your
W2s and a separate file for all of your 1099s.
Prior registration is not required for W2 electronic filing. But you must register prior to filing with the
IRS for 1099s. (For more information on the IRS registration process refer to the chapter on
Electronic Filing).
9
Menus and Lists
As described in a previous section, this program operates around a MAIN MENU and a series of submenus. All activities in the program start at the MAIN MENU and eventually return there. The MAIN
MENU looks like this:
As you can see from the graphic above, there is a series of buttons along the left side and bottom of
the menu screen. To start an activity simply click the corresponding button.
In addition to buttons, the MAIN MENU also displays some important information:
Item
Application
Folder
Data Files
Temporary
Files
Printer Name
Software
Version
Contents
This is the drive and folder where the program is installed.
This is the path to where the program database is stored.
This folder is where temporary files are stored while you
are using the program.
This is the printer that the program will use to print forms
and reports.
The version of the software that you are currently using.
10
Important Buttons
The three buttons along the bottom of the screen deserve special mention.
The
button will make a complete backup of all data that you have stored in the
program. The importance of backing up your data cannot be emphasized enough. Without backup
you risk losing all of your work due to a hardware failure or data corruption. You do not need this at
the end of January! Not only should you create the backup file regularly (at least at the end of each
day of activity) but you should also copy the backup file to a separate disk drive or removable media.
That way, if anything happens to your computer or hard drive, your data is safe and sound.
BACK UP EARLY AND OFTEN!
Hopefully, you will never need to use the
button. It’s purpose is to recover your
data in the event of a mishap. It will take the data from a backup and put it all back in place, ready to
use. Using backup/restore is also a good way to move the program and data from one computer to
another (more on this later).
The third button on the bottom row is the
button. Use this button to keep your
software up to date. When clicked, the program will connect to our web site and check if a newer
version of the software is available than what you are currently using. If so, it will download the new
version automatically for you.
Lists
As mentioned above, some program activities work on one payer / form at a time (recipient data
entry) and others can work on multiple payers / forms (form printing). The way that you choose the
payer(s) and form(s) is to select them from a list. When you select one of these activities from a
menu, the program will display the lists for you to make your choices. The payer list looks like this:
Below is the forms list:
11
To select a single payer or form:
•
Click on the desired entry in the list
•
Click OK
- or •
Double_click the desired entry
•
To select a range of entries:
•
Click on the first desired entry
•
Hold down the [SHIFT] key
•
Click on the last desired entry
To pick and choose from the list:
•
Click the first desired entry
•
Hold down the [CTL] key as you click on each of the other desired entries
12
Payer Setup
Payers are the clients and companies for whom you will process forms, including perhaps your own
company. The actual process of setting up a payer is quite simple: go MAIN MENU
PAYERS
ADD
and complete the screen. You complete one screen for each payer. This screen looks this:
In addition to the basic payer information, this screen also displays the number of (non VOID) forms
of each type on file for the employer. It also collects individual sate reporting tax ids for the payer
(described below).
Field Notes
Tax Year – In the program it is possible to collect and process information for the current tax year,
previous tax years, and the next tax year. Recipient information for different tax years should be set
up under separate payers. Indicate the tax year in this field.
Tax ID – Can be entered with or without dashes.
Name – Enter the company name. If the tax id is a social security number, enter the individual’s
name in line 1 and the dba name in line 2.
Client Number – (optional) this is for your use to store any in-house client or department number.
13
Empl Type – this is the employment type for the W3 form. Leave blank or set to “R” for a 941
employer, “H” for household employer. Press F1 for other values.
Other EIN – used on the W3 form. If this employer reported wages using a different employer id
during the year, enter it here.
Notes – for your use to record notes about the payer.
Final 1096 – check this box if this year will be the final 1096 for a payer.
Electronically file this payer separately – normally you would electronically file all of your payers
and forms altogether in one file. However, you may have one or more payers that have individual
TCC codes or SSA pin numbers. In that case, check this box and enter the TCC or SSA pin number in
the next fields.
State tax ids
Click the
button to record individual state tax ids for the payer on this screen:
You can record as many state ids as needed. State tax id’s are entered only one time on this screen.
They are automatically printed on forms or included in electronic filing files as needed.
14
Recipient Data Entry
If you enter recipient information via keyboard (rather than importing), Recipient Data Entry is where
you will spend most of your time in the program. For this reason, we have tried to make the data
entry process as smooth and as efficient as possible. The screens are easy to navigate, include
automatic calculations for W2s, automatic error checking is performed as you enter data, and there
are several styles of numeric entry to suit your preference.
Data entry strategy is very simple: Choose a payer, choose a form, then complete one screen for
each recipient. In addition to adding new recipients, the data entry screen provides additional
features that:
•
Review recipients
•
Locate a specific recipient
•
Change data and correct mistakes
•
Immediately (re)print a form
•
Display file totals
•
Void/Unvoid a recipient
•
Make 1099 corrections
•
Change screen styles
Taken together, the data entry features provide everything you need to manage your recipient data.
Screen styles
Two styles of screen are available for all recipient data entry screens. The default screen layout looks
just like the real form. For example, the W2 screen looks like this:
15
In addition to the look-alike screens, all forms have a standard data entry form that has been
designed to speed data entry. The standard data entry for the W2 looks like this:
16
The choice of screen style is up to you, and you can switch back and forth between styles at any time.
Each has its advantages. Both have the same buttons, features, and capabilities.
Keyboard vs. mouse
When performing a lot of data entry, it can be tiresome to switch from the keyboard to the mouse and
back again. The screens are designed so that data entry can be performed without using the mouse.
For example, you can press the “A” key to add a new recipient, press “ENTER” to move from field to
field, press the “PgDn” key to end the screen, and press the “ESC” key to cancel your entries. You can
use the mouse if you want to, but you don’t need to. Sometimes it is easier to do everything using
the keyboard.
What the buttons do
– adds a new recipient. Press “A” or click the ADD button, fill in the screen, press
“PgDn” or click OK when done.
– change the data for the recipient displayed on the screen.
– checks your entire file for errors and omissions (described in detail below).
– locates a specific recipient from part of the tax id or name.
– Changes the order in which recipients appear when you browse
– Immediately prints a form for the recipient on the screen
– allows selection of setup items for this type of form
– displays (and optionally prints) totals for the file
– voids the current recipient
- makes a 1099 correction return
– changes the screen style
Checking for errors
Error checking is one of the most valuable features in the program. When the
button is
clicked, the program begins a scan of all forms for errors. It looks for missing data (like missing zip
codes), and also for data that is obviously wrong (like a tax id with only 8 digits). It also looks for
questionable data (like SS withholding that doesn’t agree with SS wages). When an error is found,
the program stops, displays the record in error and tells you what the error is:
17
At that point you can correct the error immediately, ignore the error and proceed, or void the record
altogether. If you correct the record or ignore the error, the program will resume the error check with
the next record.
When the error check is complete - all records have been examined – a summary is displayed:
Errors do not prevent you from exercising other features in the program, like printing forms or
creating IRS/SSA files. The error messages are warnings only and are there to help you produce
accurate forms.
18
(Re)Print a form immediately
Clicking the
button immediately prints a form for the recipient currently displayed on the
screen. When you click the PRINT button, the following screen appears:
Selecting NOW will print the form immediately. Selecting LATER will turn on the print flag, so that this
recipient can be printed with a group of other selected recipients also with the print flag turned on.
You can also print the form to a PDF file. This is useful when you want to email a form.
Void recipients
Clicking the
button turns on the VOID flag for the current recipient. VOID recipients are
not automatically removed from the file. Void records remain in the file but are not included in any
print operations, totals, or IRS/SSA files. They are invisible to all other program operations. A void
recipient can be un-VOIDed by clicking the
button a second time.
To physically remove VOID recipients, go MAIN MENU
TOOLS
REMOVE VOID RECIPIENTS.
Batch Numbers
The batch number field provides a convenient method of grouping input:
19
It is sometimes easier to manage large data entry jobs by dividing them into smaller batches, each
with its own totals for balancing. Batch numbers can and should also be assigned to import jobs.
Batch numbers are totally under your control and can be any 6 digit number. Many program
operations (printing forms and creating electronic files, for example) allow you to select recipients by
batch number.
You do not need to enter (type in) the batch number on every form. Enter the batch number on the
first form of a batch. Each time you subsequently press the
button, the batch number will
be automatically carried over from the previous screen. To start a new batch, just type in the batch
number on the first form of the new batch.
Setup
The
button provides access to data entry options available for a particular type of form.
For example, the W2 screen has the following options:
20
Getting Help
There are two types of help available during data entry. The first is “F1” help, displayed by pressing
the F1 key from anywhere on the screen. F1 help describes how the screen works and what the
various buttons do. The other type of help is “IRS” help, which displays the actual IRS instructions for
the form on which you are currently working. To access IRS help, click the red “IRS Inst.” Button at
the bottom of the screen:
21
1099 Corrections
IRS Point of view
1099 corrections make more sense when referenced from the IRS point of view. To the IRS, a 1099
correction serves two purposes. First, it tells them what to do with the previous, original 1099. And
second, it tells them the new, corrected information. Some 1099 corrections require two transactions
and some require only one.
When the recipient name or tax id is changed, two transactions are required: one with the old tax
id/name and one with the new name/tax id. When receiving a name/tax id correction the IRS must
first deal with the original 1099 that it already has on file. The only way that it can do this is to have
a transaction with the old tax id/name and all of the amounts set to zero. The second transaction
contains the new information with the new tax id/name and the correct dollar amounts.
When only the address or amount information is changed, the IRS needs only one transaction. Since
it already has a 1099 with the correct tax id/name, it can easily match the new, corrected information
with the 1099 it has on file.
Data entry
The program takes care of this decision making for you. To make a 1099 correction simply call the
original 1099 to the screen, click the
button, then make the necessary changes. The
program will examine your entries and create either one or two new records based on what
information you change.
If you change just the address or amount information, the program will generate a new record in the
database with the corrected information and with a “G” in the corrected flag field on the screen (will
print as an “X” in the corrected box on a form). You will now have two records on file for the
recipient: the original, incorrect 1099 with an empty corrected flag and a new 1099 with the correct
information and a “G” in the corrected flag.
If you changed the tax id or name, the program will automatically generate 2 new records in the
database. The first will have the original tax id/name, a “G” in the correct flag field on the screen, and
all of the amounts set to zero. This record tells the IRS to “zero out” the original 1099. The second of
the two transactions will have the correct tax id/name, all of the original amount information, and a
“C” in the corrected flag field on the screen. When this form prints the corrected box will be empty.
The IRS will regard this transaction as simply a new 1099 that was not received before. In the end,
the old information has been zeroed out, and the new information is now on file.
Automatic batch number
If you watch closely, you will notice that the program will automatically set the batch number on any
new correction forms. The new batch number will be based on the date of the correction and will be in
22
YYMMDD format. So, for example, 1099 corrections made on March 23, 2011 would receive a batch
number of 110323.
This new batch number makes it very easy to make a new IRS file that has only your corrections in it
and not all of your original filings. When creating an IRS file you have the option of selecting
recipients to be included by batch number. All you need to do when making the IRS file for your
corrections is to include only those batches that contain corrections. All you need to know is the
approximate date they were made.
Click CORRECT and make changes
The important point to remember about 1099 corrections is that all you need to do is to click the
CORRECT button then make your changes. The program does the rest.
23
Importing
Overview
Computer files come in many flavors. For this reason the program supports a variety of file formats,
including:
Prior year data
CSV
dBASE
Fixed record length
Print image
IRS, SSA
Application Specific
Database from this program from a prior year or trial version
Comma separated text file, with or without headings, use with Excel
Including Visual Fox Pro
“Flat file”, often produced by mainframe systems
Form data printed to a file, use with QB 1099 files and QB W2 files prior
to ver. 2006
Files used for filing with IRS or SSA
There are a number of import formats developed for specific
applications, such as GEAC SmartStream
The importing of prior year data files, as well as IRS, SSA, and application specific files is very straight
forward. You supply the file name and the program takes it from there. The format and contents of
these files are fixed and the program knows how to decode them.
CSV, dBASE, flat, and print image files present a special problem. These files have an “open” format.
There are rules for each that prescribe how each data item must be formatted, but the ordering of the
data items and the purpose of each data item is not predefined. To import one of these file types the
program needs to know the meaning of each data item in your file (name, address, wages,
withholding, etc.) As part of the import process you will create a list of your data items (more on this
later). We call this list a “map”. The program uses this map to decode your file.
The important point to remember is that you can import virtually any file from any program, as long
as it is in one of these formats. They are the most popular formats, and almost every software
program can generate a file in one of them.
Typically you will be importing recipient information for a single payer (company). However, it is
possible to import recipients for multiple companies in a single file. The following rules apply:
1. Print image files are always restricted to a single payer and form.
2. IRS / SSA files include the company information and can contain multiple payers and forms.
3. CSV, dBASE, and flat files can include multiple payers, but the file must include at least the
payer tax id and name.
Always assign a batch number to an import. The Import Options Screen (described below) provides a
data entry field for a batch number. By assigning a batch number you can display totals for your
import separate from any other information that is already on file.
Starting an import
To start an import, go MAIN MENU -> IMPORT/EXPORT. On the next screen, choose the type of file
you wish to import.
24
(the other options on this screen are covered later).
On the next screen (shown below) indicate whether you will be importing into a single payer
(company or client) that is already on file or whether the information for the payer (or multiple
payers) is contained in the file.
The next step is to choose the payer and form being imported. If you elected to obtain the payer
information from your file, then you will be presented with only the list of forms to choose from. If
you elected to select the payer from a list, then you will also be presented with a list of payers to
choose from.
After choosing payer and form, specify your import file.
25
On the next screen you will choose the map that describes your file. Remember, importing a CSV,
dBASE, flat, or print image file requires both a data file and a map to describe the file. If you have
already created a map, or someone else created a map for you, simply select it from the list then click
[CONTINUE]. If you need to create a new map before importing your file for the first time, click on
[Create New Map]. You can also review / revise a map by clicking on [REVIEW MAP].
If you chose a pre-existing map you can skip past the next section.
Creating a new map
26
As previously mentioned, a “map” file simply tells the program which field in your import file is which
(which field is the tax id, which field contains the recipient name, etc.) An import map file is just a list
with 2 columns. In the left column are the names of the data items in the program, such as Name,
Address, FIT Wages, Social Security Number, etc. The entries in the right column give the location in
your import file of the data for that item. The left column is always the same. The contents of the
right column depend on the type of file being imported. This table summarizes the right column
contents for the various file types:
File Type
CSV – no column headings
CSV – with column headings
dBASE
Flat (fixed record length)
Print image
Right Column Contents
Field number
Column heading text
Field name
Start pos, length, decimal places
Row, start pos, length
As the program leads you through the process of creating a map, there are two windows displayed on
the screen. The first window, on the left, corresponds to the left column of the list and displays the
program data items. It looks like this:
To map a data item, simply dbl-click on the item in the list. When you do, a second window appears
displaying the field names/numbers from your file and sample data from the first record in your file.
For example, if you were mapping FIT Wages to field 13 in your import file, your screen will look
something like this:
a
Notice how the right hand window displays sample data from your file to assist you. To select a data
item from your file simply dbl-click on the item. This maps the two together, and your left hand
window now looks something like this:
27
After you double-click on FIELD13 the right window will close.
28
You can see that the FIT Wages data item is now associated (mapped) with Field 13 in your file. To
complete your map, simply repeat the process for each data item that you wish to import from your
file.
NOTE: You do not need to map all of the program data items. There will be some that do not apply
to you. Nor do you need to map all of the fields in your file. There may extra data in your file that
you do not need for the forms. You need to map only the fields in your file that you wish to import.
Once you have created your map it needs to be saved. Once saved, your map can be used again
without having to go through the entire mapping process. Also, any mistakes in your map file can
easily be corrected without having to remake the entire map. Choose a relevant title for your map
and enter it when prompted on the following screen:
Let’s review. At this point in the import process you have:
•
Selected the type of file to import
•
Selected the import file
•
Chosen a map or created a new map
29
Starting the import
There is one more step (screen) remaining before the actual import begins. There are several
processing options to choose from. You select options on the following screen:
The meaning and use of each option is summarized in this table:
Option
Usage
Append
Imported data will be added to any data already on file for the
payer/form being imported
Any data already on file for the payer/form being imported will be
discarded before the import starts. The imported data will replace
any data on file
Imported records are matched on tax id with any pre-existing data.
IF a match is found, the imported data items replace corresponding
data items in the matching record. If a match is not found, a new
record is added to the database.
Imported records are matched on tax id with any pre-existing data.
If a match is found, imported amounts are added to the
corresponding amounts already on file in the matching record. If a
match is not found a new record is added to the database.
Importing starts at this record number in the import file. Most often
used to bypass “header” records in an import file.
Imports only the number of records specified. Use when testing a
large import with a small test sample of data.
Assigns a batch number to the records imported. ALWAYS assign a
unique batch number to each import.
When importing W2 files, the program can automatically fill the
description part of box 14.
Replace
Update in place
Transaction update
Starting record number
Number of records to import
Batch number
Fill box 14
Once you click OK on the options screen the actual import begins.
30
Checking import results
The best way to check the results of an import is to go MAIN MENU -> RECIPIENTS and look at the
recipient data screens. There you can browse through the screens, checking to see that the right data
item from your file was imported into the correct program data item, and that all needed data items
were imported.
If you want to look at the records in the order in which they appeared in your import file, click the
ORDER button on the recipient screen, select “As entered”, then click the double left arrow button.
This positions the database at the first record imported. Clicking the right arrow takes you to the next
record imported.
Clicking the TOTALS button will display the total number of records imported and totals for all numeric
amount fields.
If you find that a data item is missing or is in the wrong field you will need to revise your map and
import again. To correct the map, go back through the import process, adding, changing, or deleting
fields from your file as needed. Save your map, then import your file again choosing the REPLACE
import option. The REPLACE option discards the results of the first import with the second. You can
then check the recipient screens and totals again to make sure that your import is complete.
CSV import
To import a CSV file, follow the general guidelines above. There are, however, additional
considerations for a CSV file. When you select CSV from the file type list, additional fields will appear
on the screen:
31
The CSV options are summarized in this table:
Option
Usage
Column headings in file
Some CSV files have column headings in the first record in the file.
Check this box if your file has them, leave blank if not.
Check this box if the dollar amounts in your file do not have actual
decimal point characters in the data. When this box is checked the
program will insert them automatically.
Most CSV type files use the comma as the field separator character.
Sometimes the TAB character is used, and sometimes a different
character altogether is used. The default separator is the comma. If
your file uses a different character as a field separator, specify it
here. You can specify it as a character, hex, or decimal value.
Insert decimal point
Field separator
dBASE import
Follow the general guidelines above to import a dBASE file. While creating the map, the field names
taken from the file will appear next to your sample data, like this:
Flat file import
Follow the general guidelines above to import a flat (fixed record length) file. When crating the map,
you will specify field starting position, length, and (if a numeric item) the number of decimal positions
to apply to the item (scale factor). The screen looks like this:
32
The “Scale Factor” means the power of 10 to apply to the data item to locate the decimal point. So,
to insert a decimal point a two places, the scale factor would be “-2”.
33
Print image import
A print image file is a file of recipient data printed to a file instead of a printer. When you look at the
contents of a W2 print image file it might look something like this:
The file contains recipient information as if it were printed to a form, but without the actual form being
printed. The importing of a print image file follows the same general sequence described above
except that the mapping process is slightly different. Instead of selecting fields in a file, you will be
“painting” the fields with the mouse on an actual sample form taken from your import file. The
mapping screen looks something like this:
To map a data item, you simply “paint” over the information on the screen with the mouse, as shown
here:
34
When painting a data item, be sure to include as few spaces to the left and the right of the data. Also,
be sure that the payer tax id on the payer screen EXACTLY matches the payer tax id in the print
image file. If they don’t match an error message (“Payer tax id not found …”) is displayed and the
import cannot continue.
The first “form” in your file is used as the sample form for mapping. However, it may be the case that
the first form does not have all of the data items on it. This is especially likely for W2s. Notice from
the screen shot above that you can “browse” for a form that has all of the data you need. By pressing
the “+” and “-“ keys you can move forward and backward through the file until you find a form
suitable for mapping.
IRS / SSA files
IRS / SSA files are much easier to import. The locations of all of the data items are predefined and
the payer information is embedded in the file. All that is needed is the path and name to the file.
You do not need to make or use a map when importing an IRS / SSA file. Once you supply the file
name the program will proceed with importing.
An IRS / SSA file contains the payer information. For this reason you need to decide ahead of time
what to do when a payer to be imported is already on file in the data base.
35
If a payer in the import file is already in the database, you can add a new payer anyway, or you can
choose to use the payer record already on file. If you choose to use the payer record already on file,
you have a choice of how you want the imported recipients handled.
Last year’s data
This is the most commonly used import feature. Bringing forward the database from one year to the
next can eliminate huge quantities of manual data entry. Using this feature your can bring forward:
•
Payer information (including state id info)
•
Recipient information (with or without amounts)
•
Import maps
Additionally, when bringing forward Payer and/or recipient information you can import all payers and
forms or you can pick and choose the payers and forms to be included.
When you begin the process the program will first ask for the path to the previous year’s data. The
program will “look around” to locate it and suggest the folder name if possible. If it cannot be found
then you will need to supply the entire path. The screen looks like this:
36
After locating the data from last year, the next screen asks what information is to be brought forward.
It looks like this:
When bringing forward recipient information, you should always choose “Payers and Recipient Names
And Addresses Only”. Here’s why: if you bring forward the amounts, you run the risk of leaving an
amount from the previous year unchanged, thus creating an erroneous form. It’s better to set the
amounts to zero by bringing forward just the names and addresses.
There may be occasions when you want to bring forward amounts, such as when you have data in a
trial versions, or when you started collecting data for the current year in the previous year’s program.
In these cases it is ok to also bring forward amounts. But otherwise, select only names and
addresses.
37
System specific imports
Import maps for some systems are already included in the program. GEAC SmartStream is an
example. If you choose SmartStream as a file type to import, the program will display a map for
SmartStream in the map list:
There are other systems for which a map is already made. The software vendor has provided us with
map information and we have included it in the program. Except for the need to create a map,
importing from other systems follows the same general strategy as the other imports.
Using other people’s maps
Suppose that someone sent you map via email, or that you downloaded a map from a web site.
Before you can use the map you need to get it into the program. This is done via the Map Tools
feature. Map Tools are accessed from the Import / Export menu selection:
38
To bring your map into the program, click on the Map Tools button, which brings up the Map Tools
screen:
Click on the Create from file button, then browse for your map file. From then on, your new map will
appear in the map list.
Sending a map to someone else
To send a map file you first copy the map to a file. Go MAIN MENU -> IMPORT/EXPORT then select
the Map Tools feature:
39
On the Map Tools screen, select the map you wish to send then click the COPY TO FILE button:
The selected map will be copied to a folder and file of your choice.
40
QuickBooks 2006+ Import
Strategy
The basic strategy consists of exporting 3 reports from QuickBooks 2006(+), then importing the 3
export files into the program. The reports are:
•
•
•
Employee contact listing
Payroll item listing
Transaction detail by account
Rather than printing the reports you will export each to a CSV file. This is easily accomplished by
clicking the EXPORT button on the QB report display screen, as shown here:
Then:
41
Export each file to a different file name. If you have more than one client to export, it is a good idea
to create a folder for each in the …\DATA\IMPORT folder. For example, if one of your clients is
Acme Sales, you would create a folder named …\DATA\IMPORT\Acme Sales, then export your
three reports to this folder.
E
mployee List - The first report, the Employee Contact listing is printed from the “Employees …”
section of the report center. It is a simple name and address list. When selecting this report, make
sure that the QB “Filter” setting is set to include ALL employees, not just active employees. Export
the report to a CSV file. Your report should look like this before exporting:
Payroll Items - The second report to export is the Payroll Item Listing.
It lists all of the possible
categories for payroll amounts of any type, such as Compensation, Federal Withholding, Social
security, etc. Select this report without any modifications and also export as a CSV file. Your report
should look like this before exporting:
42
E
arnings Summary - The third report Employee Earnings Summary is found also on the
Employees and Payroll section of the report center. Be sure to enter a data range that include all
payroll dates for the year ( eg 01/01 thru 12/31). When displayed, the report should look like this:
Now that you have the three files needed to create W2’s you can close QB and start the program. At
the MAIN MENU screen, Click on IMPORT then select the QB2006 import:
43
Choose the company and form, then point to the three files you just exported from QB, as shown
here:
When you click OK, the actual import process will start.
Fix City Names
The first file to be imported is the employee list, which includes all of the names and addresses of the
employees. This file is somewhat problematic. Intuit has done everything possible to make it difficult
to extract payroll information from QB 2006 (they want everyone to use their services). As part of
this strategy, the street address, city, state and zip are contained in a single data item, all strung
together, as in “123 Main Street Anytown OH 12345”. The program does its best to separate the
address into the individual components. But when the city name contains two or more words, the
program cannot clearly distinguish which words belong to the street address or to the city name, such
as in “456 Maple West Palm Beach FL 12345”.
To resolve this problem, the program scans the file then presents a list of the encountered city names
on the screen, like this:
44
In the sample above, you can see that “St. Helens” and “Oregon City” are a problem. If you have a
situation like this, double-click on the line with the problem. The program will display the following
screen:
Click YES, and (in this example), the word OREGON will be moved from the street address to the city
name, as shown here:
45
You may be asking, “Do I have to do this for every single address?” The answer is no. Only one
address line will show in the list for each city/zip code combination, so the list should be quite
compact, depending on the size of the city(ies) involved. Repeat for each city name that needs
correcting. When done, click the APPLY CHANGES button.
Assign Payroll Items to W2 Boxes
The next step is to assign the various payroll items (from the Payroll Items Listing Report) to a box on
the W2 form. This is done using two screens. These screens might seem confusing at first until you
understand why they are needed.
QB provides flexibility in its payroll by allowing you, the user, to create payroll wage and deduction
categories and assign them a title of your choosing. This is a necessary and useful feature of the QB
payroll. However, because the titles of the payroll items are not standardized, the program has no
way to determine how an item relates to the payroll. Is it a wage item? Is it a deduction. Perhaps it
is neither. Is it company paid or employee paid?
This is where the two screens come in. The program uses these two screens to provide a way for you
to specify how each payroll item should be handled on the W2.
P
ayroll Item List – The first of the two screens presents a list of all of the payroll items from your
payroll. It looks like this:
46
Before displaying this list for the first time, the program analyzes your payroll items and assigns
proposed rules for those items.
The left column contains the payroll item title, and the text in the right column explains how you want
the item handled when creating the W2s. Taken together we call these “rules”. To change a rule, dblclick on the item, which causes the item rule screen to display. It looks like this:
47
It is on this screen that you indicate how the payroll item should be handled when it is applied to a
W2. If the program assigned defaults are not proper you can change them. Here are some important
details about the items on this screen:
Compensation | Deduction – In QB, compensation amounts are stored as positive numbers while
deductions are stored as negative numbers. To avoid confusion over the sign, use these checkboxes
to distinguish between them. Them program will then take care of the arithmetic.
Federal | State Wage Items – Payroll items can be added (by checking the left check box) or
subtracted (by checking the right check box) to wages. Hourly wages, for example would be added to
Fit, SS, MC, State, and local wages. 401K amounts, on the other hand, would be subtracted from FIT
wages (also state and local wages in some states).
State and Locality Codes – The program looks to the state code in the state tax withholding item to
get the state code for state wages and withholding. It looks to the locality code in the local wage
withholding item (if any) to get the locality code. So if you have these withholding items in your
payroll, be sure to assign the state code, and if necessary, the locality code. As long as you assign
the code in the withholding item it is not necessary to assign a code to each wage item. The program
will figure it out. However, if you report to more than one state, you will need to assign the proper
state (and locality, if necessary) to each wage item.
Final Step
After checking and possible revising the payroll item rules, the program will now process your files and
generate a W2 for each employee. When done, go to the RECIPIENT screen to review the results. Be
sure to compare the totals in the program to your QB payroll totals.
48
49
QuickBooks 1099 Import
Importing 1099 information from QuickBooks involves 3 operations:
1. Creating a generic text-only printer in Windows
2. Create a file of 1099 information in QuickBooks to the new printer
3. Importing the 1099 file using the Print Image import feature
Creating the Generic printer
1.
2.
3.
4.
5.
6.
On your computer, go to START -> CONTROL PANEL
Dbl-click on PRINTERS AND FAXES
Dbl_click ADD A PRINTER to start the new printer “Wizard”
Choose “Local printer attached to this computer”
Uncheck “Automatically detect and install my Plug and Play printer”
For the “Use the following port” setting, choose the FILE option, as shown here:
Then choose the GENERIC PRINTER option, shown here:
50
Print the 1099s to the new printer
7.
8.
In Windows, make the new printer the currently selected printer
In QuickBooks, print the 1099s, being sure to choose the new generic text-only printer and
selecting the “Continuous Forms” in the QB print options window.
Import the print image file
9.
10.
11.
12.
13.
14.
15.
16.
In the program, go MAIN MENU -> PAYERS -> ADD. Set up the payer for the 1099s that you
just printed. Be sure to enter the payer tax id EXACLTY as it appears in your print image file,
including any dashes.
From the MAIN MENU select IMPORT
Choose “Print Image” as the file type to import
Select the new payer and form
Enter or browse for the new print image file that you created above
Create your import map as described in the previous chapter
On the import options screen be sure to choose the SAP option. This option does the best job
of importing the names and addresses.
After the import is correct, go back to the MAIN MENU then click RECIPIENTS to see the
results of your import. If you find that one or more data items did not import properly, simply
reimport, revising your map to correct the problem. You do not need to recreate the file.
51
Consolidation
The consolidation features provide a means of manipulating recipient files in bulk. These capabilities
include:
•
Copying payer and recipient information to an external file
•
Loading payer and recipient information from an external file
•
Combining two or more recipient files into one
•
Applying a recipient file to another as a file of transactions
•
Rolling up a recipient file based on tax id
Consolidation Out
The consolidation out feature copies one or more payers and their corresponding recipients to an
external zip (compressed, encrypted, and password protected) file. This feature is useful for moving
selected payers and recipients to another computer, such as a laptop, where they can be loaded using
the Consolidation in feature (described next). The output files can be on any type of local drive or
network drive and placed in any folder of your choice.
The first step in Consolidation Out is to select the Payers and Forms that you wish to copy. You do
this on the Select Payer and Select Forms screens that you have already seen. On the next screen
you select the output folder for the consolidation file. The YES program will supply the name of the
file automatically. You need to indicate the drive and path only. The Consolidation Out options screen
looks like this:
After your files have been copied to the output zip file, the following results screen is displayed:
52
This screen confirms the drive, folder, and file name of the Consolidation Out file, and also gives you
the option to send the file to NewportWave Tech Support if you have been requested to do so. The
process of sending your file is very secure. Your file is compressed, encrypted, and password
protected. No one but you and NewportWave can access your file.
Consolidation In
Consolidation In works in the opposite direction of Consolidation Out. It reads in payers and recipients
from an external file created by Consolidation Out. (Consolidation In will read in only files that have
been created by Consolidation Out. If you need to read in a file of a different type refer to the
Importing feature.) This feature is most useful for combining work done on two or more computers.
The first step in Consolidation in is to select the input file previously created by Consolidation Out.
You can either type the file name or browse for the file.
53
On this screen you also indicate how you want the consolidation file processed. You have a choice of:
•
Append – the records in the consolidation file will be added to the recipients already on file.
•
Replace – the records in the consolidation file will completely replace any recipients already on
file for the payers and forms being processed.
•
Update in place – the records in the consolidation file will be used to update the recipients
already on file or create new ones if they don’t exist.
Once the file is located, the program will display the date and the time that the file was
created for you to verify that you have correct file.
Transaction update
54
The transaction update mode of Consolidation works with tow or more recipient files. It treats the
recipient records in one file as a master file to be updated. It treats the other files as transaction files
to be used to update the master file. The records in the transaction file are matched to records in the
master file based on tax id. When a match is found, the amounts in the transaction record are ADDED
TO the amounts in the master file record. If no match is found, the transaction record is used to
create a new master record.
File combine
The File Combine Consolidation feature merely combines the recipients in tow or more file into one big
recipient file. You specify the target (output) payer and form, and then specify the source (input) files
that will be combined.
NOTE: A good opportunity to use File Combine is when you need to import from two or more sources
into the same payer. An example of this situation might be when you have two or three separate
payroll systems. You need to import from each of them into the same company. A good strategy to
follow is to import each into a separate payer and form, so that each import can be kept separate in
case you need to reimport at some point. Then, after all of the imports are complete, you can use the
File Combine feature to collect all of the employees into one big file for printing and filing.
Rollup on tax id
This feature “rolls up” recipient files based on tax id. If you have a recipient file with more than one
record for a tax id, this feature will combine them all into one record. The tax ids do not have to be
configured identically. The feature will combine the records based on the digits in the tax id,
regardless of dashes.
55
Form Setup
Recipient copies of forms can be printed in a variety of styles. Copy B of the W2, for example, can be
printed in a two, three, or four per page style. It can be printed with or without instructions, on plain
paper or pre-printed forms, with variable margin settings. All of these choices and settings are made
in Form Setup. If you need to change anything about forms, from styles to margins, you do so in
Form Setup.
Form Setup is accessed by going MAIN MENU -> SETUP -> FORM SETUP. This brings up the Form
Setup screen, which looks like this:
When working in Form Setup, you are always working on one form/copy/style at a time. The form,
copy, and style are displayed at the top of the screen, next to the form, copy, and style buttons. To
select a different form, copy, or style, simply click on one of these buttons and make your choice from
the drop-down list. The lists are intuitive. If you click the Style button while on the W2 form, you will
see only those styles available for the W2 form.
The following sections describe the actions of the buttons and features.
56
Usage
Usage refers to whether a form is generated on plain paper or whether pre-printed forms are used.
Copy A forms for 1099s can only be printed on the “red” pre-printed forms because they are the only
forms that the IRS will accept. W2 copy A forms can be laser generated or printed on pre-printed
forms. The laser generated format created by the program is approved each year by the SSA.
All other copies of forms (Recipient, File, State, etc.) can be laser generated or printed on pre-printed
forms. You can shange the usage at any time by simply clicking this button.
Printer
All form settings (including margins) are printer specific. This makes sense because all printers do not
print at the same location on the paper. One printer in your office will start printing at a certain
location while another printer will start printing at an entirely different location. For this reason,
printer settings must be maintained separately for each printer. When you begin a forms printing
operation, the program will check which printer you have chosen, and then select the settings for that
printer.
To change printers simply click this button to bring up the printer selection dialog.
Contents
Not only can you select the style of form for a recipient page, you also have control over which copies
of the form print on the page. When printing the 4 per page tiled style of W2, for example, you can
dictate which form copy (Copy B, Copy 1, Instructions) appears in each form space on the page. The
edit box next to the button describes the current setting. To change the page contents, click the
CONTENTS button, which brings up the contents selection screen:
The first choice to make is whether you want to print only one form per recipient (thus a page could
contain enough forms for 4 recipients), or whether you want to print the entire page for one recipient.
The most useful selection is the latter, all forms to the same recipient. This choice eliminates the
tedious task of separating the forms for mailing.
57
On the right hand side of the screen you make you choices for which copy is to appear in which form
space. This part of the screen will change depending on which form and style you are working.
Margins
Margin settings most often are changed to align the print on pre-printed forms. But they can also be
set for laser generated forms when the form encroaches on the perforations on the page or for
envelope window alignment.
To check or change margin settings, first make a test print of the form. Then, click the MARGINS
button to bring up the margin settings dialog:
Make a best guess as to the direction and amount of alignment change is needed. Make your entries
then make another test print of the form. Repeat this procedure until your form is properly aligned.
Advanced
Clicking the ADVANCED button brings up the advanced form setup screen:
This screen provides access to all of the settings that affect the printing of a form. Make changes to
this screen only when instructed to do so by someone in Technical Support. Making uninformed
changes to this screen can bring about unexpected results.
58
Items
Form Setup provides control over the positioning of every individual printed data item on the page.
These settings are managed on the print position screen. Clicking the ITEMS button first brings up a
list of all printable data items for the form on which you are working:
To change the alignment for an item, dbl-click on the item name in the list. This will bring up the print
position screen for the item:
It is the settings on this page that determine exactly where on a form a data item is printed. The
various settings are as follows:
59
Item – the data item name from the list
Class – do not change this setting unless instructed to do so
Name – do not change this setting unless instructed to do so
Print? – determines whether or not a data item is actually printed
Row and Column – Print rows are the “Y” setting and go across thee page. Columns are the “X”
setting and go down the page. The actual size of a row or column is determined by the LPI and CPI
settings on the Advanced Margins page. The most common LPI setting is 6 LPI, so that a row would
be 1/6th inch tall. The most common CPI setting is 12 CPI, so that a column would be 1/12th inch
wide. Increasing the Row setting moves the data item down on the page, and increasing the Column
setting moves the data item to the right.
Row and Column Micro-Adjust - These settings provide for “fine tuning” of the data item print
position. The unit of measure for micro-adjust is 1/300th of an inch. The smallest change that is
visible to the naked eye is 3 units. Said otherwise, you need to make an adjustment of 75 just to
move 1/4th of an inch.
Picture – this item determines the width of a data item when it is printed. One “X” or “9” in the
picture represents one print character in the output of the data item. Change this setting only when
instructed to do so.
Test Mask – this is the representation of the data item print when a test form is printed.
Test print
The best way to check the alignment for a form is to make a test print. On a test print, each data
item is represented by a series of X’s or 9’s, which print for the full width of the data item as it will
appear on a real form.
Blank form
Prints a sample blank form. Obviously useful only for laser generated forms.
60
Printer Setup
PRINTER SETUP allows you to perform some basic setup on your printer, and is accessed from the
Main Menu by going MAIN MENU -> SETUP -> PRINTER SETUP. The printer setup screen looks like
this:
The default printer type for the program is a Laser printer with one paper tray, which is what most
people have. If this is your situation then you do not need to access printer setup at all. However, if
you have a dot matrix printer or would like to draw paper from different bins based on the copy of the
form being printed, then you make those selections on this screen.
The program can draw paper from different bins depending on which copy of a form is being printed.
For example, you could put the blank “red” copies of the forms in one bin (tray) and put plain white
paper for recipient copies in another tray. To make a bin selection, click the down-arrow and the
program will display a list of available bins for your printer from which you may choose. For example,
the bin list for a standard HP 2015 laser printer looks like this:
61
(NOTE: To select duplex printing click the ADVANCED button on the Form Setup screen)
62
Printing Forms
Forms printing is where you see the most results, but it is one of the easiest activities in the program.
To initiate forms printing go MAIN MENU -> PRINT -> FORMS. Before you actually start printing make
sure you have the correct printer selected. The currently selected printer is displayed on the Main
Menu screen.
Also before starting, plan ahead for the most convenient strategy. Some prefer to print one
copy for all payers, then print the next copy. They might print all recipient copies for all payers and
forms, then print all Copy A forms for all payers and forms. Others will prefer to print one
payer (client) at a time. Think ahead, then choose the best strategy for your situation.
Supplies
For preprinted forms, you will of course need the actual forms. When ordering, don’t forget to also
order W3 and 1096 forms when needed. You can purchase forms from any forms vendor. The margin
setting and print positioning features of the program (found in FORM SETUP) ensure that each field of
information will be properly positioned on any form that you might choose.
For laser generated forms you really aren’t required to purchase any supplies other than plain paper.
Every laser generated form produced by the program will fit on an 8 ½ x 11 inch sheet of paper.
However, most people use perforated paper for the recipient copies. In addition to a more
professional appearance, forms printed on perforated paper are easier to fold and stuff into envelopes.
W2 and 1099 forms require special envelopes. The mailing addresses on the forms will not align
properly if you try to use standard #10 envelopes. As with forms, envelopes can be purchased from
almost any forms vendor.
The program supports PressureSeal forms. Several different styles are available, especially for the W2
and 1099MISC. Special folding and sealing equipment is required for Pressure Seal forms. If you
already have the equipment, Pressure Seal is the most efficient way to handle distribution of the
forms.
63
Printing options
The print options screen is displayed before actual printing starts:
Which recipients to print – the default setting is ALL. Select PRINT FLAFS ONLY to print only those
recipients which have had the print flag turned on in Recipient Data Entry.
Batches – enter starting and ending batch numbers to restrict printing to a selected range of batches.
Print these records – you can specify actual record numbers to print. Keep in mind that the records
are counted in the sort order you select below.
Restart after this tax id – If for some reason you cancelled a prior print job while printing, you can
restart that print job by entering here the tax id from the last properly printed form. You must enter
the tax id EXACTLY as shown on that form, including dashes.
Sort by – choose the output sort order for your forms.
Group by state – check this box if you want the forms grouped by state. This option is most useful
when printing the state copies of forms.
Print this state only – allows you select a specific state and locality for printing. Enter the state and
locality codes EXACTLY as shown on a totals display / print.
Print totals report – when checked, a totals report will be printed for each payer/form completed.
Notify – when checked, the program will stop and display a message before starting each
payer/form/copy.
Clear print flags – when checked, the program will clear all print flags for recipients who are printed.
64
Print to PDF – prints the forms to a PDF file. The file will be located in the [install]\PDF folder.
Print alignment test form – prints a test form before actual printing begins. Use when you need to
check margin and alignment settings before printing.
Individual PDF Files
(NOTE: This feature is available in the Enterprise version only)
Recipient copies of forms can be printed to individual PDF files. These files can then be used in web
applications that provide employees online access to W2s and 1099s. In addition, you have significant
control over the actual file name assigned to the files. To use this feature, select the option on the
PRINT OPTIONS screen, as shown here:
To configure the output file name for each individual PDF file, first click the PDF FILE NAME
CONSTRUCTOR button. This brings up the constructor screen:
65
The BASE FOLDER is the folder where the files will be stored. The CALCULATED FOLDER AND FILE
NAME is the actual name of the file. In the screen above the file name will consist of the tax year
followed by an underscore followed by the social security number then end with another underscore.
The point here is that you can construct your own file pattern.
To add a “part” to the calculated file name, click ADD PART then choose the desired part from the list.
You can add as many parts to the file name as needed. You can even use the backslash part to build
subfolder names. You can revise your selections by deleting parts then reselecting. To delete the last
part in the string click the DELETE PART button.
File name guidelines:
•
•
•
Select only the parts you actually need. Try not to complicate the names by including
unnecessary parts.
It is more secure to use only the last 4 digits of a tax id in place of the entire tax id.
Separate parts with an underscore. It makes the names much easier to read.
66
Electronic Filing
Electronic filing is a quick and easy way to send your information to the IRS / SSA and involves only
two steps:
•
Create a file in the program
•
Upload the file on the IRS or SSA web site
The first step, creating the file, is performed within the program. You simply select payers and forms,
choose a few options, and the program creates the file. This same procedure is followed for federal,
state, and local agency files.
The second step is performed at the IRS and SSA web sites. You log into their web site then choose
the options to upload a file. You can check back at their web sites in a few days to make sure your file
was processed.
NOTE – neither the IRS nor the SSA any longer accepts diskette files. Filings must
be made on-line through their respective web sites.
IRS registration
The IRS requires registration before you can file electronically. You only need to register one time,
however, the first time you file. To register with the IRS, submit a form 4419. In return, the IRS will
issue you a TCC (transmitter control code) which you enter on the transmitter screen when creating
an electronic file. The program embeds the TCC in your file. A form 4419 PDF file is available on the
IRS web site. Point your browser to www.irs.gov. On the home page click “More Forms and
Publications” then click “Form and Instruction Number” then select the 4419 form from the list.
SSA Registration
Registration is required with the SSA before filing electronically. Additionally, you must register once
a year to change your password. You cannot file with an expired password. To register with the SSA,
go to www.ssa.gov/employer. Click on “Electronically file your W2’s”, then “Wage Reporting”, and
finally “REGISTRATION”. Just follow along on the screens through the registration process.
Creating an electronic file
To create an IRS/SSA file start at the MAIN MENU then choose ELECTRONIC FILING. This displays the
electronic filing screen:
67
The top part of the screen displays any files that you have already created. When you first start you
will not have created any so this area will be blank. The rest of the screen contains buttons that
encapsulate the management of your files.
The first step is to click the CREATE NEW IRS/SSA FILE button. On the next screen select the type of
file you wish to create:
After selecting payers and forms, verifying your transmitter information, an options screen appears.
The exact option screen depends upon the type of file selected:
W2 file options
The W2 options screen looks like this:
68
TAX YEAR – of the payers you selected in the previous step, only those with a
corresponding tax year field will be considered for the file. This is the tax year being
reported in the file.
PURPOSE OF FILE – select “Original filing” unless creating a file to replace a file already
rejected by the SSA.
TYPE OF FILE – select the type of agency to which the file will be sent
STATE TO REPORT – if you chose to create a state file, enter the state code here.
INCLUDE LOCAL WAGE INFORMATION – When making a state file, you can also include
local wage information. Most states don’t require local information – some can’t
seem to make up their minds.
LOCALITY TO REPORT – if making a local file enter the name of the locality as it appears
on the W2s and totals reports.
START BATCH – END BATCH – you can restrict your file to certain batch numbers.
Normally you would accept the defaults of 0 and 999999.
REPLACEMENT WFID – if you had a previous file rejected by the SSA, they would have
reported the reasons to you and included a “WFID” number in their report. If you
are now making a replacement file to replace the previously rejected file, enter that
WFID number here.
69
1099 file options
The 1099 electronic filing options screen:
TAX YEAR – of the payers you selected in the previous step, only those with a
corresponding tax year field will be considered for the file. This is the tax year being
reported in the file.
TYPE OF FILE – Ordinarily you will select FILING. This selection is used the first time you
send a file.
NOTE – Test files are not needed since you are not doing the programming for
your file. For you the programming is already done and your file is guaranteed to
meet the IRS specifications.
STATE CODE – leave blank if creating a federal file for the IRS. If creating a state file,
enter the 2 character state code here.
COMBINED FILING – check this box if you participate in the combined filing program. You
can learn the details of this program in IRS Publication 1220.
START BATCH – END BATCH – batch numbers are most often used when filing 1099
corrections. See the “1099 Corrections” section in this document for more
information. When not filing corrections you will mot often accept the defaults of 0
and 999999.
ALPHA CHARACTER and IRS FILE NAME – if you are creating a replacement file for a file
that was previously rejected by the IRS, they will include an alpha character after
your TCC number in their report. They will also include the IRS file name used for
your file. Enter the alpha character and IRS file name in these fields.
Electronic Filing File Name - At the time you upload your file to the IRS / SSA web site
you will need to know the name of the file. Click on this button to display the path and file
70
name that you need. The file name is copied to the Windows clipboard so that when you
need the name you can just paste [Ctl-V] it in.
Lock - Prevents your file from being removed
IRS Web Site – takes you to the IRS web site
SSA Web Site – takes you to the SSA web site
File Viewer – displays the file in a text editor like window
Basic Info – displays basic information about the file
Contents report – prints a report with totals for each payer / form type in the file
Mark for Resubmit – marks a file internally for resubmission
Remove – deletes an electronic file
71
Security
Overview
NOTE: Security features are available only in the enterprise version of the
software.
The security features provide 2 benefits:
•
Controlled access to specific payers / forms
•
File encryption
These two features may be used together or separately.
Under controlled access, only assigned operators may access the program by logging in to the
program with a three-character operator id and a password. No one else may access the program in
any way. Operators are set up by the OWNER (the person who initially turns security on) or by
ADMINISTRATORS, special operators established by the owner who may act on the owner’s behalf.
Individual operators can be assigned either read/write access or read/only access. With read/write
access an operator may access data, add new data, make changes to existing data and exercise all
program options except to turn off security. Read/only operators, on the other hand, may only view
data and print forms; they cannot enter new or make changes to existing data.
An operator’s privileges can be set for individual payers and forms. When one or more operators are
assigned to a payer/form, only those operators may access that particular payer/form. All others are
denied access. As discussed in the preceding paragraph, the operators may be read/write or
read/only. (The owner and administrators automatically have read/write access to all payers/forms).
An operator may have read/only access to one payer form but may also have read/write access in
another payer/form.
Payers where specific operator access has not been specified can be accessed by all operators,
controlled by the access level assigned when the operator was established. Thus, for a payer where
you have not assigned specific operators, read/write access will be allowed for ALL read/write
operators and read/only access will be granted for ALL read/only operators.
This security strategy means you can apply access control to specific payers/forms when necessary,
but have the convenience of generalized control when specific control is not needed. Said otherwise,
you can have tight security where you need it, and more loose security where you do not.
The file encryption feature allows you to encrypt recipient files for specific payers/forms. Encryption
often becomes necessary when dealing with in-house payroll or retirement information. Encryption
cannot be reversed – once a payer/form is encrypted it remains so forever. Encrypted files cannot be
viewed by any other programs and are useless except in the program.
Enable security
To enable security, go MAIN MENU -> SETUP -> SECURITY. This displays the security setup
dialog:
72
Read the explanatory text, then, if you are certain that you want to enable security, click YES.
Because you are the person who enabled security, you become the OWNER. The owner has complete
control over security and can never be deleted or changed. The first task as owner is to establish your
login, which is done in the operator setup dialog.
It is a best practice to use 3 initials for the login id, as they are rarely forgotten. Be certain to make a
record of your password – you will need it from this point on to enter the program. This same dialog
is used to set up all operators. When OK is clicked, your login is saved and you are returned to the
SETUP MENU.
Adding Operators
Now that you, the OWNER are established, you can begin setting up other operators that you wish to
have access to the program. You can establish ADMINISTRATOR, READ/WRITE, and READ/ONLY
operators. IT is a good practice to establish at least two ADMINISTRATORS who can act on your
behalf when you are unavailable. To establish a new operator, go MAIN MENU -> SETUP ->
SECURITY. This displays the operator list (available only to owners and administrators).
73
Click the ADD button, then fill out the operator setup dialog. Do this for each operator to be
established, being sure to select the correct access level for each. Note that operator information,
including password, can be changed from this screen, and also that operators can be deleted.
Payer/Form Level Control
Up to this point, you have established generalized security control that applies to all payers. The
operators that you have established have access to all payers and forms based on the access level
assigned. You can now apply further restrictions to specific payers/forms where needed. To begin, go
MAIN MENU -> PAYERS, and display the payer screen for the payer to receive restrictions. Click the
CHANGE button, then check the box labeled “Restrict”.
74
This payer can now have specific restrictions applied. To establish these restrictions, click on the
PERMISSIONS button to display the permissions list.
This dialog lists all specific restrictions placed for the payer. Only those operators listed here (in
addition to the owner and administrators) will have access to this payer. To add an operator for this
payer to the list, simply click the ADD button then complete the operator permissions dialog (shown
here).
75
Note that the access level you assign for a payer/form supersedes and operator’s general access level.
You can assign as many operators to a payer/form as needed. From this point forward, any operator
without permission attempting to access a form for this payer will receive the following message:
Encryption
Encryption provides a further layer of protection for recipient files. By encrypting a file, it is
made unusable outside the program. Thus, a recipient file could not be imported into Excel
or another external program. Encrypted recipient files remain encrypted even while in use.
Warning! Encryption should not be deployed across all payers and forms. It should only
be used to protect sensitive information such as an in-house payroll or retirement file.
Encryption is available at the payer level only. To enable encryption for a payer, go MAIN
MENU -> PAYERS. On the payer screen, check the box labeled “Encrypt” as shown below:
76
The payer’s current files will be immediately encrypted. Any new files created in the future will also
be encrypted.
NOTE: The encryption algorithm used is highly sophisticated and virtually impossible to decipher.
Passwords are also encrypted using the same algorithm.
77
SSN – TIN Verification
Note: This feature is available in the Enterprise version only.
Both the IRS and the SSA have bulk TIN verification systems and both work in a similar fashion.
Basically, you upload a file to them, they process it then send back a results file. The Enterprise
version of the software will create the files for social security number and tax id verification. Over all,
the process is straight forward. First you create a file (MAIN MENU -> ELECTRONIC FILING ->
CREATE NEW SSA/IRS FILE) in the program. This file contains the names and tax ids of the recipients
from payers (companies) and forms that you select. You then go to the IRS or SSA web site and
upload this file. Within the next 24 hours or so your file will be processed. After that, a results file is
made available for you to download. You then import this file into the program, which updates the
recipients based on the results in the file. When you next look at the recipient screen for one of these
recipients you will see a message indicating whether or not the recipients tax id was properly
matched. Recipients that failed to match will also receive an error code, and will appear on a recipient
list report where you have chosen to include errors.
Creating the File
The first step in the process is to create the file. Go MAIN MENU -> ELECTRONIC FILING then click on
CREATE NEW SSA/IRS file. On the next screen, select your option for either an SSA file to check
social security numbers for W2s or IRS file to verifiy tax ids for 1099 processing.
After choosing payers and, in the case of an IRS file, forms to be included, the program will crate the
file and place the file in the grid on the scrren.
78
In the grid above, the file with a TYPE of “IRST” is an IRS file for matching tax ids for 1099 processing,
and the file with TYPE “SSAT” is a file for verifying social security numbers for 1099 processing. The
complete name of the file for uploading to the IRS/SSA is shown in the box just below the grid.
Getting Registered
Unfortunately, you can’t just log on to the web site and upload your file. For both the IRS and the
SSA you need to complete a registration process first. This process can take up to three or four
weeks, so plan ahead.
For the IRS, first go www.irs.gov. Click on TAX PROFESSIONALS on the top menu, then click or the eservices link in the middle of the next page.
For the SSA, go to www.ssa.gov/employer. There is a link to SSNVS halfway down the page.
Both of these sites will lead you through the registration process. Once you are fully registered you
will be able to use the verification service and upload your file(s).
Uploading your file(s)
To upload your file(s), just go to the IRS or SSA web site address list above and follow the links to
upload your file. The links are easily recognized.
As mentioned above, it can take up to 24 hours for them to process your file. Once processed, they
will make a results file available to you for download.
79
Processing the Results File
First, download the results file. It is not necessary to download to a specific folder – any folder will do.
Just be sure to make a note of the download location so that you can browse for the file in the next
step.
Then, in the program, Go MAIN MENU -> IMPORT / EXPORT , then select either the IRS or SSA results
file choice.
The program will then ask you to browse for the results file that you downloaded in the previous step.
You do not need to select payers of forms since that information is already embedded in the results
file. The rest of the processing is automatic.
After processing, the recipient screens will display a message for each recipient indicating the results
of the match. For a 1099 recipient the screen looks as follows:
80
The message on the W2 screen is similar. Before the results are processed the message will read “TIN
not verified”.
81
CP2100 – Paper Listing
Process a CP2100 paper listing notice by going through the listing, recipient by recipient, calling each
to the screen. As you bring each recipient to the screen in turn, indicate the receipt of the notice and
print the appropriate B Notice, right from the data entry screen.
To begin, go to recipient data entry (MAIN MENU -> RECIPIENTS) and bring the first recipient from
your CP2100 listing to the screen. If the BNotice panel is not showing at the bottom of the recipient
screen, click the BNOTICE button, as shown here:
82
Your screen should now look like this:
The BNotice panel is at the bottom of the screen. If this is the first notice for the recipient (as it is for
the recipient in the picture above) click on the arrow button next to “1st CP2100”. This will insert the
date, which you can change to match the date of your listing, if desired. Then, click the “P” button (P
stands for PRINT) next to “1st B-Notice”. This will cause a first B_Notice form and a W-9 form to be
printed for the recipient. The W-9 form will be addressed to the recipient, ready to fold and insert into
a standard 2-window envelope.
If you have already been noticed about this recipient, the previous notice date and B-Notice date will
already be on the screen. In that case, click the arrow next to the “2nd CP2100” field and print the
second BNotice.
83
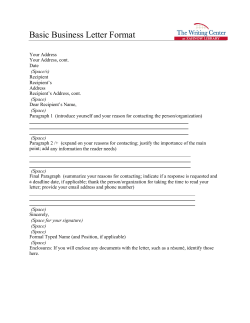
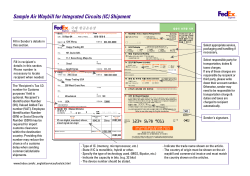
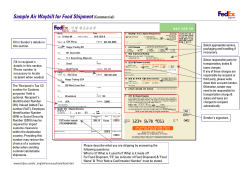


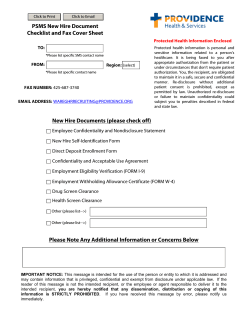
© Copyright 2026