
PROJECT MANUAL
PROJECT MANUAL OWNER or TENANT O’Reilly Automotive Stores, Inc., A Missouri Corporation (formerly known as O’Reilly Automotive, Inc.) Corporate Offices 233 South Patterson Springfield, MO 65802 417-862-2674 Phone Tenant Infill for New O’Reilly Auto Parts Store 644 State Street Springfield, Massachusetts PROJECT NUMBER (SD1) August 15, 2014 TENANT INFILL FOR NEW O’REILLY AUTO PARTS STORE SPRINGFIELD, MASSACHUSETTS (SD1) TABLE OF CONTENTS INTRODUCTORY INFORMATION 00 01 01 Project Title Page 00 01 05 Certification Page 00 01 10 Table of Contents (Revised 07/17/14) 00 01 15 List of Drawings SPECIFICATIONS DIVISION 1 – GENERAL REQUIREMENTS 01 11 00 Summary of Work (Revised 05/15/12) 01 20 00 Project Procedures (Revised 03/21/14) 01 33 00 Submittals and Substitutions (Revised 05/15/12) DIVISION 2 – EXISTING CONDITIONS – NOT USED DIVISION 3 – CONCRETE 03 35 43 Polished Concrete Finishing (Revised 07/30/12) DIVISION 4 – MASONRY – NOT USED DIVISION 5 – METALS 05 40 00 Cold-Formed Metal Framing (Revised 06/28/13) 05 50 00 Metal Fabrications (Revised 08/10/12) DIVISION 6 – WOOD AND PLASTICS 06 10 00 Rough Carpentry (Revised 05/23/13) DIVISION 7 – THERMAL AND MOISTURE PROTECTION 07 21 00 Building Insulation (Revised 08/23/13) 07 92 00 Joint Sealants (Revised 01/31/11) DIVISION 8 – DOORS AND WINDOWS 08 11 19 Steel Doors and Frames (Revised 06/28/13) 08 14 16 Flush Wood Doors (Revised 01/31/11) 08 71 00 Door Hardware (Revised 06/14/12) DIVISION 9 – FINISHES 09 21 16 Gypsum Board Assemblies (Revised 05/23/13) 09 51 00 Acoustical Tile Ceilings (Revised 06/07/12) 09 65 13 Resilient Base and Accessories (Revised 08/20/13) 09 77 00 Sanitary Wall and Ceiling Panels (Revised 11/20/12) 09 90 00 Painting (Revised 05/23/13) DIVISION 10 – SPECIALTIES 10 28 13 Toilet Accessories (Revised 05/23/13) 10 80 00 Miscellaneous Specialties (Revised 02/22/13) TABLE OF CONTENTS (Revised 07/17/14) TC-1 DIVISION 20, 21, 22, 23 and 25 – MECHANICAL 20 01 00 General Provisions (Revised 06/11/12) 20 02 00 Contract Closeout & Commissioning (Revised 03/12/08) 20 03 00 Materials and Methods (Revised 01/31/11) 20 04 00 Testing Piping Systems (Revised 06/11/12) 20 05 00 Valves (Revised 05/01/09) 20 06 00 Mechanical Identification (Revised 06/15/12) 20 07 00 Existing Systems and Owner Furnished Equipment (Revised 06/11/12) 21 13 13 Wet Pipe Sprinkler Systems (Revised 07/09/12) 22 00 00 Plumbing (Revised 06/15/12) 22 07 19 Piping Insulation (Revised 06/14/12) 22 40 00 Plumbing Fixtures (Revised 07/09/12) 23 05 93 Testing, Adjusting & Balancing of HVAC Systems (Revised 07/11/12) 23 11 00 Gas Piping Systems (Revised 07/16/12) 23 23 00 Refrigerant Piping (Revised 07/09/12) 23 30 00 Air Distribution (Revised 01/31/11) 23 74 00 Rooftop Heating/Cooling Units (Revised 06/11/12) 25 00 00 Controls and Instrumentation (Revised 06/14/12) DIVISION 26 – ELECTRICAL 26 00 10 Basic Electrical Requirements (Revised 07/20/12) 26 00 20 Contract Closeout and Commissioning (Revised 07/11/12) 26 00 30 Existing Systems and Owner Furnished Equipment (Revised 06/11/12) 26 05 19 Wires and Cables (Revised 07/20/12) 26 05 26 Secondary Grounding (Revised 07/20/12) 26 05 33 Raceways (Revised 06/11/12) 26 05 34 Boxes (Revised 07/20/12) 26 05 53 Electrical Identification (Revised 07/16/12) 26 24 00 Electrical Equipment (Revised 06/13/12) 26 27 26 Wiring Devices (Revised 07/20/12) 26 29 00 Motor Control (Revised 09/06/12) 26 50 00 Lighting (Revised 06/13/12) END OF DOCUMENT TABLE OF CONTENTS (Revised 07/17/14) TC-2 SECTION 00 01 15 LIST OF DRAWINGS SPRINGFIELD, MASSACHUSETTS (SD1) 1. T1 COVER SHEET 2. A1 3. A2 4. A3 FLOOR PLAN DOOR SCHEDULE INTERIOR ELEVATIONS 5. F1 FINISH PLAN 6. FP1 FIRE PROTECTION PLAN 7. P1 PLUMBING PLAN 8. M1 9. M2 HVAC PLAN HVAC SCHEDULES 10. E1 11. E2 12. E3 LIGHTING PLAN POWER PLAN ELECTRICAL SCHEDULES 13. VS1 14. VS2 15. VS3 VENSTAR SURVEYOR VENSTAR O’REILLY DETAILS VENSTAR SURVEYOR - SOW END OF DOCUMENT LIST OF DRAWINGS 00 01 15-1 SECTION 01 11 00 SUMMARY OF WORK PART 1 – GENERAL 1.01 SUMMARY A. Project summary: 1. Construction and completion of the O’Reilly Auto Parts Store for the Owner’s intended use of wholesale and retail sale of auto parts at the location described in Invitation To Bid under a single lump sum contract and quantity of time as described in the Contract. B. Work Owner: or others, furnished and installed: 1. Interior painted graphics. 2. Equipment or merchandising fixtures. 3. Exterior building signage (Electrical system and final connection by Contractor). 4. Security systems not indicated on drawings. 5. Portion of toilet accessories, refer drawings. 6. Communication systems not indicated on drawings. 7. Temporary marketing and advertising signage. 8. Refer to mechanical and electrical plans for utility responsibility. 9. Construction Materials Testing C. Work Owner: furnished, Contractor installed (Contractor scope of work shall include coordination with Owner for ordering, receipt, handling, storage, and installation requirements of Owner furnished materials): 1. Pre-engineered metal building components. a. Refer to Drawings and Section 13 34 19 – Pre-Engineered Metal Building System Erection for additional requirements. 2. Exterior hollow metal door package. 3. Floor safe. 4. Mechanical heating/cooling equipment, including thermostats. a. Contractor’s scope of Work: Order, receive and install heating/cooling mechanical units. Provide and install duct work, supply diffusers, return air grills, restroom exhaust fan and duct work, and accessories for complete functioning system. 5. Pre-engineered metal building insulation system. 6. Energy Management System . 7. Building Insulation (Refer to Section 07 21 00) 8. Lighting fixtures and switchgear as specified on project schedules. 9. Water heater on plumbing fixture schedule. D. Permits and Fees: Apply for, obtain, and pay for permits, fees, and utility company back charges required to perform the work. Submit copies and invoices to Owner for reimbursement. No overhead and profit charges are allowed. E. Industry Standards: 1. Applicability of Standards: Except where more explicit or stringent requirements are written into the Contract Documents, applicable construction industry standards have the same force and effect as if bound into or copied directly into the Contract Documents. Such industry standards are made a part of the Contract Documents by reference. Individual specification sections indicate which codes and standards the Contractor must keep available at project site for reference. 2. Publication Dates: Except as otherwise indicated, where compliance with an industry standard is required, comply with standard in effect as of date of Contract Documents. SUMMARY OF WORK (Revised 05/15/12) 01 11 00-1 3. Conflicting Requirements: Where compliance with two or more standards is specified, and where these standards establish different or conflicting requirements for minimum quantities or quality levels, the most stringent requirement will be enforced, unless the Contract Documents specifically indicate otherwise. Refer requirements that are different, but apparently equal, and uncertainties as to which quality level is more stringent to the Owner for a decision before proceeding. 4. Copies of Standard: The Contract Documents require that each entity performing work be experienced in that part of the work being performed. Each entity is also required to be familiar with industry standards applicable to that part of the work. Copies of standards are needed for proper performance of the work; the Contractor is required to obtain such copies directly from the publication source. 5. Abbreviations and Names: Trade association names and titles of general standards are frequently abbreviated. Where acronyms or abbreviations are used in the specifications or other Contract Documents they are defined to mean the recognized name of the trade association, standards generating organization, governing authority, or other entity applicable to the context of the text provisions. F. Codes: Comply with applicable codes and regulations of authorities having jurisdiction. If pertinent codes and standards conflict with any instruction, process or material stated in the Contract Documents, the more stringent shall govern. Submit copies of inspection reports, notices and similar communications to Owner. G. Definitions: 1. Provide: Furnish and install, complete with all necessary accessories, ready for intended use. Pay for all related costs. 2. Approved: Acceptance of item submitted for approval. Not a limitation or release for compliance with the Contract Documents or regulatory requirements. Refer to limitations of ‘Approved’ in General and Supplementary Conditions. 3. Match Existing: Match existing as acceptable to the Owner. H. Intent: Drawings and specifications are intended to provide the basis for proper completion of the work suitable for the intended use of the Owner. Anything not expressly set forth but which is reasonably implied or necessary for proper performance of the project shall be included. I. Writing style: Specifications are written in the imperative mode. Except where specifically intended otherwise, the subject of all imperative statements is the Contractor. For example, ‘Provide tile’ means ‘Contractor shall provide tile’. PART 2 – PRODUCTS – Not Applicable To This Section PART 3 – EXECUTION – Not Applicable To This Section SUMMARY OF WORK (Revised 05/15/12) 01 11 00-2 SECTION 01 20 00 PROJECT PROCEDURES PART 1 – GENERAL 1.01 SUMMARY A. Follow project procedures for proper submission of payment request, schedules, contract correspondence documents, coordination of work, and communication with Owner and Architect. B. Submit information on Owner provided Project Forms where referenced by AIA, CSI, ORL, or ES numbers. Refer Section 00 90 00 for listing. 1.02 PROCEDURES PRIOR TO CONSTRUCTION A. Within 72 hours of Contractor’s receipt of Notice to Proceed or letter of intent. 1. Submit Subcontractors and Major Material Suppliers to be used for the project, (ORL-G). B. Within 10 days upon Contractor’s receipt of Notice to Proceed or letter of intent. 1. Submit proposed progress schedule, bar-chart type, indicating a time bar for each trade or operation or work to be performed at the site. Time bar shall demonstrate planned work, properly sequenced and intermeshed, for expeditious completion of the project. 2. Forward copy of building permit within 48 hours of issuance by Government Agency. C. Prior to commencing work on the project, Contractor must record Notice of Commencement or similar notices to the extent applicable in the state where the project is located. Provide copy of recorded notice to Owner. 1.03 PROCEDURES DURING CONSTRUCTION A. Progress Payment Request Procedures: Application for payment and lien waivers to be received together on a monthly basis. Submit electronically to [email protected]. Refer to Article 21.2c of the General Conditions of the Contract for electronic submittal requirements. 1. Submit Application and Certificate for Payment (AIA G702 and G703). a. Itemize separate line cost for each major item of work and each subcontracted item of work (Sections under Division 2 through 33 in Table of Contents as a basis for listing). b. Application to include a summary of approved Change Orders. Actual copies of change orders are not required. B. Requirements for sequencing or scheduling: 1. Coordination: a. Coordinate the work of all trades. b. Verify location of utilities and existing conditions. c. Schedule 10 days after notice to proceed with local utility companies for installation of utility service connections. 2. Work: Owner Furnished, Contractor Installed a. Section 07 21 00 – Building Insulation. Refer to GBP Silvercote Insulation Delivery Procedures attached to end of this section. b. Section 08 11 19 – Steel Doors and Frames. Refer to GBP Silvercote Delivery procedures attached to end of this section. c. Section 08 71 00 – Door Hardware. Refer to GBP Silvercote Delivery procedures attached to end of this section. PROJECT PROCEDURES (Revised 03/21/14) 01 20 00-1 Section 13 34 19 - Pre-Engineered Metal Building System Erection. Owner to schedule with Contractor 28 days prior to anticipated shipping date of Owner supplied Pre-Engineered Metal Building. e. Division 20, 21, 22, 23 and 25 – Mechanical. Contractor to schedule with Owner’s Mechanical Equipment Supplier 14 days prior to completion of building areas being prepared for installation of mechanical systems for ordering, shipping, and receiving of equipment. Orders are to be filled out and submitted by fax on Supplier provided form (ES 1.1). Refer to procedures attached to end of this section. f. Division 26 – Electrical. 1) Light fixture package and switchgear. Refer to procedures attached to end of this section 2) EMS package. Refer to procedures attached to end of this section. Inspection: 1. Contractor to notify Owner’s testing and inspection company prior to beginning major portions of the work as required by individual specification sections, but not less than 48 hours. 2. Coordinate with local, state or federal organizations having jurisdiction over the project for notification and inspection requirements. Forward copies of reports to Owner. 3. Meetings or correspondence between Contractor and Entities having jurisdiction over the project which result in requested modifications to the Work shall be summarized in writing within 72 hours of such meeting and forwarded to Owner for review and response. Testing: 1. Comply with Section 01 45 16 – Quality Control Procedures. 2. Unless otherwise indicated, Owner shall provide testing and inspection professional services as required by General Conditions and individual sections. Refer to sections for testing types and frequency requirements. 3. Owner and/or Architect reserve the right to have tests made when deemed necessary. a. Tests not specified as part of a section shall be paid for by the Owner. Should test reveal a failure of the work to meet Contract Document requirements, subsequent tests, related to the failure, will be paid by the Owner, with cost deducted from monies owed to the Contractor by change order. b. Tests shall be made in accordance with recognized standards by a competent, independent testing laboratory. c. Materials found defective or not in conformance with the Contract Document requirements shall be promptly replaced or repaired at the expense of the Contractor. Field engineering: 1. Secure the services of a registered civil engineer, land surveyor, or employ qualified personnel for setting, maintaining and establishing finished elevations and lines. 2. If the site conditions indicated in the Contract Documents differ materially from those the Contractor encounters in the performance of the work, the Contractor shall within 48 hours and before such conditions are disturbed, notify the Owner in writing. Construction contract administration correspondence to be submitted as follows: 1. Weekly report (ORL-R) and supporting photos, summarizing site conditions and activities for the specified period. Report to be submitted by e-mail to [email protected] and received not later than 9:00 am the following Monday or first available business day of Owner operations. a. Photos shall be submitted as follows: 1) Minimum acceptable resolution is approximately 1152 x 864. Maximum is 1400 x 1200. d. C. D. E. F. PROJECT PROCEDURES (Revised 03/21/14) 01 20 00-2 2) Set the photo quality and/or image resolution on the camera to the “fine” setting. 3) Photos should be date stamped 4) Send the photos as an attachment of the e-mail, not as embedded images. 5) Photos should be submitted as a .jpg/.jpeg file format 6) Weekly reports should have a minimum of 10 photos attached. 2. Contractor’s Request for Interpretation (CSI 13.2A). 3. Contractor’s Change Order Request Proposal (CSI 13.6A). 4. Contractor’s Proposal Worksheet (CSI 13.6C and CSI 13.6D). G. Contractor to maintain record drawings and specifications on site by annotation as work progresses. 1.04 GENERAL PROCEDURES A. Dimensions: Verify dimensions indicated on drawings with field dimensions before fabrication or ordering of materials. DO NOT scale drawings. B. Cutting and Patching: 1. Provide cutting and patching work to properly complete the work. Do not cut and patch in a manner that would result in a failure of the work to perform as intended, decreased energy performance, increased maintenance, decreased operational life, or decreased safety. 2. Perform work with workmen skilled in the trades involved. Use proper tools to minimize damage to adjacent work. Check for concealed utilities and structure before cutting. 3. Match existing materials with new materials conforming to project requirements. 4. Make patches, seams, and joints durable and inconspicuous. Comply with tolerances of new work. C. General Installation Requirements 1. Inspect substrates and report unsatisfactory conditions in writing. 2. Do not proceed until unsatisfactory conditions have been corrected. 3. Take field measurements prior to fabrication where practical. Form to required shapes and sizes with true edges, lines and angles. Provide inserts and templates as needed for work of other trades. 4. Install materials in exact accordance with manufacturer’s instructions and approved submittals. 5. Install materials in proper relation with adjacent construction and with proper appearance. 6. Restore construction and site damaged during installation. Replace construction, which cannot be restored, at no additional expense to the Owner. 7. Refer to additional installation requirements and tolerances specified under individual specification sections. D. Existing conditions: Notify Owner of existing conditions differing from those indicated on the drawings. Do not remove or alter structural components without prior written approval. Inspect conditions prior to work to identify scope and type of work required. Protect adjacent work. 1.05 PROCEDURES PRIOR TO CONTRACT CLOSEOUT A. The following are prerequisites to substantial completion. Provide the following: 1. Punch list (ORL-H). B. Provide the following prerequisites for final acceptance: 1. Final payment request (AIA G702 and G703). 2. Completed punch list (ORL-H). 3. Occupancy Permit. C. Provide the following closeout items: 1. Submission of record documents. PROJECT PROCEDURES (Revised 03/21/14) 01 20 00-3 2. Submission of Warranties, where indicated. 3. Comply with requirements of Section 20 02 00 - Contract Closeout & Commissioning. Submit Operation and Maintenance Manuals. 4. Store Turn Over Walkthrough (ORL-1) 5. Final cleaning and touch-up. 6. Removal of temporary facilities. PART 2 – PRODUCTS – Not Applicable To This Section PART 3 – EXECUTION – Not Applicable To This Section GBP Silvercote Insulation Delivery Procedures When receiving delivery of insulation materials and doors from GBP Silvercote the following items must be completed. 1) The person accepting delivery of the materials for O’Reilly Automotive must sign both Bill of Lading and packing slip showing the number of rolls of insulation, tapes, pallets and packages received. 2) The receiving party should retain copies of the Bill of Lading and packing slip for their job records. 3) Any discrepancies between the number of rolls shown on the packing slip and the number counted by the person accepting the delivery should be noted on the packing slip. Any visible damage to the items received should also be noted on the Bill of Lading. Any notes on damage or count discrepancies must be made in the presence of the truck driver delivering the materials and must be legible on all copies of the Bill of Lading and/or packing slips. Count discrepancies and visible damage should also be reported immediately to GBP/Silvercote. PROJECT PROCEDURES (Revised 03/21/14) 01 20 00-4 PROCEDURES FOR FREIGHT DAMAGED OR SHORT SHIPMENTS FOR LIGHTING AND GEAR FREIGHT DAMAGE: Damage If any of the pieces are damaged, or if boxes are not in good condition, or if there is internal rattling, ACCEPT goods and mark the freight bill indicating what is wrong and the extent of the damage. A copy of the freight bill must be faxed to Graybar at 888-280-0128 within 3 days of receipt of goods. Concealed loss or damage When the delivery receipt is signed clear and upon inspection you find concealed damage, you must report to Graybar within 3 days of receipt . 1) Write and circle the number of pieces you received, and also write the number of pieces damaged. Be sure to write DAMAGED. The specific exception noted on a delivery receipt should: record the number of damaged or missing pieces. identify the affected products and, if available, pallet or carton ID number of damaged goods. describe the damage precisely. SHORTAGES Short Cartons If any pieces/cartons are missing, ACCEPT goods, and write and circle the total pieces you receive. Be sure to write SHORT on the Freight Bill and fax within 3 days to Graybar at 888-280-0128 . Short Goods If upon further inspection of goods you find an internal shortage (not full carton shortage, but item(s) shortage), indicate shortage on packing slip and fax to Graybar at 888-280-0128 within 3 days. Call Kathy Schrumpf with questions at 314-573-2083 PROJECT PROCEDURES (Revised 03/21/14) 01 20 00-5 Contractor Instructions: Delivery, Storage, & Handling A. Sara Tilton, 866-389-4658, should coordinate Carrier HVAC Equipment to jobsite. B. Each site contractor is responsible for following the Damaged and Defective Product Procedures outlined below. Should there be questions on any of this information contact Carrier National Accounts at the listed number. C. Carrier’s return policy is 30 days. Anything over 30 days is subject to be denied for return. Or possible allowance with a restocking fee. D. All equipment, parts, and accessories that are being returned must be in its original packaging. If it is not, distribution will charge us with a restocking fee that will have to be passed on to O’Reilly’s. DAMAGED AND DEFECTIVE PRODUCT REPLACEMENT PROCEDURES FOR O’REILLY AUTO, INC. IN ORDER TO INSURE PROMPT REPLACEMENT AND/OR REIMBURSEMENT FOR HVAC PRODUCTS PROVIDED FOR O’REILLY AUTO, INC. BY CARRIER CORPORATION FOR THIS PROJECT THE JOBSITE CONSIGNEE (CONTRACTOR), IS RESPONSIBLE FOR THE FOLLOWING: FAILURE TO COMPLY WITH THESE GUIDELINES MAY RESULT IN ADDITONAL CHARGES TO THE JOBSITE CONTRACTOR. Damaged Freight When receiving a shipment from freight carrier, please inspect all cartons/units carefully for damage. If you suspect damage, but cannot confirm it at the time, please make a note on the freight bill of “possible concealed damage.” When damage is visible, please describe the type of damage on the delivery papers as well. The truck driver must also sign the delivery receipt acknowledging the damage or shortage. 1. If possible, the packaging and crating material should be kept intact. The material should not be moved for the original location unless absolutely necessary. Concealed damage requires that the trucker be notified within seven (7) days of receipt. 2. A packing slip is provided with each shipment. Please use this to take an inventory of all items received, making note of anything missing or damaged. 3. The jobsite contractor is responsible for filing the freight claim with the trucking company on any damaged product. As well as taking pictures to support the freight claim. PROJECT PROCEDURES (Revised 03/21/14) 01 20 00-6 4. For assistance contact Carrier National Accounts immediately when shipping damage or shortages are identified. Call Carrier National Accounts: Sara Tilton, 866-389-4658 for assistance. 5. Carrier will accept responsibility for the cost of repair or replacement, and freight claim resolution only if the above procedures are followed. Defective Products 1. If a product is found to be defective upon installation the installer must immediately contact: Carrier National Accounts, Sara Tilton, 866-389-4658. At this time a determination will be made on how to most efficiently correct the problem. 2. All parts replacement will be handled within the normal manufacturer’s warranty guidelines. For questions regarding warranty parts replacement contact: Sara Tilton, 866-389-4658. Delivery shortages/Missing products 1. If an order is found to have parts missing at a jobsite contact: Sara Tilton, 866-389-4658. Proof of Delivery will be provided by the carrier involved. IT IS IMPORTANT THAT THE ABOVE PROCEDURES BE FOLLOWED CONCERNING DAMAGED OR DEFECTIVE PRODUCTS. WE WISH TO THANK YOU IN ADVANCE FOR YOUR COOPERATION. PROJECT PROCEDURES (Revised 03/21/14) 01 20 00-7 VENSTAR FREIGHT CLAIM POLICY Occasionally items are lost in transit or shipping damage occurs. Resolving the problem of transit damage or loss depends on the cooperation of all parties. Venstar makes every effort to ensure that your shipment arrives on time and in good condition and when a claim arises, we work with our customers to satisfy all parties All claims for damage or missing items must be made within three days of receipt of the original shipment. All such requests for replacement merchandise shall be made in writing by email to Venstar with a copy to the O’Reilly Project Manager and the O’Reilly National Accounts Supervisor. Failure to do so may result in the General Contractor or Developer/Owner accepting full responsibility for the cost of replacing damaged or short merchandise and associate freight costs incurred. Freight damage claims must be made against the common carrier; therefore, it is imperative that you follow these guidelines: 1. Inspect all shipments upon arrival. If damage or loss is apparent upon delivery, do not accept the shipment until you make a notation of the damage on all copies of the carrier's Bill Of Lading. Have the driver sign all copies to acknowledge the notation. 2. In the event you have signed for a shipment and there is concealed damage do not throw away the packing materials or cartons or there will be no basis for a claim. Contact Venstar at (818) 341-8760 and speak to the shipping department (extension 203) and to the local branch of the carrier immediately. Venstar must file a claim with the carrier but cooperation between the consignee and Venstar are essential to secure a claim. Please note: much of this process will be done in writing. 3. If you do not follow the instructions in Paragraph 1, Venstar will not be able to file a claim and bears no responsibility for freight claims or for damage. 4. Even if the driver acknowledges the damage in writing, an inspection by the carrier will have to take place so retain the merchandise, carton, and packing materials at the address to which shipment was made until the carrier authorizes further action. If you have a camera or digital camera, photographs that record the date on which they were taken will help to speed the claim process. 5. Please advise Venstar immediately of all damage(s). Do not return merchandise to Venstar. File your claim by calling the shipping department at Venstar and be prepared to fax copies of the bill of lading (signed by the driver). Keep all packing materials and boxes with the damaged product. Do not throw anything away until the claim is settled. Although Venstar will file the claim with the carrier, Venstar is not responsible for paying for the freight nor does it accept liability for freight claims or the cost of the repair. The consignee is responsible to pay all freight charges under the terms of Venstar invoices. Questions or comments may be addressed to: Venstar, Inc. 9250 Owensmouth Ave. Chatsworth, CA 91311 Attn: Shipping Dept. (818) 341-8760 [email protected] END OF SECTION PROJECT PROCEDURES (Revised 03/21/14) 01 20 00-8 SECTION 01 33 00 SUBMITTALS AND SUBSTITUTIONS PART 1 – GENERAL 1.01 SUMMARY A. Provide types of submittals including shop drawings, product data, samples, schedules, reports, and request for substitutions, as required by the Bidding and Contract Documents in strict accordance with provisions listed in individual sections and number of copies indicated. B. Provide required resubmittals if original submittals are not approved. Provide distribution of approved copies including modifications after submittals have been approved. C. Provide warranties as specified; warranties shall not limit length of time for remedy of damages Owner may have by legal statute. Warranties shall be signed by contractor, supplier or installer responsible for performance of warranty. PART 2 – PRODUCTS 2.01 PRE-BID SUBSTITUTIONS A. The naming of specified items on the drawings or in the specifications mean that such named items are specifically desired by the Owner. If the words “or acceptable equal” or “or approved equal” follows such named items, substitution request may be submitted. REQUEST FOR SUBSTITUTION MUST BE RECEIVED BY OWNER 5 DAYS PRIOR TO BID SUBMITTAL, UNLESS OTHERWISE NOTED. B. Substitution Request Forms (Refer Section 00 90 00): Request must be submitted on copies of form (CSI 1.5C) and must name the exact item proposed with complete information filled out and back-up data attached as specified on that form. Use separate Substitution Request Form for each item. Submit one copy of form and backup data for architectural items and two copies of form and back-up data for engineering items. Request showing only brand name or manufacturer, or otherwise incomplete, will not be reviewed. Submit samples if requested. C. The Owner is the sole judge as to the equality of proposed substitutions. Only written acceptances will be held valid by the Owner. D. If any substitution will affect a correlated function, adjacent construction, or the work of other trades or contractors, the necessary changes and modifications to the affected work will be considered as part of the substitution, to be accomplished without additional cost to the Owner, if and when accepted. E. Under no circumstances shall the Owner’s acceptance of any such substitution relieve the Contractor from timely, full and proper performance of the work. 2.02 AFTER AWARD OF CONTRACT SUBSTITUTION REQUEST A. Substitution request will be considered only under one of the following conditions: 1. Unavailability of specified product due to a strike, lockout, bankruptcy, discontinuance of manufacturing of a product, or natural disasters. Submit proof that orders were placed within 10 days after review by Owner of item listed in specifications. Failure to order materials in time for proper delivery is not an acceptable condition. 2. When warranty of performance is required and, in the judgement of the Contractor, the specified product or process will not produce the desired result. SUBMITTALS AND SUBSTITUTIONS (Revised 05/15/12) 01 33 00-1 B. Submit request for such substitution in writing to Owner within 10 days of date of ascertaining unavailability of material or equipment specified, or that the performance cannot be warranted. C. If any substitution will affect correlated function, adjacent construction, or work of other trades or contractor, the necessary changes and modifications to the affected work will be considered as part of the substitution, to be accomplished without additional cost to Owner, if and when accepted. D. Approved substitutions will be effected by a Change Order. Under no circumstances shall the Owner’s acceptance of any such substitution relieve the Contractor from timely, full and proper performance of the work. 2.03 SHOP DRAWINGS A. Submit required shop drawings drawn to a scale sufficiently large to show pertinent features of item and its method of connection to work. Submit related shop drawings together; partial submittals will not be accepted. Reproduction of contract documents in any form for use as shop drawings will not be permitted. Provide manufacturer’s name and model number of prefabricated items and indicate methods of attachment and clearances required relative to other trades affecting all elements of work. Identify deviations from Contract Documents, (if any). Check dimensions, check that trades have been coordinated and that no conflict will develop in this installation. After reviewing shop drawings, indicate Contractor’s approval by signing and dating on Contractor’s stamp. Failure to follow these procedures will result in rejection of submission and no additional contract time will be allowed for delay for this cause. B. Submit one reproducible and one print of Contractor’s stamped and approved shop drawings for Owners review. The Owner will review the reproducible and stamp it with indication of action as appropriate. The Owner will retain the print for his record, and will return the reproducible to the Contractor. For reproducible returned “Rejected” or “Returned for Corrections-Resubmit”, correct the original drawings, make a new reproducible reproduction and print, and resubmit. For reproducible returned “Accepted Subject to Contract Requirements” or “Accepted as Noted Subject to Contract Requirements”, provide such number of prints of the reproducible as may be needed for field distribution. 2.04 PRODUCT DATA AND SAMPLES A. Submit (1) copy of product data for Owner’s review for items specified in various specification sections (copies for mechanical and electrical data is specified in Divisions 20, 21, 22, 23, 25, and 26). Submit samples, where specified, along with product data. Make submissions affecting color selection within 30 days after signing the Contract. Mark data clearly to indicate exact items submitted, and note deviations from Contract Documents, (if any). After reviewing the submittals, indicate approval by signing and dating on Contractor’s stamp, and submit to the Owner for review. PART 3 – EXECUTION 3.01 IDENTIFICATION OF SUBMITTALS A. Completely identify each submittal and re-submittal by showing at least the following information: 1. Name of project as it appears on Construction Documents. 2. Name and address of submitter, plus name and telephone number of the individual who may be contacted for further information. 3. Drawing number and specifications section number to which the submittal applies. 4. Whether this is an original submittal or re-submittal. SUBMITTALS AND SUBSTITUTIONS (Revised 05/15/12) 01 33 00-2 3.02 TIMING OF SUBMITTALS A. General: Make all submittals far enough in advance for schedule dates of installation to provide all required time for reviews, for securing necessary approvals, for possible revision and re-submittal, and for placing orders and securing delivery. B. Delays: Costs of delays due to late submittals may be back-charged as necessary and shall not be borne by the Owner. END OF SECTION SUBMITTALS AND SUBSTITUTIONS (Revised 05/15/12) 01 33 00-3 SECTION 03 35 43 POLISHED CONCRETE FINISHING PART 1 - GENERAL 1.01 SUMMARY A. Provide polished concrete finishing system where indicated on drawings, complete. This section includes the following: 1. Concrete floor substrate grinding to specified finish. 2. Applying sealer, hardener and densifier and performing grinding and polishing to specified finish. 3. Application of protective sealer and stain inhibiter and polishing to specified finish. B. Special Note: Products, materials, tolerances and installation requirements specified under this section shall govern over requirements specified in other related sections. Coordinate with polished concrete finish locations indicated on drawings. 1.02 SUBMITTALS A. Comply with Section 01 33 00. B. Test Reports: Upon request provide sheen gloss reading test results conducted as specified and recorded on floor plan diagram confirming compliance with specified performance criteria. C. Warranty: Provide 10 year product manufacturer’s warranty agreeing to replace and repair defective materials that may occur within the warranty period at no cost to the Owner. D. Installer’s Certification: Provide letter documenting Installer’s accreditation and certification compliance as specified under quality assurance. 1.03 QUALITY ASSURANCE A. The following specifications are provided as a guide to the minimum “Polishing/Grinding Steps” and liquid densifier/sealer applications required. It is the contractor/installers ultimate responsibility to provide a diamond polished/ground floor meeting the specified criteria. In all cases the specified Surface Preparation and Cleaning steps, the minimum number of specified Diamond Polishing/Grinding Steps, the specified applications of liquid densifier and concrete stain inhibitor/sealer shall be performed. B. Comply with governing codes and regulations. Provide products of acceptable manufacturers which have been in satisfactory use in similar service for three years. C. Installer’s Certification: 1. Contact manufacturers specified for listing of approved Certified Installers. 2. Use experienced installers who have successfully performed a minimum of 5 projects of at least 6000 square feet each. Upon request provide listing of projects and contact references. 3. Upon request provide letter of certification from manufacturer stating that Installer is certified applicator of polished concrete finishing system specified and is familiar with proper procedures and installation requirements required by the manufacturer. D. Deliver, handle, and store materials in accordance with manufacturer’s instructions. Maintain records of product container numbers. E. Standards: Comply with the provisions of the following specifications and standards, except as otherwise noted or specified, or as accepted or directed by the Owner.. 1. Comply with related standards indicated in Section 03 30 00 Cast-In-Place Concrete. POLISHED CONCRETE FINISHING (Revised 07/30/12) 03 35 43 - 1 2. ASTM E 1155, Standard Test Method for Determining Floor Flatness and Levelness Using the F number system. 3. ASTM E 430, Standard Test Methods for Measurement of Gloss of High-Gloss Surfaces by Abridged Goniophotometry. 4. ASTM G23-81, Standard Test Method for Ultraviolet Light and Water Spray Resistance. F. Finish and Appearance Quality Standards per Concrete Polishing Association of America (CPAA): 1. Level of cut / aggregate exposure based on the following criteria: a. Level 1 - Cream: Polishing only the portland paste at the surface of the substrate without exposing small, medium or large aggregate. b. Level 2 – Salt/Pepper: Exposing the fine aggregate such as sand and small aggregate within the substrate. The depth of grind will depend greatly on placement and finishing procedures. Generally this level of grind can be achieved within 1/16 inch of the surface. c. Level 3 – Medium Aggregate: Exposing more of the overall girth of the aggregate within the substrate. The depth of grind will depend greatly on the placement and finishing procedures. Generally this level of grind can be achieved within 1/8 inch of the surface. d. Level 4 – Large Aggregate: Exposing the overall girth of the aggregate within the substrate. The depth of grind will depend greatly on the placement and finishing procedures. Generally this level of grind can be achieved within ¼ inch of the surface. 2. Level of sheen per ASTM E 430 when the concrete surfaced is mechanically processed. Gloss readings are not to be obtained through the use of any microfilming products, sealers, coating, enhancers or the result of resin transfer from resin bond abrasives. Readings shall be taken not less than 10’ on center in field areas and within 1’ of floor area perimeters. In no case shall a reading be below 2% of specified minimum sheen. a. Level A Sheen (Satin) as determined by gloss reading of 45-60 before application of specified concrete stain inhibitor and sealer. Not less than 5 step process concluding with 800 grit resin bonded tooling. b. Level B Sheen (Semi-Gloss) as determined by gloss reading of 60-70 before application of specified concrete stain inhibitor and sealer. Not less than 6 step process concluding with 1500 grit resin bonded tooling. c. Level C Sheen (High Gloss0 as determined by gloss reading of 70 or higher before application of specified concrete stain inhibitor and sealer. Not less than 7 step process concluding with 3000 grit resin bonded tooling. PART 2 – PRODUCTS 2.01 PROJECT SYSTEM PERFORMANCE AND APPERANCE CRITERIA A. Concrete Mix Color: Natural without dyes or pigment additives. B. Quality Level of Cut: Level 1 – Cream. C. Quality Level of Sheen: Level A, Satin, Polished with 800 grit minimum, Gloss reading 45-60 per ASTM E 430. D. Ultra Violet Light and Water Spray: ASTM G23-81 – No adverse effect to ultra violet and water spray. 2.02 MATERIALS AND MANUFACTURERS A. GENERAL 1. Compatibility: Provide products which are recommended by manufacturers to be fully compatible with project substrate conditions and special concrete floor finish materials, means and methods. POLISHED CONCRETE FINISHING (Revised 07/30/12) 03 35 43 - 2 2. Provide special concrete floor finish products from a single manufacturer unless otherwise approved. 3. All products used shall comply with Environmental Protection Agency (EPA) volatile organic compound (VOC) evaporation requirements. B. CAST-IN-PLACE CONCRETE MATERIALS 1. Materials: Comply with Section 03 30 00. Materials and products shall be compatible with special concrete floor finish system. C. SEALER, HARDENER AND DENSIFIER PRODUCTS 1. Manufacturers: Contact manufacturers for listing of Certified Installers of specified products. a. Advanced Flooring Products, 888-942-3144. b. Euclid Chemical Company, 800-321-7628. c. L&M Construction Chemicals, 800-362-3331. 2. Concrete Sealer, Hardener and Densifier: Advanced Flooring Products “RetroPlate 99”, Euclid “Euco Diamond Hard”, L&M “FGS Hardener Plus”, or approved equal. 3. Concrete Stain Inhibitor and Sealer: Advanced Flooring Products “RetroGuard Stain Inhibitor and Sealer”, Euclid “Euco Diamond Hard”, L&M “PermaGuard SPS”, or approved equal. D. AUXILIERY MATERIALS 1. Water: Potable. 2. Joint Sealants: Semi-rigid, 2-component, self-leveling, 100% solids, rapid curing, polyurea control and expansion joint filler with Shore A 80 or higher hardness. Comply with Section 07 92 00. Materials and products shall be compatible with special concrete floor finish system. Use color that matches adjacent surface finish. 3. Grinding and Polishing: Provide other related materials as recommend by manufacturer, not specifically described, but required for complete and proper system installation. 4. Cleaning and Preparation Agents: Products recommended by manufacturer for project conditions. 5. Protection Materials: Products recommended by manufacturer for project conditions. PART 3 – EXECUTION 3.02 PROJECT CONDITIONS A. Environmental Requirements: 1. Comply with manufacturer’s written instruction for substrate temperature and moisture content, ambient temperature and humidity, ventilation and other conditions affecting installation and performance of special concrete floor finish. 2. Coordinate scheduling with Owner to provide completion of installation of special concrete floor finish prior to 10 days minimum of installation of racking and equipment for an uninhibited continuous application of finish system. B. Examination: 1. Inspect substrate and report unsatisfactory conditions in writing. Verify that surfaces and site conditions are ready to receive work. Correct conditions detrimental to timely and proper installation of work. Beginning work means acceptance of substrate conditions. 2. Concrete must be cured for sufficient period recommended by the special concrete floor finish manufacturer before application can begin. 3. Comply with special concrete floor finish manufacturer’s recommendations and instructions. Clean, prime and prepare substrate surfaces for proper installation. C. Tolerances: 1. Comply with Section 03 30 00. POLISHED CONCRETE FINISHING (Revised 07/30/12) 03 35 43 - 3 2. Where new or existing substrates are not in compliance with specified tolerances provide repair, grinding, patching or other remedies recommended by polished concrete floor finish manufacturer for project conditions and approved by the Owner and/or Architect. D. Protection: 1. Provide manufacturer’s approved substrate protection materials, means and methods to maintain and ensure system performance and appearance criteria specified. 2. Avoid surface deposits of oil, chemicals, agents or other material that will adversely affect special concrete floor finish performance or appearance. No satisfactory chemical or cleaning procedure may be available to remove petroleum stains from the concrete surface. Prevention is therefore essential. 3. All hydraulic powered equipment must be diapered to avoid staining of the concrete. 4. No trade will park vehicles on the inside slab. If necessary to complete work, drop cloths will be placed under vehicles at all times. 5. No pipe cutting machine shall be used on the inside floor slab. 6. Do not place steel on interior slab to avoid rust staining. 7. All equipment must be equipped with non-marking tires. 8. Do not drag or drop equipment or material across the slab which will scratch, chip or damage surfaces. 3.03 INSTALLATION A. General: 1. Install polished concrete floor finishing system per manufacturer’s recommendations and instructions. Use equipment, means and methods for proper installation. 2. Where walls, columns or substrate penetrations are installed adjacent to or through polished concrete floor finish areas, extend grinding and polishing process to within 1” maximum distance from perimeter of surface interrupting condition by means necessary for uniform appearance with field surface area finish. B. Concrete Substrate Installation: 1. New Construction: a. Comply with Section 03 30 00 and the governing requirements of this section. b. Provide hard steel trowel finish with a minimum of 3 separate passes with power trowel to achieve Class 5 finish as described in ACI 302R to comply with minimum tolerances specified in this section. c. Provide concrete curing and sealing materials compatible with special concrete floor finish system recommended by manufacturer. 2. Existing Construction: a. Remove existing applied floor finish(s) including, but not limited to, carpet, VCT, tile, grout, mastic, adhesives, paint, epoxy or other non-concrete floor material to concrete substrate conditions by appropriate means and methods necessary for proper installation of new special concrete floor finish per manufacturer’s recommendations. b. Where existing substrates are not in compliance with specified tolerances provide repair, grinding, patching or other remedies recommended by special concrete floor finish manufacturer for project conditions and approved by the Owner and/or Architect C. Concrete Substrate Grinding and Polishing: 1. Use equipment, means and methods recommended by manufacturer. 2. Grind, polish and clean concrete floor surfaces using methods depending on substrate conditions to achieve project system performance and appearance criteria. 3. Scrub and rinse floor and remove residual color, dust and debris. POLISHED CONCRETE FINISHING (Revised 07/30/12) 03 35 43 - 4 D. E. F. G. 4. All grinding and polishing passes shall be made in the same direction until the entire given area has been covered. New Construction Concrete Control Joints: 1. Freshly Placed Uncured Concrete: After concrete grinding and polishing, clean concrete substrate of dirt, chalk, markings and saw cut debris with cleaning agent or process recommended by manufacturer. Sealer, Hardener and Densifier Application: 1. Prior to application of product, substrate to be clean, dry and absorbent. Confirm surface absorbency with a light water spray. If surface does not wet uniformly, use appropriate surface preparation cleaner or mechanical process to remove remaining surface contaminants per manufacturer’s recommendations. 2. Calculate Target Coverage Rate: Variations in concrete quality, porosity, job conditions, temperature and relative humidity will affect coverage rates and drying times. Test a representative section of the substrate surface to calculate the target coverage rate, but not less than 200 sq. ft. per gallon. 3. Apply material at specified coverage rate by means recommend by manufacturer. Apply sufficient product to wet the surface without producing puddles. Use a clean, soft bristle push broom, microfiber pad or other means recommended by manufacturer to spread the product and ensure uniform wetting, saturation and penetration of surfaces. 4. If surfaces dry immediately or become sticky, increase rate of application and reapply product. Avoid excess material puddling. 5. Before product dries and cures, immediately clean surfaces not intended to receive application of material. 6. Allow treated surfaces to dry or cure for duration recommended by manufacturer for project conditions. 7. Remove any dried powder residue using stiff broom, power sweeper, automatic scrubbing machine, and/or cleaning agent recommended by manufacturer. Avoid pads or brushes which may damage the floor finish. Sealer and Stain Inhibiter Application: 1. Prior to application of product, surfaces to be clean, dry and absorbent. Use appropriate surface preparation cleaner or mechanical process to remove contaminants per manufacturer’s recommendations. 2. Calculate Target Coverage Rate: Variations in concrete quality, porosity, job conditions, temperature and relative humidity will affect coverage rates and drying times. Test a representative section of the substrate surface to calculate the target coverage rate per manufacturer’s recommendations, but not less than 500 sq. ft. per gallon. 3. Apply material at the specified coverage rate by means recommend by manufacturer to produce an even coat. Restrict spreading area of product to maintain wet edge and avoid drying and visible overlapping. 4. Allow treated surfaces to dry or cure for duration recommended by manufacturer for project conditions. 5. Once dry, burnish surface using a high-speed burnisher, or polishing pad for use on gloss finishes, to heat and fuse the material bond to increase durability and longevity. Surface temperatures immediately behind the burnisher must achieve 90.5 degrees Fahrenheit. 6. Repeat sealer and stain inhibiter material application and burnishing process between coats as necessary for specified gloss finish. Apply up to three coats maximum. 7. Do not allow floor to be subjected to any forms of moisture, including mopping and wet foot traffic for 72 hours minimum. Testing: 1. Test with a properly calibrated abridged goniophotometry device in accordance with ASTM E 430. POLISHED CONCRETE FINISHING (Revised 07/30/12) 03 35 43 - 5 2. Record results on floor plan diagram. Readings shall be taken not less than 10’ on center in field areas and within 1’ of floor area perimeters. 3. Results shall comply with specified system performance and appearance criteria. 4. Rework areas not in compliance until acceptable results are achieved or otherwise approved by Owner. H. Joint Sealant Installation: 1. Clean concrete floor joints and substrate by means necessary to allow proper bonding and sufficient sealant material deposit. 2. Install sealant material in control and expansion joints in compliance with Section 07 92 00. 3. Install joint sealants to a depth flush with adjacent surfaces. 4. Remove excess material and clean. 3.04 PROTECTION, REPAIR AND CLEANING A. Provide disposal of slurry, dust and debris in compliance with applicable codes. B. Remove debris and spatter from adjoining surfaces as necessary. C. Repair damages to surface caused by cleaning operation and construction activities per manufacturer’s recommendations. D. Restrict areas to traffic, cover and provide protection as specified and per manufacturer’s recommendations to prevent damage by other trades during project completion. E. Protect from elements, sweep, clean and maintain until project completion and Owner’s acceptance of the work. F. Provide Owner’s representative documentation for proper cleaning and maintenance. 3.05 NON CONFORMING WORK A. If O'Reilly does not accept defective or non-conforming Work, the contractor shall install, at Contractor’s expense (09 65 00) Resilient Flooring and (09 65 13) Resilient Base and Accessories. A Change Order will be issued to reflect an appropriate reduction in the Contract Sum to reimburse Owner the expense of two years of VCT maintenance costs, if VCT installation is required. END OF SECTION POLISHED CONCRETE FINISHING (Revised 07/30/12) 03 35 43 - 6 SECTION 05 40 00 COLD-FORMED METAL FRAMING PART 1 – GENERAL 1.01 SUMMARY A. Provide cold-formed metal framing: 1. Exterior and interior load-bearing steel-stud framing. 2. Exterior and interior nonload-bearing steel-stud framing. 1.02 SUBMITTALS A. None required unless submitting for approved equals. 1.03 QUALITY ASSURANCE A. Comply with governing codes and regulations. Provide products of acceptable manufacturers, which have been in satisfactory use in similar service for at least three years. Use experienced installers. Deliver, handle, and store materials in accordance with manufacturer’s instructions. B. Standards: Comply with the provisions of the following specifications and standards, except otherwise noted or specified, or as accepted or directed by the Architect. 1. AISI, Specification for Design of Cold-Formed Steel Structural Members. 2. AWS D1.3, Structural Welding Code. 3. ASTM A1003-13a Standard Specification for Sheet Sheet, Carbon, Metallic- and Nonmetallic-Coated for Cold-Formed Framing Members. 4. ASTM C645-11a, Specifications for Non-Load (Axial) Bearing Steel Studs, Runners (Tracks), and Rigid Furring Channels for Screw Application of Gypsum Board. 5. ASTM C754-11, Specifications for Installation of Steel Framing Members to Receive Screw-Attached Gypsum Board. 6. ASTM C1007-11a Standard Specification for Installation of Load Bearing (Transverse and Axial) Steel Studs and Related Accessories. 1.04 LOADING AND DEFLECTION CRITERIA A. In addition to the loads indicated on the drawings, components to withstand design criteria as follows: 1. Interior partition framing: 5 psf minimum lateral load. 2. Exterior masonry veneer framing: L/600 total deflection. 3. All other framing locations, unless otherwise indicated: L/240 total deflection. B. Design system to provide movement of components without damage. 1.05 TOLERANCES A. Fabrication Tolerances: 1/8-inch in 10’. B. Erection Tolerances: 1/16-inch. PART 2 – PRODUCTS 2.01 MATERIALS COLD-FORMED METAL FRAMING (Revised 06/28/13) 05 40 00-1 A. Manufacturers: Marino, Dietrich, Dale/Incor, Superior, USG, Gold Bond, Unimast, or approved equal. B. Sheet Steel: ASTM A1003-13a, grade as required for structural performance of project conditions, G60 galvanized coating. Where in direct contact with fire treated wood products, provide G90 galvanized coating. C. Cold-Formed Metal Framing Materials: Refer to drawings for specific member requirements: 1. Exterior Framing: C-shaped load-bearing steel studs with 1.625-inch flange and flange return lip. 2. Interior Framing (Load-Bearing): C-shaped steel studs with 1.625-inch flange and flange return lip. 3. Interior Framing (Non-Load Bearing)” C-shaped steel studs with 1.250 inch flange and flange return lip. 4. Shaftwall Framing: C-H, C-T, or I-shaped nonload bearing steel studs. 5. Runner Channel: U-shaped with 1.25-inch minimum flange. 6. Joist Framing: C-shaped load-bearing steel joists with 1.625-inch flange and flange return lip. 7. Furring Channel: W-shaped steel furring channels. 8. Furring Channel: Z-shaped, steel furring channels for rigid board insulation, 1 ¼” wide screw flange, toed in leg to grip insulation positively 9. Resilient Channel: Single-leg, ½" deep x 1 ¼” wide screw flange 10. Deflection Channel: Single slip track design with 2.0-inch minimum flange length. 11. Units 14 gage (68 mils.) (.0677-inch min.) and heavier: Yield point 50,000 psi. 12. Units 16 gage (54 mils.) (.0538-inch min.) and heavier: Yield point 50,000 psi. 13. Units 18 gage (43 mils.) (.0428-inch min.): Yield point 33,000 psi. 14. Units 20 gage (33 mils.) (.0329-inch min.): Yield point 33,000 psi. 15. Units 24 gage (18 mils.) (.0179-inch min.): Yield point 33,000 psi. D. Framing Accessories: With each type of metal framing required, provide manufacturers standard accessories as recommended by manufacturer for applications indicated, as needed to provide a complete metal framing system, including: 1. Supplementary framing. 2. Lateral bracing, bridging, and solid blocking. a. Strap: 1-1/2” x 20 gage. b. Channels: 1-1/2” x 20 gage. 3. Web stiffeners. 4. Gusset plates. 5. Deflection track and vertical side clips. 6. Stud kickers and girts. 7. Joist hangers and end closures. 8. Reinforcement plates. 9. Anchors, clips, and fasteners. PART 3 – EXECUTION 3.01 GENERAL A. Install materials and systems in accordance with manufacturer’s instructions and approved submittals. Install materials and systems in proper relation with adjacent construction. Coordinate with work of other sections. B. Comply with requirements of ASTM C1007-11a for installation of steel studs and accessories and Metal Lath/Steel Framing Association Lightweight Steel Framing Systems Manual. C. Make provisions for erection stresses. Provide temporary alignment and bracing. Framing components may be prefabricated into panels prior to erection. Perform lifting of prefabricated panels in a manner to prevent damage or distortion in any members in the assembly. Wire tying of framing components is NOT permitted. COLD-FORMED METAL FRAMING (Revised 06/28/13) 05 40 00-2 3.02 INSTALLATION A. Runner Tracks: Install continuous tracks sized to match studs. Align tracks accurately to the layout at base and top of studs. Secure tracks as recommended by the stud manufacturer for the type of construction involved, except do not exceed 24-inches on center spacing for nail or power driven fasteners, nor 16-inches on center for other types of attachment. Provide fasteners at corners and ends of tracks. B. Wall Studs: Install at 24-inches on center, unless otherwise indicated. 1. Set studs plumb, except as needed for diagonal bracing or required for non-plumb walls or warped surfaces and similar requirements. 2. Secure studs to top and bottom runner tracks by either welding or screw fastening at both inside and outside flanges. Erect horizontal and vertical load bearing studs one piece full length. Splicing of studs is NOT permitted. Punch-outs shall be 10inches minimum from ends of studs. 3. Allow for deflection, directly below horizontal building framing for non-load bearing framing as indicated on drawings. 4. Install horizontal stiffeners in stud system, spaced vertically at not more than 4 feet on center. Fasten at each stud intersection. 5. Construct corners using minimum 3 studs. Double stud wall openings, door and window jambs with opening larger than 2 feet square, except where indicated in manufacturers instructions. Install runner tracks and jamb studs with stud shoes or by welding and space jack studs same as full height studs of the wall. Secure stud system all around to wall opening frame in the manner indicated. 6. Install supplementary framing, blocking, and bracing in the metal framing system wherever walls or partitions are indicated to support fixtures, equipment, services, casework, heavy trim and furnishing, and similar work requiring attachment to the wall or partition. Where type of supplementary support is not otherwise indicated, comply with the stud manufacturer’s recommendations and industry standards in each case, considering the weight of loading resulting from the items supported. 7. Where stud system abuts structural columns or walls, anchor ends of stiffeners to supporting structure. 8. Install diagonal racking bracing at each corner where walls are free standing and not attached to structure. 9. Frame both sides of expansion and control joints, with separate studs; DO NOT bridge the joint with components of the stud system. C. Joist: Install at 24-inches on center, unless otherwise indicated. 1. Place joist as shown on drawings; not more than 2-inches from abutting walls. Connect joist to supports using fasteners or welding 2. Set joist parallel and level, with lateral bracing and bridging. 3. Locate joist end bearing directly over load bearing studs or provide load distributing member to top of stud track. Punch-outs shall be 10-inches minimum from ends of joist. 4. Provide web stiffeners at reaction point and/or as shown on drawings. 5. Provide double joist at floor openings exceeding 2 feet and at interruption of one or more spanning members. 6. End blocking shall be provided where joist ends are not otherwise restrained from rotation. D. Restore damaged components. Protect work from damage. END OF SECTION COLD-FORMED METAL FRAMING (Revised 06/28/13) 05 40 00-3 SECTION 05 50 00 METAL FABRICATIONS PART 1 – GENERAL 1.01 SUMMARY A. Provide the following where indicated on drawings: 1. Rough hardware. 2. Pipe bollards. 3. Loose bearing, leveling plates and templates. 4. Anchor bolts, expansion anchors and miscellaneous fasteners. 5. Steel supports for work of other trades. 6. Loose steel lintels. 7. Pipe and tube handrails and guardrail systems. 8. Roof access ladder. 9. Sidewalk drain cover plates, edge angles, and studs. 1.02 SUBMITTALS A. Comply with Section 01 33 00. B. Upon request submit shop drawings of pipe and tube handrails and guardrail for approval. 1.03 QUALITY ASSURANCE A. Comply with governing codes and regulations. Provide products of acceptable manufacturers, which have been in satisfactory use in similar service for three years. Use experienced installers. Deliver, handle, and store materials in accordance with manufacturer’s instructions. B. Standards: Comply with the provisions of the following specifications and standards, except as otherwise noted or specified, or as accepted or directed by the Architect. 1. AISC A 36-90, “Specifications of Structural Steel”. 2. ASTM A 53-90a, “Specification of Pipe, Steel, Black and Hot-Dipped, Zinc-Coated Welded and Seamless”. 3. ASTM A 500-90, “Specification for Cold-Formed Welded and Seamless Carbon Steel Structural Tubing in Rounds and Shapes”. 4. ASTM A 501-89, ‘Specification for Hot-Formed Welded and Seamless Carbon Steel Structural Tubing”. PART 2 – PRODUCTS 2.01 MATERIALS A. Ferrous Materials: 1. Steel Plates, Shapes and Bars: ASTM A 36. 2. Steel Pipe, Black Finish: ASTM A 53. 3. Steel Tubing: ASTM A 500 or A 501. 4. Rolled Steel Floor Plates: ASTM A 786. 5. Reinforcing Bars: ASTM A 615, Grade 60. 6. Concrete Inserts: Threaded or wedge type. 7. Welding Rods and Bare Electrodes: AWS specifications. B. Fasteners: 1. Bolts and Nuts: Hexagon head type, ASTM A 307, Grade A. 2. Lag Bolts: Square head, FS FF-B-561. METAL FABRICATIONS (Revised 08/10/12) 05 50 00-1 3. Machine Screws: Cadmium plated steel, FS FF-S-92. 4. Wood Screws: Flat head carbon steel, FS FF-S-111. 5. Plain Washers: Round carbon steel, FS FF-W-92. 6. Drilled-In Expansion Anchors: FS FF-S-325. 7. Toggle Bolts: Tumble-wing type, FS FF-B-588. 8. Lock Washers: Spring type carbon steel, FS FF-W-84. 9. Zinc-Coating: Fasteners in exterior assemblies or exterior walls. C. Auxiliary Materials: 1. Nonshrink Metallic Grout: CE CRD-C621. 2. Nonshrink Non-Metallic Grout (where exposed): CE CRD-C621. 3. Interior Anchoring Cement: Hydraulic expansion cement. 4. Exterior/Interior Anchoring Cement: Erosion-resistant hydraulic expansion cement. 5. Finish: Primed and painted, refer to Section 09900 for additional requirements. PART 3 – EXECUTION 3.01 GENERAL INSTALLATION A. Take field measurements prior to preparation of shop drawings and fabrication. DO NOT delay job; allow for cutting and fitting if field measurement is not practical. B. Form work true to line with sharp angles and edges. Weld continuously, grind flush and make smooth on exposed surfaces, unless otherwise indicated. C. Field weld components as indicated. Perform field welding in accordance with AWS D1.1. D. Install work plumb and level with hairline joints and ground flush welds. E. Lintels: Provide sizes indicated with 8-inch bearing at each end. F. Touch-up damaged coatings with shop primer and galvanize repair paint. G. Paint items scheduled in accordance with Section 09 90 00. 3.02 MISCELLANEOUS METAL FABRICATIONS A. Pipe Railings: Standard weight steel pipe, with the fittings and brackets as variously detailed, of sizes indicated, neatly welded and all welds dressed smooth. Round with 2-inch minimum radius all changes of direction. Plug open ends. Set pipe in concrete in non-corrosive pipe sleeves with non-shrink grout or anchor to supports with adequate metal expansion bolts. 1. Steel Handrails and Guardrails: Type and layout as shown on drawings. a. Submit shop drawings for Owner approval prior to beginning construction. b. Handrails shall be constructed of 1-1/2” diameter standard pipe material at 36” high measured from the highest adjacent walking surface elevation above ground and as projected above from top of noising at stairs. c. Guardrails shall be constructed of 1-1/2” diameter standard pipe material at 42” high measured from the highest adjacent walking surface elevation above ground. d. Post shall be constructed of 1-1/2” diameter standard pipe material. e. Infill pickets shall be constructed of ½” diameter solid bar material at 4” on center at locations where handrails or guardrails exceed 15” above the lowest adjacent ground surface. f. Painting shall comply with Section 09 90 00. B. Ladder: Steel bars, rods and shapes of sizes and designs indicated, and securely anchored to floor and wall. C. Steel Supports: provide structural steel lintels, channels, braces, angles, etc., as indicated and assemble as detailed. Secure all connections to provide rigid supports of all items required including supports not specifically specified in other sections. END OF SECTION METAL FABRICATIONS (Revised 08/10/12) 05 50 00-2 SECTION 06 10 00 ROUGH CARPENTRY PART 1 – GENERAL 1.01 SUMMARY A. Provide rough carpentry where indicated on plans: 1. Framing with dimension lumber. 2. Wood grounds, nailers, and blocking. 3. Wood sheathing. 1.02 SUBMITTALS A. None required unless submitting for approved equals. 1.03 QUALITY ASSURANCE A. Comply with governing codes and regulations. Provide products of acceptable manufacturers, which have been in satisfactory use in similar service for three years. Use experienced installers. Deliver, handle, and store materials in accordance with manufacturer’s instructions. B. Lumber Standards and Grade Stamps: US Product Standard PS 20, American Softwood Lumber Standard and inspection agency grade stamps. Factory mark each piece of lumber or plywood with type, grade, mill, and grading agency identification or submit mill certificate that material has been inspected and graded in accordance with requirements if it cannot be marked on material surface. C. Construction Panel Standards: PS 1, US Product Standard for Construction and Industrial Plywood; APA PRP-108. D. Preservative Treatment: AWPA UC3B for lumber and AWPA UC3B for plywood; waterborne pressure treatment. Label each piece of pressure treated lumber and plywood with the quality control mark. E. Fire-Retardant Treatment: AWPA UCFB for lumber and AWPA UCFB for plywood; non-corrosive type. Identify material with appropriate classification marking of Underwriters Laboratories, Inc., US Testing, Timber Products Inspection, or other testing and inspecting agency acceptable to authorities having jurisdiction. PART 2 – PRODUCTS 2.01 MATERIALS A. General: 1. Fire-Retardant Treatment: Provide at building interior and exterior where required by code. 2. Preservative Treatment: Provide for wood in contact with soil, concrete, masonry, roofing, flashing, damp-proofing, and waterproofing, or where installed less than 18-inches above grade. 3. Moisture Content: 19% for lumber items not specified to receive wood preservative treatment and stamped “S-DRY”, “K-D”, or “MC19”. B. Dimension Lumber: 1. Species: Spruce-Pine-Fir graded under National Grading Rules, PS 20-70, or approved equal. 2. Light Framing: Stud, NO. 3 or standard grade. ROUGH CARPENTRY (Revised 05/23/13) 06 10 00-1 3. Structural Framing: No. 2 grade meeting or exceeding the stress rating allowable for repetitive members classified as follows: a. 1-1/2” thick and 3-1/2” wide 1). Fb Bending: 1650 psi 2). Ft Tension: 825 psi 3). Fv Shear: 90 psi 4). Fc Perpendicular: 405 psi 5). Fc Parallel: 975 psi 6). E Modulus of Elasticity: 1,600,000 psi b. 1-1/2” to 4” thick and 5-1/2” to 12” wide 1). Fb Bending: 1400 psi 2). Ft Tension: 625 psi 3). Fv Shear: 90 psi 4). Fc Perpendicular: 405 psi 5). Fc Parallel: 1000 psi 6). E Modulus of Elasticity: 1,600,000 psi C. Construction Panels: 1. Plywood Sheathing: APA sheathing, Exposure 1, exterior grade, fire-retardant treated. Waferboard, composite board, and oriented stand board (but not structural particle-board) are accepted as equals providing specified span ratings are met for installed condition. In all cases, thickness shown is minimum regardless of span rating. Material used for same purpose shall be of same thickness. D. Fasteners and Adhesives: 1. Fasteners: Nails, metal connectors, bolts, nuts, screws, washers, staples, and other fasteners (except as specified or noted otherwise); hot-dip galvanized steel. 2. Power Nails: Not permitted without prior approval of Owner. 3. Adhesives: Meet requirements of American Plywood Association Specifications AFG-01, (latest revision). Use Phenol Resorcinol type for use on pressure treated wood products. PART 3 – EXECUTION 3.01 INSTALLATION A. Wood Framing: Comply with recommendations of NFPA manual for House Framing, NFPA Recommended Nailing Schedule, and NFPA National Design Specifications for Wood Construction. B. Plywood: Comply with recommendations of APA Design and Construction GuideResidential and Commercial. C. Provide nailers, blocking, and grounds where required. Set work plumb, level, and accurately cut. D. Install materials and systems in accordance with manufacturer’s instructions. Install materials and systems in proper relation with adjacent construction. Coordinate with other work. E. Comply with manufacturers requirements for cutting, handling, fastening, and working treated materials. F. Securely attach carpentry work to substrate by anchoring and fastening as indicated and as required by recognized standards. Countersink nail heads on exposed carpentry work and fill holes. Select fasteners of size that will not penetrate members where opposite side will be exposed to view or will receive finish materials. Make tight connections between members. Install fasteners without splitting of wood, pre-drill as required. G. Restore damaged components. Protect work from damage. END OF SECTION ROUGH CARPENTRY (Revised 05/23/13) 06 10 00-2 SECTION 07 21 00 BUILDING INSULATION PART 1 – GENERAL 1.01 SUMMARY A. Provide building insulation and vapor retarders where indicated: (Note: For Owner furnished/Contractor installed products, refer to Sections 01 11 00 and 01 20 00) 1. Under slabs-on-grade and foundation walls, board type. 2. Thermal insulation in exterior walls, blanket type. 3. Thermal insulation at underside of roofs, over heated spaces and over soffits, blanket type. 4. Pre-engineered metal building insulation, blanket type. 5. Insulation in interior walls, blanket type. 6. Thermal insulation in exterior masonry walls, foam in place type. 7. Sheet vapor retarders. 1.02 SUBMITTALS A. None required unless submitting for approved equals. 1.03 QUALITY ASSURANCE A. Comply with governing codes and regulations. Provide products of acceptable manufacturers, which have been in satisfactory use in similar service for three years. Use experienced installers. Deliver, handle, and store materials in accordance with manufacturer’s instructions. B. Standards: Comply with the provisions of the following specifications and standards, except as otherwise noted or specified, or as accepted or directed by the Owner. 1. ASHRA Standard 90.1, “Energy Conservation Code”. 2. ASTM C518-10, Standard Test Method for Steady State Thermal Transmission Properties by Means of the Heat Flow Meter Apparatus 3. ASTM C578-12b, Specification for Preformed, Cellular Polystyrene Thermal Insulation. 4. ASTM C665-12, Specification for Mineral-Fiber Thermal Insulation For Light Frame Construction and Manufactured Housing. 5. ASTM C1363-11, Standard Test Method for Thermal Performance of Building Materials and Envelope Assemblies by Means of a Hot Box Apparatus. 6. ASTM D2842-12, Standard Test Method for Water Absorption of Rigid Cellular Plastics. 7. ASTM D4397-10, Standard Specification for Polyethylene Sheeting for Construction, Industrial, and Agricultural Applications. 8. ASTM E84-13a, Standard Test Method for Surface Burning Characteristics of Building Materials. 9. NAIMA, North American Insulation Manufacturers Association - Standards of Products. 10. UL 1479, Fire Tests of Through-Penetration Firestops. PART 2 – PRODUCTS 2.01 MATERIALS BUILDING INSULATION (Revised 08/23/13) 07 21 00-1 A. General: Refer to drawings for minimum “R” value and/or thickness requirements and locations. B. Blanket/Batt Insulation: 1. Manufacturers: a. Pre-engineered metal building wall and roof: GBP Silvercote, Inc., (NO SUBSTITUTES). b. All other locations: Owens-Corning, Manville, Certainteed, USG, Knauf Fiber Glass, Schuller, or approved equal for application. 2. Type: a. Interior Walls: Glass fiber, ASTM C665-12, Type I, Class A, Unfaced. b. Exterior Stud Walls, Soffits and Roof Insulation: Glass fiber, ASTM C665-12, Type I, Class A, with foil faced vapor-retarder membrane. c. Pre-engineered metal building insulation: 1). Exterior Walls: Glass fiber, ASTM C665-12, Type I, Class A, with “Lamtec” WMP-10 woven reinforced polypropylene faced vapor-retarder membrane (White), ASTM D4397-10, 6 mils, 0.13 perm vapor transmission rating. 2). Roof: Glass fiber, ASTM C665-12, Type I, Class A, with “Lamtec” WMP-10 woven reinforced polypropylene faced vapor-retarder membrane (White), ASTM D4397-10, 6 mils, 0.13 perm vapor transmission rating. Where two layers of insulation are used to attain required “R” factor, only layer towards interior of building shall have facing and multi layers shall be oriented perpendicular to each other. 3). Steel Straps: 80 KSI tempered, high tensile strength steel, galvanized, primed with 0.7 mils of low gloss white baked on polyester paint on exposed side, 0.2 mils of medium gloss polyester backer on non exposed side. Minimum size shall be 0.019 inch thick by ¾-inch wide by continuous length. 4). Crack sealers and tapes for application per manufacturer’s recommendations. 3. Flame Spread and Smoke Development Ratings: a. Tested in accordance with ASTM E84-13a standards. b. Exposed and Concealed Insulation: Flame spread rating of 0 to 25, smoke development rating of 0 to 450. 4. Width: a. Stud Framing: Provide in same width as stud spacing. b. Metal Building Framing: Provide largest width possible to reduce number of seams and joints in manufacturers standard widths. 5. Vapor Retarder: Integral or separate component vapor retarder as indicated. C. Board Insulation: 1. Manufacturers: Dow “Styrofoam SM”, Zonolite “Styrene Foam” or equivalent products of Amoco Foam, UC Foam, and Minnesota Diversified. 2. Type: Extruded polystyrene, rigid, ASTM C578-12a, “R” of 5.0 per nominal inch, compressive strength 30 psi minimum, water absorption 0.3 percent by volume maximum per ASTM D2842-12, square edges. Refer to drawings for thickness and/or “R” value required. 3. Vapor Retarder: Integral vapor retarder as required for application. D. Foamed In Place Insulation: 1. Manufacturers: CFI Foam “Core Foam Masonry Foam Insulation”, PolyMaster “R501”, Tailored Chemical “Core-Fill 500”, Thermal Corp. “Thermco”, or approved equal. 2. Type: Non-toxic amino plastic foam or multi-part plastic polymer resins, ASTM C518-10, “R” of 4.5 per nominal inch, compressive strength 30 psi minimum, shrinkage of 5% maximum, water absorption 5% by volume maximum, water vapor transmission 7 perms per inch maximum per ASTM D2842-12. 3. Thermal Performance: ASTM C1363-11, 8” CMU at 105 pcf, R-11.0 minimum. BUILDING INSULATION (Revised 08/23/13) 07 21 00-2 4. Flame Spread and Smoke Development Ratings: ASTM E84-13a, Class 1 or Class A, Flame spread rating of 0 to 25, smoke development rating of 0 to 450. E. Accessories: 1. Adhesives, mechanical anchors, hangers and clips for application per manufacturer’s recommendations. 2. Crack sealers and tapes for application per manufacturer’s recommendations. PART 3 – EXECUTION 3.01 INSTALLATION A. Install materials and systems in accordance with manufacturer’s instructions. Install materials and systems in proper relation with adjacent construction. Coordinate with work of other sections. Provide full thickness in one layer over entire area, tightly fitting around penetrations. B. Install vapor retarder over entire area of inside face of exterior walls and elsewhere as indicated. Seal all seams and around perimeter and penetrations with duct tape to form a continuous vapor retarder free of holes, leave no gapes in insulation/vapor envelope. Repair punctures and tears immediately before concealment of work. C. Protect installed insulation and vapor retarder. END OF SECTION BUILDING INSULATION (Revised 08/23/13) 07 21 00-3 SECTION 07 92 00 JOINT SEALANTS PART 1 – GENERAL 1.01 SUMMARY A. Provide joint sealers at interior and exterior vertical and horizontal joints. Work includes joints around frames of doors, windows, louvers, or other openings in exterior walls, flooring joints, joints at penetrations of walls, decks, roofs, and floors by piping and other services and equipment, joints between items of equipment and other construction, joints at plumbing fixtures, joints at dissimilar material transitions, expansion and contraction joints of masonry and concrete, and other joints indicated to be sealed. 1.02 SUBMITTALS A. None required unless submitting for approved equals. 1.03 QUALITY ASSURANCE A. Comply with governing codes and regulations. Provide products of acceptable manufacturers, which have been in satisfactory use in similar service for three years. Use experienced installers. Deliver, handle, and store materials in accordance with manufacturer’s instructions. PART 2 – PRODUCTS 2.01 MATERIALS A. Compatibility: Provide joint sealers, joint fillers, and other related materials that are compatible with one another and with joint substrates under conditions of service and application, as demonstrated by testing and field experience. B. Colors: As selected by Owner from Manufacturers’ standard colors or match color of material applied, unless otherwise indicated. 2.02 ELASTOMERIC JOINT SEALANTS A. Provide manufacturers standard chemically curing, elastomeric sealant of base polymer indicated which complies with ASTM C 920 requirements, including those for type, grade class, and uses. B. One-Component Nonsag Urethane Sealant: Type M, Grade NS, Class 25, Sonneborn “Sonolastic NP 1”, Tremco “Dymonic”, Bostik “Chem-Calk 900”, Pecora “Dynatrol 1”, Mameco “Vulkem 116”, or approved equal. C. Two-or-More Component Nonsag Urethane Sealant: Type M, Grade NS, Class 25. Tremco “Dymeric”, Sonneborn “Sonolastic NP 2”, Bostik “Chem-Calk 500”, Pecora “Dynatrol II”, or approved equal. D. Two-Component Pourable Urethane Sealant: Type M, Grade P, Class 25. Tremco “THC 900”, Sonneborn “Sonolastic SL-2”, Bostik “Chem-Calk 550”, Pecora “NR-200 Urexpan”, or approved equal. E. One-Component Pourable Urethane Sealant: Type S, Grade P, Class 25. Sonneborn “SL-1”, Bostik “Chem-Calk 550”, Pecora “NR-201 Urexpan”, Maneco “Vulken 45”, or approved equal. JOINT SEALANTS (Revised 01/31/11) 07 92 00-1 F. One-Component Mildew-Resistant Silicone Sealant: Type S, Grade NS, Class 25. GE “SCS 1702”, Dow Corning “786”, Tremco “Proglaze White”, Pecora “863 #345”, or approved equal. 2.03 ACRYLIC EMULSION SEALANT A. One component, nonsag, acrylic, paintable, mildew-resistant, complying with ASTM C 843. Tremco “Acrylic Latex Caulk”, Sonneborn “Sonolac”, Pecora “AC-20”, Woodmont “Chem-Calk 600”, or approved equal. 2.04 MISCELLANEOUS MATERIALS A. Joint Cleaner: Type of joint cleaning compound recommended by sealant manufacturer for the joint surfaces to be cleaned. B. Joint Primer/Sealer: Type recommended by the sealant manufacturer for the joint surfaces to be primed or sealed. C. Bond Breaker Tape: Polyethylene tape or other plastic tape as recommended by sealant manufacturer, to be applied to sealant-contact surfaces where bond to the substrate or joint filler must be avoided for proper performance of sealant. Provide self-adhesive tape wherever applicable. D. Sealant Backer Rod: Compressible rod stock polyethylene foam, polyethylene jacketed polyurethane foam, butyl rubber foam, neoprene foam or other flexible, permanent, durable non-absorptive material as recommended for compatibility with sealant by the sealant manufacturer. Provide size and shape of rod which will control the joint depth for sealant placement, break bond of sealant at bottom of joint, form optimum shape of sealant bead on back side, and provide a highly compressible backer to minimize the possibility of sealant extrusion when joint is compressed. E. Joint Fillers for Concrete Paving: Refer to Section 03 30 00 (CIP) for requirements. PART 3 – EXECUTION 3.01 JOINT TYPES AND USAGE A. Acrylic Emulsion Sealant: All interior joints except joints with metal, aluminum, and wet work. B. Elastomeric Sealants: Use single or multi-component urethane at all exterior joints and all interior joints with aluminum or metal. Use mildew resistant silicone sealant at sinks, plumbing fixtures, and other wet work. Use minimum 35 Shore A hardness single or multi-component pourable polyurethane sealant for horizontal joints subject to pedestrian and vehicular traffic. 3.02 JOINT SURFACE PREPARATION A. Clean joint surfaces immediately before installation of sealant. Remove dirt, insecure coatings, moisture, and other substances, which would interfere with bond of sealant. B. Perform preparation in accordance with ASTM C804 for solvent release or ASTM C790 for latex base sealants. C. For elastomeric sealants, DO NOT proceed with installation of sealant over joint surface which have been painted, lacquered, waterproofed, or treated with water repellent or other treatment or coating. Remove coating or treatment from joint surfaces before installing sealant. D. Etch cementitious joint surfaces to remove excess alkalinity. Etch with 5% solution of muriatic acid; neutralize with dilute ammonia solution, rinse thoroughly with water and allow to dry before sealant installation. JOINT SEALANTS (Revised 01/31/11) 07 92 00-2 E. Rough joint surfaces on vitreous coated and similar non-porous materials, wherever sealant manufacturer’s data indicates lower bond strength than for porous surfaces. Rub with fine abrasive cloth or wool to produce a dull sheen. 3.03 INSTALLATION A. Install materials and systems in accordance with manufacturer’s instructions. Install materials and systems in proper relation with adjacent construction and with uniform appearance. Coordinate with work of other sections. B. Examine substrate, report unsatisfactory conditions in writing. Beginning work means acceptance of substrates. C. Clean and prime joints, and install bond breakers, backer rods and sealant as recommended by manufacturers. D. DO NOT apply sealant at temperatures below 40° F. E. Apply sealant with hand-caulking gun with nozzle of proper size to fit joints. Use sufficient pressure to insure full contact to both sides of joint to full depth of joint. Employ only proven installation techniques, which will ensure that sealants will be deposited in uniform, continuous ribbons without gaps or air pockets, with complete “wetting” of the joint bond surfaces equally on opposite sides. Except as otherwise indicated, fill sealant rabbet to a slightly concave surface, slightly below adjoining surfaces. Where horizontal joints are between a horizontal surface and a vertical surface, fill joint to form a slight cove, so that joint will not trap moisture and dirt. F. Install sealants to depths as shown or, if not shown, as recommended by the sealant manufacturer but within the following general limitations, measured at the center (thin) section of the bead. 1. For sidewalks, pavements, and similar joints sealed with elastomeric sealants and subject to traffic and other abrasion and indentation exposure, fill joints to a depth equal to 75% of joint width, but neither more than 5/8-inch deep nor less than 3/8inch deep. 2. For normal moving joints sealed with elastomeric sealants, but not subject to traffic, fill joints to a depth equal to 50% of joint width, but neither more than ½-inch deep nor less than ¼-inch deep. 3. For joints sealed with non-elastomeric sealants, fill joints to a depth in the range of 75% to 125% of joint width. G. DO NOT allow sealants or compounds to overflow or spill onto adjoining surfaces. Use masking tape or other precautionary devices to prevent staining of adjoining surfaces, by either. H. Tool joints immediately after application of sealant if required to achieve full bedding to substrate or to achieve smooth sealant surface. I. Cure and protect sealants as directed by manufactuers. Replace or restore damaged sealants. Clean adjacent surfaces to remove spillage. END OF SECTION JOINT SEALANTS (Revised 01/31/11) 07 92 00-3 SECTION 08 11 19 STEEL DOORS AND FRAMES PART 1 – GENERAL 1.01 SUMMARY A. Provide steel doors and frames. 1. Exterior and interior steel doors. 2. Hollow metal steel frames. 1.02 SUBMITTALS A. None required unless submitting for approved equals. 1.03 QUALITY ASSURANCE A. Comply with governing codes and regulations. Provide products of acceptable manufacturers, which have been in satisfactory use in similar service for three years. Use experienced installers. Deliver, handle, and store materials in accordance with manufacturer’s instructions. B. Standards: Comply with the provisions of the following specifications and standards, except as otherwise noted or specified, or as accepted or directed by the Architect. 1. ANSI/SDI-100, Recommended Specifications for Standard Steel Doors and Frames. 2. SDI 117 “Manufacturing Tolerances Standard Steel Doors and Frames”. 3. Fire-Rated Assemblies: ANSI/NFPA 80, and acceptable testing agency listing. 4. Thermal-Rated Assemblies at Exterior: ASTM C518-10 Standard Test Method for Steady-State Thermal Transmission Properties by Means of the Heat Flow Meter Apparatus. 5. High Wind and Impact Resistance Assemblies: a. ANSI A250.13: Testing and Rating of Severe Windstorm Resistant Components for Swinging Door Assemblies. b. ASTM E1886-05: Standard Test Method for Performance of Exterior Windows, Curtain Walls, Doors, and Storm Shutters Impacted by Missile(s) and Exposed to Cyclic Pressure Differentials. c. ASTM E1996-12a: Standard Specifications for Performance of Exterior Windows, Glazed Curtain Walls, Doors and Storm Shutters Impacted by Wind Borne Debris in Hurricanes. d. ASTM E330-02 (2010): Test Method for Structural Performance of Exterior Windows, Curtain Walls and Doors by Uniform Static Air Pressure Difference. e. Florida Building Code (FBC), TAS 201-94: Large Missile Impact Test. f. Florida Building Code (FBC), TAS 202-94: Uniform Static Air Pressure Test. g. Florida Building Code (FBC), TAS 203-94: Cyclic Pressure Loading Test. PART 2 – PRODUCTS 2.01 MANUFACTURERS A. Manufacturers: Black Mountain Door, Ceco, Curries, Mesker, Steelcraft, Republic,Tell Manufacturing, Daybar, or approved equal. STEEL DOORS AND FRAMES (Revised 06/28/13) 08 11 19-1 B. Provide metal doors and frames from a single manufacturer. 2.02 MATERIALS A. Fabrication: Fabricate steel doors and frames rigid, neat in appearance and free from defects, warp, or buckle. Provide clean cut, straight, and true molded members, well formed and aligned miters, dressed and ground smooth, and where applicable, concealed fasteners. Reinforce at corners as required to prevent sagging. Accurately form metal to required sizes and profiles including astragals. Fit, assemble, and weld units at factory or shop. B. Anchors, Fasteners, Accessories: Manufacturers standard, hot-dipped galvanized at exterior. Provide not less than 3 anchors per jamb. C. Fire Rated Units: Provide fire-rated units complying with ANSI/NFPA 80 “Standard for Fire Doors and Window”, and units tested, listed, and labeled in accordance with NFPA 252 “Standard Methods of Fire Test of Door Assemblies” by a nationally recognized independent testing and inspection agency acceptable to authorities having jurisdiction. Labels must be affixed to the frame. DO NOT paint labels. D. High Wind and Impact Resistant Units: Refer to drawings for governing code and design requirements. Components and assemblies shall meet or exceed minimum impact resistance and design pressures indicated, but not less than -50/+50 psf, when tested in accordance with ASTM E330-02 and FBC, TAS 202-94 and TAS 203-94. Unit shall be tested, listed, and labeled by an independent testing agency acceptable to authorities having jurisdiction. Labels shall be affixed to components. DO NOT paint labels. E. Steel Doors: 1. Exterior Doors: ANSI/SDI-100, Grade II, heavy-duty, minimum 18 gage (.0358 inch) cold-rolled sheet steel, 1-3/4 inches thick with face sheets zinc coating G60, mill phosphatized. Provide thermally improved doors with maximum Uvalue of 0.24 BTU/hr./sq. ft/degree F (ASTM C518-10), “R” factor 14.97, STC rating 26 (ASTM E 90 and ASTM E 413). 2. Interior Doors: ASNI/SDI-100, Grade II, heavy-duty, minimum 18 gage (.0358 inch) cold-rolled steel, 1-3/4 inches thick. Provide acoustically improved doors with minimum STC of 33 (ASTM E90-09 and ASTM E413-10) where indicated. 3. Cores: Continuously reinforced with a full core of resin-impregnated kraft honeycomb with 1-inch nested, hexagonal-shaped cells. Bond core to inside of both face sheets or polystyrene insulated panel core. 4. Channel Fillers: Flush steel channel fillers for top channel of exterior doors. 5. Vision Panels: Provide glazing stops/moldings for glazed panels. Glass and glazing is specified in Section 08 80 00. 6. Astragals: Provide T and U astragal for pairs of exterior and fire-rated doors and as indicated on door schedule. F. Steel Frames: 1. Exterior and Interior Frames: Welded type, 16 gage (.0598 inch) sheet steel oil or cold rolled. At exterior openings provide frames with G60 zinc coating, mill phosphatized. Joints to be mitered or coped corners. 2. Accessories: Door silencers and plaster guards, minimum 3 on strike jamb. 3. Glazing Frames: Provide manufacturers standard steel channel or tubular stops, predrilled for screws and factory finished as specified for doors and frames. Glass and glazing is specified in Section 08 80 00. 2.03 HARDWARE A. Preparation: Prepare hollow metal units to receive mortised and concealed finished hardware, including cutouts, reinforcing, drilling, and tapping in accordance with door hardware schedule and templates provided by the hardware supplier. STEEL DOORS AND FRAMES (Revised 06/28/13) 08 11 19-2 Reinforce hollow metal units to receive surface-applied hardware. Drilling and tapping for surface-applied hardware will be done on the job site. B. Location of Hardware: Locate finish hardware as indicated in door hardware supplier templates and/or in compliance with Door and Hardware Institute publication “Recommended Location for Builder’s Hardware”. 2.04 FINISH A. Finish: Factory primed and field finished. Provide manufacturers standard rust inhibitive primer compatible with finish paint specified in Section 09 90 00. Provide asphalt emulsion sound deadening coating on concealed frame interiors. DO NOT prime or paint testing agency labels. PART 3 – EXECUTION 3.01 INSTALLATION A. Install doors and frames in compliance with SDI-100. Set frames accurately in position, plumb and aligned, and securely anchor to adjacent construction. B. Install hardware, adjust as required to provide smooth and proper operation with secure latching or locking. C. Erect fire doors and frames in compliance with ANSI/NFPA 80 and requirements of authorities having jurisdiction. D. Clearances: Provide clearances of not more than 1/8-inch at jambs and heads, and not more than ¾-inch from floor or 3/16-inch from thresholds. Exterior doors provide 3/8-inch undercut for accessibility threshold standards. E. Touch-up damaged coatings and leave ready to receive finish painting. END OF SECTION STEEL DOORS AND FRAMES (Revised 06/28/13) 08 11 19-3 SECTION 08 14 16 FLUSH WOOD DOORS PART 1 – GENERAL 1.01 SUMMARY A. Provide flush wood doors where indicated: 1. Interior solid core flush doors. 1.02 SUBMITTALS A. None required unless submitting for approved equals. 1.03 QUALITY ASSURANCE A. Comply with governing codes and regulations. Provide products of acceptable manufacturers, which have been in satisfactory use in similar service for three years. Use experienced installers. Deliver, handle, and store materials in accordance with manufacturer’s instructions. B. Standards: Comply with the provisions of the following specifications and standards, except as otherwise noted or specified, or as accepted or directed by the Owner. 1. Quality Standards: NWWDA I.S. 1A, and AWI Architectural Quality Standards. 2. Quality Standards: NWWDA I.S. 1A, and WIC Manual of Millwork. 3. Fire Rated Wood Doors: Meeting NFPA 252 requirements. PART 2 – PRODUCTS 2.01 MATERIALS A. Manufacturers: Ampco, Mohawk, Summit, Graham, or approved equal B. Interior Solid Core Doors: 1. Grade: Custom grade. 2. Construction: PC-7 (7-ply, particleboard core) or SLC-7 (7-ply, glued-block core), 1-3/4 inches thick. 3. Wood Finish: Rotary-sliced natural birch faces. 4. Rating: Provide rating as scheduled on drawings. DO NOT finish over required label. C. Auxiliary Materials (Where scheduled on drawing): 1. Glazing Frames: Provide manufacturers standard steel channel or tubular stops, 18 gage cold rolled steel, factory primed, and approved for use in door of fire-rating indicated, pre-drilled for screws and factory finished as specified for doors and frames. Glass and glazing is specified is Section 08 80 00. 2.02 HARDWARE A. Preparation: Prepare wood door units to receive mortised and concealed finished hardware, including cutouts, reinforcing, drilling and tapping in accordance with door hardware schedule and templates provided by the hardware supplier. Reinforce wood door units to receive surface-applied hardware. Drilling and tapping for surface-applied hardware will be done on the job site. FLUSH WOOD DOORS (Revised 01/31/11) 08 14 16-1 B. Location of Hardware: Locate finish hardware as indicated in door hardware supplier templates and/or in compliance with Door and Hardware Institute publication “Recommended Location for Builders Hardware”. 2.03 FINISH A. Comply with requirements of Section 09 90 00. Do not prime or finish testing agency labels. Refer to interior finish schedule for colors. B. Factory pre-finished. C. Color: Equal to Graham #300 medium brown. Any variance requires submittal of sample for prior approved by Owner. PART 3 – EXECUTION 3.01 INSTALLATION A. Install door and frames in compliance with SDI-100 and NWMA I.S 1A. Prefit doors to frames. Premachine doors for hardware listed on door hardware schedules. Factory bevel doors. B. Set door and frame accurately in position, plumb and aligned, and securely anchor to adjacent construction. C. Install hardware, adjust as required to provide smooth and proper operation with secure latching or locking. D. Install doors with not more than 1/8-inch clearance at top and sides, 1-inch at bottom unless otherwise indicated. E. Erect fire doors and frames in compliance with NFPA 80 and requirements of authorities having jurisdiction. F. Touch-up damaged coatings and leave ready to receive final finish. G. Adjust, clean, and protect. END OF SECTION FLUSH WOOD DOORS (Revised 01/31/11) 08 14 16-2 SECTION 08 71 00 DOOR HARDWARE PART 1 – GENERAL 1.01 SUMMARY A. Provide door hardware where indicated. 1.02 SUBMITTALS A. Shop Drawings: None required unless submitting for approved equals. B. Operating and Maintenance Instructions: None required unless submitting for approved equals. 1.03 QUALITY ASSURANCE A. Comply with governing codes and regulations. Provide products of acceptable manufacturers, which have been in satisfactory use in similar service for three years. Use experienced installers. Deliver, handle, and store materials in accordance with manufacturer’s instructions. B. Qualification of Supplier: The finish hardware supplier shall have in his employ an AHC member of the American Society of Architectural Hardware Consultants. C. Hardware for Fire-Rated Openings: NFPA 80 and local requirements. D. Handicapped Accessibility: ANSI A117.1, AADAG, and local requirements. E. Materials and Application: ANSI A156 series standards. PART 2 – PRODUCTS 2.01 MATERIALS A. Schedule: Refer to drawing door hardware schedule. Furnish in amounts and finish indicated or as required for complete and operable facility. B. Manufacturers: Products of the following manufacturers will be considered acceptable provided products are of equivalent weight, function, materials, and design. Submit others for prior approval by Owner. 1. Locksets and Cylinders: Schlage (NO Substitutes). 2. Deadbolts and Deadlock Levers: Adams Rite (NO Substitutes). 3. Panic Devices with Alarms (battery powered): Detex, Corbin Russwin, Von Duprin. 4. Panic Devices without Alarms: Yale, Dorma. 5. Hinges and Butts: Hager, Soss, Stanley, PBB. 6. Closers: LCN, Norton, Reading, Cal Royal. 7. Storefront Pivots: Rixon. 8. Storefront Push/Pulls: EFCO, Kawneer, Vistawall. 9. Stops, Bumpers, Weather-stripping, Sweeps, and Thresholds: Pemco, Rockwood, Trimco, Reese, National Guard, Hager. 10. Knox box for fire emergency keys: As required and approved by local governing agency. 2.02 KEYING A. Exterior doors with removable core lock cylinders shall be keyed alike. Include construction keying and control keying with removable core cylinders. B. Supply 2 change keys for each lock. DOOR HARDWARE (Revised 06/14/12) 08 71 00-1 2.03 FASTENINGS A. Furnish all necessary screws, bolts, and other fasteners of suitable size and type to properly anchor the hardware. B. Furnish fastenings, where necessary, with expansion shields, toggle bolts, sex bolts, and other anchors, according to the material to which hardware is to be applied and the recommendations of the hardware manufacturer. C. Furnish fastenings compatible with both hardware and substrate material and if exposed, matching hardware finish. PART 3 – EXECUTION 3.01 INSTALLATION A. Follow guidelines of DHI “Recommended Locations for Builders Hardware” and hardware manufacturer’s instructions. B. Install materials and systems in accordance with manufacturer’s instructions and approved submittals. Install materials and systems in proper relation with adjacent construction and with uniform appearance. Coordinate with work of other sections. C. Drill and countersink units, which are not factory-prepared for anchorage fasteners. Space fasteners and anchors in accordance with industry standards. D. Set thresholds in full bed of butyl-rubber or polyisobutylene mastic sealant. E. Adjust operation, clean, and protect. END OF SECTION DOOR HARDWARE (Revised 06/14/12) 08 71 00-2 SECTION 09 21 16 GYPSUM BOARD ASSEMBLIES PART 1 – GENERAL 1.01 SUMMARY A. Provide gypsum board assemblies where indicated. (Note: Cold-Formed Metal Framing specified under Section 05 40 00) 1. Interior walls, partitions, and ceilings. 2. Exterior wall, ceiling and soffit substrates for exterior finish materials. 3. Fire rated assemblies. 4. Remodeling at existing gypsum board construction. 1.02 SUBMITTALS A. None required unless submitting for approved equals. 1.03 QUALITY ASSURANCE A. Comply with governing codes and regulations. Provide products of acceptable manufacturers, which have been in satisfactory use in similar service for three years. Use experienced installers. Deliver, handle, and store materials in accordance with manufacturer’s instructions. B. Standards: Comply with the provisions of the following specifications and standards, except as otherwise noted or specified. 1. ASTM C442, Standard Specification for Gypsum Backing Board, Gypsum Coreboard, and Gypsum Shaftliner Board. 2. ASTM C475/C475M-12, Standard Specification for Joint Compound and Joint Tape for Finishing Gypsum Board. 3. ASTM C840-11, Standard Specification for Application and Finishing of Gypsum Board. 4. ASTM C1002-07, Standard Specifications for Steel Self Piercing Tapping Screws for the Application of Gypsum Panel Products or Metal Plaster Bases to Wood Studs or Steel Studs. 5. ASTM C1047-10a, Standard Specification for Accessories for Gypsum Wall Board and Gypsum Veneer Base. 6. ASTM C1177/C1177M-08, Standard Specification for Glass Matt Gypsum Substrate Used for Sheathing. 7. ASTM C1280-13, Standard Specification for Application of Exterior Gypsum Panel Products for Use as Sheathing. 8. ASTM C1396/C1396M-13, Standard Specification for Gypsum Board. 9. ASTM D3273-12, Standard Test Method for Resistance to Growth of Mold on the Surface of Interior Coatings in an Environmental Chamber. 10. ASTM E90-09, Standard Test Method for Laboratory Measurement of Airborne Sound Transmission Loss of Building Partitions and Elements. 11. ASTM E119-12a. Standard Test Methods for Fire Tests of Building Construction and Materials. C. Fire Resistant for Fire Rated Assemblies: Where work is indicated for fireresistance ratings, provide materials and installations identical with assemblies whose fire resistance rating has been determined per ASTM E119-12a by a testing and inspection organization acceptable to authorities having jurisdiction. D. Moisture and Mold-Resistant Assemblies: Provide moisture and mold-resistant gypsum board products with surfaces complying with ASTM C1396/C1396M-13 and ASTM C1177/C1177M-08 in all locations subject to moisture exposure. GYPSUM BOARD ASSEMBLIES (Revised 05/23/13) 09 21 16-1 E. Performance: Structural and seismic performance meeting requirements of building code and local authorities. PART 2 – PRODUCTS 2.01 MATERIALS A. Manufacturers of Gypsum Board: CertainTeed Gypsum, Inc., Georgia-Pacific Corp., National Gypsum Co., Temple-Inland, United States Gypsum Co., or approved equal. B. Gypsum Board: 1. Gypsum Wallboard: ASTM C1396/C1396M-13, Type X fire-rated type, , tapered edges. 2. Moisture Resistant Gypsum Backing Board: ASTM C1396/C1396M-13, Type X fire-rated type,. 3. Fiberglass-Mat Faced Gypsum Sheathing: ASTM C1177/C1177M-08, Type X fire rated, ASTM D3273-12, mold resistant 10, fiberglass matt faced gypsum core, square edges. 4. Shaftwall: ASTM C442, Type SLX, Type X beveled edges, width required for blind installation in framing spacing and type indicated. C. Joint Treatment Materials: ASTM C475/C475M-12 and ASTM C840-11, 2-coat joint compound, and other materials, paper, or fiberglass tape. D. Trim Accessories: ASTM C1047-10a. Provide manufacturer’s standard trim accessories of types indicated for drywall work, formed of galvanized steel unless otherwise indicated, with either knurled and perforated or expanded flanges for attachment, and beaded for concealment of flanges in joint compound. Provide all corner beads, edge trim-beads, and one-piece control joint beads. Provide decorative profiles factory primed of types indicated. E. Fasteners: ASTM C1002-07, self-drilling, self tapping screws for power driving with special head design for gypsum board attachment (Type S), producing surface depression for proper concealment; 1-inch long for single ply, 1-5/8-inch long for double ply, 2-inch long for multiple plies. Use other fasteners as required. F. Textures: All exposed to view surfaces to be smooth sanded finish, unless otherwise indicated. Where spray application for splatter, knock-down and orange peel type textures specified, submit samples for Owner’s review and approval. PART 3 – EXECUTION 3.01 INSTALLATION A. Inspection: Coordinate with carpenter and insulator in placing of backing, blocking, bracing, and insulation where required in walls for acoustical treatment, millwork, fixtures, fittings, and accessories. Examine substrates for proper application of gypsum board systems. Beginning work means acceptance of conditions. B. General: Install gypsum board assemblies in compliance with ASTM C840-11. Install gypsum board assemblies true, plumb, level, and in proper relation to adjacent surfaces. C. Tolerances: Not more than 1/16-inch difference in true plane at joints between adjacent boards before finishing. After finishing, joints shall not be visible. Not more than 1/8-inch in 10 feet deviation from true plane, plumb, level, and proper relation to adjacent surfaces in finished work. D. Partitions: Install boards vertically parallel to studs. DO NOT allow butt-to-butt joints and joints that do not fall over framing members. Arrange gypsum board joints on opposite sides of partitions to occur on different studs. GYPSUM BOARD ASSEMBLIES (Revised 05/23/13) 09 21 16-2 E. Ceilings and Soffits: Install boards across framing members in manner which minimizes number of end-butt joints and which avoids end joints in central area of each ceiling and soffit. Stagger end joints at least 24-inches. F. Fastening: Fasten gypsum board to metal studs with specified screws spaced 16inches on center for walls and 12-inches on center for ceilings of single layer application, 24-inches on center for wall and 16-inches on center for base layer, and 16-inches on center for wall and 12-inches on center for ceilings of double layer applications. G. Expansion/Control Joints: Install expansion/control joints in ceilings exceeding 2500 sq. ft. in area and in partition and wall runs exceeding 30-feet unless otherwise indicated. DO NOT exceed a distance of 50-feet in either direction, between ceiling control joints and install a control joint where ceiling framing of furring changes direction. DO NOT exceed a distance of 30-feet between control joints in walls unless otherwise indicated. H. Transitions, Trim, and Corners: 1. Provide casing beads where edges of gypsum board meet dissimilar materials. 2. Treat all internal angles formed by the intersection of either wallboard surfaces with metal trim and/or a taped joint system as indicated or required. 3. Treat all vertical and horizontal external corners with metal bead corner reinforcement applied in accordance with manufacturer’s recommendations. 4. Where new partitions meet existing construction, remove existing corner beads to provide a smooth transition. 3.02 FIRE RATED SYSTEMS A. Provide fire rated systems where indicated or where required by authorities having jurisdiction in accordance with ASTM E119-12a. B. Provided fire rated construction materials and installations identical with requirements of indicated recognized independent testing agency referenced assemblies. C. Coordinate inspection requirements with authorities having jurisdiction prior to begging work. Upon request, provide documentations of fire-rated construction materials, means, and methods. 3.03 FINISHING A. Finishing: Comply with ASTM C840-11. Refer to drawings for finish types and locations. 1. Level 1: Concealed areas, plenums, service corridors, above ceilings. Except provide higher level of finish as required to comply with fire resistance ratings and acoustical ratings. 2. Level 2: Areas of water resistant gypsum backing board under tile, exposed areas where appearance is not critical. 3. Level 3: Areas to receive heavy or medium textured coatings, heavy-grade wall coverings. 4. Level 4: Areas to receive flat sheen paint finish, light textured coatings, lightweight wall coverings. 5. Level 5: Areas to receive gloss, semi-gloss sheen paints, critical lighting conditions. END OF SECTION GYPSUM BOARD ASSEMBLIES (Revised 05/23/13) 09 21 16-3 SECTION 09 51 00 ACOUSTICAL TILE CEILINGS PART 1 – GENERAL 1.01 SUMMARY A. Provide the following: 1. Acoustical tile ceilings, trim, and concealed metal suspension system. 1.02 SUBMITTALS A. None required unless submitting for approved equals. B. Provide 2% of extra replacement tile matching each type of material provided to Owner at substantial completion. 1.03 QUALITY ASSURANCE A. Comply with governing codes and regulations. Provide products of acceptable manufacturers, which have been in satisfactory use in similar service for three years. Use experienced installers. Deliver, handle, and store materials in accordance with manufacturer’s instructions. B. Performance: Fire, structural, and seismic performance meeting requirements of building code and local authorities. Acoustical performance based on project requirements. PART 2 – PRODUCTS 2.01 ACOUSTICAL LAY-IN PANELS A. Manufacturers: Armstrong is specified; equivalent products of BPB Celotex and USG Interiors are acceptable; or approved equal. B. Type C-1: (Refer drawing finish schedule.) 1. Style: Armstrong “1729” Fine Fissured. 2. Size: 24 x 48 inches by 5/8-inch. 3. Material: Mineral Base Panels, Water Felted. 4. Edge Detail: Square. 5. Pattern: Fissured pattern. 6. Type, Form, and Finish: ASTM E 1264, Type III, Form 2 with painted finish. 7. Class A Flame Resistance, Class I Flame Spread Rating of 25 or less, STC 35-39, NRC 0.55. 8. Insulation Value: Average R-Value of 1.5 at 75°. 9. Weight: 0.60 lbs./sq. ft. 2.02 SUSPENSION SYSTEM MATERIALS A. Manufacturers: Armstrong is specified; equivalent products of Chicago Metallic, Donn, and National Rolling Mills are acceptable; or approved equal. B. Type CG-1: 1. Style: Armstrong “Prelude” 15/16 Exposed Tee System. 2. Type: Exposed grid system, direct-hung double-web intermediate-duty system, ASTM C 635. Non-Fire-Resistance Rated. 3. Finish: Steel members, treated and protected against rust and corrosion and factory finished with baked on vinyl enamel or polyester or anodized. ACOUSTICAL TILE CEILINGS (Revised 06/07/12) 09 51 00-1 4. Color: White. 5. Wall Molding: Provide wall molding, of types and profiles indicated, of same material and finish as suspension system. C. Attachment Devices: Type recommended by suspension system manufacturer for attachment or anchorage of ceiling hangers to structure above ceiling, sized for not less than 5 times the hanger design load for the structural classification indicated. D. Hanger Wire: Minimum No. 12 gage, galvanized annealed steel wire. Provide seismic reinforcing as recommended by suspension system manufacturer for compliance with local building codes. 2.03 MISCELLANEOUS MATERIALS A. Tile adhesive, staples, and sealant: Provide type recommended by manufacturer for specific project conditions. B. Hold-down clips, impact clips, and seismic compression bracing: Provide type recommended by manufacturer for compliance with local building codes. PART 3 – EXECUTION 3.01 INSTALLATION A. Install materials and suspension systems in accordance with manufacturer’s instructions and recommendations and ASTM C 636. Coordinate installation with location of mechanical and electrical work to ensure proper locations. B. Center locate system on room axis, leaving equally spaced border along perimeter. Lay directional patterned units one way with pattern parallel to longest room axis. Level ceiling to within 1/8-inch in 10 feet both directions. Scribe and cut panels to fit accurately. Measure and layout to avoid less than half panel units unless otherwise indicated. C. Provide hold down clips at all units within 20 feet of an exterior door. D. Seismic bracing, where required by local building codes, shall be located at 12 feet on center with the first line of bracing 4 feet or less from wall boundary. Seismic bracing shall consist of (4) splay wires at 45° to runner connections and 45° to plane of ceiling, (1) vertical connection wire provided with compression bracing of ½-inch rigid conduit extending full height between connection points. Coordinate with building official for inspection requirements. E. Removal and reinstallation at existing ceilings: Remove and store materials for reuse. Handle with gloves to avoid damaging corners and edges. Clean tiles and grid system, which have been removed. Provide additional materials to complete the work and to replace damaged existing materials. New materials shall exactly match existing materials as approved. F. Adjust, clean, and touch-up all system components. G. Provide wrapped and labeled maintenance stock of new material equal to 2% of ceiling panels, tile, and suspension installed. END OF SECTION ACOUSTICAL TILE CEILINGS (Revised 06/07/12) 09 51 00-2 SECTION 09 65 13 RESILIENT BASE AND ACCESSORIES PART 1 – GENERAL 1.01 SUMMARY A. Provide resilient base, trim, edging, transitions, and accessory systems, complete. 1.02 SUBMITTALS A. Comply with Section 01 33 00. B. None required unless submitting for approved equals. C. Provide 2% extra stock matching each type of different material provided at substantial completion. 1.03 QUALITY ASSURANCE A. Comply with governing codes and regulations. Provide products of acceptable manufacturers, which have been in satisfactory use in similar service for three years. Use experienced installers. Deliver, handle, and store materials in accordance with manufacturer’s instructions. B. Standards: Comply with the provisions of the following specifications and standards, except as otherwise noted or specified. 1. ASTM E119-12a. Standard Test Methods for Fire Tests of Building Construction and Materials. 2. ASTM E662-13 Standard Test Method for Specific Optical Density of Smoke Generated by Solid Materials. 3. ASTM F1861-08(2012)e1 Standard Specification for Resilient Wall Base. C. Performance: Fire performance meeting requirements of building code and local authorities. D. Provide materials and adhesives which do not contain asbestos. PART 2 – PRODUCTS 2.01 VINYL BASE AND TRANSITIONS A. Vinyl base B-1: (Refer drawing finish schedule.) 1. Manufacturers: VPI specified; equivalent by Johnsonite, Roppe, Afco, or approved equal. 2. Color: Jet #01. 3. Type: ASTM F1861-08, Type TV, Vinyl, Thermoplastic 4. Size: 4-inches by 1/8-inch thick, cove toe. 5. Fire/Smoke Rating: ASTM E119-12a and ASTM E662-13, flame spread rating 25 or less, smoke development rating 450 or less. B. Vinyl Transitions: 1. Manufacturers: VPI specified; equivalent by Johnsonite, Roppe, Afco, or approved equal. 2. Color: Jet #01. 3. Type: ASTM F1861-08, Type TV, Vinyl, Thermoplastic 4. Size: Manufacturer’s standard as required for flooring type transitions, not less than 1-inch wide. 5. Fire/Smoke Rating: ASTM E119-12a and ASTM E662-13, flame spread rating 25 or less, smoke development rating 450 or less. RESILIENT BASE AND ACCESSORIES (Revised 08/20/13) 09 65 13-1 2.02 MISCELLANEOUS MATERIALS A. Provide adhesives, primers, seam sealers, crack fillers and other materials required but not specifically described and recommended by the resilient flooring and accessories. PART 3 – EXECUTION 3.01 INSTALLATION A. Comply with manufacturer’s instructions and recommendations. Install in proper relation to adjacent work. B. Examine the areas and conditions under which resilient base and accessory work is to be placed. Moisture content of substrates, building air temperature, and relative humidity must be within limits recommended by resilient base manufacturer. DO NOT proceed until unsatisfactory conditions have been corrected. Maintain minimum temperature of 70° F for minimum of 48 hours prior to installation. Maintain 70° F temperature continuously during and after installation as recommended by manufacturer, but in any case not less than 48 hours. C. Prepare surfaces by cleaning, leveling, and priming as required. Test adhesive for bond before general installation. D. Resilient Base: Apply resilient base to walls, columns, pilasters, casework, and other permanent fixtures in rooms or areas where base is indicated. Install base in as long lengths as practicable. Tightly bond base to backing throughout the length of each piece, with continuous contact at horizontal and vertical surfaces. DO NOT stretch resilient base during installation. E. Resilient Edge Strip: Place edge strips tightly butted and secured to flooring with adhesive. Install edge strips at all unprotected edges of flooring unless otherwise indicated. F. Clean and protect work per manufacturer’s recommendations until final acceptance. END OF SECTION RESILIENT BASE AND ACCESSORIES (Revised 08/20/13) 09 65 13-2 SECTION 09 77 00 SANITARY WALL & CEILING PANELS PART 1 - GENERAL 1.01 SUMMARY A. Provide sanitary wall panels, ceiling panels and surface preparation where indicated. 1.02 SUBMITTALS A. Comply with Section 01 33 00. B. Upon request submit for approval samples, product data, and maintenance 1.03 QUALITY ASSURANCE A. Comply with governing codes and regulations. Provide products of acceptable manufacturers which have been in satisfactory use in similar service for three years. Use experienced installers. Deliver, handle, and store materials in accordance with manufacturer's instructions. B. Performance: Fire performance meeting requirements of building code and local authorities. PART 2 - PRODUCTS 2.01 MATERIALS A. Fiberglass Reinforced Panel (FRP) Wall Covering: 1. Manufacturers: Nudo Products, Inc. specified; Equivalent by Crane Composites, Inc., Marlite, Sequentia or approved equal. 2. Panel Type: “Fiber-Lite” by Nudo. a. Model No.: “LP-F9”. b. Surface Burning Characteristics: Fire rating Class A (ASTM E-84-81A), flame spread index 25, smoke development value 335. c. Thickness: 0.90 inch minimum., 9000 psi flex strength (ASTM D790), 660,000 psi tensile strength (ASTM D638). d. Finish: “Pebble Texture”, embossed, tabor abrasion resistance 0.038. e. Water Absorption Percentage: 0.16 (ASTM D570). f. Panel sizes: Manufacturer’s standard sizes. Horizontal seams are not permitted g. Color: Refer to drawings. Unless otherwise indicated, to be selected by Architect from manufacturer’s standard samples. 3. Certification: ICBO, USDA/FSIS. 4. Trim, edges, moldings, flashing, and counterflashing: PVC, vinyl or aluminum as required for moisture resistant assembly. Color to match panel. 5. Fasteners: Non-corroding type as required for substrate attachment. Stainless nails or screws. Nylon, chrome, or plastic, one-piece rivets, for sanitary maintenance. Colors to match panel. 6. Adhesive: As recommended by manufacturer for substrate attachment conditions. 7. Sealant: Comply with Section 07 92 00. SANITARY WALL AND CEILING PANELS (Revised 11/20/12) 09 77 00 - 1 PART 3 - EXECUTION 3.01 INSTALLATION A. Acclimatize materials; prime and seal substrates; test substrates for moisture content and prepare surfaces in compliance with manufacturer's recommendations. Substrates must be flat, clean, dry and free of all dirt, dust, or grease. B. Install in accordance with manufacturer's instructions. Apply adhesive and install with seams plumb to ensure tight closure except where pattern would not match. Do not place seams within 6" of corners. C. Adhesive: Wall panels to be installed with 100% adhesive coverage. Fasteners are used in conjunction with adhesives in certain applications, where needed in high moisture conditions, uneven substrate, high abuse and large panel areas. D. Expansion: Leave not less than 1/4" gap at ceilings and floor, 1/8" gap between wall panels for normal expansion and contraction. Allow not less than 1/8" gap around pipes, electrical fittings and other projections. Fill gaps with flexible, silicone-based sealant to complete moisture seal. E. Fastener Position: Install fasteners not farther than 8" apart around outside edges and 12" apart on intermediate 16" centers. Stagger fasteners on opposing panel edges. Outside fasteners should be approximately 1" from panel edge. F. Sealant: Seal all corner seams, ceiling and base junctures and fastener holes. G. Remove air bubbles, blisters, wrinkles and other defects; horizontal seams are not permitted. Remove excess adhesive immediately; clean walls and protect surfaces. END OF SECTION SANITARY WALL AND CEILING PANELS (Revised 11/20/12) 09 77 00 - 2 SECTION 09 90 00 PAINTING PART 1 – GENERAL 1.01 SUMMARY A. Provide the following where indicated: 1. Painting and surface preparation for interior and exterior surfaces as scheduled. 2. Re-painting and surface preparation at areas of remodeling. 1.02 SUBMITTALS A. Comply with Section 01 33 00. B. None required unless submitting for approved equals. 1.03 QUALITY ASSURANCE A. Comply with governing codes and regulations. Provide products of acceptable manufacturers, which have been in satisfactory use in similar service for three years. Use experienced installers. Deliver, handle, and store materials in accordance with manufacturer’s instructions. B. Regulations: Compliance with VOC and environmental regulations. PART 2 – PRODUCTS 2.01 MATERIALS A. Manufacturers: ICI-Devoe & Raynolds, Glidden Co., Benjamin Moore, Pratt and Lambert, Sherwin Williams or approved equal. First-line commercial-quality products for all coating systems. B. Coatings: Ready mixed except field catalyzed coatings of good flow and brushing properties, capable of drying or curing free of streaks or sags. C. Accessory Materials: Linseed oil, shellac, turpentine, paint thinners, and other materials required to achieve the finishes specified. 2.02 FINISHES A. Refer to drawing interior and exterior finish schedules to types, colors, and locations. PART 3 – EXECUTION 3.01 EXAMINATION AND PREPARATION A. Examine the areas and conditions under which painting work is to be preformed. DO NOT proceed with the work until unsatisfactory conditions have been corrected. Starting of painting work will be construed as acceptance of the surfaces within any particular areas. B. Perform all preparation and cleaning procedures in strict accordance with the coating manufacturer’s instructions and as herein specified. Remove all hardware, plates, lighting fixtures, and similar items in place and not to be finish painted, or provide protection prior to surface preparation and painting operations. Remove, if necessary, for the complete painting of the items and adjacent surfaces. Re-install the removed items by workmen skilled in the trades involved, after painting is complete. PAINTING (Revised 05/23/13) 09 90 00-1 C. Cementitious Materials: Prepare cementitious surfaces to be painted by removing all chalk, dust, dirt, grease, oils, and by roughening as required to remove glaze. Determine the alkalinity and moisture content of the surfaces to be painted by performing appropriate test. If the surfaces are found to be sufficiently alkaline to cause blistering and burning of the finish paint, correct this condition before application of paint. D. Wood: Clean wood surfaces to be painted of all dirt, oil, or other foreign substances with scrapers, mineral spirits, and sandpaper, as required. Sandpaper smooth those surfaces exposed to view and dust off. Prime, stain, or seal wood required to be job painted immediately upon delivery to job. Prime edges, ends, faces, undersides, and backsides of such wood, including cabinets, counters, cases, etc. Scrape and clean small, dry seasoned knots, and apply a thin coat of white shellac or other recommended knot sealer before application of the priming coat. After priming, fill holes and imperfections in finish surfaces with putty or plastic wood filler. Sandpaper smooth when dried. E. Gypsum Wall-Board: DO NOT paint over gypsum wallboard work until taped joints are thoroughly dry. F. Ferrous Metals: Touch-up shop applied prime coats which have damaged or bare areas. Wire-brush, solvent clean, and touch up with the same primer as the shop coat. G. Galvanized Surfaces: Clean free of oil and surface contaminates with an acceptable non-petroleum based solvent. H. Aluminum: Remove film of oil and grease before painting by washing with mineral spirits. I. Existing Materials to Remain: At existing areas to be re-painted, remove blistered or peeling paint to sound substrates. Remove chalk deposits and mildew and wash all surfaces with mild detergent. Perform related minor preparation including caulk and glazing compounds. Spot prime bare areas before priming and painting as specified. J. Split Face and Smooth Face Applications: Individual job applications will require that the Contractor pay particular attention to the weather conditions prior to and during applications of products. A cold weather application is given if the temperatures are such that it is necessary for installation. All manufacturers’ application data should be followed on temperature and humidity installation. Upon installation, the Contractor shall confirm a pin hole free surface is achieved of the coating system. After application, the Contractor shall peer down on the wall from the top of the building to make sure all of the ledges are covered and are pin hole free. It is recommended that the products are sprayed up, down and side-to-side. It is also recommended that the application be back rolled as well for proper coverage. Contractor must also verify mil thickness at each coating prior to applying succeeding coatings. 3.02 APPLICATION A. Apply paint by brush, roller, spray, or other acceptable practice in accordance with the manufacturer’s directions. Use brushes best suited for the type of material being applied. Use rollers or carpet, velvet back, or high pile sheep wood as recommended by the manufacturer for material and texture required. B. The number of coats and paint film thickness required is the same regardless of the application method. DO NOT apply succeeding coats until previous coat has completely dried. Sand between each enamel or varnish coat application with fine sand paper, or rub surfaces with pumice stone where required to produce an even smooth surface in accordance with coating manufacturer’s directions. C. Apply additional coats when undercoats, stains, or other conditions show through the final coat of paint, until the paint film is of uniform finish, color and appearance. D. Give special attention to insure that all surfaces, including edges, corners, crevices, welds, and exposed fasteners receive a film thickness equivalent of that of flat surfaces. PAINTING (Revised 05/23/13) 09 90 00-2 3.03 SCHEDULE OF TREATMENTS A. Interior gypsum board or plaster walls and ceilings: 1. One coat of latex primer sealer. 2. Two coats of acrylic latex paint. B. Interior Wood- Transparent: 1. Filler coat (for open grained wood only). 2. One coat of stain. 3. One coat of sealer. 4. Two coats of varnish, satin. C. Exterior and Interior Wood- Painted: 1. One coat of acrylic primer sealer. 2. Two coats of exterior acrylic paint. D. Exterior and Interior Ferrous Metal: 1. One coat of rust-inhibiting primer. 2. Two coats exterior alkyd paint. E. Exterior and Interior Galvanized Metal: 1. Chemical wash. 2. Galvanized iron primer. 3. Two coats exterior alkyd paint. F. Exterior and Interior Concrete, Concrete Block: a. General Application 1. One coat interior/exterior latex block filler. Equal to Sherwin Williams “Preprite Block Filler B25W25”. Not less than 8 mils thick. 2. Two coats elastometric coating. Equal to Sherwin Williams “Conflex XL Smooth Elastomeric A5-400”. Not less than 5.7 mils thick each coat. b. Cold Weather Application 1. One coat Acrylic resin block surfacer. Equal to Sherwin Williams “Loxon Block Surfacer”. Not less than 8 mils thick. 2. Two coats solvent borne masonry coating (waterproof sealer). Equal to Sherwin Williams “Ultracrete Solvent Borne Smooth B46”. Not less than 8 mils each coat or 16 mils total. END OF SECTION PAINTING (Revised 05/23/13) 09 90 00-3 SECTION 10 28 13 TOILET ACCESSORIES PART 1 – GENERAL 1.01 SUMMARY A. Provide toilet accessories and metal framed mirrors. 1.02 SUBMITTALS A. None required unless submitting for approved equals. 1.03 QUALITY ASSURANCE A. Comply with governing codes and regulations. Provide products of acceptable manufacturers, which have been in satisfactory use in similar service for three years. Use experienced installers. Deliver, handle, and store materials in accordance with manufacturer’s instructions. B. Regulations: ADAAG and local accessibility requirements. PART 2 – PRODUCTS 2.01 MATERIALS A. Manufacturers: Bobrick specified; equivalent by American Specialties Inc., Bradley Corp., GAMCO, Fort Howard, Accessory Specialties, or approved equal. B. Schedule: Refer drawing toilet accessories schedule for types and model numbers. C. Materials and Finishes: 1. Stainless Steel: ASTM A 167, AISI Type 302 or 304, No. 4 polished finish; 22 gage minimum. 2. Chromium Plated Brass or Steel: ASTM B 456, type SC 2. 3. Baked Enamel on Steel: Factory-applied gloss white. 4. Sheet Steel: ASTM A366. 5. Tubing: ASTM A269 stainless steel. 6. Adhesive: Contact, waterproof, as recommended by accessory manufacturer. 7. Fasteners, screws, and bolts: Hot dip galvanized steel, tamper-proof. Sizes and spacing as recommended by accessory manufacturer. 8. Glazing: Mirror glass, ¼-inch thick, ASTM C 1036. PART 3 – EXECUTION 3.01 INSTALLATION A. Install materials and systems in accordance with manufacturer’s instructions. Install materials and systems in proper relation with adjacent construction and with uniform appearance. Coordinate with work of other sections. B. Install units plumb and level, firmly anchored in location and at heights indicated or directed by Architect. C. Coordinate with carpenter for installation of required fire treated blocking in framing. D. Restore damaged finishes and test for proper operation. Clean and protect work from damage. END OF SECTION TOILET ACCESSORIES (Revised 05/23/13) 10 28 13-1 SECTION 10 80 00 MISCELLANEOUS SPECIALTIES PART 1 – GENERAL 1.01 SUMMARY A. Provide miscellaneous specialties, complete: 1. Fire extinguisher and mounting brackets. 2. Interior building signage. 3. Exterior vinyl building address lettering. 1.02 SUBMITTALS A. None required unless submitting for approved equals. 1.03 QUALITY ASSURANCE A. Comply with governing codes and regulations. Provide products of acceptable manufacturers, which have been in satisfactory use in similar service for three years. Use experienced installers. Deliver, handle, and store materials in accordance with manufacturer’s instructions. B. Standards: UL and FM listed products, NFPA 10. C. Regulations: ADAAG. PART 2 – PRODUCTS 2.01 FIRE EXTINGUISHERS A. Manufacturers: Ansul Sentry specified; equivalent by J.L. Industries, Larsen’s Manufacturing, Potter-Roemer, or approved equal. B. Fire Extinguishers: 1. Model: # SY-1014. 2. Type: Multipurpose dry chemical type. 3. Rating: UL listed ABC. 4. Capacity: 10 lbs. heavy duty steel extinguisher. 5. Surface Mounting: Manufacturer’s standard metal brackets and fasteners as recommended by manufacturer for substrate attached. 2.02 INTERIOR SIGNS A. Manufacturers: Rockwood specified; equivalent by ASI, APCO, Best, Kroy, Kaltech, Mohawk, National Signage, Seton, or approved equal. B. Interior Signs: 1. Model: Refer drawing toilet accessories schedule. 2. Type: Raised or engraved acrylic or plastic. 3. Size: 8 inch by 8 inch. 4. Color: Manufacturers standard colors contrasting from background and as indicated on drawings or selected by Architect. 5. Copy: Helvetica Medium 5/8-inch height lettering, Braille, and accessibility graphics meeting requirements of ADA and CABO/ANSI A117.1 specifications. 6. Fasteners, Tape, and Adhesive: As recommended by sign manufacturer for substrate attached. MISCELLANEOUS SPECIALTIES (Revised 02/22/13) 10 80 00-1 2.03 EXTERIOR VINYL BUILDING ADDRESS LETTERING A. Vinyl lettering indicating building address number, white, Helvetica Medium 6-inch high copy. Attached to glazing per lettering manufacturer’s recommendations with non-staining or non-yellowing adhesive. PART 3 – EXECUTION 3.01 INSTALLATION A. Install materials and systems in accordance with manufacturer’s instructions. Install materials and systems in proper relation with adjacent construction and with uniform appearance. Coordinate with work of other sections. B. Install fire extinguishers with wall-hung brackets at locations and heights indicated and acceptable to authorities having jurisdiction. C. Install interior signs at locations and height indicated and acceptable to authorities having jurisdiction. Comply with ADA and CABO/ANSI A117.1 specifications. D. Install exterior vinyl lettering per manufacturer’s recommendations. Ensure attachment to withstand local wind load requirements. E. Restore damaged finishes and test for proper operation. Clean and protect work from damage. END OF SECTION MISCELLANEOUS SPECIALTIES (Revised 02/22/13) 10 80 00-2 SECTION 20 01 00 GENERAL PROVISIONS PART 1 - GENERAL 1.01 RELATED DOCUMENTS A. The following shall apply to this Section: 1. Drawings 2. General Conditions 1.02 WORK INCLUDES A. The work to be performed under this Division shall include all labor, materials, equipment, and transportation necessary to provide a complete and satisfactory system ready to use. The words "the Contractor" or "this Contractor" refers to the Contractor for the work specified in that Section. This Contractor shall examine all Drawings and all Sections of the Specifications and shall be responsible for ascertaining to what extent other Drawings and Sections affect the work herein specified. B. Unless noted on the drawings otherwise, work shall also include: 1. The procurement of and payment for all fees, permits and licenses required for the performance of the work. 2. All fees and direct expenses involved in any inspection required for the project. 3. All hoists, scaffolds, staging, runways, and equipment required for the performance of the work. 4. All job measurements and shop layouts required for the proper installation of material and equipment included in the work. 5. All lights, guards, and signs as required by safety regulations applicable to the work. 6. The removal from the premises, as it accumulates, of all dirt and refuse resulting from the performance of the work. C. The work shall include revisions, modifications, and rework of existing work as required for installation of new work and as required for connections of new work to existing systems, and as required for connections of existing work to new systems. 1.03 CODES, REGULATIONS, AND STANDARDS A. All work must be performed in accordance with the requirements of local, county, state and national codes and regulations including the requirements of the following: 1. Building Code, Latest Edition. 2. National Electrical Code. 3. Mechanical Code, Latest Edition. 4. Occupational Safety and Health Act. of 1970. 5. Life Safety Code, N.F.P.A. No. 101. 6. For work not specifically listed above, use standards and codes of the National Fire Protection Association. 7. Plumbing Code, Latest Edition. 1.04 ABBREVIATIONS A. All equipment, apparatus and systems shall be rated, tested, fabricated and/or installed in accordance with the applicable industry standard mentioned. The following list will serve to clarify abbreviations that appear in other sections of this specification: GENERAL PROVISIONS (Revised 06/11/12) 20 01 00 - 1 1. 2. 3. 4. 5. 6. 7. AABC-Associated Air Balance Council FS-Federal Specifications ADC-Air Diffusion Council NFPA-National Fire Protection Association AGA-American Gas Association NSC-National Safety Council ASHRAE-American Society of Heating, Refrigerating and Air Conditioning Engineers 8. ASME-American Society of Mechanical Engineers 9. IEEE-Institute of Electrical and Electronics Eng. 10. NSF-National Sanitation Foundation 11. AMCA-Air Moving and Conditioning Assoc.3. ASE-Association of Safety Engineers 12. ASTM-American Society for Testing and Matl 13. MCAA-Mechanical Contractors' Association of Amer. 14. AWWA-American Water works Association 15. ANSI-American National Standards Institute 16. SMACNA-Sheet Metal and Air Conditioning Contractors National Association 17. NEBB-National Environmental Balancing Bureau 18. ARI-Air Conditioning and Refrigeration Inst. 19. UL-Underwriters Laboratories 20. NEMA-National Electrical Manufacturers Assoc. 21. OSHA- Occupational Safety & Health Administration 22. EPA-Environmental Protection Agency 1.05 SUBMITTALS A. See Section 01 33 00 "SUBMITTALS" for requirements for shop drawings and product data. 1.06 SUBSTITUTION OF EQUIPMENT A. All proposed substitutions for specified products on this project (except as listed above) require approval in advance of bidding. Approval will not be granted after award of contract. Substitutions must be submitted for review no later than five (5) working days prior to the bid date to be considered. B. In the event of Owner’s approval of a substitution of equipment, notification will be given by the Owner (or authorized representative), by the issuance of an amendment to the contract documents incorporating the equipment by name and model number. 1.07 CONTRACT DRAWINGS A. The layout shown on the Contract Drawings is necessarily diagrammatic but shall be followed as closely by actual construction as work will allow 1.08 PRODUCT DELIVERY, STORAGE, AND HANDLING A. Deliver products to the project properly identified with names, model numbers, types, grades, compliance labels, and other information needed for identification. B. Follow manufacturer's directions in delivery, storage, protection and handling of all equipment and materials. C. Deliver and store equipment and materials to the site in original containers, suitably sheltered from the elements and mechanical injury, but readily accessible for inspection until installed. PART 2 – PRODUCTS - (NOT APPLICABLE) GENERAL PROVISIONS (Revised 06/11/12) 20 01 00 - 2 PART 3 - EXECUTION 3.01 ROUGH-IN A. Verify final locations for rough-ins with field measurements and requirements of the actual equipment to be connected. 3.02 MECHANICAL INSTALLATIONS A. Sequence, coordinate, and integrate the various elements of mechanical systems, materials, and equipment. 3.03 DEFECTIVE WORK AND MATERIAL A. All materials or work found to be defective or in non-conformance with the drawings or different from the requirements of the drawings and specifications or damaged through negligence of Contractor or his employees, or through action of fire or weather will be rejected and shall be immediately removed from premises by Contractor and satisfactory materials and work substituted without delay. 3.04 COOPERATION AND COORDINATION A. Contractor shall confer with other contractors at the site before installing his work to avoid interferences so that maximum head room and clearances may be maintained B. Particular attention shall be paid to situations where recessed equipment, such as pipes and lights occur, or where the work of several trades occurs together above suspended ceilings, in pipe shafts or in areas where space is limited. C. All fixtures, equipment, devices, switches, outlets, pumps, etc., shall be positioned to avoid all interferences with and to assure proper coordination with work of all other trades, cases, partitions, wall, floor and ceiling patterns, architectural features, etc. 3.05 CUTTING AND PATCHING A. Perform cutting and patching in accordance with techniques acceptable to the owner. Restore all finishes to as-new condition. 3.06 PROTECTION OF EQUIPMENT AND SYSTEMS A. Keep pipe openings closed by means of plugs or caps to prevent entrance of foreign matter, and cover all fixtures, equipment and apparatus as required to protect them against dirt, water, chemical or mechanical damage both before and after installation. B. Fixtures, equipment or apparatus damaged prior to final acceptance of work shall be restored to original condition or replaced by Installer. C. Equipment shall be inherently safe and moving parts shall be covered with guards which meet OSHA requirements. D. Provide protective guards for devices such as or similar to thermostats, valves, and switches which are so located as to be readily subject to tampering, accidental damage, or vandalism. E. Provide safety railings as required. END OF SECTION GENERAL PROVISIONS (Revised 06/11/12) 20 01 00 - 3 SECTION 20 02 00 CONTRACT CLOSEOUT & COMMISSIONING PART 1 - GENERAL 1.01 MAINTENANCE MANUAL AND OPERATING INSTRUCTIONS (20 01 00) A. All switches, controls, and safety devices shall be clearly and permanently marked with embossed or printed plates as to purpose and as to operation and shall be tested to ensure function and purpose. B. Upon completion of the work, Contractors shall put the systems into service. Contractors shall be entirely responsible for the equipment during all testing operations including the lubricating and turning on and off of such apparatus. 1.02 PROJECT RECORD AND CLOSEOUT DOCUMENTS (20 01 00) A. See Division 01 Section "RECORD DOCUMENTS" for red lining of all documents during construction to reflect "as-built" conditions. B. In addition to the requirements specified in Division 01, indicate the following installed conditions: 1. Ductwork mains and branches,size and location, for both exterior and interior; locations of dampers and other control devices; filters, boxes, and terminal units requiring periodic maintenance or repair. 2. Mains and branches of piping systems, with valves and control devices located and numbered, concealed unions located, and with items requiring maintenance located (i.e., traps, strainers, expansion compensators, tanks, etc.). Valve location diagrams, complete with valve tag chart. Refer to Section 20 03 00 - "MATERIAL AND METHODS". Indicate actual inverts and horizontal locations of underground piping. 3. Equipment locations (exposed and concealed), dimensioned from prominent building lines. 4. Approved substitutions, Contract Modifications, and actual equipment and materials installed. 5. Contract Modifications, actual equipment and materials installed. 1.03 CLEANING EQUIPMENT AND SYSTEMS (20 01 00) A. All equipment, piping systems and duct systems shall be thoroughly cleaned internally and externally before being placed in service. B. The Contractor is charged with the responsibility for maintaining all systems and equipment clean and free of foreign matter during the processes of assembly and erection. C. Pipe strainers and air filters shall be cleaned and serviced immediately prior to final inspection. D. When flushing systems, all control, thermal and other elements subject to blocking by foreign matter shall be removed. E. When piping systems are flushed with fluids other than that normally contained, the Contractor shall take adequate precautions to insure that the normal contents of the piping will not be contaminated when placed in service. 2.01 FIRESTOPPING (20 03 00) A. Where ducts and/or pipes penetrate fire-rated ceilings, walls, floors, and any other fire rated assembly the cavity shall be sealed with intumescent material capable of expanding 5 to 10 times when exposed to temperatures of 250F. It shall be ICBO, BOCA, and SBCCI (NRB 243) approved ratings per ASTM E-814 (U.L. 1479). Acceptable materials: CONTRACT CLOSEOUT & COMMISSIONING (Revised 03/12/08) 20 02 00-1 DOW-CORNING 3-6548 silicone RTV foam or 3-M fire barrier caulk, or 3-M fire barrier 2001 silicone RTV foams. 3.01 MECHANICAL PIPING SYSTEM IDENTIFICATION (20 06 00) A. General: Install pipe markers on each system indicated to receive identification, and include arrows to show normal direction of flow. B. Locate pipe markers and color bands as follows wherever piping is exposed to view in occupied spaces, machine rooms, accessible maintenance spaces (shafts, tunnels, plenums) and exterior non-concealed locations. 1. Near each valve and control device. 2. Near each branch, excluding short take-offs for fixtures and terminal units; mark each pipe at branch, where there could be question of flow pattern. 3. Near locations where pipes pass through walls or floors/ceilings, or enter nonaccessible enclosures. 4. At access doors, manholes and similar access points which permit view of concealed piping. 5. Near major equipment items and other points of origination and termination. 6. Spaced intermediately at maximum spacing of 50' along each piping run, except reduce spacing to 25' in congested areas of piping and equipment. 7. On piping above removable acoustical ceilings, except omit intermediately spaced markers. 4.01 COMMISSIONING SPRINKLER SYSTEMS (21 13 13) (required if installed) A. Starting Procedures: Follow manufacturer’s written procedures. If no procedures are prescribed by manufacturer, proceed as follows: Verify that specialty valves, trim, fittings, controls, and accessories have been installed correctly and operate correctly. Verify that specified tests of piping are complete. Check that damaged sprinklers and sprinklers with paint or coating not specified have been replace with new, correct type of sprinkler. Check that sprinkler are correct type have correct finish and temperature ratings, and have guards where required for applications. Check that potable water supplies have correct type of backflow preventer. Check that hose valves and fire department connections have threads compatible with local fire department equipment and have correct pressure settings. Fill wet-pipe sprinkler systems with water. Adjust operating controls and pressure settings. B. Coordinate the fire alarm systems tests. Operate systems as required. 5.01 DISINFECTION OF DOMESTIC WATER SYSTEMS (22 00 00) A. General: 1. Before being placed in service and after testing is completed, all potable water piping shall be chlorinated as specified herein, in accordance with AWWA Standard C60154 and as required by the local Health Department codes. 2. Chlorine may be applied by the use of chlorine gas-water mixture, direct chlorine-gas feed or a mixture of calcium hypochlorite and water. If calcium hypochlorite is used, it shall be equivalent to commercial products such as Perchloron, HTH or Maxochlor. The powder shall be mixed with water to form a paste thinned to a slurry and pumped or injected into the lines. 3. If direct chlorine-gas feed is used, it shall be fed with either a solution-feed chlorinator or by a pressure-feed chlorinator. 4. The lines and fixtures shall be flushed thoroughly after chlorination to remove all foreign matter. CONTRACT CLOSEOUT & COMMISSIONING (Revised 03/12/08) 20 02 00-2 5. Injection shall start only when all fixtures are connected and ready for operation. 6. A service cock or riser (3/4" to at least 1-1/4") shall be provided by the Contractor and located at the point of connection to water service. The disinfecting agent shall be injected into and through the system from this cock or riser only. 7. Chlorine, either gas or liquid, or calcium hypochlorite (liquid or powered) shall be used as a disinfecting agent as approved in federal and AWWA procedures. 8. The disinfecting agent shall be injected by a proportioning pump or device through the service cock or riser slowly and continuously at an even rate. 9. All outlets shall be fully opened and closed at least four times during injection and the residual checked with orthotolidine solution. 10. When the chlorine residual concentration indicated not less than 50 parts per million at all outlets, all fixtures and water supply valves shall be closed. 11. The residual shall then be retained for a period of not less than eight hours. 12. After retention, the residual upon checking at most outlets, shall not be less than ten parts per million. If less, the disinfection must be repeated as described above. 13. If satisfactory, all fixtures shall be flushed until residual or orthotolidine tests are not greater than the water supply. 14. Contractor shall furnish Engineer or his authorized representative with sterilization report indicating potable water to be safe from contamination. 5.02 FLUSHING WATER PIPING (22 00 00) A. After the piping has been chlorinated, each run of pipe shall be thoroughly flushed out so as to remove all foreign matter from the lines. Flushing will ordinarily be done by opening drain valves along the lines. B. Sufficient flushing water shall be introduced into the mains to produce a velocity of not less than 4 ft. per second, and this flow rate shall be continued until the discharge is clean and clear and does not show evidences of silt or foreign matter when a sample is visually inspected. 6.01 FIELD QUALITY CONTROL OF GAS PIPING SYSTEMS (23 11 00) A. Inspect, test, and purge gas systems according to NFPA 54, Part 4 "Gas Piping Inspection, Testing, and Purging" and local gas utility requirements as applicable. B. Repair leaks and defects with new materials, and retest system until satisfactory results are obtained. C. Verify capacities and pressure ratings of gas meters, regulators, valves, and specialties. D. Verify correct pressure settings for pressure regulators. E. Verify that specified piping tests are complete. 7.01 COMMISSIONING REFRIGERANT PIPING (23 23 00) (REQUIRED ON SPLIT SYSTEMS ONLY) A. Charge system using the following procedure: 1. Install core in filter dryer after leak test but before evacuation. 2. Evacuate refrigerant system with vacuum pump; until temperature of 35 deg F is indicated on vacuum dehydration indicator. 3. During evacuation, apply heat to pockets, elbows, and low spots in piping. 4. Maintain vacuum on system for minimum of 5 hours after closing valve between vacuum pump and system. 5. Break vacuum with refrigerant gas, allow pressure to build up to 2 psi. 6. Complete charging of system, using new filter dryer core in charging line. Provide full operating charge. 8.01 CLEANING AND ADJUSTING OF HVAC EQUIPMENT CONTRACT CLOSEOUT & COMMISSIONING (Revised 03/12/08) 20 02 00-3 A. Cleaning: Upon completion of installation, inspect units and associated components. Remove paint splatters and other spots, dirt, and debris. Touch up scratches and mars of finish to match original finish. Clean unit internally using methods and materials recommended by manufacturer. B. Adjusting: Make control and other adjustments for optimum heating, cooling and/or efficiency. 9.01 STARTUP OF CONDENSING UNITS (23 81 26) A. Start-up condensing unit, in accordance with manufacturer's start-up instructions. Test controls and demonstrate compliance with requirements. Replace damaged or malfunctioning controls and equipment. 10.01 COMMISSIONING OF HEAT AND COOL UNITS (23 74 00) A. Start-up Services: 1. Start-up HVAC units, in accordance with manufacturer's written start-up instructions. Test controls and demonstrate compliance with requirements. Replace damaged or malfunctioning controls and equipment. 10.02 CONTROL EQUIPMENT LABELING (25 00 00) A. Labels shall be installed wherever necessary to clarify functions of components and facilitate adjustment and servicing. Labels shall be required on, but not limited to the following: 1. Control panels. 2. Automatic damper motors. 10.03 FINAL ADJUSTMENT OF CONTROLS (25 00 00) A. After completion of the installation, adjust all thermostats, control valves, motors and other equipment provided under this contract and place them in complete operating condition subject to approval of Engineer. 11.01 TESTING, ADJUSTING, AND BALANCING OF HVAC SYSTEMS (23 05 93) A. HVAC systems shall be tested and balanced by the HVAC Contractor, as called for in Section 23 05 93. B. The HVAC Contractor shall put all heating, ventilating and air conditioning systems and equipment into operation and shall continue the operation of same during each working day of testing and balancing and shall place the automatic temperature control system in satisfactory operation. C. The Contractor shall make all necessary corrections within 48 hours and within 10 working days for items that require replacement or installation. END OF SECTION CONTRACT CLOSEOUT & COMMISSIONING (Revised 03/12/08) 20 02 00-4 SECTION 20 03 00 MATERIALS AND METHODS PART 1 - GENERAL 1.01 WORK INCLUDES A. Provide the materials as specified in this Section when required by this project. PART 2 - PRODUCTS 2.01 ACCEPTABLE MANUFACTURERS A. Hangers, Supports, and Inserts (Insulated or non-insulated piping) 1. Elcen - 12X. 2. Grinnell - #65. 2.02 FLUES, VENTS, AND CHIMNEYS A. Vent Connectors from Individual Equipment: 1. May be single-wall vent pipe unless otherwise called out on plans. Single-wall vent connectors must be totally exposed in the mechanical room, and may not penetrate any wall, ceiling, or chase. Vent connectors for water heaters (where permitted by the recommendations of the manufacturer) shall be 22 gauge galvanized, minimum. All joints shall be made with proper fittings. Cut-in “Taps” will not be permitted. 2. Vent connectors shall be the same size as the appliance outlet, unless shown larger on the drawings. They shall pitch upward at ¼” per foot minimum. Length shall not exceed that allowed by the applicable mechanical code. Two vent connectors shall not be combined before connecting to the vent or chimney. B. Combined Vent - Type B: 1. The gas vent system shall be so constructed as to develop a positive flow adequate to exhaust all flue gases to outside atmosphere, without condensation within the vent or spillage at any appliance draft hood. 2. All flue-gas carrying parts of the vent system shall be Selkirk Metalbestos Type B double-wall gas vent piping, and such piping shall be continuous from the appliances vent connector to the vent top. 3. Gas vent piping shall be installed in full compliance with the terms of its Underwriters Laboratories, Inc. listing, with the manufacturer’s installation instruction, and with nationally recognized building codes. C. Concentric Vent/Intake Piping for Condensing Equipment : 1. This applies to condensing gas-fired furnaces & unit heaters: 2. Vent/intake piping and fitting materials: a. Schedule 40 NSF-PW PVC 1120 ASTM D1785 or b. Schedule 40 PVC ASTM D1785 and D2665 (dual marked)or c. DWV ASTM D2665 d. Schedule 40 CPCV ASTM D1785 (where required). 3. Where required by manufacturer’s instructions, use CPVC vent piping. 4. Arrangement of vent fittings must conform to National Fuel Gas Code ANSI: Z223.1-“latest edition”. D. Positive Pressure Vent – Stainless Steel: 1. This applies to Air Turnover Units (Thermal Economizers). 2. The gas vent system shall be Metalbestos Galva-Temp series or approved equal. 3. 304 stainless steel inner liner, 1” solid pack insulation, galvanized steel outer casing. MATERIALS AND METHODS (Revised 01/31/11) 20 03 00-1 4. Rated for 1,000°F continuous operating temperature. 5. Listed UL – 103. 6. Clearance of 2” is required to combustibles. 2.03 HVAC CONDENSATE PIPING A. HVAC Condensate Piping: 1. Horizontal condensate lines longer than 5 feet (such as in ceiling spaces) shall be 1 ½” Schedule 40 PVC DWV. Connections to units shall be ¾”, equipped with a trap. 2. Condensate lines which pass through return air plenum ceiling spaces shall be 1” type “L” hard-drawn copper in lieu of PVC as stated above. 3. Vertical condensate lines which are not downstream of larger piping shall be ¾” PVC, Schedule 40, DWV. 4. Condensate lines which penetrate outside walls and spill to grade shall be harddrawn copper tube, Type “L”. 5. Exterior condensate lines shall be PVC Schedule 40, electrical conduit, ultraviolent resistant. Size per plans. 2.04 PIPING MATERIALS A. All piping and fittings shall be manufactured in the United States. Each length of pipe and each fitting shall be marked with the manufacturer's name or trademark and the specification code to which it conforms. 2.05 VALVES A. Refer to Section 20 05 00 "Valves" for globe, ball, butterfly, and check valves. 2.06 PIPE SPECIALTIES A. Unions in copper pipe 2 in. and smaller shall be Mueller, Anaconda or Chase Brass, brass solder joint unions constructed for 150 psi working pressure. B. Unions 2-1/2 in. in size and larger shall be companion flanges. (ANSI B16.1). Flanged unions shall be Van Stone, Grinnell or Crane Lap flanges over welding nipples welded into pipelines. C. Dielectric unions suitable for dielectric service shall be provided at pipe connections between steel or cast iron piping and copper tubing. 2.07 HANGERS, SUPPORTS AND INSERTS A. Hangers and supports shall conform to the recommendations of Standard Practice SP.58 of the Manufacturers' Standardization Society of the Valve and Fitting Industry. B. All hangers for insulated piping shall be oversized to allow the insulation to run through the hanger uninterrupted. Insulation shall be protected from crushing by sheet metal shields. C. Hanger rods shall conform to the following: Pipe Size Rod Diameter Up to 2" 3/8" 2-1/2" to 5" 1/2" Trapeze hanger rods shall be of sufficient size to carry weight of trapeze channel, piping and contents, insulation supports and an additional 200 lb. load. D. Wire or perforated strap iron hangers, expansion anchors, and power actuated fasteners will not be permitted. MATERIALS AND METHODS (Revised 01/31/11) 20 03 00-2 2.08 SLEEVES A. Provide pipe sleeves for all penetrations of piping through walls. B. Wall sleeves for exterior foundation walls shall be cast iron, standard weight galvanized steel or PVC schedule 40 fabricated sleeves flush with wall inside and outside. Caulk with oakum and lead wool or otherwise adequately waterproof opening between pipe and sleeve. 2.09 FIRESTOPPING A. Where ducts and/or pipes penetrate fire-rated ceilings, walls , floors and any other fire rated assembly the cavity shall be sealed with intumescent material capable of expanding 5 to 10 times when exposed to temperatures of 250 F. It shall be ICBO, BOCA, and SBCCI (NRB 243) approved ratings per ASTM E-814 (U.L. 1479). Acceptable materials: DOW-CORNING 3-6548 silicone RTV foam or 3-M fire barrier caulk, or 3-M fire barrier 2001 silicone RTV foams. 2.10 ESCUTCHEONS A. Provide set-screw chrome plated escutcheons (not friction-dependent) on all exposed pipe or pipe insulation passing through or into finished walls, partitions, ceiling and floors. Escutcheons at insulated pipes shall be large enough to encircle insulation without penetrating vapor barrier or jacket. 2.11 STARTERS A. Each piece of equipment requiring a motor starter integral or factory installed, shall incorporate a motor starter. B. Starter heater coil sizes shall be determined by motor nameplate. C. Motor starter control circuits and devices shall be 120 volt, 60 hertz characteristic regardless of power circuit voltage serving motor. D. Provide auxiliary contacts where required for interlocking, intermittent starting, pilot control, remote control, motor shut-down and safety features. 2.12 CONDUIT AND WIRING A. Wiring systems provided under Sections 20, 21, 22, 23 & 25 shall be as specified in Section 26. B. All electrical terminals shall be labeled. C. Provide wiring diagrams inside each cabinet. D. Conduit shall comply with all requirements of Section 26. E. Final connections to equipment shall be flexible. 2.13 BELT AND COUPLING GUARDS A. Guards shall be provided for all belt-driven units and at chains, gears, couplings, keys, projecting set screws, and other rotating or moving parts. PART 3 - EXECUTION 3.01 FLUE, VENT, AND CHIMNEY INSTALLATIONS A. Install in accordance with all requirements of the applicable mechanical code. B. Comply with applicable requirements of NFPA 54, fuel gas code, latest edition. C. Any joint in the system which cannot be assembled using factory-fabricated fittings shall be welded gas-tight. MATERIALS AND METHODS (Revised 01/31/11) 20 03 00-3 3.02 PIPE AND FITTINGS APPLICATIONS A. Use pipe, tube, fittings, and joining methods are specified within each specific individual section. 3.03 JOINTING OF PIPING A. Threads shall be full and clean cut, and ends of pipe shall be reamed. When screwed joints are assembled, the male thread shall be thoroughly coated with appropriate thread compound to serve as a joint sealer and as a prime coat of paint for the exposed threads. (Teflon tape may be used at contractor's option.) B. Soldered or brazed joints made with fittings having pre-inserted rings of solder or brazing alloy shall have the tube and fittings cleaned bright and fluxed. Flux shall be water soluble binder flux. C. In potable water systems, the use of solder and flux exceeding 0.2 percent lead content is prohibited. 3.04 EXPANSION AND CONTRACTION A. Provisions shall be made for expansion and contraction in all piping. Piping shall be installed in a manner such that joints will not develop leaks. 3.05 INSTALLATION OF PIPING A. Piping shall be installed on long continuous lengths, with a minimum number of joints. Joints, where necessary shall be carefully made to insure against leakage. B. All piping shall be firmly supported using hangers, brackets and braces to prevent sagging and/or lateral movement. All hangers, brackets, and other supports shall be securely fastened to the construction as may be required and in a manner acceptable to the Engineer. C. All piping shall be installed to maintain maximum head room. D. Nothing shall be suspended from the roof deck. E. Arrangement of all piping shall be as shown on plans. It is especially necessary that all mains be installed with view to accessibility in case of repair and location of pipe lines and spacing between same shall be so made that there will be no conflict between pipe lines by the several trades. F. Under no circumstances shall the size of piping shown on the drawings be changed without written approval of the Engineer. G. Unions or flanges are to be installed on the equipment side of all valves in pipe connections from mains to equipment, to enable equipment to be drained and disconnected without necessitating the draining of mains. H. Valves must be arranged for easy access. 3.06 WELDING A. When welding is to be performed, precautionary measures must be taken to prevent fire. B. Welded joints shall be made by the oxy-acetylene or electric process in accordance with Code for Pressure Piping ANSI B31.l. C. Filler metal for the oxy-acetylene welding process shall conform to the American Society for Testing and Materials Specification for Iron and Steel Gas-Welding Rods, ASTM Designation A251-46T, Classification GA60. Filler metals for the metallic arc welding process shall conform to the American Society for Testing and Materials Specification for Mild Steel Arc-Welding Electrodes, ASTM Designation A233-58T. MATERIALS AND METHODS (Revised 01/31/11) 20 03 00-4 Classification of electrodes shall be one of the following: E6010, E6015, E7016, E7018. D. Welding shall be done with good quality modern welding equipment by competent operators, and in a thorough, first class, workmanlike manner. Preparation, fabrication welding and installation shall be in accordance with ANSI B31.3 - 1962. 3.07 HANGERS, SUPPORTS AND INSERTS A. Provide all hangers, supports, bracing, inserts, beams, anchors, guides, sleeves and miscellaneous steel for the proper support, alignment, expansion and contraction of piping and equipment. B. Hanger supports shall be securely fastened to structural members by approved beam clamps and clips, concrete inserts, anchors, or other appropriate methods agreed upon with the Engineer. C. Maximum spacing of hangers and supports for steel and copper piping shall be as follows: Pipe Size Spacing 1/2" thru 1-1/4" Not over 8'-0" l-1/2" thru 3" Not over 10'-0" 3.08 OPENINGS IN CONSTRUCTION A. The Contractor shall be responsible for arranging the work so that minimum cutting or provision of openings will be required. 3.09 CONCRETE EQUIPMENT PADS A. The Contractor shall supply all concrete pads and machine bases required for his equipment noted otherwise. 3.10 VALVES A. Install ball valves with the stem above body in accessible position. B. The necessary valves shall be installed within the systems to provide the following: 1. Required shut-off. 2. Flow control service. 3. Isolation for inspection. 4. Maintenance repair of each piece of equipment. 5. Maintenance and repair of each fixture. 6. Each main and branch service loop. C. Each valve shall be installed so that it is easily accessible for operation, visual inspection and preventative maintenance. 3.11 MOTORS A. Unattached electric motors (motors furnished loose with equipment) shall be set by the contractor. 3.12 CLEANING THE PIPING SYSTEMS A. Before pipe covering is applied and final tests are made, flush the water piping systems thoroughly to remove grit, sand, oil, etc., to thoroughly clean apparatus and piping. END OF SECTION MATERIALS AND METHODS (Revised 01/31/11) 20 03 00-5 SECTION 20 04 00 TESTING PIPING SYSTEMS PART 1 - GENERAL 1.01 RELATED DOCUMENTS A. The following shall apply to this Section: 1. Drawings. 2. General Conditions. 1.02 WORK INCLUDES A. Provide pressure tests on soil, waste, and vent piping systems. B. Provide pressure tests on domestic cold and hot water piping systems. C. Provide pressure tests on gas piping system (if a gas system has been installed). 1.03 RELATED WORK A. B. C. D. E. 1.04 Section 33 00 00 Section 20 03 00 Section 22 07 19 Section 22 00 00 Section 23 23 00 “SITE PIPING” "MATERIALS AND METHODS". "PIPING INSULATION" "PLUMBING". “REFRIGERANT PIPING”. QUALITY ASSURANCE A. Piping systems where required, shall be pressure tested for leaks in accordance with the Code for Pressure Piping, ANSI B31.1.0, and as specified herein. B. All tests shall be performed and all piping defects shall be corrected prior to insulating, inaccessible concealing or back filling. Leaks shall be repaired; all repaired piping shall be retested. All defective pipe, materials and workmanship shall be removed and replaced and tests shall be repeated until systems are proven entirely tight. C. The tests shall not be performed until after cleaning the piping systems. PART 2 - PRODUCTS 2.01 TESTING MATERIALS A. All materials, pumps, compressors and equipment required for testing shall be provided by the Contractor installing the piping system. B. Where water is used in hydrostatic testing, only potable water shall be used. PART 3 - EXECUTION 3.01 TESTING OF PIPING SYSTEM - GENERAL A. Devices or equipment, or parts thereof regulators, gauges, thermometers, etc., which may be damaged by test pressures shall be removed or protected during tests. B. Fabricated piping shall not be connected to equipment until testing has been completed. Before applying test pressure, provide restraining devices as required to prevent distortion of piping system during testing. C. Welding and screwed joints and other potential leak sources of the systems to be TESTING PIPING SYSTEMS (Revised 06/11/12) 20 04 00 - 1 hydrostatically tested shall be painted with a powdered blue chalk and water mixture and allow to dry before testing begins. D. All joints in the piping systems shall be inspected during the test period. All defective joints shall be removed, repaired and replaced. E. Where air is used for pressure testing, the air pressure shall be gradually applied. All leak sources shall be checked for leaks by applying a coating of soap suds to the source. F. After tests have been completed and piping systems proven tight, piping and equipment shall be tested for complete drainage through unions, caps, plugs, faucets or hose valves at low points. If piping and equipment do not drain properly, piping and equipment shall be regraded and drain points added until system can be completely drained. Systems shall be left dry in freezing weather. 3.02 SOIL, WASTE, AND VENT PIPING SYSTEM A. All stacks and underfloor sewers of all kinds shall be tested by capping outlets 5'-0" outside building wall, capping all connections, providing a 10'-0" high tight pipe extension and filling with water to top of extension. B. Water shall remain in each system for at least 2 hours without dropping more than 1". Leaks shall be repaired and tests repeated until system is proven watertight. System may be tested in sections, but every joint between sections must be tested. 3.03 DOMESTIC COLD AND HOT WATER PIPING SYSTEMS A. Domestic cold and hot water piping shall be hydrostatically tested to a pressure of 100 psig registered at ground floor level. B. Testing shall be considered complete when systems hold the test pressure for a minimum period of one hour without variation in pressure except that which is due to changes in temperature. 3.04 WET PIPE SPRINKLER SYSTEMS (required, if installed) A. All fire sprinkler piping shall be tested in accordance with NFPA No. 13, Chapter 8, System Acceptance. B. Per NFPA No. 13, Chapter 8, the required minimum hydrostatic test pressure is 200 psi. Test pressure is to be maintained without loss for 2 hours. C. See NFPA No. 13, Chapter 8 for test exceptions and interim air test requirements. 3.05 GAS SYSTEM A. All gas piping shall be tested in accordance with NFPA No. 54 (the minimum test). B. Pressure for air-pressure test shall be 20 psi and the minimum test duration shall be two (2) hours. END OF SECTION TESTING PIPING SYSTEMS (Revised 06/11/12) 20 04 00 - 2 SECTION 20 05 00 VALVES PART 1 - GENERAL 1.01 RELATED DOCUMENTS A. The following shall apply to this Section: 1. Drawings. 2. Supplementary Conditions. 3. General Conditions. 1.02 WORK INCLUDES A. This Section includes general duty valves common to most mechanical piping systems. 1. Special purpose valves are specified in individual piping system specifications. 1.03 RELATED WORK A. Section 20 01 00 - "GENERAL PROVISIONS". B. Section 20 03 00 - "MATERIALS AND METHODS". 1.04 QUALITY ASSURANCE A. Single Source Responsibility. PART 2 - PRODUCTS 2.01 ACCEPTABLE MANUFACTURERS A. Valves: Bell and Gossett Conbraco (Apollo) Crane Flowdesign Grinnell Jomar Keystone Nibco Stockham Victaulic Watts 2.02 VALVE FEATURES - GENERAL A. Pressure and Temperature Ratings: As scheduled and required to suit system pressures and temperatures. B. Sizes: Same size as upstream pipe, unless otherwise indicated. C. Operators: Provide the following special operator features: Lever handles, on quarter-turn valves 6-inch and smaller, except for plug valves. Provide plug valves with square heads; provide one wrench for every 10 plug valves. D. Extended Stems: Where insulation is indicated or specified, provide extended stems arranged to receive insulation. VALVES (Revised 05/01/09) 20 05 00 - 1 2.03 GATE VALVES A. Do Not Use Gate Valves in Building Piping Systems. 2.04 BALL VALVES A. Ball Valves, 2 Inches and Smaller: Rated for 150 psi saturated steam pressure, 400 psi WOG pressure; two-piece construction; with bronze body conforming to ASTM B 62, standard (or regular) port, chrome-plated brass ball, replaceable "Teflon" or "TFE" seats and seals, blowout-proof stem, and vinyl-covered steel handle. 2.05 CHECK VALVES A. Swing Check Valves: MSS SP-80; Class 125, cast-bronze body and cap conforming to ASTM B 62; with horizontal swing, Y-pattern, and bronze disc; and having threaded or solder ends. Provide Class 150 valves meeting the above specifications, with threaded end connections, where system pressure requires or where Class 125 valves are not available. PART 3 - EXECUTION 3.01 VALVE ENDS SELECTION A. Select valves with the following ends or types of pipe/tube connections: 1. Copper Tube Size, 2-Inch and Smaller: Solder ends. 2. Steel Pipe Sizes, 2-Inch and Smaller: threaded or grooved end. 3. Steel Pipe Sizes 2-1/2 Inch and Larger: grooved end or flanged. 3.02 VALVE INSTALLATIONS A. General Application: Use ball and butterfly valves for shut-off duty; globe, and butterfly for throttling duty. Refer to piping system specification sections for specific valve applications and arrangements. 1. Locate valves for easy access and provide separate support where necessary. 2. Install valves and unions for each fixture and item of equipment arranged to allow equipment removal without system shutdown. Unions are not required on flanged devices. 3. Install valves in horizontal piping with stem at or above the center of the pipe. 4. Install valves in a position to allow full stem movement. B. Installation of Check Valves: Install for proper direction of flow as follows: 1. Swing Check Valves: Horizontal position with hinge pin level. 3.03 FIELD QUALITY CONTROL A. Tests: After piping systems have been tested and put into service, but before final adjusting and balancing, inspect valves for leaks. Adjust or replace packing to stop leaks; replace valves if leak persists. 3.04 ADJUSTING AND CLEANING A. Cleaning: Clean mill scale, grease, and protective coatings from exterior of valves and prepare valves to receive finish painting or insulation. END OF SECTION VALVES (Revised 05/01/09) 20 05 00 - 2 SECTION 20 06 00 MECHANICAL IDENTIFICATION PART 1 - GENERAL 1.01 RELATED DOCUMENTS A. The following shall apply to this Section: 1. Drawings 2. General Provisions of the Contract 3. Solicitation Documents 4. General Conditions 5. Section 01 1.02 WORK INCLUDES A. Provide identification of all systems and equipment installed under Sections 20, 21, 22, 23 & 25. 1.03 RELATED WORK A. Section 01 - "GENERAL REQUIREMENTS". B. Section 20 01 00 - "GENERAL PROVISIONS". 1.04 QUALITY ASSURANCE - (Not Applicable) PART 2 - PRODUCTS 2.01 ACCEPTABLE MANUFACTURERS A. B. C. D. Allen Systems, Inc Brady (W.H.) Co.; Signmark Div. Industrial Safety Supply Co., Inc. Seton Name Plate Corp. 2.02 PLASTIC PIPE MARKERS A. Snap-On Type: Provide manufacturer's standard pre-printed, semi-rigid snap-on, colorcoded pipe markers, complying with ANSI A13.1. B. Pressure-Sensitive Type: Provide manufacturer's standard pre-printed, permanent adhesive, color-coded, pressure-sensitive vinyl pipe markers, complying with ANSI A13.1. C. Small Pipes: For external diameters less than 6" (including insulation if any), provide fullband pipe markers, extending 360 degrees around pipe at each location, fastened by one of the following methods: 1. Snap-on application of pre-tensioned semi-rigid plastic pipe marker. 2. Adhesive lap joint in pipe marker overlap. 2.03 UNDERGROUND-TYPE PLASTIC LINE MARKERS A. General: Manufacturer's standard permanent, bright-colored, continuous-printed detectable tape, intended for direct-burial service; not less than 6" wide x 4 mils thick. Provide tape with printing which most accurately indicates type of service of buried pipe. 1. Provide multi-ply tape consisting of solid aluminum foil core between 2-layers of plastic tape. MECHANICAL IDENTIFICATION (Revised 06/15/12) 20 06 00 - 1 PART 3 - EXECUTION 3.01 GENERAL INSTALLATION REQUIREMENTS A. Coordination: Where identification is to be applied to surfaces which require insulation, painting or other covering or finish, including valve tags in finished mechanical spaces, install identification after completion of covering and painting. Install identification prior to installation of acoustical ceilings and similar removable concealment. 3.02 PIPING SYSTEM IDENTIFICATION A. See Section 20 02 00 - “Contract Close-out & Commissioning”. 3.03 UNDERGROUND PIPING IDENTIFICATION A. General: During back-filling/top-soiling of underground gas piping, install continuous underground-type detectable type line marker, located directly over buried line at 6" to 8" below finished grade. END OF SECTION MECHANICAL IDENTIFICATION (Revised 06/15/12) 20 06 00 - 2 SECTION 20 07 00 EXISTING SYSTEMS AND OWNER FURNISHED EQUIPMENT PART 1 - GENERAL 1.01 RELATED DOCUMENTS A. The following shall apply to this Section: 1. Drawings. 2. General Provisions of the Contract. 3. Solicitation Documents. 4. General Conditions. 5. Architectural Division. 1.02 WORK INCLUDES A. Contractor shall perform all work on all existing systems and equipment that require expansion, relocation, modification, and/or repairs as per the drawings and/or specifications. PART 2 - PRODUCTS - NOT APPLICABLE PART 3 - EXECUTION 3.01 RELOCATED OR SERVICED EQUIPMENT A. From the time that the equipment is disconnected, or taken out of service, until the time that the equipment is started up and commissioned, the equipment shall be the responsibility of the contractor. Any damage occurring during the disconnecting, storing, relocating, reinstalling or start-up shall be repaired by the contractor so that the condition of the equipment will be at least as good as when disconnected in the judgment of the engineer. B. Contractor is responsible to ascertain and submit in writing to the engineer operating condition of existing equipment prior to being taken out of service. If contractor fails to provide a report o n the condition and operation of the existing equipment, then it will be assumed that the existing equipment was fully functional and operating correctly at its full intended capacity at the time of being taken out of service. C. Accessory items necessary for the proper operation of existing relocated equipment shall be relocated and re-installed per manufacturer’s recommendations. The contractor shall verify proper operation of such accessories before disconnecting the equipment. Notify engineer of any accessory items which need to be replaced before relocation the equipment. 3.02 EXPANDED SYSTEMS A. Any existing system which is expanded as a part of this project (HVAC duct, hydronic piping, plumbing etc.) shall be expanded per the sizes and/or flows indicated in the contract documents. B. Materials used for the expansion of any existing system shall meet the specifications in Section 20 03 00, and shall also meet the requirements of local codes. C. Commissioning of any expanded system means the commissioning of the entire system, both the existing and new components. D. The contractor shall install refrigerant and oil as required by any affected existing refrigeration system. EXISTING SYSTEMS AND OWNER FURNISHED EQUIPMENT (Revised 06/11/12) 20 07 00 - 1 3.03 OWNER FURNISHED EQUIPMENT REQUIRING PLUMBING AND HVAC CONNECTIONS AND CONTROLS A. Provide rough-ins and final connections to all Owner furnished equipment including shut off valves, piping, traps, ducts etc. necessary to connect up equipment after it has be installed in place. B. Install all faucets, sinks drains, tailpieces, overflows, traps, etc. furnished loose with all Owner furnished equipment. C. All exposed piping readily visible for Owner furnished equipment shall be chrome plated red brass pipe and fittings. Braces for support of exposed piping shall be chrome plated. D. Pending installation of Owner furnished equipment; all service lines shall be suitably capped, plugged and protected. All water lines shall be valved. E. Furnish vacuum breakers, pressure regulators solenoid valves, traps, piping and controls, etc. as required for installation of equipment. END OF SECTION EXISTING SYSTEMS AND OWNER FURNISHED EQUIPMENT (Revised 06/11/12) 20 07 00 - 2 SECTION 21 13 13 WET-PIPE SPRINKLER SYSTEMS PART 1 - GENERAL 1.01 RELATED DOCUMENTS A. The following shall apply to this Section: 1. Drawings. 2. General Conditions 3. General Provisions of the Contract. 4. Solicitation Documents. 5. Section 01, 01 11 00-Summary of Work 6. Section 33 00 00 – Site Piping 1.02 WORK INCLUDES A. The wet pipe sprinkler systems for buildings and structures. B. Sprinkler cabinet with spare sprinklers and sprinkler wrenches. C. Fees, permits and licenses; see Section 20 01 00, 1.02 “Work Includes”. 1.03 SUBMITTALS A. Product data for fire protection system components. Include the following: 1. Backflow preventers. 2. Valves, fittings and all types of pipe to be used. 3. Specialty valves, accessories, and devices. 4. Alarm devices. Include electrical data. 5. Fire department connections. Include type of fire department connection; number, size, type, and arrangement of inlets; size and direction of outlet; and finish. 6. Sprinklers, escutcheons, and guards. Include sprinkler flow characteristics, mounting, finish, and other data. B. Working Plans & Hydraulic Calculations: Sprinkler system drawings prepared according to NFPA 13. Plans and calculations shall be sealed by a professional engineer registered in the respective state of the project. C. Submit To: “Working plans and hydraulic calculations” must be submitted to the Owner for review and approval prior to submission to authorities having jurisdiction. Once Owner has approved “working plans and hydraulic calculations,” submit required number of sets to authority having jurisdiction for review, comment, and approval. D. Test reports and certificates as described in NFPA 13. Include "Contractor's Material & Test Certificate for Aboveground Piping" and "Contractor's Material & Test Certificate for Underground Piping." E. Maintenance data for each type of fire protection specialty specified. 1.04 QUALITY ASSURANCE A. Manufacturer Qualifications: Firms whose equipment, specialties, and accessories are listed by product name and manufacturer in UL Fire Protection Equipment Directory and FM Approval Guide and that conform to other requirements indicated. B. Listing and Labeling: Equipment, specialties, and accessories that are listed and labeled. 1. The Terms "Listed" and "Labeled": As defined in "National Electrical Code," Article 100. C. Comply with requirements of authority having jurisdiction for submittals, approvals, materials, hose threads, installation, inspections, and testing. WET-PIPE SPRINKLER SYSTEMS (Revised 07/09/12) 21 13 13-1 D. Licensed Engineer: Submit design drawings and design calculations. Include seal and signature of registered engineer licensed in jurisdiction where Project is located, certifying compliance with specifications and applicable codes. E. Installer's Qualifications: Firms qualified to install and alter fire protection piping, equipment, specialties, and accessories, and repair and service equipment. A qualified firm is one that is experienced (minimum of 5 previous projects similar in size and scope to this Project) in such work, familiar with precautions required, and in compliance with the requirements of the authority having jurisdiction. Submit evidence of qualifications to the Engineer upon request. F. NFPA Standards: Equipment, specialties, accessories, installation, and testing complying with the following as applicable: 1. NFPA 13 "Standard for the Installation of Sprinkler Systems." Latest Edition) 2. NFPA 26 "Recommended Practice for the Supervision of Valves Controlling Water Supplies for Fire Protection" 3. NFPA 70 "National Electrical Code" 1.05 DEFINITIONS A. Pipe sizes used in this Section are nominal pipe size (NPS) specified in inches. Tube sizes are standard tube size specified in inches. B. Working plans as used in this Section refer to documents (including drawings and calculations) prepared pursuant to requirements in NFPA 13 for obtaining approval of authority having jurisdiction and for fabrication and installation of the sprinkler systems. C. Other definitions for fire protection systems are included in referenced NFPA standards. 1.06 SYSTEM DESCRIPTION A. Wet Pipe Sprinkler System: System with automatic sprinklers attached to piping system containing water and connected to water supply so that water discharges immediately from sprinklers when they are opened by fire. B. Sprinkler System Protection Limits: All spaces within areas indicated. Include closets, toilet and locker room areas, each landing of each stair, and special applications areas. 1.07 SYSTEM PERFORMANCE REQUIREMENTS A. Design and obtain approval from authority having jurisdiction for fire protection systems specified. B. Minimum Pipe Sizes: Not smaller than sizes indicated for connection to water supply piping and system riser. C. Conduct fire hydrant flow tests as required to obtain hydraulic data needed to prepare design for hydraulically calculated systems. D. Hydraulically design sprinkler systems according to: 1. Sprinkler System Occupancy Hazard Classifications as indicated by Drawings or as required by code. 2. Minimum Density Requirements for Automatic Sprinkler System Hydraulic Design: As follows: a. Light Hazard - .10 GPM/sq. ft. over 1500 sq. ft. b. Ordinary Hazard, Group 1 Occupancy: 0.15 GPM/sq. ft. over 1500 sq. ft. E. Components and Installation: Capable of producing piping systems with the following minimum working pressure ratings except where indicated otherwise. 1. Sprinkler Systems: 175 psig (1200 kPa). PART 2 - PRODUCTS 2.01 ACCEPTABLE MANUFACTURERS WET-PIPE SPRINKLER SYSTEMS (Revised 07/09/12) 21 13 13-2 A. Backflow Preventers: 1. Ames Co., Inc. 2. Hersey Products, Inc., Grinnell Corp. 3. Cla-Val Co. 4. Watts Regulator Co. 5. Conbraco Industries, Inc. 6. Wilkins Regulator Div., Zurn Industries, Inc. 7. Febco. B. Fire Department Connections: 1. Badger-Powhatan, Figgie International Co. 2. Guardian Fire Equipment, Inc. 3. Croker Div., Fire-End and Croker Corp. 4. Potter-Roemer Div., Smith Industries, Inc. 5. Elkhart Brass Mfg. Co., Inc. 6. Reliable Automatic Sprinkler Co., Inc. 7. Firematic Sprinkler Devices, Inc. 8. Sierra Fire Equipment Co. 9. Gem Sprinkler Co. Div., Grinnell Corp. C. Fire Protection Service Gate and Check Valves: 1. Gem Sprinkler Co. Div., Grinnell Corp. 2. Stockham Valves and Fittings, Inc. 3. Kennedy Valve Div., McWane, Inc. 4. Victaulic Company of America. 5. Nibco, Inc. D. Grooved Couplings for AWWA Ductile-Iron Piping: 1. Gustin-Bacon Div., Tyler Pipe Subsid., Tyler Corp. 2. Victaulic Company of America. E. Grooved Couplings for Steel Piping: 1. Grinnell Supply Sales Co., Grinnell Corp. 2. Stockham Valves and Fittings, Inc. 3. Gustin-Bacon Div., Tyler Pipe Subsid., Tyler Corp. 4. Victaulic Company of America. 5. Sprink-Line by Sprink, Inc. F. Indicator Posts and Indicator Post Gate Valves: 1. Clow Valve Co. Div., McWane, Inc. 2. Nibco, Inc. 3. Gem Sprinkler Co. Div., Grinnell Corp. 4. Stockham Valves and Fittings, Inc. 5. Kennedy Valve Div., McWane, Inc. 6. Waterous Co. G. Specialty Valves and Electric Alarm Bells: 1. ASCOA Fire Systems, Figgie International Co. 2. Globe Fire Sprinkler Corp. 3. Central Sprinkler Corp. 4. Reliable Automatic Sprinkler Co., Inc. 5. Firematic Sprinkler Devices, Inc. 6. Star Sprinkler Corp. 7. Gem Sprinkler Co. Div., Grinnell Corp. 8. Viking Corp. H. Sprinklers: 1. ASCOA Fire Systems, Figgie International Co. 2. Globe Fire Sprinkler Corp. 3. Central Sprinkler Corp. 4. Reliable Automatic Sprinkler Co., Inc. 5. Firematic Sprinkler Devices, Inc. WET-PIPE SPRINKLER SYSTEMS (Revised 07/09/12) 21 13 13-3 I. 2.02 6. Star Sprinkler Corp. 7. Gem Sprinkler Co. Div., Grinnell Corp. 8. Viking Corp. Waterflow Indicators and Supervisory Switches: 1. Gamewell Co. 2. System Sensor Div., Pittway Corp. 3. Gem Sprinkler Co. Div., Grinnell Corp. 4. Victaulic Company of America. 5. Potter Electric Signal Co. 6. Watts Regulator Co. 7. Reliable Automatic Sprinkler Co., Inc. PIPES AND TUBES A. Refer to Part 3 Article "Sprinkler and Standpipe System Piping Applications" and for identification of systems where pipe and fitting materials specified below are used. B. Ductile Iron Pipe: ANSI/AWWA C151/A21.51, ductile iron barrel with iron alloy threaded flanges, 150-psig minimum working pressure rating, and AWWA C104 cement mortar lining. 1. Option: Pipe may be AWWA pattern, cut grooved for grooved coupling joints. C. Steel Pipe: ASTM A 53, Schedule 40 in sizes 6 inches (150 mm) and smaller and Schedule 30 in sizes 8 inches (200 mm) and larger, black and galvanized, plain and threaded ends, for welded, threaded, cut groove, and rolled groove joints. D. Steel Pipe: ASTM A 135, Schedule 10 through 5-inch (125 mm) sizes and NFPA 13 specified wall thickness for 6-inch (150 mm) through 10-inch (250 mm) sizes, with plain ends, black and galvanized, for rolled groove and welded joints. E. Steel Pipe: ASTM A 135, threadable lightwall, black and galvanized, for threaded joints. F. Steel Pipe: ASTM A 795, black and galvanized, for joints listed and for use with fittings for plain end steel pipe. 1. Type: Lightweight pipe, Schedule 10, for rolled- groove and welding joints. 2.03 PIPE AND TUBE FITTINGS A. Ductile Iron and Gray-Iron Flanged Fittings: AWWA C110, 250-psig (1725 kPa) minimum pressure rating, with AWWA C104 cement mortar lining. B. Malleable Iron Threaded Fittings: ASME B16.3, Class 300, standard pattern, with threads according to ASME B1.20.1. C. Grooved End Fittings for Ductile Iron Pipe: ASTM A 536 ductile iron or ASTM A 47 malleable iron, AWWA pipe size, designed to accept AWWA C606 grooved couplings. Include cement lining or Food and Drug Administration (FDA)-approved interior coating. D. Steel Fittings: ASTM A 234/A 234M, seamless or welded; ASME B16.9, buttwelding; or ASME B16.11, socket welding type for welded joints. E. Steel Flanges and Flanged Fittings: ASME B16.5. F. Grooved End Fittings for Steel Pipe: UL-listed and FM-approved, ASTM A 536, Grade 65-45-12 ductile iron or ASTM A 47 Grade 32510 malleable iron, with grooves or shoulders designed to accept grooved couplings. 2.04 JOINING MATERIALS A. Refer to Section 20 03 00 - "MATERIALS AND METHODS" for joining materials not included in this Section. B. Flanged Joints for Ductile Iron Pipe and Ductile Iron or Cast Iron Fittings: AWWA C115 ductile iron or gray iron pipe flanges, rubber gaskets, and high strength steel bolts and nuts. C. Couplings for Grooved End Steel Pipe and Grooved End Ferrous Fittings: UL 213, AWWA C606, ASTM A 536 ductile iron or ASTM A 47 malleable iron housing, with WET-PIPE SPRINKLER SYSTEMS (Revised 07/09/12) 21 13 13-4 enamel finish. Include synthetic rubber gasket with central cavity, pressure responsive design; ASTM A 183 carbon steel bolts and nuts; and locking pin, toggle, or lugs to secure grooved pipe and fittings. D. Couplings for Grooved End Ductile Iron Pipe and Fittings: UL 213, AWWA C606, ASTM A 536 ductile iron housing, with enamel finish. Include synthetic rubber gasket with central cavity, pressure responsive design, and ASTM A 183 carbon steel bolts and nuts to secure grooved pipe and fittings. 2.05 FIRE PROTECTION SERVICE VALVES A. General: UL-listed and FM-approved, with 175-psig (1200 kPa) non-shock minimum working pressure rating. 1. Option: Valves for use with grooved piping may be grooved type. B. Gate Valves, 2 Inches (50 mm) and Smaller: UL 262, cast bronze, threaded ends, solid wedge, outside screw and yoke, rising stem. C. Gate Valves, 2-1/2 Inches (65 mm) and Larger: UL 262, iron body, bronze mounted, taper wedge, outside screw and yoke, rising stem. Include replaceable, bronze, wedge facing rings and flanged ends. D. Gate Valves, 2-1/2 Inches (65 mm) and Larger for Use with Indicator Posts: UL 262, iron body, bronze mounted, solid wedge disc, non-rising stem with operating nut and flanged ends. E. Indicator Posts: UL 789, wall type, cast iron body, with windows for target plates that indicate valve position, extension rod and coupling, locking device, and red enamel finish. 1. Operation: Cast Hand Wheel. F. Swing Check Valves, 2-1/2 Inches (65 mm) and Larger: UL 312, cast iron body and bolted cap, with bronze disc or cast iron disc with bronze disc ring and flanged ends. G. Ball Drip Valves: UL 1726, automatic drain valve, 3/4-inch (20 mm) size, spring-loaded, ball check device with threaded ends. 2.06 BACKFLOW PREVENTERS A. General: ASSE standard backflow preventers, of size indicated for maximum flow rate indicated and maximum pressure loss indicated. 1. Working Pressure: 150 psig (1035 kPa) minimum except where indicated otherwise. 2. Bronze, cast-iron, steel, or stainless steel body with flanged ends. 3. Interior Lining: FDA-approved epoxy coating, for backflow preventers having cast iron or steel body. 4. Interior Components: Corrosion resistant materials. B. Double-Check Backflow Prevention Assemblies: ASSE 1015, consisting of shutoff valves on inlet and outlet and strainer on inlet. Include test cocks with 2 positive seating check valves for continuous pressure application. 1. Pressure Loss: 5 psig (35 kPa) maximum, through middle third of flow range. 2.07 SPRINKLERS A. Automatic Sprinklers: With heat responsive element conforming to: 1. UL 199, for applications except residential. 2. UL 1767, for early suppression, fast response applications. B. Sprinkler types and categories shall be as indicated on drawings and as required by application. Furnish automatic sprinklers with nominal 1/2-inch (12.7 mm) orifice for "Ordinary" temperature classification rating except where otherwise indicated and required by application. C. Sprinkler types, features, and options include: 1. Flush (concealed) ceiling sprinklers, including escutcheon. WET-PIPE SPRINKLER SYSTEMS (Revised 07/09/12) 21 13 13-5 2. Upright sprinklers. 3. Recessed pendent, dry type sprinklers. 4. Pendent sprinklers with ceiling escutcheon. 5. Sidewall sprinkler heads with matching escutcheon D. Sprinkler Finishes: Chrome plated, white painted, or bronze. E. Sprinkler Escutcheons: Materials, types, and finishes as required by sprinkler mounting applications. Escutcheons for concealed sprinklers are specified with sprinklers. Escutcheons for recessed or pendent sprinklers shall match the finish of the sprinkler as called for on drawings. F. Sprinkler Cabinets: Finished steel cabinet and hinged cover, with space for minimum of 6 spare sprinklers plus sprinkler wrench, suitable for wall mounting. Include number of sprinklers required by NFPA 13 and 1 wrench for sprinklers. Include separate cabinet with sprinklers and wrench for each style sprinkler on Project. 2.08 SPECIALTY SPRINKLER FITTINGS A. Specialty Fittings: UL-listed and FM-approved, made of steel, ductile iron, or other materials compatible with system materials and applications where used. B. Locking Lug Fittings: UL 213, ductile iron body with locking lug ends, for use with plain end steel pipe. C. Mechanical-"T" Fittings: UL 213, ductile iron housing with pressure responsive gasket, bolts, and threaded or locking lug outlet. D. Mechanical Cross Fittings: UL 213, ductile iron housing with pressure responsive gaskets, bolts, and threaded or locking lug outlets. E. Drop Nipple Fittings: UL 1474, with threaded inlet, threaded outlet, and seals; adjustable. F. Sprinkler Alarm Test Fittings: Ductile iron housing with 1-1/2-inch (40 mm) inlet and outlet, integral test valves, combination orifice and sight glass, and threaded or locking lug ends. 2.09 FIRE DEPARTMENT CONNECTIONS A. Exposed, Wall Mounted Fire Department Connections: UL 405, cast brass body; NH-standard thread inlets according to NFPA 1963 and matching local fire department threads; and threaded NPS outlet. Include lugged cap, gasket, and chain; lugged swivel connection and drop clappers for each hose connection inlet; and round wall escutcheon plate with marking "AUTO SPKR." 2.10 ALARM DEVICES A. Alarm Devices: Types and sizes that will match piping and equipment connections. B. Electric Alarm Bells: UL Listed, 8" round, electric type detector, and designed for horizontal or vertical installation. Polarized, mount to 4" square outlet box, high-efficiency motor driven striker, red finish; on outdoor installations provide #WBB weatherproof back box, 30 aM at 8-24 volts d.c. (See Fire Protection Drawings). C. Supervisory Switches: UL 753, for valves, electrical supervision type, SPDT (single-pole, double-throw), normally closed contacts, designed to signal controlled valve in other than full open position (See Fire Protection Drawings). 2.11 PRESSURE GAUGES A. Pressure Gauges: UL 393, 3-1/2 to 4-1/2 inches (90 to 115 mm) diameter dial with dial range of 0-250 psig (0-1600 kPa). PART 3 - EXECUTION WET-PIPE SPRINKLER SYSTEMS (Revised 07/09/12) 21 13 13-6 3.01 SPRINKLER SYSTEM PIPING APPLICATIONS A. Refer to Part 2 of this Section for detailed specifications on pipe and fittings products listed below. Use pipe, tube, fittings, and joining methods according to the following applications. Piping may be joined with flanges instead of indicated joints. Use grooved end fittings with grooved couplings that are made by the same manufacturer and that comply with listing when used together for grooved- coupling joints. B. Under slab fire protection water piping: Use only ductile iron pipe, 150psi, ANSI/AWWA C-151/A21.51. C. Pipe Between Fire Department Connections and Check Valves: Use galvanized steel pipe instead of black steel pipe when steel pipe is specified. Do not use welded joints. D. Sizes 2 Inches (50 mm) and Smaller: (Above finish floor) ASTM A 53, A 135, or A 795; threadable light-wall pipe, Schedule 40 steel pipe with cut groove ends, grooved end steel pipe fittings, and grooved coupling joints; or with threaded joints and fittings. E. Sizes 2-1/2 Inches (65 mm) and larger: (Above finish floor) ASTM A 135 or A 795, Schedule 10 steel pipe with rolled- groove ends, grooved end steel pipe fittings, and grooved coupling joints. 3.02 VALVE APPLICATIONS A. Drawings indicate valve types to be used. Where specific valve types are not indicated, the following requirements apply: 1. Shutoff Duty: Use gate, ball, or butterfly valves. 2. Throttling Duty: Use globe, ball, or butterfly valves. 3.03 JOINT CONSTRUCTION A. Refer to Section 20 03 00 - "MATERIALS AND METHODS" for basic piping joint construction. B. Grooved End Pipe and Grooved End Fitting Joints: Use grooved end fittings and grooved couplings that are made by the same manufacturer and that are listed for use together. Groove pipe and assemble joints with grooved coupling, gasket, lubricant, and bolts according to coupling and fitting manufacturer's written instructions. Grooves may be cut or rolled where permitted by code for the specific type of pipe being used. C. Locking Lug Joints: Follow manufacturer's written instructions. D. Dissimilar Materials Piping Joints: Make joints using adapters compatible with both piping materials. 3.04 SERVICE ENTRANCE PIPING A. Connect fire protection piping to water service piping of size and in location indicated for service entrance to building. Water service piping is specified in Section 33 00 00 "SITE PIPING." B. Install shutoff valve, backflow preventer, pressure gauge, drain, and other accessories indicated at connection to water supply piping. C. Piping for service entrance from 5’-0” outside the building, up to the anchored flange shall be ductile iron with mechanical joints. Install reaction blocking as required. 3.05 TESTING PIPING SYSTEMS A. See Section 20 04 00 – “TESTING PIPING SYSTEMS” for required pressure tests. 3.06 PIPING INSTALLATIONS A. Refer to Section 20 03 00 - "MATERIALS AND METHODS" for basic piping installation. B. Locations and Arrangements: Drawings (plans, schematics, and diagrams) indicate WET-PIPE SPRINKLER SYSTEMS (Revised 07/09/12) 21 13 13-7 C. D. E. F. G. H. I. J. 3.07 general location and arrangement of piping. Install piping as indicated, as far as practical. All piping shall be installed as high as possible. 1. Deviations from approved "working plans" for sprinkler piping require written approval from the authority having jurisdiction. File written approval with the Engineer prior to deviating from approved "working plans." Use approved fittings to make changes in direction, branch takeoffs from mains, and reductions in pipe sizes. Install unions adjacent to each valve in pipes 2 inches (50 mm) and smaller. Unions are not required on flanged devices or in piping installations using grooved couplings. Install flanges or flange adapters on valves, apparatus, and equipment having 2-1/2-inch (65 mm) and larger connections. Install "Inspector's Test Connections" in sprinkler piping, complete with shutoff valve, sized and located according to NFPA 13. Install sprinkler piping with drains for complete system drainage. Install ball drip valves to drain piping between fire department connections and check valves, and where indicated. Drain to floor drain or outside building. Install alarm devices in piping systems. Inform the General Contractor of the locations of all alarm devices to facilitate coordination with the fire alarm or electrical subcontractor. Install pressure gages on riser or feed main. Include pressure gauges with connection not less than 1/4 inch (7 mm) and with soft metal seated globe valve. Install gauges to permit removal, and install where they will not be subject to freezing. HANGERS AND SUPPORTS A. Comply with NFPA 13. Install according to NFPA 13. 1. Install hanger and support spacing and locations for steel piping joined with grooved mechanical couplings according to manufacturer's written instructions for rigid systems. Reference table below. Nominal Pipe Size (in.) ¾ 1 1¼ 1½ 2 2½ 3 3½ 4 5 6 Steel Pipe Except Threaded N/A 12-0 12-0 15-0 15-0 15-0 15-0 15-0 15-0 15-0 15-0 Lightwall Threaded Lightwall Steel Pipe N/A 12-0 12-0 12-0 12-0 12-0 12-0 N/A N/A N/A N/A Copper Tube 8-0 8-0 10-0 10-0 12-0 12-0 12-0 15-0 15-0 15-0 15-0 CPVC Polybutylene (IPS) 5-6 6-0 6-6 7-0 8-0 9-0 10-0 N/A N/A N/A N/A Polybutylene (CTS) 2-11 3-4 3-11 4-5 5-5 N/A N/A N/A N/A N/A N/A For SI Units: 1 in. = 25.4 mm; 1 ft = 0.3048 m. Note: (IPS) Iron Pipe Size. CTS Copper Tube Size. 3.08 SPECIALTY SPRINKLER FITTING INSTALLATIONS A. Install specialty sprinkler fittings according to manufacturer's written instructions. 3.09 VALVE INSTALLATIONS A. Refer to Section 20 05 00 - "VALVES" for installation of general duty valves. Install fire protection specialty valves, trim, fittings, controls, and specialties according to NFPA 13, manufacturer's written instructions, and the authority having jurisdiction. B. Gate Valves: Install fire protection service valves supervised open, located to control sources of water supply except from fire department connections. Where there is more than 1 control valve, provide permanently marked identification signs indicating portion of system controlled by each valve. C. Alarm Check Valves: Install valves in vertical position for proper direction of flow, including bypass check valve and retard chamber drain line connection. 3.10 BACKFLOW PREVENTER INSTALLATION WET-PIPE SPRINKLER SYSTEMS (Revised 07/09/12) 21 13 13-8 8 15-0 N/A 15-0 N/A N/A A. Install backflow preventers of type, size, and capacity indicated. Comply with plumbing code and authority with jurisdiction. Do not install bypass around backflow preventer. 3.11 SPRINKLER APPLICATIONS A. Install the types of sprinklers indicated on the drawings. Where drawings do not indicate, use the types listed below: 1. Rooms without Ceilings: Upright brass sprinklers. 2. Rooms with Suspended Ceilings: Chrome pendant recessed sprinklers with chrome escutcheons. 3. Wall Mounting: Sidewall sprinklers (chrome). 4. Spaces Subject to Freezing: Upright or pendent dry type. 5. Special Applications: Use extended coverage, flow- control, and quick response sprinklers where indicated. 3.12 SPRINKLER FINISHES A. Use sprinklers with finishes as called for on drawings. Where drawings do not indicate, use finishes as follows: 1. Unfinished areas and rooms without ceilings: bronze. 2. Areas with ceilings: chrome plated. 3. Sidewall sprinklers: chrome plated. 3.13 SPRINKLER LOCATIONS A. Where drawings require it, sprinklers shall be centered in acoustical tile panels. B. If not specified on drawings, sprinklers shall be located with their center at least 6” from ceiling grid lines. 3.14 FIRE DEPARTMENT CONNECTION INSTALLATIONS A. Install fire department connections of types and features indicated in locations indicated. B. Install ball drip valves at each check valve for fire department connection and where indicated. Drain to a floor drain or outside building. 3.15 CONNECTIONS A. Connect the specified water supplies to standpipe and sprinkler systems. B. Electrical Connections: Power wiring is specified in Section 26. C. Connect alarm devices to fire alarm system. 3.16 FIELD QUALITY CONTROL A. Perform field acceptance tests of each fire protection system. 1. Flush, test, and inspect sprinkler piping systems according to NFPA 13 Chapter "System Acceptance." B. Replace piping system components that do not pass test procedures specified, then retest to demonstrate compliance. Repeat procedure until satisfactory results are obtained. C. Report test results promptly and in writing to authority having jurisdiction when required. 3.17 CLEANING A. Clean dirt and debris from sprinklers. Replace sprinklers having any paint other than WET-PIPE SPRINKLER SYSTEMS (Revised 07/09/12) 21 13 13-9 factory finish with new sprinklers. Cleaning and reuse of painted sprinklers is prohibited. 3.18 COMMISSIONING & DEMONSTRATION A. See Section 20 02 00 “Contract Close-out & Commissioning”. 3.19 DEMONSTRATION A. See Section 20 02 00 “Contract Close-out & Commissioning”. END OF SECTION WET-PIPE SPRINKLER SYSTEMS (Revised 07/09/12) 21 13 13-10 SECTION 22 00 00 PLUMBING PART 1 - GENERAL 1.01 RELATED DOCUMENTS A. The following shall apply to this Section: 1. Drawings. 2. General Conditions. 1.02 WORK INCLUDES A. All piping, fittings, meters, valves, hangers and other accessories specified and shown on the drawings for a complete: 1. Domestic cold and hot water piping system. 2. Sanitary waste and vent piping system, including all necessary excavating and backfilling to 5'-0" outside building foundation. 3. All floor drains, and cleanouts. 4. Roughing in and final connection to equipment provided by Owner. 5. All non-freeze wall hydrants, hose bibbs, and required vacuum breakers. 6. Testing, flushing, and cleaning, for all piping systems and chlorination of the domestic water piping system. 7. Gas piping system (if required). 8. All water heaters. 9. All backflow preventers. B. Fees, permits and licenses; see Section 20 01 00, 1.02 “Work Includes”. 1.03 RELATED WORK A. B. C. D. E. F. G. H. I 1.04 33 00 00 20 01 00 20 03 00 20 04 00 20 05 00 20 06 00 22 07 19 22 40 00 23 11 00 “Site Piping” “General Provisions” “Materials and Methods” “Testing Piping Systems” “Valves” “Mechanical Identification “Piping Insulation” ”Plumbing Fixtures and Trim” “Gas Piping Systems” (If Required) SUBMITTALS A. None required unless submitting for approved equals. 1.05 QUALITY ASSURANCE A. Codes and Standards: Comply with current edition of following: 1. Pipe and fittings shall conform to applicable ANSI, AWWA, ASTM, and USASI standards referenced for those products. B. No plumbing fixture, special equipment, device or piping shall be installed which will provide cross connection or interconnection between distributing supply for drinking water or domestic water and polluted supply or waste so as to make possible backflow or back-siphonage of sewage or polluted water into potable water supply system. C. Where possibility of back-siphonage exists, water supplied to fixture shall be introduced through a suitable vacuum breaker installed at code minimum distance above fixture. PLUMBING (Revised 06/15/12) 22 00 00-1 PART 2 - PRODUCTS 2.01 ACCEPTABLE MANUFACTURERS A. Water Hammer Arrestors 1. Souix Chief. B. Unions (in copper pipe 2 in. and smaller) 1. Anaconda. 2. Mueller. 3. Chase Brass. C. Flanged Unions 1. Cranelap. 2. Van Stone. 3. Grinnell. D. Flange Connections 1. Cranite. 2. Garlock. E. Cleanouts, Floor Drains 1. Jay R. Smith. 2. Wade. 3. Josam. 4. Zurn. F. Hose Bibbs 1. Chicago Faucet. 2. Woodford. G. Water Heater - Electric 1. A.O. Smith. 2. State. 3. Rheem. 2.02 DOMESTIC COLD AND HOT WATER PIPING SYSTEMS A. All piping and fittings shall be manufactured in the United States. Each length of pipe and each fitting shall be marked with the manufacturer's name or trademark and the specification code to which it conforms. B. At each location indicated on the drawings, install a water hammer arrestor. Air chambers are not acceptable. C. All supply connections to plumbing fixtures and equipment shall be galvanized or copper piping up to face of wall and chromium plated brass piping and fittings for exposed connections. Supply piping shall have screwed connections on both ends for piping through wall. Each fixture shall have a shut off valve at the fixture. D. Each water connection to a plumbing fixture or item of equipment having a submerged inlet or hose end attached shall be provided with a vacuum breaker to prevent backsiphonage of contaminated water into drinking supply, approved by local and state health authorities. 2.03 PIPE AND TUBE MATERIALS A. See Part 3 Article "Pipe and Fittings Applications" for the application of the following pipe, tube, and fitting materials and joining methods required for plumbing piping systems: 1. Hard Copper Tube: ASTM B 88, Types K, and L, water tube, drawn temper. 2. Soft Copper Tube: ASTM B 88, Types K and L, water tube, annealed temper. PLUMBING (Revised 06/15/12) 22 00 00-2 3. Hubless, Cast-Iron Soil Pipe: CISPI 301. 4. Poly(Vinyl Chloride (PVC) Plastic, DWV Pipe: ASTM D 2665, Schedule 40 or PVCDWV "Foam Core" - ASTM-F-891; plain ends. 5. Schedule 40 Black Steel: A53 ERW, Grade B. 6. Schedule 10 Black Steel: A135 ERW or A795 ERW, Grade B. 2.04 PIPE AND TUBE FITTINGS A. Wrought-Copper, Solder-Joint Pressure Fittings: ASME B16.22. B. Copper Tube, Grooved-End Mechanical Fittings: ASTM B 75, copper tube and ASTM B 584 bronze castings. C. Copper Unions: ASME B16.18, cast-copper-alloy body, hexagonal stock, with ball-and-socket joint, metal- to-metal seating surfaces, and solder-joint, threaded, or solder-joint and threaded ends. 1. Threaded Ends: Threads conforming to ASME B1.20.1. D. Mechanically Formed Outlets: Manufacturer's standard written procedure for forming tee-branch outlet from pipe and tube. E. Malleable-Iron Unions: ASME B16.39, Class 150 hexagonal stock, with ball-and-socket joint, metal-to-metal bronze seating surfaces, and female threaded ends having threads conforming to ASME B1.20.1. F. Malleable-Iron Threaded Fittings: ASME B16.39, Class 150, standard pattern, with threads conforming to ASME B1.20.1. G. Hubless, Cast-Iron Soil Pipe Fittings: CISPI 301. H. Poly Vinyl Chloride (PVC) Plastic, DWV Pipe Fittings: ASTM D 2665, made to ASTM D 3311; socket-type; drain, waste, and vent pipe patterns. I. Poly Vinyl Chloride (PVC) Plastic, Schedule 40, Socket-Type Pipe Fittings: ASTM D 2466. 2.05 JOINING MATERIALS A. Solder, brazing, and welding filler metals are specified in Part 3 of this Section. B. Cast-Iron Soil Pipe and Fittings: ASTM C 564 neoprene rubber gaskets and lubricant. C. Ductile-Iron Pipe and Ductile-Iron or Cast-Iron Fittings: The following materials apply: 1. Push-On Joints: AWWA C111 rubber gaskets and lubricant. 2. Mechanical Joints: AWWA C111 ductile-iron or gray-iron glands, high-t\strength steel bolts and nuts, and rubber gaskets. 3. Flanged Joints: AWWA C115 ductile-iron or gray-iron pipe flanges, rubber gaskets, and high-strength steel bolts and nuts. D. Gasket-Type couplings for Plain-End, Nonpressure System Pipe: Rubber or elastomeric compression gasket, made to match pipe inside diameter or hub and adjoining pipe outside diameter. 1. Gaskets: ASTM C 564, rubber for cast-iron soil pipe and ASTM F 477, elastomeric seal for plastic pipe. Gaskets for dissimilar or other pipe materials shall be compatible with pipe materials being joined. E. Couplings for Grooved-End Copper Tube and Grooved- End Copper Fittings: ASTM A 536 ductile-iron or ASTM A 47 malleable-iron housing having copper-colored enamel finish, with synthetic-rubber gasket having central- cavity, pressure-responsive design and suitable for hot water, with ASTM A 183 carbon-steel bolts and nuts. F. Schedule 40 Black Steel Pipe and Fittings - 2" and Smaller: Screwed joints with malleable-iron threaded fittings. G. Schedule 40 Black Steel Pipe and Fittings - 2-1/2" and Larger: Welded joints with standard weight welding fittings. H. Couplings for Schedule 10 Black Steel Pipe 2" and Larger: ASTM A 536 ductile-iron or ASTM A 47 malleable-iron housing having orange-colored enamel finish, with synthetic-rubber gasket having central-cavity, pressure responsive design and suitable for hot water, with ASTM A 183 carbon-steel bolts and nuts. PLUMBING (Revised 06/15/12) 22 00 00-3 2.06 PIPE SPECIALTIES A. Unions in copper pipe 2 in. and smaller shall be brass solder joint unions constructed for 150 psi working pressure. B. Unions in steel pipe 2 inch and smaller shall be screwed, malleable iron, brass to steel type (F.S. WW-U-531c Class 1) for 150 psi working pressure. C. Unions 2-1/2 in. in size and larger shall be companion flanges. (ANSI B16.1). Flanged unions shall be over welding nipples welded into pipelines. D. Flanges shall be forged steel flanges (ANSI B16.5) constructed for 150 psi. working pressure. Bolts for flanged joints shall be made of bolt steel and shall have clean cut threads with upset square heads and semi-flush hexagonal cold pressed nuts (F.S. WW-F406b). E. Flange connections shall be made up with high pressure special type graphited 1/16 in. sheet packing (ANSI B16.21); or rubber, for temperature up to 200°F (F.S. HH-G-156 class A). F. Dielectric unions suitable for dielectric service shall be provided at pipe connections between steel or cast iron piping and copper tubing. 2.07 GAS PIPING A. See Section 23 11 00 – ”GAS PIPING SYSTEMS” for gas piping materials. 2.08 TRAPS A. Trap all fixtures having waste connections with a water seal placed as close to fixture as possible. Provide all required traps including traps not furnished in combination with fixture and equipment. B. Traps for lavatories or sinks shall be chrome plated 17 gauge brass unless noted otherwise on drawings. 2.09 WATER HEATER - ELECTRIC A. Water heater shall be electric storage type, U.L. listed and in compliance with ASHRAE 90A energy efficiency requirements. B. Tank shall be glass-lined with a working pressure of 150 psi and shall be equipped with magnesium anodes. C. Heater shall have a steel jacket with baked enamel finish and shall be fully insulated. Heater shall be equipped with thermostat with automatic overheat safety control, immersion aquastat and single heating element. Provide ASME pressure and temperature relief valve. PART 3 - EXECUTION 3.01 PIPE AND FITTINGS APPLICATIONS A. The following applications are for only inside and below the building and ending at a point 5’-0” outside the perimeter building walls. For piping from 5’-0” outside the building to the utility point of connection (POC), see Section 33 00 00 “Site Piping”. B. Use pipe, tube, fittings, and joining methods for piping systems according to the following applications: 1. Domestic Water Distribution Piping Below Ground: Use the following: a. All interior domestic water piping shall be type "K" hard drawn copper tubing (SIL-FOS 2, FOS-FLO 7 or other silver brazing material). This is required for the water service line from the shut-off valve in the building to a point 5 feet outside the building. PLUMBING (Revised 06/15/12) 22 00 00-4 2. 3. 4. 5. 6. 3.02 b. All copper piping shall be installed with wrought copper fittings. Field-fabricated "T-Drill" taps are acceptable on piping 1" and larger, if silver-brazed (aboveground piping only). c. Soft temper copper tubing may be used for small pipe in concealed spaces only to permit bends for roughing in. d. Do not use tin-lead solder on domestic water piping. Use only approved leadfree solder or brazing material. Domestic Water Distribution Piping Above Ground: Use the following: a. Hard copper tube, Type L; wrought-copper or cast-copper-alloy pressure fittings; copper unions; bronze flanges; and solder joints with Alloy Sn95 solder. b. Fittings Option: Mechanically formed outlets, brazing filler alloy, and brazed joints. c. Fittings Option: Grooved fittings for copper piping. All Exterior Domestic Water Piping Below Ground: a. From 5’-0” outside the building to the utility water main, see Section 33 00 00 “Site Piping” Soil, Waste, and Vent Piping Below Ground: Use either of the following: a. Schedule 40 poly vinyl chloride (PVC) plastic DWV pipe; PVC socket-type drain, waste, and vent pipe pattern fittings; and solvent-cemented joints. Soil, Waste, and Vent Piping Above Ground: Use either of the following: a. Hubless cast-iron soil pipe; hubless cast-iron soil pipe fittings; stainless-steel, cast-iron, or FM-type heavy-duty couplings for hubless cast-iron soil pipe and fittings; and hubless joints. b. Poly vinyl chloride (PVC) plastic DWV pipe; PVC socket-type drain, waste, and vent pipe pattern fittings; and solvent-cemented joints. c. PVC piping is not permitted in air-handling ceiling spaces, use only cast-iron or ductile iron pipe in these locations. See paragraph 5.a. above for cast-iron pipe specifications. All Exterior Soil and Waste Piping Below Ground: a. From 5’-0” outside the building to the utility sewer main: See Section 33 00 00 “Site Piping”. JOINTING OF PIPING A. See section 20 03 00 - “MATERIALS AND METHODS”, Part 3 - Execution. 3.03 EXPANSION AND CONTRACTION A. See section 20 03 00 - “MATERIALS AND METHODS”, Part 3 - Execution. 3.04 INSTALLATION OF PIPING A. See section 20 03 00 - “MATERIALS AND METHODS”, Part 3 Execution. 3.05 DISINFECTION OF DOMESTIC WATER SYSTEMS WITHIN THE BUILDING A. See Section 20 02 00 - “Contract Close-out & Commissioning”. 3.06 FLUSHING WATER PIPING A. See Section 20 02 00 - “Contract Close-out & Commissioning”. 3.07 SOIL, WASTE, AND VENT SYSTEMS A. Size of soil, waste and vent stacks and branch piping shall be as indicated on the drawings, but in no case less than required by the provisions of the applicable codes. PLUMBING (Revised 06/15/12) 22 00 00-5 B. Where possible, sewers and branches shall pitch down 1/4" per foot, but not less than 1%. Branches, arms and connections, shall be sloped 1/4" in 1'-0" where possible and provide with adequate hangers as specified elsewhere. C. Interior underground, underfloor or on-ground piping, shall be continuously bedded with depressions for hubs on compacted sand or gravel to undisturbed soil for a minimum depth of 6" under pipe. D. Connections to soil, waste and drain stacks shall be at 45 degrees; those to vent stacks may be at 45 degrees or 90 degrees except vent stacks shall be connected at 45 degrees to soil, waste or drain stack. E. Connections to stacks and sewers shall be arranged so that operation of any fixture will not cause fluctuation of water level in traps of other fixtures. F. Interior downspout shall be connected to roof drains; and provided with ample offsets or expansion joints below or integral with roof drains. G. All thread joints shall be made up with red lead applied to male thread only. Threads exposed after joints are made up shall be painted with red lead to prevent rust. Teflon tape may be used at Contractor's option. H. Junctions of screwed pipe to bell and spigot cast iron shall be made with ring or half coupling screwed to end of galvanized pipe to form spigot end. I. Junctions in all drainage lines shall be made with "Y" branches or 1/8" bends, unless closeness of connection prevents it, in which case, where direction of flow is from horizontal to vertical, sanitary tees may be used upon the approval of the Engineer's superintendent. J. Compression joint installation for cast iron soil pipe: 1. Fold and insert the one piece neoprene rubber gas-ket into the hub which has been properly cleaned. 2. Apply gasket lubricant to the spigot and inside of the gasket. 3. Push, draw or drive the spigot into the gasketed hub with a pulling tool or suitable device. K. Do not install pvc piping in air-handling ceiling spaces. 3.08 STACKS A. Stacks shall impose no stress or strain on branches or connections, be plumb and straight and supported at base with 18" x 18" concrete or brick pier to undisturbed soil. B. Unless otherwise noted, soil, waste, drain, and vent stacks shall be concealed in walls, pipe chases, pipe shafts, etc., with cleanouts extended to accessible locations. 3.09 VENTING A. All plumbing fixtures shall be vented to prevent siphoning of traps. Venting shown on plans is minimum required and vents and vent stacks shall be increased in size and/or number and relocated as required, to prevent trap siphoning and to comply with applicable codes, ordinances, statutes, regulations of all governmental bodies, without increase in contract price. B. A vent stack shall be run parallel to each soil or waste stack to receive branch vents from fixtures and traps. Each vent stack shall originate from a soil or waste pipe at its base. Each soil or waste stack and each vent stack shall be carried through the roof. Where possible, soil, waste, or vent stacks shall be combined before passing through the roof so as to have as few roof openings as possible. Pipes running close to walls shall be offset away from such walls before passing through the roof to permit proper flashing. All vent pipes passing through the roof shall be sized as indicated on the drawings, and shall extend 12" above roof. C. All horizontal vent pipes shall grade up to meet the requirements of the local and state codes. D. Vent risers and branches shall connect to the soil and waste risers above waste of highest fixture. PLUMBING (Revised 06/15/12) 22 00 00-6 3.10 ROOF FLASHINGS A. All plumbing piping passing through the roof membrane shall be flashed under the roofing specifications. B. Contractor shall insure all such items are properly flashed and made watertight. 3.11 CLEANOUTS A. Cleanouts for indoor sanitary and storm drainage systems shall be installed not more than 50 feet apart, including the developed length of the cleanout pipe, in all horizontal drainage lines. A cleanout shall be provided at, or no more than two feet above the base of each vertical soil or waste stack and storm water conductor. Cleanouts shall be installed at such other points as may be necessary for adequate rodding out of drainage piping systems. Cleanouts shall be set flush with floor or wall surfaces. 3.12 INSTALLATION OF WATER HEATER A. General: Install water heater in accordance with manufacturer's installation instructions. Install unit plumb and level, firmly anchored in location indicated, and maintain manufacturer's recommended clearances. B. Support: Orient so controls and devices needing service and maintenance have adequate access. END OF SECTION PLUMBING (Revised 06/15/12) 22 00 00-7 SECTION 22 07 19 PIPING INSULATION PART 1 - GENERAL 1.01 RELATED DOCUMENTS A. The following shall apply to this Section: 1. Drawings. 2. General Conditions. 1.02 WORK INCLUDES A. Provide all materials, equipment, apparatus, services, methods, tools, labor, transportation, etc., required to complete the insulation of the piping systems as specified. B. Cold piping requiring insulation: 1. Domestic cold water piping. C. Hot piping requiring insulation: 1. Domestic hot water piping. 1.03 CODES AND STANDARDS A. The Fire Hazard Classification of the materials herein specified shall be listed and inspected by Underwriters Laboratories, Inc. The flame spread rating, fuel contributed and smoke developed as shown in the listing shall be determined by ASTM E84 "Method of Tests for Surface Burning Characteristics of Building Materials". Each product shall bear the label of Underwriters' Laboratories. All products used on this project shall be classified as "non- combustible" in the Building Code or NFPA National Fire Code. 1.04 DEFINITION A. The term "piping" as used in this section of the specifications shall include pipe, fittings, valves, specialties, strainers, flanges, unions, runouts, final connections, etc. 1.05 PROTECTION A. Protect insulation against dirt, water, chemical or mechanical damage before, during and after installation. PART 2 - PRODUCTS 2.01 ACCEPTABLE MANUFACTURERS A. Insulation B. Adhesives, Lagging, and Sealers 1. Certain-Teed/Saint Gobain Corp. 2. Benjamin Foster. 3. Owens-Corning Fiberglass Corp. 4. Insul-Coustic. 5. Manville Corp. 6. Chicago Mastic Co. 7. Knauf Fiberglass. C. PVC Premolded Fitting , and PVC JacketingValve Covers PIPING INSULATION (Revised 06/14/12) 22 07 19 - 1 D. Closed Cell Elastomeric 1. Insul-Coustic Corp. 2. Armstrong. 3. Zeston, Inc. 4. Halstead Industrial Products. 5. Certain-Teed/Saint Gobain Corp. E. Cellular Glass Insulation 1. P.I.C. Plastics 2. Pittsburg Corning Corporation (PCC) 3. Ceel-Co. 4. Johns-Manville 2.02 COLD AND HOT WATER PIPING AND EQUIPMENT INSULATION A. "Fiberglass": Minimum 3-1/2 pounds per cubic foot density, fiberglass factory molded or spun pipe insulation with a "K" factor of 0.24 at 75F. mean temperature and a factory applied fire retardant self sealing vapor barrier "ASJ" jacket. B. "Armaflex": At the Contractor's option (for interior piping only), 25/50-rated, closed-cell elastomeric thermal insulation equal to "Armstrong - Armaflex" may be used. Install in full accordance with the manufacturer's recommendations, including provisions for cementing joints and insulating fittings. 2.06 ADHESIVES, LAGGING, AND SEALERS A. Adhesives, lagging and sealers shall be as recommended by the insulation manufacturers. B. Jacket (PVC) adhesive, lagging and sealers shall be as recommended by the manufacturers. Jackets (PVC) shall be sealed with an all white welding adhesive on all longitudinal and circumferal seams. 2.05 PREMOLDED FITTING AND VALVE COVERS A. Pre-molded fitting and valve covers shall be factory made of one piece polyvinyl chloride 30 mil minimum. Covers shall overlap the adjoining pipe insulation. PART 3 - EXECUTION 3.01 PREPARATION/GENERAL REQUIREMENTS A. B. Clean thoroughly to remove rust, plaster, and dirt before insulation is applied. Insulation shall be applied on clean dry surfaces only. Piping shall have been tested and approved before covering. Provide saddles, shields, metal protectors and other appurtenances necessary to prevent crushing of insulation at hangers, rollers, supports and anchors. Provide rigid insulation blocks at saddles. 3.02 PIPING INSULATION A. Insulate all above-ground piping systems, except gas piping and sprinkler piping, with piping insulation of specified type and thickness: PIPING INSULATION (Revised 06/14/12) 22 07 19 - 2 Type of System or Pipe 1. Domestic cold water piping, domestic hot water piping, tempered water piping--Insulation Thickness Runouts up to 2” Mains ---------- ½”-----------------1” B. Runouts are individual branches to units/fixtures, not exceeding 12’-0” in length. C. Installation of insulation shall be as follows: 1. Pipe: Butt all joints firmly together. Cover joints with 3" butt strips. Smoothly secure all jacket laps and joints strips with adhesive. Self-sealing laps shall be applied according to manufacturer’s recommendations. Ends of pipe insulation shall be sealed off with a vapor barrier coating at all fittings and valves and at intervals of 21 feet on continuous runs. END OF SECTION PIPING INSULATION (Revised 06/14/12) 22 07 19 - 3 SECTION 22 40 00 PLUMBING FIXTURES PART 1 - GENERAL 1.01 RELATED DOCUMENTS A. The following shall apply to this Section: 1. Drawings. 2. General Conditions. 1.02 WORK INCLUDES A. All plumbing fixtures, including supply and waste fittings, stops, trim, brackets, carriers, etc. required for complete installation. B. All piping, fittings, valves, trim, stops, etc. specified, required for rough-in and final connection to Equipment furnished by Owner. 1.03 SUBMITTALS A. None required. Contractor shall select from and install only the manufacturers listed in paragraph 2.01-ACCEPTABLE MANUFACTURERS. 1.04 QUALITY ASSURANCE A. Codes and Standards: Comply with current edition of the following: 1. Vitreous china fixture, NBS-CS-CS20. 2. Plumbing fixtures (land use), FS-WW-P-541. 3. Enameled iron fixtures, NBS-CS-CS77. B. No plumbing fixture, special equipment, device or piping shall be installed which will provide cross connection or interconnection between potable water system and polluted water or sewage system so as to make possible backflow or back siphonage of sewage or polluted water into the potable water supply system. C. Where possibility of back siphonage exists, water supplied to fixture shall be introduced through a suitable vacuum breaker installed at code minimum height. D. The water system of electric water coolers shall be manufactured of pure copper components only (completely lead free material). The water ways shall not contain any internal plating or coatings. All joints shall be made using silver solder brazing alloy. No lead or soft solder shall be used. PART 2 - PRODUCTS 2.01 ACCEPTABLE MANUFACTURERS Contractor shall select from and install only the manufacturers listed below. A. Brass 1. American Standard. 2. Moen Commercial. 3. Chicago Faucet. 4. T & S Brass. B. Drench Shower and Eyewash Units 1. Bradley. 2. Haws. C. Electric Water Coolers 1. Elkay. PLUMBING FIXTURES (Revised 07/09/12) 22 40 00-1 D. E. F. G. 2.02 2. Halsey-Taylor. 3. Oasis. Mop Service Basins 1. Fiat. 2. Williams. Seats 1. Beneke. 2. Olsonite. 3. Church. Sinks 1. Elkay. 2. Moen. 3. Just. Valves 1. Ames. 2. Keystone. 3. Apollo. 4. Magnetrol. 5. ASCO. 6. Stockham. 7. Febco. 8. Watts. PLUMBING FIXTURES AND TRIM A. All fixtures shall be vitreous china, acid resisting enamel cast iron or stainless steel as specified complete with brass piping, fittings, supplies, stops, flush pipes, trim and brackets. Exposed brass piping and fittings shall be chrome plated. B. Where manufacturer's numbers for a complete assembly are called for, such assembly shall be modified as specified in this section. C. Fixtures shall have water, drain, waste, soil, vent, and other connections as called for. Each water connection fixture shall have an air gap or vacuum breaker as required by local and state departments of health. Water connection sizes are minimum and must be increased to correspond to manufacturer's standards. D. Carriers for wall hung fixtures shall be selected for the particular fixture, piping arrangement and building conditions prevailing at each location. E. Where lavatories without legs are specified, each shall be supported on a chair type carrier with concealed arms. F. Fixture Carriers: 1. Lavatories, urinals, and wall-mounted water closets shall be supported by floormounted carriers. Urinal carriers may be omitted where urinals are mounted on masonry walls 6" thick or more. 2.03 WATER CLOSET-HANDICAPPED A. For water closets in stalls or rooms intended to be accessible to the handicapped, the ADA requires the flush handle to be located on the wide side of the stall. For tank-type water closets, furnish units with the handle on the proper side of the tank. For flush valve water closets, install the flush valve with the handle on the proper side. PART 3 - EXECUTION 3.01 PLUMBING FIXTURES AND TRIM A. All fixtures shall be set firm and true, connected to all piping services ready for use. B. Fixtures shall be installed per manufacturer’s recommendations. PLUMBING FIXTURES (Revised 07/09/12) 22 40 00-2 C. Fixtures intended to meet ADA requirements shall be installed at recommended heights and with appropriate clearances. D. Sinks and lavatories for handicapped access shall be installed with offset tailpieces and insulated traps. 3.02 OWNER FURNISHED EQUIPMENT A. Provide rough-ins and final connections to all Owner furnished equipment including shut off valves, piping, traps, etc. necessary to connect up equipment after it has be installed in place. See also Section 20 07 00 “Existing Systems and Owner Furnished Equipment”. END OF SECTION PLUMBING FIXTURES (Revised 07/09/12) 22 40 00-3 SECTION 23 05 93 TESTING ADJUSTING & BALANCING OF HVAC SYSTEMS PART 1 - GENERAL 1.01 RELATED DOCUMENTS A. The following shall apply to this Section: 1. Drawings. 2. General Conditions. 1.02 WORK INCLUDES A. HVAC systems shall be tested and balanced by the HVAC Contractor. PART 2 - PRODUCTS - (NOT APPLICABLE) PART 3 - EXECUTION 3.01 TESTING, ADJUSTING, AND BALANCING OF HVAC A. HVAC systems shall be tested and balanced by the HVAC Contractor. B. Certified testing and balancing is not required on this project. The Contractor shall measure all air flows and record his measurements on Test and Balancing Forms similar to those at the end of this section. Any necessary adjustments and/or ductwork modifications necessary to achieve the specified air flows shall be made by the Contractor promptly at no additional cost to the Owner. See sample “NEBB Sample Test and Balancing Forms” at the end of this section. C. Flowrates of outside air shall be reported for each mechanical unit. D. The HVAC Contractor shall perform the balancing and testing of the HVAC in accordance with the procedures of AABC or NEBB to analyze, balance, adjust and test air distribution systems. E. The HVAC Contractor shall put all heating, ventilating and air conditioning systems and equipment into operation and shall continue the operation of same during each working day of testing and balancing and shall place the automatic temperature control system in satisfactory operation before testing and balancing. F. The Contractor shall replace all air filters with new filters prior to the start of testing and balancing activity. TESTING ADJUSTING & BALANCING OF HVAC SYSTEMS (Revised 07/11/12) 23 05 93 -1 TESTING ADJUSTING & BALANCING OF HVAC SYSTEMS (Revised 07/11/12) 23 05 93 -2 TESTING ADJUSTING & BALANCING OF HVAC SYSTEMS (Revised 07/11/12) 23 05 93 -3 TESTING ADJUSTING & BALANCING OF HVAC SYSTEMS (Revised 07/11/12) 23 05 93 -4 END OF SECTION TESTING ADJUSTING & BALANCING OF HVAC SYSTEMS (Revised 07/11/12) 23 05 93 -5 SECTION 23 11 00 GAS PIPING SYSTEMS PART 1 - GENERAL 1.01 RELATED DOCUMENTS A. The following shall apply to this Section: 1. Drawings. 2. General Conditions. 3. Refer to Section 01 11 00-Summary of Work. 1.02 WORK INCLUDES A. B. This Section includes piping, specialties, and accessories for gas systems within the building and outdoors. Fees, permits and licenses; see Section 20 01 00, 1.02 “Work Includes”. 1.03 RELATED WORK A. Section 20 03 00 - "MATERIALS AND METHODS" 1.04 SUBMITTALS A. B. No submittals required when using specified materials. Otherwise, comply with Section 26 00 10 "SUBMITTALS" and “SUBSTITUTION OF EQUIPMENT”. Upon request test reports specified in "Field Quality Control" Article in Part 3, Section 23 11 00. 1.05 QUALITY ASSURANCE A. B. C. D. 1.06 Comply with NFPA 54 "National Fuel Gas Code" for gas piping materials and components; installations; and inspection, testing, and purging. Comply with the International Mechanical Code, latest edition, for all fuel gas piping installation. Provide listing/approval stamp, label, or other marking on equipment made to specified standards. Listing and Labeling: Provide equipment and accessories that are listed and labeled. DEFINITIONS A. B. C. D. Low-Pressure Gas Piping System: Operating at pressure of 7" W.C. or 1/2 psi, or as indicated on drawings. Medium-Pressure Gas Piping System: Operating at a pressure of above ½ psi to 10 psi. Gas Service: Pipe from the street main or LP gas storage tank to point of delivery for the building being served. Piping includes gas service piping, gas valve, service pressure regulator. Gas Piping System: Pipe within the building that conveys gas from point of delivery to points of usage. Piping includes dielectric fitting and gas valve immediately downstream from point of delivery. PART 2 - PRODUCTS 2.01 ACCEPTABLE MANUFACTURERS GAS PIPING SYSTEMS (Revised 07/16/12) 23 11 00 - 1 A. Gas Pressure Regulators 1. American Meter Co. 2. Jordan Valve Div., Richards Industries, Inc. 3. Fisher Controls. 4. Lancaster by National Meter Parts, Inc. 5. Gas Energy, Inc., Subsid., Brooklyn Union Gas. 6. Maxitrol Co. B. Low-Pressure Gas Stops 1. Hammond Valve Corp. 2. Lancaster by National Meter Parts, Inc. 3. Jomar International, Ltd. 4. Rockford-Eclipse Div., Eclipse, Inc. C. Gas Valves, 2 Inches and Smaller 1. Homestead by Olson Technologies, Inc. 2. Mueller Co., A Grinnell Co. 3. Lancaster by National Meter Parts, Inc. 4. Mueller Steam Specialty Div., Core Industries, Inc. 5. Lunkenheimer Co. 6. Nordstrum Valves, Inc. 7. Milliken Valve Co., Inc. 8. Rockford-Eclipse Div., Eclipse, Inc. D. CSST (Corrugated stainless steel tubing) 1. Titeflex. 2.02 PIPES AND TUBES A. B. C. D. Refer to "Pipe Applications" Article in Part 3 for identification of systems where the following materials are used. Steel Pipe: ASTM A 53, Type E, Electric-Resistance Welded or Type S, Seamless, Grade B, Schedule 40, black. Plastic Pipe: ASTM D-2513, polyethylene pipe, SR-11, labeled for gas system use. CSST: Corrugated stainless steel tubing with polyethylene jacketing; 304 stainless steel. 2.03 PIPE AND TUBE FITTINGS A. B. C. D. E. Malleable-Iron Threaded Fittings: ASME B16.3, Class 150, standard pattern, with threads conforming to ASME B1.20.1. Unions: ASME B16.39, Class 150, black malleable iron; female pattern; brass-to-iron seat; ground joint. Steel Fittings: ASME B16.9, wrought steel, butt-welding type; and ASME B16.11, forged steel. Transition Fittings: Type, material, and end connections to match piping being joined. ESST Mechanical Fittings: Type, material, and end connections to match piping being joined. 2.04 JOINING MATERIALS A. Common Joining Materials: Refer to Section 20 03 00- "MATERIALS AND METHODS" for joining materials not included in this Section. 2.05 VALVES A. B. Manual Valves: Conform to standards listed, or where appropriate, valves according to ANSI Z21.15 and ANSI Z21.15a. Low-Pressure Gas Stops, 2 Inches and Smaller: AGA- certified design for 2 psig or less gas, with AGA stamp, plug or ball type, bronze body and bronze plug or chrome-plated GAS PIPING SYSTEMS (Revised 07/16/12) 23 11 00 - 2 C. brass ball. Include flat head, square head, or lever handle and threaded ends. Gas Valves, 2-1/2 Inches and Larger: MSS SP-78, Class 125 or 175 WOG, lubricated plug type, semi steel body, wrench operated, with flanged ends. 2.06 PIPING SPECIALTIES A. B. Gas Pressure Regulators: comply with ANSI Z21.18. ,For appliance regulators or ANSI/U.L. 144 for second-stage regulators. (This applies only to regulators furnished and installed as part of the project, and not regulations furnished by others). Flexible Connectors: ANSI Z21.24 or ANSI Z21.24a, copper alloy. PART 3 - PRODUCTS 3.01 PREPARATION A. B. Precautions: Close equipment shutoff valves before turning off gas to the premises or section of piping. Perform leakage test as specified in Section 20 02 00 - “Contract, Closeout & Commissioning” “Field Quality Control" Article to determine that all equipment is turned off in the piping section to be affected. Comply with NFPA 54 "Prevention of Accidental Ignition." 3.02 SERVICE ENTRANCE PIPING A. 3.03 Extend gas piping and connect to the gas service piping in location and size indicated for gas service entrance to building. PIPE APPLICATIONS A. B. C. D. E. Flanges, unions, transition and special fittings, and valves with pressure ratings same or higher than system pressure rating may be used in applications below, except where specified otherwise. Low-Pressure Gas Systems, above Ground within or outside Building: Use the following: 1. 2 Inches and Smaller: Steel pipe, malleable-iron, threaded fittings, and threaded joints. 2. 2-1/2 Inches and Larger: Steel pipe, butt-welding fittings, and welded joints. Low-pressure gas systems, below ground within the buildings: Use the following: 1. 1 inch and smaller: CSST tubing inside a schedule 40 PVC plastic sleeve. Medium pressure (greater than ½ PSI up to 10 PSI) Gas Systems, Below Ground outside the buildings: 1. 1/2 “ and larger: Polyethylene, ASTM D2513. Medium pressure (greater than ½ PSI up to 10 PSI) gas systems above ground within the building and/or on the roof: 1. Steel pipe, butt-welding fittings, welded joints 3.04 VALVE APPLICATIONS A. Use low-pressure gas stops, tapered plug or ball type, for shutoff to appliances with 2-inch or smaller low- pressure gas supply. B. Use gas valves for shutoff to appliances. Where the appliance input exceeds one million BTUH, use a lubricated plug valve. C. Use gas valves of sizes indicated for other gas shut-off applications where indicated. 3.05 JOINT CONSTRUCTION A. For steel pipe, refer to Section 20 03 00 - "MATERIALS AND METHODS" for basic piping joint construction. GAS PIPING SYSTEMS (Revised 07/16/12) 23 11 00 - 3 B. C. Use materials suitable for gas service. Joints and connections in underground polyethylene gas piping shall be made by buttfused heat fusion methods, only by qualified personnel. 3.06 PIPING INSTALLATIONS A. B. C. D. E. F. G. H. Refer to Section 20 03 00 - "MATERIALS AND METHODS" for basic piping installation requirements. Above-Ceiling Locations: Gas piping may be installed in accessible above-ceiling spaces (subject to approval of the authority having jurisdiction), whether or not such spaces are used as a plenum. Do not locate valves or unions in such spaces. 1. Prohibited Locations: Do not install gas piping in or through circulating air ducts, chimneys or gas vents (flues), or ducts. 2. Concealed locations: Gas piping may be installed in concealed (inaccessible) locations as permitted by the International Mechanical Code only if all joints in the piping are welded. Drips and Sediment Traps: Install drips at points where condensate may collect. Include outlets of gas meters. Locate where readily accessible to permit cleaning and emptying. Do not install where condensate would be subject to freezing. 1. Construct drips and sediment traps using tee fitting with bottom outlet plugged or capped. Use minimum-length nipple of 3 pipe diameters, but not less than 3 inches long, and same size as connected pipe. Install with space between bottom of drip and floor for removal of plug or cap. Install gas piping at a uniform grade of 1/4 inch in 15 feet, upward toward risers. Install piping upward from the service point to equipment. Connect branch piping from top or side (not bottom) of horizontal piping. Install unions in pipes 2 inches and smaller, adjacent to each valve, at final connection to each piece of equipment, and elsewhere as indicated. Unions are not required on flanged devices. Anchor piping to ensure proper direction of piping expansion and contraction. Install expansion joints, expansion loops, and pipe guides as indicated. Install vent of gas pressure regulators pointing down, in accordance with manufacturer's instructions. 3.07 HANGER AND SUPPORT INSTALLATION A. B. C. D. Refer to Section 20 03 00 - "MATERIALS AND METHODS" for hanger and support devices. Install hangers for horizontal piping at 10' on centers or otherwise as called for on the drawings. Do Not support gas piping by extending it to stand on the floor. Install vent of gas pressure regulators pointing down, in accordance with manufacturer's instructions. 3.08 VALVE INSTALLATION A. B. Install valves in accessible locations, protected from physical damage. Install a gas valve upstream of each gas pressure regulator. 3.09 CONNECTIONS A. B. Install gas piping near gas-utilizing equipment and appliances so as to allow servicing and maintenance. Connect gas piping to gas-utilizing equipment and appliances with shutoff valves and unions. Make connections downstream of valves and unions, with flexible connectors where indicated. GAS PIPING SYSTEMS (Revised 07/16/12) 23 11 00 - 4 3.10 TERMINAL EQUIPMENT CONNECTIONS A. B. Install a gas valve upstream and within 6 feet of each gas-utilizing appliance. Install a union or flanged connection downstream from the valve to permit removal of controls. Sediment Traps: Install as described above, as close as practical to gas appliance inlets, downstream of the shut-off valve for the appliance. 3.11 ELECTRICAL BONDING AND GROUNDING A. B. Install above-ground portions of gas piping systems that are upstream from equipment shutoff valves, electrically continuous and bonded to a grounding electrode according to NFPA 70. Do not use gas piping as a grounding electrode. 3.12 FIELD QUALITY CONTROL A. See Section 20 02 00- “Contract Close-out & Commissioning”. 3.13 ADJUSTING A. Adjust controls and safety devices. Replace damaged and malfunctioning controls and safety devices. END OF SECTION GAS PIPING SYSTEMS (Revised 07/16/12) 23 11 00 - 5 SECTION 23 23 00 REFRIGERANT PIPING PART 1 - GENERAL 1.01 RELATED DOCUMENTS A. The following shall apply to this Section: 1. Drawings. 2. General Conditions. 3. Refer to Section 01 11 00-Summary of Work. 1.02 WORK INCLUDES A. B. C. D. Refrigerant piping used for air conditioning applications. Special duty valves. Pipes, tubing, fittings, and specialties. Refrigerants. 1.03 RELATED WORK A. Section 07 84 00 “FIRE STOPPING” for materials and methods for sealing pipe penetrations through basement walls and fire/smoke barriers. B. Section 20 03 00 - "MATERIALS AND METHODS". C. Section 20 06 00 - "MECHANICAL IDENTIFICATION". D. Products installed but not furnished under this Section include pre-charged tubing, refrigerant specialties, and refrigerant accessories furnished as an integral part of or separately with packaged air conditioning equipment. 1.04 SUBMITTALS A. Product data for the following products: 1. Each type valve specified. 2. Each type refrigerant piping specialty specified. B. Maintenance data for refrigerant valves and piping specialties, for inclusion in Operating and Maintenance Manual specified in Section 01, and Section 20 01 00 - "GENERAL PROVISIONS." 1.05 QUALITY ASSURANCE A. Regulatory Requirements: Comply with provisions of the following codes: 1. ANSI B31.5: ASME Code for Pressure Piping - Refrigerant Piping. 2. ANSI/ASHRAE Standard 15: Safety Code for Mechanical Refrigeration. PART 2 - PRODUCTS 2.01 ACCEPTABLE MANUFACTURERS A. Refrigerant Valves and Specialties 1. Alco Controls Div, Emerson Electric. 2. Henry Valve Company. 3. Danfoss Electronics, Inc. 4. Parker-Hannifin Corp., Refrig. and A/C Div. 5. EATON Corporation, Control Div. 6. Sporlan Valve Company. REFRIGERANT PIPING (Revised 07/09/12) 23 23 00–1 2.02 PIPE AND TUBING MATERIALS A. Refer to Part 3, Article "Pipe Application" for identification of systems where the below specified pipe and fitting materials are used. B. Copper Tubing: ASTM B 280, Type ACR, hard drawn straight lengths, or annealed seamless copper tubing. Tubing shall be factory cleaned, ready for installation, and have ends capped to protect cleanliness of pipe interiors prior to shipping. 2.03 FITTINGS A. Wrought-Copper Fittings: ANSI B16.22, streamlined pattern. 2.04 JOINING MATERIALS A. Brazing Filler Metals: AWS A5.8, Classification BAg-1 (Silver). 2.05 VALVES A. All valves shall be incorporated in the mechanical equipment. 2.06 REFRIGERANT PIPING SPECIALTIES A. Complete refrigerant piping specialty assembly shall be UL-listed and designed to conform to ARI 760. B. Strainers: 500 psig maximum working pressure; forged brass body with monel 80-mesh screen, and screwed cleanout plug; Y-pattern, with solder end connections. C. Moisture/liquid Indicators: 500 psig maximum operation pressure, 200 deg. F. maximum operating temperature; forged brass body, with replaceable polished optical viewing window, and solder end connections. D. Filter-driers: 500 psig maximum operation pressure; steel shell, flange ring, and spring, ductile iron cover plate with steel capscrews, and wrought copper fittings for solder end connections. Furnish complete with replaceable filter-drier core kit, including gaskets, as follows: 1. High capacity desiccant sieves to provide micronic filtration and extra drying capacity. E. Suction Line Filter-Drier: 350 psig maximum operation pressure, 225 deg. F. maximum operating temperature; steel shell, and wrought copper fittings for solder end connections. Permanent filter element shall be molded felt core surrounded by a desiccant for removal of acids and moisture for refrigerant vapor. F. Flexible Connectors: 500 psig maximum operating pressure; seamless tin bronze or stainless steel core, high tensile bronze braid covering, solder connections, and synthetic covering; dehydrated, pressure tested, minimum 7 inch in length. 2.07 REFRIGERANT A. Refrigerant No. 410A, in accordance with ASHRAE Standards. PART 3 - EXECUTION 3.01 EXAMINATION A. Examine rough-in for refrigerant piping systems to verify actual locations of piping connections prior to installation. 3.02 PIPE APPLICATIONS A. Use Type ACR (only) hard drawn copper tubing with wrought copper fittings and brazed joints above ground and within building. Mechanical fittings (crimp or flare) are not REFRIGERANT PIPING (Revised 07/09/12) 23 23 00–2 permitted. B. Clean and protect inside of tubing as specified in Article "Cleaning" below. 3.03 PIPING INSTALLATIONS A. Install refrigerant piping in accordance with ASHRAE Standard 15 - "The Safety Code for Mechanical Refrigeration." B. Install piping in as short and direct arrangement as possible to minimize pressure drop. C. Install piping for minimum number of joints using as few elbows and other fitting as possible. D. Arrange piping to allow normal inspection and servicing of compressor and other equipment. Install valves and specialties in accessible locations to allow for servicing and inspection. E. Provide adequate clearance between pipe and adjacent walls and hanger, or between pipes for insulation installation. Use sleeves through floors, walls, or ceilings, sized to permit installation of full thickness insulation. F. Insulate suction lines with 3/4" "Armaflex" or equal. Liquid line is not required to be insulated, except where installed adjacent and clamped to suction lines, where both liquid and suction lines shall be insulated as a unit. 1. Do not install insulation until system testing has been completed and all leaks have been eliminated. G. Slope refrigerant piping as follows: 1. Install horizontal suction lines with 1/2 inch per 10 feet downward slope to the compressor, with no long traps or dead ends which may cause oil to separate from the suction gas and return to the compressor in damaging slugs. 2. Install traps and double risers where indicated, and where required to entrain oil in vertical runs. 3. Liquid lines may be installed level. H. Install exposed piping at right angles or parallel to building walls. Diagonal runs are not permitted, unless expressly indicated. I Install piping free of sags or bends and with ample space between piping to permit proper insulation applications. J. Install piping tight to slabs, beams, joists, columns, walls, and other permanent elements of the building. Provide space to permit insulation applications, with 1 inch clearance outside the insulation. Allow sufficient space above removable ceiling panels to allow for panel removal. K. Locate groups of pipe parallel to each other, spaced to permit applying insulation and servicing of valves. L. Exterior Wall Penetrations: Seal pipe penetrations through exterior walls using sleeves and mechanical sleeve seals. Pipe sleeves smaller than 6 inch shall be steel; pipe sleeves 6 inch and larger shall be sheet metal. M. Fire Barrier Penetrations: Where pipes pass through fire rated walls, partitions, ceilings, and floors, maintain the fire rated integrity. N. Make reductions in pipe sizes using eccentric reducer fittings installed with the level side down. O. Install strainers immediately ahead of each expansion valve, solenoid valve, hot gas bypass valve, compressor suction valve, and as required to protect refrigerant piping system components. P. Install moisture/liquid indicators in liquid lines between filter/driers and thermostatic expansion valves and in liquid line to receiver. Q. Install unions to allow removal of solenoid valves, pressure regulating valves, expansion valves, and at connections to compressors and evaporators. R. Install flexible connectors at the inlet and discharge connection of compressors. 3.04 HANGERS AND SUPPORTS A. General: Hanger, supports, and anchors are specified in Section 20 03 00 REFRIGERANT PIPING (Revised 07/09/12) 23 23 00–3 "MATERIALS AND METHODS." Conform to the table below for maximum spacing of supports. B. Install the following pipe attachments: 1. Adjustable steel clevis hangers for individual horizontal runs less than 20 feet in length. C. Install hangers with the following minimum rod sizes and maximum spacing: NOM MAX MIN. ROD PIPE SIZE SPAN - FT. SIZE - INCHES 17 1-1/2 2 7 9 10 3/8 3/8 3/8 3.05 PIPE JOINT CONSTRUCTION A. Brazed Joints: Comply with the procedures contained in the AWS "Brazing Manual." 1. WARNING: Some filler metals contain compounds which produce highly toxic fumes when heated. Avoid breathing fumes. Provide adequate ventilation. 2. CAUTION: When solenoid valves are being installed, remove the coil to prevent damage. When sight glasses are being installed, remove the glass. Remove stems, seats, and packing of valves, and accessible internal parts of refrigerant specialties before brazing. Do not apply heat near the bulb of the expansion valve. B. Fill the pipe and fittings during brazing, with an inert gas (i.e., nitrogen or carbon dioxide) to prevent formation of scale. C. Heat joints using oxy-acetylene torch. Heat to proper and uniform brazing temperature. 3.06 EQUIPMENT CONNECTIONS A. The Drawings indicate the general arrangement of piping, fittings, and specialties. B. Install piping adjacent to machine to allow servicing and maintenance. 3.07 FIELD QUALITY CONTROL A. Inspect, test, and perform corrective action of refrigerant piping in accordance with ASME Code B31.5, Chapter VI. B. Repair leaking joints using new materials, and retest for leaks. 3.08 ADJUSTING AND CLEANING A. Verify actual evaporator applications and operating conditions, and adjust thermostatic expansion valve to obtain proper evaporator superheat requirements. B. Clean and inspect refrigerant piping systems in accordance with requirements of Section 20 03 00 - "MATERIALS AND METHODS" Article "Pipes and Pipe Fittings". C. Adjust controls and safeties. Replace damaged or malfunctioning controls and equipment with new materials and products. 3.09 COMMISSIONING A. See Section 20 02 00- “Contract Close-out & Commissioning”. END OF SECTION REFRIGERANT PIPING (Revised 07/09/12) 23 23 00–4 SECTION 23 30 00 AIR DISTRIBUTION PART 1 - GENERAL 1.01 RELATED DOCUMENTS A. The following shall apply to this Section: 1. Drawings. 2. General Conditions. 1.02 WORK INCLUDES A. Provide all ductwork with extractors, dampers, turning vanes, hangers, etc., as indicated on the drawings, as specified and as required to complete this portion of the work in conjunction with the air distribution system. B. Provide factory fabricated units, exhaust fans, wall louvers, access doors, fire dampers, security grilles, grilles, registers, diffusers, etc., as specified and as shown on the drawings. C. Provide control dampers, fire dampers, and balancing dampers as shown on drawings or as required for proper duct system operation. 1.03 SUBMITTALS A. No submittals required when using specified materials, otherwise: Submit shop drawings in accordance with Section 20 01 00 - "GENERAL PROVISIONS" for the following equipment: 1. Registers, grilles and diffusers. 2. Duct liner. 2. Fire dampers. 4. Sealing materials. 3. Exhaust fans. 6. Fire stopping materials. B. NFPA Compliance: Comply with the following: 1. NFPA 90A, "Standard for the Installation of Air Conditioning and Ventilating Systems," except as indicated otherwise. 1.04 QUALITY ASSURANCE A. Codes and Standards: Duct lining materials, separately and in combination shall be UL listed and shall have maximum fire hazard classifications of flame spread 25 and smoke development 50. B. Units shall be factory assembled and tested. Fan ratings to be based on current AMCA Standards. C. Roof exhaust fans shall bear AMCA seal. D. Fire dampers shall conform to requirements of National Fire Protection Association and the state and local fire marshal. PART 2 - PRODUCTS 2.01 ACCEPTABLE MANUFACTURERS A. Grilles and Registers 1. Anemostat. AIR DISTRIBUTION (Revised 01/31/11) 23 30 00-1 B. C. D. E. F. G. H. I. 2.02 2. Titus. 3. Carnes. 4. Tuttle and Bailey. 5. Price Louvers and Dampers 1. Airline. 2. Louvers & Dampers Co. 3. Carnes. 4. Nailor. 5. Greenheck. Flexible Ducts 1. Atco. 2. Wiremold. 3. Thermoflex. Acoustical Duct Lining 1. Certain-Teed "Ultralite Duct Liner". 2. Owens-Corning "Aeroflex Type 200". 3. Johns-Manville "Mircolite Duct Liner". Duct Wrap Insulation 1. Certain-Teed Standard Duct Wrap. 2. Owens-Corning 0 All-Service/100 Branch Duct Fittings 1. Buckley #BMD. (Bellmouth type for rectangular duct) 2. Air-Tite #CATDR (Commercial saddle type for round duct) Fire Dampers 1. Air Balance. 2. Ruskin. 3. Cesco. 4. Vent Products. Air Filters 1. Airguard Industries - DP-40-2. 2. Continental Filters Company - Areopleat. 3. American Air Filter - AM AIR 300X. 4. Farr - 30/30. Fans 1. Cook 2. Greenheck 3. Carnes 4. Penn DUCTS - GENERAL A. Ductwork, unless otherwise shown, shall be galvanized steel sheets (F.S. QQ-S-775 Type l, Class e) or aluminum alloy 3003 (F.S. QQ-A-250/2c Temper H-14). B. Exposed ducts that are noted as painted, use "Paint-Grip" galvanized steel. Ducts, unless otherwise approved by the Engineer, shall conform accurately to the sizes indicated on the drawings and shall be straight and smooth on the inside, with joints neatly finished. Ducts shall be securely anchored to the building in an approved manner and shall be installed so as to be completely free from vibration under all conditions of operation. C. Turning vanes shall be installed in all elbows, in both supply and return ducts. Do not install any radiused elbows (applies to fabricated rectangular duct only). Sheet metal ducts shall be properly braced and reinforced. Specific ducts require sealing of joints. See paragraph “Duct Sealing” AIR DISTRIBUTION (Revised 01/31/11) 23 30 00-2 2.03 DUCTS - RECTANGULAR A. Rectangular ducts shall be lined as per Section 23 30 00, 2.08 “Acoustical Duct Lining”. B. Ducts (unless noted otherwise on drawings) shall be constructed in accordance with SMANCA low pressure duct construction standards for 1" w.c. pressure. For convenience, they may be constructed per the following table: DIMENSION GAUGE REINFORCING MAX SPACING 0" - 12" 26 None 13" - 26" 26 1" standing "S" 5'0" 27" - 42" 24 1" standing "S" 4'0" 43" - 60" 22 1" x 1" x ⅛" angle 2'6" Install reinforcing on four sides of duct where depth exceeds 16"; install on two sides only where duct depth is 16" or less. C. All rectangular duct with dimensions over 12" shall be cross-broken to prevent "oilcanning." D. At the Contractor's option, the rectangular ducts may be assembled with transverse joints made with the "Ductmate" system or an approved equal. If used, the Ductmate joints shall be assembled with corners, cleats and gasket tape per the manufacturer's instructions. Additional duct sealant is not required with the “Duct Mate” system. Duct metal gauges may be reduced per the ductmate recommendations. 2.04 DUCTS - ROUND A. Round low-pressure ductwork shall be galvanized steel "Snaplock" pipe, insulated as per Section 23 30 00, 2.09 “Duct Wrap Insulation”. Tape all transverse joints. See also “DUCT SEALING.” Round ducts: 1. This section supersedes the latest SMACNA standards. Construct round ducts from steel sheets of the following U.S. gauge thickness, using the seam method shown: INNER DIAMETER DIMENSION 3” to 8” 9” through 26” 2.05 GAUGE SEAM TYPE 28 gauge 26 gauge Longitudinal Longitudinal FLEX DUCT A. UL listed Class I preinsulated flex duct (sheathed in a seamless vinyl jacket) may be used, subject to approval of submittals. It shall be used only for runouts to supply or return diffusers and only in lengths of 8' or less. Provide nylon, self-extinguishing, locking clamps to secure flexible duct. 2.06 EXHAUST DUCTS A. Exhaust ducts shall be round or rectangular galvanized steel as shown on the plans. Flexible duct is not permitted. Do not line or insulate exhaust ducts, except as called for on the drawings and as specified below. AIR DISTRIBUTION (Revised 01/31/11) 23 30 00-3 2.07 DUCT SEALING A. All transverse duct joints shall be sealed during or after assembly with "United" “UniSeal” (synthetic elastometric duct sealer or equal. No leakage shall be detectable when the duct is pressurized to 1" water column above the maximum working pressure to be experienced by the system. Un-Sealed duct joints are not acceptable. B. Duct tape, if used, shall be equal to “Venture Tape” #1502, silver. Metalized, polyethylene cloth tape with pressure sensitive adhesive. Minimum 10 mil. Thickness. C. See PART 3 -EXECUTION, “DUCT SEALING”, for application. 2.08 ACOUSTICAL DUCT LINING (RECTANGULAR DUCTS) A. Acoustical duct lining shall be 1" thick 1 ½ lb./cu. ft. density. Minimum R-Value of 3.6. 2.09 DUCT WRAP INSULATION (ROUND DUCTS) A. Duct wrap insulation shall be 1 ½ " thick, 1 lb./cu. ft. density, fiber glass type, with foil scrim kraft facing. The insulation shall have an r-value of 5.7 @ 75°F. mean temperature. FLEXIBLE CONNECTIONS B. Where sheet metal connections are made to fan or where ducts of dissimilar metal are connected, a noncombustible flexible connection of approved noncombustible material approximately 6 inches in width, conforming to ASTM Specification D1571-67, shall be installed. 2.10 INSPECTION AND ACCESS DOORS A. Doors shall be 15" x 15" unless otherwise indicated. Where size of duct will not accommodate this size, the doors shall be made as large as possible without weakening duct. Man-size access doors shall be rigid, and shall be provided with airtight neoprene gaskets. Doors shall be provided with galvanized piano hinges and two Camlock brass fasteners. Man-size access doors shall be provided with door handles operable from both sides. Doors in insulated ducts shall be of the insulated type. 2.11 HANGERS AND SUPPORTS FOR DUCTS A. Install rigid round, rectangular, and flat oval metal duct with support systems indicated in SMACNA "HVAC Duct Construction Standards," Tables 4-1 through 4-3 and Figures 4-1 through 4-8. B. Support horizontal ducts within 2 feet of each elbow and within 4 feet of each branch intersection. C. Support vertical ducts at a maximum interval of 16 feet and at each floor. D. Upper attachments to structures shall have an allowable load not exceeding ¼ of the failure (proof test) load but are not limited to the specific methods indicated. 2.12 REGISTERS AND GRILLES A. Registers and grilles shall be of the size indicated on the drawings. Registers and grilles shall have vanes slanted to prevent direct sight into grille. B. Anything visible through grille in customer contact and office areas shall be painted flat black. C. Provide anti-smudge rings on all ceiling diffuser located in gypsum board and lay-in ceilings. Where ceiling height permits. AIR DISTRIBUTION (Revised 01/31/11) 23 30 00-4 2.13 BELLMOUTH FITTINGS A. Supply air branch duct bellmouth fittings with dampers shall be of the locking quadrant type and shall clearly indicate damper position. Extension rods shall be installed where necessary. Each branch duct shall be provided with a bellmouth fitting damper. Bellmouths shall be heavy-duty galvanized steel with neoprene gasket and low-leak 26 gauge galvanized damper. B. "Spin-in" fittings or job-fabricated units are not acceptable for supply air ducts. 2.14 FIRE DAMPERS A. Fire dampers shall have the following features: 1. UL #555 listed and labeled to close, if activated, even if air distribution system is in operation. 2. One piece steel frame. 3. Steel blades with interlocking joints. Blades in airstream. 4. Stainless steel negator closure spring if required for horizontal mounting. 5. 160 degree F. U.L. listed fusible links and blade locks. 2.15 FANS A. Inline Exhaust: 1. Ceiling ventilator shall be direct drive, forward curved, centrifugal blower type. Fan wheel shall be constructed of galvanized steel and shall be dynamically balanced. The housing shall be constructed of galvanized steel and acoustically insulated for quiet operation. An integral aluminum backdraft damper shall be standard. Blower and motor assembly shall be easily removable from the housing without disturbing the ductwork. The motor shall be permanently lubricated with built-in thermal overload protection and shall be factory tested prior to shipment. The unit shall be supplied with an internal wiring box and receptacle. The discharge position shall be adjustable by moving interchangeable panels supplied with removable fasteners. 2. Ceiling ventilators shall be certified and licensed to bear the AMCA Seal for Air and Sound Performance. Ceiling ventilator performance shall be based on tests and procedures performed in accordance with AMCA publication 211 and comply with the requirements of the AMCA Certified Ratings Program. Fan sound power level ratings shall be based on tests and procedures performed in accordance with AMCA publication 311 and comply with the requirements of the AMCA Certified Ratings Program. Ceiling ventilators shall be UL Listed. 2.16 AIR FILTERS A. Air filters shall be 2" thick medium efficiency, pleated disposable type. Each filter shall consist of cotton media wire bonded to a heavy duty paperboard frame. Filters shall have not less than 4.25 sq. feet of gross media area per sq. ft. filter area. B. Filters shall have an average efficiency of 25-35% when tested in accordance with ASHRAE 52-76 standard. C. Initial clean resistance shall be no more than 0.14 inches W.G. when passing air at the rate of 300 feet per minute. D. The air filters shall be listed by Underwriters Laboratories as UL Class 2. E. Provide clean set of air filters prior to final acceptance and complete extra set left on site. F. Install filters in filter grilles and remove filters from units so equipped, but only at completion of construction. PART 3 - EXECUTION AIR DISTRIBUTION (Revised 01/31/11) 23 30 00-5 3.01 DUCTWORK A. Duct System Pressure Class: Construct and install each duct system for the specific duct pressure classification indicated. B. Ducts shall be of the internal dimensions shown on the Drawings. In no case shall the Contractor change the indicated size of the ductwork without approval of the Engineer. Wherever necessary to change the shape of the duct, it shall be done gradually and the full area retained. C. Assemble and install ductwork in accordance with recognized industry practices which will achieve air-tight (5% leakage for systems rated 3" and under; 1% for systems rated over 3") and noiseless (no objectionable noise) systems, capable of performing each indicated service. Install each run with minimum number of joints. All joints shall be sealed with duct sealant. Align ductwork accurately at connections, within ⅛" misalignment tolerance and with internal surfaces smooth. Support ducts rigidly with suitable ties, braces, hangers and anchors of type which will hold ducts true-to-shape and to prevent buckling. Support vertical ducts at every floor. D. Ducts 24 inch or greater in width or height shall be stiffened with galvanized structural angle reinforcing, not to exceed 4 ft. on centers and on all four surfaces, to prevent sagging or buckling and to provide a rigid installation and freedom from vibration and noise. Where angle cleats are made of same gauge metal as ducts (or heavier) the angle cleats will serve as reinforcing members on two surfaces of the ducts at joints in the ducts. Additional reinforcing angles shall be provided adjacent to branch duct connections which are of less width or depth than the surface of the main duct at point of connection, and at all other locations as necessary to make the duct work free from noise and vibration when fans are operating. E. This Contractor shall carefully check the arrangement of ducts and dimensions for all working spaces at the building so that there will not be interference with the running of ducts. F. Where ducts pass through walls and ceilings (exposed and concealed), this Contractor shall provide bent angle collar (as required to cover annular space) having flanges at corners lapped and riveted and the other leg of angle cut short and bent around corner of duct. Collars shall serve to confine sound barrier packing and shall fit tight around ducts. Where more than one duct passes through the same opening the collars shall form a complete seal of the spaces between and around all such ducts. This shall apply to concealed ductwork as well as exposed ductwork. The space between the duct and wall shall be packed with fiberglass duct-seal to provide an effective sound and dust barrier. Where the bent angle collar in any wall opening must support masonry in the wall above the opening, the top member of the bent angle collar shall be reinforced with rolled section steel angles suitable for the weight to be carried as approved by the Engineer and placed so as to be concealed in the wall in all locations where exposed in finished rooms. 3.02 FLEXIBLE CONNECTIONS A. Flexible connections shall be securely fastened by zinc-coated iron clinch-type draw bands, for round ducts. For rectangular ducts, flexible connections locked to metal collars shall be installed using normal duct construction methods. 3.03 ACCESS DOORS A. Access doors in ductwork shall be provided at all fire dampers, motorized dampers, and where indicated on the drawings. Unless otherwise indicated, doors shall swing so that fan pressure or suction holds the door closed. Access doors in ductwork with duct liner or insulation shall be insulated. AIR DISTRIBUTION (Revised 01/31/11) 23 30 00-6 3.04 HANGING OF DUCTS A. Horizontal ducts shall be supported with angle and rod or strap iron trapeze hangers. Strap iron hangers shall be placed around sides and bottom of ducts with sheet metal screws in sides and bottom. Trapeze hangers shall be securely fastened to ducts and to the construction above. Horizontal duct supports shall be spaced not to exceed 8 ft. apart and not less than one trapeze support per section of duct. B. Special hanging systems, where indicated, will be installed in lieu of duct supports specified above. C. No equipment or ductwork shall be hung from roof deck. 3.05 BELLMOUTH FITTING A. Install bellmouth fitting with damper in each supply air branch takeoff. Mark damper open and closed positions on side of duct with black paint. B. Fittings shall be secured in duct with screws. Operators shall be outside the duct system. All holes shall be carefully covered and sealed. 3.06 FIRE DAMPERS A. Fire dampers shall be installed as required by NFPA 90A, and as indicated on the drawings. Fire dampers must be installed in 10 ga. sleeve above ceiling terminal air devices or in masonry wall. Steel retaining angles, 10 ga., shall be bolted or welded to sleeve on both sides of wall, with duct connected to sleeve on both sides with slip connector held with not less than one No. 8 sheet metal screw on each vertical side of duct. 3.07 INSTALLATION OF EQUIPMENT A. Install all fans, fire dampers, registers, grilles, etc., per manufacturer's recommendation and instructions. B. Care shall be taken with installation of roof exhaust fans and roof vents to prevent damage. Any fan or vent dented or damaged in any other way during construction shall be repaired or replaced. 3.08 DUCT TAPE AND SEALANT - INSTALLATION A. Duct Tape shall be installed at the following locations: 1. All. B. Duct Sealant shall be installed on all transverse joints at the following locations: 1. All sheet metal rectangular ducts. 2. All medium and high pressure round metal ducts. 3.09 ACOUSTICAL DUCT LINING – INSTALLATION (RECTANGULAR DUCT ONLY) A. Acoustically line sheet metal rectangular supply, outside, and return air ducts and return air plenums with ductliner and install as called for in latest edition of manufacturer's installation manual and/or as called for or shown on pages 2-25 to 2-29 of the SMACNA HVAC Duct Construction Manual - 1985. B. Adhere liner with coated side toward air stream to all interior sides of duct with 100% coverage of fire-resistant insulation bonding adhesive. Adhesive shall completely cover sheet metal at each end of each section of ductwork. Provide Z bar liner retainer on leading edge of liner in the first fitting downstream of any fan. C. When duct width or height exceeds 12" further secure the liner to these surfaces with mechanical fasteners at 16" o.c. D. Velocities - 1500 to 4000 FPM: Install as above but additionally paint all joints of liner AIR DISTRIBUTION (Revised 01/31/11) 23 30 00-7 and butter the edges of liner where sections of ductwork will be joined with fire-resistant mastic. E. Note: All duct sizes shown are inside of linings. Increase sheet metal sizes as required. F. Acoustical duct lining shall be installed at the following locations: 1. All sheet metal rectangular supply, outside, and return air ductwork. 3.10 DUCT WRAP – INSTALLATION (ROUND DUCTS ONLY) A. Wrap all round supply, return, and outside air ducts with duct wrap and install as called for in latest edition of manufacturer's installation manual and/or as called for or shown on pages 2-25 to 2-29 of the SMACNA HVAC Duct Construction Manual - 1985. B. Adhere duct wrap with vapor barrier outward to all sides of duct with 100% coverage of fire-resistant insulation bonding adhesive. Adhesive shall completely cover sheet metal at each end of each section of ductwork. C. When duct width or height exceeds 24" further secure the duct wrap to these surfaces with mechanical fasteners at 16" o.c. D. Duct wrap shall be installed at the following locations: 1. All round return, supply, and outside air ducts. 3.11 EXHAUST DUCTS - UNINSULATED A. Exhaust ducts shall not be insulated or lined. 3.12 ADJUSTING AND CLEANING A. Adjust volume control devices as required by the testing and balancing procedures to achieve required air flow. Refer to Section 23 05 93 - "TESTING, ADJUSTING, AND BALANCING OF HVAC SYSTEMS" for requirements and procedures for adjusting and balancing air systems. END OF SECTION AIR DISTRIBUTION (Revised 01/31/11) 23 30 00-8 SECTION 23 74 00 ROOFTOP HEATING/COOLING UNITS PART 1 - GENERAL 1.01 RELATED DOCUMENTS A. The following shall apply to this Section: 1. Drawings. 2. General Conditions. 3. Refer to Section 01 11 00 – Summary of Work 1.02 WORK INCLUDES A. Rooftop heating/cooling unit and accessories. Equipment support curbs by General Contractor and metal building supplier. B. Room thermostat and installation of control wiring and conduit from thermostat to unit is by Section 25 00 00 – “CONTROLS AND INSTRUMENTATION”. C. General Contractor to provide and install rooftop unit roof curb. Mechanical Contractor to provide and install internal curb framing for duct support. 1.03 RELATED WORK A. Section 20 01 00 – “GENERAL PROVISIONS”. B. Section 20 06 00 – “MECHANICAL IDENTIFICATION”. C. Section 23 30 00 – “AIR DISTRIBUTION”. 1.04 SUBMITTALS A. None required on owner furnished equipment. 1.05 QUALITY ASSURANCE A. Manufacturer's Qualifications: Firms regularly engaged in manufacture of rooftop units, of types and capacities required, whose products have been in satisfactory use in similar service for not less than 5 years. B. Codes and Standards: 1. Insulation and adhesive shall meet NFPA 90A requirements for flame spread and smoke generation. 2. Testing and rating of rooftop shall be in accordance with ARI 240 and 270 and provide Certified Rating Seal. Sound testing and rating of units shall be in accordance with ARI 270 "Standard for Sound Rating of Outdoor Unitary Equipment". Units shall bear Certified Rating Seal. 3. Refrigerating system construction of rooftop units shall be in accordance with ASHRAE 15 "Safety Code for Mechanical Refrigeration". 4. Energy Efficiency Ratio (EER) of rooftop units shall be equal to or greater than prescribed by ASHRAE 90A "Energy Conservation in New Building Design". 5. Rooftop units shall be listed by UL and have UL label as a unit. 6. Rooftop units shall be designed, manufactured, and tested in accordance with UL requirements. 1.06 DELIVERY, STORAGE, AND HANDLING A. Handle rooftop units and components carefully to prevent damage. Replace damaged ROOFTOP HEATING/COOLING UNITS (Revised 06/11/12) 23 74 00-1 rooftop units or components with new. B. Store rooftop units and components in clean dry place, off the ground, and protect from weather, water, and physical damage. C. Rig rooftop units to comply with manufacturer's rigging and follow installation instructions for unloading rooftop units, and moving them to final location. 1.07 SCHEDULING AND SEQUENCING A. Coordinate installation of roof mounting curb with roof structure. B. Coordinate roof opening locations for mechanical and electrical connections. 1.08 WARRANTY-LABOR ONLY A. Warranty: Provide written labor only warranty, signed by contractor, agreeing to replace/repair, within warranty period, inadequate and defective materials and workmanship, including leakage, breakage, improper assembly, or failure to perform as required; provided manufacturer's instructions for handling, installing, protecting, and maintaining units have been adhered to during warranty period. 1. Warranty Period: 1 year from date of substantial completion. PART 2 - PRODUCTS 2.01 ACCEPTABLE MANUFACTURERS A. Carrier Air Conditioning; Div. of Carrier Corp. 2.02 HVAC CONDENSATE PIPING A. See Section 20 03 00 – Materials and Methods, Part 2, “HVAC Condensate Piping”, for the type of condensate piping materials. 2.03 ROOFTOP UNITS – GAS FIRED (SEE PLANS FOR TYPE REQUIRED) A. General: Factory assembled single piece, gas heating electric cooling rooftop unit. Contained within the unit enclosure shall be all factory wiring, piping, controls, refrigerant charge (R-22), and special features required prior to field start-up. B. Unit Cabinet: 1. Unit cabinet shall be constructed of galvanized steel, bonderized and coated with a prepainted baked enamel finish. 2. Indoor blower compartment interior cabinet surfaces shall be insulated with a minimum 1/2 in. thick, flexible glass fiber insulation, coated on the air side. Aluminum foil faced glass fiber insulation shall be used in the heating compartment. 3. Cabinet panels shall be easily removable for servicing. 4. Filters will be accessible through a hinged access panel. 5. Holes shall be provided in the base rails for rigging shackles to facilitate overhead rigging. C. Fans: 1. Indoor blower (Evaporator Fan): a. Fan shall be belt driven with an adjustable motor pulley. b. Fan wheel shall be made from steel, be double inlet type with forward curved blades with a corrosion resistant finish and dynamically balanced. c. Bearings shall be sealed, permanently lubricated, or extended lubricating lines provided to exterior of units. 2. Outdoor (condenser) fan shall be of the direct driven propeller type with aluminum blades, riveted to corrosion resistant steel spiders, dynamically balanced, and ROOFTOP HEATING/COOLING UNITS (Revised 06/11/12) 23 74 00-2 discharge air vertically upwards. D. Compressors: 1. Semi-hermetic or hermetic type with internal and external vibration isolation. 2. Equipped with factory-installed crankcase heater to prevent refrigerant dilution of oil. E. Coils: 1. Evaporator and condenser coils shall have aluminum plate fins mechanically bonded to seamless copper tubes with all joints brazed. 2. Tube sheet openings shall be belled to prevent tube wear. F. Refrigerant Components: 1. Expansion device. 2. Sight glasses 3. Filter driers. 4. Service valves. G. Filter Section: 1. Standard filter section shall consist of one size of factory-installed low-velocity, disposable 2 in. thick glass fiber filters of commercially available sizes. 2. Filter face velocity shall not exceed 400 FPM at nominal airflows. H. Furnace Section: 1. Induced draft combustion type with intermittent spark ignition pilot and redundant main gas valves. 2. Heat exchanger of minimum 20 gauge aluminized steel. I. Controls and Safeties: 1. Unit Controls: a. Unit shall be complete with factory installed self-contained solid state control system for cooling, economizer, and heating control based on input from "Lightstat" thermostat. b. Thermostat shall be Lightstat by Dynelco, or equivalent. 2. Safeties: Unit shall incorporate a solid-state compressor protector which provides reset capability at the space thermostat, should any of the following safety devices trip and shut off compressor. a. Compressor overtemperature, overcurrent. b. Airflow switch (Heating Section). c. Low-pressure switch. d. Temperature limits (Heating Section). e. Freezestat, evaporator coil. f. Flame rollout switches. g. High-pressure switch. h. Pilot flame proving switches. i. Ground fault. j. Induced draft fan centrifugal switch. J. Operating Characteristics: 1. Unit shall be capable of starting and running at 115 degrees F ambient outdoor temperature per maximum load criteria of ARI Standard 240. 2. Compressor with standard controls shall be capable of operation down to 45 degrees F ambient outdoor temperature in cooling duty. K. Electrical Requirements: All unit power wiring shall enter unit cabinet at a single location. L. Motors: 1. Compressor motors shall be of the refrigerant cooled type with line break thermal and current overload protection. 2. All fan motors shall have permanently lubricated bearings, and inherent automatic reset thermal overload protection. M. Special Features: 1. Roof Curb: a. Provided by equipment supplier and installed by Contractor, ROOFTOP HEATING/COOLING UNITS (Revised 06/11/12) 23 74 00-3 b. Capable of supporting entire unit weight. 2. Compressor Cycle Delay: Compressor shall be prevented from restarting for a minimum of 5 minutes after shutdown. 2.04 ROOFTOP UNITS – HEAT PUMPS (SEE PLANS FOR TYPE REQUIRED) A. General: Factory assembled single piece, electric heat pump heating and cooling rooftop unit. Contained within the unit enclosure shall be all factory wiring, piping, controls, refrigerant charge (R-22), and special features required prior to field start-up. B. Unit Cabinet: 1. Unit cabinet shall be constructed of galvanized steel, bonderized and coated with a prepainted baked enamel finish. 2. Indoor blower compartment interior cabinet surfaces shall be insulated with a minimum 1/2 in. thick, flexible glass fiber insulation, coated on the air side. Aluminum foil faced glass fiber insulation shall be used in the heating compartment. 3. Cabinet panels shall be easily removable for servicing. 4. Filters will be accessible through a hinged access panel. 5. Holes shall be provided in the base rails for rigging shackles to facilitate overhead rigging. C. Fans: 1. Indoor blower (Evaporator Fan): a. Fan shall be direct driven. b. Fan wheel shall be made from steel, be double inlet type with forward curved blades with a corrosion resistant finish and dynamically balanced. c. Bearings shall be sealed, permanently lubricated, or extended lubricating lines provided to exterior of units. 2. Outdoor (condenser) fan shall be of the direct driven propeller type with aluminum blades, riveted to corrosion resistant steel spiders, dynamically balanced, and discharge air vertically upwards. D. Compressors: 1. Semi-hermetic or hermetic type with internal and external vibration isolation. 2. Equipped with factory-installed crankcase heater to prevent refrigerant dilution of oil. E. Coils: 1. Evaporator and condenser coils shall have aluminum plate fins mechanically bonded to seamless copper tubes with all joints brazed. 2. Tube sheet openings shall be belled to prevent tube wear. F. Refrigerant Components: 1. Expansion device. 2. Sight glasses 3. Filter driers. 4. Service valves. G. Filter Section: 1. Standard filter section shall consist of one size of factory-installed low-velocity, disposable 2 in. thick glass fiber filters of commercially available sizes. 2. Filter face velocity shall not exceed 400 FPM at nominal airflows. H. Furnace Section: 1. Induced draft combustion type with intermittent spark ignition pilot and redundant main gas valves. 2. Heat exchanger of minimum 20 gauge aluminized steel. I. Controls and Safeties: 1. Unit Controls: a. Unit shall be complete with factory installed self-contained solid state control system for cooling, outdoor air, and heating control based on input from "Lightstat" thermostat. ROOFTOP HEATING/COOLING UNITS (Revised 06/11/12) 23 74 00-4 b. Thermostat shall be Lightstat by Dynelco, or equivalent. c. Defrost control: time initiated, temperature terminated, adaptive demand. 2. Safeties: Unit shall incorporate a solid-state compressor protector which provides reset capability at the space thermostat, should any of the following safety devices trip and shut off compressor. a. Compressor overtemperature, overcurrent. b. Airflow switch (Heating Section). c. Low-pressure switch. d. Temperature limits (Heating Section). e. Freezestat, evaporator coil. f. High-pressure switch. g. Ground fault. J. Operating Characteristics: 1. Unit shall be capable of starting and running at 115 degrees F ambient outdoor temperature per maximum load criteria of ARI Standard 240. 2. Compressor with standard controls shall be capable of operation down to 0 degrees F ambient outdoor temperature in cooling duty. K. Electrical Requirements: All unit power wiring shall enter unit cabinet at a single location. L. Motors: 1. Compressor motors shall be of the refrigerant cooled type with line break thermal and current overload protection. 2. All fan motors shall have permanently lubricated bearings, and inherent automatic reset thermal overload protection. M. Special Features: 1. Roof Curb: a. Provided by equipment supplier and installed by Contractor. b. Capable of supporting entire unit weight. 2. Compressor Cycle Delay: Compressor shall be prevented from restarting for a minimum of 5 minutes after shutdown. PART 3 – EXECUTION 3.01 EXAMINATION A. Examine areas and conditions under which rooftop units are to be installed. Do not proceed with work until unsatisfactory conditions have been corrected in manner acceptable to Installer. 3.02 INSTALLATION A. General: Install rooftop units in accordance with manufacturer's installation instructions. Install units plumb and level, firmly anchored in locations indicated, and maintain manufacturer's recommended clearances. B. Support: Install and secure roof curb to roof structure, in accordance with National Roofing Contractors Association (NRCA) installation recommendations and shop drawings. Install and secure rooftop units on curbs and coordinate roof penetrations and flashing. C. Thermostat installation and wiring by Section 25 00 00. 3.03 DEMONSTRATION A. See Section 20 02 00 - “Contract Close-out & Commissioning”. END OF SECTION ROOFTOP HEATING/COOLING UNITS (Revised 06/11/12) 23 74 00-5 SECTION 25 00 00 CONTROLS AND INSTRUMENTATION PART 1 - GENERAL 1.01 RELATED DOCUMENTS A. The following shall apply to this Section: 1. Drawings. 2. General Conditions. 1.02 WORK INCLUDES A. This Section includes all HVAC controls, and accessories for a complete electric electronic temperature control system within the building. B. Provide as herein specified, a complete electric electronic temperature control system. The control system shall be installed by competent control mechanics. The control system shall consist of all thermostats, automatic dampers, damper operators, switches, control panels and other accessory equipment along with a complete system of electrical wiring to fill the intent of the specification and provide for a complete and operable system. All wiring and conduit shall comply with requirements of Division 26. C. The contractor shall install controls as indicated on the drawings for the purpose of automatically controlling each HVAC system. This contractor shall acquaint himself with the desired sequence of control, and it shall be his responsibility to bring about this result. D. The control system must be installed by an experienced contractor who is regularly engaged in installations of similar size and description in his normal course of business, and has existing installations that have been fully operational for a period of not less than three years. Proof of such installations may be required prior to contract approval by the Owner. 1.03 RELATED WORK A. Section 20 03 00- "MATERIALS AND METHODS". 1.04 SYSTEM DESCRIPTION A. The system shall be as indicated in the control diagram. Exact duplication of the arrangements shown in the diagram is not required. System design is the responsibility of the controls subcontractor, and he shall arrange the system to accomplish the objectives of control which are indicated by the diagrams and the sequence of operation herein. 1.05 ELECTRIC WIRING A. Control wiring, regardless of voltage, is the responsibility of the contractor, including all conduit and outlet boxes for controls. All line voltage and low voltage control wiring shall be installed in accordance with the requirements of the Electrical Specifications. No control wiring shall be installed inside any duct. In general, corridor ceiling spaces on this project are considered to be air handling. B. Control wiring which operates at more than 24 volts nominal shall be copper wire installed in EMT conduit. Low voltage control wiring in accessible locations above ceilings may be jacketed plenum cable. No wire smaller than 18 gauge shall be used. CONTROLS AND INSTRUMENTATION (Revised 06/14/12) 25 00 00-1 Such wiring shall be neatly strapped in place with plastic wire ties. Attach to electrical conduits, top chords of bar joists, or top rows of joist bridging. Do not attach to or lay on ceilings or bottom chords of bar joists. Low voltage wiring where exposed to view shall be installed in EMT conduit. C. Outlet boxes or other recessed enclosures for control wiring shall be installed as indicated and the contractor shall assure that the proper boxes are available in time to avoid delaying the masonry work or other trades. D. Line voltage wiring which provides power to the main motor of any piece of HVAC equipment, including manual switch wiring, is considered power wiring and is specified under the electrical work. Circuits to motorized dampers are control wiring. PART 2 – PRODUCTS 2.01 ACCEPTABLE MANUFACTURERS A. Carrier. 2.02 CONTROL DEVICES A. Thermostats, room sensors, temperature controllers, damper motors, relays, switches, and all other control devices shall be provided as required to achieve the control sequences called for. All control system elements require the Engineer's approval of submittals. All equipment and devices used shall be of first quality, the best offered by the control system being used. B. Provide guards for thermostats as noted on the drawings. PART 3 - EXECUTION 3.01 CONTROL DEVICES A. Transformers, control module, and motor interface devices shall be mounted on a plywood base adjacent to air handling unit. B. Install room thermostats furnished with HVAC units and unit heaters, wire, test and calibrate controls. 3.02 TRAINING A. The contractor shall conduct a training session for the Owner's operating and maintenance personnel to familiarize them with the control system. This session shall be held after the system is fully operational. 3.03 EQUIPMENT LABELING A. 3.04 See Section 20 02 00 - “Contract Close-out & Commissioning”. FINAL ADJUSTMENT OF CONTROLS A. See Section 20 02 00 - “Contract Close-out & Commissioning”. END OF SECTION CONTROLS AND INSTRUMENTATION (Revised 06/14/12) 25 00 00-2 SECTION 26 00 10 BASIC ELECTRICAL REQUIREMENTS PART 1 - GENERAL 1.01 RELATED DOCUMENTS A. The following shall apply to this Section: 1. Drawings. 2. General Conditions. 1.02 SUMMARY A. This Section includes requirements for electrical installations: 1. Submittals. 2. Rough-ins. 3. Record documents. 4. Electrical installations. 5. Maintenance manuals. 6. Cutting and patching. 1.03 WORK INCLUDES A. The work to be performed under this Section shall include all labor, materials, equipment, transportation, and facilities necessary to provide a complete and satisfactory system ready to use. Wherever the words "the Contractor" or "this Contractor" appear in this Section, they refer to the Contractor for the work specified in that Section. This Contractor shall examine all Drawings and all Sections of the Specifications and shall be responsible for ascertaining to what extent other Drawings and Sections affect the work herein specified.’ B. Unless noted on the drawings otherwise, work shall also include: 1. The procurement of and payment for all fees, permits and licenses required for the performance of the work. 2. All fees and direct expenses involved in any inspection required for the project. 3. All hoists, scaffolds, staging, runways, and equipment required for the performance of the work. 4. All job measurements and shop layouts required for the proper installation of material and equipment included in the work. 5. All lights, guards, and signs as required by safety regulations applicable to the work. 6. The removal from the premises, as it accumulates, of all dirt and refuse resulting from the performance of the work. C. The work shall include revisions, modifications, and rework of existing work as required for installation of new work, and as required for connections of new work to existing systems, and as required for connections of existing work to new systems. 1.04 CODES, REGULATIONS, AND STANDARDS A. All work must be performed in accordance with the requirements of local, county, state and national codes and regulations including the requirements of the following: 1. National Electrical Code, Latest Edition BASIC ELECTRICAL REQUIREMENTS (Revised 07/20/12) 26 00 10-3 2. 3. 4. 5. 1.05 Occupational Safety and Health Act. of 1970. Life Safety Code, N.F.P.A. No. 101. NFPA 17/17A, 72, 72E, 54, and 96. For work not specifically listed above, use standards and codes of the National Fire Protection Association. ABBREVIATIONS A. All equipment, apparatus and systems shall be rated, tested, fabricated and/or installed in accordance with the applicable industry standard mentioned. The following list will serve to clarify abbreviations that appear in other sections of this specification: 1. AABC Associated Air Balance Council 2. ADC Air Diffusion Council 3. ANSI American National Standards Institute 4. ASE Association of Safety Engineers 5. ASTM American Society for Testing and Materials 6. EPA Environmental Protection Agency 7. IEEE Institute of Electrical and Electronics Engineers 8. NEMA National Electrical Manufacturers Association 9. NFPA National Fire Protection Association 10. NSC National Safety Council 11. UL Underwriters Laboratories 1.06 SUBMITTALS A. See also Section 01 33 00 "SUBMITTALS" for requirements for submittals, shop drawings and product data. 1.07 SUBSTITUTION OF EQUIPMENT A. All proposed substitutions for specified products on this project (except as listed above) require approval in advance of bidding. Approval will not be granted after award of contract. Substitutions must be submitted for review five (5) working days prior to the bid date to be considered. B. In the event of Engineer's approval of a substitution of equipment, the requesting entity will be notified by telephonic message or FAX by the Engineer (or authorized representative), and/or by the issuance of an amendment to the contract documents incorporating the equipment by name and model number. 1.08 CONTRACT DRAWINGS A. The layout shown on the Contract Drawings is necessarily diagrammatic but shall be followed as closely as actual construction and as other work will allow. 1.09 PRODUCT DELIVERY, STORAGE AND HANDLING A. B. C. D. Deliver equipment in time to maintain approved construction schedule. Deliver products to the project properly identified with names, model numbers, types, grades, compliance labels, and other information needed for identification. Store in safe, dry location. Protect from dust, moisture, weather and extreme temperatures. Follow manufacturer's recommendation for transportation, handling and storage. BASIC ELECTRICAL REQUIREMENTS (Revised 07/20/12) 26 00 10-4 1.10 GUARANTEES AND WARRANTIES A. Submit to the Owner, two copies of all warranties and guarantees specified in the General Conditions, Supplementary Conditions, the individual sections of the specifications, or as provided by the various subcontractors and material suppliers. All such documents shall show the name and location of the project and the name of the purchaser. B. This Contractor shall provide to the Owner a non-prorated guarantee of all materials and workmanship for a period of not less than one year from the date of the Owner's final certificate. C. Exclusions: lamps furnished by the Contractor shall be guaranteed for their rated life, not to exceed one year from the date of final acceptance. Lamps failing to meet the rated life shall be replaced by the Contractor. Replacement lamps shall be furnished to the Owner and installation of the replacement lamps shall be by the Owner. PART 2 - PRODUCTS - (NOT APPLICABLE) PART 3 - EXECUTION 3.01 ROUGH-IN A. Verify final locations for rough-ins with field measurements and with the requirements of the actual equipment to be connected. 3.02 ELECTRICAL INSTALLATIONS A. Sequence, coordinate, and integrate the various elements of electrical systems, materials, and equipment. 3.03 DEFECTIVE WORK AND MATERIAL A. All materials or work found to be defective or not in strict conformity with the drawings or different from requirements of the drawings and specifications or defaced or injured through negligence of Contractor or his employees, or through action of fire or weather will be rejected and shall be immediately removed from premises by Contractor and satisfactory materials and work substituted without delay. 3.04 COOPERATION AND COORDINATION A. Contractor shall confer with other contractors at the site before installing his work to avoid interferences so that maximum head room and clearances may be maintained B. Particular attention shall be paid to situations where recessed equipment, pipes and lights occur, or where the work of several trades occurs together above suspended ceilings, in pipe shafts or in areas where space is limited. C. All fixtures, equipment, devices, switches, outlets, pumps, etc., shall be positioned to avoid all interferences with and to assure proper coordination with work of all other trades, cases, partitions, wall, floor and ceiling patterns, architectural features, etc. All recessed devices, fixtures, etc., shall be coordinated with all wall, floor and ceiling patterns. 3.05 CUTTING AND PATCHING A. Perform cutting and patching in accordance with techniques acceptable to the owner. Restore all finishes to as-new condition. END OF SECTION BASIC ELECTRICAL REQUIREMENTS (Revised 07/20/12) 26 00 10-5 SECTION 26 00 20 CONTRACT CLOSEOUT & COMMISSIONING PART 1 - GENERAL - NOT APPLICABLE PART 2 - PRODUCTS - NOT APPLICABLE PART 3 - EXECUTION 3.01 OPERATING INSTRUCTIONS A. All switches, controls, and safety devices shall be clearly and permanently marked with embossed or printed plates as to purpose and as to operation and shall be tested in the presence of the Owner designated representative to ensure that he understands their function and purpose. B. Upon completion of the work, Contractors shall put the systems into service. Contractors shall be entirely responsible for the equipment during all testing operations including the lubricating and turning on and off of such apparatus. 3.02 PROJECT RECORD AND CLOSEOUT DOCUMENTS A. See Section 01 20 00 for red lining of all documents during construction to reflect "asbuilt" conditions. 3.03 WIRES & CABLES FIELD QUALITY CONTROL A. Inspect wiring for physical damage and proper connection. B. Torque test conductor terminations to manufacturer's recommended values. C. Perform continuity test on all power and branch circuit conductors. Verify proper phasing. 3.04 ELECTRICAL EQUIPMENT IDENTIFICATION PLATES A. Provide plates for all equipment consisting of machine engraved laminated plastic. Plate field shall be black with white core. 1. Size of plate shall be commensurate with lettering thereon. 2. Lettering for major items of equipment, such as a disconnect or panelboard, shall be 1/2" in height. Lettering for smaller items, such as light or timer switches shall be 1/4" in height. 3. Wording on plate shall contain the following information as appropriate and approved by the Engineer. a. Equipment served, such as RTU-1. b. Originating or controlled circuit number, such as AL 1, 3, & 5. c. Voltage. d. Maximum fuse size (if applicable). 3.05 ELECTRICAL EQUIPMENT INSTALLATION (26 24 00) A. Provide engraved plastic nameplates for each switch in main panel, for each panelboard, and for each safety switch. Indicate type of load and maximum fuse size. Provide schedule of nameplates with submittals. CONTRACT CLOSEOUT & COMMISSIONING (Revised 07/11/12) 26 00 20-1 3.06 SECONDARY GROUNDING FIELD QUALITY CONTROL A. Measure ground resistance from system neutral connection at service entrance to convenient ground reference point using suitable ground testing equipment. Resistance shall not exceed 10 ohms. When resistance exceeds 10 ohms drive and bond an additional ground rod, one rod length away. Ground resistance test shall be made a minimum of 48 hours after rainfall. 3.07 LIGHT FIXTURES (26 50 00) A. Remove all dirt, paint and foreign matter from fixture lenses and frames between substantial completion and final acceptance of the building. 3.08 CONTINUITY TESTS A. Test branch circuits and control circuits to determine continuity of wiring and connections. 3.09 VOLTAGE TESTS A. Make and record voltage tests and recorded at the following listed points. Conduct tests under normal load conditions. 1. Service entrance at main panelboard. 3.10 TESTING PHASE RELATIONSHIP A. Examine connections to equipment for proper phase relationships. Verify proper motor rotation. 3.11 TESTING CORRECTION OF DEFECTS A. When tests disclose any unsatisfactory workmanship or equipment furnished under this Contract, correct defects and retest. Repeat tests until satisfactory results are obtained. B. When any wiring or equipment is damaged by tests, repair or replace such wiring or equipment. Test repaired items to ensure satisfactory operation. END OF SECTION CONTRACT CLOSEOUT & COMMISSIONING (Revised 07/11/12) 26 00 20-2 SECTION 26 00 30 EXISTING SYSTEMS AND OWNER FURNISHED EQUIPMENT PART 1 - GENERAL 1.01 RELATED DOCUMENTS A. The following shall apply to this Section: 1. Drawings. 4. General Conditions. 2. General Provisions of the Contract. 5. Architectural Division. 3. Solicitation Documents. 1.02 WORK INCLUDES A. Contractor shall perform all work on all existing systems and equipment that require expansion, relocation, modification, and/or repairs as per the drawings and/or specifications PART 2 - PRODUCTS (NOT APPLICABLE) PART 3 - EXECUTION 3.01 RELOCATED OR SERVICED EQUIPMENT A. From the time that the equipment is disconnected, or taken out of service, until the time that the equipment is started up and commissioned, the equipment shall be the responsibility of the contractor. Any damage occurring during the disconnecting, storing, relocating, re-installing or start-up shall be repaired by the contractor so that the condition of the equipment will be at least as good as when disconnected in the judgment of the engineer. B. Contractor is responsible to ascertain and submit in writing to the engineer operating condition of existing equipment prior to being taken out of service. If contractor fails to provide a report on the condition and operation – of the existing equipment, then it will be assumed that the existing equipment was fully functional and operating correctly at its full intended capacity at the time of being taken out of service. C. Accessory items necessary for the proper operation of existing relocated equipment shall be relocated and re-installed per manufacturer’s recommendations. The contractor shall verify proper operation of such accessories before disconnecting the equipment. Notify engineer of any accessory items which need to be replaced before relocating the equipment. 3.02 EXPANDED SYSTEMS A. Any existing system which is expanded as a part of this project shall be expanded per the sizes indicated in the contract documents. B. Materials used for the expansion of any existing system shall meet the specifications and shall also meet the requirements of local codes. C. Commissioning of any expanded system means the commissioning of the entire system, both the existing and new components. EXISTING SYSTEMS AND OWNER FURNISHED EQUIPMENT (Revised 06/11/12) 26 00 30-1 3.03 OWNER FURNISHED EQUIPMENT A. Provide rough-ins and final connections to all Owner furnished equipment including switchgear, circuitry, services, Energy Management System, etc. necessary to connect up equipment after it has be installed in place. B. Install all electrical items furnished loose with all Owner furnished equipment. C. See list of owner furnished equipment on cover sheet of drawings. D. Electrical contractor is responsible for mounting all owner furnished equipment and all wiring noted on the Energy Management drawings. See all “ES” – sheets at end of set. All low-voltage wiring, for the Energy Management Systems, does NOT have to run inside conduits. However, all low-voltage wiring MUST be bundled together, stretched tight and wired-tied to the building structure at a minimum of 3’-0” on center. END OF SECTION EXISTING SYSTEMS AND OWNER FURNISHED EQUIPMENT (Revised 06/11/12) 26 00 30-2 SECTION 26 05 19 WIRES & CABLES PART 1 - GENERAL 1.01 RELATED DOCUMENTS A. The following shall apply to this Section: 1. Drawings. 2. General Conditions. 1.02 WORK INCLUDES A. Provide wiring and cables including, but not limited to, feeders, branch circuit power, and lighting. B. Provide electrical connections to all equipment unless noted otherwise. 1.03 SUBMITTALS A. No submittals required when using specified materials. Otherwise, Section 26 00 10 "SUBMITTALS" and “SUBSTITUTION OF EQUIPMENT”. 1.04 QUALITY ASSURANCE A. Regulatory Requirements: 1. Wire, cable and installation thereof shall be in accord with the NEC and standards specified. 2. All materials shall be new, without blemish or defect, and UL listed or labeled. 3. Test power and signal wire and cable according to Section 26 00 20 - "Contract Close-Out and Commissioning". 1.05 REFERENCES A. Specified references, or cited portions thereof, govern the work. B. National Electrical Manufacturers Association (NEMA): 1. WC 3 - Rubber-Insulated Wire and Cable for the Transmission and Distribution of Electrical Energy. 2. WC 5 - Thermoplastic-Insulated Wire and Cable for the Transmission and Distribution of Electrical Energy. 3. WC 7 - Cross-Linked-Thermosetting-Polyethylene-Insulated. Wire and Cable for the Transmission and Distribution of Electrical Energy. C. National Fire Protection Association (NFPA): NFPA 70 - National Electrical Code 1993 Edition. D. Underwriters Laboratories, Inc. (UL): Listed and labeled materials. E. Manufacturers' Catalogs: Specified manufacturers' catalogs are incorporated by reference to same force and effect as if repeated herein in full. 1.06 DELIVERY, STORAGE AND HANDLING A. Materials shall be suitably packaged by manufacturer to prevent damage during shipment. Damaged materials will not be acceptable for use. B. Store materials on site in a clean, dry storage area. C. Handle all materials carefully to preclude damage. Material with damaged insulation shall not be acceptable for use. WIRES & CABLES (Revised 07/20/12) 26 05 19-1 PART 2 - PRODUCTS 2.01 ACCEPTABLE MANUFACTURERS A. Building Wire 1. Anaconda Wire & Cable Co. 2. Phelps Dodge Cable & Wire Co. 3. Crescent. 4. Pirelli. 5. General Cable Corp. 6. Sigma Corra-Clad (MC Cable). 7. General Electric Co. 8. Triangle. 9. Okonite. B. Joints and Splices - Indent Type Pressure Connector for #8 AWG and Smaller 1. Buchanan. 2. Ideal. 3. Burndy. 4. Thomas & Betts. C. Joints and Splices - Insulated Spring Compression Connectors for #10 Awg and Smaller 1. Buchanan, Bcap. 2. T & B, Piggy. 3. Ideal, Wing nut. 4. 3M, Scotchlok. 5. ITT Holub, Free Spring. D. Joints and Splices - Mechanical Compression or Bolted Type Connector for #6 Awg or Larger 1. AMP, Inc. 2. Ideal Industries. 3. Anderson. 4. ITT Weaver. 5. Blackburn. 6. O.Z./Gedney Co. 7. Burndy Corp. 8. T & B. 9. General Electric Co. 10. 3M Co. 2.02 BUILDING WIRE A. Thermoplastic insulated building wire: NEMA WC 5, UL-83 ICEA S-61-402 or S-66524. B. Color code conductor insulation for #8 AWG or smaller. Standard colors: 120/240V 1 phase 1. Phase A Black 2. Phase B Red 3. Neutral White 4. Ground Green C. Provide 1" wide taped, colored bands at panelboards, cabinets, and boxes for sizes larger than #8 AWG. 2.03 JOINTS & SPLICES WIRES & CABLES (Revised 07/20/12) 26 05 19-2 A. Make terminations, taps and splices with an indent type pressure connector with insulating cover for #8 AWG and smaller. B. Instead of indent type connectors, insulated spring compression connectors may be used for #10 AWG and smaller. C. Use mechanical compression or bolted type connector for #6 AWG or larger. Cover connector with insulating tape or heat shrinkable insulation equivalent to 150% conductor insulation. PART 3 - EXECUTION 3.01 BASIC WIRING A. B. C. D. E. F. G. H. 3.02 All power wiring shall be installed in a raceway. Use no wire smaller than #12 AWG for power and lighting circuits. Use no smaller than #14 AWG for control wiring for fused control circuits. Multiwire branch circuits with a “shared neutral” are NOT allowed for single phase circuits. The only allowed multiwire branch circuit with a “shared neutral” is a multi-pole individual branch circuit to a single piece of equipment (for example “current carrying conductors that share a common yoke”). Each allowed multiwire branch circuit shall be provided with a means that will simultaneously disconnect all ungrounded conductors at the point where the branch circuit originates. Splice only in accessible junction or outlet boxes. Do not splice in panelboard cabinets and gutters. Neatly train and lace wiring inside boxes, equipment and panelboards. Make conductor lengths for parallel circuits equal. All equipment circuits shall be installed in separate conduits. WIRING IN RACEWAYS A. Pull all conductors into a raceway at the same time. Use UL listed wire pulling lubricant for pulling #4 AWG and larger wires. B. Install wire in raceway after interior of building has been physically protected from weather, all plumbing, heating and ventilating work likely to injure conductors completed, conduit system is complete and interior of raceway cleaned. 3.03 CONNECTIONS AND TERMINATIONS A. Identify each conductor in panelboards, junction or pull boxes, or troughs with a permanent pressure sensitive label with suitable numbers or letters for easy recognition. Identify control wiring at each end and in junction boxes with numeric wire number corresponding to control wiring diagram. See Section 26 05 53 - "ELECTRICAL IDENTIFICATION", for identification requirements. B. Thoroughly clean wire before installing lugs and connectors. C. Make splices, taps and terminations to carry full ampacity of conductors without perceptible temperature rise. D. Terminate spare conductors with electrical tape and roll up in box. 3.04 FIELD QUALITY CONTROL A. See Section 26 00 20 - “Contract Close-out & Commissioning”. 3.05 BUILDING WIRE INSTALLATION CABLE A. All wiring shall be in conduit, except that MC-Cable may be substituted only as follows; 1. MC-Cable (maximum cable length of 10’-0”) may be installed only for branch circuit WIRES & CABLES (Revised 07/20/12) 26 05 19-3 wiring to light fixtures in lay-in grid ceilings. 2. MC-Cable (maximum cable lenghts shown on Detail 2/E2) shall be installed inside the front checkout counters. B. Feeders and branch circuits: Copper, stranded conductor, 600 volt insulation THHN/THWN. (Exception: Wire sizes #10 AWG and smaller shall be solid.) C. Control Circuits: Copper, solid or stranded conductor, 600 volt insulation, THHN/THWN. END OF SECTION WIRES & CABLES (Revised 07/20/12) 26 05 19-4 SECTION 26 05 26 SECONDARY GROUNDING PART 1 - GENERAL 1.01 RELATED DOCUMENTS A. The following shall apply to this Section: 1. Drawings. 2. General Conditions. 1.02 WORK INCLUDES A. Provide power system grounding for service. B. Provide equipment grounding. 1.03 RELATED WORK A. Section 26 05 33 - "RACEWAYS". B. Section 26 00 20 – “CONTRACT CLOSE-OUT AND COMMISSIONING”. C. Section 26 05 19 - "WIRES AND CABLES". 1.04 SUBMITTALS A. Test data. Comply with Section 26 00 10 "SUBMITTALS". 1.05 QUALITY ASSURANCE A. Regulatory Requirements: 1. Comply with 1993 National Electric Code. 2. Comply with Public Authorities having jurisdiction. 1.06 SYSTEM DESCRIPTION A. Ground electrical service neutral at service entrance equipment to the electrode system. B. Ground raceways and electrical equipment. C. Bond together system neutrals, service entrance enclosures, exposed non-current carrying metal parts of electrical equipment, metal raceway systems, grounding conductor in raceways and cables, receptacle ground connectors, and plumbing systems. 1.07 REFERENCES A. Specified references, or cited portions thereof, govern the work. B. National Fire Protection Association (NFPA): NFPA 70 - 93 National Electrical Code (NEC) 1993 Edition. C. Underwriters Laboratories, Inc. (UL): All products UL listed and labeled. PART 2 - PRODUCTS 2.01 MATERIALS A. Ground rods: steel, copper-encased, 3/4 in. O.D., minimum length 10 ft B. Connections: bronze clamps. SECONDARY GROUNDING (Revised 07/20/12) 26 05 26-1 PART 3 - EXECUTION 3.01 INSTALLATION A. Provide a system ground and equipment grounding provisions as shown on plans, and as specified in this section. Comply with NEC Article 250. B. Main service grounding electrode shall consist of all of the following: 1. A concrete encased conductor at the footing as detailed on drawing. 2. Metal cold water pipes where the underground portion of the main water pipe is at least 10 feet long. Install a flexible copper bonding jumper around the water meter. 3. All connections to the grounding electrode shall be of the exothermic type. C. Equipment grounding provisions shall consist of the following: 1. Exposed, noncurrent-carrying metal parts of fixed equipment likely to become energized, including the following, shall be grounded (bonded): a. Electrical distribution and control equipment enclosures, frames, cabinets, and cutout boxes. b. Metal raceways and boxes. c. Wiring devices. d. Motor frames and enclosures. 2. Cord and plug connected equipment, except for double insulated appliances and other exceptions allowed by the National Electrical Code, shall be grounded. D. Equipment grounding conductors shall comply with the following requirements: 1. An equipment grounding conductor shall be installed in all branch circuit and feeder raceways. 2. Ground wires shall be run inside the same raceways as the circuit conductors and shall have green insulation of the same type as the circuit conductors. Ground wires shall be bonded to all boxes and equipment enclosures through which they pass and at each end of metal raceways by means of grounding bushings. 3.02 FIELD QUALITY CONTROL A. See Section 26 00 20- “Contract Close-out & Commissioning. END OF SECTION SECONDARY GROUNDING (Revised 07/20/12) 26 05 26-2 SECTION 26 05 33 RACEWAYS PART 1 - GENERAL 1.01 RELATED DOCUMENTS A. The following shall apply to this Section: 1. Drawings. 2. General Conditions. 1.02 WORK INCLUDES A. Provide raceways for all conductors, including, but not limited to, that required for service, feeders, branch circuit power, and lighting. B. Provide power raceways to connecting point for all equipment. Make final electrical connections unless noted otherwise. C. Provide identification of all raceways. 1.03 SUBMITTALS A. No submittals required when using specified materials. Otherwise, comply with Section 26 00 10 "SUBMITTALS". 1.04 QUALITY ASSURANCE A. Provide all new materials, without blemish or defect, in accord with standards specified and UL listed or labeled. 1.05 SYSTEM DESCRIPTION A. Raceways Include: 1. Rigid Metal conduit and fittings. 2. Rigid non metallic conduit and fittings. 3. Intermediate metal conduit and fittings. 4. Liquidtight flexible metallic tubing and fittings. 5. Flexible metallic conduit and fittings. 6. Electrical metallic tubing and fittings. 7. Liquidtight Flexible conduit and fittings. 1.06 REFERENCES A. Specified references, or cited portions thereof, current at date of bidding documents unless otherwise specified, govern the work. B. American National Standards Institute (ANSI): 1. C80.1 - Rigid Steel Conduit, Zinc coated. 2. C80.3 - Electrical Metallic Tubing, Zinc coated. 3. C80.4 - Fittings for Rigid Metal Conduit and Electrical Metallic Tubing. C. American National Standards Institute/National Electrical Manufacturers Association (ANSI/NEMA): FB 1 - Fittings and Supports for Conduit. D. National Electrical Manufacturers Association (NEMA): 1. NEMA TC-3 - PVC Fittings for use with Rigid PVC Conduit and Tubing. RACEWAYS (Revised 06/11/12) 26 05 33-1 1.07 DELIVERY, STORAGE AND HANDLING A. Materials shall be suitably packaged by manufacturers to prevent damage during shipment. Damaged materials will not be acceptable for use. PART 2 - PRODUCTS 2.01 ACCEPTABLE MANUFACTURERS A. Raceways 1. Allied Tube and Conduit. 2. Republic Steel. 3. Anaconda. 4. Robintech. 5. B-line. 6. Steelduct Conduit Products 7. Carlon. 8. Square D. 9. Certain-Teed Corp. 10. Triangle. 11. Electri-Flex 12. Walker. 13. ETP. 14. Wheatland Tube. 15. International Metal Hose. 16. Wiremold. 17. Jones & Laughlin Steel. 18. Youngstown Steel. B. Fittings 1. Carlon. 2. O.Z./Gedney. 3. Crouse-Hinds. 4. RACO. 5. Killark. 6. Steel City. C. Conduit Sealing 1. Chase Technology-CTC, PR-855. 2. T & B - Flamesafe. 3. Dow Corning - Silicone RTV foam 3-6548. 4. 3M - Fire Barrier. 5. Nelson - Flameseal. D. Conduit Supporting Devices 1. Minerallac. 2. Crouse-Hinds. 3. Midwest Electric. 4. T & B. 2.02 RACEWAYS A. Conduit: 1. Steel Rigid Metal: Comply with ANSI C80.1, FS-WW-C-581 and UL-6. 2. Intermediate Metal: Comply with ANSI C80.1, FS-WW-C-581 and UL-6. 3. Steel Flexible Metal: Comply with FS-WW-C-566 and UL-1. 4. Steel Liquidtight Flexible: Comply with FS-WW-C-566 and UL-1. 5. Rigid Nonmetallic: Comply with NEMA TC-2, PVC, Schedule 40 RACEWAYS (Revised 06/11/12) 26 05 33-2 B. Tubing: 1. Steel Electrical Metallic (EMT): Comply with ANSI C80.3, FS-WW-C-563 and UL 797. C. Surface metallic raceway: 1. Comply with UL E4376 and E41751. 2.03 FITTINGS A. Rigid and IMC Conduit fittings and conduit bodies: 1. Comply with ANSI C80.4, ANSI/NEMA FB 1, threaded type. 2. Locknuts; steel or malleable iron. 3. Bushings; insulating or insulated throat type. 4. Couplings; threaded or gland compression malleable iron type. Set screw or indenter type not acceptable. 5. UL listed hazardous location fittings (with sealing compound). B. Electrical Metallic Tubing fittings and conduit bodies: 1. Couplings and Connectors; steel compression type. Set screw type not acceptable. Comply with ANSI/ NEMA FB 1. C. Flexible conduit fittings and conduit bodies: 1. Connectors; malleable iron, threadless, squeeze clamp type for nonjacketed conduit. 2. Connectors; steel or malleable iron compression type with insulated throat and "O" ring assembly for liquidtight conduit. 3. Comply with ANSI/NEMA FB 1. D. Nonmetallic conduit fittings and conduit bodies: 1. Comply with NEMA TC 3. 2.04 CONDUIT SEALING A. Where conduits and/or electrical devices penetrate fire-rated walls and/or floors, the cavity shall be sealed with intumescent material capable of expanding 5 to 10 times when exposed to temperatures of 250 F. It shall be ICBO, BOCA, and SBCCI (NRB 243) approved ratings per ASTM E-814 (U.L. 1479). Acceptable materials: DOW-CORNING 3-6548 silicone RTV foam or 3-M fire barrier caulk, or 3-M fire barrier 2001 silicone RTV foams. B. Water Seal: 1. Seal penetrations of perimeter walls or floors below grade to prevent entry of water. Use materials compatible with wall or floor construction and reviewed by Engineer's Representative. Use premanufactured fittings. 2. Seal penetrations of roof with flashings compatible with roof design and reviewed by Roofing System Manufacturer and Engineer's Representative. C. Hazardous Location Seal: 1. Install conduit sealing fitting on conduits entering the hazardous location. Fill fittings with sealing compound. 2. Install conduit sealing fittings on conduits entering devices within the hazardous location. 2.05 RACEWAY SUPPORTING DEVICES A. Suspended conduits less than 1 inch. 1. For exposed construction, provide strap type hangers supported from beam clamps or threaded rods. 2. For conduits suspended above ceilings, anchor to building structural steel. When span exceeds NEC limits, provide channel steel between framing members. Tie wiring of conduit to air ducts, or other piping not permitted. Plumber's perforated strap not permitted. B. Suspended Conduit 1 inch or larger. 1. Provide threaded rod with "U" type hangers for single conduit. 2. Provide trapeze hanger assemblies with Unistrut P-1000, Husky HP-200 or Kindorf B-901 RACEWAYS (Revised 06/11/12) 26 05 33-3 and threaded rod for two or more conduits. Anchor conduits to hanger assembly with split pipe clamps. 3. Anchor threaded rod to inserts in concrete or beam clamp on steel structure. C. Surface Mounted Conduit: 1. Provide one-hole galvanized steel straps for conduits one inch or less manufactured by Appleton, Steel City or RACO. Provide clampbacks on exterior walls below grade or in wet areas. 2. For conduit larger than one inch and all exterior surfaces, use malleable iron pipe straps. 3. For multiple conduits, provide channel anchored to wall with conduit attached to channel with split pipe clamps. D. Anchoring: 3. Hollow Masonry: Toggle bolts or spider type expansion anchors. 4. Solid Masonry: Lead expansion anchors or preset anchors. 5. Concrete: Self-drilling anchor or powder driven studs. 6. Metal: Machine screws, bolts or welded studs. 7. Wood: Wood screws. PART 3 - EXECUTION 3.01 INTERFERENCES A. Coordinate work with other trades so that interference between piping, equipment, structural and electrical work will be avoided. B. When interference develops, Engineer's Representative will decide which equipment will be relocated; regardless of which apparatus was installed first. 3.02 CONDUIT SIZING, ARRANGEMENT, AND SUPPORT A. In general, conduit shall be concealed within walls, ceilings, and floors. Conduit in spaces such as equipment rooms may be exposed. B. Size conduit for conductor type installed; 1/2 in. minimum size unless noted otherwise. C. Arrange conduit to maintain headroom and present a neat appearance. D. Route exposed conduit and conduit above accessible ceilings parallel and perpendicular to walls and adjacent piping. E. Maintain minimum 6 in. clearance between conduit and uninsulated piping. Maintain 12 in. clearance between conduit and heat sources such as flues, and heating appliances. F. Arrange conduit supports to prevent distortion of alignment by wire pulling operations. Fasten conduit using galvanized straps, lay-in adjustable hangers, clevis hangers, or bolted split stamped galvanized hangers. G. Group conduit in parallel runs where practical and use conduit rack constructed of steel channel with conduit straps or clamps. Provide space for 25 percent additional conduit. H. Do not fasten conduit with wire or perforated pipe straps. Remove all wire used for temporary conduit support during construction, before conductors are pulled. I. DO NOT SUPPORT ANY CONDUITS, BOXES OR ANY OTHER ELECTRICAL WORK DIRECTLY FROM UNDERSIDE OF ROOF DECK WITHOUT WRITTEN CONSENT OF ENGINEER'S REPRESENTATIVE. 3.03 CONDUIT INSTALLATION A. B. C. D. All conduit in finished spaces shall be concealed unless otherwise noted. Cut conduit square using a saw or pipe cutter; de-burr cut ends. Bring conduit to the shoulder of fittings and couplings and fasten securely. Use conduit hubs or sealing locknuts for fastening conduit to cast boxes, and for fastening conduit to sheet metal boxes in damp or wet locations. E. Install no more than the equivalent of four 90-degree bends between boxes. (Two 90-degree bends for telephone conduits, data conduits, and sound system conduit). RACEWAYS (Revised 06/11/12) 26 05 33-4 F. Use conduit bodies to make sharp changes in direction, as around beams. G. Use hydraulic one-shot conduit bender or factory elbows for bends in conduit larger than 2 in. size. H. Avoid moisture traps where possible; where unavoidable, provide junction box with drain fitting at conduit low point. I. Use suitable conduit caps to protect installed conduit against entrance of dirt and moisture. J. Provide No. 12 AWG insulated conductor or nylon pull string in empty conduit, except sleeves and nipples. K. Provide UL listed expansion-deflection joints where conduit crosses building expansion or seismic joints. L. Where conduit penetrates fire-rated walls and floors, provide mechanical fire-stop fittings with UL listed fire rating equal to wall or floor rating, or, at contractor's option, seal opening around conduit in accord with paragraph 2.04. M. Route conduit through roof openings for piping and ductwork where possible. Provide flashing making waterproof joints where conduits pass through roof or roofing membrane. N. Maximum Size Conduit in floor slabs: 3/4 in. Do not route conduits to cross each other in slabs. Run larger conduits below floor slabs or above ceilings. O. Thermally seal conduit where conduits leave heated area and enter unheated area. See 2.04. P. Wipe plastic conduit clean and dry before joining. Apply full even coat of cement to entire area that will be inserted into fitting. Let joint cure for 20 minutes minimum. 3.04 CONDUIT INSTALLATION SCHEDULE A. Underground Installations: Rigid steel conduit. Plastic-coated rigid steel conduit. Schedule 40 PVC conduit. B. Installations In or Under Concrete Slab: Schedule 40 PVC conduit. C. In Slab Above Grade: Schedule 40 PVC conduit. D. Exposed Outdoor Locations: Rigid steel conduit. Intermediate metal conduit. E. Interior Locations Above Floor Slabs: Rigid steel conduit. Intermediate metal conduit. Electrical metallic tubing. F. Where nonmetallic conduit is used in or below slab or underground, continue the conduit runs above slab or grade using: IMC or rigid steel conduit. G. Connections to ballasted lighting fixtures, appliances, and equipment with motors or compressors: Flexible Metallic Conduit. Liquidtight flexible conduit in exterior locations in wet locations, and in grease laden areas such as food service areas. Provide green insulated equipment grounding conductor. H. Hazardous Locations: Intermediate metal conduit. Rigid steel conduit. I. Interior exposed locations in finished spaces: surface metallic raceway system. J. Provide a green insulated equipment grounding conductor in all feeder and branch circuit raceways. Size conductor according to NEC Section 250-95. END OF SECTION RACEWAYS (Revised 06/11/12) 26 05 33-5 SECTION 26 05 34 BOXES PART 1 - GENERAL 1.01 RELATED DOCUMENTS A. The following shall apply to this Section: 1. Drawings. 2. General Conditions. 1.02 WORK INCLUDES A. Provide all boxes for the work. B. Provide coordination of boxes requiring access with General work. C. General Construction Trades provide access panels for boxes hidden by building construction. 1.03 SUBMITTALS A. No submittals required when using specified materials. Otherwise, comply with General Conditions Section 26 00 10 "SUBMITTALS". 1.04 QUALITY ASSURANCE A. Regulatory Requirements 1. Comply with NFPA. 2. Provide materials listed/labeled by UL. 3. National Electric Code. 1.05 SYSTEM DESCRIPTION A. Boxes include: 1. Wall and ceiling outlet boxes. 2. Pull and junction boxes. 1.06 REFERENCES A. Specified references, or cited portions thereof, current at date of bidding documents unless otherwise specified, govern the work. B. American National Standards Institute/National Electrical Manufacturers Association (ANSI/NEMA OS-1-Sheet Steel Outlet Boxes, Device Boxes, Covers and Box Supports). C. National Electrical Manufacturers Association (NEMA): NEMA 250 - Enclosures for Electrical Equipment. D. National Fire Protection Association (NFPA): NFPA 70 - National Electrical Code latest Edition. E. Manufacturers' Catalogs: Specified manufacturers' catalogs are incorporated by reference to same force and effect as if repeated herein in full. 1.07 DELIVERY, STORAGE AND HANDLING A. Materials shall be suitably packaged by manufacturer to prevent damage during shipment. Damaged materials not acceptable for use. B. Store materials on site in a clean, dry storage area. BOXES (Revised 07/20/12) 26 05 34-1 C. Handle all materials carefully to preclude damage. PART 2 - PRODUCTS 2.01 ACCEPTABLE MANUFACTURERS A. Boxes (other than Floor Boxes) 1. Appleton Electric Co. 2. Pyle-National 3. Crouse-Hinds Co. 4. RACO 5. General Electric Co. 6. Square D. 7. Hoffman Co. 8. Steel City 9. Hubbell. 10. Thomas & Betts Co. 11. Killark Electric Mfg. Co. 12. Walker. 13. O.Z./Gedney Co. 14. Quazite. 2.02 PULL BOXES AND JUNCTION BOXES A Comply with 1996 NEC - 370, UL 50 and ANSI/NEMOS 1; galvanized steel. B. Flush mounted pull boxes: Overlapping cover with flush head retaining screws, primecoated. C. Surface mounted boxes: Screw-on or hinged cover. Provide silicon bronze standard retaining screws. D. Finished Areas: Boxes of 14 gauge steel minimum, galvanized or prime coated. E. Boxes greater than 144 square inch: Make of 1-1/2 in. X 1-1/2 in. X 1/4 in. galvanized angle covered with 10 gauge galvanized sheet steel riveted or bolted with hinged cover of 11 gage galvanized steel. F. Boxes larger than 12 inches in any dimension: hinged enclosure. G. Exterior Below Grade: Non-metallic, sand-gravel polymer base fiberglass reinforced. 2.03 OUTLET BOXES A. Hot dipped galvanized, 1.25 oz. per sq. ft., sherardized or cadmium plated. Conform to UL 514. B. Interior boxes: Sheet steel with conduit knockouts, attached lugs for locating. ANSI/NEMA OS 1. C. Exterior boxes or exposed interior in wet/damp locations: Cast aluminum, deep type, corrosion proof fasteners, watertight, gasketed, threaded hubs. D. For suspended or surface mounted fixtures: 1. 4-inch octagonal or square according to devices used. Minimum 1-1/2 in. deep. Furnished with fixture studs. Installed with 3/4 in. minimum depth plaster rings on suspended ceilings. 4 in. octagonal or square for all exposed conduit work with fixture extension pan or deep fixture canopy to enclose the box. 2. Fixtures listed for thru-way wiring may be used as such without an outlet box. E. For recessed fixtures: 1. 4 in. octagonal or square. Minimum 1-1/2 in deep. Complete with blank cover. 2. Fixtures listed for thru-way wiring may be used as such without an outlet box. F. Switch and Receptacle Boxes: 1. Wall: 4 in. square for up to two devices. Single gang with 18 cubic inch minimum capacity for one device. Solid gang boxes for two devices. Complete BOXES (Revised 07/20/12) 26 05 34-2 with 1 in. minimum depth tile ring where used in exposed tile, paneled walls. Complete with 1 in. minimum depth plaster ring where used In plastered walls. Install with 1/2 in. raised galvanized device covers conduit work. Provide concrete-tight masonry boxes in poured concrete or CMU walls. 2.04 CONDUIT BODIES A. Galvanized cast metal of type, shape and size to fit location. B. Constructed with threaded conduit ends, removable cover, corrosion resistant screws. PART 3 - EXECUTION 3.01 COORDINATION A. Provide boxes as shown and for splices, taps, wire pulling, equipment connections and code compliance. B. Locations shown are approximate unless dimensioned. Verify location of boxes and outlets prior to rough-in. C. Locate boxes to allow access. When inaccessible, provide access doors. D. Locate boxes to maintain headroom and present a neat appearance. 3.02 INSTALLATION A. Provide knockout closures to cap unused knockout holes where blanks have been removed. B. Support all boxes independently of conduit except for cast boxes connected to two rigid conduits both supported within 12 inches of box. C. Outlet Boxes: 1. Flush mount outlet boxes in areas other than mechanical rooms, electrical rooms, and above removable ceilings. 2. Do not install boxes back-to-back in same wall. Provide at least 6 in. separation where possible. 3. Use multiple gang boxes where more than one device is mounted together. Do not use sectional boxes. Provide barriers to separate different voltage systems. 4. For boxes mounted in exterior walls, make sure insulation is behind outlet boxes. Do not damage insulation. 5. For outlets mounted above counters, benches, or backsplashes, coordinate location and mounting heights with units. Where boxes are mounted on sidewalls, at counters and lavatories, hold boxes to front of counter or lavatory for handicapped accessibility. 6. Adjust outlet mounting height to agree with specified location for equipment served. 7. Position outlets to locate luminaires as shown on reflected ceiling drawings. 8. Position outlets and junction boxes in inaccessible ceilings areas within 6 in. of luminaire; accessible through luminaire ceiling opening. 9. Provide recessed boxes in finished areas; secure to interior wall and partition studs, allow for surface finish thickness. Use stamped steel stud hangers in hollow stud wall, and adjustable steel channel fasteners for flush ceiling boxes. 10. Align wall-mounted outlet boxes for switches, thermostats, and similar devices. 11. Provide cast boxes for exterior locations & wet locations. BOXES (Revised 07/20/12) 26 05 34-3 D. Pull and Junction Boxes: 1. Locate above accessible ceilings or in unfinished areas. 2. Support independent of conduit. E. Provide covers for all boxes. END OF SECTION BOXES (Revised 07/20/12) 26 05 34-4 SECTION 26 05 53 ELECTRICAL IDENTIFICATION PART 1 - GENERAL 1.01 RELATED DOCUMENTS A. The following shall apply to this Section: 1. Drawings. 2. General Conditions. 3. General Provisions of the Contract. 4. Solicitation Documents. 5. Section 01. 1.02 WORK INCLUDES A. Provide identification of manual and automatic operable equipment: 1. Safety Switches. 2. Panelboards & Switchboards. 3. Starters. 4. Control panels, relay panels, and special junction boxes. 5. Contactors, relays and time switches. 6. Manual starters and interval timers. B. Provide identification of all passive equipment: 1. Terminal Cabinets. C. Provide identification of conduit system including boxes. D. Provide identification of wiring system. 1.03 QUALITY ASSURANCE A. Comply with: 1. ANSI A 13.1, Identification of Piping Systems. 2. Local Rules & Regulations. 3. National Electric Code. (NEC) 1.04 REFERENCES A. Specified references, or cited portions thereof, current at date of bidding documents unless otherwise specified, govern the work. B. American National Standards Institute (ANSI): ANSI A13.1 - Identification of Piping Systems. C. National Fire Protection Association (NFPA): NFPA 70 - National Electrical Code (NEC) 1993 Edition. D. Underwriters Laboratories, Inc. (UL): All products UL listed and labeled. E. Manufacturers' Catalogs: Specification manufacturers' catalogs are incorporated by reference to same force and effect as if repeated herein in full. 1.05 SUBMITTALS A. See Section 26 00 10 “SUBMITTALS”. PART 2 - PRODUCTS 2.01 EQUIPMENT IDENTIFICATION PLATES ELECTRICAL IDENTIFICATION (Revised 07/16/12) 26 05 53 - 1 A. See Section 26 00 20 - “Contract Close-out & Commissioning”. 2.02 CONDUIT SYSTEM IDENTIFICATION A. See Section 26 00 20 - “Contract Close-out & Commissioning”. 2.03 UNDERGROUND-TYPE PLASTIC LINE MARKERS A. General: Manufacturer's standard permanent, bright-colored, continuous-printed detectable tape, intended for direct-burial service; not less than 6" wide x 4 mils thick. Provide tape with printing which most accurately indicates type of service of buried pipe. 1. Provide multi-ply tape consisting of solid aluminum foil core between 2-layers of plastic tape. 2.04 WIRING SYSTEM IDENTIFICATION A. Wire Insulation Color: See Section 26 05 19 - "WIRES AND CABLES". B. Code all wire and cable larger than color coded sizes available from manufacturer by application of electrical plastic tape in colors specified. Apply tape in uniform manner circling wire or cable. Apply tape in all boxes and cabinets. Half-lap tape for length of cable as required by Local Authorities or NEC. Tape shall be 3M, Plymouth or Permacel. C. Maintain consistent coding throughout installation to ensure proper phase identification. D. See Section 26 00 20 - “Contract Close-out & Commissioning”. 2.05 MISCELLANEOUS IDENTIFICATION A. Complete all panel directories completely typewritten. Each circuit shall be identified by location and type of load. Example: Lighting - Office. PART 3 - EXECUTION 3.01 INSTALLATION A. Affix Equipment Identification Plates to equipment with stainless steel self tapping screws. Do not use adhesive. 3.02 UNDERGROUND PIPING IDENTIFICATION A. General: During back-filling/top-soiling of underground gas piping, install continuous underground-type detectable type line marker, located directly over buried line at 6" to 8" below finished grade. END OF SECTION ELECTRICAL IDENTIFICATION (Revised 07/16/12) 26 05 53 - 2 SECTION 26 24 00 ELECTRICAL EQUIPMENT PART 1 - GENERAL 1.01 RELATED DOCUMENTS A. The following shall apply to this Section: 1. Drawings. 2. General Conditions. 1.02 WORK INCLUDES A. Provide: 1. Panelboards. 2. Contactors. 3. Safety Switches. 4. Fuses. 1.03 SUBMITTALS A. No submittals required when using specified equipment or owner provided equipment, otherwise submit information as outlined in Section 01 33 00. 1.04 QUALITY ASSURANCE A. Regulatory requirements: 1. Panelboards: a. UL Standard 67. b. Fed. Spec. W-P-115A Type 1, Class 1. c. NEMA Standards PBI-1977. 2. Safety Switches: a. UL Std. 98. b. NEMA Std. KS1-1975. 3. Contactors: a. UL Std. 508. b. NEMA Std. 1CSZ-Z11B. 1.05 PRODUCT DELIVERY, STORAGE, AND HANDLING A. Deliver equipment in time to maintain approved construction schedule. B. Store in safe, dry location. Protect from dust, moisture, weather and extreme temperatures. C. Follow manufacturer's recommendation for transportation, handling and storage. PART 2 - PRODUCTS 2.01 ACCEPTABLE MANUFACTURERS A. Electrical Equipment 1. Cutler-Hammer. 2. Siemens-ITE. 3. GE. 4. Square D. ELECTRICAL EQUIPMENT (Revised 06/13/12) 26 24 00-1 B. Fuses 1. Bussman. 2.02 PANELBOARDS - LIGHTING AND APPLIANCE A. Circuit breakers panelboards shall meet Federal Spec W-P-115A for Type 1 panels. Panelboard bussing may be tinned-aluminum. Circuit breakers shall be quick-make, quick-break, thermal-magnetic, trip indicating, and have common trip on all multi-pole circuit breakers. Trip indication shall be shown by the breaker handle taking a neutral position between ON and OFF when the breaker is tripped. The ampacity of the circuit breaker shall be stamped in a location visible without removing the front of the panelboard. The minimum circuit breaker interrupting capacity shall be as indicated on plans. Circuit breakers shall be plug on type. All circuit breakers on lighting panels shall be UL labeled "SWD" and "HACR". All circuit breakers serving HID loads shall be so rated. Panelboards shall be equal to the style/type shown on schedules. B. All terminals shall be UL listed as suitable for the type of conductor specified. C. Main lugs shall be bolt type. D. Panelboard bus assemblies shall be enclosed in galvanized or rust-resisting steel cabinets. Fronts shall include doors and cylinder tumbler type locks with catches and spring loaded door pulls. All doors shall be keyed alike. Door hinges shall be concealed when panel doors are closed. Fronts shall not be removable with doors locked. A circuit directory frame and card with clear plastic cover shall be locked on the inside of the front. Door and front shall be of code gauge steel with rust inhibiting primer and gray baked enamel finish. E. Panelboards shall have solid neutral and equipment grounding bus. Panels designated for electronic equipment (Cpx) shall have 200% neutral bus. 2.03 SAFETY SWITCHES A. All safety switches shall be the fusible type, horsepower rated, NEMA type, general duty (240V and below) unless otherwise noted on drawings. Note: Heavy duty safety switches shall be provided on all voltages greater than 240V. B. Enclosures shall be code gauge steel with rust inhibiting primer and gray baked enamel finish. Install safety switches with NEMA 1 enclosures in dry locations and NEMA 3R enclosures in wet locations. C. Switches shall have quick-make, quick-break operating handle and mechanism which shall be an integral part of the enclosure. Switches shall be lockable in both positions and shall have an interlock to prevent opening switch door with handle in the OFF position. This feature shall have a defeater mechanism. D. Switch blades shall be visible in OFF position with door open. Switches shall be dead front type with arc suppressors. Lugs shall be UL listed for copper or aluminum. All current carrying parts shall be plated. E. Switches shall have a solid neutral unless otherwise noted. F. Switches shall have factory installed kits to prevent the use of other than UL class R fuses. 2.04 LIGHTING CONTACTORS A. Contactors shall be electrically held and shall switch the load at the voltage required and shall have the quantity of poles required. B. The contactor shall be continuously rated per pole for all types of ballast and tungsten lighting and resistance loads, and shall not be de-rated for use on high-inrush loads. C. The contactor shall have double-break, silver-cadmium-oxide power contacts. Auxiliary arcing contacts are not acceptable. all power contacts shall be convertible from N.O. to N.C. or vice-versa. All contacts shall HVAC clearly visible N.O. and N.C. contact-status indicators. ELECTRICAL EQUIPMENT (Revised 06/13/12) 26 24 00-2 D. The contactor shall be industrial-duty rated for applications to 600 volts maximum. E. The contactor shall have NEMA type enclosure as required by installation. 2.05 FUSES A. Circuits 601 to 6000 amperes shall be protected by current limiting time-delay fuses. Fuses shall hold 500% of rated current for a minimum of 4 seconds, clear 20 times rated current in .01 seconds or less and be listed by Underwriters Laboratories, Inc., with an interrupting rating of 200,000 amperes RMS symmetrical. The fuses shall be UL Class L. B. Circuits 0 to 600 amperes shall be protected by current limiting dual-element fuses. All dual-element fuses shall have separate overload and short-circuit elements. Fuse shall incorporate a spring activated thermal overload element having a 284 alloy and shall be independent of the short-circuit clearing chamber. The fuse shall hold 500% of rated current for a minimum of 10 seconds (30A, 250V Class RK1 case size shall be a minimum of 8 seconds at 500% of rated current) and be listed by Underwriters Laboratories, Inc., with an interrupting rating of 200,000 amperes RMS symmetrical. C. Motor circuits - All individual motor circuits with full load ampere ratings (FLA) of 480 amperes or less shall be protected by dual-element fuses. The fuses shall be UL Class RK1, or J, dual-element time-delay. D. The ampere rating of fuses shall be as required by the load served. Field verify by inspecting the nameplate of the equipment being protected. PART 3 - EXECUTION 3.01 INSTALLATION A. Comply with equipment manufacturer's written installation instructions for all equipment. B. Install equipment with minimum of 3'-6" working clearance measured from front of enclosure. C. Set equipment true and plumb using a carpenter's level. D. Support panels adequately in the same manner as described for outlet boxes for different types of construction. E. Wiring within equipment cabinets shall be done in a neat and workmanlike manner with branch circuit conductors run along the outside edges of the wiring gutters and then horizontally into the terminals. F. For flush mounted panelboards, stub a minimum of three 3/4" diameter raceways into the ceiling cavity space. G. Install safety switches which serve as equipment disconnecting means so that equipment maintenance can be performed within sight of the disconnect, if possible. H. When safety switches are mounted directly to equipment in wet locations, the installation shall be watertight. Install sealing locknuts with rubber O-rings for equipment with knockouts. I. Tighten connectors and terminals, including screws and bolts, in accordance with equipment manufacturer's published torque tightening values for equipment connectors. Where manufacturer's torquing requirements are not indicated, tighten connectors and terminals to comply with tightening torques specified in UL Std. 486A. J. Adjust operating mechanisms for free mechanical movement. K. Touch-up scratched or marred surfaces to match original finishes. L. Prior to energization of circuitry, check all accessible connections to manufacturer's tightening torque specifications. M. Prior to energization of equipment, check with ground resistance tester phase-to-phase and phase-to-ground insulation resistance levels to ensure requirements are fulfilled. ELECTRICAL EQUIPMENT (Revised 06/13/12) 26 24 00-3 N. Prior to energization, check equipment for electrical continuity to circuits, and for shortcircuits. O. Subsequent to wire and cable hook-ups, energize equipment and demonstrate functioning in accordance with requirements. Where necessary, correct malfunctioning units, and then retest to demonstrate compliance. P. See Section 26 00 20- “Contract Close-out & Commissioning”. Q. Fuses shall not be installed until equipment is ready to be energized. END OF SECTION ELECTRICAL EQUIPMENT (Revised 06/13/12) 26 24 00-4 SECTION 26 27 26 WIRING DEVICES PART 1 - GENERAL 1.01 RELATED DOCUMENTS A. The following shall apply to this Section: 1. Drawings. 2. General Conditions. 1.02 WORK INCLUDES A. Provide: 1. Switches. 2. Device plates. 3. Receptacles. 1.03 RELATED WORK A. Section 26 05 19– “WIRES AND CABLES”. B. Section 26 05 34 – “BOXES”. 1.04 SUBMITTALS A. Provide product data in accordance with Section 26 00 10 "Basic Electrical Requirements". 1.05 QUALITY ASSURANCE A. Regulatory Requirements: All materials: U.L. listed or labeled. 1.06 REFERENCES A. Specified references, or cited portions thereof, govern the work. B. National Electrical Manufacturers Association (NEMA): 1. WD-1 - General Purpose Wiring Devices. 2. WD-5 - Specific Purpose Wiring Devices. 3. National Fire Protection Association (NFPA): NFPA 70 - National Electrical Code (NEC) Latest Edition. 4. Underwriters' Laboratories, Inc. (UL): All materials UL listed and labeled. 5. Federal Specification WC596F (Receptacles) and WS896E (Switches). 1.07 DELIVERY, STORAGE AND HANDLING A. Materials shall be suitably packaged by manufacturer to prevent damage during shipment. Damaged materials will not be acceptable for use. B. Store materials on site in a clean, dry storage area. C. Handle all materials carefully to preclude damage during installation. PART 2 - PRODUCTS 2.01 ACCEPTABLE MANUFACTURERS A. Arrow-Hart. B. Leviton. WIRING DEVICES (Revised 07/20/12) 26 27 26-1 C. Hubbell. D. Pass & Seymour. 2.01 WALL SWITCHES A. Specification Grade, 20A, 120-277 V., quiet type, back and side wired, toggle handle. Color - Ivory. Equal to Hubbell series as follows: 1. Single pole - #CS-1221 2. 4-Way - #CS-1224 3. Double pole - #CS-1222 4. Pilot Light Switch - #HBL-1221L 5. 3-Way - #CS-1223 B. Narrow Switches: Equal to “Eagle” #1211-V, 20A, 227V, quiet type, back wired, toggle handle. Color – ivory. Provide Eagle #919 mounting strap and “Pass & Seymour” SNG1 cover plate. 2.02 RECEPTACLES A. Duplex: 1. Flush, straight blade, 3 wire grounding, construction series, heavy duty, specification grade, 20 A, 125 V., NEMA 5-20R, capable of being split wired and/or feed thru. 2. Hubbell #CR-5362 or equal. 3. Color: Ivory (Gray for “Designated Receptacle). B. Ground Fault Circuit Interrupter: 1. Commercial, specification grade feed through type capable of protecting downstream receptacles on same circuit, grounding type, UL class A-Group 1, 20 amp 125 v. 2. Solid State ground fault sensing and signaling, 5 ma. trip level. 3. Color: Ivory. 4. Hubbell #GF-5362 or equal. C. Isolated Ground: 1. Single or duplex, 3 wire, construction series, heavy duty specification grade, 20 amp, 125V, NEMA 5-20R. 2. Color: Orange. 3. Hubbell CR-5352IG or equal. D. Telephone/Communication Outlet: 1. Provide wall box only and provide blank coverplate for locations that are not used. 2.03 DEVICE PLATES A. Materials: 1. Finished Spaces: .04 inch thick, type 302, satin finished stainless steel. 2. Outdoor, Exterior: Cast metal, gasketed. Provide springloaded gasketed door for receptacles. 3. Surface Devices in Unfinished Areas: Galvanized steel. B. Use plates manufactured by device manufacturer. PART 3 - EXECUTION 3.01 INSTALLATION A. Install wall switches with OFF position down. B. Install convenience receptacles with grounding pole on top when mounted vertically or with grounding pole on left when mounted horizontally. C. Install plates on all switch, and receptacle outlets. Install blank plates on all unused boxes. WIRING DEVICES (Revised 07/20/12) 26 27 26-2 D. Install devices and plates flush and level. E. Seal all connections on GFCI with seal coat compound and wrap with two layers tape. END OF SECTION WIRING DEVICES (Revised 07/20/12) 26 27 26-3 SECTION 26 29 00 MOTOR CONTROL PART 1 - GENERAL 1.01 RELATED DOCUMENTS A. The following shall apply to this Section: 1. Drawings. 2. General Conditions. 1.02 WORK INCLUDES A. Provide starters specified and shown on electrical drawings. 1.03 RELATED WORK A. B. C. D. 1.04 SUBMITTALS A. 1.05 Section 26 05 33 - "RACEWAYS". Section 26 24 00 - "ELECTRICAL EQUIPMENT". Section 26 05 19 - "WIRES AND CABLES". Section 26 05 53 - "ELECTRICAL IDENTIFICATION". None required unless submitting for approved equal. QUALITY ASSURANCE A. Regulatory Requirements 2. Power & Control Wiring in accord with N.E.C. 3. NEMA ICS-2, NEMA KS1. PART 2 - PRODUCTS 2.01 ACCEPTABLE MANUFACTURERS A. B. C. D. 2.02 General Electric. Siemens. Square D. Eaton. MOTOR CONTROLLERS A. Manual Motor Controller 1. NEMA ICS 2, AC general-purpose Class A manually operated, full-voltage controller with overload element, red pilot light, auxiliary contact, where noted, and push button operator. B. Fractional Horsepower Manual Motor Controller 1. NEMA ICS 2, AC general-purpose Class A manually operated, full-voltage controller for fractional horsepower induction motors, with thermal overload unit, red pilot light, and toggle operator. C. Motor Starting Switches 1. NEMA ICS 2, AC general-purpose Class A manually operated, full-voltage MOTOR CONTROL (Revised 09/06/12) 26 29 00-1 controller for fractional horsepower induction motors, without thermal overload unit, with red pilot light where shown, and toggle operator. D. Magnetic Motor Controllers - Non-reversing 1. NEMA ICS 2, AC general-purpose Class A magnetic controller for induction motors rated in horsepower with 120 volt encapsulate coil, poles and size as scheduled or as indicated. 2. Contacts: Totally enclosed, double-break, silver-cadmium-oxide power contacts. Contact inspection and replacement shall be possible without disturbing line or load wiring. 3. Wiring: Straight-through wiring with all terminals clearly marked. 4. Overload Relay: NEMA ICS; with one-piece thermal unit construction. Thermal units shall be interchangeable. Overload relay control circuit contact shall be replaceable. Thermal units shall be required for starter to operate. 5. Auxiliary contacts, pilot devices and other options as scheduled or as indicated. 6. All controller enclosures shall be as scheduled or indicated. PART 3 - EXECUTION 3.01 INSTALLATION A. Install enclosed controllers where indicated, in accordance with manufacturer's instructions. B. Install enclosed controllers plumb with 5 ft. AFF to operating handle. C. Install fuses in fusible switches under provisions of fuses section. D. Select and install overload heater elements in motor controllers to match installed motor characteristics. E. Provide engraved plastic nameplates under the provisions of Section 26 05 53 "ELECTRICAL IDENTIFICATION". F. Provide neatly typed label inside each motor controller door identifying motor served, nameplate horsepower, full load amperes, code letter, service factor, and voltage/phase rating. END OF SECTION MOTOR CONTROL (Revised 09/06/12) 26 29 00-2 SECTION 26 50 00 LIGHTING PART 1 - GENERAL 1.01 RELATED DOCUMENTS A. The following shall apply to this Section: 1. Drawings. 2. General Conditions. 3. Refer to Section 01 11 00-Summary of Work. 1.02 WORK INCLUDES A. Provide lighting fixtures. B. Provide required fixture supports. C. Provide lamps. 1.03 SUBMITTALS A. No submittals required on specified equipment or owner furnished equipment otherwise provide: Product data in accordance with Section 26 00 10 “SUBMITTALS”. 1.04 QUALITY ASSURANCE A. Regulatory requirements. 1. NEMA Std. Pub. Nos. SH5 and TT1 for pole construction, materials, and hardware. 2. Building lighting fixtures: a. Applicable sections of NEC. b. ANSI 132.1 c. UL 57, 676, 1570, 1571, and 1572. d. Fluorescent ballasts shall be CBM labeled. e. NEMA Std. Pub. Nos. FA1. LE1 and LE2. PART 2 - PRODUCTS 2.01 ACCEPTABLE MANUFACTURERS A. Electronic ballasts 1. Advance. B. Lamps 1. General Electric. 2. Phillips. 3. Osram-Sylvania 2.02 FIXTURES A. Specified on plans. 2.03 BALLASTS A. All ballasts shall be rated for the circuit voltage shown on plans. B. All ballasts shall be P thermal rating. Fluorescent ballasts shall have class A sound rating. C. Ballasts for exterior lighting fixtures shall be suitable for use at temperatures -20°F. and above. D. Unless otherwise noted, fluorescent ballasts shall be solid state electronic type for use with T8 LIGHTING (Revised 06/13/12) 26 50 00–1 (Octron or equal) fluorescent lamps. Electronic ballasts shall have a total harmonic distortion of 10% or less. 2.04 LAMPS A. Provide lamps for all light fixtures as scheduled on drawings. B. All fluorescent lamps shall contain mercury in reduced amounts allowing them to pass the EPS’s “Toxic Characteristic Leaching Procedure” (TCLP) and be so labeled. PART 3 - EXECUTION 3.01 LIGHTING FIXTURES A. Provide all plaster frames, angles, channel, hangers and supports required to support lighting fixtures. Fixtures shall be supported independently of ceiling. B. Exit signs in suspended ceiling areas shall be located in the center of the ceiling tile and oriented so as to provide maximum visibility to escape paths. C. See Section 26 00 20 - “Contract Close-out & Commissioning”. END OF SECTION LIGHTING (Revised 06/13/12) 26 50 00–2

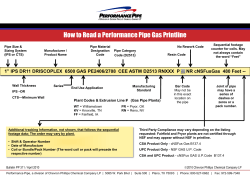


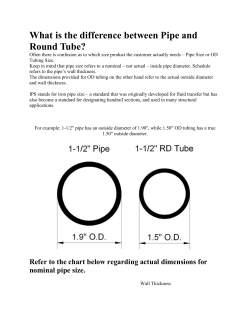


© Copyright 2026