
ZoneZ Dimmer Manual
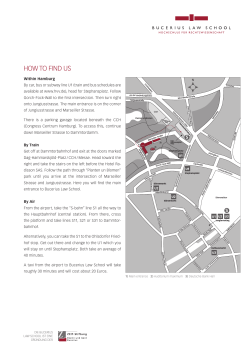
Zo n e Z Di mmer M a n u a l
Ta b l e O f Co ntent s
Preparation...���������������������������������������������������������������������������������������������������������������������������������������������2
ZNZ-ZD Overview.. . ����������������������������������������������������������������������������������������������������������������������������������3
Installation Notes.. ����������������������������������������������������������������������������������������������������������������������������������4
Retrofitting an Existing System.������������������������������������������������������������������������������������������������������������� 5
Line Voltage Wiring and Connections.��������������������������������������������������������������������������������������������������� 6
Contact Closure Switch Wiring and Connections (Dimmers 1-6) . . . ����������������������������������������������������7
Contact Closure Switch Wiring and Connections (Scenes). . .���������������������������������������������������������������8
Contact Closure Switch Wiring and Connections (LED).. ��������������������������������������������������������������������9
Programming Interface Explanations.�������������������������������������������������������������������������������������������������10
Programming Scene Functions.�����������������������������������������������������������������������������������������������������������11
Programming LED Functions.. ��������������������������������������������������������������������������������������������������������������12
Address Dip Switches.���������������������������������������������������������������������������������������������������������������������������13
Option Dip Switches.������������������������������������������������������������������������������������������������������������������������������ 14
Termination Dip Switches.. �������������������������������������������������������������������������������������������������������������������14
LED Intensity Dip Switches. . .�����������������������������������������������������������������������������������������������������������������14
Troubleshooting Guide.������������������������������������������������������������������������������������������������������������������������15
Frequently Asked Questions.����������������������������������������������������������������������������������������������������������������� 16
1830 Way n e Tra ce
l
Fo r t Way n e, I ndi ana 46803
l
1.260.426.1565
l
w w w.to uc hp late.co m
Pre p a rat i o n
Unpack the ZNZ-ZD and inspec t the contents for damaged or missing par ts. I f any problems ar ise,
please contac t Touch-Plate at 260.426.1 565 for assistance.
Pre c a u t i o n s
The ZNZ-ZD hardware is designed to be in environments that have a temperature range of 0-60°C
(non- condensing atmosphere). I nstalling in an environment outside of these parameters will
shor ten the life span of the hardware.
Touch-Plate recommends the use of 18 to 22 AWG wire for low voltage wir ing of contac t closure
produc ts and 18 AWG wire for all 24V power connec tions.
Al l 120VAC wir ing must use wire as specified by National Elec tr ic Code for load size and wire length.
Co mp at i b l e Hard ware
The ZNZ-ZD produc t can be a par t of a net wor ked, intelligent system with a Time -Keeper. I t can also
be a standalone item that can incor porate the following produc ts:
Contac t Closure Switches:
••
••
••
••
••
••
••
••
5000 S er ies
G enesis S er ies
Classic S er ies
Eclipse S er ies
I ndustr ial S er ies
M ystique S er ies
R oyal S er ies
Ultra S er ies
Wa r ra nt y
T ouch-Plate
wa r rant s t h is p ro d u c t a ga in st d efec t s i n mate r i a l s o r wo r k ma n s h i p, u n d e r n o r ma l u s e, fo r a pe r i o d of O NE (1)
year from date o f sh ip m ent. I f a d efec t a r ises a n d a va l i d c l a i m i s re ce i ve d w i th i n th e Wa r ra nt y Pe r i o d, To u c h - Pl ate wi ll repai r
or repla ce the pro d u c t at n o ch a rge.
Th is wa r ra nt y does n o t a p p ly to :
a .
Da ma ge to u n it ( s) ca u sed by a cc id ent, a c ts o f G o d, i n a ppro pr i ate i n s ta l l ati o n , f a u l t y i n s ta l l ati o n , o r any
ne g ligent u se;
b.
Unit(s) wh ic h h ave b een su b j ec t to b e i n g ta k e n a pa r t o r o th e r w i s e mo d i f i e d ;
c.
Unit no t u sed in a cco rd a n ce wit h in s tr u c ti o n s ;
d.
The f in ish o n a ny p o r t io n o f t h e p ro d u c t, s u c h a s s u r f a ce a n d /o r we ath e r i n g, a s th i s i s co n s i d e re d nor mal
wea r a n d tea r ;
e.
No n-To u c h - Plate h a rd wa re in st a lled by th e u s e r ;
f.
Da ma ge c a u sed by No n -To u c h - Plate pro d u c ts ;
g.
Da ma ge c a u sed by o p erat in g t h e p rod u c t o u ts i d e th e pe r mi tte d o r i nte n d e d u s e s d e s c r i be d by
To uch- Plate;
h.
- o r- S p ecific p la n s o r S p ecific a p p lic ati o n re qu i re me nts, u n l e s s th e pl a n s a n d s pe c i f i c ati o n s h ave be en
for ward ed to To u ch - Plate a n d To u c h -Pl ate h a s a pprove d a n d a cce pte d th e pl a n s i n w r i ti n g.
Except a s provided in t h is wa r ra nt y, To u ch - Plate is n o t re s po n s i bl e fo r d i re c t, s pe c i a l, i n c i d e nta l, o r co n s e qu e ntial d amag es
resulting fro m a ny b rea ch o f wa r ra nt y o r co n d it ion , i n c l u d i n g bu t n o t l i mi te d to, I n s ta l l ati o n o r R e pl a ce me nt l a b or costs.
Pa ge 2
w w w. touc hp l ate. co m
To uc h- Plate® L ight ing Controls
Zo neZ D i m mer M a nu al
ZN Z- Z D O ver view
The ZNZ-ZD is the effor tless lighting solution that allows for simple dimming control.
The ZNZ-ZD has the following options:
A
RS485 Connec tion to Time -Keeper M aster Controller
B
Ter mination DIP Switches
A
B
C
C
LED O utputs
D
Contac t Closure Switch I nputs
E
S cene I nputs
F
Option DIP Switches
D
E
G
Address DIP Switches
H
Pilot I ntensit y DIP Switches
I
Programming I nter face
F
G
H
I
Touc h-Pl ate ® Li g hti n g Co ntro l s
Zone Z D i m m e r M a n u a l
Pa g e 3
w w w.to uc hplate.com
I n s t a l l at i o n Notes
The ZNZ-ZD has dimmer modules which can be removed from the system if they ever need to be
re placed.
Use the following diagram and instruc tions on how to remove the modules from the ZNZ-ZD system.
A
Unplug the r ibbon cable from the ZNZ-ZD.
B
Disconnec t the wires from the line voltage board.
C
Unscrew the lock nut from the dimmer modules.
C
A
B
A
C
B
B
A
C
Pa ge 4
w w w. touc hp l ate. co m
To uc h- Plate® L ight ing Controls
Zo neZ D i m mer M a nu al
R e t ro f i t t i n g an E xist ing System
To cor rec tly update an existing system, be sure that the entire system is being updated. Power from
the circuit breaker MUST be tur ned off before removing any existing par ts. M ost systems that have
control stations with pilot lights must have those existing control stations replaced before br inging
power to the updated system.
Use the following instruc tions to cor rec tly label and remove the existing system.
A
Label all wires before or dur ing removal. Use the following char t to identify the wires that need labeled.
Wires to be Labeled
Low Voltage Switch Leg
Wire D escr iption
Low Voltage Switch Leg from the Switch to the R elay
Common
Common from the Switch to the Transver ter ( TPS/T VR)
Common
Common from the Switch to the Transfor mer (PL-6)
Line Voltage Switch Leg
Wire from the Breaker to the Transver ter ( TPS/T VR)
Breaker
Wire from the Breaker to the Lighting Load
B
Disconnec t the Transver ter (t ypically a T VR-1 or TPS -0120).
C
Disconnec t the line voltage from the relay (t wo wires from the base of the relay); many times the Hot wires are jumped together.
D
Disconnec t the low voltage from the relay (wires from the coil of the relay).
E
Disconnec t the pilot light transfor mer from the lighting load and control station(s). The line voltage wires connec ted to the pilot light transfor mer are no longer needed.
R emove the enclosure with all the relays, transver ter, and pilot light transfor mers F
d i s co n n e c te d. I f re u s i n g t h e e n c l o s u re, o n l y re m ove t h e re l ays, t ra n s ve r te r, a n d p i l o t l i g ht A
transfor mers.
E
E
C
D
A
A
A
B
A
Touc h-Pl ate ® Li g hti n g Co ntro l s
Zone Z D i m m e r M a n u a l
A
Pa g e 5
w w w.to uc hplate.com
L in e Vo l t a g e Wiring and Connec tio ns
Use the line voltage wir ing connec tions diagram to setup your system. This diagram does not show
all possible connec tions and configurations.
A
Connec t switch leg 1 from the lighting load to the ter minal labeled DIM 1. Continue to do the same for switch leg’s 2-6.
B
Connec t the neutral wires from each lighting load to the neutral bar.
C
Br ing a neutral feed from the neutral bar to each of the ter minals labeled Neutral. Connec t a neutral wire from the neutral bar to the K T3 block ( Ter minal Block).
D
Connec t the neutral wire from the breaker panel to the K T3 block ( Ter minal Block).
E
Connec t the hot wire from the breaker panel to the K T3 block ( Ter minal Block).
F
Jump the hot feed from the K T3 block ( Ter minal Block) to each of the ter minals lab eled Hot.
B
A
B
C
A
C
B
A
A
B
C
A
A
F
D
B
B
Pa ge 6
w w w. touc hp l ate. co m
To uc h- Plate® L ight ing Controls
Zo neZ D i m mer M a nu al
Co nt a c t Cl o sure Switch Wiring and Co nnec tio ns ( D immers 1- 6)
Use the Contac t Closure Switch wir ing connec tions diagram to setup your system. This diagram
does not show all possible connec tions and configurations.
The Contac t Closure Switch I nputs are used when programming is not going to be used.
switches will be wired direc tly into the ter minal of the cor responding dimmer.
The
For example, if button 1 is to control dimmer 1, the wire would be brought into the ter minal labeled
‘Dimmer 1’.
A
Connec t the button 1 wire to the desired ter minal.
Continue to connec t all button wires to the desired ter minals.
Terminals available are Dimmer 1, Dimmer 2, Dimmer 3, Dimmer 4, Dimmer 5, and
Dimmer 6.
B
Connec t the common wires to the ter minal labeled ‘SC ’ (Switch Common).
B
A
Touc h-Pl ate ® Li g hti n g Co ntro l s
Zone Z D i m m e r M a n u a l
Pa g e 7
w w w.to uc hplate.com
Co nt a c t Cl o sure Switch Wiring and Co nnec tio ns ( S cenes)
Use the Contac t Closure Switch wir ing connec tions diagram to setup your system. This diagram
does not show all possible connec tions and configurations.
The pur pose of the S cene Func tion is to define an ac tion for a group of dimmers.
The S cene I nputs are used when programming is going to be used. The switches will be wired dire c tly into the ter minal of the cor responding S cene. Programming will need to take place before
any of the buttons wor k proper ly.
For example, if button 1 is to control dimmers 1 - 3, the wire would be brought into the ter minal
labeled ‘S cene 1’.
A
Connec t the button 1 wire to the desired scene ter minal.
Continue to connec t all button wires to the desired scene ter minals.
Ter minals available are S cene 1, S cene 2, S cene 3, S cene 4, S cene 5, S cene 6, S cene 7, and S cene 8.
B
Connec t the common wires to the ter minal labeled ‘SC ’ (Switch Common).
B
A
Pa ge 8
w w w. touc hp l ate. co m
To uc h- Plate® L ight ing Controls
Zo neZ D i m mer M a nu al
Co nt a c t Cl o sure Switch Wiring and Co nnec tio ns ( LED)
Use the Contac t Closure Switch wir ing connec tions diagram to setup your system. This diagram
does not show all possible connec tions and configurations.
The LED outputs are used when LEDs are present on the Switches. These can be wired and used
whether the Contac t Closure Switch I nputs or S cene I nputs are used.
The LED outputs cor respond to the LED location on the switch.
For example, when wir ing LED #4 on the switch, br ing the LED wire to the ter minal labeled ‘LED 4’.
A
Connec t the LED 1 wire to the desired ter minal.
Continue to connec t all LED wires to the desired ter minals.
Ter minals available are LED 1, LED 2, LED 3, LED 4, LED 5, LED 6, LED 7, and LED 8.
B
Connec t the common wires to the ter minal labeled ‘PC ’ (Pilot/LED Common).
B
A
Touc h-Pl ate ® Li g hti n g Co ntro l s
Zone Z D i m m e r M a n u a l
Pa g e 9
w w w.to uc hplate.com
Pro g ra m mi ng I nter face E xp lanatio ns
These explanations will help to understand each sec tion of the I nter face and its definition.
S ec tion
S etup
I tem
Button
D efinition
Press 1 time to tur n on programming control
Press and hold for 12 secs to clear the programming
S cene
O utput
Ac tion
Level
R ate
1
Controls S cene 1
2
Controls S cene 2
3
Controls S cene 3
4
Controls S cene 4
5
Controls S cene 5
6
Controls S cene 6
7
Controls S cene 7
8
Controls S cene 8
1
Cor responds to Dimmer 1
2
Cor responds to Dimmer 2
3
Cor responds to Dimmer 3
4
Cor responds to Dimmer 4
5
Cor responds to Dimmer 5
6
Cor responds to Dimmer 6
Non e
No ac tion will occur
Up
The load dims up as the button is held
D own
The load dims down as the button is held
Cycle
Each button press c ycles the load bet ween ON and OFF.
To
The button press dims the light to the preset level
A15
I f the lights are off, they will tur n on. I n 15 mins they will tur n off. I f the
lights are on, they will stay on. Af ter 15 mins, the lights will tur n off.
A30
I f the lights are off, they will tur n on. I n 30 mins they will tur n off. I f the
lights are on, they will stay on. Af ter 30 mins, the lights will tur n off.
A60
I f the lights are off, they will tur n on. I n 1 hr they will tur n off. I f the
lights are on, they will stay on. Af ter 1 hr, the lights will tur n off..
0
The load will dim to 0% out of 100%
1
The load will dim to 1% out of 100%
5
The load will dim to 5% out of 100%
10
The load will dim to 10% out of 100%
20
The load will dim to 20% out of 100%
50
The load will dim to 50% out of 100%
75
The load will dim to 75% out of 100%
100
The load will dim to 100% out of 100%
Slow
The dimmer will dim to the level slower than the default setting
M ed
D efault setting
Fast
The dimmer will dim to the level faster than the default setting
Pa ge 10
w w w. touc hp l ate. co m
To uc h- Plate® L ight ing Controls
Zo neZ D i m mer M a nu al
Pro g ra m mi ng S cene Func tions
Use the programming diagram to setup your system. Each load needs to have its Ac tion deter mined
before programming begins. Each syste m will have different programming charac ter istics and this
document does not show all possible programming options.
A
Press the ‘SE TUP ’ button once to begin the programming.
B
Press the ‘SCENE’ button multiple times until the LED Is lit nex t to the S cene Numb er that is to be programmed.
C
Press the ‘OUTPUT ’ button multiple times until the LED is lit nex t to the Dimmer Number that is to be programmed.
D
Press the ‘AC TION’ button multip le times until the LED Is lit nex t to the Ac tion that is to be car r ied out by the dimmer.
E
Press the ‘LE VEL’ button multiple times until the LED Is lit nex t to the Level that the dimmer is to dim to.
F
Press the ‘R ATE’ button multiple times until the LED is lit nex t to the R ate that indicates how fast the dimmer is to dim.
G
Press the ‘SCENE’ button to move to the nex t scene that is desired to be programmed.
A
Touc h-Pl ate ® Li g hti n g Co ntro l s
Zone Z D i m m e r M a n u a l
B
C
D
E
F
Pa g e 1 1
w w w.to uc hplate.com
Pro g ra m mi ng LE D Func t ions
Use the programming diagram to setup your system. These instruc tions are used to progra m an LED
to respond to the S cene programming. Each system will have different programming charac ter istics
and this document does not show all possible programming options.
A
Press the ‘SE TUP ’ button t wice to begin the programming.
B
Press the ‘SCENE’ button multiple times until the LED Is lit nex t to the S cene Numb er that is to have a cor responding LED tur ned On.
C
Press the ‘SCENE’ button to move to the nex t LED that is desired to be programmed.
A
Pa ge 12
w w w. touc hp l ate. co m
B
To uc h- Plate® L ight ing Controls
Zo neZ D i m mer M a nu al
Ad d re s s D i p Switches
The Address Dip Switches are used to set the DMX Address only if a Time -Keeper is present.
Nor mally, these Dip Switches come from the fac tor y pre -programmed. I f they do not, make sure you
do not duplicate addresses, as each ZNZ-ZD must have its own unique address.
Note that each ZNZ-ZD utilizes 6 addresses. For example, if on one Time -Keeper net wor k there were
t wo (2) ZNZ-ZD ’s, the first would be set to Address 1 and the second would be set to Address 7.
Do not change values unless direc ted by Touch-Plate!!!
Address
1
2
3
4
5
6
7
8
9
1
ON
OFF
OFF
OFF
OFF
OFF
OFF
OFF
OF F
7
ON
ON
ON
OFF
OFF
OFF
OFF
OFF
OFF
13
ON
OFF
ON
ON
OFF
OFF
OFF
OFF
OF F
19
ON
ON
OFF
OFF
ON
OFF
OFF
OFF
OFF
25
ON
OFF
OFF
ON
ON
OFF
OFF
OFF
OF F
31
ON
ON
ON
ON
ON
OFF
OFF
OFF
OFF
37
ON
OFF
ON
OFF
OFF
ON
OFF
OFF
OFF
43
ON
ON
OFF
ON
OFF
ON
OFF
OFF
OFF
49
ON
OFF
OFF
OFF
ON
ON
OFF
OFF
OFF
55
ON
ON
ON
OFF
ON
ON
OFF
OFF
OFF
61
ON
OFF
ON
ON
ON
ON
OFF
OFF
OFF
67
ON
ON
OFF
OFF
OFF
OFF
ON
OFF
OF F
Va lid Ad d re s s e s a re th ro u g h Ad d re s s 7 2
Valid addresses are bet ween 1 to 72. Addresses are set using the nine Address Dip Switches, which
each have a va lue noted in the char t be low.
Address Dip Switch
1
2
3
4
5
6
7
8
9
Value
1
2
4
8
16
32
64
128
256
The values of all switches in the ON position are added together and the total is equ al to the
address. S ee the examples below :
DMX Address 1: Tur n on switch 1 only, and leave all other Address switches off.
DMX Address 13: Tur n on switches 1, 3 and 4. The values of those switches is 1 + 4 + 8 = 13.
Touc h-Pl ate ® Li g hti n g Co ntro l s
Zone Z D i m m e r M a n u a l
Pa g e 1 3
w w w.to uc hplate.com
O p t i o n D i p Switches
The O ther Dip Switches are used to set different func tions.
Option
ON/OFF
D efinition
1
ON
LED follows the individual load
1
OFF
LED follows the S cene
2
ON
LED follows the individual load
2
OFF
LED follows the S cene
3
ON
LED follows the individual load
3
OFF
LED follows the S cene
4
ON
LED follows the individual load
4
OFF
LED follows the S cene
5
ON
LED follows the individual load
5
OFF
LED follows the S cene
6
ON
LED follows the individual load
6
OFF
LED follows the S cene
7
ON
Tests each load and the LED status output. The
test star ts at dimmer 1 and dims the load from 0 % 100% - 0%. While it is dimming, the LED status will
be on while the load dims. Once dimmer 1 is complete, the test will move sequentially through the
remaining dimmers.
7
OFF
Test mode is off
Ter m i n at i o n D ip Switches
The Ter mination Dip Switches are used to set the Ter minations.
Ter minations
D efinition
A
Pull Up
B
Pull D own
AB
Ter mination
L E D I nte n s i t y D ip Switches
The Pilot I ntensit y Dip Switches are used to set the LED I ntensit y. This option is only used when the
fac tor y has been contac ted.
I ntensit y
D efinition
1
ON = Low I ntensit y
2
ON = M edium I ntensit y
1 & 2
Pa ge 14
w w w. touc hp l ate. co m
1 ON & 2 ON = H igh I ntensit y
To uc h- Plate® L ight ing Controls
Zo neZ D i m mer M a nu al
Tro u b l e s h o oting G uid e
I f no response occurs when the system is powered up, use the following steps to identify the
problem.
1. R emove the Diecut from the ZNZ-ZD.
2. Look for the LED indicator to be blink ing.
a.
b.
c. For the indicator to be blink ing, power has to be cor rec tly brought to the
system.
I f the LED indicator is not blink ing, confir m power connec tions and then
contac t the fac tor y for assistance.
I f the LED indicator is blink ing, move on to the nex t step.
3. Ver ify that the line voltage has been fed to all the necessar y relays.
4. Ver ify that each light fix ture is connec ted to the ‘Switched Leg’.
5. U tilize Dip Switch #7. S ee page 14 for instruc tions.
6. Ver ify that 120 VAC has been connec ted to the transfor mer
7. Take a shor t piece of thin wire (both ends need to be str ipped) and hold one end to
the conduc tive metal of the ‘Switch Common’.
8. Take the other end of the shor t wire and tap it to the conduc tive metal of each of
the Dimmer ter minals, on the ZNZ-ZD, one at a time.
a.
Each touch should energize the dimmer and change its state. The lights in
the respec tive rooms should go ON and OFF when the ter minal is touched.
9. I f the lights do not respond, use a meter on the line voltage dimmer outputs to see
if the voltage switches from 0 to 120 VAC.
10. I f these steps do not solve the problem, please contac t the fac tor y for assistance.
Touc h-Pl ate ® Li g hti n g Co ntro l s
Zone Z D i m m e r M a n u a l
Pa g e 1 5
w w w.to uc hplate.com
Fre q u e nt l y Asked Q uest ions
1. What are S cenes?
a.
b.
S cenes allow for a single button to control multiple dimmers.
For example: I n most bathrooms there are lights above the sink and above
the shower. I f both lights are desired to be tur ned on at the same time with
the push of a single button, a S cene makes this possible.
2. What are the ‘Option’ Func tions?
a.
Option Func tions are to be used when a Time -Keeper is connec ted to the
ZNZ-ZD.
3. What is the ‘DMX Address’?
a.
b.
The DMX Address is a number in a line of specific addresses.
This has to be done because ever ything has a unique address and has to be
programmed to do so.
4. What are the wattages on the dimmer modules?
a.
b.
The Standard dimmer module is 300W per channel.
There is an option available that is 600W per channel.
5. What are the ‘ Ter minations’?
a.
These are DMX line ter minations. This is only used if a DMX controller is
connec ted to the ZNZ-ZD
6. How do you save the programming?
a.
The programming is saved once the S cene, Dimmer, Ac tion, Level, or R ate is
entered and the button press is released.
Pa ge 16
w w w. touc hp l ate. co m
To uc h- Plate® L ight ing Controls
Zo neZ D i m mer M a nu al
Touch-Plate ZoneZ Dimmer M anual
R evision: 1.0a


© Copyright 2026