
Technical Manual Version 3.0
Technical Manual Version 3.0 Application Server Technical Manual Xarios Ltd. 1 Contents 1 2 CONTENTS .................................................................................................................................. 2 INTRODUCTION .......................................................................................................................... 4 2.1 3 3.1 3.2 3.3 3.4 3.5 3.6 3.7 4 FEATURES....................................................................................................................... 4 REQUIREMENTS.......................................................................................................................... 5 TARGET PC REQUIREMENTS .............................................................................................. 5 TARGET PC REQUIREMENTS - CAMPAIGN MANAGER ............................................................. 5 VMWARE READY ............................................................................................................ 5 MITEL MCD REQUIREMENTS ............................................................................................ 5 MITEL 5000 REQUIREMENTS ............................................................................................ 6 FEATURE REQUIREMENTS.................................................................................................. 6 SOFTWARE LIMITATIONS ................................................................................................... 6 INSTALLATION ............................................................................................................................ 7 4.1 LICENSING .................................................................................................................... 11 4.1.1 Mitel 5000 .......................................................................................................... 11 4.1.2 Mitel MCD .......................................................................................................... 11 4.1.3 License Validation .............................................................................................. 11 4.1.4 Registering a Software license ........................................................................... 13 4.1.5 Hardware USB Dongle Licensing ........................................................................ 15 4.2 INITIAL CONFIGURATION ................................................................................................. 17 4.2.1 Database Connection ......................................................................................... 17 4.2.2 Migrating Version 1.x Database ........................................................................ 18 4.2.3 Website Connection ........................................................................................... 19 4.2.4 Telephone System Connection ........................................................................... 21 4.2.5 Starting the Application Server Service .............................................................. 22 5 SERVER CONFIGURATION ......................................................................................................... 23 5.1 SYSTEMS ...................................................................................................................... 23 5.1.1 Settings .............................................................................................................. 23 5.2 SMTP CONFIGURATION ................................................................................................. 29 5.2.1 Configuration ..................................................................................................... 30 5.2.2 Email Groups ...................................................................................................... 31 5.3 SUPPORT...................................................................................................................... 31 5.3.1 Logging Tab ....................................................................................................... 31 5.3.2 Dealer Tab .......................................................................................................... 32 6 CLIENT OPTIONS ....................................................................................................................... 33 6.1.1 Settings Tab ....................................................................................................... 33 6.1.2 Dial Patterns ...................................................................................................... 36 6.1.3 Directory ............................................................................................................ 38 6.2 CONFIGURATION FILES .................................................................................................... 42 6.3 CONTACTS .................................................................................................................... 43 6.3.1 Contacts database ............................................................................................. 44 6.3.2 DDI Mapping ...................................................................................................... 48 6.3.3 CLI Mapping ....................................................................................................... 49 7 ADVANCED FEATURES .............................................................................................................. 51 7.1 ALARMS ....................................................................................................................... 51 7.2 AUTO ANSWER ............................................................................................................. 52 7.3 CALL RECORDER ............................................................................................................ 53 7.4 CAMPAIGN MANAGER .................................................................................................... 54 7.4.1 Settings .............................................................................................................. 54 Version 3.0 Page 2 of 91 Application Server Technical Manual Xarios Ltd. 7.4.2 Data Connection ................................................................................................ 55 7.5 HOT DESKING ............................................................................................................... 56 7.6 MESSAGING.................................................................................................................. 62 7.6.1 Settings .............................................................................................................. 62 7.7 NIGHT MODE................................................................................................................ 63 7.7.1 Settings .............................................................................................................. 64 7.7.2 Daily Settings ..................................................................................................... 64 7.8 SMS ........................................................................................................................... 65 7.8.1 Basic ................................................................................................................... 65 7.8.2 Cellular Terminals & Email Services ................................................................... 65 7.9 TIME SYNC ................................................................................................................... 66 7.9.1 Enable ................................................................................................................ 67 7.9.2 Feature Codes .................................................................................................... 67 7.9.3 Admin Keyset ..................................................................................................... 67 7.9.4 Synchronise time ................................................................................................ 67 7.9.5 Date Format ....................................................................................................... 67 7.9.6 Time Format....................................................................................................... 67 7.10 WEB CALLBACK ............................................................................................................. 67 7.10.1 Web Callback call requests ................................................................................ 68 7.10.2 Basic ................................................................................................................... 69 7.10.3 Skills ................................................................................................................... 70 7.10.4 History ................................................................................................................ 71 8 SYSTEM STATUS ....................................................................................................................... 72 8.1 STATUS ........................................................................................................................ 72 8.2 LICENSING .................................................................................................................... 72 8.3 CONNECTED CLIENTS...................................................................................................... 73 8.4 EVENTS ........................................................................................................................ 73 8.5 AUDIT TRAIL ................................................................................................................. 74 8.6 DIAGNOSTICS ................................................................................................................ 75 8.6.1 Client Real-time Status....................................................................................... 75 8.6.2 Hot Desking Real-time Status ............................................................................ 77 8.6.3 Web Callback Real-time Status .......................................................................... 79 9 MAINTENANCE ......................................................................................................................... 81 9.1 BACKUP ....................................................................................................................... 81 9.2 RESTORE ...................................................................................................................... 84 9.3 UPGRADES ................................................................................................................... 86 9.3.1 Software............................................................................................................. 86 9.3.2 Licensing ............................................................................................................ 86 10 TROUBLESHOOTING ................................................................................................................. 88 Version 3.0 Page 3 of 91 Application Server Technical Manual Xarios Ltd. 2 Introduction Xarios Application Server is a product specifically designed for Mitel 5000 and Mitel MCD (Mitel Communications Director) series telephone systems. It has been designed as a single software installation that includes ‘modules’ that deliver additional features and functionality to the phone system. It works as a central connection point for the Xarios Phone Manager or Xarios Phone Integrator clients. The Application Server runs as a service on a server that can connect to the phone system over TCP/IP. Application Server uses SQL Server to store a manage data and is configured using a website hosted using Microsoft IIS. Xarios Application Server software has been designed with ease of use in mind so that Mitel resellers and users can install, configure and support the applications with the minimum of training. 2.1 Features The Xarios Application Server has modules to support different features and applications. The main feature is to support the connection of Xarios Phone Manager when connected to a Mitel 5000 or Xarios Phone Integrator clients when connected to a Mitel MCD system. Module Requires Axxess Axxess License v5 + v6 v7 Axxess v8+ Mitel 5000 Mitel MCD Phone Manager Clients Phone Integrator Clients Web Callback Multiple Message Notification Telephone System Time Sync Auto Answer Hot Desking Hot Desking (with CLI change) Night Mode Alarm Notification Table 2.1 Version 3.0 Page 4 of 91 Application Server Technical Manual 3 Xarios Ltd. Requirements It is recommended that Application Server be installed on a dedicated server. 3.1 Target PC Requirements Windows XP Professional SP3 (x86), Windows 2003 Server SP2 (x86), Windows 2008 Server (x86 or x64), Windows 7 Professional/Enterprise/Ultimate (x86 or x64) versions supported Intel Pentium Core 2 Duo or equivalent processor 2GB RAM Network interface card Microsoft .NET Framework 4.0 Microsoft Windows Installer 4.5 Power Shell v1.0+ Microsoft IIS 6.0 + USB 2.0 (for license dongle) Microsoft IP v4 20GB Hard Disk Space NOTE: We do NOT recommend or support installing the Application Server software on a Windows Active Directory Domain Controller. 3.2 Target PC Requirements - Campaign Manager When using Campaign Manager then the specification should be significantly higher and depends on the amount of users, call rates and campaigns. As a minimum it should be increased to: 4GB RAM Intel Xeon processor 3.3 VMWare Ready The Application Server has been certified as VMWare Ready. 3.4 Mitel MCD Requirements Minimum MCD Version 10+, Release v4.1 Xarios Application Server MiTAI License MiTAI support enabled in the Class of Service for each device (endpoint\trunk) that needs to be monitored. o HCI/CTI/TAPI Call Control Allowed enabled o HCI/CTI/TAPI Monitor Allowed enabled The following endpoints are supported: Mitel 5xxx IP Endpoints, Hot Desking Users, Single Line Endpoint, Multi Line Endpoint, Key Systems, Generic SIP (limited features) The following trunks are support: Digital PRI & BRI, SIP Trunks and Analog Trunk Single instance configuration Non resilient MiTAI connections Version 3.0 Page 5 of 91 Application Server Technical Manual Xarios Ltd. 3.5 Mitel 5000 Requirements System OAI Events & Third Party Call Control enabled in premium features. If Hot desking in a multi-site environment, the ‘Remote ACD Hunt Groups’ premium feature is also required. 3.6 Feature Requirements In order for logging and alarm notification to work, a valid email address and an SMTP server are required. If using Web Call-back, a POP3 email account is required. Time Sync and Night Mode features require the use of a keyset to perform feature code operations. In order to use SMS for Alarm Notification and Phone Manager SMS a Fixed Cellular Terminal (FCT) and spare USB 2.0 port is required. 3.7 Software Limitations Xarios Application Server will support up to 250 Phone Integrator clients or Phone Manager clients connected at any one time. Version 3.0 Page 6 of 91 Application Server Technical Manual 4 Xarios Ltd. Installation Xarios Application Software has been designed with ease of use in mind so that Mitel resellers and end users can install, configure and support the applications with the minimum of training. To install Xarios Application Server successfully, follow the instructions set out below. 1. Xarios Application Server requires Microsoft .Net Framework v4.0 Full version to be installed first. This can be found at Windows Update, the Microsoft downloads website on the disk provided or on the Xarios Application Server website. 2. Restart the computer if prompted to do so. 3. Run the Xarios Application Software setup and restart if prompted to. 4. Ensure the USB dongle is installed in the computer after the Application Server has been installed. If you are using a software license, a USB dongle is not required. 5. Launch the Configuration tool to the system tray and ensure the license is being read correctly and the database connectivity is tested. 6. Application Server can now be administered using a web browser. Note: Only Server versions of Microsoft Windows support running more than a single website so during installation the default website will be stopped. The installation is available in two different files. A complete installation is available that contains all of the pre requisites required including SQL Server Express, SQL Server Express Management & the Dongle Drivers and this file is about 300MB in size. A minimal installation is also provided that does not contain any of the pre requisites and can be used if they are already installed or for upgrading existing installs and this files is about 35MB in size. To start the installation run the setup file provided, and follow the instructions below. Version 3.0 Page 7 of 91 Application Server Technical Manual Xarios Ltd. Click on Next> to continue. Figure 4.1 Click on “I accept the terms in the license agreement” to continue and press Next > Figure 4.2 Enter your User Name and Organisation then click Next >. Figure 4.3 Version 3.0 Page 8 of 91 Application Server Technical Manual Xarios Ltd. Select the Complete setup and click Next> Figure 4.4 If the default SQL Server database is been installed then the connection details will already be completed. If a different database is been used then enter the correct details in here and click Next>. Figure 4.5 The Application Server website can be configured to work on a different IP Address, if left blank then all addresses will be used. The TCP Port can be changed from the default of 80 and optionally any host header values can be used. Click Next > to continue. Figure 4.6 Version 3.0 Page 9 of 91 Application Server Technical Manual Xarios Ltd. Click on Install to start the Xarios Application Server installation. Figure 4.7 The installation may take about 30 minutes to run depending on the performance of the server and what needs to be installed. Upgrading existing installation where SQL Server is already installed will take a siginfacnlty shorter time. Other windows may also appear during setup these will close automatiocally so do not close them. When the installation is complete click on Finish and Xarios Application Server Configuration Tool will automatically start. Figure 4.8 Once installed the Application Server administration website is by default installed on port 80 and can be accessed from other servers on the network. When the Application Server is installed a default user account is created to allow access to the web site. The details are shown in Table 4.1 Version 3.0 Page 10 of 91 Application Server Technical Manual Xarios Ltd. Username: Password: engineer appserver Table 4.1 Open a web browser and got: http://appserver and the logon page, as shown in Figure 4.9, should be displayed. Figure 4.9 Entering the default username and password should the enable access to the configuration website. 4.1 Licensing The Application Server is licensed in two different modes depending on the features and telephone system connecting to. 4.1.1 Mitel 5000 If this was provided with a Mitel 5000 telephone system and only Phone Manager Standard clients were requested then a limited software license key is provided. If any other modules or clients were needed then a full software or hardware USB dongle license is required. 4.1.2 Mitel MCD If only Phone Integrator TAPI license were required then a limited software license key is provided. If any other modules or clients were needed then a full software or hardware USB dongle license is required. 4.1.3 License Validation Once the Application Server is installed, the licensing needs to be checked for the following reasons: Version 3.0 Page 11 of 91 Application Server Technical Manual Xarios Ltd. 1. Ensure that the dongle is being read correctly by the software (if applicable). 2. Ensure that the correct license has been shipped. 3. If a software based license is being used Application server must be registered before use. The license can be viewed on the system tray configuration tool as shown in Figure 4.10. Figure 4.10 The license status can also be viewed from the Licensing tab on the Status page on the website as shown in Figure 4.12. If no license details are shown, as in Figure 4.11, then click on the requery license link at the bottom of the page to refresh the details. Version 3.0 Page 12 of 91 Application Server Technical Manual Xarios Ltd. Figure 4.11 Figure 4.12 4.1.4 Registering a Software license Software licenses must be registered at http://www.xarios.com using the licensing form on the system tray configuration tool. Version 3.0 Page 13 of 91 Application Server Technical Manual Xarios Ltd. To register a software license, a license request file must be generated on the Application Server. The license request file can then be uploaded to http://www.xarios.com and a corresponding License file downloaded. Note: A user account for the http://www.xarios.com is required to perform a software registration. Access to http://www.xarios.com is only available to authorized Mitel dealers. Figure 4.13 Software Licensing Steps: To register a software license, load the Licensing Status form from the configuration application and wait for the Validating license message to disappear. Once this occurs, the Register button will become enabled. Clicking this button will load the form show in Figure 4.13. Enter the Site Id and Serial Number into the boxes provided. The Site Id and Serial Number can be found on the back of the Application Server CD that was distributed with the telephone system. Press the Create a license request file button. At this stage the folder selection form will appear, select the location you wish to save the license request file. Logon to the Xarios portal at http://portal.xarios.com and on the first page after you have logged in follow the Need to license your software? Click here! link to register your software as shown in Figure 4.14. Version 3.0 Page 14 of 91 Application Server Technical Manual Xarios Ltd. Figure 4.14 Follow the instructions on the web site. Upload the license request file created earlier and download the License file. (If necessary this stage can be performed on a separate PC if the Application Server has no Internet access) Once the license file has been downloaded from the website, go back to the Registration form within Application Server and press the Process License button. Your software is now licensed! 4.1.5 Hardware USB Dongle Licensing If a USB license dongle is provided this should be connected to a spare USB 2.0 port on the same server that the Application Server was installed and should be done after this installation. If installing into a virtualised environment then the host needs to support native USB pass through to the client operating system that the Application Server was installed on. When the dongle is connected it will be detected and then displayed in Windows Device Manager as shown in Figure 4.15. It will be shown under Universal Serial Bus Controllers -> SafeNet USB SuperPro/UltraPro. Version 3.0 Page 15 of 91 Application Server Technical Manual Xarios Ltd. Figure 4.15 Version 3.0 Page 16 of 91 Application Server Technical Manual Xarios Ltd. 4.2 Initial Configuration When the installation is complete the Application Configuration Tool needs to be run to create or update the database that is used – BEFORE the Application Service is started. 4.2.1 Database Connection Application Server uses a Microsoft SQL Server Express database to store configuration and data. To configure the database settings from the Application Server desktop select the shortcut from Xarios -> Application Server -> Launch Configuration Tool this will display the Application Server icon in the system tray. Figure 4.16 Right click on the icon as shown in Figure 4.16 to display the SQL Database Settings form shown in Figure 4.17. Version 3.0 Page 17 of 91 Application Server Technical Manual Xarios Ltd. Figure 4.17 Check to ensure the details are correct and then click on the Test button and this will validate the connection details and display message with the results. 4.2.2 Migrating Version 1.x Database Application Server version 1.x used Microsoft Access Databases to store configuration and data. Application Server version 2.x provides a method for migrating the existing data into the SQL Server database so that configuration and data is not lost. Select the Migrate button shown in Figure 4.17 will display the Data Migration utility as shown in Figure 4.18. Version 3.0 Page 18 of 91 Application Server Technical Manual Xarios Ltd. Figure 4.18 When migrating the data simply follow the instructions on screen. The databases to be migrated are call AAS.mdb and Contacts.mdb. If the Application Server was upgraded from version 1.x then the files will be found in the route of the Application Server version 2 install (Default location: C:\Program Files\Xarios\Xarios Application Server\Application Server). 4.2.3 Website Connection The Application Server uses a web based management tool to enable the configuration to be set. NOTE: If this is been installed on a non-Windows Server Operating System, i.e. Windows XP Professional, then only a single website can be running at once. Any other website will be disabled once this has been installed. During the installation process you can configure what IP Address, TCP Port and Host Header values to use. To change these value use the Microsoft IIS Management tool. Using the default installation values the web site within IIS should be similar to that shown in Figure 4.19. Version 3.0 Page 19 of 91 Application Server Technical Manual Xarios Ltd. Figure 4.19 The TCP Port that is used to launch the web site using the Application Settings menu option can be configured from the System Tray menu option shown in Figure 4.20. NOTE: This needs to match the configuration within Microsoft IIS. Figure 4.20 For Windows XP/2003 installation as the website uses ASP.NET v2.0 and this needs to be enabled in IIS as shown in Figure 4.21. If this is not enabled then the website may display a HTTP 404 Not Found error. Version 3.0 Page 20 of 91 Application Server Technical Manual Xarios Ltd. Figure 4.21 4.2.4 Telephone System Connection The Application Server needs to be configured to connect to the telephone system. From the website select Server Configuration -> Systems on the as shown in Figure 4.22. For details on configuring the PBX details see the Server Configuration section. Figure 4.22 Once configured the Application Server Service should be started. If connection to the PBX is successful the system tray configuration tool will display a solid green icon. The System Status icon on the website for the Application Server Service page will also change from red to green as shown in Figure 4.23. Version 3.0 Page 21 of 91 Application Server Technical Manual Xarios Ltd. Figure 4.23 4.2.5 Starting the Application Server Service The Application Server service can be started from the Configuration tool. Right click on the system tray icons and select the Service Control -> Start Application Server menu as shown in Figure 4.24. Figure 4.24 It can also be started from the service.msc as shown in Figure 4.25. Figure 4.25 Version 3.0 Page 22 of 91 Application Server Technical Manual Xarios Ltd. 5 Server Configuration The Server Configuration section of the website enables the telephone system connection details to be configured and the email and technical support options. Figure 5.1 5.1 Systems This section of the website allows configuration of all information regarding the telephone system that Application Server will be connecting to. To access the Systems section select Server Configuration -> Systems from the menu or select the Systems icon as shown in Figure 5.1. 5.1.1 Settings If no telephone system has been configured then a new connection can be created by selecting the New link as shown in Figure 5.2. Figure 5.2 This will then display the Connection Settings window as shown in Figure 5.3. Version 3.0 Page 23 of 91 Application Server Technical Manual Xarios Ltd. Figure 5.3 Depending on the system type connecting to some of the details may not be displayed. 5.1.1.1 Name Enter a user friendly description for this connection. 5.1.1.2 System Type Select the type of PBX connecting to, either a Mitel 5000 or Mitel Communications Director (MCD). 5.1.1.3 Host / IP address The hostname or IP address for the telephone system 5.1.1.4 Password The CTI connection password for the telephone systems; this only applies to the Mitel 5000. 5.1.1.5 Port The TCP/IP port number used to connect to the CTI connection; this only applies to the Mitel 5000. 5.1.1.6 Backup connections settings For Mitel 5000 telephone systems only, these settings mirror that of the main connection settings but will be used when no connection to the main telephone system can be established. Once a connection to a backup system has been established Application Server will not reconnect back to the main system until it has lost connection to the backup or the Application Server is restarted. Backup connection settings can be used in multi-node environments so that Application Server connects to a local system when the WAN link is down. Version 3.0 Page 24 of 91 Application Server Technical Manual Xarios Ltd. 5.1.1.7 Device Information Tabs The Systems page displays tabs for each of the device types that are available on the telephone system. Depending on the type of telephone system this information can be downloaded automatically, see Table 5.1 for details. Telephone System Mitel 5000 Mitel MCD Device Setup Automatic Manual Table 5.1 Note: A successful connection to the telephone system by the Application Server must be established first for the devices to download. Some device types are not required to be programmed for each type of telephone system, Table 5.2 shows what types are required. See the Retrieving Device Information section for details on how to manually retrieve the information. Device Type Agents Endpoints Speed Dials Trunks SIP Trunks Feature Codes Hunt groups Voice Mail Ports Mitel 5000 Mitel MCD Table 5.2 Note: The Mitel MCD does not have trunk numbers for individual SIP trunks so these do not have to be configured. To create a new device, select the relevant device type tab and then click on the New link as shown in Version 3.0 Page 25 of 91 Application Server Technical Manual Xarios Ltd. Figure 5.4 . Figure 5.4 This will then expand to enable to details to be entered and entries can either be created individually or by selecting the Multiple option, ranges can be created as shown in Figure 5.5. Version 3.0 Page 26 of 91 Application Server Technical Manual Xarios Ltd. Figure 5.5 5.1.1.8 Retrieving Device Information Depending on the type of telephone system connecting to the device information can be automatically retrieved and for other systems the information needs to be manually entered. The next sections describe how to retrieve the information required from the telephone systems. Mitel MCD Digital Trunks To retrieve the PRI and BRI digital trunk information select the Digital Trunks page from the MCD programming interface as shown in Figure 5.6. The trunks numbers are shown underneath the Trunk Number column. This example shows the BRI trunk numbers as been 250 – 253 and the PRI trunk numbers starting at 560. NOTE: These need to be configured in the Trunks section of the Application Server. Version 3.0 Page 27 of 91 Application Server Technical Manual Xarios Ltd. Figure 5.6 Analog Trunks To retrieve the Analog trunk information select the Analog Trunks page from the MCD programming interface as shown in Figure 5.7. The trunks numbers are shown underneath the Trunk Number column. This example shows the analog trunks starting from 260. NOTE: These need to be configured in the Trunks section of the Application Server. Figure 5.7 Voice Mail Ports To retrieve the Voice Mail port information select the VM Ports page from the MCD programming interface as shown in Figure 5.8. The directory numbers are shown underneath the Prime Directory Number column. This example shows the directory numbers starting at 2400. NOTE: These need to be configured in the Extensions section of the Application Server. Version 3.0 Page 28 of 91 Application Server Technical Manual Xarios Ltd. Figure 5.8 Devices To retrieve the Device information select the User and Device Configuration page from the MCD programming interface as shown in Figure 5.9. The device numbers are shown underneath the Number column. All of the devices shown in the this form need to be entered including User and Device and Hot Desking User. NOTE: These need to be configured in the Extensions section of the Application Server. Figure 5.9 5.2 SMTP Configuration Email functionality is used in various parts of the Application Server; for logging, alarm notification and Web Callback. If any of these features are being used it is important first to configure and test these settings. Version 3.0 Page 29 of 91 Application Server Technical Manual Xarios Ltd. 5.2.1 Configuration The email configuration window shown in Figure 5.10 enables the site specific details to be configured and then tested. Figure 5.10 5.2.1.1 SMTP Server The IP address or the hostname of an SMTP server that can be used to send emails. 5.2.1.2 Source Email Address The email address that will be used as a source address when sending emails 5.2.1.3 Enable Authentication If the SMTP server being used requires authentication to send emails then this box needs to be checked and the Username & Password text boxes must be completed. 5.2.1.4 Enable SSL If SSL encryption is required for email authentication enable this with this checkbox. 5.2.1.5 Port If a different SMTP port is required to be used then enter it here. 5.2.1.6 Username Enter the Username for authentication, if required. Version 3.0 Page 30 of 91 Application Server Technical Manual Xarios Ltd. 5.2.1.7 Password Enter the Password for authentication, if required. 5.2.1.8 Testing To ensure the email settings have been configured correctly they must first be tested. Pressing the Test button will prompt the user for a destination email address to send a test email to. Send an email and check that it has been successfully received. 5.2.2 Email Groups Email groups are used in various features of Application Server. Multiple email address can be grouped together to speed up configuration in other parts of the application. 5.3 Support The Support section is used for technical support and diagnostic reasons. These setting should only be changed under instruction from a qualified engineer, as shown in Figure 5.11. Figure 5.11 5.3.1 Logging Tab This option is used to enable or disable telephone system communication logging. 5.3.1.1 PBX events This configures the Application Server to log communication to the telephone system CTI connection. 5.3.1.2 Advanced Logging If Advanced Logging is selected more detailed logging information is recorded. 5.3.1.3 Log client communications This configures the Application Server to log communication from all clients. 5.3.1.4 Maximum log file size This defines the maximum size of each log file. Version 3.0 Page 31 of 91 Application Server Technical Manual Xarios Ltd. 5.3.1.5 Email logs Email logging allows the Xarios Application Server to send OAI logs to a specified email address. Please note that the SMTP server is required to be configured on the Email / SMS tab of the Application Server for email logging to work. 5.3.1.6 Email group The email address the logs are to be sent to. Note: The logging features should only be enabled when instructed to do so by an engineer. Enabling logging all the time will have an adverse effect on the performance of the software and use a significant amount of hard disk space. 5.3.2 Dealer Tab This section allows additional support details to be added to Xarios products. Contact details and dealer logos can be imported into Xarios products, including Phone Manager and Phone Integrator so end users have the correct support details for the dealer. Dealer name, Phone number, Website address – These details will be visible via the Phone Manager or Phone Integrator About section. 5.3.2.1 Enable Heart Beat The Heart Beat is used to allow the maintainers of your Xarios Application Server to support your software. To enable your maintainer to view details of your Application Server enable this checkbox. Note: The server running Xarios Application Server is required to have internet access and allow traffic out over port 80. Version 3.0 Page 32 of 91 Application Server Technical Manual Xarios Ltd. 6 Client Options As well as hosting a variety of applications, the Application Server accepts client connections from Phone Manager or Phone Integrator clients. The following settings specify the network and dialling settings for clients that will connect to the Application Server. This section can be accessed from the Client Options menu as shown in Figure 6.1. Figure 6.1 Any changes to these settings require the Application Server to be restarted before taking effect. 6.1.1 Settings Tab These settings allow you to configure how the clients connect to the Xarios Application Server and what access is available as shown in Figure 6.2. Some of the options are only applicable to specific telephone system configurations. Version 3.0 Page 33 of 91 Application Server Technical Manual Xarios Ltd. Figure 6.2 6.1.1.1 User Access vs Extension ID Access In previous version of Application Server all client connections were based upon the extension number only. Application Server version 2 introduced user based security for the following benefits: Clients can be configured to use only a specific endpoint Phone Manager clients can be configured to use only a specific agent ID Instant messaging between Phone Manager clients is user based only so that you can be confident of who you are communicating with To offer backwards compatibility and easier configuration Application Server still supports Extension only based connections. The Extension id access check box is used to configure whether Application Server should support extension only connections or whether it requires a user to be authenticated when a client is connecting. Note: With Extension id access enabled, Application Server will accept connections from older version 1.4 clients. 6.1.1.2 Extension based Access On Mitel 5000 series PBXs the Extension based connections can now be secured using the Passcode that is configured against the endpoint in Mitel Database Programming. Each client that connects will then need to provide this password when connecting. This prevents any client from entering any extension number to connect to without priori authentication. Version 3.0 Page 34 of 91 Application Server Technical Manual Xarios Ltd. 6.1.1.3 Standard User Access vs Active Directory When users are connecting a client to Application Server with a user account, they can do so in one of two ways. Standard Access – User accounts and passwords are manually created on Application server and clients must enter a username and password when connecting. Active Directory Access – User account details are imported from an Active Directory domain and users connecting clients are authenticated against these Active Directory users. Selecting Active Directory access allows a valid username and password to be entered that is used to connect to Active Directory as shown in Figure 6.3. NOTE: This account must have the correct permissions to be able to do this, a standard user account is normally sufficient. It does not have to be a Domain Admin. Figure 6.3 6.1.1.4 Connection Settings Listening address If there is more than one IP address on the server running the Xarios Application Server the correct IP address to listen for connections from a client can be selected from the drop down box. If you require client connections to be accepted on all IP addresses on the server select the All option from the drop down menu. Version 3.0 Page 35 of 91 Application Server Technical Manual Xarios Ltd. Secure listening port Specify the secure TCP/IP port used by the server to listen for client connections; this will need to be set on all clients to connect to the Xarios Application Server. Listening port Specify the TCP/IP port used by the server to listen for client connections; this will need to be set on all clients to connect to the Xarios Application Server. Secure remoting port Specify the TCP/IP port used by the server to listen for client connections; this will need to be set on all clients to connect to the Xarios Application Server. Unsecure remoting port Specify the TCP/IP port used by the server to listen for client connections; this will need to be set on all clients to connect to the Xarios Application Server. Admin remoting port Specify the TCP/IP port used by the server to listen for administration connections, this should not be changed. Professional password Specify the password used by clients requesting a Professional license to gain access to the server. This will need to be set on the clients to connect to the Xarios Application Server with a Professional license. Team Leader password Specify the password used by clients requesting a Team Leader license to gain access to the server. This will need to be set on the clients to connect to the Xarios Application Server with a Team Leader license. Only applies to Phone Manager clients. 6.1.2 Dial Patterns The dial patterns section allows you to specify the dialling settings for your local area. These are required to be set before any clients connect to the Xarios Application Server. To enable the default settings for a particular region simply select the region from the drop down box and click on the load country default settings link as shown in Figure 6.4. Version 3.0 Page 36 of 91 Application Server Technical Manual Xarios Ltd. Figure 6.4 6.1.2.1 Country Select the country from the drop down menu that the telephone system resides in and then select the Set button. This will put the default settings in for the country that has been selected. 6.1.2.2 International Outbound Code Set the international outbound code that is required to dial international numbers excluding the code to obtain an outside line. 6.1.2.3 International Code Set the country code of where the telephone system resides. 6.1.2.4 Outside Line Select the digit that is used to gain an outside line on the telephone system; in default this is set to 8. 6.1.2.5 Toll Digit Select the toll digit, in the UK the toll digit should be set to 0 and for the US this should be 1. 6.1.2.6 Local Area Codes Enter the local area code for the area that the telephone system resides in. Version 3.0 Page 37 of 91 Application Server Technical Manual Xarios Ltd. 6.1.2.7 Local Override Codes Enter the local area code for calls that are treated as long distance calls. 6.1.2.8 Outbound Prefixes If a prefix is required to be dialled before the outbound number is dialled enter the prefix in the section, i.e. LCR (least cost routing) digits. 6.1.2.9 Service Codes Enter the service codes that are dialled from the telephone system. Any numbers here will be dialled as though they are an outside number, i.e. if 911 is dialled then 8911 will actually be dialled with the outside line digit prefixed. 6.1.2.10 Max Endpoint Length Select the maximum length of an endpoint on the telephone system; in default this is set to 4. If this is not set correctly then dialling an endpoint may result in an external call been made. 6.1.2.11 Number Length Enter the number of digits in a telephone number where the telephone system resides, this should include the local area code and the toll digit. 6.1.2.12 Dial Toll on long Distance Calls Enable this if the toll digit should be added to long distance calls. 6.1.2.13 Dial Toll on Local Calls Enable this if a toll prefix should be added to all locally dialled calls. 6.1.2.14 Dial # A pound / hash (#) can be automatically added to the dial string to send the call to the telephone system immediately without waiting for the timeout. 6.1.2.15 Dial Primary Local Area Code If local area codes are to be dialled please enable this option, if this is left unchecked then when a local area code is dialled Phone Integrator automatically removes the locally dialled area code. If the Dial Local Area Code is enabled the first area. 6.1.3 Directory The directory section of Application Server is used to configure the user and computer accounts that will be connecting to the Application Server. 6.1.3.1 Standard Access / Active Directory Access If Standard Access has been select under the Settings then Users, Computers and Groups must be manually configured here, as shown in Figure 6.5. Version 3.0 Page 38 of 91 Application Server Technical Manual Xarios Ltd. Figure 6.5 If Active Directory Access has been selected then the Users, Computers and Groups will automatically be imported from the domain. 6.1.3.2 Domains When using Active Directory Access the domains tab will appear on the Directory window as shown in Figure 6.6. If the Application Server is a member of a domain selecting the query domain link will automatically search for all the domains that are available and populate the domains table. If the domain you require is not visible then you can add the domain manually. NOTE: Multiple domains can be added as long as the username and password details have permissions across all the domains. Version 3.0 Page 39 of 91 Application Server Technical Manual Xarios Ltd. Figure 6.6 6.1.3.3 Creating Domains Before the User, Computer and Group objects are queried from Active Directory domain the relevant domain details need to be created. From the Domains tab, shown in Figure 6.6, select the Query Domains option and if the Application Server is a member of any domains then they will automatically appear. If the server is not connected to a domain then select the New Domain option to manually create it, as shown in Figure 6.7. Figure 6.7 Distinguished Name The distinguished name (often referred to as a “DN”) uniquely identifies an entry in the Active Directory for the domain. If you have a domain called “Xarios.net” then you would enter “dc=xarios.net”. The Application server would then query the entire domain for User, Computer and Group objects. Version 3.0 Page 40 of 91 Application Server Technical Manual Xarios Ltd. In large Active Directory domains there may be a significant amount of information that is retrieved, so to restrict the area of the domain that is queried the Distinguished name can include Organisation Units. For example you may have an Organisation Unit called “Sales” and only the Sales users will be using the clients. Entering “ou=sales,dc=xarios,dc=net” would only bring back objects beneath this. Sub-domains can also be supported by entering multiple “dc=” values, for example if there is a domain called “sales.xarios.net” then “dc=sales,dc=xarios,dc=net” would be entered. Pre 2000 Name Enter the pre-Windows 2000 name of the domain. For example if the domain is called “xarios.net” this would normally be “xariosnet” and for “sales.xarios.net” this would be “salesxariosnet”. Domain Host Enter the DNS name of the domain controller that the Application Server will use to query for the information. NOTE: This is only required if the Application Server is not a member of the relevant domain. Domain Port Enter the TCP port that will be used to query the Active Directory information, this is the LDAP port and the default is 389. Active Select this option to enable this domain to be used. 6.1.3.4 Editing Domains Once the domain has been created it will be displayed as shown in Figure 6.8. Figure 6.8 Selecting the will cause the Application Server to retrieve the information from the domain. To edit the details click on and to delete the domain select . Version 3.0 Page 41 of 91 Application Server Technical Manual Xarios Ltd. 6.1.3.5 User objects Each user object can be used by a client to authenticate with Application Server. Only one instance of a User can be used by a client at any one time. By assigning an Agent ID to a User object a connecting Phone Manager client will automatically know which Agent ID to log that extension in with. 6.1.3.6 Computer Objects Computer objects can be used to map physical endpoint to computers. By doing this the need for users to type in the extension they are sitting at is removed when connecting with a client. 6.1.3.7 Group Objects Group objects are solely used in Application Server to assign configuration files. 6.1.3.8 Configuration Files Each part of a client’s configuration is saved in an XML file. Application Server provides the ability to store configuration files centrally and then assign them to Users, Computers and Groups so that end-users don’t have to go through the configuration of client. Once a configuration file has been assigned to a client the configuration of that part of the application will become Read-Only. For more on configuration files please see the Configuration Files section of the manual. 6.2 Configuration files Configuration files are XML files used by clients to dictate how features work and are displayed to the end user. For example: The DSS window within Phone Manager, the icons displayed and the columns selected are saved with in a file called DSS.xml. Using the Config Files window in Application Server it is possible to centralize these files and assign them to Users, Computers or Groups. Any assigned configuration files are downloaded by a client upon connection and are applied throughout the application. Once a configuration file has been assigned to a certain area of the application, all settings in that area become Read-Only to the end user. The priority in which configuration files are applied is as follows: 1. User 2. Group 3. Computer This means that a file applied a User level will always take precedence over a file assigned at Computer level. Version 3.0 Page 42 of 91 Application Server Technical Manual Xarios Ltd. 6.2.1.1 File Types The files shown in Table 6.1 can be centralised and assigned to Phone Manager and/or Phone Integrator clients: File Name Description DSS.xml Stores configuration about icons loaded on the DSS window Column selection and widths for the call banner Button selection and configuration for the toolbar Configuration for the custom button on the call banner Configuration for the application hot keys Stores the personal directory entries. Stores the banner colour configuration Stores the security configuration for the clients FieldList.xml Toolbar.xml CustomButton.xml HotKeys.xml PersonalDirectory.xml BannerColor.xml SEC.xml Phone Manager Phone Integrator Table 6.1 6.2.1.2 Managing A configuration file must be created from an existing Phone Manager or Phone Integrator client and then uploaded to the Application Server from the Config files section shown in Figure 6.9. Figure 6.9 6.3 Contacts The contact sections allows for contacts and DDI information to be imported into the Application Server. This information is then provided to the clients to provide them with extra information relating to the calls they make or receive. Caller id (CLI) mapping information can also be imported to allow the outgoing CLI to be altered depending on the number dialled. Version 3.0 Page 43 of 91 Application Server Technical Manual Xarios Ltd. To access this section select Client Options -> Contacts from the main menu or the Contacts icon from Figure 6.1. Figure 6.10 6.3.1 Contacts database The Application Server provides a central contacts database that enables extra information to be associated with a particular caller id. When an inbound or outbound call is placed this information is then provided through to the clients and can be displayed on the call banner and used within Application Support. The Application Server can import data from several different types of data source and can be scheduled so that it refreshes this information on a set period. 6.3.1.1 Import source The contacts import supports multiple different import sources. To create a new import source click on the New Contact Import Source button to display the import configuration as shown in Figure 6.11. Figure 6.11 Version 3.0 Page 44 of 91 Application Server Technical Manual Xarios Ltd. Depending on the type of import source selected different options will be shown. Text File This requires a text file saved in CSV format to be used as the data source as shown in Figure 6.12. Figure 6.12 Description: Enter a useful description that describes this data source. File Path: Browse to the file path of where the file containing the contacts is located. This path is referenced by the Application Server service and need to be accessible from the account that is running the service. Field Separator: Select how the fields separating the contacts and telephone numbers in the file to be imported are separated from the drop down box. Text Identifier: Select the character used to identify where a text string for a contact starts and ends. Order: The order in which this import will be run relative to any other import sources configured. Maximizer This enables the contacts from a Maximizer database to be imported into the contacts database. The settings shown in Figure 6.13 needs to be configured. Figure 6.13 Version 3.0 Page 45 of 91 Application Server Technical Manual Xarios Ltd. Description: Enter a useful description that describes this data source. DSN Name: This needs to be set to the DSN data source for the Maximizer database. This should be in the format of “DSN=maxserver”. Order: The order in which this import will be run relative to any other import sources configured. ODBC/OLEDB This enables an ODBC/OLEDB compatible database to be used to import contacts into the Application Server. The settings shown in Figure 6.14 needs to be configured. Figure 6.14 Description: Enter a useful description that describes this data source. Connection string: This needs to be set to the DSN data source for the ODBC/OLEDB database. This should be in the format of “DSN=dbserver”. Alternatively a valid database connection string can be used. Depending on the connection string used the valid database driver will need to be installed on the Application Server. Version 3.0 Page 46 of 91 Application Server Technical Manual Xarios Ltd. For help in determining what the connection string should be this web page can be a useful reference (this is an external link, Xarios are not responsible for its contents): http://www.connectionstrings.com Command Text: Enter the T-SQL command that is used to retrieve the information from the database. For example: “SELECT myfield1, myfield2, myfield3 FROM MyDatabase”. Command Type: Enter the type of T-SQL command that is been used, this can either by standard SQL or a stored procedure. Order: The order in which this import will be run relative to any other import sources configured. Mapping Import Fields: The mapping of the fields returned from the import source to the fields within the contacts database is done by entering the field number into the associated text boxes labelled (Telephone, Name, Field 3, Field 4, Field 5, Field 6, Field 7, Field 8, Field 9, Field 10) For example If the SQL statement “SELECT myfield1, myfield2, myfield3 FROM MyDatabase” is used this would map MyField1 to the Telephone contacts field, myfield2 to the Name contacts field and myfield3 to the Field 3 contacts field as shown in Figure 6.15. Figure 6.15 6.3.1.2 Data Option Select the type of import to perform, if Append/Update is selected then this will insert new records and update existing records, if Overwrite is selected then the contacts database will be cleared and replaced with the contents of this import. 6.3.1.3 Scheduled contacts import Select this to enable the import to be scheduled to run automatically. 6.3.1.4 Import Time Enter the time in hours and minutes when the import should run, for example 07:00 will import the contacts at 7am every morning. Version 3.0 Page 47 of 91 Application Server Technical Manual Xarios Ltd. 6.3.1.5 Advanced Schedule Check this to enable the import schedule to be run more than once a day. 6.3.1.6 Start Time / End Time When using the Advanced Schedule this sets the start and end times to run the import between. For example using a start time of 07:00 and 17:00 will only run the import between the hours of 7am and 5pm. 6.3.1.7 Interval (mins) When using the Advanced Schedule this sets the interval to import the contacts, for example every 10 minutes, between the hours set in the Start Time and End Time. 6.3.1.8 Run import on save Select the option to run the import as soon as Save is clicked. If Scheduled contacts import is also selected then it will automatically run at the next scheduled time. 6.3.1.9 Delete all To delete the current list of contacts stored in the Application Server database select this option. 6.3.2 DDI Mapping DDI Mapping provides a method to override the DNIS field on the phone system with custom details which is then provided through to the clients and can be displayed on the call banner. NOTE: This feature is only available on the Mitel 5000 telephone system. Figure 6.16 6.3.2.1 Enable scheduled DDI Mapping Import Set this to enable the DDI details to be imported at the scheduled time every day. NOTE: Imports can only be scheduled to run automatically once each day. 6.3.2.2 DDI Prefix If the records that you are going to import include the DDI prefix, this prefix needs to be entered into the DDI prefix section. When the import takes place this DDI prefix will then be Version 3.0 Page 48 of 91 Application Server Technical Manual Xarios Ltd. automatically removed so that the records match how the DDIs are presented to the telephone system. 6.3.2.3 Import Time Select the time that the DDI Mapping import file should be automatically imported every day. If any changes have been made to the file being imported the records will be updated. 6.3.2.4 File Path Browse to the file path of where the file containing the DDI information is located. 6.3.2.5 Field Separator Select how the fields separating the DDI and custom details in the file to be imported are separated from the drop down box. 6.3.2.6 Text Identifier Select the character used to identify where a text string for a DDI starts and ends. 6.3.2.7 Data Option Select the type of import to perform, if Append/Update is selected then this will insert new records and update existing records, if Overwrite is selected then the DDI database will be cleared and replaced with the contents of this import. 6.3.2.8 Run import on save Select the option to run the import as soon as Save is clicked. If Scheduled contacts import is also selected then it will automatically run at the next scheduled time. 6.3.2.9 Delete all To delete the current list of contacts stored in the Application Server database select this option. 6.3.3 CLI Mapping CLI mapping provides a method to override the CLI presented when a call is made using a client to a given number or range of numbers using the prefix to find a CLI to use. For example any calls made to 0161 could present one CLI and calls to 0151 could present another. Precedence as to the CLI presented is given to a closer match to the prefix of the number dialled. The format of the import file should be prefix first and then CLI. NOTE: This feature is only available on the Mitel 5000 telephone system. Version 3.0 Page 49 of 91 Application Server Technical Manual Xarios Ltd. Figure 6.17 6.3.3.1 Enable Set this to enable the feature and if set then the CLIs will be changed. 6.3.3.2 Scheduled Import Set this to enable the CLI details to be imported at the scheduled time every day. NOTE: Imports can only be scheduled to run automatically once each day. 6.3.3.3 Import Time Select the time that the CLI Mapping import file should be automatically imported every day. If any changes have been made to the file being imported the records will be updated. 6.3.3.4 File Path Browse to the file path of where the file containing the CLI information is located. 6.3.3.5 Field Separator Select how the fields separating the prefix and cli numbers in the file to be imported are separated from the drop down box. 6.3.3.6 Text Identifier Select the character used to identify where a text string for a CLI information starts and ends. 6.3.3.7 Data Option Select the type of import to perform, if Append/Update is selected then this will insert new records and update existing records, if Overwrite is selected then the CLI database will be cleared and replaced with the contents of this import. 6.3.3.8 Run import on save Select the option to run the import as soon as Save is clicked. If Scheduled import is also selected then it will automatically run at the next scheduled time. 6.3.3.9 Delete all To delete the current list of CLIs stored in the Application Server database select this option. Version 3.0 Page 50 of 91 Application Server Technical Manual Xarios Ltd. 7 Advanced Features The Advanced Features section enables the other Application Server modules and features to be configured. Some features are only available on certain telephone systems and may require additional licensing. To access the Advanced Features section select the Advanced Features link from the main menu bar as shown in Figure 7.1. Figure 7.1 7.1 Alarms Alarm Notification is used to send alerts of Application Server and PBX based alarms by email and SMS to support personnel. NOTE: Please note for SMS messages to be sent via cell phones to support staff, a fixed cellular terminal is required to be connected to the server running the Xarios Application Server. NOTE: Alarms are dependent on the telephone system connected to. The system can be configured to send all alarms to either a single or group of email address and SMS numbers. Each individual alarm can be configured to go to specific destination. When configuring each alarm individually a destination must be set for each alarm for it to alert. Version 3.0 Page 51 of 91 Application Server Technical Manual Xarios Ltd. Figure 7.2 Alarms will be forwarded to the destinations specified as soon as they are received by Application Server along with any corresponding clear messages. NOTE: Email and SMS groups can be configured from the Server Configuration section. 7.2 Auto Answer The Auto Answer feature gives the agent a burst of ringtone before a call is force fed to the agent. The amount of ringtone played before the call is force fed to the agent is configurable. NOTE: This feature is only available on the Mitel 5000 telephone system. Version 3.0 Page 52 of 91 Application Server Technical Manual Xarios Ltd. Figure 7.3 7.2.1.1 Enable Set to enable Auto Answer. 7.2.1.2 Delay Set the time in milliseconds after the call has started ringing at an extension before it will be automatically answered. 7.2.1.3 Agent List A list of all the agents on the phone system will be supplied in the Agent List. To enable Auto Answer for agents simply check the box against any agent whose calls need to be automatically answered. The list of agents is created when the Application Server connects to the phone system. If the list is blank, start the Application Server service and then re-open the settings window to see a full list of agents programmed on the system. 7.3 Call Recorder The Application Server support integration in the Xarios Call Recorder. This enables clients to be able to access the Call Recorder. All clients are able to tag recordings and pause/resume recording and Phone Manager clients are able to search and playback their own recordings. To access the configuration select the Advanced Feature -> Call Recorder from the main menu as shown in Figure 7.4. Version 3.0 Page 53 of 91 Application Server Technical Manual Xarios Ltd. Figure 7.4 7.3.1.1 Server Enter the IP Address or hostname of the Xarios Call Recorder and also the SQL Server instance details. By default this would be “CallRecorderHostName\Callrecorder”. 7.3.1.2 Username Enter a valid SQL server user name to connect to the Xarios Call Recorder database. By default there is an account configured on the recorder for this called “appserver”. 7.3.1.3 Password Enter a valid SQL server password to connect to the Xarios Call Recorder database. By default the password for “appserver” user is “callrecorder”. 7.3.1.4 Database This should be configured to be “CallRecorder”. 7.3.1.5 Web server This should be configured to be the IP Address or hostname used to connect to the web site for the Xarios Call Recorder. 7.4 Campaign Manager The Campaign Manager section enables the phone system specific configuration to be set for the Campaign Manager features to be used. For more detailed information on Campaign Manager see the Campaign Manager documentation. To access the configuration select the Advanced Feature -> Campaign Manager from the main menu as shown in Figure 7.5. 7.4.1 Settings This enables Campaign Manager to be enabled as shown in Figure 7.5. Version 3.0 Page 54 of 91 Application Server Technical Manual Xarios Ltd. Figure 7.5 7.4.1.1 Enable This enables the Campaign Manager feature. 7.4.1.2 ACD agent hunt group This should be set to the hunt group on the phone system that contains the ACD hunt group with the agent ids that are to be used with Campaign Manager. 7.4.2 Data Connection This enables to database that Campaign Manager uses to be configured as shown in Figure 7.6. Figure 7.6 7.4.2.1 Use default connection This sets Campaign Manager to use the default database installed with the Application Server. If a different database is to be used then the specific connection details can be entered as shown in Figure 7.7. NOTE: If an alternative database is been used then this must be running Microsoft SQL Server 2005/2008 with mixed mode authentication enabled. Version 3.0 Page 55 of 91 Application Server Technical Manual Xarios Ltd. Figure 7.7 Server: The name of the server hosting the database Database: The name of the database to use. Username: The username to use when connecting to the database. Password: The password to use when connecting to the database. 7.5 Hot Desking The Hot Desking feature provides hot desking or hoteling. To access the configuration for this feature select Advanced Configuration -> Hot Desking from the main menu. NOTE: This feature is only available on the Mitel 5000 telephone system. Figure 7.8 7.5.1.1 What does it do? Using Hot Desking, agents can log onto any keyset and still receive direct dialled, intercom and hunt group calls. Voicemail and keyset messaging will follow the agent as well as Version 3.0 Page 56 of 91 Application Server Technical Manual Xarios Ltd. outgoing caller id, username, description and class of service. When agents are logged out, calls can be forwarded to voicemail or any internal or external number. 7.5.1.2 How does it work? Hot Desking uses the concept of phantom devices on the telephone system to create a virtual keyset for all Hot Desking agents. Each phantom created has the same number as an associated Hot Desking agent id. When an agent log on to a keyset, calls are forwarded from the phantom to the agent’s location. When the agent logs out, calls are forwarded to their logged out destination. 7.5.1.3 What doesn’t it do? The way Hot Desking uses phantoms means that a couple of normal phone system features are changed: The DND feature does work when Hot Desking, but DND Override will not work Reverse transfer has to be entered using the physical extension the agent is logged into and not their phantom 7.5.1.4 Hot Desking Requirements Hot Desking requires the following capacity on the phone system. 1 phantom for each Hot Desking agent. 1 Extra phantom for the whole system if using class of service features. 1 ACD agent hunt group for agents to log in and out of. If agents need to log in across nodes, the ‘Remote ACD Hunt Groups’ premium features must be enabled. 7.5.1.5 Telephone System Programming 1. Create a phantom for each hot desk 2. Create an agent ID for each hot desk (The phantom numbers and the agent ID’s should match). 3. Program each phantom as if it were being used as the Hot Desker’s extension. 4. Program the username, description and give it a mailbox if required. 5. Point any direct dial numbers to the phantom devices. 6. Create an ACD agent hunt group for Hot Desking. 7. Add the Hot Desking agents to this hunt group. 8. Add the Hot Desking agents to any other hunt groups they need to be members of for inbound calls. 7.5.1.6 Basic Settings The Basic settings tab allows the core configuration values to be programmed, these need to match what is programmed on the telephone system. Version 3.0 Page 57 of 91 Application Server Technical Manual Xarios Ltd. Figure 7.9 Enable This option is used to turn the Hot Desking functionality on or off. If the box is greyed out, Hot Desking has not been licensed, please contact your Inter-Tel reseller to obtain a license for Hot Desking. Hot desking Hunt Group The number of the hunt group that has been programmed on the telephone system for Hot Desking. Initial logged out destination When Hot Desking first starts, this will be the initial destination for all phantoms when agents are not logged in. Default class of service (COS) keyset If the Change class of service option on the Advanced Tab is set, the class of service extension will be applied to all extensions when an agent logs out. Default outgoing CLI It the Change outgoing CLI option on the Advanced Tab is set, this CLI will be applied to all extensions when an agent logs out. Keyset programming password If a programming password has been set on the keyset enter the password in this field. 7.5.1.7 Advanced Options The advanced options relate to additional Hot Desking settings that can be set up. Version 3.0 Page 58 of 91 Application Server Technical Manual Xarios Ltd. Figure 7.10 Change class of service When selected, Hot Desking will change the class of service that is set on the phantom device onto the extension that the agent has logged into. This will enable the agent to only make calls that they are allowed to make and restrict calls that the agent is not allowed to make. Change username When selected, Hot Desking will change the username and description of the extension the agent logs into to match their phantom. Change station speed dials When enabled Hot Desking will change the station speed dial bins when an agent logs in so that they match the ones on the associated phantom. To leave the station speed dials in place leave this option unchecked. Clear local messages on login When enabled any messages on the extension will be cleared when the agent logs in. If this is left unchecked the extension messages and phantom messages will both be shown on the extension. Logged out messages When this option is not enabled, messages will only notify an extension when the Hot Desking is logged in. When selected, if calls are forwarded to another extension upon logout, this extension will be notified about the forwarding Hot Desking agent’s messages. Change outgoing CLI When selected, Hot Desking will change the outgoing CLI for the agent that has been set in the Agent specific settings. If this is left unchecked the Default outgoing CLI will be used. To set the Caller ID that should be applied to agents please enter the details into the Agent Specific Settings. Version 3.0 Page 59 of 91 Application Server Technical Manual Xarios Ltd. Clear settings on logout This option applies to changing the username on the extension. When selected, Hot Desking will clear the username and description on an extension when an agent logs out. If not selected, Hot Desking will return the previous username and description to the extension. Log agents out at midnight To overcome agents forgetting to log out at the end of the day, Hot Desking can automatically logout all Hot Desking agents at midnight. To automatically log agents out at midnight enable this checkbox. Save logged out destination When enabled the logged out destination will be saved and applied every time the agent logs out. If this is not enabled the "Initial logged out destination" will be applied if a forward is not applied to the phantom device. Example: Agent A is on sick leave. Agent A’s logged out destination is set to be Agent B’s Hot Desking ID. When Agent B logs in, they are notified about both Agent A and their own messages. 7.5.1.8 Screen Control Settings To allow Hot Desking to be able to control the screen on the extension these settings need to be completed. Figure 7.11 Enable To enable screen control for Hot Desking check this option. Prompt for pin If a PIN number is required to login enable this checkbox. Prompt for login minutes If a time limit is required for how long the agent should be logged in for enable this checkbox. Version 3.0 Page 60 of 91 Application Server Technical Manual Xarios Ltd. Agent ID length Enter the valid agent ID length in this field. Pin attempts If using PIN numbers to login select the number of PIN attempts that are allowed. Screen control CRA Enter the CRA that has been set up for screen control. In database programming the CRA has to be set up with enough long pauses in the day and night greetings so that the agent has time to enter their details, in default we would recommend at least 4 long pauses are set. Pin change CRA Enter the CRA that has been set up for changing the PIN for an agent’s login. In database programming the CRA has to be set up with enough long pauses in the day and night greetings so that the agent has time to enter their details, in default we would recommend at least 4 long pauses are set. 7.5.1.9 Agents The agent specific settings allow different outgoing CLI to be given when an agent is logged into an extension. A pin number can also be set which has to be entered when the agent logs in. Version 3.0 Page 61 of 91 Application Server Technical Manual Xarios Ltd. Figure 7.12 The above shown in Figure 7.12 is an example of the agent specific settings. The agent IDs and descriptions are read in from the phone system. To set a different outgoing CLI for the agent enter the desired CLI in the corresponding Caller ID field. If a pin number is required for logging agents in enter the pin number in the PIN field. 7.6 Messaging This feature enhances voicemail functionality so that a single message can notify more than one extension. An example of this is where the recall destination of a hunt group is set to voicemail and typically the supervisor is the only extension with the notification of outstanding mail. NOTE: This feature is only available on the Mitel 5000 telephone system. Multiple message notification will replicate the message light on a list of additional devices as long as a message is outstanding on the primary extension configured. 7.6.1 Settings The Settings tab enables the feature to be enabled. Version 3.0 Page 62 of 91 Application Server Technical Manual Xarios Ltd. Figure 7.13 Enable To enable multiple message notification this checkbox needs to be enabled. Duplicate Extension Messages To duplicate voicemail notification on extensions this checkbox needs to be enabled. 7.6.1.1 Duplicate Extension Mailboxes are added by first inputting the primary extension, and then adding the duplicate extension, additional extensions can be duplicated by separating the extensions with a comma. The process must be repeated for each additional duplicate mailbox. Figure 7.14 7.7 Night Mode Night Mode enables the telephone system to be placed into Night Mode based upon a defined schedule automatically. NOTE: This feature is only available on the Mitel 5000 telephone system. Version 3.0 Page 63 of 91 Application Server Technical Manual Xarios Ltd. Figure 7.15 7.7.1 Settings The Settings tab enables the feature to be enabled and basic settings to be configured. 7.7.1.1 Enable night mode control To enable night mode control this checkbox must be enabled for the Night Mode module to work. 7.7.1.2 Feature Code Enter the feature code that is used to put the Inter-Tel phone system into night mode. The night mode code by default is 9860. 7.7.1.3 Admin keyset Enter the extension number of the administrator keyset used to put the Inter-Tel phone system into night mode. Please note the extension has to be idle at the time when the phone system needs to be put into/taken out of night mode. 7.7.1.4 Same time all week If the phone system is to go into and come out of night mode at the same times each day, Monday to Sunday then enter the times that this should be done in the turn on and turn off boxes. 7.7.2 Daily Settings If the night mode settings change from day to day, the advance settings must be used, which allows daily settings for night mode to be made. To keep the system in night mode throughout the weekend, the on and off times should be the same. Version 3.0 Page 64 of 91 Application Server Technical Manual Xarios Ltd. Figure 7.16 7.8 SMS SMS integration can be used with Xarios Phone Manager and a fixed cellular terminal to send SMS messages from Phone Manager Clients. NOTE: This feature is only available on the Mitel 5000 telephone system. 7.8.1 Basic The Basic tab enables the feature to be enabled and basic settings to be configured. Figure 7.17 7.8.1.1 Enable SMS Integration To utilise SMS messages to be sent from Phone Manager Clients SMS integration must be enabled. 7.8.1.2 Password If a password is entered the same password is required to be entered on the Phone Manager Client to allow the Clients to be able to send SMS messages. 7.8.2 Cellular Terminals & Email Services Device Setup allows you to select the communications devices and ports that the fixed cellular terminal used to send SMS messages and alarm notifications is connected to on the server that is running Xarios Application Server. Version 3.0 Page 65 of 91 Application Server Technical Manual Xarios Ltd. Figure 7.18 To add a device select new link and enter a description, the port and the settings for the fixed cellular terminal that are required. The fixed cellular terminal can now be used to send SMS messages from the DSS Console on a Phone Manager client that has SMS enabled. NOTE: The fixed cellular terminal requires connection via a spare USB 2.0 connection, see http://www.xarios.com for compatible terminals. 7.9 Time Sync Time Sync is a simple module that synchronises the time on the phone system once a day with the time on the server running Xarios Application Server. Any timing changes made on the server will automatically trip through to the phone system (e.g. Daylight saving time). NOTE: This feature is only available on the Mitel 5000 telephone system. Version 3.0 Page 66 of 91 Application Server Technical Manual Xarios Ltd. Figure 7.19 7.9.1 Enable When this box is checked, Time Sync is enabled. To disable Time Sync uncheck this option. 7.9.2 Feature Codes Enter the feature code of the Mitel phone system used to set the time. 7.9.3 Admin Keyset Enter the extension number of the administrator keyset used to set the time. Please note the extension has to be idle at the time of the synchronisation time to allow the software to change the time on the phone system. 7.9.4 Synchronise time The time of day to synchronise the phone system time with the time on the server running the Application Server. 7.9.5 Date Format Select the correct date format being used on the phone system from DD/MM/YYYY and MM/DD/YYYY. 7.9.6 Time Format Select the correct time format being used on the phone system from 12-hour and 24-hour 7.10 Web Callback Web Call-back is a ‘Web call me’ module, designed to bring customers browsing a website in contact with a call centre agent. The architecture of the Web Call back process is show in . Version 3.0 Page 67 of 91 Application Server Technical Manual Xarios Ltd. Figure 7.20 To utilise Web Call-back a valid email address and POP3 server are required as shown in Figure 7.21. Figure 7.21 7.10.1 Web Callback call requests Web Callback allows website users to request a call back from a company representative simply by clicking a button. Agents log into the Web Callback using the client. When a call back request is received, all the available agents receive a screen pop in the bottom of their screen. Clicking the screen pop will dial the customer and display the web page they were looking at when they requested the call back. Version 3.0 Page 68 of 91 Application Server Technical Manual Xarios Ltd. In order for Web Callback to work the Enable Web Call-back functionality box must be checked. In addition to this a valid POP3 Server and email address must be specified and the correct password for the email account must be entered. NOTE: This feature is only available on the Mitel 5000 telephone system. The Web Call back systems uses emails to accept request as sample email is shown below: From: Customer X Sent: 15 January 2008 13:25 To: '[email protected]' Subject: Web Call Back – Xarios Tech Support [Name: John Smith] [Phone: 0845 373 6880] [Webpage: www.xarios.com/support] [Skill: XariosTechSupport] The above example email would be sent via the website after the customer has filled in the details, i.e. their phone number and when they want the call back to take place. The email would then be delivered to the [email protected] address where the Xarios Application Server would pick up the email and then distribute this to the agents that are currently logged into the XariosTechSupport skill group. 7.10.2 Basic The Settings tab enables the feature to be enabled and basic settings to be configured as shown in Figure 7.21. 7.10.2.1 Enable Set this to enable web callback requests to be processed. 7.10.2.2 POP3 server Enter the IP Address or hostname of the POP3 email server to connect to. 7.10.2.3 Email account Enter the email account to use to query for requests. 7.10.2.4 Password Enter the password for the email account to query for requests. 7.10.2.5 Polling Timer The polling timer is the rate at which Xarios Application Server checks the POP3 email account for web call back requests. Reducing the polling timer will increase the response by staff to web call back requests but will also put an additional strain on server and network resources. Version 3.0 Page 69 of 91 Application Server Technical Manual Xarios Ltd. 7.10.2.6 Loop Limit The loop limit is a global setting indicating how many times a web call-back will be offered out to agents until it is classed as dead and no longer attempted. 7.10.3 Skills Defining skills of particular agents allows calls to be directed or targeted to the relevant members of staff. For example, a call back from the support page of a web site would be targeted at the Technical Support department whereas a call back from a products page of the website would be targeted at the Sales Department. Figure 7.22 The default setting is to have one skill group (Default) that includes all of the agents that are logged on to the Web Call-back server. 7.10.3.1 Creating Skill Groups To add a skill, click on the Add button on the Web Callback Skills window. In the dialogue box that appears the user will be prompted for the name of the skill group and the hunt group extension number. At this point specific timeouts and loop counts can be specified. If there is more than one skill defined then a Recall skill can be selected. This means that if there is no answer in the targeted skill group then the call is transferred to another skill group. Skill groups should map directly to Hunt Groups on the phone system. If a web call is directed at a certain skill group, then Agents that are members of the corresponding hunt group will get the pop up. Using the Edit button, the settings of existing skills groups can be altered. This allows the user to change all of the settings except the name. 7.10.3.2 Renaming Skill Groups In order to rename a group a new group has to be created with the new name and the same settings as the previous one. The old group should then be deleted using the Delete button. Version 3.0 Page 70 of 91 Application Server Technical Manual Xarios Ltd. 7.10.4 History Web Callback History is a feature that allows administrators to monitor the performance of the Web Call-back feature of their website, as well as the performance of their staff in responding to the call back request. Figure 7.23 The Web Callback History window allows administrators to filter through the call back records in order to analyse performance and check on the status of web call back requests. This can also allow administrators to produce performance figures for agents, skill groups etc. Version 3.0 Page 71 of 91 Application Server Technical Manual Xarios Ltd. 8 System Status The status of the system can be monitored from the website using the System Status page. This is displayed that is shown when you login to the website as shown in Figure 8.1. Figure 8.1 8.1 Status The Status tab gives you information on the state of the Application Server Service and the License Dongle. If any problems are detected then the traffic lights next to each area will display in orange or red – if no problems are detected then it will show green as in Figure 8.1. This tab also gives you information about the local drive space available. 8.2 Licensing The licensing tab shows what this Application Server is licensed for as shown in Figure 8.2. Version 3.0 Page 72 of 91 Application Server Technical Manual Xarios Ltd. Figure 8.2 8.3 Connected Clients The Connected Clients tab shows the current clients that are connected to this Application Server as shown in Figure 8.3. It displays the version of the client, the extension they are associated with, the type of client, the computer and IP address that they are connecting from and the license this client is using. Figure 8.3 8.4 Events The Events tab displays key events that have happened on the system and what module they occurred in as shown in Figure 8.4. Version 3.0 Page 73 of 91 Application Server Technical Manual Xarios Ltd. Figure 8.4 Using the filter options the types of events can be filtered down to aid in diagnosing any problems and see what has happened on the system. 8.5 Audit Trail The Audit Trail tab shows a history of all the user interaction with the website. This provides a trail of what has changed, who it was changed by and when as shown in Figure 8.5. Version 3.0 Page 74 of 91 Application Server Technical Manual Xarios Ltd. Figure 8.5 8.6 Diagnostics The Application Server Configuration Tool that is installed on the Application Server can provide extra diagnostics information when trouble shooting any issues. From the Application Server console this can be opened by right clicking on the system tray icons and selecting Application Status as shown in Figure 8.6. This will display the Real-time Status window as shown in Figure 8.7. Figure 8.6 8.6.1 Client Real-time Status This displays the clients that are currently connected to the Application Server and the associated details of the client. Individual clients can also be disconnected or all clients can be forcibly disconnected. Version 3.0 Page 75 of 91 Application Server Technical Manual Xarios Ltd. Figure 8.7 8.6.1.1 Extension The status window shows the extension number that is associated with the Phone Manager that is connected to the Application Server. 8.6.1.2 License The license level that is being utilised is also given. This allows a system administrator to easily and quickly see where their licenses for Phone Manager are being used. 8.6.1.3 Version The Version field shows the client version that is running. 8.6.1.4 Hostname The Hostname is the name of the machine that the Phone Manager client is running on. This allows a system administrator to tell which machine is running which client. 8.6.1.5 IP Address The IP Address field show the current IP address of the machine that the Phone Manager client is running on. This allows a system administrator to tell which machine is running which client. Version 3.0 Page 76 of 91 Application Server Technical Manual Xarios Ltd. 8.6.1.6 Username The Username field shows the current username that is logged into the machine running the Phone Manager client. 8.6.1.7 Name The Name field shows the name of the application that is currently connected. 8.6.1.8 Duration The Duration field show how long the client has been connected for. 8.6.1.9 Connect Time The Connect Time field shows the time and date that the Phone Manager client connected to the Application Server. 8.6.1.10 Disconnect All Clients The Disconnect All Clients button can be used to disconnect all clients that are currently connected to the Xarios Application Server. 8.6.1.11 Disconnect Selected Clients The Disconnect Selected Clients button can be used to disconnect all the clients that are currently highlighted in the status window. 8.6.1.12 Refresh Client List The Refresh Client List button can be used to refresh the list of clients that are currently connected to the Application Server. 8.6.2 Hot Desking Real-time Status The Hot Desking Status window will show all events that relate to Hot Desking that take place through the Xarios Application Server. Please note the events will only be shown when the status window is open. Version 3.0 Page 77 of 91 Application Server Technical Manual Xarios Ltd. Figure 8.8 In the example shown in Figure 8.8, you can see when agents log out of the Hot Desking hunt group, and when they log in which includes the node that they are connected to and the extension in the format [Node]: [Extension], so in the above example agent 1035 has logged in on node 1 on extension 1221. 8.6.2.1 Save Hot Desking Events The Hot Desking events can be saved to a text file by selecting the Save button you will be asked to specify a file name. where 8.6.2.2 Clear Hot Desking Event Window You can clear the events that are currently in the Hot Desking event window by selecting the clear events button be cleared. all events that are currently in the Hot Desking window will now 8.6.2.3 Pause Hot Desking Events The Hot Desking events can be paused by selecting the pause button then be resumed by selecting the play button Version 3.0 the event can . Page 78 of 91 Application Server Technical Manual Xarios Ltd. 8.6.3 Web Callback Real-time Status The Web Callback Status window will show all events that relate to Web Callbacks that take place through the Xarios Application Server. Please note the events will only be shown when the status window is open. Figure 8.9 In the example in Figure 8.9, you can see when a Web Call-back is received and when a Web Call-back has been accepted and by which agent. 8.6.3.1 Save Web Callback Events The Web Call-back events can be saved to a text file by selecting the Save button where you will be asked to specify a file name. 8.6.3.2 Clear Web Callback Event Window You can clear the events that are currently in the Web Call-back event window by selecting the clear events button now be cleared. Version 3.0 all events that are currently in the Web Call-back window will Page 79 of 91 Application Server Technical Manual Xarios Ltd. 8.6.3.3 Pause Web Callback Events The Web Call-back events can be paused by selecting the pause button then be resumed by selecting the play button Version 3.0 the event can . Page 80 of 91 Application Server Technical Manual Xarios Ltd. 9 Maintenance The Application Server uses standard Microsoft technologies, i.e. Microsoft SQL Server and Microsoft Internet Information Services (IIS). This enables standard Microsoft maintenance tools to be used to perform any backup operations. The main configuration settings for the Application Server are stored within the Microsoft SQL Server database, with only the basic database & website connectivity settings saved in the registry. Backing up of the database will provide the ability to be able to restore the Application Server to full working order in case of hardware failure of the server or corruption of the Operating System. The follow sections detail how to backup and restore the database. If the Application Server needs to be restored to a different server the following process can be used. Install the latest Application Server install. Restore the last Application Server database backup from the old server. Move the license dongle from the old server to the new server. Run the Application Server Configuration tool and Check the database (see Database Connection setup). Start the Application Server service. NOTE: Ensure that the version of the Application Server that is been installed on the new server is the same or later version. 9.1 Backup To perform a backup of the database the Microsoft SQL Server Management Studio Express tool can be used and this is normally installed at the same time. From the Application Server log on with a user account with local Administrator rights and select the SQL Server Management Studio Express option from the Start Menu as shown in Figure 9.1 Figure 9.1 To find the database that the Application Server is using right click on the Application Server Configuration tool icon and select database settings as shown in Figure 9.2. Version 3.0 Page 81 of 91 Application Server Technical Manual Xarios Ltd. Figure 9.2 Connect to the Application Server database that is been used (this would have been set during the install) as shown in Figure 9.3. Version 3.0 Page 82 of 91 Application Server Technical Manual Xarios Ltd. Figure 9.3 Expand the database and right click on the ApplicationServer database to display the Back Up.. options as shown in Figure 9.4. Figure 9.4 The Back Up Database will then be displayed as shown in Figure 9.5. Ensure that the ApplicationServer database is selected in the Source, that the Backup type is set to Full and then enter a friendly name for this backup in the Backup set -> Name field. Click on the Add button to select the location and the filename to save the backup to. Version 3.0 Page 83 of 91 Application Server Technical Manual Xarios Ltd. Figure 9.5 NOTE: For more details on backing up Microsoft SQL Server databases, including scheduling backups follow this MSDN link: http://msdn.microsoft.com/en-us/library/ms189621(v=SQL.90).aspx 9.2 Restore To perform a restore of the database the Microsoft SQL Server Management Studio Express tool can be used. From the Application Server log on with a user account with local Administrator rights and select the SQL Server Management Studio Express option from the Start Menu as shown in Figure 9.1 The Application Server service needs to be stopped before restoring the database. Select the Stop Application Server option from the Application Server Configuration tool as shown in Figure 9.6 to stop the service. Figure 9.6 Version 3.0 Page 84 of 91 Application Server Technical Manual Xarios Ltd. Once connected to the database right click on the database to restore to and select the Database… option as shown in Figure 9.7. Figure 9.7 NOTE: This process will overwrite the entire database that is been restored to. Use extreme caution to ensure the correct database is selected. The Restore Database window will be displayed as shown in Figure 9.8. Select the ApplicationServer database to restore to, change the Source to be From device and then click on the … button to select the database file to use. Figure 9.8 NOTE: For more details on restoring Microsoft SQL Server databases follow this MSDN link: http://msdn.microsoft.com/en-us/library/ms189621(v=SQL.90).aspx Version 3.0 Page 85 of 91 Application Server Technical Manual Xarios Ltd. 9.3 Upgrades 9.3.1 Software When a new release of the Application Server software is available then the new install can be run over the existing installation. When the installation is complete the Application Server Configuration tool should be run in order to update the current database to this version. See the Database Connection section for details. 9.3.2 Licensing If the Application Server is running with a software based license key and an upgrade is requested this will normally require a hardware USB license dongle is provided. Once the USB dongle is received this needs to be connected to a free USB 2.0 port on the Application Server server. Then the Application Server service can then be restarted for the new license details to be retrieved. NOTE: Once the USB dongle has been connected and the Application Server service restarted the software license becomes invalid. If the Application Server already has a USB license dongle then a dongle update executable (dongleupdate.exe) will be available from http://www.xarios.com for this site. This file needs to be copied onto the Application Server server and run using an account with Administrator permissions. When the dongleupdate.exe is run the Xarios License Update will be displayed as shown in Figure 9.9. Version 3.0 Page 86 of 91 Application Server Technical Manual Xarios Ltd. Figure 9.9 Follow the instructions and ensure the update will apply the new licenses that you expect and then click on Update. Once complete, restart the Application Server service for the changes to take effect. NOTE: The dongleupdate.exe will only update the USB dongle with the correct site id. Version 3.0 Page 87 of 91 Application Server Technical Manual Xarios Ltd. 10 Troubleshooting The following section details the potential problems that may be found when installing or configuring the Application Server. Sympton Resolution When running the installation if you receive the error “Microsoft .NET Framework 4.0 Full package or greater needs to be installed for this installation to continue” then the .Net Framework 4.0 Full version needs to be installed. NOTE: This is different to the .Net Framework 4 Client Profile. This can be downloaded from here: http://www.microsoft.com/download/en/detail s.aspx?id=17851 The Application Server service is not running. Start the Application Server service. See Starting the Application Server Service section. The connection details (IP address /hostname /port) are incorrect or not accessible from the server. Ensure no firewalls are preventing connection and the details are correct. See the Telephone System Connection section. The USB license dongle cannot be found, ensure that it is plugged in and the dongle drivers are installed. See Hardware USB Dongle Licensing section. Version 3.0 Page 88 of 91 Application Server Technical Manual Xarios Ltd. The USB dongle is not connected or the dongle drivers are not installed. See Hardware USB Dongle Licensing section. If this is a software license key then it may not have been registered. See Registering a Software license section. The Application Server website cannot be displayed. Check that the website site is running and that you are connecting to the correct IP address/hostname and port. See Website Connection section. Version 3.0 Page 89 of 91 Application Server Technical Manual Xarios Ltd. The Microsoft IIS Windows component is not installed. For Windows 2003/XP from the Windows Control Panel select Add or Remove Programs -> Add/Remove Windows Components -> Application Server -> Details and then select Internet Information Services (IIS) and ASP.NET and click Ok. If this is running on a 64 bit version of Windows then ensure that 32 bit support has been enabled on the webserver. See the Error! Reference source not found. section. Version 3.0 Page 90 of 91 Application Server Technical Manual Xarios Ltd. HTTP 503.19 Errors are displayed when you try and connect to the Application Server website that is running on Microsoft Small Business Server 2008. See Knowledge Base Article 10160. https://portal.xarios.com/Support/KB/Article.aspx?id=10160 Version 3.0 Page 91 of 91


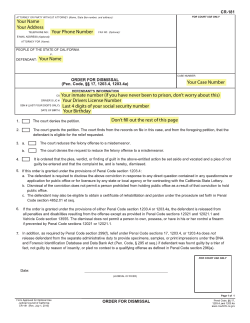

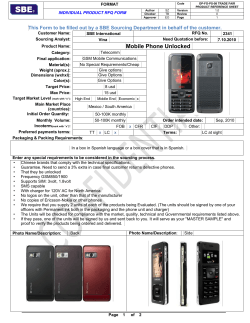
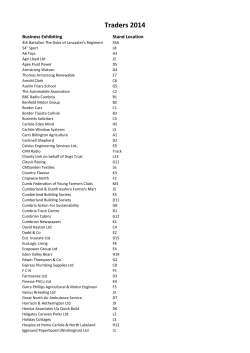

© Copyright 2026