
Operations Manual
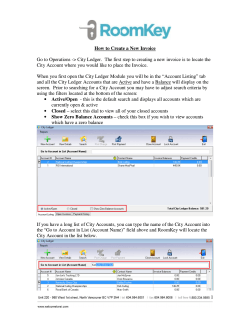
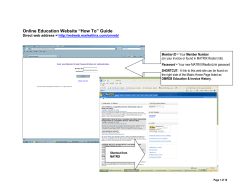
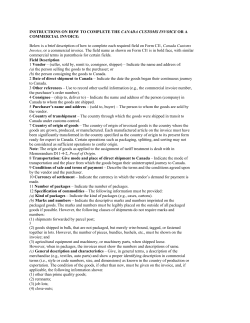
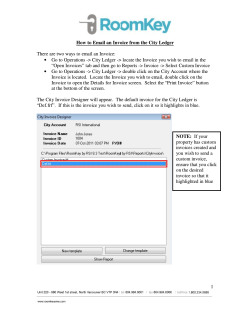
Operations Manual
Aleph Objects Operations Manual
by Aleph Objects, Inc.
Copyright © 2014 Aleph Objects, Inc.
Permission is granted to copy, distribute and/or modify this document
under the terms of the Creative Commons Attribution 4.0 International
Public License (CC BY-SA 4.0).
Published by Aleph Objects, Inc., 626 West 66th Street, Loveland, Colorado,
80538 USA.
For more information, call +1-970-377-1111 or visit www.alephobjects.com.
20140929
Contents
Introduction
Welcome Aboard
·
·
·
·
·
·
·
·
·
Open Source Hardware, Free Software · · · · · · · ·
1
Information Technology
Downtime is Intolerable ·
·
·
·
·
1.1 Servers · · · · · · · · · · · · ·
Aleph Mountain Servers · · · · · · ·
Tummy Servers · · · · · · · · · ·
Test Aleph Mountain Servers · · · · · ·
Virtual Servers Elastichosts Los Angeles · ·
Virtual Servers Elastichosts San Antonio · ·
Virtual Servers Open Hosting · · · · ·
Test Virtual Servers Elastichosts Los Angeles
1.2 Services · · · · · · · · · · · · ·
Public URLs · · · · · · · · · · ·
Employee URLs · · · · · · · · · ·
Server Daemons · · · · · · · · · ·
1.3 3D Printer Cluster · · · · · · · · ·
1.4 Workstation Software · · · · · · · ·
User Applications · · · · · · · · · ·
Workstation Daemons · · · · · · · ·
1.5 Phones · · · · · · · · · · · · ·
Hard Phones · · · · · · · · · · ·
Cell Phones · · · · · · · · · · · ·
1.6 Network Diagram · · · · · · · · · ·
2 Customer Relations Management
·
·
Phone, Email, Forum, Chat
iii
·
·
·
·
·
·
·
·
·
·
·
·
·
·
·
·
·
·
·
·
·
·
·
·
·
·
·
·
·
·
·
·
·
·
·
·
·
·
·
·
·
·
·
·
·
·
·
·
·
·
·
·
·
·
·
·
·
·
·
·
·
·
·
·
·
·
ix
x
·
·
·
·
·
·
·
·
·
·
·
·
·
·
·
·
·
·
·
·
·
11
12
12
12
12
12
13
13
13
14
14
14
14
16
16
16
17
18
18
18
19
·
21
CONTENTS
2.1
·
·
·
·
·
·
·
·
·
·
·
·
·
·
·
·
22
22
24
24
24
25
25
25
·
·
·
·
·
·
·
·
·
·
·
·
·
·
·
·
·
·
·
27
28
28
28
28
28
28
28
28
30
·
·
·
·
·
·
·
·
·
·
·
·
·
·
·
·
·
·
·
·
·
33
34
34
36
37
38
38
38
38
38
38
5 Locations
We Are Here ·
·
·
·
·
·
·
·
·
·
5.1 Aleph Mountain · · · · · · · · · · · · ·
5.2 Fulfillment · · · · · · · · · · · · · · ·
Retail · · · · · · · · · · · · · · · · ·
·
·
·
·
39
40
40
40
2.2
2.3
2.4
2.5
Helpdesk · · · · · · · · · ·
Requests Through Support Email · ·
Requests through Phone / Direct Email
Using the Phones · · · · · · · ·
Transfer call · · · · · · · · ·
Forum · · · · · · · · · · ·
RMA · · · · · · · · · · · ·
Chat · · · · · · · · · · · ·
·
·
·
·
·
·
·
·
·
·
·
·
·
·
·
·
·
·
·
·
·
·
·
·
3 Human Resources
Us
·
·
·
·
·
·
·
·
·
·
·
3.1 Professional Employment Organizations (PEO)
3.2 Employee Benefits · · · · · · · · · ·
3.3 Logging hours in OpenERP · · · · · · ·
3.4 Requesting time off in OpenERP · · · · ·
3.5 Recruitment / Interviewing · · · · · · ·
3.6 Performance · · · · · · · · · · · ·
3.7 Training · · · · · · · · · · · · · ·
3.8 Organizational Chart · · · · · · · · ·
3.9 Schedules · · · · · · · · · · · · ·
4 Purchasing
Buying and Receiving
4.1 Requester · · ·
4.2 Materials Planner
4.3 Purchase Approver
4.4 Accounting · · ·
4.5 Notes · · · · ·
4.6 Products
· · ·
4.7 Suppliers · · ·
4.8 Inventory · · ·
Receiving · · ·
Moves · · · ·
·
·
·
·
·
·
·
·
·
·
·
·
·
·
·
·
·
·
·
·
·
·
·
·
·
·
·
·
·
·
·
·
·
·
·
·
·
·
·
·
·
·
iv
·
·
·
·
·
·
·
·
·
·
·
·
·
·
·
·
·
·
·
·
·
·
·
·
·
·
·
·
·
·
·
·
·
·
·
·
·
·
·
·
·
·
·
·
·
·
·
·
·
·
·
·
·
·
·
·
·
·
·
·
·
·
·
·
·
·
·
·
·
·
·
·
·
·
·
·
·
·
·
·
·
·
·
·
·
·
·
·
·
·
·
·
·
CONTENTS
·
·
·
·
·
·
·
·
·
·
·
·
·
·
·
·
·
·
·
·
·
·
·
·
·
·
·
·
·
·
·
·
·
·
·
·
·
·
·
·
·
·
·
·
·
·
·
·
·
·
·
·
·
·
·
·
·
·
·
·
·
·
·
40
40
40
40
40
40
40
6 Manufacturing
Open Source Hardware ·
·
·
6.1 Supply Chain · · · · · · ·
6.2 Configuration · · · · · · ·
Product Definitions · · · · ·
Product Category · · · · ·
Warehouses and Locations · · ·
Routings and Work Centers · ·
Bill of Materials · · · · · ·
6.3 Manufacturing Process · · · ·
Creating Manufacturing Order ·
Processing Manufacturing Order
6.4 Safety · · · · · · · · ·
6.5 Pre-sub Assembly · · · · ·
6.6 Pilot Line · · · · · · · ·
6.7 Main Line · · · · · · · ·
6.8 Quality Control · · · · · ·
6.9 Packaging · · · · · · · ·
6.10 Lean · · · · · · · · · ·
·
·
·
·
·
·
·
·
·
·
·
·
·
·
·
·
·
·
·
·
·
·
·
·
·
·
·
·
·
·
·
·
·
·
·
·
·
·
·
·
·
·
·
·
·
·
·
·
·
·
·
·
·
·
·
·
·
·
·
·
·
·
·
·
·
·
·
·
·
·
·
·
·
·
·
·
·
·
·
·
·
·
·
·
·
·
·
·
·
·
·
·
·
·
·
·
·
·
·
·
·
·
·
·
·
·
·
·
·
·
·
·
·
·
·
·
·
·
·
·
·
·
·
·
·
·
·
·
·
·
·
·
·
·
·
·
·
·
·
·
43
44
44
44
47
49
49
52
54
54
55
57
57
57
57
57
57
57
·
·
·
·
·
·
·
·
·
·
·
·
·
·
·
·
·
·
·
·
·
·
·
·
·
·
·
·
·
·
·
·
·
·
·
·
·
·
·
59
60
60
60
60
60
8 Products
Buy and Sell ·
·
·
·
·
·
·
·
·
·
·
8.1 New Product Introduction · · · · · · · · · · ·
61
62
5.3
5.4
5.5
5.6
Amazon · · · · · ·
Shipwire · · · · · ·
Resellers · · · · · ·
Contract Manufacturers
Customer · · · · ·
Employee · · · · ·
Historical · · · · ·
·
·
·
·
·
·
·
·
·
·
·
·
·
·
7 Marketing and Public Relations
New and Deprecated Media ·
7.1 Trade Shows / Events · · ·
7.2 Web Ads · · · · · · ·
7.3 Social Media · · · · · ·
7.4 Promotions · · · · · · ·
7.5 Traditional Deprecated Media
v
·
·
·
·
·
·
·
·
·
·
·
·
·
CONTENTS
8.2
·
·
·
·
·
·
·
·
·
·
·
·
·
·
·
·
·
·
·
·
·
·
·
·
·
·
·
·
·
·
·
·
·
·
·
·
·
·
·
·
·
·
·
·
9 Sales
Moar
·
·
·
·
·
·
9.1 Quotes · · · · · · · ·
Creating a new Quote · · ·
Confirming the Quote · · ·
9.2 Orders · · · · · · · ·
Delivering the Order · · · ·
Generating Customer Invoice ·
9.3 Accepting Customer Payments
Notes · · · · · · · · ·
9.4 Value Chain · · · · · ·
9.5 Customers · · · · · · ·
9.6 Export Compliance · · · ·
9.7 Phones · · · · · · · ·
Transfer call · · · · · ·
9.8 Incoming OpenERP Email ·
9.9 Products
· · · · · · ·
·
·
·
·
·
·
·
·
·
·
·
·
·
·
·
·
·
·
·
·
·
·
·
·
·
·
·
·
·
·
·
·
·
·
·
·
·
·
·
·
·
·
·
·
·
·
·
·
·
·
·
·
·
·
·
·
·
·
·
·
·
·
·
·
·
·
·
·
·
·
·
·
·
·
·
·
·
·
10 Shipping
Delivery and Receiving
·
·
·
·
·
10.1 Serial Numbers · · · · · · · · ·
Updating Serial Numbers in Delivery Order
10.2 Delivery · · · · · · · · · · · ·
10.3 Inventory · · · · · · · · · · ·
Receiving · · · · · · · · · · ·
Moves · · · · · · · · · · · ·
10.4 Export Compliance · · · · · · · ·
·
·
·
·
·
·
·
·
·
·
·
·
·
·
·
·
·
·
·
·
·
·
8.3
8.4
Part Numbers · · · · ·
Internal Part Numbers · ·
Manufacturer Part Numbers
Supplier Part Numbers · ·
Serial numbers · · · · ·
Inventory · · · · · ·
Locations · · · · · ·
FIFO · · · · · · · ·
Receiving · · · · · ·
Delivery · · · · · · ·
Moves · · · · · · ·
vi
·
·
·
·
·
·
·
·
·
·
·
·
·
·
·
·
·
·
·
·
·
·
·
·
·
·
·
·
·
·
·
·
·
·
·
·
·
·
·
·
·
·
·
·
·
·
·
·
·
·
·
·
·
·
·
·
·
·
·
·
·
·
·
·
·
·
·
·
·
·
·
·
·
·
·
·
·
·
·
·
·
·
·
·
·
·
·
·
·
·
·
·
·
·
·
·
·
62
62
62
62
62
62
62
62
62
62
62
·
·
·
·
·
·
·
·
·
·
·
·
·
·
·
·
·
·
·
·
·
·
·
·
·
·
·
·
·
·
·
63
64
64
65
65
65
67
68
69
69
69
69
70
70
70
70
·
·
·
·
·
·
·
·
·
·
·
·
·
·
·
71
72
72
72
72
72
73
73
·
·
CONTENTS
10.5
10.6
10.7
10.8
Products
· · ·
Harmonized codes
Country of origin ·
NAFTA · · · ·
·
·
·
·
·
·
·
·
·
·
·
·
·
·
·
·
·
·
·
·
·
·
·
·
·
·
·
·
·
·
·
·
·
·
·
·
·
·
·
·
·
·
·
·
·
·
·
·
·
·
·
·
·
·
·
·
·
·
·
·
·
·
·
·
·
·
·
·
·
·
·
·
·
·
·
·
·
·
·
·
·
·
·
·
·
·
·
·
·
·
·
·
·
·
·
·
·
·
·
·
·
·
·
·
·
·
·
·
·
·
·
·
·
·
·
·
·
·
·
·
·
·
·
·
·
·
·
·
·
·
·
·
·
·
·
·
·
·
·
12 Accounting
Finance ·
·
·
·
12.1 Chart of Accounts ·
12.2 Periodic Processes ·
Monthly Processes ·
Quarterly Processes ·
Annual Processes · ·
12.3 Payables · · · · ·
12.4 Receivables · · · ·
12.5 Taxes · · · · · ·
Sales Tax Nexus · ·
Payroll · · · · ·
12.6 GAAP · · · · ·
·
·
·
·
·
·
·
·
·
·
·
·
·
·
·
·
·
·
·
·
·
·
·
·
·
·
·
·
·
·
·
·
·
·
·
·
·
·
·
·
·
·
·
·
·
·
·
·
·
·
·
·
·
·
·
·
·
·
·
·
·
·
·
·
·
·
·
·
·
·
·
·
·
·
·
·
·
·
·
·
·
·
·
·
·
·
·
·
·
·
·
·
·
·
·
·
·
·
·
·
·
·
·
·
·
11 Warehouse
First In, First Out
11.1 Products
· ·
Serial Numbers
11.2 Inventory · ·
Receiving · ·
Delivery · · ·
Moves · · ·
11.3 FIFO · · · ·
11.4 Locations · ·
·
·
·
·
·
·
·
·
·
·
·
·
·
·
·
·
73
73
73
73
·
·
·
·
·
·
·
·
·
·
·
·
·
·
·
·
·
75
76
76
76
76
76
76
76
76
·
·
·
·
·
·
·
·
·
·
·
·
·
·
·
·
·
·
·
·
·
·
·
77
78
78
78
78
78
78
78
79
79
80
80
·
·
·
·
·
·
·
·
·
·
·
·
·
13 Research and Development
Free Software and Open Hardware
·
·
81
14 Contact
Phone, Email, Web, Location
·
14.1 Support · · · · · · · · · ·
14.2 Sales · · · · · · · · · · ·
14.3 Website · · · · · · · · · ·
·
·
·
·
·
· · · · · · ·
· · · · · · ·
· · · · · · ·
83
84
84
84
vii
·
·
·
List of Figures
1.1
Network Diagram . . . . . . . . . . . . . . . . . . . . . . . . . . 20
3.1
3.2
3.3
Organizational Chart . . . . . . . . . . . . . . . . . . . . . . . . 29
Weekly Company Meetings . . . . . . . . . . . . . . . . . . . . 31
Monthly Company Meetings at 8:00AM . . . . . . . . . . . . . 32
6.1
Main Line Layout . . . . . . . . . . . . . . . . . . . . . . . . . . 58
viii
Introduction
Welcome Aboard
Introduction
Open Source Hardware, Free Software
Aleph Objects, Inc. is a Loveland, Colorado, USA company that manufactures Open Source Hardware using Free Software.
This book is about the operation of the company, not about the
company’s products.
For more info, visit http://www.alephobjects.com.
x
Information Technology
Downtime is Intolerable
Information Technology
1.1
Servers
Aleph Mountain Servers
• abejas.alephobjects.com
• amfw1.alephobjects.com
• amfw2.alephobjects.com
• aodb.alephobjects.com
• erp.alephobjects.com
• jebstation.alephobjects.com
• tunk.alephobjects.com
Tummy Servers
• belly.alephobjects.com
Test Aleph Mountain Servers
• aogfs1.alephobjects.com
• aogfs2.alephobjects.com
Virtual Servers Elastichosts Los Angeles
• aomail.alephobjects.com
• analytics.alephobjects.com
• cal.alephobjects.com
• drupalsql.lulzbot.com
• forum.lulzbot.com
• jabber.alephobjects.com
• ldap.alephobjects.com
12
1.1. SERVERS
• ohai-kit.alephobjects.com
• opsview.alephobjects.com
• www.lulzbot.com
Virtual Servers Elastichosts San Antonio
• download.alephobjects.com
• fone.alephobjects.com
• mail.alephobjects.com
• www2.alephobjects.com
Virtual Servers Open Hosting
• www1.alephobjects.com
Test Virtual Servers Elastichosts Los Angeles
• alfresco.alephobjects.com
• develdrupal.lulzbot.com
• develerp.lulzbot.com
• djshop.lulzbot.com
• laxp-g001.alephobjects.com
• laxp-g002.alephobjects.com
• libreconf.alephobjects.com
• nuxeo.alephobjects.com
• TeX.alephobjects.com
13
Information Technology
1.2
Services
Public URLs
• http://devel.alephobjects.com
• http://devel.lulzbot.com
• http://download.alephobjects.com
• http://download.lulzbot.com
• http://forum.lulzbot.com
• http://ohai-kit.alephobjects.com
• http://www.alephobjects.com
• http://www.lulzbot.com
• rsync://rsync.alephobjects.com
• sip://fone.alephobjects.com
Employee URLs
• http://analytics.alephobjects.com
• https://aomail.alephobjects.com
• https://opsview.alephobjects.com
Server Daemons
• Apache Web Server
• Asterisk
• Backups
• dhcpd
• django
14
1.2. SERVICES
• DNS
• Drupal with UberCart
• ejabberd
• Firewall
• sshfs
• GlusterFS
• IMAP
• MySQL
• ntpd
• OpenERP
• OpenSSH
• OpenVPN
• Opsview
• Pentaho
• phpBB
• Postfix
• Postgres
• rsync
• tftp
• Varnish
• Zabbix
15
Information Technology
1.3
3D Printer Cluster
• BeagleBone Black
• Octoprint
• Debian armhf
1.4
Workstation Software
All workstations run Debian stable (Wheezy).
User Applications
• Arduino
• Blender
• Chromium
• dsh
• epdfview
• evince
• Firefox (Iceweasel)
• FreeCAD
• sshfs
• galculator
• geeqie
• GIMP
• git
• git-cola
• glabels
16
1.4. WORKSTATION SOFTWARE
• gnumeric
• iceowl (Thunderbird calendar)
• Kicad
• Kdenlive
• LaTeX
• LibreOffice
• Meshlab
• OpenERP
• OpenSCAD
• OpenSSH
• Pidgin (+ OTR)
• Pronterface
• Slic3r
• icedove (Thunderbird)
• vim
• XFCE
• Xournal
Workstation Daemons
• cron
• cups
• dhcp client
• gdm
• ntp
17
Information Technology
1.5
Phones
Hard Phones
• Grandstream GXV3140
• Grandstream GXV3175
Cell Phones
• Browser
• Calendar
• Camera
• ChatSecure
• ConnectBot
• DAVdroid
• Document Viewer
• Email
• F-Droid
• File Manager
• Firefox
• Gallery
• Google Nexus 5
• K-9 Mail
• Kontalk
• Linphone
• Messaging
• MobileWebCam
18
1.6. NETWORK DIAGRAM
• Movie Studio
• MuPDF
• OpenVPN for Android
• OmniROM
• People
• Phone
• pttdroid
• RMaps
• Sanity
• Settings
• Terminal Emulator
• VI IMproved Touch
• VLC
1.6 Network Diagram
See figure 1.1 for Aleph Object’s network diagram.
19
Network Diagram 2014-02
Aleph Objects, Inc.
GlusTer 1
Servers
Gluster 2
AODB
cluster
debian
moar
magpie
droid 1
v
video7
video1
snow
trees
video5
flat
wood
duck
video14
video2
aM-fw1
video10
aM-fw2
jebstation
Assembly Switch
debian
debian
debian
debian
debian
debian
knife
debian
debian
debian
Assembly
pilot Switch
Aleph Mountain
tunk
Main Switch
abejas
POE Switch
R&D
debian
aohq-fw2
aohq-fw1
consume
debian
aohq-g002
R&D Switch
office Switch
closet Switch
aohq-g001
consume
ceo
Ceo Switch
blossom
AOHQ
swan
video13
droid 2
quetzal
droid 3
drill
Cluster Switch
ron
East Back Switch
West Back Switch
punto
wifi 2
poptart
emma
door
debian
debian
debian
debian
video2
debian
owl
redstone
debian
debian
debian
pilot
debian
debian
debian
video3
Figure 1.1: Network Diagram
video2
debian
debian
aleph www2
OpenHosting
sat-p
seattle
sharp
swan
video8
openerp devel
jabber
forum
develdrupal
Drupalwww
drupalsql
2081-eh-backup
laxp-g002
laxp-g001
lax-p
love729
memphis
satp-g002
video9
video6
satp-g001
video4
Internet
download www
www
mail
fone
Chicago
Customer Relations Management
Phone, Email, Forum, Chat
Customer Relations Management
2.1
Helpdesk
• Customer Support Representative (CSR): The front-line person who
deals with the customer calls or emails.
Requests Through Support Email
Emails to [email protected] are directly registered in OpenERP
as Helpdesk request. The process to handle these is as follows:
1. Customer support person logs into OpenERP and opens the Helpdesk
requests list by going to Sales/After-Sale Services/Helpdesk and
Support.
2. By default, only the active items (new, pending, in progress) are
shown in the list.
3. Additional filters can be applied using the search / filter feature in
OpenERP.
4. Open the Helpdesk request (or ticket hereafter).
5. Review the request and take appropriate action
a) If the request is for information or a simple issue that can be
resolved by the customer support person, do so.
i. Assign self as “Responsible” person on the ticket.
ii. Record the resolution in the “send a message”
22
2.1. HELPDESK
iii. Email with the resolution will be sent to the requester
iv. Set Reference field to “Product” and select a product (typically a printer – e.g. TAZ Printer 2.0)
v. Click on “Open” to set the state to “In Progress” and save
the ticket.
b) If the request needs to be worked upon before resolution, assign
the request to appropriate person for resolution.
i.
ii.
iii.
iv.
Assign the person
Set category of the problem
Set priority for the problem resolution
Set Reference field to “Product” and select a product (typically a printer – e.g. TAZ Printer 2.0)
v. Click on “Open” to set the state to “In Progress” and save
the ticket.
vi. If required, send an email to the reporter by using “Send a
message” from the chatter area (the area below the Helpdesk
request form).
vii. Use “Log a note” if you wish to record your observations
/ queries to the responsible person working on the ticket.
This information will be retained internally and will not be
emailed to the reporter. Note: If the request is based on an
order (sale order, delivery order), then use the Reference2
field to pick the sale order / delivery order and select the
sale order for the customer reporting the problem.
6. Reviewing In-Progress/Pending items: Periodically review these tickets and provide updates to the customer by using “Send a message.”
7. Closing tickets: Once the resolution is accepted by the customer (you
may not hear the success of the resolution from the customer always
– so closing resolved cases after a gestation period is OK). If the
customer responds to a resolution on a closed ticket, the ticket will
be reopened for your review automatically allowing the ticket to be
reopened or closed/cancelled.
8. Cancelling tickets: If the ticket is a spam or made for testing purposes,
it can be cancelled by clicking on the Cancel Case button.
23
Customer Relations Management
Requests through Phone / Direct Email
The only difference in this is that the Helpdesk request (ticket) does not
exist in the system and so it must be created.
1. On receiving a phone call from a customer, customer support person
logs into OpenERP and opens the Helpdesk requests list by going to
Sales/After-Sale Services/Helpdesk and Support.
2. Click on Create button to create a new request.
3. Select the partner from the list of available partners. If the call is from
a person not registered as a customer with Aleph Objects, record the
information in the notes section – name, phone number, address and
other pertinent details of the customer.
4. Record the email address of the caller.
5. Write a brief summary header in the “Query” field.
6. Based on your assessment of the call, set the priority of the call and
the category.
7. Continue processing the ticket following the procedure outlined for
the automated email (to [email protected]) ticket. Note:
Process Helpdesk requests in personal emails in the same manner as
a call.
2.2
Using the Phones
See: shared-j/Documents/phone_directory.txt for the most current
company phone directory.
Transfer call
1. Ask the caller if you can transfer them.
2. Put the call on hold: *2
3. Dial internal extension number you want to transfer to.
24
2.3. FORUM
4. Explain transfer when internal callee answers.
5. Hang up, and the call will automatically transfer.
2.3
Forum
Answer questions and contribute information at our LulzBot forum:
http://forum.lulzbot.com/
2.4
RMA
Return Merchanise Authorization. Through OpenERP.
2.5
Chat
Chat server at jabber.alephobjects.com
25
Human Resources
Us
Human Resources
3.1
Professional Employment Organizations
(PEO)
Insperity.
3.2
Employee Benefits
See employee handbook at http://esc.insperitiy.com
3.3
Logging hours in OpenERP
For hourly Insperity employees:
OpenERP —> Human Resources —> Attendences —> Attendences
For hourly Kelly employees, track your hours on Kelly’s website.
3.4
Requesting time off in OpenERP
OpenERP —> Human Resources —> Leaves —> Leave Requests
3.5
Recruitment / Interviewing
Kelly, Insperity, JobZology.
3.6
Performance
Insperity.
3.7
Training
Certifications.
3.8
Organizational Chart
See figure 3.1 for Aleph Object’s organizational chart.
28
Cluster
Tech
Assembly
I
Cluster
Tech
Engineer
Assistant
Assembly
I
Engineer
Assistant
CTO
Assembly
II
Assembly
II
Shipping
Manager
SysAdmin
Assembly
II
Sales
Manager
Figure 3.1: Organizational Chart
Assembly
II
Assembly
Lead
VP Mfg
Bookkeeper
CEO
Programmer
COO
Comms
CSR
Human Resources
3.9
Schedules
The following calendars list when there are recurring meetings.
See figure 3.2 for Aleph Object’s weekly meeting schedule.
See figure 3.3 for Aleph Object’s monthly company meeting schedule.
30
3pm
2pm
Retail Purchasing
CSR
Figure 3.2: Weekly Company Meetings
NPI / R&D
Marketing
HR
Software Dev
Web Dev
Friday
11am
10am
9am
8am
7am
Public Tours
3pm
2pm
1pm
Shipping
Interviews
& Reviews
Thursday
1pm
Facility
IT
Cluster
Mini Dev
Wednesday
12pm
Finance
Sales
Manufacturing
& Materials
New Employee
Tuesday
12pm
11am
10am
9am
8am
7am
Monday
January
February
March
M T W T F S S
M T W T F S S
M T W T F S S
1 2 3 4 5
8 9 10 11 12
15 16 17 18 19
22 23 24 25 26
29 30 31
1 2
7 8 9
14 15 16
21 22 23
28
1 2
8 9
15 16
22 23
29 30
6 7
13 14
20 21
27 28
3 4 5 6
10 11 12 13
17 18 19 20
24 25 26 27
3 4 5 6 7
10 11 12 13 14
17 18 19 20 21
24 25 26 27 28
31
May
April
June
M T W T F S S
M T W T F S S
M T W T F S S
1 2 3 4 5 6
8 9 10 11 12 13
15 16 17 18 19 20
22 23 24 25 26 27
29 30
1 2 3 4
8 9 10 11
15 16 17 18
22 23 24 25
29 30 31
1
8
15
22
29
7
14
21
28
July
5 6 7
12 13 14
19 20 21
26 27 28
August
2 3 4 5 6 7
9 10 11 12 13 14
16 17 18 19 20 21
23 24 25 26 27 28
30
September
M T W T F S S
M T W T F S S
M T W T F S S
1 2 3 4 5 6
8 9 10 11 12 13
15 16 17 18 19 20
22 23 24 25 26 27
29 30 31
1 2 3
8 9 10
15 16 17
22 23 24
29 30 31
1 2 3 4 5 6 7
8 9 10 11 12 13 14
15 16 17 18 19 20 21
22 23 24 25 26 27 28
29 30
7
14
21
28
October
4 5 6 7
11 12 13 14
18 19 20 21
25 26 27 28
November
December
M T W T F S S
M T W T F S S
M T W T F S S
1 2 3 4 5
8 9 10 11 12
15 16 17 18 19
22 23 24 25 26
29 30 31
1 2
8 9
15 16
22 23
29 30
1 2 3 4 5 6 7
8 9 10 11 12 13 14
15 16 17 18 19 20 21
22 23 24 25 26 27 28
29 30 31
6 7
13 14
20 21
27 28
2014
3 4 5 6 7
10 11 12 13 14
17 18 19 20 21
24 25 26 27 28
Figure 3.3: Monthly Company Meetings at 8:00AM
Purchasing
Buying and Receiving
Purchasing
4.1
Requester
1. Post the product request to the Product Requests Group.
a) From messaging, pick Product Requests from My Groups.
b) Click on the ”send a message to the group” box.
c) Click on the icon on the top right corner of the message box
with a hover info “Open the full mail composer”
d) Pick the “Internal Product Request” in the use template pick
(bottom right corner of the popup)
e) Type the product request with the following information
•
•
•
•
•
•
•
•
•
Date Needed:
Name of Requester:
Internal Charge account code for PO:
Item description:
Quantity:
Estimated Cost:
Suggested supplier:
Supplier model/item number:
Purpose: f) Click on the send button
Note: The product requests group by default includes all employees.
The requester is any Aleph Objects employee. To make the request,
the employee needs an OpenERP account.
2. If the materials planner or purchase approver requires additional
information, they may reply to this message and it will show up in
the requester’s Inbox.
4.2
Materials Planner
This role creates the Purchase Quotation. The following steps are to be
followed to generate a purchase quotation.
34
4.2. MATERIALS PLANNER
1. Review the Purchase Requests message group for new product requests.
2. Note the details of the request and identify the product from the
OpenERP product catalog – this is done by searching for the product
from Purchases/Product/Product menu. This will only show products that have been marked ”Can be purchased.”
3. Create
a
new
purchase
chases/Purchase/Quotations.
quotation
from
Pur-
4. Pick the supplier (this can be reviewed from the supplier list on the
product identified in step 2)
5. Add supplier reference and source document.
6. Pick the product in the order lines and set the quantity and adjust
unit price if it is different.
7. Add terms and conditions, payment terms, expected date to the RFQ.
8. Save RFQ.
9. Confirm the purchase order. If the order amount is less than 100,
the order will be approved automatically. If not, the Purchase Order
will wait for a second approval. Refer to Purchase Approver process
before continuing with the next steps.
10. There are two types of purchase orders possible: The first is when
the materials planner goes ahead and makes the purchase on his/her
credit card and/or gets the material for immediate use. The second
is when a formal order is placed with a supplier and the supplies /
supplier invoice are awaited.
11. An incoming shipment document and a draft supplier invoice will be
created on PO confirmation.
12. Option A: Purchase on Credit Card (Prepaid purchases)
a) The materials planner goes ahead and makes the purchase of the
required materials and makes a payment using the credit/debit
card. [Going to the nearest store or placing an order on the
supplier website]
35
Purchasing
b) If materials are purchased from a local store, the materials
planner updates the receipt of goods in OpenERP. If purchase
order is placed on the supplier website, the incoming shipment
will be handled by the warehouse person on its arrival.
i. Go to Warehouse/ Receive/Deliver by Orders /Incoming
Shipments.
ii. Select the incoming shipment document corresponding to
the PO.
iii. Mark the goods as received.
iv. Create draft supplier invoice from incoming shipment /
purchase order.
c) Turn in the details of the payment and the PO reference number
to Accounting. Accounting Person continues with the workflow.
13. Option B: Placing purchase orders by email
a) The materials planner confirms the purchase order. He/she then
emails/faxes the PO to the supplier.
b) The warehouse person processes material receipt
i. Go to Warehouse/ Receive/Deliver by Orders /Incoming
Shipments.
ii. Select the incoming shipment document corresponding to
the PO.
iii. Mark the goods as received.
iv. Create draft supplier invoice from incoming shipment /
purchase order.
c) Accounting Person continues with the workflow.
4.3
Purchase Approver
This role approves the RFQ by confirming it to become a purchase order.
The approval step may be carried out by the Materials Planner based on
the purchase amount rule [amount > 100].
1. The approver lists all Purchase Orders that are in “Waiting Approval”
state.
36
4.4. ACCOUNTING
2. The details of the PO are reviewed.
3. The approver can then confirm the PO to approve or set it back to
“draft” state” to reject.
4. The materials planner will be notified for the approval state.
4.4 Accounting
This role manages the supplier invoice and payments to suppliers.
1. The warehouse person on the materials planning person has already
created a draft supplier invoice.
2. On receipt of the incoming shipment note (Option B)/payment made
(Option A), the accountant/book keeper adjusts the draft invoice and
confirms the invoice.
3. The invoice is now ready for payment. The payment can be processed
in a few ways:
a) Click on Register Payment in the supplier invoice screen. Follow
through on the wizard that pops up and record the payment.
This method requires the actual check/payment processing to
happen outside of OpenERP. The payment made will be adjusted with the current invoice even if there are pending payments to the supplier.
b) Click on Accounting/Supplier/Supplier Payment menu and create a new payment. Select the supplier. All pending payments
will be listed and payment amount will be adjusted against
the pending payments including the current one based on the
amount and payment aging. This method is relevant and useful
when payments to suppliers are batched.
c) Payment through checks generated in OpenERP. This section
will be elaborated after the installation and configuration of
check writing module.
37
Purchasing
4.5
Notes
1. Record conversations with the supplier during the negotiation if any
along with the purchase order using “Log a Note” feature. If the
information needs to reach the supplier then the “Send Message”
option should be used.
2. Once the purchase order is confirmed the only changes allowed are
to the text fields. The supplier, pricing details, product details are
frozen and cannot be changed. Please review all the options before
confirming the PO.
4.6
Products
A Product in OpenERP language, is anything you buy or sell.
OpenERP —> Purchases —> Products —> Products
4.7
Suppliers
A supplier is a Partner that we buy Products from.
OpenERP —> Purchases —> Purchase —> Supplier
4.8
Inventory
Receiving
Keep track of what comes in, count it, track in OpenERP:
OpenERP —> Purchases —> Incoming Products —> Incoming Shipments
OpenERP —> Purchases —> Incoming Products —> Incoming Products
Moves
OpenERP —> Warehouse —> Traceability —> Stock Moves
38
Locations
We Are Here
Locations
5.1
Aleph Mountain
5.2
Fulfillment
Retail
• Loveland, Colorado, USA
Amazon
• USA
Shipwire
• Chicago, Illinois, USA
• Philadelphia, Pennsylvania, USA
• Los Angeles, California, USA
• Toronto, Canada
• London, United Kingdom
Resellers
• Builders
• Drop Ship
5.3
Contract Manufacturers
5.4
Customer
5.5
Employee
5.6
Historical
• 2011 Redstone Canyon, Colorado, USA
40
5.6. HISTORICAL
• 2011 Fort Collins, Colorado, USA
• 2011-2014 AOHQ, Loveland, Colorado, USA
41
Manufacturing
Open Source Hardware
Manufacturing
6.1
Supply Chain
Plan
6.2
Source
Make
Deliver
Configuration
The manufacturing process requires a few configuration steps before it can
be modeled in OpenERP.
Product Definitions
Every product that is purchased, manufactured, sold, or valued as an
assembly should be defined in OpenERP. The assets (computers, printers,
furniture), consumables (stationery) may be defined in OpenERP but are
not part of this document. Shipping and services need to be defined as well.
The definition of a product should cover the following:
Product Definitions
Field
Description
Product Name
The descriptive name for the product. Keep as unique as possible.
Category
Select from existing category list. Do not leave it as ”All Products.”
See section below for creating new product categories
Can be sold
Set on all finished products, parts/consumables, sub-assemblies that
can be sold. Do not set on intermediate sub-assemblies that are not
sold.
Can be purchased
Set on all parts/consumables (category that includes filaments) that
44
6.2. CONFIGURATION
are purchased. Do not set on intermediate sub-assemblies that are
not sold.
Can be expensed
Do not set on any of the products that have inventory valuation.
Information Tab
Product Type
”Stockable Product”. For shipping and service items, choose ”Service”
Unit of Measure
Select the most appropriate unit. This is the sale unit of measure.
Sale Price
This should be set for all items that are sold.
Is Shipwired
Check this flag on all items that are stocked at shipwire location.
Failure to do so will result in the goods at those warehouses not
tracked.
Internal Reference
Define the part number for the item. Set this for every item
sold/purchased and intermediate sub-assembly items.
Schedule B#
Set this on every item that is sold.
EAN
Not required unless you have it for tracking
UPS
Set for every item that is stocked on shipwire locations.
Description
Detailed description of the product
45
Manufacturing
Procurements Tab
Procurement Method
Define as ”Make to Stock”
Supply Method
Set it as ”Buy” for all ”can be purchased items.” Set it as ”Manufacture” for all assemblies and final products.
Purchase requisition
Do not use
Cost Price
Set the purchase price (only if you do not have supplier pricing
defined.
Manufacturing Lead Time
Set this for all items that have Supply Method as ”Manufacture.”
Active
Uncheck this for items that are no longer required, that are duplicates.
Purchase Unit of Measure
Set this to the unit of measure used in purchasing the item.
Manufacturer
If manufacturer of the item is tracked, record this.
Manf. Product Name
If manufacturer of the item is tracked, record this.
Suppliers Tab
Supplier
Supplier name from the list of suppliers defined. Do not add suppliers
from this form.
Supplier Product Name
Name used by the supplier for the product/item
Supplier Product Code
Code used by supplier for this product/item
46
6.2. CONFIGURATION
Minimal quantity
If the supplier enforces a minimum quantity for purchase, set it here.
Delivery lead time
Set this value to get an accurate estimation of manufacturing/procurement/delivery schedules
Supplier Pricelist
Set this to record quantity based pricing
Description for Suppliers
Set this item to show on RFQ/POs
Inventory Tab
Rack
Record location where the product is stored in the warehouse
Row
Record location where the product is stored in the warehouse
Case
Record location where the product is stored in the warehouse
Accounting Tab
Inventory Valuation
Defaults to ”Real Time (automated).” Do not change this.
Do not set any account related information here as they will be used
from the Product Category definition.
Product Category
Product Category helps group products and define common information to
be used on all the products. The following are the categories defined for
Aleph Objects.
Category Name
Description
47
Manufacturing
Printers
To group printers (finished products) that have Supply Method as
”Manufacture.”
Parts
All other components that are bought and sold and goes into the
manufacture of printers
Shipping
Groups all shipping services
Service
Groups all other services like consulting, labor
Consumables
Filaments, tape and special category items. Do not record stationery,
coffee cups and such in this category.
Each category must have the following fields set:
Field
Description
Parent Category
Choose ”All Products”
Category Type
Choose ”Normal”
Income Account
Each category is set to have its own income account. For new category,
an income account must be created.
Expense Account
Each category is set to have its own expense account.
category, an expense account must be created.
Stock Input Account
Set it to ”14305 Goods Received”
Stock Output Account
Set it to ”14395 Goods Delivered”
48
For new
6.2. CONFIGURATION
Stock Valuation account
Set it to ”14310 Products”
Stock Journal
Choose ”Stock Journal (USD)”
Any new product category must be reviewed by Jeff and the financial
consultants as many management budgets and reports are based on the
standard five categories.
Warehouses and Locations
• Warehouses and Locations: The required warehouse and locations
are already in place. However, if there is a need to create a new
warehouse, first create the location and then the warehouse.
• Location: Physical locations are where Aleph Objects stores and owns
goods - AM, HQ, Shipwire locations.
• Shipwire locations need to have the shipwire location field selected. If
a new shipwire location is needed, it needs to be in the ursa shipwire
module and the module needs to be upgraded.
• RPC, OTM are sub-contract manufacturing locations of type Production.
• The internal production locations (AM Cluster, AM Main Assembly,
AM Pilot Assembly, AM Pre-Sub) are virtual production locations.
• These production locations need to have stock valuation account
mapped to ”14350 Work In Progress.”
Routings and Work Centers
Routings
This is the flow of material/products in the assembly line. It consists of a
number of steps (work center operations) in order to complete an assembly
(a sub-assembly or a finished product). A routing requires a production
location to be picked from the list of production locations (internal and
sub-contracting) defined in the previous step.
49
Manufacturing
Menu: Manufacturing/Products/Routings
1. Define a unique name for the routing. If a routing is defined for a
specific product, use the name of the product in the routing name.
This will add clarity.
2. Define a unique code for the routing.
3. Select production location (one of sub-contract or virtual production).
Do not attempt to create a new location from this field. Always ensure
that the location is defined before it is used.
4. Set the routing as active. [To make a routing redundant or not list,
make active false]
5. Define Work center operations
a) Define Work Centers (next section)
b) Click on ”Add an Item”
i. Define a name for the operation. E.g. Push dowel in plate
ii. Define a sequence. The sequence number sets the position
of this operation in the routing.
iii. Pick the work center associated with the operation.
iv. Define number of cycles required for this operation in the
routing. Typically, the number of cycles will be 1. In some
cases, it is possible that the step be repeated.
v. Define number of hours for the operation (for the work in
progress material/assembly/product at this step)
vi. Description: Provide information on the routing - instructions, specifications, etc. The notes tab may be used to
capture more information if required.
Work Centers
Work centers are stations / tables / machines that are on the assembly
line. It is also used to represent workers on the assembly line. For example,
pressing a dowel in a plate is done at a press. So, the press is a work center.
There is no need to identify the person on that work center - it will be done
50
6.2. CONFIGURATION
through the assignment of hours on the work center. Another example is
a QC inspection work center which may be defined as a human.
Menu: Manufacturing/Configuration/Work Center
1. Define a unique name for the work center to avoid incorrect association with a routing.
2. Define resource type - material for machines/tables and human for
pure labor (QC type of work centers)
3. Define a unique code for the work center. E.g. <Location>-<WC><#>
4. Define Working time: Pick the Aleph Working Time defined. If
additional working time (calendar) is required, they can be created
from Manufacturing/Configuration/Resources/Working Time
5. Define capacity information
a) Efficiency factor: A factor of 1.00 assumes 100% work center
efficiency. This may be a good starting value if this information
is not available.
b) Capacity per cycle: This field captures the number of units of
finished products that are produced in a single run (or cycle).
For e.g. some of the printed parts were produced at the rate of
4 per cycle, some were 2 and some were 1.
c) Time per cycle - Define how long it takes for one cycle to finish.
d) Time before prod. - Setup time for the work station
e) Time after prod. - Cleanup time for the work station
f) Define costing information
g) Work center product: Do not set. This allows the work centers
to be generic (tables, machines, people) and be used in more
than one product.
h) Cost per hour: Define the labor cost per hour on this work
center.
i) Hour account: Set the analytic account (CHECK with financial
consultant if this is required)
51
Manufacturing
j) Cost per cycle: Define the overhead cost for use of the machine
- manf.overhead or direct cost?
k) Cycle account: Set the analytic account (CHECK with financial
consultant if this is required)
l) Analytic Journal: Skip the field.
m) General Account: Assign the expense account (Since this is
direct labor costs, it should go into COGS group - CHECK with
financial consultant on how to map this)
Bill of Materials
Bill of Materials: Bill of materials is used to define the components in
a finished product/assembly. It will also be used to disassemble finished
components / packages / kits. Bill of Materials is necessary (required)
for every finished product, sub-assembly, manufactured part, disassembled
kits, and sub-contracted assemblies.
Menu: Manufacturing/Bill of Materials or Product Screen: Click on
Bill of Materials button
Pre-requisite: All the components required for the assembly or the byproducts that would come out need to be defined before bill of materials is
defined.
Manufacturing/Printing
1. Pick the product (finished product / sub-assembly / printed part /
kit or package).
2. Define a unique name - It is typical to set the product name
3. Define quantity - Typically 1. But there may be instances when
multiple units can be produced.
4. Reference - Set a unique reference
5. Pick the routing what will help manufacture the product.
6. Define list of components
a) Click on add an item
52
6.2. CONFIGURATION
b) Select product component / raw material
c) Set the quantity to be consumed
d) Set the unit of measure for the component/raw material consumption
e) Valid from and Valid until does not need to be set. Use this if
a component is being replaced but you would like to keep it in
the component list.
7. Define internal reference, valid from and valid until in the Properties
tab if required.
8. Do not use the By Products tab.
Disassembly of Kits
1. Pick the product (A main product from the disassembly - e.g. Rambo
board).
2. Define a unique name - It is typical to set the product name
3. Define quantity - Typically 1. But if the kit has multiple items of the
product use that.
4. Reference - Set a unique reference
5. Pick the routing what will help manufacture the product.
6. Define list of components
a)
b)
c)
d)
Click on add an item
Select the kit (e.g Rambo Kit)
Set the quantity to be consumed to 1
Set the unit of measure for the component/raw material consumption
e) Valid from and Valid until does not need to be set.
7. Define internal reference, valid from and valid until in the Properties
tab if required.
8. In the By products tab, pick all the other products that come out of
the kit disassembly. Leave the Quantity Type to be ”Variable.”
53
Manufacturing
6.3
Manufacturing Process
Manufacturing in OpenERP allows tracking of goods and materials consumed in the process of production or assembly of finished products. The
scheduler in OpenERP generates manufacturing orders for products that
have supply method as ”Manufacture” for the order level set for the product
if the procurement method is ”Make to Stock” and when a sale order is
confirmed for products that are ”Make to Order.” At Aleph Objects, all
the products have been set as ”Make to Stock.” This necessitates manual
creation of manufacturing orders based on production planning (not yet
available on OpenERP directly).
Creating Manufacturing Order
Guidelines for creating manufacturing orders:
1. Follow a quarterly or multi-month MO creation for printed parts, subassemblies, sub-contracted assemblies/parts. This allows for different
planning approach for the final finished products such as printers.
2. Follow a monthly cycle for finished products such as printers.
3. The purchase delay, manufacturing delay fields defined with the
product is important. The manufacturing dates will be computed
based on these delay values.
4. In addition to the above, set the parameters in the company record
(this may require admin/configuration access).
a) Scheduler range days: It is now set to 80 days. This means
that the scheduler will schedule procurement/manufacturing
for the next 80 days. Change this if required. This will
be based on visibility required into the manufacturing window
(month/quarter/half-year, etc.)
b) Purchase lead time: Additional lead time added to account for
material receipt, inspection and use. This is the margin of error
for supplier lead time. Default is 7 days.
c) Manufacturing lead time: Margin of error for manufacturing
lead time. Default is 7 days.
54
6.3. MANUFACTURING PROCESS
d) Security Days: Additional margin on the date promised to the
customer. Default is 2 days.
5. Ensure all locations (for subcontracting and internal production lines)
are set.
6. Ensure all required routings are defined.
7. Since the routing captures the location (internal or sub-contract),
a single manufacturing process will cover internal and sub-contract
manufacturing. Additional details for sub-contract manufacturing are
provided at the end of this section.
Processing Manufacturing Order
Process:
1. Creating an MO:
a) Create a new manufacturing order from
ing/Manufacturing/Manufacturing Orders
Manufactur-
b) Select the product to produce
c) Select routing
d) Set quantity of products to produce
e) Define the person responsible for completion of the manufacturing order.
f) Define source document (product planning reference if any)
g) Raw materials location and finished products location should be
”Physical Locations / Aleph Objects, Inc. / AM” for internal
locations. For subcontract production, the appropriate location
must be shown. This is automatically populated based on the
routing.
h) Set the priority in the ”Extra Information” tab.
i) Save the order
2. Confirm production: This step brings up the products to consume list
as per the Bill of Material defined for the product being produced.
55
Manufacturing
3. At this point, the details of the production can be viewed from work
orders tab; details of products consumed from ”Scheduled Products”
tab and the finished product from ”Finished Products” tab.
4. If all the components are available for production, the manufacturing
order will have ”Produce, Mark as Started, Cancel Production”
buttons. The manufacturing order will be in ”Ready to Produce”
state.
5. If components are not available, procurement exception will be generated for the components. This will automatically resolve if there are
reorder levels defined for the parts not in stock. If not, the Purchase
order will have to be generated manually and the procurement
exception cleared. Once the parts/materials are available, the MO
will automatically proceed to the ”Ready to Produce” state.
6. In case of a sub-contract, stock moves for the material will be
created for delivering the parts/raw materials to the subcontractor.
In a similar manner, moves will be created for receiving finished
parts/products from subcontractor.
7. Send the material to sub-contractor as per the delivery order created.
8. Mark as started: The floor supervisor marks the order as started for
internal production and the production controller / manufacturing
head set it for the sub-contract orders.
9. For simple, single-step orders, the ”Produce” button can be clicked.
This will execute the work order (see work order tab in MO form)
automatically.
10. For multi-step process, there are two options available to the production floor supervisor: Mark the entire MO as produced when the order
is completed or manually process each of the work order. The work order can be processed from the Manufacturing order form/Work order
tab or picking them from the Manufacturing/Manufacturing/Work
Orders menu.
56
6.4. SAFETY
6.4
Safety
Keep everything clean. :)
6.5
Pre-sub Assembly
Soldering, PEMS, etc.
6.6
Pilot Line
The pilot line is the line currently building TAZ.
6.7
Main Line
The main line is the line being set up in the big room.
See figure 6.1 for Aleph Object’s main floor line layout.
6.8
Quality Control
Link to docs here...
6.9
Packaging
Continually improve packaging. Lessen cost, very expensive at present.
Send to FedEx for testing.
6.10
Lean
Get rid of everything unused.
57
X
(-73, 43)
Lights
(-71, 34)
4
Frm
&
Fxz
shelves
(door) On
BI
&
OCT
3.5
CPU Tel 2
Wall Mounted 1tel/1ntk
6.5
(-60, 43)
Cal1
Frame X-Z
3.0
4
F.A.
Cal2
2
4
4
&
Boxes
Supply Shelf
4
4
(-58, 17) X-Axis
2
Frame (-62, 17)
4
4
Print
Head
LINE 3
Y-Axis
Sub-Assb Parts/Fxz
3.0
(-60, 34)
4 4
4 4
PS, Cords, Fan Cover
Assblies on bottom shelves
4
Box & 4 2 AdT
AdT= Adjustable Table
Label
4x40”
Pallet
Boxed Printer
FLOW
6.5
Output
Cart
5
Special
Stand
24
R&D
Transfer
Rack
(-49.5, 34)
2 4
Door
4
3.5
Frm
&
Fxz
(door)
Cal3
BI
&
OCT
FA
For
CAL
YPart
Flat
Output
Carts
4 2
Rework
Bench
4
(-49.5, 5)
Glass
wall
3.5
Lights
On
shelves
Special
Stand
6
4
CPU
6.5
Tel
2
(-38.5, 43) 1tel/1ntk
F.A.
Cal2
PS, Cords, Fan Cover
Assblies on bottom shelves
Cal1
4 4
4 4
Frame X-Z
(-38.5, 34)
3.0
Sub-Assb Parts/Fxz
3.0
4
2
4
4
&
Boxes
Supply Shelf
4
4
(-36.5, 17) X-Axis
2
Frame (-40.5, 17) Y-Axis
4
4
Print
Head
LINE 2
6
SHIPPING
3.5
Transfer
Rack
(-28, 34)
Frm
&
Fxz
(door)
BI
&
OCT
2 4
Cal3
FA
For
CAL
YPart
Flat
Output
Carts
4 2
Rework
Bench
(-28, 5)
20
3.5
Lights
On
shelves
Special
Stand
4
CPU
Tel
(-17, 43)
2
1tel/1ntk
F.A.
Cal2
PS, Cords, Fan Cover
Assblies on bottom shelves
Cal1
4 4
4 4
Frame X-Z
(-17, 34)
3.0
3.0
2
(-19, 17)
4
4
4
4
4
(-6.5, 43)
4.5
Box & 4 2 AdT
Label
5
8
Output
Cart
YPart
FA
For
CAL
Cal3
2 4
(-6.5, 34)
3.5
2
Door Glass
wall
4
Supply Shelf
&
Boxes
(-15, 17) X-Axis
2
Y-Axis
Sub-Assb Parts/Fxz
Frame
4
4
Print
Head
LINE 1
4 (Quad) Network Drop
4 (Quad) Electrical Drop
(#,#) : X, Y (ft) coordinates of cable drop points
Figure 6.1: Main Line Layout
4x40”
Pallet
4
(0,30)
2
18x2
Cluster
Part
Shelf
Y
6
28
2
(0,0)
Marketing and Public Relations
New and Deprecated Media
Marketing and Public Relations
7.1
Trade Shows / Events
7.2
Web Ads
7.3
Social Media
7.4
Promotions
7.5
Traditional Deprecated Media
60
Products
Buy and Sell
Products
8.1
New Product Introduction
8.2
Part Numbers
Internal Part Numbers
Manufacturer Part Numbers
Supplier Part Numbers
8.3
Serial numbers
8.4
Inventory
Locations
FIFO
Receiving
Delivery
Moves
62
Sales
Moar
Sales
9.1
Quotes
Creating a new Quote
A quotation is a draft document that captures customer’s interest in the
company’s products. In this state, the document may be changed any
number of times and / or cancelled.
1. From Sales/Sales/Quotations, create a new quotation.
a) Alternately, the lead-opportunity process may have created a
quotation already. In that scenario, open that quotation for the
next step.
2. Select customer. If there are separate addresses for invoicing and
delivery, choose them.
3. Provide customer reference (e.g. PO02533, phone reference, etc.).
4. For government or educational institutions, select “Govt/Educational
Institutions (USD)” pricelist.
5. Define terms and conditions if any.
6. Select products for the Order lines tab. Define quantity, adjust unit
price, set discount.
7. Switch to Other Information tab.
a) Set Incoterm. Default is EX WORKS for orders transferred from
ecommerce site (Ubercart). Change to “Delivered At Place” for
orders that will be invoiced for billing. Change to “Delivered
Duty Paid” for orders processed through Fedex IPD.
b) Invoicing terms: Default is “On Delivery Order.” Change this to
“On Demand” for international orders. This change will allow
generation of Proforma Invoice before delivery.
c) Select payment term – relevant for non-web orders
d) Select Fiscal Position – Tax terms as applicable [This will
probably change with Avalara module]
8. Save the quotation
64
9.2. ORDERS
9. Print the quotation if required.
Confirming the Quote
This step confirms the customer’s intent to buy. Confirmation generates a
series of stock moves and other documents in OpenERP. The sale order (the
quotation becomes a sale order on confirmation) cannot be cancelled without the associated delivery order and invoice (if any) cancelled. Changes
are allowed only on the text fields – no quantity, price, customer, address,
terms info may be changed after confirmation.
1. Identify the quotation from Sales/Sales/Quotations by searching on
the customer name or by quotation number.
2. Verify the contents of the quotation and ensure its completeness (refer
to Creating the Quote steps).
3. Press “Confirm Sale” button to confirm the quotation.
4. The sale order is created. From this time, this order will be seen
under Sales/Sales/Sales Orders.
5. Print the sale order to send to customer / email the document directly
– this step requires the customer’s email in OpenERP. If not the user
will be prompted to enter one.
6. If the order is international, press the create invoice button to create
a draft invoice.
9.2
Orders
Delivering the Order
Once the sale order is confirmed, a delivery order is created. This lets
the warehouse person know what to ship and where. Additionally, the
warehouse person may generate the customer invoice depending on the
invoice creation mode.
65
Sales
OpenERP Sales
1. The items pending delivery can be viewed
house/Receive/Deliver By Orders/Delivery Orders.
from
Ware-
a) The status of the delivery orders will be one of Ready, Waiting,
Back Orders, and To Invoice.
i. Ready: These are orders that can be fulfilled immediately.
ii. Waiting: These orders are waiting for one or more items in
the order.
iii. Back Orders: These orders are partial delivery pending from
a previous order. Note that the partial delivery is based on
quantities not fulfilled when they could have been.
iv. To Invoice: These orders are waiting for the warehouse
person to generate invoice. This state will be shown on
orders that originated from sale orders that have invoice
method as “On Delivery Order.”
b) Additional search conditions may be defined based on delivery
order number of source document number – which in this case
is the sale order number.
2. Select the delivery order.
3. Record additional information in the internal notes section – tracking
number, shipper notes, etc.
4. If the delivery is international, the proforma invoice needs to be
printed before the delivery order can be processed.
a) Go to the sale order associated with the delivery order. The
invoice method on this sale order must be “On Demand.”
b) Generate the customer draft invoice if not generated already.
c) Open the invoice by clicking on the “View invoice.”
i. Click on Proforma to set the invoice in the proforma state
ii. Print the invoice and it will read “Proforma Invoice.”
d) Attach the proforma invoice to the delivery order and enclose a
copy of it to the delivery package.
5. Click on deliver to complete the delivery order.
66
9.2. ORDERS
Web Sales
1. The invoice method should be set to On Demand in the sale order
associated with these sales.
2. The warehouse person reviews the delivery order and confirms the
delivery of goods for the order from Shipwire.
3. If not all items have been shipped from Shipwire, the delivery order
will be kept pending until all items in the order are delivered.
4. If Shipwire has fulfilled the order, the delivery order can be updated to
reflect this information (tracking number, etc.) and marked delivered
by clicking on “Deliver” button. The source location in the delivery
order line must be set to the appropriate location (Shipwire location
or AM location).
Generating Customer Invoice
Web Sales
Web Sales: These are sales for which payments have been received through
credit card on the shopping cart (Ubercart). Currently, these orders are
being keyed in from Ubercart. Once the sale order is created in OpenERP
(Invoice method = On Demand, Incoterms=EX Works), the invoice must
be created and payment processed.
1. Confirm the sale order.
2. Create the draft invoice (Note: this method is used for all web sales
and OpenERP sales that are international shipment)
3. Validate the invoice and get it ready for payment.
OpenERP Sales
OpenERP Sales: These are sales that are entered in OpenERP (phone sales,
local sales, institutional sales, donations, etc.) The invoice method must
be set to “On Delivery Order” and Incoterms must be set to “Delivered
at Place” for non IPD shipments, and “Delivered Duty Paid” for IPD
shipments. For sales that are paid through Credit Card or international
shipments, set the invoice method to “On Demand.”
67
Sales
1. Confirm the sale order.
2. If payment has been received through Paypal/Credit card or for
international shipments, create draft invoice.
3. For international shipments, set invoice state to Proforma and print
it out.
4. For institutional and other orders that will be invoiced on delivery,
follow delivery process to create the invoice.
5. Validate the invoice and get it ready for payment
Note: Setting the correct invoice method is essential for a smooth workflow
in the system and among the team.
9.3
Accepting Customer Payments
Record the customer payment when received. If invoice is in draft state,
validate the invoice before proceeding with this. Invoices may be paid in
two different ways.
1. Click on Pay in the invoice. This allows payment to be recorded
against the invoice.
a) Enter the payment amount and pick the correct journal to
record.
b) Complete payment.
c) Note: The payment amount if not in full will result in the invoice
not marked “Paid.”
d) The balance due from the customer will be tracked.
2. Use Customer Payments to record the payment. This method brings
up all pending payments due from the customer for payment.
a) Select the customer.
b) All the payments due from and to customer are listed in the
Credits/Debits section.
c) Record the paid amount.
68
9.4. VALUE CHAIN
d) This amount will automatically be reconciled against pending
payments and if completely adjusted, “Full Reconcile” flag will
be checked against the credit records. If payment is not sufficient
to fully reconcile against the dues, it will be adjusted against the
first / latest due.
Notes
1. Record conversations with the customer during the negotiation if
any along with the sales order using “Log a Note” feature. If the
information needs to reach the customer then the “Send Message”
option should be used.
2. Once the sales order is confirmed the only changes allowed are to
the text fields. The customer, pricing details, product details are
frozen and cannot be changed. Please review all the options before
confirming the SO.
3. Make sure to set the right payment term for the customer (Immediate
payment for web sales and NET30 or as the case may be for other
orders) as this will be used for aging analysis.
9.4
Value Chain
Everything we do must create value for the customer.
9.5
Customers
OpenERP —> Sales —> Sales —> Customers
9.6
Export Compliance
Comply with export.gov. Contact Denver office with any questions we can’t
resolve.
69
Sales
9.7
Phones
Transfer call
1. Ask the caller if you can transfer them.
2. Put the call on hold: *2
3. Dial internal extension number you want to transfer to.
4. Explain transfer when internal callee answers.
5. Hang up, and the call will automatically transfer.
9.8
Incoming OpenERP Email
The email address [email protected] and [email protected]
goes into the OpenERP Sales Leads.
OpenERP —> Sales —> Sales —> Leads
9.9
Products
OpenERP —> Sales —> Products —> Products
70
Shipping
Delivery and Receiving
Shipping
10.1
Serial Numbers
Updating Serial Numbers in Delivery Order
Serial numbers can be entered only in a draft Delivery Order.
1. For each line in the delivery order, click on the “Split in Serial
Number” button on the line.
2. Click on Add an Item in the popup that opens and key in the serial
number.
Enter serial number and quantity for each number. Typically, in
Aleph Objects case, the quantity will be 1 for each serial number.
In the above example, the quantity is defined at 2. So, enter two
serial numbers on two separate lines.
3. When serial number is entered, choose the “Create and Edit” option
after keying in the serial number. This will bring up a popup as
shown below.
Enter internal reference, prefix information if required. Do not enter
revision number or stock moves in this popup. Save the serial number.
4. Repeat the process for each line in the delivery order with a product
that requires serial number association.
10.2
Delivery
10.3
Inventory
OpenERP —> Warehouse
Receiving
OpenERP —> Warehouse —> Receive/Deliver By Orders —> Incoming
Shipments
72
10.4. EXPORT COMPLIANCE
Moves
OpenERP —> Warehouse —> Receive/Deliver By Orders —> Internal
Moves
10.4 Export Compliance
If you are unsure, don’t ship. If we don’t have the answer internally, contact
Denver office of export.gov.
10.5 Products
OpenERP —> Warehouse —> Products —> Products
10.6 Harmonized codes
Every Product we sell must have a harmonized code listed. We are using
the USA’s Schedule B.
10.7 Country of origin
We need to know the country of origin of every product we sell.
10.8 NAFTA
We can get most of our Products into Canada and Mexico duty free under
the North American Free Trade Agreement. Our printers and most of our
parts qualify.
73
Warehouse
First In, First Out
Warehouse
11.1
Products
Serial Numbers
11.2
Inventory
Receiving
Delivery
Moves
11.3
FIFO
11.4
Locations
76
Accounting
Finance
Accounting
12.1
Chart of Accounts
12.2
Periodic Processes
Monthly Processes
Monthly Bank Statement Reconciliation
Monthly Statements
Monthly Reports
Quarterly Processes
Quarterly Statements
Quartlery Reports
Quarterly Budget
Annual Processes
Yearly Bank Statement Reconciliation
Yearly Statements
Yearly Reports
Yearly Budget
12.3
Payables
OpenERP —> Accounting —> Suppliers —> Supplier Invoices
12.4
Receivables
OpenERP —> Accounting —> Customers —> Customer Invoices
OpenERP —> Accounting —> Customers —> Customer Payments
78
12.5. TAXES
12.5 Taxes
Sales Tax Nexus
Colorado, USA
Colorado Secretary of State
Loveland, Colorado, USA City of Loveland
Larimer County, Colorado, USA Larimer County
Longmont, Colorado, USA City of Longmont
Washington, USA
Washington
Pennsylvania, USA
Pennsylvania
Illinois, USA
Illinois, and maybe Chicago
UK, EU
We are registered as a UK business so we can collect VAT.
Canada Federal
We are registered withe a Canadian Business Number, so we can collect
and pay sales tax.
Canada Provinces
Canadian Provinces...
79
Accounting
Payroll
We are doing payroll through two companies at present.
Insperity
Insperity is a Professional Employment Organization (PEO).
Kelly
Kelly is temp-to-hire and recruitment.
12.6
GAAP
Generally Accepted Accounting Principles
80
Research and Development
Free Software and Open Hardware
Research and Development
The license must be FSF approved or GTFO.
82
Contact
Phone, Email, Web, Location
Contact
14.1
Support
Email: [email protected]
Phone: +1-970-377-1111 x610
14.2
Sales
Email: [email protected]
Phone: +1-970-377-1111 x600
14.3
Website
Aleph Objects, Inc.
www.alephobjects.com
84
Colophon
Created with 100% Free Software
GNU/Linux
LATEX Memoir


© Copyright 2026