
R&S -K18 Power Amplifier and Envelope Tracking Measurements
R&S®-K18 Power Amplifier and Envelope Tracking Measurements User Manual (;Úðë2) User Manual Test & Measurement 1176.9893.02 ─ 01 This manual describes the following R&S®FSW applications: ● R&S®FSW-K18 (1325.2170.K02) The firmware of the instrument makes use of several valuable open source software packages. For information, see the "Open Source Acknowledgement" on the user documentation CD-ROM (included in delivery). Rohde & Schwarz would like to thank the open source community for their valuable contribution to embedded computing. © 2014 Rohde & Schwarz GmbH & Co. KG Mühldorfstr. 15, 81671 München, Germany Phone: +49 89 41 29 - 0 Fax: +49 89 41 29 12 164 E-mail: [email protected] Internet: www.rohde-schwarz.com Subject to change – Data without tolerance limits is not binding. R&S® is a registered trademark of Rohde & Schwarz GmbH & Co. KG. Trade names are trademarks of the owners. The following abbreviations are used throughout this manual: R&S®FSW-K18 is abbreviated as R&S FSW-K18. R&S®-K18 Contents Contents 1 Welcome to the Amplifier Measurement Application......................... 5 2 Performing Amplifier Measurements................................................... 8 3 Configuring Amplifier Measurements................................................ 21 4 Analysis................................................................................................ 53 5 Remote Control Commands for Amplifier Measurements............... 62 List of Commands..............................................................................139 User Manual 1176.9893.02 ─ 01 3 R&S®-K18 User Manual 1176.9893.02 ─ 01 Contents 4 R&S®-K18 Welcome to the Amplifier Measurement Application Starting the Application 1 Welcome to the Amplifier Measurement Application The R&S FSW-K18 is a firmware application that adds functionality to measure the efficiency of traditional amplifiers and amplifiers that support envelope tracking with the R&S FSW signal analyzer. This user manual contains a description of the functionality that the application provides, including remote control operation. Functions that are not discussed in this manual are the same as in the base unit and are described in the R&S FSW User Manual. The latest versions of the manuals are available for download at the product homepage. http://www2.rohde-schwarz.com/product/FSW.html. Installation Find detailed installing instructions in the Getting Started or the release notes of the R&S FSW. ● ● Starting the Application............................................................................................. 5 Understanding the Display Information..................................................................... 6 1.1 Starting the Application The amplifier measurement application adds a new type of measurement to the R&S FSW. To activate the the Amplifier application 1. Press the MODE key on the front panel of the R&S FSW. A dialog box opens that contains all operating modes and applications currently available on your R&S FSW. 2. Select the "Amplifier" item. The R&S FSW opens a new measurement channel for the Amplifier application. All settings specific to amplifier measurements are in their default state. User Manual 1176.9893.02 ─ 01 5 R&S®-K18 Welcome to the Amplifier Measurement Application Understanding the Display Information 1.2 Understanding the Display Information The following figure shows the display as it looks for amplifier measurements. All different information areas are labeled. They are explained in more detail in the following sections. Fig. 1-1: Screen layout of the amplifier measurement application 1 2 3 4 5 = = = = = Channel bar Diagram header Result display Status bar Softkey bar For a description of the elements not described below, please refer to the Getting Started of the R&S FSW. Channel bar information The channel bar contains information about the current measurement setup, progress and results. Fig. 1-2: Channel bar of the amplifier application Ref Level Current reference level of the analyzer. Att Current attenuation of the analyzer. Freq Frequency the signal is transmitted on. Meas Time Length of the signal capture. Meas BW Bandwidth with wichich the signal is recorded. SRate Sample rate with which the signal is recorded. User Manual 1176.9893.02 ─ 01 6 R&S®-K18 Welcome to the Amplifier Measurement Application Understanding the Display Information SGL Indicates that single sweep mode is active. Count The current signal count for measurement tasks that involve a specific number of subsequent sweeps. Window title bar information For each diagram, the header provides the following information: Fig. 1-3: Window title bar information of the amplifier application 1 2 3 4 = = = = Window number Window type Trace color and number Trace mode Status bar information Global instrument settings, the instrument status and any irregularities are indicated in the status bar beneath the diagram. Furthermore, the progress of the current operation is displayed in the status bar. User Manual 1176.9893.02 ─ 01 7 R&S®-K18 Performing Amplifier Measurements 2 Performing Amplifier Measurements Note that you can use the R&S FSW-K18 with the Sequencer available with the R&S FSW. The functionality is the same as in the Spectrum application. Please refer to the R&S FSW User Manual for more information. Numeric Result Summary............................................................................................... 8 AM/AM.......................................................................................................................... 11 AM/PM.......................................................................................................................... 12 Gain Compression........................................................................................................ 13 Magnitude Capture (RF, I and Q)..................................................................................14 PAE vs Input Power...................................................................................................... 14 PAE vs Time................................................................................................................. 15 Power vs Time.............................................................................................................. 15 Raw EVM...................................................................................................................... 16 EV Spectrum................................................................................................................. 17 Spectrum FFT............................................................................................................... 18 Time Domain.................................................................................................................18 Numeric Result Summary The Result Summary shows various measurement results in numerical form, combined in one table. The table is split in two parts (three parts when you use the baseband input). ● The first part shows the modulation accuracy ● The second part shows the power characteristics of the RF signal ● The third part shows the power supply characteristics of the amplifier For each result type, several values are displayed. ● Current Value measured during the last sweep. In case of measurements that evaluate each captured sample, this value represents the average value over all samples captured in the last sweep. ● Min In case of measurements that evaluate each captured sample, this value represents the sample with lowest value captured in the last sweep. ● Max In case of measurements that evaluate each captured sample, this value represents the sample with the highest value captured in the last sweep. User Manual 1176.9893.02 ─ 01 8 R&S®-K18 Performing Amplifier Measurements Results that evaluate each captured sample ● Raw EVM and Raw Model EVM ● Power In and Power Out ● Gain ● All baseband results, except the Average PAE Note: When synchronization has failed, some results may be unavailable. Results to check modulation accuracy Raw EVM Error vector magnitude between synchronized reference and measurement signal. FETCh:MACCuracy:REVM:CURRent[:RESult]? on page 86 Raw Model EVM Error vector magnitude between synchronized reference and model signal. FETCh:MACCuracy:RMEV:CURRent[:RESult]? on page 87 Frequency Error Difference of the RF frequency of the reference signal compared to the measured signal. If the reference frequencies are coupled, the frequency offset should be about 0 Hz. If the offset is very high, it is likely that the reference frequency sources are not coupled correctly, e.g. if the analyzer is configured for external reference frequency, but the cable is not connected. FETCh:MACCuracy:FERRor:CURRent[:RESult]? on page 84 Sample Rate Error Sample rate difference between reference and measurement signal. FETCh:MACCuracy:SRERror:CURRent[:RESult]? on page 87 Magnitude Error Difference in magnitude between the reference signal and the measured signal. FETCh:MACCuracy:MERRor:CURRent[:RESult]? on page 85 Phase Error Phase difference between reference and measurement signal. If you are using the RF path for measurements, the phase between reference and measurement signal is random because the RF phases between signal generator and analyzer are not locked, even if the reference frequencies are locked. This is a typical behavior of two RF measurement instruments. FETCh:MACCuracy:PERRor:CURRent[:RESult]? on page 86 Quadrature Error Phase deviation of the 90° phase difference between the real (I) and imaginary (Q) part of the signal. Within a typical transmitter, the I and Q signal parts are mixed with an angle of 90° by the IQ output mixer. Due to hardware imperfections, the signal delay of I and Q may be different and thus lead to an angle non-equal to 90°. FETCh:MACCuracy:QERRor:CURRent[:RESult]? on page 86 Gain Imbalance Gain difference between the real (I) and imaginary (Q) part of the signal. This effect is typically generated by two separate amplifiers in the I and Q path of the analog baseband signal generation which have different gains. FETCh:MACCuracy:GIMBalance:CURRent[:RESult]? on page 84 User Manual 1176.9893.02 ─ 01 9 R&S®-K18 Performing Amplifier Measurements I/Q Imbalance Combination of Quadrature error and Gain imbalance. The I/Q imbalance parameter is another representation of the combination of Quadrature error and gain imbalance. FETCh:MACCuracy:IQIMbalance:CURRent[:RESult]? on page 85 I/Q Offset Shift of the measured signal compared to the ideal I/Q constellation in the I/Q plane. FETCh:MACCuracy:IQOFfset:CURRent[:RESult]? on page 85 Results to check power characteristcs Power In Signal power at the DUT input. Should correspond to the generator output level. FETCh:POWer:INPut:CURRent[:RESult]? on page 90 Power Out Signal power at the DUT output. FETCh:POWer:OUTPut:CURRent[:RESult]? on page 90 Gain Gain of the DUT. FETCh:POWer:GAIN:CURRent[:RESult]? on page 90 Crest Factor In Crest factor of the signal at the DUT input. The crest factor is the ratio of the RMS and peak power. FETCh:POWer:CFACtor:IN:CURRent[:RESult]? on page 89 Crest Factor Out Crest factor of the signal at the DUT output. The crest factor is the ratio of the RMS and peak power. FETCh:POWer:CFACtor:OUT:CURRent[:RESult]? on page 89 AM/AM Curve Width Vertical spread of the samples in the AM/AM result display compared to the ideal AM/AM curve. The spread is measured at the RMS level of the signal. FETCh:AMAM:CWIDth:CURRent[:RESult]? on page 88 AM/PM Curve Width Vertical spread of the samples in the AM/PM result display compared to the ideal AM/PM curve. The spread is measured at the RMS level of the signal. FETCh:AMPM:CWIDth:CURRent[:RESult]? on page 88 Results to check the power supply characteristics of the amplifier These results are available when you turn on the baseband input. For valid results, make sure that you have configured the measurement correctlyregarding the equipment you are using (see "Configuring PAE measurements (Power Added Efficiency)" on page 51). Baseband Input Voltage I Voltage measured at the I channel of the analyzer baseband input. FETCh:IVOLtage:PURE:CURRent[:RESult]? on page 92 Baseband Input Voltage Q Voltage measured at the Q channel of the analyzer baseband input. FETCh:QVOLtage:PURE:CURRent[:RESult]? on page 93 User Manual 1176.9893.02 ─ 01 10 R&S®-K18 Performing Amplifier Measurements Voltage Voltage measured at the Q channel of the analyzer baseband input. This value represents the supply voltage of the power amplifier. The result is the same as the "Baseband Input Voltage Q" when the mulitplier = 1 and the offset = 0 (see "Configuring PAE measurements (Power Added Efficiency)" on page 51) FETCh:VCC:CURRent[:RESult]? on page 93 Current Current measured at the I channel of the baseband input. This corresponds to the current drawn by the amplifier. FETCh:ICC:CURRent[:RESult]? on page 92 Power DC power measured at the baseband input. The DC power is the product of the measured voltage and current. FETCh:POWer:CURRent[:RESult]? on page 92 Average PAE The average Power Added Efficiency (PAE) indicates the efficiency of the amplifier. The PAE is the ratio of the difference between RF output and input power and the DC power: PAE = (Output Power - Input Power) / DC power FETCh:APAE:CURRent[:RESult]? on page 91 Remote command: Selecting the result display: LAY:ADD ? '1',LEFT,RTAB Querying results: see chapter 5.5.3, "Retrieving Numeric Results", on page 83 AM/AM The AM/AM result display shows nonlinear effects of the DUT. It shows the amplitude at the DUT input against the amplitude at the DUT output. The ideal AM/AM curve would be a straight line at 45°. However, nonlinear effects result in a measurement curve that does not follow the ideal curve. When you drive the amplifier into saturation, the curve typically flattens at high input levels. The width of the AM/AM trace is an indicator of memory effects: the larger the width of the trace, the more memory effects occur. The AM/AM Curve Width is shown in the numerical Result Summary. Both axes show the power of the signal in dBm. You can analyze the AM/AM characteristics of the measured signal and the modeled signal. ● ● Measured signal Shows the AM/AM characteristics of the DUT. The software uses the reference signal in combination with the synchronized measurement signal to calculate a software model that describes the characteristics of the device under test.. The measured signal is represented by a colored cloud of values. The cloud is based on the recorded samples. In case of samples that have the same values (and would thus be superimposed), colors represent the statistical frequency with which a certain input / output level combination occurs in recorded samples. Blue pixels represent low statistical frequencies, red pixels high statistical frequencies. A color map is provided within the result display. Modeled signal User Manual 1176.9893.02 ─ 01 11 R&S®-K18 Performing Amplifier Measurements Shows the AM/AM characteristics of the model that has been calculated. The modeled signal is calculated by applying the DUT model to the reference signal. When the model matches the characteristics of the DUT, the characteristics of the model signal are the same as those of the measured signal (minus the noise). The modeled signal is represented by a line trace. When system modeling has been turned off, this trace is not displayed. All traces include the digital predistortion, when you have turned that feature on. Remote command: Selection: LAY:ADD AMAM Result query: TRACe<n>[:DATA]? on page 81 AM/PM The AM/PM result display shows nonlinear effects of the DUT. It shows the phase difference between DUT input and output for each sample of the synchronized measurement signal.. The ideal AM/PM curve would be a straight line at 0°. However, nonlinear effects result in a measurement curve that does not follow the ideal curve. Typically, the curve drifts from a zero phase shift, especially at high power levels when you drive the amplifier into saturation. The width of the AM/PM trace is an indicator of memory effects: the larger the width of the trace, the more memory effects occur. The AM/PM Curve Width is shown in the numerical Result Summary. The x-axis shows the levels of all samples of the synchronized measurement signal in dBm. The y-axis shows the phase of the signal for the corresponding power level. The unit is either rad or degree, depending on your phase unit selection in the "Display Settings". You can analyze the AM/PM characteristics of the real DUT or of the modeled DUT. ● Measured signal Shows the AM/PM characteristics of the DUT. The software uses the reference signal together with the synchronized measurement signal to calculate a software model that describes the characteristics of the device under test. The measured signal is represented by a colored cloud of values. The cloud is based on the recorded samples. In case of samples that have the same values (and would thus be superimposed), colors represent the statistical frequency with which a certain input / output level combination occurs in recorded samples. A color map is provided within the result display. User Manual 1176.9893.02 ─ 01 12 R&S®-K18 Performing Amplifier Measurements ● Modeled signal Shows the AM/PM characteristics of the model that has been calculated. The modeled signal is calculated by applying the DUT model to the reference signal. When the model matches the characteristics of the DUT, the characteristics of the modeled signal are the same as those of the measured signal (minus the noise). The modeled signal is represented by a line trace. When system modeling has been turned off, this trace is not displayed. All traces include the digital predistortion, when you have turned that feature on. Remote command: Selection: LAY:ADD AMPM Result query: TRACe<n>[:DATA]? on page 81 Gain Compression The Gain Compression result display shows the gain and error effects of the DUT against the DUT input or output power. The gain is the ratio of the input and output power of the DUT. The x-axis shows the levels of all samples of the synchronized measurement signal in dBm.. You can select the information displayed on the x-axis in the "Display Settings" dialog box. The y-axis shows the gain in dB. The ideal Gain Compression curve would be a straight horizontal line. However, nonlinear effects result in a measurement curve that does not follow the ideal curve. In addition, the curve widens at very low input levels due to noise influence. The width of the Gain Compression trace is an indicator of memory effects: the larger the width of the trace, the more memory effects occur. The x-axis shows the measured power levels in dBm. The y-axis shows the signal gain in dB. The gain is represented by a colored cloud of values. The cloud is based on the recorded samples. In case of samples that have the same values (and would thus be superimposed), colors represent the statistical frequency with which a certain level / gain combination occurs in recorded samples. Blue pixels represent low statistical frequencies, red pixels high statistical frequencies. A color map is provided within the result display. User Manual 1176.9893.02 ─ 01 13 R&S®-K18 Performing Amplifier Measurements Remote command: Selection: LAY:ADD GC Result query: TRACe<n>[:DATA]? on page 81 Magnitude Capture (RF, I and Q) The Magnitude Capture result display contains the raw data that has been recorded and thus represents the characteristics of the DUT. It is available for the data recorded on the RF input and both baseband inputs (I and Q channels). (Note that the I and Q channel capture buffers are only available when parallel baseband capture has been turned on.) The capture buffer shows the signal level over time. The unit is either dBm (RF capture), V or A (baseband capture). In case of the baseband capture, all multipliers and offsets are already included in the results. The raw data is source for all further evaluations. You can also use the data in the capture buffer to identify the causes for possible unexpected results. Remote command: Selection (RF): LAY:ADD RFM Selection (I): LAY:ADD IMAG Selection (Q): LAY:ADD QMAG Result query: TRACe<n>[:DATA]? on page 81 PAE vs Input Power The PAE Input Power result display shows the Power Added Efficiency (PAE) against the input power. It helps you to find the input levels at which the DUT works most efficiently. The x-axis shows the levels of all samples of the synchronized measurement signal in dBm. The y-axis shows the efficiency in %, based on the following formula: User Manual 1176.9893.02 ─ 01 14 R&S®-K18 Performing Amplifier Measurements PAE = (RF Output Power - RF Input Power) / DC Power The measured signal is represented by a colored cloud of values. The cloud is based on the recorded samples. In case of samples that have the same values (and would thus be superimposed), colors represent the statistical frequency with which a certain input / output level combination occurs in the recorded samples. Blue pixels represent low statistical frequencies, red pixels high statistical frequencies. A color map is provided within the result display. Remote command: Selection: LAY:ADD PAEI Result query: TRACe<n>[:DATA]? on page 81 PAE vs Time The PAE Time result display shows the Power Added Efficiency against time. The x-axis represents the time in seconds. The y-axis shows the efficiency in %, based on the following formula: PAE = (RF Output Power - RF Input Power) / DC Power Remote command: Selection: LAY:OUT PAET Result query: TRACe<n>[:DATA]? on page 81 Power vs Time The Power vs Time result display shows the supply power of the power amplifier against time. The results are calculated by multiplying the supply voltage with the supply current which are recorded at the baseband inputs of the R&S FSW. The unit of the results is W. User Manual 1176.9893.02 ─ 01 15 R&S®-K18 Performing Amplifier Measurements For valid results, make sure that you have configured the measurement correctly regarding the equipment you are using (see "Configuring PAE measurements (Power Added Efficiency)" on page 51). Remote command: Selection: LAY:ADD PVT Result query: TRACe<n>[:DATA]? on page 81 Raw EVM The Raw EVM result display shows the error vector magnitude of the signal over time. The EVM is a measure of the modulation accuracy. It compares two signals and shows the distance of the measured constellation points and the ideal constellation points. In the R&S FSW-K18, you can compare the measured signal against the reference signal and against the modeled signal. ● ● Measured signal against reference signal Trace 1 compares the measured signal and the reference signal. To get useful results, the calculated linear gain is compensated to match both signals. Depending on the DUT, noise and nonlinear effects may have been added to the measurement signal. These effects are visualized by this trace. Measured signal against modeled signal Trace 2 compares the measured signal and the modeled signal. The EVM between the measured and modeled signal indicates the quality of the DUT modeling. If the model matches the DUT behavior, the modeling error is zero (or is merely influenced by noise). This result display shows changes in the model and its parameters and thus allows you to optimize the modeling. When system modeling has been turned off, this trace is not displayed. Note that the raw EVM is calculated for each sample that has been recorded. Thus, the raw EVM might differ from EVM values that are calculated according to a specific mobile communication standard that apply special rules to calculate the EVM, for example LTE. User Manual 1176.9893.02 ─ 01 16 R&S®-K18 Performing Amplifier Measurements Remote command: Selection: LAY:ADD REVM Result query: TRACe<n>[:DATA]? on page 81 EV Spectrum The EV Spectrum result display shows the error vector (EV) signal in the spectrum around the center frequency. The EV is a measure of the modulation accuracy. It compares two signals and shows the distance of the measured constellation points and the ideal constellation points. The unit is dBm. In the R&S FSW-K18, you can compare the measured signal against the reference signal and against the modeled signal. ● ● Measured signal against reference signal Trace 1 compares measured signal and the reference signal. To get useful results, the calculated linear gain is compensated to match both signals. Depending on the DUT, noise and nonlinear effects may have been added to the measurement signal. These effects are visualized by this trace. Measured signal against modeled signal Trace 2 compares measured signal and the modeled signal. The EVM between the measured and modeled signal indicates the quality of the DUT modeling. If the model matches the DUT behavior, the modeling error is zero (or is merely influenced by noise). This result display shows changes in the model and its parameters and thus allows you to optimize the modeling. When system modeling has been turned off, this trace is not displayed. User Manual 1176.9893.02 ─ 01 17 R&S®-K18 Performing Amplifier Measurements Remote command: Selection: LAY:OUT SEVM Result query: TRACe<n>[:DATA]? on page 81 Spectrum FFT The Spectrum FFT result display shows the frequency spectrum of the signal. It is available for the data recorded on the RF input and both baseband inputs (I and Q channels). (Note that the Spectrum FFT of the I and Q channel are only available when parallel baseband capture has been turned on.) The Spectrum FFT result shows the signal level in the spectrum around the center frequency. The unit is dBm. In case of the RF spectrum, you can display the spectrum of the measured signal and the reference signal. In the best case, the measured signal has the same shape as the reference signal. Remote command: Selection (RF): LAY:ADD RFS Selection (I): LAY:ADD ISP Selection (Q): LAY:ADD QSP Result query: TRACe<n>[:DATA]? on page 81 Time Domain The Time Domain result display shows the signal characteristics over time. It is similar to the Power vs Time and Magnitude Capture result displays in that it shows the signal characteristics over time. However, it delibaretly shows only a very short period of the signal. You can thus use it to compare various aspects of the signal, especially the timing of the displayed signals, in a single result display. ● Measured signal User Manual 1176.9893.02 ─ 01 18 R&S®-K18 Performing Amplifier Measurements ● ● ● ● ● Trace 1 shows the characteristics of the measured signal over time. The data should be the same as the results shown in the Magnitude Capture RF result display. In the best case, the measured signal is the same as the reference signal. Modeled signal Trace 2 shows the characteristics of the modeled signal. When system modeling has been turned off, this trace is not displayed. If the model matches the behavior of the DUT, the characteristics of the signal are the same as those of the measured signal (minus the noise). Reference signal Trace 3 shows the characteristics of the reference signal. The reference signal present at the DUT input represents the ideal signal. Current measured at the I channel of the baseband input Trace 4 shows the characteristics of the current that is drawn by the amplifier. It is measured at the I channel of the baseband input. Voltage measured at the Q channel of the baseband input Trace 5 shows the characteristics of the power amplifier supply voltage. It is measured at the Q channel of the baseband input. Power measured at the baseband input Trace 6 shows the power of the signal at the baseband input. The power is the product of the current and the voltage measured at the baseband channels. Traces 4 to 6 are available when parallel baseband capture has been turned on. In case of the baseband capture, all multipliers and offsets are already included in the results. Scale of the x-axis (display settings for the Time Domain) The scale of the x-axis depends on your configuration in the "Display Settings" dialog box. The logic is as follows: ● When you select automatic scaling (➙ "Position: Auto") and synchronization has failed, the application searches for the peak level in the capture buffer and shows the signal around the peak for the "Duration" that has been defined. ● When you select automatic scaling (➙ "Position: Auto") and synchronization is OK, the application searches for the peak level in the synchronized area of the capture buffer and shows the signal around the peak for the "Duration" that has been defined. ● When you select manual scaling (➙ "Position: Manual") and synchronization has failed, the x-axis starts at an "Offset" relative to the first sample in the capture buffer. The end of the x-axis depends on the "Duration" you have defined. User Manual 1176.9893.02 ─ 01 19 R&S®-K18 Performing Amplifier Measurements ● When you select manual scaling (➙ "Position: Manual") and synchronization is OK, the x-axis starts at an "Offset" relative to the first sample in the synchronized area of the capture buffer. The end of the x-axis depends on the "Duration" you have defined. Note: The "Display Settings" for the time domain are only available after you have selected the "Specifics for: Time Domain" item from the corresponding dropdown menu at the bottom of the dialog box. Scale of the y-axis The scale of the y-axis also depends on your configuration. The signal characteristics displayed in the Time Domain result display all have a different unit. Therefore, the application provides a feature that normalizes all results to 1 (see "Configuring the Time Domain result display" on page 59). Normalization makes it easier to comapre the timing between the traces. By default, normalization is on. Unnormalized results are displayed in their respective unit. In that case, however, the diagram might be hard to read. Remote command: Selection: LAY:ADD TDOM Result query: TRACe<n>[:DATA]? on page 81 User Manual 1176.9893.02 ─ 01 20 R&S®-K18 Configuring Amplifier Measurements Configuration Overview 3 Configuring Amplifier Measurements ● ● ● ● ● ● ● ● ● ● ● Configuration Overview...........................................................................................21 Performing Measurements......................................................................................23 Designing a Reference Signal.................................................................................24 Configuring Inputs and Outputs.............................................................................. 30 Triggering Measurements....................................................................................... 42 Configuring the Data Capture................................................................................. 42 Synchronizing Measurement Data.......................................................................... 45 Estimating and Compensating Signal Errors.......................................................... 46 Applying System Models.........................................................................................47 Applying Digital Predistortion.................................................................................. 49 Configuring Envelope Measurements..................................................................... 51 3.1 Configuration Overview Throughout the measurement channel configuration, an overview of the most important currently defined settings is provided in the "Overview". The "Overview" is displayed when you select the "Overview" icon, which is available at the bottom of all softkey menus. In addition to the main measurement settings, the "Overview" provides quick access to the main settings dialog boxes. The individual configuration steps are displayed in the order of the data flow. Thus, you can easily configure an entire measurement channel from input over processing to output and analysis by stepping through the dialog boxes as indicated in the "Overview". In particular, the "Overview" provides quick access to the following configuration dialog boxes (listed in the recommended order of processing): 1. Reference Signal See chapter 3.3, "Designing a Reference Signal", on page 24. User Manual 1176.9893.02 ─ 01 21 R&S®-K18 Configuring Amplifier Measurements Configuration Overview 2. Input and output See chapter 3.4, "Configuring Inputs and Outputs", on page 30. 3. Trigger See chapter 3.5, "Triggering Measurements", on page 42. 4. Data Acquisition See chapter 3.6, "Configuring the Data Capture", on page 42. 5. Synchronisation, error estimation and compensation See chapter 3.7, "Synchronizing Measurement Data", on page 45. See chapter 3.8, "Estimating and Compensating Signal Errors", on page 46. 6. Measurement Modeling: see chapter 3.9, "Applying System Models", on page 47. DPD: see chapter 3.10, "Applying Digital Predistortion", on page 49. Envelope: see chapter 3.11, "Configuring Envelope Measurements", on page 51. 7. Result configuration See chapter 4, "Analysis", on page 53. 8. Display configuration See chapter 2, "Performing Amplifier Measurements", on page 8. To configure settings ► Select any button in the "Overview" to open the corresponding dialog box. Select a setting in the channel bar (at the top of the measurement channel tab) to change a specific setting. Preset Channel Select the "Preset Channel" button in the lower lefthand corner of the "Overview" to restore all measurement settings in the current channel to their default values. Note that the PRESET key on the front panel restores the entire instrument to its default values and thus closes all measurement channels on the R&S FSW (except for the default Spectrum application channel)! Remote command: SYSTem:PRESet:CHANnel[:EXECute] on page 70 Specifics for The measurement channel may contain several windows for different results. Thus, the settings indicated in the "Overview" and configured in the dialog boxes vary depending on the selected window. Select an active window from the "Specifics for" selection list that is displayed in the "Overview" and in all window-specific configuration dialog boxes. The "Overview" and dialog boxes are updated to indicate the settings for the selected window. User Manual 1176.9893.02 ─ 01 22 R&S®-K18 Configuring Amplifier Measurements Performing Measurements 3.2 Performing Measurements Continuous Sweep/RUN CONT.................................................................................... 23 Single Sweep/ RUN SINGLE........................................................................................ 23 Continue Single Sweep.................................................................................................24 Sweep / Average Count................................................................................................ 24 Continuous Sweep/RUN CONT After triggering, starts the measurement and repeats it continuously until stopped. This is the default setting. While the measurement is running, the "Continuous Sweep" softkey and the RUN CONT key are highlighted. The running measurement can be aborted by selecting the highlighted softkey or key again. The results are not deleted until a new measurement is started. Note: Sequencer. If the Sequencer is active, the "Continuous Sweep" softkey only controls the sweep mode for the currently selected channel; however, the sweep mode only has an effect the next time the Sequencer activates that channel, and only for a channel-defined sequence. In this case, a channel in continuous sweep mode is swept repeatedly. Furthermore, the RUN CONT key controls the Sequencer, not individual sweeps. RUN CONT starts the Sequencer in continuous mode. Remote command: INITiate:CONTinuous on page 78 Single Sweep/ RUN SINGLE After triggering, starts the number of sweeps set in "Sweep Count". The measurement stops after the defined number of sweeps has been performed. While the measurement is running, the "Single Sweep" softkey and the RUN SINGLE key are highlighted. The running measurement can be aborted by selecting the highlighted softkey or key again. Note: Sequencer. If the Sequencer is active, the "Single Sweep" softkey only controls the sweep mode for the currently selected channel; however, the sweep mode only has an effect the next time the Sequencer activates that channel, and only for a channel-defined sequence. In this case, a channel in single sweep mode is swept only once by the Sequencer. Furthermore, the RUN SINGLE key controls the Sequencer, not individual sweeps. RUN SINGLE starts the Sequencer in single mode. If the Sequencer is off, only the evaluation for the currently displayed measurement channel is updated. Remote command: INITiate[:IMMediate] on page 79 User Manual 1176.9893.02 ─ 01 23 R&S®-K18 Configuring Amplifier Measurements Designing a Reference Signal Continue Single Sweep While the measurement is running, the "Continue Single Sweep" softkey and the RUN SINGLE key are highlighted. The running measurement can be aborted by selecting the highlighted softkey or key again. Remote command: INITiate:CONMeas on page 78 Sweep / Average Count Defines the number of sweeps to be performed in the single sweep mode. Values from 0 to 200000 are allowed. If the values 0 or 1 are set, one sweep is performed. Remote command: [SENSe:]SWEep:COUNt on page 80 3.3 Designing a Reference Signal The first thing you should do when measuring amplifiers is to design a reference signal. The reference signal describes the characteristics of the signal that you feed into the amplifier and whose amplified version is measured by the application. You can define any signal you want as a reference signal. The application provides several methods to design a reference signal: ● Designing the signal on a generator ● Designing the signal in a waveform file ● Designing the signal in the R&S FSW-K18 For all three methods, having a signal generator in the test setup is mandatory. (Note: The only supported signal generator is the R&S SMW.) ► To access reference signal settings, proceed as follows: ● ● In the "Configuration Overview", select the "Reference Signal" button. Press the MEAS CONFIG key and then select the "Reference Signal" softkey. The dialog box to configure the reference signal is made up out of three tabs. Each tab represents one of the available methods to design the reference signal. Signal information Each tab of the "Reference Signal" dialog box contains some basic information about the reference signal that is currently in use. he information is only displayed when a reference signal has been successfully loaded. When you load a different waveform, the reference signal information is updated accordingly. User Manual 1176.9893.02 ─ 01 24 R&S®-K18 Configuring Amplifier Measurements Designing a Reference Signal ● Sample rate The sample rate in the header of the currently used reference signal waveform file in Hz. ● Sample length Length of the currently used reference signal waveform file in samples. ● Loaded waveform file Name of the waveform file currently in use. Remote command: Sample rate: CONFigure:REFSignal:SINFo:SRATe? on page 99 Sample length: CONFigure:REFSignal:SINFo:SLENgth? on page 99 Transferring the reference signal.................................................................................. 25 Designing a reference signal on a signal generator......................................................26 Designing a reference signal in a waveform file............................................................27 Designing a reference signal within the R&S FSW-K18............................................... 27 └ Clock Rate...................................................................................................... 28 └ Signal Bandwidth............................................................................................ 29 └ Signal Length.................................................................................................. 29 └ Crest Factor.................................................................................................... 29 └ Notch Width.................................................................................................... 29 └ Notch Position.................................................................................................29 └ Pulse Duty Cycle.............................................................................................29 └ Ramp Length.................................................................................................. 30 └ Waveform File Name...................................................................................... 30 Transferring the reference signal Both the signal generator and analyzer used in the test setup need to know the characteristics of the reference signal. ● ● The signal generator needs that information to generate the signal. The analyzer needs that information for the evaluation of the results. This is why you have to transfer the signal information to both instruments. The transmission is done through a LAN connection that you have to establish when setting up the measurement. For more information on that see chapter 3.4.6, "Controlling a Signal Generator", on page 39. ● ● When you design the reference signal on the signal generator, transfer the signal information from the generator to the analyzer with the ➙"Read and Load Current Signal from R&S SMW" button. You can either design a reference signal with one of the available firmware options (for example an LTE signal with the R&S SMW-K55) or design a signal in a custom waveform file. Note that the R&S FSW-K18 does not support all firmware options of the R&S SMW. When you load the reference signal from a waveform file or design the signal within the R&S FSW-K18, transfer the signal information from the analyzer to the genera- User Manual 1176.9893.02 ─ 01 25 R&S®-K18 Configuring Amplifier Measurements Designing a Reference Signal tor. Depending on the signal source, you can do this either with the "Load and Export Selected Waveform File to R&S SMW" or the "Generate and Load Signal and Export it to R&S SMW" buttons. When you send the signal information to the generator, the application automatically configures the generator accordingly. Transmission state The LED displayed with the transmission button shows the state of the reference signal transmission. The LED is either grey, green or red: ● Grey LED Transmission state unknown (for example when you have not yet started the transmission). ● Green LED Transmission has been successful. ● Red LED Transmission has not been successful. Check if the connection between analyzer and generator has been established or if the IP address has been stated correctly. Designing a reference signal on a signal generator One way to design a reference signal is to design the signal on the signal generator itself. You can design any signal you like, as long as it is storable as an arbitrary waveform (ARB) file. When you are done, you have to transfer the signal information from the signal generator to the signal analyzer with the "Read Signal from R&S SMW" button. Most of the options available for the R&S SMW are supported by the automatic signal import functionality of the R&S FSW-K18. If the signal import was not successful (indicated by a red LED), you have to transfer the reference signal in another way (for example with a memory stick). User Manual 1176.9893.02 ─ 01 26 R&S®-K18 Configuring Amplifier Measurements Designing a Reference Signal For a comprehensive description of all features available on the signal generator and information on how to generate signals, please refer to the documentation of the signal generator. Remote command: See signal generator documentation. CONFigure:REFSignal:CGW:READ on page 95 CONFigure:REFSignal:CGW:LEDState? on page 94 Designing a reference signal in a waveform file One way to design a reference signal is to define its characteristics in a waveform file (*.wv). Basically, this file contains the characteristics of the reference signal. The R&S FSWK18 automatically transfers the file to the R&S SMW, which then generates the corresponding signal. You can create a waveform file, for example ● with the R&S®WinIQSIM2 software package ● by exporting a signal designed on the signal generator For a comprehensive description of all features available on the signal generator and information on how to generate and export signals to a file, please refer to the documentation of the signal generator. To upload a waveform file and process it with the ARB generator of the R&S SMW, proceed as follows: ▶ In the "Custom Waveform" tab, select a file via the "Select File" button. ▶ Upload the file to the generator with the "Send Signal to R&S SMW" button. Remote command: Select file: CONFigure:REFSignal:CWF:FPATh on page 95 Transfer file: CONFigure:REFSignal:CWF:WRITe on page 96 Transmission state: CONFigure:REFSignal:CWF:LEDState? on page 95 Designing a reference signal within the R&S FSW-K18 One way to design a reference signal is to design the signal within the R&S FSW-K18. User Manual 1176.9893.02 ─ 01 27 R&S®-K18 Configuring Amplifier Measurements Designing a Reference Signal The application provides functionality to design a basic reference signal and saves the signal characteristics in a waveform file which you have to transfer to the signal generator with the "Send Signal to R&S SMW" button. When the data has been transfered, the R&S SMW generates the corrsponding signal. The generated signal is a multicarrier signal with OFDM characeristics, whose basic properties, like crest factor and bandwidth, you can specify as required. To generate a reference signal within the application, proceed as follows: ▶ In the "Generated Reference Signal" tab, design the reference signal as required. The application stores the current signal properties as an ARB signal in a waveform file. ▶ Upload the data to the generator with the "Send Signal to R&S SMW" button. You can define the following signal characteristics. ● "Clock Rate" on page 28 ● "Signal Bandwidth" on page 29 ● "Signal Length" on page 29 ● "Crest Factor" on page 29 ● "Notch Width" on page 29 ● "Notch Position" on page 29 ● "Pulse Duty Cycle" on page 29 ● "Ramp Length" on page 30 ● "Waveform File Name" on page 30 Remote command: CONFigure:REFSignal:GOS:WRITe on page 99 CONFigure:REFSignal:GOS:LEDState? on page 97 Clock Rate ← Designing a reference signal within the R&S FSW-K18 Defines the clock or sample rate that the reference signal is generated with. User Manual 1176.9893.02 ─ 01 28 R&S®-K18 Configuring Amplifier Measurements Designing a Reference Signal The purpose of the application is to measure nonlinear effects. These generate spectral regrowth (amplitude components in addition to the signal). Remote command: CONFigure:REFSignal:GOS:SRATe on page 98 Signal Bandwidth ← Designing a reference signal within the R&S FSW-K18 Defines the bandwidth of the reference signal. The bandwidth should not be larger than maximum I/Q bandwidth supported by your signal analyzer (which depends on the analyzer configuration). Remote command: CONFigure:REFSignal:GOS:BWIDth on page 96 Signal Length ← Designing a reference signal within the R&S FSW-K18 Defines the number of samples that the reference signal consists of. A number that is a power of 2 will speed up the internal signal processing. Thus, such a number should be specified if no other requirements limit the choice of the sample count. For more information see "Pulse Duty Cycle" on page 29. Remote command: CONFigure:REFSignal:SINFo:SLENgth? on page 99 Crest Factor ← Designing a reference signal within the R&S FSW-K18 Defines the crest factor of the reference signal. The crest factor shows the RMS power in relation to the peak power. Remote command: CONFigure:REFSignal:GOS:CRESt on page 96 Notch Width ← Designing a reference signal within the R&S FSW-K18 Defines the width of a notch that you can add to the reference signal. Within the notch, all carriers of the reference signal have zero amplitude. You can use the noise notch to, for example, determine the noise power ratio (NPR) before and after the DPD. Remote command: CONFigure:REFSignal:GOS:NWIDth on page 98 Notch Position ← Designing a reference signal within the R&S FSW-K18 Defines an offset for the noise notch relative to the center frequency. The offset moves the notch to a position outside the center of the signal. You can use the offset to, for example, generate a one-sided noise signal or to examine asymmetric distortion effects. Remote command: CONFigure:REFSignal:GOS:NPOSition on page 97 Pulse Duty Cycle ← Designing a reference signal within the R&S FSW-K18 Defines the duty cycle of a pulsed reference signal. User Manual 1176.9893.02 ─ 01 29 R&S®-K18 Configuring Amplifier Measurements Configuring Inputs and Outputs The duty cycle of a pulse is the ratio of the pulse duration and the actual length of the pulse. A duty cycle of 100 % correposnds to a continuous signal. Example: The pulse duration is 2 μs. The actual length of the pulse is 1 μs. The duty cycle is 1 μs : 2 μs = 0.5 or 50 %. Remote command: CONFigure:REFSignal:GOS:DCYCle on page 97 Ramp Length ← Designing a reference signal within the R&S FSW-K18 Defines the number of samples used to ramp up the pulse to its full power and vice versa. Remote command: CONFigure:REFSignal:GOS:RLENgth on page 98 Waveform File Name ← Designing a reference signal within the R&S FSW-K18 Defines the name of the waveform file that the reference ARB signal configuration is stored in. Remote command: CONFigure:REFSignal:GOS:WNAMe on page 99 3.4 Configuring Inputs and Outputs ● ● ● ● ● ● Selecting and Configuring the Input Source........................................................... 30 Configuring the Frequency......................................................................................34 Defining Level Characteristics.................................................................................35 Using Probes...........................................................................................................38 Configuring Outputs................................................................................................ 39 Controlling a Signal Generator................................................................................39 3.4.1 Selecting and Configuring the Input Source The R&S FSW-K18 allows you to use the RF input and the Analog Baseband input which is available with option R&S FSW-B71. Simultanous use of the RF input and the Analog Baseband input Compared to other applications available for the R&S FSW, the R&S FSW-K18 allows you to use both the RF input and the Analog Baseband input simultaneously. This allows for various specific measurements which require a simultaneous capture of the RF signal, of the supply voltage and of the current drawn by an amplifier. Such a test setup is, for example, required to calculate the instantaneous PAE (Power Added Efficiency), which in turn is of interest for measurements on amplifiers that make use of envelope tracking. User Manual 1176.9893.02 ─ 01 30 R&S®-K18 Configuring Amplifier Measurements Configuring Inputs and Outputs You can configure the signal inputs in the "Input Source" tab of the "Input / Output" dialog box. ► To access the input source settings, proceed as follows: ● ● ● ● 3.4.1.1 In the "Configuration Overview", select the "Input / Output" button and then the "Input Source" tab. Press the INPUT / OUTPUT key and then select the "Input Source Config" softkey. Configuring the RF Input......................................................................................... 31 Configuring the Analog Baseband Input (R&S FSW-B71)...................................... 33 Configuring the RF Input The RF input captures the RF signal that you are measuring. It is always on. The RF input source characteristics are similar to those available in the Spectrum application.For a comprehensive description of these settings, please refer to the R&S FSW User Manual. ► Select the "RF Input" tab (vertical) from the "Input Source" dialog box. Input Coupling............................................................................................................... 31 Impedance.................................................................................................................... 32 High-Pass Filter 1...3 GHz............................................................................................ 32 YIG-Preselector.............................................................................................................32 Input Connector.............................................................................................................32 Input Coupling The RF input of the R&S FSW can be coupled by alternating current (AC) or direct current (DC). AC coupling blocks any DC voltage from the input signal. This is the default setting to prevent damage to the instrument. Very low frequencies in the input signal may be distorted. User Manual 1176.9893.02 ─ 01 31 R&S®-K18 Configuring Amplifier Measurements Configuring Inputs and Outputs However, some specifications require DC coupling. In this case, you must protect the instrument from damaging DC input voltages manually. For details, refer to the data sheet. Remote command: INPut:COUPling on page 101 Impedance The reference impedance for the measured levels of the R&S FSW can be set to 50 Ω or 75 Ω. 75 Ω should be selected if the 50 Ω input impedance is transformed to a higher impedance using a 75 Ω adapter of the RAZ type (= 25 Ω in series to the input impedance of the instrument). The correction value in this case is 1.76 dB = 10 log (75Ω/50Ω). Remote command: INPut:IMPedance on page 102 High-Pass Filter 1...3 GHz Activates an additional internal high-pass filter for RF input signals from 1 GHz to 3 GHz. This filter is used to remove the harmonics of the analyzer in order to measure the harmonics for a DUT, for example. This function requires option R&S FSW-B13. (Note: for RF input signals outside the specified range, the high-pass filter has no effect. For signals with a frequency of approximately 4 GHz upwards, the harmonics are suppressed sufficiently by the YIG filter.) Remote command: INPut:FILTer:HPASs[:STATe] on page 101 YIG-Preselector Activates or deactivates the YIG-preselector. An internal YIG-preselector at the input of the R&S FSW ensures that image frequencies are rejected. However, this is only possible for a restricted bandwidth. In order to use the maximum bandwidth for signal analysis you can deactivate the YIG-preselector at the input of the R&S FSW, which may lead to image-frequency display. Note that the YIG-preselector is active only on frequencies greater than 8 GHz. Therefore, switching the YIG-preselector on or off has no effect if the frequency is below that value. Remote command: INPut:FILTer:YIG[:STATe] on page 101 Input Connector Determines whether the RF input data is taken from the RF INPUT connector (default) or the optional BASEBAND INPUT I connector. This setting is only available if the Analog Baseband Interface (R&S FSW-B71) is installed and active for input. It is not available for the R&S FSW67. This feature is available when you turn off Enable Parallel BB Capture. User Manual 1176.9893.02 ─ 01 32 R&S®-K18 Configuring Amplifier Measurements Configuring Inputs and Outputs For more information on the Analog Baseband Interface (R&S FSW-B71) see the R&S FSW I/Q Analyzer and I/Q Input User Manual. Remote command: INPut:CONNector on page 100 3.4.1.2 Configuring the Analog Baseband Input (R&S FSW-B71) The analog baseband input input is available with option R&S FSW-B71. For measurements that also take into account the supply voltage and the current drawn by the PA, the analog baseband inputs are required to measure the voltage (baseband input Q) and the current (baseband input I). Typically some power probes have to be connected to the baseband inputs for this purpose. ► Select the "BB Input Analog" tab (vertical) from the "Input Source" dialog box. Enable Parallel BB Capture.......................................................................................... 33 High Accuracy Timing Trigger - Baseband - RF........................................................... 33 Enable Parallel BB Capture Turns simultaneous data capture on the RF input and the analog baseband input on and off. This is necessary when you perform measurements that take into account the supply voltage and the current drawn by the PA. Remote command: INPut:SELect:BBANalog[:STATe] on page 102 High Accuracy Timing Trigger - Baseband - RF Activates a mode with enhanced timing accuracy between analog baseband, RF and external trigger signals. To obtain this high timing precision, trigger port 1 and port 2 must be connected via the Cable for High Accuracy Timing (order number 1325.3777.00). Note: Trigger port 2 is configured as output if the high accuracy timing option is active. Make sure not to activate this option if you use trigger port 2 in your measurement setup. When you first enable this setting, you are prompted to connect the cable for high accuracy timing to trigger ports 1 and 2. If you cancel this prompt, the setting remains disabled. As soon as you confirm this prompt, the cable must be in place - the firmware does not check the connection. (In remote operation, the setting is activated without a prompt.) User Manual 1176.9893.02 ─ 01 33 R&S®-K18 Configuring Amplifier Measurements Configuring Inputs and Outputs For more information see the R&S FSW I/Q Analyzer and I/Q Input User Manual. Remote command: CALibration:AIQ:HATiming[:STATe] on page 100 3.4.2 Configuring the Frequency The "Frequency" tab of the "Input / Output" dialog box contains settings to configure frequency characteristics. ► To access the frequency settings, proceed as follows: ● ● In the "Configuration Overview", select the "Input / Output" button and then the "Frequency" tab. Press the FREQ key and then select the "Frequency Config" softkey. The frequency characteristics are similar to those available in the Spectrum application. For a comprehensive description of these settings, please refer to the R&S FSW User Manual. Center Frequency......................................................................................................... 34 Center Frequency Stepsize...........................................................................................34 Frequency Offset...........................................................................................................35 Center Frequency Defines the frequency of the measured signal. The possible value range depends on the R&S FSW model you have. See the data sheet for more information about the supported frequency range. Remote command: [SENSe:]FREQuency:CENTer on page 102 Center Frequency Stepsize Defines the step size by which the center frequency is increased or decreased when the arrow keys are pressed. When you use the rotary knob the center frequency changes in steps of only 1/10 of the "Center Frequency Stepsize". "= Center" User Manual 1176.9893.02 ─ 01 Sets the step size to the value of the center frequency and removes the coupling of the step size to span or resolution bandwidth. The used value is indicated in the "Value" field. 34 R&S®-K18 Configuring Amplifier Measurements Configuring Inputs and Outputs "Manual" Defines a fixed step size for the center frequency. Enter the step size in the "Value" field. Remote command: [SENSe:]FREQuency:CENTer:STEP on page 103 Frequency Offset Shifts the displayed frequency range along the x-axis by the defined offset. This parameter has no effect on the instrument's hardware, or on the captured data or on data processing. It is simply a manipulation of the final results in which absolute frequency values are displayed. Thus, the x-axis of a spectrum display is shifted by a constant offset if it shows absolute frequencies, but not if it shows frequencies relative to the signal's center frequency. A frequency offset can be used to correct the display of a signal that is slightly distorted by the measurement setup, for example. The allowed values range from -100 GHz to 100 GHz. The default setting is 0 Hz. Remote command: [SENSe:]FREQuency:OFFSet on page 103 3.4.3 Defining Level Characteristics The "Amplitude" tab of the "Input / Output" dialog box contains settings to configure the signal level characteristics. ► To access the amplitude settings, proceed as follows: ● ● In the "Configuration Overview", select the "Input / Output" button and then the "Amplitude" tab. Press the AMPT key and then select the "Amplitude Config" softkey. The level characteristics are the same as those available in the Spectrum application. For a comprehensive description of these settings, please refer to the R&S FSW User Manual. User Manual 1176.9893.02 ─ 01 35 R&S®-K18 Configuring Amplifier Measurements Configuring Inputs and Outputs Functions available in the "Amplitude" dialog box described elsewhere: ● "Input Coupling" on page 31 ● "Impedance" on page 32 Reference Level............................................................................................................ 36 └ Shifting the Display (Offset)............................................................................ 36 Full Scale Level.............................................................................................................36 Preamplifier (option B24).............................................................................................. 37 Input Coupling............................................................................................................... 37 Impedance.................................................................................................................... 37 Attenuation Mode / Value..............................................................................................38 Using Electronic Attenuation (Option B25)....................................................................38 Reference Level Defines the expected maximum reference level. Signal levels above this value may not be measured correctly, which is indicated by the "IF OVLD" status display. The reference level is also used to scale power diagrams; the reference level is then used as the maximum on the y-axis. Since the R&S FSW hardware is adapted according to this value, it is recommended that you set the reference level close above the expected maximum signal level to ensure an optimum measurement (no compression, good signal-to-noise ratio). Note that the "Reference Level" value ignores the Shifting the Display (Offset). It is important to know the actual power level the R&S FSW must handle. Remote command: DISPlay[:WINDow<n>]:TRACe:Y[:SCALe]:RLEVel on page 104 Shifting the Display (Offset) ← Reference Level Defines an arithmetic level offset. This offset is added to the measured level irrespective of the selected unit. The scaling of the y-axis is changed accordingly. Define an offset if the signal is attenuated or amplified before it is fed into the R&S FSW so the application shows correct power results. All displayed power level results will be shifted by this value. Note, however, that the Reference Level value ignores the "Reference Level Offset". It is important to know the actual power level the R&S FSW must handle. To determine the required offset, consider the external attenuation or gain applied to the input signal. A positive value indicates that an attenuation took place (R&S FSW increases the displayed power values) , a negative value indicates an external gain (R&S FSW decreases the displayed power values). The setting range is ±200 dB in 0.01 dB steps. Remote command: DISPlay[:WINDow<n>]:TRACe:Y[:SCALe]:RLEVel:OFFSet on page 104 Full Scale Level The full scale level defines the maximum power you can input at the Baseband Input connector without clipping the signal. ● 0.25 V User Manual 1176.9893.02 ─ 01 36 R&S®-K18 Configuring Amplifier Measurements Configuring Inputs and Outputs ● ● ● 0.5 V 1V 2V If probes are connected, the possible full scale values are adapted according to the probe's attenuation and maximum allowed power. Available for parallel capture on the baseband and RF inputs. Remote command: INPut:IQ:FULLscale:LEVel on page 106 Preamplifier (option B24) If option R&S FSW-B24 is installed, a preamplifier can be activated for the RF input signal. You can use a preamplifier to analyze signals from DUTs with low input power. For R&S FSW 26 or higher models, the input signal is amplified by 30 dB if the preamplifier is activated. For R&S FSW 8 or 13 models, the following settings are available: "Off" Deactivates the preamplifier. "15 dB" The RF input signal is amplified by about 15 dB. "30 dB" The RF input signal is amplified by about 30 dB. Remote command: INPut:GAIN:STATe on page 107 INPut:GAIN[:VALue] on page 106 Input Coupling The RF input of the R&S FSW can be coupled by alternating current (AC) or direct current (DC). AC coupling blocks any DC voltage from the input signal. This is the default setting to prevent damage to the instrument. Very low frequencies in the input signal may be distorted. However, some specifications require DC coupling. In this case, you must protect the instrument from damaging DC input voltages manually. For details, refer to the data sheet. Remote command: INPut:COUPling on page 101 Impedance The reference impedance for the measured levels of the R&S FSW can be set to 50 Ω or 75 Ω. 75 Ω should be selected if the 50 Ω input impedance is transformed to a higher impedance using a 75 Ω adapter of the RAZ type (= 25 Ω in series to the input impedance of the instrument). The correction value in this case is 1.76 dB = 10 log (75Ω/50Ω). Remote command: INPut:IMPedance on page 102 User Manual 1176.9893.02 ─ 01 37 R&S®-K18 Configuring Amplifier Measurements Configuring Inputs and Outputs Attenuation Mode / Value The RF attenuation can be set automatically as a function of the selected reference level (Auto mode). This ensures that the optimum RF attenuation is always used. It is the default setting. By default and when Using Electronic Attenuation (Option B25) is not available, mechanical attenuation is applied. In "Manual" mode, you can set the RF attenuation in 1 dB steps (down to 0 dB, also using the rotary knob). Other entries are rounded to the next integer value. The range is specified in the data sheet. If the defined reference level cannot be set for the defined RF attenuation, the reference level is adjusted accordingly and the warning "Limit reached" is displayed. NOTICE! Risk of hardware damage due to high power levels. When decreasing the attenuation manually, ensure that the power level does not exceed the maximum level allowed at the RF input, as an overload may lead to hardware damage. Remote command: INPut:ATTenuation on page 104 INPut:ATTenuation:AUTO on page 105 Using Electronic Attenuation (Option B25) If option R&S FSW-B25 is installed, you can also activate an electronic attenuator. In "Auto" mode, the settings are defined automatically; in "Manual" mode, you can define the mechanical and electronic attenuation separately. Note: Electronic attenuation is not available for stop frequencies (or center frequencies in zero span) >13.6 GHz. In "Auto" mode, RF attenuation is provided by the electronic attenuator as much as possible to reduce the amount of mechanical switching required. Mechanical attenuation may provide a better signal-to-noise ratio, however. When you switch off electronic attenuation, the RF attenuation is automatically set to the same mode (auto/manual) as the electronic attenuation was set to. Thus, the RF attenuation may be set to automatic mode, and the full attenuation is provided by the mechanical attenuator, if possible. Both the electronic and the mechanical attenuation can be varied in 1 dB steps. Other entries are rounded to the next lower integer value. If the defined reference level cannot be set for the given attenuation, the reference level is adjusted accordingly and the warning "Limit reached" is displayed in the status bar. Remote command: INPut:EATT:STATe on page 106 INPut:EATT:AUTO on page 105 INPut:EATT on page 105 3.4.4 Using Probes The "Probes" tab of the "Input / Output" dialog box contains settings to configure and use probes. User Manual 1176.9893.02 ─ 01 38 R&S®-K18 Configuring Amplifier Measurements Configuring Inputs and Outputs Probes are a mandatory part of the test setup if you want to perform measurements measurements that take into account the supply voltage and the current drawn by the PA. ► Select the "Input / Output" button from the "Configuration Overview" dialog box, then select the "Probes" tab. For more information about the contents of the "Probes" dialog box, please refer to the R&S FSW User Manual. 3.4.5 Configuring Outputs The "Output" tab of the "Input / Output" dialog box contains settings to configure the various signal outputs available on the R&S FSW. The functionality is the same as in the Spectrum application. For more information about the output functions, please refer to the R&S FSW User Manual. 3.4.6 Controlling a Signal Generator The "Generator Setup" tab of the "Input / Output" dialog box contains settings to control the signal generator from within the R&S FSW-K18. A remote control connection between the R&S FSW and the signal generator has to be established to be able to do so. Because a signal generator is mandatory in the test setup, these features make measurement configuration as easy as possible. This way, you can control both analyzer and generator from within the application without having to operate the two instruments to configure the measurement. ► To access the generator setup settings, proceed as follows: In the "Configuration Overview", select the "Input / Output" button and then the "Generator Setup" tab. User Manual 1176.9893.02 ─ 01 39 R&S®-K18 Configuring Amplifier Measurements Configuring Inputs and Outputs State of operation Most settings have an LED that shows the state of the corresponding setting on the signal generator. The LED is either grey, green or red: ● Grey LED Configuration state unknown (for example when you have not yet started the transmission). ● Green LED Configuration has been successful. Generator has been configured correctly. ● Red LED Configuration has not been successful. Check if the connection between analyzer and generator has been established or if the IP address has been stated correctly. Generator details The "Generator Details" contain information about the connected signal generator, like the software version or the serial number of the generator. Updating generator settings When you change the generator level or frequency in this dialog, the application automatically updates those settings on the generator. When you use the "Update Generator Setting Manually" button, you can force an update of all generator settings available in this dialog box. Useful when you change the level or frequency on the generator itself. In that case, those settings remain the same in the R&S FSW-K18. To restore the original settings defined within the R&S FSW-K18, use that button and the generator settings will be restored. Remote command: CONFigure:GENerator:SETTings:UPDate on page 110 User Manual 1176.9893.02 ─ 01 40 R&S®-K18 Configuring Amplifier Measurements Configuring Inputs and Outputs Generator IP Address................................................................................................... 41 Generator RMS Level................................................................................................... 41 Attach to R&S FSW Frequency.....................................................................................41 Center Frequency......................................................................................................... 41 Path RF / BB................................................................................................................. 41 Generator IP Address Defines the IP address of the signal generator connected to the analyzer via LAN. If you are not sure about the IP address of your generator, kindly ask your IT administrator if he can provide one. Remote command: CONFigure:GENerator:IPConnection:ADDRess on page 109 CONFigure:GENerator:IPConnection:LEDState? on page 109 Generator RMS Level Defines the RMS level of the signal that should be generated. When you define the RMS level here, the signal generator is automatically configured to that level. Note: Make sure to always change the generator level from within the R&S FSW-K18 user interface and thus synchronize the level of both instruments. If you change the generator level on the R&S SMW, the R&S FSW-K18 won't synchronize the levels and measurement results are going to be invalid. Remote command: CONFigure:GENerator:POWer:LEVel on page 109 CONFigure:GENerator:POWer:LEVel:LEDState? on page 110 Attach to R&S FSW Frequency Turns synchronization of the analyzer and generator frequency on and off. When you turn this feature on, changing the frequency on the analyzer automatically adjusts the frequency on the generator. Remote command: CONFigure:GENerator:FREQuency:CENTer:SYNC[:STATe] on page 108 Center Frequency Defines the frequency of the signal that the generator transmits. When you turn Attach to R&S FSW Frequency on, any changes you make to the generator frequency are also adjusted on the analyzer. Remote command: CONFigure:GENerator:FREQuency:CENTer on page 108 CONFigure:GENerator:FREQuency:CENTer:LEDState? on page 108 Path RF / BB Selects the RF signal path of the generator that should be used for signal generation. User Manual 1176.9893.02 ─ 01 41 R&S®-K18 Configuring Amplifier Measurements Triggering Measurements Note that the baseband path (which is required for envelope tracking measurements) is always the same as the RF path. Remote command: RF path: CONFigure:GENerator:TARGet:PATH:RF on page 110 BB path: CONFigure:GENerator:TARGet:PATH:BB? on page 110 3.5 Triggering Measurements The R&S FSW-K18 provides functionality to perform triggered measurements. The "Trigger" dialog box contains settings to configure triggered measurements. The following trigger sources are supported: ● Free Run ● External ● I/Q Power ● IF Power ● RF Power ► To access the trigger settings, proceed as follows: ● ● In the "Configuration Overview", select the "Trigger" button. Press the TRIG key and then select the "Trigger Config" softkey. The functionality to configure triggered measurements is similar as that provided in the Spectrum application. For a comprehensive description of the trigger functionality, please refer to the R&S FSW User Manual. The functionality to configure those trigger sources is similar as that provided in the Spectrum application. For a comprehensive description of the trigger functionality, please refer to the R&S FSW User Manual. 3.6 Configuring the Data Capture The "Data Acquisition" dialog box contains settings to configure the process of how the application records the signal. ► To access the data acquisition settings, proceed as follows: ● ● ● In the "Configuration Overview", select the "Data Acquisition" button and then the "Data Acquisition" tab. Press the MEAS CONFIG key and then select the "Data Acquisition" softkey. Press the BW key and then select the "Bandwidth Config" softkey. User Manual 1176.9893.02 ─ 01 42 R&S®-K18 Configuring Amplifier Measurements Configuring the Data Capture Configuring the measurement bandwidth..................................................................... 43 Configuring the capture time......................................................................................... 44 Inverting the I/Q branches.............................................................................................45 Configuring the measurement bandwidth The sample rate defined for data acquisition is the sample rate with which the analyzer samples the amplified signal. The analysis (or measurement) bandwidth defines the flat, usable bandwidth of the final I/Q data. The application allows you to adjust both values automatically or manually. Automatic adjustment When you select automatic adjustment of sample rate and analysis bandwidth, the application selects a bandwidth that is appropriate for the characteristics of the reference signal and adjusts the sample rate accordingly. For more information about the reference signal, see chapter 3.3, "Designing a Reference Signal", on page 24. Manual definition When you define the sample rate and analysis bandwidth manually, you can select values that you are comfortable with. Because the bandwidth is a function of the sample rate (and vice versa), the application adjusts the values when you change either setting. The following dependencies apply: ● When you change the sample rate, the application updates the bandwidth accordingly (and vice versa). It also adjusts the capture length to the new values. The capture time remains the same. ● When you change the capture time or capture length, the sample rate and bandwidth remain the same. Maximum bandwidth The maximum bandwidth you can use depends on your hardware configuration. (The following bandwidth extensions are available for the R&S FSW: 160 MHz, 320 MHz, 500 MHz.) User Manual 1176.9893.02 ─ 01 43 R&S®-K18 Configuring Amplifier Measurements Configuring the Data Capture By default, the application automatically determines the maximum bandwidth. When you select a maximum bandwidth other than "Auto", the bandwidth is restricted to that value. When you select the maximum bandwidth manually, make sure that this bandwidth is suited for the signal you are testing. Otherwise, the signal may be distorted and results are no longer valid. When you are using the baseband input R&S FSW-B71, the maximum bandwidth is always limited to 80 MHz. If you have no bandwidth extension this setting is not available. Remote command: Mode: TRACe:IQ:SRATe:AUTO on page 113 Sample Rate: TRACe:IQ:SRATe on page 113 Bandwidth: TRACe:IQ:BWIDth on page 112 Max. Bandwidth: TRACe:IQ:WBANd[:STATe] on page 114 Max Bandwidth: TRACe:IQ:WBANd:MBWidth on page 114 Configuring the capture time The capture time defines the duration of a measurement in which the required number of samples is collected. The capture length is the number of samples that are captured during the selected measurement time. The capture length is a function of the sample rate and the capture time. Automatic adjustment When you select automatic adjustment of capture time, the application selects a capture time that is appropriate for the characteristics of the reference signal. Length of the reference signal As orientation, the application shows the length of the reference signal in the corresponding field in the dialog box (➙ "Ref Signal Duration"). For more information about the reference signal, see chapter 3.3, "Designing a Reference Signal", on page 24. Manual definition When you define the capture length and time manually, you can select values that you are comfortable with. However, make sure to define a capture time that is greater than the length of the reference signal - otherwise the application won't be able to analyze the signal correctly. The following dependencies apply: ● When you change the capture time, the application updates the capture length accordingly (and vice versa). Sample rate and bandwidth remain the same. ● When you change the sample rate or bandwidth, the application updates the capture length accordingly. The capture time remains the same. User Manual 1176.9893.02 ─ 01 44 R&S®-K18 Configuring Amplifier Measurements Synchronizing Measurement Data Note that the maximum capture time depends on the current analysis bandwidth. Remote command: Mode: [SENSe]:SWEep:TIME:AUTO on page 112 Time: [SENSe]:SWEep:TIME on page 112 Capture length: [SENSe]:SWEep:LENGth on page 111 Reference signal: [SENSe:]REFSig:TIME? on page 111 Inverting the I/Q branches The application allows you to swap the I and Q branches of the signal, if required. This is useful, for example, when the DUT inverts the real (I) and imaginary (Q) parts of the signal and transfers the signal that way. Note that the sideband is also inverted when you turn this feature on. Remote command: [SENSe]:SWAPiq on page 111 3.7 Synchronizing Measurement Data The R&S FSW-K18 allows you to synchronize the measured signal with the reference signal and provides various features to control synchronization. ► To access synchronization settings, proceed as follows: ● ● In the "Configuration Overview", select the "Sync / Error Est / Comp" button and then the "Synchronization" tab. Press the MEAS CONFIG key, select the "Sync / Error Est / Comp" softkey and then the "Synchronization" tab. Synchronizing the measured signal.............................................................................. 45 Synchronizing the measured signal During measurements, the application tries to synchronize the measured signal with the reference signal. When no significant correlation between the measured and reference signal can be found, synchronization fails. When you turn on "Stop on Sync Failed", the application automatically aborts the measurement, in the case where synchronization fails. In addition, you can select the method with which the application synchronizes the signals with the "Sync Domain" parameter. The following methods are available. ● I/Q Direct User Manual 1176.9893.02 ─ 01 45 R&S®-K18 Configuring Amplifier Measurements Estimating and Compensating Signal Errors ● ● ● The I/Q data for the reference signal is directly correlated with the reference and measured signal. The performance of this method will degrade in the presence of a frequency offset between the measured and reference signals. I/Q Phase Difference Correlation on the phase differentiated I/Q data. This retains phase change information and can handle a frequency offset , but is more sensitive to noise than the "I/Q Direct" method. I/Q Magnitude Correlation on the magnitude of the I/Q data with no regard for phase information. This method can handle a frequency offset and is less sensitive to noise that the "I/Q Phase Diff" method, but is only useful with amplitude modulated signals. Trigger It is assumed that the capture is triggered at the start of the reference waveform. Only minimal correlation is performed to account for trigger jitter. This is the fastest synchronization method. Remote command: CONFigure:SYNC:SOFail on page 115 CONFigure:SYNC:DOMain on page 115 3.8 Estimating and Compensating Signal Errors The application allows you to estimate possible undesired effects in the signal, and, if there are any, also compensate these effects. ► To access error estimation and compensation, proceed as follows: ● ● In the "Configuration Overview", select the "Sync / Error Est / Comp" button and then the "Error Est / Compensation" tab. Press the MEAS CONFIG key, select the "Sync / Error Est / Comp" softkey and then the "Error Est / Compensation" tab. Configuring error estimation and compensation When you turn on error estimation only, the results are not compensated for the corresponding errors. When you turn on error compensation, the displayed results are also corrected by the estimated errors. Note that in that case, the signal might look better than it actually is. Compensation without estimation is not possible. User Manual 1176.9893.02 ─ 01 46 R&S®-K18 Configuring Amplifier Measurements Applying System Models You can estimate and compensate the following effects ● I/Q Imbalance: combined effect of amplitude and phase error. ● Amplitude Droop: decrease of the signal power over time in the transmitter. ● Sample Error Rate: difference between the sample rate of the reference signal and the measured signal. 3.9 Applying System Models The R&S FSW-K18 allows you to calculate a polynomial model that describes the characteristics of the DUT based on the input signal and the output signal of the amplifier. ► To access system modeling settings, proceed as follows: ● ● In the "Configuration Overview", select the "Measurement" button and then the "Modeling" tab. Press the MEAS CONFIG key and then select the "Meas Config" softkey and then the "Modeling" tab. Turning system modeling on and off............................................................................. 47 Selecting the degree of the polynomial......................................................................... 48 Defining the modeling range......................................................................................... 48 Turning system modeling on and off The R&S FSW-K18 provides functionality to calculate a mathematical model that describes the properties of the DUT. Using a model is useful to observe and estimate the behavior of the amplifier and, if necessary, adjust the DUT behavior. The application supports memory-free polynomial models to the 18th degree. The following diagrams contain traces that show the model. These traces are calculated by using the model function on the reference signal. ● AM/AM ● AM/PM Note that the model traces are also the basis for the DPD functionality available in the R&S FSW-K18. User Manual 1176.9893.02 ─ 01 47 R&S®-K18 Configuring Amplifier Measurements Applying System Models When the characteristics of the modeled signal matches those of the measured signal, the model describes the DUT behavior well. If not, you can try to get a better result by adjusting the model properties. When you turn on modeling, the application shows an additional trace in the graphical result displays. This trace corresponds to the signal characteristics after the model has been applied to the reference signal. Remote command: CONFigure:MODeling[:STATe] on page 119 Selecting the degree of the polynomial In addition to the type of curve you can also select the order of the model. The order of the model define the degree, complexity and number of terms in the polynomial model. In general, a polynomial of the Nth degree looks like this. y = a0 + a1x + a2x2 + … + aNxN The degree of the model is defined by N (as an index or exponent). The higher the order, the more complex the calculation and the longer it takes to calculate the model. Higher models do not necessarily lead to better model curves. Note that the nonlinear effects consume an additional bandwidth proportional to 2 times the number of odd factors in the polynom, excluding the linear one. Example: If the signal bandwidth is 1 MHz and the highest degree is 5, the bandwidth of the resulting signal is increased by 2 times 2 (because there are the variables x3 and x5) times 1 MHz which are 4 MHz and leading to a total signal bandwidth of 5 MHz. The configured recording bandwidth must be at least 5 MHz to record all nonlinear effects generated by the DUT. Remote command: AM/AM: CONFigure:MODeling:AMAM:MORDer on page 118 AM/PM: CONFigure:MODeling:AMPM:MORDer on page 118 Defining the modeling range Applying the model over the complete signal consumes some computing capacity, which may increase the measurement time. However, it is usually sufficient to use a small number of samples covering the linear range and the peak level to calculate the system model correctly. With the "Modeling Level Range" setting, you can use a smaller level range to apply the model to and still get valid results. When you limit the level range, only samples with levels between peak level and (peak level minus modeling level range value) are taken into account during the calculation of the model. User Manual 1176.9893.02 ─ 01 48 R&S®-K18 Configuring Amplifier Measurements Applying Digital Predistortion In addition, you can define the number of points on the curve that the application uses to calculate the model. The selected points are spaced equidistant. Using less modeling points further speeds up measurement times (but may reduce the quality of the model if set too low). Remote command: Range: CONFigure:MODeling:LRANge on page 119 Points: CONFigure:MODeling:NPOints on page 119 3.10 Applying Digital Predistortion Digital predistortion (DPD) is one of the methods used to improve the efficiency of RF power amplifiers. The R&S FSW-K18 features functionality to deliberately take digital predistortion into account. There are several known models used to describe distortions. This implementation focuses on the following two types of distortion: ● the AM/AM (amplitude-to-amplitude) distortion and ● the AM/PM (amplitude-to-phase) distortion. Requirements Using the predisortion functionality requires an R&S SMW equipped with option K541. ► To access the DPD settings, proceed as follows: ● ● In the "Configuration Overview", select the "Measurement" button and then the "DPD" tab. Press the MEAS CONFIG key, select the "Meas Settings" softkey and then the "DPD" tab. Selecting the DPD shaping method.............................................................................. 50 Selecting the order of model calculation....................................................................... 50 User Manual 1176.9893.02 ─ 01 49 R&S®-K18 Configuring Amplifier Measurements Applying Digital Predistortion Selecting the DPD shaping method The application provides several ways for DPD calculation (or shaping). ● ● "From Table" Shapes the DPD function based on a table that contains the correction values required to predistort the signal. The calculation of the table is based on the AM/AM and AM/PM polynomial models. For more information about the contents and usage of the shaping table, please refer to the documentation of the R&S SMW. You can define a file name for the DPD table in the corresponding field. "From Polynomial" Shapes the DPD function based on the polynomial defined for the system model. Compared to DPD based on a shaping table, this method does not transfer a list with correction values. Instead, the application transfers the polynomial coefficients of the polynomial function used for the correction. For more information see chapter 3.9, "Applying System Models", on page 47. You can update the DPD shaping on the R&S SMW comfortably with the "Update" button. Remote command: Mode: CONFigure:DPD:SHAPing:MODE on page 121 Table name: CONFigure:DPD:FNAMe on page 120 Selecting the order of model calculation The application allows you to calculate either the AM/AM distortion, the AM/PM distortion or both simultaneously. You can turn correction of the distortion models on and off in the corresponding fields. In case you want to predistort both the AM/AM distortion and the AM/PM distortion simultaneously, you can select the order in which the curves are calculated and applied to the I/Q signal on the R&S SMW. ● ● AM/AM First Calculates the AM/AM first, then calculates the AM/PM based on the signal that has already been corrected by its AM/AM distortions. AM/PM First Calculates the AM/PM first, then calculates the AM/AM based on the signal that has already been corrected by its AM/PM distortions. Note: the DPD sequence is displayed by the diagram that is part of the dialog box. Remote command: AM/AM state: CONFigure:DPD:AMAM[:STATe] on page 120 AM/PM state: CONFigure:DPD:AMPM[:STATe] on page 120 Calculation order: CONFigure:DPD:MODorder on page 120 User Manual 1176.9893.02 ─ 01 50 R&S®-K18 Configuring Amplifier Measurements Configuring Envelope Measurements 3.11 Configuring Envelope Measurements When you perform measurements on power amplifiers supporting envelope tracking, you have to describe several characteristics of the measurement equipment in order to get valid results. ► To access the envelope settings, proceed as follows: ● ● In the "Configuration Overview", select the "Measurement" button and then the "PA Envelope / Supply" tab. Press the MEAS CONFIG key, select the "Meas Settings" softkey and the "PA Envelope / Supply" tab. Configuring PAE measurements (Power Added Efficiency)......................................... 51 Parameter A / B.............................................................................................................52 Configuring PAE measurements (Power Added Efficiency) When you are testing amplifiers that supprt envelope tracking, the Power Added Efficiency (PAE) of the system is the value that characterizes its performance. To calculate the PAE, you have to measure the supply voltage and current drawn by the power amplifier. The PAE is calculated according to the following equation: PAE = (RF Output Power - RF Input Power) / DC Power with DC Power = Voltage * Current Measuring the voltage and current requires additional equipment and components in the test setup. For valid measurement results, you have to define the characteristics for those components. Required components One way to measure the voltage is to use a probe. The voltage is measured on the Q channel of the baseband input provided by hardware option R&S FSW-B71. User Manual 1176.9893.02 ─ 01 51 R&S®-K18 Configuring Amplifier Measurements Configuring Envelope Measurements One way to measure the current is to use a shunt resistor and another probe. The current is measured on the I channel of the baseband input provided by hardware option R&S FSW-B71. For both types of components, you have to accurately define their characteristics and behavior. Measuring current When using a shunt resistor to measure the current, you have to define the resistance R of the shunt resistor you are using. The resistance is a value with the unit Ω. The test setup may also have additional characteristics that have to be taken into account (for example those of passive probes). You can take those into account via the multiplier. The multiplier is a value without unit. (When you are using an active probe from Rohde & Schwarz, you do not have to change the multiplier, because it is automatically detected by the Amplifier application.) In addition, you have to compensate the DC offset of active probes. The DC offset is described by the offset value, which differs depending on the probe you are using. The offset value has to be measured. Measuring voltage To measure the voltage, you also have to define the multiplier (to take the attenuation of passive probes into account) as well as the offset (to compensate the DC offset of active probes). Note that entering wrong values for these parameters yields invalid measurement results. Generally speaking, the multiplier multiplies the results by a certain value, the offset is added to the results. These settings are available when you turn on the baseband input. Remote command: See chapter 5.6.11, "Configuring Envelope Tracking", on page 122 Parameter A / B Undocumented feature. Remote command: CONFigure:PAE:PCONsumption[:PARameter]:A CONFigure:PAE:PCONsumption[:PARameter]:B User Manual 1176.9893.02 ─ 01 52 R&S®-K18 Analysis Configuring Traces 4 Analysis The R&S FSW-K18 provides several tools to get more information about the results. Most of these tools work similar to those available in the Spectrum application. For more information about these tools, please refer to the R&S FSW User Manual. ● ● ● ● ● Configuring Traces..................................................................................................53 Using Markers......................................................................................................... 54 Configuring the Result Summary............................................................................ 57 Configuring Result Display Characteristics............................................................. 58 Scaling the Y-Axis................................................................................................... 60 4.1 Configuring Traces The R&S FSW-K18 provides several tools to configure and evaluate traces. ● ● Selecting the Trace Information.............................................................................. 53 Exporting Traces..................................................................................................... 54 4.1.1 Selecting the Trace Information Each result display contains one or several traces specific to the corresponding result type. The number of traces available for each result display and the information these traces provide are described in chapter 2, "Performing Amplifier Measurements", on page 8. Remote command: DISPlay[:WINDow<n>]:TRACe<t>:MODE on page 123 ► To access the trace configuration, proceed as follows: Press the TRACE key and select the "Trace Config" softkey. User Manual 1176.9893.02 ─ 01 53 R&S®-K18 Analysis Using Markers Restoring default traces You can press the "Preset All Traces" button anytime to restore the default trace configuration for each result display. 4.1.2 Exporting Traces The functionality to export traces is the same as in the Spectrum application. For more information, please refer to the R&S FSW User Manual. 4.2 Using Markers The R&S FSW-K18 provides four markers in most result displays. ● ● Configuring Individual Markers................................................................................54 Positioning Markers.................................................................................................56 4.2.1 Configuring Individual Markers The functionality to position markers and query their position is similar to the marker functionality available in the Spectrum application. ► To access markers, proceed as follows: ● ● In the "Configuration Overview", select the "Result Configuration" button and then the "Markers" or "Marker Settings" tab. Press the MKR key and select the "Marker Config" softkey. User Manual 1176.9893.02 ─ 01 54 R&S®-K18 Analysis Using Markers Availability of markers The "Markers" and "Marker Settings" tabs are available for result displays that support markers. If the tabs are unavailable, make sure to select a result display that actually supports markers from the "Specifics for:" dropdown menu (for example the Spectrum FFT result display). Note also that the R&S FSW-K18 does not support more than four markers in any result display. Selected Marker............................................................................................................ 55 Marker State..................................................................................................................55 Marker Position (X-value)..............................................................................................55 Marker Type.................................................................................................................. 55 Reference Marker......................................................................................................... 56 Assigning the Marker to a Trace................................................................................... 56 All Markers Off.............................................................................................................. 56 Marker Table Display.................................................................................................... 56 Selected Marker Marker name. The marker which is currently selected for editing is highlighted orange. Remote command: Marker selected via suffix <m> in remote commands. Marker State Activates or deactivates the marker in the diagram. Remote command: CALCulate<n>:MARKer<m>[:STATe] on page 128 CALCulate<n>:DELTamarker<m>[:STATe] on page 127 Marker Position (X-value) Defines the position (x-value) of the marker in the diagram. Remote command: CALCulate<n>:MARKer<m>:X on page 128 CALCulate<n>:DELTamarker<m>:X on page 127 Marker Type Toggles the marker type. The type for marker 1 is always "Normal", the type for delta marker 1 is always "Delta". These types cannot be changed. Note: If normal marker 1 is the active marker, switching the "Mkr Type" activates an additional delta marker 1. For any other marker, switching the marker type does not activate an additional marker, it only switches the type of the selected marker. User Manual 1176.9893.02 ─ 01 55 R&S®-K18 Analysis Using Markers "Normal" A normal marker indicates the absolute value at the defined position in the diagram. "Delta" A delta marker defines the value of the marker relative to the specified reference marker (marker 1 by default). Remote command: CALCulate<n>:MARKer<m>[:STATe] on page 128 CALCulate<n>:DELTamarker<m>[:STATe] on page 127 Reference Marker Defines a marker as the reference marker which is used to determine relative analysis results (delta marker values). Remote command: CALCulate<n>:DELTamarker<m>:MREF on page 126 Assigning the Marker to a Trace The "Trace" setting assigns the selected marker to an active trace. The trace determines which value the marker shows at the marker position. If the marker was previously assigned to a different trace, the marker remains on the previous frequency or time, but indicates the value of the new trace. If a trace is turned off, the assigned markers and marker functions are also deactivated. Remote command: CALCulate<n>:MARKer<m>:TRACe on page 128 All Markers Off Deactivates all markers in one step. Remote command: CALCulate<n>:MARKer<m>:AOFF on page 127 Marker Table Display Defines how the marker information is displayed. "On" Displays the marker information in a table in a separate area beneath the diagram. "Off" Displays the marker information within the diagram area. "Auto" (Default) Up to two markers are displayed in the diagram area. If more markers are active, the marker table is displayed automatically. Remote command: DISPlay:MTABle on page 125 4.2.2 Positioning Markers Peak Search..................................................................................................................57 Search Next Peak......................................................................................................... 57 Search Minimum........................................................................................................... 57 Search Next Minimum...................................................................................................57 User Manual 1176.9893.02 ─ 01 56 R&S®-K18 Analysis Configuring the Result Summary Peak Search Sets the selected marker/delta marker to the maximum of the trace. If no marker is active, marker 1 is activated. Remote command: CALCulate<n>:MARKer<m>:MAXimum[:PEAK] on page 131 CALCulate<n>:DELTamarker<m>:MAXimum[:PEAK] on page 129 Search Next Peak Sets the selected marker/delta marker to the next (lower) maximum of the assigned trace. If no marker is active, marker 1 is activated. Remote command: CALCulate<n>:MARKer<m>:MAXimum:NEXT on page 130 CALCulate<n>:DELTamarker<m>:MAXimum:NEXT on page 129 Search Minimum Sets the selected marker/delta marker to the minimum of the trace. If no marker is active, marker 1 is activated. Remote command: CALCulate<n>:MARKer<m>:MINimum[:PEAK] on page 131 CALCulate<n>:DELTamarker<m>:MINimum[:PEAK] on page 130 Search Next Minimum Sets the selected marker/delta marker to the next (higher) minimum of the selected trace. If no marker is active, marker 1 is activated. Remote command: CALCulate<n>:MARKer<m>:MINimum:NEXT on page 131 CALCulate<n>:DELTamarker<m>:MINimum:NEXT on page 130 4.3 Configuring the Result Summary The R&S FSW-K18 allows you to customize the contents of the Result Summary. By default, the application shows all numerical results in the Result Summary. However, you can add or remove results as you like. ► To access markers, proceed as follows: ● In the "Configuration Overview", select the "Result Configuration" button and then the "Table Config" tab. User Manual 1176.9893.02 ─ 01 57 R&S®-K18 Analysis Configuring Result Display Characteristics Accessing the "Table Config" tab Note that the "Table Config" tab is only available after you have selected the "Specifics for: Result Summary" item from the corresponding dropdown menu at the bottom of the dialog box. The dialog box is made up out of three tabs: ● One for modulation accuracy results. ● One for power related results. ● One for voltage and current related results. The results in this tab are available after you have activated baseband measurements. You can add or remove individual results by turning them "On" or "Off". Remote command: DISPlay[:WINDow<n>]:TABLe:ITEM on page 132 4.4 Configuring Result Display Characteristics The R&S FSW-K18 allows you to define the information displayed in various graphical result displays. ► To access result display characteristics, proceed as follows: ● ● In the "Configuration Overview", select the "Result Configuration" button and then the "Display Settings" tab. Press the MEAS CONFIG key, select the "Result Config" softkey and then the "Display Settings" tab.. User Manual 1176.9893.02 ─ 01 58 R&S®-K18 Analysis Configuring Result Display Characteristics Scope of the scaling The functionality of the "Display Settings" is only available when you have selected one of the result displays that support this feature from the "Specifics for:" dropdown menu at the bottom of the dialog box. (In this case, the functionality to adjust the Time Domain result display.) Configuring the Time Domain result display................................................................. 59 Configuring the AM/PM result display........................................................................... 59 Configuring the Gain Compression Result Display....................................................... 60 Configuring the Time Domain result display The "Time Domain" settings select the information displayed in the Time Domain result display and can thus be used to customize the diagram scale. You can define the characteristics of the x-axis (the amount of displayed data) as well as those of the y-axis (normalized data or actual units). Available when the Time Domain result display has been selected. For more information see "Time Domain" on page 18. Remote command: Normalization: DISPlay[:WINDow<n>]:TDOMain:Y[:SCALe]:NORMalise[: STATe] on page 135 Position: DISPlay[:WINDow<n>]:TDOMain:X[:SCALe]:MODE on page 134 Origin: DISPlay[:WINDow<n>]:TDOMain:X[:SCALe]:OFFSet on page 134 Duration: DISPlay[:WINDow<n>]:TDOMain:X[:SCALe]:DURation on page 133 Configuring the AM/PM result display The "Gain Display" settings select the information displayed in the AM/PM result display. You can display phase information either in degrees or radians. Select the preferred unit from the corresponding dropdown menu. Remote command: CALCulate<n>:UNIT:ANGLe on page 133 User Manual 1176.9893.02 ─ 01 59 R&S®-K18 Analysis Scaling the Y-Axis Configuring the Gain Compression Result Display The "Gain Display" settings select the information displayed in the Gain Compression result display. You can analyze the Gain Compression either at the DUT input or at the DUT output. By default, the Gain Compression result display shows the gain against the "Input Power". To analyze the gain against the output power, select the "Output Power" item from the Gain Display "X-Axis" dropdown menu. Available when the Gain Compression result display has been selected. For more information about the Gain Compression result display see "Gain Compression" on page 13. Remote command: CALCulate<n>:GAIN:X on page 133 4.5 Scaling the Y-Axis The R&S FSW-K18 allows you to customize the scale of the y-axis in graphical result displays. By default, the application automatically scales the y-axis based on the current results. The scale changes when new measurement results are available. When you change the scale manually, the changes are shown in the diagram next to the settings. ► To access scaling functionality, proceed as follows: ● ● ● In the "Configuration Overview", select the "Result Configuration" button and then the "Y Scaling" tab. Press the MEAS CONFIG key, select the "Result Config" softkey and then the "Y Scaling" tab.. Press the AMPT key, and then select the "Scale Config" softkey. User Manual 1176.9893.02 ─ 01 60 R&S®-K18 Analysis Scaling the Y-Axis Scope of the scaling Scaling is applied only to the result display that you have selected from the "Specifics for:" dropdown menu at the bottom of the dialog box. (In this case, the scale is applied to the Spectrum FFT result display.) Scaling the y-axis automatically.................................................................................... 61 Scaling the y-axis manually...........................................................................................61 Scaling the y-axis automatically By default, the application scales the y-axis in all diagrams automatically (➙ "Auto" = ON). Automatic scaling tries to obtain the ideal scale for the current measurement results. The application adjusts the scale each time the results change. You can also force an automatic scaling of the y-axis at any time with the "Auto Scale Once" function. When you select this function, the application scales the y-axis even if the results have not been changed. Remote command: DISPlay[:WINDow<n>]:TRACe<t>:Y[:SCALe]:AUTO on page 135 Scaling the y-axis manually Settings for manual scaling of the y-axis become available when you turn automatic scaling off. The application provides two methods to scale the y-axis. ● ● Scaling according to minimum and maximum values The scale is defined by the values at the lower and upper end of the y-axis. Scaling according to reference value The scale is defined relative to the reference value and a constant distance between the grid lines (➙ per division). The distance between grid lines refers to diagrams that are split into 10 divisions. The position of the reference value is arbitrary. By default it is at the upper end of the y-axis (100 %). Remote command: Minimum: DISPlay[:WINDow<n>]:TRACe<t>:Y[:SCALe]:MAXimum on page 135 Maximum: DISPlay[:WINDow<n>]:TRACe<t>:Y[:SCALe]:MINimum on page 136 Reference value: DISPlay[:WINDow<n>]:TRACe<t>:Y[:SCALe]:RVALue on page 137 Position: DISPlay[:WINDow<n>]:TRACe<t>:Y[:SCALe]:RPOSition on page 136 Distance: DISPlay[:WINDow<n>]:TRACe<t>:Y[:SCALe]:PDIVision on page 136 User Manual 1176.9893.02 ─ 01 61 R&S®-K18 Remote Control Commands for Amplifier Measurements Overview of Remote Command Suffixes 5 Remote Control Commands for Amplifier Measurements The following remote control commands are required to configure and perform amplifier measurements in a remote environment. The R&S FSW must already be set up for remote operation in a network as described in the base unit manual. Universal functionality Note that basic tasks that are also performed in the base unit in the same way are not described here. For a description of such tasks, see the R&S FSW User Manual. In particular, this includes: ● Managing Settings and Results, i.e. storing and loading settings and result data. ● Basic instrument configuration, e.g. checking the system configuration, customizing the screen layout, or configuring networks and remote operation. ● Using the common status registers (specific status registers for Pulse measurements are not used). ● ● ● ● ● ● ● Overview of Remote Command Suffixes................................................................ 62 Introduction............................................................................................................. 63 Selecting the Application.........................................................................................67 Configuring the Screen Layout................................................................................71 Performing Amplifier Measurements.......................................................................77 Configuring Amplifier Measurements...................................................................... 94 Analyzing Results..................................................................................................123 5.1 Overview of Remote Command Suffixes The remote commands for the LTE Measurement application support the following suffixes. Suffix Description <k> Selects a limit line. Irrelevant for amplifier measurements. <m> Selects a marker. <n> Selects a measurement window. <t> Selects a trace. User Manual 1176.9893.02 ─ 01 62 R&S®-K18 Remote Control Commands for Amplifier Measurements Introduction 5.2 Introduction Commands are program messages that a controller (e.g. a PC) sends to the instrument or software. They operate its functions ('setting commands' or 'events') and request information ('query commands'). Some commands can only be used in one way, others work in two ways (setting and query). If not indicated otherwise, the commands can be used for settings and queries. The syntax of a SCPI command consists of a header and, in most cases, one or more parameters. To use a command as a query, you have to append a question mark after the last header element, even if the command contains a parameter. A header contains one or more keywords, separated by a colon. Header and parameters are separated by a "white space" (ASCII code 0 to 9, 11 to 32 decimal, e.g. blank). If there is more than one parameter for a command, these are separated by a comma from one another. Only the most important characteristics that you need to know when working with SCPI commands are described here. For a more complete description, refer to the User Manual of the R&S FSW. Remote command examples Note that some remote command examples mentioned in this general introduction may not be supported by this particular application. 5.2.1 Conventions used in Descriptions Note the following conventions used in the remote command descriptions: ● Command usage If not specified otherwise, commands can be used both for setting and for querying parameters. If a command can be used for setting or querying only, or if it initiates an event, the usage is stated explicitely. ● Parameter usage If not specified otherwise, a parameter can be used to set a value and it is the result of a query. Parameters required only for setting are indicated as Setting parameters. Parameters required only to refine a query are indicated as Query parameters. Parameters that are only returned as the result of a query are indicated as Return values. ● Conformity Commands that are taken from the SCPI standard are indicated as SCPI confirmed. All commands used by the R&S FSW follow the SCPI syntax rules. ● Asynchronous commands A command which does not automatically finish executing before the next command starts executing (overlapping command) is indicated as an Asynchronous command. ● Reset values (*RST) User Manual 1176.9893.02 ─ 01 63 R&S®-K18 Remote Control Commands for Amplifier Measurements Introduction Default parameter values that are used directly after resetting the instrument (*RST command) are indicated as *RST values, if available. ● Default unit This is the unit used for numeric values if no other unit is provided with the parameter. ● Manual operation If the result of a remote command can also be achieved in manual operation, a link to the description is inserted. 5.2.2 Long and Short Form The keywords have a long and a short form. You can use either the long or the short form, but no other abbreviations of the keywords. The short form is emphasized in upper case letters. Note however, that this emphasis only serves the purpose to distinguish the short from the long form in the manual. For the instrument, the case does not matter. Example: SENSe:FREQuency:CENTer is the same as SENS:FREQ:CENT. 5.2.3 Numeric Suffixes Some keywords have a numeric suffix if the command can be applied to multiple instances of an object. In that case, the suffix selects a particular instance (e.g. a measurement window). Numeric suffixes are indicated by angular brackets (<n>) next to the keyword. If you don't quote a suffix for keywords that support one, a 1 is assumed. Example: DISPlay[:WINDow<1...4>]:ZOOM:STATe enables the zoom in a particular measurement window, selected by the suffix at WINDow. DISPlay:WINDow4:ZOOM:STATe ON refers to window 4. 5.2.4 Optional Keywords Some keywords are optional and are only part of the syntax because of SCPI compliance. You can include them in the header or not. Note that if an optional keyword has a numeric suffix and you need to use the suffix, you have to include the optional keyword. Otherwise, the suffix of the missing keyword is assumed to be the value 1. Optional keywords are emphasized with square brackets. User Manual 1176.9893.02 ─ 01 64 R&S®-K18 Remote Control Commands for Amplifier Measurements Introduction Example: Without a numeric suffix in the optional keyword: [SENSe:]FREQuency:CENTer is the same as FREQuency:CENTer With a numeric suffix in the optional keyword: DISPlay[:WINDow<1...4>]:ZOOM:STATe DISPlay:ZOOM:STATe ON enables the zoom in window 1 (no suffix). DISPlay:WINDow4:ZOOM:STATe ON enables the zoom in window 4. 5.2.5 Alternative Keywords A vertical stroke indicates alternatives for a specific keyword. You can use both keywords to the same effect. Example: [SENSe:]BANDwidth|BWIDth[:RESolution] In the short form without optional keywords, BAND 1MHZ would have the same effect as BWID 1MHZ. 5.2.6 SCPI Parameters Many commands feature one or more parameters. If a command supports more than one parameter, these are separated by a comma. Example: LAYout:ADD:WINDow Spectrum,LEFT,MTABle Parameters may have different forms of values. ● ● ● ● ● 5.2.6.1 Numeric Values.......................................................................................................65 Boolean...................................................................................................................66 Character Data........................................................................................................67 Character Strings.................................................................................................... 67 Block Data...............................................................................................................67 Numeric Values Numeric values can be entered in any form, i.e. with sign, decimal point or exponent. In case of physical quantities, you can also add the unit. If the unit is missing, the command uses the basic unit. Example: with unit: SENSe:FREQuency:CENTer 1GHZ without unit: SENSe:FREQuency:CENTer 1E9 would also set a frequency of 1 GHz. User Manual 1176.9893.02 ─ 01 65 R&S®-K18 Remote Control Commands for Amplifier Measurements Introduction Values exceeding the resolution of the instrument are rounded up or down. If the number you have entered is not supported (e.g. in case of discrete steps), the command returns an error. Instead of a number, you can also set numeric values with a text parameter in special cases. ● MIN/MAX Defines the minimum or maximum numeric value that is supported. ● DEF Defines the default value. ● UP/DOWN Increases or decreases the numeric value by one step. The step size depends on the setting. In some cases you can customize the step size with a corresponding command. Querying numeric values When you query numeric values, the system returns a number. In case of physical quantities, it applies the basic unit (e.g. Hz in case of frequencies). The number of digits after the decimal point depends on the type of numeric value. Example: Setting: SENSe:FREQuency:CENTer 1GHZ Query: SENSe:FREQuency:CENTer? would return 1E9 In some cases, numeric values may be returned as text. 5.2.6.2 ● INF/NINF Infinity or negative infinity. Represents the numeric values 9.9E37 or -9.9E37. ● NAN Not a number. Represents the numeric value 9.91E37. NAN is returned in case of errors. Boolean Boolean parameters represent two states. The "ON" state (logically true) is represented by "ON" or a numeric value 1. The "OFF" state (logically untrue) is represented by "OFF" or the numeric value 0. Querying boolean parameters When you query boolean parameters, the system returns either the value 1 ("ON") or the value 0 ("OFF"). Example: Setting: DISPlay:WINDow:ZOOM:STATe ON Query: DISPlay:WINDow:ZOOM:STATe? would return 1 User Manual 1176.9893.02 ─ 01 66 R&S®-K18 Remote Control Commands for Amplifier Measurements Selecting the Application 5.2.6.3 Character Data Character data follows the syntactic rules of keywords. You can enter text using a short or a long form. For more information see chapter 5.2.2, "Long and Short Form", on page 64. Querying text parameters When you query text parameters, the system returns its short form. Example: Setting: SENSe:BANDwidth:RESolution:TYPE NORMal Query: SENSe:BANDwidth:RESolution:TYPE? would return NORM 5.2.6.4 Character Strings Strings are alphanumeric characters. They have to be in straight quotation marks. You can use a single quotation mark ( ' ) or a double quotation mark ( " ). Example: INSTRument:DELete 'Spectrum' 5.2.6.5 Block Data Block data is a format which is suitable for the transmission of large amounts of data. The ASCII character # introduces the data block. The next number indicates how many of the following digits describe the length of the data block. In the example the 4 following digits indicate the length to be 5168 bytes. The data bytes follow. During the transmission of these data bytes all end or other control signs are ignored until all bytes are transmitted. #0 specifies a data block of indefinite length. The use of the indefinite format requires a NL^END message to terminate the data block. This format is useful when the length of the transmission is not known or if speed or other considerations prevent segmentation of the data into blocks of definite length. 5.3 Selecting the Application INSTrument:CREate:DUPLicate........................................................................................ 68 INSTrument:CREate:REPLace.......................................................................................... 68 INSTrument:CREate[:NEW].............................................................................................. 68 INSTrument:DELete......................................................................................................... 69 INSTrument:LIST?........................................................................................................... 69 INSTrument:REName.......................................................................................................69 INSTrument[:SELect]........................................................................................................70 SYSTem:PRESet:CHANnel[:EXECute].............................................................................. 70 User Manual 1176.9893.02 ─ 01 67 R&S®-K18 Remote Control Commands for Amplifier Measurements Selecting the Application INSTrument:CREate:DUPLicate This command duplicates the currently selected measurement channel, i.e creates a new measurement channel of the same type and with the identical measurement settings. The name of the new channel is the same as the copied channel, extended by a consecutive number (e.g. "Spectrum" -> "Spectrum 2"). The channel to be duplicated must be selected first using the INST:SEL command. Example: INST:SEL 'Spectrum' INST:CRE:DUPL Duplicates the channel named 'Spectrum' and creates a new measurement channel named 'Spectrum 2'. Usage: Event INSTrument:CREate:REPLace <ChannelName1>,<ChannelType>,<ChannelName2> This command replaces a measurement channel with another one. Setting parameters: <ChannelName1> String containing the name of the measurement channel you want to replace. <ChannelType> Channel type of the new channel. For a list of available channel types see INSTrument:LIST? on page 69. <ChannelName2> String containing the name of the new channel. Note: If the specified name for a new channel already exists, the default name, extended by a sequential number, is used for the new channel (see INSTrument:LIST? on page 69). Example: INST:CRE:REPL 'Spectrum2',IQ,'IQAnalyzer' Replaces the channel named 'Spectrum2' by a new measurement channel of type 'IQ Analyzer' named 'IQAnalyzer'. Usage: Setting only INSTrument:CREate[:NEW] <ChannelType>, <ChannelName> This command adds an additional measurement channel. The number of measurement channels you can configure at the same time depends on available memory. Parameters: <ChannelType> User Manual 1176.9893.02 ─ 01 Channel type of the new channel. For a list of available channel types see INSTrument:LIST? on page 69. 68 R&S®-K18 Remote Control Commands for Amplifier Measurements Selecting the Application <ChannelName> String containing the name of the channel. The channel name is displayed as the tab label for the measurement channel. Note: If the specified name for a new channel already exists, the default name, extended by a sequential number, is used for the new channel (see INSTrument:LIST? on page 69). Example: INST:CRE SAN, 'Spectrum 2' Adds an additional spectrum display named "Spectrum 2". INSTrument:DELete <ChannelName> This command deletes a measurement channel. If you delete the last measurement channel, the default "Spectrum" channel is activated. Parameters: <ChannelName> String containing the name of the channel you want to delete. A measurement channel must exist in order to be able delete it. Example: INST:DEL 'Spectrum4' Deletes the channel with the name 'Spectrum4'. Usage: Event INSTrument:LIST? This command queries all active measurement channels. This is useful in order to obtain the names of the existing measurement channels, which are required in order to replace or delete the channels. Return values: <ChannelType>, <ChannelName> For each channel, the command returns the channel type and channel name (see tables below). Tip: to change the channel name, use the INSTrument: REName command. Example: INST:LIST? Result for 3 measurement channels: 'ADEM','Analog Demod','IQ','IQ Analyzer','IQ','IQ Analyzer2' Usage: Query only INSTrument:REName <ChannelName1>, <ChannelName2> This command renames a measurement channel. Parameters: <ChannelName1> User Manual 1176.9893.02 ─ 01 String containing the name of the channel you want to rename. 69 R&S®-K18 Remote Control Commands for Amplifier Measurements Selecting the Application <ChannelName2> String containing the new channel name. Note that you can not assign an existing channel name to a new channel; this will cause an error. Example: INST:REN 'Spectrum2','Spectrum3' Renames the channel with the name 'Spectrum2' to 'Spectrum3'. Usage: Setting only INSTrument[:SELect] <ChannelType> | <ChannelName> This command activates a new measurement channel with the defined channel type, or selects an existing measurement channel with the specified name. Also see ● INSTrument:CREate[:NEW] on page 68 Parameters: <ChannelType> Channel type of the new channel. For a list of available channel types see INSTrument:LIST? on page 69. <ChannelName> String containing the name of the channel. Example: INST IQ Activates a measurement channel for the I/Q Analyzer application. INST 'MyIQSpectrum' Selects the measurement channel named 'MyIQSpectrum' (for example before executing further commands for that channel). Usage: SCPI confirmed SYSTem:PRESet:CHANnel[:EXECute] This command restores the default instrument settings in the current channel. Use INST:SEL to select the channel. Example: INST 'Spectrum2' Selects the channel for "Spectrum2". SYST:PRES:CHAN:EXEC Restores the factory default settings to the "Spectrum2" channel. Usage: Event Manual operation: See "Preset Channel" on page 22 User Manual 1176.9893.02 ─ 01 70 R&S®-K18 Remote Control Commands for Amplifier Measurements Configuring the Screen Layout 5.4 Configuring the Screen Layout DISPlay:FORMat............................................................................................................. 71 DISPlay[:WINDow<n>]:SIZE............................................................................................. 71 LAYout:ADD[:WINDow]?...................................................................................................72 LAYout:CATalog[:WINDow]?.............................................................................................73 LAYout:DIRection.............................................................................................................73 LAYout:IDENtify[:WINDow]?..............................................................................................74 LAYout:REMove[:WINDow]...............................................................................................74 LAYout:REPLace[:WINDow]..............................................................................................74 LAYout:SPLitter............................................................................................................... 75 LAYout:WINDow<n>:ADD?...............................................................................................76 LAYout:WINDow<n>:IDENtify?..........................................................................................76 LAYout:WINDow<n>:REMove........................................................................................... 77 LAYout:WINDow<n>:REPLace..........................................................................................77 LAYout:WINDow<n>:TYPe?..............................................................................................77 DISPlay:FORMat <Format> This command determines which tab is displayed. Parameters: <Format> SPLit Displays the MultiView tab with an overview of all active channels SINGle Displays the measurement channel that was previously focused. *RST: Example: SING DISP:FORM SPL DISPlay[:WINDow<n>]:SIZE <Size> This command maximizes the size of the selected result display window temporarily. To change the size of several windows on the screen permanently, use the LAY:SPL command (see LAYout:SPLitter on page 75). Parameters: <Size> LARGe Maximizes the selected window to full screen. Other windows are still active in the background. SMALl Reduces the size of the selected window to its original size. If more than one measurement window was displayed originally, these are visible again. *RST: Example: User Manual 1176.9893.02 ─ 01 SMALl DISP:WIND2:LARG 71 R&S®-K18 Remote Control Commands for Amplifier Measurements Configuring the Screen Layout LAYout:ADD[:WINDow]? <WindowName>,<Direction>,<WindowType> This command adds a window to the display in the active measurement channel. This command is always used as a query so that you immediately obtain the name of the new window as a result. To replace an existing window, use the LAYout:REPLace[:WINDow] command. Parameters: <WindowName> <Direction> String containing the name of the existing window the new window is inserted next to. By default, the name of a window is the same as its index. To determine the name and index of all active windows, use the LAYout:CATalog[:WINDow]? query. LEFT | RIGHt | ABOVe | BELow Direction the new window is added relative to the existing window. <WindowType> text value Type of result display (evaluation method) you want to add. See the table below for available parameter values. Return values: <NewWindowName> When adding a new window, the command returns its name (by default the same as its number) as a result. Example: LAY:ADD? '1',LEFT,MTAB Result: '2' Adds a new window named '2' with a marker table to the left of window 1. Usage: Query only Manual operation: See "Numeric Result Summary" on page 8 See "AM/AM" on page 11 See "AM/PM" on page 12 See "Gain Compression" on page 13 See "Magnitude Capture (RF, I and Q)" on page 14 See "PAE vs Input Power" on page 14 See "PAE vs Time" on page 15 See "Power vs Time" on page 15 See "Raw EVM" on page 16 See "EV Spectrum" on page 17 See "Spectrum FFT" on page 18 See "Time Domain" on page 18 Table 5-1: <WindowType> parameter values for LTE Uplink Measurement application Parameter value Window type AMAM AM/AM AMPM AM/PM User Manual 1176.9893.02 ─ 01 72 R&S®-K18 Remote Control Commands for Amplifier Measurements Configuring the Screen Layout Parameter value Window type GC Gain Compression IMAG Magnitude Capture I ISP Spectrum FFT I MTAB Marker Table PAEI PAE Input Power PAET PAE Time PVT Power vs Time (I x Q) QMAG Magnitude Capture Q QSP Spectrum FFT Q REVM Raw EVM RFM Magnitude Capture RF RFSP Spectrum FFT RTAB Result Summary SEVM Spectrum EVM TDOM Time Domain LAYout:CATalog[:WINDow]? This command queries the name and index of all active windows in the active measurement channel from top left to bottom right. The result is a comma-separated list of values for each window, with the syntax: <WindowName_1>,<WindowIndex_1>..<WindowName_n>,<WindowIndex_n> Return values: <WindowName> string Name of the window. In the default state, the name of the window is its index. <WindowIndex> numeric value Index of the window. Example: LAY:CAT? Result: '2',2,'1',1 Two windows are displayed, named '2' (at the top or left), and '1' (at the bottom or right). Usage: Query only LAYout:DIRection <Direction> This command selects the general direction of the smart grid. User Manual 1176.9893.02 ─ 01 73 R&S®-K18 Remote Control Commands for Amplifier Measurements Configuring the Screen Layout Parameters: <Direction> HORizontal VERTical *RST: HORizontal LAYout:IDENtify[:WINDow]? <WindowName> This command queries the index of a particular display window in the active measurement channel. Note: to query the name of a particular window, use the LAYout:WINDow<n>: IDENtify? query. Query parameters: <WindowName> String containing the name of a window. Return values: <WindowIndex> Index number of the window. Usage: Query only LAYout:REMove[:WINDow] <WindowName> This command removes a window from the display in the active measurement channel. Parameters: <WindowName> Usage: String containing the name of the window. In the default state, the name of the window is its index. Event LAYout:REPLace[:WINDow] <WindowName>,<WindowType> This command replaces the window type (for example from "Diagram" to "Result Summary") of an already existing window in the active measurement channel while keeping its position, index and window name. To add a new window, use the LAYout:ADD[:WINDow]? command. Parameters: <WindowName> String containing the name of the existing window. By default, the name of a window is the same as its index. To determine the name and index of all active windows in the active measurement channel, use the LAYout:CATalog[:WINDow]? query. <WindowType> Type of result display you want to use in the existing window. See LAYout:ADD[:WINDow]? on page 72 for a list of available window types. Example: LAY:REPL:WIND '1',MTAB Replaces the result display in window 1 with a marker table. User Manual 1176.9893.02 ─ 01 74 R&S®-K18 Remote Control Commands for Amplifier Measurements Configuring the Screen Layout LAYout:SPLitter <Index1>,<Index2>,<Position> This command changes the position of a splitter and thus controls the size of the windows on each side of the splitter. Compared to the DISPlay[:WINDow<n>]:SIZE on page 71 command, the LAYout:SPLitter changes the size of all windows to either side of the splitter permanently, it does not just maximize a single window temporarily. Note that windows must have a certain minimum size. If the position you define conflicts with the minimum size of any of the affected windows, the command will not work, but does not return an error. Fig. 5-1: SmartGrid coordinates for remote control of the splitters Parameters: <Index1> The index of one window the splitter controls. <Index2> The index of a window on the other side of the splitter. <Position> New vertical or horizontal position of the splitter as a fraction of the screen area (without channel and status bar and softkey menu). The point of origin (x = 0, y = 0) is in the lower left corner of the screen. The end point (x = 100, y = 100) is in the upper right corner of the screen. (See figure 5-1.) The direction in which the splitter is moved depends on the screen layout. If the windows are positioned horizontally, the splitter also moves horizontally. If the windows are positioned vertically, the splitter also moves vertically. Range: Example: User Manual 1176.9893.02 ─ 01 0 to 100 LAY:SPL 1,3,50 Moves the splitter between window 1 ('Frequency Sweep') and 3 ('Marker Table') to the center (50%) of the screen, i.e. in the figure above, to the left. 75 R&S®-K18 Remote Control Commands for Amplifier Measurements Configuring the Screen Layout Example: LAY:SPL 1,4,70 Moves the splitter between window 1 ('Frequency Sweep') and 3 ('Marker Peak List') towards the top (70%) of the screen. The following commands have the exact same effect, as any combination of windows above and below the splitter moves the splitter vertically. LAY:SPL 3,2,70 LAY:SPL 4,1,70 LAY:SPL 2,1,70 LAYout:WINDow<n>:ADD? <Direction>,<WindowType> This command adds a measurement window to the display. Note that with this command, the suffix <n> determines the existing window next to which the new window is added, as opposed to LAYout:ADD[:WINDow]?, for which the existing window is defined by a parameter. To replace an existing window, use the LAYout:WINDow<n>:REPLace command. This command is always used as a query so that you immediately obtain the name of the new window as a result. Parameters: <Direction> <WindowType> LEFT | RIGHt | ABOVe | BELow Type of measurement window you want to add. See LAYout:ADD[:WINDow]? on page 72 for a list of available window types. Return values: <NewWindowName> When adding a new window, the command returns its name (by default the same as its number) as a result. Example: LAY:WIND1:ADD? LEFT,MTAB Result: '2' Adds a new window named '2' with a marker table to the left of window 1. Usage: Query only LAYout:WINDow<n>:IDENtify? This command queries the name of a particular display window (indicated by the <n> suffix) in the active measurement channel. Note: to query the index of a particular window, use the LAYout:IDENtify[: WINDow]? command. Return values: <WindowName> User Manual 1176.9893.02 ─ 01 String containing the name of a window. In the default state, the name of the window is its index. 76 R&S®-K18 Remote Control Commands for Amplifier Measurements Performing Amplifier Measurements Usage: Query only LAYout:WINDow<n>:REMove This command removes the window specified by the suffix <n> from the display in the active measurement channel. The result of this command is identical to the LAYout:REMove[:WINDow] command. Usage: Event LAYout:WINDow<n>:REPLace <WindowType> This command changes the window type of an existing window (specified by the suffix <n>) in the active measurement channel. The result of this command is identical to the LAYout:REPLace[:WINDow] command. To add a new window, use the LAYout:WINDow<n>:ADD? command. Parameters: <WindowType> Type of measurement window you want to replace another one with. See LAYout:ADD[:WINDow]? on page 72 for a list of available window types. LAYout:WINDow<n>:TYPe? Queries the window type of the window specified by the index <n>. For a list of possible window types see LAYout:ADD[:WINDow]? on page 72. Example: LAY:WIND2:TYPE? Response: MACC Modulation accuracy Usage: Query only 5.5 Performing Amplifier Measurements ● ● ● Performing Measurements......................................................................................78 Retrieving Graphical Measurement Results............................................................81 Retrieving Numeric Results.....................................................................................83 User Manual 1176.9893.02 ─ 01 77 R&S®-K18 Remote Control Commands for Amplifier Measurements Performing Amplifier Measurements 5.5.1 Performing Measurements You can include the Amplifier measurements in a sequence of measurements. For a comprehensive description of commands required to do so, please refer to the R&S FSW User Manual. INITiate:CONMeas...........................................................................................................78 INITiate:CONTinuous....................................................................................................... 78 INITiate[:IMMediate]......................................................................................................... 79 INITiate:SEQuencer:ABORt.............................................................................................. 79 INITiate:SEQuencer:IMMediate......................................................................................... 79 INITiate:SEQuencer:MODE...............................................................................................80 [SENSe:]SWEep:COUNt...................................................................................................80 SYSTem:SEQuencer........................................................................................................81 INITiate:CONMeas This command restarts a (single) measurement that has been stopped (using ABORt) or finished in single sweep mode. The measurement is restarted at the beginning, not where the previous measurement was stopped. As opposed to INITiate[:IMMediate], this command does not reset traces in maxhold, minhold or average mode. Therefore it can be used to continue measurements using maxhold or averaging functions. Usage: Event Manual operation: See "Continue Single Sweep" on page 24 INITiate:CONTinuous <State> This command controls the measurement mode for an individual measurement channel. Note that in single measurement mode, you can synchronize to the end of the measurement with *OPC, *OPC? or *WAI. In continuous measurement mode, synchronization to the end of the measurement is not possible. Thus, it is not recommended that you use continuous measurement mode in remote control, as results like trace data or markers are only valid after a single measurement end synchronization. If the measurement mode is changed for a measurement channel while the Sequencer is active (see INITiate:SEQuencer:IMMediate on page 79) the mode is only considered the next time the measurement in that channel is activated by the Sequencer. User Manual 1176.9893.02 ─ 01 78 R&S®-K18 Remote Control Commands for Amplifier Measurements Performing Amplifier Measurements Parameters: <State> ON | OFF | 0 | 1 ON | 1 Continuous sweep OFF | 0 Single sweep *RST: 1 Example: INIT:CONT OFF Switches the sweep mode to single sweep. INIT:CONT ON Switches the sweep mode to continuous sweep. Manual operation: See "Continuous Sweep/RUN CONT" on page 23 INITiate[:IMMediate] This command starts a (single) new measurement. You can synchronize to the end of the measurement with *OPC, *OPC? or *WAI. Usage: Event Manual operation: See "Single Sweep/ RUN SINGLE" on page 23 INITiate:SEQuencer:ABORt This command stops the currently active sequence of measurements. The Sequencer itself is not deactivated, so you can start a new sequence immediately using INITiate:SEQuencer:IMMediate on page 79. To deactivate the Sequencer use SYSTem:SEQuencer on page 81. Usage: Event INITiate:SEQuencer:IMMediate This command starts a new sequence of measurements by the Sequencer. Its effect is similar to the INITiate[:IMMediate] command used for a single measurement. Before this command can be executed, the Sequencer must be activated (see SYSTem:SEQuencer on page 81). Example: User Manual 1176.9893.02 ─ 01 SYST:SEQ ON Activates the Sequencer. INIT:SEQ:MODE SING Sets single sequence mode so each active measurement will be performed once. INIT:SEQ:IMM Starts the sequential measurements. 79 R&S®-K18 Remote Control Commands for Amplifier Measurements Performing Amplifier Measurements Usage: Event INITiate:SEQuencer:MODE <Mode> This command selects the way the R&S FSW application performs measurements sequentially. Before this command can be executed, the Sequencer must be activated (see SYSTem:SEQuencer on page 81). Note: In order to synchronize to the end of a sequential measurement using *OPC, *OPC? or *WAI you must use SINGle Sequence mode. Parameters: <Mode> SINGle Each measurement is performed once (regardless of the channel's sweep mode), considering each channels' sweep count, until all measurements in all active channels have been performed. CONTinuous The measurements in each active channel are performed one after the other, repeatedly (regardless of the channel's sweep mode), in the same order, until the Sequencer is stopped. CDEFined First, a single sequence is performed. Then, only those channels in continuous sweep mode (INIT:CONT ON) are repeated. *RST: Example: CONTinuous SYST:SEQ ON Activates the Sequencer. INIT:SEQ:MODE SING Sets single sequence mode so each active measurement will be performed once. INIT:SEQ:IMM Starts the sequential measurements. [SENSe:]SWEep:COUNt <SweepCount> This command defines the number of measurements that the application uses to average traces. In case of continuous sweep mode, the application calculates the moving average over the average count. In case of single sweep mode, the application stops the measurement and calculates the average after the average count has been reached. Parameters: <SweepCount> User Manual 1176.9893.02 ─ 01 Range: *RST: 1 to 1 1 80 R&S®-K18 Remote Control Commands for Amplifier Measurements Performing Amplifier Measurements Example: SWE:COUN 64 Sets the number of sweeps to 64. INIT:CONT OFF Switches to single sweep mode. INIT;*WAI Starts a sweep and waits for its end. Usage: SCPI confirmed Manual operation: See "Sweep / Average Count" on page 24 SYSTem:SEQuencer <State> This command turns the Sequencer on and off. The Sequencer must be active before any other Sequencer commands (INIT:SEQ...) are executed, otherwise an error will occur. Parameters: <State> ON | OFF | 0 | 1 ON | 1 The Sequencer is activated and a sequential measurement is started immediately. OFF | 0 The Sequencer is deactivated. Any running sequential measurements are stopped. Further Sequencer commands (INIT: SEQ...) are not available. *RST: Example: 0 SYST:SEQ ON Activates the Sequencer. INIT:SEQ:MODE SING Sets single Sequencer mode so each active measurement will be performed once. INIT:SEQ:IMM Starts the sequential measurements. SYST:SEQ OFF 5.5.2 Retrieving Graphical Measurement Results TRACe<n>[:DATA]?.........................................................................................................81 TRACe<n>[:DATA]:X?......................................................................................................82 TRACe<n>[:DATA]? <Trace> This command queries the measurement results as displayed on the y-axis in the graphical result displays. User Manual 1176.9893.02 ─ 01 81 R&S®-K18 Remote Control Commands for Amplifier Measurements Performing Amplifier Measurements Query parameters: <Trace> TRACE1 | ... | TRACE6 Selects the trace to be queried. Note that the available number of traces depends on the result display. For example, the Magnitude Capture result display only supports TRACE1, while the Time Domain result display supports TRACE1 to TRACE6. Return values: <Result> Y-axis values of the captured samples in chronological order. Example: TRAC:DATA TRACE1 Queries the results displayed on trace 1. Usage: Query only Manual operation: See "AM/AM" on page 11 See "AM/PM" on page 12 See "Gain Compression" on page 13 See "Magnitude Capture (RF, I and Q)" on page 14 See "PAE vs Input Power" on page 14 See "PAE vs Time" on page 15 See "Power vs Time" on page 15 See "Raw EVM" on page 16 See "EV Spectrum" on page 17 See "Spectrum FFT" on page 18 See "Time Domain" on page 18 TRACe<n>[:DATA]:X? <Trace> This command queries the measurement results as displayed on the x-axis in the graphical result displays. Query parameters: <Trace> TRACE1 | ... | TRACE6 Selects the trace to be queried. Note that the available number of traces depends on the result display. For example, the Magnitude Capture result display only supports TRACE1, while the Time Domain result display supports TRACE1 to TRACE6. Return values: <Result> X-axis values of the captured samples in chronological order. Example: TRAC:DATA TRACE1 Queries the results displayed on trace 1. Usage: Query only User Manual 1176.9893.02 ─ 01 82 R&S®-K18 Remote Control Commands for Amplifier Measurements Performing Amplifier Measurements 5.5.3 Retrieving Numeric Results ● ● ● ● 5.5.3.1 Retrieving All Results.............................................................................................. 83 Retrieving the Modulation Accuracy........................................................................83 Retrieving Power Results........................................................................................88 Retrieving Baseband Characteristics...................................................................... 91 Retrieving All Results FETCh:MACCuracy[:RESult]:ALL?.................................................................................... 83 FETCh:MACCuracy[:RESult]:ALL? This command queries all numerical results shown in the Result Summary. Return values: <Results> 5.5.3.2 Numerical results as a comma separated list. The order of results is the same as in the result summary: <RawEVMMin>, <RawEVMCurrent>, <RawEVMMax>, <RawModelEVMMin>, <RawModelEVMCurrent>, <RawModelEVMMax>,... The unit depends on the result. Example: FETC:MACC:ALL? would return, e.g. 0.277,0.277,0.277,0.002,0.245,0.922,... Usage: Query only Retrieving the Modulation Accuracy FETCh:MACCuracy:FERRor:MAXimum[:RESult]?...............................................................84 FETCh:MACCuracy:FERRor:MINimum[:RESult]?................................................................84 FETCh:MACCuracy:FERRor:CURRent[:RESult]?................................................................84 FETCh:MACCuracy:GIMBalance:MAXimum[:RESult]?........................................................ 84 FETCh:MACCuracy:GIMBalance:MINimum[:RESult]?..........................................................84 FETCh:MACCuracy:GIMBalance:CURRent[:RESult]?..........................................................84 FETCh:MACCuracy:IQIMbalance:MAXimum[:RESult]?........................................................ 85 FETCh:MACCuracy:IQIMbalance:MINimum[:RESult]?......................................................... 85 FETCh:MACCuracy:IQIMbalance:CURRent[:RESult]?......................................................... 85 FETCh:MACCuracy:IQOFfset:MAXimum[:RESult]?............................................................. 85 FETCh:MACCuracy:IQOFfset:MINimum[:RESult]?.............................................................. 85 FETCh:MACCuracy:IQOFfset:CURRent[:RESult]?.............................................................. 85 FETCh:MACCuracy:MERRor:MAXimum[:RESult]?..............................................................85 FETCh:MACCuracy:MERRor:MINimum[:RESult]?............................................................... 85 FETCh:MACCuracy:MERRor:CURRent[:RESult]?............................................................... 85 FETCh:MACCuracy:PERRor:MAXimum[:RESult]?.............................................................. 86 FETCh:MACCuracy:PERRor:MINimum[:RESult]?................................................................86 FETCh:MACCuracy:PERRor:CURRent[:RESult]?................................................................86 FETCh:MACCuracy:QERRor:MAXimum[:RESult]?.............................................................. 86 User Manual 1176.9893.02 ─ 01 83 R&S®-K18 Remote Control Commands for Amplifier Measurements Performing Amplifier Measurements FETCh:MACCuracy:QERRor:MINimum[:RESult]?............................................................... 86 FETCh:MACCuracy:QERRor:CURRent[:RESult]?............................................................... 86 FETCh:MACCuracy:REVM:MAXimum[:RESult]?................................................................. 86 FETCh:MACCuracy:REVM:MINimum[:RESult]?.................................................................. 86 FETCh:MACCuracy:REVM:CURRent[:RESult]?.................................................................. 86 FETCh:MACCuracy:RMEV:MAXimum[:RESult]?................................................................. 87 FETCh:MACCuracy:RMEV:MINimum[:RESult]?.................................................................. 87 FETCh:MACCuracy:RMEV:CURRent[:RESult]?.................................................................. 87 FETCh:MACCuracy:SRERror:MAXimum[:RESult]?............................................................. 87 FETCh:MACCuracy:SRERror:MINimum[:RESult]?.............................................................. 87 FETCh:MACCuracy:SRERror:CURRent[:RESult]?.............................................................. 87 FETCh:MACCuracy:FERRor:MAXimum[:RESult]? FETCh:MACCuracy:FERRor:MINimum[:RESult]? FETCh:MACCuracy:FERRor:CURRent[:RESult]? This command queries the Frequency Error as shown in the Result Summary. Return values: <FrequencyError> <numeric value> Minimum, maximum or current Frequency Error, depending on the command syntax. Default unit: Hz Example: FETC:MACC:FERR:MAX? would return, e.g. 1.2879 Usage: Query only Manual operation: See "Numeric Result Summary" on page 8 FETCh:MACCuracy:GIMBalance:MAXimum[:RESult]? FETCh:MACCuracy:GIMBalance:MINimum[:RESult]? FETCh:MACCuracy:GIMBalance:CURRent[:RESult]? This command queries the Gain Imbalance as shown in the Result Summary. Return values: <GainImbalance> <numeric value> Minimum, maximum or current Gain Imbalance, depending on the command syntax. Default unit: dB Example: FETC:MACC:GIMB:MIN? would return, e.g. 0.887 Usage: Query only Manual operation: See "Numeric Result Summary" on page 8 User Manual 1176.9893.02 ─ 01 84 R&S®-K18 Remote Control Commands for Amplifier Measurements Performing Amplifier Measurements FETCh:MACCuracy:IQIMbalance:MAXimum[:RESult]? FETCh:MACCuracy:IQIMbalance:MINimum[:RESult]? FETCh:MACCuracy:IQIMbalance:CURRent[:RESult]? This command queries the I/Q Imbalance as shown in the Result Summary. Return values: <IQImbalance> <numeric value> Minimum, maximum or current I/Q Imbalance, depending on the command syntax. Default unit: dB Example: FETC:MACC:ACPI:CURR? would return, e.g. 0.02 Usage: Query only Manual operation: See "Numeric Result Summary" on page 8 FETCh:MACCuracy:IQOFfset:MAXimum[:RESult]? FETCh:MACCuracy:IQOFfset:MINimum[:RESult]? FETCh:MACCuracy:IQOFfset:CURRent[:RESult]? This command queries the I/Q Offset as shown in the Result Summary. Return values: <IQOffset> <numeric value> Minimum, maximum or current I/Q Offset, depending on the command syntax. Default unit: dB Example: FETC:MACC:IQOF:MIN? would return, e.g. 0.001 Usage: Query only Manual operation: See "Numeric Result Summary" on page 8 FETCh:MACCuracy:MERRor:MAXimum[:RESult]? FETCh:MACCuracy:MERRor:MINimum[:RESult]? FETCh:MACCuracy:MERRor:CURRent[:RESult]? This command queries the Magnitude Error as shown in the Result Summary. Return values: <Magnitude> <numeric value> Minimum, maximum or current Magnitude Error, depending on the command syntax. Default unit: % User Manual 1176.9893.02 ─ 01 85 R&S®-K18 Remote Control Commands for Amplifier Measurements Performing Amplifier Measurements Example: FETC:MACC:MERR:MAX? would return, e.g. 1.12 Usage: Query only Manual operation: See "Numeric Result Summary" on page 8 FETCh:MACCuracy:PERRor:MAXimum[:RESult]? FETCh:MACCuracy:PERRor:MINimum[:RESult]? FETCh:MACCuracy:PERRor:CURRent[:RESult]? This command queries the Phase Error as shown in the Result Summary. Return values: <PhaseError> <numeric value> Minimum, maximum or current Phase Error, depending on the command syntax. Default unit: degree Example: FETC:MACC:PERR:CURR? would return, e.g. 1.84 Usage: Query only Manual operation: See "Numeric Result Summary" on page 8 FETCh:MACCuracy:QERRor:MAXimum[:RESult]? FETCh:MACCuracy:QERRor:MINimum[:RESult]? FETCh:MACCuracy:QERRor:CURRent[:RESult]? This command queries the Quadrature Error as shown in the Result Summary. Return values: <QuadratureError> <numeric value> Minimum, maximum or current Quadrature Error, depending on the command syntax. Default unit: degree Example: FETC:MACC:QERR:MAX? would return, e.g. 2.76 Usage: Query only Manual operation: See "Numeric Result Summary" on page 8 FETCh:MACCuracy:REVM:MAXimum[:RESult]? FETCh:MACCuracy:REVM:MINimum[:RESult]? FETCh:MACCuracy:REVM:CURRent[:RESult]? This command queries the Raw EVM as shown in the Result Summary. User Manual 1176.9893.02 ─ 01 86 R&S®-K18 Remote Control Commands for Amplifier Measurements Performing Amplifier Measurements Return values: <EVM> <numeric value> Minimum, maximum or current Raw EVM, depending on the command syntax. Default unit: % Example: FETC:MACC:REVM:MAX? would return, e.g. 3.606 Usage: Query only Manual operation: See "Numeric Result Summary" on page 8 FETCh:MACCuracy:RMEV:MAXimum[:RESult]? FETCh:MACCuracy:RMEV:MINimum[:RESult]? FETCh:MACCuracy:RMEV:CURRent[:RESult]? This command queries the Raw Model EVM as shown in the Result Summary. Return values: <EVM> <numeric value> Minimum, maximum or current Raw Model EVM, depending on the command syntax. Default unit: % Example: FETC:MACC:RMEV:CURR? would return, e.g. 0.879 Usage: Query only Manual operation: See "Numeric Result Summary" on page 8 FETCh:MACCuracy:SRERror:MAXimum[:RESult]? FETCh:MACCuracy:SRERror:MINimum[:RESult]? FETCh:MACCuracy:SRERror:CURRent[:RESult]? This command queries the Sample Rate Error as shown in the Result Summary. Return values: <SampleRateError> <numeric value> Minimum, maximum or current SampleRateError, depending on the command syntax. Default unit: Hz Example: FETC:MACC:SRER:CURR? would return, e.g. -0.023 Usage: Query only Manual operation: See "Numeric Result Summary" on page 8 User Manual 1176.9893.02 ─ 01 87 R&S®-K18 Remote Control Commands for Amplifier Measurements Performing Amplifier Measurements 5.5.3.3 Retrieving Power Results FETCh:AMAM:CWIDth:MAXimum[:RESult]?.......................................................................88 FETCh:AMAM:CWIDth:MINimum[:RESult]?........................................................................88 FETCh:AMAM:CWIDth:CURRent[:RESult]?........................................................................88 FETCh:AMPM:CWIDth:MAXimum[:RESult]?.......................................................................88 FETCh:AMPM:CWIDth:MINimum[:RESult]?........................................................................88 FETCh:AMPM:CWIDth:CURRent[:RESult]?........................................................................88 FETCh:POWer:CFACtor:IN:MAXimum[:RESult]?................................................................ 89 FETCh:POWer:CFACtor:IN:MINimum[:RESult]?................................................................. 89 FETCh:POWer:CFACtor:IN:CURRent[:RESult]?................................................................. 89 FETCh:POWer:CFACtor:OUT:MAXimum[:RESult]?.............................................................89 FETCh:POWer:CFACtor:OUT:MINimum[:RESult]?.............................................................. 89 FETCh:POWer:CFACtor:OUT:CURRent[:RESult]?..............................................................89 FETCh:POWer:GAIN:MAXimum[:RESult]?......................................................................... 90 FETCh:POWer:GAIN:MINimum[:RESult]?.......................................................................... 90 FETCh:POWer:GAIN:CURRent[:RESult]?.......................................................................... 90 FETCh:POWer:INPut:MAXimum[:RESult]?......................................................................... 90 FETCh:POWer:INPut:MINimum[:RESult]?.......................................................................... 90 FETCh:POWer:INPut:CURRent[:RESult]?.......................................................................... 90 FETCh:POWer:OUTPut:MAXimum[:RESult]?..................................................................... 90 FETCh:POWer:OUTPut:MINimum[:RESult]?.......................................................................90 FETCh:POWer:OUTPut:CURRent[:RESult]?.......................................................................90 FETCh:AMAM:CWIDth:MAXimum[:RESult]? FETCh:AMAM:CWIDth:MINimum[:RESult]? FETCh:AMAM:CWIDth:CURRent[:RESult]? This command queries the AM/AM Curve Width as shown in the Result Summary. Return values: <CurveWidth> <numeric value> Minimum, maximum or current AM/AM Curve Width, depending on the command syntax. Default unit: dB Example: FETC:AMAM:CWID:MIN? would return, e.g. 0.69 Usage: Query only Manual operation: See "Numeric Result Summary" on page 8 FETCh:AMPM:CWIDth:MAXimum[:RESult]? FETCh:AMPM:CWIDth:MINimum[:RESult]? FETCh:AMPM:CWIDth:CURRent[:RESult]? This command queries the AM/PM Curve Width as shown in the Result Summary. User Manual 1176.9893.02 ─ 01 88 R&S®-K18 Remote Control Commands for Amplifier Measurements Performing Amplifier Measurements Return values: <CurveWidth> <numeric value> Minimum, maximum or current AM/PM Curve Width, depending on the command syntax. Default unit: degree Example: FETC:AMPM:CWID:MAX? would return, e.g. 1.441 Usage: Query only Manual operation: See "Numeric Result Summary" on page 8 FETCh:POWer:CFACtor:IN:MAXimum[:RESult]? FETCh:POWer:CFACtor:IN:MINimum[:RESult]? FETCh:POWer:CFACtor:IN:CURRent[:RESult]? This command queries the Crest Factor at the DUT input as shown in the Result Summary. Return values: <CrestFactor> <numeric value> Minimum, maximum or current Crest Factor, depending on the command syntax. Default unit: dB Example: FETC:POW:CFAC:IN:CURR? would return, e.g. 10.34 Usage: Query only Manual operation: See "Numeric Result Summary" on page 8 FETCh:POWer:CFACtor:OUT:MAXimum[:RESult]? FETCh:POWer:CFACtor:OUT:MINimum[:RESult]? FETCh:POWer:CFACtor:OUT:CURRent[:RESult]? This command queries the Crest Factor at the DUT output as shown in the Result Summary. Return values: <CrestFactor> <numeric value> Minimum, maximum or current Crest Factor, depending on the command syntax. Default unit: dB Example: FETC:POW:CFAC:CURR? would return, e.g. 8.72 Usage: Query only User Manual 1176.9893.02 ─ 01 89 R&S®-K18 Remote Control Commands for Amplifier Measurements Performing Amplifier Measurements Manual operation: See "Numeric Result Summary" on page 8 FETCh:POWer:GAIN:MAXimum[:RESult]? FETCh:POWer:GAIN:MINimum[:RESult]? FETCh:POWer:GAIN:CURRent[:RESult]? This command queries the signal gain as shown in the Result Summary. Return values: <Gain> <numeric value> Minimum, maximum or current gain, depending on the command syntax. Default unit: dB Example: FETC:POW:GAIN:MAX? would return, e.g. 21.37 Usage: Query only Manual operation: See "Numeric Result Summary" on page 8 FETCh:POWer:INPut:MAXimum[:RESult]? FETCh:POWer:INPut:MINimum[:RESult]? FETCh:POWer:INPut:CURRent[:RESult]? This command queries the power at the DUT input as shown in the Result Summary. Return values: <Power> <numeric value> Minimum, maximum or current power, depending on the command syntax. Default unit: dBm Example: FETC:POW:INP:MIN? would return, e.g. 9.39 Usage: Query only Manual operation: See "Numeric Result Summary" on page 8 FETCh:POWer:OUTPut:MAXimum[:RESult]? FETCh:POWer:OUTPut:MINimum[:RESult]? FETCh:POWer:OUTPut:CURRent[:RESult]? This command queries the signal power at the DUT output as shown in the Result Summary. User Manual 1176.9893.02 ─ 01 90 R&S®-K18 Remote Control Commands for Amplifier Measurements Performing Amplifier Measurements Return values: <Power> <numeric value> Minimum, maximum or current power, depending on the command syntax. Default unit: dBm 5.5.3.4 Example: FETC:POW:OUTP:MIN? would return, e.g. 7.198 Usage: Query only Manual operation: See "Numeric Result Summary" on page 8 Retrieving Baseband Characteristics FETCh:APAE:MAXimum[:RESult]?.................................................................................... 91 FETCh:APAE:MINimum[:RESult]?..................................................................................... 91 FETCh:APAE:CURRent[:RESult]?..................................................................................... 91 FETCh:ICC:MAXimum[:RESult]?....................................................................................... 92 FETCh:ICC:MINimum[:RESult]?........................................................................................ 92 FETCh:ICC:CURRent[:RESult]?........................................................................................ 92 FETCh:IVOLtage:PURE:MAXimum[:RESult]?..................................................................... 92 FETCh:IVOLtage:PURE:MINimum[:RESult]?...................................................................... 92 FETCh:IVOLtage:PURE:CURRent[:RESult]?...................................................................... 92 FETCh:POWer:CURRent[:RESult]?................................................................................... 92 FETCh:QVOLtage:PURE:MAXimum[:RESult]?................................................................... 93 FETCh:QVOLtage:PURE:MINimum[:RESult]?.....................................................................93 FETCh:QVOLtage:PURE:CURRent[:RESult]?.....................................................................93 FETCh:VCC:MAXimum[:RESult]?......................................................................................93 FETCh:VCC:MINimum[:RESult]?....................................................................................... 93 FETCh:VCC:CURRent[:RESult]?.......................................................................................93 FETCh:APAE:MAXimum[:RESult]? FETCh:APAE:MINimum[:RESult]? FETCh:APAE:CURRent[:RESult]? This command queries the Average PAE as shown in the Result Summary. Return values: <PAE> <numeric value> Minimum, maximum or current Average PAE, depending on the command syntax. Default unit: % Example: FETC:APAE:CURR? would return, e.g. 1.231 Usage: Query only Manual operation: See "Numeric Result Summary" on page 8 User Manual 1176.9893.02 ─ 01 91 R&S®-K18 Remote Control Commands for Amplifier Measurements Performing Amplifier Measurements FETCh:ICC:MAXimum[:RESult]? FETCh:ICC:MINimum[:RESult]? FETCh:ICC:CURRent[:RESult]? This command queries the measured baseband current (I_cc) as shown in the Result Summary. Return values: <Current> <numeric value> Minimum, maximum or current current, depending on the command syntax. Default unit: A Example: FETC:ICC:MAX? would return, e.g. 2.63 Usage: Query only Manual operation: See "Numeric Result Summary" on page 8 FETCh:IVOLtage:PURE:MAXimum[:RESult]? FETCh:IVOLtage:PURE:MINimum[:RESult]? FETCh:IVOLtage:PURE:CURRent[:RESult]? This command queries the measured baseband input voltage on the I channel as shown in the Result Summary. Return values: <Voltage> <numeric value> Minimum, maximum or current voltage, depending on the command syntax. Default unit: V Example: FETC:IVOL:PURE:CURR? would return, e.g. 1.4 Usage: Query only Manual operation: See "Numeric Result Summary" on page 8 FETCh:POWer:CURRent[:RESult]? This command queries the measured baseband power (I_cc * V_cc) as shown in the Result Summary. Return values: <Power> <numeric value> Minimum, maximum or current power, depending on the command syntax. Default unit: W User Manual 1176.9893.02 ─ 01 92 R&S®-K18 Remote Control Commands for Amplifier Measurements Performing Amplifier Measurements Example: FETC:POW:CURR? would return, e.g. 0.75 Usage: Query only Manual operation: See "Numeric Result Summary" on page 8 FETCh:QVOLtage:PURE:MAXimum[:RESult]? FETCh:QVOLtage:PURE:MINimum[:RESult]? FETCh:QVOLtage:PURE:CURRent[:RESult]? This command queries the measured baseband voltage on the Q channel as shown in the Result Summary. Return values: <Voltage> <numeric value> Minimum, maximum or current voltage, depending on the command syntax. Default unit: V Example: FETC:IVOL:PURE:CURR? would return, e.g. 1.42 Usage: Query only Manual operation: See "Numeric Result Summary" on page 8 FETCh:VCC:MAXimum[:RESult]? FETCh:VCC:MINimum[:RESult]? FETCh:VCC:CURRent[:RESult]? This command queries the measured baseband voltage (V_cc) as shown in the Result Summary. Return values: <Voltage> <numeric value> Minimum, maximum or current voltage, depending on the command syntax. Default unit: V Example: FETC:VCC:CURR? would return, e.g. 0.4 Usage: Query only Manual operation: See "Numeric Result Summary" on page 8 User Manual 1176.9893.02 ─ 01 93 R&S®-K18 Remote Control Commands for Amplifier Measurements Configuring Amplifier Measurements 5.6 Configuring Amplifier Measurements ● ● ● ● ● ● ● ● ● ● ● Designing a Reference Signal.................................................................................94 Selecting and Configuring the Input Source......................................................... 100 Configuring the Frequency....................................................................................102 Defining Level Characteristics...............................................................................104 Controlling a Signal Generator..............................................................................107 Configuring the Data Capture............................................................................... 111 Synchronizing Measurement Data........................................................................ 115 Estimating and Compensating Signal Errors........................................................ 115 Applying a System Model......................................................................................118 Applying Digital Predistortion................................................................................ 120 Configuring Envelope Tracking............................................................................. 122 5.6.1 Designing a Reference Signal CONFigure:REFSignal:CGW:LEDState?............................................................................ 94 CONFigure:REFSignal:CGW:READ...................................................................................95 CONFigure:REFSignal:CWF:FPATh.................................................................................. 95 CONFigure:REFSignal:CWF:LEDState?.............................................................................95 CONFigure:REFSignal:CWF:WRITe.................................................................................. 96 CONFigure:REFSignal:GOS:BWIDth................................................................................. 96 CONFigure:REFSignal:GOS:CRESt...................................................................................96 CONFigure:REFSignal:GOS:DCYCle.................................................................................97 CONFigure:REFSignal:GOS:LEDState?.............................................................................97 CONFigure:REFSignal:GOS:NPOSition............................................................................. 97 CONFigure:REFSignal:GOS:NWIDth................................................................................. 98 CONFigure:REFSignal:GOS:RLENgth............................................................................... 98 CONFigure:REFSignal:GOS:SLENgth................................................................................98 CONFigure:REFSignal:GOS:SRATe.................................................................................. 98 CONFigure:REFSignal:GOS:WNAMe................................................................................ 99 CONFigure:REFSignal:GOS:WRITe.................................................................................. 99 CONFigure:REFSignal:SINFo:SLENgth?............................................................................99 CONFigure:REFSignal:SINFo:SRATe?.............................................................................. 99 CONFigure:REFSignal:CGW:LEDState? This command queries the transmission state of the reference signal designed on an R&S SMW. Available when you configure the reference signal on the R&S SMW. Return values: <State> GREen Transmission was successful. GREY Unknown transmission state. RED Transmission was not successful. User Manual 1176.9893.02 ─ 01 94 R&S®-K18 Remote Control Commands for Amplifier Measurements Configuring Amplifier Measurements Example: CONF:REFS:CGW:READ CONF:REFS:CGW:LEDS? would return, e.g. GRE Usage: Query only Manual operation: See "Designing a reference signal on a signal generator" on page 26 CONFigure:REFSignal:CGW:READ This command transfers a reference signal designed on the R&S SMW into the R&S FSW-K18. Example: CONF:REFS:CGW:READ Imports the reference signal data from the generator. Usage: Event Manual operation: See "Designing a reference signal on a signal generator" on page 26 CONFigure:REFSignal:CWF:FPATh <FileName> This command selects a waveform file containing a reference signal. Parameters: <FileName> String containing the name and path to the waveform file. Example: CONF:REFS:CWF:FPAT 'C:\RefSignal.wv' Selects a waveform file on drive c: called 'RefSignal.wv'. Manual operation: See "Designing a reference signal in a waveform file" on page 27 CONFigure:REFSignal:CWF:LEDState? This command queries the transmission state of the reference signal to the signal generator. Available when you generate the reference signal with a waveform file. Return values: <State> GREen Transmission was successful. GREY Unknown transmission state. RED Transmission was not successful. User Manual 1176.9893.02 ─ 01 95 R&S®-K18 Remote Control Commands for Amplifier Measurements Configuring Amplifier Measurements Example: CONF:REFS:CWF:FPAT 'C:\RefSignal.wv' CONF:REFS:CWF:WRITE CONF:REFS:CWF:LEDS? would return, e.g. GRE Usage: Query only Manual operation: See "Designing a reference signal in a waveform file" on page 27 CONFigure:REFSignal:CWF:WRITe This command transfers a waveform file that contains a reference signal to the R&S SMW Example: CONF:REFS:CWF:FPAT 'C:\RefSignal.wv' CONF:REFS:CWF:WRITE Transfers the reference signal to the generator. Usage: Event Manual operation: See "Designing a reference signal in a waveform file" on page 27 CONFigure:REFSignal:GOS:BWIDth <Bandwidth> This command defines the bandwidth of the reference signal. Parameters: <Bandwidth> numeric value Default unit: Hz Example: CONF:REFS:GOS:BWID 10MHZ Defines a reference signal bandwidth of 10 MHz. Manual operation: See "Signal Bandwidth" on page 29 CONFigure:REFSignal:GOS:CRESt <CrestFactor> This command defines the crest factor of the reference signal. Parameters: <CrestFactor> numeric value Default unit: dB Example: CONF:REFS:GOS:CRES 15 Defines a crest factor of 15 dB. Manual operation: See "Crest Factor" on page 29 User Manual 1176.9893.02 ─ 01 96 R&S®-K18 Remote Control Commands for Amplifier Measurements Configuring Amplifier Measurements CONFigure:REFSignal:GOS:DCYCle <DutyCycle> This command defines the duty cycle of a pulsed reference signal. Parameters: <DutyCycle> numeric value Default unit: % Example: CONF:REFS:GOS:DCYC 75 Defines a duty cycle of 75 %. Manual operation: See "Pulse Duty Cycle" on page 29 CONFigure:REFSignal:GOS:LEDState? This command queries the transmission state of the reference signal to the signal generator. Available when you configure the reference signal within the R&S FSW-K18. Return values: <State> GREen Transmission was successful. GREY Unknown transmission state. RED Transmission was not successful. Example: CONF:REFS:GOS:WRITE CONF:REFS:GOS:LEDS? would return, e.g. GRE Usage: Query only Manual operation: See "Designing a reference signal within the R&S FSW-K18" on page 27 CONFigure:REFSignal:GOS:NPOSition <Frequency> This command defines the offset of a notch relative to the center frequency in the reference signal. Parameters: <Frequency> Numeric value Default unit: Hz Example: CONF:REFS:GOS:NPOS 10000 Defines a notch offset of 10 kHz. Manual operation: See "Notch Position" on page 29 User Manual 1176.9893.02 ─ 01 97 R&S®-K18 Remote Control Commands for Amplifier Measurements Configuring Amplifier Measurements CONFigure:REFSignal:GOS:NWIDth <Frequency> This command defines the notch width of a reference signal. Parameters: <Frequency> Numeric value Default unit: Hz Example: CONF:REFS:GOS:NWID 150000 Defines a notch width of 150 kHz. Manual operation: See "Notch Width" on page 29 CONFigure:REFSignal:GOS:RLENgth <Samples> This command defines the ramp length of a pulsed reference signal. Parameters: <Samples> Numeric value that defines the number of samples on each side of the pulse (= ramp length). Default unit: Samples Example: CONF:REFS:GOS:RLEN 5 Defines a ramp length of 5 samples. Manual operation: See "Ramp Length" on page 30 CONFigure:REFSignal:GOS:SLENgth <Samples> This command defines the length of the reference signal. Parameters: <Samples> numeric value Default unit: Samples Example: CONF:REFS:GOS:SLEN 1024 Defines a reference signal made up out of 1024 samples. CONFigure:REFSignal:GOS:SRATe <ClockRate> This command defines the clock (or sample) rate of the reference signal generated by the signal generator. Parameters: <ClockRate> numeric value Default unit: Hz Example: CONF:REFS:GOS:SRAT 20000000 Defines a sample rate of 20 MHz. Manual operation: See "Clock Rate" on page 28 User Manual 1176.9893.02 ─ 01 98 R&S®-K18 Remote Control Commands for Amplifier Measurements Configuring Amplifier Measurements CONFigure:REFSignal:GOS:WNAMe <FileName> This command defines a file name for the waveform of the reference signal. Parameters: <FileName> String containing the name of the waveform file. The file extension (.wv) is added automatically. Example: CONF:REFS:GOS:WNAM 'RefSignal' Defines the name "RefSignal" for the waveform file. Manual operation: See "Waveform File Name" on page 30 CONFigure:REFSignal:GOS:WRITe This command transfers the reference signal characteristics defined within the R&S FSW-K18 to the R&S SMW. Example: CONF:REFS:GOS:WRITE Transfers the reference signal to the generator. Usage: Event Manual operation: See "Designing a reference signal within the R&S FSW-K18" on page 27 CONFigure:REFSignal:SINFo:SLENgth? This command queries the sample length of the currently used reference signal. Return values: <Sample> Numeric value Default unit: Samples Example: CONF:REFS:SINF:SLEN? would return, e.g. 40000 Usage: Query only Manual operation: See "Signal Length" on page 29 CONFigure:REFSignal:SINFo:SRATe? This command queries the sample rate of the currently used reference signal. Return values: <SampleRate> Numeric value Default unit: Hz Example: User Manual 1176.9893.02 ─ 01 CONF:REFS:SINF:SRAT? would return, e.g. 32000000 99 R&S®-K18 Remote Control Commands for Amplifier Measurements Configuring Amplifier Measurements Usage: Query only 5.6.2 Selecting and Configuring the Input Source CALibration:AIQ:HATiming[:STATe]................................................................................. 100 INPut:CONNector...........................................................................................................100 INPut:COUPling.............................................................................................................101 INPut:FILTer:HPASs[:STATe]..........................................................................................101 INPut:FILTer:YIG[:STATe].............................................................................................. 101 INPut:IMPedance...........................................................................................................102 INPut:SELect:BBANalog[:STATe].................................................................................... 102 CALibration:AIQ:HATiming[:STATe] <State> Activates a mode with enhanced timing accuracy between analog baseband, RF and external trigger signals. Parameters: <State> ON | OFF | 1 | 0 ON | 1 The high accuracy timing function is switched on. The cable for high accuracy timing must be connected to trigger ports 1 and 2. OFF | 0 The high accuracy timing function is switched off. *RST: OFF Example: CAL:AIQ:HAT:STAT ON Manual operation: See "High Accuracy Timing Trigger - Baseband - RF" on page 33 INPut:CONNector <ConnType> Determines whether the RF input data is taken from the RF input connector or the optional Analog Baseband I connector. This command is only available if the Analog Baseband interface (R&S FSW-B71) is installed and active for input. For more information on the Analog Baseband Interface (R&S FSW-B71) see the R&S FSW I/Q Analyzer and I/Q Input User Manual. Parameters: <ConnType> RF RF input connector AIQI Analog Baseband I connector *RST: Example: User Manual 1176.9893.02 ─ 01 RF INP:CONN:AIQI Selects the analog baseband input. 100 R&S®-K18 Remote Control Commands for Amplifier Measurements Configuring Amplifier Measurements Usage: SCPI confirmed Manual operation: See "Input Connector" on page 32 INPut:COUPling <CouplingType> This command selects the coupling type of the RF input. Parameters: <CouplingType> AC AC coupling DC DC coupling *RST: AC Example: INP:COUP DC Usage: SCPI confirmed Manual operation: See "Input Coupling" on page 31 INPut:FILTer:HPASs[:STATe] <State> Activates an additional internal high-pass filter for RF input signals from 1 GHz to 3 GHz. This filter is used to remove the harmonics of the R&S FSW in order to measure the harmonics for a DUT, for example. This function requires option R&S FSW-B13. (Note: for RF input signals outside the specified range, the high-pass filter has no effect. For signals with a frequency of approximately 4 GHz upwards, the harmonics are suppressed sufficiently by the YIG filter.) Parameters: <State> ON | OFF *RST: OFF Example: INP:FILT:HPAS ON Turns on the filter. Usage: SCPI confirmed Manual operation: See "High-Pass Filter 1...3 GHz" on page 32 INPut:FILTer:YIG[:STATe] <State> This command turns the YIG-preselector on and off. Note the special conditions and restrictions for the YIG filter described in "YIG-Preselector" on page 32. User Manual 1176.9893.02 ─ 01 101 R&S®-K18 Remote Control Commands for Amplifier Measurements Configuring Amplifier Measurements Parameters: <State> ON | OFF | 0 | 1 *RST: 1 (0 for I/Q Analyzer, GSM, VSA and MC Group Delay measurements) Example: INP:FILT:YIG OFF Deactivates the YIG-preselector. Manual operation: See "YIG-Preselector" on page 32 INPut:IMPedance <Impedance> This command selects the nominal input impedance of the RF input. 75 Ω should be selected if the 50 Ω input impedance is transformed to a higher impedance using a matching pad of the RAZ type (= 25 Ω in series to the input impedance of the instrument). The power loss correction value in this case is 1.76 dB = 10 log (75Ω/50Ω). Parameters: <Impedance> 50 | 75 *RST: 50 Ω Example: INP:IMP 75 Usage: SCPI confirmed Manual operation: See "Impedance" on page 32 INPut:SELect:BBANalog[:STATe] <State> This command turns simultaneous use of RF input and analog baseband input on and off. Parameters: <State> ON | OFF Example: INP:SEL:BBAN ON Turns the analog baseband on. Manual operation: See "Enable Parallel BB Capture" on page 33 5.6.3 Configuring the Frequency [SENSe:]FREQuency:CENTer.........................................................................................102 [SENSe:]FREQuency:CENTer:STEP............................................................................... 103 [SENSe:]FREQuency:OFFSet......................................................................................... 103 [SENSe:]FREQuency:CENTer <Frequency> This command defines the center frequency. User Manual 1176.9893.02 ─ 01 102 R&S®-K18 Remote Control Commands for Amplifier Measurements Configuring Amplifier Measurements Parameters: <Frequency> The allowed range and fmax is specified in the data sheet. UP Increases the center frequency by the step defined using the [SENSe:]FREQuency:CENTer:STEP command. DOWN Decreases the center frequency by the step defined using the [SENSe:]FREQuency:CENTer:STEP command. *RST: fmax/2 Default unit: Hz Example: FREQ:CENT 100 MHz FREQ:CENT:STEP 10 MHz FREQ:CENT UP Sets the center frequency to 110 MHz. Usage: SCPI confirmed Manual operation: See "Center Frequency" on page 34 [SENSe:]FREQuency:CENTer:STEP <StepSize> This command defines the center frequency step size. Parameters: <StepSize> fmax is specified in the data sheet. Range: 1 to fMAX *RST: 0.1 x span Default unit: Hz Example: FREQ:CENT 100 MHz FREQ:CENT:STEP 10 MHz FREQ:CENT UP Sets the center frequency to 110 MHz. Manual operation: See "Center Frequency Stepsize" on page 34 [SENSe:]FREQuency:OFFSet <Offset> This command defines a frequency offset. If this value is not 0 Hz, the application assumes that the input signal was frequency shifted outside the application. All results of type "frequency" will be corrected for this shift numerically by the application. Parameters: <Offset> Range: *RST: -100 GHz to 100 GHz 0 Hz Example: FREQ:OFFS 1GHZ Usage: SCPI confirmed User Manual 1176.9893.02 ─ 01 103 R&S®-K18 Remote Control Commands for Amplifier Measurements Configuring Amplifier Measurements Manual operation: See "Frequency Offset" on page 35 5.6.4 Defining Level Characteristics DISPlay[:WINDow<n>]:TRACe:Y[:SCALe]:RLEVel............................................................ 104 DISPlay[:WINDow<n>]:TRACe:Y[:SCALe]:RLEVel:OFFSet................................................104 INPut:ATTenuation.........................................................................................................104 INPut:ATTenuation:AUTO...............................................................................................105 INPut:EATT................................................................................................................... 105 INPut:EATT:AUTO......................................................................................................... 105 INPut:EATT:STATe........................................................................................................ 106 INPut:IQ:FULLscale:LEVel..............................................................................................106 INPut:GAIN[:VALue].......................................................................................................106 INPut:GAIN:STATe........................................................................................................ 107 DISPlay[:WINDow<n>]:TRACe:Y[:SCALe]:RLEVel <ReferenceLevel> This command defines the reference level. Example: DISP:TRAC:Y:RLEV -60dBm Usage: SCPI confirmed Manual operation: See "Reference Level" on page 36 DISPlay[:WINDow<n>]:TRACe:Y[:SCALe]:RLEVel:OFFSet <Offset> This command defines a reference level offset. Parameters: <Offset> Range: *RST: -200 dB to 200 dB 0dB Example: DISP:TRAC:Y:RLEV:OFFS -10dB Manual operation: See "Shifting the Display (Offset)" on page 36 INPut:ATTenuation <Attenuation> This command defines the total attenuation for RF input. If you set the attenuation manually, it is no longer coupled to the reference level, but the reference level is coupled to the attenuation. Thus, if the current reference level is not compatible with an attenuation that has been set manually, the command also adjusts the reference level. Parameters: <Attenuation> User Manual 1176.9893.02 ─ 01 Range: see data sheet Increment: 5 dB *RST: 10 dB (AUTO is set to ON) 104 R&S®-K18 Remote Control Commands for Amplifier Measurements Configuring Amplifier Measurements Example: INP:ATT 30dB Defines a 30 dB attenuation and decouples the attenuation from the reference level. Usage: SCPI confirmed Manual operation: See "Attenuation Mode / Value" on page 38 INPut:ATTenuation:AUTO <State> This command couples or decouples the attenuation to the reference level. Thus, when the reference level is changed, the R&S FSW determines the signal level for optimal internal data processing and sets the required attenuation accordingly. Parameters: <State> ON | OFF | 0 | 1 *RST: 1 Example: INP:ATT:AUTO ON Couples the attenuation to the reference level. Usage: SCPI confirmed Manual operation: See "Attenuation Mode / Value" on page 38 INPut:EATT <Attenuation> This command defines an electronic attenuation manually. Automatic mode must be switched off (INP:EATT:AUTO OFF, see INPut:EATT:AUTO on page 105). If the current reference level is not compatible with an attenuation that has been set manually, the command also adjusts the reference level. Parameters: <Attenuation> attenuation in dB Range: see data sheet Increment: 1 dB *RST: 0 dB (OFF) Example: INP:EATT:AUTO OFF INP:EATT 10 dB Manual operation: See "Using Electronic Attenuation (Option B25)" on page 38 INPut:EATT:AUTO <State> This command turns automatic selection of the electronic attenuation on and off. If on, electronic attenuation reduces the mechanical attenuation whenever possible. Parameters: <State> ON | OFF | 0 | 1 *RST: User Manual 1176.9893.02 ─ 01 1 105 R&S®-K18 Remote Control Commands for Amplifier Measurements Configuring Amplifier Measurements Example: INP:EATT:AUTO OFF Manual operation: See "Using Electronic Attenuation (Option B25)" on page 38 INPut:EATT:STATe <State> This command turns the electronic attenuator on and off. Parameters: <State> ON | OFF *RST: OFF Example: INP:EATT:STAT ON Switches the electronic attenuator into the signal path. Manual operation: See "Using Electronic Attenuation (Option B25)" on page 38 INPut:IQ:FULLscale:LEVel <PeakVoltage> This command defines the peak voltage to be displayed in the diagram. The range of the power scale is then defined by +<PeakVoltage> to -<PeakVoltage>. Parameters: <PeakVoltage> Peak voltage level *RST: 1Vp Example: INP:IQ:FULL 3V Selects a peak voltage of 3 V. Manual operation: See "Full Scale Level" on page 36 INPut:GAIN[:VALue] <Gain> This command selects the preamplification level if the preamplifier is activated (INP:GAIN:STAT ON, see INPut:GAIN:STATe on page 107). The command requires option R&S FSW-B24. Parameters: <Gain> 15 dB | 30 dB The availability of preamplification levels depends on the R&S FSW model. R&S FSW8/13: 15dB and 30 dB R&S FSW26 or higher: 30 dB All other values are rounded to the nearest of these two. *RST: OFF Example: INP:GAIN:VAL 30 Switches on 30 dB preamplification. Usage: SCPI confirmed Manual operation: See "Preamplifier (option B24)" on page 37 User Manual 1176.9893.02 ─ 01 106 R&S®-K18 Remote Control Commands for Amplifier Measurements Configuring Amplifier Measurements INPut:GAIN:STATe <State> This command turns the preamplifier on and off. It requires option R&S FSW-B24. Parameters: <State> ON | OFF *RST: OFF Example: INP:GAIN:STAT ON Switches on 30 dB preamplification. Usage: SCPI confirmed Manual operation: See "Preamplifier (option B24)" on page 37 5.6.5 Controlling a Signal Generator CONFigure:GENerator:EXTernal:ROSCillator................................................................... 107 CONFigure:GENerator:EXTernal:ROSCillator:LEDState?...................................................107 CONFigure:GENerator:FREQuency:CENTer.................................................................... 108 CONFigure:GENerator:FREQuency:CENTer:LEDState?....................................................108 CONFigure:GENerator:FREQuency:CENTer:SYNC[:STATe]..............................................108 CONFigure:GENerator:IPConnection:ADDRess................................................................ 109 CONFigure:GENerator:IPConnection:LEDState?...............................................................109 CONFigure:GENerator:POWer:LEVel.............................................................................. 109 CONFigure:GENerator:POWer:LEVel:LEDState?..............................................................110 CONFigure:GENerator:SETTings:UPDate........................................................................ 110 CONFigure:GENerator:TARGet:PATH:BB?...................................................................... 110 CONFigure:GENerator:TARGet:PATH:RF........................................................................ 110 CONFigure:GENerator:EXTernal:ROSCillator <Source> This command selects the source of the generator reference frequency. Parameters: <Source> EXT The generator uses the reference frequency of the analyzer. INT The generator uses its own reference frequency. Example: CONF:GEN:EXT:ROSC INT Selects the reference frequency of the generator. CONFigure:GENerator:EXTernal:ROSCillator:LEDState? This command queries the state of the connection to the external reference. User Manual 1176.9893.02 ─ 01 107 R&S®-K18 Remote Control Commands for Amplifier Measurements Configuring Amplifier Measurements Return values: <State> GREen Connection was successful. GREY Unknown connection state. RED Connection was not successful. Example: CONF:GEN:EXT:ROSC:LEDS? would return, e.g.: RED Usage: Query only CONFigure:GENerator:FREQuency:CENTer <Frequency> This command defines the frequency of the generator. Parameters: <Frequency> numric value Default unit: Hz Example: CONF:GEN:FREQ:CENT 100000000 Defines a generator frequency of 100 MHz. Manual operation: See "Center Frequency" on page 41 CONFigure:GENerator:FREQuency:CENTer:LEDState? This command queries the frequency synchronization state. Return values: <State> GREen Frequency synchronization was successful. GREY Unknown frequency synchronization state. RED Frequency synchronization was not successful. Example: CONF:GEN:FREQ:CENT:LEDS? would return, e.g.: GRE Usage: Query only Manual operation: See "Center Frequency" on page 41 CONFigure:GENerator:FREQuency:CENTer:SYNC[:STATe] <State> This command turns synchronization of the analyzer and generator frequency on and off. User Manual 1176.9893.02 ─ 01 108 R&S®-K18 Remote Control Commands for Amplifier Measurements Configuring Amplifier Measurements Parameters: <State> ON | OFF Example: CONF:GEN:FREQ:CENT:SYNC ON Synchronizes the analyzer and generator frequency when you change it. Manual operation: See "Attach to R&S FSW Frequency" on page 41 CONFigure:GENerator:IPConnection:ADDRess <IPAddress> This command defines the IP address of the connected signal generator. Parameters: <IPAddress> String containing the IP address. Example: CONF:GEN:IPC:ADDR '192.0.2.0' Connects the generator with the stated IP address. Manual operation: See "Generator IP Address" on page 41 CONFigure:GENerator:IPConnection:LEDState? This command queries the state of connection to the signal generator. Return values: <State> GREen Connection was successful. GREY Unknown connection state. RED Connection was not successful. Example: CONF:GEN:IPC:LEDS? would return, e.g.: RED Usage: Query only Manual operation: See "Generator IP Address" on page 41 CONFigure:GENerator:POWer:LEVel <Level> This command defines the signal generator RMS level. Parameters: <Level> numeric value Default unit: dBm Example: CONF:GEN:POW:LEV 0 Defines a level of 0 dBm. Manual operation: See "Generator RMS Level" on page 41 User Manual 1176.9893.02 ─ 01 109 R&S®-K18 Remote Control Commands for Amplifier Measurements Configuring Amplifier Measurements CONFigure:GENerator:POWer:LEVel:LEDState? This command queries the level configuration state on the generator. Return values: <State> GREen Level configuration was successful. GREY Unknown level configuration state. RED Level configuration was not successful. Example: CONF:GEN:POW:LEV:LEDS? would return, e.g.: GRE Usage: Query only Manual operation: See "Generator RMS Level" on page 41 CONFigure:GENerator:SETTings:UPDate This command updates the generator settings as defined within the R&S FSW-K18. Usage: Event CONFigure:GENerator:TARGet:PATH:BB? This command queries the signal path of the R&S SMW used for baseband signal generation. Note that the baseband path is always the same as the RF path selected with CONFigure:GENerator:TARGet:PATH:RF. Return values: <Path> A|B Example: CONF:GEN:TARG:PATH:BB? would return, e.g. A Usage: Query only Manual operation: See "Path RF / BB" on page 41 CONFigure:GENerator:TARGet:PATH:RF <Path> This command selects the signal path of the R&S SMW used for RF signal generation. Parameters: <Path> Example: User Manual 1176.9893.02 ─ 01 A|B CONF:GEN:TARG:PATH:RF A Selects RF path A to generate the signal. 110 R&S®-K18 Remote Control Commands for Amplifier Measurements Configuring Amplifier Measurements Manual operation: See "Path RF / BB" on page 41 5.6.6 Configuring the Data Capture [SENSe:]REFSig:TIME?................................................................................................. 111 [SENSe]:SWAPiq...........................................................................................................111 [SENSe]:SWEep:LENGth................................................................................................111 [SENSe]:SWEep:TIME................................................................................................... 112 [SENSe]:SWEep:TIME:AUTO......................................................................................... 112 TRACe:IQ:BWIDth......................................................................................................... 112 TRACe:IQ:SRATe.......................................................................................................... 113 TRACe:IQ:SRATe:AUTO................................................................................................ 113 TRACe:IQ:WBANd:MBWidth...........................................................................................114 TRACe:IQ:WBANd[:STATe]............................................................................................ 114 [SENSe:]REFSig:TIME? This command queries the length of the reference signal as shown in the "Acquisition" dialog box. Return values: <Length> numeric value Default unit: s Example: REFS:TIME? would return, e.g.: 0.00125 Usage: Query only Manual operation: See "Configuring the capture time" on page 44 [SENSe]:SWAPiq <State> This command inverts the I and Q branches of the signal. Parameters: <State> ON | OFF Example: SWAP ON Inverts the I and Q channel. Manual operation: See "Inverting the I/Q branches" on page 45 [SENSe]:SWEep:LENGth <Samples> This command defines the capture length. This command is available when [SENSe]:SWEep:TIME:AUTO has been turned off. Note that when you change the capture length, the capture time is adjusted automatically to the new capture length. User Manual 1176.9893.02 ─ 01 111 R&S®-K18 Remote Control Commands for Amplifier Measurements Configuring Amplifier Measurements Parameters: <Samples> numeric value Default unit: Samples Example: SWE:TIME:AUTO OFF SWE:LENG 1000000 Defines a capture length of 1 million samples. Manual operation: See "Configuring the capture time" on page 44 [SENSe]:SWEep:TIME <Time> This command defines the capture time. This command is available when [SENSe]:SWEep:TIME:AUTO has been turned off. Note that when you change the capture time, the capture length is adjusted automatically to the new capture time. Parameters: <Time> numeric value Default unit: s Example: SWE:TIME:AUTO OFF SWE:TIME 10MS Defines a sweep time of 10 ms. Manual operation: See "Configuring the capture time" on page 44 [SENSe]:SWEep:TIME:AUTO <State> This command turns automatic selection of an appropriate capture time on and off. When you turn this feature on, the application calculates an appropriate capture time based on the reference signal and adjusts the other acquisition settings accordingly. Parameters: <State> ON | OFF *RST: ON Example: SWE:TIME:AUTO ON Selects automatic adjustment of the capture time. Manual operation: See "Configuring the capture time" on page 44 TRACe:IQ:BWIDth <Bandwidth> This command defines the analysis bandwidth with which the amplified signal is captured. This command is available when TRACe:IQ:SRATe:AUTO has been turned off. Note that when you change the analysis bandwidth, the sample rate and capture length are adjusted automatically to the new bandwidth. User Manual 1176.9893.02 ─ 01 112 R&S®-K18 Remote Control Commands for Amplifier Measurements Configuring Amplifier Measurements Parameters: <Bandwidth> numeric value Note that the application automatically adjust the sample rate when you change the bandwidth manually. Default unit: Hz Example: TRAC:IQ:SRAT:AUTO OFF TRAC:IQ:BWID 50MHZ Defines a bandwidth of 50 MHz. The sample rate is adjusted accordingly. Manual operation: See "Configuring the measurement bandwidth" on page 43 TRACe:IQ:SRATe <SampleRate> This command defines the sample rate with which the amplified signal is captured. This command is available when TRACe:IQ:SRATe:AUTO has been turned off. Note that when you change the sample rate, the analysis bandwidth and capture length are adjusted automatically to the new sample rate. Parameters: <SampleRate> numeric value Note that the application automatically adjust the analysis bandwidth when you change the sample rate manually. Default unit: Hz Example: TRAC:IQ:SRAT:AUTO OFF TRAC:IQ:SRAT 20MHZ Defines a sample rate of 20 MHz. The analysis bandwidth is adjusted accordingly. Manual operation: See "Configuring the measurement bandwidth" on page 43 TRACe:IQ:SRATe:AUTO <State> This command turns automatic selection of an appropriate (capture) sample rate on and off. When you turn this feature on, the application calculates an appropriate sample rate based on the reference signal and adjusts the other data acquisition settings accordingly. Parameters: <State> ON | OFF *RST: ON Example: TRAC:IQ:SRAT:AUTO ON Selects automatic adjustment of the sample rate. Manual operation: See "Configuring the measurement bandwidth" on page 43 User Manual 1176.9893.02 ─ 01 113 R&S®-K18 Remote Control Commands for Amplifier Measurements Configuring Amplifier Measurements TRACe:IQ:WBANd:MBWidth <Bandwidth> This command selects the largest possible bandwidth that can be applied for the wideband signal path. The wideband signal path is available with the corresponding bandwidth extensions available for the R&S FSW (for example R&S FSW-B160). The command is available when you turn on TRACe:IQ:WBANd[:STATe]. Parameters: <Bandwidth> 80MHZ Restricts the bandwidth to 80 MHz. (The wideband signal path is not used in that case. TRACe:IQ: WBANd[:STATe] is turned off.) 160MHZ | 320MHZ | 500MHZ Restricts the bandwidth to the corresponding value, even if you have installed a higher bandwidth extension. Default unit: Hz Example: TRAC:IQ:WBAN ON TRAC:IQ:WBAN:MBW 160MHZ Restricts the bandwidth to 160 MHz. Manual operation: See "Configuring the measurement bandwidth" on page 43 TRACe:IQ:WBANd[:STATe] <State> This command turns the wideband signal path on and off. The wideband signal path is available with the corresponding bandwidth extensions available for the R&S FSW (for example R&S FSW-B160). Parameters: <State> ON Turns on the wideband signal path. By default, the application allows you to use the maximum available bandwidth ("Auto" mode in manual operation). You have to turn on the wideband signal path when you want to use bandwidths greater than 80 MHz. OFF Turns off the wideband signal path. The largest available bandwidth is 80 MHz. Example: TRAC:IQ:WBAN OFF Turns off the wideband signal path. Manual operation: See "Configuring the measurement bandwidth" on page 43 User Manual 1176.9893.02 ─ 01 114 R&S®-K18 Remote Control Commands for Amplifier Measurements Configuring Amplifier Measurements 5.6.7 Synchronizing Measurement Data CONFigure:SYNC:DOMain............................................................................................. 115 CONFigure:SYNC:SOFail............................................................................................... 115 CONFigure:SYNC:DOMain <Domain> This command selects the synchronization method. Parameters: <Domain> IQDirect I/Q data for the reference signal is directly correlated with the reference and measured signal. IQPDiff Correlation on the phase differentiated I/Q data. MAGNitude Correlation on the magnitude of the I/Q data with no regard for phase information. NONE It is assumed that the capture is triggered at the start of the reference waveform. Example: CONF:SYNC:DOM IQD Tries to find a correlation in the raw I/Q data. Manual operation: See "Synchronizing the measured signal" on page 45 CONFigure:SYNC:SOFail <State> This command turns a measurement stop when synchronization of measured and reference signal fails on and off. Parameters: <State> ON | OFF *RST: OFF Example: CONF:SYNC:SOF ON Stops the measurement when synchronization fails. Manual operation: See "Synchronizing the measured signal" on page 45 5.6.8 Estimating and Compensating Signal Errors CONFigure:SIGNal:ERRor:COMPensation:ADRoop:[STATe]............................................. 116 CONFigure:SIGNal:ERRor:COMPensation:FOFFset:[STATe].............................................116 CONFigure:SIGNal:ERRor:COMPensation:IQIMbalance:[STATe]....................................... 116 CONFigure:SIGNal:ERRor:COMPensation:IQOFfset:[STATe]............................................ 116 CONFigure:SIGNal:ERRor:COMPensation:SRATe:[STATe]............................................... 117 CONFigure:SIGNal:ERRor:ESTimation:ADRoop:[STATe].................................................. 117 CONFigure:SIGNal:ERRor:ESTimation:FOFFset:[STATe]..................................................117 User Manual 1176.9893.02 ─ 01 115 R&S®-K18 Remote Control Commands for Amplifier Measurements Configuring Amplifier Measurements CONFigure:SIGNal:ERRor:ESTimation:IQIMbalance:[STATe]............................................ 117 CONFigure:SIGNal:ERRor:ESTimation:IQOFfset:[STATe]................................................. 118 CONFigure:SIGNal:ERRor:ESTimation:SRATe:[STATe].................................................... 118 CONFigure:SIGNal:ERRor:COMPensation:ADRoop:[STATe] <State> This command turns compensation of the Amplitude Droop on and off. Available when you turn on CONFigure:SIGNal:ERRor:ESTimation:ADRoop: [STATe]. Parameters: <State> ON | OFF *RST: Example: ON CONF:SIGN:ERR:COMP:ADR ON Turns on error compensation. CONFigure:SIGNal:ERRor:COMPensation:FOFFset:[STATe] <State> This command turns compensation of the Frequency Offset on and off. Available when you turn on CONFigure:SIGNal:ERRor:ESTimation:FOFFset: [STATe]. Parameters: <State> ON | OFF *RST: Example: ON CONF:SIGN:ERR:COMP:FOFF ON Turns on error compensation. CONFigure:SIGNal:ERRor:COMPensation:IQIMbalance:[STATe] <State> This command turns compensation of the I/Q Imbalance on and off. Available when you turn on CONFigure:SIGNal:ERRor:ESTimation: IQIMbalance:[STATe]. Parameters: <State> ON | OFF *RST: Example: ON CONF:SIGN:ERR:COMP:IQIM ON Turns on error compensation. CONFigure:SIGNal:ERRor:COMPensation:IQOFfset:[STATe] <State> This command turns compensation of the Sample Error Rate on and off. Available when you turn on CONFigure:SIGNal:ERRor:ESTimation:IQOFfset: [STATe]. User Manual 1176.9893.02 ─ 01 116 R&S®-K18 Remote Control Commands for Amplifier Measurements Configuring Amplifier Measurements Parameters: <State> ON | OFF *RST: Example: ON CONF:SIGN:ERR:COMP:IQOF ON Turns on error compensation. CONFigure:SIGNal:ERRor:COMPensation:SRATe:[STATe] <State> This command turns compensation of the Sample Error Rate on and off. Available when you turn on CONFigure:SIGNal:ERRor:ESTimation:SRATe: [STATe]. Parameters: <State> ON | OFF *RST: Example: ON CONF:SIGN:ERR:COMP:SRAT ON Turns on error compensation. CONFigure:SIGNal:ERRor:ESTimation:ADRoop:[STATe] <State> This command turns estimation of the Amplitude Droop on and off. Parameters: <State> ON | OFF *RST: Example: ON CONF:SIGN:ERR:EST:ADR ON Turns on error estimation. CONFigure:SIGNal:ERRor:ESTimation:FOFFset:[STATe] <State> This command turns estimation of the Frequency Offset on and off. Parameters: <State> ON | OFF *RST: Example: ON CONF:SIGN:ERR:EST:FOFF ON Turns on error estimation. CONFigure:SIGNal:ERRor:ESTimation:IQIMbalance:[STATe] <State> This command turns estimation of the I/Q Imbalance on and off. Parameters: <State> ON | OFF *RST: User Manual 1176.9893.02 ─ 01 ON 117 R&S®-K18 Remote Control Commands for Amplifier Measurements Configuring Amplifier Measurements Example: CONF:SIGN:ERR:EST:IQIM ON Turns on error estimation. CONFigure:SIGNal:ERRor:ESTimation:IQOFfset:[STATe] <State> This command turns estimation of the I/Q Offset on and off. Parameters: <State> ON | OFF *RST: Example: ON CONF:SIGN:ERR:EST:IQOF ON Turns on error estimation. CONFigure:SIGNal:ERRor:ESTimation:SRATe:[STATe] <State> This command turns estimation of the Sample Error Rate on and off. Parameters: <State> ON | OFF *RST: Example: ON CONF:SIGN:ERR:EST:SRAT ON Turns on error estimation. 5.6.9 Applying a System Model CONFigure:MODeling:AMAM:MORDer............................................................................ 118 CONFigure:MODeling:AMPM:MORDer............................................................................ 118 CONFigure:MODeling:LRANge....................................................................................... 119 CONFigure:MODeling:NPOints........................................................................................119 CONFigure:MODeling[:STATe]........................................................................................119 CONFigure:MODeling:AMAM:MORDer <Order> This command defines the order (or degree) of the AM/AM model polynom. Parameters: <Order> Numeric value *RST: 7 Example: CONF:MOD:AMAM:MORD 5 Defines a model to the 5th degree. Manual operation: See "Selecting the degree of the polynomial" on page 48 CONFigure:MODeling:AMPM:MORDer <Order> This command defines the order (or degree) of the AM/PM model polynom. User Manual 1176.9893.02 ─ 01 118 R&S®-K18 Remote Control Commands for Amplifier Measurements Configuring Amplifier Measurements Parameters: <Order> Numeric value *RST: 7 Example: CONF:MOD:AMPM:MORD 5 Defines a model to the 5th degree. Manual operation: See "Selecting the degree of the polynomial" on page 48 CONFigure:MODeling:LRANge <Level> This command defines the modeling level range. Parameters: <Level> Numeric value Default unit: dB Example: CONF:MOD:LRAN 30 Defines a modeling level range of 30 dB. Manual operation: See "Defining the modeling range" on page 48 CONFigure:MODeling:NPOints <Points> This command defines the number of modeling points. Parameters: <Points> Numeric value *RST: 50 Default unit: --- Example: CONF:MOD:NPO 100 Calculates the model based on 50 points. Manual operation: See "Defining the modeling range" on page 48 CONFigure:MODeling[:STATe] <State> This command turns system modeling on and off. Parameters: <State> ON | OFF *RST: OFF Example: CONF:MOD ON Turns on system modeling. Manual operation: See "Turning system modeling on and off" on page 47 User Manual 1176.9893.02 ─ 01 119 R&S®-K18 Remote Control Commands for Amplifier Measurements Configuring Amplifier Measurements 5.6.10 Applying Digital Predistortion CONFigure:DPD:AMAM[:STATe].....................................................................................120 CONFigure:DPD:AMPM[:STATe].....................................................................................120 CONFigure:DPD:FNAMe................................................................................................ 120 CONFigure:DPD:MODorder............................................................................................ 120 CONFigure:DPD:SHAPing:MODE................................................................................... 121 CONFigure:DPD:UPDate................................................................................................121 CONFigure:DPD:UPDate:LEDState?............................................................................... 121 CONFigure:DPD:AMAM[:STATe] <State> This command turns calculation of AM/AM predistortion on and off. Parameters: <State> ON | OFF *RST: ON Example: CONF:DPD:AMAM ON Turns on calculation of AM/AM curve. Manual operation: See "Selecting the order of model calculation" on page 50 CONFigure:DPD:AMPM[:STATe] <State> This command turns calculation of AM/PM predistortion on and off. Parameters: <State> ON | OFF *RST: ON Example: CONF:DPD:AMPM ON Turns on calculation of AM/PM curve. Manual operation: See "Selecting the order of model calculation" on page 50 CONFigure:DPD:FNAMe <FileName> This command defines a name for the DPD correction table. Parameters: <FileName> String containing the DPD table file name. Example: CONF:DPD:FNAM 'DPDTable' Defines the table name 'DPDTable'. Manual operation: See "Selecting the DPD shaping method" on page 50 CONFigure:DPD:MODorder <Order> This command selects the order in which the AM/AM and AM/PM distortion are calculated. User Manual 1176.9893.02 ─ 01 120 R&S®-K18 Remote Control Commands for Amplifier Measurements Configuring Amplifier Measurements Available when both CONFigure:DPD:AMAM[:STATe] and CONFigure:DPD: AMPM[:STATe] have been turned on. Parameters: <Order> AMFirst Calculates the AM/AM distortion first, then the AM/PM distortion. PMFirst Calculates the AM/PM distortion first, then the AM/AM distortion. Example: CONF:DPD:MOD AMF Calculates the AM/AM curve first. Manual operation: See "Selecting the order of model calculation" on page 50 CONFigure:DPD:SHAPing:MODE <Method> This command selects the method use to shape the DPD function. Parameters: <Method> POLYnomial DPD function based on the characterstics of the polynomial system model. TABLe DPD function based on the correction values kept in a table calculated by the R&S SMW. *RST: TABLe Example: CONF:DPD:SHAP:MODE POLY DPD function based on a polynomial system model. Manual operation: See "Selecting the DPD shaping method" on page 50 CONFigure:DPD:UPDate This command updates the DPD shaping tables on the R&S SMW when modeling parameters have changed. Example: CONF:DPD:UPD Updates the shaping table. Usage: Event CONFigure:DPD:UPDate:LEDState? This command queries the state of an update of the shaping table. User Manual 1176.9893.02 ─ 01 121 R&S®-K18 Remote Control Commands for Amplifier Measurements Configuring Amplifier Measurements Return values: <State> GREen Transmission was successful. GREY Unknown transmission state. RED Transmission was not successful. Example: CONF:DPD:UPD CONF:DPD:UPD:LEDS? would return, e.g.: GREY Usage: Query only 5.6.11 Configuring Envelope Tracking CONFigure:PAE:ICHannel:MULTiplier..............................................................................122 CONFigure:PAE:ICHannel:OFFSet..................................................................................122 CONFigure:PAE:ICHannel:RESistor................................................................................ 122 CONFigure:PAE:QCHannel:MULTiplier............................................................................123 CONFigure:PAE:QCHannel:OFFSet................................................................................ 123 CONFigure:PAE:ICHannel:MULTiplier <State> This command defines a multiplier to take into account various effects resulting from the measurement equipment connected to the I channel. Parameters: <Multiplier> Example: Numeric value CONF:PAE:ICH:MULT 0.75 Defines a multiplier of 0.75. CONFigure:PAE:ICHannel:OFFSet <Offset> This command defines an offset for the I channel. Parameters: <Offset> Numeric value that describes the probe characteristics. Default unit: No unit Example: CONF:PAE:ICH:EOFF 1 Defines an offset of 1. CONFigure:PAE:ICHannel:RESistor <Resistance> This command defines the characteristics of the shunt resistor used in the test setup. Parameters: <Resistance> User Manual 1176.9893.02 ─ 01 Resistance in Ohm. 122 R&S®-K18 Remote Control Commands for Amplifier Measurements Analyzing Results Example: CONF:PAE:ICH:RES 1.5 Defines a resistance of 1.5 Ohm. CONFigure:PAE:QCHannel:MULTiplier <State> This command defines a multiplier to take into account various effects resulting from the measurement equipment connected to the Q channel. Parameters: <Multiplier> Example: Numeric value CONF:PAE:QCH:MULT 1.2 Defines a multiplier of 1.2. CONFigure:PAE:QCHannel:OFFSet <Offset> This command defines an offset for the Q channel. Parameters: <Offset> Numeric value that describes the probe characteristics. Default unit: No unit Example: CONF:PAE:QCH:OFFS 1 Defines an offset of 1. 5.7 Analyzing Results ● ● ● ● ● ● Configuring Traces................................................................................................123 Using Markers....................................................................................................... 125 Configuring the Result Summary.......................................................................... 132 Configuring Result Display Characteristics........................................................... 133 Scaling the Y-Axis................................................................................................. 135 Managing Measurement Data...............................................................................137 5.7.1 Configuring Traces DISPlay[:WINDow<n>]:TRACe<t>:MODE.........................................................................123 DISPlay[:WINDow<n>]:TRACe<t>:MODE <Trace> This command selects the traces to be displayed in the graphical result displays. User Manual 1176.9893.02 ─ 01 123 R&S®-K18 Remote Control Commands for Amplifier Measurements Analyzing Results Parameters: <Trace> Available traces depend on the result display. See table below for details. BBI Selects the trace showing data recorded on the baseband I channel. BLANk Turns the trace off. BBPower Selects the trace showing the combined data of the I and Q channel. BBQ Selects the trace showing data recorded on the baseband Q channel. MODel Selects the trace showing the modeled signal. REFerence Selects the trace showing the reference signal. RF Selects the trace showing the measured signal recorded on the RF input. WRIT Selects the clear write trace. Example: e.g. for the AM/AM result display: DISP:WIND:TRAC1:MODE RF DISP:WIND:TRAC2:MODE MOD Displays the measured and the modeled signal. e.g. for the Spectrum EVM result display: DISP:WIND:TRAC1:MODE RF DISP:WIND:TRAC2:MODE BLAN Displays the measured signal and hides the modeled signal. Result display Supported traces AM/AM RF (always trace 1) MODel (always trace 2) BLANk (for both traces) AM/PM RF (always trace 1) MODel (always trace 2) BLANk (for both traces) Gain Compression RF (always trace 1) Magnitude Capture (RF, I and Q) WRITe (always trace 1) PAE Input Power WRITe (always trace 1) PAE Time WRITe (always trace 1) Power vs Time WRITe (always trace 1) User Manual 1176.9893.02 ─ 01 124 R&S®-K18 Remote Control Commands for Amplifier Measurements Analyzing Results Result display Supported traces Raw EVM REFerence (always trace 1) MODel (always trace 2) BLANk (for both traces) Spectrum EVM REFerence (always trace 1) MODel (always trace 2) BLANk (for both traces) Spectrum FFT RF RF (always trace 1) MODel (always trace 2) REFerence (always trace 3) BLANk (for all three traces) Spectrum FFT I WRITe (always trace 1) Spectrum FFT Q WRITe (always trace 1) Time Domain RF (always trace 1) MODel (always trace 2) REFerence (always trace 3) BBI (always trace 4) BBQ (always trace 5) BBP (always trace 6) BLANk (for all six traces) 5.7.2 Using Markers ● ● ● 5.7.2.1 General Marker Settings....................................................................................... 125 Configuring Individual Markers..............................................................................126 Positioning Markers...............................................................................................129 General Marker Settings DISPlay:MTABle............................................................................................................ 125 DISPlay:MTABle <DisplayMode> This command turns the marker table on and off. User Manual 1176.9893.02 ─ 01 125 R&S®-K18 Remote Control Commands for Amplifier Measurements Analyzing Results Parameters: <DisplayMode> ON Turns the marker table on. OFF Turns the marker table off. AUTO Turns the marker table on if 3 or more markers are active. *RST: 5.7.2.2 AUTO Example: DISP:MTAB ON Activates the marker table. Manual operation: See "Marker Table Display" on page 56 Configuring Individual Markers CALCulate<n>:DELTamarker:AOFF................................................................................ 126 CALCulate<n>:DELTamarker<m>:MREF......................................................................... 126 CALCulate<n>:DELTamarker<m>[:STATe].......................................................................127 CALCulate<n>:DELTamarker<m>:TRACe........................................................................ 127 CALCulate<n>:DELTamarker<m>:X................................................................................ 127 CALCulate<n>:MARKer<m>:AOFF..................................................................................127 CALCulate<n>:MARKer<m>[:STATe]...............................................................................128 CALCulate<n>:MARKer<m>:TRACe................................................................................128 CALCulate<n>:MARKer<m>:X........................................................................................ 128 CALCulate<n>:DELTamarker:AOFF This command turns all delta markers off. Example: CALC:DELT:AOFF Turns all delta markers off. Usage: Event CALCulate<n>:DELTamarker<m>:MREF <Reference> This command selects a reference marker for a delta marker other than marker 1. Parameters: <Reference> 1 to 16 Selects markers 1 to 16 as the reference. Example: CALC:DELT3:MREF 2 Specifies that the values of delta marker 3 are relative to marker 2. Manual operation: See "Reference Marker" on page 56 User Manual 1176.9893.02 ─ 01 126 R&S®-K18 Remote Control Commands for Amplifier Measurements Analyzing Results CALCulate<n>:DELTamarker<m>[:STATe] <State> This command turns delta markers on and off. If necessary, the command activates the delta marker first. No suffix at DELTamarker turns on delta marker 1. Parameters: <State> ON | OFF *RST: OFF Example: CALC:DELT2 ON Turns on delta marker 2. Manual operation: See "Marker State" on page 55 See "Marker Type" on page 55 CALCulate<n>:DELTamarker<m>:TRACe <Trace> This command selects the trace a delta marker is positioned on. Note that the corresponding trace must have a trace mode other than "Blank". If necessary, the command activates the marker first. Parameters: <Trace> Example: Trace number the marker is assigned to. CALC:DELT2:TRAC 2 Positions delta marker 2 on trace 2. CALCulate<n>:DELTamarker<m>:X <Position> This command moves a delta marker to a particular coordinate on the x-axis. If necessary, the command activates the delta marker and positions a reference marker to the peak power. Parameters: <Position> Numeric value that defines the marker position on the x-axis. Range: The value range and unit depend on the measurement and scale of the x-axis. Example: CALC:DELT:X? Outputs the absolute x-value of delta marker 1. Manual operation: See "Marker Position (X-value)" on page 55 CALCulate<n>:MARKer<m>:AOFF This command turns all markers off. Example: User Manual 1176.9893.02 ─ 01 CALC:MARK:AOFF Switches off all markers. 127 R&S®-K18 Remote Control Commands for Amplifier Measurements Analyzing Results Usage: Event Manual operation: See "All Markers Off" on page 56 CALCulate<n>:MARKer<m>[:STATe] <State> This command turns markers on and off. If the corresponding marker number is currently active as a deltamarker, it is turned into a normal marker. Parameters: <State> ON | OFF *RST: OFF Example: CALC:MARK3 ON Switches on marker 3. Manual operation: See "Marker State" on page 55 See "Marker Type" on page 55 CALCulate<n>:MARKer<m>:TRACe <Trace> This command selects the trace the marker is positioned on. Note that the corresponding trace must have a trace mode other than "Blank". If necessary, the command activates the marker first. Parameters: <Trace> 1 to 4 Trace number the marker is assigned to. Example: CALC:MARK3:TRAC 2 Assigns marker 3 to trace 2. Manual operation: See "Assigning the Marker to a Trace" on page 56 CALCulate<n>:MARKer<m>:X <Position> This command moves a marker to a particular coordinate on the x-axis. If necessary, the command activates the marker. If the marker has been used as a delta marker, the command turns it into a normal marker. Parameters: <Position> Numeric value that defines the marker position on the x-axis. The unit depends on the result display. Range: The range depends on the current x-axis range. Example: CALC:MARK2:X 1.7MHz Positions marker 2 to frequency 1.7 MHz. Manual operation: See "Marker Position (X-value)" on page 55 User Manual 1176.9893.02 ─ 01 128 R&S®-K18 Remote Control Commands for Amplifier Measurements Analyzing Results 5.7.2.3 Positioning Markers CALCulate<n>:DELTamarker<m>:MAXimum:LEFT...........................................................129 CALCulate<n>:DELTamarker<m>:MAXimum:NEXT.......................................................... 129 CALCulate<n>:DELTamarker<m>:MAXimum[:PEAK]........................................................ 129 CALCulate<n>:DELTamarker<m>:MAXimum:RIGHt..........................................................129 CALCulate<n>:DELTamarker<m>:MINimum:LEFT............................................................130 CALCulate<n>:DELTamarker<m>:MINimum:NEXT........................................................... 130 CALCulate<n>:DELTamarker<m>:MINimum[:PEAK]......................................................... 130 CALCulate<n>:DELTamarker<m>:MINimum:RIGHt...........................................................130 CALCulate<n>:MARKer<m>:MAXimum:LEFT...................................................................130 CALCulate<n>:MARKer<m>:MAXimum:NEXT.................................................................. 130 CALCulate<n>:MARKer<m>:MAXimum[:PEAK]................................................................ 131 CALCulate<n>:MARKer<m>:MAXimum:RIGHt..................................................................131 CALCulate<n>:MARKer<m>:MINimum:LEFT....................................................................131 CALCulate<n>:MARKer<m>:MINimum:NEXT................................................................... 131 CALCulate<n>:MARKer<m>:MINimum[:PEAK]................................................................. 131 CALCulate<n>:MARKer<m>:MINimum:RIGHt...................................................................131 CALCulate<n>:DELTamarker<m>:MAXimum:LEFT This command moves a delta marker to the next higher value. The search includes only measurement values to the left of the current marker position. Usage: Event CALCulate<n>:DELTamarker<m>:MAXimum:NEXT This command moves a marker to the next higher value. Usage: Event Manual operation: See "Search Next Peak" on page 57 CALCulate<n>:DELTamarker<m>:MAXimum[:PEAK] This command moves a delta marker to the highest level. If the marker is not yet active, the command first activates the marker. Usage: Event Manual operation: See "Peak Search" on page 57 CALCulate<n>:DELTamarker<m>:MAXimum:RIGHt This command moves a delta marker to the next higher value. The search includes only measurement values to the right of the current marker position. User Manual 1176.9893.02 ─ 01 129 R&S®-K18 Remote Control Commands for Amplifier Measurements Analyzing Results Usage: Event CALCulate<n>:DELTamarker<m>:MINimum:LEFT This command moves a delta marker to the next higher minimum value. The search includes only measurement values to the right of the current marker position. Usage: Event CALCulate<n>:DELTamarker<m>:MINimum:NEXT This command moves a marker to the next higher minimum value. Usage: Event Manual operation: See "Search Next Minimum" on page 57 CALCulate<n>:DELTamarker<m>:MINimum[:PEAK] This command moves a delta marker to the minimum level. If the marker is not yet active, the command first activates the marker. Usage: Event Manual operation: See "Search Minimum" on page 57 CALCulate<n>:DELTamarker<m>:MINimum:RIGHt This command moves a delta marker to the next higher minimum value. The search includes only measurement values to the right of the current marker position. Usage: Event CALCulate<n>:MARKer<m>:MAXimum:LEFT This command moves a marker to the next lower peak. The search includes only measurement values to the left of the current marker position. Usage: Event CALCulate<n>:MARKer<m>:MAXimum:NEXT This command moves a marker to the next lower peak. Usage: Event Manual operation: See "Search Next Peak" on page 57 User Manual 1176.9893.02 ─ 01 130 R&S®-K18 Remote Control Commands for Amplifier Measurements Analyzing Results CALCulate<n>:MARKer<m>:MAXimum[:PEAK] This command moves a marker to the highest level. If the marker is not yet active, the command first activates the marker. Usage: Event Manual operation: See "Peak Search" on page 57 CALCulate<n>:MARKer<m>:MAXimum:RIGHt This command moves a marker to the next lower peak. The search includes only measurement values to the right of the current marker position. Usage: Event CALCulate<n>:MARKer<m>:MINimum:LEFT This command moves a marker to the next minimum value. The search includes only measurement values to the right of the current marker position. Usage: Event CALCulate<n>:MARKer<m>:MINimum:NEXT This command moves a marker to the next minimum value. Usage: Event Manual operation: See "Search Next Minimum" on page 57 CALCulate<n>:MARKer<m>:MINimum[:PEAK] This command moves a marker to the minimum level. If the marker is not yet active, the command first activates the marker. Usage: Event Manual operation: See "Search Minimum" on page 57 CALCulate<n>:MARKer<m>:MINimum:RIGHt This command moves a marker to the next minimum value. The search includes only measurement values to the right of the current marker position. Usage: User Manual 1176.9893.02 ─ 01 Event 131 R&S®-K18 Remote Control Commands for Amplifier Measurements Analyzing Results 5.7.3 Configuring the Result Summary DISPlay[:WINDow<n>]:TABLe:ITEM................................................................................ 132 DISPlay[:WINDow<n>]:TABLe:ITEM <Item>, <State> This command adds and removes results from the Result Summary. Parameters: <State> ON | OFF *RST: All results are ON. Parameters for setting and query: <Item> Selects the result. See the table below for a list of available parameters. Example: DISP:TABL:ITEM GIMB,OFF Removes the Gain Imbalance result from the Result Summary. SCPI parameter Result AMW AM Curve Width APAE Average PAE BBIV Baseband I Input Voltage BBP Baseband Power BBQV Baseband Q Input Voltage CFIN Crest Factor In CFOU Crest Factor Out FERR Frequency Error GAIN Gain GIMB Gain Imbalance ICC Current IQIM I/Q Imbalance IQOF I/Q Offset MERR Magnitude Error PERR Phase Error PINP Power In PMW PM Curve Width POUT Power Out QERR Quadrature Error REVM Raw EVM RMEV Raw Model EVM User Manual 1176.9893.02 ─ 01 132 R&S®-K18 Remote Control Commands for Amplifier Measurements Analyzing Results SCPI parameter Result SRER Sample Rate Error VCC Voltage 5.7.4 Configuring Result Display Characteristics CALCulate<n>:GAIN:X................................................................................................... 133 CALCulate<n>:UNIT:ANGLe........................................................................................... 133 DISPlay[:WINDow<n>]:TDOMain:X[:SCALe]:DURation......................................................133 DISPlay[:WINDow<n>]:TDOMain:X[:SCALe]:MODE.......................................................... 134 DISPlay[:WINDow<n>]:TDOMain:X[:SCALe]:OFFSet........................................................ 134 DISPlay[:WINDow<n>]:TDOMain:Y[:SCALe]:NORMalise[:STATe]...................................... 135 CALCulate<n>:GAIN:X <ResultType> This command selects the type of information displayed on x-axis in the Gain Compression result display. Parameters: <ResultType> PINPut Shows the gain compression against the input level. POUTput Shows the gain compression against the output level. Example: CALC:GAIN:X PINP Displays the gain against the input level. Manual operation: See "Configuring the Gain Compression Result Display" on page 60 CALCulate<n>:UNIT:ANGLe <Unit> This command selects the unit that the phase is shown in the AM/PM result display. Parameters: <Unit> DEG Phase displayed in degrees. RAD Phase displayed in radians. Example: CALC:UNIT:ANGL DEG Shows the phase results in degrees. Manual operation: See "Configuring the AM/PM result display" on page 59 DISPlay[:WINDow<n>]:TDOMain:X[:SCALe]:DURation <Time> This command defines the amount of data displayed on the x-axis of the Time Domain result display. User Manual 1176.9893.02 ─ 01 133 R&S®-K18 Remote Control Commands for Amplifier Measurements Analyzing Results The command is available when DISPlay[:WINDow<n>]:TDOMain:X[:SCALe]: MODE has been turned off. Parameters: <Time> Time that is displayed on the x-axis, beginning at the offset defined with DISPlay[:WINDow<n>]:TDOMain:X[:SCALe]: OFFSet. Default unit: s Example: DISP:TDOM:X:MODE OFF DISP:TDOM:X:DUR 12us Scales the x-axis to display 12 µs in the Time Domain result display. Manual operation: See "Configuring the Time Domain result display" on page 59 DISPlay[:WINDow<n>]:TDOMain:X[:SCALe]:MODE <Mode> This command turns automatic scaling of the x-axis in the Time Domain result display on and off. Parameters: <Mode> ON Turns on automatic scaling of the x-axis. OFF Turns on manual scaling of the x-axis. Example: DISP:TDOM:X:MODE OFF Turns on manual scaling of the x-axis. Manual operation: See "Configuring the Time Domain result display" on page 59 DISPlay[:WINDow<n>]:TDOMain:X[:SCALe]:OFFSet <Time> This command defines the origin of the x-axis in the Time Domain result display. The command is available when DISPlay[:WINDow<n>]:TDOMain:X[:SCALe]: MODE has been turned off. Parameters: <Time> Time offset relative to the first recorded sample (when synchronization has failed) or the first sample of the synchronized data (when synchronization was successful). Default unit: s Example: DISP:TDOM:X:MODE OFF DISP:TDOM:X:OFFS 12us Defines an offset of 12 µs. Manual operation: See "Configuring the Time Domain result display" on page 59 User Manual 1176.9893.02 ─ 01 134 R&S®-K18 Remote Control Commands for Amplifier Measurements Analyzing Results DISPlay[:WINDow<n>]:TDOMain:Y[:SCALe]:NORMalise[:STATe] <State> This command turns normalization of the results in the Time Domain result display on and off. Parameters: <State> ON | OFF Example: DISP:TDOM:Y:NORM ON Normalizes the results in the Time Domain result display to 1. Manual operation: See "Configuring the Time Domain result display" on page 59 5.7.5 Scaling the Y-Axis DISPlay[:WINDow<n>]:TRACe<t>:Y[:SCALe]:AUTO......................................................... 135 DISPlay[:WINDow<n>]:TRACe<t>:Y[:SCALe]:MAXimum................................................... 135 DISPlay[:WINDow<n>]:TRACe<t>:Y[:SCALe]:MINimum.....................................................136 DISPlay[:WINDow<n>]:TRACe<t>:Y[:SCALe]:PDIVision.................................................... 136 DISPlay[:WINDow<n>]:TRACe<t>:Y[:SCALe]:RPOSition................................................... 136 DISPlay[:WINDow<n>]:TRACe<t>:Y[:SCALe]:RVALue...................................................... 137 DISPlay[:WINDow<n>]:TRACe<t>:Y[:SCALe]:AUTO <State> This command turns automatic scaling of the y-axis in graphical result displays on and off. Parameters: <State> OFF Selects manual scaling of the diagram. ON Automatically scales the diagram when new results are available. ONCE Automaically scales the diagram once whenever required. Example: DISP:TRAC:Y:AUTO ON Scales the axis each time new results are available. Manual operation: See "Scaling the y-axis automatically" on page 61 DISPlay[:WINDow<n>]:TRACe<t>:Y[:SCALe]:MAXimum <Value> This command defines the value at the top of the y-axis. Parameters: <Value> Numeric value Default unit: Depends on the result display. User Manual 1176.9893.02 ─ 01 135 R&S®-K18 Remote Control Commands for Amplifier Measurements Analyzing Results Example: DISP:TRAC:Y:AUTO OFF DISP:TRAC:Y:MIN -10DBM DISP:TRAC:Y:MAX -110DBM The y-axis covers a level range of 100 dB. Manual operation: See "Scaling the y-axis manually" on page 61 DISPlay[:WINDow<n>]:TRACe<t>:Y[:SCALe]:MINimum <Value> This command defines the value at the bottom of the y-axis. Parameters: <Value> Numeric value Default unit: Depends on the result display. Example: DISP:TRAC:Y:AUTO OFF DISP:TRAC:Y:MIN -10DBM DISP:TRAC:Y:MAX -110DBM The y-axis covers a level range of 100 dB. Manual operation: See "Scaling the y-axis manually" on page 61 DISPlay[:WINDow<n>]:TRACe<t>:Y[:SCALe]:PDIVision <Distance> This command defines the distance between the grid lines in graphical result displays. Available when you turn off automatic scaling with DISPlay[:WINDow<n>]: TRACe<t>:Y[:SCALe]:AUTO. Parameters: <Distance> Numeric value Default unit: Depends on the result display. Example: DISP:TRAC:Y:SCAL:AUTO OFF DISP:TRAC:Y:PDIV 5DBM Defines a distance of 5 dBm between the grid lines. Manual operation: See "Scaling the y-axis manually" on page 61 DISPlay[:WINDow<n>]:TRACe<t>:Y[:SCALe]:RPOSition <Position> This command defines the position of the reference value. You can define the reference value with DISPlay[:WINDow<n>]:TRACe<t>:Y[: SCALe]:RVALue. Parameters: <Position> Numeric value Default unit: % User Manual 1176.9893.02 ─ 01 136 R&S®-K18 Remote Control Commands for Amplifier Measurements Analyzing Results Example: DISP:TRAC:Y:AUTO OFF DISP:TRAC:Y:RVAL 0DBM DISP:TRAC:Y:RPOS 80 Positions the reference value at the 80 % mark of the y-axis. Manual operation: See "Scaling the y-axis manually" on page 61 DISPlay[:WINDow<n>]:TRACe<t>:Y[:SCALe]:RVALue <Reference> This command defines the reference value of a result display. Available when you turn off automatic scaling with DISPlay[:WINDow<n>]: TRACe<t>:Y[:SCALe]:AUTO. Parameters: <Reference> Numeric value Default unit: The unit depends on the result display. Example: DISP:TRAC:Y:AUTO OFF DISP:TRAC:Y:RVAL 10DB Defines a reference value of a 10 dB. Manual operation: See "Scaling the y-axis manually" on page 61 5.7.6 Managing Measurement Data MMEMory:LOAD:IQ:STATe............................................................................................ 137 MMEMory:STORe<n>:IQ:COMMent................................................................................ 137 MMEMory:STORe<n>:IQ:STATe.....................................................................................138 MMEMory:STORe<n>:TRACe.........................................................................................138 MMEMory:LOAD:IQ:STATe 1, <FileName> This command stores the currently captured I/Q data to a file. After restoring the I/Q data, the application also analyzes the data again. Setting parameters: 1 <FileName> String containing the path and file name. Example: MMEM:LOAD:IQ:STAT 1,'C:\IQData\Amplfier.iq.tar' Restores the specified I/Q data. Usage: Setting only MMEMory:STORe<n>:IQ:COMMent <Comment> This command defines a comment for I/Q data you want to store. Setting parameters: <Comment> String containing the comment. User Manual 1176.9893.02 ─ 01 137 R&S®-K18 Remote Control Commands for Amplifier Measurements Analyzing Results Example: See MMEMory:STORe<n>:IQ:STATe. MMEMory:STORe<n>:IQ:STATe 1, <FileName> This command stores the currently captured I/Q data to a file. In secure user mode, settings that are to be stored on the instrument are stored to volatile memory, which is restricted to 256 MB. Thus, a "Memory full" error may occur although the hard disk indicates that storage space is still available. To store data permanently, select an external storage location such as a USB memory device. For details see "Protecting Data Using the Secure User Mode" in the "Data Management" section of the R&S FSW User Manual. Setting parameters: 1 <FileName> String containing the path and file name. Example: MMEM:STOR:IQ:COMM 'A sensible comment' MMEM:STOR:IQ:STAT 1,'C:\IQData\Amplfier.iq.tar' Saves the I/Q data to the specified file and adds a sensible comment. Usage: Setting only MMEMory:STORe<n>:TRACe <Trace>, <FileName> This command stores current trace data in a file. Setting parameters: <Trace> Number of the trace you want to save. Note that the available number of traces depends on the selected result display. Range: 1 to 6 <FileName> String containing the path and file name. Example: MMEM:STOR:TRAC 2,'C:\AmplifierTrace' Saves the second trace in the specified directory. Usage: Setting only User Manual 1176.9893.02 ─ 01 138 R&S®-K18 List of Commands List of Commands [SENSe:]FREQuency:CENTer.......................................................................................................................102 [SENSe:]FREQuency:CENTer:STEP............................................................................................................ 103 [SENSe:]FREQuency:OFFSet....................................................................................................................... 103 [SENSe:]REFSig:TIME?................................................................................................................................ 111 [SENSe:]SWEep:COUNt................................................................................................................................. 80 [SENSe]:SWAPiq...........................................................................................................................................111 [SENSe]:SWEep:LENGth.............................................................................................................................. 111 [SENSe]:SWEep:TIME.................................................................................................................................. 112 [SENSe]:SWEep:TIME:AUTO....................................................................................................................... 112 CALCulate<n>:DELTamarker:AOFF............................................................................................................. 126 CALCulate<n>:DELTamarker<m>:MAXimum:LEFT..................................................................................... 129 CALCulate<n>:DELTamarker<m>:MAXimum:NEXT.....................................................................................129 CALCulate<n>:DELTamarker<m>:MAXimum:RIGHt.................................................................................... 129 CALCulate<n>:DELTamarker<m>:MAXimum[:PEAK]...................................................................................129 CALCulate<n>:DELTamarker<m>:MINimum:LEFT.......................................................................................130 CALCulate<n>:DELTamarker<m>:MINimum:NEXT......................................................................................130 CALCulate<n>:DELTamarker<m>:MINimum:RIGHt..................................................................................... 130 CALCulate<n>:DELTamarker<m>:MINimum[:PEAK]....................................................................................130 CALCulate<n>:DELTamarker<m>:MREF......................................................................................................126 CALCulate<n>:DELTamarker<m>:TRACe.................................................................................................... 127 CALCulate<n>:DELTamarker<m>:X............................................................................................................. 127 CALCulate<n>:DELTamarker<m>[:STATe]...................................................................................................127 CALCulate<n>:GAIN:X.................................................................................................................................. 133 CALCulate<n>:MARKer<m>:AOFF............................................................................................................... 127 CALCulate<n>:MARKer<m>:MAXimum:LEFT.............................................................................................. 130 CALCulate<n>:MARKer<m>:MAXimum:NEXT............................................................................................. 130 CALCulate<n>:MARKer<m>:MAXimum:RIGHt............................................................................................. 131 CALCulate<n>:MARKer<m>:MAXimum[:PEAK]........................................................................................... 131 CALCulate<n>:MARKer<m>:MINimum:LEFT............................................................................................... 131 CALCulate<n>:MARKer<m>:MINimum:NEXT...............................................................................................131 CALCulate<n>:MARKer<m>:MINimum:RIGHt.............................................................................................. 131 CALCulate<n>:MARKer<m>:MINimum[:PEAK].............................................................................................131 CALCulate<n>:MARKer<m>:TRACe.............................................................................................................128 CALCulate<n>:MARKer<m>:X...................................................................................................................... 128 CALCulate<n>:MARKer<m>[:STATe]........................................................................................................... 128 CALCulate<n>:UNIT:ANGLe......................................................................................................................... 133 CALibration:AIQ:HATiming[:STATe].............................................................................................................. 100 CONFigure:DPD:AMAM[:STATe].................................................................................................................. 120 CONFigure:DPD:AMPM[:STATe].................................................................................................................. 120 CONFigure:DPD:FNAMe............................................................................................................................... 120 CONFigure:DPD:MODorder.......................................................................................................................... 120 CONFigure:DPD:SHAPing:MODE.................................................................................................................121 CONFigure:DPD:UPDate...............................................................................................................................121 CONFigure:DPD:UPDate:LEDState?............................................................................................................ 121 CONFigure:GENerator:EXTernal:ROSCillator...............................................................................................107 CONFigure:GENerator:EXTernal:ROSCillator:LEDState?............................................................................ 107 CONFigure:GENerator:FREQuency:CENTer................................................................................................ 108 User Manual 1176.9893.02 ─ 01 139 R&S®-K18 List of Commands CONFigure:GENerator:FREQuency:CENTer:LEDState?..............................................................................108 CONFigure:GENerator:FREQuency:CENTer:SYNC[:STATe].......................................................................108 CONFigure:GENerator:IPConnection:ADDRess........................................................................................... 109 CONFigure:GENerator:IPConnection:LEDState?..........................................................................................109 CONFigure:GENerator:POWer:LEVel........................................................................................................... 109 CONFigure:GENerator:POWer:LEVel:LEDState?.........................................................................................110 CONFigure:GENerator:SETTings:UPDate.................................................................................................... 110 CONFigure:GENerator:TARGet:PATH:BB?.................................................................................................. 110 CONFigure:GENerator:TARGet:PATH:RF.................................................................................................... 110 CONFigure:MODeling:AMAM:MORDer.........................................................................................................118 CONFigure:MODeling:AMPM:MORDer.........................................................................................................118 CONFigure:MODeling:LRANge..................................................................................................................... 119 CONFigure:MODeling:NPOints..................................................................................................................... 119 CONFigure:MODeling[:STATe]......................................................................................................................119 CONFigure:PAE:ICHannel:MULTiplier.......................................................................................................... 122 CONFigure:PAE:ICHannel:OFFSet............................................................................................................... 122 CONFigure:PAE:ICHannel:RESistor............................................................................................................. 122 CONFigure:PAE:QCHannel:MULTiplier........................................................................................................ 123 CONFigure:PAE:QCHannel:OFFSet............................................................................................................. 123 CONFigure:REFSignal:CGW:LEDState?........................................................................................................ 94 CONFigure:REFSignal:CGW:READ................................................................................................................95 CONFigure:REFSignal:CWF:FPATh............................................................................................................... 95 CONFigure:REFSignal:CWF:LEDState?......................................................................................................... 95 CONFigure:REFSignal:CWF:WRITe............................................................................................................... 96 CONFigure:REFSignal:GOS:BWIDth.............................................................................................................. 96 CONFigure:REFSignal:GOS:CRESt................................................................................................................96 CONFigure:REFSignal:GOS:DCYCle..............................................................................................................97 CONFigure:REFSignal:GOS:LEDState?......................................................................................................... 97 CONFigure:REFSignal:GOS:NPOSition..........................................................................................................97 CONFigure:REFSignal:GOS:NWIDth.............................................................................................................. 98 CONFigure:REFSignal:GOS:RLENgth............................................................................................................ 98 CONFigure:REFSignal:GOS:SLENgth............................................................................................................ 98 CONFigure:REFSignal:GOS:SRATe............................................................................................................... 98 CONFigure:REFSignal:GOS:WNAMe............................................................................................................. 99 CONFigure:REFSignal:GOS:WRITe............................................................................................................... 99 CONFigure:REFSignal:SINFo:SLENgth?........................................................................................................ 99 CONFigure:REFSignal:SINFo:SRATe?...........................................................................................................99 CONFigure:SIGNal:ERRor:COMPensation:ADRoop:[STATe]...................................................................... 116 CONFigure:SIGNal:ERRor:COMPensation:FOFFset:[STATe]......................................................................116 CONFigure:SIGNal:ERRor:COMPensation:IQIMbalance:[STATe]............................................................... 116 CONFigure:SIGNal:ERRor:COMPensation:IQOFfset:[STATe]..................................................................... 116 CONFigure:SIGNal:ERRor:COMPensation:SRATe:[STATe]........................................................................ 117 CONFigure:SIGNal:ERRor:ESTimation:ADRoop:[STATe]............................................................................ 117 CONFigure:SIGNal:ERRor:ESTimation:FOFFset:[STATe]........................................................................... 117 CONFigure:SIGNal:ERRor:ESTimation:IQIMbalance:[STATe]..................................................................... 117 CONFigure:SIGNal:ERRor:ESTimation:IQOFfset:[STATe]........................................................................... 118 CONFigure:SIGNal:ERRor:ESTimation:SRATe:[STATe].............................................................................. 118 CONFigure:SYNC:DOMain............................................................................................................................115 CONFigure:SYNC:SOFail..............................................................................................................................115 DISPlay:FORMat............................................................................................................................................. 71 User Manual 1176.9893.02 ─ 01 140 R&S®-K18 List of Commands DISPlay:MTABle............................................................................................................................................ 125 DISPlay[:WINDow<n>]:SIZE............................................................................................................................71 DISPlay[:WINDow<n>]:TABLe:ITEM............................................................................................................. 132 DISPlay[:WINDow<n>]:TDOMain:X[:SCALe]:DURation................................................................................133 DISPlay[:WINDow<n>]:TDOMain:X[:SCALe]:MODE.....................................................................................134 DISPlay[:WINDow<n>]:TDOMain:X[:SCALe]:OFFSet...................................................................................134 DISPlay[:WINDow<n>]:TDOMain:Y[:SCALe]:NORMalise[:STATe]...............................................................135 DISPlay[:WINDow<n>]:TRACe:Y[:SCALe]:RLEVel.......................................................................................104 DISPlay[:WINDow<n>]:TRACe:Y[:SCALe]:RLEVel:OFFSet......................................................................... 104 DISPlay[:WINDow<n>]:TRACe<t>:MODE.....................................................................................................123 DISPlay[:WINDow<n>]:TRACe<t>:Y[:SCALe]:AUTO....................................................................................135 DISPlay[:WINDow<n>]:TRACe<t>:Y[:SCALe]:MAXimum............................................................................. 135 DISPlay[:WINDow<n>]:TRACe<t>:Y[:SCALe]:MINimum.............................................................................. 136 DISPlay[:WINDow<n>]:TRACe<t>:Y[:SCALe]:PDIVision.............................................................................. 136 DISPlay[:WINDow<n>]:TRACe<t>:Y[:SCALe]:RPOSition............................................................................. 136 DISPlay[:WINDow<n>]:TRACe<t>:Y[:SCALe]:RVALue................................................................................ 137 FETCh:AMAM:CWIDth:CURRent[:RESult]?....................................................................................................88 FETCh:AMAM:CWIDth:MAXimum[:RESult]?.................................................................................................. 88 FETCh:AMAM:CWIDth:MINimum[:RESult]?....................................................................................................88 FETCh:AMPM:CWIDth:CURRent[:RESult]?....................................................................................................88 FETCh:AMPM:CWIDth:MAXimum[:RESult]?.................................................................................................. 88 FETCh:AMPM:CWIDth:MINimum[:RESult]?....................................................................................................88 FETCh:APAE:CURRent[:RESult]?.................................................................................................................. 91 FETCh:APAE:MAXimum[:RESult]?................................................................................................................. 91 FETCh:APAE:MINimum[:RESult]?.................................................................................................................. 91 FETCh:ICC:CURRent[:RESult]?......................................................................................................................92 FETCh:ICC:MAXimum[:RESult]?.....................................................................................................................92 FETCh:ICC:MINimum[:RESult]?......................................................................................................................92 FETCh:IVOLtage:PURE:CURRent[:RESult]?..................................................................................................92 FETCh:IVOLtage:PURE:MAXimum[:RESult]?.................................................................................................92 FETCh:IVOLtage:PURE:MINimum[:RESult]?..................................................................................................92 FETCh:MACCuracy:FERRor:CURRent[:RESult]?...........................................................................................84 FETCh:MACCuracy:FERRor:MAXimum[:RESult]?......................................................................................... 84 FETCh:MACCuracy:FERRor:MINimum[:RESult]?...........................................................................................84 FETCh:MACCuracy:GIMBalance:CURRent[:RESult]?....................................................................................84 FETCh:MACCuracy:GIMBalance:MAXimum[:RESult]?...................................................................................84 FETCh:MACCuracy:GIMBalance:MINimum[:RESult]?....................................................................................84 FETCh:MACCuracy:IQIMbalance:CURRent[:RESult]?................................................................................... 85 FETCh:MACCuracy:IQIMbalance:MAXimum[:RESult]?.................................................................................. 85 FETCh:MACCuracy:IQIMbalance:MINimum[:RESult]?................................................................................... 85 FETCh:MACCuracy:IQOFfset:CURRent[:RESult]?......................................................................................... 85 FETCh:MACCuracy:IQOFfset:MAXimum[:RESult]?........................................................................................85 FETCh:MACCuracy:IQOFfset:MINimum[:RESult]?......................................................................................... 85 FETCh:MACCuracy:MERRor:CURRent[:RESult]?..........................................................................................85 FETCh:MACCuracy:MERRor:MAXimum[:RESult]?.........................................................................................85 FETCh:MACCuracy:MERRor:MINimum[:RESult]?..........................................................................................85 FETCh:MACCuracy:PERRor:CURRent[:RESult]?.......................................................................................... 86 FETCh:MACCuracy:PERRor:MAXimum[:RESult]?......................................................................................... 86 FETCh:MACCuracy:PERRor:MINimum[:RESult]?.......................................................................................... 86 FETCh:MACCuracy:QERRor:CURRent[:RESult]?.......................................................................................... 86 User Manual 1176.9893.02 ─ 01 141 R&S®-K18 List of Commands FETCh:MACCuracy:QERRor:MAXimum[:RESult]?.........................................................................................86 FETCh:MACCuracy:QERRor:MINimum[:RESult]?.......................................................................................... 86 FETCh:MACCuracy:REVM:CURRent[:RESult]?............................................................................................. 86 FETCh:MACCuracy:REVM:MAXimum[:RESult]?............................................................................................ 86 FETCh:MACCuracy:REVM:MINimum[:RESult]?............................................................................................. 86 FETCh:MACCuracy:RMEV:CURRent[:RESult]?............................................................................................. 87 FETCh:MACCuracy:RMEV:MAXimum[:RESult]?............................................................................................ 87 FETCh:MACCuracy:RMEV:MINimum[:RESult]?............................................................................................. 87 FETCh:MACCuracy:SRERror:CURRent[:RESult]?......................................................................................... 87 FETCh:MACCuracy:SRERror:MAXimum[:RESult]?........................................................................................ 87 FETCh:MACCuracy:SRERror:MINimum[:RESult]?......................................................................................... 87 FETCh:MACCuracy[:RESult]:ALL?..................................................................................................................83 FETCh:POWer:CFACtor:IN:CURRent[:RESult]?.............................................................................................89 FETCh:POWer:CFACtor:IN:MAXimum[:RESult]?........................................................................................... 89 FETCh:POWer:CFACtor:IN:MINimum[:RESult]?.............................................................................................89 FETCh:POWer:CFACtor:OUT:CURRent[:RESult]?.........................................................................................89 FETCh:POWer:CFACtor:OUT:MAXimum[:RESult]?....................................................................................... 89 FETCh:POWer:CFACtor:OUT:MINimum[:RESult]?.........................................................................................89 FETCh:POWer:CURRent[:RESult]?................................................................................................................ 92 FETCh:POWer:GAIN:CURRent[:RESult]?...................................................................................................... 90 FETCh:POWer:GAIN:MAXimum[:RESult]?..................................................................................................... 90 FETCh:POWer:GAIN:MINimum[:RESult]?...................................................................................................... 90 FETCh:POWer:INPut:CURRent[:RESult]?...................................................................................................... 90 FETCh:POWer:INPut:MAXimum[:RESult]?..................................................................................................... 90 FETCh:POWer:INPut:MINimum[:RESult]?...................................................................................................... 90 FETCh:POWer:OUTPut:CURRent[:RESult]?.................................................................................................. 90 FETCh:POWer:OUTPut:MAXimum[:RESult]?................................................................................................. 90 FETCh:POWer:OUTPut:MINimum[:RESult]?.................................................................................................. 90 FETCh:QVOLtage:PURE:CURRent[:RESult]?................................................................................................ 93 FETCh:QVOLtage:PURE:MAXimum[:RESult]?...............................................................................................93 FETCh:QVOLtage:PURE:MINimum[:RESult]?................................................................................................ 93 FETCh:VCC:CURRent[:RESult]?.................................................................................................................... 93 FETCh:VCC:MAXimum[:RESult]?................................................................................................................... 93 FETCh:VCC:MINimum[:RESult]?.................................................................................................................... 93 INITiate:CONMeas...........................................................................................................................................78 INITiate:CONTinuous.......................................................................................................................................78 INITiate:SEQuencer:ABORt.............................................................................................................................79 INITiate:SEQuencer:IMMediate.......................................................................................................................79 INITiate:SEQuencer:MODE.............................................................................................................................80 INITiate[:IMMediate].........................................................................................................................................79 INPut:ATTenuation........................................................................................................................................ 104 INPut:ATTenuation:AUTO............................................................................................................................. 105 INPut:CONNector.......................................................................................................................................... 100 INPut:COUPling.............................................................................................................................................101 INPut:EATT....................................................................................................................................................105 INPut:EATT:AUTO.........................................................................................................................................105 INPut:EATT:STATe........................................................................................................................................106 INPut:FILTer:HPASs[:STATe]........................................................................................................................101 INPut:FILTer:YIG[:STATe]............................................................................................................................. 101 INPut:GAIN:STATe........................................................................................................................................107 User Manual 1176.9893.02 ─ 01 142 R&S®-K18 List of Commands INPut:GAIN[:VALue]...................................................................................................................................... 106 INPut:IMPedance...........................................................................................................................................102 INPut:IQ:FULLscale:LEVel............................................................................................................................ 106 INPut:SELect:BBANalog[:STATe]..................................................................................................................102 INSTrument:CREate:DUPLicate......................................................................................................................68 INSTrument:CREate:REPLace........................................................................................................................68 INSTrument:CREate[:NEW].............................................................................................................................68 INSTrument:DELete.........................................................................................................................................69 INSTrument:LIST?...........................................................................................................................................69 INSTrument:REName......................................................................................................................................69 INSTrument[:SELect].......................................................................................................................................70 LAYout:ADD[:WINDow]?................................................................................................................................. 72 LAYout:CATalog[:WINDow]?...........................................................................................................................73 LAYout:DIRection............................................................................................................................................ 73 LAYout:IDENtify[:WINDow]?............................................................................................................................74 LAYout:REMove[:WINDow]............................................................................................................................. 74 LAYout:REPLace[:WINDow]............................................................................................................................74 LAYout:SPLitter............................................................................................................................................... 75 LAYout:WINDow<n>:ADD?............................................................................................................................. 76 LAYout:WINDow<n>:IDENtify?........................................................................................................................76 LAYout:WINDow<n>:REMove.........................................................................................................................77 LAYout:WINDow<n>:REPLace........................................................................................................................77 LAYout:WINDow<n>:TYPe?............................................................................................................................77 MMEMory:LOAD:IQ:STATe...........................................................................................................................137 MMEMory:STORe<n>:IQ:COMMent............................................................................................................. 137 MMEMory:STORe<n>:IQ:STATe.................................................................................................................. 138 MMEMory:STORe<n>:TRACe.......................................................................................................................138 SYSTem:PRESet:CHANnel[:EXECute]........................................................................................................... 70 SYSTem:SEQuencer.......................................................................................................................................81 TRACe:IQ:BWIDth.........................................................................................................................................112 TRACe:IQ:SRATe..........................................................................................................................................113 TRACe:IQ:SRATe:AUTO...............................................................................................................................113 TRACe:IQ:WBANd:MBWidth......................................................................................................................... 114 TRACe:IQ:WBANd[:STATe].......................................................................................................................... 114 TRACe<n>[:DATA]:X?.....................................................................................................................................82 TRACe<n>[:DATA]?........................................................................................................................................ 81 User Manual 1176.9893.02 ─ 01 143


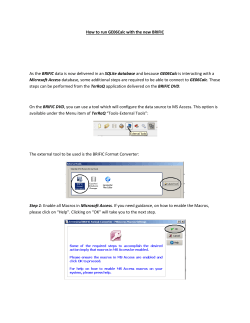


© Copyright 2026