
Air Fit Owner’s Manual ™
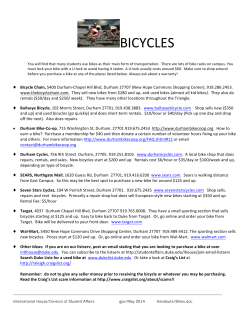
Air Fit™ Owner’s Manual 620-8245 Owner’s Manual 1 Table Of Contents Safeguards 11 Assembly and Setup 12 Assembly Instructions 13 Testing Bike 20 Instructions 21 Seat Adjustment 21 Pedal Strap Adjustment 22 Watt Measurement 22 Training Information 23 Dismounting Bike 23 Why Maintenance 24 Maintenance 25 Moving and Leveling 25 Preventive Maintenance 25 Daily Maintenance 25 Weekly Maintenance 26 Monthly Maintenance 26 Inspection and Adjustment 26 Frame Care 27 Parts Replacement Contact Information 27 28 Owner’s Manual 2 Introduction This manual will acquaint you with the assembly, operation and maintenance of your Air Fit™ bike. Be sure to read and follow the information and instructions for your specific model before assembly, using or servicing your indoor cycling bike. Manufacturer STAIRMASTER 4400 NE 77th Avenue, Suite 300 Vancouver, WA 98662 Telephone: (888) 678-2476 http://www.stairmaster.com Warranty Frame is covered for 10 years from the date of purchase for structural failure. Additionally, the Air Fit™ frame is warranted for five (5) years from the date of purchase against build up and propagation of rust. Flywheel Assembly, Handlebar Assembly, Seat Post, and Foot Adjustments are covered for three (3) years from the date of purchase. Seat Post Plastic Sleeve, Bottom Bracket Assembly, Seat Saddle Assembly, and Pop-Pin Assembly, are covered for two (2) years for the date of purchase. Pedals, Belt, Rubber Frame Guard, Brass Brake Nut and remaining parts are covered for one (1) year from the date of purchase. Customer Support If any items need replacement contact the StairMaster Customer Support Department at (888) 678-2476, option 2. For international customers, please contact your local distributer. Safety Instructions This chapter includes precautions and fitness safeguards for the installation and use of the Air Fit™. Please read this chapter carefully before installing or using your equipment. Safety instructions are provided in the following languages (in the order shown): • English • Dutch • French • Italian • Portuguese • Spanish • Swedish • Chinese • Japanese Owner’s Manual 3 Precautions These safety notes are directed to you as the owner of the Air Fit™ manufactured by StairMaster. Please train all your users and fitness staff to follow these safety instructions. DO • DO NOT • Do not let unsupervised children operate the bike • Do encourage each of your users to discuss their health program or fitness regimen with a healthcare professional. Do stop operating your bike if you feel dizzy or faint. • Do not use without proper athletic shoes or cycling shoes. • Do perform regular preventative maintenance. • • Do exercise slowly until you reach a level of comfort. • • Do use the bike only for its intended use, as described in this manual. • Do not use in rainy weather outdoors, or in an enclosed pool environment. Do not drop or insert any object, hands, or feet into any opening or within the area of the flywheel. Do not attempt to remove any shrouds or modify the bike. WARNING Your Air Fit™ manufactured by StairMaster is designed for aerobic exercise in a commercial or consumer environment. Please check with your physician prior to beginning any exercise program. Do not push yourself to excess. Stop if you are feeling faint, dizzy, or exhausted. Use common sense when biking. Read the owner’s manual in its entirety before operating the bike. Failure to obey this warning can result in injury or death. Owner’s Manual 4 VOORZORGSMAATREGELEN Deze veiligheidsaantekeningen zijn aan u gericht als eigenaar van de Air Fit™ manufactured by StairMaster. Gelieve uw gebruikers en uw per- soneel voor conditietraining volledig bekend te maken met deze veiligheidsinstructies. Doe het volgende: Doe het volgende NIET: Moedig elk van uw gebruikers aan hun gezondheidspro- gramma of conditietherapie met een professioneel uit de gezondheidszorg te bespreken. ■ Laat kinderen zonder toezicht de bike niet bedienen. ■ Niet zonder gymschoenen gebruiken. ■ Stop het gebruik van uw bike als u zich duizelig of een flauwte voelt. ■ Niet buiten bij regenachtig weer gebruiken, of in dichte ruimte met een zwembad. ■ Voer regelmatig preventief onderhoud uit. ■ Laat geen enkel voorwerp in de bike vallen en steek uw handen of voeten in geen enkele opening van of onder uw bike. ■ Oefen langzaam totdat u een comfortniveau heeft bereikt. ■ Probeer geen omhulsels te verwijderen of uw bike te wijzigen. ■ Gebruik de bike alleen voor zijn bedoelde gebruik, zoals in deze handleiding staat beschreven. ■ WAARSCHUWING Uw Air Fit™ manufactured by StairMaster is ontworpen voor aërobische oefeningen in een commerciële of gebruiker- somgeving. Zie uw arts vóór het beginnen van een oefenprogramma. Dwing uzelf niet tot buitensporige oefeningen. Stop als u zich duizelig, uitgeput of een flauwte voelt. Lees de gebruikershandleiding helemaal en aandachtig door alvorens uw bike te bedienen. Nalaten deze waarschuwing op te volgen kan letsel of overlijden tot gevolg hebben. PRÉCAUTIONS Ces consignes de sécurités s'adressent aux propriétaires du Air Fit™ manufactured by StairMaster. Veuillez instruire tous vos utilisateurs et instructeurs à suivre ces consignes. À Faire ■ Encouragez tous les utilisateurs à consulter un médecin au sujet de leur programme de fitness ou régime d'exercice. À éviter ■ Ne laissez pas des enfants utiliser le bike sans sur- veillance. ■ Cessez d'utiliser le bike en cas d'étourdissement ou de faiblesse. ■ Ne l'utilisez pas sans porter de chaussures d'athlétisme. ■ Exécutez régulièrement la maintenance préventive. ■ ■ Commencez l'exercice lentement jusqu'à ce que vous atteignez un niveau confortable. Ne l'utilisez pas en extérieur lors de temps pluvieux, ni en intérieur dans une salle de piscine. ■ Utilisez le bike uniquement de la manière prévue, telle que décrite dans ce manuel. Évitez de laisser tomber tout objet ou d'introduire les mains ou pieds dans toute ouverture ou en-dessous du bike. ■ Ne tentez pas de retirer tout carter de protection ni de modifier le bike. ■ AVERTISSEMENT Le Air Fit™ manufactured by StairMaster est conçu pour l'exercice aérobique dans un environnement commercial ou privé. Veuillez consulter un médecin avant de commencer tout programme d'exercice. Ne vous poussez pas au-delà de vos limites. Arrêtez-vous si vous vous sentez faible, étourdi ou épuisé. Faites preuve de bon sens lorsque vous vous entraînez. Lisez le guide de l'utilisateur en entier avant d'utiliser le bike. Le non-respect de ces avertissements peut se traduire par des blessures, voire la mort. Owner’s Manual 5 VORSICHTSMASSNAHMEN Die folgenden Vorsichtsmaßnahmen richten sich an Sie als Besitzer des Air Fit™ manufactured by StairMaster. Bitte schulen Sie alle Ihre. Benutzer und Ihr Fitness-Personal in der Beachtung dieser Sicherheitsvorschriften. Gebote Verbote ■ Legen Sie jedem Ihrer Benutzer nahe, sein Gesundheits- oder Fitnessprogramm mit einem medi- zinischen Fachmann zu besprechen. ■ Beenden Sie den Betrieb Ihres bike, wenn Sie sich schwindelig oder schwach fühlen. ■ Führen Sie regelmäßige vorbeugende Wartungsmaßnahmen durch. ■ Trainieren Sie langsam, bis Sie eine gewisse Komfortzone erreichen. ■ Verwenden Sie den bike nur zum vorgesehenen, in dieser Anleitung beschriebenen Zweck. ■ Lassen Sie den bike nicht von unbeaufsichtigten Kindern in Betrieb nehmen. ■ Benutzen Sie das Gerät nicht ohne Sportschuhe. ■ Benutzen Sie das Gerät bei regnerischen Witterungsbedingungen nicht im Freien und nicht in einer geschlossenen Schwimmbadumgebung. ■ Lassen Sie keine Gegenstände in irgendwelche Öffnun- gen oder unter den bike fallen und halten Sie Hände und Füße von diesen Bereichen fern. ■ Unternehmen Sie keinen Versuch, irgendwelche Abdeckungen zu entfernen oder den bike zu modi- fizieren. ACHTUNG Der Air Fit™ manufactured by StairMaster ist für aerobische Übungen in einer kommerziellen oder Verbraucherumgebung vorgesehen. Bitte holen Sie vor Aufnahme eines jeden Trainingsprogramms den Rat Ihres Arztes ein. Trainieren Sie nicht übertrieben hart. Hören Sie auf, wenn Sie ein Schwäche-, Schwindel- oder Erschöpfungsgefühl verspüren. Lassen Sie sich beim Schritttraining von Ihrer Vernunft leiten. Lesen Sie vor Inbetriebnahme Ihres bike die Bedienungsanleitung vollständig durch. Ein Missachten dieses Achtungshinweises kann Verletzungen oder den Tod zur Folge haben. PRECAUZIONI Queste note precauzionali sono dirette a voi, come proprietario dello Air Fit™ manufactured by StairMaster. Siete pregati di istruire i vostri uten- ti e il vostro personale all'osservanza di queste precauzioni. Da Non Fare Da Fare ■ Incoraggiate i vostri utenti a discutere il loro programma di salute o di fitness con uno specialista dell'healthcare. ■ Interrompete l'uso dello bike se avete giramenti di testa o se vi sentite mancare. ■ Eseguite periodicamente servizi di manutenzione. ■ Utilizzate lo bike soltanto per l'uso è a cui è destina- to, come descritto nel manuale. ■ Non consentite a bambini di usare lo bike senza la supervisione di un adulto. ■ Non utilizzate lo bike senza scarpe atletiche. ■ Non utilizzate lo bike all'esterno in condizioni piovose o in un ambiente con piscina interna. ■ Non lasciate cadere oggetti sullo bike e non inserite oggetti, mani o piedi in qualsiasi apertura esterna o sotto lo bike. ■ Non cercate di rimuovere le coperture o di modificare lo bike. AVVERTENZE Lo Air Fit™ manufactured by StairMaster è stato realizzato per esercizi di aerobica in un ambiente pubblico o privato adeguato. Prima di iniziare un programma di esercizio fisico, consultate il vostro medico. Non eccedete i vostri limiti. Fermatevi se vi sentite mancare, se avete giramenti di testa o se vi sentite esausti. Usate buon senso nell'utilizzo dell'attrezzatura. Leggete il Manuale dell'utente interamente prima di utilizzare lo Air Fit. La mancata osservanza di queste avvertenze può comportare lesioni gravi o morte. Owner’s Manual 6 PRECAUÇÕES Estas notas de segurança destinam-se a você, proprietário do bike Air Fit™ manufactured by StairMaster. Treine todos os usuários e o pessoal da academia para que sigam estas instruções de segurança. O que fazer ■ O que não fazer Incentive todos os usuários a discutirem seu programa de saúde ou sistema de condicionamento físico com um profissional da área de saúde. ■ Pare o funcionamento do bike se sentir tontura ou vertigem. ■ Efetue a manutenção preventiva regular. ■ Faça exercícios lentamente até atingir um grau de con- forto. ■ Use o bike apenas de acordo com a finalidade para que se destina, conforme descrito neste manual. ■ Não deixe crianças sem supervisão operarem o bike. ■ Não use sem os sapatos esportivos apropriados. ■ Não utilize em ambientes externos quando o tempo estiver chuvoso, nem em um ambiente fechado de pisci- na interna. ■ Não deixe cair nem insira nenhum objeto, mãos ou pés em qualquer abertura ou sob o bike. ■ Não tente remover nenhum degrau nem modificar seu bike. ADVERTÊNCIA Seu Air Fit™ manufactured by StairMaster foi projetado para exercícios aeróbicos em um ambiente comercial ou próprio do consumidor. Consulte seu médico antes de começar qualquer programa de exercícios. Não se esforce demais. Pare se sentir tontura, vertigem ou exaustão. Tenha bom senso ao fazer o exercício. Leia todo o Manual do Proprietário antes de operar o seu bike. Deixar de observar esta advertência pode resultar em ferimentos ou morte. PRECAUCIONES Estas notas de seguridad están dirigidas a usted como el dueño de Air Fit™ manufactured by StairMaster. Por favor instruya a todos sus usuar- ios y personal de entrenamiento para que sigan estas instrucciones de seguridad. Lo que se debe hacer Lo que no se debe hacer ■ Dígale a cada uno de sus usuarios que discuta su pro- grama de salud o régimen de ejercicio con un profe- sional de la salud. ■ No permita que los niños operen su bike sin super- visión. Deje de operar su bike si se siente mareado o como que va a desmayarse. ■ ■ No lo use sin zapatos atléticos. ■ ■ Lleve a cabo mantenimiento preventivo a intervalos reg- ulares. No lo utilice afuera en la lluvia ni en un ambiente cerra- do donde haya una piscina. Haga ejercicio lentamente hasta que alcance un nivel en el que se sienta cómodo. ■ ■ No lo deje caer ni inserte objetos, manos o pies en ninguna apertura de su bike ni debajo de él. Utilice el bike solamente para lo que fue diseñado, como se describe en este manual. ■ ■ No intente quitar ninguna cubierta o recubrimiento ni modificar su bike. ADVERTENCIA Su Air Fit™ manufactured by StairMaster está diseñado para el ejercicio aerobic en un ambiente commercial o de consume. Por favor consulte con su médico antes de iniciar cualquier programma de ejercicio. No haga un esfuerzo excesivo. Deténgase si se siento mareado, exhaust o como si fuera a desmayarse. Use su sentido común al hacer ejercico. Lea completamente el Manual del dueño antes de operar su Air Fit. El no cumplir con esta advertenicia puedo resultar en una lesión o en la muerte. Owner’s Manual 7 FÖRSIKTIGHETSÅTGÄRDER Dessa säkerhetsanmärkningar är riktade till dig i egenskap av ägare av Air Fit™ manufactured by StairMaster. Var god utbilda alla användare och all personal att följa dessa säkerhetsanvisningar. Man ska Man ska inte ■ uppmuntra alla användare att konsultera sitt hälso- progam eller sin träningsregim med en läkare. ■ sluta använda bike om man känner sig yr eller svim- färdig. ■ utföra regelbundet underhåll i förebyggande syfte. ■ ■ ■ låta barn använda bike utan uppsikt. ■ använda bike utan sportskor. ■ använda bike utomhus i fuktigt väder eller i ett innes- lutet bassängområde. motionera långsamt tills man når en komfortnivå. ■ endast använda bike för dess avsedda användning, enligt beskrivning i denna handbok. tappa in eller föra in något föremål, händer eller fötter i någon öppning, eller under bike. ■ försöka att avlägsna några skyddskåpor eller att modi- fiera bike. VARNINGAR Din Air Fit™ manufactured by StairMaster är avsedd för aerobisk träning i kommersiella eller konsumentinriktade miljöer. Konsultera din läkare innan du inleder något träningsprogram. Driv inte dig själv för hårt. Sluta om du känner dig yr, svimfärdig eller utmattad. Använd Air Fit med sunt förnuft. Läs igenom hela handboken innan du använder Air Fit. Underlåtelse att iaktta dessa varningar kan medföra skada eller dödsfall. Owner’s Manual 8 Air Fit™ manufactured by StairMaster bike bike Bike bike bike Air Fit™ manufactured by StairMaster Owner’s Manual 9 Air Fit™ manufactured by StairMaster bike bike bike bike bike bike bike Air Fit™ manufactured by StairMaster bike Owner’s Manual 10 Safeguards NCTIONS The following fitness safeguards and operating precautions are directed to purchasers and users of the Air Fit™. Club Managers should ensure that members and fitness staff are trained to follow these same instructions. Failure to follow these safeguards may result in injury or serious health risk. • Ensure that the seat height adjustment knobs is properly secured and do not interfere with range of motion during exercise. • Children under the age of 16 should not ride the bike. The bike mechanism and ergonomics are designed for adult use only. • Do not insert any object, hands or feet into any openings, or expose hands, arms or feet to the drive mechanism or other potentially moving part of the bike. • The maximum weight for individuals riding the bike should not exceed 350 pounds (159 kilograms). • Do not dismount the bike until both the pedals and the moving arms have stopped completely. Failure to comply may lead to loss of control and serious injury. • If at any time you feel dizzy or have difficulty breathing, gradually stop pedaling and carefully dismount the bike. • Listen to your body, ride at a pace that feels right for you. • Keep children and pets away from the bike whenever it's in use. • Never turn the pedal crank arms by hand. • Stay hydrated. Drink water throughout your ride as needed. • Always keep some resistance on the flywheel. • Stay in control by executing all movements at a slow pace before attempting to increase your speed. Do not attempt to ride the bike in a standing position. • Do not exercise at high speeds and intensity without having initially established a baseline fitness level and obtaining a medical clearance from your physician. Focus on form, posture and establishing a controllable pace before attempting any high intensity short duration sprints. • Do not use the bike without proper footwear. Never operate the bike with bare feet. • Never place your feet in any position on the bike other that the pedals or the stationary foot platforms on the sides of the flywheel cage. Do not extend your legs out to the side, in the movement path of the pedals and movable arms, while the bike is in motion to avoid injury. Owner’s Manual 11 Assembly & Setup Use the following procedures to unpack and assemble your Air Fit™. UNPACKING AND PARTS LIST Position the shipping carton so the “Heavy End” logo is located at the bottom. Open the top of the carton and fold back all four flaps. Carefully tilt the box forward so that the box may be lifted to expose the bike. Remove all parts from the shipping carton and foam inserts, and verify that the following parts are included in your shipment: NOTE: All tools required to assemble the bike are included within the packaging, except for a Rubber Mallet, which is recommended when assembling the pedals onto the bike. Air Fit™ Parts List Description Main Frame Assembly Console Mast Console Left and Right Arms Left and Right Foot Stand Left and Right Foot Pedals Seat Post Qty. 1 1 1 2 2 2 1 Description Qty. M8x15mm Button Head Bolt M8x16 O.D. Flat Washer M8x20mm Socket Head Cap Screw M8x25mm O.D. Flat washer M24x1.5 Hex Jam Nut M8x20mm Button Head Bolt M8x1.24x14mm Specialty Hex Screw M4x10mm Socket Head Cap Screw M4x10mm Phillips Pan Head Form Screw 14 14 2 2 2 4 2 2 2 Take time now to enter your Air Fit™ serial number in the space below (serial number is located on underside the bottom rear cross member). If parts are missing, or if you have any operational questions, please call StairMaster’s Service department at (888) 678-2476, option 2. Have your serial number ready. Serial No._____________________________________________ NOTE: If you are missing any of the parts listed above, inspect the packing material and the box for items that may have been overlooked. If parts are missing, or if you have any product questions, please call StairMaster’s Service Department at (888) 678-2476, option 2. Please have your bike’s serial number ready. CAUTION: Damage to the bike during assembly is not covered as part of the limited StairMaster warranty. Take care not to drop or lean the bike on the handle bar pop-pin. Carefully stand the bike up in the normal upright position on a stable surface so it will not tip over during assembly. Owner’s Manual 12 Assembly Instructions 1. Locate an open area to unbox the packaged machine (Fig. 1). Fig. 1 2. Cut all straps and remove the top half (Fig. 2) of the cardboard box to expose the base and assembly components of the machine. Fig. 2 3. Extract the base (Fig. 3) from the lower box. Fig. 3 Owner’s Manual 13 4. Hover the console mast (Fig. 5) over the base joints and mate the wires coming out of each component. Fig. 4 5. Slide the console mast (Fig. 6) over the neck joints of the base and align the three securing bolt holes. WARNING To prevent any damage, verify the cable harness is not kinked and out of the way of the brackets when mating the console mast to the base of the machine. Fig. 5 6. Install three bolts with washers (Fig. 7) thru each neck joint hole and torque all bolts to their final value. Repeat this for the opposite side. Hardware M8 x 15mm Button Head Bolt M8 x 16mm O.D. Flat Washer QTY 6 6 Final Torque: 18-19 Lb-Ft (24-26 Nm) Fig. 6 Owner’s Manual 14 7. Hover the console (Fig. 8) over the neck mast and connect the cable coming out of the mast into the cable protruding from the console. Fig. 7 8. Mount the console (Fig. 9) to the frame using the four pre-installed Phillips head screws thru each of the available holes on the neck plate. Fig. 8 9. Mount the left & right grip arms (Fig. 10) onto the corresponding pivot shafts located on the base of the machine while mating the end of the grip arms to each of the crank linkages and keeping the arms together by loosely inserting a socket head cap screw with washer to each joint. Hardware M8 x 20mm Socket Head Cap Screw M8 x 25mm O.D. Flat Washer QTY 2 2 Fig. 9 Owner’s Manual 15 10. Lock the grip arms in place (Fig. 11) by threading the large jam nut onto each pivot shaft and applying the corresponding final torque to each nut. Hardware M24 x 1.5 Hex Jam Nut QTY 2 Final Torque 48-50 Lb-Ft (65-67.8 Nm) Fig. 10 11. Secure the left & right grip arms to the crank linkages by applying final toque (Fig. 12) to the joining bolt and plugging the bearing housings with the corresponding plastic caps. Final Torque 100-110 Lb-Ft (136-149 Nm) Fig. 11 12. Mount the left & right foot stand mounting plate (Fig. 13) onto the arm pivot shafts and secure them in place by bolting the respective button head cap screws thru the center of each plate and into the pivot shafts. Hardware M8 x 20mm Button Head Bolt QTY 4 Fig. 12 Owner’s Manual 16 13. Attach the left & right plastic foot stand covers (Fig. 14) over the mounting plates and secure the covers from the underside by bolting four button head cap screws along with washers into the corresponding four available holes. Hardware M8 x 15mm Button Head Bolt M8 x 16mm O.D. Flat Washer QTY 8 8 Fig. 13 14. Locate the left & right foot pedals. ASSEMBLY TIP Each pedal has an “L” or “R” marking (Fig. 15) stamped into the strap that indicates the user side for installation purposes. Fig. 14 15. Insert each pedal (Fig. 16) into the corresponding crank arm. Fig. 15 Owner’s Manual 17 16. Insert the pedal securing bolts into each pedal (Fig. 17) thru the back of each crank arm and torque each screw to its final value. Hardware M8x1.25x14mm Specialty Hex Screw QTY 2 Final Torque 33-37 Lb-Ft (45-50 Nm) Fig. 16 17. Locate the seat slider and mount the assembly (Fig. 18) onto the seat post by sliding the post into the seat slider while pulling on the pull pin under the seat slider. Fig. 17 18. Install the corresponding stopper bolt (Fig. 19) into the slider section of the seat post. Hardware M4 x10mm Socket Head Cap Screw QTY 2 Fig. 18 Owner’s Manual 18 19. Insert the assembled seat post (Fig. 20) into the frame by pulling on the pull pin located on the upright column of the frame and sliding the post downward along with the plastic sleeve verifying to lock the post into one of the available positions. Fig. 19 20. Mate the edge of the plastic sleeve flush with the edge of the upright tube (Fig. 21) and install the corresponding hardware to lock the plastic sleeve in place. Hardware M4 x 10mm Phillips Pan Head Thread Form Screw QTY 2 Fig. 20 21. Review all areas of the machine to verify no hardware was left loose and adjust the leveling feet under each foot (Fig. 22) incase the base is not resting on flat even ground. Owner’s Manual 19 Fig. 21 Testing Bike Use this checklist to perform the bike test procedure. Recheck all the bolts and make sure they are all tightened to the proper torque specification (when indicated) and no parts are missing. Test the seat post to make sure they move freely and you are able to lock in at different positions. Check the seat to make sure it is level and tight and does not rotate around or tilt. Tighten and adjust as needed. Test the seats horizontal adjustment for movement front to rear and check it by settings it at different settings. Adjust seat post to your needs (Refer to page 23). Ride / test the bike for proper operation according to this owner's manual. CAUTION: The movement arms move whenever the pedals are turning. Do not dismount the bike until the pedals and movement arms come to a complete stop. Pedal the bike at a moderate pace and test for proper and smooth movement of the pedals and arms. When the testing is complete, even the movement arms, and tip the bike forward using the arms and roll it on a smooth surface to the final location and adjust the leveling feet so the bike is stable. Owner’s Manual 20 Instructions Your Air Fit™ bike is easy to use. There are no resistance knobs to adjust as the resistance comes from the isokenetic resistance created by the movement of air with the fan-shaped flywheel. Control over the resistance is obtained by simply varying the pace of pedaling and of the push / pull on the movement arms. Typically, exercising at a slower pace generates a lower resistance from the flywheel, enabling a cardiovascular endurance workout that can be sustained for extended periods of time. Higher pace exercise involving faster pedaling and more forceful pushing / pulling on the movement arms creates a greater resistance level that will deliver a greater muscle endurance or anaerobic workout. Anaerobic exercise and High Intensity Interval Training (HIIT) are much more strenuous forms of exercise that should only be undertaken by users that have established a baseline fitness level capable of adapting to this form of exercise. Users are also encouraged to discuss their health program or fitness regimen with their healthcare professional. Additionally, the bike can be operated with only the use of the movement arms for an upper-body-only workout. The front foot platforms, located on either side of the flywheel are to be used when exercising only with the movement arms. Position feet securely on these platforms while pushing / pulling on the movement arms. NOTE: that the pedals will continue to rotate when the bike is used with the movement arms only. Be certain to maintain feet on the front foot platforms when exercising with the movement arms only so that feet stay clear of the rotating pedals. Seat Adjustments Proper bike setup gives you a more comfortable ride and reduces your risk of injury. To adjust the seat height: Dismount the bike. Pull out on the seat height pop-pin to release it from its current preset location, while holding the seat with one hand. Raise or lower the seat to the desired height, then gently release the pop-pin. Raise or lower the seat slightly, if necessary, until the pop-pin engages a preset hole. The seat adjustment mechanism for the bike is designed to ratchet upwards without the need to pull out on the pop-pin, if desired seat height is known then this is an easy method to adjust the seat. Note that the ratcheting method only works when raising the seat height. In order to lower the seat height, pulling out on the pop-pin is required. Fore/Aft Pop-Pin Seat Height PopPin SEAT HEIGHT At the proper height, there should be a slight bend in your knee when you’re at the bottom of a pedal stroke. FORE/AFT POSITION Once the proper height has been achieved, adjust the seat forward or back so that when the feet are in the 3 o'clock and 9 o'clock positions, the forward knee is directly over the pedal axle. Recheck the seat height again after making the fore/aft adjustment, as moving the seat forward and backward can have the same effect as moving it higher or lower. Owner’s Manual 21 Pedal Strap Adjustment To adjust the pedal straps: The pedal straps should be adjusted to hold each foot comfortably but firmly on the pedal. Place your foot on the pedal, then adjust the pedal strap as necessary. Pull the free end of the strap down to tighten. Press the release button to loosen. Note: The pedal straps should be adjusted to hold comfortably but firmly on the pedal. Air Fit™ Pedal Tightening Clip Watts Measurement The console does not directly measure or estimate watts power. But information on watts produced by cycling on the Air Fit can be seen on the chart below, where RPMs generated by the flywheel are correlated to watts. Values were generated by the use of a computer controlled Dynamometer which was coupled to the crank of the Air Fit. RPMs are displayed on the horizontal axis with watts displayed on the vertical axis. Below the RPM values on the horizontal axis are the actual watts measurement for that RPM value. For example, at 30 RPMs the watts are 30, whereas at 55 RPMs the watts measurement is 100. The curvature of the graph is due to the exponential increase in the isokenetic resistance of the movement of air across the fan wheel. Therefore, faster the fan wheel is turned, the higher watts generated. Air Fit Watt Output Owner’s Manual 22 Training Information Before Beginning Be sure the seat, handlebar and pedal straps are properly adjusted for your body size and comfort before beginning your workout. Consult your physician before beginning this or any other exercise routine. Discontinue any exercise that causes you discomfort and consult a medical expert. Warm-Up Once you are in position and sitting on the bike with your hands in a comfortable position on the movement arms, slowly begin pedaling, while pushing / pulling on the arms. A gradual warm-up prepares the muscles and cardiovascular system for a more intense workout, and helps prevent potential injuries from occurring. Your warm-up should be sufficient once your breathing rate begins to increase and you begin to perspire lightly. The warm-up period should last about five minutes. Work Out A brisk and rhythmic workout will train the muscles and cardiovascular system to perform at a higher efficiency. The key is to exercise aerobically; typically at 60% – 75% of your maximum heart rate. Cool-Down Slow and relaxed activity after a workout allows the muscles and cardiovascular system to gradually return to a resting level. Dismounting Bike WARNING: DO NOT DISMOUNT THE BIKE OR REMOVE YOUR FEET FROM THE PEDALS UNTIL BOTH THE PEDALS AND THE MOVEMENT ARMS HAVE STOPPED COMPLETELY. Failure to comply may lead to loss of control and serious personal injury. Owner’s Manual 23 Why Maintenance A regular preventative maintenance schedule with all fitness equipment ensures that products are working at an optimal condition without affecting the end user exercise experience. To assist in the maintenance regiment, it is recommended to break service into: Daily, Weekly, & Monthly intervals. Details on each interval can be found in the “Maintenance Intervals” section of this document. Tools Working on this product will require basic and/or sometimes specialty tools based on the type of service that will be performed at any time. To assist, StairMaster recommends having the tools listed (Fig. 1) available when performing maintenance. Tool Crank Puller Metric Allen (Hex Key) Wrench Set Purpose Removing cranks & pedals Tightening or removing various Allen head screws throughout the product. Metric Sockets Set Tightening or removing various hex nuts used throughout the product. Metric Open Wrench Set Tightening or removing various hex nuts used throughout the product. Square Drive Ratchet Wrenches To use in conjunction with Allen head and or hex socket sets. Torque Wrench Tightening various critical bolts throughout the product to specific torque specifications. Phillips Head Screwdriver Set Tightening or removing various Phillips head screws used throughout the product. Flat Head Screwdriver Set Prying off specific shrouds from wedged locations. Fig. 1 Owner’s Manual 24 Maintenance This section provides the procedures to maintain the Air Fit™ in serviceable condition. Moving & Leveling To move the bike to a new location: Lift the bike from the rear and use the front wheels (located on the front leg, below the handlebar) to roll the bike from one location to another. To level the bike: Use the four leveling adjusters (located on the underside of the front and rear legs) to compensate for uneven floor surfaces. Preventive Maintenance Perform regular scheduled preventive maintenance procedures to maintain your Air Fit™ indoor cycling bike in serviceable condition. TE Daily Maintenance The life of your Air Fit™ product will be determined by how consistently you perform the daily maintenance procedures. Dry the Air Fit™ bike after each use to remove sweat and moisture. It is best to use a liquid non-abrasive cleaner diluted with water. Wipe Down / Cleaning To prevent the build-up of rust and other forms of corrosion, wipe down the bike at the end of each day (or preferably at the end of each class). Raise all posts to the highest setting to expose moisture. Using an absorbent cloth, focus on all areas that perspiration can settle. Give particular attention to the following areas: • Handlebar • Seat / adjustable slide for the seat • Flywheel • Back leg assembly • Belt guard • Brake knob and bolt assembly • Pop-pins • Leveling feet NOTE: Never use abrasive cleaning liquids or petroleum-based solvents when wiping down the bike. Owner’s Manual 25 Inspection / Adjustment Inspect major moving parts that require constant proper torque. Loose or misadjusted parts can result in personal injury or damage to the bike. Check the following parts for security and/or proper torque. Pedals Verify that the pedals are re-torqued after the first 10 hours of use and every 100 hours of operation, thereafter. Use a torque wrench if components are loose. NOTE: The pedal to the crank arm bolt torque is: 33-37 lb-ft. IMPORTANT: It is not recommended that members change out the pedals on the bike. Weekly Maintenance Weekly maintenance should focus on the overall performance of the Air Fit™ indoor cycling bike. During these inspections, look for vibration and possible loose assemblies. Have an experienced rider ride each bike to identify and help diagnose any vibration, noises, and any "unusual" feeling from the drive belt. Either faulty flywheel alignment or a loose belt can cause vibration. • Check for proper flywheel alignment. Torque flywheel nuts as necessary. Inspect each bike for loose assemblies, parts, bolts and nuts. Give particular attention to the following: • Tighten all frame base hardware. • Tighten all pop-pin handles. • Tighten seat hardware. • Tighten pedal toe clip / toe straps. • Inspect and tighten tension knob assembly. Monthly Maintenance The monthly maintenance check should be a comprehensive inspection of the overall frame and main assembly components of the Air Fit™ indoor cycling bike in addition to the Weekly Maintenance. Inspection and Adjustment Inspect the frame and main assembly components for rust or corrosion. Tilt the bike or place in an upside down position to locate areas where rust and corrosion may develop. Use a small, wire brush to remove rust build-up in small crevasses, such as leveling feet, pop pin handles and other bolt assemblies. Give particular attention to the following areas: • Leveling feet • Pop pin handles Inspect all wear items for adjustments or possible part replacement. Give particular attention to the following: • Inspect brake pad for wear. Excessive wear, such as glazing or leather separation, indicates replacement is required. • Inspect seat pad for wear. Rips, tears or excessive movement indicates replacement is required. • Inspect pedals for play. Excessive movement of pedals indicates replacement is required. • Tighten seat hardware. • Tighten pedal toe clip / toe straps. • Inspect and tighten tension knob assembly. • Leveling feet. Owner’s Manual 26 Frame Care It is recommended that the frame on the each Air Fit™ bike is sealed from sweat impurities that may speed the corrosion process at least once a month. Cleaning Using a clean terry cloth that is dampened in 30 parts water to 1 part non-abrasive detergent or car wash soap rub over the frame of the product. Wash/Dry Dampen a clean terry cloth in an only water solution to wipe away any soap residue. Using a second clean and dry terry cloth; dry off any liquid residue. Sealing The frame can be sealed by applying a wax or polishing coat that can help repel away liquids like human perspiration. Apply the wax or polish per the manufacturer’s instructions for best results. Parts Replacement Depending on the use and maintenance of the product, certain items may need to be replaced upon inspection due to wear. These can be identified during scheduled inspections as described in the Preventative Maintenance section of this owner’s manual beginning on page 28. Owner’s Manual 27 Contact Information CORPORATE HEADQUARTERS: StairMaster 4400 NE 77th Ave., Suite 300 Vancouver, WA 98662 USA Phone (888) 678-2476 www.stairmaster.com Warranty All warranty parts and technical support is provided by our in-house service team. Phone: 1-888-678-2476, option 2 E-mail: [email protected] Please supply the serial number of your machine and the date of purchase when you call. Use the space in the boxes below to write down this information. To find the serial number on your machine, refer to the Safety Warning Label information page. Please record the following information for future reference. Serial Number Date of Purchase Owner’s Manual 28 Owner’s Manual 29 Owner’s Manual 30 Owner’s Manual 31 © 2014 Core Fitness, LLC, dba StairMaster. All rights reserved. ™ and ® indicates a trademark or registered trademark. Core Fitness, LLC trademarks include StairMaster®, Gauntlet®, Air Fit™, Schwinn®, A.C.™, Smart Release™, Ride Right™, MPower™, IC Pro™, QuickFit™, Triple Link™ and respective logos. 1.888.678.2476, www.stairmaster.com. Other trademarks are the property of their respective owners. Owner’s Manual 32


© Copyright 2026