
Band on Demand™ Store Owner’s Manual
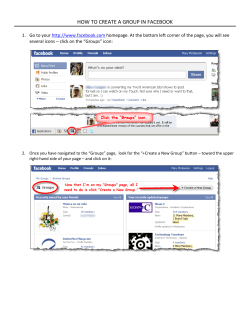
Band on Demand™
Store Owner’s Manual
Revision: 06/11/2014
How to manage your store and sell your products!
Table of Contents
The Band on Demand™ Advantage
Read Me First!
Getting Started
Appearance
Website Pages
Adding Products
Editing Products
General Settings
Product and Design Settings
Appearance Settings
Commission Settings
Website & Facebook Integration
Your Printing Options
W-9 Tax Form
Terms & Conditions
Store Setup Checklist
4-5
6
8-9
10-11
12-13
14-21
22-23
24-25
26
27
28
29-31
32
33
34-35
36
How “Other” Stores
Work
M
ost companies providing
“web store” solutions to
bands are merely e-commerce
platforms. You get a pretty
template, but you still have to
build the store, figure out where
to get your merchandise printed,
buy all that merchandise upfront, manage shipping and
customer service, pay creditcard transaction fees, etc.
With most e-commerce systems,
www.rokbiz.com • (866) 245-1272
Page 4 of 38
you are also responsible for returns,
quality control, and other timeconsuming management issues.
How On Demand™
Merch Stores Work
We handle everything! We build
and manage your store, process
customer payements, purchase
apparel for printing, manage
inventory, print and ship customer
orders, handle all customer service
issues, and automatically pay you
your cut of the sales profits!
We even give you powerful
marketing and SEO tools so you
can integrate your store into
websites, Facebook and Google
Analytics!
This leaves your band free to
focus on the music business and
not worry so much about the
merchandising business!
www.rokbiz.com • (866) 245-1272
Page 5 of 38
Read Me First!
Before you go any further in this owner’s manual, there are some really
important things you need to know:
We Build Your Store & Initial Content, and Manage Customer Orders
You may have noticed (from pages 4 and 5) that we build your store, create
up to twenty (20) apparel products1 based on up to five (5) graphic designs
that you provide, and then manage the orders placed by your customers. We
take care of credit card processing, printing & shipping, and handle customer
service.
You Manage Future Content Changes
After your store is built, you may want to make modifications, add or remove
products, create embeddable widgets for other websites, manage Google
Analytics, or view customer orders & visitor data.
This manual was created to help you manage such administrative tasks. It has
been arranged by topic so you can quickly find the subject you need.
What to Do If You Still Need Help
If you’ve tried the manual and still can’t figure out how to accomplish what
you need, just send an email to [email protected]. We’ll generate a troubleticket and try to get your issue resolved quickly.
If You Need Dedicated Support
If you need somone on our staff to actively manage all aspects of your store
(including updates), this can be arranged for a nominal fee. Please contact
[email protected] for details.
1
Band on Demand™ product options are available in our catalog: products.rokbiz.com
www.rokbiz.com • (866) 245-1272
Page 6 of 38
Admin Pages
MANAGE YOUR SITE
Getting Started
T
his section will cover the basics of gettign logged in, retrieving lost
passwords, and basic navigation.
Logging In
When your site was first created, you should have been notified via email about
its URL. You will need this to log in. The usual format is:
yourbandname.rokbiz.com/settings
So if your band is called the World’s Best Band, then your URL is probably:
worldsbestband.rokbiz.com/settings
Enter the username and password you were
assigned when the store was created. If you
cannot remember the password, enter your
email address on the “Login Trouble” box to reset
your password.
Changing Your Password & Contact Information
On the very top & right of any page, click the link called “Acco unt” to update
your contact information or change your password. It is important that you
have up-to-date email and phone information.
It’s also a good idea to change your password from the default we set for you to
something more secure.
www.rokbiz.com • (866) 245-1272
Page 8 of 38
Navigation Basics
When you first log into your store, you will most likely be presented with the
Dashboard page. At the top of the Dashboard page (and every other page on
your site) is the main navigation menu:
• Email Icon: The Email icon next to “Manage Store” is for system messages. If
there are no messages, it will be grey. If there are messages, it will be red, with
a number indicating the number of unread messages you have.
• Dashboard: The Dashboard page contains an overview of sales, page traffic,
and recent orders.
• Appearance: Contains controls for changing the store name & logo, and template HTML & CSS.
• Website Pages: Contains configuration controls for existing website pages, as
well as controls to create or delete pages.
• Customers: Contains a master list of all your customers.
• Orders: Contains a master list of all your orders and their status.
• Products: Allows the creation and modification of your decorated products.
• Designs: Contains a master list of all your uploaded printable designs.
• Marketing: Contains controls for creating product sales widgets that can be
embedded into other websites.
www.rokbiz.com • (866) 245-1272
Page 9 of 38
Appearance
T
he Appearance page contains advanced
controls for controlling the CSS and
HTML template of your page, as well as some
important controls for managing your store’s
name, logo, and social media links.
• Customize Template CSS: This control is
for advanced administrators only. Do not
change anything unless you know precisely
what you are doing! If you modify your
template CSS and require our professional
assistance to have it fixed, we will charge a
standard hourly fee with a minimum onehour charge.
• Customize Template HTML: This control
is for advanced administrators only. Do
not change anything unless you know precisely what you are doing! If you
unsuccessfully modify your template HTML, you could make your store
unusable and require our professional assistance to have it fixed. We will
charge a standard hourly fee with a minimum one-hour charge should this
occur.
• Site Name and Logo: clicking this button will open a new page that contains
some very useful controls:
www.rokbiz.com • (866) 245-1272
Page 10 of 38
• Store Name: Make sure your band name is spelled correctly and with
correct capitalization. This is important for search engines.
• Tagline: If your band has a tagline, enter it here. If you don’t, write a
short sentence that describes your band. This will be seen by search
engines.
• Store Logo: We will create a logo for you when we create your
store. If you wish to change this logo, be sure that the new graphic is
680x200 pixels in dimension. If you do not create a graphic using these
dimensions, your uploaded images will be cropped to fit, and probably
won’t look good.
• Site Title: Generally, it is a good idea to make this match the Store
Name.
• Site Icon: This will cause a small 16x16 px “favicon” to appear to the
left of the URL in a user’s browser. The uploaded file MUST be an ICO
file.
• Print Logo: Not used.
• Store Directory Logo: If you want your store to be able to appear in
the ROKBIZ™ master directory of Band on Demand™s, upload a 175x175px
graphic.
• Social Site Links: You can have selected social media icons appear on
every page of your store simply by filling in the appropriate blanks. It is
important to remember NOT to paste the entire URL in the blank; only
the username is needed.
www.rokbiz.com • (866) 245-1272
Page 11 of 38
Website Pages
The “Pages” Dialog
T
he Website Pages menu gives you considerable
power to customize your store pages. By default,
we set up most stores with a Home page and Band
Merchandise Page.
Your default store will contain a number of “greyed out”
pages. These have been intentionally de-activated, as
they are of little use to bands.
You can create your own pages, if you wish to have info
about your band, videos, etc. To do this, simply click
“Add Page” at the top.
You can also change the order of pages, or even set
one page as a sub-page of another via drag & drop.
The “Page Details” Dialog
I
ndividual pages are named, as well as turned
on and off using this dialog box. Note that
what you name the page will automatically
become a top-level menu item for people
viewing your site, and there is limited space
for the menu bar. Use short names, if at all
www.rokbiz.com • (866) 245-1272
Page 12 of 38
possible.
You can also create main-menu items that link to other websites using this dialog
box. To do so, simply change Page Status to “Link to External Site.”
Body Settings
The Body Settings dialog box allows you to add content to your custom pages
or to modify how the default pages are displayed.
Some pages (in particular, the default product pages) will have considerably
more options than shown above, and most of their configurable options should
be left alone.
To add a header graphic to the top of your page, use the “Page Image” button.
To add content to your page, click the “Configure” button and add your content
via the WYSWYG editor (below left). You can also edit the source HTML by
clicking the “Source” button (below right).
www.rokbiz.com • (866) 245-1272
Page 13 of 38
Products
The “Products” page allows you to create new decorated products, modify
existing products, change pricing, hide products from public viewing, and delete
obsolete products.
To create a new product, click the “Create
Decorated Products” button on the right side
of the page. This will bring up a new screen
that looks similar to the image below:
A Note About Our Blank Product Offerings
Page 15 contains many of the products typically desired by bands & their fans.
In reality, this is a very small subset of our entire product line, which contains
well over 2,000 varieties of apparel. It is most likely that the blank products you
see on this page will suffice for your band’s needs, but if not, just contact us. We
have a huge number of other products not represented here.
www.rokbiz.com • (866) 245-1272
Page 14 of 38
www.rokbiz.com • (866) 245-1272
Page 15 of 38
Products (continued)
Adding Your Design(s)
After you select which piece of apparel you want to use, you will be presented
with an online designer which allows you to add your graphics to the front and/
or back of the item:
5
2
3
1
4
1. Select Your View
Most products have more than one print area. T-shirts, for example, can be
printed on both front and back.
www.rokbiz.com • (866) 245-1272
Page 16 of 38
2. Add Your Design
This will generate a popup window, as seen at the right. Nearly all Band on
Demand™ items are setup for Digital Printing, so simply choose the first option,
then upload your file.
3. Size and Position Your Design
Once uploaded, your design can be resized and dragged around within the
bounds of the orange Design Area.
(a) The Designer will give you a warning if your image quality
is not good enough for printing, or if you put part of the image
outside the boundaries of the Design Area.
(b) For best results, always use 24-bit PNG files, or other file
formats that support transparency. A minimum size of 10x10
inches at 200-300dpi is required to ensure high quality prints.
4. Product Colors
It is important to note that certain products, particularly the Gildan Ultra Cotton™
(shown left), have a large number of default colors (over 70) - and most bands
only use black or grey. In cases such as these, we have created simplified versions
of the shirt with only the required colors. Other varieties of the shirt with all
color options are available in the Products listing page.
5. Design Area Off
When you’re done adding your artwork, turn off the design area to see how it
looks!
www.rokbiz.com • (866) 245-1272
Page 17 of 38
Products (continued)
Batch Settings Screen
The Batch Settings screen allows you to name your product and give it a
description. Use the image below for configuration instructions:
www.rokbiz.com • (866) 245-1272
Page 18 of 38
• Name: Try to choose something interesting. Other than the picture itself, this
will always be one of the first things your customers see on any given product.
• Description: Put as much text as you would like about the product here. You
can have multiple paragraphs, if you like, but 2-3 sentences is usually adequate.
• Category: You should set this to “Concert Merchandise”
• Position: Doesn’t matter too much. After you’re done adding the product,
you can visit the Products page any time and drag the product exactly where
you want it to be.
• Customize: With rare exception, you should always set this to “Don’t allow
users to customize.” If you allow users to customize your design, they’ll be
able to drag it around, resize it, re-color it, and even delete it in the onlinedesigner. That’s generally bad for your band’s branding, so it’s best to never let
them customize unless you have a VERY specific reason for wanting them to.
www.rokbiz.com • (866) 245-1272
Page 19 of 38
Products (continued)
Create Decorated Products - Batch Settings
After you select a name,
description, etc., and click
“Continue,” you will be
presented with a very simple
screen, and while it may not
look like much, it’s VERY
powerful!
2
1. Color Options
Click the small color
thumbnail to change the
default color of the product.
1
You can also uncheck the
“All Colors” checkbox if you want to manually select which colors are available
for a particular product.
Note: See “Product Colors” on page 17 for notes on product color selection.
www.rokbiz.com • (866) 245-1272
Page 20 of 38
2. “Select Products” button
Clicking the “Select Products”
button
allows
you
to
automatically configure more
products with the current design!
When you click the button, you
will be prompted a popup much
like the image (right).
Simply click one or more
additional products and click the
Save button.
Depending on the additional products you selected, your page might look like
the graphic (below). Before you continue to the final pricing screen, take a look at
your product colors and
change defaults and color
availability if desired.
Note: The final two stages
of product creation are
not covered in the manual.
There are no significant
configurable options to
discuss, and the screens
should be reasonably self
explanatory.
www.rokbiz.com • (866) 245-1272
Page 21 of 38
Products (continued)
Editing Existing Products
F
or the most part, editing existing products is
very similar to adding new ones. We’ll try to
skip redundant information and focus on the things
that are different. All existing products will have a
thumbnail that looks similar to the one shown (right).
Moving Products
To move a product’s position in the store, simply drag
it by the top-left (+) handle to the new position.
Editing Products
Clicking the “Configure” button on any product thumbnail will open its edit
window, shown (right).
Note: Almost all of the configuration options in this window are
reasonably self-explanatory. This manual will only focus on two:
1. Make Private
This button will set a product so it can only been seen by the store administrator.
This is useful when you need to discuss a product with your band members or
manager before making it available for public viewing.
www.rokbiz.com • (866) 245-1272
Page 22 of 38
2
1
2. Edit Decoration
This button starts a process identical to the one described on pages 16-21. You
may use this to change the design, add or remove additional products, and
change default & available colors.
Note: If you move or change the graphic, all designs linked by the Batch
Editor (see page 21) will be automatically updated as well.
www.rokbiz.com • (866) 245-1272
Page 23 of 38
Settings
General Settings
Store Focus
Don’t change these settings
Site Options
Dont’ change these settings
SEO & Google Analytics
You can track your store’s statistics and visitors using Google Analytics. To do so:
1. Create your account by visiting google.com/analytics.
2. In your store administration, click Settings -> SEO & Google Analytics ->
Google Analytics. Paste the Google UA code (looks like UA-XXXXXXX-X)
into the space provided.
Domain Settings
This is an advanced feature for bands who wish to rebrand their store with their
own domain name.
This requires some light DNS modification at your domain registrar
(where you bought the domain name), so make sure you’re logged in to
both your store and your registrar before continuing!
www.rokbiz.com • (866) 245-1272
Page 24 of 38
Domain Settings (continued)
Before you change anything, you first need to make a decision on how to
name your domain. Let’s say your band already has a website located at www.
mybandsite.com. For our example, we’re going to rebrand our Band on Demand™
store to the following location: store.mybandsite.com.
store.mybandsite.com
1. Click Settings ->
Domain Settings and
enter store.mybandsite.
com into the box, as
shown (left)
You will now see a new entry under “Existing Store Domains” that looks something
like the image (below):
2. Login to your domain registrar and ADD a line to your domain’s DNS host
records:
RecordTypeHostNameAddressTTL
A-Recstore66.135.58.2014400 (or automatic)
3. Click the “Revalidate” button (see image above).
Because different registrars work differently, it’s impossible to say how long it
will take for the DNS change to take effect. Usually it’s within a few minutes or
hours. Once it’s done, you can set the new domain to be the store default!
www.rokbiz.com • (866) 245-1272
Page 25 of 38
Settings
Product and Design
Settings
Price Settings
This page gives you full control to
set your retail markup on products. By default, we set all products to a flat $4.99 markup (your commission),
but this may not fit all situations.
Note: This page sets your store’s “overall” markup. You can always override markup on an individual product via it’s Edit page (see pages 22-23).
Select Blank Products
Dont’ change these settings
Watermark Store Designs
You can add a custom copyright message to overlay your product graphics if
you like. This option is set to “Off” by default.
www.rokbiz.com • (866) 245-1272
Page 26 of 38
Settings
Appearance Settings
StoreName & Logo
Contains the same Appearance settings as
found on pages 10-11.
Configure Online Designer
Dont’ change these settings
Page Settings
Don’t change these settings
Social Site Links
Contains the same Social Site Link settings as found on pages 10-11.
www.rokbiz.com • (866) 245-1272
Page 27 of 38
Settings
Commission Settings
Receiving Commissions
Enter the email address of the
PayPal account you wish your
payments to go to.
Review Commissions
Gives an overview of commissions earned, as well as the ability to view specific
date ranges.
Commission Payments Received
Gives an total of payments made to the PayPal account on record.
www.rokbiz.com • (866) 245-1272
Page 28 of 38
Website Integration
I
t’s simple to integrate some or all of your products into any website using
the iFrame Setup tool available in your Band on Demand™ store administration
pages.
Build the iFrame
1. Navigate to Marketing -> iFrame Setup from the main menu.
2. Modify the parameters in iFrame Settings to suit the needs of the website
you’ll be integrating with.
A live preview of the iFrame will update itself under the parameters so
you can see what the iFrame will look like. The Title parameter is not
required, and can be deleted if your target website has its own titling
styles.
3. Copy the code from the “iFrame HTML” box and paste it into your target
website.
Once the code is in your target website, you don’t need to use the iFrame
Setup tool to modify the size. You’ll find the height and width embedded
with the code and you can change it directly.
www.rokbiz.com • (866) 245-1272
Page 29 of 38
Facebook Integration
I
t’s simple to integrate your products into your
Facebook fan page. You can even have a Merch Store
button, right next to your Likes & Photos that will take
fans straight to the store!
Generate iFrame Code
To get the iFrame code, you can either follow the instructions found on Website
Integration (page 29), or you can simply modify the following example code:
<div style=”padding-left: 35px;”><h3>Your Band Name Official Apparel Store</h3>
<p>Welcome to Your Band Name’s Official Apparel Store. Check out our current line of shirts and goods.
More products and new designs coming periodically! Clicking on any of the designs below will take you to
our apparel store!</p>
<p>Go directly to our store, just <a href=”http://yourstorename.rokbiz.com/” target=”_blank”>click here</
a></p></div>
<iframe style=”border: 0px;” width=”700” height=”600” src=”https://yourstorename.secure-decoration.com/
publish/ifeed?s=0&o=0&f=Arial&fs=10&bg=%23FFFFFF&fg=%23000000&c=4&cnt=100”/>
This example code will create a title, intro paragraph, and then the actual products
from your store. Feel free to modify any part to your needs.
Build the Facebook Landing Page
The iFrame Code you just generated (or copied) is going to be pasted into a
special landing page in Facebook. Just follow the instructions below, and you’ll
have a working Store in your Facebook site in minutes!
www.rokbiz.com • (866) 245-1272
Page 30 of 38
1. There are four buttons underneath your Facebook fan page
banner. To the right of those buttons is a small box with a
downward pointing arrow (see right image). Click this box.
2. Find a blank box (see right image) and click the small plus sign
on its top right, the click “Find More Apps” in the dropdown menu
that appears.
3. Find the Search for apps link and click it. Then type “html” and click
the app called Static HTML : iFrame tabs, then click the blue
“Go to App” button. On the next page, click the large blue
“Add Static HTML to a Page” button.
4. Choose your Facebook fan page from the dropdown (see right
image) then click the “Add Page Tab” button. Once you do this,
it is very likely that you’ll be taken back to Facebook with no
notification that you did the steps correctly!
5. Back on your fan page, click the same small box you clicked in step 1.
You should now see your newly installed app (see right image). Click it,
then click the green “Edit Tab” button.
6. In the resulting popup screen, find a window that contains
the text, “You only need to use this index.html...” and delete
all the text. Paste your iFrame code here. Then click the “Save
& Publish” button.
7. Navigate back to your fan page on Facebook. Follow step 5 to find your
app again, but this time click the small (+) on the top right of the icon.
Then select Edit Settings to change the name and icon for your store.
If you plan to make your own store icon, make sure it is exactly 111x72
pixels. Or, you can download our default icon and use it.
www.rokbiz.com • (866) 245-1272
Page 31 of 38
Your Printing Options
What Is On-Demand Printing?
O
ur On Demand Printing utilizes the most sophisticated digital print
technology on the market today. The average cost of the machines that
print your band store shirts is around $300,000.00 each! All of of products that
are available in your custom band store are printed using this super high end
digital printing technology to give you the best product possible.
On Demand Printing differs from our screen printing in the sense that there
are no set-up charges and we can print a single piece of apparel and ship it
to your fans in 72 hours! The quality and durability of digital printing are just
as good as traditional screen print. In some cases where super fine detail is
required, digital printing will give better, cleaner results with no loss of fidelity
to the original art. All On Demand Printing uses the CMYK ink set meaning it is
considered “full color printing”. And get this - there is no limit to the amount
of colors you can print per design. Additional colors do not add to the cost!
A one color imprint on a t-shirt is the same cost as a full color print. So we
suggest not skimping on the color!
Bulk Screen Printing
W
e offer tremendous deals on bulk screen printing for your gigs. We
print up to 8 colors on t-shirts, sweatshirts an other standard apparel.
We do have specific file types that we require for traditional screen printing.
Generally screen printing files should be Adobe Illustrator or Corel Draw files.
An experienced customer service representative can help you decide on the
best course of action to create killer merch.
www.rokbiz.com • (866) 245-1272
Page 32 of 38
W-9 Tax Form
Summary
B
ecause we pay you directly for sales, all Band on Demand™ store owners
are required by law to submit a W-9 tax form to ROKBIZ™.
1. Download and print the W-9 from the IRS website.
2. Fill out the form and sign it.
3. Scan the signed document and email it to [email protected]
... or ...
4. Fax the document to (201) 688-3799
www.rokbiz.com • (866) 245-1272
Page 33 of 38
Terms & Conditions
1. Terms
By accessing this web site, you are agreeing to be bound by these web site Terms and Conditions of Use, all
applicable laws and regulations, and agree that you are responsible for compliance with any applicable local
laws. If you do not agree with any of these terms, you are prohibited from using or accessing this site. The
materials contained in this web site are protected by applicable copyright and trade mark law.
2. Use License
Permission is granted to temporarily download one copy of the materials (information or software) on the
ROKBIZ™ web site for personal, non-commercial transitory viewing only. This is the grant of a license, not a
transfer of title, and under this license you may not:
• modify or copy the materials;
• use the materials for any commercial purpose, or for any public display (commercial or non-commercial);
• attempt to decompile or reverse engineer any software contained on the ROKBIZ™ web site;
• remove any copyright or other proprietary notations from the materials; or
• transfer the materials to another person or “mirror” the materials on any other server.
This license shall automatically terminate if you violate any of these restrictions and may be terminated by
ROKBIZ™ at any time. Upon terminating your viewing of these materials or upon the termination of this license,
you must destroy any downloaded materials in your possession whether in electronic or printed format.
3. Disclaimer
The materials on the ROKBIZ™ web site are provided “as is”. ROKBIZ™ makes no warranties, expressed or
implied, and hereby disclaims and negates all other warranties, including without limitation, implied warranties
or conditions of merchantability, fitness for a particular purpose, or non-infringement of intellectual property
or other violation of rights. Further, ROKBIZ™ does not warrant or make any representations concerning the
accuracy, likely results, or reliability of the use of the materials on its Internet web site or otherwise relating to
such materials or on any sites linked to this site.
4. Limitations
In no event shall ROKBIZ™ or its suppliers be liable for any damages (including, without limitation, damages
for loss of data or profit, or due to business interruption,) arising out of the use or inability to use the materials
on The ROKBIZ™ Internet site, even if ROKBIZ™ or a ROKBIZ™ authorized representative has been notified
orally or in writing of the possibility of such damage. Because some jurisdictions do not allow limitations on
implied warranties, or limitations of liability for consequential or incidental damages, these limitations may
not apply to you.
5. Revisions and Errata
The materials appearing on the ROKBIZ™ web site could include technical, typographical, or photographic
errors. ROKBIZ™ does not warrant that any of the materials on its web site are accurate, complete, or current.
ROKBIZ™ may make changes to the materials contained on its web site at any time without notice. ROKBIZ™
does not, however, make any commitment to update the materials.
www.rokbiz.com • (866) 245-1272
Page 34 of 38
6. Links
ROKBIZ™ has not reviewed all of the sites linked to its Internet web site and is not responsible for the contents
of any such linked site. The inclusion of any link does not imply endorsement by ROKBIZ™ of the site. Use of
any such linked web site is at the user’s own risk.
7. Site Terms of Use Modifications
ROKBIZ™ may revise these terms of use for its web site at any time without notice. By using this web site you
are agreeing to be bound by the then current version of these Terms and Conditions of Use.
8. Governing Law
Any claim relating to The ROKBIZ™ web site shall be governed by the laws of the State of New Jersey without
regard to its conflict of law provisions.
General Terms and Conditions applicable to Use of a Web Site.
9. Privacy Policy
Your privacy is very important to us. Accordingly, we have developed this Policy in order for you to understand
how we collect, use, communicate and disclose and make use of personal information. The following outlines our
privacy policy.
• Before or at the time of collecting personal information, we will identify the purposes for which information
is being collected.
• We will collect and use of personal information solely with the objective of fulfilling those purposes
specified by us and for other compatible purposes, unless we obtain the consent of the individual
concerned or as required by law.
• We will only retain personal information as long as necessary for the fulfillment of those purposes.
• We will collect personal information by lawful and fair means and, where appropriate, with the knowledge or
consent of the individual concerned.
• Personal data should be relevant to the purposes for which it is to be used, and, to the extent necessary for
those purposes, should be accurate, complete, and up-to-date.
• We will protect personal information by reasonable security safeguards against loss or theft, as well as
unauthorized access, disclosure, copying, use or modification.
• We will make readily available to customers information about our policies and practices relating to the
management of personal information.
We are committed to conducting our business in accordance with these principles in order to ensure that the
confidentiality of personal information is protected and maintained. For full and detailed information regarding
our policy, please review our Privacy Policy page.
10. Return policy
Returns and exchanges are accepted with Customer Service Return Authorization number. All returns will be
shipped at the customer’s expense unless otherwise authorized by ROKBIZ™.
All merchandise return and exchange requests must be made to Customer Service within 72 hours of receipt of
merchandise by the customer.
www.rokbiz.com • (866) 245-1272
Page 35 of 38
Store Setup Checklist
________________ Band Name
________________ Updated title & tagline?
(pg 11)
________________ Updated social links?
________________ Updated $4.99 markup?
(pg 26)
________________ Verified page meta data?
________________ Google Analytics setup?
(pg 11)
(pg 24)
________________ Homepage banner & logo graphics updated?
________________ Paypal address entered?
(pg 11 & 27)
(pg 12)
(pg 28)
________________ Band contact information updated?
(pg 8)
________________ Default password changed?
(pg 8)
________________ Products added?(pg 14-23)
________________ All products have description & pricing set?
(pg 22-23)
________________ Products linked to other related products?
(pg 23)
________________ Domain updated?(pg 24-25)
________________ Facebook or webpage integration done?
(pg 30-31)
________________ W-9 sent to ROKBIZ™?
(pg 33)
www.rokbiz.com • (866) 245-1272
Page 36 of 38
www.rokbiz.com • (866) 245-1272
Page 37 of 38
W
e realize this was a lot
of information and we
commend you for taking the
time to read it. You are selling
a valuable commodity and
by having this information
up-front we’re betting you’ll
be better prepared for the
process.
Thanks for your time and we
look forward to serving you!
www.rokbiz.com • (866) 245-1272
Page 38 of 38


© Copyright 2026