
HOW TO CREATE A GROUP IN FACEBOOK
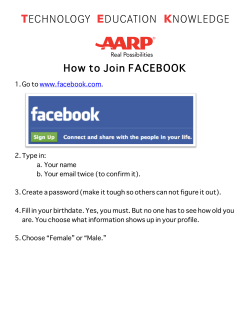
HOW TO CREATE A GROUP IN FACEBOOK
1. Go to your http://www.facebook.com homepage. At the bottom left corner of the page, you will see
several icons – click on the “Groups” icon:
2. Once you have navigated to the “Groups” page, look for the “+Create a New Group” button – toward the upper
right-hand side of your page – and click on it:
3. To create your group, you will need to complete the form shown here, including the Group Name, Description,
and Group Type. You can provide more detail – office, email address, physical address – if you’d like:
4. Now that you have entered the basic information, it’s time to customize your group. The first way to make your
group page unique is to add an image – kind of like choosing your personal profile image:
5. Do you have or know of a website that you would like to be affiliated with your group? If so, include the URL of
that website in the form. The “options” area determines how much or how little input the members will be
allowed. If the site is “information only,” and you do not wish to allow the users the ability to write on The Wall,
create a discussion thread, upload photos, etc, then you would un-check many of these boxes, or select “Only
allow admins to . . . “. For my group, I want my members to be very involved, so I’ve left the default settings:
6. Choose how private or public you want the group to be (mine is open to anyone, but I would choose something
more restrictive if I were to use the Facebook Group feature for a class), then click the “save” button:
7. After hitting “save,” Facebook will give you a small preview pop-up window (although you can opt to skip this
step in the future). If you are satisfied with the group image, the group name, the description, and other details
if you have added them, the click “Publish”:
8. Now it is time to start getting some members in your group! You can invite people by using their email accounts
(this is handy if you want to invite someone who does not have a Facebook account), or you can search
Facebook for people you might know, but by far the easiest place to start is with your own friends list:
9. Once you have selected the friends that might be interested in your group, you can hit “Send Invitations” and
the invitees will receive an email notification from Facebook. I prefer to add at least a short personalized note
that will be included in the notification email:
10. Well, it looks like your new group is ready to go! Once people accept the invitation to join the group, they can
write on The Wall, start a discussion thread, upload their photos or videos, include their favorite links to great
websites . . . who knows?


© Copyright 2026