
IBM SmartCloud Control Desk Integrating IBM Endpoint Manager for Software Deployment Version 1.0
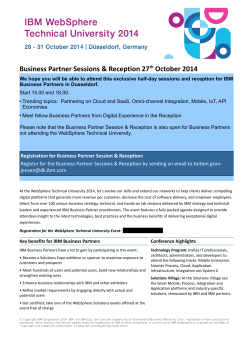
IBM®
IBM SmartCloud Control Desk
Integrating IBM Endpoint Manager for
Software Deployment
Version 1.0
1
© Copyright International Business Machines Corporation 2014.
US Government Users Restricted Rights – Use, duplication or disclosure restricted by GSA ADP Schedule
Contract with IBM Corp.
2
CONTENTS
Table of Contents
Contents................................................................................................................................................3
Introduction............................................................................................................................................4
Prerequisites..........................................................................................................................................5
Importing data from IEM into SmartCloud Control Desk........................................................................6
Importing the software catalog.............................................................................................................15
Importing an IEM SSL certificate into WebSphere Application Server..................................................16
Setting up the Jython library................................................................................................................17
Configuring SmartCloud Control Desk.................................................................................................17
Using the Acrobat sample for other software deployments..................................................................32
3
1
Introduction
Automated software provisioning is based on the integration of SmartCloud Control Desk with IBM
Endpoint Manager (IEM). This guide describes how to integrate the two products when you have them
installed in your local environment.
A first step is to decide which software applications to offer to users for automatic deployment.
In IBM Endpoint Manager you define the deployable software distribution packages and the tasks that
are associated with deploying the packages.
Using Integration Composer with the IBM Endpoint Manager and IBM Endpoint Manager for Software
Use Analysis adapters, you import discovered data about software into SmartCloud Control Desk.
You typically populate the Software Catalog application in SmartCloud Control Desk by importing the
software catalog data that is provided by Software Knowledge Base Toolkit.
You configure the SmartCloud Control Desk applications that manage software fulfillment. IBM
provides an optional content package with workflows and artefacts that facilitate software provisioning.
When this integration is complete, SmartCloud Control Desk users can request a software product in
the Self Service Center, and the requested software is automatically deployed to their computer by
IBM Endpoint Manager.
The following image illustrates the workflows for this integration.
1.
Software packages are published in the SmartCloud Control Desk Self-Service Center catalog.
2.
End user requests software (License entitlement check is optional).
3.
Workflow is initiated. (License entitlement check is optional).
4
4.
Optional: Automatic or manual approvals occur based on corporate policy.
5.
Runbook calls IBM Endpoint Manager to deploy the software
6.
IBM Endpoint Manager deploys software to the target.
7.
Status and inventory information are returned to IBM Endpoint Manager.
8.
Optional: For license audit IBM Endpoint Manager for Software Usage Analysis is loaded into
SmartCloud Control Desk.
This document describes how to integrate IBM Endpoint Manager with IBM SmartCloud Control Desk
and how to create software offerings in SmartCloud Control Desk that can be automatically deployed
by IBM Endpoint Manager.
To configure the integration, you must complete the following tasks:
•
import data from IBM Endpoint Manager and IBM Endpoint Manager for Software Use Analysis
into SmartCloud Control Desk using IBM Integration Composer
•
import data from Software Knowledge Base Toolkit into SmartCloud Control Desk (optional)
•
configure SmartCloud Control Desk to communicate with IBM Endpoint Manager
•
add a Jython library to the SmartCloud Control Desk server
•
configure SmartCloud Control Desk components to create the software offering
2
Prerequisites
Before you begin the integration process, you must install and configure the following products:
•
IBM SmartCloud Control Desk Version 7.5.1.1 or later
When installing SmartCloud Control Desk, ensure that you install the optional content. The
optional content includes the Service Catalog Content for IBM SmartCloud Control Desk
7.5.1.1, which provides workflows and artefacts that support software deployment.
For installation instructions, see Installing SmartCloud Control Desk.
•
IBM Integration Composer Version 7.5.1.1 or later
You can install Integration Composer as part of the SmartCloud Control Desk installation. Make
sure to install Hot Fix 5 or later. Note that Java 6 is the Java version that is required. Java 7 is
not supported.
For installation instructions, see Installing Integration Composer.
•
IBM Endpoint Manager Version 9.0 or later
For information about installing IBM Endpoint Manager, see the IBM Endpoint Manager
Installation Guide.
Keep the following points in mind when installing IBM Endpoint Manager:
▪
Ensure that the Client Configuration dashboard and the Manage Distribution Packages
dashboard are set up. For instructions, see IBM Endpoint Manager 9.0 Software
Distribution User's Guide.
5
▪
Ensure that you have a computer system that is configured as a client to which you will
deploy the software.
▪
Ensure that you can manually deploy the software product to the client computer system
from the IBM Endpoint Manager Console.
▪
Ensure that you enable remote API access for IBM Endpoint Manager.
▪
Ensure that you have installed IBM Endpoint Manager for Software Use Analysis 2.0 on
the IBM Endpoint Manager server. For instructions, see IBM Endpoint Manager for
Software Use Analysis in the IBM Knowledge Center. For helpful information, see Best
practices for IBM Endpoint Manager for Software Use Analysis.
When creating software distribution tasks in IBM Endpoint Manager, take note of the Task ID.
The Task ID must be added to the Deployment Tasks tab in the Software Catalog application
when you configure SmartCloud Control Desk for deployment. In the following example, the
task ID is 51.
3
Importing data from IEM into SmartCloud Control Desk
This section of the guide explains how to import data from IBM Endpoint Manager and IBM Endpoint
Manager for Software Use Analysis into SmartCloud Control Desk using Integration Composer.
Importing data from IBM Endpoint Manager
To import data, complete the following steps:
1.
Log in to Integration Composer.
2.
To define a data source for SmartCloud Control Desk, complete the following steps:
6
a)
On the main Integration Composer page, select Define a New Data Source.
b)
On the Data Schema tab select Deployed Asset 7.5 and click Next.
c)
In the Data Source field on the Data Source tab, enter sccd-dpa and click Next.
d)
In the Connection Information window, enter values in the fields as shown in the following
image and click Finish.
7
3.
4.
To define a data source for IBM Endpoint Manager, complete the following steps:
a)
On the main Integration Composer page, select Define a New Data Source.
b)
On the Data Schema tab select IBM Endpoint Manager 9.0 and click Next.
c)
In the Data Source field on the Data Source tab, enter iem90-dpa and click Next.
d)
In the Connection Method field on the Connection Information tab, select IBM Tivoli
Endpoint Manager SUA API and specify a user name and password, as shown in the
following sample image:
e)
Click Finish.
To define a mapping from the IBM Endpoint Manager to SmartCloud Control Desk integration,
complete the following steps:
a)
On the main Integration Composer page, select Create New Mapping.
8
b)
In the New Mapping window, select the following values:
▪
Source: iem90-dpa
▪
Target: sccd-dpa
▪
Mapping Name: iem90-dpa-sccd
c)
Click OK.
d)
On the Connection Information tab for IBM Endpoint Manager, enter the IBM Endpoint
Manager password and click Finish.
e)
On the Connection Information tab for SmartCloud Control Desk, enter the Maximo database
password, and click Finish.
9
Integration Composer displays the Mapping window.
f)
In the Mapping window, click Select Action and choose Import.
g)
In the Import Mapping window, select IEM90ToDPA75.fsn and click Open.
h)
From the Select Action menu, choose Save.
i)
From the Select Action menu, choose Close.
10
j)
5.
Click Yes to save the mapping.
To execute the mapping to import data from IBM Endpoint Manager to SmartCloud Control Desk,
complete the following steps:
a)
Open a command prompt.
b)
Go to the bin directory in your Integration Composer installation directory.
c)
Run the executemapping script as shown in the following example.
executeMapping.bat <mapping_name> <maximo_id> <maximo_passwd> <iem_id>
<iem_passwd> <maximo_id> <maximo_passwd>
For example:
C:\Integration Composer\bin>executeMapping.bat iem90-dpa-sccd maximo
Puls32013 Administrator G0vmware maximo Puls32013
Output should be similar to the following sample:
Verify that there are no errors.
Importing data from IBM Endpoint Manager for Software Use Analysis
For this import, you can use the data source that you defined for SmartCloud Control Desk in the
previous task. You need only to create a data source for IBM Endpoint Manager for Software Use
Analysis.
11
To import data, complete the following steps:
1.
Log in to Integration Composer.
2.
To define a data source for IBM Endpoint Manager, complete the following steps:
3.
a)
On the main Integration Composer page, select Define a New Data Source.
b)
On the Data Schema tab select Tivoli Endpoint Manager SUA 2.0 and click Next.
c)
In the Data Source field on the Data Source tab, enter tem20-dpa and click Next.
d)
In the Connection Method field on the Connection Information tab, select IBM Tivoli
Endpoint Manager SUA API and specify a user name and password, as shown in the
following image:
e)
Click Finish.
To define a mapping from IBM Endpoint Manager for Software Use Analysis to SmartCloud
Control Desk integration, complete the following steps:
a)
On the main Integration Composer page, select Create New Mapping.
b)
In the New Mapping window, select the following values:
c)
▪
Source: tem20-dpa
▪
Target: sccd-dpa
▪
Mapping Name: tem20-dpa-sccd
Click OK.
12
d)
On the Connection Information tab for IBM Endpoint Manager, enter the IBM Endpoint
Manager password and click Finish.
e)
On the Connection Information tab for SmartCloud Control Desk, enter the Maximo database
password, and click Finish.
Integration Composer displays the Mapping window.
f)
In the Mapping window, click Select Action and choose Import.
13
4.
g)
In the Import Mapping window, select TEMSUA20ToDPA75.fsn and click Open.
h)
From the Select Action menu, choose Save.
i)
From the Select Action menu, choose Close.
j)
Click Yes to save the mapping.
To execute the mapping to import data from IBM Endpoint Manager to SmartCloud Control Desk,
complete the following steps:
a)
Open a command prompt.
b)
Go to the bin directory in your Integration Composer installation directory.
c)
Run the executemapping script as shown in the following example.
executeMapping.bat <mapping_name> <maximo_id> <maximo_passwd>
<iem_sua_id> <iem_sua_passwd> <maximo_id> <maximo_passwd>
For example:
14
C:\Integration Composer\bin>executeMapping.bat tem20-dpa-sccd maximo
Puls32013 Administrator G0vmware maximo Puls32013
Output should be similar to the following sample:
Verify that there are no errors.
4
Importing the software catalog
This section of the guide explains how to import data from Software Knowledge Base Toolkit into
SmartCloud Control Desk.
Importing the software catalog is optional. You can manually create catalog records in the Software
Catalog application if the imported data does not contain the software records that you need.
Importing the software catalog includes two tasks:
•
downloading the software catalog file
•
configuring the cron task that schedules and runs the import
Downloading the software catalog file
The first step is to download the latest software catalog file. IBM publishes software catalog data
provided by Software Knowledge Base Toolkit on the following IBM site:
ftp://ftp.software.ibm.com/software/tivoli_support/misc/CandO/TivoliCatalog/ibm/SwKBT/
The file is updated monthly.
The name of the file to download is IBMSoftwareCatalog_canonical_form_yyyymmdd.zip where
yyyymmdd is the date code for the date that the file was released. It is updated at the beginning of a
month and contains the catalog through the end of the previous month. Inside the zip file is an XML file
(similarly named). This is the file that is needed on the Maximo server.
Download the file from the ftp site and copy the XML file to a directory, for example c:\swkbt.
15
Configuring a cron task to import the software catalog
After you download the software catalog file, complete the following steps to configure the cron task to
import the data into SmartCloud Control Desk:
1.
Log in to SmartCloud Control Desk and select Go To > System Configuration > Platform
Configuration > Cron Task Setup.
2.
In the Cron Task Setup application, select SWCATALOGIMPORT, the cron task for software
catalog imports.
3.
In the Cron Tasks Instances table on the Cron Task tab, expand the row for the Software
Knowledge Base Toolkit cron task instance.
4.
In the Schedule field, click Set Schedule and specify a schedule for importing software catalog
data from the Software Knowledge Base Toolkit. Since this file will only be imported once, you can
set the interval to a small interval to get the import process going. You can disable the cron task
instance after the import is complete.
5.
To activate the schedule, select the Active check box.
6.
On the Parameters subtab, expand the row for the PARTIALRUN parameter and specify 6 in the
Value field.
7.
Expand the row for the REPOSITTORYID parameter. In the Value field, specify the
databaseInstanceId attribute that is in the header element in the XML file that you imported.
8.
Expand the row for the TEMPDIR parameter. In the Value field, specify the directory where the
XML file is located.
9.
Expand the row for the TEMPFILE parameter. In the Value field, specify the name of the
temporary file for the software catalog. Typically, you rename the XML file to name that is shorter
than the original name.
10. Save the cron task.
5
Importing an IEM SSL certificate into WebSphere Application Server
Import the IBM Endpoint Manager SSL certificate into the SmartCloud Control Desk WebSphere
16
Application Server so that SmartCloud Control Desk can communicate with the IBM Endpoint
Manager server.
To import the certificate, complete the following steps:
1.
Log in to the WebSphere Application Server administrative console and click Security > SSL
Certificate and key management > Key stores and certificates > CellDefaultTrustStore >
Signer certificates > Retrieve from port, as shown in the following image.
2.
Click Apply.
3.
Click OK.
6
Setting up the Jython library
Tivoli's process automation engine does not contain all the Jython modules that are needed (such as
httplib).
Download Jython 2.5.x and copy it to c:\jython\Lib directory.
7
Configuring SmartCloud Control Desk
This section of the guide explains how to configure various components in SmartCloud Control Desk
for software provisioning.
The Service Catalog optional content for SmartCloud Control Desk provides workflows and artefacts
for deployment based on a sample Adobe offering. The Adobe sample is used in this guide to illustrate
configuration. You can use the sample as a model for creating other deployable catalog offerings.
For each deployable software package, you provide deployment details such as Task ID on the
Deployment Tasks tab of the associated record in the Software Catalog application.
You then create the associated offerings in the Offerings application. Typically you create the offerings
by starting with a sample offering that is available for SmartCloud Control Desk. The optional offering
contains the workflows that are required for the automatic deployments.
17
You must configure an endpoint for connecting SmartCloud Control Desk to the IBM Endpoint
Manager server.
Step 1: Specify an end point for connecting to the IEM server
To specify an end point for connecting to the IBM Endpoint Manager server, complete the following
steps:
1.
Log in to SmartCloud Control Desk and select Go To > Integration > End Points.
2.
In the End Points application, select the SCCDTEMSERVER end point.
3.
In the Properties table, specify password, username, and URL (hostname and port) property
values for connecting to the IBM Endpoint Manager server.
You can determine the URL by pointing to the IBM Endpoint Manager URL;
https://hostname:52311/api/sites should display the list of sites.
Step 2: Create a software record in the Software Catalog
This step describes how to add the software product to your Software Catalog.
If you imported the software catalog from Software Knowledge Base Toolkit, the software record might
already exist in the catalog and some of the steps in this section are not needed. You can skip steps 1
through 3. You can select the software record in the Software Catalog and complete steps 4 through
13.
To add the software product to your catalog, complete the following steps:
1.
In SmartCloud Control Desk, select Go To > Administration > Deployed Assets > Software
Catalog.
18
2.
Create a new item for the software that you want to deploy.
3.
Optional: If you do not import the Software Knowledge Base Toolkit catalog, you might have to
create a manufacturer record for the software in the Manufacturer Conversion application. The
software catalog import from Software Knowledge Base Toolkit provides manufacturer records for
most vendors. But if you do not import the catalog, you can create a manufacturer.
4.
a)
To create a manufacturer, in the Manufacturer field in the Software Catalog application, click
Go to Manufacturer Conversion.
b)
In the Target Manufacturer field of the Manufacturer Conversion application, specify a
manufacturer for your software and select Yes in the Reviewed field.
c)
When you complete the manufacturer record, click Save and click Return With Value to
return to the Software Catalog application.
In the Associated Items section of the Software tab, select Create Item Master to create a
software item in your inventory that is associated with the software that you created in your
software catalog. You can click Link to Item Master to link to an existing inventory item if one
exists.
19
The Item Master application opens.
5.
In the Item Master application, create an item for the software and click Generate Items.
The Create Item Master window closes.
6.
In the Item field in Associated Items section on the Software tab, select Go to Item Master to go
to the Item Master application and activate the software item that you created.
20
7.
On the Item tab in the Item Master application, select the Rotating check box.
8.
In the Common Actions menu, select Change Status.
21
9.
Specify an active status and click OK.
10. In the upper right corner of the Item Master window, click Return to return to the Software Catalog
application.
11. In the Software Catalog application, you must add the Task ID that was assigned to the software
when you created the software distribution task in IBM Endpoint Manager to your software record.
To add the distribution task ID to the software record, complete the following steps:
a)
Select the Deployment Tasks tab for the software product and click New Row to add
deployment details for your software package.
b)
In the Task ID field, enter the Task ID value from IBM Endpoint Manager.
Tip: One method of locating the Task ID is to open the IBM Endpoint Manager Console,
expand Tasks and Fixlets in the navigator, click Tasks Only, and search for your task. If
the ID column does not display in the view, right-click in the heading area and select ID.
c)
In the Task Name field, enter a description for the task.
d)
In the Task Type field, select Install.
22
e)
In the Site ID field, enter the Site ID from IBM Endpoint Manager. The entry for this field
should be numeric.
Tip: To locate the Site ID, open the IBM Endpoint Manager Console, click Sites in the
navigator, and search for the task. If the ID column does not display, right-click the
heading area and select ID. Note: For Master Action Site, leave Site ID blank.
f)
In the Endpoint Name field, select SCCDTEMSERVER.
13. Save the software record
Step 3: Create a vendor for the software in the Company Master application
This step is required if you create your software entry in the Software Catalog. If you are using
imported software catalog data, a vendor might exist. Check that a company record exists for the
vendor of the software.
To add the software product vendor to your inventory, complete the following steps:
1.
In SmartCloud Control Desk, select Go To > Purchasing > Company Master.
2.
Create a new company for the vendor of the software that you want to deploy.
3.
To associate this vendor to your organization, from the More Actions menu select Add Company
Master to Organization and specify the appropriate organization.
4.
Click OK.
5.
Click OK in response to the message that confirms the company was added.
Step 4: Activate the PMSCIBM Organization
If you use the Adobe offering that is provided with the optional content installed with SmartCloud
Control Desk, you must complete this step to activate the organization that is associated with the
offering.
In production environments, most companies define their own organizations and sites. Organizations
and sites must be set up when you configure SmartCloud Control Desk. For information about setting
23
up sites and organizations, see Organizations application.
If you are not using the Adobe offering as the model for creating a software deployment, skip this step.
If you are using the offering in the optional content, ensure that the PMSCIBM Organization that
SmartCloud Control Desk provides for this offering is activated. Complete the following tasks to
activate the organization.
Ensure that the mail.smtp.host property is configured for a valid SMTP server
1.
In SmartCloud Control Desk, select Go To > System Configuration > Platform Configuration >
System Properties.
2.
In the Global Properties table, locate the mail.smtp.host property and ensure that the system
property mail.smtp.host is set to a valid SMTP server.
3.
If a valid SMTP server is not specified, you can configure SMTP and specify the following value
for the property: us.ibm.com. For detailed instructions about configuring SMTP system
properties, see Configuring SMTP in the SmartCloud Control Desk Knowledge Center.
Configure a general ledger account component
1.
Open the Database Configuration application by selecting Go To > System Configuration
>Platform Configuration >Database Configuration.
2.
From the More Actions menu, choose GL Account Configuration.
3.
Click New Row.
4.
Enter a component name in the Component field, for example MYCOMPONENT.
5.
Enter a numeric length for the component, for example 5.
6.
Enter a type for the component, for example ALN.
7.
Click OK.
Apply your changes to the database
1.
Log in to the administrative console as maxadmin.
2.
Open the System Configuration > Platform Configuration > Database Configuration
application. Every object that must be updated in the database has a status of To Be Added.
3.
Choose the Manage Admin Mode action.
4.
Click Turn Admin Mode ON, and then click OK when prompted. This task takes several minutes
to complete. You can use the Refresh Status button to view progress.
5.
After Admin Mode has been enabled, select Apply Configuration Changes, to apply the
changes to the database. To Be Changed must not appear in the status column for objects listed.
6.
To turn Admin Mode OFF, complete the following steps.
a)
Open the System Configuration > Platform Configuration > Database Configuration
application.
b)
Choose the Manage Admin Mode action.
24
c)
Click Turn Admin Mode OFF, and then click OK when prompted. Failing to turn off Admin
Mode within the application causes cron tasks to fail.
Create a general ledger account
1.
To open the Chart of Accounts application, select Go To > Financials > Chart of Accounts.
2.
Select the name of your organization to select PMSCIBM.
3.
From the Select Action drop-down menu, select GL Component Maintenance.
4.
In the GL Component Maintenance window, click New Row.
5.
Add a GL Component value and description, then click OK. For example, 1234.
6.
In the GL Accounts table, click New Row.
7.
Select your general ledger account.
8.
Click Save.
Activate the PMBSCIBM organization
1.
To open the Chart of Accounts application, select Go To > Administration > Organizations.
2.
Select the organization PMSCIBM.
3.
In the Clearing Account field, select the general ledger account that you just created.
4.
In the Default Item Status field, select Active.
5.
Click Save.
Step 5: Promote deployed asset data to authorized assets
Before you can provision software, you must promote the deployed asset data that you imported into
SmartCloud Control Desk to authorized assets.
NOTE: Before you begin this step, make sure that the default insert site is set for the administrator
(maxadmin in our sample). Otherwise, the next step will fail. Test to make sure you can create a new
record in the Assets application. A default insert site can be specified in the Users application in the
Security module.
For information about promoting deployed assets, see Promotion to assets.
To promote deployed assets, complete the following steps:
1.
In SmartCloud Control Desk, Go To >Assets->Deployed Assets->Computers.
2.
Select the computer that you want to promote, in this case a computer that has IBM Endpoint
Manager.
3.
From the More Actions menu, select Promote to Asset.
4.
In the Promote to Assets window, specify a site, classification, and status for the asset.
25
5.
Click Apply Defaults.
6.
Click OK.
Step 6: Assign a primary user or custodian
You must assign a primary user or custodian to the promoted asset.
To assign a primary user or custodian, complete the following steps:
1.
In SmartCloud Control Desk, select Go To >Assets.
2.
Select the asset that was promoted.
3.
From the More Actions menu, select Associate user and custodian.
4.
In the Associate Users and Custodians window, select the Primary field.
5.
Select either the Custodian or the User field.
6.
Save the record.
26
Step 7: Create a license for the software
In this step you create a license record for the software product that you are planning to
deploy and associate it with the product.
1.
In SmartCloud Control Desk, select Go To > Assets > Licenses.
2.
Create a new license for the software product that you want to deploy, in this sample Adobe.
3.
In the Associated Products section, associate the license with the software product.
27
4.
To activate the item, in the Status field select Active.
5.
Save the license.
Step 8: Activate the job plan
A job plan to execute when the new offering is requested is included in the optional Service Catalog
content that was installed with SmartCloud Control Desk. The following instructions describe how to
use this job plan.
You can create your own job plan by duplicating the TEMROLLOUT job plan and adjusting it to meet
your organization's needs. For information about creating a job plan, see Working with job plans.
To activate the job plan, complete the following steps:
1.
In SmartCloud Control Desk, select Go To > Planning > Job Plans.
2.
Select the TEMROLLOUT job plan or a job plan that you created specifically for this software
deployment.
3.
In the Item field on the Materials subtab, click New Row and specify the software that you created
for your deployment.
28
4.
Select the Direct Issue check box and specify the task as shown in the following image.
5.
Select the Licenses subtab and click New Row.
6.
In the License field on the Licenses tab, select the license that you created for the software as
shown in the following image.
29
7.
Save the job plan.
8.
On the Specifications tab in the job plan, ensure that you specify the fixlet ID for the IBM Endpoint
Manager fixlet in the SCCD_TEM_FIXLETID field.
9.
From the Common Actions menu, select Change Status.
10. To activate the job plan, specify Active in the Status field.
Step 9: Create a new service catalog offering
In this step you create an offering in the Offerings application and specify how to display the
offering for your users in the Self Service Center.
The optional content that you installed with SmartCloud Control Desk includes a pre-defined
offering for Adobe software. You can duplicate the offering and modify the duplicate for your
purposes, or you can create your own software offering using the Adobe offering as a model.
The following steps describe how to define a software offering if you are not duplicating the
30
Adobe model.
For information about the offering configuration options, see Offering tab in the SmartCloud Control
Desk Knowledge Center.
To create a software offering, complete the following steps:
1.
In SmartCloud Control Desk, Go To >Service Request Catalog->Offerings.
2.
From the More Actions menu, select Insert an Offering.
3.
In the Offering tab, enter the offering name and description.
4.
Select SCCD_SW_DEPLOY in the Classification field.
5.
Specify a fulfillment time and unit of measure for the fulfillment time.
7.
In the Service Request Processing section, complete the following steps:
a)
Specify approval times as required by your organization.
b)
Ensure that Create Standard Work Order is selected.
c)
In the Job Plan field specify the job plan that was created for the offering.
d)
In the Standard Work Order Work Flow field, select PMSC_WOWFL.
e)
Select Copy SR Attributes to Work Order and Tasks.
8.
On the Specification and Presentation tab, ensure that the appropriate options are specified for
your offering.
9.
Save the offering.
10. From the More Actions menu, select Add Offering to Catalog.
11. In the Add to Catalogs window, select End User Services Catalog and click Add to Catalog.
31
12. From the Common Actions menu, select Change Status.
13. In the New Status field in the Change Status window, specify Active.
The application should now be available in the Self Service Center.
Step 10: Activate the escalation
An escalation for the offering deployment is included in the optional Service Catalog content that was
installed with SmartCloud Control Desk. The escalation polls IBM Endpoint Manager to determine
whether or not the deployment was successful and the software was installed on the computer.
Activate the escalation to start the polling process.
To activate the escalation, complete the following steps:
1.
In SmartCloud Control Desk, select Go To > System Configuration > Platform Configuration >
Escalations.
2.
Select the SCCDRBATEM job plan.
3.
Select the Active check box.
4.
Save the record.
Step 11: Verify the integration
After you complete the steps in this guide, you can request the software, and it will be installed on the
computer that you specified.
To verify that the integration works properly, go to the Self Service Center and select the software
offering. Then check that the offering was deployed on the computer as expected.
8
Using the Acrobat sample for other software deployments
The workflows and artefacts for deployment in the Service Catalog optional content for SmartCloud
Control Desk are based on a sample Adobe offering.
You can use the sample as a model for creating other deployable catalog offerings. You can duplicate
the sample offering and job plan and enter the appropriate information for your offering.
If you are duplicating the model, make sure that you have the following components for your offering:
◦
a catalog record for the software in the Software Catalog application
◦
an item record in the Item Master application for your software
◦
the appropriate company specified in the Company Master application for your vendor
◦
a license for the software created in the Licenses application
◦
When you duplicate the Acrobat job plan, ensure you update it to specify the new item and
license for your software.
◦
Review the job plan that is provided to ensure that the plan specifies a work flow that works
for your organization.
32
◦
When you duplicate the offering in the Service Request Catalog > Offerings application,
ensure that you specify the appropriate information for your new offering.
33
®
© Copyright IBM Corporation 2014
IBM United States of America
Produced in the United States of America
US Government Users Restricted Rights - Use, duplication or disclosure restricted by GSA ADP Schedule Contract with IBM
Corp.
IBM may not offer the products, services, or features discussed in this document in other countries. Consult your local IBM
representative for information on the products and services currently available in your area. Any reference to an IBM product,
program, or service is not intended to state or imply that only that IBM product, program, or service may be used. Any
functionally equivalent product, program, or service that does not infringe any IBM intellectual property right may be used
instead. However, it is the user's responsibility to evaluate and verify the operation of any non-IBM product, program, or
service.
IBM may have patents or pending patent applications covering subject matter described in this document. The furnishing of
this document does not grant you any license to these patents. You can send license inquiries, in writing, to:
IBM Director of Licensing
IBM Corporation
North Castle Drive
Armonk, NY 10504-1785
U.S.A.
The following paragraph does not apply to the United Kingdom or any other country where such provisions are
inconsistent with local law:
INTERNATIONAL BUSINESS MACHINES CORPORATION PROVIDES THIS PAPER “AS IS” WITHOUT WARRANTY OF
ANY KIND, EITHER EXPRESS OR IMPLIED, INCLUDING, BUT NOT LIMITED TO, THE IMPLIED WARRANTIES OF NONINFRINGEMENT, MERCHANTABILITY OR FITNESS FOR A PARTICULAR PURPOSE. Some states do not allow disclaimer
of express or implied warranties in certain transactions, therefore, this statement may not apply to you.
This information could include technical inaccuracies or typographical errors. Changes may be made periodically to the
information herein; these changes may be incorporated in subsequent versions of the paper. IBM may make improvements
and/or changes in the product(s) and/or the program(s) described in this paper at any time without notice.
Any references in this document to non-IBM Web sites are provided for convenience only and do not in any manner serve as
an endorsement of those Web sites. The materials at those Web sites are not part of the materials for this IBM product and
use of those Web sites is at your own risk.
IBM may have patents or pending patent applications covering subject matter described in this document. The furnishing of
this document does not give you any license to these patents. You can send license inquiries, in writing, to:
IBM Director of Licensing
IBM Corporation
4205 South Miami Boulevard
Research Triangle Park, NC 27709 U.S.A.
All statements regarding IBM's future direction or intent are subject to change or withdrawal without notice, and represent
goals and objectives only.
This information is for planning purposes only. The information herein is subject to change before the products described
become available.
If you are viewing this information softcopy, the photographs and color illustrations may not appear.
Trademarks
IBM, the IBM logo, and ibm.com are trademarks or registered trademarks of International Business Machines Corporation in
the United States, other countries, or both. If these and other IBM trademarked terms are marked on their first occurrence in
this information with a trademark symbol (® or ™), these symbols indicate U.S. registered or common law trademarks owned
by IBM at the time this information was published. Such trademarks may also be registered or common law trademarks in
other countries. A current list of IBM trademarks is available on the web at "Copyright and trademark information" at
http://www.ibm.com/legal/copytrade.shtml.
IT Infrastructure Library is a registered trademark of the Central Computer and Telecommunications Agency which is now
part of the Office of Government Commerce.
Microsoft, Windows, Windows NT, and the Windows logo are trademarks of Microsoft Corporation in the United States, other
countries, or both.
ITIL is a registered trademark, and a registered community trademark of the Office of Government Commerce, and is
registered in the U.S. Patent and Trademark Office.
Java and all Java-based trademarks and logos are trademarks or registered trademarks of Oracle and/or its affiliates.
Other company, product, or service names may be trademarks or service marks of others.


© Copyright 2026